The Ultimate Guide To Web Scraping
web-scraping-guide
User Manual: Pdf
Open the PDF directly: View PDF ![]() .
.
Page Count: 82
- Table of Contents
- Introduction to Web Scraping
- Web Scraping as a Legitimate Data Collection Tool
- Understand Web Technologies: What Your Browser is Doing Behind the Scenes
- Pattern Discovery: Finding the Right URLs that Return the Data You're Looking For
- Pattern Discovery: Finding the Structure in an HTML Document
- Hands On: Building a Simple Web Scraper with Python
- Hands On: Storing the Scraped Data & Keeping Track of Progress
- Scraping Data that's Not in the Response HTML
- Avoiding Common Scraping Pitfalls, Good Scraping Etiquette & Other Best Practices
- How to Troubleshoot and Fix Your Web Scraping Code Without Pulling Your Hair Out
- A Handy, Easy-To-Reference Web Scraping Cheat Sheet
- Web Scraping Resources: A Beginner-Friendly Sandbox and Online Course

The Ultimate Guide to Web Scraping
Hartley Brody
This book is for sale at http://leanpub.com/web-scraping-guide
This version was published on 2017-02-18
This is a Leanpub book. Leanpub empowers authors and publishers with the Lean Publishing
process. Lean Publishing is the act of publishing an in-progress ebook using lightweight tools and
many iterations to get reader feedback, pivot until you have the right book and build traction once
you do.
© 2013 - 2017 Hartley Brody
Contents
Introduction to Web Scraping .................................. 1
Web Scraping as a Legitimate Data Collection Tool ...................... 5
Understand Web Technologies: What Your Browser is Doing Behind the Scenes ..... 9
Pattern Discovery: Finding the Right URLs that Return the Data You’re Looking For . . 18
Pattern Discovery: Finding the Structure in an HTML Document .............. 24
Hands On: Building a Simple Web Scraper with Python ................... 30
Hands On: Storing the Scraped Data & Keeping Track of Progress ............. 37
Scraping Data that’s Not in the Response HTML ....................... 45
Avoiding Common Scraping Pitfalls, Good Scraping Etiquette & Other Best Practices . . 52
How to Troubleshoot and Fix Your Web Scraping Code Without Pulling Your Hair Out .61
A Handy, Easy-To-Reference Web Scraping Cheat Sheet ................... 67
Web Scraping Resources: A Beginner-Friendly Sandbox and Online Course ........ 77
Introduction to Web Scraping
Web Scraping in the process of programmatically pulling information out of a web page. But if
you’re reading this you probably already knew that.
The truth is, web scraping is more of an art form than a typical engineering challenge. Every website
you’ll encounter is different – there are no “right ways” to do web scraping. To successfully scrape a
website requires time and patience. You must study your target site and learn its ways. Where is the
information you need? How is that information loaded onto the page? What traps have they setup,
ready to set off the alarms and block your scraper as an unwanted intruder?
In this book – The Ultimate Guide to Web Scraping – you will hone your skills and become a master
craftsman in the art of web scraping. We’ll talk about the reasons why web scraping is a valid way to
harvest information – despite common complaints. We’ll look at the various ways that information
is sent from a website to your computer, and how you can intercept and parse it. We’ll also look at
common traps and anti-scraping tactics and how you might be able to thwart them.
Loosely Structured Data
When we talk about web scraping, we’re usually talking about pulling information out of an HTML
document – a webpage. At the most fundamental level, HTML is simply a markup language (as in
Hyper Text Markup Language). A good website developer uses HTML to provide structure to the
document, marking up certain elements as “navigation” or “products” or “tables.”
<nav …
<div class="product" …
<table id="secret-information" …
The websites that your computer downloads and renders are simply text files that contain informa-
tion along with a bunch of markup. If your browser can render that text into a usable webpage, then
that implies that there’s an underlying structure to the HTML. If all “product” items on the page
look the same, then they probably share very similar markup.
Modern standards encourage web developers to use HTML to simply provide the structure of the
website. CSS is used to control the presentation of the website, and Javascript is used to control the
behavior of a website. If the developer of the site you’re scraping is any good, the information you’re
looking for will be marked up semantically, and you will have any easy time parsing it out of the
HTML.
Introduction to Web Scraping 2
Looking for Patterns
One of the primary abilities of a web scraper is the ability to find patterns. We’ll talk more about
different ways to find them later on, but it’s worth mentioning early since it’s so important.
In general, humans are lazy. The people who built the site you’re scraping are no exception. If there’s
a listing of search results on a web page, the chance of each item in the list having its own custom
markup is virtually zero.
A lot of modern website are built using frameworks that include template engines. Those template
engines usually have looping structures that let the web developer say things like “for each item in
this list of search results, print out the same HTML, but change the title and link.” For example, a
web developer might write the following code in their template:
<ul class="results">
{% for item in search_results %}
<li class="result">
<a href="{{item.link}}"class="result-link">
<span class="result-title">{{item.title}}</span>
</a>
</li>
{% endfor %}
</ul>
If you can’t read that, don’t worry.
Basically what you end up with is HTML that looks like this.
<ul class="results">
<li class="result">
<a href="http://www.example.com/pages/foo/" class="result-link">
<span class="result-title">Foo</span>
</a>
</li>
<li class="result">
<a href="http://www.example.com/pages/bar/" class="result-link">
<span class="result-title">Bar</span>
</a>
</li>
<li class="result">
<a href="http://www.example.com/pages/baz/" class="result-link">
<span class="result-title">Baz</span>
</a>

Introduction to Web Scraping 3
</li>
</ul>
Spend a few seconds scanning through that HTML. Notice any patterns? The markup for each
search result is almost exactly the same, but the details inside each <li> tag are slightly different.
Conceptually, this allows us to discover things like:
• Iterating over the list of <li> elements with the class result should give us each search result
• Within each <li class="result"> item, there’s an <a class="result-link"> element that
contains the item’s URL
• Within each <li class="result"> item, there’s a <span class="result-title"> element
that contains the title of the item
These sorts of patterns are used everywhere on many different websites. It not only makes the
website developer’s life easier, it makes our life easier as web scrapers, since the data we’re trying to
scrape can likely be teased out of patterns in the HTML. It just takes a bit of work to discover those
patterns.
A Bit of Caution
Web scraping sometimes gets a bad reputation because of its name. If a non-technical person heard
that you were going to “scrape” their information, they might not know what that means, but they’d
still have a sense that it sounded like something bad or illegal.
Many large website explicitly forbid web scraping in their terms of service. They might call it
“programatic access” or “data harvesting” but it all means the same thing. If the site does forbid
web scraping, then you have to decide whether you still want to proceed.
On the one hand, pretty much every website is “scraped” by Google’s search spiders and any other
search engine crawlers. Most site owners don’t usually complain about that type of scraping since
it allows their site to be discovered by search engines, driving in new traffic.
On the other hand, courts have sometimes ruled that violating a website’s terms of service or simply
scraping data might actually constitute a felony under the anti-hacking Computer Fraud and Abuse
Act in the United States. Some notable cases include:
•In 2010, some ticket scalpers were charged for getting around the CAPTCHAs on Ticketmas-
ter’s website.1
•In 2012, internet activist Aaron Swartz was charged with 13 felonies for downloading an entire
archive of scholarly articles from JSTOR’s website.2
1http://www.wired.com/threatlevel/2010/07/ticketmaster/
2http://www.wired.com/threatlevel/2012/09/aaron-swartz-felony/

Introduction to Web Scraping 4
•Also in 2012, a man was charged when he discovered a few URL’s on AT&T’s website that
displayed information about AT&T’s customers, totally in the clear.3
•Check out the “Legal Issues” section of the Wikipedia article on “Web Scraping” for more4
I’m obviously not your lawyer so I can’t tell you what the risks are for your particular case, but
it’s very important to understand that certain types of automated data harvesting can land you in a
heap of trouble. Make sure you’re aware of the risk and talk to a lawyer if you’re uncertain.
Like most other tools and technologies, web scraping can be used for harmless data collection just
as easily as it can be used to collect private information that isn’t properly guarded. We’ll talk a bit
about ways you can make your scraper more “polite” later on in the book.
But in the mean time, we’ll learn how to make requests to a web server, pull back come HTML and
then parse out the information we’re looking for. We’ll look at the technology behind browsers and
web servers and talk about some ways you can trick a web server into believing your scraper is
just another person browsing their website. By the end of the book, you should feel armed with a
complete, modern knowledge of web scraping.
Let’s dive in!
3http://www.wired.com/opinion/2012/11/att-ipad-hacker-when-embarassment-becomes-a-crime/
4http://en.wikipedia.org/wiki/Web_scraping#Legal_issues
Web Scraping as a Legitimate Data
Collection Tool
As with any tool, it’s important to understand when to use web scraping, and when not to. As any
good engineer will tell you, you should be aware of both the pros and cons of each potential solution,
in order to choose the best one for your project’s needs. So before we dive into web scraping tactics,
it’s important that we take a step back and look at why someone might consider using web scraping
as a method for collecting information, and some of the alternatives that are available.
Other methods
To start, here’s a list of some common ways that site owners expose their information to the outside
world:
1. A public website
2. An API
3. A mobile app
4. An RSS or Atom Feed
5. CSV export functionality
For the remainder of the section, we’ll mostly be focusing on numbers 1 & 2, but I wanted to touch
on some of the others, and when you might try to use them instead.
While mobile apps are becoming increasingly popular, they’re challenging to scrape because you’re
inherently limited with the tools you have when you’re working on a mobile device. Being able to
inspect web requests and look at raw response information (which we learn more about in the next
section) is much more difficult on a smart phone than it is on a larger computer. And chances are,
if a company has a mobile app, they probably also have a full-sized website that’s much easier to
scrape from a full-sized computer anyways.
RSS & Atom feeds are primarily built to syndicate new content as it’s updated. They’re fairly well-
defined formats, and are often used for things like blogs, subscription services, search results, or
other instances when a set of information might be updated frequently. Because they’re primarily
designed for pushing out updates, they’re a great way to see the latest information that a site owner
has published, but not necessarily the best way to see all the information a site has ever published,
depending on the implementation. If that’s okay for your needs, then I’d definitely suggest looking
at feeds before you go with web scraping.

Web Scraping as a Legitimate Data Collection Tool 6
Occasionally, you’ll see a site that allows its information to be exported as a CSV, XLS or other type
of spreadsheet file. While it is less common, if the site you’re collecting information from offers the
ability to export it directly, I’d start there first. The information is likely laid out in nice columns and
rows, making it easy to understand and parse by a script or application. The main drawback to this
method is that the spreadsheet tends to be a snapshot from a point in time, and won’t be updated
with new information as quickly as a website might be.
The above methods are worth keeping in mind as you’re deciding how to collect your information.
However, they often only make sense in specific, and narrowly-defined use-cases. The most common
ways to pull information are the two that we’ll talk about next: APIs and web scraping.
The Pros & Cons of APIs
If a website wants to expose its information to you in an easy-to-use format, the most common
method is to release an API (Application Programming Interface5). The site owners will build URL
endpoints that third-party developers can call to read (and sometimes write) data through a network
protocol (usually HTTP).
Sometimes they will even build clients for their API in a variety of popular languages, making it
even easier for you to get started. If API clients exist, then pulling data can be as simple as installing
those clients and then making a method call.
# 3 lines of code to charge a customer's credit card using Stripe's API client
import stripe
stripe.api_key ="sk_test_mkGsLqEW6SLnZa487HYfJVLf"
stripe.Charge.create(
amount=400,
currency="usd",
card="tok_1RSGZv8BYZVS86",# obtained with Stripe.js
description="Charge for test@example.com"
)
An API can be seen as a “promise” from the website’s operators to you – a third-party developer
– that the data will always be returned in a consistent, standard format. The information that’s
returned by an API isn’t supposed to change that often, and if it does, there’s usually a big heads
up, so that you have time to change your application to accommodate the changes to the API.
Another benefit of APIs is that they’re usually documented to help you understand what data is
available and how to access it. The API documentation usually describes the data and behavior of
the API in order to help you understand how to build your own application on top of it.
5http://en.wikipedia.org/wiki/Api

Web Scraping as a Legitimate Data Collection Tool 7
In an ideal world, APIs are the best way to reliably pull information from a website you don’t own.
However, the world we live in is far from ideal. The main problem you’ll probably run into is that
most websites simply don’t have APIs. APIs don’t exist by default, it takes a concerted effort by
the team that’s running a company’s website to think about the data they store, how it’s organized,
what they might want to expose to outsiders, and then dedicate engineering resources to building,
documenting and maintaining the API. For many businesses, this concept never even occurs to them.
Unless you’re pulling information from an organization that’s very web savvy, you probably won’t
find an API so using an API might not be an option.
Even when a website does have an API, it still might not be the best solution for pulling information.
APIs are often “second class” citizens within a business, compared to their website. If the website
goes down or has a bug, it’s all hands on deck to get it back online. But if an API has issues, the
company might not notice for weeks or months, depending on how important it is to them. You’ll
often find better uptime with a company’s website than you will with their API.
The other big problem with APIs is that they’re often really difficult to learn and use. If documen-
tation exists at all, it’s often complex and confusing. It’s been my experience that well-written API
documentation is the exception, not the rule. I’ve run into situations where the documentation was
so old and out of date that I wasted hours trying to debug my code when the error was actually on
their side. Their documentation said one thing, but the API returned something different. Wrong
documentation can be worse than no documentation at all.
You might also find that the API is incomplete. For example – despite being a full-fledged social
network – the Google Plus API6currently only offers a single endpoint that lets you read the stories
from a user’s feed. There’s no way to use the API to send updates, manage a user’s circles, or do any
of the other things you might expect an API to let you do. Their API is incredibly incomplete.
Another drawback of APIs is that they often require authentication with each request. You probably
have to sign up for an account, register your application with their site or even pay money to get
access to their API. If you’re trying to keep your data collection below the radar, you might want to
pull your information anonymously, without identifying your business or application, so this might
be another drawback for you.
And finally, some APIs implement “rate limiting” where you’re only allowed to make a certain
number of API calls within a given time period. This might require you to slow your code down to
avoid bumping into those limits and having your API access shut off. If you’re trying to pull a lot
of information, this could significantly delay your project.
Well-documented, well-supported APIs can be a real pleasure to work with. In the wild however,
they’re often poorly designed & documented, provide incomplete access to the information you need
and have other gotchas like rate limiting and authentication that might not fit with the goals of your
project.
6https://developers.google.com/+/api/
Web Scraping as a Legitimate Data Collection Tool 8
The Pros & Cons of Web Scraping
On the other hand, web scraping avoids a lot of those pains of developing with an API. Every business
that displays data on a website is automatically providing a freely accessible, loosely structured form
of their information. There’s no need to read documentation and hope it’s up to date, you can just
browse through their website to discover the data you need (which we’ll get to later). If you know
how to browse a website to find what you’re looking for, you know how to find the data you need.
Any content that can be viewed on a webpage can be scraped. Period.
There’s also generally no rate limiting on websites like there is with APIs – and when there is rate
limiting, it’s easier to avoid (which we’ll discuss later on).
The main drawback and often-cited complaint about web scraping is that it is inherently fragile for
applications that need to keep pulling information over time. If the site you’re scraping is redesigned
– or even if they change their markup subtly – there’s a chance that the patterns you discovered
to get at information will suddenly vanish, and you’ll need to rebuild your parsing logic. If you
were looking for elements with a certain class attribute to lead you to the data you need, and those
elements change or the class is renamed, then your web scraper will probably break.
This is definitely true and is obviously very important that you understand. If the website you’re
scraping changes their HTML – either through a major website redesign, small tweaks or to
intentionally throw off your scraper – that pattern-matching that you’ve built into your application
will break.
“In theory, theory and practice are the same. In practice, they are not.” – Albert Einstein
But, as I’ve mentioned before, often the theory doesn’t line up with reality. For most business
websites I’ve scraped, the markup on their pages changes rarely (maybe every few years). Even
on big sites with a huge technical team (think Google, Facebook, Amazon) the markup stays fairly
consistent. A scraper I wrote a few years ago for pulling information from Google search results still
works just fine to this day.
So while that point is technically true, in practice I’ve found that it’s usually much less of an issue
than people make it out to be. It’s also not a problem if you only need to pull information once.
In that case, future changes to the site’s markup won’t affect your application because you already
have your data.
Web scraping isn’t a panacea, and it’s important to be aware of it limitations and weaknesses. But
across dozens of projects, I’ve found it to be the best tool for pulling information from websites that
I don’t control. As with any technical decision, it’s important to evaluate the pros and cons of all
the options to make the most informed decision for your project.
If it sounds like web scraping will be a good fit for your project, then you’ve come to the right place.
Next we’ll go over some basic web technologies before finally diving into the more technical web
scraping information.
Understand Web Technologies: What
Your Browser is Doing Behind the
Scenes
Before we start trying to build our own applications that make requests and parse responses, let’s
spend some time looking at some familiar software that already does that – the web browser.
Since you managed to buy this book online, you already know how to use browser to click on links,
fill out forms and otherwise navigate the web. But do you really know what’s going on behind the
scenes when you’re doing your day-to-day web surfing?
Browsers perform many of the same functions that our web scrapers will need to perform, so they’re
a good model to start with. In this chapter, we’re going to peel back the curtain to show you how a
browser interacts with a web server and renders the web pages you see and use every day.
At a high level, we’ll break the behavior down into three high-level categories:
1. Sending HTTP requests
2. Receiving HTTP responses
3. Turning the text of an HTML document into a nested structure known as “the DOM”
Since our web browser performs these steps every single time we navigate to a new web page, it
offers a great backdrop to help you learn how these processes work, so that you can emulate the
same behavior in your web scraping scripts.
Sending HTTP Requests
HTTP (Hyper Text Transfer Protocol) is simply a protocol for transferring hyper text documents. If
that sounds scary and confusing, don’t worry – “hyper text documents” simply means HTML pages
(remember, Hyper Text Markup Language)? So essentially, HTTP is just a common standard for
computers to send HTML files to each other.
HTTP is message-based, which simply means that a client makes a request and then expects to
receive a response. The other important thing to know about HTTP is that it is inherently stateless.
That means that if you send multiple requests to the same site, HTTP doesn’t provide any built-in
way of telling the server that each request came from the same client. This is why cookies were
developed, to track users within sessions. We’ll talk more about those in this chapter.

Understand Web Technologies: What Your Browser is Doing Behind the Scenes 10
When you visit a web page in your browser, your computer automatically builds an HTTP request for
you and sends it over the internet to a far-off web server. HTTP requests are fairly straightforward
and easy to understand. Let’s take a look at a sample request:
GET /page/2/ HTTP/1.1
Host:www.example.com
Connection:keep-alive
Accept:text/html
User-Agent:Mozilla/5.0 ... {{clipped for brevity}}
Accept-Encoding:gzip,deflate,sdch
Accept-Language:en-US,en;q=0.8
Cookie:{{omitted}}
This is a request for the URL http://www.example.com/page/2/. It might seem like there’s a lot
going on there, but we can break it down part by part.
Required Information
The first two lines are really the most important, the others are all optional. Let’s break them down:
GET /page/2/ HTTP/1.1
Host:www.example.com
The first part says that you’re making a GET request, which is a particular type of HTTP request.
Your web browser usually sends GET requests as you click on links or type in URLs. We’ll primarily
be using GET requests for our web scraping, but might occasionally send POST requests if we need
to send data to the server – maybe by submitting a form, for example. GET and POST are the two
“HTTP methods” that cover the majority of day-to-day browsing and web scraping use-cases, but
you can view the full list on Wikipedia7.
The next part of the first line specifies the path we’re trying to reach – in this case /page/2/ which
could be the second page of a blog. The last part of the line – HTTP/1.1 – is your bowser telling the
server it would like to communicate using version 1.1 of the HTTP specification. This ensures your
computer and the web server are speaking the same version of the protocol, and nothing gets lost in
translation. Finally, the next line specifies the Host, which is domain name of the site you’re trying
to connect to.
For 95% of the requests you’re likely to make when scraping the web, that is all the information you
will need in order to build the correct HTTP request. Simply provide the request method (usually
GET, sometimes POST) and the full page URL (made up of the path for line #1 and the domain for the
Host: header) and that’s it!
However, for the remaining 5% of requests, there’s a bit more that you’ll need to know about.
7http://en.wikipedia.org/wiki/HTTP_Verbs#Request_methods

Understand Web Technologies: What Your Browser is Doing Behind the Scenes 11
Headers
When your browser makes an HTTP request, it will also send along several common Headers that
contain some extra meta-information about the request. Headers are essentially key/value pairs that
give the web server hints about who made the request, and how it should respond.
They’re not required, but there are a few standard headers that most severs expect to see and that
your browser will usually send for you:
•Connection: The type of connection that you’d like to make with the server (usually keep-
alive)
•Accept: Specifies the different types of files you’d be willing to accept as a response (usually
text/html)
•User-Agent: Information about the web browser you’re using
•Accept-Encoding: Tells the server what encodings we’ll accept (whether the server can
compress the response)
•Accept-Language: Tells the server what human language we’d prefer to read (helps with
internationalization)
For a complete list, check out the Wikipedia article on HTTP headers.8.
Just like your browser, most programming tools and libraries will automatically populate the
Headers for you when you make an HTTP request, so you don’t need to worry about setting them
manually yourself. The request line and headers are all just text – delineated by newlines, spaces
and colons – that are sent over the wire to the website’s servers whenever you make a request. It’s
up to the server to parse and understand them, in order to build a proper response.
The one header that you might find yourself needing to set manually is User-Agent header, which
tells the server what sort of software is making the request. Some websites will check the User-Agent
header to see if the software that made the request is one of the well-known browser vendors like
Mozilla (Firefox), Google (Chrome), Microsoft (Internet Explorer) or Apple (Safari).
This is usually an attempt to block requests from non-browser users like scripts, bots and web
scrapers. However, just like you can easily set the value of URL of an HTTP request, you can also
set the value of the User-Agent header to make it seem like the request is coming from a browser.
We’ll look more at this type of “User Agent Spoofing” in Chapter 9.
Cookies
You may have heard the term “Cookies” used before – maybe you were told to “clear your cookies”
to fix a mis-configured website or other online issue. You may also be familiar with the idea that
cookies can be used to track a user on a website – tying all of their browsing behavior back to the
same user.
8http://en.wikipedia.org/wiki/List_of_HTTP_headers#Requests
Understand Web Technologies: What Your Browser is Doing Behind the Scenes 12
While cookies have somewhat of a bad reputation, they’re essential to the modern internet landscape.
Cookies are what allow you to login to your favorite websites and set preferences that persist across
multiple page loads. They’re basically a way to tell a website who the user is that’s making the
request.
Cookies are just another HTTP request header – they don’t have any special status in the HTTP
specification. But since HTTP is stateless, cookies have taken on the roll of keeping track of sessions
between requests.
Let’s look at an example of how cookies are used. For our example purposes, let’s look at a user who
is attempting to login to their email inbox with their webmail hosting provider.
1. The user clicks the bookmark they have that that usually takes them straight to their inbox:
http://example.com/inbox. However, the user has recently cleared their cookies, so when
the browser is building the HTTP request to that URL, it has no cookies to send along in the
Cookie header.
2. The server receives the request and immediately checks for a “User ID” cookie to see which
user is logged in. However, since there were no cookies sent with the HTTP request, the server
instead redirects the user to a login page.
Now the user is on the login page and ready to identify themselves to the server, in order to get their
email.
1. The user fills out the login form with their email address and password. The browser
automatically takes this information and makes an HTTP request to the server. There are
still no cookies set, but the browser passes along the email address and password that the user
entered into the form.
2. The server receives the request – including the submitted email address and password from
the login form. It looks up the user by their email address and verifies that the submitted
password is correct for the user.
3. Now that the server has determined who the user is, it returns an HTTP Response with a
header called Set-Cookie (more on Response Headers, below). In that header, it tells your
web browser to set a cookie called “User ID” with the now-logged-in user’s ID of “123”. The
browser stores this cookie in the “cookie jar” for the email provider’s domain name.
Now that the user has successfully logged in, when they click on their email bookmark again, here’s
what happens:
1. On subsequent HTTP requests to the same domain, the browser automatically looks up all
of the cookies that it has stored for that domain in the site’s cookie jar, and appends those
cookies to the request in the Cookie header.
2. The server then checks the “Cookie” header to see what the “User ID” is for the current user.
Understand Web Technologies: What Your Browser is Doing Behind the Scenes 13
3. When the server sees that the “User ID” cookie is set, it looks up the user with the ID of “123”
(in this case) and renders that user’s email in their inbox.
This is a bit of an over-simplification (with some obvious security holes) but hopefully it helps
illustrate that cookies are very important for identifying users to websites and tying a single user’s
web requests together. This is essential to understand if you plan to scrape any sites that require
logins in order to access the content. If you try to make a request directly to the “protected” URL
without the correct cookie header, you won’t be able to access the content and will see an error page
or be redirected to a login form.
So while some web scrapers try to avoid sending along cookies since it identifies who they are in
their requests, for some web scraping projects, you’ll need to work with cookies in order to get
access to the protected data you’re looking for. Keep in mind that this means that the site you’re
scraping will be able to tie all of your HTTP requests together and know that they’re associated with
your account. Make sure you’re very thoughtful whenever you’re using Cookies in a web scraping
project.
HTTP Responses
Once the server receives your HTTP request, it must decide how to respond. An HTTP response
generally takes the form of some response headers (similar to the request headers, above) and then
an HTML document.
Here’s an example of a raw HTTP response that the browser might receive after making a request
to a server:
HTTP/1.1 200 OK
Server: nginx
Content-Type: text/html; charset=utf-8
Connection: keep-alive
Content-Encoding: gzip
Content-Length: 131
Set-Cookie: user-id=123
<html>
<head>
<title>An Example Page</title>
</head>
<body>
Hello World, this is a very simple HTML document.
</body>
</html>

Understand Web Technologies: What Your Browser is Doing Behind the Scenes 14
The first line acknowledges that we’re using version 1.1 of the HTTP specification, and then says
what the status code of the response is. The status code is a three digit number and is used as a
simple way to tell the web browser what happened with the request.
Generally, if the status code is in the 200s, the request was successful, and that’s what we’re always
looking for. The majority of HTTP requests you make as you browse the web get back a 200 response
code, letting the browser know that everything went okay.
If the status code is in the 400s, there was a problem with the request. For example, a 404 error
means that the request asked for a resource that the server couldn’t find. If the status code is in the
500s, there was a problem on the server. It might mean that the server is temporarily overwhelmed
with traffic, or that the request caused the server to do something that raised an error. For more
information about status codes and what they mean, check out this Wikipedia article9.
The next few lines of the response are more HTTP headers similar to what we saw before with
request headers. They tell your web browser more information about the response, like what sort of
document it is (in this case text/html means it’s a normal HTML document), how it’s encoded (in
this case, it’s compressed using the gzip algorithm) and all sorts of other things. You’ll also notice a
Set-Cookie response header, like the one we talked about in our cookies examples earlier.
Your browser uses all of the information contained in the response headers to decide how to process
and display the response to you, the user.
After the headers there’s a blank line, and then we see the body of the HTML document. It’s all
still being passed around as plain text (with HTML markup) but because of the Content-Type:
text/html header, your web browser knows to translate that plain text into an elegant web page.
Turning HTML Markup into a Web Page
If you want to see the underlying HTML of a web page, right click in your browser and click on
“view source.” This will show you all of the plain HTML text that was sent over by the server. You’ll
see lots of <div>s and <a href="">s and other HTML tags. To the untrained eye, it might look like
a messy bunch of pointed brackets, but to your web browser, it looks like the building blocks of a
web page.
Your browser parses through all of those tags and builds a nested tree structure known as the DOM,
or Document Object Model. The DOM can be very complex, but the important thing to remember
is that it establishes a nested hierarchy for the elements on the page.
Nesting is a very important concept with the DOM, and provides the basis for a lot of what we’ll
learn in the next sections. Nesting is what tells your browser “this link goes inside of the nav element,
while these ones go in the footer” or “these images go inside of the sidebar while this text goes inside
of the main content area”.
Let’s take a look at an example. Imagine that your web browser receives the following HTML:
9http://en.wikipedia.org/wiki/List_of_http_status_codes

Understand Web Technologies: What Your Browser is Doing Behind the Scenes 15
<div id="main-content">
<p class="preview-text">
Here's some text and here's <a href="#">a link</a>.
</p>
</div>
You browser can parse through this HTML text and turn it into a nested structure. First you have a
<div> element, and then inside that is a paragraph tag <p> and inside that there’s some text, as well
as another anchor tag <a> which creates a clickable link.
These tags are probably further nested inside other tags further up the page. Usually, the entire page
itself is nested inside a <body> tag, and that <body> tag is nested inside an outermost <html> tag.
You can inspect the DOM for a given website by either pulling up the web inspector in Chrome10,
or using the Firefox Developer Tools11. Right away, you’ll notice how the elements on the page are
all nested inside each other.
You should try playing around with the DOM on some of your favorite websites to get familiar
with it. Traverse “down” the DOM by moving into more deeply nested elements, and move “up” the
DOM by zooming back out to the parent elements. Learning to find your way around the DOM for
a website is a crucial skill you’ll use as you start to locate the information on your target website.
DOM Tricks
The other thing notice – and this is a common gotcha in web scraping – is that the DOM that your
browsers builds for a given page might by different than the plain HTML text that was sent back
in the response from the server. This means you might see elements in the DOM (and on the page)
that don’t actually appear in the HTML if you right click, view source.
Remember that the DOM is a complex beast. While it’s initially built in your browser by parsing
the HTML that the server returns, it’s possible for other parts of the page to change it.
For example, the original HTML that’s returned from the server might load some Javascript, and
that Javascript might make additional requests to the server for more information that is eventually
added to the DOM. This is what happens on “infinite scroll” websites, where more content is added
to the page as you scroll down. Those elements are added to the DOM, even though they weren’t
present when the initial HTML document was returned from the server.
Keep an eye out for parts of the page that seem to load “after” the initial page has loaded. These
elements are probably being added to the DOM by some Javascript, and won’t appear in the initial
HTML document returned by the server.
An easy way to see DOM manipulation in action is to disable Javascript in your browser and then
try to load the site you intend to scrape. If it no longer shows the information you’re looking for, that
10https://developer.chrome.com/devtools
11https://developer.mozilla.org/en-US/docs/Tools

Understand Web Technologies: What Your Browser is Doing Behind the Scenes 16
means the content was being added to the DOM from somewhere else – and wasn’t being returned
in the HTML response from the server.
In Chapter 8 we focus on how to find content that isn’t loaded in the initial HTML response and
how you can still scrape it.
Quirks Mode
The other thing to be aware of is that web browsers tend to be extremely gracious as they’re building
the DOM. If a website returns bad HTML that doesn’t form a properly nested structure, the browser
will attempt to figure out what the website meant, and display that instead.
For example, if a website were to return this in its HTML document, the browser can’t easily figure
out what’s supposed to be nested inside what. Note the nesting of the <div> and <p> tags
<div>
<p>
Here's some text and here's <a href="#">a link</a>.
</div>
</p>
Is the div inside the paragraph, or is the paragraph inside the div? The browser will try to guess
instead of throwing an ugly error that the visitor sees. When this happens, the browser goes into
what’s known as “quirks mode12” which means the browser is no longer assuming that the page is
using standard’s compliant markup.
The people who build and design websites aren’t perfect, and it’s often the case that the site you’re
scraping isn’t “valid” HTML, meaning HTML that provides a clear and unambiguous blueprint for
a DOM structure.
It’s generally considered bad practice to force a browser to use quirks mode to parse your site. Each
browser will “guess” how to render your broken markup a bit differently, meaning your site might
look totally different when viewed in different browsers. But it happens frequently and it’s good to
be aware of.
There are even different versions of HTML, so an HTML tag that’s written one way might be totally
valid in one version of HTML and lead to an obvious DOM structure. But that same content might
need to be written differently in another version of HTML to provide the same DOM structure.
If a site is using serving “broken” HTML in its responses, then it might prove tricky for an HTML
parser to understand and find patterns – whether that’s a user’s browser or your web scraping
program. It’s important that the HTML parsing library you use is just as flexible as the browsers’.
We’ll talk more about that in Chapter 5.
12http://en.wikipedia.org/wiki/Quirks_mode

Understand Web Technologies: What Your Browser is Doing Behind the Scenes 17
In Review
This all happens in the span of a few seconds:
1. Whenever we click on links or submit forms, our web browser turns our navigation action
into an HTTP request with a URL, method and headers.
2. The HTTP request it sent as plain text to some far-away server that hosts the website we’re
trying to reach.
3. The server examines our request and determines how to respond.
4. The server generates an HTML document, and sends that as text back to our browser, along
with a few other headers to tell our browser how things went.
5. If the response seems to be an HTML document, our browser takes the text from the HTML
part of the response and turns it into a dynamic, nested structure known as the DOM.
These are the basics you need to understand to get started with web scraping.
More Information
Understanding HTTP and how your browser converts HTML markup into the DOM is all really
important stuff for any developers working in a web context. This chapter really only touches on
the basics of what we’ll need to know for web scraping. It’s outside the scope of this book to offer a
full-blown explanation of this topics, but if you’re interested in learning more, I’d highly recommend
the following resources:
•A Security-focused HTTP Primer by Daniel Miessler13
•Wikipedia’s article on HTTP14
•W3School’s tutorial on the HTML DOM15
With that stuff under your belt, you now know everything you need about how to scrape websites.
So let’s get started!
13http://danielmiessler.com/study/http/
14http://en.wikipedia.org/wiki/Hypertext_Transfer_Protocol
15http://www.w3schools.com/htmldom/
Pattern Discovery: Finding the Right
URLs that Return the Data You’re
Looking For
In some rare occasions, the data you’re trying to scrape might all appear on one page. Maybe there’s
a long list of items that doesn’t copy/paste well from your browser and you want to build a simple
web scraper just for that one URL.
More commonly however, you’ll need your web scraper to make multiple requests to many different
pages on your target site, in order to get them to return all of the data you want. Discovering the
URL patterns you’ll need to make those requests is the focus of this chapter.
This is the first big “pattern discovery” process you need to use when conducting web scraping.
Every website is free to setup their own URL structure, and it’s up to you to figure out which URLs
will give you the information you need.
The goal is to come up with the pattern of URLs that you’ll need to send requests to in order to
access all of the data you’re hoping to scrape. You can then build your scraper to follow the pattern
and make requests to all of the necessary URLs.
Since each site is different, it’s impossible for me to offer a “definitive guide” to finding the data you
need that will work on every website. But at a high level, there are two broad categories of URL
structures that you are most likely to run into:
1. Browse Pages
2. Search Pages & Forms
Browsing Pages
Browsing pages are the best places to start if you’re going to be pulling information on lots of items.
The concept of listing many items on one page – and letting users click through multiple pages of
items – is one of the most common user interface designs on the web, and most sites offer some sort
of functionality like this.
For example, if you’re pulling information about products, you’ll probably find a part of the site that
lets you drill down into different categories and sections. Click through several different categories
and pay attention to the page’s URL and how it changes as you navigate between pages.
Usually you’ll notice a few parts of the URL that change consistently. As you browse between
different categories, there might be a catId= that gets appended to the URL. As you click through
Pattern Discovery: Finding the Right URLs that Return the Data You’re Looking For 19
to page 2 of the results, you might notice that the URL gets some additional stuff added to the end,
like a pagenum or offset parameter.
These are called query parameters, and they always appear in a URL after the domain, path and
then a single question mark (?). They almost always take the form of key-value pairs, separated by
an equals sign (=). In between each set of of key-value pairs is an ampersand (&). Here’s example of
a URL with query parameters:
https://example.com/browse/category?cat=shoes&page=3
Here, our domain is example.com, the path is /browse/category and then we have two query
parameters:
1. cat=shoes – likely indicating that we’re looking at the “shoes” category
2. page=2 – likely indicating that we’ve gone to the second page of items in that category
Depending on how the site is setup, usually the path of the URL won’t change as you go page deeper
into a category, you’ll just see a query parameter in the URL that grows larger as you click further
from the first page.
If you’re looking at different categories, you’re more likely to see the path change, but some major
sites (like Amazon) store all of the information about the category and page you’re on in the query
parameters.
Click through to page 2 and see what changes in the URL. Usually, you’ll see some sort of offset=
parameter added to the URL. This is usually either the page number or else the number of items
displayed on the page.
Try changing this to some really high number and see what response you get when you “fall off the
end” of the data. With this information, you can now iterate over every page of results, incrementing
the offset parameter as necessary, until you hit that “end of data” condition, then you know you’ve
gotten everything.
Another thing to keep an eye out for when you’re browsing the site is any options that let’s you
change “Display X Items per Page.” Try setting that to the highest value that the site allows and
examine the query parameters in the URL to see how they change. If the site only gives you the
option to display, say, 12, 30 or 90 items per page, but there are thousands of items in the category,
you could try setting the “items per page” query parameters to an arbitrarily large number.
Sometimes you’ll be able to get all of the data back at once in a single request! Some sites will have
hard limits on the server and might still cap the number of items returned, but this could still cut
down on the number of requests you have to make to the site in order to fetch all of the data – which
is still a big improvement.
When you’re looking for patterns in the query parameters, you should try removing other
unnecessary parameters from the URL – ensuring it still loads the information you want – until
Pattern Discovery: Finding the Right URLs that Return the Data You’re Looking For 20
you are left with only the ones you need to load the correct page. You should end up with a domain,
path and a set of query parameters – as well as an understanding of (roughly) what values the query
parameters take and what they control in the response from the server.
Search Pages
Another way to browse the collection of items on a site is to use something like a search box or
other web form to put in some information about what you’re looking for and then get taken to a
page that shows results.
Just like we discussed in the previous section, your goal is to load a couple different pages and look
for patterns in how the URL changes. Try running a few different queries through the search box
and see how the information you enter is appended to the URL.
If you’re searching for items, you’ll probably see a URL parameter like q= or query= or search=
that shows up in the query parameters, along with whatever text you typed in. Here’s a simplified
example of a URL that loads a google search query, with all of the unnecessary query parameters
stripped out:
https://www.google.com/search?q=web+scraping
Some forms have many fields, and not all of them are text. The forms might include dropdowns
with pre-set values, checkboxes, radio buttons, sliders, toggles or lots of other widgets. Regardless
of how the form looks in your browser, when it’s submitted, the values that a user enters into the
form have to be sent to the server somehow.
If you spend a few minutes playing around with the form and trying different combinations of
inputs, you can usually tease out a pattern of which params are required to view the data you’re
looking for, and what values they should take.
Illegal Characters and “Escaping” URLs
A quick note here on query parameters, there are certain characters that are “illegal” to have in
URLs. If you try to enter a search query that has a space in it (“web scraping”, for example), you
may notice that the value that’s appended to the URL is an “escaped” version that contains slightly
different characters. It might appear in the URL like query=web+scraping or query=web%20scraping.
Your browser automatically handles this “escaping” for you so that you don’t send any illegal
characters in the URL. When you’re building your own web scrapers you’ll want to ensure that
you HTTP request library is automatically escaping values properly. We’ll talk more about that
very soon when we start building out own scrapers.

Pattern Discovery: Finding the Right URLs that Return the Data You’re Looking For 21
Sometimes the URL Doesn’t Reflect Your Form
With some forms, you may notice that filling them out does not append anything to the URL. There’s
seemingly nothing in the URL that indicates what your searched for or what values you entered into
the form. This most likely means that the form was submitted slightly differently.
In the previous chapter, we talked about making HTTP requests and how most requests use the
GET method. Whenever you edit a URL manually in your browser and hit “enter”, the browser
automatically makes a GET request.
But there are some forms that, when submitted, trigger a POST request to the server instead of a GET
request. With a POST request, the parameters that the user enters aren’t included in the URL. This is
commonly used for login forms – it would not be great for security if the site put a user’s email and
password up in the URL whenever they logged in. It’s also sometimes used for forms that submit
sensitive information.
If the form you’re trying to scrape uses POST requests instead of GET, you’ll need to do a bit more
digging to figure out what params to send with your requests. You’ll need to open the “developer
tools” that come with your browser (instructions for Chrome16 and Firefox17) and click over to the
“Network” tab.
When this tab is open, it will record all of the HTTP requests you make and show you detailed
information about the headers, request method and “Form Data” that is sent on each request. The
“Form Data” is essentially like the query parameters for a POST request. Try filling out the form and
then click on the request you just made to read more about what data was sent.
Here’s a screenshot of what it looks like in Google Chrome’s developer tools:
16https://developer.chrome.com/devtools
17https://developer.mozilla.org/en-US/docs/Tools
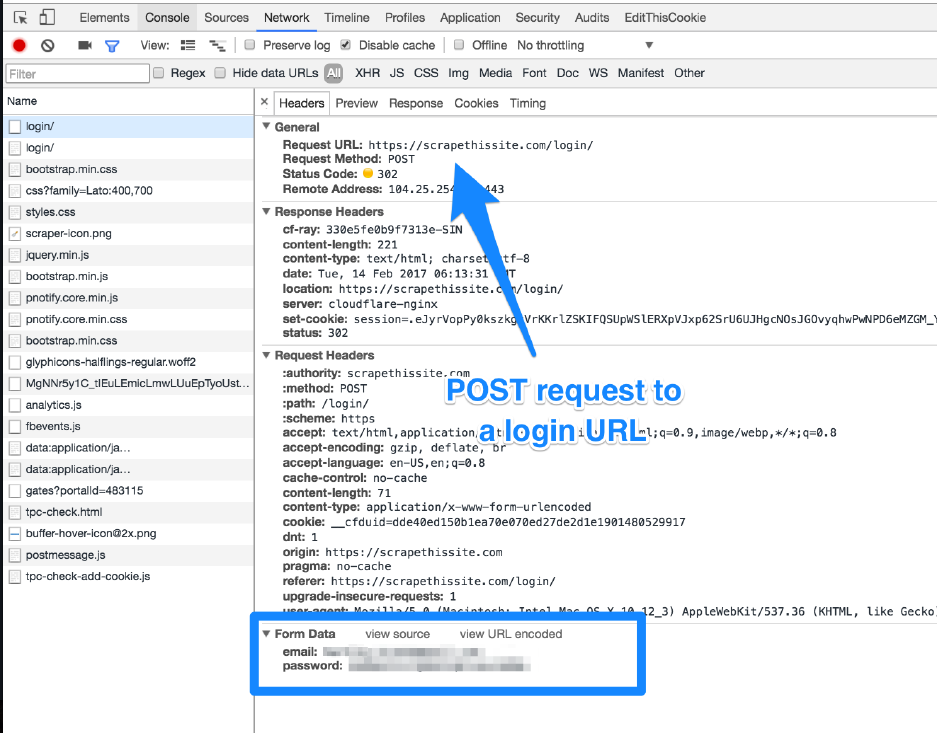
Pattern Discovery: Finding the Right URLs that Return the Data You’re Looking For 22
Example of a POST request in Chrome’s Developer Tools.
The Trouble With Search Scrapers
Pulling information from websites that only expose their data via search can be a tricky problem.
After all, there are an infinite number of things someone could type into a search box, each
potentially showing different results. It would be like trying to use google search to discover every
single page on the internet – what would you have to search for to find them all?
If your goal is to pull every single piece of data from a site that uses a search-only interface, then
you’ll have to think creatively.
Sometimes, you might have a large list of seed data. Maybe you’re searching a members’ directory,
and you have a large list of first and last names that you can plug into the search box, one-by-one.
Even if we didn’t have our list of seed data already, perhaps we could scrape together a list from
somewhere else. If you want to scrape a site that has car stats on every single make, model and year,
maybe you can find another website that lists that information and scrape that site first. Wikipedia is

Pattern Discovery: Finding the Right URLs that Return the Data You’re Looking For 23
often a great source for lists of data in a category and uses fairly consistent markup between articles.
You could scrape that data source first to build your initial seed list, and then you could use that list
to search your original car stats website. (1972 Honda Civic,1973 Honda Civic, etc)
Occasionally, a site may offer a “View All” link at the bottom of the page. This sidesteps the issue of
search altogether and lets you simply and easily paginate through every page of “results.”
If you’re really determined to pull all the information from a site, and have no way of building a
seed list or using “view all” to paginate through, a final option is to look for patterns in the search
result page URLs.
Say you’re scraping a website that lets you search for a name and tells you if there are any unclaimed
properties or assets for that person. You may not have a list of everyone’s name, but if you start
clicking through the results, you may notice that they follow a pattern like:
Joanna Smith - http://unclaimedassets.gov/asset/claims/?id=1236348
Robert Rudy - http://unclaimedassets.gov/asset/claims/?id=1236392
Jennifer Barnes - http://unclaimedassets.gov/asset/claims/?id=1235217
Winston Warbler - http://unclaimedassets.gov/asset/claims/?id=1234952
Notice the pattern in the id query parameter for each person’s claims page? Instead of using search,
you could try just making requests to http://unclaimedassets.gov/asset/claims/ and passing a
query parameter of, say id=1230000 and then id=1230001,id=1230002, etc.
Use a loop and a variable to keep track of what id you’re searching for. Some ids might not have
any properties or assets, so your scraper might need to handle 404 errors for those pages by just
moving onto the next one.
Hopefully by this point, you’ve figured out exactly how to view the information you’re looking to
scrape in your web browser. You know how to filter it down to just the stuff you need, and paginate
over the results if you can’t get it all in one go.
In the next section, we’ll look at ways to pull that information out of an HTML document and into
the raw data forms you need to process or store it yourself.
Pattern Discovery: Finding the
Structure in an HTML Document
Now that you’ve found a way to systematically retrieve the information you need from the server,
it’s time to extract it out of the HTML response that you’re getting back.
The first step is to pull up your browser’s developer tools. Start by right clicking on a piece of
information on the website and choosing “inspect element.” This should open the developer tools
and take you straight to that DOM node in your browser’s web inspector.
One of the first things you’ll notice is that each node in the DOM probably has several different
attributes on it. Attributes are key/value pairs that are either defined inside an element’s HTML
markup, or applied to the element dynamically with Javascript. This is what attributes look like:
<element attribute-1="value-1" attribute-2="value-2" />
You’ll probable notice lots of class attributes on the element you’ve selected, as well as on the
parent element. This is common practice on most websites since it allows the site’s web designers
to apply CSS styles to each of the elements on the page.
Using CSS Selectors
CSS is a language used to describe the presentation and aesthetics of a web page. It allows web
designers to apply specific display properties to each of the elements on the page. In order to select
the correct element to apply the styles to, CSS primarily relies upon the class and id attributes on
HTML elements.
<a href="http://www.example.com" class="external-link link" id="example-link">
Go to Example.com
</a>
In the above line of HTML, we have a single HTML element. The <a> tag is the anchor element which
is a way of defining links between pages. This particular element has three attributes:href,class
and id. While CSS rules can be applied using any attribute on an element, the CSS specification
mainly supports the use of class and id attributes as selectors.
An element’s id must be unique on the page – that is, there should only be a single element on the
entire page that has a given id. On the other hand, a single class value can appear multiple times
on the page – meaning there can be multiple elements on the page that share the same class value.

Pattern Discovery: Finding the Structure in an HTML Document 25
This is important to keep in mind as you’re looking for patterns in a site’s markup. If you’re only
pulling a single element from the page, then it’s fine to use id selectors to target the information
you want. But if you want to pull a list of items from a single page, then you probably want to use
the class selectors.
The other important distinction to be aware of is that a single HTML element can have multiple
classes, but only one id. In the example <a> element above, there are two classes – external-
link and link – and only one id. A single element can have as many classes as the web designer
wants, although it’s rare to see more than two or three on a single element. Classes are listed in a
single, space-delineated string.
XPath
While CSS selectors are probably good enough for most use cases, it’s also good to know about
XPath. XPath is a somewhat-obscure query language for finding specific nodes in an XML
document. Since HTML is somewhat based on XML, this can often be a valid option.
XPath uses path expressions to find specific nodes – nodes are the same as the HTML elements we
just discussed. There’s a whole syntax that’s a bit outside the scope of this book, but W3Schools has
a decent tutorial on using XPath18.
If you’re unsure which to use for your scraping needs, I’d recommend using CSS selectors since
they’re much simpler to read and write. XPath has some more powerful features and lets you perform
queries that you simply can’t with CSS, but I’ve never found myself needing those features, so I
usually stick with CSS selectors. John Resig (creator of jQuery) has a good overview that covers the
pros and cons of each19
Finding the Elements You Need
Now that you know how you might identify and extract an element from the DOM, it’s time to
figure out which elements you need. Moving forward, I’m going to be assuming that you’re using
CSS selectors, but these ideas hold just as well if you’re using XPath.
If you’re trying to pull multiple items per page, you want to find the outermost element (probably a
<div> or <li>) that wraps each item, and look for common classes they all share.
Here’s some example HTML you might see on a website:
18http://www.w3schools.com/xpath/default.asp
19http://ejohn.org/blog/xpath-css-selectors/
Pattern Discovery: Finding the Structure in an HTML Document 26
<div class="productItem">
<a href="http://example.com/item-1/" class="productLink productImageLink">
<img src="http://img.example.com/item-1.jpg" class="productImage" />
</a>
<a href="http://example.com/item-1/" class="productDescLink">
<div class="productDesc">
<span class="productTitle">Item #1</span>
<span class="productPrice">$19.95</span>
</div>
</a>
</div>
<div class="productItem">
<a href="http://example.com/item-2/" class="productLink productImageLink">
<img src="http://img.example.com/item-2.jpg" class="productImage" />
</a>
<a href="http://example.com/item-2/" class="productDescLink">
<div class="productDesc">
<span class="productTitle">Item #2</span>
<span class="productPrice">$12.95</span>
</div>
</a>
</div>
...
Take a minute to read over that markup, paying attention to the class attributes as well as the
nesting structure of the elements. You can see that the (hypothetical) site’s web designers did a
pretty good job using simple, readable classes for each of the elements. Even without the values
inside the elements, you’d still be able to understand what each element contains.
This same HTML is used repeatedly on the page, whenever there’s a new product shown. If this was
a “browse” type page, this same HTML pattern would likely appeared dozens of times on the page –
each time with the same element and class structure, but with different values for the <a href="">,
<img src=""> and class="productTitle" and class="productPrice".
If you’re looking at a list view page like this that you want to pull multiple elements from, you
want to look for the outer wrapper element that they all share. In the example markup above, I’d
want to pull out all <div> elements with class="productItem". Once you have all of those wrapper
elements in a list or array, you’ll be able to iterate over each of them and pull out the specifics details
you need.
If you’re on a detail page for a single product or you’re just pulling specific bits of information
that aren’t repeated, then you don’t need to find those wrapper elements, you can just look for the
specific elements that contain the information you want.

Pattern Discovery: Finding the Structure in an HTML Document 27
Choosing The Right HTML Parsing Library
We’re getting really close to actually writing some code and implementing the patterns matching
we’ve found for the URLs and the HTML DOM elements we’re looking for. But first, I want to talk
about the importance of selecting a good HTML parsing library.
Just like your browser turns plain text HTML into a complex nested structure known as the DOM,
you’ll also need a library or package in your favorite language that can build a structured object out
of the HTML you’ll be parsing.
Remember, when you make requests to a web server, all that comes back is a regular ol’ plaintext file
with a bunch of pointy brackets (‘< >’) and some text. You don’t want to be pulling your information
out using string splitting or a giant regular expression20. Having a good HTML parsing library saves
you a boatload of time and makes finding your elements fast and easy.
HTML, not XML
Whenever I recommend my favorite HTML parsing library, I often hear the complaint that it’s “too
slow” when compared against an XML parsing library. And since HTML is loosely based on XML,
it’s tempting to think that an XML parsing library will suit your needs and be a great choice.
In the world of XML, standards are very clearly defined and generally very well followed.
Unfortunately, in the world of HTML, neither of these facts hold true. Remember when we talked
about “quirks mode,” when the browser has to try and guess how a site is supposed to be structured
because of poorly-written HTML?
HTML parsing libraries often have their own version of “quirks mode” that still allows them to figure
out the nested structure of a web page, even when the markup isn’t well formed. XML libraries will
usually throw up their hands and say, “This isn’t valid markup, I refuse to parse it!” which leaves
you in a bad spot if the site you’re scraping doesn’t use perfectly-formed HTML.
You HTML Parsing Library Can be Simple
You’re really only going to be needing two functions from your HTML parsing library: find_all()
and find(). They might be called different things in different libraries, but the idea is that same:
• one function that pulls a list of elements based on some filters
• one function that pulls a single element based on some filters
That’s pretty much it. With those two functions, you can pull out a list of wrapper elements to iterate
over, or drill down to find specific elements in the structure. Often, you’ll use a combination of both:
20http://stackoverflow.com/a/1732454/625840
Pattern Discovery: Finding the Structure in an HTML Document 28
find_all() to pull out the list of wrapper elements, and then find() on each element to extract the
specific fields of information you’re looking for. We’ll take a look at some example code for this in
the next chapter.
Common Traps When Parsing HTML
Now that you’ve found your elements and gotten your HTML parsing library picked out, you’re
almost ready to get started! But before you do, let’s look at some common pitfalls so that you know
what to keep an eye out for.
The DOM in the developer tools is not (always) the same the
HTML returned by the server
We’ve talked about this already – how elements might appear in the DOM tree even if they weren’t
in the original HTML document returned by the server. On Javascript-heavy websites, entire sections
of content might be loaded asynchronously, or added to the page after the original HTML has been
downloaded.
Whenever you find the right selectors to point you towards the elements you need, you should
always double-check that those elements appear in the page’s HTML. I’ve wasted countless hours
scratching my head wondering why an element I see in the web inspector’s DOM isn’t getting picked
up by my HTML parsing library, when it turned out that the element wasn’t being returned in the
HTML response at all. We’ll talk more about scraping content that’s loaded asynchronously with
Javascript and AJAX in Chapter 8.
Even on sites that don’t use Javascript to load content, it’s possible that your browser has gone into
“quirks mode” while trying to render, and the DOM you see in your inspector is only a guess as to
how the site is supposed to be structured.
When in doubt, always double check that the elements you’re attempting to pull out of the DOM
actually exist in the HTML that’s returned in the main response body. The easiest way to do this is
to simply right-click, “view source” and then cmd-F and search for the class name or other selector
you’re hoping to use.
If you see the same markup that you found in the web inspector, you should be good to go.
Text Nodes Can be Devious
In the example markup I provided earlier, you can see that some of the elements terminate with so
called text nodes. These are things like "Item #1" and $19.95. Usually, these text nodes are the raw
information that you’ll be pulling into your application and potentially be saving to a database.
Now imagine a situation where a clever manager at this ecommerce company says to themselves,
“you know what? I want the word ‘Item’ to appear on a different line than ‘#1’. My nephew tried

Pattern Discovery: Finding the Structure in an HTML Document 29
teaching me HTML one time, and I remember that typing <br> makes things go down a line. I’ll
enter the name of the item as Item<br>#1 into the system and that’ll trick it to go down a line.
Perfect!”.
Aside from being a silly way to mix business information with presentation logic, this also creates
a problem for your web scraping application. Now, when you encounter that node in the DOM and
go to pull out the text – surprise! – there’s actually another DOM element stuffed in there as well.
I’ve seen this happen myself a number of times. For example, in 9 out of 10 product descriptions, there
will be a simple blob of text inside a <p> element. But occasionally, the <p> element will also contain
a bulleted list with <ul> and <li> tags and other DOM nodes that my scraper wasn’t expecting.
Depending on your HTML parsing library, this can cause problems.
One solution is to simply flatten all of the content into a string and save that, but it might require
some extra parsing afterwards to strip out the <br> or other hidden tags that are now mixed in with
your text. Just something else to be aware of.
Now that you know how to find patterns in the DOM that lead you to your data, and have picked
out a good HTML parser, and know how to avoid the most common HTML parsing pitfalls, it’s time
to start writing some code!

Hands On: Building a Simple Web
Scraper with Python
Now that we’ve gotten a solid understanding of how to build the correct HTTP requests and how
to parse HTML responses, it’s time to put it all together and write some working web scraper code.
In this chapter, I’ll walk you through the process of building a simple web scraper in python, step-
by-step.
The page that we’ll be scraping is a simple list of countries21, along with their capital, population
and land mass in square kilometers. The information is hosted on a site that I built specifically to be
an easy-to-use sandbox for teaching beginner web scrapers: Scrape This Site.
There are a number of pages in the sandbox that go through more complex web scraping problems
using common website interface elements, but for this chapter, we’ll stick with the basics on this
page:
https://scrapethissite.com/pages/simple/
We’ll be using python since it has simple syntax, it is widely deployed (it comes pre-installed by
default on many operating systems) and it has some excellent libraries for sending HTTP requests
and parsing HTML responses that will make our lives much easier.
Our first step is to make sure that we have two core packages installed that we’ll be using: requests
and BeautifulSoup. If your system already has python and pip installed, you should be fine to run
this command at the command line to get the packages installed:
pip install requests beautifulsoup4
If that command fails, you should make sure that you have python installed (instructions for
Windows users22). You also need to ensure you have pip installed by running the following command
from the command line:
easy_install pip
Once you’ve got python, pip and those packages installed, you’re ready to get started.
21https://scrapethissite.com/pages/simple/
22http://www.howtogeek.com/197947/how-to-install-python-on-windows/
Hands On: Building a Simple Web Scraper with Python 31
Finding the Patterns
Since all of the data that we’re loading is on a single page, there isn’t much to look for in terms of
URL patterns. There’s another page in the sandbox23 that uses plenty of query parameters to support
a search box, pagination and “items per page” interface, if you’re looking for more of a challenge.
The main patterns we’ll be looking for in this example are the patterns in the HTML of the page
around each country. If I visit the page we’re scraping in the Google Chrome web browser and then
right-click on a country’s name, then choose “Inspect Element” I start to see some patterns.
Looking for HTML Patterns in Chrome
You can “open” and “close” nested structures within the DOM by clicking on the little gray arrows
that you see. This will let you drill down into elements, and zoom back up the DOM tree to look for
patterns in higher-level elements.
Even without knowing anything about the site or its developers, I can start to read the HTML
elements and their attributes. If I right-click > “Inspect Element” on a few different countries, I start
to form an idea of some patterns in my head. It seems like the general format for the HTML that
displays each country on the page looks something like this. Note that I’ve used the double-curly
23https://scrapethissite.com/pages/forms/
Hands On: Building a Simple Web Scraper with Python 32
brackets to represent the actual data that we’d want to pull.
<div class="col-md-4 country">
<h3 class="country-name">
<i class="flag-icon flag-icon-{{COUNTRY_CODE}}"></i>
{{COUNTRY_NAME}}
</h3>
<div class="country-info">
<strong>Capital:</strong>
<span class="country-capital">
{{COUNTRY_CAPITAL}}
</span>
<br>
<strong>Population:</strong>
<span class="country-population">
{{COUNTRY_POPULATION}}
</span>
<br>
<strong>Area (km<sup>2</sup>):</strong>
<span class="country-area">
{{COUNTRY_AREA}}
</span>
<br>
</div>
</div>
If we wanted to find all of the countries on the page, we could look for all <div> elements with a
class of country. Then we could loop over each of those elements and look for the following:
1. <h3> elements with a class of country-name to find the country’s name
2. <span> elements with a class of country-capital to find the country’s capital
3. <span> elements with a class of country-population to find the country’s population
4. <span> elements with a class of country-area to find the country’s area
Note that we don’t even really need to get into the differences between an <h3> element and a <span>
or <div> element, what they mean or how they’re displayed. We just need to look for the patterns
in how the website is using them to markup the information we’re looking to scrape.
Implementing the Patterns
Now that we’ve found our patterns, it’s time to code them up. Let’s start with some code that makes
a simple HTTP request to the page we want to scrape:
Hands On: Building a Simple Web Scraper with Python 33
import requests
url ="https://scrapethissite.com/pages/simple/"
r=requests.get(url)
print "We got a {} response code from {}".format(r.status_code, url)
Save this code in a file called simple.py on your Desktop, and then run it from the command line
using the following command
python ~/Desktop/simple.py
You should see it print out the following:
We got a 200 response code from https://scrapethissite.com/pages/simple/
If so, congratulations! You’ve made your first HTTP request from a web scraping program and
verified that the server responded with a successful response status code.
Next, let’s update our program a bit to take a look at the actual HTML response that we got back
from the server with our request:
import requests
url ="https://scrapethissite.com/pages/simple/"
r=requests.get(url)
print "We got a {} response code from {}".format(r.status_code, url)
print r.text # print out the HTML response text
If you scroll back up through your console after you run that script, you should see all of the HTML
text that came back from the server. This is the same as what you’d see if in your browser if you
right-click > “View Source”.
Now that we’ve got the actual HTML text of the response, let’s pass it off to our HTML parsing
library to be turned into a nested, DOM-like structure. Once it’s formed into that structure, we’ll do
a simple search and print out the page’s title. We’ll be using the much beloved BeautifulSoup and
telling it to use the default HTML parser. We’ll also remove an earlier print statement that displayed
the status code.
Hands On: Building a Simple Web Scraper with Python 34
import requests
from bs4 import BeautifulSoup
r=requests.get("https://scrapethissite.com/pages/simple/")
soup =BeautifulSoup(r.text, "html.parser")
print soup.find("title")
Now if we run this, we should see that it makes an HTTP request to the page and then prints out
the page’s <title> tag.
Next, let’s try adding in some of the HTML patterns that we found earlier while inspecting the site
in our web browser.
import requests
from bs4 import BeautifulSoup
r=requests.get("https://scrapethissite.com/pages/simple/")
soup =BeautifulSoup(r.text, "html.parser")
countries =soup.find_all("div","country")
print "We found {} countries on this page".format(len(countries))
In that code, we’re using the find_all() method of BeautifulSoup to find all of the <div> elements
on the page with a class of country. The first argument that we pass to find_all() is the name of
the element that we’re looking for. The second argument we pass to the find_all() function is the
class that we’re looking for.
Taken together, this ensures that we only get back <div> elements with a class of country. There
are other arguments and functions you can use to search through the soup, which are explained in
more detail in Chapter 11.
Once we find all of the elements that match that pattern, we’re storing them in a variable called
countries. Finally, we’re printing out the length of that variable – basically a way to see how many
elements matched our pattern.
This is a good practice as you’re building your scrapers – making sure the pattern you’re using is
finding the expected number of elements on the page helps to ensure you’re using the right pattern.
If it found too many or too few, then there might be an issue that warrants more investigation.
If you run that code, you should see that it says
Hands On: Building a Simple Web Scraper with Python 35
We found 250 countries on this page
Now that we’ve implemented one search pattern to find the outer wrapper around each country, it’s
time to iterate over each country that we found and do some further extraction to get at the values
we want to store. We’ll start by just grabbing the countries’ names.
import requests
from bs4 import BeautifulSoup
r=requests.get("https://scrapethissite.com/pages/simple/")
soup =BeautifulSoup(r.text, "html.parser")
countries =soup.find_all("div","country")
for country in countries:
print country.find("h3").text.strip()
Here we’ve added a simple for-loop that iterates over each item in the countries list. Inside the
loop, we can access the current country we’re looping over using the country variable.
All that we’re doing inside the loop is another BeautifulSoup search, but this time, we’re only
searching inside the specific country element (remember, each <div class="country">...). We’re
looking for an <h3> element, then grabbing the text inside of it using .text attribute, stripping off
any extra whitespace around it with .strip() and finally printing it to the console.
If you run that from the command line, you should see the full list of countries printed to the page.
You’ve just built your first web scraper!
We can update it to extract more fields for each country like so:
import requests
from bs4 import BeautifulSoup
r=requests.get("https://scrapethissite.com/pages/simple/")
soup =BeautifulSoup(r.text, "html.parser")
countries =soup.find_all("div","country")
# note: you will likely get errors when you run this!
for country in countries:
name =country.find("h3").text.strip()
capital =country.find("span","country-capital").text.strip()
population =country.find("span","country-population").text.strip()
Hands On: Building a Simple Web Scraper with Python 36
area =country.find("span","country-area").text.strip()
print "{} has a capital city of {}, a population of {} and an area of {}".fo\
rmat(name, capital, population, area)
If you try running that, it might start printing out information on the first few countries, but then
it’s likely to encounter an error when trying to print out some of the countries’ information. Since
some of the countries have foreign characters, they don’t play nicely when doing thing like putting
them in a format string, printing them to the terminal or writing them to a file.
We’ll need to update our code to add .encode("utf-8") to the extracted values that are giving us
problems. In our case, those are simply the country name and the capital city. When we put it all
together, it should look like this.
import requests
from bs4 import BeautifulSoup
r=requests.get("https://scrapethissite.com/pages/simple/")
soup =BeautifulSoup(r.text, "html.parser")
countries =soup.find_all("div","country")
for country in countries:
name =country.find("h3").text.strip().encode("utf-8")
capital =country.find("span","country-capital").text.strip().encode("utf-8\
")
population =country.find("span","country-population").text.strip()
area =country.find("span","country-area").text.strip()
print "{} has a capital city of {}, a population of {} and an area of {}".fo\
rmat(name, capital, population, area)
And there you have it! Only a dozen lines of python code, and we’ve already built our very first
web scraper that loads a page, finds all of the countries and then loops over them, extracting several
pieces of content from each country based on the patterns we discovered in our browser’s developer
tools.
One thing you’ll notice, that I did on purpose, is to build the scraper incrementally and test it often.
I’d add a bit of functionality to it, and then run it and verify it does what we expect before moving
on and adding more functionality. You should definitely follow this same process as you’re building
your scrapers.
Web scraping can be more of an art than a science sometimes, and it often takes a lot of guess and
check work. Use the print statement liberally to check on how your program is doing and then
make tweaks if you encounter errors or need to change things. I talk more about some strategies for
testing and debugging your web scraping code in Chapter 10, but it’s good to get into the habit of
making small changes and running your code often to test those changes.
Hands On: Storing the Scraped Data &
Keeping Track of Progress
In the last chapter, we built out very first web scraper that visited a single page and extracted
information about 250 countries. However, the scraper wasn’t too useful – all we did with that
information was print it to the screen.
In reality, it’d be nice to store that information somewhere useful, where we could access it and
analyze it after the scrape completes. If the scrape will visit thousands of pages, it’d be nice to check
on the scraped data while the scraper is still running, to check on our progress, see how quickly
we’re pulling in new data, and look for potential errors in our extraction patterns.
Store Data As You Go
Before we look at specific methods and places for storing data, I wanted to cover a very important
detail that you should be aware of for any web scraping project: You should be storing the
information that you extract from each page, immediately after you extract it.
It might be temping to add the information to a list in-memory and then run some processing or
aggregation on it after you have finished visiting all the URLs you intend to scrape, before storing it
somewhere. The problem with this solution becomes apparent anytime you’re scraping more than
a few dozen URLs, and is two fold:
1. Because a single request to a URL can take 2-3 seconds on average, web scrapers that need to
access lots of pages end up taking quite a while to run. Some back of the napkin math says that
100 requests will only take 4-5 minutes, but 1,000 requests will take about 45 minutes, 10,000
requests will take about 7 hours and 100,000 requests will take almost 3 days of running non-
stop.
2. The longer a web scraping program runs for, the more likely it is to encounter some sort of
fatal error that will bring the entire process grinding to a halt. We talk more about guarding
against this sort of issue in later chapters, but it’s important to be aware of even if your script
is only going to run for a few minutes.
Any web scraper that’s going to be running for any length of time should be storing the extracted
contents of each page somewhere permanent as soon as it can, so that if it fails and needs to be
restarted, it doesn’t have to go back to square one and revisit all of the URLs that it already extracted
content from.
Hands On: Storing the Scraped Data & Keeping Track of Progress 38
If you’re going to do any filtering, cleaning, aggregation or other processing on your scraped data,
do it separately in another script, and have that processing script load the data from the spreadsheet
or database where you stored the data initially. Don’t try to do them together, instead you should
scrape and save immediately, and then run your processing later.
This also gives you the benefit of being able to check on your scraped data as it is coming in. You
can examine the spreadsheet or query the database to see how many items have been pulled down
so far, refreshing periodically to see how things are going and how quickly the data is coming in.
Storing Data in a Spreadsheet
Now that we’ve gone over the importance of saving data right away, let’s look at a practical example
using the scraper we started working on in the last chapter. As a reminder, here is the code we ended
up with:
import requests
from bs4 import BeautifulSoup
r=requests.get("https://scrapethissite.com/pages/simple/")
soup =BeautifulSoup(r.text, "html.parser")
countries =soup.find_all("div","country")
for country in countries:
name =country.find("h3").text.strip().encode("utf-8")
capital =country.find("span","country-capital").text.strip().encode("utf-8\
")
population =country.find("span","country-population").text.strip()
area =country.find("span","country-area").text.strip()
print "{} has a capital city of {}, a population of {} and an area of {}".fo\
rmat(name, capital, population, area)
What we’d like to do is store the information about each country in a Comma Separated Value (CSV)
spreadsheet. Granted, in this example we’re only making one request, so the “save data right away
so that you don’t have to revisit URLs” is a bit of a moot point, but hopefully you’ll see how this
would be important if we were scraping many more URLs.
Let’s spend a minute thinking about what we’d want our spreadsheet to look like. We’d want the
first row to contain header information – the label for each of our columns: country name, capital,
population and area. Then, each row underneath that should contain information about a new
country, with the data in the correct columns. Our final spreadsheet should have 250 rows, one
for each country, plus an extra row for the headers, for a total of 251 rows. There should be four
columns, one for reach field we’re going to extract.
Hands On: Storing the Scraped Data & Keeping Track of Progress 39
It’s good to spend a bit of time thinking about what our results should look like so that we can have a
way to tell if our scraper ran correctly. Even if we don’t know exactly how many items we’ll extract,
we should try to have a ballpark sense of the number (order of magnitude) so that we know how
large our finished data set will be, and how long we (roughly) expect our scraper to take to run until
completion.
Python comes with a builtin library for reading from and writing to CSV files, so you won’t have to
run any pip commands to install it. Let’s take a look at a simple use case:
import csv
with open("/path/to/output.csv","w+")as f:
writer =csv.writer(f)
writer.writerow(["col #1","col #2","col #3"])
This creates a file called output.csv (note that you’ll likely have to change the full file path to point
to an actual folder on your computer’s hard drive). We open the file and then create a csv.writer()
object, before calling the writerow() method of that writer object.
This sample code only writes a single row to the CSV with three columns, but you can imagine that
it would write many rows to a file if the writerow() function was called inside of a for-loop, like
the one we used to iterate over the countries.
Note that the indentation of the lines matters here, just like it did inside our for-loop in the last
chapter. Once we’ve opened the file for writing, we need to indent all of the code that accesses that
file. Once our code has gone back out a tab, python will close the file for us and we won’t be able
to write to it anymore. In python, the number of spaces at the beginning of a line are significant, so
make sure you’re careful when you’re nesting file operations, for-loop and if-statements.
Let’s look at how we can combine the CSV writing that we just learned with our previous scraper.
import csv
import requests
from bs4 import BeautifulSoup
with open("/path/to/output.csv","w+")as f:
writer =csv.writer(f)
writer.writerow(["Name","Capital","Population","Area"])
r=requests.get("https://scrapethissite.com/pages/simple/")
soup =BeautifulSoup(r.text, "html.parser")
countries =soup.find_all("div","country")
Hands On: Storing the Scraped Data & Keeping Track of Progress 40
for country in countries:
name =country.find("h3").text.strip().encode("utf-8")
capital =country.find("span","country-capital").text.strip().encode("u\
tf-8")
population =country.find("span","country-population").text.strip()
area =country.find("span","country-area").text.strip()
writer.writerow([name, capital, population, area])
You’ll see that we added the import csv statement to the top of the file with our other imports.
Then we open our output file and create a csv.writer() for it. Before we even get to our scraping
code, we’re going to write a quick header row to the file, labeling the columns in the same order
that we’ll be saving them below inside our loop. Then we’re indenting all the rest of our code over
so that it’s “inside” the file handling code and can write our output to the csv file.
Just as before, we make the HTTP request, pass the response HTML into BeautifulSoup to parse,
look for all of the outer country wrapper elements, and then loop over them one-by-one. Inside our
loop, we’re extracting the name, capital, population and area, just as before, except this time we’re
now writing them to our CSV with the writer.writerow() function, instead of simply printing to
the screen.
If you save that into a text file on your Desktop called “countries.py”, then you can run it from the
command line with
python ~/Desktop/countries.py
You won’t see any output at the command line since we don’t have any print statements in our
scraper. However, if you open the output file that you created using a spreadsheet tool like excel,
you should see all 251 rows that we were expecting, with the data in the correct columns.
CSV is a very simple file format and doesn’t support formatting like bolding, colored backgrounds,
formulas, or other things you might expect from a modern spreadsheet. But it’s a universal format
that can be opened by pretty much any spreadsheet tool, and can then be re-saved into a format that
does support modern spreadsheet features, like an .xls file.
CSV files are a useful place to write data to for many applications. They’re easy files to open, edit
and work with, and are easy to pass around as email attachments or share with coworkers. If you
know your way around a spreadsheet application, you could use pivot tables or filters to rum some
basic queries and aggregation.
But if you really want a powerful place to store your data and run complex queries and relational
logic, you’d want to use a SQL database, like sqlite.
Hands On: Storing the Scraped Data & Keeping Track of Progress 41
Storing Data in a SQLite Database
There are a number of well-known and widely used SQL database that you may already be familiar
with, like MySQL, PostgreSQL, Oracle or Microsoft SQL Server.
When you’re working with a SQL database, it can be local – meaning that the actual database lives
on the same computer where your scraper is running – or it could be running on a server somewhere
else, and you have to connect to it over the network to write your scraped information to it.
If your database isn’t local (that is, it’s hosted on a server somewhere) you should consider that
each time you insert something into it, you’re making a round-trip across the network from your
computer to the database server, similar to making an HTTP request to a web server. I usually try
to have the database live locally on the machine that I’m running the scrape from, in order to cut
down on extra network traffic.
For those not familiar with SQL databases, an important concept is that the data layout is very
similar to a spreadsheet – each table in a database has several pre-defined columns and each new
item that’s added to the database is thought of as a “row” being added to the table, with the values
for each row stored in the appropriate columns.
When working with a database, your first step is always to open a connection to it (even if it’s a
local database). Then you create a cursor on the connection, which you use to send SQL statements
to the database. Finally, you can execute your SQL statements on that cursor to actually send them
to the database and have them be implemented.
Unlike spreadsheets, you have to define your table and all of its columns ahead of time before you
can begin to insert rows. Also, each column has a well-defined data type. If you say that a certain
column in a table is supposed to be a number or a boolean (ie “True” or “False”) and then try to insert
a row that has a text value in that column, the database will block you from inserting the incorrect
data type and return an error.
You can also setup unique constraints on the data to prevent duplicate values from being inserted.
We won’t go through all the features of a SQL database in this book, but we will take a look at some
basic sample code shortly.
The various SQL databases all offer slightly different features and use-cases in terms of how you
can get data out and work with it, but they all implement a very consistent SQL interface. For
our purposes, we’ll simply be inserting rows into our database using the INSERT command, so
the differences between the database are largely irrelevant. We’re using SQLite since it’s a very
lightweight database engine, easy to use and comes built in with python.
Let’s take a look at some simple code that connects to a local sqlite database, creates a table, inserts
some rows into the table and then queries them back out.
Hands On: Storing the Scraped Data & Keeping Track of Progress 42
import sqlite3
# setup the connection and cursor
conn =sqlite3.connect('example.db')
conn.row_factory =sqlite3.Row
conn.isolation_level =None
c=conn.cursor()
# create our table, only needed once
c.execute("""
CREATE TABLE IF NOT EXISTS items (
name text,
price text,
url text
)
""")
# insert some rows
insert_sql ="INSERT INTO items (name, price, url) VALUES (?, ?, ?);"
c.execute(insert_sql, ("Item #1","$19.95","http://example.com/item-1"))
c.execute(insert_sql, ("Item #2","$12.95","http://example.com/item-2"))
# get all of the rows in our table
items =c.execute("SELECT * FROM items")
for item in items.fetchall():
print item["name"]
Just as we described, we’re connecting to our database and getting a cursor before executing some
commands on the cursor. The first execute() command is to create our table. Note that we have the
IF NOT EXISTS because otherwise SQLite would throw an error if we ran this script a second time,
it tried to create the table again and discovered that there was an existing table with the same name.
We’re creating a table with three columns (name, price and URL), all of which use the column type
of text. It’s good practice to use the text column type for scraped data since it’s the most permissive
data type and is least likely to throw errors. Plus, the data we’re storing is all coming out of an HTML
text file anyways, so there’s a good chance it’s already in the correct text data type.
After we’ve created our table with the specified columns, then we can begin inserting rows into
it. You’ll see that we have two lines that are very similar, both executing INSERT SQL statements
with some sample data. You’ll also notice that we’re passing two sets of arguments to the execute()
command in order to insert the data.
The first is a SQL string with the INSERT command, the name of the table, the order of the columns
and then finally a set of question marks where we might expect the data to go. The actual data is
Hands On: Storing the Scraped Data & Keeping Track of Progress 43
passed in inside a second argument, rather than inside the SQL string directly. This is to prevent
against accidental SQL injection issues.
If you build the SQL INSERT statement as a string yourself using the scraped values, you’ll run
into issues if you scrape a value that has an apostrophe, quotation mark, comma, semicolon or lots
of other special characters. Our sqlite3 library has a way of automatically escaping these sort of
values for us so that they can be inserted into the database without issue.
It’s worth repeating: never build your SQL INSERT statements yourself directly as strings. Instead,
use the ?as a placeholder where your data will go, and then pass the data in as a second argument.
The sqlite3 library will take care of escaping it and inserting it into the string properly and safely.
Now that we’ve seen how to work with database, let’s go back to our earlier scraper and change it
to insert our scraped data into our SQLite database, instead of a CSV.
import sqlite3
import requests
from bs4 import BeautifulSoup
# setup the connection and cursor
conn =sqlite3.connect('countries.db')
conn.row_factory =sqlite3.Row
conn.isolation_level =None
c=conn.cursor()
c.execute("""
CREATE TABLE IF NOT EXISTS countries (
name text,
capital text,
population text,
area text
)
""")
r=requests.get("https://scrapethissite.com/pages/simple/")
soup =BeautifulSoup(r.text, "html.parser")
countries =soup.find_all("div","country")
insert_sql ="INSERT INTO countries (name, capital, population, area) VALUES (?,\
?, ?, ?);"
for country in countries:
name =country.find("h3").text.strip()

Hands On: Storing the Scraped Data & Keeping Track of Progress 44
capital =country.find("span","country-capital").text.strip()
population =country.find("span","country-population").text.strip()
area =country.find("span","country-area").text.strip()
c.execute(insert_sql, (name, capital, population, area))
We’ve got our imports at the top of the file, then we connect to the database and setup our cursor,
just like we did in the previous SQL example. When we were working with CSV files, we had to
indent all of our scraping code so that it could still have access to the output CSV file, but with our
SQL database connection, we don’t have to worry about that, so our scraping code can stay at the
normal indentation level.
After we’ve opened the connection and gotten the cursor, we setup our countries table with 4
columns of data that we want to store, all set to a data type of text. Then we make the HTTP
request, create the soup, and iterate over all the countries that we found, executing the same INSERT
statements over and over again, passing in the newly extracted information. You’ll notice that we
removed the .encode("utf-8") calls at the end of the name and capital extraction lines, since sqlite
has better support for the unicode text that we get back from BeautifulSoup.
Once your script has finished running, you can connect to your SQLite database and run a SELECT
* FROM countries command to get all of the data back. Running queries to aggregate and analyze
your data is outside the scope of this book, but I will mention the ever-handy SELECT COUNT(*)
FROM countries; query, which simply returns the number of rows in the table. This is useful for
checking on the progress of long-running scrapes, or ensuring that your scraper pulled in as many
items as you were expecting.
In this chapter, we learned the two most common ways you’ll want to store your scraped data –
in a CSV spreadsheet or a SQL database. At this point, we have a complete picture of how to find
the pattern of HTTP requests and HTML elements we’ll need to fetch and extract our data, and
we know how to turn those patterns into python code that makes the requests and hunts for the
patterns. Now we know how to store our extracted data somewhere permanent.
For 99% of web scraping use-cases, this is a sufficient skill set to get the data we’re looking for. The
rest of the book covers some more advanced skills that you might need to use on especially tricky
websites, as well as some handy cheat sheets and tips for debugging your code when you run into
issues.
If you’re looking for some more practice with the basics, head over to Scrape This Site24, an entire
web scraping portal that I built out in order to help new people learn and practice the art of web
scraping. There’s more sample data that you can scrape as well as a whole set of video courses you
can sign up for that walk you through everything step-by-step.
24https://scrapethissite.com

Scraping Data that’s Not in the
Response HTML
For most sites, you can simply make an HTTP request to the page’s URL that you see in the bar at
the top of your browser. Occasionally though, the information we see on a web page isn’t actually
fetched the way we might initially expect.
The reality is that now-a-days, websites can be very complex. While we generally think of a web
page as having its own URL, the reality is that most web pages require dozens of HTTP requests –
sometimes hundreds – to load all of their resources. Your browser makes all of these requests in the
background as it’s loading the page, going back to the web server to fetch things like CSS, Javascript,
fonts, images – and occasionally, extra data to display on the page.
Open your browser’s developer tools, click over to the “Network” tab and then try navigating to a
site like The New York Times25. You’ll see that there might be hundreds of different HTTP requests
that are sent, simply to load the homepage.
The developer tools show some information about the “Type” of each request. It also allows you to
filter the requests if you’re only interested in certain request types. For example, you could filter to
only show requests for Javascript files or CSS stylesheets.
25https://www.nytimes.com/
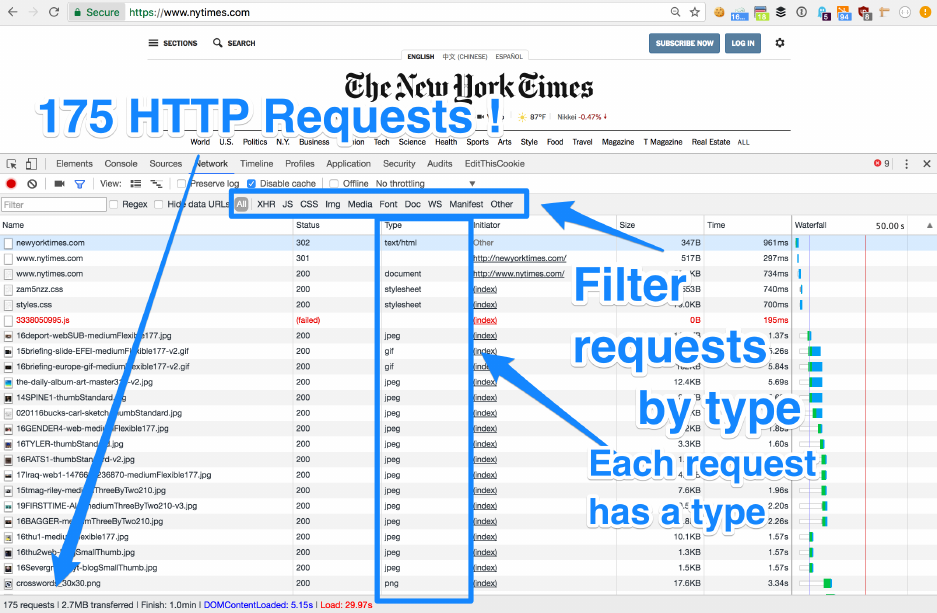
Scraping Data that’s Not in the Response HTML 46
175 HTTP Requests to Load the NYTimes.com Homepage!
It’s important to note that each one of these 175 resources that were needed to load the homepage
each required their own HTTP request. Just like the request to the main page URL (https://www.nytimes.com/),
each of these requests has its own URL, request method and headers.
Similarly, each request returns a response code, some response headers and then the actual body of
the response. For the requests we’ve looked at so far, the body of the response has always been a large
blob of HTML text, but for these requests, often the response is formatted completely differently,
depending on what sort of response it is.
I mention all of this because it’s important to note that sometimes, the data that you see on a page that
you’re trying to scrape isn’t actually returned in the HTML response to the page’s URL. Instead, it’s
requested from the web server and rendered in your browser in one of these other “hidden” requests
that your browser makes behind the scenes as the page loads.
If you try to make a request to the parent page’s URL (the one you see in your browser bar) and
then look for the DOM patterns that you see in the “Inspect Element” window of your developer
tools, you might be frustrated to find that the HTML in the parent page’s response doesn’t actually
contain the information as you see it in your browser.
At a high-level, there are two ways in which a site might load data from a web server to render in
your browser, without actually returning that data in the page’s HTML. The first is that Javascript-
heavy websites might make AJAX calls in the background to fetch data in a raw form from an API.
Scraping Data that’s Not in the Response HTML 47
The second is that sites might sometimes return iframes that embed some other webpage inside the
current one.
Javascript and AJAX Requests
With many modern websites and web applications, the first HTTP request that’s made to the parent
page’s URL doesn’t actually return much information at all. Instead, it returns just a bit of HTML
that tells the browser to download a big Javascript application, and then the Javascript application
runs in your browser and makes its own HTTP requests to the backend to fetch data and then add
it to the DOM so that it’s rendered for the user to see.
The data is pulled down asynchronously – not at the same time as the main page request. This leads
to the name AJAX for asynchronous javascript and XML (even though the server doesn’t actually
need to return XML data, and often doesn’t).
Some common indications that the site you’re viewing uses Javascript and AJAX to add content to
the page:
• so called “infinite scrolling” where more content is added to the page as you scroll
• clicking to another page loads a spinner for a few seconds before showing the new content
• the page doesn’t appear to clear and then reload when clicking around, the new content just
shows up
• the URL contains lots of information after a hashtag character (#)
It may sound complicated at first, and some web scraping professionals really get throw into a
tailspin when they encounter a site that uses Javascript. They think that they need to download all
of the site’s Javascript and run the entire application as if they were the web browser. Then they
need to wait for the Javascript application to make the requests to fetch the data, and then they
need to wait for the Javascript application to render that data to the page in HTML, before they can
finally scrape it from the page. This involves installing a ton of tools and libraries that are usually a
pain to work with and add a lot of overhead that slows things down.
The reality – if we stick to our fundamentals – is that scraping Javascript-heavy websites is actually
easier than scraping an HTML page, using the simple tools we already have. All we have to do is
inspect the requests that the Javascript application is triggering in our browser, and then instruct
our web scraper to make those same requests. Usually the response to these requests is in a nicely
structured data format like JSON (javascript object notation), which is even easier to parse and read
through than an HTML document.
In your browser’s developer tools, pull up the “Network” tab, reload then page, and then click the
request type filter at the top to only show the XHR requests. These are the AJAX requests that the
Javascript application is making to fetch the data.
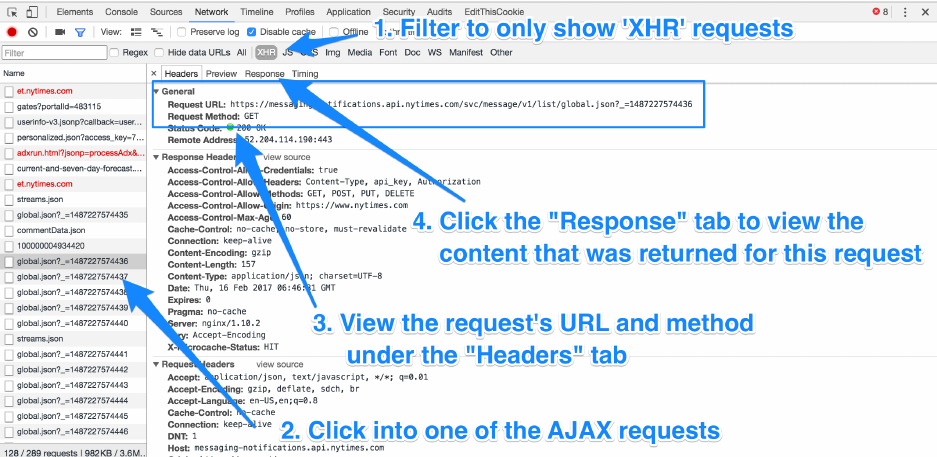
Scraping Data that’s Not in the Response HTML 48
Once you’ve filtered down the list of requests, you’ll probably see a series of HTTP requests that
your browser has made in the background to load more information onto the page. Click through
each of these requests and look at the Response tab to see what content was returned from the server.
Inspecting an AJAX request in the “Network” tab of Chrome’s Developer Tools
Eventually, you should start to see the data that you’re looking to scrape. You’ve just discovered
your own hidden “API” that the website is using, and you can now direct your web scraper to use
it in order to pull down the content you’re looking for.
You’ll need to read through the response a bit to see what format the data is being returned in. You
might be able to tell by looking at the Content-Type Response header (under the “Headers” tab for
the request). Occasionally, AJAX requests will return HTML – in which case you would parse the
response with BeautifulSoup just as we have been.
Normally though, sites will have their AJAX requests return JSON formatted data. This is a much
more lightweight format than HTML and is usually more straightforward to parse. In fact, the
requests library that we’ve been using in python has a simple helper method to access JSON data
as a structured python object. Let’s take a look at an example.
Let’s say that we’ve found a hidden AJAX request URL that returns JSON-formatted data like this:
Scraping Data that’s Not in the Response HTML 49
{
"items": [{
"name": "Item #1",
"price": "$19.95",
"permalink": "/item-1/",
},
{
"name": "Item #2",
"price": "$12.95",
"permalink": "/item-2/",
},
...
]
}
We could build a simple scraper, like so:
import requests
# make the request to the "hidden" AJAX URL
r=requests.get("http://example.com/ajax/data")
# convert the response JSON into a structured python `dict()`
response_data =r.json()
for item in response_data["items"]:
print item["name"]
print item["price"]
The data is automatically parsed into a nested structure that we can loop over and inspect, without
having to do any of our own pattern matching or hunting around. Pretty straightforward.
It takes a bit of work up-front to discover the “hidden” AJAX requests that the Javascript application
is triggering in the background, so that’s not as quick as simply grabbing the URL in the big bar at
the top of your browser. But once you find the correct URLs, it’s often much simpler to scrape data
from these hidden AJAX APIs.
Pages Inside Pages: Dealing with iframes
There’s another sort of issue you’ll run into where the parent page doesn’t actually have the data
that’s displayed in it’s own HTML response. That’s when the site you’re scraping uses iframes.

Scraping Data that’s Not in the Response HTML 50
Iframes are a special HTML element that allows a parent page to embed a completely different page
(at a completely different URL) and load all of that page’s content onto the parent page, inside a box.
It’s basically a way to open one web page inside another web page.
This is commonly used for embedding content between sites, like when someone wants to embed
a youtube video on their blog. Over the years, iframes have been used and abused for all sorts of
reasons, but they’re still alive and well on the web and they’re important to know about if the site
you’re scraping is using them.
Let’s take a look at a hypothetical example.
Say I just visited a parent page with a URL http://mybaseballblog.com and I see some stats that I
want to scrape. The site owner of mybaseballblog.com didn’t come up with the stats themselves or
write the HTML to include them on their site, instead they embedded a widget from mlb.com.
The “embed code” that mlb.com provided might look something like this:
<iframe src="http://mlb.com/widgets/teams/indians"></iframe>
All that the site owner at mybaseballblog.com did was copy that one line of HTML onto their blog,
and then the browsers of any visitors to mybaseballblog.com will know to load the content from the
mlb.com URL in the src attribute and shove it into a box on the mybaseballblog.com page.
As a web scraper, when you’re inspecting the elements in the DOM using your browser’s developer
tools, you should always check up a few elements in the DOM tree to see if the elements you’re
looking at are nested inside of an <iframe> element with a src attribute pointing to some other
URL.
If so, you’ll need to make a request to the URL inside that iframe’s src attribute in order to get the
data back from the server. If you’re able to predict the iframe’s src URL ahead of time, then you can
send an HTTP request directly to that URL and skip loading the parent page altogether.
However, if the iframe’s src URL seems to be generated randomly or there isn’t much of a pattern,
then you may have to load the parent web page first, then parse the HTML response of that page to
find the iframe, get the URL in the src attribute, and then make another request to that iframe URL
in order to fetch the content from the HTML response for that nested page.
For most sites you’ll scrape, the content you see in on the page is simply returned in the HTML
response for the parent web page. However, sometimes you’ll drive yourself crazy wondering why
the DOM patterns that you see in your browser’s developer tools aren’t showing up when you
attempt to parse the original HTML response with BeautifulSoup.
In those cases, it’s good to take a step back and re-examine the page to see how the content is being
loaded. One sure-fire way to see if the content you want to scrape is in the original HTML or not is
to simply right click on the page and choose “view source.”
Scraping Data that’s Not in the Response HTML 51
This will open a new tab in your browser that shows the HTML response of the parent page and
nothing else. Hit cmd-F and try searching through this HTML to see if some of the data you want to
scrape is contained in the raw HTML.
If you’re able to find it, then that means it’s being returned in the response to the parent page’s URL
and you can keep working on finding the pattern to extract it. But if you don’t find it in the “view
source”, then it’s likely being pulled in with one of the two methods described in this chapter.
Avoiding Common Scraping Pitfalls,
Good Scraping Etiquette & Other Best
Practices
So far, we’ve looked at the most common ways to make simple requests and parse out patterns in
the response. But unfortunately, sometimes it’s not quite so easy to get the data you want from a
website.
Sometimes the people who own websites will – intentionally or not – place obstacles in your way.
They might be purposefully blocking your scraper, or the issue could stem from a problem with
their web server or web application. It’s always frustrating when you encounter these issues but
remember:
Any content that can be viewed on a webpage can be scraped. Period.
If your browser is able to make requests to a website and parse the HTML that’s returned to display
it on a web page, then your scraper can too. Sometimes it takes a bit more work to make your scraper
function more closely to your web browser, and make it appear that a single user is browsing the
site as normal.
In this section, we’ll look at some of the common pitfalls and issues you’re likely to run into at some
point and how to deal with them, as well as a bit of good web scraping etiquette and best practices
you should follow
1. Spoofing the User Agent and Other HTTP Headers
2. Dealing with Logins and Session Cookies
3. Handling Hidden (But Required) Security Fields on POST Forms
4. Respecting a Website’s robots.txt File
5. Slowing Down Your Requests to Not Overwhelm the Website
6. Make Your Requests Appear to be Distributed Across Multiple IP Addresses
7. Guarding Against Network Errors
8. Gracefully Handling Missing HTML Elements
At a high level, the tactics we’ll be looking at involve adding more functionality or error handling to
make our scrapers more robust, and to make the pattern of requests that we generate more closely
mirror any other user browsing the same website.
Avoiding Common Scraping Pitfalls, Good Scraping Etiquette & Other Best Practices 53
Spoofing the User Agent and Other HTTP Headers
Spoofing headers is the first tactic I turn to when my scraper appears to be returning no content, or
different content than what I see in my browser. As we learned in Chapter 3, when your browser
makes a regular HTTP request on your behalf, it sends along a number of headers to the web server
to tell it more about the request and who is making it. We can instruct our own web scraper to send
along a similar set of headers with the requests that our scraper is making.
One of the most important headers to spoof is the User-Agent. This tells the web server some
basic information about the software that’s sending the HTTP request. In your web browser, it’s
automatically set to a value like Mozilla/5.0 (Macintosh; Intel Mac OS X ...) . You can see
what User-Agent your browser is sending by checking the Network tab in your browser’s developer
tools and clicking on a request to inspect its headers.
By default, the library that you use to make HTTP requests probably sets its own User-Agent value
based on the name of the library, the language you’re using, and so on. This makes it obvious to the
web server that the requests are coming from a script, not a human being with a browser.
If you can load the correct HTML with the data you’d like to scrape in your browser, but are having
difficulty getting the same HTML back in your scraper, then I’d start by ensuring that you’re sending
the same headers with your scraper’s HTTP requests that your browser is sending.
Try copying every single one of the request headers that your browser uses (except Cookies, see
below) and send those with your request. This will override the default headers your HTTP library
uses and ensure that the requests your scraper is sending look the same as the ones your browser is
sending to the web server.
Here’s an example of how you would do that in python. Simply create a dictionary with all of the
headers and the values that you see in your browser’s network tab, including the User-Agent:
import requests
headers ={
"Accept":"text/html,application/xhtml+xml,application/xml;q=0.9,image/webp,\
*/*;q=0.8",
"Accept-Encoding":"gzip, deflate, sdch, br",
"Accept-Language":"en-US,en;q=0.8",
"Cache-Control":"no-cache",
"dnt":"1",
"Pragma":"no-cache",
"Upgrade-Insecure-Requests":"1",
"User-Agent":"Mozilla/5.0 (Macintosh; Intel Mac OS X 10_12_3) AppleWebKit/5\
37.36 (KHTML, like Gecko) Chrome/56.0.2924.87 Safari/537.36"
}
r=requests.get("http://www.example.com", headers=headers)
Avoiding Common Scraping Pitfalls, Good Scraping Etiquette & Other Best Practices 54
Dealing with Logins and Session Cookies
Remember that we said that in Chapter 3 that the Cookie header is where a site can store identifying
information about you to tie your requests together, and potentially tie your requests to a specific
user account that you have setup with the site.
In general, most people want to avoid identifying themselves to the site they’re scraping, and prefer
not to send the Cookie header to the site they’re scraping (notice that I omitted the Cookie header
when we were spoofing headers, above).
However, if the site you’re scraping requires you to be logged in to fetch the data you’re trying to
scrape, then you really have no option but to login, get a session cookie from the server, and then
send that session cookie back to the server on each subsequent request.
If you don’t send that cookie and try to browse anonymously, the responses you’ll get back will
simply be the same error pages or login page redirects that you see when you try visiting the site in
your browser while logged out.
While it might sound like a bit of work to keep track of all those cookies, the python requests library
that we’ve been using throughout the book has a handy helper called a session that keeps track of
cookies that have been set by the server and automatically appends them to our subsequent requests
to the same site.
import requests
session =requests.Session()
# make a login POST request, using the session
session.post("http://example.com/login", data=dict(
email="me@domain.com",
password="secret_value"
))
# subsequent requests that use the session will automatically handle cookies
r=session.get("http://example.com/protected_page")
Note that instead of calling requests.get() and requests.post() to send requests like we have
been, instead we’re calling those methods on the Session() object that we’ve created.
Handling Hidden (But Required) Security Fields on
POST Forms
In Chapter 4, we talked about inspecting the forms that a website uses to build requests. We saw
how some forms send GET requests while others send POST requests. We also looked at ways to
Avoiding Common Scraping Pitfalls, Good Scraping Etiquette & Other Best Practices 55
tell what values you should send to the server in the query parameters (for GET requests) or form
data (for POST requests).
Usually with these sorts of patterns, you can discover what values you need to set in which
parameters and build your scraper to automatically populate those values depending on what data
you’re trying to collect. Then you make your request directly to the URL that the form submits to,
sending along the values you need.
Some websites – whether intentionally or not – make the process of submitting POST requests with
form data a bit more difficult. Basically what will happen is when the user loads the page with the
form in their browser, the website will include some hidden form fields that aren’t displayed to the
user but are pre-populated with some long, randomly generated value.
When the user fills out the form and clicks “submit,” this hidden form field is automatically sent
along with whatever the user entered, and the web server verifies that the hidden form field value
matches the one that was set earlier, before it processes the rest of the form and sends a response.
If you try to send a request directly to the form processing URL and don’t include the hidden, random
value – or include a value that’s too old or has expired – then the request will be rejected and you’ll
get some sort of error in the response telling you to try again.
Lots of sites do this to prevent what’s known as Cross-Site Request Forgeries (CSRF), which can be
a security vulnerability depending on what the form does. The website’s goal is to prevent people
from submitting a form without actually loading the page that the form is on.
For the purpose of web scraping, what this means is that you can’t make POST requests directly
to the form’s submission URL. Instead, you’ll have to make a request to the URL of the page with
the form on it, look through the HTML markup of the form to find the hidden field, extract the
pre-set value that has been generated for you, and then send that field and value along with your
subsequent request to the form’s URL.
Start by looking at the outer <form> tag, and then drill down and look for <input type="hidden">
values, and get their name attribute as well as their value attribute, and send those along with your
request. Something like:
csrf_field = soup.find("form").find_all("input", type="hidden")
csrf_name = csrf_field["name"]
csrf_value = csrf_field["value"]
...
r = requests.post("http://example.com", data={
csrf_name: csrf_value,
"other_field": "other_value"
}
In this way, you’re loading the page first, getting the hidden security value, and then submitting that
to the page so that your “form submission” HTTP request isn’t rejected by the web server as being
a malicious CSRF attack.

Avoiding Common Scraping Pitfalls, Good Scraping Etiquette & Other Best Practices 56
As far as the site can tell, you properly loaded the form’s page before “submitting” the form, so your
request will be processed normally. It adds an extra step and obviously slows things down a bit, but
is necessary to make these sorts of protected POST requests go through successfully.
Respecting a Website’s robots.txt File
While I’m not a lawyer and this book certainly is not meant to contain legal advice, the legality of
web scraping is an issue that commonly comes up. Everyone wants to know if pulling data from a
site is something that’s going to land them in legal trouble.
Aside from reading through all of the legal stuff in a website’s Terms of Service, you should also
check their robots.txt file. The Robots Exclusion Standard.26 is a de-facto standard that allows
website owners to specify a set of guidelines and rules for web scrapers to follow.
You should always check to see if the site you’re scraping has a robots.txt file by going to
www.example.com/robots.txt – replacing www.example.com with the domain of the site you’re
scraping. An example robots.txt file might look like this:
User-agent: *
Disallow: /products/
This says that all bots and scrapers (the User-Agent part) are asked to not scrape any page that
falls under the /products/ directory. Wikipedia has an excellent article on the Robots Exclusion
Standard27 if you want to learn more about the rules and what they mean.
Note that this is basically just an appeal from the site owners to you and your web scraping script. It
doesn’t mean that your scraper will necessarily be unable to scrape those pages, it just that the site
owners would prefer if you didn’t. If you’re hoping not to draw the ire of anyone associated with
the site you’re scraping, it would be wise to heed the requests of the site owner in their robots.txt
file.
Slowing Down Your Requests to Not Overwhelm the
Website
Depending on the site, the average user probably spends at least a few seconds browsing a single
page before they attempts to navigate to another page, triggering another HTTP request in their
browser. But when you’re making a series of requests to a website in a row inside a script, you have
the potential to create a situation where you’re sending so many requests that the web server can’t
keep up with the load.
26http://www.robotstxt.org/robotstxt.html
27http://en.wikipedia.org/wiki/Robots_Exclusion_Standard
Avoiding Common Scraping Pitfalls, Good Scraping Etiquette & Other Best Practices 57
In these situations, you might notice that the site you’re scraping is beginning to slow down or
become completely unavailable. Even if a site owner has explicitly allowed your scraping, it’s still
important to consider the other users that are out there trying to browse the same site. You should
ensure that you’re not making so many requests that the web server cannot keep or respond to
requests from other users.
Running your scraper in off-hours – such as during the middle of the night – helps ensure that your
scraper isn’t competing for resources with human traffic, and that you’re not degrading the web
server’s performance for others.
You should also consider adding exponential back-offs if your scraper encounters an error while
requesting a page. That is, don’t retry the request over and over as fast as you can, but instead add
an exponentially increasing delay between each request to give the web server a chance to come
back up.
Another option to consider is timing how long each of your requests takes to complete, and then
intentionally introducing some delay between your requests that’s proportional to how long they’re
taking to complete. This way, if the site begins to slow down and your requests take longer to return
a response, you are automatically spacing your request out more and more.
import time
for term in ["web scraping","web crawling","scrape this site"]:
t0 =time.time()
r=requests.get("http://example.com/search", params=dict(
query=term
))
# get the difference between before and after the request, in seconds
response_delay =time.time() -t0
# wait 10x longer than it took them to respond
time.sleep(10 * response_delay)
This assumes they’re you’re attempting to be polite and don’t mind if your script takes a bit longer to
finish, so that you can help other users who are browsing the site you’re trying to scrape. Sometimes,
you have the opposite motivation – you want to make requests as fast as you can, even if the site
explicitly tries to slow you down.
Make Your Requests Appear to be Distributed Across
Multiple IP Addresses
Besides checking the User-Agent, setting rate limits is the next most common way that I’ve seen
websites try to keep out web scrapers. Rate limiting is a process where a web server keeps track of

Avoiding Common Scraping Pitfalls, Good Scraping Etiquette & Other Best Practices 58
the number of requests it is getting from each IP address, and limits its response if the number of
requests from any one IP address crosses a certain threshold within a certain amount of time. It’s
pretty uncommon for most smaller sites to have implemented rate limiting, but most of the bigger
sites with large engineering teams and financial incentive to protect their data have implemented
something like this.
While it’s certainly possible to spoof headers as mentioned above, it’s impossible to spoof your IP
address when making a regular HTTP request when you’re hoping to read the response. In order for
the server to send the response back, it needs to know the IP address of the machine that sent the
request. If you were to try and change this value to something fake at the network level, you’d never
get any responses back. Not good if you’re hoping to scrape the data contained in the response!
Instead, the only way to really mask where your request is coming from is to send the request
through a proxy server, so that the target site sees the request coming from the IP address of the
proxy server, instead of your machine.
When you send your request with a proxy server, the request is first relayed to the proxy server,
and then the proxy server makes the request to your target web server. The web server returns the
response to the proxy server’s IP address, and the proxy server turns around and sends it back to
you. In this way, you still receive the response to your request, without the target website knowing
your own real IP address. To the web server you’re scraping, the request appear to have come from
the proxy server.
For large-scale scrapes of websites that implement rate limiting, people will usually rent access to a
network of dozens or even hundreds of proxy servers, and rotate their requests through each of the
proxy servers, so that each individual proxy server IP stays under the rate limit, while the actual
scrape is happening much faster.
The price for getting access to a network of proxy servers varies, but the proxy service I like to use28
charges about $40USD for 100 IP addresses. You can also pay for exclusive, dedicated IP addresses
that will be faster and guarantee that no one else is using them, but these are usually much more
expensive and not worth it in my experience.
Using proxy servers introduces more complexity into your web scraper, but it enables you to make
far more requests to the target site than you would normally be able to get away with. Keep in mind
that by doing something like this, you’re likely violating the target site’s Terms and Conditions and
are certainly using their site in a way they didn’t intend, which could have the potential to opening
you up to legal trouble, depending on your intentions and what you’re doing with the scraped data.
Guarding Against Network Errors
There are two broad classes of network errors that you’re likely to run into: timeouts and broken
connections. Timeouts occur when a web server takes a very long time to return a response – usually
28http://hartbro.com/proxy-service
Avoiding Common Scraping Pitfalls, Good Scraping Etiquette & Other Best Practices 59
more than 30 seconds. However, sometimes requests can take much longer than 30 seconds to return
if the web server is slowly trickling back bits and pieces of a response.
Usually, if a request for a simple HTML document is taking this long, something is going wrong.
Maybe the site you’re scraping is having problems, or is trying to block you. Either way, your best
bet is to abort the request, wait a little bit, and then try it again.
The requests library for python that we’ve been using makes it easy to set a timeout on your request.
try:
requests.get("http://example.com",timeout=10) #wait up to 10 seconds
except requests.exceptions.Timeout:
pass #handle the timeout
If too much time elapses before the response has been completely returned, the library will trigger
an exception and move down into your error handling code.
The other sort of network problem is broken connections. If a connection is dropped, the network
changes or the web server unexpectedly “hangs up,” then the HTTP request you made will be in an
ambiguous state, and you won’t get a useful response back.
Our requests library handles this by raising an exception. If you don’t have any code to handle this,
then it will cause your script to crash. Instead, you could handle these sorts of errors by wrapping
the request in some error handling code, similar to handling timeouts.
try:
requests.get("http://example.com")
except requests.exceptions.RequestException:
pass #handle the exception.maybe wait and try again later
In your exception handler, it’s up to you what to do. As with the timeouts, I’d recommend waiting
a bit and then trying again. You can also add in an exponential backoff, so that you wait, say 2
seconds after the first exception happens before trying the request again. It it happens again, you
wait 4 seconds, then 8 seconds, 16 seconds, and so on.
Lots of popular software has this sort of exponential backoff built in, to decrease the chance that
the user would hammer a site that’s already down by repeatedly retrying the same request until it
works. It’s a good practice to build it into your web scraper as well.
Gracefully Handling Missing HTML Elements
Just as the network can cause errors or return unexpectedly, you should also be cautious whenever
you’re extracting content from HTML. You may have inspected several pages on the site to find

Avoiding Common Scraping Pitfalls, Good Scraping Etiquette & Other Best Practices 60
the HTML patterns you need to extract your data, but presumably you didn’t ensure those same
patterns were present on ever single page you intend to scrape. That’d be silly, you might as well
just copy/paste all the data if you’re going to manually visit and inspect each page.
While sites tend to have fairly consistent HTML markup between pages, there’s no guarantee that
every page your scraper will visit has the exact same patterns. I’ve run into issues where most of the
products on a site have similar HTML patterns, but there were a few products that were “on sale”
that had slightly different HTML markup that didn’t follow my extractors’ patterns. Or the content
in one section or category of the site has a slightly different format or HTML class than content in
another section or category.
If the HTML extraction pattern you’re using with BeautifulSoup are very explicit, but some of those
elements are different or missing from the page, then the library won’t be able to extract the data
and will throw an exception, causing your scraper to crash. If you’re scraping a sufficiently large
number of pages, you’re almost guaranteed that some pages will be slightly different than others
and you’ll encounter this problem.
In order to be safe, whenever you’re extracting content from HTML, you should wrap your extractors
in some exception handling code, and store some sort of “MISSING DATA” placeholder instead. This
will allow the scraper to continue running just fine in the event of missing data, and it also allows
you to easily look for the items where your extraction patterns weren’t quite right.
As the scrape is running (or after it has completed) look for rows in your scraped data that contain
the “MISSING DATA” placeholder value, then go visit the page for that item, see if you can discover
a new pattern and update your scraper with the more robust extraction rules.
try:
country_name =country.find("h3").text.strip()
except:
country_name ="MISSING COUNTRY NAME"
As I said at the very beginning of the book, web scraping can be more of an art form than a typical
engineering challenge. Knowing a bit about the pitfalls that are out there and the best practices to
follow gives you a great foundation for solving whatever challenges you may run into.

How to Troubleshoot and Fix Your
Web Scraping Code Without Pulling
Your Hair Out
This past summer, I launched a web scraping class targeted at total beginners29.
After talking to a lot of people who were having web scraping challenges over the past few years,
I realized that many of the students in the class weren’t coders and didn’t have any technical
backgrounds. Many people who were looking to learn web scraping had never coded before.
So, when I was making the material and lessons for the course, I had to keep this in the front of
mind. I couldn’t expect students to know what a for-loop is or how to spot syntax errors in their
text editors.
I really tried to hold students’ hands through all of the class material, writing the simplest possible
code, explaining things line by line as I went, and intentionally running into common mistakes to
show them how to power through.
But even with all of that assistance, the real world is a lot messier. Students would begin to stumble
when they’d go out on their own. Their code “wouldn’t work” and they’d feel hopelessly stuck pretty
quickly.
I realized that the process of troubleshooting and fixing the bugs in your code isn’t intuitive yet to
anyone who hasn’t spent a long time learning to code already. So I decided to include a chapter with
some of my most common tips for beginners who feel stuck when their code is giving errors or isn’t
doing what they want it to do.
While these tips are generally geared towards beginners, many of them are actually the tips I still
follow day-to-day when debugging issues with my own code. Even as someone who has been coding
full time since 201130, I use these steps myself constantly.
Print things a lot
On every single line of code, you should have a sense of what all of the variables values’ are. If
you’re not sure, print them out.
Then when you run your program, you can look at the console and see how the values might be
changing or getting set to null values in ways you’re not expecting.
29https://scrapethissite.com/lessons/sign-up/
30https://blog.hartleybrody.com/learning-to-code/

How to Troubleshoot and Fix Your Web Scraping Code Without Pulling Your Hair Out 62
Sometimes it’s helpful to print a fixed string right before you print a variable, so that your print
statements don’t all run together and you can tell what is being printed from where
print "about to check some_var"
print some_var
Sometimes you may not be sure if a block of code is being run at all. A simple print "got here"
is usually enough to see whether you have a mistake in your control flow like if-statements or
for-loops.
Start with code that already works
When in doubt, start with someone else’s existing code that already works. If you’re a beginner,
you’re still more of a Hacker than an Engineer31, and so it’s better to start with an existing structure
and tweak it to meet your needs.
If you’re working on your own project, try googling around for a script that does what you’re trying
to do. In my web scraping class32, I provide working python code that completes the tasks in each
lesson.
Make sure you run the code you find before you make any changes to verify that it works properly
and does what it claims to do. Then make small changes to the existing code and test it often to see
if your changes have introduced bugs.
Run your code every time you make a small change
Do not start with a blank file, sit down and code for an hour and then run your code for the first
time. You’ll be endlessly confused with all of the little errors you may have created that are now
stacked on top of each other. It’ll take you forever to peel back all the layers and figure out what is
going on.
Instead, you should be running any script changes or web page updates every few minutes – it’s
really not possible to test and run your code too often.
The more code that you change or write between times that you run your code, the more places you
have to go back and search if you hit an error.
Plus, every time you run your code, you’re getting feedback on your work. Is it getting closer to
what you want, or is it suddenly failing?
31https://blog.hartleybrody.com/hacker-developer-engineer/
32https://scrapethissite.com/

How to Troubleshoot and Fix Your Web Scraping Code Without Pulling Your Hair Out 63
Read the error message
It’s really easy to throw your hands up and say “my code has an error” and feel lost when you see
a stacktrace. But in my experience, about 2/3rds of error messages you’ll see are fairly accurate and
descriptive.
The language runtime tried to execute your program, but ran into a problem. Maybe something was
missing, or there was a typo, or perhaps you skipped a step and now it’s not sure what you want it
to do.
The error message does its best to tell you what went wrong. At the very least, it will tell you what
line number it got to in your program before crashing, which gives you a great clue for places to
start hunting for bugs.
Google the error message
If you can’t seem to figure out what your error message is trying to tell you, your best bet is to copy
and paste the last line of the stacktrace into Google. Chances are, you’ll get a few stackoverflow.com
results, where people have asked similar questions and gotten explanations and answers.
https://xkcd.com/979/ - Googling an Error Message
This can sometimes be hit-or-miss, depending on how specific or generic your error is. Make sure
you try to read the code in the question and see if it’s similar to yours – make sure it’s using the
same language! Then read through the comments and the first 2-3 answers to see if any of them
work for you.
How to Troubleshoot and Fix Your Web Scraping Code Without Pulling Your Hair Out 64
Guess and Check
If you’re not 100% sure how to fix something, be open to trying 2 or 3 things to see what happens.
You should be running your code often, so you’ll get feedback quickly. Does this fix my error? No?
Okay, let’s go back and try something else.
There’s a solid possibility that the fix you try may introduce some new error, and it can be hard to
tell if you’re getting closer or farther away. Try not to go so far down a rabbit hole that you don’t
know how to get back to where you started.
Trying a few things on your own is important because if you go to ask someone else for help, one of
the first things they’ll ask you for is to list 2-3 things you’ve tried already. This helps save everyone
time by avoiding suggestions you’ve already tried, and shows that you’re committed to solving your
problem and not just looking for someone else to give you free, working code.
Comment-out code
Every programming language has a concept of a comment, which is a way for developers to
leave notes in the code, without the language runtime trying to execute the notes as programming
instructions.
You can take advantage of this language feature by temporarily “commenting out” code that you
don’t want to lose track of, but that you just don’t want running right now. This works by basically
just putting the “comment character” for your language at the start (and sometimes at the end) of
the lines that you’re commenting out.
# in python, you use the "hashtag" character
# to turn a line of code into a comment
# here_is = some_code.that_is_commented_out() # this won't run
here_is =some_code.that_is_NOT_commented_out() # this WILL run
If your script is long, you can comment out parts of the code that are unrelated to the specific changes
you’re working on. This might make it run faster and make it easier to search the remainder of the
code for the mistake.
Just make sure you don’t comment out some code that sets variables that your program is using
later on – the commented-out code is skipped entirely, so statements that run later on won’t have
access to any variables that are set or updated in the commented out sections.
And of course, make sure you remove the comment characters so that it turns back into instructions
when you’re done testing the other sections.
How to Troubleshoot and Fix Your Web Scraping Code Without Pulling Your Hair Out 65
If you’re not sure where the problem is, do a binary
search
The more code you have that’s running, the more places you have to check for an error. Especially
as your project grows past a few dozen lines, it can get more and more difficult to find out where
errors are happening. Your stack trace and error message should give you a clue as to where things
are going wrong, but sometimes they’re not too helpful.
In that case, it’s helpful to do a binary search to hone in on the section of code that’s misbehaving.
At a high level, a binary search involves splitting something in half and searching each of the halves
for what you’re looking for. Once you decide which half it’s in, you repeat the process again on that
half. This is one of the quickest ways to hone in on where something is, in an otherwise large list of
instructions.
For finding bugs in your script or web app, just run the first half of your code, comment out the
second half, and then print the half-way done results. If those look right, then the first half of your
code is running fine and the problem you’re encountering must be in the second half. If there’s a
problem with the half-way done results, then the error is occurring somewhere in the first half.
Repeat this process over and over, and you’ll be able to quickly hone in on the 2 or 3 lines that seem
to be leading your program astray.
You may have noticed that this method combines a lot of the earlier steps of printing variables out,
commenting code out and reading the error messages looking for line numbers.
Take a break and walk away from the keyboard
It’s really easy to get caught up in the details of your current implementation. You get bogged down
in little details and start to lose sight of the forest through the trees.
In cases where I feel like I’ve been spinning my wheels for the last 20 or 30 minutes, I try to step
away from the code and do some other activity for a little while before coming back. I’ll go get a
drink of water, meander around a bit or have a snack. It’s a great way to reset your mind, pull back
and start to think of another approach.
I realize that it’s also seemingly unsatisfying if you haven’t tried it. “If I walk away now, I’ll forget
all of these details! I’ll have to start all over again. Plus I don’t feel satisfied leaving code in a broken
state. What if I never fix it and I’m a failure. I can’t leave until it’s working again.” I used to think
all of those things as well.
But it has become one of my favorites tips and has helped me past dozens of bugs over the years. If
you try it you might be surprised just how helpful that can be.
How to Troubleshoot and Fix Your Web Scraping Code Without Pulling Your Hair Out 66
How to ask for help
Sometimes, you may bee like you’ve really tried everything and it seems like nothing is working.
Now you feel like you’re really ready to ask someone else for help.
Before asking anyone about a bug in your code, it’s important that you make sure you have all of
the following components of an excellent code question:
1. Explain what you’re trying to do
2. Show the code that’s giving the error
3. Show the entire stack trace including the error message
4. Explain 2-3 things that you’ve tried already and why they didn’t work
Sometimes, in the simple process of going through these items in your mind and writing them down,
a new solution becomes obvious. I call this the “Stack Overflow” effect.
Over the years, the times when I’ve really felt like I couldn’t figure something out and need to ask
for help, simply writing each of these 4 things down makes it suddenly obvious what the problem is,
or something new that I can try. I’ve abandoned many Stack Overflow question form boxes when
the act of asking a good question makes the answer obvious.
It may work for you as well!

A Handy, Easy-To-Reference Web
Scraping Cheat Sheet
Once you’ve put together enough web scrapers, you start to feel like you can do it in your sleep. I’ve
probably built hundreds of scrapers over the years for my own projects, as well as for clients and
students in my web online scraping course33.
Occasionally though, I find myself referencing documentation or re-reading old code looking for
snippets I can reuse. One of the students in my web scraping course suggested I put together a
“cheat sheet” of commonly used code snippets and patterns for easy reference.
Most of these are things that we already covered in this book at some point, but I wanted to lay out
some basic code samples all in one place for easy reference. Feel free to copy/paste these and tweak
them to suit your needs as you build your own web scraping scripts with python.
Useful Libraries
For the most part, a scraping program deals with making HTTP requests and parsing HTML
responses.
I always make sure I have requests34 and BeautifulSoup35 installed before I begin a new scraping
project. From the command line:
pip install requests
pip install beautifulsoup4
Then, at the top of your .py file, make sure you’ve imported these libraries correctly.
import requests
from bs4 import BeautifulSoup
Making Simple Requests
Make a simple GET request (just fetching a page)
33https://scrapethissite.com/lessons/sign-up/
34http://docs.python-requests.org/en/master/user/quickstart/
35https://www.crummy.com/software/BeautifulSoup/bs4/doc/

A Handy, Easy-To-Reference Web Scraping Cheat Sheet 68
r = requests.get("http://example.com/page")
Make a POST requests (usually used when sending information to the server like submitting a form)
r = requests.post("http://example.com/page", data=dict(
email="me@domain.com",
password="secret_value"
))
Pass query arguments aka URL parameters (usually used when making a search query or paging
through results)
r = requests.get("http://example.com/page", params=dict(
query="web scraping",
page=2
))
Inspecting the Response
See what response code the server sent back (useful for detecting 4XX or 5XX errors)
print r.status_code
Access the full response as text (get the HTML of the page in a big string)
print r.text
Look for a specific substring of text within the response
if "blocked" in r.text:
print "we've been blocked"
Check the response’s Content Type (see if you got back HTML, JSON, XML, etc)
print r.headers.get("content-type", "unknown")
Extracting Content from HTML
Now that you’ve made your HTTP request and gotten some HTML content, it’s time to parse it so
that you can extract the values you’re looking for.
Using Regular Expressions
Using Regular Expressions to look for HTML patterns is famously NOT recommended at all36.
36http://stackoverflow.com/a/1732454/625840
A Handy, Easy-To-Reference Web Scraping Cheat Sheet 69
However, regular expressions are still useful for finding specific string patterns like prices, email
addresses or phone numbers.
Run a regular expression on the response text to look for specific string patterns:
import re # put this at the top of the file
...
re.findall(r'\$[0-9,.]+', r.text)
Using BeautifulSoup
BeautifulSoup is widely used due to its simple API and its powerful extraction capabilities. It has
many different parser options that allow it to understand even the most poorly written HTML pages
– and the default one works great.
Compared to libraries that offer similar functionality, it’s a pleasure to use. To get started, you’ll
have to turn the HTML text that you got in the response into a nested, DOM-like structure that you
can traverse and search
soup = BeautifulSoup(r.text, "html.parser")
Look for all anchor elements on the page (useful if you’re building a crawler and need to find the
next pages to visit)
links = soup.find_all("a")
Look for all elements with a specific class attribute (eg <li class="search-result">...</li>)
elements = soup.find_all("li", "search-result")
Look for the element with a specific ID attribute (eg: <div id="bar">...</div>)
element = soup.find("div", id="bar")
Look for nested patterns of elements (useful for finding generic elements, but only within a specific
section of the page)
elements = soup.find("div", id="search-results").find_all("a", "external-links")
Look for all elements matching CSS selectors (similar query to the last one, but might be easier to
write for someone who knows CSS)

A Handy, Easy-To-Reference Web Scraping Cheat Sheet 70
elements = soup.select("#search-results .external-links")
Get a list of strings representing the inner contents of a element (this includes both the text nodes
as well as the text representation of any other nested HTML elements within)
inner_contents = soup.find("div", id="price").contents
Return only the text contents within this element, but ignore the text representation of other HTML
elements (useful for stripping our pesky <span>,<strong>,<i>, or other inline elements that might
show up sometimes)
inner_text = soup.find("div", id="price").text.strip()
Convert the text that are extracting from unicode to ascii if you’re having issues printing it to the
console or writing it to files
inner_text = soup.find("div", id="price").text.strip().encode("utf-8")
Get the attribute of a element (useful for grabbing the src attribute of an <img> element or the href
attribute of an <a> element)
anchor_href = soup.find("a")["href"]
Putting several of these concepts together, here’s a common idiom: iterating over a bunch of
container elements and pull out content from each of them
for product in soup.find_all("div", "products"):
product_title = product.find("h3").text.strip().encode("utf-8")
product_price = product.find("span", "price").text.strip()
product_url = product.find("a")["href"]
print "{} is selling for {} at {}".format(product_title, product_price, prod\
uct_url)
Using XPath Selectors
BeautifulSoup doesn’t currently support XPath selectors, and I’ve found them to be really terse
and more of a pain than they’re worth. I haven’t found a pattern I couldn’t parse using the above
methods.
If you’re really dedicated to using them for some reason, you can use the lxml library instead of
BeautifulSoup, as described here.37
37http://stackoverflow.com/a/11466033/625840
A Handy, Easy-To-Reference Web Scraping Cheat Sheet 71
Storing Your Data
Now that you’ve extracted your data from the page, it’s time to save it somewhere.
Note: The implication in these examples is that the scraper went out and collected all of the items,
and then waited until the very end to iterate over all of them and write them to a spreadsheet or
database.
I did this to simplify the code examples. In practice, you’d want to store the values you extract from
each page as you go, so that you don’t lose all of your progress if you hit an exception towards the
end of your scrape and have to go back and re-scrape every page.
Writing to a CSV
Probably the most basic thing you can do is write your extracted items to a CSV file. By default,
each row that is passed to the csv.writer object to be written has to be a python list.
In order for the spreadsheet to make sense and have consistent columns, you need to make sure all of
the items that you’ve extracted have their properties in the same order. This isn’t usually a problem
if the lists are created consistently.
import csv
...
with open("~/Desktop/output.csv","w")as f:
writer =csv.writer(f)
# collected_items = [
# ["Item #1", "$19.95", "http://example.com/item-1"],
# ["Item #2", "$12.95", "http://example.com/item-2"],
# ...
# ]
for item_property_list in collected_items:
writer.writerow(item_property_list)
If you’re extracting lots of properties about each item, sometimes it’s more useful to store the item
as a python dict instead of having to remember the order of columns within a row. The csv module
has a handy DictWriter that keeps track of which column is for writing which dict key.
A Handy, Easy-To-Reference Web Scraping Cheat Sheet 72
import csv
...
field_names =["Product Name","Price","Detail URL"]
with open("~/Desktop/output.csv","w")as f:
writer =csv.DictWriter(f, field_names)
# collected_items = [
# {
#"Product Name": "Item #1",
# "Price": "$19.91",
# "Detail URL": "http://example.com/item-1"
# },
# ...
# ]
# Write a header row
writer.writerow({x: x for xin field_names})
for item_property_dict in collected_items:
writer.writerow(item_property_dict)
Writing to a SQLite Database
You can also use a simple SQL insert if you’d prefer to store your data in a database for later querying
and retrieval.
import sqlite3
conn =sqlite3.connect("/tmp/output.sqlite")
cur =conn.cursor()
...
for item in collected_items:
cur.execute("INSERT INTO scraped_data (title, price, url) values (?, ?, ?)",
(item["title"], item["price"], item["url"])
)
More Advanced Topics
These aren’t really things you’ll need if you’re building a simple, small scale scraper for most
websites. But they’re useful tricks to keep up your sleeve.
A Handy, Easy-To-Reference Web Scraping Cheat Sheet 73
Javascript Heavy Websites
Contrary to popular belief, you do not need any special tools to scrape websites that load their
content via Javascript. In order for the information to get from their server and show up on a page
in your browser, that information had to have been returned in an HTTP response somewhere.
It usually means that you won’t be making an HTTP request to the page’s URL that you see at the
top of your browser window, but instead you’ll need to find the URL of the AJAX request that’s
going on in the background to fetch the data from the server and load it into the page.
There’s not really an easy code snippet I can show here, but if you open the Chrome or Firefox
Developer Tools, you can load the page, go to the “Network” tab and then look through the all of
the requests that are being sent in the background to find the one that’s returning the data you’re
looking for. Start by filtering the requests to only XHR or JS to make this easier.
Once you find the AJAX request that returns the data you’re hoping to scrape, then you can make
your scraper send requests to this URL, instead of to the parent page’s URL. If you’re lucky, the
response will be encoded with JSON which is even easier to parse than HTML.
print r.json() # returns a python dict, no need for BeautifulSoup
Content Inside Iframes
This is another topic that causes a lot of hand wringing for no reason. Sometimes the page you’re
trying to scrape doesn’t actually contain the data in its HTML, but instead it loads the data inside
an iframe.
Again, it’s just a matter of making the request to the right URL to get the data back that you want.
Make a request to the outer page, find the iframe, and then make another HTTP request to the
iframe’s src attribute.
inner_content = requests.get(soup.find("iframe")["src"])
Sessions and Cookies
While HTTP is stateless, sometimes you want to use cookies to identify yourself consistently across
requests to the site you’re scraping.
The most common example of this is needing to login to a site in order to access protected pages.
Without the correct cookies sent, a request to the URL will likely be redirected to a login form or
presented with an error response.
However, once you successfully login, a session cookie is set that identifies who you are to the
website. As long as future requests send this cookie along, the site knows who you are and what
you have access to.
A Handy, Easy-To-Reference Web Scraping Cheat Sheet 74
# create a session
session = requests.Session()
# make a login POST request, using the session
session.post("http://example.com/login", data=dict(
email="me@domain.com",
password="secret_value"
))
# subsequent requests that use the session will automatically handle cookies
r = session.get("http://example.com/protected_page")
Delays and Backing Off
If you want to be polite and not overwhelm the target site you’re scraping, you can introduce an
intentional delay or lag in your scraper to slow it down
import time
for term in ["web scraping","web crawling","scrape this site"]:
r=requests.get("http://example.com/search", params=dict(
query=term
))
time.sleep(5)# wait 5 seconds before we make the next request
Some also recommend adding a backoff that’s proportional to how long the site took to respond
to your request. That way if the site gets overwhelmed and starts to slow down, your code will
automatically back off.
import time
for term in ["web scraping","web crawling","scrape this site"]:
t0 =time.time()
r=requests.get("http://example.com/search", params=dict(
query=term
))
response_delay =time.time() -t0
time.sleep(10 * response_delay) # wait 10x longer than it took them to resp\
ond
A Handy, Easy-To-Reference Web Scraping Cheat Sheet 75
Spoofing the User Agent
By default, the requests library sets the User-Agent header on each request to something like
“python-requests/2.12.4”. You might want to change it to identify your web scraper, perhaps
providing a contact email address so that an admin from the target website can reach out if they see
you in their logs.
More commonly, this is used to make it appear that the request is coming from a normal web browser,
and not a web scraping program.
headers = {
"User-Agent": "my web scraping program. contact me at admin@domain.com"
}
r = requests.get("http://example.com", headers=headers)
Using Proxy Servers
Even if you spoof your User Agent, the site you are scraping can still see your IP address, since they
have to know where to send the response.
If you’d like to obfuscate where the request is coming from, you can use a proxy server in between
you and the target site. The scraped site will see the request coming from that server instead of your
actual scraping machine.
r=requests.get("http://example.com/", proxies=dict(
http="http://proxy_user:proxy_pass@104.255.255.255:port",
))
If you’d like to make your requests appear to be spread out across many IP addresses, then you’ll
need access to many different proxy servers. You can keep track of them in a list and then have
your scraping program simply go down the list, picking off the next one for each new request, so
that the proxy servers get even rotation.
Setting Timeouts
If you’re experiencing slow connections and would prefer that your scraper moved on to something
else, you can specify a timeout on your requests.

A Handy, Easy-To-Reference Web Scraping Cheat Sheet 76
try:
requests.get("http://example.com",timeout=10) #wait up to 10 seconds
except requests.exceptions.Timeout:
pass #handle the timeout
Handling Network Errors
Just as you should never trust user input in web applications, you shouldn’t trust the network to
behave well on large web scraping projects. Eventually you’ll hit closed connections, SSL errors or
other intermittent failures.
try:
requests.get("http://example.com")
except requests.exceptions.RequestException:
pass #handle the exception.maybe wait and try again later
With the concepts, techniques and code samples laid out in the book so far, you should have
everything you need to tackle even the most difficult web scraping problems. If you’re looking
for more opportunities to practice your skills and get some real-world scraping experience, check
out the resources in the final chapter.
Web Scraping Resources: A
Beginner-Friendly Sandbox and
Online Course
As I’m writing this second edition of “The Ultimate Guide to Web Scraping”, it has been almost four
years since I first published the book in 2013. Since then, the book has sold over a thousand copies
on my blog, and I’ve been happy to hear how helpful it was to many of my readers.
I heard from everyone from graduate students and software developers to small business owners
and journalists. Many wrote in with praise for how the book had helped them finally understand
the technical concepts and collect the data they were looking for.
But it wasn’t all rosy feedback. I’ve received quite a few suggestions from people about other content
they wanted me to cover. But by far, the number one piece of feedback I got about the book was that
people wanted more hands-on examples. They wanted to practice building scrapers for simplified
sites that were easy to learn. Some people just wanted working code that they could tweak and use
for their own purposes.
I struggled with this for a while, for a number of reasons.
First, there’s no guarantee that the sites I build scrapers for won’t change their markup. You’ll
remember that this was one of the most common complaints leveled against web scraping – that
code must be updated whenever a target site changes.
In fact, in the first version of the book, I included a simple python scraper for scraping Google
search results. Over the years, Google would occasionally changed the HTML markup in their search
results. I wouldn’t always know right away until a reader would tell me that the sample code didn’t
run properly, and then I’d have to scramble to make a fix and update the book.
I want the content in this guide to be timeless – something you can refer back to years later and it
all still rings true and works well. Web scraping has some common, simple fundamentals that are
used again and again. But tying a specific solution to a specific website at a specific point in time
can be fragile and prone to eventual failure. This is the nature of the web.
The other reason I was hesitant to include more web scraping example code was that it’s often
explicitly against the Terms of Service of most large, well-known websites to make automated
requests. If I was teaching people how to scrape, surely I shouldn’t be leading them afoul of the law.
It reflects poorly on me as a teacher if I have my students practice something that might knowingly
ruffle some feathers.
But after much hand-wringing, I finally came up with a solution.

Web Scraping Resources: A Beginner-Friendly Sandbox and Online Course 78
I decided I would build my very own website that’s specifically built from the ground-up to be
scraped by everyone. The HTML markup would never change, and the Terms of Service would
encourage people to build bots to practice scraping data. I decided to call it, fittingly Scrape This
Site:
https://scrapethissite.com
The goal of the site is to provide a public sandbox for people to use when they’re learning web
scraping. There are a few different sections of the site that implement common website elements
like forms, tables, pagination and search boxes, many of which we covered in this book. There are
also pages that implement the sorts of things you’d find on Javascript-heavy web sites that use
AJAX to load content, as well as sites that use iframes or implement other common “gotchas” you’ll
encounter in the wild.
While the sandbox section of the site is free for anyone to use, I also put together a premium online
course that anyone can sign up to join. There are currently dozens of video lessons in the course,
each with their own “download and run” python code samples covering the most common scraping
problems you’ll encounter. The course is designed to be:
• Built for beginners – no coding or technical background required
• Easy to follow, with simple step-by-step instructions
• Focused on the fundamentals that apply to every single website
• Thorough, giving plenty of examples and use cases
Since you’ve already purchased the book, I’d like to offer you a special discount code. Simply visit
the following URL38 to activate your discount code and receive $50 off the course tuition:
https://scrapethissite.com/lessons/sign-up/?code=book_purchase
$50 off is a lot more than you paid for this book, so it you sign up for the course and use that discount
code, it’s like you got this book for free :)
So far, I’ve already worked with hundreds of students who have gone through the Scrape This Site
curriculum and learned the crucial skills to help collect the data they need. Here’s what they had to
say about their experience:
“The course was great and well worth the tuition. It was easy to follow, and I was able
to conquer the basics of web scraping very quickly.” -Paul Blank, VP Global IT
“I really liked your course, because it showed me how it is possible to do things in a
simple and elegant way and saved me a lot of time (days if not weeks).” -Lev Selector,
Ph.D. & Data Scientist
38https://scrapethissite.com/lessons/sign-up/?code=book_purchase
Web Scraping Resources: A Beginner-Friendly Sandbox and Online Course 79
“I loved the course and believed it was worth every penny!” -Nicholas Renotte, Bank
Analyst
Sign up today to join them, and take your web scraping skills to the next level!
