Wicket 6 Reference Guide
User Manual: Pdf
Open the PDF directly: View PDF ![]() .
.
Page Count: 220 [warning: Documents this large are best viewed by clicking the View PDF Link!]

1
Free Online Guide for Apache Wicket framework
Apache Wicket User Guide -
Reference Documentation
Authors: Andrea Del Bene, Martin Grigorov, Carsten Hufe, Christian Kroemer, Daniel Bartl, Paul Bor, Tobias
Soloschenko, Joachim Rohde
Version: 6.x
Table of Contents
1Introduction
2How to use the example code
3Why should I learn Wicket?
3.1 We all like spaghetti :-) ...
3.2 Component oriented frameworks - an overview
3.3 Benefits of component oriented frameworks for web development
3.4 Wicket vs the other component oriented frameworks
4Wicket says Hello world!
4.1 Wicket distribution and modules
4.2 Configuration of Wicket applications
4.3 The HomePage class
4.4 Wicket Links
4.5 Summary
5Wicket as page layout manager
5.1 Header, footer, left menu, content, etc...
5.2 Here comes the inheritance!
5.3 Divide et impera!
5.4 Markup inheritance with the wicket:extend tag
5.5 Summary
6Keeping control over HTML
6.1 Hiding or disabling a component
6.2 Modifing tag attributes
6.3 Generating tag attribute 'id'
6.4 Creating in-line panels with WebMarkupContainer
6.5 Working with markup fragments
6.6 Adding header contents to the final page
6.7 Using stub markup in our pages/panels

2
6.8 How to render component body only
6.9 Hiding decorating elements with the wicket:enclosure tag
6.10 Surrounding existing markup with Border
6.11 Summary
7Components lifecycle
7.1 Lifecycle stages of a component
7.2 Hook methods for component lifecycle
7.3 Initialization stage
7.4 Rendering stage
7.5 Removing stage
7.6 Summary
8Page versioning and caching
8.1 Stateful pages vs stateless
8.2 Stateful pages
8.3 Stateless pages
8.4 Summary
9Under the hood of the request processing
9.1 Class Application and request processing
9.2 Request and Response classes
9.3 The director of request processing - RequestCycle
9.4 Session Class
9.5 Exception handling
9.6 Summary
10 Wicket Links and URL generation
10.1 PageParameters
10.2 Bookmarkable links
10.3 Automatically creating bookmarkable links with tag wicket:link
10.4 External links
10.5 Stateless links
10.6 Generating structured and clear URLs
10.7 Summary
11 Wicket models and forms
11.1 What is a model?
11.2 Models and JavaBeans
11.3 Wicket forms
11.4 Component DropDownChoice
11.5 Model chaining
11.6 Detachable models
11.7 Using more than one model in a component
11.8 Use models!
11.9 Summary
12 Wicket forms in detail

3
12.1 Default form processing
12.2 Form validation and feedback messages
12.3 Input value conversion
12.4 Validation with JSR 303
12.5 Submit form with an IFormSubmittingComponent
12.6 Nested forms
12.7 Multi-line text input
12.8 File upload
12.9 Creating complex form components with FormComponentPanel
12.10 Stateless form
12.11 Working with radio buttons and checkboxes
12.12 Selecting multiple values with ListMultipleChoices and Palette
12.13 Summary
13 Displaying multiple items with repeaters
13.1 The RepeatingView Component
13.2 The ListView Component
13.3 The RefreshingView Component
13.4 Pageable repeaters
13.5 Summary
14 Internationalization with Wicket
14.1 Localization
14.2 Localization in Wicket
14.3 Bundles lookup algorithm
14.4 Localization of component's choices
14.5 Internationalization and Models
14.6 Summary
15 Resource management with Wicket
15.1 Static vs dynamic resources
15.2 Resource references
15.3 Package resources
15.4 Adding resources to page header section
15.5 Context-relative resources
15.6 Resource dependencies
15.7 Aggregate multiple resources with resource bundles
15.8 Put JavaScript inside page body
15.9 Header contributors positioning
15.10 Custom resources
15.11 Mounting resources
15.12 Shared resources
15.13 Customizing resource loading
15.14 CssHeaderItem and JavaScriptHeaderItem compression
15.15 Summary

4
16 An example of integration with JavaScript
16.1 What we want to do...
16.2 ...and how we will do it
16.3 Summary
17 Wicket advanced topics
17.1 Enriching components with behaviors
17.2 Generating callback URLs with IRequestListener
17.3 Initializers
17.4 Using JMX with Wicket
17.5 Generating HTML markup from code
17.6 Summary
18 Working with AJAX
18.1 How to use AJAX components and behaviors
18.2 Build-in AJAX components
18.3 Built-in AJAX behaviors
18.4 Using an activity indicator
18.5 AJAX request attributes and call listeners
18.6 Creating custom AJAX call listener
18.7 Summary
19 Integration with enterprise containers
19.1 Integrating Wicket with EJB
19.2 Integrating Wicket with Spring
19.3 JSR-330 annotations
19.4 Summary
20 Native WebSockets
20.1 How does it work ?
20.2 How to use
20.3 Client-side APIs
20.4 Testing
20.5 Differences with Wicket-Atmosphere module.
20.6 FAQ
21 Security with Wicket
21.1 Authentication
21.2 Authorizations
21.3 Using HTTPS protocol
21.4 URLs encryption in detail
21.5 Package Resource Guard
21.6 Summary
22 Test Driven Development with Wicket
22.1 Utility class WicketTester
22.2 Testing Wicket forms
22.3 Testing markup with TagTester

5
22.4 Summary
23 Test Driven Development with Wicket and Spring
23.1 Configuration of the runtime environment
23.2 Configuration of the JUnit based integration test environment
23.3 Summary
24 Wicket Best Practices
24.1 Encapsulate components correctly
24.2 Put models and page data in fields
24.3 Correct naming for Wicket IDs
24.4 Avoid changes at the component tree
24.5 Implement visibilities of components correctly
24.6 Always use models
24.7 Do not unwrap models within the constructor hierarchy
24.8 Pass models extended components
24.9 Validators must not change any data or models
24.10 Do not pass components to constructors
24.11 Use the Wicket session only for global data
24.12 Do not use factories for components
24.13 Every page and component must be tested
24.14 Avoid interactions with other servlet filters
24.15 Cut small classes and methods
24.16 The argument "Bad documentation"
24.17 Summary
25 Wicket Internals
25.1 Page storing
26 Working with Maven (Appendix)
26.1 Switching Wicket to DEPLOYMENT mode
26.2 Creating a Wicket project from scratch and importing it into our favourite IDE
27 Project WicketStuff (Appendix)
27.1 What is project WicketStuff
27.2 Module tinymce
27.3 Module wicketstuff-gmap3
27.4 Module wicketstuff-googlecharts
27.5 Module wicketstuff-inmethod-grid
27.6 Module wicketstuff-rest-annotations
27.7 Module stateless
28 Lost In Redirection With Apache Wicket (Appendix)
29 Contributing to this guide (Appendix)

6
1 Introduction
Wicket has been around since 2004 and it has been an Apache project since 2007. During these years it has
proved to be a solid and valuable solution for building enterprise web applications.
Wicket core developers have done a wonderful job with this framework and they continue to improve it release
after release. However Wicket never provided a freely available documentation and even if you can find on
Internet many live examples and many technical articles on it (most of them at and at Wicket Library Wicket in
), the lack of an organized and freely available documentation has always been a sore point for thisAction
framework.
That's quite an issue because many other popular frameworks (like Spring, Hibernate or Struts) offer a vast and
very good documentation which substantially contributed to their success.
This document is not intended to be a complete reference for Wicket but it simply aims to be a straightforward
introduction to the framework that should significantly reduce its learning curve. What you will find here reflects
my experience with Wicket and it's strictly focused on the framework. The various Wicket-related topics are
gradually introduced using pragmatic examples of code that you can find in the according repository on Github.
However remember that Wicket is a vast and powerful tool, so you should feel confident with the topics exposed
in this document before starting to code your real applications!
For those who need further documentation on Wicket, there are available for this framework.many good books
Hope you'll find this guide helpful. Have fun with Wicket!
Andrea Del Bene, adelbene@apache.org
: this guide is based on Wicket 6. However if you are using an older version you should find this guide usefulPS
as well, but it's likely that the code and the snippets won't work with your version.
: although I've tried to do my best working on this tutorial, this document is a work in progress and mayPPS
contain errors and/or omissions. That's why any feedback of any kind is REALLY appreciated!
Project started by
7
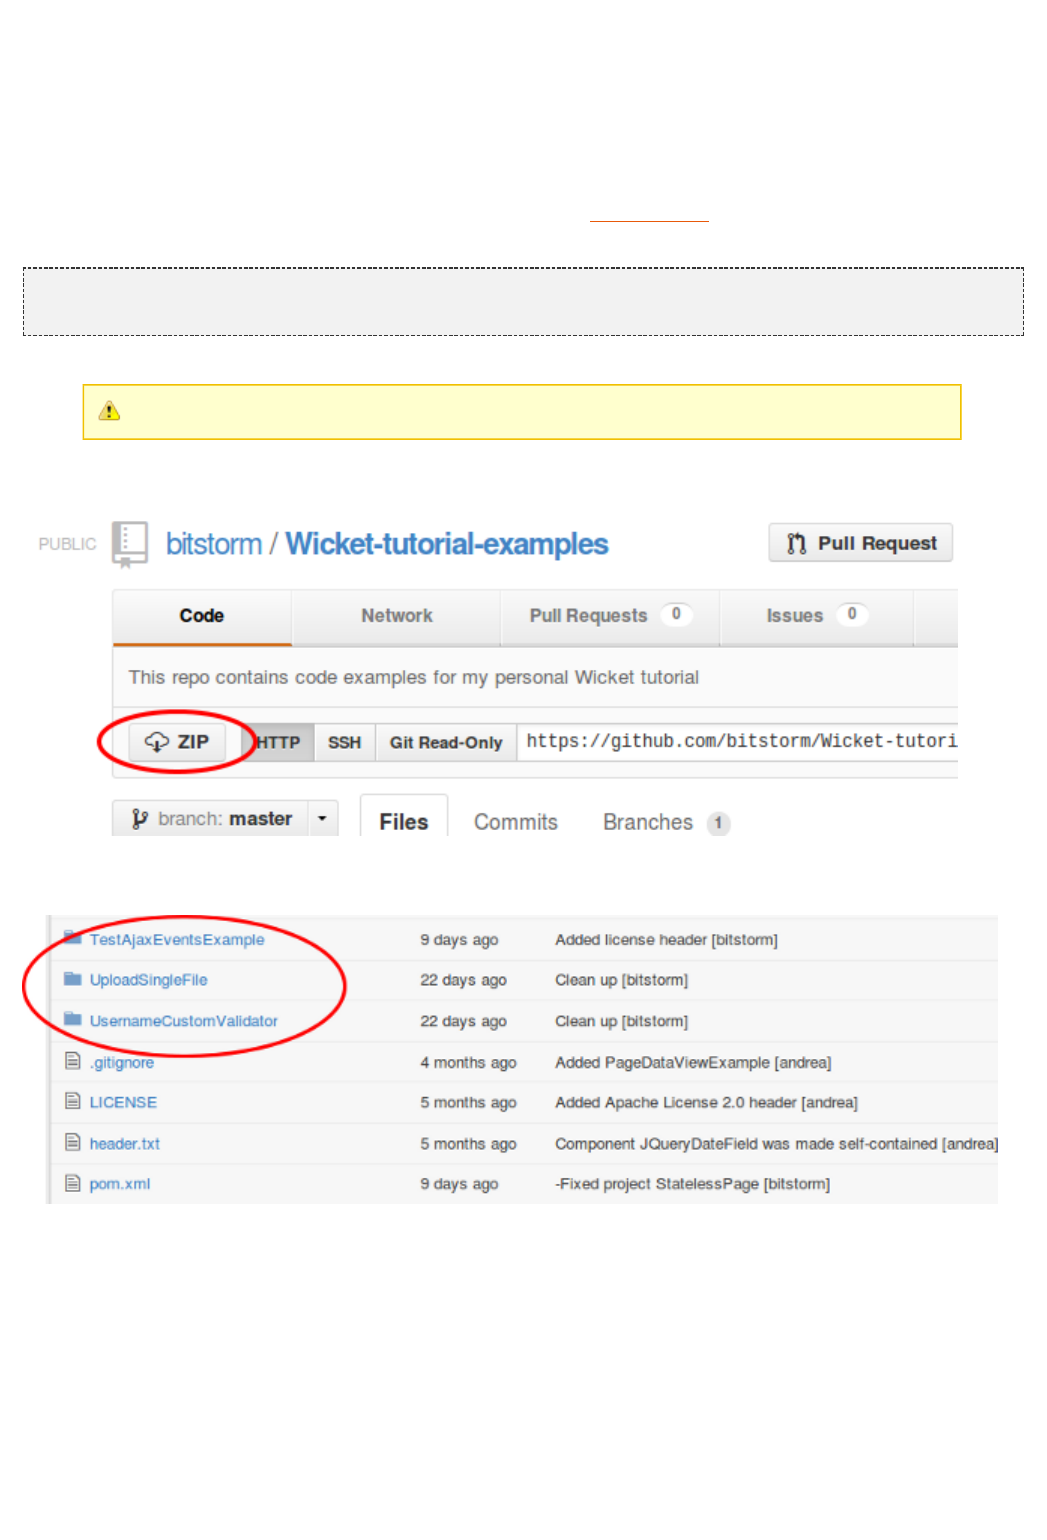
2 How to use the example code
Most of the code you will find in this document is available as a and is licensed under the ASF 2.0.Git repository
To get a local copy of the repository you can run the clone command from shell:
git clone https://github.com/bitstorm/Wicket-tutorial-examples.git
If you are using Wicket 6.x remember to switch to branch wicket-6.x
If you aren't used to Git, you can simply download the whole source as a zip archive:
The repository contains a multi-module Maven project. Every subproject is contained in the relative folder of the
repository:
When the example code is used in the document, you will find the name of the subproject it belongs to. If you
don't have any experience with Maven, you can read Appendix A where you can learn the basic commands
needed to work with the example projects and to import them into your favourite IDE (NetBeans, IDEA or
Eclipse).
8
1.
2.
3.
3 Why should I learn Wicket?
Software development is a challenging activity and developers must keep their skills up-to-date with new
technologies.
But before starting to learn the last “coolest” framework we should always ask ourself if it is the right tool for us
and how it can improve our everyday job. Java's ecosystem is already full of many well-known web frameworks,
so why should we spend our time learning Wicket?
This chapter will show you how Wicket is different from other web frameworks you may know and it will explain
also how it can improve your life as web developer.
3.1 We all like spaghetti :-) ...
...but we all hate spaghetti code! That's why in the first half of the 2000s we have seen the birth of so many web
frameworks. Their mission was to separate our business code from presentation layer (like JSP pages).
Some of theme (like Struts, Spring MVC, Velocity, etc...) have become widely adopted and they made the MVC
pattern very popular among developers. However, none of these frameworks offers a real object-oriented (OO)
abstraction for web pages and we still have to take care of web-related tasks such as HTTP request/response
handling, URLs mapping, storing data into user session and so on.
The biggest limit of MVC frameworks is that they don't do much to overcome the impedance mismatch between
the stateless nature of HTTP protocol and the need of our web applications of handling a (very complex) state.
To overcome these limits developers have started to adopt a new generation of component oriented web
frameworks designed to provide a completely different approach to web development.
3.2 Component oriented frameworks - an overview
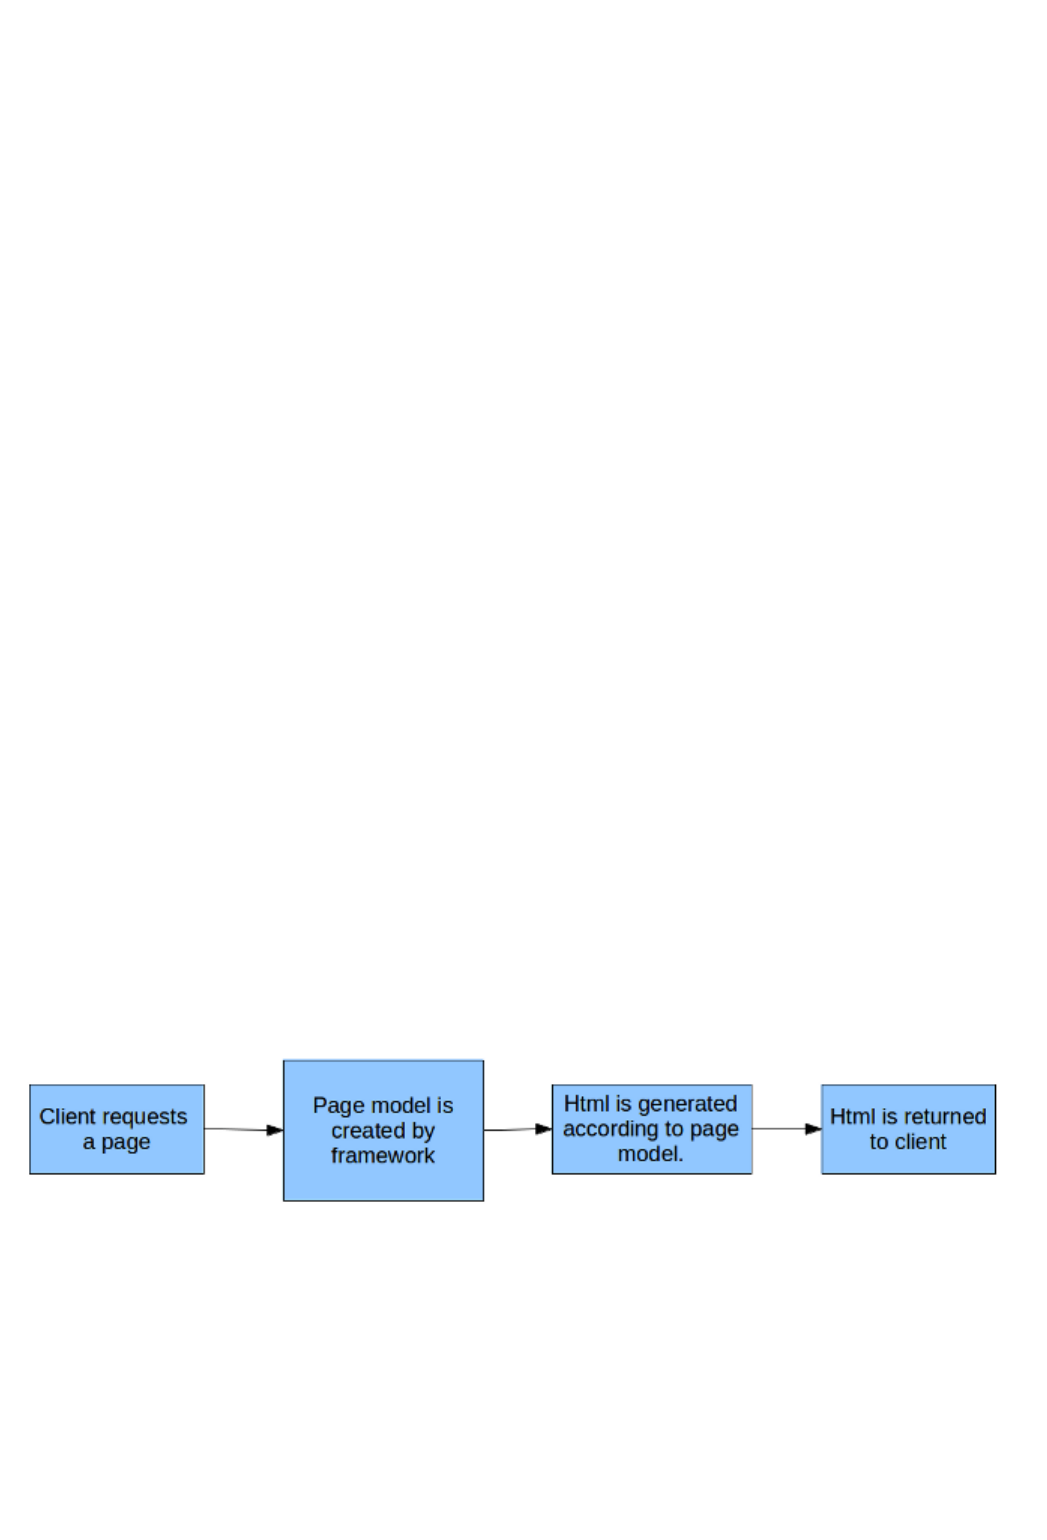
Component oriented frameworks differ from classic web frameworks in that they build a model of requested page
on the server side and the HTML sent back to the client is generated according to this model. You can think of
the model as if it was an “inverse” JavaScript DOM, meaning that:
is built on server-side
is built before HTML is sent to client
HTML code is generated using this model and not vice versa.
General schema of page request handling for a component oriented framework
With this kind of framework our web pages and their HTML components (forms, input controls, links, etc...), are
pure class instances. Since pages are class instances they live inside the JVM heap and we can handle them as
we do with any other Java class. This approach is very similar to what GUI frameworks (like Swing or SWT) do
with desktop windows and their components. Wicket and the other component oriented frameworks bring to web
development the same kind of abstraction that GUI frameworks offer when we build a desktop application. Most
of those kind of frameworks hide the details of the HTTP protocol and naturally solve the problem of its stateless
nature.
3.3 Benefits of component oriented frameworks for web development
9
At this point some people may still wonder why OOP is so important also for web development and what benefits
it can bring to developers. Let's quickly review the main advantages that this paradigm can offer us:
Web pages are objects: web pages are not just text files sent back to the client. They are object instances
and we can harness OOP to design web pages and their components. With Wicket we can also apply
inheritance to HTML markup in order to build a consistent graphic layout for our applications (we will see
markup inheritance in ).chapter 4.2
We don't have to worry about application's state: pages and components can be considered stateful
entities. They are Java objects and they can keep a state inside them and reference other objects. We can
stop worrying about keeping track of user data stored inside the and we can start managingHttpSession
them in a natural and transparent way.
Testing web applications is much easier: since pages and components are pure objects, you can use
JUnit to test their behavior and to ensure that they render as expected. Wicket has a set of utility classes for
unit testing that simulate user interaction with web pages, hence we can write acceptance tests using just
JUnit without any other test framework (unit testing is covered in ).chapter 21
3.4 Wicket vs the other component oriented frameworks
Wicket is not the only component oriented framework available in the Java ecosystem. Among its competitors we
can find GWT (from Google), JSF (from Oracle), Vaadin (from Vaadin Ltd.), etc… Even if Wicket and all those
other frameworks have their pros and cons, there are good reasons to prefer Wicket over them:
Wicket is 100% open source: Wicket is a top Apache project and it doesn't depend on any private
company. You don't have to worry about future licensing changes, Wicket will always be released under
Apache license 2.0 and freely available.
Wicket is a community driven project: The Wicket team supports and promotes the dialogue with the
framework's users through two mailing lists and(one for users and another one for framework developers)
an (the issue tracking system). Moreover, as any other Apache project, Wicket is developedApache JIRA
paying great attention to user feedbacks and to suggested features.
Wicket is just about Java and good old HTML: almost all web frameworks force users to adopt special
tags or to use server side code inside HTML markup. This is clearly in contrast with the concept of
separation between presentation and business logic and it leads to a more confusing code in our pages. In
Wicket we don't have to take care of generating HTML inside the page itself, and we won't need to use any
tag other than standard HTML tags. All we have to do is to attach our components (Java instances) to the
HTML tags using a simple tag attribute called (we will shortly see how to use it).wicket:id
With Wicket we can easily use JavaBeans and in our web tierPOJO : one of the most annoying and
error-prone task in web development is collecting user input through a form and keeping form fields
updated with previously inserted values. This usually requires a huge amount of code to extract input from
request parameters (which are strings), parse them to Java types and store them into some kind of
variable. And this is just half of the work we have to do as we must implement the inverse path (load data
from Java to the web form).Moreover, most of the times our forms will use a JavaBean or a POJO as
backing object, meaning that we must manually map form fields with the corresponding object fields and
vice versa. Wicket comes with an intuitive and flexible mechanism that does this mapping for us without any
configuration overhead (using a convention over configuration approach) and in a transparent way. Chapter
will introduce the concept of Wicket model and we will learn how to harness this entity with forms.10
No complex XML needed: Wicket was designed to minimize the amount of configuration files needed to
run our applications. No XML file is required except for the standard deployment descriptor web.xml (unless
you are using Servlet 3 or a later version. See for more details).Chapter 4
10
4 Wicket says “Hello world!”
Wicket allows us to design our web pages in terms of components and containers, just like AWT does with
desktop windows. Both frameworks share the same component-based architecture: in AWT we have a Windows
instance which represents the physical windows containing GUI components (like text fields, radio buttons,
drawing areas, etc...), in Wicket we have a instance which represents the physical web pageWebPage
containing HTML components (pictures, buttons, forms, etc… ) .
In both frameworks we find a base class for GUI components called . Wicket pages can beComponent
composed (and usually are) by many components, just like AWT windows are composed by Swing/AWT
components. Both frameworks promote the reuse of presentation code and GUI elements building custom
components. Even if Wicket already comes with a rich set of ready-to-use components, building custom
components is a common practice when working with this framework. We'll learn more about custom
components in the next chapters.
4.1 Wicket distribution and modules
Wicket is available as a binary package on the main site . Inside this archive we can findhttp://wicket.apache.org
the distribution jars of the framework. Each jar corresponds to a sub-module of the framework. The following
table reports these modules along with a short description of their purpose and with the related dependencies:
Module'sname Description Dependencies
wicket-core Contains the main classes of the framework, like class
and .Component Application
wicket-request,
wicket-util
wicket-request This module contains the classes involved into web request
processing. wicket-util
wicket-util Contains general-purpose utility classes for functional areas such
as I/O, lang, string manipulation, security, etc... None
wicket-datetime Contains special purpose components designed to work with
date and time. wicket-core
wicket-bean-validation Provides support for JSR 303 standard validation. wicket-core
wicket-devutils Contains utility classes and components to help developers with
tasks such as debugging, class inspection and so on. wicket-core,
wicket-extensions
wicket-extensions Contains a vast set of built-in components to build a rich UI for
our web application (Ajax support is part of this module). wicket-core
wicket-auth-roles Provides support for role-based authorization. wicket-core
This module provides common classes to support Inversion Of
11
wicket-ioc Control. It's used by both Spring and Guice integration module. wicket-core
wicket-guice This module provides integration with the dependency injection
framework developed by Google. wicket-core,
wicket-ioc
wicket-spring This module provides integration with Spring framework. wicket-core,
wicket-ioc
wicket-velocity This module provides panels and utility class to integrate Wicket
with Velocity template engine. wicket-core
wicket-jmx This module provides panels and utility class to integrate Wicket
with Java Management Extensions. wicket-core
wicket-objectsizeof-agent Provides integration with Java agent libraries and instrumentation
tools. wicket-core
Please note that the core module depends on the utility and request modules, hence it cannot be used without
them.
4.2 Configuration of Wicket applications
In this chapter we will see a classic Hello World! example implemented using a Wicket page with a built-in
component called (the code is from project the HelloWorldExample). Since this is the first example of theLabel
guide, before looking at Java code we will go through the common artifacts needed to build a Wicket application
from scratch.
All the example projects presented in this document have been generated using Maven
and the utility page at . containshttp://wicket.apache.org/start/quickstart.html Appendix A
the instructions needed to use these projects and build a quickstart application using
Apache Maven. All the artifacts used in the next example (files web.xml, HomePage.class
and HomePage.html) are automatically generated by Maven.
Wicket application structure
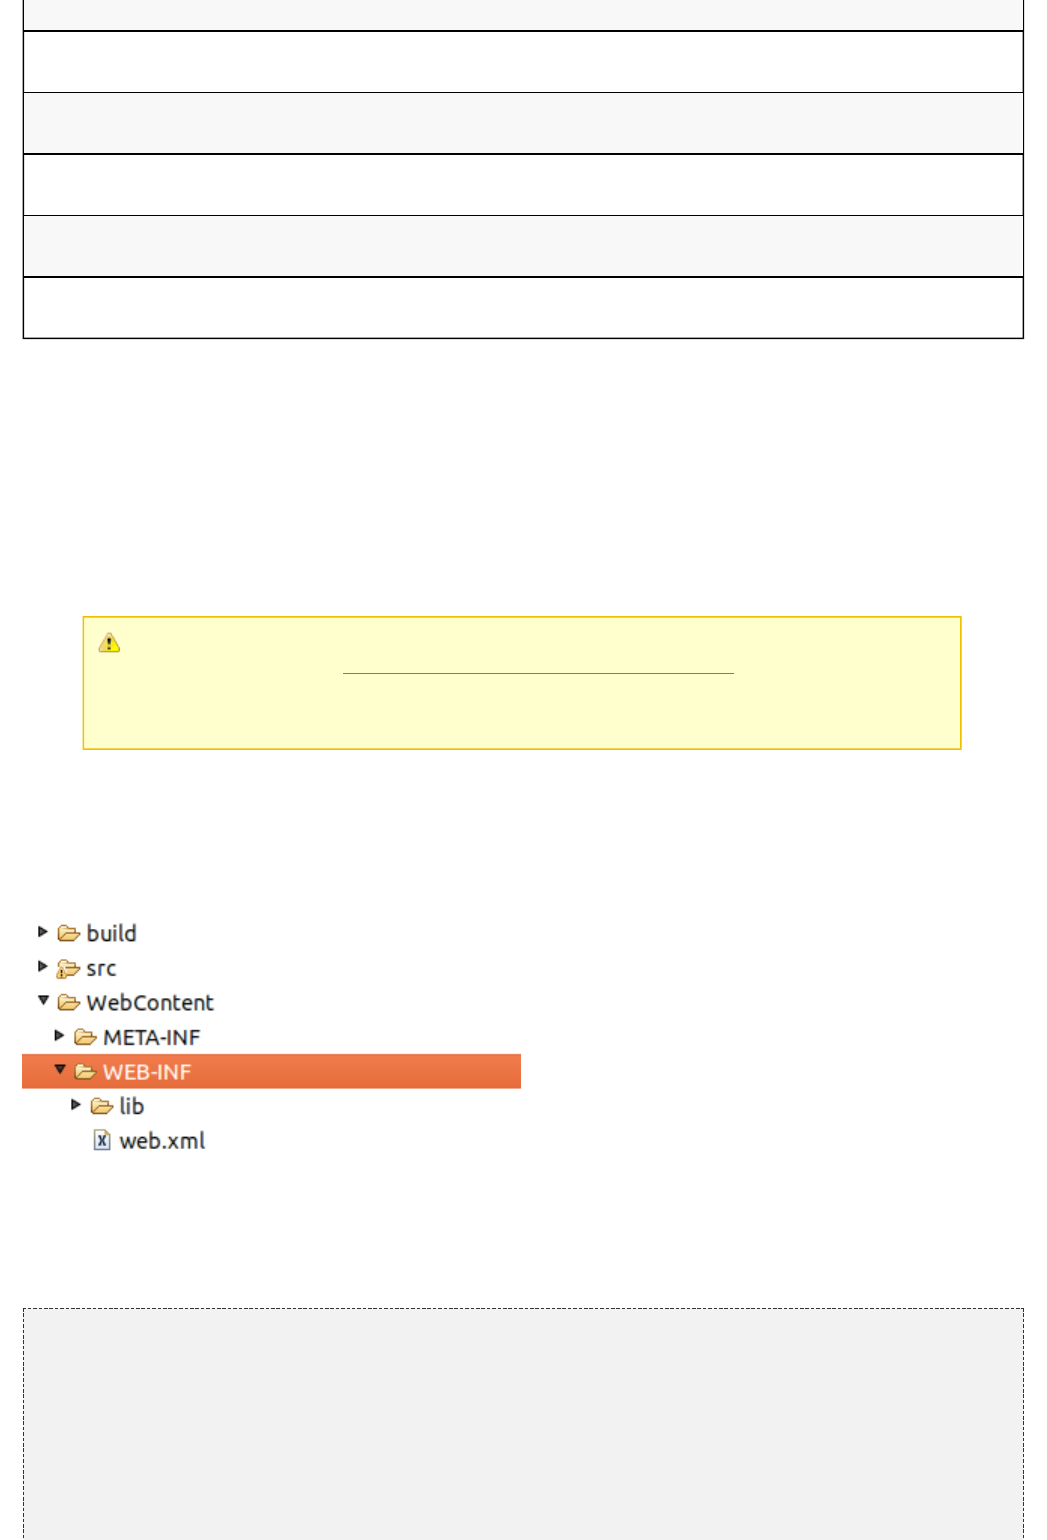
A Wicket application is a standard Java EE web application, hence it is deployed through a web.xml file placed
inside folder WEB-INF:
Illustration : The standard directory structure of a Wicket application
The content of web.xml declares a servlet filter (class
) which dispatches web requests to our Wicketorg.apache.wicket.Protocol.http.WicketFilter
application:
<?xml version= encoding= ?>"1.0" "UTF-8"
<web-app>
Wicket Test<display-name> </display-name>
<filter>
TestApplication<filter-name> </filter-name>
org.apache.wicket.protocol.http.WicketFilter<filter-class> </filter-class>
<init-param>
applicationClassName<param-name> </param-name>
org.wicketTutorial.WicketApplication<param-value> </param-value>
</init-param>
</filter>
<filter-mapping>
12
TestApplication<filter-name> </filter-name>
/*<url-pattern> </url-pattern>
</filter-mapping>
</web-app>
Since this is a standard servlet filter we must map it to a specific set of URLs through the <filter-mapping>
tag). In the xml above we have mapped every URL to our Wicket filter.
If we are using Servlet 3 or a later version, we can of course use a class in place of web.xml to configure our
application. The following example uses annotation @WebFilter.
@WebFilter(value = , initParams = { @WebInitParam(name = , value ="/*" "applicationClassName"
), "com.mycompany.WicketApplication"
@WebInitParam(name= , value= ) })"filterMappingUrlPattern" "/*"
class ProjectFilter WicketFilter {public extends
}
Wicket can be started in two modes named respectively DEVELOPMENT and
DEPLOYMENT. The first mode activates some extra features which help application
development, like resources monitoring and reloading, full stack trace rendering of
exceptions, an AJAX debugger window, etc… The DEPLOYMENT mode turns off all
these features optimizing performances and resource consumption. In our example
projects we will use the default mode which is DEVELOPMENT. containsChapter 24.1
the chapter “Switching Wicket to DEPLOYMENT mode“ where we can find further details
about these two modes as well as the possible ways we have to set the desired one. In
any case, DO NOT deploy your applications in a production environment without switching
to DEPLOYMENT mode!
The application class
If we look back at web.xml we can see that we have provided the Wicket filter with a parameter called
. This value must be the fully qualified class name of a subclass of applicationClassName
. This subclass represents our web application built upon Wicket and it'sorg.apache.wicket.Application
responsible for configuring it when the server is starting up. Most of the times our custom application class won't
inherit directly from class , but rather from class Application
which provides a closer integration with servletorg.apache.wicket.protocol.http.WebApplication
infrastructure. Class comes with a set of configuration methods that we can override to customizeApplication
our application's settings. One of these methods is that must be overridden as it is declaredgetHomePage()
abstract:
public <? Page> getHomePage()abstract Class extends
As you may guess from its name, this method specifies which page to use as homepage for our application.
Another important method is :init()
protected void init()
This method is called when our application is loaded by the web server (Tomcat, Jetty, etc...) and is the ideal
place to put our configuration code. The class exposes its settings grouping them into interfacesApplication
(you can find them in package ). We can access these interfaces throughorg.apache.wicket.settings
getter methods that will be gradually introduced in the next chapters when we will cover the related settings.
The current application's instance can be retrieved at any time calling static method inApplication.get()
our code. We will give more details about this method in . The content of the application class fromchapter 9.3
project HelloWorldExample is the following:
13
public class WicketApplication WebApplicationextends
{
@Override
<? WebPage> getHomePage()public Class extends
{
HomePage.class;return
}
@Override
void init()public
{
.init();super
// add your configuration here
}
}
Since this is a very basic example of a Wicket application, we don't need to specify anything inside the init
method. The home page of the application is the class. In the next paragraph we will see how thisHomePage
page is implemented and which conventions we have to follow to create a page in Wicket.
Declaring a inside web.xml descriptor is not the only way we have toWicketFilter
kickstart our application. If we prefer to use a servlet instead of a filter, we can use class
. See the JavaDoc for furtherorg.apache.wicket.protocol.http.WicketServlet
details.
4.3 The HomePage class
To complete our first Wicket application we must explore the home page class that is returned by the
's method seen above. In Wicket a web page is a subclass of Application getHomePage()
. This subclass must have a corresponding HTML file which will be used by theorg.apache.wicket.WebPage
framework as template to generate its HTML markup. This file is a regular plain HTML file (its extension must be
html).
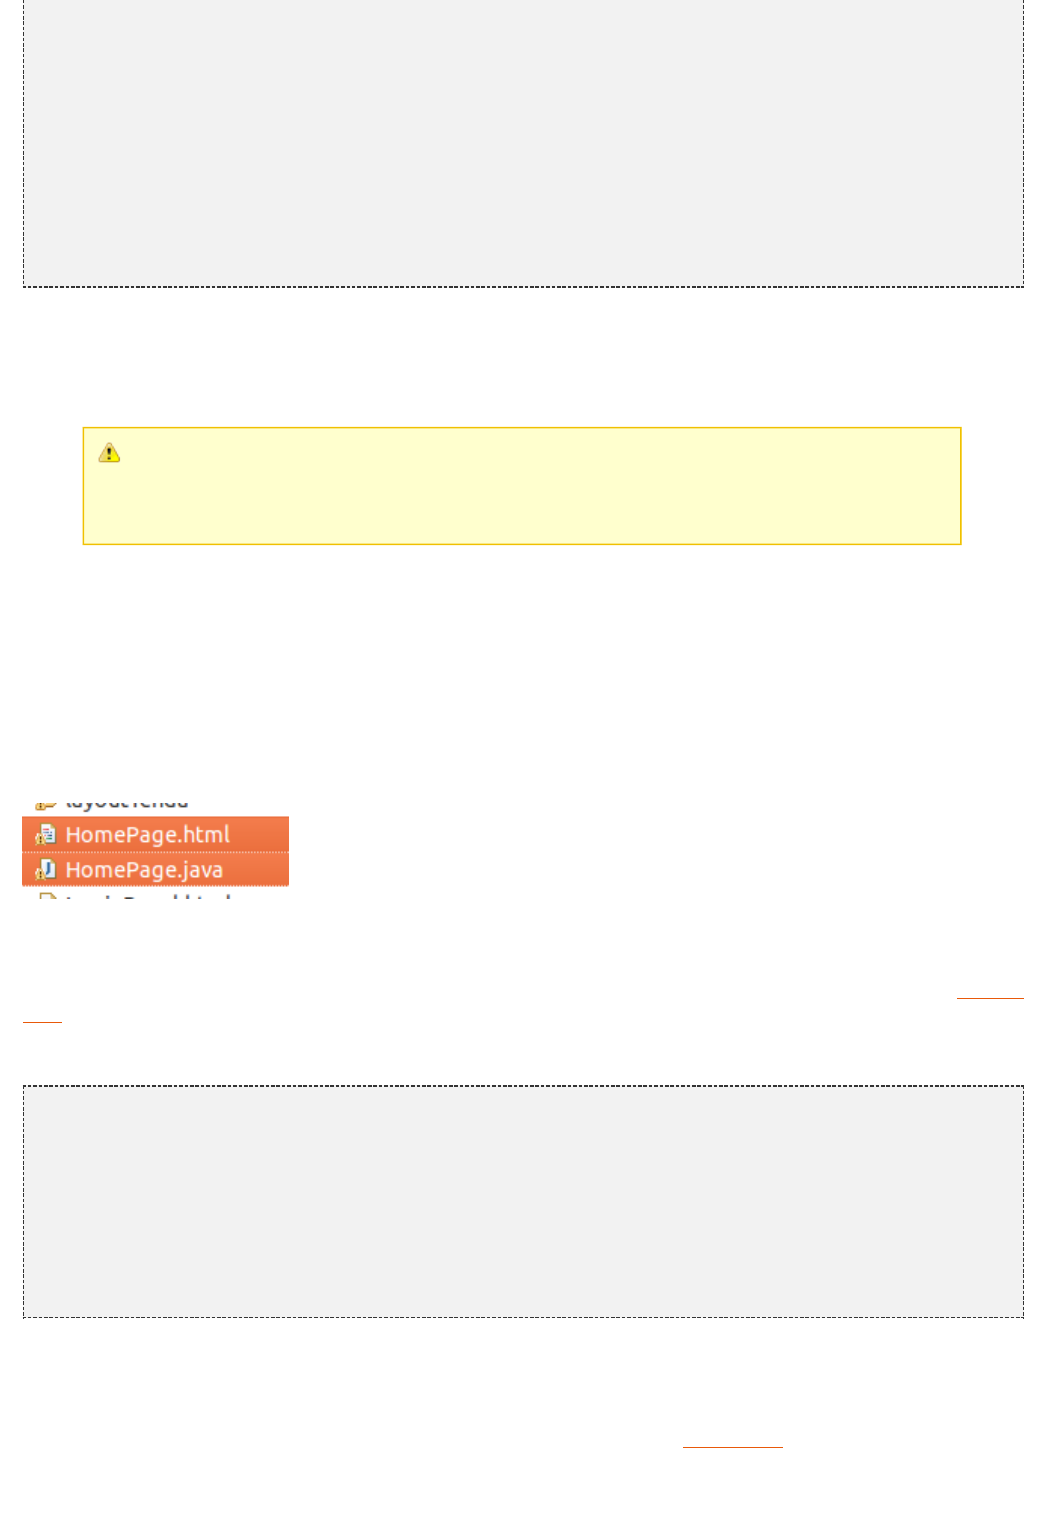
By default this HTML file must have the same name of the related page class and must be in the same package:
Illustration :Page class and its related HTML file
If you don't like to put class and html side by side (let's say you want all your HTML files in a separated folder)
you can use Wicket settings to specify where HTML files can be found. We will cover this topic later in chapter
.15.9
The Java code for the class is the following:HomePage
package org.wicketTutorial;
org.apache.wicket.request.mapper.parameter.PageParameters;import org.apache.wicket.markup.html.basic.Label;import org.apache.wicket.markup.html.WebPage;import
class HomePage WebPage { public extends
HomePage() {public
add( Label( , ));new "helloMessage" "Hello WicketWorld!"
}
}
Apart from subclassing , defines a constructor that adds a component to itself.WebPage HomePage Label
Method is inherited from ancestor class add(Component component)
and is used to add children components to a web page. We'll seeorg.apache.wicket.MarkupContainer
more about later in . Class MarkupContainer chapter 5.2
is the simplest component shipped with Wicket. It justorg.apache.wicket.markup.html.basic.Label
inserts a string (the second argument of its constructor) inside the corresponding HTML tag. Just like any other
Wicket component, needs a textual id ( in our example) to be instantiated. At runtimeLabel 'helloMessage'
14
Wicket will use this value to find the HTML tag we want to bind to the component. This tag must have a special
attribute called and its value must be identical to the component id (comparison is case-sensitive!).wicket:id
Here is the HTML markup for (file HomePage.html):HomePage
<!DOCTYPE html>
<html>
<head>
<meta charset= />"utf-8"
<title>Apache Wicket HelloWorld</title>
</head>
<body>
<div wicket:id= >"helloMessage"
[Label's message goes here]
</div>
</body>
</html>
We can see that the attribute is set according to the value of the component id. If we run thiswicket:id
example we will see the text Inside a tag.Hello WicketWorld! <div>
replaces the original content of its tag (in our example Label Label's message goes
) with the string passed as value ( in our example).here Hello WicketWorld!
If we specify a attribute for a tag without adding the correspondingwicket:id
component in our Java code, Wicket will throw a Exception. OnComponentNotFound
the contrary if we add a component in our Java code without specifying a corresponding
attribute in our markup, Wicket will throw a .wicket:id WicketRuntimeException
4.4 Wicket Links
The basic form of interaction offered by web applications is to navigate through pages using links. In HTML a link
is basically a pointer to another resource that most of the time is another page. Wicket implements links with
component , but due to the component-oriented nature oforg.apache.wicket.markup.html.link.Link
the framework, this component is quite different from classic HTML links. Following the analogy with GUI
frameworks, we can consider Wicket link as a “click” event handler: its purpose is to perform some actions (on
server side!) when the user clicks on it.
That said, you shouldn't be surprised to find an abstract method called inside the class. In theonClick() Link
following example we have a page with a containing an empty implementation of :Link onClick
public class HomePage WebPage {extends
HomePage(){public
add( Link( ){new "id"
@Override
void onClick() {public
//link code goes here
}
});
}
}
By default after has been executed, Wicket will send back to the current page to the client webonClick
browser. If we want to navigate to another page we must use method of class :setResponsePage Component
public class HomePage WebPage {extends
HomePage(){public
add( Link( ){new "id"
@Override
void onClick() { public
//we redirect browser to another page.
setResponsePage(AnotherPage.class);
}
15
});
}
}
In the example above we used a version of which takes as input the class of the targetsetResponsePage
page. In this way a new instance of will be created each time we click on the link. The otherAnotherPage
version of takes in input a page instance instead of a page class:setResponsePage
@Override
void onClick() { public
//we redirect browser to another page.
AnotherPage anotherPage = AnotherPage();new
setResponsePage(anotherPage);
}
The difference between using the first version of rather than the second one will besetResponsePage
illustrated in , when we will introduce the topic of stateful and stateless pages. For now, we canchapter 8
consider them as equivalent.
Wicket comes with a rich set of link components suited for every need (links to static URL, Ajax-enhanced links,
links to a file to download, links to external pages and so on). We will see them in .chapter 10
We can specify the content of a link (i.e. the text of the picture inside it) with its method
. This method takes in input a generic Wicket model, which will be the topic of setBody .chapter 11
4.5 Summary
In this chapter we have seen the basic elements that compose a Wicket application. We have started preparing
the configuration artifacts needed for our applications. As promised in , we needed to put in place justchapter 2.4
a minimal amount of XML with an application class and a home page. Then we have continued our “first contact”
with Wicket learning how to build a simple page with a label component as child. This example page has shown
us how Wicket maps components to HTML tags and how it uses both of them to generate the final HTML
markup. In the last paragraph we had a first taste of Wicket links and we have seen how they can be considered
as a “click” event listener and how they can be used to navigate from a page to another.
16
5 Wicket as page layout manager
Before going ahead with more advanced topics, we will see how to maintain a consistent layout across our site
using Wicket and its component-oriented features. Probably this is not the most interesting use we can get out of
Wicket, but it is surely the simplest one so it's the best way to get our hands dirty with some code.
5.1 Header, footer, left menu, content, etc...
There was a time in the 90s when Internet was just a buzzword and watching a plain HTML page being rendered
by a browser was a new and amazing experience. In those days we used to organize our page layout using the
HTML tag. Over the years this tag has almost disappeared from our code and it survives only in few<frame>
specific domains. For example is still being used by JavaDoc.
With the adoption of server side technologies like JSP, ASP or PHP the tag has been replaced by a<frame>
template-based approach where we divide our page layout into some common areas that will be present in each
page of our web application. Then, we manually insert these areas in every page including the appropriate
markup fragments.
In this chapter we will see how to use Wicket to build a site layout. The sample layout we will use is a typical
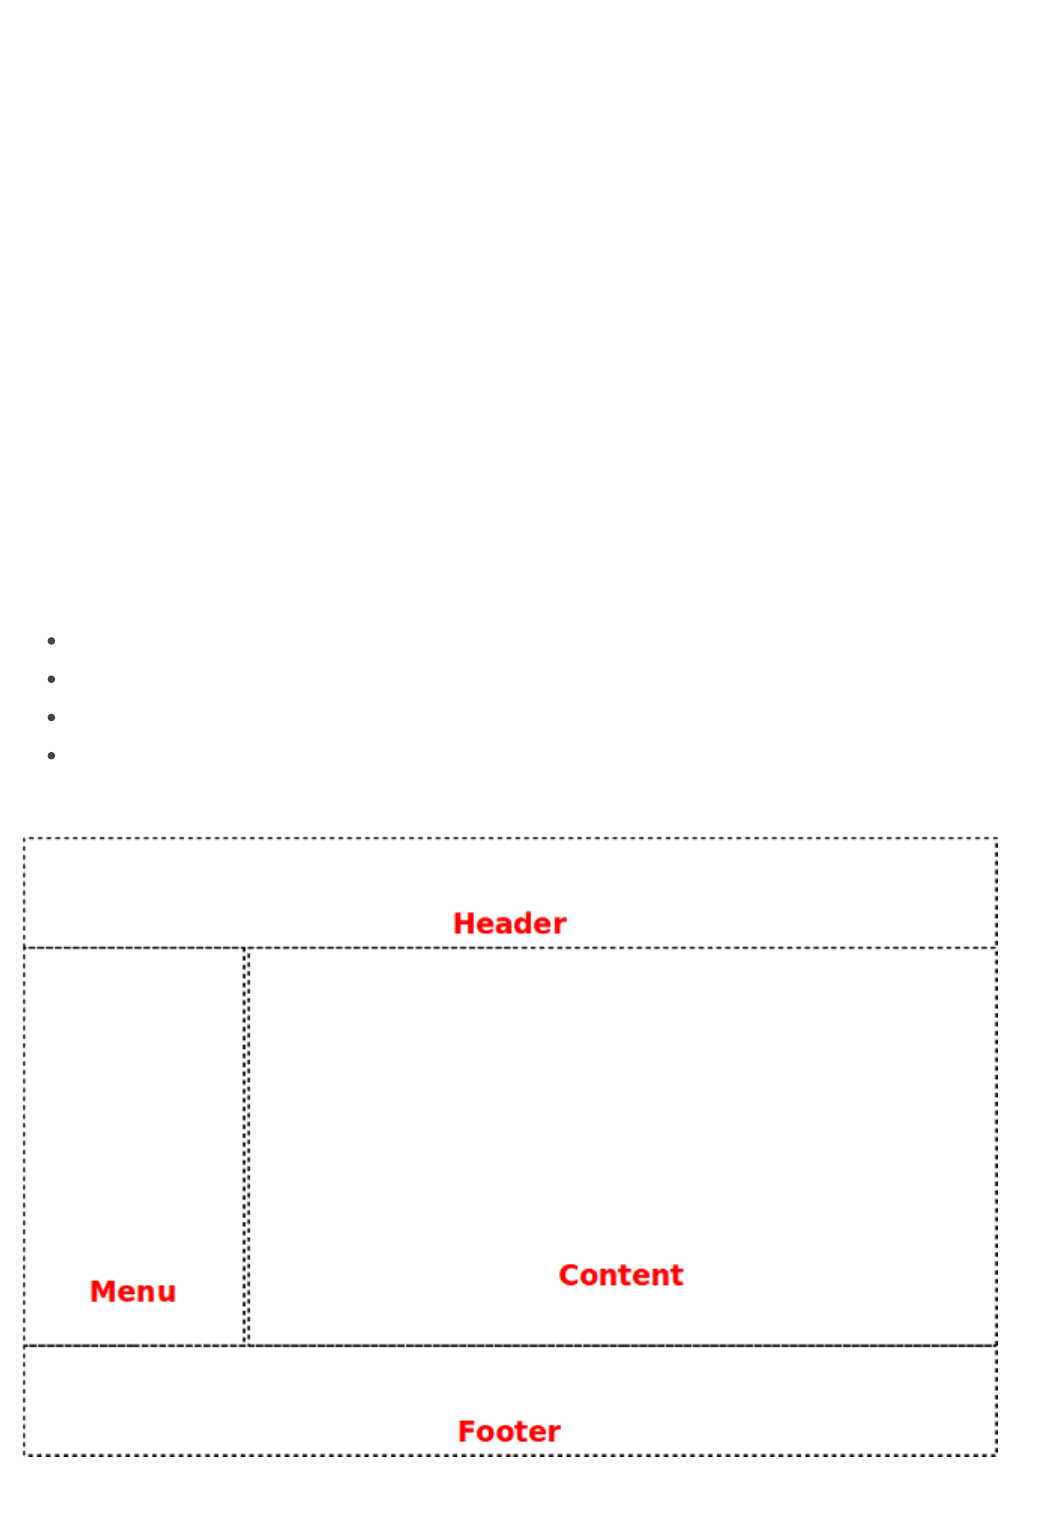
page layout consisting of the following areas:
a header which could contain site title, some logos, a navigation bar, etc...
a left menu with a bunch of links to different areas/functionalities of the site.
a footer with generic informations like web master's email, the company address, etc...
a content area which usually contains the functional part of the page.
The following picture summarises the layout structure:
Once we have chosen a page layout, our web designer can start building up the site theme. The result is a
beautiful mock of our future web pages. Over this mock we can map the original layout areas:
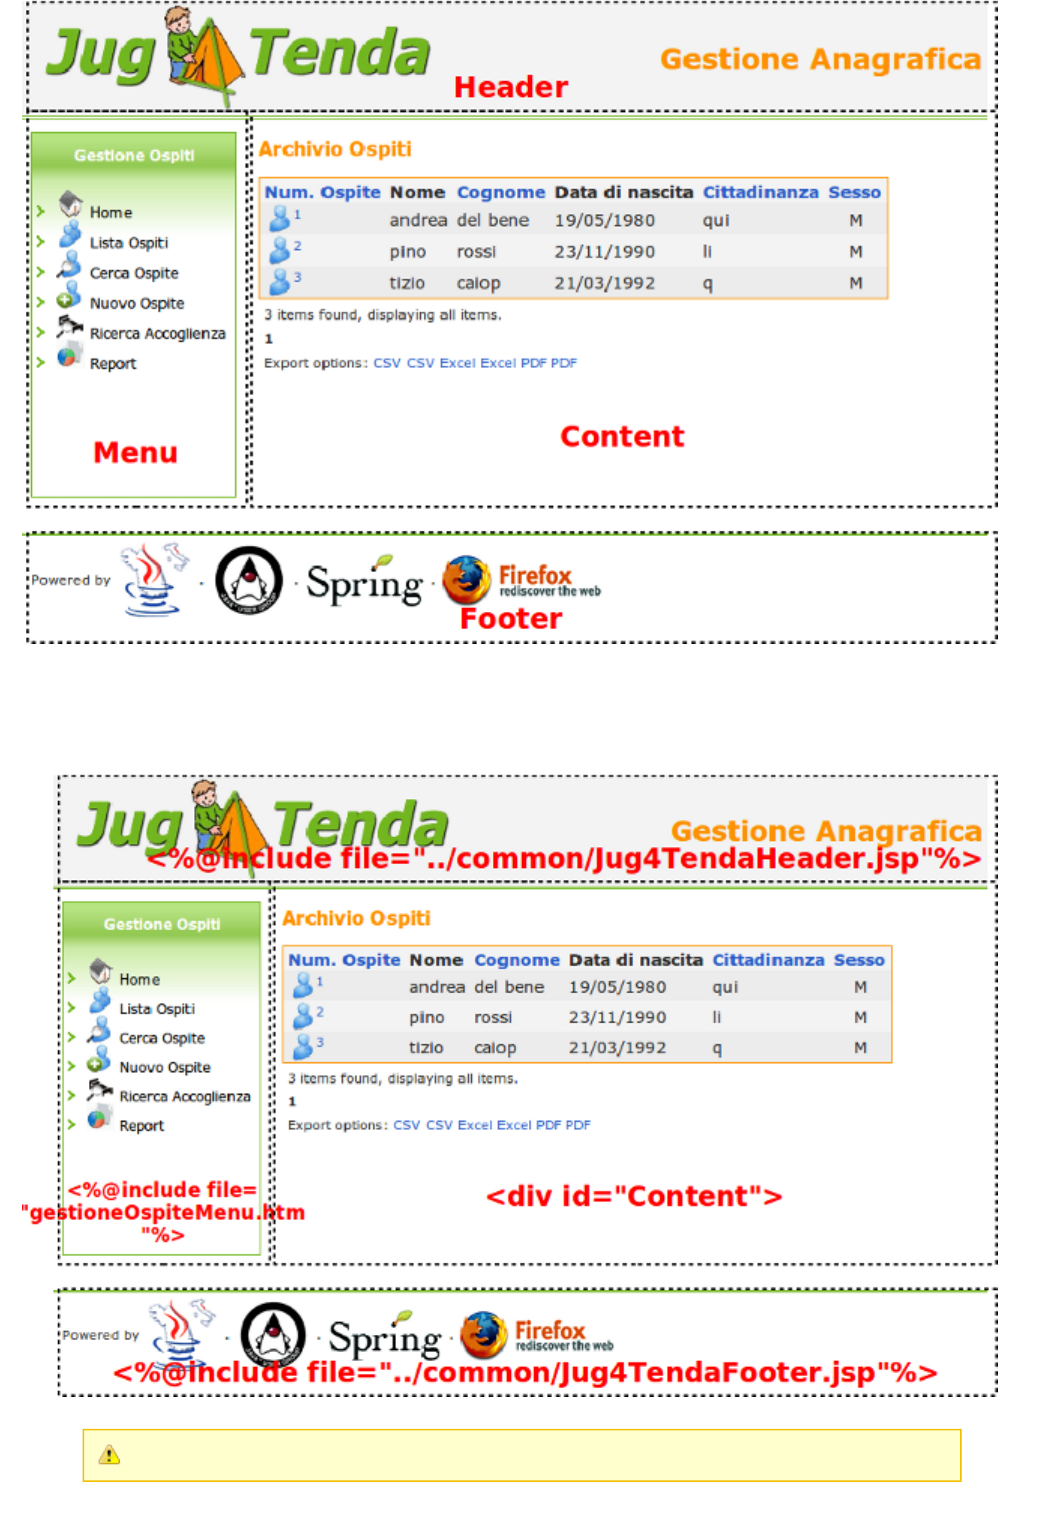
17
Now in order to have a consistent layout across all the site, we must ensure that each page will include the
layout areas seen above. With an old template-based approach we must manually put them inside every page. If
we were using JSP we would probably end up using directive to add layout areas in our pages. Weinclude
would have one for each of the areas (except for the content):include
For the sake of simplicity we can consider each included area as a static HTML fragment.
Now let's see how we can handle the layout of our web application using Wicket.
18
5.2 Here comes the inheritance!
The need of ensuring a consistent layout across our pages unveiled a serious limit of the HTML: the inability to
apply inheritance to web pages and their markup. Wouldn't be great if we could write our layout once in a page
and then inherit it in the other pages of our application? One of the goals of Wicket is to overcome this kind of
limit.
Markup inheritance
As we have seen in the previous chapter, Wicket pages are pure Java classes, so we can easily write a page
which is a subclass of another parent page. But in Wicket inheritance is not limited to the classic object-oriented
code inheritance. When a class subclasses a it also inherits the HTML file of the parent class. ThisWebPage
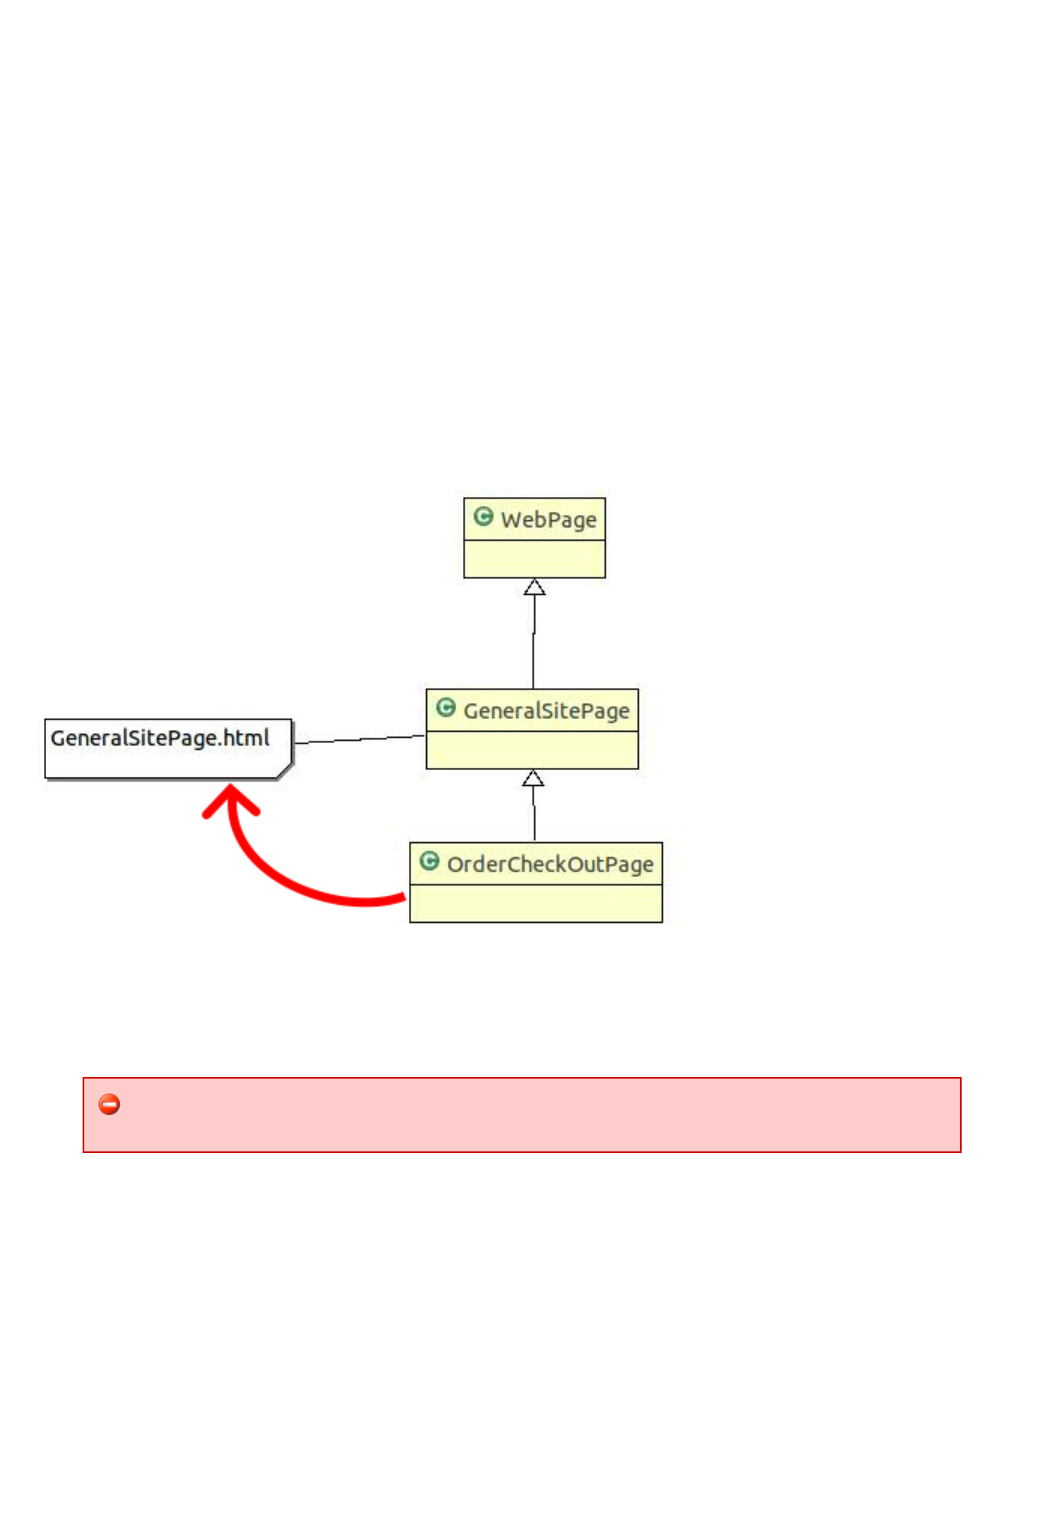
type of inheritance is called markup inheritance. To better illustrate this concept let's consider the following
example where we have a page class called with the corresponding HTML fileGenericSitePage
GenericSitePage.html. Now let's create a specific page called where users can check outOrderCheckOutPage
their orders on our web site. This class extends but we don't provide it with anyGenericSitePage
corresponding HTML file. In this scenario will use GenericSitePage.html as markup file:OrderCheckOutPage
Markup inheritance comes in handy for page layout management as it helps us avoid the burden of checking that
each page conforms to the site layout. However to fully take advantage of markup inheritance we must first learn
how to use another important component of the framework that supports this feature: the panel.
If no markup is found (nor directly assigned to the class, neither inherited from an
ancestor) a is thrown.MarkupNotFoundException
Panel class
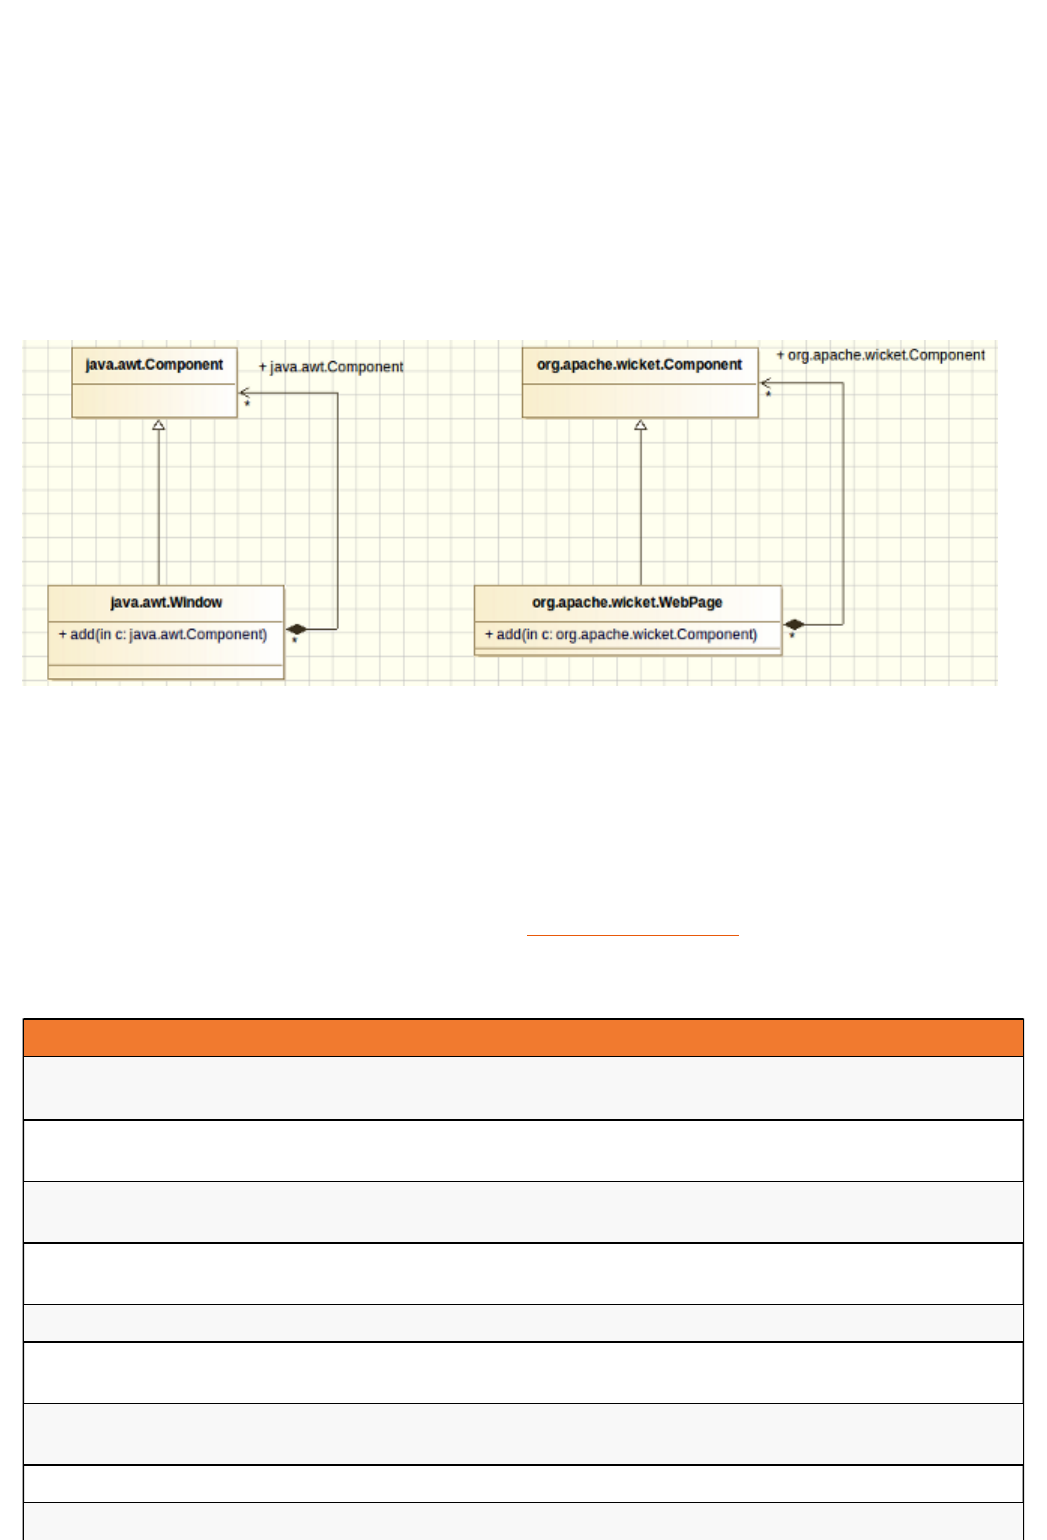
Class is a special component which lets us reuse GUIorg.apache.wicket.markup.html.panel.Panel
code and HTML markup across different pages and different web applications. It shares a common ancestor
class with WebPage class, which is :org.apache.wicket.MarkupContainer
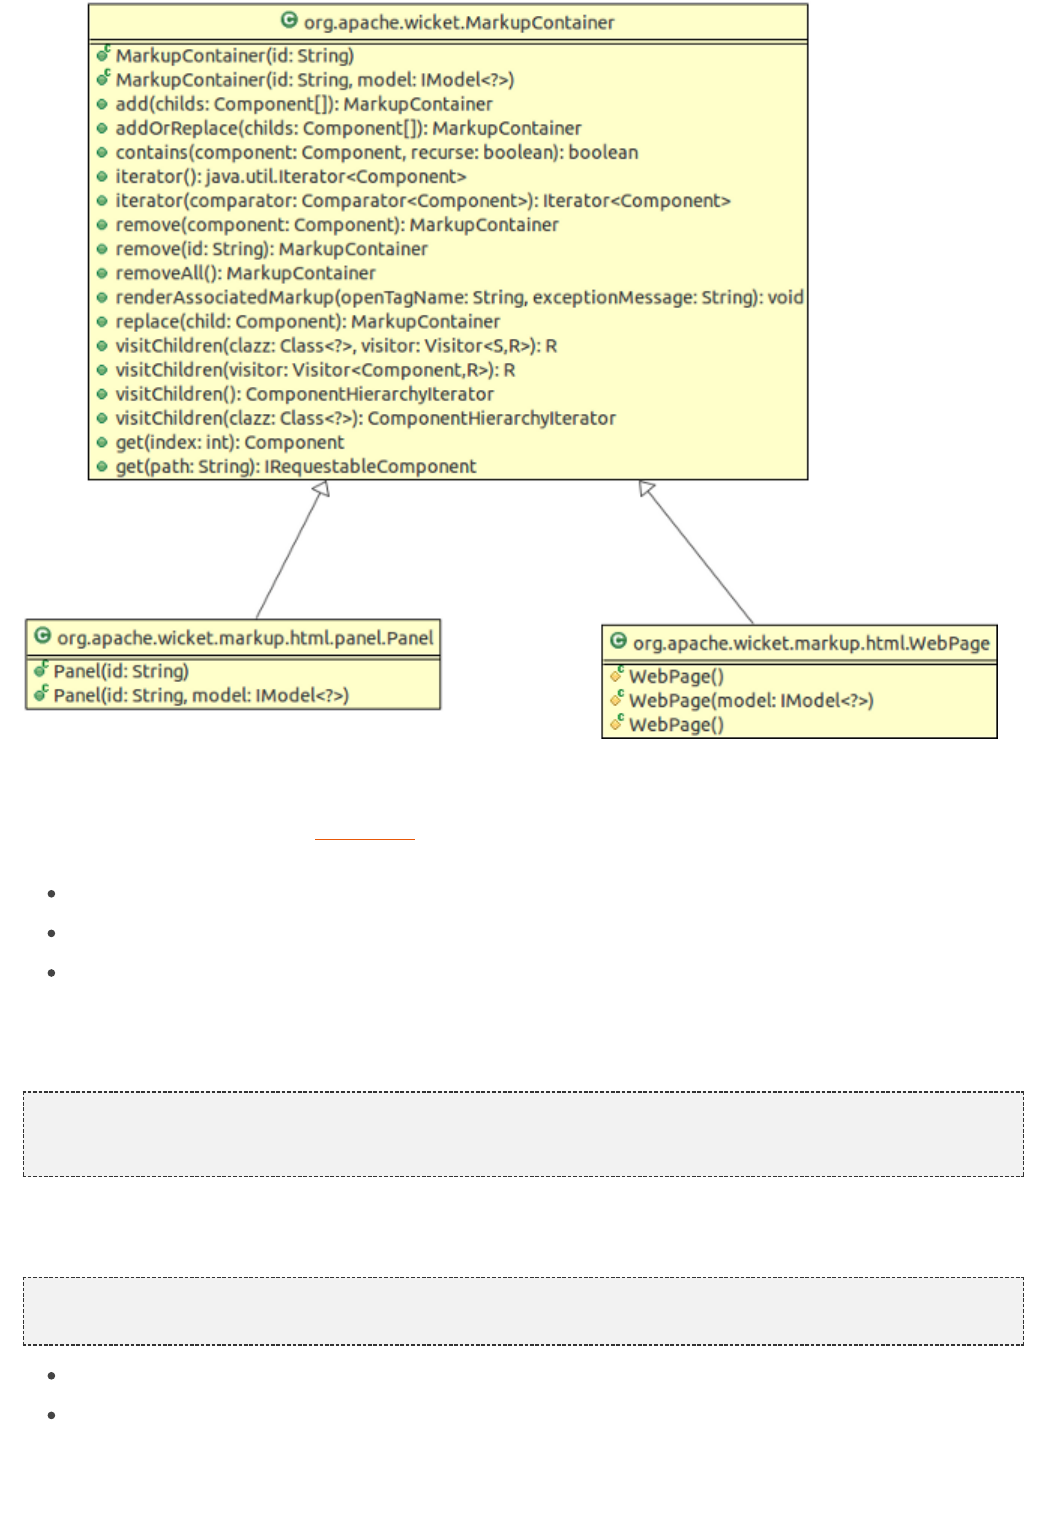
19
Illustration: Hierarchy of WebPage and Panel classes
Subclasses of can contain children components that can be added with method MarkupContainer
(seen in ). implements a full set of methods to manageadd(Component...) chapter 3.3 MarkupContainer
children components. The basic operations we can do on them are:
add one or more children components (with method ).add
remove a specific child component (with method ).remove
retrieve a specific child component with method . The string parameter is the id of theget(String)
component or its relative path if the component is nested inside other s. This path is aMarkupContainer
colon-separated string containing also the ids of the intermediate containers traversed to get to the child
component. To illustrate an example of component path, let's consider the code of the following page:
MyPanel myPanel = MyPanel ( );new "innerContainer"
add(myPanel);
Component is a custom panel containing only a label having as id. Under those conditions weMyPanel "name"
could retrieve this label from the container page using the following path expression:
Label name = (Label)get( );"innerContainer:name"
replace a specific child component with a new component having the same id (with method ).replace
iterate thought children components with the iterator returned by method or using visitoriterator
pattern1 with methods .visitChildren
Both and have their own associated markup file which is used to render the correspondingPanel WebPage
component. If such file is not provided, Wicket will apply markup inheritance looking for a markup file through

20
their ancestor classes. When a panel is attached to a container, the content of its markup file is inserted into its
related tag.
While panels and pages have much in common, there are some notable differences between these two
components that we should keep in mind. The main difference between them is that pages can be rendered as
standalone entities while panels must be placed inside a page to be rendered. Another important difference is
the content of their markup file: for both and this is a standard HTML file, but uses aWebPage Panel Panel
special tag to indicate which part of the whole file will be considered as markup source. This tag is
. A markup file for a panel will typically look like this:<wicket:panel>
<html>
<head>
<meta http-equiv= content= >"Content-Type" "text/html; charset=UTF-8"
…
</head>
<body>
<wicket:panel>
<!-- Your markup goes here -->
</wicket:panel>
</body>
</html>
The HTML outside tag will be removed during rendering phase. The space outside this tag<wicket:panel>
can be used by both web developers and web designers to place some mock HTML to show how the final panel
should look like.
5.3 Divide et impera!
Let's go back to our layout example. In we have divided our layout in common areas that must bechapter 5.1
part of every page. Now we will build a reusable template page for our web application combining pages and
panels. The code examples are from project MarkupInheritanceExample.
Panels and layout areas
First, let's build a custom panel for each layout area (except for 'content' area). For example given the header
area
we can build a panel called with a related markup file called HeaderPanel.html containing theHeaderPanel
HTML for this area:
<html>
<head>
<meta http-equiv= content= >"Content-Type" "text/html; charset=UTF-8"
…
</head>
<body>
<wicket:panel>
<table width= style= >"100%" "border: 0px none;"
<tbody>
<tr>
<td>
<img alt= src= >"Jug4Tenda" "wicketLayout_files/logo_jug4tenda.gif"
</td>
<td>
<h1>Gestione Anagrafica</h1>
</td>
</tr>
</tbody>
</table>
</wicket:panel>
</body>
<html>
The class for this panel simply extends base class :Panel
21
package helloWorld.layoutTenda;
org.apache.wicket.markup.html.panel.Panel;import
class HeaderPanel Panel {public extends
HeaderPanel( id) {public String
(id); super
}
}
For each layout area we will build a panel like the one above that holds the appropriate HTML markup. In the end
we will have the following set of panels:
HeaderPanel
FooterPanel
MenuPanel
Content area will change from page to page, so we don't need a reusable panel for it.
Template page
Now we can build a generic template page using our brand new panels. Its markup is quite straightforward :
<html>
<head>
<meta http-equiv= content= > "Content-Type" "text/html; charset=UTF-8"
…
<!--Include CSS-->
…
</head>
<body>
<div id= wicket:id= >header</div>"header" "headerPanel"
<div id= >"body"
<div id= wicket:id= >menu</div>"menu" "menuPanel"
<div id= wicket:id= >content</div>"content" "contentComponent"
</div>
<div id= wicket:id= >footer</div>"footer" "footerPanel"
</body>
</html>
The HTML code for this page implements the generic left-menu layout of our site. You can note the 4 <div>
tags used as containers for the corresponding areas. The page class contains the code to physically assemble
the page and panels:
package helloWorld.layoutTenda;
org.apache.wicket.markup.html.WebPage;import org.apache.wicket.Component;import org.apache.wicket.markup.html.basic.Label;import
class JugTemplate WebPage {public extends
CONTENT_ID = ;public static final String "contentComponent"
Component headerPanel;private
Component menuPanel;private
Component footerPanel;private
JugTemplate(){public
add(headerPanel = HeaderPanel( ));new "headerPanel"
add(menuPanel = MenuPanel( ));new "menuPanel"
add(footerPanel = FooterPanel( ));new "footerPanel"
add( Label(CONTENT_ID, ));new "Put your content here"
}
//getters layout areasfor
//…
}
Done! Our template page is ready to be used. Now all the pages of our site will be subclasses of this parent page
and they will inherit the layout and the HTML markup. They will only substitute the inserted as contentLabel
22
area with their custom content.
Final example
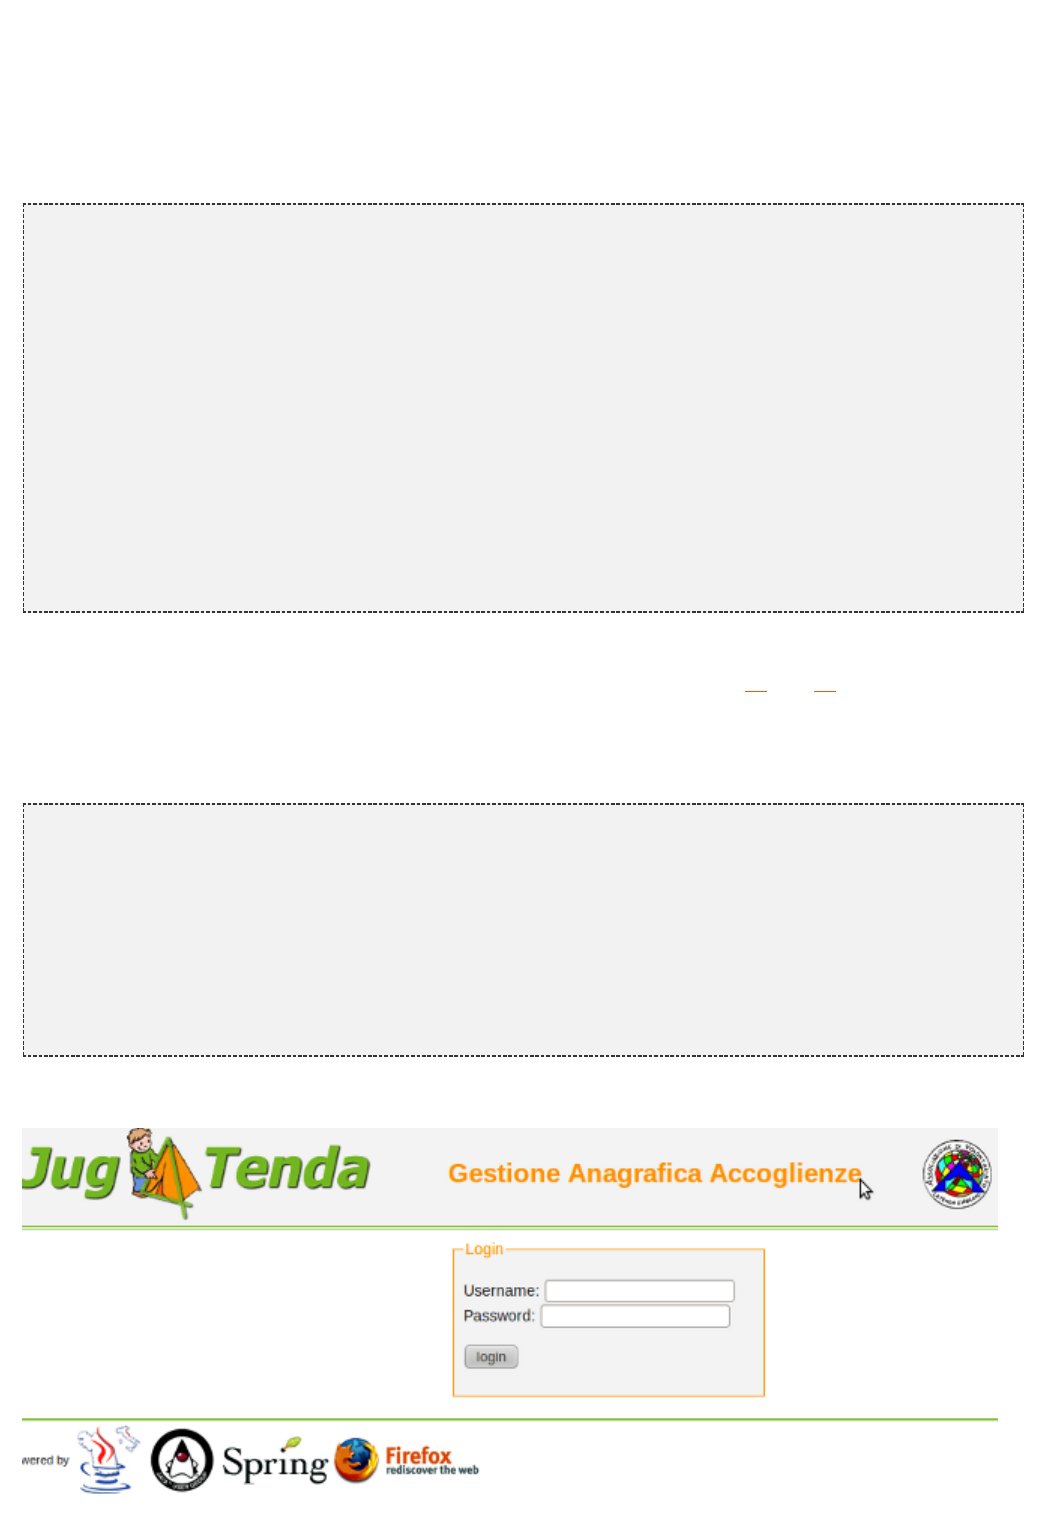
As final example we will build the login page for our site. We will call it . First, we need aSimpleLoginPage
panel containing the login form. This will be the content area of our page. We will call it and theLoginPanel
markup is the following:
<html>
<head>
</head>
<body>
<wicket:panel>
<div style= >"margin: auto; width: 40%;"
<form id= method= >"loginForm" "get"
<fieldset id= class= >"login" "center"
<legend >Login</legend>
<span >Username: </span><input type= id= /><br/> "text" "username"
<span >Password: </span><input type= id= />"password" "password"
<p>
<input type= name= value= />"submit" "login" "login"
</p>
</fieldset>
</form>
</div>
</wicket:panel>
</body>
</html>
The class for this panel just extends class so we won't see the relative code. The form of this panel is forPanel
illustrative purpose only. We will see how to work with Wicket forms in chapters and . Since this is a login11 12
page we don't want it to display the left menu area. That's not a big deal as class exposes a methodComponent
called which sets whether the component and its children should be displayed.setVisible
The resulting Java code for the login page is the following:
package helloWorld.layoutTenda;
helloWorld.LoginPanel;import org.apache.wicket.event.Broadcast;import org.apache.wicket.event.IEventSink;import
class SimpleLoginPage JugTemplate {public extends
SimpleLoginPage(){public
(); super
replace( LoginPanel(CONTENT_ID));new
getMenuPanel().setVisible( );false
}
}
Obviously this page doesn't come with a related markup file. You can see the final page in the following picture:

23
5.4 Markup inheritance with the wicket:extend tag
With Wicket we can apply markup inheritance using another approach based on the tag . This<wicket:child>
tag is used inside the parent's markup to define where the children pages/panels can “inject” their custom
markup extending the markup inherited from the parent component. An example of a parent page using the tag
is the following:<wicket:child>
<html>
<head>
<meta http-equiv= content= > "Content-Type" "text/html; charset=UTF-8"
</head>
<body>
This is parent body!
<wicket:child/>
</body>
</html>
The markup of a child page/panel must be placed inside the tag . Only the markup inside <wicket:extend>
will be included in final markup. Here is an example of child page markup:<wicket:extend>
<html>
<head>
<meta http-equiv= content= > "Content-Type" "text/html; charset=UTF-8"
</head>
<body>
<wicket:extend>
This is child body!
</wicket:extend>
</body>
</html>
Considering the two pages seen above, the final markup generated for child page will be the following:
<html>
<head>
<meta http-equiv= content= >"Content-Type" "text/html; charset=UTF-8"
</head>
<body>
This is parent body!
<wicket:child>
<wicket:extend>
This is child body!
</wicket:extend>
</wicket:child>
</body>
</html>
Our example revisited
Applying tag to our layout example, we obtain the following markup for the main template<wicket:child>
page:
<html>
<head>
<meta http-equiv= content= > "Content-Type" "text/html; charset=UTF-8"
</head>
<body>
<div id= wicket:id= >header</div>"header" "headerPanel"
<div id= >"body"
<div id= wicket:id= >menu</div>"menu" "menuPanel"
<wicket:child/>
</div>
<div id= wicket:id= >footer</div>"footer" "footerPanel"
</body>
</html>
24
We have replaced the tag of the content area with the tag . Going forward with our<div> <wicket:child>
example we can build a login page creating class which extends the page,SimpleLoginPage JugTemplate
but with a related markup file like this:
<html>
<head>
</head>
<body>
<wicket:extend>
<div style= >"margin: auto; width: 40%;"
<form id= method= >"loginForm" "get"
<fieldset id= class= >"login" "center"
<legend >Login</legend>
<span >Username: </span><input type= id= /><br/> "text" "username"
<span >Password: </span><input type= id= />"password" "password"
<p>
<input type= name= value= />"submit" "login" "login"
</p>
</fieldset>
</form>
</div>
</wicket:extend>
</body>
</html>
As we can see this approach doesn't require to create custom panels to use as content area and it can be useful
if we don't have to handle a GUI with a high degree of complexity.
5.5 Summary
Wicket applies inheritance also to HTML markup making layout management much easier and less error-prone.
Defining a master template page to use as base class for the other pages is a great way to build a consistent
layout and use it across all the pages on the web site. During the chapter we have also introduced the Panel
component, a very important Wicket class that is primarily designed to let us divide our pages in smaller and
reusable UI components.
25
6 Keeping control over HTML
Many Wicket newbies are initially scared by its approach to web development because they have the impression
that the component-oriented nature of the framework prevents them from having direct control over the
generated markup. This is due to the fact that many developers come from other server-side technologies like
JSP where we physically implement the logic that controls how the final HTML is generated.
This chapter will prevent you from having any initial misleading feeling about Wicket showing you how to control
and manipulate the generated HTML with the built-in tools shipped with the framework.
6.1 Hiding or disabling a component
At the end of the previous chapter we have seen how to hide a component calling its method . In asetVisible
similar fashion, we can also decide to disable a component using method . When a component issetEnabled
disabled all the links inside it will be in turn disabled (they will be rendered as ) and it can not fire<span>
JavaScript events.
Class provides two getter methods to determinate if a component is visible or enabled: Component isVisible
and .isEnabled
Even if nothing prevents us from overriding these two methods to implement a custom logic to determinate the
state of a component, we should keep in mind that methods and are called multipleisVisible isEnabled
times before a component is fully rendered. Hence, if we place non-trivial code inside these two methods, we can
sensibly deteriorate the responsiveness of our pages.
As we will see in the next chapter, class provides method which is more suited toComponent onConfigure
contain code that contributes to determinate component states because it is called just once during rendering
phase.
6.2 Modifing tag attributes
To modify tag attributes we can use class . This class extends org.apache.wicket.AttributeModifier
and can be added to any component via the 's org.apache.wicket.behavior.Behavior Component add
method. Class is used to expand component functionalities and it can also modify componentBehavior
markup. We will see this class in detail later in .chapter 17.1
As first example of attribute manipulation let's consider a component bound to the following markup:Label
<span wicket:id= ></span>"simpleLabel"
Suppose we want to add some style to label content making it red and bolded. We can add to the label an
which creates the tag attribute with value :AttributeModifier style "color:red;font-weight:bold"
label.add( AttributeModifier( , ));new "style" "color:red;font-weight:bold"
If attribute already exists in the original markup, it will be replaced with the value specified by style
. If we don't want to overwrite the existing value of an attribute we can use subclass AttributeModifier
which will append its value to the existing one:AttributeAppender
label.add( AttributeAppender( , ));new "style" "color:red;font-weight:bold"
We can also create attribute modifiers using factory methods provided by class and it'sAttributeModifier
26
also possible to prepend a given value to an existing attribute:
//replaces existing value with the given one
label.add(AttributeModifier.replace( , ));"style" "color:red;font-weight:bold"
//appends the given value to the existing one
label.add(AttributeModifier.append( , ));"style" "color:red;font-weight:bold"
//prepends the given value to the existing one
label.add(AttributeModifier.prepend( , ));"style" "color:red;font-weight:bold"
6.3 Generating tag attribute 'id'
Tag attribute plays a crucial role in web development as it allows JavaScript to identify a DOM element.id
That's why class provides two dedicated methods to set this attribute. With method Component
we can decide if the attribute will be rendered or not in the finalsetOutputMarkupId(boolean output) id
markup (by default is not rendered). The value of this attribute will be automatically generated by Wicket and it
will be unique for the entire page. If we need to specify this value by hand, we can use method
. The value of the id can be retrieved with method .setMarkupId(String id) getMarkupId()
6.4 Creating in-line panels with WebMarkupContainer
Create custom panels is a great way to handle complex user interfaces. However, sometimes we may need to
create a panel which is used only by a specific page and only for a specific task.
In situations like these component is betterorg.apache.wicket.markup.html.WebMarkupContainer
suited than custom panels because it can be directly attached to a tag in the parent markup without needing a
corresponding html file (hence it is less reusable). Let's consider for example the main page of a mail service
where users can see a list of received mails. Suppose that this page shows a notification box where user can
see if new messages have arrived. This box must be hidden if there are no messages to display and it would be
nice if we could handle it as if it was a Wicket component.
Suppose also that this information box is a tag like this inside the page:<div>
<div wicket:id= >"informationBox"
//here's the body
You've got <span wicket:id= ></span> messages."messagesNumber" new
</div>
Under those conditions we can consider using a component rather than implementing aWebMarkupContainer
new panel. The code needed to handle the information box inside the page could be the following:
//Page initialization code
WebMarkupContainer informationBox = WebMarkupContainer ( );new "informationBox"
informationBox.add( Label( , messagesNumber));new "messagesNumber"
add(informationBox);
//If there are no messages, hide informationBoxnew
informationBox.setVisible( );false
As you can see in the snippet above we can handle our information box from Java code as we do with any other
Wicket component.
6.5 Working with markup fragments
Another circumstance in which we may prefer to avoid the creation of custom panels is when we want to
conditionally display in a page small fragments of markup. In this case if we decided to use panels, we would end
up having a huge number of small panel classes with their related markup file.
To better cope with situations like this, Wicket defines component in package Fragment
. Just like its parent component ,org.apache.wicket.markup.html.panel WebMarkupContainer
Fragment doesn't have its own markup file but it uses a markup fragment defined in the markup file of its parent

27
container, which can be a page or a panel. The fragment must be delimited with tag and<wicket:fragment>
must be identified by a attribute. In addition to the component id, 's constructor takes aswicket:id Fragment
input also the id of the fragment and a reference to its container.
In the following example we have defined a fragment in a page and we used it as content area:
Page markup:
<html>
…
<body>
…
<div wicket:id= ></div>"contentArea"
<wicket:fragment wicket:id= >"fragmentId"
<!-- Fragment markup goes here -->
</wicket:fragment>
</body>
</html>
Java code:
Fragment fragment = Fragment ( , , );new "contentArea" "fragmentId" this
add(fragment);
Fragments can be very helpful with complex pages or components. For example let's say that we have a page
where users can register to our forum. This page should first display a form where user must insert his/her
personal data (name, username, password, email and so on), then, once the user has submitted the form, the
page should display a message like “Your registration is complete! Please check your mail to activate your user
profile.”.
Instead of displaying this message with a new component or in a new page, we can define two fragments: one
for the initial form and one to display the confirmation message. The second fragment will replace the first one
after the form has been submitted:
Page markup:
<html>
<body>
<div wicket:id= ></div>"contentArea"
<wicket:fragment wicket:id= >"formFrag"
<!-- Form markup goes here -->
</wicket:fragment>
<wicket:fragment wicket:id= >"messageFrag"
<!-- Message markup goes here -->
</wicket:fragment>
</body>
</html>
Java code:
Fragment fragment = Fragment ( , , );new "contentArea" "formFrag" this
add(fragment);
//form has been submitted
Fragment fragment = Fragment ( , , );new "contentArea" "messageFrag" this
replace(fragment);
6.6 Adding header contents to the final page
Panel's markup can also contain HTML tags which must go inside header section of the final page, like tags
or . To tell Wicket to put these tags inside page , we must surround them with the <script> <style> <head>
tag.<wicket:head>
Considering the markup of a generic panel, we can use tag in this way:<wicket:head>
28
<wicket:head>
<script type= >"text/javascript"
function myPanelFunction(){
}
</script>
<style>
.myPanelClass{
font-weight: bold;
color: red;
}
</style>
</wicket:head>
<body>
<wicket:panel>
</wicket:panel>
</body>
Wicket will take care of placing the content of inside the tag of the final page.<wicket:head> <head>
The tag can also be used with children pages/panels which extend<wicket:head>
parent markup using tag .<wicket:extend>
The content of the tag is added to the header section once per<wicket:head>
component class. In other words, if we add multiple instances of the same panel to a
page, the tag will be populated just once with the content of .<head> <wicket:head>
The tag is ideal if we want to define small in-line blocks of CSS or<wicket:head>
JavaScript. However Wicket provides also a more sophisticated technique to let
components contribute to header section with in-line blocks and resource files like CSS or
JavaScript files. We will see this technique later in .chapter 15
6.7 Using stub markup in our pages/panels
Wicket's tag can be very useful when our web designer needs to show us how a page or a<wicket:remove>
panel should look like. The markup inside this tag will be stripped out in the final page, so it's the ideal place for
web designers to put their stub markup:
<html>
<head>
</head>
<body>
<wicket:remove>
<!-- Stub markup goes here -->
</wicket:remove>
</body>
</html>
6.8 How to render component body only
When we bind a component to its corresponding tag we can choose to get rid of this outer tag in the final
markup. If we call method on a component Wicket will remove the surroundingsetRenderBodyOnly(true)
tag.
For example given the following markup and code:
HTML markup:
<html>
<head>
<title>Hello world page</title>
</head>
<body>
29
<div wicket:id= >[helloWorld]</div>"helloWorld"
</body>
</html>
Java code:
Label label = Label( , “Hello World!”);new "helloWorld"
label.setRenderBodyOnly( );true
add(label);
the output will be:
<html>
<head>
<title>Hello world page</title>
</head>
<body>
Hello World!
</body>
</html>
As you can see the tag used for component is not present in the final markup.<div> Label
6.9 Hiding decorating elements with the wicket:enclosure tag
Our data are rarely displayed alone without a caption or other graphic elements that make clear the meaning of
their value. For example:
<label>Total amount: </label><span wicket:id= ></span>"totalAmount"
Wicket comes with a nice utility tag called that automatically hides those decorating<wicket:enclosure>
elements if the related data value is not visible. All we have to do is to put the involved markup inside this tag.
Applying to the previous example we get the following markup:<wicket:enclosure>
<wicket:enclosure>
<label>Total amount: </label><span wicket:id= ></span>"totalAmount"
</wicket:enclosure>
Now if component is not visible, its description ( ) will be automatically hidden. IftotalAmount Total amount:
we have more than a Wicket component inside we can use attribute to specify<wicket:enclosure> child
which component will control the overall visibility:
<wicket:enclosure child= > "totalAmount"
<label>Total amount: </label><span wicket:id= ></span><br/>"totalAmount"
<label>Expected delivery date: </label><span wicket:id= ></span>"delivDate"
</wicket:enclosure>
attribute supports also nested components with a colon-separated path:child
<wicket:enclosure child= > "totalAmountContainer:totalAmount"
<div wicket:id= >"totalAmountContainer"
<label>Total amount: </label><span wicket:id= ></span>"totalAmount"
</div>
<label>Expected delivery date: </label><span wicket:id= ></span>"delivDate"
</wicket:enclosure>
6.10 Surrounding existing markup with Border
30
Component is a special purpose container created toorg.apache.wicket.markup.html.border.Border
enclose its tag body with its related markup. Just like panels and pages, borders also have their own markup file
which is defined following the same rules seen for panels and pages. In this file tag is used<wicket:border>
to indicate which part of the content is to be considered as border markup:
<?xml version= encoding= ?>"1.0" "UTF-8"
<html xmlns= xmlns:wicket= >"http://www.w3.org/1999/xhtml" "http://wicket.apache.org"
<head></head>
<body>
<!-- everything above <wicket:border> tag will be discarded...-->
<wicket:border>
<div>
foo<br />
<wicket:body/><br />
buz <br />
</div>
</wicket:border>
<!-- everything below </wicket:border> tag will be discarded...-->
</body>
</html>
The tag used in the example above is used to indicate where the body of the tag will be<wicket:body/>
placed inside border markup. Now if we attached this border to the following tag
<span wicket:id= >"myBorder"
bar
</span>
we would obtain the following resulting HTML:
<span wicket:id= >"myBorder"
<div>
foo<br />
bar<br />
buz <br />
</div>
</span>
can also contain children components which can be placed either inside its markup file or inside itsBorder
corresponding HTML tag. In the first case children must be added to the border component with method
, while in the second case we must use the method.addToBorder(Component...) add(Component...)
The following example illustrates both use cases:
Border class:
public class MyBorder Border {extends
MyBorder( id) {public String
(id); super
}
}
Border Markup:
<?xml version= encoding= ?>"1.0" "UTF-8"
<html xmlns= xmlns:wicket= >"http://www.w3.org/1999/xhtml" "http://wicket.apache.org"
<head></head>
<body>
<wicket:border>
<div>
<div wicket:id= ></div>"childMarkup"
<wicket:body/><br />
</div>
</wicket:border>
31
</body>
</html>
Border tag:
<div wicket:id= >"myBorder"
<span wicket:id= ></span>"childTag"
</div>
Initialization code for border:
MyBorder myBorder = MyBorder( );new "myBorder"
myBorder.addToBorder( Label( , ));new "childMarkup" "Child inside markup."
myBorder.add( Label( , ));new "childTag" "Child inside tag."
add(myBorder);
6.11 Summary
In this chapter we have seen the tools provided by Wicket to gain complete control over the generated HTML.
However we didn't see yet how we can repeat a portion of HTML with Wicket. With classic server-side
technologies like PHP or JSP we use loops (like or ) inside our pages to achieve this result. Towhile for
perform this task Wicket provides a special-purpose family of components called repeaters and designed to
repeat their markup body to display a set of items.
But to fully understand how these components work, we must first learn more of Wicket's basics. That's why
repeaters will be introduced later in .chapter 13
32
1.
2.
3.
7 Components lifecycle
Just like applets and servlets, also Wicket components follow a lifecycle during their existence. In this chapter we
will analyze each stage of this cycle and we will learn how to make the most of the hook methods that are
triggered when a component moves from one stage to another.
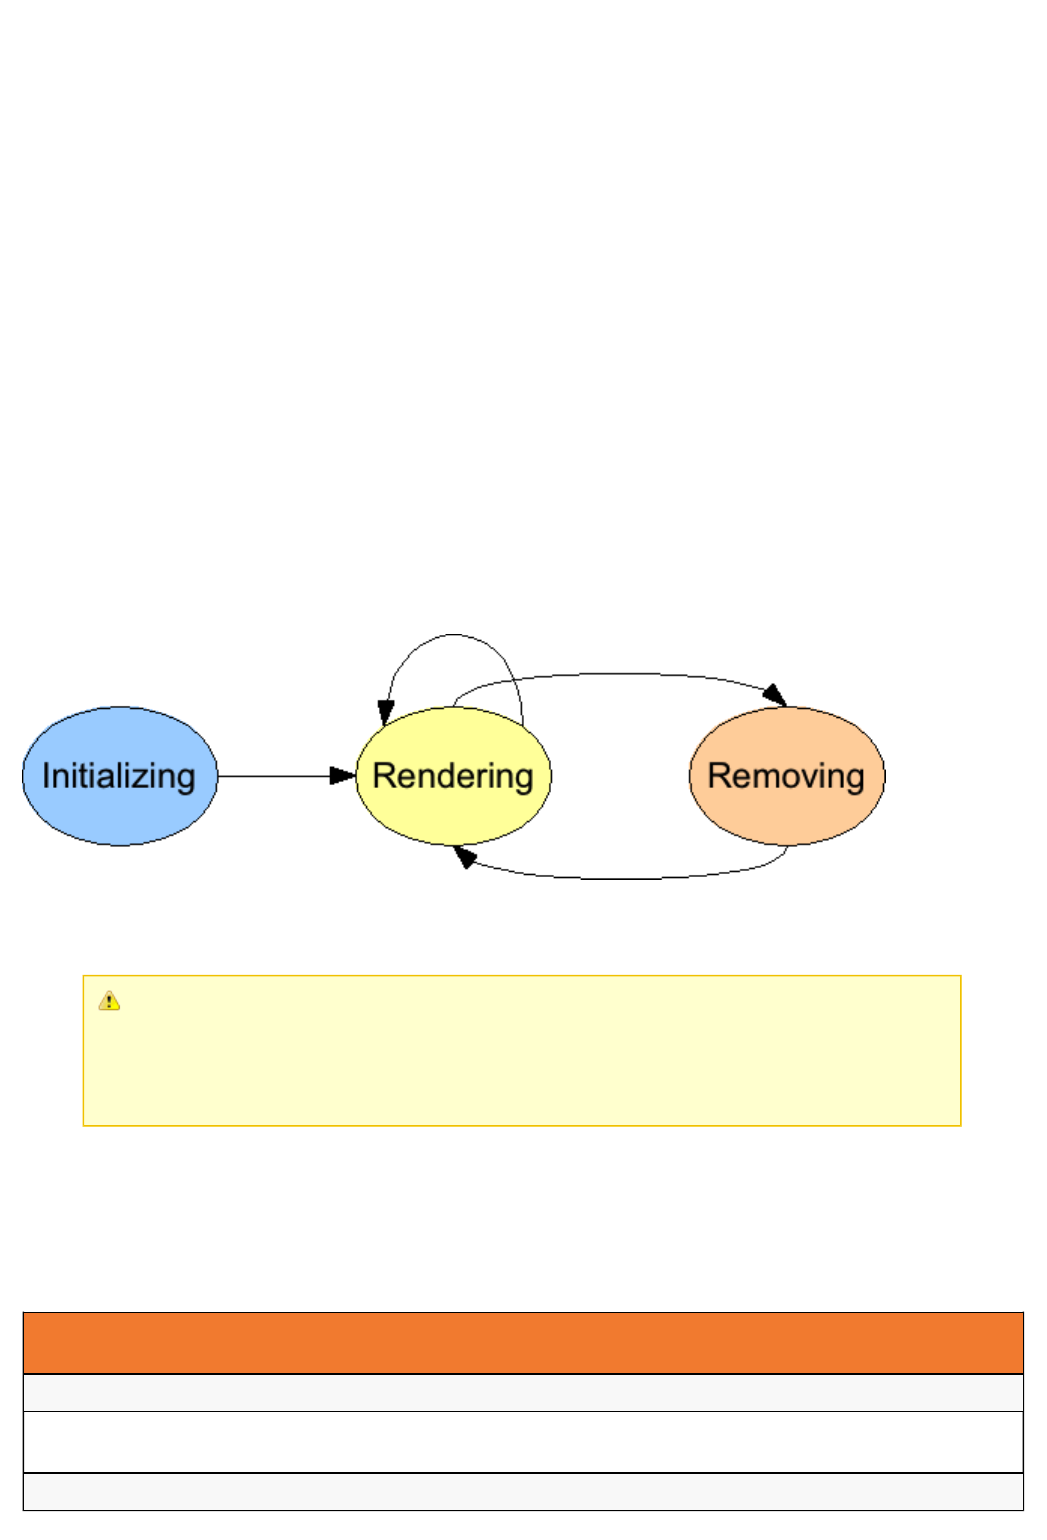
7.1 Lifecycle stages of a component
During its life a Wicket component goes through three basic stages:
Initialization: a component is instantiated by Wicket and prepared for the rendering phase.
Rendering: in this stage Wicket generates component markup. If a component contains children (i.e. is a
subclass of ) it must first wait for them to be rendered before starting its own rendering.MarkupContainer
Removing: this stage is triggered when a component is explicitly removed from its component hierarchy,
i.e. when its parent invokes on it. This stage is facultative and is never triggered forremove(component)
pages.
The following picture shows the state diagram of component lifecycle:
Once a component has been removed it can be added again to a container, but the initialization stage won't be
executed again.
If you read the JavaDoc of class you will find a more detailed description ofComponent
component lifecycle. However this description introduces some advanced topics we didn't
covered yet hence, to avoid confusion, in this chapter some details have been omitted and
they will be covered later in the next chapters.
For now you can consider just the simplified version of the lifecycle described above.
7.2 Hook methods for component lifecycle
Class comes with a number of hook methods that can be overridden in order to customizeComponent
component behavior during its lifecycle. In the following table these methods are grouped according to the stage
in which they are invoked (and they are sorted by execution order):
Cycle
stage Involved methods
Initialization onInitialize
Rendering onConfigure, onBeforeRender, onRender, onComponentTag, onComponentTagBody,
onAfterRenderChildren, onAfterRender
Removing onRemove
33
Now let's take a closer look at each stage and to at hook methods.
7.3 Initialization stage
This stage is performed at the beginning of the component lifecycle. During initialization, the component has
already been inserted into its component hierarchy so we can safely access to its parent container or to its page
with methods or . The only method triggered during this stage is .getParent() getPage() onInitialize()
This method is a sort of “special” constructor where we can execute a custom initialization of our component.
Since is similar to a regular constructor, when we override this method we have to call onInitialize
inside its body, usually as first instruction.super.onInitialize
7.4 Rendering stage
This stage is triggered each time a component is rendered by Wicket, typically when its page is requested or
when it is refreshed via AJAX.
Method onConfigure
Method has been introduced in order to provide a good point to manage the component statesonConfigure()
such as its visibility or enabled state. This method is called before the render phase starts. As stated in chapter
, and are called multiple times when a page or a component is rendered, so it's6.1 isVisible isEnabled
highly recommended not to directly override these method, but rather to use to changeonConfigure
component states. On the contrary method (see the next paragraph) is not indicated for thisonBeforeRender
task because it will not be invoked if component visibility is set to false.
Method onBeforeRender
The most important hook method of this stage is probably . This method is called before aonBeforeRender()
component starts its rendering phase and it is our last chance to change its children hierarchy.
If we want add/remove children components this is the right place to do it. In the next example (project
LifeCycleStages) we will create a page which alternately displays two different labels, swapping between them
each time it is rendered:
public class HomePage WebPageextends
{
Label firstLabel;private
Label secondLabel;private
HomePage(){public
firstLabel = Label( , );new "label" "First label"
secondLabel = Label( , );new "label" "Second label"
add(firstLabel);
add( Link( ){new "reload"
@Override
void onClick() {public
}
});
}
@Override
void onBeforeRender() {protected
(contains(firstLabel, ))if true
replace(secondLabel);
else
replace(firstLabel);
.onBeforeRender();super
}
}
The code inside is quite trivial as it just checks which label among and onBeforeRender() firstLabel
is currently inserted into the component hierarchy and it replaces the inserted label with the othersecondLabel
one.
This method is also responsible for invoking children so if we decide to override it we haveonBeforeRender()
to call . However, unlike , the call to superclass method shouldsuper.onBeforeRender() onInitialize()
34
be placed at the end of method's body in order to affect children's rendering with our custom code.
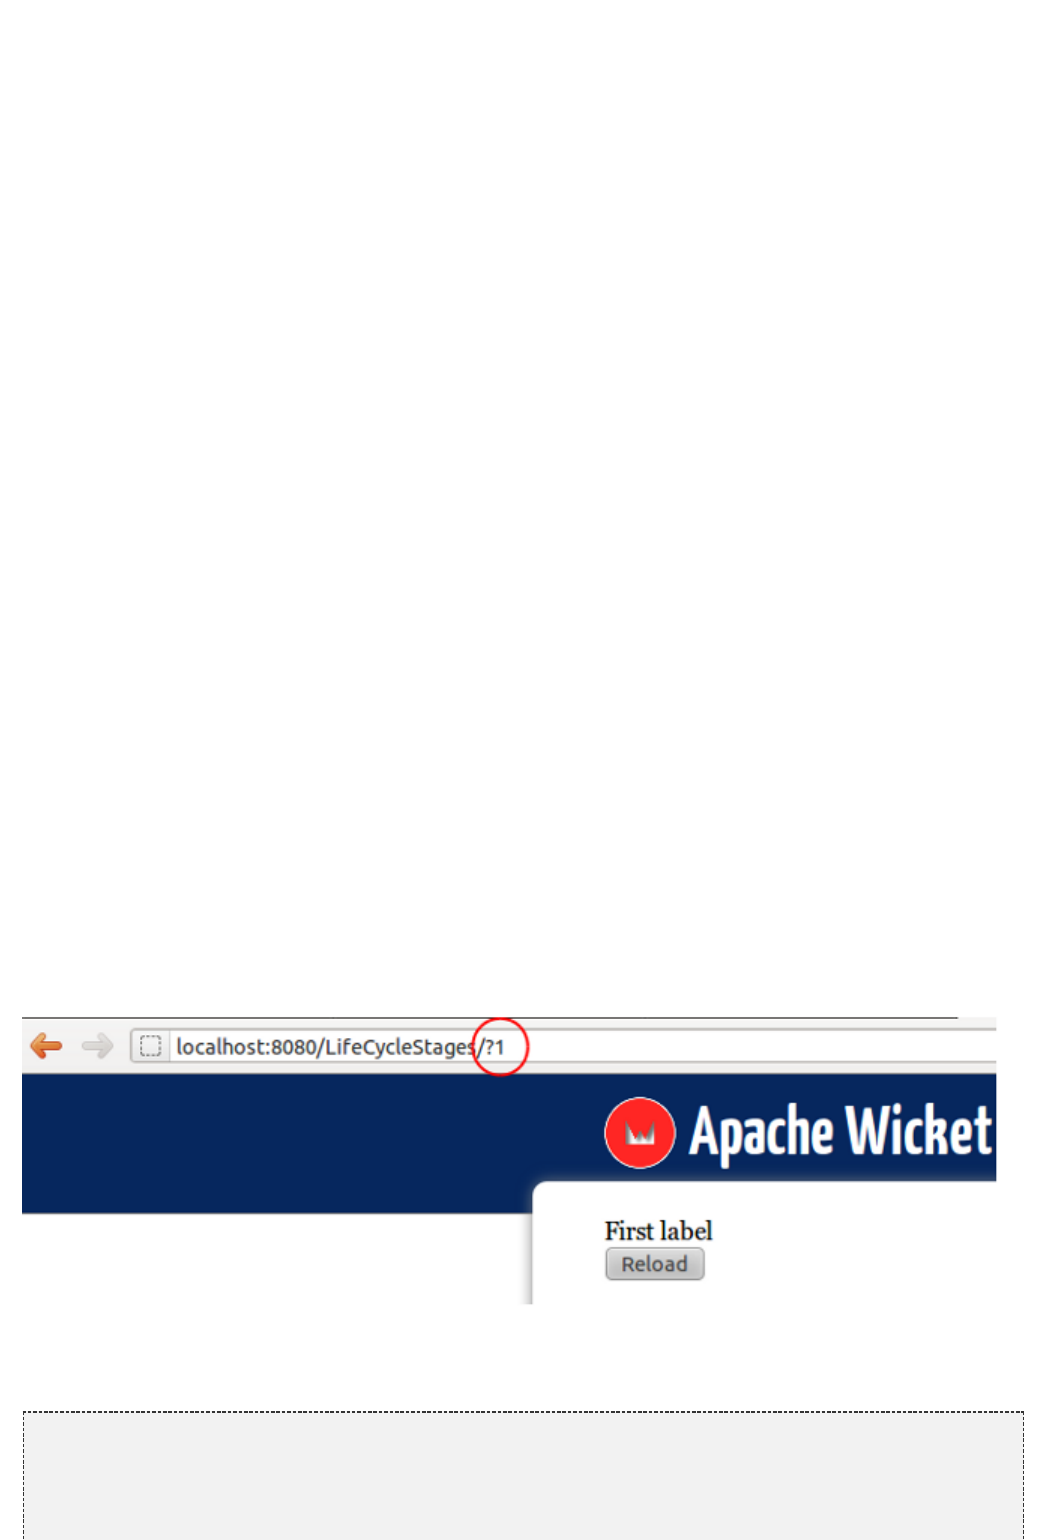
Please note that in the example above we can trigger the rendering stage pressing F5 key or clicking on link
“reload”.
If we forget to call superclass version of methods or onInitialize()
, Wicket will throw an with the followingonBeforeRender() IllegalStateException
message:
org.apache.wicket.Componentjava.lang.IllegalStateException: has not
been properly initialized. Something in the hierarchy of <page
class name> has not called super.onInitialize()/onBeforeRender()
in the override of onInitialize()/ onBeforeRender() method
Method onComponentTag
Method is called to process component tag, which can be freelyonComponentTag(ComponentTag)
manipulated through its argument of type . For example weorg.apache.wicket.markup.ComponentTag
can add/remove tag attributes with methods and put(String key, String value) remove(String
, or we can even decide to change the tag or rename it with method (the followingkey) setName(String)
code is taken from project OnComponentTagExample):
Markup code:
<head>
<meta charset= />"utf-8"
<title></title>
</head>
<body>
<h1 wicket:id= ></h1> "helloMessage"
</body>
Java code:
public class HomePage WebPage {extends
HomePage() {public
add( Label( , ){new "helloMessage" "Hello World"
@Override
void onComponentTag(ComponentTag tag) { protected
.onComponentTag(tag);super
//Turn the h1 tag to a span
tag.setName( );"span"
//Add formatting style
tag.put( , );"style" "font-weight:bold"
}
});
}
}
Generated markup:
<head>
<meta charset= />"utf-8"
<title></title>
</head>
<body>
<span wicket:id= style= >Hello World</span> "helloMessage" "font-weight:bold"
</body>
Just like we do with , if we decide to override we must remember to call theonInitialize onComponentTag
same method of the super class because also this class may also customize the tag. Overriding
is perfectly fine if we have to customize the tag of a specific component, but if we wanted toonComponentTag
reuse the code across different components we should consider to use a behavior in place of this hook method.
35
We have already seen in how to use behavior to manipulate the tag'schapter 6.2 AttributeModifier
attribute. In we will see that base class offers also a callback method named chapter 17.1 Behavior
that can be used in place of the hook method onComponentTag(ComponentTag, Component)
.onComponentTag(ComponentTag)
Methods onComponentTagBody
Method is called to process the component tag'sonComponentTagBody(MarkupStream, ComponentTag)
body. Just like it takes as input a parameter representing the componentonComponentTag ComponentTag
tag. In addition, we also find a parameter which represents the page markup stream that will beMarkupStream
sent back to the client as response.
can be used in combination with the 's method onComponentTagBody Component
to render a custom body under specific conditions. For example (taken fromreplaceComponentTagBody
project OnComponentTagExample) we can display a brief description instead of the body if the label component
is disabled:
public class HomePage WebPage {extends
HomePage() {public
add( Label( , ){new "helloMessage" "Hello World"
@Override
void onComponentTagBody(MarkupStream markupStream, ComponentTag tag) {protected
(!isEnabled())if
replaceComponentTagBody(markupStream, tag, ); "(the component is disabled)"
else
.onComponentTagBody(markupStream, tag);super
}
});
}
}
Note that the original version of is invoked only when we want to preserve the standardonComponentTagBody
rendering mechanism for the tag's body (in our example this happens when the component is enabled).
7.5 Removing stage
This stage is triggered when a component is removed from its container hierarchy. The only hook method for this
phase is . If our component still holds some resources needed during rendering phase, we canonRemove()
override this method to release them.
Once a component has been removed we are free to add it again to the same container or to a different one.
Starting from version 6.18.0 Wicket added a further hook method called which is triggered everyonReAdd()
time a previously removed component is re-added to a cointainer. Please note that while isonInitialize
called only the very first time a component is added, is called every time it is re-added after havingonReAdd
been removed.
7.6 Summary
In this chapter we have seen which stages compose the lifecycle of Wicket components and which hook
methods they provide. Overriding these methods we can dynamically modify the component hierarchy and we
can enrich the behavior of our custom components.
36
8 Page versioning and caching
This chapter explains how Wicket manages page instances, underlining the difference between stateful and
stateless pages. The chapter also introduces some advanced topics like Java Serialization and multi-level cache.
However, to understand what you will read you are not required to be familiar with these concepts.
8.1 Stateful pages vs stateless
Wicket pages can be divided into two categories: stateful and stateless pages. Stateful pages are those which
rely on user session to store their internal state and to keep track of user interaction. On the contrary stateless
pages are those which don't change their internal state during their lifecycle and they don't need to occupy space
into user session.
From Wicket's point of view the biggest difference between these two types of page is that stateful pages are
versioned, meaning that they will be saved into user session every time their internal state has changed. Wicket
automatically assigns a session to the user the first time a stateful page is requested. Page versions are stored
into user session using Java Serialization mechanism. Stateless pages are never versioned and that's why they
don't require a valid user session. If we want to know whether a page is stateless or not, we can call the
isPageStateless() method of class Page.
In order to build a stateless page we must comply with some rules to ensure that the page won't need to use
user session. These rules are illustrated in paragraph 8.3 but before talking about stateless pages we must first
understand how stateful pages are handled and why they are versioned.
8.2 Stateful pages
Stateful pages are versioned in order to support browser's back button: when this button is pressed Wicket must
respond by rendering the same page instance previously used.
A new page version is created when a stateful page is requested for the first time or when an existing instance is
modified (for example changing its component hierarchy). To identify each page version Wicket uses a
session-relative identifier called page id. This is a unique number and it is increased every time a new page
version is created.
In the final example of the previous chapter (project LifeCycleStages), you may have noticed the number
appended at the end of URL. This number is the page id we are talking about:
In this chapter we will use a revised version of this example project where the component hierarchy is modified
inside the Link's onClick()method. This is necessary because Wicket creates a new page version only if the page
is modified before its method onBeforeRender() is invoked. The code of the new home page is the following:
public class HomePage WebPageextends
{
serialVersionUID = 1L;private static final long
Label firstLabel;private
Label secondLabel;private
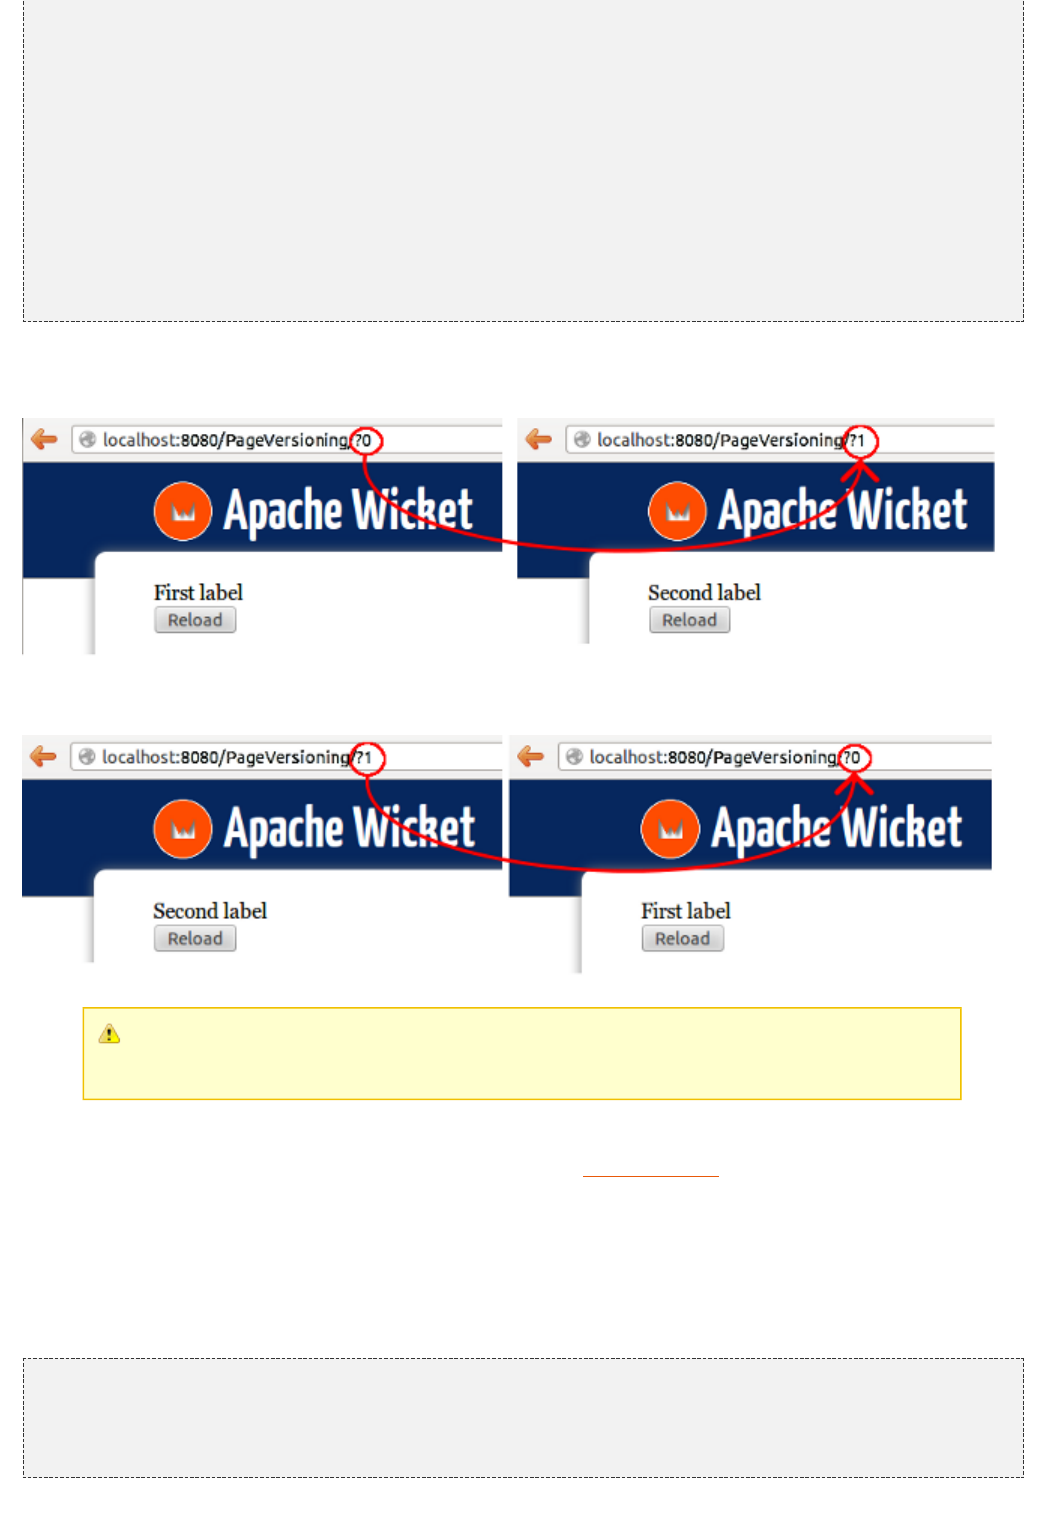
37
HomePage(){public
firstLabel = Label( , );new "label" "First label"
secondLabel = Label( , );new "label" "Second label"
add(firstLabel);
add( Link( ){new "reload"
@Override
void onClick() { public
(getPage().contains(firstLabel, ))if true
getPage().replace(secondLabel);
else
getPage().replace(firstLabel);
}
});
}
}
Now if we run the new example (project LifeCycleStagesRevisited) and we click on the “Reload” button, a new
page version is created and the page id is increased by one:
If we press the back button the page version previously rendered (and serialized) will be retrieved (i.e.
deserialized) and it will be used again to respond to our request (and page id is decremented):
For more details about page storing you can take a look at paragraph "Page storing" from
chapter "Wicket Internals". The content of this paragraph is from wiki page
https://cwiki.apache.org/confluence/display/WICKET/Page+Storage.
As we have stated at the beginning of this chapter, page versions are stored using Java serialization, therefore
every object referenced inside a page must be serializable. In we will see how to overcome thisparagraph 11.6
limit and work with non-serializable objects in our components using detachable Wicket models.
Using a specific page version with PageReference
To retrieve a specific page version in our code we can use class byorg.apache.wicket.PageReference
providing its constructor with the corresponding page id:
//load page version with page id = 3
PageReference pageReference = PageReference(3);new
//load the related page instance
Page page = pageReference.getPage();
To get the related page instance we must use the method getPage.

38
Turning off page versioning
If for any reason we need to switch off versioning for a given page, we can call its method setVersioned(false).
Pluggable serialization
Starting from version 1.5 it is possible to choose which implementation of Java serialization will be used by
Wicket to store page versions. Wicket serializes pages using an implementation of interface
. The default implementation is org.apache.wicket.serialize.ISerializer
and it uses the standard Java serializationorg.apache.wicket.serialize.java.JavaSerializer
mechanism based on classes ObjectOutputStream and ObjectInputStream. However on Internet we can find
other interesting serialization libraries like or which perform faster then the standard implementation.Kryo Fast
The serializer in use can be customized with the setSerializer(ISerializer) method defined by setting interface
.org.apache.wicket.settings.IFrameworkSettings
We can access this interface inside the method init of the class Application using the getFrameworkSettings()
method :
@Override
void init()public
{
.init();super
getFrameworkSettings().setSerializer(yourSerializer);
}
A serializer based on Kryo library and another one based on Fast are provided by the WicketStuff project. You
can find more information on this project, as well as the instructions to use its modules, in Appendix B.
Page caching
By default Wicket persists versions of pages into a session-relative file on disk, but it uses a two-levels cache to
speed up this process. The first level of the cache uses a http session attribute called
“wicket:persistentPageManagerData-<APPLICATION_NAME>” to store pages. The second level cache stores
pages into application-scoped variables which are identified by a session id and a page id.
The following picture is an overview of these two caching levels:
The session-scoped cache is faster then the other memory levels but it contains only the pages used to serve
the last request. Wicket allows us to set the maximum amount of memory allowed for the application-scoped
cache and for the page store file. Both parameters can be configured via setting interface
.org.apache.wicket.settings.IStoreSettings
This interface provides the setMaxSizePerSession(Bytes bytes) method to set the size for page store file. The
39
1.
Bytes parameter is the maximum size allowed for this file:
@Override
void init()public
{
.init();super
getStoreSettings().setMaxSizePerSession(Bytes.kilobytes(500));
}
Class is an utility class provided by Wicket to express size in bytesorg.apache.wicket.util.lang.Bytes
(for further details refer to the JavaDoc). For the second level cache we can use the setInmemoryCacheSize(int
inmemoryCacheSize) method. The integer parameter is the maximum number of page instances that will be
saved into application-scoped cache:
@Override
void init()public
{
.init();super
getStoreSettings().setInmemoryCacheSize(50);
}
Page expiration
Page instances are not kept in the user session forever. They can be discarded when the limit set with the
setMaxSizePerSession method is reached or (more often) when user session expires. When we ask Wicket for a
page id corresponding to a page instance removed from the session, we bump into a PageExpiredException and
we get the following default error page:
This error page can be customized with the setPageExpiredErrorPage method of the
interface:org.apache.wicket.settings.IApplicationSettings
@Override
void init()public
{
.init();super
getApplicationSettings().setPageExpiredErrorPage(
CustomExpiredErrorPage.class);
}
The page class provided as custom error page must have a public constructor with no argument or a constructor
that takes as input a single PageParameters argument (the page must be bookmarkable as described in
).paragraph 10.1.1
8.3 Stateless pages
Wicket makes it very easy to build stateful pages, but sometimes we might want to use an “old school” stateless
page that doesn't keep memory of its state in the user session. For example consider the public area of a site or
a login page: in those cases a stateful page would be a waste of resources or even a security threat, as we will
see in paragraph .paragraph 12.10
In Wicket a page can be stateless only if it satisfies the following requirements:
40
1.
2.
it has been instantiated by Wicket (i.e. we don't create it with operator new) using a constructor with no
argument or a constructor that takes as input a single PageParameters argument (class PageParameters
will be covered in ).chapter 10.1
All its children components (and behaviors) are in turn stateless, which means that their method isStateless
must return true.
The first requirement implies that, rather than creating a page by hand, we should rely on Wicket's capability of
resolving page instances, like we do when we use method setResponsePage(Class page).
In order to comply with the second requirement it could be helpful to check if all children components of a page
are stateless. To do this we can leverage method visitChildren and the visitor pattern to iterate over components
and test if their method isStateless actually returns true:
@Override void onInitialize() {protected
.onInitialize();super
visitChildren( IVisitor<Component, >() {new Void
@Override
void component(Component component, IVisit< > arg1) {public Void
(!component.isStateless())if
.out.println( + component.getId() + System "Component " " is not
);stateless"
}
});
}
Alternatively, we could use the utility annotation along with the StatelessComponent StatelessChecker
class (they are both in package ). willorg.apache.wicket.devutils.stateless StatelessChecker
throw an if a component annotated with doesn'tIllegalArgumentException StatelessComponent
respect the requirements for being stateless. To use annotation we must first add the StatelessComponent
to our application as a component render listener:StatelessChecker
@Override
void init()public
{
.init();super
getComponentPostOnBeforeRenderListeners().add( StatelessChecker());new
}
Most of the Wicket's built-in components are stateful, hence they can not be used with a
stateless page. However some of them have also a stateless version which can be
adopted when we need to keep a page stateless. In the rest of the guide we will point out
when a built-in component comes also with a stateless version.
A page can be also explicitly declared as stateless setting the appropriate flag to true with the
setStatelessHint(true) method. This method will not prevent us from violating the requirements for a stateless
page, but if we do so we will get the following warning log message:
Page '<page class>' is not stateless because of component with path '<component path>'
8.4 Summary
In this chapter we have seen how page instances are managed by Wicket. We have learnt that pages can be
divided into two families: stateless and stateful pages. Knowing the difference between the two types of pages is
important to build the right page for a given task.
However, to complete the discussion about stateless pages we still have to deal with two topics we have just
outlined in this chapter: class PageParameters and bookmarkable pages. The first part of will coverchapter 10
these missing topics.

41
9 Under the hood of the request
processing
Although Wicket was born to provide a reliable and comprehensive object oriented abstraction for web
development, sometimes we might need to work directly with “raw” web entities such as user session, web
request, query parameters, and so on. For example this is necessary if we want to store an arbitrary parameter
in the user session.
Wicket provides wrapper classes that allow us to easily access to web entities without the burden of using the
low-level APIs of Java Servlet Specification. However it will always be possible to access standard classes (like
HttpSession, HttpServletRequest, etc...) that lay under our Wicket application. This chapter will introduce these
wrapper classes and it will explain how Wicket uses them to handle the web requests initiated by the user's
browser.
9.1 Class Application and request processing
Beside configuring and initializing our application, the Application class is responsible for creating the internal
entities used by Wicket to process a request. These entities are instances of the following classes:
RequestCycle, Request, Response and Session.
The next paragraphs will illustrate each of these classes, explaining how they are involved into request
processing.
9.2 Request and Response classes
The and classes are located in package and theyRequest Response org.apache.wicket.request
provide an abstraction of the concrete request and response used by our web application.
Both classes are declared as abstract but if our application class inherits from it will use theirWebApplication
sub classes and , both of them located inside the package ServletWebRequest ServletWebResponse
and wraporg.apache.wicket.protocol.http.servlet.ServletWebRequest ServletWebResponse
respectively a and a object. If we need to access to theseHttpServletRequest HttpServletResponse
low-level objects we can call 's method and 's method Request getContainerRequest() Response
.getContainerResponse()
9.3 The “director” of request processing - RequestCycle
Class is the entity in charge of serving a weborg.apache.wicket.request.cycle.RequestCycle
request. Our application class creates a new on every request with its method RequestCycle
.createRequestCycle(request, response)
Method is declared as final, so we can't override it to return a custom subclass of createRequestCycle
. Instead, we must build a request cycle provider implementing interface RequestCycle
, and then we must tell our application class to use it via theorg.apache.wicket.IRequestCycleProvider
method.setRequestCycleProvider
The current running request cycle can be retrieved at any time by calling its static method
. Strictly speaking this method returns the request cycle associated with the current (orRequestCycle.get()
local) thread, which is the thread that is serving the current request. A similar method is also implementedget()
in classes (as we have seen in ) and org.apache.wicket.Application paragraph 4.2.2
in order to get the application and the session in use by the current thread.org.apache.wicket.Session
The implementation of the get method takes advantage of the standard class
. See its JavaDoc for an introduction to local-thread variables.java.lang.ThreadLocal
42
Class provides the method which is a convenienceorg.apache.wicket.Component getRequestCycle()
method that internally invokes :RequestCycle.get()
public RequestCycle getRequestCycle() {final
RequestCycle.get();return
}
RequestCycle and request processing
This paragraph will provide just the basic informations about what happens behind the
scenes of request processing. When you work with Wicket it's unlikely to have a need for
customizing this process, so we won't cover this topic in detail.
In order to process a request, delegates the task to another entity which implements interface RequestCycle
. There are different implementations of this interface,org.apache.wicket.request.IRequestHandler
each suited for a particular type of requested resource (a page to render, an AJAX request, an URL to an
external page, etc.).
To resolve the right handler for a given HTTP request, the uses a set of objects implementingRequestCycle
the interface. The mapping interface defines the org.apache.wicket.request.IRequestMapper
method which returns a score indicating how compatible thegetCompatibilityScore(Request request)
request mapper is for the current request. will choose the mapper with the highest score and itRequestCycle
will call its method to get the proper handler for the given request. Once mapRequest(Request request)
has resolved a request handler, it invokes its method RequestCycle respond(IRequestCycle
to start request processing.requestCycle)
The following sequence diagram recaps how a request handler is resolved by the :RequestCycle
Developers can create additional implementations of IRequestMapper and add them to their application via the
mount(IRequestMapper mapper) method of the WebApplication class. In paragraph 10.6 we will see how Wicket
uses this method to add built-in mappers for mounted pages.
Generating URL with the urlFor and mapUrlFor methods
The RequestCycle is also responsible for generating the URL value (as CharSequence) for the following entities:
a page class, via the methodurlFor(Class<C> pageClass, PageParameters parameters)
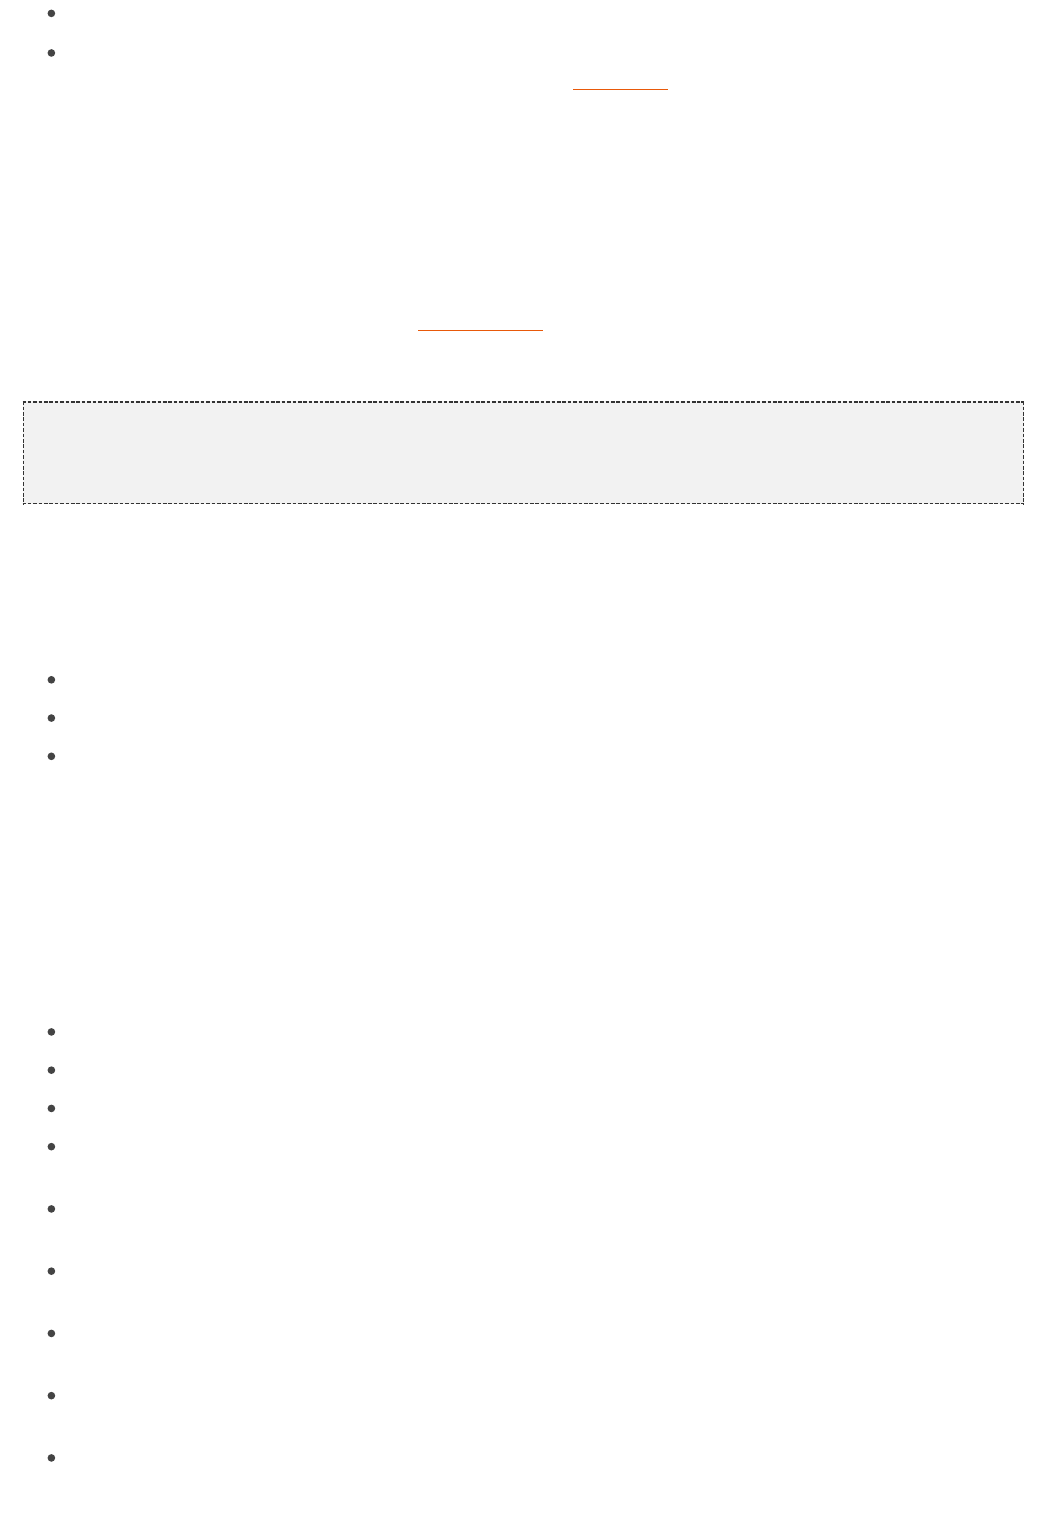
43
an IRequestHandler via the methodurlFor(IRequestHandler handler)
a ResourceReference via the urlFor(ResourceReference reference, PageParameters
method (resource entities will be introduced in ).params) chapter 15
The overloaded method from above also has a corresponding version that returns an instance of urlFor
instead of a . This version has the prefix 'map' in itsorg.apache.wicket.request.Url CharSequence
name (i.e. it has as full name).mapUrlFor
Method setResponsePage
The class contains the implementation of the method we use to redirect aRequestCycle setResponsePage
user to a specific page (see ). The namesake method of class paragraph 4.4
is just a convenience method that internally invokes the actualorg.apache.wicket.Component
implementation on current request cycle:
public void setResponsePage( Page page) {final final
getRequestCycle().setResponsePage(page);
}
RequestCycle's hook methods and listeners
The RequestCycle comes with some hook methods which can be overridden to perform custom actions when
request handling reaches a specific stage. These methods are:
onBeginRequest(): called when the RequestCycle is about to start handling the request.
onEndRequest(): called when the RequestCycle has finished to handle the request
onDetach(): called after the request handling has completed and the RequestCycle is about to be
detached from its thread. The default implementation of this method invokes detach() on the current
session (the Session class will be shortly discussed in paragraph 9.4).
Methods onBeforeRequest and onEndRequest can be used if we need to execute custom actions before and
after business code is executed, such as opening a Hibernate/JPA session and closing it when code has
terminated.
A more flexible way to interact with the request processing is to use the listener interface
. In addition to the three methods alreadyorg.apache.wicket.request.cycle.IRequestCycleListener
seen for RequestCycle, this interface offers further hooks into request processing:
onBeginRequest(RequestCycle cycle): (see the description above)
onEndRequest(RequestCycle cycle): (see the description above)
onDetach(RequestCycle cycle): (see the description above)
onRequestHandlerResolved(RequestCycle cycle, IRequestHandler handler): called when an
IRequestHandler has been resolved.
onRequestHandlerScheduled(RequestCycle cycle, IRequestHandler handler): called when an
IRequestHandler has been scheduled for execution.
onRequestHandlerExecuted(RequestCycle cycle, IRequestHandler handler): called when an
IRequestHandler has been executed.
onException(RequestCycle cycle, Exception ex): called when an exception has been thrown during
request processing.
onExceptionRequestHandlerResolved(RequestCycle rc, IRequestHandler rh, Exception ex): called
when an IRequestHandler has been resolved and will be used to handle an exception.
onUrlMapped(RequestCycle cycle, IRequestHandler handler, Url url): called when an URL has been
generated for an IRequestHandler object.
44
To use the request cycle listeners we must add them to our application which in turn will pass them to the new
's instances created with method:RequestCycle createRequestCycle
@Override
void init() {public
.init();super
IRequestCycleListener myListener;
//listener initialization…
getRequestCycleListeners().add(myListener)
}
The method returns an instance of class getRequestCycleListeners
. This class is a sort of typedorg.apache.wicket.request.cycle.RequestCycleListenerCollection
collection for and it also implements the .IRequestCycleListener Composite pattern
9.4 Session Class
In Wicket we use class to handle session-relative informations such as clientorg.apache.wicket.Session
informations, session attributes, session-level cache (seen in paragraph 8.2), etc...
In addition, we know from paragraph 8.1 that Wicket creates a user session to store versions of stateful pages.
Similarly to what happens with RequestCycle, the new Session's instances are generated by the Application
class with the method. This method is notnewSession(Request request, Response response)
declared as final, hence it can be overridden if we need to use a custom implementation of the Session class.
By default if our custom application class is a subclass of WebApplication, method newSession will return an
instance of class . As we have mentioned talking about org.apache.wicket.protocol.http.WebSession
, also class Session provides a static method which returns the session associated to theRequestCycle get()
current thread.
Session and listeners
Similar to the , class also offers support for listener entities.RequestCycle org.apache.wicket.Session
With Session these entities must implement the callback interface org.apache.wicket.ISessionListener
which exposes only the method. As you might guess from its name, thisonCreated(Session session)
method is called when a new session is created. Session listeners must be added to our application using a
typed collection, just like we have done before with request cycle listeners:
@Override
void init(){public
.init();super
//listener initialization…
ISessionListener myListener;
//add a custom session listener
getSessionListeners().add(myListener)
}
Handling session attributes
The Session class handles session attributes in much the same way as the standard interface
javax.servlet.http.HttpSession. The following methods are provided to create, read and remove session
attributes:
setAttribute(String name, Serializable value): creates an attribute identified by the given name. If the
session already contains an attribute with the same name, the new value will replace the existing one. The
value must be a serializable object.
getAttribute(String name): returns the value of the attribute identified by the given name, or null if the
name does not correspond to any attribute.
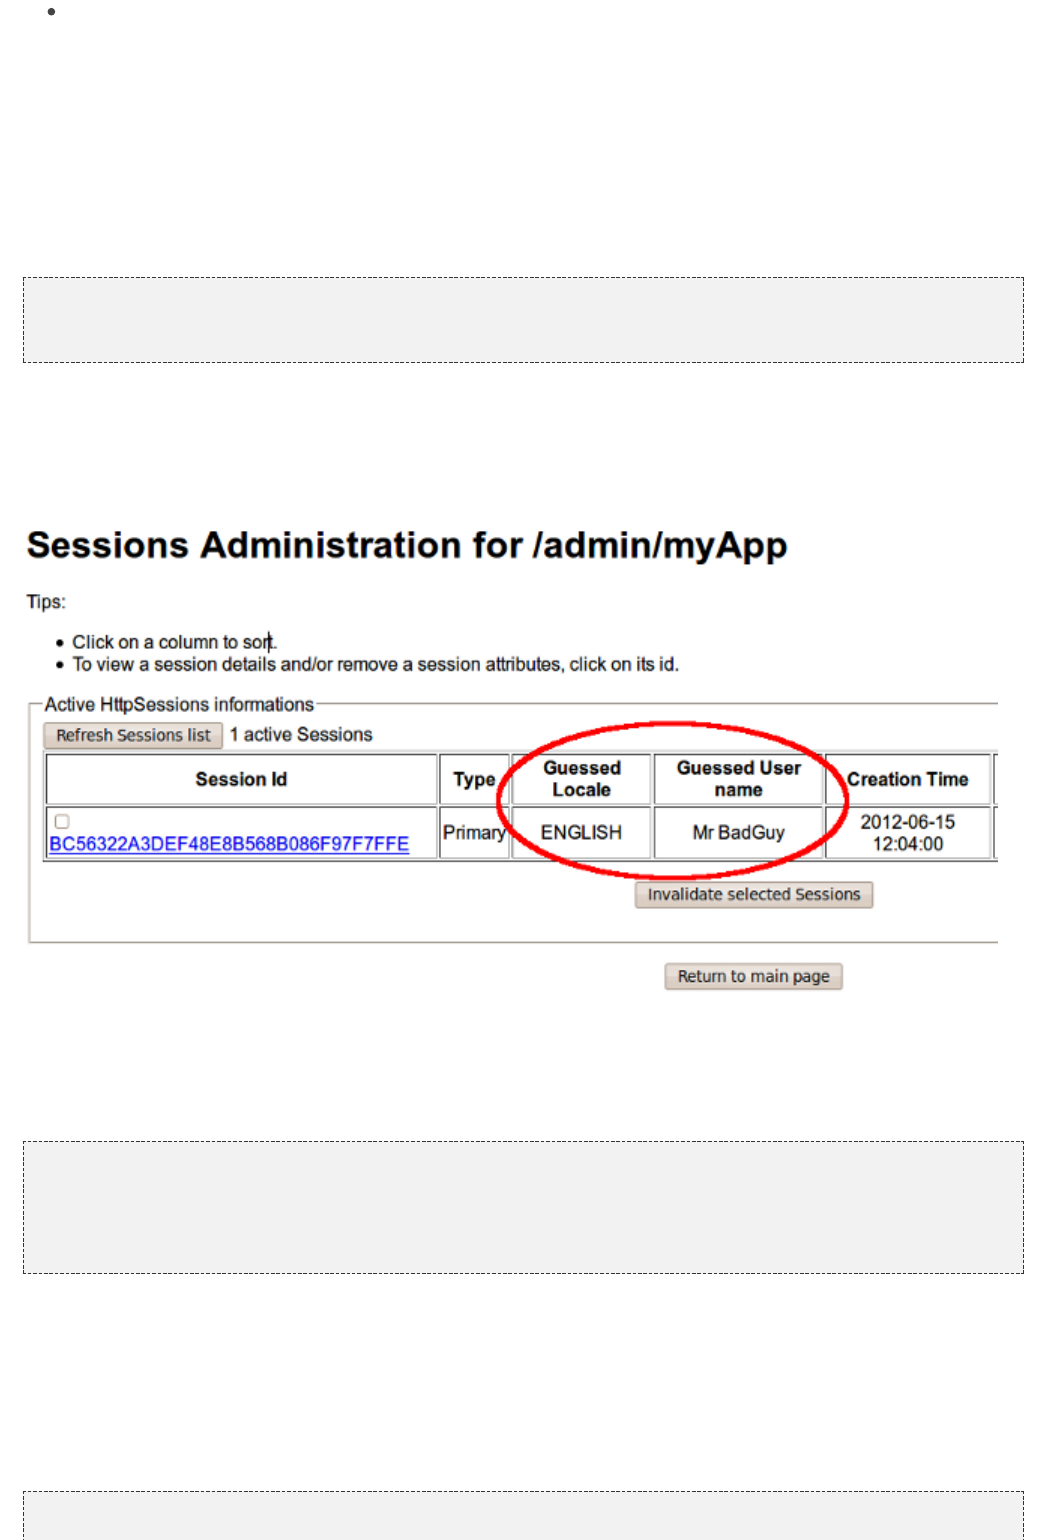
45
removeAttribute(String name): removes the attribute identified by the given name.
By default class WebSession will use the underlying HTTP session to store attributes. Wicket will automatically
add a prefix to the name of the attributes. This prefix is returned by the WebApplication's method
getSessionAttributePrefix().
Accessing to the HTTP session
If for any reason we need to directly access to the underlying HttpSession object, we can retrieve it from the
current request with the following code:
HttpSession session = ((ServletWebRequest)RequestCycle.get()
.getRequest()).getContainerRequest().getSession();
Using the raw session object might be necessary if we have to set a session attribute with a particular name
without the prefix added by Wicket. Let's say for example that we are working with Tomcat as web server. One of
the administrative tools provided by Tomcat is a page listing all the active user sessions of a given web
application:
Tomcat allows us to set the values that will be displayed in columns “Guessed locale” and “Guessed User
name”. One possible way to do this is to use session attributes named “Locale” and “userName” but we can't
create them via Wicket's Session class because they would not have exactly the name required by Tomcat.
Instead, we must use the raw HttpSession and set our attributes on it:
HttpSession session = ((ServletWebRequest)RequestCycle.get().
getRequest()).getContainerRequest().getSession();
session.setAttribute( , );"Locale" "ENGLISH"
session.setAttribute( , );"userName" "Mr BadGuy"
Temporary and permanent sessions
Wicket doesn't need to store data into user session as long as the user visits only stateless pages. Nonetheless,
even under these conditions, a temporary session object is created to process each request but it is discarded at
the end of the current request. To know if the current session is temporary, we can use the isTemporary()
method:
Session.get().isTemporary();
46
If a session is not temporary (i.e. it is permanent), it's identified by an unique id which can be read calling the
getId() method. This value will be null if the session is temporary.
Although Wicket is able to automatically recognize when it needs to replace a temporary session with a
permanent one, sometimes we may need to manually control this process to make our initially temporary session
permanent.
To illustrate this possible scenario let's consider project BindSessionExample where we have a stateless home
page which sets a session attribute inside its constructor and then it redirects the user to another page which
displays with a label the session attribute previously created. The code of the two pages is as follows:
Home page:
public class HomePage WebPage {extends
HomePage( PageParameters parameters) {public final
Session.get().setAttribute( , );"username" "tommy"
Session.get().bind();
setResponsePage(DisplaySessionParameter.class);
}
}
Target page:
public class DisplaySessionParameter WebPage {extends
DisplaySessionParameter() {public
();super
add( Label( , ( ) Session.get().getAttribute( )));new "username" String "username"
}
}
Again, we kept page logic very simple to not over-bloat the example with unnecessary code. In the snippet above
we have also bolded Session's bind() method which converts temporary session into a permanent one. If the
home page has not invoked this method, the session with its attribute would have been discarded at the end of
the request and the page DisplaySessionParameter would have displayed an empty value in its label.
Discarding session data
Once a user has finished using our web application, she must be able to log out and clean any session data. To
be sure that a permanent session will be discarded at the end of the current request, class Session provides the
invalidate() method. If we want to immediately invalidate a given session without waiting for the current request
to complete, we can invoke the invalidateNow() method.
Remember that invalidateNow() will immediately remove any instance of components (and
pages) from the session, meaning that once we have called this method we won't be able
to work with them for the rest of the request process.
Storing arbitrary objects with metadata
JavaServer Pages Specification1 defines 4 scopes in which a page can create and access a variable. These
scopes are:
request: variables declared in this scope can be seen only by pages processing the same request. The
lifespan of these variables is (at most) equal to the one of the related request. They are discarded when the
full response has been generated or when the request is forwarded somewhere else.
page: variables declared in this scope can be seen only by the page that has created them.
session: variables in session scope can be created and accessed by every page used in the same session
where they are defined.
47
application: this is the widest scope. Variables declared in this scope can be used by any page of a given
web application.
Although Wicket doesn't implement the JSP Specification (it is rather an alternative to it), it offers a feature called
metadata which resembles scoped variables but is much more powerful. Metadata is quite similar to a Java Map
in that it stores pairs of key-value objects where the key must be unique. In Wicket each of the following classes
has its own metadata store: RequestCycle, Session, Application and Component.
The key used for metadata is an instance of class . To put anorg.apache.wicket.MetaDataKey<T>
arbitrary object into metadata we must use the setMetaData method which takes two parameters as input: the
key used to store the value and the value itself. If we are using metadata with classes Session or Component,
data object must be serializable because Wicket serializes both session and component instances. This
constraint is not applied to metadata of classes Application and RequestCycle which can contain a generic
object. In any case, the type of data object must be compatible with the type parameter T specified by the key.
To retrieve a previously inserted object we must use the method. IngetMetaData(MetaDataKey<T> key)
the following example we set a object in the application's metadata so it can be usedjava.sql.Connection
by any page of the application:
Application class code:
public MetaDataApp WebApplication{static extends
//Do some stuff…
/**
* Metadata key definition
*/
MetaDataKey<Connection> connectionKey = MetaDataKey<Connection> (){};public static new
/**
* Application's initialization
*/
@Override
void init(){public
.init();super
Connection connection;
//connection initialization…
setMetaData(connectionKey, connection);
//Do some other stuff..
}
}
Code to get the object from the metadata:
Connection connection = Application.get().getMetaData(MetaDataApp.connectionKey);
Since MetaDataKey<T> class is declared as abstract, we must implement it with a subclass or with an
anonymous class (like we did in the example above).
9.5 Exception handling
Wicket uses a number of custom exceptions during the regular running of an application. We have already seen
raised when a page version is expired. Other examples of such exceptions are PageExpiredException
and . We will see them later in the next chapters.AuthorizationException RestartResponseException
All the other exceptions raised during rendering phase are handled by an implementation of
which by default is class org.apache.wicket.request.IExceptionMapper
. If we are working in DEVELOPMENT mode this mapperorg.apache.wicket.DefaultExceptionMapper
will redirect us to a page that shows the exception stacktrace (page ). On the contrary, ifExceptionErrorPage
application is running in DEPLOYMENT mode will display an internal error pageDefaultExceptionMapper
which by default is . To use a customorg.apache.wicket.markup.html.pages.InternalErrorPage
internal error page we can change application settings like this:
getApplicationSettings().setInternalErrorPage(MyInternalErrorPage.class);
48
We can also manually set if Wicket should display the exception with or if we want toExceptionErrorPage
use the internal error page or if we don't want to display anything at all when an unexpected exception is thrown:
//show developer pagedefault
getExceptionSettings().setUnexpectedExceptionDisplay( IExceptionSettings.SHOW_EXCEPTION_PAGE
);
//show internal error page
getExceptionSettings().setUnexpectedExceptionDisplay(
IExceptionSettings.SHOW_INTERNAL_ERROR_PAGE );
//show no exception page when an unexpected exception is thrown
getExceptionSettings().setUnexpectedExceptionDisplay(
IExceptionSettings.SHOW_NO_EXCEPTION_PAGE );
Developers can also decide to use a custom exception mapper instead of . To doDefaultExceptionMapper
this we must override 's method :Application getExceptionMapperProvider
@Override
IProvider<IExceptionMapper> getExceptionMapperProvider()public
{
//…
}
The method returns an instance of that should return our customorg.apache.wicket.util.IProvider
exception mapper.
Ajax requests
To control the behavior in Ajax requests the application may use
org.apache.wicket.settings.IExceptionSettings#
. By default if an errorsetAjaxErrorHandlingStrategy(IExceptionSettings.AjaxErrorStrategy)
occurs during the processing of an Ajax request Wicket will render the configured error page. By configuring
org.apache.wicket.settings.IExceptionSettings.
as the default strategy the application will call theAjaxErrorStrategy#INVOKE_FAILURE_HANDLER
JavaScript callback(s) instead.onFailure
9.6 Summary
In this chapter we had a look at how Wicket internally handles a web request. Even if most of the time we won't
need to customize this internal process, knowing how it works is essential to use the framework at 100%.
Entities like Application and Session will come in handy again when we will tackle the topic of security in chapter
.21
49
10 Wicket Links and URL
generation
Up to now we used component Link to move from a page to another and we have seen that it is quiet similar to a
“click” event handler (see ).paragraph 4.4
However this component alone is not enough to build all possible kinds of links we may need in our pages.
Therefore, Wicket offers other link components suited for those tasks which can not be accomplished with a
basic Link.
Besides learning new link components, in this chapter we will also see how to customize the page URL
generated by Wicket using the encoding facility provided by the framework and the page parameters that can be
passed to a target page.
10.1 PageParameters
A common practice in web development is to pass data to a page using query string parameters (like
?paramName1=paramValu1¶mName2=paramValue2...). Wicket offers a more flexible and object oriented
way to do this with models (we will see them in the next chapter). However, even if we are using Wicket, we still
need to use query string parameters to exchange data with other Internet-based services. Consider for example
a classic confirmation page which is linked inside an email to let users confirm important actions like password
changing or the subscription to a mailing list. This kind of page usually expects to receive a query string
parameter containing the id of the action to confirm.
Query string parameters can also be referred to as named parameters. In Wicket they are handled with class
. Since named parameters areorg.apache.wicket.request.mapper.parameter.PageParameters
basically name-value pairs, PageParameters works in much the same way as Java Map providing two methods
to create/modify a parameter (add(String name, Object value) and set(String name, Object value)), one method
to remove an existing parameter (remove(String name)) and one to retrieve the value of a given parameter
(get(String name)) . Here is a snippet to illustrate the usage of PageParameters:
PageParameters pageParameters = PageParameters(); new
//add a couple of parameters
pageParameters.add( , );"name" "John"
pageParameters.add( , 28);"age"
//retrieve the value of 'age' parameter
pageParameters.get( );"age"
Now that we have seen how to work with page parameters, let's see how to use them with our pages.
PageParameters and bookmarkable pages
Base class Page comes with a constructor which takes as input a PageParameters instance. If we use this
superclass constructor in our page, PageParameters will be used to build the page URL and it can be retrieved
at a later time with the Page's getPageParameters() method.
In the following example taken from the PageParametersExample project we have a home page with a link to a
second page that uses a version of setResponsePage method that takes as input also a PageParameters to
build the target page (named PageWithParameters). The code for the link and for the target page is the
following:
Link code:
add( Link( ) {new "pageWithIndexParam"
@Override
50
void onClick() {public
PageParameters pageParameters = PageParameters();new
pageParameters.add( , );"foo" "foo"
pageParameters.add( , );"bar" "bar"
setResponsePage(PageWithParameters.class, pageParameters);
}
});
Target page code:
public class PageWithParameters WebPage {extends
//Override superclass constructor
PageWithParameters(PageParameters parameters) {public
(parameters);super
}
}
The code is quite straightforward and it’s more interesting to look at the URL generated for the target page:
<app root>/PageParametersExample/wicket/bookmarkable/
org.wicketTutorial.PageWithParameters?foo=foo&bar=bar
At first glance the URL above could seem a little weird, except for the last part which contains the two named
parameters used to build the target page.
The reason for this “strange” URL is that, as we explained in paragraph 8.3, when a page is instantiated using a
constructor with no argument or using a constructor that accepts only a PageParameters, Wicket will try to
generate a static URL for it, with no session-relative informations. This kind of URL is called bookmarkable
because it can be saved by the users as a bookmark and accessed at a later time.
A bookmarkable URL is composed by a fixed prefix (which by default is bookmarkable) and the qualified name of
the page class (org.wicketTutorial.PageWithParameters in our example). Segment wicket is another fixed prefix
added by default during URL generation. In paragraph 10.6 we will see how to customize fixed prefixes with a
custom implementation of IMapperContext interface.
Indexed parameters
Besides named parameters, Wicket also supports indexed parameters. These kinds of parameters are rendered
as URL segments placed before named parameters. Let's consider for example the following URL:
<application path>/foo/bar?1&baz=baz
The URL above contains two indexed parameters (foo and bar) and a query string consisting of the page id and
a named parameter (baz). Just like named parameters also indexed parameters are handled by the
PageParameters class. The methods provided by PageParameters for indexed parameters are set(int index,
Object object) (to add/modify a parameter), remove(int index)(to remove a parameter) and get(int index) (to read
a parameter).
As their name suggests, indexed parameters are identified by a numeric index and they are rendered following
the order in which they have been added to the PageParameters. The following is an example of indexed
parameters:
PageParameters pageParameters = PageParameters(); new
//add a couple of parameters
pageParameters.set(0, );"foo"
pageParameters.set(1, );"bar"
//retrieve the value of the second parameter ( )"bar"
pageParameters.get(1);

51
Project PageParametersExample comes also with a link to a page with both indexed parameters and a named
parameter:
add( Link( ) {new "pageWithNamedIndexParam"
@Override
void onClick() {public
PageParameters pageParameters = PageParameters();new
pageParameters.set(0, );"foo"
pageParameters.set(1, );"bar"
pageParameters.add( , );"baz" "baz"
setResponsePage(PageWithParameters.class, pageParameters);
}
});
The URL generated for the linked page (PageWithParameters) is the one seen at the beginning of the
paragraph.
10.2 Bookmarkable links
A link to a bookmarkable page can be built with the link component
:org.apache.wicket.markup.html.link.BookmarkablePageLink
BookmarkablePageLink bpl= BookmarkablePageLink(PageWithParameters.class, pageParameters);new
The specific purpose of this component is to provide an anchor to a bookmarkable page, hence we don't have to
implement any abstract method like we do with Link component.
10.3 Automatically creating bookmarkable links with tag wicket:link
Bookmarkable pages can be linked directly inside markup files without writing any Java code. Using
<wicket:link> tag we ask Wicket to automatically add bookmarkable links for the anchors wrapped inside it. Here
is an example of usage of <wicket:link> tag taken from the home page of the project
BookmarkablePageAutoLink:
<!DOCTYPE html>
<html xmlns:wicket= >"http://wicket.apache.org"
<head>
<meta charset= />"utf-8"
<title>Apache Wicket Quickstart</title>
</head>
<body>
<div id= >"bd"
<wicket:link>
<a href= >HomePage</a><br/>"HomePage.html"
<a href= >SubPackagePage</a> "anotherPackage/SubPackagePage.html"
</wicket:link>
</div>
</body>
</html>
The key part of the markup above is the href attribute which must contain the package-relative path to a page.
The home page is inside package org.wicketTutorial which in turns contains the sub package anotherPackage.
This package hierarchy is reflected by the href attributes: in the first anchor we have a link to the home page
itself while the second anchor points to page SubPackagePage which is placed into sub package
anotherPackage. Absolute paths are supported as well and we can use them if we want to specify the full
package of a given page. For example the link to SubPackagePage could have been written in the following
(more verbose) way:
<a href= > SubPackagePage</a>"/org/wicketTutorial/anotherPackage/SubPackagePage.html"
52
If we take a look also at the markup of SubPackagePage we can see that it contains a link to the home page
which uses the parent directory selector (relative path):
<!DOCTYPE html>
<html xmlns:wicket= >"http://wicket.apache.org"
<head>
<meta charset= />"utf-8"
<title>Apache Wicket Quickstart</title>
</head>
<body>
<div id= >"bd"
<wicket:link>
<a href= >HomePage</a><br/>"../HomePage.html"
<a href= >SubPackagePage</a> "SubPackagePage.html"
</wicket:link>
</div>
</body>
</html>
Please note that any link to the current page (aka self link) is disabled. For example in the home page the self
link is rendered like this:
<span><em>HomePage</em></span>
The markup used to render disabled links can be customized using the markup settings (interface
IMarkupSettings) available in the application class:
@Override
void init()public
{
.init();super
//wrap disabled links with <b> tag
getMarkupSettings().setDefaultBeforeDisabledLink( );"<b>"
getMarkupSettings().setDefaultAfterDisabledLink( ); "</b>"
}
The purpose of <wicket:link> tag is not limited to just simplifying the usage of bookmarkable pages. As we will
see in chapter 13, this tag can also be adopted to manage web resources like pictures, CSS files, JavaScript
files and so on.
10.4 External links
Since Wicket uses plain HTML markup files as templates, we can place an anchor to an external page directly
inside the markup file. When we need to dynamically generate external anchors, we can use link component
. In order to build an external link we mustorg.apache.wicket.markup.html.link.ExternalLink
specify the value of the href attribute using a model or a plain string. In the next snippet, given an instance of
Person, we generate a Google search query for its full name:
Html:
<a wicket:id= >Search me on Google!</a>"externalSite"
Java code:
Person person = Person( , ); new "John" "Smith"
fullName = person.getFullName();String
//Space characters must be replaced by character '+'
googleQuery = + fullName.replace( , );String "http://www.google.com/search?q=" " " "+"
add( ExternalLink( , googleQuery));new "externalSite"
Generated anchor:
53
<a href= >Search me on Google!</a>"http://www.google.com/search?q=John+Smith"
If we need to specify a dynamic value for the text inside the anchor, we can pass it as an additional constructor
parameter:
Html:
<a wicket:id= >Label goes here...</a>"externalSite"
Java code:
Person person = Person( , ); new "John" "Smith"
fullName = person.getFullName();String googleQuery = + fullName.replace( , );String "http://www.google.com/search?q=" " " "+"
linkLabel = + fullName + ;String "Search '" "' on Google."
add( ExternalLink( , googleQuery, linkLabel));new "externalSite"
Generated anchor:
<a href= >Search 'John Smith' on Google.</a>"http://www.google.com/search?q=John+Smith"
10.5 Stateless links
Component Link has a stateful nature, hence it cannot be used with stateless pages. To use links with these
kinds of pages Wicket provides the convenience
component which is basically a subtype of Linkorg.apache.wicket.markup.html.link.StatelessLink
with the stateless hint set to true.
Please keep in mind that Wicket generates a new instance of a stateless page also to serve stateless links, so
the code inside the onClick() method can not depend on instance variables. To illustrate this potential issue let's
consider the following code (from the project StatelessPage) where the value of the variable index is used inside
onclick():
public class StatelessPage WebPage {extends
index = 0;private int
StatelessPage(PageParameters parameters) {public
(parameters);super
}
@Override
void onInitialize() {protected
.onInitialize();super
setStatelessHint( );true
add( StatelessLink( ) {new "statelessLink"
@Override
void onClick() {public
//It will always print zero
.out.println(index++);System
}
});
}
}
The printed value will always be zero because a new instance of the page is used every time the user clicks on
the statelessLink link.
10.6 Generating structured and clear URLs
54
Having structured URLs in our site is a basic requirement if we want to build an efficient SEO strategy, but it also
contributes to improve user experience with more intuitive URLs. Wicket provides two different ways to control
URL generation. The first (and simplest) is to “mount” one or more pages to an arbitrary path, while a more
powerful technique is to use custom implementations of IMapperContext and IPageParametersEncoder
interfaces. In the next paragraphs we will learn both of these two techniques.
Mounting a single page
With Wicket we can mount a page to a given path in much the same way as we map a servlet filter to a desired
path inside file web.xml (see ). Using mountPage(String path, Class <T> pageClass) method of theparagraph 4.2
WepApplication class we tell Wicket to respond with a new instance of pageClass whenever a user navigates to
the given path. In the application class of the project MountedPagesExample we mount MountedPage to the
"/pageMount" path:
@Override
void init()public
{
.init();super
mountPage( , MountedPage.class);"/pageMount"
//Other initialization code…
}
The path provided to mountPage will be used to generate the URL for any page of the specified class:
//it will return "/pageMount"
RequestCycle.get().urlFor(MountedPage.class);
Under the hood the mountPage method mounts an instance of the request mapper
configured for the given path:org.apache.wicket.request.mapper.MountedMapper
public <T Page> void mountPage( path, <T> pageClass) {final extends final String final Class
mount( MountedMapper(path, pageClass));new
}
Request mappers and the Application's method mount have been introduced in the previous chapter (paragraph
).9.3
Using parameter placeholders with mounted pages
The path specified for mounted pages can contain dynamic segments which are populated with the values of the
named parameters used to build the page. These segments are declared using special segments called
parameter placeholders. Consider the path used in the following example:
mountPage( , MountedPageWithPlaceholder.class);"/pageMount/${foo}/otherSegm"
The path used above is composed by three segments: the first and the last are fixed while the second will be
replaced by the value of the named parameter foo that must be provided when the page
MountedPageWithPlaceholder is instantiated:
Java code:
PageParameters pageParameters = PageParameters();new
pageParameters.add( , );"foo" "foo"
setResponsePage(MountedPageWithPlaceholder.class, pageParameters)
55
Generated URL:
<Application path>/pageMount/foo/otherSegm
On the contrary if we manually insert an URL like '<web app path>/pageMount/bar/otherSegm', we can read
value 'bar' retrieving the named parameter foo inside our page.
Place holders can be declared as optional using the '#' character in place of '$':
mountPage( , MountedPageOptionalPlaceholder.class);"/pageMount/#{foo}/otherSegm"
If the named parameter for an optional placeholder is missing, the corresponding segment is removed from the
final URL:
Java code:
PageParameters pageParameters = PageParameters();new
setResponsePage(MountedPageWithPlaceholder.class, pageParameters);
Generated URL:
<Application path>/pageMount/otherSegm
Mounting a package
In addition to mounting a single page, Wicket allows to mount all of the pages inside a package to a given path.
Method mountPackage(String path, Class<T> pageClass) of class WepApplication will mount every page inside
pageClass's package to the specified path.
The resulting URL for package-mounted pages will have the following structure:
<Application path>/mountedPath/<PageClassName>[optional query string]
For example in the MountedPagesExample project we have mounted all pages inside the subpackage
org.tutorialWicket.subPackage with this line of code:
mountPackage( , StatefulPackageMount.class);"/mountPackage"
StatefulPackageMount is one of the pages placed into the desired package and its URL will be:
<Application path>/mountPackage/StatefulPackageMount?1
Similarly to what is done by the mountPage method, the implementation of the mountPackage method mounts
an instance of to the given path.org.apache.wicket.request.mapper.PackageMapper
Providing custom mapper context to request mappers
Interface is used by request mappers to createorg.apache.wicket.request.mapper.IMapperContext
new page instances and to retrieve static URL segments used to build and parse page URLs. Here is the list of
these segments:
56
Namespace: it's the first URL segment of non-mounted pages. By default its value is wicket.
Identifier for non-bookmarkable URLs: it's the segment that identifies non bookmarkable pages. By default
its value is page.
Identifier for bookmarkable URLs: it's the segment that identifies bookmarkable pages. By default its value
is bookmarkable (as we have seen before in ).paragraph 10.1.1
Identifier for resources: it's the segment that identifies Wicket resources. Its default value is resources. The
topic of resource management will be covered in .chapter 15
IMapperContext provides a getter method for any segment listed above. By default Wicket uses class
as mapper context.org.apache.wicket.DefaultMapperContext
Project CustomMapperContext is an example of customization of mapper context where we use index as
identifier for non-bookmarkable pages and staticURL as identifier for bookmarkable pages. In this project,
instead of implementing our mapper context from scratch, we used DefaultMapperContext as base class
overriding just the two methods we need to achieve the desired result (getBookmarkableIdentifier() and
getPageIdentifier()). The final implementation is the following:
public class CustomMapperContext DefaultMapperContext{extends
@Override
getBookmarkableIdentifier() {public String
;return "staticURL"
}
@Override
getPageIdentifier() {public String
;return "index"
}
}
Now to use a custom mapper context in our application we must override the newMapperContext() method
declared in the Application class and make it return our custom implementation of IMapperContext:
@Override IMapperContext newMapperContext() {protected
CustomMapperContext();return new
}
Controlling how page parameters are encoded with IPageParametersEncoder
Some request mappers (like MountedMapper and PackageMapper) can delegate page parameters
encoding/decoding to interface org.apache.wicket.request.mapper.parameter.IPage
. This entity exposes two methods: encodePageParameters() andParametersEncoder
decodePageParameters(): the first one is invoked to encode page parameters into an URL while the second one
extracts parameters from the URL.
Wicket comes with a built-in implementation of this interface which encodes named page parameters as URL
segments using the following pattern: /paramName1/paramValue1/paramName2/param Value2...
This built-in encoder is class. In the org.apache.wicket.request.mapper.parameter.UrlPathPageParametersEncoder
project we have manually mounted a that takes as inputPageParametersEncoderExample MountedMapper
also an :UrlPathPageParametersEncoder
@Override
void init() {public
.init();super
mount( MountedMapper( , MountedPage.class, new "/mountedPath" new
UrlPathPageParametersEncoder()));
}
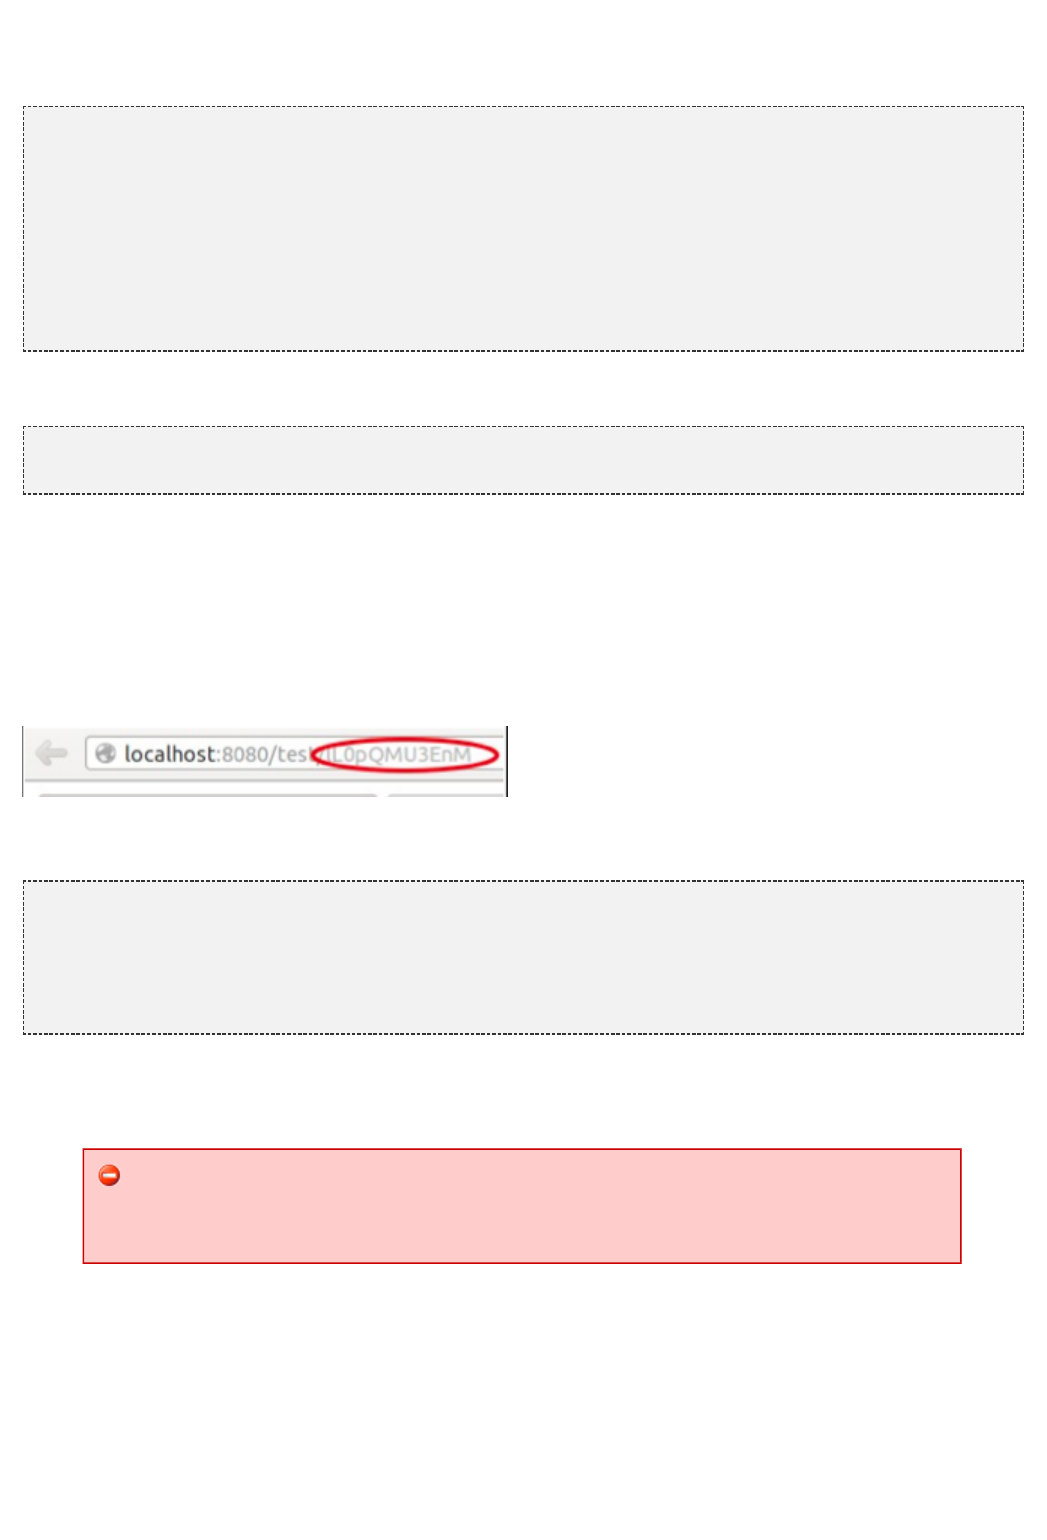
57
The home page of the project contains just a link to the MountedPage web page. The code of the link and the
resulting page URL are:
Link code:
add( Link( ) {new "mountedPage"
@Override
void onClick() {public
PageParameters pageParameters = PageParameters();new
pageParameters.add( , );"foo" "foo"
pageParameters.add( , );"bar" "bar"
setResponsePage(MountedPage.class, pageParameters);
}
});
Generated URL:
<Application path>/mountedPath/foo/foo/bar/bar?1
Encrypting page URLs
Sometimes URLs are a double–edged sword for our site because they can expose too many details about the
internal structure of our web application making it more vulnerable to malicious users.
To avoid this kind of security threat we can use the request mapper which wraps an existingCryptoMapper
mapper and encrypts the original URL producing a single encrypted segment:
Typically, is registered into a Wicket application as the root request mapper wrapping theCryptoMapper
default one:
@Override
void init() {public
.init();super
setRootRequestMapper( CryptoMapper(getRootRequestMapper(), )); new this
//pages and resources must be mounted after we have set CryptoMapper
mountPage( , HomePage.class);"/foo/"
As pointed out in the code above, pages and resources must be mounted after having set asCryptoMapper
root mapper, otherwise the mounted paths will not work.
By default encrypts page URLs with a cipher that might not be strongCryptoMapper
enough for production environment. Paragraph 21.4 will provide a more detailed
description of how Wicket encrypts page URLs and we will see how to use stronger
ciphers.
10.7 Summary
Links and URLs are not trivial topics as they may seem and in Wicket they are strictly interconnected.
Developers must choose the right trade-off between producing structured URLs and avoiding to make them
verbose and vulnerable.
In this chapter we have explored the tools provided by Wicket to control how URLs are generated. We have
started with static URLs for bookmarkable pages and we have seen how to pass parameters to target pages with

58
PageParameters. In the second part of the chapter we focused on mounting pages to a specific path and on
controlling how parameters are encoded by Wicket. Finally, we have also seen how to encrypt URLs to prevent
security vulnerabilities.
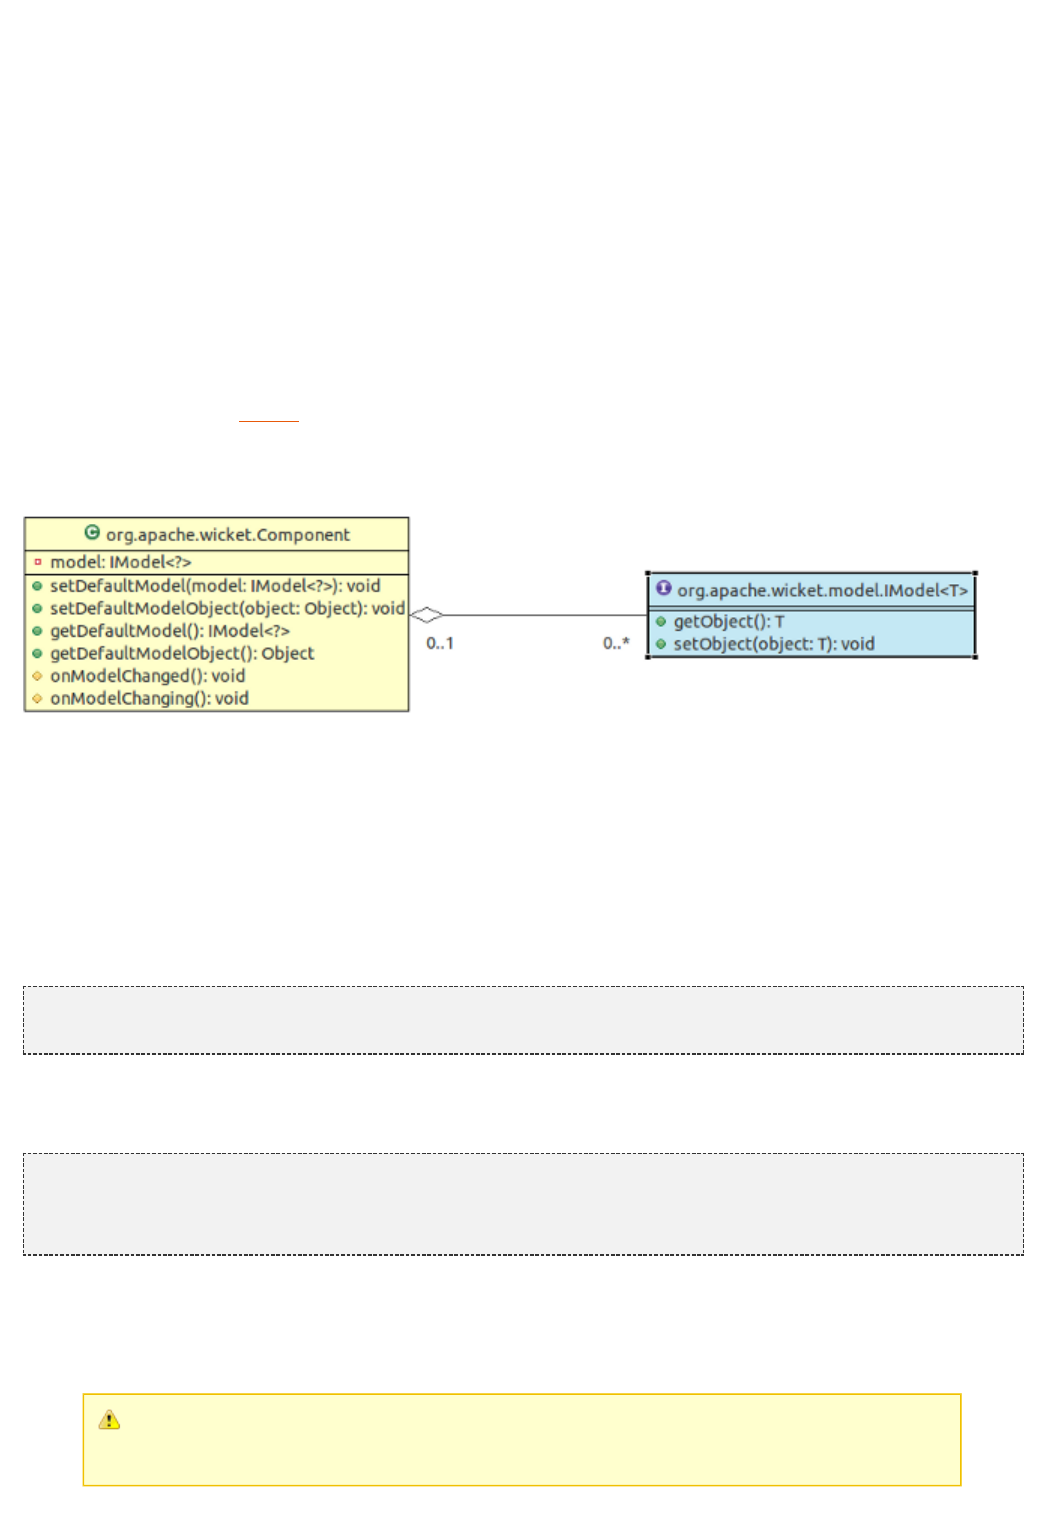
59
11 Wicket models and forms
In Wicket the concept of “model” is probably the most important topic of the entire framework and it is strictly
related to the usage of its components. In addition, models are also an important element for internationalization,
as we will see in paragraph 12.6. However, despite their fundamental role, in Wicket models are not difficult to
understand but the best way to learn how they work is to use them with forms. That's why we haven't talked
about models so far, and why this chapter discusses these two topics together.
11.1 What is a model?
Model is essentially a interface which allows components to access and modify their data withoutfacade
knowing any detail about how they are managed or persisted. Every component has at most one related model,
while a model can be shared among different components. In Wicket a model is any implementation of the
interface :org.apache.wicket.model.IModel
The IModel interface defines just the methods needed to get and set a data object (getObject() and setObject()),
decoupling components from concrete details about the persistence strategy adopted for data. In addition, the
level of indirection introduced by models allows access data object only when it is really needed (for example
during the rendering phase) and not earlier when it may not be ready to be used.
Any component can get/set its model as well as its data object using the 4 public shortcut methods listed in the
class diagram above. The two methods onModelChanged() and onModelChanging() are triggered by Wicket
each time a model is modified: the first one is called after the model has been changed, the second one just
before the change occurs. In the examples seen so far we have worked with Label component using its
constructor which takes as input two string parameters, the component id and the text to display:
add( Label( , ));new "helloMessage" "Hello WicketWorld!"
This constructor internally builds a model which wraps the second string parameter. That's why we didn't mention
label model in the previous examples. Here is the code of this constructor:
public Label( id, label) {final String String
(id, Model< >(label));this new String
}
Class is a basic implementation of . It can wrap any object thatorg.apache.wicket.model.Model IModel
implements the interface java.io.Serializable. The reason of this constraint over data object is that this model is
stored in the web session, and we know from chapter 6 that data are stored into session using serialization.
In general, Wicket models support a detaching capability that allows us to work also with
non-serializable objects as data model. We will see the detaching mechanism later in this
chapter.
60
Just like any other Wicket components, Label provides a constructor that takes as input the component id and
the model to use with the component. Using this constructor the previous example becomes:
add( Label( , Model< >( )));new "helloMessage" new String "Hello WicketWorld!"
The Model class comes with a bunch of factory methods that makes it easier to build new
model instances. For example the of(T object) method creates a new instance of Model
which wraps any Object instance inside it. So instead of writing
new Model<String>("Hello WicketWorld!")
we can write
Model.of("Hello WicketWorld!")
If the data object is a List, a Map or a Set we can use similar methods called ofList, ofMap
and ofSet. From now on we will use these factory methods in our examples.
It's quite clear that if our Label must display a static text it doesn't make much sense to build a model by hand
like we did in the last code example. However is not unusual to have a Label that must display a dynamic value,
like the input provided by a user or a value read from a database. Wicket models are designed to solve these
kinds of problems.
Let's say we need a label to display the current time stamp each time a page is rendered. We can implement a
custom model which returns a new Date instance when the getObject() method is called:
IModel timeStampModel = Model< >(){new String
@Override
getObject() {public String
Date().toString();return new
}
};
add( Label( , timeStampModel));new "timeStamp"
Even if sometimes writing a custom model could be a good choice to solve a specific problem, Wicket already
provides a set of IModel implementations which should fit most of our needs. In the next paragraph we will see a
couple of models that allow us to easily integrate JavaBeans with our web applications and in particular with our
forms.
By default the class Component escapes HTML sensitive characters (like '<', '>' or '&')
from the textual representation of its model object. The term 'escape' means that these
characters will be replaced with their corresponding HTML (for example '<' becomesentity
'< '). This is done for security reasons as a malicious user could attempt to inject markup
or JavaScript into our pages. If we want to display the raw content stored inside a model,
we can tell the Component class not to escape characters by calling the
setEscapeModelStrings(false) method.
11.2 Models and JavaBeans
One of the main goals of Wicket is to use JavaBeans and POJO as data model, overcoming the impedance
mismatch between web technologies and OO paradigm. In order to make this task as easy as possible, Wicket
offers two special model classes: and org.apache.wicket.model.PropertyModel
. We will see how to use them in the next twoorg.apache.wicket.model.CompoundPropertyModel
examples, using the following JavaBean as the data object:
public class Person Serializable {implements
name;private String
surname;private String
address;private String
email;private String
passportCode;private String
61
Person spouse;private
List<Person> children;private
Person( name, surname) {public String String
.name = name;this
.surname = surname;this
}
getFullName(){public String
name + + surname;return " "
}
/*
* Getters and setters fieldsfor private
*/
}
PropertyModel
Let's say we want to display the name field of a Person instance with a label. We could, of course, use the Model
class like we did in the previous example, obtaining something like this:
Person person = Person(); new
//load person's data...
Label label = Label( , Model(person.getName()));new "name" new
However this solution has a huge drawback: the text displayed by the label will be static and if we change the
value of the field, the label won't update its content. Instead, to always display the current value of a class field,
we should use the model class:org.apache.wicket.model.PropertyModel
Person person = Person(); new
//load person's data...
Label label = Label( , PropertyModel(person, ));new "name" new "name"
PropertyModel has just one constructor with two parameters: the model object (person in our example) and the
name of the property we want to read/write ("name" in our example). This last parameter is called property
expression. Internally, methods getObject/setObject use property expression to get/set property's value. To
resolve class properties PropertyModel uses class Resolverorg.apache.wicket.util.lang.Property
which can access any kind of property, private fields included.
Just like the Java language, property expressions support dotted notation to select sub properties. So if we want
to display the name of the Person's spouse we can write:
Label label = Label( , PropertyModel(person, ));new "spouseName" new "spouse.name"
PropertyModel is null-safe, which means we don't have to worry if property expression
includes a null value in its path. If such a value is encountered, an empty string will be
returned.
If property is an array or a List, we can specify an index after its name. For example, to display the name of the
first child of a Person we can write the following property expression:
Label label = Label( , PropertyModel(person, ));new "firstChildName" new "children.0.name"
Indexes and map keys can be also specified using squared brackets:
62
children[0].name …
mapField[key].subfield ...
CompoundPropertyModel and model inheritance
Class is a particular kind of model which is usuallyorg.apache.wicket.model.CompoundPropertyModel
used in conjunction with another Wicket feature called model inheritance. With this feature, when a component
needs to use a model but none has been assigned to it, it will search through the whole container hierarchy for a
parent with an inheritable model. Inheritable models are those which implement interface
and is one oforg.apache.wicket.model.IComponentInheritedModel CompoundPropertyModel
them. Once a has been inherited by a component, it will behave just like aCompoundPropertyModel
PropertyModel using the id of the component as property expression. As a consequence, to make the most of
CompoundPropertyModel we must assign it to one of the containers of a given component, rather than directly to
the component itself.
For example if we use CompoundPropertyModel with the previous example (display spouse's name), the code
would become like this:
//set CompoundPropertyModel as model the container of the labelfor
setDefaultModel( CompoundPropertyModel(person));new
Label label = Label( );new "spouse.name"
add(label);
Note that now the id of the label is equal to the property expression previously used with PropertyModel. Now as
a further example let's say we want to extend the code above to display all of the main informations of a person
(name, surname, address and email). All we have to do is to add one label for every additional information using
the relative property expression as component id:
//Create a person named 'John Smith'
Person person = Person( , );new "John" "Smith"
setDefaultModel( CompoundPropertyModel(person));new
add( Label( ));new "name"
add( Label( ));new "surname"
add( Label( ));new "address"
add( Label( ));new "email"
add( Label( ));new "spouse.name"
CompoundPropertyModel can save us a lot of boring coding if we choose the id of components according to
properties name. However it's also possible to use this type of model even if the id of a component does not
correspond to a valid property expression. The method bind(String property) allows to create a property model
from a given CompoundPropertyModel using the provided parameter as property expression. For example if we
want to display the spouse's name in a label having "xyz" as id, we can write the following code:
//Create a person named 'John Smith'
Person person = Person( , );new "John" "Smith"
CompoundPropertyModel compoundModel;
setDefaultModel(compoundModel = CompoundPropertyModel(person));new
add( Label( , compoundModel.bind( )));new "xyz" "spouse.name"
CompoundPropertyModel are particularly useful when used in combination with Wicket forms, as we will see in
the next paragraph.
Model is referred to as static model because the result of its method getObject is fixed and
it is not dynamically evaluated each time the method is called. In contrast, models like
PropertyModel and CompoundProperty Model are called dynamic models.
11.3 Wicket forms
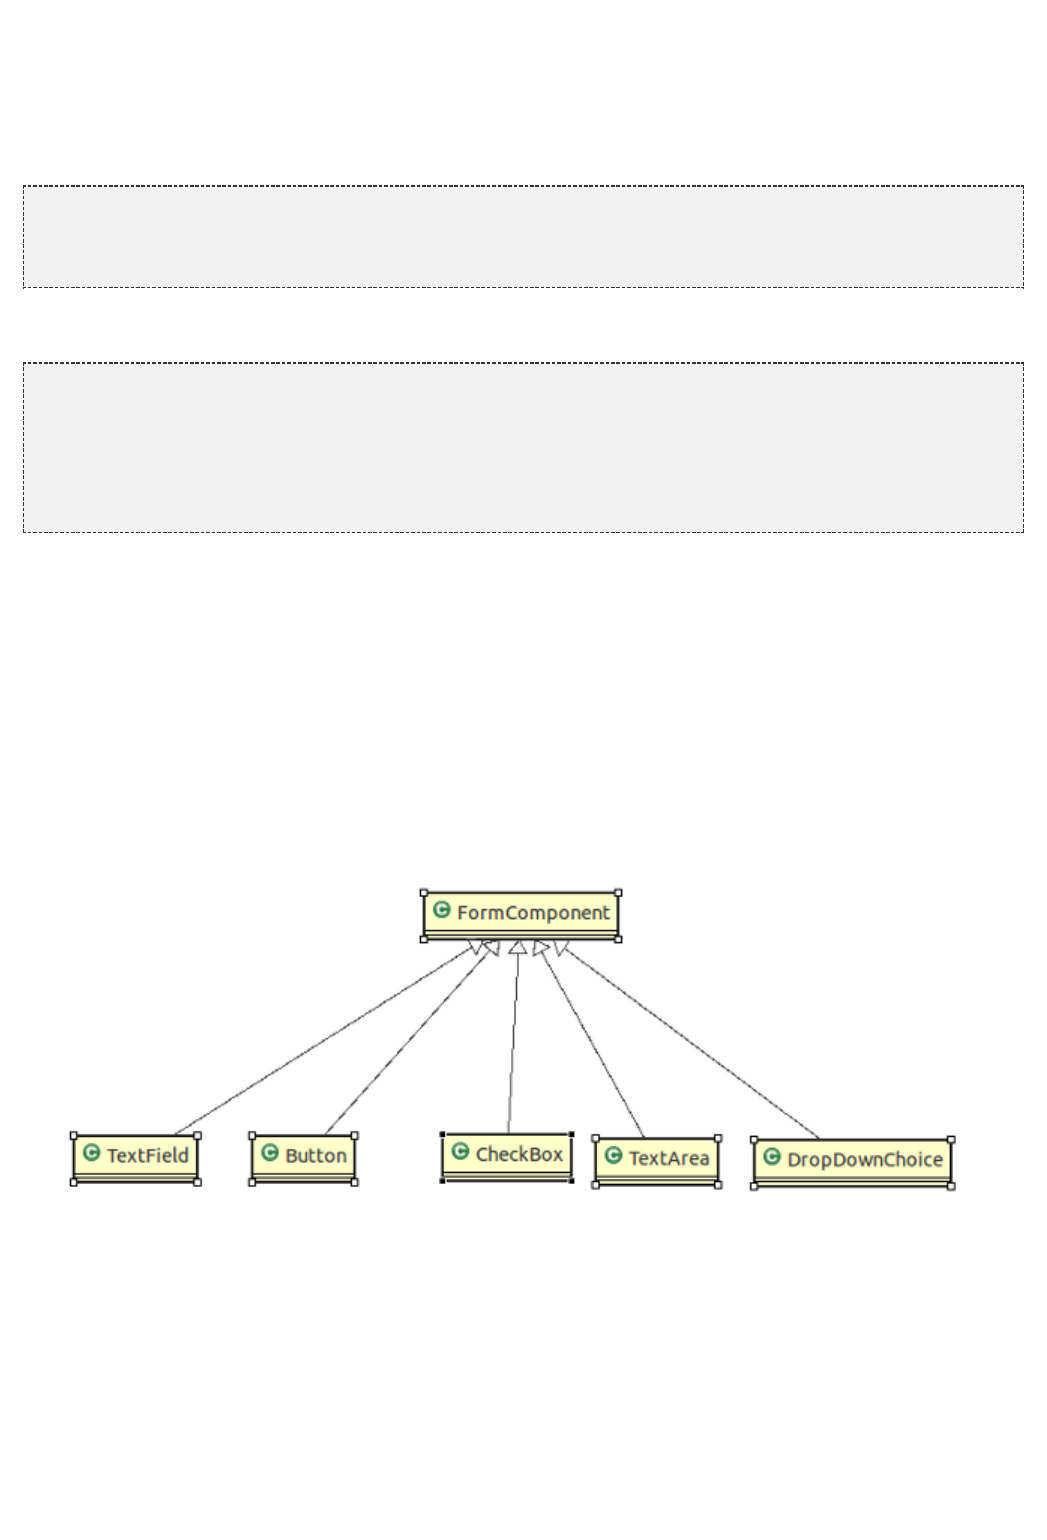
63
11.3 Wicket forms
Web applications use HTML forms to collect user input and send it to the server. Wicket provides
class to handle web forms. This component must be boundorg.apache.wicket.markup.html.form.Form
to <form> tag. The following snippet shows how to create a very basic Wicket form in a page:
Html:
<form wicket:id= >"form"
<input type= value= />"submit" "submit"
</form>
Java code:
Form form = Form( ){new "form"
@Override
void onSubmit() {protected
.out.println( );System "Form submitted."
}
};
add(form);
Method onSubmit is called whenever a form has been submitted and it can be overridden to perform custom
actions. Please note that a Wicket form can be submitted using a standard HTML submit button which is not
mapped to any component (i.e. it does not have a wicket:id attribute). In the next chapter we will continue to
explore Wicket forms and we will see how to submit forms using special components which implement interface
.org.apache.wicket.markup.html.form.IFormSubmitter
Form and models
A form should contain some input fields (like text fields, check boxes, radio buttons, drop-down lists, text areas,
etc.) to interact with users. Wicket provides an abstraction for all these kinds of elements with component
org.apache.wicket.markup.html.form.FormComponent:
The purpose of FormComponent is to store the corresponding user input into its model when the form is
submitted. The form is responsible for mapping input values to the corresponding components, avoiding us the
burden of manually synchronizing models with input fields and vice versa.
Login form
As first example of interaction between the form and its models, we will build a classic login form which asks for
username and password (project LoginForm).
64
The topic of security will be discussed later in chapter 20. The following form is for
example purposes only and is not suited for a real application. If you need to use a login
form you should consider to use component
shippedorg.apache.wicket.authroles.authentication.panel.SignInPanel
with Wicket.
This form needs two text fields, one of which must be a password field. We should also use a label to display the
result of login process1. For the sake of simplicity, the login logic is all inside onSubmit and is quite trivial.
The following is a possible implementation of our form:
public class LoginForm Form {extends
TextField usernameField;private
PasswordTextField passwordField;private
Label loginStatus;private
LoginForm( id) {public String
(id);super
usernameField = TextField( , Model.of( ));new "username" ""
passwordField = PasswordTextField( , Model.of( )); new "password" ""
loginStatus = Label( , Model.of( ));new "loginStatus" ""
add(usernameField);
add(passwordField);
add(loginStatus);
}
void onSubmit() {public final
username = ( )usernameField.getDefaultModelObject();String String
password = ( )passwordField.getDefaultModelObject();String String
(username.equals( ) && password.equals( ))if "test" "test"
loginStatus.setDefaultModelObject( );"Congratulations!"
else
loginStatus.setDefaultModelObject( ); "Wrong username or password!"
}
}
Inside form's constructor we build the three components used in the form and we assign them a model
containing an empty string:
usernameField = TextField( , Model.of( ));new "username" ""
passwordField = PasswordTextField( , Model.of( )); new "password" ""
loginStatus = Label( , Model.of( ));new "loginStatus" ""
If we don't provide a model to a form component, we will get the following exception on form submission:
java.lang.IllegalStateException: Attempt to set model object on model of component:null
Component TextField corresponds to the standard text field, without any particular behavior or restriction on the
allowed values. We must bind this component to the <input> tag with the attribute type set to "text".
PasswordTextField is a subtype of TextFiled and it must be used with an <input> tag with the attribute type set
to"password". For security reasons component PasswordTextField cleans its value at each request, so it wil be
always empty after the form has been rendered. By default PasswordTextField fields are required, meaning that
if we left them empty, the form won't be submitted (i.e. onSubmit won't be called). Class FormComponent
provides method setRequired(boolean required) to change this behavior. Inside onSubmit, to get/set model
objects we have used shortcut methods setDefaultModelObject and getDefaultModelObject. Both methods are
defined in class Component (see class diagram from Illustration 9.1).
The following are the possible markup and code for the login page:
Html:
<html>

65
<head>
<title>Login page</title>
</head>
<body>
<form id= method= wicket:id= >"loginForm" "get" "loginForm"
<fieldset>
<legend style= >Login</legend>"color: #F90"
<p wicket:id= ></p>"loginStatus"
<span>Username: </span><input wicket:id= type= id="username" "text"
/><br/>"username"
<span>Password: </span><input wicket:id= type= id="password" "password"
/>"password"
<p>
<input type= name= value= />"submit" "Login" "Login"
</p>
</fieldset>
</form>
</body>
</html>
Java code:
public class HomePage WebPage {extends
HomePage( PageParameters parameters) {public final
(parameters);super
add( LoginForm( ));new "loginForm"
}
}
The example shows how Wicket form components can be used to store user input inside their model. However
we can dramatically improve the form code using CompoundPropertyModel and its ability to access the
properties of its model object. The revisited code is the following (the LoginFormRevisited project):
public class LoginForm Form{extends
username;private String
password;private String
loginStatus;private String
LoginForm( id) {public String
(id); super
setDefaultModel( CompoundPropertyModel( ));new this
add( TextField( ));new "username"
add( PasswordTextField( ));new "password"
add( Label( ));new "loginStatus"
}
void onSubmit() { public final
(username.equals( ) && password.equals( ))if "test" "test"
loginStatus = ;"Congratulations!"
else
loginStatus = ; "Wrong username or password !"
}
}
In this version the form itself is used as model object for its CompoundPropertyModel. This allows children
components to have direct access to form fields and use them as backing objects, without explicitly creating a
model for themselves.
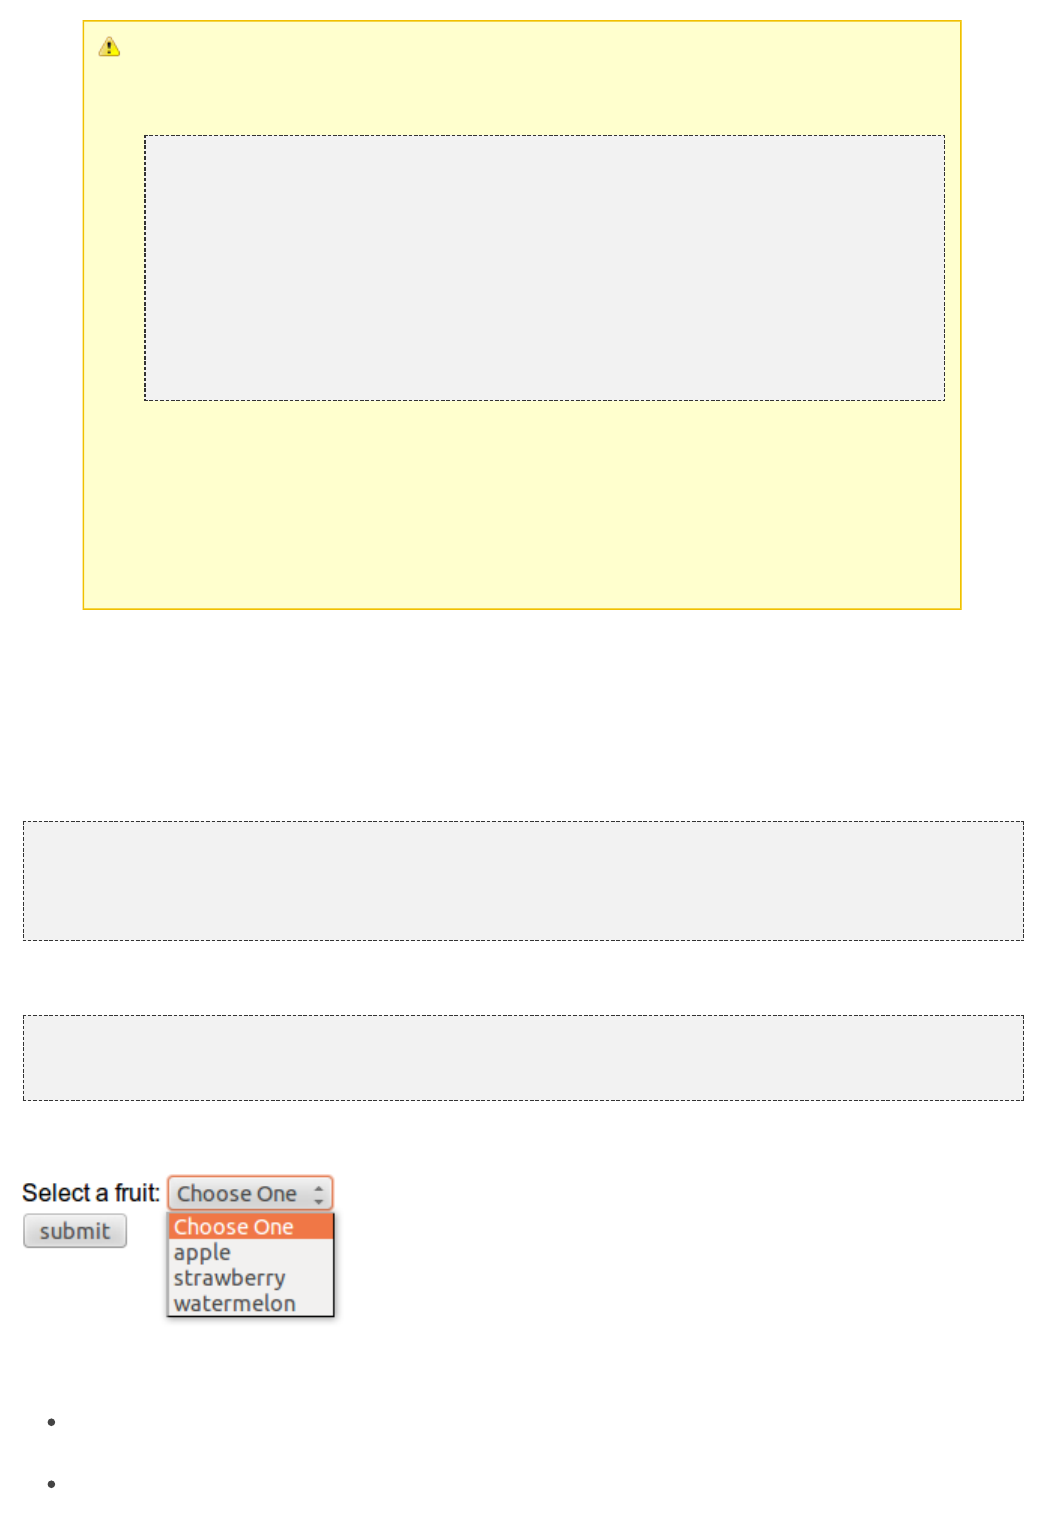
66
Keep in mind that when CompoundPropertyModel is inherited, it does not consider the ids
of traversed containers for the final property expression, but it will always use the id of the
visited child. To understand this potential pitfall, let's consider the following initialization
code of a page:
//Create a person named 'John Smith'
Person person = Person( , );new "John" "Smith"
//Create a person named 'Jill Smith'
Person spouse = Person( , );new "Jill" "Smith"
//Set Jill as John's spouse
person.setSpouse(spouse);
setDefaultModel( CompoundPropertyModel(person));new
WebMarkupContainer spouseContainer = WebMarkupContainer( );new "spouse"
Label name;
spouseContainer.add(name = Label( ));new "name"
add(spouseContainer);
The value displayed by label "name" will be "John" and not the spouse's name "Jill" as you
may expect. In this example the label doesn't own a model, so it must search up its
container hierarchy for an inheritable model. However, its container (WebMarkup
Container with id 'spouse') doesn't own a model, hence the request for a model is
forwarded to the parent container, which in this case is the page. In the end the label
inherits CompoundPropertyModel from page but only its own id is used for the property
expression. The containers in between are never taken into account for the final property
expression.
11.4 Component DropDownChoice
Class is the form component needed toorg.apache.wicket.markup.html.form.DropDownChoice
display a list of possible options as a drop-down list where users can select one of the proposed options. This
component must be used with <select> tag:
Html:
<form wicket:id= >"form"
Select a fruit: <select wicket:id= ></select>"fruits"
<div><input type= value= /></div>"submit" "submit"
</form>
Java code:
List< > fruits = Arrays.asList( , , ); String "apple" "strawberry" "watermelon"
form.add( DropDownChoice< >( , Model(), fruits));new String "fruits" new
Screenshot of generated page:
In addition to the component id, in order to build a DropDownChoice we need to provide to its constructor two
further parameters:
a model containing the current selected item. This parameter is not required if we are going to inherit a
CompoundPropertyModel for this component.
a list of options to display which can be supplied as a model or as a regular java.util.List.
67
In the example above the possible options are provided as a list of String objects. Now let's take a look at the
markup generated for them:
<select name= wicket:id= >"fruits" "fruits"
<option value= selected= >Choose One</option>"" "selected"
<option value= >apple</option>"0"
<option value= >strawberry</option>"1"
<option value= >watermelon</option>"2"
</select>
The first option is a placeholder item corresponding to a null model value. By default DropDownChoice cannot
have a null value so users are forced to select a not-null option. If we want to change this behavior we can set
the nullValid flag to true via the setNullValid method. Please note that the placeholder text (“Chose one”) can be
localized, as we will see in chapter 14. The other options are identified by the attribute value. By default the value
of this attribute is the index of the single option inside the provided list of choices, while the text displayed to the
user is obtained by calling toString()on the choice object. This default behavior works fine as long as our options
are simple objects like strings, but when we move to more complex objects we may need to implement a more
sophisticated algorithm to generate the value to use as the option id and the one to display to user. Wicket has
solved this problem with interface. Thisorg.apache.wicket.markup.html.form.IChoiceRender
interface defines method getDisplayValue(T object) that is called to generate the value to display for the given
choice object, and method getIdValue(T object, int index) that is called to generate the option id. The built-in
implementation of this interface is class whichorg.apache.wicket.markup.html.form.ChoiceRenderer
renders the two values using property expressions.
In the following code we want to show a list of Person objects using their full name as value to display and using
their passport code as option id:
Java code:
List<Person> persons;
//Initialize the list of persons here…
ChoiceRenderer personRenderer = ChoiceRenderer( , );new "fullName" "passportCode"
form.add( DropDownChoice< >( , Model<Person>(), persons,new String "persons" new
personRenderer));
The choice renderer can be assigned to the DropDownChoice using one of its constructor that accepts this type
of parameter (like we did in the example above) or after its creation invoking setChoiceRenderer method.
11.5 Model chaining
Models that implement the interface can be used to build aorg.apache.wicket.model.IChainingModel
chain of models. These kinds of models are able to recognize whether their model object is itself an
implementation of IModel and if so, they will call getObject on the wrapped model and the returned value will be
the actual model object. In this way we can combine the action of an arbitrary number of models, making exactly
a chain of models. Chaining models allows to combine different data persistence strategies, similarly to what we
do with chains of To see model chaining in action we will build a page that implements theI/O streams.
List/Detail View pattern, where we have a drop-down list of Person objects and a form to display and edit the
data of the current selected Person.
The example page will look like this:
What we want to do in this example is to chain the model of the DropDownChoice (which contains the selected
68
Person) with the model of the Form. In this way the Form will work with the selected Person as backing object.
The DropDownChoice component can be configured to automatically update its model each time we change the
selected item on the client side. All we have to do is to override method wantOnSelectionChangedNotifications to
make it return true. In practice, when this method returns true, DropDownChoice will submit its value every time
JavaScript event onChange occurs, and its model will be consequently updated. To leverage this functionality,
DropDownChoice doesn't need to be inside a form.
The following is the resulting markup of the example page:
…
<body>
List of persons <select wicket:id= ></select> <br/>"persons"
<br/>
<form wicket:id= > "form"
<div style= >"display: table;"
<div style= >"display: table-row;"
<div style= >Name: </div>"display: table-cell;"
<div style= >"display: table-cell;"
<input type= wicket:id= /> "text" "name"
</div>
</div>
<div style= >"display: table-row;"
<div style= >Surname: </div>"display: table-cell;"
<div style= >"display: table-cell;"
<input type= wicket:id= />"text" "surname"
</div>
</div>
<div style= >"display: table-row;"
<div style= >Address: </div>"display: table-cell;"
<div style= >"display: table-cell;"
<input type= wicket:id= />"text" "address"
</div>
</div>
<div style= >"display: table-row;"
<div style= >Email: </div>"display: table-cell;"
<div style= >"display: table-cell;"
<input type= wicket:id= />"text" "email"
</div>
</div>
</div>
<input type= value= />"submit" "Save"
</form>
</body>
The initialization code for DropDownChoice is the following:
Model<Person> listModel = Model<Person>();new
ChoiceRenderer<Person> personRender = ChoiceRenderer<Person>( );new "fullName"
personsList = DropDownChoice<Person>( , listModel, loadPersons(), personRender){new "persons"
@Override
wantOnSelectionChangedNotifications() {protected boolean
;return true
}
};
As choice render we have used the basic implementation provided with the org.apache.wicket
.markup.html.form.ChoiceRenderer class that we have seen in the previous paragraph. loadPersons() is just an
utility method which generates a list of Person instances. The model for DropDownChoice is a simple instance of
the Model class.
Here is the whole code of the page (except for the loadPersons() method):
public class PersonListDetails WebPage {extends
Form form;private
DropDownChoice<Person> personsList;private
PersonListDetails(){public
Model<Person> listModel = Model<Person>();new
ChoiceRenderer<Person> personRender = ChoiceRenderer<Person>( );new "fullName"
personsList = DropDownChoice<Person>( , listModel, loadPersons(),new "persons"
personRender){
@Override
wantOnSelectionChangedNotifications() {protected boolean
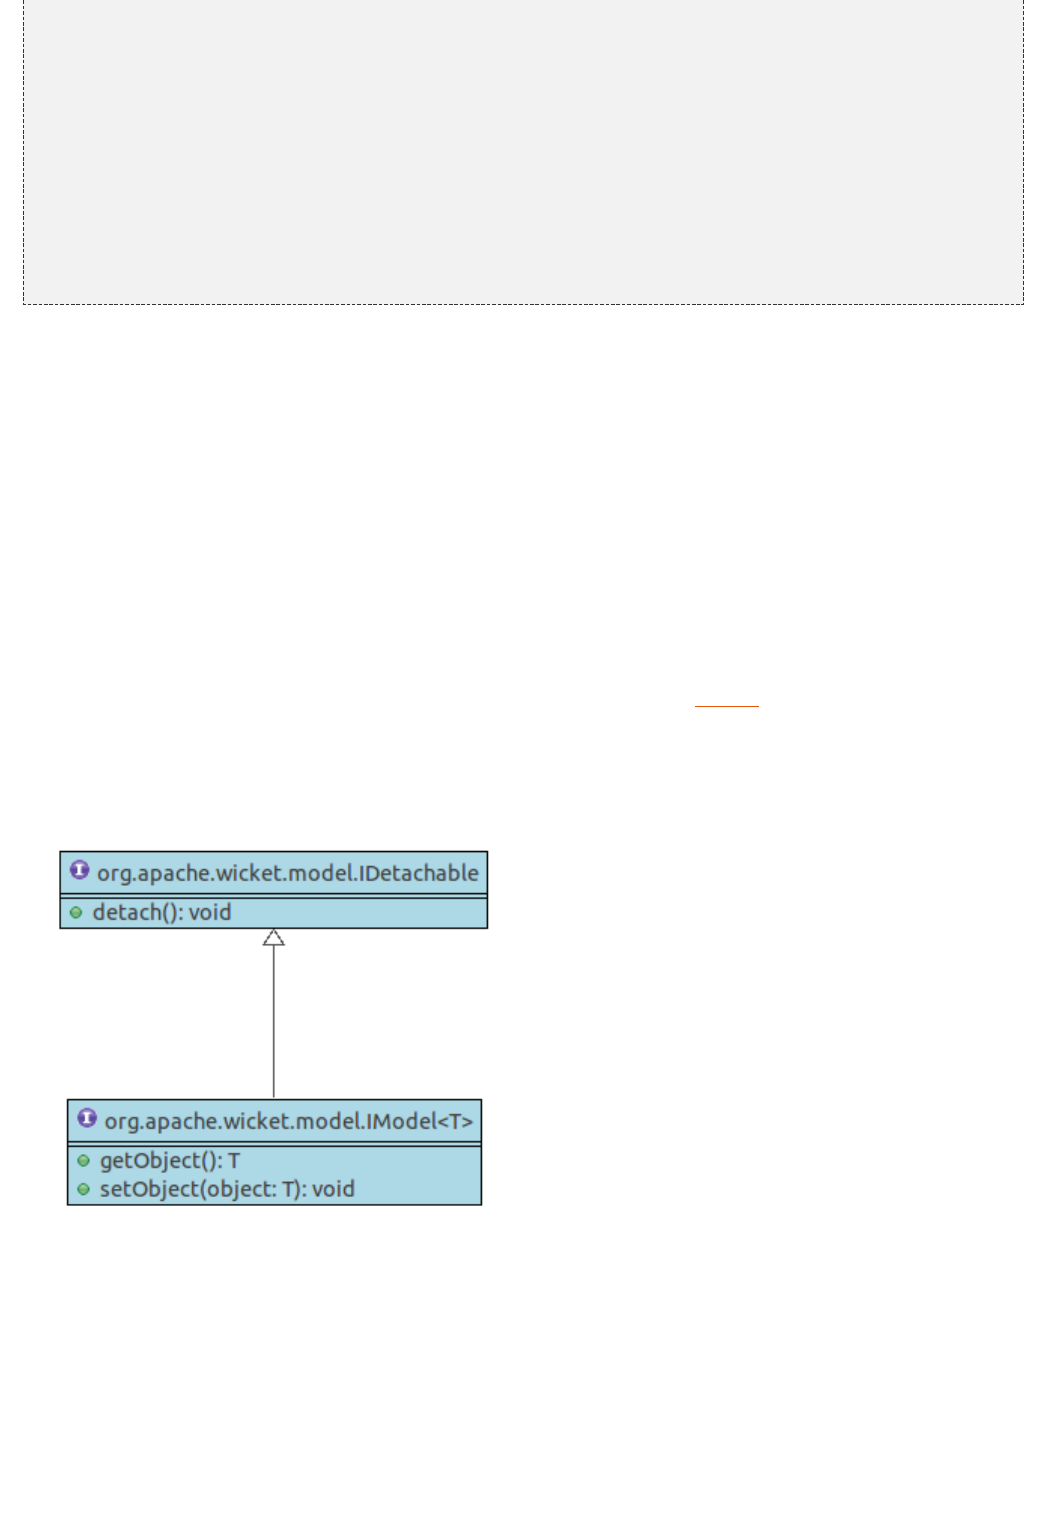
69
1.
2.
;return true
}
};
add(personsList);
form = Form( , CompoundPropertyModel<Person>(listModel)); new "form" new
form.add( TextField( ));new "name"
form.add( TextField( ));new "surname"
form.add( TextField( ));new "address"
form.add( TextField( ));new "email"
add(form);
}
//loadPersons()
//…
}
The two models work together as a pipeline where the output of method getObject of Model is the model object
of CompoundPropertyModel. As we have seen, model chaining allows us to combine the actions of two or more
models without creating new custom implementations.
11.6 Detachable models
In chapter 6 we have seen how Wicket uses serialization to store page instances. When an object is serialized,
all its referenced objects are recursively serialized. For a page this means that all its children components, their
related models as well as the model objects inside them will be serialized. For model objects this could be a
serious issue for (at least) two main reasons:
The model object could be a very large instance, hence serialization would become very expensive in terms
of time and memory.
We simply may not be able to use a serializable object as model object. In paragraphs 1.4 and 9.2 we
stated that Wicket allows us to use a POJO as backing object, but are ordinary objects with noPOJOs
prespecified interface, annotation or superclass, hence they are not required to implement the standard
Serializable interface.
To cope with these problems IModel extends another interface called IDetachable.
This interface provides a method called detach() which is invoked by Wicket at the end of web request
processing when data model is no more needed but before serialization occurs. Overriding this method we can
clean any reference to data object keeping just the information needed to retrieve it later (for example the id of
the table row where our data are stored). In this way we can avoid the serialization of the object wrapped into the
model overcoming both the problem with non-serializable objects and the one with large data objects.
Since IModel inherits from IDetachable, every model of Wicket is “detachable”, although not all of them
implement a detaching policy (like the Model class). Usually detaching operations are strictly dependent on the
persistence technology adopted for model objects (like a relational db, a NoSQL db, a queue, etc), so it's not
unusual to write a custom detachable model suited for the persistence technology chosen for a given project. To
ease this task Wicket provides abstract model LoadableDetachableModel. This class internally holds a transient
reference to a model object which is initialized the first time getObject()is called to precess a request. The
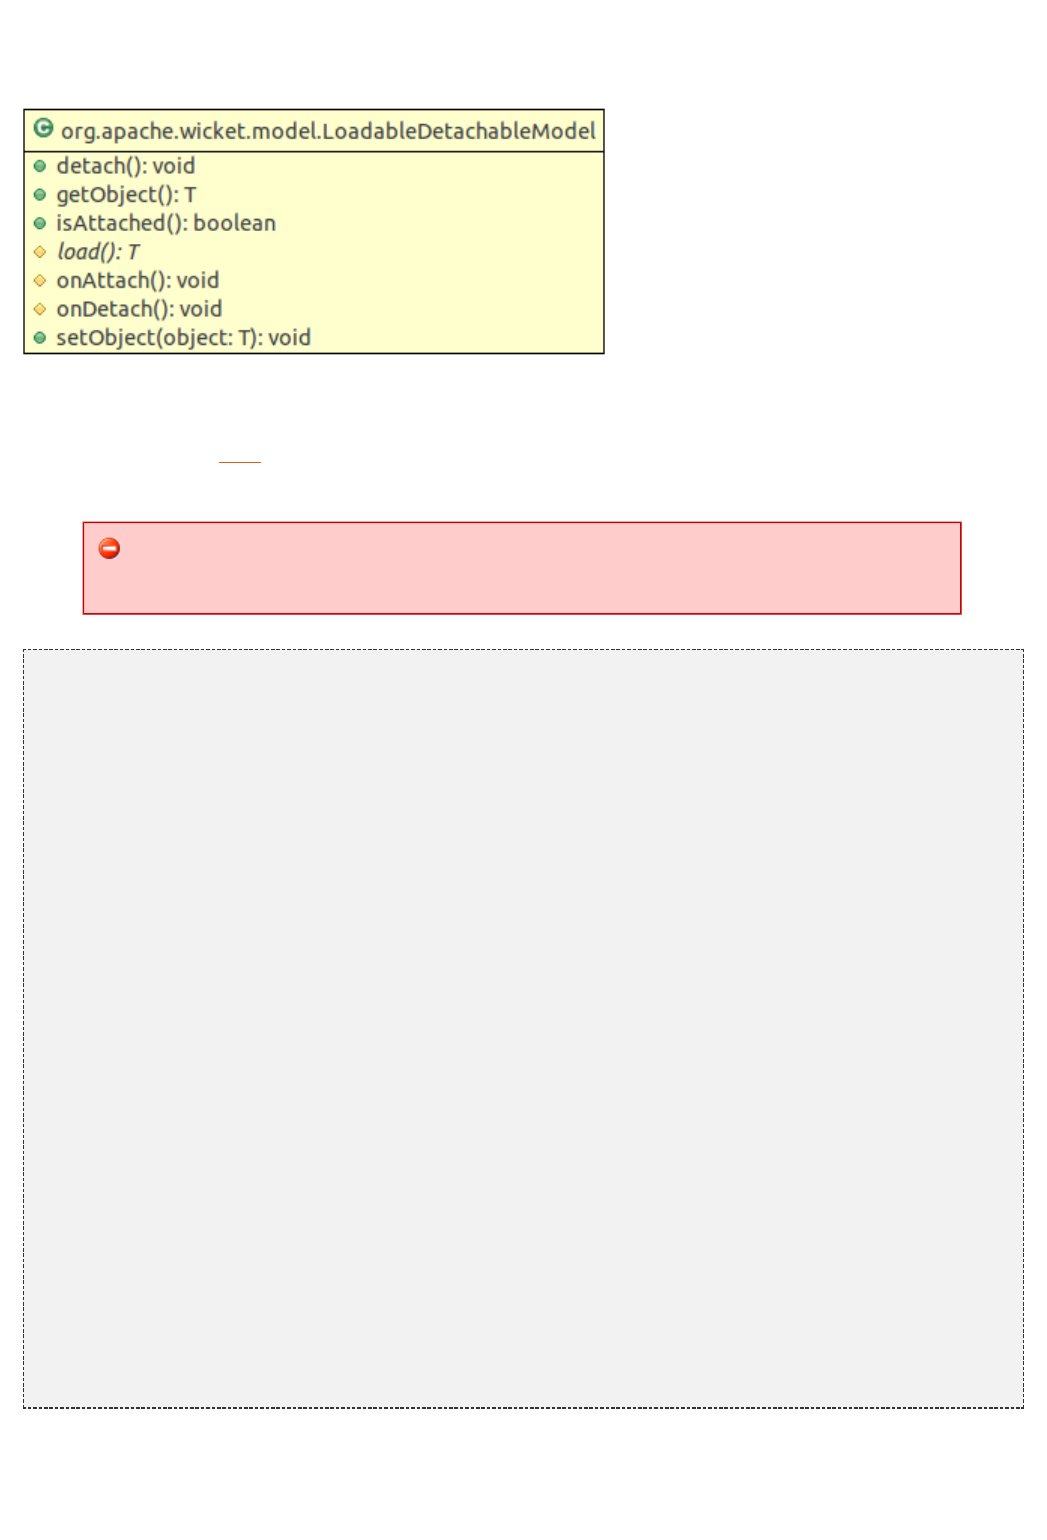
70
concrete data loading is delegated to abstract method T load(). The reference to a model object is automatically
set to null at the end of the request by the detach() method.
The following class diagram summarizes the methods defined inside LoadableDetachableModel.
onDetach and onAttach can be overridden in order to obtain further control over the detaching procedure.
Now as example of a possible use of LoadableDetachableModel, we will build a model designed to work with
entities managed via To understand the following code a basic knowledge of JPA is required even if weJPA.
won't go into the detail of this standard.
The following model is provided for example purposes only and is not intended to be used
in production environment. Important aspects such as transaction management are not
taken into account and you should rework the code before considering to use it.
public class JpaLoadableModel<T> LoadableDetachableModel<T> {extends
EntityManagerFactory entityManagerFactory;private
<T> entityClass;private Class
Serializable identifier;private
List< > constructorParams;private Object
JpaLoadableModel(EntityManagerFactory entityManagerFactory, T entity) {public
();super
PersistenceUnitUtil util = entityManagerFactory.getPersistenceUnitUtil();
.entityManagerFactory = entityManagerFactory;this
.entityClass = ( <T>) entity.getClass();this Class
.identifier = (Serializable) util.getIdentifier(entity);this
setObject(entity);
}
@Override
T load() {protected
T entity = ;null
(identifier != ) { if null
EntityManager entityManager = entityManagerFactory.createEntityManager();
entity = entityManager.find(entityClass, identifier);
}
entity;return
}
@Override
void onDetach() {protected
.onDetach();super
T entity = getObject();
PersistenceUnitUtil persistenceUtil =
entityManagerFactory.getPersistenceUnitUtil();
(entity == ) ;if null return
identifier = (Serializable) persistenceUtil.getIdentifier(entity);
}
}
The constructor of the model takes as input two parameters: an implementation of the JPA interface
javax.persistence.EntityManagerFactory to manage JPA entities and the entity that must be handled by this
71
model. Inside its constructor the model saves the class of the entity and its id (which could be null if the entity
has not been persisted yet). These two informations are required to retrieve the entity at a later time and are
used by the load method.
onDetach is responsible for updating the entity id before detachment occurs. The id can change the first time an
entity is persisted (JPA generates a new id and assigns it to the entity). Please note that this model is not
responsible for saving any changes occurred to the entity object before it is detached. If we don't want to loose
these changes we must explicitly persist the entity before the detaching phase occurs.
Since the model of this example holds a reference to the EntityManager Factory, the
implementation in use must be serializable.
11.7 Using more than one model in a component
Sometimes our custom components may need to use more than a single model to work properly. In such a case
we must manually detach the additional models used by our components. In order to do this we can overwrite
the Component's onDetach method that is called at the end of the current request. The following is the generic
code of a component that uses two models:
/**
*
* fooModel is used as main model beeModel must be manually detachedwhile
*
*/ class ComponetTwoModels Component{public extends
IModel<Bee> beeModel;private
ComponetTwoModels( id, IModel<Foo> fooModel, IModel<Bee> beeModel) {public String
(id, fooModel);super
.beeModel = beeModel;this
}
@Override
void onDetach() {public
(beeModel != )if null
beeModel.detach();
.onDetach();super
}
}
When we overwrite onDetach we must call the super class implementation of this method, usually as last line in
our custom implementation.
11.8 Use models!
Like many people new to Wicket, you may need a little time to fully understand the power and the advantages of
using models. Taking your first steps with Wicket you may be tempted to pass row objects to your components
instead of using models:
/**
*
* NOT TO DO: passing row objects to components instead of using models!
*
*/ class CustomComponent Component{public extends
FooBean fooBean;private
CustomComponent( id, FooBean fooBean) {public String
(id);super
.fooBean = fooBean;this
}
//...some other ugly code :)…
}
That's a bad practice and you must avoid it. Using models we do not only decouple our components from the
data source, but we can also relay on them (if they are dynamic) to work with the most up-to-date version of our
model object. If we decide to bypass models we lose all these advantages and we force model objects to be

72
serialized.
11.9 Summary
Models are at the core of Wicket and they are the basic ingredient needed to taste the real power of the
framework. In this chapter we have seen how to use models to bring data to our components without littering
their code with technical details about their persistence strategy. We have also introduced Wicket forms as
complementary topic. With forms and models we are able to bring our applications to life allowing them to
interact with users. But what we have seen in this chapter about Wicket forms is just the tip of the iceberg. That's
why the next chapter is entirely dedicated to them.
73
1.
2.
3.
12 Wicket forms in detail
In the previous chapter we have only scratched the surface of Wicket forms. The Form component was not only
designed to collect user input but also to extend the semantic of the classic HTML forms with new features.
One of such features is the ability to work with nested forms (they will be discussed in ).paragraph 12.6
In this chapter we will continue to explore Wicket forms learning how to master them and how to build effective
and user-proof forms for our web applications.
12.1 Default form processing
In we have seen a very basic usage of the Form component and we didn't pay much attention toparagraph 11.3
what happens behind the scenes of form submission. In Wicket when we submit a form we trigger the following
steps on server side:
Form validation: user input is checked to see if it satisfies the validation rules set on the form. If validation
fails, step number 2 is skipped and the form should display a feedback message to explain to user what
went wrong. During this step input values (which are simple strings sent with a web request) are converted
into Java objects. In the next paragraphs we will explore the infrastructures provided by Wicket for the three
sub-tasks involved with form validation, which are: conversion of user input into objects, validation of user
input, and visualization of feedback messages.
Updating of models: if validation succeeds, the form updates the model of its children components with the
converted values obtained in the previous step.
Invoking callback methods onSubmit() or onError(): if we didn't have any validation error, method
onSubmit() is called, otherwise onError() will be called. The default implementation of both these methods
is left empty and we can override them to perform custom actions.
Please note that the model of form components is updated only if no validation error
occurred (i.e. step two is performed only if validation succeeds).
Without going into too much detail, we can say that the first two steps of form processing correspond to the
invocation of one or more Form's internal methods (which are declared protected and final). Some examples of
these methods are validate(), which is invoked during validation step, and updateFormComponentModels(),
which is used at the step that updates the form field models.
The whole form processing is started invoking public method process(IFormSubmitter) (Later in paragraph 12.5
we will introduce interface IFormSubmitter).
12.2 Form validation and feedback messages
A basic example of a validation rule is to make a field required. In we have already seen how thisparagraph 11.3
can be done calling setRequired(true) on a field. However, to set a validation rule on a FormComponent we must
add the corresponding validator to it.
A validator is an implementation of the interface and the org.apache.wicket.validation.IValidator
has a version of method add which takes as input a reference of this interface.FormComponent
For example if we want to use a text field to insert an email address, we could use the built-in validator
EmailAddressValidator to ensure that the inserted input will respect the email format :local-part@domain
TextField email = TextField( );new "email"
email.add(EmailAddressValidator.getInstance());
74
Wicket comes with a set of built-in validators that should suit most of our needs. We will see them later in this
chapter.
Feedback messages and localization
Wicket generates a feedback message for each field that doesn't satisfy one of its validation rules. For example
the message generated when a required field is left empty is the following
Field '<label>' is required.
<label> is the value of the label model set on a FormComponent with method setLabel(IModel <String> model). If
such model is not provided, component id will be used as the default value.
The entire infrastructure of feedback messages is built on top of the Java internationalization (I18N) support and
it uses to store messages.resource bundles
The topics of internationalization will be covered in . For now we will give justchapter 14
few notions needed to understand the examples from this chapter.
By default resource bundles are stored into properties files but we can easily configure other sources as
described later in .paragraph 14.2
Default feedback messages (like the one above for required fields) are stored in the file Application. properties
placed inside Wicket the org.apache.wicket package. Opening this file we can find the key and the localized
value of the message:
Required=Field '${label}' is required.
We can note the key (Required in our case) and the label parameter written in the expression language
(${label}). Scrolling down this file we can also find the message used by the Email AddressValidator:
EmailAddressValidator=The value of '${label}' is not a valid email address.
By default FormComponent provides 3 parameters for feedback message: input (the value that failed validation),
label and name (this later is the id of the component).
Remember that component model is updated with the user input only if validation
succeeds! As a consequence, we can't retrieve the wrong value inserted for a field from its
model. Instead, we should use getValue() method of FormComponent class. (This method
will be introduced in the example used later in this chapter)
Displaying feedback messages and filtering them
To display feedback messages we must use component
. This component automatically reads all theorg.apache.wicket.markup.html.panel.FeedbackPanel
feedback messages generated during form validation and displays them with an unordered list:
<ul class= > "feedbackPanel"
<li class= > "feedbackPanelERROR"
<span class= >Field 'Username' is required.</span> "feedbackPanelERROR"
</li>
</ul>
CSS classes "feedbackPanel" and "feedbackPanelERROR" can be used in order to customize the style of the
message list:

75
The component can be freely placed inside the page and we can set the maximum amount of displayed
messages with the setMaxMessages() method.
Error messages can be filtered using three built-in filters:
ComponentFeedbackMessageFilter: shows only messages coming from a specific component.
ContainerFeedbackMessageFilter: shows only messages coming from a specific container or from any of
its children components.
ErrorLevelFeedbackMessageFilter: shows only messages with a level of severity equals or greater than a
given lower bound. Class FeedbackMessage defines a set of static constants to express different levels of
severity: DEBUG, ERROR, WARNING, INFO, SUCCESS, etc.... Levels of severity for feedback messages
are discussed later in this chapter.
These filters are intended to be used when there are more than one feedback panel (or more than one form) in
the same page. We can pass a filter to a feedback panel via its constructor or using the setFilter method. Custom
filters can be created implementing the IFeedbackMessageFilter interface. An example of custom filter is
illustrated later in this paragraph.
Built-in validators
Wicket already provides a number of built-in validators ready to be used. The following table is a short reference
where validators are listed along with a brief description of what they do. The default feedback message used by
each of them is reported as well:
EmailAddressValidator
Checks if input respects the format local-part@domain.
Message:
The value of '${label}' is not a valid email address.
UrlValidator
Checks if input is a valid URL. We can specify in the constructor which protocols are allowed (http://, https://, and
ftp://).
Message:
The value of '${label}' is not a valid URL.
DateValidator
Validator class that can be extended or used as a factory class to get date validators to check if a date is bigger
than a lower bound (method minimum(Date min)), smaller than a upper bound (method maximum(Date max)) or
inside a range (method range(Date min, Date max)).
Messages:
The value of '${label}' is less than the minimum of ${minimum}.
The value of '${label}' is larger than the maximum of ${maximum}.
The value of '${label}' is not between ${minimum} and ${maximum}.
RangeValidator
Validator class that can be extended or used as a factory class to get validators to check if a value is bigger than
a given lower bound (method minimum(T min)), smaller than a upper bound (method maximum(T max)) or inside
a range (method range(T min,T max)).
The type of the value is a generic subtype of java.lang.Comparable and must implement Serializable interface.
Messages:
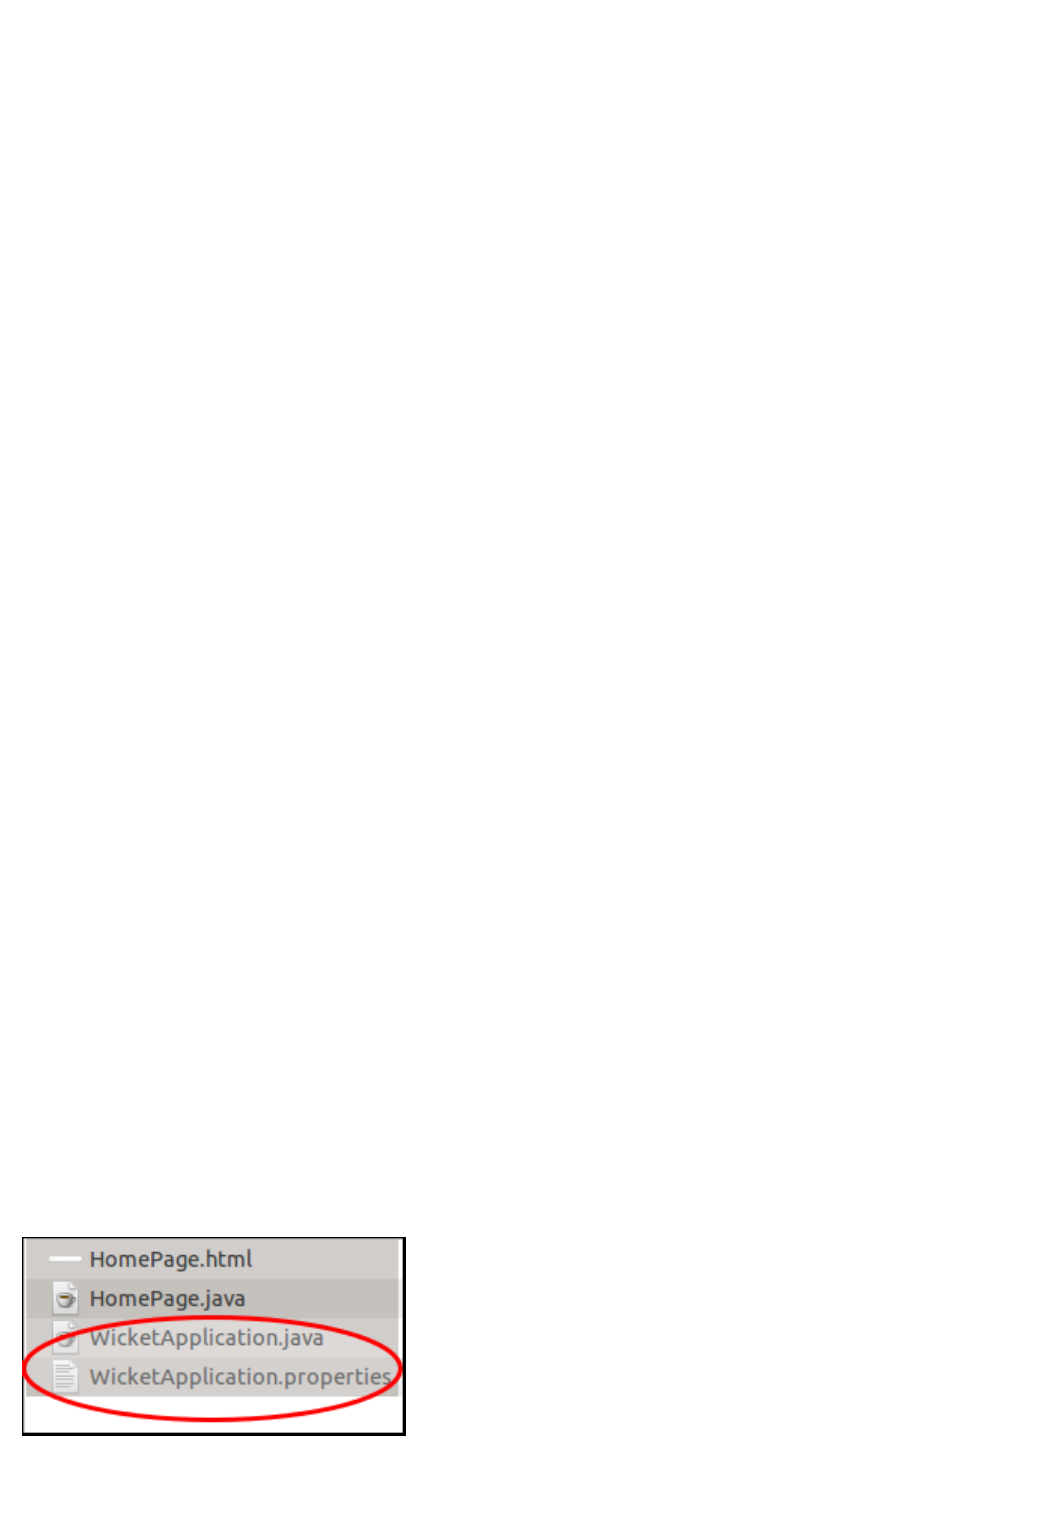
76
The value of '${label}' must be at least ${minimum}.
The value of '${label}' must be at most ${maximum}.
The value of '${label}' must be between ${minimum} and ${maximum}.
StringValidator
Validator class that can be extended or used as a factory class to get validators to check if the length of a string
value is bigger then a given lower bound (method minimumLength (int min)), smaller then a given upper bound
(method maximumLength (int max)) or within a given range (method lengthBetween(int min, int max)).
To accept only string values consisting of exactly n characters, we must use method exactLength(int length).
Messages:
The value of '${label}' is shorter than the minimum of ${minimum} characters.
The value of '${label}' is longer than the maximum of ${maximum} characters.
The value of '${label}' is not between ${minimum} and ${maximum} characters long.
The value of '${label}' is not exactly ${exact} characters long.
CreditCardValidator
Checks if input is a valid credit card number. This validator supports some of the most popular credit cards (like
“American Express", "MasterCard", “Visa” or “Diners Club”).
Message:
The credit card number is invalid.
EqualPasswordInputValidator
This validator checks if two password fields have the same value.
Message:
${label0} and ${label1} must be equal.
Overriding standard feedback messages with custom bundles
If we don't like the default validation feedback messages, we can override them providing custom properties files.
In these files we can write our custom messages using the same keys of the messages we want to override. For
example if we wanted to override the default message for invalid email addresses, our properties file would
contain a line like this:
EmailAddressValidator=Man, your email address is not good!
As we will see in the next chapter, Wicket searches for custom properties files in various positions inside the
application's class path, but for now we will consider just the properties file placed next to our application class.
The name of this file must be equal to the name of our application class:
The example project OverrideMailMessage overrides email validator's message with a new one which also
reports the value that failed validation:
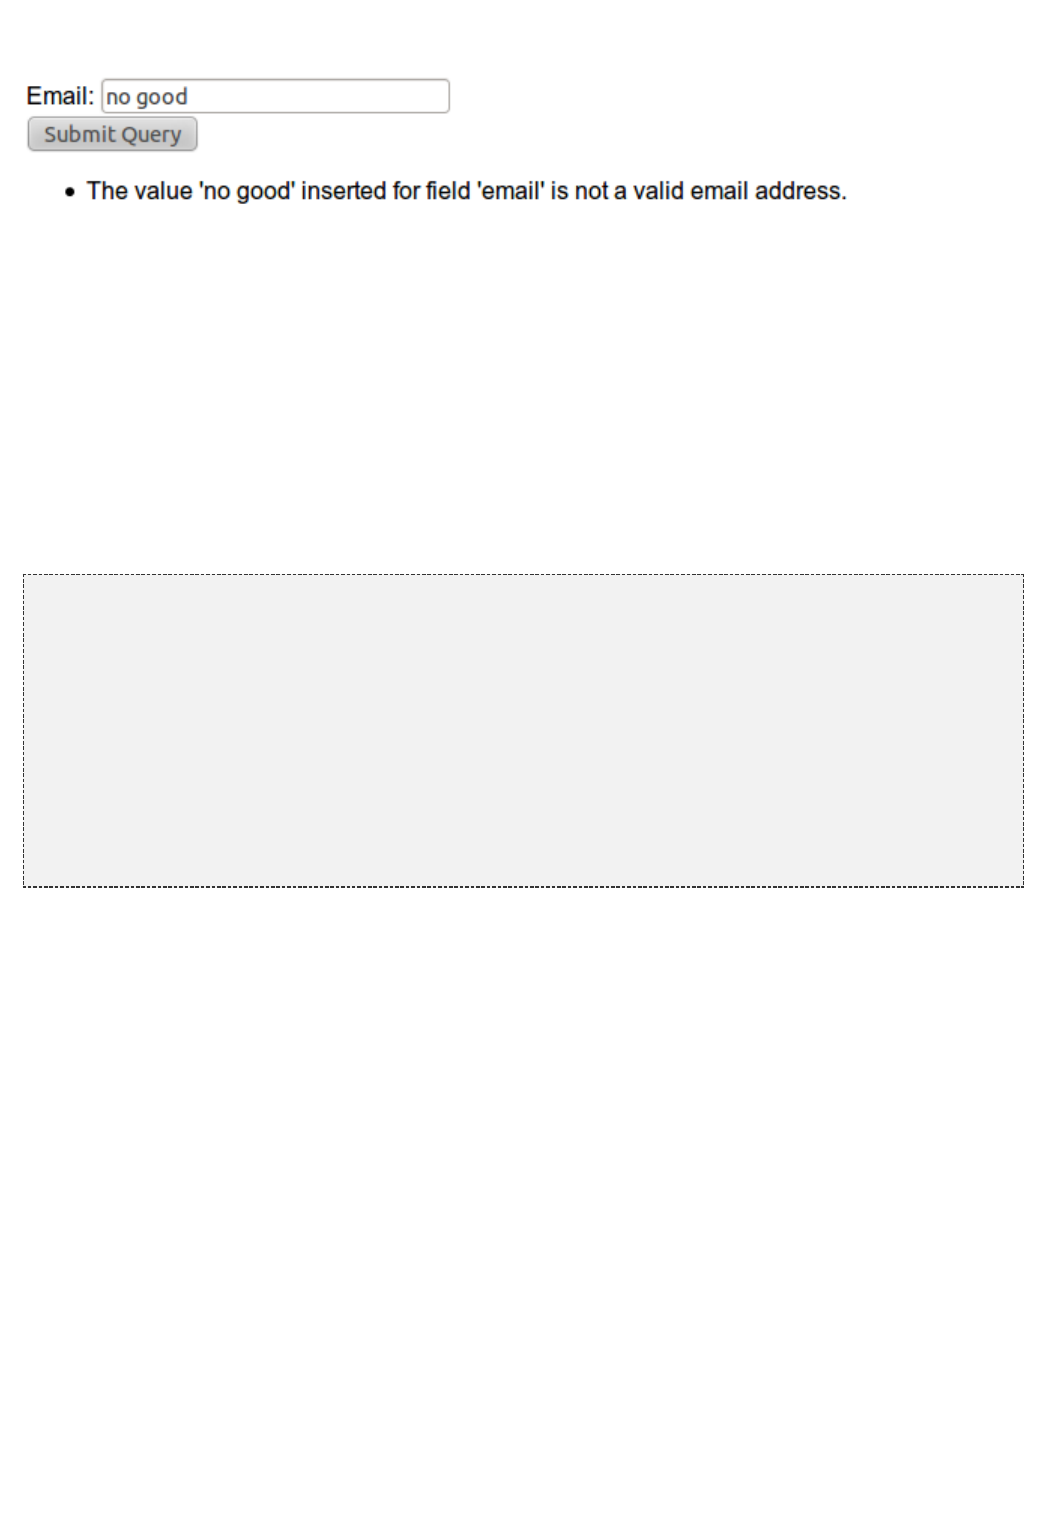
77
EmailAddressValidator=The value '${input}' inserted for field '${label}' is not a
valid email address.
Creating custom validators
If our web application requires a complex validation logic and built-in validators are not enough, we can
implement our own custom validators. For example (project UsernameCustomValidator) suppose we are working
on the registration page of our site where users can create their profile choosing their username. Our registration
form should validate the new username checking if it was already chosen by another user. In a situation like this
we may need to implement a custom validator that queries a specific data source to check if a username is
already in use.
For the sake of simplicity, the validator of our example will check the given username against a fixed list of three
existing usernames.
A custom validator must simply implement interface IValidator:
public class UsernameValidator IValidator< > {implements String
List< > existingUsernames = Arrays.asList( , , );String "bigJack" "anonymous" "mrSmith"
void validate(IValidatable< > validatable) {public String
chosenUserName = validatable.getValue();String
(existingUsernames.contains(chosenUserName)){if
ValidationError error = ValidationError( );new this
Random random = Random();new
error.setVariable( , "suggestedUserName"
validatable.getValue() + random.nextInt());
validatable.error(error);
}
}
}
The only method defined inside IValidator is validate(IValidatable<T> validatable) and is invoked during
validation's step. Interface IValidatable represents the component being validated and it can be used to retrieve
the component model (getModel()) or the value to validate (getValue()).
The custom validation logic is all inside IValidator's method validate. When validation fails a validator must use
IValidatable's method error(IValidationError error) to generate the appropriate feedback message. In the code
above we used the ValidationError class as convenience implementation of the IValidationError interface which
represents the validation error that must be displayed to the user. This class provides a constructor that uses the
class name of the validator in input as key for the resource to use as feedback message (i.e.
'UsernameValidator' in the example). If we want to specify more then one key to use to locate the error message,
we can use method addKey(String key) of ValidationError class.
In our example when validation fails, we suggest a possible username concatenating the given input with a
pseudo-random integer. This value is passed to the feedback message with a variable named
suggestedUserName. The message is inside application's properties file:
UsernameValidator=The username '${input}' is already in use. Try with
'${suggestedUserName}'
To provide further variables to our feedback message we can use method setVariable(String name, Object
value) of class ValidationError as we did in our example.
The code of the home page of the project will be examined in the next paragraph after we have introduced the
topic of flash messages.
Using flash messages
78
So far we have considered just the error messages generated during validation step. However Wicket's
Component class provides a set of methods to explicitly generate feedback messages called flash messages.
These methods are:
debug(Serializable message)
info(Serializable message)
success(Serializable message)
warn(Serializable message)
error(Serializable message)
fatal(Serializable message)
Each of these methods corresponds to a level of severity for the message. The list above is sorted by increasing
level of severity.
In the example seen in the previous paragraph we have a form which uses success method to notify user when
the inserted username is valid. Inside this form there are two FeedbackPanel components: one to display the
error message produced by custom validator and the other one to display the success message. The code of the
example page is the following:
HTML:
<body>
<form wicket:id= >"form"
Username: <input type= wicket:id= />"text" "username"
<br/>
<input type= />"submit"
</form>
<div style= wicket:id= >"color:green" "succesMessage"
</div>
<div style= wicket:id= >"color:red" "feedbackMessage"
</div>
</body>
Java code:
public class HomePage WebPage {extends
HomePage( PageParameters parameters) { public final
Form form = Form( ){new "form"
@Override
void onSubmit() {protected
.onSubmit();super
success( );"Username is good!"
}
};
TextField mail;
form.add(mail = TextField( , Model.of( )));new "username" ""
mail.add( UsernameValidator());new
add( FeedbackPanel( , new "feedbackMessage"
ExactErrorLevelFilter(FeedbackMessage.ERROR)));new
add( FeedbackPanel( , new "succesMessage"
ExactErrorLevelFilter(FeedbackMessage.SUCCESS)));new
add(form);
}
class ExactErrorLevelFilter IFeedbackMessageFilter{implements
errorLevel;private int
ExactErrorLevelFilter( errorLevel){public int
.errorLevel = errorLevel;this
}
accept(FeedbackMessage message) {public boolean
message.getLevel() == errorLevel;return
}
}
//UsernameValidator definition
//…
}
79
The two feedback panels must be filtered in order to display just the messages with a given level of severity
(ERROR for validator message and SUCCESS for form's flash message). Unfortunately the built-in message
filter ErrorLevelFeedbackMessageFilter is not suitable for this task because its filter condition does not check for
an exact error level (the given level is used as lower bound value). As a consequence, we had to build a custom
filter (inner class ExactErrorLevelFilter) to accept only the desired severity level (see method accept of interface
IFeedbackMessageFilter).
Since version 6.13.0 Wicket provides the additional filter class
org.apache.wicket.feedback.ExactLevelFeedbackMessageFilter to accept only feedback
messages of a certain error level.
12.3 Input value conversion
Working with Wicket we will rarely need to worry about conversion between input values (which are strings
because the underlying HTTP protocol) and Java types because in most cases the default conversion
mechanism will be smart enough to infer the type of the model object and perform the proper conversion.
However, sometimes we may need to work under the hood of this mechanism to make it properly work or to
perform custom conversions. That's why this paragraph will illustrate how to control input value conversion.
The component that is responsible for converting input is the FormComponent itself with its convertInput()
method. In order to convert its input a FormComponent must know the type of its model object. This parameter
can be explicitly set with method setType(Class<?> type):
// field must receive an integer valuethis
TextField integerField = TextField( , Model()).setType( .class));new "number" new Integer
If no type has been provided, FormComponent will try to ask its model for this information. The PropertyModel
and CompoundPropertyModel models can use reflection to get the type of object model. By default, if
FormComponent can not obtain the type of its model object in any way, it will consider it as a simple String.
Once FormComponent has determined the type of model object, it can look up for a converter, which is the entity
in charge of converting input to Java object and vice versa. Converters are instances of
interface and are registered by our application class onorg.apache.wicket.util.convert.IConverter
start up.
To get a converter for a specific type we must call method getConverter(Class<C> type) on the interface
IConverterLocator returned by Application's method getConverterLocator():
//retrieve converter typefor Boolean
Application.get().getConverterLocator().getConverter( .class);Boolean
Components which are subclasses of AbstractSingleSelectChoice don't follow the schema
illustrated above to convert user input.
These kinds of components (like DropDownChoice and RadioChoice1) use their choice
render and their collection of possible choices to perform input conversion.
Creating custom application-scoped converters
The default converter locator used by Wicket is . This classorg.apache.wicket.ConverterLocator
provides converters for the most common Java types. Here we can see the converters registered inside its
constructor:
public ConverterLocator()
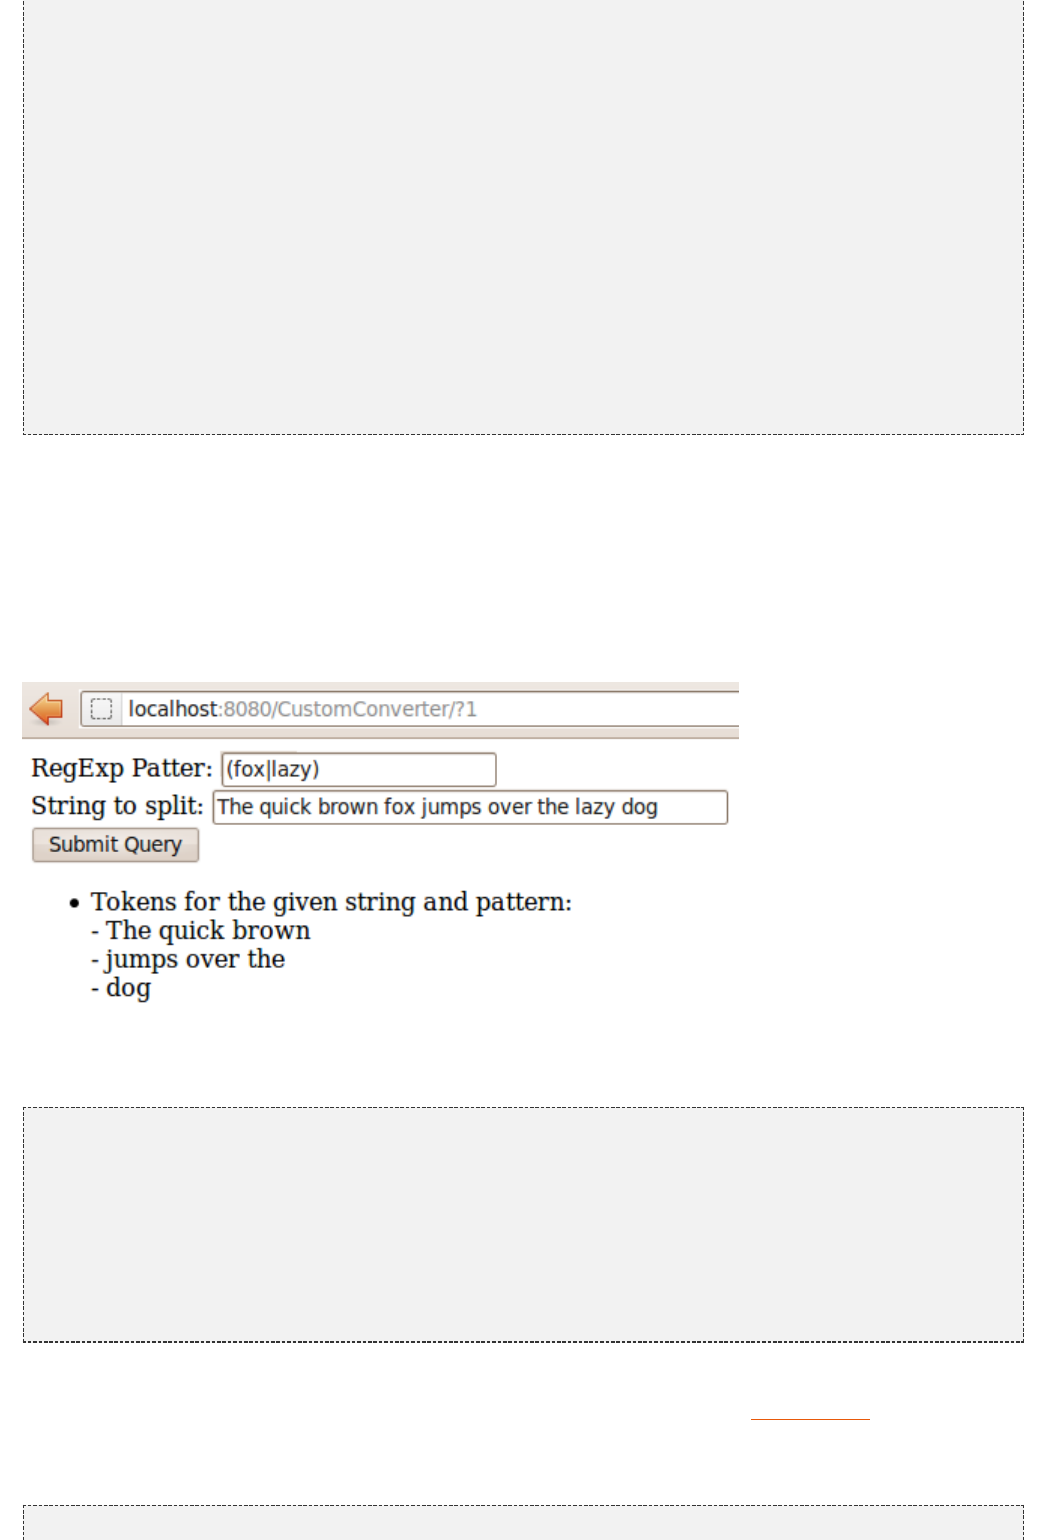
80
{
set( .TYPE, BooleanConverter.INSTANCE);Boolean
set( .class, BooleanConverter.INSTANCE);Boolean
set( .TYPE, ByteConverter.INSTANCE);Byte
set( .class, ByteConverter.INSTANCE);Byte
set( .TYPE, CharacterConverter.INSTANCE);Character
set( .class, CharacterConverter.INSTANCE);Character
set( .TYPE, DoubleConverter.INSTANCE);Double
set( .class, DoubleConverter.INSTANCE);Double
set( .TYPE, FloatConverter.INSTANCE);Float
set( .class, FloatConverter.INSTANCE);Float
set( .TYPE, IntegerConverter.INSTANCE);Integer
set( .class, IntegerConverter.INSTANCE);Integer
set( .TYPE, LongConverter.INSTANCE);Long
set( .class, LongConverter.INSTANCE);Long
set( .TYPE, ShortConverter.INSTANCE);Short
set( .class, ShortConverter.INSTANCE);Short
set(Date.class, DateConverter());new
set(Calendar.class, CalendarConverter());new
set(java.sql.Date.class, SqlDateConverter());new
set(java.sql.Time.class, SqlTimeConverter());new
set(java.sql.Timestamp.class, SqlTimestampConverter());new
set(BigDecimal.class, BigDecimalConverter());new
}
If we want to add more converters to our application, we can override Application's method newConverterLocator
which is used by application class to build its converter locator.
To illustrate how to implement custom converters and use them in our application, we will build a form with two
text field: one to input a regular expression pattern and another one to input a string value that will be split with
the given pattern.
The first text field will have an instance of class java.util.regex.Pattern as model object. The final page will look
like this (the code of this example is from the CustomConverter project):
The conversion between Pattern and String is quite straightforward. The code of our custom converter is the
following:
public class RegExpPatternConverter IConverter<Pattern> {implements
@Override
Pattern convertToObject( value, Locale locale) {public String
Pattern.compile(value);return
}
@Override
convertToString(Pattern value, Locale locale) {public String
value.toString();return
}
}
Methods declared by interface IConverter take as input a Locale parameter in order to deal with locale-sensitive
data and conversions. We will learn more about locales and internationalization in .paragraph 14
Once we have implemented our custom converter, we must override method newConverterLocator() inside our
application class and tell it to add our new converter to the default set:
81
@Override
IConverterLocator newConverterLocator() {protected
ConverterLocator defaultLocator = ConverterLocator();new
defaultLocator.set(Pattern.class, RegExpPatternConverter());new
defaultLocator;return
}
Finally, in the home page of the project we build the form which displays (with a flash message) the tokens
obtained splitting the string with the given pattern:
public class HomePage WebPage {extends
Pattern regExpPattern;private
stringToSplit;private String
HomePage( PageParameters parameters) { public final
TextField regExpPatternTxt;
TextField stringToSplitTxt;
Form form = Form( ){new "form"
@Override
void onSubmit() {protected
.onSubmit();super
messageResult = ;String "Tokens the given string and pattern:<br/>"for
[] tokens = regExpPattern.split(stringToSplit);String
( token : tokens) {for String
messageResult += + token + ;"- " "<br/>"
}
success(messageResult);
}
};
form.setDefaultModel( CompoundPropertyModel( ));new this
form.add(regExpPatternTxt = TextField( ));new "regExpPattern"
form.add(stringToSplitTxt = TextField( ));new "stringToSplit"
add( FeedbackPanel( ).setEscapeModelStrings( ));new "feedbackMessage" false
add(form);
}
}
If the user input can not be converted to the target type, FormComponent will generate the
default error message “The value of '${label}' is not a valid ${type}.”. The bundle key for
this message is IConverter.
12.4 Validation with JSR 303
Standard JSR 303 defines a set of annotations and APIs to validate our domain objects at field-level. Wicket has
introduced an experimental support for this standard since version 6.4.0 and with version 6.14.0 it has became
an official Wicket module (named ). In this paragraph we will see the basic stepswicket-bean-validation
needed to use JSR 303 validation in our Wicket application. Code snippets are from example project
.JSR303validation
In the example application we have a form to insert the data for a new bean and its relative .Person Address
The code for class is the followingPerson
public class Person Serializable{implements
@NotNull
name;private String
//regular expression to validate an email address
@Pattern(regexp = )"^[_A-Za-z0-9-]+(.[_A-Za-z0-9-]+)*[A-Za-z0-9-]+(.[A-Za-z0-9-]+)*((.[A-Za-z]{2,}){1}$)"
email;private String
@Range(min = 18, max = 150)
age;private int
NotNull Past
Date birthDay;private
@NotNull
Address address; private
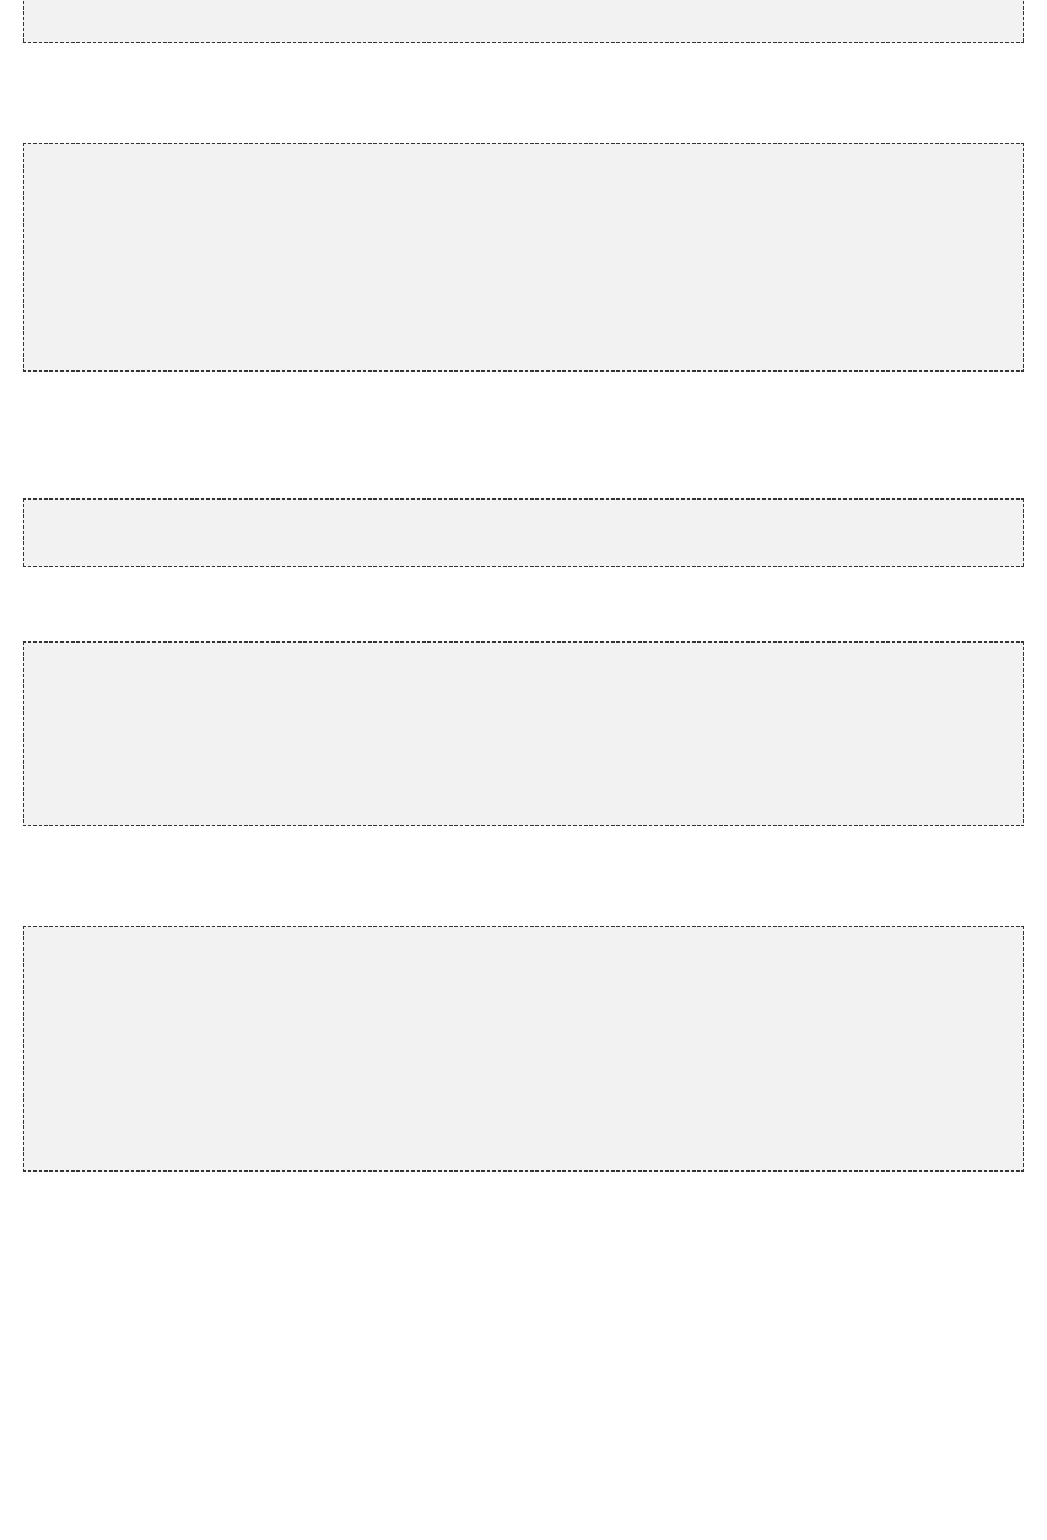
82
}
You can note the JSR 303 annotations used in the code above to declare validation constraints on class fields.
Class has the following code:Address
public class Address Serializable {implements
@NotNull
city;private String
@NotNull
street;private String
@Pattern(regexp = "\\d+ {address.invalidZipCode}")", message = "
zipCode;private String
}
You might have noted that in class we have used annotation Address Pattern using also attribute
message which contains the key of the bundle to use for validation message. Our
HomePage.properties@:custom bundle is contained inside
address.invalidZipCode=The inserted zip code is not valid.
To tell Wicket to use JSR 303, we must register bean validator on Application's startup:
public class WicketApplication WebApplication {extends
@Override
void init(){public
.init();super
BeanValidationConfiguration().configure( );new this
}
}
The last step to harness JSR 303 annotations is to add validator
to our corresponding form components:org.apache.wicket.bean.validation.PropertyValidator
public HomePage( PageParameters parameters) {final
(parameters);super
setDefaultModel( CompoundPropertyModel<Person>( Person()));new new
Form< > form = Form< >( );Void new Void "form"
form.add( TextField( ).add( PropertyValidator()));new "name" new
form.add( TextField( ).add( PropertyValidator()));new "email" new
form.add( TextField( ).add( PropertyValidator()));new "age" new
//…
}
Now we can run our application an see that JSR 303 annotations are fully effective:
83
12.5 Submit form with an IFormSubmittingComponent
Besides submitting forms with a standard HTML submit button, Wicket allows us to use special components
which implement interface IFormSubmittingComponent. This entity is a subinterface of IFormSubmitter:
At the beginning of this chapter we have seen that form processing is started by process method which takes as
input an instance of IFormSubmitter. This parameter corresponds to the IFormSubmittingComponent clicked by a
user to submit the form and it is null if we have used a standard HTML submit button (like we have done so far).
A submitting component is added to a form just like any other child component using method add(Component...).
A form can have any number of submitting components and we can specify which one among them is the default
one by calling the Form's method setDefaultButton(IFormSubmittingComponent component). The default
submitter is the one that will be used when user presses 'Enter' key in a field of the form. In order to make the
default button work, Wicket will add to our form a hidden <div> tag containing a text field and a submit button
with some JavaScript code to trigger it:
<div style= >"width:0px;height:0px;position:absolute;left:-100px;top:-100px;overflow:hidden"
<input type= autocomplete= />"text" "off"
<input type= name= onclick= />"submit" "submit2" " b=document...."var
</div>
Just like Wicket forms, interface IFormSubmitter defines methods onSubmit and onError. These two methods
have the priority over the namesake methods of the form, meaning that when a form is submitted with an
84
IFormSubmitter, the onSubmit of the submitter is called before the one of the form. Similarly, if validation errors
occurs during the first step of form processing, submitter's method onError is called before the form's one.
Starting with Wicket version 6.0 interface IFormSubmitter defines a further callback
method called onAfterSubmit(). This method is called after form's method onSubmit() has
been executed.
Components Button and SubmitLink
Component is a basic implementation of a formorg.apache.wicket.markup.html.form.Button
submitter. It can be used with either the <input> or <button> tags. The string model received as input by its
constructor is used as button label and it will be the value of the markup attribute value.
In the following snippet we have a form with two submit buttons bound to an <input> tag. One of them is set as
default button and both have a string model for the label:
HTML:
<body>
<form wicket:id= >"form"
Username: <input type= wicket:id= />"text" "username"
<br/>
<input type= wicket:id= />"submit" "submit1"
<input type= wicket:id= />"submit" "submit2"
</form>
</body>
Java code:
public class HomePage WebPage {extends
HomePage( PageParameters parameters) { public final
Form form = Form( );new "form"
form.add( TextField( , Model.of( )));new "username" ""
form.add( Button( , Model.of( )));new "submit1" "First submitter"
Button secondSubmitter;
form.add(secondSubmitter = Button( , Model.of( )));new "submit2" "Second submitter"
form.setDefaultButton(secondSubmitter);
add(form);
}
}
Generated markup:
<form wicket:id= id= method= action= >"form" "form1" "post" "?0-1.IFormSubmitListener-form"
<div>
…
<!-- Code generated by Wicket to handle the button -->default
…
</div>
Username: <input type= wicket:id= value= name= />"text" "username" "" "username"
<br/>
<input type= wicket:id= name= id= value="submit" "submit1" "submit1" "submit13" "First
/>submitter"
<input type= wicket:id= name= id= value="submit" "submit2" "submit2" "submit22" "Second
/>submitter"
</form>
Another component that can be used to submit a form is
. This component uses JavaScript to submit theorg.apache.wicket.markup.html.form.SubmitLink
form. Like the name suggests, the component can be used with the <a> tag but it can be also bound to any other
tag that supports the event handler onclick. When used with the <a> tag, the JavaScript code needed to submit
the form will be placed inside href attribute while with other tags the script will go inside the event handler onclick.

85
A notable difference between this component and Button is that SubmitLink can be placed outside the form it
must submit. In this case we must specify the form to submit in its constructor:
HTML:
<html xmlns:wicket= >"http://wicket.apache.org"
<head>
</head>
<body>
<form wicket:id= >"form"
Password: <input type= wicket:id= />"password" "password"
<br/>
</form>
<button wicket:id= >"externalSubmitter"
Submit
</button>
</body>
</html>
Java code:
public class HomePage WebPage {extends
HomePage( PageParameters parameters) { public final
Form form = Form( );new "form"
form.add( PasswordTextField( , Model.of( )));new "password" ""
//specify the form to submit
add( SubmitLink( , form));new "externalSubmitter"
add(form);
}
}
Disabling default form processing
With an IFormSubmittingComponent we can choose to skip the default form submission process by setting the
appropriate flag to false with the setDefaultFormProcessing method. When the default form processing is
disabled only the submitter's onSubmit is called while form's validation and models updating are skipped.
This can be useful if we want to implement a “Cancel” button on our form which redirects user to another page
without validating his/her input.
When we set this flag to false we can decide to manually invoke the form processing by calling the
process(IFormSubmittingComponent) method.
12.6 Nested forms
As you might already known, HTLM doesn't allow to have nested forms. However with Wicket we can overcome
this limitation by adding one or more form components to a parent form.
This can be useful if we want to split a big form into smaller ones in order to reuse them and to better distribute
responsibilities among different components. Forms can be nested to an arbitrary level:
<form wicket:id= > "outerForm"
…
<form wicket:id= > "innerForm"
…
<form wicket:id= >"veryInnerForm"
…
</form>
</form>
</form>
When a form is submitted also its nested forms are submitted and they participate in the validation step. This
means that if a nested form contains invalid input values, the outer form won't be submitted. On the contrary,
nested forms can be singularly submitted without depending on the status of their outer form.
86
To submit a parent form when one of its children forms is submitted, we must override its method
wantSubmitOnNestedFormSubmit and make it return true.
12.7 Multi-line text input
HTML provides a multi-line text input control with <textarea> tag. The Wicket counterpart for this kind of control is
component:org.apache.wicket.markup.html.form.TextArea
HTML:
<textarea wicket:id= rows= cols= ></textarea>"description" "5" "40"
Java code:
form.add( TextArea( , Model.of( )));new "description" ""
Component TextArea is used just like any other single-line text field. To specify the size of the text area we can
write attributes rows and cols directly in the markup file or we can create new attribute modifiers and add them to
our TextArea component.
12.8 File upload
Wicket supports file uploading with the FileUploadField component which must be used with the <input> tag
whose type attribute must be set to "file". In order to send a file on form submission we must enable multipart
mode calling MultiPart(true)on our form.
In the next example (project UploadSingleFile) we will see a form which allows users to upload a file into the
temporary directory of the server (path /tmp on Unix/Linux systems):
HTML:
<html>
<head>
</head>
<body>
<h1>Upload your file here!</h1>
<form wicket:id= >"form"
<input type= wicket:id= /> "file" "fileUploadField"
<input type= value= />"submit" "Upload"
</form>
<div wicket:id= >"feedbackPanel"
</div>
</body>
</html>
Java code:
public class HomePage WebPage {extends
FileUploadField fileUploadField;private
HomePage( PageParameters parameters) {public final
fileUploadField = FileUploadField( );new "fileUploadField"
Form form = Form( ){new "form"
@Override
void onSubmit() {protected
.onSubmit();super
FileUpload fileUpload = fileUploadField.getFileUpload();
{try
File file = File( .getProperty( ) + +new System "java.io.tmpdir" "/"
fileUpload.getClientFileName());
fileUpload.writeTo(file);
} (IOException e) {catch
e.printStackTrace();
}
87
}
}
};
form.setMultiPart( );true
//set a limit uploaded file's sizefor
form.setMaxSize(Bytes.kilobytes(100));
form.add(fileUploadField);
add( FeedbackPanel( ));new "feedbackPanel"
add(form);
}
}
The code that copies the uploaded file to the temporary directory is inside the onSubmit method of the Form
class. The uploaded file is handled with an instance of class FileUpload returned by the getFileUpload() method
of the FileUploadField class. This class provides a set of methods to perform some common tasks like getting
the name of the uploaded file (getClientFileName()), coping the file into a directory (writeTo(destinationFile)),
calculating file digest (getDigest (digestAlgorithm)) and so on.
Form component can limit the size for uploaded files using its setMaxSize(size) method. In the example we have
set this limit to 100 kb to prevent users from uploading files bigger than this size.
The maximum size for uploaded files can also be set at application's level using the
setDefaultMaximumUploadSize(Bytes maxSize) method of the IApplicationSettings
interface:
@Override
void init()public
{
getApplicationSettings().setDefaultMaximumUploadSize(Bytes.kilobytes(100));
}
Upload multiple files
If we need to upload multiple files at once and our clients support HTML5, we can still use FileUploadField
adding attribute "multiple" to its tag. If we can not rely on HTML5, we can use the MultiFileUploadField
component which allows the user to upload an arbitrary number of files using a JavaScript-based solution. An
example showing how to use this component can be found in Wicket module wicket-examples in file
MultiUploadPage.java. The live example is hosted at
.http://www.wicket-library.com/wicket-examples-6.0.x/upload/multi
12.9 Creating complex form components with FormComponentPanel
In we have seen how to use class Panel to create custom components with their own markup andchapter 5.2.2
with an arbitrary number of children components.
While it's perfectly legal to use Panel also to group form components, the resulting component won't be itself a
form component and it won't participate in the form's submission workflow.
This could be a strong limitation if the custom component needs to coordinate its children during sub-tasks like
input conversion or model updating. That's why in Wicket we have the
component which combines the featuresorg.apache.wicket.markup.html.form.FormComponentPanel
of a Panel (it has its own markup file) and a FormComponent (it is a subclass of FormComponent).
A typical scenario in which we may need to implement a custom FormComponentPanel is when our web
application and its users work with different units of measurement for the same data.
To illustrate this possible scenario, let's consider a form where a user can insert a temperature that will be
recorded after being converted to Kelvin degrees (see the example project CustomForm ComponentPanel).
The Kelvin scale is wildly adopted among the scientific community and it is one of the seven base units of the
, so it makes perfect sense to store temperatures expressed with this unit ofInternational System of Units
measurement.
88
However, in our everyday life we still use other temperature scales like Celsius or Fahrenheit, so it would be nice
to have a component which internally works with Kelvin degrees and automatically applies conversion between
Kelvin temperature scale and the one adopted by the user.
In order to implement such a component, we can make a subclass of FormComponentPanel and leverage the
convertInput and onBeforeRender methods: in the implementation of the convertInput method we will convert
input value to Kelvin degrees while in the implementation of onBeforeRender method we will take care of
converting the Kelvin value to the temperature scale adopted by the user.
Our custom component will contain two children components: a text field to let user insert and edit a temperature
value and a label to display the letter corresponding to user's temperature scale (F for Fahrenheit and C for
Celsius). The resulting markup file is the following:
<html>
<head>
</head>
<body>
<wicket:panel>
Registered temperature: <input size= maxlength= "3" "3"
wicket:id= /> "registeredTemperature"
<label wicket:id= ></label> "mesuramentUnit"
</wicket:panel>
</body>
</html>
As shown in the markup above FormComponentPanel uses the same <wicket:panel> tag used by Panel to
define its markup. Now let's see the Java code of the new form component starting with the onInitialize() method:
public class TemperatureDegreeField FormComponentPanel< > {extends Double
TextField< > userDegree;private Double
TemperatureDegreeField( id) {public String
(id); super
}
TemperatureDegreeField( id, IModel< > model) {public String Double
(id, model); super
}
@Override
void onInitialize() {protected
.onInitialize();super
AbstractReadOnlyModel< > labelModel= AbstractReadOnlyModel< >(){String new String
@Override
getObject() {public String
(getLocale().equals(Locale.US))if
;return "°F"
;return "°C"
}
};
add( Label( , labelModel));new "mesuramentUnit"
add(userDegree= TextField< >( , new Double "registeredTemperature" new
Model< >()));Double
userDegree.setType( .class);Double
}
Inside the onInitialize method we have created a read-only model for the label that displays the letter
corresponding to the user's temperature scale. To determinate which temperature scale is in use, we retrieve the
Locale from the session by calling Component's getLocale() method (we will talk more about this method in
). Then, if locale is the one corresponding to the United States, the chosen scale will be Fahrenheit,paragraph 14
otherwise it will be considered as Celsius.
In the final part of onInitialize() we add the two components to our custom form component. You may have
noticed that we have explicitly set the type of model object for the text field to double. This is necessary as the
starting model object is a null reference and this prevents the component from automatically determining the type
of its model object.
Now we can look at the rest of the code containing the convertInput and onBeforeRender methods:
// continued example
89
@Override
void convertInput() {protected
userDegreeVal = userDegree.getConvertedInput();Double
kelvinDegree;Double
(getLocale().equals(Locale.US)){if
kelvinDegree = userDegreeVal + 459.67;
BigDecimal bdKelvin = BigDecimal(kelvinDegree);new
BigDecimal fraction = BigDecimal(5).divide( BigDecimal(9));new new
kelvinDegree = bdKelvin.multiply(fraction).doubleValue();
} {else
kelvinDegree = userDegreeVal + 273.15;
}
setConvertedInput(kelvinDegree);
}
@Override
void onBeforeRender() {protected
.onBeforeRender();super
kelvinDegree = ( ) getDefaultModelObject(); Double Double
userDegreeVal = ;Double null
(kelvinDegree == ) ;if null return
(getLocale().equals(Locale.US)){if
BigDecimal bdKelvin = BigDecimal(kelvinDegree);new
BigDecimal fraction = BigDecimal(9).divide( BigDecimal(5));new new
kelvinDegree = bdKelvin.multiply(fraction).doubleValue();
userDegreeVal = kelvinDegree - 459.67;
} {else
userDegreeVal = kelvinDegree - 273.15;
}
userDegree.setModelObject(userDegreeVal);
}
}
Since our component does not directly receive the user input, convertInput() must read this value from the inner
text field using FormComponent's getConvertedInput() method which returns the input value already converted to
the type specified for the component (Double in our case). Once we have the user input we convert it to kelvin
degrees and we use the resulting value to set the converted input for our custom component (using method
setConvertedInput(T convertedInput)).
Method onBeforeRender() is responsible for synchronizing the model of the inner textfield with the model of our
custom component. To do this we retrieve the model object of the custom component with the
getDefaultModelObject() method, then we convert it to the temperature scale adopted by the user and finally we
use this value to set the model object of the text field.
12.10 Stateless form
In we have seen how Wicket pages can be divided into two categories: stateful and stateless. Pageschapter 8
that are stateless don't need to be stored in the user session and they should be used when we don't need to
save any user data in the user session (for example in the public area of a site).
Besides saving resources on server-side, stateless pages can be adopted to improve user experience and to
avoid security weaknesses. A typical situation where a stateless page can bring these benefits is when we have
to implement a login page.
For this kind of page we might encounter two potential problems if we chose to use a stateful page. The first
problem occurs when the user tries to login without a valid session assigned to him. This could happen if the
user leaves the login page opened for a period of time bigger than the session's timeout and then he decides to
log in. Under these conditions the user will be redirected to a 'Page expired' error page, which is not exactly a
nice thing for user experience.
The second problem occurs when a malicious user or a web crawler program attempts to login into our web
application, generating a huge number of page versions and consequently increasing the size of the user
session.
To avoid these kinds of problems we should build a stateless login page which does not depend on a user
session. Wicket provides a special version of the Form component called StatelessForm which is stateless by
default (i.e its method getStatelessHint() returns true), hence it's an ideal solution when we want to build a
stateless page with a form. A possible implementation of our login form is the following (example project
StatelessLoginForm):

90
HTML:
<html>
<head>
<meta charset= />"utf-8"
</head>
<body>
<div>Session is <b wicket:id= ></b></div>"sessionType"
<br/>
<div>Type 'user' as correct credentials</div>
<form wicket:id= >"form"
<fieldset>
Username: <input type= wicket:id= /> <br/>"text" "username"
Password: <input type= wicket:id= /><br/>"password" "password"
<input type= />"submit"
</fieldset>
</form>
<br/>
<div wicket:id= ></div>"feedbackPanel"
</body>
</html>
Java code:
public class HomePage WebPage {extends
Label sessionType;private
password;private String
username;private String
HomePage( PageParameters parameters) {public final
StatelessForm form = StatelessForm( ){new "form"
@Override
void onSubmit() {protected
//sign in username and password are “user”if
( .equals(username) && username.equals(password))if "user"
info( );"Username and password are correct!"
else
error( );"Wrong username or password"
}
};
form.add( PasswordTextField( ));new "password"
form.add( TextField( ));new "username"
add(form.setDefaultModel( CompoundPropertyModel( )));new this
add(sessionType = Label( , Model.of( )));new "sessionType" ""
add( FeedbackPanel( ));new "feedbackPanel"
}
@Override
void onBeforeRender() {protected
.onBeforeRender();super
(getSession().isTemporary())if
sessionType.setDefaultModelObject( );"temporary"
else
sessionType.setDefaultModelObject( );"permanent"
}
}
Label sessionType shows if current session is temporary or not and is set inside onBeforeRender(): if our page is
really stateless the session will be always temporary. We have also inserted a feedback panel in the home page
that shows if the credentials are correct. This was done to make the example form more interactive.
12.11 Working with radio buttons and checkboxes
In this paragraph we will see which components can be used to handle HTML radio buttons and checkboxes.
Both these input elements are usually grouped together to display a list of possible choices:
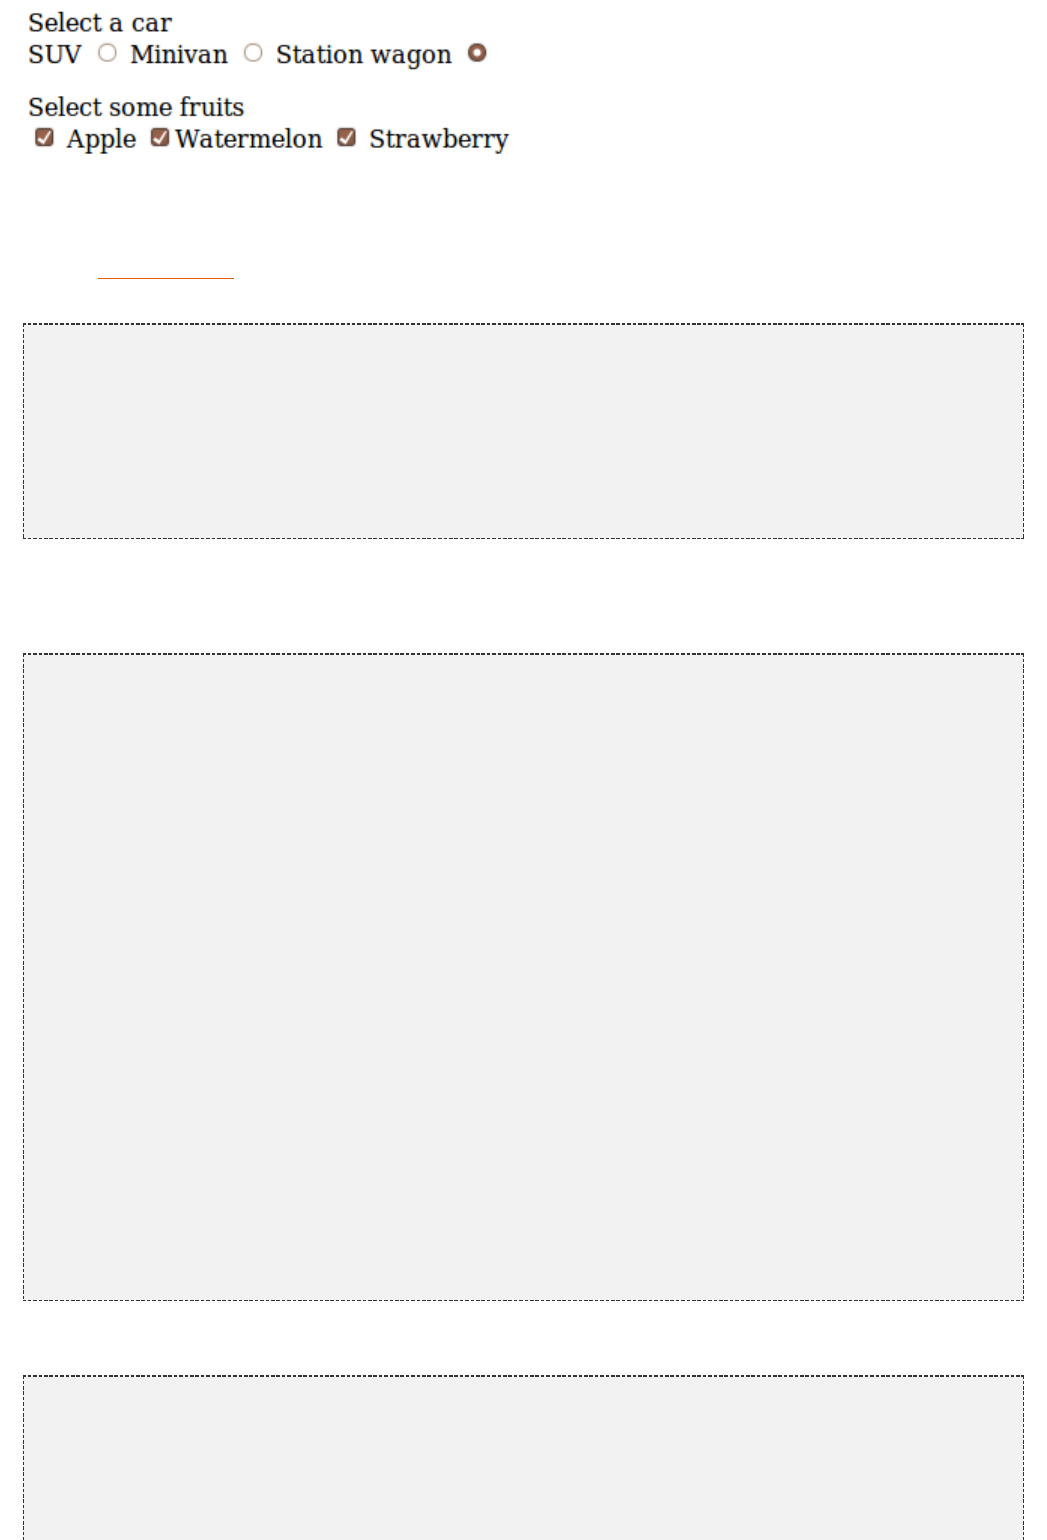
91
A check box can be used as single component to set a boolean property. For this purpose Wicket provides the
component which must be attached to <inputorg.apache.wicket.markup.html.form.CheckBox
type="checkbox".../> tag. In the next example (project SingleCheckBox) we will consider a form similar to the one
used in to edit a Person object, but with an additional checkbox to let the user decide if sheparagraph 11.5
wants to subscribe to our mailing list or not. The form uses the following bean as backing object:
public class RegistrationInfo Serializable {implements
name;private String
surname;private String
address;private String
email;private String
subscribeList;private boolean
/*Getters and setters*/
}
The markup and the code for this example are the following:
HTML:
<form wicket:id= > "form"
<div style= >"display: table;"
<div style= >"display: table-row;"
<div style= >Name: </div>"display: table-cell;"
<div style= >"display: table-cell;"
<input type= wicket:id= /> "text" "name"
</div>
</div>
<div style= >"display: table-row;"
<div style= >Surname: </div>"display: table-cell;"
<div style= >"display: table-cell;"
<input type= wicket:id= />"text" "surname"
</div>
</div>
<div style= >"display: table-row;"
<div style= >Address: </div>"display: table-cell;"
<div style= >"display: table-cell;"
<input type= wicket:id= />"text" "address"
</div>
</div>
<div style= >"display: table-row;"
<div style= >Email: </div>"display: table-cell;"
<div style= >"display: table-cell;"
<input type= wicket:id= />"text" "email"
</div>
</div>
<div style= >"display: table-row;"
<div style= >Subscribe list:</div>"display: table-cell;"
<div style= >"display: table-cell;"
<input type= wicket:id= />"checkbox" "subscribeList"
</div>
</div>
</div>
<input type= value= />"submit" "Save"
</form>
Java code:
public HomePage( PageParameters parameters) {final
RegistrationInfo registrtionInfo = RegistrationInfo();new
registrtionInfo.setSubscribeList( );true
Form form = Form( , new "form"
CompoundPropertyModel<RegistrationInfo>(registrtionInfo));new
form.add( TextField( ));new "name"
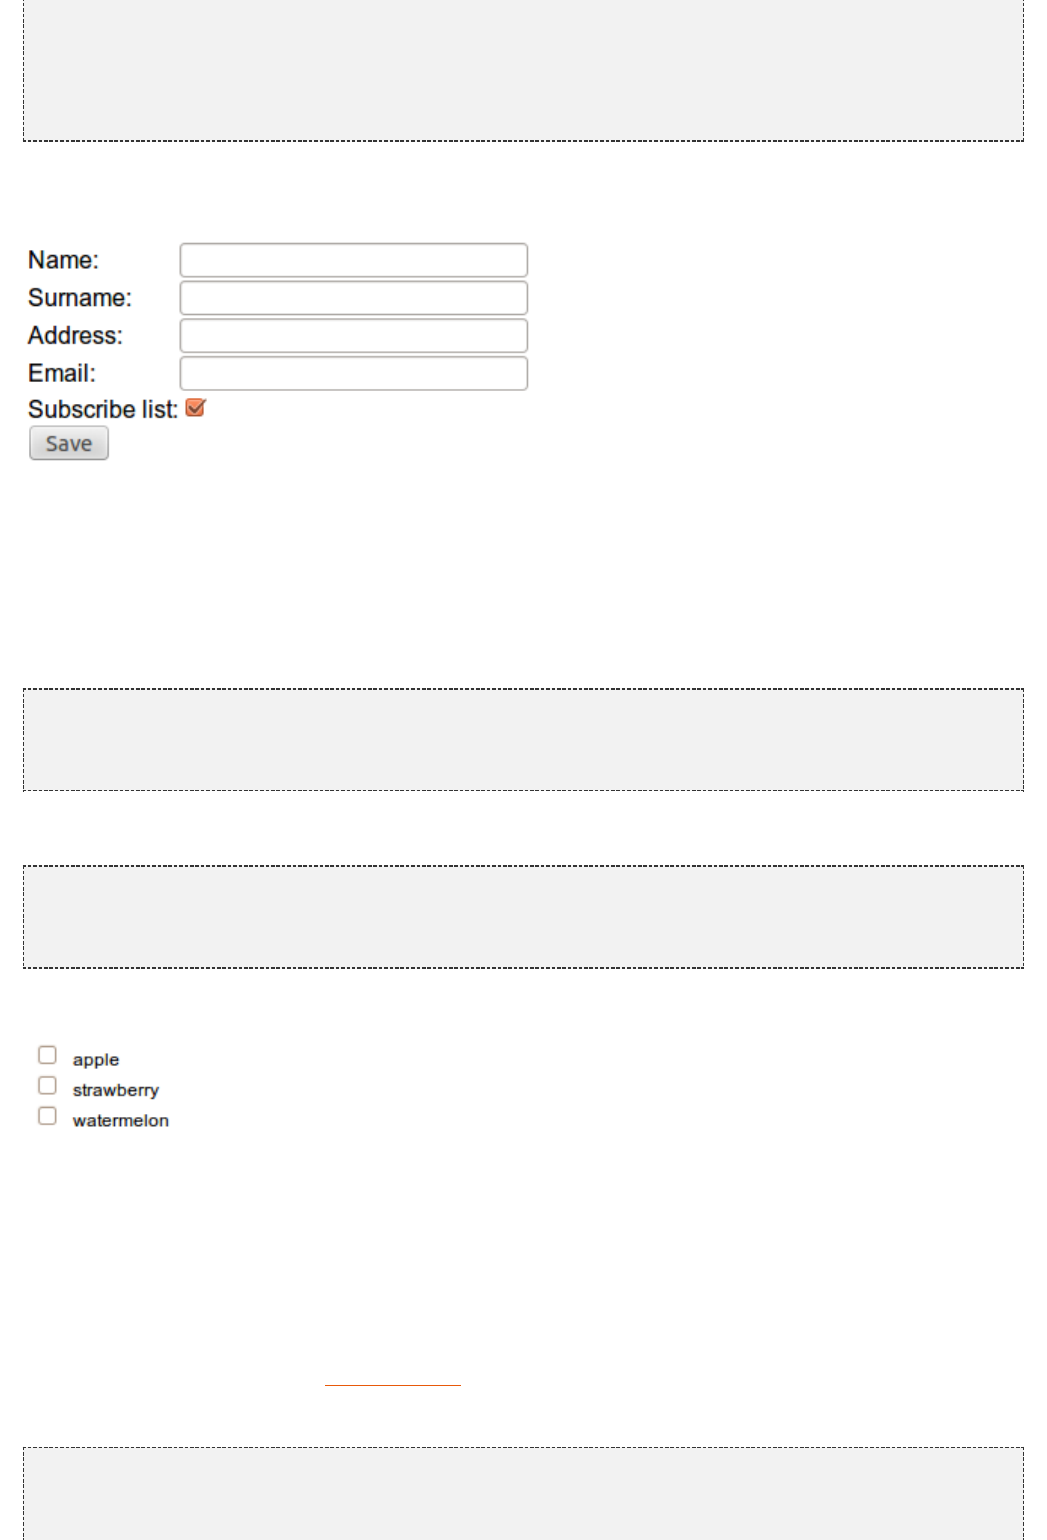
92
form.add( TextField( ));new "surname"
form.add( TextField( ));new "address"
form.add( TextField( ));new "email"
form.add( CheckBox( ));new "subscribeList"
add(form);
}
Please note that the checkbox will be initially selected because we have set to true the subscribe flag during the
model object creation (with instruction registrtionInfo.setSubscribeList(true)):
Working with grouped checkboxes
When we need to display a given number of options with checkboxes, we can use the
component. For example, If ourorg.apache.wicket.markup.html.form.CheckBoxMultipleChoice
options are a list of strings, we can display them in this way:
HTML:
<div wicket:id= >"checkGroup"
<input type= />It will be replaced by the actual checkboxes…"checkbox"
</div>
Java code:
List< > fruits = Arrays.asList( , , ); String "apple" "strawberry" "watermelon"
form.add( CheckBoxMultipleChoice( , ListModel< >( new "checkGroup" new String new
ArrayList< >()), fruits));String
Screenshot:
This component can be attached to a <div> tag or to a <span> tag. No specific content is required for this tag as
it will be populated with the actual checkboxes. Since this component allows multiple selection, its model object
is a list. In the example above we have used model class org.apache.wicket.model.util.ListModel
which is specifically designed to wrap a List object.
By default CheckBoxMultipleChoice inserts a <br/> tag as suffix after each option. We can configure both the
suffix and the prefix used by the component with the setPrefix and setSuffix methods.
When our options are more complex objects than simple strings, we can render them using an IChoiceRender,
as we did for DropDownChoice in :paragraph 11.5
HTML:
<div wicket:id= >"checkGroup"
<input type= />It will be replaced by actual checkboxes…"checkbox"
</div>
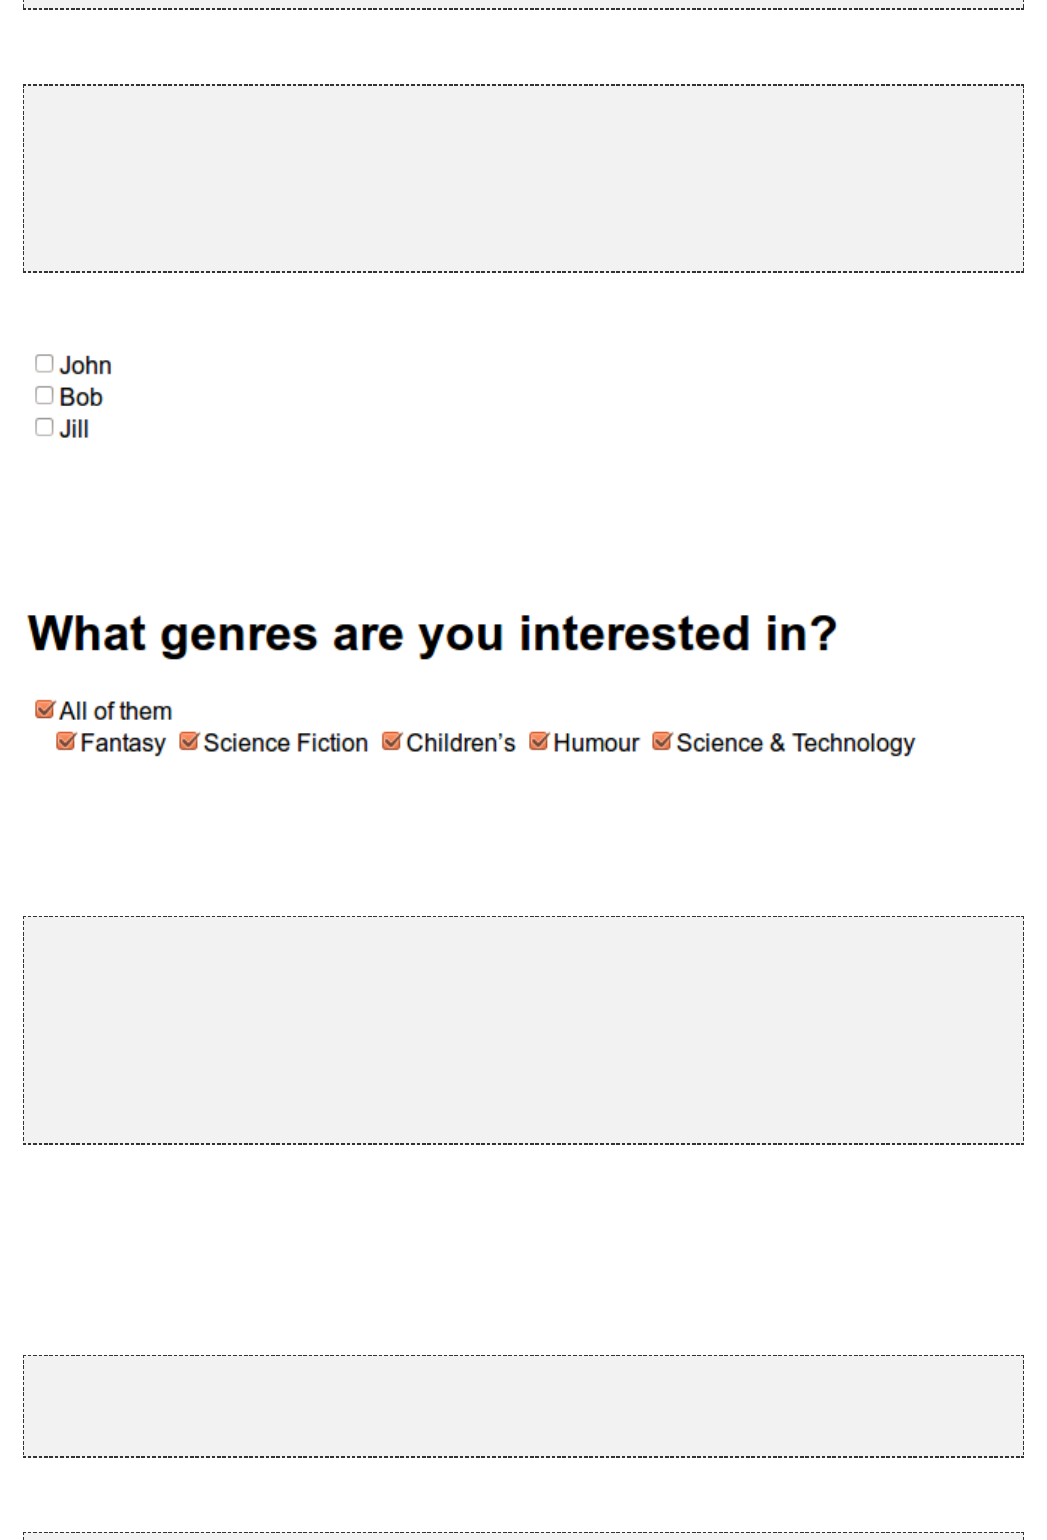
93
Java code:
Person john = Person( , );new "John" "Smith"
Person bob = Person( , );new "Bob" "Smith"
Person jill = Person( , );new "Jill" "Smith"
List<Person> theSmiths = Arrays.asList(john, bob, jill);
ChoiceRenderer render = ChoiceRenderer( );new "name"
form.add( CheckBoxMultipleChoice( , ListModel< >( ArrayList<new "checkGroup" new String new String
>()),
theSmiths, render));
Screenshot:
How to implement a "Select all" checkbox
A nice feature we can offer to users when we have a group of checkboxes is a “special” checkbox which
selects/unselects all the other options of the group:
Wicket comes with a couple of utility components that make it easy to implement such a feature. They are
CheckboxMultipleChoiceSelector and CheckBoxSelector classes, both inside package
. The difference between these two components is that the firstorg.apache.wicket.markup.html.form
works with an instance of CheckBoxMultipleChoice while the second takes in input a list of CheckBox objects:
/* CheckboxMultipleChoiceSelector usage: */
CheckBoxMultipleChoice checkGroup;
//checkGroup initialization…
CheckboxMultipleChoiceSelector cbmcs = CheckboxMultipleChoiceSelector( , checkGroup);new "id"
/* CheckBoxSelector usage: */
CheckBox checkBox1, checkBox2, checkBox3;
//checks initialization…
CheckBoxSelector cbmcs = CheckBoxSelector( , checkBox1, checkBox2, checkBox3);new "id"
Working with grouped radio buttons
For groups of radio buttons we can use the org.apache.wicket.markup.html.form.RadioChoice
component which works in much the same way as CheckBoxMultipleChoice:
HTML:
<div wicket:id= >"radioGroup"
<input type= />It will be replaced by actual radio buttons…"radio"
</div>
Java code:
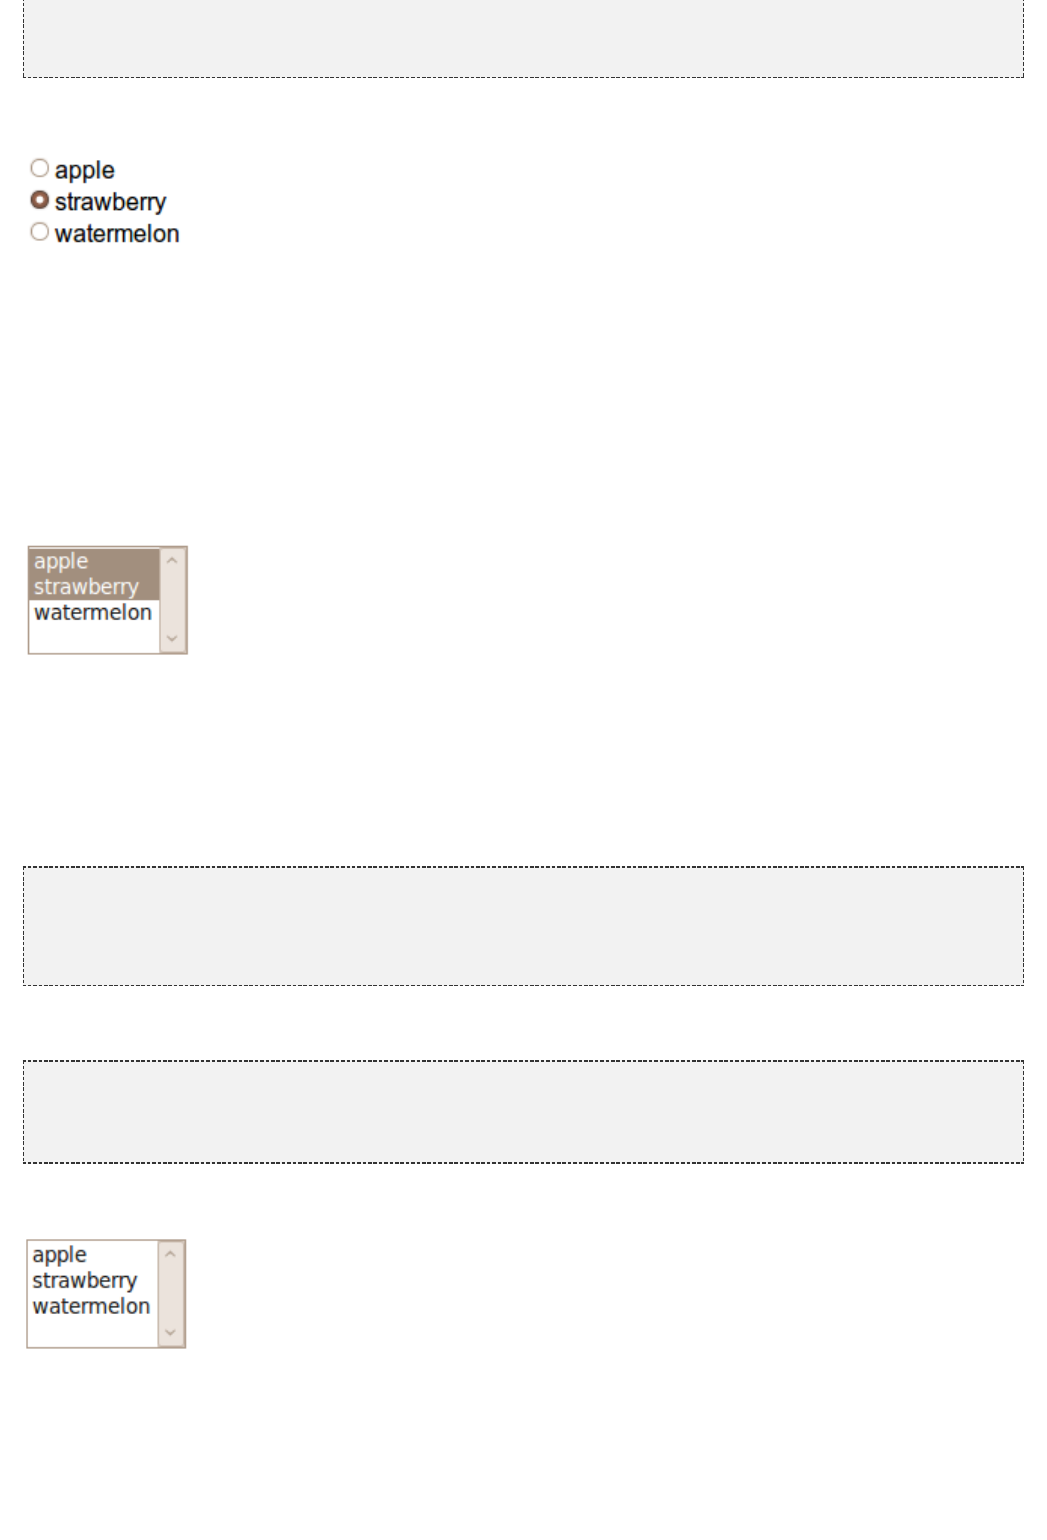
94
List< > fruits = Arrays.asList( , , ); String "apple" "strawberry" "watermelon"
form.add( RadioChoice( , Model.of( ), fruits));new "radioGroup" ""
Screenshot:
Just like CheckBoxMultipleChoice, this component provides the setPrefix and setSuffix methods to configure the
prefix and suffix for our options and it supports IChoiceRender as well. In addition, RadioChoice provides the
wantOnSelectionChangedNotifications() method to notify the web server when the selected option changes (this
is the same method seen for DropDownChoice in paragraph 9.4).
12.12 Selecting multiple values with ListMultipleChoices and Palette
Checkboxes work well when we have a small amount of options to display, but they quickly become chaotic as
the number of options increases. To overcome this limit we can use the <select> tag switching it to
multiple-choice mode with attribute multiple="multiple":
Now the user can select multiple options by holding down Ctrl key (or Command key for Mac) and selecting
them.
To work with multiple choice list Wicket provides the
component:org.apache.wicket.markup.html.form.ListMultipleChoice
HTML:
<select wicket:id= >"fruits"
<option>choice 1</option>
<option>choice 2</option>
</select>
Java code:
List< > fruits = Arrays.asList( , , ); String "apple" "strawberry" "watermelon"
form.add( ListMultipleChoice( , ListModel< >( ArrayList< >()),new "fruits" new String new String
fruits));
Screenshot:
This component must be bound to a <select> tag but the attribute multiple="multiple" is not required as it will
automatically be added by the component.
The number of visible rows can be set with the setMaxRows(int maxRows) method.
Component Palette
95
While multiple choice list solves the problem of handling a big number of multiple choices, it is not much intuitive
for end users. That's why desktop GUIs have introduced a more complex component which can be generally
referred to as multi select transfer component (it doesn't have an actual official name):
This kind of component is composed by two multiple-choice lists, one on the left displaying the available options
and the other one on the right displaying the selected options. User can move options from a list to another by
double clicking on them or using the buttons placed between the two list.
Built-in component providesorg.apache.wicket.extensions.markup.html.form.palette.Palette
an out-of-the-box implementation of a multi select transfer component. It works in a similar way to
ListMultipleChoice:
HTML:
<div wicket:id= >"palette"
Select will be replaced by the actual content…
<select multiple= >"multiple"
<option>option1</option>
<option>option2</option>
<option>option3</option>
</div>
Java code:
Person john = Person( , );new "John" "Smith"
Person bob = Person( , );new "Bob" "Smith"
Person jill = Person( , );new "Jill" "Smith"
Person andrea = Person( , );new "Andrea" "Smith"
List<Person> theSmiths = Arrays.asList(john, bob, jill, andrea);
ChoiceRenderer render = ChoiceRenderer( );new "name"
form.add( Palette( , Model.of( ArrayList< >()), ListModel< >new "palette" new String new String
(theSmiths), render, 5, ));true
Screenshot:
96
The last two parameters of the Palette's constructor (an integer value and a boolean value) are, respectively, the
number of visible rows for the two lists and a flag to choose if we want to display the two optional buttons which
move selected options up and down. The descriptions of the two lists (“Available” and “Selected”) can be
customized providing two resources with keys palette.available and palette.selected.
The markup of this component uses a number of CSS classes which can be extended/overriden to customize the
style of the component. We can find these classes and see which tags they decorate in the default markup file of
the component:
<table cellspacing= cellpadding= class= >"0" "2" "palette"
<tr>
<td class= ><span wicket:id= >[available"header headerAvailable" "availableHeader"
header]</span></td>
<td> </td>
<td class= ><span wicket:id= >[selected"header headerSelected" "selectedHeader"
header]</span>
</td>
</tr>
<tr>
<td class= >"pane choices"
<select wicket:id= class= >[choices]</select> "choices" "choicesSelect"
</td>
<td class= >"buttons"
<button type= wicket:id= class= ><div/> "button" "addButton" "button add"
</button><br/>
<button type= wicket:id= class= ><div/> "button" "removeButton" "button remove"
</button><br/>
<button type= wicket:id= class= ><div/> "button" "moveUpButton" "button up"
</button><br/>
<button type= wicket:id= class= ><div/> "button" "moveDownButton" "button down"
</button><br/>
</td>
<td class= >"pane selection"
<select class= wicket:id= >[selection]</select> "selectionSelect" "selection"
</td>
</tr>
</table>
12.13 Summary
Forms are the standard solution to let users interact with our web applications. In this chapter we have seen the
three steps involved with the form processing workflow in Wicket. We have started looking at form validation and
feedback messages generation, then we have seen how Wicket converts input values into Java objects and vice
versa.
In the second part of the chapter we learnt how to build reusable form components and how to implement a
stateless form. We have ended the chapter with an overview of the built-in form components needed to handle
standard input form elements like checkboxes, radio buttons and multiple selections lists.
97
13 Displaying multiple items with
repeaters
A common task for web applications is to display a set of items. The most typical scenario where we need such
kind of visualization is when we have to display some kind of search result. With the old template-based
technologies (like JSP) we used to accomplish this task using classic for or while loops:
<html>
<head>
<meta http-equiv= content= >"Content-Type" "text/html; charset=UTF-8"
<title>Insert title here</title>
</head>
<body>
<%
( i = 12; i<=32; i++) {for int
%>
<div>Hello! I'm index n°<%= %></div>
<%
}
%>
</body>
To ease this task Wicket provides a number of special-purpose components called repeaters which are designed
to use their related markup to display the items of a given set in a more natural and less chaotic way.
In this chapter we will see some of the built-in repeaters that come with Wicket.
13.1 The RepeatingView Component
Component is a container which renders itsorg.apache.wicket.markup.repeater.RepeatingView
children components using the tag it is bound to. It can contain an arbitrary number of children elements and we
can obtain a new valid id for a new child calling its method newChildId(). This component is particularly suited
when we have to repeat a simple markup fragment, for example when we want to display some items as a HTML
list:
HTML:
<ul>
<li wicket:id= ></li>"listItems"
</ul>
Java Code:
RepeatingView listItems = RepeatingView( );new "listItems"
listItems.add( Label(listItems.newChildId(), ));new "green"
listItems.add( Label(listItems.newChildId(), ));new "blue"
listItems.add( Label(listItems.newChildId(), ));new "red"
Generated markup:
<ul>
<li>green</li>
<li>blue</li>
<li>red</li>
</ul>
98
As we can see in this example, each child component has been rendered using the parent markup as if it was its
own.
13.2 The ListView Component
As its name suggests, component is designed toorg.apache.wicket.markup.html.list.ListView
display a given list of objects which can be provided as a standard Java List or as a model containing the
concrete List. ListView iterates over the list and creates a child component of type
for every encountered item.org.apache.wicket.markup.html.list.ListItem
Unlike RepeatingView this component is intended to be used with complex markup fragments containing nested
components.
To generate its children, ListView calls its abstract method populateItem(ListItem<T> item) for each item in the
list, so we must provide an implementation of this method to tell the component how to create its children
components. In the following example we use a ListView to display a list of Person objects:
HTML:
…
<body>
<div id= style= >"bd" "display: table;"
<div wicket:id= style= >"persons" "display: table-row;"
<div style= ><b>Full name: </b></div>"display: table-cell;"
<div wicket:id= style= ></div>"fullName" "display: table-cell;"
</div>
</div>
</body>
...
Java Code (Page Constructor):
public HomePage( PageParameters parameters) {final
List<Person> persons = Arrays.asList( Person( , ), new "John" "Smith"
Person( , ));new "Dan" "Wong"
add( ListView<Person>( , persons) {new "persons"
@Override
void populateItem(ListItem<Person> item) {protected
item.add( Label( , PropertyModel(item.getModel(), new "fullName" new "fullName"
)));
}
});
}
Screenshot of generated page:
In this example we have displayed the full name of two Person's instances. The most interesting part of the code
is the implementation of method populateItem where parameter item is the current child component created by
ListView and its model contains the corresponding element of the list. Please note that inside populateItem we
must add nested components to the object and not directly to the .item ListView
ListView and Form
By default replaces its children components with new instances every time is rendered. UnfortunatelyListView
this behavior is a problem if is inside a form and it contains form components. The problem is causedListView
by the fact that children components are replaced by new ones before form is rendered, hence they can't keep
their input value if validation fails and, furthermore, their feedback messages can not be displayed.
To avoid this kind of problem we can force to reuse its children components using its methodListView
setReuseItems and passing true as parameter. If for any reason we need to refresh children components after
we have invoked setReuseItems(true), we can use MarkupContainer's method to force removeAll()
to rebuild them.ListView
99
13.3 The RefreshingView Component
Component is a subclass of RepeatingVieworg.apache.wicket.markup.repeater.RefreshingView
that comes with a customizable rendering strategy for its children components.
RefreshingView defines abstract methods populateItem(Item) and getItemModels(). The first method is similar to
the namesake method seen for ListView, but it takes in input an instance of class
which is a subclass of . RefreshingView isorg.apache.wicket.markup.repeater.Item ListItem
designed to display a collection of models containing the actual items. An iterator over these models is returned
by the other abstract method getItemModels.
The following code is a version of the previous example that uses in place of :RefreshingView ListView
HTML:
…
<body>
<div id= style= >"bd" "display: table;"
<div wicket:id= style= >"persons" "display: table-row;"
<div style= ><b>Full name: </b></div>"display: table-cell;"
<div wicket:id= style= ></div>"fullName" "display: table-cell;"
</div>
</div>
</body>
...
Java Code (Page Constructor):
public HomePage( PageParameters parameters) {final
//define the list of models to use
List<IModel<Person>> persons = ArrayList<IModel<Person>>();final new
persons.add(Model.of( Person( , ))); new "John" "Smith"
persons.add(Model.of( Person( , )));new "Dan" "Wong"
add( RefreshingView<Person>( ) {new "persons"
@Override
void populateItem(Item<Person> item) {protected
item.add( Label( , PropertyModel(item.getModel(), )));new "fullName" new "fullName"
}
@Override
Iterator<IModel<Person>> getItemModels() {protected
persons.iterator();return
}
});
}
Item reuse strategy
Similar to , the default behavior of the is to replace its children with new instancesListView RefreshingView
every time is rendered. The strategy that decides if and how children components must be refreshed is returned
by method . This strategy is an implementation of interface IItemReuseStrategy. ThegetItemReuseStrategy
default implementation used by is class but Wicket providesRefreshingView DefaultItemReuseStrategy
also strategy which reuses an item if its model has been returned by theReuseIfModelsEqualStrategy
iterator obtained with method .getItemModels
To set a custom strategy we must use method .setItemReuseStrategy
13.4 Pageable repeaters
Wicket offers a number of components that should be used when we have to display a big number of items (for
example the results of a select SQL query).
All these components implement interface
and use interface org.apache.wicket.markup.html.navigation.paging.IPageable
(placed in package ) as data source. ThisIDataProvider org.apache.wicket.markup.repeater.data
interface is designed to support data paging. We will see an example of data paging later in .paragraph 13.4.2
100
The methods defined by IDataProvider are the following:
iterator(long first, long count): returns an iterator over a subset of the entire dataset. The subset starts from
the item at position first and includes all the next count items (i.e. it's the closed interval first,first+count).
size(): gets the size of the entire dataset.
model(T object): this method is used to wrap an item returned by the iterator with a model. This can be
necessary if, for example, we need to wrap items with a detachable model to prevent them from being
serialized.
Wicket already provides implementations of IDataProvider to work with a List as data source (ListDataProvider)
and to support data sorting (SortableDataProvider).
Component DataView
Class is the simplest pageable repeater shippedorg.apache.wicket.markup.repeater.data.DataView
with Wicket. DataView comes with abstract method populateItem(Item) that must be implemented to configure
children components. In the following example we use a DataView to display a list of Person objects in a HTML
table:
HTML:
<table>
<tr>
<th>Name</th><th>Surename</th><th>Address</th><th>Email</th>
</tr>
<tr wicket:id= >"rows"
<td wicket:id= ></td>"dataRow"
</tr>
</table>
Java Code:
//method loadPersons is defined elsewhere
List<Person> persons = loadPersons();
ListDataProvider<Person> listDataProvider = ListDataProvider<Person>(persons);new
DataView<Person> dataView = DataView<Person>( , listDataProvider) {new "rows"
@Override
void populateItem(Item<Person> item) {protected
Person person = item.getModelObject();
RepeatingView repeatingView = RepeatingView( );new "dataRow"
repeatingView.add( Label(repeatingView.newChildId(), person.getName()));new
repeatingView.add( Label(repeatingView.newChildId(), person.getSurename()));new
repeatingView.add( Label(repeatingView.newChildId(), person.getAddress())); new
repeatingView.add( Label(repeatingView.newChildId(), person.getEmail()));new
item.add(repeatingView);
}
};
add(dataView);
Please note that in the code above we have used also a RepeatingView component to populate the rows of the
table.
In the next paragraph we will see a similar example that adds support for data paging.
Data paging
To enable data paging on a pageable repeater, we must first set the number of items to display per page with
method setItemsPerPage(long items). Then, we must attach the repeater to panel PagingNavigator (placed in
package ) which is responsible for rendering aorg.apache.wicket.markup.html.navigation.paging
navigation bar containing the links illustrated in the following picture:
101
Project PageDataViewExample mixes a DataView component with a PagingNavigator to display the list of all
countries of the world sorted by alphabetical order. Here is the initialization code of the project home page:
HTML:
<table>
<tr>
<th>ISO 3166-1</th><th>Name</th><th> name</th><th>Capital</th><th>Population</th>Long
</tr>
<tr wicket:id= >"rows"
<td wicket:id= ></td>"dataRow"
</tr>
</table>
Java Code:
public HomePage( PageParameters parameters) {final
(parameters);super
//method loadCountriesFromCsv is defined elsewhere in the class.
//It reads countries data from a csv file and returns each row as an array of Strings.
List< []> countries = loadCountriesFromCsv();String
ListDataProvider< []> listDataProvider = ListDataProvider< []>(countries);String new String
DataView< []> dataView = DataView< []>( , listDataProvider) {String new String "rows"
@Override
void populateItem(Item< []> item) {protected String
[] countriesArr = item.getModelObject();String
RepeatingView repeatingView = RepeatingView( );new "dataRow"
( i = 0; i < countriesArr.length; i++){for int
repeatingView.add( Label(repeatingView.newChildId(), countriesArr[i]));new
}
item.add(repeatingView);
}
};
dataView.setItemsPerPage(15);
add(dataView);
add( PagingNavigator( , dataView));new "pagingNavigator"
}
The data of a single country (ISO code, name, long name, capital and population) are handled with an array of
strings. The usage of PagingNavigator is quite straightforward as we need to simply pass the pageable repeater
to its constructor.
To explore the other pageable repeaters shipped with Wicket you can visit the page at
where you can find live examples of these components.http://www.wicket-library.com/wicket-examples/repeater/
Wicket provides also component PageableListView which is a sublcass of ListView that
implements interface IPageable, hence it can be considered a pageable repeater even if it
doesn't use interface IDataProvider as data source.
13.5 Summary
In this chapter we have explored the built-in set of components called repeaters which are designed to repeat
their own markup in output to display a set of items. We have started with component whichRepeatingView
can be used to repeat a simple markup fragment.
Then, we have seen components and which should be used when the markup toListView RefreshingView
repeat contains nested components to populate.
Finally, we have discussed those repeaters that support data paging and that are called pageable repeaters. We
ended the chapter looking at an example where a pageable repeater is used with panel PagingNavigator to
make its dataset navigable by the user.

102
1.
2.
3.
14 Internationalization with Wicket
In we have seen how the topic of localization is involved in the generation of feedback messageschapter 12.2
and we had a first contact with resource bundles. In this chapter we will continue to explore the localization
support provided by Wicket and we will learn how to build pages and components ready to be localized in
different languages.
14.1 Localization
As we have seen in , the infrastructure of feedback messages is built on top of Javaparagraph 12.2
internationalization (i18n) support, so it should not be surprising that the same infrastructure is used also for
localization purpose. However, while so far we have used only the <ApplicationClassName>.properties file to
store our custom messages, in this chapter we will see that also pages, components, validators and even Java
packages can have their own resource bundles. This allows us to split bundles into multiple files keeping them
close to where they are used. But before diving into the details of internationalization with Wicket, it's worthwhile
to quickly review how i18n works under Java, see what classes are involved and how they are integrated into
Wicket.
Providing a full description of Java support for i18n is clearly out of the scope of this
document. If you need more informations about this topic you can find them in the
JavaDocs and in the official .i18n tutorial
Class Locale and ResourceBundle
Class java.util.Locale represents a specific country or language of the world and is used in Java to retrieve other
locale-dependent informations like numeric and date formats, the currency in use in a country and so on. Such
kind of informations are accessed through special entities called resource bundles which are implemented by
class . Every resource bundle is identified by a full name which is built using fourjava.util.ResourceBundle
parameters: a base name (which is required), a language code, a country code and a variant (which are all
optional). These three optional parameters are provided by an instance of Locale with its three corresponding
getter methods: getLanguage(), getCountry() and getVariant(). Parameter language code is a lowercase ISO 639
2-letter code (like zh for Chinese, de for German and so on) while country code is an uppercase ISO 3166
2-letter code (like CN for China, DE for Germany and so on). The final full name will have the following structure
(NOTE: tokens inside squared brackets are optional):
<base name>[ <COUNTRY_CODE>[_<variant code>]]]<language code>[
For example a bundle with MyBundle as base name and localized for Mandarin Chinese (language code zh,
country code CH, variant cmn) will have MyBundle_zh_CH_cmn as full name. A base name can be a fully
qualified class name, meaning that it can include a package name before the actual base name. The specified
package will be the container of the given bundle. For example if we use org.foo.MyBundle as base name, the
bundle named MyBundle will be searched inside package org.foo. The actual base name (MyBundle in our
example) will be used to build the full name of the bundle following the same rules seen above.
is an abstract factory class, hence it exposes a number of factory methods named getBundleResourceBundle
to load a concrete bundle. Without going into too much details we can say that a bundle corresponds to a file in
the classpath. To find a file for a given bundle, getBundle needs first to generate an ordered list of candidate
bundle names. These names are the set of all possible full names for a given bundle. For example if we have
org.foo.MyBundle as base name and the current locale is the one seen before for Mandarin Chinese, the
candidate names will be:
org.foo.MyBundle_zh_CH_cmn
org.foo.MyBundle_zh_CH
103
3.
4.
org.foo.MyBundle_zh
org.foo.MyBundle
The list of these candidate names is generated starting from the most specific one and subtracting an optional
parameter at each step. The last name of the list corresponds to the default resource bundle which is the most
general name and is equal to the base name. Once that getBundle has generated the list of candidate names, it
will iterate over them to find the first one for which is possible to load a class or a properties file. The class must
be a subclass of having as class name the full name used in the current iteration. If such aResourceBundle
class is not found, getBundle will try to locate a properties file having a file name equals to the current full name
(Java will automatically append extension .properties to the full name). For example given the resource bundle of
the previous example, Java will search first for class org.foo.MyBundle_zh_CH_cmn and then for file
MyBundle_zh_CH_cmn.properties inside package org.foo. If no file is found for any of the candidate names, a
MissingResourceException will be thrown. Bundles contains local-dependent string resources identified by a key
that is unique in the given bundle. So once we have obtained a valid bundle we can access these objects with
method getString (String key).
As we have seen before working with feedback messages, in Wicket most of the times we will work with
properties files rather than with bundle classes. In we used a properties file having as base nameparagraph 12.2
the class name of the application class and without any information about the locale. This file is the default
resource bundle for a Wicket application. In we will explore the algorithm used in Wicket to locateparagraph 14.3
the available bundles for a given component. Once we have learnt how to leverage this algorithm, we will be able
to split our bundles into more files organized in a logical hierarchy.
14.2 Localization in Wicket
A component can get the current locale in use calling its method getLocale(). By default this method will be
recursively called on component's parent containers until one of them returns a valid locale. If no one of them
returns a locale, this method will get the one associated with the current user session. This locale is
automatically generated by Wicket in accordance with the language settings of the browser.
Developers can change the locale of the current session with Session's method setLocale (Locale locale):
Session.get().setLocale(locale)
Style and variation parameters for bundles
In addition to locale's informations, Wicket supports two further parameters to identify a resource bundle: style
and variation. Parameter style is a string value and is defined at session-level. To set/get the style for the current
session we can use the corresponding setter and getter of class Session:
Session.get().setStyle( );"myStyle"
Session.get().getStyle();
If set, style's value contributes to the final full name of the bundle and it is placed between the base name and
the locale's informations:
<base name>[ <language code>[ <variant code>]]]style][ <COUNTRY_CODE>[
Wicket gives the priority to candidate names containing the style information (if available). The other parameter
we can use for localization is variation. Just like style also variation is a string value, but it is defined at
component-level. The value of variation is returned by Component's method getVariation(). By default this
method returns the variation of the parent component or a null value if a component hasn't a parent (i.e. it's a
page). If we want to customize this parameter we must overwrite method getVariation and make it return the
desired value.
Variation's value contributes to the final full name of the bundle and is placed before style parameter:
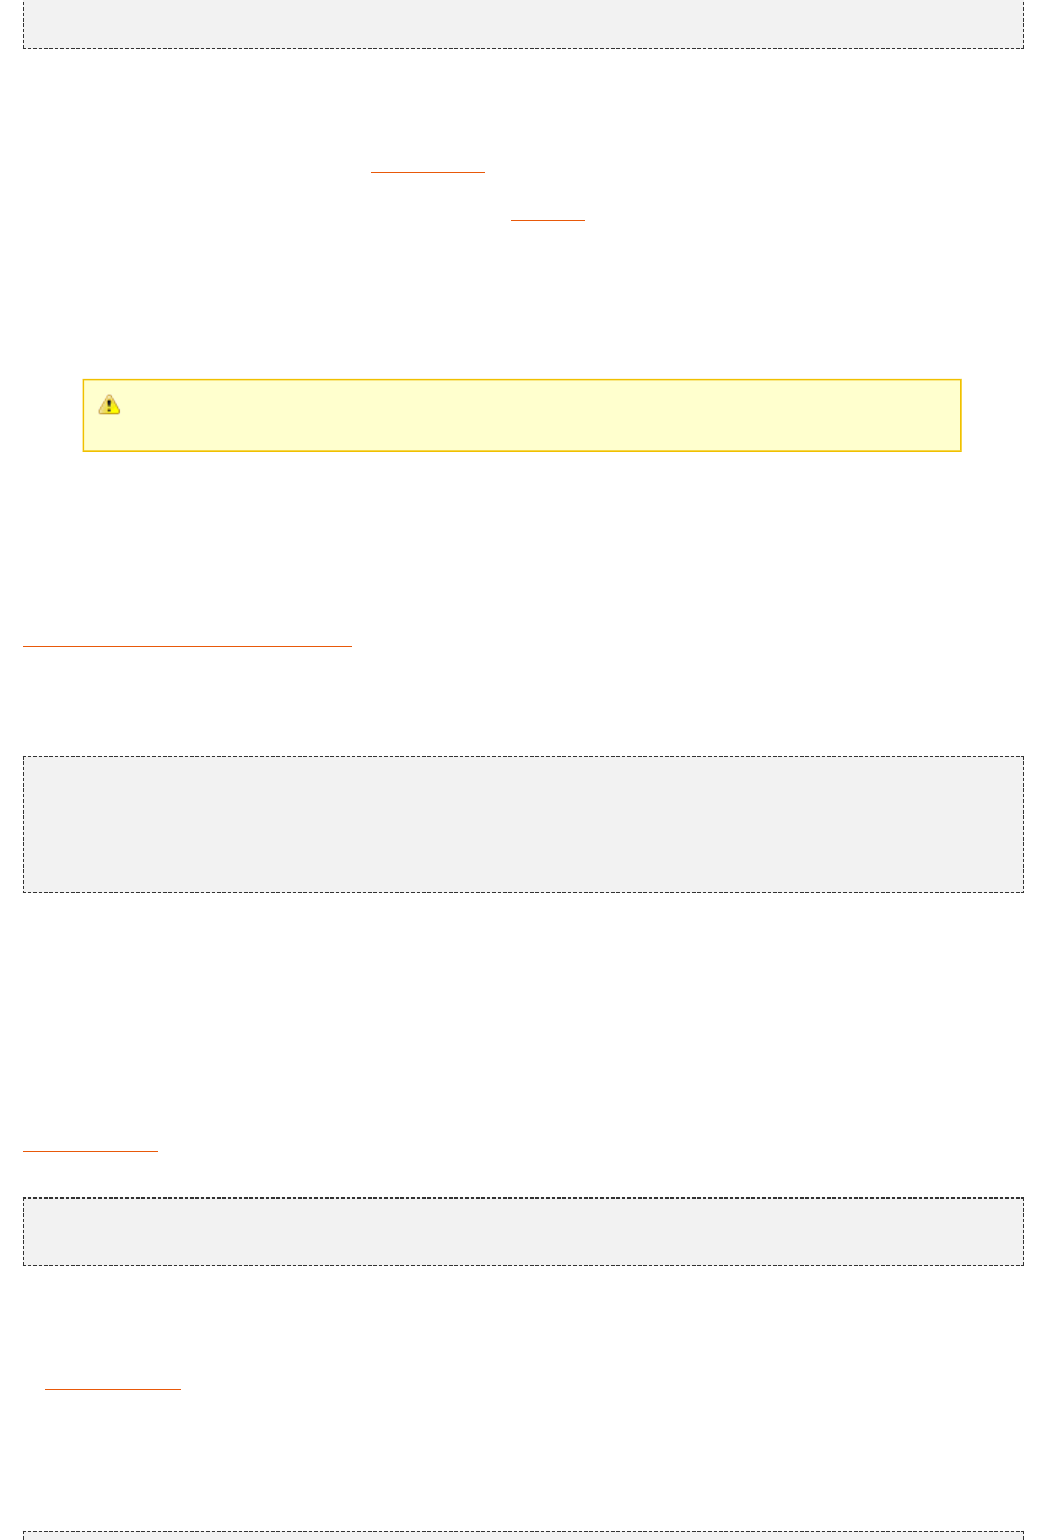
104
<base name>[ <language code>[ <variant code>]]]variation][_style][ <COUNTRY_CODE>[
Using UTF-8 for resource bundles
Java uses the standard character set to encode text files like properties files. Unfortunately ISOISO 8859-11
8859-1 does not support most of the extra-European languages like Chinese or Japanese. The only way to use
properties files with such languages is to use escaped characters, but this leads to not human-readableUnicode
files. For example if we wanted to write the word 'website' in simplified Chinese (the ideograms are ) we should
write the Unicode characters . For this reason ISO 8859-11 is being replaced with anotheru7F51u7AD9
Unicode-compliant character encoding called UTF-8. Text files created with this encoding can contain Unicode
symbols in plain format. Wicket provides a useful convention to use properties file encoded with UTF-8. We just
have to add prefix to file extension (i.e. )..utf8. .utf8.properties
If you want to use UTF-8 with your text files, make sure that your editor/IDE is actually
using this character encoding. Some OS like Windows use a different encoding by default.
Using XML files as resource bundles
Starting from version 1.5, Java introduced the support for XML files as resource bundles. XML files are generally
encoded with character sets UTF-8 or UTF-16 which support every symbol of the Unicode standard. In order to
be a valid resource bundle the XML file must conform to the DTD available at
.http://java.sun.com/dtd/properties.dtd
Here is an example of XML resource bundle taken from project LocalizedGreetings (file
WicketApplication_zh.properties.xml) containing the translation in simplified Chinese of the greeting message
“Welcome to the website!”:
<?xml version= encoding= ?>"1.0" "UTF-8"
<!DOCTYPE properties SYSTEM >"http://java.sun.com/dtd/properties.dtd"
<properties>
<entry key= >"greetingMessage" </entry>
</properties>
To use XML bundles in Wicket we don't need to put in place any additional configuration. The only rule we have
to respect with these files is to use properties.xml as extension while their base name follows the same rules
seen so far for bundle names.
Reading bundles from code
Class Component makes reading bundles very easy with method getString(String key). This method searches
for a resource with the given key looking into the resource bundles visited by the lookup algorithm illustrated in
. For example if we have a greeting message with key greetingMessage in our application'sparagraph 14.3
resource bundle, we can read it from our component code with this instruction:
getString( );"greetingMessage"
Localization of bundles in Wicket
In we have used as resource bundle the properties file placed next to our application class. Thisparagraph 12.2
file is the default resource bundle for the entire application and it is used by the lookup algorithm if it doesn't find
any better match for a given component and locale. If we want to provide localized versions of this file we must
simply follow the rules of Java i18n and put our translated resources into another properties file with a name
corresponding to the desired locale. For example project LocalizedGreetings comes with the default application's
properties file ( WicketApplication.properties) containing a greeting message:

105
greetingMessage=Welcome to the site!
Along with this file we can also find a bundle for German (WicketApplication_de.properties) and another one in
XML format for simplified Chinese (WicketApplication_zh.properties.xml). The example project consists of a
single page (HomePage.java) displaying the greeting message. The current locale can be changed with a
drop-down list and the possible options are English (the default one), German and simplified Chinese:
The label displaying the greeting message has a custom read-only model which returns the message with
method getString. The initialization code for this label is this:
AbstractReadOnlyModel< > model = AbstractReadOnlyModel< >() { String new String
@Override
getObject() {public String
getString( ); return "greetingMessage"
}
};
add( Label( , model));new "greetingMessage"
Class is a convenience class for implementingorg.apache.wicket.model.AbstractReadOnlyModel
read-only models. In this project we have implemented a custom read-only model for illustrative purposes only
because Wicket already provides built-in models for the same task. We will see them in paragraph paragraph
.14.5
The rest of the code of the home page builds the stateless form and the drop-down menu used to change the
locale.
List<Locale> locales = Arrays.asList(Locale.ENGLISH, Locale.CHINESE, Locale.GERMAN);
DropDownChoice<Locale> changeLocale = final
DropDownChoice<Locale>( , Model<Locale>(), locales);new "changeLocale" new
StatelessForm form = StatelessForm( ){new "form"
@Override
void onSubmit() {protected
Session.get().setLocale(changeLocale.getModelObject());
}
};
setStatelessHint( );true
add(form.add(changeLocale))
Localization of markup files
Although resource bundles exist to extract local-dependent elements from our code and from UI components, in
Wicket we can decide to provide different markup files for different locale settings. Just like standard markup
files, by default localized markup files must be placed next to component's class and their file name must contain
the locale's informations. In the following picture, CustomPanel comes with a standard (or default) markup file
and with another one localized for German:
106
When the current locale corresponds to German country (language code de), markup file CustomPanel_de.html
will be used in place of the default one.
Reading bundles with tag <wicket:message>
String resources can be also retrieved directly from markup code using tag <wicket:message>. The key of the
desired resource is specified with attribute key:
<wicket:message key= >"greetingMessage" message goes here</wicket:message>
By default the resource value is not escaped for HTML entities. To do that use the attribute:escape
<wicket:message key= escape= >"greetingMessage" "true" message goes here</wicket:message>
can be adopted also to localize the attributes of a tag. The name of the attribute and thewicket:message
resource key are expressed as a colon-separated value. In the following markup the content of attribute value
will be replaced with the localized resource having 'key4value' as key:
<input type= value= wicket:message= />"submit" "Preview value" "value:key4value"
If we want to specify multiple attributes at once, we can separate them with a comma:
<input type= value= wicket:message="submit" "Preview value" "value:key4value, title:key4title"
/>
14.3 Bundles lookup algorithm
As we hinted at the beginning of this chapter, by default Wicket provides a very flexible algorithm to locate the
resource bundles available for a given component. In this paragraph we will learn how this default lookup
algorithm works and which options it offers to manage our bundle files.
Localizing pages and panels
Similarly to application class, also component classes can have their own bundle files having as base name the
class name of the related component and placed in the same package. So for example if class CustomPanel is a
custom panel we created, we can provide it with a default bundle file called CustomPanel.properties containing
the textual resources used by this panel. This rule applies to page classes as well:
107
One fundamental thing to keep in mind when we work with these kinds of bundles is that the lookup algorithm
gives priority to the bundles of the containers of the component that is requesting a localized resource. The more
a container is higher in the hierarchy, the bigger is its priority over the other components. This mechanism was
made to allow containers to overwrite resources used by children components. As a consequence the values
inside the resource bundle of a page will have the priority over the other values with the same key defined in the
bundles of children components.
To better grasp this concept let's consider the component hierarchy depicted in the following picture:
If CustomPanel tries to retrieve the string resource having 'message' as key, it will get the value 'Wellcome!' and
not the one defined inside its own bundle file.
The default message-lookup algorithm is not limited to component hierarchy but it also includes the class
hierarchy of every component visited in the search strategy described so far. This makes bundle files inheritable,
just like markup files. When the hierarchy of a container component is explored, any ancestor has the priority
over children components. Consider for example the hierarchy in the following picture:
108
Similarly to the previous example, the bundle owned by CustomPanel is overwritten by the bundle of page class
BasePage (which has been inherited by CustomPage).
Component-specific resources
In order to make a resource specific for a given child component, we can prefix the message key with the id of
the desired component. Consider for example the following code and bundle of a generic page:
Page code:
add( Label( , ResourceModel( )));new "label" new "labelValue"
add( Label( , ResourceModel( )));new "anotherLabel" new "labelValue"
Page bundle:
labelValue=Default value
anotherLabel.labelValue=Value anotherLabelfor
Label with id anotherLabel will display the value 'Value for anotherLabel' while label label will display 'Default
value'. In a similar fashion, parent containers can specify a resource for a nested child component prepending
also its relative path (the path is dot-separated):
Page code:
Form form = Form( );new "form"
form.add( Label( , ResourceModel( )));new "anotherLabel" new "labelValue"
add(form);
Page bundle:

109
1.
labelValue=Default value
anotherLabel.labelValue=Value anotherLabelfor
form.anotherLabel.labelValue=Value anotherLabel inside formfor
With the code and the bundle above, the label inside the form will display the value 'Value for anotherLabel
inside form'.
Package bundles
If no one of the previous steps can find a resource for the given key, the algorithm will look for package bundles.
These bundles have as base name and they can be placed in one of the package of ourwicket-package
application:
Packages are traversed starting from the one containing the component requesting for a resource and going up
to the root package.
Bundles for feedback messages
The algorithm described so far applies to feedback messages as well. In case of validation errors, the
component that has caused the error will be considered as the component which the string resource is relative
to. Furthermore, just like application class and components, validators can have their own bundles placed next to
their class and having as base name their class name. This allows us to distribute validators along with the
messages they use to report errors:
Validator's resource bundles have the lowest priority in the lookup algorithm. They can be overwritten by
resource bundles of components, packages and application class.
Extending the default lookup algorithm
Wicket implements the default lookup algorithm using the strategy pattern. The concrete strategies are
abstracted with the interface . Byorg.apache.wicket.resource.loader.IStringResourceLoader
default Wicket uses the following implementations of (sorted by execution order):IStringResourceLoader
ComponentStringResourceLoader: implements most of the default algorithm. It searches for a given
resource across bundles from the container hierarchy, from class hierarchy and from the given component.
110
2.
3.
4.
5.
PackageStringResourceLoader: searches into package bundles.
ClassStringResourceLoader: searches into bundles of a given class. By default the target class is the
application class.
ValidatorStringResourceLoader: searches for resources into validator's bundles. A list of validators is
provided by the form component that failed validation.
InitializerStringResourceLoader: this resource allows internationalization to interact with the initialization
mechanism of the framework that will be illustrated in .paragraph 17.3
Developer can customize lookup algorithm removing default resource loaders or adding custom implementations
to the list of the resource loaders in use. This task can be accomplished using method
getStringResourceLoaders of setting interface :org.apache.wicket.settings.IResourceSettings
@Override
void init()public
{
.init();super
//retrieve IResourceSettings and then the list of resource loaders
List<IStringResourceLoader> resourceLoaders = getResourceSettings().
getStringResourceLoaders();
//customize the list...
14.4 Localization of component's choices
Components that inherit from (such as , AbstractChoice DropDownChoice CheckBoxMultipleChoice
and ) must override method and make it return true to localize theRadioChoice localizeDisplayValues
values displayed for their choices. By default this method return false so values are displayed as they are. Once
localization is activated we can use display values as key for our localized string resources. In project
LocalizedChoicesExample we have a drop-down list that displays four colors (green, red, blue, and yellow) which
are localized in three languages (English, German and Italian). The current locale can be changed with another
drop-down menu (in a similar fashion to project ). The code of the home page and theLocalizedGreetings
relative bundles are the following:
Java code:
public HomePage( PageParameters parameters) {final
(parameters);super
List<Locale> locales = Arrays.asList(Locale.ENGLISH, Locale.ITALIAN, Locale.GERMAN);
List< > colors = Arrays.asList( , , , );String "green" "red" "blue" "yellow"
DropDownChoice<Locale> changeLocale = DropDownChoice<Locale>( , final new "changeLocale"
Model<Locale>(), locales);new
StatelessForm form = StatelessForm( ){new "form"
@Override
void onSubmit() {protected
Session.get().setLocale(changeLocale.getModelObject());
}
};
DropDownChoice< > selectColor = DropDownChoice< >( , String new String "selectColor" new
Model< >(), colors){String
@Override
localizeDisplayValues() {protected boolean
;return true
}
};
form.add(selectColor);
add(form.add(changeLocale));
}
Default bundle (English):
selectColor. =Select a colornull
green=Green
red=Red
blue=Blue
yellow=Yellow
111
German bundle:
selectColor. =Wählen Sie eine Farbenull
green=Grün
red=Rot
blue=Blau
yellow=Gelb
Italian bundle:
selectColor. =Scegli un colorenull
green=Verde
red=Rosso
blue=Blu
yellow=Giallo
Along with the localized versions of colors names, in the bundles above we can also find a custom value for the
placeholder text (“Select a color ”) used for null value. The resource key for this resource is 'null' or '<component
id>.null' if we want to make it component-specific.
14.5 Internationalization and Models
Internationalization is another good chance to taste the power of models. Wicket provides two built-in models to
better integrate our components with string resources: they are ResourceModel and StringResourceModel.
ResourceModel
Model acts just like the read-only model we haveorg.apache.wicket.model.ResourceModel
implemented in . It simply retrieves a string resource corresponding to a given key:paragraph 14.3
//build a ResourceModel key 'greetingMessage'for
ResourceModel( );new "greetingMessage"
We can also specify a default value to use if the requested resource is not found:
//build a ResourceModel with a valuedefault
ResourceModel( , );new "notExistingResource" "Resource not found."
StringResourceModel
Model allows to work with complex and dynamicorg.apache.wicket.model.StringResourceModel
string resources containing parameters and property expressions. The basic constructor of this model takes in
input a resource key and another model. This further model can be used by both the key and the related
resource to specify dynamic values with property expressions. For example let's say that we are working on an
e-commerce site which has a page where users can see an overview of their orders. To handle the state of
user's orders we will use the following bean and enum (the code is from project StringResourceModelExample):
Bean:
public class Order Serializable {implements
Date orderDate;private
ORDER_STATUS status;private
Order(Date orderDate, ORDER_STATUS status) {public
();super
.orderDate = orderDate;this
112
.status = status;this
}
//Getters and setters fieldsfor private
}
Enum:
public enum ORDER_STATUS {
PAYMENT_ACCEPTED(0),
IN_PROGRESS(1),
SHIPPING(2),
DELIVERED(3);
code;private int
//Getters and setters fields for private
}
Now what we want to do in this page is to print a simple label which displays the status of an order and the date
on which the order has been submitted. All the informations about the order will be passed to a
StringResourceModel with a model containing the bean Order. The bundle in use contains the following
key/value pairs:
orderStatus.0=Your payment submitted on ${orderDate} has been accepted.
orderStatus.1=Your order submitted on ${orderDate} is in progress.
orderStatus.2=Your order submitted on ${orderDate} has been shipped.
orderStatus.3=Your order submitted on ${orderDate} has been delivered.
The values above contain a property expression (${orderDate}) that will be evaluated on the data object of the
model. The same technique can be applied to the resource key in order to load the right resource according to
the state of the order:
Order order = Order( Date(), ORDER_STATUS.IN_PROGRESS);new new
add( Label( , StringResourceModel( ,new "orderStatus" new "orderStatus.${status.code}"
Model.of(order))));
As we can see in the code above also the key contains a property expression (${status.code}) which makes its
value dynamic. In this way the state of an object (an Order in our example) can determinate which resource will
be loaded by StringResourceModel. If we don't use properties expressions we can provide a null value as model
and in this case StringResourceModel will behave exactly as a ResourceModel. StringResourceModel supports
also the same parameter substitution used by standard class java.text.MessageFormat. Parameters can be
generic objects but if we use a model as parameter, StringResourceModel will use the data object inside it as
actual value (it will call getObject on the model). Parameters are passed to constructor as a vararg argument.
Here is an example of usage of parameter substitution:
Java code:
PropertyModel propertyModel = PropertyModel<Order>(order, );new "orderDate"
//build a string model with two parameters: a property model and an integer value
StringResourceModel srm = StringResourceModel( , , propertyModel,new "orderStatus.delay" null
3);
Bundle:
orderStatus.delay=Your order submitted on ${0} has been delayed by {1} days.
One further parameter we can specify when we build a StringResourceModel is the component that must be
used by the lookup algorithm. Normally this parameter is not relevant, but if we need to use a particular bundle
owned by a component not considered by the algorithm, we can specify this component as second parameter. If

113
we pass all possible parameters to StringResourceModel's constructor we obtain something like this:
new StringResourceModel( , myComponent, myModel, param1, param2, param3,...);"myKey"
14.6 Summary
Internationalization is a mandatory step if we want to take our applications (and our business!) abroad. Choosing
the right strategy to manage our localized resources is fundamental to avoid to make a mess of them. In this
chapter we have explored the built-in support for localization provided by Wicket, and we have learnt which
solutions it offers to manage resource bundles. In the final part of the chapter we have seen how to localize the
options displayed by a component (such as DropDownChoice or RadioChoice) and we also introduced two new
models specifically designed to localize our components without introducing in their code any detail about
internationalization.

114
15 Resource management with
Wicket
One of the biggest challenge for a web framework is to offer an efficient and consistent mechanism to handle
internal resources such as CSS/JavaScript files, picture files, pdf and so on. Resources can be static (like an
icon used across the site) or dynamic (they can be generated on the fly) and they can be made available to users
as a download or as a simple URL.
In we have already seen how to add CSS and JavaScript contents to the header section of theparagraph 6.6
page. In the first half of this chapter we will learn a more sophisticated technique that allows us to manage static
resources directly from code and “pack” them with our custom components.
Then, in the second part of the chapter we will see how to implement custom resources to enrich our web
application with more complex and dynamic functionalities.
15.1 Static vs dynamic resources
In Wicket a resource is an entity that can interact with the current request and response and It must implement
interface . This interface defines just methodorg.apache.wicket.request.resource.IResource
respond(IResource.Attributes attributes) where the nested class IResource. Attributes provides access to
request, response and page parameters objects.
Resources can be static or dynamic. Static resources don't entail any computational effort to be generated and
they generally correspond to a resource on the filesystem. On the contrary dynamic resources are generated on
the fly when they are requested, following a specific logic coded inside them.
An example of dynamic resource is the built-in class CaptchaImageResource in package
which generates a captcha image each time isorg.apache.wicket.extensions.markup.html.captcha
rendered.
As we will see in , developers can build custom resources extending base class paragraph 15.10 .org.apache.wicket.request.resource.AbstractResource
15.2 Resource references
Most of the times in Wicket we won't directly instantiate a resource but rather we will use a reference to it.
Resource references are represented by abstract class
which returns a concrete resource withorg.apache.wicket.request.resource.ResourceReference
factory method getResource(). In this way we can lazy-initialize resources loading them only the first time they
are requested.
15.3 Package resources
With HTML we use to include static resources in our pages using tags like <script>, <link> or <img>. This is what
we have done so far writing our custom panels and pages. However, when we work with a component-oriented
framework like Wicket, this classic approach becomes inadequate because it makes custom components hardly
reusable. This happens when a component depends on a big number of resources. In such a case, if somebody
wanted to use our custom component in his application, he would be forced to know which resources it depends
on and make them available.
To solve this problem Wicket allows us to place static resource files into component package (like we do with
markup and properties files) and load them from component code.
These kinds of resources are called package resources (a CSS and a JavaScript file in this screenshot):

115
With package resources custom components become independent and self-contained and client code can use
them without worrying about their dependencies.
To load package resources Wicket provides class
.org.apache.wicket.request.resource.PackageResourceReference
To identify a package resource we need to specify a class inside the target package and the name of the desired
resource (most of the times this will be a file name).
In the following example taken from project ImageAsPackageRes, CustomPanel loads a picture file available as
package resource and it displays it in a <img> tag using the built-in component
:org.apache.wicket.markup.html.image.Image
HTML:
<html>
<head>...</head>
<body>
<wicket:panel>
Package resource image: <img wicket:id= />"packageResPicture"
</wicket:panel>
</body>
</html>
Jave Code:
public class CustomPanel Panel {extends
CustomPanel( id) {public String
(id);super
PackageResourceReference resourceReference =
PackageResourceReference(getClass(), );new "calendar.jpg"
add( Image( , resourceReference));new "packageResPicture"
}
}
Wicket will take care of generating a valid URL for file calendar.jpg. URLs for package resources have the
following structure:
<path to application root>/wicket/resource/<fully qualified classname>/<resource
file name>-<ver-<id>>(.file extension)
In our example the URL for our picture file calendar.jpg is the following:
./wicket/resource/org.wicketTutorial.CustomPanel/calendar-ver-1297887542000.jpg
The first part of the URL is the relative path to the application root. In our example our page is already at the
application's root so we have only a single-dotted segment. The next two segments, wicket and resource, are
respectively the namespace and the identifier for resources seen in .paragraph 10.6.4
The fourth segment is the fully qualified name of the class used to locate the resource and it is the scope of the
package resource. In the last segment of the URL we can find the name of the resource (the file name).
As you can see Wicket has automatically appended to the file name a version identifier (ver-1297887542000).
When Wicket runs in DEVELOPMENT mode this identifier contains the timestamp in millisecond indicating the
last time the resource file was modified. This can be useful when we are developing our application and resource
files are frequently modified. Appending the timestamp to the original name we are sure that our browser will use
always the last version of the file and not an old, out of date, cached version.
When instead Wicket is running in DEPLOYMENT mode, the version identifier will contain the MD5 digest of the
file instead of the timestamp. The digest is computed only the first time the resource is requested. This perfectly
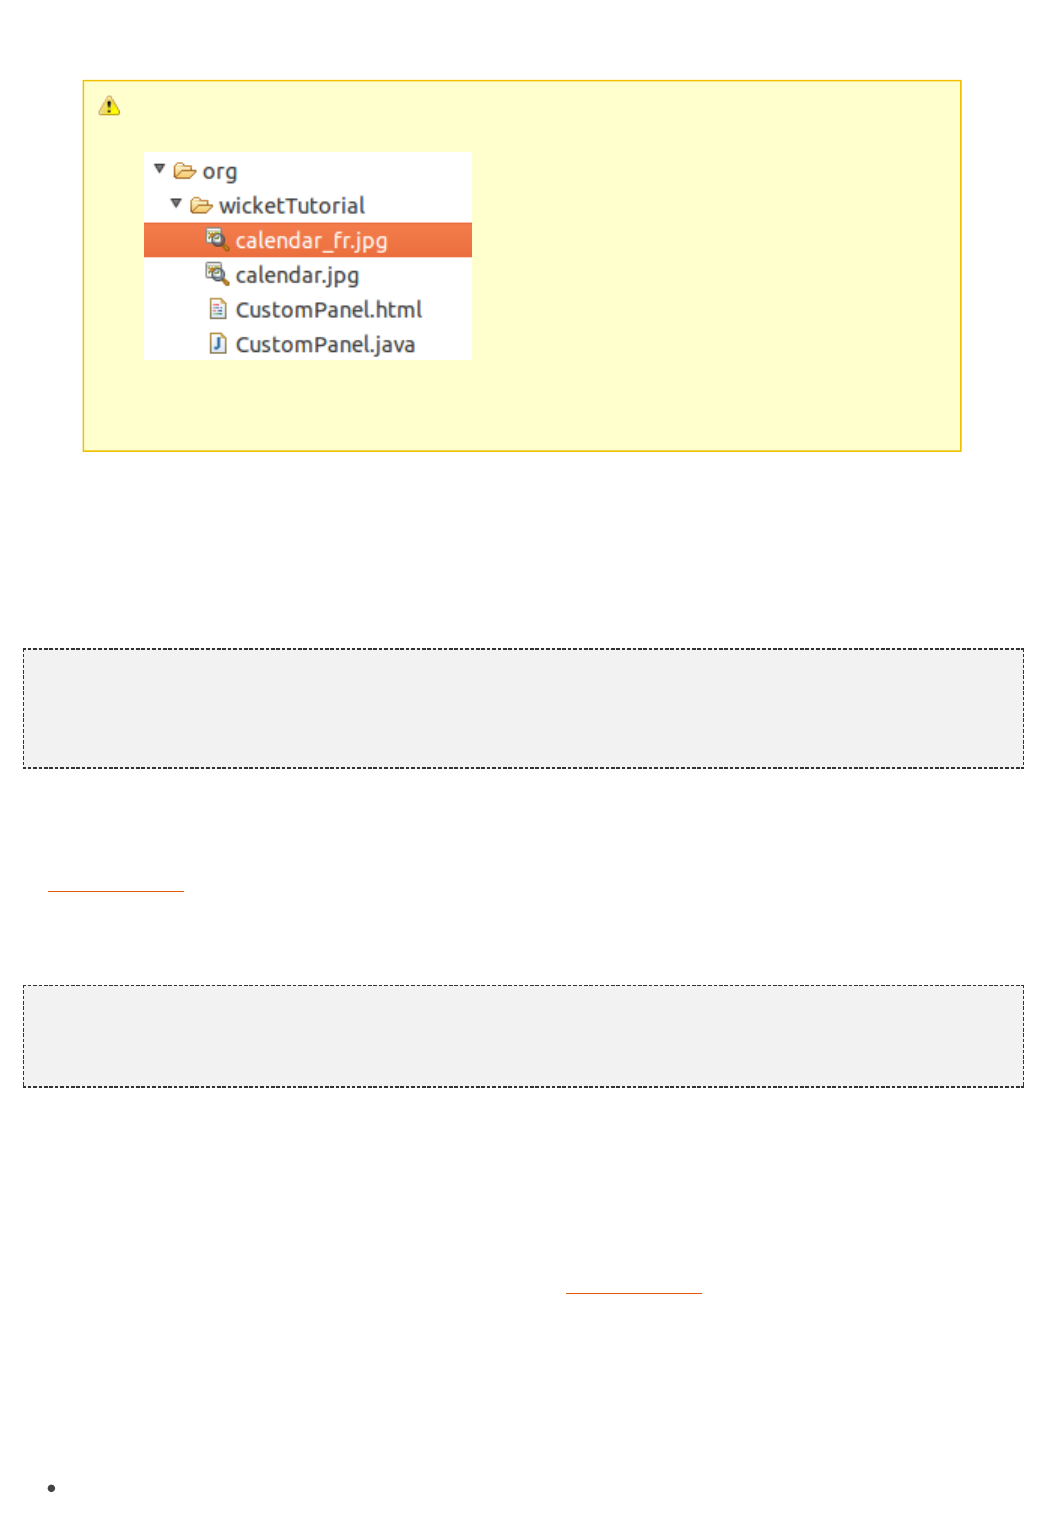
116
makes sense as static resources don't change so often when our application runs into production environment
and when this appends the application is redeployed.
Package resources can be localized following the same rules seen for resource bundles
and markup files:
In the example illustrated in the picture above, if we try to retrieve package resource
calendar.jpg when the current locale is set to French, the actual file returned will be
calendar_fr.jpg.
Inline Image - embedded resource reference content
In some components like in the inline image resource references are going to be translated to other
representations like base64 content.
Java Code:
…
add( InlineImage( , PackageResourceReference(getClass(),new "inline" new "image2.gif"
)));
...
Using package resources with tag <wicket:link>
In we have used tag <wicket:link> to automatically create links to bookmarkable pages. Theparagraph 10.3
same technique can be used also for package resources in order to use them directly from markup file. Let's
assume for example that we have a picture file called icon.png placed in the same package of the current page.
Under these conditions we can display the picture file using the following markup fragment:
<wicket:link>
<img src= />"icon.png"
</wicket:link>
In the example above Wicket will populate the attribute src with the URL corresponding to the package resource
icon.png. <wicket:link> supports also tag <link> for CSS files and tag <script> for JavaScript files.
15.4 Adding resources to page header section
Wicket comes with interface which allowsorg.apache.wicket.markup.html.IHeaderContributor
components and behaviors (which will be introduced later in ) to contribute to the header sectionparagraph 17.1
of their page. The only method defined in this interface is renderHead(IHeaderResponse response)
where is an interface which defines method to write staticIHeaderResponse render(HeaderItem item)
resources or free-form text into the header section of the page.
Header entries are instances of abstract class . Wicketorg.apache.wicket.markup.head.HeaderItem
provides a set of built-in implementations of this class suited for the most common types of resources. With the
exception of , every implementation of is an abstract factory class:PriorityHeaderItem HeaderItem
CssHeaderItem: represents a CSS resource. Factory methods provided by this class are forReference
which takes in input a resource reference, which creates an CSS item from a given URL and forUrl
117
which takes in input an arbitrary CSS string and an optional id value to identify the resource.forCSS
JavaScriptHeaderItem: represents a JavaScript resource. Just like it provides factoryCssHeaderItem
methods and along with method which takes in input an arbitraryforReference forUrl forScript
string representing the script and an optional id value to identify the resource. Method alsoforReference
supports boolean parameter which renders the namesake attribute in the script tag ( attributedefer defer
indicates that our script must be execute only after the page has loaded).
OnDomReadyHeaderItem: it adds JavaScript code that will be executed after the DOM has been built, but
before external files (such as picture, CSS, etc...) have been loaded. The class provides a factory method
which takes in input an arbitrary string representing the script to execute.forScript
OnEventHeaderItem: the JavaScript code added with this class is executed when a specific JavaScript
event is triggered on a given DOM element. The factory method is forScript(String target,
, where target is the id of a DOM element (or theString event, CharSequence javaScript)
element itself), event is the event that must trigger our code and javaScript is the code to execute.
OnLoadHeaderItem: the JavaScript code added with this class is executed after the whole page is loaded,
external files included. The factory method is .forScript(CharSequence javaScript)
PriorityHeaderItem: it wraps another header item and ensures that it will have the priority over the other
items during rendering phase.
StringHeaderItem: with this class we can add an arbitrary text to the header section. Factory method is
.forString(CharSequence string)
MetaDataHeaderItem: starting from version 6.17.0, Wicket provides this class to handle meta informations
such as <meta> tags or . The available factory methods are and canonical link element forLinkTag
which can be used to create respectively a <link> tag or a <meta> one. We can add tagforMetaTag
attribute to an existing instance of with method MetaDataHeaderItem addTagAttribute(String
. See JavaDoc for further details on this class.attributeName, Object attributeValue)
HtmlImportHeaderItem: introduced in Wicket 6.19.0, provides a HTML5 functionality to include other
wicket pages (other html files) into the current generated. Factory methods provided by this class are
which takes the page class or the url of the page / html to be included.forImportLinkTag
In the following example our custom component loads a CSS file as a package resource (placed in the same
package) and it adds it to header section.
public class MyComponent Component{extends
@Override
void renderHead(IHeaderResponse response) {public
PackageResourceReference cssFile =
PackageResourceReference( .getClass(), );new this "style.css"
CssHeaderItem cssItem = CssHeaderItem.forReference(cssFile);
response.render(cssItem);
}
}
15.5 Context-relative resources
In web applications, it's quite common to have one or more root context folders containing css/js files. These
resources are normally referenced with an absolute path inside link/script tags:
<script src= ></script>"/misc/js/jscript.js"
<link type= rel= href= />"text/css" "stylesheet" "/misc/css/themes/style.css"
To handle this kind of resources from code we can use resource reference class
. To build a neworg.apache.wicket.request.resource.ContextRelativeResourceReference
instance of this class we must specify the root context path of the resource we want to use:
ContextRelativeResourceReference resource = ContextRelativeResourceReference(new
);"/misc/js/jscript.js"

118
By default when our application runs in DEPLOYMENT mode willContextRelativeResourceReference
automatically load the minified version of the specified resource using 'min' as postfix. In the example above it
will load '/misc/js/jscript.min.js'. We can force to always use theContextRelativeResourceReference
not-minified resource passing an additional flag to class constructor:
//it will always use '/misc/js/jscript.js'
ContextRelativeResourceReference resource = ContextRelativeResourceReference(new
, );"/misc/js/jscript.js" false
The minified postfix can be customized with an optional string parameter:
//it will use '/misc/js/jscript.minified.js' in DEPLOYMENT mode
ContextRelativeResourceReference resource = ContextRelativeResourceReference(new
, );"/misc/js/jscript.js" "minified"
is usually used with the header item classes we have seen before inContextRelativeResourceReference
this chapter to create entries for the page header section.
Picture files
For picture files Wicket provides a specific component with class
which is meant to be used with tag <img>org.apache.wicket.markup.html.image.ContextImage
//build the component specifying its id and picture's context path
ContextImage image = ContextImage( , );new "myPicture" "/misc/imgs/mypic.png"
15.6 Resource dependencies
Class allows to specify the resources it depends on overriding method ResourceReference
. The method returns an iterator over the set of that must be renderedgetDependencies() HeaderItems
before the resource referenced by can be used. This can be really helpful when ourResourceReference
resources are JavaScript or CSS libraries that in turn depend on other libraries.
For example we can use this method to ensure that a custom reference to JQueryUI library will find JQuery
already loaded in the page:
Url jqueyuiUrl = Url.parse( + "https://ajax.googleapis.com/ajax/libs/jqueryui/"
);"1.10.2/jquery-ui.min.js"
UrlResourceReference jqueryuiRef = UrlResourceReference(jqueyuiUrl){new
@Override
Iterable<? HeaderItem> getDependencies() {public extends
Application application = Application.get();
ResourceReference jqueryRef = application.getJavaScriptLibrarySettings().
getJQueryReference();
Arrays.asList(JavaScriptHeaderItem.forReference(jqueryRef));return
}
};
Please note that in the code above we have built a resource reference using a URL to the desired library instead
of a package resource holding the physical file.
The same method is defined also for class .getDependencies() HeaderItem
15.7 Aggregate multiple resources with resource bundles
One of the best practices to make our web application faster and reduce its latency is to reduce the number of
requests to the server to load page resources like JavaScript or CSS files. To achieve this goal some
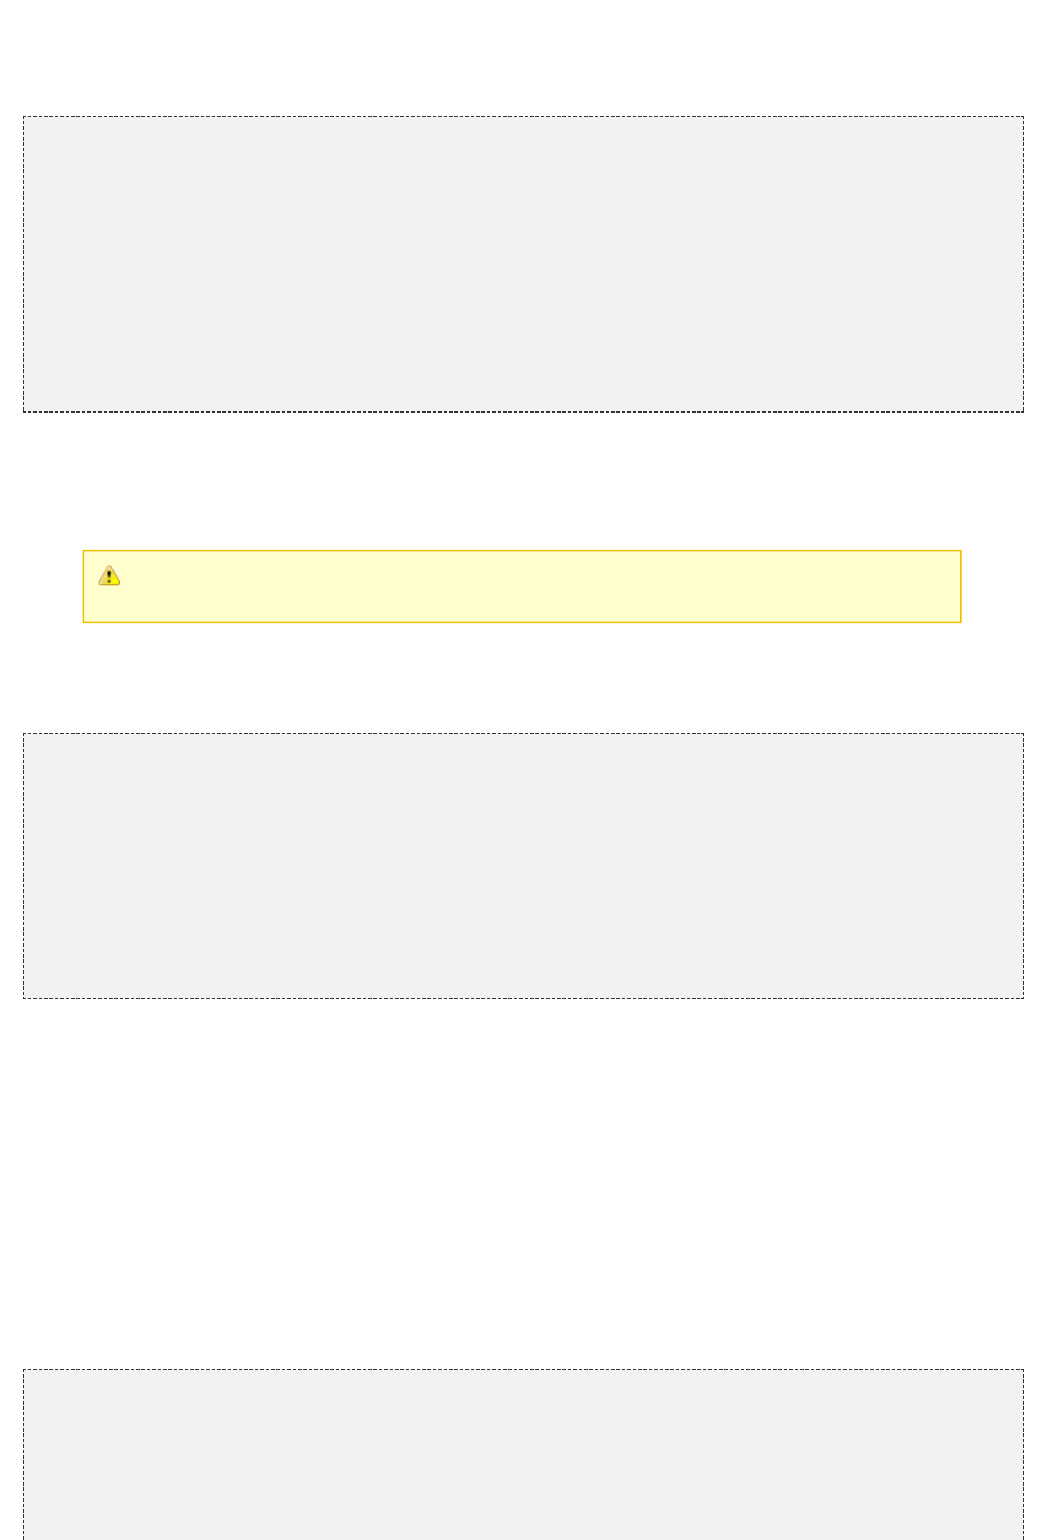
119
JavaScript-based build tools (like Grunt) allow to merge multiple files used in a page into a single file that can be
loaded in a single request. Wicket provides class to aggregateorg.apache.wicket.ResourceBundles
multiple resource references into a single one. A resource bundle can be declared during application initialization
listing all the resources that compose it:
@Override
void init() {public
.init();super
getResourceBundles().addJavaScriptBundle(WicketApplication.class,
,"jqueryUiJs"
jqueryJsReference,
jqueryUiJsReference);
getResourceBundles().addCssBundle(WicketApplication.class,
,"jqueryUiCss"
jqueryCssReference,
jqueryUiCssReference);
}
To declare a new resource bundle we need to provide a class ( in ourscope WicketApplication.class
example) and an unique name. Now, when one of the resources included in the bundle is requested, the entire
bundle is rendered instead.
A specific resource reference can not be shared among different resource bundles (i.e. it
can be part of only one bundle).
15.8 Put JavaScript inside page body
Some web developers prefer to put their <script> tags at the end of page body instead of inside the <head> tags:
<html>
<head>
//no <script> tag here…
</head>
<body>
…
<script>
//one or more <script> tags at the end of the body
</script>
</body>
</html>
In Wicket we can achieve this result providing a custom to a our application andIHeaderResponseDecorator
using Wicket tag <wicket:container/> to indicate where we want to render our scripts inside the page. Interface
defines method IHeaderResponseDecorator IHeaderResponse decorate(IHeaderResponse
which allows to decorate or add funtionalities to Wicket . Our custom response) IHeaderResponse
can be registered in the application with method IHeaderResponseDecorator
. Anytime Wicket creates an instance of , it will call thesetHeaderResponseDecorator IHeaderResponse
registered to decorate the header response.IHeaderResponseDecorator
In the example project we can find a custom that rendersScriptInsideBody IHeaderResponseDecorator
CSS into the usual <head> tag and put JavaScricpt header items into a specific container (tag
<wicket:container/>) Wicket already comes with class JavaScriptFilteredIntoFooterHeaderResponse
which wraps a and renders in a given container all the instances of IHeaderResponse
. The following code is taken from the Application class of the project:JavaScriptHeaderItem
//…
@Override
void init()public
{
setHeaderResponseDecorator( JavaScriptToBucketResponseDecorator(new "footer-container"
));
}
120
/**
* Decorates an original IHeaderResponse and renders all javascript items
* (JavaScriptHeaderItem), to a specific container in the page.
*/
class JavaScriptToBucketResponseDecorator IHeaderResponseDecorator static implements
{
bucketName;private String
JavaScriptToBucketResponseDecorator( bucketName) {public String
.bucketName = bucketName;this
}
@Override
IHeaderResponse decorate(IHeaderResponse response) {public
JavaScriptFilteredIntoFooterHeaderResponse(response, bucketName);return new
}
}
As you can see in the code above the "bucket" that will contain JavaScript tags is called "footer-container"
. To make a use of it the developer have to add a special component called in hisHeaderResponseContainer
page:
add( HeaderResponseContainer( , ));new "someId" "filterName"
Please note that 's needs also a name for the corresponding header response'sHeaderResponseContainer
filter. The markup of our page will look like this:
<html>
<header>
//no <script> tag here…
</header>
<body>
<!-- here we will have our JavaScript tags -->
<wicket:container wicket:id= /> "someId"
</body>
</html>
The code of the home page is the following:
public HomePage( PageParameters parameters) {final
(parameters);super
add( HeaderResponseContainer( , ));new "footer-container" "footer-container"
}
@Override
void renderHead(IHeaderResponse response) {public
response.render(JavaScriptHeaderItem.forReference(new
PackageResourceReference(getClass(),
)));"javasciptLibrary.js"
response.render(OnEventHeaderItem.forScript( , , ));"'logo'" "click" "alert('Clicked me!')"
}
Looking at the code above you can note that our page adds two script to the header section: the first is an
instance of and will be rendered in the while theJavaScriptHeaderItem HeaderResponseContainer
second will follow the usual behavior and will be rendered inside <head> tag.
15.9 Header contributors positioning
Starting from version 6.15.0 we can specify where header contributors must be rendered inside <head> tag
using the placeholder tag :<wicket:header-items/>
<head>
121
<meta charset= />"UTF-8"
<wicket:header-items/>
<script src= ></script>"my-monkey-patch-of-wicket-ajax.js"
</head>
With the code above all header contributions done by using IHeaderResponse in your Java code or the special
tag will be put between the <meta> and <script> elements, i.e. in the place of <wicket:head>
.<wicket:header-items/>
This way you can make sure that some header item is always before or after the header items managed by
Wicket.
can be used only in the page's <head> element and there could be at most one<wicket:header-items/>
instance of it.
15.10 Custom resources
In Wicket the best way to add dynamic functionalities to our application (such as csv export, a pdf generated on
the fly, etc...) is implementing a custom resource. In this paragraph as example of custom resource we will build
a basic RSS feeds generator which can be used to publish feeds on our site (project CustomResourceMounting).
Instead of generating a RSS feed by hand we will use Rome framework and its utility classes.
As hinted above in , class can be used as base class to implement newparagraph 15.1 AbstractResource
resources. This class defines abstract method which is invoked when the resource isnewResourceResponse
requested. The following is the code of our RSS feeds generator:
public class RSSProducerResource AbstractResource {extends
@Override
ResourceResponse newResourceResponse(Attributes attributes) {protected
ResourceResponse resourceResponse = ResourceResponse();new
resourceResponse.setContentType( );"text/xml"
resourceResponse.setTextEncoding( );"utf-8"
resourceResponse.setWriteCallback( WriteCallback()new
{
@Override
void writeData(Attributes attributes) IOExceptionpublic throws
{
OutputStream outputStream = attributes.getResponse().getOutputStream();
Writer writer = OutputStreamWriter(outputStream);new
SyndFeedOutput output = SyndFeedOutput();new
{try
output.output(getFeed(), writer);
} (FeedException e) {catch
WicketRuntimeException( );throw new "Problems writing feed to response..."
}
}
});
resourceResponse;return
}
// method getFeed()…
}
Method returns an instance of representing the responsenewResourceResponse ResourceResponse
generated by the custom resource. Since RSS feeds are based on XML, in the code above we have set the type
of the response to text/xml and the text encoding to utf-8.
To specify the content that will be returned by our resource we must also provide an implementation of inner
class which is responsible for writing content data to response's output stream. In our projectWriteCallback
we used class SyndFeedOutput from Rome framework to write our feed to response. Method is justgetFeed()
an utility method that generates a sample RSS feed (which is an instance of interface
).com.sun.syndication.feed.synd.SyndFeed
Now that we have our custom resource in place, we can use it in the home page of the project. The easiest way
to make a resource available to users is to expose it with link component :ResourceLink
add( ResourceLink( , RSSProducerResource()));new "rssLink" new
122
In the next paragraphs we will see how to register a resource at application-level and how to mount it to an
arbitrary URL.
15.11 Mounting resources
Just like pages also resources can be mounted to a specific path. Class provides method WebApplication
which is almost identical to seen in :mountResource mountPage paragraph 10.6.1
@Override
void init() {public
.init();super
//resource mounted to path /foo/bar
ResourceReference resourceReference = ResourceReference( ){new "rssProducer"
RSSReaderResource rssResource = RSSReaderResource();new
@Override
IResource getResource() {public
rssResource;return
}};
mountResource( , resourceReference);"/foo/bar"
}
With the configuration above (taken from project ) every request to /foo/bar will beCustomResourceMounting
served by the custom resource built in the previous paragraph.
Parameter placeholders are supported as well:
@Override
void init() {public
.init();super
//resource mounted to path /foo with a required indexed parameter
ResourceReference resourceReference = ResourceReference( ){new "rssProducer"
RSSReaderResource rssResource = RSSReaderResource();new
@Override
IResource getResource() {public
rssResource;return
}};
mountResource( , resourceReference);"/bar/${baz}"
}
15.12 Shared resources
Resources can be added to a global registry in order to share them at application-level. Shared resources are
identified by an application-scoped key and they can be easily retrieved at a later time using reference class
. The global registry can be accessed with 's method SharedResourceReference Application
. In the following excerpt of code (taken again from project getSharedResources CustomResourceMounting
) we register an instance of our custom RSS feeds producer as application-shared resource:
//init application's method
@Override
void init(){public
RSSProducerResource rssResource = RSSProducerResource();new
// …
getSharedResources().add( , rssResource); "globalRSSProducer"
}
Now to use an application-shared resource we can simply retrieve it using class SharedResourceReference
and providing the key previously used to register the resource:
add( ResourceLink( , SharedResourceReference( )));new "globalRssLink" new "globalRSSProducer"
The URL generated for application shared resources follows the same pattern seen for package resources:
./wicket/resource/org.apache.wicket.Application/globalRSSProducer
123
The last segment of the URL is the key of the resource while the previous segment contains the scope of the
resource. For application-scoped resources the scope is always the fully qualified name of class .Application
This should not be surprising since global resources are visible at application level (i.e. the scope is the
application).
Package resources are also application-shared resources but they don't need to be
explicitly registered.
Remember that we can get the URL of a resource reference using method
urlFor(ResourceReference resourceRef, PageParameters params )
available with both class and class .RequestCycle Component
15.13 Customizing resource loading
Wicket loads application's resources delegating this task to a resource locator represented by interface
. To retrieve or modifyorg.apache.wicket.core.util.resource.locator.IResourceStreamLocator
the current resource locator we can use the getter and setter methods defined by setting interface
:IResourceSettings
//init application's method
@Override
void init(){ public
//get the resource locator
getResourceSettings().getResourceStreamLocator();
//set the resource locator
getResourceSettings().setResourceStreamLocator(myLocator);
}
The default locator used by Wicket is class which in turn tries to load a requestedResourceStreamLocator
resource using a set of implementations of interface . This interface defines method IResourceFinder
which tries to resolve a resource corresponding to the given classfind(Class class, String pathname)
and path.
The default implementation of used by Wicket is whichIResourceFinder ClassPathResourceFinder
searches for resources into the application class path. This is the implementation we have used so far in our
examples. However some developers may prefer storing markup files and other resources in a separate folder
rather than placing them side by side with Java classes.
To customize resource loading we can add further resource finders to our application in order to extend the
resource-lookup algorithm to different locations. Wicket already comes with two other implementations of
IResourceFinder designed to search for resources into a specific folder on the file system. The first is class Path
and it's defined in package . The constructor of this class takes in input anorg.apache.wicket.util.file
arbitrary folder that can be expressed as a string path or as an instance of Wicket utility class (inFolder
package ). The second implementation of interface isorg.apache.wicket.util.file IResourceFinder
class which looks into a folder placed inside webapp's root path (but not inside folderWebApplicationPath
WEB-INF).
Project CustomFolder4MarkupExample uses to load the markup file and the resourceWebApplicationPath
bundle for its home page from a custom folder. The folder is called markupFolder and it is placed in the root path
of the webapp. The following picture illustrates the file structure of the project:
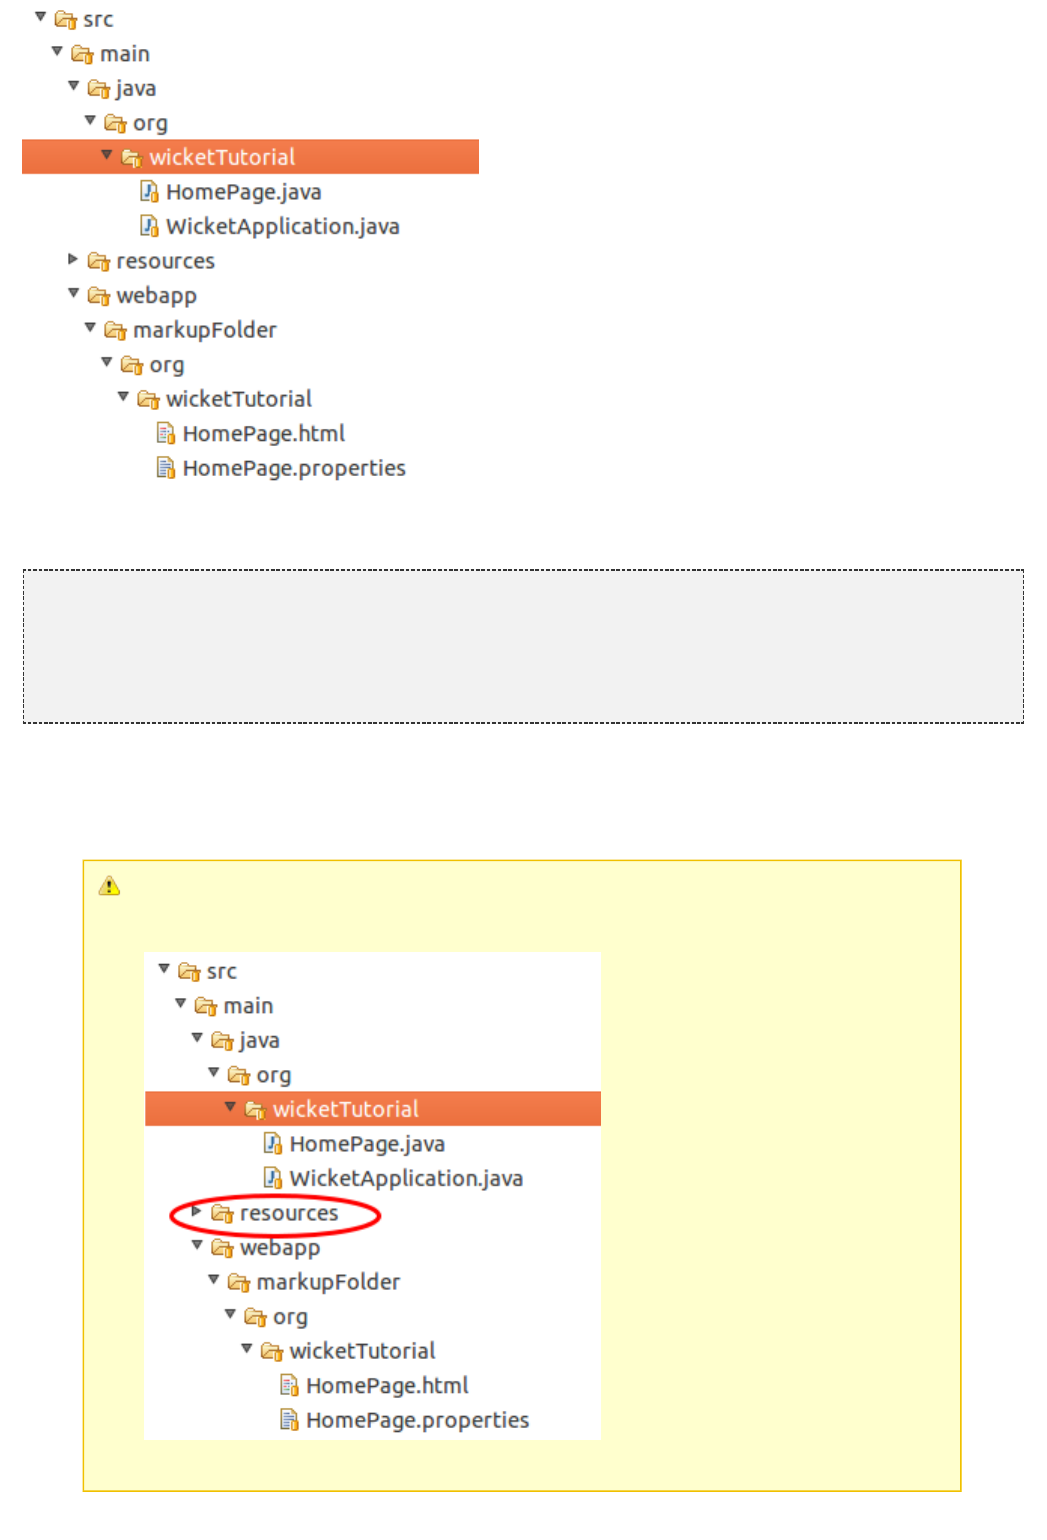
124
As we can see in the picture above, we must preserve the package structure also in the custom folder used as
resource container. The code used inside application class to configure WebApplicationPath is the following:
@Override
void init()public
{
getResourceSettings().getResourceFinders().add(
WebApplicationPath(getServletContext(), ));new "markupFolder"
}
Method getResourceFinders() defined by setting interface IResourceSettings returns the list of resource finders
defined in our application. The constructor of WebApplicationPath takes in input also an instance of standard
interface javax.servlet.ServletContext which can be retrieved with WebApplication's method getServletContext().
By default, if resource files can not be found inside application classpath, Wicket will
search for them inside “resources” folder. You may have noted this folder in the previous
picture. It is placed next to the folder “java” containing our source files:
This folder can be used to store resource files without writing any configuration code.
15.14 CssHeaderItem and JavaScriptHeaderItem compression
125
15.14 CssHeaderItem and JavaScriptHeaderItem compression
Introduced in Wicket 6.20.0 / Wicket 7.0.0 there is a default way to be used in which the output of all
CssHeaderItems / JavaScriptHeaderItems is modified before they are cached and delivered to the client. You
can add a so called Compressor by receiving the resource settings and invoke #setJavaScriptCompressor(...) /
#setJavaScriptCompressor(...). If you want to add several Compressors use
or org.apache.wicket.resource.CompositeCssCompressor
org.apache.wicket.resource.CompositeJavaScriptCompressor
Java Code:
…
class WicketApplication WebApplicationpublic extends
{
@Override
<? WebPage> getHomePage()public Class extends
{
HomePage.class;return
}
@Override
void init()public
{
.init();super
getResourceSettings().setCssCompressor( CssUrlReplacer());new
}
}
...
In the previous example you see that a is added whichorg.apache.wicket.resource.CssUrlReplacer
does not compress the content, but replaces all urls in CSS files and applies a Wicket representation for them by
automatically wrapping them into PackageResourceReferences. Here is an example where you can see what
Wicket does with the url representation.
HomePage (in package my/company/): Java Code:
…
response.render(CssReferenceHeaderItem.forReference(new
PackageResourceReference(HomePage.class, )));"res/css/mycss.css"
...
mycss.css (in package my/company/res/css/): CSS:
…
body{
background-image:url('../images/some.png');
}
...
some.png (in package my/company/res/images/): <blob>
Output of mycss.css: CSS:
…
body{
background-image:url('../images/some-ver-1425904170000.png');
}
...
If you add a url which looks like this background-image:url('../images/some.png?embedBase64'); Wicket is going
to embed the complete image as base64 string with its corresponding mime type into the css file. It looks like the
following code block demonstrates.
Output of mycss.css: CSS:
…
body{

126
background-image: url(data:image/png;base64,R0lGODlh1wATAX....);
}
...
15.15 Summary
In this chapter we have learnt how to manage resources with the built-in mechanism provided by Wicket. With
this mechanism we handle resources from Java code and Wicket will automatically take care of generating a
valid URL for them. We have also seen how resources can be bundled as package resources with a component
that depends on them to make it self-contained.
Then, in the second part of the chapter, we have built a custom resource and we have learnt how to mount it to
an arbitrary URL and how to make it globally available as shared resource.
Finally, in the last part of the paragraph we took a peek at the mechanism provided by the framework to
customize the locations where the resource-lookup algorithm searches for resources.
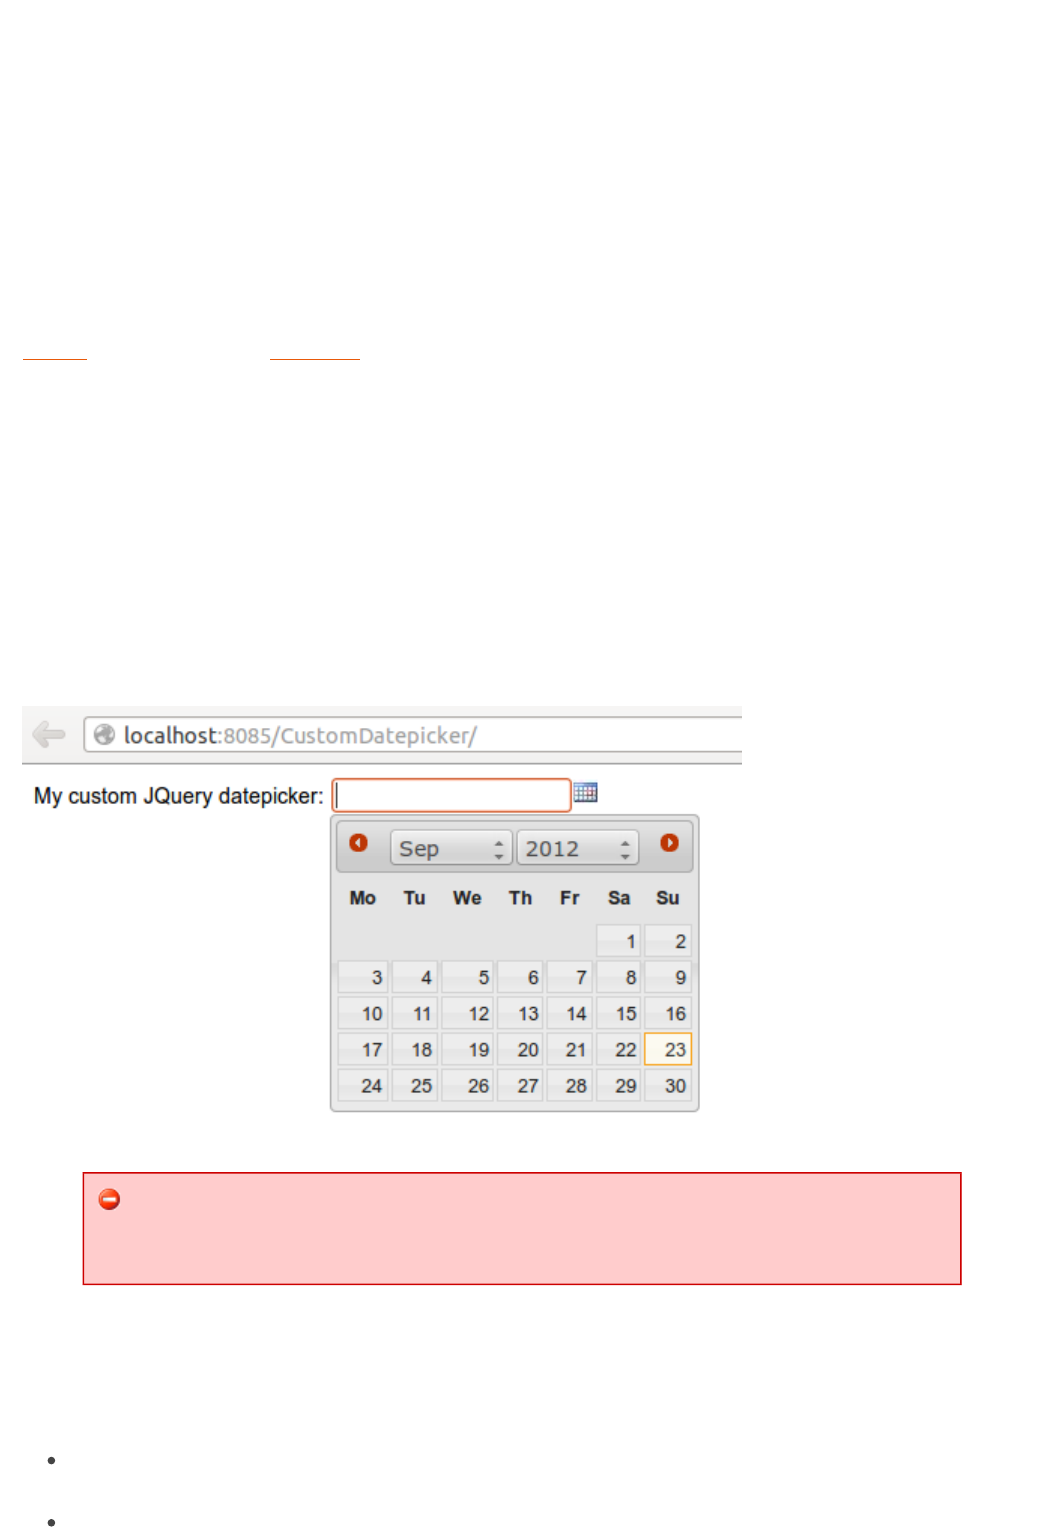
127
16 An example of integration with
JavaScript
It's time to put into practice what we have learnt so far in this guide. To do this we will build a custom date
component consisting of a text field to edit a date value and a fancy calendar icon to open a JavaScript
datepicker. This chapter will also illustrate an example of integration of Wicket with a JavaScript library like
and its child project .JQuery JQuery UI
16.1 What we want to do...
For end-users a datepicker is one of the most appreciated widget. It allows to simply edit a date value with the
help of a user-friendly pop-up calendar. That's why nearly all UI frameworks provide a version of this widget.
Popular JavaScript libraries like YUI and JQuery come with a ready-to-use datepicker to enrich the user
experience of our web applications. Wicket already provides a component which integrates a text field with a
calendar widget from YUI library, but there is no built-in component that uses a datepicker based on JQuery
library.
As both JQuery and its child project JQueryUI have gained a huge popularity in the last years, it's quite
interesting to see how to integrate them in Wicket building a custom component. In this chapter we will create a
custom datepicker based on the corresponding widget from JQueryUI project:
On Internet you can find different libraries that already offer a strong integration between
Wicket and JQuery. The goal of this chapter is to see how to integrate Wicket with a
JavaScript framework building a simple homemade datepicker which is not intended to
provide every feature of the original JavaScript widget.
What features we want to implement
Before starting to write code, we must clearly define what features we want to implement for our component. The
new component should:
Be self-contained: we must be able to distribute it and use it in other projects without requiring any kind of
additional configuration.
Have a customizable date format: developer must be able to decide the date format used to display date
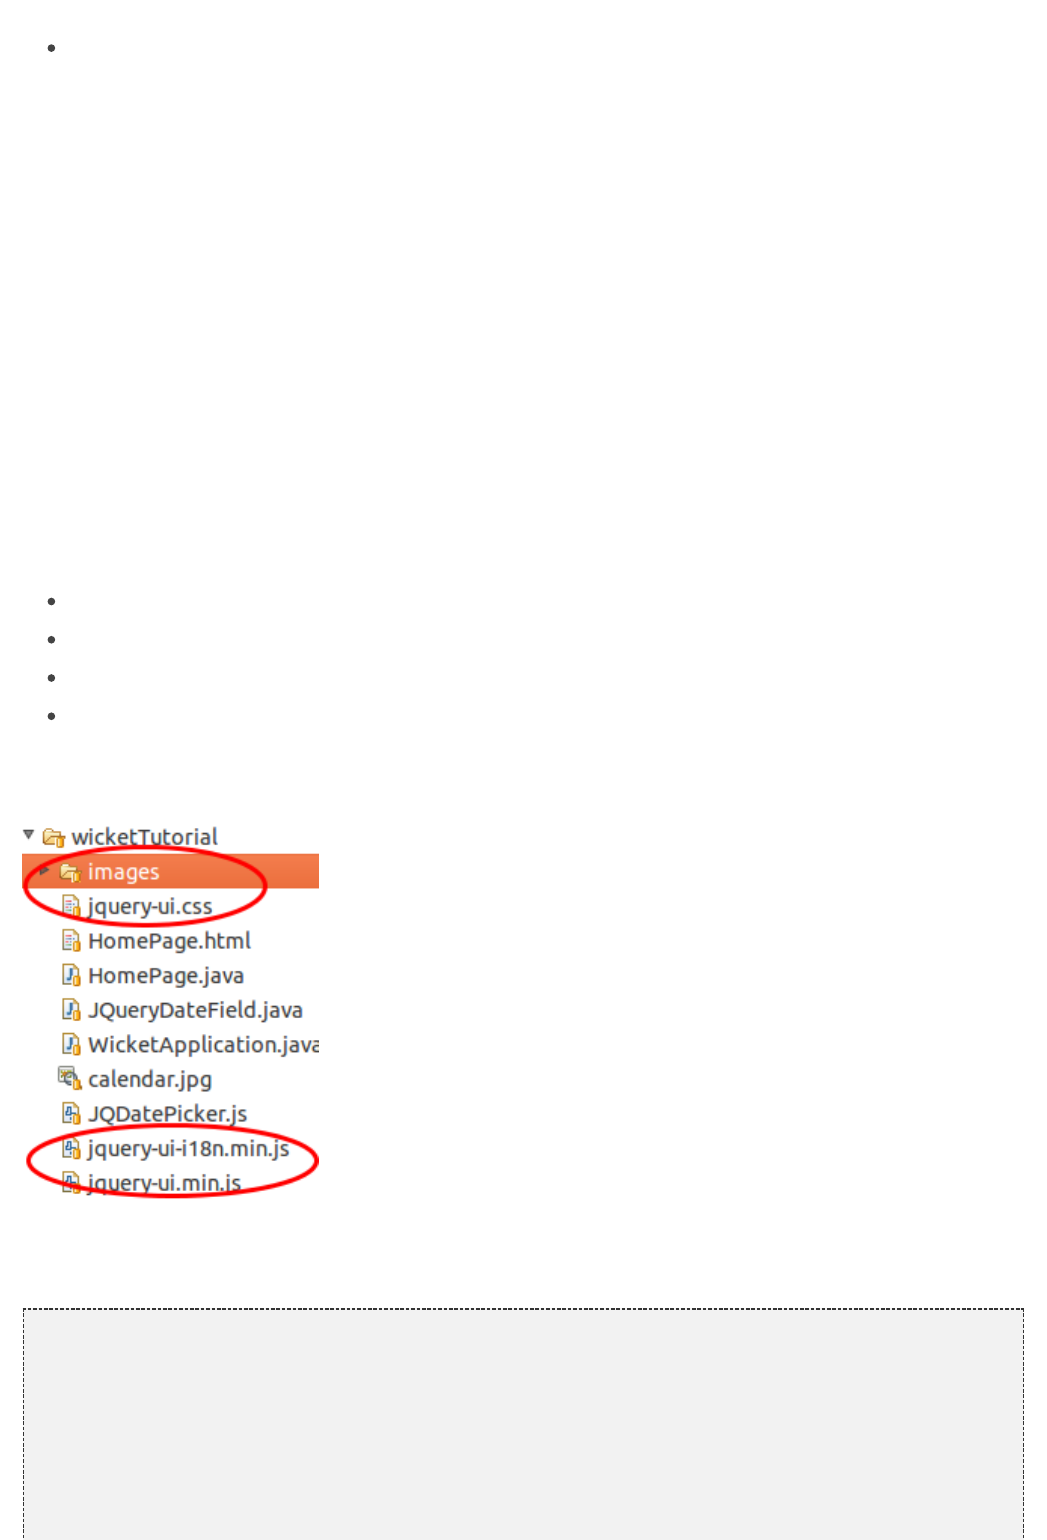
128
value and to parse user input.
Be localizable: the pop-up calendar must be localizable in order to support different languages.
That's what we'd like to have with our custom datepicker. In the rest of the chapter we will see how to implement
the features listed above and which resources must be packaged with our component.
16.2 ...and how we will do it
Our new component will extend the a built-in text field
which already uses aorg.apache.wicket.extensions.markup.html.form.DateTextField
java.util.Date as model object and already performs conversion and validation for input values. Since the
component must be self-contained, we must ensure that the JavaScript libraries it relies on (JQuery and JQuery
UI) will be always available.
Starting from version 6.0 Wicket has adopted JQuery as backing JavaScript library so we can use the version
bundled with Wicket for our custom datepicker.
To make JQuery UI available we should instead go to its official site, download the required artifacts and use
them as package resources of our component.
Component package resources
JQuery UI needs the following static resources in order to work properly:
jquery-ui.min.js: the minified version of the library.
jquery-ui.css: the CSS containing the style used by JQuery UI widgets.
jquery-ui-i18n.min.js: the minified JavaScript containing the built-in support for localization.
Folder 'images': the folder containing picture files used by JQuery UI widgets.
In the following picture we can see these package resources with our component class (named
JQueryDateField):
Along with the four static resources listed above, we can find also file calendar.jpg, which is the calendar icon
used to open the pop up calendar, and file JQDatePicker.js which contains the following custom JavaScript code
that binds our component to a JQuery UI datepicker:
function initJQDatepicker(inputId, countryIsoCode, dateFormat, calendarIcon) {
localizedArray = $.datepicker.regional[countryIsoCode];var
localizedArray['buttonImage'] = calendarIcon;
localizedArray['dateFormat'] = dateFormat;
initCalendar(localizedArray);
$( + inputId).datepicker(localizedArray); "#"
};
function initCalendar(localizedArray){
localizedArray['changeMonth']= ;true
localizedArray['changeYear']= ;true
localizedArray['showOn'] = 'button';
129
localizedArray['buttonImageOnly'] = ;true
};
Function initJQDatepicker takes in input the following parameters:
inputId: the id of the HTML text field corresponding to our custom component instance.
countryIsoCode: a two-letter low-case ISO language code. It can contain also the two-letter upper-case
ISO country code separated with a minus sign (for example en-GB)
dateFormat: the date format to use for parsing and displaying date values.
calendarIcon: the relative URL of the icon used as calendar icon.
As we will see in the next paragraphs, its up to our component to generate this parameters and invoke the
initJQDatepicker function.
Function initCalendar is a simple utility function that sets the initialization array for datepicker widget. For more
details on JQuery UI datepicker usage see the documentation at http://jqueryui.com/ datepicker.
Initialization code
The initialization code for our component is contained inside its method onInitialize and is the following:
@Override void onInitialize() {protected
.onInitialize();super
setOutputMarkupId( );true
datePattern = ResourceModel( , )new "jqueryDateField.shortDatePattern" "mm/dd/yy"
.getObject();
countryIsoCode = ResourceModel( , ) new "jqueryDateField.countryIsoCode" "en-GB"
.getObject();
PackageResourceReference resourceReference =
PackageResourceReference(getClass(), );new "calendar.jpg"
urlForIcon = urlFor(resourceReference, PageParameters());new
dateConverter = PatternDateConverter(datePattern, ); new false
}
@Override
<Date> IConverter<Date> getConverter( <Date> type) {public Class
(IConverter<Date>) dateConverter;return
}
The first thing to do inside onInitialize is to ensure that our component will have a markup id for its related text
field. This is done invoking setOutputMarkupId(true).
Next, JQueryDateField tries to retrieve the date format and the ISO language code that must be used as
initialization parameters. This is done using class which searches for a given resource in theResourceModel
available bundles. If no value is found for date format or for ISO language code, default values will be used
('mm/dd/yy' and 'en-GB').
To generate the relative URL for calendar icon, we load it as package resource reference and then we use
's method urlFor to get the URL value (we have seen this method in ).Component paragraph 9.3.2
The last configuration instruction executed inside onInitialize is the instantiation of the custom converter used by
our component. This converter is an instance of the built-in class
and must use the previously retrieved date formatorg.apache.wicket.datetime.PatternDateConvert
to perform conversion operations. Now to tell our component to use this converter we must return it overriding
's method .FormComponent getConverter
Header contributor code
The rest of the code of our custom component is inside method , which is responsible for addingrenderHeader
to page header the bundled JQuery library, the three files from JQuery UI distribution, the custom file
JQDatePicker.js and the invocation of function :initJQDatepicker
130
@Override
void renderHead(IHeaderResponse response) {public
.renderHead(response);super
// component is disabled we don't have to load the JQueryUI datepickerif
(!isEnabledInHierarchy())if
;return
//add bundled JQuery
IJavaScriptLibrarySettings javaScriptSettings =
getApplication().getJavaScriptLibrarySettings();
response.render(JavaScriptHeaderItem.
forReference(javaScriptSettings.getJQueryReference()));
//add resourcespackage
response.render(JavaScriptHeaderItem.
forReference( PackageResourceReference(getClass(), )));new "jquery-ui.min.js"
response.render(JavaScriptHeaderItem.
forReference( PackageResourceReference(getClass(), )));new "jquery-ui-i18n.min.js"
response.render(CssHeaderItem.
forReference( PackageResourceReference(getClass(), )));new "jquery-ui.css"
//add custom file JQDatePicker.js. Reference JQDatePickerRef is a fieldstatic
response.render(JavaScriptHeaderItem.forReference(JQDatePickerRef));
//add the init script datepickerfor
jqueryDateFormat = datePattern.replace( , ).toLowerCase();String "yyyy" "yy"
initScript = + getMarkupId() + + countryIsoCode +String ";initJQDatepicker('" "', '"
+ jqueryDateFormat + + + urlForIcon + ;"', '" "', " "'" "');"
response.render(OnLoadHeaderItem.forScript(initScript));
}
If component is disabled the calendar icon must be hidden and no datepicker must be displayed. That's why
is skipped if component is not enabled.renderHeader
To get a reference to the bundled JQuery library we used the JavaScript setting interface
and its method .IJavaScriptLibrarySettings getJQueryReference
In the last part of we build the string to invoke function using the valuesrenderHeader initJQDatepicker
obtained inside onInitialize. Unfortunately the date format used by JQuery UI is different from the one adopted in
Java so we have to convert it before building the JavaScript code. This init script is rendered into header section
using a to ensure that it will be executed after all the other scripts have been loaded.OnLoadHeaderItem
If we add more than one instance of our custom component to a single page, static
resources are rendered to the header section just once. Wicket automatically checks if a
static resource is already referenced by a page and if so, it will not render it again.
This does not apply to the init script which is dynamically generated and is rendered for
every instance of the component.
Our datepicker is not ready yet to be used with AJAX. In we will see how tochapter 18
modify it to make it AJAX-compatible.
16.3 Summary
In this brief chapter we have seen how custom components can be integrated with technologies. To doDHTML
so we have used most of what we have learnt in this guide. Now we are able to build complex components with a
rich user experience. However this is not enough yet to develop applications. We still have to cover aWeb 2.0
fundamental technology like AJAX and some other Wicket-related topics that will help us building our application
in more modular and efficient way.
131
17 Wicket advanced topics
In this chapter we will learn some advanced topics which have not been covered yet in the previous chapters but
which are nonetheless essential to make the most of Wicket and to build sophisticated web applications.
17.1 Enriching components with behaviors
With class Wicket provides a very flexible mechanism to shareorg.apache.wicket.behavior.Behavior
common features across different components and to enrich existing components with further functionalities. As
the class name suggests, adds a generic behavior to a component modifying its markup and/orBehavior
contributing to the header section of the page ( implements the interface ).Behavior IHeaderContributor
One or more behaviors can be added to a component with 's method , while toComponent add(Behavior...)
remove a behavior we must use method .remove(Behavior)
Here is a partial list of methods defined inside class along with a brief description of what they do:Behavior
beforeRender(Component component): called when a component is about to be rendered.
afterRender(Component component): called after a component has been rendered.
onComponentTag(Component component, ComponentTag tag): called when component tag is being
rendered.
getStatelessHint(Component component): returns if a behavior is stateless or not.
bind(Component component): called after a behavior has been added to a component.
unbind(Component component): called when a behavior has been removed from a component.
detach(Component component): overriding this method a behavior can detach its state before being
serialized.
isEnabled(Component component): tells if the current behavior is enabled for a given component. When
a behavior is disabled it will be simply ignored and not executed.
isTemporary(Component component): tells component if the current behavior is temporary. A temporary
behavior is discarded at the end of the current request (i.e it's executed only once).
onConfigure(Component component): called right after the owner component has been configured.
onRemove(Component component): called when the owner component has been removed from its
container.
renderHead(Component component, IHeaderResponse response): overriding this method behaviors
can render resources to the header section of the page.
For example the following behavior prepends a red asterisk to the tag of a form component if this one is required:
public class RedAsteriskBehavior Behavior {extends
@Override
void beforeRender(Component component) {public
Response response = component.getResponse();
asterisktHtml = (200);StringBuffer new StringBuffer
(component FormComponent if instanceof
&& ((FormComponent)component).isRequired()){
asteriskHtml.append( );" <b style="color:red;font-size:medium">*</b>"
}
response.write(asteriskHtml);
}
}

132
Since method is called before the coupled component is rendered, we can use it to prependbeforeRender
custom markup to component tag. This can be done writing our markup directly to the current Response object,
as we did in the example above.
Please note that we could achieve the same result overriding component method . HoweveronBeforeRender
using a behavior we can easily reuse our custom code with any other kind of component without modifying its
source code. As general best practice we should always consider to implement a new functionality using a
behavior if it can be shared among different kinds of component.
Behaviors play also a strategic role in the built-in AJAX support provided by Wicket, as we will see in the next
chapter.
17.2 Generating callback URLs with IRequestListener
With Wicket it's quite easy to build a callback URL that executes a specific method on server side. This method
must be defined in a functional interface (i.e. an an interface that defines just one method) that inherits from
built-in and it must be a void method with no parameters in input:org.apache.wicket.IRequestListener
public IMyListener IRequestListenerinterface extends
{
/**
* Called when the relative callback URL is requested.
*/
void myCallbackMethod();
}
To control how the method will be invoked we must use class
. In Wicket is a common practice to instantiate this classorg.apache.wicket.RequestListenerInterface
as a public static field inside the relative callback interface:
public IMyListener IRequestListenerinterface extends
{
/**RequestListenerInterface instance*/
RequestListenerInterface INTERFACE = public static final new
RequestListenerInterface(IMyListener.class);
/**
* Called when the relative callback URL is requested.
*/
void myCallbackMethod();
}
By default will respond rendering the current page after the callback methodRequestListenerInterface
has been executed (if we have a non-AJAX request). To change this behavior we can use setter method
.setRenderPageAfterInvocation(boolean)
Now that our callback interface is complete we can generate a callback URL with 's method Component
or with method urlFor(RequestListenerInterface, PageParameters) urlFor (Behavior,
if we are using a callback interface with a behavior (seeRequestListenerInterface, PageParameters)
the following example).
Project CallbackURLExample contains a behavior (class ) that implementsOnChangeSingleChoiceBehavior
a callback interface to update the model of an component when userAbstractSingleSelectChoice
changes the selected option (it provides the same functionality of method
).wantOnSelectionChangedNotifications
Instead of a custom callback interface, implements built-in interface OnChangeSingleChoiceBehavior
which is designed to generate a callback URL fororg.apache.wicket.behavior.IBehaviorListener
behaviors. The callback method defined in this interface is and the following is theonRequest()
implementation provided by :OnSelectionChangedNotifications
@Override
void onRequest() { public
Request request = RequestCycle.get().getRequest();
IRequestParameters requestParameters = request.getRequestParameters();
StringValue choiceId = requestParameters.getParameterValue( );"choiceId"

133
//boundComponent is the component that the behavior it is bound to.
boundComponent.setDefaultModelObject( convertChoiceIdToChoice(choiceId.toString()));
}
When invoked via URL, the behavior expects to find a request parameter (choiceId) containing the id of the
selected choice. This value is used to obtain the corresponding choice object that must be used to set the model
of the component that the behavior is bound to (boundComponent). Method is inconvertChoiceIdToChoice
charge of retrieving the choice object given its id and it has been copied from class
.AbstractSingleSelectChoice
Another interesting part of is its method where someOnChangeSingleChoiceBehavior onComponentTag
JavaScript “magic” is used to move user's browser to the callback URL when event “change” occurs on bound
component:
@Override
void onComponentTag(Component component, ComponentTag tag) {public
.onComponentTag(component, tag);super
CharSequence callBackURL = getCallbackUrl();
separatorChar = (callBackURL.toString().indexOf('?') > -1 ? : );String "&" "?"
finalScript = +String " isSelect = $( ).is('select');n"var this
+ " component;n"var
+" (isSelect)n"if
+" component = $( );n"this
+" n"else
+" component = $( ).find('input:radio:checked');n"this
+ callBackURL + separatorChar + "window.location.href='"
+ ;"choiceId=' + " "component.val()"
tag.put( , finalScript);"onchange"
}
The goal of is to build an onchange handler that forces user's browser to move to theonComponentTag
callback URL (modifing standard property window.location.href). Please note that we have appended the
expected parameter (choiceId) to the URL retrieving its value with a JQuery selector suited for the current type of
component (a drop-down menu or a radio group). Since we are using JQuery in our JavaScript code, the
behavior comes also with method that adds the bundled JQuery library to the current page.renderHead
Method is used to generate the callback URL for our custom behavior and it has beengetCallbackUrl()
copied from built-in class :AbstractAjaxBehavior
public CharSequence getCallbackUrl(){
(boundComponent == ){if null
IllegalArgumentException(throw new
);"Behavior must be bound to a component to create the URL"
}
RequestListenerInterface rli;final
rli = IBehaviorListener.INTERFACE;
boundComponent.urlFor( , rli, PageParameters());return this new
}
Static field is the implementation of IBehaviorListener.INTERFACE RequestListenerInterface
defined inside callback interface .IBehaviorListener
The home page of project contains a and a whichCallbackURLExample DropDownChoice RadioChoice
use our custom behavior. There are also two labels to display the content of the models of the two components:
134
Implementing interface makes a behavior stateful because itsIBehaviorListener
callback URL is specific for a given instance of component.
As final note it's interesting to see how Wicket internally uses callback URLs for its standard link component.
Class implements interface org.apache.wicket.markup.html.link.Link
which in turn extends :org.apache.wicket.markup.html.link.ILinkListener IRequestListener
public ILinkListener IRequestListenerinterface extends
{
/** Listener */interface
RequestListenerInterface INTERFACE = RequestListenerInterface(public static final new
ILinkListener.class);
/**
* Called when a link is clicked.
*/
void onLinkClicked();
}
The implementation of method simply delegates event handling to our custom version of onLinkClicked
:onClick
@Override
void onLinkClicked()public final
{
// Invoke subclass handler
onClick();
}
Wicket events infrastructure
Starting from version 1.5 Wicket offers an event-based infrastructure for inter-component communication. The
infrastructure is based on two simple interfaces (both in package ) : org.apache.wicket.event
and .IEventSource IEventSink
The first interface must be implemented by those entities that want to broadcast en event while the second
interface must be implemented by those entities that want to receive a broadcast event.
The following entities already implement both these two interfaces (i.e. they can be either sender or receiver):
, , and . exposes a single method namedComponent Session RequestCycle Application IEventSource
send which takes in input three parameters:
sink: an implementation of that will be the receiver of the event.IEventSink
broadcast: a enum which defines the broadcast method used to dispatch the event to the sinkBroadcast
and to other entities such as sink children, sink containers, session object, application object and the
current request cycle. It has four possible values:
Value Description
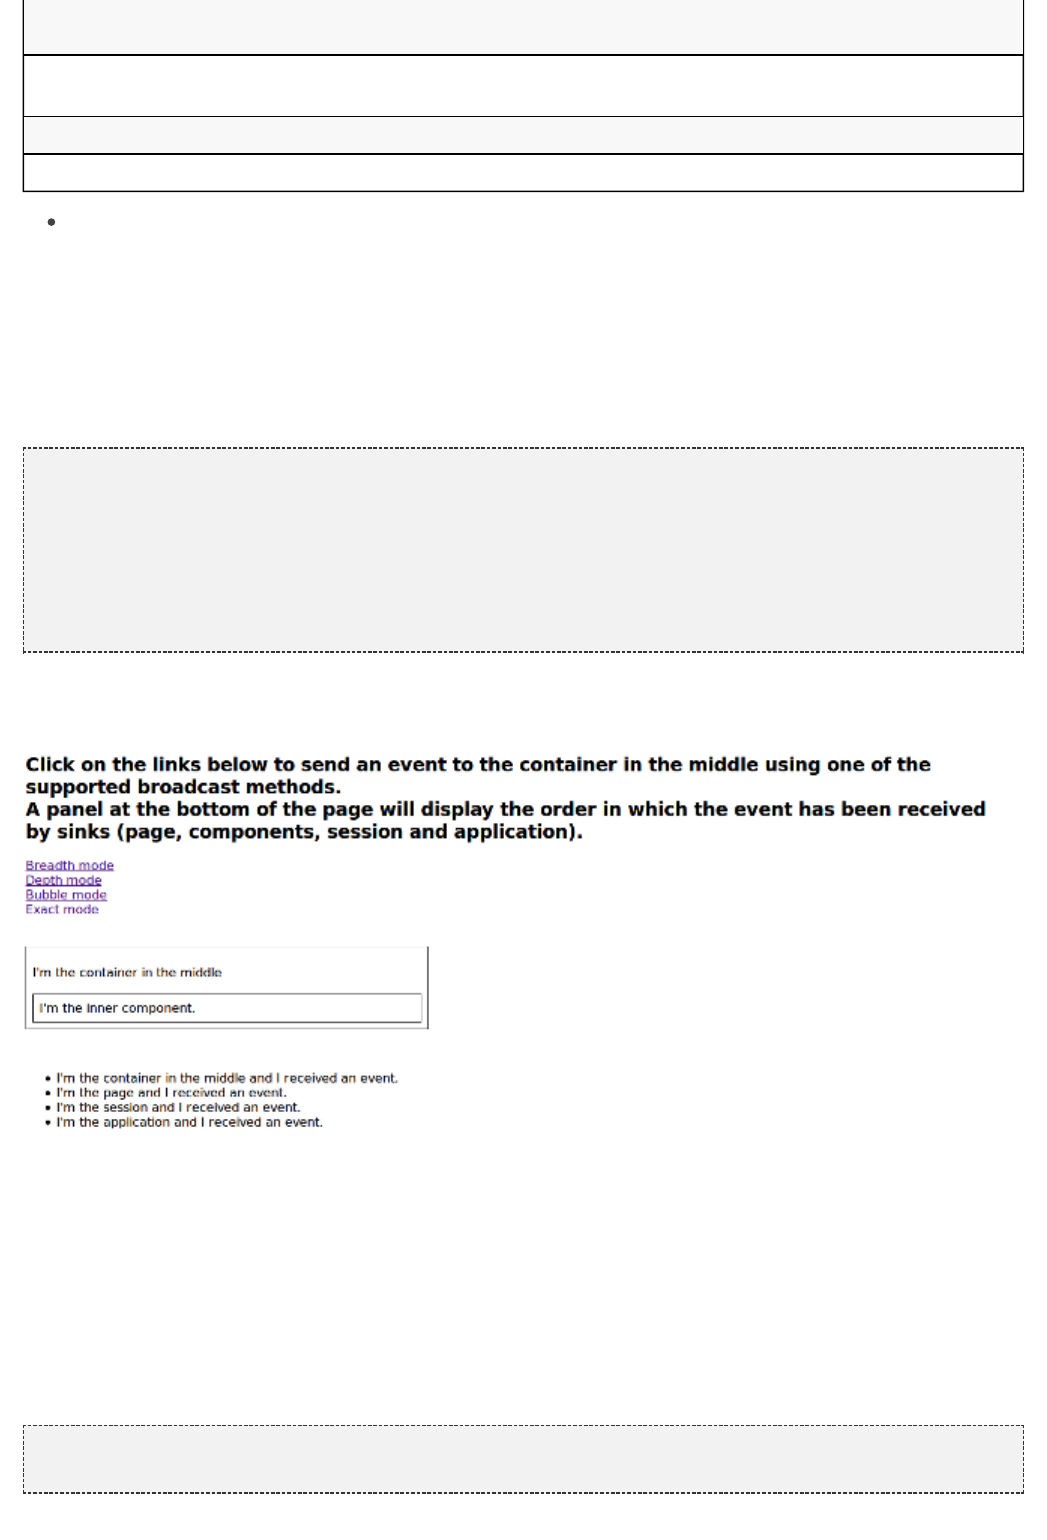
135
BREADTH The event is sent first to the specified sink and then to all its children components following a
breadth-first order.
DEPTH The event is sent to the specified sink only after it has been dispatched to all its children
components following a depth-first order.
BUBBLE The event is sent first to the specified sink and then to its parent containers.
EXACT The event is sent only to the specified sink.
payload: a generic object representing the data sent with the event.
Each broadcast mode has its own traversal order for , and . SeeSession RequestCycle Application
JavaDoc of class for further details about this order.Broadcast
Interface exposes callback method which is triggered when a sinkIEventSink onEvent(IEvent<?> event)
receives an event. The interface represents the received event and provides getter methods to retrieveIEvent
the event broadcast type, the source of the event and its payload. Typically the received event is used checking
the type of its payload object:
@Override
void onEvent(IEvent event) {public
// the type of payload is MyPayloadClass perform some actions if
(event.getPayload() MyPayloadClass) {if instanceof
//execute some business code.
} {else
//other business code
}
}
Project provides a concrete example of sending an event to a componentInterComponetsEventsExample
(named 'container in the middle') using all the available broadcast methods:
17.3 Initializers
Some components or resources may need to be configured before being used in our applications. While so far
we used Application's init method to initialize these kinds of entities, Wicket offers a more flexible and modular
way to configure our classes.
During application's bootstrap Wicket searches for any properties file named wicket.properties placed in one of
the classpath roots visible to the application. When one of these files is found, the initializer defined inside it will
be executed. An initializer is an implementation of interface and isorg.apache.wicket.IInitializer
defined inside wicket.properties with a line like this:
initializer=org.wicketTutorial.MyInitializer

136
The fully qualified class name corresponds to the initializer that must be executed. Interface IInitializer
defines method init(Application) which should contain our initialization code, and method
which is invoked when application is terminated:destroy(Application)
public class MyInitializer IInitializer{implements
void init(Application application) {public
//initialization code
}
void destroy(Application application) {public
//code to execute when application is terminated
}
}
Only one initializer can be defined in a single wicket.properties file. To overcome this limit we can create a main
initializer that in turn executes every initializer we need:
public class MainInitializer IInitializer{implements
void init(Application application) {public
AnotherInitializer().init(application);new
YetAnotherInitializer().init(application);new
//…
}
//destroy…
}
17.4 Using JMX with Wicket
JMX (Java Management Extensions) is the standard technology adopted in Java for managing and monitoring
running applications or Java Virtual Machines. Wicket offers support for JMX through module wicket-jmx. In this
paragraph we will see how we can connect to a Wicket application using JMX. In our example we will use
JConsole as JMX client. This program is bundled with Java SE since version 5 and we can run it typing jconsole
in our OS shell.
Once JConsole has started it will ask us to establish a new connection to a Java process, choosing between a
local process or a remote one. In the following picture we have selected the process corresponding to the local
instance of Jetty server we used to run one of our example projects:
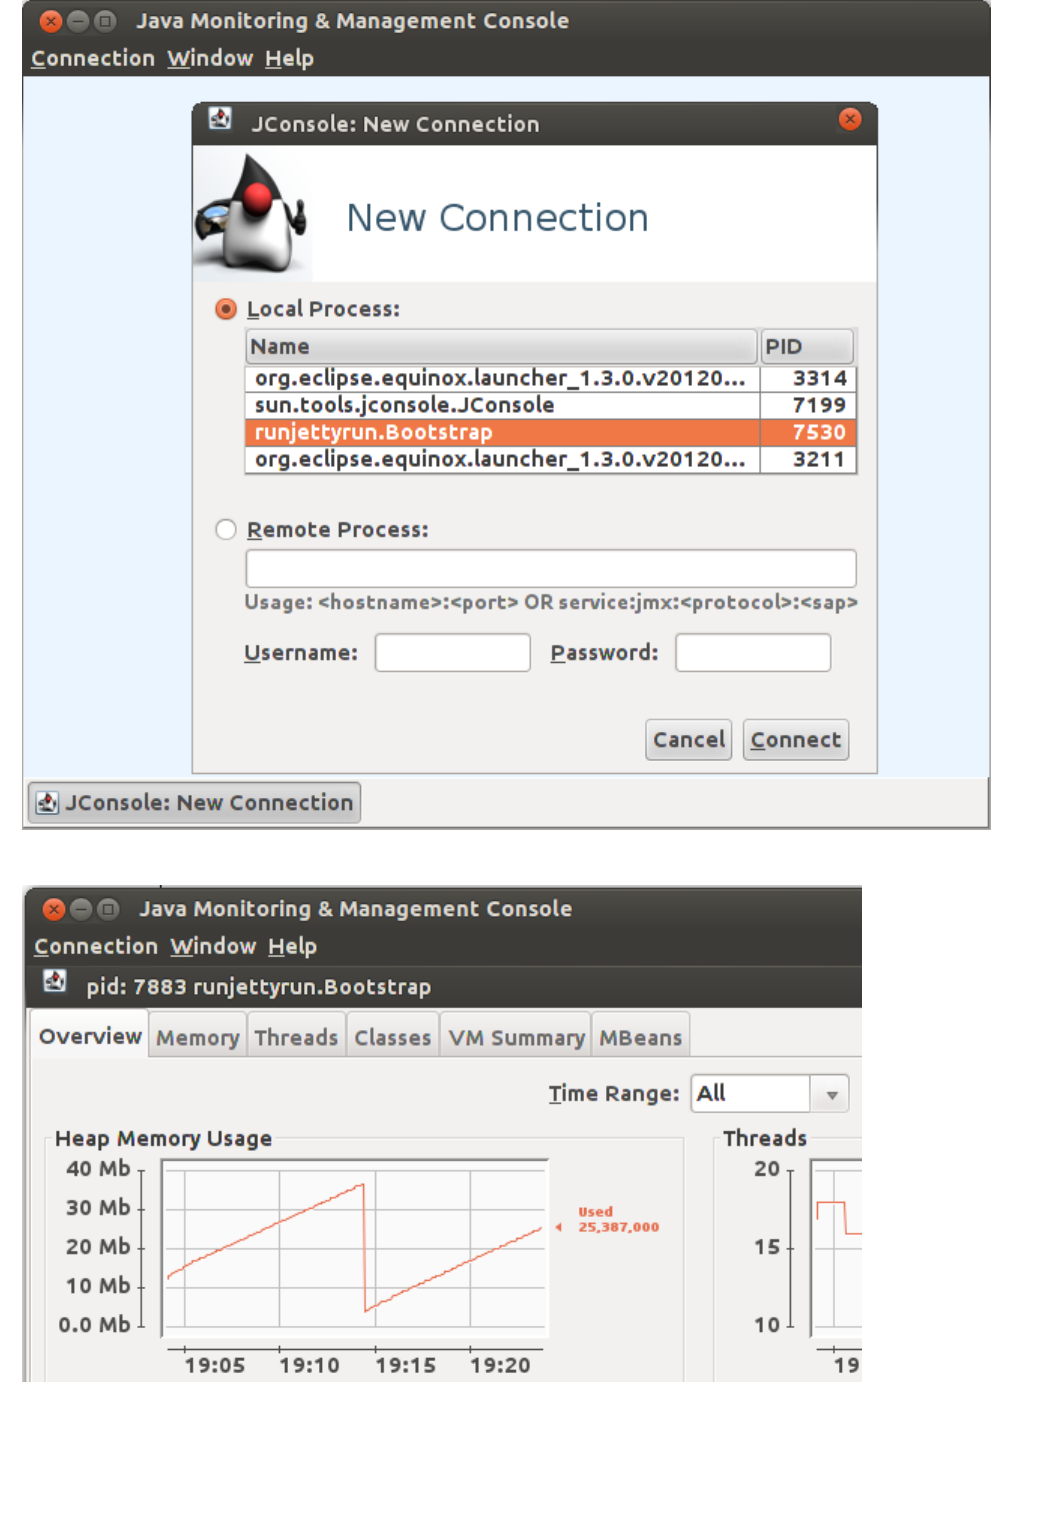
137
After we have established a JMX connection, JConsole will show us the following set of tabs:
JMX exposes application-specific informations using special objects called MBeans (Manageable Beans), hence
if we want to control our application we must open the corresponding tab. The MBeans containing the
application's informations is named .org.apache.wicket.app.<filter/servlet name>
In our example we have used wicket.test as filter name for our application:
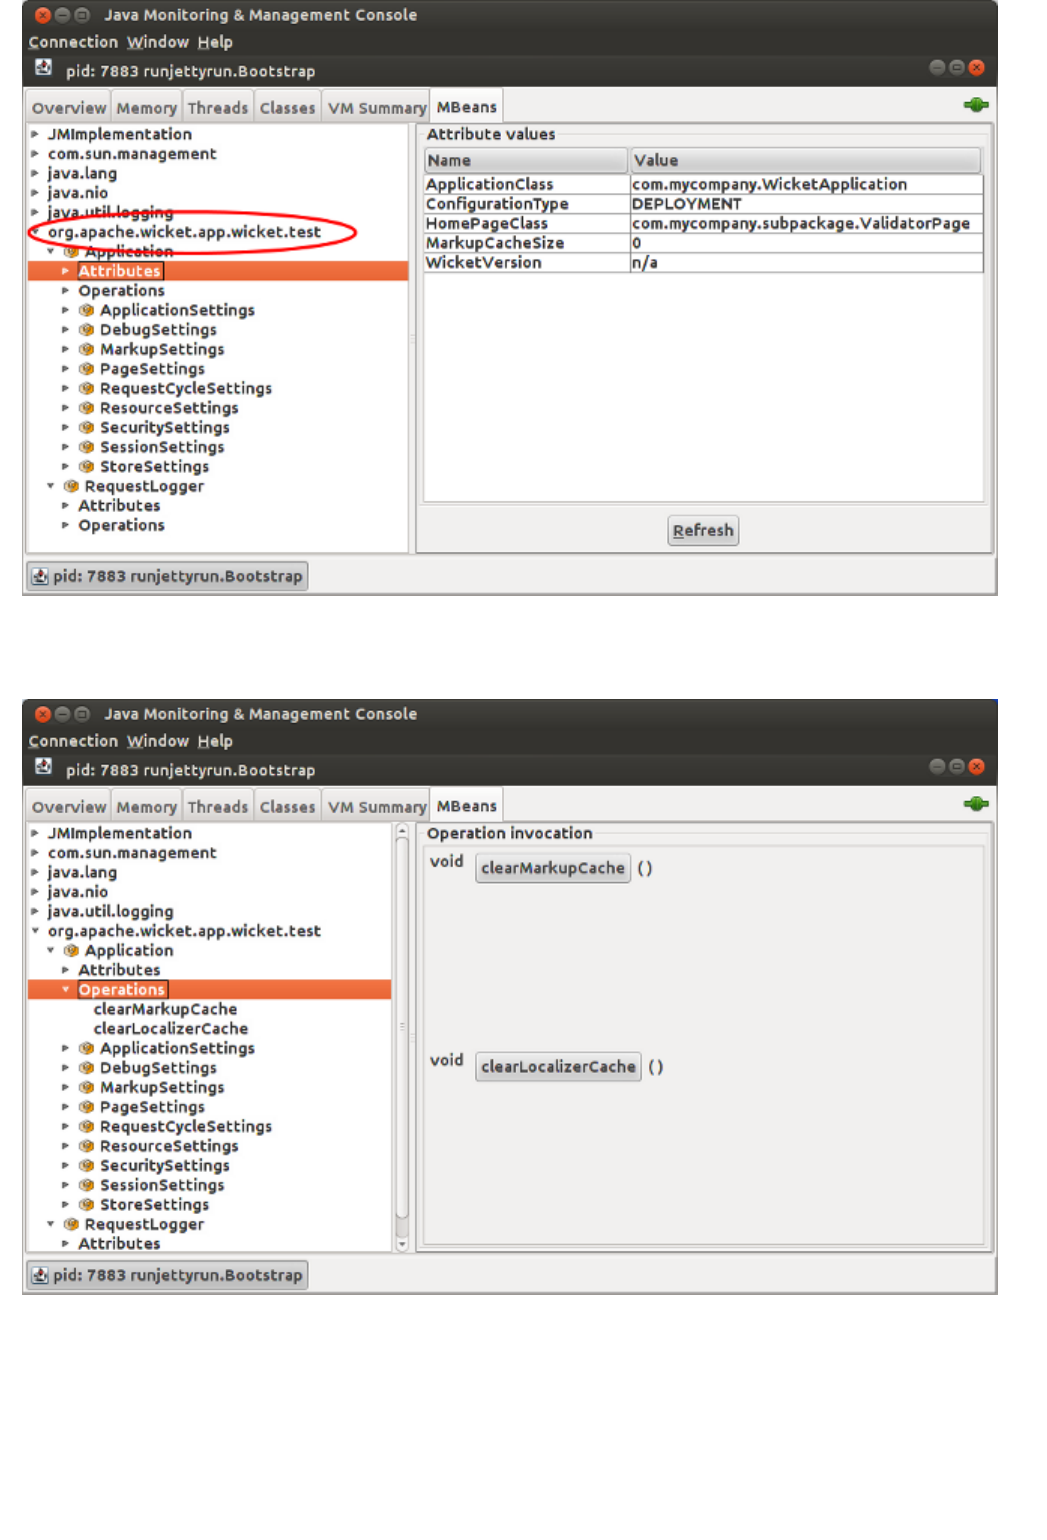
138
As we can see in the picture above, every MBean exposes a node containing its attributes and another node
showing the possible operations that can be performed on the object. In the case of a Wicket application the
available operations are clearMarkupCache and clearLocalizerCache:
With these two operations we can force Wicket to clear the internal caches used to load components markup and
resource bundles. This can be particularly useful if we have our application running in DEPLOYMENT mode and
we want to publish minor fixes for markup or bundle files (like spelling or typo corrections) without restarting the
entire application. Without cleaning these two caches Wicket would continue to use cached values ignoring any
change made to markup or bundle files.
Some of the exposed properties are editable, hence we can tune their values while the application is running. For
example if we look at the properties of we can set the maximum size allowed for anApplicationSettings
upload modifying the attribute DefaultMaximumUploadSize:
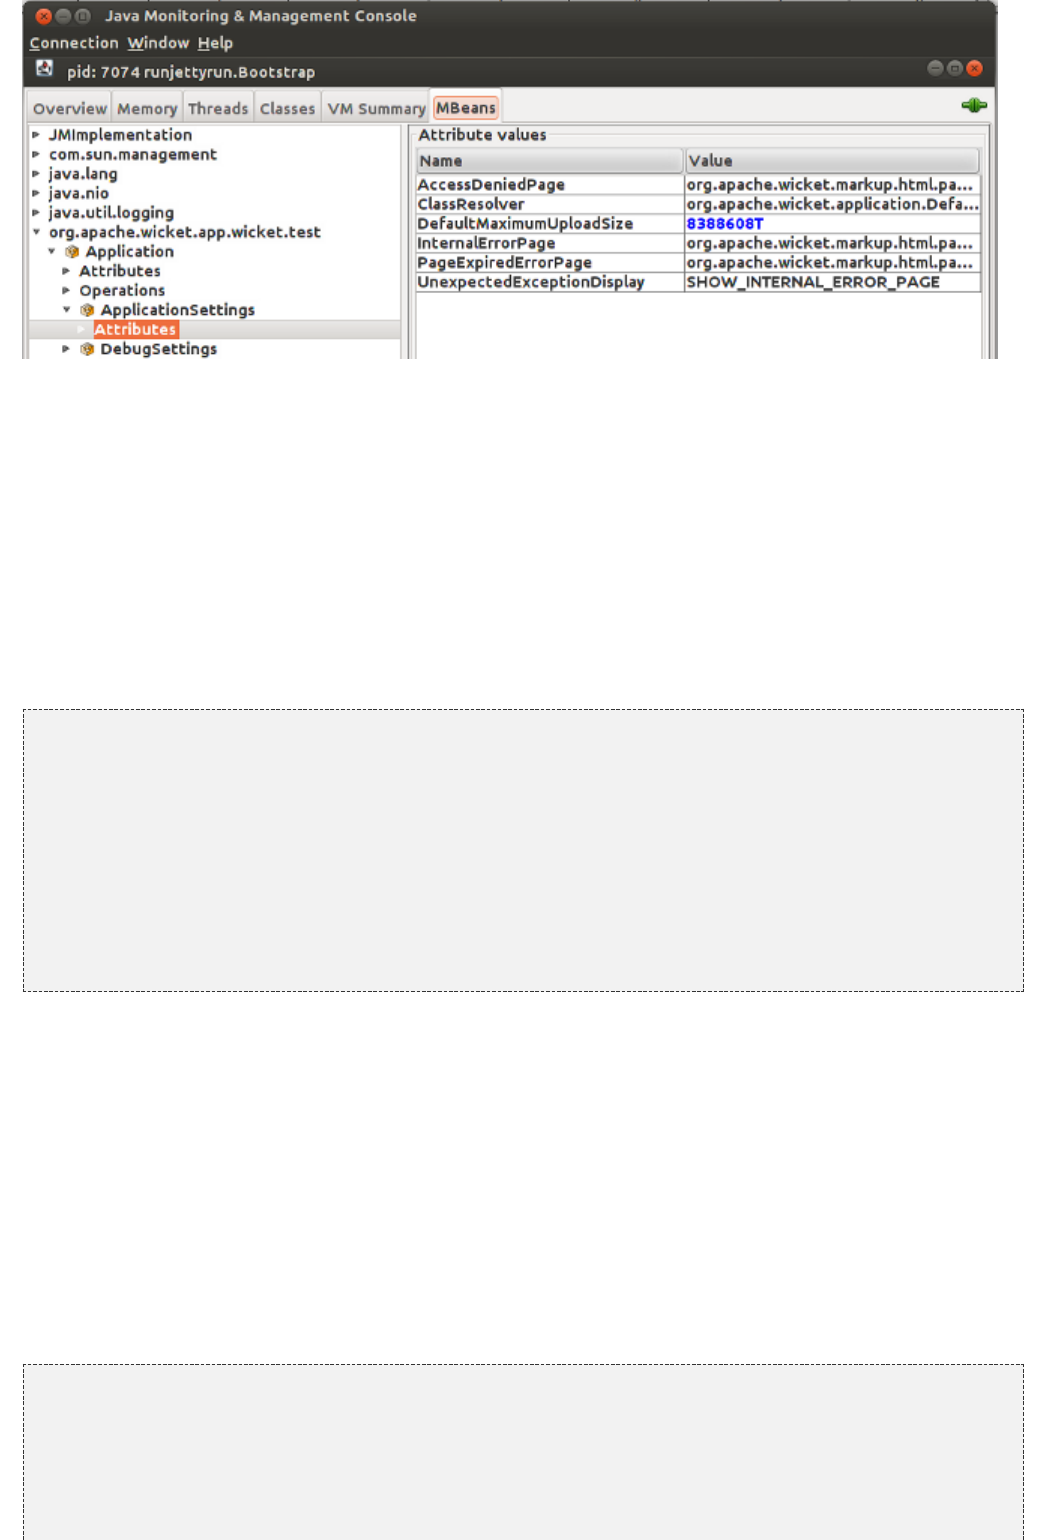
139
17.5 Generating HTML markup from code
So far, as markup source for our pages/panels we have used a static markup file, no matter if it was inherited or
directly associated to the component. Now we want to investigate a more complex use case where we want to
dynamical generate the markup directly inside component code.
To become a markup producer, a component must simply implement interface
. The only method defined in thisorg.apache.wicket.markup.IMarkupResourceStreamProvider
interface is which returns an utility interfacegetMarkupResourceStream(MarkupContainer, Class<?>)
called representing the actual markup.IResourceStream
In the following example we have a custom panel without a related markup file that generates a simple <div> tag
as markup:
public class AutoMarkupGenPanel Panel IMarkupResourceStreamProvider {extends implements
AutoMarkupGenPanel( id, IModel<?> model) {public String
(id, model); super
}
@Override
IResourceStream getMarkupResourceStream(MarkupContainer container,public
<?> containerClass) {Class
markup = ;String "<wicket:panel><div>Panel markup</div></wicket:panel>"
StringResourceStream resourceStream = StringResourceStream(markup);new
resourceStream;return
}
}
Class StringResourceStream is a resource stream that uses a String instance as backing object.
Avoiding markup caching
As we have seen in the previous paragraph, Wicket uses an internal cache for components markup. This can be
a problem if our component dynamical generates its markup when it is rendered because once the markup has
been cached, Wicket will always use the cached version for the specific component. To overwrite this default
caching policy, a component can implement interface .IMarkupCacheKeyProvider
This interface defines method which returns a string valuegetCacheKey(MarkupContainer, Class<?>)
representing the key used by Wicket to retrieve the markup of the component from the cache. If this value is null
the markup will not be cached, allowing the component to display the last generated markup each time it is
rendered:
public class NoCacheMarkupPanel Panel IMarkupCacheKeyProvider {extends implements
NoCacheMarkupPanel( id, IModel<?> model) {public String
(id, model); super
}
/**
* Generate a dynamic HTML markup that changes every time
* the component is rendered
*/

140
*/
@Override
IResourceStream getMarkupResourceStream(MarkupContainer container,public
<?> containerClass) {Class
markup = + String "<wicket:panel><div>Panel with current nanotime: " System
.nanoTime() +
;"</div></wicket:panel>"
StringResourceStream resourceStream = StringResourceStream(markup);new
resourceStream;return
}
/**
* Avoid markup caching componentfor this
*/
@Override
getCacheKey(MarkupContainer arg0, <?> arg1) {public String Class
;return null
}
}
17.6 Summary
In this chapter we have introduced some advanced topics we didn't have the chance to cover yet. We have
started talking about behaviors and we have seen how they can be used to enrich existing components
(promoting a component-oriented approach). Behaviors are also fundamental to work with AJAX in Wicket, as
we will see in the next chapter.
After behaviors we have learnt how to generate callback URLs to execute a custom method on server side
defined inside a specific callback interface.
The third topic of the chapter has been the event infrastructure provided in Wicket for inter-component
communication which brings to our components a desktop-like event-driven architecture.
Then, we have introduced a new entity called initializer which can be used to configure resources and
component in a modular and self-contained way.
We have also looked at Wicket support for JMX and we have seen how to use this technology for monitoring and
managing our running applications.
Finally we have introduced a new technique to generate the markup of a component from its Java code.
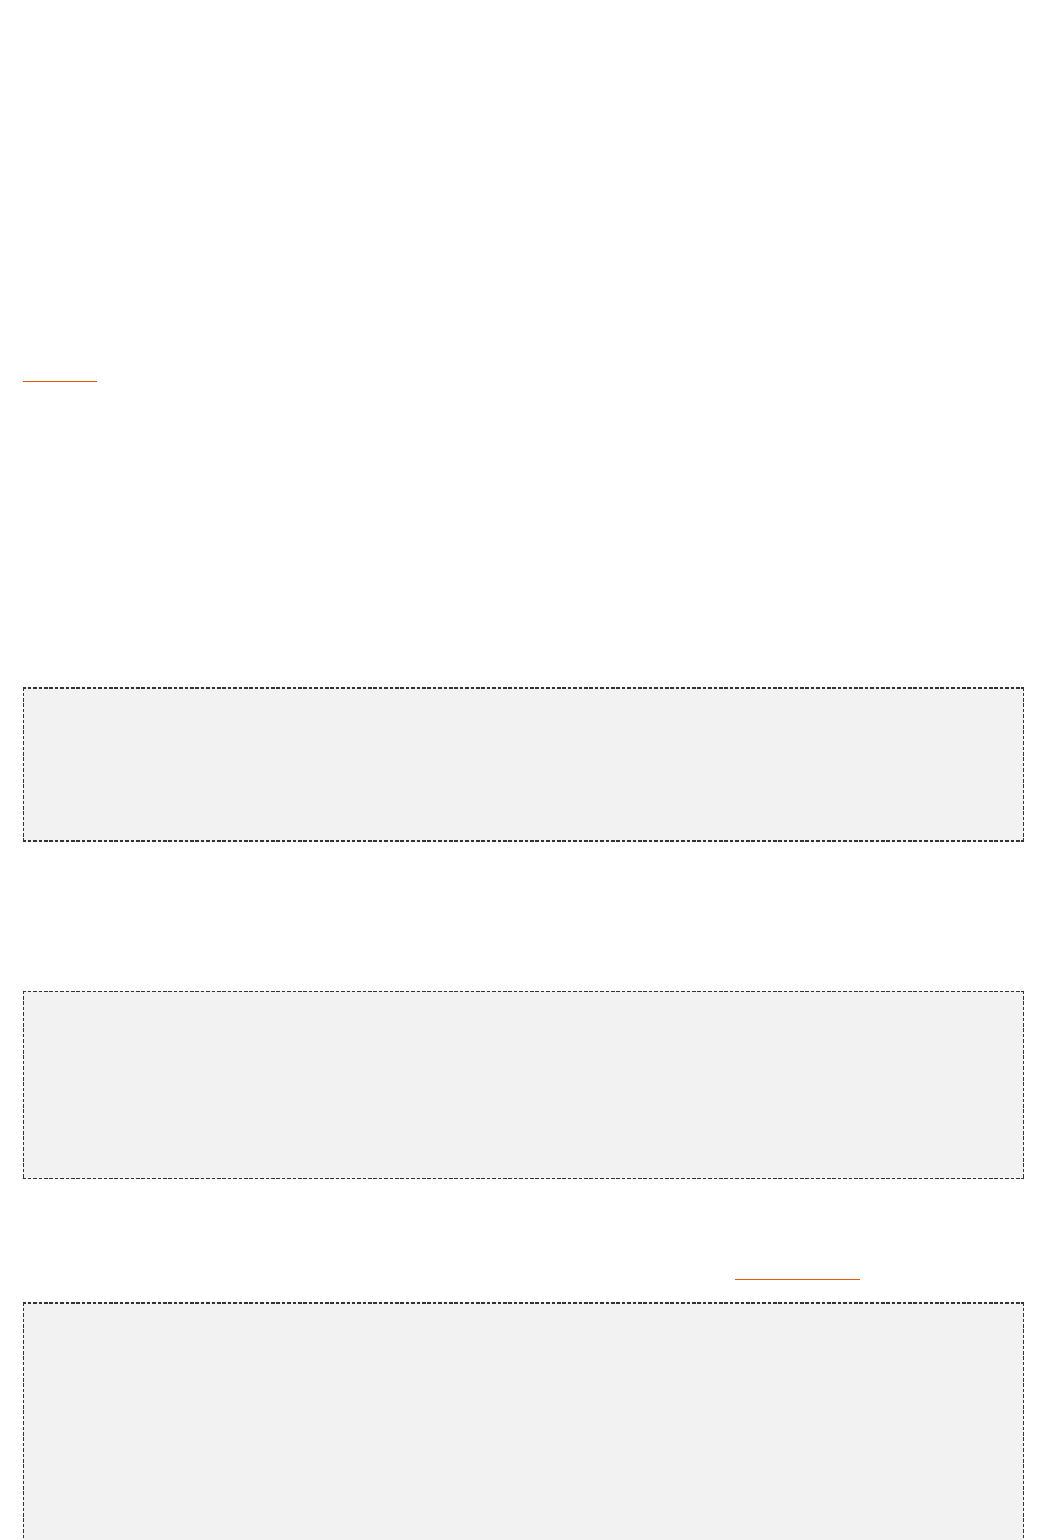
141
18 Working with AJAX
AJAX has become a must-have for nearly all kinds of web application. This technology does not only help to
achieve a better user experience but it also allows to improve the bandwidth performance of web applications.
Using AJAX usually means writing tons of JavaScript code to handle asynchronous requests and to update user
interface, but with Wicket we can leave all this boilerplate code to the framework and we don't even need to write
a single line of JavaScript to start using AJAX.
In this chapter we will learn how to leverage the AJAX support provided by Wicket to make our applications fully
compliant.Web 2.0
18.1 How to use AJAX components and behaviors
Wicket support for AJAX is implemented in file wicket-ajax-jquery.js which makes complete transparent to Java
code any detail about AJAX communication.
AJAX components and behaviors shipped with Wicket expose one or more callback methods which are executed
when they receive an AJAX request. One of the arguments of these methods is an instance of interface
.org.apache.wicket.ajax.AjaxRequestTarget
For example component AjaxLink (in package ) defines abstractorg.apache.wicket.ajax.markup.html
method which is executed when user clicks on the component:onClick(AjaxRequestTarget target)
new AjaxLink( ){"ajaxLink"
@Override
void onClick(AjaxRequestTarget target) {public
//some server side code…
}
};
Using AjaxRequestTarget we can specify the content that must be sent back to the client as response to the
current AJAX request. The most commonly used method of this interface is probably add(Component…
. With this method we tell Wicket to render again the specified components and refresh theircomponents)
markup via AJAX:
new AjaxLink( ){"ajaxLink"
@Override
void onClick(AjaxRequestTarget target) {public
//modify the model of a label and refresh it on browser
label.setDefaultModelObject( );"Another value 4 label."
target.add(label);
}
};
Components can be refreshed via Ajax only if they have rendered a markup id for their related tag. As a
consequence, we must remember to set a valid id value on every component we want to add to
. This can be done using one of the two methods seen in :AjaxRequestTarget paragraph 6.3
final Label label = Label( , );new "labelComponent" "Initial value."
//autogenerate a markup id
label.setOutputMarkupId( );true
add(label);
//… AjaxLink( ){new "ajaxLink"
@Override
void onClick(AjaxRequestTarget target) {public
//modify the model of a label and refresh it on client side
label.setDefaultModelObject( );"Another value 4 label."
142
target.add(label);
}
};
Another common use of AjaxRequestTarget is to prepend or append some JavaScript code to the generated
response. For example the following AJAX link displays an alert box as response to user's click:
new AjaxLink( ){"ajaxLink"
@Override
void onClick(AjaxRequestTarget target) {public
target.appendJavaScript( );";alert('Hello!!');"
}
};
Repeaters component that have
as base class (like org.apache.wicket.markup.repeater.AbstractRepeater
, , etc...) can not be directly updated via AJAX.ListView RepeatingView
If we want to refresh their markup via AJAX we must add one of their parent containers to
the .AjaxRequestTarget
The standard implementation of used by Wicket is class AjaxRequestTarget
. To create new instances of aorg.apache.wicket.ajax.AjaxRequestHandler AjaxRequestTarget
Wicket application uses the provider object registered with method :setAjaxRequestTargetProvider
setAjaxRequestTargetProvider(
IContextProvider<AjaxRequestTarget, Page> ajaxRequestTargetProvider)
The provider is an implementation of interface , hence toorg.apache.wicket.util.IContextProvider
use custom implementations of we must register a custom provider that returns theAjaxRequestTarget
desired implementation:
private class MyCustomAjaxRequestTargetProvider static implements
IContextProvider<AjaxRequestTarget, Page>
{
@Override
AjaxRequestTarget get(Page page)public
{
MyCustomAjaxRequestTarget();return new
}
}
During request handling sends an event to its application to notifyAjaxRequestHandler
the entire component hierarchy of the current page:
//'page' is the associated Page instance
page.send(app, Broadcast.BREADTH, );this
The payload of the event is the itself.AjaxRequestHandler
18.2 Build-in AJAX components
Wicket distribution comes with a number of built-in AJAX components ready to be used. Some of them are the
ajaxified version of common components like links and buttons, while others are AJAX-specific components.
AJAX components are not different from any other component seen so far and they don't require any additional
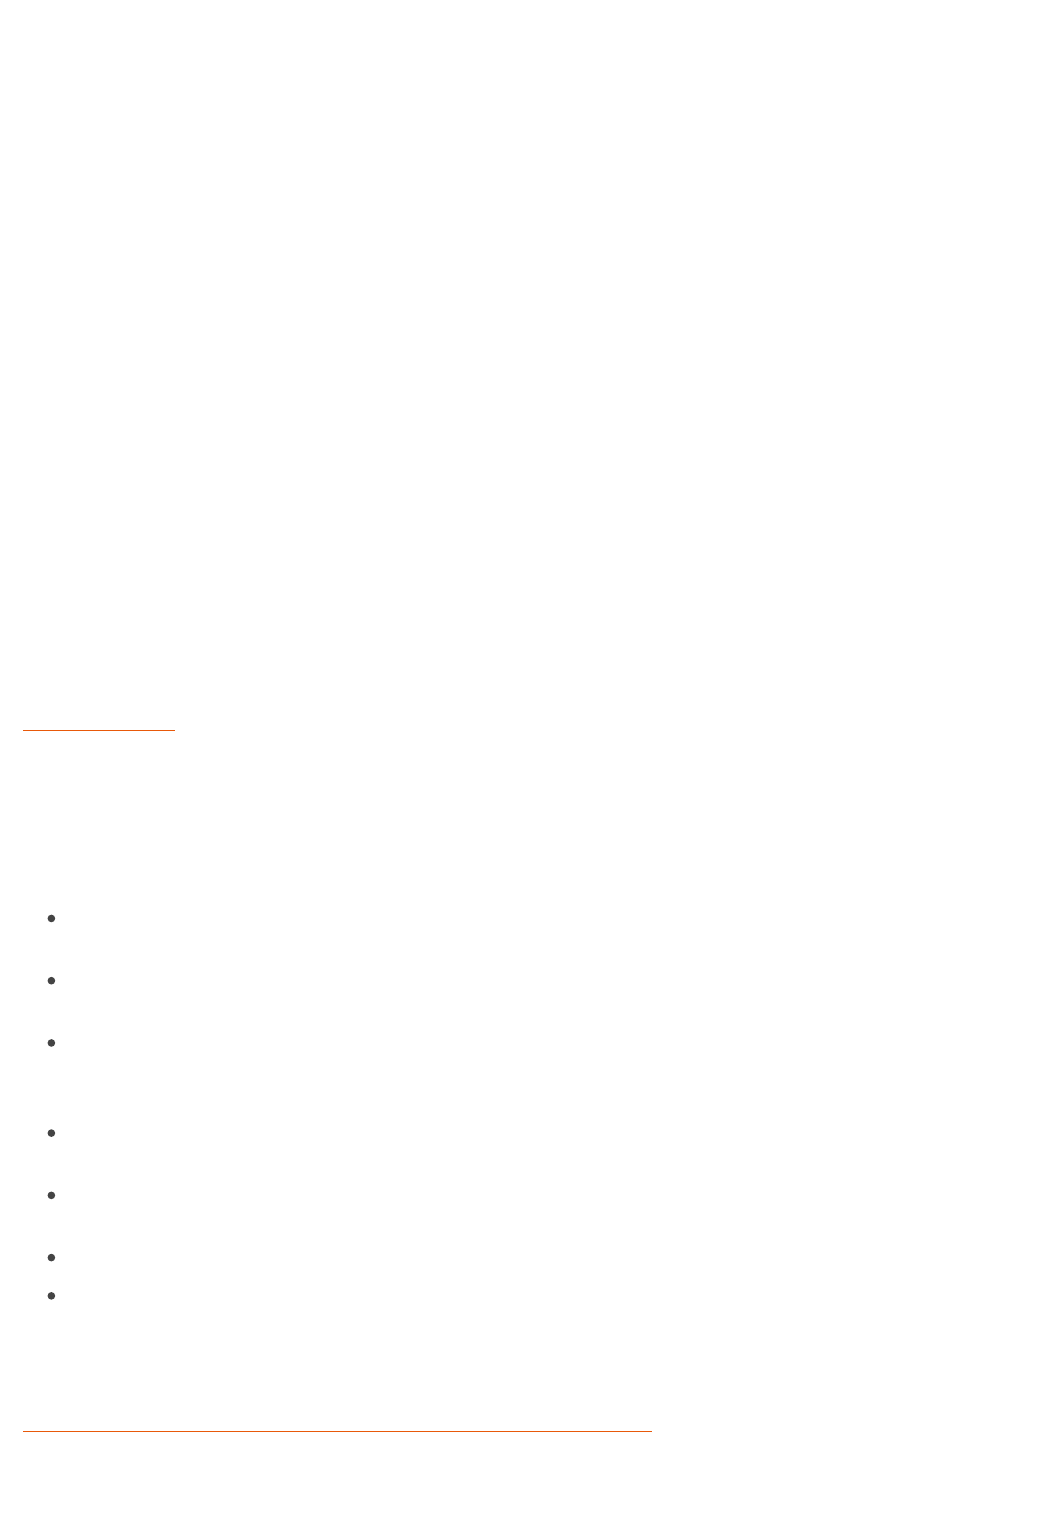
143
configuration to be used. As we will shortly see, switching from a classic link or button to the ajaxified version is
just a matter of prepending “Ajax” to the component class name.
This paragraph provides an overview of what we can find in Wicket to start writing AJAX-enhanced web
applications.
Links and buttons
In the previous paragraph we have already introduced component AjaxLink. Wicket provides also the ajaxified
versions of submitting components SubmitLink and Button which are simply called AjaxSubmitLink and
AjaxButton. These components come with a version of methods onSubmit, onError and onAfterSubmit that takes
in input also an instance of .AjaxRequestTarget
Both components are in package .org.apache.wicket.ajax.markup.html.form
Fallback components
Building an entire site using AJAX can be risky as some clients may not support this technology. In order to
provide an usable version of our site also to these clients, we can use components and AjaxFallbackLink
which are able to automatically degrade to a standard link or to a standard button ifAjaxFallbackButton
client doesn't support AJAX.
AJAX Checkbox
Class is a checkbox component thatorg.apache.wicket.ajax.markup.html.form.AjaxCheckBox
updates its model via AJAX when user changes its value. Its AJAX callback method is
. The component extends standard checkbox component onUpdate(AjaxRequestTarget target)
adding an to itself (we will see this behavior later in CheckBox AjaxFormComponentUpdatingBehavior
).paragraph 18.3.3
AJAX editable labels
An editable label is a special label that can be edited by the user when she/he clicks on it. Wicket ships three
different implementations for this component (all inside package
):org.apache.wicket.extensions.ajax.markup.html
AjaxEditableLabel: it's a basic version of editable label. User can edit the content of the label with a text
field. This is also the base class for the other two editable labels.
AjaxEditableMultiLineLabel: this label supports multi-line values and uses a text area as editor
component.
AjaxEditableChoiceLabel: this label uses a drop-down menu to edit its value.
Base component AjaxEditableLabel exposes the following set of AJAX-aware methods that can be overriden:
onEdit(AjaxRequestTarget target): called when user clicks on component. The default implementation
shows the component used to edit the value of the label.
onSubmit(AjaxRequestTarget target): called when the value has been successfully updated with the new
input.
onError(AjaxRequestTarget target): called when the new inserted input has failed validation.
onCancel(AjaxRequestTarget target): called when user has exited from editing mode pressing escape
key. The default implementation brings back the label to its initial state hiding the editor component.
Wicket module wicket-examples contains page class which shows all these threeEditableLabelPage.java
components together. You can see this page in action at
:http://www.wicket-library.com/wicket-examples-6.0.x/ajax/editable-label
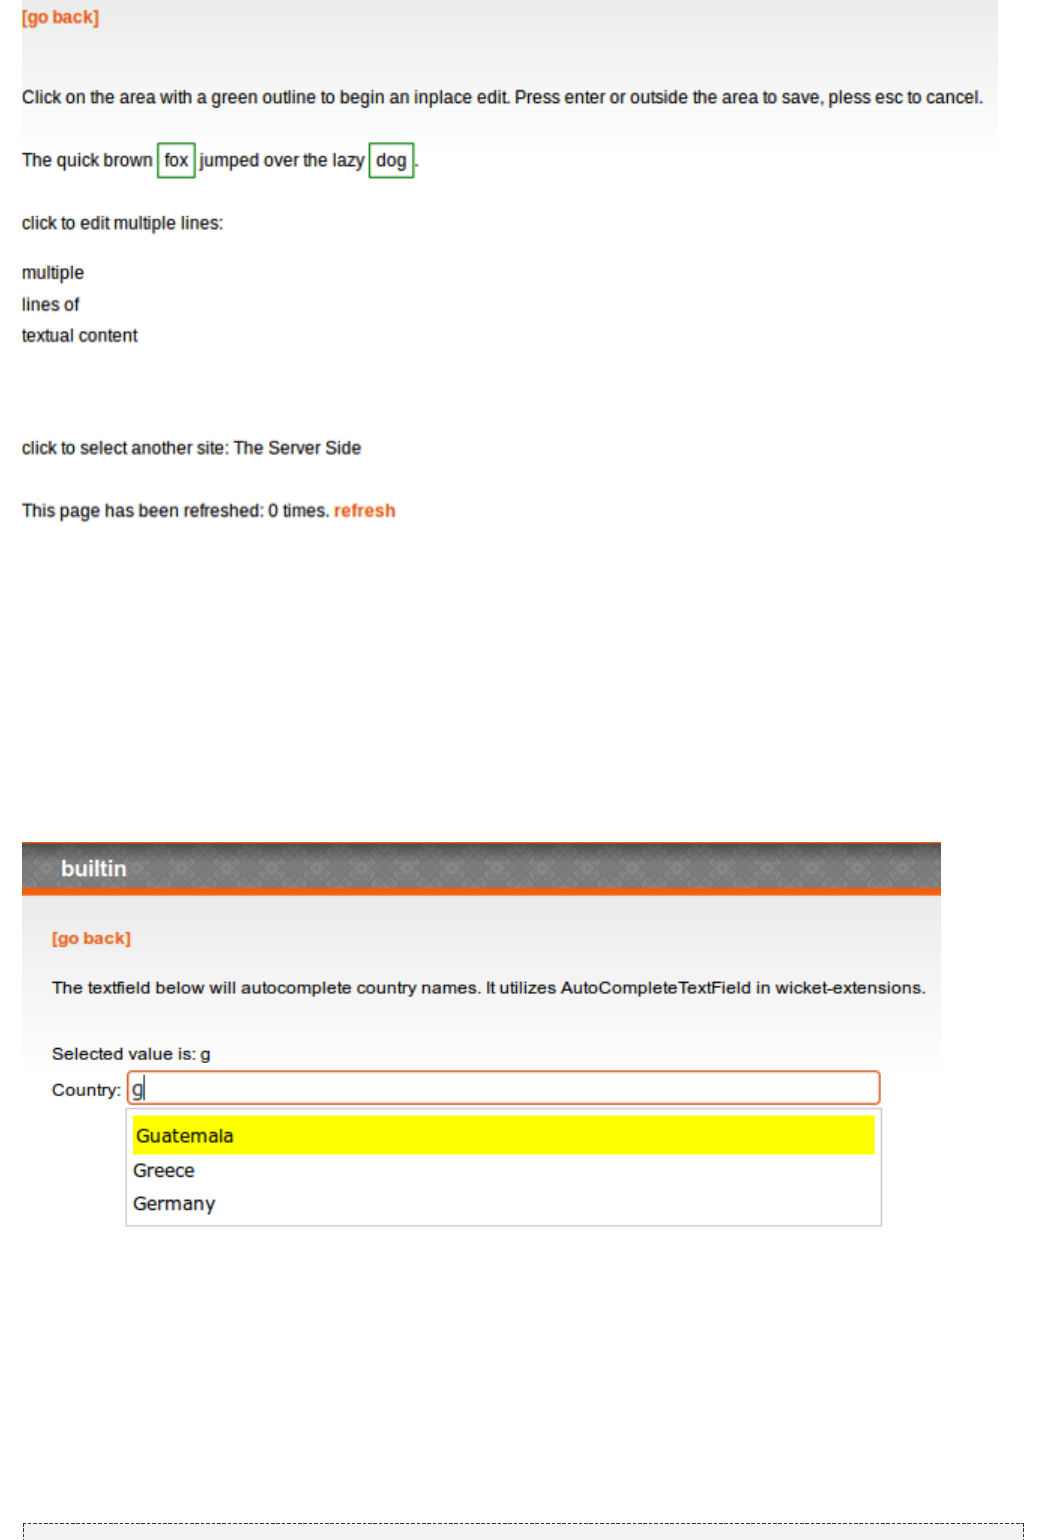
144
Autocomplete text field
On Internet we can find many examples of text fields that display a list of suggestions (or options) while the user
types a text inside them. This feature is known as autocomplete functionality.
Wicket offers an out-of-the-box implementation of an autocomplete text field with component
.org.apache.wicket.extensions.ajax.markup.html.autocomplete.AutoCompleteTextField
When using AutoCompleteTextField we are required to implement its abstract method getChoices(String input)
where the input parameter is the current input of the component. This method returns an iterator over the
suggestions that will be displayed as a drop-down menu:
Suggestions are rendered using a render which implements interface . The defaultIAutoCompleteRenderer
implementation simply calls toString() on each suggestion object. If we need to work with a custom render we
can specify it via component constructor.
AutoCompleteTextField supports a wide range of settings that are passed to its constructor with class
.AutoCompleteSettings
One of the most interesting parameter we can specify for is the throttle delay whichAutoCompleteTextField
is the amount of time (in milliseconds) that must elapse between a change of input value and the transmission of
a new Ajax request to display suggestions. This parameter can be set with method :setThrottleDelay(int)
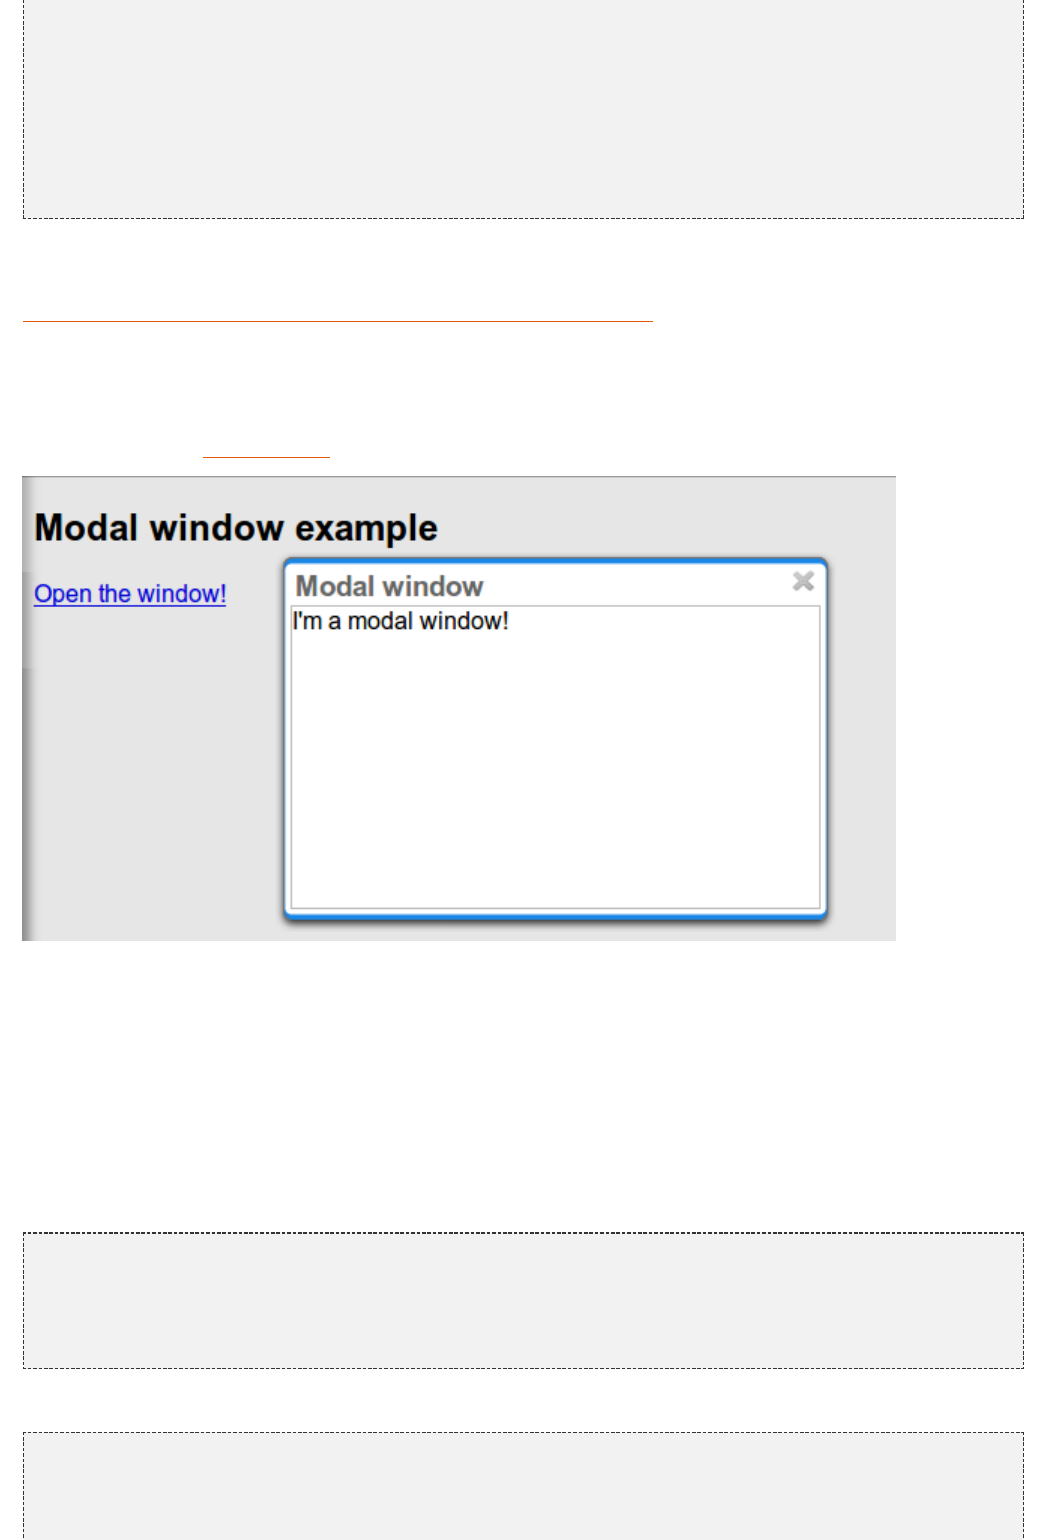
145
AutoCompleteSettings settings = AutoCompleteSettings();new
//set throttle to 400 ms: component will wait 400ms before displaying the options
settings.setThrottleDelay(400);
//...
AutoCompleteTextField field = AutoCompleteTextField<T>( , model) {new "field"
@Override
Iterator getChoices( arg0) {protected String
// an iterator over the options return
}
};
Wicket module wicket-examples contains page class which shows an exampleAutoCompletePagePage.java
of autocomplete text field. The running example is available at
.http://www.wicket-library.com/wicket-examples-6.0.x/ajax/autocomplete
Modal window
Class is anorg.apache.wicket.extensions.ajax.markup.html.modal.ModalWindow
implementation of a based on AJAX:modal window
The content of a modal window can be either another component or a page. In the first case the id of the
component used as content must be retrieved with method getContentId().
If instead we want to use a page as window content, we must implement the inner interface
and pass it to method . The page used as content will beModalWindow.PageCreator setPageCreator
embedded in a <iframe> tag.
To display a modal window we must call its method . This is usuallyshow(AjaxRequestTarget target)
done inside the AJAX callback method of another component (like an ). The following markup andAjaxLink
code are taken from project and illustrate a basic usage of a modal window:BasicModalWindowExample
HTML:
<body>
<h2>Modal Windod example</h2>
<a wicket:id= >Open the window!</a>"openWindow"
<div wicket:id= ></div>"modalWindow"
</body>
Java Code:
public HomePage( PageParameters parameters) {final
(parameters);super
ModalWindow modalWindow = ModalWindow( );final new "modalWindow"
Label label = Label(modalWindow.getContentId(), );new "I'm a modal window!"
146
modalWindow.setContent(label);
modalWindow.setTitle( );"Modal window"
add(modalWindow);
add( AjaxLink( ) {new "openWindow"
@Override
void onClick(AjaxRequestTarget target) {public
modalWindow.show(target);
}
});
}
Just like any other component also must be added to a markup tag, like we did in our exampleModalWindow
using a <div> tag. Wicket will automatically hide this tag in the final markup appending the style value
display:none. The component provides different setter methods to customize the appearance of the window:
setTitle(String): specifies the title of the window
setResizable(boolean): by default the window is resizeable. If we need to make its size fixed we can use
this method to turn off this feature.
setInitialWidth(int) and setInitialHeight(int): set the initial dimensions of the window.
setMinimalWidth(int) and setMinimalHeight(int): specify the minimal dimensions of the window.
setCookieName(String): this method can be used to specify the name of the cookie used on client side to
store size and position of the window when it is closed. The component will use this cookie to restore these
two parameters the next time the window will be opened. If no cookie name is provided, the component will
not remember its last position and size.
setCssClassName(String): specifies the CSS class used for the window.
setAutoSize(boolean): when this flag is set to true the window will automatically adjust its size to fit
content width and height. By default it is false.
The modal window can be closed from code using its method . Theclose(AjaxRequestTarget target)
currently opened window can be closed also with the following JavaScript instruction:
Wicket.Window.get().close();
gives the opportunity to perform custom actions when window is closing. Inner interface ModalWindow
can be implemented and passed to window's method ModalWindow.WindowClosedCallback
to specify the callback that must be executed after window has been closed:setWindowClosedCallback
modalWindow.setWindowClosedCallback( ModalWindow.WindowClosedCallback() {new
@Override
void onClose(AjaxRequestTarget target) {public
//custom code…
}
});
Tree repeaters
Class is the baseorg.apache.wicket.extensions.markup.html.repeater.tree.AbstractTree
class of another family of repeaters called tree repeaters and designed to display a data hierarchy as a tree,
resembling the behavior and the look & feel of desktop tree components. A classic example of tree component
on desktop is the tree used by nearly all file managers to navigate file system:
147
Because of their highly interactive nature, tree repeaters are implemented as AJAX components, meaning that
they are updated via AJAX when we expand or collapse their nodes.
The basic implementation of a tree repeater shipped with Wicket is component . In order to use aNestedTree
tree repeater we must provide an implementation of interface which is in charge of returningITreeProvider
the nodes that compose the tree.
Wicket comes with a built-in implementation of ITreeProvider called TreeModelProvider that works with the same
tree model and nodes used by Swing component . These Swing entities should bejavax.swing.JTree
familiar to you if you have previously worked with the old tree repeaters (components and )Tree TreeTable
that have been deprecated with Wicket 6 and that are strongly dependent on Swing-based model and nodes.
can be used to migrate your code to the new tree repeaters.TreeModelProvider
In the next example (project ) we will build a tree that displays some of the main cities ofCheckBoxAjaxTree
three European countries: Italy, Germany and France. The cities are sub-nodes of a main node representing the
relative county. The nodes of the final tree will be also selectable with a checkbox control. The whole tree will
have the classic look & feel of Windows XP. This is how our tree will look like:
We will start to explore the code of this example from the home page. The first portion of code we will see is
where we build the nodes and the for the three. As tree node we will use Swing class TreeModelProvider
:javax.swing.tree.DefaultMutableTreeNode
public class HomePage WebPage {extends
HomePage( PageParameters parameters) {public final
(parameters);super
DefaultMutableTreeNode root = DefaultMutableTreeNode( );new "Cities of Europe"
addNodes(addNodes(root, ), , , , );"Italy" "Rome" "Venice" "Milan" "Florence"
addNodes(addNodes(root, ), , , , , "Germany" "Stuttgart" "Munich" "Berlin" "Dusseldorf"
);"Dresden"
addNodes(addNodes(root, ), , , , , "France" "Paris" "Toulouse" "Strasbourg" "Bordeaux" "Lyon"
);
DefaultTreeModel treeModel = DefaultTreeModel(root);new
148
TreeModelProvider<DefaultMutableTreeNode> modelProvider = new
TreeModelProvider<DefaultMutableTreeNode>( treeModel ){
@Override
IModel<DefaultMutableTreeNode> model(DefaultMutableTreeNode object){public
Model.of(object);return
}
};
//To be continued...
Nodes have been built using simple strings as data objects and invoking custom utility method addNodes which
converts string parameters into children nodes for a given parent node. Once we have our tree of
we can build the Swing tree model ( ) that will be theDefaultMutableTreeNodes DefaultTreeModel
backing object for a . This provider wraps each node in a model invoking its abstractTreeModelProvider
method model. In our example we have used a simple as wrapper model.Model
Scrolling down the code we can see how the tree component is instantiated and configured before being added
to the home page:
//Continued from previous snippet…
NestedTree<DefaultMutableTreeNode> tree = NestedTree<DefaultMutableTreeNode>( , new "tree"
modelProvider)
{
@Override
Component newContentComponent( id, IModel<DefaultMutableTreeNode>model)protected String
{
CheckedFolder<DefaultMutableTreeNode>(id, , model);return new this
}
};
//select Windows theme
tree.add( WindowsTheme());new
add(tree);
}
//implementation of addNodes
//…
}
To use tree repeaters we must implement their abstract method which is callednewContentComponent
internally by base class when a new node must be built. As content component we have usedAbstractTree
built-in class which combines a component with a form control.CheckedFolder Folder CheckBox
The final step before adding the tree to its page is to apply a theme to it. Wicket comes with two behaviors,
WindowsTheme and HumanTheme, which correspond to the classic Windows XP theme and to the Human
theme from Ubuntu.
Our checkable tree is finished but our work is not over yet because the component doesn't offer many
functionalities as it is. Unfortunately neither NestedTree nor CheckedFolder provide a means for collecting
checked nodes and returning them to client code. It's up to us to implement a way to keep track of checked
nodes.
Another nice feature we would like to implement for our tree is the following user-friendly behavior that should
occur when a user checks/unchecks a node:
When a node is checked also all its children nodes (if any) must be checked. We must also ensure that all
the ancestors of the checked node (root included) are checked, otherwise we would get an inconsistent
selection.
When a node is unchecked also all its children nodes (if any) must be unchecked and we must also ensure
that ancestors get unchecked if they have no more checked children.
The first goal (keeping track of checked node) can be accomplished building a custom version of
that uses a shared Java Set to store checked node and to verify if its node has been checked.CheckedFolder
This kind of solution requires a custom model for checkbox component in order to reflect its checked status when
its container node is rendered. This model must implement typed interface and must beIModel<Boolean>
returned by 's method .CheckedFolder newCheckBoxModel
For the second goal (auto select/unselect children and ancestor nodes) we can use 's callbackCheckedFolder
method onUpdate(AjaxRequestTarget) that is invoked after a checkbox is clicked and its value has been
updated. Overriding this method we can handle user click adding/removing nodes to/from the Java Set.
149
Following this implementation plan we can start coding our custom (named CheckedFolder
):AutocheckedFolder
public class AutocheckedFolder<T> CheckedFolder<T> {extends
ITreeProvider<T> treeProvider;private
IModel<Set<T>> checkedNodes;private
IModel< > checkboxModel;private Boolean
AutocheckedFolder( id, AbstractTree<T> tree, public String
IModel<T> model, IModel<Set<T>> checkedNodes) {
(id, tree, model); super
.treeProvider = tree.getProvider();this
.checkedNodes = checkedNodes; this
}
@Override
IModel< > newCheckBoxModel(IModel<T> model) {protected Boolean
checkboxModel = CheckModel();new
checkboxModel;return
}
@Override
void onUpdate(AjaxRequestTarget target) {protected
.onUpdate(target);super
T node = getModelObject();
nodeChecked = checkboxModel.getObject();boolean
addRemoveSubNodes(node, nodeChecked);
addRemoveAncestorNodes(node, nodeChecked);
}
class CheckModel AbstractCheckBoxModel{extends
@Override
isSelected() {public boolean
checkedNodes.getObject().contains(getModelObject());return
}
@Override
void select() {public
checkedNodes.getObject().add(getModelObject());
}
@Override
void unselect() {public
checkedNodes.getObject().remove(getModelObject());
}
}
}
The constructor of this new component takes in input a further parameter which is the set containing checked
nodes.
Class CheckModel is the custom model we have implemented for checkbox control. As base class for this model
we have used which is provided to implement custom models for checkboxAbstractCheckBoxModel
controls.
Methods and are called to automatically add/removeaddRemoveSubNodes addRemoveAncestorNodes
children and ancestor nodes to/from the current Set. Their implementation is mainly focused on the navigation of
tree nodes and it heavily depends on the internal implementation of the tree, so we won't dwell on their code.
Now we are just one step away from completing our tree as we still have to find a way to update the checked
status of both children and ancestors nodes on client side. Although we could easily accomplish this task by
simply refreshing the whole tree via AJAX, we would like to find a better and more performant solution for this
task.
When we modify the checked status of a node we don't expand/collapse any node of the three so we can simply
update the desired checkboxes rather than updating the entire tree component. This alternative approach could
lead to a more responsive interface and to a strong reduction of bandwidth consumption.
With the help of JQuery we can code a couple of JavaScript functions that can be used to check/ uncheck all the
children and ancestors of a given node. Then, we can append these functions to the current atAjaxRequest
the end of method onUpdate:
@Override
void onUpdate(AjaxRequestTarget target) {protected
.onUpdate(target);super
150
T node = getModelObject();
nodeChecked = checkboxModel.getObject();boolean
addRemoveSubNodes(node, nodeChecked);
addRemoveAncestorNodes(node, nodeChecked);
updateNodeOnClientSide(target, nodeChecked);
}
void updateNodeOnClientSide(AjaxRequestTarget target,protected
nodeChecked) {boolean
target.appendJavaScript( + getMarkupId() +";CheckAncestorsAndChildren.checkChildren('"
+ nodeChecked + );"'," ");"
target.appendJavaScript( + getMarkupId() + ";CheckAncestorsAndChildren.checkAncestors('"
+ nodeChecked + );"'," ");"
}
The JavaScript code can be found inside file autocheckedFolder.js which is added to the header section as
package resource:
@Override
void renderHead(IHeaderResponse response) {public
PackageResourceReference scriptFile = PackageResourceReference( .getClass(), new this
);"autocheckedFolder.js"
response.render(JavaScriptHeaderItem.forReference(scriptFile));
}
Working with hidden components
When a component is not visible its markup and the related id attribute are not rendered in the final page, hence
it can not be updated via AJAX. To overcome this problem we must use Component's method
which has the effect of rendering a hidden <span> tag containingsetOutputMarkupPlaceholderTag(true)
the markup id of the hidden component:
final Label label = Label( , );new "labelComponent" "Initial value."
//make label invisible
label.setVisible( );false
//ensure that label will leave a placeholder its markup idfor
label.setOutputMarkupPlaceholderTag( );true
add(label);
//… AjaxLink( ){new "ajaxLink"
@Override
void onClick(AjaxRequestTarget target) {public
//turn label to visible
label.setVisible( );true
target.add(label);
}
};
Please note that in the code above we didn't invoked method as setOutputMarkupId(true)
already does it internally.setOutputMarkupPlaceholderTag
18.3 Built-in AJAX behaviors
In addition to specific components, Wicket offers also a set of built in AJAX behaviors that can be used to easily
add AJAX functionalities to existing components. As we will see in this paragraph AJAX behaviors can be used
also to ajaxify components that weren't initially designed to work with this technology. All the following behaviors
are inside package .org.apache.wicket.ajax
AjaxEventBehavior
AjaxEventBehavior allows to handle a JavaScript event (like click, change, etc...) on server side via AJAX. Its
constructor takes in input the name of the event that must be handled. Every time this event is fired for a given
151
component on client side, the callback method is executed.onEvent(AjaxRequestTarget target)
onEvent is abstract, hence we must implement it to tell what to do when the specifiedAjaxEventBehavior
event occurs.
In project we used this behavior to build a “clickable” Label component thatAjaxEventBehaviorExample
counts the number of clicks. Here is the code from the home page of the project:
HTML:
<body>
<div wicket:id= ></div>"clickCounterLabel"
User has clicked <span wicket:id= ></span> time/s on the label above."clickCounter"
</body>
Java Code:
public class HomePage WebPage {extends
HomePage( PageParameters parameters) {public final
(parameters);super
ClickCounterLabel clickCounterLabel = final
ClickCounterLabel( , );new "clickCounterLabel" "Click on me!"
Label clickCounter =final
Label( , PropertyModel(clickCounterLabel, ));new "clickCounter" new "clickCounter"
clickCounterLabel.setOutputMarkupId( );true
clickCounterLabel.add( AjaxEventBehavior( ){new "click"
@Override
void onEvent(AjaxRequestTarget target) {protected
clickCounterLabel.clickCounter++;
target.add(clickCounter);
}
});
add(clickCounterLabel);
add(clickCounter.setOutputMarkupId( )); true
}
}
class ClickCounterLabel Label{extends
clickCounter;public int
ClickCounterLabel( id) {public String
(id);super
}
ClickCounterLabel( id, IModel<?> model) {public String
(id, model);super
}
ClickCounterLabel( id, label) {public String String
(id, label); super
}
}
In the code above we have declared a custom label class named that exposes a publicClickCounterLabel
integer field called clickCounter. Then, in the home page we have attached a to ourAjaxEventBehavior
custom label to increment clickCounter every time it receives a click event.
The number of clicks is displayed with another standard label named .clickCounter
AjaxFormSubmitBehavior
This behavior allows to send a form via AJAX when the component it is attached to receives the specified event.
The component doesn't need to be inside the form if we use the constructor version that, in addition to the name
of the event, takes in input also the target form:
Form form = Form( ); new "form"
Button submitButton = Button( );new "submitButton"
//submit form when button is clicked
submitButton.add( AjaxFormSubmitBehavior(form, ){});new "click"
add(form);
add(submitButton);
152
AjaxFormComponentUpdatingBehavior
This behavior updates the model of the form component it is attached to when a given event occurs. The
standard form submitting process is skipped and the behavior validates only its form component.
The behavior doesn't work with radio buttons and checkboxes. For these kinds of components we must use
:AjaxFormChoiceComponentUpdatingBehavior
Form form = Form( ); new "form"
TextField textField = TextField( , Model.of( ));new "textField" ""
//update the model of the text field each time event occurs"change"
textField.add( AjaxFormComponentUpdatingBehavior( ){new "change"
@Override
void onUpdate(AjaxRequestTarget target) {protected
//...
}
});
add(form.add(textField));
AbstractAjaxTimerBehavior
executes callback method at aAbstractAjaxTimerBehavior onTimer(AjaxRequestTarget target)
specified interval. The behavior can be stopped and restarted at a later time with methods
and :stop(AjaxRequestTarget target) restart(AjaxRequestTarget target)
Label dynamicLabel = Label( );new "dynamicLabel"
//trigger an AJAX request every three seconds
dynamicLabel.add( AbstractAjaxTimerBehavior(Duration.seconds(3)) { new
@Override
void onTimer(AjaxRequestTarget target) {protected
//...
}
});
add(dynamicLabel);
As side effect AJAX components and behaviors make their hosting page stateful. As a
consequence they are unfit for those pages that must stay stateless. Project WicketStuff
provides a module with a stateless version of the most common AJAX components and
behaviors. You can find more informations on this module in Appendix B.
18.4 Using an activity indicator
One of the things we must take care of when we use AJAX is to notify user when an AJAX request is already in
progress. This is usually done displaying an animated picture as activity indicator while the AJAX request is
running.
Wicket comes with a variant of components , and that display aAjaxButton AjaxLink AjaxFallbackLink
default activity indicator during AJAX request processing. These components are respectively
, and .IndicatingAjaxButton IndicatingAjaxLink IndicatingAjaxFallbackLink
The default activity indicator used in Wicket can be easily integrated in our components using behavior
AjaxIndicatorAppender (available in package ) andorg.apache.wicket.extensions.ajax.markup.html
implementing the interface (in package ).IAjaxIndicatorAware org.apache.wicket.ajax
declares method which returns the id of theIAjaxIndicatorAware getAjaxIndicatorMarkupId()
markup element used to display the activity indicator. This id can be obtained from the AjaxIndicatorAppender
behavior that has been added to the current component. The following code snippet summarizes the steps
needed to integrate the default activity indicator with an ajaxified component:
153
//1-Implement IAjaxIndicatorAwareinterface
class MyComponent Component IAjaxIndicatorAware {public extends implements
//2-Instantiate an AjaxIndicatorAppender
AjaxIndicatorAppender indicatorAppender =private
AjaxIndicatorAppender();new
MyComponent( id, IModel<?> model) {public String
(id, model);super
//3-Add the AjaxIndicatorAppender to the component
add(indicatorAppender);
}
//4-Return the markup id obtained from AjaxIndicatorAppender
getAjaxIndicatorMarkupId() { public String
indicatorAppender.getMarkupId();return
}
//…
}
If we need to change the default picture used as activity indicator, we can override method
of and return the URL to the desired picture.getIndicatorUrl() AjaxIndicatorAppender
18.5 AJAX request attributes and call listeners
Starting from version 6.0 Wicket has introduced two entities which allow us to control how an AJAX request is
generated on client side and to specify the custom JavaScript code we want to execute during request handling.
These entities are class and interface , both placed inAjaxRequestAttributes IAjaxCallListener
package .org.apache.wicket.ajax.attributes
AjaxRequestAttributes exposes the attributes used to generate the JavaScript call invoked on client side to start
an AJAX request. Each attribute will be passed as a parameter to the JavaScript function JSON
which is responsible for sending the concrete AJAX request. Every JSON parameter isWicket.Ajax.ajax
identified by a short name. Here is a partial list of the available parameters:
Short
name Description Default
value
u The callback URL used to serve the AJAX request that will be sent.
c The id of the component that wants to start the AJAX call.
e A list of event (click, change, etc...) that can trigger the AJAX call. domready
m The request method that must be used (GET or POST). GET
f The id of the form that must be submitted with the AJAX call.
mp If the AJAX call involves the submission of a form, this flag indicates whether the data
must be encoded using the encoding mode “multipart/form-data”. false
sc The input name of the submitting component of the form
async A boolean parameter that indicates if the AJAX call is asynchronous (true) or not. true
wr Specifies the type of data returned by the AJAX call (XML, HTML, JSON, etc...). XML
ih, bh, pre,
bsh, ah, sh,
fh, coh, dh
This is a list of the listeners that are executed on client side (they are JavaScript
scripts) during the lifecycle of an AJAX request. Each short name is the abbreviation of
one of the methods defined in the interface IAjaxCallListener (see below).
An empty
list
A full list of the available request parameters as well as more details on the related
JavaScript code can be found at
.https://cwiki.apache.org/confluence/display/WICKET/Wicket+Ajax
Parameters 'u' (callback URL) and 'c' (the id of the component) are generated by the AJAX behavior that will
serve the AJAX call and they are not accessible through .AjaxRequestAttributes
Here is the final AJAX function generate for the behavior used in example project AjaxEventBehavior
Example:
154
Wicket.Ajax.ajax({ : , : , "u" "./?0-1.IBehaviorListener.0-clickCounterLabel" "e" "click"
: });"c" "clickCounterLabel1"
Even if most of the times we will let Wicket generate request attributes for us, both AJAX components and
behaviors give us the chance to modify them overriding their method updateAjaxAttributes
.(AjaxRequestAttributes attributes)
One of the attribute we may need to modify is the list of returned by method IAjaxCallListeners
.getAjaxCallListeners()
defines a set of methods which return the JavaScript code (as a ) thatIAjaxCallListener CharSequence
must be executed on client side when the AJAX request handling reaches a given stage:
getInitHandler(Component): (backported from Wicket 7.x into ) returns theAjaxCallListener
JavaScript code that will be executed on initialization of the Ajax call, immediately after the causing event.
The code is executed in a scope where it can use variable attrs, which is an array containing the JSON
parameters passed to Wicket.Ajax.ajax.
getBeforeHandler(Component): returns the JavaScript code that will be executed before any other
handlers returned by IAjaxCallListener. The code is executed in a scope where it can use variable attrs,
which is an array containing the JSON parameters passed to Wicket.Ajax.ajax.
getPrecondition(Component): returns the JavaScript code that will be used as precondition for the AJAX
call. If the script returns false then neither the Ajax call nor the other handlers will be executed. The code is
executed in a scope where it can use variable attrs, which is the same variable seen for getBeforeHandler.
getBeforeSendHandler(Component): returns the JavaScript code that will be executed just before the
AJAX call is performed. The code is executed in a scope where it can use variables attrs, jqXHR and
settings:
attrs is the same variable seen for getBeforeHandler.
jqXHR is the the jQuery XMLHttpRequest object used to make the AJAX call.
settings contains the settings used for calling jQuery.ajax().
getAfterHandler(Component): returns the JavaScript code that will be executed after the AJAX call. The
code is executed in a scope where it can use variable attrs, which is the same variable seen before for
getBeforeHandler.
getSuccessHandler(Component): returns the JavaScript code that will be executed if the AJAX call has
successfully returned. The code is executed in a scope where it can use variables attrs, jqXHR, data and
textStatus:
attrs and jqXHR are same variables seen for getBeforeSendHandler:
data is the data returned by the AJAX call. Its type depends on parameter wr (Wicket AJAX
response).
textStatus it's the status returned as text.
getFailureHandler(Component): returns the JavaScript code that will be executed if the AJAX call has
returned with a failure. The code is executed in a scope where it can use variable attrs, which is the same
variable seen for getBeforeHandler.
getCompleteHandler(Component): returns the JavaScript that will be invoked after success or failure
handler has been executed. The code is executed in a scope where it can use variables attrs, jqXHR and
textStatus which are the same variables seen for getSuccessHandler.
getDoneHandler(Component): (backported from Wicket 7.x into ) returns theAjaxCallListener
JavaScript code that will be executed after the Ajax call is done, regardless whether it was sent or not. The
code is executed in a scope where it can use variable attrs, which is an array containing the JSON
parameters passed to Wicket.Ajax.ajax.
In the next paragraph we will see an example of custom designed to disable aIAjaxCallListener
component during AJAX request processing.
18.6 Creating custom AJAX call listener

155
18.6 Creating custom AJAX call listener
Displaying an activity indicator is a nice way to notify user that an AJAX request is already running, but
sometimes is not enough. In some situations we may need to completely disable a component during AJAX
request processing, for example when we want to avoid that impatient users submit a form multiple times. In this
paragraph we will see how to accomplish this goal building a custom and reusable . TheIAjaxCallListener
code used in this example is from project .CustomAjaxListenerExample
What we want for our listener
The listener should execute some JavaScript code to disable a given component when the component it is
attached to is about to make an AJAX call. Then, when the AJAX request has been completed, the listener
should bring back the disabled component to an active state.
When a component is disabled it must be clear to user that an AJAX request is running and that he/she must
wait for it to complete. To achieve this result we want to disable a given component covering it with a
semi-transparent overlay area with an activity indicator in the middle.
The final result will look like this:
How to implement the listener
The listener will implement methods and : the first will return the codegetBeforeHandler getAfterHandler
needed to place an overlay <div> on the desired component while the second must remove this overlay when
the AJAX call has completed.
To move and resize the overlay area we will use another module from that allows us to positionJQueryUI library
DOM elements on our page relative to another element.
So our listener will depend on four static resources: the JQuery library, the position module of JQuery UI, the
custom code used to move the overlay <div> and the picture used as activity indicator. Except for the activity
indicator, all these resources must be added to page header section in order to be used.
Ajax call listeners can contribute to header section by simply implementing interface
. Wicket provides adapter class thatIComponentAwareHeaderContributor AjaxCallListener
implements both and . We will use this classIAjaxCallListener IComponentAwareHeaderContributor
as base class for our listener.
JavaScript code
Now that we know what to do on the Java side, let's have a look at the custom JavaScript code that must be
returned by our listener (file moveHiderAndIndicator.js):
DisableComponentListener = {
disableElement: function(elementId, activeIconUrl){
hiderId = elementId + ;var "-disable-layer"
indicatorId = elementId + ;var "-indicator-picture"
elementId = + elementId;"#"
//create the overlay <div>
$(elementId).after('<div id="' + hiderId
156
style= >' + '" "position:absolute;"
+ '<img id= src= />'"' + indicatorId + '" "' + activeIconUrl + '"
+ '</div>');
hiderId = + hiderId;"#"
//set the style properties of the overlay <div>
$(hiderId).css('opacity', '0.8');
$(hiderId).css('text-align', 'center');
$(hiderId).css('background-color', 'WhiteSmoke');
$(hiderId).css('border', '1px solid DarkGray');
//set the dimention of the overlay <div>
$(hiderId).width($(elementId).outerWidth());
$(hiderId).height($(elementId).outerHeight());
//positioning the overlay <div> on the component that must be disabled.
$(hiderId).position({of: $(elementId),at: 'top left', my: 'top left'});
//positioning the activity indicator in the middle of the overlay <div>
$( + indicatorId).position({of: $(hiderId), at: 'center center',"#"
my: 'center center'});
},
//function hideComponent
Function DisableComponentListener.disableElement places the overlay <div> an the activity indicator on the
desired component. The parameters in input are the markup id of the component we want to disable and the
URL of the activity indicator picture. These two parameters must be provided by our custom listener.
The rest of custom JavaScript contains function DisableComponentListener.hideComponent which is just a
wrapper around the JQuery function remove():
hideComponent: function(elementId){
hiderId = elementId + ;var "-disable-layer"
$('#' + hiderId).remove();
}
};
Java class code
The code of our custom listener is the following:
public class DisableComponentListener AjaxCallListener {extends
PackageResourceReference customScriptReference = private static new
PackageResourceReference(DisableComponentListener.class, );"moveHiderAndIndicator.js"
PackageResourceReference jqueryUiPositionRef = private static new
PackageResourceReference(DisableComponentListener.class, );"jquery-ui-position.min.js"
PackageResourceReference indicatorReference = private static
PackageResourceReference(DisableComponentListener.class, );new "ajax-loader.gif"
Component targetComponent;private
DisableComponentListener(Component targetComponent){public
.targetComponent = targetComponent;this
}
@Override
CharSequence getBeforeHandler(Component component) { public
CharSequence indicatorUrl = getIndicatorUrl(component);
+ targetComponent.getMarkupId() return ";DisableComponentListener.disableElement('"
+ + + indicatorUrl + ;"'," "'" "');"
}
@Override
CharSequence getCompleteHandler(Component component) {public
return ";DisableComponentListener.hideComponent('"
+ targetComponent.getMarkupId() + ;"');"
}
CharSequence getIndicatorUrl(Component component) {protected
component.urlFor(indicatorReference, );return null
}
@Override
void renderHead(Component component, IHeaderResponse response) { public
ResourceReference jqueryReference =
Application.get().getJavaScriptLibrarySettings().getJQueryReference();
response.render(JavaScriptHeaderItem.forReference(jqueryReference));
response.render(JavaScriptHeaderItem.forReference(jqueryUiPositionRef));
response.render(JavaScriptHeaderItem.forReference(customScriptReference) );
157
}
}
As you can see in the code above we have created a function ( ) to retrieve the URL of thegetIndicatorUrl
indicator picture. This was done in order to make the picture customizable by overriding this method.
Once we have our listener in place, we can finally use it in our example overwriting method
of the AJAX button that submits the form:updateAjaxAttributes
//… AjaxButton( ){new "ajaxButton"
@Override
void updateAjaxAttributes(AjaxRequestAttributes attributes) {protected
.updateAjaxAttributes(attributes);super
attributes.getAjaxCallListeners().add( DisableComponentListener(form));new
}
}
//...
Global listeners
So far we have seen how to use an AJAX call listener to track the AJAX activity of a single component. In
addition to these kinds of listeners, Wicket provides also global listeners which are triggered for any AJAX
request sent from a page.
Global AJAX call events are handled with JavaScript. We can register a callback function for a specific event of
the AJAX call lifecycle with function Wicket.Event.subscribe('<eventName>', <callback
. The first parameter of this function is the name of the event we want to handle. The possibleFunction>)
names are:
'/ajax/call/init': called on initialization of an ajax call
'/ajax/call/before': called before any other event handler.
'/ajax/call/beforeSend': called just before the AJAX call.
'/ajax/call/after': called after the AJAX request has been sent.
'/ajax/call/success': called if the AJAX call has successfully returned.
'/ajax/call/failure': called if the AJAX call has returned with a failure.
'/ajax/call/complete': called when the AJAX call has completed.
'/ajax/call/done': called when the AJAX call is done.
'/dom/node/removing': called when a component is about to be removed via AJAX. This happens when
component markup is updated via AJAX (i.e. the component itself or one of its containers has been added
to )AjaxRequestTarget
'/dom/node/added': called when a component has been added via AJAX. Just like '/dom/node/removing',
this event is triggered when a component is added to .AjaxRequestTarget
The callback function takes in input the following parameters: attrs, jqXHR, textStatus, jqEvent and errorThrown.
The first three parameters are the same seen before with while jqEvent is an eventIAjaxCallListener
internally fired by Wicket. The last parameter errorThrown indicates if an error has occurred during the AJAX call.
To see a basic example of use of a global AJAX call listener, let's go back to our custom datepicker created in
. When we built it we didn't think about a possible use of the component with AJAX. When a complexchapter 16
component like our datepicker is refreshed via AJAX, the following two side effects can occur:
After been refreshed, the component loses every JavaScript handler set on it. This is not a problem for our
datepicker as it sets a new JQuery datepicker every time is rendered (inside method renderHead).
The markup previously created with JavaScript is not removed. For our datepicker this means that the icon
used to open the calendar won't be removed while a new one will be added each time the component is
refreshed.

158
To solve the second unwanted side effect we can register a global AJAX call listener that completely removes
the datepicker functionality from our component before it is removed due to an AJAX refresh (which fires event
'/dom/node/removing').
Project contains a new version of our datepicker which adds to its JavaScript fileCustomDatepickerAjax
JQDatePicker.js the code needed to register a callback function that gets rid of the JQuery datepicker before the
component is removed from the DOM:
Wicket.Event.subscribe('/dom/node/removing',
function(jqEvent, attributes, jqXHR, errorThrown, textStatus) {
componentId = '#' + attributes['id'];var
($(componentId).datepicker !== undefined)if
$(componentId).datepicker('destroy');
}
);
The code above retrieves the id of the component that is about to be removed using parameter attributes. Then it
checks if a JQuery datepicker was defined for the given component and if so, it removes the widget calling
function destroy.
18.7 Summary
AJAX is another example of how Wicket can simplify web technologies providing a good component and object
oriented abstraction of them.
In this chapter we have seen how to take advantage of the AJAX support provided by Wicket to write
AJAX-enhanced applications. Most of the chapter has been dedicated to the built-in components and behaviors
that let us adopt AJAX without almost any effort.
In the final part of the chapter we have seen how Wicket physically implements an AJAX call on client side using
AJAX request attributes. Then, we have learnt how to use call listeners to execute custom JavaScript during
AJAX request lifecycle.
159
19 Integration with enterprise
containers
Writing a web application is not just about producing a good layout and a bunch of “cool” pages. We must also
integrate our presentation code with enterprise resources like data sources, message queues, business objects,
etc...
The first decade of 2000s has seen the rising of new frameworks (like ) and new specifications (like Spring EJB
) aimed to simplify the management of enterprise resources and (among other things) their integration with3.1
presentation code.
All these new technologies are based on the concepts of container and dependency injection. Container is the
environment where our enterprise resources are created and configured while is a patterndependency injection
implemented by containers to inject into an object the resources it depends on.
Wicket can be easily integrated with enterprise containers using component instantiation listeners. These entities
are instances of interface andorg.apache.wicket.application.IComponentInstantiationListener
can be registered during application's initialization. IComponentInstantiationListener defines callback method
onInstantiation(Component component) which can be used to provide custom instantiation logic for Wicket
components.
Wicket distribution and project already provide a set of built-in listeners to integrate our applicationsWicketStuff
with EJB 3.1 compliant containers (like JBoss Seam) or with some of the most popular enterprise frameworks
like or Spring.Guice
In this chapter we will see two basic examples of injecting a container-defined object into a page using first an
implementation of the EJB 3.1 specifications (project ) and then using Spring.OpenEJB
19.1 Integrating Wicket with EJB
WicketStuff provides a module called wicketstuff-javaee-inject that contains component instantiation listener
. If we register this listener in our application we can use standard EJBJavaEEComponentInjector
annotations to inject dependencies into our Wicket components.
To register a component instantiation listener in Wicket we must use 's method Application
which returns a typed collection of getComponentInstantiationListeners
.IComponentInstantiationListeners
The following initialization code is taken from project :EjbInjectionExample
public class WicketApplication WebApplicationextends
{
//Constructor...
@Override
void init()public
{
.init();super
getComponentInstantiationListeners().add( JavaEEComponentInjector( )); new this
}
}
In this example the object that we want to inject is a simple class containing a greeting message:
@ManagedBean
class EnterpriseMessage {public
message = ;public String "Welcome to the EJB world!"
}
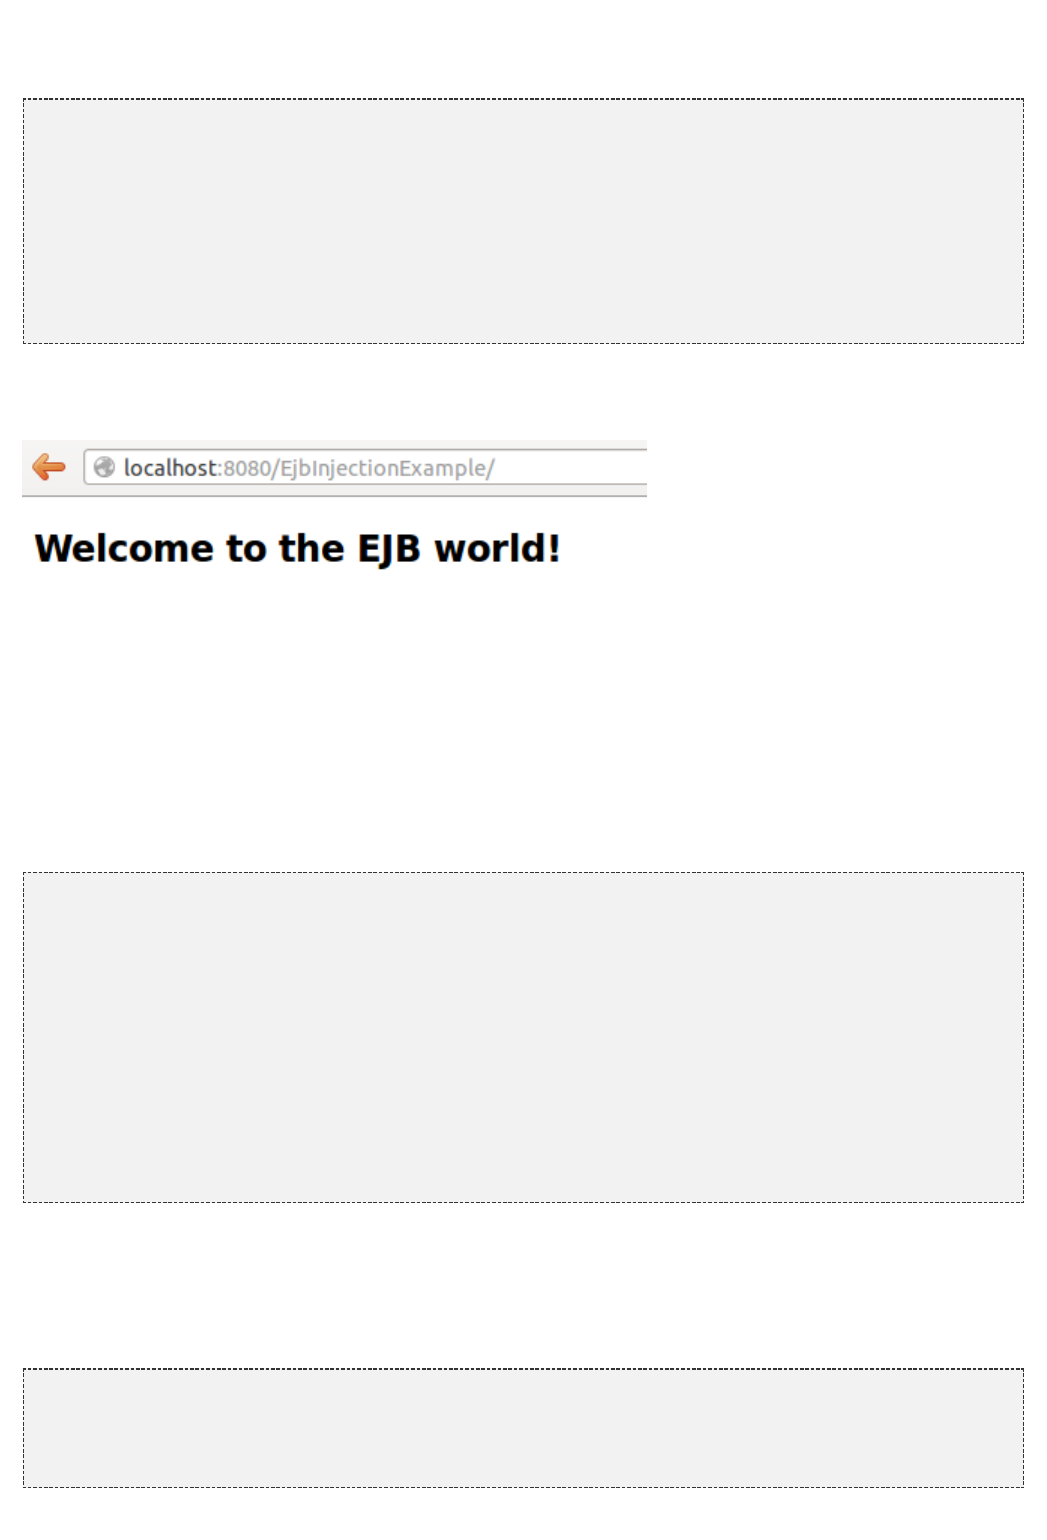
160
Please note that we have used annotation ManagedBean to decorate our object. Now to inject it into the home
page we must add a field of type EnterpriseMessage and annotate it with annotation @EJB:
public class HomePage WebPage {extends
@EJB
EnterpriseMessage enterpriseMessage;private
//getter and setter enterpriseMessage...for
HomePage( PageParameters parameters) {public final
(parameters);super
add( Label( , enterpriseMessage.message));new "message"
}
}
That is all. We can point the browser to the home page of the project and see the greeting message injected into
the page:
19.2 Integrating Wicket with Spring
If we need to inject dependencies with Spring we can use listener
provided by moduleorg.apache.wicket.spring.injection.annot.SpringComponentInjector
wicket-spring.
For the sake of simplicity in the example project we have used Spring class SpringInjectionExample
to avoid any XML file and create a Spring context directly fromAnnotationConfigApplicationContext
code:
public class WicketApplication WebApplicationextends
{
//Constructor...
@Override
void init()public
{
.init();super
AnnotationConfigApplicationContext ctx = AnnotationConfigApplicationContext();new
//Scan annotated beanspackage for
ctx.scan( );"org.wicketTutorial.ejbBean"
ctx.refresh();
getComponentInstantiationListeners().add( SpringComponentInjector( , ctx));new this
}
}
As we can see in the code above, the constructor of takes in input also anSpringComponentInjector
instance of Spring context.
The injected object is the same used in the previous project , it differs only for theEjbInjectionExample
greeting message:
@ManagedBean
class EnterpriseMessage {public
message = ;public String "Welcome to the Spring world!"
}
161
In the home page of the project the object is injected using Wicket annotation @SpringBean:
public class HomePage WebPage {extends
@SpringBean
EnterpriseMessage enterpriseMessage;private
//getter and setter enterpriseMessage...for
HomePage( PageParameters parameters) {public final
(parameters);super
add( Label( , enterpriseMessage.message));new "message"
}
}
By default searches into Spring context for a bean having the same type of the annotated field. IfSpringBean
we want we can specify also the name of the bean to use as injected object and we can declare if the
dependency is required or not. By default dependencies are required and if they can not be resolved to a
compatible bean, Wicket will throw an :IllegalStateException
//set the dependency as not required, i.e the field can be left null
@SpringBean(name= , required= )"anotherName" false
EnterpriseMessage enterpriseMessage;private
19.3 JSR-330 annotations
Spring (and Guice) users can use standard annotations to wire their dependencies. This will make theirJSR-330
code more interoperable with other containers that support this standard:
//inject a bean specifying its name with JSR-330 annotations
@Inject
@Named( )"anotherName"
EnterpriseMessage enterpriseMessage;private
19.4 Summary
In this chapter we have seen how to integrate Wicket applications with Spring and with an EJB container. Module
wicket-examples contains also an example of integration with Guice (see application class
).org.apache.wicket.examples.guice.GuiceApplication
162
20 Native WebSockets
is a technology that provides full-duplex communications channels over a single TCP connection.WebSockets
This means that once the browser establish a web socket connection to the server the server can push data
back to the browser without the browser explicitly asking again and again whether there is something new for it.
Wicket Native WebSockets modules provide functionality to integrate with the non-standard APIs provided by
different web containers (like and ) and standard implementations.Apache Tomcat Jetty JSR356
Native WebSocket works only when both the browser and the web containers support
WebSocket technology. There are no plans to add support to fallback to long-polling,
streaming or any other technology that simulates two way communication. Use it only if
you really know that you will run your application in an environment that supports
WebSockets. Currently supported web containers are Jetty 7.5+ , Tomcat 7.0.27+ and
JBoss WildFly 8.0.0+. Supported browsers can be found at .caniuse.com
20.1 How does it work ?
Each of the modules provide a specialization of thatorg.apache.wicket.protocol.http.WicketFilter
registers implementation specific endpoint when an HTTP request is to WebSocket one. Later Wicketupgraded
uses this endpoint to write data back to the browser and read data sent by it.
WebSockets communication can be used in a Wicket page by using
or in a IResource by exteding org.apache.wicket.protocol.ws.api.WebSocketBehavior
. When a client is connected it is beingorg.apache.wicket.protocol.ws.api.WebSocketResource
registered in a application scoped registry using as a key the application name, the client http session id, and the
id of the page or the resource name that registered it. Later when the server needs to push a message it can use
this registry to filter out which clients need to receive the message.
When a message is received from the client Wicket wraps it in and callsIWebSocketMessage
WebSocketBehavior# or WebSocketResource# where the application logic can reactonMessage() onMessage()
on it. The server can push plain text and binary data to the client, but it can also add components for re-render,
prepend/append JavaScript as it can do with .Ajax
20.2 How to use
Classpath dependency
Depending on the web container that is used the application has to add a dependency to either:
for Jetty 9.0.x
<dependency>
<groupId>org.apache.wicket</groupId>
<artifactId>wicket- -websocket-jetty9</artifactId>native
<version>...</version>
</dependency>
for Jetty 7.x and 8.x
<dependency>
<groupId>org.apache.wicket</groupId>
<artifactId>wicket- -websocket-jetty</artifactId>native
<version>...</version>
</dependency>
163
for Tomcat 7.0.27+ (the old, non-JSR356 implementation)
<dependency>
<groupId>org.apache.wicket</groupId>
<artifactId>wicket- -websocket-tomcat</artifactId>native
<version>...</version>
</dependency>
for JSR356 complaint implementations (at the moment are supported: Tomcat 8.0+, Tomcat 7.0.47+, Jetty
9.1.0+ and JBoss Wildfly 8.0.0+)
<dependency>
<groupId>org.apache.wicket</groupId>
<artifactId>wicket- -websocket-javax</artifactId>native
<version>...</version>
</dependency>
All web containers providing JSR356 implementation are built with Java 7. This is the
reason why module is available only with Wicketwicket-native-websocket-javax
7.x. If your application runs with JRE 7.x then you can use
together with the latest version of Wicket 6.x.wicket-native-websocket-javax
Beware that the API/implementation of maywicket-native-websocket-javax
change before Wicket 7.0.0 is released!
The examples above show snippets for Maven's pom.xml but the application can use any
other dependency management tool like , , …Gradle SBT
web.xml
In replace the usage of with any of the following depending on the webWEB-INF/web.xml WicketFilter
container that is used:
For Jetty 9.0.x:
<filter-class>org.apache.wicket.protocol.ws.jetty9.Jetty9WebSocketFilter</filter-class>
For Jetty 7.5+ and 8.x:
<filter-class>org.apache.wicket.protocol.ws.jetty7.Jetty7WebSocketFilter</filter-class>
For Tomcat 7.0.27+ (old implementation):
<filter-class>org.apache.wicket.protocol.ws.tomcat7.Tomcat7WebSocketFilter</filter-class>
For JSR356 complaint web containers (at the moment: Tomcat 7.0.47+, Tomcat 8.x and Jetty 9.1.x):
<filter-class>org.apache.wicket.protocol.ws.javax.JavaxWebSocketFilter</filter-class>
WebSocketBehavior
is similar to Wicket Ajax behaviors that youorg.apache.wicket.protocol.ws.api.WebSocketBehavior
may have used. Add WebSocketBehavior to the page (or to any component in the page) that will use web socket
communication:
164
public class MyPage WebPage {extends
MyPage()public
{
add( WebSocketBehavior() {new
@Override
void onMessage(WebSocketRequestHandler handler, TextMessage message)protected
{
msg = message.getText();String
// something with msgdo
}
});
}
}
Use to read the message sent by the client and use to push amessage.getText() handler.push(String)
text message to the connected client. Additionally you can use to add Wickethandler.add(Component...)
components for re-render, and handler#prependJavaScript(CharSequence)
as you do with .handler#appendJavaScript(CharSequence) AjaxRequestTarget
WebSocketResource
Wicket allows one thread at a time to use a page instance to simplify the usage of the pages in multithreaded
enviroment. When a WebSocket message is sent to a page Wicket needs to acquire the lock to that page to be
able to pass the to the . This may be problematic when theIWebSocketMessage WebSocketBehavior
application needs to send many messages from the client to the server. For this reason Wicket provides
- an IResource implemetation that provides the same APIs as .WebSocketResource WebSocketBehavior
The benefit is that there is no need of synchronization as with the pages and the drawback is that
method cannot be used because there is no access toWebSocketRequesthandler#add(Component...)
the components in an .IResource
To register such WebSocket resource add such line to method:YourApplication#init()
getSharedResources().add( , MyWebSocketResource());"someName" new
and
page.add( BaseWebSocketBehavior( ));new "someName"
to any page. This will prepare the JavaScript connection for you.
WebSocket connection registry
To push data to one or more clients the application can use the to find allIWebSocketConnectionRegistry
registered connections and send data to all/any of them:
Application application = Application.get(applicationName);
WebSocketSettings webSocketSettings = WebSocketSettings.Holder.get(application);
IWebSocketConnectionRegistry webSocketConnectionRegistry =
webSocketSettings.getConnectionRegistry();
IWebSocketConnection connection = webSocketConnectionRegistry.getConnection(application,
sessionId, key);
20.3 Client-side APIs
By adding a to your component(s) Wicket will contribute (Base)WebSocketBehavior
library which provides some helper functions to write your client side code.wicket-websocket-jquery.js
There is a default websocket connection per Wicket Page opened for you which you can use like:
Wicket.WebSocket.send('{msg: }')."my message"
165
1.
To close the default connection:
Wicket.WebSocket.close()
Wicket.WebSocket is a simple wrapper around the native window.WebSocket API which is used to intercept the
calls and to fire special JavaScript events (Wicket.Event PubSub). Once a page that contributes
is rendered the client may react on messages pushed by the server by(Base)WebSocketBehavior
subscribing to the event:'/websocket/message'
Wicket.Event.subscribe( , function(jqEvent, message) {"/websocket/message"
data = JSON.parse(message);var
processData(data); // does something with the pushed message
});
Here is a table of all events that the application can subscribe to:
Event name Arguments Description
/websocket/open jqEvent A WebSocket connection has been just opened
/websocket/message jqEvent,
message A message has been received from the server
/websocket/closed jqEvent A WebSocket connection has been closed
/websocket/error jqEvent An error occurred in the communication. The connection will be
closed
20.4 Testing
The module provides which givesorg.apache.wicket.protocol.ws.util.tester.WebSocketTester
you the possibility to emulate sending and receiving messages without the need to run in a real web container,
as WicketTester does this for HTTP requests. Check and WebSocketTesterBehaviorTest
for examples.WebSocketTesterResourceTest
20.5 Differences with Wicket-Atmosphere module.
Wicket-Atmosphere experimental module provides integration with and let it handle theAtmosphere
inconsistencies in WebSocket protocol support in different browsers and web containers. If either the browser or
the web container do not support WebSockets then Atmosphere will downgrade (depending on the configuration)
to either long-polling, streaming, server-side events, jsonp, … to simulate the long running connection.
20.6 FAQ
Request and session scoped beans do not work.
The Web Socket communication is not processed by Servlet Filters and Listeners and thus the Dependency
Injection libraries have no chance to export the request and session bean proxies.
166
21 Security with Wicket
Security is one of the most important non-functional requirements we must implement in our applications. This is
particularly true for enterprise applications as they usually support multiple concurrent users, and therefore they
need to have an access control policy.
In this chapter we will explore the security infrastructure provided by Wicket and we will learn how to use it to
implement authentication and authorizations in our web applications.
21.1 Authentication
The first step in implementing a security policy is assigning a trusted identity to our users, which means that we
must authenticate them. Web applications usually adopt a form-based authentication with a login form that asks
user for a unique username and the relative password:
Wicket supports form-based authentication with session class and applicationAuthenticatedWebSession
class , both placed inside package AuthenticatedWebApplication
.org.apache.wicket.authroles.authentication
AuthenticatedWebSession
Class AuthenticatedWebSession comes with the following set of public methods to manage user authentication:
authenticate(String username, String password): this is an abstract method that must be implemented
by every subclass of . It should contain the actual code that checks forAuthenticatedWebSession
user's identity. It returns a boolean value which is true if authentication has succeeded or false otherwise.
signIn(String username, String password): this method internally calls authenticate and set the flag
signedIn to true if authentication succeeds.
isSignedIn():getter method for flag signedIn.
signOut(): sets the flag signedIn to false.
invalidate(): calls signOut and invalidates session.
Remember that signOut does not discard any session-relative data. If we want to get rid of
these data, we must invoke method invalidate instead of signOut.
Another abstract method we must implement when we use is getRoles which isAuthenticatedWebSession
inherited from parent class . This method can be ignored for now as itAbstractAuthenticatedWebSession
will be discussed later when we will talk about role-based authorization.
167
AuthenticatedWebApplication
Class AuthenticatedWebApplication provides the following methods to support form-based authentication:
getWebSessionClass(): abstract method that returns the session class to use for this application. The
returned class must be a subclass of .AbstractAuthenticatedWebSession
getSignInPageClass(): abstract method that returns the page to use as sign in page when a user must be
authenticated.
restartResponseAtSignInPage(): forces the current response to restart at the sign in page. After we have
used this method to redirect a user, we can make her/him return to the original page calling 'sComponet
method .continueToOriginalDestination()
The other methods implemented inside will be introduced when we will talkAuthenticatedWebApplication
about authorizations.
A basic example of authentication
Project is a basic example of form-based authentication implemented withBasicAuthenticationExample
classes and .AuthenticatedWebSession AuthenticatedWebApplication
The homepage of the project contains only a link to page which can be accessed only ifAuthenticatedPage
user is signed in. The code of is this following:AuthenticatedPage
public class AuthenticatedPage WebPage {extends
@Override
void onConfigure() {protected
.onConfigure();super
AuthenticatedWebApplication app = (AuthenticatedWebApplication)Application.get();
// user is not signed in, redirect him to sign in pageif
(!AuthenticatedWebSession.get().isSignedIn())if
app.restartResponseAtSignInPage();
}
@Override
void onInitialize() {protected
.onInitialize();super
add( Link( ) {new "goToHomePage"
@Override
void onClick() {public
setResponsePage(getApplication().getHomePage());
}
});
add( Link( ) {new "logOut"
@Override
void onClick() {public
AuthenticatedWebSession.get().invalidate();
setResponsePage(getApplication().getHomePage());
}
});
}
}
Page checks inside onConfigure if user is signed in and if not, it redirects her/him to theAuthenticatedPage
sign in page with method . The page contains also a link to the homepagerestartResponseAtSignInPage
and another link that signs out user.
The sign in page is implemented in class and contains the form used to authenticate users:SignInPage
public class SignInPage WebPage {extends
username;private String
password;private String
@Override
void onInitialize() {protected
.onInitialize();super
StatelessForm form = StatelessForm( ){new "form"
@Override
168
void onSubmit() {protected
(Strings.isEmpty(username))if
;return
authResult = AuthenticatedWebSession.get().signIn(username, password);boolean
// authentication succeeds redirect user to the requested pageif
(authResult)if
continueToOriginalDestination();
}
};
form.setDefaultModel( CompoundPropertyModel( ));new this
form.add( TextField( ));new "username"
form.add( PasswordTextField( ));new "password"
add(form);
}
}
The form is responsible for handling user authentication inside its method onSubmit. The username and
password are passed to 's method and ifAuthenticatedWebSession signIn(username, password)
authentication succeeds, the user is redirected to the original page with method
.continueToOriginalDestination
The session class and the application class used in the project are reported here:
Session class:
public class BasicAuthenticationSession AuthenticatedWebSession {extends
BasicAuthenticationSession(Request request) {public
(request); super
}
@Override
authenticate( username, password) {public boolean String String
//user is authenticated both username and password are equal to 'wicketer'if
username.equals(password) && username.equals( );return "wicketer"
}
@Override
Roles getRoles() {public
;return null
}
}
Application class:
public class WicketApplication AuthenticatedWebApplication{ extends
@Override
<HomePage> getHomePage(){public Class
HomePage.class;return
}
@Override
<? AbstractAuthenticatedWebSession> getWebSessionClass(){protected Class extends
BasicAuthenticationSession.class;return
}
@Override
<? WebPage> getSignInPageClass() {protected Class extends
SignInPage.class;return
}
}
The authentication logic inside authenticate has been kept quite trivial in order to make the code as clean as
possible. Please note also that session class must have a constructor that accepts an instance of class Request
.
Redirecting user to an intermediate page
Method is an example of redirecting user to an intermediate page beforerestartResponseAtSignInPage
allowing him to access to the requested page. This method internally throws exception
169
which saves the URL of theorg.apache.wicket.RestartResponseAtInterceptPageException
requested page into session metadata and then redirects user to the page passed as constructor parameter (the
sign in page).
Component's method works in much the same way as redirectToInterceptPage(Page)
but it allows us to specify which page to use as intermediate page:restartResponseAtSignInPage
redirectToInterceptPage(intermediatePage);
Since both and restartResponseAtSignInPage redirectToInterceptPage
internally throw an exception, the code placed after them will not be executed.
21.2 Authorizations
The authorization support provided by Wicket is built around the concept of authorization strategy which is
represented by interface (in package ):IAuthorizationStrategy org.apache.wicket.authorization
public IAuthorizationStrategyinterface
{
// methods interface
<T IRequestableComponent> isInstantiationAuthorized( <T>extends boolean Class
componentClass);
isActionAuthorized(Component component, Action action);boolean
// authorization strategy that allows everythingdefault
IAuthorizationStrategy ALLOW_ALL = IAuthorizationStrategy()public static final new
{
@Override
<T IRequestableComponent> isInstantiationAuthorized( <T>public extends boolean final Class
c)
{
;return true
}
@Override
isActionAuthorized(Component c, Action action)public boolean
{
;return true
}
};
}
This interface defines two methods:
isInstantiationAuthorized checks if user is allowed to instantiate a given component.
isActionAuthorized checks if user is authorized to perform a given action on a component's instance. The
standard actions checked by this method are defined into class Action and are Action.ENABLE and
Action.RENDER.
Inside we can also find a default implementation of the interface (calledIAuthorizationStrategy
ALLOW_ALL) that allows everyone to instantiate every component and perform every possible action on it. This
is the default strategy adopted by class .Application
To change the authorization strategy in use we must register the desired implementation into security settings
(interface ) during initialization phase with method setAuthorization Strategy:ISecuritySettings
//Application class code…
@Override
void init()public
{
.init();super
getSecuritySettings().
setAuthorizationStrategy(myAuthorizationStrategy);
}
//...
170
If we want to combine the action of two or more authorization strategies we can chain them with strategy
which implements composite pattern for authorization strategies.CompoundAuthorizationStrategy
Most of the times we won't need to implement an from scratch as Wicket alreadyIAuthorizationStrategy
comes with a set of built-in strategies. In the next paragraphs we will see some of these strategies that can be
used to implement an effective and flexible security policy.
SimplePageAuthorizationStrategy
Abstract class SimplePageAuthorizationStrategy (in package
) is a strategy that checks user authorizationsorg.apache.wicket.authorization.strategies.page
calling abstract method only for those pages that are subclasses of a given supertype. If isAuthorized
returns false, the user is redirected to the sign in page specified as second constructorisAuthorized
parameter:
SimplePageAuthorizationStrategy authorizationStrategy = SimplePageAuthorizationStrategy(new
PageClassToCheck.class, SignInPage.class)
{
isAuthorized()protected boolean
{
//Authentication code…
}
};
By default checks for permissions only on pages. If we want toSimplePageAuthorizationStrategy
change this behavior and check also other kinds of components, we must override method
and implement our custom logic inside it.isActionAuthorized
Role-based strategies
At the end of we have introduced AbstractAuthenticatedWebSession's method getRoles which isparagraph 21.1
provided to support role-based authorization returning the set of roles granted to the current user.
In Wicket roles are simple strings like “BASIC_USER” or “ADMIN” (they don't need to be capitalized) and they
are handled with class .org.apache.wicket.authroles.authorization.strategies.role.Roles
This class extends standard HashSet collection adding some functionalities to check whether the set contains
one or more roles. Class already defines roles Roles.USER and Roles.ADMIN.Roles
The session class in the following example returns a custom “SIGNED_IN” role for every authenticated user and
it adds an Roles.ADMIN role if username is equal to superuser:
class BasicAuthenticationRolesSession AuthenticatedWebSession {extends
userName;private String
BasicAuthenticationRolesSession(Request request) {public
(request); super
}
@Override
authenticate( username, password) {public boolean String String
authResult= ;boolean false
authResult = //some authentication logic...
(authResult)if
userName = username;
authResult;return
}
@Override
Roles getRoles() {public
Roles resultRoles = Roles();new
(isSignedIn())if
resultRoles.add( );"SIGNED_IN"
(userName.equals( ))if "superuser"
resultRoles.add(Roles.ADMIN);
resultRoles;return
}
171
}
Roles can be adopted to apply security restrictions on our pages and components. This can be done using one
of the two built-in authorization strategies that extend super class
: and AbstractRoleAuthorizationStrategyWicket MetaDataRoleAuthorizationStrategy
AnnotationsRoleAuthorizationStrategy
The difference between these two strategies is that handlesMetaDataRoleAuthorizationStrategy
role-based authorizations with Wicket metadata while usesAnnotationsRoleAuthorizationStrategy
Java annotations.
Application class already sets AuthenticatedWebApplication
and MetaDataRoleAuthorizationStrategy
as its own authorization strategies (itAnnotationsRoleAuthorizationStrategy
uses a compound strategy as we will see in ).paragraph 21.2
The code that we will see in the next examples is for illustrative purpose only. If our
application class inherits from we won't need toAuthenticatedWebApplication
configure anything to use these two strategies.
Using roles with metadata
Strategy uses application and components metadata to implementMetaDataRoleAuthorizationStrategy
role-based authorizations. The class defines a set of static methods authorize that can be used to specify which
roles are allowed to instantiate a component and which roles can perform a given action on a component.
The following code snippet reports both application and session classes from project
and illustrates how to use toMetaDataRolesStrategyExample MetaDataRoleAuthorizationStrategy
allow access to a given page (AdminOnlyPage) only to ADMIN role:
Application class:
public class WicketApplication AuthenticatedWebApplication{ extends
@Override
<? WebPage> getHomePage(){public Class extends
HomePage.class;return
}
@Override
<? AbstractAuthenticatedWebSession> getWebSessionClass() {protected Class extends
BasicAuthenticationSession.class;return
}
@Override
<? WebPage> getSignInPageClass() {protected Class extends
SignInPage.class;return
}
@Override
void init(){ public
getSecuritySettings().setAuthorizationStrategy( MetaDataRoleAuthorizationStrategy(new
));this
MetaDataRoleAuthorizationStrategy.authorize(AdminOnlyPage.class, Roles.ADMIN);
}
}
Session class:
public class BasicAuthenticationSession AuthenticatedWebSession {extends
username;private String
BasicAuthenticationSession(Request request) {public
(request); super
}
@Override
authenticate( username, password) {public boolean String String
//user is authenticated username and password are equalif
172
authResult = username.equals(password);boolean
(authResult)if
.username = username;this
authResult;return
}
Roles getRoles() {public
Roles resultRoles = Roles();new
// user is signed in add the relative roleif
(isSignedIn())if
resultRoles.add( );"SIGNED_IN"
// username is equal to 'superuser' add the ADMIN roleif
(username!= && username.equals( ))if null "superuser"
resultRoles.add(Roles.ADMIN);
resultRoles;return
}
@Override
void signOut() {public
.signOut();super
username = ;null
}
}
The code that instantiates and set it as application's strategy isMetaDataRoleAuthorizationStrategy
inside application class method init.
Any subclass of needs an implementation of interface AbstractRoleAuthorizationStrategyWicket
to be instantiated. For this purpose in the code above we used the application classIRoleCheckingStrategy
itself because its base class already implements interface AuthenticatedWebApplication
. By default checks for authorizations using theIRoleCheckingStrategy AuthenticatedWebApplication
roles returned by the current . As final step inside init we grant theAbstractAuthenticatedWebSession
access to page to ADMIN role calling method authorize.AdminOnlyPage
The code from session class has three interesting methods. The first is authenticate which considers as valid
credentials every pair of username and password having the same value. The second notable method is
getRoles which returns role SIGNED_IN if user is authenticated and it adds role ADMIN if username is equal to
superuser. Finally, we have method signOut which has been overridden in order to clean the username field
used internally to generate roles.
Now if we run the project and we try to access to from the home page without having theAdminOnlyPage
ADMIN role, we will be redirected to the default access-denied page used by Wicket:
The access-denied page can be customized using method setAccessDeniedPage(Class<? extends
of setting interface :Page>) IApplicationSettings
//Application class code…
@Override
void init(){ public
getApplicationSettings().setAccessDeniedPage(
MyCustomAccessDeniedPage.class);
}
Just like custom “Page expired” page (see ), also custom “Access denied” page must bechapter 8.2.5
bookmarkable.
Using roles with annotations

173
Using roles with annotations
Strategy relies on two built-in annotations to handle role-basedAnnotationsRoleAuthorizationStrategy
authorizations. These annotations are and . As their namesAuthorizeInstantiation AuthorizeAction
suggest the first annotation specifies which roles are allowed to instantiate the annotated component while the
second must be used to indicate which roles are allowed to perform a specific action on the annotated
component.
In the following example we use annotations to make a page accessible only to signed-in users and to enable it
only if user has the ADMIN role:
@AuthorizeInstantiation( )"SIGNED_IN"
@AuthorizeAction(action = , roles = { })"ENABLE" "ADMIN"
class MyPage WebPage {public extends
//Page class code…
}
Remember that when a component is not enabled, user can render it but he can neither click on its links nor
interact with its forms.
Example project is a revisited version of AnnotationsRolesStrategyExample
where we use asMetaDataRolesStrategyExample AnnotationsRoleAuthorizationStrategy
authorization strategy. To ensure that page is accessible only to ADMIN role we have used theAdminOnlyPage
following annotation:
@AuthorizeInstantiation( )"ADMIN"
class AdminOnlyPage WebPage {public extends
//Page class code…
}
Catching an unauthorized component instantiation
Interface IUnauthorizedComponentInstantiationListener (in package )org.apache.wicket.authorization
is provided to give the chance to handle the case in which a user tries to instantiate a component without having
the permissions to do it. The method defined inside this interface is
and it is executed whenever a user attempts to execute anonUnauthorizedInstantiation(Component)
unauthorized instantiation.
This listener must be registered into application's security settings with method setUnauthorized
defined by setting interface . In the followingComponentInstantiationListener ISecuritySettings
code snippet we register a listener that redirect user to a warning page if he tries to do a not-allowed
instantiation:
public class WicketApplication AuthenticatedWebApplication{ extends
//Application code…
@Override
void init(){ public
getSecuritySettings().setUnauthorizedComponentInstantiationListener(
IUnauthorizedComponentInstantiationListener() {new
@Override
void onUnauthorizedInstantiation(Component component) {public
component.setResponsePage(AuthWarningPage.class);
}
});
}
}
In addition to interface , class implements also IRoleCheckingStrategy AuthenticatedWebApplication
and registers itself as listener for unauthorizedIUnauthorizedComponentInstantiationListener
instantiations.
By default redirects users to sign-in page if they are not signed-in and theyAuthenticatedWebApplication
174
try to instantiate a restricted component. Otherwise, if users are already signed in but they are not allowed to
instantiate a given component, an will be thrown.UnauthorizedInstantiationException
Strategy RoleAuthorizationStrategy
Class is a compound strategy that combines both RoleAuthorizationStrategy
and .MetaDataRoleAuthorizationStrategy AnnotationsRoleAuthorizationStrategy
This is the strategy used internally by .AuthenticatedWebApplication
21.3 Using HTTPS protocol
HTTPS is the standard technology adopted on Internet to create a secure communication channel between web
applications and their users.
In Wicket we can easily protect our pages with HTTPS mounting a special request mapper called HttpsMapper
and using annotation RequireHttps with those pages we want to serve over this protocol. Both these two entities
are in package .org.apache.wicket.protocol.https
HttpsMapper wraps an existing mapper and redirects incoming requests to HTTPS if the related response must
render a page containing annotation . Most of the times the wrapped mapper will be the rootRequireHttps
one, just like we saw before for in .CryptoMapper paragraph 10.6
Another parameter needed to build a is an instance of class g. This class allows usHttpsMapper HttpsConfi
to specify which ports must be used for HTTPS and HTTP. By default the port numbers used by these two
protocols are respectively 443 and 80.
The following code is taken from project and illustrates how to enable HTTPS in ourHttpsProtocolExample
applications:
//Application class code…
@Override
void init(){ public
setRootRequestMapper( HttpsMapper(getRootRequestMapper(), new
HttpsConfig(8080, 443))); new
}
Now we can use annotation RequireHttps to specify which pages must be served using HTTPS:
@RequireHttps
class HomePage WebPage {public extends
HomePage( PageParameters parameters) {public final
(parameters); super
}
}
If we want to protect many pages with HTTPS without adding annotation to each of them, weRequireHttps
can annotate a marker interface or a base page class and implement/extend it in any page we want to make
secure:
// Marker :interface
@RequireHttps
IMarker{public interface
}
// Base class:
@RequireHttps
class BaseClass WebPage{public extends
//Page code…
}
// Secure page inheriting from BaseClass:
class HttpsPage BaseClass{public extends
//Page code…
}
// Secure page implementing IMarker:
class HttpsPage IMarker{public implements
175
class HttpsPage IMarker{public implements
//Page code…
}
21.4 URLs encryption in detail
In chapter we have seen how to encrypt URLs using request mapper. To encrypt/decrypt10.6 CryptoMapper
page URLs uses an instance of interface:CryptoMapper org.apache.wicket.util.crypt.ICrypt
public ICryptinterface
{
encryptUrlSafe( plainText);String final String
decryptUrlSafe( encryptedText);String final String
…
}
The default implementation for this interface is class . Itorg.apache.wicket.util.crypt.SunJceCrypt
provides password-based cryptography using algorithm coming with the standard securityPBEWithMD5AndDES
providers in the Java Runtime Environment.
For better security it is recommended to install Java Cryptography Extension (JCE)
Unlimited Strength Jurisdiction for your version of JDK/JRE and use strongerPolicy Files
algorithms. See this of a custom implementation for inspiration.example ICrypt
By using constructorCryptoMapper(IRequestMapper wrappedMapper, Application application)
the mapper will use the configured from org.apache.wicket.util.crypt.ICryptFactory
. To use a strongerorg.apache.wicket.settings.ISecuritySettings#getCryptFactory()
cryptography mechanism there are the following options:
The first option is to use constructor CryptoMapper(IRequestMapper wrappedMapper,
and give it an implementation of IProvider<ICrypt> cryptProvider)
that returns a custom org.apache.wicket.util.IProvider
.org.apache.wicket.util.crypt.ICrypt
is a single-method interface that acts asorg.apache.wicket.util.IProvider
object supplier:
public IProvider<T>interface
{
T get();
}
The second option is to register a cipher factory at application level with method
of interface :setCryptFactory(ICryptFactory cryptFactory) ISecuritySettings
@Override
void init() {public
.init();super
getSecuritySettings().setCryptFactory( SomeCryptFactory());new
setRootRequestMapper( CryptoMapper(getRootRequestMapper(), ));new this
}
Since version 6.19.0 Wicket uses
as a default factory for org.apache.wicket.core.util.crypt.KeyInSessionSunJceCryptFactory
176
objects. This factory generates a unique key for each user that is stored in her HTTP session. This wayICrypt
it helps to protect the application against attacks - the <form> action url will be encrypted in such way thatCSRF
it will be unique for each user of the application. The url itself serves as .encrypted token
org.apache.wicket.core.util.crypt.KeyInSessionSunJceCryptFactory
binds the http session if it is not already bound! If the application needs to run in stateless
mode then the application will have to provide a custom implementation of
that stores the user specific keys by other means.ICryptFactory
21.5 Package Resource Guard
Wicket internally uses an entity called package resource guard to protect package resources from external
access. This entity is an implementation of interface
.org.apache.wicket.markup.html.IPackageResourceGuard
By default Wicket applications use as package resource guard class , whichSecurePackageResourceGuard
allows to access only to the following file extensions (grouped by type):
File Extensions
JavaScript files .js
CSS files .css
HTML pages .html
Textual files .txt
Flash files .swf
Picture files .png, .jpg, .jpeg, .gif, .ico, .cur, .bmp, .svg
Web font files .eot, .ttf, .woff
To modify the set of allowed files formats we can add one or more patterns with method addPattern(String)
. The rules to write a pattern are the following:
patterns start with either a "+" or a "-". In the first case the pattern will add one or more file to the set while
starting a pattern with a “-” we exclude all the files matching the given pattern. For example pattern
“-web.xml” excludes all web.xml files in all directories.
wildcard character “*” is supported as placeholder for zero or more characters. For example pattern
“+*.mp4” adds all the mp4 files inside all directories.
subdirectories are supported as well. For example pattern “+documents/*.pdf” adds all pdf files under
“documents” directory. Character “*” can be used with directories to specify a nesting level. For example
“+documents/*/*.pdf” adds all pdf files placed one level below “documents” directory.
a double wildcard character “**” indicates zero or more subdirectories. For example pattern
“+documents/**/*.pdf” adds all pdf files placed inside “documents” directory or inside any of its
subdirectories.
Patterns that allow to access to every file with a given extensions (such as “+*.pdf”) should be always avoided in
favour of more restrictive expressions that contain a directory structure:
//Application class code…
@Override
void init() public
{
IPackageResourceGuard packageResourceGuard = application.getResourceSettings()
.getPackageResourceGuard();
(packageResourceGuard SecurePackageResourceGuard)if instanceof
{
SecurePackageResourceGuard guard = (SecurePackageResourceGuard)
packageResourceGuard;
//Allow to access only to pdf files placed in the “ ” directory.public
guard.addPattern( );"+ /*.pdf"public
}
}

177
21.6 Summary
In this chapter we have seen the components and the mechanisms that allow us to implement security policies in
our Wicket-based applications. Wicket comes with an out of the box support for both authorization and
authentication.
The central element of authorization mechanism is the interface which decouplesIAuthorizationStrategy
our components from any detail about security strategy. The implementations of this interface must decide if a
user is allowed to instantiate a given page or component and if she/he can perform a given action on it.
Wicket natively supports role-based authorizations with strategies MetaDataRoleAuthorizationStrategy
and . The difference between these two strategies is that theAnnotationsRoleAuthorizationStrategy
first offers a programmatic approach for role handling while the second promotes a declarative approach using
built-in annotations.
After having explored how Wicket internally implements authentication and authorization, in the last part of the
chapter we have learnt how to configure our applications to support HTTPS and how to specify which pages
must be served over this protocol.
In the last paragraph we have seen how Wicket protects package resources with a guard entity that allows us to
decide which package resources can be accessed from users.
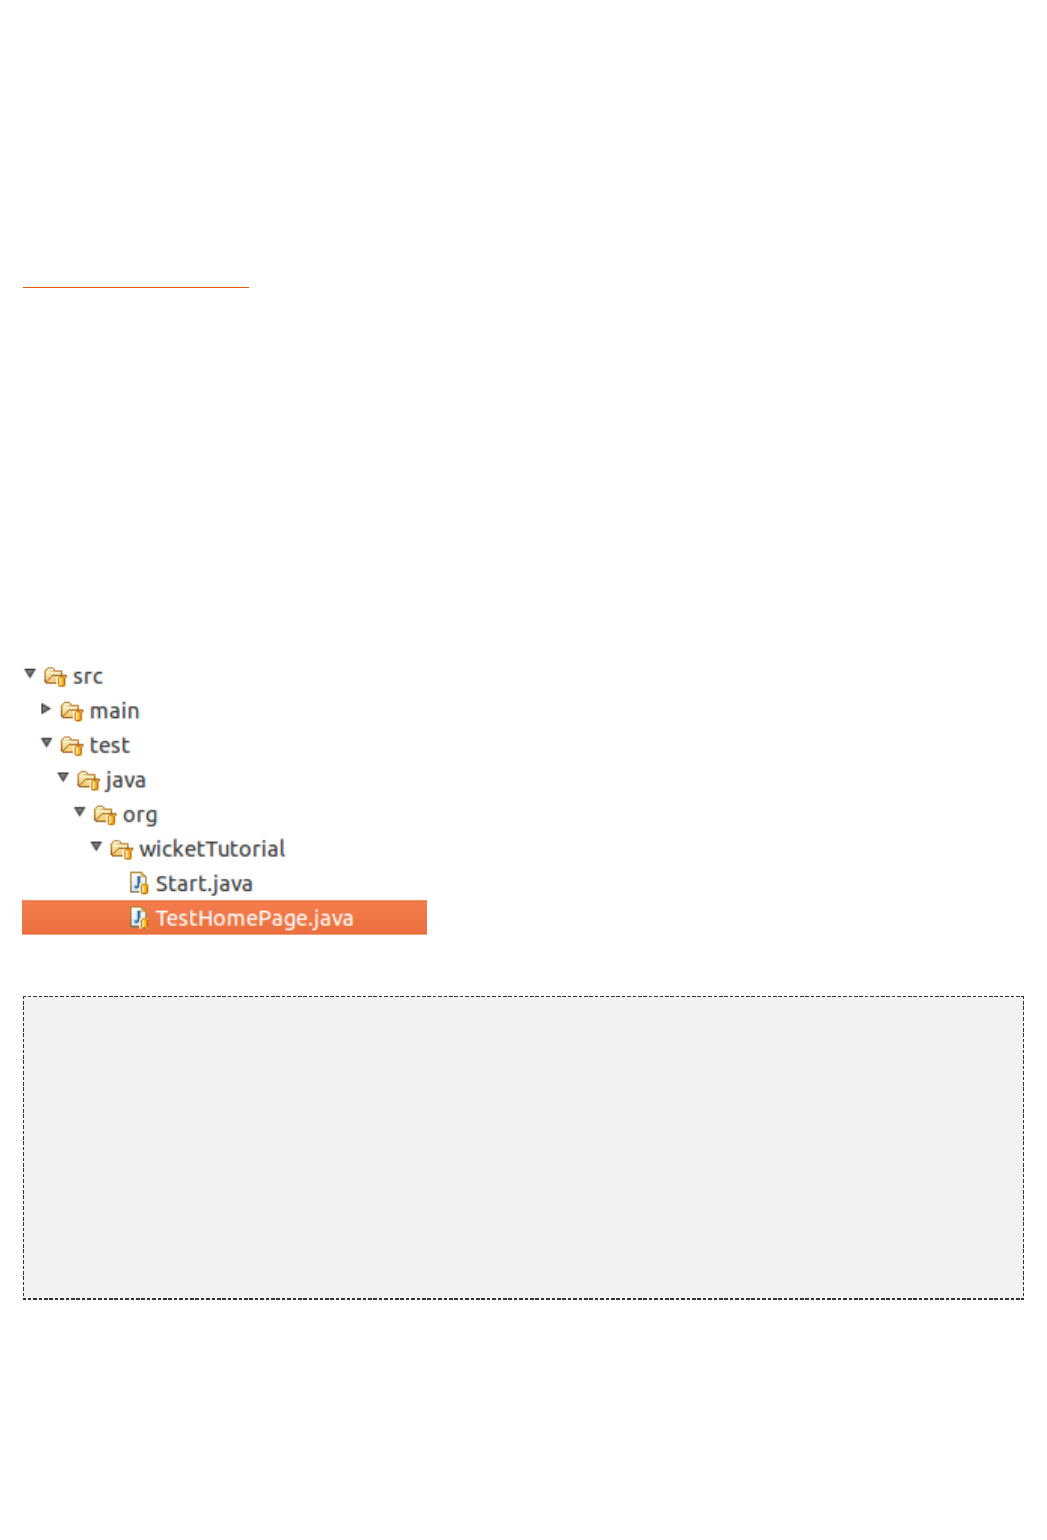
178
22 Test Driven Development with
Wicket
has become a crucial activity for every modern development methodology. ThisTest Driven Development
chapter will cover the built-in support for testing provided by Wicket with its rich set of helper and mock classes
that allows us to test our components and our applications in isolation (i.e without the need for a servlet
container) using JUnit, the de facto standard for Java unit testing.
In this chapter we will see how to write unit tests for our applications and components and we will learn how to
use helper classes to simulate user navigation and write acceptance tests without the need of any testing
framework other than JUnit.
The JUnit version used in this chapter is 4.x.
22.1 Utility class WicketTester
A good way to start getting confident with Wicket unit testing support is looking at the test case class
that is automatically generated by Maven when we use Wicket archetype to create a newTestHomePage
project:
Here is the content of TestHomePage:
public class TestHomePage{
WicketTester tester;private
@Before
void setUp(){public
tester = WicketTester( WicketApplication());new new
}
@Test
void homepageRendersSuccessfully(){public
//start and render the test page
tester.startPage(HomePage.class);
//assert rendered page class
tester.assertRenderedPage(HomePage.class);
}
}
The central class in a Wicket testing is . This utility classorg.apache.wicket.util.tester.WicketTester
provides a set of methods to render a component, click links, check if page contains a given component or a
feedback message, and so on.
The basic test case shipped with illustrates how is typically instantiated (insideTestHomePage WicketTester
method ). In order to test our components, WicketTester needs to use an instance of setUp()
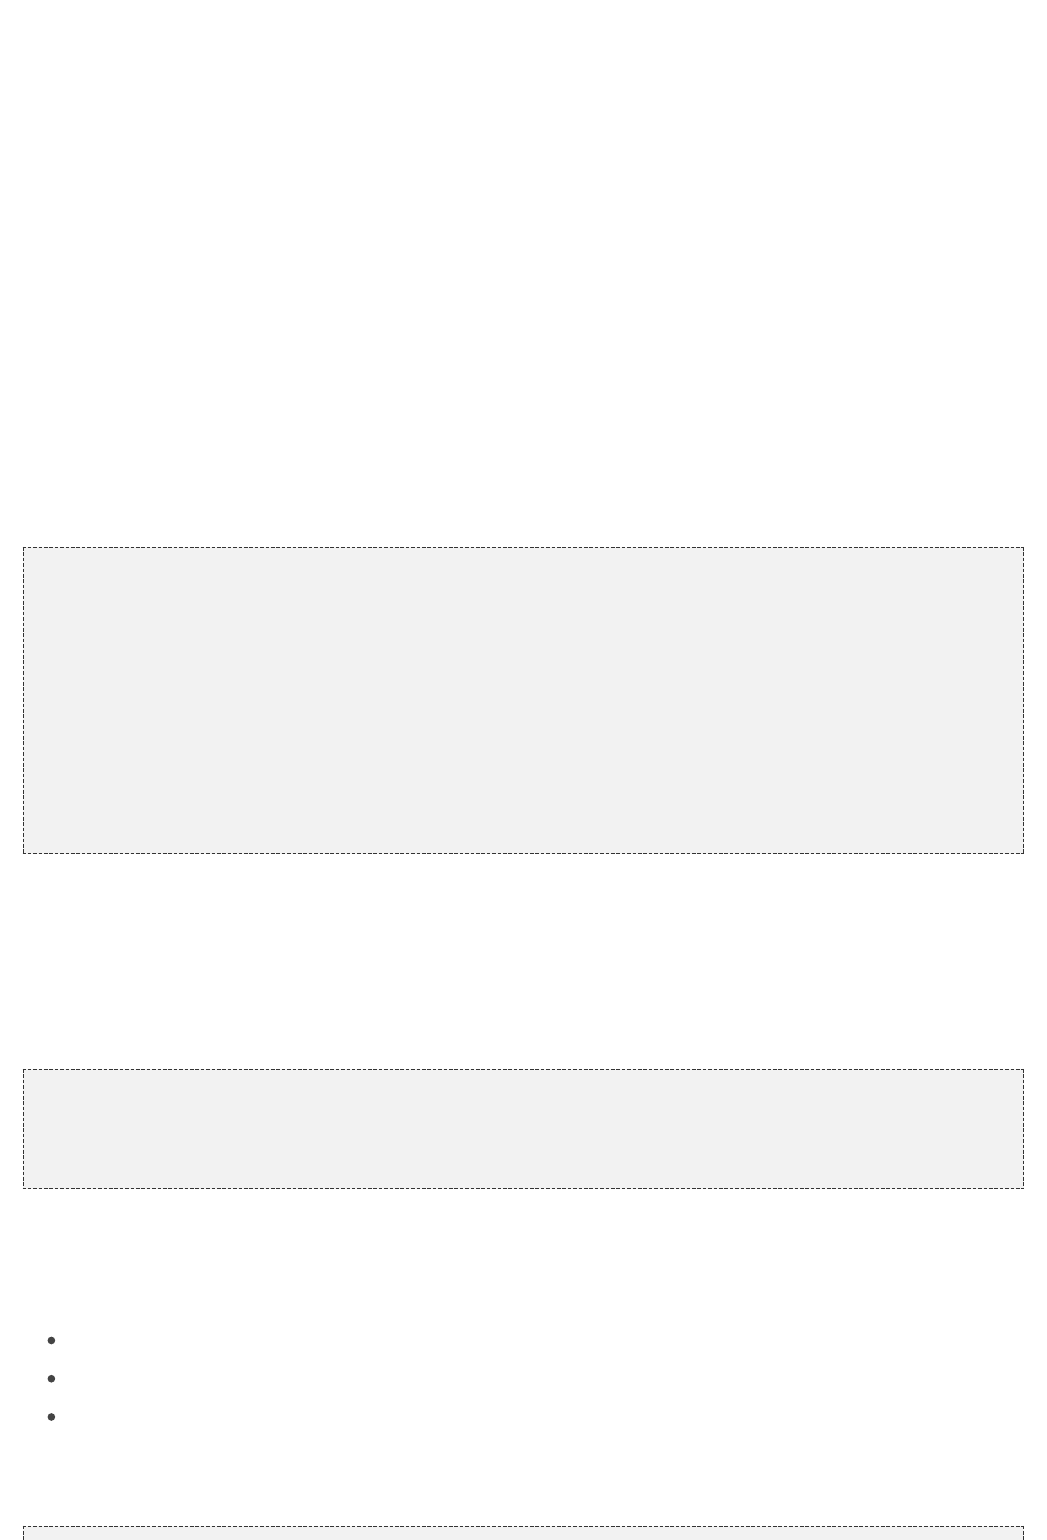
179
. Usually, we will use our application class as , but we can also decide toWebApplication WebApplication
build WicketTester invoking its no-argument constructor and letting it automatically build a mock web application
(an instance of class ).org.apache.wicket.mock.MockApplication
The code from introduces two basic methods to test our pages. The first is method TestHomePage startPage
that renders a new instance of the given page class and sets it as current rendered page for WicketTester. The
second method is assertRenderedPage which checks if the current rendered page is an instance of the given
class. In this way if TestHomePage succeeds we are sure that page HomePage has been rendered without any
problem. The last rendered page can be retrieved with method .getLastRenderedPage
That's only a taste of what can do. In the next paragraphs we will see how it can be used to testWicketTester
every element that composes a Wicket page (links, models, behaviors, etc...).
Testing links
A click on a Wicket link can be simulated with method which takes in input the link component or theclickLink
page-relative path to it.
To see an example of usage of clickLink, let's consider again project . As weLifeCycleStagesRevisited
know from chapter 5 the home page of the project alternately displays two different labels (“First label” and
“Second label”), swapping between them each time button "reload" is clicked. The code from its test case checks
that label has actually changed after button "reload" has been pressed:
//…
@Test void switchLabelTest(){public
//start and render the test page
tester.startPage(HomePage.class);
//assert rendered page class
tester.assertRenderedPage(HomePage.class);
//assert rendered label
tester.assertLabel( , );"label" "First label"
//simulate a click on button"reload"
tester.clickLink( );"reload"
//assert rendered label
tester.assertLabel( , ); "label" "Second label"
}
//...
In the code above we have used to click on the "reload" button and force page to be renderedclickLink
again. In addition, we have used also method that checks if a given label contains the expectedassertLabel
text.
By default assumes that AJAX is enabled on client side. To switch AJAX off we can use anotherclickLink
version of this method that takes in input the path to the link component and a boolean flag that indicates if AJAX
must be enabled (true) or not (false).
//…
//simulate a click on a button without AJAX support
tester.clickLink( , );"reload" false
//...
Testing component status
WicketTester provides also a set of methods to test the states of a component. They are:
assertEnabled(String path)/assertDisabled(String path): they test if a component is enabled or not.
assertVisible(String path)/assertInvisible(String path): they test component visibility.
assertRequired(String path): checks if a form component is required.
In the test case from project we used / to checkCustomDatepickerAjax assertEnabled assertDisabled
if button "update" really disables our datepicker:
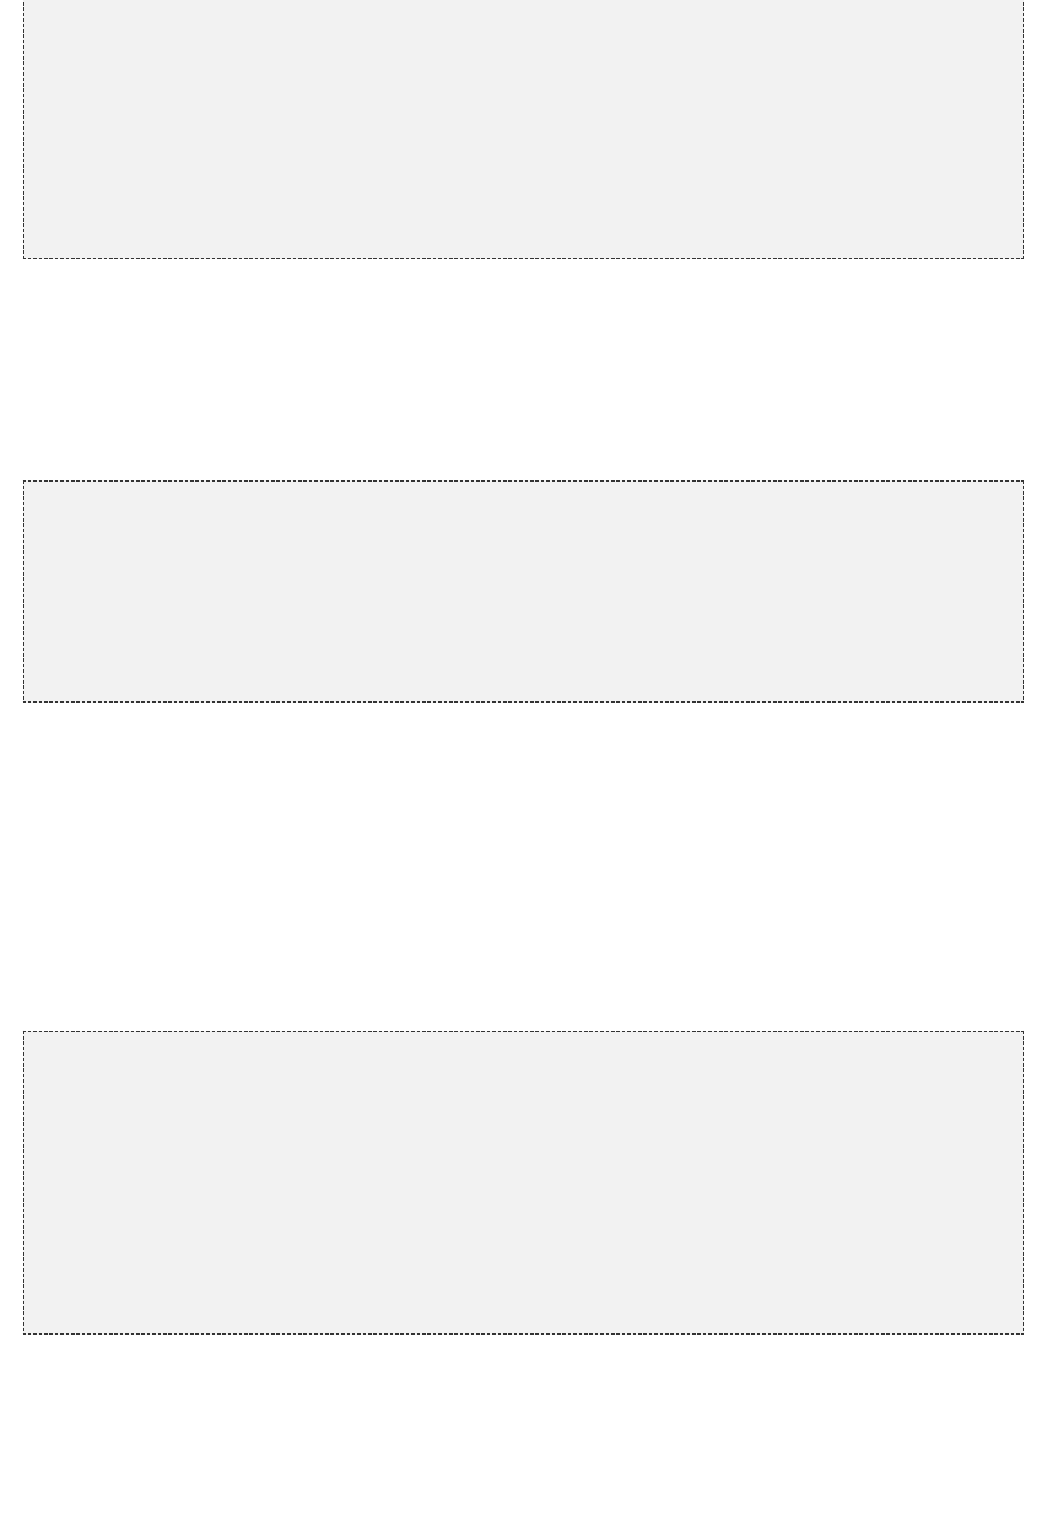
180
//…
@Test void testDisableDatePickerWithButton(){public
//start and render the test page
tester.startPage(HomePage.class);
//assert that datepicker is enabled
tester.assertEnabled( );"form:datepicker"
//click on update button to disable datepicker
tester.clickLink( );"update"
//assert that datepicker is disabled
tester.assertDisabled( ); "form:datepicker"
}
//...
Testing components in isolation
Method can be used to test a component in isolation without having to createstartComponent(Component)
a container page for this purpose. The target component is rendered and both its methods onInitialize()
and are executed. In the test case from project we usedonBeforeRender() CustomFormComponentPanel
this method to check if our custom form component correctly renders its internal label:
//…
@Test void testCustomPanelContainsLabel(){public
TemperatureDegreeField field = TemperatureDegreeField( , Model.of(0.00));new "field"
//Use standard JUnit class Assert
Assert.assertNull(field.get( )); "mesuramentUnit"
tester.startComponent(field);
Assert.assertNotNull(field.get( ));"mesuramentUnit"
}
//...
If test requires a page we can use which automatically generates astartComponentInPage(Component)
page for our component.
Testing the response
allows us to access to the last response generated during testing with method WicketTester
. The returned value is an instance of class MockHttpServletResponse that provides helpergetLastResponse
methods to extract informations from mocked request.
In the test case from project we extract the text contained in the last response withCustomResourceMounting
method and we check if it is equal to the RSS feed used for the test:getDocument
//…
@Test void testMountedResourceResponse() IOException,public throws
FeedException{tester.startResource( RSSProducerResource());new
responseTxt = tester.getLastResponse().getDocument();String
//write the RSS feed used in the test into a ByteArrayOutputStream
ByteArrayOutputStream outputStream = ByteArrayOutputStream();new
Writer writer = OutputStreamWriter(outputStream);new
SyndFeedOutput output = SyndFeedOutput();new
output.output(RSSProducerResource.getFeed(), writer);
//the response and the RSS must be equal
Assert.assertEquals(responseTxt, outputStream.toString());
}
//...
To simulate a request to the custom resource we used method which can be used also withstartResource
resource references.
Testing URLs
can be pointed to an arbitrary URL with method . This can beWicketTester executeUrl(String url)

181
useful to test mounted pages, resources or request mappers:
//…
//the resource was mapped at '/foo/bar'
tester.executeUrl( ); "./foo/bar"
//...
Testing AJAX components
If our application uses AJAX to refresh components markup, we can test if contains aAjaxRequestTarget
given component with 's method :WicketTester assertComponentOnAjaxResponse
//…
//test AjaxRequestTarget contains a component (using its instance)if
tester.assertComponentOnAjaxResponse(amountLabel);
//…
//test AjaxRequestTarget contains a component (using its path)if
tester.assertComponentOnAjaxResponse( );"pathToLabel:labelId"
It's also possible to use method to know if a componentisComponentOnAjaxResponse(Component cmp)
has been added to :AjaxRequestTarget
//…
//test AjaxRequestTarget does NOT contain amountLabel if
assertFalse(tester.isComponentOnAjaxResponse(amountLabel));
//...
Testing AJAX events
Behavior and its subclasses can be tested simulating AJAX events with AjaxEventBehavior WicketTester
's method . Here is the sample code from project executeAjaxEvent(Component cmp, String event)
:TestAjaxEventsExample
Home page code:
public class HomePage WebPage {extends
INIT_VALUE = ;public static String "Initial value"
OTHER_VALUE = ;public static String "Other value"
HomePage( PageParameters parameters) {public final
(parameters);super
Label label;
add(label = Label( , INIT_VALUE)); new "label"
label.add( AjaxEventBehavior( ) {new "click"
@Override
void onEvent(AjaxRequestTarget target) {protected
//change label's data object
getComponent().setDefaultModelObject(
OTHER_VALUE);
target.add(getComponent());
}
}).setOutputMarkupId( );true
//…
}
}
Test method:
@Test void testAjaxBehavior(){public
//start and render the test page
tester.startPage(HomePage.class);
//test label has the initial expected valueif
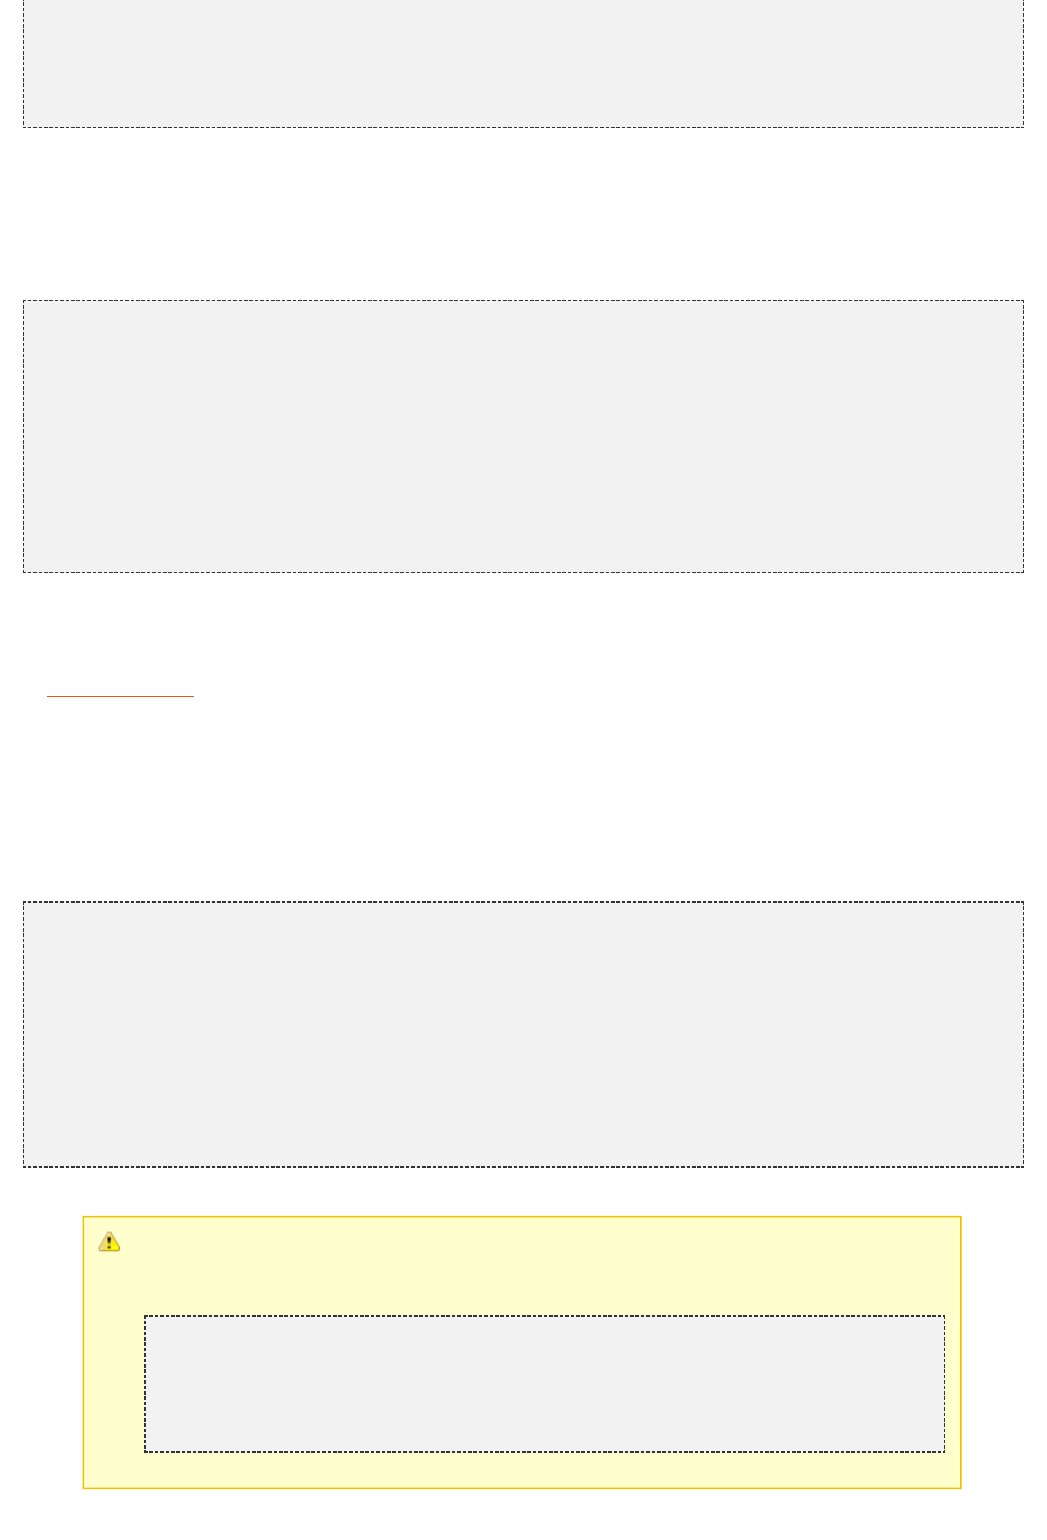
182
tester.assertLabel( , HomePage.INIT_VALUE); "label"
//simulate an AJAX event"click"
tester.executeAjaxEvent( , );"label" "click"
//test label has changed as expectedif
tester.assertLabel( , HomePage.OTHER_VALUE);"label"
}
Testing AJAX behaviors
To test a generic AJAX behavior we can simulate a request to it using 's method WicketTester
:executeBehavior(AbstractAjaxBehavior behavior)
//…
AjaxFormComponentUpdatingBehavior ajaxBehavior =
AjaxFormComponentUpdatingBehavior( ){new "change"
@Override
void onUpdate(AjaxRequestTarget target) {protected
//...
}
};
component.add(ajaxBehavior);
//…
//execute AJAX behavior, i.e. onUpdate will be invoked
tester.executeBehavior(ajaxBehavior));
//...
Using a custom servlet context
In we have seen how to configure our application to store resource files into a custom folderparagraph 15.13
placed inside webapp root folder (see project ).CustomFolder4MarkupExample
In order to write testing code for applications that use this kind of customization, we must tell WicketTester
which folder to use as webapp root. This is necessary as under test environment we don't have any web server,
hence it's impossible for to retrieve this parameter from servlet context.WicketTester
Webapp root folder can be passed to 's constructor as further parameter like we did in the testWicketTester
case of project :CustomFolder4MarkupExample
public class TestHomePage{
WicketTester tester;private
@Before
void setUp(){public
//build the path to webapp root folder
File curDirectory = File( .getProperty( ));new System "user.dir"
File webContextDir = File(curDirectory, );new "src/main/webapp"
tester = WicketTester( WicketApplication(), webContextDir.getAbsolutePath());new new
}
//test methods…
}
After a test method has been executed, we may need to clear any possible side effect
occurred to the and objects. This can be done invoking Application Session
's method :WicketTester destroy()
@After void tearDown(){public
//clear any side effect occurred during test.
tester.destroy();
}
22.2 Testing Wicket forms
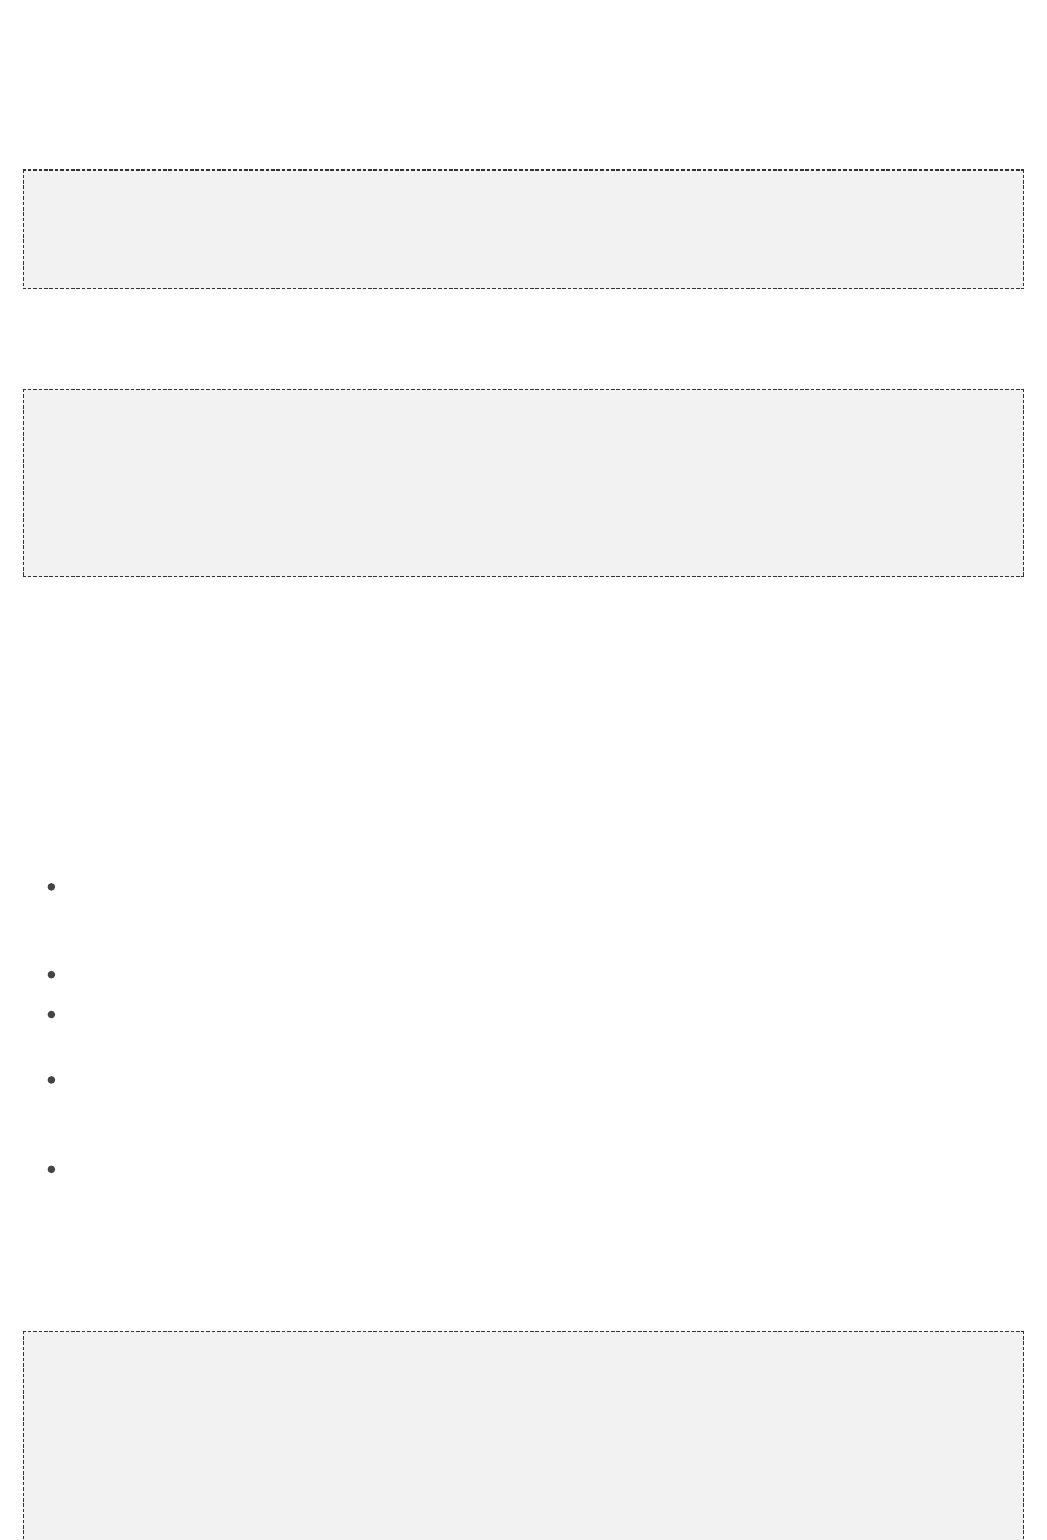
183
22.2 Testing Wicket forms
Wicket provides utility class FormTester that is expressly designed to test Wicket forms. A new FormTester is
returned by 's method which takes in input theWicketTester newFormTester(String, boolean)
page-relative path of the form we want to test and a boolean flag indicating if its form components must be filled
with a blank string:
//…
//create a form tester without filling its form components with a blank stringnew
FormTester formTester = tester.newFormTester( , );"form" false
//...
can simulate form submission with method submit which takes in input as optional parameter theFormTester
submitting component to use instead of the default one:
//…
//create a form tester without filling its form components with a blank stringnew
FormTester formTester = tester.newFormTester( , );"form" false
//submit form with submitterdefault
formTester.submit();
//…
//submit form using component 'button' as alternate buttoninner
formTester.submit( );"button"
If we want to submit a form with an external link component we can use method submitLink(String path,
specifying the path to the link.boolean pageRelative)
In the next paragraphs we will see how to use and to interact with a form and withWicketTester FormTester
its children components.
Setting form components input
The purpose of a HTML form is to collect user input. comes with the following set of methods thatFormTester
simulate input insertion into form's fields:
setValue(String path, String value): inserts the given textual value into the specified component. It can be
used with components and . A version of this method that accepts a componentTextField TextArea
instance instead of its path is also available.
setValue(String checkboxId, boolean value): sets the value of a given component.CheckBox
setFile(String formComponentId, File file, String contentType): sets a object on a File
component.FileUploadField
select(String formComponentId, int index): selects an option among a list of possible options owned by
a component. It supports components that are subclasses of along with AbstractChoice RadioGroup
and .CheckGroup
selectMultiple(String formComponentId, int indexes): selects all the options corresponding to the given
array of indexes. It can be used with multiple-choice components like or CheckGroup
.ListMultipleChoice
is used inside method to set the username and password fields of thesetValue insertUsernamePassword
form used in project :StatelessLoginForm
protected void insertUsernamePassword( username, password) {String String
//start and render the test page
tester.startPage(HomePage.class);
FormTester formTester = tester.newFormTester( );"form"
//set credentials
formTester.setValue( , username);"username"
formTester.setValue( , password); "password"
//submit form
formTester.submit();
}
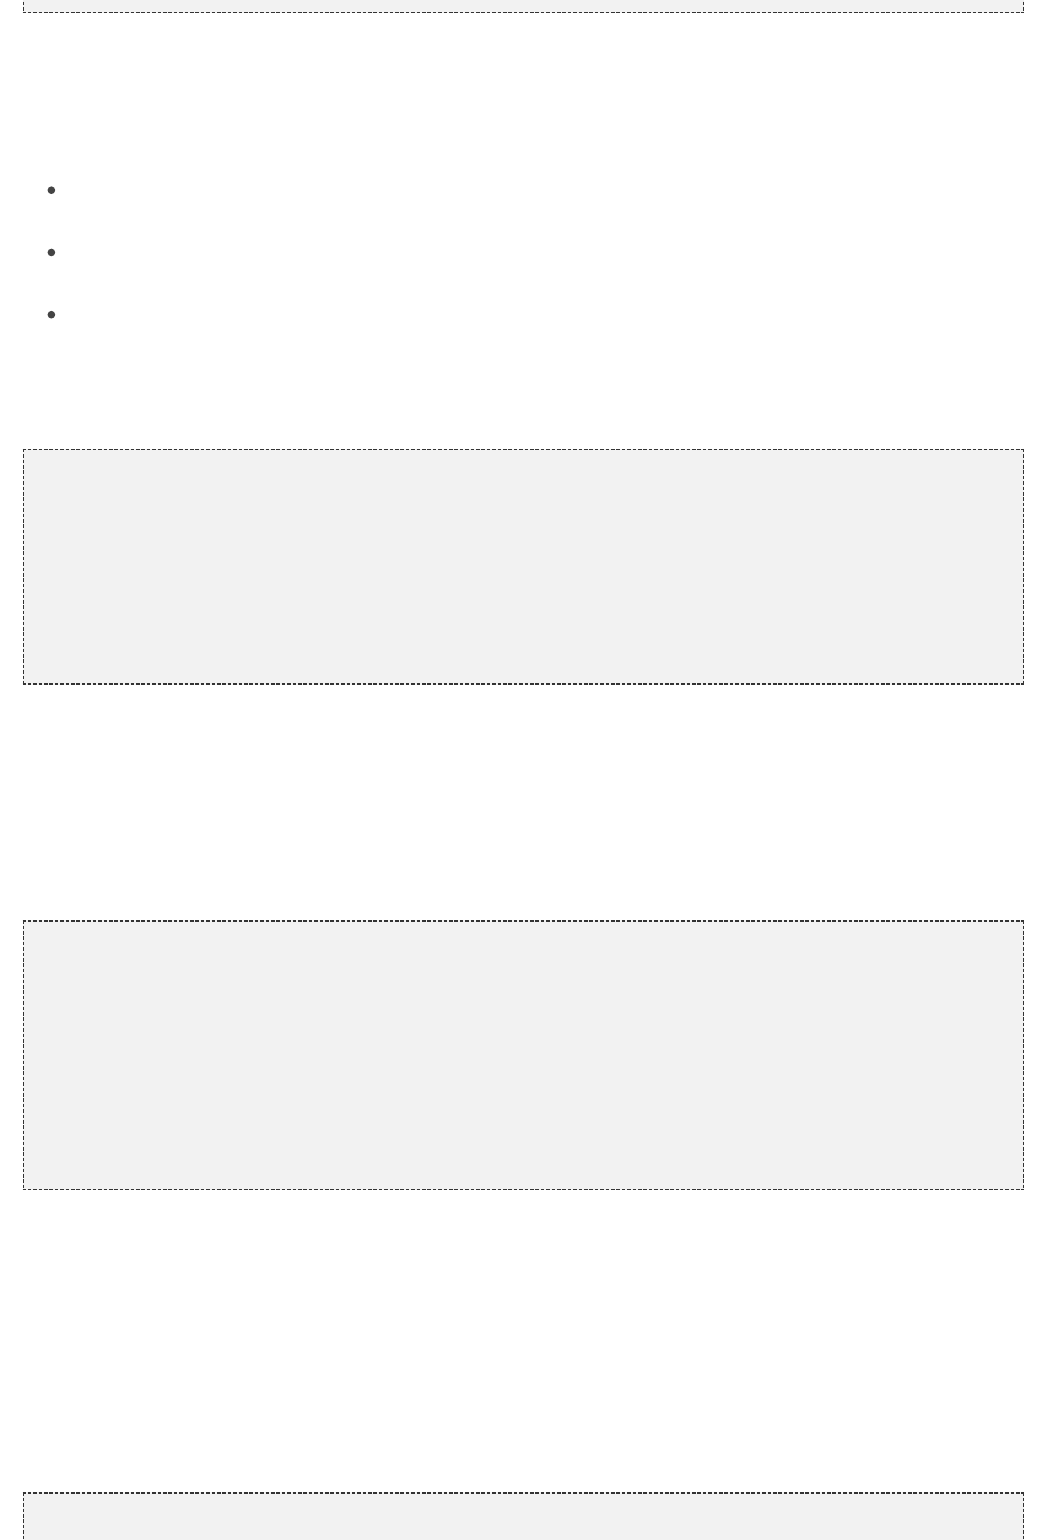
184
Testing feedback messages
To check if a page contains one or more expected feedback messages we can use the following methods
provided by :WicketTester
assertFeedback(String path, String… messages): asserts that a given panel contains the specified
messages
assertInfoMessages(String… expectedInfoMessages): asserts that the expected info messages are
rendered in the page.
assertErrorMessages(String… expectedErrorMessages): asserts that the expected error messages are
rendered in the page.
and are used in the test case from project assertInfoMessages assertErrorMessages
to check that form generates a feedback message in accordance with the login result:StatelessLoginForm
@Test void testMessageForSuccessfulLogin(){public
inserUsernamePassword( , ); "user" "user"
tester.assertInfoMessages( );"Username and password are correct!"
}
@Test void testMessageForFailedLogin (){public
inserUsernamePassword( , ); "wrongCredential" "wrongCredential"
tester.assertErrorMessages( );"Wrong username or password"
}
Testing models
Component model can be tested as well. With method we can test if a specific componentassertModelValue
has the expected data object inside its model.
This method has been used in the test case of project to check if the form and theModelChainingExample
drop-down menu share the same data object:
@Test void testFormSelectSameModelObject(){public
PersonListDetails personListDetails = PersonListDetails();new
DropDownChoice dropDownChoice = (DropDownChoice) personListDetails.get( );"persons"
List choices = dropDownChoice.getChoices();
//select the second option of the drop-down menu
dropDownChoice.setModelObject(choices.get(1));
//start and render the test page
tester.startPage(personListDetails);
//assert that form has the same data object used by drop-down menu
tester.assertModelValue( , dropDownChoice.getModelObject());"form"
}
22.3 Testing markup with TagTester
If we need to test component markup at a more fine-grained level, we can use class from package TagTester
.org.apache.wicket.util.tester
This test class allows to check if the generated markup contains one or more tags having a given attribute with a
given value. TagTester can not be directly instantiated but it comes with three factory methods that return one or
more TagTester matching the searching criteria. In the following test case (from project )TagTesterExample
we retrieve the first tag of the home page (a <span> tag) having attribute class equal to myClass:
HomePage markup:
<html xmlns:wicket= >"http://wicket.apache.org"

185
<head>
<meta charset= />"utf-8"
<title></title>
</head>
<body>
<span class= ></span>"myClass"
<div class= ></div>"myClass"
</body>
</html>
Test method:
@Test void homePageMarkupTest()public
{
//start and render the test page
tester.startPage(HomePage.class);
//retrieve response's markup
responseTxt = tester.getLastResponse().getDocument();String
TagTester tagTester = TagTester.createTagByAttribute(responseTxt, , );"class" "myClass"
Assert.assertNotNull(tagTester);
Assert.assertEquals( , tagTester.getName());"span"
List<TagTester> tagTesterList = TagTester.createTagsByAttribute(responseTxt,
, , );"class" "myClass" false
Assert.assertEquals(2, tagTesterList.size());
}
The name of the tag found by TagTester can be retrieved with its method getName. Method
returns all the tags that have the given value on the class attribute. In the codecreateTagsByAttribute
above we have used this method to test that our markup contains two tags having attribute class equal to
myClass.
Another utility class that comes in handy when we want to test components markup is inComponentRenderer
package . The purpose of this class is to render a page or aorg.apache.wicket.core.util.string
component in isolation with its static methods and . Both methods return therenderComponent renderPage
generated markup as :CharSequence
@Test void customComponentMarkupTest()public
{
//instantiate MyComponent
MyComponent myComponent = //...
//render and save component markup
componentMarkup = ComponentRenderer.renderComponent(myComponent);String
//perform test operations
//…
}
22.4 Summary
With a component-oriented framework we can test our pages and components as we use to do with any other
Java entity. Wicket offers a complete support for writing testing code, offering built-in tools to test nearly all the
elements that build up our applications (pages, containers, links, behaviors, etc...).
The main entity discussed in this chapter has been class which can be used to write unit testsWicketTester
and acceptance tests for our application, but we have also seen how to test forms with and how toFormTester
inspect markup with .TagTester
In addition to learning how to use the utility classes provided by Wicket for testing, we have also experienced the
innovative approach of Wicket to web testing that allows to test components in isolation without the need of
running our tests with a web server and depending only on JUnit as testing framework.

186
23 Test Driven Development with
Wicket and Spring
Since the development of many web applications is mostly based on the Spring framework for dependency
injection and application configuration in general, it's especially important to get these two frameworks running
together smoothly not only when deployed on a running server instance itself but rather during the execution of
JUnit based integration tests as well. Thanks to the API provided by the Wicket framework itself,WicketTester
one can easily build high-quality web applications while practicing test driven development and providing a
decent set of unit and integration tests to be executed with each build. As already mentioned previously,
integration and configuration of our web applications is based on a lightweight Spring container meaning that the
integration of Spring's and a WicketTester API is essential to get our integration testsApplicationContext
running. In order to explain how to achieve that integration in an easy and elegant fashion in your integration test
environment, we'll first take a look at a configuration of these 2 framework beauties in a runtime environment.
23.1 Configuration of the runtime environment
In order to get the Wicket framework up to speed when your server is up and running, you usually configure a
instance in your web application deployment descriptor file ( ) while passing it a singleWicketFilter web.xml
init parameter called that points to your main implementation class extending applicationClassName
where all of your application-wide settings andorg.apache.wicket.protocol.http.WebApplication
initialization requirements are dealt with:
<filter>
wicketfilter<filter-name> </filter-name>
org.apache.wicket.protocol.http.WicketFilter<filter-class> </filter-class>
<init-param>
applicationClassName<param-name> </param-name>
com.comsysto.webapp.MyWebApplication<param-value> </param-value>
</init-param>
</filter>
In case you want to get Wicket application up and running while leaving the application configuration and
dependency injection issues to the Spring container, the configuration to be provided within the deployment
descriptor looks slightly different though:
<web-app>
<filter>
wicketfilter<filter-name> </filter-name>
org.apache.wicket.protocol.http.WicketFilter<filter-class> </filter-class>
<init-param>
applicationFactoryClassName<param-name> </param-name>
org.apache.wicket.spring.SpringWebApplicationFactory<param-value> </param-value>
</init-param>
</filter>
<listener>
org.springframework.web.context.ContextLoaderListener<listener-class>
</listener-class>
</listener>
<context-param>
contextConfigLocation<param-name> </param-name>
/WEB-INF/applicationContext.xml<param-value> </param-value>
</context-param>
</web-app>
The additional configuration part containing listener and context parameter definition is a usual Spring container
related configuration detail. ContextLoaderListener is an implementation of standard Servlet API
ServletContextListener interface provided by the Spring framework itself and is responsible for looking up an
according bean definition file(s) specified by the context param above and creating an ApplicationContext

187
instance during servlet context initialization accordingly. When integrating an ApplicationContext instance with
Wicket, one of the beans defined in the above mentioned Spring bean definition file has to be your own specific
extension of . You can either define a suitableorg.apache.wicket.protocol.http.WebApplication
bean in the bean definition file itself:
<beans>
<bean id= class= />"myWebApp" "com.comsysto.webapp.MyWebApplication"
</beans>
or use powerful classpath scanning feature of the Spring framework and annotate the MyWebApplication
implementation with the appropriate annotation accordingly while enabling the Spring container to@Component
scan the according package(s) of your application for relevant bean definitions:
<beans>
<context:component-scan base-package= />"com.comsysto.webapp"
<context:component-scan base-package= />"com.comsysto.webapp.service"
<context:component-scan base-package= />"com.comsysto.webapp.repository"
</beans>
Either way, if everything goes well, you'll get a pre-configured ApplicationContext all set up during the startup of
your web container. One of the beans in the ApplicationContext will be your own extension of Wicket's
WebApplication type. SpringWebApplicationFactory implementation provided by the Wicket framework itself that
you have defined as the in the configuration of your WicketFilter will then beapplicationFactoryClassName
used in order to retrieve that very same WebApplication bean out of your Spring ApplicationContext. The Factory
expects one and only one extension of Wicket's very own WebApplication type to be found within the
ApplicationContext instance at runtime. If no such bean or more than one bean extending WebApplication is
found in the given ApplicationContext an according IllegalStateException will be raised and initialization of your
web application will fail:
Map<?,?> beans = BeanFactoryUtils.beansOfTypeIncludingAncestors(ac,WebApplication.class,
, );false false
(beans.size() == 0)if
{
IllegalStateException( + WebApplication.class.getName() +throw new "bean of type ["
);"] not found"
} (beans.size() > 1)if
{
IllegalStateException( +throw new "more than one bean of type ["
WebApplication.class.getName() + );"] found, must have only one"
}
After the WebApplication bean has been successfully retrieved from the ApplicationContext via
SpringWebApplicationFactory, WicketFilter will then, as part of its own initialization process, trigger both
internalInit() and init() methods of the WebApplication bean. The latter one is the exact spot where the last piece
of the runtime configuration puzzle between Wicket and Spring is to be placed :
@Component
class MyWebApplication WebApplication {public extends
@Override
void init() {protected
.init();super
getComponentInstantiationListeners().add( SpringComponentInjector( ));new this
}
}
SpringComponentInjector provided by the Wicket framework enables you to get dependencies from the
ApplicationContext directly injected into your Wicket components by simply annotating these with the according
annotation.@SpringBean
23.2 Configuration of the JUnit based integration test environment

188
One of the main features of Apache Wicket framework is the ability to easily write and run plain unit tests for your
Pages and all other kinds of Components that even include the verification of the rendering process itself by
using JUnit framework and the WicketTester API only. When using Spring framework for application
configuration together with Wicket, as we do, you can even use the same tools to easily write and run full blown
integration tests for your web application as well. All you have to do is use frameworkSpring's TestContext
additionally to configure and run your JUnit based integration tests. The Spring Framework provides a set of
Spring specific annotations that you can use in your integration tests in conjunction with the TestContext
framework itself in order to easily configure an according ApplicationContext instance for your tests as well as for
appropriate transaction management before, during and after your test execution. Following code snippet
represents a simple JUnit 4 based test case using Spring's specific annotations in order to initialize an
ApplicationContext instance prior to executing the test itself:
@RunWith(SpringJUnit4ClassRunner.class)
@ContextConfiguration(locations = { })"classpath:WEB-INF/applicationContext.xml"
@TransactionConfiguration(transactionManager = , defaultRollback = )"txManager" false
class LoginPageTest {public
WicketTester tester;private
@Autowired
ApplicationContext ctx;private
@Autowired
MyWebApplication myWebApplication;private
@Before
void setUp() {public
tester = WicketTester(myWebApplication);new
}
@Test
@Transactional
@Rollback( )true
void testRenderMyPage() {public
tester.startPage(LoginPage.class);
tester.assertRenderedPage(LoginPage.class);
tester.assertComponent( , LoginComponent.class);"login"
}
}
By defining three annotations on the class level (see code snippet above) in your test, Spring's TestContext
framework takes care of preparing and initializing an ApplicationContext instance having all the beans defined in
the according Spring context file as well as the transaction management in case your integration test includes
some kind of database access. Fields marked with annotation will be automatically dependency@Autowired
injected as well so that you can easily access and use these for your testing purposes. Since MyWebApplication,
which extends Wicket's WebApplication type and represents the main class of our web application, is also a
bean within the ApplicationContext managed by Spring, it will also be provided to us by the test framework itself
and can be easily used in order to initialize a WicketTester instance later on during the execution of the test's
setUp() method. With this kind of simple, annotation based test configuration we are able to run an integration
test that verifies whether a LoginPage gets started and initialized, whether the rendering of the page runs
smoothly and whether the page itself contains a LoginComponent that we possibly need in order to process
user's login successfully.
When you run this test though, you'll unfortunately get the following exception raised:
java.lang.IllegalStateException: No WebApplicationContext found: no ContextLoaderListener
registered?
at org.springframework.web.context.support.WebApplicationContextUtils.
getRequiredWebApplicationContext(WebApplicationContextUtils.java:84)
at org.apache.wicket.spring.injection.annot.
SpringComponentInjector.<init>(SpringComponentInjector.java:72)
at com.comsysto.serviceplatform.uiwebapp.MyWebApplication.
initializeSpringComponentInjector(MyWebApplication.java:59)
at com.comsysto.serviceplatform.uiwebapp.MyWebApplication.
init(MyWebApplication.java:49)
at org.apache.wicket.protocol.http.WicketFilter.
init(WicketFilter.java:719)
at org.apache.wicket.protocol.http.MockWebApplication.
<init>(MockWebApplication.java:168)
at org.apache.wicket.util.tester.BaseWicketTester.
<init>(BaseWicketTester.java:219)
at org.apache.wicket.util.tester.WicketTester.
<init>(WicketTester.java:325)
at org.apache.wicket.util.tester.WicketTester.
<init>(WicketTester.java:308)
189
As you can see above, the Exception gets raised during the initialization of the instance evenWicketTester
before the actual test method gets executed. Even though we have applied rather cool and simple annotation
based test configuration already described and passed in perfectly well prepared ApplicationContext instance to
the WicketTester instance in the constructor, somewhere down the rabbit hole someone complained that no
WebApplicationContext instance could have been found which seems to be required in order to initialize the
WicketTester properly.
The problem that we run against here is due to the fact that SpringComponentInjector during its own initialization
is trying to get hold of an according Spring's ApplicationContext instance that would normally be there in a
runtime environment but does not find any since we are running in a test environment currently.
SpringComponentInjector delegates to Spring's own WebApplicationContextUtils class to retrieve the instance of
ApplicationContext out of the ServletContext which is perfectly fine for a runtime environment but is unfortunately
failing in a test environment:
public WebApplicationContext getRequiredWebApplicationContext(ServletContext sc)static
IllegalStateException {throws
WebApplicationContext wac = getWebApplicationContext(sc);
(wac == ) {if null
IllegalStateException(throw new "No WebApplicationContext found: no
);ContextLoaderListener registered?"
}
wac;return
}
If you still remember we defined a ContextLoaderListener in our web.xml file as part of the configuration of our
runtime environment that makes sure an according WebApplicationContext instance gets initialized and
registered against the ServletContext properly. Luckily, this problem can easily be solved if we slightly change
the way we initialize SpringComponentInjector in our main MyWebApplication class. Apart from the constructor
that we have used so far, there is another constructor in the SpringComponentInjector class that expects the
caller to provide it with an according ApplicationContext instance rather than trying to resolve one on its own:
public SpringComponentInjector(WebApplication webapp, ApplicationContext ctx,
wrapInProxies)boolean
{
(webapp == )if null
{
IllegalArgumentException( );throw new "Argument [[webapp]] cannot be "null
}
(ctx == )if null
{
IllegalArgumentException( );throw new "Argument [[ctx]] cannot be "null
}
// store context in application's metadata …
webapp.setMetaData(CONTEXT_KEY, ApplicationContextHolder(ctx));new
// … and create and register the annotation aware injector

190
InjectorHolder.setInjector( AnnotSpringInjector( ContextLocator(),new new
wrapInProxies));
}
In order to use this constructor instead of the one we used previously, we now obviously need to get hold of the
instance on our own in our implementation. The easiest way toApplicationContext MyWebApplication
do this is to use Spring's own concept of provided to the beans managed by the Springlifecycle callbacks
container. Since our is also a bean managed by the Spring container at runtime (enabledMyWebApplication
by the classpath scanning and annotation on a type level), we can declare it to implement @Component
interface which ensures that it gets provided with the ApplicationContextAware ApplicationContext
instance that it runs in by the Spring container itself during startup.
public ApplicationContextAware {interface
void setApplicationContext(ApplicationContext applicationContext) BeansException;throws
}
So the relevant parts of type will now look something like the following code snippet:MyWebApplication
@Component
class MyWebApplication WebApplication ApplicationContextAware {public extends implements
@Override
void init() {protected
addComponentInstantiationListener( SpringComponentInjector( , ctx, ));new this true
}
void setApplicationContext(ApplicationContext applicationContext) public throws
BeansException {
.ctx = applicationContext;this
}
}
For additional clarification of how now relates to both Wicket and Spring framework here isMyWebApplication
an according class diagram:
23.3 Summary
With the configuration outlined above, no additional modifications are required to the test itself. It's going to turn
green now. This way you can use exactly the same Spring context configuration that you'd use in your runtime
environment for running your JUnit based integration tests as well.
191
24 Wicket Best Practices
This section is addressed to developers, who have already made their first experiences with Apache Wicket.
Developers who get into Wicket often have difficulties with it because they apply the typical JSF and Struts
patterns and approaches. These frameworks primarily use procedural programming methods. In contrast Wicket
is strongly based on object oriented patterns. So forget all Struts and JSF patterns, otherwise you won't have fun
with Wicket in the long run.
24.1 Encapsulate components correctly
A component should be self-contained. The user of a component should neither have to know nor care about its
internal structure. She should just be familiar with its external interfaces and its documentation in order to be able
to use it. This means in detail: Every component that extends Wicket's own Panel type (thus is a Panel itself)
must provide its own HTML template. In contrast, when a component extends the classes
or , there is no HTML template. This implies that you should add componentsWebMarkupContainer Form
through composition in or .WebMarkupContainer Form
Listing 1:
// Poor component
class RegistrationForm Form<Registration> {public extends
RegistrationForm( id, IModel<Registration> regModel) {public String
(id, CompoundPropertyModel<Registration>(regModel))super new
// Wrong: RegistrationForm provides its own components
add( TextField( ));new "username"
add( TextField( ));new "firstname"
add( TextField( ));new "lastname"
}
}
This snippet is an example for a poor component. The user of the must know the internalRegistrationForm
structure of the markup and component in order to use it.
Listing 2:
public class RegistrationPage Page {extends
RegistrationPage(IModel<Registration> regModel) {public
Form<?> form = RegistrationForm( );new "form"
form.add( SubmitButton( ) {new "register"
void onSubmit() {public
// somethingdo
}
});
add(form);
}
}
<html>
<body>
<form wicket:id= >"form"
<!-- These are internal structure information from RegistrationForm -->
Username <input type= wicket:id= />"text" "username"
First name <input type= wicket:id= />"text" "firstname"
Last name <input type= wicket:id= />"text" "lastname"
<!-- Above components from page which the user knows -->new
<input type= wicket:id= value= />"submit" "register" "Register"
</form>
</body>
</html>

192
The code above shows the usage of the poor component in the . You can see that theRegistrationPage
input fields , and get used, even though these components are not addedfirstname lastname username
explicitly to the . Avoid this, because other developers cannot directly see that theRegistrationPage
components were added in class.RegistrationPage
Listing 3:
// Good component
class RegistrationInputPanel Panel{public extends
RegistrationInputPanel( id, IModel<Registration> regModel) {public String
(id, regModel);super
IModel<Registration> compound = CompoundPropertyModel<Registration(regmodel)new
Form<Registration> form = Form<Registration>( , compound);new "form"
// Correct: Add components to Form over the instance variable
form.add( TextField( ));new "username"
form.add( TextField( ));new "firstname"
form.add( TextField( ));new "lastname"
add(form);
}
}
<html>
<body>
<wicket:panel>
<form wicket:id= >"form"
Username <input type= wicket:id= />"text" "username"
First name <input type= wicket:id= />"text" "firstname"
Last name <input type= wicket:id= />"text" "lastname"
</form>
</wicket:panel>
</body>
</html>
Now we have a properly encapsulated input component which provides its own markup. Furthermore you can
see the correct usage of a Wicket . The components get added by calling on theForm form.add(Component)
instance variable. On the other hand, it is allowed to add behaviours and validators over inheritance, because
those do not have markup ids which must be bound.
With that, the usage of is much more intuitive. There is no markup of otherRegistrationInputPanel
embedded components present anymore, just markup of components which get directly added. The
provides its own form that delegates the submit to all Wicket nested forms which areRegistrationPage
contained in the component tree.
Listing 4:
public class RegistrationPage Page {extends
RegistrationPage(IModel<Registration> regModel) {public
Form<?> form = Form( );new "form"
form.add( RegistrationInputPanel( , regModel);new "registration"
form.add( SubmitButton( ) {new "register"
void onSubmit() {public
// somethingdo
}
});
add(form);
}
}
<html>
<body>
<form wicket:id= >"form"
<div wicket:id= >"registration"
Display the RegistrationInputPanel
</div>
<input type=”submit” wicket:id= value= />"register" "Register"
</form>
</body>
</html>

193
24.2 Put models and page data in fields
In contrast to Struts, Wicket pages and components are no singletons, they are stateful and session-scoped.
This enables us to store user-specific information within pages and components. The information should be
stored in fields. This way you can access the information within a class while avoiding long method signatures
only for passing the same information around. Instances of components can exist for several requests. For
example, a page with a form which gets submitted and produces validation errors uses the same page instance.
Furthermore the same page instance gets used when the user presses the back button of the browser and
resubmits this formular again. Information which gets passed by the constructor should be assigned to fields
(normally this must be models). When storing information in fields you should consider that the information is
serializable, because the pages are stored using Java serialization. By default Wicket stores pages on the hard
disk. A non-serializable object leads to and .NullPointerExceptions NonSerializableExceptions
Additionally, big data (like binary stuff) should not be stored directly in fields because this can cause performance
losses and memory leaks during serialization and deserialization. In this case, you should use the
which can be assigned to a field because this provides an efficient mechanism toLoadableDetachableModel
load and detach data.
24.3 Correct naming for Wicket IDs
For many developers, naming is a dispensable thing, but I think it is one of the major topics in software
development. With the help of correct naming, you can easily identify the business aspects of a software
component. Additionally good naming avoids unneccessary and bad comments.
Bad namings for Wicket-IDs are , and . Why? ThebirthdateTextField firstnameField addressPanel
naming contains two aspects: A technical aspect ( ) and the business aspect ( ). Only the"TextField" "birthdate"
the business aspect is relevant because both the HTML template as well as the Java code already contain the
technical details (" )". Additionally, such names add a lot of effort when you donew TextField("birthdate")
technical refactorings, e.g. if you have to replace a by a and the Wicket ID TextField DatePicker
becomes . Another reason for avoiding technical aspects inbirthdateTextField birthdateDatePicker
Wicket IDs is the . This model delegates the properties to its child componentsCompoundPropertyModel
named by Wicket IDs (see listing 3). For example the automatically calls TextField username
and on the object. A setter like setUsername() getUsername() Registration
would be very inconvenient here.setUsernameTextfield()
24.4 Avoid changes at the component tree
You should consider Wicket's component tree a constant and fixed skeleton which gets revived when its model is
filled with data like a robot without brain. Without brain the robot is not able to do anything and is just a dead and
fixed skeleton. However, when you fill it with data, it becomes alive and can act. There is no need for changing
hardware when filling him with data. In Wicket, you should manipulate the component tree as little as possible.
Consequently, you should avoid calling methods like and Component.replace(Component)
. Calling these methods indicates missing usage or misusage of Wicket'sComponent.remove(Component)
models. Furthermore the component trees should not be constructed using conditions (see listing 5). This
reduces the possibility of reusing the same instance significantly.
Listing 5:
// typical strutsfor
(MySession.get().isNotLoggedIn()) {if
add( LoginBoxPanel( ))new "login"
} {else
add( EmptyPanel( ))new "login"
}
Instead of constructing conditionally, it is recommended to always add the panel and controlLoginBoxPanel
the visibility by overriding . So the component is responsible for displaying itself.isVisible() LoginBoxPanel
We move the responsibility into the same component which executes the login. Brilliant! Cleanly encapsulated
business logic. There is no decision from outside, the component handles all the logic. You can see another
example in "Implement visibilities of components correctly".
24.5 Implement visibilities of components correctly
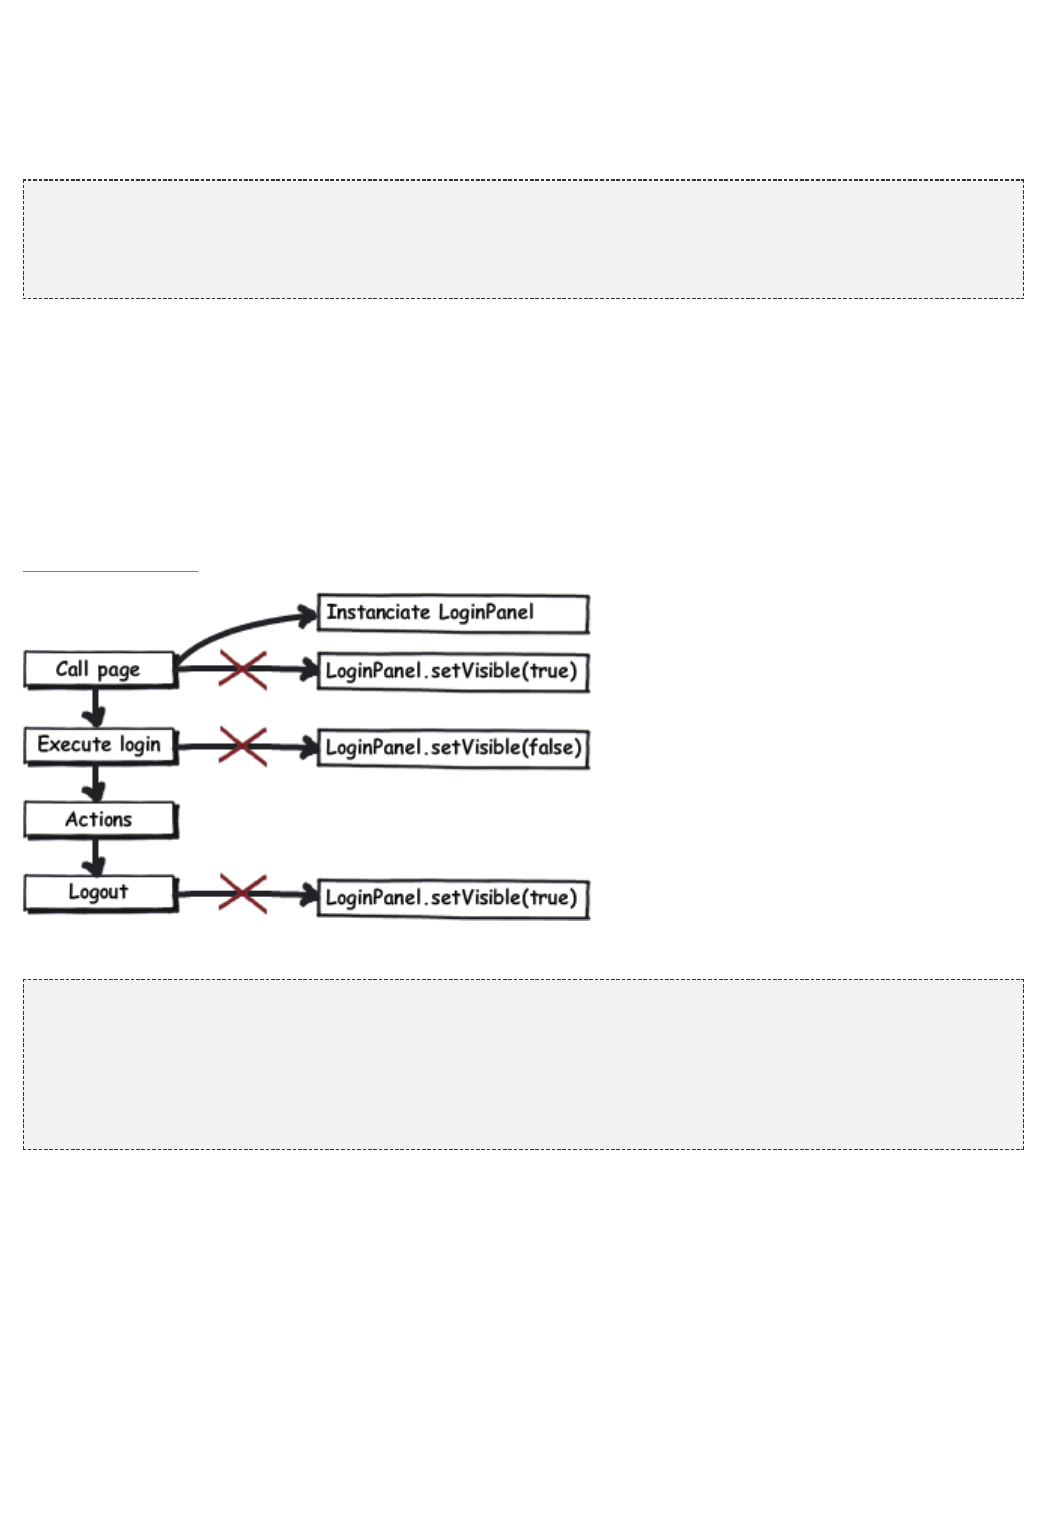
194
Visibility of components is an important topic. In Wicket you control any component's visibility via the methods
and . These methods are within Wicket's base class and therefore itisVisible() setVisible() Component
is applicable for every component and page. Let's have a look at a concrete example of . TheLoginBoxPanel
panel just gets displayed when the user is not logged in.
Listing 6:
// Poor implementation
LoginBoxPanel loginBox = LoginBoxPanel( );new "login"
loginBox.setVisible(MySession.get().isNotLoggedIn());
add(loginBox);
Listing 6 shows a poor implementation, because a decision about the visibility is made while instanciating the
component. Again, in Wicket instances of components exist for several requests. To reuse the same instance
you have to call . This is very unhandy, because we always have to call loginBox.setVisible(false)
and manage the visibility. Furthermore you are going to duplicate the states, because visible issetVisible()
equal to "not logged in". So we have two saved states, one for the business aspect "not logged in" and one for
the technical aspect "visible". Both is always equal. This approach is error-prone and fragile, because we always
have to pay attention to setting the correct information every time. But this is often forgotten because the logic is
widely spread over the code. The solution is the Hollywood principle: "Don't call us, we'll call you.". Take a look at
the following diagram illustrating an application flow with some calls. We avoid three calls through the
and we just have to instanciate the .Hollywood-Principle LoginBoxPanel
Listing 7:
public class LoginBoxPanel {
// constructor etc.
@Override
isVisible() {public boolean
MySession.get().isNotLoggedIn();return
}
};
Now the control over visibility has been inverted, the decides on its visibility autonomously. ForLoginBoxPanel
each call of there is a refreshed interpretion of the login state. Hence, there is no additional stateisVisible()
that might be outdated. The logic is centralized in one line code and not spread throughout the application.
Furthermore, you can easily identify that the technical aspect correlates to the business aspectisVisible()
"logged in". The same rules can be applied to the method . If returns false theisEnabled() isEnabled()
components get displayed in gray. Forms which are within an inactive or invisible component do not get
executed.
Note that there are cases in which you cannot avoid to call the methods and .setVisible() setEnabled()
An example: The user presses a button to display an inlined registration form. In general, you can apply the
following rules: data driven components override these methods and delegates to the data model. User triggered
events call the method . You can also override these methods with inlinesetVisible(boolean)
implementations:
Listing 8:

195
new Label( , headlineModel) {"headline"
@Override
isVisible() {public boolean
// Hidden headline text starts with if "Berlusconi"
headline = getModelObject();String
headline.startWith( );return "Berlusconi"
}
}
Some people insist on overriding being . The method getsNote: isVisible() a bad thing isVisible()
called very often (more than once for each request!), so you have to ensure that the calls within isVisible()
are cheap. The main point is that the visibility of a component should be controlled by its own and not be
controlled by other components. This avoids a wide-spread logic over the whole application. Another way you
can realize this is to override and set the visibility there. This method gets called once duringonConfigure()
each request.
24.6 Always use models
Always use models - period! Do not pass raw objects directly to components. Instances of pages and
components can exist for several requests. If you use raw objects, you cannot replace them later. An example is
an entity which gets loaded at each request within a . The entity manager createsLoadableDetachableModel
a new object reference, but the page would keep the obsolete instance. Always pass in the constructorIModel
of your components:
Listing 9:
public class RegistrationInputPanel Panel{extends
// Correct: The class Registration gets wrapped by IModel
RegistrationInputPanel( id, IModel<Registration> regModel) {public String
// add components
}
}
This code can use any implementation of , e.g. the class , a or a customIModel Model PropertyModel
implementation of which loads and persists the values automatically. The modelLoadableDetachableModel
implementations gets very easy to replace. You - as a developer - just need to know: if I call
, I will get an object of type . Where the object comes from is within theIModel.getObject() Registration
responsibility of the model implementation and the calling component. For example you can pass the model
while instanciating the component. If you avoid using models, you will almost certainly have to modify the
component tree sooner or later which forces you to duplicate states and thus produce unmaintainable code.
Additionally, you should use models due to serialization issues. Objects which get stored in fields of pages and
components get serialized and deserialized on each request. This can be inefficient in some cases.
24.7 Do not unwrap models within the constructor hierarchy
Avoid unwrapping models within the constructor hierarchy, i.e. do not call within anyIModel.getObject()
constructor. As already mentioned, a page instance can exist for several page requests, so you might store
obsolete and redundant infomation. It is reasonable to unpack Wicket Models at events (user actions), that are
methods like , onSubmit()@:onUpdate() onClick() or
Listing 10:
new Form( ) {"register"
void onSubmit() {public
// correct, unwrap model in an event call
Registration reg = registrationModel.getObject()
userService.register(reg);
}
}
An additional possibility to unwrap models is via overriding methods like , or isVisible() isEnabled()

196
.onBeforeRender()
24.8 Pass models extended components
Always try to pass models on to the parent component. By that, you ensure that at the end of every request the
method gets called. This method is responsible for a data cleanup. Another example: youIModel.detach()
have implemented your own model which persists the data in the method. So the call of isdetach() detach()
necessary for that your data gets persisted. You can see an exemplary passing to the super constructor here:
Listing 11:
public class RegistrationInputPanel Panel{extends
RegistrationInputPanel( id, IModel<Registration> regModel) {public String
(id, regModel)super
// add components
}
}
24.9 Validators must not change any data or models
Validators should just validate. Consider a bank account form which has a . This validatorBankFormValidator
checks the bank data over a webservice and corrects the bank name. Nobody would expect that a validator
modifies information. Such logic has to be located in or in the event logic of a button.Form.onSubmit()
24.10 Do not pass components to constructors
Do not pass entire components or pages to constructors of other components.
Listing 12:
// Bad solution
class SettingsPage Page {public extends
SettingsPage (IModel<Settings> settingsModel, Webpage backToPage) {public final
Form<?> form = Form( );new "form"
// add components
form.add( SubmitButton( ) {new "changeSettings"
void onSubmit() {public
// somethingdo
setResponsePage(backToPage);
}
});
add(form);
}
}
The expects the page which should be displayed after a successful submit to be passed to itsSettingsPage
constructor. This solution works, but is very bad practice. You need to know during the instanciation of
where you want to redirect the user. This requires a predetermined order of instanciation. It isSettingsPage
better to order the instanciation based on business logic (e.g. the order in the HTML template). Furthermore, you
need an unnecessary instance of the next success page which might never be displayed. The solution is once
again the Hollywood principle. For this you create an abstract method or a hook:
Listing 13:
// Good solution
class SettingsPage Page {public extends
SettingsPage (IModel<Settings> settingsModel) {public
Form<?> form = Form( );new "form"
// add components
form.add( SubmitButton( ) {new "changeSettings"
void onSubmit() {public
// somethingdo
onSettingsChanged();
}
});
add(form);
}
// hook

197
// hook
void onSettingsChanged() {protected
}
// The usage of the componentnew
Link< > settings = Link< >( ) {Void new Void "settings"
void onClick() {public
setResponsePage( SettingsPage(settingsModel) {new
@Override
void onSettingsChanged() {protected
// reference to the current page
setResponsePage( );this
}
});
}
}
add(settings);
This solution has more code, but it is more flexible and reuseable. We can see there is an event
and this event is called after a successful change. Furthermore, there is the possibilityonSettingsChanged()
to execute additional code besides setting the next page. For example, you can display messages or persist
information.
24.11 Use the Wicket session only for global data
The Wicket session is your own extension of Wicket's base session. It is fully typed. There is no map structure to
store information unlike the servlet session. You just should use Wicket's session for global data. Authentication
is a good example for global data. The login and user information is required on nearly each page. For a blog
application it would be good to know whether the user is an author who is allowed to compose blog entries. So
you are able to hide or or show links to edit a blog entry. In general you should store the whole authorization
logic in Wicket's session, because it is a global thing and you would expect it there. Data of forms and flows
which only span certain pages should not stored in the session. This data can be passed from one page to the
next via the constructor (see listing 14). As a consequence of this, the models and data have a clearly defined
lifecycle that reflects the corresponding the page flow.
Listing 14:
public class MyPage WebPage {extends
IModel<MyData> myDataModel;
MyPage(IModel<MyData> myDataModel) {public
.myDataModel = myDataModel;this
Link< > next = Link< >( ) {Void new Void "next"
void onClick() {public
// somethingdo
setResponsePage( NextPage(myDataModel));new
}
}
add(next);
}
}
You should pass concrete information to the page. All models can simply be stored in fields because Wicket
pages are user-specific instances and no singletons in contrast to Struts. The big advantage of this approach is
that the data gets automatically cleaned up when a user completes or exits the page flow. No manual cleanup
anymore! This is basically an automatic garbage collector for your session.
24.12 Do not use factories for components
The factory pattern is useful, but nevertheless not suitable for Wicket components.
Listing 15:
public class CmsFactory {
Label getCmsLabel( markupId, url) {public String final String
IModel< > fragment = AbstractReadOnlyModel< >() {String new String
@Override
getObject() {public String
loadSomeContent(url);return
}
};
Label result = Label(markupId, fragment);new
198
result.setRenderBodyOnly( );true
result.setEscapeModelStrings( );false
result;return
}
loadContent( url) {public String String
// load some content
}
}
// create the component within the page:
class MyPage WebPage {public extends
@SpringBean
CmsFactory cmsFactory;
MyPage() {public
add(cmsFactory.getCmsLabel( , ));"id" "http://url.to.load.from"
}
}
This approach for adding a label from the to a page seems to be okay at first glance, but it comesCmsFactory
with some disadvantages. There is no possibility to use inheritance anymore. Furthermore, there is no possibility
to override and . The factory could also be a Spring service which instanciates theisVisible() isEnabled()
component. A better solution is to create a .CmsLabel
Listing 16:
public class CmsLabel Label {extends
@SpringBean
CmsResource cmsResource;
CmsLabel( id, IModel< > urlModel) {public String String
(id, urlModel);super
IModel< > fragment = AbstractReadOnlyModel< >(){String new String
@Override
getObject() {public String
cmsResource.loadSomeContent(urlModel.getObject());return
}
};
setRenderBodyOnly( );true
setEscapeModelStrings( );false
}
}
// create the component within a page
class MyPage WebPage {public extends
MyPage() {public
add( CmsLabel( , Model.of( )));new "id" "http://url.to.load.from"
}
}
The label in listing 16 is clearly encapsulated in a component without using a factory. Now you can easily create
inline implementations and override or other stuff. Naturally, you might claim "I need a factory toisVisible()
initialize some values in the component, e.g. a Spring service.". For this you can create a implementation of
. This listener gets called on the super-constructor of everyIComponentInstantiationListener
component. The most popular implementation of this interface is the whichSpringComponentInjector
injects Spring beans in components when the fields are annotated with . You can easliy write and@SpringBean
add your own implementation of . So there is no reason for using aIComponentInstantiationListener
factory anymore. More information about the instanciation listener is located in Wicket's JavaDoc.
24.13 Every page and component must be tested
Every page and component should have a test. The simplest test just renders the component and validates its
technical correctness. For example, a child component should have a matching wicket id in the markup. If the
wicket id is not correctly bound - through a typo or if it was just forgotten - the test will fail. An advanced test
could test a form, where a backend call gets executed and validated over a mock. So you can validate your
component's behaviour. This is a simple way to detect and fix technical and business logic bugs during the build
process. Wicket is very suitable for a test driven development approach. For instance, if you run a unit test which
fails and shows a message that the wicket id not bound, you will avoid an unneccessary server startup (a server
startup takes longer than running a unit test). This reduces the development turnaround. A disadvantage is the
difficult testing possibility of AJAX components. However, the testing features of Wicket are much more
sophisticated than in other web frameworks.
24.14 Avoid interactions with other servlet filters

199
24.14 Avoid interactions with other servlet filters
Try to get within the Wicket world whenever possible. Avoid the usage of other servlet filters. For this you can
use the and override the methods and . You can applyRequestCycle onBeginRequest() onEndRequest()
the same to the . The equivalent in Wicket is the . Just extend the andHttpSession WebSession WebSession
override the -method from the Application class. There are very few reasons to access thenewSession()
servlet interfaces. An example could be to read an external cookie to authenticate a user. Those parts should be
properly encapsulated and avoided when possible. For this example, you could do the handling within the Wicket
session because this is an authentication.
24.15 Cut small classes and methods
Avoid monolithic classes. Often I have seen that developers put the whole stuff into constructors. These classes
are getting very unclear and chaotic because you use inline implementations over serveral levels. It is
recommended to group logical units and extract methods with a correct business naming. This enhances the
clarity and the understandability of the business aspect. When a developer navigates to a component, he is not
interested in the technical aspect at first, however he just need the business aspect. To retrieve technical
information of a component you can navigate to the method implementation. In case of doubt you should
consider to extract seperate components. Smaller components increase the chances of reuse and make testing
easier. Listing 17 shows an example of a possible structuring.
Listing 17:
public class BlogEditPage WebPage {extends
IModel<Blog> blogModel;private
BlogEditPage(IModel<Blog> blogModel) {public
( PageParameters());super new
.blogModel = blogModel;this
add(createBlogEditForm());
}
Form<Blog> createBlogEditForm() {private
Form<Blog> form = newBlogEditForm();
form.add(createHeadlineField());
form.add(createContentField());
form.add(createTagField());
form.add(createViewRightPanel());
form.add(createCommentRightPanel());
form.setOutputMarkupId( );true
form;return
}
// more methods here
}
24.16 The argument "Bad documentation"
It is a widespread opinion that Wicket has a bad documentation. This argument is just partly correct. There are a
lot of code samples and snippets which can be used as code templates. Furthermore, there is a big community
that answers complex questions very quickly. In Wicket it is very hard to document everything, because nearly
everything is extensible and replaceable. If a component is not completely suitable, you will extend or replace it.
Working with Wicket means permanently navigating through code. For example, just consider validators. How
can I find all navigators that exist? Open the interface (Eclipse: Ctrl + Shift + T) and then open theIValidator
type hierachy (Crtl + T). Now we can see all the validators existing in Wicket and our project.
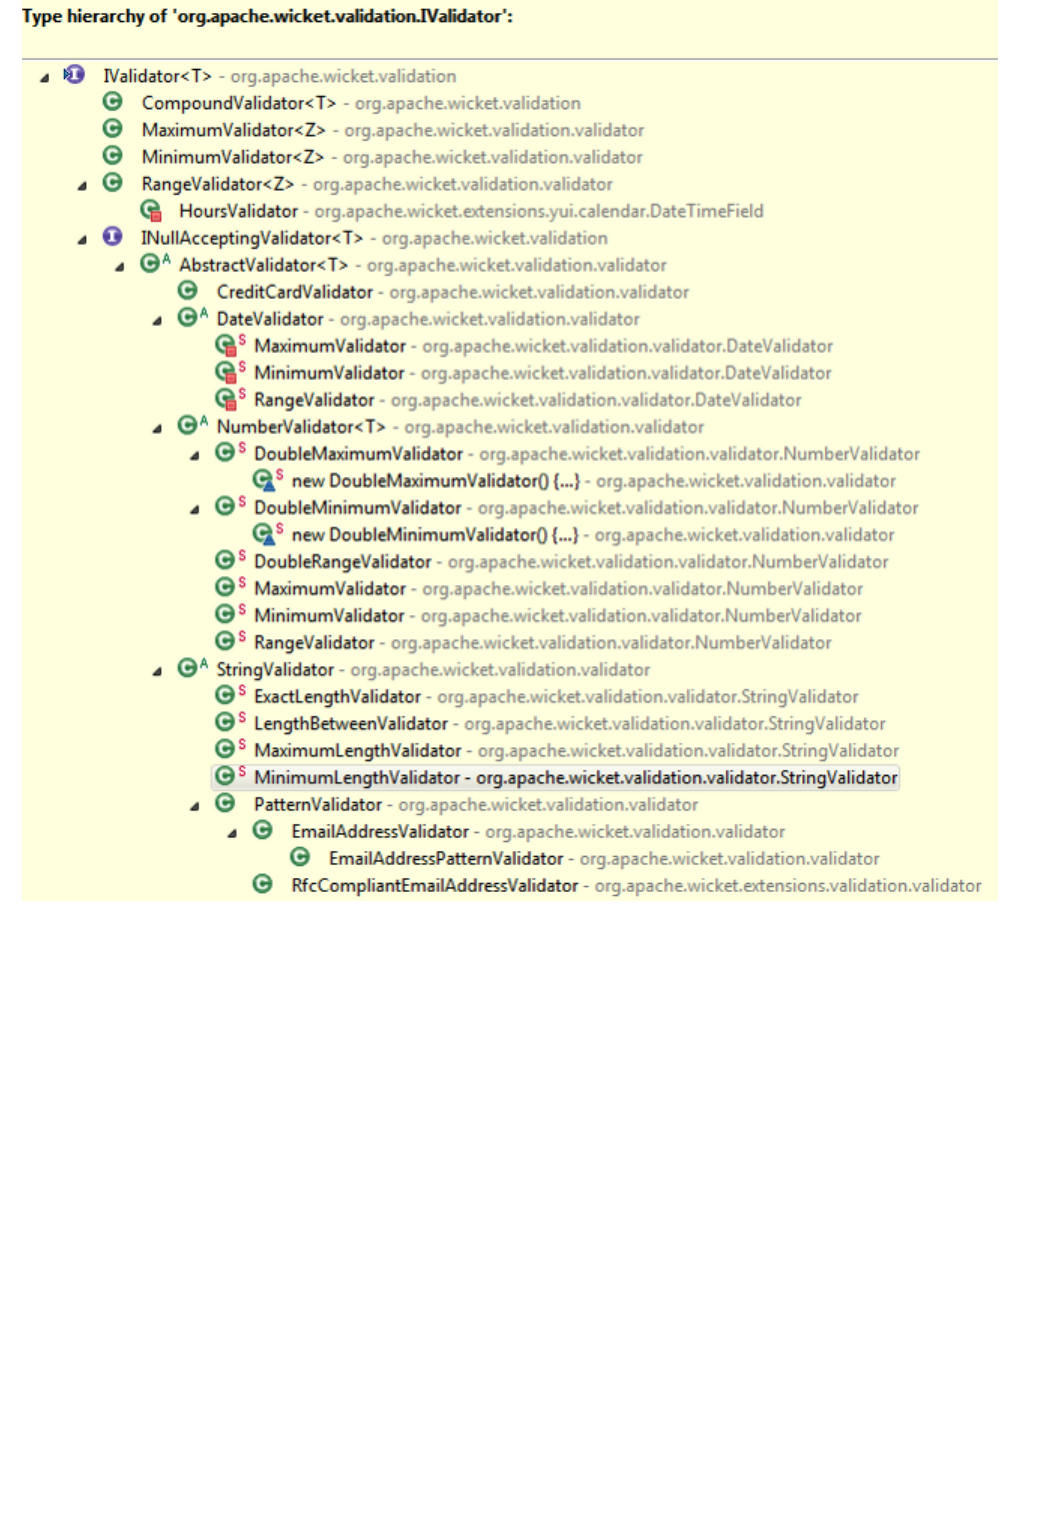
200
24.17 Summary
The best practices presented in this chapter should help you to write better and more maintainable code in
Wicket. All described methodologies were already proven in a few Wicket projects. If you follow these advices,
your Wicket projects will get future-proof and hopefully successful.
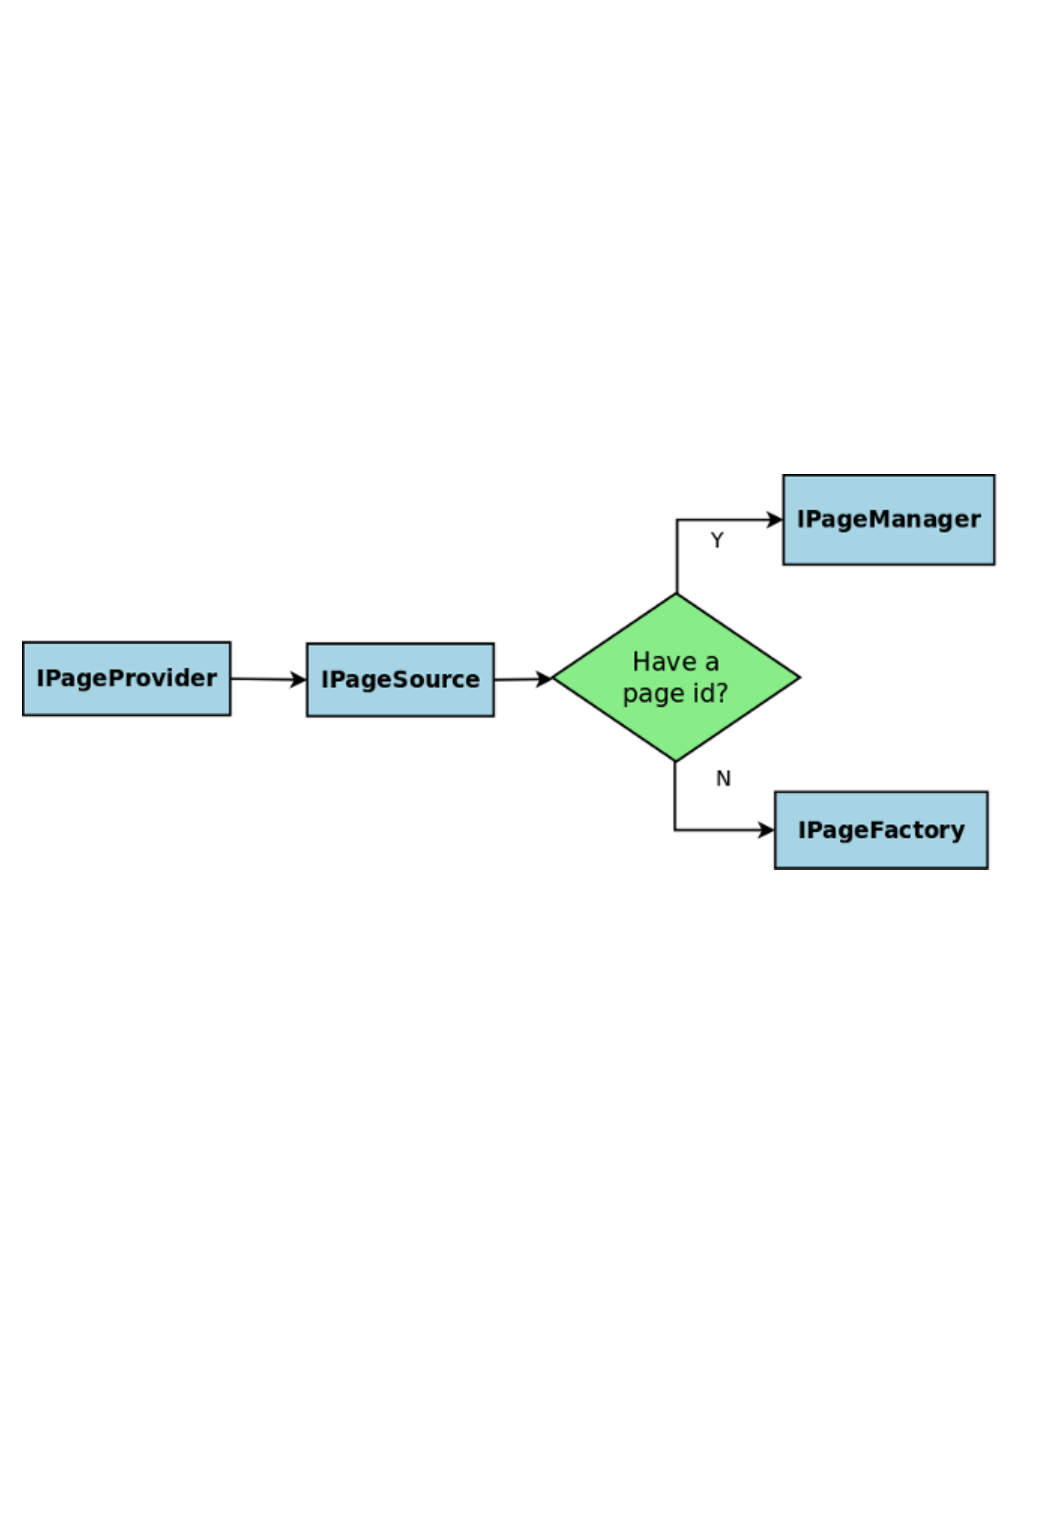
201
25 Wicket Internals
25.1 Page storing
During request handling, Wicket manages page instances through interface
. This interface creates a new page instance ororg.apache.wicket.request.handler.IPageProvider
loads a previously serialized page instance if we provide the corrisponding page id. delegatesIPageProvider
page creation and retrieval to interface . When pageorg.apache.wicket.request.mapper.IPageSource
class is provided delegates page creation to interface ,IPageSource org.apache.wicket.IPageFactory
while when page id is provided it uses interface to load theorg.apache.wicket.page.IPageManager
previously serialized page.
The following workflow diagram summarizes the mechanism seen so far:
IPageManager
's task is to manage which pages have been used in a requestorg.apache.wicket.page.IPageManager
and store their last state in the backing stores, namely . The default implementation IPageStore
collects all stateful pages which have been used in theorg.apache.wicket.page.PageStoreManager
request cycle (more than one page can be used in a single request if for example or setResponsePage()
is used). At the end of the request all collected page instances are being storedRestartResponseException
in the first level cache - http session. They are stored in http session attribute named
and passed to the underlying "wicket:persistentPageManagerData-APPLICATION_NAME" IPageStore
. When the next http request comes will ask for page with specific id and IPageProvider PageStoreManager
will look first in the http session and if no match is found then it will delegate to the IPageStore. At the end of the
second request the http session based cache is being overwritten completely with the newly used page
instances.
To setup another implementation use IPageManager
. Theorg.apache.wicket.Application.setPageManagerProvider(IPageManagerProvider)
custom implementation may or may not use .IPageManager IPageStore/IDataStore
IPageStore
's role is to mediate the storing and loading of pages done byorg.apache.wicket.pageStore.IPageStore
the underlying . The default implementation IDataStore
pre-processes the pages before passing them to org.apache.wicket.pageStore.DefaultPageStore

202
and to post-processes them after IDataStore#storeData(String, int, byte)
. The processing consists of transforming the page instance to IDataStore#getData(String, int)
. This is a struct of:org.apache.wicket.pageStore.DefaultPageStore.SerializedPage
{
sessionId: ,String
pageId : ,int
data : []byte
}
i.e. this is the serialized page instance (data) plus additional information needed to be able to easily find it later
(sessionId, pageId).
When a has to be stored stores it in a application scoped cacheSerializedPage DefaultPageStore
({sessionId, pageId} -> SerializedPage) and additionally gives it to the underlying
. The application scoped cache is used as secondIDataStore#storeData(sessionId, pageId, data)
level cache. Getting a page from it is slower than the http session based cache in becausePageStoreManager
the page has to be deserialized, but is faster than the underlying which stores the page bytes inIDataStore
some persistent store.
The size of the application scoped cache is configurable via
.org.apache.wicket.settings.IStoreSettings.setInmemoryCacheSize(int)
IDataStore
is used to persist Wicket pages (as bytes) to a persistentorg.apache.wicket.pageStore.IDataStore
store like e.g. files or databases. The default implementation is
which as its name says stores the pages in files. Theorg.apache.wicket.pageStore.DiskDataStore
location of the folder where the files are stored is configurable via
, by default the weborg.apache.wicket.settings.IStoreSettings.setFileStoreFolder(File)
container's work folder is used (ServletContext attribute 'javax.servlet.context.tempdir'). In this folder a sub-folder
is created named . This folder contains a sub-folder for each active http'applicationName-filestore'
session. This session folder contains a single file named 'data' which contains the bytes for the pages. The size
of this 'data' file is configurable via
. When this size isorg.apache.wicket.settings.IStoreSettings.setMaxSizePerSession(Bytes)
exceeded the newly stored files overwrite the oldest ones.
AsynchronousDataStore
By default Wicket wraps with DiskDataStore
. The role of is toorg.apache.wicket.pageStore.AsynchronousDataStore AsynchronousDataStore
detach the http worker thread from waiting for the write of the page bytes to the disk. To disable it use:
. AsynchronousDataStoreorg.apache.wicket.settings.IStoreSettings.setAsynchronous(false)
can delay the storage of pages' bytes for at most
pages. Iforg.apache.wicket.settings.IStoreSettings.setAsynchronousQueueCapacity(int)
this capacity is exceeded then the page's bytes are written synchronously to the backing .IDataStore
DebugDiskDataStore
Wicket provides an extension of that can be used to browse the content of the 'data' filesDiskDataStore
created by . This extension can be found in wicket-devutils.jar and needs to be enabled in the DiskDataStore
-method of your application viainit
DebugDiskDataStore.register( );this
The debug information can be seen at http://host:port/context/wicket/internal/debug/diskDataStore
HttpSessionDataStore
203
In some environments like Google AppEngine it is not allowed to write to the file system and thus
cannot be used. In this case DiskDataStore
can be used as replacement. Thisorg.apache.wicket.pageStore.memory.HttpSessionDataStore
implementation of is not persistent and puts all the data in the http session. Wicket comes with 2IDataStore
default eviction strategies to keep the size of the http session reasonable:
org.apache.wicket.pageStore.memory.PageNumberEvictionStrategy - specifies how many pages can
be hold
org.apache.wicket.pageStore.memory.MemorySizeEvictionStrategy - specifies the maximum amount
of memory for pages per http session.
To configure it:
MyApp#init()
{
.init();super
setPageManagerProvider( DefaultPageManagerProvider( )new this
{
IDataStore newDataStore()protected
{
HttpSessionDataStore(getPageManagerContext(), return new new
PageNumberEvictionStrategy(20));
}
}
}
DebugBar
Further insights which can be valueable during debugging can be retrieved using the
from wicket-devutils.jar. It's a panel which youorg.apache.wicket.devutils.debugbar.DebugBar
simply add:
Java:
add( DebugBar( ));new "debug"
HTML:
<span wicket:id= />"debug"
204
26 Working with Maven (Appendix)
26.1 Switching Wicket to DEPLOYMENT mode
As pointed out in the note in , Wicket can be started in two modes, DEVELOPMENT andparagraph 4.2
DEPLOYMENT. When we are in DEVELOPMENT mode Wicket warns us at application startup with the following
message:
********************************************************************
*** WARNING: Wicket is running in DEVELOPMENT mode. ***
*** ^^^^^^^^^^^ ***
*** Do NOT deploy to your live server(s) without changing . ***this
*** See Application#getConfigurationType() more information. ***for
********************************************************************
As we can read Wicket itself discourages us from using DEVELOPMENT mode into production environment. The
running mode of our application can be configured in four different ways. The first one is adding a filter parameter
inside deployment descriptor web.xml:
<filter>
<filter-name>wicket.MyApp</filter-name>
<filter-class>org.apache.wicket.protocol.http.WicketFilter</filter-class>
<init-param>
<param-name>applicationClassName</param-name>
<param-value>org.wicketTutorial.WicketApplication</param-value>
</init-param>
<init-param>
<param-name>configuration</param-name>
<param-value>deployment</param-value>
</init-param>
</filter>
The additional parameter is written in bold. The same parameter can be also expressed as context parameter:
<context-param>
<param-name>configuration</param-name>
<param-value>deployment</param-value>
</context-param>
The third way to set the running mode is using system property wicket.configuration. This parameter can be
specified in the command line that starts up the server:
java -Dwicket.configuration=deployment ...
The last option is to set it in your Java code (e.g. in the init-method of your WebApplication):
setConfigurationType(RuntimeConfigurationType.DEPLOYMENT);
Remember that system properties overwrite other settings, so they are ideal to ensure that on production
machine the running mode will be always set to DEPLOYMENT.
26.2 Creating a Wicket project from scratch and importing it into our favourite
IDE
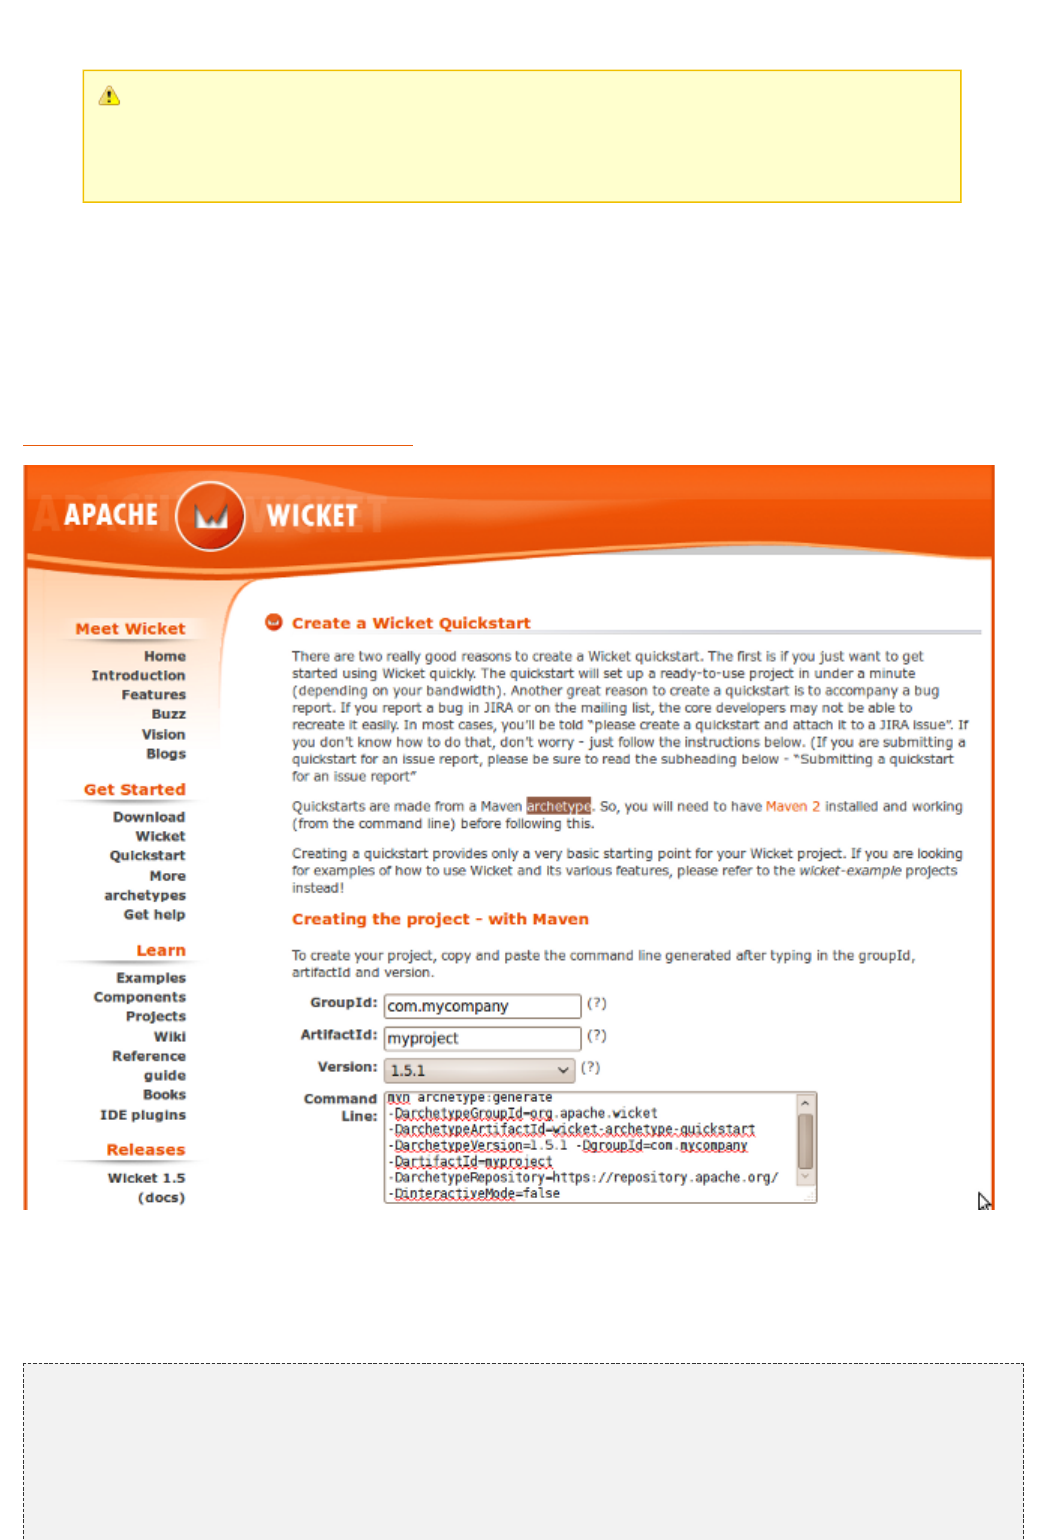
205
IDE
In order to follow the instructions of this paragraph you must have Maven installed on your
system. The installation of Maven is out of the scope of this guide but you can easily find
an extensive documentation about it on Internet. Another requirement is a good Internet
connection (a flat ADSL is enough) because Maven needs to connect to its central
repository to download the required dependencies.
From Maven to our IDE
Wicket project and its dependencies are managed using Maven. This tool is very useful also when we want to
create a new project based on Wicket from scratch. With a couple of shell commands we can generate a new
project properly configured and ready to be imported into our favourite IDE. The main step to create such a
project is to run the command which generates project's structure and its artifacts. If we are not familiar with
Maven or we simply don't want to type this command by hand, we can use the utility form on Wicket site at
:http://wicket.apache.org/start/quickstart.html
Here we have to specify the root package of our project (GroupId), the project name (ArtifactId) and which
version of Wicket we want to use (Version). Once we have run the resulting command in the OS shell, we will
have a new folder with the same name of the project (i.e the ArtifactId). Inside this folder we can find a file called
pom.xml. This is the main file used by Maven to manage our project. For example, using “org.wicketTutorial” as
GroupId and “MyProject” as ArtifactId, we would obtain the following artifacts:
.MyProject
| pom.xml
|
---src
+---main
| +---java
| | ---org
| | ---wicketTutorial
206
| | HomePage.html
| | HomePage.java
| | WicketApplication.java
| |
| +---resources
| | log4j.properties
| |
| ---webapp
| ---WEB-INF
| web.xml
|
---test
---java
---org
---wicketTutorial
TestHomePage.java
Amongst other things, file pom.xml contains a section delimited by tag <dependencies> which declares the
dependencies of our project. By default the Maven archetype will add the following Wicket modules as
dependencies:
…
<dependencies>
<!-- WICKET DEPENDENCIES -->
<dependency>
org.apache.wicket<groupId> </groupId>
wicket-core<artifactId> </artifactId>
${wicket.version}<version> </version>
</dependency>
<dependency>
org.apache.wicket<groupId> </groupId>
wicket-ioc<artifactId> </artifactId>
${wicket.version}<version> </version>
</dependency>
<!-- OPTIONAL DEPENDENCY
<dependency>
org.apache.wicket<groupId> </groupId>
wicket-extensions<artifactId> </artifactId>
${wicket.version}<version> </version>
</dependency>
-->
…
</dependencies>
...
If we need to use more Wicket modules or additional libraries, we can add the appropriate XML fragments here.
Importing a Maven project into our IDE
Maven projects can be easily imported into the most popular Java IDEs. However, the procedure needed to do
this differs from IDE to IDE. In this paragraph we can find the instructions to import Maven projects into three of
the most popular IDEs among Java developers : NetBeans, JetBrains IDEA and Eclipse.
Starting from version 6.7, NetBeans includes Maven support, hence we can start it and directly openNetBeans
the folder containing our project:
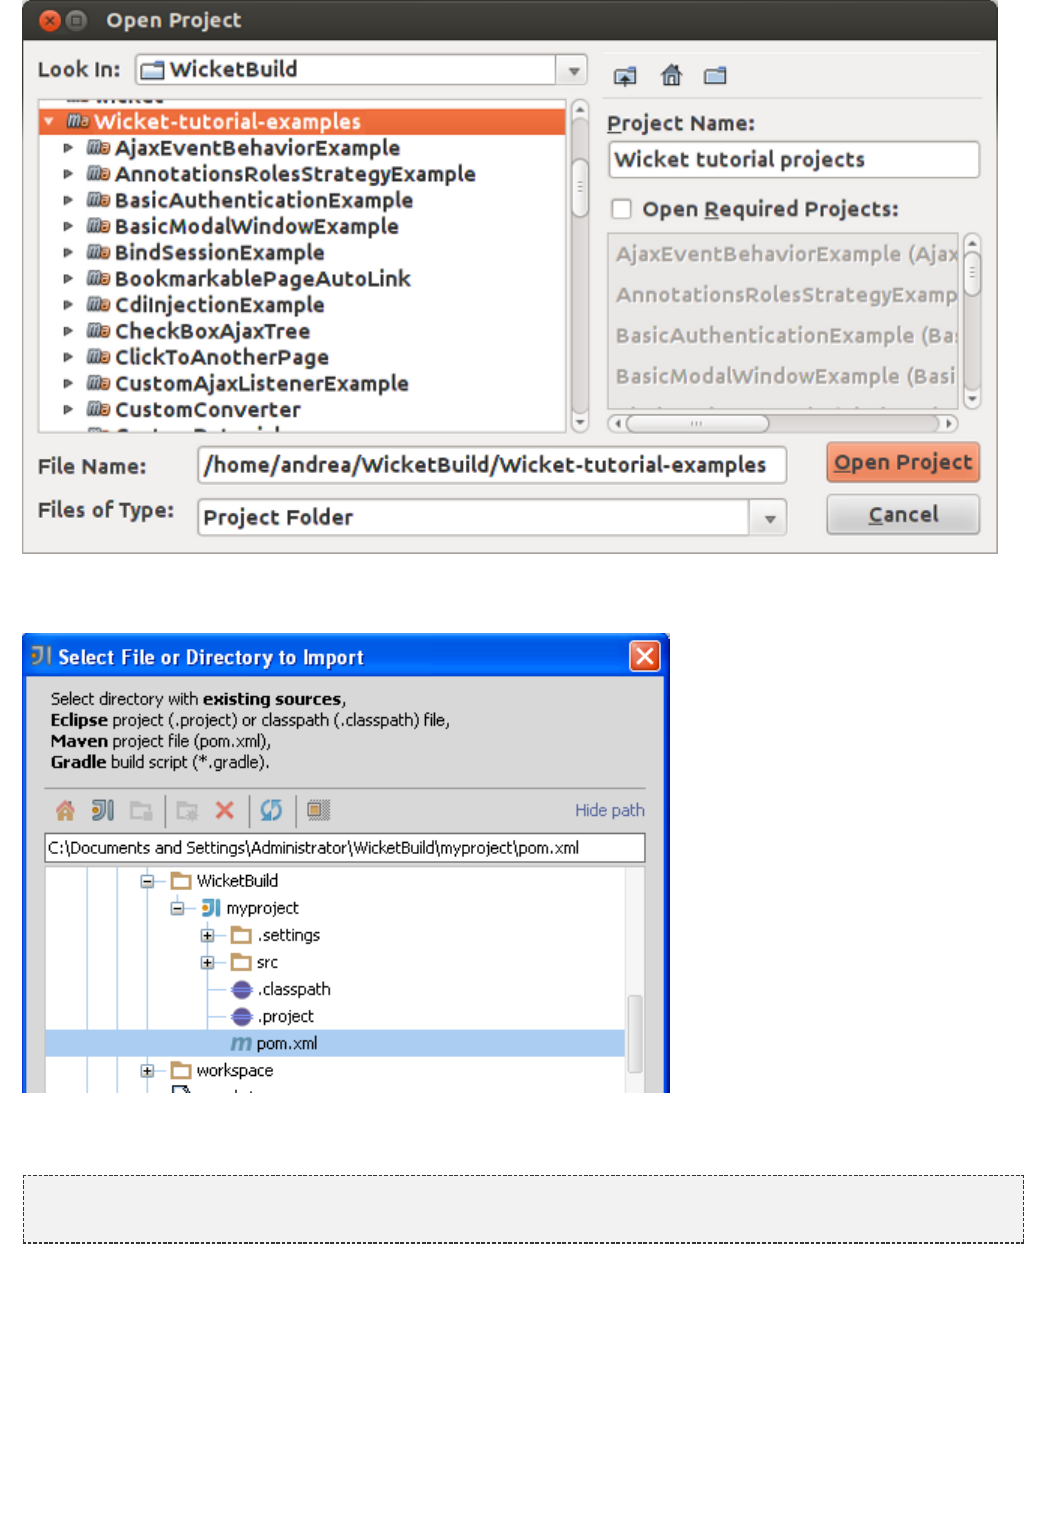
207
Intellj IDEA comes with a Maven importing functionality that can be started under “File/NewIntellj IDEA
Project/Import from external model/Maven”. Then, we just have to select the pom.xml file of our project:
If our IDE is Eclipse the import procedure is a little more complex. Before opening the new project weEclipse
must generate the Eclipse project artifacts running the following command from project root:
mvn eclipse:eclipse
Now to import our project into Eclipse we must create a classpath variable called M2_REPO that must point to
your local Maven repository. This can be done selecting “Window/Preferences” and searching for “Classpath
Variables”. The folder containing our local Maven repository is usually under our user folder and is called .m2 (for
example under Unix system is /home/<myUserName>/.m2/repository):

208
Once we have created the classpath variable we can go to “File/Import.../Existing Project into Workspace”, select
the directory of the project and press “Finish”:
Once the project has been imported into Eclipse, we are free to use our favourite plug-ins to run it or debug it
(like for example "run-jetty-run": http://code.google.com/p/run-jetty-run/ ).
209
Please note the option “Copy projects into workspace” in the previous illustration. If we
select it, the original project generated with Maven won't be affected by the changes made
inside Eclipse because we will work on a copy of it under the current workspace.
If we modify the pom.xml file (for example adding further dependencies) we must
regenerate project's artifacts and refresh the project (F5 key) to reflect changes into
Eclipse.
Speeding up development with plugins.
Now that we have our project loaded into our IDE we could start coding our components directly by hand.
However it would be a shame to not leverage the free and good Wicket plugins available for our IDE. The
following is a brief overview of the most widely used plugins for each of the three main IDEs considered so far.
NetBeans offers Wicket support through 'NetBeans Plugin for Wicket' hosted at NetBeans . This plugin is released under CDDL-1.0 license. Youhttp://plugins.netbeans.org/plugin/3586/wicket-1-4-support
can find a nice introduction guide to this plugin at
.http://netbeans.org/kb/docs/web/quickstart-webapps-wicket.html
For JetBrain IDEA we can use WicketForge plugin, hosted at Google Code Intellj IDEA . The plugin is released under ASF 2.0 license.http://code.google.com/p/wicketforge/
With Eclipse we can install one of the plugins that supports Wicket. As of the writing of this document,Eclipse
the most popular is probably Qwickie, available in the Eclipse Marketplace and hosted on Google Code at
. QWickie is released under ASF 2.0 license.http://code.google.com/p/qwickie/
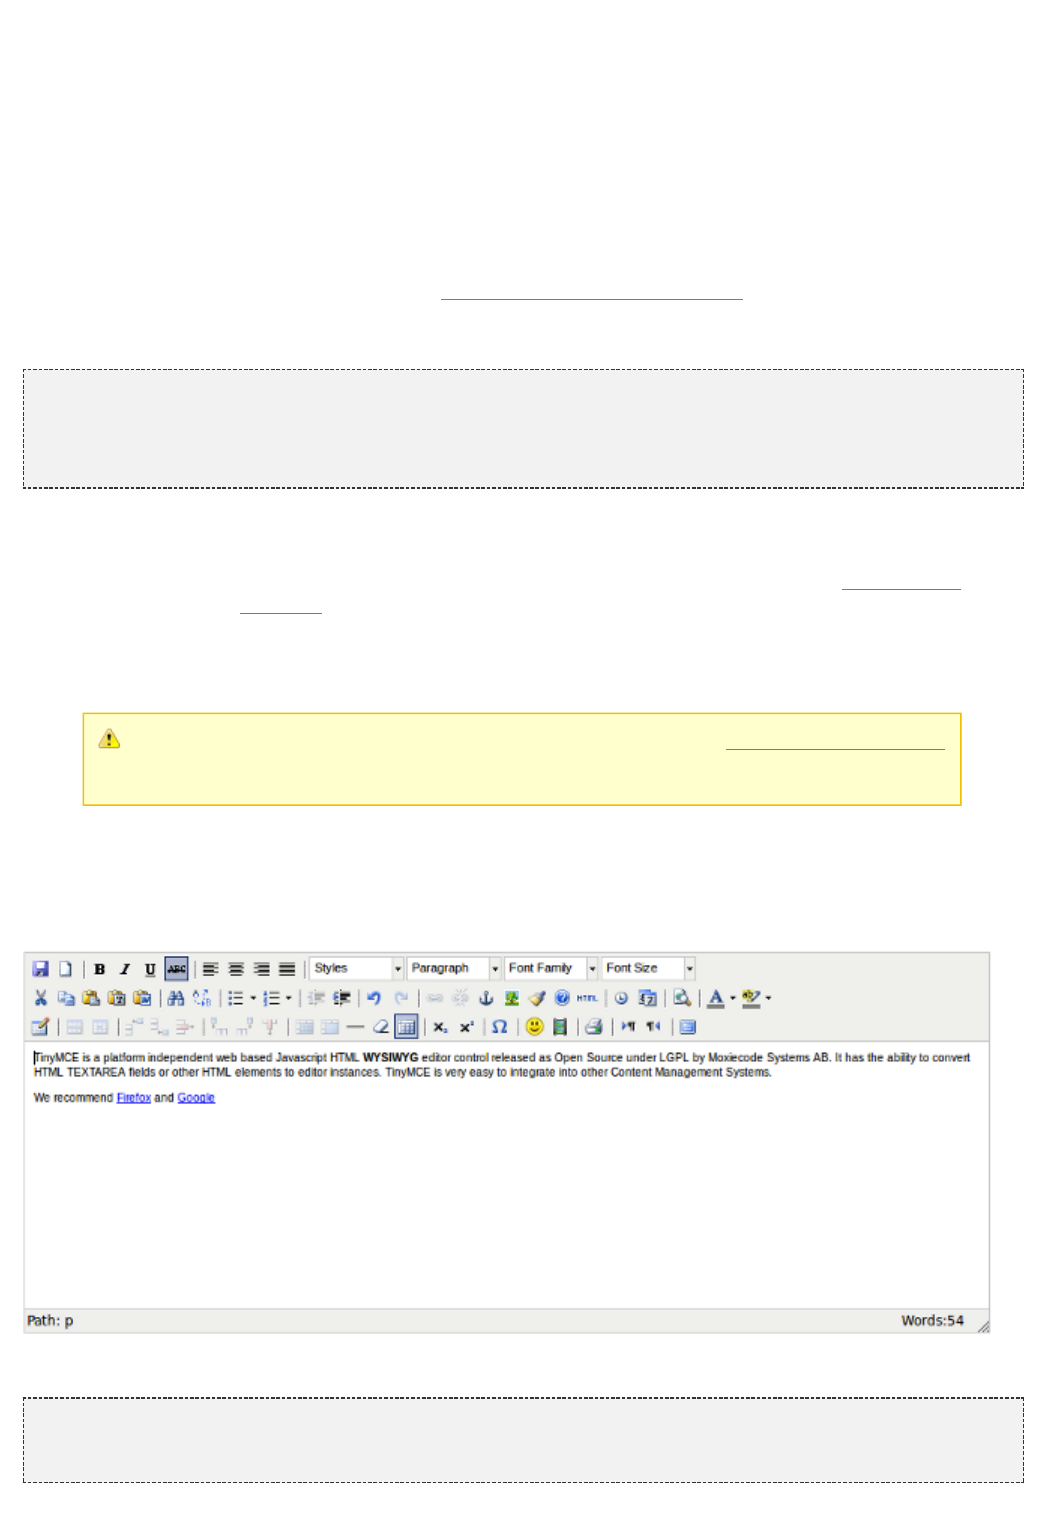
210
27 Project WicketStuff (Appendix)
27.1 What is project WicketStuff
WicketStuff is an umbrella project that gathers different Wicket-related projects developed and maintained by the
community. The project is hosted on GitHub at . Every module is structured ashttps://github.com/wicketstuff/core
a parent Maven project containing the actual project that implements the new functionality and an example
project that illustrates how to use it in our code. The resulting directory structure of each module is the following:
<module name>-parent
|
+---<module name>
---<module name>-examples
So far we have introduced only modules Kryo Serializer and JavaEE Inject, but WicketStuff comes with many
other modules that can be used in our applications. Some of them come in handy to improve the user experience
of our pages with complex components or integrating some popular web services (like ) andGoogle Maps
JavaScript libraries (like ).TinyMCE
This appendix provides a quick overview of what WicketStuff offers to enhance the usability and the
visually-appealing of our pages.
Every WicketStuff module can be downloaded as JAR archive at http://mvnrepository.com
. This site provides also the XML fragment needed to include it as a dependency into our
pom.xml file.
27.2 Module tinymce
Module tinymce offers integration with the namesake JavaScript library that turns our “humble” text-areas into a
full-featured HTML WYSIWYG editor:
To “tinyfy” a textarea component we must use behavior TinyMceBehavior:
TextArea textArea = TextArea( , Model( ));new "textArea" new ""
textArea.add( TinyMceBehavior());new
By default TinyMceBehavior adds only a basic set of functionalities to our textarea:
211
To add more functionalities we must use class TinyMCESettings to register additional TinyMCE plugins and to
customize the toolbars buttons. The following code is an excerpt from example page FullFeaturedTinyMCEPage:
TinyMCESettings settings = TinyMCESettings(new
TinyMCESettings.Theme.advanced);
//…
// first toolbar
//…
settings.add(Button.newdocument, TinyMCESettings.Toolbar.first,
TinyMCESettings.Position.before);
settings.add(Button.separator, TinyMCESettings.Toolbar.first,
TinyMCESettings.Position.before);
settings.add(Button.fontselect, TinyMCESettings.Toolbar.first,
TinyMCESettings.Position.after);
//…
// other settings
settings.setToolbarAlign(
TinyMCESettings.Align.left);
settings.setToolbarLocation(
TinyMCESettings.Location.top);
settings.setStatusbarLocation(
TinyMCESettings.Location.bottom);
settings.setResizing( );true
//…
TextArea textArea = TextArea( , Model(TEXT));new "ta" new
textArea.add( TinyMceBehavior(settings));new
For more configuration examples see pages inside package wicket.contrib.examples.tinymce in the example
project of the module.
27.3 Module wicketstuff-gmap3
Module wicketstuff-gmap3 integrates service with Wicket providing componentGoogle Maps
org.wicketstuff.gmap.GMap. If we want to embed Google Maps into one of our pages we just need to add
component GMap inside the page. The following snippet is taken from example page SimplePage:
HTML:
…
<body>
<div wicket:id= >Map</div>"map"
</body>
...
Java code:
public class SimplePage WicketExamplePageextends
{
SimplePage()public
{
GMap map = GMap( );new "map"
map.setStreetViewControlEnabled( );false
map.setScaleControlEnabled( );true
map.setScrollWheelZoomEnabled( );true
map.setCenter( GLatLng(52.47649, 13.228573)); new
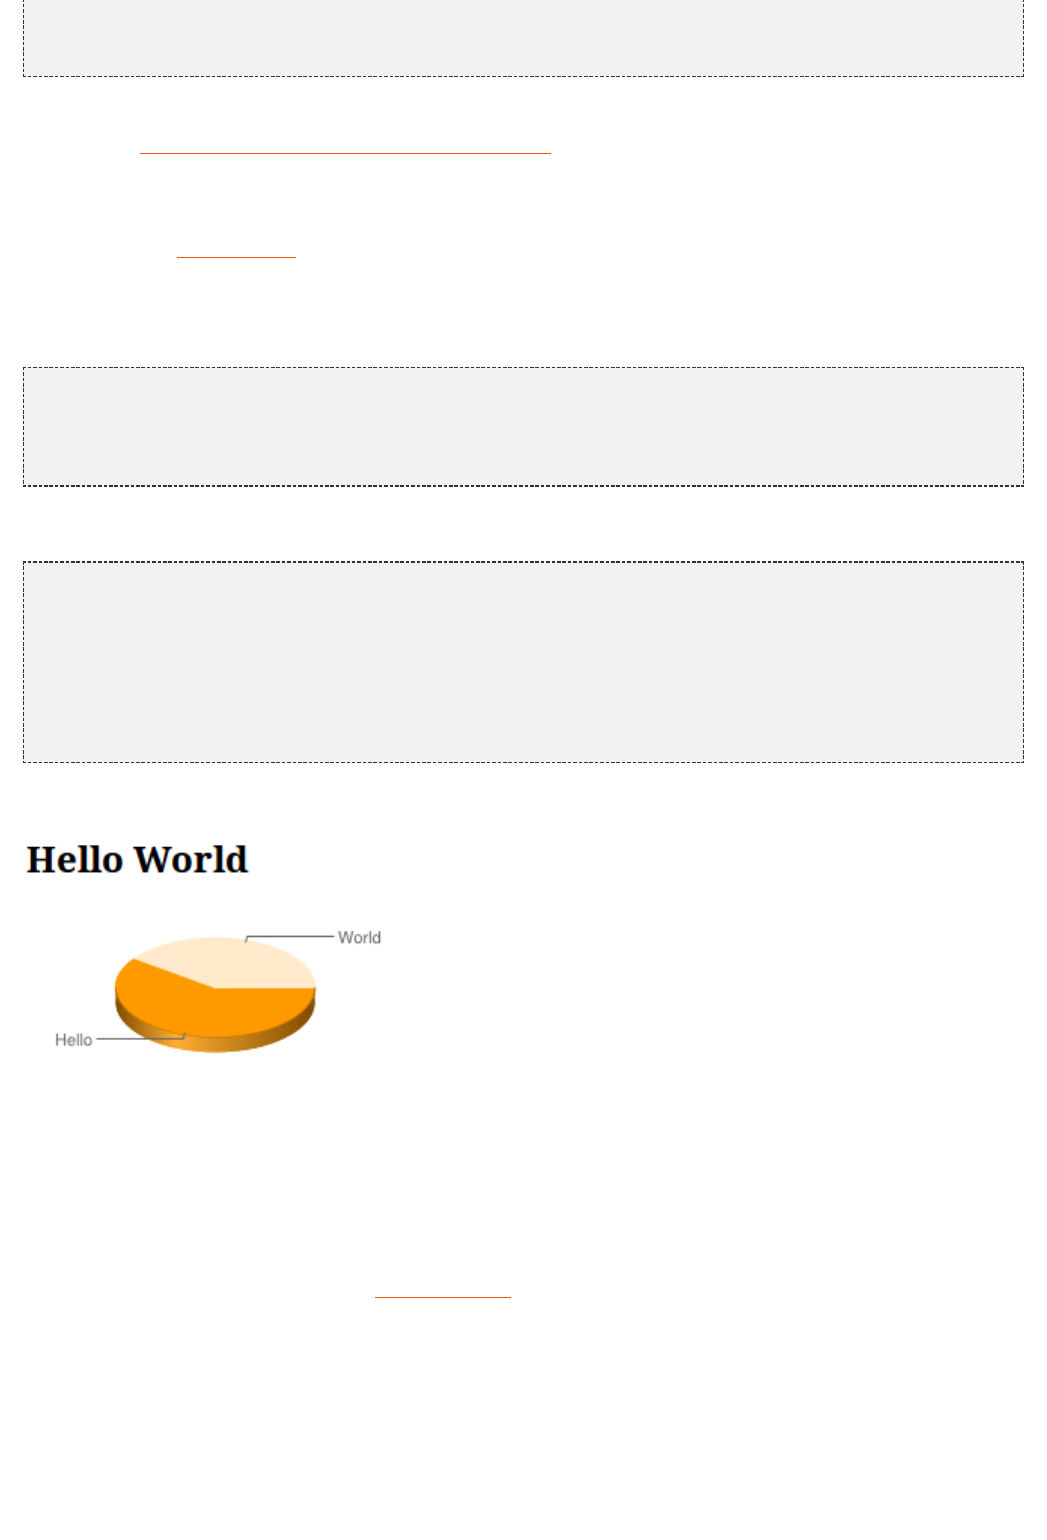
212
add(map);
}
}
The component defines a number of setters to customize its behavior and appearance. More info can be found
on wiki page .https://github.com/wicketstuff/core/wiki/Gmap3
27.4 Module wicketstuff-googlecharts
To integrate the tool into our pages we can use module wicketstuff-googlecharts. To display aGoogle Chart
chart we must combine the following entities: component Chart, interface IChartData and class ChartProvider, all
inside package org.wicketstuff.googlecharts. The following snippet is taken from example page Home:
HTML:
…
<h2>Hello World</h2>
<img wicket:id= />"helloWorld"
...
Java code:
IChartData data = AbstractChartData(){new
[][] getData(){public double
[][] { { 34, 22 } };return new double
}
};
ChartProvider provider = ChartProvider( Dimension(250, 100), ChartType.PIE_3D, data);new new
provider.setPieLabels( [] { , });new String "Hello" "World"
add( Chart( , provider));new "helloWorld"
Displayed chart:
As we can see in the snippet above, component Chart must be used with <img> tag while the input data returned
by IChartData must be a two-dimensional array of double values.
27.5 Module wicketstuff-inmethod-grid
Module wicketstuff-inmethod-grid implements a sophisticated grid-component with class com.
inmethod.grid.datagrid.DataGrid.
Just like pageable repeaters (seen in ) DataGrid provides data pagination and uses interfaceparagraph 13.4
IDataProvider as data source. In addition the component is completely ajaxified:
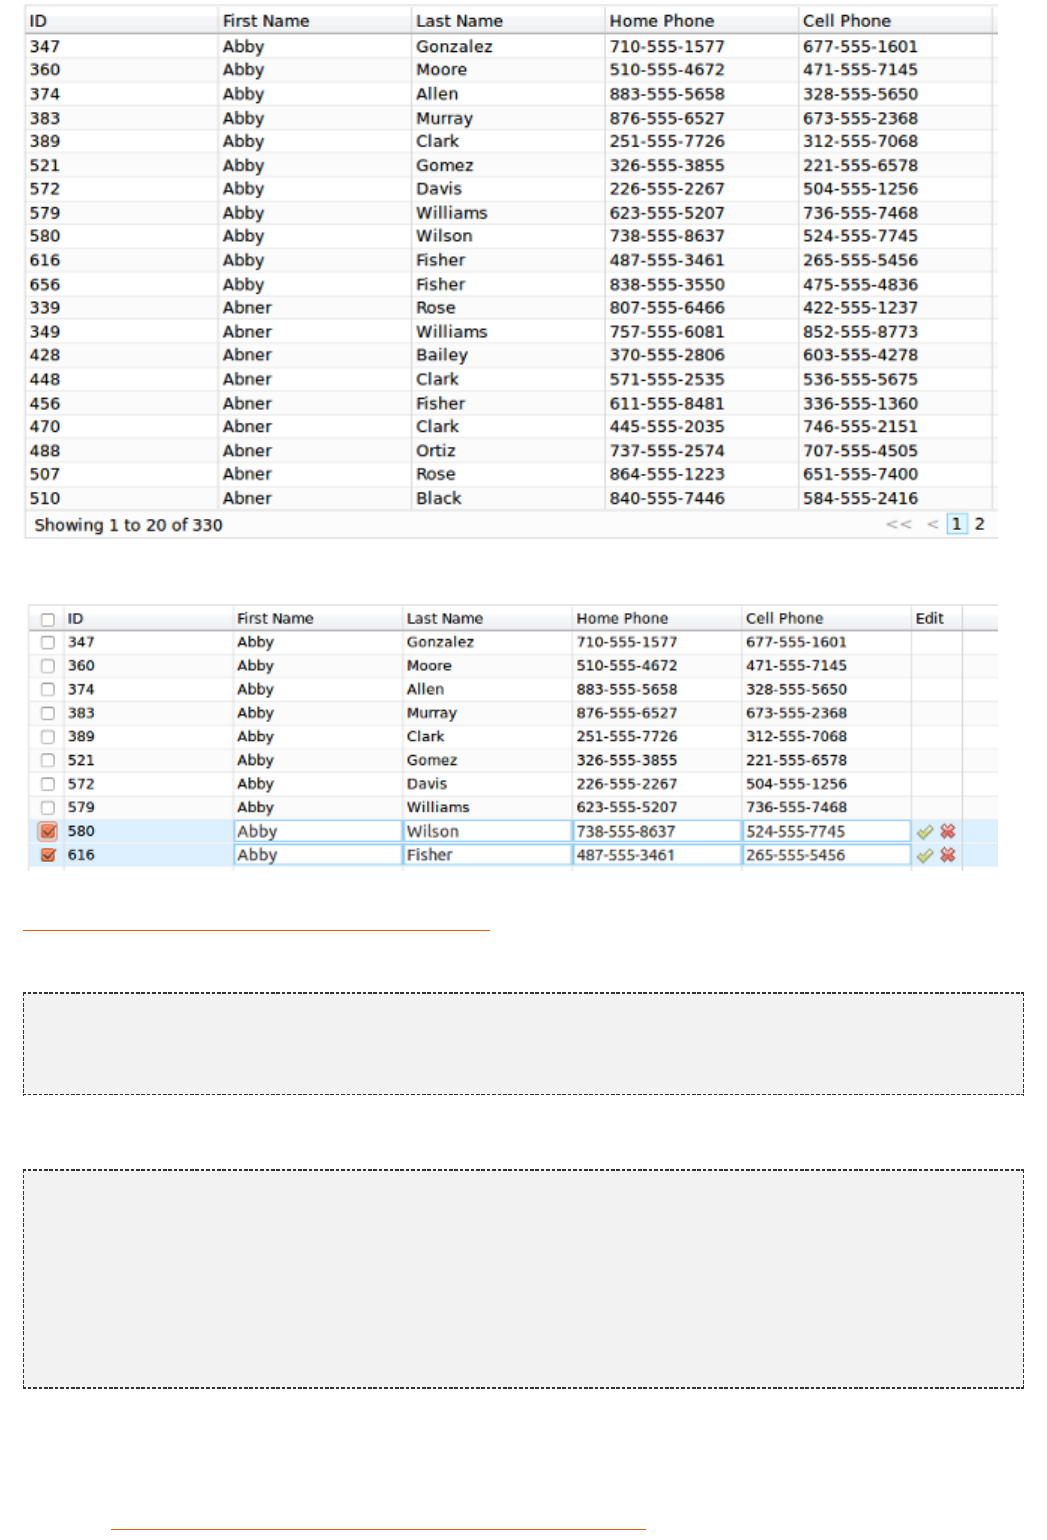
213
DataGrid supports also editable cells and row selection:
The following snippet illustrate how to use DataGrid and is taken from wiki page
:https://github.com/wicketstuff/core/wiki/InMethodGrid
HTML:
…
<div wicket:id= >Grid</div>"grid"
...
Java code:
final List<Person> personList = //load a list of Persons
ListDataProvider listDataProvider = ListDataProvider(personList);final new
//define grid's columns
List<IGridColumn> cols = (List) Arrays.asList(
PropertyColumn( Model( ), ),new new "First Name" "firstName"
PropertyColumn( Model( ), ));new new "Last Name" "lastName"
DataGrid grid = DefaultDataGrid( , DataProviderAdapter(listDataProvider),new "grid" new
cols);
add(grid);
In the code above we have used convenience class DefaultDataGrid that is a subclass of DataGrid and it already
comes with a navigation toolbar.
The example pages are under package com.inmethod.grid.examples.pages in the example project which is
hosted at .http://www.wicket-library.com/inmethod-grid/data-grid/simple

214
27.6 Module wicketstuff-rest-annotations
REST-based API are becoming more and more popular around the web and the number of services based on
this architecture is constantly increasing.
Wicket is well-known for its capability of transparently handling the state of web applications on server side, but it
can be also easily adopted to create RESTful services. WicketStuff module for REST provides a special resource
class and a set of annotations to implement REST APIs/services in much the same way as we do it with Spring
MVC or with the standard JAX-RS.
The module provides class as generic abstract class to implement a Wicket resourceAbstractRestResource
that handles the request and the response using a particular data format (XML, JSON, etc...). Subclassing
we can create custom resources and map their pubblic methods to a given subpathAbstractRestResource
with annotation . The following snippet is taken from resource insideMethodMapping PersonsRestResource
module :'restannotations-examples'
@MethodMapping( )"/persons"
List<PersonPojo> getAllPersons() {public
//method mapped at subpath and HTTP method GET"/persons"
}
@MethodMapping(value = , httpMethod = HttpMethod.DELETE)"/persons/{personIndex}"
void deletePerson( personIndex) {public int
//method mapped at subpath and HTTP method DELETE. "/persons/{personIndex}"
//Segment {personIndex} will contain an integer value as index.
}
@MethodMapping(value = , httpMethod = HttpMethod.POST)"/persons"
void createPerson(@RequestBody PersonPojo personPojo) {public
//creates a instance of PersonPojo reading it from request bodynew
}
requires to specify the subpath we want to map the method to. In addition we can specify alsoMethodMapping
the HTTP method that must be used to invoke the method via REST (GET, POST, DELETE, PATCH, etc...).
This value can be specified with enum class and is GET by default. In the code above we can seeHttpMethod
annotation which is used to extract the value of a method parameter from the request bodyRequestBody
(method createPerson). To write/read objects to response/from request, uses anAbstractRestResource
implementation of interface which defines the following methods:IWebSerialDeserial
public IWebSerialDeserial {interface
void objectToResponse( targetObject, WebResponse response, mimeType) public Object String
Exception;throws
<T> T requestToObject(WebRequest request, <T> argClass, mimeType) public Class String throws
Exception;
isMimeTypeSupported( mimeType);public boolean String
}
To convert segments value (which are strings) to parameters type, uses the standardAbstractRestResource
Wicket mechanism based on the application converter locator:
// the converter type clazzreturn for
IConverter converter = Application.get().getConverterLocator().getConverter(clazz);
//convert string to object
converter.convertToObject(value, Session.get().getLocale());return
In order to promote the principle of convention over configuration, we don't need to use any annotation to map
method parameters to path parameters if they are declared in the same order. If we need to manually bind
method parameters to path parameters we can use annotation .PathParam
@MethodMapping(value = , produces = RestMimeTypes.PLAIN_TEXT)"/variable/{p1}/order/{p2}"
testParamOutOfOrder( PathParam( ) public String PathParam( ) textParam, "p2" String "p1" int
intParam) {
215
//method parameter textParam is taken from path param 'p2', intParam uses 'p1'while
}
As JSON is de-facto standard format for REST API, the project comes also with a ready-to-use resource (
) and a serial/deserial ( ) that work with JSON format (both insideGsonRestResource GsonSerialDeserial
module ). These classes use Gson as JSON library.'restannotations-json'
supports role-based authorizations for mapped method with annotation AbstractRestResource
:AuthorizeInvocation
@MethodMapping(value = , httpMethod = HttpMethod.GET)"/admin"
@AuthorizeInvocation( )"ROLE_ADMIN"
void testMethodAdminAuth() {public
}
To use annotation we must specify in the resource construcor an instance of WicketAuthorizeInvocation
interface .IRoleCheckingStrategy
To read the complete documentation of the module and to discover more advanced feature please refer to the
project homepage
27.7 Module stateless
Wicket makes working with AJAX easy and pleasant with its component-oriented abstraction. However as side
effect, AJAX components and behaviors make their hosting page stateful. This can be quite annoying if we are
working on a page that must be stateless (for example a login page). In this case an obvious solution would be to
roll out our own stateless components/behaviors, but Wicketstuff alredy offers such kind of artifacts with
module. Here you can find the stateless version of the basic AJAX componets and behaviors shipedstateless
with Wicket, like , , StatelessAjaxSubmitLink StatelessAjaxFallbackLink
, etc… A short introduction to thisStatelessAjaxEventBehavior StatelessAjaxFormSubmitBehavior
module can be found on its .home page
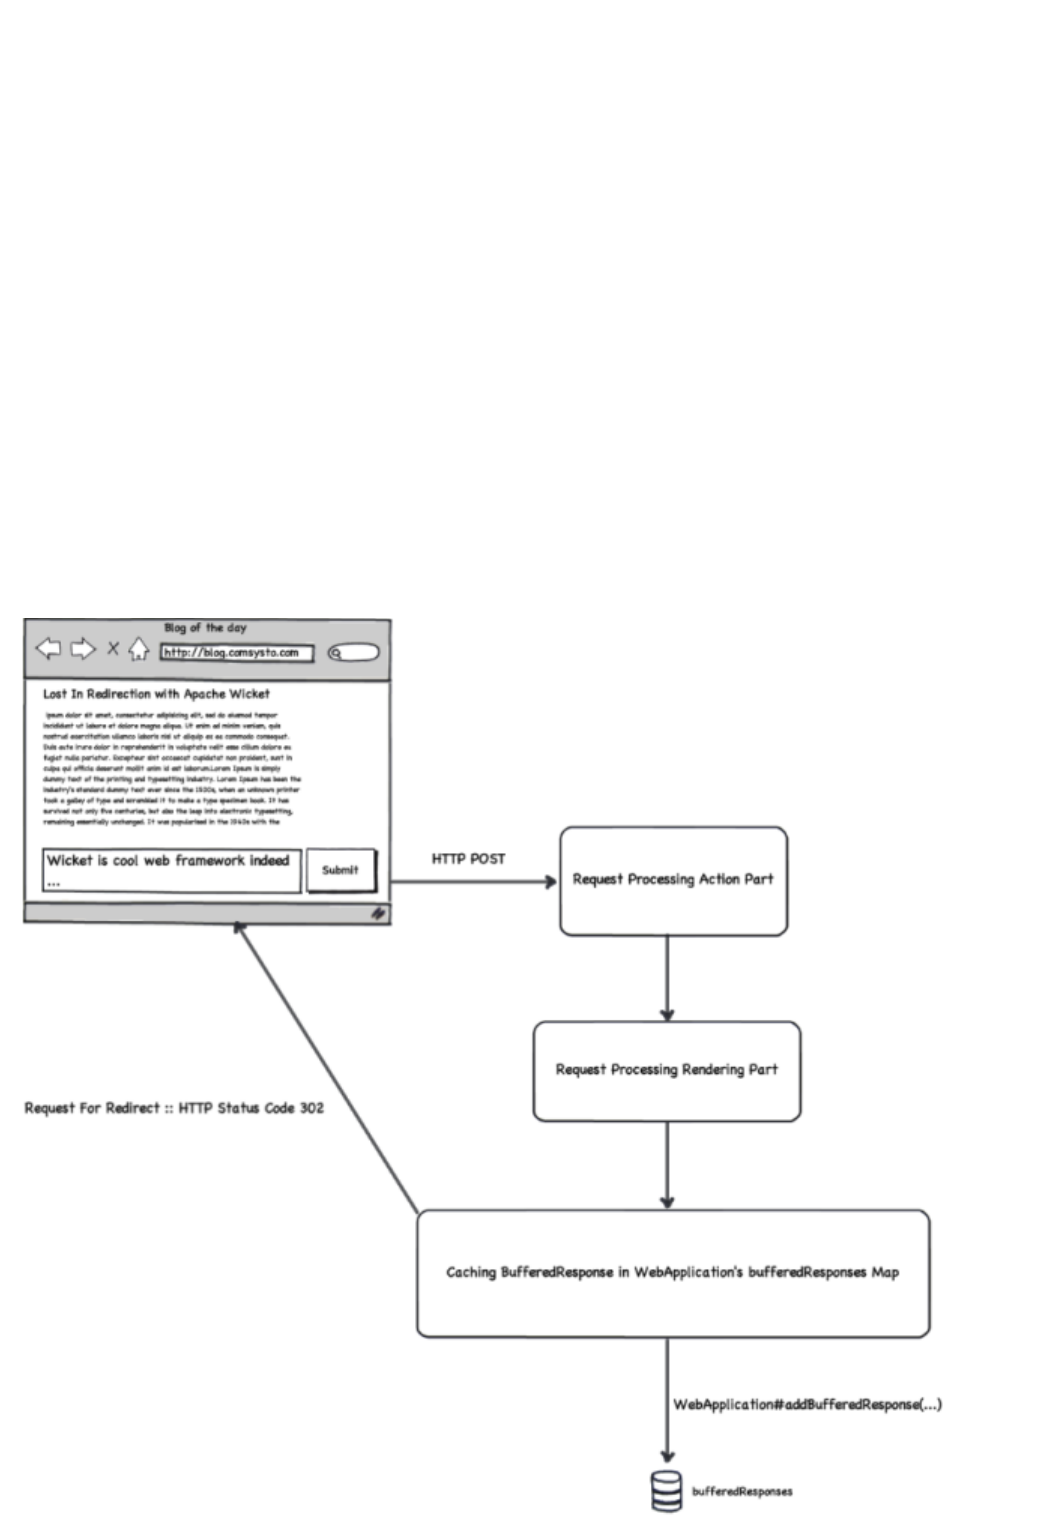
216
28 Lost In Redirection With
Apache Wicket (Appendix)
Quite a few teams have already got stuck into the following problem when working with wicket forms in a
clustered environment while having 2 (or more) tomcat server with enabled session replication running.
In case of invalid data being submitted with a form instance for example, it seemed like according error
messages wouldn’t be presented when the same form page gets displayed again. Sometimes! And sometimes
they would! One of those nightmares of rather deterministic programmer’s life. This so called Lost In Redirection
problem, even if it looks like a wicket bug at first, is rather a result of a default setting in wicket regarding the
processing of form submissions in general. In order to prevent another wide known problem of double form
submissions, Wicket uses a so called REDIRECT_TO_BUFFER strategy for dealing with rendering a page after
web form’s processing (@see IRequestCycleSettings#RenderStrategy).
What does the default RenderStrategy actually do?
Both logical parts of a single HTTP request, an action and a render part get processed within the same request,
but instead of streaming the render result to the browser directly, the result is cached on the server first.
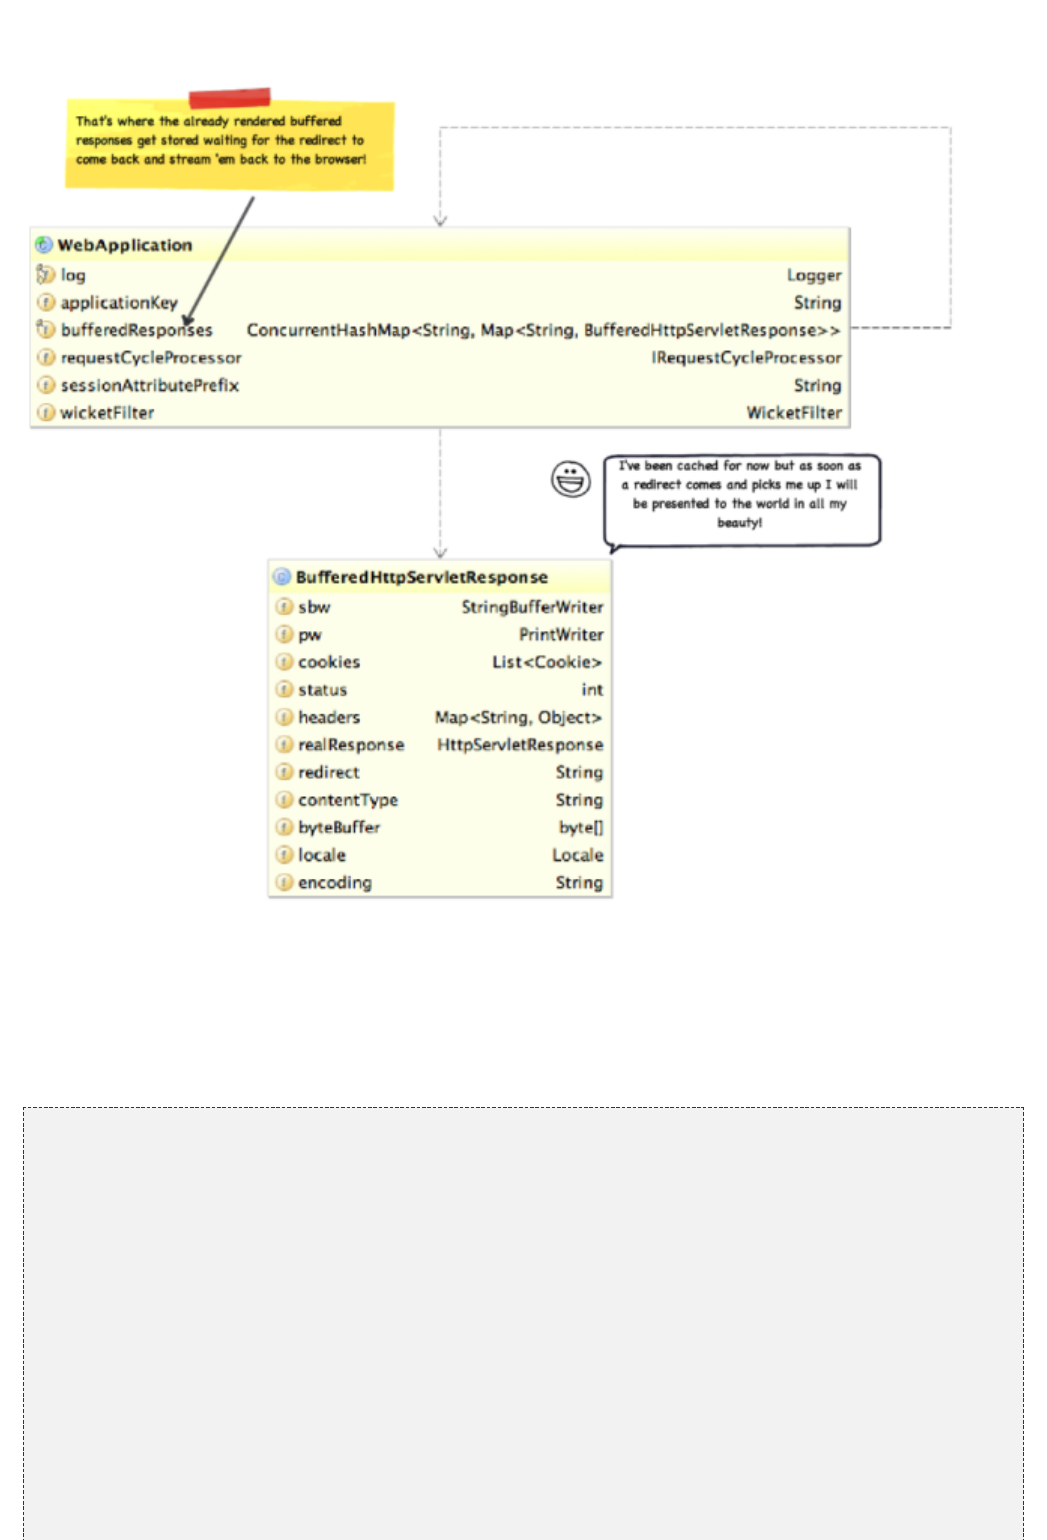
217
Wicket will create an according BufferedHttpServletResponse instance that will be used to cache the resulting
HttpServletResponse within the WebApplication.
After the buffered response is cached the HTTP status code of 302 get’s provided back to the browser resulting
in an additional GET request to the redirect URL (which Wicket sets to the URL of the Form itself). There is a
special handling code for this case in the WicketFilter instance that then looks up a Map of buffered responses
within the WebApplication accordingly. If an appropriate already cached response for the current request is
found, it get’s streamed back to the browser immediately. No additional form processing happens now. The
following is a code snippet taken from WicketFilter:
// Are we using REDIRECT_TO_BUFFER?
(webApplication.getRequestCycleSettings().getRenderStrategy() ==if
IRequestCycleSettings.REDIRECT_TO_BUFFER)
{
// Try to see there is a redirect storedif
// get an existing sessiontry
ISessionStore sessionStore = webApplication.getSessionStore();
sessionId = sessionStore.getSessionId(request, );String false
(sessionId != )if null
{
BufferedHttpServletResponse bufferedResponse = ;null
queryString = servletRequest.getQueryString();String
// look buffered responsefor
(!Strings.isEmpty(queryString))if
{
bufferedResponse = webApplication.popBufferedResponse(sessionId,
queryString);
}
else
{
bufferedResponse = webApplication.popBufferedResponse(sessionId,
relativePath);
}
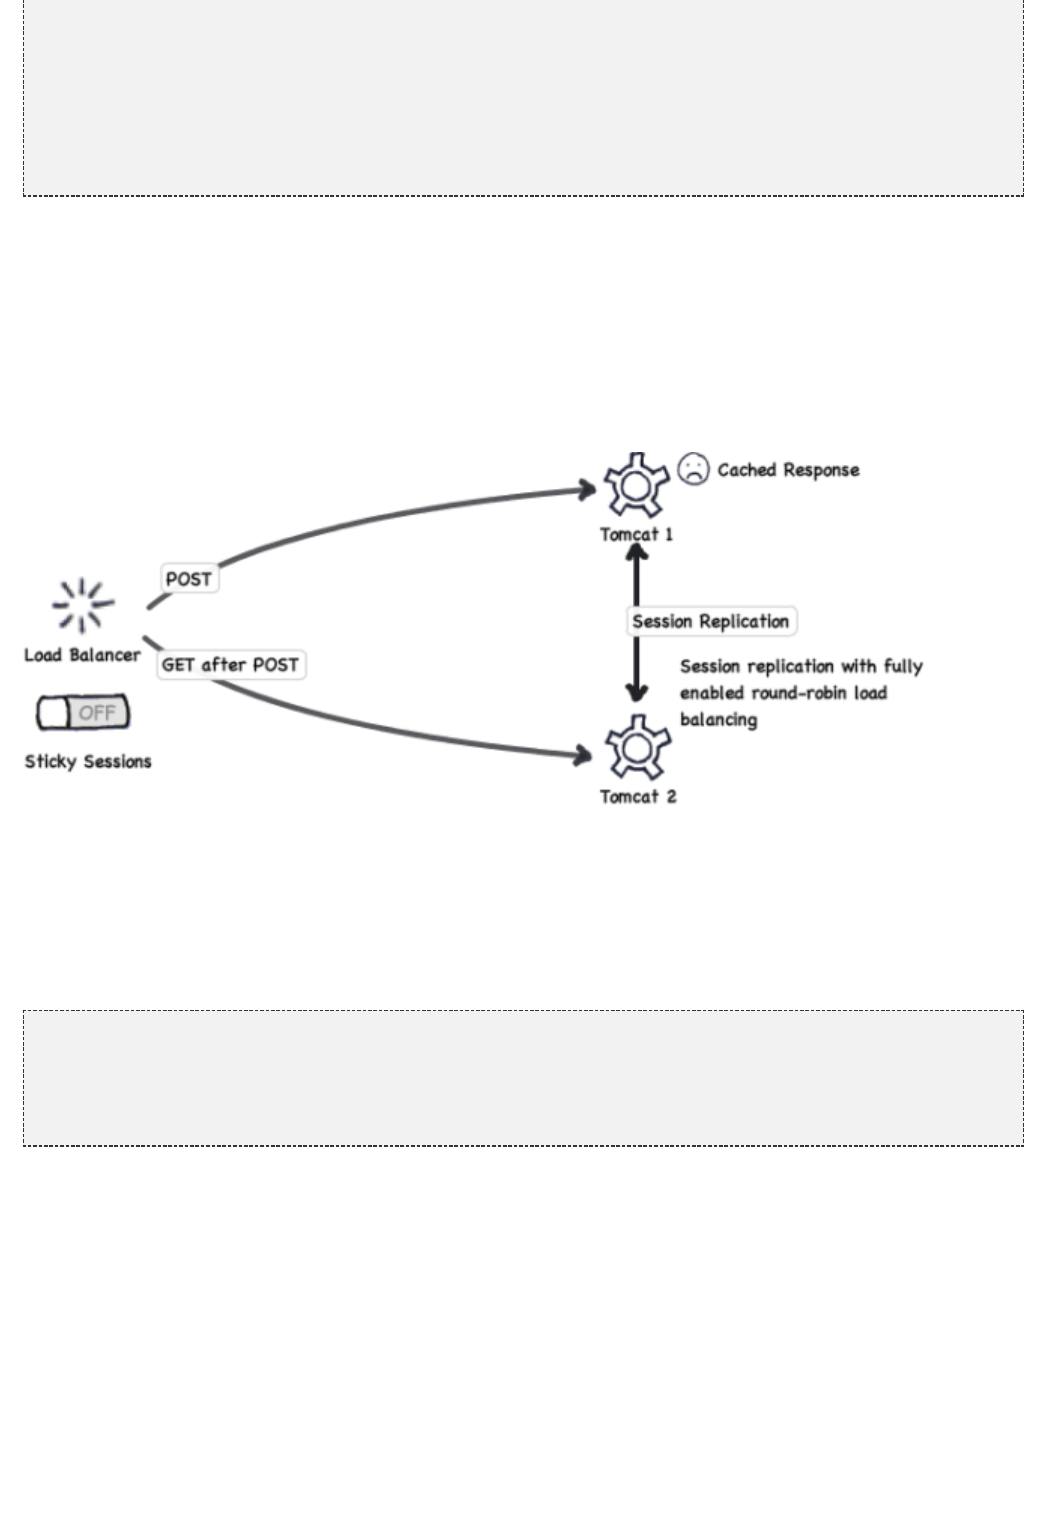
218
// a buffered response was foundif
(bufferedResponse != )if null
{
bufferedResponse.writeTo(servletResponse);
// redirect responses are ignored the requestfor
// logger…
;return true
}
}
}
So what happens in case you have 2 server running your application with session replication and load balancing
turned on while using the default RenderStrategy described above?
Since a Map of buffered responses is cached within a WebApplication instance that does not get replicated
between the nodes obviously, a redirect request that is suppose to pick up the previously cached response
(having possibly form violation messages inside) potentially get’s directed to the second node in your cluster by
the load balancer. The second node does not have any responses already prepared and cached for your user.
The node therefore handles the request as a completely new request for the same form page and displays a
fresh new form page instance to the user accordingly.
Unfortunately, there is currently no ideal solution to the problem described above. The default RenderStrategy
used by Apache Wicket simply does not work well in a fully clustered environment with load balancing and
session replication turned on. One possibility is to change the default render strategy for your application to a so
called ONE_PASS_RENDER RenderStrategy which is the more suitable option to use when you want to do
sophisticated (non-sticky session) clustering. This is easily done in the init method of your own subclass of
Wicket’s WebApplication :
@Override void init() {protected
getRequestCycleSettings().setRenderStrategy(
IRequestCycleSettings.ONE_PASS_RENDER);
}
ONE_PASS_RENDER RenderStrategy does not solve the double submit problem though! So this way you’d
only be trading one problem for another one actually.
You could of course turn on the session stickiness between your load balancer (apache server) and your tomcat
server additionally to the session replication which would be the preferred solution in my opinion.
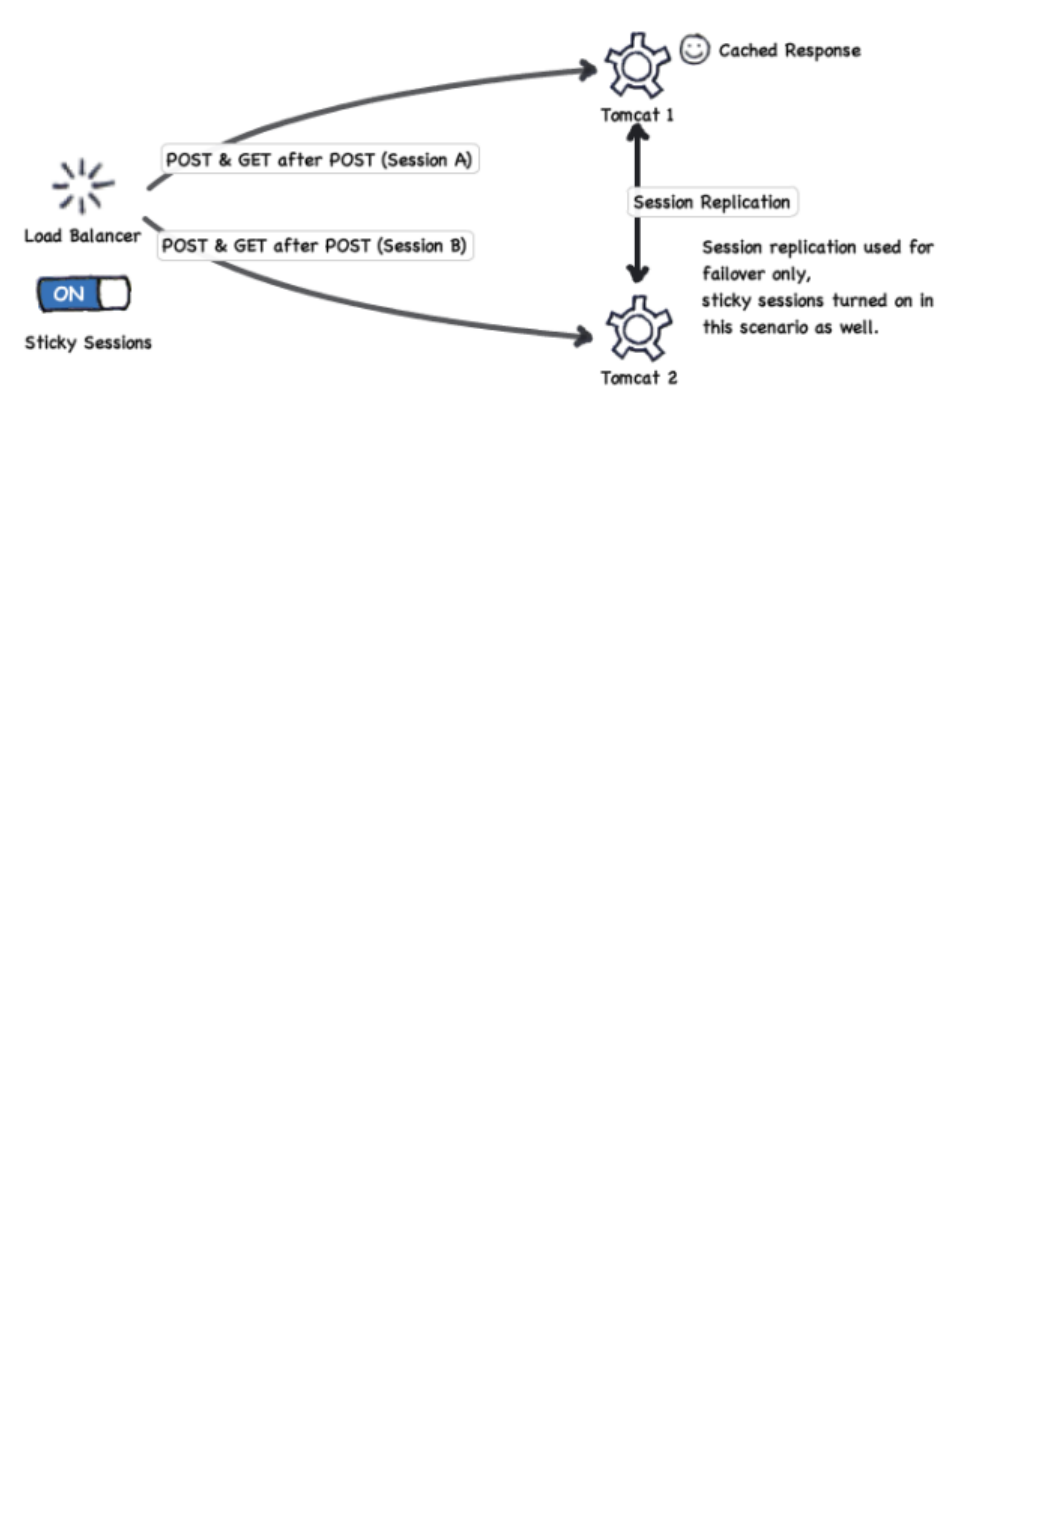
219
Session replication would still provide you with failover in case one of the tomcat server dies for whatever reason
and sticky sessions would ensure that the Lost In Redirection problem does not occur any more.
220
29 Contributing to this guide
(Appendix)
You can contribute to this guide by following these steps:
The guide uses Grails GDoc to generate the final HTML/PDF so you should consult with its .syntax
Clone Apache Wicket's GIT repository site
git clone https://github.com/apache/wicket.git
Edit the files in folder.gdoc wicket/wicket-user-guide/src/docs/guide
To preview your changes run "mvn clean package -P guide" in the folder (inwicket/wicket-user-guide
eclipse use a run configuration)
Navigate to and open one of the following files a browser / pdfwicket/wicket-user-guide/target/guide/6.x
viewer:
(multi page version)index.html
(single page version)guide/single.html
(single page pdf version)guide/single.pdf
Create a ticket in Apache Wicket's JIRA
Commit and push the changes to your forked Apacke Wicket's GIT repository and create a pull request
on github
Thank you!
Copyright 2013-2016 — — The Apache Software Foundation (Generated on: 2017-12-30 - 23:17:21 +0000)
