Pearl Automation P120 Car Adapter, part of a vehicular RearVision system User Manual Quick Start Guide
Pearl Automation Inc. Car Adapter, part of a vehicular RearVision system Quick Start Guide
Contents
- 1. Quick Start Guide
- 2. Safety and Operating Guide
- 3. Rearvision Quick Start Guide
- 4. User Manual Quick Start Guide
- 5. User Manual Safety Guide
User Manual Quick Start Guide

Pearl
RearVision
Installation & Tips

Inside your RearVision box,
you’ll find:
• Camera Frame with attached
security screw, license plate
Bracket and two (2) small
rubber bumpers
• Locking Tool
• Car Adapter
• Phone Mount with vent clip
and adhesive dash base
• Small envelope containing
Phone Plates and cleaning wipe
Note: If you’re installing this
on your Audi® or Volvo®, you
should have received additional
parts with specific installation
instructions. If you didn’t or
have questions, please go to
pearlauto.com/support and
we’ll be happy to help you.
From your own toolbox,
you’ll need:
• Tool for removing and re-attaching
your license plate (e.g. screwdriver,
socket wrench, etc…)
Take Stock
Welcome!
We’re excited you chose Pearl RearVision and
can’t wait for you to use it. Follow these steps and,
in minutes, you’ll be backing up with confidence.
Let’s get started.
Remove your license plate from your
car. Keep the screws handy – you will
need them to reinstall your license
plate and Bracket.
Note: If your license plate is held into place
with four screws, only two will be reused.
1: Install the Camera Frame
Remove your license plate
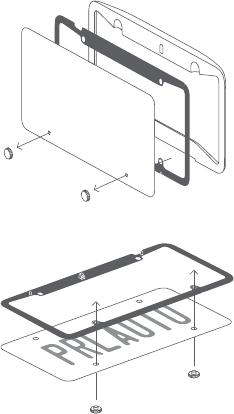
Separate the Camera Frame from
the Bracket. Unscrew both of the
small rubber bumpers. (Keep them
close. You’ll need them again shortly.)
Remove the card.
Put the flat side of the Bracket on the
front of your license plate. Flip them
over and screw together with the small
rubber bumpers in the two bottom
screw holes.
Attach the Bracket

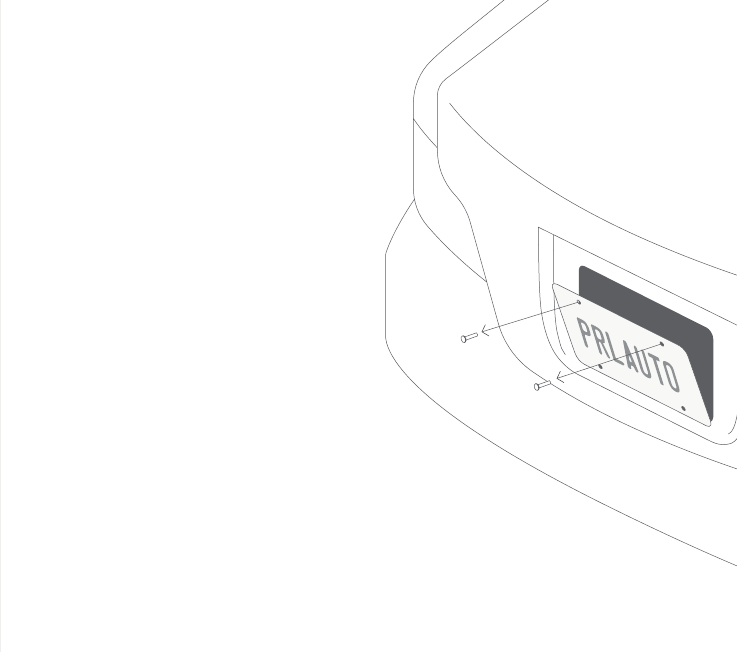
Place your license plate – which
should now be fastened to and
framed by the Bracket – on the
back of your car with the rubber
bumpers resting against the car.
Using two of the screws that
originally held your license plate in
place, reattach it to your car.
Replace your license plate
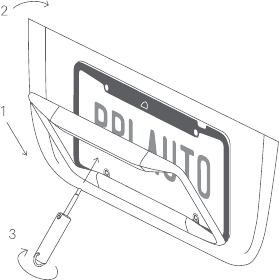
Install the Camera Frame by inserting
the bottom of the frame into the
bottom lip of the Bracket and press
it up into place so that the Camera
Frame rests flush on the Bracket.
Using the Locking Tool, tightly fasten
the security screw located in the
middle of the Camera Frame, between
the two cameras.
Tip: Keep your Locking Tool somewhere safe
and accessible in case you need to remove
your Camera Frame.
Secure the Camera Frame

Exterior installation. Check.
Let’s move to the interior of your car.
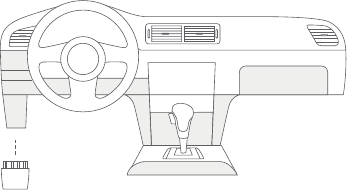
Plug the Car Adapter into the OBD
(on-board diagnostics) port that’s
typically under the dash in most
cars. You should hear a chime
when it’s properly connected.
Notes:
• The OBD port is on virtually every
car built after 1996.
• Possible locations are highlighted
in grey.
• Your car doesn’t have to be running.
Tip:
Having trouble locating your OBD port?
Download the Pearl App and tap on
“Can’t find your car’s OBD port?”
2. Plug in the Car Adapter
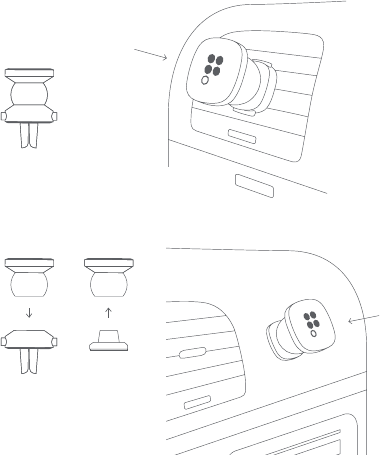
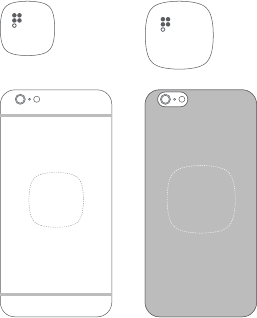
Choose the Phone Mount base
that works best for you.
Vent Mount: It’s ready to go.
Just clip the mount into your vent.
Dash Mount: First remove the
attached vent clip, then attach
the adhesive base to the Phone
Mount and adhere it to your dash.
Tips:
• Clean your dash with the included
Cleaning Wipe before adhering the
Dash Mount base.
• For best results, let the adhesive
cure for several hours before use.
A. B.
3: Set up your Phone Mount
Install the Mount
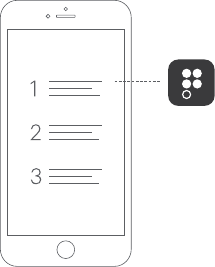
Aix the small Phone Plate to the back
of your phone or phone case. Or, stick
the larger Phone Plate under your case.
Your phone will now magnetically
mount for easy viewing.
Important Note:
Charging your phone wirelessly may cause
the Phone Plate to overheat and is not recom-
mended. Please see pearlauto.com/support
for more information.
Tips:
• Make sure your phone/phone case is clean
before applying the Phone Plate.
• Be sure to let the adhesive cure for a few
minutes before use.
Attach the Phone Plates
Small Phone Plate
Back of phone
Large Phone Plate
Inside phone case
Download the Pearl App from
pearlauto.com/download, the App
Store® or Google Play™. Follow the
step-by-step instructions and you’re
ready to go!
Important Note: Before using Pearl
RearVision, be sure to read the Safety &
Operating Information in the box or online
at pearlauto.com/safety.
4: Download the Pearl App

Congratulations!
You’ve successfully upgraded
your car with Pearl RearVision.
RearVision Tips
We want you to get the most out of
RearVision, so we’ve outlined a few
tips below.
Because driving situations – and
driver preferences – vary, RearVision
is viewable in portrait and landscape
on your phone and oers you a
choice of views and control options:
• Tap the App screen to:
º Switch from narrow- to
wide-view, and back
º Turn Night Mode on/o
º Turn o audible obstacle alerts
º Adjust your general settings
º Pan from left to right
º Bring up App Launcher (double-tap)
Did you know RearVision gets better
over time? Go to pearlauto.com/support
for details and the most up-to-date list
of tips and tricks.
Recharging your Camera Frame
The Camera Frame is solar-charged,
and, with good exposure to sunlight,
should maintain a charge.
A USB cable has been built into the
Camera Frame should the Camera
Frame battery require wired recharging.
You’ll receive a “low battery” warning
via the Pearl App if this is ever the case.
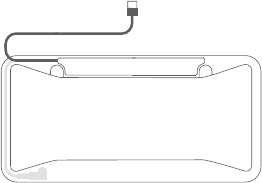
To recharge the Camera Frame:
• Remove the Camera Frame from
your car using the Locking Tool.
Note: It is not necessary to remove your
license plate.
• Pull out the USB plug and cable
that runs along the back side of
the Camera Frame.
• Plug the USB cable into any
standard USB charger
(not included).
Notes:
• Allow at least five (5) hours for a
full charge.
• While charging, the LED light on the front
of the Camera Frame will blink green. It
will show solid green when fully charged.
• Once charged, tuck the USB cable
back into the Camera Frame.
Note: If the connector or cable are
improperly placed, they may be crushed
or damaged and charging may become
diicult or impossible.
• Re-install the Camera Frame, using the
Locking Tool to lock it back into place.

For vehicle and phone compatibility,
technical specs, customer support and
more, visit pearlauto.com/support.
Stay up to date with all-things Pearl. Follow us!Stay up to date with all-things Pearl. Follow us!
pearlautomation
pearl_auto
pearl_auto

Pearl and the Pearl logo are trademarks of Pearl
Automation Inc. iPhone is a trademark of Apple Inc.,
registered in the U.S. and other countries. App Store
is a service mark of Apple, registered in the U.S.
and other countries. Google Play is a trademark of
Google Inc.
Designed by Pearl in California. Assembled in China.
© 2016 Pearl Automation Inc. All rights reserved.