Peg Perego Duette Sw Stroller Chassis Users Manual
Peg-Perego-Duette-Sw-Stroller-Chassis-Owners-Manual peg-perego-duette-sw-stroller-chassis-owners-manual
2015-06-15
: Peg-Perego Peg-Perego-Duette-Sw-Stroller-Chassis-Users-Manual-747306 peg-perego-duette-sw-stroller-chassis-users-manual-747306 peg-perego pdf
Open the PDF directly: View PDF ![]() .
.
Page Count: 20

duette sw
U.S.A./CANADA/AUSTRALIA
EN Instructions for use
ES Instrucciones de uso
FR Notice d’emploi
12
1
CB
A
3
B
A
2
CB
A
4
5
6
OK NO
8
C
AB
B
A
C
9
A
B
7
12
3
4
10
B
A
11
A
B
C
12
B
A
13
C
B
A
14
A
B
15
A
B
C
D
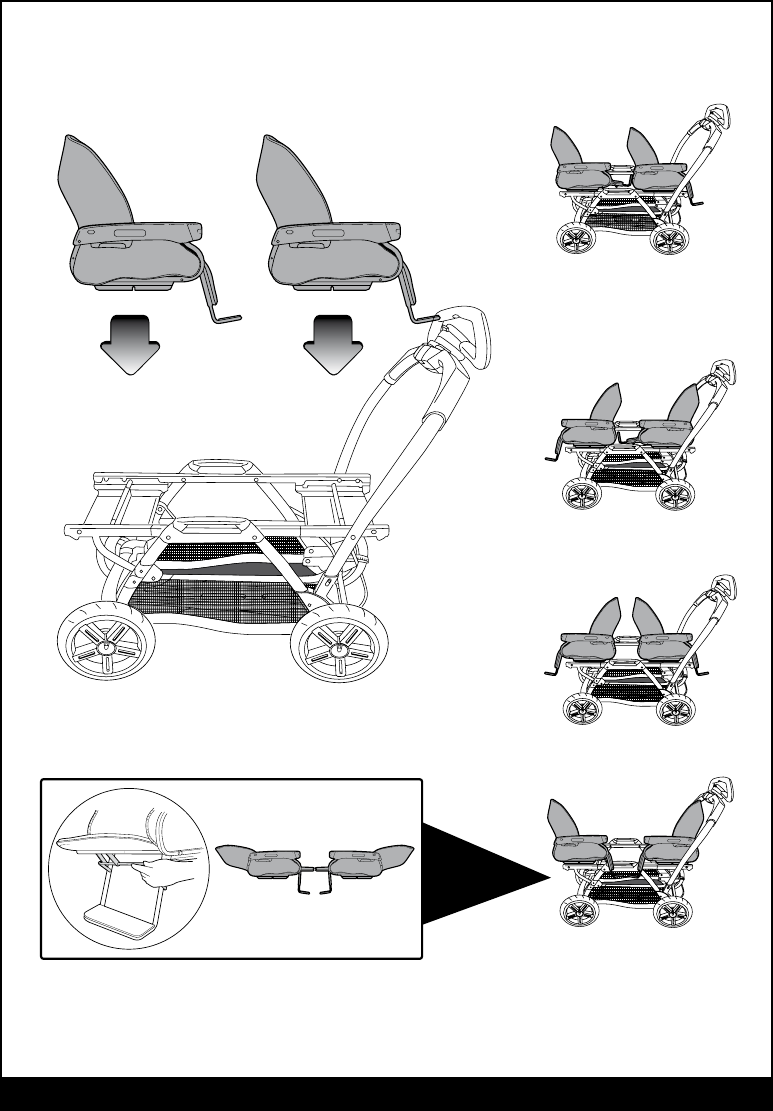
16 Ganciomatic System: 2 Seat Unit
A
A
B
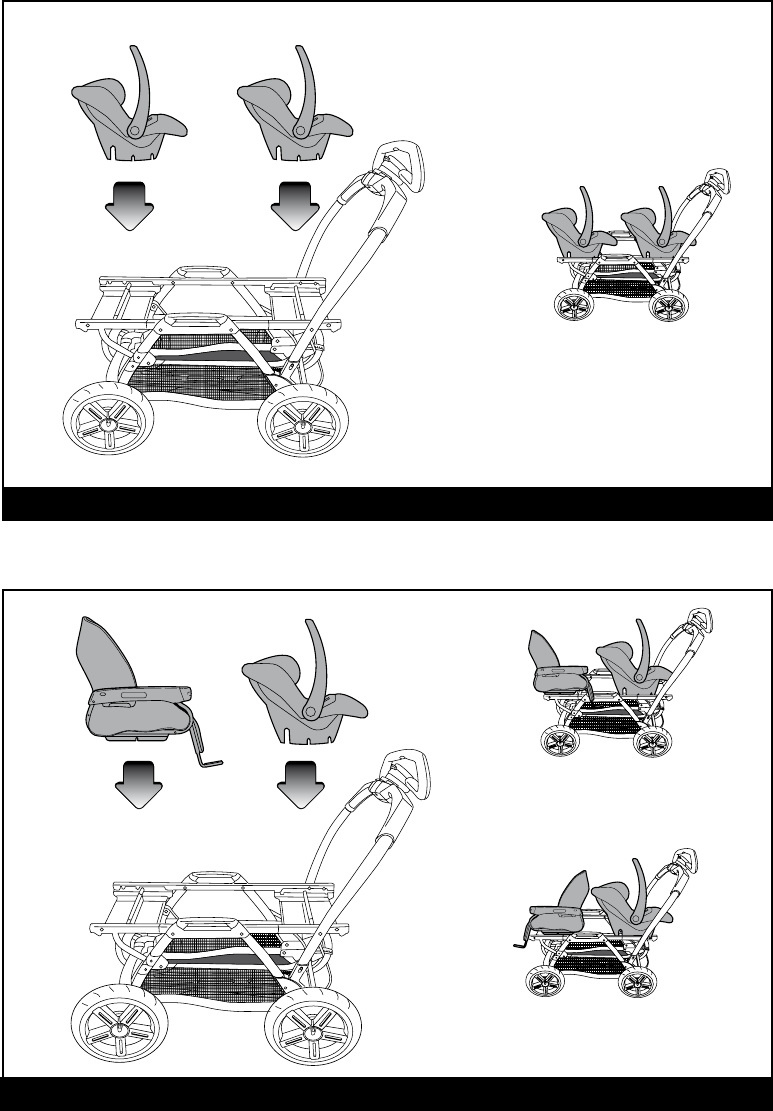
17 Ganciomatic System: 2 Primo Viaggio SIP
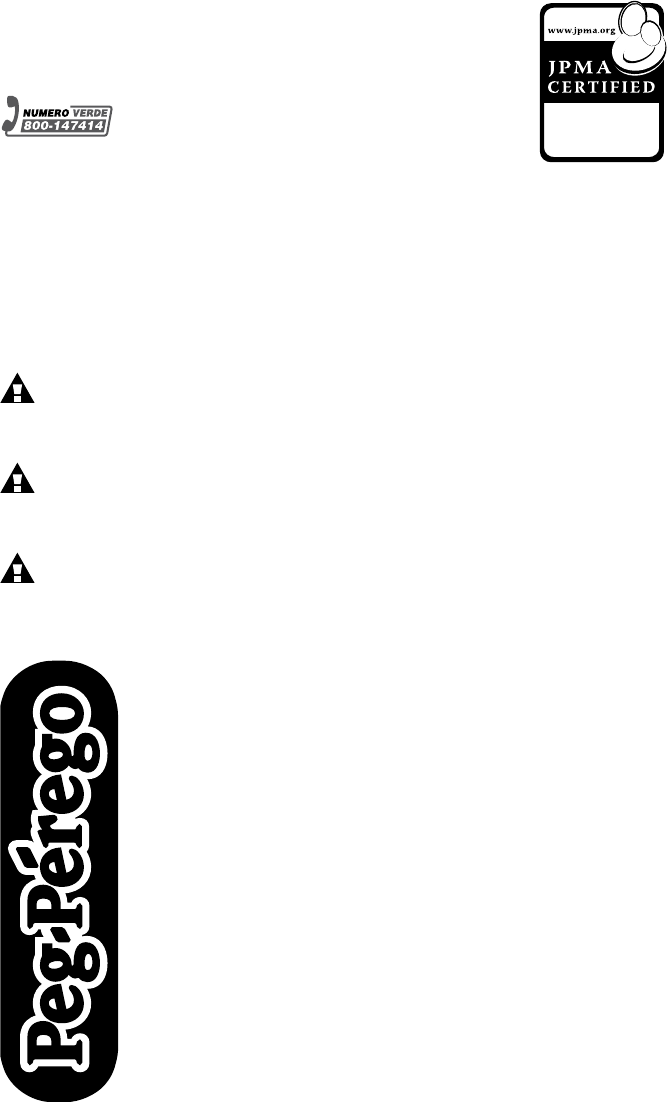
18 Ganciomatic System: Seat Unit + Primo Viaggio SIP

- 9 -
1
2
3
5
7
4
6
Duette SW
EN•Sparepartsavailableindifferentcolourstobespecifiedwhenordering.
ES•Repuestosdisponiblesenotroscoloresqueseespecificaránenelpedido.
FR•Piècesderechangedisponiblesenplusieurscouleursàspécifierdanslademande.
1)SPST5981GR
2)ARPI0372NGR
3)SPST5971N
4) ERSHDS*
5)ASPI0096L65N
6)ASPI0097L65N
7)SPST5968N

- 10 -
EN_English
ThankyouforchoosingaPeg-Péregoproduct.
WARNING
_ IMPORTANT: READ THE
INSTRUCTIONS CAREFULLY
BEFORE USE AND KEEP THEM FOR
FUTURE REFERENCE. THE CHILD
MAY BE HURT IF YOU DO NOT
FOLLOW THESE INSTRUCTIONS.
_ THISPRODUCTISDESIGNEDFOR
CHILDRENWHOSEMAXIMUM
WEIGHTIS45POUNDS(20KG)AND
WHOSEMAXIMUMHEIGHTIS43
INCHES(110CM).THISSHOPPER
BASKETISDESIGNEDTOCARRYA
MAXIMUMWEIGHTOF11POUNDS
(5KG).ANYPOACHORPOCKET
PROVIDEDWITHTHISUNITIS
DESIGNEDTOCARRYAMAXIMUM
WEIGHTOF0.44POUNDS(0.2KG).
_ FAILURETOFOLLOW
MANUFACTURER’SSPECIFICATIONS
ORUSEOFACCESSORIESOTHER
THANTHOSEAPPROVEDBYTHE
MANUFACTURERMAYCAUSETHE
UNITTOBECOMEUNSTABLE.
_ AVOIDSERIOUSINJURYFROM
FALLINGORSLIDINGOUT.ALWAYS
USECOMPLETE5POINTSEATBELT.
_ NEVERLEAVEYOURCHILD
UNATTENDED.
_ ALWAYSUSEALLTHEBRAKES
WHENEVERPARKED.
_ TOAVOIDSERIOUSINJURY,WHEN
MAKINGADJUSTMENTSENSURE
THECHILD’SBODYISCLEAROFALL
MOVINGPARTS.
_ ALLOPERATINGANDASSEMBLY
PROCEDURESSHOULDBE
PERFORMEDBYANADULT.
_ DONOTLIFTTHESTROLLERBY
GRIPPINGTHEFRONTBAR.THE
FRONTBARISNOTDESIGNEDTO
WITHSTANDLOADS.
_ ENSURETHATTHESTROLLERIS
OPENEDCORRECTLYANDLOCKEDIN
POSITIONOFUSE.
_ CHECKTOMAKESURETHATTHE
CARSEATORTHEBABYCARRIAGE
ISCORRECTLYFASTENEDTOTHE
STROLLER(WHEREAPPLICABLE).
_ DONOTDRIVETHISPRODUCT
AROUNDSTAIRSORSTEPS;CARE
MUSTBETAKENIFUNITISUSEDON
STAIRSORESCALATORS.
_ DONOTUSETHEPRODUCTIFITHAS
BROKENORMISSINGPARTS.
_ DONOTUSENEARFIREOREXPOSED
FLAME.
_ CHILDMAYSLIPINTOLEGOPENINGS
ANDSTRANGLE,NEVERUSEIN
RECLINECARRIAGEPOSITION
UNLESSFOOTRESTENCLOSUREIS
FULLYINSTALLED/IMPLEMENTED
(SEEMANUALINSTRUCTIONSFOR
CORRECTUSE).
NOTICE
THISARTICLEMEETSOREXCEEDS
ALLREQUIREMENTSCOVEREDIN
ASTMF833STANDARDANDLATEST
REVISIONS.
INSTRUCTIONS
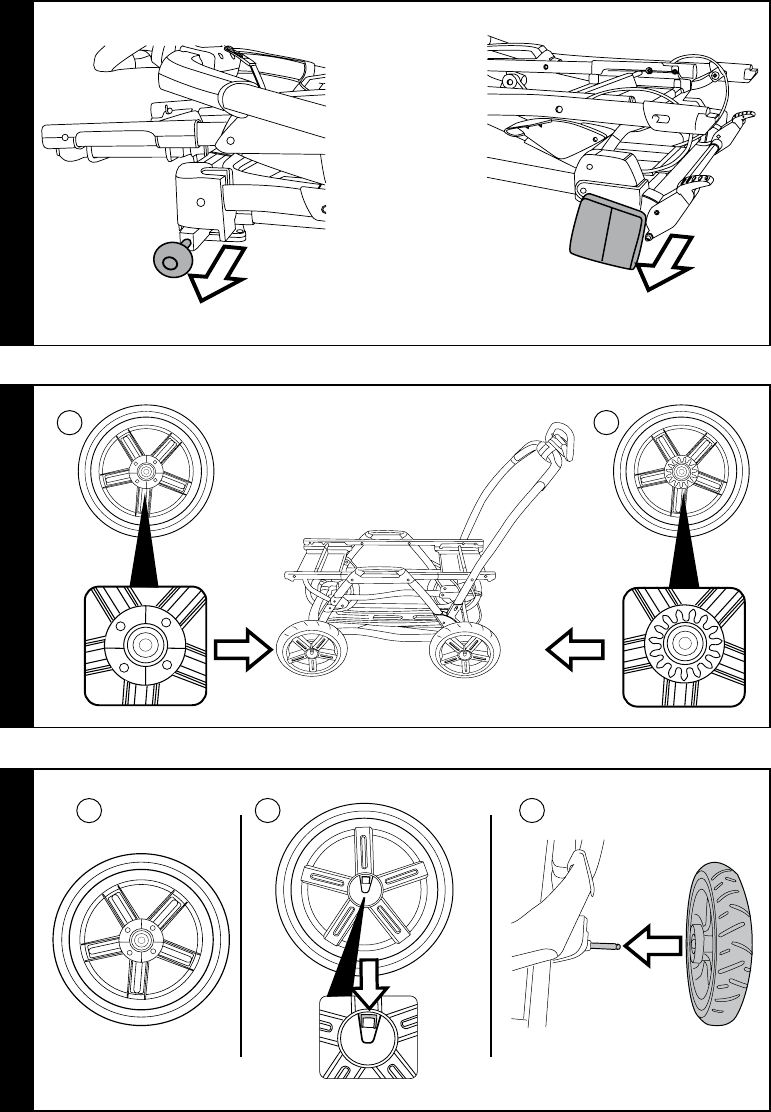
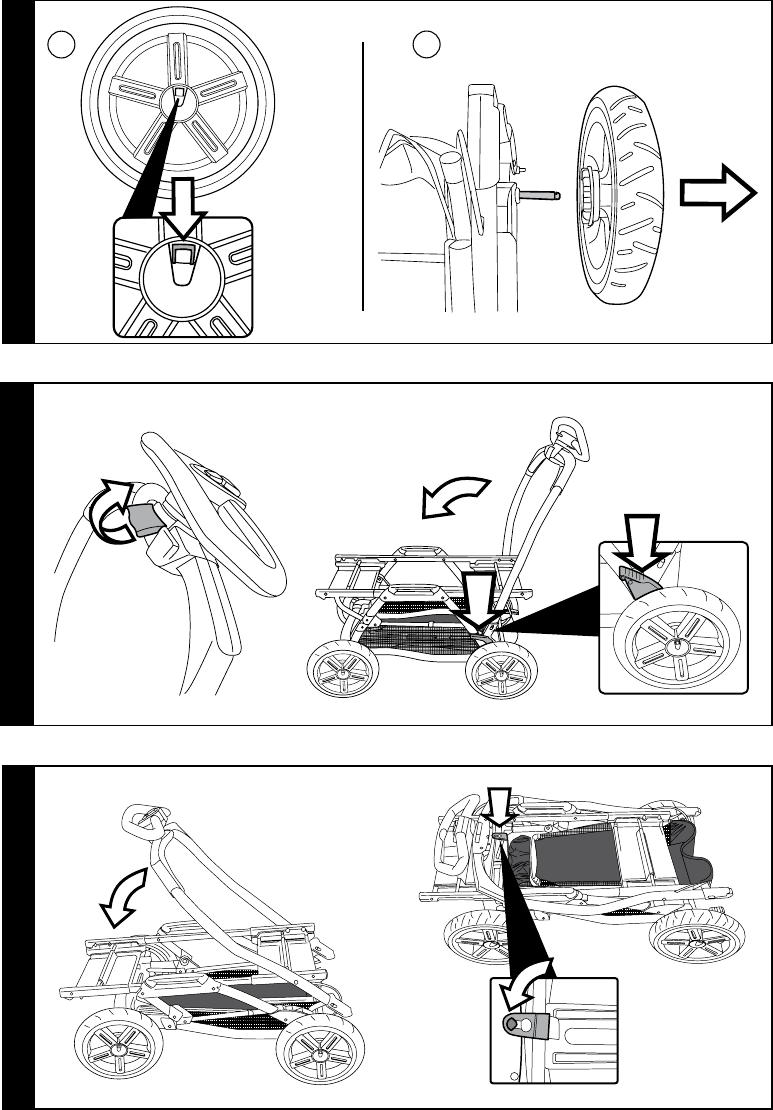
1 FITTINGTHEWHEELS:removethefour
protectivecaps,(tworoundandtwosquare)
fromthefoldedchassis,asinthefigure.
2 WARNING:distinguishthefrontwheels(Fig.A)
fromtherearwheels(Fig.B),asinthefigure.
3 Fitthefrontwheels,whichareshownin
FigureA,whilethebaseisclosed.Itis
necessarytopushthelockingleverdown
(fig.B)andatthesametimepushthehub
ontothepin(fig.C).Checkthatthewheels
areproperlyattachedbypullingthemin
oppositedirections.
4 Tofittherearwheels,repeattheaction
carriedoutforthefrontwheels(sequenceB
andC).Therearwheelscanbeidentifiedby
theblackteeth,asshowninfigureA.Check
thatthewheelsareproperlyattachedby
pullingtheminoppositedirections.
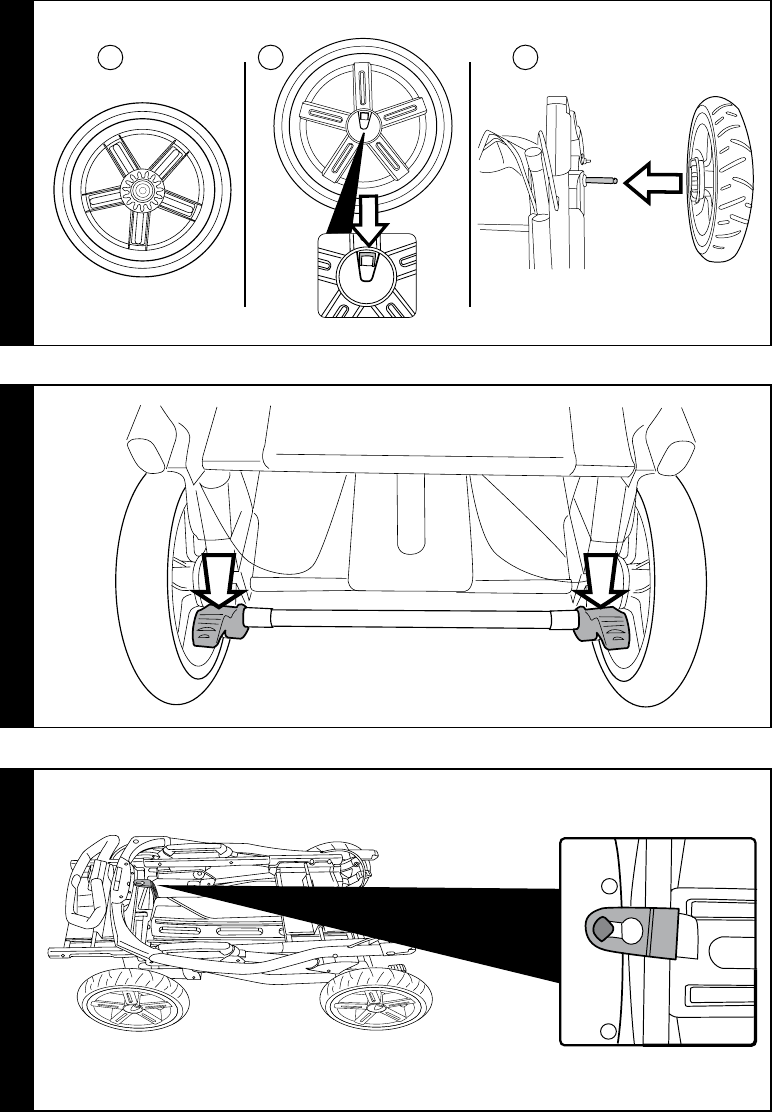
5 BRAKE:toactivatethebrakeonthechassis,
pushdownwithyourfootonthebrakebar
- 11 -
locatedontherearwheels,asshownbythe
arrowsinthefigure.
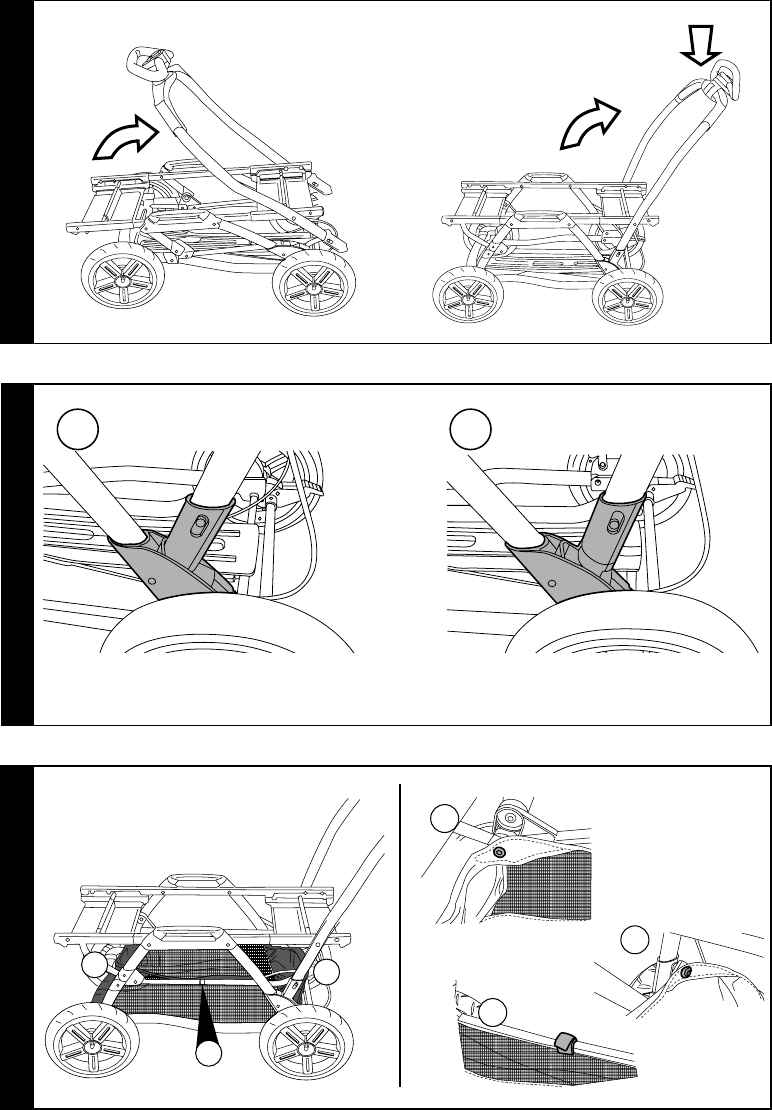
6 OPENING:activatethebrakeonthefolded
chassis.Unfastenthetab,asinthefigure.
7 Liftthehandlebarinthedirectionof
thearrow(Fig.A).Pressthehandlebar
downwardsuntilthefinalclick(Fig.B).
8 Checkthattheopeningiscorrect,asinthe
figure.
9 BASKET:fastenthebasketonthechassis
base,asshowninthefigure,atsixspecific
points.Attachthefourbuttons,tothefront
andrear,asinfiguresAandB;thenattach
thetwoVelcrostripstothechassistube,asin
figureC.
10 STEERINGWHEEL:toguaranteegoodgrip,
thesteeringwheelmayadoptfourdifferent
positions.Toadjustthem,pressthebuttonas
inthefigure.
11 STEERABLEWHEELS:thepracticalsteering
wheelallowsyoutosteerthefrontwheels.To
steer,movetheleveronthesteeringwheel
totheright,asinfigureA.Tofixthewheels,
movethelevertotheleft,asinfigureB.
12 EXTERNALHANDLEBARS:thecomplete
chassismaybeliftedusingthecentral
externalhandles(Fig.A)andtherear
handlebar(Fig.B).Thechassismustbelifted
bytwopeople.FigureCshowsthecorrect
waytoliftit.
13 WHEELREMOVAL:pressdownonthelever
atthecentreofthewheel,asshownbythe
arrowinfigureA,andsimultaneouslypullthe
wheeltowardsyou(Fig.B).
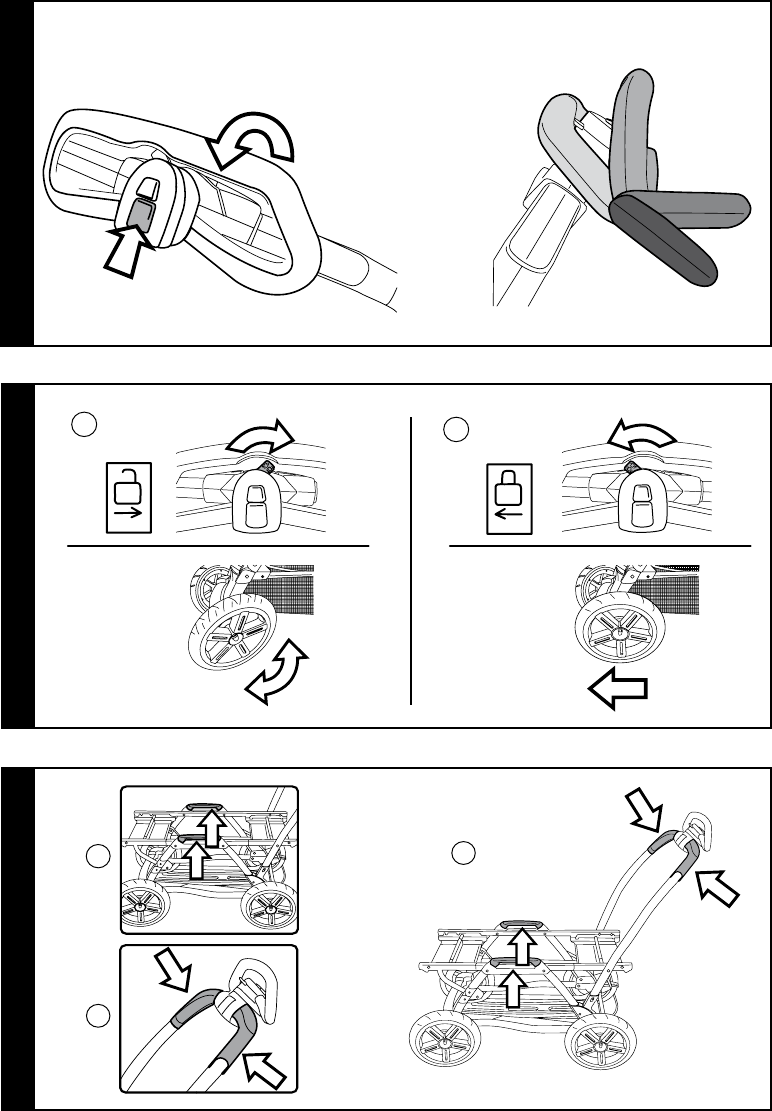
14 FOLDING:activatethebrakeandreleasethe
seats.Tofoldthechassis,lifttheleveron
thehandlebar(Fig.A),thusdetachingthe
handlebar,andmoveitslightlyforwards(Fig.
B).Pushdownonthesafetyleverwithyour
leftfoot(Fig.C)toreleasethehandlebar.
15 Rotatethehandlebardownwards(Fig.A).
Foldthechassis,attachingthetabtothe
handlebarfastener(Fig.B).
GANCIOMATIC SYSTEM
Ganciomaticisafastandpracticalsystem
thatallowsyoutoattachthePrimoGiro
carryingchair,thePrimoViaggioSIP carseat
(soldseparately)totheGanciomaticBasein
onestep.
PlacetheitemontheGanciomaticBaseand
pushdownwithbothhandsuntilyouheara
click.
Alwaysactivatethechassisorstrollerbrake
beforeattachingorremovingproducts(refer
totherespectiveinstructionmanuals).
Follow the instructions for the product
combinations.
16DUETTE + 2 CARRYING CHAIRS
WARNING:tomaintainproductstability,
alwaysattachbothcarryingchairs.Ifforany
reasonDuetteSWisusedforonlyonechild,fit
bothcarryingchairsanywayandensurethat
theyareproperlyattached.FiguresA,B,Cand
Dshowtheattachmentoptionsforthechairs.
FigureDshowsthe“cot”position,obtained
byrecliningthebackrestsandliftingthe
footboards,asinthefigure.
17DUETTE + 2 PRIMO VIAGGIO SIP CAR SEATS
FigureAshowshowtoattachtheproduct
(facingthepersonpushing).
18DUETTE + 1 PRIMO VIAGGIO SIP CAR SEAT
AND 1 CARRYING CHAIR
WARNING:tomaintainproductstability
alwaysattachthecarryingchair.Ifforany
reasonDuetteSWisusedforonlyonechild,
fitthecarryingchairanywayandensurethat
itisproperlyattached.FiguresAandBshow
howtoattachtheproducts.
CLEANING AND MAINTENANCE
PRODUCTMAINTENANCE:protectfromthe
weather:water,rain,orsnow;prolonged
andcontinuousexposuretobrightsunlight
maygiverisetocolourchangesofvarious
differentmaterials;storethisproductinadry
place.
CLEANINGTHECHASSIS:periodicallycleanall
plasticpartswithadampcloth.Donotuse
solventorsimilarcleaningproducts;keep
allmetalpartsdrytopreventrusting;keep
movingpartsclean(adjustmentmechanisms,
lockingmechanisms,wheels,...)andfreeof
dustandsandand,ifnecessary,lubricatewith
lightmachineoil.
PEG-PÉREGO S.p.A.
PegPéregocanmakechangesatanytimeto
themodelsdescribedinthispublicationfor
technicalorcommercialreasons.
PEG-PÉREGO AFTER-SALES
SERVICE
Ifanypartsoftheitemgetlostordamaged,
onlyusegenuinePegPéregospareparts.
Foranyrepairs,replacements,information
ontheproductsandsalesofgenuinespare
partsandaccessories,contactthePeg

- 12 -
PéregoAssistanceServiceandstatetheserial
numberoftheproduct,ifpresent.
USA:
tel. 800.671.1701
fax: 260.471.6332
call us toll free: 1.800.671.1701
web site: www.pegperego.com
CANADA
tel.905.839.3371
fax905.839.9542
call us toll free1.800.661.5050
websitewww.pegperego.com
Peg-Peregoreservestherighttomakeany
necessarychangesorimprovementstothe
productsshownatanytimewithoutnotice.
ES_Español
Leagradecemoshaberelegidounproducto
Peg-Pérego.
ADVERTENCIA
_ IMPORTANTE: LÉASE
ATENTAMENTE ESTAS
INSTRUCCIONES Y CONSÉRVELAS
PARA FUTURAS CONSULTAS. LA
SEGURIDAD DEL NIÑO PODRÍA
ESTAR EN PELIGRO SI NO SE LEEN
DICHAS INSTRUCCIONES.
_ ESTE PRODUCTO HA SIDO DISEÑADO
PARA NIÑOS CON UN PESO MÁXIMO
DE 20 KG Y UNA ALTURA MÁXIMA
DE 110 CM. LA CESTILLA HA SIDO
REALIZADA PARA SOPORTAR UN PESO
MÁXIMO DE 5 KG. CUALQUIER BOLSA
ENTREGADA JUNTO AL PRODUCTO
ESTÁ REALIZADA PARA SOPORTAR UN
PESO MÁXIMO DE 0,2 KG.
_ SI NO SE RESPETAN LAS INDICACIONES
ESPECIFICADAS O SI SE USAN
ACCESORIOS DIFERENTES DE LOS
HOMOLOGADOS POR EL FABRICANTE,
EL PRODUCTO PUEDE SER INESTABLE.
_ PARA EVITAR LESIONES GRAVES POR
CAÍDAS O SI ESCAPA EL NIÑO DE
LA SILLA DE PASEO, USAR SIEMPRE
UN CINTURÓN DE SEGURIDAD DE 5
PUNTOS COMPLETO.
_ NO DEJAR NUNCA AL NIÑO SIN
VIGILANCIA.
_ USAR SIEMPRE TODOS LOS
DISPOSITIVOS DE BLOQUEO CADA VEZ
QUE LA SILLA DE PASEO NO ESTÉ EN
MOVIMIENTO.
_ PARA EVITAR LESIONES GRAVES,
ASEGURARSE DE QUE EL NIÑO NO
PUEDA MOVERSE PELIGROSAMENTE
MIENTRAS SE REGULA EL PRODUCTO.
_ TODAS LAS OPERACIONES DE
ENSAMBLAJE DEBE REALIZARLAS SOLO
UN ADULTO.
_ NO LEVANTAR LA SILLA DE PASEO
COGIÉNDOLA POR LA BARRA
- 13 -
FRONTAL. LA BARRA FRONTAL NO HA
SIDO CONCEBIDA PARA SOPORTAR
PESOS.
_ ASEGURARSE DE QUE LA SILLA DE
PASEO ESTÉ ABIERTA CORRECTAMENTE
Y BLOQUEADA EN LA POSICIÓN
CORRECTA PARA SU UTILIZACIÓN.
_ ASEGURARSE DE QUE LA SILLA
DE AUTO O EL COCHECITO ESTÉN
ENGANCHADOS CORRECTAMENTE A
LA SILLA DE PASEO.
_ NO USAR LA SILLA DE PASEO CERCA
DE ESCALERAS O ESCALONES; PRESTAR
ATENCIÓN CUANDO SE UTILIZA EN
ESCALERAS O ESCALERAS MECÁNICAS.
_ NO UTILIZAR EL PRODUCTO SI PRESENTA
PARTES DAÑADAS O SI FALTA ALGUNA
PARTE.
_ NO USAR EN PRESENCIA DE LLAMAS O
FUENTES DE CALOR.
_ EL NIÑO PODRÍA RESBALARSE POR
LAS APERTURAS DE LAS PIERNAS Y
ESTRANGULARSE, POR LO QUE NO
UTILIZAR NUNCA EL COCHECITO EN
POSICIÓN INCLINADA SI EL REPOSAPIÉS
NO ESTÁ COMPLETAMENTE
INSTALADO/APLICADO (VER EL
MANUAL DE INSTRUCCIONES PARA UN
USO CORRECTO).
AVISO
ESTE PRODUCTO CUMPLE
SUFICIENTEMENTE CON TODOS LOS
REQUISITOS ESTABLECIDOS POR LA
NORMA ASTM F833 Y ULTERIORES
REVISIONES.
INSTRUCCIONES DE USO
1 MONTAJEDELASRUEDAS:quitarloscuatro
taponesdeprotección(dosredondosydos
cuadrados)delcarritoaúncerradocomo
muestralafigura.
2 ATENCIÓN:distinguirlasruedasdelanteras
(Fig.A)delastraseras(Fig.B)comomuestra
lafigura.
3 Conelcarritocerrado,montarlasruedas
delanterasquesemuestranenlafiguraA.
Presionarsobrelapalanquitadeenganche
(fig.B)haciaabajoysimultáneamenteencajar
elcojineteeneleje(fig.C).Controlarel
correctoenganchetirandodelasruedasen
direcciónopuesta.
4 Paramontarlasruedastraseras,quese
distinguenporlosdientesnegrostalycomo
enlafiguraA,repetirlamismaoperación
anteriorconlasruedasdelanteras(secuencia
ByC).Controlarelcorrectoenganchetirando
delasruedashacialadirecciónopuesta.
5 FRENO:parafrenarelcarritobajarconel
pielabarradefrenodispuestaenlasruedas
traserascomoindicanlasflechasenlafigura.
6 APERTURA:accionarelfrenodelcarrito
estandocerrado.Desengancharlalengüeta
comoenlafigura.
7 Alzarelmanillarenelsentidoindicadoporla
flecha(Fig.A).Presionarelmanillarhaciaabajo
ybloquearlohastaoírelclicfinal(Fig.B).
8 Comprobarquelaaperturaseacorrectataly
comomuestralafigura.
9 CESTA:lacestasecolocaenlabasedelcarrito
enseispuntosespecíficos,comoindicala
figura.Abrocharloscuatrobotonescomo
seindicaenlasfigurasAyBenlaparte
delanteraytraseray,después,unirlosdos
velcrosalbastidordelcarritocomoindicala
figuraC.
10 VOLANTE:elvolantepuedeponerseen
cuatroposicionesdiferentespresionandoel
botóncomoindicalafiguraconobjetode
asirlosiemprecorrectamente.
11 RUEDASDEDIRECCIÓN:graciasalpráctico
volantepuedeelegirgirarlasruedas
delanteras.Paragirarlasruedasdelanteras,
hayquedesplazarhacialaderechala
palanquitaquehayenelvolante,como
indicalafiguraA.Paraquelasruedasqueden
fijas,moverlapalanquitahacialaizquierda,
comoindicalafiguraB.
12 EMPUÑADURASEXTERIORES:sepuede
levantarelcarritocompletoporlas
empuñadurascentralesexteriores(Fig.A)
yporelmanillarposterior(Fig.B).Elcarrito
debelevantarseentredospersonas.Lafigura
Cmuestracómohacersedeformacorrecta.
13 PARAQUITARLASRUEDAS:presionarla
palanquitaquehayenelcentrodelarueda
comoindicalaflechadelafiguraAyalmismo
tiempotirardelaruedahaciasí(Fig.B).
14 CIERRE:accionarelfrenoyquitarlassillitas.
Paracerrarelcarritolevantarlapalanquita
quehayenelmanillar,comoindicalafigura
(Fig.A),ydesengancharlomoviéndoloun
pocohaciadelante(FigB).Paradesbloquear
elmanillar,presionarconelpieizquierdo
- 14 -
lapalancadeseguridadhaciaabajo,como
indicalafigura(Fig.C).
15 Girarelmanillarhaciaabajo(Fig.A).Cerrarel
carrito,enganchandolapalanquitadecierre
alganchodelmanillar(Fig.B).
GANCIOMATIC SYSTEM
Ganciomaticsystemeselsistemapráctico
yvelozquepermiteconunúnicogesto
engancharalaBaseGanciomaticdelcarrito
lasillitaextraíblePrimoGiro,lasilladeauto
PrimoViaggioSIP(artículosenventapor
separado).
ApoyarcadaproductoalaBaseGanciomatic
ypresionarsobreélconambasmanoshasta
oírelclicfinal.
Accionarsiempreelfrenodelchasisode
lasilladepaseoantesdeengancharo
desengancharcadaproducto(consultarel
correspondientemanualdeinstrucciones).
Deben respetarse las indicaciones para las
combinaciones de los productos.
16 DUETTE + 2 SILLITAS EXTRAÍBLES
ADVERTENCIA:paramantenerelproducto
estableserecomiendainstalarsiemprelas
dossillasextraíbles.
SiporalgúnmotivoseutilizaDuetteSWcon
unsoloocupante,seaconsejaengancharlas
dossillasextraíblesyasegurarsedequeestén
bienancladas.
LasfigurasA,B,CyDmuestranlas
posibilidadesdeenganchedelassillas
extraíbles.
LafiguraD,muestralaposición“camita”,
bajandolosrespaldosysubiendolos
reposapiésdelospeldañoscomomuestrala
figura.
17 DUETTE + 2 SILLAS DE AUTO PRIMO
VIAGGIO SIP
LafiguraAmuestracómoacoplarelproducto
(giradohaciamamá).
18DUETTE + 1 SILLA DE AUTO PRIMO VIAGGIO
SIP Y 1 SILLA EXTRAÍBLE
ADVERTENCIA:paramantenerelproducto
estableserecomiendainstalarsiempre
lasillaextraíble.Siporalgúnmotivose
utilizaDuetteSWconunsoloocupante,se
recomiendadetodasformasengancharla
sillaextraíbleyasegurarsedequeestébien
enganchada.
LasfigurasAyBmuestrancómoenganchar
losproductos.
LIMPIEZA Y MANTENIMIENTO
MANTENIMIENTODELPRODUCTO:proteger
contraagentesatmosféricos(agua,lluviao
nieve).Unaexposicióncontínuayprolongada
alsolpodríacausarcambiosdecolorde
muchosmateriales.Conservaresteproducto
enunlugarseco.
LIMPIEZADELCHASIS:Limpiar
periódicamentelaspartesdeplásticocon
unpañohúmedosinusarsolventesuotros
productossimilares.Mantenersecastodaslas
partesdemetalparaprevenirlaoxidación.
Mantenerlimpiastodaslaspartesmóviles
(dispositivoderegulación,deenganche,
ruedas...)quitandoelpolvoolaarenay,
encasonecessario,engrasarlasconaceites
ligeros.
PEG-PÉREGO S.p.A
Peg-Péregopodráaportarencualquier
momentomodificacionesalosmodelos
quesedescribenenelpresentemanualpor
razonestécnicasocomerciales.
SERVICIO DE ASISTENCIA
PEG-PÉREGO
Sisepierdenodañanalgunaspartesdel
modelo,utilizarúnicamenterepuestos
originalesPegPérego.Paracualquier
reparación,sustitución,informaciónacercade
losproductos,ventaderepuestosoriginalesy
accesorios,contactaralServicioalClientePeg
Péregoindicando,encasofuerepresente,el
númerodeseriedelproducto.
USA:
tel.: 800.225.1558 (Español)
fax: 260.471.6332
Número de teléfono gratis: 1.800.225.1558
(Español)
sito internet: www.pegperego.com
Peg-Peregosereservaelderechoparahacer
cambiosnecesariosomejorarlosproductos
alcualquiertiemposinnotificación.

- 15 -
FR_Français
Mercid’avoirchoisiunproduitPeg-Pérego.
AVERTISSEMENT
_ IMPORTANT : LIRE CES
INSTRUCTIONS AVEC ATTENTION
ET LES CONSERVER POUR TOUTE
RÉFÉRENCE FUTURE. LA SÉCURITÉ
DE L’ENFANT POURRAIT ÊTRE
MENACÉE SI CES INSTRUCTIONS NE
SONT PAS SUIVIES.
_ CE PRODUIT A ETE CONÇU POUR DES
ENFANTS DONT LE POIDS N’EXCEDE
PAS 20 KG (45 LIVRES) ET LA TAILLE NE
DEPASSE PAS 110 CM (43 POUCES).
LE PANIER A ETE CONÇU POUR
SUPPORTER DES CHARGES MAXIMALES
DE 5 KG (11 LIVRES). LES POCHETTES
OU SACS FOURNIS AVEC CE PRODUIT
ONT ETE CONÇUS POUR SUPPORTER
DES CHARGES MAXIMALES DE 0,2 KG
(0,44 LIVRES).
_ LE DEFAUT D’OBSERVATION DES
SPECIFICATIONS DU FABRICANT
OU L’EMPLOI D’ACCESSOIRES NON
APPROUVES PAR LE FABRICANT PEUT
AFFECTER LA STABILITE DU PRODUIT.
_ POUR ÉVITER DE GRAVES BLESSURES
SUITE À LA CHUTE OU AU GLISSEMENT
DE L’ENFANT DU PRODUIT, TOUJOURS
UTILISER UNE CEINTURE DE SÉCURITÉ
À 5 POINTS COMPLÈTE.
_ NE JAMAIS LAISSER L’ENFANT SANS
SURVEILLANCE.
_ TOUJOURS ACTIONNER LES FREINS
LORSQUE LE PRODUIT EST A L’ARRET.
_ POUR ÉVITER DE GRAVES BLESSURES
LORS DU RÉGLAGE DU PRODUIT,
S’ASSURER QUE LES MEMBRES DE
L’ENFANT NE SONT PAS EN CONTACT
AVEC DES PIÈCES EN MOUVEMENT.
_ L’ENSEMBLE DES PROCÉDURES DE
MONTAGE ET D’UTILISATION DOIT
ÊTRE EFFECTUÉ PAR UN ADULTE.
_ NE PAS SOULEVER LA POUSSETTE PAR
LA BARRE FRONTALE. ELLE N’A PAS
ÉTÉ CONÇUE POUR SUPPORTER DES
CHARGES.
_ S’ASSURER QUE LA POUSSETTE
EST CORRECTEMENT OUVERTE
EST BLOQUÉE DANS LA POSITION
CONVENANT À SON UTILISATION.
_ CONTRÔLER QUE LE SIÈGE ENFANT
OU LE LANDAU EST CORRECTEMENT
ACCROCHÉ À LA POUSSETTE.
_ NE PAS UTILISER CE PRODUIT
À PROXIMITÉ DE MARCHES OU
D’ESCALIERS; PRÊTER ATTENTION À LA
MANIPULATION DU PRODUIT DANS
DES ESCALIERS OU DES ESCALATORS.
_ NE PAS UTILISER LE PRODUIT SI DES
PIÈCES SONT MANQUANTES OU
CASSÉES.
_ NE PAS UTILISER PRÈS DU FEU OU
D’UNE FLAMME DIRECTE.
_ L’ENFANT POURRAIT GLISSER À
TRAVERS LES PASSAGES DE JAMBES
ET S’ÉTRANGLER; NE JAMAIS UTILISER
DANS LA POSITION LANDAU INCLINÉE
À MOINS QUE LE SYSTÈME DE REPOSE-
PIED NE SOIT COMPLÈTEMENT
INSTALLÉ/EN PLACE (SE REPORTER AU
MANUEL D’INSTRUCTIONS POUR UNE
UTILISATION CORRECTE).
REMARQUE
CET ARTICLE REMPLIT LES CONDITIONS
REQUISES PAR LA NORME ASTM F833
ET RÉVISIONS RÉCENTES OU SATISFAIT
À DES CONDITIONS PLUS SÉVÈRES.
INSTRUCTIONS
D’UTILISATION
1 MONTAGEDESROUES:retirerlesquatre
emboutsdeprotection(deuxrondsetdeux
carrés)duchâssisencorefermé,comme
indiquésurlafigure.
2 ATTENTION:distinguerlesrouesavant(fig.A)
desrouesarrière(fig.B)ensereportantàla
figure.
3 Monterlesrouesavant(voirfigureA)surle
châssisfermé.Lalanguettedefixationdoit
êtrepousséeverslebas(fig.B).Danslemême
- 16 -
temps,insérerlemoyeusurl’axe(fig.C).
Contrôlerquelemontageaétécorrectement
effectuéentirantlesrouesdansladirection
opposée.
4 Pourmonterlesrouesarrière,caractérisées
pardesdentsnoires(fig.A),répéter
l’opérationprécédemmentréaliséeavecles
rouesavant(séquencesBetC).Contrôlerque
lemontageaétécorrectementeffectuéen
tirantlesrouesdansladirectionopposée.
5 FREIN:pourimmobiliserlechâssis,abaisser
aveclepiedlabarredefreinsituéeau-dessus
desrouesarrière,commel’indiquentles
flèchessurlafigure.
6 OUVERTURE:actionnerlefreinduchâssis
encorefermé.Décrocherlalanguette,comme
indiquésurlafigure.
7 Releverlapoignéearrièredanslesens
indiquéparlaflèche(fig.A).Pousserla
poignéeverslebasetlabloquerenveillantà
entendreledéclicfinal(fig.B).
8 Vérifierquel’ouvertureaétéeffectuée
correctementensereportantàlafigure.
9 PANIER:positionnerlepanieràlabase
duchâssis,commeindiquésurlafigure,
enrespectantlessixpointsspécifiques.
Boutonnerlesquatreboutonsàl’avantetà
l’arrière,commeindiquésurlesdétailsAet
B;attacherensuitelesdeuxpetitsrubans
àscratchaumontantduchâssis,comme
indiquésurledétailC.
10 VOLANT:levolantpeutêtrerégléenquatre
positionsdifférentesenappuyantsurle
boutonindiquésurlafigure,afindetoujours
garantirunebonneprise.
11 ROUESPIVOTANTES:grâceauvolant,ilest
possiblederendrelesrouesavantpivotantes.
Pourrendrelesrouesavantpivotantes,
déplacerversladroitelepetitleviersitué
surlevolant,commeindiquésurlafigureA.
Pourmettreenpositionfixe,déplacerversla
gauchelepetitlevier,commesurlafigureB.
12 POIGNÉESLATÉRALES:Lechâssispeutse
transportergrâceauxpoignéeslatérales
(fig.A)etparlapoignéearrière(fig.B).Deux
personnessontnécessairespourlesoulever.
LafigureCindiquecommentsoulever
correctementlechâssis.
13 ENLEVERLESROUES:tirerverslebasla
languettesituéeaucentredelaroue,comme
l’indiquelaflèchedelafigureA,et,dansle
mêmetemps,tirerlaroueverssoi(fig.B).
14 FERMETURE:actionnerlefreinetdécrocher
lesblocspoussettes.Pourrefermerlechâssis,
releverlepetitleviersituésurlapoignée
centrale(fig.A);lapoignéeseraainsi
débloquéeetbasculeralégèrementenavant
(fig.B).Appuyerdupiedgauchesurlelevier
desécurité(fig.C)pourdébloquerlapoignée.
15 Fairebasculerlapoignéeverslebas(fig.
A).Refermerlechâssisenaccrochantla
languettedefermetureaucrochetdela
poignée(fig.B).
SYSTÈME GANCIOMATIC
Pratiqueetrapide,leSystèmeGanciomatic
permetd’accrocherenunseulgestelebloc
poussettePrimoGiro,lesiège-autoPrimo
ViaggioSIP(vendusséparément)àlaBase
Ganciomaticduchâssis.
LesposersurlaBaseGanciomaticetappuyer
desdeuxmainsjusqu’audéclic.
Toujoursactionnerlefreinduchâssisavant
d’accrocheroudedécrocherlesproduits
(consulterlemanueld’instructionsdechaque
produit).
Suivre les indications relatives aux
combinaisons de produits.
16 DUETTE + 2 BLOCS POUSSETTES
AVERTISSEMENT:pourmaintenirlastabilité
duproduit,ilestrecommandédetoujours
installerlesdeuxblocspoussettes.
Si,pouruneraisonparticulière,DuetteSW,
edevaitêtreutiliséepourunseulenfant,ilest
recommandéd’accrochertoutdemêmeles
deuxblocspoussettesetdes’assurerqu’ils
sontbienfixés.
LesfiguresA,B,CetDmontrentles
possibilitésd’installationdesblocs
poussettes.
LafigureDmontrelapositionallongée,
obtenueenabaissantlesdossierseten
relevantlesrepose-piedsdesmarchepieds,
commeindiquésurlafigure.
17DUETTE + 2 SIÈGES AUTO PRIMO VIAGGIO
SIP
LafigureAmontrecommentaccrocherles
siègesauto(tournésverslesparents)
18DUETTE + 1 SIÈGE-AUTO PRIMO VIAGGIO
SIP ET 1 BLOC POUSSETTE
AVERTISSEMENT:pourmaintenirlastabilité
duproduit,ilestrecommandédetoujours
installerblocpoussette.
Si,pouruneraisonparticulière,DuetteSW
devaitêtreutiliséeavecunseulenfant,,ilest
recommandéd’accrochertoutdemêmele
siègeamovibleetdes’assurerqu’ilestbien
fixé.
LesfiguresAetBmontrentcomment
accrocherlesproduits.
- 17 -
NETTOYAGE ET ENTRETIEN
ENTRETIENDEL’ARTICLE:protégerl’article
desagentsatmosphériques(eau,pluieou
neige);uneexpositioncontinueetprolongée
ausoleilpourraitentraînerunchangement
decouleurdenombreuxmatériaux;ranger
cetarticledansunlieusec.
NETTOYAGEDUCHÂSSIS:nettoyer
régulièrementlespiècesenplastiqueàl’aide
d’unlingehumide;nepasutiliserdesolvants
ouautresproduitssimilaires.Veilleràce
quetouteslespiècesmétalliquesrestent
sèchespourprévenirlaformationderouille.
Maintenirlebonétatdepropretédetoutes
lespiècesmobiles(mécanismesderéglage,
mécanismesdefixation,roues,etc.)en
enlevantpoussièreousable;graisseravec
unehuilelégèresinécessaire.
PEG-PÉREGO S.p.A
Peg-Péregopodráaportarencualquier
momentomodificacionesalosmodelos
quesedescribenenelpresentemanualpor
razonestécnicasocomerciales.
SERVICIO DE ASISTENCIA
PEG-PÉREGO
Encasdepertedepiècesouderupturede
l'uned'elles,utiliserexclusivementdespièces
derechangeoriginalesPeg-Pérego.Pour
touteréparation,remplacement,informations
surlesproduits,ventedepiècesdétachées
d’origineetaccessoires,contactezleservice
après-ventePegPéregoenindiquant,si
présent,lenumérodesérieduproduit.
CANADA:
tel.: 905.839.3371
fax: 905.839.9542
numéro sans frais: 1.800.661.5050
site internet: www.pegperego.com
Peg-Péregoseréserveledroitd’apporterà
toutmomentdesmodificationsauxmodèles
décritsdansleprésentouvrage,pourdes
raisonsdenaturetechniqueoucommerciale.
- 18 -
- 19 -
FINA1001I63
02/11/2010
duette sw
Conforms to
ASTM F833
Safety Standards
PEG PEREGO S.p.A.
VIA DE GASPERI 50 20043 ARCORE MI ITALIA
tel. 0039 039 60881 fax 0039 039 615869/616454
Servizio Post Vendita - After Sale:
tel. 0039 039 6088213 fax: 0039 039 3309992
PEG PEREGO U.S.A. Inc.
3625 INDEPENDENCE DRIVE FORT WAYNE INDIANA 46808
phone 260 482 8191 fax 260 484 2940
Call us toll free: 1 800 671 1701
PEG PEREGO CANADA Inc.
585 GRANITE COURT PICKERING ONTARIO CANADA L1W3K1
phone 905 839 3371 fax 905 839 9542
Call us toll free: 1 800 661 5050
www.pegperego.com
WARNING
AVOID SERIOUS INJURY FROM FALLING OR SLIDING OUT.
ALWAYS USE COMPLETE 5 POINT SEAT BELT.
ADVERTENCIA
EVITE LESIÓNES DE CAIDAS O DESLIZAMIENTOS HACIA FUERA.
SIEMPRE UTILIZE EL CINTURON COMPLETO DE 5 PUNTOS.
AVERTISSEMENT
EVITER UNE BLESSURE SÉRIEUSE DUE À UNE CHUTE OU À UN GLISSEMENT.
TOUJOURS UTILISER LA CEINTURE DE SÉCURITÉ À 5 POINTS COMPLÈTE.
