Peiker acustic BLUETOUCH Multimedia Device with Bluetooth technology User Manual GB01 eps
Peiker acustic GmbH & Co. KG Multimedia Device with Bluetooth technology GB01 eps
user manual

Operating manual
BLUETOUCH® software 1.04.00
www.bluetouch.de
ENGLISH
BTMBED003
Introduction
BLUETOUCH® offers you the capability to connect
mobile sources of music such as Apple™iPod®, SD-
cards, USB sticks, audio streaming via Bluetooth®-
A2DP and MP3 telephones and players.
At the same time, BLUETOUCH® is a convenient
hands-free system for Bluetooth® telephones.
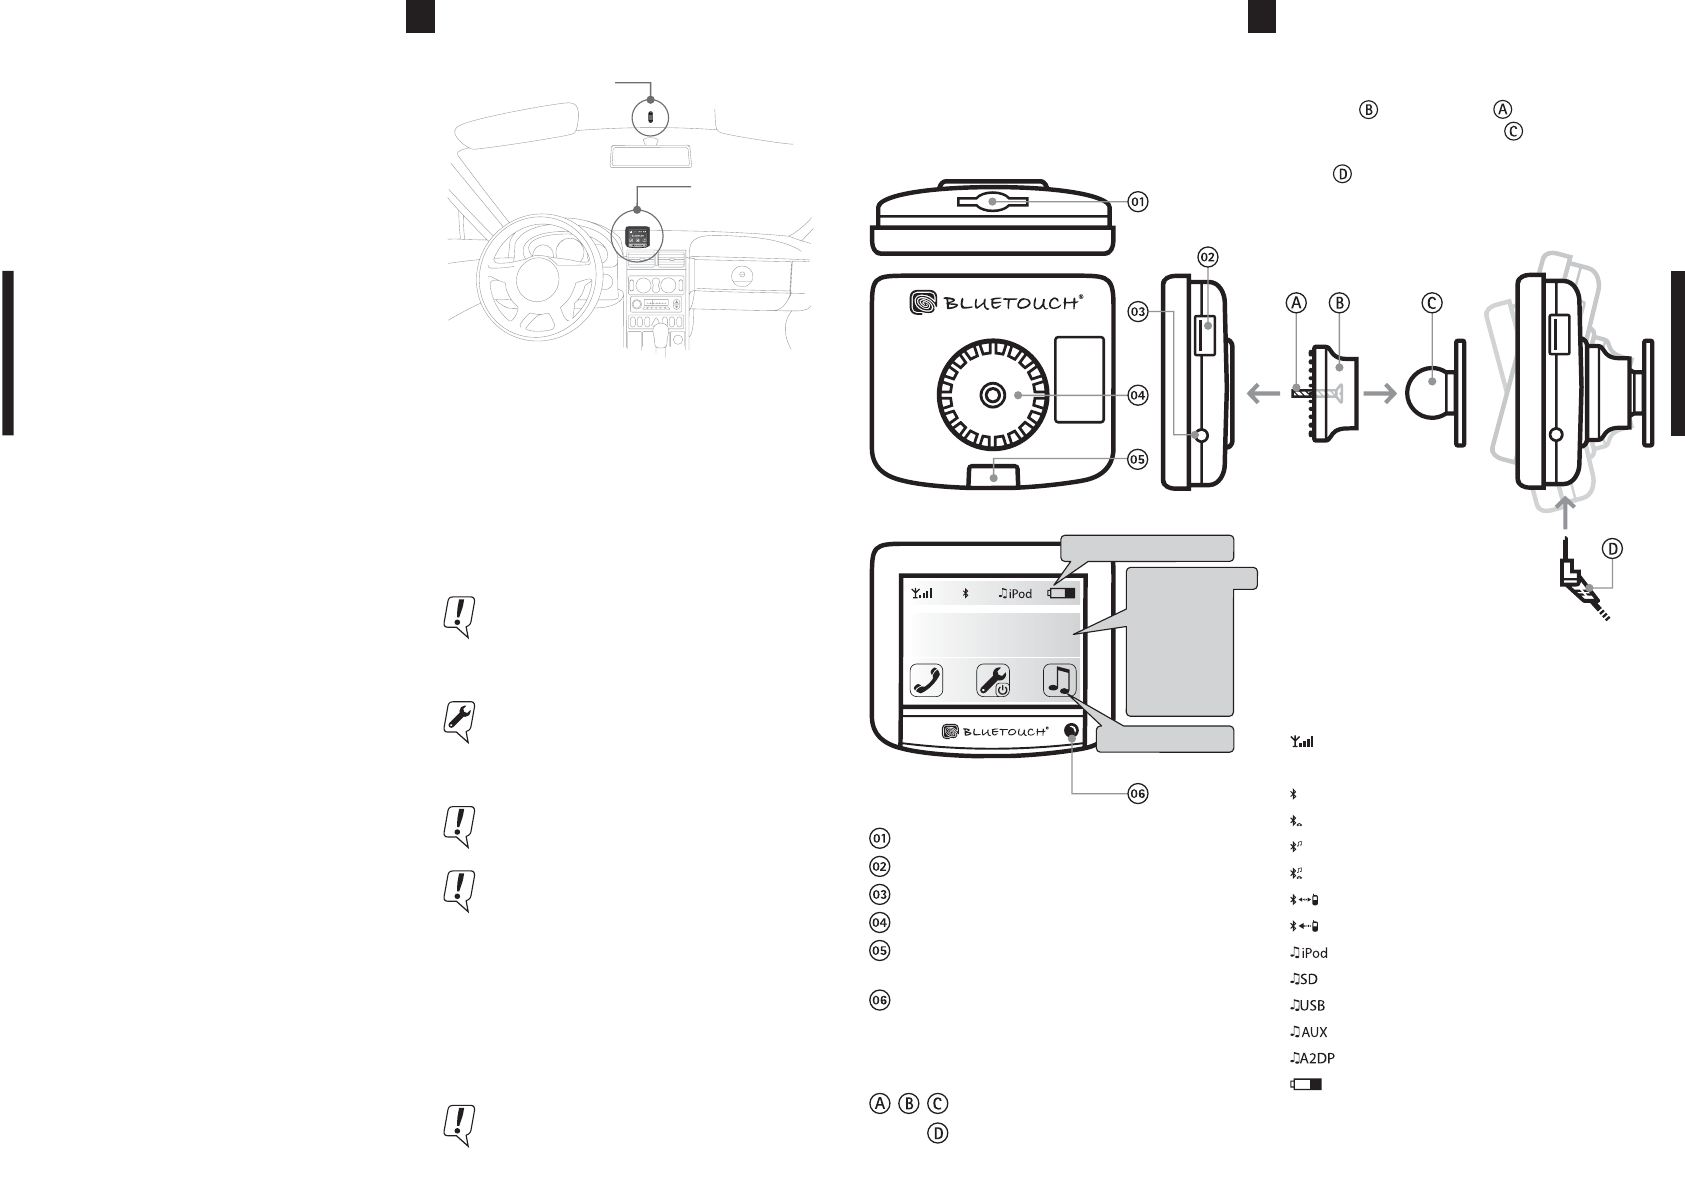
Optimal mounting in the vehicle
Touch screen
02
Icons in the status bar
Signal strength of the mobile phone (1)
Frequency setting (optional)
Bluetooth® connection established
Connection via HFP-profile
Connection via A2DP-profile
Connection via HFP + A2DP-profile
Establish Bluetooth® connection
Bluetooth® download of the contacts
iPod as an active music source
SD/MMC card as an active music source
USB stick as an active music source
3.5 mm plug as an active music source
Bluetooth®A2DP as an active music source
Battery level of the mobile phone (1)
88,0
External microphone
Bluetooth® Technology
With the help of the wireless Bluetooth® technology,
you can transfer data (telephone contacts, music)
from your mobile phone to BLUETOUCH®.
Thus hands-free telephony and playback of your mu-
sic files are possible in the vehicle. To use these
functions, read the operating manual of your mobile
phone and the notes on this page and the last page.
Contents
The following elements are included as standard
equipment:
· Touch screen
· Ball joint support
· Display cable
· Electronic box (CIB-Box)
· External microphone
· 3.5 mm plug
Further connection cables are specific to the vehicle
and the radio. You will find the exact contents listed
on the label of the product packaging.
Optional accessories
· iPod connection cable
· Mobile phone specific adapter cable (to connect a
music capable mobile phone, see page ??).
· Mobile phone specific charging cradle (charging
function and antenna connection).
Information concerning accessories and the current
product range can be found at www.bluetouch.de
BLUETOUCH® was developed for subsequent in-
stallation in vehicles therefore only qualified
technical personnel are permitted to install the
system.
Road safety is the highest priority. Operate the
BLUETOUCH® system only when traffic permits.
Make yourself familiar with the system before
you leave.
If BLUETOUCH® does not start with ignition of
engine touch the display for one second.
OPERATING MANUAL
Introduction / Contents / Accessories / Notes........02
Touch screen / Status display / Mounting...............03
Overview of the function keys............................04 / 05
Bluetooth® connection.................................................06
Music playback / SD card / USB.................................07
iPod® / A2DP....................................................................08
3.5 mm plug / Telephony..............................................09
Telephony / Speech recognition.................................10
Speech recognition / Speech prompts.......................11
Trouble shooting / Legal references..........................12
Position the screen so that you are able to
glance at the display quickly and easily. The de-
vice should also be positioned in a way that
avoids reflections and glare from the screen.
The screen should also not be positioned within
he area directly in front of the airbag as this
may prevent the airbag from inflating. Make
sure the device is sufficiently secure so that it
will not become dislodged even in the event
of emergency braking or a collision.
Please do not use any cleaning agents or deter-
gents to clean the screen and case of the device.
The best method is to use a soft, damp cloth.
Mounting of the touch screen
Select a place for installation where the touch
screen is both easy to read and operate. Mount the
ball joint with the screw on the display. Press
both firmly onto the ball unit , which must be
mounted beforehand. Now attach the connection
cable to the touch screen so that the plug fits in
the housing. Due to the ball joint any view can be
set individually.
• Elements of the ball joint
• Connection cable to the electronic box
• SD / MMC memory card port
• Software update via USB link
• 3.5 mm stereo audio input
• Mounting surface for the ball joint mounting
• Port for attaching the connection cable to the
electronic box
• Light sensor for the automatic adjustment of
the display brightness
03
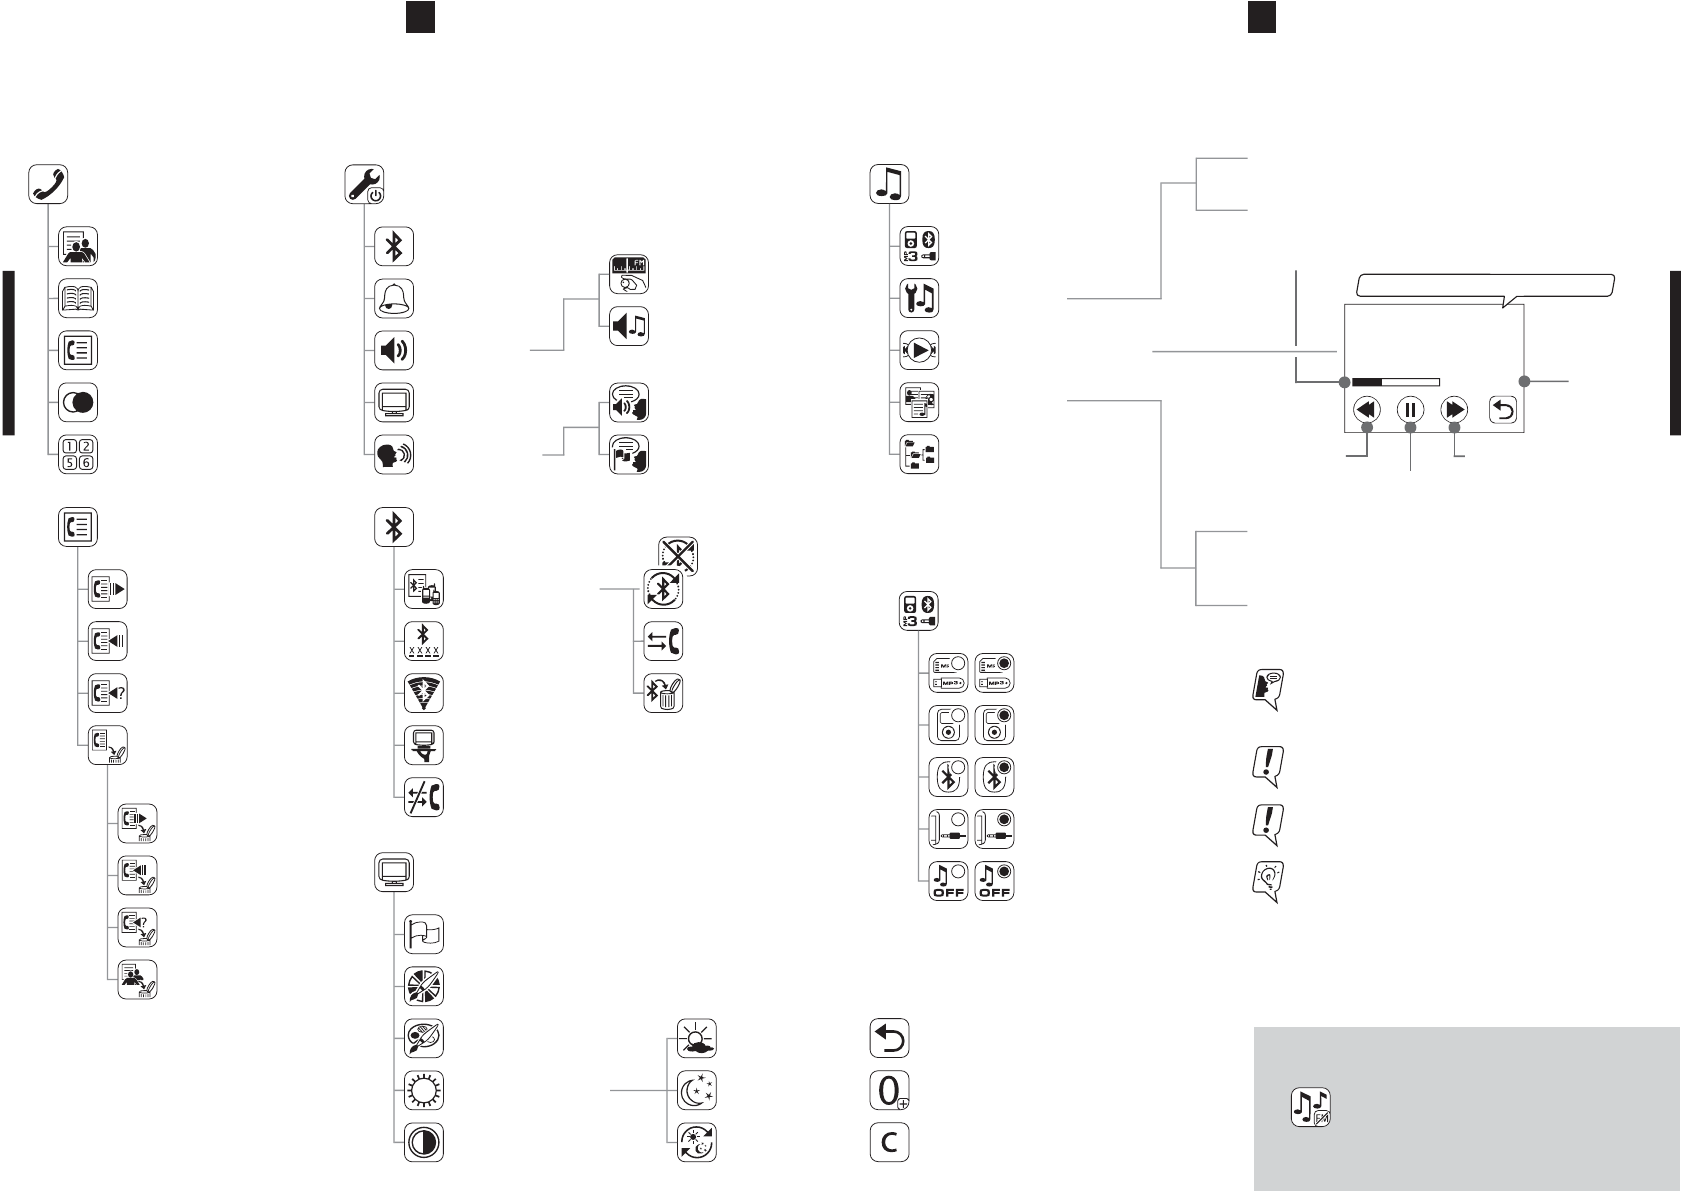
Overview of the touch screen
The control of all functions takes place via the touch
screen. There are readouts and keys (framed) on
the touch screen. Only keys can be pressed in order
to activate an action or switch into another menu.
Status bar (icons)
Function keys
(1) The transfer of these signals depends on the mobile phone.
BLUETOUCH
name of the phone
(1)
· Provider
· Name of
the phone
· Number
· Caller
· Music title
04
If this key appears on your touch screen, please
follow the directions on the attached card (FM-
modulation). The functions are identical to those of the
music menu.
MUSIC MENU (1)
Dialed calls
Received calls
Missed calls
Delete calling lists
Calling menu
List of known
Change Bluetooth®
Search for new
BLUETOUCH® visible for
Disconnect the established
Bluetooth® menu
devices
PIN-code
devices
other Bluetooth® devices
Bluetooth® connection
Day
Night
Automatic
device
(1) Concerning the music menu
Frequency setting(1)
Basic volume
(optional)
music
05
Top list of your contacts
Calling menu
Redialing
Keypad
TELEPHONE MENU
Redialing
Directory
Speaker dependent voice dialing
Bluetooth® menu
Ringtones
Display menu
SETUP MENU
System switch off
Setup
music output
Setup
speech recognition
Volume
Setup language
available ( D / GB / FR )
speech prompts
Connect selected
Delete selected
device from list
Selected device
automatic con-
nect ON / OFF
Selection
Setup
Navigator
Title / file
audio source
SD/MMC + USB
music lists
navigator
Selection audio source
(active if circle is filled out)
iPod®
Bluetooth®A2DP
3.5 mm plug
music OFF
SD / MMC card*
USB stick*
Repeat
Shuffle
off / all / one
off / album / title
Active iPod® access to:
Shuffle songs / Playlists / Artists / Albums / Genres / Songs /
Composers / Audiobooks / Podcasts
Active SD/MMC or USB access to:
Playlists / Artists / Albums / Songs / Genres
After audio source selection please go back to the
music menu where you can control the music.
Artist
Song
Album
title / playback control
Forward
12/235
Back
Pause / Play
Title run time
Counter
Title / playback control (2)
(2) Title / playback control is available only with iPod®,
SD/MMC or USB connection. Music playback via
Bluetooth®A2DP doesn´t support the title menu.
After audio source selection the music starts auto-
matically in the last position.
Some music functions can be controlled via speech.
You will find more information to speech recognition
on the next page.
*supported file formats: mp3
(2)
Back
Digit 0
Delete last digit
To the main menu
Plus symbol
Delete the whole input
Additional keys
Language selection menu
Preset color select
Mixable color select
Setup brightness
Contrast
Display menu
Operation of the function keys
All keys (framed) trigger a function or lead into a
further menu. Some keys have double functions in
order to reach a certain function faster.
This double function is activated by holding the res-
pective key (hold 1 second, then release). If a key
has a double function (hold 1 second, then release)
this is briefly explained below in italics.
Delete the
Delete the
Delete the
Delete the
dialed calls
received calls
missed calls
Top list
HINT: There are many “hidden” key functions. You
will find operating assistance for these on the
BLUETOUCH® homepage under “Tipps+Tricks”.

06
List: known devices
07
music menu
Key: Title / playback
control
Key: Navigator music lists
Key: Title / file navigator
Key: Selection audio source
Key: Setup SD / USB
Music playback
BLUETOUCH® offers you the connection of mobile
sources of music such as Apple™iPod®, SD cards,
USB sticks, audio streaming via Bluetooth®A2DP and
MP3 telephones and players.
The touch screen allows for the easy and convenient
operation of all music functions.
Selection of the desired music source
· In the music menu, press the key select music
source.
· Now activate the desired source (the audio source
is activated when the circle is filled out).
· Using the back key, you will return to the music
menu. From there you will be able to use the va-
rious functions of this menu for music navigation.
Management of music using music lists
This function is only available with SD/MMC card,
USB storage medium and iPod®!
· Press the key navigator music lists in the music
menu.
· You now have convenient access to all titles with
information about the artists, genre etc. as well
as to possible saved playlists.
Management of music using music files
This function is only available with SD/MMC card,
USB storage medium and iPod®!
· Press the key title / file navigator in the music
menu.
· You have now access to all music files.
selection audio source
Key: Music OFF
Key: Bluetooth® A2DP
Key: 3.5 mm plug
Key: SD / MMC Karte + USB
Key: iPod®
You will get more information on connection
and operation of the various audio sources
from the following articles.
BLUETOUCH
name of the phone
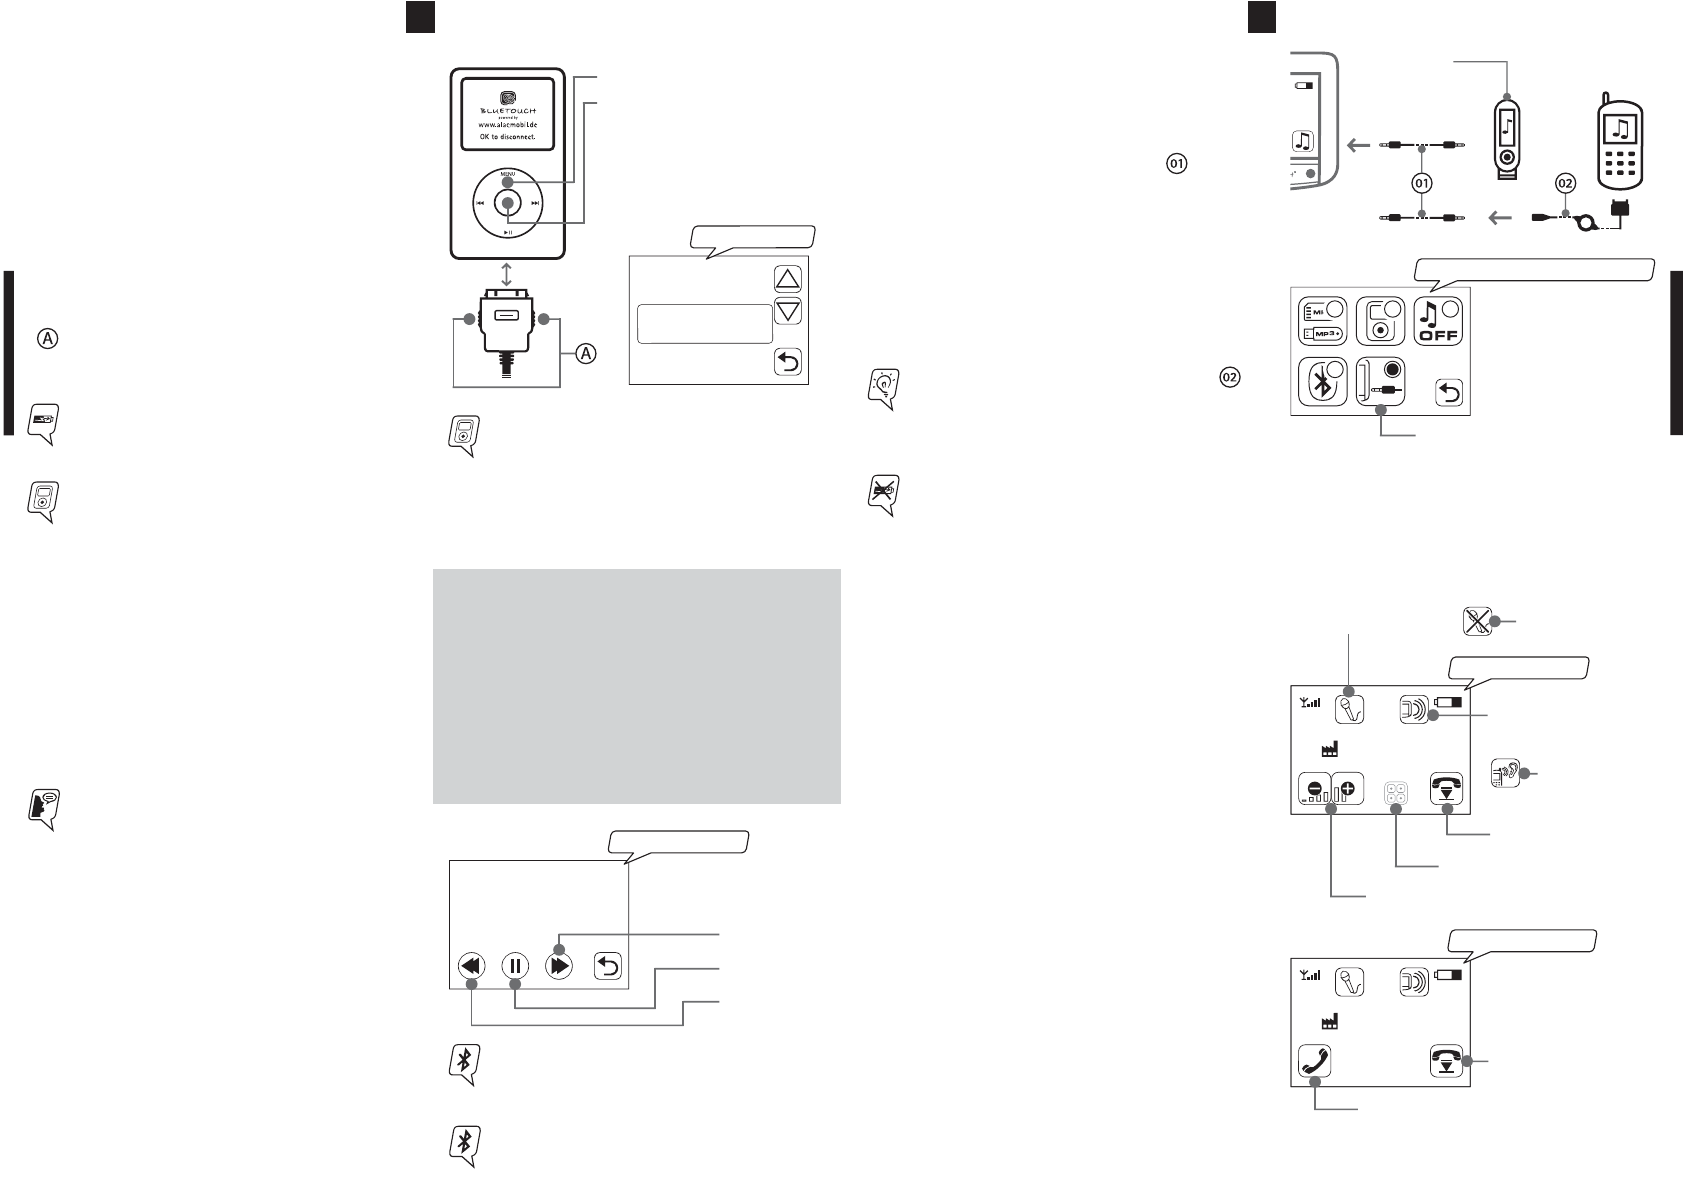
Playback of the music from SD/MMC
card and USB stick
BLUETOUCH® supports the music playback of
SD/MMC cards and USB storage media, e.g. USB stick.
Connect the desired audio source with the touch
screen as illustrated on the right; then activate this
in the music menu, as described above. You now
have access to all music lists or to the saved music
files.
Insert the SD/MMC card with
label forward (contacts on
reverse) into the provided
opening until the card locks
into place (clicking sound).
Insert the
USB stick into the
provided slot on the side
(control light on the USB
stick will flash).
Be sure to connect only one audio source to the
touch screen in each case; otherwise, delays
can occur during playback.
SD/MMC cards and USB storage media support
the playback of MP3 files.
Bluetooth® connection
In order to use the hands-free function as well as
the music transfer via Bluetooth®A2DP, the follow-
ing requirements must be fulfilled:
· BLUETOUCH® has been correctly mounted and is
switched on.
· Bluetooth® is activated on your mobile phone.
· Your mobile phone was paired with BLUETOUCH®.
First pairing of your mobile phone
· Press the search key in the Bluetooth® menu.
· When the search procedure is finished, select your
mobile phone shown on the display.
· BLUETOUCH® now demands a PIN-code. Enter
this PIN (0000 is preset) on your mobile phone.
· BLUETOUCH® and the mobile phone are now paired
and your directory of contacts is downloaded au-
tomatically . The download is finished when
the Bluetooth® symbol is displayed.
· Your mobile phone is now in the list of known de-
vices.
Pairing and deleting a mobile phone from the
list of known devices
· Select the desired mobile phone from the list
of known devices.
You can now do the following with the selected
mobile phone:
· Automatic pairing so that the selected device is
paired to BLUETOUCH® as soon as you approach
the system.
· Manual coupling.
· Delete from list.
Changing the PIN-code
· Press the PIN-code key to read the keypad.
· Enter a combination of at least 4 digits
and confirm by pressing OK.You can also establish a connection to BLUE-
TOUCH® from your mobile phone. In order to
do set BLUETOUCH® to “visible” and follow the
operating manual of your mobile phone.
Bluetoothmenu
Key: Search for new
devices
Key: Visibility
Key: Disconnect
Key: List of known devices
Key: PIN-code
My W810i
Key: Automatic
connect ON / OFF
Key: Connect
Key: Delete
menu: selected device
A multiple pairing of up to five mobile phones
is possible.
ADVISE: Give your mobile phone a special name
in order to find it more easily in the selection
list (see page ??) among same mobile phones.
Look in the operating manual of your mobile
phone for further information.
With all described Bluetooth® functions please
consult the operating manual of your mobile
phone first. Inform yourself which Bluetooth®
profiles and functions your mobile telephone
supports. Signal level, battery status, provider,
directory entries and downloads are mobile
phone specific, and how they are supported de-
pending on the individual mobile phone.
08
ipod - Menu
My iPod
Shuffle songs
Playlists
Artists
Musik via Bluetooth® A2DP
BLUETOUCH® unterstützt die Übertragung von Mu-
sik via Bluetooth® Audiostreaming (A2DP). Falls Ihr
Mobiltelefon diese Funktion unterstützt, können Sie
ganz einfach die Musik von Ihrem Handy auf die
Fahrzeuglautsprecher übertragen.
· Pair your phone with BLUETOUCH®.
· Activate in the music menu the Bluetooth®A2DP key.
· Press the title / playback control key and you can
then operate the tracks:
FORWARD, BACK, PLAY / PAUSE
Music playback via Bluetooth®A2DP doesn´t
support the title menu.
Speech recognition for iPod®
BLUETOUCH® offers the possibility to control the
iPod® via speech recognition.
· Activate the speech recognition in the main menu.
(for this, see section “speech recognition” starting
from page ??).
· Now give one of the speech prompts specified on
the right.
You will find further speech prompts and infor-
mation on the way they function beginning on
page ??.
09
Key: 3.5 mm plug
The connection via the stereo audio cable does
not support a charging function.
With a mobile phone specific adapter cable*
you can connect your music-capable mobile
phone, which does not support Bluetooth®A2DP,
to BLUETOUCH®.
Audio source
e.g. MP3 player
*All available mobile phone specific adapter cables can
be found on www.bluetouch.de
Connection of audio sources (e.g. MP3
player) via 3.5 mm plug.
BLUETOUCH® offers the option to connect numer-
ous audio sources with the included stereo audio
cable.
· Connect the 3.5 mm-stereo audio cable with
BLUETOUCH® and your audio source.
· Activate the plug key.
· Now you can listen to your music.
The volume can be set on both your audio device
and your radio. Control of the entire music operation
(play, track, pause, ...) is conducted through your au-
dio device.
Menu button
Center button
As soon as the iPod is connected to the cable,
the BLUETOUCH® logo appears in the display of
the iPod. Now you operate only via BLUETOUCH®.
When connected with the cable the iPod is in
charge mode.
Playback and connection of an iPod®
BLUETOUCH® was developed for the use with all
iPods with dock connector. The touch screen offers
the possibility of operating the iPod menu.
You can browse through your tracks, artists, albums
and play lists to the full extent, just as you are used
to doing with your iPod.
· Connect your iPod with the connection cable.
· Start BLUETOUCH®, switch to the music menu,
and using the iPod key you will reach the iPod
menu navigation familiar to you.
Disconnecting the iPod
· Slightly press both sides of the locking mechanism
of the cable jack in order to remove the cable
from the iPod.
After disconnecting the iPod from the connec-
tion cable, operating errors can occur on the
iPod. Simply RESET the iPod by pressing and
holding the “MENU” and the “SELECTION” but-
ton at the same time until the BLUETOUCH® lo-
go disappears and the iPod switches off.
Speech prompts for iPod®
• IPOD HELP
• IPOD ARTISTS
• IPOD PLAYLISTS
• IPOD ALBUMS
• IPOD SONGS
• IPOD COMPOSERS
• IPOD GENRE
Further information concerning this function
can be found in the corresponding section of
the operating manual of your mobile phone.
A2DP-display
Forward
Pause / Play
Back
name of A2DP device
selection audio source
(1) The transfer of this function is mobile phone dependent.
Max Muster
Max Muster
Call answering key
Incoming call
Hang-up key
Volume keys
DTMF key
Hang-up key
Call Display
Microphone key Microphone mute
Private key (1)
(Hands-free mode)
Private key (1)
(Diskrete mode)
Telephoning
After pairing your mobile phone with BLUETOUCH®
(see page ??), you can accept and make calls using
the hands-free system, provided that the system is
switched on and the mobile phone is within range.
When a call is received or you make a call, the ste-
reo system of the vehicle automatically switches it-
self on mute.
Functions during a telephone call
· Adjust the volume using + and - keys.
· End the call with the hang-up key.
· If you want to transmit key tones (e.g. mailbox),
press the DTMF key and you will reach the keypad.
Now enter your desired numbers or press Back if
you have completed your input.
· During a call press the microphone key in order to
switch the microphone off;
press again in order to continue the call.
· Press the private key (1), in order to continue the
conversation discreetly on your mobile phone;
pressing it again allows you to speak freely again.
10 11
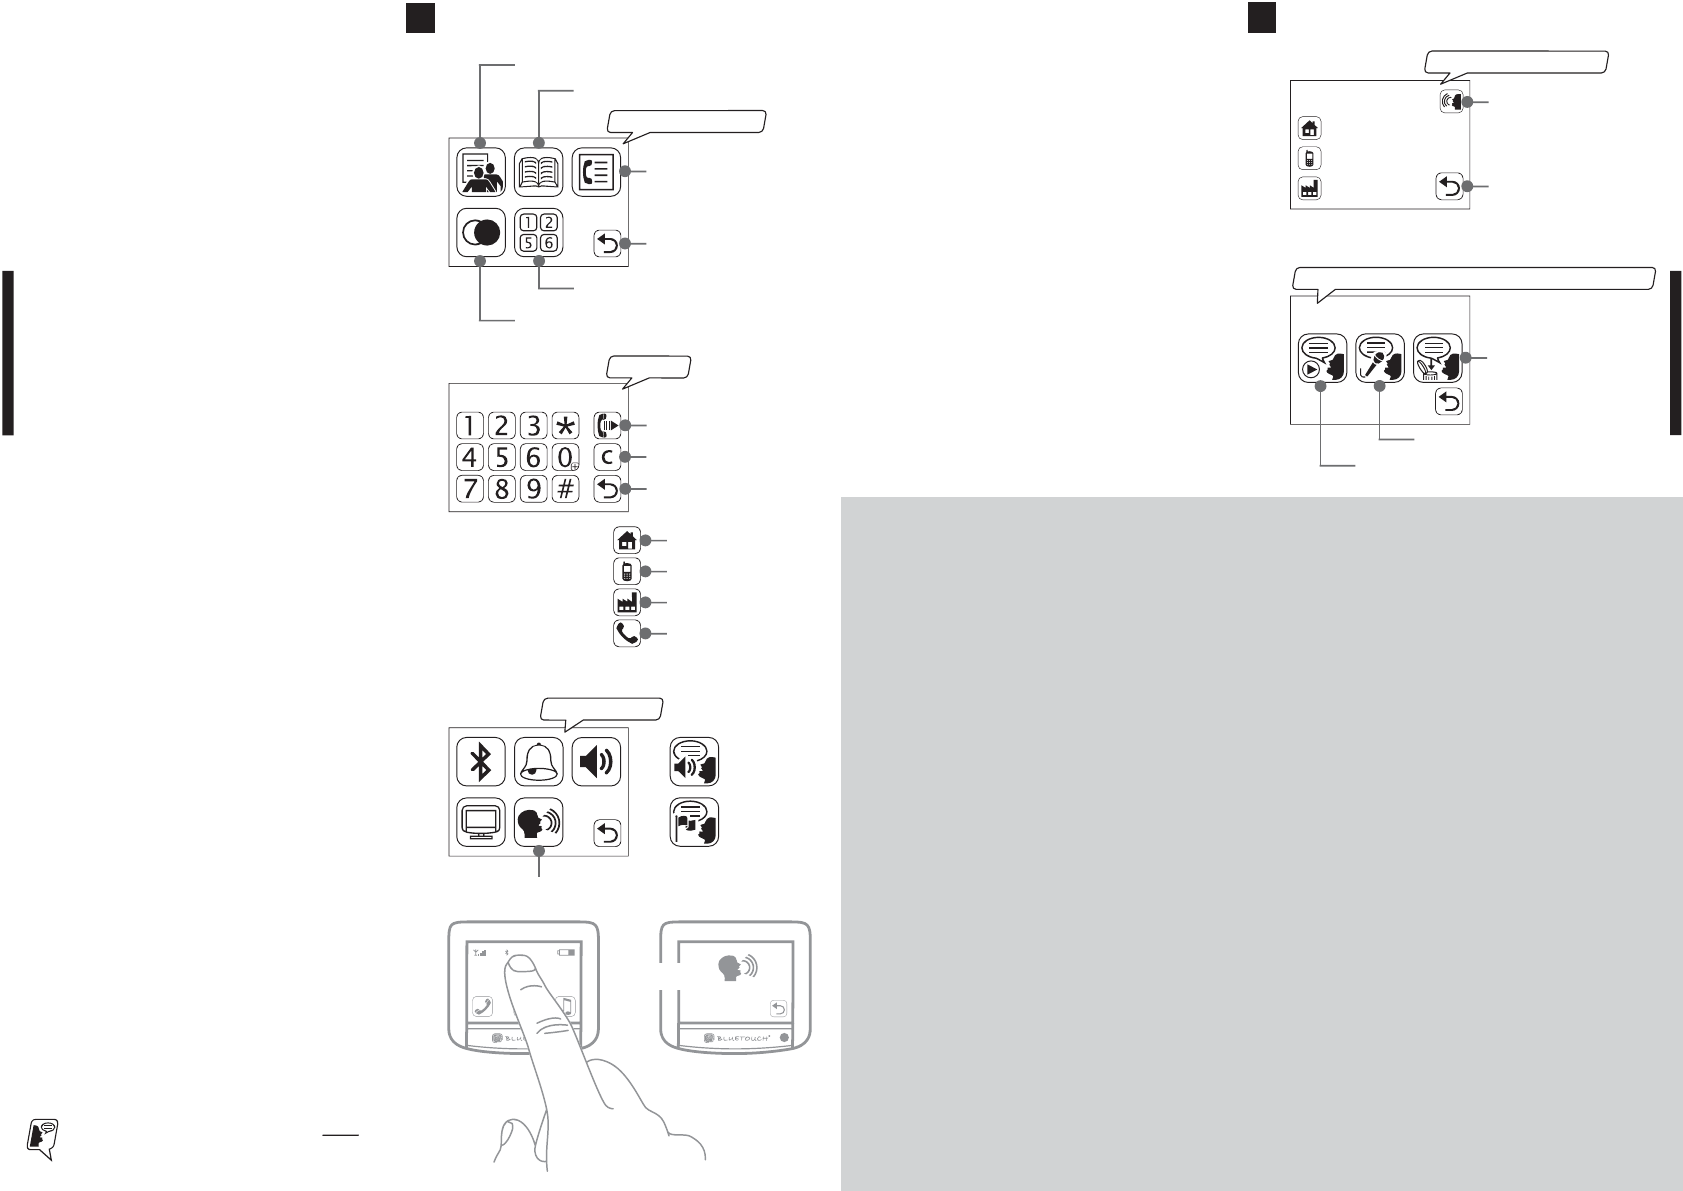
Numbers
Symbols / Keys
Speech recognition
BLUETOUCH® offers the possibility of controlling
telephone and music functions by speech. At present,
speech recognition for the German, English and
French languages is available.
Setup speech recognition
· Select the key setup speech recognition in the
setup menu.
· You can now set the volume of the voice output
and the country language.
Activation of speech recognition
The speech recognition can be started only using the
start display:
· Press onto the upper half of the touch screen and
hold for a longer interval; after the beep, give the
desired speech prompt. (see page ??).
Muster, Max
00492762...
00491704455...
00492761334...
selected contact
Key:
Speech recognition
for names
Key: Back
Muster, Max
menu: speech recognition for names
Key: Playback speech prompt
Key: Record speech prompt
Key: Delete speech
prompt
BLUETOUCH
Name des Telefons
All speech prompts can be activated ONLY
from the start display!!
Key: Setup speech recognition
setup menu
Beep !
Key:
Volume
Key:
Language
Speech recognition for names
In order to use the voice selection for names, you
must record the speech prompts to BLUETOUCH®.
· Select your desired contact from the telephone
directory.
· Press the key speech recognition for names, and in
the following menu the speech prompt can be
recorded, played and deleted.
· Follow the announced instructions.
The speech recognition for names can now be star-
ted from the start display. Use the appropriate
speech prompts, as specified below:
Number
(no category)
Private number
Mobile number
Office number
Answering calls
Depending on the mobile phone, the name and/or
the number is displayed on the touch screen.
· Press the call answering key.
Making a call
· Press the toplist key (your most frequent contacts
are calculated) and select the desired number or
the dialogue partner from the list.
· Press the directory key to display your mobile phone
book entries and select your desired contact from
the list.
· Press the call list key to display the call lists (dialed,
received, missed) and select the desired number.
· Press re-dial.
· Press the keypad and you can dial as usually. After
dialing press the call key and the call is made.
Voice dialing (mobile phone dependent)
· In order to use voice dialing you must first record
the commands on your mobile phone (comply with
the operating manual of your mobile phone).
· Hold the directory key (long click) and follow the
instructions on the display.
...04927611234561
Delete key
Call key
Back
KeYpad
Telephonemenu
Call list key
Redialing
Keypad
Toplist key
Directory key
Back
Speech prompts for music
• NEXT TITLE/SONG/TRACK or NEXT
(play next title)
• PREVIOUS TITLE/SONG/TRACK or BACK
(play previous title)
• IPOD HELP
(help prompt with all possible commands for iPod®)
• IPOD ARTISTS
• IPOD PLAYLISTS
• IPOD ALBUMS
• IPOD SONGS
• IPOD COMPOSERS
• IPOD GENRE
(go directly to this iPod® menu if possible)
• DIAL NAME
(prompt to enter name or report error if not possible. If
more then one number is available for this name addi-
tional dialog for category:)
• HOME
• OFFICE
• MOBILE
plus final step whether numbered should be dialed:
• YES
• NO
• CANCEL
Speech prompts for telephone
• HELP
(help prompt with all possible commands)
• TELEPHONE HELP
(help prompt with all possible commands for telephone
handling)
• READ PHONEBOOK or
READ OUT PHONEBOOK
(read out phonebook if existing, report missing phone-
book else)
• DIAL NUMBER or DIAL PHONENUMBER
(start dialog for number entering)
Within this dialog you can say:
• Numbers 0 - 9 (and “PLUS” at the very beginning)
(when pausing, last block will be repeated)
• HELP
(give possible commands for this dialog)
• DELETE or CLEAR
(delete number and start over number entering)
• CORRECT or CORRECT NUMBER
(delete last block, repeat last remaining block)
• CANCEL
(cancel this dialog, go back to main)
• READ OUT NUMBER
(read out complete number)
• DIAL NUMBER
(dial number)
• CANCEL
(cancel current speech recognition, discarding everything
you might have entered already)
• REDIAL

12 Conformity to FCC-Rules:
This device contains Transmitter Module FCC-ID: QWY-BLUETOUCH
RF exposure:
The max sourcebased time-averaged output of 0.48 mW is below the low threshold of 24mW for d < 2.5 cm.
This is very low power configuration. The antenna shown in this filing can be co-located or operated in con-
junction with any other antenna or transmitter. For portable applications installer need no additional testing
or SAR evaluation.
USA only:
Statement according to FCC part 15.19:
This device complies with Part 15 of the FCC Rules. Operation is subject to the following two conditions:
(1) this device may not cause harmful interference, and
(2) this device must accept any interference received, including interference that may cause undesired
operation.
Statement according to FCC part 15.21:
Modifications to this device not expressly approved by this company could void the user’s authority to operate
the equipment.
Statement according to FCC part 15.105:
Note: This equipment has been tested and found to comply with the limits for a Class A digital device, pursu-
ant to part 15 of the FCC Rules. These limits are designed to provide reasonable protection against harmful
interference when the equipment is operated in a commercial environment. This equipment generates, uses,
and can radiate radio frequency energy and, if not installed and used in accordance with the user manual, may
cause harmful interference to radio communications. Operation of this equipment in a residential area is likely
to cause harmful interference in which case the user will be required to correct the interference at his own
expense.
Statement according to FCC part 15.27:
With this device will no additional special accessories be shipped or marketed. This equipment (BLUETOUCH)
has to be assembled by professional installing personnel of the vehicle manufacturer. It is the responsibility of
the installer to install the equipment in that way that the resulting system complies with the regulations.
Canada only:
Statement according to RSS-210:
This device complies with RSS-210 of Industry Canada. Operation is subject to the following two conditions:
(1) this device may not cause harmful interference, and
(2) this device must accept any interference received, including interference that may cause undesired
operation.
Modifications to this device not expressly approved by this company could void the user’s authority to operate
the equipment.
Trouble shooting and other steps
Before you consult your installation service please
Follow these simple checking steps. More steps and
information may be found on www.bluetouch.de
BLUETOUCH® cannot be paired
· The Bluetooth® function on the mobile phone must
be activated.
· BLUETOUCH® must be switched on.
· No solid objects should be between the mobile
phone and BLUETOUCH®.
· BLUETOUCH® is possibly paired with another mo-
bile phone. Cut the connection to the other device
(page 17).
· Possibly another hands-free system is paired with
the mobile phone. Some mobile phones can only
manage one hands-free system in the list of paired
mobile phones. Consult the operating manual of
the mobile phone.
· Clear the list of known devices in BLUETOUCH®
and pair your mobile phone again.
· Clear the list of Bluetooth® devices on your mobile
phone and couple again.
Some functions of BLUETOUCH® cannot be used.
· Check the operating manual of your mobile phone
to determine whether it supports the respective
function or the corresponding Bluetooth® profile.
A list of all mobile phones which support Blue-
tooth®A2DP at present can be found on
www.bluetouch.de
The dialogue partner hears an echo.
· Increase the distance between microphone and the
vehicle loudspeakers (distance should be at least
80 cm).
· Reduce the volume of BLUETOUCH®.
iPod cannot be accessed.
· Make sure that the iPod connection cable is
attached correctly.
No music playback via 3.5 mm plug.
· Make sure that no calls are being conducted via
BLUETOUCH®.
· Check that the cables are firmly mounted.
· Switch the AUX key on.
Restore to factory configuration (all modifica-
tions and adjustments you have made will be
lost): Go to the telephone menu and enter the
following in the keypad:
*#000#
Using mobile phones reception interference can
occur which can impair the system performance.
Therefore we recommend an additional cradle
with an external antenna. This considerably im-
proves the transmission and reception proper-
ties of the mobile phone, and your mobile phone
is always fully charged.
Apple™ and iPod® are registered trademarks of Apple™
Computer, Inc.
Bluetooth® is a registered trademark of Bluetooth® SIG, Inc.
We reserve the right to make unannounced modifications
of all capability characteristics and specifications.
Under no circumstances are we responsible for data loss
or for any special, accompanying, indirect or direct dama-
ges, however these may have come about.
Certain components in the software used in BLUETOUCH®
are subject to conditions of the GPL or LGPL license. A co-
py of these licenses and further information can be found
on www.bluetouch.de/gpl.html
We expressly point out that in case of any type of modifi-
cation to the BLUETOUCH® system, the warranty claim is
voided.
BLUETOUCH® is a joint development of the companies
PEIKER acustic GmbH & CO.KG and ALAC GmbH.
For further information visit the homepage
www.bluetouch.de
DECLARATION OF CONFORMITY
We, PEIKER acustic GmbH & CO.KG, declare fully respon-
sibly that the product BLUETOUCH®Music complies with
the terms of Guideline 94/54 EC of the Council of the Eu-
ropean Union. You can find the complete text of the de-
claration of conformity under www.bluetouch.de
Regulate the music volume as usual via your
car hi-fi system.
Note the volume preset (optional).
BLUETOUCH® SOFTWARE UPDATES
You can easily conduct necessary software up-
dates via the USB interface. Additional infor-
mation on this can be found under:
www.bluetouch.de
13