Pelco DX4700 DX4700_DX4800_Series_ Hybrid_Video_Recorder User Manual To The C1e32027 3319 436c Aa5e E6f563fb8936
User Manual: Pelco DX4700 to the manual
Open the PDF directly: View PDF ![]() .
.
Page Count: 28
- DX4700/DX4800 Series Hybrid Video Recorder
- Contents
- List of Illustrations
- List of Tables
- Important Notices
- Description
- Product Overview
- Installation
- Equipment Placement
- Equipment Connections Overview
- Connecting Analog Cameras
- Connecting IP Cameras
- Connecting Serial PTZ
- Connecting Alarm Devices
- Connecting a Relay Output
- Connecting the Main Monitor
- Connecting the Spot Monitor
- Connecting USB Devices
- Connecting Audio Devices
- Connecting the Mouse
- Connecting to a Network
- Connecting Power
- Installing Client Software
- Operation/Configuration
- Specifications
- Appendixes
INSTALLATION
C4675M (2/11)
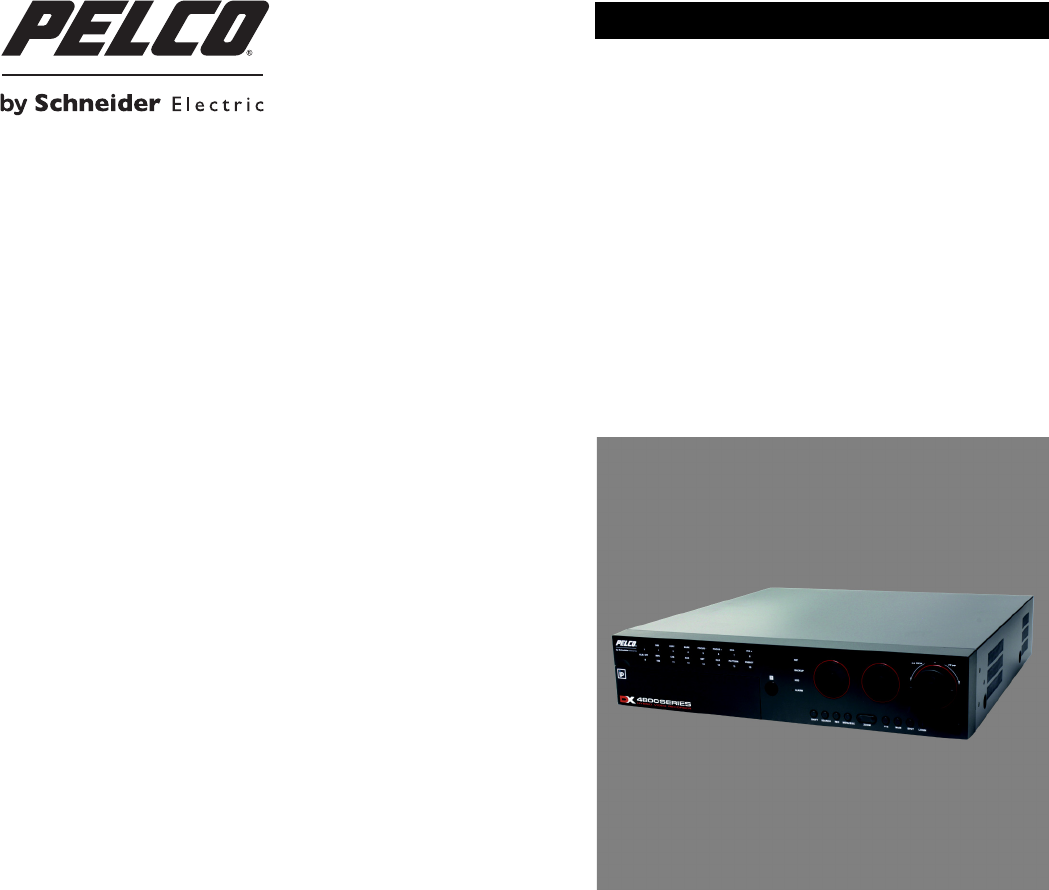
DX4700/DX4800 Series
Hybrid Video Recorder

2C4675M (2/11)
Contents
Important Notices . . . . . . . . . . . . . . . . . . . . . . . . . . . . . . . . . . . . . . . . . . . . . . . . . . . . . . . . . . . . . . . . . . . . . . . . . . . . . . . . . . . . . . . . . . . . . . . . . . . . . 4
Legal Notice . . . . . . . . . . . . . . . . . . . . . . . . . . . . . . . . . . . . . . . . . . . . . . . . . . . . . . . . . . . . . . . . . . . . . . . . . . . . . . . . . . . . . . . . . . . . . . . . . . . . . 4
Regulatory Notices . . . . . . . . . . . . . . . . . . . . . . . . . . . . . . . . . . . . . . . . . . . . . . . . . . . . . . . . . . . . . . . . . . . . . . . . . . . . . . . . . . . . . . . . . . . . . . . . 4
Video Quality Caution . . . . . . . . . . . . . . . . . . . . . . . . . . . . . . . . . . . . . . . . . . . . . . . . . . . . . . . . . . . . . . . . . . . . . . . . . . . . . . . . . . . . . . . . . . . . . . 4
Open Source Software Notice . . . . . . . . . . . . . . . . . . . . . . . . . . . . . . . . . . . . . . . . . . . . . . . . . . . . . . . . . . . . . . . . . . . . . . . . . . . . . . . . . . . . . . . 5
Description. . . . . . . . . . . . . . . . . . . . . . . . . . . . . . . . . . . . . . . . . . . . . . . . . . . . . . . . . . . . . . . . . . . . . . . . . . . . . . . . . . . . . . . . . . . . . . . . . . . . . . . . . . . 6
Client Application Software . . . . . . . . . . . . . . . . . . . . . . . . . . . . . . . . . . . . . . . . . . . . . . . . . . . . . . . . . . . . . . . . . . . . . . . . . . . . . . . . . . . . . . . . . 6
Models . . . . . . . . . . . . . . . . . . . . . . . . . . . . . . . . . . . . . . . . . . . . . . . . . . . . . . . . . . . . . . . . . . . . . . . . . . . . . . . . . . . . . . . . . . . . . . . . . . . . . . . . . 7
Optional Accessories . . . . . . . . . . . . . . . . . . . . . . . . . . . . . . . . . . . . . . . . . . . . . . . . . . . . . . . . . . . . . . . . . . . . . . . . . . . . . . . . . . . . . . . . . . . . . . 7
Product Overview. . . . . . . . . . . . . . . . . . . . . . . . . . . . . . . . . . . . . . . . . . . . . . . . . . . . . . . . . . . . . . . . . . . . . . . . . . . . . . . . . . . . . . . . . . . . . . . . . . . . . . 8
Package Contents . . . . . . . . . . . . . . . . . . . . . . . . . . . . . . . . . . . . . . . . . . . . . . . . . . . . . . . . . . . . . . . . . . . . . . . . . . . . . . . . . . . . . . . . . . . . . . . . . 8
Front Panel . . . . . . . . . . . . . . . . . . . . . . . . . . . . . . . . . . . . . . . . . . . . . . . . . . . . . . . . . . . . . . . . . . . . . . . . . . . . . . . . . . . . . . . . . . . . . . . . . . . . . . 9
Rear Panel. . . . . . . . . . . . . . . . . . . . . . . . . . . . . . . . . . . . . . . . . . . . . . . . . . . . . . . . . . . . . . . . . . . . . . . . . . . . . . . . . . . . . . . . . . . . . . . . . . . . . . 12
Remote Control . . . . . . . . . . . . . . . . . . . . . . . . . . . . . . . . . . . . . . . . . . . . . . . . . . . . . . . . . . . . . . . . . . . . . . . . . . . . . . . . . . . . . . . . . . . . . . . . . . 13
Installation . . . . . . . . . . . . . . . . . . . . . . . . . . . . . . . . . . . . . . . . . . . . . . . . . . . . . . . . . . . . . . . . . . . . . . . . . . . . . . . . . . . . . . . . . . . . . . . . . . . . . . . . . . 15
Equipment Placement . . . . . . . . . . . . . . . . . . . . . . . . . . . . . . . . . . . . . . . . . . . . . . . . . . . . . . . . . . . . . . . . . . . . . . . . . . . . . . . . . . . . . . . . . . . . . 15
Equipment Connections Overview . . . . . . . . . . . . . . . . . . . . . . . . . . . . . . . . . . . . . . . . . . . . . . . . . . . . . . . . . . . . . . . . . . . . . . . . . . . . . . . . . . . 15
Connecting Analog Cameras . . . . . . . . . . . . . . . . . . . . . . . . . . . . . . . . . . . . . . . . . . . . . . . . . . . . . . . . . . . . . . . . . . . . . . . . . . . . . . . . . . . . . . . 16
Connecting IP Cameras. . . . . . . . . . . . . . . . . . . . . . . . . . . . . . . . . . . . . . . . . . . . . . . . . . . . . . . . . . . . . . . . . . . . . . . . . . . . . . . . . . . . . . . . . . . . 16
Connecting Serial PTZ. . . . . . . . . . . . . . . . . . . . . . . . . . . . . . . . . . . . . . . . . . . . . . . . . . . . . . . . . . . . . . . . . . . . . . . . . . . . . . . . . . . . . . . . . . . . . 17
Connecting Alarm Devices . . . . . . . . . . . . . . . . . . . . . . . . . . . . . . . . . . . . . . . . . . . . . . . . . . . . . . . . . . . . . . . . . . . . . . . . . . . . . . . . . . . . . . . . . 18
Connecting a Relay Output . . . . . . . . . . . . . . . . . . . . . . . . . . . . . . . . . . . . . . . . . . . . . . . . . . . . . . . . . . . . . . . . . . . . . . . . . . . . . . . . . . . . . . . . . 19
Connecting the Main Monitor . . . . . . . . . . . . . . . . . . . . . . . . . . . . . . . . . . . . . . . . . . . . . . . . . . . . . . . . . . . . . . . . . . . . . . . . . . . . . . . . . . . . . . 19
Connecting the Spot Monitor . . . . . . . . . . . . . . . . . . . . . . . . . . . . . . . . . . . . . . . . . . . . . . . . . . . . . . . . . . . . . . . . . . . . . . . . . . . . . . . . . . . . . . . 19
Connecting USB Devices . . . . . . . . . . . . . . . . . . . . . . . . . . . . . . . . . . . . . . . . . . . . . . . . . . . . . . . . . . . . . . . . . . . . . . . . . . . . . . . . . . . . . . . . . . 20
Connecting Audio Devices . . . . . . . . . . . . . . . . . . . . . . . . . . . . . . . . . . . . . . . . . . . . . . . . . . . . . . . . . . . . . . . . . . . . . . . . . . . . . . . . . . . . . . . . . 20
Connecting the Mouse . . . . . . . . . . . . . . . . . . . . . . . . . . . . . . . . . . . . . . . . . . . . . . . . . . . . . . . . . . . . . . . . . . . . . . . . . . . . . . . . . . . . . . . . . . . . 20
Connecting to a Network . . . . . . . . . . . . . . . . . . . . . . . . . . . . . . . . . . . . . . . . . . . . . . . . . . . . . . . . . . . . . . . . . . . . . . . . . . . . . . . . . . . . . . . . . . 20
Connecting Power. . . . . . . . . . . . . . . . . . . . . . . . . . . . . . . . . . . . . . . . . . . . . . . . . . . . . . . . . . . . . . . . . . . . . . . . . . . . . . . . . . . . . . . . . . . . . . . . 20
Installing Client Software. . . . . . . . . . . . . . . . . . . . . . . . . . . . . . . . . . . . . . . . . . . . . . . . . . . . . . . . . . . . . . . . . . . . . . . . . . . . . . . . . . . . . . . . . . 21
Operation/Configuration . . . . . . . . . . . . . . . . . . . . . . . . . . . . . . . . . . . . . . . . . . . . . . . . . . . . . . . . . . . . . . . . . . . . . . . . . . . . . . . . . . . . . . . . . . . . . . . 22
Unit Startup. . . . . . . . . . . . . . . . . . . . . . . . . . . . . . . . . . . . . . . . . . . . . . . . . . . . . . . . . . . . . . . . . . . . . . . . . . . . . . . . . . . . . . . . . . . . . . . . . . . . . 22
Logging On and Logging Off . . . . . . . . . . . . . . . . . . . . . . . . . . . . . . . . . . . . . . . . . . . . . . . . . . . . . . . . . . . . . . . . . . . . . . . . . . . . . . . . . . . . . . . . 22
Unit Shutdown . . . . . . . . . . . . . . . . . . . . . . . . . . . . . . . . . . . . . . . . . . . . . . . . . . . . . . . . . . . . . . . . . . . . . . . . . . . . . . . . . . . . . . . . . . . . . . . . . . 23
Specifications . . . . . . . . . . . . . . . . . . . . . . . . . . . . . . . . . . . . . . . . . . . . . . . . . . . . . . . . . . . . . . . . . . . . . . . . . . . . . . . . . . . . . . . . . . . . . . . . . . . . . . . 24
Appendixes . . . . . . . . . . . . . . . . . . . . . . . . . . . . . . . . . . . . . . . . . . . . . . . . . . . . . . . . . . . . . . . . . . . . . . . . . . . . . . . . . . . . . . . . . . . . . . . . . . . . . . . . . 25
Appendix A: Connecting ATM/POS Devices . . . . . . . . . . . . . . . . . . . . . . . . . . . . . . . . . . . . . . . . . . . . . . . . . . . . . . . . . . . . . . . . . . . . . . . . . . . 25
Appendix B: Connecting Audio Devices . . . . . . . . . . . . . . . . . . . . . . . . . . . . . . . . . . . . . . . . . . . . . . . . . . . . . . . . . . . . . . . . . . . . . . . . . . . . . . . 26

C4675M (2/11) 3
List of Illustrations
1 Package Contents . . . . . . . . . . . . . . . . . . . . . . . . . . . . . . . . . . . . . . . . . . . . . . . . . . . . . . . . . . . . . . . . . . . . . . . . . . . . . . . . . . . . . . . . . . . . . . . . . 8
2 Front Panel . . . . . . . . . . . . . . . . . . . . . . . . . . . . . . . . . . . . . . . . . . . . . . . . . . . . . . . . . . . . . . . . . . . . . . . . . . . . . . . . . . . . . . . . . . . . . . . . . . . . . . 9
3 Back Panel. . . . . . . . . . . . . . . . . . . . . . . . . . . . . . . . . . . . . . . . . . . . . . . . . . . . . . . . . . . . . . . . . . . . . . . . . . . . . . . . . . . . . . . . . . . . . . . . . . . . . . 12
4 Remote Control . . . . . . . . . . . . . . . . . . . . . . . . . . . . . . . . . . . . . . . . . . . . . . . . . . . . . . . . . . . . . . . . . . . . . . . . . . . . . . . . . . . . . . . . . . . . . . . . . . 13
5 Equipment Connections Overview . . . . . . . . . . . . . . . . . . . . . . . . . . . . . . . . . . . . . . . . . . . . . . . . . . . . . . . . . . . . . . . . . . . . . . . . . . . . . . . . . . . 15
6 Recommended IP Camera Settings . . . . . . . . . . . . . . . . . . . . . . . . . . . . . . . . . . . . . . . . . . . . . . . . . . . . . . . . . . . . . . . . . . . . . . . . . . . . . . . . . . 16
7 Connecting a Serial PTZ Device . . . . . . . . . . . . . . . . . . . . . . . . . . . . . . . . . . . . . . . . . . . . . . . . . . . . . . . . . . . . . . . . . . . . . . . . . . . . . . . . . . . . . 17
8 Connecting Alarm Devices . . . . . . . . . . . . . . . . . . . . . . . . . . . . . . . . . . . . . . . . . . . . . . . . . . . . . . . . . . . . . . . . . . . . . . . . . . . . . . . . . . . . . . . . . 18
9 Connecting the Relay Output Device . . . . . . . . . . . . . . . . . . . . . . . . . . . . . . . . . . . . . . . . . . . . . . . . . . . . . . . . . . . . . . . . . . . . . . . . . . . . . . . . . 19
10 Hard Disk Option Partition Notification . . . . . . . . . . . . . . . . . . . . . . . . . . . . . . . . . . . . . . . . . . . . . . . . . . . . . . . . . . . . . . . . . . . . . . . . . . . . . . . 22
11 ATM/POS Supported Equipment Configuration . . . . . . . . . . . . . . . . . . . . . . . . . . . . . . . . . . . . . . . . . . . . . . . . . . . . . . . . . . . . . . . . . . . . . . . . 25
12 Live and Playback Audio/Video Configuration . . . . . . . . . . . . . . . . . . . . . . . . . . . . . . . . . . . . . . . . . . . . . . . . . . . . . . . . . . . . . . . . . . . . . . . . . 26
List of Tables
A Video Coaxial Cable Requirements . . . . . . . . . . . . . . . . . . . . . . . . . . . . . . . . . . . . . . . . . . . . . . . . . . . . . . . . . . . . . . . . . . . . . . . . . . . . . . . . . . 16
B Supported PTZ Protocols. . . . . . . . . . . . . . . . . . . . . . . . . . . . . . . . . . . . . . . . . . . . . . . . . . . . . . . . . . . . . . . . . . . . . . . . . . . . . . . . . . . . . . . . . . . 17

4C4675M (2/11)
Important Notices
LEGAL NOTICE
SOME PELCO EQUIPMENT CONTAINS, AND THE SOFTWARE ENABLES, AUDIO/VISUAL AND RECORDING CAPABILITIES, THE IMPROPER USE OF
WHICH MAY SUBJECT YOU TO CIVIL AND CRIMINAL PENALTIES. APPLICABLE LAWS REGARDING THE USE OF SUCH CAPABILITIES VARY
BETWEEN JURISDICTIONS AND MAY REQUIRE, AMONG OTHER THINGS, EXPRESS WRITTEN CONSENT FROM RECORDED SUBJECTS. YOU
ARE SOLELY RESPONSIBLE FOR INSURING STRICT COMPLIANCE WITH SUCH LAWS AND FOR STRICT ADHERENCE TO ANY/ALL RIGHTS OF
PRIVACY AND PERSONALTY. USE OF THIS EQUIPMENT AND/OR SOFTWARE FOR ILLEGAL SURVEILLANCE OR MONITORING SHALL BE DEEMED
UNAUTHORIZED USE IN VIOLATION OF THE END USER SOFTWARE AGREEMENT AND RESULT IN THE IMMEDIATE TERMINATION OF YOUR
LICENSE RIGHTS THEREUNDER.
REGULATORY NOTICES
This device complies with Part 15 of the FCC Rules. Operation is subject to the following two conditions: (1) this device may not cause harmful
interference, and (2) this device must accept any interference received, including interference that may cause undesired operation.
Radio and Television Interference
This equipment has been tested and found to comply with the limits of a Class B digital device, pursuant to Part 15 of the FCC Rules. These limits
are designed to provide reasonable protection against harmful interference in a residential installation. This equipment generates, uses, and can
radiate radio frequency energy and, if not installed and used in accordance with the instructions, may cause harmful interference to radio
communications. However there is no guarantee that the interference will not occur in a particular installation. If this equipment does cause
harmful interference to radio or television reception, which can be determined by turning the equipment off and on, the user is encouraged to try
to correct the interference by one or more of the following measures:
• Reorient or relocate the receiving antenna.
• Increase the separation between the equipment and the receiver.
• Connect the equipment into an outlet on a circuit different from that to which the receiver is connected.
• Consult the dealer or an experienced radio/TV technician for help.
You may also find helpful the following booklet, prepared by the FCC: “How to Identify and Resolve Radio-TV Interference Problems.” This
booklet is available from the U.S. Government Printing Office, Washington D.C. 20402.
Changes and modifications not expressly approved by the manufacturer or registrant of this equipment can void your authority to operate this
equipment under Federal Communications Commission’s rules.
In order to maintain compliance with FCC regulations shielded cables must be used with this equipment. Operation with non-approved
equipment or unshielded cables is likely to result in interference to radio and television reception.
This Class B digital apparatus complies with Canadian ICES-003.
Cet appareil numérique de la classe B est conforme à la norme NMB-003 du Canada.
VIDEO QUALITY CAUTION
FRAME RATE NOTICE REGARDING USER-SELECTED OPTIONS
Pelco systems are capable of providing high quality video for both live viewing and playback. However, the systems can be used in lower quality
modes, which can degrade picture quality, to allow for a slower rate of data transfer and to reduce the amount of video data stored. The picture
quality can be degraded by either lowering the resolution, reducing the picture rate, or both. A picture degraded by having a reduced resolution
may result in an image that is less clear or even indiscernible. A picture degraded by reducing the picture rate has fewer frames per second,
which can result in images that appear to jump or move more quickly than normal during playback. Lower frame rates may result in a key event
not being recorded by the system.
Judgment as to the suitability of the products for user’s purposes is solely the user’s responsibility. Users shall determine the suitability of the
products for their own intended application, picture rate and picture quality. In the event user intends to use the video for evidentiary purposes in
a judicial proceeding or otherwise, user should consult with its attorney regarding any particular requirements for such use.
C4675M (2/11) 5
OPEN SOURCE SOFTWARE NOTICE
This product includes certain open source or other software originated from third parties that is subject to the GNU General Public License (GPL),
GNU Library/Lesser General Public License (LGPL) and different and/or additional copyright licenses, disclaimers, and notices.
The exact terms of GPL, LGPL, and some other licenses are provided to you with this product. Please refer to the exact terms of the GPL and LGPL
at http://www.fsf.org (Free Software Foundation) or http://www.opensource.org (Open Source Initiative) regarding your rights under said license.
You may obtain a complete corresponding machine-readable copy of the source code of such software under the GPL or LGPL by sending your
request to digitalsupport@pelco.com; the subject line should read Source Code Request. You will then receive an email with a link for you to
download the source code.
This offer is valid for a period of three (3) years from the date of the distribution of this product by Pelco.

6C4675M (2/11)
Description
DX4700/DX4800 Series H.264 hybrid video recorders (HVRs) bring a new range of performance and capability to the Pelco DX Series product line.
The DX4700/DX4800 Series offers a cost-effective solution to expand existing analog systems with megapixel IP recording. And, the ability to
support two Pelco megapixel IP cameras or Axis® cameras, gives new power and flexibility in IP migration. (Due to native display resolution, IP
streams can be viewed in standard resolution at the server and in megapixel resolution at the client.)
DX4700/DX4800 Series models record up to 30 images per second (ips) on all channels. In addition, the DX4800 adds the ability to record full
frame rate video at 4CIF resolution for all cameras.
DX4700/DX4800 Series HVRs provide unparalleled storage selections for systems in this class. With up to 8 TB of internal storage, the higher
storage demands of megapixel and high speed recording can be overcome without sacrificing speed for resolution. DX4700/DX4800 Series HVRs
also match security requirements to storage needs with the unique HDD partitioning feature, which allocates individual disk partitions for normal
and alarm recording. And, video is easily backed up to an optional USB-attached HDD enclosure (up to 1 TB).
The unit provides the unique ability to leverage installed systems: the new DX Series client provides operational functionality for DX8000 digital
video recorders (DVRs), DX8100 Series and DX4700/DX4800 Series HVRs, DX4500/DX4600, DX4100 and DX4000 Series DVRs. Optionally,
DS ControlPoint software allows integration with DX Series products and Digital Sentry® systems.
DX4700/DX4800 Series is full-featured and provides a wide range of robust capabilities including the ability to capture and overlay ATM/POS
text with video recording, access instant playback for quick investigative work, and the use of bidirectional audio for enhanced security.
The unit reduces installation overhead with out of the box recording. An intuitive interface makes custom installation easy and reduces learning
time for end customers.
CLIENT APPLICATION SOFTWARE
Fully implemented networking capabilities allow remote viewing of live video, playback, and administration of DVR/HVR server features.
Versatile high-speed search operations include time and date, bookmark, event, pixel, thumbnail, and point of sales (POS) searching. Extensive
scheduling features allow the customization of day, weekday, weekend, and special event recording. The DX Series client provides a graphical
user interface (GUI), allowing for quick and efficient access to setup and operating features.
The DX Series DVR/HVRs support four software applications that run on a PC:
•DX Series Client software application: Allows you to log on to, operate, and administer up to 100 DX Series DVR/HVRs. DX Series
servers supports a total of five simultaneous connections when using the DX Series client and Web client applications.
•DX Series Export Viewer: Allows you to view exported video. The export viewer is designed to recognize and verify the digital
watermark that is embedded in the Pelco-engineered .exp video format.
•DX Series Emergency Agent: Works with networked DX4500/DX4600, DX4500/DX4600, and DX4104 units to alert users when one or
more channels detect an alarm, motion, text, or video loss event. The emergency agent runs on a networked client PC.
•DX Series Web Client: Allows you to view live video and operate PTZ features of cameras attached to a DVR/HVR.
C4675M (2/11) 7
MODELS
OPTIONAL ACCESSORIES
DX4708DVD 8 channel HVR with DVD; supports up to two audio inputs and outputs; records up to 30 ips on all channels.
DX4716DVD 16 channel HVR with DVD; supports up to two audio inputs and outputs; records up to 30 ips on all channels.
DX4808DVD 8 channel HVR with DVD; supports up to four audio inputs and two outputs; records up to 30 ips 4CIF on all channels.
DX4816DVD 16 channel HVR with DVD; supports up to four audio inputs and two outputs; records up to 30 ips 4CIF on all channels.
DX4546250HDD* DX4500/DX4600 SATA 250 GB upgrade
DX4546500HDD* DX4500/DX4600 SATA 500 GB upgrade
DX4546750HDD* DX4500/DX4600 SATA 750 GB upgrade
DX4546HD1000* DX4500/DX4600 SATA 1000 GB upgrade
DX4546HD2000* DX4500/DX4600 SATA 2000 GB upgrade
DX4546-DVDKIT* DVD drive upgrade for the DX4500/DX4600
KBD300A KBD300A desktop keyboard with full switching and configuration capabilities and joystick control of PTZ functions;
requires a KDB300USBKIT or a KBD300USBKIT-X
KBD300USBKIT Remote keyboard wiring kit (120 VAC) for KBD300A
KBD300USBKIT-X Remote keyboard wiring kit (230 VAC) for KBD300A
*DX4500/DX4600 HDD parts can be used with the entire DX Series product line.
8C4675M (2/11)
Product Overview
Before you install and operate the DX4700/DX4800 Series, thoroughly familiarize yourself with the information in this manual. Make sure the
package contains all of the items listed below.
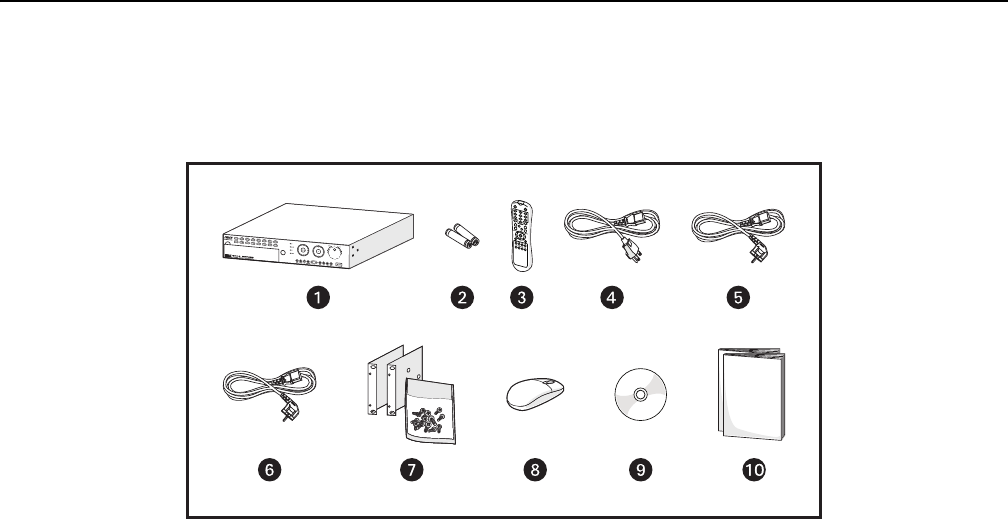
PACKAGE CONTENTS
Figure 1. Package Contents
ìDX4700/DX4800 Hybrid Video Recorder (1 ea.)
îAAA Batteries for Remote Control (2 ea.)
ïRemote Control (1 ea.)
ñUSA Standard Power Cord (1 ea.)
óEuropean Standard Power Cord (1 ea.)
rUK Standard Power Cord (1 ea.)
sRack Ears (2 ea.) and Hardware Pack (1 ea.)
tUSB Mouse (1 ea.)
uResource Disc (1 ea.)
NOTE: Disc includes user documentation and PC client, emergency agent, and export viewer applications
~í Installation Manual, Server Operation/Configuration Manual, and Important Safety Instructions (1 ea.)
C4675M (2/11) 9
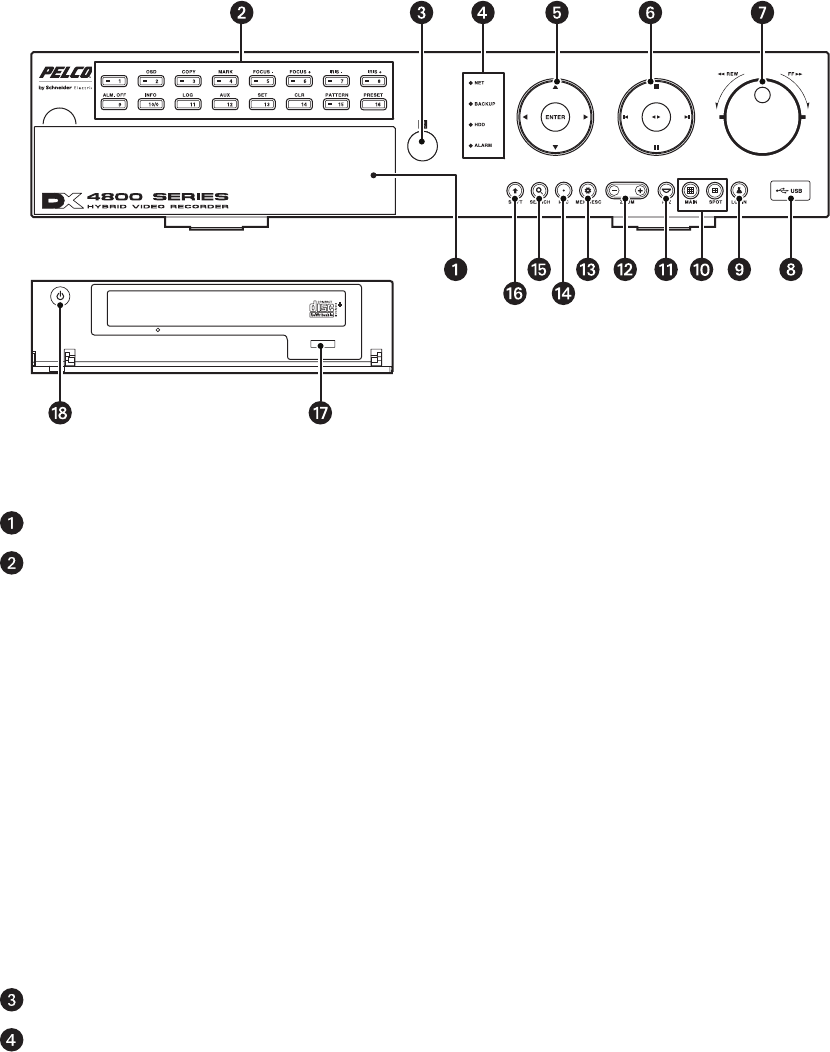
FRONT PANEL
The unit’s front panel includes indicators and controls. The controls let you perform most unit functions without the remote control or mouse
(refer to Figure 2). For information on using the remote control, refer to Remote Control on page 13. For information on using the mouse and for
general unit operation, refer to the DX4700/DX4800 Server Operation/Configuration manual.
Figure 2. Front Panel
Access Door: Provides access to the power button and optical CD/DVD drive.
Channel and Camera Control Buttons:
•Button [1]: Only selects camera 1.
•Buttons [2 to 8], Eight-Channel Unit or [2 to 16], Sixteen-Channel Unit: Selects the respective camera and its alternate
function. (Press the Shift button to access the alternate function).
[2] OSD: Displays or hides the toolbar.
[3] COPY: Copies recorded video data to the target media.
[4] MARK: Sets the beginning point from which to search recorded data.
[5] FOCUS-: Decreases camera focus.
[6] FOCUS+: Increases camera focus.
[7] IRIS-: Closes the camera iris.
[8] IRIS+: Opens the camera iris.
[9] ALM OFF: Turns off the active alarm state.
[10] INFO: Displays or hides the System Information list.
[11] LOG: Displays or hides System Log list.
[12] AUX: Sends an auxiliary command.
[13] SET: Starts the PTZ configuration mode.
[14] CLR: Clears a configured event.
[15] PATTERN: Assigns the recorded PTZ actions to the user-specified pattern number.
[16] PRESET: Assigns the position of the selected camera to a user-specified preset number.
Remote Sensor: Communicates between the HVR and remote control.
System Status Indicators:
•NET: Blinks when the network is connected.
•BACKUP: Glows when the backup and erase media process is active.
•HDD: Blinks when the hard drive is accessed.
•ALARM: Glows when the alarm out is in progress.

10 C4675M (2/11)
Selection Control:
•Directional Arrows: (Up, down, left, and right) Navigates between the options of the Menu, Options, and Properties panes.
•Enter: Selects the highlighted option in the Menu, Option, and Properties panes.
Playback Controls:
Left Arrow: Provides two functions.
•Reverse: Searches recorded video at normal speed. Repeatedly press the button to search recorded video in the reverse
direction at 2X, 3X, or 4X the normal speed.
•Reverse Skip: Activates when playback is paused. Press the button to play back video frame-by-frame, or press the button
repeatedly to quickly skip through video in the reverse direction. Press and hold the button to go directly to the beginning of the
recorded video.
Right Arrow: Provides two functions.
•Forward: Searches recorded video at normal speed. Repeatedly press the button to search recorded video in the forward
direction at 2X, 3X, or 4X the normal speed.
•Forward Skip: Activates when playback is paused. Press the button to search video frame-by-frame, or press the button
repeatedly to quickly skip through video in the forward direction. Press and hold the button to go directly to the end of the
recorded video.
STOP: Stops playback.
PAUSE: Pauses playback.
Play: Provides an alternate playback function for viewing video. Press to start playback in forward direction; press again to play back
video in the reverse direction.
Jog Control (inner dial): Navigates through various mode options.
•Menu Mode: Increases (clockwise) or decreases (counter-clockwise) the selected option values.
•Date/Time Search Mode: Increases (clockwise) or decreases (counter-clockwise) to select the start time from which to begin
playback. Played back video is displayed in the picture-in-picture view. The picture-in-picture view is displayed in one or four
panes.
•Event Search Mode: During the initial video playback mode, the inner jog dial does not change the playback parameters. Once
the shuttle dial is used to pause played back video, the inner jog allows you to search forward (clockwise) or backward (counter-
clockwise) through each frame.
•Bookmark Search Mode: Once the shuttle dial is used to pause played back video, the jog dial allows you to search forward
(clockwise) or backward (counter-clockwise) through each frame.
•ATM/POS Search Mode: Increases (clockwise) or decreases (counter-clockwise) to select the start time from which to begin
playback. Played back video is displayed in the picture-in-picture view. The picture-in-picture view is displayed in one or four
panes.
•Export Review: Increases (clockwise) or decreases (counter-clockwise) to select the start time from which to begin playback.
Played back video is displayed in the picture-in-picture view. The picture-in-picture view is displayed in one or four panes.
Shuttle Dial (outer ring):
•Quick Lift and Release Action (clockwise or counter-clockwise): For any of the above search modes, the initial quick lift
and release of the shuttle causes the played back video to pause. Subsequent quick lift and release actions searches the played
back video in the forward (clockwise) or reverse (counter-clockwise) direction, one frame at a time.
•Turn and Hold Action (clockwise or counter-clockwise): Turn the shuttle a little further to search the played back video in
the forward (clockwise) or reverse (counter-clockwise) direction faster, frame-by-frame. Turning the shuttle a full rotation in either
direction searches the playback at the fastest rate. The playback returns to pause when the shuttle is released.
High-Speed USB 2.0 Ports: One port on the front and two on the back of the HVR.
LOGIN: Displays the login dialog box if a user is not logged on to the system. If a user is already logged on, pressing this button logs
off the user. When a user is logged on, the button is lit blue; when a user is not logged on, the button is not lit. This button performs the
same function as the Login icon on the toolbar.

C4675M (2/11) 11
Monitor Selection:
•Main: Allows you to select the order in which channels are displayed on the VGA or main analog monitor. Use in conjunction
with buttons 1 to 8 or 1 to 16 to select which camera input is displayed first on the VGA or main analog monitor. This button
performs the same function as the MAIN icon on the GUI toolbar.
•VGA monitor selection: If the main video is displayed on the analog monitor, use the MAIN button to switch the display to the
VGA monitor.
•SPOT: Allows you to select the order in which channels are displayed on the spot monitor. Use in conjunction with buttons 1 to 8
or 1 to 16 to configure the first camera displayed. This button performs the same function as the SPOT icon on the GUI toolbar.
PTZ: Displays the PTZ dialog box for a camera configured for PTZ control. This button performs the same function as the PTZ icon
on the GUI toolbar.
ZOOM: Zooms a camera in and out.
MENU/ESC: Displays or closes the Setup menu.
REC: Manually starts and stops recording.
SEARCH: Displays the Search window and is organized into the following categories:
•INTERNAL HDD: Selects the target media to search for data.
•Data/Time Search: Displays the date/time monthly calendar view. The search criteria is based on the date, time, and
camera/channel.
•Event Search: Displays the event type view and selections (SENSOR, ALL, and MOTION). The event search criteria includes
date, time, camera/channel, and event types.
•Bookmark Search: Displays the bookmark search view to locate previously recorded bookmarks (data and channel/camera
number).
•ATM/POS Search: Displays the text mode search results.
•Export Review: Displays the exported video search results.
SHIFT: Switches the operation of the camera control buttons from the primary to secondary function.
DVD Drive: Accepts recordable media: CD-R, CD-RW, DVD-R, DVD-RW, DVD+R, and DVD+RW.
Power Switch: Turns the unit power on and off.
12 C4675M (2/11)
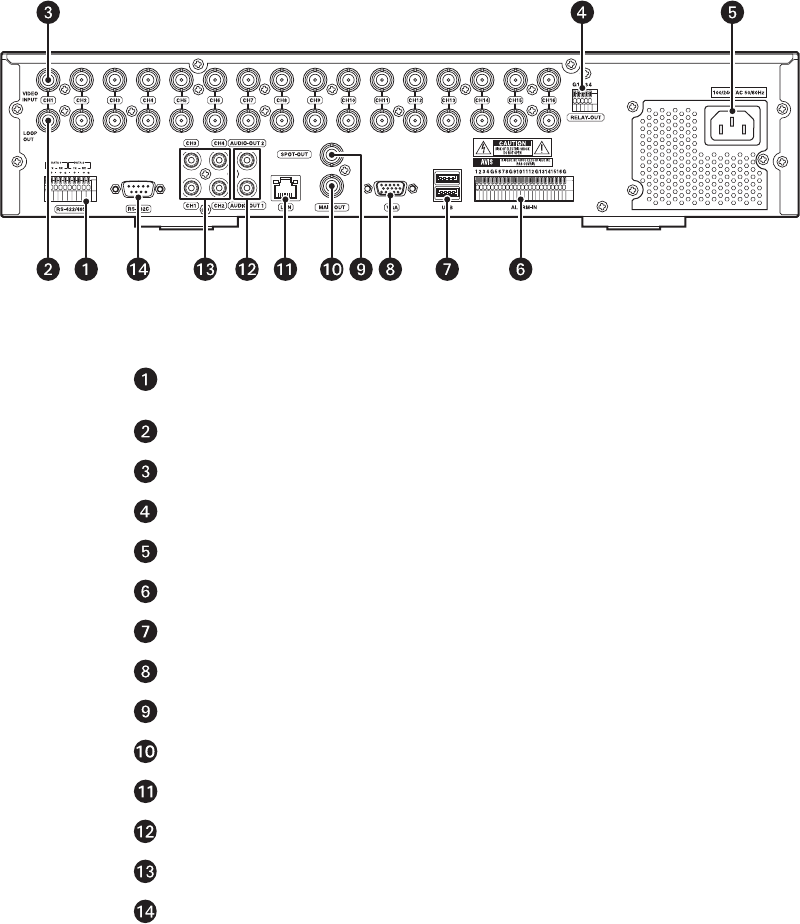
REAR PANEL
Figure 3 shows the connectors on the unit’s rear panel.
Figure 3. Back Panel
RS-422/RS-485 (compliant) Connector: Provides two RS-422/RS-485 connections
(DATA 1 and DATA 2) for interfacing multiple devices
Camera Outputs: Eight or sixteen BNC camera outputs
Camera Inputs: Eight or sixteen BNC camera inputs
Relay Outputs: Four normally open outputs
Autoranging AC Power Input: Voltage range from 100 VAC and 240 VAC, 50/60 Hz
Alarm Inputs: Eight or sixteen normally closed inputs
High-Speed USB 2.0 Ports: One USB port on the front and two on the back of unit
VGA Monitor Output: 15-pin output
Spot Monitor: Analog spot monitor BNC output
Main Monitor: Analog main monitor BNC output
Ethernet Adapter Port: 100 Mbps port
Audio Output: Two RCA line-level audio outputs
Audio Input: Two or four RCA line-level inputs
RS-232C: On 9-pin serial port for ATM/POS device connection
C4675M (2/11) 13
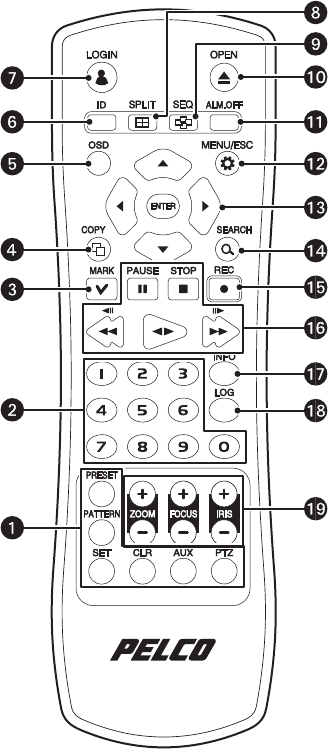
REMOTE CONTROL
The unit’s remote control lets you perform most unit functions without the mouse or front panel controls (refer to Figure 4). For information on
using the front panel controls, refer to Front Panel on page 9. For information on using the mouse and for general unit operation, refer to the
DX4700/DX4800 Server Operation/Configuration manual.
Figure 4. Remote Control
ìPTZ Controls:
•PRESET: Assigns the position of the selected camera to a user-specified preset number.
•PATTERN: Assigns the recorded PTZ actions to the user-specified pattern number.
•SET: Starts the PTZ configuration mode.
•CLR: Clears a configuration event.
•AUX: Sends an auxiliary command to the specified PTZ camera.
•PTZ: Starts the PTZ mode for the selected device and displays the on-screen PTZ control.
NOTE: PTZ controls are only available for cameras that support and are configured for PTZ operation.
îNumeric Keypad: Used for various unit functions, including camera selection, PTZ control, and numeric entry in selected dialog boxes.
ïMARK: Bookmarks video with the search starting location.
ñCOPY: Starts the export operation.
DX4700/DX4800
14 C4675M (2/11)
óOSD: Displays the on-screen display (OSD) menu.
•Control Bar On/Off: Displays or hides the toolbar.
•Video Adjustment: Displays the video adjustment dialog box.
•Motion: Displays the motion configuration grid.
rID: Links the remote control to one or many DX4700/DX4800s. For information on setting the IR remote ID on the unit, refer to the
DX4700/DX4800 Server Operation/Configuration manual.
sLOGIN: Displays the on-screen keyboard if a user is not logged on to system. If a user is logged on, this button logs off the user.
tSPLIT: Displays all four channels in a 2 x 2 format.
uSEQ: Displays all channels in sequence in a full-screen display.
~í OPEN: Opens the DVD tray (DVD models only).
~â ALM.OFF: Turns off an active alarm for the selected camera. Also cancels alarm activation and returns the system to the condition before
the alarm was activated.
~ä MENU/ESC: Opens and closes the Setup menu.
~ã Menu Controls:
•Arrow Buttons: Selects menu options.
•ENTER: Selects the highlighted menu item.
~å SEARCH: Displays the Search menu.
~ç REC: Starts and stops manual recording.
~é Playback Controls:
•PAUSE: Pauses playback.
•STOP: Stops playback.
•Left Arrow: Searches or plays back video in reverse.
•Play: Plays back video. Press the button once to play back video; press it again to play back video in reverse.
•Right Arrow: Searches or plays back video.
NOTE: These buttons have additional functions. Refer to the DX4700/DX4800 Server Operation/Configuration manual for more
information.
~è INFO: Displays the System Information.
~ê LOG: Displays the System Log List.
~ë Lens Controls:
•ZOOM: Zooms in (+) and out (–) on the video image in live and playback modes. This option does not change the actual video stream.
•FOCUS: Changes the camera’s focus far (+) and near (–).
•IRIS: Opens (+) and closes (–) the camera’s iris.
NOTE: Focus and iris functions only operate with supported cameras.
C4675M (2/11) 15
Installation
EQUIPMENT PLACEMENT
The unit can be placed on any flat surface (desk or table). Rack mounting hardware is provided for mounting the unit in an equipment rack.
Position the unit to allow for cable and power cord clearance at the rear of the unit. Be sure that the air flow around the unit is not obstructed.
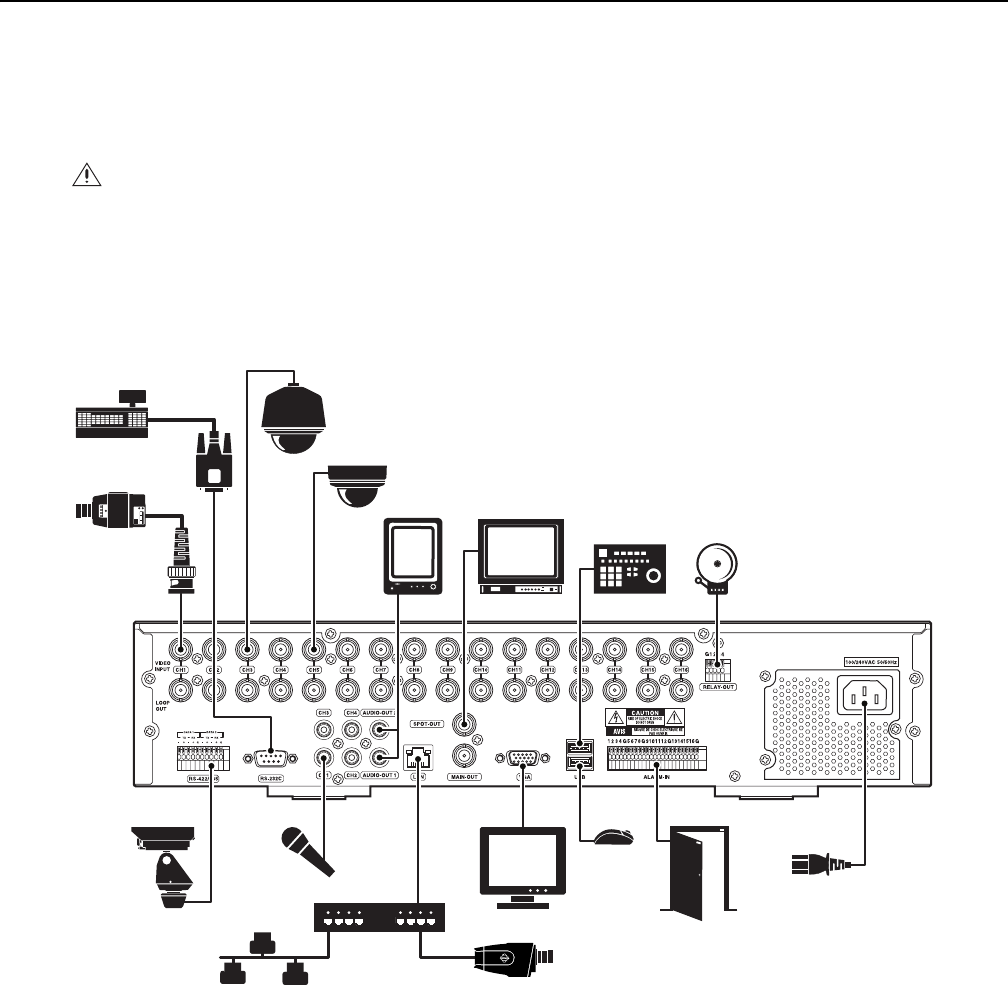
EQUIPMENT CONNECTIONS OVERVIEW
Figure 5 shows the equipment connections for the unit.
NOTE: Refer to the KBD300USBKIT Installation manual for information about installing the KBD300A keyboard.
Figure 5. Equipment Connections Overview
IMPORTANT NOTE. PLEASE READ. The network implementations in this document are shown as general representations only and are not
intended to show detailed network topologies. Your actual network will differ, requiring changes or perhaps additional network equipment to
accommodate the systems as illustrated. Please contact your local Pelco Representative to discuss your specific requirements.
WARNING: Do not place the unit on its side. In this position, the unit is likely to fall over and may cause equipment damage or personal
injury.
16 C4675M (2/11)
CONNECTING ANALOG CAMERAS
DX4708/DX4808 units support up to eight analog cameras and two IP cameras. DX4716/DX4816 units support up to sixteen analog and two IP
cameras. Be sure to disconnect power from each camera before connecting it to the unit. Also, use 75-ohm video coaxial cables with BNC
connectors to connect the analog cameras to the unit. Refer to Table A for coaxial cable requirements.
NOTE: Operational issues may occur when analog cameras are not correctly terminated. When connecting camera devices, use a normal
termination of 75 ohms. When using the video loop-through option, make sure the signal is terminated at the last device. For additional
information about terminating a specific device, refer to the device’s installation manual.
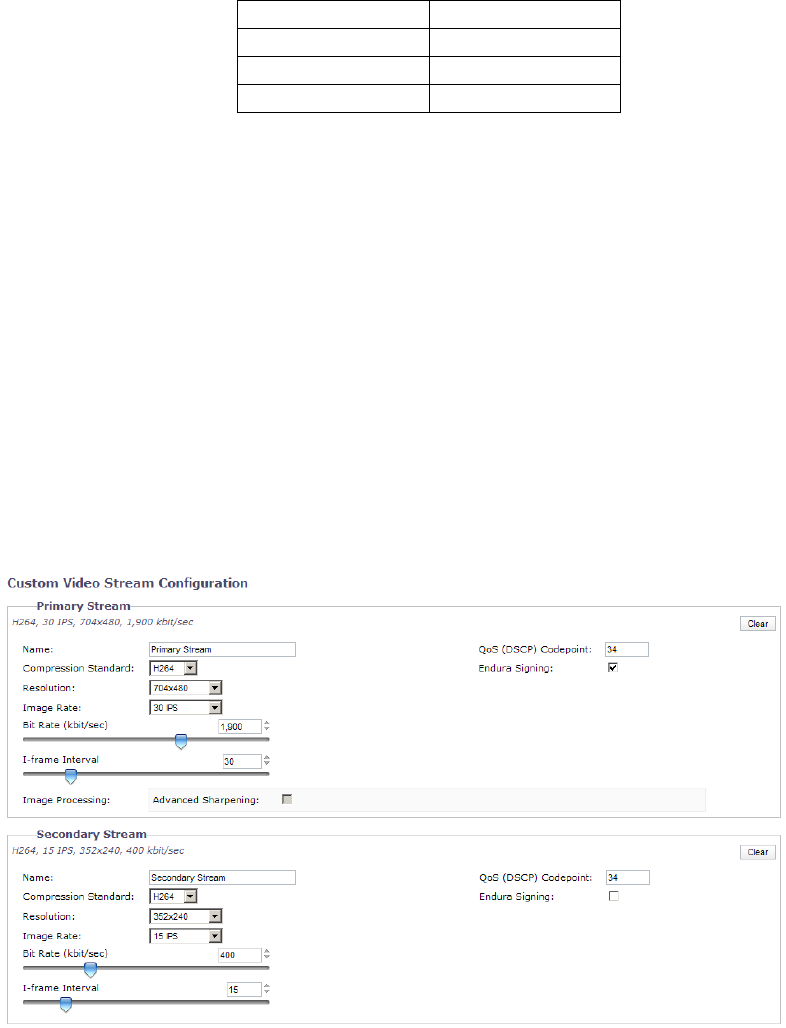
CONNECTING IP CAMERAS
The DX4700/DX4800 supports up to two IP cameras. For information about the supported IP camera resolutions, refer to Appendix D: Supported
IP Camera Resolutions in the DX4700/DX4800 Series Server Operation/Configuration manual.
NOTES:
• The unit does not support alarm or motion recording for IP cameras.
• IP cameras only record in the normal recording mode.
• The IP camera video stream must be configured as recommended by Pelco (refer to Figure 6).
Figure 6. Recommended IP Camera Settings
Table A. Video Coaxial Cable Requirements
Cable Type* Maximum Distance
RG59/U 229 m (750 ft)
RG6/U 305 m (1,000 ft)
RG11/U 457 m (1,500 ft)
*Cable requirements:
75-ohms impedance
All-copper center conductor
All-copper braided shield with 95% braid coverage.
C4675M (2/11) 17
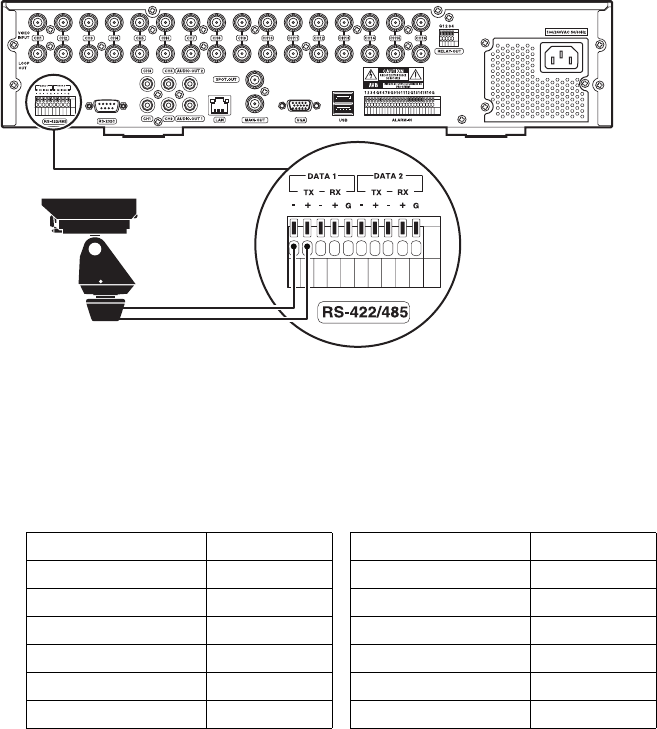
CONNECTING SERIAL PTZ
The unit has two RS-485 ports on the rear panel. You can connect multiple PTZ devices in a daisy chain from either port. Be sure to disconnect
power from any camera before connecting its data leads to the unit.
To connect the data leads from a serial PTZ device to the unit:
1. Using a small screwdriver (or similar tool), push in the TX– wire retainer on the first data port on the terminal block.
2. Insert the RX– data wire from the PTZ device into the TX– retainer.
3. Push in the TX+ wire retainer on the first data port on the terminal block.
4. Insert the RX+ data wire from the PTZ device into the TX+ retainer.
5. To connect a PTZ device to the second data port, repeat the previous steps, as necessary.
6. To connect additional PTZ devices in a daisy chain, refer to the documentation supplied with the PTZ devices.
NOTE: Maximum distance for serial communication lines is 1,219 m (4,000 ft) between the DX4700/DX4800 and the last PTZ device on the daisy
chain.
Figure 7. Connecting a Serial PTZ Device
After installation, you need to configure the communication settings and the PTZ protocol for the unit as well as the PTZ device. The
DX4700/DX4800 supports Pelco C, Pelco D (2-wire control only), Pelco P, and other PTZ protocols.
For information about configuring the unit for PTZ operation, refer to the DX4700/DX4800 Series Server Operation/Configuration manual. For
information about configuring the PTZ device, refer to the documentation supplied with the device.
Table B. Supported PTZ Protocols
Protocol Name Manufacturer Protocol Name Manufacturer
PELCO C Pelco GANZ_P360V1 CBC
PELCO D Pelco KALATEL_CYBERDOME Kalatel™
PELCO P LG®PANASONIC_CS850 Panasonic®
LG_MULTIX LG SAMSUNG_SCC Samsung™
LG_SD168 LG BOSCH_AUTODOME Bosch®
GANZ®_DSCP CBC™ (America)
NOTE: Bosch and Panasonic do not support up-the-coax PTZ control.
18 C4675M (2/11)
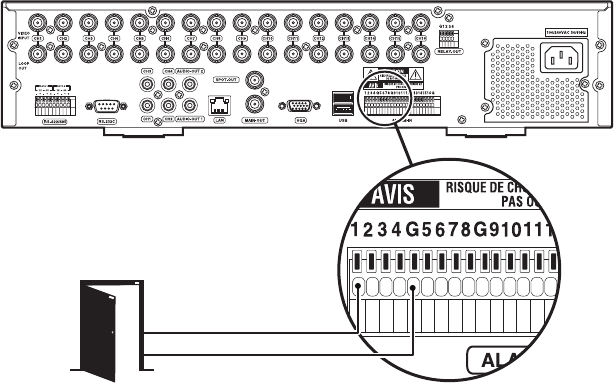
CONNECTING ALARM DEVICES
The unit provides a numbered terminal block for connecting up to four alarm devices. You can configure alarms for normally open or normally
closed operation. For information about configuring alarm inputs, refer to the DX4700/DX4800 Series Server Operation/Configuration manual.
To connect an alarm device:
1. Using a small screwdriver (or similar tool), push in the IN wire retainer (1 to 4) on the terminal block.
2. Insert one wire from the alarm device into the retainer.
3. Push in the ground wire retainer (G) on the terminal block.
4. Insert the ground wire from the alarm device into the retainer.
5. Repeat the previous steps to connect additional alarm devices.
NOTE: Ground wires from all alarm devices should be connected to alarm ground wire retainer (G) on the terminal block.
Figure 8. Connecting Alarm Devices
C4675M (2/11) 19
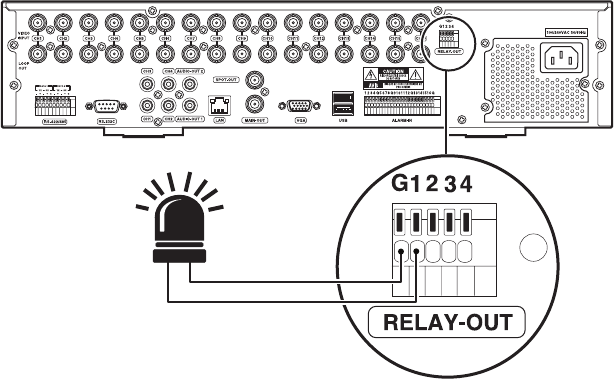
CONNECTING A RELAY OUTPUT
The unit provides a single terminal block for connecting up to four relay devices. The relay output is not configurable; it operates as a normally
open circuit. A signal from the relay output will operate the relay device. The maximum relay power rating is 0.3 A at 125 VAC or 1 A at 30 VDC.
For information about configuring the relay output, refer to the DX4700/DX4800 Series Server Operation/Configuration manual.
NOTE: If the electric current in the relay circuit exceeds the maximum power rating, the unit can be damaged.
To connect a relay device:
1. Using a small screwdriver (or similar tool), push in the OUT wire retainer (1) on the terminal block.
2. Insert one wire from the relay device into the retainer.
3. Push in the ground wire retainer (G) on the terminal block.
4. Insert the ground wire from the relay device into the retainer.
Figure 9. Connecting the Relay Output Device
CONNECTING THE MAIN MONITOR
The DX4700/DX4800 supports the connection of both an analog monitor and a VGA monitor simultaneously.
•Analog Monitor: Connect the monitor to the MAIN OUT connector. Use a 75-ohm video coaxial cable with BNC connectors.
•VGA Monitor: Connect the monitor to the VGA connector. Use a 15-pin VGA monitor cable.
CONNECTING THE SPOT MONITOR
The DX4700/DX4800 also supports the connection of both an analog spot monitor and a VGA monitor simultaneously. The spot monitor can be
configured to display individual video channels or a sequence of video channels.
Connect the optional spot monitor to the SPOT OUT connector on the rear panel. Use a 75-ohm video coaxial cable with BNC connectors.
20 C4675M (2/11)
CONNECTING USB DEVICES
The unit has one high speed USB 2.0 port on the front panel and two high speed USB 2.0 ports on the rear panel. You can use a USB flash drive
to upgrade the unit software or to export video. You can use a USB hard disk drive to back up video data.
To connect a USB device:
1. Connect a USB cable (not supplied) to one of the USB connectors on the front or rear panel.
2. Connect the other end of the cable to your USB device. The unit automatically recognizes it.
CONNECTING AUDIO DEVICES
The unit supports up to four line input and two line output audio devices. Each of the audio inputs can be associated with one or more video
channels.
You can connect up to four audio input devices to the CH1 to CH4 connectors on the rear panel. You can also connect up to two audio output devices
to the AUDIO-OUT 1 and AUTO-OUT 2 connector on the rear panel. Refer to Appendix B: Connecting Audio Devices on page 26 for more information.
NOTE: To send and receive live audio, CH 01 to CH 04 must be configured for audio. For more information about configuring the unit for live
audio, refer to the DX Series Client Operation/Configuration manual.
To connect live audio devices:
1. Connect an audio input source (microphone) and output device (amplified speaker) to the DX Series Client computer.
2. Connect a microphone and speaker to the DX4700/DX4800 HVR:
a. Connect a microphone to an audio input channel (CH 1 to CH 4) located at the rear of the unit.
b. To hear live and playback audio at the server, connect a speaker to Audio Out 1.
c. To hear live audio received from the DX Series client, connect a speaker to Audio Out 2.
CONNECTING THE MOUSE
Connect the supplied USB mouse to the MOUSE connector on the rear panel.
CONNECTING TO A NETWORK
The unit supports a 10/100/1000Base-T network interface. You can use the DX Series client application to configure and operate the unit over
the network. You can also use various network services, including Dynamic Host Configuration Protocol (DHCP) and Network Time Protocol (NTP)
to support various DX4700/DX4800 network features.
To connect the unit to a network:
1. Connect a straight Ethernet cable (not supplied) to the local area network (LAN) port on the rear panel.
2. Connect the other end of the cable to your network device. The NET indicator on the front panel glows when the network establishes
communication with the unit.
CONNECTING POWER
The unit includes three power cords: one USA standard, one UK standard, and one European standard.
To connect power:
1. Connect the power cord to the rear panel.
2. Connect the other end of the power cord to the power source.
C4675M (2/11) 21
INSTALLING CLIENT SOFTWARE
The unit includes the client, export viewer, and emergency agent software applications. The recommended system requirements for these
applications are as follows:
•Processor: Intel® Pentium® 4 (or later), 1 GHz
•Operating system: Microsoft® Windows® 2000, Windows XP (SP3), Windows Vista®, or Windows 7, and DirectX® 9.1 (or later)
•Memory: 256 MB
•Video: 64 MB
•Display resolution: 1024 x 768, 32-bit color
To install the unit’s software applications:
1. Close all programs on the computer, including any antivirus software.
2. Insert the unit’s resource disc into the DVD drive, and wait for the resource disc menu to appear.
3. Click Software. The unit’s software installation options appear.
4. Click the Client/Emergency Agent/Viewer option. The Pelco DX4700/DX4800 Client InstallShield Wizard appears.
5. Click Next. The Software License Agreement appears.
6. Click Yes to accept the terms of the license agreement. The “Ready to Install the Program” dialog box appears.
7. Click Install. The installation process starts. After the software is installed, the InstallShield Wizard Complete dialog box appears.
8. Click Finish to complete the installation process.
Refer to the DX4700/DX4800 Series Client Operation/Configuration manual for information about using the client software applications.
22 C4675M (2/11)
Operation/Configuration
The unit is ready for configuration and operation as soon as the unit is installed. Refer to the DX4700/DX4800 Series Server Operation/
Configuration manual for more information.
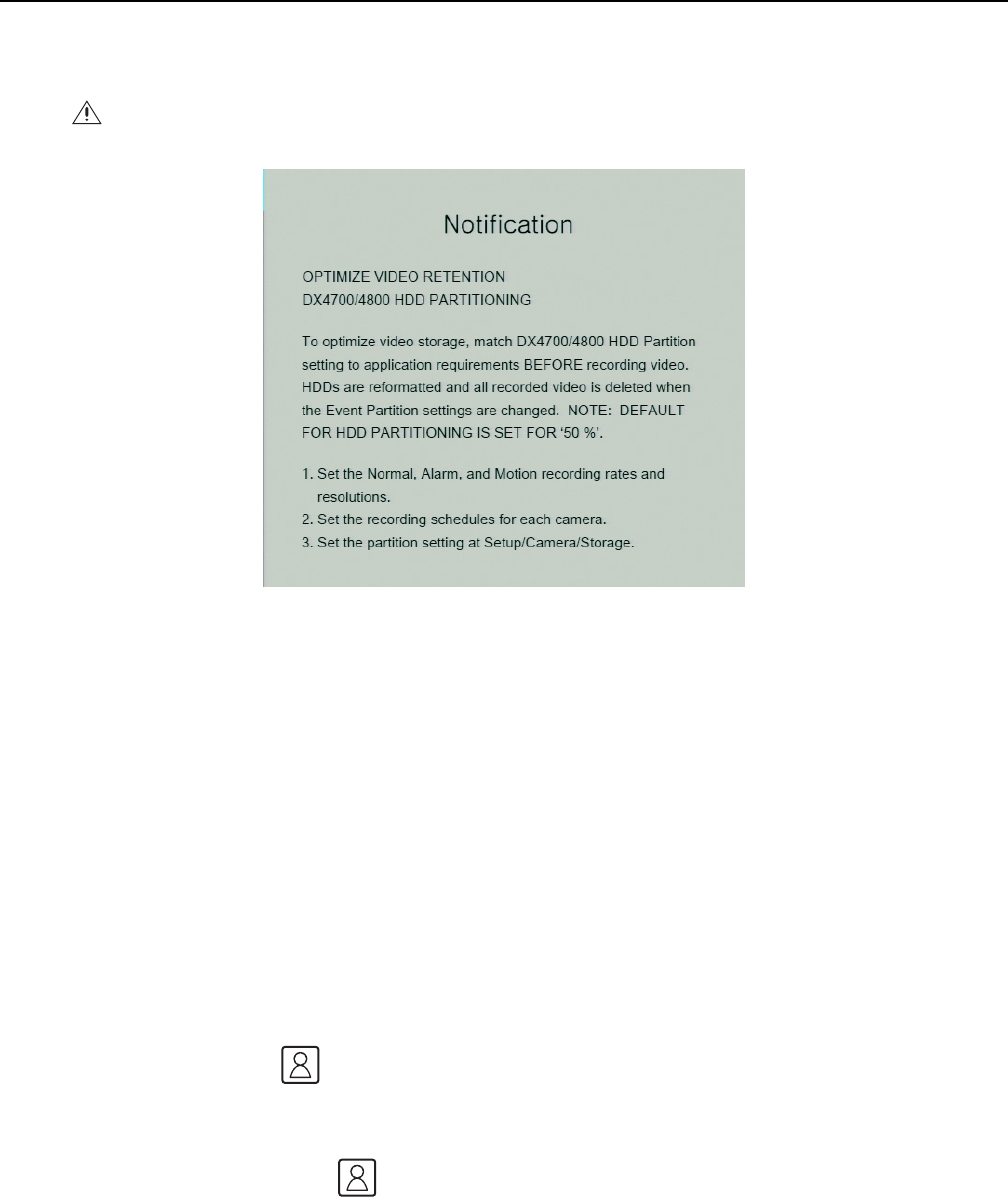
Figure 10. Hard Disk Option Partition Notification
UNIT STARTUP
To start the unit, press and hold the POWER button located on the front panel until your hear a beep. After a few seconds, the unit’s application
window appears.
LOGGING ON AND LOGGING OFF
You must log on to the unit with a valid user name and password to operate the HVR. User names and passwords are case sensitive. By default,
the unit includes one administrator logon account; both the default user name and password are admin.
NOTES:
• When you log on for the first time, the system does not automatically prompt you to change the default administrator password. Anyone
who knows the administrator user name and the default password can access the unit; therefore, Pelco recommends that you change the
system administrator password and store it in a secure location.
• Passwords must be from four to eight characters in length.
To log on to the unit:
1. On the toolbar, click Login .
2. Type the password using the on-screen keyboard.
3. Click OK. The system logs you on the Login icon turns blue.
4. To log off from the unit, click Login . The system logs you off and the Login icon turns black.
WARNING: Before you use the unit to record video, read the Hard Disk Option Partition Notification (refer to Figure 10). Refer to the
DX4700/DX4800 Series Server Operation/Configuration manual for information about configuring the hard disk partition feature.

C4675M (2/11) 23
UNIT SHUTDOWN
You must be logged on to the unit with administrator-level permissions to shut down the HVR.
To shut down the unit:
1. On the front, press and hold the power switch until you hear a beep. The Login virtual keyboard appears. You have approximately
25 seconds to enter the password before it closes.
2. Type the password.
3. Click OK.

24 C4675M (2/11)
Specifications
VIDEO
Signal System NTSC/PAL, switchable
Recording Resolutions NTSC PAL
352 x 240 352 x 288
704 x 240 704 x 288
704 x 480 704 x 576
Video Compression H.264
Video Inputs 8 or 16 (looping with automatic termination)
PTZ Controls Pelco C, Pelco P, Pelco D, other third-party protocols
Video Outputs 2 main, 1 VGA (DB15) and 1, analog (BNC);
1, analog spot (BNC)
AUDIO
Line In
DX4708/DX4716 2, mono, RCA line in
DX4808/DX4816 4, mono, RCA line in
Output 2, mono, 0 dB, RCA
Sampling Rate 128 Kbps (16 KHz)
Two-Way Audio Mic-in, line-out
ELECTRICAL
Input Voltage 12 VDC at 5 A (100 to 240 VAC 50/60 Hz adapter)
Power Consumption Maximum 40 W (1 HDD and 1 DVD drive)
Alarm Input Terminals 4 N.C. or N.O.
Relay Output Terminal 1 N.C. or N.O.; 30 VDC/1 A, 125 VAC/0.3 A
Remote Administration Full remote control through TCP/IP network
CONNECTORS
Video Inputs 8 or 16, BNC
Video Output 8 or 16, BNC, looping
Alarm Input 1 per BNC input; screw terminal N/C or N/O, supervised or unsupervised
Relay Output 2 for 8 channels
4 for 16-channel (N/O or N/C)
Video Output 1 SVGA and 1 analog
TCP/IP Port RJ-45, 10/100/1000
Data Input 2, RS-422/RS-485 terminal s for connecting PTZ cameras
DB9 1, RS-232C connector for interfacing an ATM/POS device
DB15 VGA port
RJ-45 10/100 Megabit Ethernet
USB 3 high-speed USB 2.0 ports (1 front, 2 rear); connects USB backup and export devices
ENVIRONMENTAL
Operating Temperature 0° to 35°C (32° to 95°F)
Relative Humidity Maximum 80%, noncondensing
PHYSICAL
Dimensions 49.78 x 48.26 x 8.89 cm
(19.6" D x 19.0" W x 3.5" H)
Approximate Unit Weight
Without HDD 6 kg (13.2 lb)
With HDD 9 kg (19.8 lb)
Camera Views
Server 1, 4, 6, 7, 9, 16
Client 1 to 36
C4675M (2/11) 25
Appendixes
APPENDIX A: CONNECTING ATM/POS DEVICES
The DX4700/DX4800 allows you to connect to one ATM or POS device. One camera channel can be used to record ATM/POS video. For
information about configuring the unit for ATM/POS recording, refer to the DX4700/DX4800 Operation/Configuration manual. For information
about connecting your DX4700/DX4800 using AVE equipment, contact Pelco Product Support.
Refer to the following information when referencing the DX4700/DX4800 Operation/Configuration manual:
• Setting up the ATM/POS interface
• Configuring ATM/POS transaction settings
• Configuring advanced ATM/POS activated relay output
• Linking relay outputs to ATM/POS events
• Linking cameras to record in response to ATM/POS events
• Linking presets and patterns to ATM/POS events
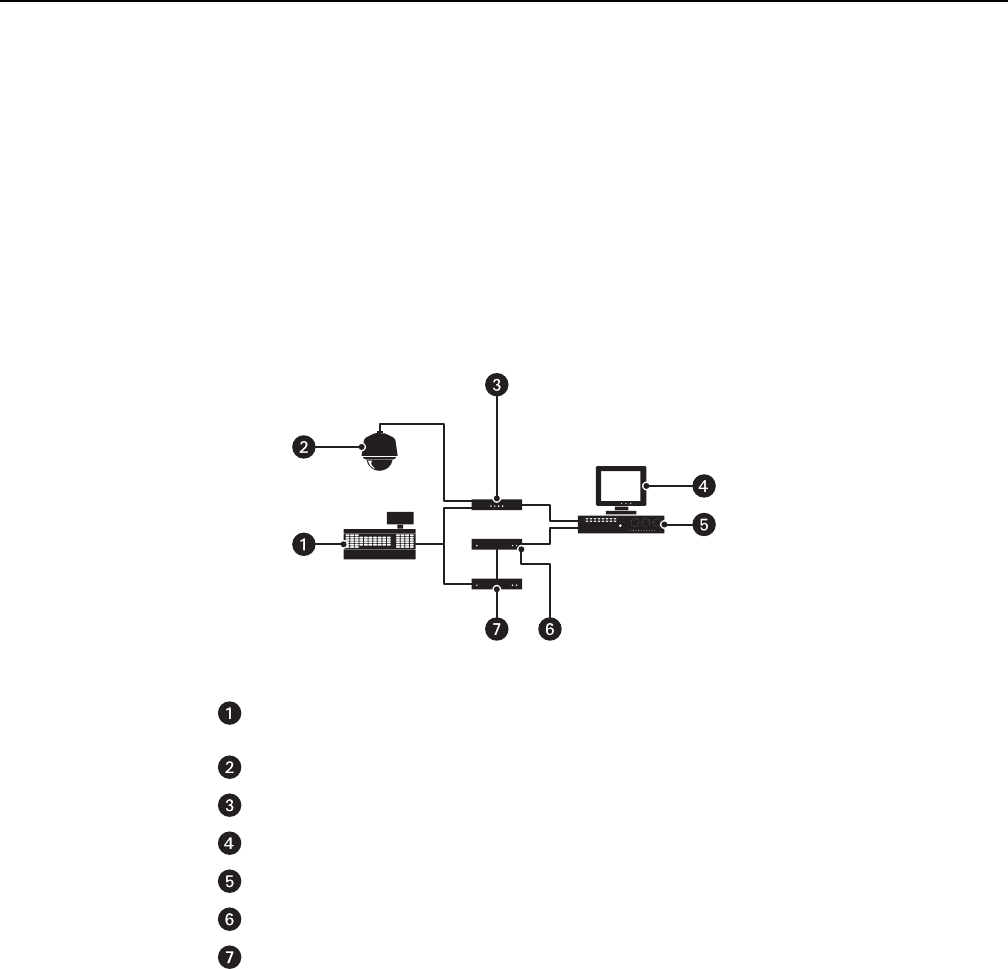
Figure 11. ATM/POS Supported Equipment Configuration
To connect the unit to an ATM/POS device:
1. Refer to the AVE instruction documentation that came with the AVE equipment and perform the following steps:
a. Connect the AVE equipment to the ATM/POS device.
b. Connect the AVE equipment to the DX4700/DX4800 unit.
2. On the AVE Hydra unit, set the SW1-8 switch to the ON (up) position.
3. On the Regcom unit, set the SW1-1 and SW1-8 switches to the ON (up) position.
4. Verify the ATM/POS device communication settings.
5. Configure the AVE equipment communication settings to match those of the ATM/POS device.
6. Refer to the DX4700/DX4800 Operation/Configuration manual, and enter the ATM/POS communication and recording settings.
ATM/POS Device: Device from which the data transaction is generated. The device provides
RS-232 data to both the AVE VSI-PRO and Regcom units.
Camera: Provides video of ATM/POS transactions.
AVE VSI-PRO: Sends video to the HVR.
Monitor: Displays ATM/POS recorded video overlay with synchronized transaction data.
HVR: Records transaction video and data.
AVE Hydra: Sends transaction RS-232 data that triggers ATM/POS text recording.
Regcom: Sends RS-485 transaction data to the AVE Hydra unit.
26 C4675M (2/11)
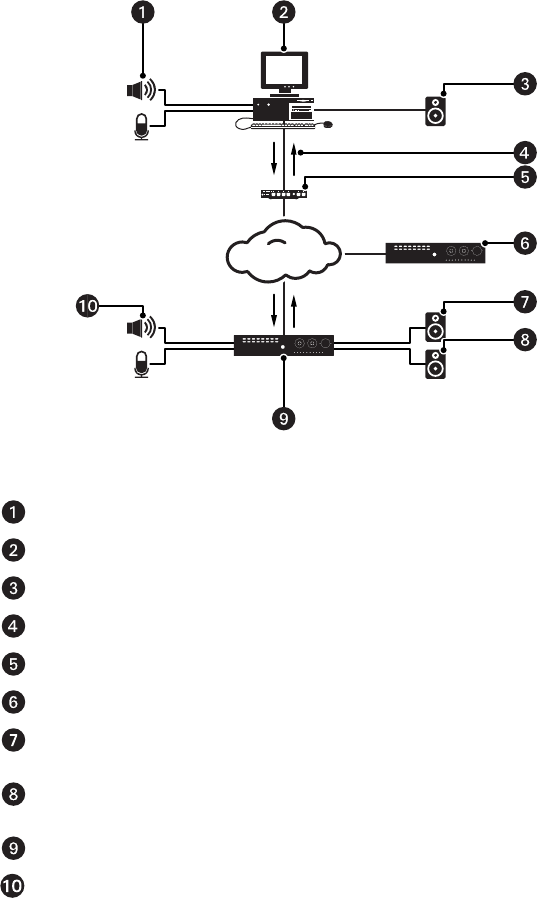
APPENDIX B: CONNECTING AUDIO DEVICES
DX Series HVRs support simultaneous live audio and the playback of recorded audio/video. The DX Series client can send live audio to the server.
It can also receive live audio/video and play back audio/video from the server simultaneously.
Figure 12. Live and Playback Audio/Video Configuration
Microphone/Audio Input System Connected to the DX Series Client Computer
DX Series Client Computer
Speaker or Audio Output System Connected to the DX Series Client Computer
Live and Recorded Audio and Video Received from the DX4700/DX4800 HVR server
Network Switch
DX4700/DX4800 HVR Server 2
Speaker/Audio Output System Connected to Audio Out 1 (only live audio and recorded audio
playback are sent to Audio Out 1)
Speaker/Audio Output System Connected to Audio Out 2 (only live audio from the DX Series client
is sent to Audio Out 2)
DX4700/DX4800 HVR Server 1
Microphone/Audio Input System Connected to CH 01 to CH 04 (live audio can be heard and recorded
at Audio Out 1)
NETWORK

PRODUCT WARRANTY AND RETURN INFORMATION
WARRANTY
Pelco will repair or replace, without charge, any merchandise proved defective in
material or workmanship for a period of one year after the date of shipment.
Exceptions to this warranty are as noted below:
• Five years:
– Fiber optic products
– Unshielded Twisted Pair (UTP) transmission products
– CC3701H-2, CC3701H-2X, CC3751H-2, CC3651H-2X, MC3651H-2, and
MC3651H-2X camera models
• Three years:
– Pelco-designed fixed network cameras and network dome cameras with
Sarix™ technology.
– Pelco-branded fixed camera models (CCC1390H Series, C10DN Series,
C10CH Series, and IP3701H Series)
– EH1500 Series enclosures
– Spectra® IV products (including Spectra IV IP)
– Camclosure® Series (IS, ICS, IP) integrated camera systems
– DX Series digital video recorders (except DX9000 Series which is covered
for a period of one year), DVR5100 Series digital video recorders, Digital
Sentry® Series hardware products, DVX Series digital video recorders, and
NVR300 Series network video recorders
– Endura® Series distributed network-based video products
– Genex® Series products (multiplexers, server, and keyboard)
– PMCL200/300/400 Series LCD monitors
– PMCL5xx Series FHD monitors
• Two years:
– Standard varifocal, fixed focal, and motorized zoom lenses
– DF5/DF8 Series fixed dome products
– Legacy® Series integrated positioning systems
– Spectra III™, Spectra Mini, Spectra Mini IP, Esprit®, ExSite®, and PS20
scanners, including when used in continuous motion applications.
– Esprit Ti and TI2500 Series thermal imaging products
– Esprit and WW5700 Series window wiper (excluding wiper blades).
– CM6700/CM6800/CM9700 Series matrix
– Digital Light Processing (DLP®) displays (except lamp and color wheel). The
lamp and color wheel will be covered for a period of 90 days. The air filter is
not covered under warranty.
– Intelli-M® eIDC controllers
• One year:
– Video cassette recorders (VCRs), except video heads. Video heads will be
covered for a period of six months.
•Six months:
– All pan and tilts, scanners, or preset lenses used in continuous motion
applications (preset scan, tour, and auto scan modes).
Pelco will warrant all replacement parts and repairs for 90 days from the date of
Pelco shipment. All goods requiring warranty repair shall be sent freight prepaid
to a Pelco designated location. Repairs made necessary by reason of misuse,
alteration, normal wear, or accident are not covered under this warranty.
Pelco assumes no risk and shall be subject to no liability for damages or loss
resulting from the specific use or application made of the Products. Pelco’s liability
for any claim, whether based on breach of contract, negligence, infringement of
any rights of any party or product liability, relating to the Products shall not exceed
the price paid by the Dealer to Pelco for such Products. In no event will Pelco be
liable for any special, incidental, or consequential damages (including loss of use,
loss of profit, and claims of third parties) however caused, whether by the
negligence of Pelco or otherwise.
The above warranty provides the Dealer with specific legal rights. The Dealer may
also have additional rights, which are subject to variation from state to state.
If a warranty repair is required, the Dealer must contact Pelco at (800) 289-9100 or
(559) 292-1981 to obtain a Repair Authorization number (RA), and provide the
following information:
1. Model and serial number
2. Date of shipment, P.O. number, sales order number, or Pelco invoice number
3. Details of the defect or problem
If there is a dispute regarding the warranty of a product that does not fall under
the warranty conditions stated above, please include a written explanation with
the product when returned.
Method of return shipment shall be the same or equal to the method by which the
item was received by Pelco.
RETURNS
To expedite parts returned for repair or credit, please call Pelco at (800) 289-9100
or (559) 292-1981 to obtain an authorization number (CA number if returned for
credit, and RA number if returned for repair) and designated return location.
All merchandise returned for credit may be subject to a 20 percent restocking and
refurbishing charge.
Goods returned for repair or credit should be clearly identified with the assigned
CA or RA number and freight should be prepaid.
The materials used in the manufacture of this document and its components are compliant to the requirements of Directive 2002/95/EC.
This equipment contains electrical or electronic components that must be recycled properly to comply with Directive 2002/96/EC of the European Union
regarding the disposal of waste electrical and electronic equipment (WEEE). Contact your local dealer for procedures for recycling this equipment.
2-10-10
REVISION HISTORY
Manual # Date Comments
C4675M 2/11 Original version.
Pelco, the Pelco logo, and other trademarks associated with Pelco products referred to in this publication are trademarks of Pelco, Inc. or its affiliates. © Copyright 2011, Pelco, Inc.
All other product names and services are the property of their respective companies. All rights reserved.
Product specifications and availability are subject to change without notice.

