User Manual
Gayle-OBrien-C02L80FZFFRR (3)
ENTRY DOOR
DEADBOLT SENSOR
QUICK START GUIDE
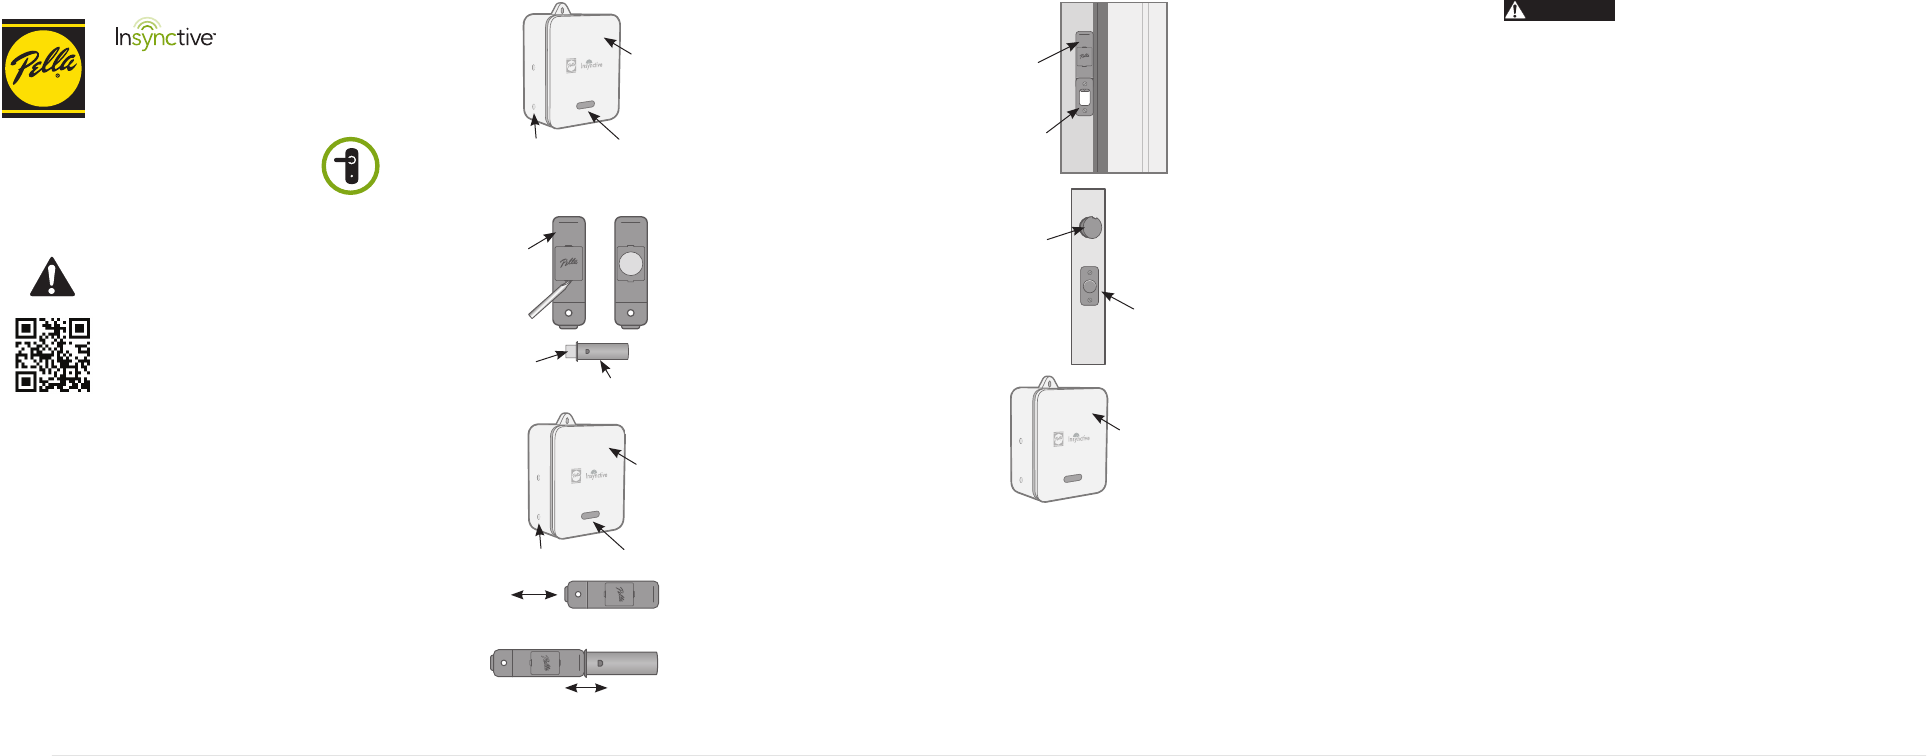
1. Get Started
• Plug BRIDGE into electrical outlet
(light will turn green and then fl ash blue).
NOTE: Follow Bridge Quick Start Guide to set up BRIDGE.
2. Prepare SENSORS
• Use flathead screwdriver to remove
battery cover from LOCK SENSOR.
• Remove battery and plastic tab from
LOCK SENSOR. Reinsert battery.
• Remove plastic tab from OPEN/CLOSE
SENSOR battery.
• Replace battery covers. (OPEN/CLOSE
SENSOR battery cover is included in a bag
within package.)
NOTE: You will have 2 minutes to sync your SENSORS
once the plastic tabs are removed. If 2 minutes pass
without a successful sync, remove and insert the
battery again.
3. Sync SENSORS to BRIDGE
• Press and release the Sync button on BRIDGE
(button nearest the light). Orange light will fl ash
continuously. BRIDGE is in sync mode while the
light is fl ashing orange.
• Depress LOCK SENSOR plunger twice within
2 seconds.
• Green light on BRIDGE and beep will
indicate success.
• Touch OPEN/CLOSE SENSOR to the recessed
line at the top of LOCK SENSOR, and separate
by at least 1 inch. Repeat twice within 2 seconds.
• Green light on BRIDGE and beep will
indicate success.
• To exit sync mode: press and hold Sync button
on BRIDGE until light stops fl ashing orange.
Depress twice within 2 seconds.
5. Install OPEN/CLOSE SENSOR
• Open the door and locate the black plastic
cover on the side of the door panel above the
deadbolt.
• Use a fl athead screwdriver to remove the black
plastic cover.
• Insert OPEN/CLOSE SENSOR until it is fl ush
with the edge of the door panel.
4. Install LOCK SENSOR
• Open the door and locate the deadbolt
strike plate.
• Use a Phillips-head screwdriver to remove
the deadbolt strike plate screws.
• Remove the deadbolt strike plate and black
plastic insert.
• Visit Insynctive.Pella.com/EntryDoor
DeadboltSensor for specifi c Entry Door
Deadbolt Sensor installation instructions, as
requirements vary by door type.
6. Test SENSORS
• Unlock your entry door with SENSORS installed,
and BRIDGE should beep twice.
• Open your entry door with SENSORS installed,
and BRIDGE should beep twice.
WARNING! OPEN/CLOSE SENSOR may indicate a closed
status when door is not completely closed. See Product
Guide on Insynctive.Pella.com for complete review of
ENTRY DOOR DEADBOLT SENSOR operation.
If you will be using the Pella® Insynctive™ STATUS INDICATOR to
monitor your entry doors, please reference the Quick Start Guide
in the STATUS INDICATOR package to sync.
HAVE A HOME AUTOMATION OR SECURITY SYSTEM?
For instructions on how to sync a Pella Insynctive ENTRY DOOR
DEADBOLT SENSOR to it, visit Insynctive.Pella.com/HomeAutomation.
NEED HELP WITH THE STEPS ABOVE?
Find troubleshooting information and videos at
Insynctive.Pella.com/Support or call 855-473-5524.
WANT TO EASILY REGISTER PELLA INSYNCTIVE PRODUCTS?
Visit Insynctive.Pella.com/Registration for instant access to
instructions, warranties and how-to videos.
FCC Compliance and Industry Canada
This equipment has been tested and found to comply with the limits for Class B
digital devices, pursuant to Part 15 of the FCC Rules. These limits are designed
to provide reasonable protection against harmful interference in a residential
installation. This equipment generates, uses and can radiate radio frequency
energy and, if not installed and used in accordance with the instruction manual,
may cause harmful interference to radio communications. However, there is
no guarantee that interference will not occur in a particular installation. If this
equipment does cause harmful interference to radio or television reception, which
can be determined by turning the equipment off and on, the user is encouraged
to try to correct the interference by one or more of the following measures:
• Reorient or relocate the receiving antenna.
• Increase the separation between the equipment and receiver.
• Connect the equipment to an outlet on a different circuit from the receiver.
• Consult the dealer or an experienced radio/TV contractor for help.
Changes or modifi cations not expressly approved by Pella Corporation could
void the user’s authority to operate the equipment.
This device complies with Industry Canada license-exempt RSS standard(s).
Operation is subject to the following two conditions: (1) this device may not
cause interference, and (2) this device must accept any interference, including
interference that may cause undesired operation of the device.
Cet appareil est conforme avec Industrie Canada exempts de licence standard
RSS. L’opération est soumise aux deux conditions suivantes: (1) cet appareil ne
peut causer d’interférences, et (2) cet appareil doit accepter toute interférence,
y compris les interférences qui peuvent causer un mauvais fonctionnement de
l’appareil.
FCC ID: SO7-205Y0000 FCC ID: SO7-205Z0000
IC ID: 11009A-205Y0000 IC ID: 11009A-205Z0000
LIGHT
SYNC BUTTON
LOCK
SENSOR
OPEN/CLOSE
SENSOR
DEADBOLT
STRIKE PLATE
OPEN/CLOSE
SENSOR
LOCK
SENSOR
Separate by at least 1 inch
twice within 2 seconds.
DEADBOLT
BRIDGE
BRIDGE
LIGHT
SYNC BUTTON
BRIDGE
WHAT’S INCLUDED:
• ENTRY DOOR LOCK SENSOR: SENSOR will transmit a signal to BRIDGE
when deadbolt is locked or unlocked.
• ENTRY DOOR OPEN/CLOSE SENSOR: SENSOR will transmit a signal to
BRIDGE when the door is opened or closed.
• ENTRY DOOR OPEN/CLOSE SENSOR BATTERY COVER
• QUICK START GUIDE
WHAT’S REQUIRED:
• BRIDGE (required — sold separately): Wirelessly connects your Insynctive
products to STATUS INDICATOR or a compatible security or home
automation system.
• STATUS INDICATOR (optional — sold separately): Lights indicate status of
Pella® Insynctive SENSORS. Or you can use a compatible security or home
automation system to monitor your entry door.
• PELLA ENTRY DOOR PREPPED FOR ENTRY DOOR DEADBOLT SENSOR
• FLATHEAD SCREWDRIVER
• PHILLIPS-HEAD SCREWDRIVER
• DRILL AND 1/8-INCH DRILL BIT
Scan the QR Code® or visit Insynctive.Pella.com/
EntryDoorDeadboltSensor for complete Product Guide
and warnings, instructional videos and other Pella®
Insynctive™ quick tips.
This Quick Start Guide is intended only to provide an overview
of the product and its use. Before using this product, read the
complete Product Guide and warnings.
Failure to adhere to the warnings below may result in death, serious injury
and/or loss of valuables.
• Pella® Insynctive™ products are not 100% reliable for a variety of reasons (see
Product Guide and the Warning in Step 6 of this Quick Start Guide for more
information). Therefore, Pella Insynctive products should not be relied upon
in situations where life, safety and/or protection of valuables are solely
dependent on their function. Test each product at least once per year to
help ensure proper operation.
• Pella Insynctive products are not a substitute for careful adult supervision
of children.
• Keep battery and small parts out of reach of children. If swallowed,
immediately seek medical help.
Read the complete Product Guide for additional warnings and information.
WARNING
© 2014 Pella Corporation
IQSGED0414
PLASTIC
TAB
Gayle-OBrien-C02L80FZFFRR (3)
SENSOR PARA PESTILLO
DE PUERTA DE ENTRADA
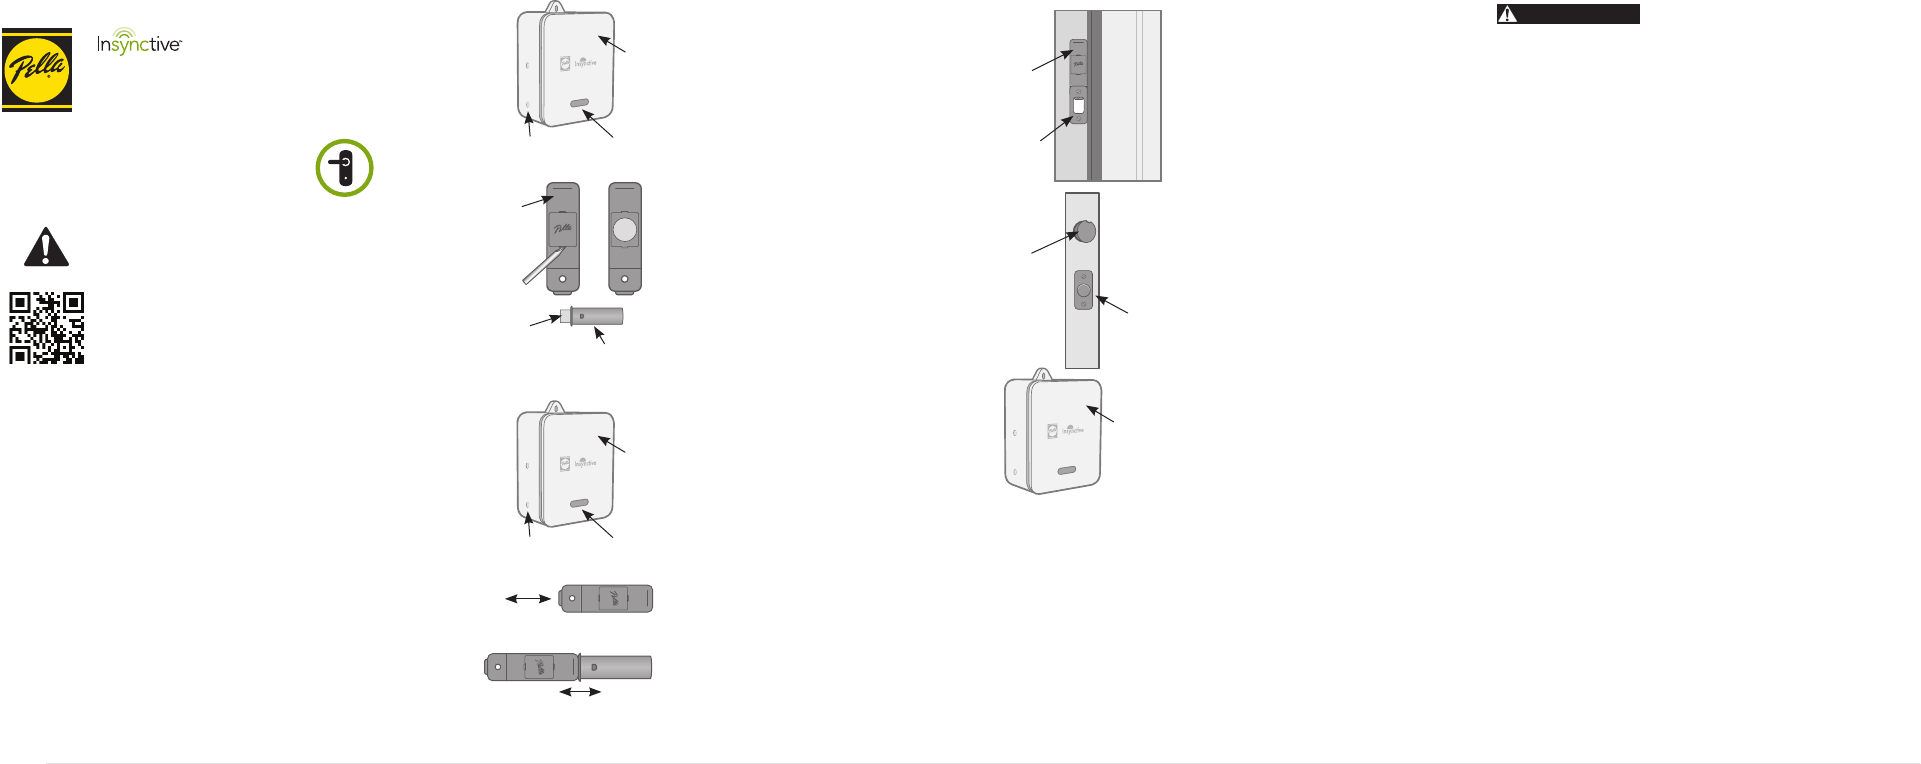
1. Empiece
• Enchufe el PUENTE en un tomacorriente
(la luz se pondrá verde y luego titilará azul).
NOTA: Siga la guía de inicio rápido del puente para
confi gurar el PUENTE.
2. Prepare los SENSORES
• Use el destornillador de cabeza plana para
retirar la cubierta de la batería del SENSOR DE
BLOQUEO.
• Retire la batería y la pestaña plástica del
SENSOR DE BLOQUEO. Vuelva a colocar la
batería.
• Retire la pestaña plástica del SENSOR DE
APERTURA/CIERRE.
• Vuelva a colocar las cubiertas. (La cubierta de la
batería del SENSOR DE APERTURA/CIERRE se
incluye en una bolsa dentro del paquete).
NOTA: Usted tendrá 2 minutos para sincronizar los
SENSORES después de retirar las pestañas plásticas.
Si pasan 2 minutos sin que logre la sincronización, retire
la batería y vuélvala a colocar.
3. Sincronice los SENSORES al PUENTE
• Presione y suelte el botón de sincronización
en el PUENTE (el botón más cercano a la luz).
La luz anaranjada destellará continuamente. El
PUENTE está en modo sincronización mientras
la luz destelle naranja.
• Presione el gatillo del SENSOR DE BLOQUEO
dos veces en menos de 2 segundos.
• La luz verde en el PUENTE y el sonido breve
indicarán que tuvo éxito.
• Toque el SENSOR DE APERTURA/CIERRE en
la línea incrustada en la parte superior del
SENSOR DE BLOQUEO y separe 2,54 cm como
mínimo. Repita la operación dos veces en
menos de 2 segundos.
• La luz verde en el PUENTE y el sonido breve
indicarán que tuvo éxito.
• Para salir del modo sincronización: mantenga
presionado el botón de sincronización en el
PUENTE hasta que la luz deje de destellar
anaranjado.
Presione dos veces en menos
de 2 segundos.
5. Instale el SENSOR DE APERTURA/CIERRE
• Abra la puerta y ubique la cubierta plástica
negra al costado del panel de la puerta sobre
el pestillo.
• Use un destornillador de cabeza plana para
retirar la cubierta plástica negra.
• Introduzca el SENSOR DE APERTURA/CIERRE
hasta que esté al ras del borde del panel de la
puerta.
4. Instale el SENSOR DE BLOQUEO
• Abra la puerta y ubique la placa de la cerradura
con pestillo.
• Use un destornillador Phillips para retirar los
tornillos de la placa de la cerradura con pestillo.
• Retire la placa de la cerradura con pestillo y el
accesorio de plástico negro.
• Visite Insynctive.Pella.com/EntryDoor
DeadboltSensor para obtener instrucciones
de instalación específi cas para el sensor para
pestillo de la puerta de entrada, ya que los
requerimientos varían según el tipo de puerta.
6. Pruebe los SENSORES
• Quite el seguro a su puerta de entrada con los
SENSORES instalados, y el PUENTE debería
sonar dos veces.
• Abra su puerta de entrada con los SENSORES in-
stalados, y el PUENTE debería sonar dos veces.
¡ADVERTENCIA! Los SENSORES DE APERTURA/CIERRE
pueden indicar un estado de cerrado aun cuando la puerta
no está completamente cerrada. Consulte la guía del
producto en Insynctive.Pella.com para obtener una
descripción completa del funcionamiento del SENSOR
PARA PESTILLO DE PUERTA DE ENTRADA.
Si va a usar el INDICADOR DE ESTADO de Pella® Insynctive™ para
monitorear sus puertas de entrada, consulte la guía de inicio rápido
en el paquete del INDICADOR DE ESTADO para sincronizar.
¿CUENTA CON UN SISTEMA DE SEGURIDAD O DE AUTOMATIZACIÓN
DEL HOGAR?
Para obtener instrucciones sobre cómo sincronizarlo con los productos
Pella Insynctive, visite Insynctive.Pella.com/HomeAutomation.
¿NECESITA AYUDA CON LOS PASOS ANTERIORES?
Encuentre información sobra la solución de problemas y videos en
Insynctive.Pella.com/Support o llame 855-473-5524.
¿DESEA REGISTRAR DE FORMA SENCILLA LOS PRODUCTOS PELLA
INSYNCTIVE?
Visite Insynctive.Pella.com/Registration para acceder rápidamente a
instrucciones, garantías y videos instructivos.
SENSOR DE
BLOQUEO
SENSOR DE
APERTURA/
CIERRE
PL ACA PARA
CERRADURA
CON PESTILLO
SENSOR DE
APERTURA/CIERRE
SENSOR DE
BLOQUEO
Separe 2,54 cm como mínimo dos
veces en menos de 2 segundos.
PESTILLO
PUENTE
LUZ
BOTÓN DE
SINCRONIZACIÓN
PUENTE
LO QUE INCLUYE:
• SENSOR DE BLOQUEO DE PUERTA DE ENTRADA: El SENSOR transmitirá
una señal al PUENTE cuando el pestillo esté con seguro o sin seguro.
• SENSOR DE APERTURA/CIERRE DE PUERTA DE ENTRADA: El SENSOR
transmitirá una señal al PUENTE cuando la puerta se abra o se cierre.
• CUBIERTA DE BATERÍA DEL SENSOR DE APERTURA/CIERRE DE PUERTA
DE ENTRADA
• GUÍA DE INICIO RÁPIDO
SE REQUIERE:
• PUENTE (se requiere, se vende por separado): Conecta de forma inalám
brica sus productos Insynctive a un INDICADOR DE ESTADO o a un sistema de
seguridad o de automatización de hogar compatible.
• INDICADOR DE ESTADO (opcional, se vende por separado): Las luces
indican el estado de los SENSORES Pella® Insynctive o puede usar un sistema
de seguridad o de automatización del hogar compatible para monitorear su
puerta de entrada.
• PUERTA DE ENTRADA PELLA PREPARADA PARA UN SENSOR PARA
PESTILLO DE PUERTA DE ENTRADA
• DESTORNILLADOR DE CABEZA PLANA
• DESTORNILLADOR PHILLIPS
• TALADRO Y BROCA DE 1/8 PULG
© 2014 Pella Corporation
IQSGED0414
GUÍA DE INICIO RÁPIDO
Escanee el QR Code® o visite Insynctive.Pella.com/
EntryDoorDeadboltSensor para obtener toda la guía del
producto y las advertencias, videos informativos y otros
consejos rápidos Pella® Insynctive™.
Esta guía de inicio rápido está diseñada únicamente con la
fi nalidad de brindar una descripción general del producto
y de su uso. Antes de usar el producto, lea toda la guía del
producto y las advertencias.
ADVERTENCIA
Cumplimiento con FCC y con el Ministerio de Industrias de Canadá
Este equipo ha sido probado y se ha verifi cado que cumple con los límites para
dispositivos digitales clase B, conforme a la parte 15 de las reglas de la FCC. Estos
límites han sido diseñados para proporcionar una protección razonable contra la
interferencia perjudicial en una instalación residencial. Este equipo genera, utiliza y
puede irradiar energía de radiofrecuencia y, si no se instala y usa de acuerdo con el
manual de instrucciones, puede causar interferencia perjudicial a las comunicaciones
de radio. Sin embargo, no se garantiza que no se producirán interferencias en una
instalación en especial. Si este equipo genera una interferencia perjudicial para la
recepción de radio o televisión, que se puede determinar apagando y encendiendo
el equipo, se recomienda al usuario que intente corregir la interferencia con una o
más de las siguientes medidas:
• Reorientar o reubicar la antena de recepción.
• Aumentar la separación entre el equipo y el receptor.
• Conectar el equipo a un tomacorriente de un circuito distinto al del receptor.
• Solicitar ayuda al concesionario o a un técnico con experiencia en radio/TV.
Los cambios o modifi caciones que no estén expresamente aprobados por Pella
Corporation podrían anular la autorización del usuario para utilizar el equipo.
Este dispositivo cumple con las normas RSS sin licencia del Ministerio de Industrias
de Canadá.
El funcionamiento está sujeto a las siguientes dos condiciones: (1) este dispositivo no
debe causar interferencia, y (2) este dispositivo debe aceptar cualquier interferencia
recibida, incluso aquella que pudiese causar un funcionamiento no deseado del
dispositivo.
Cet appareil est conforme avec Industrie Canada exempts de licence standard RSS.
L’opération est soumise aux deux conditions suivantes: (1) cet appareil ne peut causer
d’interférences, et (2) cet appareil doit accepter toute interférence, y compris les
interférences qui peuvent causer un mauvais fonctionnement de l’appareil.
FCC ID: SO7-205Y0000 FCC ID: SO7-205Z0000
IC ID: 11009A-205Y0000 IC ID: 11009A-205Z0000
El no respectar las advertencias a continuación puede ocasionar la muerte,
lesiones graves o pérdida de objetos valiosos.
• Los productos Pella® Insynctive™ no son 100% confi ables por diferentes razones
(consulte la guía del producto y la advertencia en el paso 6 de esta guía de
inicio rápido para obtener más información). Por tanto, no debe confi ar en los
productos Pella Insynctive en situaciones en las que la vida, la seguridad o la
protección de bienes valiosos dependan exclusivamente de su buen funciona-
miento. Pruebe cada producto al menos una vez por año para ayudar a asegurar
un funcionamiento adecuado.
• Los productos Pella Insynctive no sustituyen una supervisión atenta de niños
por parte de adultos.
• Mantenga la batería y las piezas pequeñas fuera del alcance de los niños. Si se
ingiere, busque ayuda médica de inmediato.
Lea toda la guía del producto para obtener información y advertencias adicionales.
LUZ
BOTÓN DE
SINCRONIZACIÓN
PUENTE
PESTAÑA
PLÁSTICA