PentaMedia PENTAUPLUS Digital Satellite PC Receiver User Manual Pent U p65
PentaMedia Co., Ltd. Digital Satellite PC Receiver Pent U p65
Users Manual for Digital Satallite PC Receiver

User’s Guide
Digital Satellite Internet PC Receiver
( Exteral USB type )
Pent@@
@@
@U
Pent@U
Pent@U © Copyright 1999
Pentamedia Co., Ltd. All right
reserved. All other trademarks are the
properties of their respective owners.
Product specification and product
availability are subject to change
without notice.
PentaMedia Co., LtdPentaMedia Co., Ltd
PentaMedia Co., LtdPentaMedia Co., Ltd
PentaMedia Co., Ltd.
4Fl. Sooam Bldg. 66-1 Yangjae-
Dong, Seocho-Ku, Seoul, Korea 137-
130
Tel : +82-2-3463-3164
Fax : +82-2-3461-9486
Email :
info@pentamedia.com
PentaMedia (Europe) Ltd.PentaMedia (Europe) Ltd.
PentaMedia (Europe) Ltd.PentaMedia (Europe) Ltd.
PentaMedia (Europe) Ltd.
Cedar House, Cedar Lane, Frimley,
Camberley, GU16 5HY U.K.
Tel : +44 (0) 1276 675858
Fax : +44 (0) 1276 675959
Email :
salesuk@pentamedia.com
http : www.pentamedia.com

3
Warranty
This PentaMedia product is warranted for the period of one year from the
original date of purchase, against defective materials and workmanship. In
the event that warranty service is required, customer should return the prod-
uct to PentaMedia, authorized resellers or authorized service center.
Warranty Conditions
1. The warranty is valid only if, when warranty service is required, the war-
ranty card is fully and properly completed and is presented with the origi-
nal invoice or sales slip or confirmation, and the serial number on the prod-
uct has not been defaced.
2. PentaMedias warranty is limited to the reconditioning or, at its discretion,
replacement of the product or the defective part.
3. Authorized parties of PentaMedia must carry out warranty reconditioning.
No re-imbursement will be made for repairs carried out by non authorized
parties of PentaMedia and, any such repair work and damage to the prod-
ucts caused by such repair work will not be covered by the warranty.
4. This product is not considered to be defective in materials nor workman-
ship by reason that it requires adaptation in order to conform to national or
local technical or safety standards in force in any country other than the one
for which the product was originally designed and manufactured. The war-
ranty will not cover, and no re-imbursement will be made for such adapta-
tion or any damage, which may result.
5. The warranty covers none of the followings:
a) Periodic check ups, maintenance and repair or replacement of parts
due to normal wear and tear.
b) Cost relating to transport, removal or installation of the product.
c) Misuse, including the failure to use this product for its normal purposes
or incorrect installation.
Warranty

4Pent@@
@@
@U - Users Guide
d) Damage caused by Lightning, Water, Fire, Acts of God, War, Public
Disturbances, incorrect main voltage or any other cause beyond the con-
trol of PentaMedia.
6. The warranty is valid for any person who legally acquired possession of
the product during the warranty period.
7. During the applicable warranty period, the product returned to us or autho-
rized parties by PentaMedia must be pre-authorized by us with a return
material authorization no. Marked on the outside of package. Replacement
or reconditioning for the product may be obtained by delivering the defec-
tive product accompanied by a copy of the dated proof of purchase, sent
prepaid, insured, and packaged appropriately.
Any part of this User’s Guide can be deleted or modified by discretion of
manufacturer without prior notice to any users.

Preface
Thank for choosing Pent@U - high speed
External Satellite Receiver with standard
USB interface.
This newly introduced product will bring
a new experience to your PC life.
Nowadays, PC is becoming an important
part of our daily life and a critical tool for
our personal and business purposes. The
introduction of Internet has brought inno-
vation to satisfy your demands for infor-
mation covering most of areas, and intro-
duction of Pent@U will satisfy your de-
mands for high speed download of big files
and contents and it can be used for Internet,
Multicasting, WEB casting, etc. Pent@U
propuses an easy installation to use not only
for PC users, but also for notebook PC users.

Content
Warranty ............................................. 3
Preface ............................................... 5
Content .............................................. 6
1. Features & System - Parts ................. 7
General Features .................................. 8
System Requirement ............................ 8
Packaged parts ..................................... 8
2. Hardware Installation ........................ 9
How to Install ..................................... 10
3. Software Installation ......................... 17
How to Install ..................................... 18
4. Program Start .................................... 21
Main Program Screen ......................... 22
Tuner .................................................. 22
New .................................................. . 25
Transponder ................................. ...... 27
Exit .................................................... 28
5. Setting-Up Internet ............................ 29
How to Configure Transponder .......... . 30
How to Configure Modem Connection . 32
How to Setup Modem Connection ....... 33

Chapter 1
Features & System
Parts

8Pent@@
@@
@U - Users Guide
General Features
1. Ability (To receive satellite broadcast and Internet data)
- Controllable satellite local frequency (950 MHz ~ 2150 MHz)
- Fine adjustment (0 MHz ~ 1.0 MHz)
- Symbol rate (2 MSPS ~ 45 MSPS)
- Viterbi rate - 1/2, 2/3, 3/4, 5/6, 7/8, Auto
- Band control (C, KU)
- LNB control (Hor, Ver)
- 22K On/Off
- DiSEqC 1.0
System Requirement
1. System requirement (Minimum requirement)
- IBM PC or compatible
- VGA card
- VGA monitor (Screen refresh rate more than 60 Hz is
recommended)
- Windows 95(OSR2), 98
- Sound card (Optional)
- Speaker (Optional)
Packaged parts
1. Part
1. Pent@U Box
2. User's Guide
3. Program Install CD or Diskette
4. USB Cable
5. Ac Adapter (12V, 3A)

Chapter 2
Hardware Installation
10 Pent@@
@@
@U - Users Guide
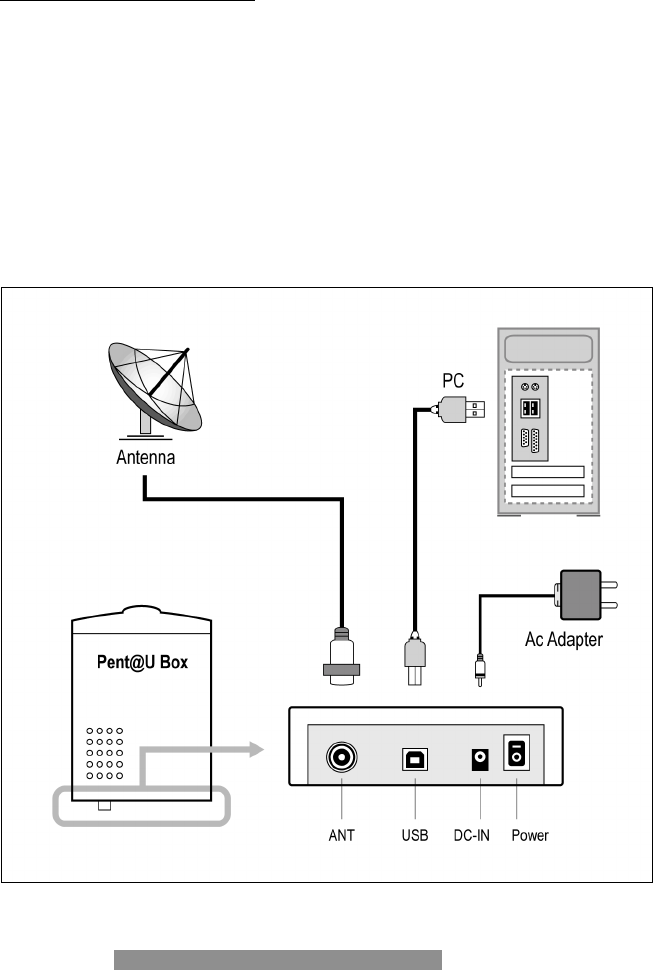
How to Install
1. Turn off your PC.
2. Connect Pent@U with your PC using USB cable.
3. Connect AC adapter in Pent@U DC-IN port..
4. Install satellite dish antenna.
Make sure to connect satellite dish antenna cable to Pent@U's an-
tenna connector as shown in Figure1. If you have antenna installa-
tion problem, please contact local dish distributor.
Figure1 - Typical Pent@U connection
11
5. When hardware installation is complete, turn on your PC.
6. Install USB driver.
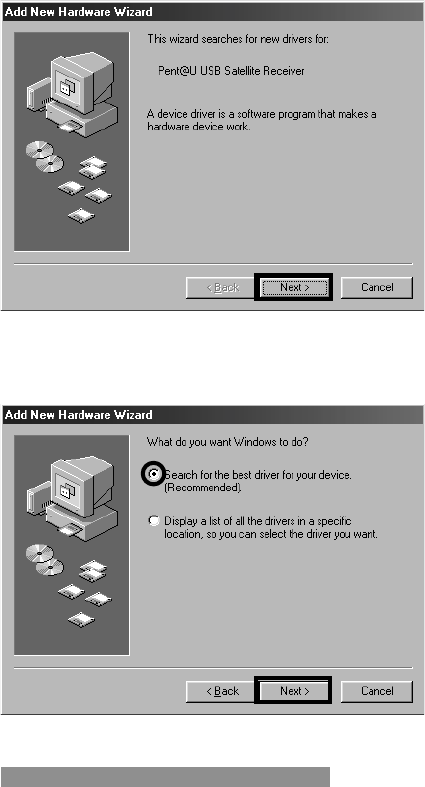
1. Turn on your PC.
2. Turn on Pent@U Box. When you turn on Pent@U will appear
Add New Hardware Wizard with Pent@U USB Satellite Re-
ceiver message, then click Next.
- Install H/W 1
3. Next window is to search the driver for Pent@U. Check on
Search for the best driver for your device, and click Next.
- Install H/W 2
1
2
3
Hardware Installation
12 Pent@@
@@
@U - Users Guide
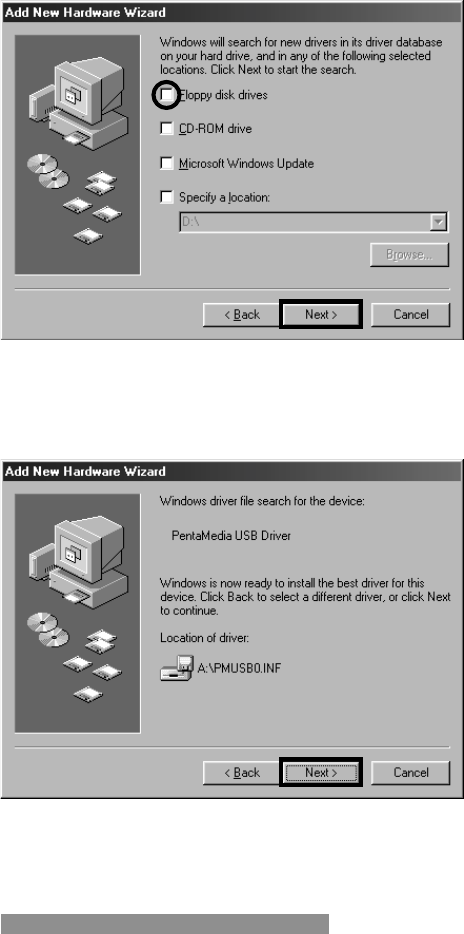
4. Next window is to search the driver. Please check on Floppy
disk drivers and click Next. It start the search automatically.
- Install H/W 3
5. When search is well, it will appear PMUSB0.INF, then click
Next.
- Install H/W 4
4
5
6
13
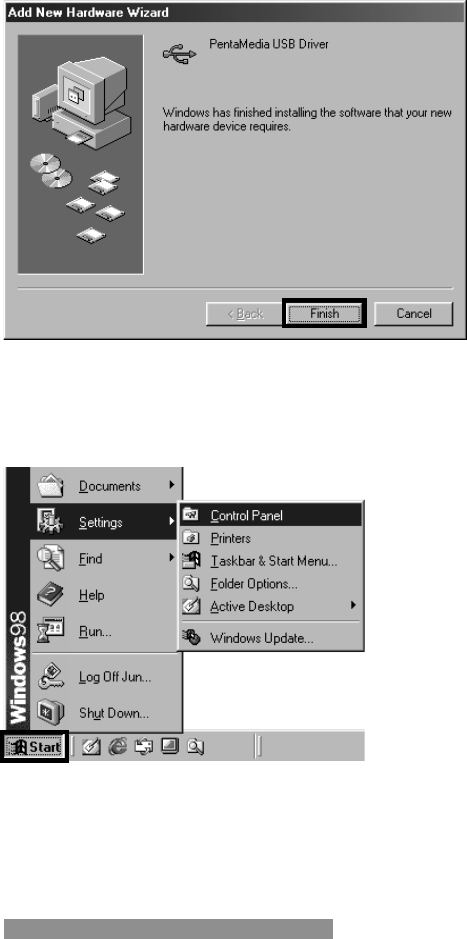
6. Now, PentaMedia USB Driver installation is complete, click
Finish.
- Install H/W 5
7. Install in Network Pent@U USB Satellite NIC manually.
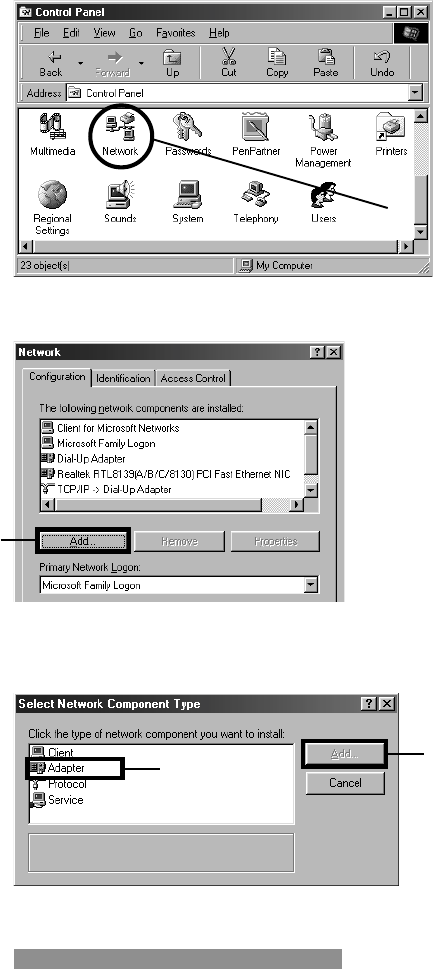
1. Click Start>Setting>Control Panel.
7
1
23
Hardware Installation
14 Pent@@
@@
@U - Users Guide
2. On Control Panel, double click Network.
3. On Network window, click Add.
4. You can see Select Network Component Type window. Click on
Adapter and click Add or double click on Adapter.
4. Double Click
5
67
15
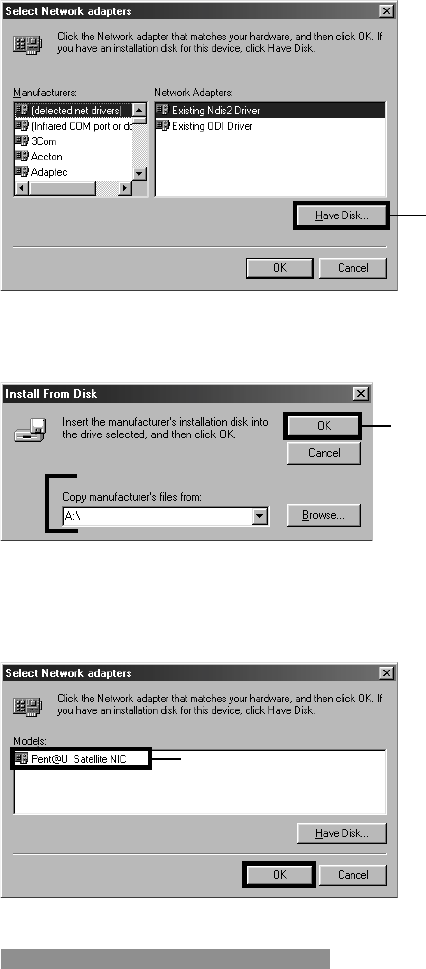
5. On Select Network Adapters window, click Have Disk... button.
6. On Install From Disk window, you must indicate where can
find driver.
7. When the search is completed, on Select Network Adapters
window appear Pent@U Satellite NIC. Click on Pent@U Satel-
lite NIC and click OK.
8
9
10
11
12
Hardware Installation
16 Pent@@
@@
@U - Users Guide
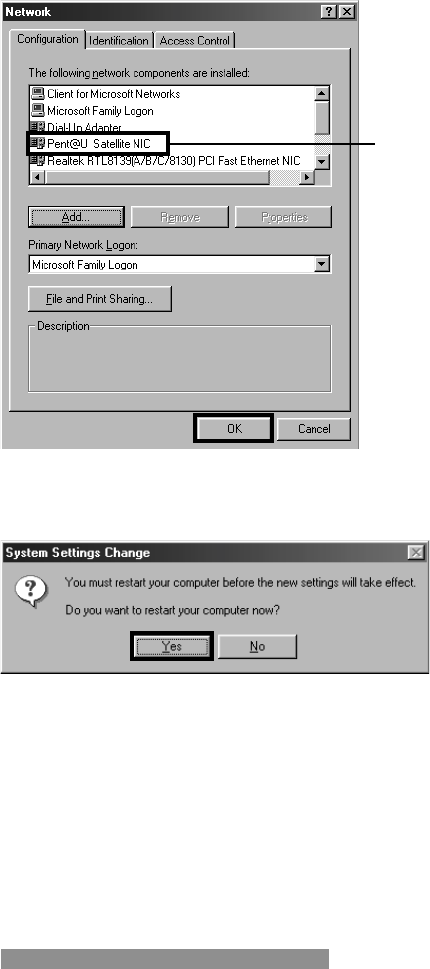
8. Now you can see on Network Pent@U Satellite NIC.
9. Network Adapter installation is completed, and PC restart
automatically.
8. If you use Windows 95(OSR2), please do following settings:
1. Click Start>Settings>Control Panel>Network.
2. Double click TCP/IP Pent@NET Satellite NIC.
3. Select Specify an IP address and enter IP Address of 125.0.0.1
and Subnet Mask of 255.255.255.0.
13. Check here
If you use
Windows 95(OSR2),
double click.
14
15

Chapter 3
Software Installation
18 Pent@@
@@
@U - Users Guide
How to Install
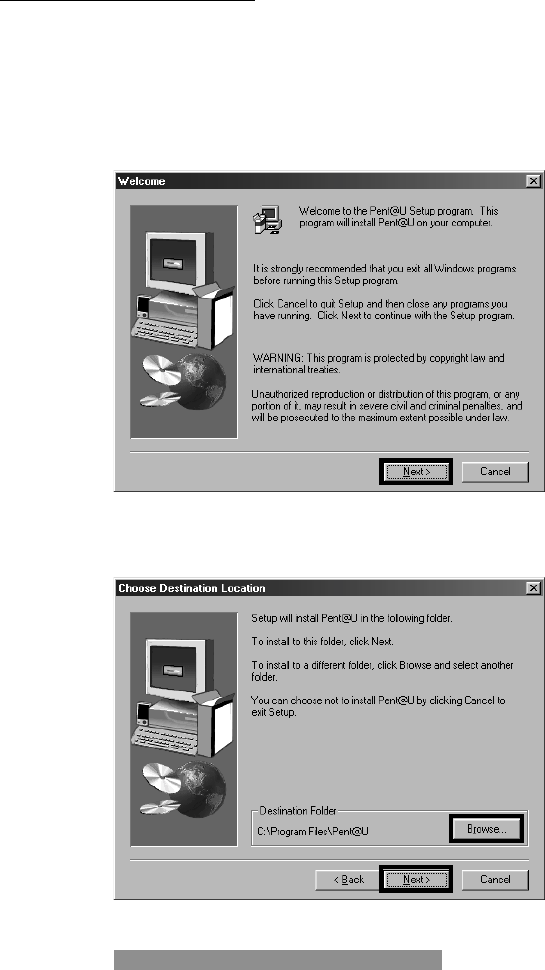
1. Installation
1. Insert installation disk on floppy drive and open file manager
from start up menu.
2. Double click setup.exe from the file manager.
- Install S/W 1
3. To install to this folder, click Next. If you want to install to a
different folder, click Browse.
- Install S/W 2
1
2-1
2-2
19
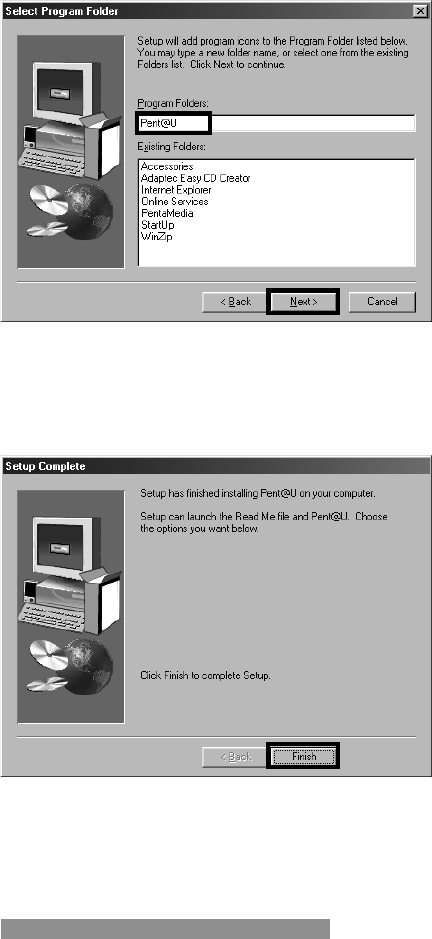
4. Type new name in Program Folder to change folder name. If you
want to select default name, click Next button.
- Install S/W 3
5. Now, your computer is copying all necessary programs into the
hard disk drive.
6. The installation is complete automatically.
- Install S/W 4
3-1
3-2
4
Software Installation
20 Pent@@
@@
@U - Users Guide
7. After finishing installation, its basic directory structure is as
follows;
C:\Program Files\Pent@U\Pent@U.exe
\AviaGTX.img
\Uninst.isu
\XX.dll
\Satconnect.exe
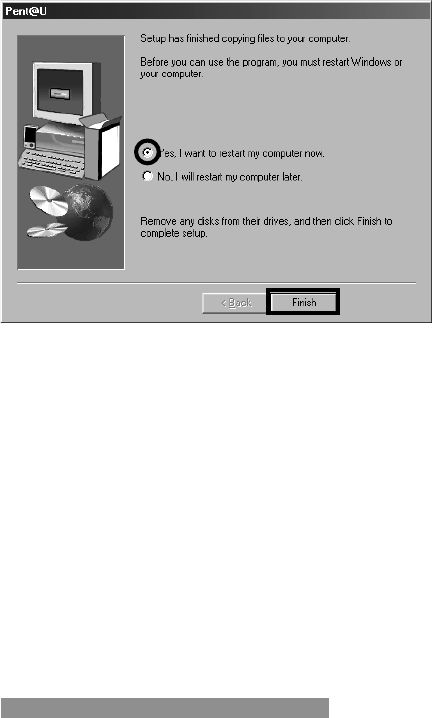
8. The Program restarts your PC automatically when it finishes to
install.
- Install S/W 5
9. Start program
1) Click Start>Program>PentaMedia>Pent@U VerX.XX or,
2) Click Start>Run, then type
C:\Program Files\Pent@U\Pent@U.exe.
6
5

Chapter 4
Program Start
22 Pent@@
@@
@U - Users Guide
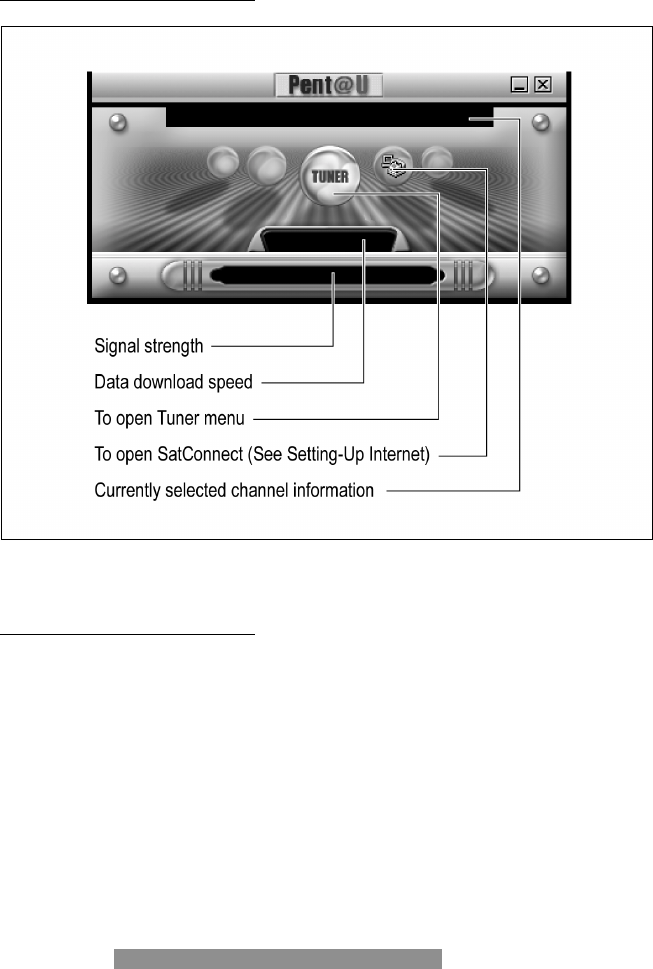
Main Program Screen
Pent@U main screen
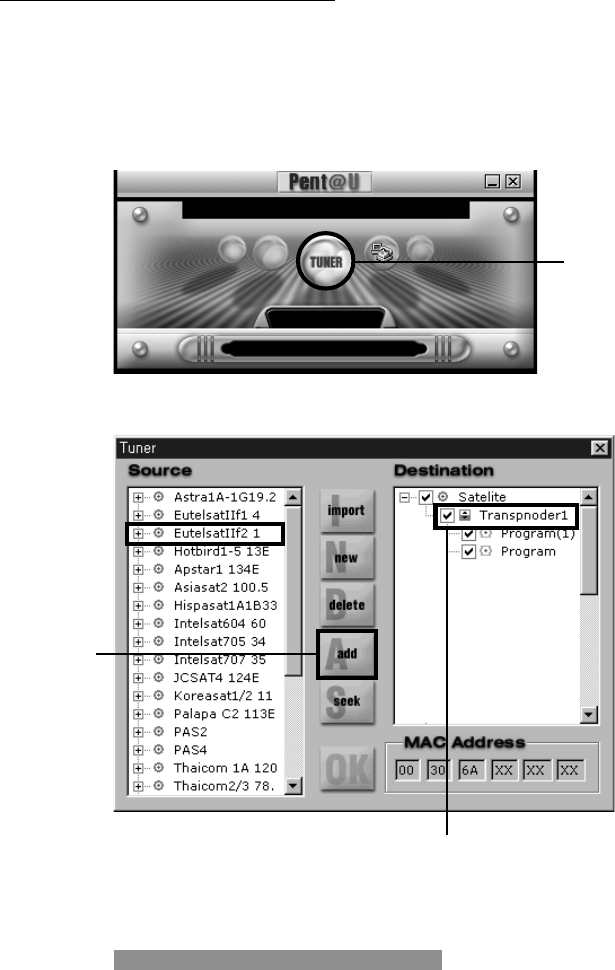
Tuner
This dialogue box contains all the information of database regarding satellites, transpon-
ders and available channels. You can see transponders by clicking + as sub-directories.
Also you can make enable and disable satellites, transponders and channels by checking
marks with mouse.
23
1. Import (Currently not providing)
To use this function, your modem should be able to be connected to
your ISP. If you are LAN user, you are ready to use it.
Once you click this button, following message will be shown.
1. FTP
Once you press this button, your computer will be connected to
www.pentamedia.com and import.dtb file will be downloaded
from PentaMedia server. While downloading satellite transpon-
der database will be updated automatically.
Program Start

24 Pent@@
@@
@U - Users Guide
2. File
If you deleted satellite/transponders on purpose or by accident
and you want to bring it back, press this button. Last updated
import.dtb files will be copied. This function is available only
once you downloaded database using FTP command at least once.
3. Cancel
To cancel database update.
2. New
This button is to register new satellite or transponder. You can make
new satellite and transponders name.
3. Delete
This button is to delete registered channel/transponder.
4. Add
This button is to add selected satellites or transponders to Destina-
tion window.
5. Seek
This button is to receive channel information from the selected tran-
sponder after locking Tuner. You can seek all transponders when
you put cursor on satellite name of Destination window and you can
stop Seek function by pressing Stop while seeking is in progress.
6. MAC (Media Access Control) Address
Address assigned for reception of satellite Internet service. You can
filter IP frames with a particular address.
7. Symbol explanation
: Satellite : Transponder
25
New
This program is to register new broadcasting channel into database.
1. Satellite
This box is to register new satellite name into database. If you type
same satellite name and add new transponder, it will be registered
as a transponder of the same satellite.
2. Transponder
This box is to register new transponder name into database.
3. Frequency
This box is to register frequency of new channel into database.
4. Symbol rate
This box is to register symbol rate of new channel into database.
Program Start

26 Pent@@
@@
@U - Users Guide
5. Polarization
This box is to register polarization of new channel into database.
6. Bandwidth
This box is to register frequency of new channel into database. You
can select C or Ku band.
7. 22 K
This box is to register 22 KHz tone of new channel. You can select
ON or OFF.
8. Viterbi rate
This box is to register Viterbi rate of new channel. If you select
AUTO mode, it can detect Viterbi rate automatically.
9. DiSEqC 1.0
This box is to set DiSEqC controller input port.
10.LNB type
This box is to register local LNB type.
11.Channel
This box is to create new channel.
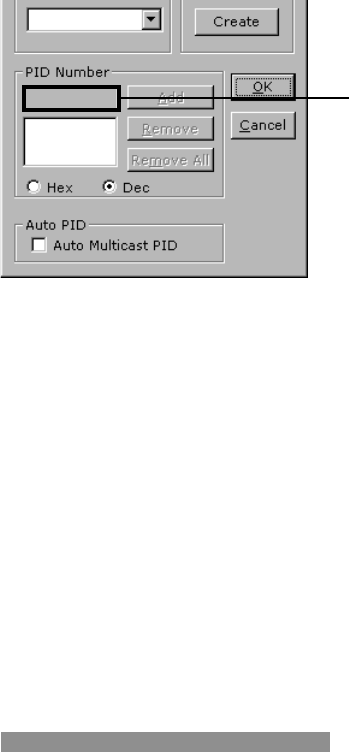
12.PID Number
Enter PID number (hex, dec) provided by your Internet service pro-
vider and use Add/Remove/Remove All to register PID numbers
into database to get Internet data or multicast stream. Click Hex if
PID number is Hexadecimal, also click Dec if PID number is
Decimal.
13.Auto PID
This box is for only Multicast filtering of European Online (EOL)
Internet service user.

27
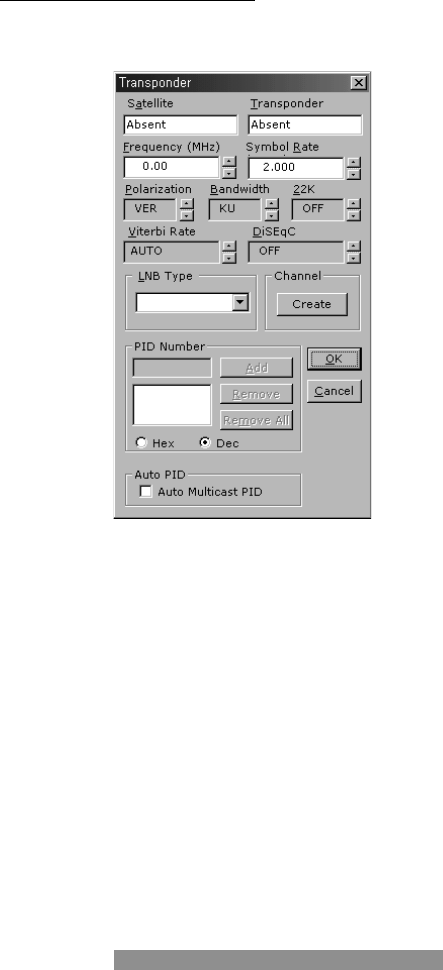
Transponder
This chapter describes how to set transponder using Transponder dialogue box.
1. Satellite
This box shows currently selected satellite name.
2. Transponder
This box shows currently selected satellite transponder name.
3. Frequency
This box is to set RF frequency of transponder.
4. Symbol rate (Symbol range: 2 MSPS ~ 45 MSPS)
This is used to make very fine adjustment of symbol rate.
5. Polarization
To select polarity of horizontal and vertical LNB.
6. Bandwidth
For selecting C band or KU band.
7. 22 K
For selecting the 22 K ON or OFF function.
8. Viterbi rate
For selecting 1/2, 2/3, 3/4, 5/6, 7/8, or AUTO Viterbi rate function.
9. DiSEqC 1.0
For DiSEqC 1.0 Supporting.
Program Start

28 Pent@@
@@
@U - Users Guide
10.LNB type
This is for selecting None, 9.30 GHz, 9.75 GHz, 10.0 GHz, 10.6
GHz, 10.75 GHz, 11.30 GHz, Universal. It is set to None for C-
band LNB.
If you do not find LNB type for Ku-band from the list box, select
None and enter calculated IF value by below equation into Frequency
column manually;
IF = RF-LNB local frequency
RF is radio frequency emitted by the satellite you use. IF value should
be in the range of 950 MHz ~ 2150 MHz.
11.Channel
It is to create new channel manually.
12.PID Number
Enter PID number (hexadecimal) provided by your Internet service
provider and use Add/Remove/Remove All to register PID num-
bers into database, or remove it out of database. Click Hex if PID
number is in Hexadecimal, also click Dec if PID number in Decimal.
13.Auto PID
This box is for only Multicast filtering of European Online (EOL)
Internet service user.
Exit
To exit Pent@U, click Exit or ALT+F4 key.

Chapter 5
Setting-Up Internet
30 Pent@@
@@
@U - Users Guide
How to Configure Transponder
You can not use satellite without subscription to a satellite Internet service. For more detail
installation, please contact with your ISP (Internet Satellite Provider).
1. Insert PID on Transponder that you have selected.
1. Run Pent@U program.
2. Click TUNER icon.
1. Click
2. Choose
3. Click
4. Double click
31
3. Select satellite and click ADD.
You can select satellite or only the sub channels of transponder
you want to use.
4. Double click selected transponder for data broadcasting.
5. Please type PID number, which is provided by your ISP, on Tran-
sponder dialogue box that the Internet data is carried. Then press
OK.
6. Please click OK on Tuner window.
2. Access Internet
When you can see the name of satellite and data or channel service
provider, now you can access Internet.
5. Type PID NO.
Setting-Up Internet
32 Pent@@
@@
@U - Users Guide
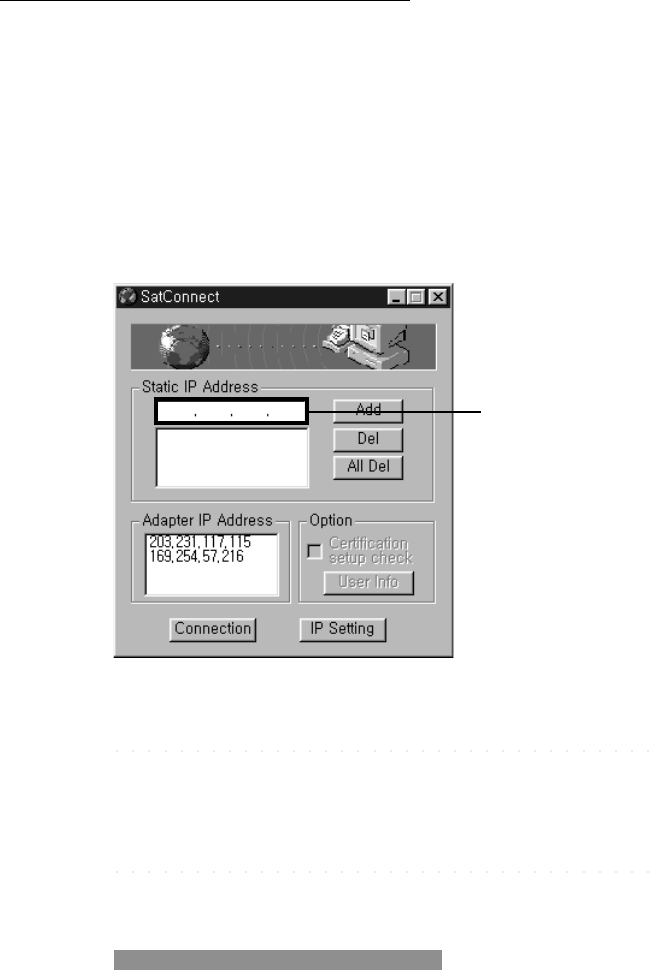
How to Configure Modem Connection
IMPORTANT : This connection program is only for Europe IP filtering user.
Mac filtering user does not need to use it.
1. Satconnect.exe
1. Run Pent@U program.
2. Click Telephone call icon.
3. Now you can see SatConnect. This window is to help to connect
with Internet satellite provider.
4. Insert IP address.
you can put in various IP address of respective services.
This service is only for IP filtering user. .
5. When you have finished inputting all of data, you can start
Internet.
To setup modem connection, see ‘How to Setup modem connection’.
Type IP address
33
How to Setup Modem Connection
This process shows establishment of modem connection to service provider with high-
speed data broadcasting services.
1. Dial_Up Networking
If Dial_Up Networking has not been installed in your system, in-
stall Dial_Up Networking as follows. If it has been installed, go
No.2.
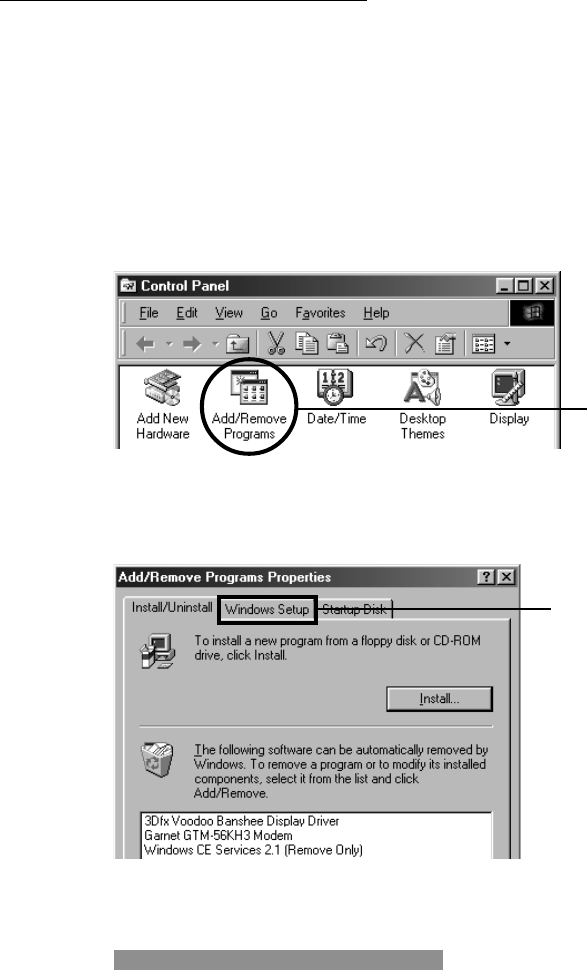
1. Click Start> Setting> Control Panel.
2. Double click Add/Remove Programs icon.
3. Click Windows Setup.
1
2
Setting-Up Internet
34 Pent@@
@@
@U - Users Guide
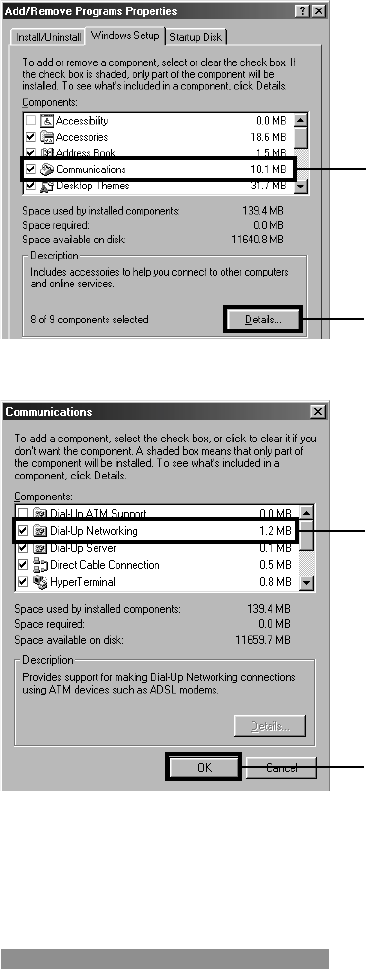
4. Click Communications and Details.
5. Check Dial_Up Networking and click OK to confirm.
6. At last, Dial_Up Networking is installed on your PC. Now, you
can utilize Make New Connection contained in Dial_Up Net-
working folder.
3
4
5
6
35
2. Make New Connection
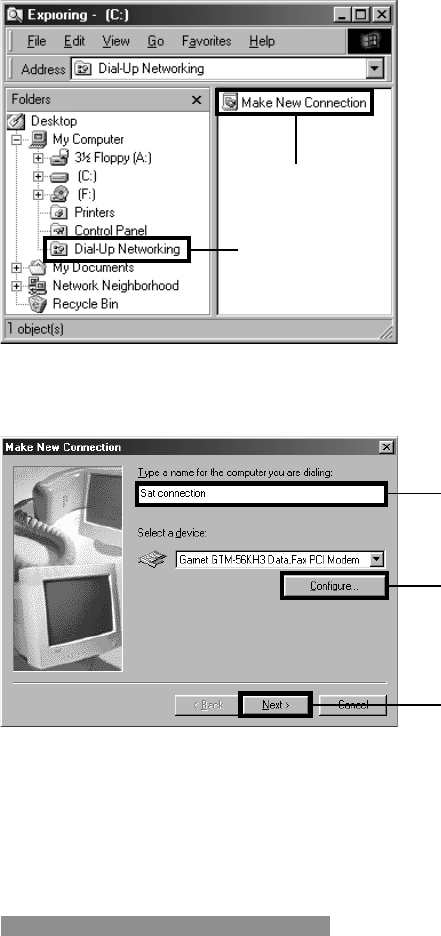
1. Click Start>Programs>Windows Explorer.
2. Click Dial-Up Networking and double click Make New Con-
nection at the next frame.
3. Type the name of service provider that you want to be connected.
4. To select modem, Click Configure.
5. When you have selected the modem, click Next.
1
2
3
4
5
Setting-Up Internet
36 Pent@@
@@
@U - Users Guide
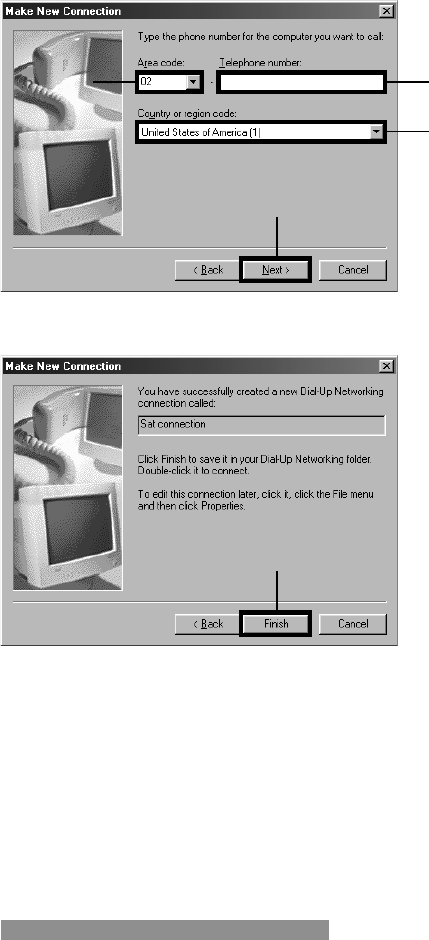
6. Input Area code, Telephone number and Country code of the
service provider. Then click Next.
7. Click Finish after confirming the message displayed on the box.
3. Start Internet
1. Double click Pent@U icon.
2. Start modem connection with your satellite Internet service.
3. When modem connection is done, you can surf with Internet
browser.
67
8
9
10

37
FCC RF
INTERFERENCE STATEMENT
NOTE :
This equipment has been tested and found to comply with the limits for a
Class B digital device, pursuant to Part 15 of the FCC Rules. These limits are
designed to provide reasonable protection against harmful interference in a
residential installation.
This equipment generates, uses and can radiate radio frequency energy
and, if not installed and used in accordance with the instructions, may
cause harmful interference to radio communications. However, there is no
guarantee that interference will not occur in a particular installation.
If this equipment does cause harmful interference to radio or television
reception which can be determined by turning the equipment off and on, the
user is encouraged to try to correct the interference by one or more of the
following measures.
-Reorient or relocate the receiving antenna.
-Increase the separation between the equipment and receiver.
-Connect the equipment into an outlet on a circuit different from that
to which the receiver is connected.
-Consult the dealer or an experienced radio, TV technical for help.
-Only shielded interface cable should be used.
Finally, any changes or modifications to the equipment by the user not
expressly approved by the grantee or manufacturer could void the users
authority to operate such equipment,
This device complies with Part 15 of the FCC rules. Operation is subject to
the following two conditions:
(1)This device may not cause harmful interference, and
(2) This device must accept any interference received, including interfer-
ence that may cause undesired operation.