PentaMedia PENTAVALUE Digital Satellite Internet PC Board User Manual PENT V 1
PentaMedia Co., Ltd. Digital Satellite Internet PC Board PENT V 1
UserManual.wiki
>
PentaMedia
>
PENTAVALUE User Manual
Users Manual for PentaVALUE PC Board
Navigation menu
Upload a User Manual
Namespaces
Wiki Guide
HTML
PDF
Info
Views
User Manual
Discussion / Help
Navigation


![11 Hardware InstallationWindow 98/SE/ME1.Pent@VALUE Driver Installation (1)Pent@VALUE WDM DVB Processor driver installation 1) Windows will check new hardware and ask for the driver 2) Click [Next] 3)Select “Search for the best ....” and click [Next].](https://usermanual.wiki/PentaMedia/PENTAVALUE/User-Guide-226414-Page-11.png)
![12 Pent@@@@@VALUE- User’s Guide 4) Insert installation CD or Floppy disk, and click [Next]. 5) After detecting the driver, click [Next].](https://usermanual.wiki/PentaMedia/PENTAVALUE/User-Guide-226414-Page-12.png)
![13 Hardware Installation 6) After copying all the driver files, click [Finish].2.Pent@VALUE Satellite NIC Driver Installation 1) Windows will ask for the driver. 2) Click [Next]](https://usermanual.wiki/PentaMedia/PENTAVALUE/User-Guide-226414-Page-13.png)
![14 Pent@@@@@VALUE- User’s Guide 3)Select “Search for the best...” and click [Next]. 4) Insert installation CD or Floppy Disk, and click [Next].](https://usermanual.wiki/PentaMedia/PENTAVALUE/User-Guide-226414-Page-14.png)
![15 5) After detecting the driver, click [Next]. 6) After copying all the driver files, click [Finish].Hardware Installation](https://usermanual.wiki/PentaMedia/PENTAVALUE/User-Guide-226414-Page-15.png)
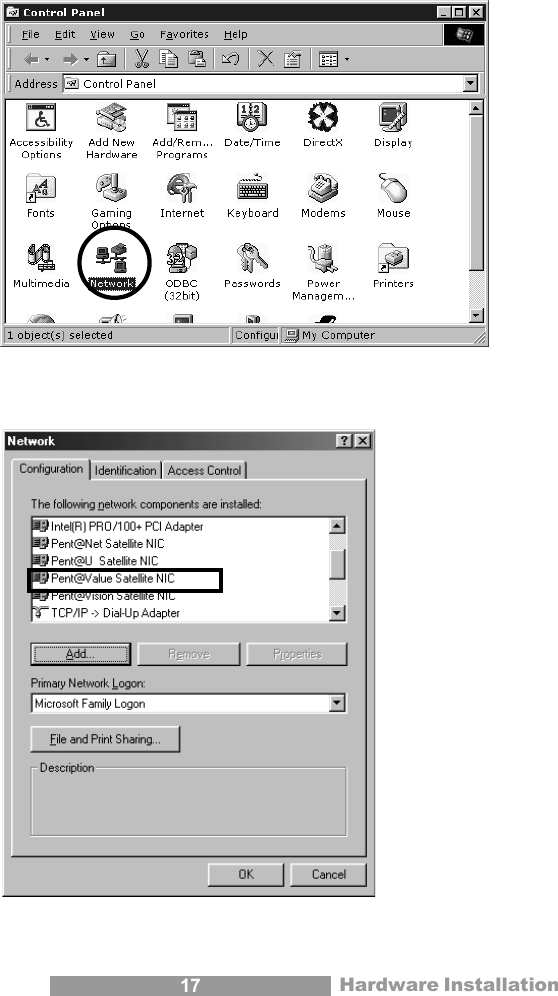
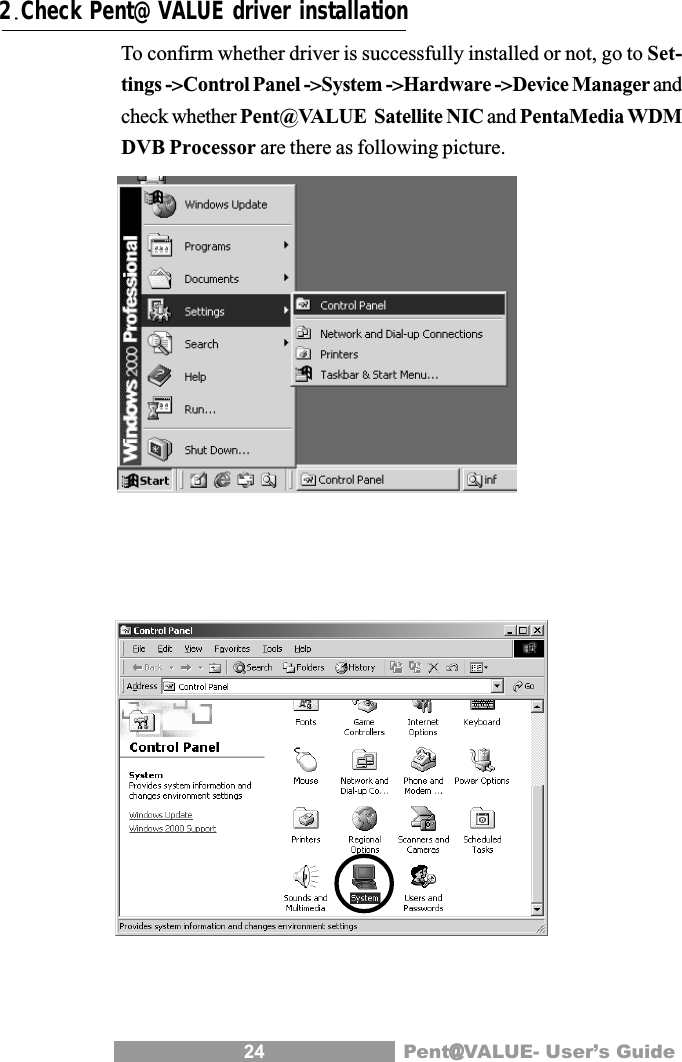
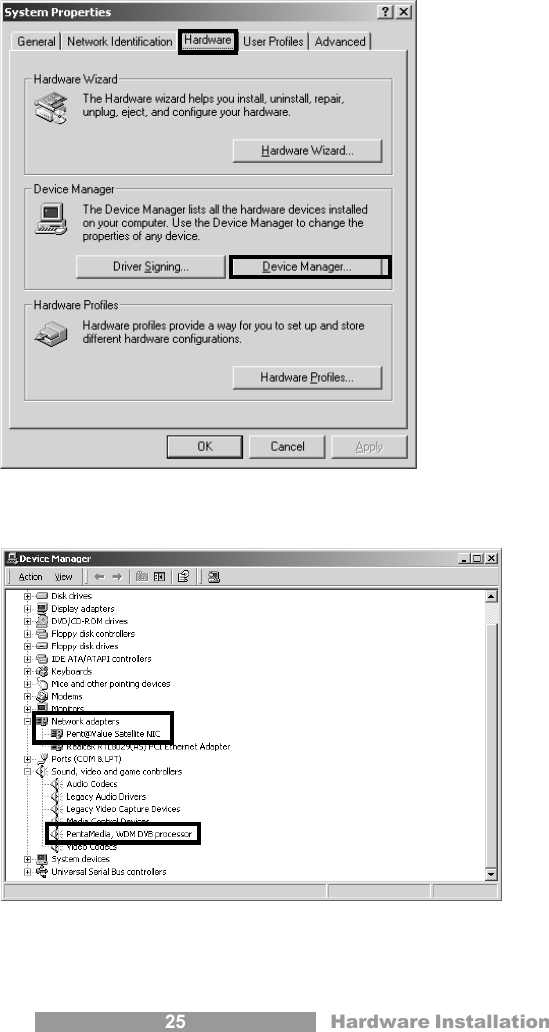
![16 Pent@@@@@VALUE- User’s Guide2.Check Pent@VALUE driver installationTo confirm whether driver is successfully installed or not, go toSettings>Control Panel>Network and check whether Pent@VALUESatellite NIC is there as following picture. 7) After successful installation of driver, click [Yes] for reboot.](https://usermanual.wiki/PentaMedia/PENTAVALUE/User-Guide-226414-Page-16.png)
![18 Pent@@@@@VALUE- User’s GuideWindows 20001.Pent@VALUE Driver Installation(1) Pent@VALUE WDM DVB Processor Driver Installation. 1)Click [Next] 2) Select “Search For a suitable driver..” and click [Next].](https://usermanual.wiki/PentaMedia/PENTAVALUE/User-Guide-226414-Page-18.png)
![19 Hardware Installation 3) Insert installation CD or Floppy disk and click [Next]. 4) After detecting the drive, click [Next].](https://usermanual.wiki/PentaMedia/PENTAVALUE/User-Guide-226414-Page-19.png)
![20 Pent@@@@@VALUE- User’s Guide 5) Click [OK]. 6) Click [Browse]. 7) Select the file and click [Open].](https://usermanual.wiki/PentaMedia/PENTAVALUE/User-Guide-226414-Page-20.png)
![21 Hardware Installation 8) If DWM DNB processor was successfully installed, you willsee the following dialogue box.2.Pent@VALUE Satellite NIC Driver Installation. 1) Click [Next]](https://usermanual.wiki/PentaMedia/PENTAVALUE/User-Guide-226414-Page-21.png)
![22 Pent@@@@@VALUE- User’s Guide 2) Select “Search for a suitable driver...” and Click [Next]. 3) Insert installation CD or Floppy disk and click [Next].](https://usermanual.wiki/PentaMedia/PENTAVALUE/User-Guide-226414-Page-22.png)
![23 4) After detecting the drive, click [Next]. 5) If driver was found successfully, you will see following dialogue box.](https://usermanual.wiki/PentaMedia/PENTAVALUE/User-Guide-226414-Page-23.png)


![37IF = RF-LNB local frequencyRF is radio frequency emitted by the satellite you use. IF value shouldbe in the range of 950 MHz ~ 2150 MHz.11.PID Number1) Type or select your PID.2) Click [ADD]3) List of PIDs of the service4) Remove selected PID5) Remove all PIDs in the list box6) PID value is in Hex7) PID value is in Dec12.Auto PIDThis box is for only Multicast filtering of European Online (EOL)Internet service user.Program Start7)5)4)2)1)3)6)](https://usermanual.wiki/PentaMedia/PENTAVALUE/User-Guide-226414-Page-37.png)


![44 Pent@@@@@VALUE- User’s GuideTransponder Setting for MulticastYou can not use satellite without subscription to a satellite Internet service. For more detailinstallation, please contact with your ISP (Internet Satellite Provider).1. Insert PID on Transponder that you have selected.1. Run Pent@VALUE program and click [SEEK] button.2. Select satellite in the Source.1. Click2. Choose3. Click4. Double click](https://usermanual.wiki/PentaMedia/PENTAVALUE/User-Guide-226414-Page-44.png)
![45 Setting-Up Internet3. Click [ADD].4. Double click selected transponder in the Destination for multicastdata.5. Please type PID number, which is provided by your ISP, on Tran-sponder dialogue box.6. Please click [Add] on Transponder dialogue box.7. Click [OK] on Transponder dialogue box.8. Select your transponder and click [Seek]. Then, Close tuner dia-logue box by clicking [OK].5. Type PID NO.2.Reception StatusIf the signal shows up to green, reception is OK.If the signal shows just Red only, you may have to check antennastatus/other parameter values.](https://usermanual.wiki/PentaMedia/PENTAVALUE/User-Guide-226414-Page-45.png)
![46 Pent@@@@@VALUE- User’s GuideTransponder Setting for Satellite InternetIMPORTANT : This connection program is only for Europe IP filtering user.Mac filtering user does not need to use it.1. Seek the transponder1. Run Pent@VALUE program and click [SEEK] button.2. Select Satellite in the Source.3. Click [ADD].4. Select transponder in the Destination for data broadcasting.1. Click2. Select3. Click4. SelectTelephone Call](https://usermanual.wiki/PentaMedia/PENTAVALUE/User-Guide-226414-Page-46.png)
![47 Setting-Up Internet5. Click [SEEK]6. Click [OK]2.Reception StatusIf the signal shows up to green, reception is OK.If the signal shows just Red only, you may have to check antennastatus/other parameter values.3.Setting Satellite IP Address1. Click [Telephone Call] button2. Now You can see SatConnect Program. This window is to help toconnect with Internet Satellite provider.3.Click [Advanced] button.3. Click](https://usermanual.wiki/PentaMedia/PENTAVALUE/User-Guide-226414-Page-47.png)
![48 Pent@@@@@VALUE- User’s Guide4.Insert IP address.You can put in various IP address of respective service.This service is only for IP filtering user.5.Click [IP setting] button6. When you have finished inputting all of data, you can start Internet.Windows 2000 NoteWindows 2000, formerly Windows NT 5.0 was released in 2000. Thereare many changes to the installation instructions for this new operat-ing system. Please note that any changes to drivers or instructionsfor Windows 2000 will be found on our web site.Please refer to our website (http://www.pentamedia.com) for moreinformation.NT’s user can obtain Pent@VALUE driver from www.pentamedia.com](https://usermanual.wiki/PentaMedia/PENTAVALUE/User-Guide-226414-Page-48.png)