PeopleNet Communications PD4 Tablet User Manual
PeopleNet Communications Corporation Tablet
Contents
- 1. user manual
- 2. user manual mounting safety
- 3. User Manual
user manual
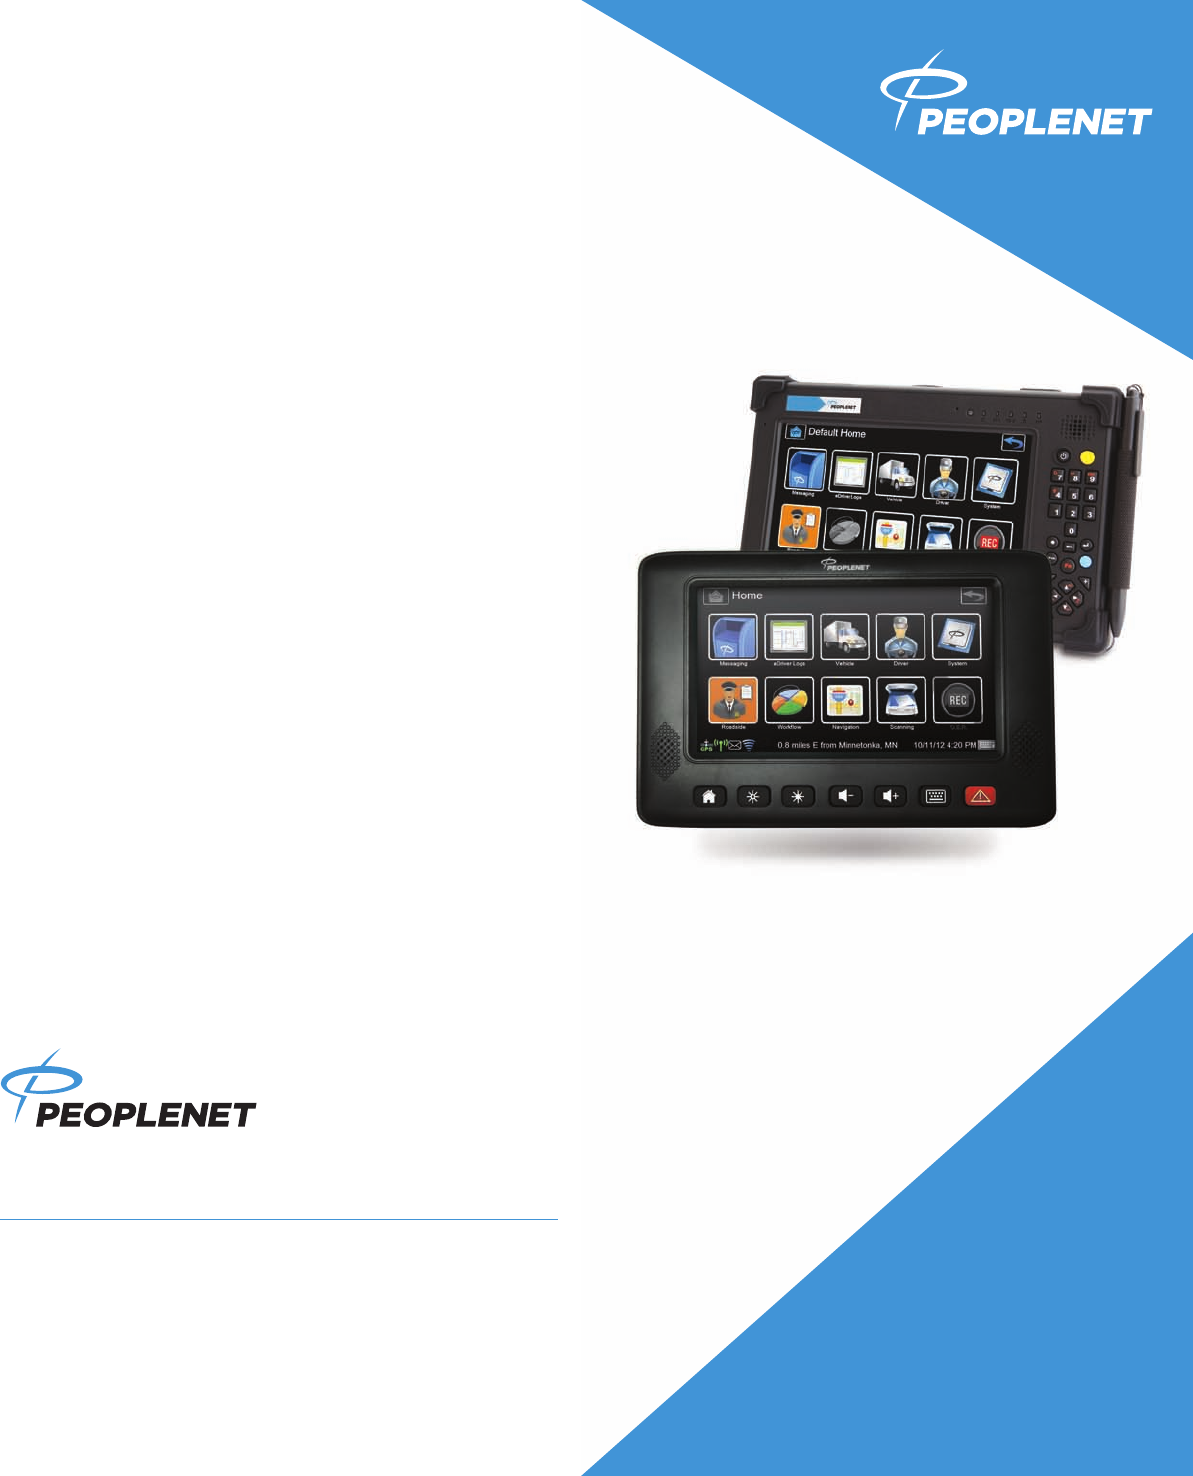
TABLET® & PD.4
QUICK REFERENCE GUIDE
PeopleNet Customer Support
888-346-3486
US Headquarters Canada Contact
PeopleNet PeopleNet Canada (888) 346-3486
4400 Baker Road 1100 Burloak Dr. • Suite 300 (952) 908-6129 Fax
Minnetonka, MN 55343-8684 Burlington, Ontario L 7L 6B2 info@peoplenetonline.com
USA Canada www.peoplenetonline.com
PeopleNet TABLET, eDriver Logs and OnBoard Event Recording are registered
trademarks of PeopleNet. CoPilot Truck is a trademark of ALK Technologies,
Inc. Pro-TREAD In-Cab is a trademark of ITI Corporation and Pro-TREAD. TripPak
SCANNING is a trademark of ACS Expedited Solutions. ©2013 PeopleNet.
All rights reserved. This information is subject to change without notice.
Printed in U.S.A. 10/13
D-011-0504-AB

TABLE OF CONTENTSTABLE OF CONTENTS
SIGNATURE CAPTURE (TABLET) ............................ 26
USING THE BAR CODE SCANNER (TABLET) ........27
IN-CAB PRINTING & PDF VIEWING (TABLET) ..... 28
ENGINE DATA ................................................................ 29
Onboard Event Recording (OER) ..........................................30
Fault Codes ...........................................................................31
SYSTEM DIAGNOSTICS ............................................. 32
AUTOMATED WORKFLOW ......................................... 33
Workflow Routing with In-Cab Navigation...........................35
CONNECTING TO A WI-FI NETWORK .................... 36
BROWSING THE INTERNET ....................................... 37
DEVICE TRAINING VIDEOS ...................................... 38
IN-CAB NAVIGATION (NaviGo) ...................................39
Searching a Location ............................................................39
Preview Route ......................................................................41
Safety View ..........................................................................42
Exit ........................................................................................ 42
Feedback for Locations ........................................................42
IN-CAB NAVIGATION (CoPilot Truck)......................43
Searching a Location ............................................................43
Preview Route ......................................................................45
Exit ........................................................................................ 45
IN-CAB TRAINING ............................................................46
IN-CAB SCANNING ..........................................................48
OVERVIEW .............................................................................4
Status Icons ............................................................................5
TABLET Docking Station LEDs ..............................................5
Soft Keyboard .........................................................................5
TABLET Keypad Buttons ........................................................6
TABLET LEDs .........................................................................7
PD.4 Device Buttons ..............................................................7
UN-DOCKING TABLET ......................................................8
USING THE DISPLAY ........................................................9
Home Screen .......................................................................... 9
Screen Header ........................................................................9
Action Bar ...............................................................................9
Custom Fleet Home Setup ...................................................10
Returning to Default Home ..................................................11
SAFE MODE ........................................................................11
eDriver® Logs ........................................................................12
Instant Fuel Efficiency ..........................................................12
Trip Average ..........................................................................12
Miles Today ..........................................................................12
Brightness Control ................................................................ 12
Safe Mode Messaging .........................................................13
DRIVERS & USERS ..........................................................14
Logging In ............................................................................. 14
Changing Current Drivers .....................................................15
Changing Active Users .........................................................15
Logging Out ..........................................................................16
MESSAGES ..........................................................................16
Reading a New Message .....................................................16
Sending a New Message .....................................................19
Sending a Form ....................................................................20
Using the Address Book .......................................................21
Hot Keys ...............................................................................22
Text to Speech ...................................................................... 23
IMAGE CAPTURE (TABLET)..........................................24
Using the Camera ................................................................. 24
Importing an Image ..............................................................25
32
4
OVERVIEW OVERVIEW
5
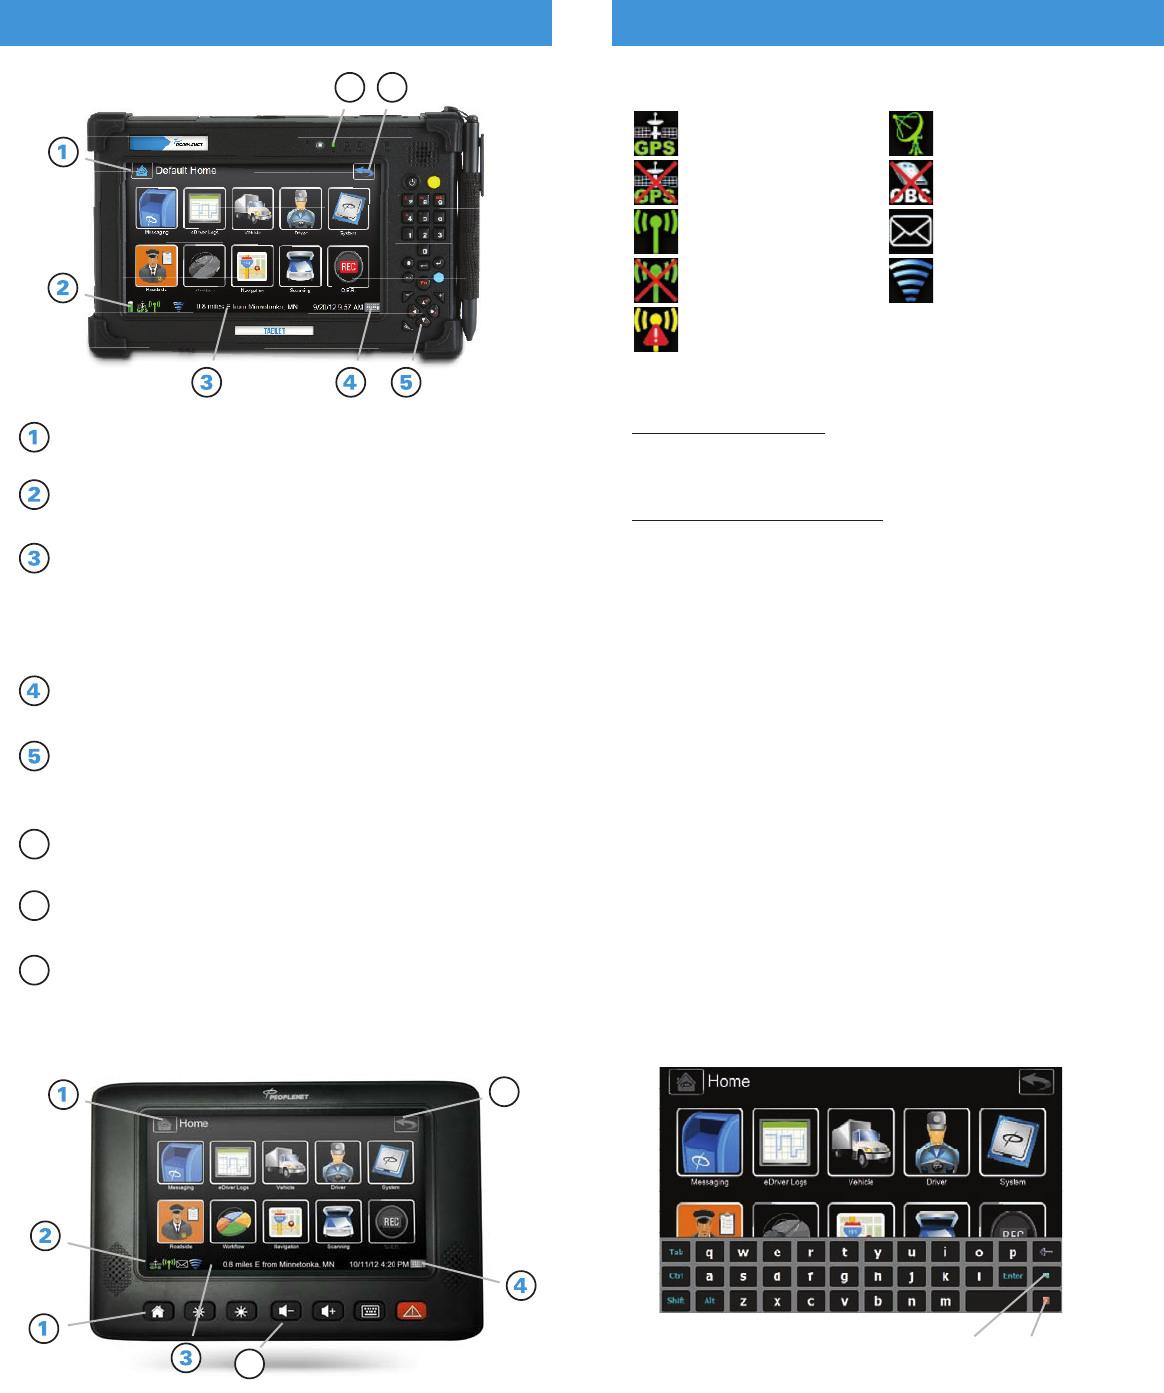
Home Button The Home button brings you back to the
Home Screen.
Status Icons The status icons are located in the lower left
corner of the on screen display.
Information Bar The information bar includes the current
date and time, as well as content provided by applications
such as Automated Workflow, or the Login Manager. For
instance, the information bar may display distance and
direction to a location, or the name of the active user.
Soft Keyboard Button Selecting this brings up the on
screen soft keyboard.
TABLET Keypad Buttons The TABLET buttons are
used for data input, controlling settings, power on/off, and
other functions.
Back Button The Back button brings you back to the
previous screen.
TABLET LEDs The TABLET LEDs (Light Emitting Diodes)
are located along the top edge of the TABLET device.
PD.4 Device Buttons The PD.4 buttons are used for
accessing the soft keyboard, triggering panic alerts, changing
volume and screen brightness, and quickly returning to the
Home Screen.
6
7
8
6
7
6
STATUS ICONS
GPS Signal Present
No GPS Signal Available
Cellular Present
(flashing during data call)
No Cellular Available
Failed Data Call
Satellite Communications
Active
No OBC Communication
New Message Notification
Wi-Fi Network is in Range
TABLET DOCKING STATION LEDs
1st LED: Power LED
On – The Dock Station has power.
Off – Power is not being supplied to Docking Station.
2nd LED: Connection LED
On – The Dock is connected and supplying power to TABLET.
Flashing – The Dock is attempting to establish a connection
with TABLET.
Off – The Dock is NOT connected with TABLET.
SOFT KEYBOARD
The soft keyboard can be displayed by selecting the Keyboard
icon to the right of the Information Bar or by selecting the
keyboard key on the TABLET keypad or the bottom far right
PD.4 device button.
The user can toggle between alpha characters and numbers
by selecting the far right key in the middle row.
Selecting the red X key (lower right key) will close the soft
keyboard, as well as pressing the keyboard key on the TABLET
keypad or the bottom far right PD.4 device button.
The soft keyboard display can be moved up and down across
the screen by pressing any space between the keys and then
sliding up or down across the screen. This can be useful to view
data that may be covered up on the screen by the soft keyboard.
Toggles between alpha
and numeric keys
Closes
keyboard
8
6
OVERVIEW
7
OVERVIEW
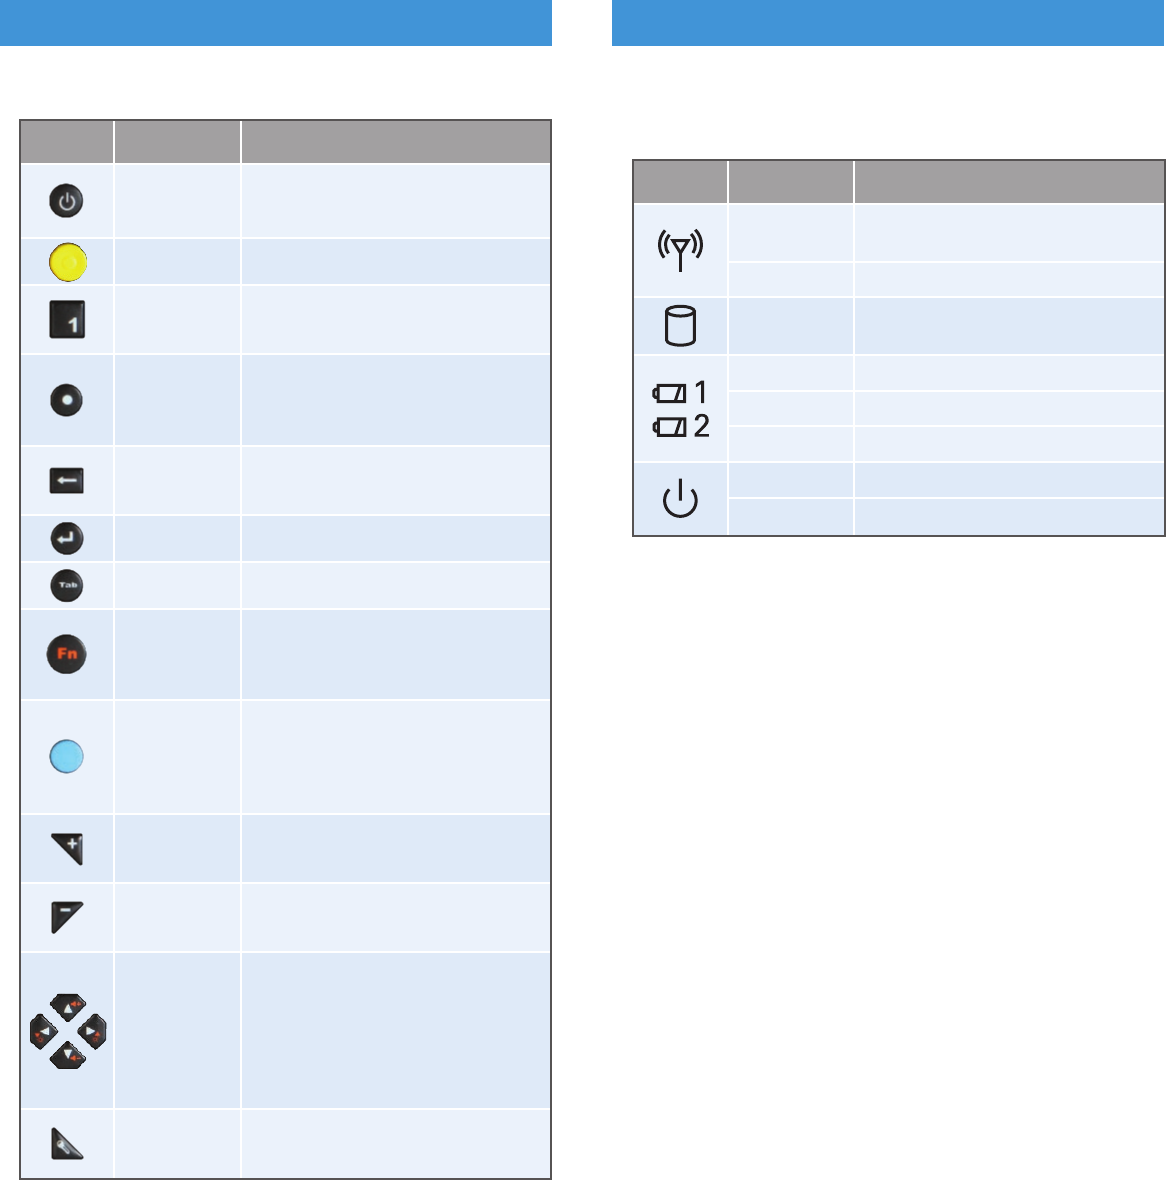
ICON NAME FUNCTION
Power Button Turns device on/off.
(Hold for 5 seconds to turn off display.)
Yellow Button Reserved for future use.
Numeric Keys Provides numeric data input
(0
-
9) into forms.
Decimal Provides data input into forms.
Point Key (Decimal for numeric entries or a
period for text entries.)
Backspace Backspace function when editing.
Button
Enter Button Enter/carriage return when editing.
Tab Button Tab function when editing.
Function Access to secondary operation of
Button some buttons (see Function Button
requirements below).
Blue Button Returns display to PeopleNet
or Return to application, when 3rd party application
ICAP Button is running (e.g. In-Cab Scanning, ITI
Training, or Navigation).
Plus Button Provides data input when editing
forms. (+)
Minus Button Provides data input when editing
forms. (
-
)
Up/ Down/ Arrows allow navigation while in forms.
Left / Right
Buttons Holding the Function Button and
pressing these buttons will adjust
BRIGHTNESS and VOLUME of
the device.
Keyboard Opens and closes the on-screen
Button soft keyboard.
TABLET KEYPAD BUTTONS TABLET LEDs
The TABLET LED indicators indicate the following:
ICON LIGHT DESCRIPTION
No light WLAN is Not powered and Bluetooth
is Not powered.
Blue WLAN or Bluetooth is enabled.
Green TABLET PC is reading from or writing
to the built-in hard disk.
Green Battery is fully charged.
Orange Battery is being charged.
Flashing Red Battery is at slow-power state.
Green Power is on.
Flashing Green System is in standby mode.
8
UN-DOCKING
When TABLET is removed from the docking station, the system
provides access to the following applications:
• Messaging
• eDriver Logs
• Device Settings & Diagnostics
Other areas of the product which require communication with
the Onboard Computer may not be accessible and the short
cuts will be grayed out.
NOTE: The device must in the docking station in order for
the driver to Logout of the system, or perform a Duty
Status change.
IMPORTANT NOTE: The vehicle should not be moved
while device is out of the docking station. If the vehicle is
moved, ALL drive time is recorded by the Onboard Computer
and will be assigned to the driver when TABLET is back in
the docking station.
If the vehicle moves without TABLET, the LED lights on the
docking station will flash as a warning to the driver to replace
the device. In addition, an Un-docked Movement Alarm will
be immediately sent to the PeopleNet Fleet Manager by the
Onboard Computer, indicating TABLET is not docked while
the vehicle is moving.
When re-docking TABLET, data is synchronized between the
Onboard Computer and the TABLET device. During this process,
TABLET should remain in the docking station.
9
USING THE DISPLAY
The display’s graphical touch screen provides quick access
to any feature by touching items on the screen. The following
segments describe how to use the touch screen to navigate.
HOME SCREEN
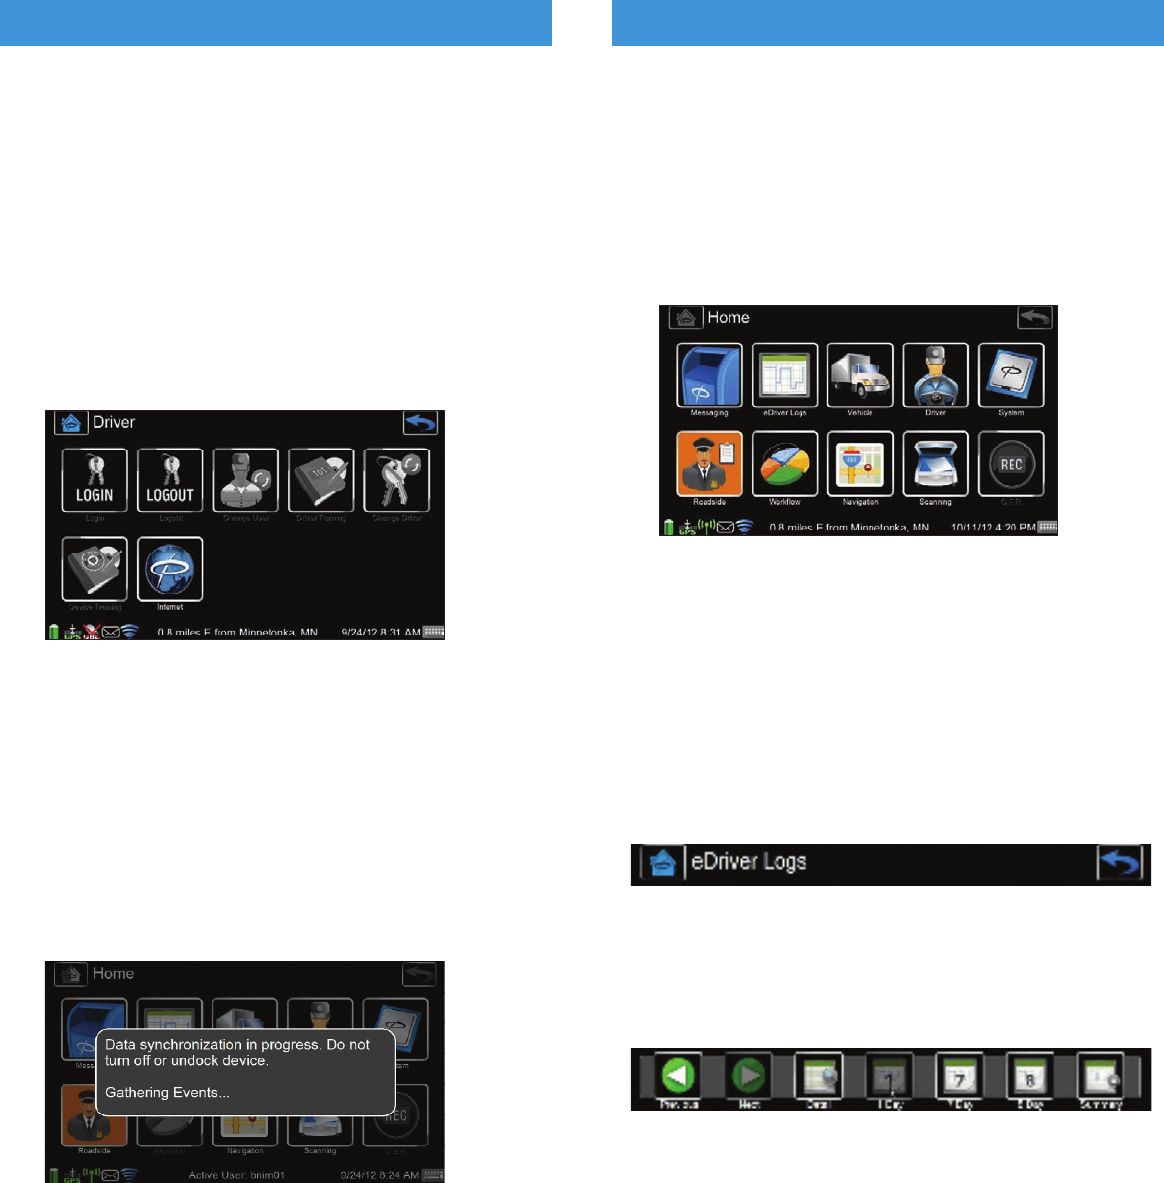
The Home screen is the default screen, with ten shortcuts
to menu categories. You return to the Home screen whenever
you press the Home button at the top left.
SCREEN HEADER
Every screen has three features. From left to right they are:
1. HOME screen button – press HOME to return to the
Home screen.
2. Current menu or screen name to identify where you are
currently at.
3. BACK button – press BACK to return to the previous
screen or menu.
ACTION BAR
Many screens also have an action bar across the bottom,
providing quick access to related screens. This is in addition
to the standard navigation buttons.
(TABLET)
USING THE DISPLAY
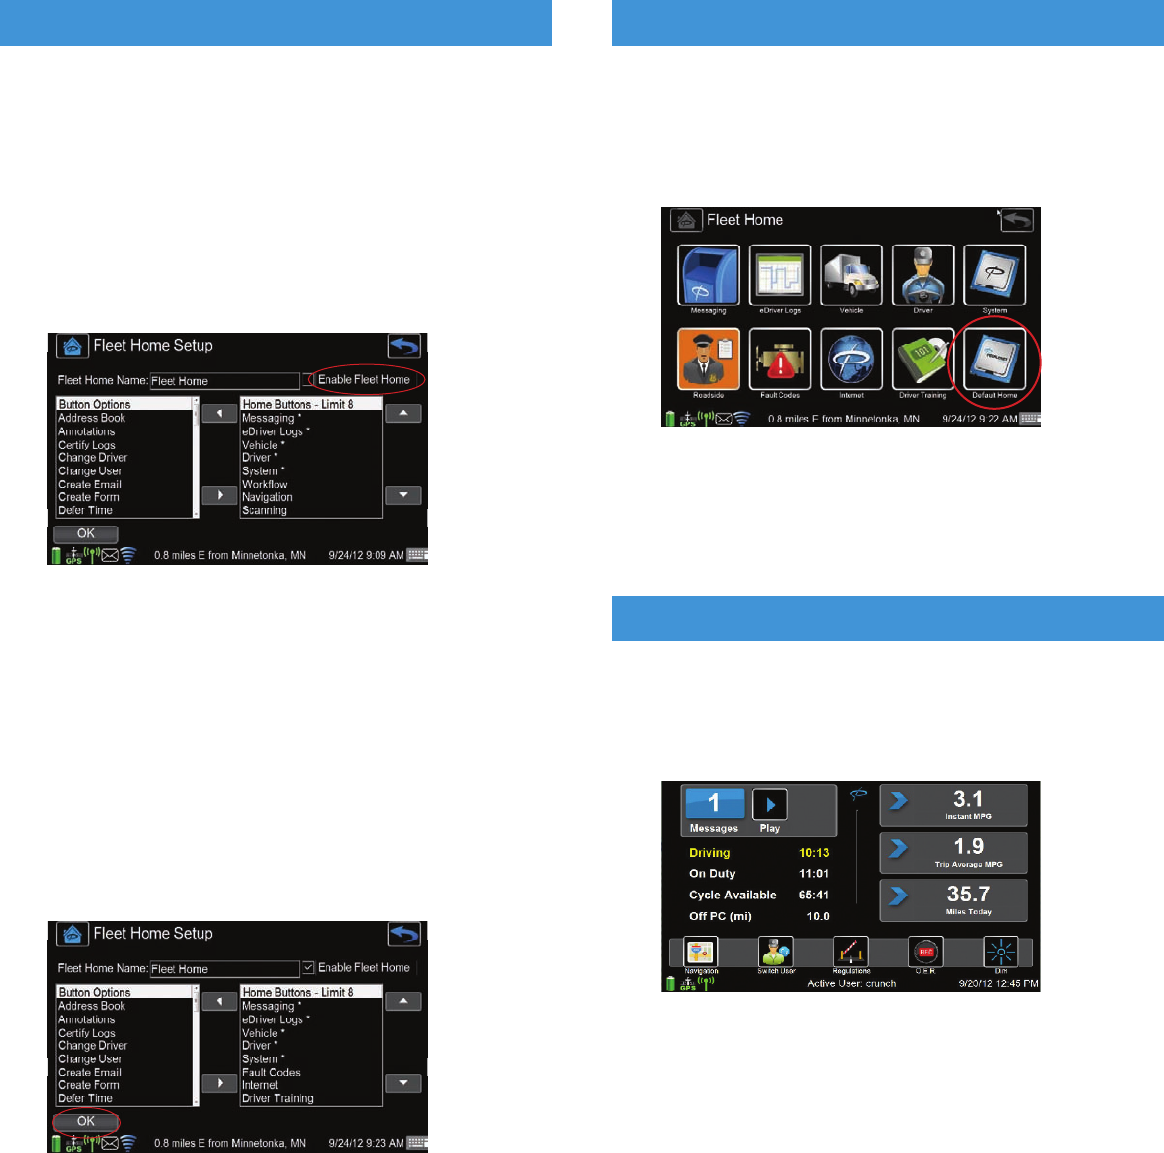
CUSTOM FLEET HOME SETUP
You can replace the default Home screen by customizing the
buttons on the Fleet Home screen for one-touch access to your
most commonly used applications, screens, and functions.
1. Select the FLEET HOME SETUP shortcut from the System
menu to begin setup of the Fleet Home.
2. Check the Enable Fleet Home box to configure your
preferred shortcuts.
3. Select SHORTCUTS from the list on the right and press the
LEFT ARROW to remove them from your custom Fleet Home
screen. Shortcuts with an asterisk (*) are feature menu items.
4. Select SHORTCUTS from the list on the left and press
the RIGHT ARROW to add them to your custom Fleet
Home screen.
NOTE: You may have up to 8 custom buttons on your Fleet
Home screen.
5. Select OK to save your changes. Now, when you press
the HOME button, you will be brought to your custom
Fleet Home screen.
10 11
RETURNING TO DEFAULT HOME
You may decide you want to have access to the default shortcuts.
The bottom right shortcut on your custom Fleet Home screen is
Default Home, which brings you to the Default Home screen.
To only use the Default Home screen,
1. Uncheck the Enable Fleet Home box in Fleet Home Setup.
2. Select OK to save your changes.
USING THE DISPLAY
Safe Mode limits driver interaction with the system while the
vehicle is moving. Safe Mode is activated by the fleet administrator
who configures the unit from the PeopleNet Fleet Manager
and sets the parameters for use.
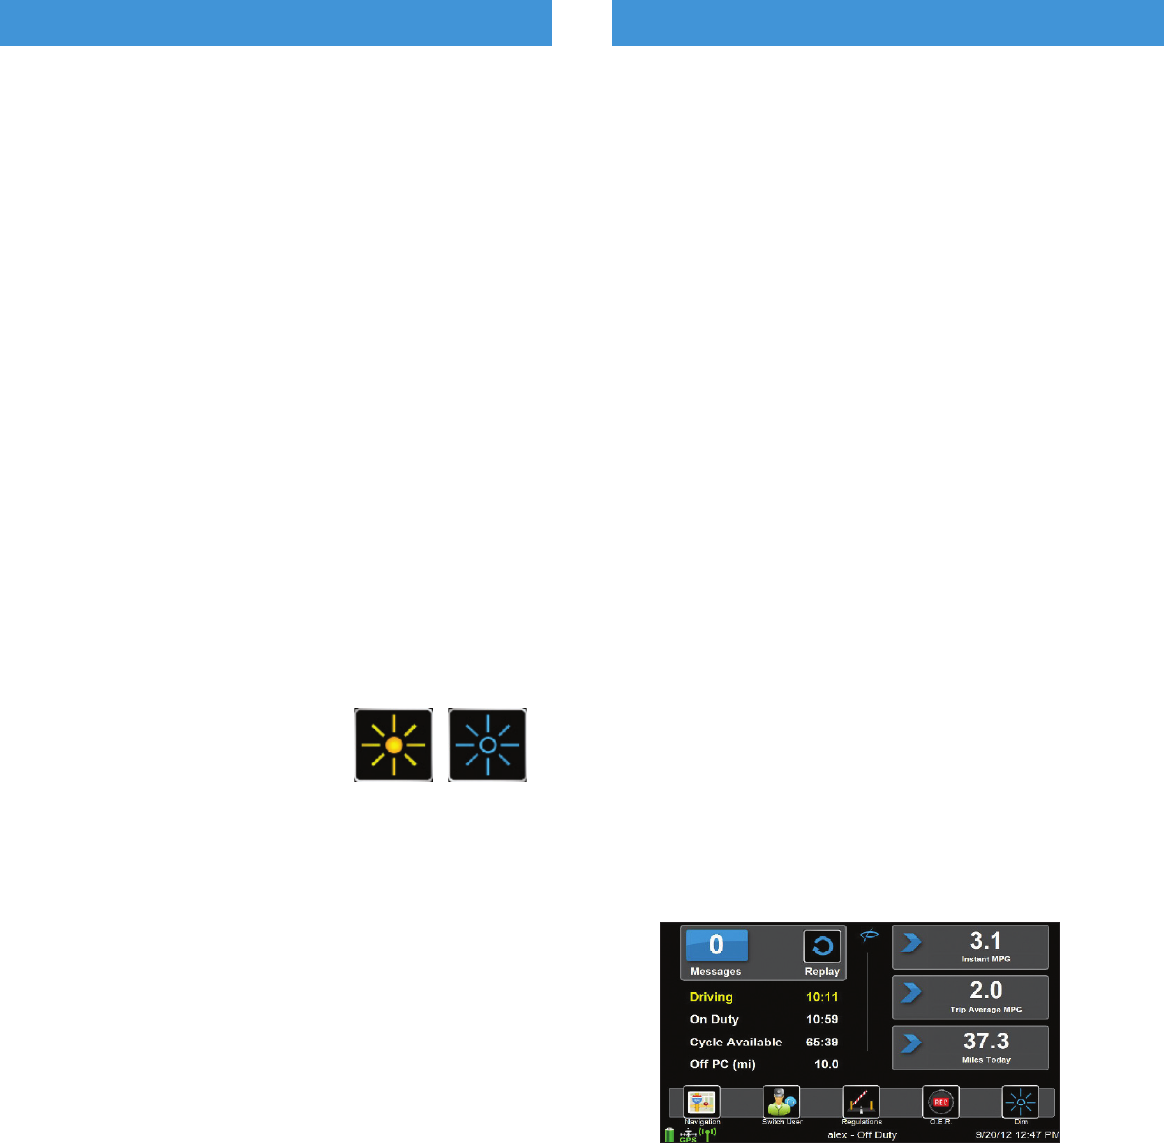
When Safe Mode is activated the services available are:
• In-Cab Navigation
• Change User
• Border Cross
• Onboard Event Recorder
• Safe Mode Messaging
SAFE MODE
SAFE MODE
eDRIVER® LOGS
If the driver utilizes eDriver Logs, Drive Time Available,
On-Duty Time Available, Cycle Time Available, and Off-Duty
(PC) for Personal Conveyance will be visible in Safe Mode.
INSTANT FUEL EFFICIENCY
Safe Mode displays the instant fuel efficiency, which can
be configured for Miles per Gallon (MI/GAL) or Liters per
100 Kilometers (L/100KM) through the Settings screen.
TRIP AVERAGE
Safe Mode displays the trip average fuel efficiency. This
measurement can be configured for Miles per Gallon (MI/GAL) or
Liters per 100 Kilometers (L/100KM) through the Settings screen.
Reset the TRIP AVERAGE from the Engine Data screen.
MILES TODAY
Safe Mode displays the distance travelled for the current day,
which can be configured for Miles or Kilometers through the
Settings screen.
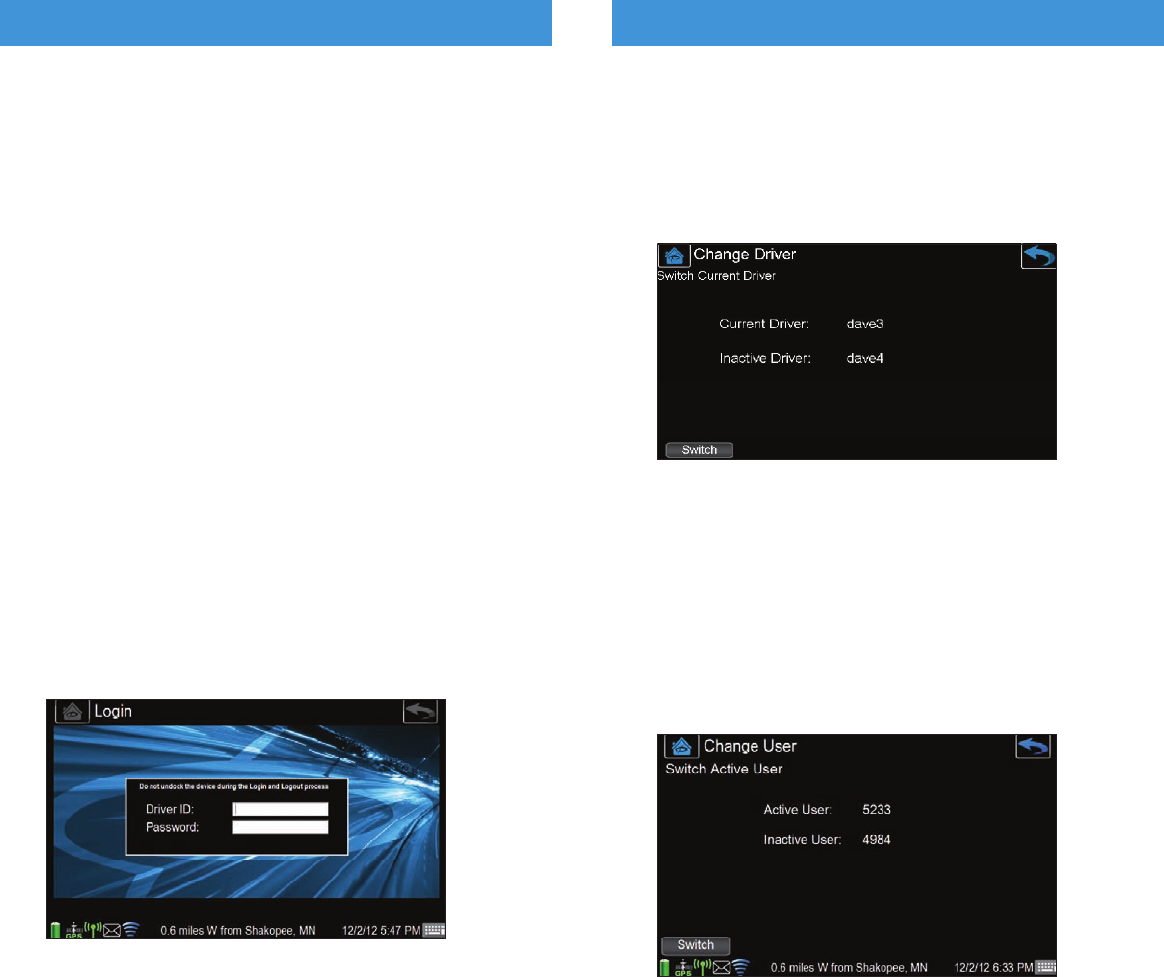
BRIGHTNESS CONTROL
Control bright and dim settings in Safe
Mode screen using the soft buttons.
By default, screen brightness is at the maximum brightness
level. For this reason, the DIM soft button is visible on the Safe
Mode screen.
Unless previously adjusted in the Settings screen or from a
previous Safe Mode change, this setting in Safe Mode dims
from the maximum down two more levels. Once the dimmest
setting is reached, the soft button becomes a BRIGHT key,
allowing you to brighten the screen until the maximum
brightness level is reached.
The brightness setting set from the Safe Mode screen holds
as the setting in the Settings screen once Safe Mode is
no longer active.
12 13
SAFE MODE MESSAGING
For additional hands-free safety in the cab, play messages from
Safe Mode while driving.
If there are any new unread messages in the Inbox before or
while the truck is moving and Safe Mode is active, then the new
message quantity displays in the on-screen New Message
Indicator box, and the PL AY function will appear.
1. Select PL AY by pressing the PL AY soft button.
2. The oldest unread message will be played from the Inbox.
NOTE: Only new messages are read oldest to newest from
the Inbox.
NOTE: Messages that have already been read from the Inbox
or any other mailbox will not be available in Safe Mode.
NOTE: In order to aid the driver, tapping anywhere on the screen
(other than another soft key) will also PLAY the message.
3. PAUSE is available using the same soft button at any time
a message is being played.
4. Select the PAUSE soft button at any time and resume
when ready by reselecting PL AY.
5. Once the message has been played completely through,
the message becomes available for REPL AY.
6. Select the REPLAY soft button, to replay the last message
that was just completely played.
7. Once the next new message has been played completely,
then it is available for REPL AY, and so forth.
NOTE: Make sure the device’s volume is not set to Mute
before entering Safe Mode and playing messages.
SAFE MODE
The Current Driver is the user that is associated with the
engine data collected, including miles driven.
For vehicles using eDriver Logs, determination of the Current
Driver is based on the following:
1. The driver in Driving duty status.
2. If no drivers are in Driving status, the Current Driver is the
user that was last in the Driving status.
3. If neither of the above statements is true, the first user to
login into the device is the Current Driver.
NOTE: Change Current Driver will appear only if there are two
drivers logged in and you are a non-eDriver logs user.
The Active User differentiates which user is currently interact-
ing with the device. For vehicles using eDriver Logs, the Active
User’s information will be shown when viewing eDriver Logs
data, graphs, and summary information.
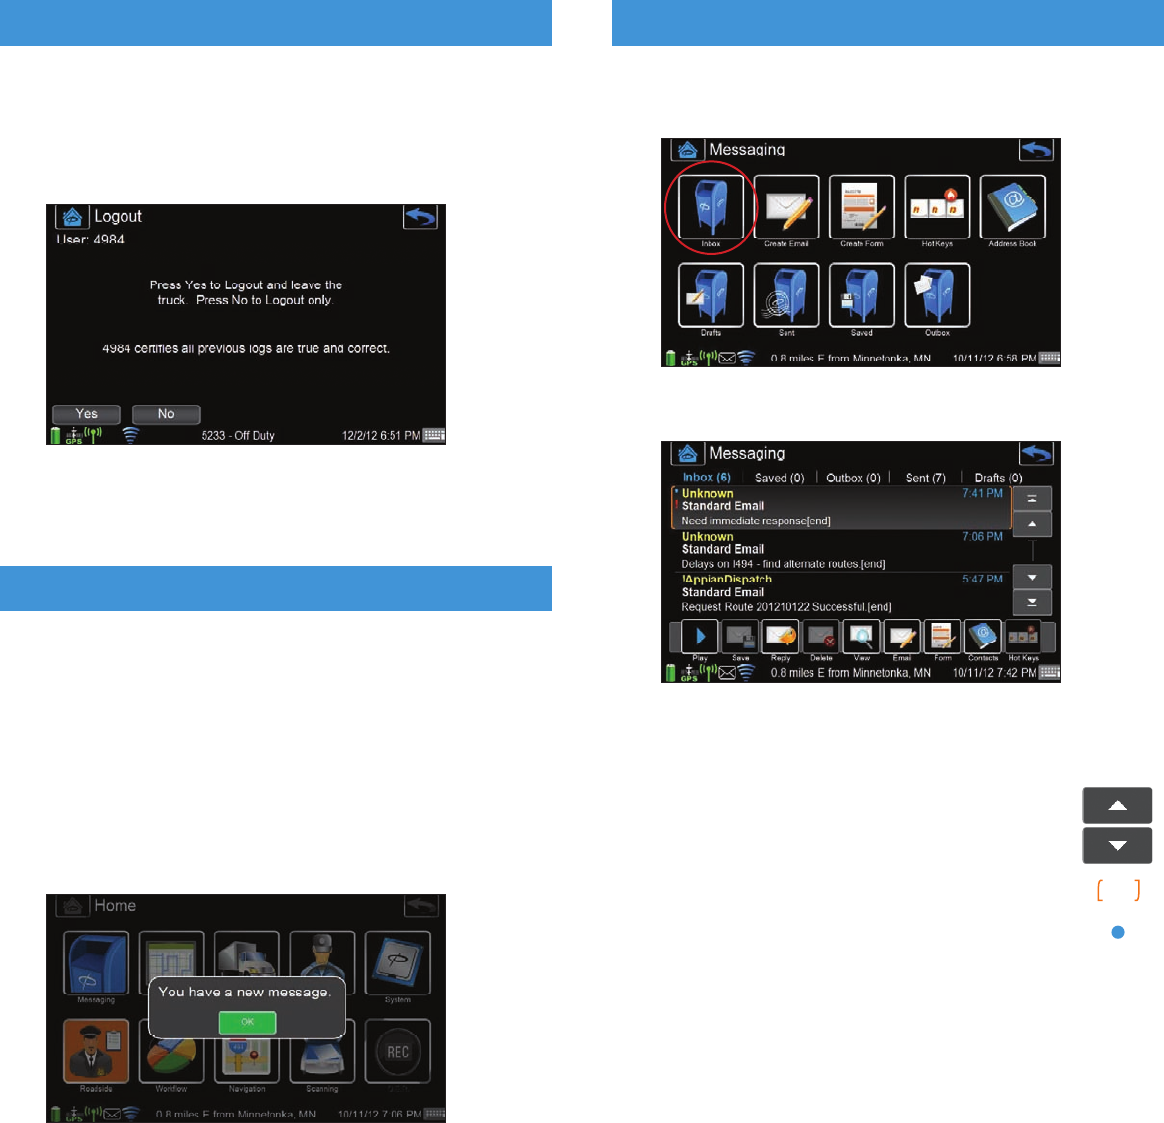
LOGGING IN
TABLET starts up automatically with the truck’s ignition switch
and displays the Login screen.
1. If no drivers are currently logged in, the Login screen will appear.
2. If another driver is already logged in, select the LOGIN
shortcut from the Driver menu to display the Login screen.
3. Enter DRIVER ID AND PASSWORD.
4. Press the OK button to initiate a data call to receive
driver information.
NOTE: If a second user needs to log in at the same time,
press the DRIVER2 button to redisplay the Login
screen. Repeat steps 3 and 4.
DRIVERS & USERS
14 15
CHANGING CURRENT DRIVERS
NOTE: Change Current Driver will appear only if there are two
drivers logged in and you are a non-eDriver logs user.
1. Select the CHANGE DRIVER shortcut in the Driver menu
to display the Switch Current Driver screen.
2. Press the SWITCH soft button to make the other logged-in
user the current driver.
NOTE: The Switch Current Driver screen remains visible
until you press the BACK or HOME buttons.
CHANGING ACTIVE USERS
1. Select the CHANGE USER shortcut in the Driver menu
to display the Switch Active User screen.
2. Press the SWITCH soft button to make the other logged-in
user the active user.
NOTE: The Switch Active User screen remains visible until
you press the BACK or HOME buttons.
DRIVERS & USERS
16
LOGGING OUT
1. Select the LOGOUT shortcut in the Driver menu to display
the Logout screen. The Active User will be displayed as
the logout recipient.
• To log out and leave the truck, press the YES soft button.
• To just log out, press the NO soft button.
READING A NEW MESSAGE
A new message is indicated in four ways:
• The New Message icon in the lower left corner flashes.
• A “You have a new message” pop-up appears.
• An audible chime is heard.
• A blue dot is shown next to the new message in the Inbox.
DRIVERS & USERS
17
MESSAGES
MESSAGES
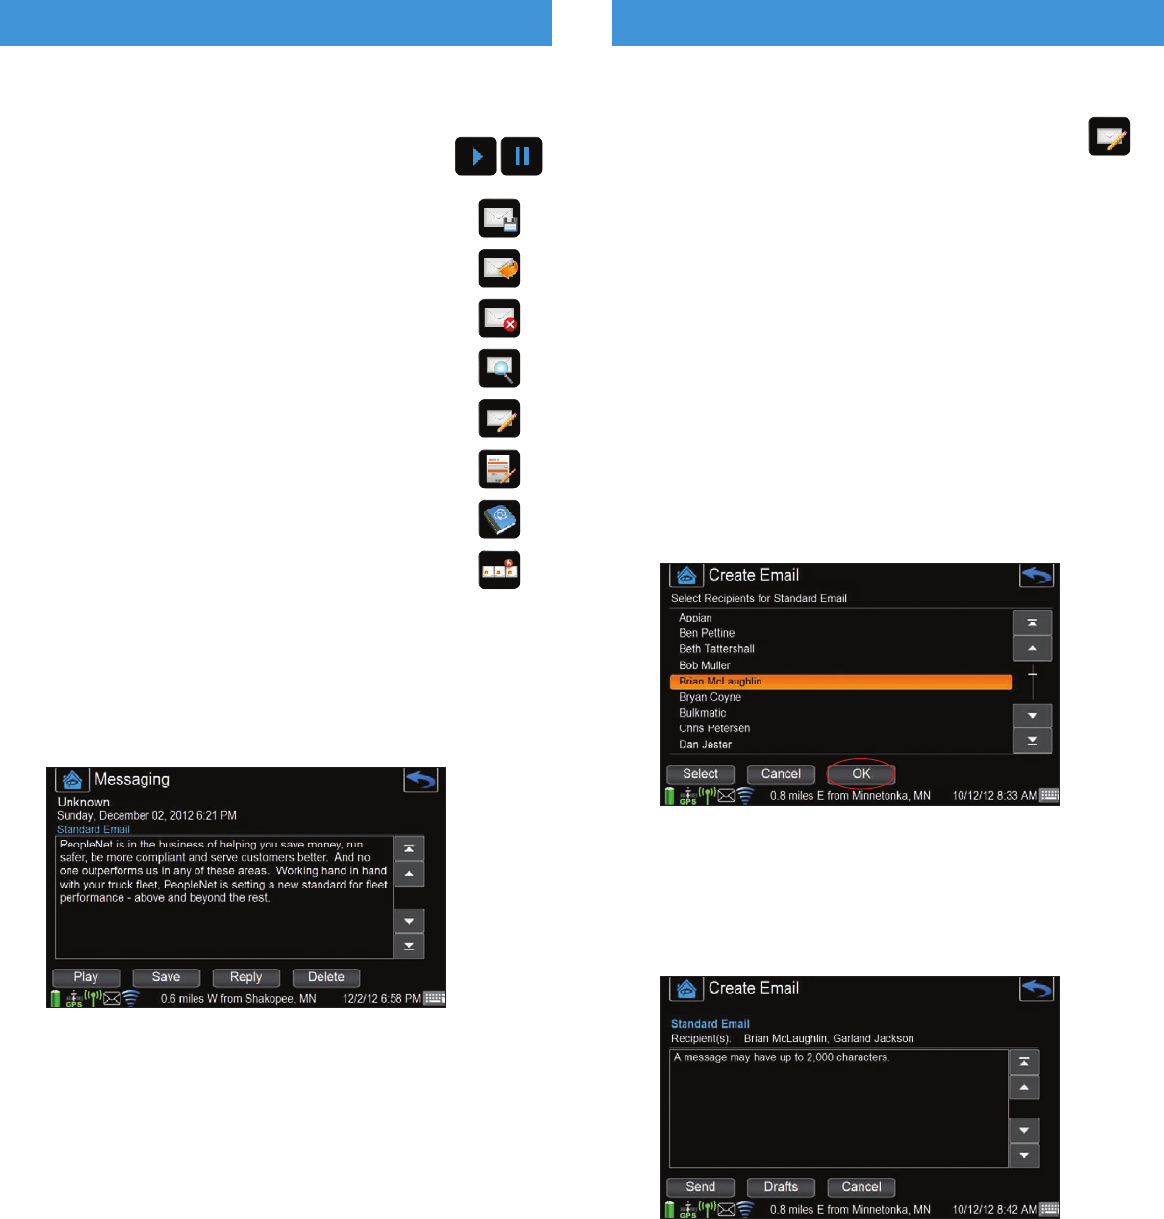
1. To view the Inbox, select MESSAGING on the Home
screen then select INBOX on the Messaging screen.
2. The Inbox lists messages in oldest-to-newest order.
3. All mailboxes are accessible from the Inbox: Saved,
Outbox, Sent, and Drafts. Each mailbox provides
a counter indicating how many messages are in
the mailbox.
• Press the SCROLL UP and SCROLL DOWN
arrows to scroll through the list of messages.
• Orange brackets indicate the selected message.
• A blue dot to the left of the message in the Inbox
indicates the message has not been viewed,
replied to, or listened to using text to speech.
• An exclamation point (!) next to a message
indicates that the message only allows a reply
option. The message reply must be sent before
doing other tasks.
!
18
• The short cut buttons at the bottom of the screen
allow the driver to:
¡
PLAY/PAUSE a message using
text to speech.
¡ SAVE a message in the Saved folder.
¡ R EPLY to a message.
¡ DELETE a message.
¡ VIEW a message.
¡ EMAIL creates a new Email Message.
¡ FORM creates a new Form Message.
¡ CONTACTS opens the Address Book.
¡ HOT KEYS opens the Hot Keys form selection.
4. To see the full text of a message:
• Touch the MESSAGE PREVIEW on the screen.
• Press the VIEW button, or
• Double-click on a MESSAGE to open it.
5. While viewing the message, the driver may select PL AY,
SAVE, REPLY, or DELETE.
MESSAGES
19
MESSAGES
SENDING A NEW MESSAGE
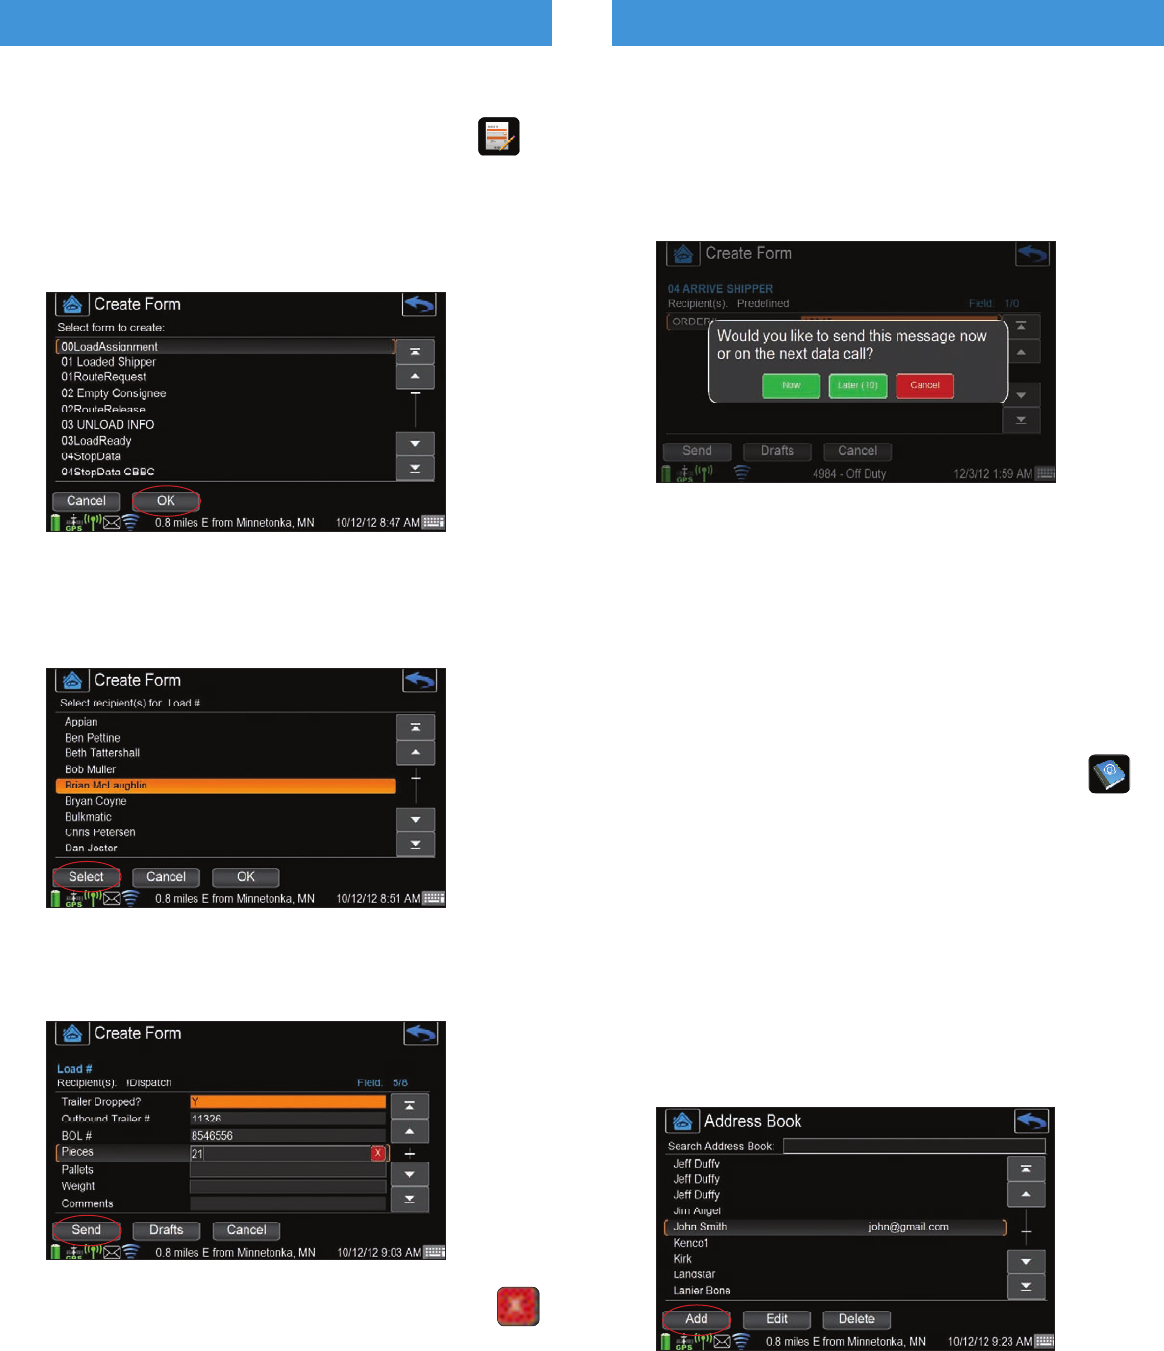
1. Create a new email by either selecting the
CREATE EMAIL short cut on the Messaging
screen or by selecting the EMAIL short cut on
the Inbox screen.
2. Select the TYPE OF EMAIL to be sent:
• Personal Email
• Standard Email
NOTE: Personal email must be enabled from the PFM.
Contract your fleet administrator for questions about
this feature.
3. On the Select Recipients screen, select the recipient’s name,
then press SELECT.
NOTE: Up to 20 recipients may be selected for a single email.
4. Press the OK button when all recipients have been selected.
5. Enter the MESSAGE TEXT (up to 2000 characters).
6. Press the SEND button to send the message.
7. Press the DRAFTS button to hold the message until it
is completed.
8. Press the CANCEL button to cancel the message.
MESSAGES
SENDING A FORM
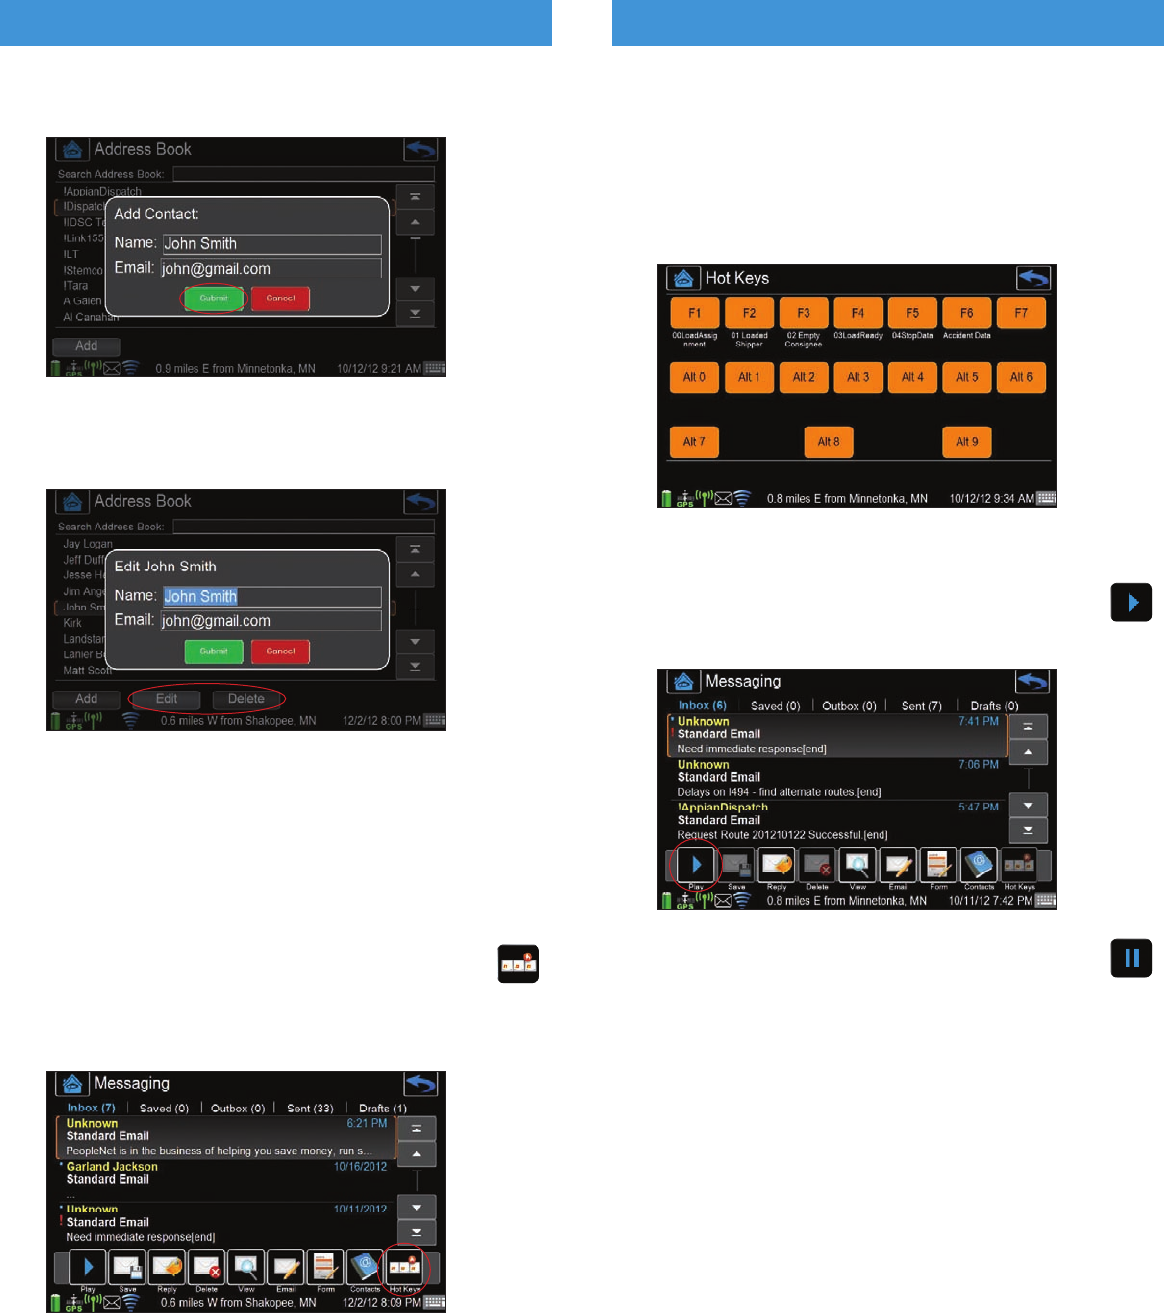
1. Create a new form by either selecting the
CREATE FORM short cut on the Messaging
screen or by selecting the FORM short cut
on the Inbox screen.
2. Select the FORM from the Forms List screen, then press
the OK button.
3. On the Select Recipients screen, select the RECIPIENT’S
NAME, then press the SELECT button.
NOTE: Up to 20 recipients may be selected for a single message.
4. Complete the FORM FIELDS.
NOTE: A field highlighted in orange indicates a required field.
NOTE: Use the red “X” to completely delete an entry
in a field.
20 21
MESSAGES
5. Press the SEND button.
NOTE: The SEND button functions when all required fields
have been completed.
6. Send options are determined by the form. A pop-up message
may appear showing what options are available.
7. To accept the default send option, do nothing. The pop-up
screen goes away after 15 seconds and the form is moved
to the Outbox until the next data call.
USING THE ADDRESS BOOK
The Address Book contains personal and corporate contacts
for the driver. Personal contacts are available only when Personal
Messaging is enabled from the PFM. Contact your fleet administrator
for more information on the Personal Messaging feature.
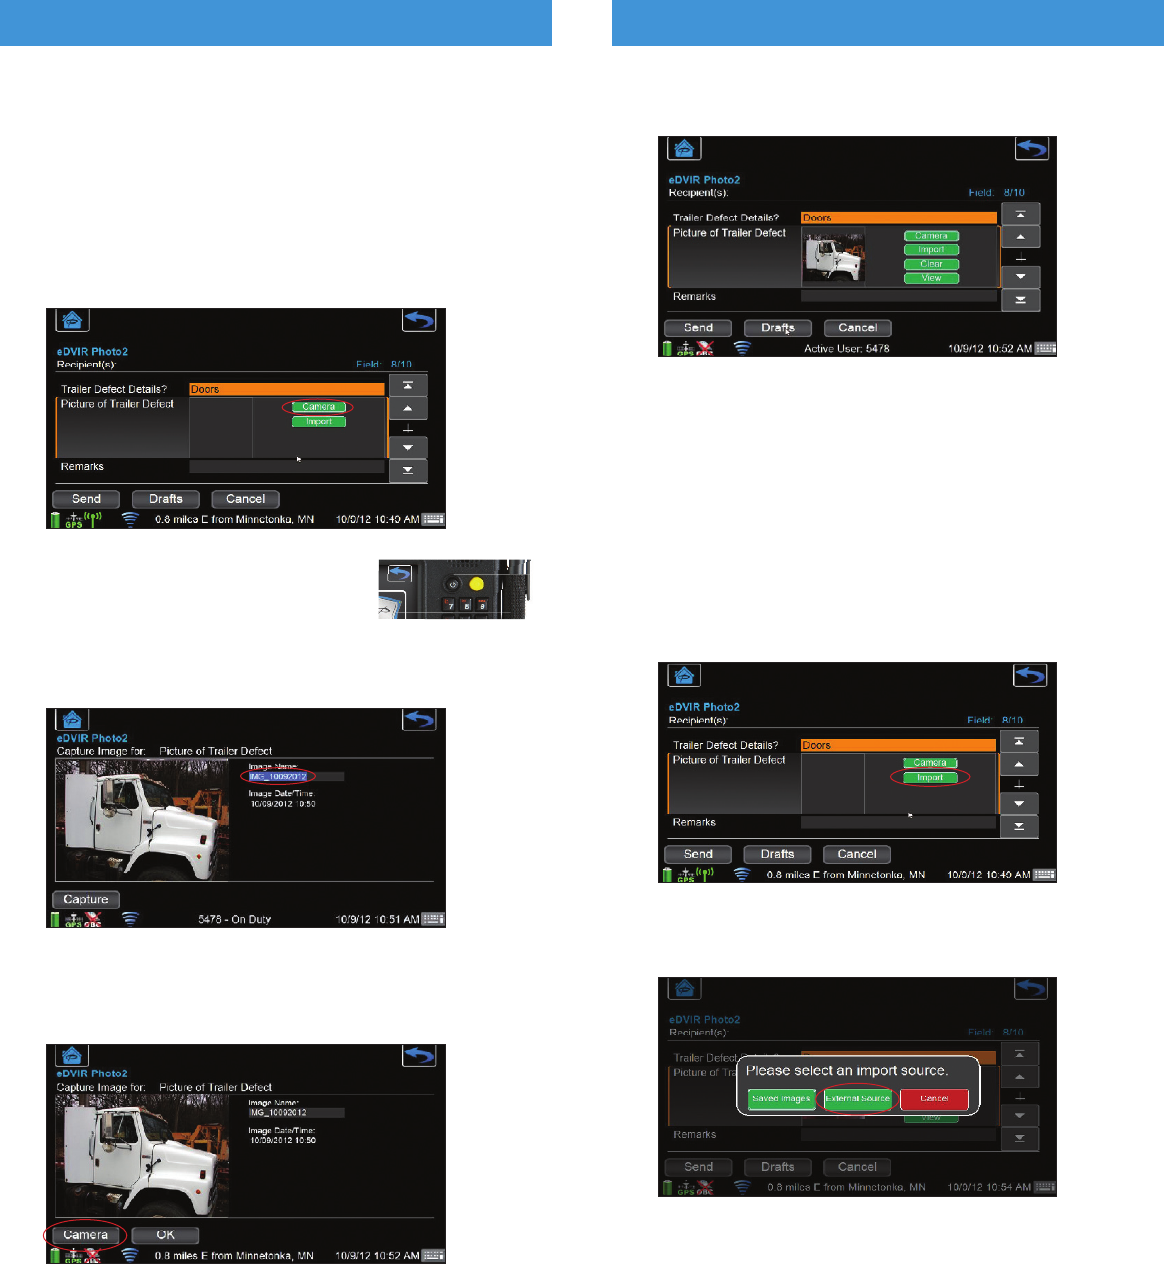
1. Select the ADDRESS BOOK by choosing the
short cut from the Messaging screen or from the
bottom of any mailbox screen.
2. Contacts are displayed in the following order:
• Special characters (example: !Dispatch)
• Numbers (00, 01, 02…10, 11)
• Alphabetically (A-Z)
NOTE: Email addresses will only be displayed for personal
contacts, not corporate contacts.
3. Press the ADD button to add a new contact to the
Address Book.
MESSAGES
4. Enter the CONTACT’S NAME AND EMAIL ADDRESS,
then press SUBMIT.
5. Press the EDIT button to make changes to a personal contact.
NOTE: Corporate contacts are not editable.
6. Press the DELETE button to delete a personal contact.
HOT KEYS
Hot Keys enable the driver to access commonly-used forms
by pressing a function key (F1, F2…). Hot Keys are configured
by the fleet administrator.
1.
Select the HOT KEYS short cut on the Messaging
screen, or
2. Select the HOT KEYS short cut at the bottom of any
mailbox screen.
22 23
MESSAGES
NOTE: The Hot Keys short cut will not appear if Hot Keys have
not been configured by the fleet administrator.
3. The Hot Keys screen shows the names of forms that have
been assigned to certain function keys.
4. To use a Hot Key and create the message, select the
FUNCTION KEY that corresponds to the form.
TEXT TO SPEECH
1. Press the PL AY button at the bottom of the View
Message screen to hear an audio version of the
message on screen.
2. While the message is playing, the PLAY button will
change to a PAUSE button, and revert back to PLAY
when PAUSE is selected.
24 25
5.
Click SAVE to add the image to the form. A thumbnail picture
of the image will appear in the image capture field on the form.
6.
If you wish to remove the picture from the form, highlight
the IMAGE CAPTURE field and click the CLEAR button.
IMPORTING AN IMAGE
Images can be imported to the form from a USB device that
contains pictures.
1. Select the IMPORT button to import an image from
an external USB device or a previously saved image on
the TABLET.
2. Plug the external USB device into the TABLET and select
the EXTERNAL SOURCE button.
USING THE CAMERA
NOTE: Image Capture is only available with TABLET.
Forms can contain image capture fields to attach pictures
in the form. Selecting or highlighting the image capture field
in the form will expand the picture field.
1.
Select the CAMERA button to activate the Camera
Viewing screen.
2. Focus the camera on the subject
and click the YELLOW BUTTON
on TABLET to take the picture.
3. You can edit the Image Name by highlighting the Image
Name field and entering a new name.
4.
If you wish to retake the picture, clicking the Camera button
will bring you back to the Camera Viewing screen and you
can take another photo.
IMAGE CAPTURE (TABLET) IMAGE CAPTURE (TABLET)
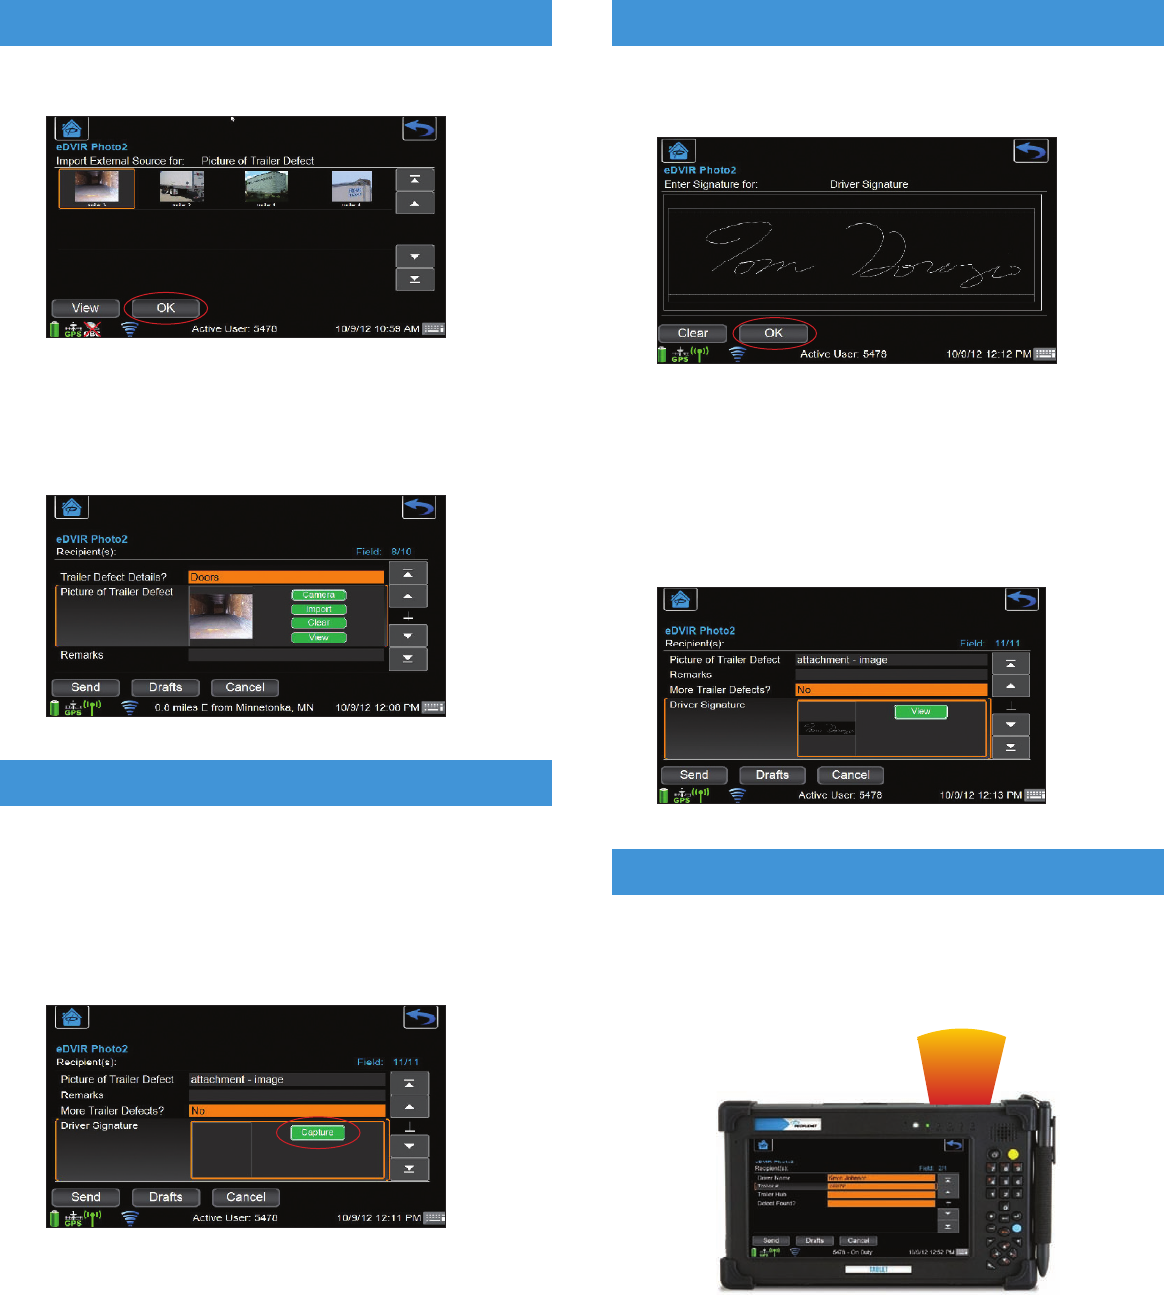
3. All photo images on the external USB device will be displayed.
4. Highlight the desired image to import to the form and click
the OK button.
5. A thumbnail picture of the image will appear in the image
capture field on the form.
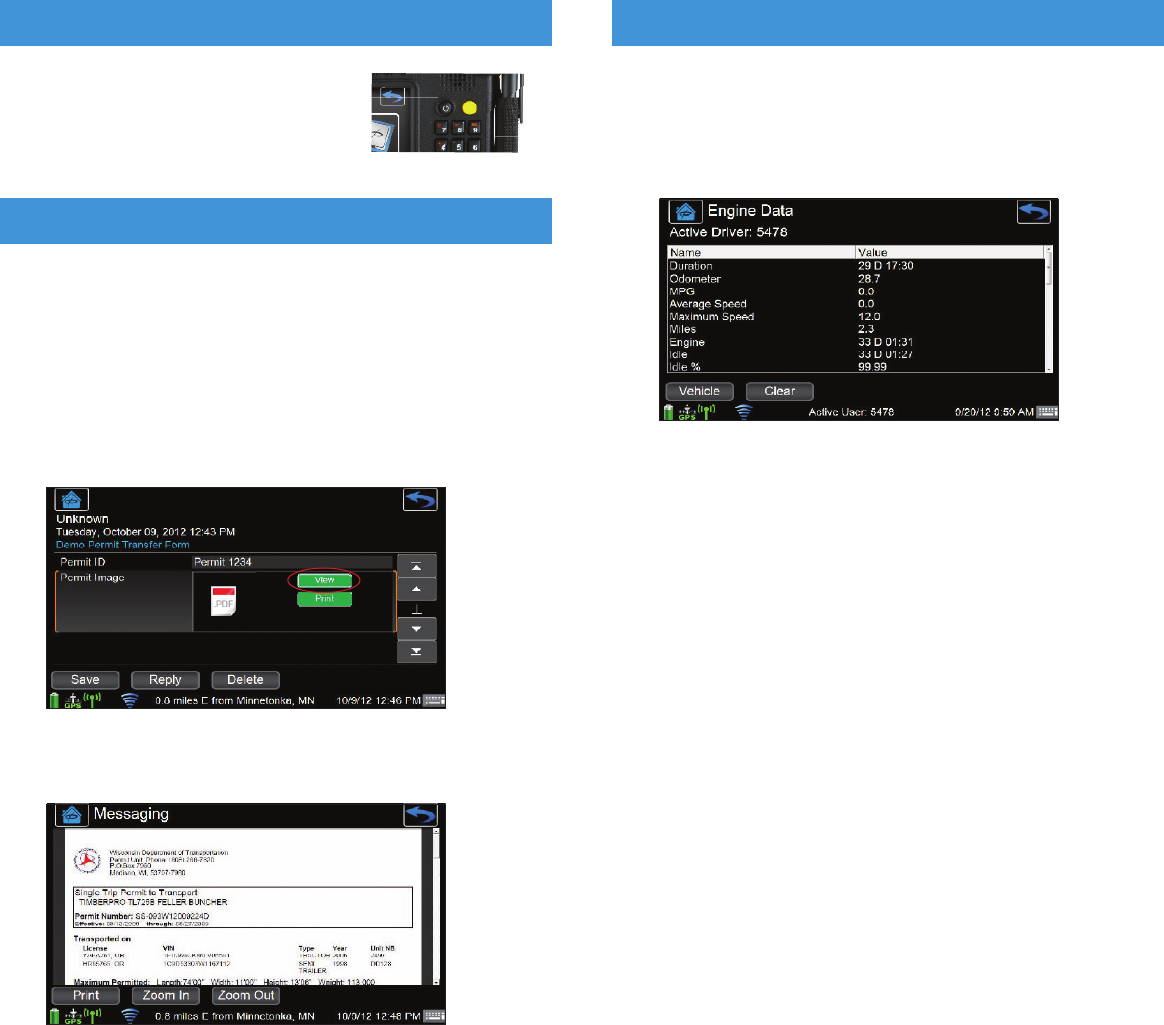
NOTE: Signature Capture is only available with TABLET.
Forms can contain signature capture fields to attach signatures
in the form. Selecting or highlighting a signature capture field
in the form will expand the field.
1. Select the CAPTURE button to enter a signature on the form.
SIGNATURE CAPTURE
26 27
2. Enter the signature and click the OK button to save the
image to the form.
3. Click the CLEAR button to erase the signature if you wish
to re-sign in the field.
NOTE: Once the signature has been saved, it can no longer be
changed or edited by the user.
4. A thumbnail picture of the image will appear in the signature
capture field on the form.
While the cursor is located on any data entry field, the bar code
scanner can be activated.
NOTE: Requires TABLET premium with built in bar code scanner.
IMAGE CAPTURE (TABLET)
(TABLET)
SIGNATURE CAPTURE (TABLET)
USING THE BAR CODE SCANNER (TABLET)
ENGINE DATA
View real-time engine performance information for a trip, leg
or any report duration from the Engine Data screen.
1. Select the ENGINE DATA shortcut from the Vehicle menu
to display the engine data assigned to the Active User.
2.
Press the VEHICLE button to view vehicle engine data for
all drivers.
DURATION: Accumulated time since the last reset.
NOTE: Use the CLEAR button to reset your in-cab averages
and trip information (hours : minutes).
ODOMETER: Odometer reading.
MPG: Average Miles Per Gallon.
AVG SPEED: Average speed.
MAX SPEED: Highest speed recorded.
MILES: Number of miles traveled.
ENGINE: Time engine has been running.
IDLE: Time spent idling (hours : minutes).
MOVE: Time spent moving (hours : minutes).
OVER RPM: Time spent exceeding company RPM goals.
The number after RPM is the company target (hours : minutes).
OVER SPEED: Time spent over company speed goals.
The number after Speed is the company target (hours : minutes).
EXCESS SPEED: Time spent exceeding what your company
has determined to be an unsafe speed. The number after Speed
is the company limit (hours : minutes).
LONG IDLE: Time spent idling longer than the threshold set by
your company (hours : minutes).
LONG IDLE %: Percentage of time spent in long idle.
NO. LONG IDLES: Number of times vehicle idled longer than
the company-set threshold.
IDLE THRESHOLD: Number of minutes used to split long and
short idle events.
1. Place the cursor on a data entry field.
2. Click the YELLOW button on TABLET
to activate the bar code scanner.
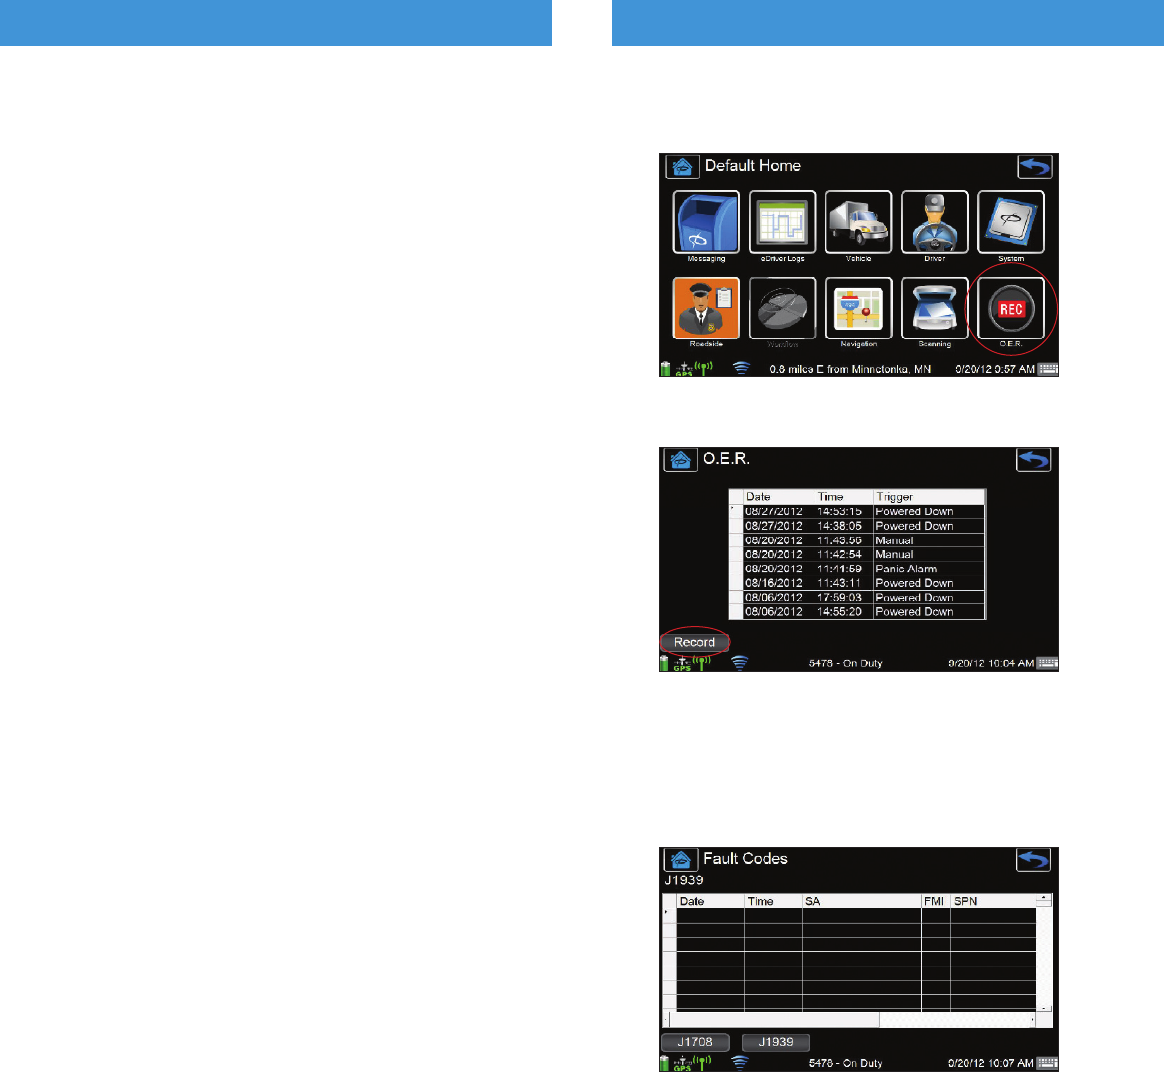
NOTE: In-Cab Printing and PDF viewing are only available
with TABLET.
PDF files can be attached to incoming forms as attachments that
can be viewed and printed in the cab. Selecting or highlighting
the attachment field in the form will expand the field.
1. Select the VIEW button to open the PDF viewer and review
the attached document.
2. Clicking Zoom In or Zoom Out will resize the display of the
attached document.
3. Click the PRINT button to send the document to an attached
USB printer.
NOTE: To setup the system to print, go to System, Settings
screen and ensure the Default Printer has been
setup correctly.
28 29
USING THE BAR CODE SCANNER (TABLET)
IN-CAB PRINTING & PDF VIEWING (TABLET)
30
ENGINE DATA
SHORT IDLE: The amount of time you have idled less than
the company goal (hours : minutes).
SHORT IDLE %: Percentage of time spent in short idle.
NO. SHORT IDLES: The number of times you have idled less
than the company goal.
SEAT BELT USE %: Percentage of time vehicle is in motion
that the driver’s seat belt has been buckled.
HEADLIGHT USE %: Percentage of time vehicle is in motion
that the headlights were in use.
FUEL TANK LEVEL %: Percentage of fuel remaining in the
primary and secondary fuel tanks.
DIESEL EXHAUST FLUID TANK %: Percentage of diesel
exhaust fluid remaining.
DIESEL PARTICULATE FILTER STATUS: Status of the diesel
exhaust particulate filter.
AMBIENT TEMPERATURE: Current temperature outside the
truck (F for Fahrenheit, C for Celsius).
SPEED GOVERNOR SETTING: Maximum speed the vehicle’s
ECM will allow.
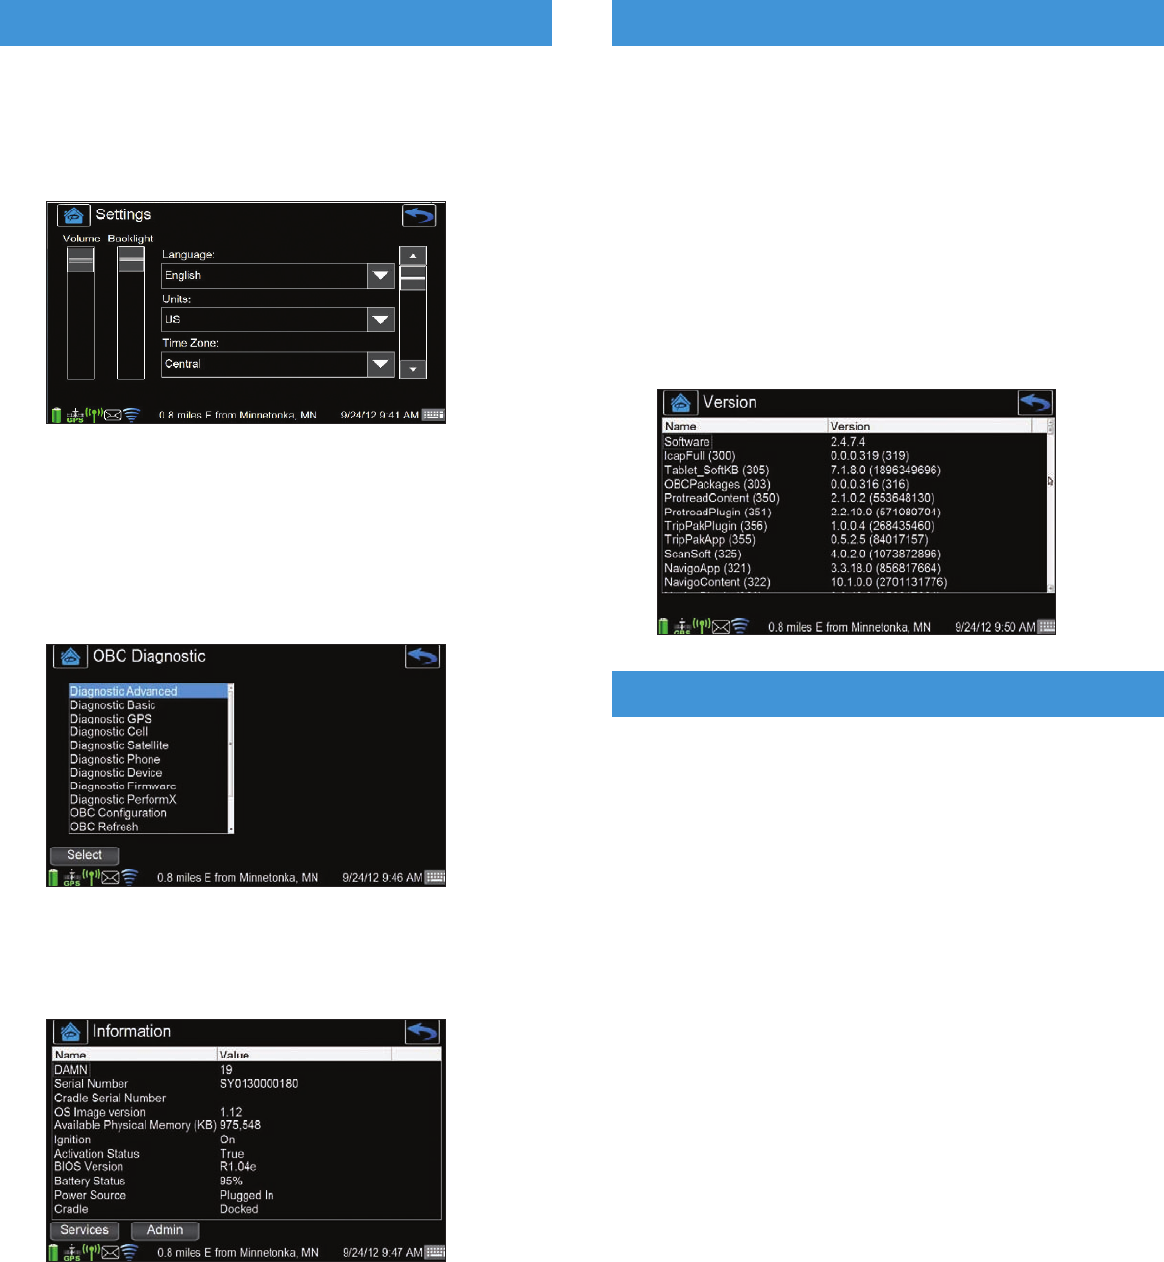
ONBOARD EVENT RECORDING (OER)
Onboard Event Recording® must be enabled by the fleet
administrator in order to record events. Please contact your
fleet administrator for more information about OER.
Three types of vehicle events can be recorded while driving:
Sudden acceleration (SA): records 60 seconds before and
30 seconds after vehicle accelerates beyond a pre-set threshold.
Sudden deceleration (SD): records 60 seconds before and
30 seconds after vehicle decelerates beyond a pre-set threshold.
Manual trigger (MT): records 170 seconds before and 30
seconds after the event. This capability must be activated by the
safety manager. A notification of the manual event appears.
Stability Control (SC): records 60 seconds before and 30
seconds after the event. This capability requires the Vehicle
Management Multi-bus Adapter and a stability system such
as Bendix or Meritor/WABCO.
View a listing of recorded events from the OER screen.
31
ENGINE DATA
Option 1: Recording Events (manual trigger)
1. Select the OER short cut from the Home screen.
2. Press RECORD to manually trigger an OER event.
FAULT CODES
Fault codes are assigned MIDs/PIDs triggered by the ECM.
1. Select the FAULT CODES shortcut from the Vehicle menu to
display the fault codes that have been triggered (if applicable).
NOTE: When collecting vehicle data with the Vehicle
Management Multi-bus Adapter, the user will have
the option to display either J1708 or J1939 fault codes
from this screen.
2. Select the J1708 and J1939 buttons to switch the data
bus displayed.
32
SYSTEM DIAGNOSTICS
System diagnostics displays the information relating to the
Onboard Computer (OBC) and the display.
1. Select the SETTINGS shortcut from the System menu
to display options for configuration for the system.
NOTE: To change the language displayed, select from the
dropdown in SETTINGS. The display will reboot and
run in the new language until changed again.
For OBC diagnostic information:
1. Select the OBC DIAGNOSTIC shortcut from the System
menu for OBC menu options.
For device diagnostic information:
1. Select the INFORMATION shortcut from the System
menu for display information.
33
2. Press SERVICES to access troubleshooting options for
the display and In-Cab Scanning, Training, and Navigation.
3. Select REFRESH to reboot the display.
4. Select CLEAR TRIPPAK TRANSACTION to clear a
pending scanned document transaction that has been sent.
NOTE: Use this option if TripPak remains in a Pending state and
cannot be resolved. TripPak must be in a Ready state
to scan and submit documents for In-Cab Scanning.
5. Select the VERSION shortcut from the System menu to
display device software versions.
Users can take advantage of Automated Workflow and viewing
of dispatches directly from the in-cab device. The Automated
Workflow feature requires no driver interaction and has three
configurable geo-fences for pre-defined stops within a dispatch:
Approaching: Date, time, and location information is recorded
and transferred either urgent or deferred, and no driver prompt
is provided. The approaching event occurs automatically as the
device detects distance from the stop location as configured
by dispatch.
Arrived: You are notified upon arrival at the stop. If you have
reached the destination and have not been prompted to arrive,
manually arrive the stop. Some dispatches may require confirma-
tion of arrival; others are configured to automatically arrive.
Departed: Date, time, and location information is recorded
and transferred either urgent or deferred. Some dispatches
may require confirmation of departure; others are configured
to automatically depart.
Messages may accompany the dispatch(es). All dispatch
messages should be saved, these messages may or may not
be presented upon arriving at the stop and a response may be
required. You will be prompted upon arrival of a stop configured
with an Automated Workflow message.
SYSTEM DIAGNOSTICS
AUTOMATED WORKFLOW
34
AUTOMATED WORKFLOW
NOTE: There are many options available to dispatch for
Automated Workflow and how stop actions for Arrive
and Depart are presented. Please consult your fleet
administrator for information.
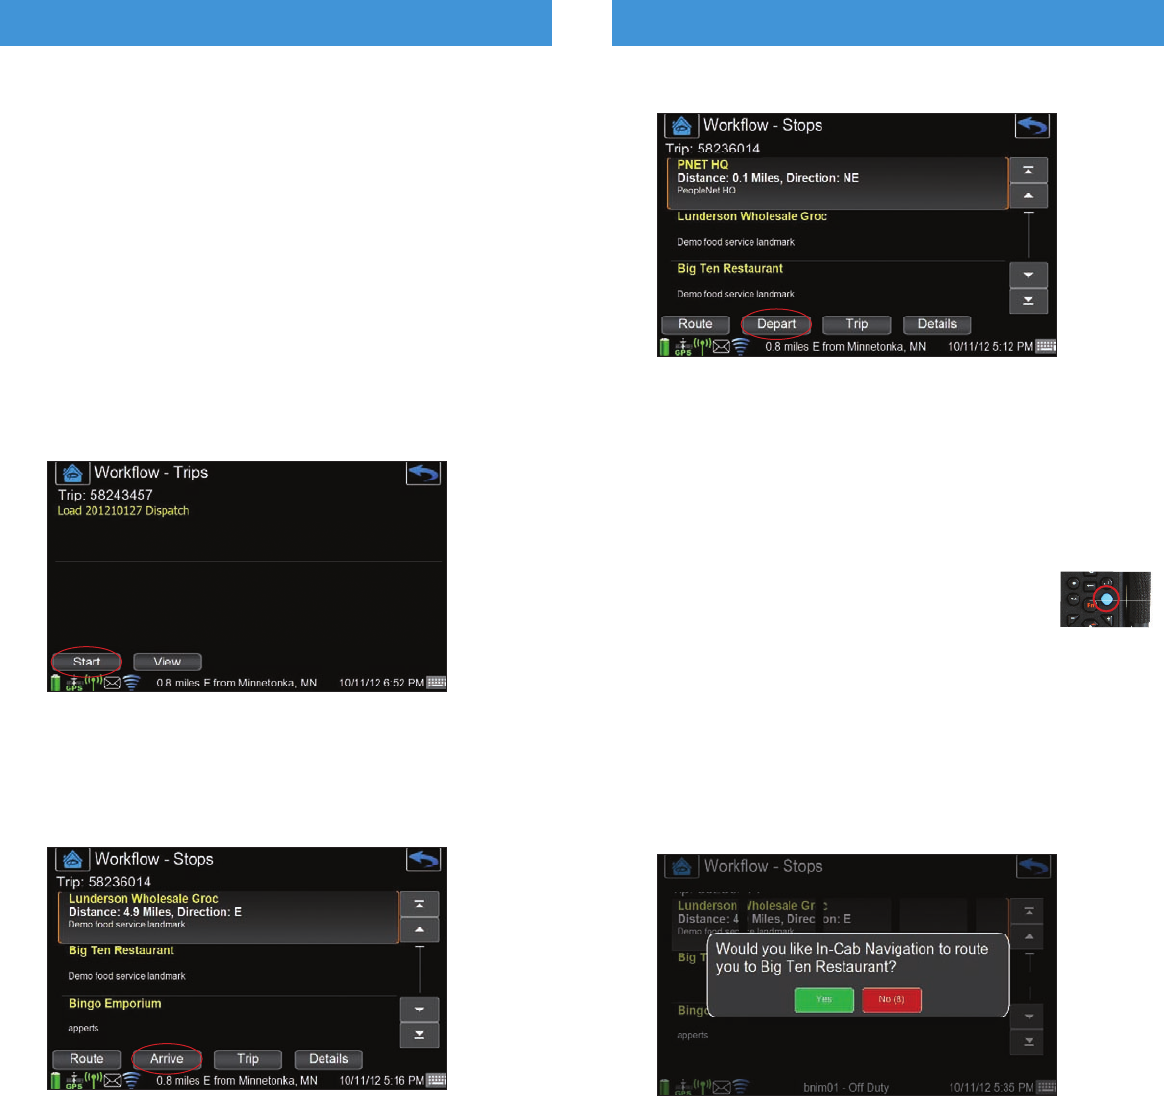
1. Select the WORKFLOW shortcut from the Home screen
to display current dispatches (trips), or
NOTE: If there are no dispatches the WORKFLOW menu
option will not be available.
2. Automated Workflow trips may start automatically at a
pre-configured time set by your dispatcher. If this happens,
proceed to your first stop.
NOTE: To start the trip prior to the appointed start time, press
the START button from the Trips screen.
3. A prompt displays once the vehicle is within the location
geofence. Press YES to confirm arrival.
NOTE: If not prompted automatically, press the ARRIVE button
for the stop to manually arrive.
4. If there is a message to be prompted, it will display
immediately after arriving at the stop.
5. Depart actions occur automatically without a prompt.
35
NOTE: To depart manually press the DEPART button.
WORKFLOW ROUTING WITH
IN-CAB NAVIGATION
PeopleNet provides routing functionality with Automated
Workflow to subscribers of In-Cab Navigation in partnership
with Telogis NaviGo™ or ALK CoPilot Truck. This is made
available once In-Cab Navigation is launched and running.
NOTE: Press the INFO RMATION BAR on the
display or press the BLUE BUTTON of
TABLET to send In-Cab Navigation to
the background.
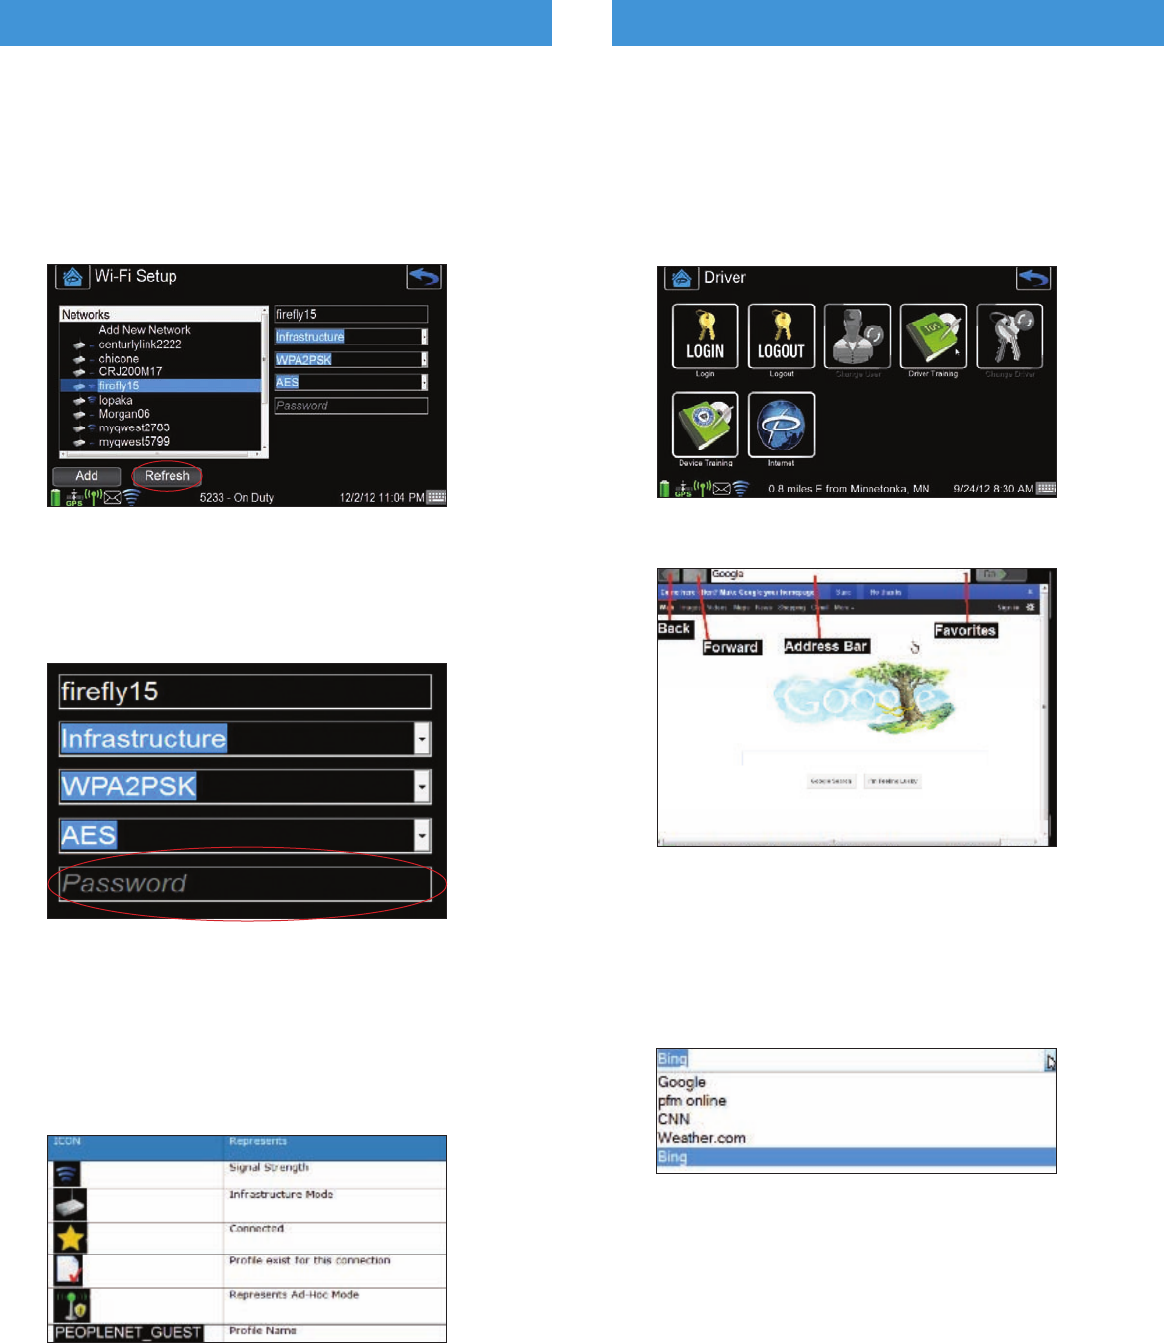
1. Press the ROUTE button from the Automated Workflow
Stops screen to have In-Cab Navigation route you to the
selected stop on the Stop List screen.
2. Or, once arrived at a stop location, Automated Workflow
may prompt you to route to the next stop automatically
using In-Cab Navigation.
3. Press YES or after 15 seconds of no response the route
will NOT be requested and the pop-up will close.
4. Alternately, if your fleet is configured for full Trip routing,
press the ROUTE button from the Automated Workflow Trip
screen to pass all dispatched stops to In-Cab Navigation
for routing.
AUTOMATED WORKFLOW
CONNECTING TO A WI-FI NETWORK BROWSING THE INTERNET
Wi-Fi must be enabled through the PFM before you begin
these steps.
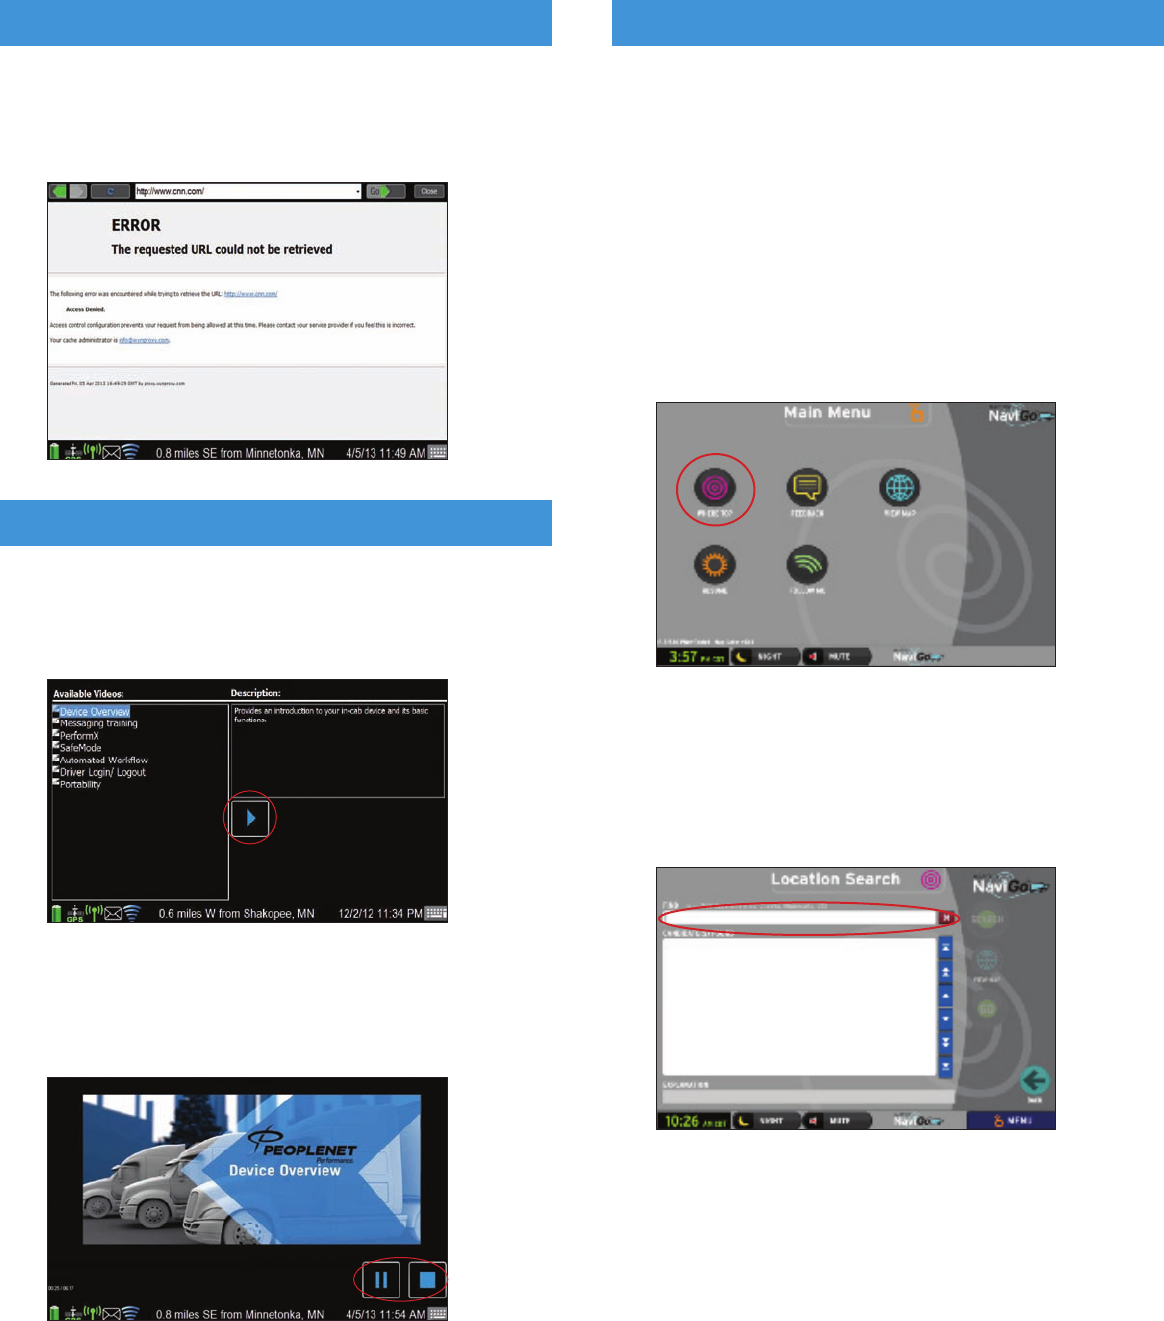
1. Select the WI-FI SETUP shortcut from the System menu.
2. On the left side of the screen you will see a list of available
wireless networks that the device can see. If your network
doesn’t show up press the REFRESH button.
3. Select the network that you wish to connect to and the
details of that network should appear on the right.
4. On the 5th line down enter the password for the network
if there is one.
5. Click ADD, and then press REFRESH.
6. Highlight the network that you just added and click CONNECT.
7. Press REFRESH until you see a gold star next to the network
you are connecting to.
The table below defines all of the Wi-Fi icons and their meaning:
You must be connected to a Wi-Fi hotspot that has Internet
connectivity before you can browse the Internet.
1. Select the INTERNET shortcut from the Driver menu to
open a browser.
NOTE: If you have not connected to a Wi-Fi hotspot, the
INTERNET menu option will not be available.
2. The Internet browser will open.
3. Click on the DROPDOWN in the address bar to show the
list of prepopulated webpages.
NOTE: The prepopulated webpages are set by your company
and cannot be changed from the device.
4. Click on the WEBSITE NAME to go to that webpage.
36 37
5. The system will allow access to any websites setup in
your PFM white list by your administrator. Attempting to
access a webpage that is not white listed will result in the
following screen.
1. Select DEVICE TRAINING from the Driver menu to view
the PeopleNet device training videos.
2. The list of available training videos will be displayed.
3. Highlight a video title and click the PL AY icon.
4. The video will begin to play. Click the PAUSE button to
pause the video, or the STOP button to exit and return
to the list of available videos.
BROWSING THE INTERNET
DEVICE TRAINING VIDEOS
38 39
1. Select NAVIGATION from the Home screen.
NOTE: In-Cab Navigation in partnership with NaviGo™ is an
optional service. Please contact your fleet administrator
to see if your fleet has activated this service for your
fleet/vehicle.
NOTE: If the NaviGo menu options do not become active (colored),
but are grayed out, please contact your fleet administrator
to see if you are authorized to use this service.
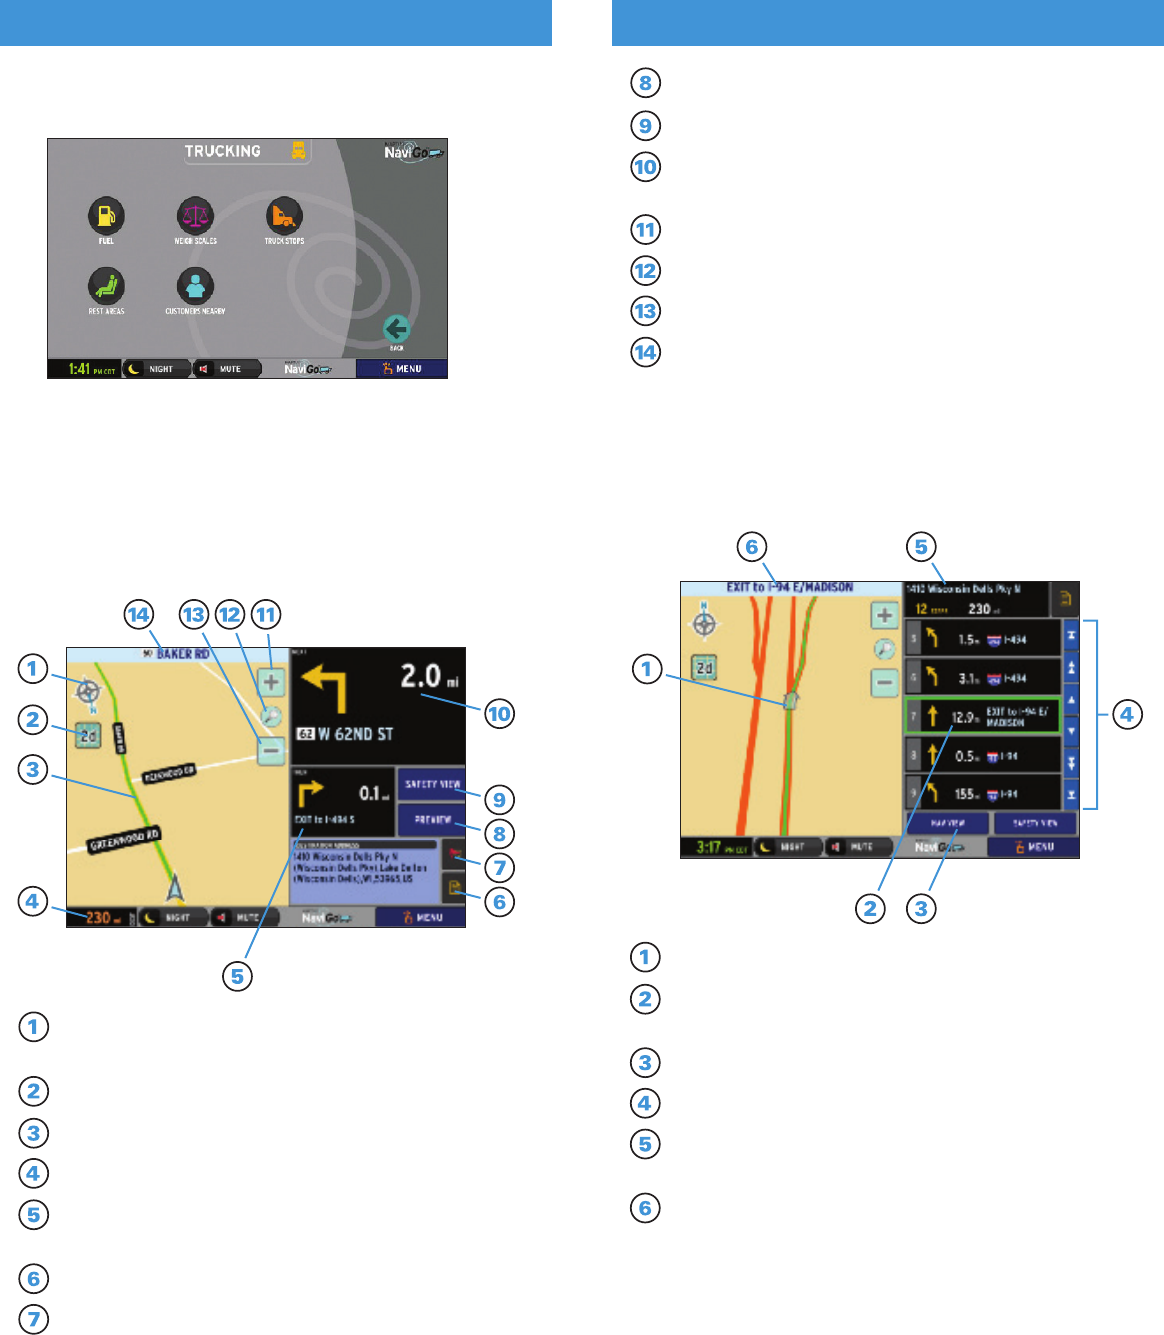
SEARCHING A LOCATION
1. Select WHERE TO? on the NaviGo menu screen.
2. Select LOCATION SEARCH to search for a new location.
NOTE: Select RECENT ADDRESSES for a searchable list of
addresses recently searched for. A blue icon indicates
locations that have been routed to previously.
3. Type the destination address in the FIND field.
4. Press SEARCH. A data call begins to confirm the
location search. Or,
IN-CAB NAVIGATION In Partnership with NaviGo™
5. Select POINTS OF INTEREST from the NaviGo menu screen
to search by category, such as restaurants or truck stops.
6. Choose where along the route to search for the Point
of Interest.
7. Select the CORRECT LOCATION from the CANDIDATE(S)
FOUND list and press GO.
8. The Navigation View screen is displayed with the vehicle’s
current position indicated on the map.
IN-CAB NAVIGATION In Partnership with NaviGo™
IN-CAB NAVIGATION In Partnership with NaviGo™
Preview Route Button
Safety View Button
Next maneuver indicator and distance from current location.
Press for verbal instructions.
Zoom In Button
Default Zoom Toggle – Country, Region, City, Local
Zoom Out Button
Current Road Name
PREVIEW ROUTE
1. Press the PREVIEW ROUTE button on the Navigation View
screen or Safety View screen to preview maneuver steps
for the route.
Route line with indicator of selected step’s maneuver.
Route steps with maneuver indicator and distance from prior
maneuver. Select a specific step to display on the map.
Navigation View Button
Scroll steps list up or down by 1, by 5, and to the start or end.
Destination, including total steps and distance. Click to
display the entire route on the map.
Location of selected step.
Compass rose. Press to toggle between Up = NORTH
and Up = CURRENT DIRECTION.
2D / 3D Toggle
Route Line
Distance remaining to destination
Then (Next +1) maneuver indicator and distance from next
maneuver. Press for verbal instructions.
Stop Details Button
Press to capture current location and route information for
future comments.
40 41
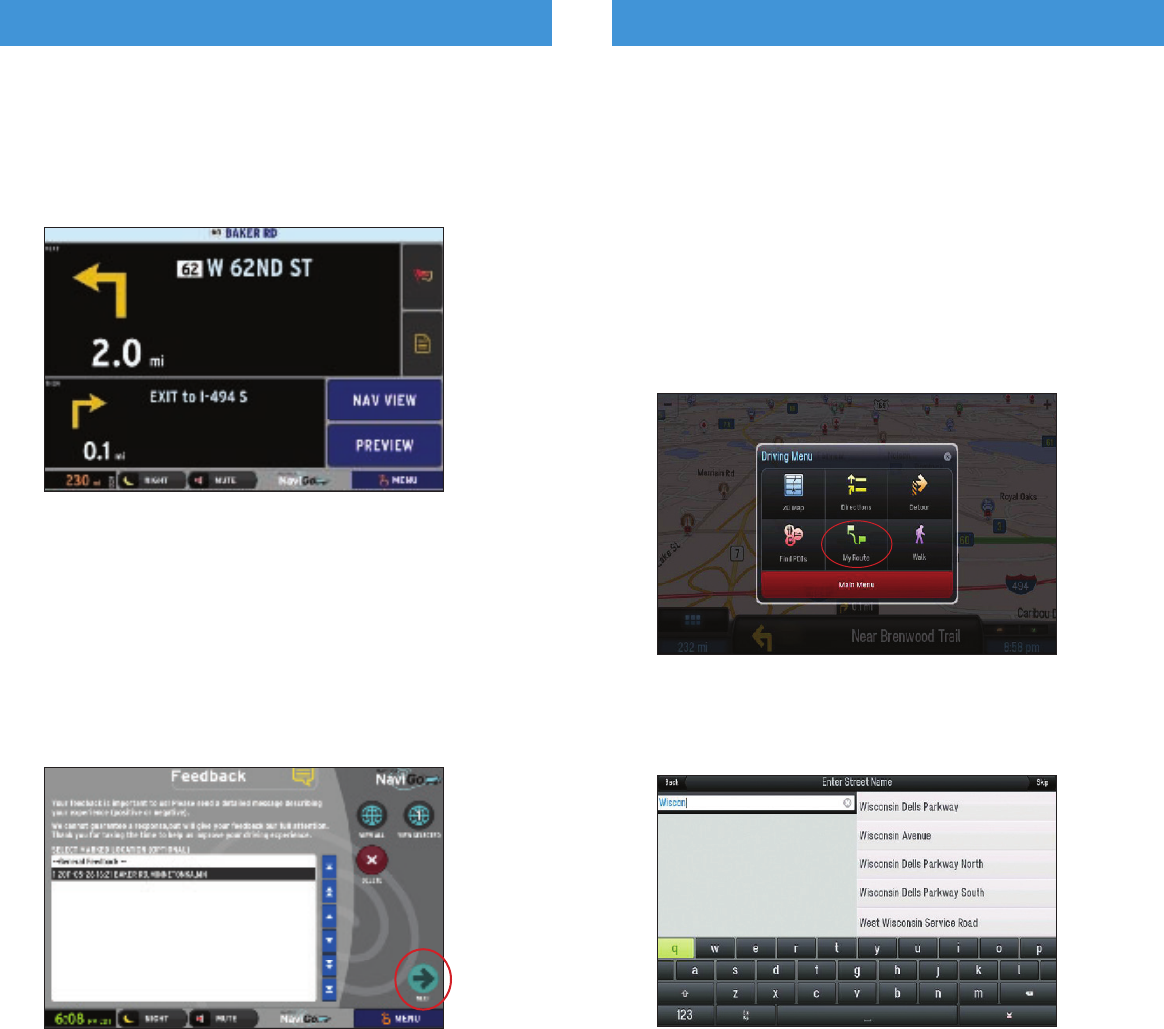
SAFETY VIEW
1. Press the SAFETY VIEW button on the Navigation View
screen or Preview screen to hide the map and increase
the size of the Next and Then (Next + 1) maneuvers for
greater visibility.
EXIT
1. Press the INFORMATION BAR across the bottom of the
screen or press the BLUE BUTTON on the face of TABLET
to send In-Cab Navigation to the background.
FEEDBACK FOR LOCATIONS (TO NAVIGO)
1. Select FEEDBACK on the NaviGo Menu screen to submit
feedback to NaviGo about your experience with NaviGo.
2. Locations previously marked from the Navigation View
screen will be listed with both address and the time they
were marked. Select GENERAL FEEDBACK or one of the
marked locations from the list.
3. Select NEXT to access the feedback entry screen. Type
feedback in the text box provided.
4. Select SEND to deliver feedback information to NaviGo.
NOTE: Use this feature to send NaviGo information on road
construction in a specific area, inaccurate road data,
or an inconvenient route. Your feedback helps to make
the NaviGo experience even better!
1. Select NAVIGATION from the Home screen.
NOTE: In-Cab Navigation in partnership with ALK CoPilot
Truck™ is an optional service. Please contact your
fleet administrator to see if you are authorized to
use this service.
SEARCHING A LOCATION
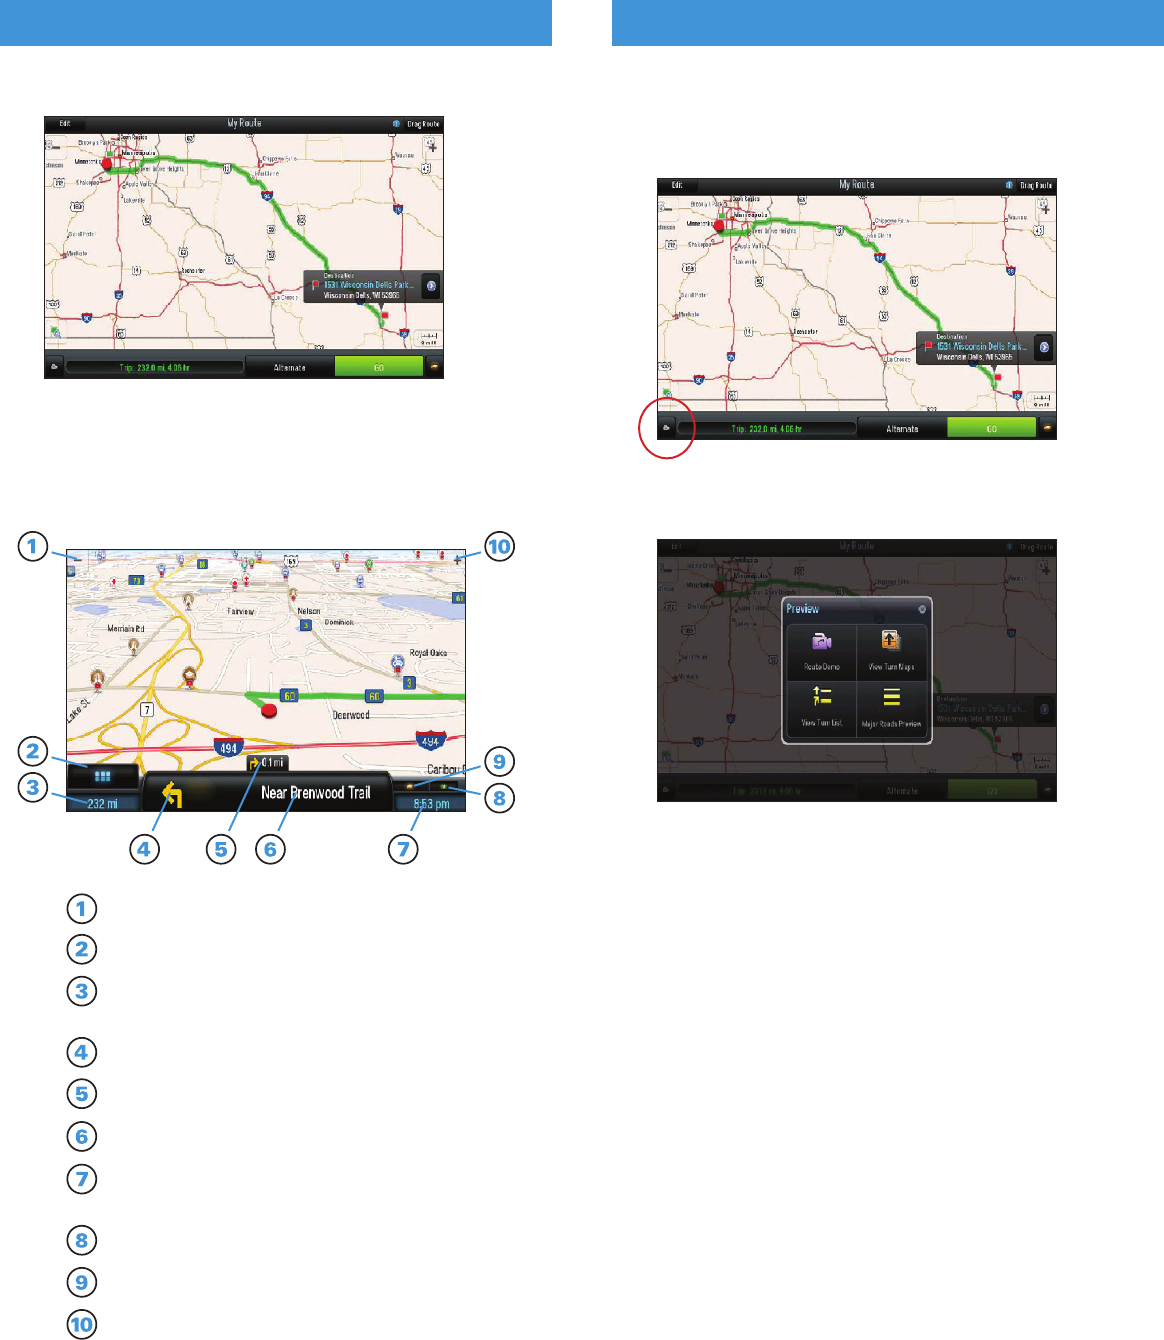
1. Select ADD NEW DESTINATION on the CoPilot Truck
Map screen or, if a previous route is still up.
2. Select MY ROUTE from the CoPilot Truck menu and select
EDIT to delete stops and create a new trip.
3. Select ADDRESS to enter in a destination by address.
CoPilot Truck suggests options based on what you type,
with recent searches at the top. Or,
4. Select POINTS OF INTEREST to search by category,
such as truck services, restaurants, or hotels.
IN-CAB NAVIGATION In Partnership with NaviGo™IN-CAB NAVIGATION In Partnership with CoPilot Truck™
42 43
IN-CAB NAVIGATION In Partnership with CoPilot Truck™IN-CAB NAVIGATION In Partnership with CoPilot Truck™
5. Select GO to accept the suggested route, or
6. Select ALTERNATE to have CoPilot Truck suggest up to
three alternative routes.
7. The navigation screen is displayed with the vehicle’s current
position indicated on the map.
PREVIEW ROUTE
1. Select MY ROUTE from the CoPilot Truck menu and
select the PREVIEW camera icon to preview your route.
2. Select ROUTE DEMO to have CoPilot Truck simulate
driving the route in the map view, or
3. Select VIEW TURN MAPS or VIEW TURN LIST to review
the route turn by turn.
EXIT
1. Press the INFORMATION BAR across the bottom of the
screen or press the BLUE BUTTON on the face of TABLET
to send In-Cab Navigation to the background.
44 45
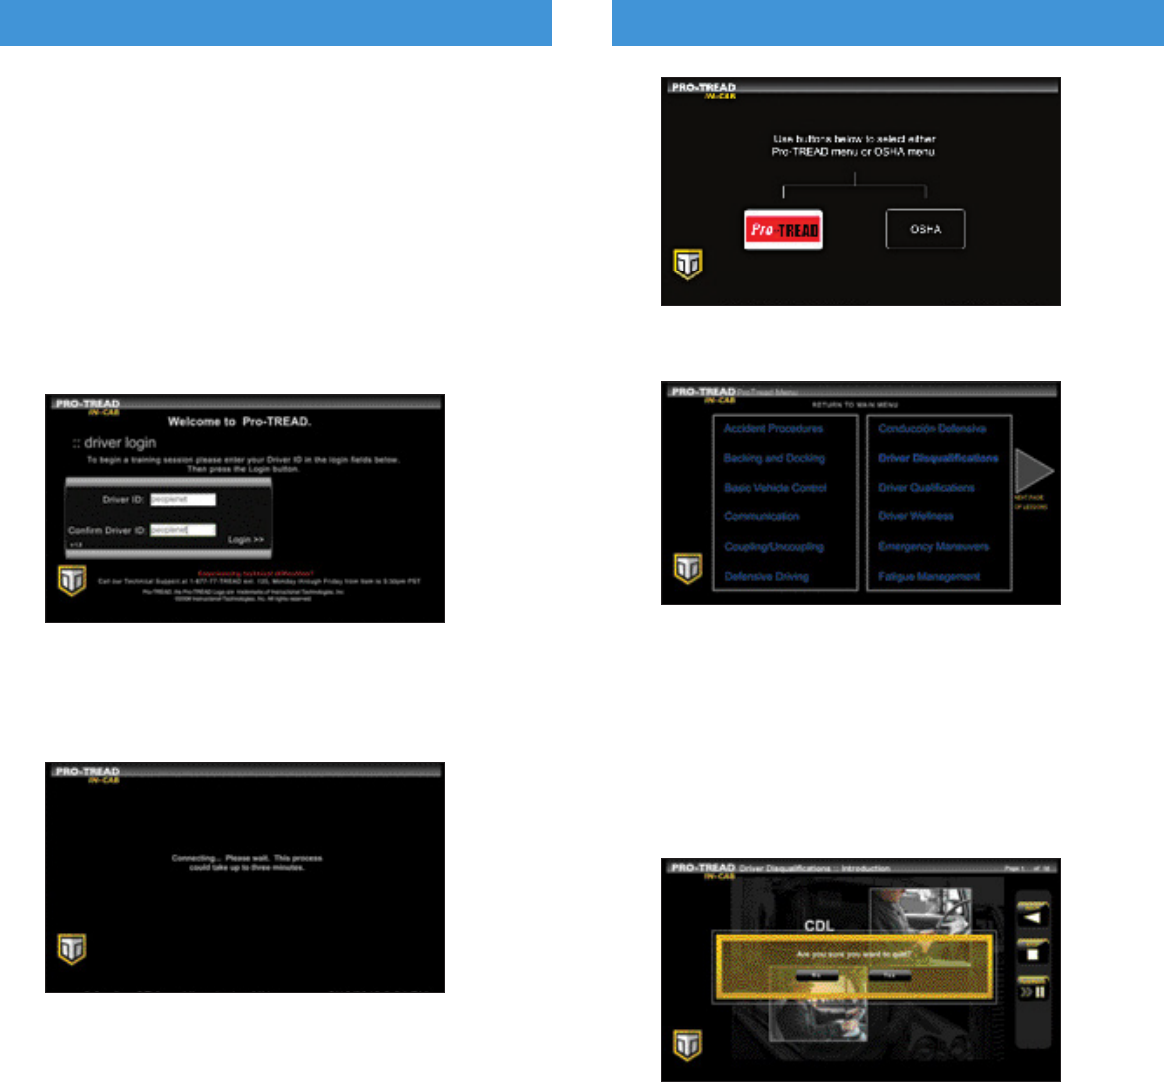
Zoom Out Button
Menu Button
Distance to destination. Press to change
information displayed.
Next maneuver and distance to it
Next +1 maneuver and distance to it if close
Next maneuver street name
Estimated time of arrival. Press to change
information displayed.
GPS status – green is good.
Vehicle type of route provided.
Zoom In Button
46
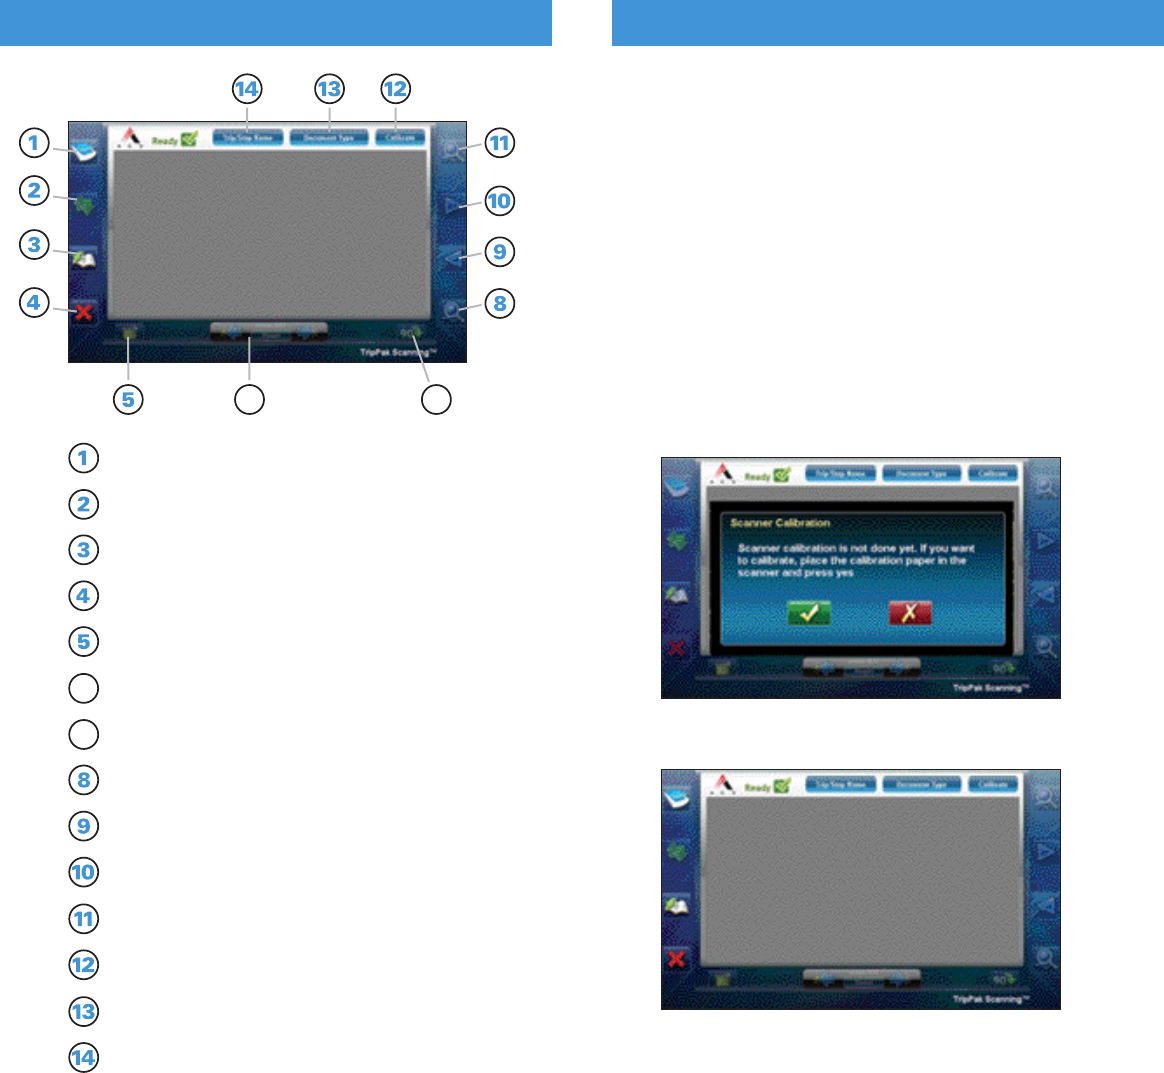
6. Select the LESSON to play from the menu.
7. From the lesson you can PLAY, PAUSE, go BACK, and
STOP anywhere within the lesson.
NOTE: The Pro-TREAD application will cease playing any
lesson if vehicle movement is detected.
8. To quit the application, press STOP and Pro-TREAD will
place a data call to submit lesson progression to the
Pro-TREAD web portal.
9. Once STOP is selected you will be prompted with a
confirmation “Are you sure you want to quit?” Select
YES to exit Pro-TREAD.
IN-CAB TRAINING In Partnership with Pro-TREAD
47
To access In-Cab Training with Pro-TREAD:
1. Select the DRIVER TRAINING shortcut in the Driver menu.
NOTE: In-Cab Training in partnership with Pro-TREAD is an
optional service. Please contact your fleet administrator
to see if your fleet has activated this service for your
fleet/vehicle.
2. Enter the DRIVER ID associated with your Pro-TREAD login.
NOTE: Contact your fleet manager for Driver ID assignment.
PeopleNet Customer Support does not have access
to this information.
3. Confirm DRIVER ID by entering it again.
4. A data call will be placed to validate login and receive
lesson progression from Pro-TREAD’s web portal.
5. Once login is complete, select the lesson category
PRO-TREAD or OSHA.
IN-CAB TRAINING In Partnership with Pro-TREAD
48
IN-CAB SCANNING In Partnership with TripPak SCANNING™
To access In-Cab Scanning:
1. Plug the TRIPPAK SCANNING SCANNER DEVICE in
the display’s USB port.
2. Select the SCANNING shortcut from the Home screen
to access TripPak scanning.
NOTE: In-Cab Scanning is an optional service. Please contact
your fleet administrator to see if your fleet has activated
this service.
3. Calibrate the SCANNER, if needed, by inserting the
calibration paper from the TripPak scanner package.
NOTE: If the calibration paper is not available, use any
document that is not blank.
4. Scan the DOCUMENT.
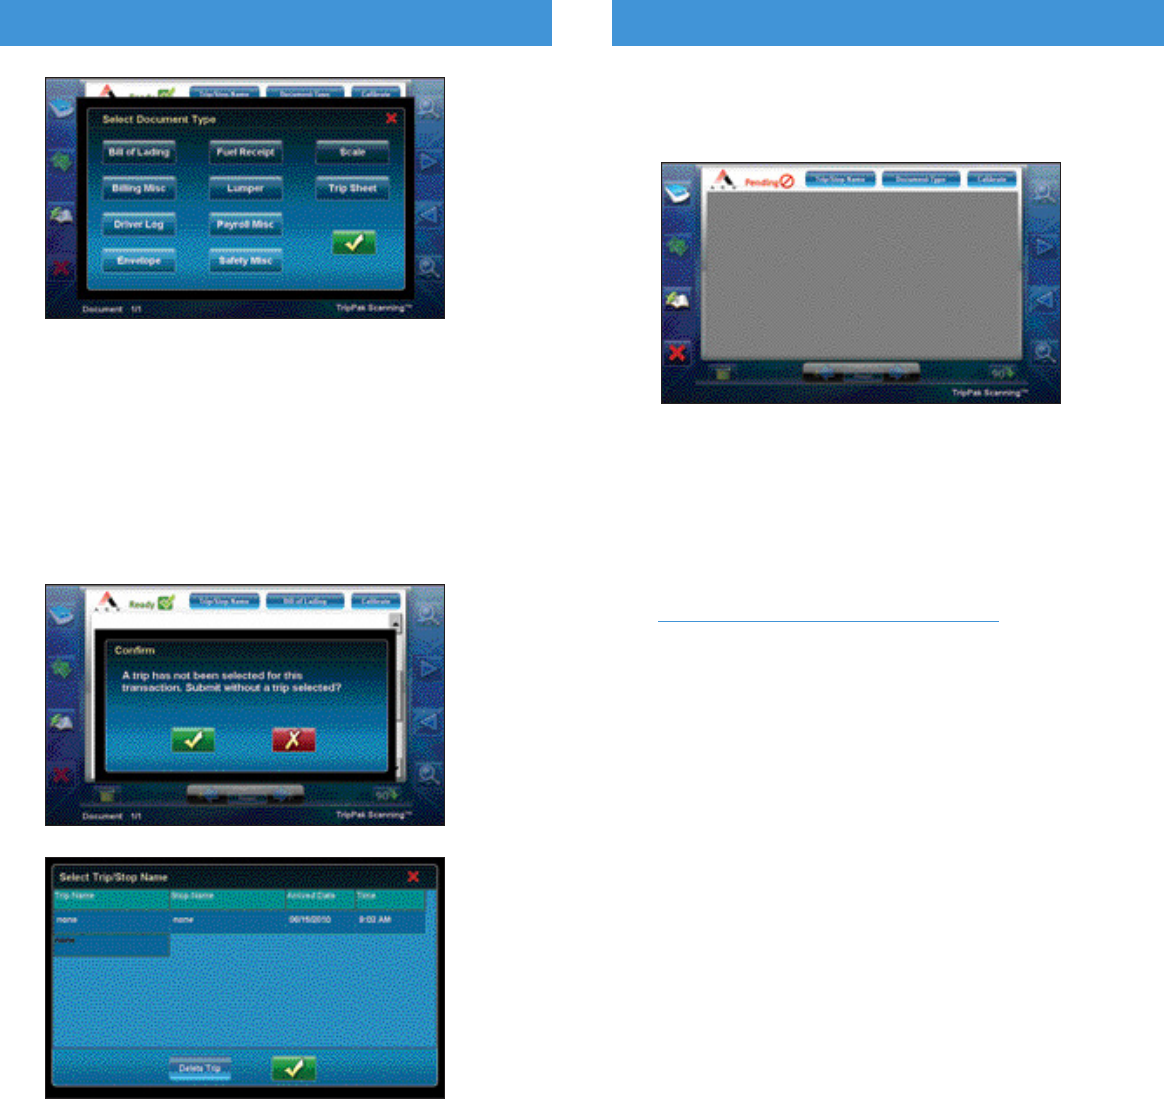
5. Select the DOCUMENT TYPE from the pop-up list.
NOTE: Document type options are not configurable. Please
choose from this list as provided.
49
IN-CAB SCANNING In Partnership with TripPak SCANNING™
67
Scan Page
Send Transaction
View Transaction History
Close the TripPak SCANNING application
Delete Image
Image Clean-Up
Rotate Image
Zoom Out
Previous Page
Next Page
Zoom In
Calibrate Scanner
On-Screen Doc Typing
In-Cab Indexing with Trip/Stop Data
6
7
50 51
IN-CAB SCANNING In Partnership with TripPak SCANNING™
10. The application will provide a PENDING status until TripPak
confirms that the transaction has been successfully received,
and a reference number provided.
11. Once the transaction is confirmed successful, the application
will go back to a READY state and the next documents can
be scanned.
12. Go to TRANSACTION HISTORY to view previous submissions.
13. Use the REFERENCE ID provided in the transaction history
to view documents online at:
https://www.trippak.com/DriverView/
IN-CAB SCANNING In Partnership with TripPak SCANNING™
6. Repeat STEPS #5 AND #6 for each document for the
stop location.
7. Press SUBMIT once all documents have been scanned
and doc typed.
8. When prompted, Select TRIP AND STOP from the pop-up
list, or if no trips/stops are available, enter the trip and stop
information manually. Press the GREEN CHECKBOX
to submit.
9. A data call will begin to send the documents to your fleet.
NOTE: Depending on the number and size of the documents
scanned, the data call can take up to several minutes,
but should not disrupt your ability to use other
applications.