PerComm 1100 e80 2-way pager User Manual E80 Quick Guide R2
PerComm Inc e80 2-way pager E80 Quick Guide R2
PerComm >
Contents
- 1. Quick Guide
- 2. Reference Manual
Quick Guide
REVISION 2: 3/10/03 © 2003 PerComm, Inc.
e80
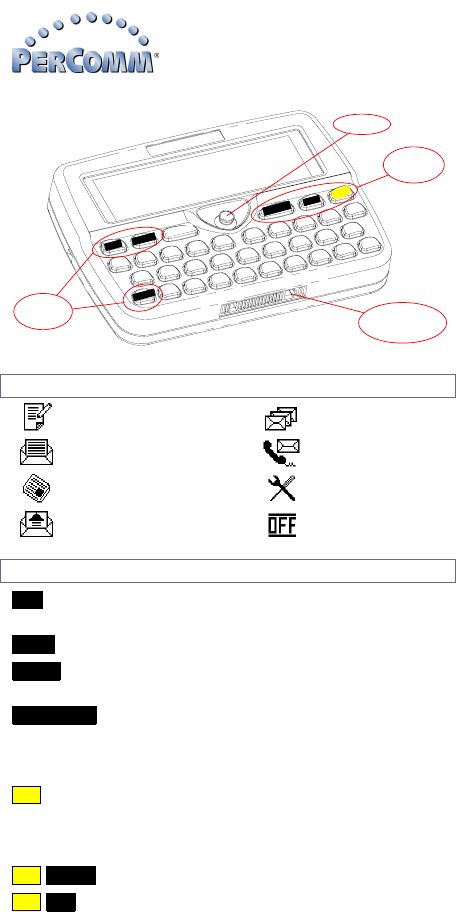
Device
Quick Start Guide
LCD display:
Main Menu appears here
PerComm
ENTER
ESCMENUDELALT
CAPS
SPACE
QWE
AS
RT
G
F
VB
H
YUI
K
N
L
,
M
J
OP
.
C
ZX
D
Joystick
Control
keys Insert power
cable here
Control
keys
MAIN MENU
SEND A MESSAGE FOLDERS
INBOX ADDRESS BOOK
NEWS PREFERENCES
OUTBOX POWER OFF
CONTROL KEYS
ESC - Exit from current menu or text screen.
- Press and hold to turn backlight on or off.
MENU - Display a popup menu (if one is available).
ENTER - Select highlighted item or next option in an
option field or checkbox.
CAPS/SHIFT - Once to enter an uppercase letter.
- Twice for Shift Lock (all uppercase).
- Once again to return to lowercase
characters.
ALT - Once to enter a number or special character.
- Twice for ALT Lock (all numbers or special
characters).
- Once again to return to normal characters.
ALT-ENTER - Return to Main Menu.
ALT-DEL - Clear (delete) all characters to the left of the
cursor (while editing text).
For more information, see the e80 Personal Messaging
Device Reference Guide on the accompanying CD-ROM.
Getting Started
© 2003 PerComm, Inc. REVISION 2: 3/10/03
INSTALL THE BATTERY
Figure showing
battery cover
being removed
Remove the battery cover by pressing
down and outwards on the cover
thumb grip.
Figure showing
battery being
installed
Position the PerComm Lithium Ion
battery as shown, oriented so that the
metal contacts on the back of the
battery line up with the metal contacts
inside the cabinet.
Figure showing
battery being
installed
Rotate the battery down into the
cabinet while holding the lower edge
in firmly, until it is in place with label
facing up.
Do not force the battery in; if properly
lined up it should snap in easily.
Figure showing
battery cover
being replaced
Replace the battery cover: position the
cover tabs in the slots on both cabinet
sides and slide the cover forward until
the tongue on the leading edge snaps
into place.
Use only a PerComm Lithium Ion battery in your e80
device. Any other battery type may cause damage.
CHARGE THE BATTERY
Figure showing
power cord being
inserted
Insert the power cable as shown in the
illustration.
Plug the AC/DC transformer into an
AC power source. Charging will begin
immediately.
Figure showing
battery charging
indicator
When the battery is completely
charged as indicated on the LCD
display, unplug the power cable at
both ends.
Your e80 device is now ready for use.
SET DATE / TIME AND OWNER INFORMATION
Select PREFERENCES in the Main Menu.
Select Owner Information and enter your name, phone
number and any comments.
When done, press ESC to save changes and exit.
Select Date and Time.
Push the joystick and to move from field to field and
press to select entries in each field.
When done, press ESC to save changes and exit.
Using Your e80 Device
REVISION 2: 3/10/03 © 2003 PerComm, Inc.
SEND A MESSAGE
Send A Message
Select SEND A MESSAGE in the Main Menu.
Press MENU and select Add Contact or Manual Entry to
enter address.
Type message in the Msg: field, press MENU and select
Send.
Resend A Message
Select OUTBOX in the Main Menu.
Highlight a message to resend, press MENU and select
Resend.
INBOX MESSAGES
Select INBOX in the Main Menu.
Read A Message
Highlight a message and press the joystick to open the
message for viewing.
Forward A Message
While reading a message, press MENU and select Forward.
Enter address in To: field, press MENU and select Send.
Delete A Message
Highlight message to delete, press MENU and select Delete.
Reply To A Message
While reading a message, press MENU and select Reply.
Press MENU again and select an automatic reply message.
Or, select Compose Reply and enter a reply message, then
press MENU and select Send.
NEWS MESSAGES
Select NEWS in the Main Menu.
You can Read, Forward, and Delete news messages in the
same way as for Inbox messages.
THE ADDRESS BOOK
Select ADDRESS BOOK in the Main Menu.
Add A Contact Or Group
Press MENU and select New Contact or New Group.
Enter information as required.
When done, press MENU and select Save.
View A Contact Or Group
Highlight a contact or group and press the joystick to view
details.
Using Your e80 Device
© 2003 PerComm, Inc. REVISION 2: 3/10/03
Edit/Delete A Contact/Group
Highlight a contact or group.
Press MENU and select Edit or Delete (Contact/Group).
After editing, press MENU and select Save.
MEMOS AND PERSONAL FOLDERS
Select FOLDERS in the Main Menu.
View A Memo
Highlight the desired memo in the Memos folder and press
the joystick.
Create A Memo
In the Memos folder, press MENU and select New Memo.
Enter memo label in Label: field and memo text in Text: field.
When done press MENU and select Save.
Edit/Delete A Memo
Highlight a memo in the Memos folder to edit or delete.
Press MENU and select Edit or Delete.
After editing, press MENU and select Save.
Add A Subfolder In News Archive/Personal Folders
Select the News Archive or Personal folder.
Press MENU and select New Folder.
Enter a name for the subfolder, press MENU and select Save.
SET PREFERENCES
Select PREFERENCES in the Main Menu.
Set the Mailbox Alert
Select Mailbox Alerts and make changes to alert volume
and type of alert for different kinds of messages.
Press ESC to save and exit.
Set an Alarm
Select Alarm Clock and make changes to alert volume and
alarm time and frequency for one or two different alarms.
Press ESC to save and exit.
Set Other Options
Select another option to modify: Private Time, Quick Text,
Signature, Address Book or Options (display features).
Make changes, then press ESC to save and exit.
…AND MORE
For more features and ways to use your e80 device, see the e80
Personal Messaging Device Reference Guide on the
accompanying CD-ROM.
RF EXPOSURE: the e80 device meets all FCC RF exposure guidelines
when hand-held or used with PerComm supplied accessories.