Phicomm WR203OC 300M Wireless N NAS router User Manual YJYWR203OC rev1
Shanghai Feixun Communication Co., Ltd. 300M Wireless N NAS router YJYWR203OC rev1
Phicomm >
YJYWR203OC-User Manual rev1

300Mbps Wireless N NAS Router
FWR-714U
User Manual
User Manual / V1.0
2
Copyright Statement
PHICOMM is the registered trademark of Shanghai Feixun Communication Co., Ltd. Other
trademark or trade name mentioned herein are the trademark or registered trademark of
the company. Copyright of the whole product as integration, including its accessories and
software, belongs to Shanghai Feixun Communication Co., Ltd. Without the permission of
Shanghai Feixun Communication Co., Ltd., individual or party is not allowed to copy,
plagiarize, imitate or translate it into other languages.
All the photos and product specifications mentioned in this manual are for references only,
as the upgrading of software and hardware, there will be changes. And if there are changes,
PHICOMM is not responsible for informing in advance. If you want to know more
information about our products, please visit our website at www.phicomm.com.

i
Table of Contents
300Mbps Wireless N NAS Rout
www.phicomm.com
CONTENTS
Chapter 1: Introduction
......................................... 1
Product Overview ....................................................................................... 1
Main Features .............................................................................................. 5
Chapter 2: Installation
................................................ 6
Physical Connection ................................................................................... 6
Configure the Computer’s IP Address ................................................ 7
Setup Wizard ............................................................................................. 14
Chapter 3: Router Configuration
................................. 19
Network Settings ..................................................................................... 19
WAN ................................................................................................................................... 21
LAN ..................................................................................................................................... 22
MAC Address Clone ..................................................................................................... 23
Dynamic DNS ................................................................................................................. 23
Wireless Settings ...................................................................................... 23
Wireless Basic Settings ............................................................................................... 24
Wireless Security Settings ......................................................................................... 25
Wireless MAC Address Filter .................................................................................... 27
Advanced Wireless Settings ..................................................................................... 28
Wireless Clients List ..................................................................................................... 30

ii
Table of Contents
300Mbps Wireless N NAS Rout
www.phicomm.com
WPS Settings .................................................................................................................. 30
WDS Settings .................................................................................................................. 31
DHCP Server .............................................................................................. 33
DHCP .................................................................................................................................. 33
DHCP Clients list ........................................................................................................... 34
Address Reservation .................................................................................................... 35
NAT ............................................................................................................... 36
Port Forwarding ............................................................................................................. 36
Port Triggering ............................................................................................................... 37
DMZ Host ......................................................................................................................... 39
UPnP ................................................................................................................................... 41
Multicast Forwarding Settings ................................................................................ 41
Security Options ....................................................................................... 42
Security Settings ........................................................................................................... 42
Advanced Security Settings ...................................................................................... 43
Local Web Management ........................................................................................... 44
Remote Web Management ...................................................................................... 45
Access Control .......................................................................................... 45
MAC/IP/Port Filter ........................................................................................................ 46
Web URL Filter ............................................................................................................... 48

iii
Table of Contents
300Mbps Wireless N NAS Rout
www.phicomm.com
Routing Settings ...................................................................................... 48
Static Routing Table .................................................................................................... 48
Dynamic Routing Settings ........................................................................................ 49
IP Bandwidth Control ............................................................................. 49
Storage ........................................................................................................ 50
UserAdmin ....................................................................................................................... 51
Disk Management ........................................................................................................ 52
FTP Server ........................................................................................................................ 52
SAMBA Server ................................................................................................................ 53
PRINTER Server .............................................................................................................. 54
MINIDLNA Server ......................................................................................................... 54
DOWNLOAD ................................................................................................................... 55
System Tools ............................................................................................. 56
Network Time Settings ............................................................................................... 56
Diagnostics ...................................................................................................................... 58
Wake On LAN ................................................................................................................. 59
Factory Defaults ............................................................................................................ 60
Backup and Restore ..................................................................................................... 61
Password .......................................................................................................................... 61
System Log ...................................................................................................................... 62
Traffic Statistics .............................................................................................................. 63

iv
Table of Contents
300Mbps Wireless N NAS Rout
www.phicomm.com
Firmware Upgrade ........................................................................................................ 63
Reboot ............................................................................................................................... 64
Logout .......................................................................................................... 64
Chapter 4: Download Wizard
...................................... 65
Before you start ........................................................................................ 65
Configuration ............................................................................................ 65
Chapter 5: Specification
............................................ 77
Appendix A: Troubleshooting
..................................... 79
Appendix B: Certification
.......................................... 83
FCC Statement .......................................................................................... 83
Appendix C: Glossary
.......................................... 85

300Mbps Wireless N NAS Rout
www.phicomm.com
1
Chapter 1: Introductio
Chapter 1: Introduction
Product Overview
Thank you for choosing FWR-714U Wireless N Router.
FWR-714U 300Mbps Wireless N Router is an all-in-one router, ideal for home and SOHO
users to share broadband Internet connection over the wired and wireless network. With
the speed of up to 300Mbps, it can provide users with extraordinary smooth internet
surfing, internet phone calling and on-line gaming.
The multi-functional USB port supports SAMBA server and DLNA (Digital Living Network
Alliance), which makes file sharing and HD streaming become easier. Each user can enjoy
easy printing after plugging in a USB printer into this wireless router. Additionally, this
FWR-714U can keep downloading HTTP, FTP and BT files to the USB disk even when your
PC is turned off.
Moreover, you can quickly setup the security at a simple push of the WPS (WiFi Protected
Setup) button on the fashionable designed router, preventing your device from potential
internet attacks.
Front Panel

300Mbps Wireless N NAS Rout
www.phicomm.com
2
Chapter 1: Introductio
Power LED: The Power LED lights up when the Router is powered on. When the Router
goes through its self-diagnostic mode during every boot-up, the LED flashes. When the
diagnostic is complete, the LED is continuously lit.
WLAN LED: The Wireless LED lights up when the wireless feature is enabled. It flashes when
the Router sends or receives data over the wireless network.
WPS (Wi-Fi Protected Setup) LED: If you have client devices (such as wireless adapters)
that support Wi-Fi Protected Setup, then you can use the Wi-Fi Protected Setup button to
automatically configure wireless security for your wireless network. To use Wi-Fi Protected
Setup, refer to the section of Wi-Fi Protected Setup.
USB LED: The USB LED lights up when a storage device or a USB printer has connected to
the USB port.

300Mbps Wireless N NAS Rout
www.phicomm.com
3
Chapter 1: Introductio
Internet LED: The Internet LED lights up when there is a connection made through the
Internet port. It flashes to indicate network activity over the Internet port.
LED (1~4): These LEDs are corresponding with the LAN ports on the rear panel. The LED is
continuously lit when the Router is connected to a device through that port. It flashes to
indicate network activity over that port.
LED Status Indication
POWER
On Power is on
Off Power is off
WLAN
On The wireless function is enabled
Off The wireless function is disabled
Blinking Sending or receiving data over wireless network
WPS
On A wireless device has been successfully connected to the network by WPS
function
Off WPS function is disabled
Blinking A wireless device is connecting to the network by WPS function. This process
will last in the first 2 minutes
USB
On A storage device or printer has connected into the USB port
Off No storage device or printer is plugged into the USB port
Blinking Data is transmitting
Internet
On Internet port is connected
Off Internet port is unconnected
Blinking Data is transmitting
LAN
(Port 1-4)
On LAN port is connected
Off LAN port is unconnected
Blinking Data is transmitting
300Mbps Wireless N NAS Rout
www.phicomm.com
4
Chapter 1: Introductio
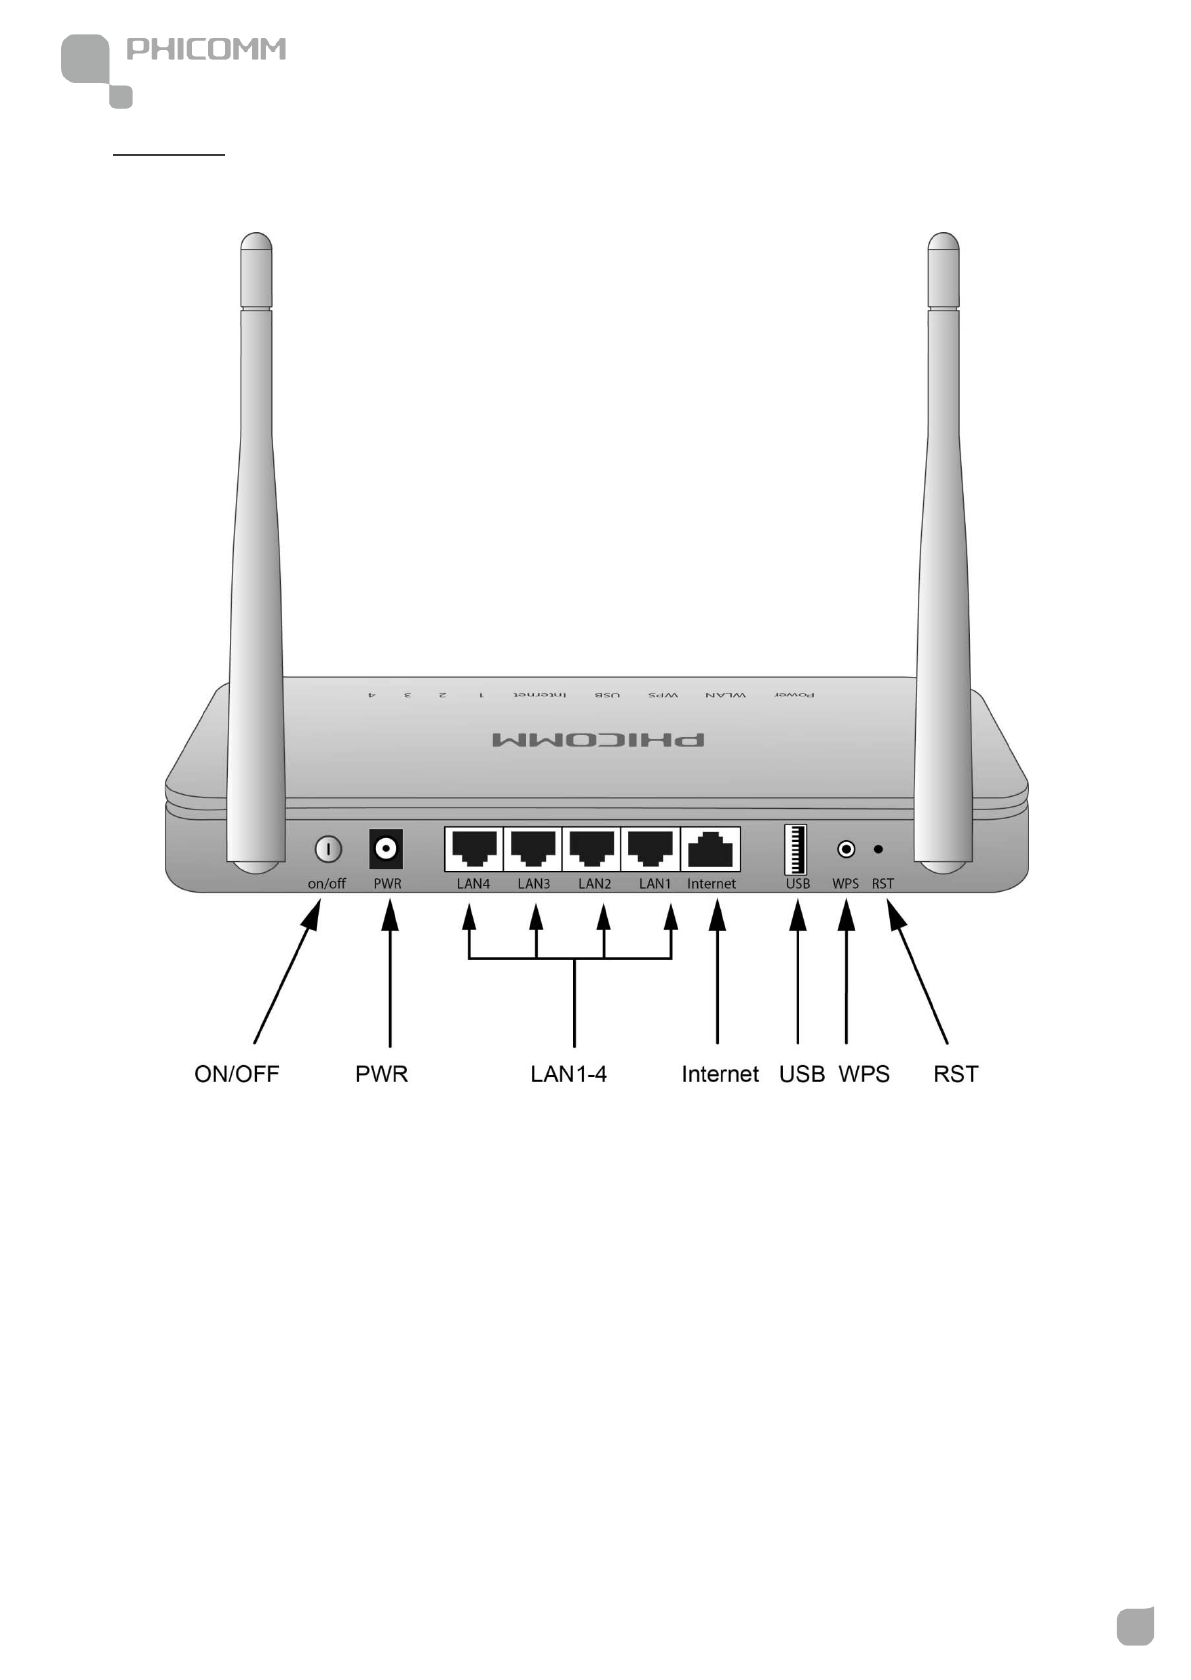
Rear Panel
ON/OFF: The power on/off button.
PWR: The Power port connects to the included power adapter.
LAN (1-4): Using Ethernet cables, these Ethernet ports (4, 3, 2, 1) connect the Router to
computers and other Ethernet network devices on your wired network.
Internet: Using an Ethernet cable (also called a network or Internet cable), the Internet port
connects the Router to your Internet connection, which is typically a cable or Digital
Subscriber Line (DSL) modem.

300Mbps Wireless N NAS Rout
www.phicomm.com
5
Chapter 1: Introductio
USB: Plug a storage device or a USB printer into this port.
WPS: Press the button and the WPS LED in front panel flashing, WPS function is enabled.
RST: Long press and hold the button for 8 seconds, the Router will restore to its factory
default settings.
Main Features
• Wireless N speed up to 300Mbps, further wireless coverage, more stable performance
• MIMO technology greatly increases the wireless range, sensitivity and stability
• File sharing, USB printing and High -definition video streaming via Multi-functional
USB port
• Supports SAMBA and DLNA, stream videos, photos and music to your HDTV
• Supports offline download, 24 hours downloading even PC is turned off
• Supports IP Bandwidth Control, helps you to control the reasonable allocation of
bandwidth to achieve optimum utilization, ensuring reliable Internet connection
• Quick wireless security setup by simply pressing the WPS button
• WDS wireless bridge provides seamless bridging to expand your wireless network
• Built-in firewall featured with IP, MAC, URL filtering and ARP attack prevention to
protect your PC
300Mbps Wireless N NAS Rout
www.phicomm.com
6
Chapter 2: Installation
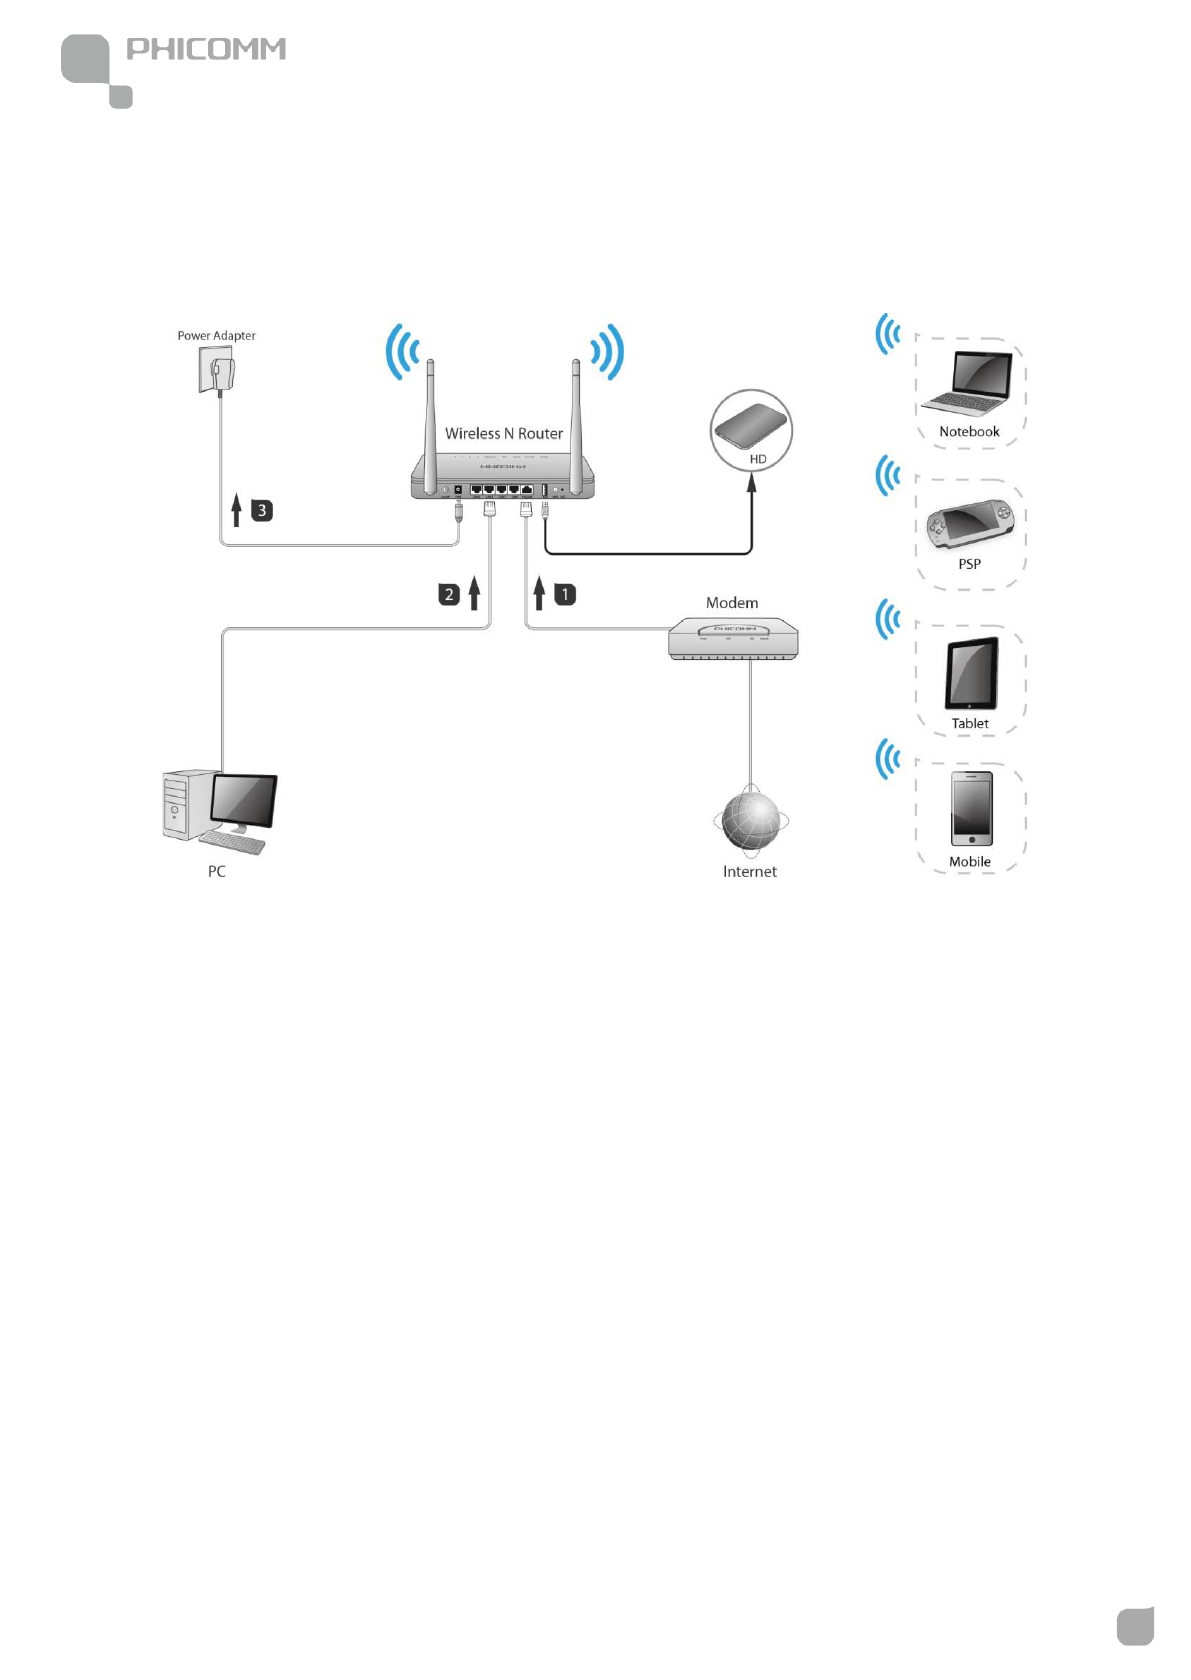
Chapter 2: Installation
Physical Connection
Note:
• Actual product may be different as the picture, but the installation will be the same.
• Please use the included power adapter. Use of a different power adapter could cause
damage and void the warranty for this product.
• Please ensure the Power, WLAN, LAN and Internet lights are ON when the installation
finished successfully.
300Mbps Wireless N NAS Rout
www.phicomm.com
7
Chapter 2: Installation
Configure the Computer’s IP Address
After connecting your PC to the router, please configure your PC’s IP address.
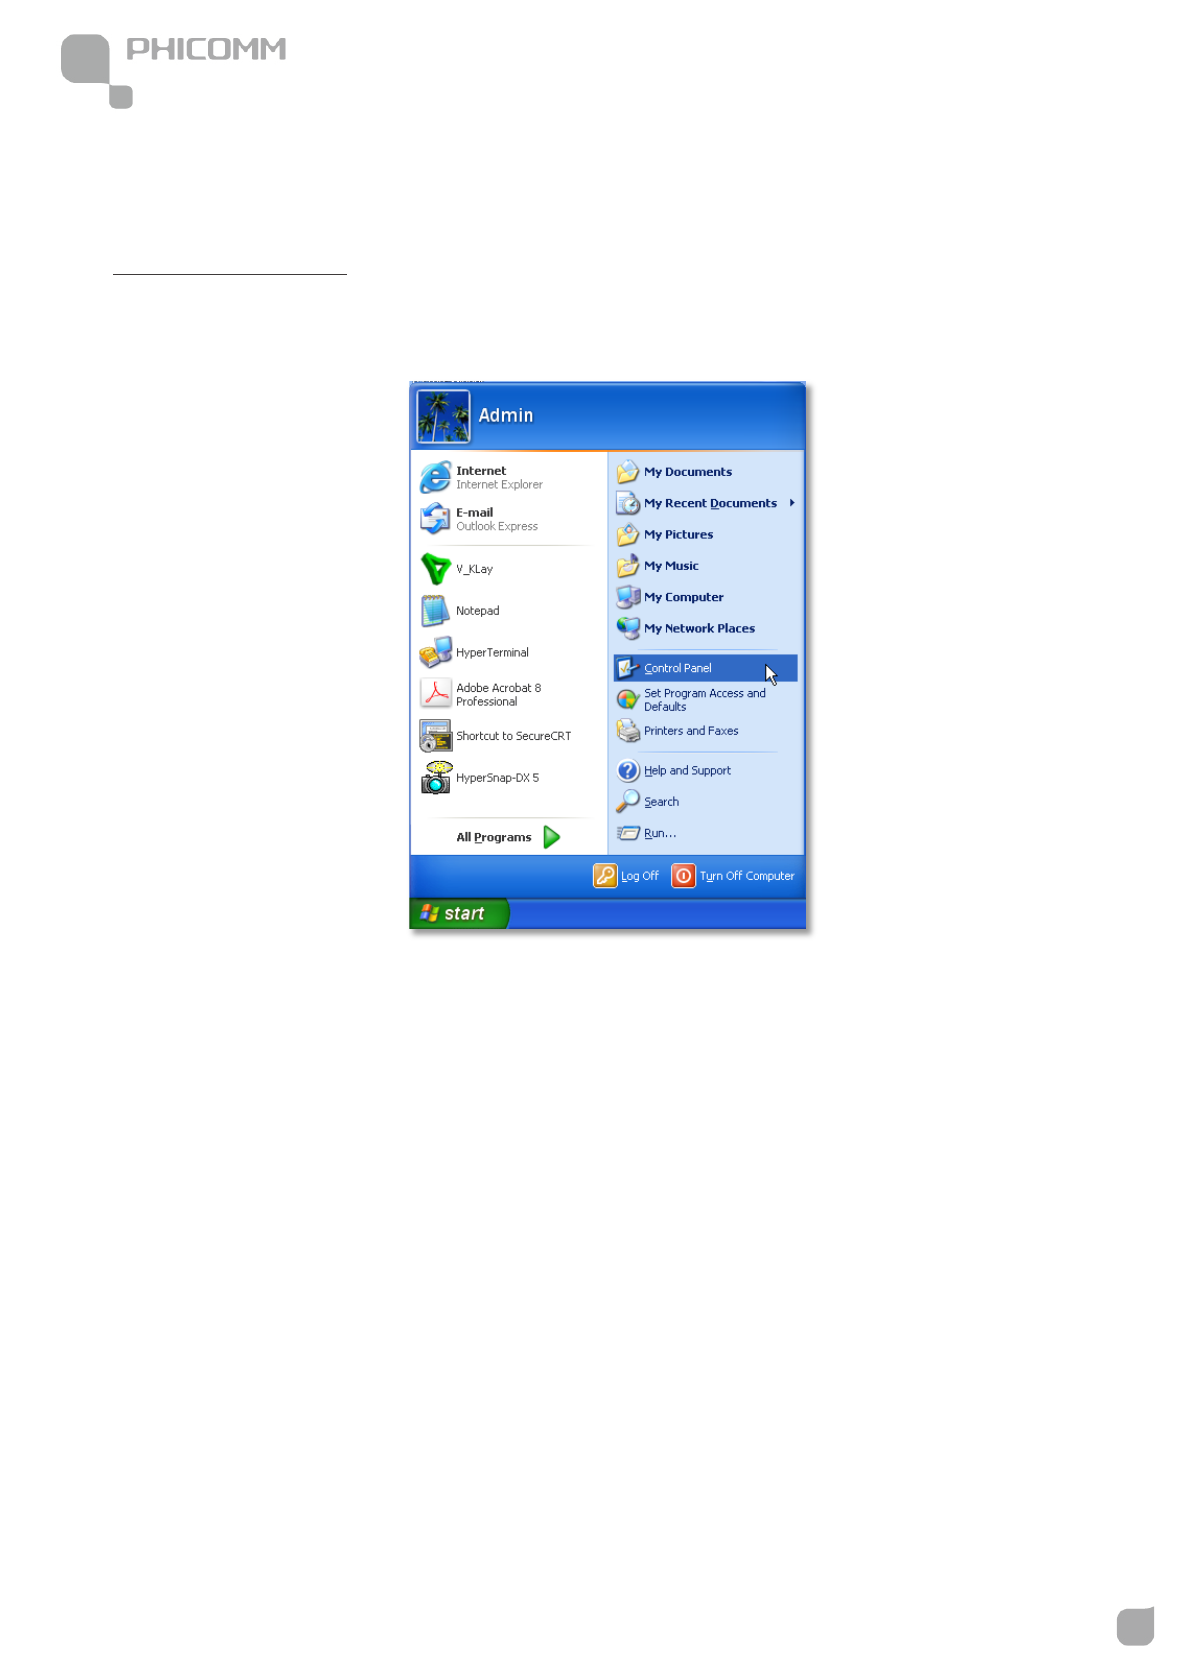
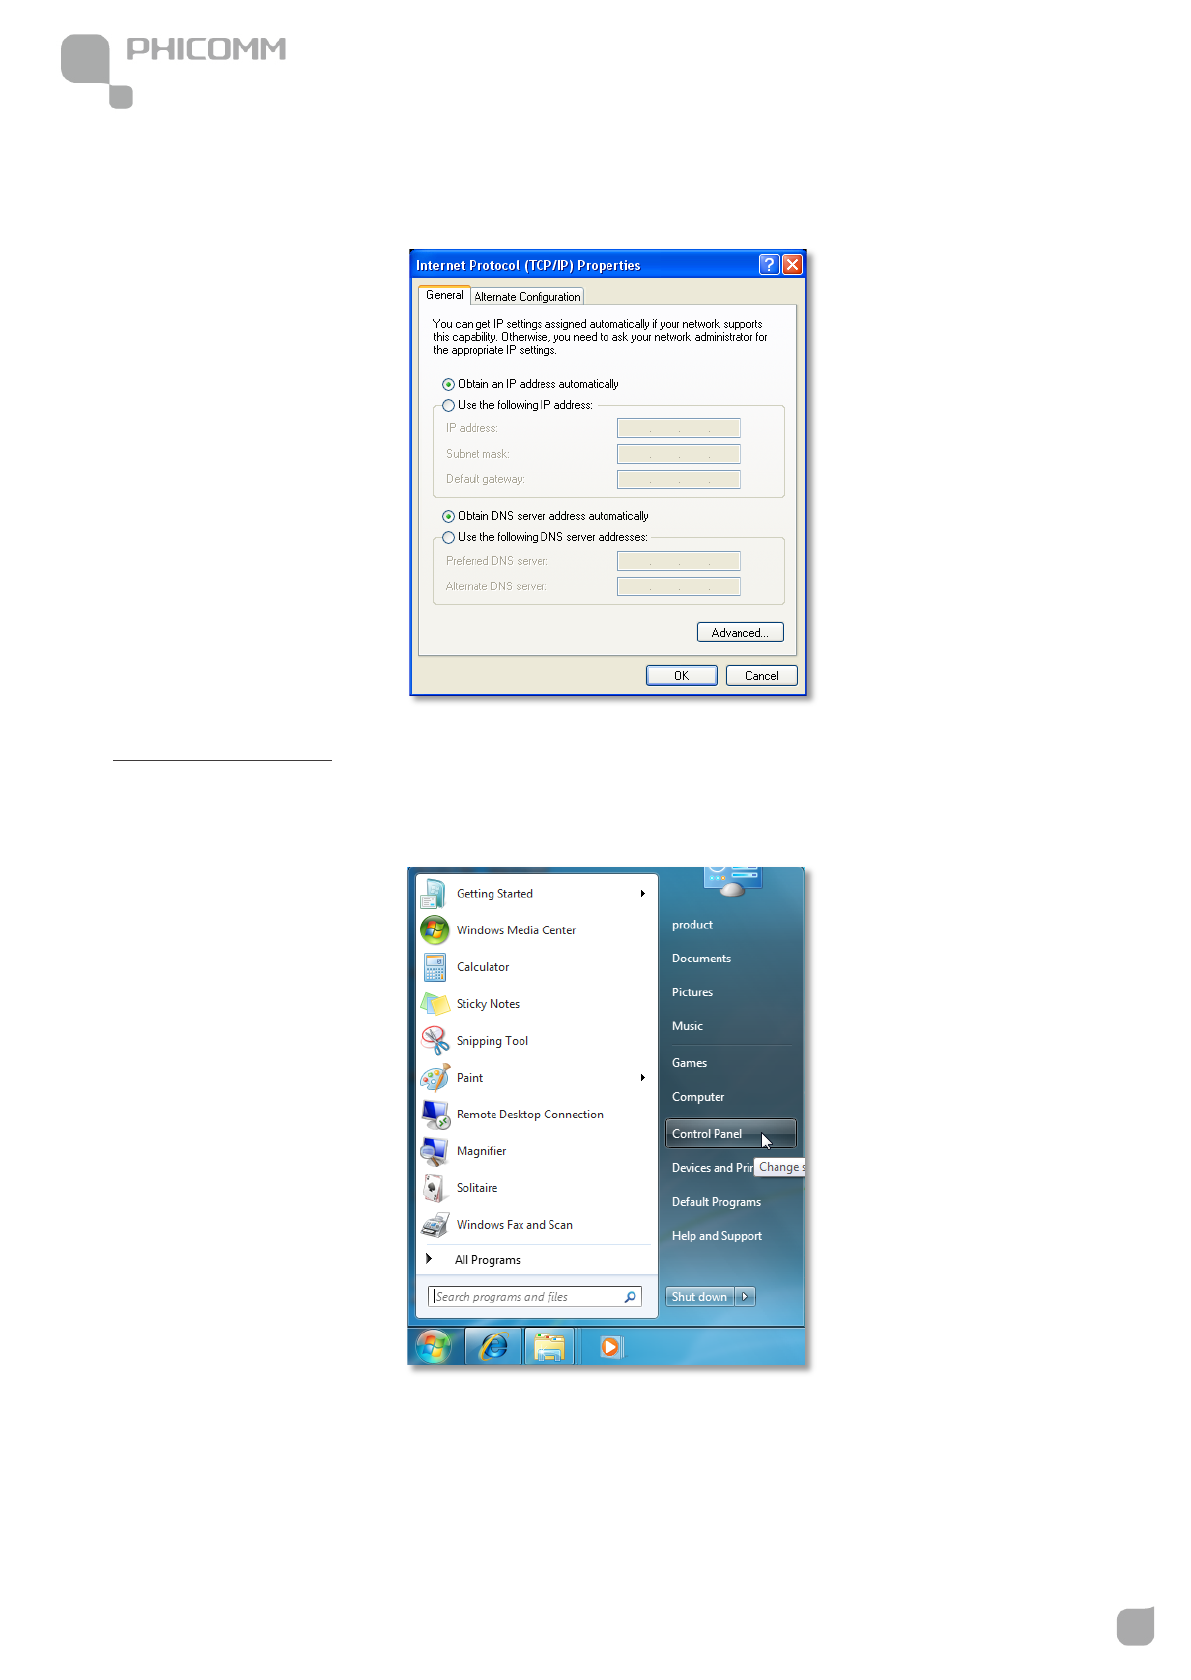
1) Click Start > Control Panel.
For Windows XP/2000
2) Select and double click Network Connections.

300Mbps Wireless N NAS Rout
www.phicomm.com
8
Chapter 2: Installation
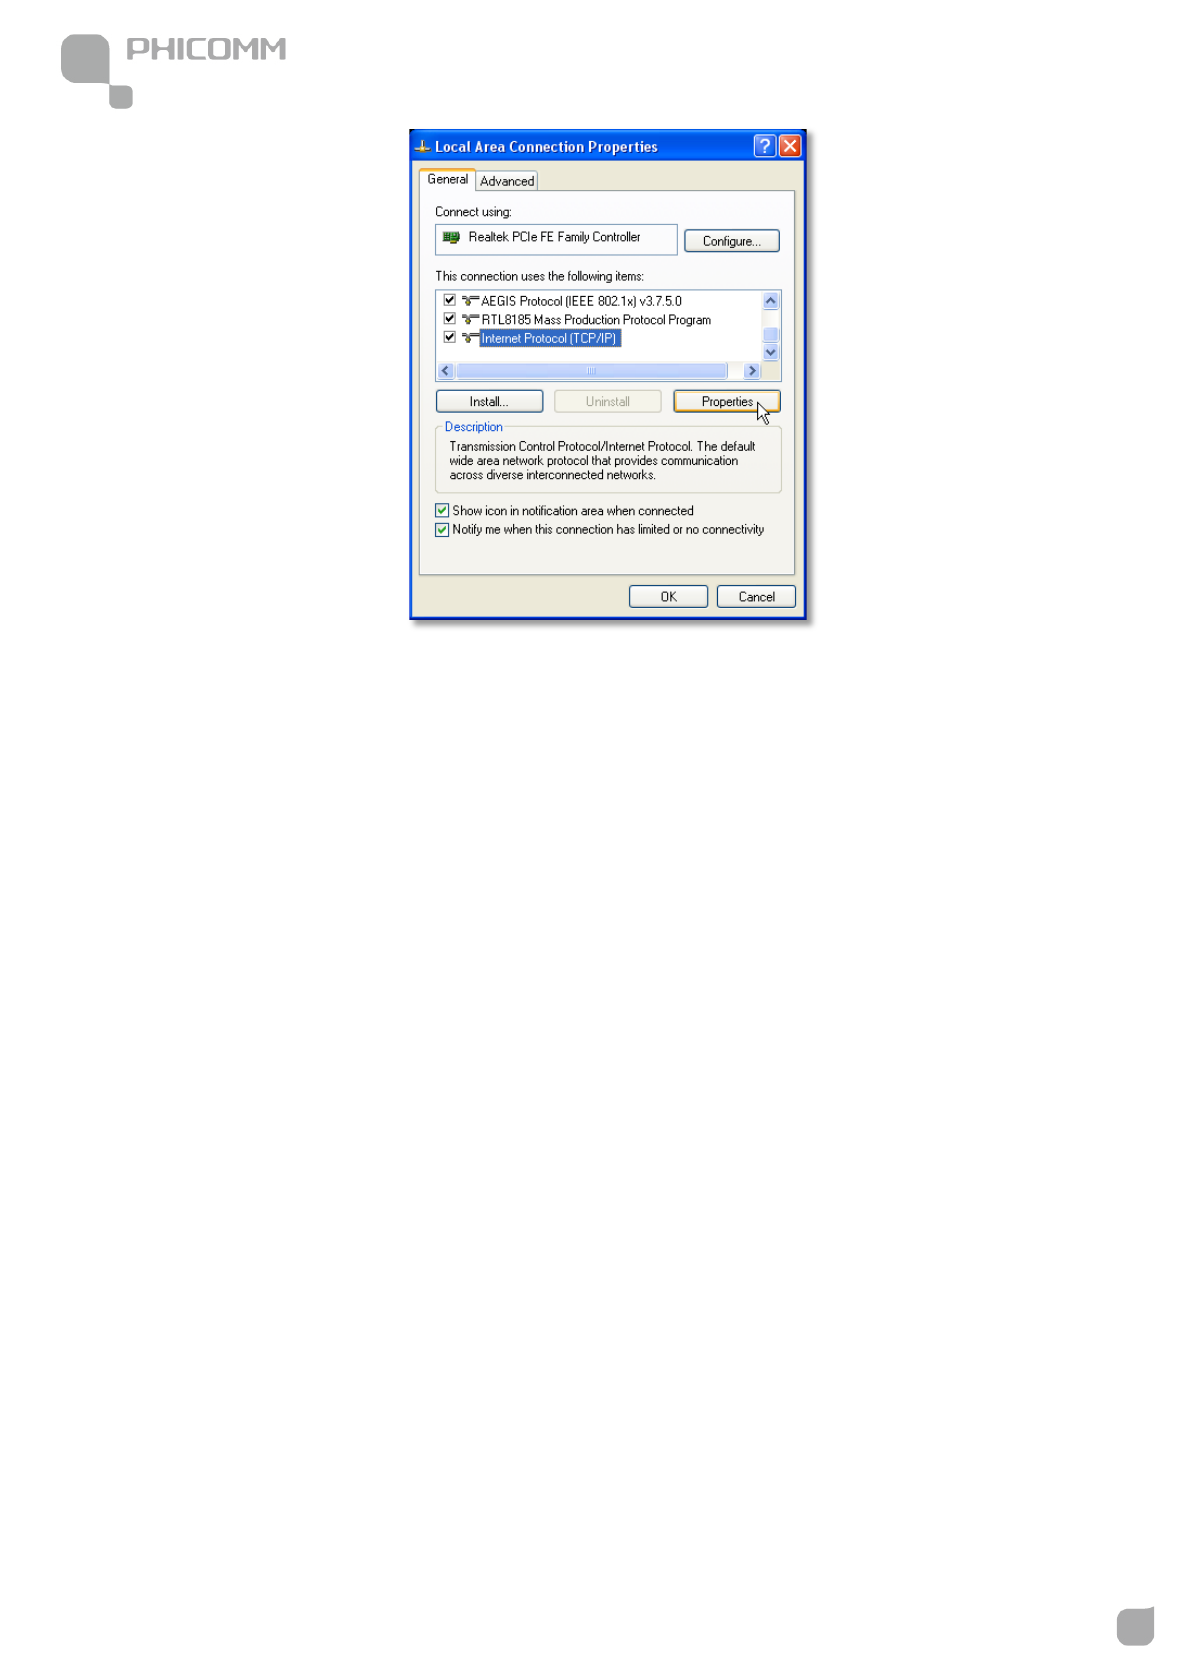
3) Right click Local Area Connection and then select Properties.
4) Select Internet Protocol (TCP/IP) and click Properties.
300Mbps Wireless N NAS Rout
www.phicomm.com
9
Chapter 2: Installation
300Mbps Wireless N NAS Rout
www.phicomm.com
10
Chapter 2: Installation
5) Select Obtain an IP address automatically and Obtain DNS server address
automatically. Then click OK.
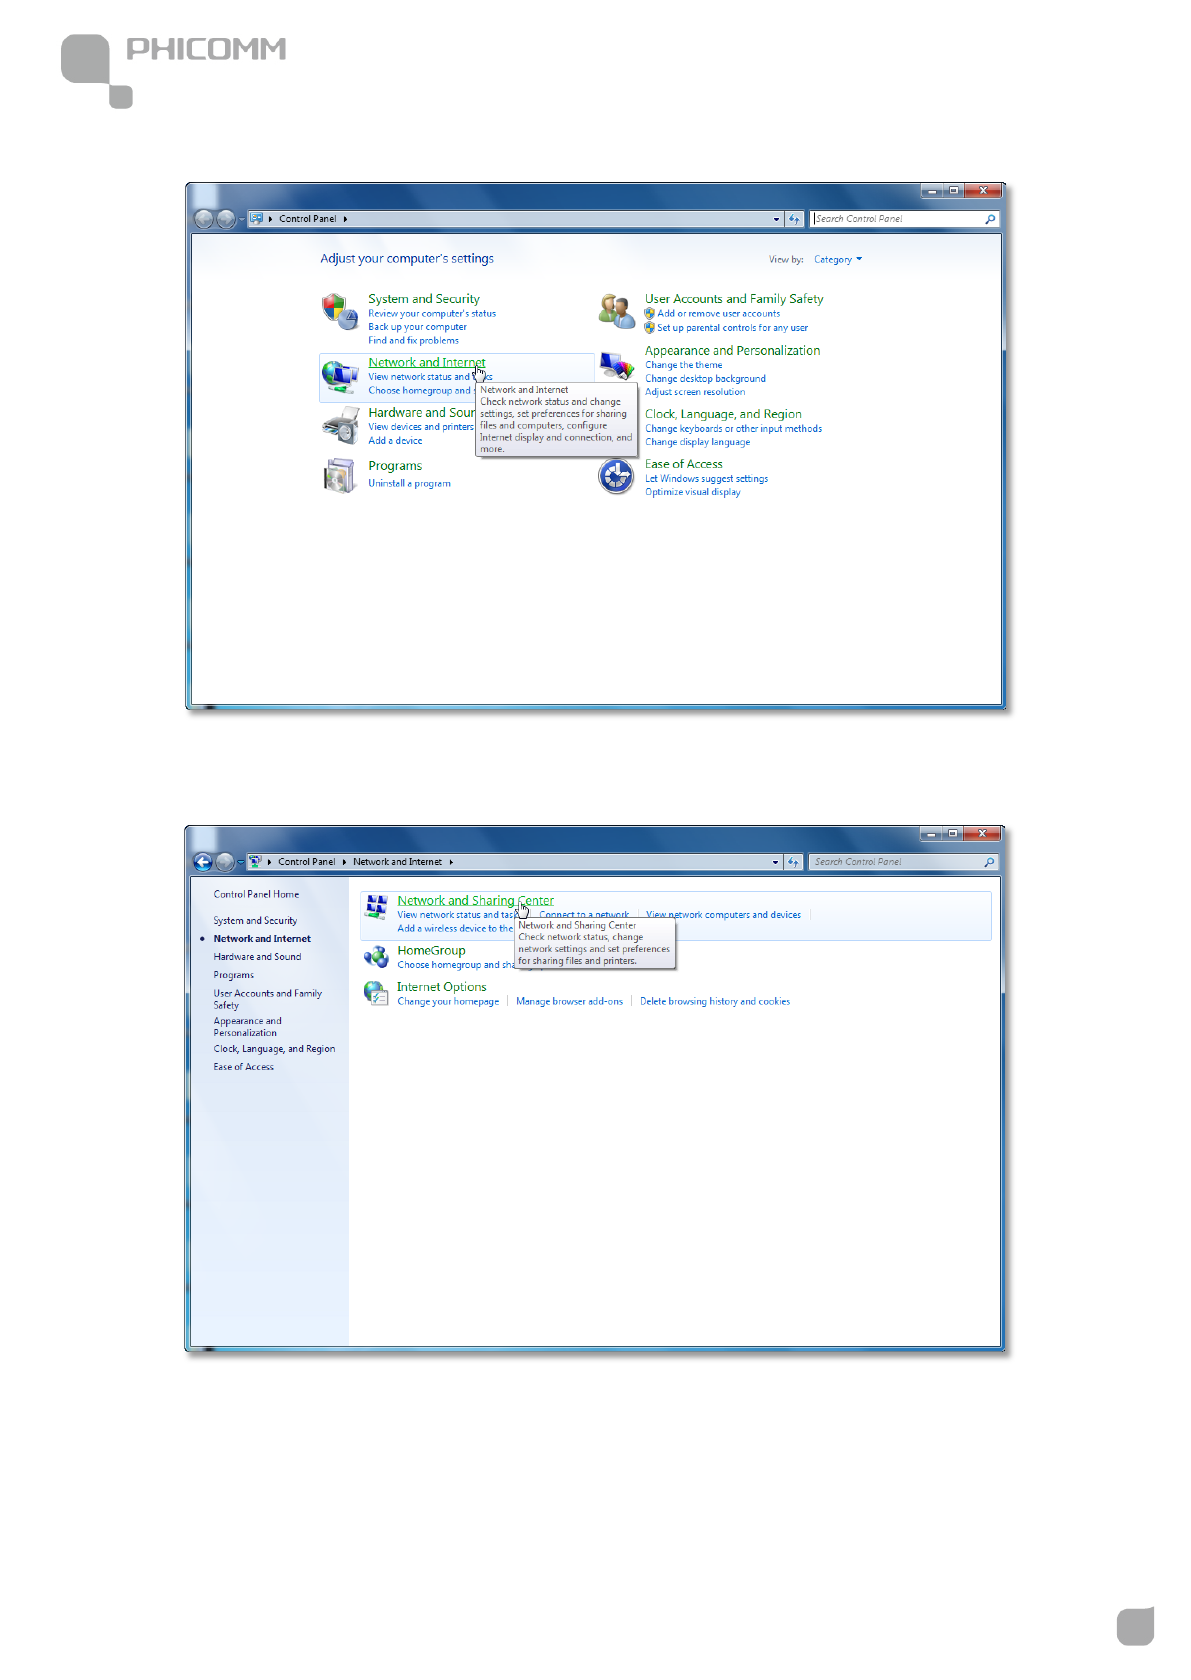
1) Click Start>Control Panel.
For Windows Vista/7
300Mbps Wireless N NAS Rout
www.phicomm.com
11
Chapter 2: Installation
2) Click Network and Internet.
3) Click Network and Sharing Center.
300Mbps Wireless N NAS Rout
www.phicomm.com
12
Chapter 2: Installation
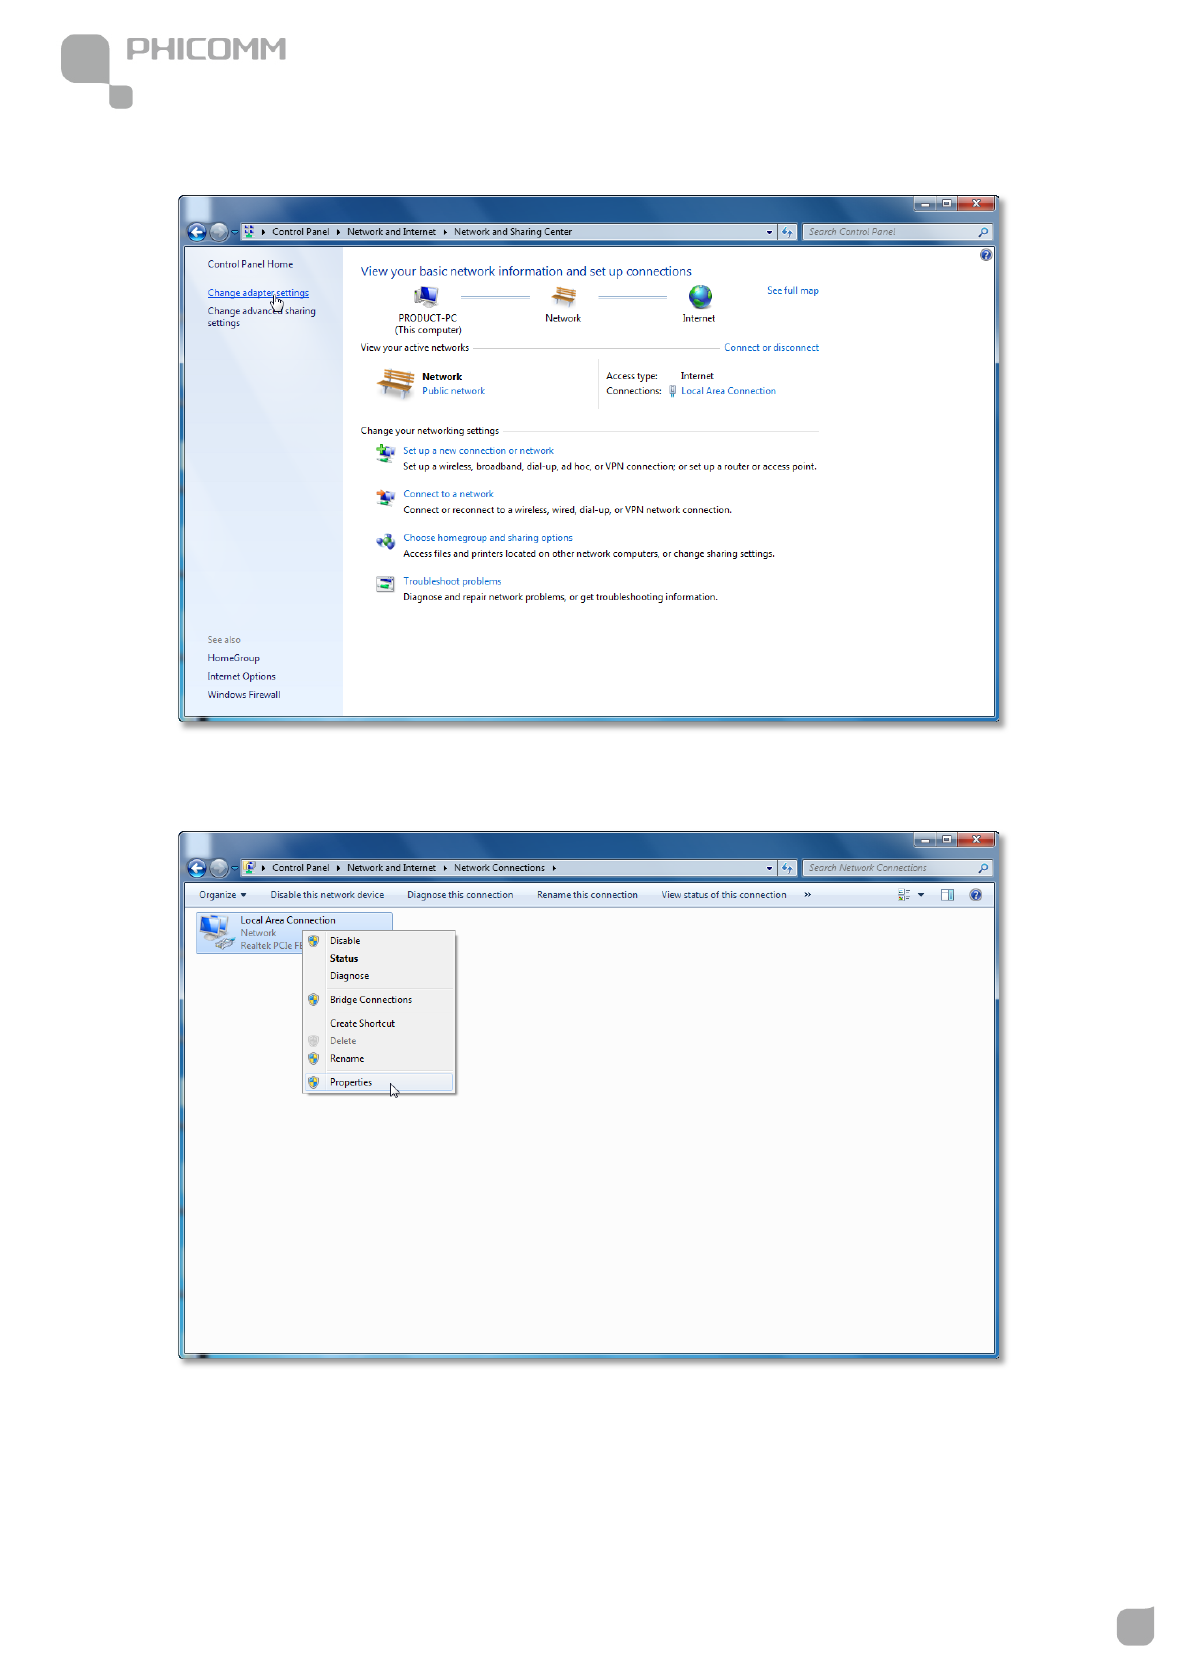
4) Go to Change Adapter Settings (win7)/Manage Network Connections (Vista).
5) Right click Local Area Connection, choose Properties.
300Mbps Wireless N NAS Rout
www.phicomm.com
13
Chapter 2: Installation
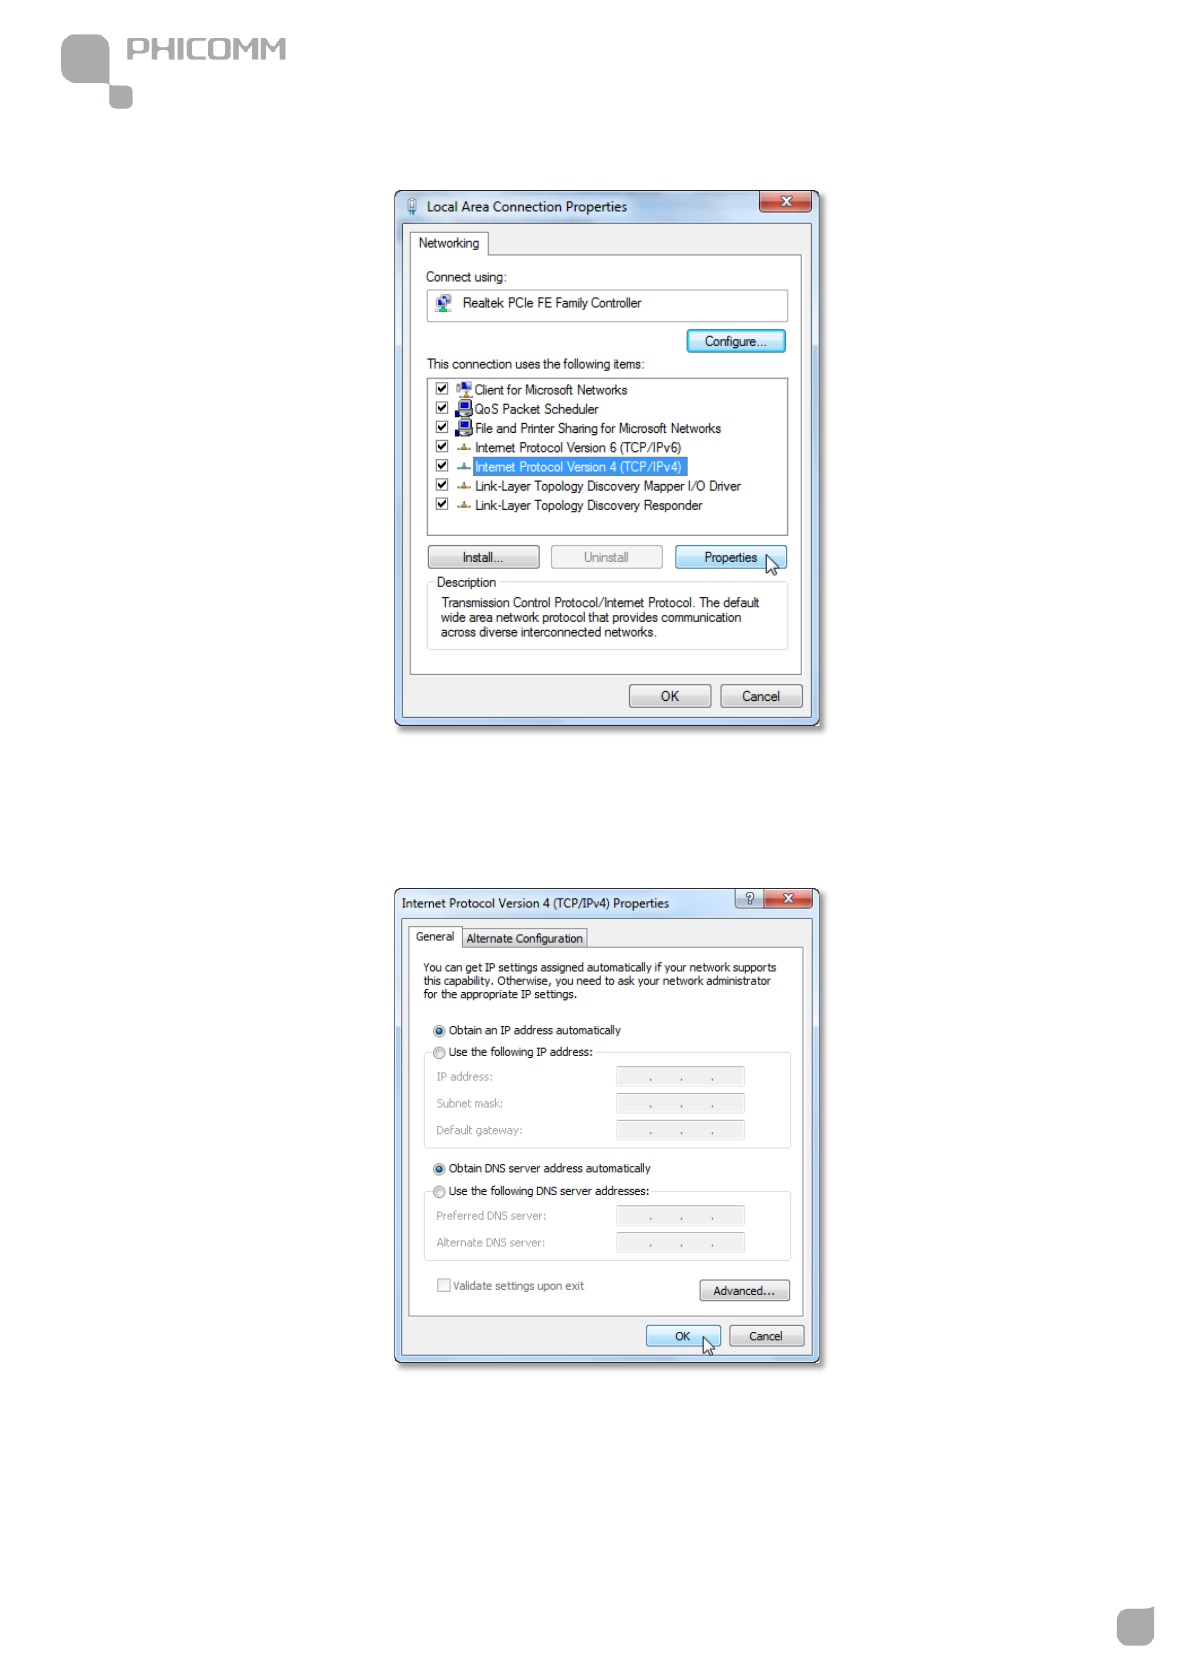
6) Select Internet Protocol Version 4 (TCP/IPv4) and click Properties.
7) Select Obtain an IP address automatically and Obtain DNS server address
automatically. Then click OK.
300Mbps Wireless N NAS Rout
www.phicomm.com
14
Chapter 2: Installation
Setup Wizard
After successful installation, you can go ahead with connecting to the internet, the
operations are as follow:
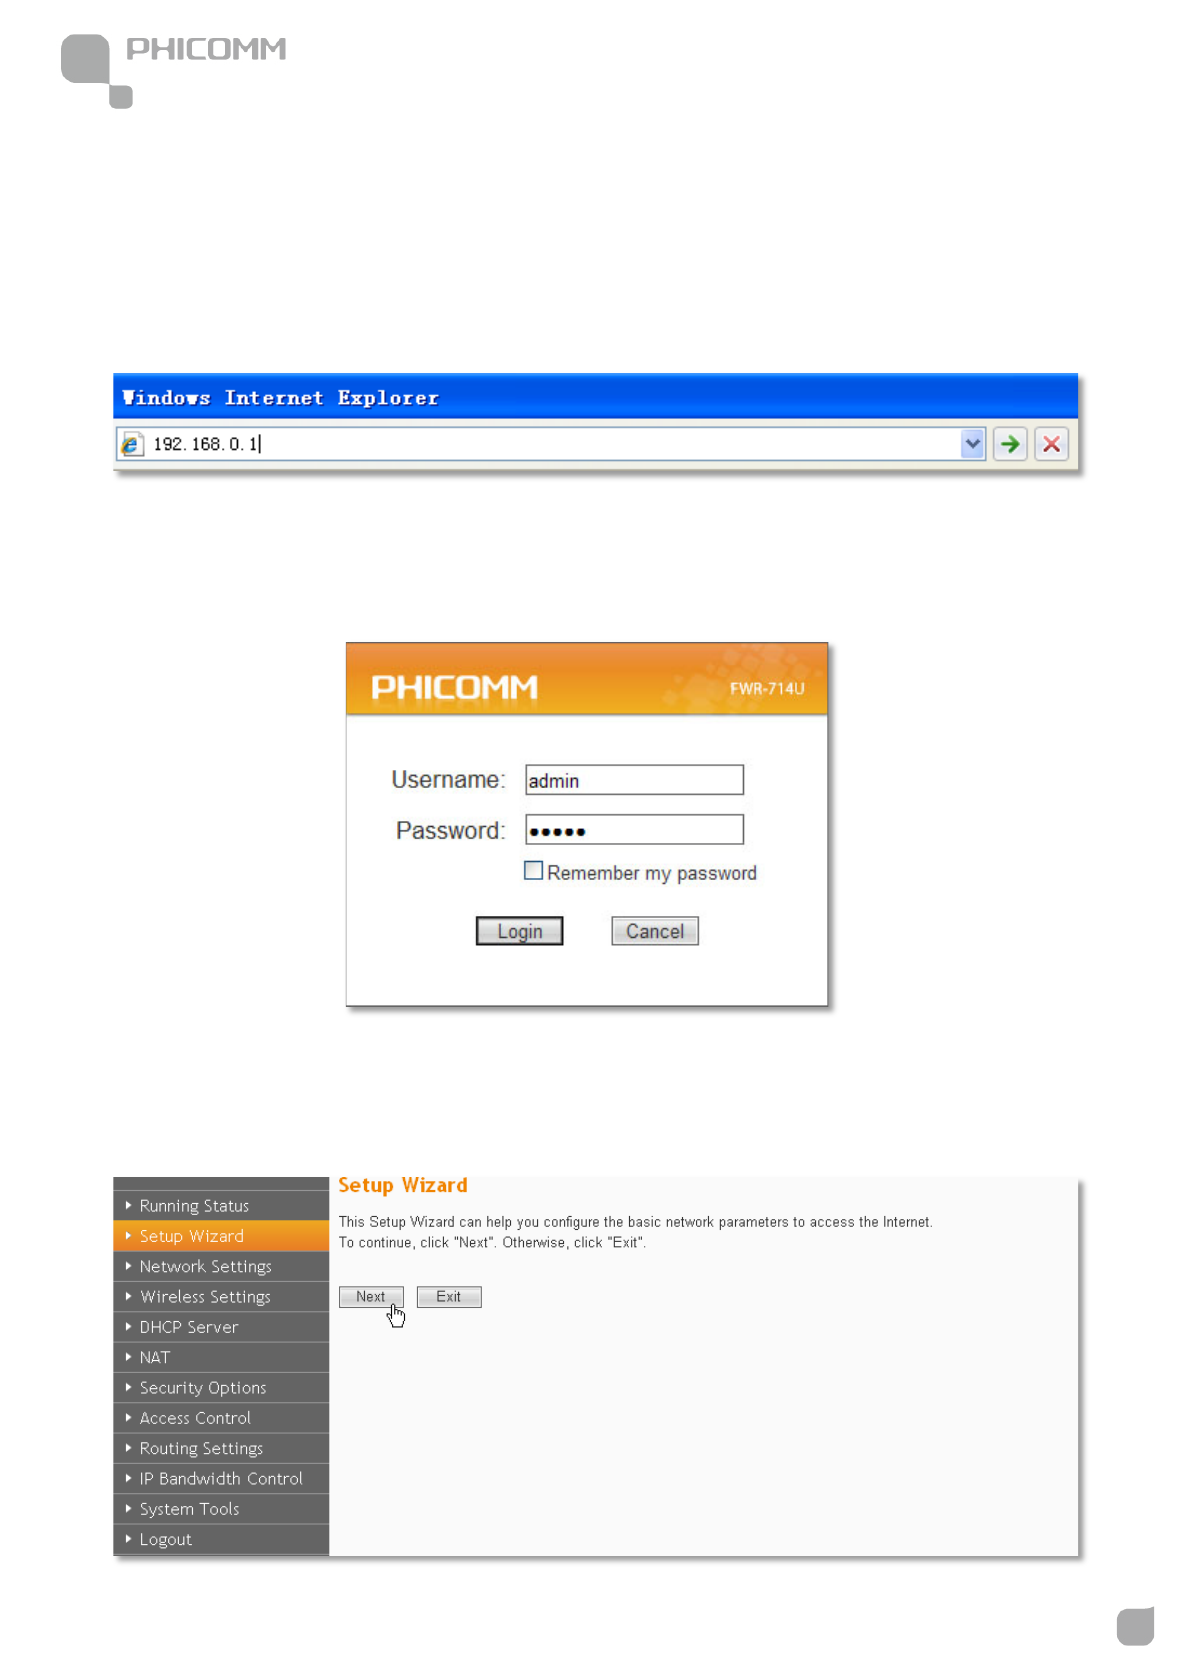
1) Open your web browser, in the address bar, type in 192.168.0.1
2) You are prompt to enter the Username/Password (preset as admin/admin) which you can
found on the label at the bottom of your router, and then click Login.
3) After successful login, you can see the web management page of the router comes up,
please go to Setup Wizard on the left side menu, Click Next.
300Mbps Wireless N NAS Rout
www.phicomm.com
15
Chapter 2: Installation
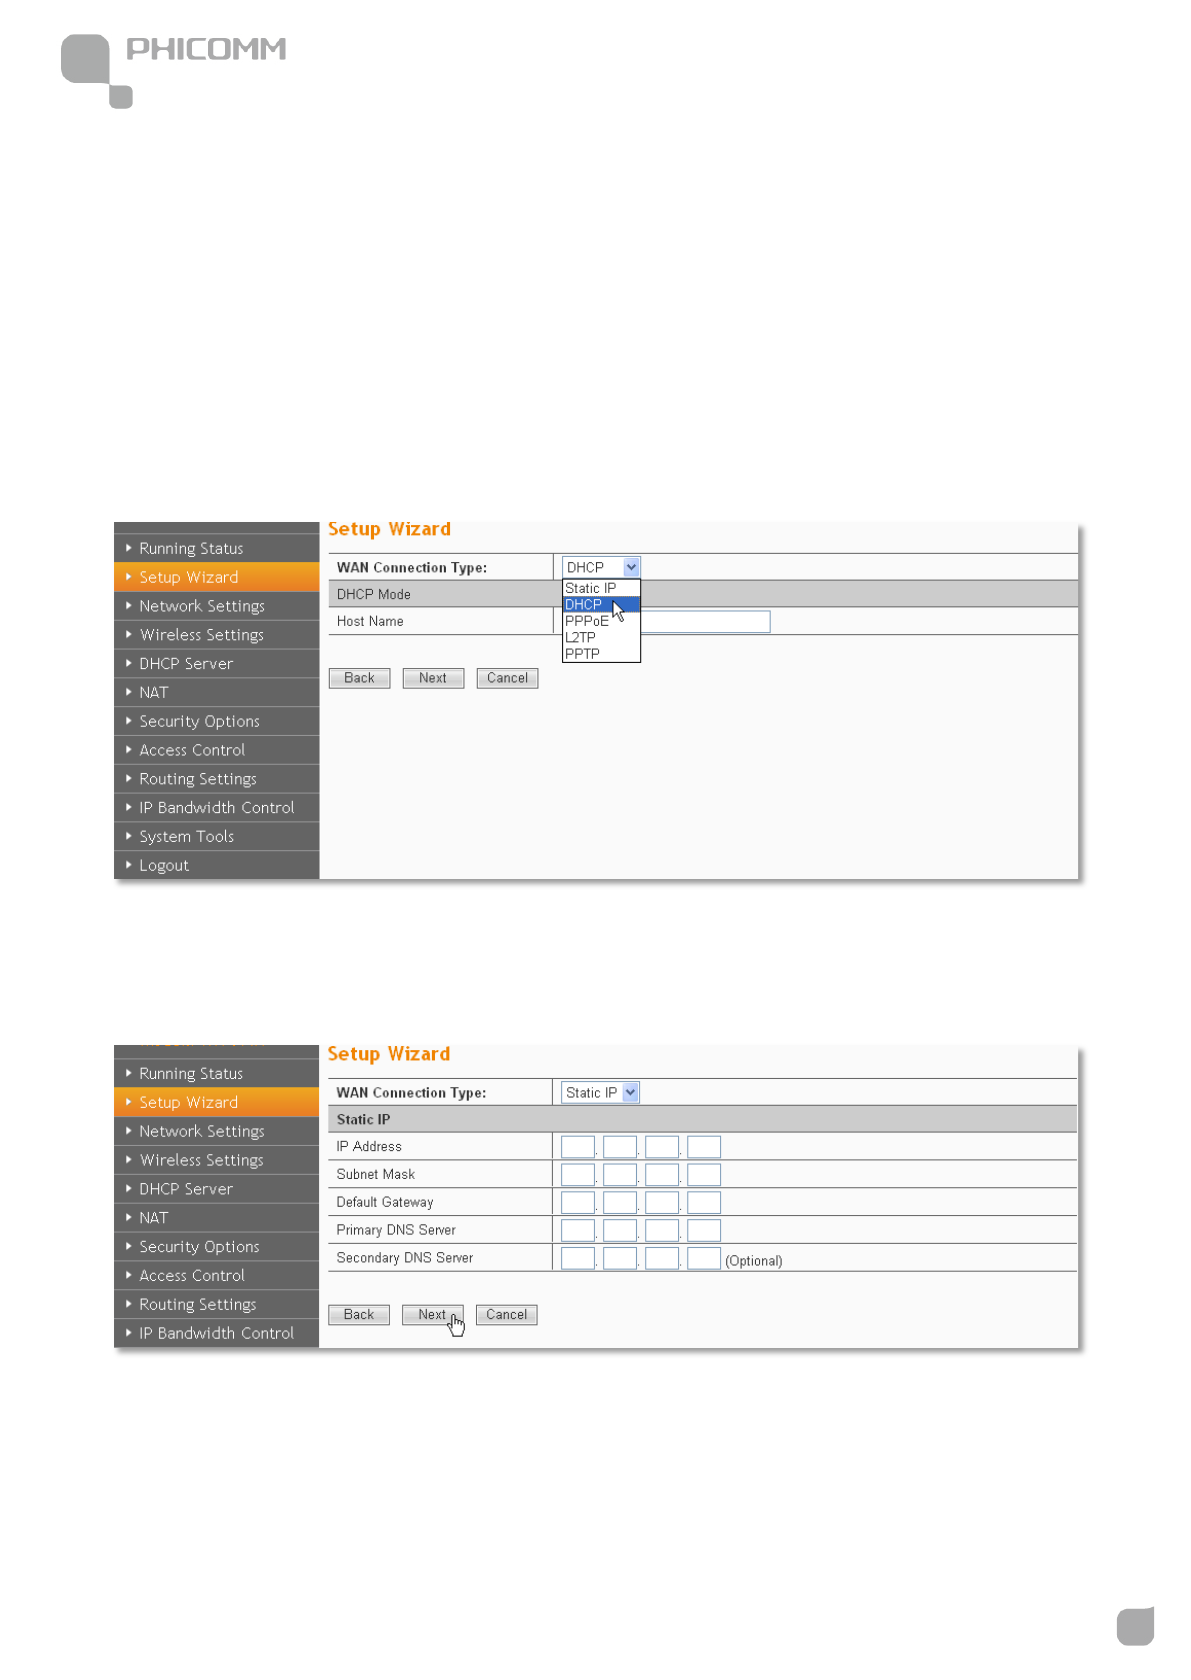
4) Please choose your WAN connection type, there are five options available: Static IP,
DHCP, PPPoE, L2TP and PPTP.
a. Select Static IP if your ISP gives you the Static IP Address, Subnet Mask, Default
Gateway and DNS Server Address, type in those information and then click Next.
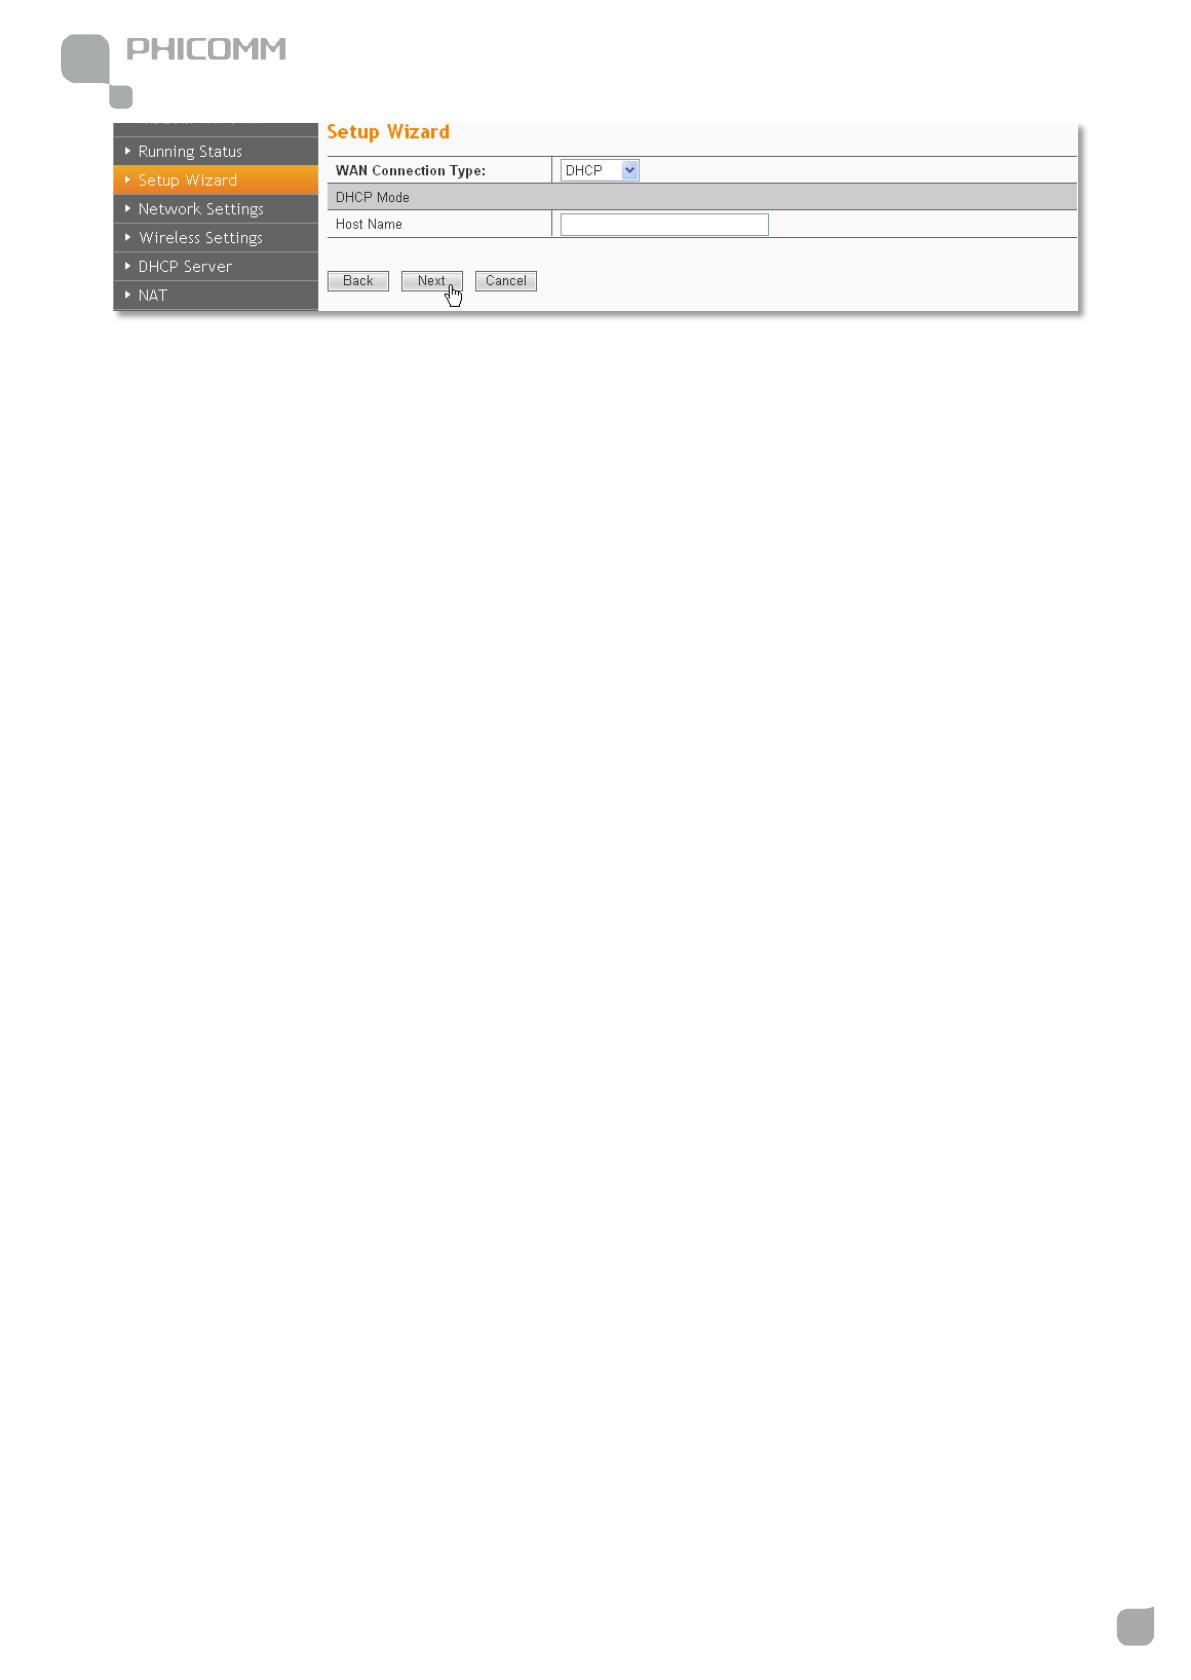
b. Select DHCP if your ISP does not gives you any IP numbers to use. This option is
commonly used for cable modem services. Router will obtain IP address information
automatically. In this case, no need to input anything but click Next.
300Mbps Wireless N NAS Rout
www.phicomm.com
16
Chapter 2: Installation
300Mbps Wireless N NAS Rout
www.phicomm.com
17
Chapter 2: Installation
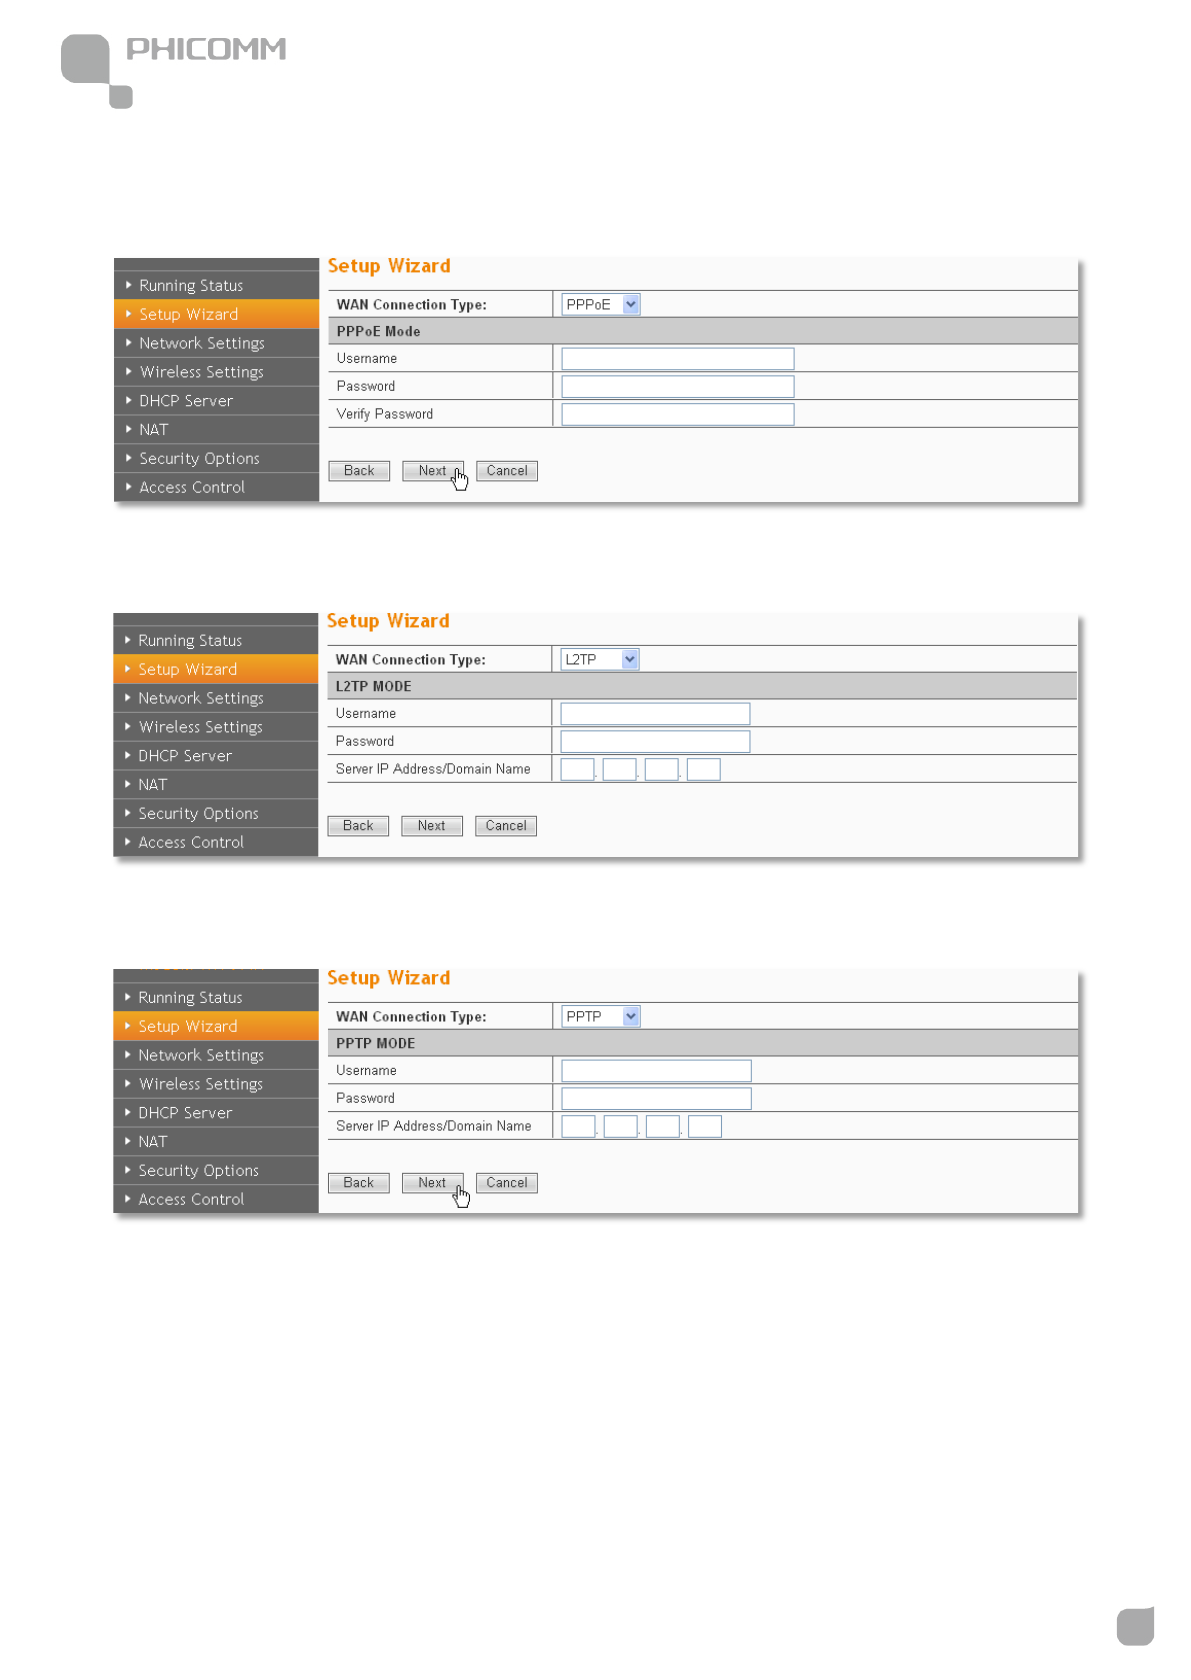
c. PPPoE is typically used for DSL services. Select PPPoE and type in the Username and
Password provided by your ISP, and then click Next.
d. Select L2TP if your ISP provides L2TP connection, and then click Next.
e. Select PPTP if your ISP provides PPTP connection, and then click Next.
300Mbps Wireless N NAS Rout
www.phicomm.com
18
Chapter 2: Installation
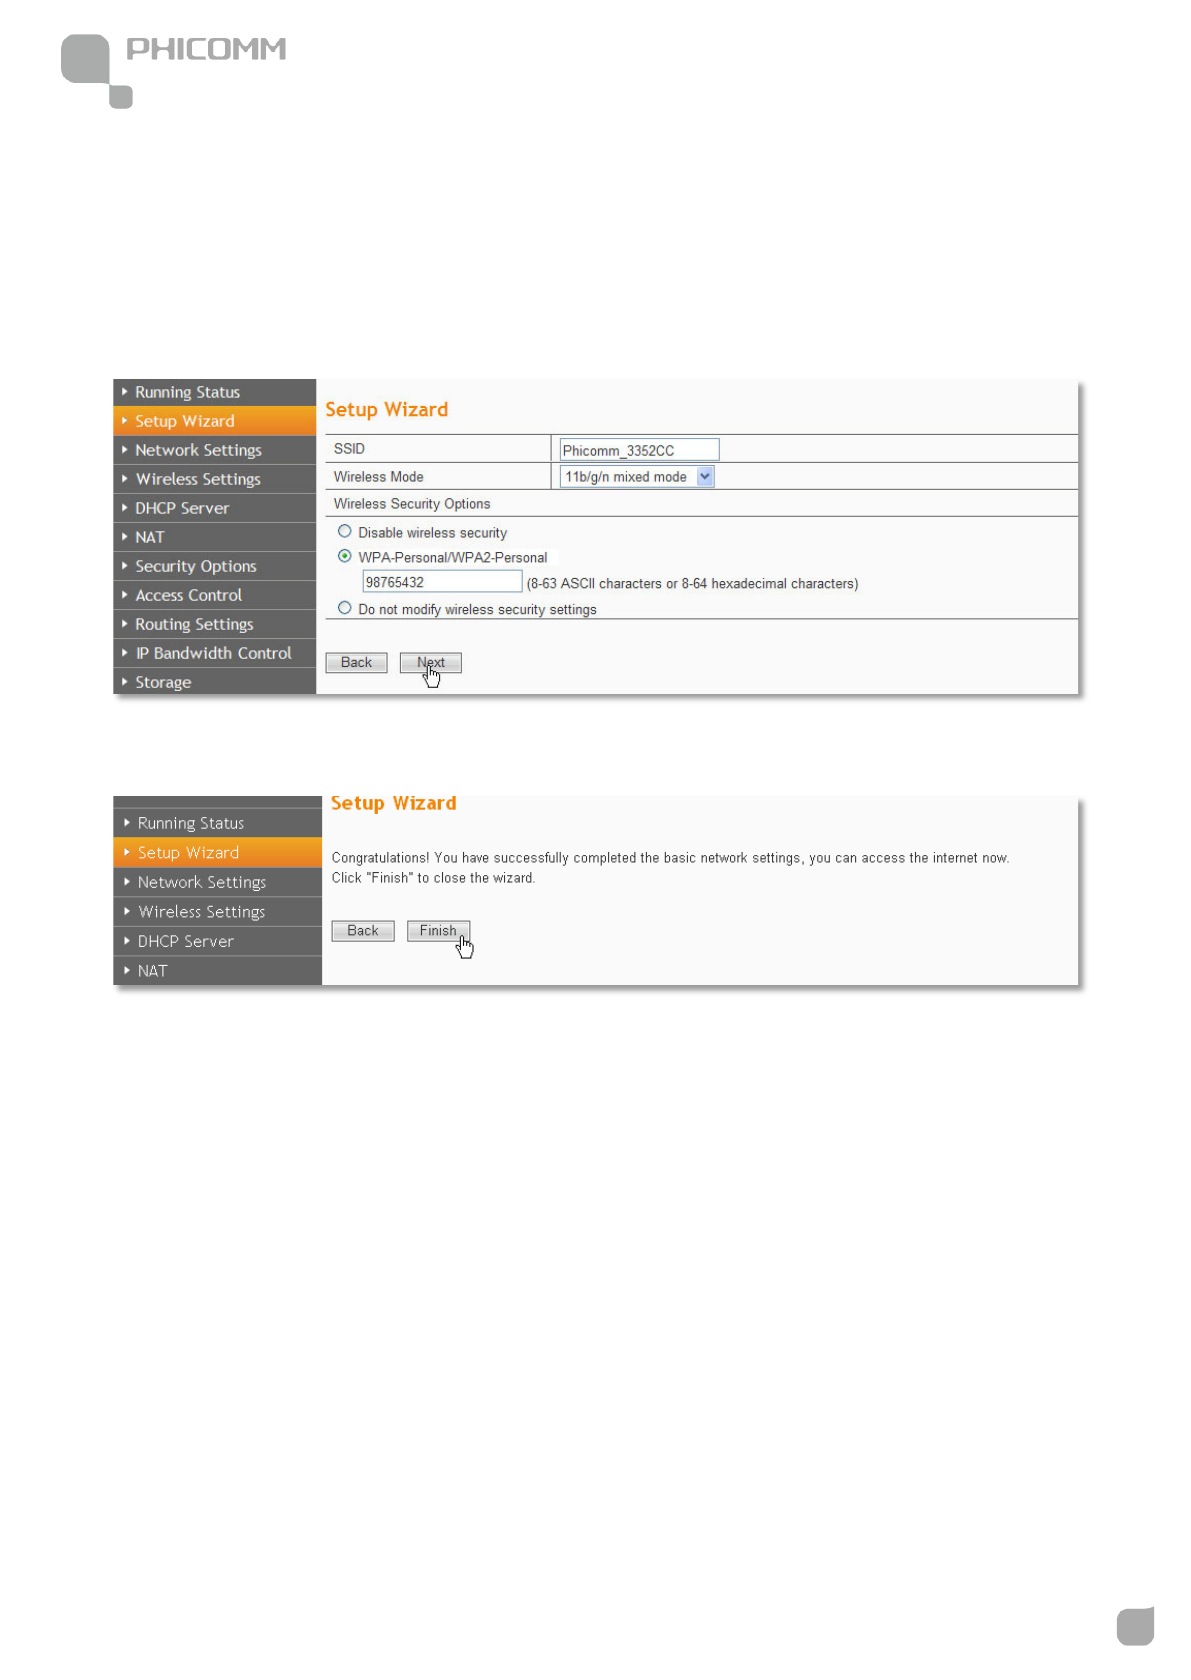
5) In this page, the SSID is the name of your wireless network, you can give it a different
name. For the Wireless Mode, you can leave it as 11 b/g/n mixed mode, as for the
Wireless Security, we recommend you to choose WPA-Personal/WPA2-Personal, and
then set up a password, click Next.
6) Click Finish, then you can check the internet is working or not.

300Mbps Wireless N NAS Rout
www.phicomm.com
19
Chapter 3: Router Configuration
Chapter 3: Router Configuration
You can see there are thirteen main menus on the left side of the router’s web management
page. On the right side, you can see a small HELP button, there are the corresponding
explanations and instructions. The Running Status page shows the current status of the
Router.
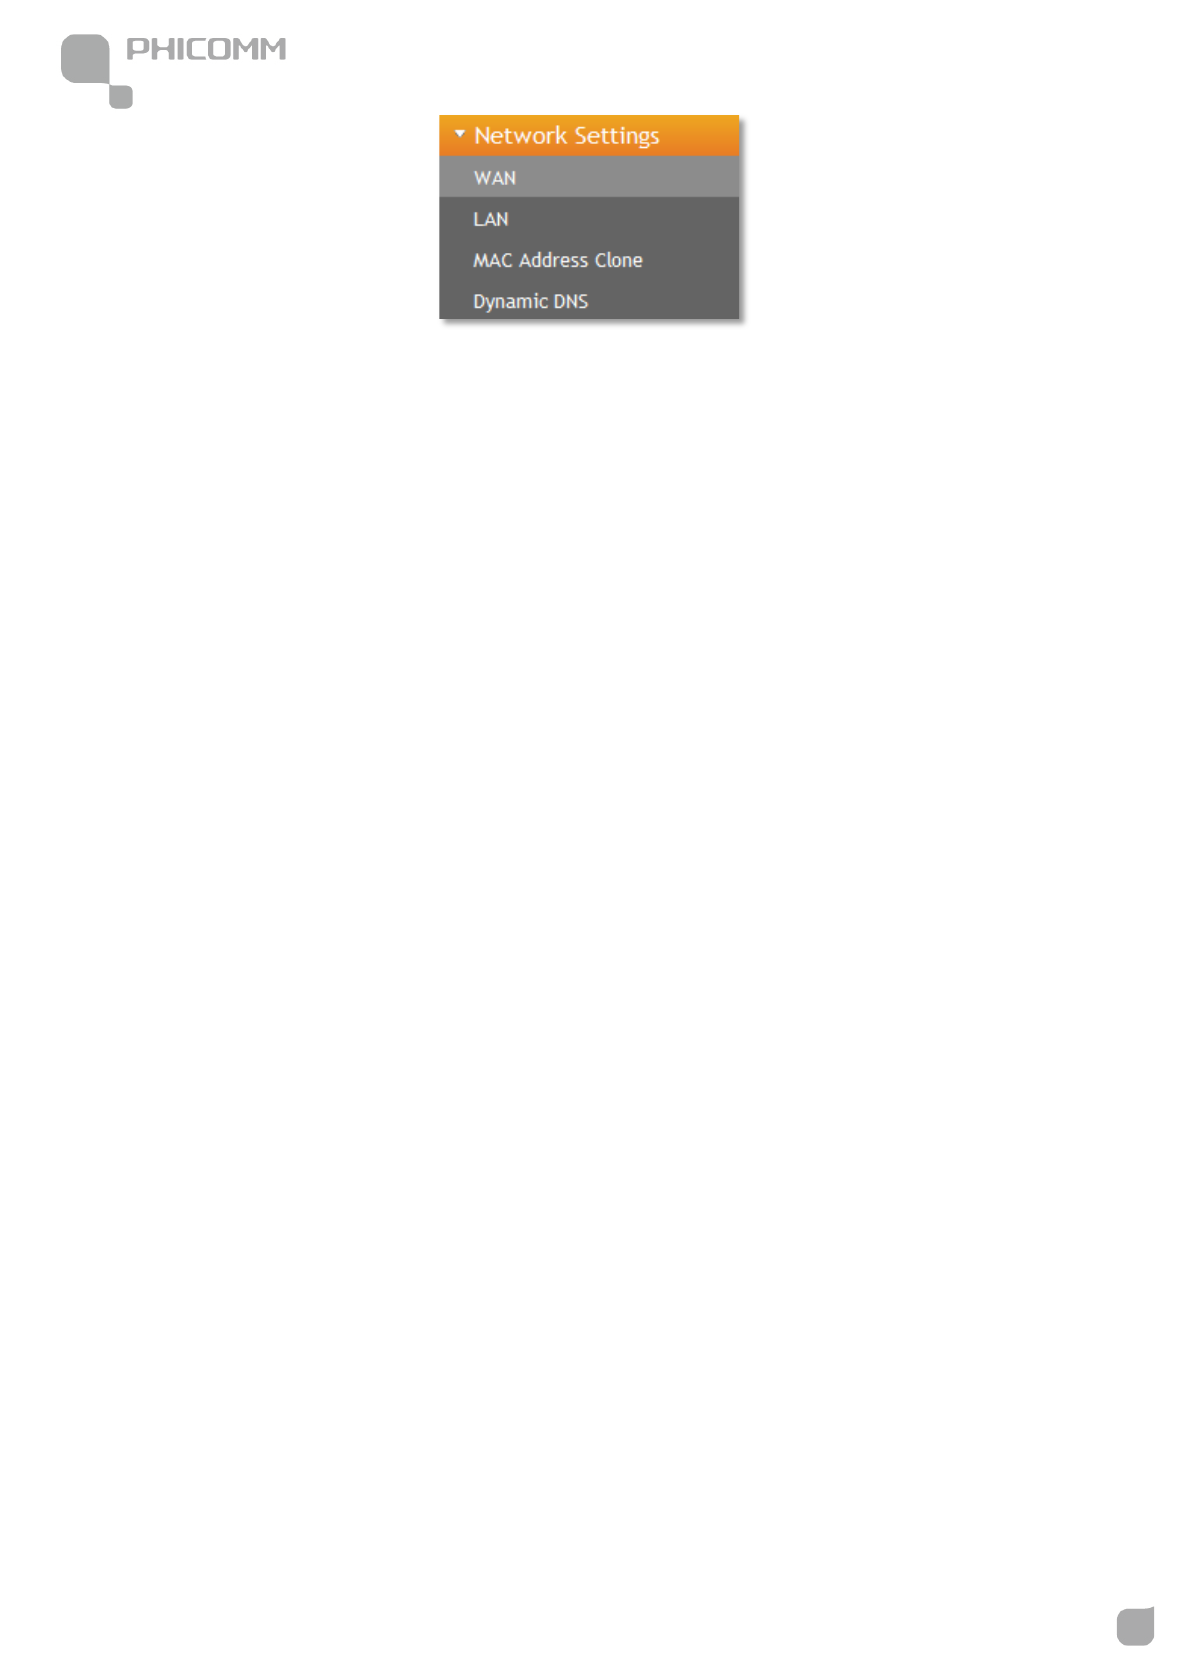
Network Settings
The Network Settings section helps you to configure the Router to access the Internet.
There are four submenus under the wireless menu: WAN, LAN, MAC Address Clone and
Dynamic DNS. Click any of them, you will be able to configure the corresponding function.
300Mbps Wireless N NAS Rout
www.phicomm.com
20
Chapter 3: Router Configuration

300Mbps Wireless N NAS Rout
www.phicomm.com
21
Chapter 3: Router Configuration
WAN
WAN Connection Type: To make sure the connection type your ISP provides, please refer
to the ISP for more information.
Dynamic IP (DHCP): Connections use dynamic IP address assignment, it means your ISP is
running a DHCP server.
Static IP: Connections use static IP address assignment, it means your ISP provides a static
or fixed IP Address, Subnet Mask, Gateway and DNS setting.
PPPoE: Connections requires username and password.
L2TP: Layer 2 Tunneling Protocol (L2TP) is a service applies to connections in Israel only.
PPTP: Point-to-Point Tunneling Protocol (PPTP) is a service applies to connections in Europe
only.
Select the connection type according to the information provided by your Internet Service
Provider (ISP), and fill in the information accordingly.
MTU Size (in bytes): The default MTU (Maximum Transmission Unit) value is 1500 Bytes.
Sometimes you need to modify the MTU required by your ISP.
Manually configure the DNS server: Check this option if your ISP gives you one or two
300Mbps Wireless N NAS Rout
www.phicomm.com
22
Chapter 3: Router Configuration
DNS IP addresses. Otherwise, leave it unchecked, the DNS servers will be assigned from ISP
dynamically.
Primary DNS Server: Enter the DNS IP address in dotted-decimal notation provided by
your ISP.
Secondary DNS Server: Enter another DNS IP address in dotted-decimal notation provided
by your ISP.
Note: If you get Address not found error when you access a website, it is likely that your
DNS servers are set up improperly. You should contact your ISP for correct DNS server
addresses.
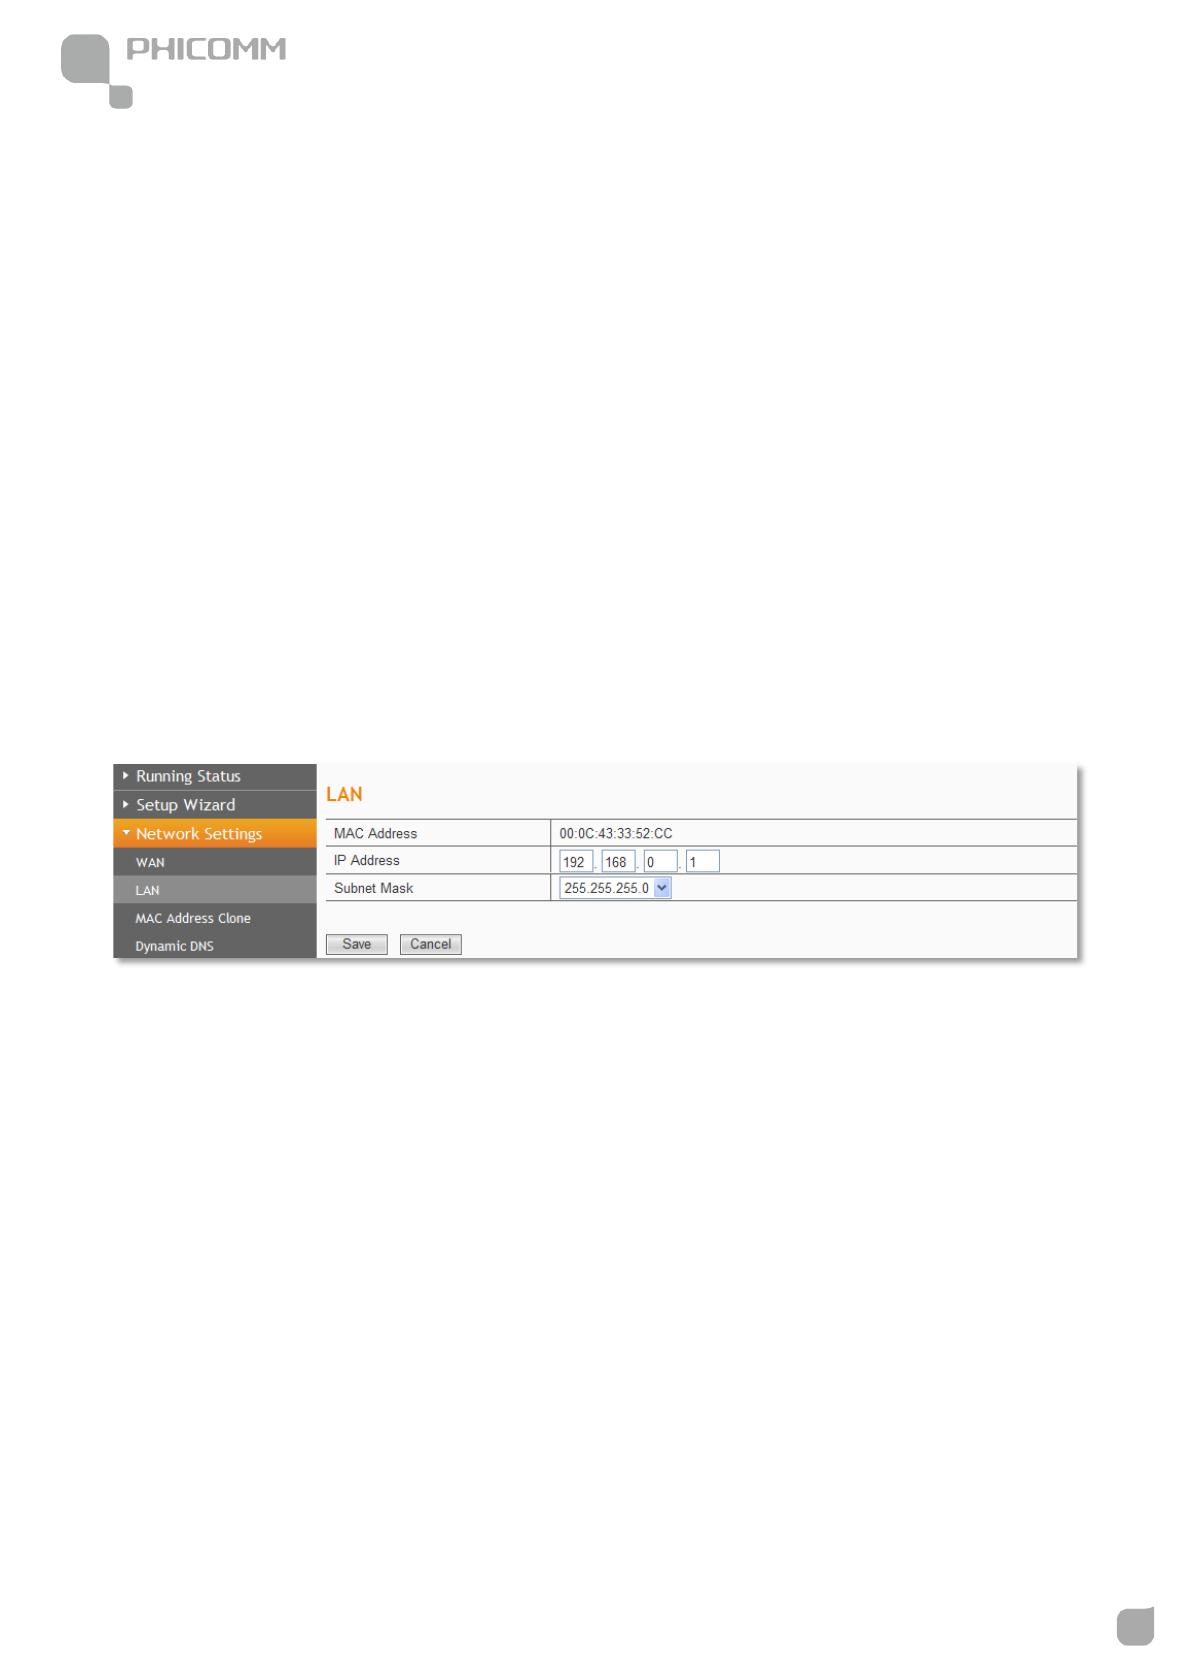
LAN
MAC Address: The physical address of the router.
IP Address: The LAN IP Address of the router.
Subnet Mask: The Subnet Mask associated with the LAN IP Address.
Note: If you changed the LAN IP Address of the router, please log in this web management
page by entering the new IP address.
300Mbps Wireless N NAS Rout
www.phicomm.com
23
Chapter 3: Router Configuration
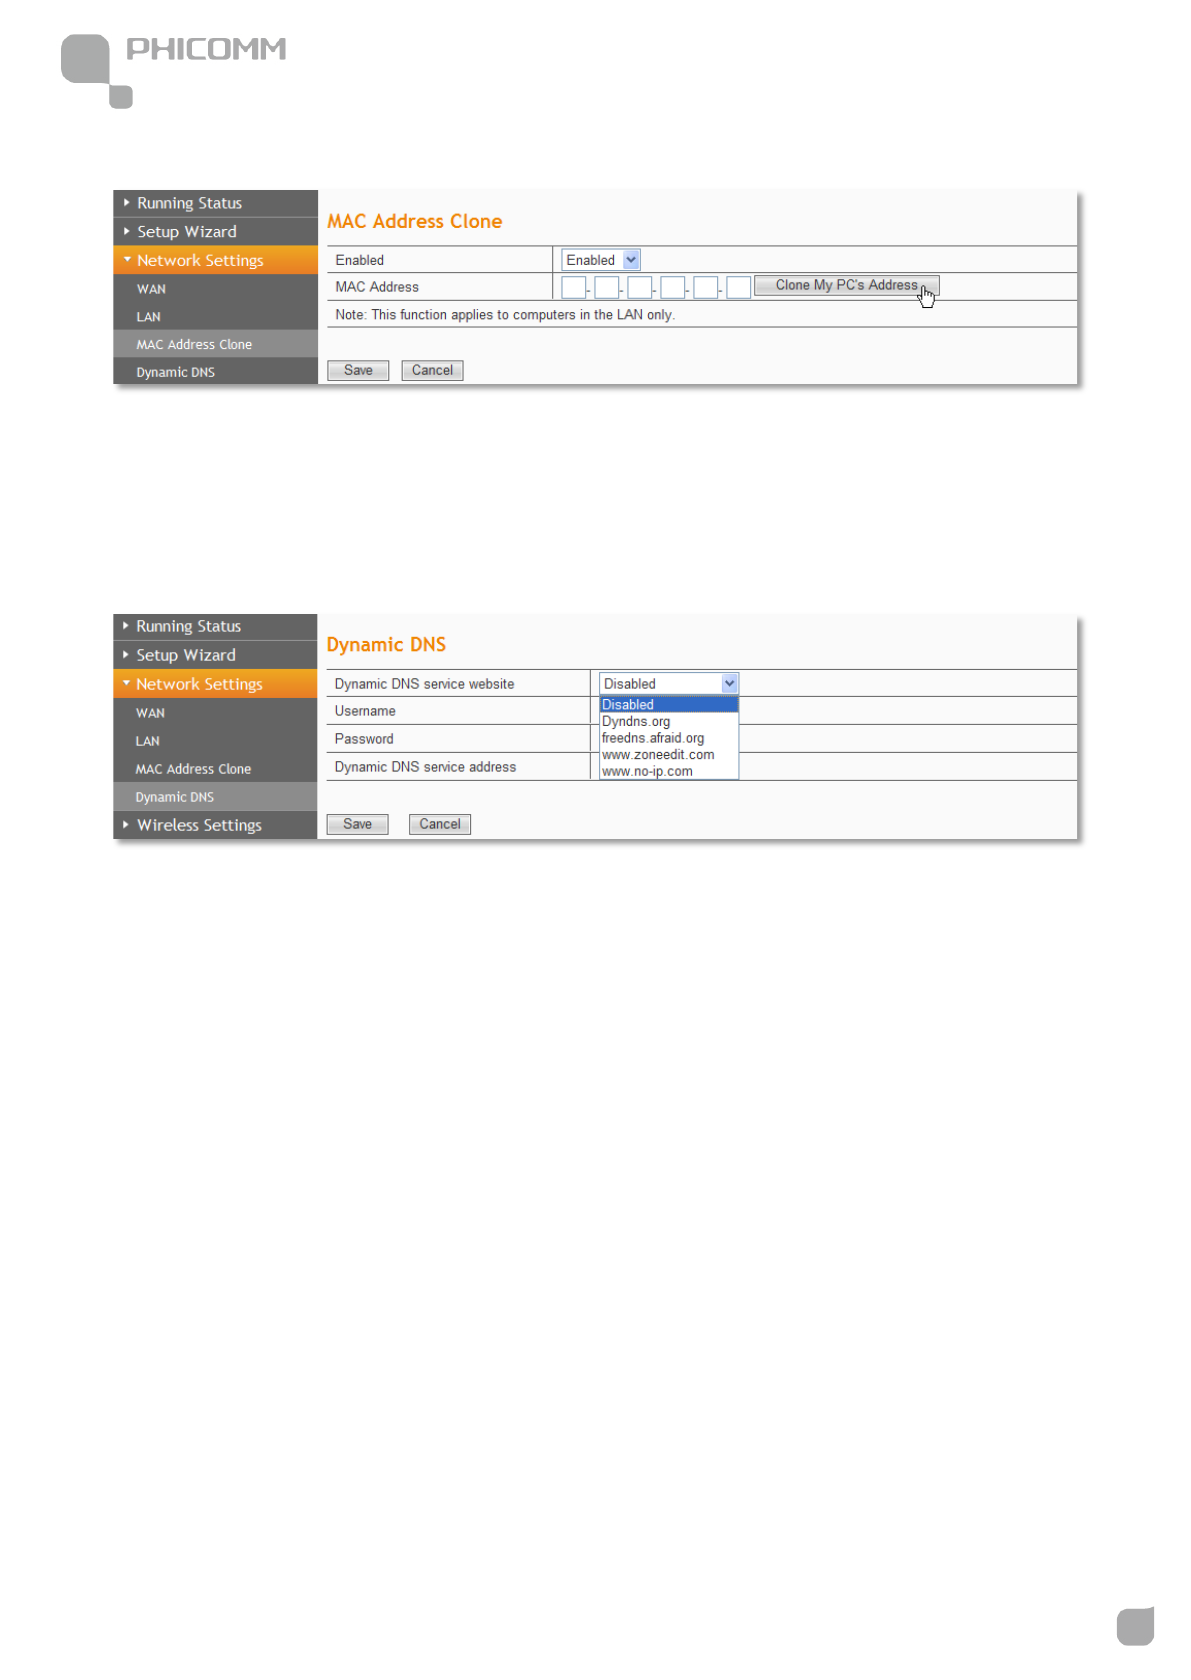
MAC Address Clone
Some ISPs require you to register the MAC Address of your computer. Choose Enabled,
and then click Clone My PC’s MAC Address, then click Save.
Dynamic DNS
Dynamic DNS lets you assign a fixed host and domain name to a dynamic Internet IP
address. If you want to use this feature, please register for this service with DDNS service
providers such as www.no-ip.com first.
If you have registered with a DDNS service provider, select the website of your service
provider, then enter the Username, Password and Dynamic DNS service address for
your DDNS account.
Wireless Settings
There are seven submenus under the wireless menu: Wireless Basic Settings, Wireless
Security Settings, Wireless MAC Address Filter, Advanced Wireless Settings, Wireless
Clients List, WPS Settings and WDS Settings. Click any of them, you will be able to
configure the corresponding function.
300Mbps Wireless N NAS Rout
www.phicomm.com
24
Chapter 3: Router Configuration
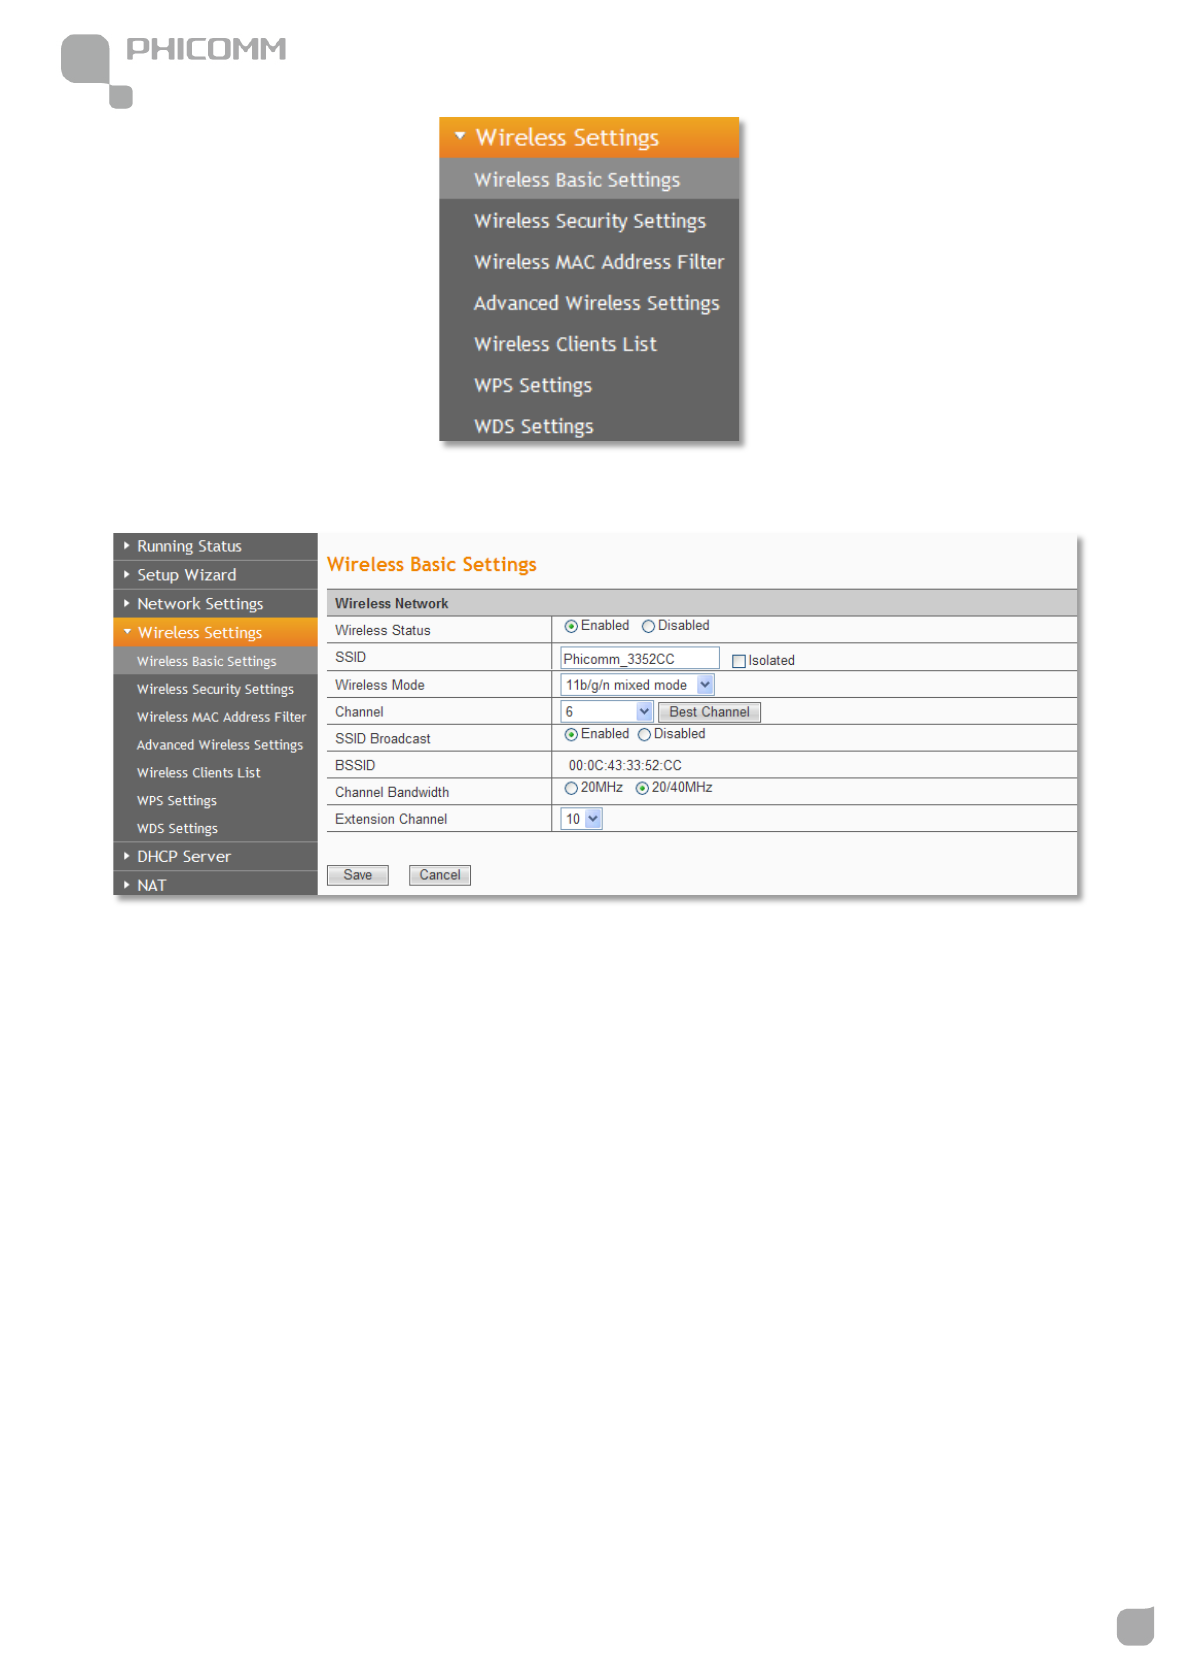
Wireless Basic Settings
Wireless Status: Choose Enable to enable the wireless function of the router, choose
Disable to disable the wireless function of the router.
SSID: Enter a value of up to 32 characters. This is the name of your wireless network, you
can give it a different name which can be easier for you to remember.
Wireless Mode: If all of the wireless devices connected with this wireless router are in the
same transmission mode (eg. 802.11b), you can choose "Only" mode (eg. 11b only). If you
have some devices which use a different transmission mode, choose the appropriate
"Mixed" mode.
Channel: The router can choose the best channel automatically in most cases. Please try to
300Mbps Wireless N NAS Rout
www.phicomm.com
25
Chapter 3: Router Configuration
change the wireless channel if you notice interference problems with another nearby
access point, or the wireless performance is not as good as you expected.
SSID Broadcast: If you choose Enabled, the wireless router will broadcast its name (SSID) .
BSSID: The physical address of the router.
Channel Bandwidth: The bandwidth of the wireless channel, you can select 20MHz or
20/40MHz.
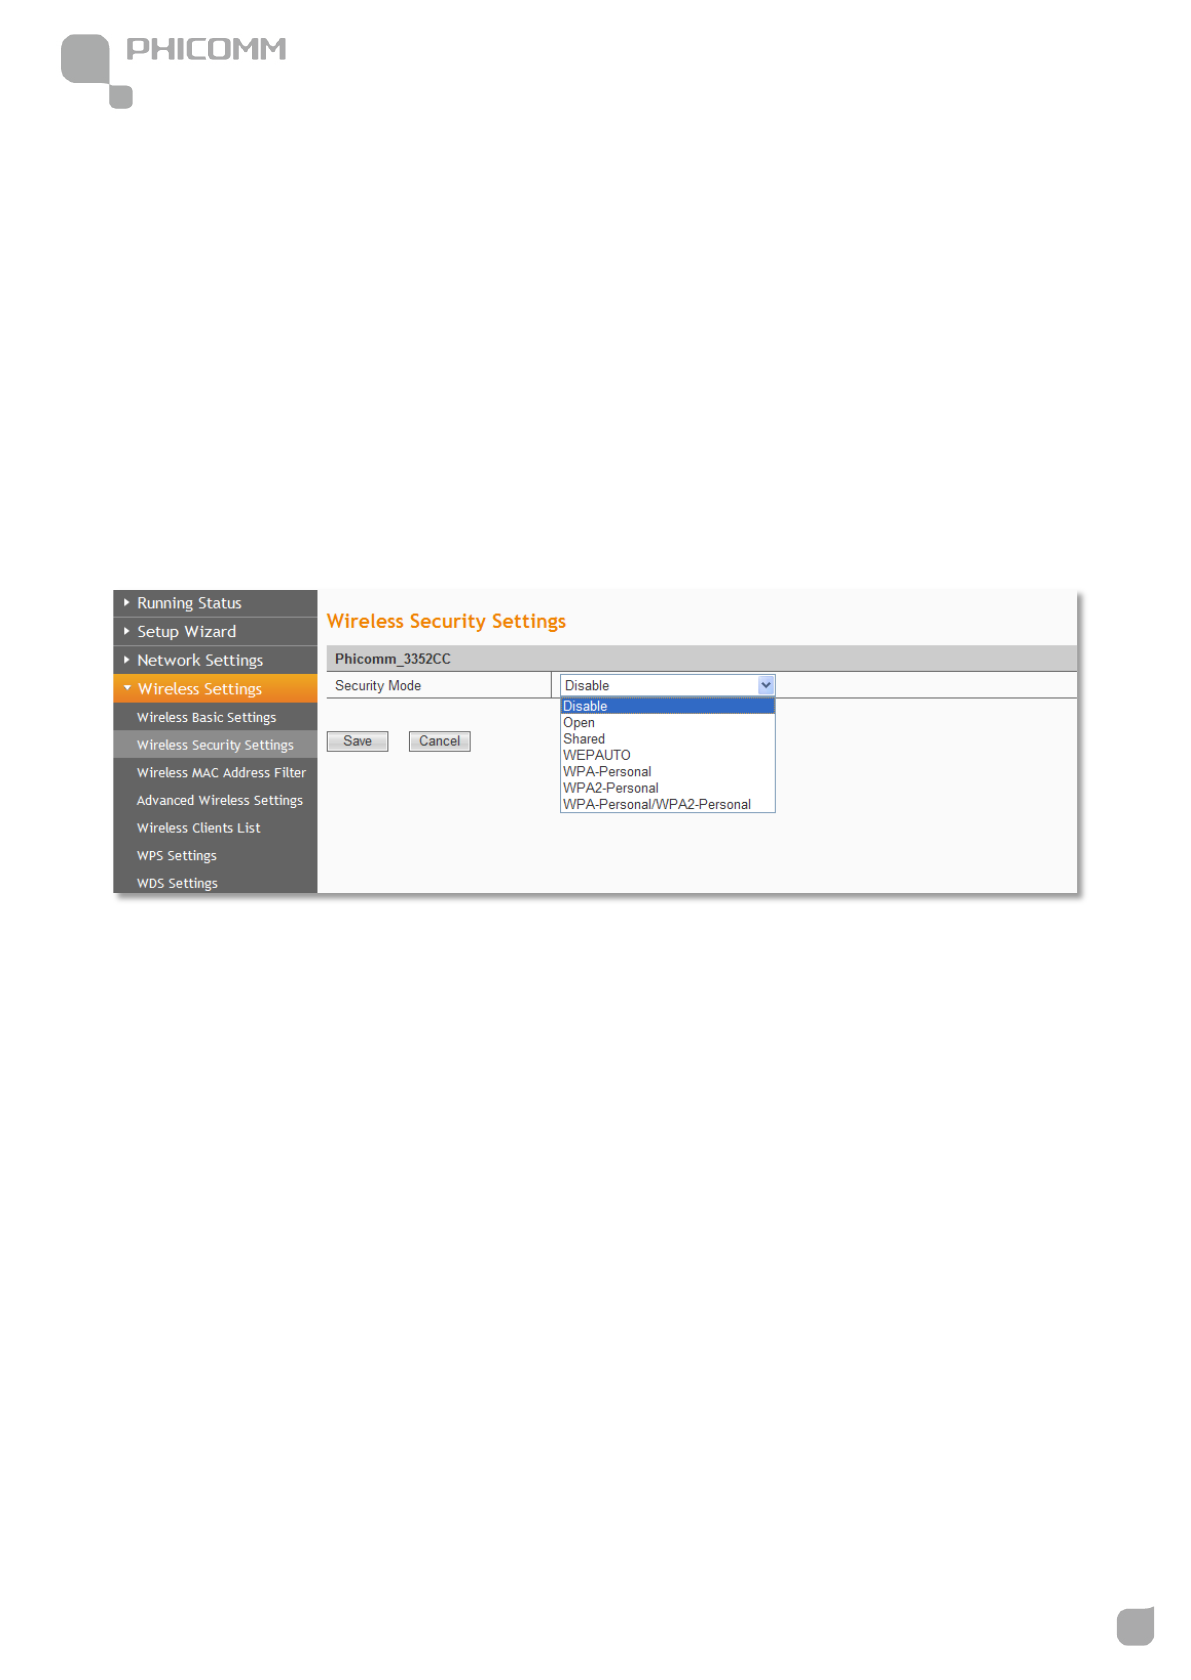
Wireless Security Settings
You can configure the security of your wireless network in this page. There are six wireless
security modes supported by this router: Open, Shared, WEPAUTO, WPA-Personal,
WPA2-Personal, and WPA- Personal / WPA2-Personal.
Security Mode: You can choose Disable, Open, Shared, WEPAUTO, WPA-Personal,
WPA2-Personal, WPA- Personal/ WPA2-Personal.
Mode 1: Security Mode > Disable
If you do not want to use wireless security, highlight on this option. That means other
people can connect to your wireless network without entering any password, so it may slow
down your internet speed, it’s recommended strongly to choose one of the following
modes to enable security.
300Mbps Wireless N NAS Rout
www.phicomm.com
26
Chapter 3: Router Configuration
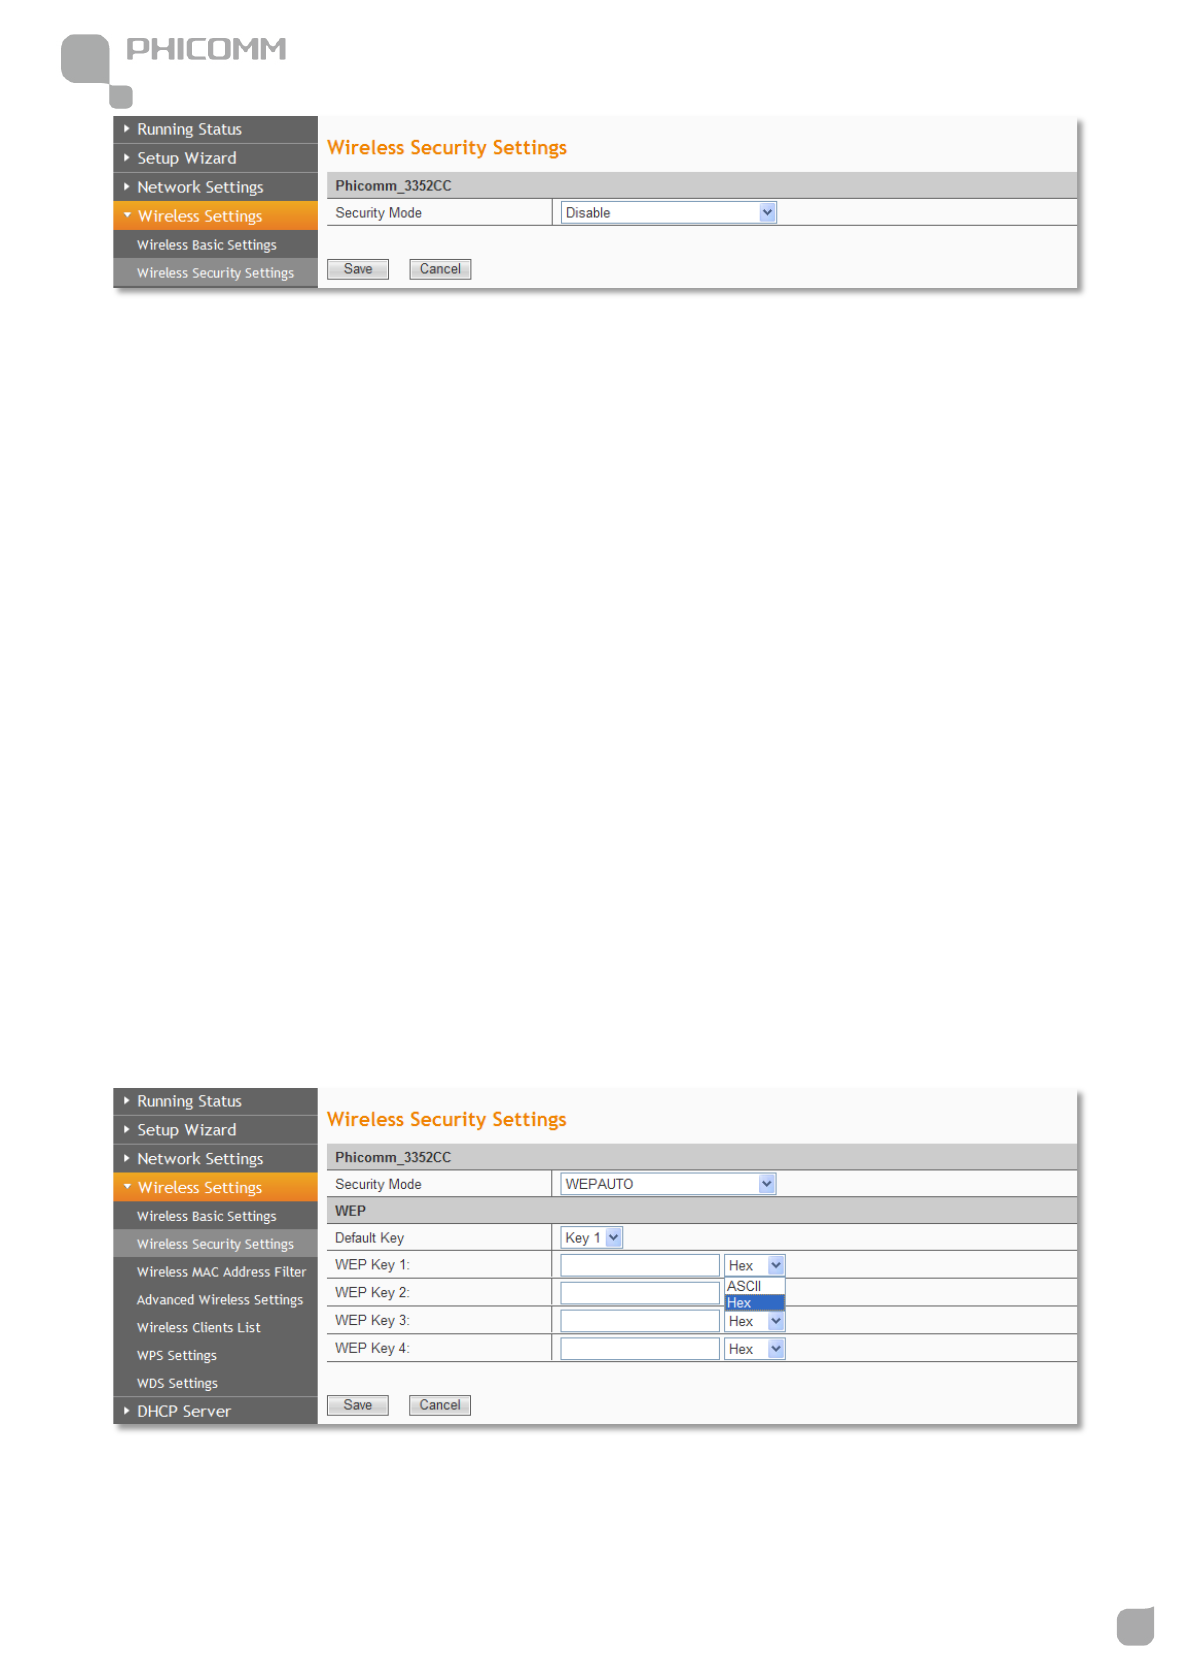
Mode 2: Security Mode > Open/Shared/ WEPAUTO
Open System: Select 802.11 Open System authentications.
Shared Key: Select 802.11 Shared Key authentications.
WEPAUTO: Select Shared Key or Open System authentication type automatically based on
the wireless station's capability and request.
You can select ASCII or Hex format. ASCII Format stands for any combination of keyboard
characters in the specified length. Hex format stands for any combination of hexadecimal
digits (0-9, a-f, A-F) in the specified length.
You can enter 10 hexadecimal digits (any combination of 0-9, a-f, A-F, and null key is not
permitted) or 5 ASCII characters. Or enter 26 hexadecimal digits (any combination of 0-9,
a-f, A-F, and null key is not permitted) or 13 ASCII characters. Or enter 32 hexadecimal digits
(any combination of 0-9, a-f, A-F, and null key is not permitted) or 16 ASCII characters.
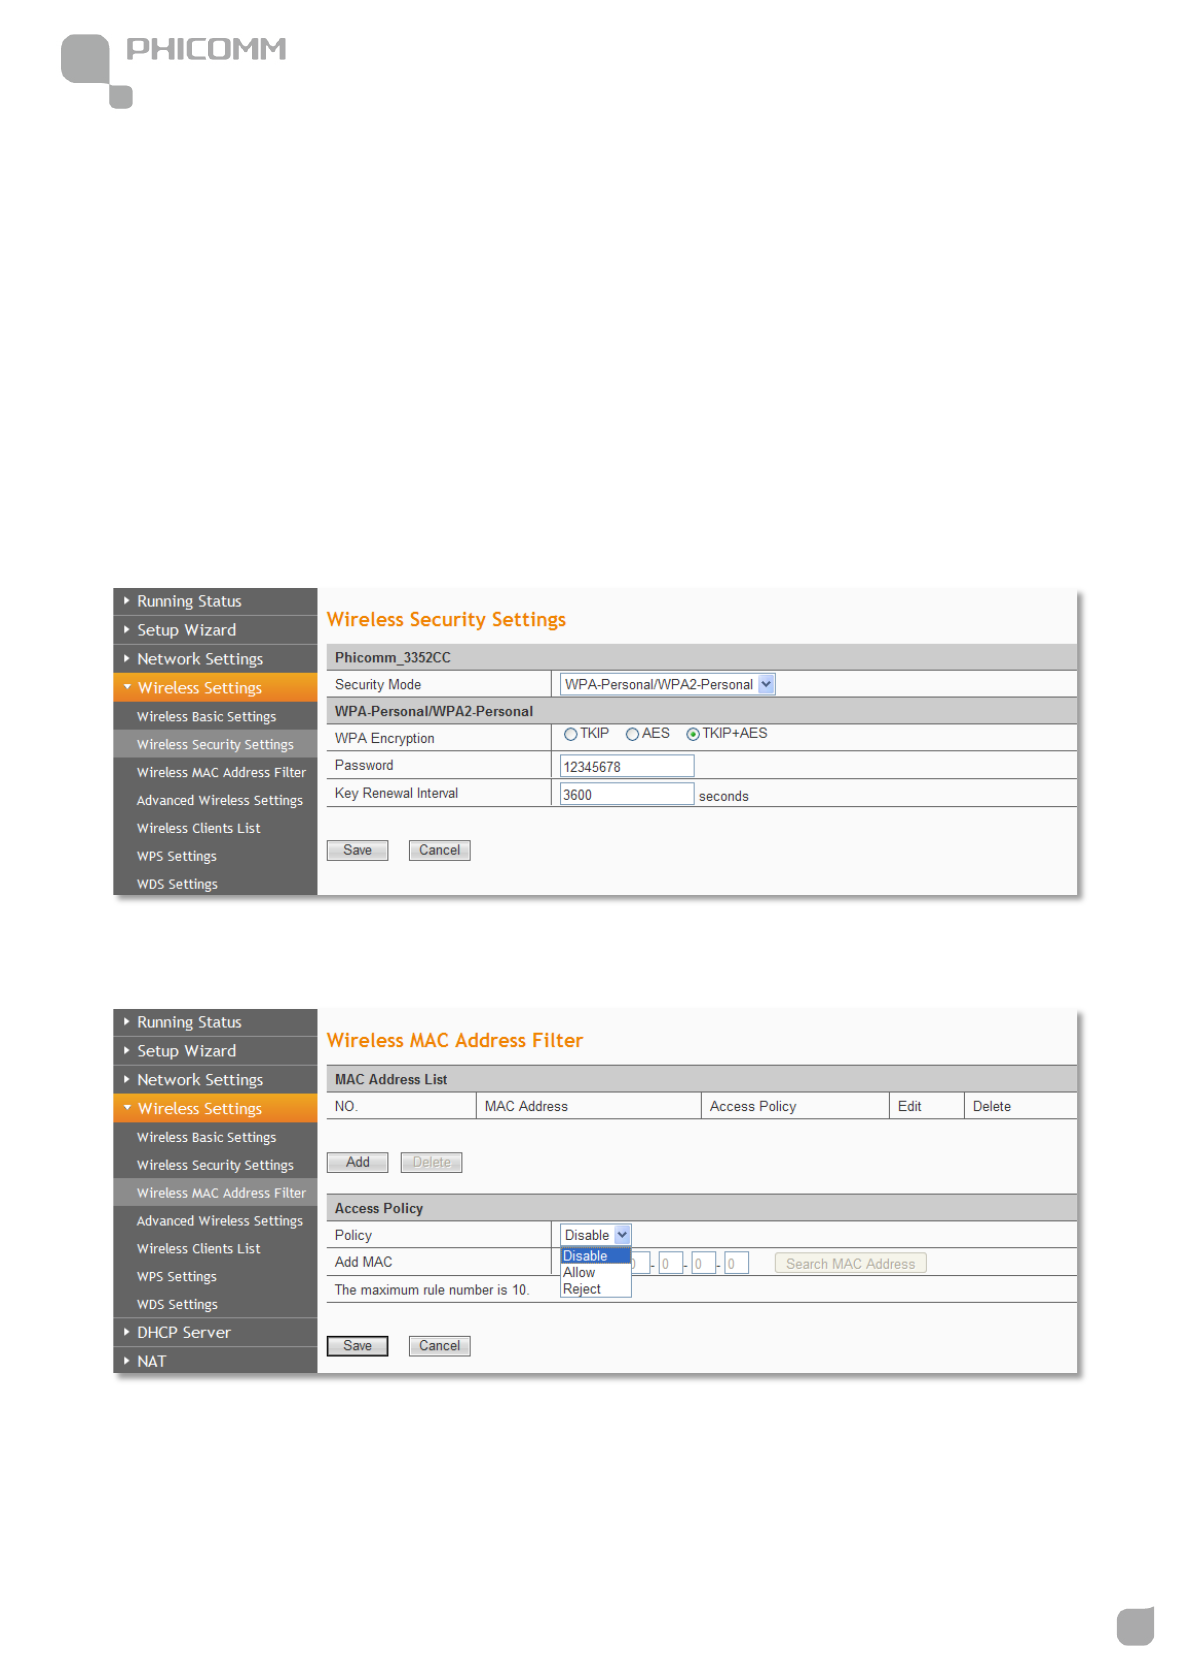
Mode 3: Security Mode > WPA-Personal, WPA2-Personal, WPA- Personal/
WPA2-Personal
300Mbps Wireless N NAS Rout
www.phicomm.com
27
Chapter 3: Router Configuration
You can select one of following versions:
WPA-Personal: Pre-shared key of WPA.
WPA2-Personal: Pre-shared key of WPA2.
WPA- Personal/ WPA2-Personal: Select WPA-Personal or WPA2-Personal automatically
based on the wireless station's capability and request.
Encryption: You can select TKIP, AES or TKIP+AES.
Password: The password should be between 8 and 63 characters.
Wireless MAC Address Filter
You can allow/deny the computers connecting to the router wirelessly by entering the MAC
address with this feature.
300Mbps Wireless N NAS Rout
www.phicomm.com
28
Chapter 3: Router Configuration
If you only want MAC address (00:0A:EB:00:07:5F) to access the Wireless Network while
others cannot:
1. Click Add button.
2. Choose Allow for the security policy.
3. Fill MAC address 00:0A:EB:00:07:5F in and click Save.
If you want MAC address (00:0A:EB:00:07:5F) cannot access the Wireless Network while
others can:
1. Click Add button.
2. Choose Reject for the security policy.
3. Filling MAC address 00:0A:EB:00:07:5F in and click Save.
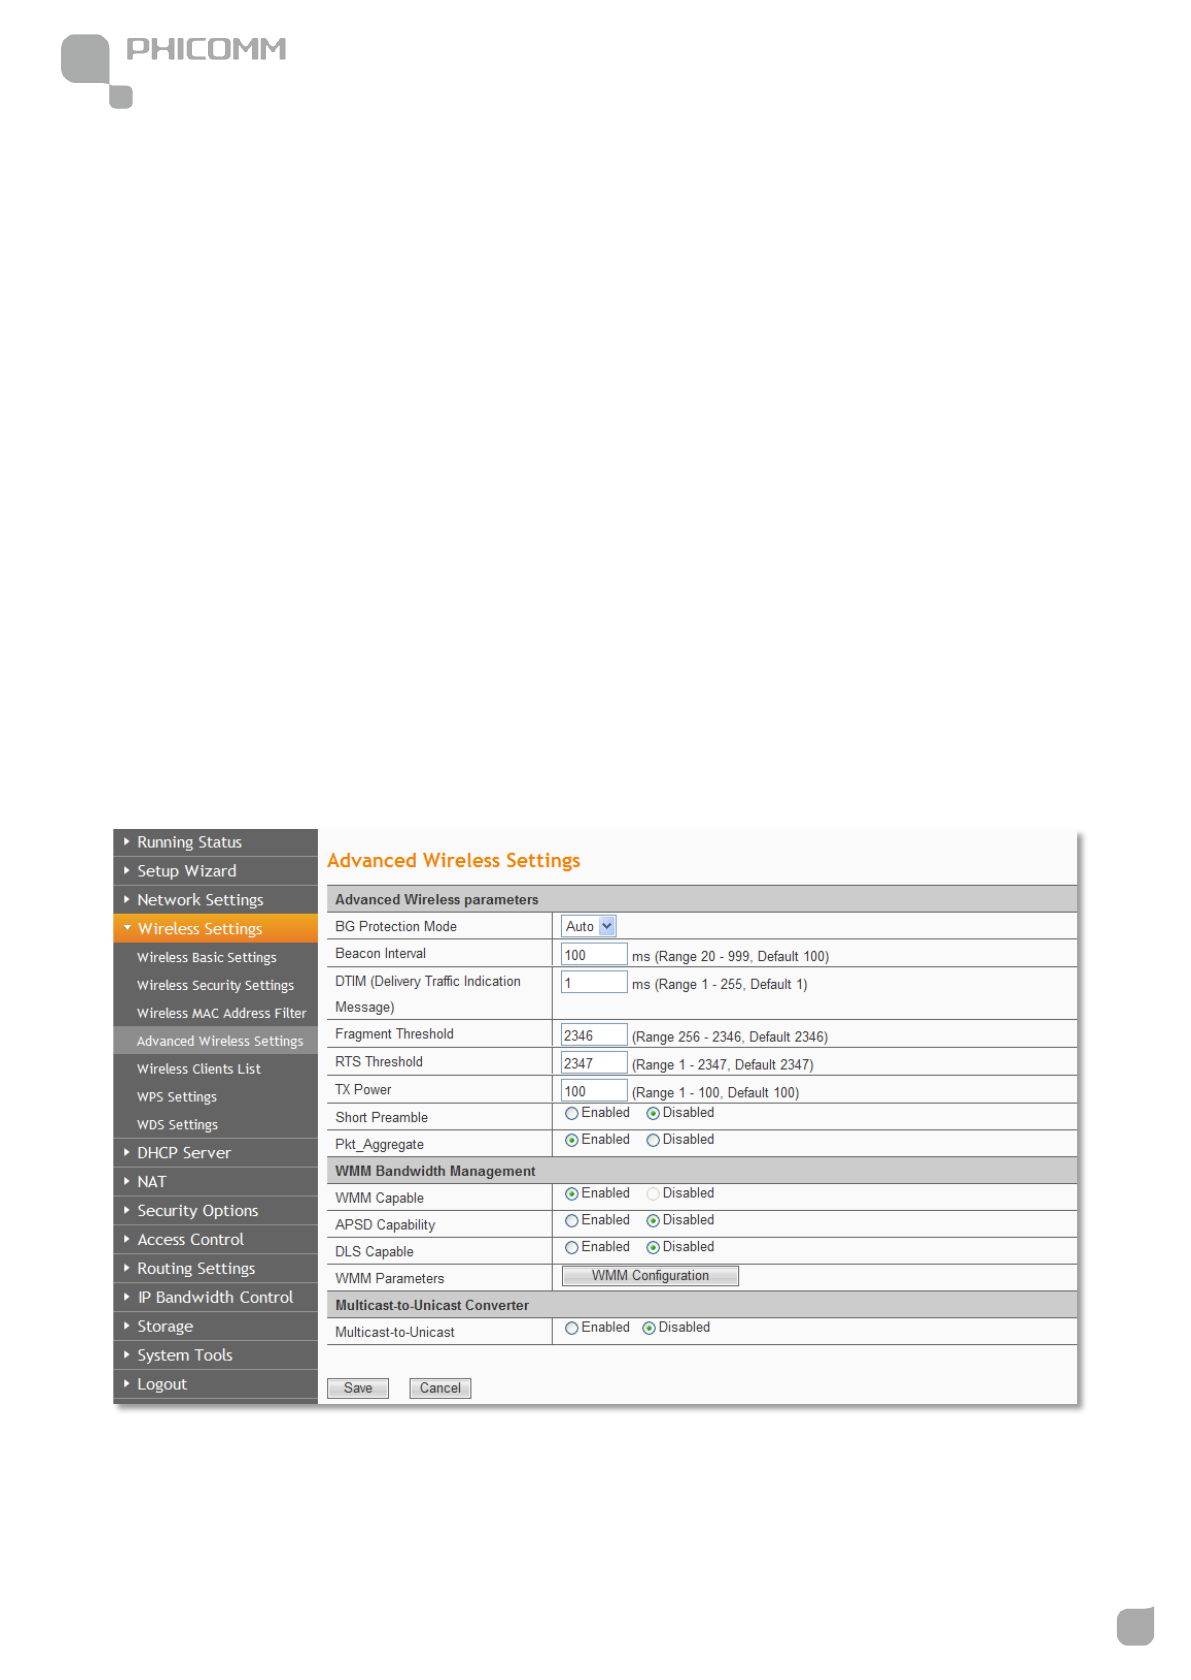
Advanced Wireless Settings
This section is to configure the advanced wireless setting of the Router, if you are not
familiar with the setting items in this page, it’s strongly recommended to keep the provided

300Mbps Wireless N NAS Rout
www.phicomm.com
29
Chapter 3: Router Configuration
default values, otherwise it may result in lower wireless network performance.
BG protection Mode: Auto by default. You can select On or Off.
Beacon Interval: The interval for sending packets of the Beacon frame. Its value range is
20-1000 in unit of ms. The default is 100.
DTIM Interval: It indicates the interval of the delivery traffic indication message (DTIM).
The value range is between 1 and 255 milliseconds. The default value is 1.
Fragment Threshold: Set the fragmentation threshold. Packets larger than the size set in
this field will be fragmented. Too many data packets will lower the Wireless Network
performance. The Fragment Threshold value should not be set too low. The default value is
2346.
RTS Threshold: Set the RTS (Request to send threshold.) threshold. When the packet size
is larger than the preset RTS size, the wireless router will send a RTS to the destination
station to start a negotiation. The default value is 2347.
TX Power: You can set the output power of wireless radio. Unless you are using this
wireless router in a really big space, you may not have to set output power to 100%. This
will enhance security (malicious/unknown users in distance will not be able to reach your
wireless router).
Enable WMM: If you select it, the router will process the packets with the priority first. You
are recommended to select this option.
APSD Capability: It is used for auto power-saved service. It is Disabled by default.
300Mbps Wireless N NAS Rout
www.phicomm.com
30
Chapter 3: Router Configuration
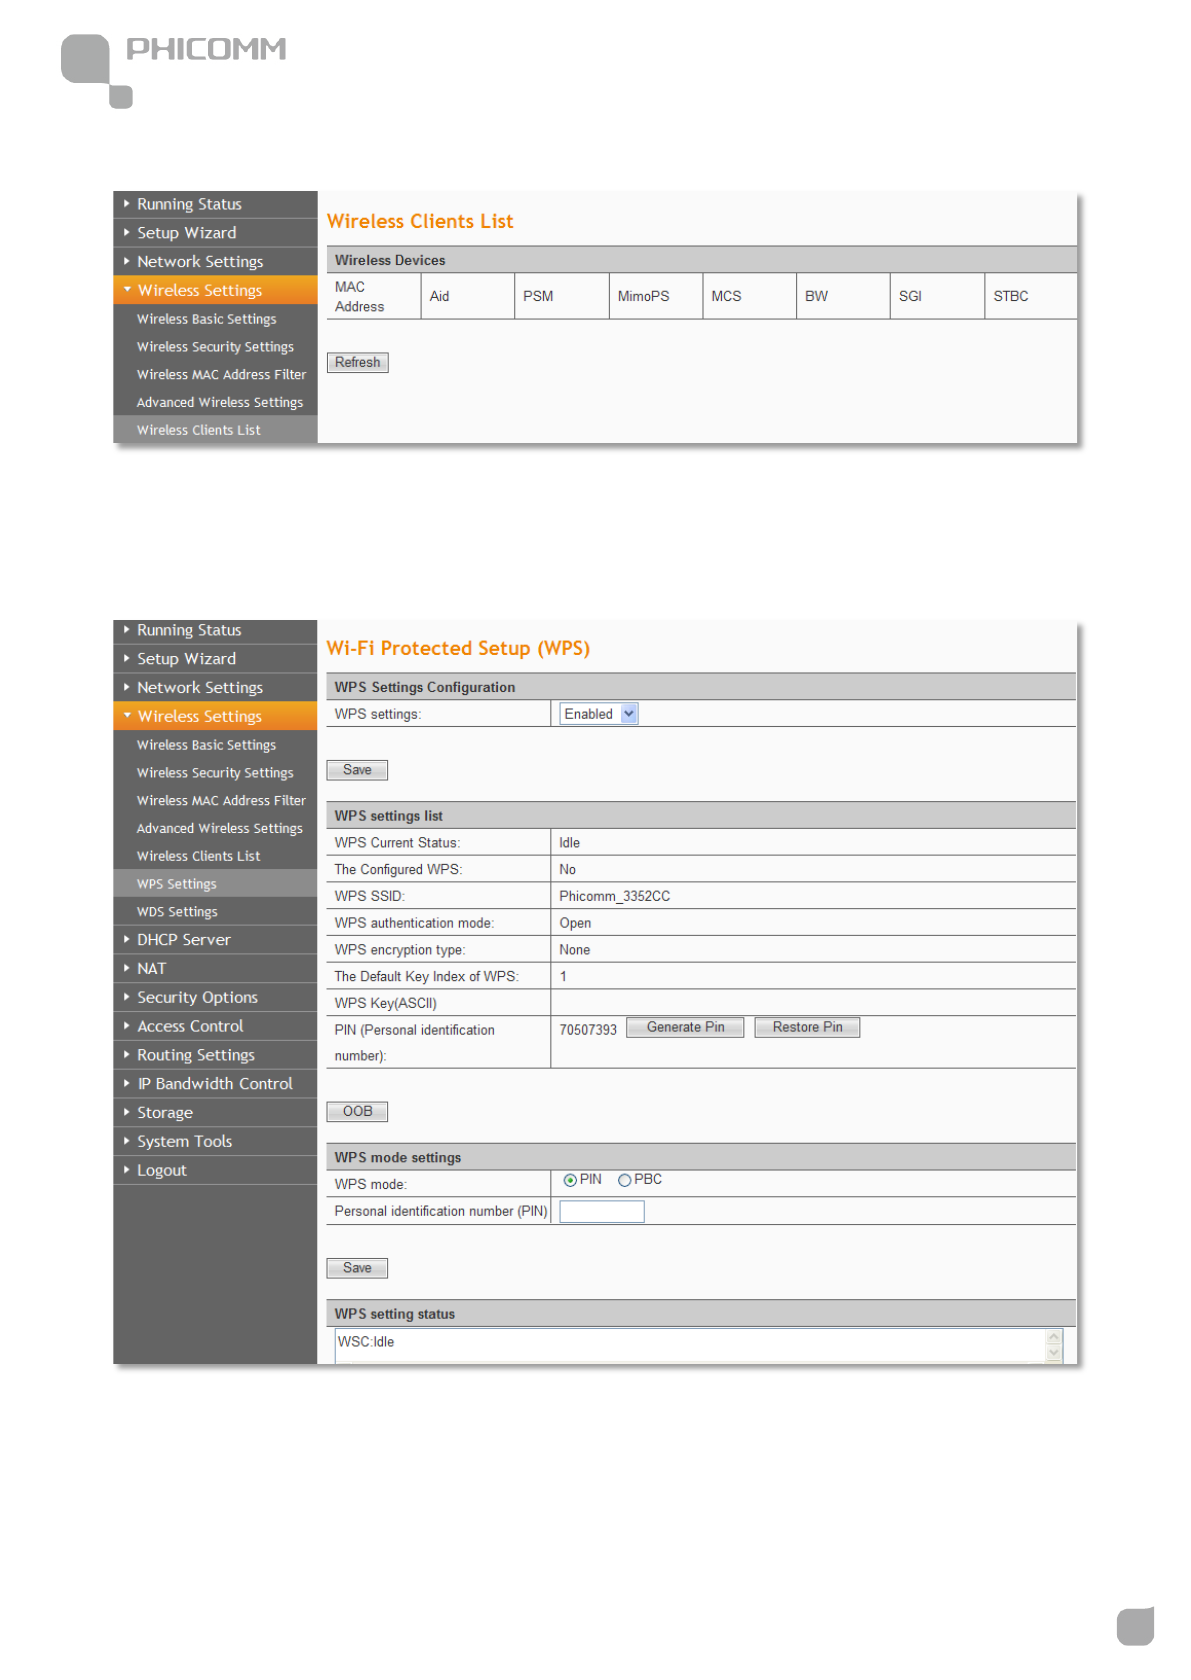
Wireless Clients List
Click Refresh button to check the wireless clients.
WPS Settings
The WPS function can help you add a new device to the network quickly. If the client device
supports Wi-Fi Protected Setup and is equipped with a WPS button, you can add it to the
network by pressing the WPS button on the device and then press the button on the router
300Mbps Wireless N NAS Rout
www.phicomm.com
31
Chapter 3: Router Configuration
within two minutes. The status LED on the router will light green for five minutes if the
device has been successfully added to the network; If your client asks for the Router’s PIN
number, enter the router’s PIN number into your client device; If your client device has a
WIFI Protected Setup PIN number, enter that number in the PIN box.
WPS (Wi-Fi Protected Setting): Easy and quick to establish the connection between
wireless network client and the router through encrypted contents. The users only enter the
PIN code to configure without selecting encryption method and entering secret keys by
manual.
WPS Mode: Supports two ways to configure WPS settings: PBC (Push-Button Configuration)
and PIN code.
PBC: Select the PBC button or press the WPS button on the panel of the Router. (Press WPS
button and WPS LED will blink, which means the WPS function is enabled. During the
blinking time, press the WPS button on another network device, WPS LED light will become
solid when the connection succeeds.)
PIN: If this option is enabled, you need to enter a wireless clients PIN code in the blank and
keep the same code in the client.
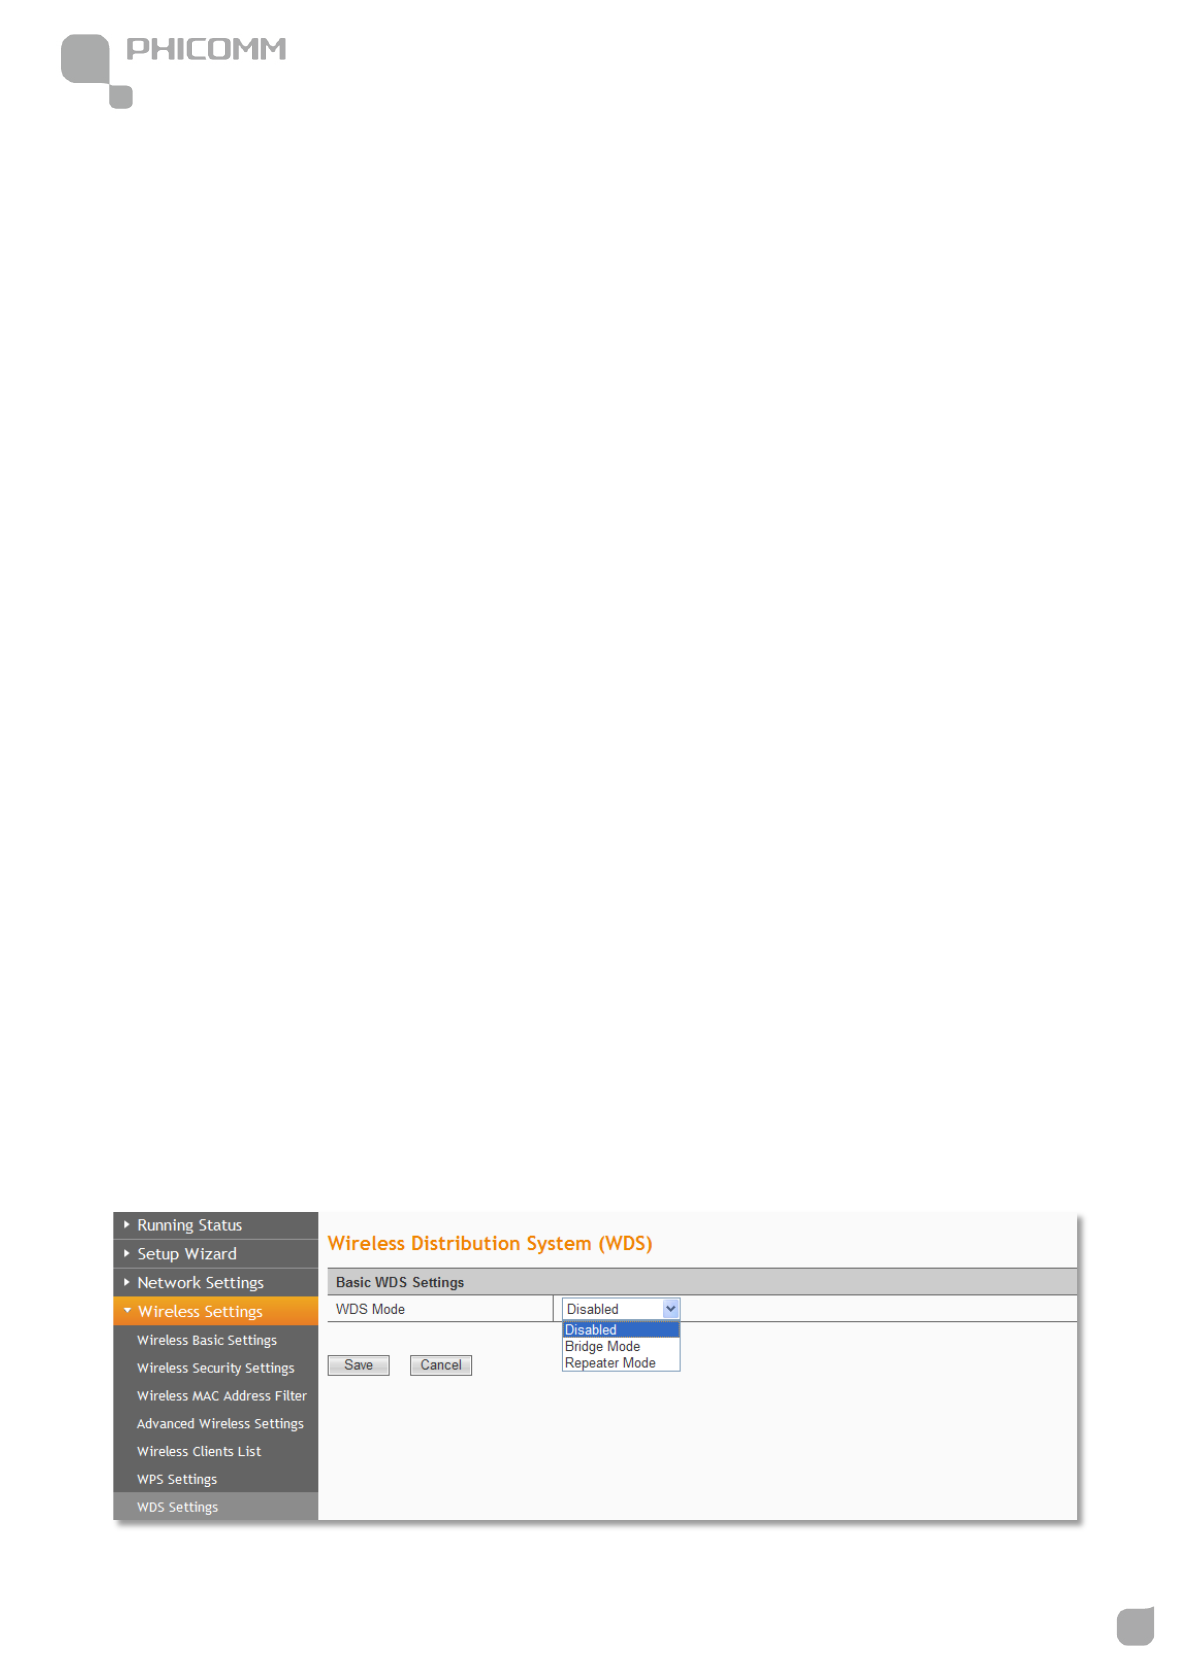
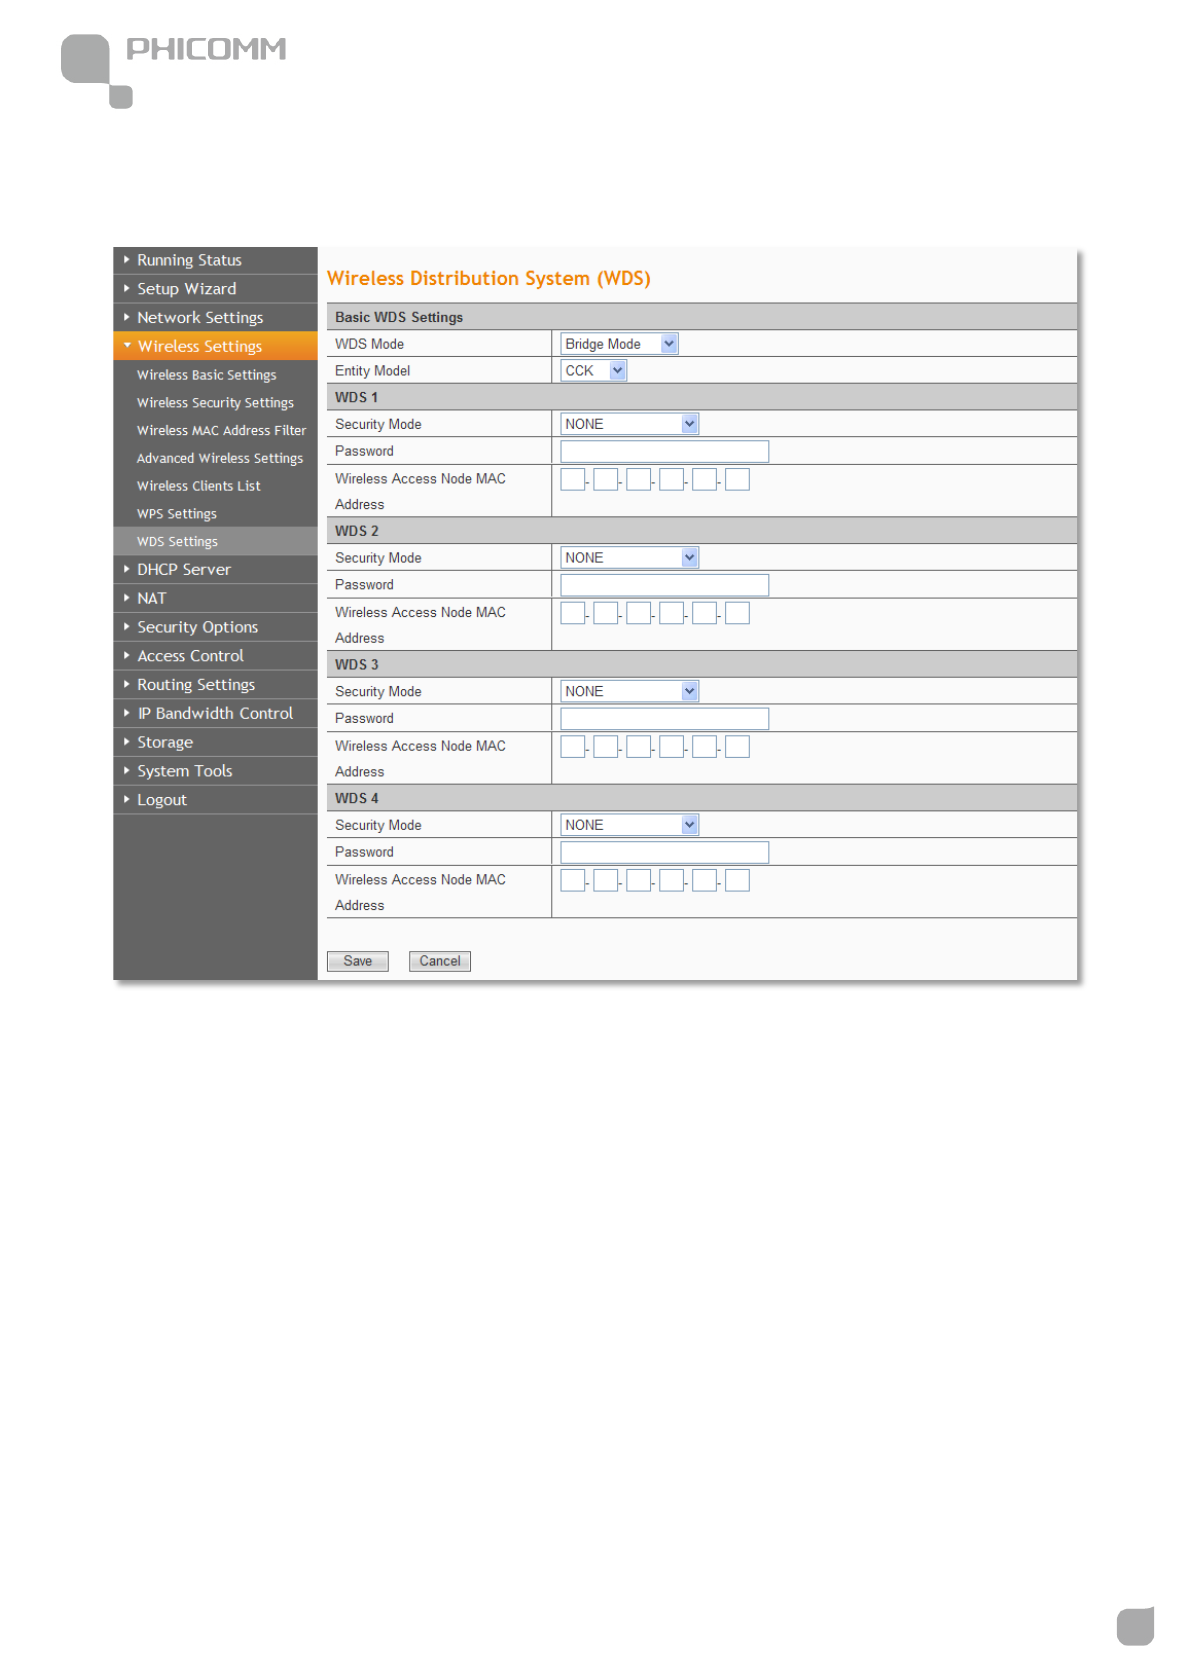
WDS Settings
300Mbps Wireless N NAS Rout
www.phicomm.com
32
Chapter 3: Router Configuration
The WDS function can help you extend the wireless range, it supports Bridge Mode and
Repeater Mode.
Bridge Mode: You can wirelessly connect two or more wired networks via this mode. In this
mode, you need to add the wireless MAC address of the connecting device into the Routers
AP MAC address table or select one from the scanning table. At the same time, the
connecting device should be in Lazy, Repeater or Bridge mode.
Repeater Mode: You can select the mode to extend the distance between the two WLAN
devices. Functioning as a WDS repeater, connects to both a client card as an AP and to
another AP. In typical repeater applications, APs connecting to other APs equipped with
WDS functionality must also support WDS. In this mode, you need to add the MAC address
of the connecting device into the Routers AP MAC address table and the connecting client
300Mbps Wireless N NAS Rout
www.phicomm.com
33
Chapter 3: Router Configuration
should be in Lazy, Repeater or client mode.
Security Mode: You can select WEP 64bits mode, WEP 128bits mode, WPA-PSK (TKIP)
mode, WPA2-PSK (AES) mode.
Password: Enter the password, the format is decided by the encryption method you
selected.
Wireless Access Node MAC Address: Input the MAC address of the other wireless router.
Note: Two wireless routers must use the same channel, encryption type and encryption key.
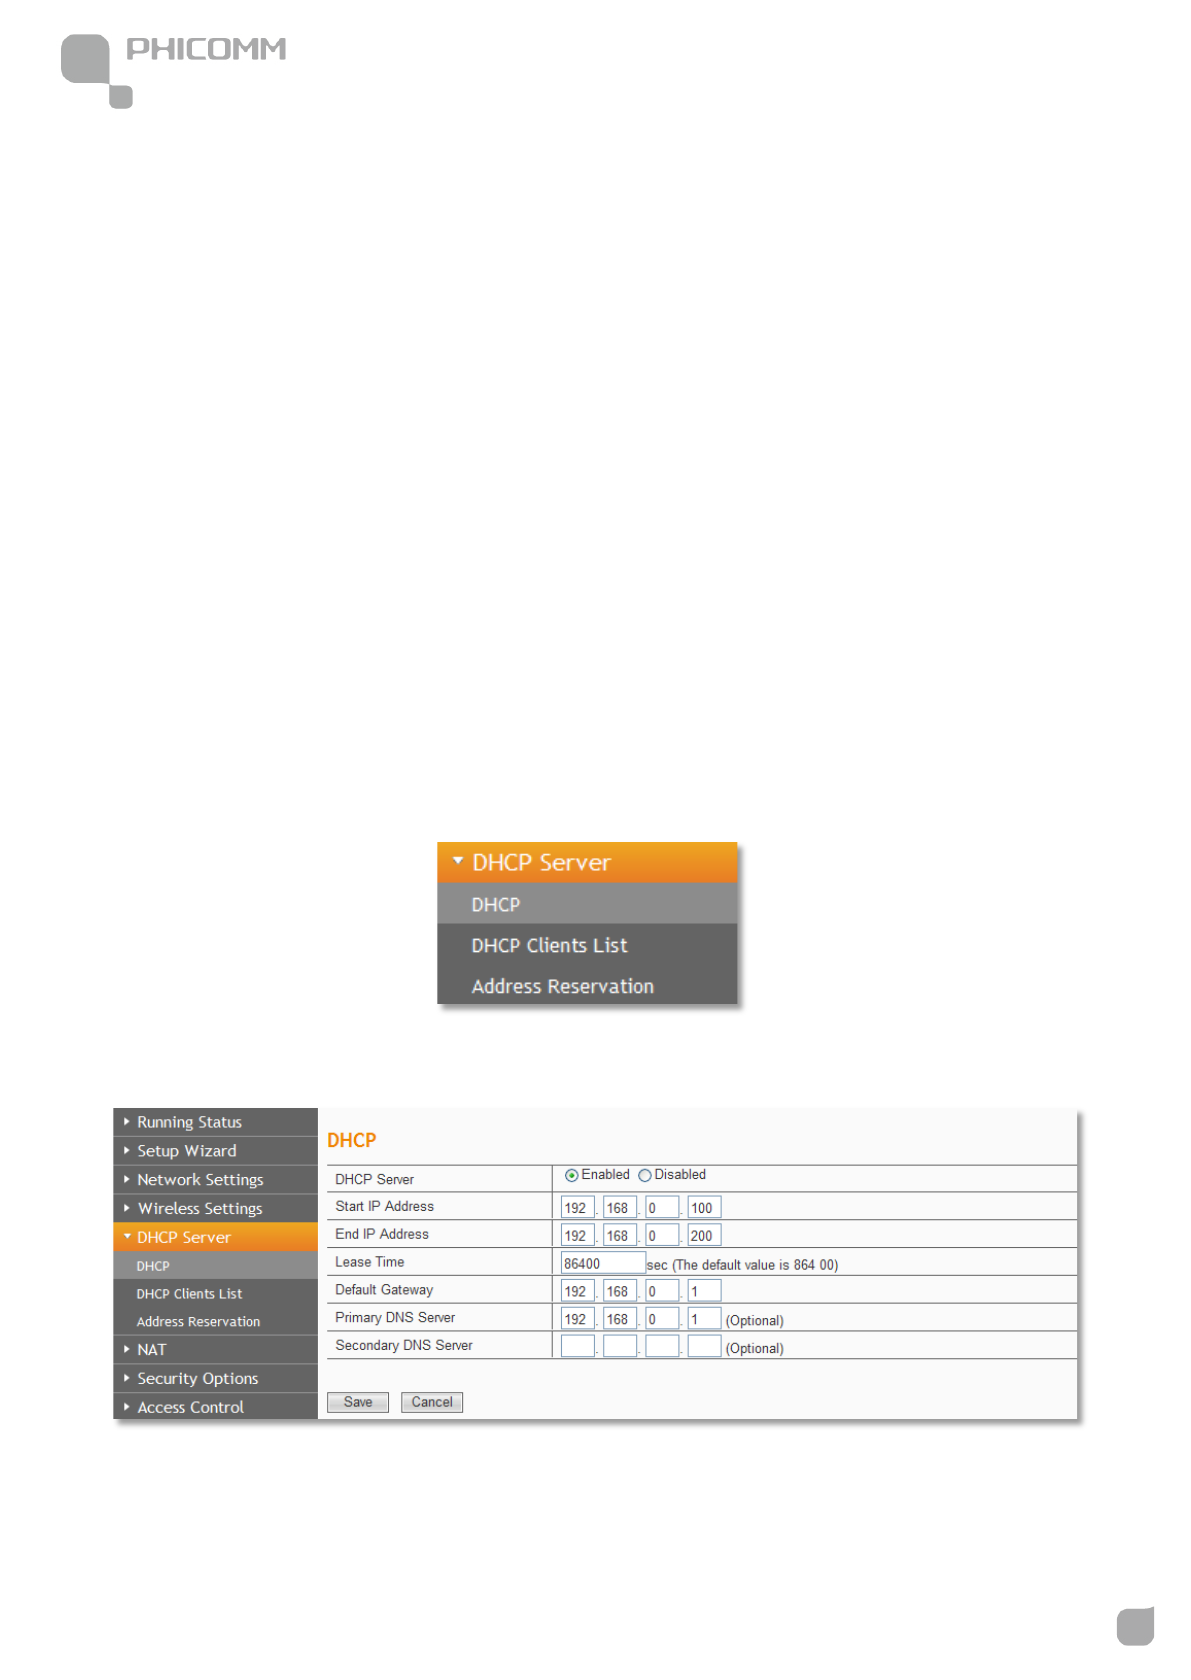
DHCP Server
There are three submenus under the DHCP menu: DHCP, DHCP Clients List and Address
Reservation. Click any of them, and you will be able to configure the corresponding
function.
DHCP
If you enable DHCP server of the router, the DHCP server automatically configures the
TCP/IP protocol for each computer in the LAN.
300Mbps Wireless N NAS Rout
www.phicomm.com
34
Chapter 3: Router Configuration
DHCP Server: If you disable the server, please make sure you have another DHCP server in
your network.
Start IP Address: The first address in the IP Address pool.
End IP Address: The last address in the IP Address pool.
Lease Time: It is the time interval that server will change to use another DHCP address.
Default Gateway: (Optional) Suggest to input the IP Address of the LAN port of the Router.
Primary DNS Server: (Optional) Input the DNS IP address provided by your ISP. Or consult
your ISP.
Secondary DNS Server: (Optional) You can input the IP Address of another DNS server if
your ISP provides two DNS servers.
Note: To use the DHCP server function of the router, please configure all computers in the
LAN as Obtain an IP Address automatically mode. This function will take effect after the
router rebooted.
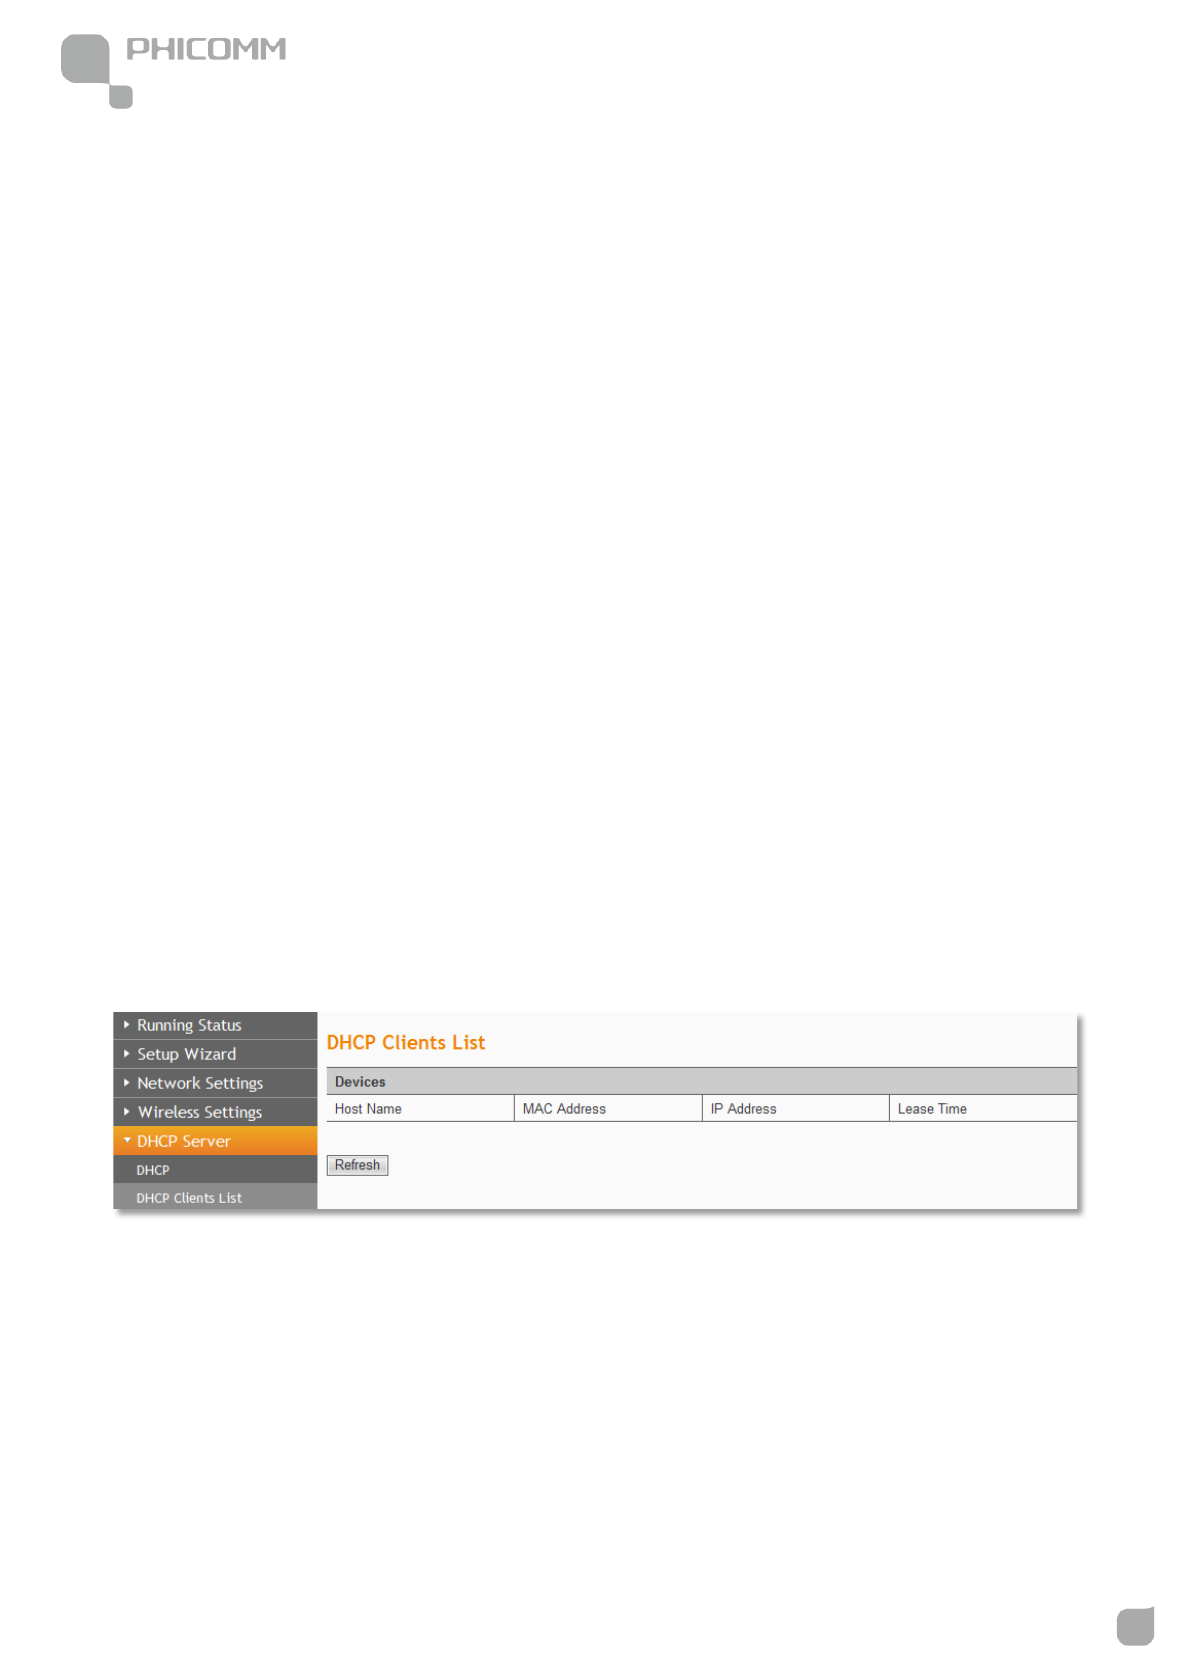
DHCP Clients list
Here you can see the information of DHCP Clients.
Refresh: Click Refresh button to refresh the DHCP clients list.

300Mbps Wireless N NAS Rout
www.phicomm.com
35
Chapter 3: Router Configuration
Address Reservation
When you specify a reserved IP address for a PC in the LAN, that PC will always receive the
same IP address each time when it accesses the DHCP server. Reserved IP addresses could
be assigned to servers that require permanent IP settings.
IP Address: The IP address that the Router reserved.
MAC Address: The MAC Address of the PC that you want to reserve for an IP address.
300Mbps Wireless N NAS Rout
www.phicomm.com
36
Chapter 3: Router Configuration
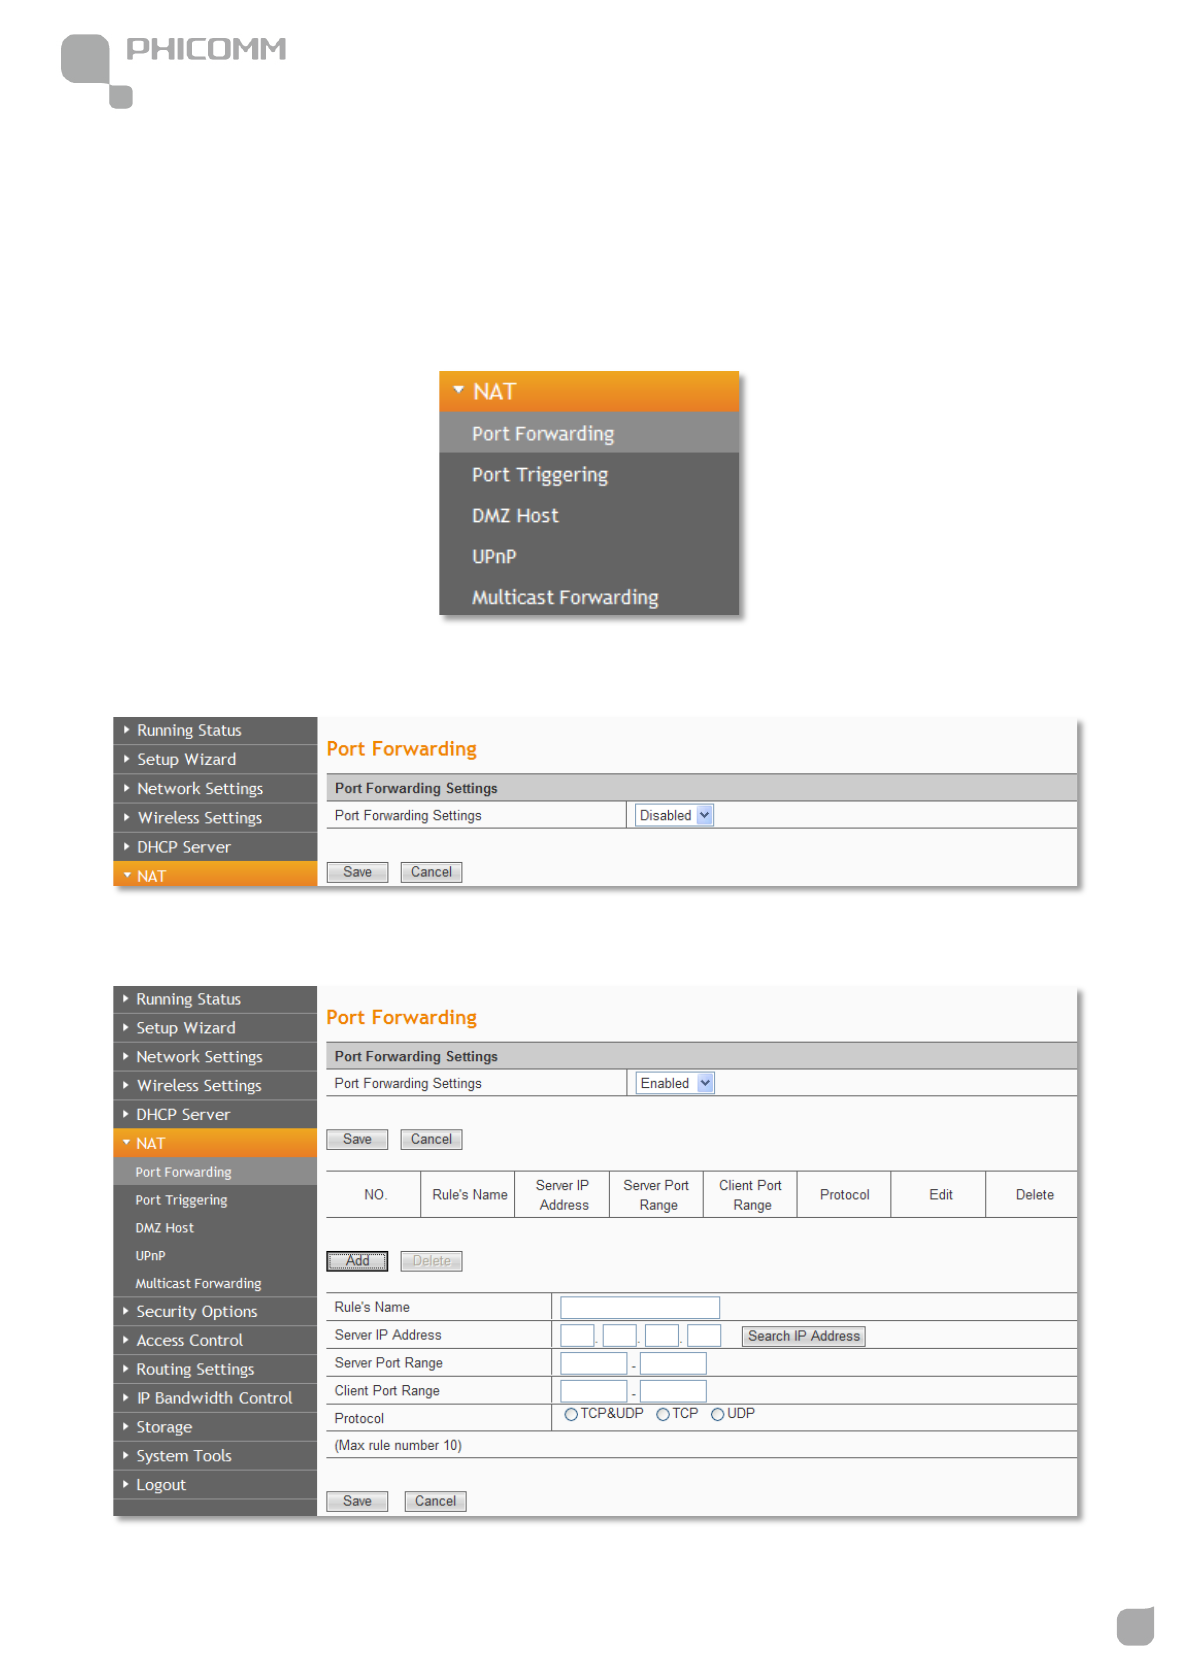
NAT
There are five submenus under the NAT menu: Port Forwarding, Port Triggering, DMZ
Host, UPnP and Multicast Forwarding. Click any of them, and you will be able to
configure the corresponding function.
Port Forwarding
Choose Enabled, then click Add button.
300Mbps Wireless N NAS Rout
www.phicomm.com
37
Chapter 3: Router Configuration
Rule’s Name: You can give this rule a name.
Server IP Address: The IP address of the server you want to open the port, it is like
192.168.0.X.
Server Port Range: The port range of the server you want to open the port.
Client Port Range: The port range of the client.
Protocol: The protocol of the server.
Note: Please assign a static IP address to the server.
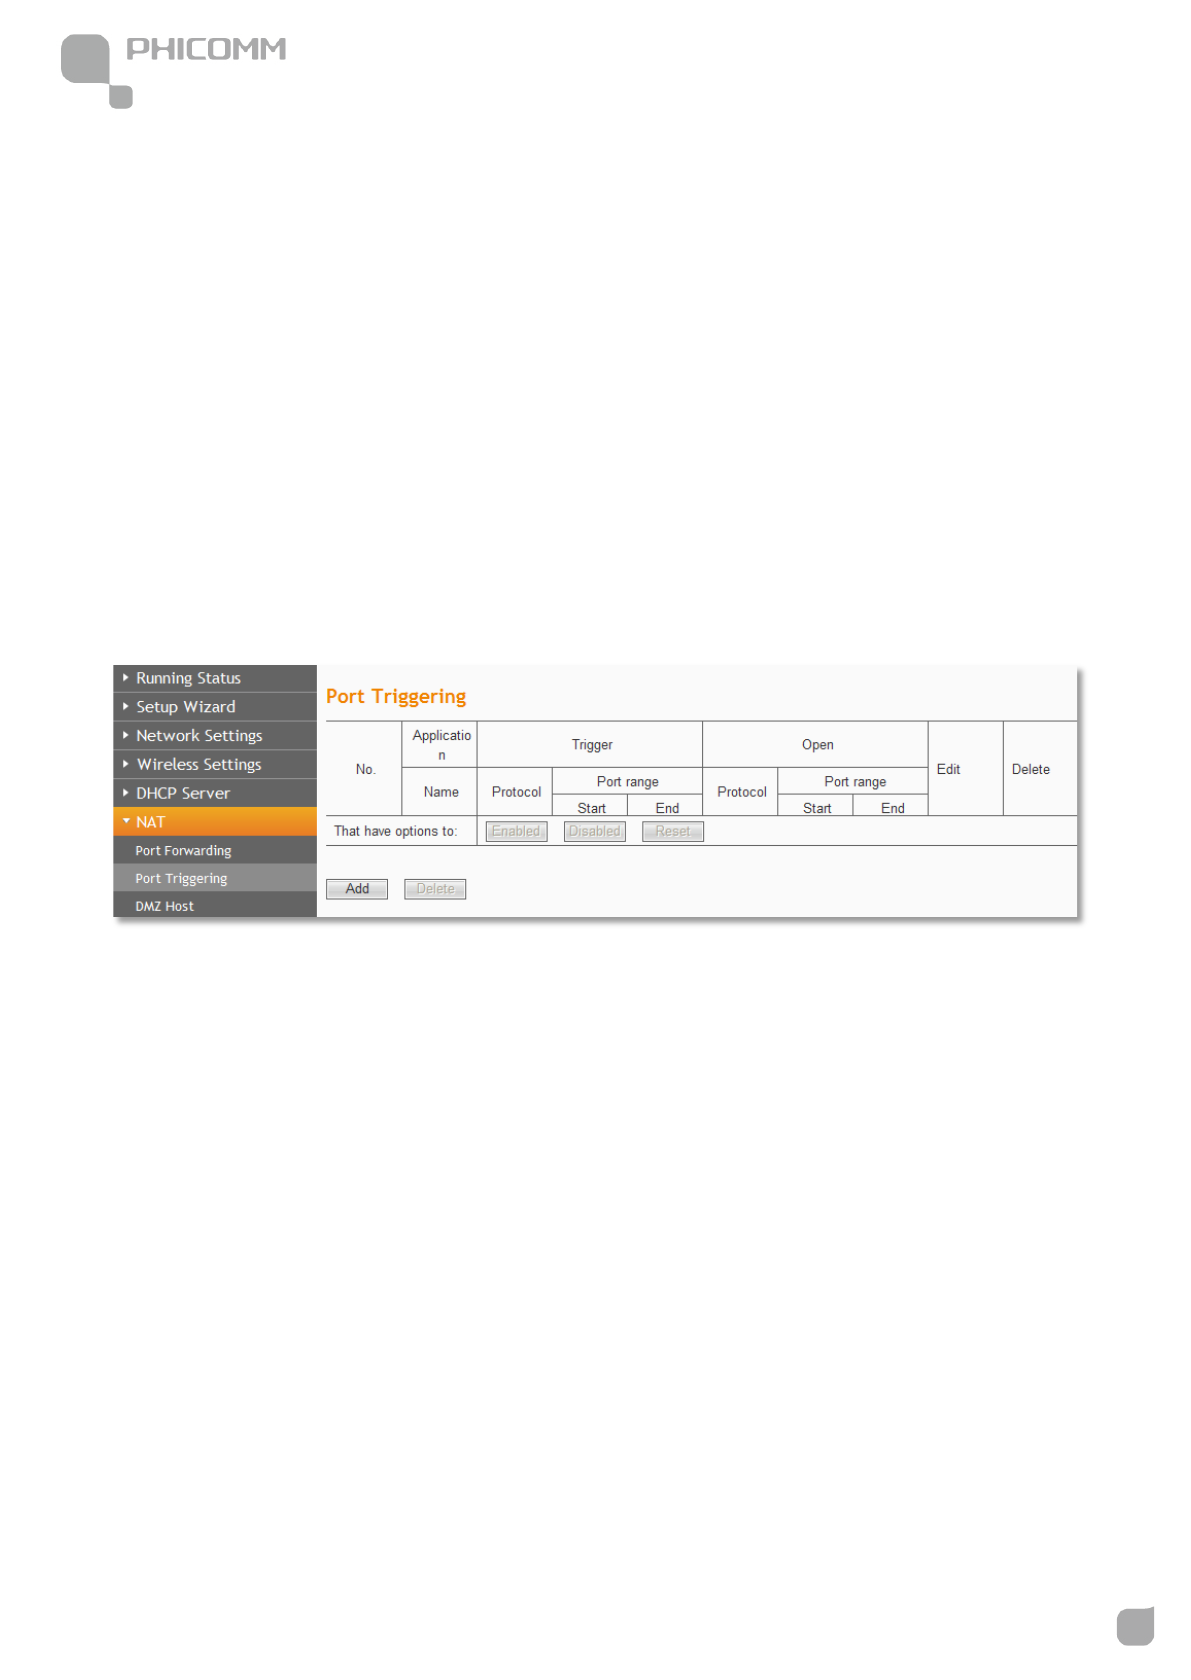
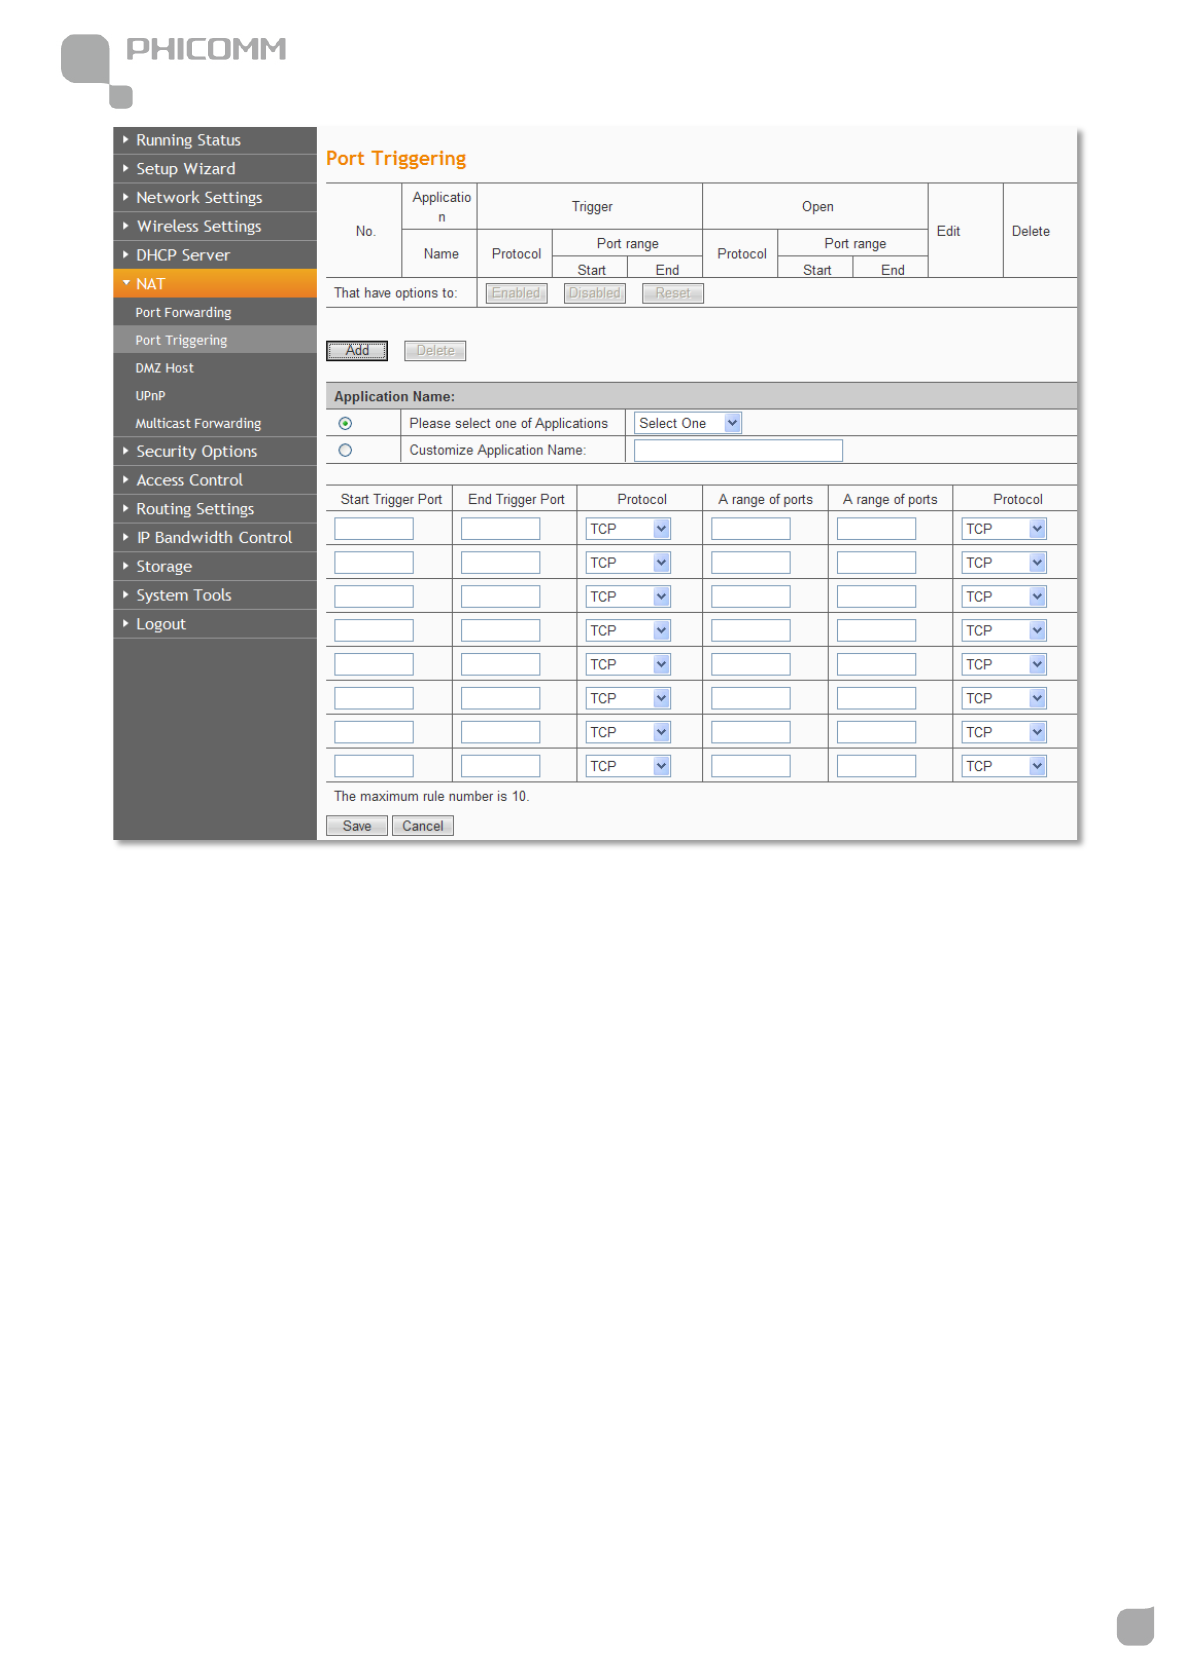
Port Triggering
Click Add button.
300Mbps Wireless N NAS Rout
www.phicomm.com
38
Chapter 3: Router Configuration
Application Name: Describe the name of the application that being set.
Please select one of the applications: There are few common applications available such
as Dailpad, MSN gaming, PC Phone etc. the blank will be automatically filled once been
chosen.
Customize Application Name: If the application you want to add is not included, enter the
blank manually.
Start/End Trigger Port: The port for outgoing traffic. An outgoing connection using this
port will trigger this rule.
Protocol: The protocol used for Trigger Ports: TCP, UDP or TCP/UDP. If you are not clear
about which protocol was being used, TCP/UDP is recommended.
300Mbps Wireless N NAS Rout
www.phicomm.com
39
Chapter 3: Router Configuration
Open Port: The port or port range used by the remote system when it responds to the
outgoing request. A response using one of these ports will be forwarded to the PC that
triggered this rule.
Open Port Protocol: The protocol used for Incoming Ports Range, it can be TCP, UDP or
TCP/UDP. If you are not clear about which protocol was being used, TCP/UDP is
recommended.
Note:
• Before using Port Triggering, you should assign a static IP address to the designated
server, and then enter this static IP address into router as the Server IP Address.
• Please ensure the SPI Firewall was closed before setting the port triggering. You could
check the SPI Firewall settings at Security Options>Security Settings.
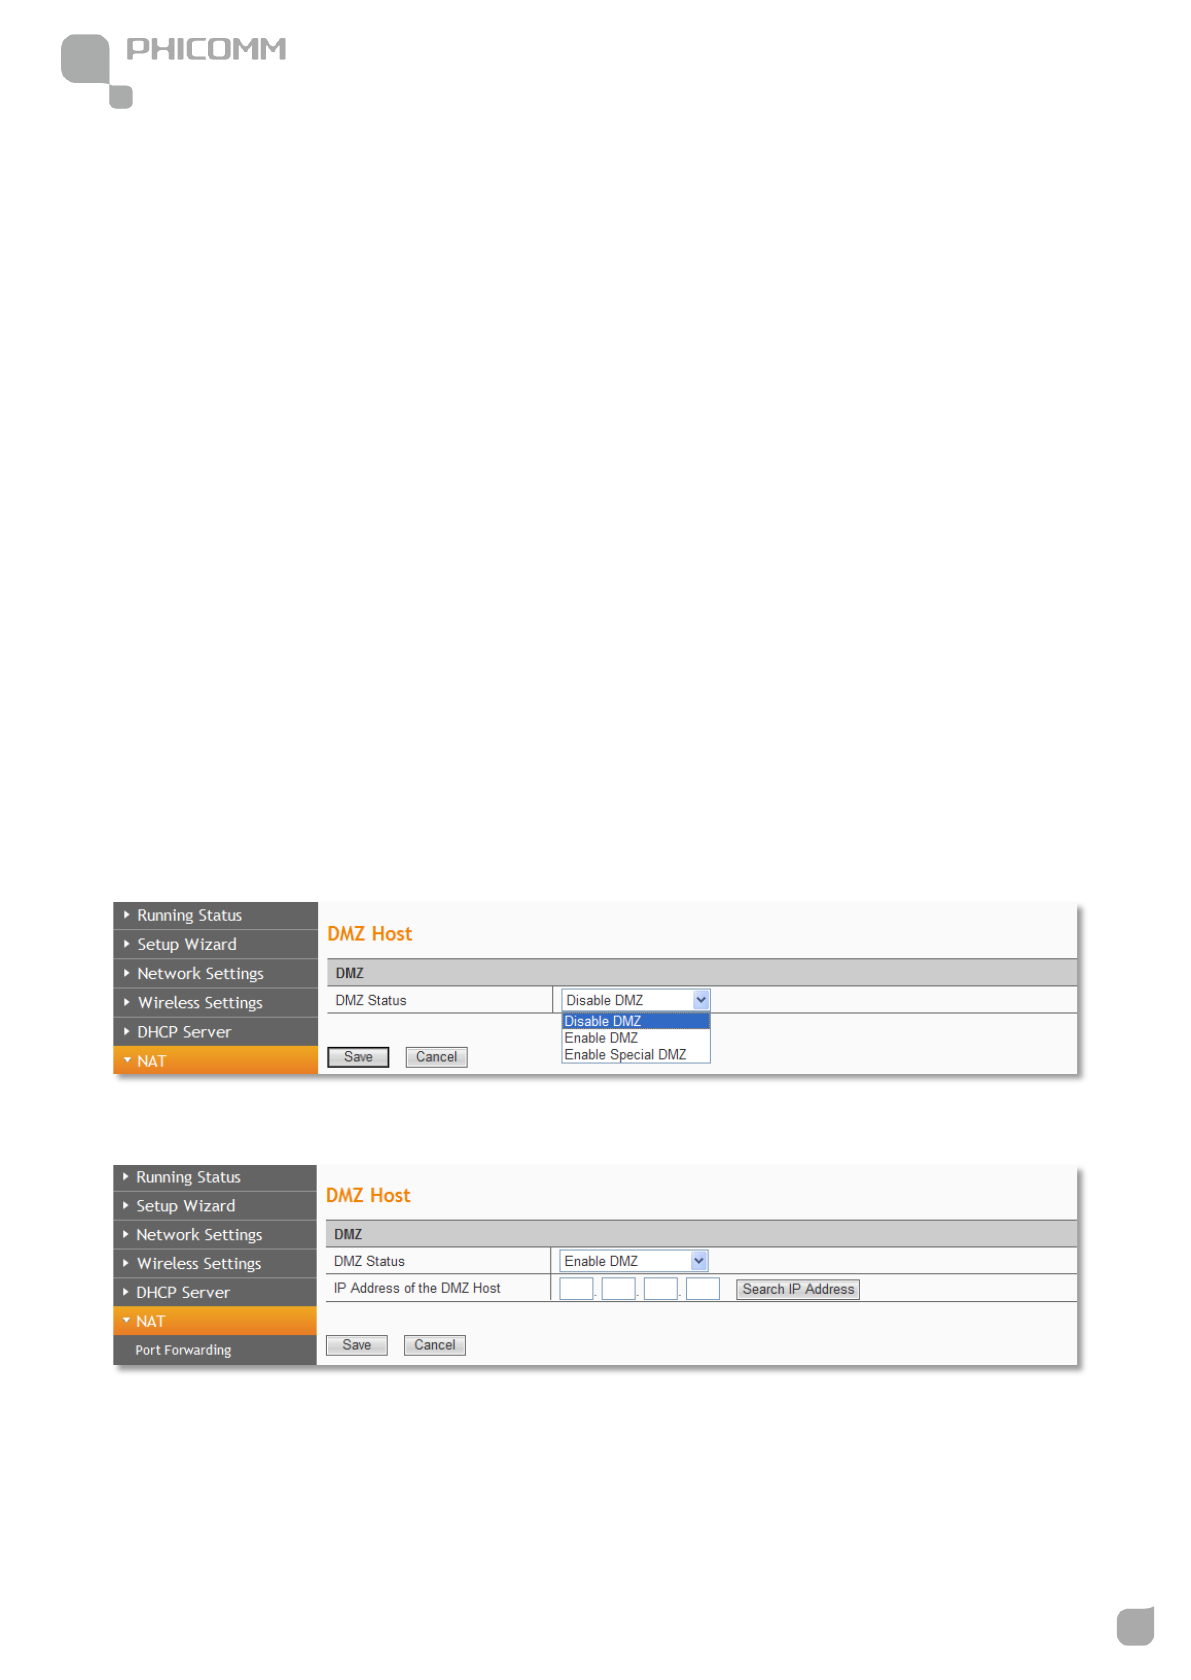
DMZ Host
Choose Enable DMZ.
IP Address of the DMZ Host: Enter the IP address of the computer in the LAN that you
want to set to a DMZ host in the DMZ Host IP Address field.
300Mbps Wireless N NAS Rout
www.phicomm.com
40
Chapter 3: Router Configuration
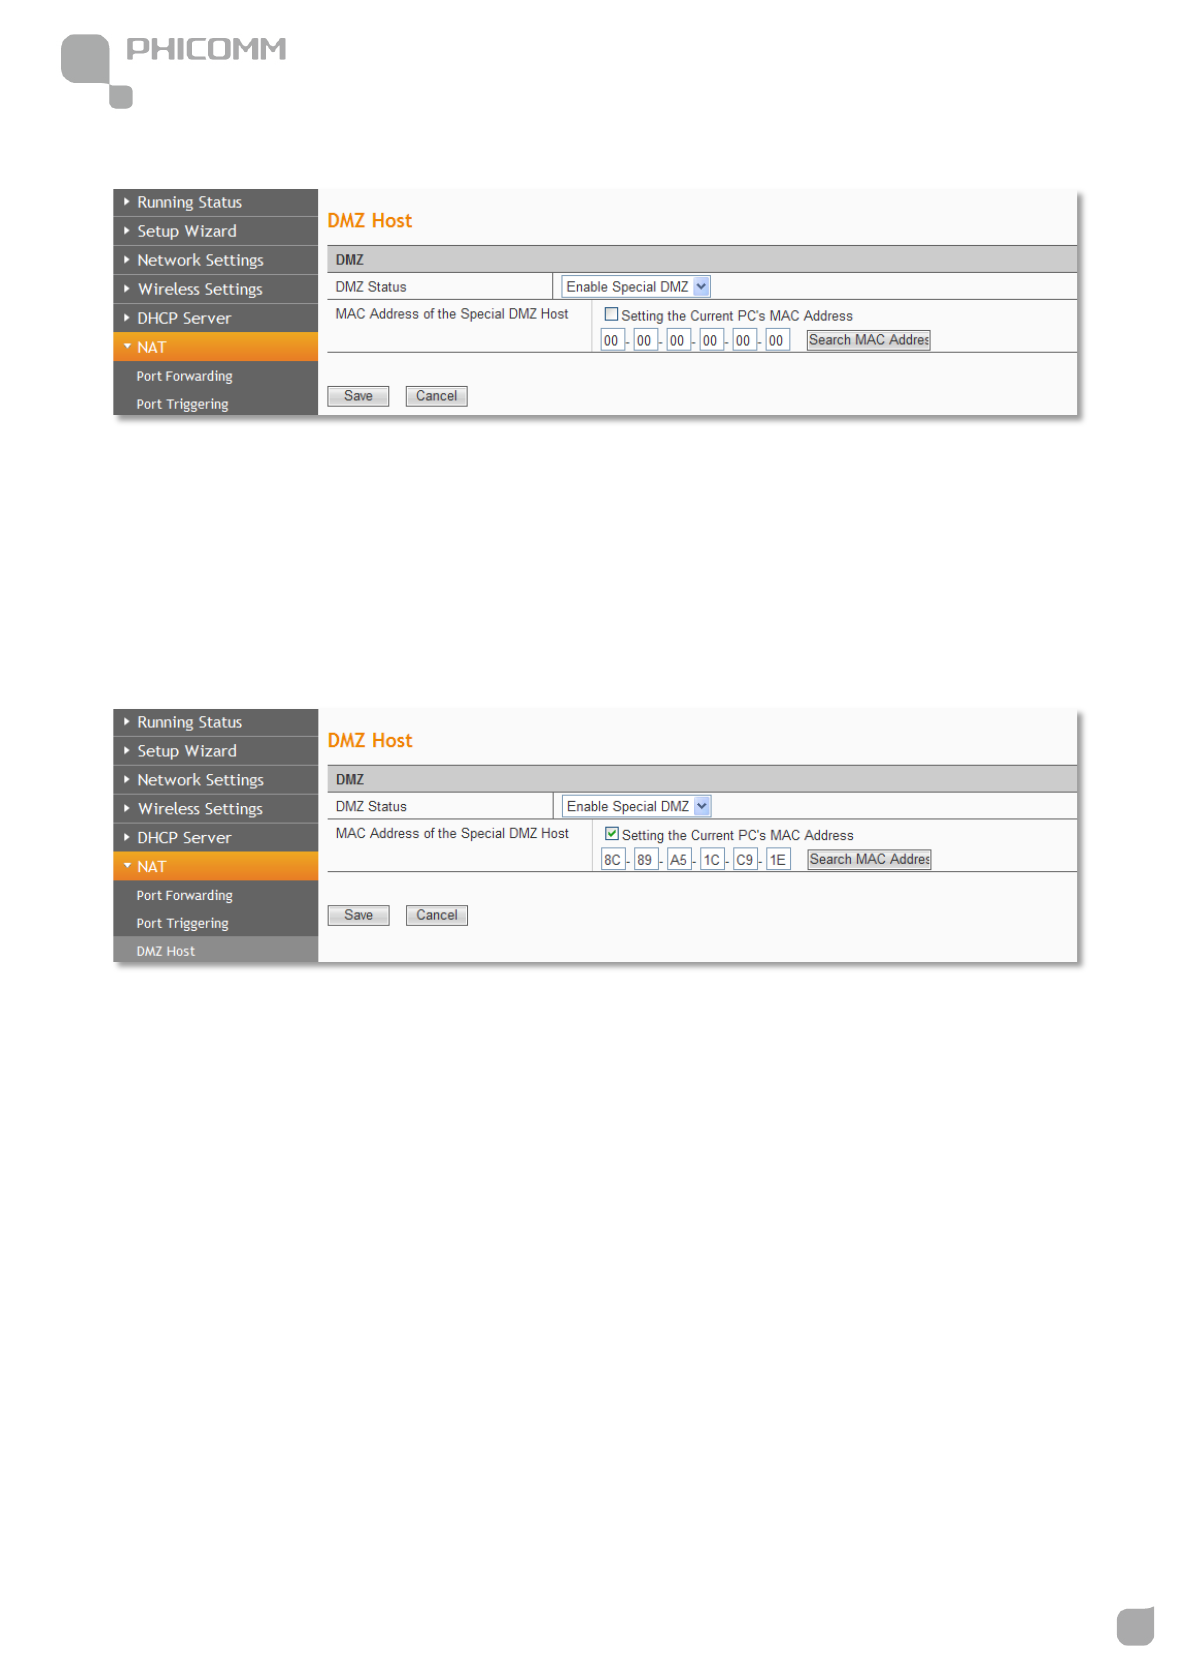
Choose Enable Special DMZ.
MAC Address of the Special DMZ Host: Enter the MAC Address of the computer in the LAN
that you want to set to a DMZ host.
If you check Setting the Current PC’s MAC Address, the current PC’s MAC address will
come up automatically.
Note:
• Before using DMZ Host, you should assign a static IP address to the designated server,
and then enter this static IP address into router as the Server IP Address.
• DMZ priority is higher than the Port Forwarding, if the DMZ open, all the port
forwarding rules are not effective.
300Mbps Wireless N NAS Rout
www.phicomm.com
41
Chapter 3: Router Configuration
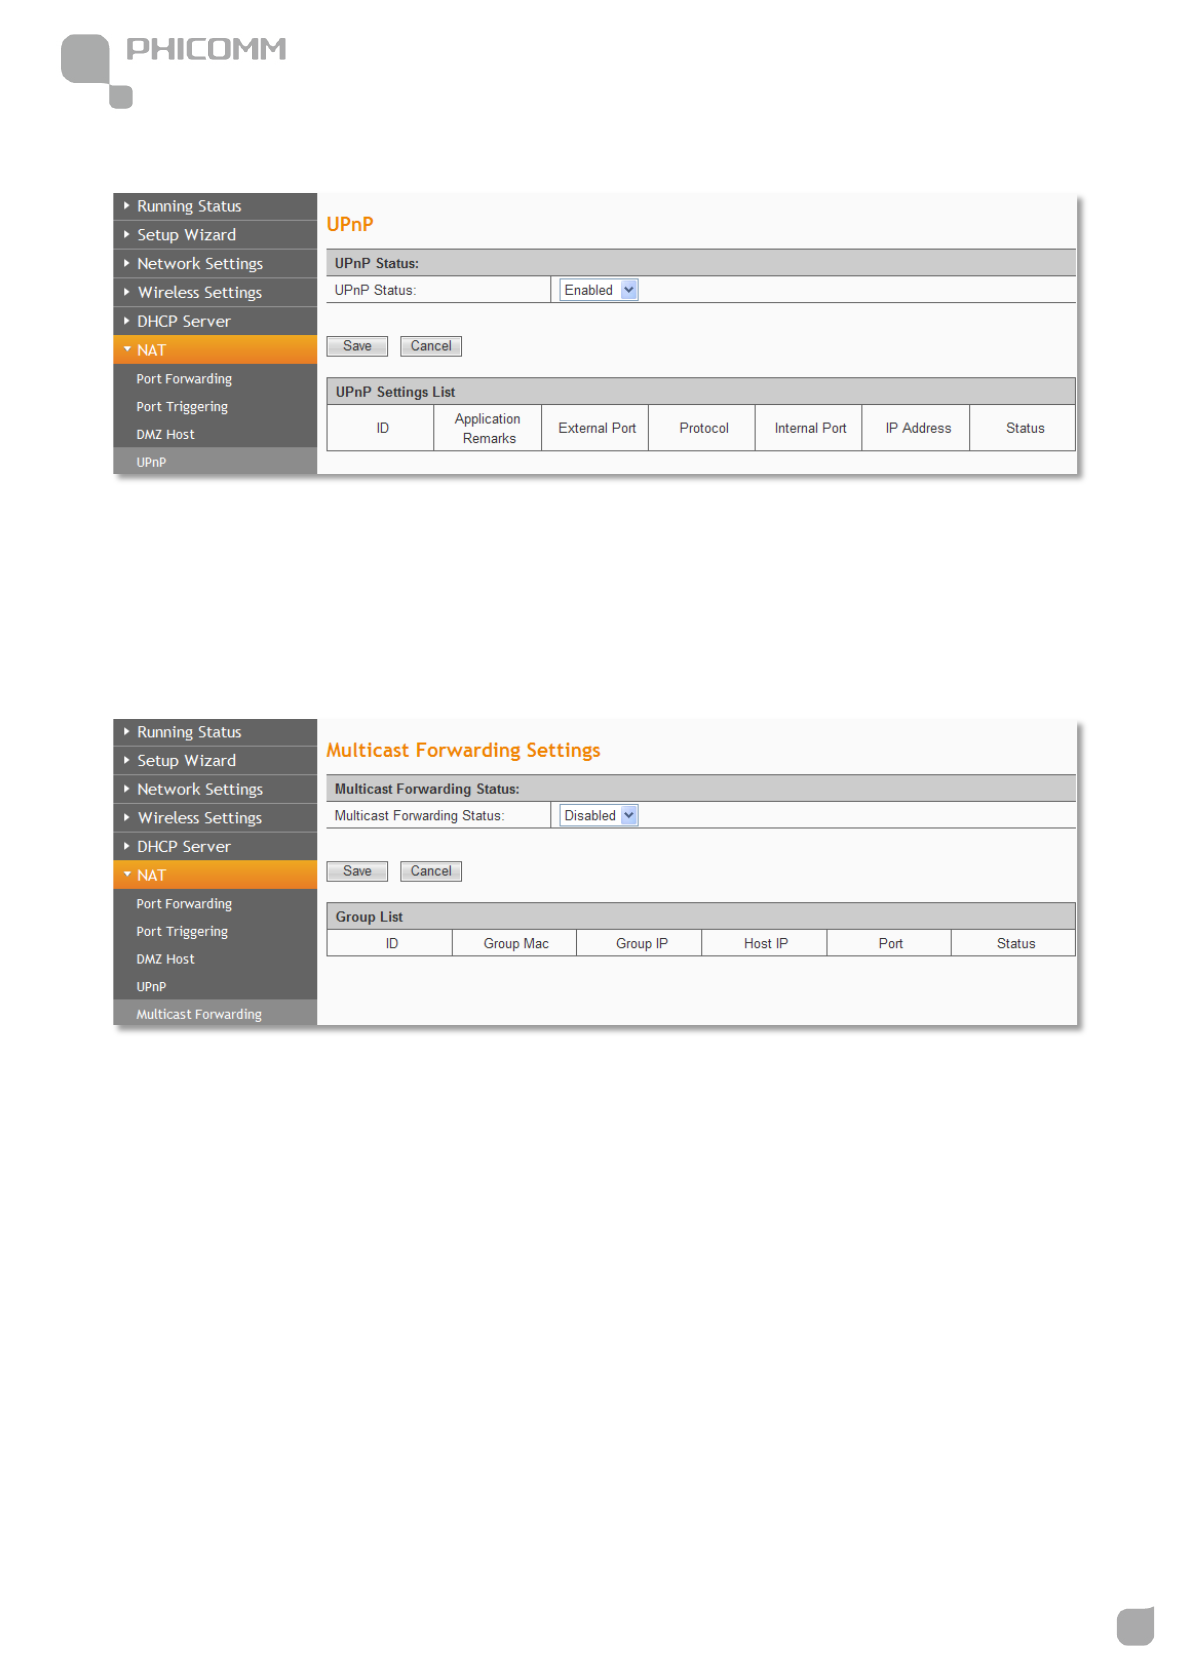
UPnP
UPnP: Click the checkbox to Enable or Disable the UPnP.
Save: Click Save button to save your setting.
Multicast Forwarding Settings
Multicast Forwarding enables the router to issue IGMP host message on behalf of hosts
that the router discovered through standard IGMP interfaces.
Group Mac: The Mac Address of the Multicast Forwarding Group.
Group IP: The IP Address of the Multicast Forwarding Group.
Host IP: The IP Address of the Group members.
Port: The port number of the Multicast group.
Status: The status of the Multicast group.
300Mbps Wireless N NAS Rout
www.phicomm.com
42
Chapter 3: Router Configuration
Security Options
There are four submenus under the Security Options menu: Security Settings, Advanced
Security Settings, Local Web Management and Remote Web Management. Click any of
them, and you will be able to configure the corresponding function.
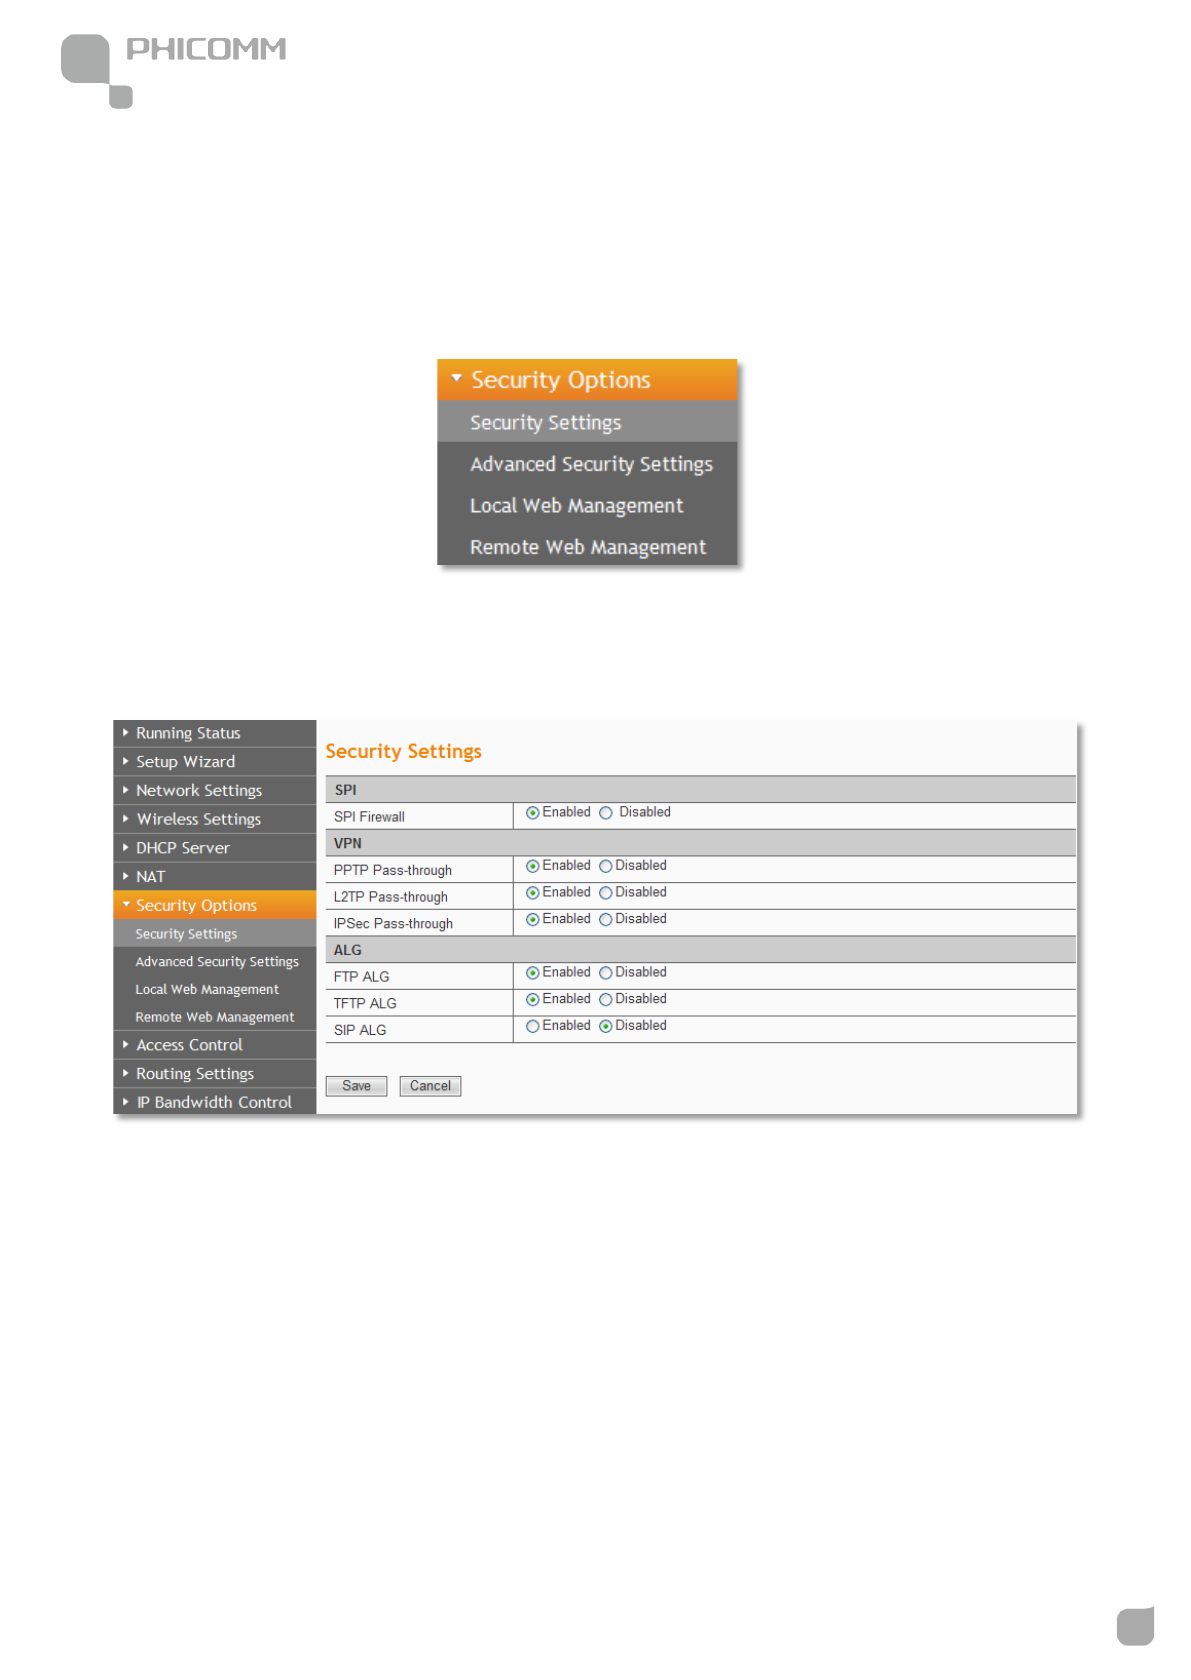
Security Settings
SPI (Stateful Packet Inspection): When the SPI firewall is enabled, the system refuses all
requests from the Internet. Only packets that belong to connections that respond requests
from the LAN and for which status database is created can pass the firewall and access to
the LAN. By default, the SPI is enabled. To expose all hosts in the LAN to the Internet, you
can disable SPI.
VPN (Virtual Private Network): VPN provides a safe communication method among
remote computers through WAN. If a host in the LAN wants to connect to the remote VPN

300Mbps Wireless N NAS Rout
www.phicomm.com
43
Chapter 3: Router Configuration
network through the router by using the VPN protocol, such as PPTP, L2TP, or IPSec, you
need to enable the corresponding VPN pass through.
ALG (Application Layer Gateway): ALG supports that some protocols at the application
layer that adopt the control/data mode, such as FTP, TFTP, and H323, help to translate
network addresses and ports at the NAT gateway. You are recommended to enable this
option. The Common Service Port drop-down list contains some common service ports.
You can select one and click Add to add the service port to the virtual server list.
Advanced Security Settings
Anti DoS Attack: Check to enable it for attack prevention.
IGMP-Flood Packet Threshold: If the number of ICMP data packets exceeds the threshold,
the defense measures act immediately.
Enable filtering UDP-FLOOD attack: Select it if you want to protect against UDP-FLOOD
attacks.
UDP-Flood Packet Threshold: If the number of UDP data packets exceeds the threshold,
the defense measures act immediately.
Enable filtering TCP-SYN-FLOOD attack: Select it if you want to protect against

300Mbps Wireless N NAS Rout
www.phicomm.com
44
Chapter 3: Router Configuration
TCP-SYN-FLOOD attacks.
TCP-SYN-Attack Packet Threshold: If the number of TCP-SYN data packets exceeds the
threshold, the defense measures act immediately.
Block the PING packets from the WAN interface: If you select this option, the PC in the
WAN cannot send the PING packets to the router.
Block the PING packets from the LAN: If you select this option, the PC in the LAN cannot
send the PING packets to the WAN.
Local Web Management
By default, the router allows all computers in the LAN to log in to the router for Web
management. If you select Allow only MAC addresses in the list to access the Web
management page, and add MAC addresses to the list, only MAC addresses in the list can
access the web management page of the router, while other computers in the LAN are
blocked from accessing the router.
MAC Address 1/2/3/4: Enter the MAC addresses of LAN computers.
300Mbps Wireless N NAS Rout
www.phicomm.com
45
Chapter 3: Router Configuration
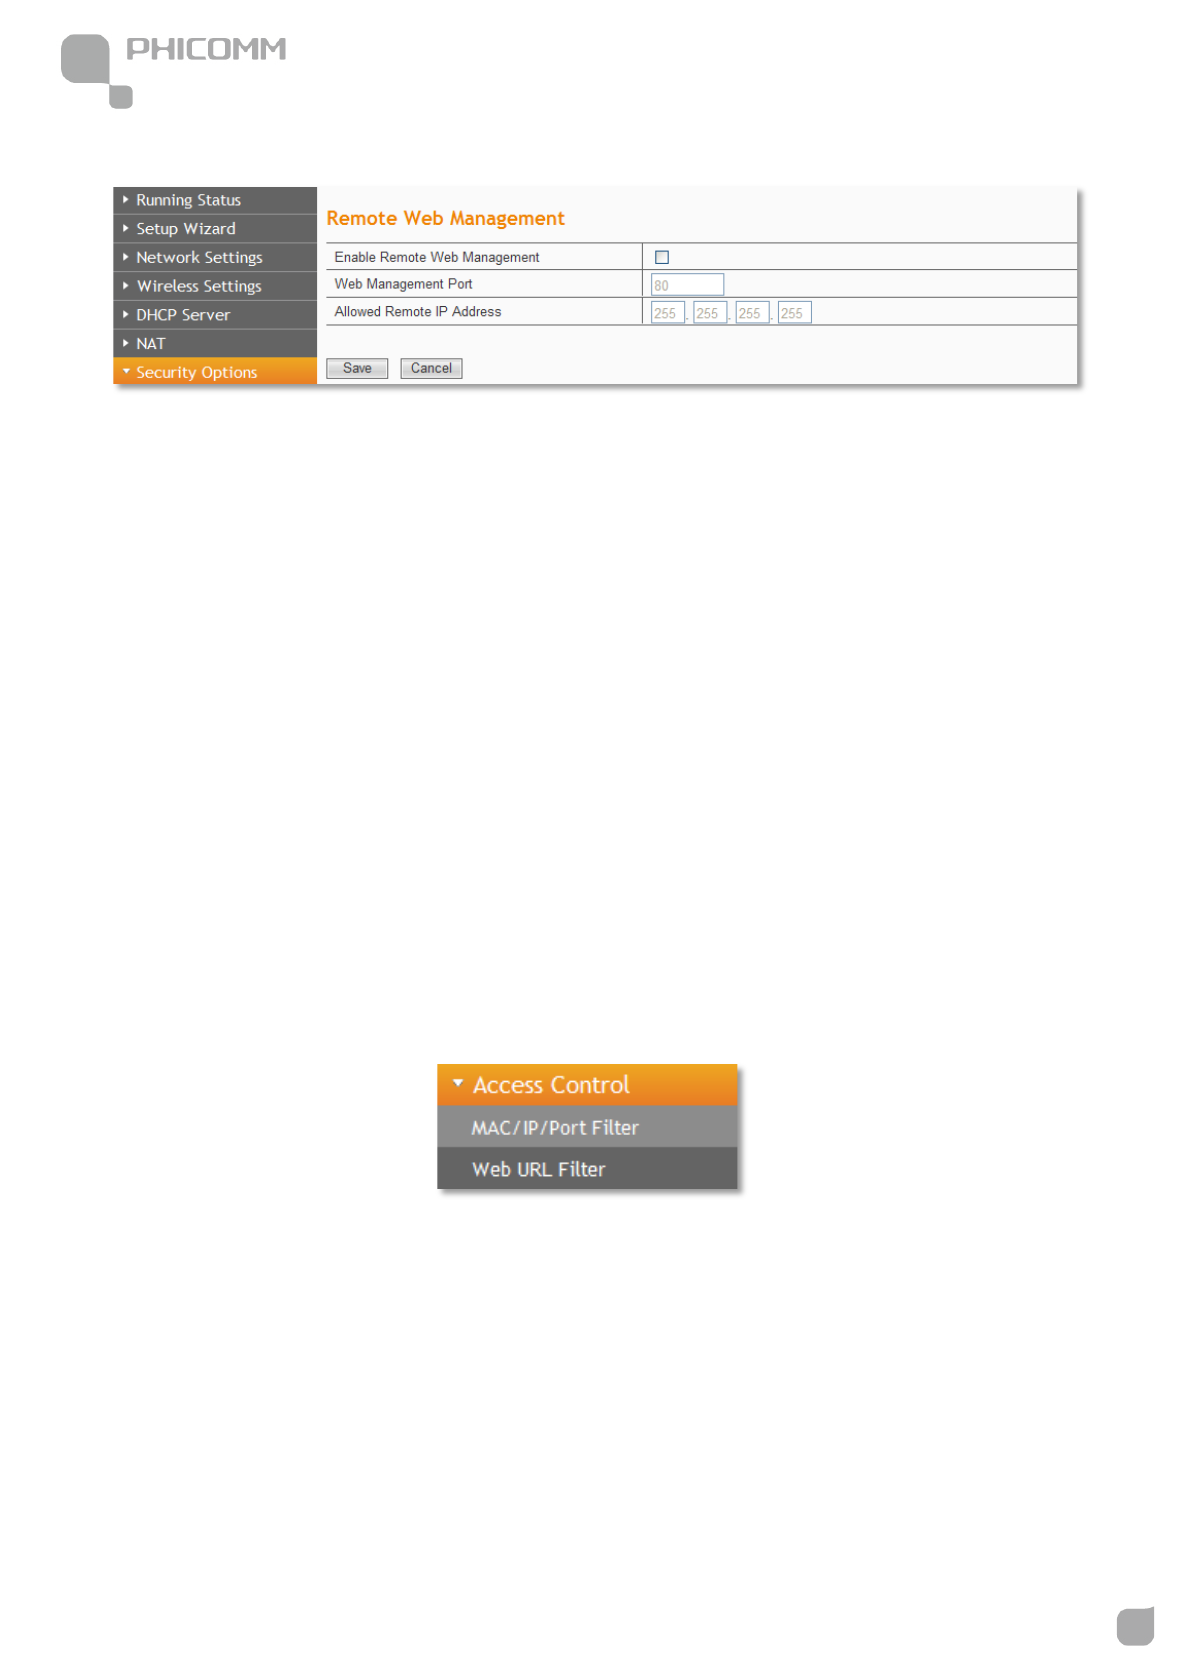
Remote Web Management
This section is to allow the network administrator to manage the Router remotely. If you
want to access the Router from outside the local network, please select the Enable Remote
Web Management.
Web Management Port: The management port open to outside access the default value is
80.
Allowed Remote IP Address: Specify the range of the WAN IP address for remote
management.
Access Control
There are two submenus under the Access Control menu: MAC/IP/Port Filter and Web
URL Filter. Click any of them, and you will be able to configure the corresponding function.
300Mbps Wireless N NAS Rout
www.phicomm.com
46
Chapter 3: Router Configuration
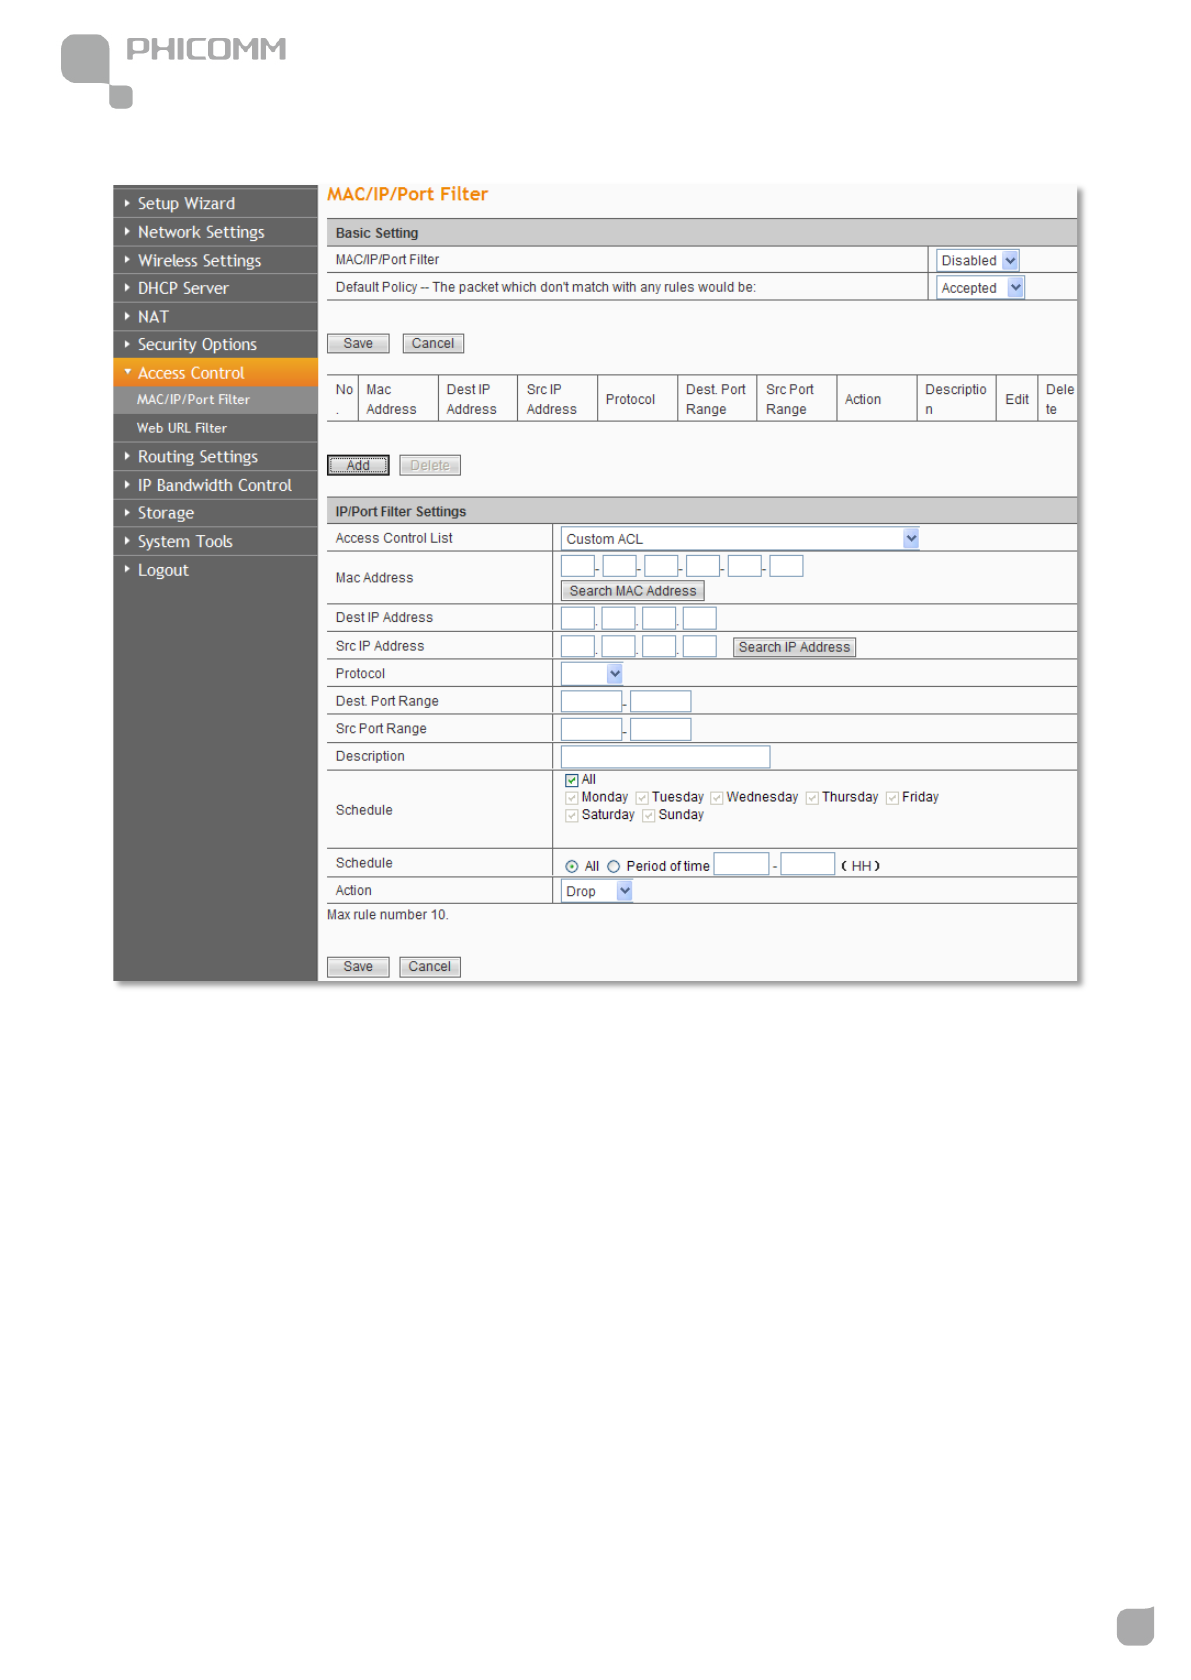
MAC/IP/Port Filter
This page is used to enable the firewall filtering function, select the filtering service or
manually set the parameters that need to be filtered, such as MAC address, IP address and
Port. You must set at least one filtering condition. You may also set multiple conditions or
all the conditions.
MAC/IP/Port Filter: Select Enabled or Disabled to enable or disable filtering.
Default Policy:Accepted chose, all the packets and devices will be allowed to be passed
normally, opposite action will be happened if Dropped was been chosen.
Current IP/Port Filtering Rules: All the existing rules will be listed below, any needed of
rules deleting, please select the rules, and then click Delete Selected.

300Mbps Wireless N NAS Rout
www.phicomm.com
47
Chapter 3: Router Configuration
Note: Please synchronize the router’s time first when selecting the timing function.

300Mbps Wireless N NAS Rout
www.phicomm.com
48
Chapter 3: Router Configuration
Web URL Filter
URL: Put in the URL you want to filter.
Routing Settings
There are two submenus under the Routing Settings menu: Static Routing Table and
Dynamic Routing Settings. Click any of them, and you will be able to configure the
corresponding function.
Static Routing Table
Static routes give the router information that it cannot learn automatically through other
means Use the Static Routing page to add or delete a route. The max number is 10.
300Mbps Wireless N NAS Rout
www.phicomm.com
49
Chapter 3: Router Configuration
Destination: This is the IP address of the network or host that you want to assign to a static
route.
Subnet Mask: The Subnet Mask determines which portion of an IP address is the network
portion, and which portion is the host portion.
Gateway: This is the IP address of the default gateway device that allows for the contact
between the Router and the network or host.
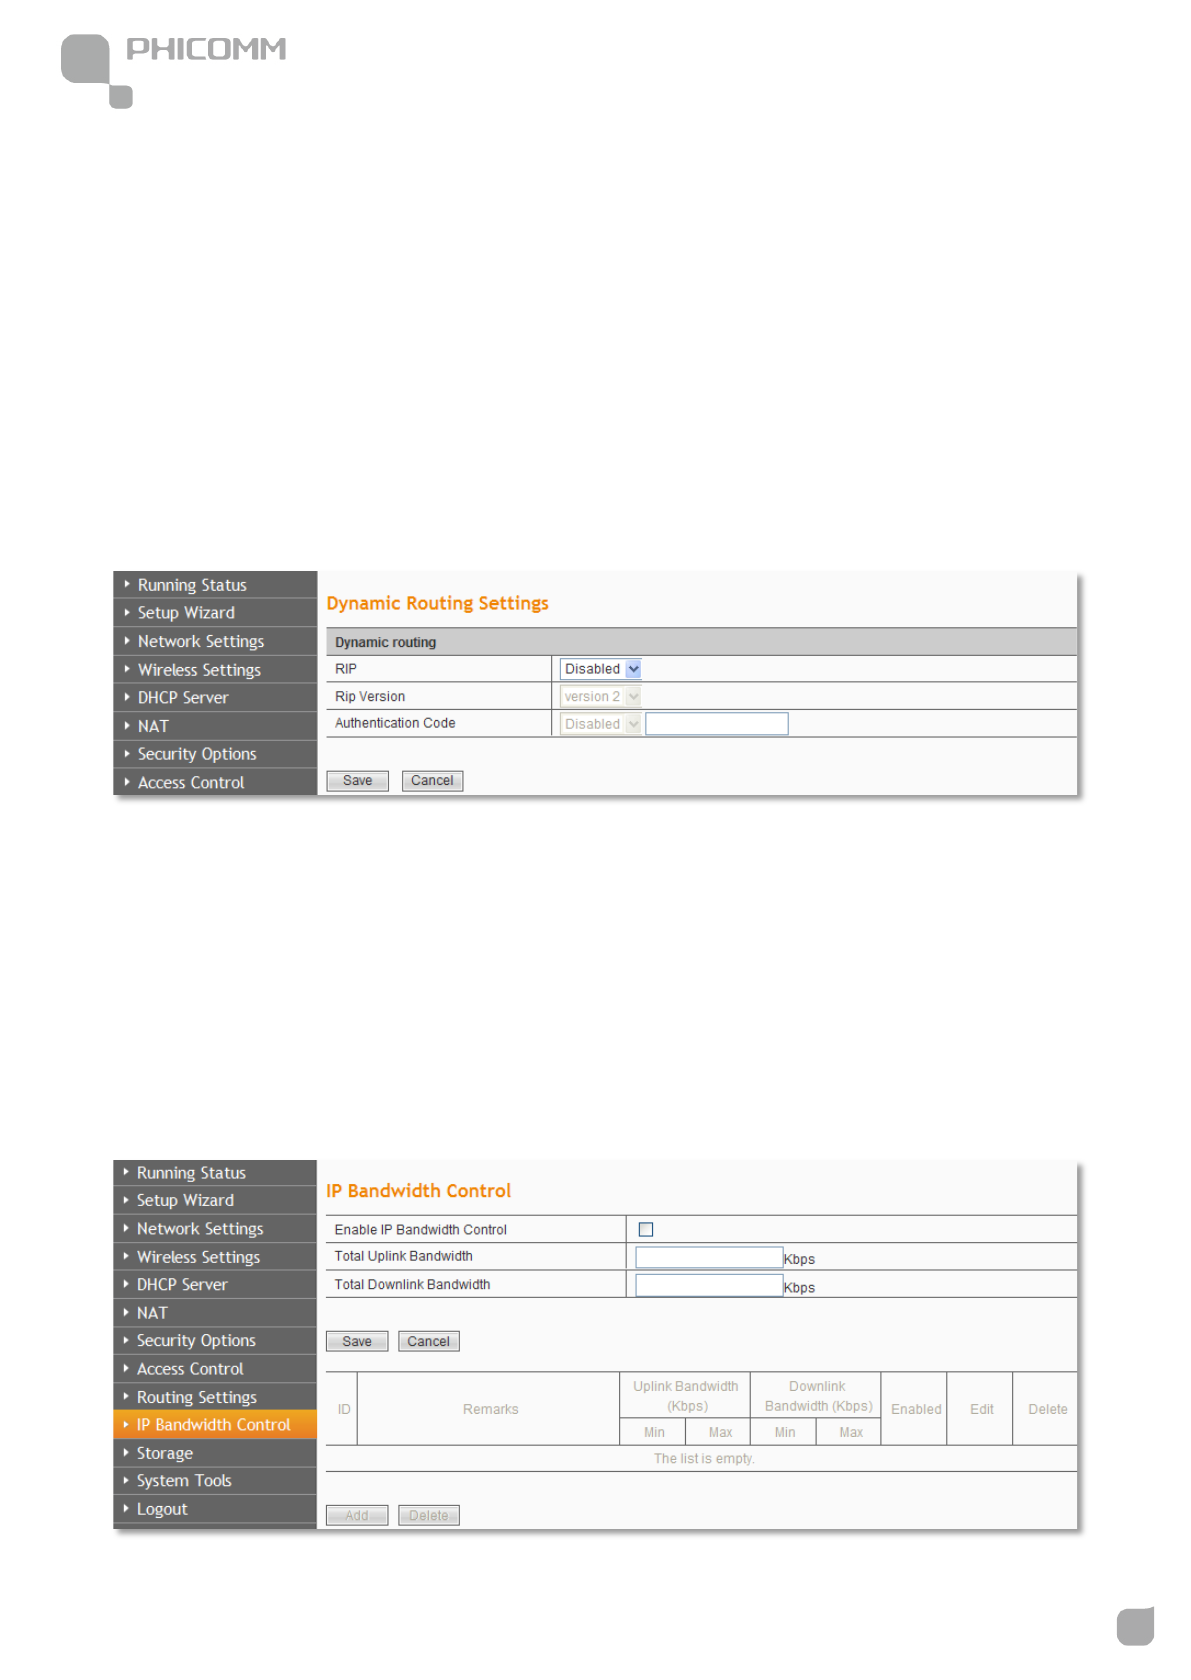
Dynamic Routing Settings
RIP: The Routing Information Protocol (RIP) is a dynamic routing protocol used in local and
wide area networks. Choose Enable dynamic routing need to be activated.
Rip Version: Choose the version of RIP.
Authentication Code: Choose the encrypt method used between routers.
IP Bandwidth Control
300Mbps Wireless N NAS Rout
www.phicomm.com
50
Chapter 3: Router Configuration
Enable IP bandwidth control: If you select it, the bandwidth control rule takes effect.
Total Uplink Bandwidth: The rate of uploading through the WAN interface.
Total Downlink Bandwidth: The rate of downloading through the WAN interface.
Note:
• The bandwidth conversion: 1 Mbps = 1024 Kbps.
• Select the type of the broadband line and the bandwidth according to the actual
situation. If you are not sure about the information, consult your broadband provider.
• After finishing the settings, click the Save button to apply the settings.
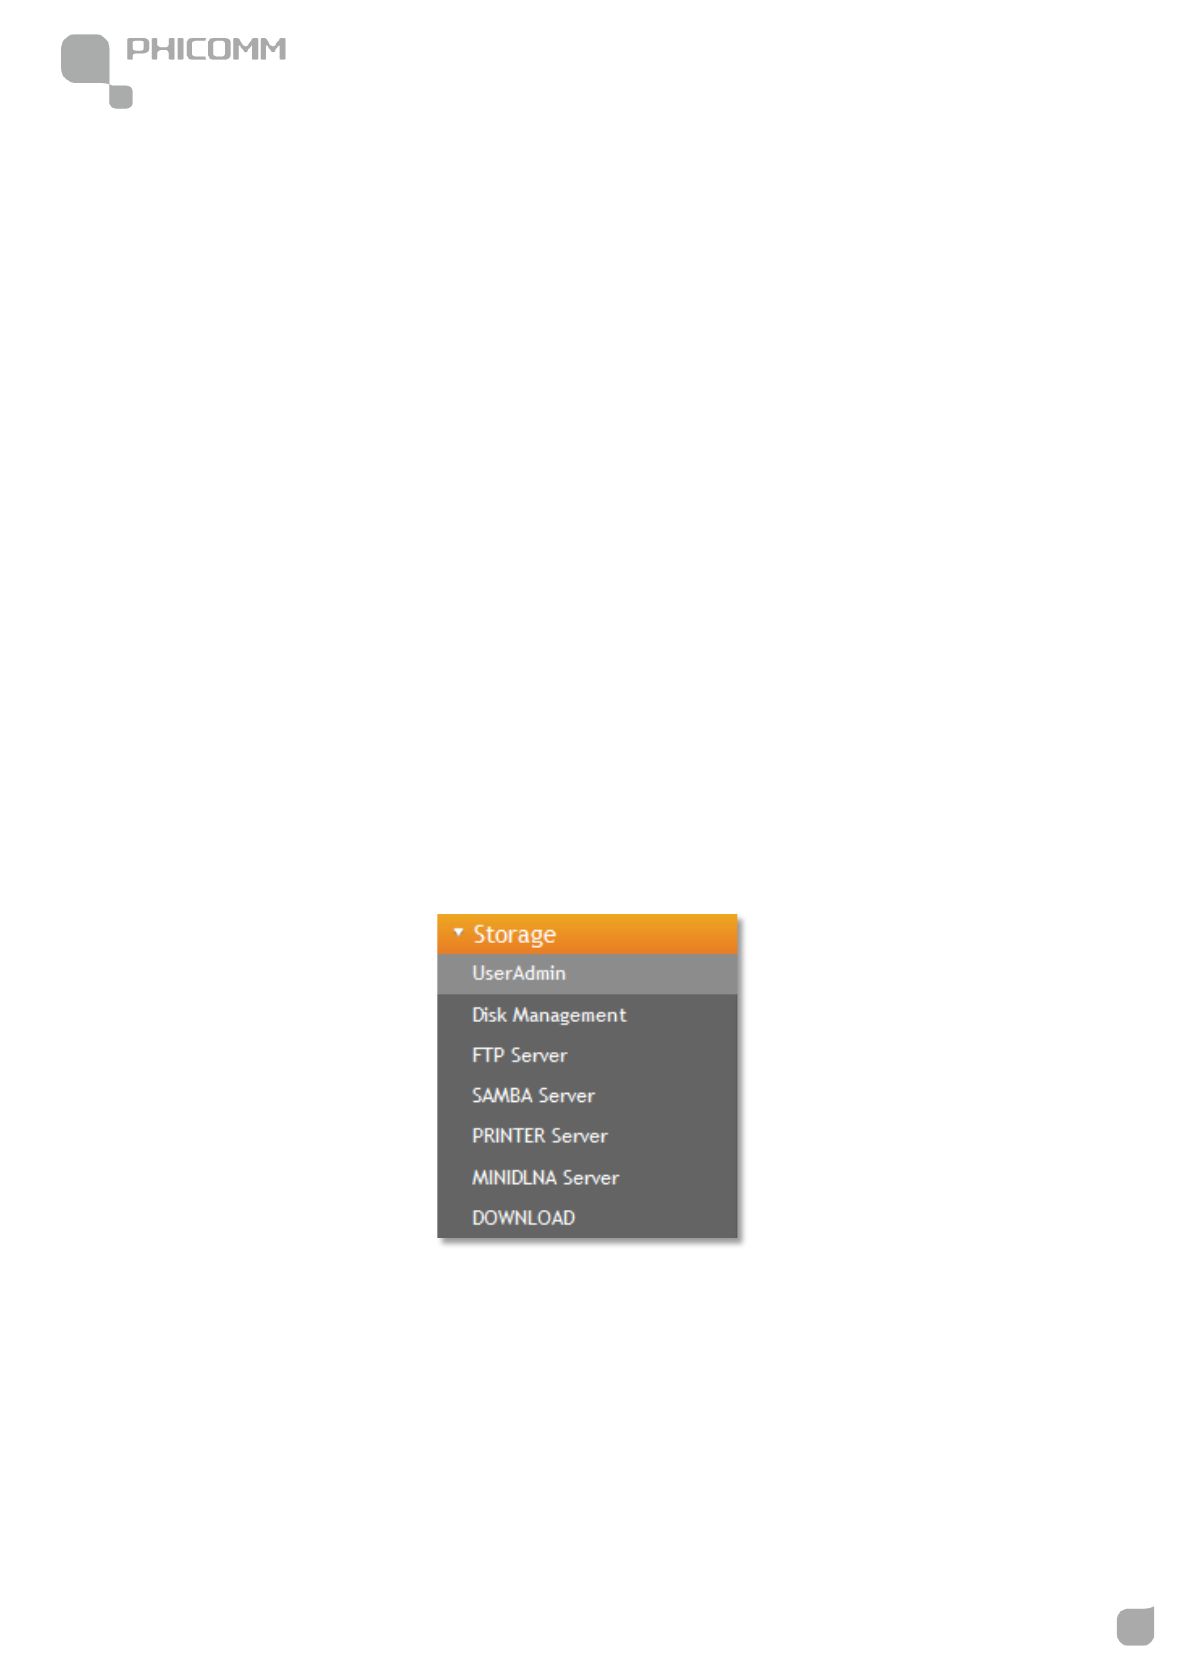
Storage
There are seven submenus under the Storage: UserAdmin, Disk Management, FTP
Server, SAMBA Server, PRINTER Server, MINIDLNA Server and DOWNLOAD. Click any
of them, and you will be able to configure the corresponding function.
300Mbps Wireless N NAS Rout
www.phicomm.com
51
Chapter 3: Router Configuration
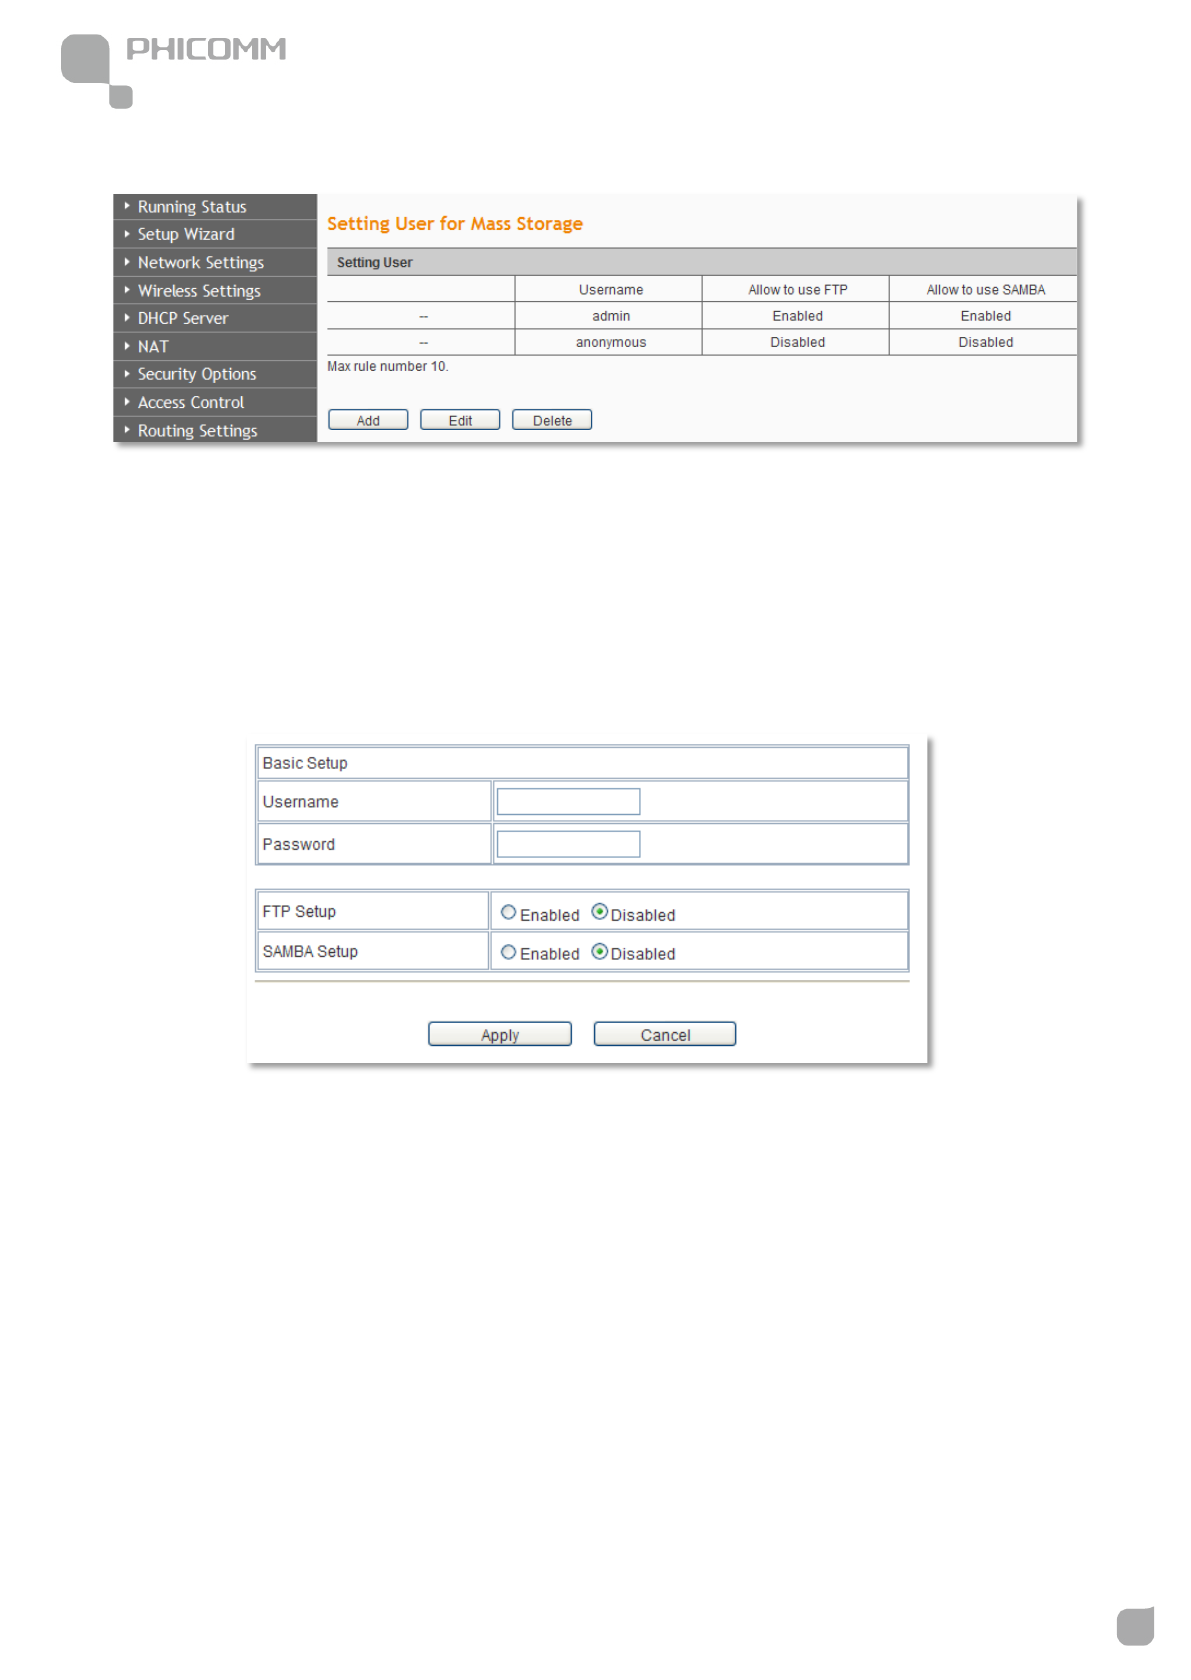
UserAdmin
The user in LAN can share the folder on mass-storage device which is plugged at USB
connector.
Click Add button, you can create a new user account, allow or prohibit the user to use FTP
or SAMBA server.
300Mbps Wireless N NAS Rout
www.phicomm.com
52
Chapter 3: Router Configuration
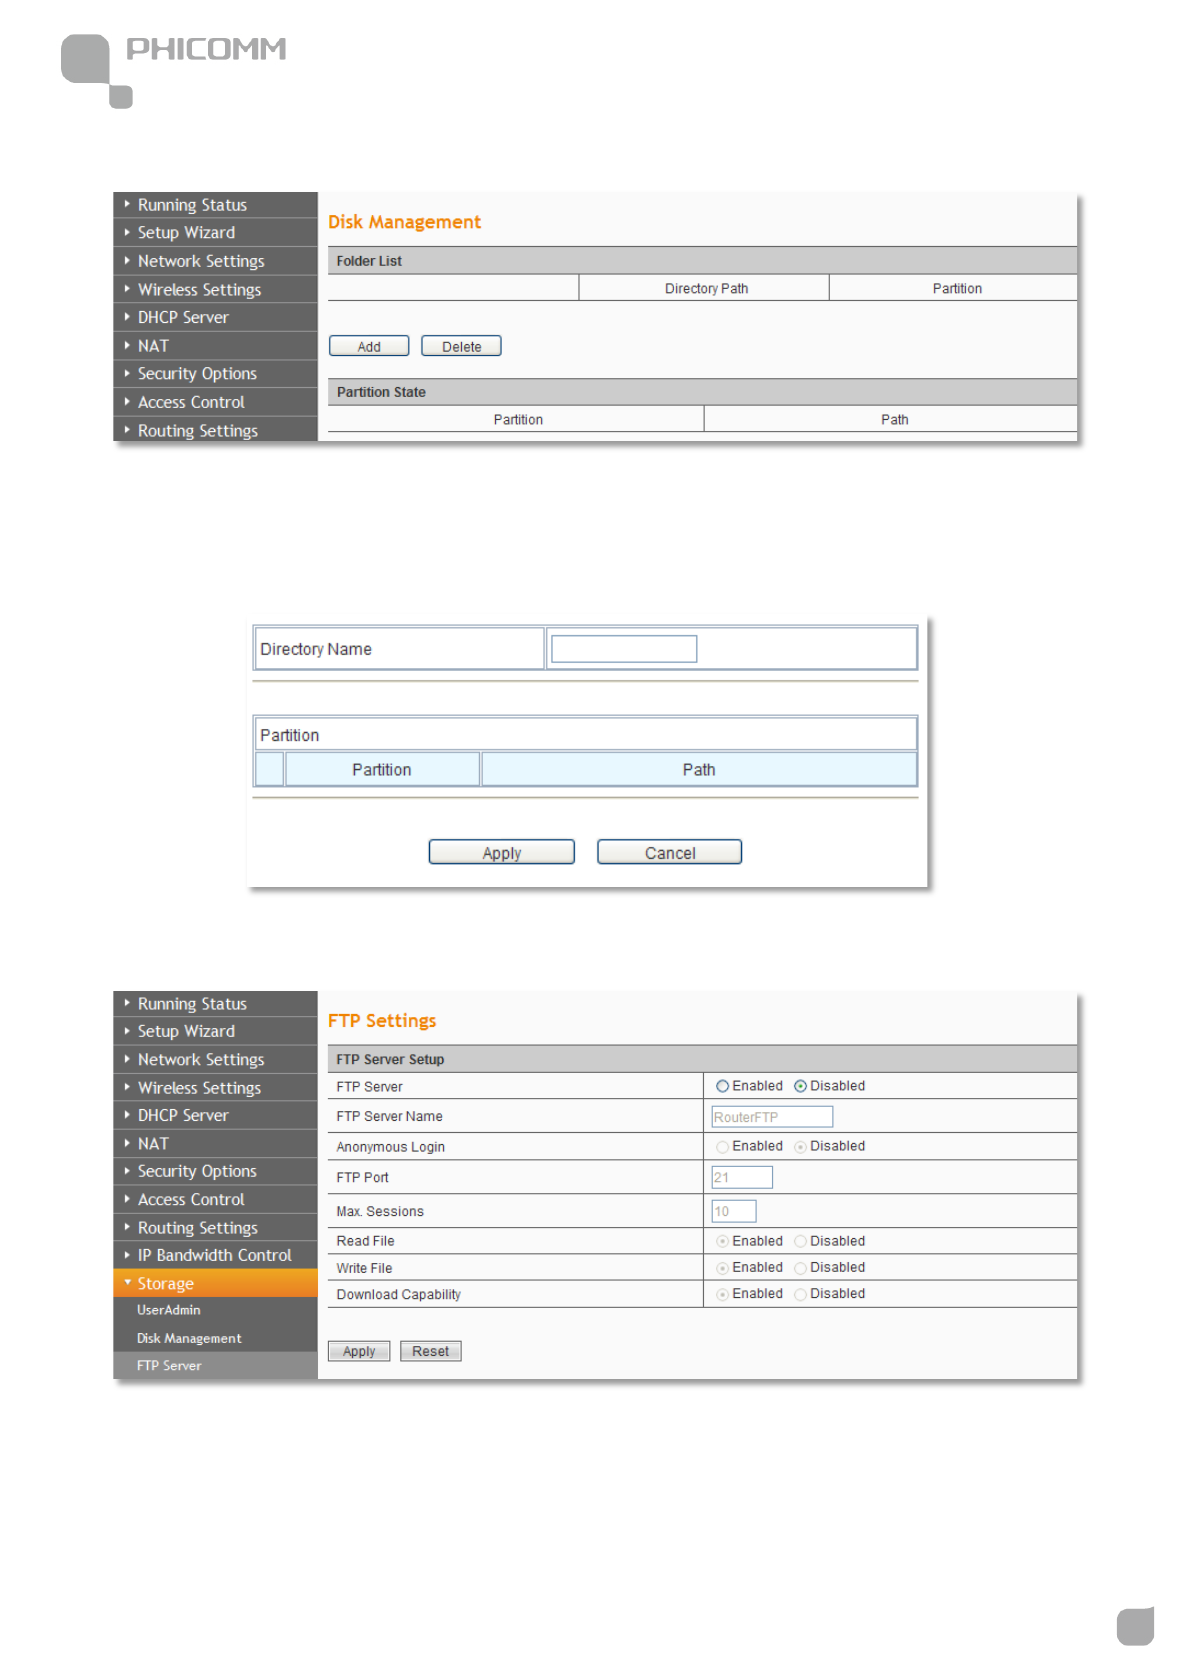
Disk Management
Click Add button, you can manage the Folder and the Partition of disk.
FTP Server
You can create a FTP Server that can be accessed from internet or local network in this page.
This function is disabled by default.
300Mbps Wireless N NAS Rout
www.phicomm.com
53
Chapter 3: Router Configuration
FTP Server: Choose Enabled or Disabled to enable or disable this function.
FTP Server Name: You can give this FTP Server a name.
Anonymous Login: Choose Enabled or Disabled to allow or deny Anonymous Login.
FTP Port: The default port number is 21, please don’t change unless necessary.
Max Sessions: The default number is 10, please don’t change unless necessary.
Read File: Choose Enabled, the file can be read, choose Disabled, the file cannot be read.
Write File: Choose Enabled, you have write access to it.
Download Capability: Choose Enabled or Disabled to enable or disable this function.
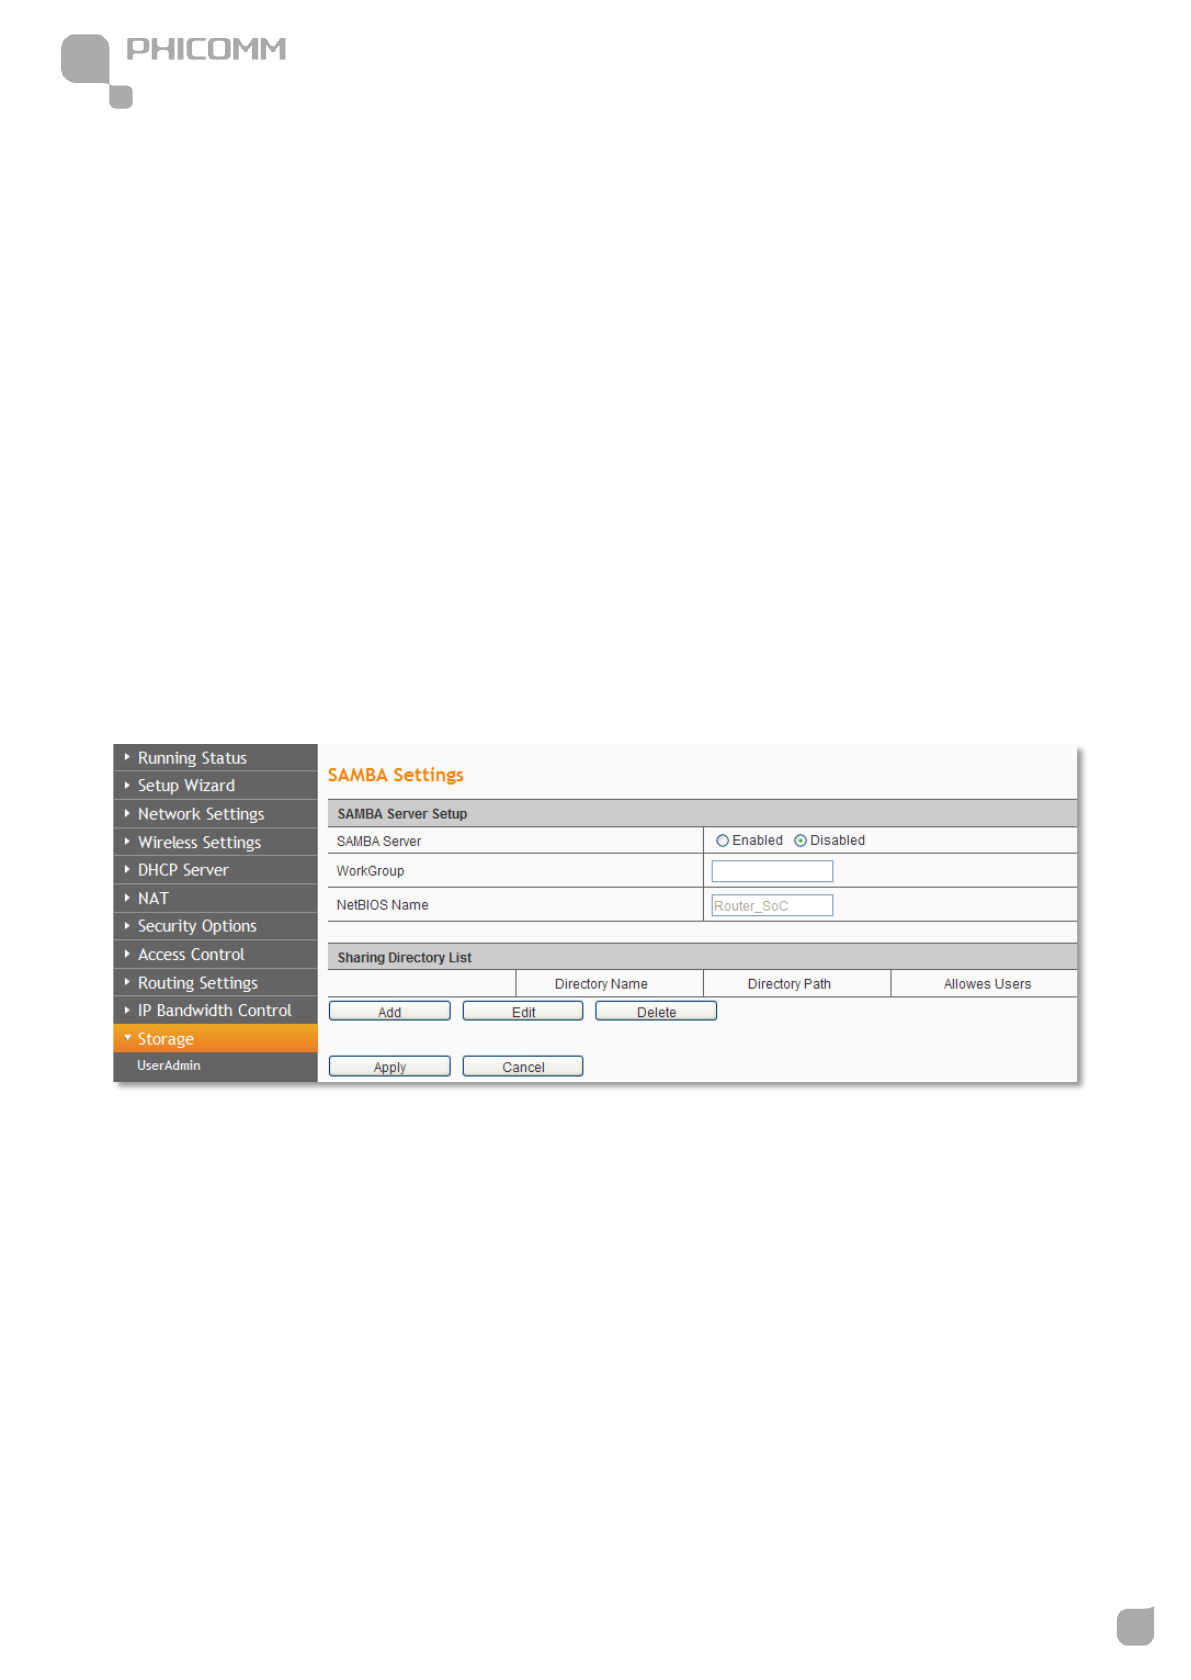
SAMBA Server
SAMBA Server: Choose Enabled or Disabled to enable or disable this function.
WorkGroup: Give your workgroup a name.
NetBIOS Name: Give NetBIOS a name
Click Add button,
300Mbps Wireless N NAS Rout
www.phicomm.com
54
Chapter 3: Router Configuration
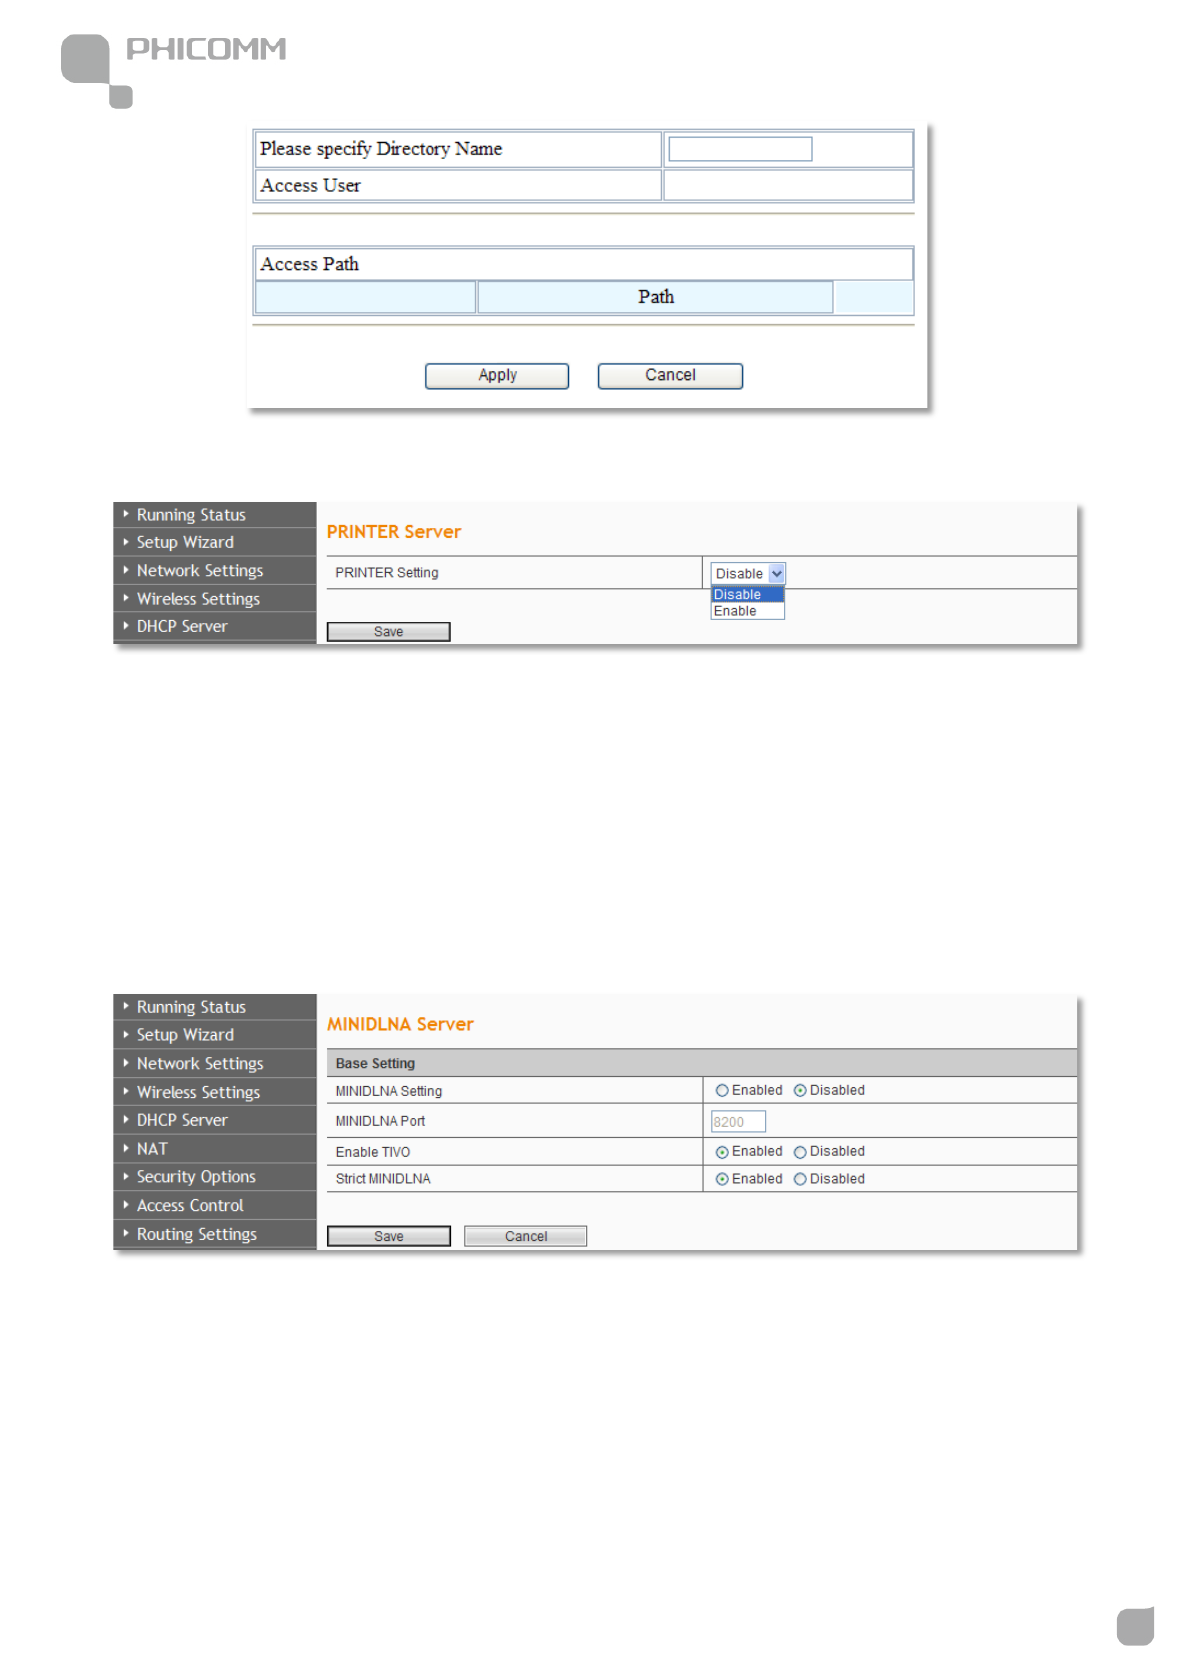
PRINTER Server
To Enable Printer Function, follow these steps:
1. Please ensure that USB Media has plug in.
2. Choose Enabled.
3. Click Save to save the change.
MINIDLNA Server
To Enable MINIDLNA Function, follow these steps:
1. Please ensure that USB Media has plug in.
2. Highlight Enabled and set the MINIDLNA Port.
3. Click Save to save the change.
300Mbps Wireless N NAS Rout
www.phicomm.com
55
Chapter 3: Router Configuration
4. Enter the name of the path you want to share; you can select the type you want to share.
5. Click Add to complete the Directories settings.
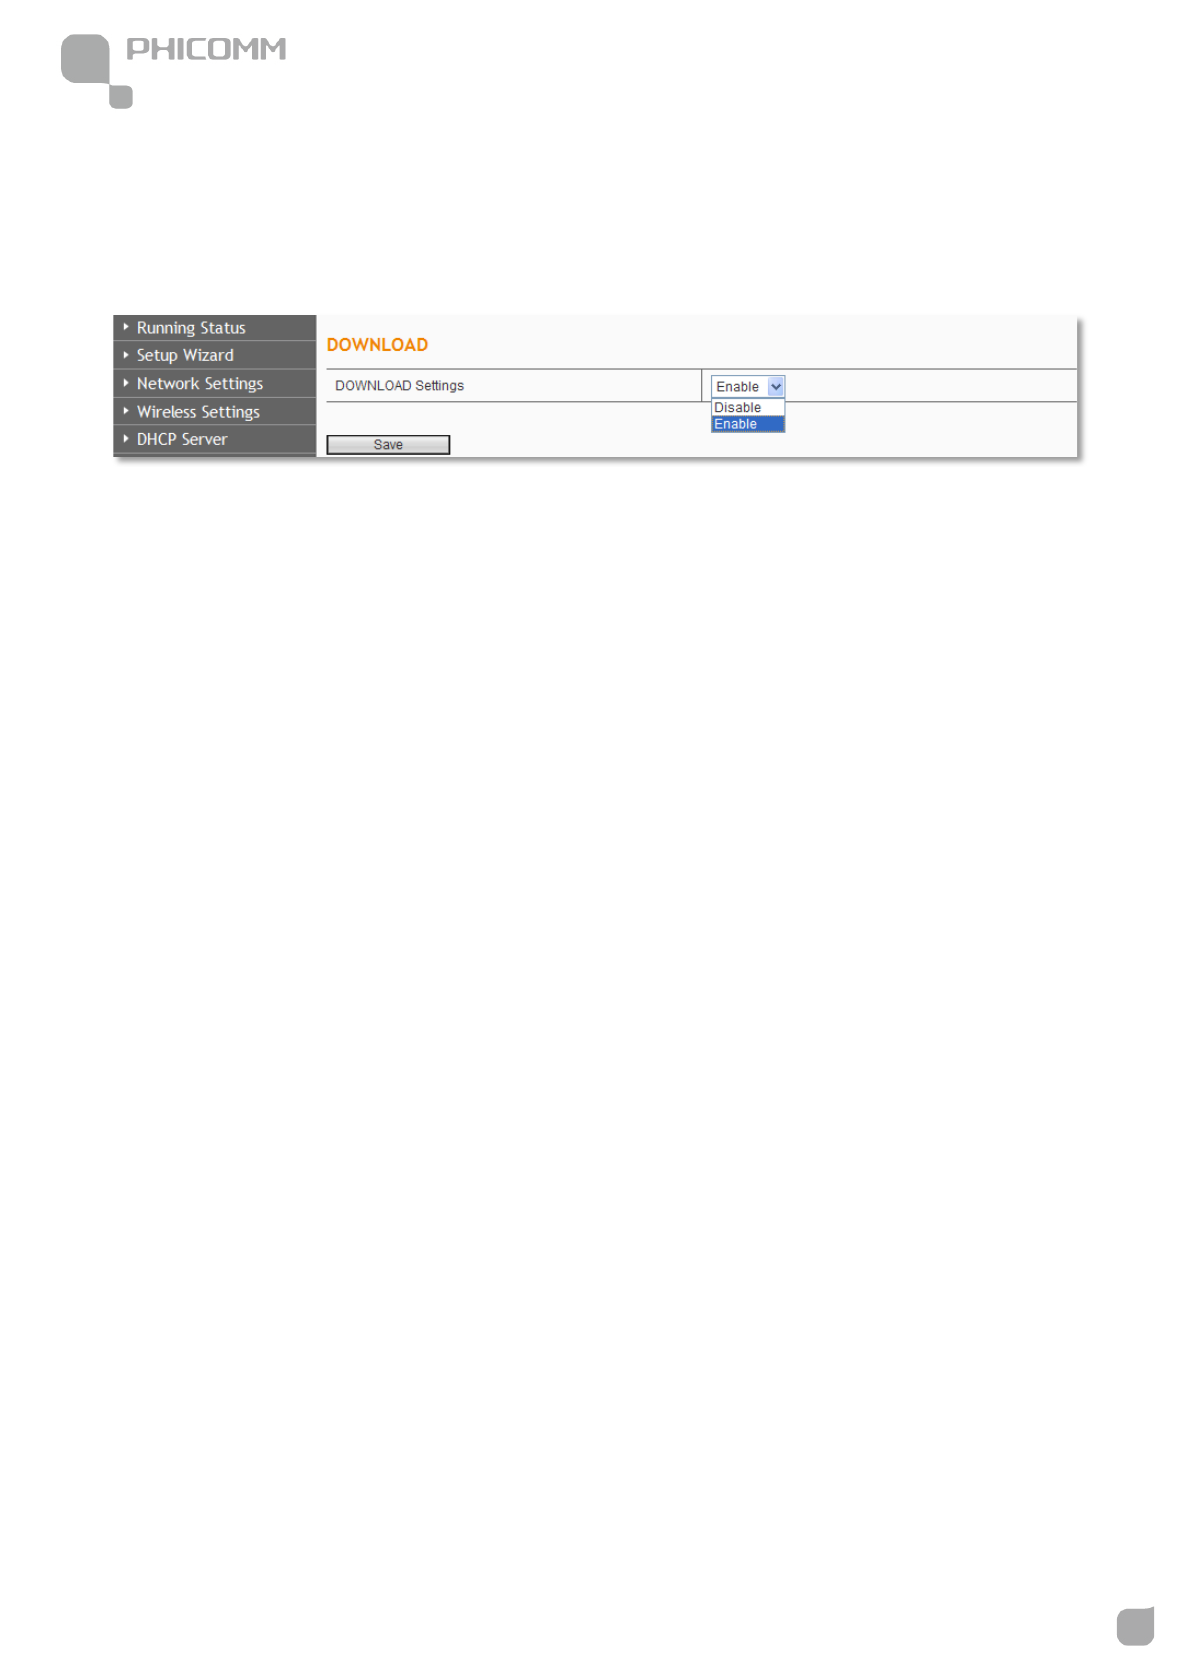
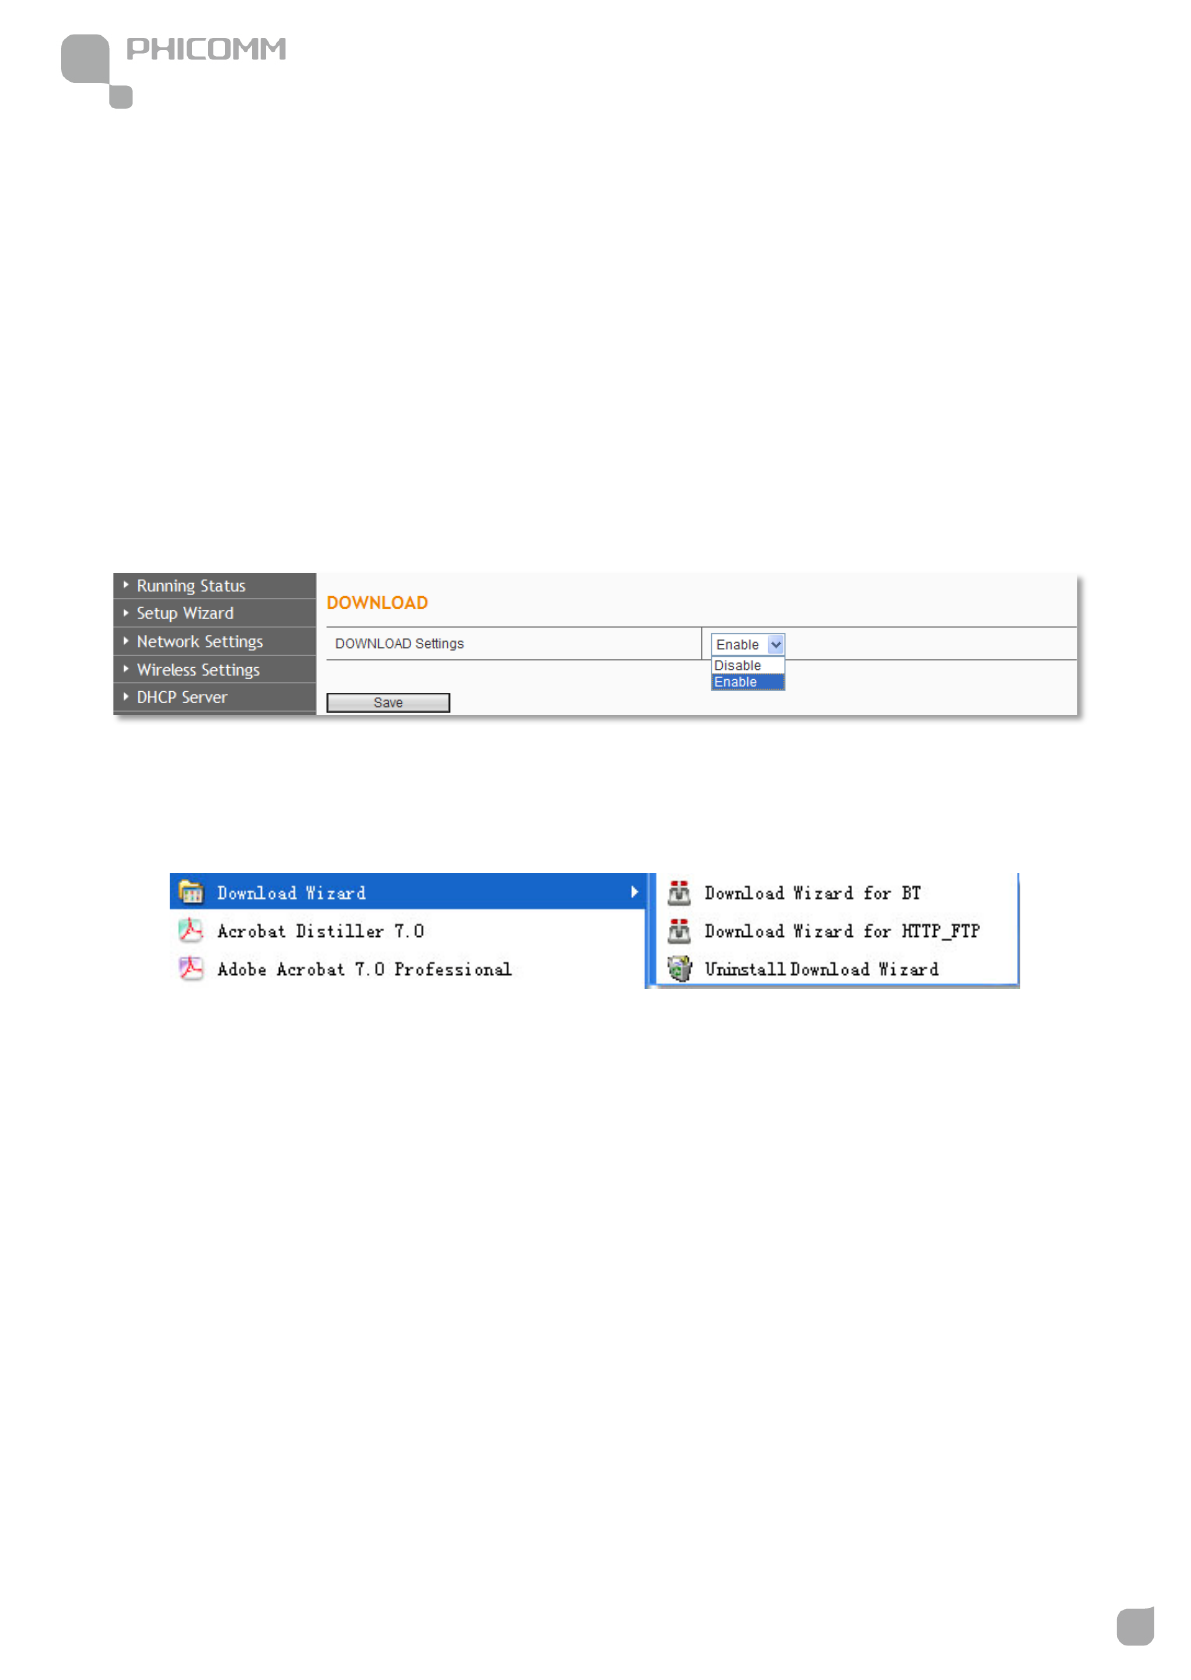
DOWNLOAD
Choose Enable, then run Download Wizard, you can keep downloading even PC is turned
off.
If you want to know more about the offline download configuration, please refer to chapter
4.
300Mbps Wireless N NAS Rout
www.phicomm.com
56
Chapter 3: Router Configuration
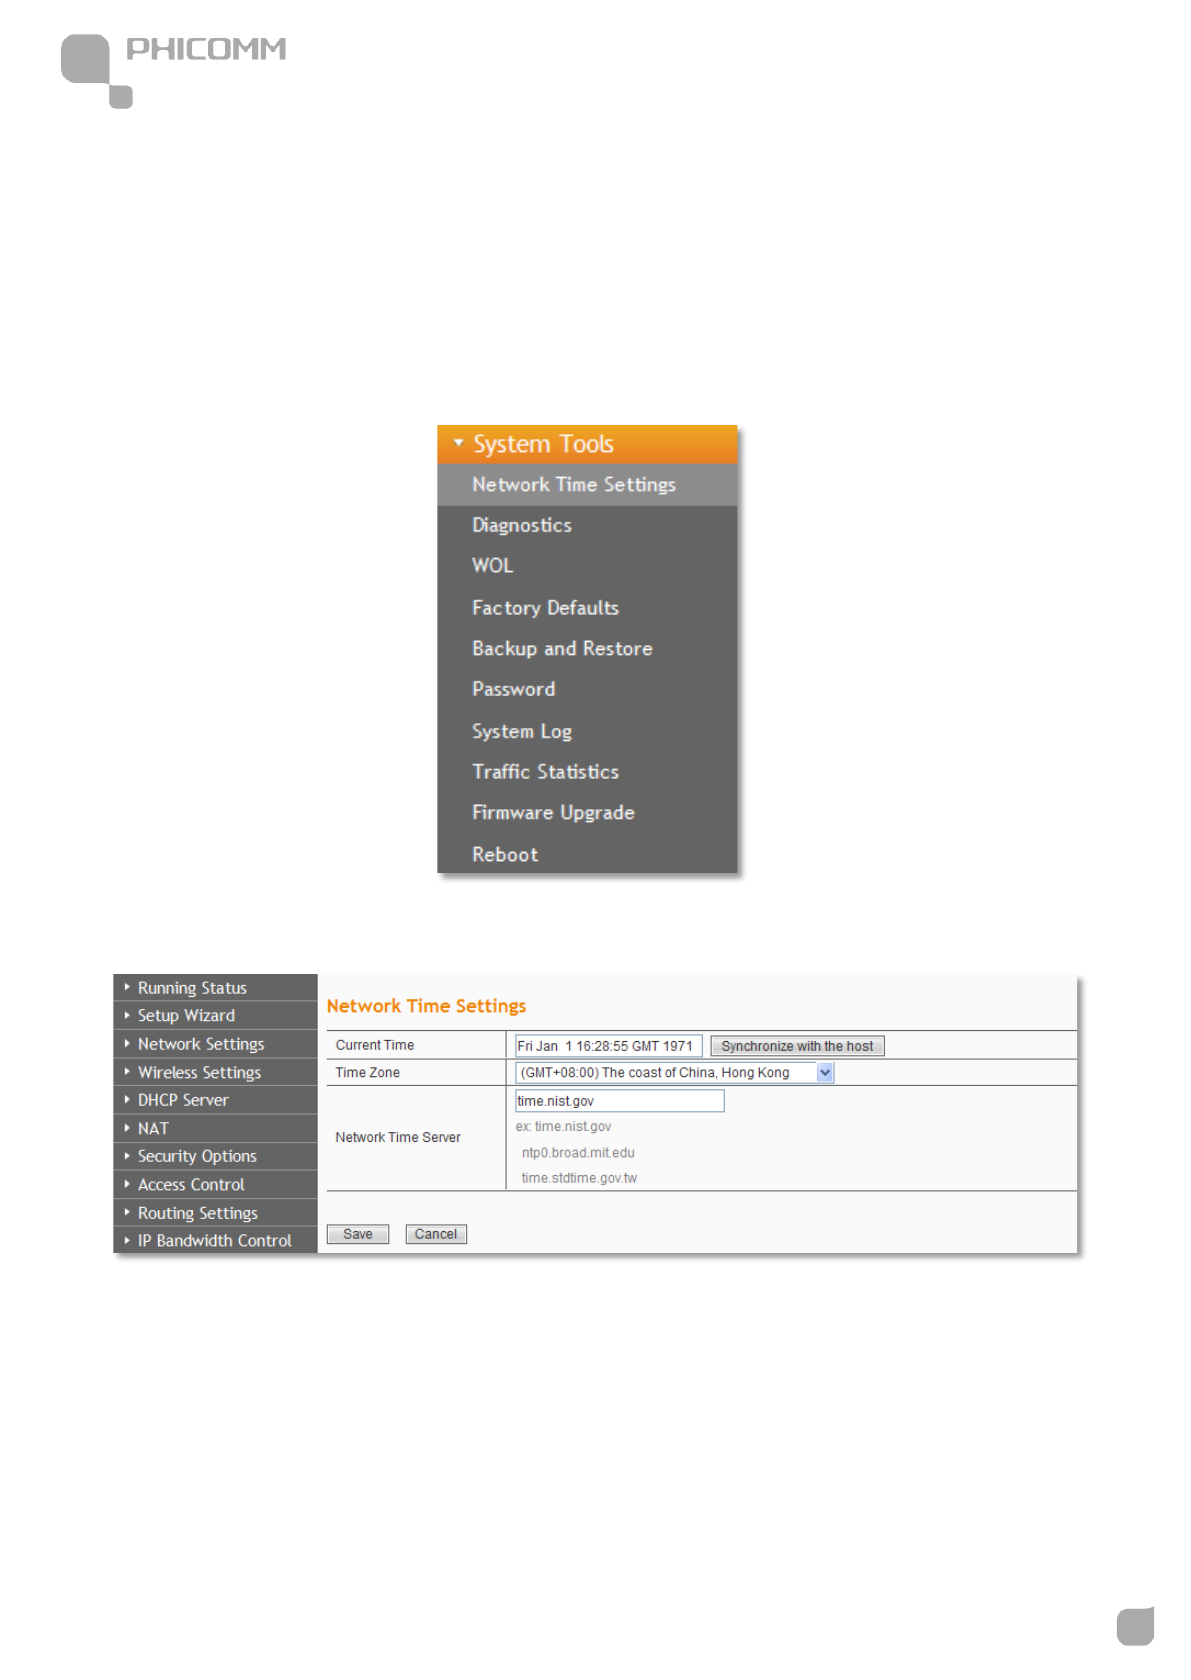
System Tools
There are ten submenus under the System Tools: Network Time settings, Diagnostics,
WOL, Factory Defaults, Backup and Restore, Password, System Log, Traffic Statistics,
Firmware Upgrade and Reboot. Click any of them, and you will be able to configure the
corresponding function.
Network Time Settings
Current time: Show the current time.
Time Zone: Select your time zone from the drop-down menu.
Network Time server: To set NTP server.
Save: Click Save to save your settings.

300Mbps Wireless N NAS Rout
www.phicomm.com
57
Chapter 3: Router Configuration
Note: The system will Synchronous with the Network Time Server every hour after saving,
and it will affect the WAN dial-up on demand.
300Mbps Wireless N NAS Rout
www.phicomm.com
58
Chapter 3: Router Configuration
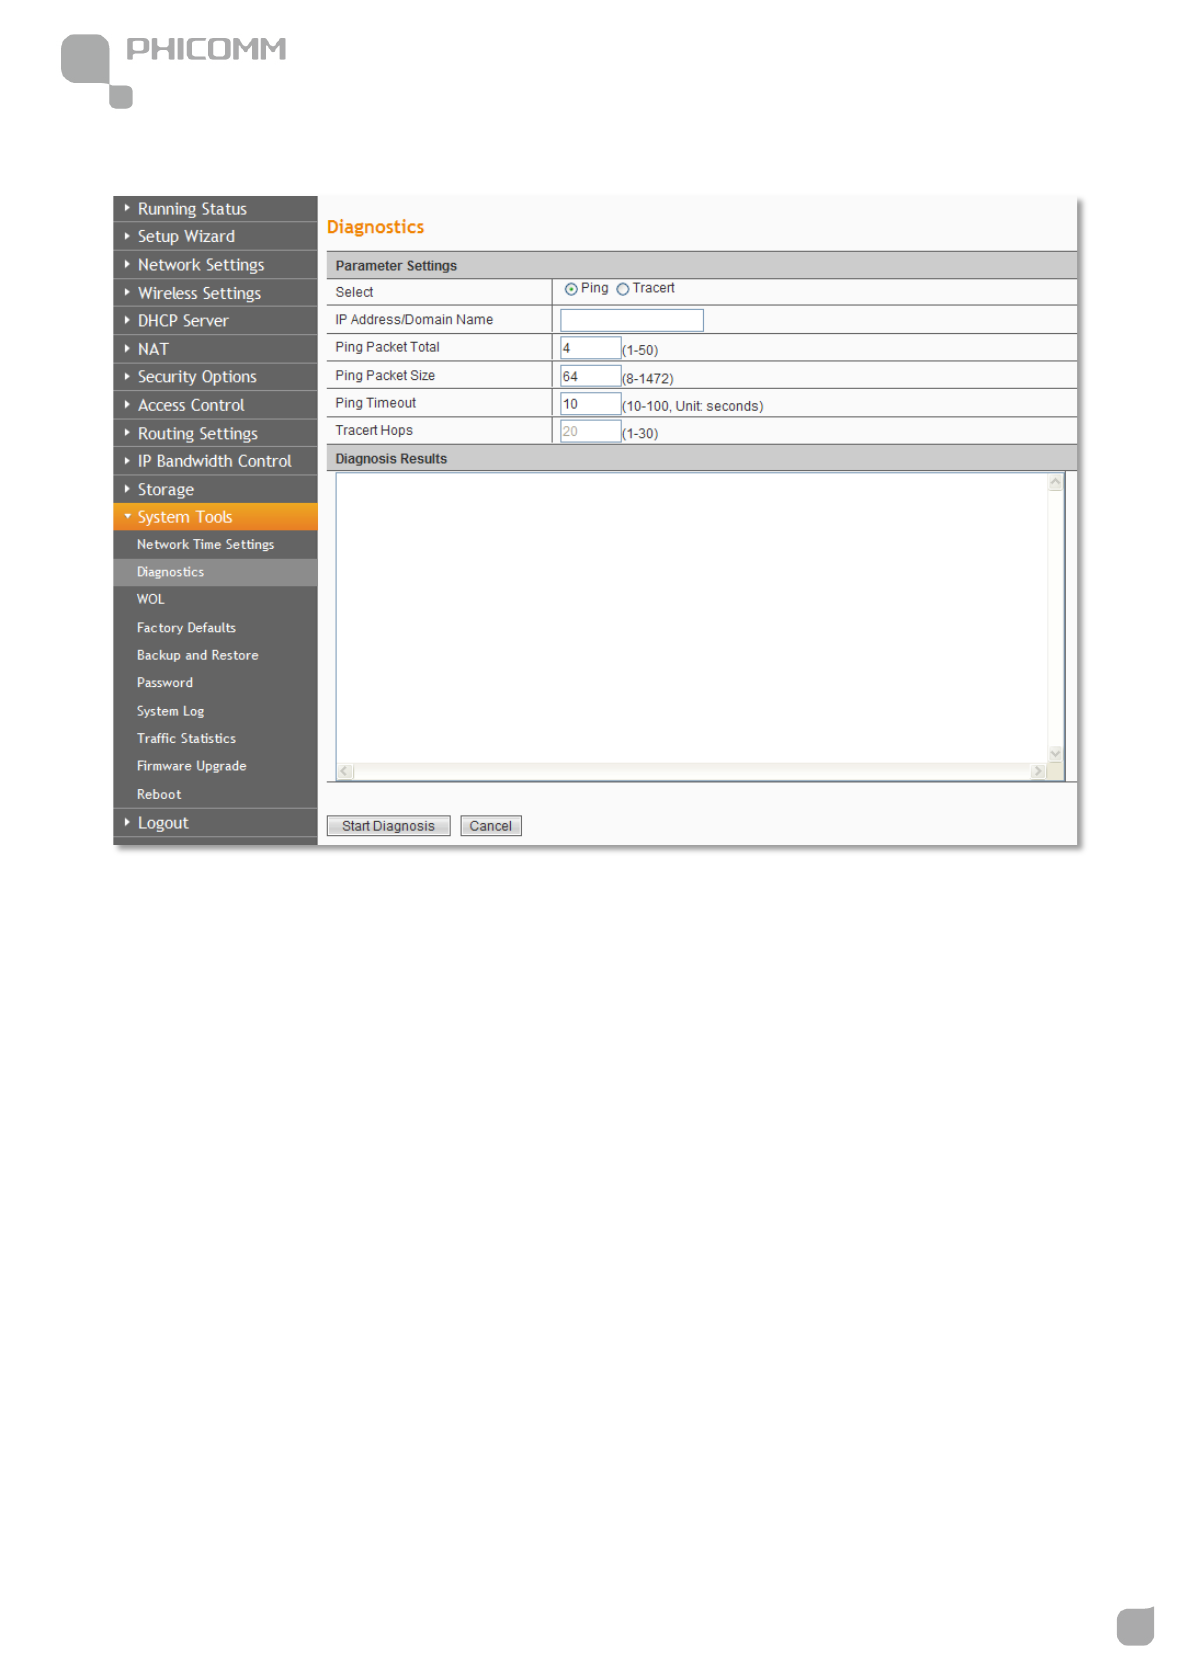
Diagnostics
Select: Select Ping or Tracert.
IP Address/Domain Name: The destination IP address or domain name.
Ping Packet Total: The number of transmitted data packet when Ping operation is carried
out.
Ping Packet Size: The size of transmitted data packet when Ping operation is carried out.
Ping Timeout: The timeout time of the ping operation.
Tracert Hops: The hops of tracert.
Click
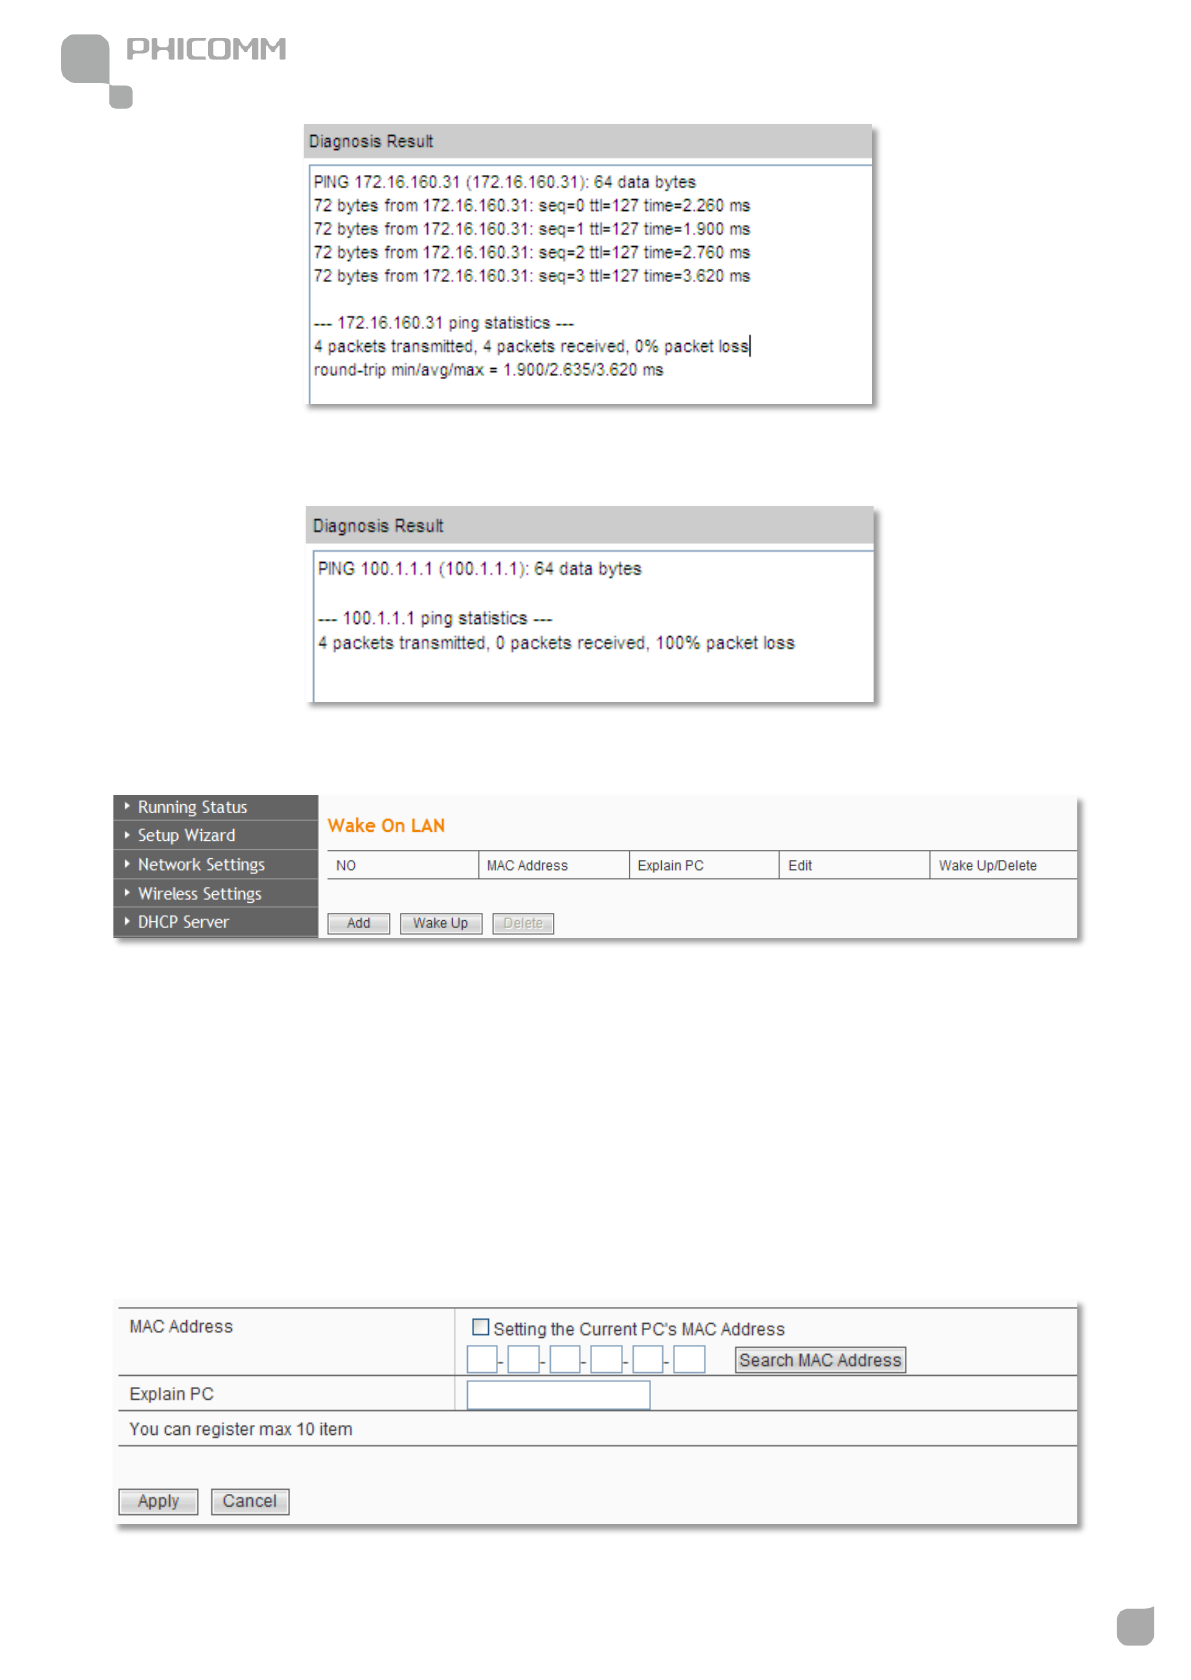
Below is a Ping diagnosis example that router has been connected to IP 172.16.160.31:
Start Diagnosis button, the selected ping or tracert testing will be started.
300Mbps Wireless N NAS Rout
www.phicomm.com
59
Chapter 3: Router Configuration
Below is a Ping diagnosis example that router has failed to connect to IP 100.1.1.1:
Wake On LAN
WOL broadcasts so called Magic Packet Frames across a network to wake up hardware that
understands such packets. These are normally NICs with Wake On LAN function.
MAC Address: Add a MAC address to wake the computer on.
Explain PC: Description about the computer.
Add: Click Add button to finish, and the computer will display in the list.

300Mbps Wireless N NAS Rout
www.phicomm.com
60
Chapter 3: Router Configuration
Select one or more computers in the list, and click Apply button, these computers will be
waked up.
Factory Defaults
Click Restore All Settings button to reset all configuration settings to their default values.
Note: All changed settings will be lost when defaults are restored.
300Mbps Wireless N NAS Rout
www.phicomm.com
61
Chapter 3: Router Configuration
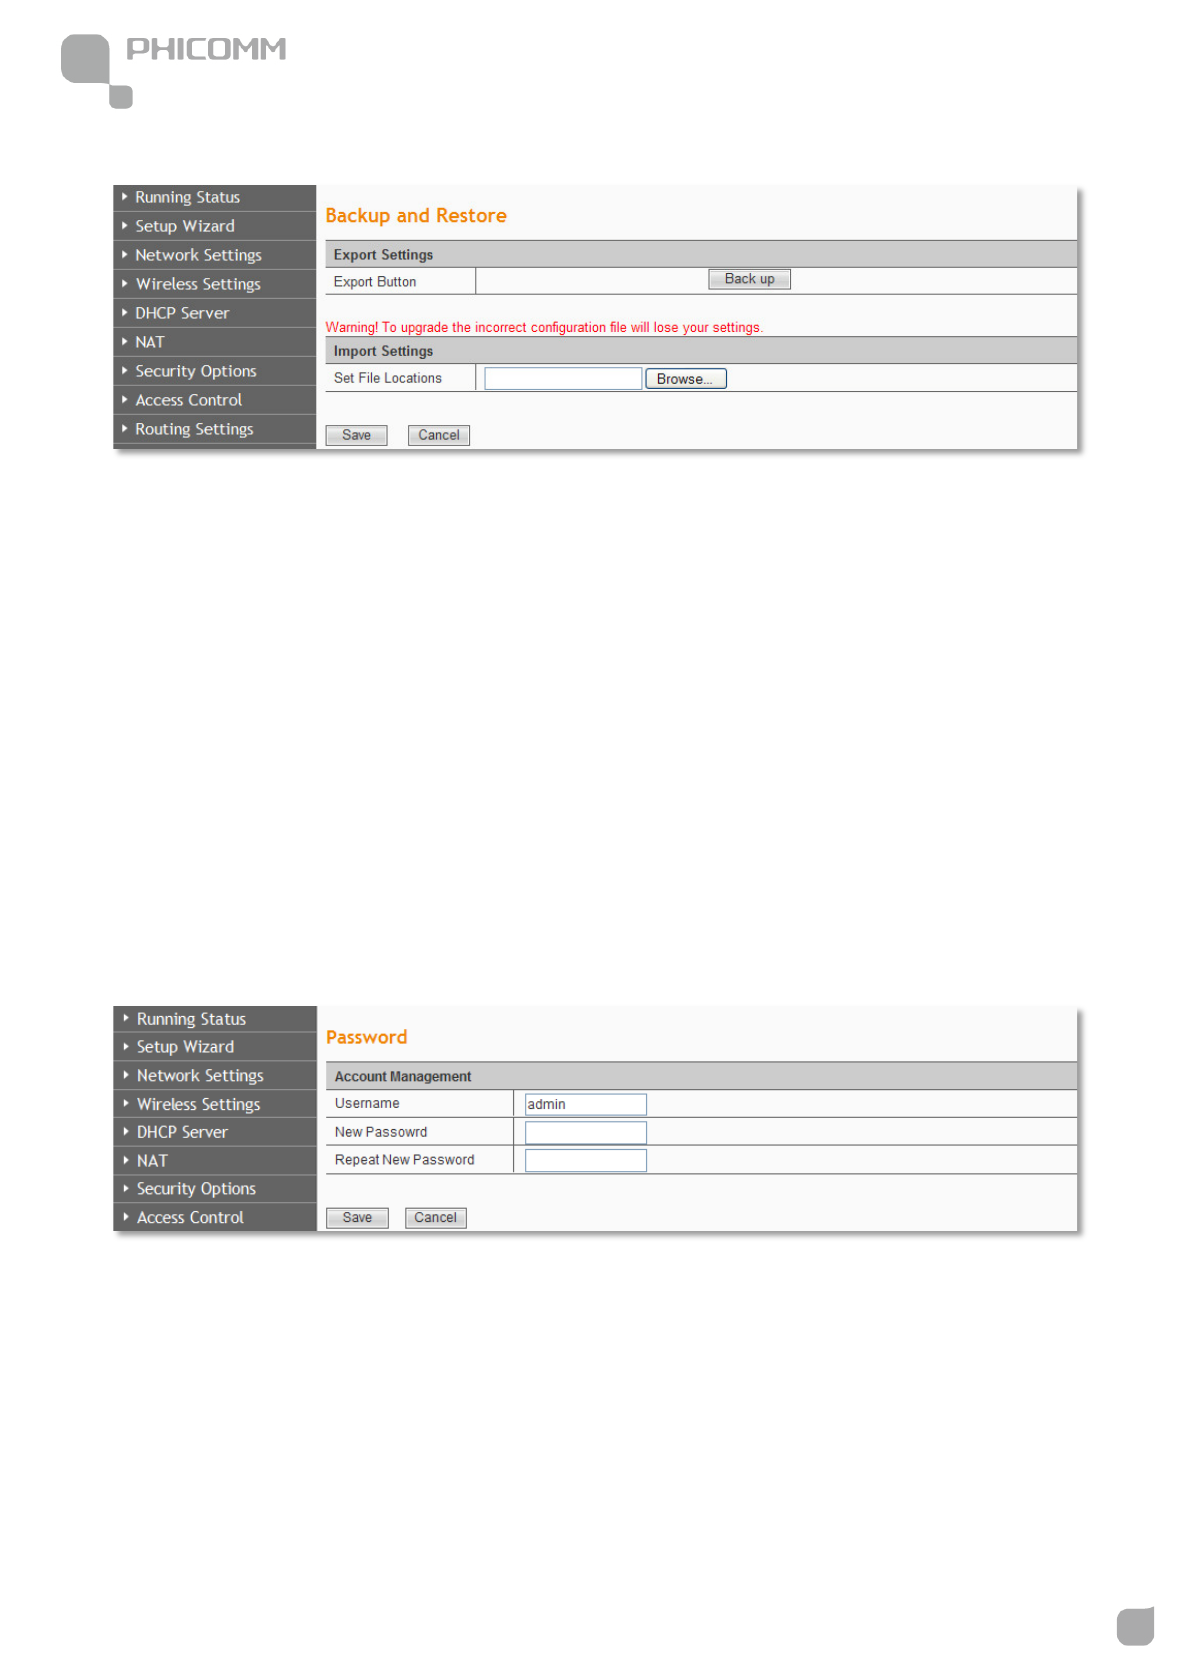
Backup and Restore
In the Export Settings column, click Backup button to save all configuration settings to
your local computer as a file.
To restore the Router's configuration, follow these instructions:
1) Click Browse to find the configuration file which you want to restore.
2) Click Save to update the configuration with the file whose path is the one you have
input or selected in the blank.
Note: Keep the power on during the process, in case of any damage.
Password
You can change the log in password for this web management page, not your ISP password
or the wireless password.
300Mbps Wireless N NAS Rout
www.phicomm.com
62
Chapter 3: Router Configuration
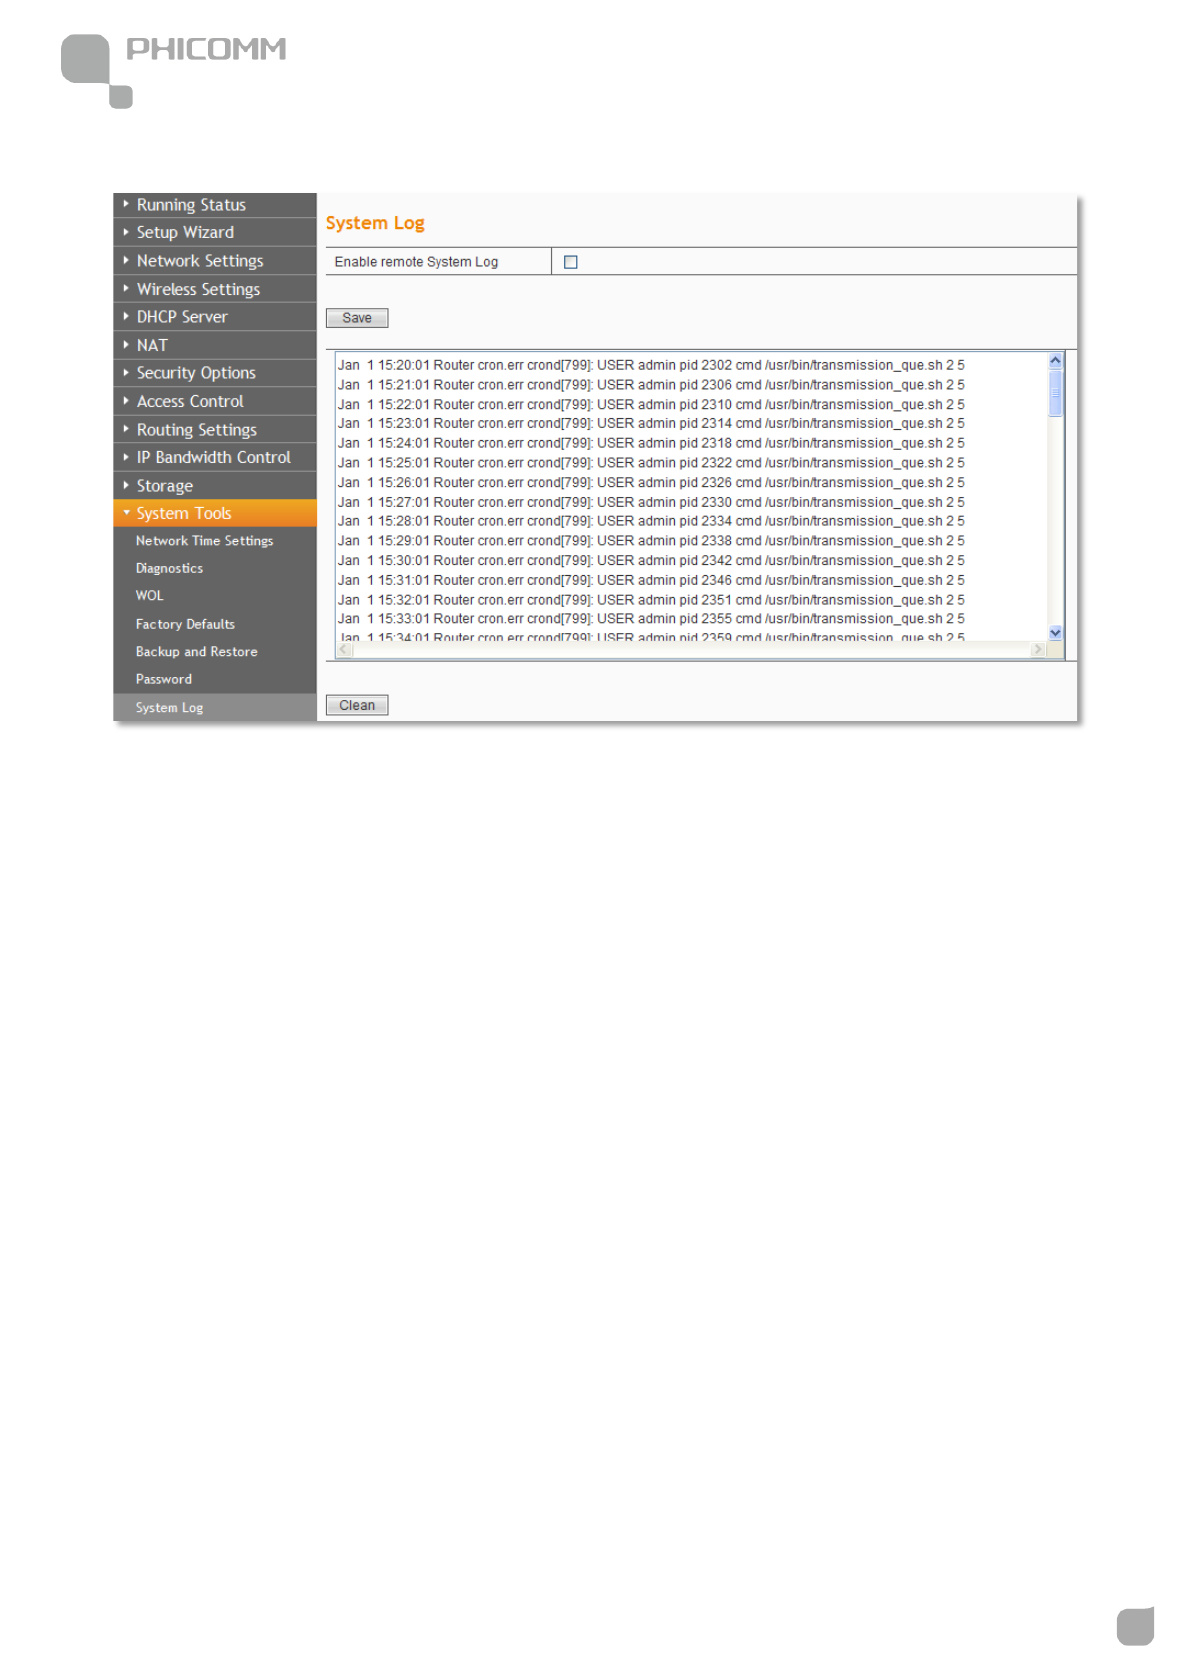
System Log
The system log is a detailed record of the websites that users on your network have
accessed or attempted to access. You can enable remote System Log function to view the
log in remote place.
Enable remote System Log: Check the radio button to enable remote System Log.
Save: Click Save to save your Log.
Clean: Click Clean to clear all shown information.

300Mbps Wireless N NAS Rout
www.phicomm.com
63
Chapter 3: Router Configuration
Traffic Statistics
This page used to display the current system memory usage, WLAN, LAN and WAN
networks to send and receive data packets to the number.
Firmware Upgrade
You can upgrade the router to the lasted version in this page, please download a most
recent firmware upgrade file from our website. After downloading the file, you need to
extract the zip file before upgrading the router. Browse for the upgrade file, then click
Upgrade button.
Caution! Once you click Upgrade button, do not interrupt the process, loss of power
300Mbps Wireless N NAS Rout
www.phicomm.com
64
Chapter 3: Router Configuration
during the upgrade could damage the Router.
Note:
• Router might be changed to factory default settings after upgrade, please backup in
advance.
• During the updating, please do not turn off the power.
• Please make sure the software version is matching with the existing hardware.
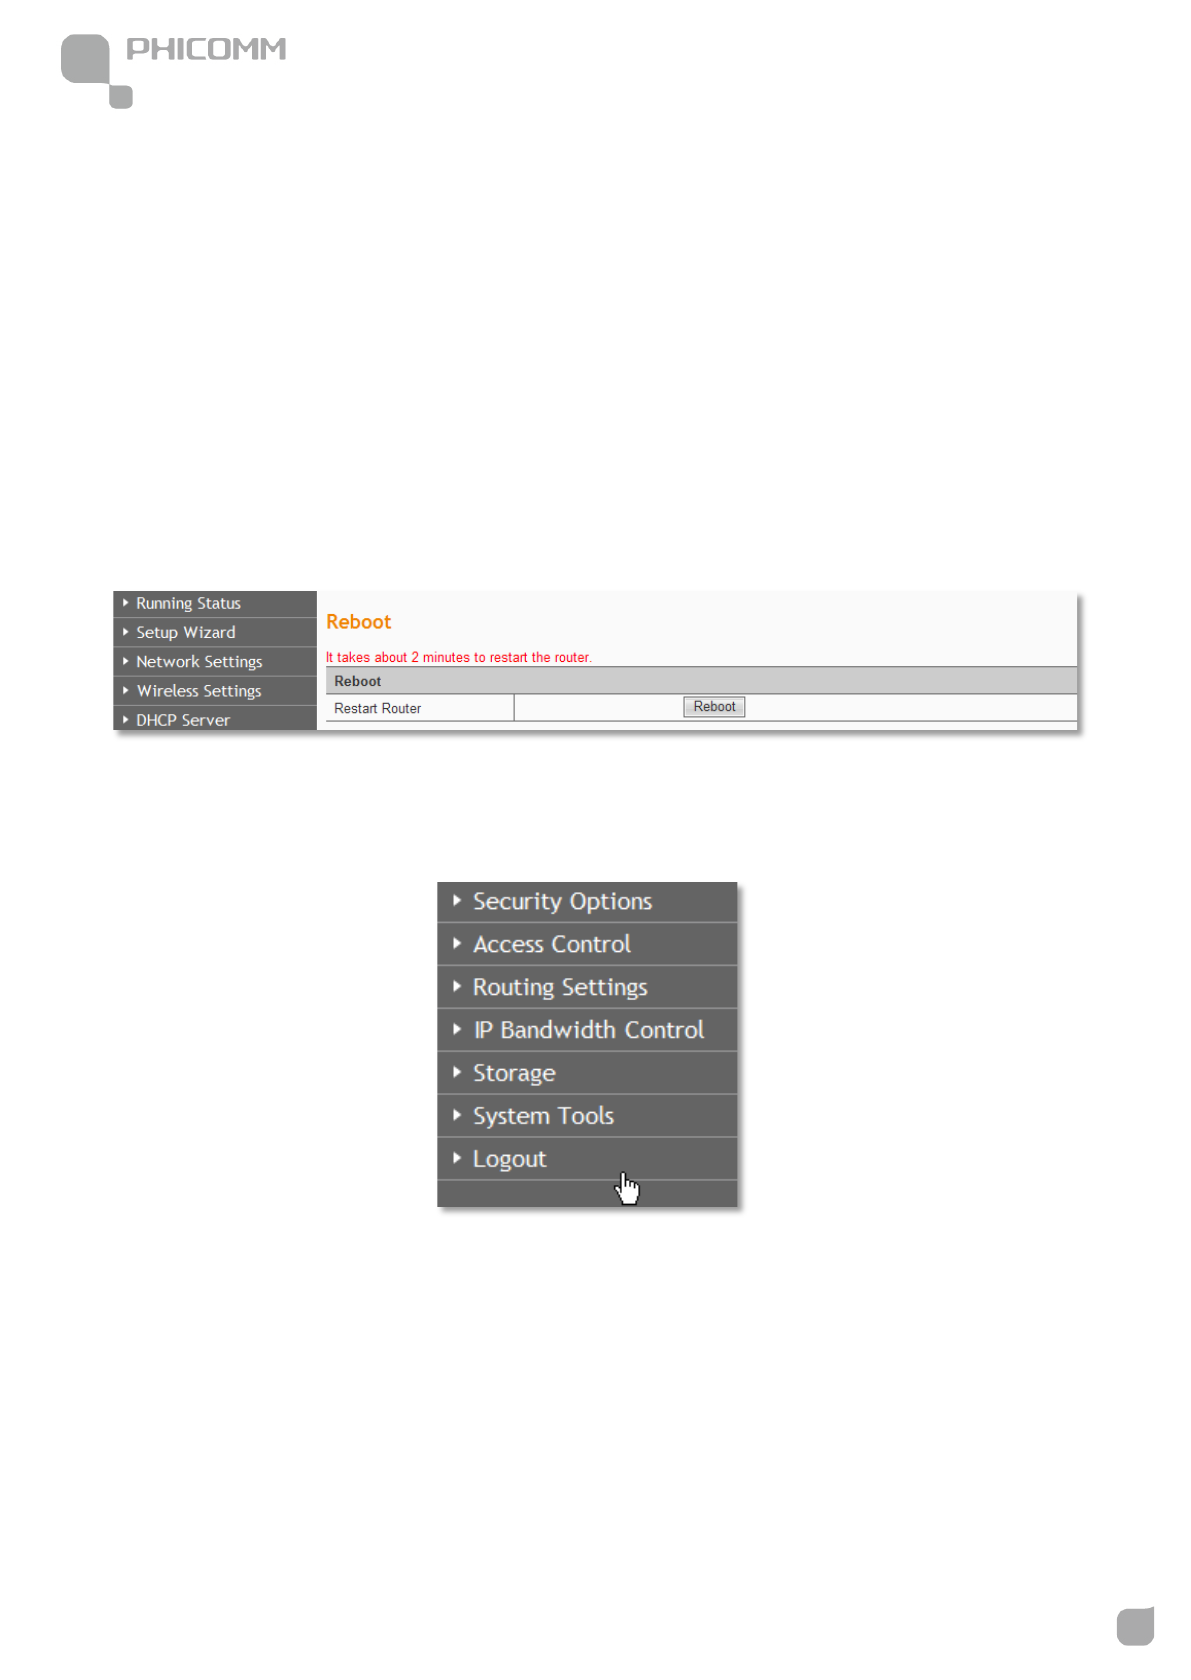
Reboot
Click Reboot button to reboot the Router.
Logout
Click to logout from the router configuration web.
300Mbps Wireless N NAS Rout
www.phicomm.com
65
Chapter 4: Download
Chapter 4: Download Wizard
Before you start
Before you use the Offline Download Wizard, please make sure:
1. The wireless router is powered on, LAN port goes into the computer, and WAN port goes
into modem.
2. The Download function is enabled in the wireless router.
3. The USB storage device is plugged into the USB port of the wireless router.
4. The Offline Download Wizard is installed successfully on your computer.
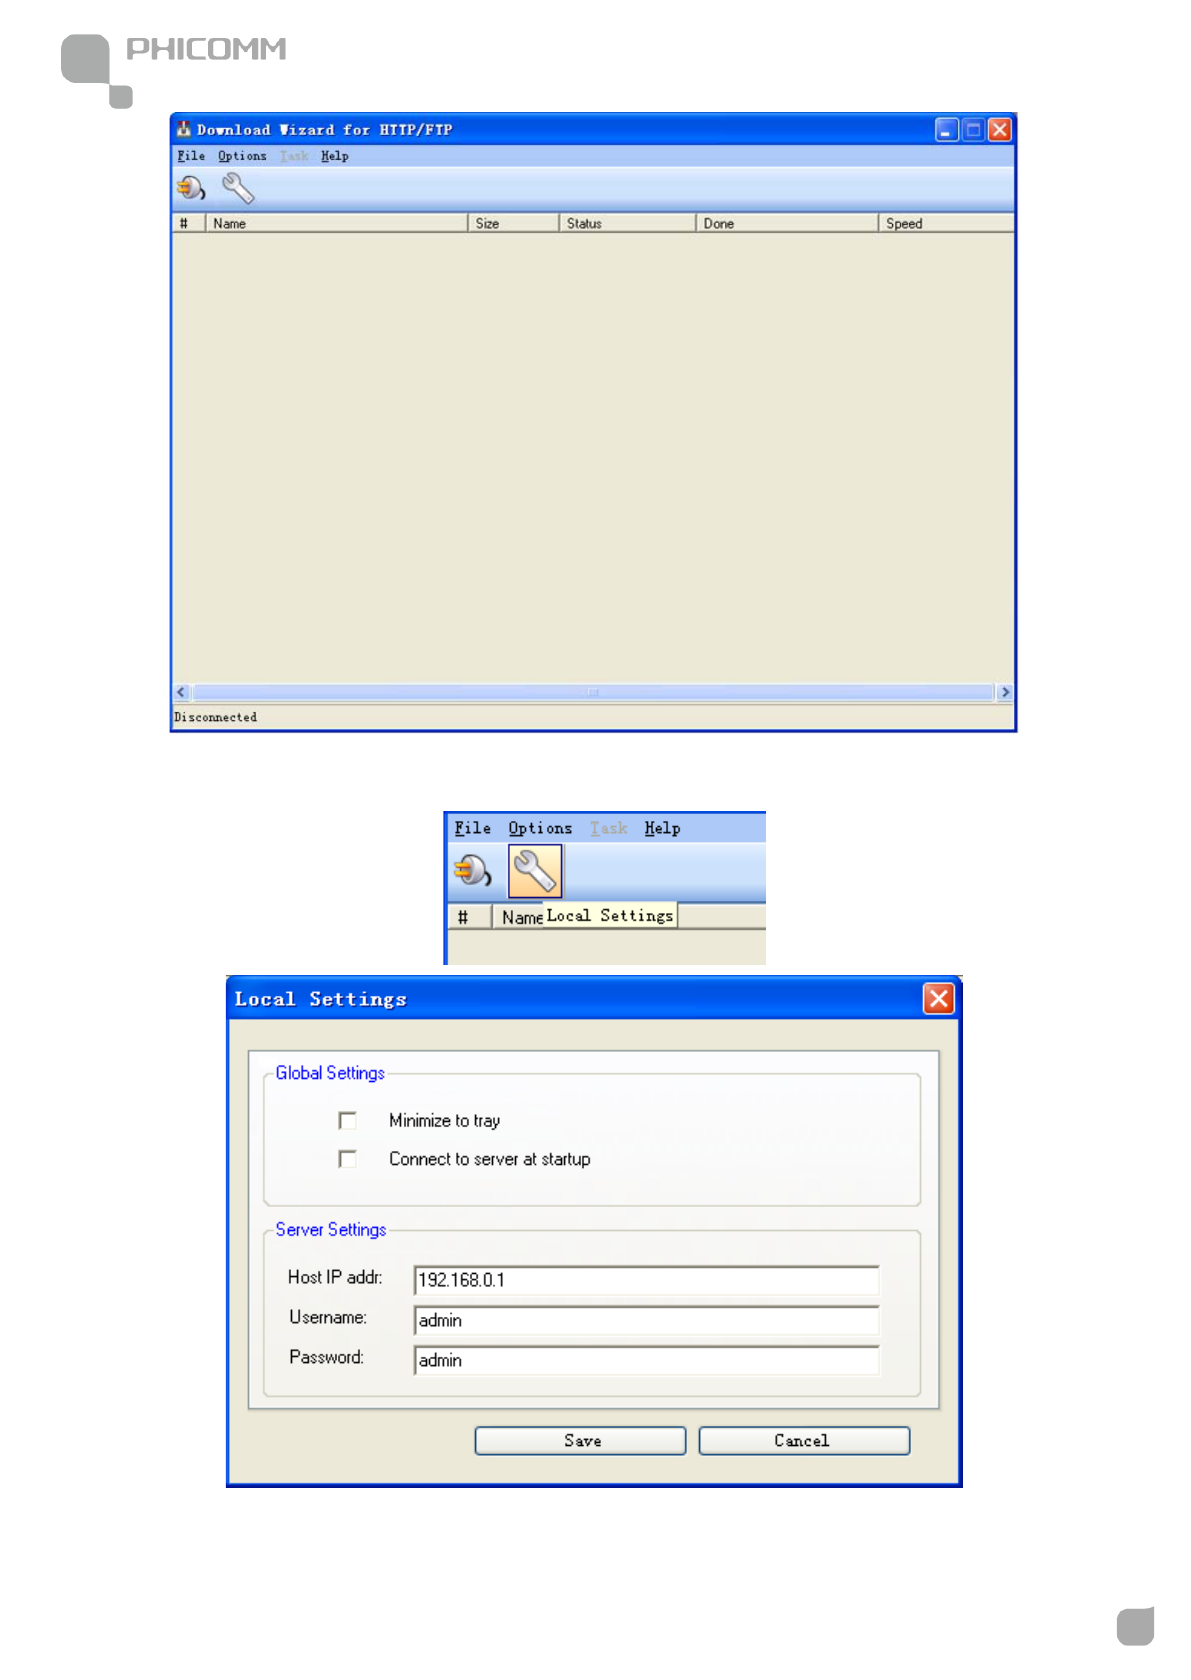
Configuration
1. Run Download Wizard for HTTP/FTP program, you can see the picture below:
300Mbps Wireless N NAS Rout
www.phicomm.com
66
Chapter 4: Download
2. Click Local Settings button, you can see a new page pop up.
300Mbps Wireless N NAS Rout
www.phicomm.com
67
Chapter 4: Download
Minimize to tray: check this option, this program will be minimized to tray, you can see a
tray icon in the Windows Taskbar.
Connect to server at startup: check this option, it will automatically connect to the offline
download server when startup.
Host IP addr: IP address of the wireless router, the default address is 192.168.0.1
Username: login username for the wireless router’s web management page, the default
username is admin.
Password: login password for the wireless router’s web management page, the default
username is admin.
Click Save button to save the changes.
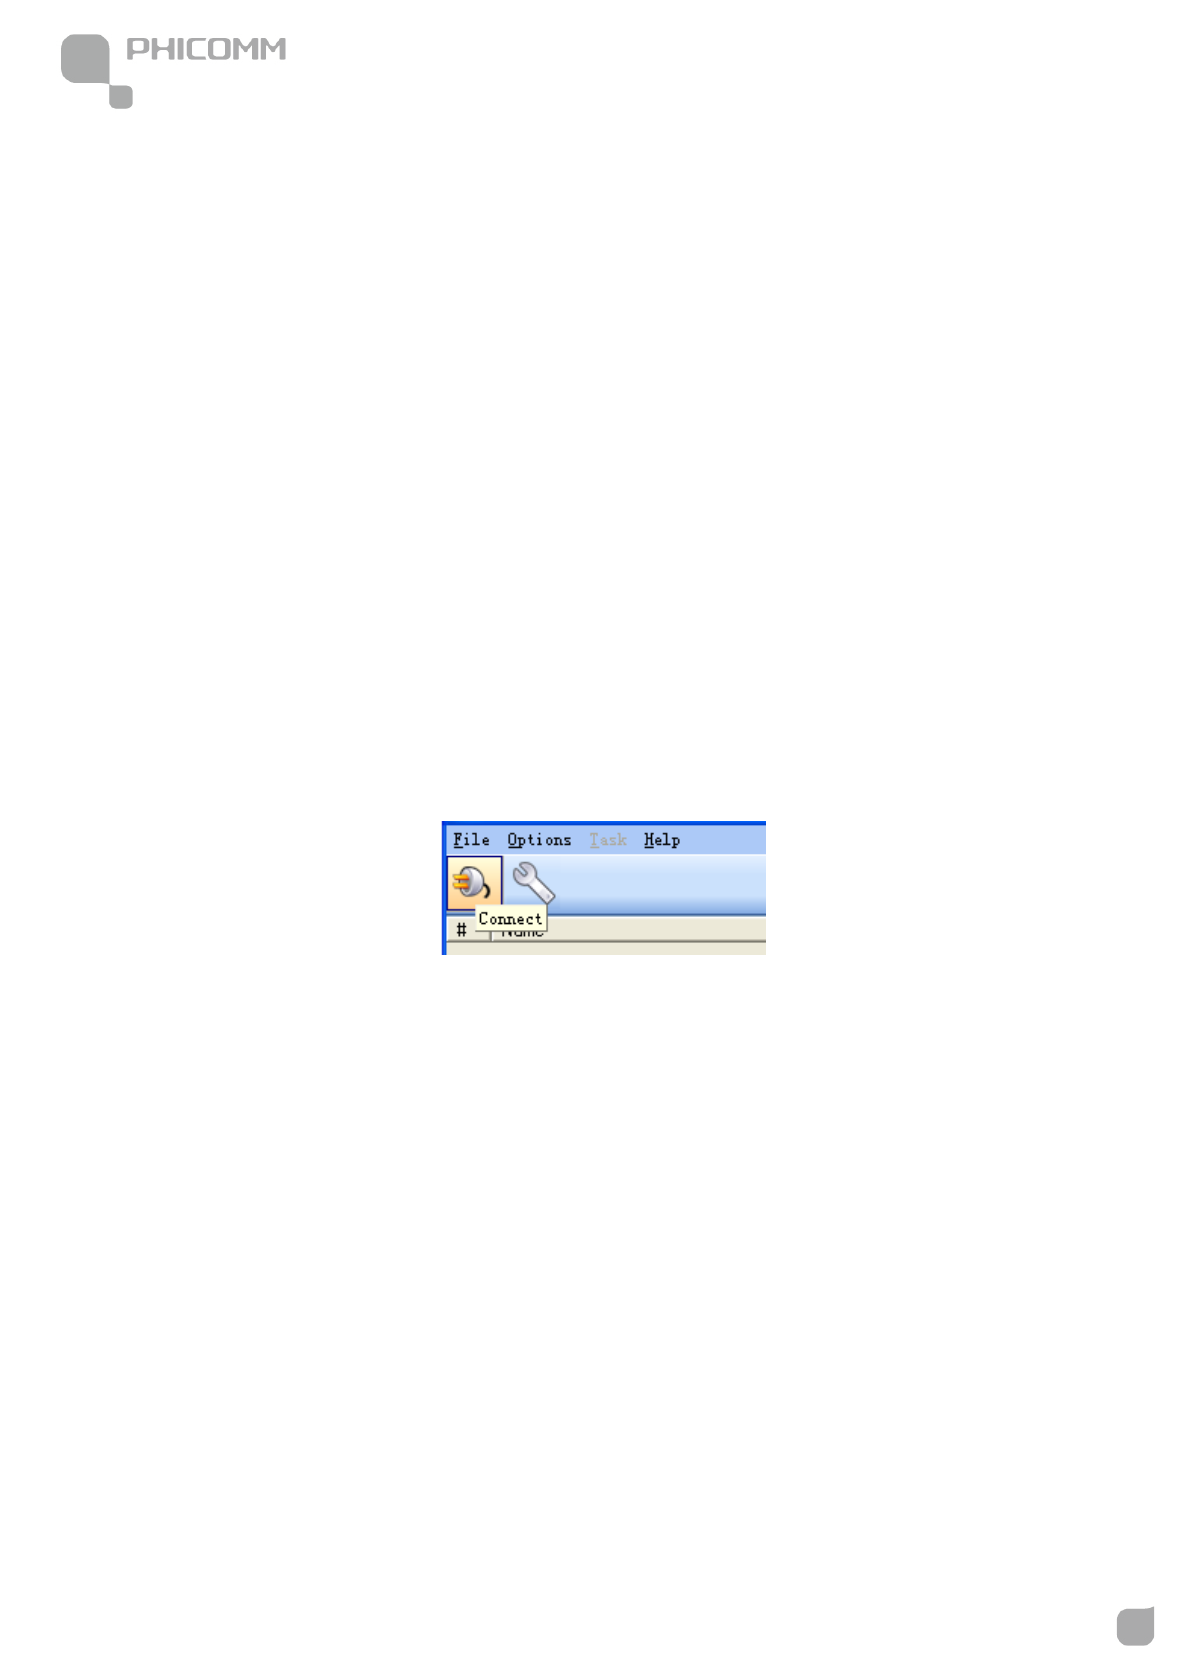
3. Click Connect button.
300Mbps Wireless N NAS Rout
www.phicomm.com
68
Chapter 4: Download
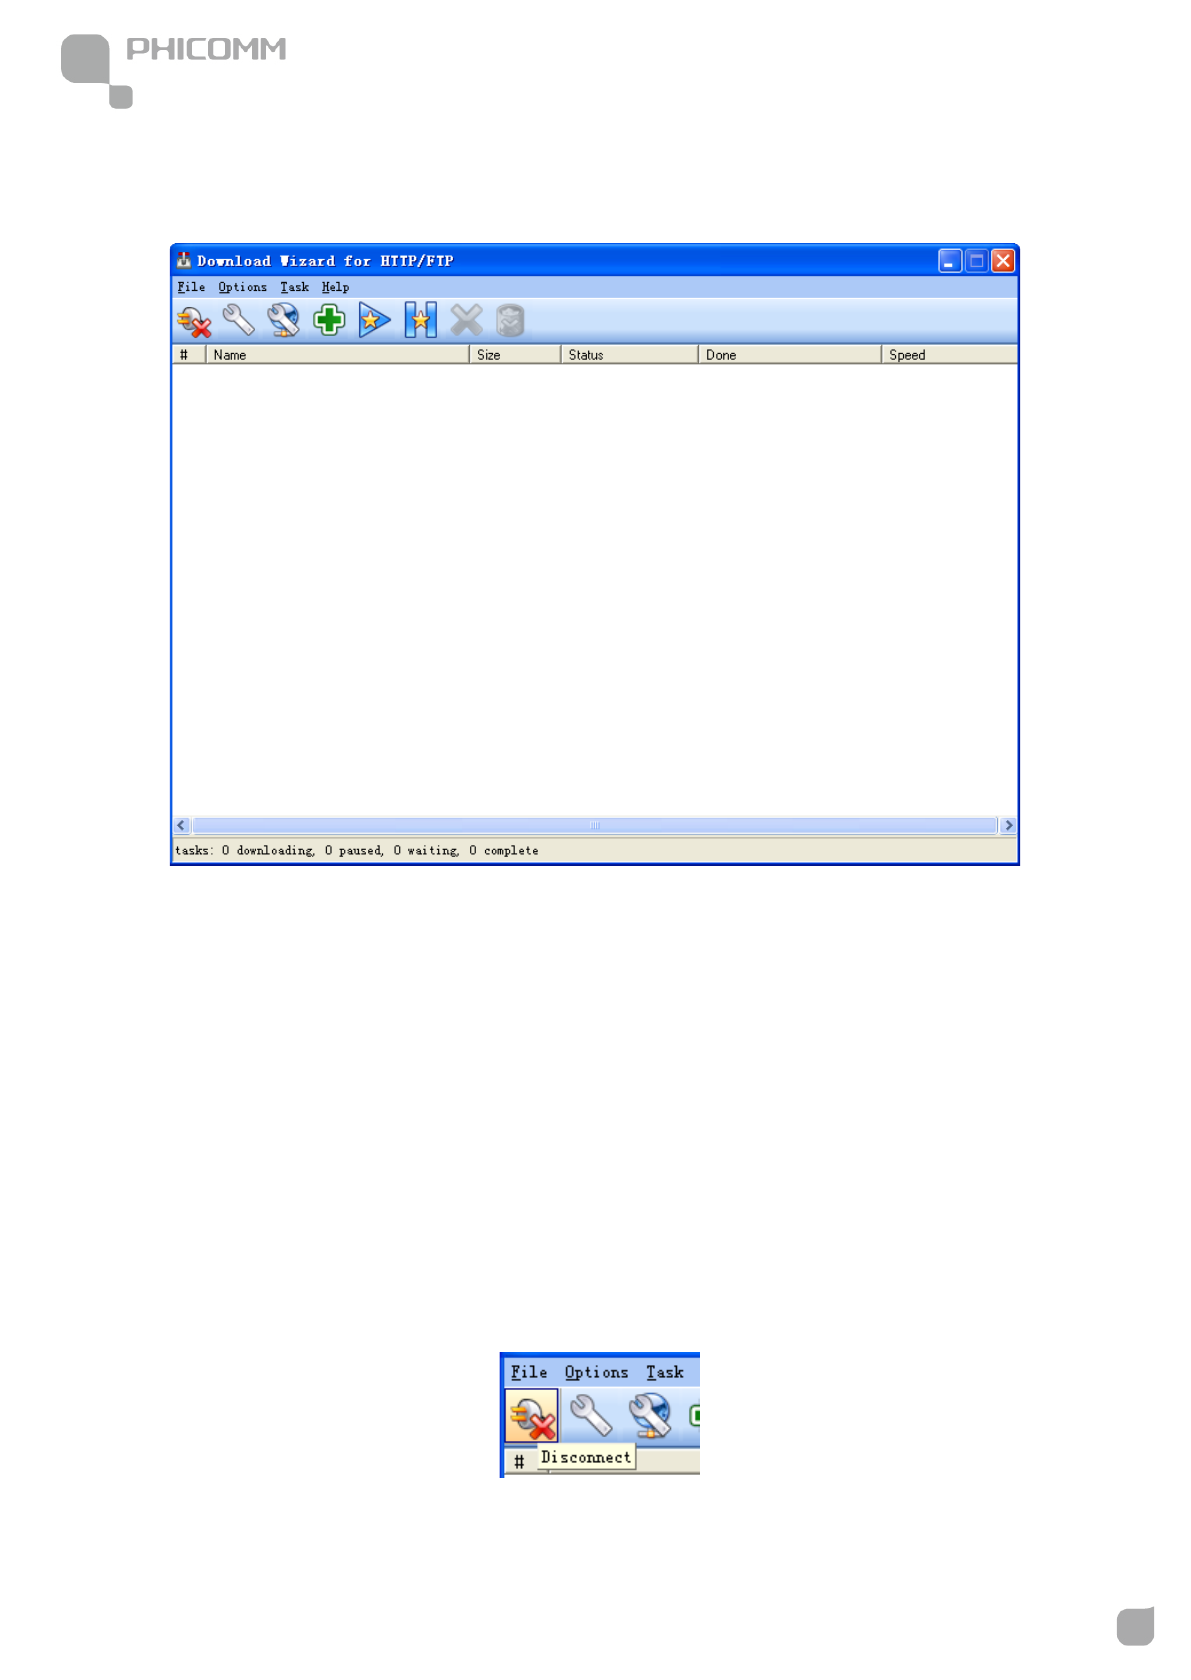
If it is successfully connected, you can see some shortcut buttons come up in the main
page,
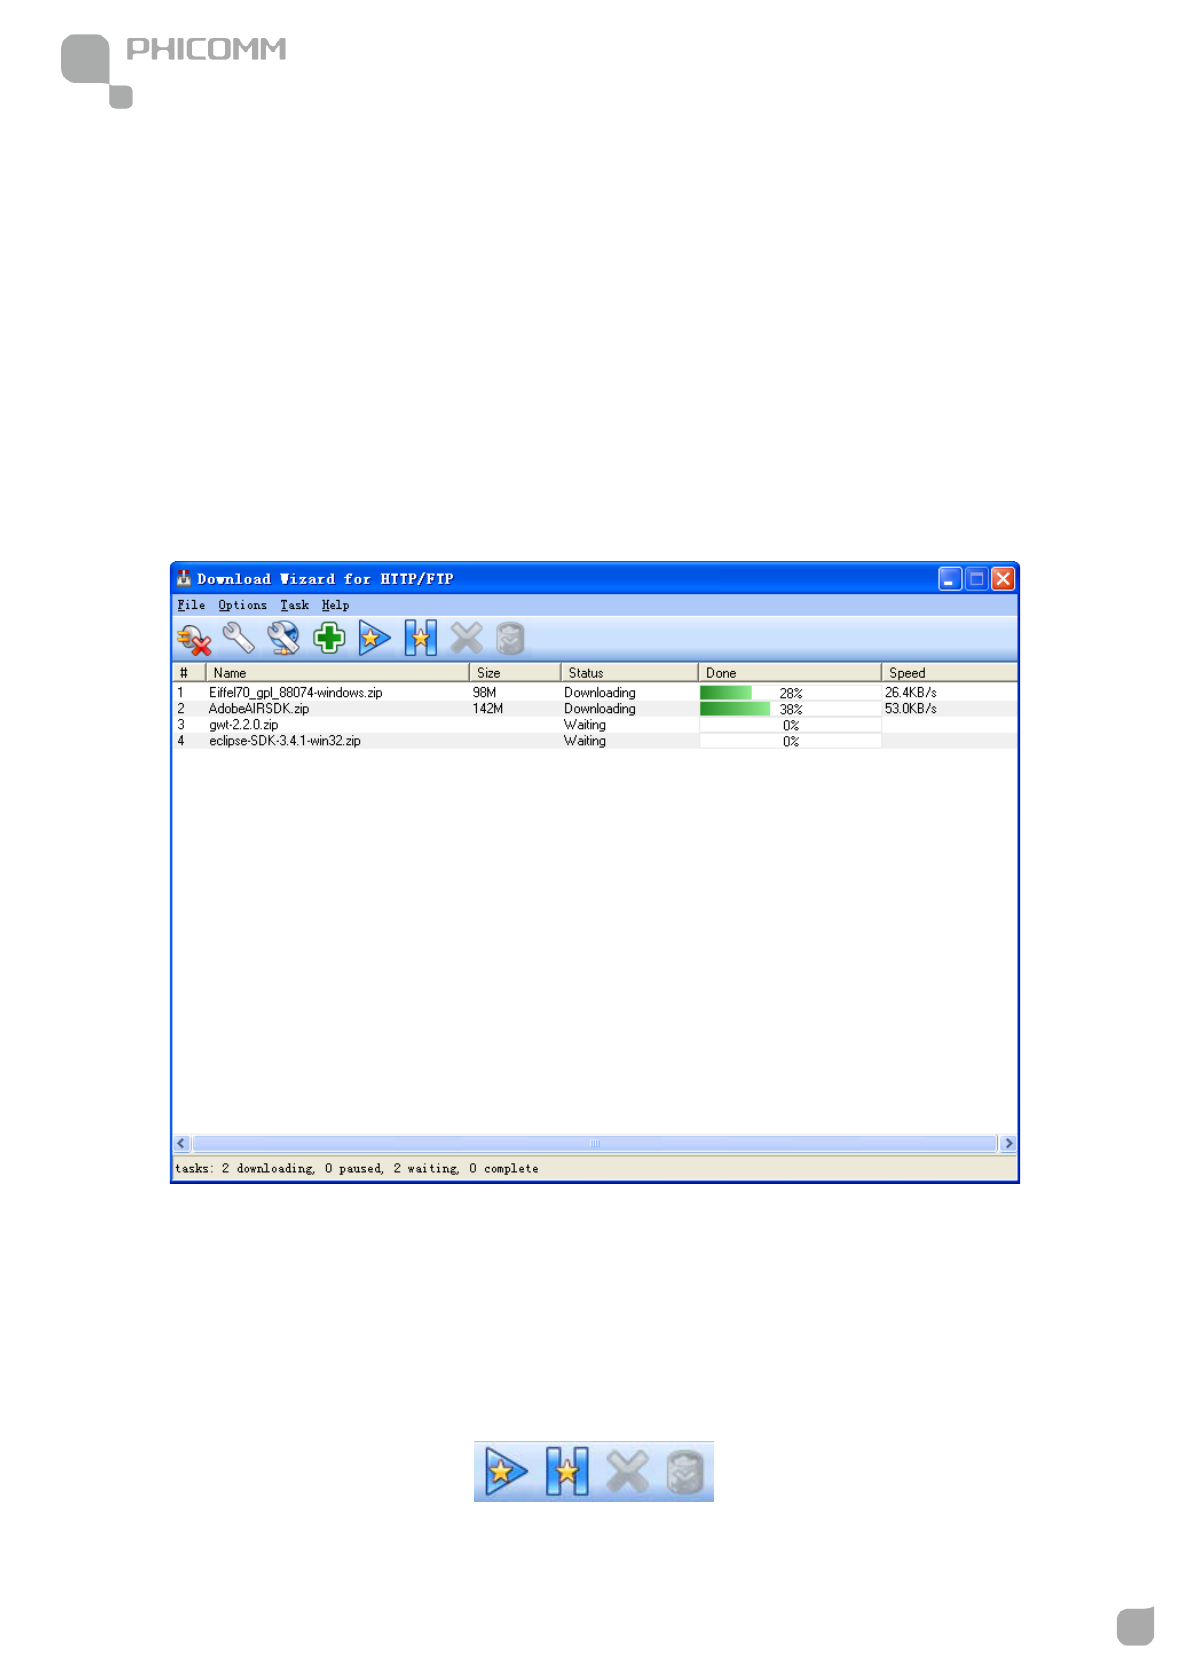
#: Task ID.
Name: The name of download file.
Size: The size of the download file, the value is in megabyte (M).
Status: It will show downloading, paused, waiting or complete.
Done: The percentage of the file that has been downloaded.
Speed: The download speed.
The Connect button changed into Disconnect button, and Task is available.
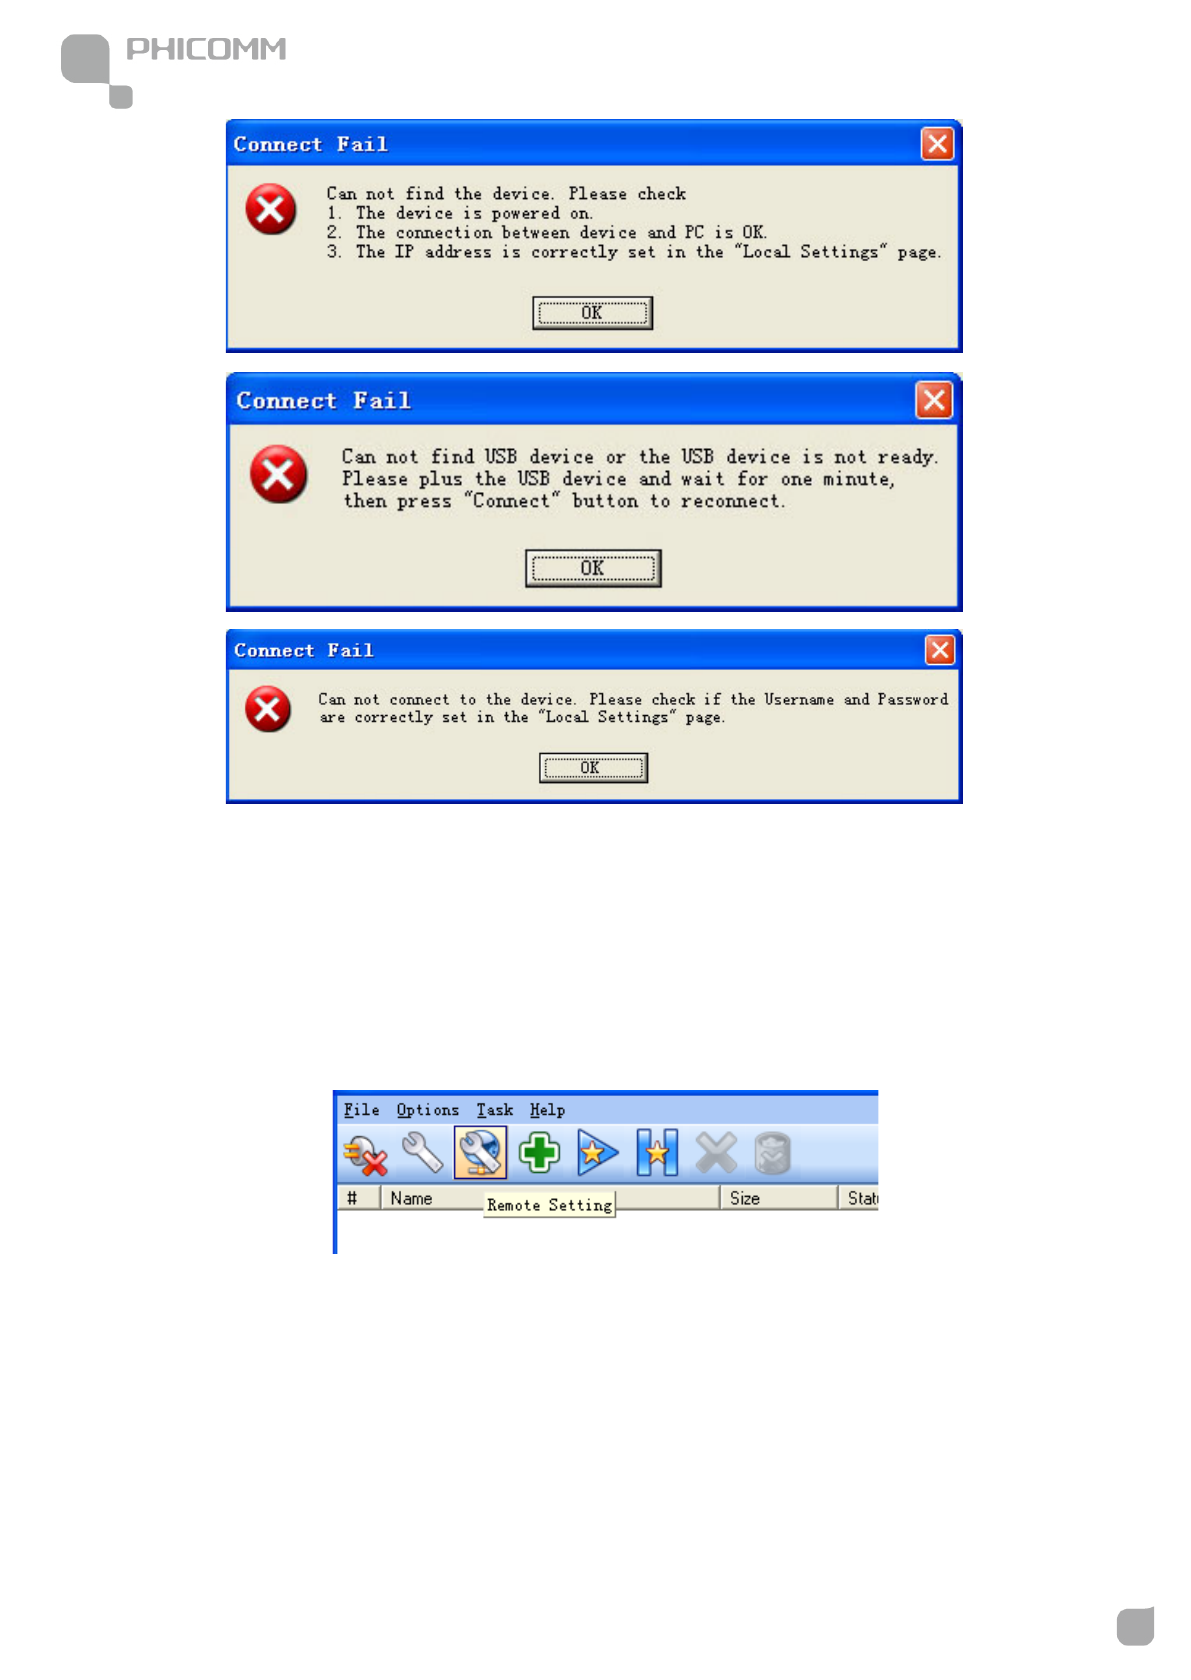
If the connection is unsuccessful, you can see some error messages.
300Mbps Wireless N NAS Rout
www.phicomm.com
69
Chapter 4: Download
Note: Please follow the instructions according the error messages, click OK button then try
to reconnect.
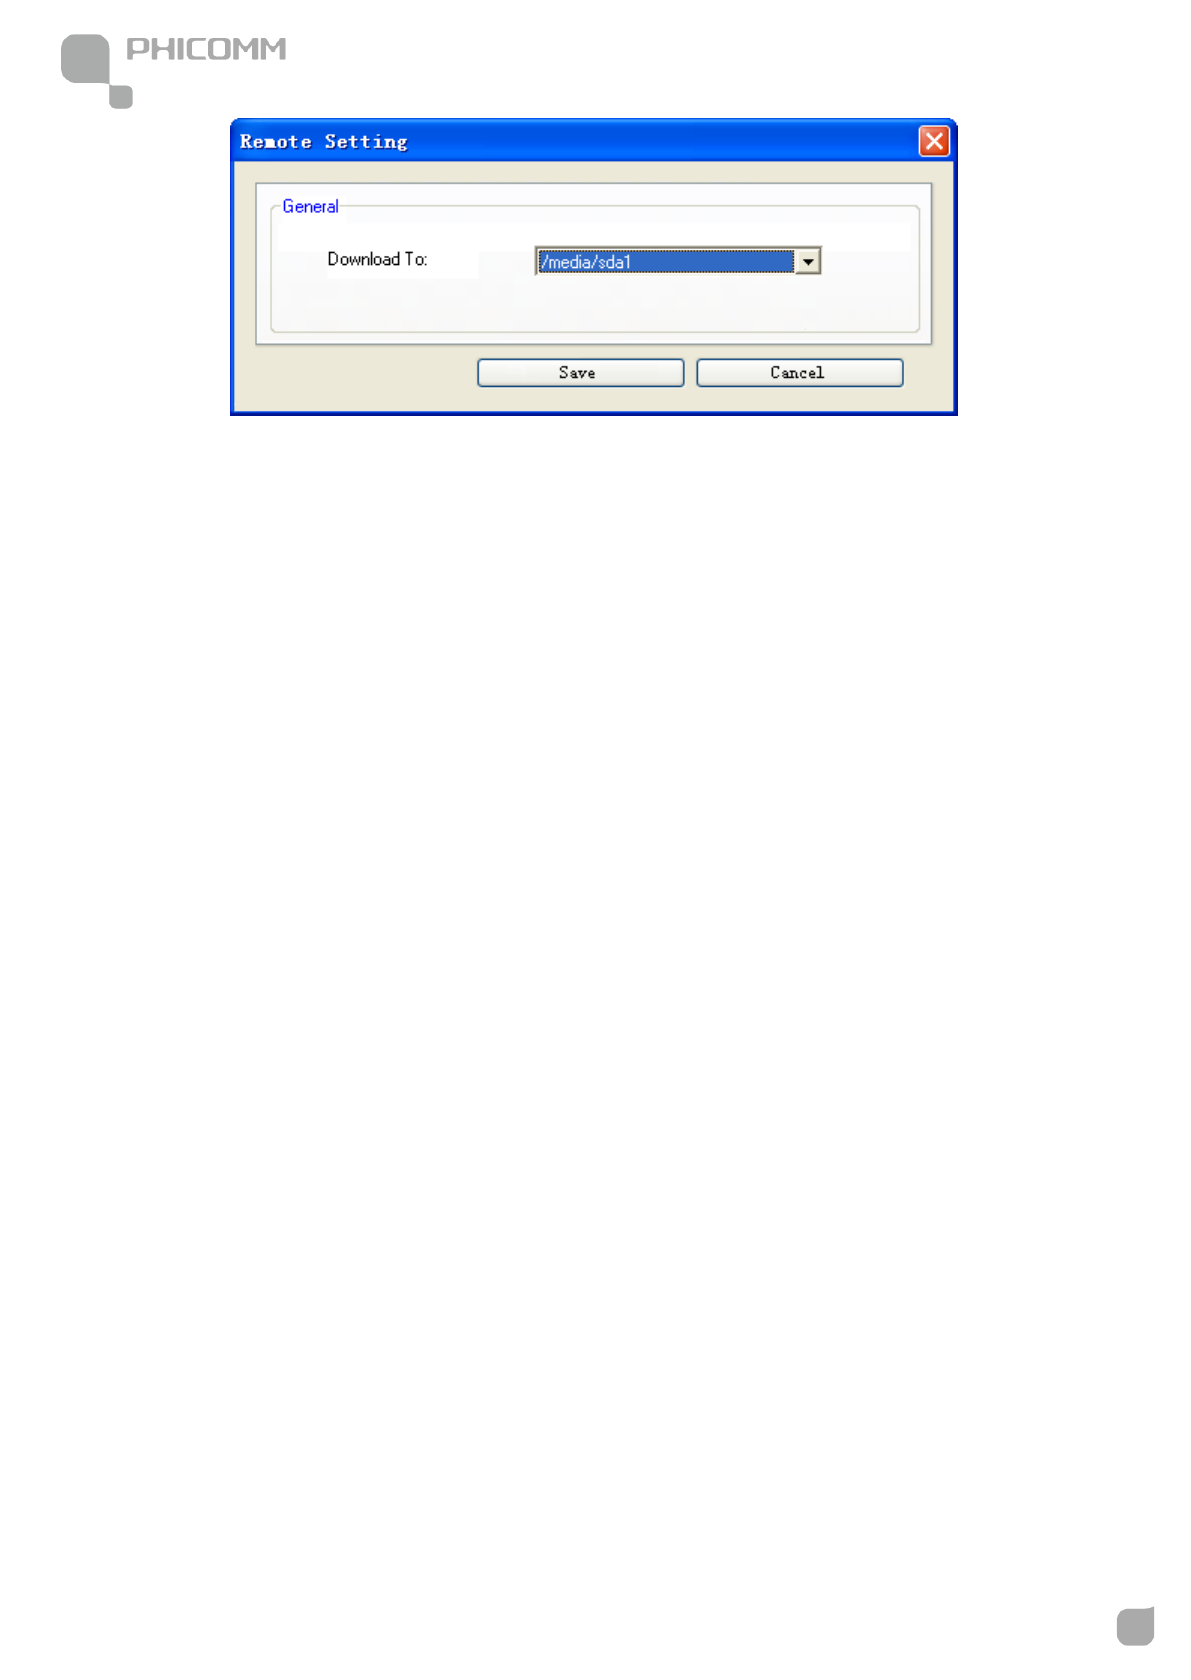
4. If there is more than one partition for the USB storage device, and you want to specify a
partition for the download files, please click Remote Setting button,
300Mbps Wireless N NAS Rout
www.phicomm.com
70
Chapter 4: Download
Note: The pull-down menus for Remote Setting include all the partition of the USB storage
device that can be detected, the first partition is /media/sda1, the second partition is
/media/sda2, and so on.
Click Save button after you choose the partition, then the new task will be downloaded to
the assigned partition.
300Mbps Wireless N NAS Rout
www.phicomm.com
71
Chapter 4: Download
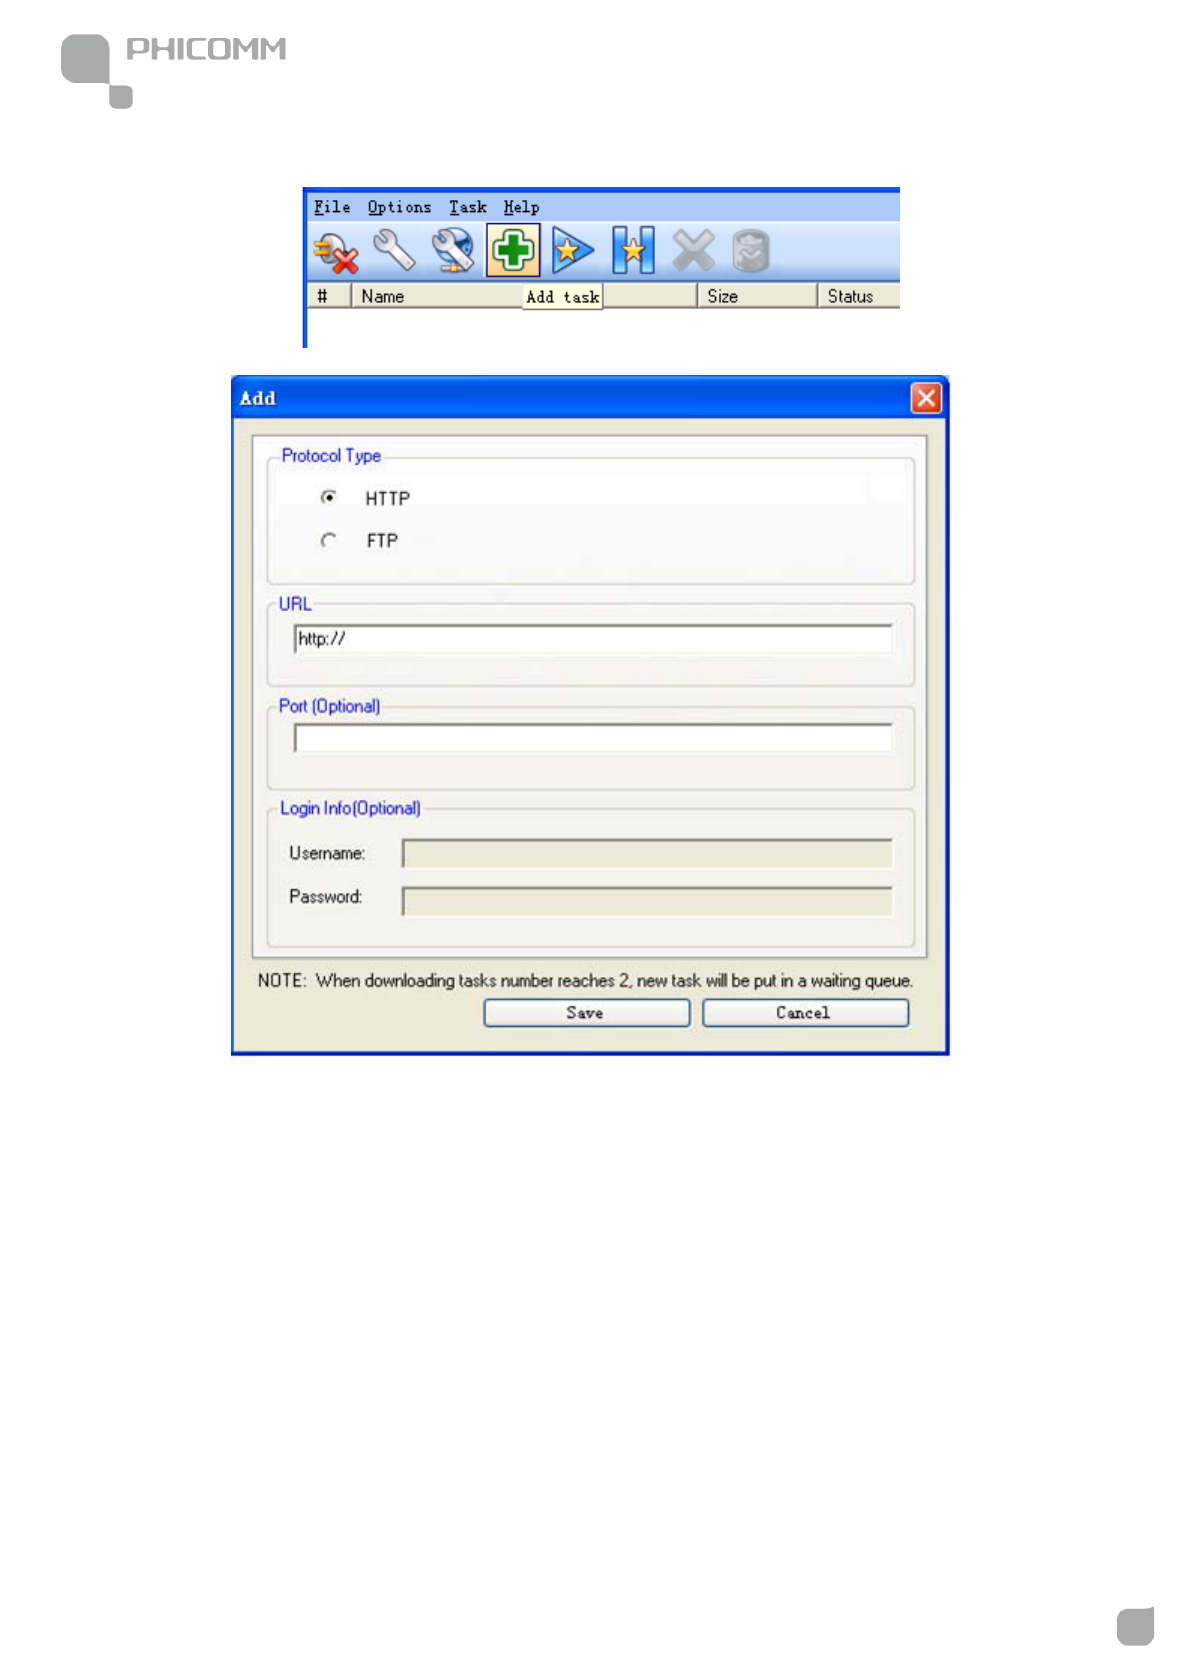
5. Click Add button to add task.
Protocol Type: the protocol type of the download file, it can be HTTP or FTP.
URL: input a legitimate and complete URL address, it can’t be blank.
Port: This is optional. If the URL does not include port number, and a special port number
is needed, then input that number (must be numbers).
Login Info: This is optional. It is available when the Protocol Type is FTP. Type in the
information
When the FTP server requires for a username and a password but the URL doesn’t include
the related information.
300Mbps Wireless N NAS Rout
www.phicomm.com
72
Chapter 4: Download
Click Save button after you add task, the new task will appears in the task list, with status
showing Downloading.
Note: Limited by the wireless router’s CPU and memory, to ensure the stability of the
offline downloading, the maximum number of Downloading task is 2. When the number of
Downloading task reaches 2, the status of the new task will be turned into Waiting
automatically. If the number of Downloading task is less than 2, the task in Waiting will be
turned into Downloading automatically.
6. The last shortcut buttons from left to right are: Start task, Pause task, Remove task and
Remove and Delete task.
(1) If there is no task selected, Remove task and Remove and Delete task icons are grayed
out.
(2) If one task is selected, all the buttons are available.
300Mbps Wireless N NAS Rout
www.phicomm.com
73
Chapter 4: Download
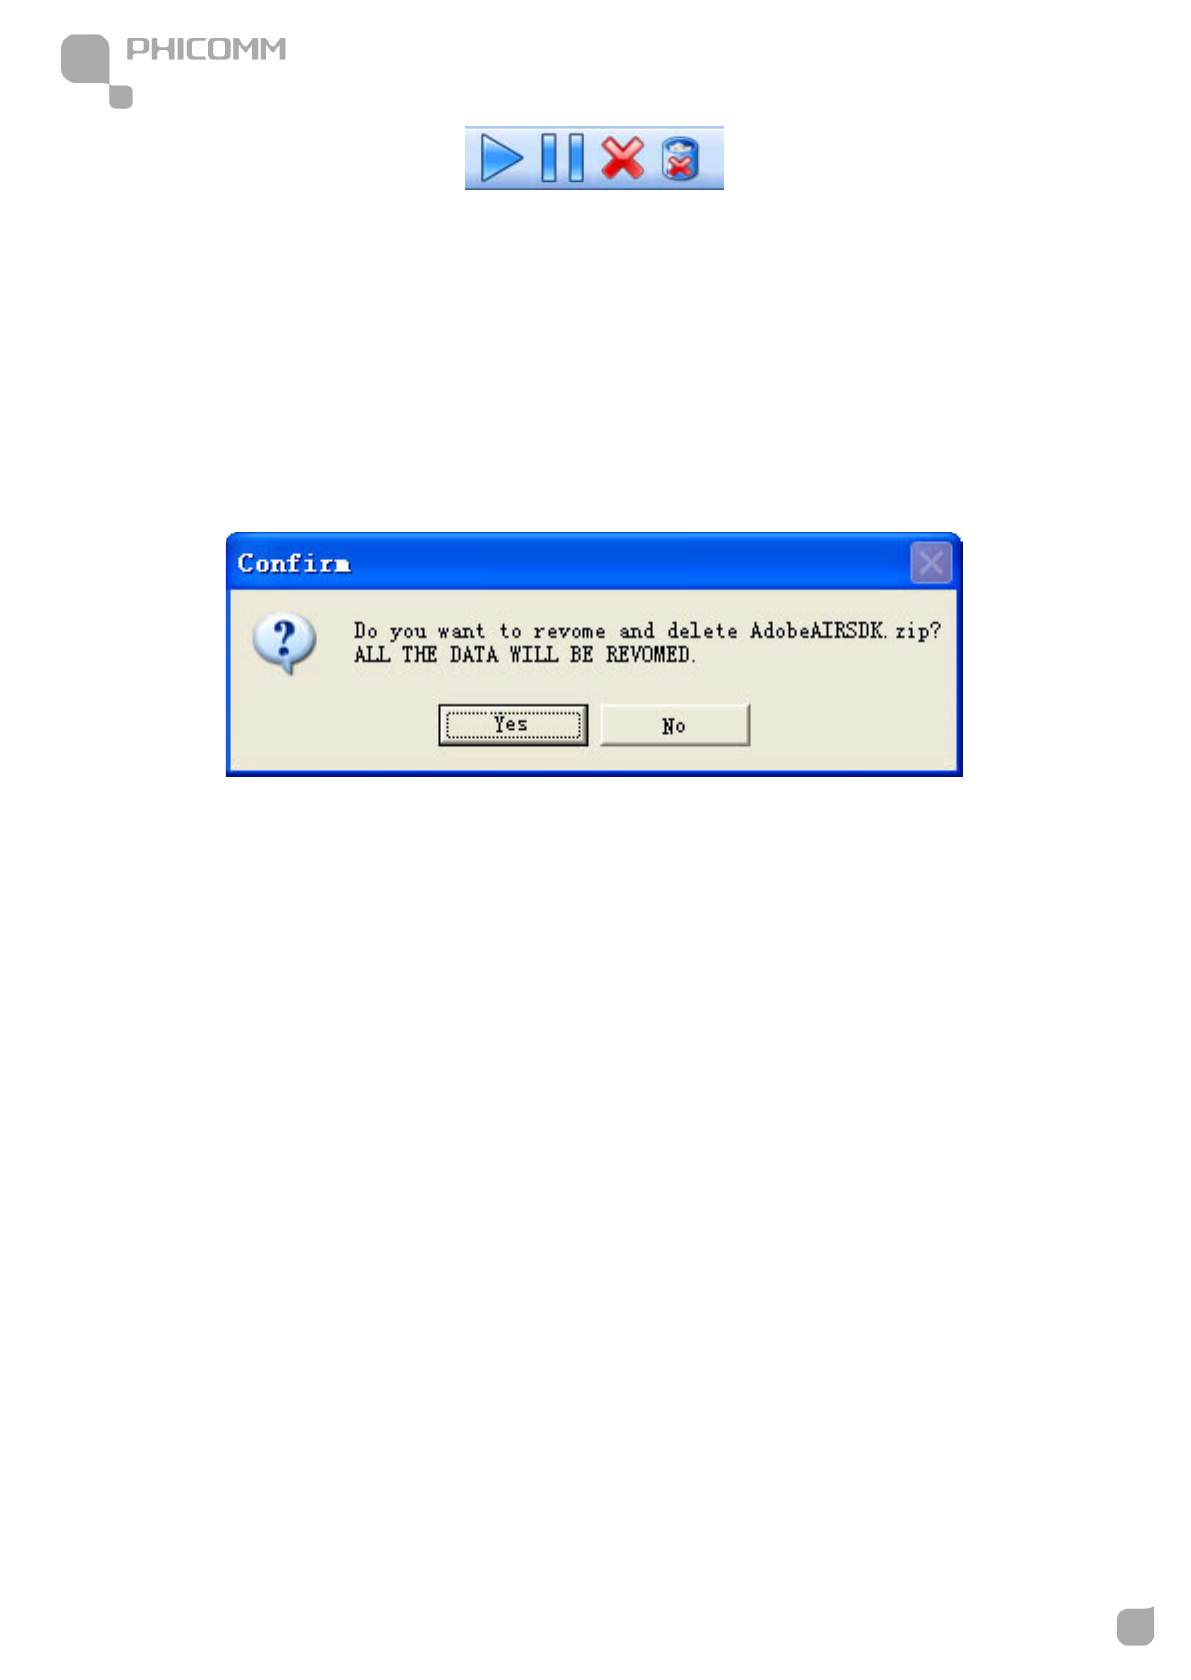
Note: The third button (like a red cross) remove task means remove the selected task, but
data already downloaded would be saved.
If you click the last button (like a trash can) remove and delete task, all the data will be
removed.
You can see this message comes up.
300Mbps Wireless N NAS Rout
www.phicomm.com
74
Chapter 4: Download
(3) If you select more than one task, you can see the icons below:
7. Main menu
(1)File
Connect: same as Connect shortcut button.
Disconnect: same as Disconnect shortcut button.
Add task: same as Add task shortcut button.
Exit: exit from the program.
(2) Option
Local settings: same as Local settings shortcut button.
Remote setting: same as Remote settings shortcut button.
(3)Task
Start: same as Start shortcut button.
300Mbps Wireless N NAS Rout
www.phicomm.com
75
Chapter 4: Download
Pause: same as Pause shortcut button.
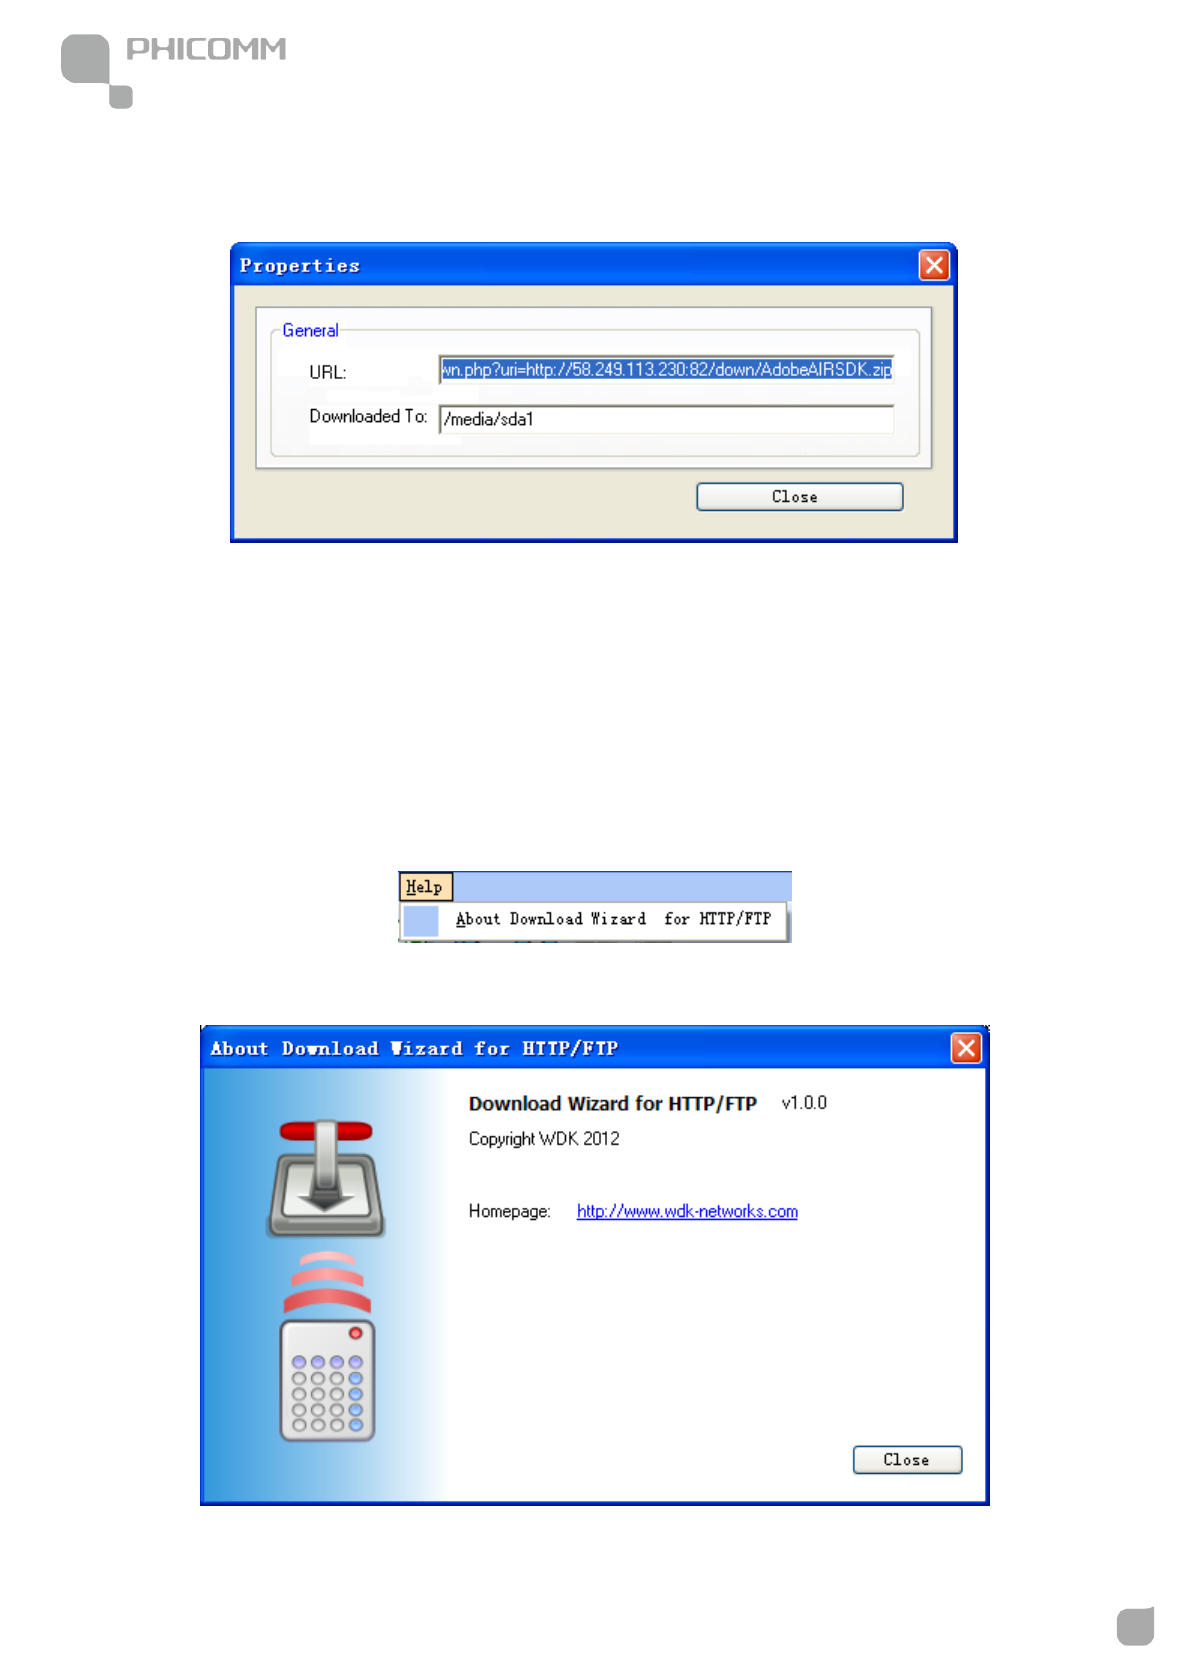
Properties: shows the properties of the selected task.
Remove: same as Remove shortcut button.
Remove and Delete: same as Remove and Delete shortcut button.
Start all: start all the tasks.
Pause all: pause all the tasks.
(4) Help
Click About Download Wizard for HTTP/FTP, you can see a page pop up.

300Mbps Wireless N NAS Rout
www.phicomm.com
76
Chapter 4: Download

300Mbps Wireless N NAS Rout
www.phicomm.com
77
Chapter 5: Specification
Chapter 5: Specification
General
Standards IEEE 802.11n, IEEE 802.11g, IEEE 802.11b, CSMA/CA with ACK
Data Rate 11n: 300Mbps 11g: 54Mbps 11b: 11Mbps
Frequency Range 2.4-2.4835GHz
Wireless Transmit Power < 23±1dBm
Modulation Type OFDM/CCK/16-QAM/64-QAM
Receive Sensitivity
300M: -68dBm@10% PER
108M: -68dBm@10% PER
54M: -68dBm@10% PER
11M: -85dBm@8% PER
6M: -88dBm@10% PER
Wireless Security 64/128-bit WEP, WPA/WPA2-Enterprise, WPA /WPA2-Personal
(TKIP/AES)
System Requirements Microsoft® Windows® 98SE, NT, 2000, XP, Vista and Windows 7
Hardware
Interfaces
4 x 10/100Mbps LAN Port
1 x 10/100Mbps Internet Port
1 x USB 2.0 Port
1 x Power Connector
LED Indicators Power, WLAN, WPS, USB, Internet, LAN1-LAN4
Buttons Power Button, WPS Button, Reset Button
Power Supply DC12V ,0.5A
Antenna 2 x Fixed Omni-directional Antenna
Dimensions ( W x D x H ) 185mm x 124mm x 27mm
Others
Operating Te mper ature 0°C~40°C (32°F~104°F)
Storage Temperature -40°C~70°C (-40°F~158°F)
Relative Humidity 10%~90%, non-condensing
Storage Humidity 5%~95%, non-condensing
Certifications FCC,CE, RoHS
Package Contents
1 x Wireless N Router
1 x Resource CD
1 x Quick Installation Guide
1 x Power Adapter

300Mbps Wireless N NAS Rout
www.phicomm.com
78
Chapter 5: Specification
1 x Ethernet Cable
* All references to speed and range are for comparison purposes only. Product specifications, size, and shape
are subject to change without notice, and actual product appearance may differ from that depicted herein.

300Mbps Wireless N NAS Rout
www.phicomm.com
79
Appendix A:
Appendix A: Troubleshooting
1. PHICOMM Setup cannot find my Router.
If PHICOMM Setup is not able to communicate with your Router during installation,
please check the following items:
1) Ensure that the router and modem are both on.
2) Make sure the computer goes into the LAN port of the router.
3) Make sure the DSL modem goes into the WAN port of the router.
4) There may be firewall software on your computer preventing an outgoing
connection. You may choose to temporarily disable this software before
attempting setup.
5) Unplug the Routers power supply for 10 seconds, then plug it back in.
2. The DSL telephone line does not fit into the Router’s Internet port.
The Router does not replace your modem. You still need your DSL modem to work
with the Router. Connect the telephone line to the DSL modem, and then insert the
setup CD into your computer. Follow the QIG to install your router.
3. I cannot login the router’s web management page.
1) Make sure the computer goes into the LAN port of the router.
2) Check the computer’s IP address, make sure the IP address is obtained automatically,
for details please refer to the section of Configure the Computers IP Address in this
manual.
3) Make sure you put 192.168.0.1 into the address bar, not the search bar.
4) Check your web browser, make sure the Proxy server is unchecked. Take Internet

300Mbps Wireless N NAS Rout
www.phicomm.com
80
Appendix A:
Explorer as an example, go to Tools>Internet Options>Connections>LAN
Settings, uncheck Use a proxy server for your LAN
5) If it tells you the username or password is error, and you cannot remember the new
one, please reset router by pressing reset button for at least 6 seconds, and then try
to login with default username and password (admin/admin).
4. The computer cannot connect to the Internet.
1) Make sure the DSL/cable modem goes into the WAN port of the router.
2) Make sure the computer goes into the LAN port of the router.
3) Ensure that the router and modem are both on.
4) Unplug the router, connect your computer to the modem directly, check the
internet is working or not through your modem.

300Mbps Wireless N NAS Rout
www.phicomm.com
81
Appendix A:
5. The computer cannot connect to the internet wirelessly.
Please make sure you can access the Internet when plug in the Ethernet cable from the
router to the computer, otherwise, please refer to Question 4. Then check the wireless
connection status on your computer:
1) Search available networks and connect to your wireless network. If your wireless
network name (SSID) is not listed in, please connect to router’s LAN port by an
Ethernet cable, login router’s web management page 192.168.0.1 to make sure
2) If you cannot connect to your wireless network, please make sure the password is
correct. You can connect to router’s LAN port by an Ethernet cable, login router’s
web management page
the
Broadcast SSID is enabled. Please refer to Page 20 in this manual.
192.168.0.1 to double check your password
3) If there is no wireless network found in range on your computer, please make sure
the wireless switch is turned on, and the wireless network adapter is working
properly.
. Please refer to
Page 21 in this manual.
6. I’ve installed this new Router and some of my network clients (computers, game
consoles etc.) are unable to connect.
Your new Router came pre-configured with a network name and no password. All clients
must use this network name to connect wirelessly to your Router. You will need to find
the network settings on your client, and select the network name from the list of
available networks to join the wireless network. Details please refer to your client
(computer, game consoles etc.).

300Mbps Wireless N NAS Rout
www.phicomm.com
82
Appendix A:

300Mbps Wireless N NAS Rout
www.phicomm.com
83
Appendix B:
Appendix B: Certification
FCC Statement
This equipment has been tested and found to comply with the limits for a Class B digital
device, pursuant to part 15 of the FCC Rules. These limits are designed to provide
reasonable protection against harmful interference in a residential installation. This
equipment generates uses and can radiate radio frequency energy and, if not installed and
used in accordance with the instructions, may cause harmful interference to radio
communications. However, there is no guarantee that interference will not occur in a
particular installation. If this equipment does cause harmful interference to radio or
television reception, which can be determined by turning the equipment off and on, the
user is encouraged to try to correct the interference by one or more of the following
measures:
• Reorient or relocate the receiving antenna.
• Increase the separation between the equipment and receiver.
• Connect the equipment into an outlet on a circuit different from that to which the
receiver is connected.
• Consult the dealer or an experienced radio/ TV technician for help.
• Changes or modifications to this unit not expressly approved by the party responsible
for compliance could void the user’s authority to operate this equipment.
FCC Caution

300Mbps Wireless N NAS Rout
www.phicomm.com
84
Appendix B:
• This device complies with Part 15 of the FCC Rules. Operation is subject to the following
two conditions: (1) This device may not cause harmful interference, and (2) this device
must accept any interference received, including interference that may cause undesired
operation.
• For product available in the USA market, only channel 1~11 can be operated. Selection
of other channels is not possible.
• This equipment complies with FCC RF radiation exposure limits set forth for an
uncontrolled environment.
• This device and its antenna(s) must not be co-located or operation in conjunction with
any other antenna or transmitter.
• This equipment should be installed and operated with a minimum distance of 20
centimeters between the radiator and your body.

85
Appendix C:
300Mbps Wireless N NAS Rout
www.phicomm.com
Appendix C: Glossary
802.11b: The 802.11b standard specifies a wireless networking at 11 Mbps using
direct-sequence spread-spectrum (DSSS) technology and operating in the unlicensed radio
spectrum at 2.4GHz, and WEP encryption for security. 802.11b networks are also referred to
as Wi-Fi networks.
802.11g: Specification for wireless networking at 54 Mbps using direct-sequence
spread-spectrum (DSSS) technology, using OFDM modulation and operating in the
unlicensed radio spectrum at 2.4GHz, and backward compatibility with IEEE 802.11b devices,
and WEP encryption for security.
802.11n: 802.11n builds upon previous 802.11 standards by adding MIMO (multiple-input
multiple-output). MIMO uses multiple transmitter and receiver antennas to allow for
increased data throughput via spatial multiplexing and increased range by exploiting the
spatial diversity, perhaps through coding schemes like Altamonte coding. The Enhanced
Wireless Consortium (EWC) was formed to help accelerate the IEEE 802.11n development
process and promote a technology specification for interoperability of next-generation
wireless local area networking (WLAN) products.
DDNS (Dynamic Domain Name System): The capability of assigning a fixed host and
domain name to a dynamic Internet IP Address.
DHCP (Dynamic Host Configuration Protocol): A protocol that automatically configure
the TCP/IP parameters for the all the PC(s) that are connected to a DHCP server.
DMZ (Demilitarized Zone): A Demilitarized Zone allows one local host to be exposed to
the Internet for a special-purpose service such as Internet gaming or videoconferencing.

86
Appendix C:
300Mbps Wireless N NAS Rout
www.phicomm.com
DNS (Domain Name System): An Internet Service that translates the names of websites
into IP addresses.
Domain Name: A descriptive name for an address or group of addresses on the Internet.
DSL (Digital Subscriber Line): A technology allowing data to be sent or received over
existing traditional phone lines.
ISP (Internet Service Provider): A company that can provide access to the Internet.
MTU (Maximum Transmission Unit): The size in bytes of the largest packet that can be
transmitted.
NAT (Network Address Translation): NAT technology translates IP addresses of a local
area network to a different IP address for the Internet.
NAS (Network-attached storage): The term network attached storage (commonly
abbreviated as NAS) describes storage devices that can be accessed over a computer
network rather than being directly connected to the computer. NAS devices enable
multiple computers to share the same storage space at once. NAS has emerged as a
powerful, proven technology for storing data that needs to be shared in the office or the
home. NAS devices enable home and business users to easily share large amounts of data
in a cost-effective and efficient manner.
PPPoE (Point to Point Protocol over Ethernet): PPPoE is a protocol for connecting
remote hosts to the Internet over an always-on connection by simulating a dial-up
connection.
SSID (Service Set Identification): It is a thirty-two character (maximum) alphanumeric key
identifying a wireless local area network. For the wireless devices in a network to

87
Appendix C:
300Mbps Wireless N NAS Rout
www.phicomm.com
communicate with each other, all devices must be configured with the same SSID. This is
typically the configuration parameter for a wireless PC card. It corresponds to the ESSID in
the wireless Access Point and to the wireless network name.
WEP (Wired Equivalent Privacy): A data privacy mechanism based on a 64-bit or 128-bit
or 152-bit shared key algorithm, as described in the IEEE 802.11 standard.
Wi-Fi: A trade name for the 802.11b wireless networking standard, given by the Wireless
Ethernet Compatibility Alliance (WECA, see http://www.wi-fi.net), an industry standards
group promoting interoperability among 802.11b devices.
WLAN (Wireless Local Area Network): A group of computers and associated devices
communicate with each other wirelessly, which network serving users are limited in a local
area.

Shanghai Feixun Communication Co.,
E-mail: support@phicomm.com
Website: www.phicomm.com
Copyright © 2011 Shanghai Feixun Communication Co., Ltd. All rights reserved.