Philips Consumer Lifestyle AEA3100MIC Wireless microphone User Manual
Philips Consumer Lifestyle Wireless microphone
user manual

www.philips.com/welcome
User manual
Always there to help you
Register your product and get support at
AEA3100/17
AEA3100/37
AEA3000/07
AEA3000/37

1EN
Contents
1 Important 2
Safety 2
Notice 3
2 Your Wireless Microphone and
Bluetooth Docking Speaker 6
Introduction 6
What's in the box 6
Overview of the unit 6
3 Get started 8
Connect power 8
Swith on the Bluetooth docking speaker 8
Install/replace microphone batteries 8
4 Play 10
Sing along through the wireless
microphone 10
Play from a Bluetooth enabled device 11
Play and charge your iPad through the
dock connector directly 12
Play from an external device 13
5 Product information 14
Specications 14
6 Troubleshooting 15
MAV-AEA7000-Troubleshooting-
Failed to set up connection between
the microphone and speaker 15
2EN
1 Important
Safety
This 'bolt of lightning' indicates uninsulated
material within the device may cause an
electrical shock. For the safety of everyone in
your household, please do not remove the
covering.
The 'exclamation mark' calls attention to
features for which you should read the enclosed
literature closely to prevent operating and
maintenance problems.
WARNING:Toreducetheriskofreorelectric
shock, the device should not be exposed to rain
ormoistureandobjectslledwithliquids,such
as vases, should not be placed on the device.
CAUTION: To prevent electric shock, fully
insert the plug. (For regions with polarized
plugs: To prevent electric shock, match wide
blade to wide slot.)
Important Safety Instructions
a Read these instructions.
b Keep these instructions.
c Heed all warnings.
d Follow all instructions.
e Do not use this apparatus near water.
f Clean only with dry cloth.
g Do not block any ventilation openings.
Install in accordance with the
manufacturer's instructions.
h Do not install near any heat sources such
as radiators, heat registers, stoves, or
other apparatus (including ampliers) that
produce heat.
i Do not defeat the safety purpose of
the polarized or grounding-type plug.
A polarized plug has two blades with
one wider than the other. A grounding
type plug has two blades and a third
grounding prong. The wide blade or the
third prong are provided for your safety.
If the provided plug does not t into
your outlet, consult an electrician for
replacement of the obsolete outlet.
j Protect the power cord from being
walked on or pinched, particularly at
plugs, convenience receptacles, and the
point where they exit from the apparatus.
k Only use attachments/accessories
specied by the manufacturer.
l Use only with the cart, stand, tripod,
bracket, or table specied by the
manufacturer or sold with the apparatus.
When a cart is used, use caution when
moving the cart/apparatus combination to
avoid injury from tip-over.
m Unplug this apparatus during lightning
storms or when unused for long periods
of time.

3EN
n Refer all servicing to qualied service
personnel. Servicing is required when
the apparatus has been damaged in any
way, such as power-supply cord or plug
is damaged, liquid has been spilled or
objects have fallen into the apparatus, the
apparatus has been exposed to rain or
moisture, does not operate normally, or
has been dropped.
o Battery usage CAUTION – To prevent
battery leakage which may result in bodily
injury, property damage, or damage to
the unit:
• Install all batteries correctly, + and - as
marked on the unit.
• Remove batteries when the unit is not
used for a long time.
• Perchlorate Material-special handling
may apply. See www.dtsc.ca.gov/
hazardouswaste/perchlorate.
p Apparatus shall not be exposed to
dripping or splashing, keep it away from
direct sunlight,naked ames or heat.
Warning
•Never remove the casing of this apparatus.
•Never lubricate any part of this apparatus.
•Never place this apparatus on other electrical
equipment.
•Keep this apparatus away from direct sunlight, naked
amesorheat.
•Ensure that you always have easy access to the power
cord, plug or adaptor to disconnect this apparatus from
the power.
Risk of overheating! Never install this apparatus
inaconnedspace.Alwaysleaveaspaceof
at least four inches around this apparatus for
ventilation. Ensure curtains or other objects
never cover the ventilation slots on this
apparatus.
Information about the use of batteries:
Caution
•Riskofleakage:Onlyusethespeciedtypeofbatteries.
Do not mix new and used batteries. Do not mix
different brands of batteries. Observe correct polarity.
Remove batteries from products that are not in use for
a longer period of time. Store batteries in a dry place.
•Risk of injury: Wear gloves when handling leaking
batteries. Keep batteries out of reach of children and
pets.
•Risk of explosion: Do not short circuit batteries. Do
not expose batteries to excessive heat. Do not throw
batteriesintothere.Donotdamageordisassemble
batteries. Do not recharge non-rechargeable batteries.
Notice
Notice of compliance
Modications
The user is cautioned that changes or
modicationsnotexpresslyapprovedbythe
party responsible for compliance could void the
user’sauthoritytooperatetheequipment.
FCC & RSS compliance statement
This device complies with Part 15 of the FCC
Rules and Industry Canada licence-exempt
RSS standard(s). Operation is subject to the
following two conditions:
a This device may not cause harmful
interference, and
b This device must accept any interference
received, including interference that may
cause undesired operation.
FCC Radiation Exposure Statement
ThisequipmentcomplieswithFCC’sandIC’s
RF radiation exposure limits set forth for an
uncontrolled environment. The antenna(s)
used for this transmitter must be installed and
operated to provide a separation distance of
at least 20 cm from all persons and must not
be collocated or operating in conjunction with
WheretheMAINSplugoranappliancecoupler
isusedas thedisconnectdevice,thedisconnect
deviceshallremain readilyoperable.
q

4EN
any other antenna or transmitter. Installers must
ensure that 20cm separation distance will be
maintained between the device (excluding its
handset) and users.
FCC rules
Thisequipmenthasbeentestedandfound
to comply with the limits for a Class B digital
device, pursuant to Part 15 of the FCC Rules.
These limits are designed to provide reasonable
protection against harmful interference in a
residentialinstallation.Thisequipmentgenerates,
usesandcanradiateradiofrequencyenergy
and, if not installed and used in accordance with
the instructions, may cause harmful interference
to radio communications. However, there is no
guarantee that interference will not occur in a
particular installation.
Ifthisequipmentdoescauseharmful
interference to radio or television reception,
which can be determined by turning the
equipmentoffandon,theuserisencouraged
to try to correct the interference by one or
more of the following measures:
• Reorient or relocate the receiving antenna.
• Increase the separation between the
equipmentandreceiver.
• Connecttheequipmentintoanoutleton
a circuit different from that to which the
receiver is connected.
• Consult the dealer or an experienced
radio/TV technician for help.
Canada:
This Class B digital apparatus complies with
Canadian ICES-003.
Disposal of your old product and
batteries
Your product is designed and manufactured
withhighqualitymaterialsandcomponents,
which can be recycled and reused.
Never dispose of your product with other
household waste. Please inform yourself about
the local rules on the separate collection of
electrical and electronic products and batteries.
The correct disposal of these products helps
preventpotentiallynegativeconsequenceson
the environment and human health.
Your product contains batteries, which cannot
be disposed of with normal household waste.
Please inform yourself about the local rules on
separate collection of batteries. The correct
disposal of batteries helps prevent potentially
negativeconsequencesontheenvironmentand
human health.
Please visit www.recycle.philips.com for
additional information on a recycling center in
your area.
Environmental information
All unnecessary packaging has been omitted.
We have tried to make the packaging easy to
separate into three materials: cardboard (box),
polystyrene foam (buffer) and polyethylene
(bags, protective foam sheet.)
Your system consists of materials which can
be recycled and reused if disassembled by
a specialized company. Please observe the
local regulations regarding the disposal of
packaging materials, exhausted batteries and old
equipment.
“Made for iPad” means that an electronic
accessory has been designed to connect
specicallytoiPad,andhasbeencertiedby
the developer to meet Apple performance
standards. Apple is not responsible for the
operation of this device or its compliance with
safety and regulatory standards. Please note that
the use of this accessory with iPad may affect
wireless performance.
iPad is a trademark of Apple Inc., registered in
the U.S. and other countries.
The Bluetooth® word mark and logos are
registered trademarks owned by Bluetooth
SIG, Inc. and any use of such marks by Philips is
under license.

5EN
Note
•The type plate is located on the back of the unit.
5EN
2 Your Wireless
Microphone
and Wireless
Receiver
Congratulations on your purchase, and
welcometoPhilips!Tofullybenetfromthe
support that Philips offers, register your product
at www.philips.com/welcome.
If you contact Philips, you will be asked for the
model and serial number of this apparatus. The
model number and serial number are on the
back of the apparatus. Write the numbers here:
Model No. __________________________
Serial No. ___________________________
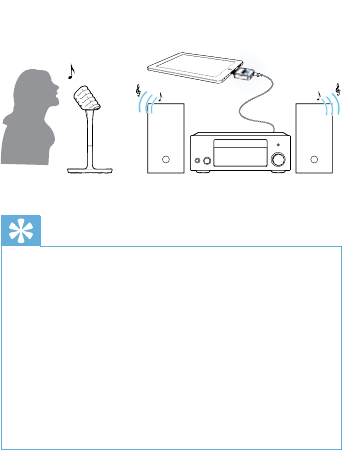
Introduction
With the wireless microphone and wireless
receiver, you can:
• connect the wireless receiver to both
your iPad and existing audio system,
and sing along with music from the app
(StarMaker Karaoke + Auto-Tune®)
through the wireless microphone.
What's in the box
Check and identify the contents of your
package:
• Wireless microphone
• Wireless receiver
• 3 X AAA batteries
• Quick start guide
Overview of the unit
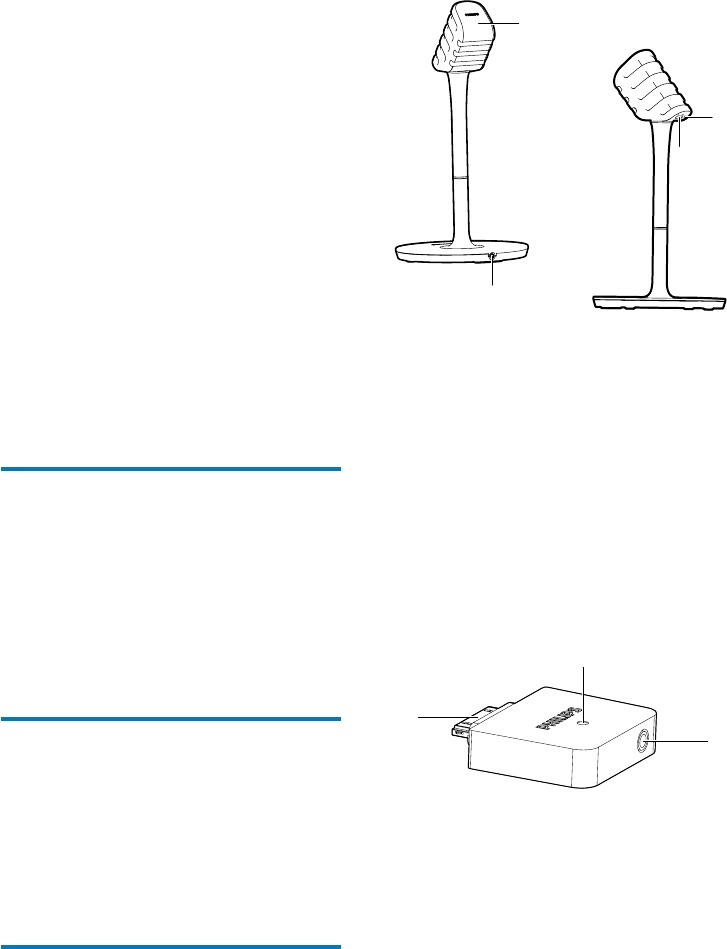
Wireless microphone
a Line out socket
• (To use the microphone separately)
connect to the MIC input socket of an
existing audio system.
b Battery compartment
c ON/OFF
• Switch the microphone on or off.
d Power indicator
• Light up red when the wireless
microphone is switched on.
• Flash red when the battery level is low.
a iPad connector
b Bluetooth indicator
• Indicate the Bluetooth status.
c LINE-OUT
• Connect the wireless receiver to an
existing audio system.
d
c
b
a
a
b
c
6EN
3 Get started
Always follow the instructions in this chapter in
sequence.
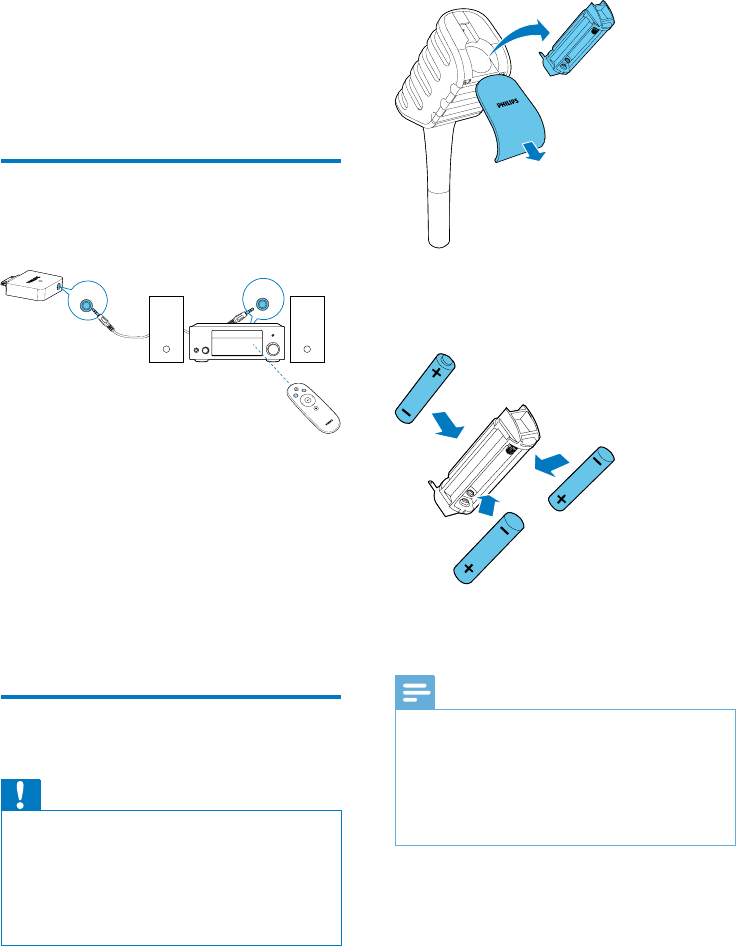
Connect the wireless
receiver to an existing audio
system
1 Connect a 3.5mm audio cable to:
• the LINE-OUT socket on the wireless
receiver.
• the 3.5mm audio input socket on your
existing audio system.
2 Power on the existing audio system and
select the 3.5mm audio input source (see
the user manual of the audio system for
detailed operation).
Install/replace microphone
batteries
Caution
•Risk of explosion! Keep batteries away from heat,
sunshine,orre.Neverdiscardbatteriesinre.
•Danger of explosion if batteries are incorrectly
replaced. Replace only with the same or equivalent
type.
•Batteries contain chemical substances, so they should
be disposed of properly.
1 Open the battery compartment and take
out the battery cartridge.
MP3 LINK
LINE-OUT
2 Insert 3 x AAA batteries (supplied) into
the cartridge with correct polarity (+/-) as
indicated.
3 Push back the battery cartridge, then close
the battery compartment.
Note
•If you are not going to use the microphone for a long
time, remove the batteries.
•New batteries installed in the microphone support up
to 30 hours of continuous use.
•Whenthepowerindicatorashesred,itindicatesthat
the power level is low and you need to replace the
batteries.
7EN
4 Play
Sing along through the
wireless microphone
Note
•The effective operation range between the wireless
microphone and wireless receiver is approximately 10
meters (30 feet).
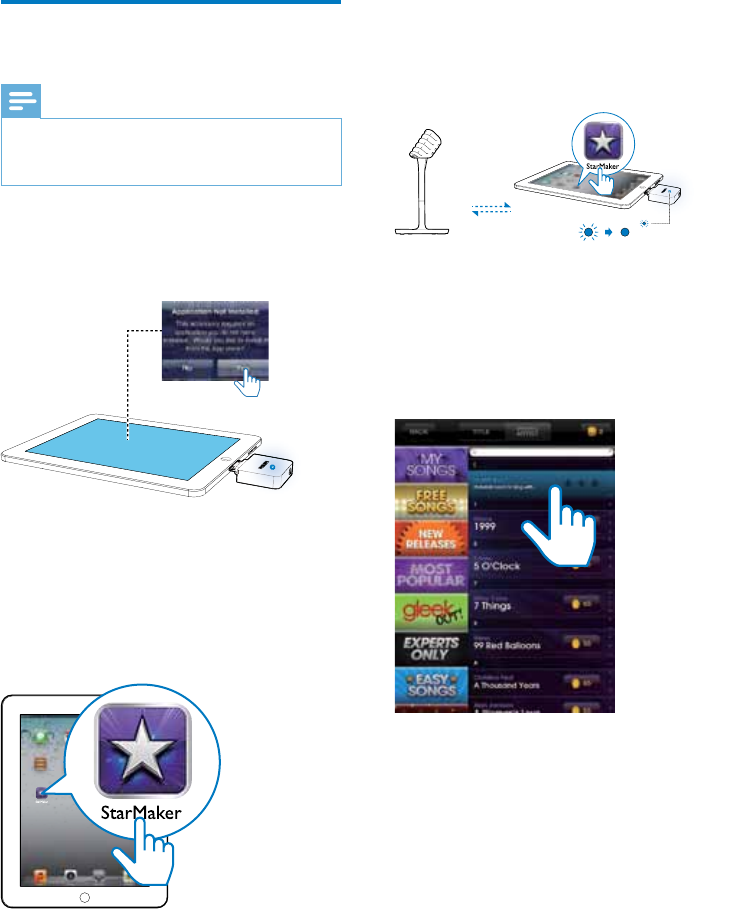
1 Connect your iPad to the wireless receiver.
» A prompt pops up on the iPad screen,
asking you to install the relevant app.
2 Tap YES on the prompt to install the app
(StarMaker Karaoke + Auto-Tune®) from
Apple App Store.
3 After successful installation, run StarMaker
Karaoke + Auto-Tune® on the iPad.
4 Slide the ON/OFF switch on the wireless
microphone to the ON position.
» The Bluetooth indicator on the
wirelessreceiverashesblue.
» The wireless microphone starts to pair
with the wireless receiver automatically.
» After successful pairing and connection,
the Bluetooth indicator turns solid
blue.
5 Find and download a tutorial from
StarMaker Karaoke + Auto-Tune®, then
tap Sing->RECORD for how to sing along
through the wireless microphone and
receiver connected to your existing audio
system.
6 Select a song from StarMaker Karaoke +
Auto-Tune® and sing along through the
wireless microphone.
8EN
Tip
•If the wireless microphone stays disconnected from
the receiver for more than 15 minutes, it switches to
standby mode automatically. To switch it on again, you
need to slide the ON/OFF switch on the microphone
to the OFF position and then back to the ON position.
•You can use controls available on the app to adjust
sound effects.
•If you experience howling or echo, try to increase the
distance between the microphone and audio system or
adjust the angle of the microphone towards the audio
system.

9EN
5 Product
information
Note
•Product information is subject to change without prior
notice.
Specications
Bluetooth
Bluetooth
specication
V2.1
SupportedProles AD2P V1.2
Advanced features Echo and noise
cancelation
Range 10 m/33 feet line of
sight
General information
Dimensions (W x H x D)
• Receiver
• Microphone
?mm
162 x 333 x
162mm
Weight
• With Packing
• Receiver
• Microphone
? kg
?kg
0.3kg

10 EN
6 Troubleshooting
Warning
•Never remove the casing of this apparatus.
To keep the warranty valid, never try to repair
the system yourself.
If you encounter problems when using this
apparatus, check the following points before
requesting service. If the problem remains
unsolved, go to the Philips web site (www.
philips.com/welcome). When you contact
Philips, ensure that the apparatus is nearby
and the model number and serial number are
available.
No power to the wireless microphone
•The batteries may be installed incorrectly
or drained. Install or replace the batteries
properly (see 'Install/replace microphone
batteries' on page 6).
•As a power-saving feature, the microphone
switches to standby mode automatically
after staying disconnected from the
speaker for more than 15 minutes. To
switch it on again, you need to slide the
ON/OFF switch on the microphone to the
OFF position and then back to the ON
position.
No sound or poor sound
•Adjust volume on the audio system
connected to the wireless receiver.
•Make sure that you have selected the
correct source on the connected audio
system.
•Make sure that you have connected the
wireless receiver to the audio system
securely.
•Check whether you have connected the
iPad securely.
•Check whether you have started music
play on the iPad.
Failed to set up connection between the
microphone and receiver
• Check whether both the wireless
microphone and wireless receiver are
switched on. The wireless receiver is
switched on automatically when it is
connected to an iPad.
• Make sure that the wireless
microphone and wireless receiver
are within the the effective operation
range, that is, approximately 10 meters
(30 feet).
Howling or echo from the wireless
microphone
• Adjust volume on the existing audio
system connected to the wireless
receiver.
• Increase the distance between the
microphone and audio system or
adjust the angle of the microphone
towards the audio system.

Specifications are subject to change without notice
© 2012 Koninklijke Philips Electronics N.V.
All rights reserved.
Document order number: 000000000000