Philips Consumer Lifestyle CID2680 Car Audio with Bluetooth User Manual CID2680 00 IFU 0 1 20100301
Philips Consumer Lifestyle Car Audio with Bluetooth CID2680 00 IFU 0 1 20100301
Users Manual

© 2008 Koninklijke Philips Electronics N.V.
All rights reserved.
Document order number: 000000000000

Register your product and get support at
www.philips.com/welcome
EN User manual

3
7 Play with Bluetooth device 24
Pair the Bluetooth-enabled devices 24
Make a call 24
Receive call 25
Listen to music from Bluetooth device
25
Adjust Bluetooth settings 25
8 Adjust sound 27
Adjust volume 27
Mute 27
Select preset equalizer 27
Adjut fader/balance 27
Set Dynamic Bass Boost (DBB)
28
9 Adjust settings 29
Display system setup menu 29
Adjust general settings 29
Adjust sound settings 32
Adjust video settings 33
Adjust Bluetooth settings 34
Adjust language settings 34
Adjust volume settings 35
Adjust DVD rating 35
10 Others 37
Listen to other devices 37
Reset 37
Remove the unit 37
Replace fuse 38
11 Product information 39
12 Troubleshooting 41
About Bluetooth device 41
13 Glossary 43
Contents
1 Important 4
Safety 4
Notice 4
2 Your in-car entertainment system 6
Introduction 6
What’s in the box 6
Overview of the main unit 7
Overview of the remote control
8
3 Get started 10
Install the car audio 10
Install remote control battery
14
Tur n on 14
Set date and time 14
4 Use map 16
Upgrade the map 16
5 Listen to radio 17
Tune to a radio station 17
Store radio stations in memory
17
Tune to a preset station 18
6 Play 19
Load discs 19
Connect USB device 19
Insert USB or SD/MMC card
20
Play/Pause 20
Search for a folder 20
Search within a title/folder 21
Repeat 21
Repeat a section 22
Random play 22
Select audio language 22
Select audio mode 22
Select subtitle language 22
Change view angle 23
Rotate pictures 23
Zoom 23
Select slide show duration 23
English
EN
4
bDo not place any sources of danger on
WKHDSSDUDWXVHJOLTXLGÀOOHGREMHFWV
lighted candles).
Toavoidshortcircuit,donotexposethe
apparatus, remote control or remote control
batteries to rain or water.
Notice
Themakingofunauthorizedcopiesof
copy-protected material, including computer
SURJUDPVÀOHVEURDGFDVWVDQGVRXQG
recordings, may be an infringement of
copyrights and constitute a criminal offence.
This equipment should not be used for such
purposes.
´'LY;'LY;µ&HUWLÀHGDQGDVVRFLDWHGORJRV
aretrademarksofDivX,Inc.andareused
under license.
2IÀFDO'LY;&HUWLÀHGSURGXFW3OD\VDOO
YHUVLRQVRI'LY;YLGHRLQFOXGLQJ'LY;
ZLWKVWDQGDUGSOD\EDFNRI'LY;PHGLDÀOHV
7KH%OXHWRRWKZRUGPDUNDQGORJRVDUH
registered trademarks owned by Bluetooth
SIG,Inc.andanyuseofsuchmarksbyPhilips
is under license.
Manufactured under license from Dolby
Laboratories.
“Dolby”andthedouble-Dsymbolare
trademarks of Dolby Laboratories.
Othertrademarksandtradenamesarethose
of their respective owners.
This apparatus includes this label:
1 Important
Safety
Read and understand all instructions
beforeyouusetheapparatus.Ifdamage
is caused by failure to follow instructions,
thewarrantydoesnotapply.
Useofcontrolsoradjustmentsor
performanceofproceduresotherthan
hereinmayresultinhazardousradiation
exposure or other unsafe operation.
This unit is designed for negative ground
(earth)12VDCoperationonly.
7RUHGXFHWKHULVNRIWUDIÀFDFFLGHQWGR
no watch video during driving.
To ensure safe driving, adjust the volume
toasafeandcomfortablelevel.
Improper fuses can cause damage or
ÀUH:KHQ\RXQHHGWRFKDQJHWKHIXVH
consult a professional.
Useonlythesuppliedmountinghardware
forasafeandsecureinstallation.
Toavoidshortcircuit,donotexposethe
apparatus, remote control or remote
control batteries to rain or water.
Neverinsertobjectsintotheventilation
slots or other openings on the apparatus.
Never place any objects other than discs
intothedisctray/slot.
Visible and invisible laser radiation when
open. Avoid exposure to beam.
Risk of damage to the screen! Never
touch,push,ruborstrikethescreenwith
any object.
Never use solvents such as benzene,
thinner, cleaners available commercially,
oranti-staticspraysintendedfordiscs.
Cleantheapparatuswithsoft,damp
cloth. Never use substances such as
alcohol, chemicals or household cleaners
on the apparatus.
aApparatus shall not be exposed to
dripping or splashing.
•
•
•
•
•
•
•
•
•
•
•
•
•
•
EN
6
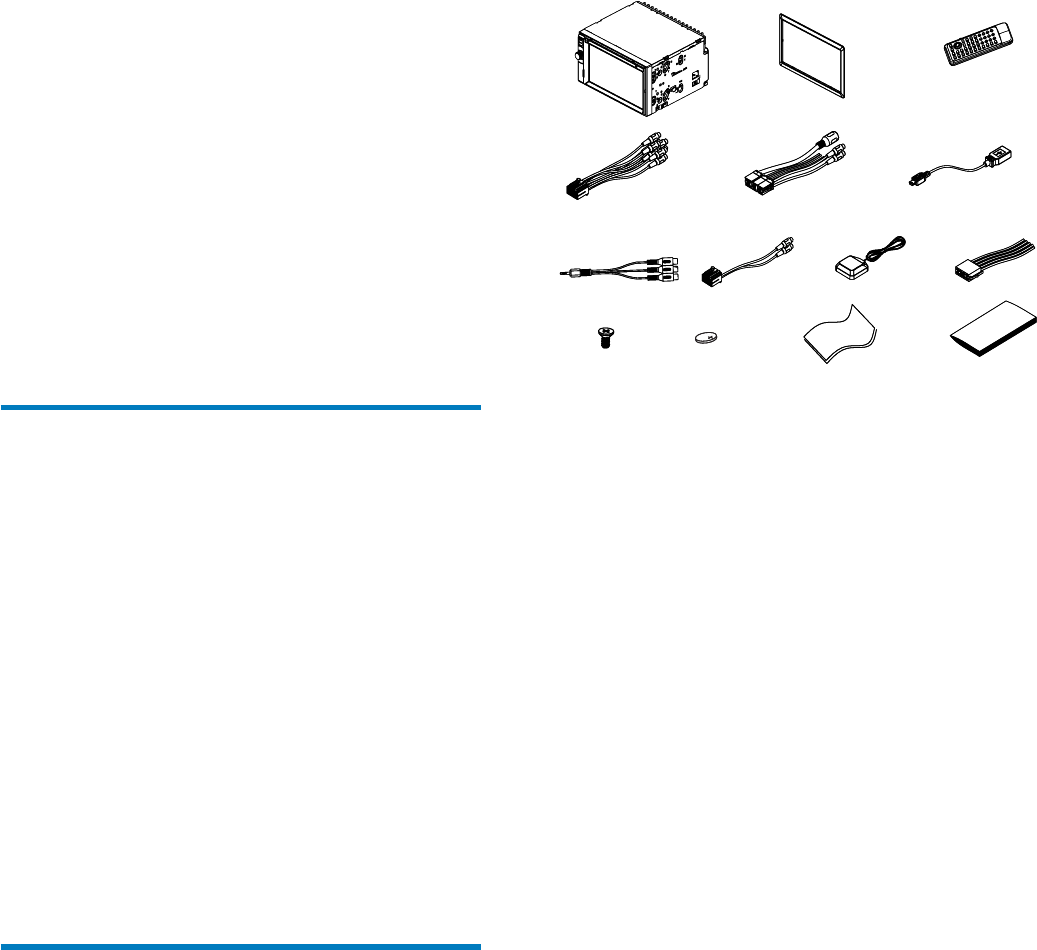
aMain unit
bTrim plate
cRemote control
dAV out cable
eControl/Camera wire
fUSB cable
gAV in cable
hMZ-TFT/Video out 2 cable
iGPS antenna
jISO connectors (x2)
kScrews
-M5x6mmx8pcs
-M5x7mmx8pcs
-M5x15x1pc
Screwnut(4x25.4)x1pc
lRemote control battery
mScreen cleaning cloth
n 3ULQWLQJPDWHULDOLQFOXGH8VHUPDQXDO
Quick start guide)
abc
def
gihj
klm n
abc
def
gihj
klm n
2 Your in-car
entertainment
system
Congratulations on your purchase, and
ZHOFRPHWR3KLOLSV7RIXOO\EHQHÀWIURPWKH
support that Philips offers, register your product
at www.philips.com/welcome.
Introduction
With the car entertainment system, you can
Quicklyfoundroutinethroughthe
navigation system
And you can also enjoy:
Audio/video/JPEG pictures from
DVD, VCD or CD
USB devices
SD/SDHC/MMC cards
External devices
FM or AM (MW) radio
Audio from Bluetooth-enabled devices
Besides, you can make/receive phone calls with
Bluetooth-enabled devices.
What’s in the box
Check and identify the contents of your
package:
•
•
•
•
•
•
•
•
EN
7
External equipment audio/video in
socket.
g
USB socket
hRESET
Reset the unit when it hangs up.
iSD/SDHC/MMC card slot
jDisc slot
kMAP
Open the cover and insert/remove
theGPSmapcard.
•
•
•
•
Overview of the main unit
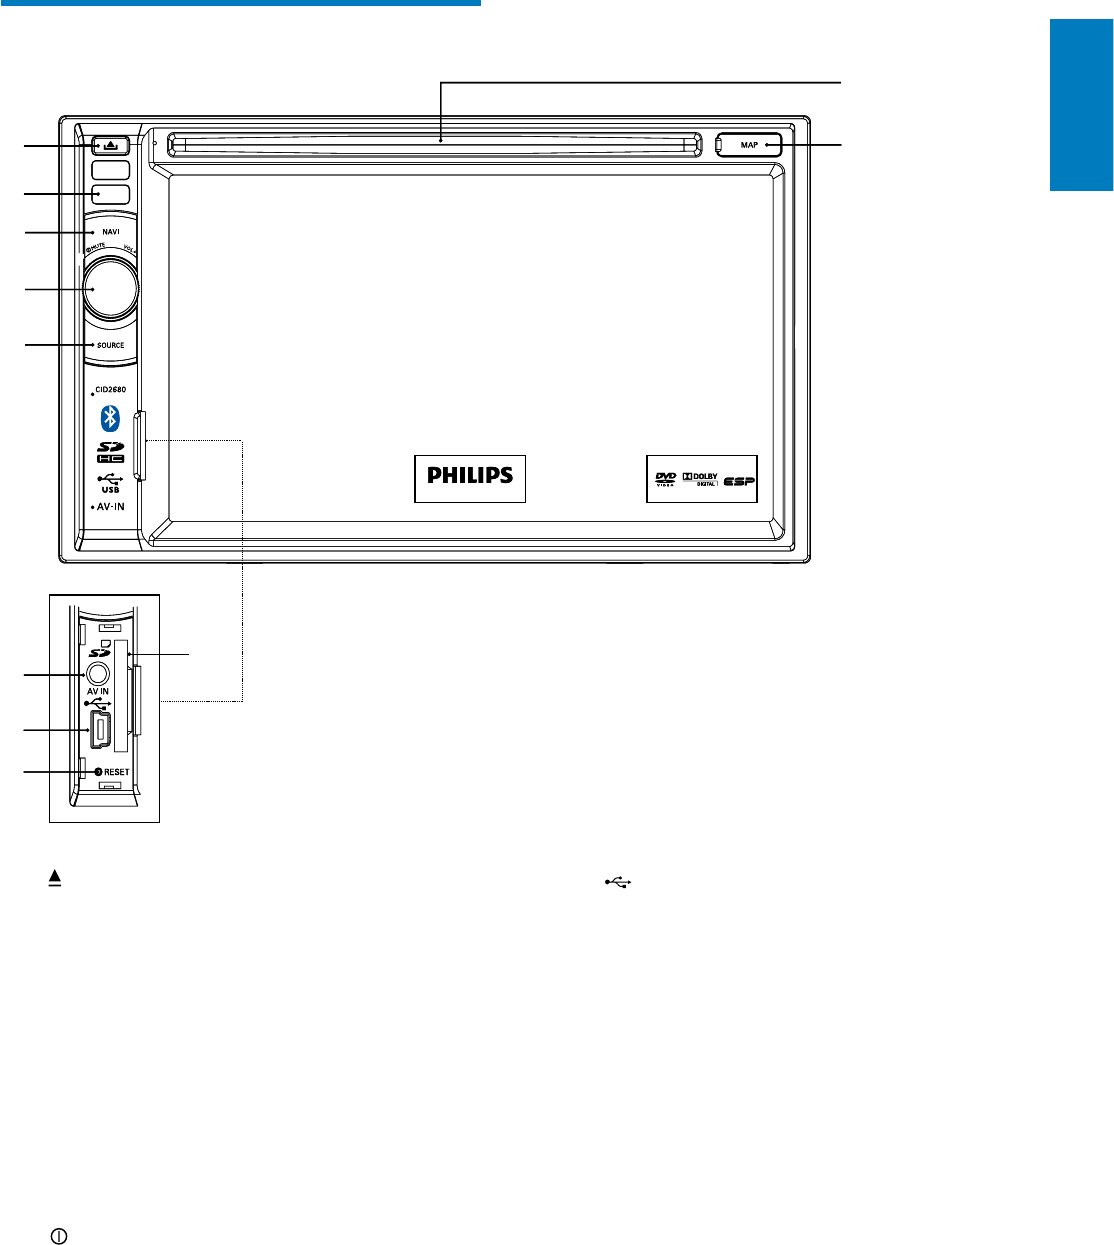
a
Eject disc.
bRemote control sensor
Detects signals from the remote
control. When using the remote
control, point it directly at the IR
sensor.
cNAVI
EntertheGPSnavigationsystemor
exit.
d/MUTE/VOL -/+
Turntheunitonoroff.
Turn mute on or off.
Adjust volume.
eSOURCE
Select source.
fAV IN
•
•
•
•
•
•
•
a
b
c
k
j
d
e
fi
g
h
a
b
c
k
j
d
e
fi
g
h
English
EN
8
Selectaudiolanguageoraudio
channel.
hBAND
Select AM or FM band.
iMUSIC
Switch to music playing mode.
jGOTO
Select track/chapter.
k (green)
Answer phone.
Dial number.
lDVD MENU
ReturntoDVDmainmenu.
mNumeric keypad
nSHUFF
Turnrandomplayonoroff.
oREPEAT
Select repeat play mode.
pSUBTITLE
SelectDVDorDivXsubtitle
language.
q
Delete entered numbers/characters.
r#/ *
Symbols for making phone call.
s (red)
Terminate call.
tENTER
&RQÀUPWKHFKDUDFWHUQXPEHU
inputs.
u/
Skip to previous/next track/chapter.
Tune for radio station.
v
Start play or pause.
&RQÀUPVHOHFWLRQ
wVIDEOANGLE
Select a difference angle/version of
thecurrentDVDscene.
•
•
•
•
•
•
•
•
•
•
•
•
•
•
•
•
•
•
•
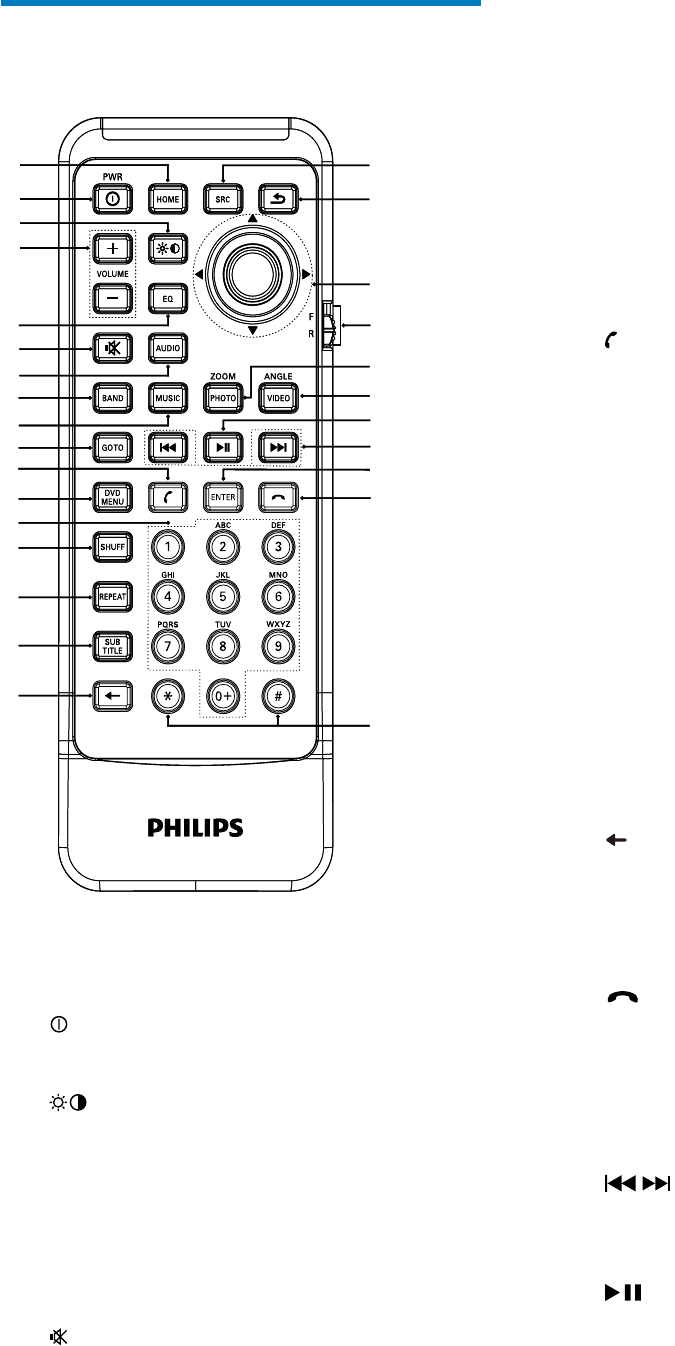
Overview of the remote
control
aHOME
Toggles the home menu on or off.
bPWR
Turntheunitonoroff.
c
Adjust screen brightness/contrast.
dVOLUME +/-
Adjust volume.
eEQ
Access audio setting menu.
f
Mute or unmute audio.
gAUDIO
•
•
•
•
•
•
a|
{
z
y
x
w
u
s
r
v
t
b
d
f
g
m
h
i
j
k
l
n
o
p
q
c
e
a|
{
z
y
x
w
u
s
r
v
t
b
d
f
g
m
h
i
j
k
l
n
o
p
q
c
e
EN

9
xPHOTOZOOM
Zoom in or out a picture/video
image.
yF/R
Switch to front/rear control mode.
zNavigation buttons
/
Skip to the previous/next preset
station.
Skiptotheprevious/nextfolder.
Search backward/forward for DVD
video.
Move cursor up/down.
/
Skiptotheprevious/nexttrack.
Move cursor to left/right.
Press the navigation button down
Start play or pause.
&RQÀUPVHOHFWLRQ
{
Return to previous menu or exit.
|SOURCE
Select source.
•
•
•
•
•
•
•
English
EN
10
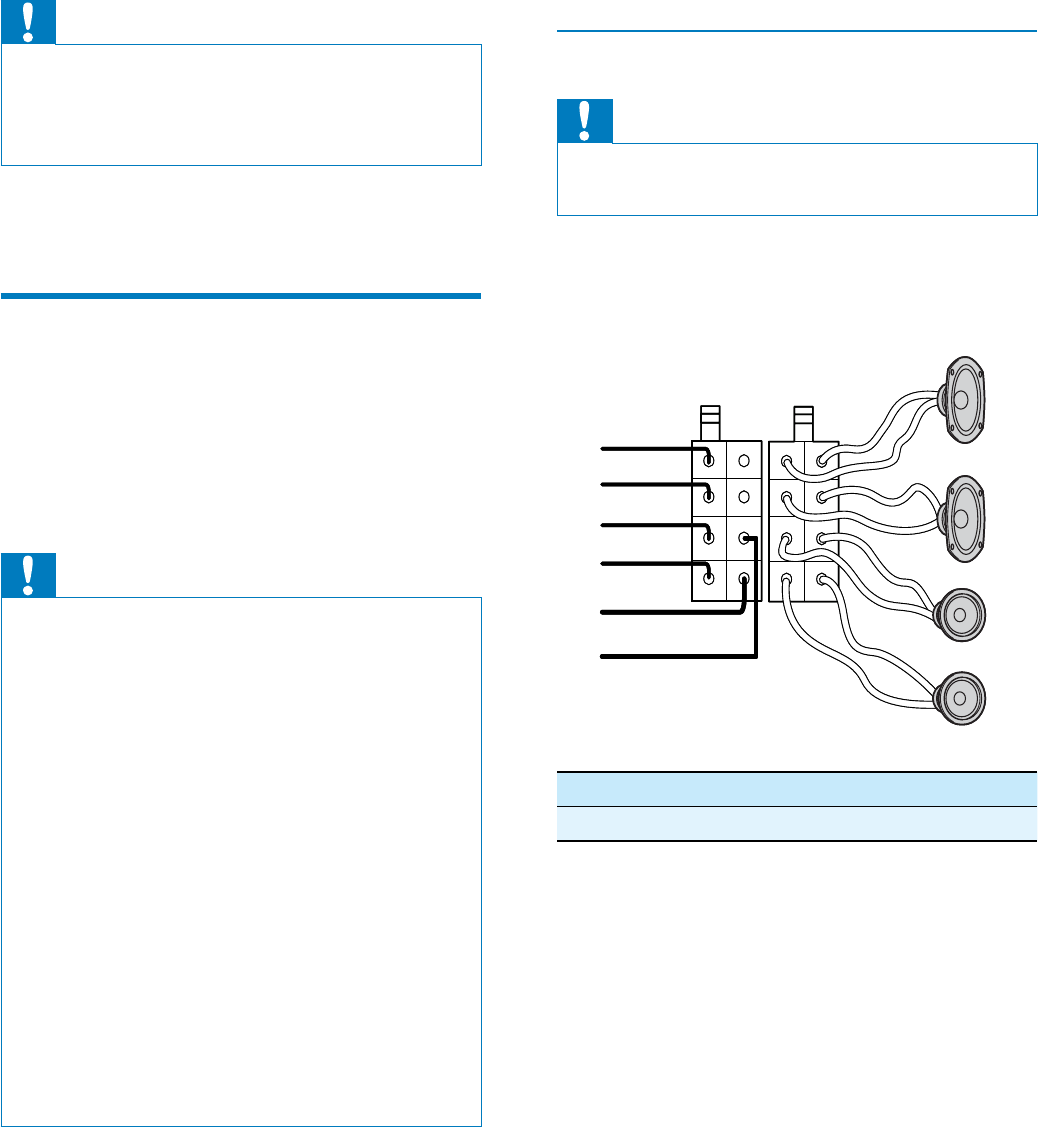
Never connect speaker wires to the
metalbodyorchassisofthecar.
Never connect speaker wires with stripes
to one another.
Connect wires
Caution
Ensure that all loose leads are insulated with
electrical tape.
•
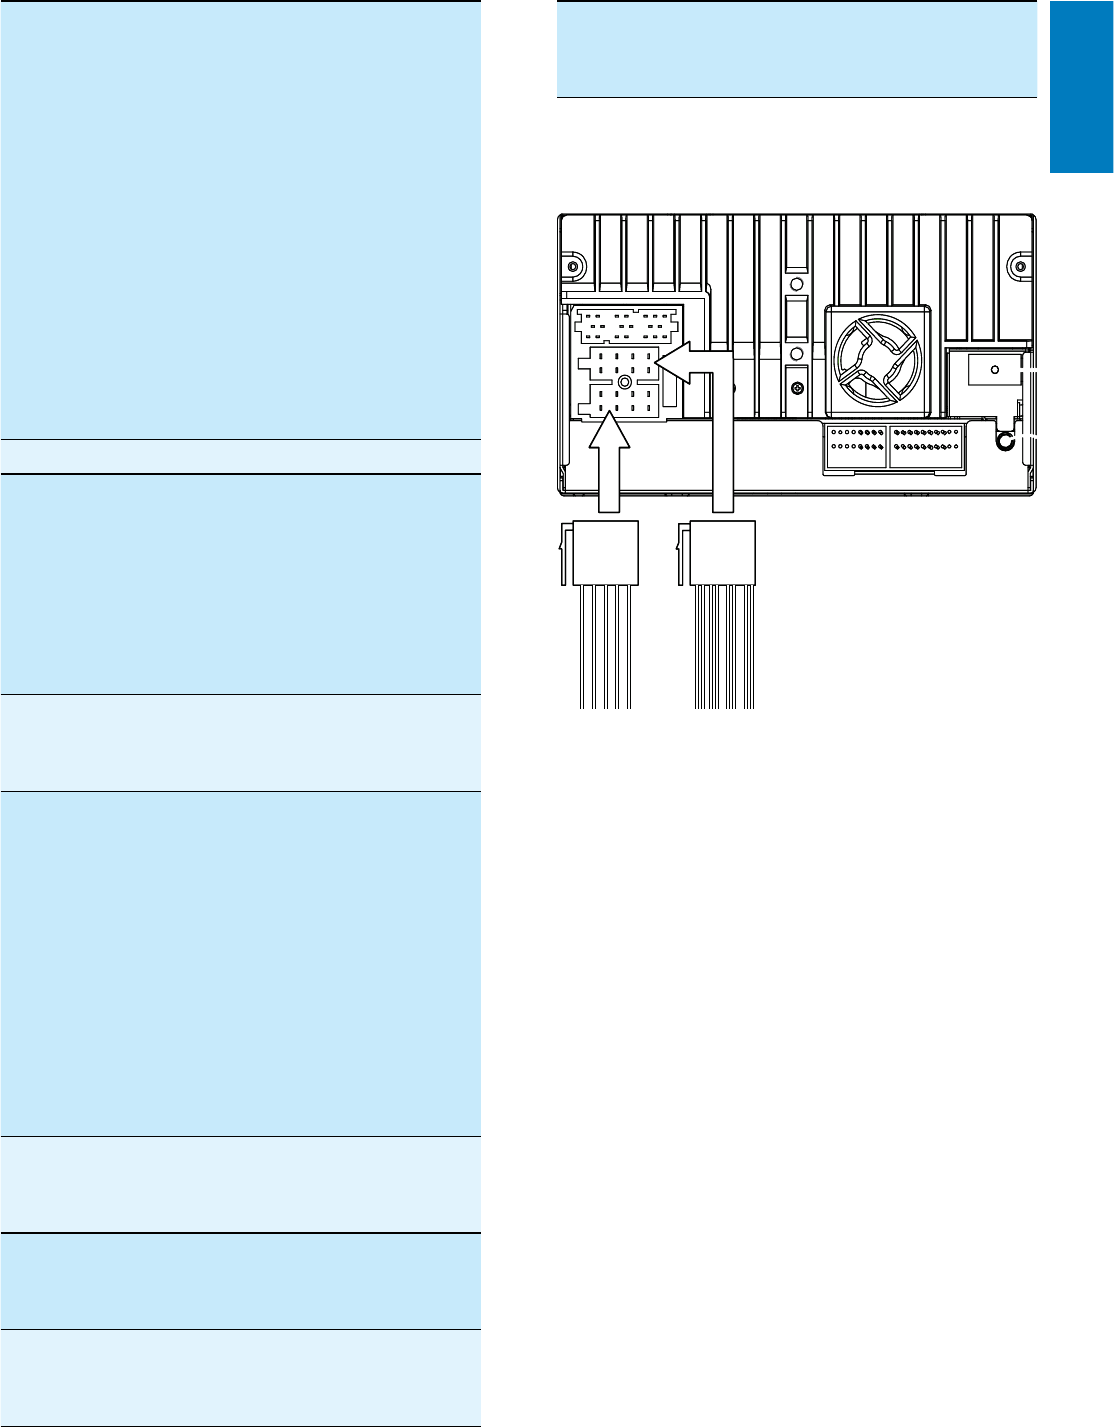
1 Check the car’s wiring carefully, then
connectthemtothetwosuppliedISO
wires.
Connector Connect to
1 Brown wire Telephone mute
•
•
a
g
h
i
j
b
c
d
e
f
a
g
h
i
j
b
c
d
e
f
3 Get started
Caution
Useofcontrolsoradjustmentsor
performanceofproceduresotherthanherein
may result in hazardous radiation exposure or
otherunsafeoperation.
•
Always follow the instructions in this chapter in
sequence.
Install the car audio
These instructions are for a typical installation.
However, if your car has different requirements,
make the corresponding adjustment. If you have
any questions regarding installation kits, consult
your Philips car audio dealer.
Caution
This unit is designed for negative ground
(earth)12VDCoperationonly.
Alwaysinstallthisunitinthecardashboard.
Other locations can be dangerous as the rear
of the unit heats up during use.
To avoid short-circuit: before you connect,
ensurethattheignitionisoff.
Ensure that you connect the yellow and red
power supply leads after all other leads are
connected.
Ensure that all loose leads are insulated with
electrical tape.
Ensure that the leads do not get caught under
screwsorinpartsthatwillmove(e.g.seatrail).
Ensure that all ground (earth) leads are run to
acommonground(earth)point.
Use only the supplied mounting hardware for a
safeandsecureinstallation.
,PSURSHUIXVHVFDQFDXVHGDPDJHRUÀUH
Whenyouneedtochangethefuse,consulta
professional.
•
•
•
•
•
•
•
•
•
Note on the power supply lead (yellow)
Whenyouconnectotherdevicestothis
system,ensurethattheratingofthecar
circuitishigherthanthetotalfusevalue
of all the connected devices.
Notes on speaker connection
•
EN
11
10 Purple and
purple/black
wires
Right speaker (Rear)
2 Connect the other end of the two ISO
connectors to the car audio system.
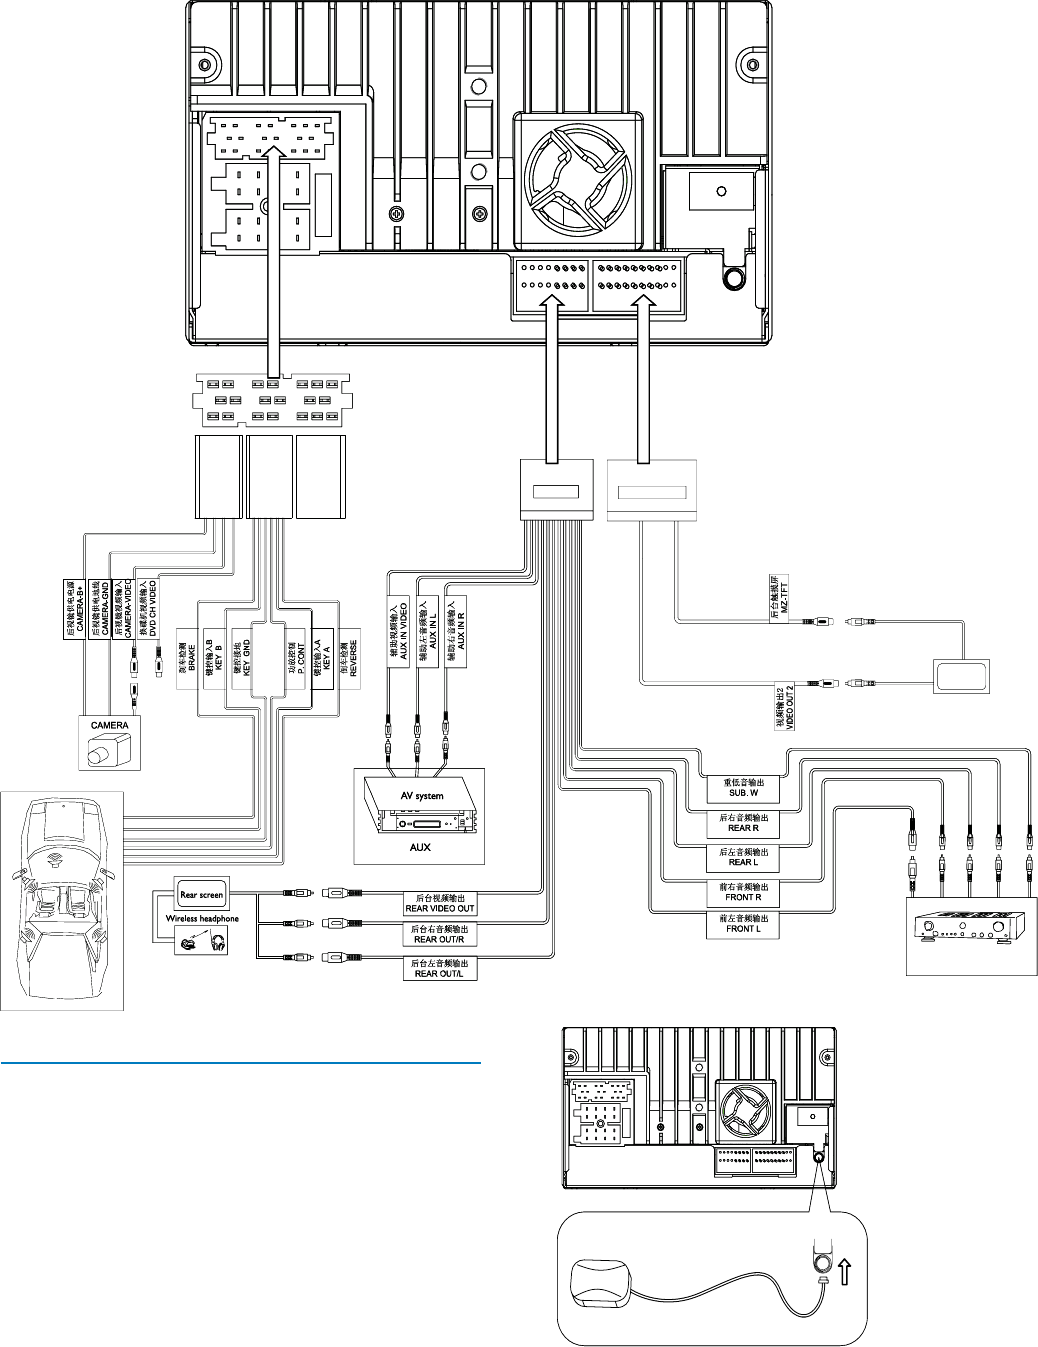
3 If necessary, do the other connections:
2RedwireThe +12V power
terminal which is
live in the accessory
(ACC) position of the
ignition switch
Ifthereisno
accessory position,
connect to the +12V
car battery terminal
that is always live.
Be sure to connect
the black ground
(earth)leadtoametal
VXUIDFHRIWKHFDUÀUVW
3 Orange wire Illumination switch
4BlackwireA metal surface of
the car
First connect the
blackground(earth)
lead, then connect the
yellow and red power
supply leads.
5YellowwireThe +12V car battery
which is live at all
times.
6 Blue wire The electric antenna
control lead or
power supply lead of
the antenna booster
Ifthereisnoelectric
antennaorantenna
booster, or it is
manually operated
telescopic antenna,
it is not necessary to
connect this lead.
7Greenand
green/black
wires
Left speaker (Rear)
8Whiteand
white/black
wires
Left speaker (Front)
9Grayand
gray/black
wires
Right speaker (Front)
English
EN
12
2 Stick the other end of the GPS antenna to
ametalsurfaceofthecar.
Connect GPS antenna
Toreceivesignalfromsatellites,connectthe
supplied GPS antenna to your car and the
system.
1 Connect the supplier GPS antenna to the
V\VWHPÀUVW
Red
White
Yellow
Red
Red
White
Yellow
Black
Yellow
Yellow Green Blue
Yellow
White
Black Touch controller
Rear screen
Amplifier
Yellow
White
Brown
Red
Red
Red
White
Yellow
Red
Red
White
Yellow
Black
Yellow
Yellow Green Blue
Yellow
White
Black Touch controller
Rear screen
Amplifier
Yellow
White
Brown
Red
Red
EN
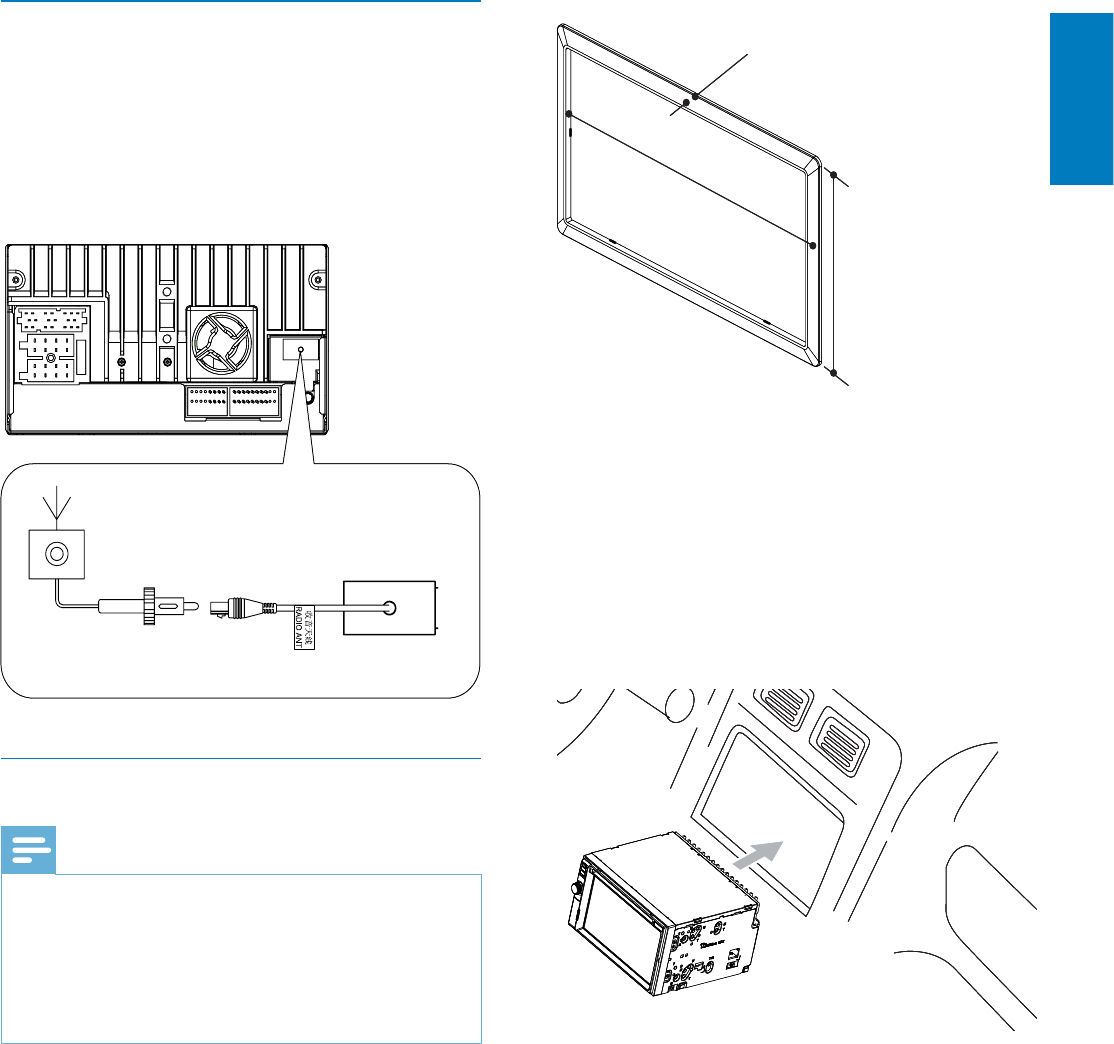
13
Sincetheunitcannotbeusedifthe
dashboard opening’s slant angle is
above20degrees:Ensurethatthe
horizontal slant of the car dashboard
openingisbetween0and20
degrees.
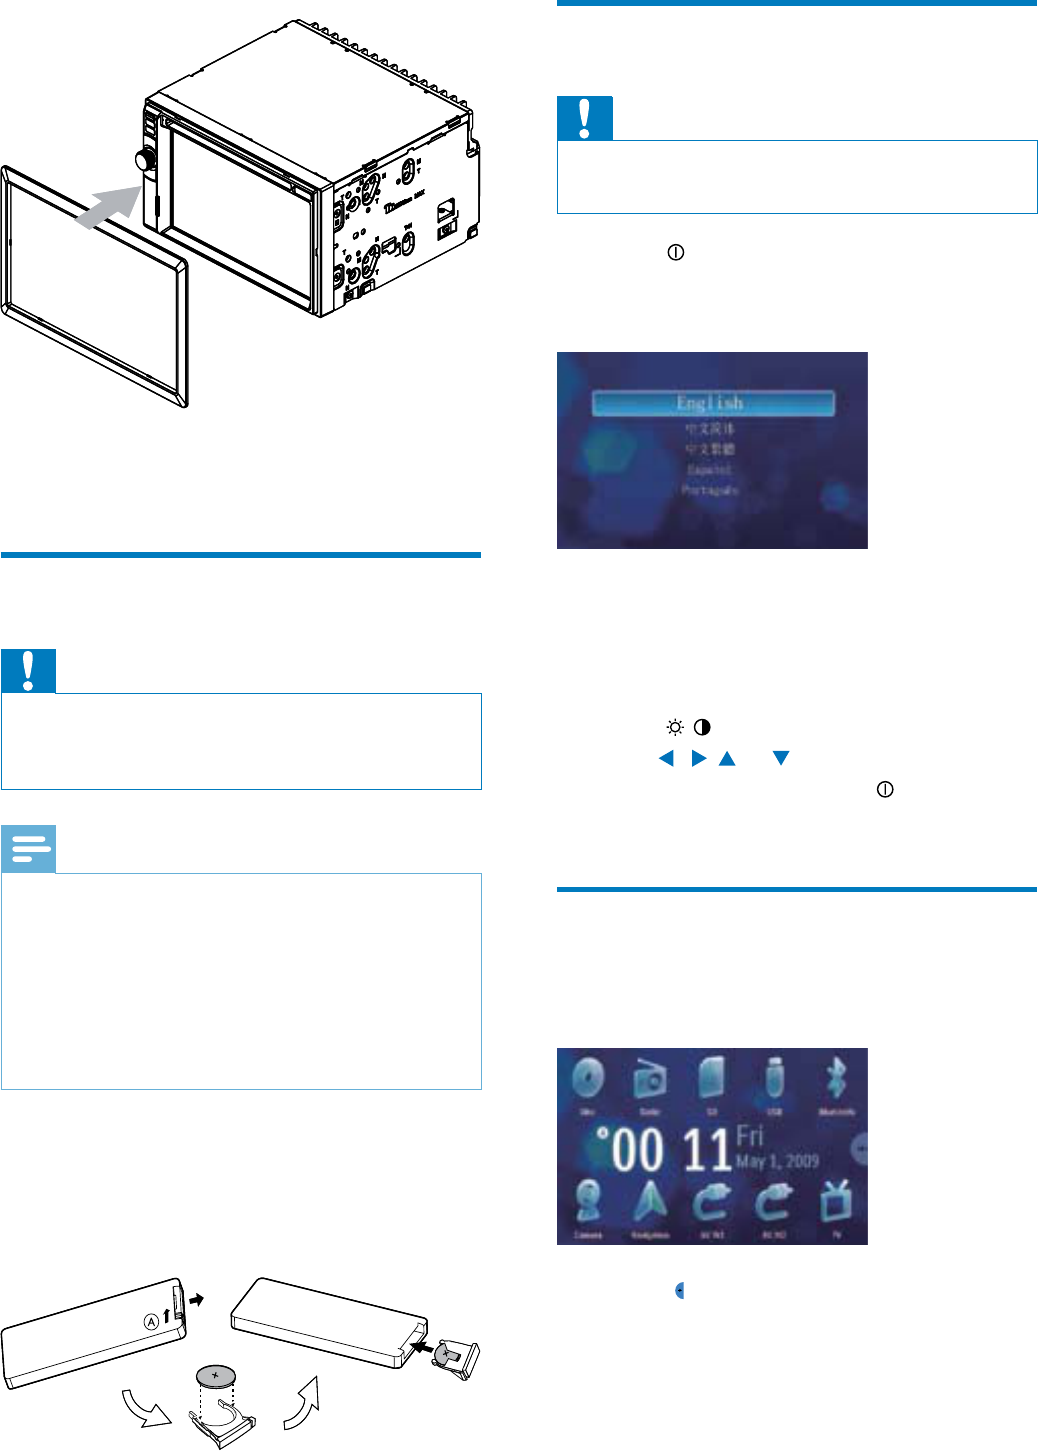
3 Slide the unit into the dashboard until a
click sound is heard.
4 Attachthetrimplate.
•
3.5mm
116 mm
187 mm
3.5mm
116 mm
187 mm
Connect GPS antenna
If your car has built-in radio antenna, connect
ittotheradioantennaofthesystemfor
better radio signal.
1 Connect the radio antenna to the car
antenna.
Mount in the dashboard
Note
Check wire connection before you mount the
unit into a car.
If preset radio stations are lost when the
ignitionkeyisturnedOFFandthenbackON,
reconnect the red leads crosswise to the
yellow ones.
•
•
1 Ifthecardoesnothaveanon-board
driveornavigationcomputer,disconnect
the negative terminal of the car battery.
If you disconnect the car battery in
acarthathasanon-boarddriveor
navigation computer, the computer
maylostitsmemory.
If the car battery is not disconnected,
to avoid short-circuit, ensure that
barewiresdonottoucheachother.
2 Ensure that car dashboard opening is
within these measurements:
•
•
English
EN
14
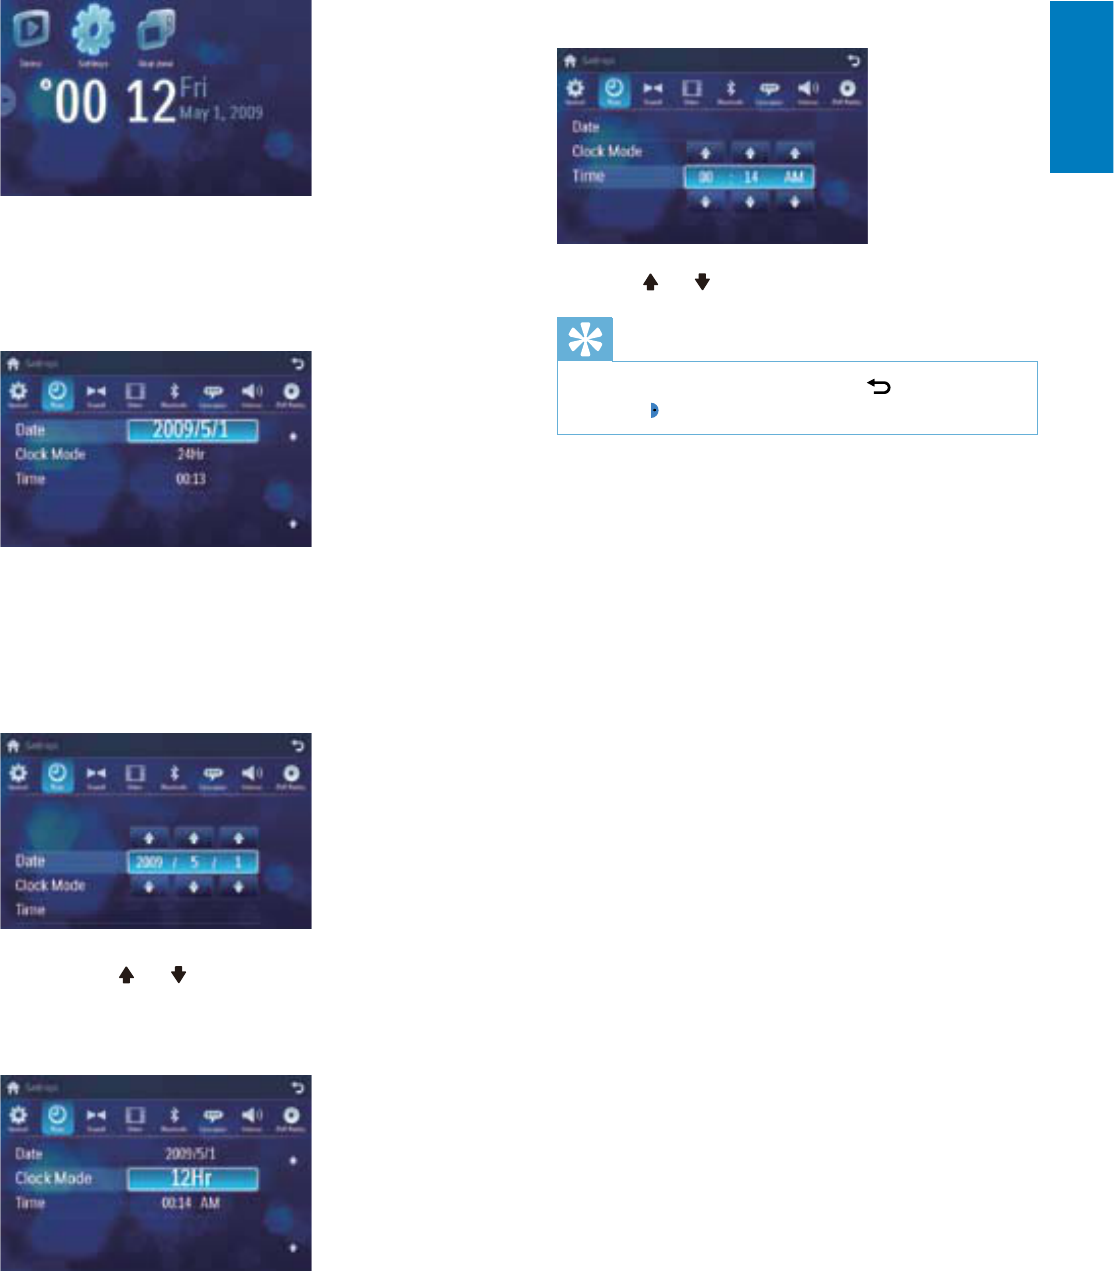
Turn on
Caution
Risk of road accidents! Never watch video or
adjust settings while you drive.
•
1 Press to turn on the unit.
The available OSD (On-Screen
Display) languages are displayed.
2 Touchalanguagetoselect.
The OSD language is changed to the
selected language immediately.
To adjust screen brightness/contrast,
press /on the remote control, then
press , , or .
Toturnofftheunit,press for 3
seconds.
Set date and time
1 Touchtheupperleftcornertodisplay
main menu.
2 Touch in the middle right side of the
screen.
The second main menu is displayed.
»
»
•
•
»
5 Reconnect the negative terminal of the
car battery.
Install remote control battery
Caution
Risk of explosion! Keep batteries away from
KHDWVXQVKLQHRUÀUH1HYHUGLVFDUGEDWWHULHV
LQÀUH
•
Note
Removebatteriesiftheyareexhaustedorif
theremotecontrolisnottobeusedforalong
time.
Batteries contain chemical substances, they
should be disposed of properly.
Perchlorate Material - special handling may
apply. See www.dtsc.ca.gov/hazardouswaste/
perchlorate.
•
•
•
1 Open the battery compartment.
2 InsertoneCR2025batterywithcorrect
polarity (+/-) as indicated.
3 Closethebatterycompartment.
EN
15
A submenu is displayed.
3.Touch or to set hour and minute.
Tip
When date/time is set, touch ÀUVWDQGWKHQ
touch to return to main menu.
•
»
3 Touch [Settings].
4 Touch [Time].
The date/time setup menu is displayed.
Set date
1 Touch [Date].
2 Touchonthedisplayeddateinformation.
A submenu is displayed.
3 Touch or to set year, month and day.
Set clock mode
1 Touch [Clock mode] .
2 Touch on [12Hr] or [24Hr] to select
clock mode.
Set time
1.Touch [Time].
2.Touch on the displayed time.
»
»
English
EN
16
5 Turn on the car audio.
The map upgrades in a few minutes.
»
4 Use map
Note
Youmayneedtoupgradethemapbefore
usingit(see“Upgradethemap”section)
•
1 Touchtheupperleftcornertodisplay
home menu.
2 Touch [Navigation].
The navigation menu is displayed in a
few seconds.
3 Refertothemapmanualtooperatethe
navigation tool.
Tip
You can press NAVI to enter/exit the
navigation system.
•
Upgrade the map
1 Turn off the car audio system.
2 Pressthemapcarduntilyouhearaclick
sound.
3 Takeoutthecardandbringittothe
authorized service center for upgrade.
4 Inserttheupgradedmapcardbackinto
the map card slot.
»
EN
17
Touch to clear the last entered
number.
Touch to clear all the entered
numbers.
5 Touch WRFRQÀUP
The radio station is broadcast.
Select radio range
Before you start to search for radio stations,
you can select radio range.
1 Touch .
2 Touch [Radio range] to toggle tuner
sensitivityfromnormaltohighsensitivity.
[Distance]:Onlystationswithstrong
signals can be broadcast.
[Local]:Stationswithstrongand
weak signals can be broadcast.
Store radio stations in
memory
You can store up to 6 stations in each band.
Store stations manually
1 Tune to the station.
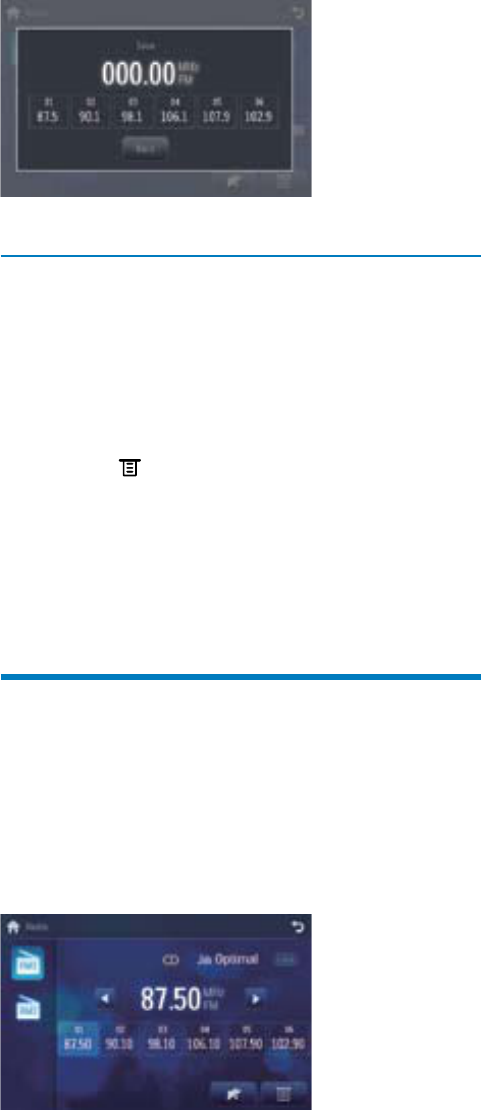
2 Touch .
3 Touch [Save].
•
•
»
•
•
5 Listen to radio
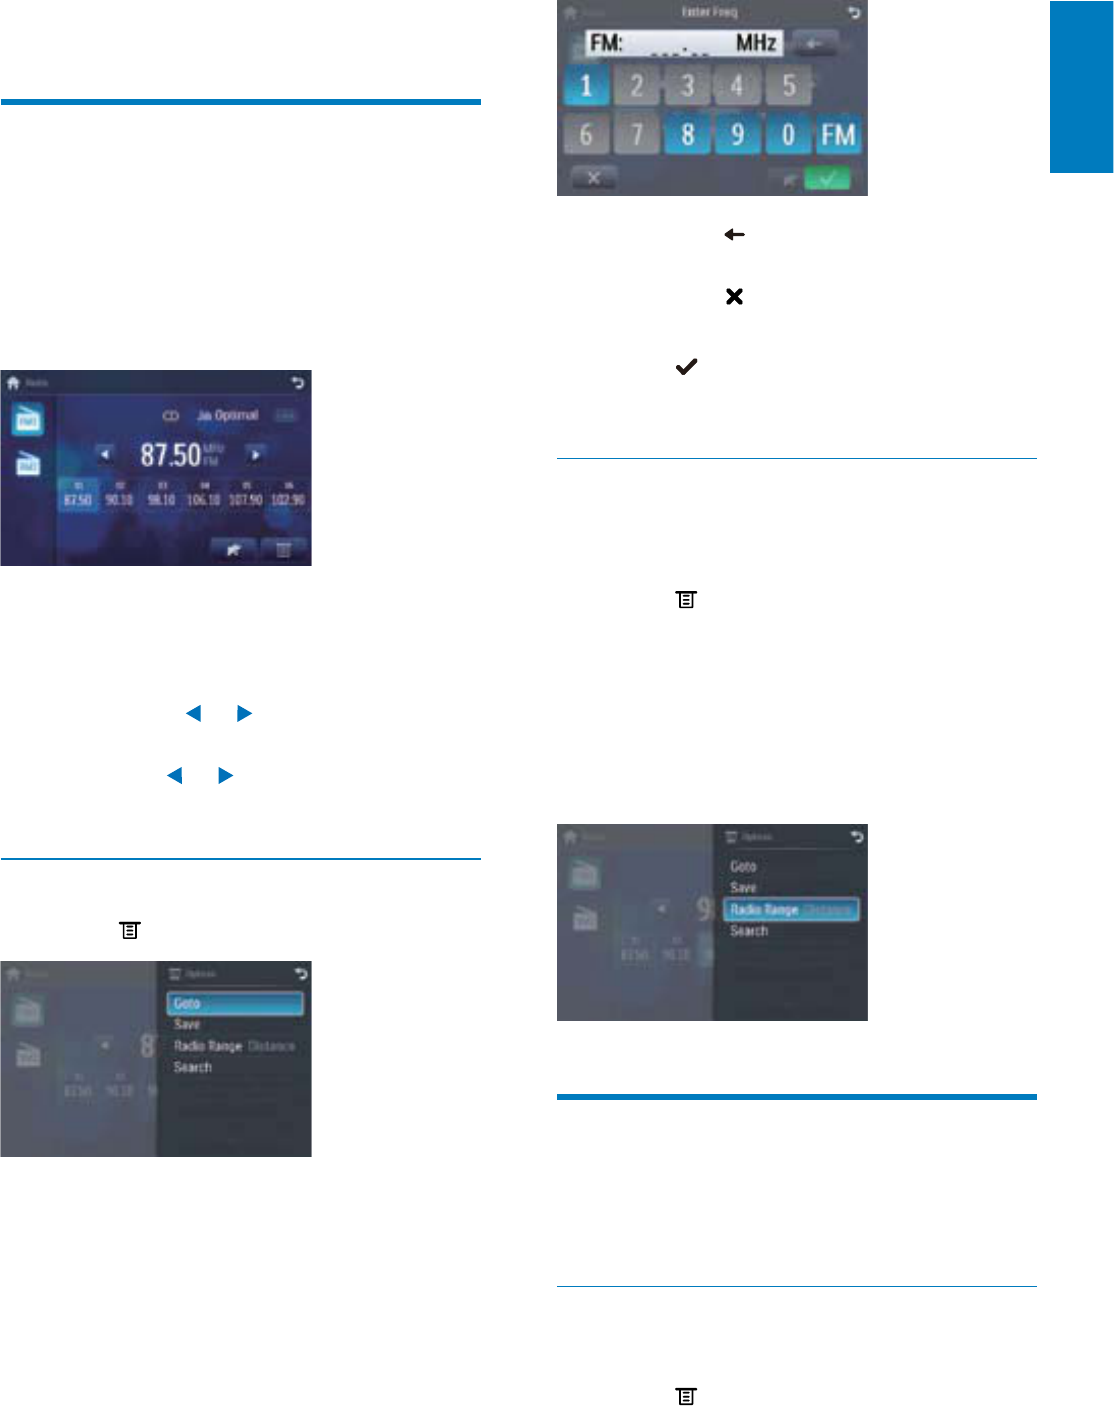
Tune to a radio station
1 Touchtheupperleftcornertodisplay
home menu.
2 Touch [Radio].
Band and frequency information is
displayed.
3 Touch on FM or AM to select band:
FM band options: )0)0)0
AM band options: $0$0
4 %ULHÁ\WRXFK or to tune to a radio
stationbystep.
Touch or forover1secondsto
tune to a radio station automatically.
Tune by frequency
1 Touch .
2 Touch [Goto].
3 Touch FM or AM to select band.
4 Touch the numbers to enter frequency.
»
•
•
•
English
EN
18
4 Touchoneofthechannels01 to 06 to
save the select band.
Store stations automatically
You can search for a station with intro search,
whichbroadcastsa10-secondpreviewofeach
detected radio station.
1 Select band.
2 Touch .
3 Touch [Search].
Auto search starts.The six strongest
stations of the selected band are saved
in preset channels 1-6 automatically.
Tune to a preset station
1 Touch [Radio].
2 Select band.
3 Touchoneofthepresetchannels(01 to
06)toselectapresetstation.
»
EN
19
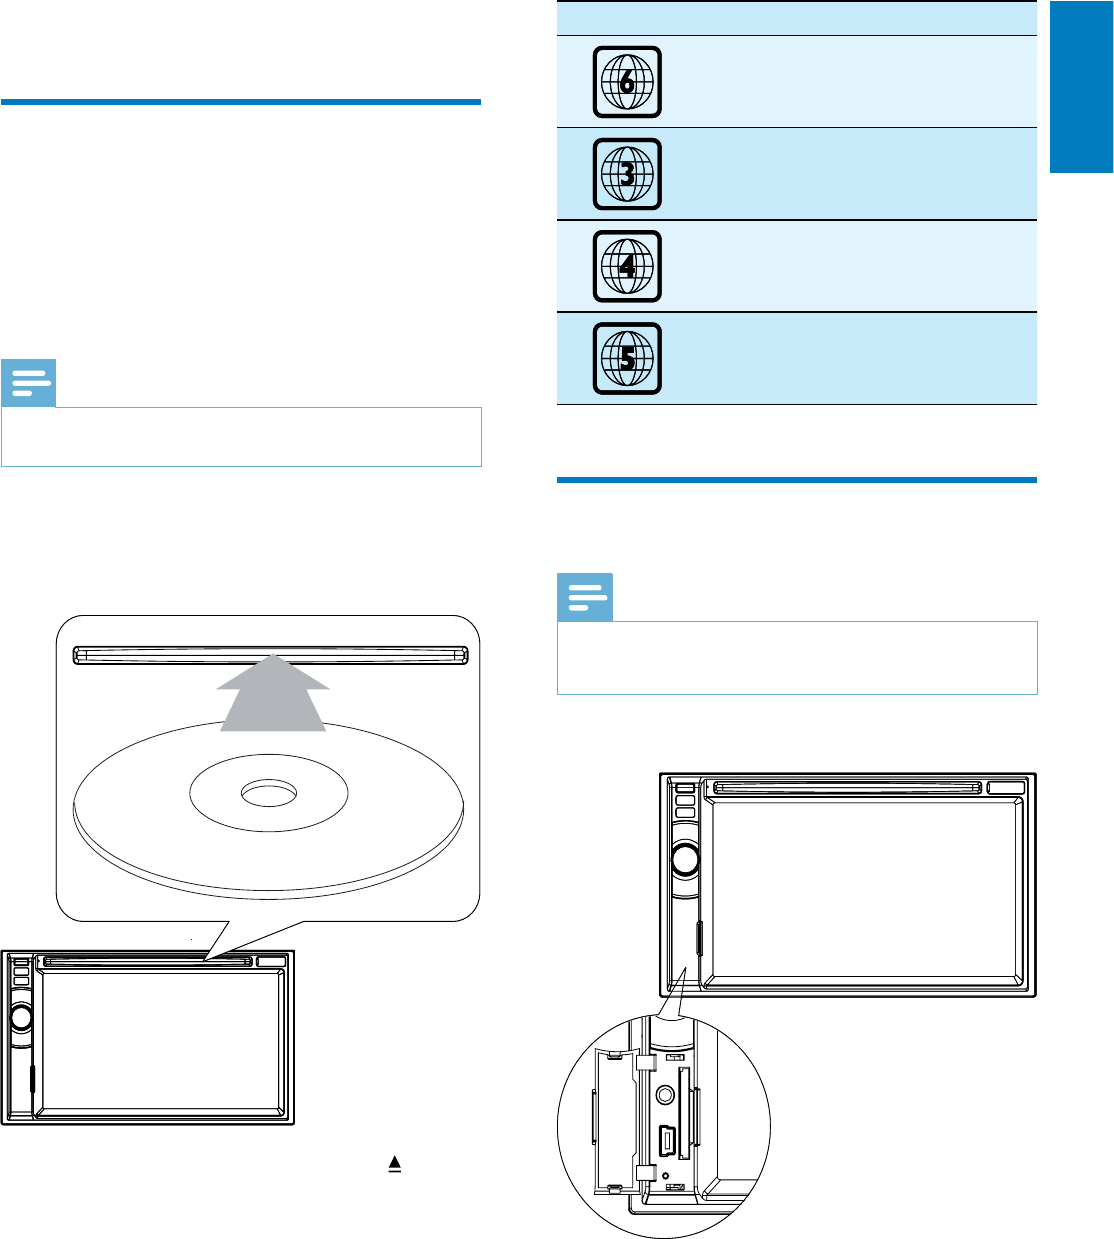
Countries DVD region code
China
$VLD3DFLÀF7DLZDQ
Korea
Latin America
Russia, India
Connect USB device
Note
Ensure that the device contains playable
content.
•
1 Open the USB door.
2 InsertthesmallendofthesuppliedUSB
cable to the USB socket, then connect
theotherendoftheUSBcabletoyour
USB device.
Play starts automatically.
»
6 Play
Load discs
You can play video, audio or images stored on
the following discs:
DVDvideo,DVD-R,DVD-RW
VCD
AudioCD,CD-R,CD-RW
Note
Ensure that the disc contains playable content.•
1 Insertthediscintothediscslotwithlabel
side facing up.
Play starts automatically.
To remove the disc, press the button.
When the disc is ejected, the unit
switches to the previous source,
if connected. Otherwise, the
unit switches to [Radio] mode
automatically.
Dependsonwhereyoubroughttheunit,you
can play DVD discs with the following region
codes:
•
•
•
»
»
»
P
r
i
n
t
i
n
g
i
n
C
h
i
n
a
P
r
i
n
t
i
n
g
i
n
C
h
i
n
a
P
r
i
n
t
i
n
g
i
n
C
h
i
n
a
P
r
i
n
t
i
n
g
i
n
C
h
i
n
a
English
EN
20
Remove the SD/MMC card
1 Press SOURCE to switch to another
source.
2 Pressthecarduntilyouhearaclick
sound.
The card is now disengaged.
3 RemovetheSDorMMCcard.
Play/Pause
1 Onceadisc,USBorSD/MMCcardis
inserted,playstartsautomatically.
ForDVDmovie,ifamenuappears,press
to start play.
2 To pause, touch .
To resume play, touch again.
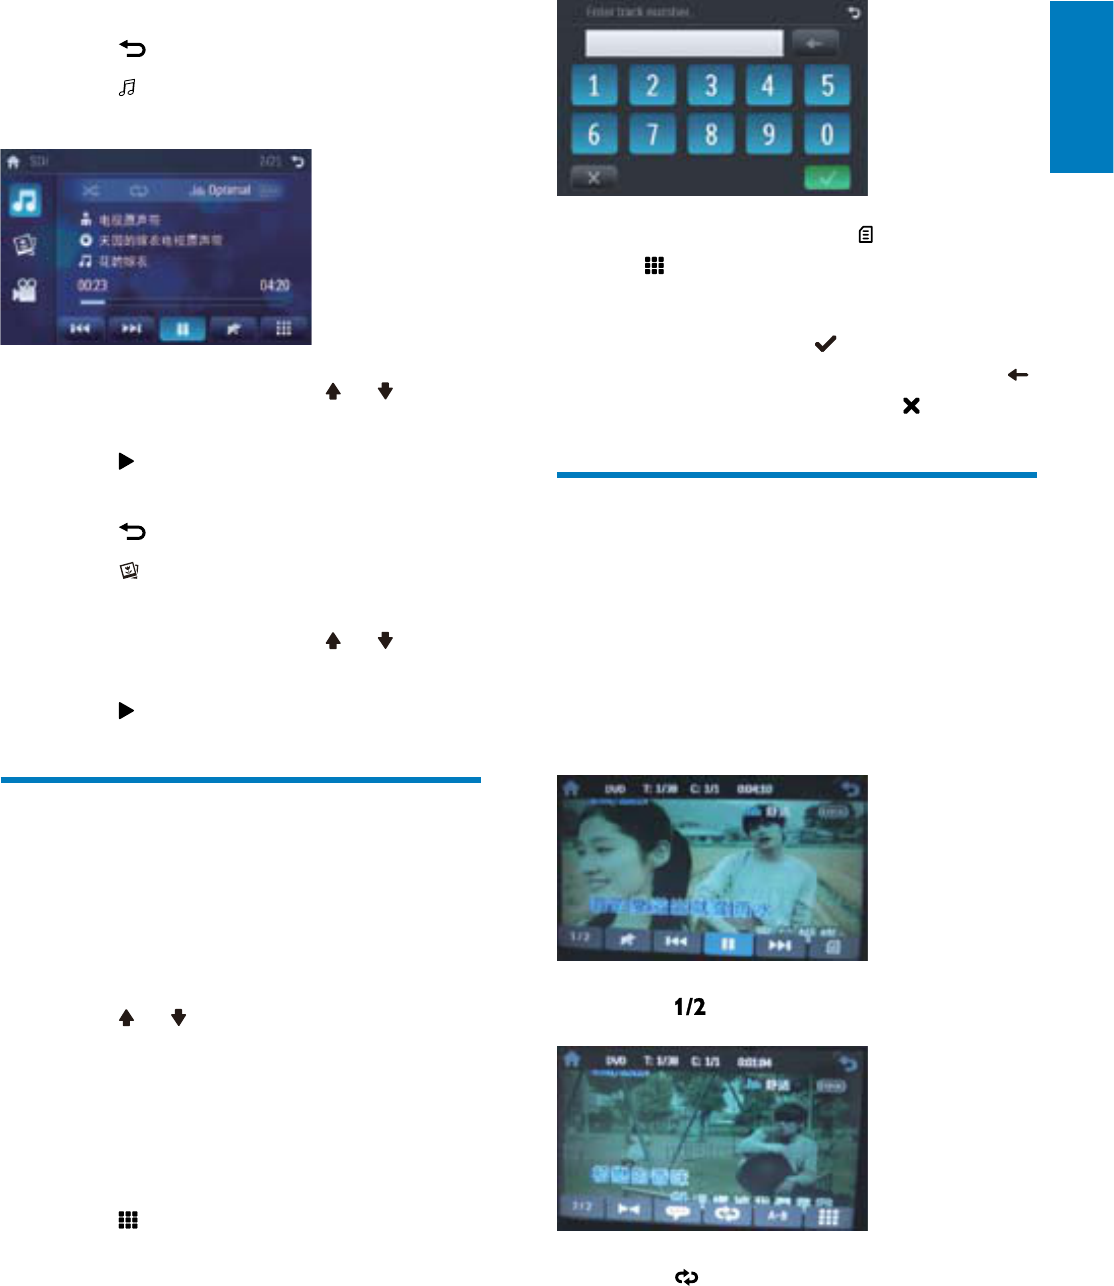
Search for a folder
)RUYLGHRÀOHV
1 Touch to return to playlist menu.
2 Touch WRGLVSOD\DOODYDLODEOHYLGHRÀOH
folders.
3 Touch a folder, then touch or to
VHOHFWDÀOH
4 Touch to start play.
»
•
Remove the USB device
1 Press SOURCE to switch to another
source.
2 Remove the USB device.
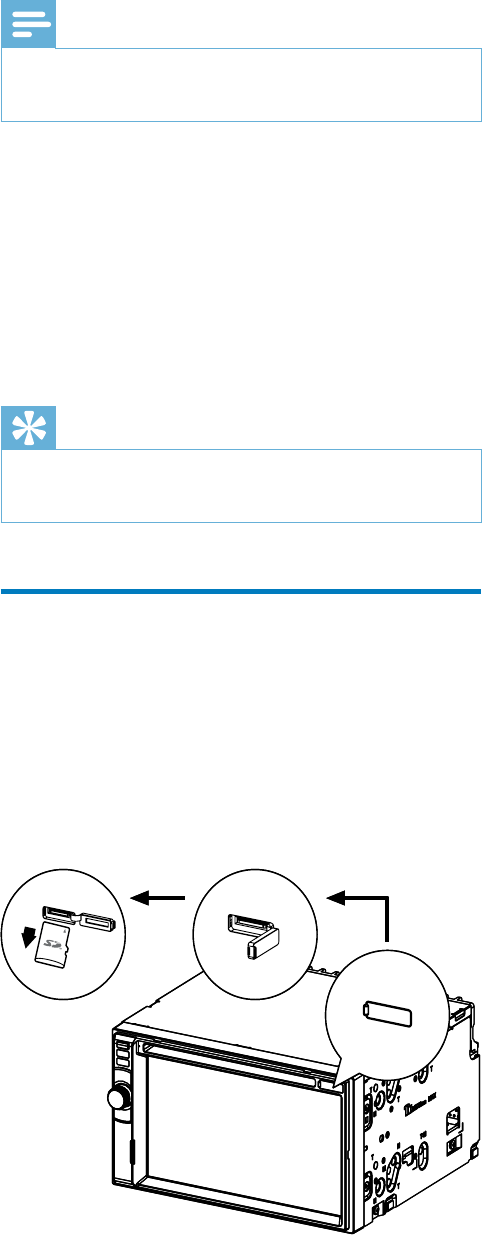
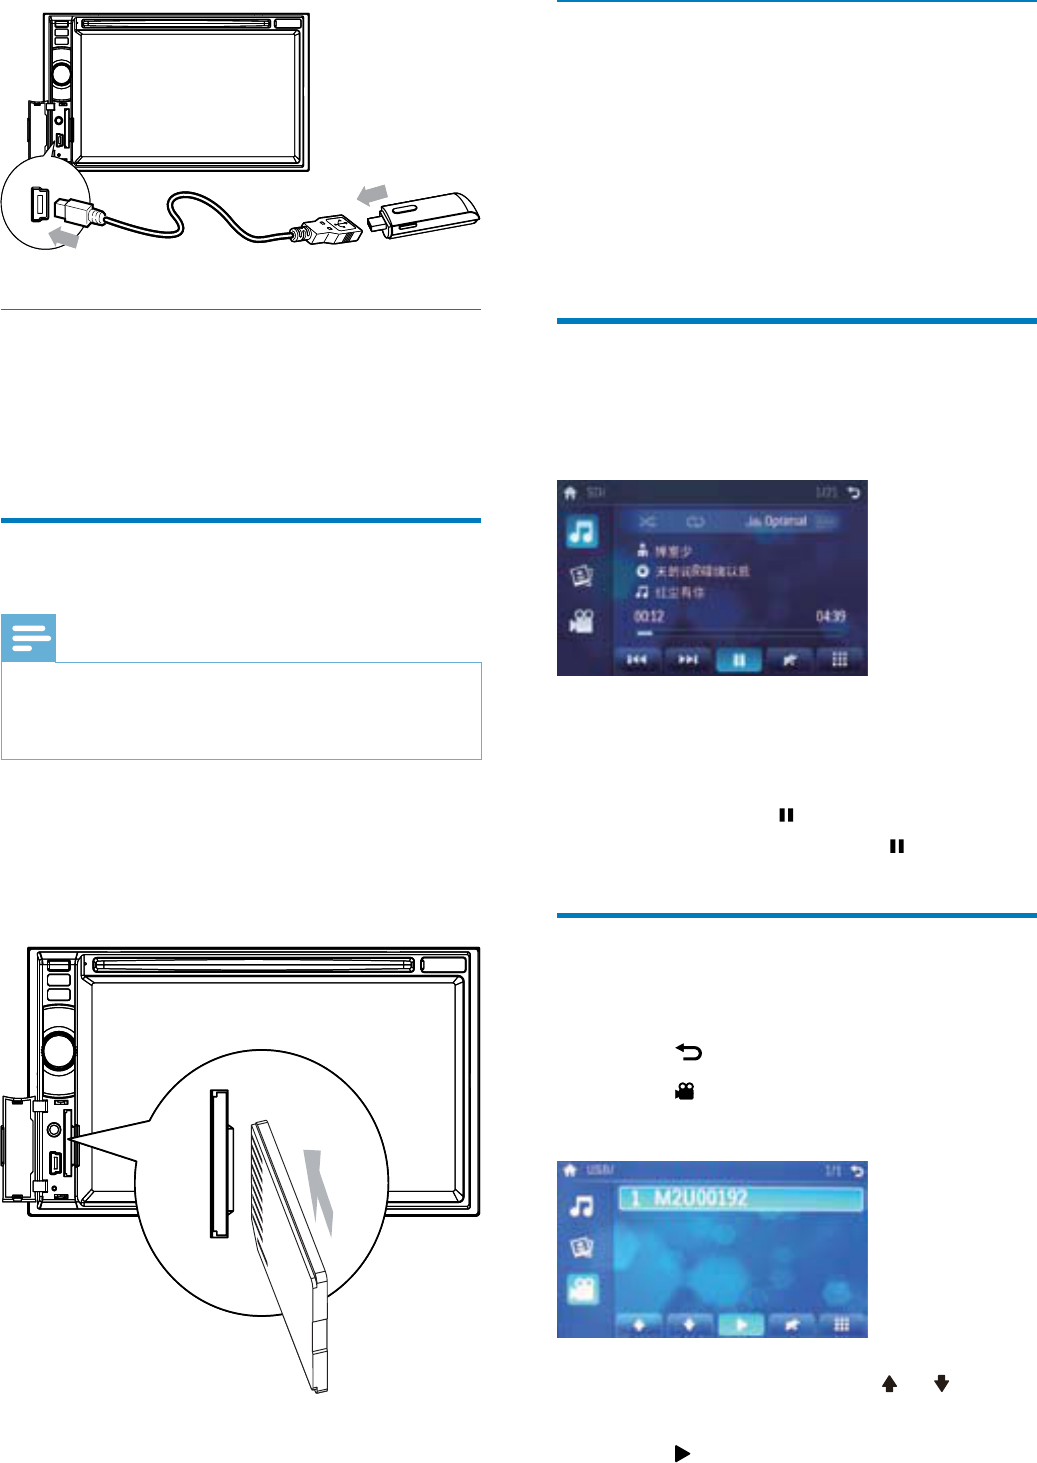
Insert USB or SD/MMC card
Note
Ensure that the device contains playable
content.
TheunitsupportsSDHCcard.
•
•
1 Open the USB/SD/MMC card cover.
2 InserttheSD/MMCcardintotheSD/
MMC card slot.
Play starts automatically.
»
EN
21
)RUYLGHRÀOHVWRXFK ÀUVWWKHQWRXFK
.
3 7RXFKWKHQXPEHUVWRHQWHUFKDSWHUÀOH
number,thentouch .
To clear the previous input, touch .
To clear all input, touch .
Repeat
During play, you can select different repeat play
modes.
For DVD/VCD movie disc:
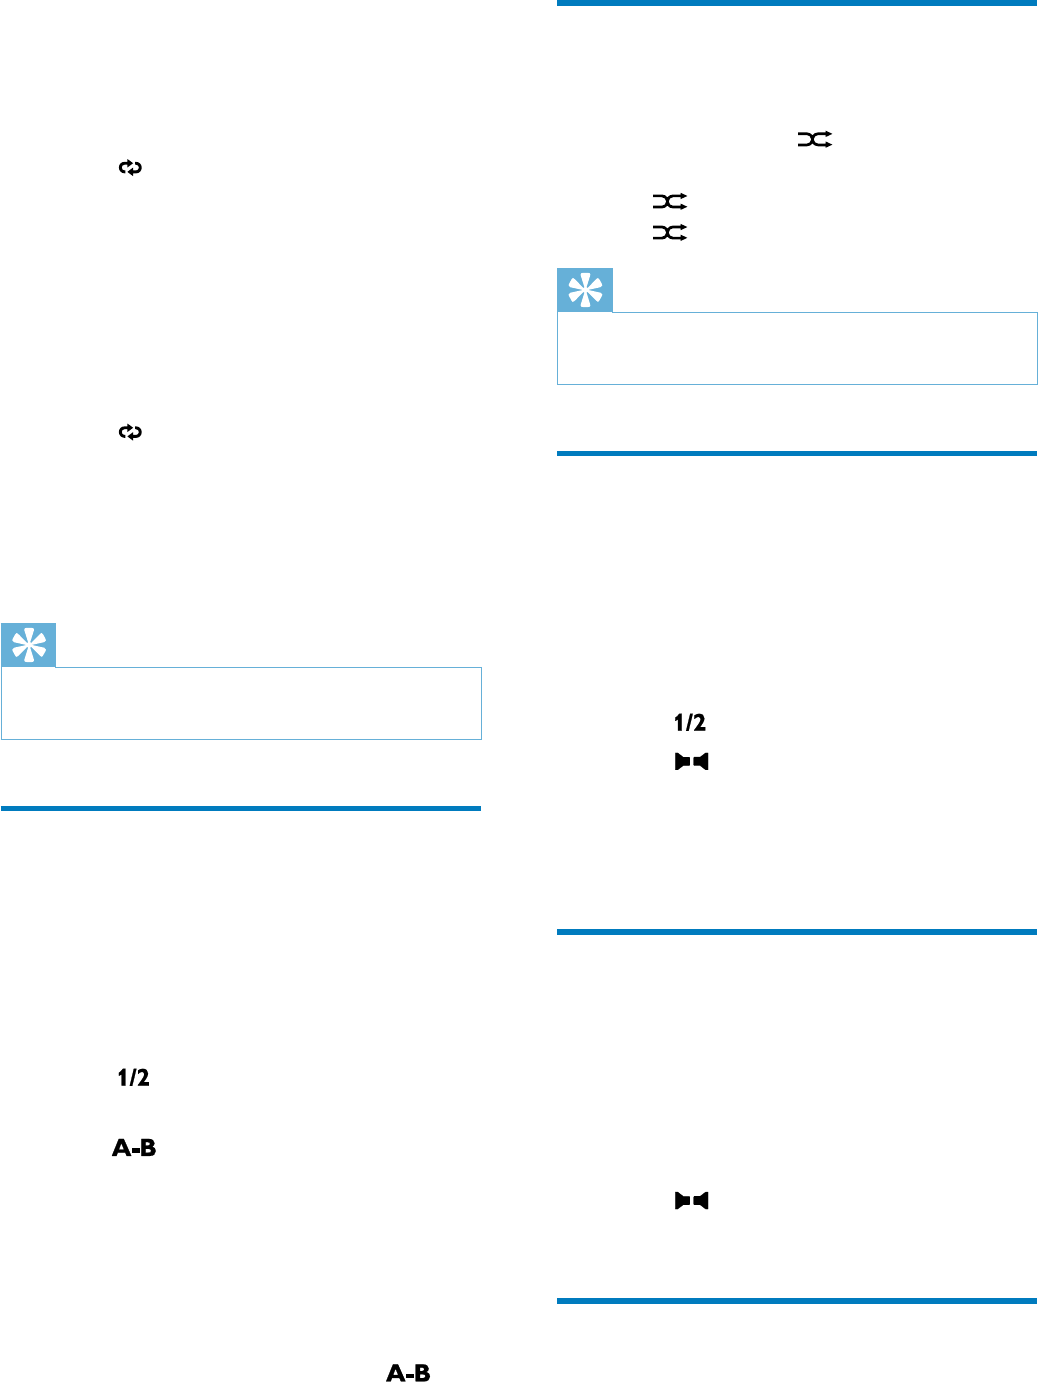
1 Touchanywhereexceptfortheupperleft
cornertodisplaymenuonthescreen,if
necessary.
2 Touch to display the 2nd menu.
3 Touch to select:
[Repeat chapter]: play the current
chapter repeatedly.
[Repeat title]: play all chapters in the
title repeatedly.
[Repeat off]:cancelrepeatplay.
»
•
•
•
•
•
)RUDXGLRÀOHV
1 Touch to return to playlist menu.
2 Touch to display all available audio
folders.
3 Touch a folder, then touch or to
VHOHFWDÀOH
4 Touch to start play.
)RUSLFWXUHÀOHV
1 Touch to return to playlist menu.
2 Touch to display all available picture
folders.
3 Touch a folder, then touch or to
selectapicture.
4 Touch to view the picture.
Search within a title/folder
Search by step
1 Touch anywhere except for the upper left
corner to display menu on the screen, if
necessary.
2 Touch or to skip to the previous or
next chapter/track.
Direct search
1 Touch anywhere except for the upper left
corner to display menu on the screen, if
necessary.
2 Touch .
The search screen is displayed.
»
English
EN
22
Random play
<RXFDQSOD\DXGLRWUDFNVÀOHVLQUDQGRPRUGHU
1 During play, touch repeatedly to turn
randomplayonoroff.
is highlighted : start random play.
turns gray: cancel random play.
Tip
You can also press SHUFF on the remote
controltoselectrandomplaymode.
•
Select audio language
For video discs that contain two or more audio
channels.
1 During play, touch anywhere except for
the upper left corner to display menu on
the screen, if necessary.
2 Touch to display the 2nd menu.
3 Touch repeatedly.
The audio channel information is
displayed on the upper line of the
screen.
Select audio mode
When you play VCDs, you can select an audio
mode (R/L/Stereo).
1 During play, touch anywhere except for
the upper left corner to display menu on
the screen.
2 Touch repeatedly until the audio
mode is selected.
Select subtitle language
For DVD or DivX discs that contain two or
more subtitle languages.
•
•
»
For VCD karaoke or audio CD:
1 Touch anywhere except for the upper left
corner to display menu on the screen, if
necessary.
2 Touch to select:
[Repeat]:playthecurrenttrack
repeatedly.
[Repeat off]:cancelrepeatplay.
)RU03:0$ÀOHV:
1 Touch anywhere except for the upper left
corner to display menu on the screen, if
necessary.
2 Touch to select:
[Repeat]:playthecurrenttrack
repeatedly.
[Repeat folder]:playallthetracksin
the current folder repeatedly.
[Repeat off]:cancelrepeatplay.
Tip
You can also press REPEAT on the remote
controltoselectrepeatedplaymode.
•
Repeat a section
<RXFDQUHSHDWDVSHFLÀFVHFWLRQRIYLGHRÀOH
(repeat A-B).
1 During play, touch anywhere except for
the upper left corner to display menu on
the screen, if necessary.
2 Touch todisplaythe2ndmenu,if
necessary.
3 Touch repeatedly to mark:
[Repeat A-]:thestartofthesection
to repeat.
[Repeat A-B]:theendofthesection
to repeat.
The selected section plays
repeatedly.
4 ToexitA-Brepeatmode,touch
repeatedly until [Repeat A-B off] is
displayed.
•
•
•
•
•
•
•
•
EN
23
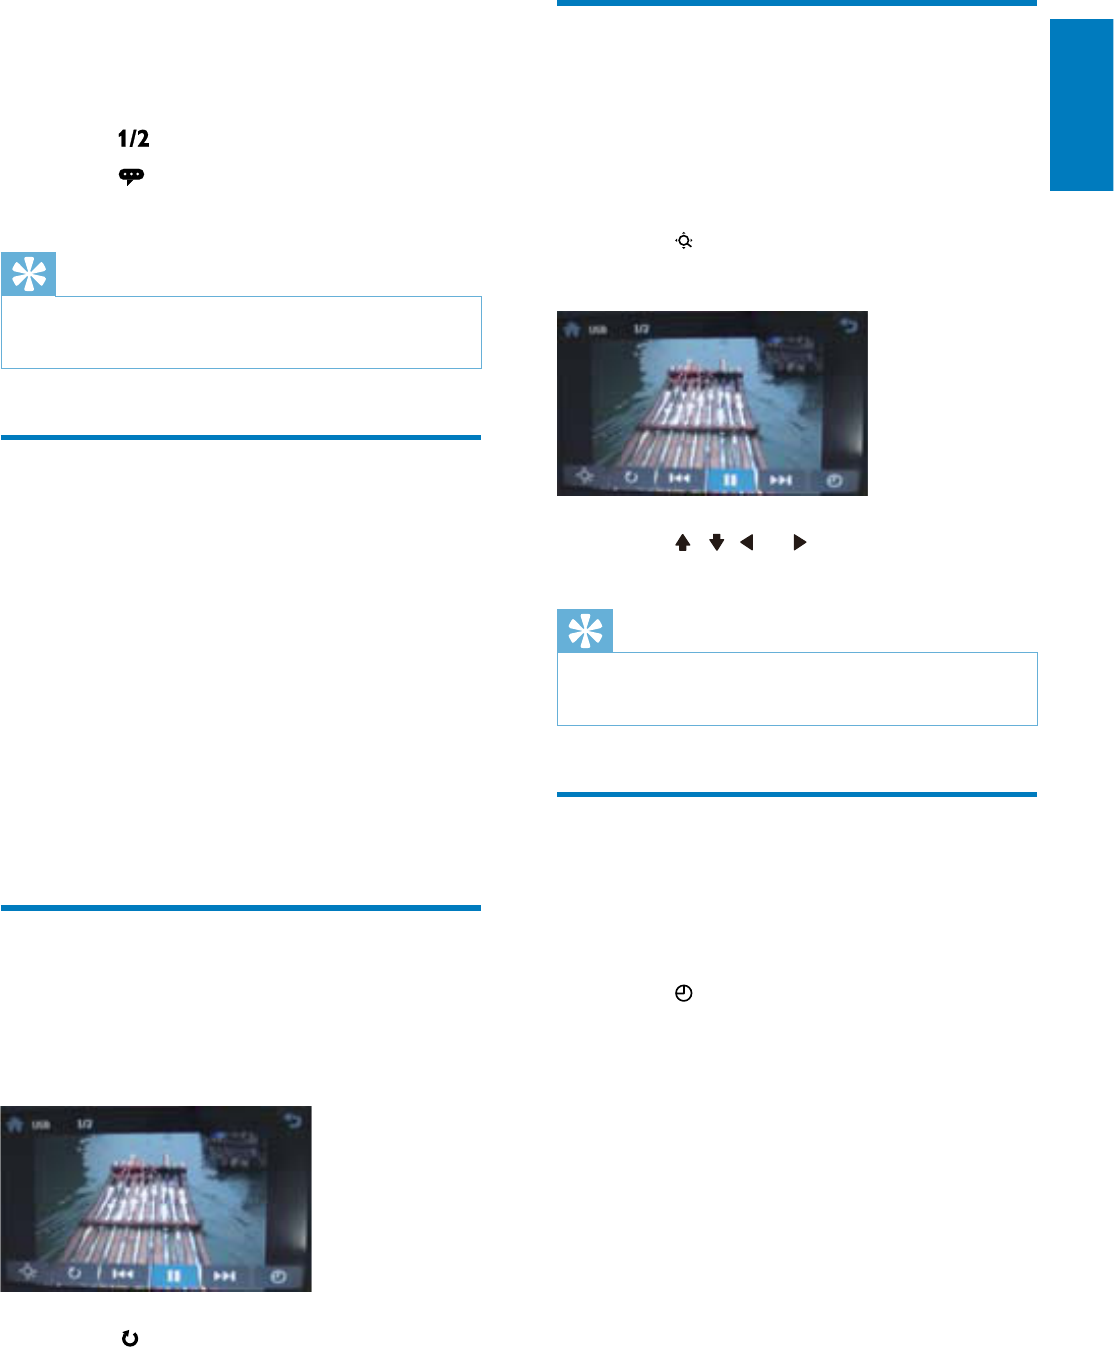
Zoom
You can zoom in pictures for a close view.
1 During view pictures, touch anywhere
exceptfortheupperleftcornertodisplay
menu on the screen, if necessary.
2 Touch repeatedlytozoominthe
picture.
3 Touch , , or topanthroughthe
enlarged picture.
Tip
To zoom in/out video image, press
PHOTOZOOM ontheremotecontrol.
•
Select slide show duration
1 Touchanywhereexceptfortheupperleft
cornertodisplaymenuonthescreen,if
necessary.
2 Touch repeatedly to select:
Fast: 3 seconds
Normal: 5 seconds
Slow: 8 seconds
•
•
•
1 During play, touch anywhere except for
the upper left corner to display menu on
the screen, if necessary.
2 Touch todisplaythe2ndmenu
3 Touch repeatedlytoselectalanguage.
The selected language is displayed.
Tip
You may also press SUBTITLE on the remote
controlrepeatedlytoselectsubtitlelanguage.
•
Change view angle
Some DVDs contain alternate scenes, such
as scenes recorded from different camera
angles. For such DVDs, you can select from the
available alternate scenes.
1 During play, touch anywhere except for
the upper left corner to display menu on
the screen, if necessary.
2 Press VIDEOANGLE repeatedly on the
remote control.
The view angle is changed.
Rotate pictures
1 When you view pictures, touch anywhere
exceptfortheupperleftcornertodisplay
menu on the screen, if necessary.
2 Touch repeatedly to rotate the picture.
»
»
English
EN
24
Disconnect Bluetooth devices
1 To disconnect one device, touch
(red).
(green) is displayed.
Tip
The device will also be disconnected when the
device is moved beyond the operational range.
If you want to reconnect the device to the
unit, place it within the operational range.
If you do not want to reconnect the device
totheunitautomatically,touch >[Auto
connect],thenselect[Off].Fordetails,seethe
“Adjust Bluetooth settings” section.
•
•
•
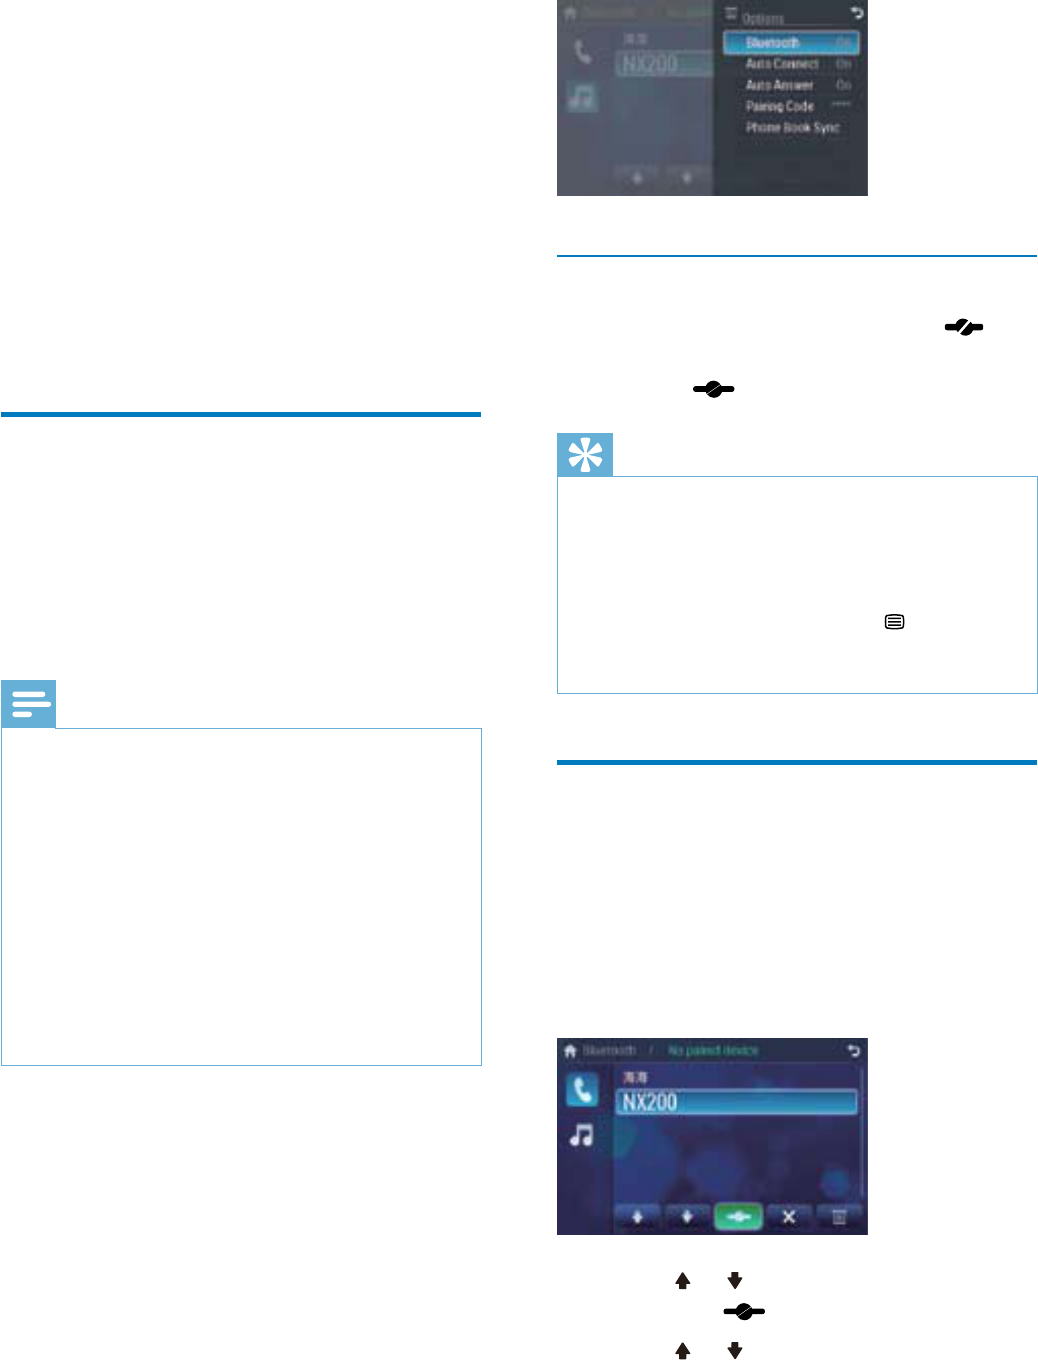
Make a call
1 Pair the phone with the unit.
2 Touchtheupperleftcornertodisplaythe
home menu.
3 Touch [Bluetooth].
The Bluetooth menu is displayed.
4 Touch or to select the paired phone,
then touch .
5 Touch or to search for phone
number from the following list:
»
»
7 Play with
Bluetooth
device
You can make or receive phone calls with
Bluetooth-enabled phones through the unit.
You can also listen to music from a Bluetooth-
enabled device.
Pair the Bluetooth-enabled
devices
To connect your Bluetooth device to the unit,
you need to pair the device to the unit. Pairing
needs only to be done once.
You can pair up to eight devices.
Note
The operational range between this unit and a
Bluetoothdeviceisapproximately10meters
(30 feet).
Before you connect a Bluetooth device to this
unit,familiarizeyourselfwiththeBluetooth
capabilities of the device.
Compatibility with all Bluetooth devices is not
guaranteed.
Anyobstaclebetweenthisunitanda
Bluetooth device can reduce the operational
range.
Keep this unit away from any other electronic
device that may cause interference.
•
•
•
•
•
1 Turn on the Bluetooth function on the
device.
2 Search for Bluetooth device with the
device.
3 Select“CID2680”inthepairinglist.
4 Enter default password “0000”.
if pairing succeeds. phone call record is
displayed.
»
EN
25
The voice is transferred from the unit’s
loudspeaker to the mobile phone.
Listen to music from
Bluetooth device
If the connected Bluetooth device supports
$GYDQFHG$XGLR'LVWULEXWLRQ3URÀOH$'3
you can listen to the music stored on the device
through the unit. If the device also supports
$XGLR9LGHR5HPRWH&RQWURO3URÀOH$95&3
SURÀOH\RXFDQXVHWKHFRQWURORQWKHXQLWRU
its remote control to play music stored on the
device.
1 Pair the phone with the unit.
2 Touchtheupperleftcornertoreturnto
home menu.
3 Touch [Bluetooth].
The Bluetooth menu is displayed.
4 Startplaymusicviadevice.
,I\RXUGHYLFHVXSSRUW$95&3
1 Touch .
2 Touch to start play.
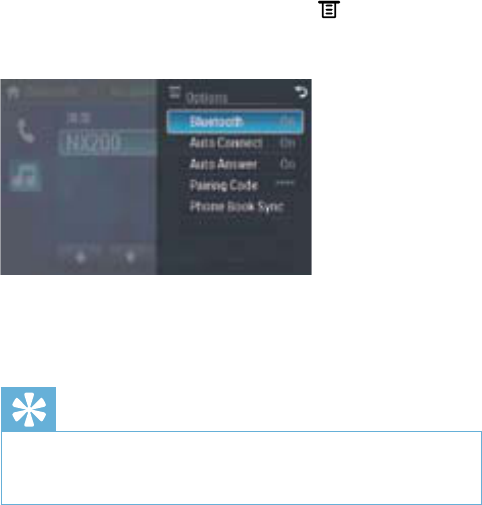
Adjust Bluetooth settings
You can change below Bluetooth settings:
[Bluetooth]:toturnonoroff
“Bluetooth” function
[Auto connect]:toturnonoroff
“Auto connect” function
[Auto answer]:toturnonoroff
“Auto answer” function
[Pairing code]:tosetparingcode
»
»
•
•
•
•
•
[Missed calls]
[Received calls]
[Dialed calls]
[Phone book]
[Sim phone book]
[Local phone book]
Or touch to dial number directly, then touch
to dial.
Receive call
By default, all incoming calls are received
automatically.
1 Ifthereisincomingcall,[Incoming call...]
ÁDVKHVRQWKHVFUHHQ6SHDNLQWRWKH
Bluetooth microphone.
2 When conversation ends, touch (red)
to terminate the call.
Tip
Youcanselecttoreceivecallsmanuallybyset
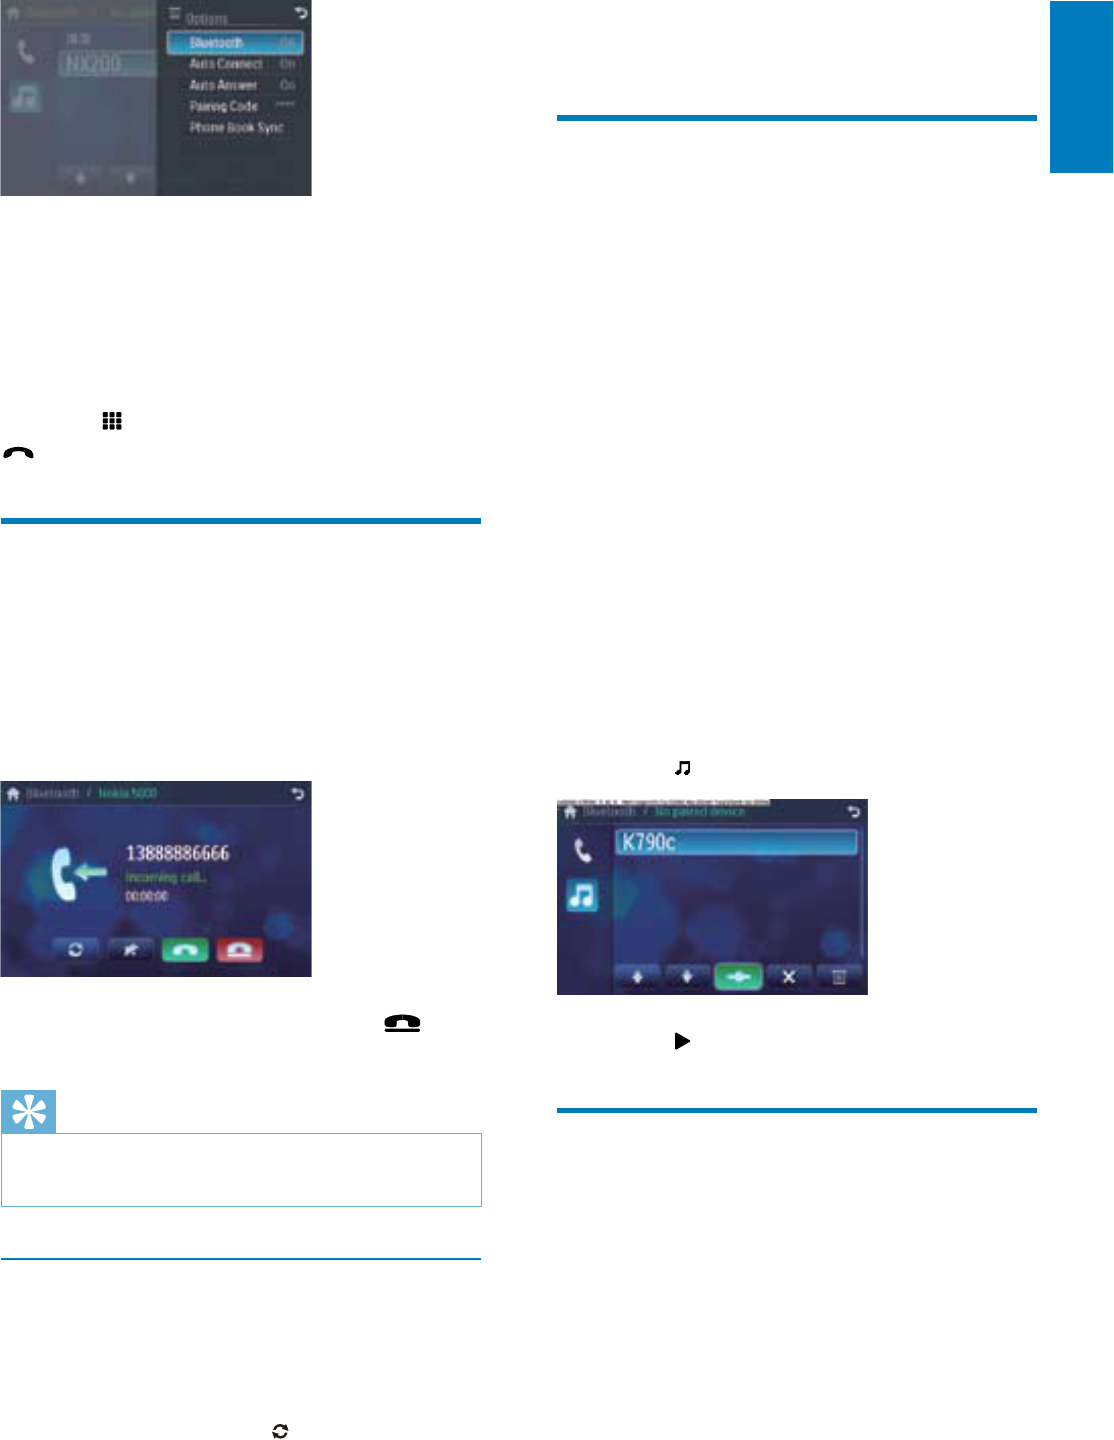
[Auto answer] to [Off] status.
•
Switch phone call to the mobile
Ifyoudonotwantyourpassengertohear
yourincomingcall,youcanswitchthecallto
the mobile.
1 During talking, touch .
•
•
•
•
•
•
English
EN
26
[Phone Book Sync]:tosynchronize
phone book
1 In Bluetooth menu, touch .
The option menu is displayed.
2 Touch on the selected option to change
the setting.
Tip
YoucanalsoadjustBluetoothsettingsinthe
“Settings” menu.
•
•
»
EN
27
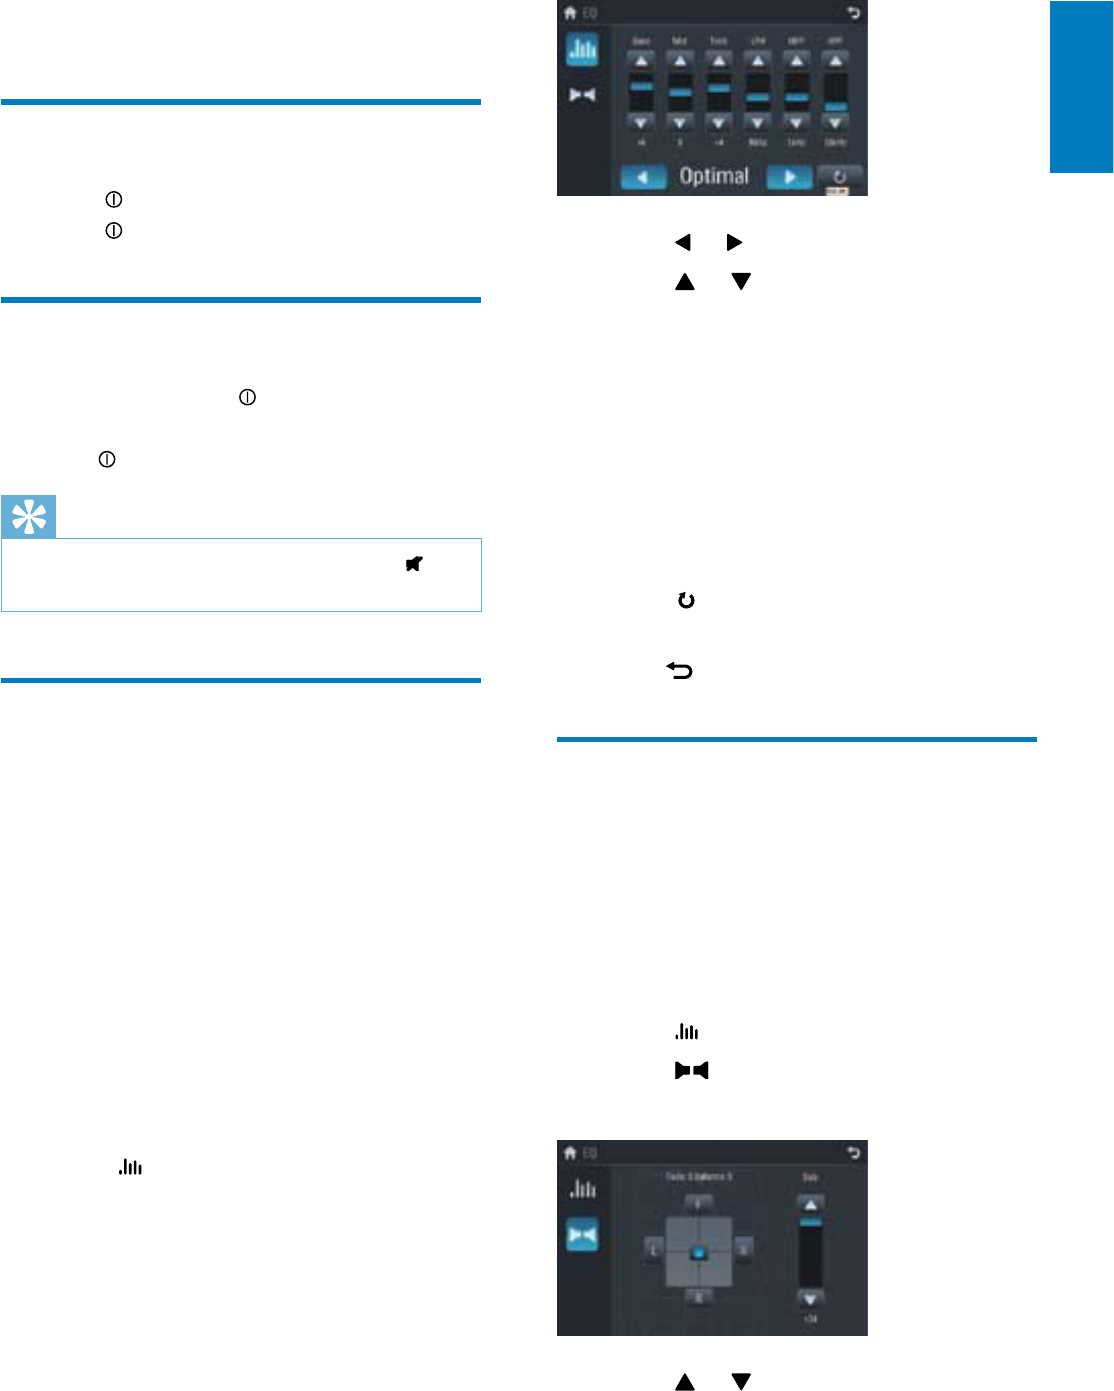
3 Touch or to select an EQ.
4 Touch or to adjust below settings:
[Bass]bass range: -14 to +14
[Mid]middle range: -14 to +14.
[Treb]treble range: -14 to +14
[LPH]ORZSDVVÀOWHUUDQJH
100, 200.
[MPF]PLGGOHSDVVÀOWHUUDQJH
1K, 1.5K, 2.5K.
[HPF]KLJKSDVVÀOWHUUDQJH.
12.5K, 15K, 17.5K.
5 Touch to restore the above settings
into default settings.
6 Press to exit.
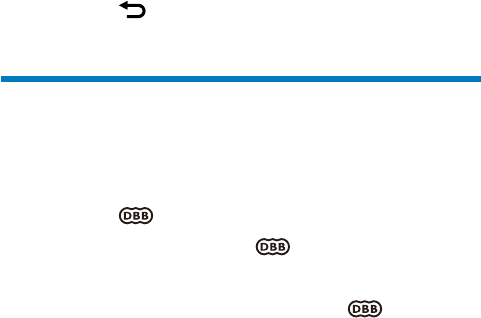
Adjut fader/balance
You can also adjust the front and rear speaker
balance, the left and right speaker balance, and
subwoofer settings.
Touch anywhere except for the upper left
corner to display menu on the screen, if
necessary.
1 Touch .
2 Touch
Below options are displayed:
3 Touch or to select subwoofer
volume.
[Sub] subwoofervolume:0to24.
•
•
•
•
•
•
»
•
8 Adjust sound
Adjust volume
1 Turn clockwisetoincreasevolume.
Turn anti-clockwise to reduce volume.
Mute
1 During play, press .
To turn the sound back on, press
again.
Tip
You can also turn off sound by touching on
the screen.
•
Select preset equalizer
You can select preset equalizer:
[User]
[Techno]
[Rock]
[Classic]
[Jazz]
[Optimal]
[Flat]
[Pop]
1 Touch anywhere except for the upper left
corner to display menu on the screen, if
necessary.
2 Touch .
The current Equalizer setting is
displayed.
•
•
•
•
•
•
•
•
•
•
»
English
EN
28
4 Touch F,R,L,orRto adjust fader/balance
value.
[Fade]faderrange:+24to-24.(F=
frontspeaker,R=rearspeaker)
[Balance] balancerange:-24to+24.
(L=leftspeaker,R=rightspeaker)
5 Touch to exit.
Set Dynamic Bass Boost
(DBB)
1 Touch to toggle between the settings.
[DBB] on: The icon is
illuminated.
[DBB] off(default):The icon is
gray.
•
•
•
•
EN
29
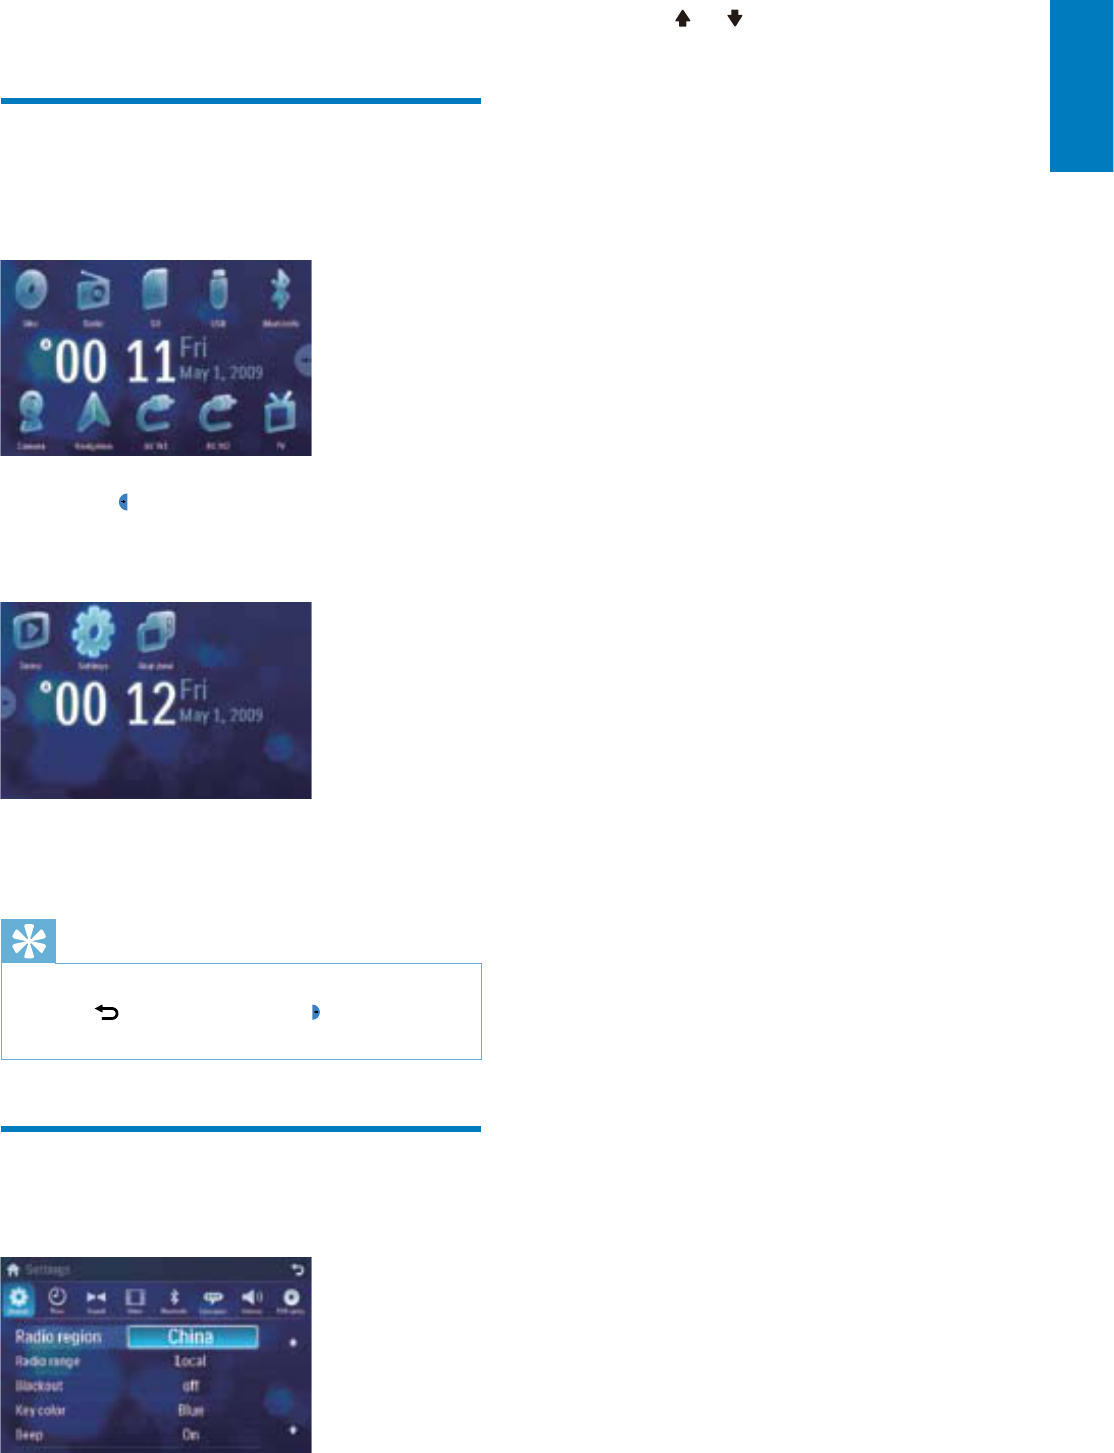
2 Touch or to highlight a setting.
3 Touch on the option to display/select an
option.
9 Adjust settings
Display system setup menu
1 Touchtheupperleftcornertodisplay
main menu.
2 Touch in the middle right side of the
screen.
The second main menu is displayed.
3 Touch [Settings].
The settings menu is displayed.
Tip
When the setup adjustment is completed,
touch ÀUVWDQGWKHQWRXFK to return to
main menu.
•
Adjust general settings
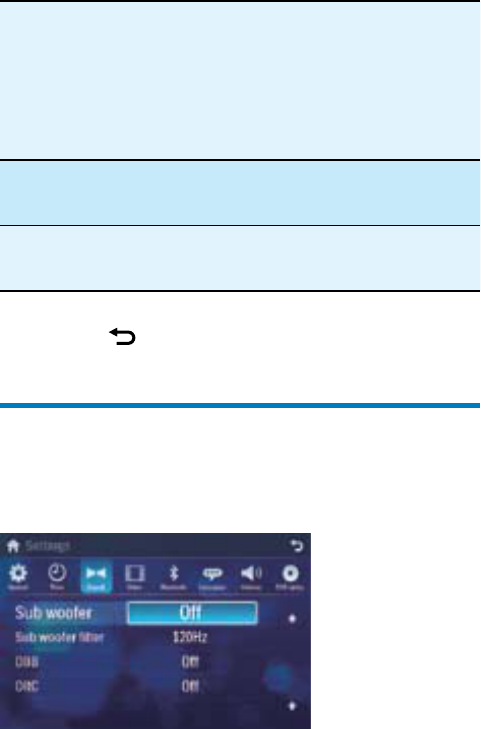
1 Touch [General],ifnecessary.
»
»
English
EN

30
General
settings
Options Description
[Radio
region]
[USA][S.
Amer-1]
[Arabia]
[China][S.
Amer-2]
[Europe]
[Korea]
[OIRT]
Select one that
matches your
location.
[Radio
range]
[Local] Only stations
with strong
signals can be
broadcast.
[Distance] Stations with
strong and weak
signals can be
broadcast.
[Blackout] [off] Never turn on
thescreensaver.
[10s] Turn on the
screen saver
automatically 10
seconds after last
operation.
[20s] Turn on the
screen saver
automatically 20
seconds after last
operation.
[Auto
dimmer]
[On] Turn on the
screen dim
automatically 5
seconds after last
operation.
[Off] Never turn the
screen dim.
[Key color] [Red] Button backlight
turns red.
[Blue] Button backlight
turns blue.
EN

31
English
EN
32
[Beep] [On] Turn on the
beep sound. Each
time you press a
button, the unit
beeps.
[Off] Turn off the beep
sound.
[Calibration] Calibrate the
touch screen.
4 Press to exit.
Adjust sound settings
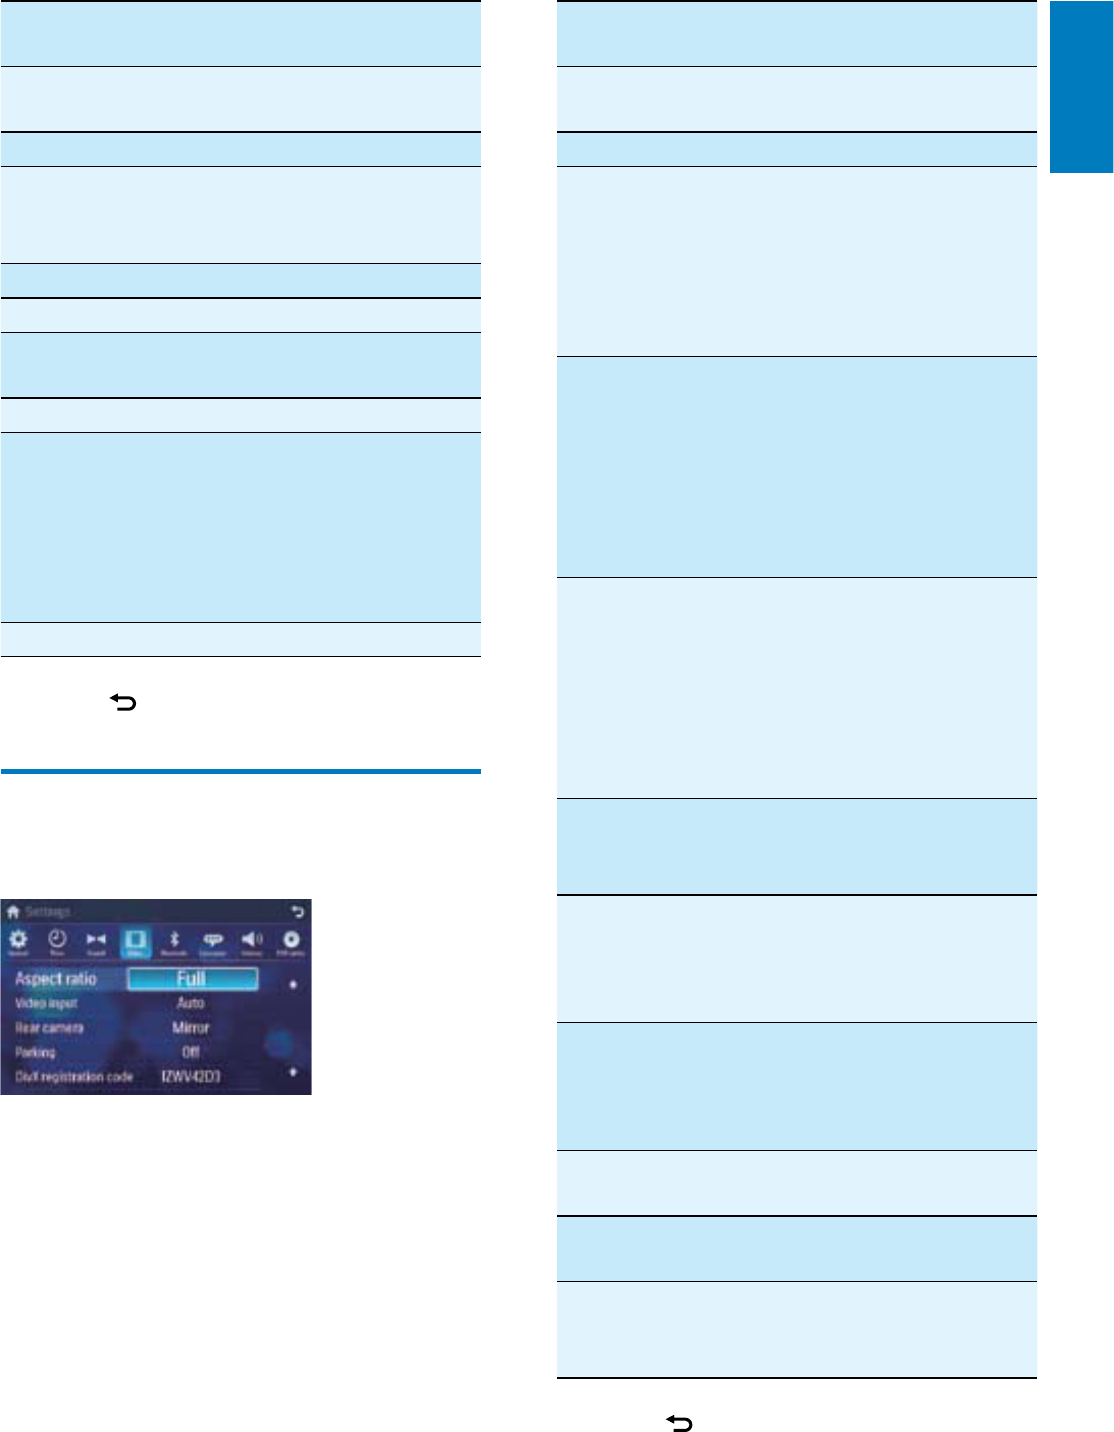
1 Touch [Sound].
2 Touchanoptionrepeatedlytoselect:
EN
33
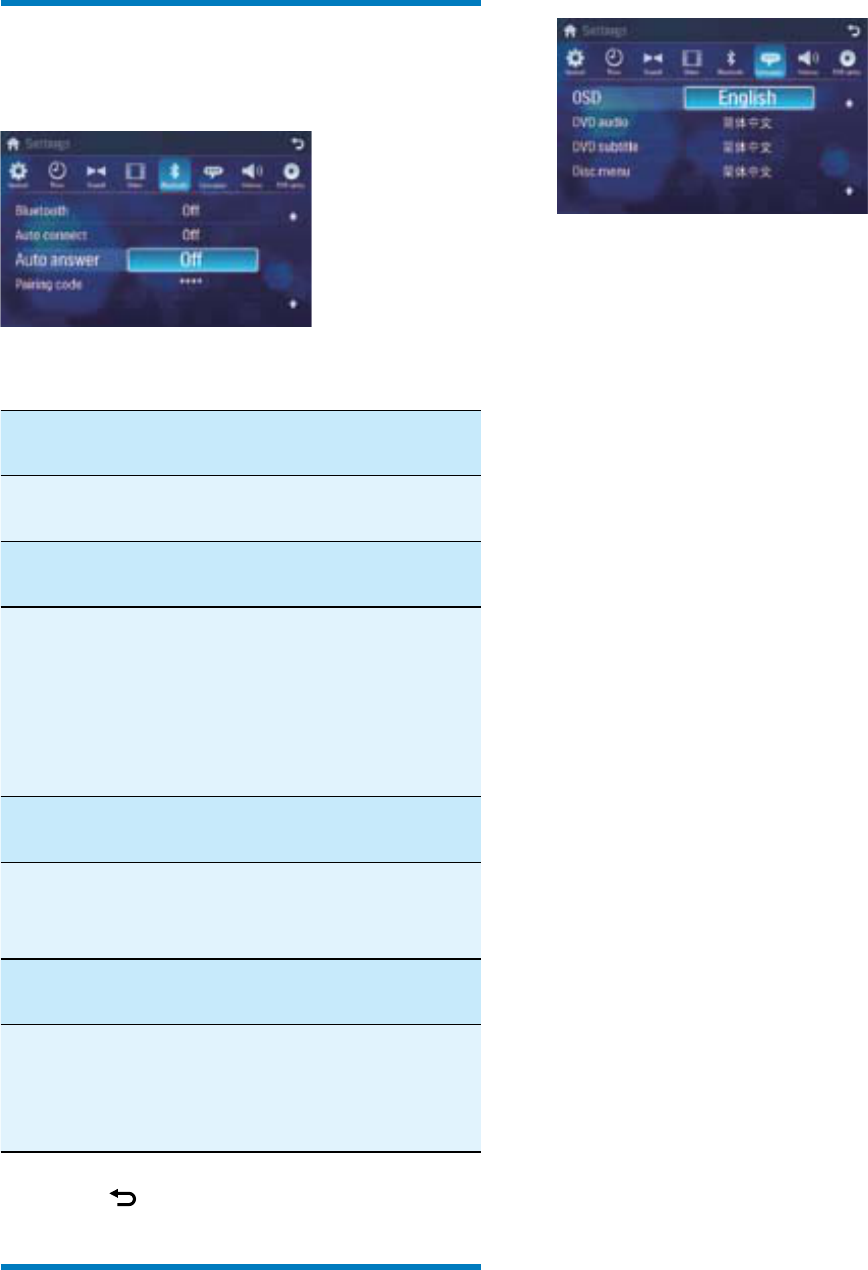
Video
settings
Options Description
[Aspect
ratio]
[Full] For widescreen
display.
[Normal] Fornormaldisplay.
[Video
input]
[Auto] The correct format
is set automatically.
Select this option
if you are not sure
which format should
be selected.
[NTSC] Used in the United
States, Canada,
Japan, Mexico, the
Philippines, South
Korea, Taiwan,
andsomeother
countries.
[PAL] Used in China,
India, Singapore, the
western European
countries (except
France), Australia,
andsomeother
countries.
[Secam] Used in France,
Russia and other
countries.
[Rear
camera]
[Normal] When you drive in
reverse, the rear
view is displayed
normally.
[Mirror] When you drive in
reverse, the rear
view is displayed in
mirror.
[Parking] [On] Disable video view
during drive.
[Off] Enable video view
during drive.
[DivX
registration
code]
View code for DivX
registration.
3 Press to exit.
Sound
settings
Options Description
[Sub
woofer]
[On] Turn on the subwoofer.
[Off] Turn off the subwoofer.
[Sub
woofer
ÀOWHU@
[80Hz] 6HOHFWVXEZRRIHUÀOWHU
criteria.
[120Hz]
[160Hz]
[DBB] [On] The Dynamic Bass Boost
(DBB) function is on.
[Off] TheDBBfunctionisoff.
[DRC] [On] Makes loud sound level
softerandsoftsound
levelloudersothatyou
can watch the DVD
movies at a low volume,
withoutdisturbingothers
[Off] TheDRCfunctionisoff.
3 Press to exit.
Adjust video settings
1 Touch [Video].
2 Touchanoptionrepeatedlytoselect:
English
EN
34
2 Touchanoptionrepeatedlytoselect:
Adjust Bluetooth settings
1 Touch [Bluetooth].
2 Touchanoptionrepeatedlytoselect:
Bluetooth
settings
Options Description
[Bluetooth] [On] Turn on the
Bluetooth function.
[Off] Turn off the
Bluetooth function.
[Auto
connect]
[On] If the pre-paired
device is within the
effectiverange,the
unit re-connects to
pre-paired device
automatically.
[Off] Need to re-connect
manually.
[Auto
answer]
[On] Answer paired
phone call
automatically.
[Off] Answer phone call
manually.
[Pairing
code]
View code for
pairing the unit with
other Bluetooth
devices.
3 Press to exit.
Adjust language settings
1 Touch [Language].
EN
35
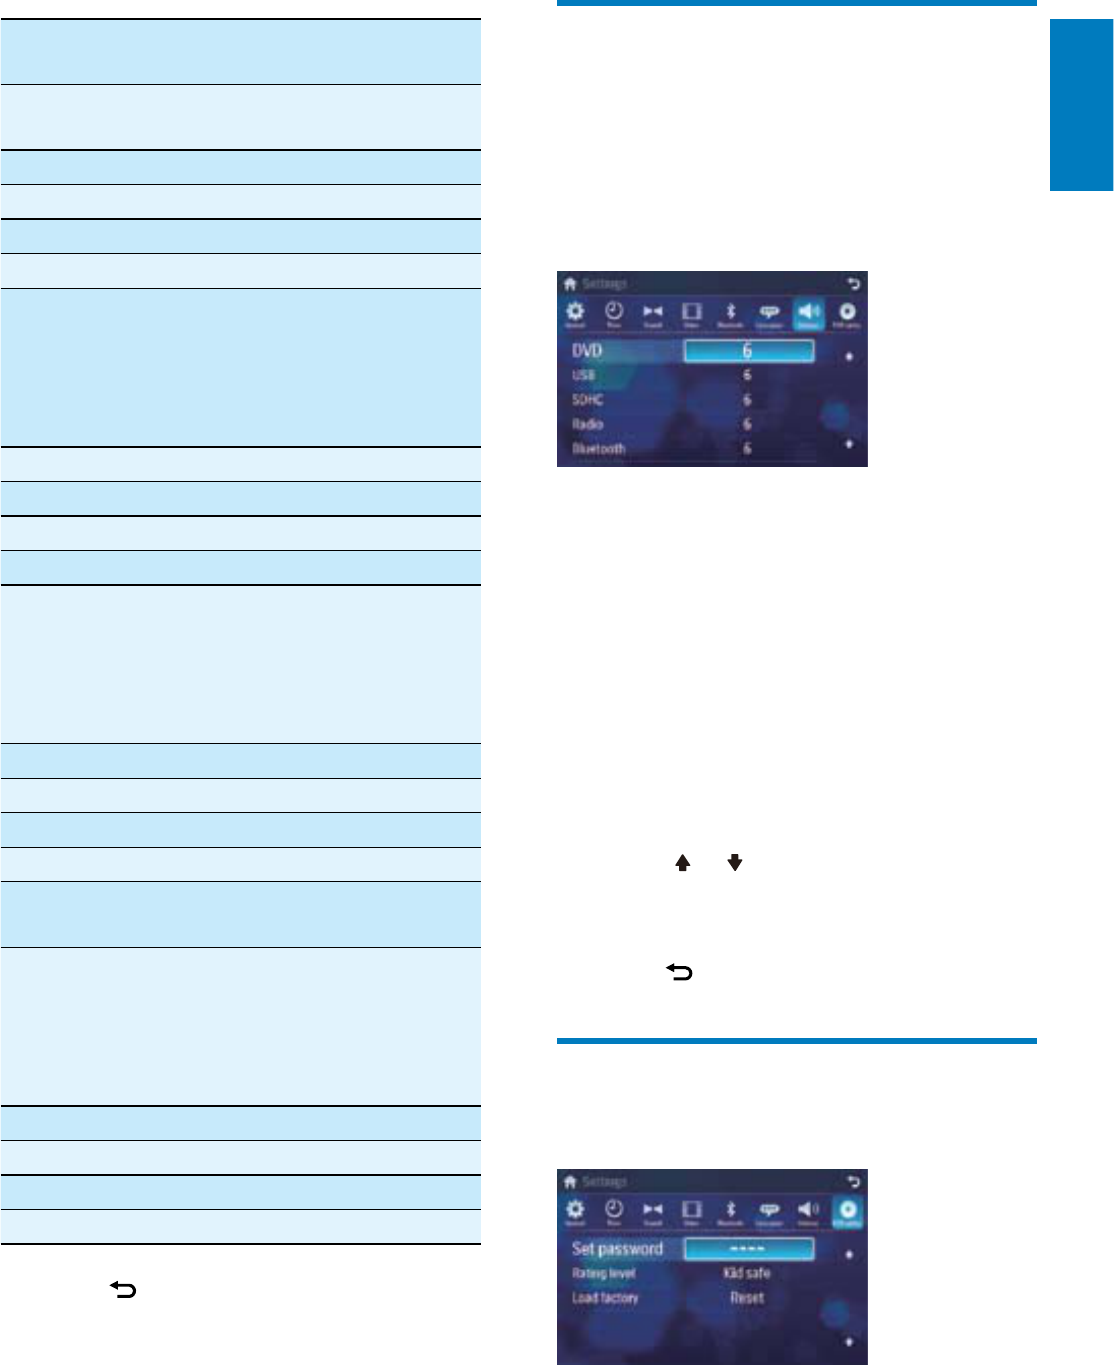
Adjust volume settings
You can set different volume for different
modes.
1 Touch [Volume].
The volume setting sub-menu is
displayed.
2 Touchonasource.
[DVD]
[USB]
[SDHC]
[Radio]
[Bluetooth]
[AV-IN1]
[AV-IN2]
[CDC]
[TV]
[Navigation]
3 Touch or toassignvalue:0to12.
When switches to the source, the
volume increases automatically.
4 Press to exit.
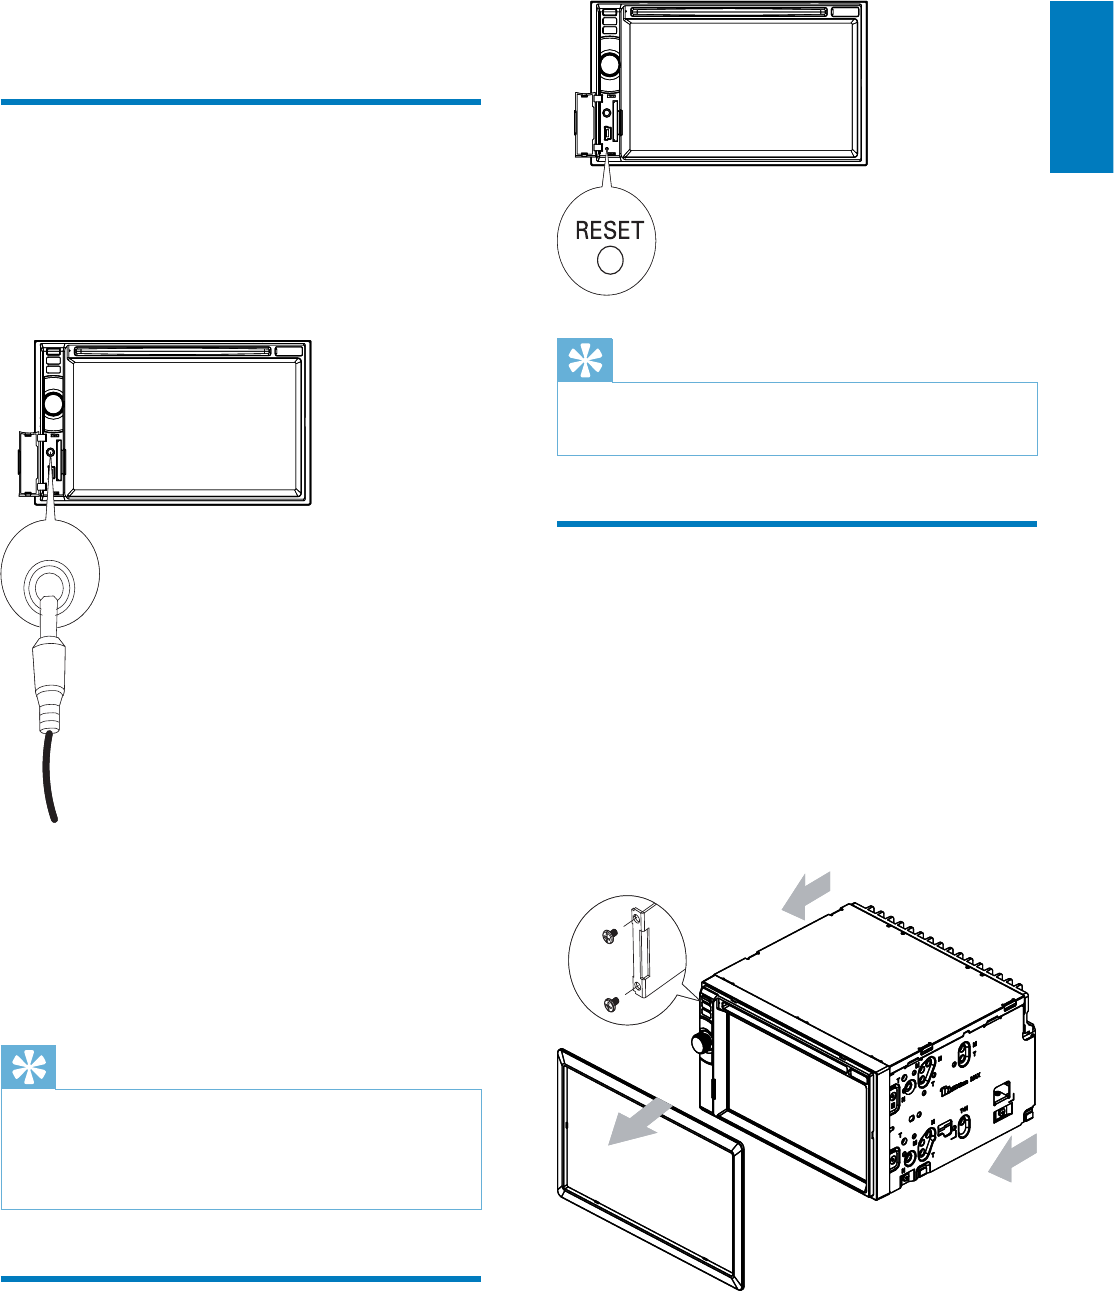
Adjust DVD rating
1 Touch [DVD rating].
2 Touchanoptionrepeatedlytoselect:
»
•
•
•
•
•
•
•
•
•
•
»
Language
settings
Options Description
[OSD] [English] Select on-screen-
display language.
>@
>@
Español
Português
[DVD
audio]
[English] Select DVD audio
language. Options
available are
dependsonDVD
disc.
>@
>@
Español
Português
[DVD
subtitle]
[English] Select DVD
subtitle language.
Options available
are depends on
DVD disc.
>@
>@
Español
Português
[Off] Turn off subtitle
language display.
[Disc
menu]
[English] Select DVD menu
language. Options
available are
dependsonDVD
disc.
>@
>@
Español
Português
3 Press to exit.
English
EN

36
DVD rating Options Description
[Set
password]
Set password to
restrict the play of
discs. The default
password is 0000.
[Rating
level]
[Kid
safe]
Acceptable for
children.
[G] Acceptable for general
viewers.
[PG] Parental guidance
suggested.
[PG-13] Unsuitable for children
under age 13.
[PG-R] Recommend parents
to restrict children
under17toview.
[R] Restricted.
Recommend parent to
guide children under
17 to view.
[NC-17] Unsuitable for children
under age 17.
[Adult] Acceptable for adults
only.
[Load
factory]
Restore to default
settings.
3 Press to exit.
EN
37
Tip
Whentheunitisreset,allthesettingsremain
unchanged.
•
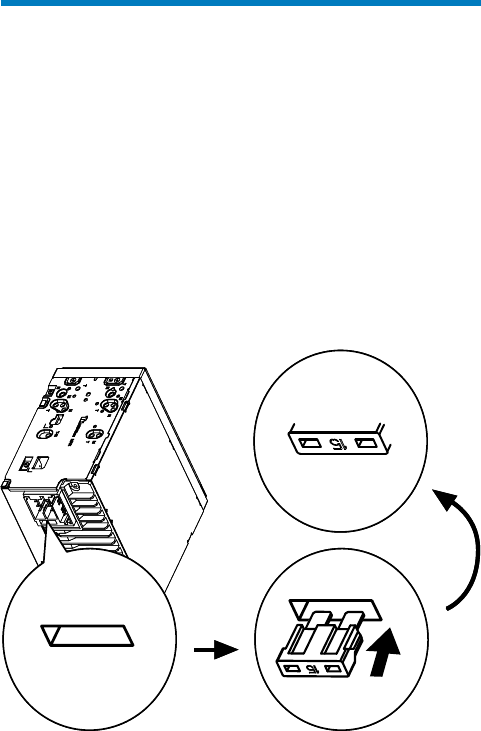
Remove the unit
To repair, replace fuse, or replace the unit
with another car audio, remove it from the
dashboard.
1 Take off the trim plate.
2 Screwoffthefour(4)screwsonthe
left/right side of the unit.
3 Pull the unit out from the dashboard.
10 Others
Listen to other devices
You can connect an external audio/video device
to the unit.
1 Connectthecaraudiotothedevicewith
thesuppliedAVcable.
2 Touchtheupperleftcornertodisplaythe
main menu.
3 Touch [AV-IN1].
4 Operated the connected the device (see
theinstructionsmanualofthedevice).
Tip
If you connected the system to other audio
device through the REAR OUT L/R connector
(see “Connect wires” section), touch [AV-IN2]
tolistentothatdevice.
•
Reset
When the unit hangs up, you can reset it.
1 Press RESET withaball-pointpenor
similar tool.
AV INAV IN
English
EN
38
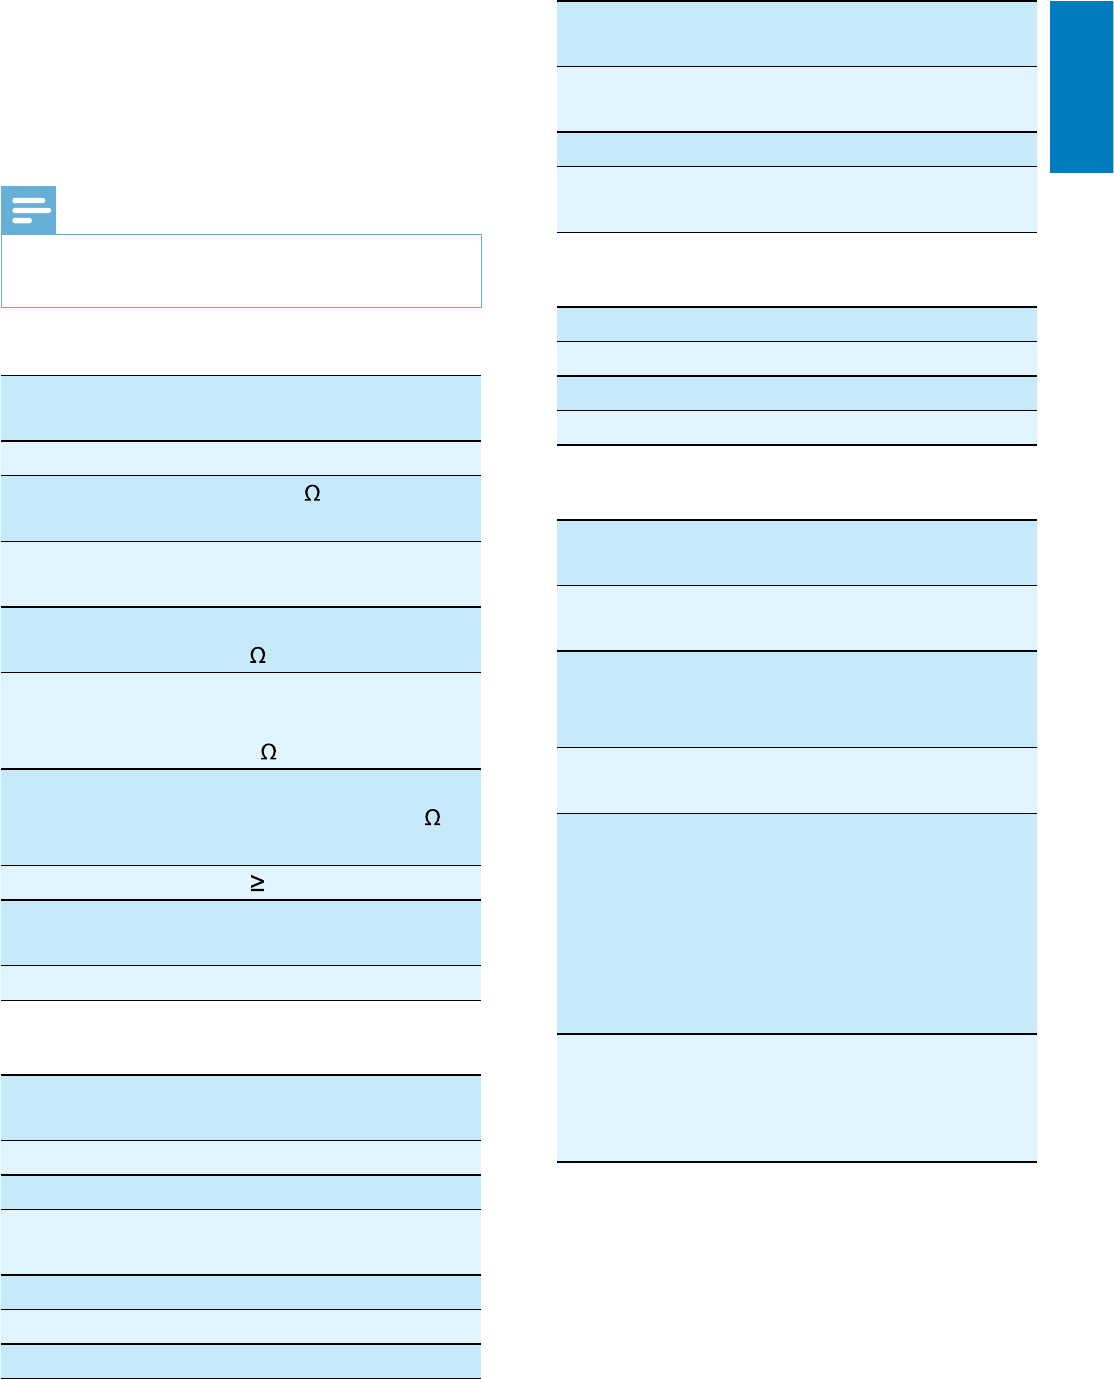
Replace fuse
If there is no power, the fuse may be damaged
and need to be replaced.
1 Take out the unit from dashboard.
2 Check the electric connection.
3 Buyafusethatmatchesthevoltageofthe
damaged fuse (15A)
4 Replace the fuse.
If the fuse gets damaged immediately after it
has been replaced, there may be an internal
malfunction. In such case, consult your Philips
dealer.
EN
39
Frequencyrange-FM 87.5-108.0MHz
(Europe)
Frequency range
-AM(MW)
522-1620KHz
(Europe)
Usable sensitivity - FM 5 uV
Usable sensitivity
-AM(MW)
50 uV
LCD
Screen size 6.5 inches (16:9)
Display resolution 800 x 480 dots
Contrast ratio 300
Brightness 350 cd/m2
Bluetooth
Communication
system
Bluetooth Standard
version 2.0
Output Bluetooth Standard Power
Class 2
Maximum
communication
range
Line of sight approx. 8m
Frequency band 2.4 GHz band (2.4000
GHz-2.4835GHz)
Compatible
Bluetooth
SURÀOHV
+DQGV)UHH3URÀOH+)3
+DQGVHW3URÀOH+63
Advanced Audio
'LVWULEXWLRQ3URÀOH
(A2DP)
Audio Video Remote
&RQWURO3URÀOH$95&3
Supported
codecs
Receive
Transmit
SBC(SubBandCodec)
SBC(SubBandCodec)
Compatible USB devices:
86%ÁDVKPHPRU\86%RU
USB1.1)
86%ÁDVKSOD\HUV86%RU
USB1.1)
memorycards(SD/MMC/SDHC)
Supported formats:
86%RUPHPRU\ÀOHIRUPDW)$7
FAT32
•
•
•
•
11 Product
information
Note
Product information is subject to change
without prior notice.
•
General
Powersupply 12VDC(11V-16
V), negative ground
Fuse 15 A
Suitable speaker
impedance
4-8
Maximum power
output
50Wx4channels
Continuous power
output
24Wx4channels(4
10% T.H.D.)
Pre-Amp output
voltage
2.0V(CDplay
mode;1kHz,0dB,10
kload)
Subwoofer output
voltage
2.0V(CDplaymode,
61Hz,0dB,10k
load)
Aux-in level 500 mV
Dimensions (W x H
xD)
178x101x160mm
Weight(mainunit) 2.5kg
Disc player
System DVD/CDaudio/
MP3 system
Frequencyresponse 20Hz-20kHz
Signal/noise ratio >75dB
Total harmonic
distortion
Less than 1%
Channel separation >55dB
Videosignalformat NTSConly
Videooutput 1+/-0.2V
Tuner
English
EN

40
MP3 bit rate (data rate): 32-320 Kbps
and variable bit rate
WMAv9orearlier
Directorynestinguptoamaximum
of8levels
Number of albums/ folders:
maximum 99
Number of tracks/titles: maximum
999
ID3 tag v2.0 or later
File name in Unicode UTF8
(maximum length: 128 bytes)
Unsupported formats:
Empty albums: an empty album is an
albumthatdoesnotcontainMP3/
:0$ÀOHVDQGLVQRWEHVKRZQLQ
the display.
8QVXSSRUWHGÀOHIRUPDWVDUH
skipped. For example, Word
GRFXPHQWVGRFRU03ÀOHVZLWK
extension .dlf are ignored and not
played.
$$&:$93&0DXGLRÀOHV
'50SURWHFWHG:0$ÀOHVZDY
.m4a,.m4p,.mp4,.aac)
:0$ÀOHVLQ/RVVOHVVIRUPDW
Supported MP3 disc format:
ISO9660, Joliet
Maximum title number: 512 (depending
RQÀOHQDPHOHQJWK
Maximum album number: 255
Supported sampling frequencies: 32 kHz,
44.1kHz, 48 kHz
Supported Bit-rates: 32-320 Kbps and
variable bit rate
Supported video formats:
DVD
Divx Home theater
MP4
Xvid
Note
Toensureabetterplayback,bitrateof4.5
Mbps is recommended.
•
•
•
•
•
•
•
•
•
•
•
•
•
•
•
•
•
•
•
•
•
•
EN

41
Disc rating exceeds the restrict setting.
Changetheratingsettingstolowerone.
Disc region code is not compatible with
theunit.Usediscwithproperregion
code.
No image
Parking brake wire connection is
incorrect. Check the parking wiring.
,PDJHÁDVKHVRUGLVWRUWHG
Video DVD settings do not match with
theDVD.AdjustvideoDVDsettings.
Video connection is improper. Check the
connections.
Noise in broadcasts.
Signals are too weak. Select other
stations with stronger signals.
Check the connection of the car antenna.
Changebroadcastfromstereotomono.
Preset stations lost.
Battery cable is not correctly connected.
Connect the battery cable to the terminal
that is always live.
Fuse is broken
TheFusetypeisincorrect.Replaceitwith
a 15A fuse.
Speakerwireorpowerwireisgrounded.
Check the connections.
Display show ERR-12
USB/SD/MMC data error. Check the USB
device or SD/MMC card.
About Bluetooth device
Music playback is unavailable on the system
even after successful Bluetooth connection.
Thedevicecannotbeusedwiththe
system to play music.
The audio quality is poor after connection
with a Bluetooth-enabled device.
The Bluetooth reception is poor. Move
thedeviceclosertothesystemor
remove any obstacle between the device
and the system.
Cannot connect with the system.
7KHGHYLFHGRHVQRWVXSSRUWWKHSURÀOHV
required for the system.
•
•
•
•
•
•
•
•
•
•
•
•
•
•
•
12 Troubleshooting
Warning
Neverremovethecasingofthisapparatus.•
To keep the warranty valid, never try to repair
the system yourself.
If you encounter problems when using this
apparatus, check the following points before
requesting service. If the problem remains
unsolved, go to the Philips web site (www.
philips.com/welcome).When you contact
Philips, ensure that the apparatus is nearby
and the model number and serial number are
available.
No power
Carenginehasnotbeenstarted.Start
the car engine.
Connections is incorrect.
Fuse has been damaged. Replace fuse
(see‘Replacefuse’onpage38).
No sound
Volumeistoolow.Adjustvolume.
Speaker connections is incorrect.
No response to the remote control
Ensure that the path between the
remotecontrolandtheunitisclearfrom
obstacles.
Fromaclosedistance,pointtheremote
controldirectlyattheunit.
Switch F/R to correct position (Ffor front
control and Rforrearcontrol).
Thefunctiondoesnotwork.Refertothe
instructions.
Replace the remote control battery.
Disc does not play
Disc is upside down. Ensure the printed
side is upwards.
Discisdirty.Cleanthediscwitha
clean, soft, lint-free cloth. Wipe the disc
outwards from the center.
Disc is defective. Try another disc.
incompatible disc is used. Try another
disc.
•
•
•
•
•
•
•
•
•
•
•
•
•
•
English
EN
42
The Bluetooth function of the device is
notenabled.Refertotheusermanualof
thedeviceforhowtoenablethefunction.
Thesystemisnotinthepairingmode.
Thesystemisalreadyconnectedwith
another Bluetooth-enabled device.
Disconnectthatdeviceorallother
connecteddevicesandthentryagain.
The paired mobile phone connects and
disconnects constantly.
TheBluetoothreceptionispoor.Move
themobilephoneclosertothesystemor
remove any obstacle between the mobile
phone and the system.
Some mobile phones may connect and
disconnect constantly when you make
orendcalls.Thisdoesnotindicateany
malfunctionofthesystem.
Forsomemobilephones,theBluetooth
connection may be deactivated
automatically as a power-saving feature.
This does not indicate any malfunction of
the system.
•
•
•
•
•
•
EN

43
SDHC
SecureDigitalHighCapacity(SDHC)isa
W\SHRIÁDVKPHPRU\FDUGEDVHGRQWKH6'$
VSHFLÀFDWLRQ7KH6'$VSHFLÀFDWLRQ
enables SD cards to reach higher capacities
from 4GB to 32GB, and growing.
W
WMA (Windows Media Audio)
An audio format owned by Microsoft, is a
part of Microsoft Windows Media technology.
Includes Microsoft Digital Rights Management
tools, Windows Media Video encoding
technology, and Windows Media Audio
encoding technology.
13 Glossary
B
Bite rate
ThemaxdatatransferthroughtheUSBport.
Bluetooth
%OXHWRRWKLVDVKRUWUDQJZLUHOHVVSURWRFRO
thatismeanttoallowmobiledevicestoshare
information and applications without the
worryofcablesorinterfaceincompatibilities.
7KHQDPHUHIHUVWRD9LNLQJ.LQJZKRXQLÀHG
Denmark.Operateat2.4GHz.Formore
information, see www.bluetooth.com.
M
MMC
MultimediaCard.Atypeofmemorycardwith
DÁDVKPHPRU\
MP3
$ÀOHIRUPDWZLWKDVRXQGGDWDFRPSUHVVLRQ
system.MP3istheabbreviationofMotion
PictureExpertsGroup1(orMPEG-1)Audio
Layer 3. With the MP3 format, one CD-R or
CD-RW can contain about 10 times more
datathanaregularCD.
R
Region code
Asystemthatallowsdiscstobeplayedonly
in the region designated. This unit only plays
discsthathavecompatibleregioncodes.You
FDQÀQGWKHUHJLRQFRGHRI\RXUXQLWRQWKH
productlabel.Somediscsarecompatiblewith
more than one region (or ALL regions.)
S
SD
SecureDigital.Atypeofmemorycardwitha
ÁDVKPHPRU\
English
EN
44
45

46