Philips Consumer Lifestyle DC350V37 Docking Entertainment System User Manual DC350 37 indd
Philips Consumer Lifestyle Docking Entertainment System DC350 37 indd
UserManual.wiki
>
Philips Consumer Lifestyle
>
DC350V37 User Manual
User manual
Navigation menu
Upload a User Manual
Namespaces
Wiki Guide
HTML
PDF
Info
Views
User Manual
Discussion / Help
Navigation


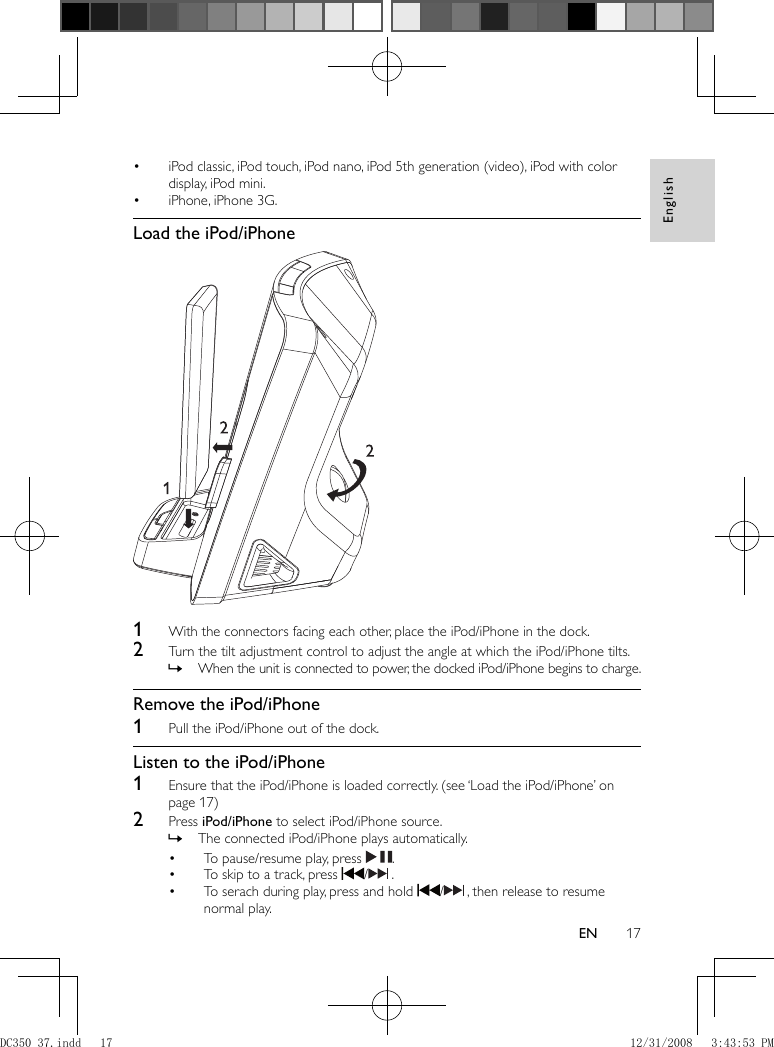
![18 EN To navigate the menu, press • MENU , and press PRESET +/- to select, then press / OK to confi rm. Connect to a computer 1 Load the iPod/iPhone in the dock. 2 Press iPod/iPhone select the iPod/iPhone source. 3 Connect the mini USB cable (supplied) to: the • TO PC jack (mini USB jack) on the back of the unit. the USB jack on the computer.• If iTunes is installed on the computer, the connected iPod/iPhone begins to »synchronize with iTunes. Refer to the device user manual for more details. Charge the iPod/iPhone When the unit is connected to power, the docked iPod/iPhone begins to charge. Play from an external device You can also listen to an external audio device through this unit. 1 Press MP3 Link to select MP3 link source. 2 Connect the supplied MP3 link cable to: the • MP3 LINK jack (3.5mm) on the back of the unit. the headphone jack on an external device.• 3 Start to play the device (see the device user manual). 5 Adjust sound Adjust volume level 1 During play, press VOL +/- to increase/decrease the volume level. Enhance bass 1 During play, press DBB to turn on or off dynamic bass enhancement. If DBB is activated, DBB is displayed. » Select a preset sound effect 1 During play, press DSC repeatedly to select: [POP] (pop)• [JAZZ] (jazz)• [CLASSIC] (classic)• [ROCK] (rock)• DC350_37.indd 18DC350_37.indd 18 12/31/2008 3:43:54 PM12/31/2008 3:43:54 PM](https://usermanual.wiki/Philips-Consumer-Lifestyle/DC350V37/User-Guide-1074684-Page-17.png)
![English19EN Mute sound 1 During play, press MUTE to mute/unmute sound. 6 Listen to radio Note Only FM radio reception is available on this unit. • Tune to a radio station 1 Press TUNER to select FM. 2 Press and hold / for more than 2 seconds. [Srch] (search) is displayed. » The radio tunes to a station with strong reception automatically. » 3 Repeat step 2 to tune to more stations. To tune to a weak station, press • / repeatedly until you fi nd optimal reception. Program radio stations automatically You can program a maximum of 20 preset radio stations. 1 In the tuner mode, press and hold PROG for more than 2 seconds to activate automatic program mdoe. [AUTO] (auto) is displayed. » All available stations are programmed in the order of waveband reception »strength. The fi rst programmed radio station is brodcast automatically. » Program radio stations manually You can program a maximum of 20 preset radio stations. 1 Press PRESET +/- to select a number (1 to 20). 2 Press and hold PRESET +/- for more than 2 seconds to activate program mode. “PRXX” is displayed and begins to blink. » 3 Tune to a radio station. (see ‘Tune to a radio station’ on page 19 ) 4 Press to confi rm. The preset number and the frequency of the preset station are displayed. »DC350_37.indd 19DC350_37.indd 19 12/31/2008 3:43:55 PM12/31/2008 3:43:55 PM](https://usermanual.wiki/Philips-Consumer-Lifestyle/DC350V37/User-Guide-1074684-Page-18.png)
![English21EN Connect with a Bluetooth device Note The operational range between this unit and a Bluetooth device is approximately 10 meters (30 feet). • Before you connect a Bluetooth device to this unit, familiarize yourself with the Bluetooth •capabilities of the device. Compatibility with all Bluetooth devices is not guaranteed. • Any obstacle between this unit and a Bluetooth device can reduce the operational range. • Keep this unit away from any other electronic device that may cause interference. • Connect a device for the fi rst time Tip This unit can memorize the connection information of up to 8 devices. • 1 Press BLUETOOTH to select the Bluetooth source. 2 For an iPhone, load it in the dock for automatic re-connection setup. 3 Press and hold PAIRING for more than 3 seconds. The Bluetooth indicator blinks. » 4 On the device, set up the Bluetooth connection: a Enable Bluetooth to search for other Bluetooth devices. (Refer to the device user manual on how to enable the function.) b When “ PHILIPS DC350” is recognized and displayed, select it to start to connect. c When prompted for a password, enter “0000”. 5 Wait until the Bluetooth indicator turns on. The connection is complete. » To connect more Bluetooth devices 1 Disconnect the currently-connected device. (see ‘Disconnect a device’ on page 22 ) 2 Repeat the steps 1-5 in “Connect a device”. Tip If no connection is made within one minute, [FAILED] (failed) is displayed on the main unit. •DC350_37.indd 21DC350_37.indd 21 12/31/2008 3:43:56 PM12/31/2008 3:43:56 PM](https://usermanual.wiki/Philips-Consumer-Lifestyle/DC350V37/User-Guide-1074684-Page-20.png)
![English23EN Tip To be heard more clearly, speak closer to the microphone. • If an echo is heard, reduce the volume of the main unit. • If you observe communication diffi culties, position the Bluetooth device closer to the main unit. • Listen to music Note You can listen to audio through this unit from devices that support A2DP or AVRCP. • As iPhone doesn’t support Bluetooth audio streaming, this unit doesn’t play audio fi les from •iPhone through Bluetooth connection. 1 Connect the Bluetooth device. (see ‘Connect with a Bluetooth device’ on page 21 ) 2 On the Bluetooth device, start play. You hear the music through the unit. » To pause/resume play, press • . To skip to a track, press • / . 8 Other features Set the alarm timer You can set two alarms which go off at different time. 1 Ensure that you have set the clock correctly. (see ‘Set clock and date’ on page 16 ) 2 Press and hold ALM 1 or ALM 2 on the main unit for 2 seconds. Hour digits blink. » [AL 1] (alarm 1) or [AL 2] (alarm 2) is displayed. » 3 Press / repeatedly to set the hour. 4 Press ALM 1 or ALM 2 to confi rm. 5 Press / repeatedly to set the minute. 6 Press ALM 1 or ALM 2 to confi rm. 7 Press VOL +/- to set a volume level for alarm tone. The volume level is applied to two alarms. » 8 Press ALM 1 or ALM 2 to confi rm. To set the other alarm, repeat the steps 2 -8.• DC350_37.indd 23DC350_37.indd 23 12/31/2008 3:43:57 PM12/31/2008 3:43:57 PM](https://usermanual.wiki/Philips-Consumer-Lifestyle/DC350V37/User-Guide-1074684-Page-22.png)
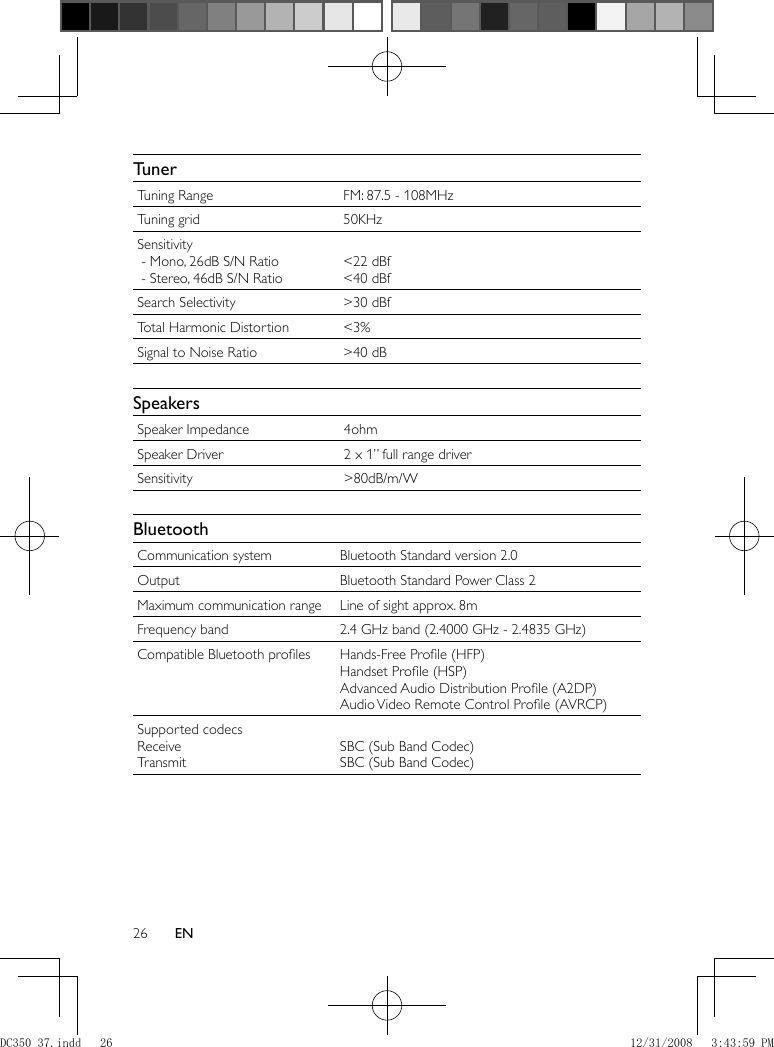
![English25EN Set the sleep timer This unit can switch to standby automatically after a set period of time. 1 When the unit is turned on, press SLEEP repeatedly to select a set period of time (in minutes). When the sleep timer is activated, the display shows » . To deactivate sleep timer 1 Press SLEEP repeatedly until [OFF] (off) is displayed. When the sleep timer is deactivated, » disappears on the display. Adjust display brightness 1 Press repeatedly BRIGHTNESS CONTROL on the main unit to select: Bright.• Dim.• Off.• 9 Product information Note Product information is subject to change without prior notice. • Specifi cations Amplifi er Rated Output Power 2X3W RMS Frequency Response 125Hz - 16kHz, ±3dB Signal to Noise Ratio >55dB Aux Input 0.6 V RMS 10kohmDC350_37.indd 25DC350_37.indd 25 12/31/2008 3:43:58 PM12/31/2008 3:43:58 PM](https://usermanual.wiki/Philips-Consumer-Lifestyle/DC350V37/User-Guide-1074684-Page-24.png)