Philips Consumer Lifestyle DS8800W Fidelio SoundCurve Wireless speaker with AirPlay User Manual DS8800W 37
Philips Consumer Lifestyle Fidelio SoundCurve Wireless speaker with AirPlay DS8800W 37
BOU-DS8800W & 135M-DS8800W User manual

Register your product and get support at
www.philips.com/welcome
EN User manual

3
Contents
1 Important 4
Safety 4
Notice 5
2 Your Entertainment System 8
Introduction 8
What’s in the box 8
What else you need 8
Overview of the main unit 8
Overview of the remote control 9
3 Prepare 10
Connect 10
4 Set up a Wi-Fi network for AirPlay 12
Connect the unit to a Wi-Fi network (router) 12
Connect an AirPlay device to the same Wi-Fi
network 17
5 Play 19
Stream audio from your AirPlay device 19
Control play 20
Advanced control 20
Update firmware 20
Play from an external device 21
Play and charge your iPod/iPhone/iPad through
USB socket 21
6 Product information 23
Specifications 23
7 Troubleshooting 24
EN

4
k Only use attachments/accessories
specified by the manufacturer.
l Use only with the cart, stand, tripod,
bracket, or table specified by the
manufacturer or sold with the apparatus.
When a cart is used, use caution when
moving the cart/apparatus combination to
avoid injury from tip-over.
m Unplug this apparatus during lightning
storms or when unused for long periods
of time.
n Refer all servicing to qualified service
personnel. Servicing is required when
the apparatus has been damaged in any
way, such as power-supply cord or plug
is damaged, liquid has been spilled or
objects have fallen into the apparatus, the
apparatus has been exposed to rain or
moisture, does not operate normally, or
has been dropped.
o Battery usage CAUTION – To prevent
battery leakage which may result in bodily
injury, property damage, or damage to the
remote control:
Install all batteries correctly, + and - as
marked on the remote control.
Remove batteries when the remote
control is not used for a long time.
Batteries (battery pack or batteries
installed) shall not be exposed to
excessive heat such as sunshine, fire
or the like.
p Apparatus shall not be exposed to
dripping or splashing, keep it away from
direct sunlight, naked flames or heat.
q This product may contain lead and
mercury. Disposal of these materials
•
•
•
1 Important
Safety
Important Safety Instructions
a Read these instructions.
b Keep these instructions.
c Heed all warnings.
d Follow all instructions.
e Do not use this apparatus near water.
f Clean only with dry cloth.
g Do not block any ventilation openings.
Install in accordance with the
manufacturer’s instructions.
h Do not install near any heat sources such
as radiators, heat registers, stoves, or
other apparatus (including amplifiers) that
produce heat.
i Do not defeat the safety purpose of
the polarized or grounding-type plug.
A polarized plug has two blades with
one wider than the other. A grounding
type plug has two blades and a third
grounding prong. The wide blade or the
third prong are provided for your safety.
If the provided plug does not fit into
your outlet, consult an electrician for
replacement of the obsolete outlet.
j Protect the power cord from being
walked on or pinched, particularly at
plugs, convenience receptacles, and the
point where they exit from the apparatus.
EN

5
Prolonged exposure to sound, even at
normally ‘safe’ levels, can also cause hearing
loss.
Be sure to use your equipment reasonably
and take appropriate breaks.
Be sure to observe the following guidelines
when using your headphones.
Listen at reasonable volumes for
reasonable periods of time.
Be careful not to adjust the volume as your
hearing adapts.
Do not turn up the volume so high that
you can’t hear what’s around you.
You should use caution or temporarily
discontinue use in potentially hazardous
situations. Do not use headphones while
operating a motorized vehicle, cycling,
skateboarding, etc.; it may create a traffic
hazard and is illegal in many areas.
Risk of overheating! Never install this apparatus
in a confined space. Always leave a space of
at least four inches around this apparatus for
ventilation. Ensure curtains or other objects
never cover the ventilation slots on this
apparatus.
Notice
Notice of compliance
Modifications
The user is cautioned that changes or
modifications not expressly approved by the
party responsible for compliance could void the
user’s authority to operate the equipment.
FCC & RSS compliance statement
This device complies with Part 15 of the FCC
Rules and Industry Canada licence-exempt
RSS standard(s). Operation is subject to the
following two conditions:
a This device may not cause harmful
interference, and
b This device must accept any interference
received, including interference that may
cause undesired operation.
•
•
•
•
•
•
may be regulated due to environmental
considerations. For disposal or recycling
information, please contact your local
authorities or the Electronic Industries
Alliance: www.eiae.org.
r Where the mains plug or an appliance
coupler is used as the disconnect device,
the disconnect device shall remain readily
operable.
Warning
Never remove the casing of this apparatus.
Never lubricate any part of this apparatus.
Never place this apparatus on other electrical
equipment.
Keep this apparatus away from direct sunlight, naked
flames or heat.
Ensure that you always have easy access to the power
cord, plug or adaptor to disconnect this apparatus from
the power.
•
•
•
•
•
Hearing safety
Listen at a moderate volume.
Using headphones at a high volume can
impair your hearing. This product can
produce sounds in decibel ranges that may
cause hearing loss for a normal person,
even for exposure less than a minute. The
higher decibel ranges are offered for those
that may have already experienced some
hearing loss.
Sound can be deceiving. Over time your
hearing ‘comfort level’ adapts to higher
volumes of sound. So after prolonged
listening, what sounds ‘normal’ can actually
be loud and harmful to your hearing. To
guard against this, set your volume to a safe
level before your hearing adapts and leave
it there.
To establish a safe volume level:
Set your volume control at a low setting.
Slowly increase the sound until you can
hear it comfortably and clearly, without
distortion.
Listen for reasonable periods of time:
•
•
•
•
EN

6EN
This equipment complies with FCC’s and
IC’s RF radiation exposure limits set forth
for an uncontrolled environment. The
antenna(s) used for this transmitter must
be installed and operated to provide a
separation distance of at least 20 cm from
all persons and must not be collocated or
operating in conjunction with any other
antenna or transmitter. Installers must
ensure that 20cm separation distance
will be maintained between the device
(excluding its handset) and users.
Notice
Notice of compliance
Modifications
The user is cautioned that changes or
modifications not expressly approved by the
party responsible for compliance could void the
user’s authority to operate the equipment.
FCC & RSS compliance statement
This device complies with Part 15 of the FCC
Rules and Industry Canada licence-exempt
RSS standard(s). Operation is subject to the
following two conditions:
a This device may not cause harmful
interference, and
b This device must accept any interference
received, including interference that may
cause undesired operation.
FCC Radiation Exposure Statement
L’appareilestconformeàlaréglementationFCC,
section15etIndustrieCanadaRSSstandardexemptsde
licence(s).Sonutilisationestsoumiseàdeuxconditions:
(1)L’appareilnedoitpasprovoquerd’interférences
nuisibles,et
(2)L’appareildoitsupporterlesinterférencesreçues,
ycomprislesinterférencesempêchantsonfonctionnement
correct.
losusuarios.
CetappareilnumériquedelaclasseBest
conformeàlanormeNMB‐003duCanada
.
Esteequipocumpleconloslímitesde
exposiciónalasradiacionesderadiofrecuencia
queestablecelaFCCeICparaprotegerelmedio
ambiente.Lasantenasutilizadasparaeste
transmisordebeninstalarseyponerseen
funcionamientoparaproporcionarunadistancia
mínimade20cmdeseparacióndetodaslas
personasynodebencolocarsenifuncionar
juntoconcualquierotraantenaotransmisor.
Losinstaladoresdebenasegurarsedequese
mantieneunadistanciade20cmdeseparación
entreeldispositivo(excluidoelmicroteléfono)y
FCC rules
This equipment has been tested and found
to comply with the limits for a Class B
digital device, pursuant to Part 15 of the
FCC Rules. These limits are designed to
provide reasonable protection against
harmful interference in a residential
installation. This equipment generates, uses
and can radiate radio frequency energy
and, if not installed and used in accordance
with the instructions, may cause harmful
interference to radio communications.
However, there is no guarantee that
interference will not occur in a particular
installation.
If this equipment does cause harmful
interference to radio or television
reception, which can be determined by
turning the equipment off and on, the
user is encouraged to try to correct
the interference by one or more of the
following measures:
Reorient or relocate the receiving antenna.
Increase the separation between the
equipment and receiver.
Connect the equipment into an outlet on
a circuit different from that to which the
receiver is connected.
Consult the dealer or an experienced
radio/TV technician for help.
Canada:
This Class B digital apparatus complies with
Canadian ICES-003.
•
•
•
•
7
Your system consists of materials which can
be recycled and reused if disassembled by
a specialized company. Please observe the
local regulations regarding the disposal of
packaging materials, exhausted batteries and old
equipment.
“Made for iPod,” “Made for iPhone,” and “Made
for iPad” mean that an electronic accessory
has been designed to connect specifically to
iPod, iPhone, or iPad, respectively, and has
been certified by the developer to meet
Apple performance standards. Apple is not
responsible for the operation of this device
or its compliance with safety and regulatory
standards. Please note that the use of this
accessory with iPod, iPhone, or iPad may affect
wireless performance.
AirPlay, iPod, and iPhone are trademarks of
Apple Inc., registered in the U.S. and other
countries. iPad is a trademark of Apple Inc.
Note
The type plate is located on the bottom of the
apparatus.
•
EN
Environmental information
All unnecessary packaging has been omitted.
We have tried to make the packaging easy to
separate into three materials: cardboard (box),
polystyrene foam (buffer) and polyethylene
(bags, protective foam sheet.)
Disposal of your old product and
batteries
Your product is designed and manufactured
with high quality materials and components,
which can be recycled and reused.
Never dispose of your product with other
household waste. Please inform yourself about
the local rules on the separate collection of
electrical and electronic products and batteries.
The correct disposal of these products helps
prevent potentially negative consequences on
the environment and human health.
Your product contains batteries, which cannot
be disposed of with normal household waste.
Please inform yourself about the local rules on
separate collection of batteries. The correct
disposal of batteries helps prevent potentially
negative consequences on the environment and
human health.
Please visit www.recycle.philips.com for
additional information on a recycling center in
your area.
Information about the use of batteries:
Caution
Risk of leakage: Only use the specified type of batteries.
Do not mix new and used batteries. Do not mix
different brands of batteries. Observe correct polarity.
Remove batteries from products that are not in use for
a longer period of time. Store batteries in a dry place.
Risk of injury: Wear gloves when handling leaking
batteries. Keep batteries out of reach of children and
pets.
Risk of explosion: Do not short circuit batteries. Do
not expose batteries to excessive heat. Do not throw
batteries into the fire. Do not damage or disassemble
batteries. Do not recharge non-rechargeable batteries.
•
•
•
8
1 x MP3 link cable
Desk top adaptor
User manual
Quick start guide
What else you need
To stream audio wirelessly by AirPlay, you need:
A wireless router that is powered on
and working properly.
An AirPlay device (e.g., an iOS 4.2 (or
later) enabled iPod touch/iPhone/iPad
or Wi-Fi enabled PC or Mac installed
with iTunes 10 (or later)).
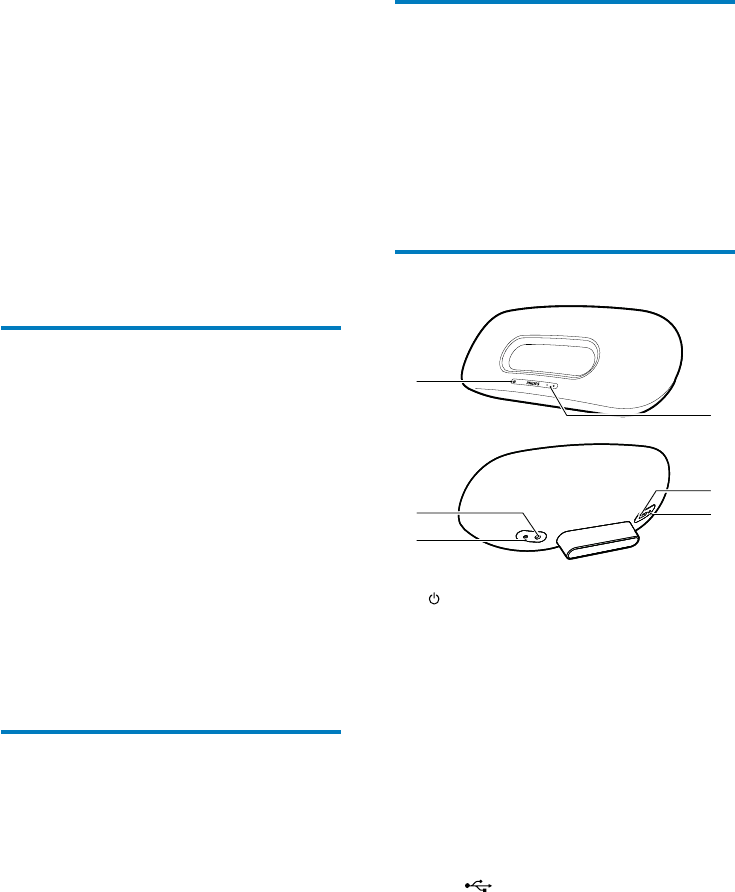
Overview of the main unit
a
Turn on/off the unit.
(Press and hold) reset the unit.
As the indicator to show the current
status of the unit.
b VOLUME +/-
Adjust volume.
c DC IN
Power socket of the unit.
d AUX IN
Socket for an external audio player.
e USB
USB socket.
•
•
•
•
•
•
•
•
•
•
•
•
•
e
f
c
d
b
a
e
f
c
d
b
a
2 Your
Entertainment
System
Congratulations on your purchase, and
welcome to Philips! To fully benefit from the
support that Philips offers, register your product
at www.philips.com/welcome.
If you contact Philips, you will be asked for the
model and serial number of this apparatus. The
model number and serial number are on the
bottom of the apparatus. Write the numbers
here:
Model No. __________________________
Serial No. ___________________________
Introduction
With this unit, you can:
stream audio from your iOS 4.2 (or
later) enabled device (e.g., an iPod
touch/iPhone/iPad) wirelessly by
AirPlay.
stream audio from your Wi-Fi enabled
PC or Mac installed with iTunes 10 (or
later) wirelessly by AirPlay.
play audio from other audio devices
through AUX IN socket or USB
socket.
charge your iPod/iPhone/iPad through
the USB socket with a USB cable (not
supplied).
What’s in the box
Check and identify the contents of your
package:
Main unit
Remote control
1 x AC power cord
•
•
•
•
•
•
•
EN
9
h
Start or pause play.•
f WI-FI SETUP
Connect the unit to a Wi-Fi network.
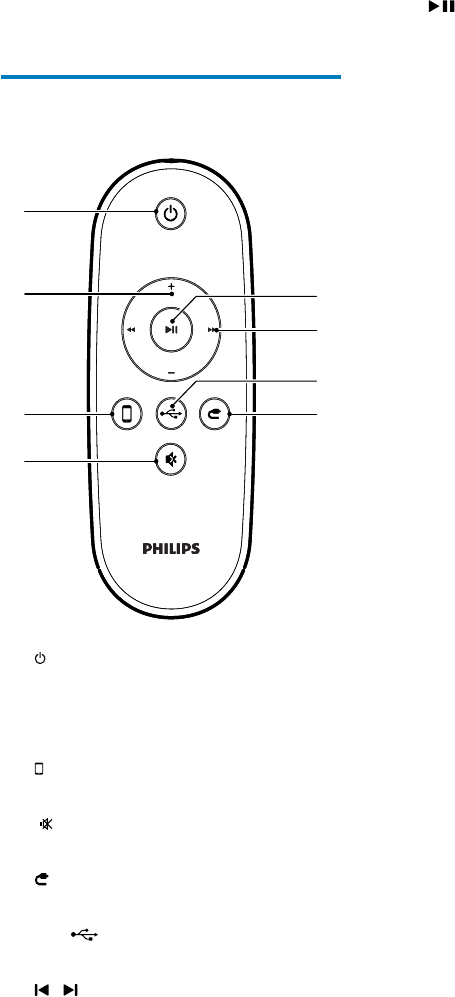
Overview of the remote
control
a
Turn on/off the unit.
b +/-
Adjust volume.
c
Select the AirPlay device audio source.
d
Mute or restore volume.
e
Select the AUX IN audio source.
f USB
USB socket.
g /
Skip to the previous/next track.
•
•
•
•
•
•
•
•
h
c
d
g
e
f
b
a
h
c
d
g
e
f
b
a
EN
10
After boot-up, the indicator starts to
blink in green slowly.
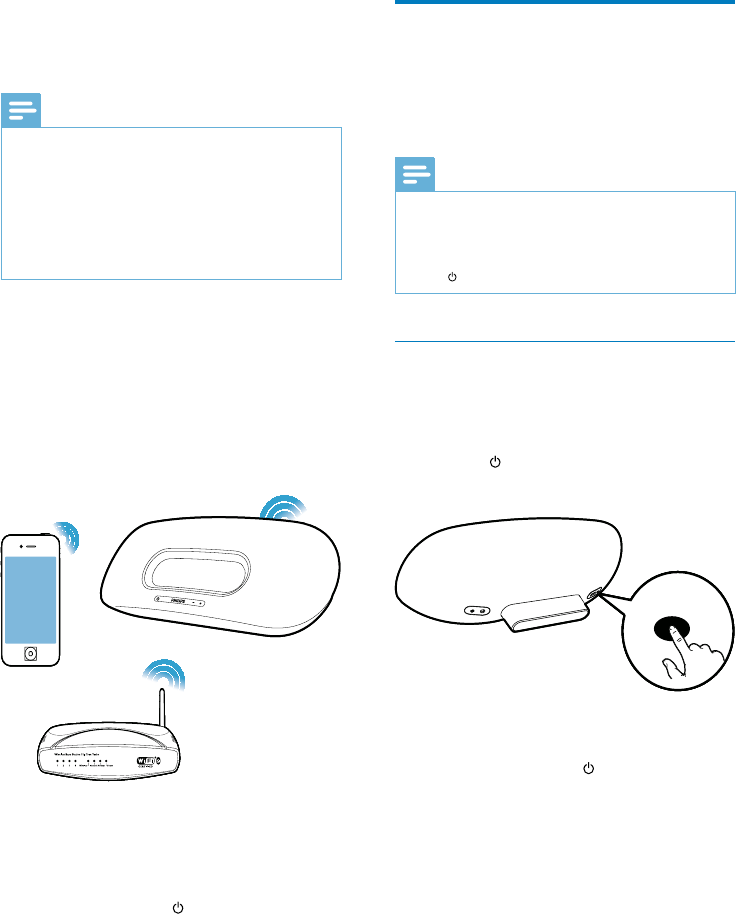
Switch on or to standby mode
The unit switches on automatically after power
connection.
To switch the unit to standby mode, press
on the front of the main unit.
To switch the unit on from the standby
mode, press again.
Prepare the remote control
Caution
Risk of explosion! Keep batteries away from heat,
sunshine or fire. Never discard batteries in fire.
Perchlorate Material - special handling may apply. See
www.dtsc.ca.gov/hazardouswaste/perchlorate.
•
•
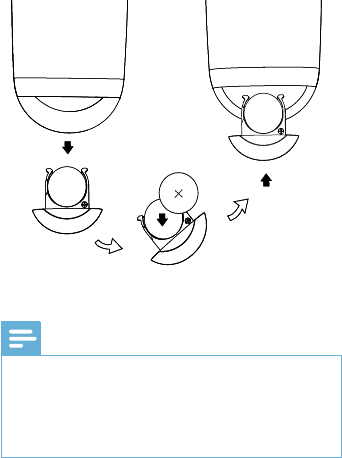
For first-time use:
1 Remove the protective tab to activate the
remote control battery.
To replace the remote control battery:
1 Open the battery compartment.
2 Insert one CR2025 battery with correct
polarity (+/-) as indicated.
3 Close the battery compartment.
»
•
•
3 Prepare
Always follow the instructions in this chapter in
sequence.
Connect
Connect power
Caution
Risk of product damage! Ensure that the power supply
voltage corresponds to the voltage printed on the
bottom of the unit.
Risk of electric shock! When you unplug the AC
adaptor, always pull the plug from the socket. Never
pull the cord.
Before connecting the AC adaptor, ensure you have
completed all other connections.
•
•
•
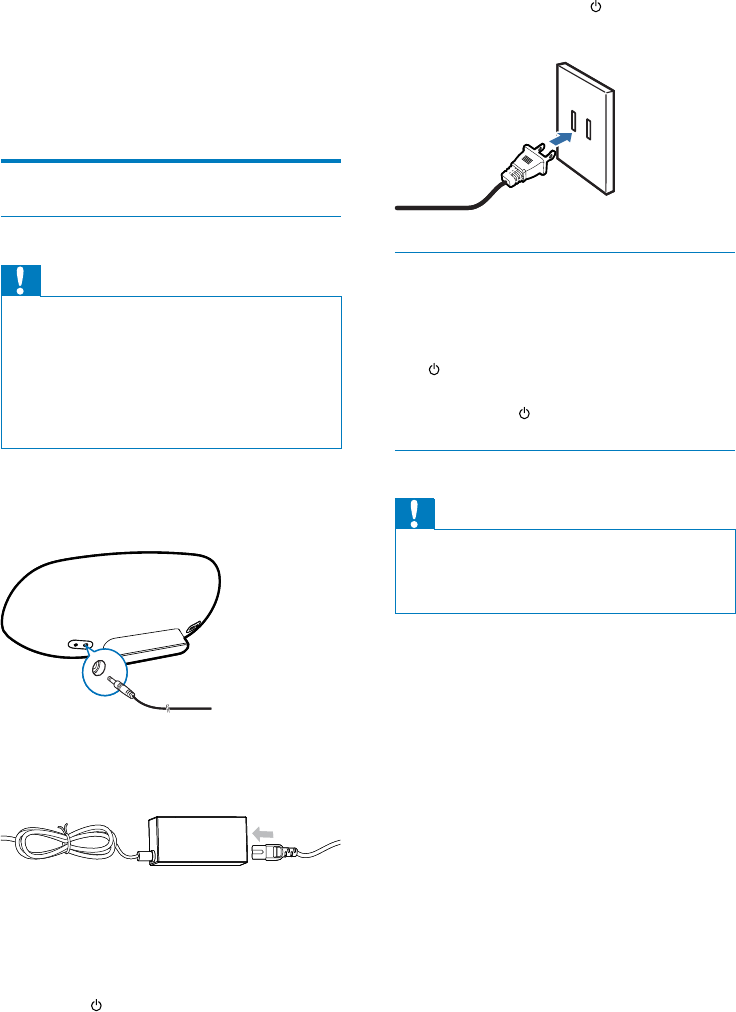
1 Insert the plug from the AC adaptor to
the DC IN socket on the back of the main
unit.
2 Connect one end of the AC power cord
to the AC adaptor.
3 Connect the other end of the AC power
cord to the wall outlet.
It takes about 35 seconds for the
speakers to boot up. During boot-up,
the indicator on the front of the
main unit blinks in green quickly.
»
EN
11
Note
Before pressing any function button on the remote
control, first select the correct source with the remote
control instead of the main unit.
If you are not going to use the remote control for a
long time, remove the battery.
•
•
EN
12
3 Check the type of the wireless router you
use.
Connect the unit to a Wi-Fi
network (router)
Select a scenario below that matches your
router type.
Note
Each time when the unit is powered on again, the
unit enters the latest configured Wi-Fi network
automatically.
In case of setup failure, repeat the steps, or press and
hold on the front of the main unit and try again.
•
•
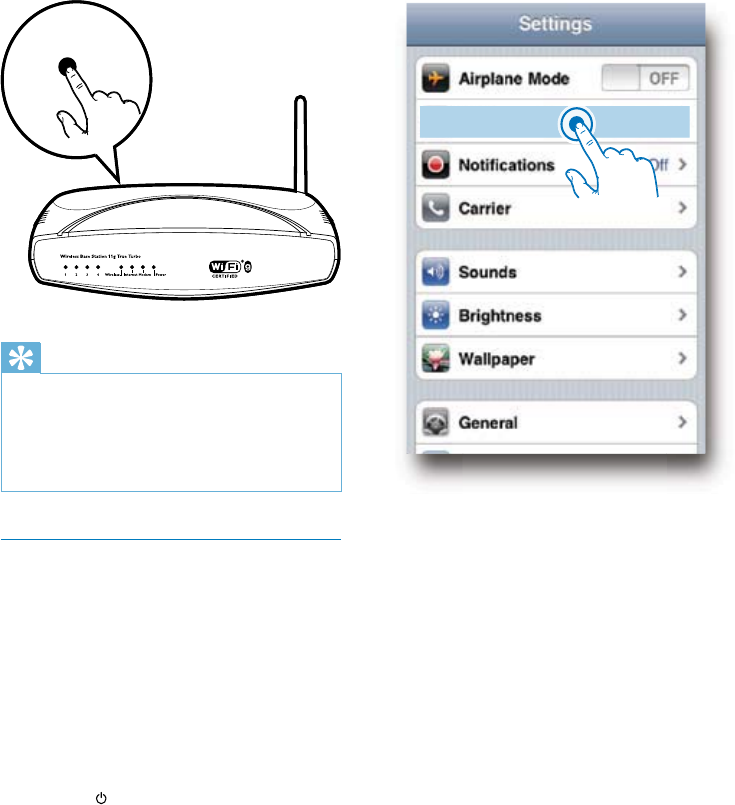
Scenario 1: Connect to a WPS-PBC
router
1 Press WI-FI SETUP on the back of the
main unit.
The indicator blinks in red, green, and
yellow alternately.
2 Press the WPS button on the wireless
router.
After a while, the indicator stops
blinking and stays green, and the
speaker beeps.
The unit joins the Wi-Fi network
successfully.
»
»
»
WIFI
SETUP
WI-FI SETUP
WIFI
SETUP
WI-FI SETUP
4 Set up a Wi-
Fi network for
AirPlay
Note
Some operations may vary as you use different types of
wireless routers.
You are recommended to change the SSID of your
wireless router to ‘PhilipsFidelioAP’. In this way, the
unit can get connected to the router automatically
after power-on. You can hear a beep after successful
connection. Then, proceed to ‘Connect an AirPlay
device to the same Wi-Fi network’ directly.
•
•
The unit is compatible with the following iPod/
iPhone/iPad models:
iPod touch (2nd, 3rd, and 4th generation)
iPhone 4
iPhone 3GS
iPad 2
iPad
Before setup of the Wi-Fi network, check
the points below.
1 Make sure that the wireless router is
powered on and working properly.
2 Make sure that the indicator on the front
of the main unit blinks in green slowly.
•
•
•
•
•
EN
13
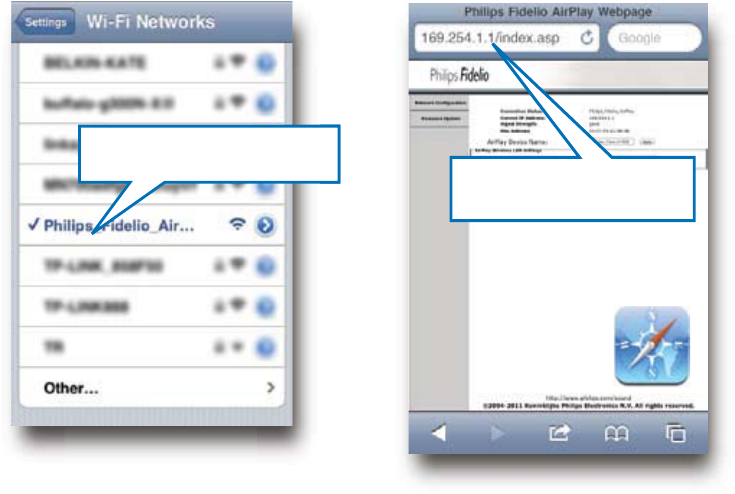
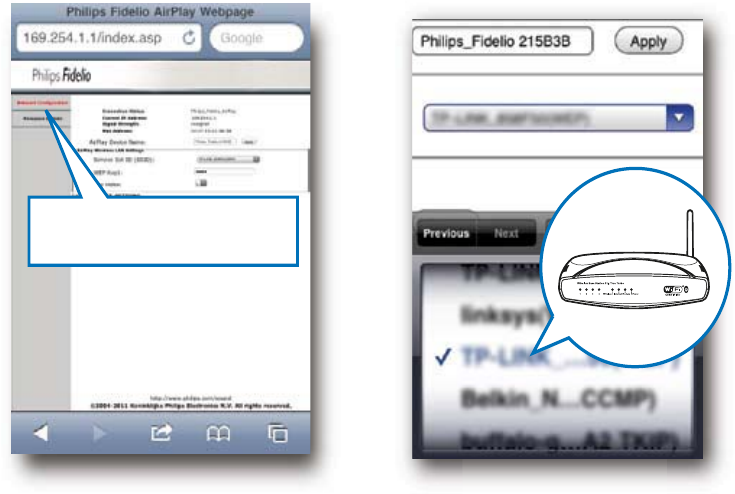
3 Select Philips_Fidelio_AirPlay from the list
of available networks.
Tip
To change the name of the unit for AirPlay, proceed
with steps 2 to 7 in ‘Scenario 2: Connect to a non-WPS
router’ below.
For some wireless routers, you may need to hold the
WPS button for WPS connection. See the user manuals
of the specific routers for details.
•
•
Scenario 2: Connect to a non-WPS
router
You can connect the unit to a non-WPS router
through
an iOS 4.2 (or later) enabled iPod
touch/iPhone/iPad
a Wi-Fi enabled PC or Mac installed
with iTunes 10 (or later)
1 Press and hold WI-FI SETUP on the back
of the main unit for more than 5 seconds.
The indicator blinks in green and
yellow alternately.
2 Select Settings -> Wi-Fi on your iPod
touch/iPhone/iPad.
Or enter the list of available wireless
networks on your PC/Mac.
•
•
»
•
WPSWPS
EN
14
7 Select the Network Configuration tab.
169.254.1.1169.254.1.1
4 Wait until successful Wi-Fi connection to
the main unit.
A Wi-Fi signal icon is displayed on the
iPod touch/iPhone/iPad.
5 Open Safari on your iPod/iPhone/iPad.
Or open the web browser on your
PC or Mac.
6 Type in 169.254.1.1 at the address bar to
enter the DS8800W configuration page.
»
•
Philips_Fidelio_AirplayPhilips_Fidelio_Airplay
EN
15
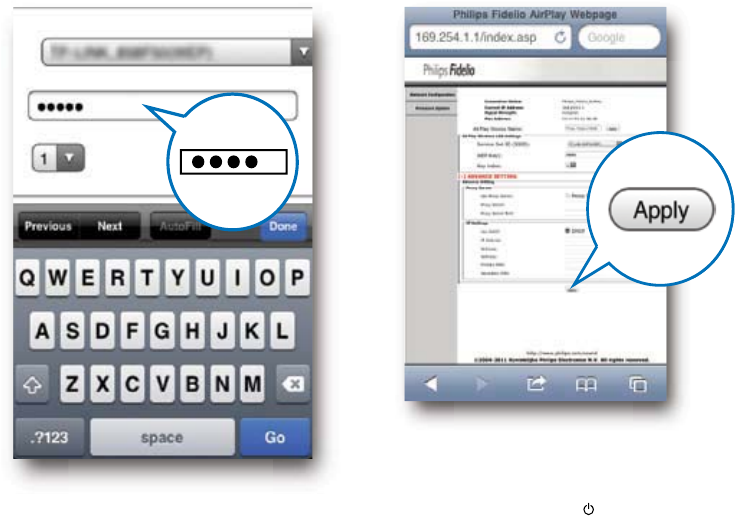
10 Enter your network key if required (For
some routers, you may also need to tick
DHCP under Advance Setting.)
8 Change the name of the unit in Airplay
Device Name if you like.
9 Select your router SSID from the pull-
down list of Service Set ID (SSID).
Network ConfigurationNetwork Configuration
EN
16
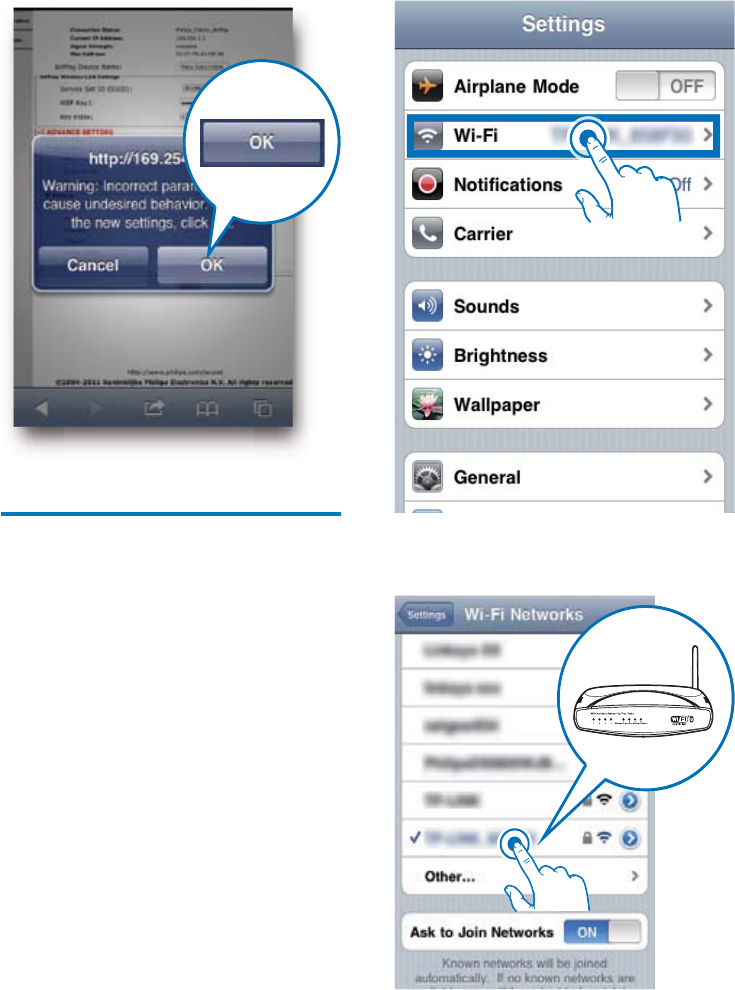
12 Click OK on the popup menu to confirm
your settings.
After a while, the indicator stops
blinking and stays green, and the
speaker beeps.
The unit joins the Wi-Fi network
successfully.
»
»
11 Click Apply at the bottom of the page to
apply your settings.
A menu for confirmation of your set
parameters pops up.
»
EN
17
2 Select your router SSID from the list of
available wireless networks.
Connect an AirPlay device to
the same Wi-Fi network
To work together with the unit, your AirPlay
device is required to join the same Wi-Fi
network as the unit.
1 Select Settings -> Wi-Fi on your iPod
touch/iPhone/iPad.
Or enter the list of available wireless
networks on your PC/Mac.
•
EN
18
3 Wait until successful Wi-Fi connection to
the router.
A Wi-Fi signal icon is displayed on the
AirPlay device.
»
EN
19
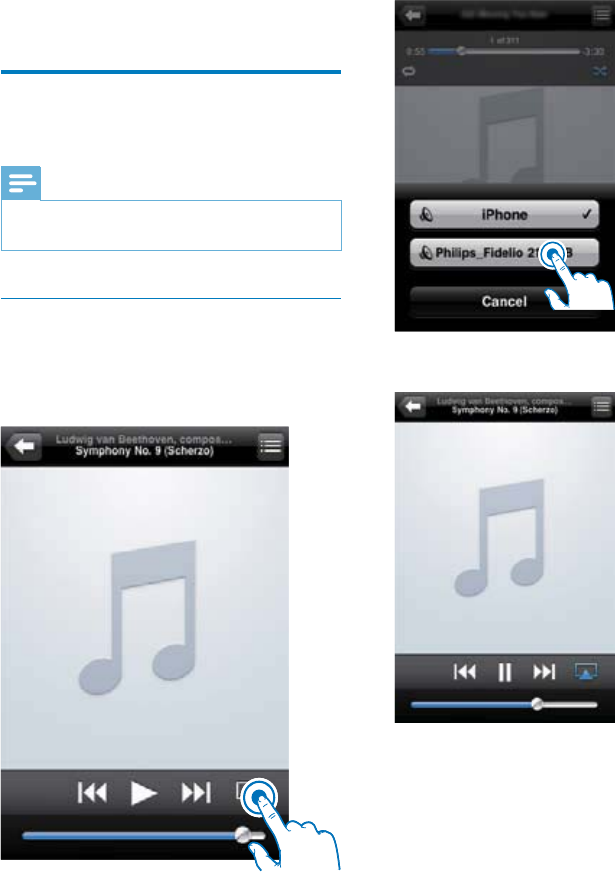
4 Select a media file and start play.
5 Wait until successful audio streaming to
the speakers.
5 Play
Stream audio from your
AirPlay device
Note
Make sure that the AirPlay device is connected to the
same Wi-Fi network as the unit.
•
Stream from your iOS 4.2 (or later)
enabled iPod touch/iPhone/iPad
1 Open iPod.
2 Tap on the AirPlay icon.
3 Select Philips_Fidelio XXXX (or user
customized name) from the list.
EN

20
Advanced control
For advanced control, you can use your
AirPlay device to download the Philips
Fidelioapplication from Apple Application Store.
Update firmware
Note
You can only update the firmware from a PC/Mac.•
Download the update file
1 On your PC/Mac, go to www.philips.com/
support.
2 Enter the model number to find the latest
firmware upgrade file available.
3 Save the upgrade file to your hard drive.
Update from the configuration page
You can update the firmware in two different
ways.
Option 1 (recommended): the unit and PC/
Mac connected to the same wireless router
1 Make sure that the unit and PC/Mac are
connected to the same wireless router.
2 Power on the unit (see ‘Prepare - Connect
- Connect power’).
It takes about 35 seconds for the
speaker to boot up. During boot-up,
the indicator on the front of the
main unit blinks in green quickly.
After boot-up, the indicator starts to
blink in green slowly.
3 Open Safari on your PC/Mac, and then
select ‘Philips_Fidelio XXX’ from the
bonjour pull-down list.
Or open the web browser on your
PC or Mac, and then type in the IP
address of DS8800W (available at
»
»
•
Stream from your Wi-Fi enabled PC
or Mac installed with iTunes 10 (or
later)
Note
Before you open iTunes, make sure that you have
enabled Bonjour service in your PC. Take Windows
XP for example: to enable the service, you can click
Start->Settings->Control Panel, and double-click
Administrative Tools-> Services->Bonjour Service,
and then click Start followed by OK on the pop-up
menu.
•
1 Open iTunes 10 (or later).
2 Click the AirPlay icon at the bottom right
corner of the window.
3 Select Philips_Fidelio_AirPlay XXXX (or
user customized name) from the list.
4 Select a media file and start play.
5 Wait until successful audio streaming to
the speaker.
Control play
You can select different play options from either
your AirPlay device or the supplied remote
control.
Note
All the operations below are based on the supplied
remote control.
•
To start or pause play, press .
To skip to the previous or next track, press
/ .
To adjust volume, press +/- repeatedly.
To mute or restore volume, press .
To switch to the AUX IN source (if
connected), press .
To switch back to the AirPlay device
source, press .
•
•
•
•
•
•
EN
21
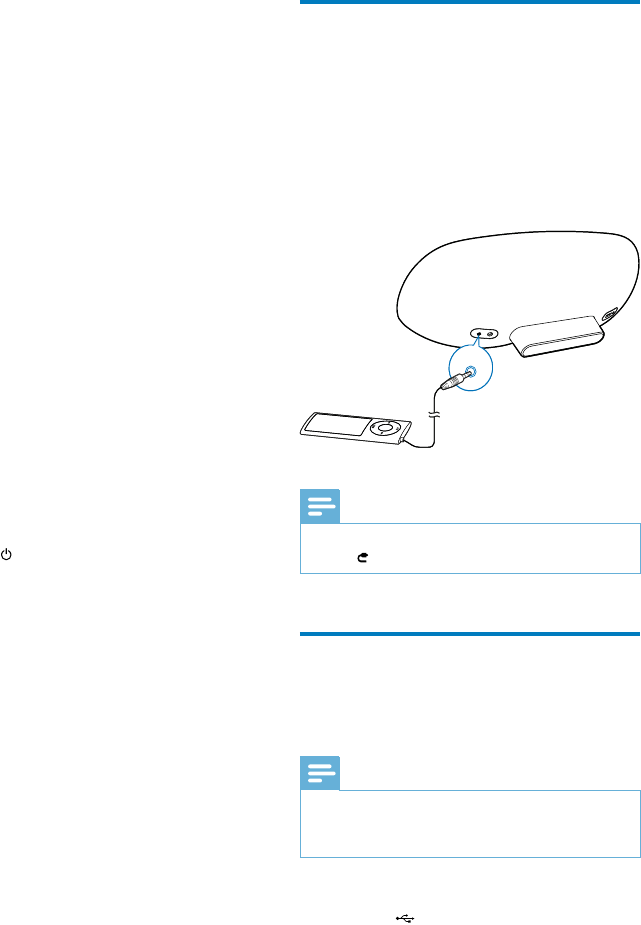
Play from an external device
You can also listen to an external audio player
through the unit.
Connect the supplied MP3 link cable to:
the AUX IN socket on the back of
the main unit.
the headphone jack on an external
audio player.
Note
To play audio from the connected audio player, first
press to select the AUX IN source.
•
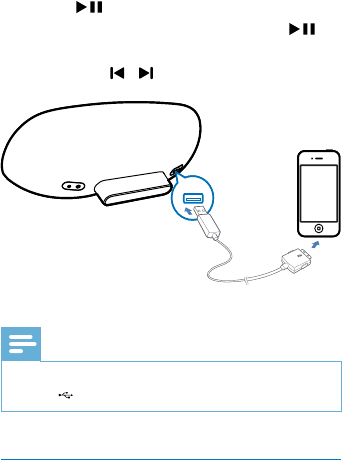
Play and charge your iPod/
iPhone/iPad through USB
socket
Note
USB source is only for Apple devices.
Ensure that the USB connected device contains
playable audio contents for supported formats.
•
•
1 Connect the USB cable (not supplied) to:
the socket on the back of the main
unit.
the charging jack on the Apple device
(iPod/iPhone/iPad).
The connected iPod/iPhone/iPad
begins to charge automatically.
•
•
•
•
»
AUX INAUX IN
the router configuration page) at the
address bar.
The DS8800W configuration
page is displayed.
4 Select the Firmware Update tab, and then
follow the on-screen instruction to enter
the next page.
5 Click Browse to select the downloaded
firmware update file, and then click Open.
6 Click Upload to upload the file, and then
compare the current and new file versions.
7 After you make sure that the downloaded
update file is the latest, click Ok to start
firmware update.
A progress bar is displayed.
8 At completion of the update process, click
Ok to confirm.
Option 2: the unit connected to PC/Mac
directly
1 Repeat step 2 in the above.
2 Press and hold WI-FI SETUP on the back
of the main unit for more than 5 seconds.
The indicator blinks in green and
yellow alternately.
3 Enter the list of available wireless networks
on your PC/Mac.
4 Select Philips_Fidelio_AirPlay (or the user
customized name) from the list of available
networks.
5 Open Safari on your PC/Mac, and then
select ‘Philips_Fidelio XXX’ from the
bonjour pull-down list.
Or open the web browser on
your PC or Mac, and then type in
169.254.1.1 at the address bar.
The DS8800W configuration
page is displayed.
6 Repeat steps 4 to 8 in the above to finish
firmware update.
»
»
»
•
»
EN
22
2 Press to start play.
To pause or resume play, press .
To skip to the previous or next track,
press / .
Note
To play audio from the connected Apple device, first
press to select the USB source.
•
Compatible iPod/iPhone/iPad
The USB socket supports the following iPod,
iPhone, and iPad models.
Made for:
iPod touch (1st, 2nd, 3rd, and 4th
generation)
iPod classic
iPod nano (2nd, 3rd, 4th, 5th, and 6th
generation)
iPhone 4
iPhone 3GS
iPhone 3G
iPhone
iPad 2
iPad
•
•
•
•
•
•
•
•
•
•
•
EN
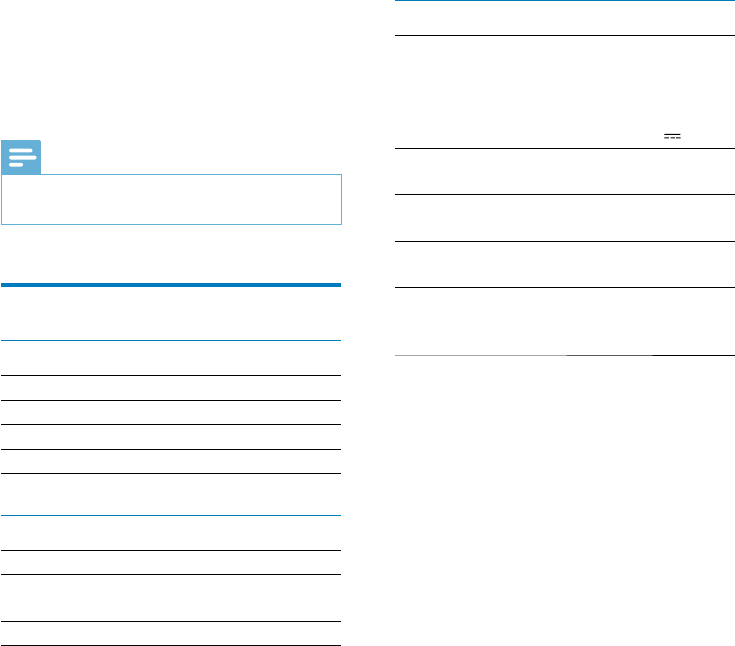
23
General information
AC power Model: GFP451DA-
1825-1
Input: 100 - 240 V~,
50/60 Hz 1.2 A
Output: 18 V 2.5 A
Operation Power
Consumption
10 W
Eco Standby Power
Consumption
< 0.5 W
Dimensions
- Main Unit
455 x 165 x 150 mm
Weight
- With Packing
- Main Unit
3.5 kg
2.5 kg
6 Product
information
Note
Product information is subject to change without prior
notice.
•
Specifications
Amplifier
Rated Output Power 2 X 15 W RMS
Frequency Response 20 - 20000 Hz, ±3 dB
Signal to Noise Ratio > 90 dB
Aux Input 650 mV RMS 20 kohm
Speakers
Speaker Impedance 8 ohm
Speaker Driver 130 mm woofer + 19
mm tweeter
Sensitivity > 85 dB/m/W
EN

24
Avoid using Wi-Fi channel which is using
or much overlapped by the nearby Wi-Fi
network.
Keep away from potential sources of
interference which may affect Wi-Fi signal,
such as microwave ovens.
If you fail to use your PC for Wi-Fi network
setup, check whether your PC is using a
Wi-Fi network. You cannot use Ethernet
connection for AirPlay network setup.
If the problem remains, it is strongly
recommended to use iPod Touch/iPhone/
iPad/Mac to do the first-time Wi-Fi setup
as some PC settings may affect the Wi-Fi
network setup.
Make sure that the SSID name of your
home router consists of normal characters
or digits, with no space or special
characters like %/#/* inserted.
If you choose to rename the AirPlay device
‘Philips_Fidelio XXXX’ in the setting
menu, do not use special characters or
symbols.
If you fail to get connected via WPS, make
sure that you are using a WPS certified
router. If the problem remains, do not
use the default SSID name for your
WPS router. The default SSID name may
involve security protection that leads to
connection failure. Use simple characters
or digits only to rename your WPS router.
Occasional breaking of AirPlay music
streaming
Do one or all of the following:
Enable the Auto Channel Scan option (if
available on the Wi-Fi router).
Enable the Wireless Intelligent Stream
Handling (WISH) option (if available on
the Wi-Fi router).
Enable the Quality of Service (QoS)
option (if available on the Wi-Fi router).
Turn off other home routers.
No AirPlay icon on Apple AirPlay device or
iTunes in my PC
Make sure that the unit have already joined
the AirPlay network.
•
•
•
•
•
•
•
•
•
•
•
7 Troubleshooting
Warning
Never remove the casing of this apparatus. •
To keep the warranty valid, never try to repair
the system yourself.
If you encounter problems when using this
apparatus, check the following points before
requesting service. If the problem remains
unsolved, go to the Philips web site (www.
philips.com/welcome). When you contact
Philips, ensure that the apparatus is nearby
and the model number and serial number are
available.
No power
Ensure that the AC power plug of the unit
is connected properly.
Ensure that there is power at the AC
outlet.
No sound
Adjust the volume.
Check the network connection. Set up the
network again if needed (see ‘Set up a Wi-
Fi network (router)’).
No response from the unit
Press and hold on the front of the
main unit to reset the device. Set up the
network again (see ‘Set up a Wi-Fi network
(router)’).
Disconnect and reconnect the AC power
plug, and then switch on the device again.
Wi-Fi network connection failed
Check if your Wi-Fi router is Wi-Fi
certified. This device is only compatible
with Wi-Fi certified routers.
This device does not support WPS-Pin
routers.
This device does not support all WPS-
PBC routers (see the user manual of your
router).
Enable SSID broadcast on the Wi-Fi router.
•
•
•
•
•
•
•
•
•
•
EN
25
Before you open iTunes, make sure that
you have enabled Bonjour service in your
PC. Take Windows XP for example: to
enable the service, you can click Start-
>Settings->Control Panel, and double-
click Administrative Tools-> Services-
>Bonjour Service, then click Start
followed by OK on the pop-up menu.
If the problem remains, try to restart the
unit.
AirPlay connection failed with Mac or PC
Disable the firewalls software and security
software, which may block ports that
AirPlay uses to stream content.
Check if your network speed is fast enough
(in cases where multiple devices share the
same router, the AirPlay performance may
be affected). Turn off the other devices
connected to your home router.
In case of audio streaming break or
disconnection when you use iPod Touch/
iPhone/iPad/iMac/PC for AirPlay, restart
your iPod Touch/iPhone/iPad, iTunes or
DS8800W.
Browsing Internet content like news, music,
video and etc. via your home router may
affect the AirPlay performance. In case
of AirPlay break or disconnection, it is
recommended to stop any Internet surfing
or disconnect from the Internet.
•
•
•
•
•
•
EN

© 2011 Koninklijke Philips Electronics N.V.
All rights reserved.
Document order number: 000000000000