Philips Consumer Lifestyle HMP2000 HD Media Player User Manual
Philips Consumer Lifestyle HD Media Player
Contents
- 1. User Manual
- 2. User Manual Safety sheet
User Manual

www.philips.com/welcome
User manual
Register your product and get support at

EN Please refer to the safety information before using the product.
ZH-CN 使用产品之前,请参阅安全信息。
Trademark notice
HDMI, the HDMI logo, and High-Denition Multimedia Interface are trademarks or registered
trademarks of HDMI licensing LLC in the United States and other countries.
Manufactured under license from Dolby Laboratories. Dolby and the double-D symbol are
trademarks of Dolby Laboratories.
ABOUT DIVX VIDEO: DivX® is a digital video format created by DivX, Inc. This is an ofcial
DivX Certied® device that plays DivX video. Visit divx.com for more information and software
tools to convert your les into DivX video.
ABOUT DIVX VIDEO-ON-DEMAND: This DivX Certied® device must be registered in order to play purchased
DivX Video-on-Demand (VOD) movies. To obtain your registration code, locate the DivX VOD section in your
device setup menu. Go to vod.divx.com for more information on how to complete your registration.
DivX®, DivX Certied®, DivX Plus™ HD and associated logos are registered trademarks of DivX, Inc. and are used
under license.
DivX Certied® to play DivX® and DivX Plus™ HD (H.264/MKV) video up to 1080p HD including premium content
Real RMVB logo is a trademark or a
registered trademark of
RealNetworks, Inc.
Manufactured under license under U.S. Patent Nos: 5,956,674; 5,974,380; 6,487,535 & other U.S.
and worldwide patents issued & pending. DTS, the Symbol, & DTS and the Symbol together
are registered trademarks & DTS 2.0+Digital Out is a trademark of DTS, Inc. Product includes
software. © DTS, Inc. All Rights Reserved.
Windows Media and the Windows logo are trademarks, or registered trademarks of Microsoft Corporation in the
United States and/or other countries.
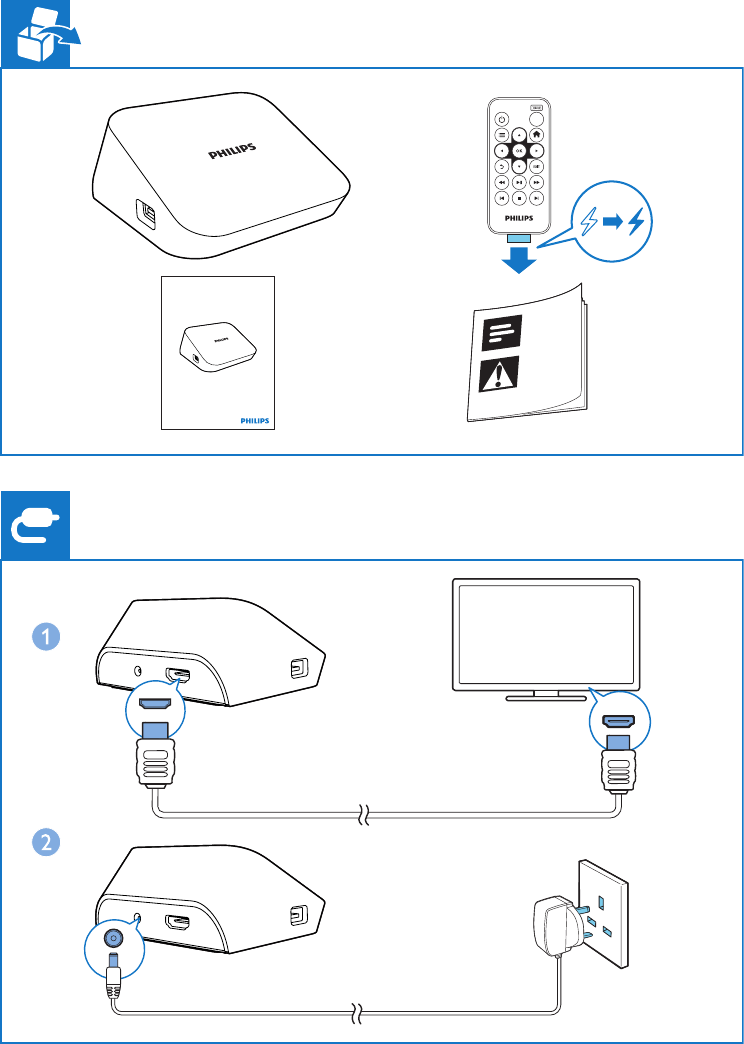
Register your product and get support at
www.philips.com/welcome
HMP7000
HDMI IN
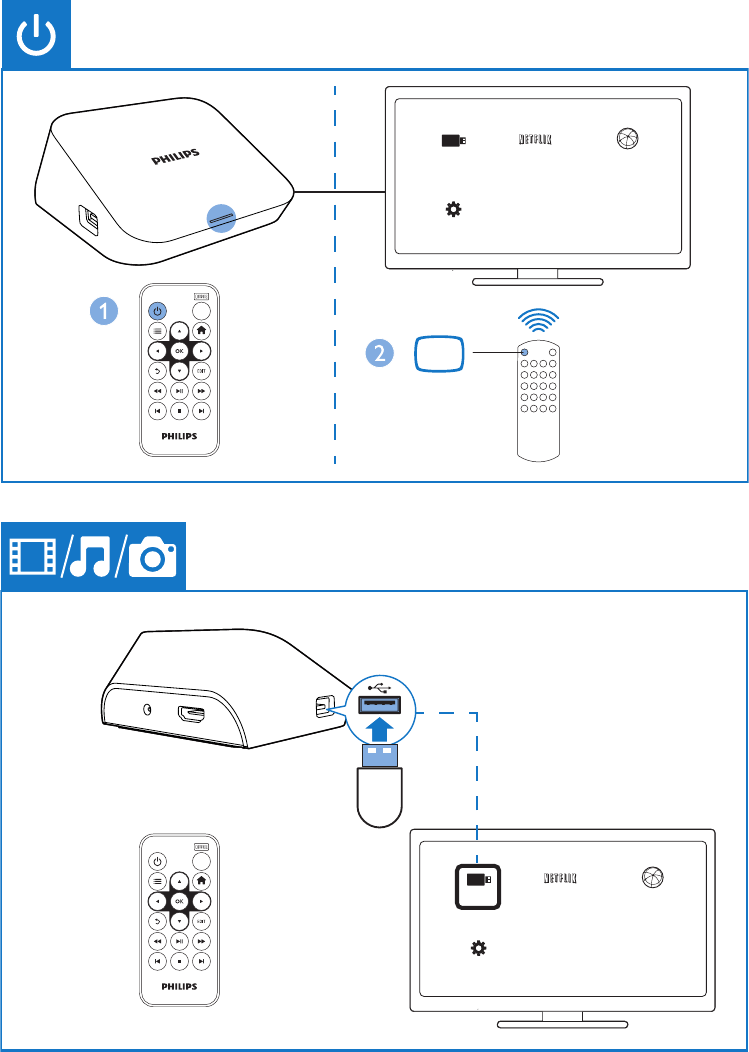
SOURCE
TV
AV / HDMI
USB NETFLIX
Setup
Internet Service
USB NETFLIX
Setup
Internet Service
USB NETFLIX
Setup
Internet Service
Private AP SettingPrivate AP
S
ettin
g
OK
Wireless
Network Info
2EN
1 Control and play
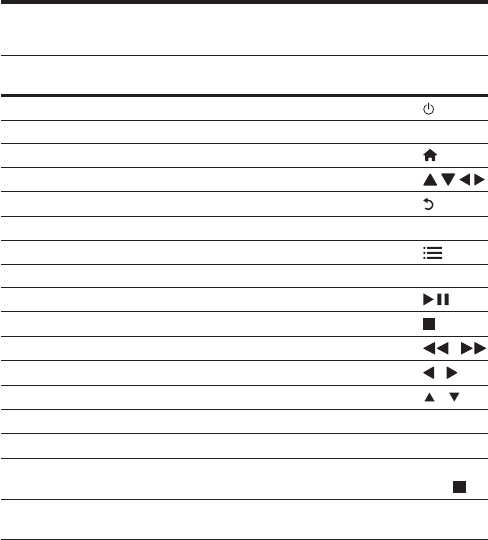
Use the remote control
Function Buttons /
Actions
Switch the player on or to standby mode
Navigate between screens or through options
• Return to the Home screen
• Navigate through options
• Back one level
• Conrmtheoption OK
Viewoptionsmenuformediaplayorlenavigation
Control the play
• Start, pause, or resume the play
• Stop the play
• Skiptotheprevious/nextmediale /
• Searchbackwardsorforwardwithincurrentle /
• Rotate a photo /
• Displaytheinformationaboutcurrentleduringplay OK
• AccessonlinevideosandTVepisodesfromNetix Netix
Remove current connected device safely Press and
hold
Manageles/foldersunder[Folder] on or between connected
storage devices
EDIT
*If there is no button press or media play on the playerfor 5 minutes, the device
switches to standby mode automatically except that:
• You enter text on the onscreen keyboard;
3EN
• You select setup options under [Setup].
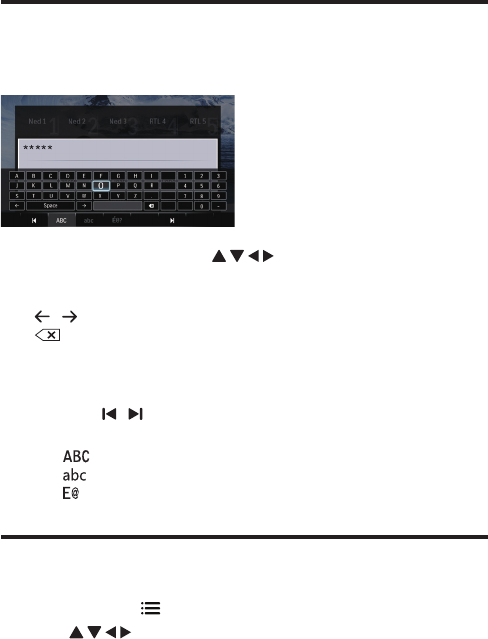
Text entry
With the onscreen keyboard, use the remote control to enter text.
1 On the remote control, press to move to a key, press OK to
select the letter or symbol.
2 Do the following to select input options:
/ : Move the cursor to the left or right.
: Delete the entry before the cursor.
3 When the text entry is complete, select OK on the onscreen keyboard to
exit.
To select input mode,
• Select / on the onscreen keyboard.
» On the onscreen keyboard, current input mode is highlighted.
: English input in upper case
: English input in low case
: symbols
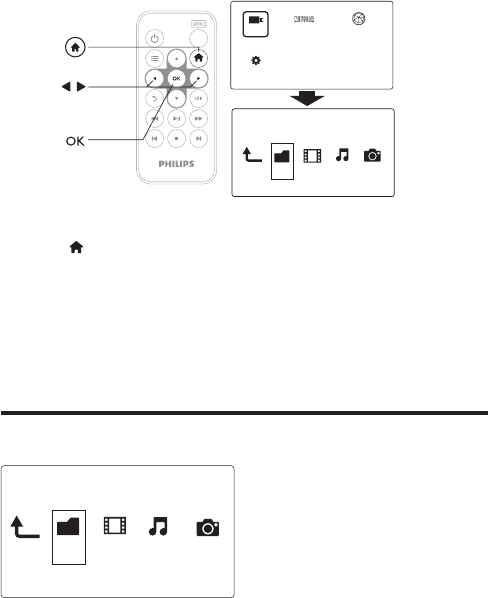
Select play options
1 During play, press on the remote control.
2 Press to select an option. Press OKtoconrm.
OK

4EN
Video options
[Subtitle]: Adjust subtitle settings. Press to select an item and to adjust
values. Then press OKtoconrm.
[Audio]: Select an audio language.
[GOTO]:Skipplaytothespecictime.Press to select an item and to
adjust values. Then press OKtoconrm.
[Repeat Title]: Repeat the current title.
[Repeat All]:Repeatthemoviele.
[Repeat Off]: Turn off a repeat mode.
[Video Setting]: Adjust the video settings. Press to select an item and to
adjust values. Then press OKtoconrm.
Audio option
[Repeat Off]: Turn off a repeat mode.
[Repeat One]:Repeatthecurrentmusicle.
[Repeat All]:Repeatallthemusicies.
[Shufe Loop]:Playmusiclesinarandomloop.
Photo options
[Slide Timing]: Set a display interval for a slideshow.
[Slide Transition]: Select a transition effect for a slideshow.
[Repeat Off]: Turn off a repeat mode.
[Repeat All]:Repeatallthephotoies.
[Shufe Loop]:Playphotolesinarandomloop.
[Background Music]:Selectandplayamusicleduringslideshow.
[Video Setting]: Adjust the video settings.
5EN
2 File browsing
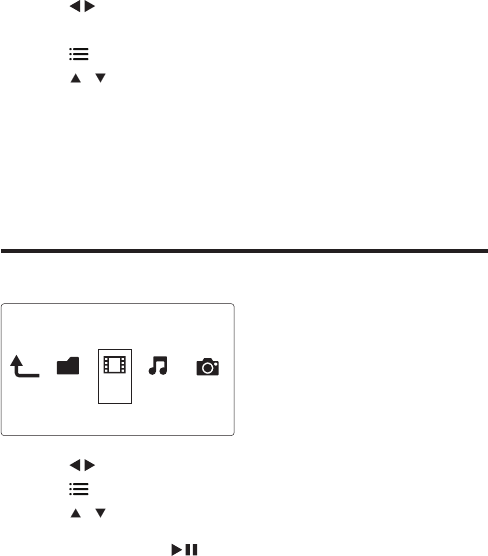
YoucanbrowsemedialesstoredinaUSB/SDstoragedevice.
1 Press .
2 Select [USB]/ [Card] / [Esata].
3 Selectamodetobrowsemediales.
• [Folder]
• [Movies]
• [Music]
• [Photos]
Browse all les
a
b
c
Folder Movies Music Photos
USBNETFLIX
Setup
Internet Service
Folder Movies MusicPhotos
6EN
1 Press to select [Folder] and press OKtoconrm.
2 Select your USB/SD storage device and press OK.
3 Press inthelebrowser.
4 Press / toselectamodetovieworarrangeles.
[Thumbnails]:Displaythumbnailsoflesorfolder.
[List]:Displaylesorfolderinalist.
[Preview]:Displaylesorfolderswithapreviewwindow.
[All Media]Displayallmediales.
[Movies]:Displaymovieles.
[Photos]:Displayphotoles.
[Music]:Displaymusicles.
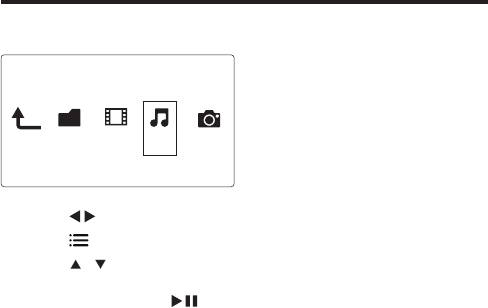
Browse movie les
1 Press to select [Movies] and press OKtoconrm.
2 Press inthelebrowser.
3 Press / toselectamodetovieworarrangeles.
[Search]:Searchmovieles.Followonscreeninstructiontotypeinkeywordsin
the mini keyboard and press to start search.
[Thumbnails]:Displaythumbnailsofmovieles.
[List]:Displaymovielesinalist.
[Preview]:Displaylesorfolderswithapreviewwindow.
[All Movies]:Displayallmoviesles.
[Show DVDs]:DisplayallISOles.
[Flash Animation]:Displayallashles.
[Go to Folder]:Gotothefolderwheretheselectedleisplaced.
[Name]:Listmovieslesinanalphabeticalorderoftheirnames.
[Size]:Listmovieslesintheascendingorderoftheirsizes.
Folder Movies Music Photos
7EN
[Most Viewed]:Listmostviewedmovieles.
[Recently Added]:Listmovielesaddedrecently.
Browse music les
1 Press to select [Music] and press OKtoconrm.
2 Press inthelebrowser.
3 Press / toselectamodetovieworarrangeles.
[Search]:Searchmusicles.Followonscreeninstructiontotypeinkeywordsin
the mini keyboard and press to start search.
[Thumbnails]:Displaythumbnailsofmusicles.
[List]:Displaymusiclesinalist.
[Preview]:Displaymusicleswithapreviewwindow.
[Go to Folder]:Gotothefolderwheretheselectedleisplaced.
[All Songs]:Displayallmusicles.
[Albums]:Displaymusiclesbyalbums.
[Artists]:Displaymusiclesbyartists.
[Genres]:Sortmusiclesbygenres.
[Years]:Sortmusiclesbyyears.
[Playlists]: Display play lists.
[Recently Played]:Listmusiclesplayedrecently.
[Recently Added]:Listmusiclesaddedrecently.
[Name]:Listmusiclesinanalphabeticalorderoftheirnames.
FolderMoviesMusic Photos
8EN
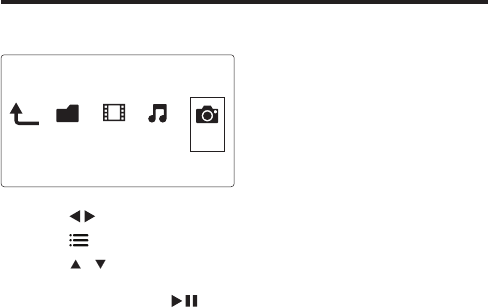
Browse photo les
1 Press to select [Photos]and press OKtoconrm.
2 Press inthelebrowser.
3 Press / toselectamodetovieworarrangeles.
[Search]:Searchphotoles.Followonscreeninstructiontotypeinkeywordsin
the mini keyboard and press to start search.
[Thumbnails]:Displaythumbnailsofphotolesorfolder.
[List]:Displaylesorfolderinalist.
[Preview]:Displaylesorfolderswithapreviewwindow.
[Photo Directory]:Displayphotolesinthedirectorymode.
[Leaf Folder View]:Displayphotolesintheleaffoldermode.
[Date view]:Sortphotolesbydatemodied.
[All Photos]:Displayallphotosles.
[Albums]:Sortphotolesbyalbums.
[Name]:Listphotolesinanalphabeticalorderoftheirnames.
[Recently Added]:Listphotolesaddedrecently.
[Recently Played]:Listphotolesplayedrecently.
Folder Movies MusicPhotos

9EN
3 Play from online services
Connect the playerto the Internet. You can enjoy online services on the TV.
Note
•Koninklijke Philips Electronics N.V. bears no responsibility for content provided by Net TV service
providers.
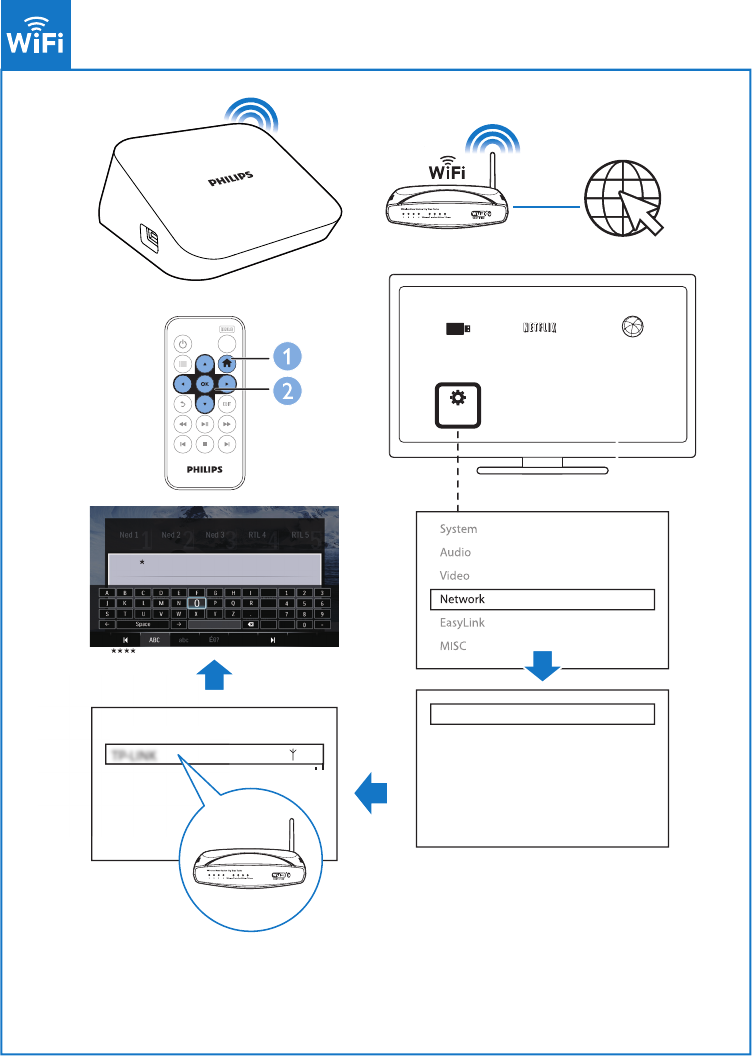
Connect to the Internet
What you need A wired router that is connected to the Internet
1 Press .
» The home page is displayed.
2 Select [Setup] and press OK.
» The setup menu is displayed.
3 Select [Network]>[Wireless]and press OK.
» A list of available wireless networks is displayed.
4 Select your network from the list and press OK.
» A mini keyboard is displayed.
• If your network is encrypted with a Wired Equivalent Privacy (WEP)
key, select [Hex code] or [ASCII] to enter the key in hex or ASCII
format from the option menu.
• If your network is not in the list, select [Private AP Setting] to enter the
SSID of your network and web key.
5 Use and OK to enter your key.
6 Press toconrm.
» A connection test is started
» The status of network connection is displayed after the test is
completed.

10 EN
7 Press OK to exit.
Note
•To re-scan available wireless networks, press .
Watch online TV
1 On the Home screen of the player, select [Netix].
» TheHomepageofNetixisdisplayed.
2 On the remote control, do the following to browse the Web pages on your
TV.
Function Button/Action
Select an option
Conrmanoption OK
Return to the previous page, or delete entry
Return to the Home page
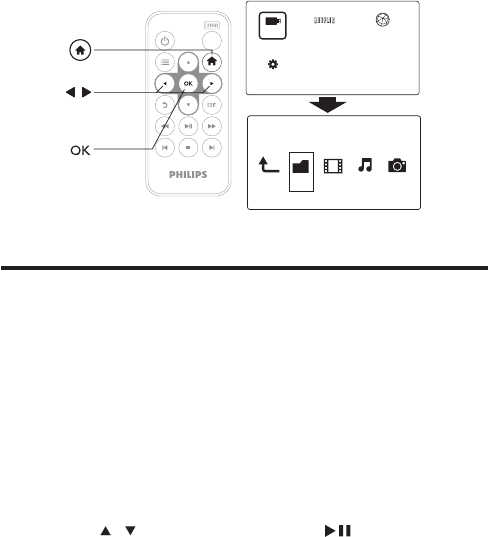
Enjoy Internet services
With this player, you can access online services, such as movies, pictures, music, and
games.
What you need Connect this player to the Internet. (see "Set up a
network").
1 Press .
2 Select [Internet Services] and press OK.
» The Internet services are displayed.

11EN
3 Select a service.
• [Facebook]: a social networking service
• [AccuWeather]: an online weather forecasting service worldwide
• [YouTube]: a video-sharing service
• [Piccasa]: an online photo album
1 Followtheon-screeninstructionanduseyourremotecontroltoenjoythe
services.
Function Button/Action
Select a service or item.
Conrmaselection. OK
Return to a previous page, or delete input text.
Return to the home page.
12 EN
4 Manage files
On the player, select the source device on the Home screen. Go to [Folder], and
youcanmanagelesontheconnectedstoragedevices.
Copy or move les and folders
Ontheplayer,youcancopyormovelesandfoldersonorbetweenconnected
storage devices.
1 In [Folder],selectaleorfolderinthelistofles/folders.
Toselectmultipleles,
a On the remote control, press EDIT.
» A list of options is displayed.
b Select [Multiple Select].
» Alelistiscreatedforyoutoaddlesorfolders.
c Press / to select a le or folder. Press to conrm.
2 On the remote control, press EDIT.
3 On the pop-up list of options, select [Copy] or [Move].
a
b
c
Folder Movies Music Photos
USBNETFLIX
Setup
Internet Service

13EN
4 Select a folder on current or another connected device as the destination.
Press toconrm.
» Theselectedlesorfoldersarecopiedormovedtothedestination.
Delete les and folders
1 FollowStep1-3under"Copyormovelesandfolders"(see'Copyormove
lesandfolders'onpage11).
2 On the pop-up list of options, select [Delete].
» Theselectedlesorfoldersaredeletedfromtheplayer.
Rename les and folders
1 In [Folder],selectaleorfolderinthelistofles/folders.
2 On the remote control, press EDIT.
3 On the pop-up list of options, select [Rename].
4 Onthepop-uponscreenkeyboard,editthele/foldername(see'Text
entry'onpage2).
Create music playlists
Ontheplayer,youcancreateplaylistsformusiclesyouwanttoplaytogether.
1 In [Folder],selectmusicles.
a On the remote control, press EDIT.
» A list of options is displayed.
b Select [Multiple Select].
» Alelistiscreatedforyoutoaddles.
c Press / to select a le. Press to conrm.

14 EN
2 On the remote control, press EDIT.
3 On the pop-up list of options, select [Save Playlist].
4 Name the playlist as needed.
» A music playlist is created.
Create photo albums
Ontheplayer,youcancreatephotoalbumsforpictureles.
1 In [Folder],selectpictureles.
a On the remote control, press EDIT.
» A list of options is displayed.
b Select [Multiple Select].
» Alelistiscreatedforyoutoaddles.
c Press / to select a le. Press to conrm.
2 On the remote control, press EDIT.
3 On the pop-up list of options, select [Save Photo Album].
4 Name the photo album as needed.
» A photo album is created.
15EN
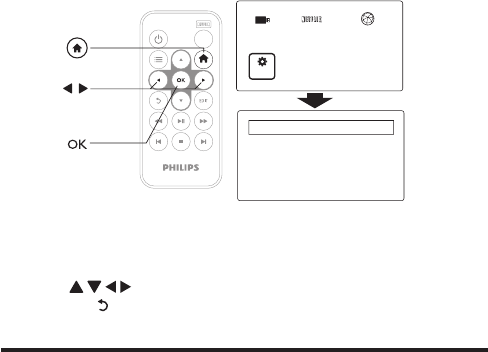
5 Setup
You can change the setup options of the player.
1 On the Home screen, select [Setup].
» The setup menu is displayed.
2 Press to select an option. Press OKtoconrmtheoption.
• Press to return to the upper-level menu.
System
[Menu Language]: Select the language for onscreen menus.
[Subtitle]: Select the subtitle language for videos.
[Screen Saver]: Enable the screen saver when the player is in the idle mode
for a selected time span, for example, in pause or stop mode.
[Device Name]: Change the name of the playerthat isdisplayed on the
connected DLNA device.
[Auto Scan]: Update the media library on connected storage devices
automatically.
[Scan Storage]: Rescan or stop scanning the storage devices that are
connected to the player.
[Resume Play]: Resume video play from the last stop position.
EasyLink
MISC
Audio
System
Network
Video
a
b
c
USBNETFLIX
Setup
Internet Service

16 EN
[Factory Default]: Restore factory settings.
Audio
[Night Mode]:Equalizeloudandsoftsoundstoplaymediaatalowvolume
level at night.
[HDMI Output]: Select audio output for the HDMI connector. Use the
HDMI output for the LPCM sound of more than two channels.
[SPDIF Output]: Select audio output for the OPTICAL connector. Select
RAW for DTS and AC3 (Dolby digital) sound.
[Lip Sync]:Synchronizeaudiowithvideoplay.
Video
[Aspect Ratio]: Select display aspect ratio.
*[TV System]: Select the video resolution that your TV supports. See your
TV manual for details.
[Video Zoom]: Zoom in or out video scenes.
*[1080P 24Hz]:Use1080p24Hzforvideooutput,where1080p24Hz
denotes the resolution and frame rate.
[Deep Color]: Display colors with more shades and hues when the video
content is recorded in Deep Color mode and the TV supports this feature.
[Video Setting]: Adjust the video settings.
Note
•*If the video resolution is incompatible with your TV, you can see a blank screen. To recover the
display, wait for 10 seconds.
•*Forvideosofhigh-denitionresolution,suchas1080p,1080i,720p,useanHDMIcabletoconnect
the player to your TV. The composite (CVBS) connection can cause no video output.

17EN
Network
[Wireless]: Set up a wireless network connection.
[Network Info]: Display current network status, such as the MAC address,
and current IP address and subnet mask.
MISC
[Version Info]: Display the information about the player.
[Online upgrade]:UpdatethermwareoftheplayerfromtheInternet.
[USB upgrade]:UpdatethermwareoftheplayerthroughaUSBstorage
device or SD memory card.

18 EN
6 EasyLink
The playersupports Philips EasyLink which uses the HDMI CEC (Consumer
Electronics Control) protocol. You can use a single remote control to control
EasyLink compliant devices that are connected through HDMI.
1 Through HDMI, connect the player to a TV compliant with the HDMI CEC
protocol.
2 On the TV, switch on the functions to allow HDMI CEC operations (Consult
the user manual of the TV).
3 On the player, switch on [Easy Link].
• On the Home screen, select [Setup] > [Easy Link]. Select [On].
4 In [Easy Link], you can select the following options:
[One Touch Play]
When you start play on the player, the TV switches to the HDMI input channel
automatically.
[One Touch Standby]
When you switch the TV to the standby mode, the player switches to the
standby mode automatically.
[Auto Power On From TV]
When you switch to the input channel of the playeron the TV,the player can
switch on automatically from the standby mode.
Note
•Philips does not guarantee 100% interoperability with all HDMI CEC devices.

19EN
7 Update the firmware
Beforeyouupdatethermware,checkcurrentrmwareversionoftheplayer.
To check the rmware version,
• On the Home screen, go to [Setup] > [MISC] > [Version Info.].
Update the rmware through the Internet
1 Connect the player to the Internet.
2 On the Home screen of the player, select [Setup] > [MISC] > [Online
upgrade].
» Ifarmwareupdateisdetected,youarepromptedtostarttheupdate.
3 Followonscreeninstructionstocompletetheupdate.
» When the update is complete, the player switches off automatically, and
then switches on again.
Update the rmware through a storage device
1 On your computer, do the following:
• Gotowww.philips.com/supporttondthelatestrmware.
• Search for your model and click on "Software and drivers".
• Downloadthermwareupdateandsavetheletotherootdirectory
of a USB storage device or SD memory card.
2 On the player, do the following:
• Connect the USB storage device and SD memory card.
• On the Home screen, select [Setup] > [MISC]> [USB upgrade].
» Ifarmwareupdateisdetected,youarepromptedtostarttheupdate.
3 Followonscreeninstructionstocompletetheupdate.
» When the update is complete, the playerswitches off automatically, and
then switches on again.

20 EN
Caution
•Keeptheplayerpoweredandthestoragedevicemountedbeforethermwareupdateiscomplete.
21EN
8 Troubleshooting
If you contact Philips, you will be asked for the model and serial number of this
player. The model number and serial number are at the bottom of this player.
Write the numbers here:
Model No. __________________________
Serial No. ___________________________
No picture.
• Refer to the TV user manual for how to select the correct video input
channel
No sound output from the TV.
• Make sure that the audio cables are connected to the audio input sockets
that are grouped with the selected video input sockets.
The contents of the USB storage device cannot be read.
• The format of this USB storage device is not supported.
• Thesupportedmemorysizeis1TBmaximum.
• Makesurethatthisplayersupportstheseles.(Referto"Specications" >
"Playable media")
• DRM-protectedvideolesthatarestoredonaUSB/SDstoragedevice
cannot be played through an analog video connection (for example,
composite).YouneedtouseanHDMIconnectiontoplaytheseles.
DivX subtitles are not displayed correctly.
• Makesurethatthesubtitlelenameisthesameasthevideolename.
• MakesurethattheDivXvideoleandthesubtitlelearesavedunderthe
same directory.

22 EN
9 Specification
Note
•Specicationanddesignaresubjecttochangewithoutnotice.
File
• Video: MPEG 1/2/4(MPEG 4 Part 2), H.264, VC-1, H.263, VP6(640 x
480), DivX Plus HD, DivX 3/4/5/6, Xvid, RMVB 8/9, RM, WMV (V9), AVI,
TS, M2TS, TP, TRP, ISO, VOB, DAT, MP4, MPG, MOV (MPEG 4, H.264),
ASF,FLV(640x480),MKV,M4V.
• Audio: Audio: Dolby digital, AAC, RA, OGG, MKA, MP3, WAV, APE,
FLAC,DTS,LPCM,PCM,WMA(V9),IMP/MSADPCM,WMAPro
• Picture:.JPEG,JPG,PNG,TIFF,GIF(unanimatedGIF),BMP,TIF,M-JPEG,
HD-JPEG
USB storage device
• Compatibility: Hi-Speed USB (2.0)
Subtitle support
• .srt, .sub, .smi, .ssa, .ass, .txt, .psb, .idx+.sub
SD card
• Compatibility: SDHC 2.0 (up to 32 GB)
Video
• Signal system: PAL /NTSC
• Composite video output: 1 Vpp ~ 75 ohm
• HDMI output: 480i, 480p, 576i, 576p, 720p, 1080i, 1080p, 1080p24
Audio
• Analog stereo output
• Signaltonoiseratio(1kHz):>90dB(A-weighted)
• DynamicRange(1kHz):>80dB(A-weighted)
• Frequencyresponse:+/-0.2dB
• Digital output: Optical
Main Unit
• Dimensions (L x W x H): 136 x 86 x 52 mm
• Net Weight: 0.41 Kg
Power
• Input: DC 9V 1.1A
• Power consumption: < 10 W

Specifications are subject to change without notice
© 2011 Koninklijke Philips Electronics N.V.
All rights reserved.
Document order number: 000000000000