Philips Consumer Lifestyle RC9800I Entertainment System Remote Control User Manual users manual part 1
Philips Consumer Lifestyle Entertainment System Remote Control users manual part 1
users manual part 1
RC9800i Touch Screen
Remote Control
User Manual
Philips Innovative Applications

RC9800i Touch Screen Remote Control - User Manual Guide Through the User Manual
Philips Innovative Applications Page 2 of 39
User Manual RC9800i Touch Screen Remote Control
Copyright 2004 Philips Innovative Applications, Interleuvenlaan 72, 3000
Leuven (Belgium).
Remark:
No part of this manual may be reproduced by means of printing or
photocopying nor may it be translated into a different language without prior
written consent of Philips Innovative Applications.
Philips Innovative Applications is not liable for possible mistakes in this
manual or for damages directly or indirectly resulting from the use of the
RC9800i Touch Screen Remote Control.
Concept and Realization of the Guide:
The Human Interface Group
De Regenboog 11, 2800 Mechelen (Belgium)
http://www.higroup.com

RC9800i Touch Screen Remote Control - User Manual Important Information
Philips Innovative Applications Page 3 of 39
Important Information
Please install and connect the RC9800i Touch Screen Remote Control only in
the order described in this manual. This assures best installation results
without technical issues.
Please read this guide carefully before using the RC9800i and keep it for
future reference.
The most recent downloads and information on this product is are available
through our website www.homecontrol.philips.com
Broadband Internet access (min. 256 kbps) is required if you want to use the
Internet functions of the RC9800i.
Please check whether your Internet service provider charges extra additional
fees for exceeding a certain limit of transferred data limit. When using
Internet media services on a daily basis, you may exceed such a limit.
For example: When you listen to Internet radio (at 64 kbps) for about 36
hours, 1 GB (gigabyte) of data will be transferred to your system.
During set-up and installation, it may be helpful to have the original remote
controls for your TV set, audio system and other wireless network
components (if appropriate) at hand.
Software information concerning Internet Radio will be available in the course
of 2005, along with a software upgrade.
Safety Precautions
Before operating the system, check that the operating voltage indicated on the
nameplate (or the voltage indication beside the voltage selector) of your
system is identical with the voltage of your local power supply. If it is not,
please consult your dealer.
Radio equipment for wireless applications is not protected against disturbance
from other radio services.
Do not expose the product to dripping or splashing.
Do not expose the product to excessive moisture, rain, sand or heat from
heating equipment or direct sunlight.
Do not open the product. Contact your Philips retailer if you experience
technical difficulties.
IFU Approbation / Safety Content RC9800i
FCC Compliancy
This device complies with Part 15 of the FCC Rules. Operation is subject to
the following two conditions:
This device should not cause harmful interference.
This device must accept any interference received, including interference that
may cause undesired operation.

RC9800i Touch Screen Remote Control - User Manual Important Information
Philips Innovative Applications Page 4 of 39
This equipment has been tested and found to comply with the limits for a
Class B digital device, pursuant to part 15 of the FCC rule.
These limits are designed to provide reasonable protection against harmful
interference in residential installations. This equipment generates, uses, and
can radiate radio frequency energy and, if not installed and used in accordance
with the instructions, may cause harmful interference to radio
communications.
However, there is no guarantee that interference will not occur in a particular
installation. If the equipment does cause harmful interference to radio or
television reception, which can be determined by turning thee equipment off
and on, the user is encouraged to try to correct the interference by using one or
more of the following measures:
Reorient or relocate the receiving antenna.
Increase the separation between the equipment and receiver.
Connect the equipment into to an outlet on a different circuit from the
receiver.
Consult the dealer or an experienced radio/TV technician for help.
CAUTION:
User changes or modifications not expressly approved by the party responsible
for compliance may void the user’s authority to operate the equipment.
Regulations According to R&TTE
Declaration
Hereby, Philips Remote Control Systems hereby declares that this universal
remote control is in compliance with the essential requirements and other
relevant provisions of Directive 1999/5/EC:
Radio: EN 300 328
EMC: ETSI EN 301 489-1, ETSI EN 301 489-17
Safety: EN60950
Finnish Philips Consumer Electronics, Remote Control Systems vakuuttaa täten että
RC9800i tyyppinen laite on direktiivin 1999/5/EY oleellisten vaatimusten ja sitä
koskevien direktiivin muiden ehtojen mukainen.
Dutch Hierbij verklaart, Philips Consumer Electronics, Remote Control Systems dat het
toestel RC9800i in overeenstemming is met de essentiële eisen en de andere
relevante bepalingen van richtlijn 1999/5/EG.
French Par la présente, Philips Consumer Electronics, Remote Control Systems, déclare
que l'appareil RC9800i est conforme aux exigences essentielles et aux autres
dispositions pertinentes de la directive 1999/5/CE
Swedish Härmed intygar, Philips Consumer Electronics, Remote Control Systems, att
denna RC9800i står I överensstämmelse med de väsentliga egenskapskrav och
övriga relevanta bestämmelser som framgår av direktiv 1999/5/EG.
Danish Undertegnede Philips Consumer Electronics, Remote Control Systems erklærer
herved, at følgende udstyr RC9800i overholder de væsentlige krav og øvrige
relevante krav i direktiv 1999/5/EF
German Hiermit erklärt Philips Consumer Electronics, Remote Control Systems die
Übereinstimmung des Gerätes RC9800i mit den grundlegenden Anforderungen und
den anderen relevanten Festlegungen der Richtlinie 1999/5/EG.
Greek ΜΕ ΤΗΝ ΠΑΡΟΥΣΑ Philips Consumer Electronics, Remote Control Systems
∆ΗΛΩΝΕΙ ΟΤΙ RC9800i ΣΥΜΜΟΡΦΩΝΕΤΑΙ ΠΡΟΣ ΤΙΣ ΟΥΣΙΩ∆ΕΙΣ
ΑΠΑΙΤΗΣΕΙΣ ΚΑΙ ΤΙΣ ΛΟΙΠΕΣ ΣΧΕΤΙΚΕΣ ∆ΙΑΤΑΞΕΙΣ ΤΗΣ Ο∆ΗΓΙΑΣ
1999/5/ΕΚ
RC9800i Touch Screen Remote Control - User Manual Important Information
Philips Innovative Applications Page 5 of 39
Italian Con la presente Philips Consumer Electronics, Remote Control Systems dichiara
che questo RC9800i è conforme ai requisiti essenziali ed alle altre disposizioni
pertinenti stabilite dalla direttiva 1999/5/CE.
Spanish Por medio de la presente, Philips Consumer Electronics, Remote Control Systems,
declara que el RC9800i cumple con los requisitos esenciales y cualesquiera otras
disposiciones aplicables o exigibles de la Directiva 1999/5/CE
Portuguese Philips Consumer Electronics, Remote Control Systems declara que este RC9800i
está conforme com os requisitos essenciais e outras disposições da Directiva
1999/5/CE.
Declaration of Conformity (DoC)
The Declaration of Conformity can be found at
http://www.pronto.philips.com/products/DoC
Marking
In line accordance with CE marking regulations, the CE mark, the notified
body number and the class 2 identifier are added to the equipment:
This device can be used in:
√ FR √ UK √ DE √ DK √ SE √ ES √ GR √ PT √ CH
√ AT √ BE √ FI √ IRE √ IT √ LU √ NL √ NO
Battery Disposal
Your device uses a rechargeable Li Polymer battery. Do not dispose the
battery along with household waste. Contact your local waste disposal agency
for the address of the nearest battery deposit site.
Service and Support
Support for Your Product
Philips products have been designed and manufactured to in accordance with
the highest quality standards. If your Philips Connected Planet product is not
working correctly, we recommend that you check your user manual to verify
that your product is properly connected and configured.
The website for Connected Planet support
(www.philips.com/connectedplanet/support) offers you all of the information
you need to optimally enjoy your product – this includes help to get started,
frequently asked questions and interactive troubleshooting. Most problems can
be solved this way, especially when they are related to the use of your product.
RC9800i Touch Screen Remote Control - User Manual Important Information
Philips Innovative Applications Page 6 of 39
Service Within During Your Warranty Period
If your product is defective and needs repair under warranty, you should return
it to the Philips dealer where you purchased it. This is the fastest and easiest
way to get your product working again under warranty.
Should you be unable to return the product to your Philips dealer, you may
select an authorized service center at your Connected Planet support website
(www.philips.com/connectedplanet/support) under “Find a service center.”
You may also contact our Consumer Care Center for repair advice. If so, we
need the following information:
A clear description of the problem – including the circumstances under which
it occurs;
The exact type number of your product;
The date of purchase.
Service Outside After Your Warranty Period
If your product is defective and needs repair, but your warranty has expired,
you may consult the Philips dealer where you purchased it or contact an
authorized service center – you will find addresses (see “Find a service
center”) at your Connected Planet support website
(www.philips.com/connectedplanet/support).
You may also contact our Consumer Care Center for repair advice. If so, we
need the following information:
A clear description of the problem – including the circumstances under which
it occurs;
The exact type number of your product;
The date of purchase.
Important Notice
You may decide to have your product repaired in a different country from
where you purchased it. We would like to inform you that repair may be
limited in those cases, and may take more time and/or include costs, e.g. due
to the need to obtain different parts. The repair center will inform you as
necessary.
Helpline
Europe
België/Belgique/Belgien 02 275 0701
Danmark 35 25 87 61
Deutschland 0696 698 4712
España 9 17 45 62 46
France 03 8717 0033
Greece 00800 3122 1223
Ireland 01 601 1161
Italia 02 48 27 11 53
Luxemburg/Luxembourg 26 84 3000
Nederland 053 482 9800
Norge 22 70 82 50

RC9800i Touch Screen Remote Control - User Manual Important Information
Philips Innovative Applications Page 7 of 39
Österreich 01 546 575 603
Portugal 800 831 363
Schweiz/Suisse/Svizzera 02 23 10 21 16
Suomi 09 2290 1908
Sverige 08 632 0016
UK (United Kingdom) 0207 949 0069
US & Canada
1 888 PHILIPS
Website
To consult the latest User Manual and to download the firmware update,
please check the RC9800i Touch Screen Remote’s website:
www.homecontrol.philips.com

RC9800i Touch Screen Remote Control - User Manual
Philips Innovative Applications Page 8 of 39
RC9800i Touch Screen Remote Control - User Manual Contents of the Box
Philips Innovative Applications Page 9 of 39
Contents of the Box
The RC9800i Touch Screen Remote Control box contains the following items:
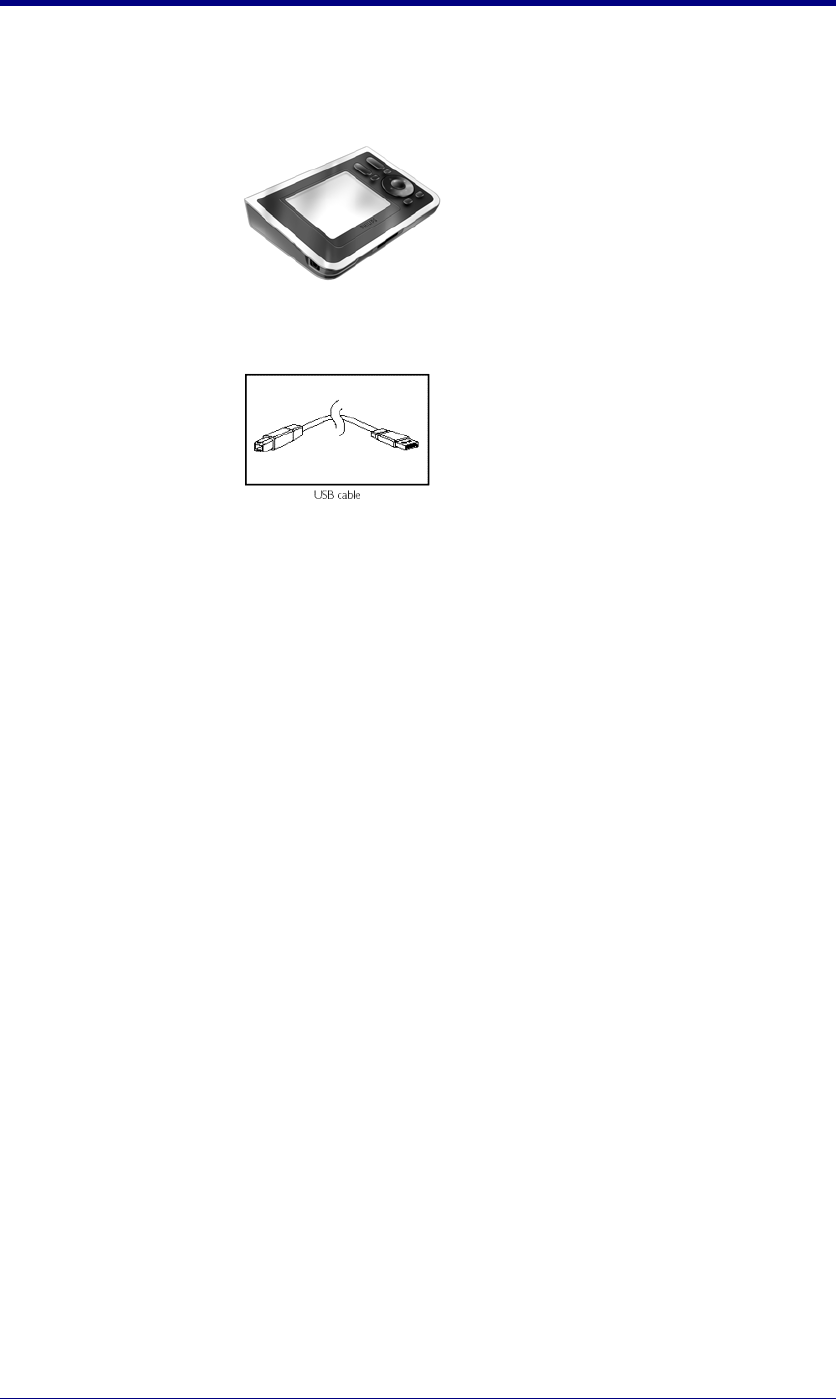
The RC9800i
A cradle and an adapter;
@@@illustration@@@
A USB cable.
In order to learn more about your RC9800i Touch Screen Remote Control,
there are two types of documentation available to you:
The Quick Start Guide supports you in getting the device up and running
quickly and easily;
The RC9800i Touch Screen Remote Control User Manual helps you to start
using the RC9800i and to get the maximum out of it.

RC9800i Touch Screen Remote Control - User Manual Contents
Philips Innovative Applications Page 10 of 39
Contents
Guide Through the User Manual........................................................ 12
Pick Up Your RC9800i and Take a Good Look ................................... 13
Powering On and Off............................................................................13
First-Time Power On......................................................................13
Everyday Use .................................................................................14
The Touch Screen.................................................................................14
The Hard Keys......................................................................................14
Charging the RC9800i..........................................................................15
The Cradle as Media Adapter.........................................................16
The USB Connector..............................................................................16
Getting the Settings Right................................................................. 17
RC9800i Settings...................................................................................17
Calibrating the Touch Screen.........................................................17
Selecting Your Location.................................................................18
Network Settings............................................................................18
Adjusting Time, Date and Time Zone Settings..............................19
Home Setup...........................................................................................19
Room Setup....................................................................................20
IR Extender Setup (If Applicable)..................................................21
Device Setup ..................................................................................22
Activity Setup........................................................................................28
Learning the Basics ........................................................................... 29
Controlling Your Legacy Audio/Video Devices .................................29
What You Should Know About Home Networking...........................30
Home Networking and Connected Devices ...................................30
Wireless Connectivity ....................................................................31
Enjoying Streaming Content ..........................................................32
What You Should Know About Activity-Based Control...................32
Watch Activities.............................................................................32
Listen Activities .............................................................................33
Installing the Software ..................................................................... 35
Installing Philips Media Manager.......................................................35
Advanced Philips Media Manager Use...............................................35
Philips Media Manager on More PCs ............................................35
Organizing Media Files..................................................................36
Creating Playlists ...........................................................................36
Upgrading the Firmware ................................................................... 37
Getting the Maximum Out of It......................................................... 38
Homepage..............................................................................................38
Activities................................................................................................38

RC9800i Touch Screen Remote Control - User Manual Contents
Philips Innovative Applications Page 11 of 39
Watching a Broadcasted Program .. Error! Bookmark not defined.
Watching a Movie Using EPG ....... Error! Bookmark not defined.
Watching Digital Pictures .............. Error! Bookmark not defined.
Watching Pictures From Your PC on the RC9800i.................Error!
Bookmark not defined.
Listening to a CD ........................... Error! Bookmark not defined.
Listening to MP3 Audio Files ........ Error! Bookmark not defined.
Listening to Songs From Your PC via the Docked RC9800i..Error!
Bookmark not defined.
Listening to Internet Radio............. Error! Bookmark not defined.
Good to Know: Smart Navigation........... Error! Bookmark not defined.
Good to Know: System Management Area .......... Error! Bookmark not
defined.
Adjusting the Settings...................................Error! Bookmark not defined.
Setup RC9800i........................................... Error! Bookmark not defined.
Power Settings................................ Error! Bookmark not defined.
Screen Settings............................... Error! Bookmark not defined.
Network Settings............................ Error! Bookmark not defined.
Audio Settings................................ Error! Bookmark not defined.
Date/Time....................................... Error! Bookmark not defined.
Describe Your Equipment........................ Error! Bookmark not defined.
EPG ................................................ Error! Bookmark not defined.
List of Symbols..............................................Error! Bookmark not defined.
FAQ................................................................Error! Bookmark not defined.
You’re in Trouble? .........................................Error! Bookmark not defined.
Technical Specifications................................Error! Bookmark not defined.
General Requirements.................... Error! Bookmark not defined.
Electrical Requirements ................. Error! Bookmark not defined.
Product description......................... Error! Bookmark not defined.
Glossary.........................................................Error! Bookmark not defined.
Index.............................................................Error! Bookmark not defined.

RC9800i Touch Screen Remote Control - User Manual Guide Through the User Manual
Philips Innovative Applications Page 12 of 39
Guide Through the User Manual
This booklet contains the following chapters;
Important Information, beginning on page 3 gives you an overview of
information concerning safety, the helpdesk and services offered by
Philips;
The chapter Contents of the Box beginning on page 9 shows you the
packaging content;
In Pick Up Your RC9800i and Take a Good Look beginning on page 13, you
get acquainted with your new RC9800i Touch Screen Remote Control;
Getting the Settings Right beginning on page 17 guides you through the initial
setup;
In Learning the Basics beginning on page 29, you learn more about what you
should know with regard to controlling legacy devices, Home
Networking, connected devices and Activity-Based Control;
Installing the Software beginning on page 35 explains how you install the
Philips Media Manager;
Upgrading the Firmware on page 37 tells you how to upgrade your firmware;
Getting the Maximum Out of It beginning on page 38 shows you how to
maximize the use of your RC9800i;
Error! Reference source not found. beginning on page Error! Bookmark
not defined. explains you how you can change your settings even after
you have run through the initial setup;
The Chapter Error! Reference source not found. beginning on page Error!
Bookmark not defined. provides an overview of the symbols used on the
RC9800i’s screens;
Error! Reference source not found. beginning on page Error! Bookmark
not defined. gives new RC9800i users an overview of the most frequently
asked questions;
When the RC9800i Touch Screen Remote Control doesn’t work as you expect,
refer to Error! Reference source not found. beginning on page Error!
Bookmark not defined.;
Error! Reference source not found. beginning on page Error! Bookmark
not defined. gives an overview of the technical specifications of your
RC9800i;
In Error! Reference source not found. beginning on page Error!
Bookmark not defined., you can find definitions of the most important
home theater and home network concepts.
RC9800i Touch Screen Remote Control - User Manual Pick Up Your RC9800i and Take a Good Look
Philips Innovative Applications Page 13 of 39
Pick Up Your RC9800i and Take
a Good Look
Congratulations on your new RC9800i Touch Screen Remote Control! This
device is a “must have” to enjoy a real state-of-the-art home entertainment
experience. You will see that using the RC9800i is in fact very easy.
First of all you can put away all of your old remote controls, because the
RC9800i is the perfect universal remote to replace them all.
But the RC9800i is much more than a remote control! It’s the top-notch
appliance for controlling virtually anything that is connected within your home
network.
Before we go into details, let’s first have a look at the remote control itself.
In this chapter you will get acquainted with the various elements of the
RC9800i. You will learn:
how to turn the RC9800i on and off;
how to operate the touch screen;
how to use the hard keys;
how to charge the device by means of a cradle;
the purpose and use of the USB connector.
Powering On and Off
First-Time Power On
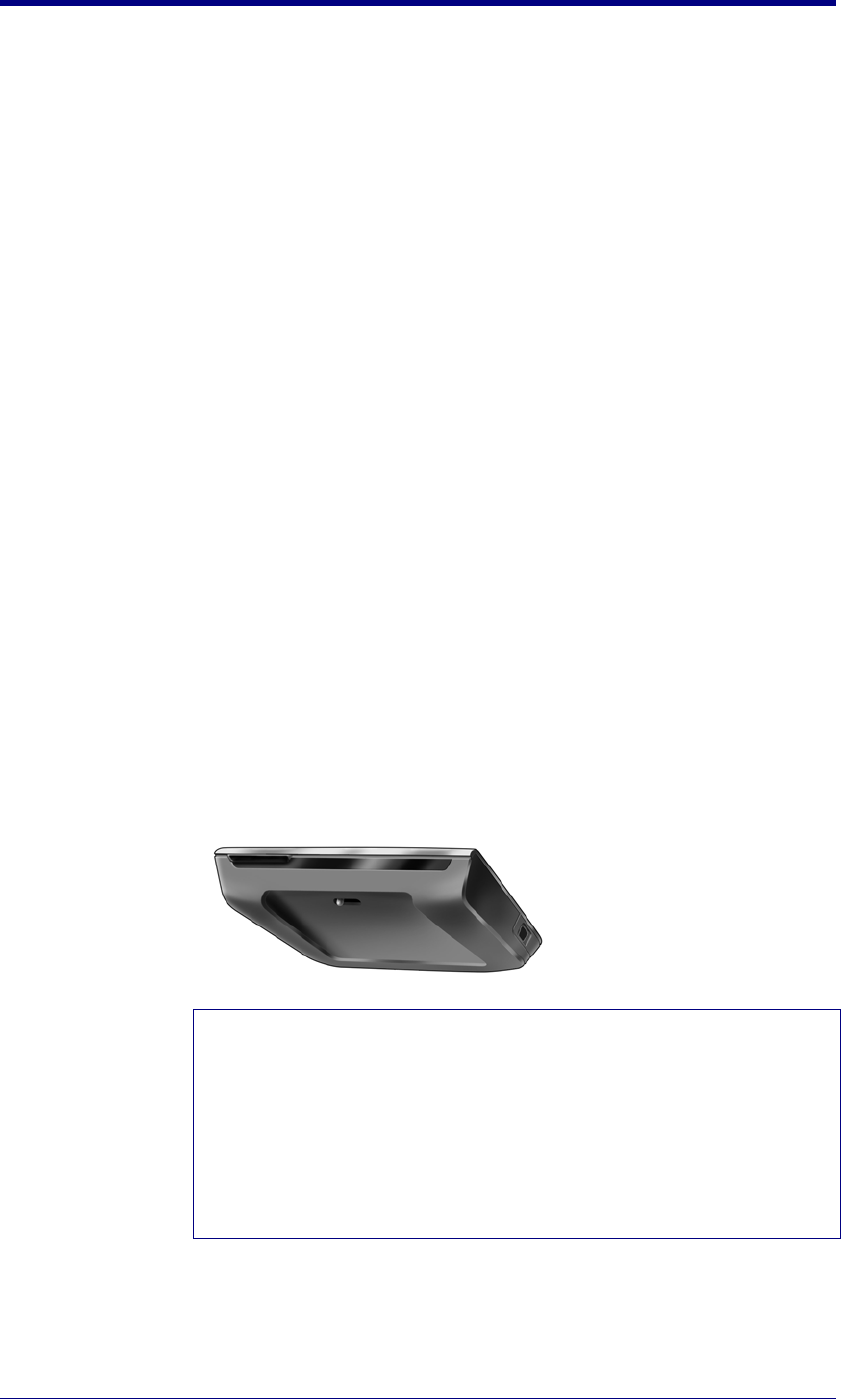
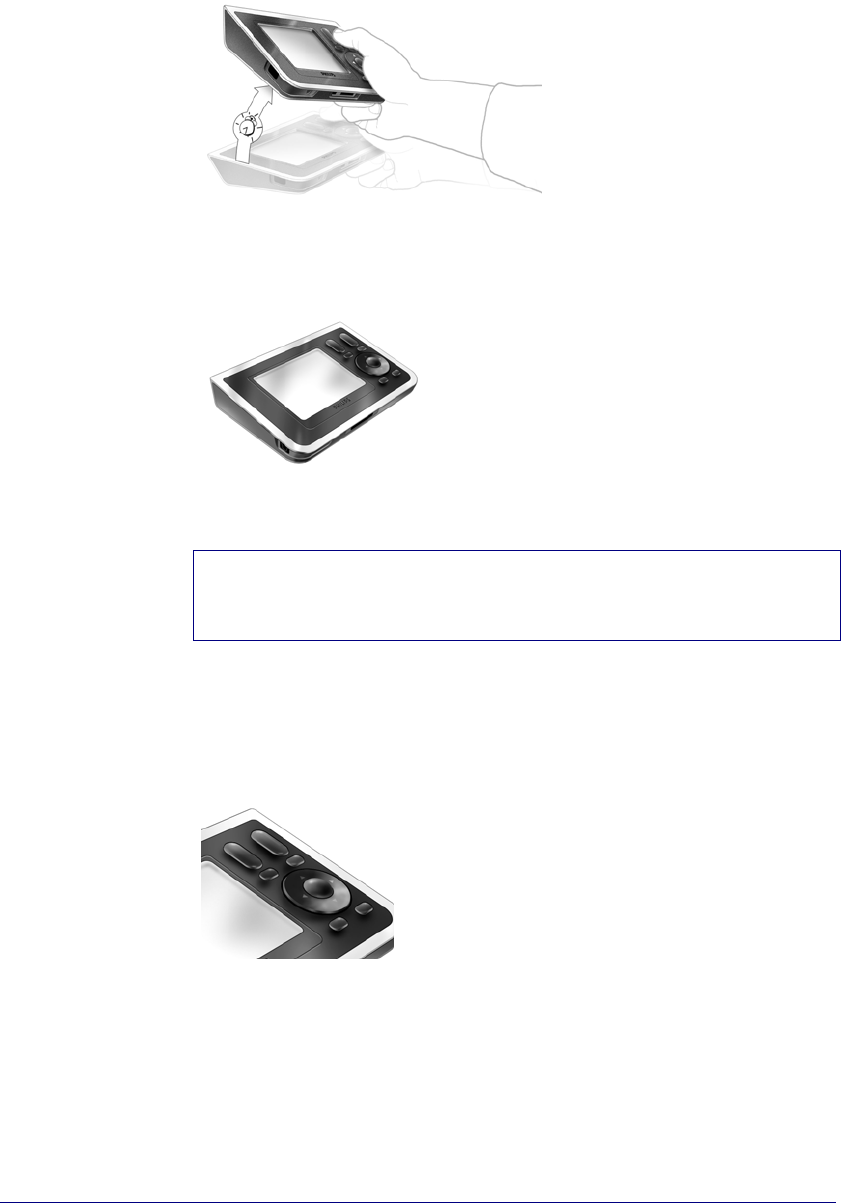
The first time you use your RC9800i, you switch it on with the On/Off
Switch. The On/Off Switch is located at the bottom of the RC9800i.
Note
You might need the On/Off Switch for resetting the RC9800i in the unlikely
event that the device doesn’t respond. See Error! Reference source not
found. beginning on page Error! Bookmark not defined..
The first time you activate your RC9800i, the Setup Wizard appears. This
wizard will assist you in setting up your RC9800i.
Before you proceed, we advise you to fully charge your RC9800i. See page 15
for more information on how to charge the device.
RC9800i Touch Screen Remote Control - User Manual Pick Up Your RC9800i and Take a Good Look
Philips Innovative Applications Page 14 of 39
Everyday Use
During normal everyday use, the RC9800i will automatically go into standby
mode when it isn’t being used. Thus, you don’t need to switch off the
RC9800i with the On/Off Switch.
To wake up the RC9800i, do one of the following:
press one of the hard keys;
tap the touch screen; or
tilt the RC9800i as shown below.
The Touch Screen
The RC9800i has a landscape-oriented touch screen. You can operate the
touch screen either with your fingers or with a blunt pen tip.
Attention!
Never use a ballpoint pen tip or other sharp object. These objects can damage
the touch screen.
The Hard Keys
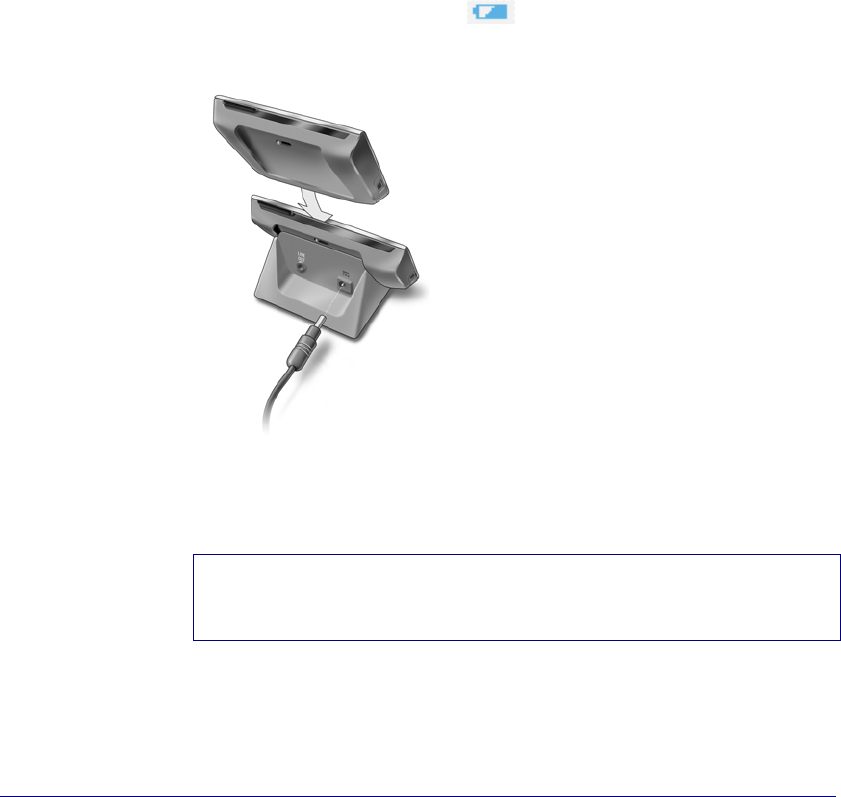
At the right-hand side of your RC9800i’s touch screen you will find several
hard keys.
Channel: Press this hard key to go one TV Channel up or down.
Volume: Press this hard key to control the volume.
Mute: Press this hard key to mute the device that is being controlled.
RC9800i Touch Screen Remote Control - User Manual Pick Up Your RC9800i and Take a Good Look
Philips Innovative Applications Page 15 of 39
Cursor: Up-Down-Left-Right and OK hard keys. The action resulting from
pressing the cursor depends on what is shown on the touch screen. In
general the cursor keys allow you to navigate around.
The Up and Down hard keys can be either partially or fully pressed:
Partially: To move through a list one item at a time, partially press the
up or down key.
Fully: To move quickly through a list, fully press the up or down key.
If you fully press and hold the keys for more than 5 seconds, the
highlight will jump to the top (or bottom) of the list.
The OK hard key in the middle of the cursor is used to confirm a selection
and to trigger the corresponding action.
Page: Press this hard key to cycle through several screens in a loop. When
only one page is available, the Page hard key is inactive.
Back : To quickly move back through the series of screens that you have been
viewing, press the Back key. For more information see Error! Reference
source not found. on page Error! Bookmark not defined..
Home: Press this hard key to return to the Homepage.
Charging the RC9800i
The battery level of the RC9800i is displayed on the touch screen. At any time
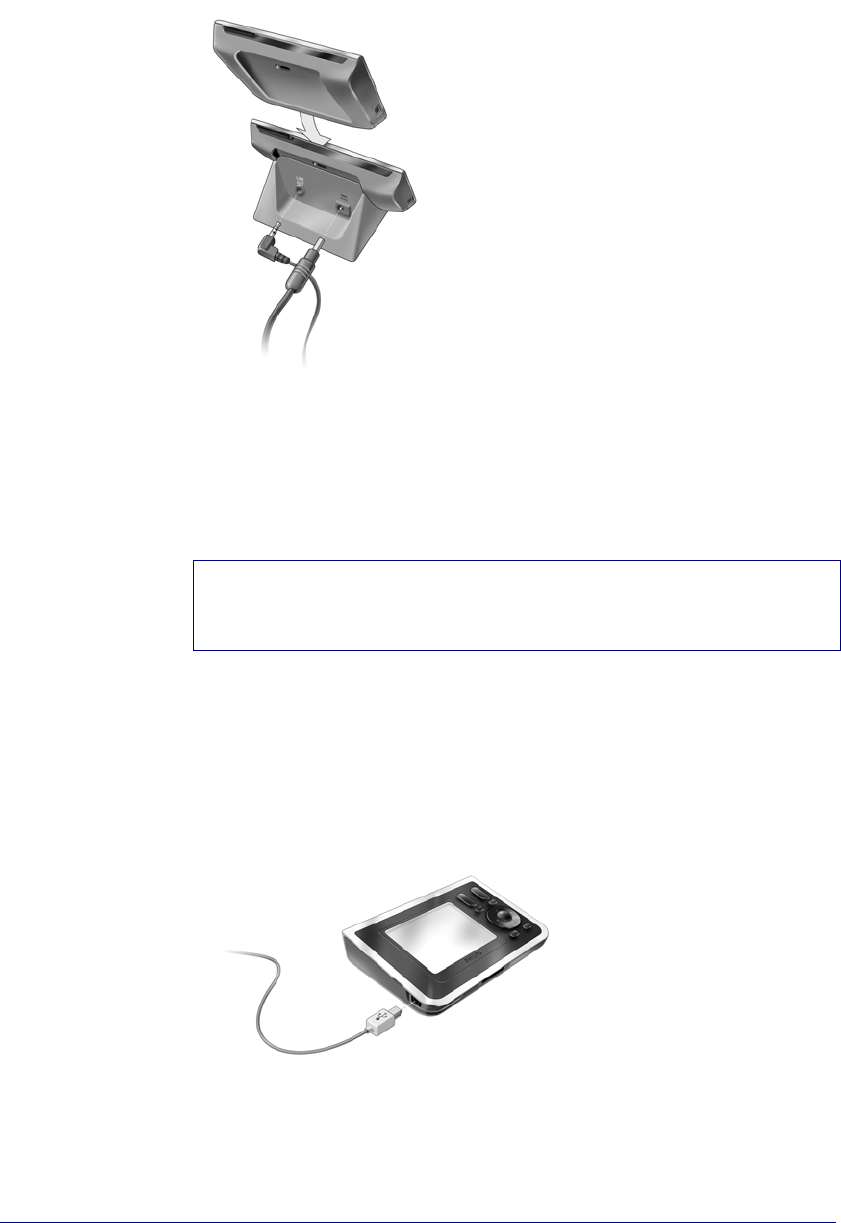
you can charge the device as follows:
Plug the power adapter into the cradle.
Dock the RC9800i in the cradle.
The RC9800i is being charged and an animation of the battery icon
appears on the touch screen.
It takes about 3 hours to fully charge the RC9800i.
When the RC9800i is in standby mode, the battery lasts for approximately 2
weeks. However, we advise you to recharge the device frequently.
Note
When the RC9800i is in standby mode, it will beep from time to time to
inform you that the battery is getting low.
RC9800i Touch Screen Remote Control - User Manual Pick Up Your RC9800i and Take a Good Look
Philips Innovative Applications Page 16 of 39
The Cradle as Media Adapter
Besides using the cradle for charging the RC9800i, you can also use it as an
audio-link Media Adapter. When you connect the cradle to the amplifier of
your audio system by means of an audio extension cable (not included), the
cradle will become an audio-link Media Adapter.
To turn the cradle into an audio-link Media Adapter, proceed as follows:
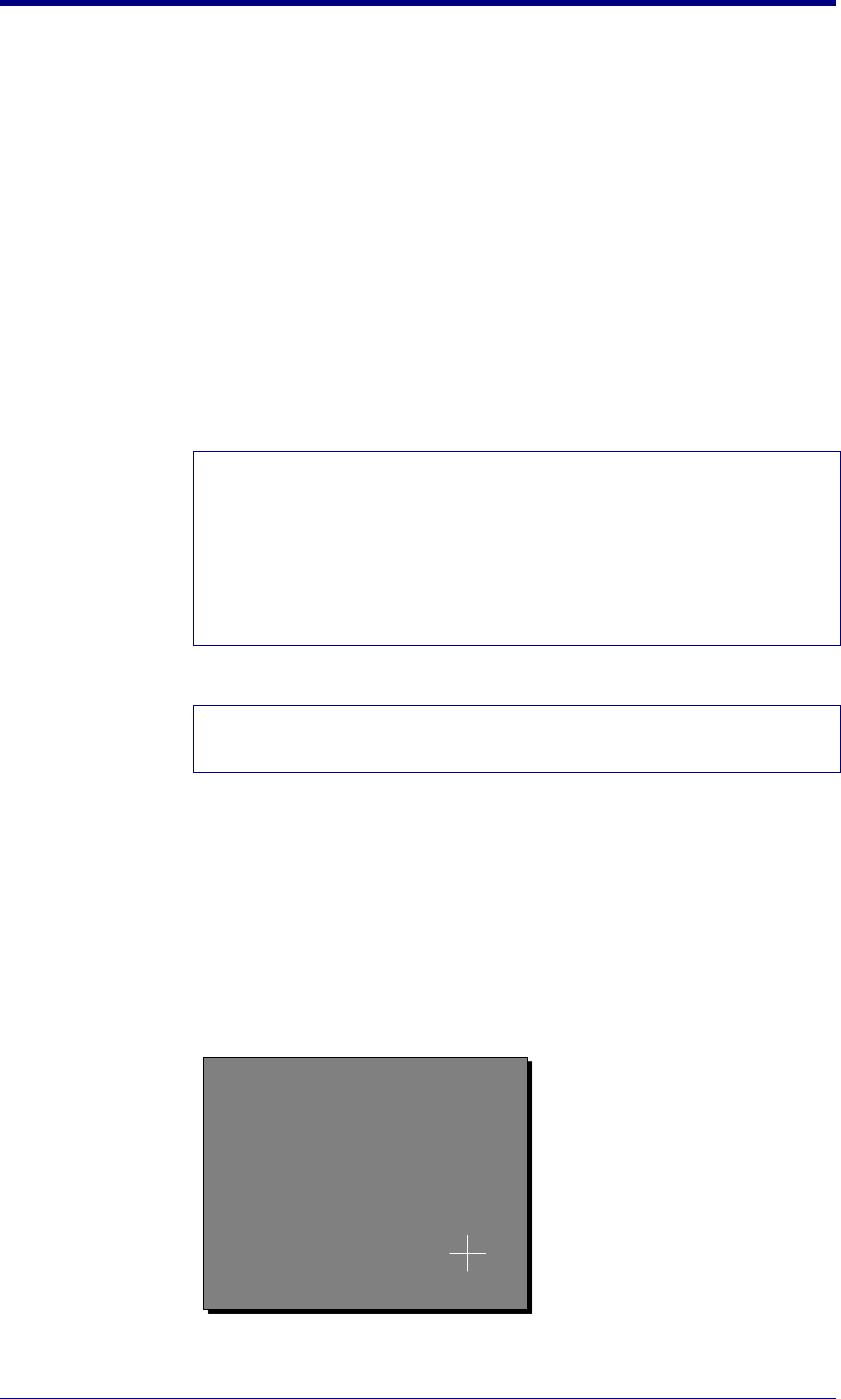
Plug one end of the audio extension cable (not included) into the cradle.
Plug the other end of the cable into the amplifier of your audio system.
Dock the RC9800i in the cradle.
If the RC9800i is actually playing music via its speaker, the RC9800i is
muted and all audio content will be transferred from the RC9800i to the
audio device.
Note
The audio extension cable is not included. For more information on audio
extension, see page Error! Bookmark not defined..
The USB Connector
The mini USB connector is located at the left-hand side of your RC9800i.
You will need this USB connector to connect to a PC in order to download
new firmware when it becomes available. For further information, see
Upgrading the Firmwareon page 37
RC9800i Touch Screen Remote Control - User Manual Getting the Settings Right
Philips Innovative Applications Page 17 of 39
Getting the Settings Right
When starting the RC9800i for the first time, a screen appears to welcome you
to the initial startup sequence. During this sequence, a wizard will guide you
through the initial set-up screens. The wizard prompts you to perform the
following actions:
Going through the RC9800i settings:
Calibrating the touch screen: see page 17.
Selecting your Location: see page 18.
Entering the RC9800i’s Network information: see page 18.
Entering information concerning Date/Time Zone.
Going through the Home Setup:
Room Setup;
IR Extender Setup;
Device Setup
Going through the Activity Setup.
Note
You can exit the initial set-up Wizard at any time by clicking Exit on a screen.
However, you can run the initial setup only once. Afterwards you can change
settings as explained in Error! Reference source not found. beginning on
page Error! Bookmark not defined..
To navigate through the initial Setup, you can use the soft buttons Back and
Next.
Attention!
Before you proceed, we advise you to fully charge your RC9800i.
RC9800i Settings
Calibrating the Touch Screen
On first use you have to calibrate the RC9800i ’s touch screen. Afterwards,
you can calibrate the touch screen any time you like to improve its accuracy.
When you activate your RC9800i for the first time the following screen
appears:
Please carefully press the center of
the crosshairs to calibrate your
touchscreen.
RC9800i Touch Screen Remote Control - User Manual Getting the Settings Right
Philips Innovative Applications Page 18 of 39
Tap consecutively the 2 crosshairs that appear.
Selecting Your Location
After calibrating the touch screen, the wizard asks you to select your location.
Attention!
The location you select affects the Electronic Programming Guide (EPG)
application, the IR code database and the setup questions. For more
information about E
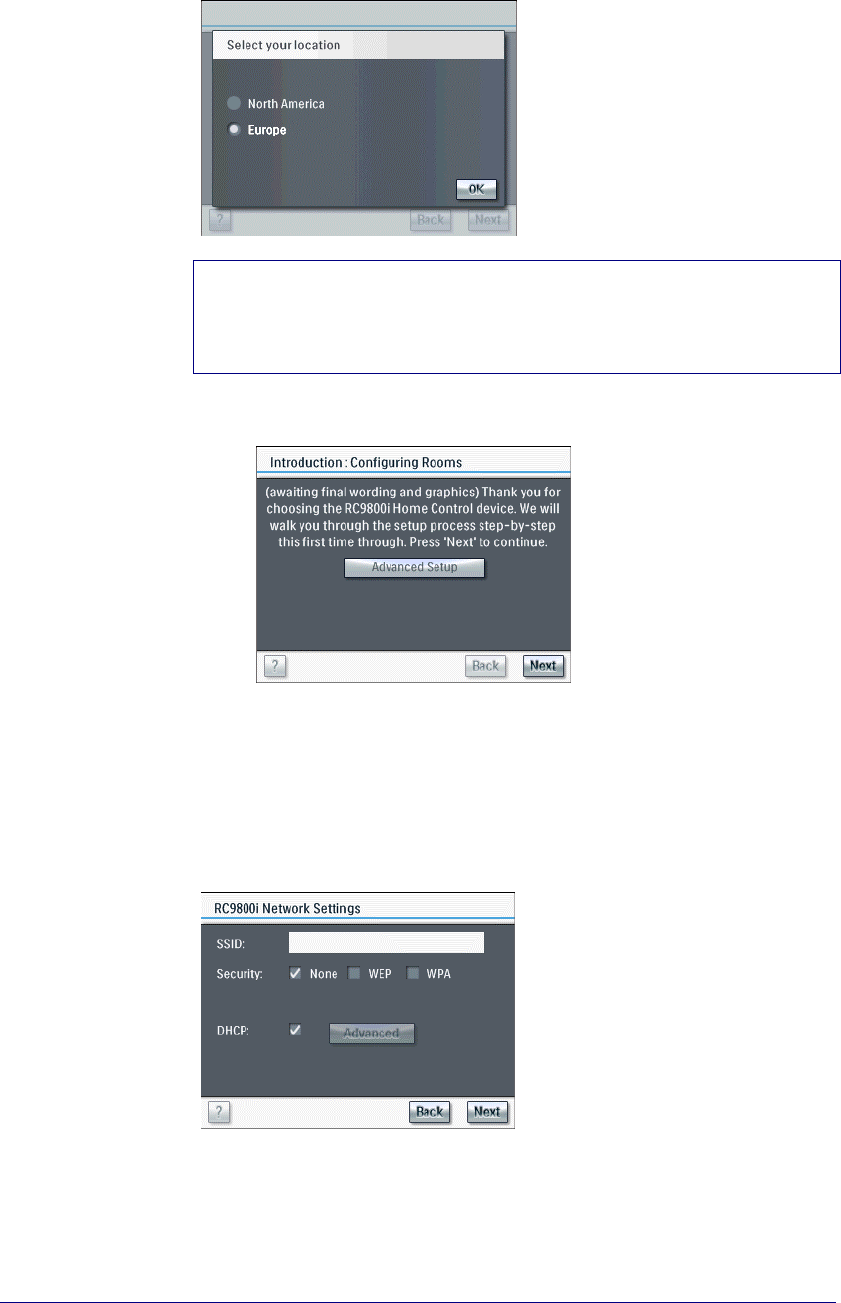
Select either North America or Europe.
The following introduction screen appears.
@@@
Tap Next to continue.
The Network Settings screen appears.
Network Settings
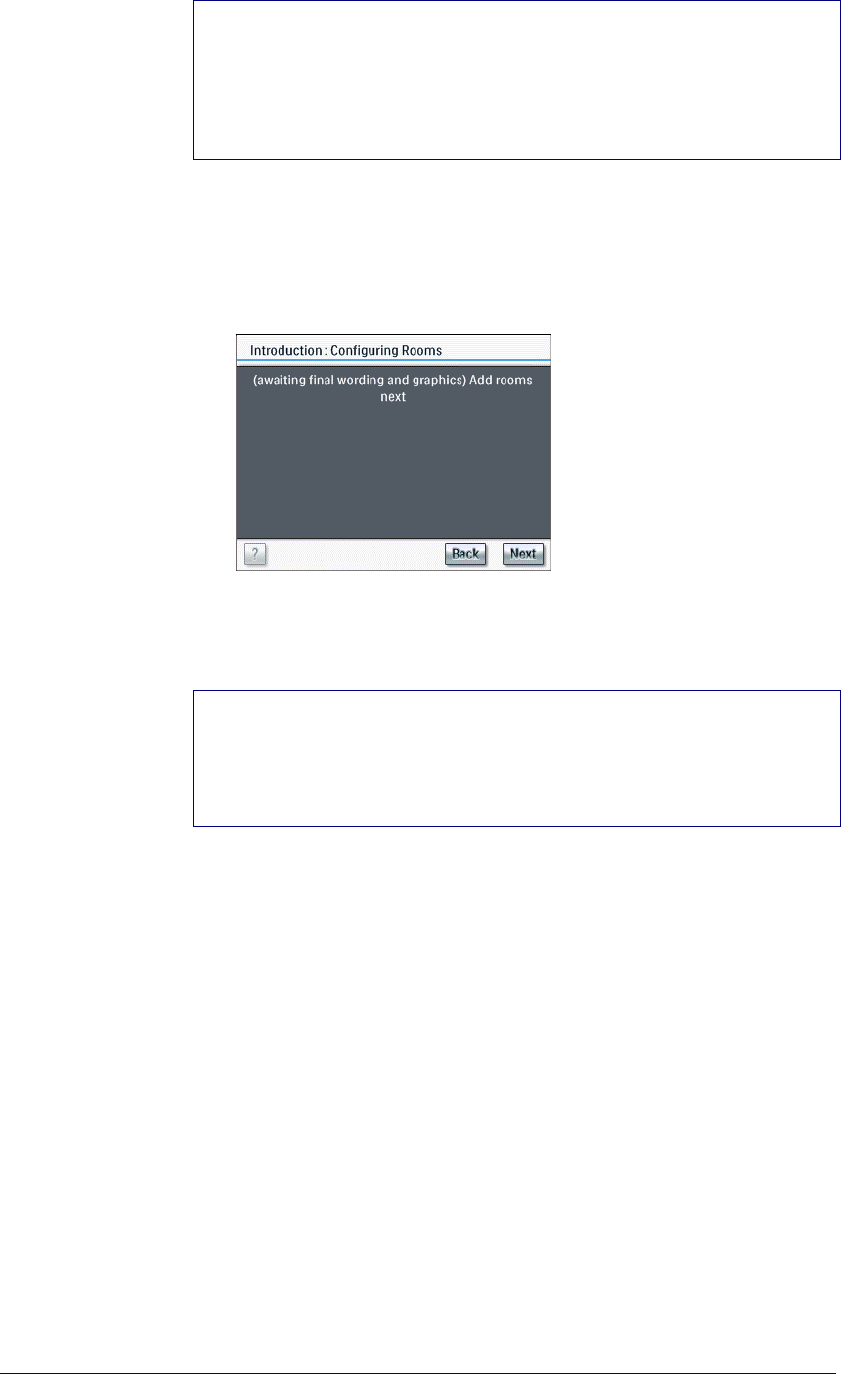
When you have selected your location, the wizard takes you to the Network
Settings.
Enter the settings for your network. Click Advanced to enter IP, DNS,
Netmask and Gateway settings.
If you want to know more about the individual settings, check the Error!
Reference source not found. on page Error! Bookmark not defined..
RC9800i Touch Screen Remote Control - User Manual Getting the Settings Right
Philips Innovative Applications Page 19 of 39
To continue, tap Next.
The screen ‘Date/Time Zone’ appears.
Attention!
Most wireless devices can also operate in peer-to-peer mode. This means that
there is a direct wireless communication link between two communicating
devices. If you have set up devices in peer-to-peer mode, we strongly
recommend that you have your wireless home network operate with a
Wireless Access Point (WAP) and that you remove all peer-to-peer links.
Adjusting Time, Date and Time Zone
Settings
When you have completed the Network Settings, the wizard continues with
the Date and Time Zone Settings.
Enter the correct data.
Tap Next.
The Home Setup process starts.
Note
If you want to set the date and time automatically, select the option Update
time automatically. This connects the RC9800i with a timeserver so that date
and time will be updated automatically. Note that this is only possible if you
have a network connection.
Home Setup
After going through the RC9800i Settings, the wizard guides you through the
Home Setup. This involves:
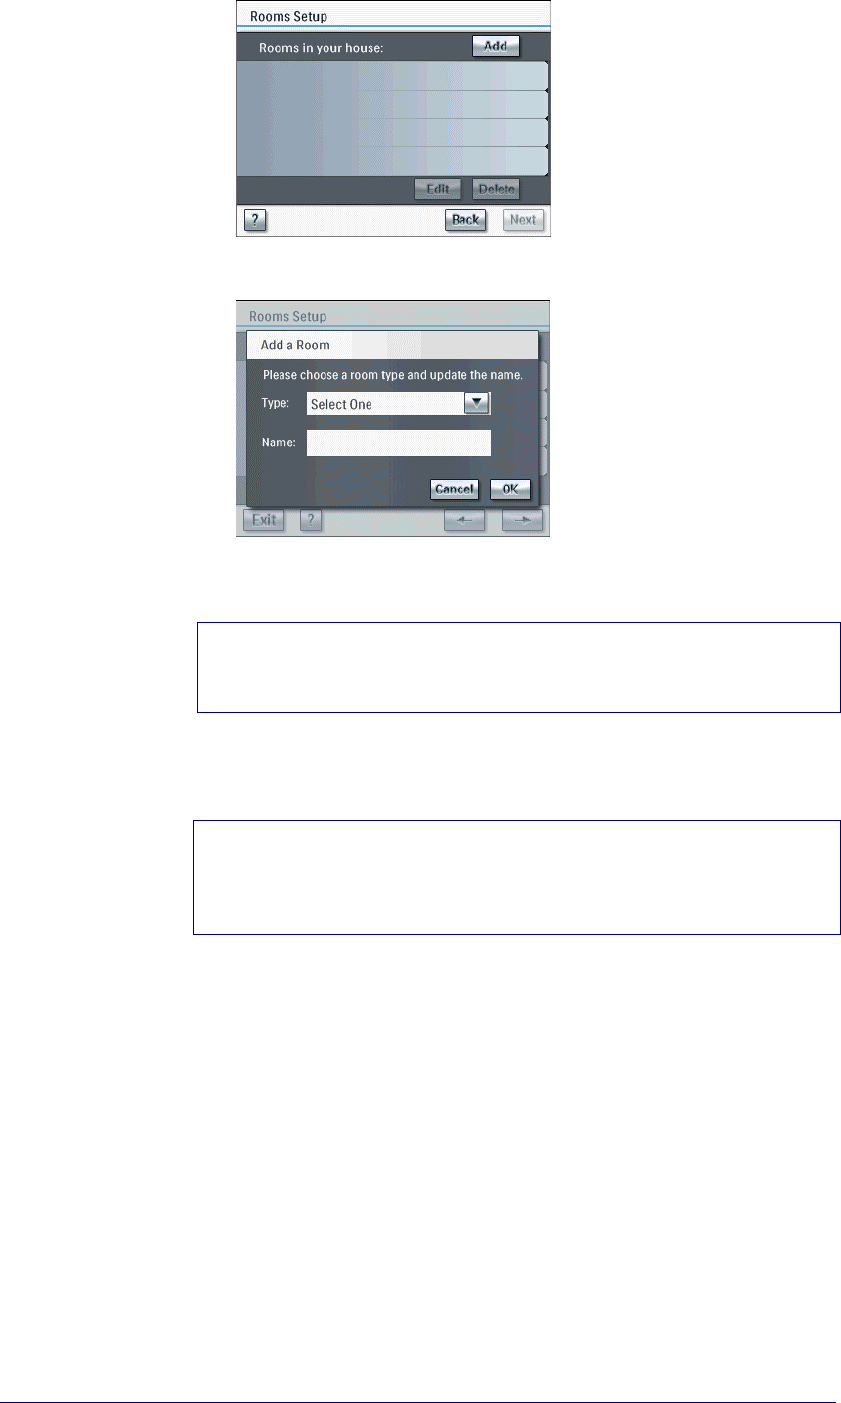
Adding rooms to the RC9800i;
Adding IR Extenders if applicable;
Adding Devices.
RC9800i Touch Screen Remote Control - User Manual Getting the Settings Right
Philips Innovative Applications Page 20 of 39
Room Setup
Tap Add.
The screen to select a room-type appears.
Select the room type of your choice.
The name of the room is filled out automatically.
Tip
If you have a room that is not in the list, choose a room that matches your
room closest and rename it.
Tap OK.
The screen to select a room type appears again the newly added room. If
you wish, you can add additional rooms.
Attention!
Make sure that you add all the rooms that should be part of your home
network at once. You cannot return to the previous setup during the initial
wizard to add extra rooms.
After adding all your rooms, tap Next.
The IR Extender Setup screen appears.
RC9800i Touch Screen Remote Control - User Manual Getting the Settings Right
Philips Innovative Applications Page 21 of 39
IR Extender Setup (Skip If Not
Applicable)
@@@
Note
If you don’t have a NetX, you may skip this section by pressing Skip.
Good To Know: About the NetX
Your RC9800i is only compatible with the NetX IR Extender. The NetX is a
part of the Philips Connected Planet solution and extends the control of the
RC9800i beyond the line of sight and into multiple rooms/rooms. No wall,
closet or obstacle can prevent you from using the RC9800i to control a device
that is out of sight. This gives you the ultimate device control around the
house. Via the NetX your RC9800i can control your A/V and Home Control
devices from virtually any room in your home.
The NetX receives Radio Frequency (RF) signals sent out by RC9800i via
your WiFi 802.11b wireless home network and converts them into infrared
(IR) signals. These IR signals are then sent out to your IR controlled A/V and
home control devices.
Check the NetX Getting Started Guide for more information.
Tap Next.
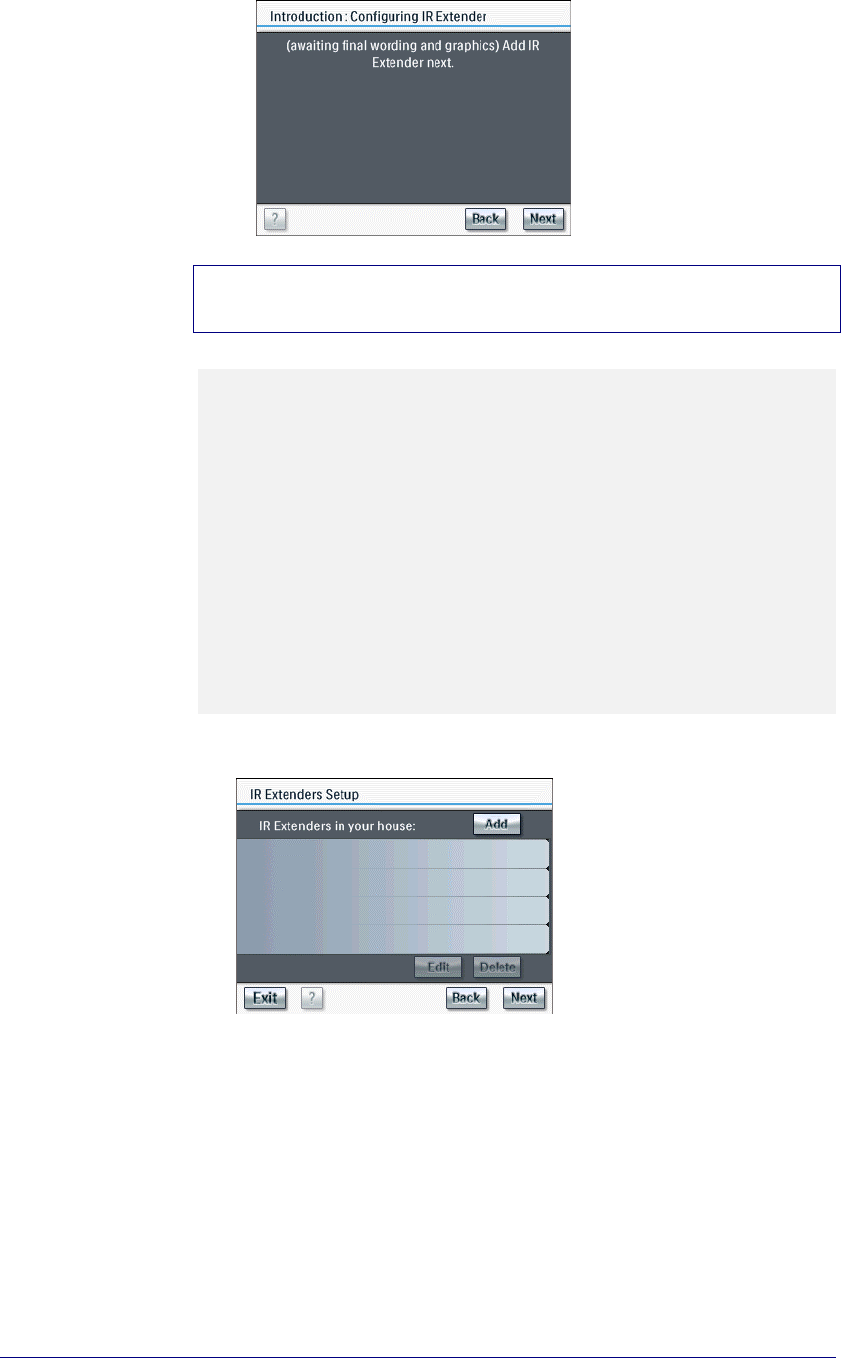
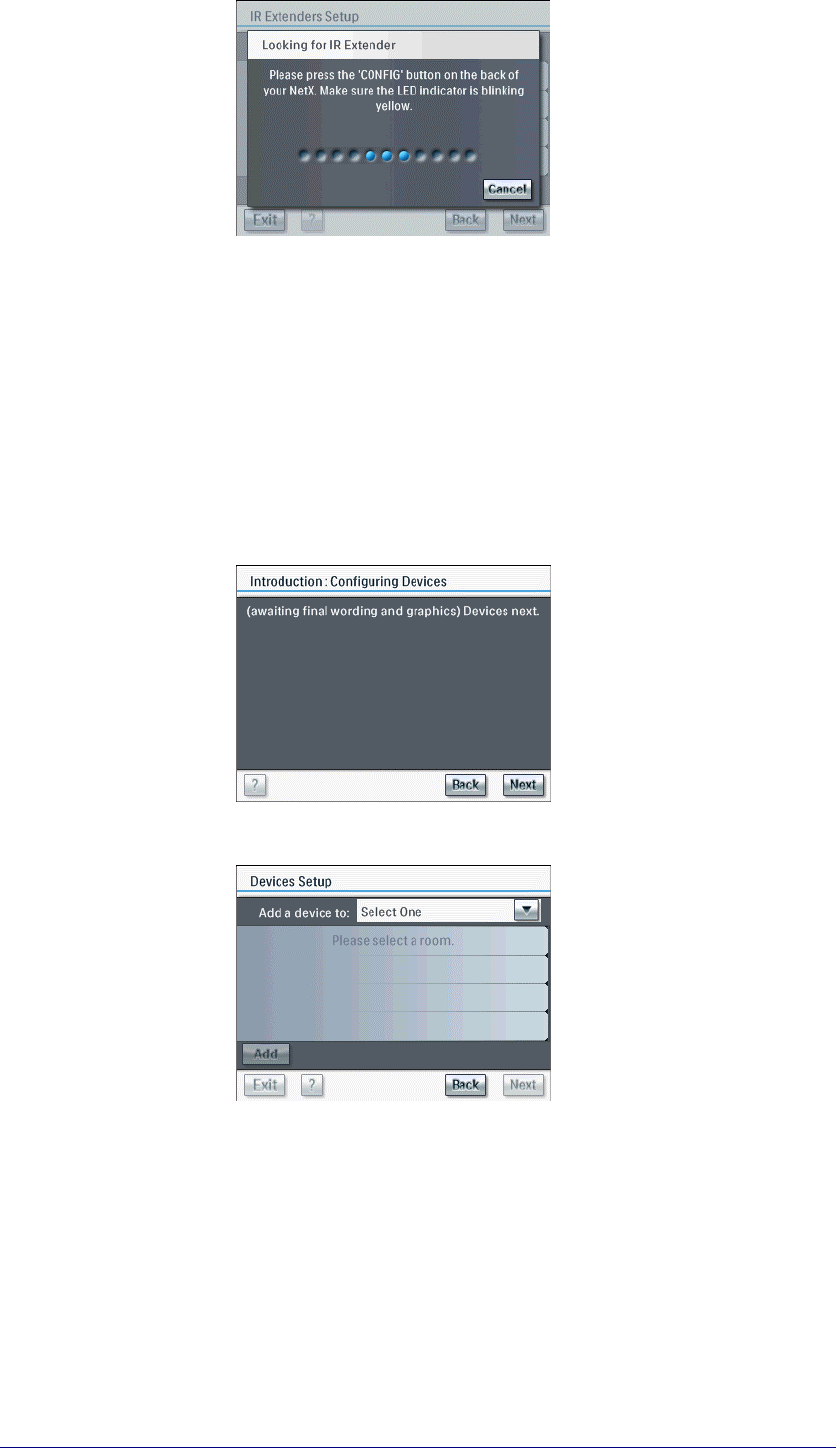
The screen ‘IR Extenders Setup’ appears.
Tap Add.
The screen ‘Looking for IR Extenders’ appears.
RC9800i Touch Screen Remote Control - User Manual Getting the Settings Right
Philips Innovative Applications Page 22 of 39
Enter the following data:
SSID;
DHCP;
IP address:
Subnet Mask.
Tap OK.
The IR extenders Setup screen appears again.
Tap Next.
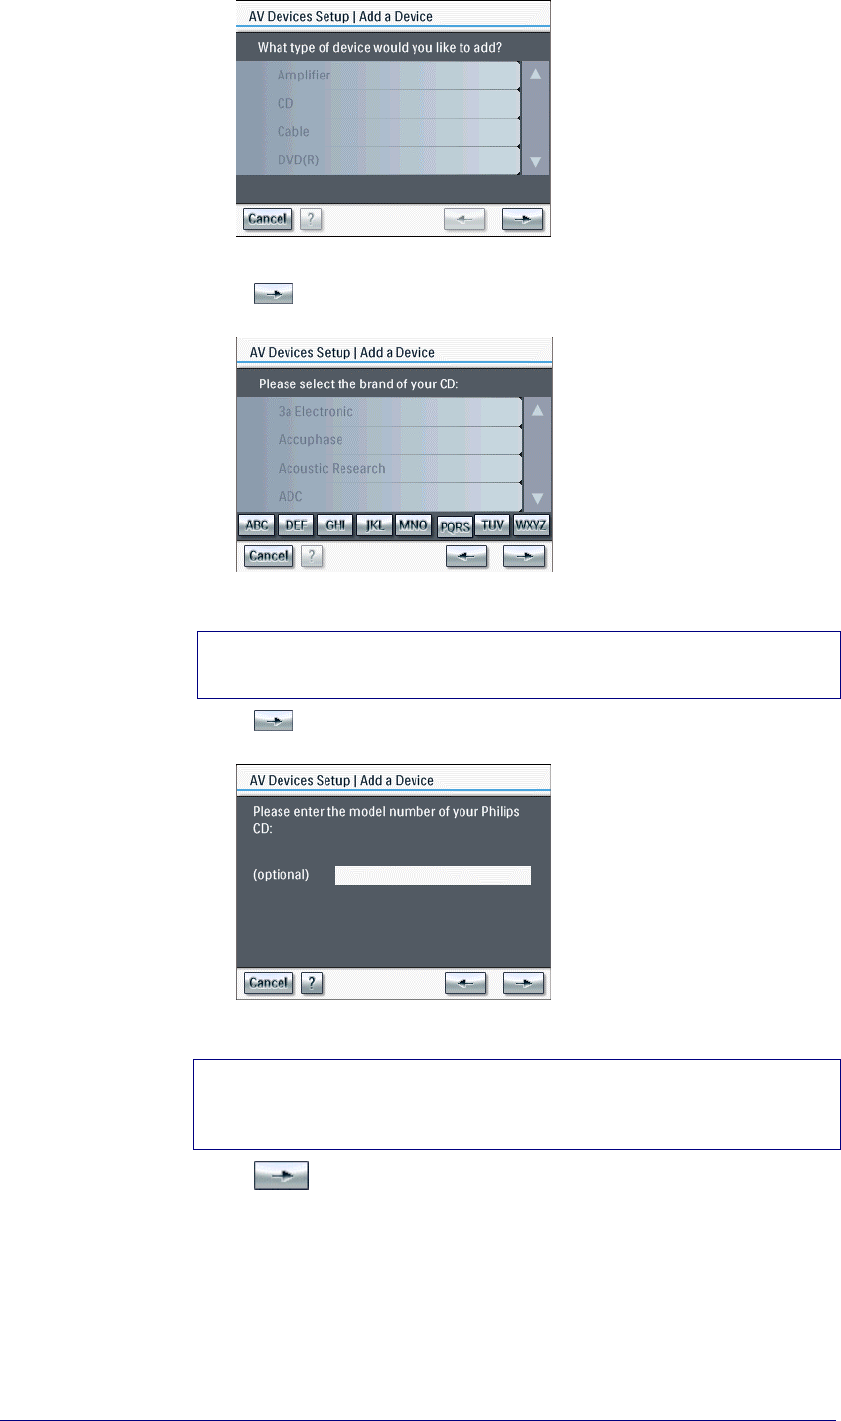
The Device Setup screen appears.
Device Setup
Tap Next.
The screen ‘Devices Setup’ appears.
Select a room.
Tap Add.
RC9800i Touch Screen Remote Control - User Manual Getting the Settings Right
Philips Innovative Applications Page 23 of 39
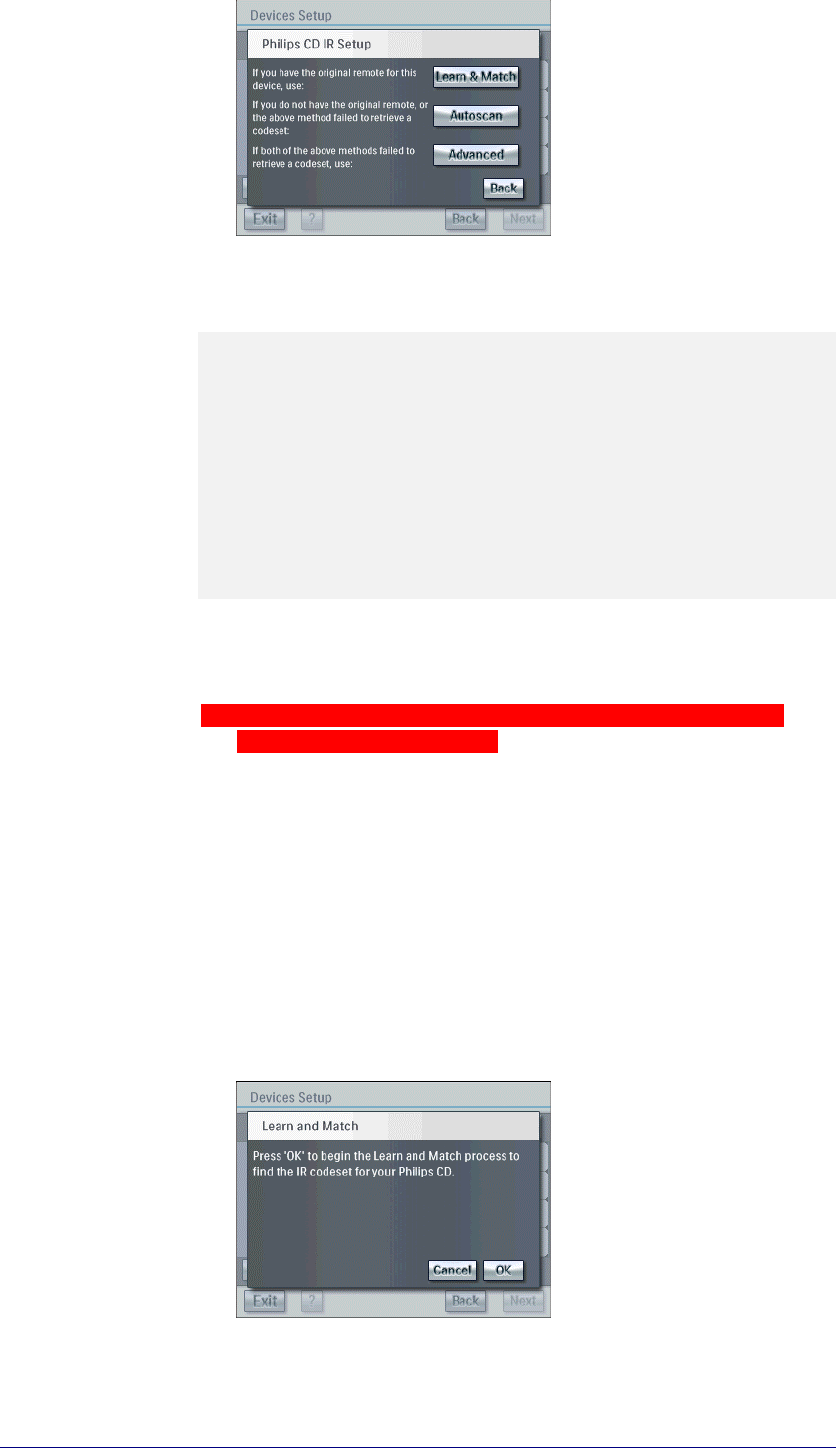
The following screen appears:
Select a device.
Tap
The following screen appears:
Select the brand of the device.
Tip
Use the alphabet buttons to quickly browse through the list of brands.
Tap
The following screen appears:
Enter the model number of the device brand.
Note
This is an optional step. If you don’t want to enter a model number, you can
leave it blank.
Tap .
The screen ‘Philips CD IR Setup’ appears. You will now assign the IR
codes to the Philips CD player.
RC9800i Touch Screen Remote Control - User Manual Getting the Settings Right
Philips Innovative Applications Page 24 of 39
Acquiring an IR Codeset
Good To Know: About IR Codes
Your RC9800i sends out infrared (IR) signals to your devices, which will
execute an action, e.g. the VCR starts recording.
For every action the RC9800i sends out a specific IR signal, called an ‘IR
code’. Your RC9800i contains a huge database that contains numerous IR
codes for all kinds of devices.
The RC9800i is set up by default to operate Philips and compatible devices. If
you possess other device brands, the RC9800i has to ‘learn’ the specific IR
codes for your device from the original Remote Control (RC) that
accompanies the device.
@@@ screens niet finaal. L&M niet volledig te testen!
In the following steps the wizard will ask you to learn the IR code for the
Philips CD.
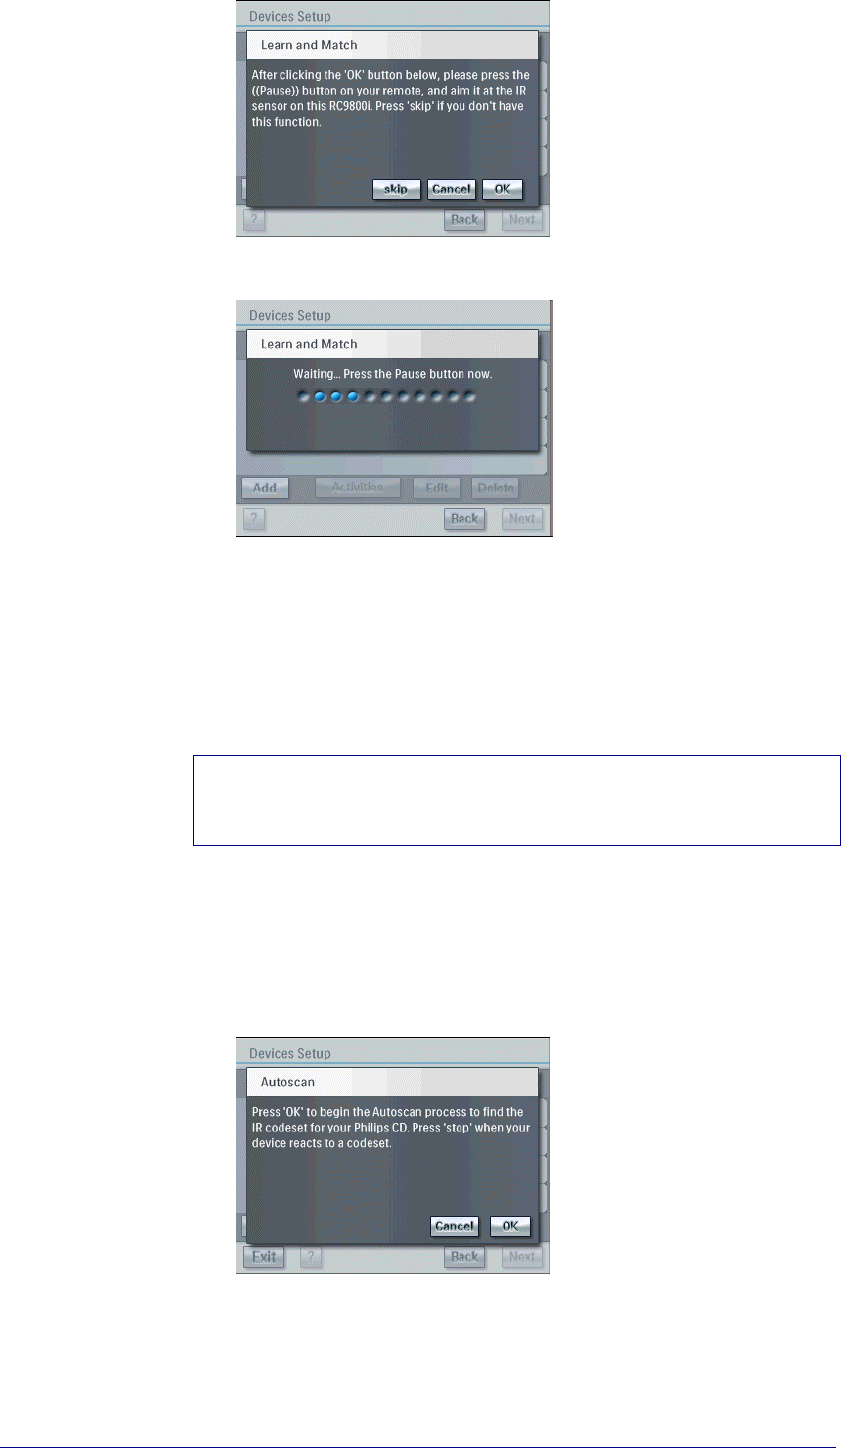
10 In the screen ‘Philips CD IR Setup, select how to control the device.
The selected item is highlighted.
There are 3 different ways to learn your IR codes:
If you have the original remote control for the device, choose Learn &
Match;
If you don’t have the original remote control or Learn & Match doesn’t work
properly, choose Autoscan;
If Learn & Match nor Autoscan work properly, choose Advanced.
Learn & Match
In this method you use your original remote control to determine the IR
codeset that your RC9800i has to use.
1 In the screen ‘Philips CD IR Setup’, tap Learn & Match.
The screen ‘Learn & Match’ appears.
To start the Learn & Match progress, tap OK.
The following screen appears:
RC9800i Touch Screen Remote Control - User Manual Getting the Settings Right
Philips Innovative Applications Page 25 of 39
Tap OK.
A progress bar appears:
Aim the IR sender of the original remote control to the RC9800i’s IR
sensor.
Press the Pause button.
A screen with the message ‘Learning …’ appears and the codeset will be
determined.
If learning was successful, you can optionally enter more detailed
information.
Note
If Learn & Match doesn’t work properly you can use the Autoscan method to
find an IR codeset for the device.
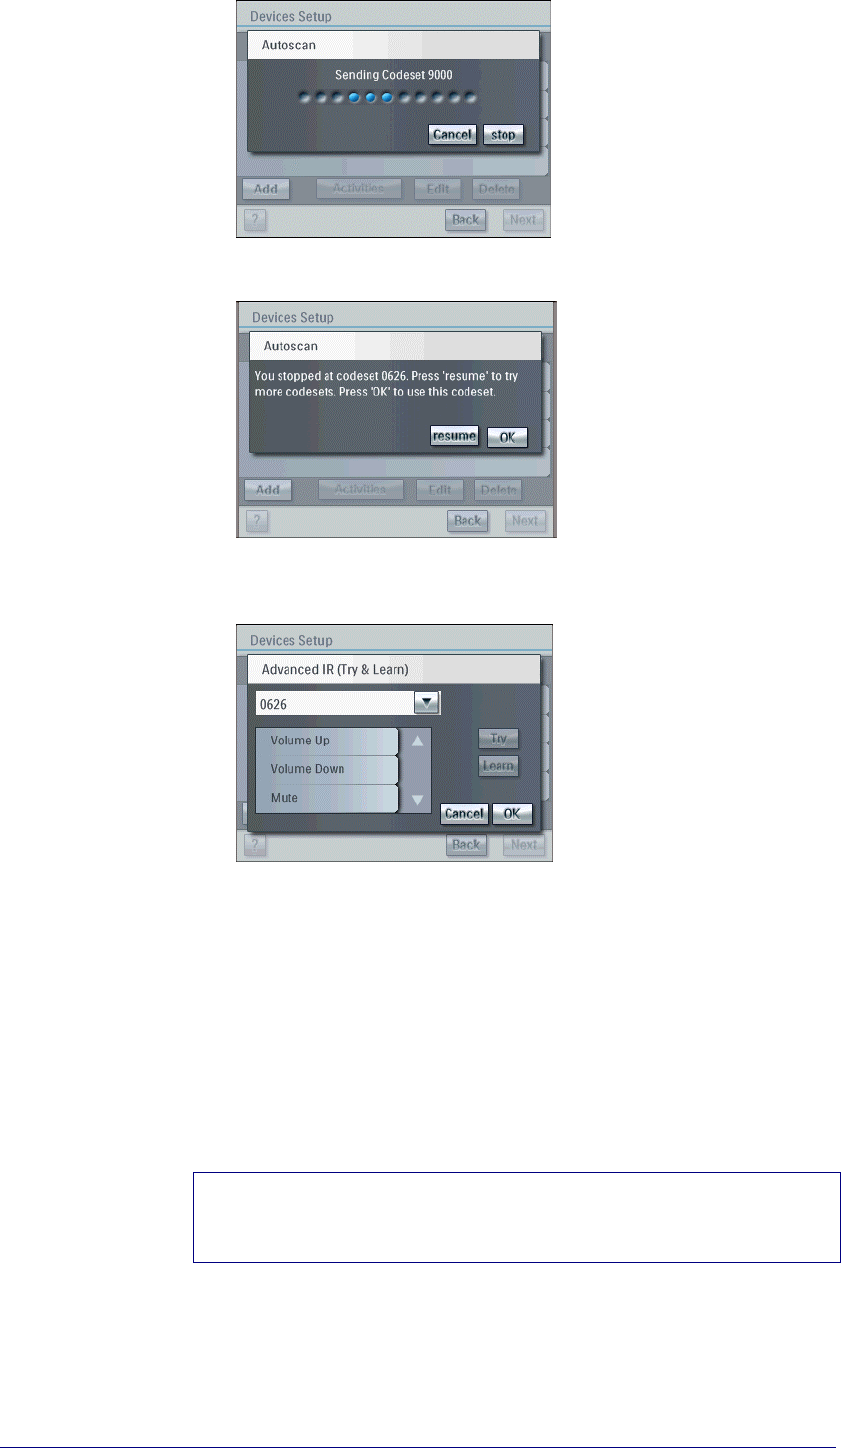
Autoscan
If you don’t have the original remote or the Learn & Match method doesn’t
work properly, use the Autoscan method. This method automatically sends
commands to your device using your RC9800i.
In the screen ‘CD Philips IR Setup’, tap Autoscan.
The screen ‘Autoscan’ appears.
Tap OK.
A progress bar appears.
RC9800i Touch Screen Remote Control - User Manual Getting the Settings Right
Philips Innovative Applications Page 26 of 39
When the device responds, tap Stop.
A confirmation screen appears.
To use this codeset, tap OK.
The screen ‘Advanced (Try & Learn)’ appears. Here you can try out more
buttons.
To test more buttons, select a button and tap Try.
If the device responds, tap OK.
or
If the device doesn’t respond, tap Learn.
Aim the IR sender of the original remote control to the RC9800i’s IR
sensor.
Press the Mute hard key on the remote.
A screen with the message ‘Learning …’ appears and the codeset will
be determined.
If learning succeeded, you can optionally enter more detailed information.
Note
If your device doesn’t respond to the Autoscan commands, use the Advanced
method.
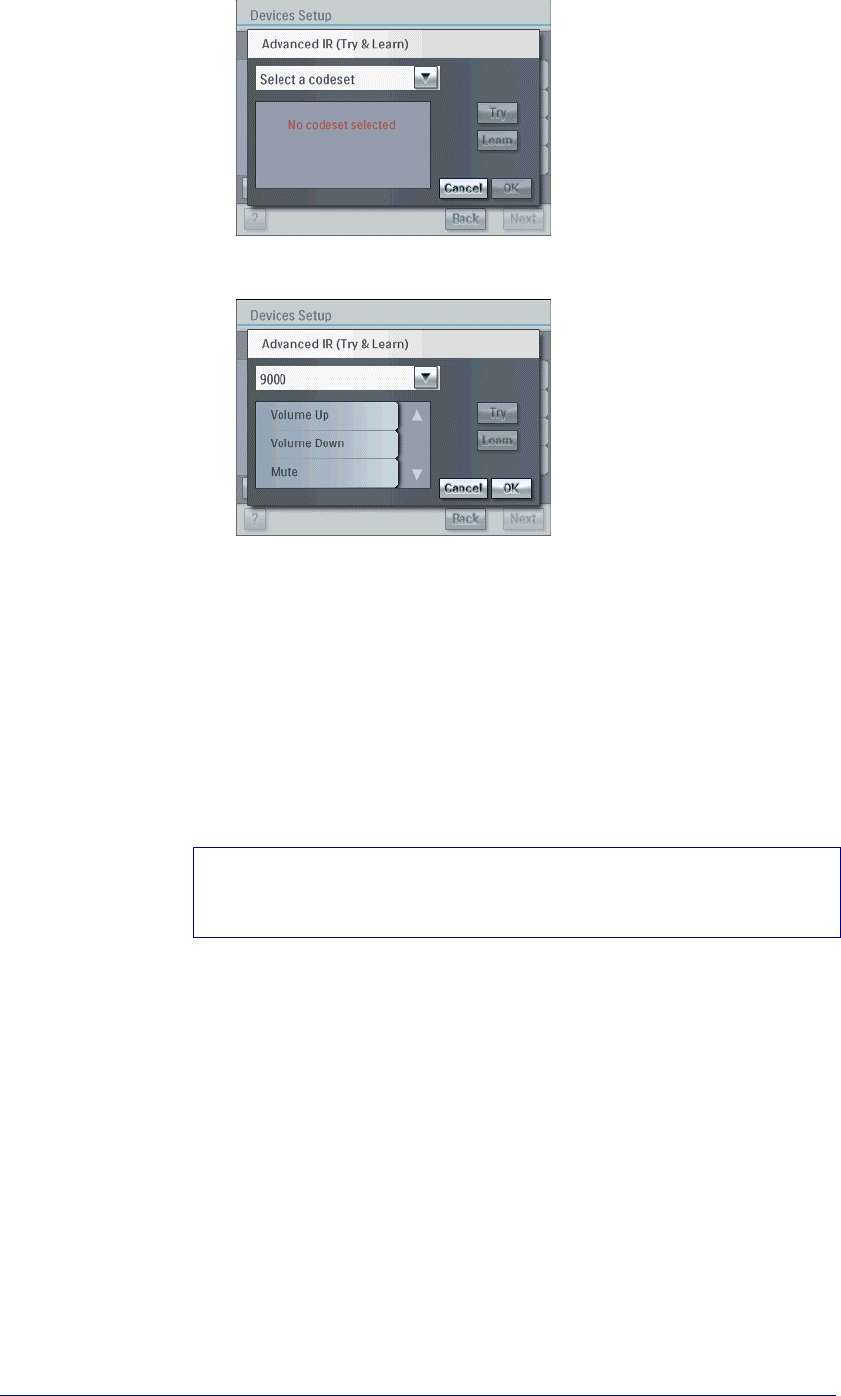
Advanced
If you don’t have the original remote control, or if Autoscan doesn’t work
properly, use the Advanced method. With this method, you can choose an IR
codeset and try this codeset on one or more buttons.
RC9800i Touch Screen Remote Control - User Manual Getting the Settings Right
Philips Innovative Applications Page 27 of 39
In the screen ‘Philips CD IR Setup’, tap Advanced.
The following screen appears:
Select a codeset.
The list is populated with several buttons.
Select a button and tap Try.
If the device responds, tap OK.
or
If the device doesn’t respond, tap Learn.
Aim the IR sender of the original remote control to the RC9800i’s IR
sensor.
Press the Mute hard key on the remote.
A screen with the message ‘Learning …’ appears and the codeset will
be determined.
If learning succeeded, you can optionally enter more detailed information.
Note
You find also red buttons in the list. These red buttons are buttons you’re
device does not know yet. To learn these buttons, select them and tap Learn.
Configure Device
After setting up all the rooms and devices, you can add more detailed
information concerning your devices. These questions are being asked to
define how best to control your device, questions concerning
Power on;
Power on-delay;
Channel tuning;
Inter-digit delay;
Input selection;
Power-on state.
To navigate through these questions, use the Back and Next soft buttons.

RC9800i Touch Screen Remote Control - User Manual Getting the Settings Right
Philips Innovative Applications Page 28 of 39
Activity Setup
The activity setup helps you to connect the devices properly. To do so the
RC9800i asks you questions during the setup concerning:
Input selection;
Channel tuning.
To navigate through these questions, use the Back and Next soft buttons.
The wizard will inform you when setup was completed successfully.
RC9800i Touch Screen Remote Control - User Manual Learning the Basics
Philips Innovative Applications Page 29 of 39
Learning the Basics
Now that your RC9800i is ready for use, you’re ready to learn the basics of its
operation. In this chapter, you get to know more about controlling your legacy
devices, home networking and Activity-Based Control.
Controlling Your Legacy Audio/Video
Devices
Legacy audio-video devices are devices that are typically operated by means
of a remote control. Your TV, for example, is such a device. When you press a
button on the TV’s remote control (e.g. Mute), the remote control sends an
Infrared (IR) signal to the TV. The TV receives this signal and executes the
command (in this case: mute the speakers).
Today, most households own many legacy A/V devices. As most, if not all, of
these devices come with their own remote control, the coffee table is getting
pretty crowded.
When you encounter this situation, the RC9800i is the perfect solution for
you.
The RC9800i is a universal remote control that can control a virtually
unlimited number of devices, such as the TV, the VCR, the DVD and so on.
The RC9800i is even more advanced: it allows you, by means of Activity-
Based Control, to automate and substantially simplify your listening and
viewing experience. To learn the ins and outs of this powerful functionality,
see What You Should Know About Activity-Based Control on page 30.
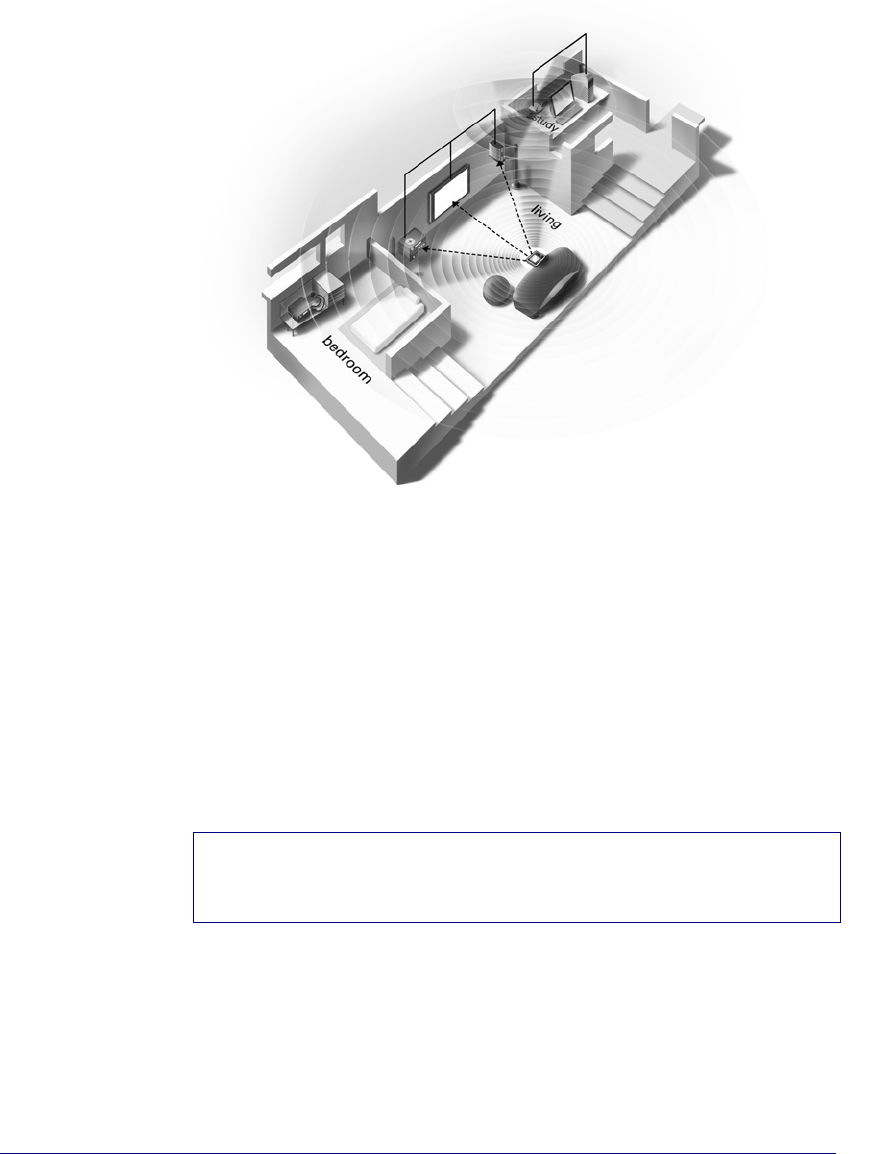
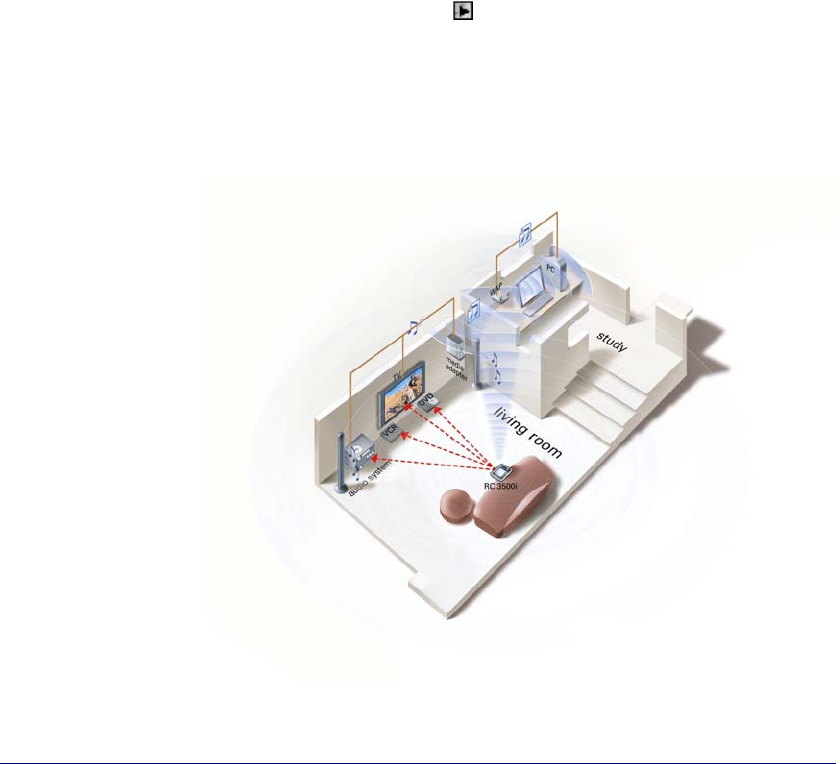
In the figure above, you can see the RC9800i functioning as a universal
remote control, controlling the audio system and the LCD TV.
RC9800i Touch Screen Remote Control - User Manual Learning the Basics
Philips Innovative Applications Page 30 of 39
What You Should Know About Home
Networking
Home Networking and Connected
Devices
The RC9800i goes one step further than ordinary universal remotes. It is
revolutionary because your RC9800i can operate all of the connected devices
in your home network.
In the home plan above a typical situation is depicted: A desktop PC (with
peripherals like monitor, mouse and keyboard) and a Wireless Access Point
(WAP) are located in the study. The details of the Wireless Access Point will
be explained further on in this chapter.
In the living room, an LCD TV is hanging against the wall. An audio system
sits in the left-hand corner and there is a Media Adapter in the right-hand
corner. The Media Adapter is wired to the LCD TV or to the audio system.
Finally there is an audio system located in the cabinet in the bedroom. You
will also notice a Philips NetX Converter mounted in the cabinet. A NetX
converter converts RF signals sent out by your RC9800i into IR signals.
Please refer to page 55 for more information on the NetX converter.
Attention!
A NetX is a so-called IR Extender. Take into account that your RC9800i refers
to IR Extenders and not to a NetX.
As you can see, the RC9800i on the couch in the living room, controls not
only legacy audio/video devices, such as the TV and the audio system, but
also connected devices such as the PC and the Media Adapter.
RC9800i Touch Screen Remote Control - User Manual Learning the Basics
Philips Innovative Applications Page 31 of 39
Connected devices are devices that comply with the UPnP (Universal Plug
and Play) Protocol. UPnP allows various devices like PCs, peripherals (e.g.
printer, flatbed scanner) and intelligent networked appliances (e.g. Media
Adapter) to communicate with each other. More specifically, UPnP allows
connected devices to discover each other and to communicate about their
capabilities and their content.
Wireless Connectivity
Connected devices can be wired, yet nowadays they are becoming more and
more a part of a wireless network. There are various technologies in use for
wireless networking. Most of them are WiFi 802.11 variants, e.g. ‘802.11a’,
‘802.11b’ and ‘802.11g’. The RC9800i can be operated in both 802.11b and
802.11g networks.
The RC9800i uses wireless technology to connect to:
networked entertainment devices, such as a Philips Connected Planet TV or
audio system;
PCs;
bridge devices like a Media Adapter. A Media Adapter is a wireless digital
device that acts as bridging device. It allows movies, pictures or music
files to be transferred from your PC to other legacy A/V devices like TVs,
audio systems, and so on.
The center of the wireless home network is the Wireless Access Point (WAP).
All information that is exchanged between devices in the wireless network
transits via the WAP.
For example, let’s see how an MP3-file, residing on the PC’s hard disk, can be
played on the audio system in the living room. After selecting the file on the
RC9800i and pressing the play soft button, the Media Adapter and the PC
establish communication via the WAP. The file’s digital content is wirelessly
transferred from the PC to the Media Adapter. The Media Adapter then
converts this digital content into an analog signal that feeds into the audio
system’s amplifier and from there it goes to the speakers. You can now use the
RC9800i to control the volume in much the same way as you would do with
the audio system’s original remote control.

RC9800i Touch Screen Remote Control - User Manual Learning the Basics
Philips Innovative Applications Page 32 of 39
Enjoying Streaming Content
In addition to the content of connected devices, your RC9800i can also control
ustreaming content from the Internet (e.g. Internet Radio, Internet Repositories
with audio files, pictures or movie files). If your WAP is connected to the
modem of a broadband Internet connection, you can make use of Internet
streams.
Note
To make use of Internet streams, you need a Philips Connected Planet device
equipped with an audio output..
For example, you want to listen to your favorite Internet Radio station. With
the RC9800i you can easily initiate the stream. You need only browse the list
of stations, select your favorite one and use the RC9800i to select the audio
system in the living room.
Note
The user manual concerning Internet streams will be available in 2005.
What You Should Know About
Activity-Based Control
Your RC9800i comes equipped with a very powerful feature called
Activity-Based Control. Activity-Based Control allows you to automate and
substantially simplify your listening and viewing experience. When using
Activity-Based Control you no longer have the hassle of switching on/off
several devices and selecting the appropriate inputs. Instead, you indicate the
activity you want to do, e.g. watch DVD on your LCD TV.
The RC9800i will take care of switching on your LCD TV and DVD while
tuning the TV to the appropriate input.
Whether the controlled devices are connected or are legacy A/V devices does
not really matter. The RC9800i blends them into a single unified control
concept: Activity-Based Control.
To control all of your audio-video devices, the RC9800i needs to know where
they are located and how they are connected to each other. This is tackled
during a one-time set-up. During set-up, you tell your RC9800i by means of
an easy-to-use wizard which devices are available in a room and how they are
connected. Your RC9800i then knows, each time you use it, which devices are
available in a specific room. Moreover, the RC9800i also knows how to
switch them on and off, and how to select the appropriate inputs. You, as a
user, will not have to bother with all of this: the RC9800i will take care of it
all.
For further information on set-up, see Getting the Settings Right beginning on
page 19.
Activity-Based Control falls into two categories: watch activities and listen
activities.
Watch Activities
You can enjoy a whole range of ‘Watch’ Activities. Just a few examples:

RC9800i Touch Screen Remote Control - User Manual Learning the Basics
Philips Innovative Applications Page 33 of 39
Tonight, there is a great movie on cable that you want to watch on your LCD
TV. With the RC9800i, you select the cable device as the source that
holds the content and the LCD TV as the device on which you’ll be
watching the movie. Next, the RC9800i will show you a screen with all of
the relevant TV control buttons as if it were the TV’s remote.
You want to watch television, but don’t know what is on. Take your RC9800i
and launch the Electronic Program Guide (EPG). You can select any
program from the EPG; the RC9800i will take care of tuning your TV to
the appropriate channel.
Some friends are coming over to see your summer holiday pictures. It won’t
be easy for everyone to gather around the PC to view the photos. Why not
view them on the LCD TV in the living room? With a Media Adapter
connected to the TV, you are all set, and with the RC9800i, you can
control the whole viewing session, including previewing photos on the
remote’s screen and setting up a slide show.
A couple of weeks ago, you went snowboarding with some friends. Now you
would love to see those pictures again. You can do that right away on
your RC9800i’s screen.
Doing all of the above is in fact very simple and it just takes 3 steps. Let’s
assume that you want to watch a DVD on your LCD TV. This is what you
would do:
12 Are you going to watch or listen to something? Watch
13 Which device will you be watching? The LCD TV
14 Which device holds the content that you will be watching? The DVD
player
For further information, see Activities on page 36.
Listen Activities
You can perform a whole range of ‘Listen’ activities:
When you want to listen to a CD on your audio system, you no longer need to
look for the right remote. With your RC9800i you can control your CD-
player and your audio system.
Instead of listening to a CD, you would like to enjoy some MP3 audio-files
from your PC. With the RC9800i you can browse through your PC
folders, select your favorite songs and play them on any connected audio
system.
While you’re reading a new novel you would like to have some background
music. You choose your RC9800i as the device that you’ll be listening to
and stream an Internet radio station to it.
Note
The undocked device only features a speaker intended for pre-listening.
Enjoying music via the RC9800i can be done best via the docking, connected
by a line to your audio system. For further information, please check The
Cradle as Media Adapter as from page 17.
Again, doing any of the above is very simple. For example, to listen to a CD
these are the steps you take:
12 Are you going to watch or listen to something? Listen
13 Which device will you be listening to? The audio system
14 Which device holds the content that you want to listen to? The CD player
RC9800i Touch Screen Remote Control - User Manual Installing the Software
Philips Innovative Applications Page 35 of 39
Installing the Software
Installing Philips Media Manager
This software makes the music, photo and movie files on your computer available
for transfer from your computer to your television.
1 Place the Philips Media Manager CD in your PC’s CD or DVD drive and
install the Philips Media Manager Software.
The CD starts automatically.
2 In the menu that appears, click Install Philips Media Manager and follow
the on-screen instructions.
3 To start the program, click Start > Programs > Philips Media Manager.
When opening the Philips Media Manager for the first time, you will be asked
if you want to add a folder and scan for media files.
4 Open a drive or a folder that contains media files, for example, the My
Documents folders if you have stored music, photos or movies there.
5 To add files to the Media Manager, click one of the media categories: Music,
Photos or Movies.
6 Click Add Music below the media categories.
7 Select a folder or one or more media files and click Open to add the selected
folder or files to the Media Manager window.
Note
When you close the Media Manager window, its icon remains active in the status
notification area (lower right-hand corner of the desktop). This icon needs to
remain visible. Double-clicking the icon opens the Media Manager window.
If the CD does not start automatically, double-click My computer. Then click the
CD-ROM drive icon, and finally click the Setup.exe to start the CD.
Advanced Philips Media Manager Use
Philips Media Manager on More PCs
The Philips Media Manager can be run on more than one computer at the same
time. To do so, proceed as follows:
1 Install the Philips Media Manager in the same way as you did for the first
computer. Perform steps 1-4 of Installing Philips Media Manager.
2 In the Media Manager window, click Settings.
3 Click the Server tab and change the Server name.

RC9800i Touch Screen Remote Control - User Manual Installing the Software
Philips Innovative Applications Page 36 of 39
Note
This server name will be shown in the top menu on your television screen. That
way you can keep separated all of the computers in the network that are
simultaneously running the Philips Media Manager.
Organizing Media Files
To help you organize and sort your media files, right-click a music track, photo or
movie and select Edit Media Information.
Creating Playlists
To create a playlist, right-click a music track or movie and select Add to Playlist.

RC9800i Touch Screen Remote Control - User Manual Upgrading the Firmware
Philips Innovative Applications Page 37 of 39
Upgrading the Firmware
@@@How can users know when new firmware is available? By Agent services(
registration > mail)? Check Mark Harmsen
The RC9800i offers you a mechanism to upgrade your firmware. You should
consult the website first to be sure that new firmware is available. If so, proceed as
follows:
Go to www.homecontrol.philips.com and download the new firmware on your
PC.
Start the RC9800i Firmware Upgrade Tool.
Connect the RC9800i to your PC with the USB cable.
On the homepage of the RC9800i, tap Settings.
The screen Settings appears.
Tap Setup RC9800i.
The screen RC9800i Settings appears.
Tap Download New Firmware.
The RC9800i will reboot and reconnect.
Some consecutive messages will appear on the PC monitor. When the firmware is
upgraded, the RC9800i will reboot automatically.
RC9800i Touch Screen Remote Control - User Manual Getting the Maximum Out of It
Philips Innovative Applications Page 38 of 39
Getting the Maximum Out of It
@@@alle schermen updaten
This chapter explains in detail the RC9800i features that allow you to maximize
your entertainment experience.
Homepage
The Homepage of the RC9800i is the starting point for all activities.
@@@ geen finale Screenshot
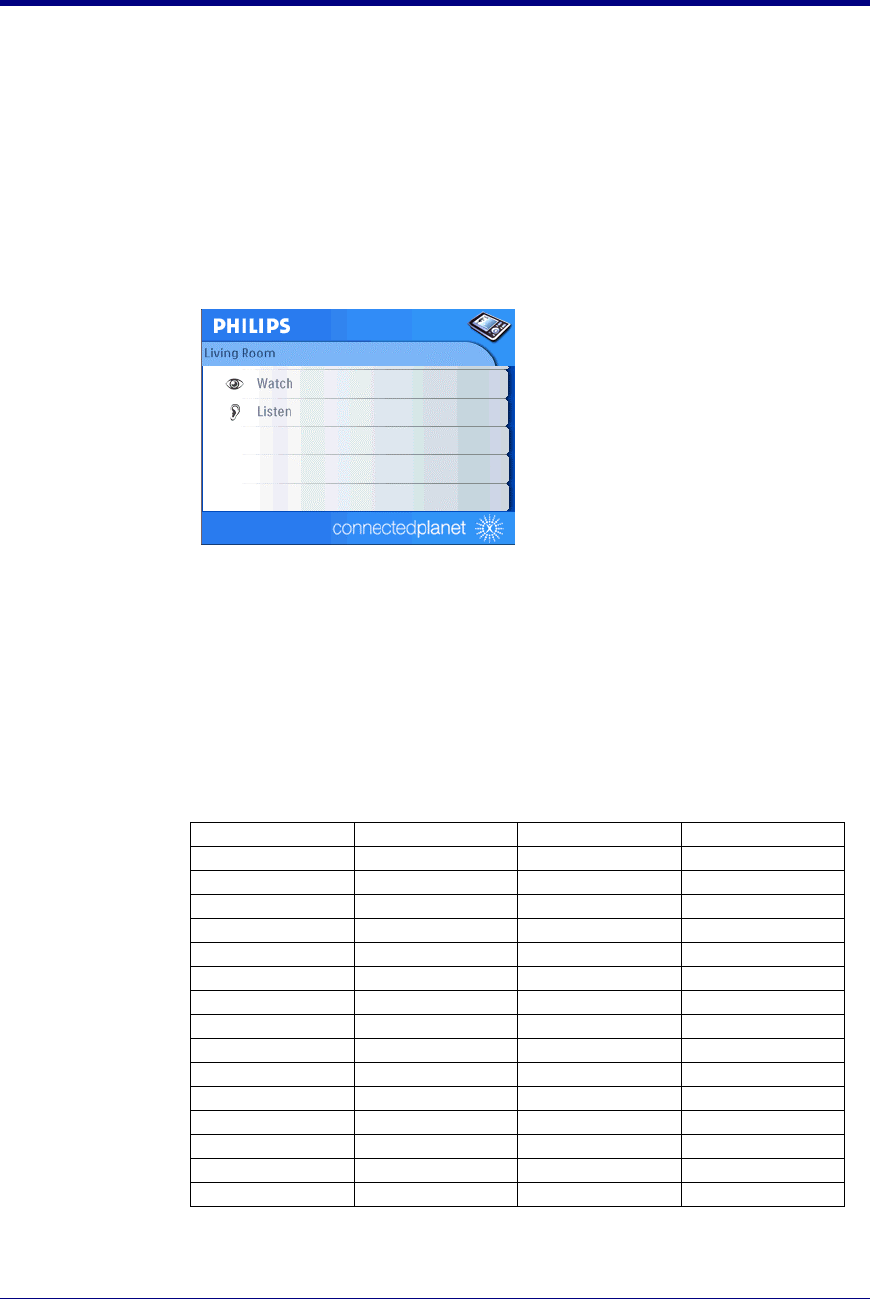
At the top of the Homepage, the current room (in this case the living room) is
displayed. The Homepage itself lists the 3 activities: Watch, Listen and Browse.
Activities
The following list shows you all the possible activities together with the device(s)
you can use to perform the activity
Watch Listen Browse
TV 3
VCR 3
DVD 3
Satellite 3
Cable box TV 3
PVR 3 3 3
PC
3
CD
3
RC9800i
3
Watch Listen Browse
Amplifier 3
Audio system 3
Cable radio 3
Cable satellite 3
Internet Radio 3

RC9800i Touch Screen Remote Control - User Manual Getting the Maximum Out of It
Philips Innovative Applications Page 39 of 39
