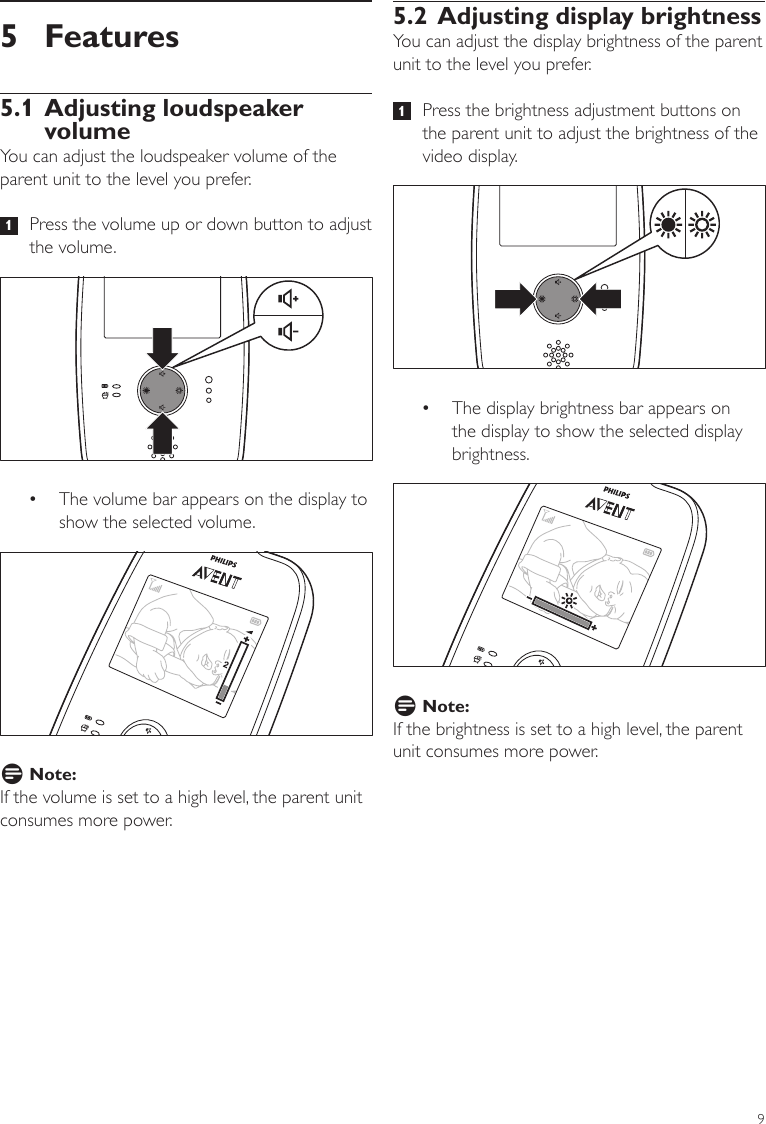
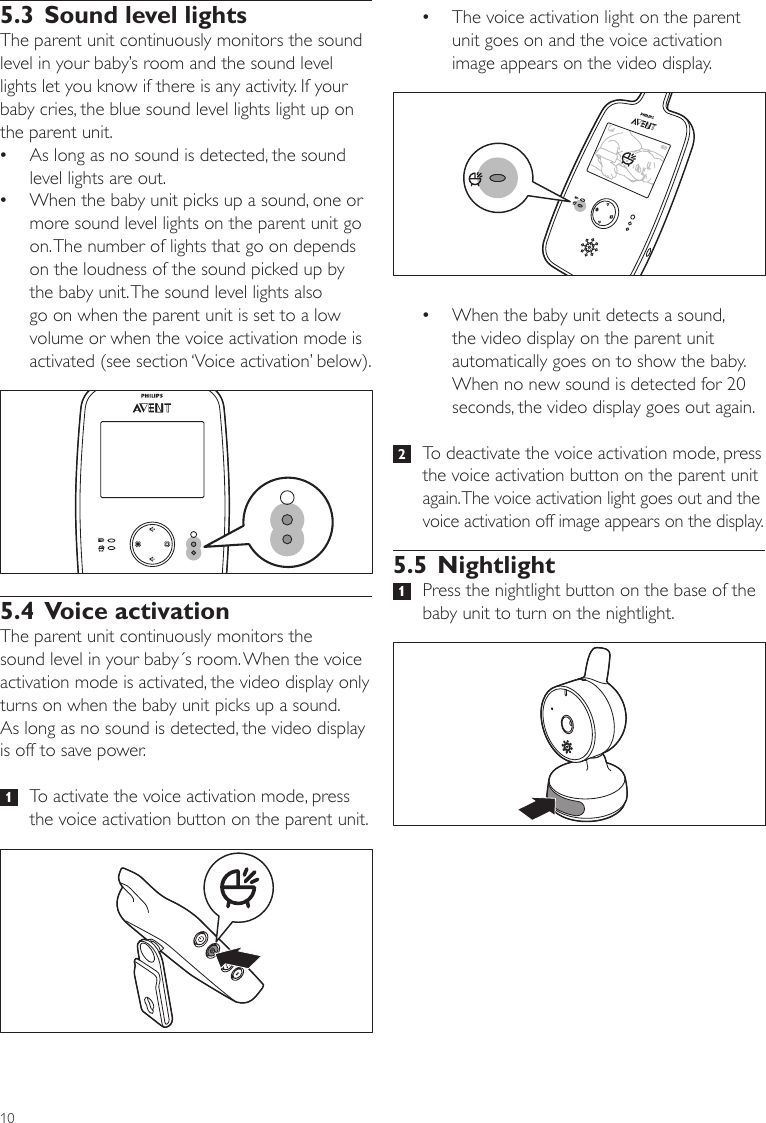
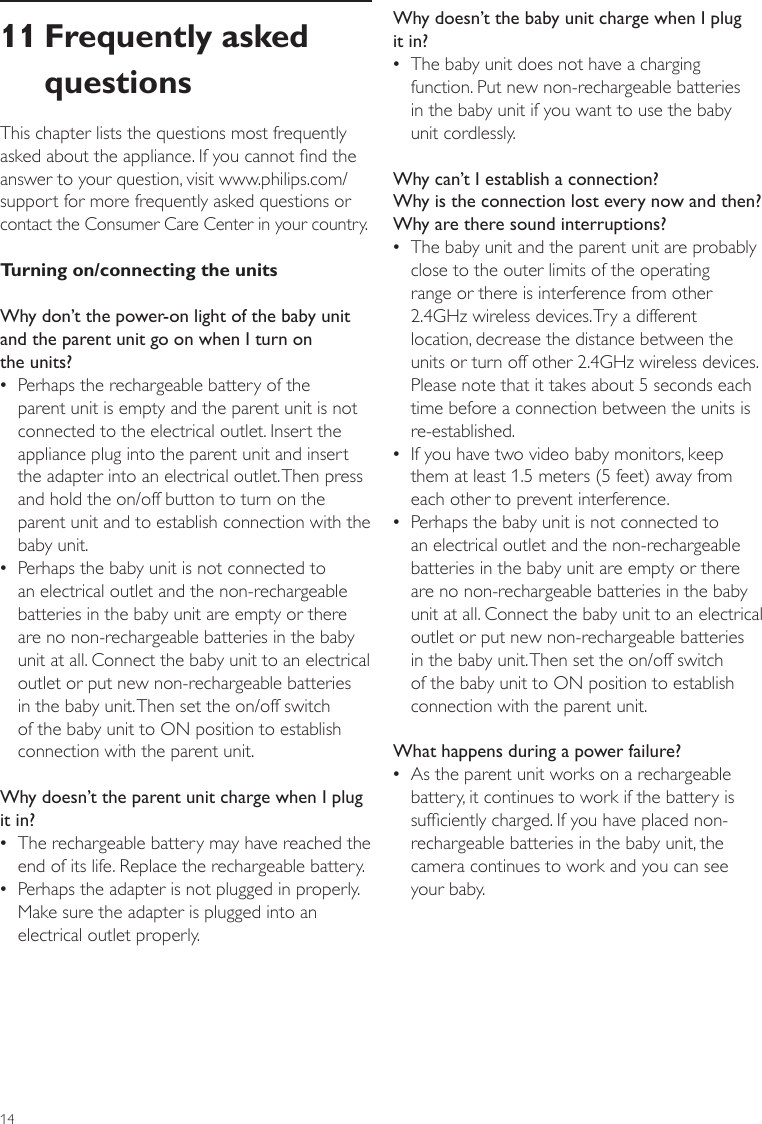
Philips Consumer Lifestyle SCD603 2.4GHz Baby Monitor - Baby Unit User Manual

Philips Consumer Lifestyle 2.4GHz Baby Monitor - Baby Unit

User Manual

EN  User manual    3   SCD603Always here to help youRegister your product and get support atwww.philips.com/welcome
1abcdefghi
31 IntroductionCongratulations on your purchase and welcome to Philips AVENT! To fully benet from the support that Philips AVENT offers, register your product at www.philips.com/welcome.The Philips AVENT video monitor provides you with round-the-clock support and it allows you to see your baby day and night from anywhere in the house. The latest digital technology guarantees clear sound and the clearest image of your baby. This gives you an additional sense of security without entering your baby’s room and disturbing its sleep.2  General descriptionI Parent unit1 Antenna2  Battery/power-on light 3  Voice activation light4  Brightness adjustment buttons5  Video display - icon explanation  a.   Parent unit and baby unit are not linked   b.  Battery status   c.  Signal strength symbol    d.  Volume level bar    e.  Brightness level bar    f.   Lullaby numbers   g.  ‘Repeat lullaby’ symbol   h.  Voice activation symbol    i.  Volume muted symbol 6  Volume up and down buttons 7  Sound level lights8  Socket for appliance plug 9 Loudspeaker10  Battery compartment lid11  Belt clip/stand 12  On/off button13  Voice activation button14  Lullaby play/stop button   15  Next lullaby button 16  Rechargeable battery   17 Adapter 18  Appliance plugTable of contents1  Introduction      32  General description      33  Preparing for use      43.1  Baby unit      43.2  Parent unit      54  Using the appliance      64.1  Positioning the baby monitor      75  Features     95.1  Adjusting loudspeaker volume      95.2  Adjusting display brightness      95.3  Sound level lights      105.4  Voice activation      105.5  Nightlight      105.6  Lullaby function      115.7  Out-of-range alert      125.8  Night vision      125.9  Belt clip/stand      125.10  Auto mute feature       125.11  Reset feature       126  Cleaning and maintenance      137  Storage      138  Ordering accessories      139  Assistance      1310  Warranty      1311  Frequently asked questions      14ENGLISH
43.1.2 Placing the non-rechargeable batteriesIn case of a power failure, the baby unit can run on four 1.5V R6 AAA alkaline batteries (not included). Do not use rechargeable batteries. The baby unit does not have a charging function and rechargeable batteries discharge slowly when  they are not in use.B Warning:Unplug the baby unit and make sure your hands and the unit are dry when you insert non-rechargeable batteries.D Note: The baby unit has an operating time of 3 hours when you use it on non-rechargeable alkaline batteries with the night light turned on.   1   Remove the battery compartment lid.  2   Insert four non-rechargeable alkaline batteries. D Note:Make sure the + and - poles point in the  right direction. II Baby unit1 Antenna 2  Power-on light3 Microphone 4  Lens   5 Loudspeaker6 Base7  Nightlight and nightlight button8  Wall-mounting holes 9  Battery compartment lid10  Socket for appliance plug11  On/off switch12  Appliance plug13  Adapter   3  Preparing for useIMPORTANT: Read the important safety instructions carefully before you use the video baby monitor and keep them for future reference. 3.1 Baby unitAlways operate the baby unit connected to an electrical outlet. To guarantee automatic power backup in case of a power failure, we advise you to insert non-rechargeable batteries. 3.1.1 Connecting the baby unit 1   Put the appliance plug in the baby unit and insert the adapter into an electrical outlet.
5 1   Slide down the battery compartment lid to remove it.  2   Insert the rechargeable battery.D Note:Make sure the + and - poles point in the  right direction.   3   Reattach the lid. 3   Reattach the lid. 3.2 Parent unit3.2.1 Operation on rechargeable batteryB Warning:Unplug the parent unit and make sure your hands and the unit are dry when you insert the rechargeable battery.  •The parent unit comes with a rechargeable Li-ion polymer 1100mAh battery.  •Charge the parent unit before you use it for the rst time or when the parent unit indicates that the battery is low. •The battery is low when the empty battery symbol ashes on the video display and the battery/power-on light on the parent unit ashes red. D Note:If the battery is completely empty, the parent unit automatically turns off and loses contact with the baby unit. ENGLISH
6D Note: •When the parent unit is charged for the rst time, the operating time is less than 7 hours. The rechargeable battery only reaches its full capacity after four discharging and charging cycles. •The battery gradually discharges, even when the parent unit is turned off.4  Using the appliance 1   Place the parent unit and the baby unit in the same room to test the connection.Make sure the baby unit is at least 1.5 meters (5 feet) away from the parent unit.  2   Set the on/off switch on the baby unit to the ON position. •The green power-on light goes on. >1.5m / 5ft 4   Insert the appliance plug into the parent unit and insert the adapter into an electrical outlet. •The battery/power-on light on the parent unit lights up green and the animated battery charging image appears at the top of the video display.  •When the battery is fully charged, the battery symbol at the top of the video display is full. •When you charge the parent unit for the rst time or after a long period of disuse, turn it off and let it charge continuously for at least 4 hours.  •Charging normally takes 2.5 hours, but it takes longer when the parent unit is turned on during charging. To keep the charging time as short as possible,  turn off the parent unit during charging.  •When the rechargeable battery is fully charged, the parent unit can be used cordlessly for approx. 7 hours if it is in voice activation mode. If the video display is on continuously, the parent unit can be used cordlessly at default setting for approx. 5.5 hours.
7E Tip:Find out what the best position is for the parent unit by looking at the signal strength symbol. The number of stripes indicates the quality of the connection.   •If no connection can be established, the parent unit beeps and the out-of-range image appears on the display. 4.1 Positioning the baby monitorB Warning:Keep the baby unit out of the reach of the baby. Never place the baby unit inside or mount it on the baby’s bed or playpen.D Note:If you use a cordless phone, wireless video, Wi-Fi network, microwave oven or Bluetooth on 2.4Ghz and you experience interference on either the parent unit or baby unit, move the parent unit further away until there is no more interference.  1   For optimal sound detection, place the baby unit at least 1 meter (3.5 feet) away from your baby, but no further than 1.5 meters  (5 feet) away.>1-1.5m / 3.5-5ftD Note:The power-on light always lights up green, even when there is no connection with the parent unit.  3   Press and hold the on/off button on the parent unit.  •The video display goes on and the linking image appears on the display. •When a connection has been established, the baby is shown on the video display and the signal strength symbol appears.1.5sENGLISH
8 4   Place the parent unit within the operating range of the baby unit. Make sure it is at least 1.5 meters (5 feet) away from the baby unit to avoid acoustic feedback.For more information on the operating range, see section ‘Operating range’ below.4.1.1 Operating rangeThe operating range of the baby monitor is  150 meters (490 feet) in open air and line of sight. Indoors the operating range is up to 30 meters (98 feet). Depending on the surroundings and other disturbing factors, this range may be smaller. For wet and moist materials, the range loss may be up to 100%.Dry materials Material thicknessLoss of rangeWood, plaster, cardboard, glass (without metal, wires or lead)< 30cm (12in)0-10%Brick, plywood < 30cm (12in)5-35%Reinforced concrete < 30cm (12in)30-100%Metal grilles or bars < 1cm (0.4in) 90-100%Metal or aluminum sheets< 1cm (0.4in) 100%>1.5m / 5ft 2   There are two ways to position the baby unit:1  Place the baby unit on a stable, level and horizontal surface.2  Mount the baby unit to the wall as shown in the gure with the screws supplied. E Tip: •Use the provided template, to mark the exact location of the screw holes on the wall.  •Position the baby unit at a higher level to get  a good overview of the baby’s bed or playpen.  3   Adjust the baby unit in a way that ensures the best visibility of your baby.B Warning:Do not position the baby unit with the microphone pointing too far down, as this may prevent the microphone from picking up sounds properly.
95.2 Adjusting display brightnessYou can adjust the display brightness of the parent unit to the level you prefer.   1   Press the brightness adjustment buttons on the parent unit to adjust the brightness of the video display. •The display brightness bar appears on the display to show the selected display brightness.D Note:If the brightness is set to a high level, the parent unit consumes more power. 5 Features5.1 Adjusting loudspeaker volumeYou can adjust the loudspeaker volume of the parent unit to the level you prefer.   1   Press the volume up or down button to adjust the volume.  •The volume bar appears on the display to show the selected volume.D Note:If the volume is set to a high level, the parent unit consumes more power. ENGLISH
10 •The voice activation light on the parent unit goes on and the voice activation image appears on the video display. •When the baby unit detects a sound, the video display on the parent unit automatically goes on to show the baby. When no new sound is detected for 20 seconds, the video display goes out again.  2   To deactivate the voice activation mode, press the voice activation button on the parent unit again. The voice activation light goes out and the voice activation off image appears on the display.5.5 Nightlight 1   Press the nightlight button on the base of the baby unit to turn on the nightlight. 5.3 Sound level lightsThe parent unit continuously monitors the sound level in your baby’s room and the sound level lights let you know if there is any activity. If your baby cries, the blue sound level lights light up on the parent unit.  •As long as no sound is detected, the sound level lights are out. •When the baby unit picks up a sound, one or more sound level lights on the parent unit go on. The number of lights that go on depends on the loudness of the sound picked up by the baby unit. The sound level lights also go on when the parent unit is set to a low volume or when the voice activation mode is activated (see section ‘Voice activation’ below).5.4 Voice activationThe parent unit continuously monitors the sound level in your baby´s room. When the voice activation mode is activated, the video display only turns on when the baby unit picks up a sound.  As long as no sound is detected, the video display is off to save power.   1   To activate the voice activation mode, press the voice activation button on the parent unit.
11 2   To select another lullaby, press the lullaby button. Continue pressing the ‘next lullaby’ button until you hear the lullaby you prefer. D Note:You can also select the repeat symbol to play all lullabies repeatedly in a loop.  3   Press the lullaby play/stop button on the parent unit to play the lullaby selected. •The lullaby starts to play on the baby unit and is repeated continuously. D Note:If you have selected the repeat mode,  all three lullabies are played repeatedly  in a loop.  4   To stop the lullaby, press the lullaby play/stop button again.  •The nightlight on the base of the baby unit goes on.  2   Press the nightlight button again to turn off the nightlight. 5.6 Lullaby function 1    Press the lullaby play/stop button on the parent unit to play a lullaby. •The lullaby starts to play on the baby unit and is repeated continuously for approx.  15 minutes. On the video display you see which lullaby number is played and repeated. This number is shown in a  blue square.  ENGLISH
125.10  Auto mute feature When the baby unit detects a low sound level, e.g. the sleeping sound of the baby, the parent unit automatically mutes the sound output so that you will not hear this sound. When the baby starts to cry, the parent unit automatically turns on the volume again to let you hear the crying sound.5.11  Reset feature This feature allows you to reset the settings of parent unit. You can use this function if problems occur that you cannot solve by following the suggestions in chapter ‘Frequently asked questions’. 1   Press and hold the on/off button on the parent unit to turn it off. 2   Press and hold the volume down button and simultaneously press and hold the on/off button until a beep is heard. The parent unit turns on again. •The parent unit has now been reset to default factory settings.5.11.1  Default settings •Loudspeaker volume: 3 •Voice activation: off •Display brightness: 45.7 Out-of-range alertWhen the parent unit is out of range of the baby unit, the parent unit beeps every 20 seconds and the out-of-range image appears on the video display. D Note:The out-of-range alert is also active when the baby unit is turned off.5.8 Night visionThe camera has infrared lights that allow you to see your baby clearly, even in a dark room. When the camera detects low light levels, the infrared lights are turned on automatically. Place the baby unit 1 to 1.5 meters (3.5 to 5 feet) away from the baby to ensure a clear view. 5.9 Belt clip/stand •If the rechargeable battery of the parent unit is sufciently charged, you can take the unit with you inside and outside the house by attaching the unit to your belt or waistband with the belt clip. This allows you to monitor your baby while you are moving around. •To use the belt clip as a stand, turn it downwards until the parent unit can rest on it.
138 Ordering accessoriesTo purchase accessories for this appliance, please visit our online shop at www.shop.philips.com/ service. If the online shop is not available in your country, go to your Philips dealer or a Philips service centre. If you have any difculties obtaining accessories for your appliance, please contact the Philips Consumer Care Centre in your country. You nd its contact details in the worldwide guarantee leaet. 9 AssistanceFor assistance call 1-800-54-AVENT  (1-800-542-8368) or visit our website:  www.philips.com/AVENT.10 Warranty10.0.1  Full two year warrantyPhilips Electronics North America Corporation(USA) and Philips Electronics Ltd (CANADA) warrant each new Philips AVENT product, model SCD603, against defects in materials or workmanship for a period of two years from the date of purchase, and agree to repair or replace any defective product without charge. IMPORTANT: This warranty does not cover damage resulting from accident, misuse or abuse, lack of reasonable care, or the afxing of any attachment not provided with the product. NO RESPONSIBILITY IS ASSUMED FOR ANY SPECIAL, INCIDENTAL OR CONSEQUENTIAL DAMAGES. In order to obtain warranty service, simply call toll-free 1-800-54-AVENT  (1-800-542-8368).6  Cleaning and maintenanceB Warning:Do not immerse the parent unit and the baby unit in water and do not clean them under running water.B Warning:Do not use a cleaning spray or liquid cleaners. 1  Turn off the baby unit and the parent unit and remove the adapters from the electrical outlet.  2   Clean the parent unit and the baby unit with  a dry cloth.D Note:Fingerprints or dirt on the lens of the baby unit may affect the camera’s performance. Avoid touching the lens with your ngers.B Warning:Make sure the baby unit and parent unit are dry before you connect them again.  3   Clean the adapters with a dry cloth.7 StorageWhen you are not going to use the baby monitor for some time, remove the non-rechargeable batteries from the baby unit and the rechargeable battery from the parent unit. Store the parent unit, the baby unit and the adapters in a cool and  dry place.ENGLISH
14Why doesn’t the baby unit charge when I plug it in? •The baby unit does not have a charging function. Put new non-rechargeable batteries  in the baby unit if you want to use the baby  unit cordlessly.Why can’t I establish a connection?  Why is the connection lost every now and then? Why are there sound interruptions? •The baby unit and the parent unit are probably close to the outer limits of the operating range or there is interference from other 2.4GHz wireless devices. Try a different location, decrease the distance between the units or turn off other 2.4GHz wireless devices. Please note that it takes about 5 seconds each time before a connection between the units is re-established. •If you have two video baby monitors, keep them at least 1.5 meters (5 feet) away from each other to prevent interference. •Perhaps the baby unit is not connected to an electrical outlet and the non-rechargeable batteries in the baby unit are empty or there are no non-rechargeable batteries in the baby unit at all. Connect the baby unit to an electrical outlet or put new non-rechargeable batteries in the baby unit. Then set the on/off switch of the baby unit to ON position to establish connection with the parent unit.What happens during a power failure? •As the parent unit works on a rechargeable battery, it continues to work if the battery is sufciently charged. If you have placed non-rechargeable batteries in the baby unit, the camera continues to work and you can see your baby. 11 Frequently asked questionsThis chapter lists the questions most frequently asked about the appliance. If you cannot nd the answer to your question, visit www.philips.com/support for more frequently asked questions or contact the Consumer Care Center in your country.Turning on/connecting the unitsWhy don’t the power-on light of the baby unit and the parent unit go on when I turn on  the units? •Perhaps the rechargeable battery of the parent unit is empty and the parent unit is not connected to the electrical outlet. Insert the appliance plug into the parent unit and insert the adapter into an electrical outlet. Then press and hold the on/off button to turn on the parent unit and to establish connection with the baby unit. •Perhaps the baby unit is not connected to an electrical outlet and the non-rechargeable batteries in the baby unit are empty or there are no non-rechargeable batteries in the baby unit at all. Connect the baby unit to an electrical outlet or put new non-rechargeable batteries in the baby unit. Then set the on/off switch of the baby unit to ON position to establish connection with the parent unit.Why doesn’t the parent unit charge when I plug it in? •The rechargeable battery may have reached the end of its life. Replace the rechargeable battery. •Perhaps the adapter is not plugged in properly. Make sure the adapter is plugged into an electrical outlet properly.
15Why does the parent unit beep? • If the parent unit beeps while the out-of-range image appears on the video display, the connection with the baby unit is lost. Move the parent unit closer to the baby unit.  • If the parent unit beeps while the battery/power-on light and the battery symbol on the video display ash red, the rechargeable battery of the parent unit is low. Connect the parent unit to an electrical outlet to recharge the battery (see chapter ‘Preparing for use’).  •The baby unit may be turned off.  Turn on the baby unit.Noise/soundWhy does the video monitor produce a  high-pitched noise? •The units may be too close to each other.  Make sure the parent unit and the baby unit are at least 1.5 meters (5 feet) away from each other and set the volume to a lower level. •The volume of the parent unit may be set too high. Decrease the volume of the parent unit.Can I increase the volume of the lullaby on  the baby unit? •No, you can’t.Why don’t I hear a sound/Why can’t I hear my baby cry? •The volume of the parent unit may be set too low or may be turned off. Press the volume up button to increase the volume level. • Perhaps you did not remove the protective foil from the microphone. Make sure all protective foil has been removed. •Perhaps you have turned on the voice activation. If the voice activation is activated, the video display only turns on when the baby unit picks up a sound. As long as no sound is detected, the video display is off to save power. Why do the non-rechargeable batteries of the baby unit run low quickly? • The baby unit consumes a lot of energy when you have the video display turned on continuously, when you play lullabies or when the nightlight is turned on. We recommend to always operate the baby unit while connected to electricity and to use the batteries for back-up purpose only. Do not place rechargeable batteries in the baby unit, as they discharge slowly even when they are not in use.Why does the charging time of the parent unit exceed 2.5 hours? •The parent unit may be turned on during charging. Turn off the parent unit during charging. Why do I need to keep the baby unit and its cord at least 1 meter (3.5 feet) from my baby?  •To avoid strangulation with the cord and for optimal sound detection, always place the baby unit and its cord at least 1 meter (3.5 feet) away from the baby.Indications on the parent unitWhy doesn’t the battery status symbol appear on the video display of the parent unit when  I start to charge the parent unit? •It may take a few minutes before the battery symbol appears on the video display of the parent unit when you charge the parent for  the rst time or after a long period of disuse.Why do the battery/power-on light and the battery symbol on the video display ash red?  •If the battery/power-on light and the battery symbol on the video display ash red,the rechargeable battery of the parent unit is low. Connect the parent unit to an electrical outlet to recharge the battery (see chapter ‘Preparing for use’). ENGLISH
16Operating time/operating rangeThe specied operating range of the baby monitor is up to 150 meters (490 feet) outdoors and up to 30 meters (98 feet) indoors. Why does my baby monitor manage a much smaller distance than that? •The specied operating range of 150 meters  (490 feet) is only valid outdoors in open air and in the line of sight. Depending on the surroundings and other disturbing factors, the operating range may be smaller. Inside your house, the operating range is limited by the number and type of walls and/or ceilings between the parent unit and the baby unitThe operating time of the parent unit is supposed to be at least 5.5 hours. Why is the operating time of my parent unit shorter? •When the parent unit has been charged for the rst time, the operating time is shorter because the battery has not reached its full capacity yet. The rechargeable battery only reaches its full capacity after four discharging and charging cycles. After this, the operating time is 5.5 hours if the voice activation is not deactivated and  7 hours if the voice activation mode is activated.  •The parent unit consumes a lot of energy when the video display is turned on continuously. Activate the voice activation mode to increase the operating time (see chapter ‘Features’, section ‘Voice activation’). •The volume of the parent unit may be set too high, which causes the parent unit to consume a lot of energy. Decrease the volume of the parent unitWhy do I get interference on the parent unit? •Interference may occur when the parent unit is out of range of the baby unit. Interference may also occur if there are too many walls or ceilings between the parent unit and the baby unit or when other 2.4GHz wireless devices are turned on (e.g. microwave, Wi-Fi router). Put the parent unit in a different place, closer to the baby unit,  or turn off other wireless devices.  •Perhaps the baby monitor is in auto mute. When the baby unit detects a low sound level, e.g. the sleeping sound of the baby, the parent unit automatically mutes the sound output so that you do not hear this sound. When the  baby starts to cry, the parent unit automatically turns on the volume again to let you hear the crying sound. •The baby unit may be too far away from your baby. Make sure the baby unit is not further than 1.5 meters (5 feet) from your baby, but not closer than 1 meter (3.5 feet) to avoid a strangulation hazard.Why does the parent unit react too quickly to other sounds? •The baby unit also picks up other sounds than those of your baby. Move the baby unit closer to the baby (but observe the minimum distance of 1 meter (3.5 feet)).Why does the parent unit make a buzzing sound? •Interference may occur when the parent unit is out of range of the baby unit. Interference may also occur if there are too many walls or ceilings between the parent unit and the baby unit or when other 2.4GHz wireless devices are turned on (e.g. microwave, Wi-Fi router). Put the parent unit in a different place, closer to the baby unit, or turn off other wireless devices.  •The rechargeable battery of the parent unit may need to be charged.
17Output video displayWhy does the video display icker? •Interference may occur when the parent unit is out of range of the baby unit. Interference may also occur if there are too many walls or ceilings between the parent unit and the baby unit or when other 2.4GHz wireless devices  are turned on (e.g. microwave, Wi-Fi router). Put the parent unit in a different place, closer to the baby unit, or turn off other wireless devices.  •The rechargeable battery of the parent unit may need to be charged. Why isn’t there any image on the video display when the battery/power-on light is on?  •The parent unit may be in the voice activation mode. Press the voice activation button again  to turn on the video display.Why isn’t the image on the video display clear? •The display brightness may be set too low. Increase the display brightness (see chapter ‘Features’, section ‘Adjusting display brightness’). •Perhaps you did not remove the protective  foil from the video display. Remove the protective foil.Why doesn’t the parent unit work in the voice activation mode? •The distance between the baby and the baby unit may be too large to pick up sounds from the baby. Make sure that the baby unit is placed 1 to 1.5 meters (3.5 to 5 feet) away from  the baby.Why isn’t the image on the video display clear in night vision? •The distance between the baby and the baby unit may be too large. Make sure that the  baby unit is placed 1 to 1.5 meters (3.5 to  5 feet) away from the baby.ENGLISH
4222.005.0395.2  (11/2012)
   SCD603Always here to help youRegister your product and get support atwww.philips.com/welcomeImportant Safety Instructions
2Know these safety symbolsCAUTION - This “bolt of lightning” indicates uninsulated material within your unit may cause an electrical shock. For the safety of everyone in your household, please do not remove product covering.  - The exclamation mark calls attention to features that require you to read the enclosed user information closely to prevent operating and maintenance problems. Warning:7RUHGXFHWKHULVNRIÀUHRUHOHFWULFVKRFNWKLVDSSDUDWXVVKRXOGQRWEHH[SRVHGWRUDLQRUPRLVWXUHDQGREMHFWVÀOOHGZLWKOLTXLGVVXFKDVvases, should not be placed on this apparatus. Important Safety Instructions1  Read these instructions.2  Keep these instructions.3  Heed all warnings.4  Follow all instructions.5  Do not use this apparatus near water.6  Clean only with dry cloth.7  Do not block any ventilation openings. Install in accordance with the manufacturer’s instructions.8  Do not install near any heat sources such as radiators, heat registers, VWRYHVRURWKHUDSSDUDWXVLQFOXGLQJDPSOLÀHUVWKDWSURGXFHKHDW9  Protect the power cord from being walked on or pinched particularly at plugs, convenience receptacles, and the point where they exit from the apparatus. 2QO\XVHDWWDFKPHQWVDFFHVVRULHVVSHFLÀHGE\WKHPDQXIDFWXUHU11  Unplug this apparatus during lightning or when unused for long periods of time.ENGLISH
 5HIHUDOOVHUYLFLQJWRTXDOLÀHGVHUYLFHSHUVRQQHO6HUYLFLQJLVUHTXLUHGwhen the apparatus has been damaged in any way, such as power-supply cord or plug is damaged, liquid has been spilled or objects have fallen into the apparatus, the apparatus has been exposed to rain or moisture, does not operate normally, or has been dropped. Please check the power cord periodically to prevent potential damages, such as worn or cut cord. For assistance, visit our website www.philips.com/AVENT or contact the Philips Consumer Care Center in your country. <RXÀQGLWVFRQWDFWGHWDLOVLQWKHZRUOGZLGHJXDUDQWHHOHDÁHW13  This product may contain lead and mercury. Disposal of these materials may be regulated due to environmental considerations. For disposal or recycling information, please contact your local authorities or the Electronic Industries Alliance: www.eiae.org.14  All the required markings are located on the battery compartment of the parent unit and the bottom enclosure of the baby unit. -  WARNING: STRANGULATION HAZARD. Children have STRANGLED in cords. Keep this cord out of the reach of children (more than 1 meter/3.5 feet away). Do not remove the tag.CautionCaution: Prevent risk of explosion, electric shock, short circuit, or leakage - The apparatus shall not be exposed to dripping or splashing and QRREMHFWVÀOOHGZLWKOLTXLGVVXFKDVYDVHVVKDOOEHSODFHGRQWKHapparatus. - Where the mains plug is used as the disconnect device, the disconnect device shall remain readily operable. - The adapters contain a transformer. Do not cut off the adapters to replace them with other plugs, as this causes a hazardous situation. - Use the supplied adapter to connect the baby and parent units to the mains. - Use the supplied adapter to charge the parent unit. - To prevent electric shock, do not open the housing of the baby unit or parent unit except for the battery compartments. - Make sure that your hands are dry when you insert or replace EDWWHULHVEDWWHU\SDFNRUZKHQ\RXKDQGOHSRZHUFRUGVRUSRZHUsupplies to be plugged to the mains. - For the parent unit, use only the rechargeable battery pack supplied with the baby monitor. Charge the rechargeable battery pack as described in the user manual. - Danger of explosion if battery is incorrectly replaced. Replace only with the same type. - The baby unit does not have a charging function. - The parent unit has a charging function with rechargeable battery only. - If the adapters or rechargeable battery pack are damaged, always have them replaced with one of the original type in order to avoid a hazard.ENGLISH 3
 - For the adapters and battery types, please refer to chapter ‘Replacement’ for details. - To prevent battery explosion or leakage, which can damage the baby monitor and cause burns and skin or eye irritation: - do not recharge non-rechargeable batteries - LQVHUWEDWWHULHVLQWKHULJKWGLUHFWLRQ - remove batteries if you are not going to use the product for more than 30 days - NHHSWKHEDWWHU\DZD\IURPH[FHVVLYHKHDWVXFKDVVXQVKLQHÀUHRUWKHOLNH - do not leave empty batteries in the baby unit. - To prevent the battery from heating up or releasing toxic materials, hydrogen, or oxygen, do not: - overcharge - short circuit - reverse charge, or - damage batteries - To handle damaged or leaked batteries, wear protective gloves to protect your skin.Adult supervision - This baby monitor is intended as an aid. It is not a substitute for responsible and proper adult supervision and should not be used as such. - Never place the baby unit inside the baby bed or playpen. - To prevent overheating, do not cover the baby monitor with a towel, blanket or any other items. - When your baby monitor uses a power outlet, make sure that you can easily access the power outlet. - For their safety, do not allow children to touch and play with the baby monitor, adapters and all the accessories. THIS IS NOT A TOY.Cleaning and maintenance - Do not immerse the parent unit or baby unit in water, and do not clean them under running water. - Do not use cleaning spray or liquid cleaners. - Unplug the parent unit and baby unit if they are connected to a power outlet. - Clean the parent unit and baby unit with a damp cloth. - Clean the adapters with a dry cloth. - This baby monitor has no other user serviceable parts.Disposal - Dispose of batteries properly in accordance with the instructions.  Do not incinerate. Batteries may explode if overheated. - Do not wrap in metal or aluminum foil. Wrap in newspaper before discarding. - It is suggested that you contact your local town or city to determine SURSHUEDWWHU\UHGHPSWLRQVLWHVLQ\RXUDUHD - Please visit www.recycle.philips.com for additional information on a recycling center in your area.ENGLISH4
Storage precautions - 8VHDQGVWRUHWKHEDE\PRQLWRUEHWZHHQ&)DQG&) - Do not expose the baby unit and parent unit to extreme cold or heat or to direct sunlight.  - Do not put the baby unit and the parent unit close to a heating source.Replacement - If you need to replace the battery and the adapter, please refer to the user manual and contact the Philips Customer Care Center.Supplied AC/DC Adapter for parent unit. Input: 100-240V AC, Output: 9'&$0RGHO1R60%8.SOXJ609(8SOXJ60886SOXJ606$8SOXJ60$$5SOXJ60'%UD]LOSOXJSupplied AD/DC Adapter for baby unit. Input: 100-240V AC, Output: 6 V '&P$0RGHO1R66:8.8.SOXJ66:(8(8SOXJ66:8686SOXJ66:$8$8SOXJ66:$5$5SOXJ66:%5%UD]LOSOXJ - For the baby unit, only use 1.5V AAA alkaline batteries (batteries not VXSSOLHG - For the parent unit, only use the Li-Ion polymer rechargeable battery Model N-S150, 3.7V, 1100mAh as supplied with the appliance. - If you need to replace the battery and the adapter, please contact the Philips Customer Care Center.General - The operating range of the baby monitor is 150 meters/490 feet in open air. Depending on the surroundings and other disturbing factors, this range may be smaller.  - If you have any combination of cordless phones, wireless video, Wi-Fi networks, microwave or Bluetooth on 2.4Ghz, connection problems may occur. The connection between the parent unit and the baby unit could be lost for some seconds or may cause interference with other devices. - We advise you to use the parent unit connected to the mains to save energy. The baby video monitor consumes more energy than a VWDQGDUGEDE\PRQLWRUZLWKRXWYLGHRCompliance information - This device complies with Part 15 of the FCC Rules and Industry Canada License-exempt RSS standard. Operation is subject to the IROORZLQJWZRFRQGLWLRQVWKLVGHYLFHPD\QRWFDXVHKDUPIXOLQWHUIHUHQFHDQGWKLVGHYLFHPXVWDFFHSWDQ\LQWHUIHUHQFHUHFHLYHGincluding interference that may cause undesired operation.Radio interferenceThis equipment has been tested and found to comply with the limits for a Class B digital device, pursuant to Part 15 of the FCC Rules and ICES-003 of Industry Canada. These limits are designed to provide reasonable protection against harmful interference in a residential installation. This equipment generates, uses and can radiate radio frequency energy and, if not installed and used in accordance with the instructions, may cause harmful interference to radio communications. However, there is no guarantee that interference will not occur in a particular installation. If this equipment does cause harmful ENGLISH 5
interference to radio or television reception, which can be determined by turning the equipment off and on, the user is encouraged to try to correct the interference by one or more of the following measures: - Reorient or relocate the receiving antenna. - Increase the separation between the equipment and receiver. - Connect the equipment to an outlet on a circuit different from that to which the receiver is connected. - Consult the dealer or an experienced radio/TV technician for help.RF Radiation Exposure StatementThis equipment complies with FCC RF radiation exposure limits set forth for an uncontrolled environment. This equipment should be installed and operated with a minimum distance of 7 3/4 inches / 20 centimeters between the radiator and your body. For handheld/body-worn operation, this equipment has been tested and meets the FCC RF/Industry Canada RF exposure guideline when used with the belt clip supplied with this product. This transmitter must not be co-located or operating in conjunction with any other antenna or transmitter. Use of other accessories may not ensure compliance with FCC RF/Industry Canada RF exposure guidelines. This equipment also complies with Industry Canada RSS-102 with respect to Canada’s Health Code 6 for Exposure of Humans to RF Fields.Do not attempt to repair or modify this equipment.Any repairs or alterations made by the user to the equipment may void the ZDUUDQW\DQGFRPSOLDQFHRIWKHHTXLSPHQW&KDQJHVRUPRGLÀFDWLRQVPDGHto this equipment not expressly approved by Philips AVENT may void the FCC authorization to operate this equipment. For assistance visit our website www.philips.com/AVENT or contact the Philips Consumer Care Center in \RXUFRXQWU\<RXÀQGFRQWDFWGHWDLOVLQWKHZRUOGZLGHJXDUDQWHHOHDÁHW(OHFWURPDJQHWLFÀHOGV(0)This Philips AVENT appliance complies ZLWKDOOVWDQGDUGVUHJDUGLQJHOHFWURPDJQHWLFÀHOGV(0),IKDQGOHGproperly and according to the instructions in this user manual, the appliance LVVDIHWRXVHEDVHGRQVFLHQWLÀFHYLGHQFHDYDLODEOHWRGD\Recycling - Your product is designed and manufactured with high quality materials and components, which can be recycled and reused. - When you see the crossed-out wheeled bin symbol with a black line at the bottom marked on a product, this means the product is covered by the European Directive 2002/96/EC: Never dispose of your product with other household waste. Please inform yourself about the local rules on the separate collection of electrical and electronic products. The correct disposal of your old product helps preventing potentially negative consequences on the environment and human health. Your product contains batteries covered by the European Directive 2006/66/EC, which cannot be disposed of with normal household waste.  - When you see the crossed-out wheeled bin symbol with the chemical symbol ‘Pb’, this means that the batteries comply with the requirement set by the directive for lead. Please inform yourself about the local rules on separate collection of batteries. The correct disposal of batteries helps prevent potentially negative consequences on the environment and human health.)RUPRUHGHWDLOUHIHUWR&'520RUZZZSKLOLSVFRPVXSSRUWENGLISH6
4222.005.0445.2   (11/2012)0979

Navigation menu