Philips Consumer Lifestyle TSU9400 WLAN Remote Control User Manual TSU9600 SGEND ESF v03
Philips Consumer Lifestyle WLAN Remote Control TSU9600 SGEND ESF v03
Users Manual

TSU9400
Starter’s Guide
Manual de inicio
Guide de démarrage
FR
ES
EN
DRAFT

ENGLISH
TSU9600 Starter’s Guide
ESPAÑOLFRANÇAIS
Starter’s Guide
Manual de inicio
Guide de démarrage
TSU9400
Using the Control Panel
Uso del Panel de Control
Utilisation du panneau de commande
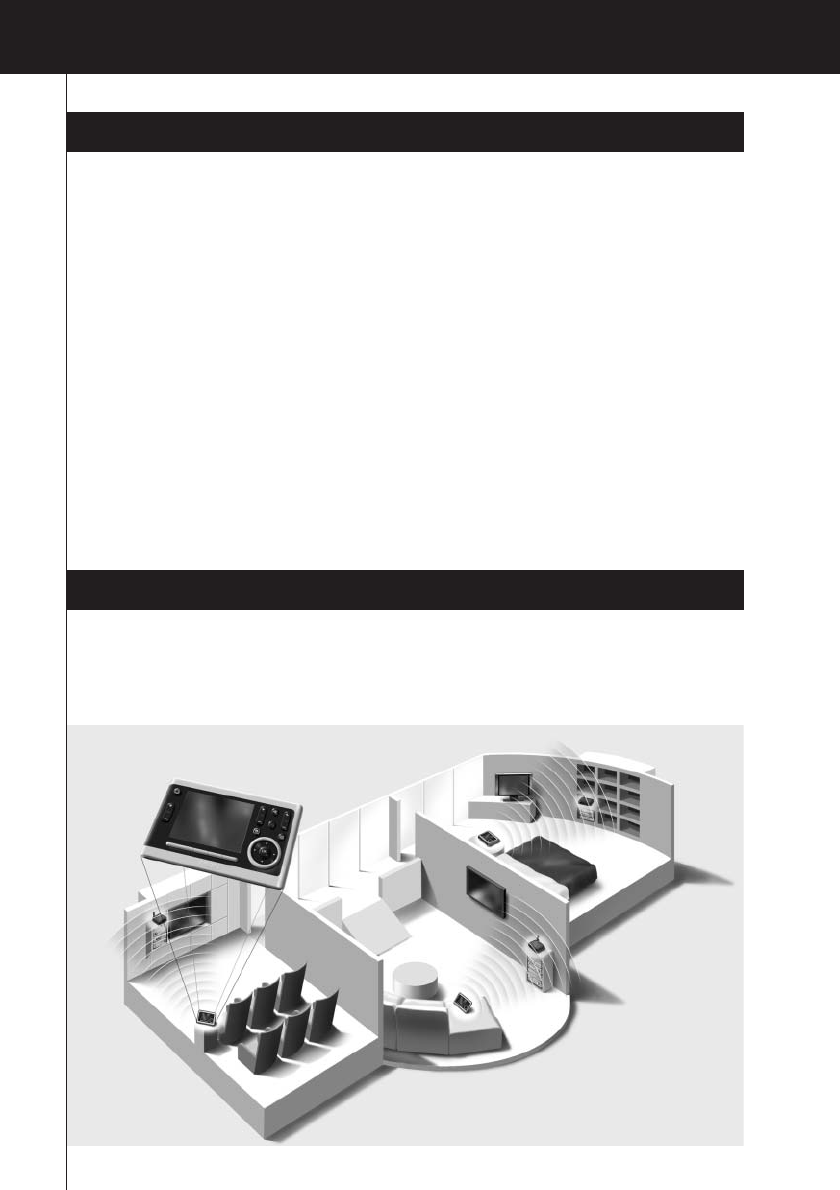
Getting to Know Your Pronto Control Panel
Your TSU9400 Control Panel is designed and manufactured with great care to offer you a reliable
and easy operation of your home theater system. It has been preprogrammed by your installer and
contains a so-called configuration file that contains all the codes, graphical buttons and navigation
behaviour.
1
TSU9600 Starter’s Guide
TSU9400 Starter’s Guide
Contents
Getting to Know Your Pronto Control Panel......................................................................................1
Taking a First Look........................................................................................................................2
Charging the Control Panel............................................................................................................3
Enjoying Your Pronto Control Panel..................................................................................................3
Controlling Your Home Theater......................................................................................................3
Changing the Pronto Settings ........................................................................................................5
Support .............................................................................................................................................6
Maintaining the Control Panel .......................................................................................................6
Troubleshooting............................................................................................................................7
Specifications...................................................................................................................................8
IFU Approbation / Safety Content TSU9400.......................................................................................i
FCC Compliancy ............................................................................................................................i
Regulations According to R&TTE ....................................................................................................i
3
TSU9400 Starter’s Guide
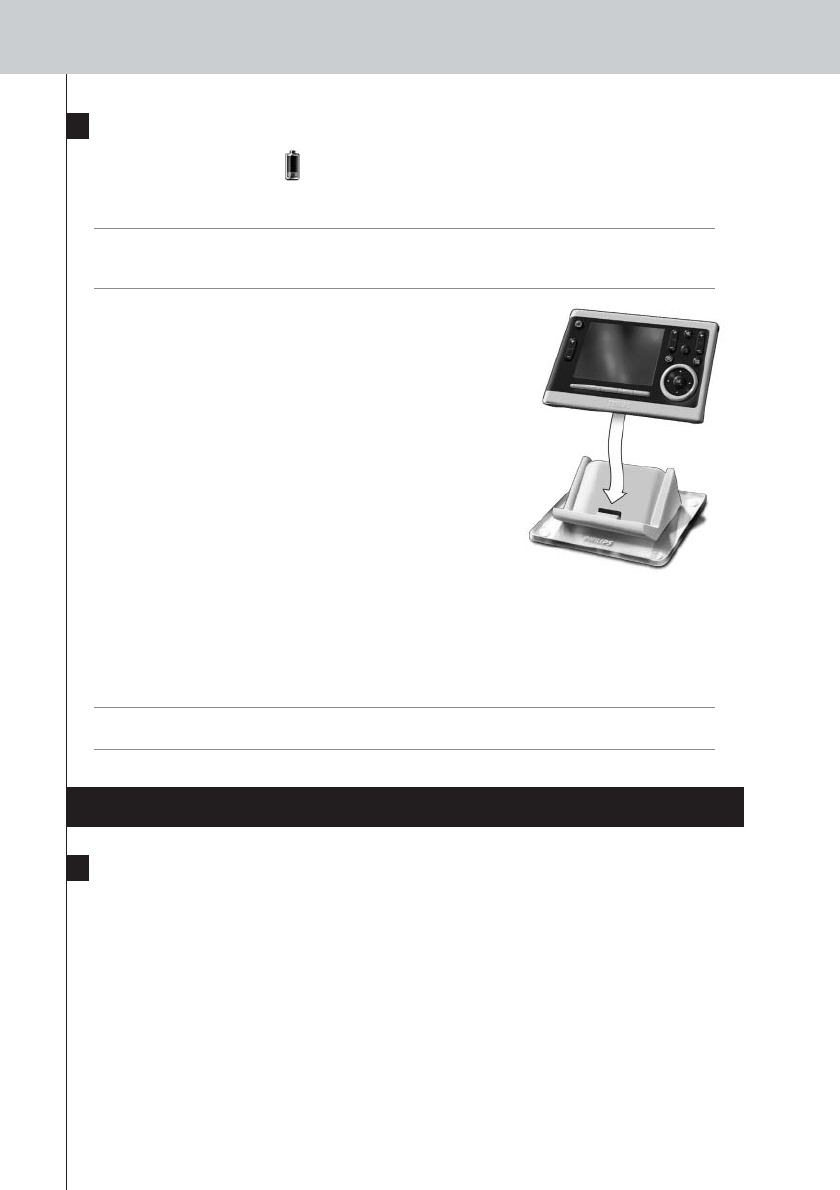
Charging the Control Panel
When the Battery level icon on your screen turns red, it is time to charge the Control Panel.
Depending on how your installer has configured the Control Panel, it can be operated for one to
several days.
Note The lifetime of the battery depends on the timeout settings and the settings of the wireless
network configured by your installer. If you notice that the battery is deteriorating, please
contact your installer.
When you place the Control Panel in the docking station, the red
Charging LED on the front of the docking station lights up.
When the Charging LED fades out, the Control Panel is fully
charged. This can take 3 to 4 hours.
When the battery is low and the Charging LED does not light up,
make sure that:
•the power switch at the bottom of the Control Panel is switched to 1.
•the docking station is plugged in the wall outlet. When it is plugged in, the docking station glows
blue.
•the Control Panel is placed properly in the docking station.
•the connector in the docking station is clean and free of obstructions.
Tip It is advised to place the Control Panel in the docking station after use. Even when the screen of
the Control Panel turns black, the Control Panel is still using power.
Enjoying Your Pronto Control Panel
Controlling Your Home Theater
Activating the screen of the Control Panel
•Tap the touch screen with the stylus enclosed or with your finger.
-Or-
•Press the Backlight key.
5
TSU9400 Starter’s Guide
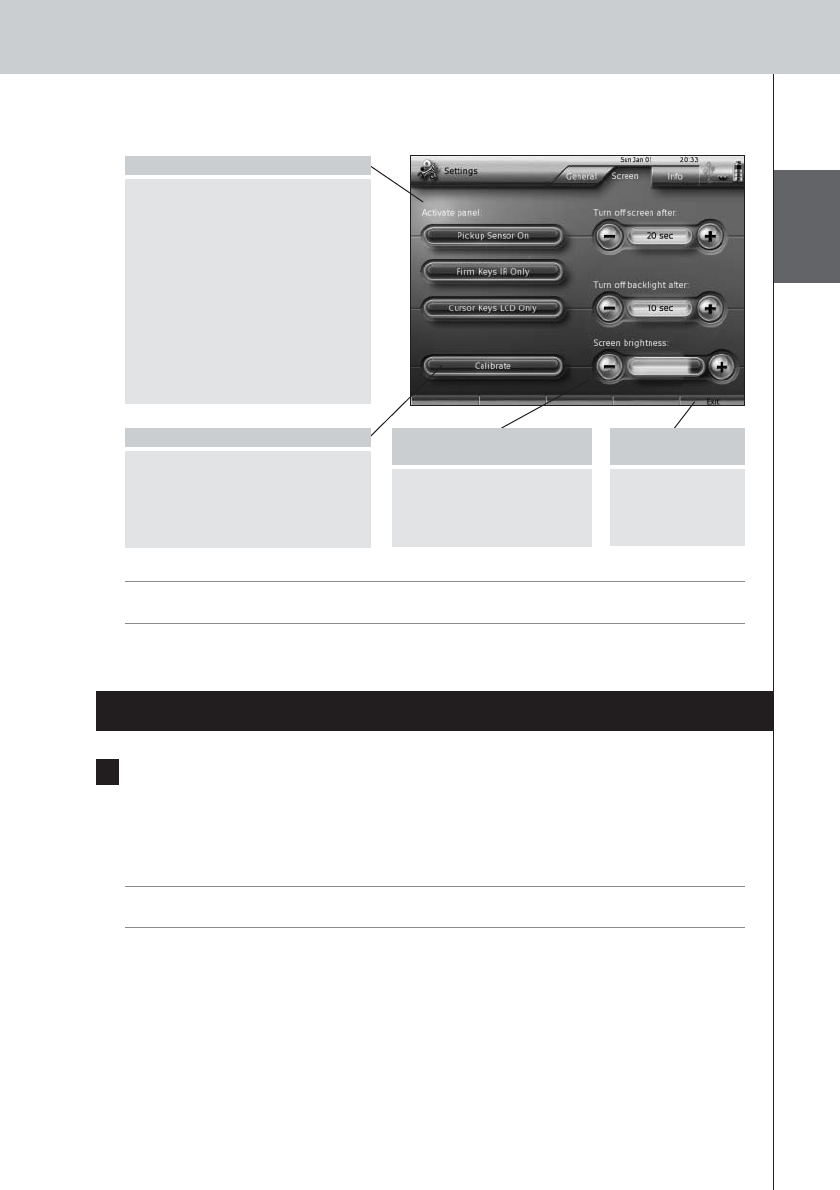
Changing the Pronto Settings
Note It is possible that your installer has blocked the access to the Settings pages. Normally, your
installer has fully programmed your Control Panel and no changes are required.
To open the Settings pages:
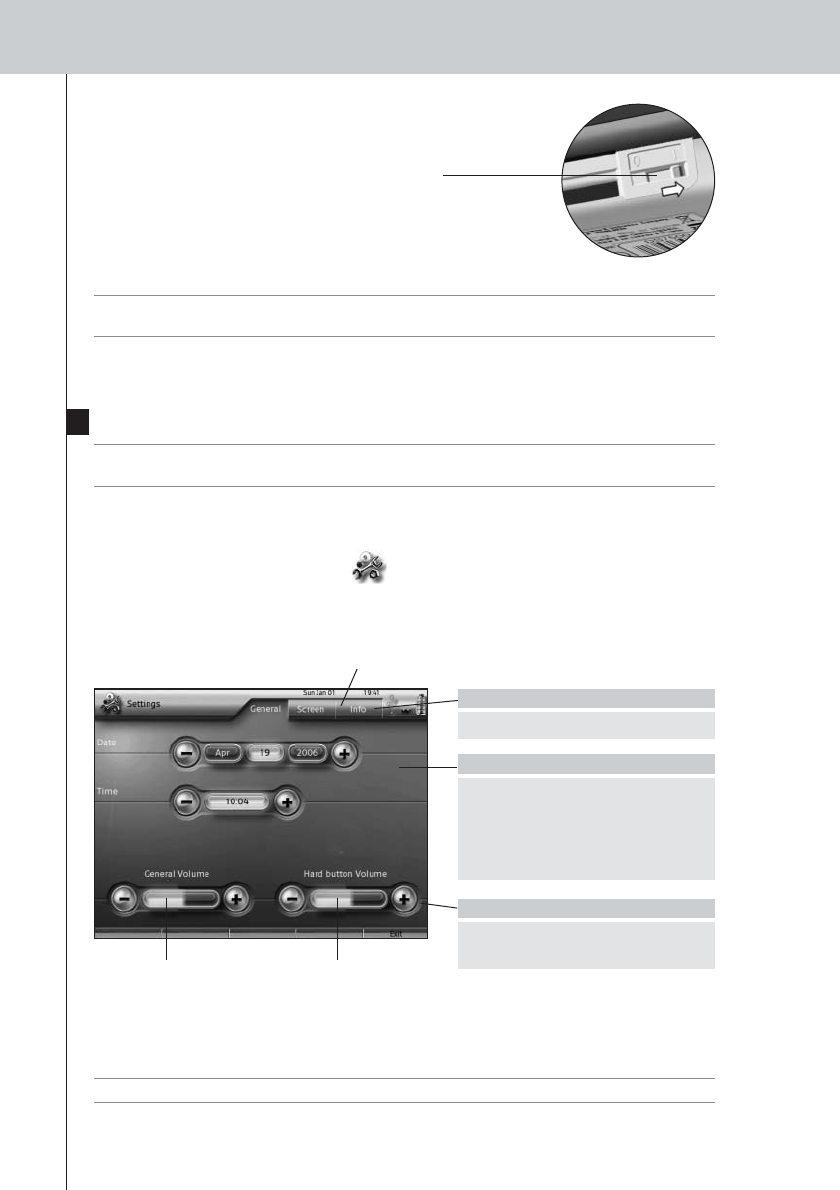
•Press and hold the Settings icon for more than 3 seconds.
General
Tip Press and hold the ‘-’ and ‘+’ buttons to increase or decrease the setting faster.
On the Info Page you can find the version and
network information and memory status.
The General volume
refers all the sounds
you hear when you
operate the Control
Panel.
The Button volume
specifically refers to
the default sound you
hear when you press
a button.
Turning the Control Panel On/Off
Tip Always switch off the Control Panel during transport to avoid the activation of the touchscreen
and battery draining.
To change Date & Time settings
1Tap the Month, Day, Year, or Time
button.
The button is highlighted.
2Tap the ‘-’ and ‘+’ buttons to
adjust the date or time.
To change the Volume settings
•Tap the ‘-’ and ‘+’ buttons to
adjust the volume settings.
To access the other Settings pages:
•Tap the different tabs.
Power switch
The Power switch on the
bottom of the Control
Panel turns the Control
Panel on and off.
6
TSU9400 Starter’s Guide
ENGLISH
Screen
Note The screen is calibrated in the factory. Do not use this function unless you experience problems
with the touch screen.
Support
Maintaining the Control Panel
Take care not to damage the touch screen
•Do not drop the Control Panel or subject it to any strong impact.
•Use the stylus enclosed or your finger to tap the touch screen.
Attention Never use an actual pen, pencil or other sharp object on the touch screen to avoid scratching
the touch screen.
Protect the Control Panel from temperature extremes
Keep the Control Panel away from heaters and other heat sources.
The Control Panel is not waterproof
The Control Panel should not be exposed to rain or moisture.
Do not store or use the Control Panel in any location that is extremely damp or wet.
When you have spilled water on the Control Panel, you have to turn it off by switching the Power
switch to 0.
Place the Control Panel in a clean environment to dry.
To change the Activation Settings:
•Tap the buttons to toggle
between the different Activation
settings:
Pick up sensor: the Control Panel
switches on when it is tilted.
Firm keys: the Control Panel
switches on and/or sends out IR
when a firm key is pressed
Cursor keys: the Control Panel
switches on and/or sends out IR
when one of the cursor keys is
pressed.
To calibrate the touch screen:
1Tap the Calibrate button.
2Follow the on screen instructions
to tap the 4 corners of the
screen.
The touch screen is calibrated.
To change the Time out and
the Brightness settings:
•Tap the ‘-’ and ‘+’ buttons
to adjust the settings.
To exit the
Settings pages:
•Press the right
firm key labeled
Exit.
7
TSU9400 Starter’s Guide
Cleaning the Control Panel
•Use a soft, damp cloth to clean the Control Panel.
•If the touch screen is dirty, clean it with a soft cloth moistened with a diluted window-cleaning
solution.
•Do not use a corrosive detergent or an abrasive sponge.
•Avoid the use of abundant water.
Troubleshooting
The buttons on the touch screen of my Control Panel do not work properly
When you find that tapping a button activates one of the adjacent buttons, or when you have to tap
next to a button to activate it, it is advised to recalibrate the touch screen as described in
‘Changing the Pronto Settings’ on page 8.
Calibrating is a way of adjusting the touch screen to reobtain accuracy and reliability.
The Control Panel goes to stand-by mode automatically
This is a time out feature of the Control Panel to save power. You can adjust the time that the
Control Panel stays active in the Settings pages on the tab Screen, as described in ‘Changing the
Pronto Settings’ on page 8.
My AV-equipment does not respond to commands from the Control Panel
•Check the status of the battery on the screen. If the Battery level icon is red, recharge the
Control Panel.
•When your Control Panel works in a WiFi environment, bear in mind that it may take the network
a few seconds to wake up and start transmitting codes.
•You may be out of reach of the WiFi network. The WiFi activity icon that normally indicates the
WiFi strenght changes into .
Please refer to the next chapter.
The WiFi activity icon shows no WiFi strength
Note The WiFi activity icon may not be visible on the screen, depending on the settings made by
your installer.
If the Control Panel shows one of the following icons:
My Control Panel runs out of power fast
•When the Control Panel works in a WiFi environment, bear in mind that the Control Panel is still
using power even when its screen is black. It is advised to place the Control Panel in the docking
station each time after use.
•When the battery runs out of power constantly, it may be time to replace the battery. Contact
your installer for more information.
No connection
•The Wireless Access Point is powered down
•The Control Panel is out of range of the Wireless Access point
•There is an encryption problem
No identification
•There occurred an IP problem. If the problem comes up regularly, contact your
installer to change the settings.
8
TSU9400 Starter’s Guide
ENGLISH
Specifications
Display 3.7” TFT color display with touch screen
VGA (640 x 480 pixels) resolution landscape LCD
65,536 colors
Infrared (IR) Operating distance = max. 36 ft (12 m)
Operating angle = 45º at max 15 ft (5 m)
Wireless System WiFi based technology operating at 2.4 GHz
Memory 64 MB SDRAM
64 MB NAND Flash
Power Management Power on by tilting, tapping the screen, pressing the back light button or
tapping the keys
Power off automatically by time out
Battery status indication
Dimensions Control Panel: 6,2 x 3,9 x 1,3 inch (157 x 100 x 34 mm)
Docking Station: 5,4 x 4,1 x 1,9 inch (137 x 103 x 49 mm)
Operating Temperature 41° F – 113° F (5° C - 45° C)
Storage temperature -13° F – 158° F (-25° C - 70° C)
Battery Lithium ion battery, 2100 mAh
Power Adapter 100V-240VAC / 50-60Hz Power adapter
( 5 V DC / 2 A output)
Accessories - Power adapter
- Docking station
- Starter’s Guide
- Warranty certificate
Pronto Control Panel Starter’s Guide
© Copyright 2006 Royal Philips Electronics, Interleuvenlaan 72 - 74, 3000 Leuven (Belgium)
Remarks:
All rights are reserved. Reproduction in whole or in part is prohibited without prior consent of the copyright owner.
Royal Philips Electronics is not liable for omissions or for technical or editorial errors in this manual or for damages
directly or indirectly resulting from the use of the Pronto Control Panel.
The information in this Starter’s Guide may be subject to change without prior notice. All brand or product names are
trademarks or registered trademarks of their respective companies or organizations.
FCC Compliancy
This device complies with Part 15 of the FCC Rules. Operation is subject to the following two conditions:
•This device may not cause harmful interference.
•This device must accept any interference received, including interference that may cause undesired
operation.
This equipment has been tested and found to comply with the limits for a Class B digital device, pursuant to
part 15 of the FCC rule.
These limits are designed to provide reasonable protection against harmful interference in residential
installations. This equipment generates, uses, and can radiate radio frequency energy and, if not installed and
used in accordance with the instructions, may cause harmful interference to radio communications.
However, there is no guarantee that interference will not occur in a particular installation. If the equipment
does cause harmful interference to radio or television reception, which can be determined by turning the
equipment off and on, the user is encouraged to try to correct the interference by one or more of the following
measures:
•Reorient or relocate the receiving antenna.
•Increase the separation between the equipment and receiver.
•Connect the equipment into an outlet on a different circuit from the receiver.
•Consult the dealer or an experienced radio/TV technician for help.
CAUTION The user changes or modifications not expressly approved by the party responsible for
compliance could void the user’s authority to operate the equipment.
Notice for Canada / Remark pour le Canada
This class B digital apparatus complies with Canadian ICES-003.
Cet appareil numerique de la Classe B est conforme a la norme NMB-003 du Canada
Regulations According to R&TTE
Declaration
Hereby, Philips Consumer Electronics, BL Home Control declares that TSU9400 is in compliance with the
essential requirements and other relevant provisions of Directive 1999/5/EC:
•Radio: ETSI EN 300 328
•EMC: ETSI EN 301 489-1, ETSI EN 301 489-17
•Safety: EN60950-1
Czech My, Philips Consumer Electronics, BL Home Control, prohlašujeme že výrobek TSU9600 splňuje základní
požadavky a ostatní příslušná ustanovení Směrnice 1999/5/EC.
Danish Philips Consumer Electronics, BL Home Control, erklærer herved, at følgende udstyr TSU9600
overholder de væsentlige krav og øvrige relevante krav i direktiv 1999/5/EF.
Dutch Hierbij verklaart Philips Consumer Electronics, BL Home Control, dat deze TSU9600 in
overeenstemming is met de essentiële eisen en de andere relevante bepalingen van richtlijn 1999/5/EG.
Finnish Philips Consumer Electronics, BL Home Control, vakuuttaa täten että TSU9600 tyyppinen laite on
direktiivin 1999/5/EY oleellisten vaatimusten ja sitä koskevien direktiivin muiden ehtojen mukainen.
French Par la présente Philips Consumer Electronics, BL Home Control, déclare que les appareils du type
TSU9600 sont conformes aux exigences essentielles et aux autres dispositions pertinentes de la directive
1999/5/CE.
German Hiermit erklärt Philips Consumer Electronics, BL Home Control, dass sich dieses Gerät (TSU9600) in
Übereinstimmung mit den grundlegenden Anforderungen und den anderen relevanten Vorschriften der
Richtlinie 1999/5/EG befindet". (BMWi).
IFU Approbation / Safety Content TSU9400
i