Philips Consumer Lifestyle WAC700 Home Audio System with WLAN audio streaming User Manual 1
Philips Consumer Lifestyle Home Audio System with WLAN audio streaming 1
Contents
- 1. FCC Notes
- 2. User manual
User manual

Wireless Music
Center + Station WACS700
User manual
March 28, 2005
www.philips.com/support
philips
2
Important notes for users in
the U.K.
Mains plug
This apparatus is fitted with an approved 13
Amp plug. To change a fuse in this type of plug
proceed as follows:
1 Remove fuse cover and fuse.
2 Fix new fuse which should be a BS1362 5 Amp,
A.S.T.A. or BSI approved type.
3 Refit the fuse cover.
If the fitted plug is not suitable for your socket
outlets, it should be cut off and an appropriate
plug fitted in its place.
If the mains plug contains a fuse, this should have
a value of 5 Amp. If a plug without a fuse is used,
the fuse at the distribution board should not be
greater than 5 Amp.
Note: The severed plug must be disposed of to
avoid a possible shock hazard should it be
inserted into a 13 Amp socket elsewhere.
How to connect a plug
The wires in the mains lead are coloured with
the following code: blue = neutral (N), brown =
live (L).
As these colours may not correspond with the
colour markings identifying the terminals in your
plug, proceed as follows:
– Connect the blue wire to the terminal marked N
or coloured black.
– Connect the brown wire to the terminal marked
L or coloured red.
– Do not connect either wire to the earth terminal
in the plug, marked E (or e) or coloured green (or
green and yellow).
Before replacing the plug cover, make certain that
the cord grip is clamped over the sheath of the
lead - not simply over the two wires.
Copyright in the U.K.
Recording and playback of material may require
consent. See Copyright Act 1956 and The
Performer’s Protection Acts 1958 to 1972.
Italia
DICHIARAZIONE DI CONFORMITA’
Si dichiara che l’apparecchio WACS700 Philips
risponde alle prescrizioni dell’art. 2 comma 1 del
D. M. 28 Agosto 1995 n. 548
Fatto a Eindhoven
Philips Consumer Electronics
Philips, Glaslaan 2
5616 JB Eindhoven,The Netherlands
HELPDESKS ACCESS NR. TYPE
A
ustria 01 5465 75603 PSTN
Belgium 02 275 0701 PSTN
Cyprus 800-92256 IFS
Denmark 35 25 87 61 PSTN
Finland 09 2290 1908 PSTN
France 03 8717 0033 DDI
Germany 0696 698 4712 PSTN
Greece 00800 3122 1223 IFS
International (Toll)
International (Toll)
Ireland 01 601 1161 PSTN
Italy 02 4827 1153 PSTN
Luxembourg 26 84 3000 PSTN
The Netherlands 053 482 9800 DDI
Norway 22 70 82 50 PSTN
Poland 00800 311 1338
Portugal 800-831-363 IFS
Spain 917 456 246 PSTN
Sweden 08 632 0016 PSTN
Switzerland 02 2310 2116 PSTN
United Kingdom 0207 949 0069 PSTN
PC PERIPHERALS
AFTER SALES

3
Index
English________________________________2
Hereby Philips Consumer Electronics, BCU Audio Video Entertainment, declares that this product
WACS700 is in compliance with the essential requirements and other relevant provisions of Directive
1999/5/EC.
CAUTION
Use of controls or adjustments or performance of procedures other than herein may
result in hazardous radiation exposure or other unsafe operation.
This set complies with the radio interference requirements of the European Community.
Hereby Philips Consumer Electronics, BCU Audio Video Entertainment, declares that this
product
WACS700
is in compliance with the essential requirements and other relevant provisions
of Directive 1999/5/EC.
English
Norge
Typeskilt finnes på apparatens bakside.
Observer: Nettbryteren er sekundert innkoplet. Den innebygde netdelen er derfor ikke
frakoplet nettet så lenge apparatet er tilsluttet nettkontakten.
For å redusere faren for brann eller elektrisk støt, skal apparatet ikke utsettes for regn eller fuktighet.

4
Philips online support
Philips products have been designed and manufactured to the highest quality standards. If your Philips Connected
Planet product is not working correctly, we recommend you check your User Manual to verify that your product
is properly connected and configured.
The web site for Connected Planet support: www.philips.com/support offers you all information you need to
optimally enjoy your product, and about new additions to this exciting range, to make your home entertainment
experience even more enjoyable.
Please visit: www.philips.com/support and enter your product name (WACS700) to view:
• FAQ Frequently Asked Questions
• Latest user manuals and PC software manuals
• Firmware upgrade files for WACS700
• Latest PC software downloads
• interactive troubleshooting
Since it is possible for you to upgrade your product, we recommend that you register your product on
www.philips.com/register so we can inform you as soon as new free upgrades become available.
Enjoy your WACS700!
The model number is on the rear of the set.

5
Philips
Philips Consumer Electronics
WRR.xxxx
EC DECLARATION OF CONFORMITY
We, Philips Consumer Electronics
(manufacturer’s name)
Philips…
declare under our responsibility that the electrical product:
Philips WACS700/22
(name) (type or model)
Wireless Music Center + Station
(product description)
to which this declaration relates is in conformity with the following standards:
EN55013-2001….

6
Important Note:
Due to the numerous versions of new
CD-Audio copy protection or
enhanced CD-Audio protection
recently available on certain discs,
Philips is unable to guarantee that
this product is fully compatible
with such new discs. Should you have
difficulty playing any such CD-Audio
discs, kindly refer them to your CD Audio
disc retailer.
Acknowledgements
Music recognition technology and related data are provided by Gracenote® and the Gracenote
CDBB® music recognition service. Gracenote is the industry standard in music recognition
technology and related content delivery. For more information visit www.gracenote.com
CD and music-related data from Gracenote, Inc., copyright © 2000-2003 Gracenote. Gracenote
CDBB® Client Software, copyright © 2000-2003 Gracenote. This product and service may practice
one or more of the following U.S. Patents #5,987,525; #6,061,680; #6,154,773, #6,161,132,
#6,230,192, #6,230,207, #6,240,459, #6,330,593, and other patents issued or pending. Services
supplied and/ or device manufactured under licence for following Open Globe, Inc. United States
Patent, 6, 304,523.
Gracenote and CDDB are registered trademarks of Gracenote. The Gracenote logo and logotype,
the Gracenote CDDB logo, and the “Powered by Gracenote” logo are trademarks of Gracenote.
IMPORTANT!
RETAIN YOUR ORIGINAL FILES
Please ensure that you retain the original files transferred to your STATION. Philips is not
responsible for any loss of content if the product becomes damaged or the hard disk not readable.

7
Contents
Safety__________________________2
Helpdesk contact __________________2
Philip online support_______________2
About your WACS700
System requirements _______________ 3
Controls and connections
Center ________________________ 4, 6
Station ________________________ 5
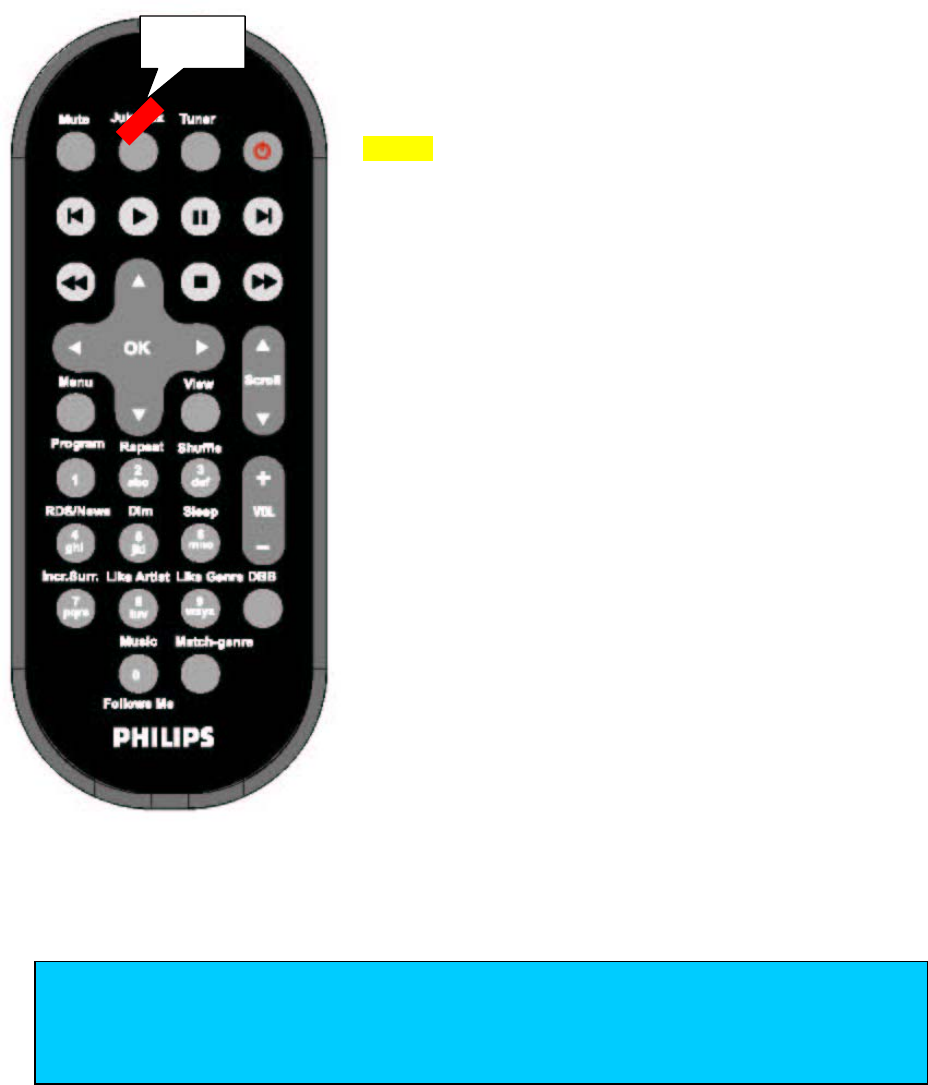
Remote control
Remote control keys _______________7
Using the remote control ___________ 10
Preparation
FM antenna/ Power supply __________11
Wi-Fi Auto installation______________12
Installing multiple Stations________13
Basic functions
Switching on_____________________ 14
Switching on, switching to standby _____ 15
Eco standby______________________15
Selecting your playback source________15
Sound control ____________________16
Volume _________________________16
MUTE _________________________ 16
DBB ___________________________16
Incredible
Surround________________________ 16
Understanding the display icons ____17
WACS700 message displays___________18
Menu options overview_____________19
Settings
Treble/ bass______________________
Display_________________________
Recording_______________________
Language________________________
Restore settings___________________
Playing CDs on the Center_______22
Recording CDs on the Center_______23
Renaming tracks_________________24
Selecting and searching ____________
Selecting a track when playback is stopped
______________________________
Selecting a track during playback ______
Searching for a passage during playback
______________________________
Additional selecting and searching (on MP3-CDs
only) __________________________
Selecting an album when playback is stopped
_____________________________
Selecting an album during playback ___
Selecting a track in the album _______
Album and track name display (on MP3-CDs only)
Using Gracenote CDDB database__25
Gracenote CDDB update__________25
HD music playback________________26
Match Genre_____________________27
Like Genre, Like
Artist___________________________27
MUSIC FOLLOWS ME______________28
BROADCAST MODE_______________29
How to create Playlists______________31
Deleting playlists___________________31
Different play modes:
SHUFFLE and REPEAT _____________32
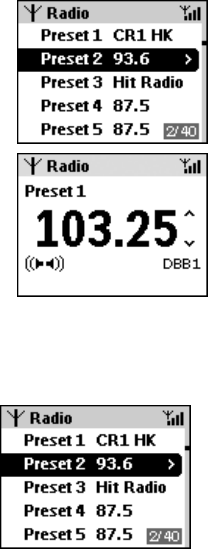
Tuner
How to tune to radio stations ________33
Autostore _______________________33
Manual tuning_____________ _______33
Programming presets _______ _______34
Listening to a preset _______________34
RDS ___________________________35
NEWS _________________________ 35
Changing the tuner grid______________36
RECORDING TUNER /AUX
Basic Recording ___________________37
How to find your recording___________37
8
Recording tuner_________________ 38
Recording AUX_________________ 38
Backup files_____________________39
uPnp Playback___________________39
SLEEP Timer
Activating or deactivating
the SLEEP timer ___________________40
Extras
Demonstration mode _______________41
Mounting kit______________________42
For computer users:
Philips Media Manager DMM)_________43
General info
Environmental information ___________ 44
Maintenance ______________________ 44
Disc handling ______________________44
Setup___________________________ 44
Technical data __________________ 45
Troubleshooting ________________46
Frequently asked questions _______46
Glossary________________________48
Index__________________________

3
About your Wireless Music Center + Station
– This all-in-one system comprises of 2 units: WACS700, your Wireless Music Center and WACS700
your Wireless Music Station.
– WACS700 is capable of wirelessly streaming audio content to up to five WACS700 Stations via
uPnP. You can share and enjoy music stored on the Center around your house at a touch of a
button.
– Display support for 5 European languages: English, French, Spanish, German and Italian
Your WACS700 Center can also:
– Play MP3, WMA, 8cm and 12cm audio CDs (up to 750 CDs), finalised audio CDR and CDRW discs
– Built-in 40GB** capacity to playback and record up to 750 CDs
– use its built-in gracenote CDDB Database to search and display any available ID3 tag
information when you load original, pre-recorded audio CDs
– rip, compress and store audio CD files into MP3 format
– record and store FM tuner or an AUX source (up to 10 files of 3 hours each) as audio Flash
files
– connect to a computer using WiFi and/or Ethernet. You can then simply transfer files from
your computer using the DMM software.
– provide up to 40GB** of hard disk storage space for other data formats
**
Actual free space=35GB or less, due to firmware, CDDB database and demo tracks stored.
WAS700 Station
This is able to stream music from any uPnP server/ PC, not just the WACS700 Center.
System Requirements
- PC system requirements: Windows 98 SE, 2000, XP or higher OS
- Ethernet-based broadband Internet access (cable/ DSL)

4
Fig.1 Wireless Music Center, WAC700
5
Fig.2 Wireless Music Station, WAS700

6
Controls (See fig. 1 & 2.
Features are same on both
Center
&
Station
unless stated
)
Top & Front
STANDBY ON - press briefly for standby on/ off (green light indicator when streaming)
-press and hold to activate ECO POWER standby (red light)
EJECT –eject disc (
on
Center
only)
ACTIVE – indicator lights up during wi-fi streaming (broadcast from Station)
LIKE ARTIST - selects all tracks of a specified artist
LIKE GENRE - selects all tracks of a specified genre
MATCH GENRE – activates preset sound setting to match a genre
MENU - menu view on/ off
MUSIC FOLLOWS ME - stream music from Center to (other) Station(s)
MUSIC BROADCAST – activates music broadcast at a chosen Station (
on
Center
only
)
DBB – toggles Dynamic Bass Boost options to enhance bass
VIEW – display view options
Flat Plexi-Piston™ speakers
IR –infrared sensor for remote controls
Always point the remote control towards these sensors
SOURCE – toggles 4 sound sources
REC – to record from a selected source. Lights up red when recording
(
on
Center
only)
INCR.SURROUND – Incredible Surround sound option on/off
MUTE – mute sound on/off
Navigation control:
OK start /pause playback; confirm a setting;
/ previous/ next level screen;
Up / previous / scroll upwards/ fast search play backwards
Down / next / scroll downwards/ fast search play forwards
STOP – stops CD/ HD playback;
- stops music broadcast;
- stops recording; (
on
Center
only)
MARK/ UNMARK - mark or unmark tracks for ripping (
on
Center
only)
VOL -/+ - adjusts volume
Left/ Right/ Rear…
X – socket for 3.5mm headphones (not included)
WI-FI - antenna
screw holes – for wall mounting
FM tuner coaxial cable connection (cable not included)
LAN/ Ethernet connection
AUX IN Left, Right – connect to the analogue audio output of external devices
LINE OUT Left, Right – connect to the analogue audio inputs of an external recording device/
amplifier (
on
Center
only
)
FM ANTENNA - connect the supplied FM cable here
Voltage selector –
some versions only. [Korea/ 01 version]
7
Please adjust to match local voltage BEFORE plugging the system to your power supply
AC mains - plug to power supply when you have made all other connections and positioned
the set (see Quick Start Guide)
Detachable stand - Detach if you choose to wall mount the system (see How to mount your
Center and Station)
Fig.3 Remote controls
Center 2-way Display Remote
- Use this remote control to navigate menu options and operate all the
features on your WACS700 system.
- By simply pressing REFRESH, the black and white display screen on
this remote conveniently allows you to select viewing the information as
displayed on your Station or Center.
- Display support for 5 European languages: English, French, Spanish,
German and Italian
REFRESH – Synchronize the remote display with the Center/ Station
- press briefly to switch to standby;
- press and hold for ECO POWER standby On
Display - shows device status, menus and track information
CD/MP3-CD – selects/ switches on device to disc source
(
on
Center
only
)
HARDDISK – selects / switches on device to hard disk source
TUNER/AUX - toggles / switches on device to Tuner/AUX
(AUX
on
Center
only
)
Navigation control:
OK confirm a setting;
/ previous/ next level screen;
Up / previous / scroll browse upwards/ fast search play backwards
Down / next /scroll browse downwards/ fast search play forwards
SCROLL / - scrolls up/ down menu items
MENU - menu view on/ off
TIP
- Some features, e.g. recording (REC button), MUSIC
BROADCAST, MARK/ UNMARK, selecting the CD
source can only be operated on the Center and 2-way
remote.
- RDS/ NEWS functions only for versions and regions with
RDS reception
8
VOL -/+ - adjusts volume
ALBUM /TITLE / -fast search MP3 album and titles backwards/
forwards
VIEW – display view options
STOP – stops CD/ HD playback;
- stops music broadcast;
- stops recording;
- ejects disc (
on
Center
only)
II / - start /pause playback
PROGRAM/ 1 - enters program menu; input 1
REPEAT/ 2, a, b, c - toggles repeat play options;
- alphanumeric input
SHUFFLE/ 3, d, e, f - toggles random play options
- alphanumeric input
INCR. SURR/ 4, g, h, i - toggles Incredible Surround sound option
on/off;
- alphanumeric input
DBB / 5, j, k, l - toggles Dynamic Bass Boost options to enhance
bass;
- alphanumeric input
MARK/ UNMARK/ 6, m, n, o - mark or unmark tracks for ripping
(
on
Center
only);
- alphanumeric input
SLEEP / 7, p, q, r, s - sets the sleep timer to automatically switch
off the device;
- alphanumeric input
DIM / 8, t, u, v – switches display lighting on/off (
on
Center
only);
- alphanumeric input
RDS/ NEWS/ -
TUNER
: selects RDS information;
9, w, x, y, z
- In other modes:
activates/ deactivates news;
- alphanumeric input
MATCH GENRE – activates preset sound setting to match a genre
LIKE ARTIST/ 0 - selects all tracks of a specified artist;
- alphanumeric input
LIKE GENRE - selects all tracks of a specified genre
REC – to record from a selected source
(
on
Center
only)
MUTE – mute sound on/off
MUSIC BROADCAST – activates/ deactivates music broadcast at a
chosen Station (
on
Center
only
)
MUSIC FOLLOWS ME - stream music from Center to (other)
station(s)
9
Fig. 4 Station 36-key card remote
- This remote is designed to operate all the features on the Station.
- Some features, e.g. recording (REC button), MUSIC BROADCAST, MARK/ UNMARK, selecting
the CD source can only be operated on the Center and 2-way remote.
Most of the controls are similar to the Center 2-way remote.
Below, is a list of variations:
alphanumeric input - combined with other feature buttons as shown
Server - selects / switches on device to hard disk source
- short press up/ long press to scroll browse
backwards
- short press down / long press to scroll browse
downwards
I - go to previous level screen
I - go to next level screen
- fast search backwards
- fast search forwards
TIP
For an explanation of the other button features, please refer to the details as
given for the Center remote (page xx-xx).
Server
10
Using the remote control
Center remote control
Inserting batteries
1 Insert 4 x AAA alkaline batteries with correct polarity (+/-) as shown.
2 Close the battery compartment.
Low battery icon
• When the Center remote display shows the battery low icon , replace your AAA batteries for
optimal performance.
Station remote control
•
For the Station remote
: remove the protective plastic tab from the
compartment before use.
• Replace the CR2025 battery from the compartment as shown, when the remote
control fails to work even when operated near the Center/ Station.
Batteries contain chemical substances, so they should be disposed of properly.
(BACK)
Station remote:
1x CR2025
Center remote: 4 x AAA
TIPS
For best operation, avoid blocking your remote signal path: Any
obstruction between the 2-Way remote signal and the Center’s IR sensor may
cause a temporary delay between the Center’s actual display and that shown on
your remote control.
Always select the source you wish to control first e.g. CD, TUNER, then select
the desired function.
Do not use old and new or different types of batteries in combination.
Remove batteries if they are empty or if the remote control will not be used
for a long time.
remove the
p
rotecti
v
e
p
lastic ta
b
11
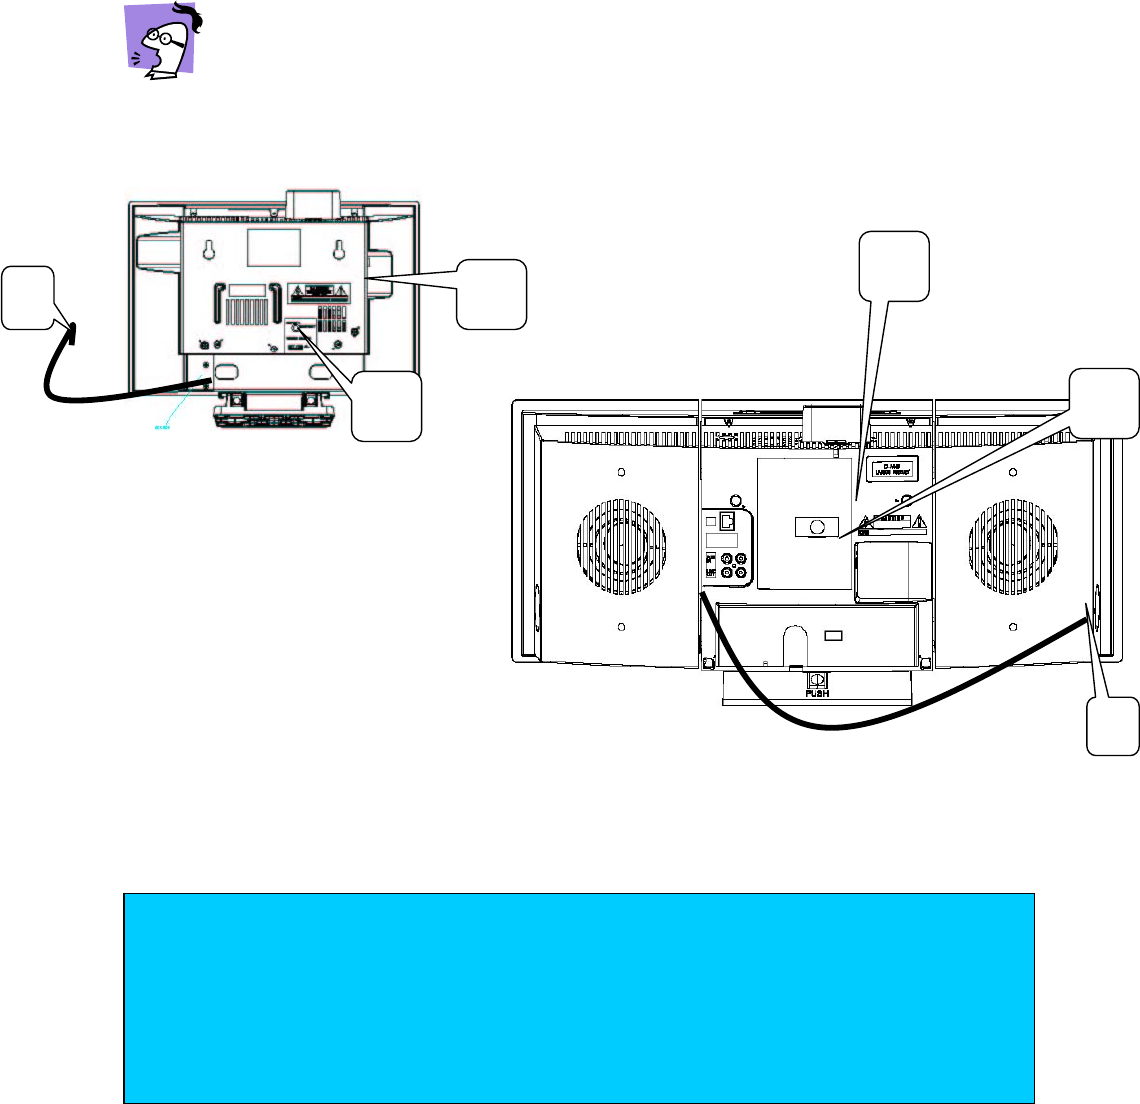
Basic connections:
FM antenna, Ethernet and AC power
In order to ensure a good wireless connection avoid placing the set close to microwave
ovens and large metal objects.
Never make or change connections with the mains supply switched on!
1 Place the Center and Station close together on the same table for easy handling.
2 Connect the FM antennae.
Station rear view
C
e
nter rear view
3
For internet connection (wired option for computer users only.
) Connect the supplied
LAN/ Ethernet cables for each device to your PC.
4 Connect the power plugs to your AC power supply.
For users in the U.K.: please follow the instructions on page 3.
4
4
2
2
33
TIP
– When the set is switched to standby, it is still consuming some power.
To disconnect the set from the mains completely, remove the mains plug from
the wall socket.
–
To avoid overheating of the set a safety circuit has been built in. Therefore your
set may disconnect under extreme conditions. If this happens, switch the set off
and let it cool down before reusing it.
12
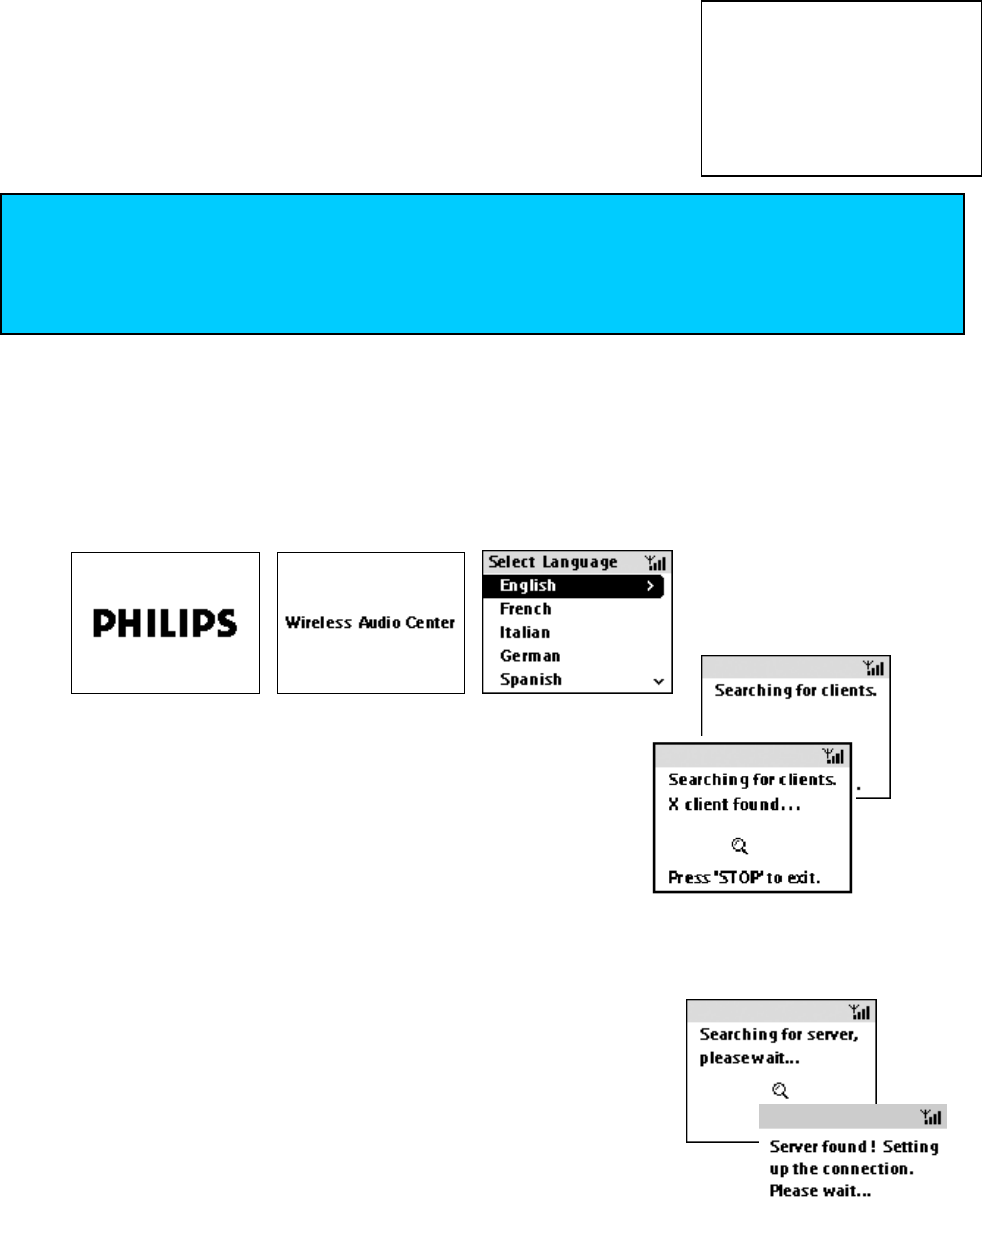
WiFi auto installation
Do this simple 4-step installation to enable streaming music between
your Center and Station:
– When you power on your system for the very first time
– whenever you add a new Station (see ‘Installing multiple Stations’)
– when you use other devices e.g. a PC to act as your Center
1 Install the Center
a After you plugged in the unit, the STANDBY ON LED lights up red. Wait several seconds until the
display shows the ‘Station status’ screen.
b Press STANDBY ON on the unit.
the STANDBY ON LED lights up green.
Center displays the following screens. In the language screen, select and confirm your language.
The Center searches for the other device, the Station.
Station search and connection status is shown, where X denotes
the number of Stations detected.
On the Station: Center search and connection status is shown.
HD screen appears. Your unit is now ready to play.
2 Install the Station
a After you plugged in the unit, the STANDBY ON LED lights up red. Wait a few seconds until the
display shows the PHILIPS’ screen.
b Press STANDBY ON on the unit.
the STANDBY ON LED lights up green.
Station displays the following screens. In the language screen, select
and confirm your language.
On the Station: Center search and connection status is shown.
HD screen appears. Your unit is now ready to play.
TIP
–
Make sure you place
WA
CS700 close together on a flat surface for easy handling.
–
To activate first-time setup, use the controls located on the Center and Station.
–
Do not use the remote controls until after you complete installation.
13
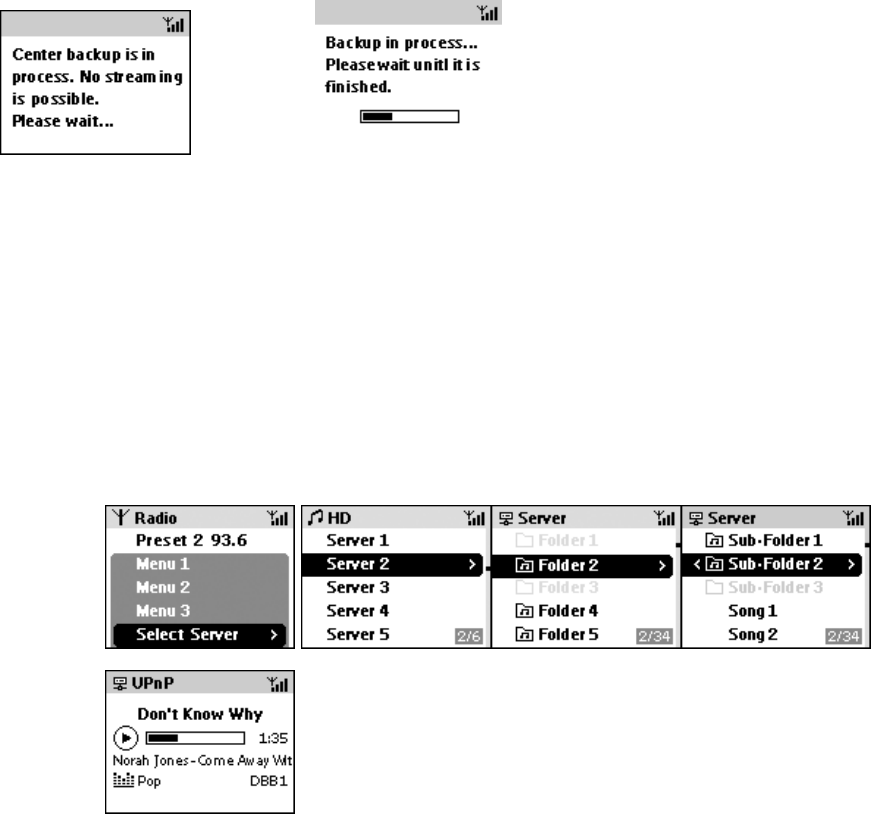
Installing multiple Stations
Install up to 5 Stations to your Center.
1 Check your Center is in the HD source mode.
2 On the Center, press MENU.
3 Connect your new Station to the power supply.
a After you plugged in the unit, the STANDBY ON LED lights up red. Wait a
few seconds until the display shows the PHILIPS’ screen.
b Press STANDBY ON on the unit.
the STANDBY ON LED lights up green.
4 On the Center, use the navigation control to select Station
Management Add new Station
5 Press OK to confirm.
Your Center and Station enters the Installation mode. Any
streaming, if active, will stop. Display shows messages: Server
adding new stations to network, shall loose connection to
Center soon, followed by No connection to Center and then
Display shows Station number when found.
Display shows Station connection status. is displayed
for connected Stations. If disconnected:
Other Connection status messages
– DMM found! Is displayed if you are using WACS700 with a computer installed with Philips
Digital Media Manager (DMM).
– [Please ensure that the Center is in Station installation mode. Switch source to abort
the install process]: This error message appears if the Station is unable to detect the Center in
10 seconds or more.
To quit auto installation mode/ installation error mode
• Press the STOP button to exit.
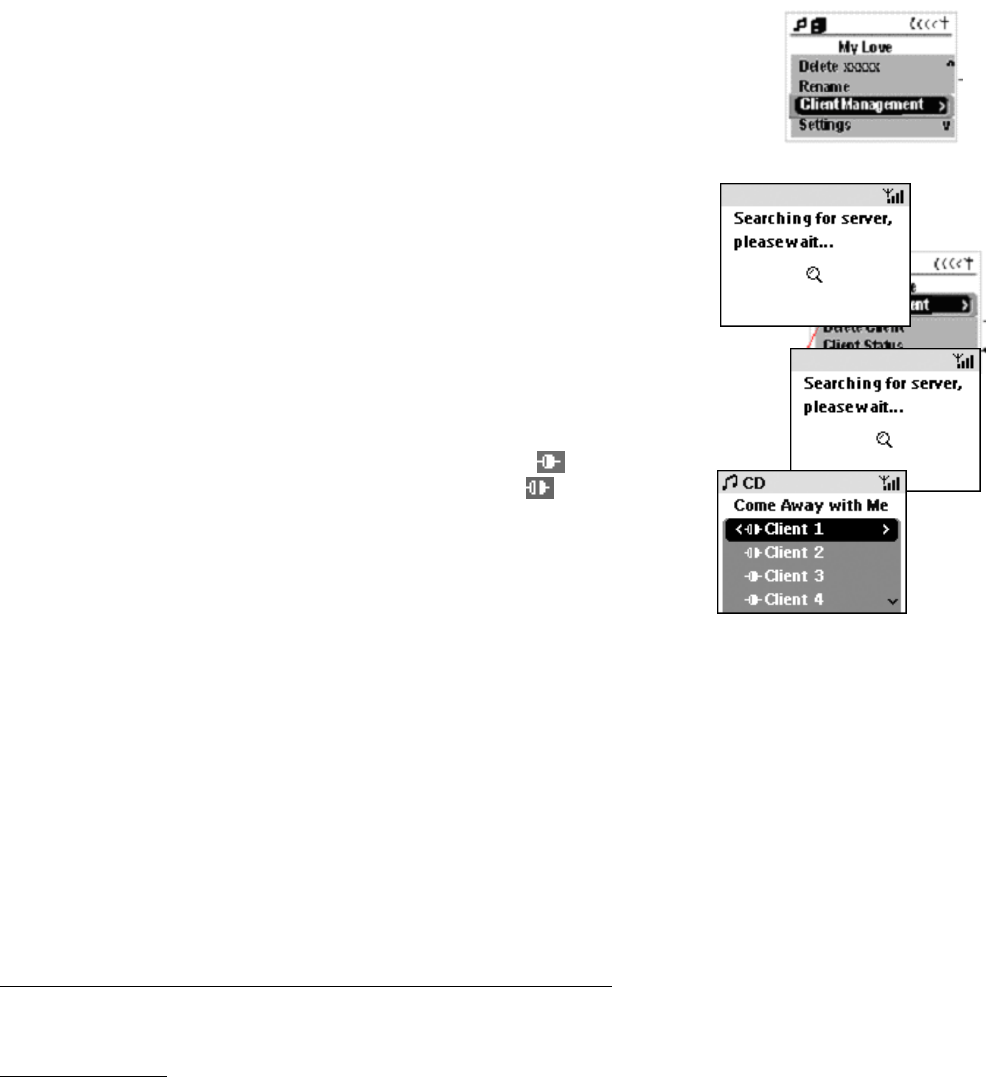
Delete Station
Select this menu option if you need to remove a Station e.g. if Station is taken away for repair.
• press MENU and select the following submenus to confirm: Station Management Delete Station
Station X (number and room location) Yes/ No? Delete Station

14
Basic Operation
Basic playback controls
Unless otherwise stated, all operations described are based on the use of Center remote control.
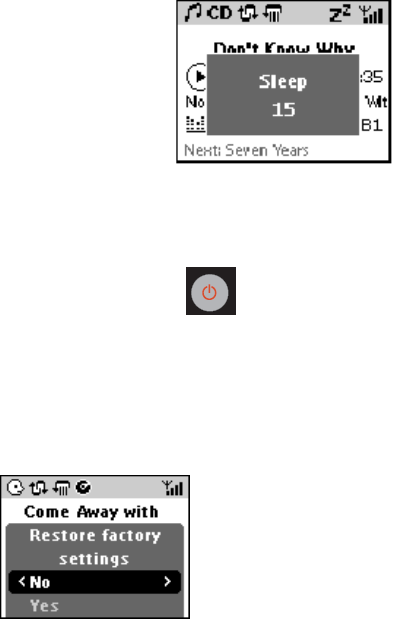
Switching on
from active standby
To switch on, you can either:
• On the set, press STANDBY/ON or SOURCE
• On the Center remote control, press HARDDISK, CD-MP3-CD or TUNER/ AUX Server
• On the Station remote control, press Server or Tuner/ Aux
Display shows the Welcome screen, then your chosen source screen/ last selected source.
When switching on for the first time, you will see the following screens:
from ECO POWER standby
•
On the set only
, press SOURCE respectively to wake-up your Center/ Station to active standby.
•
On the set/ remote control
, press STANDBY/ON respectively to wake-up your Center/ Station.
Display shows the Welcome screen, then your chosen source screen/ last selected source.
TIP
– Inserting a CD into the Center slot loader wakes the set directly into CD mode
– If you have activated Music Follows Me on either the Center/ Station, pressing Music
Follows Me (on the set/ remote control) will wake up the corresponding Center/ Station
into the respective mode.
– If you have activated MUSIC BROADCAST on the Center, pressing MUSIC
BROADCAST on the remote control will wake up the Station into this mode.
15
Switching off
into active standby
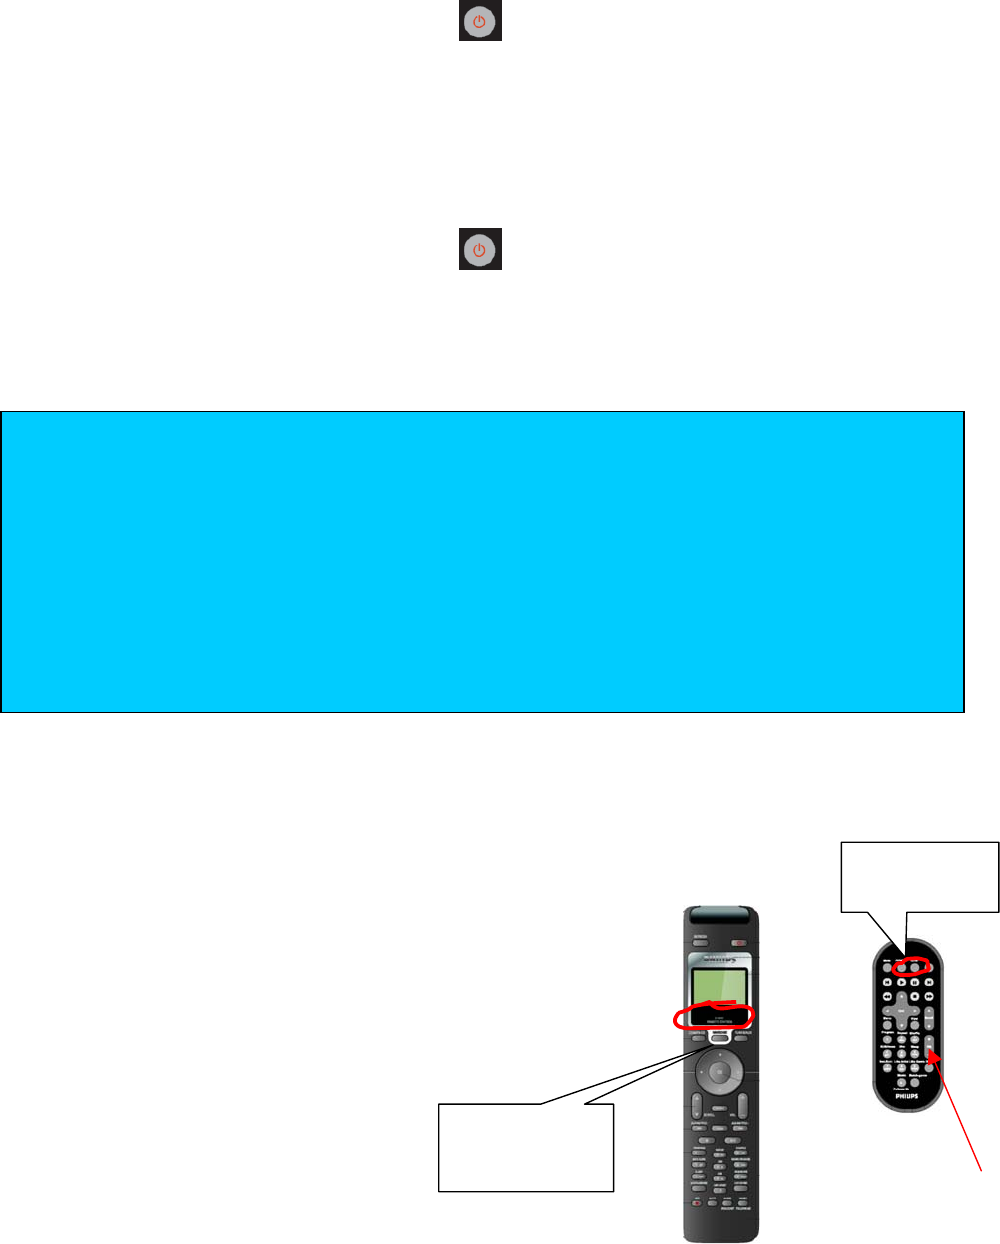
On the set, press STANDBY/ON or press briefly on the remote control.
Display shows: Goodbye and then Set in Active Standby when you switch to
standby mode.
Display shows: NEWS OFF or SLEEP OFF and then Goodbye if you were using
the NEWS or Sleep timer function.
into ECO POWER standby
On the set, press STANDBY/ON or press briefly on the remote control for 3 seconds or more.
Display shows: Goodbye and then OFF. The power indicator button on the set lights
up red.
Select your playback source
You can either:
• press a source button on the respective remote control.
• press SOURCE once or more on the Center/ Station until your
desired function screen appears on the display.
CD/MP3-CD,
HARDDISK or
TUNER/ AUX
Server or
Tuner/ Aux
TIP
– Tuner preset stations, recording and sound settings (except for MATCH GENRE and if the
last volume played exceeds level 10) are memorized and resumed when switching on from
standby or ECO POWER mode.
Center remote control displays:
– When switching off the Center/ Station to standby, the remote display shows the last
operating screen for 20 seconds before powering down.
– Set not active appears when Center/ Station is in active standby and you press REFRESH.
– When you switch on the Center/ Station, press REFRESH to wake up and synchronize the
remote control display with your set.
16
Sound control
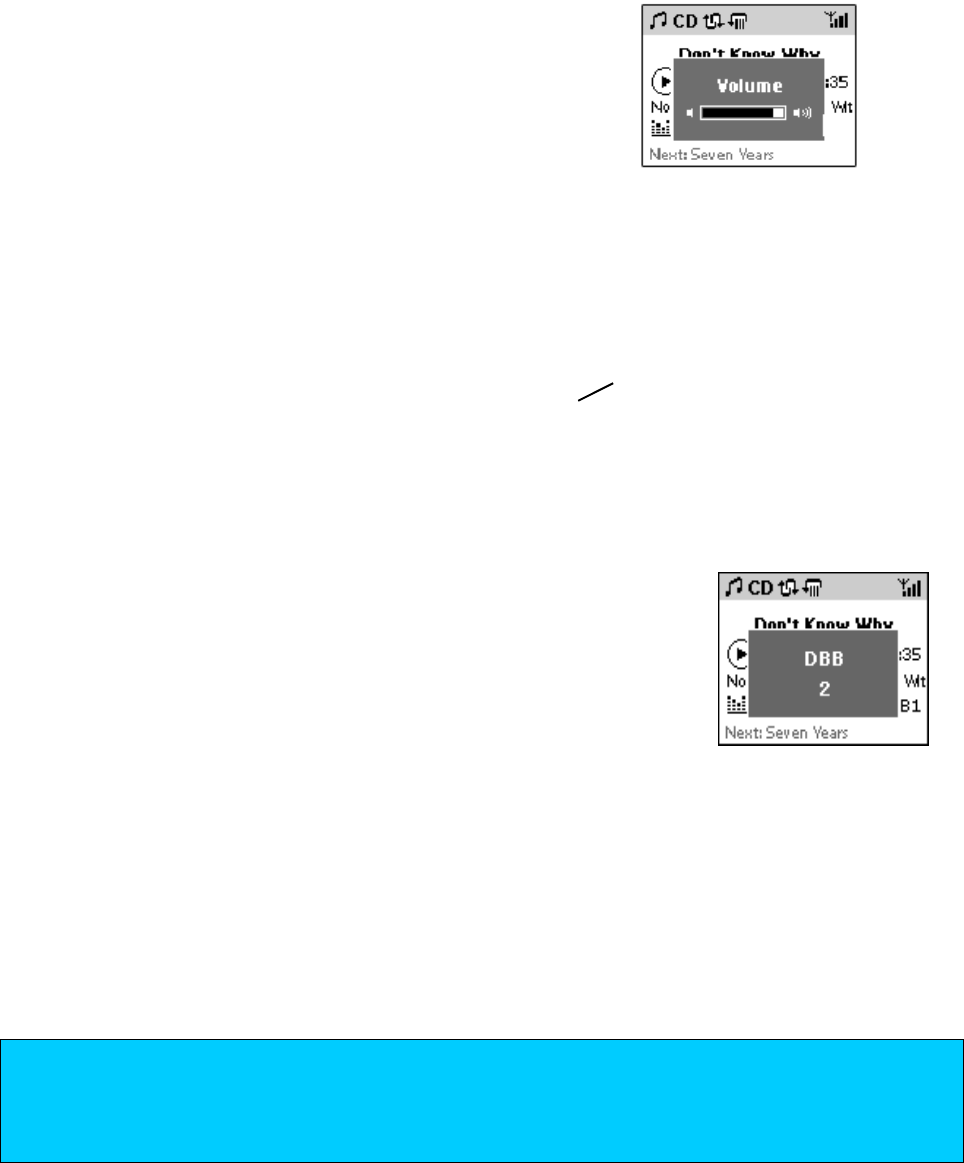
Volume
You can adjust the volume level from 0-32.
• Press VOL -/+
Display shows volume bar briefly.
MUTE
• To switch off the volume temporarily, press MUTE on the remote control.
If activated, display shows Mute ON and the mute icon 8
• To restore the volume, press MUTE again.
DBB (Dynamic Bass Boost)
• Press DBB(5 jkl) once or more to toggle to enhance bass at 3
levels.
Display shows DBB and level status 1, 2 or 3.
INCR.SURROUND
The Incredible Surround magnifies the virtual distance between the front speakers for an incredibly wide,
stereo effect.
• Press INCR.SURR (4 ghi) once or more to toggle on/off.
If activated, display shows IS ON.
If deactivated, display shows IS OFF.
TIP
– Press MENU to select and navigate through EQUALIZER menu for further predefined
sound options, e.g. Rock, Pop, Jazz.
– See page XX for details on the MATCH GENRE sound feature.
17
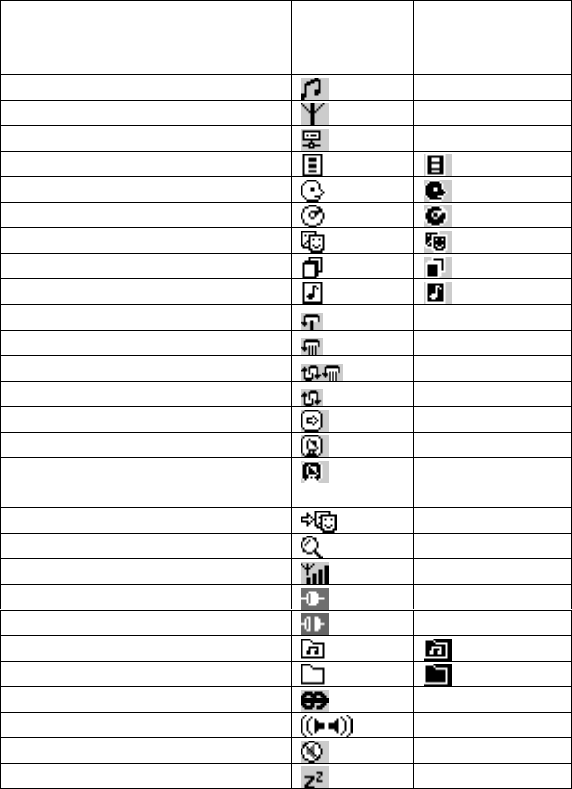
Understanding the display icons
*These are recordings created on the
Center, specifically when you record a large
number of tracks/ large audio files. They are
then stored under Raw Tracks
temporarily, before compression is fully
processed.
W
hat Main
header
icon
Sublevel
icon
HD/ CD source -
Radio source -
Server source -
Playlists
Artists
Albums
Genres
All tracks
*Raw (uncompressed) tracks
Repeat once -
Repeat all -
Shuffle and repeat -
Shuffle -
Music Follows Me -
Broadcast activated -
Station Broadcast
deactivated -
Match Genre -
Searching -
WiFi signal strength -
Station connected -
Station disconnected -
Playable folder
Data/ non-playable folder
RDS news -
Stereo -
Mute -
Sleep -
18
WACS700 message displays
Interactive pop-ups and full-screen displays will guide you through the status of your system:
- information
- Confirmation
- progress screens
- warning/error messages
Busy animation
This appears for features that require a few extra seconds to perform and indicates your unit is busy.

19
Menu options overview
Navigate and explore. Check out plenty of features inside submenus on the Center and Station:
CENTER submenus according to source
HD CD Tuner/ Aux
Equalizer Equalizer Auto Store
Create Playlist Settings Equalizer
Add to Playlist Information Settings
Delete XXX Restore
Previous
Firmware
Information
Restore
Previous
Firmware
Client Management
DMM management
Settings
Information
Restore Previous
Firmware
STATION submenus according to source
HD Tuner/Aux Upnp
Browsing
Equalizer Auto Store Equalizer
Create Playlist Equalizer Settings
Add to Playlist Settings Information
Installation Mode Information
Select Center Select Center
Settings
Information
The number of menu options vary on the Center and Station, as the Center is designed with more
functions e.g. Settings menu (below). Navigate through each screen to view submenus and options.
Table comparing Settings submenu
Center Station
1 Treble/Bass Treble/Bass
2 Display Display
3 Rec speed Language
4 Rec quality Restore settings
5 Language
6 Restore settings
7 Restore previous firmware
20
Navigation control
Navigating tracks, menu options & settings
1 Press MENU on the device/ remote control.
A menu pop-up appears.
2 Use the OK navigation up/ down, left/ right controls (,, ) to highlight and
select your option/ setting.
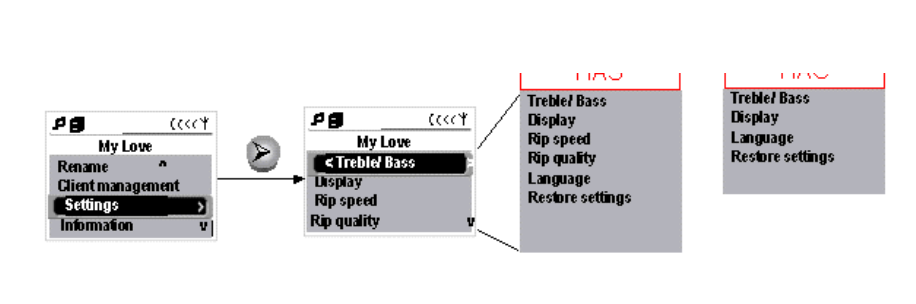
3 Press OK to confirm/ play.
Example of options when you press MENU to select Settings submenu.
Center display
Station display
21
Multi-functional controls: searching…
– To fast scroll up/ down content: Long press , (or …on the
remote control)
– Skip to next/ previous item: short press , (or …on the remote
control)
For speed, use the remote control to key in the number of a desired track.
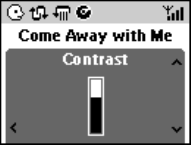
Display settings
2 options:
– Backlight (on/ off)
– Contrast
• Use the navigation controls to adjust the display settings.
22
Playing CDs on the Center
For playback on this set you can use:
– All pre-recorded audio CDs
– All finalised audio CDR and CDRW discs
– MP3-CDs (CD-ROMs with MP3 tracks)
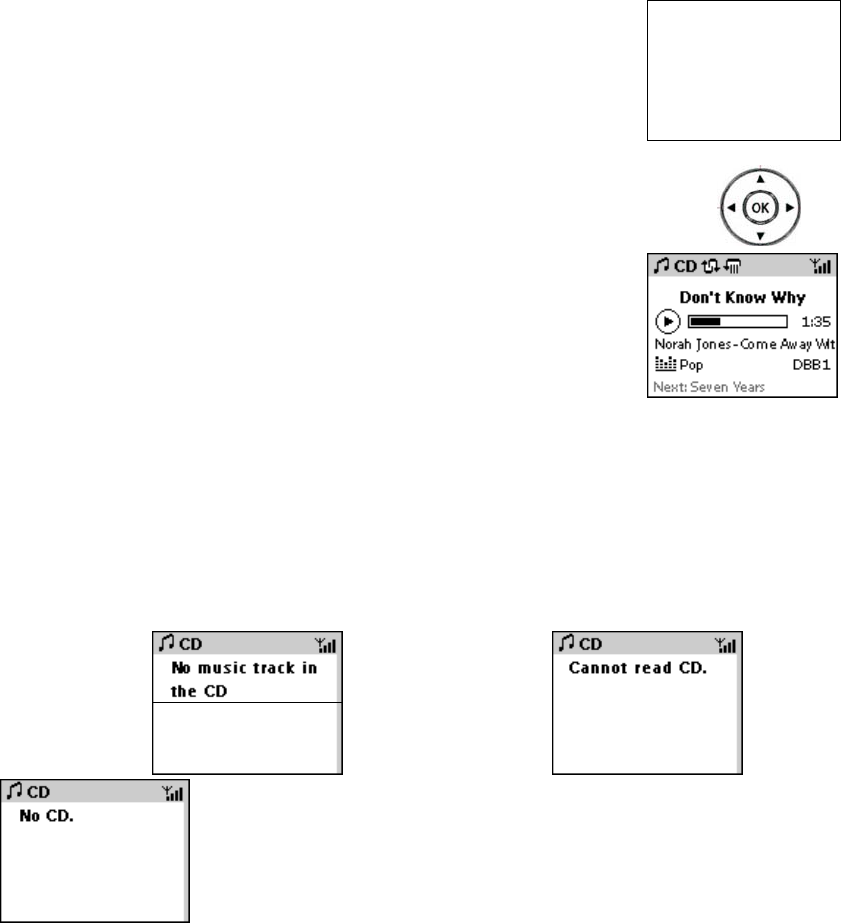
1 Insert a music CD into the CD slot loader on the Center, CD
printed side facing as shown.
During playback of other modes, when you load a disc this
automatically switches the Center to CD source (exception: recording
mode in progress.) Display shows: Reading CD
2 To start playback, press OK on the Center (or II / on the remote
control).
Display shows current track title, elapsed playtime, and
ID3 information if available. Play mode and sound
settings if selected.
3 To pause playback, press OK (or II / on the remote control).
4 To stop playback, press STOP/ .
5 To eject the CD, on the Center press EJECT.
Error display messages
If you have inserted a CDROM , a damaged/ dirty CD
or no CD
23
Recording CDs on the Center
You can record and listen to your tracks at the same time, or if you are in a hurry, you can select the Fast
ripping speed instead of Playspeed.
1 Insert a music CD into the CD slot loader on the Center, CD printed side
facing as shown.
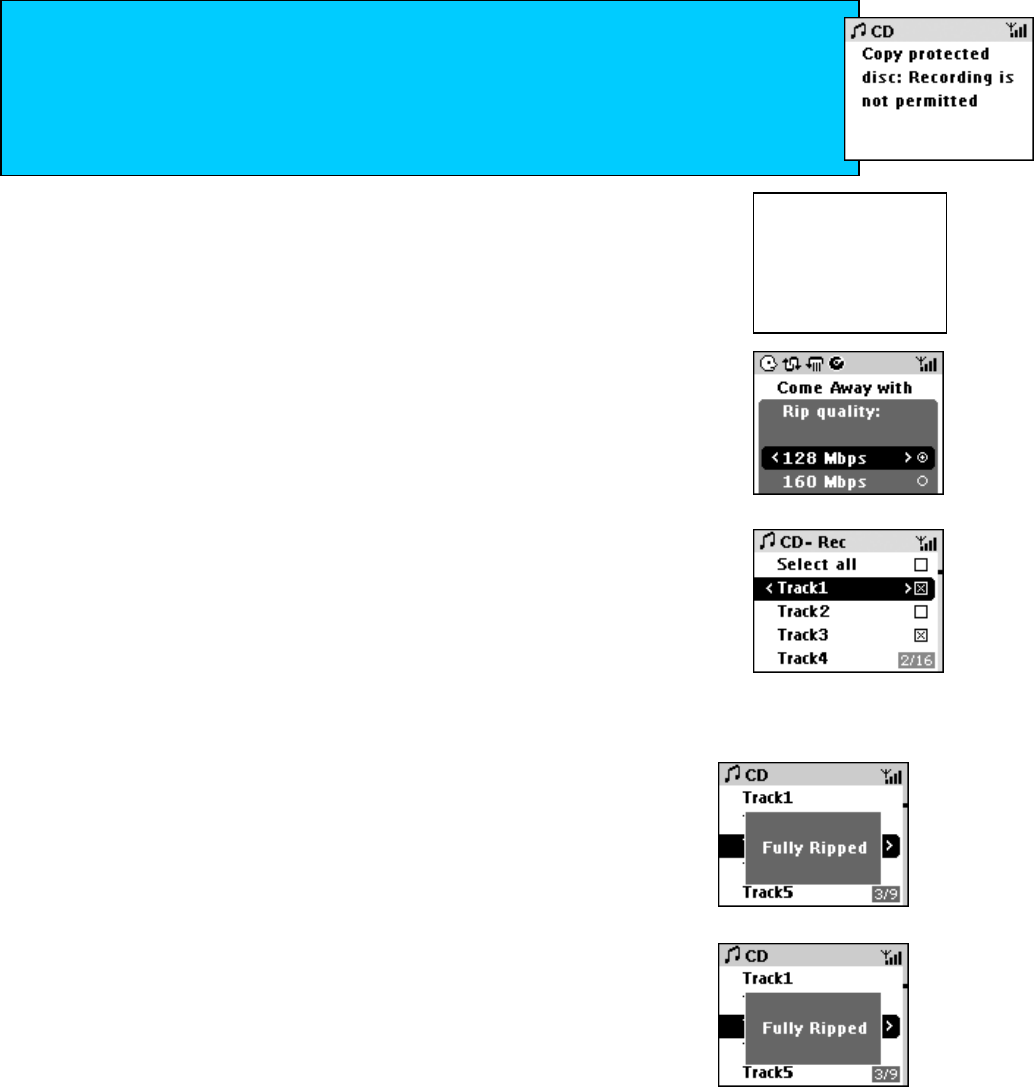
2 Press MENU.
3 To select your compression rate, use the navigation control to select and
scroll Settings Rip quality, then choose 128Mbps or 160Mbps.
4 To select your recording speed Playspeed (x 1) or fast (x 4), use the
navigation control to select and scroll Settings Rip speed, then choose
Playspeed or fast.
5 Press RECORD.
Display shows list of CD tracks with checklist boxes by default all
selected.
6 To select individual tracks for recording from a CD:
• press and hold MARK. UNMARK to toggle and mark/ unmark all
tracks
• use the navigation up/down control and press briefly MARK. UNMARK to select your desired
track.
7 Press RECORD /OK to start recording.
Display shows ripping status.
If no ID3 tag information is available, your track will be listed
as a number and automatically assigned an Album number
XXX.
Playback stops at the end of your recording.
8 To listen to your recording, select HD source. Navigate through All
tracks or Album to find.
Tip
- If you have recorded a large number of tracks/ large audio files, theses
will be stored under a temporary folder Raw Tracks. This is where
recordings are temporarily before compression is fully processed.
- The current track will not be recorded if you press STOP/ during recording. STOP/ exits
recording mode.
copyright protection technologies
CDs encoded with copyright protection technologies by some record companies may be
unplayable. This Center is able to play such CDs on your Center, but recording may be
restricted. If this happens, the Center displays:

24
Renaming tracks
25
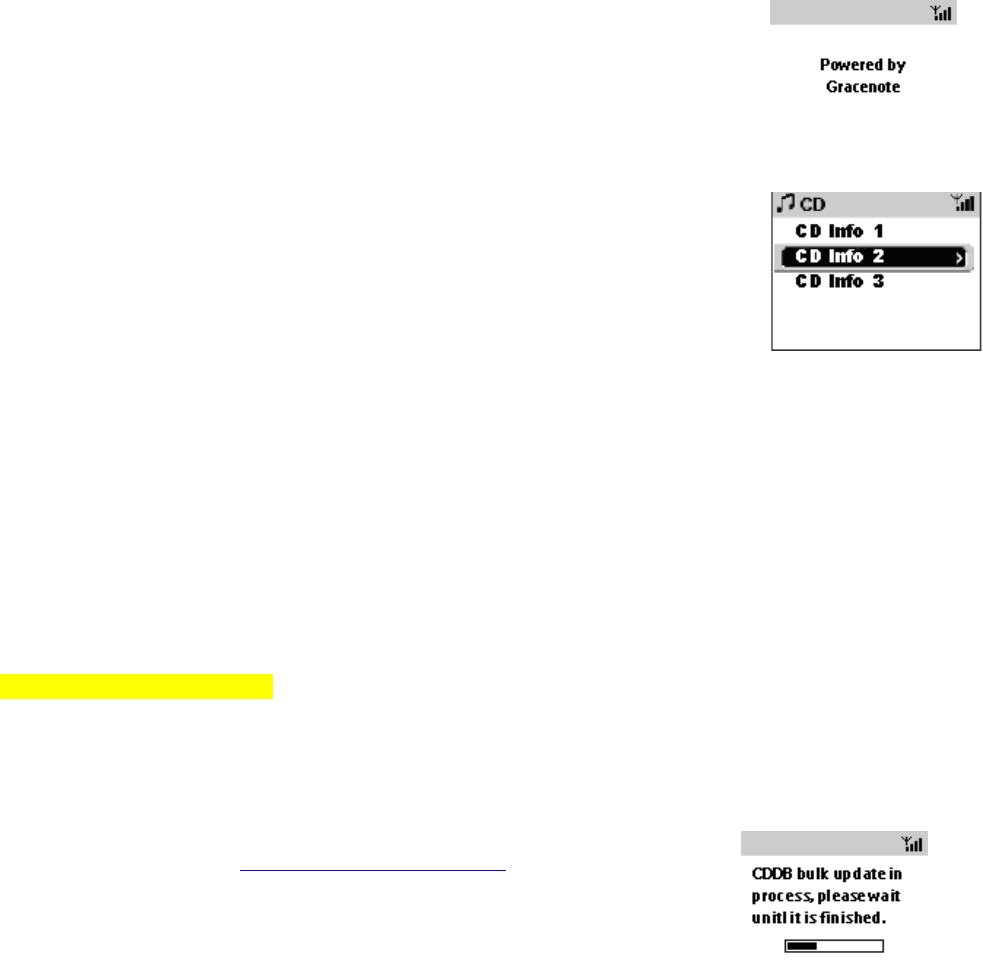
Using Gracenote CDDB database
– This built-in CDDB database allows your Center to automatically search for any available ID3
tag information, whenever you insert an original audio CDs into the slot loader. The ID3 tag
information will then be automatically stored if you choose to rip the loaded CD. CDDB is
particularly useful for ripping CD audio and having your tracks named automatically rather than
manually.
1 Insert a music CD into the CD slot loader.
2 Wait for CDDB to read your disc.
• Powered by Gracenote appears briefly. The album title is
displayed if there is a match. Use the navigation controls to view
other ID3 tag information.
• If CDDB finds multiple matches, or if No Gracenote information appears -by default
the first match e.g. Unknown is then displayed. Use the navigation
controls to browse and select the desired information.
3 To start playback, press OK on the Center (or II / on the
remote control.)
Gracenote CDDB updates via the internet
If you are have access to the internet and are either WiFi-enabled / or connected via Ethernet:
– your Center will attempt to access the latest CDDB information via your internet connection, if there
is no information on the CD in your built-in CDDB database.
– There is a 60 sec time-out for Gracenote searches via the internet.
– Gracenote searching is repeated each time you insert a CD, if none of the tracks from the CD are
currently in the Center’s database.
– The Album selection list displayed may vary from time to time according to CDDB Server updates
available via internet.
– If you wish to modify ID3 tags, please use the Philips DMM software for your computer (see the
Getting Connected manual).
How to bulk update your built-in CDDB
You can either:
- Insert the supplied installer CD into the CD slot loader on your Center.
- From time to time, visit www.philips.com/support to download the latest
CDDB Update. Follow onscreen instructions on your computer to complete
CDDB Update.

26
HD (hard disk) music playback
1 Select HD function (press HARDDISK /JUKEBOX on the respective
remote control OR press SOURCE once or more on WACS700.)
2 Use the navigation control to select and access your desired music
library option: Playlists, Artists, Albums, Genres, All tracks.
Content of each option is stored in alphabetical order.
Display shows Empty container if you library option contains no
entries. The busy animation appears if you attempt to play the Empty
container
3 To start playback, press OK (or II/ on the remote control).
Display shows following details if available: current track
title, file type, bit rate, elapsed playtime, ID3
information, equalizer sound setting, and next track
title.
Information on non-playable tracks
When playing a library option, the system may not be able to play all the tracks in it due to different
reasons. In such an event, when playback stops you will see an information summary detailing tracks played
which includes:
1. Tracks successfully played
2. Tracks failed due to DRM issues (protection)
3. Non playable tracks encountered
4. General failure (unknown reason)
27
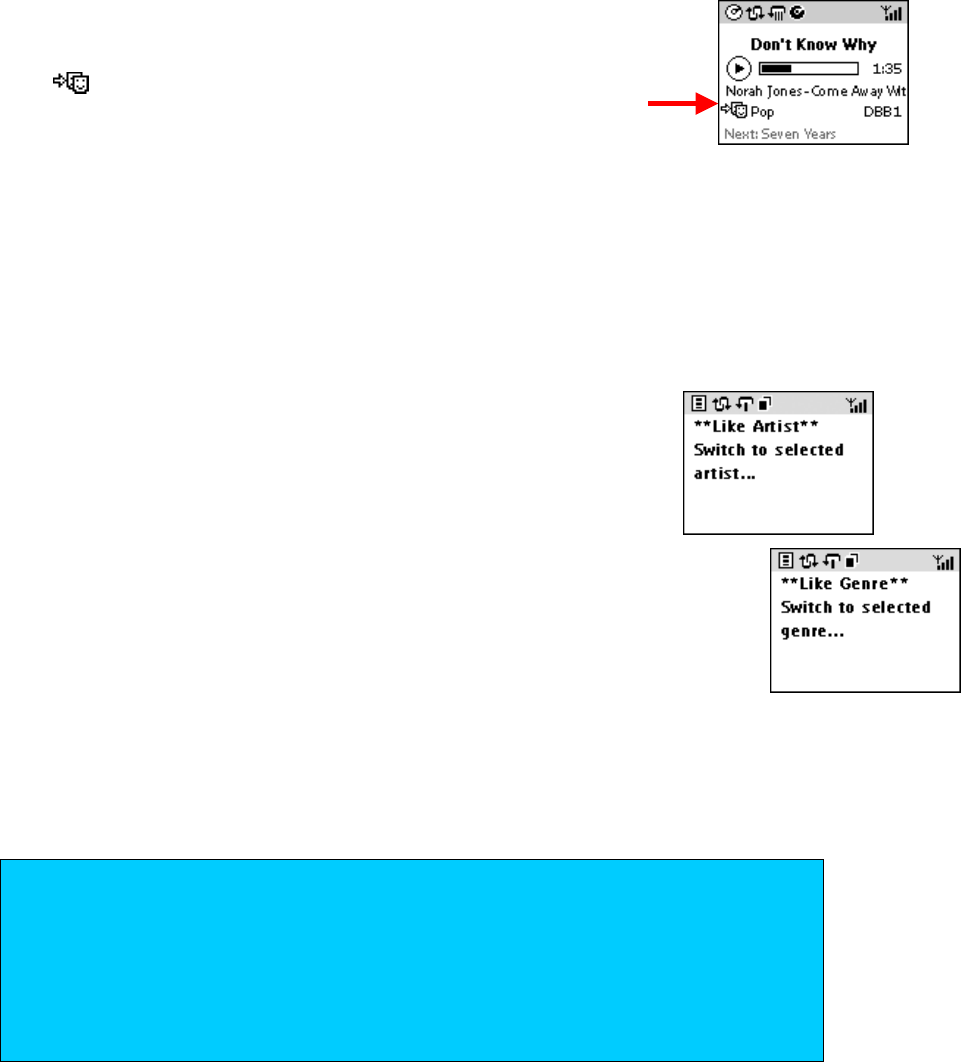
Match Genre:
Smart sound combinations to match music genre
From Acid to World music, now at one touch you can listen to each HD or MP3-CD track in smart sound
according to genre. MATCH GENRE automatically adjusts the Equalizer (Pop, Jazz, Neutral, Classical,
Techno) and DBB sound combination to match each track you listen to.
•
In HD source or MP3-CD playback,
press MATCH GENRE to
activate.
replaces your previous Equalizer setting (if active).
LIKE GENRE, LIKE ARTIST
You can select to play all your tracks according to a single specified music genre
(LIKE GENRE) or artist (LIKE ARTIST).
1
In HD source or MP3-CD playback,
press LIKE GENRE or LIKE
ARTIST to activate.
Display shows Like Artist or Like Genre message.
Playback starts to play all tracks according to a genre / artist respectively from
the current track selected.
Playback stops when the last song is played from your selected genre/ artist
(unless you have selected repeat playback mode).
TIP
– To enable MATCH GENRE/ LIKE GENRE/ LIKE ARTIST,
make sure you use Philips DMM to input the relevant ID3 track
information.
– This sound feature is cancelled when you:
• switch off your unit
• adjust the Equalizer/ INCR. SURR/ DBB sound options
28
Music Follows Me (HD source)
This feature allows your MP3/ WMA tracks stored on the HD source to follow you from one place and
device to another: – Center to the Station
– Station to the Center
– Station to another Station.
1
On the first unit
(Center/ Station): in normal standby or HD playback/ pause mode,
select a MP3/ WMA track for playback.
2 Press Music Follows Me / MUSIC FOLLOWS ME to activate.
appears on your display.
3
On the second unit
where you want the music to continue, press
Music Follows Me / MUSIC FOLLOWS ME to start playback.
the audio file stops playing on the first unit. Playback starts from the beginning of the track on the
other unit. The display on your first unit shows the HDD screen in the stop mode. If you make no
further adjustments on the second unit, its display will then enter into normal standby.
If you wish to resume playback from the exact point as played on the source device, first press pause
II / (on the remote control) or OK (on the source device) before you activate Music Follows
Me.
TBC
To stop Music Follows Me
You can either:
• Press Music Follows Me / MUSIC FOLLOWS ME again or another function key.
disappears. The device switches to a different function / resumes its previous status.
• Press STOP/ during Music Follows Me.
disappears. The device shows the HDD screen in the stop position.
IMPORTANT!
Not for playback of uncompressed CD music.
Music Follows Me can only be activated in either
normal standby (but not ECO standby,) or the HD
source playback/ pause mode.
-- An error message prompts you if you attempt to activate
the function in any other mode.
TIP
Complete steps 1-3 above within 5 minutes, otherwise Music Follows Me mode is
deactivated.
29
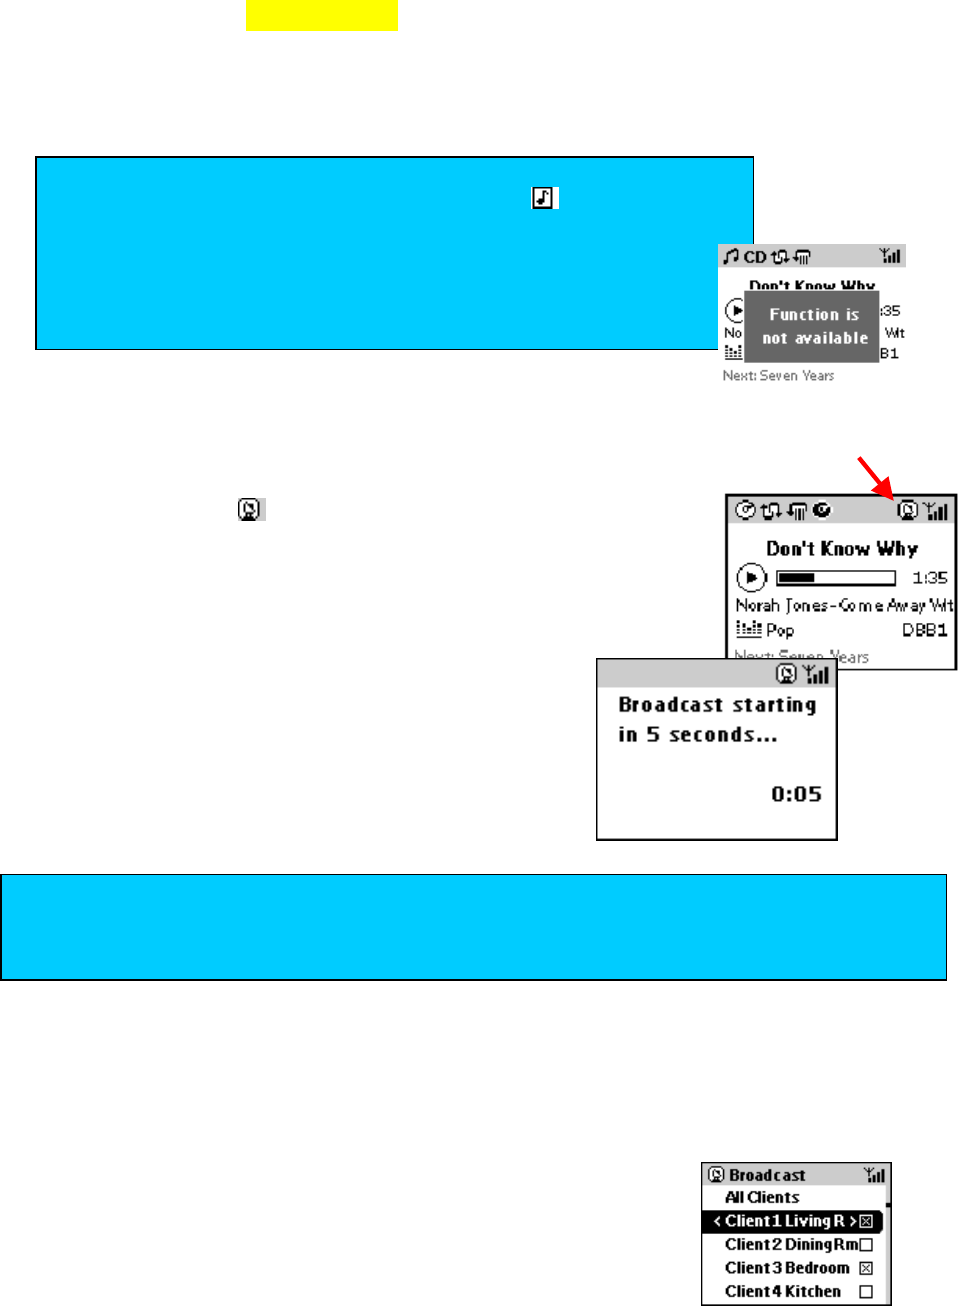
BROADCAST (Center feature)
In HD source, the Broadcast function allows you to play and share the same audio track on the Center
with one or more Stations. Everyone at home then gets to listen in what’s playing on the Center and enjoy and
share the same track simultaneously.
To start broadcast
1 Check that both Center and Station(s) are in normal standby or the HD source mode.
2 On the Center, press BROADCAST to activate.
The broadcast icon appears on both the Center and Station. The
current mode e.g. standby on your Station will be interrupted.
The Station will show a 5-second countdown message.
3 When countdown ends, broadcast begins.
Playback on your Station is now the same as that playing
and displayed on your Center.
For users with multiple Stations
If you wish a Station to join an ongoing broadcast, you will need to restart
broadcasting (see steps 1-3 above).
1 Press right navigation control to select your desired Station.
2 If necessary, select to wake up the Station from standby.
IMPORTANT!
Not for playback of uncompressed CD music.
Music Follows Me can only be activated in either
normal standby (but not ECO standby,) or the HD
source playback/ pause mode.
-- An error message prompts you if you attempt to activate
the function in any other mode.
TIP
- If your Station sound is on mute, mute is automatically deactivated upon broadcast.
- If your Station is in active standby mode, it will wake up directly into broadcast mode.
30
To stop broadcast
1 Press STOP/ on the Station, within the 5-second
countdown or during broadcast.
The Station resumes its previous status.
Rejected broadcast icon appears.
2 To cancel completely, on the Center press STOP/ .
Both the Center and Station will show the default HDD screen for 5
minutes.
If no other buttons are pressed, the system automatically enters standby mode at the end of the 5
minutes.
31
How to create Playlists
You can create a maximum of 99 playlists, each containing up to 300 tracks on both the Center and
Station. Select your desired track/ album/ genre or artist to add
1 Select the HD source.
2 During playback of a track in Artist/ Album / Genres/
All tracks, press MENU.
• If you are in the All tracks stop position, navigate and
select a track first.
3 Use the navigation control to select Create
Playlist.
Display shows: Playlist created. To add
tracks select ‘Add to Playlist’.
4 Navigate and select your playlist in the menu.
5 Press OK to add your selected track.
Each new track is added to the end of your playlist.
Display shows Playlist is full if you exceed the maximum number
of tracks.
Deleting Playlists
(available on the Center only)
You can edit, modify and delete playlists freely on the Center.
1 In the default HD source screen (Playlist highlighted), press MENU.
2 Use the navigation control to select Delete Playlist.
Display shows Playlist deleted at Center.
TIP
– If you have created multiple playlists, use the navigation control to select
your playlist first.
– On the Center, adding tracks to a playlist is not possible in CD source.

32
Different play modes: Shuffle & Repeat
• During playback in HD / CD source, on the remote control press the Shuffle/ Repeat once or
more to select a play mode. You can also combine Shuffle and Repeat.
The icons appear when you select a shuffle/ repeat mode option.
Repeat options:
– a single current track
– all tracks of a current playlist/ album/ artist/ genre
Shuffle options:
– play in random order all tracks
– play in random order all tracks of a selected playlist/ artist / album/ genre
To cancel play mode options, either:
• press Shuffle/ Repeat once or more until the icons disappear
• press STOP/ .
33
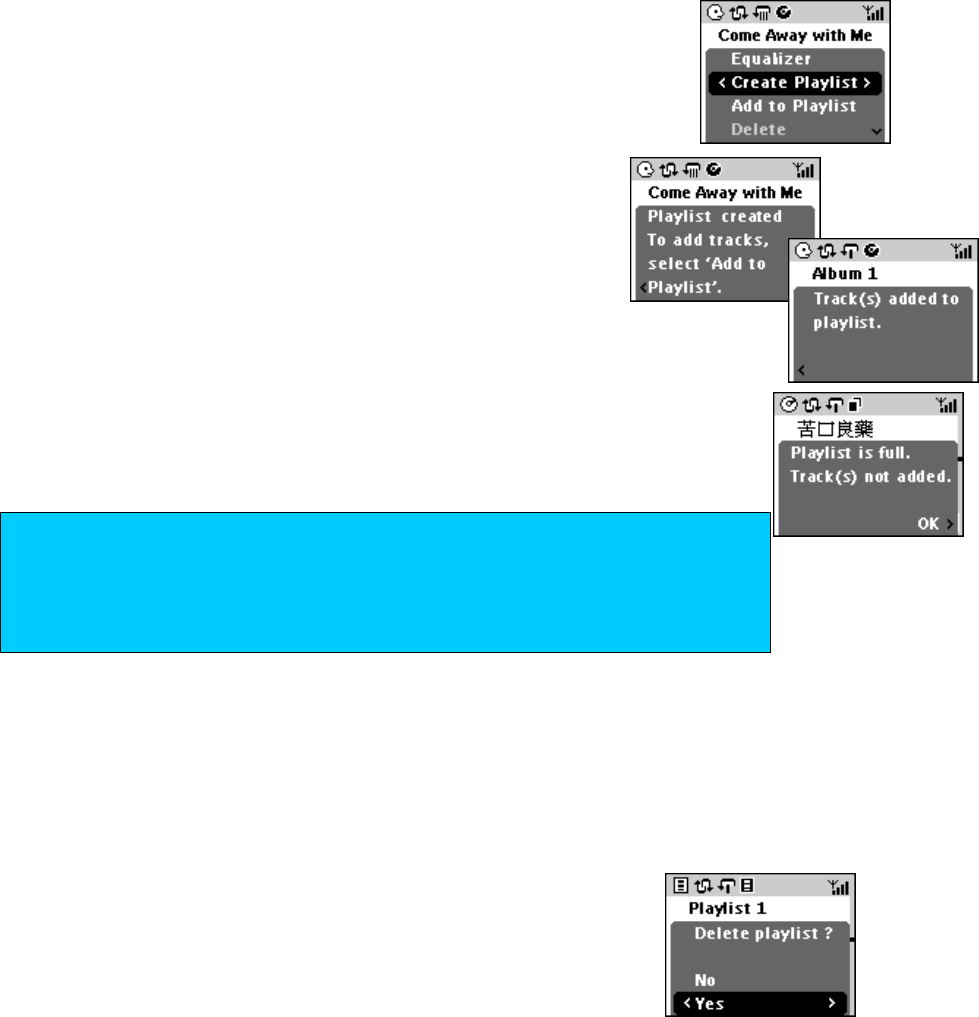
Listening to FM Tuner
• Select TUNER function.
Radio plays from the last station listened to.
Display during radio playback shows: station frequency, manual tuning prompts , ,
and if available: the preset number, stereo /sound status, and RDS text
information.
How to tune to stations
You can tune up to 40 FM stations in 2 ways, automatically or manually.
Autostore
allows you to fast tune and store 10** stations automatically.
• To tune to stations, press MENU and use the left/
right navigation controls (/ ) to browse the radio
menu options.
• Select the Autostore option to automatically store
up to 10 stations in order of increasing radio frequency.
Display shows: auto-stored stations as a list of preset numbers
of each station frequency or RDS station name if available.
**Remaining presets stations are default filled by the frequency 87.5. See next
chapters to manually tune further presets.
Manual tuning
You can either:
• press the up/ down navigation controls (/) briefly and repeatedly until
your desired frequency appears.
• press and hold / until the display shows Searching. Search tuning
stops automatically when a station of sufficient strength is detected.
TIP
Check you have connected the FM antenna to give you good radio reception. (see page xx)
34
Programming presets manually
Program up to 40 stations.
1 In tuner mode, press the left navigation key to return to the
preset list screen, if necessary.
2 Use the up/ down navigation / control to select a preset
frequency you want to overwrite.
3 Tune to your desired station as described in Manual tuning.
4 Press and hold OK on the unit for 2 seconds, or PROGRAM on the
remote control to store your preset.
If the frequency is not already stored, Preset X appears, where X
is a number (1-40) of your preset location.
5 Repeat steps 1-4 above to store your other desired stations.
Listening to preset stations
1 If necessary, press the left navigation key to return to the preset
list screen.
2 Use the up/ down navigation / control to select a preset
frequency you want to listen to.
3 Press /OK to play the station.

35
RDS
(some /00c versions only)
RDS (Radio Data System) is a service that allows FM stations to send additional information along with the
regular FM radio signal. When you are receiving an RDS station, RDS and the station name are displayed.
Switching through RDS information
1 Tune to the desired RDS radio station (see “Listening to FM tuner”).
2 Press RDS/ NEWS on the remote control repeatedly to switch through the
following information (if available):
– Station name
– Programme type (for example: News, Affairs, Sport, etc.)
– Radio text messages
– Frequency
RDS info appears in the bottom right hand corner of the display.
NEWS
(some versions only)
It is possible to set up the tuner in such a way that any playback is interrupted by the news of an RDS
station. However, this only works if the RDS radio station broadcasts the necessary signal while sending
the news.
The NEWS function can be activated from any mode except during streaming (MUSIC FOLLOWS ME,
BROADCAST) and tuner mode.
Activating the NEWS function
• On the remote control, press RDS/ NEWS once or more to toggle between switching the
NEWS function on / off.
➜ NEWS is shown and NEWS is displayed briefly.
➜ The current active mode remains uninterrupted while the set will scan the first 5 preset radio stations
and waits for the signal in any of the RDS stations.
➜ When a news transmission is detected, the set will switch to tuner and NEWS starts flashing.
Deactivating the NEWS function
• Press RDS/ NEWS again on the remote control or switch the set to tuner.
NEWS ON / NEWS OFF appears respectively.
TIP
Make sure the first 5 preset radio stations have RDS stations. If no RDS station is detected in
the first 5 presets, the set will exit from the NEWS function,
NEWS goes off and NO RDS
NEWS
is displayed.
The NEWS function works only once for each activation.

36
Changing tuner grid
(/21 IFU versions only)
• On your remote control, press and hold TUNER and for
X seconds.
GRID 9 / GRID 10 appears respectively.
37
Recording in TUNER/AUX modes
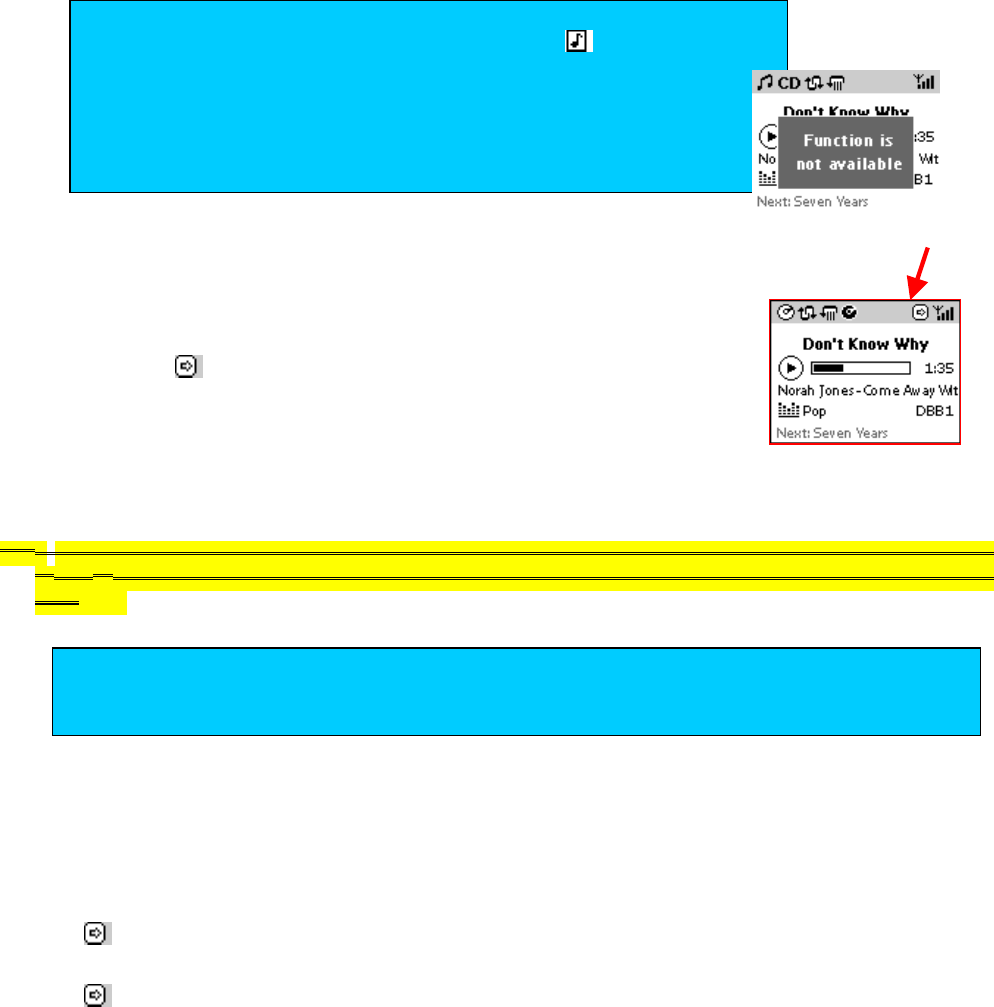
Record up to a maximum of 3 hours for each Aux/Radio recording.
Depending on your recording file size(s), this is sometimes stored in temporary folder called Raw tracks
for background encoding.
Basic recording controls
1 Select the source you want. (see the respective chapter, Recording from Tuner or Recording
from AUX)
2 Press RECORD at the point where wish to start recording.
3 To pause recording, press OK (or II / on the remote control). Press again to resume recording.
4 To stop recording, press STOP/ .
Display: Rec…disappears.
If you exceed the limit, the display shows: Max 3 hour recording reached. Abort
recording and recording will automatically end.
Hard disc full is displayed if there is insufficient space on your harddisk.
Tip
When recording is in progress, you can only operate:
STOP/
the sound controls: DBB, IS, VOL +/- and MUTE.
Display shows Function is not available if you press any other controls.
How to find your recording
When recording is finished, your recording is assigned a recording number (XXX) according to your
source: RADIO_XXX or AUX_XXX with default album, artist & genre information if available for AUX
sources.
- To listen to your recording, select HD source. Navigate through All tracks to find.
- If you have recorded a large number of tracks/ large audio files, theses will be stored under Raw
Tracks. This is where recordings are temporarily before compression is fully processed.
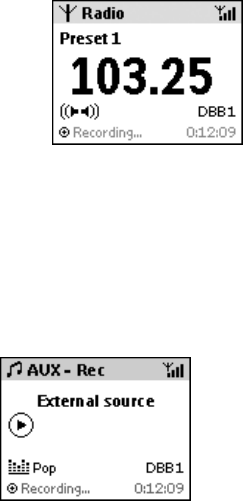
38
Recording from Tuner
1 Select Tuner source.
2 Select your desired station.
3 Press REC /OK to start recording.
Display shows Recording...
Recording from AUX
1 Select AUX source, when you have connected another
external device with a cable (not supplied) to AUX IN on the
Center.
2 Play the external device.
3 On the Center, press REC /OK to start recording.
Display shows Recording...
Tip
Always refer to the owner’s manual of the other equipment for complete connection and use details.
39
Backup files
Upnp Playback
As an alternative to music stored on your Center, you may wish to stream music direct
from your PC music folder to your Station.
6 Select your external server.
7 Use the navigation control to browse for the folder you wish to access for
playback.
8 To start playback, press OK on the Station (or II / on the remote control).
40
SLEEP: How to use the built-in timer
This function allows you to automatically switch the Center/ Station from an active mode to standby after
a preset period of time (in minutes).
1 In any active mode, press SLEEP once or more, on the remote control, to select your preset
time period: 15 (default) →30 45 60 90 120 OFF 15→→→→ → →…
If SLEEP is activated, Zz also appears.
Display shows a countdown of 10 seconds, just before switching to standby: SLEEP 10 →
SLEEP 9 →SLEEP 8 …then →SLEEP and Good-bye.
If recording is in progress during the end of a sleep period, any partially ripped tracks will
be deleted.
2 To cancel SLEEP, you can either:
• Press SLEEP until you OFF appears.
• Press STANDBY/ON (or on the remote control.)
Restore: default settings
41
Demonstration mode
1 In standby mode, activate the demo feature by pressing the STOP / key for 5 seconds.
You will see a sequence of screens introducing you the some of the Station and Center features.
Below are some sample screens:
2 To exit the demo mode, press the STOP/ key during DEMO for 5 seconds.
42
How to mount your Center and Station
SAFETY TIPS
– Choose your spot for mounting carefully, e.g. away from obstruction or
sources of danger such as water, fire hazards, extreme heat, or unstable
surfaces.
– Philips cannot be held responsible for any personal injuries, accidents and
breakages resulting from the system during and after mounting!
Tools: What else you’ll need (not supplied):
• sellotape
• 8 x screws for the Center, bracket, * screws for Station bracket
• electric drill
Preparation before you start drilling
– Check the material (e.g. drywood, concrete) of your wall to decide the best type of screw to use.
– For best performance, install the unit as far as possible from sources of noise and interference (e.g.
TVs, fluorescent lamps, microwaves).
– Connect the power cord, FM antennas, and if necessary the supplied Ethernet cable, when you test
for accessibility of your best mounting location. Decide whether you want to connect the unit with
other audio equipment.
1 Find a suitable, clean, flat wall surface to mount near a wall outlet/
power socket.
2 Align the bracket at your chosen location. Use a pencil to mark the
screw holes.
3 Drill holes as marked by you.
4 To fix and secure the bracket, insert a suitable wall screw (not
supplied) into each hole.
5 Screw by hand, the 2 supplied mounting screws on the Station rear,
and 3 screws supplied for the Center.
6 Detach the stand from each unit.
7 Carefully hook and mount each unit into place.
7
Mount &
hook unit
2-4
Illust. showing how
to align bracket to
wall for drilling &
screwing.
W
all
4
Insert
bracket +
mounting
screw
43
For computer users:
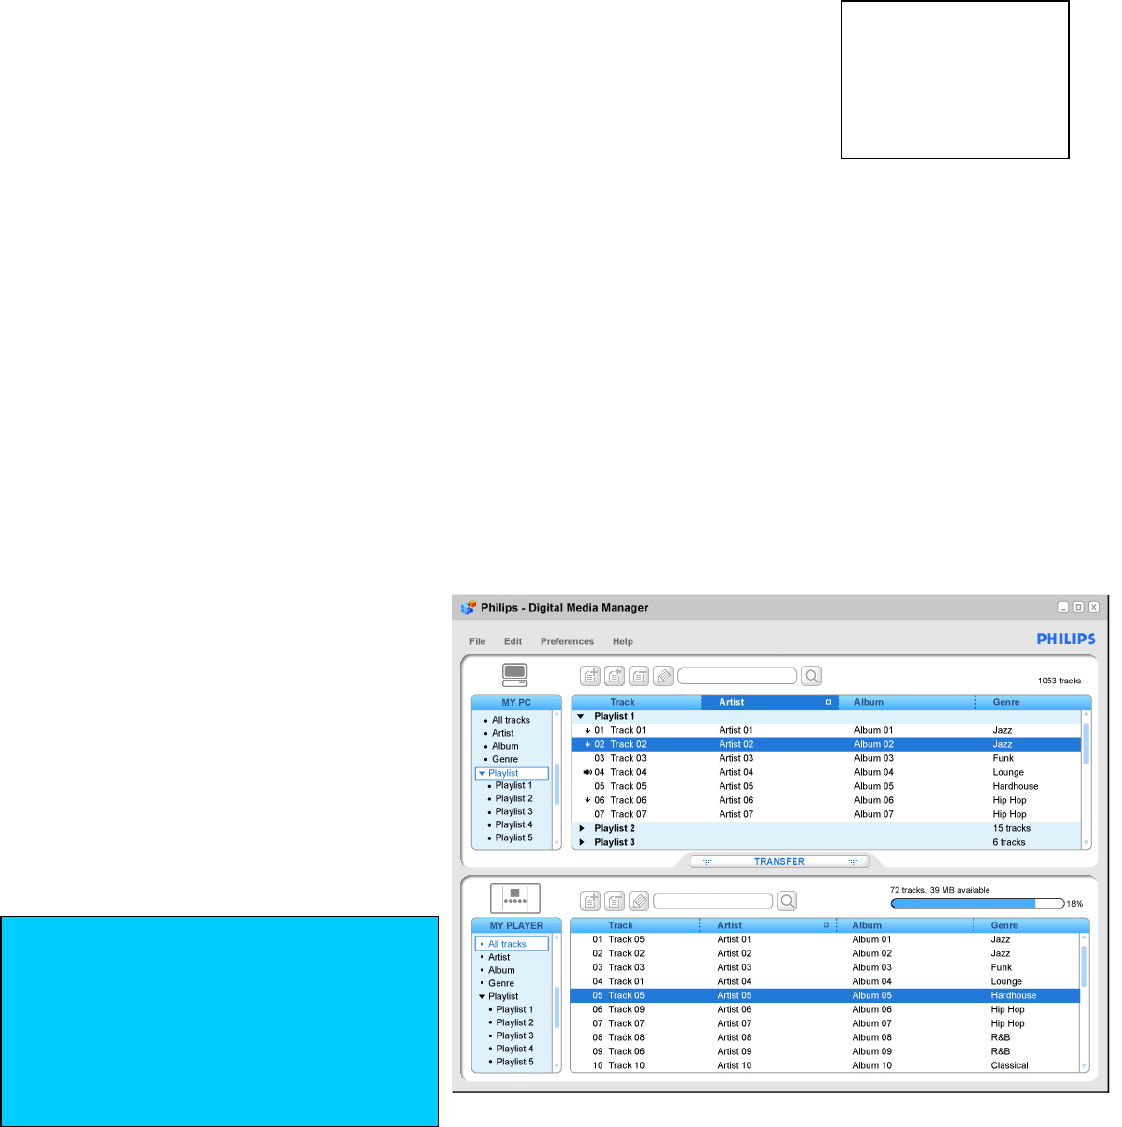
Philips Digital Media Manager (DMM) and installer setup
• Streaming music from your computer
• Installing and using the DMM music software
Play, stream and manage music stored on your computer by using the DMM software on the installer CD.
1 Switch on your computer and insert the installer CD into your CD ROM
drive.
2 Make sure you close any other programs running on your computer.
3 Choose the scenario that best fits your situation for software installation.
4 Option A:
- If you do not have a wireless computer network: make sure you have connected your Center to
your computer with the supplied Ethernet cable…
Option B:
- If you already have a wireless computer network: check the settings of your existing wireless
computer network…
5 Select your language.
6 Select your internet configuration for the CDDB feature.
7 Select your music folder.
8 Follow the screen instructions to complete installation.
9 Restart your computer if prompted.
10 The Digital Media Manager
icon X appears on your
Desktop when the DMM is
successfully installed.
11 Double-click on X to launch
DMM.
12 For tutorial help on using DMM
features, from the toolbar click
Help Digital Media
Manager Help
IMPORTANT!
RETAIN YOUR ORIGINAL FILES
Please ensure that you retain the
original files transferred to your
WACS700. Philips is not responsible
for any loss of content if the product
becomes damaged or the hard disk
not readable.
44
General info
Environmental information
– All redundant packing material has been omitted.We have done our utmost to make the packaging
easily separable into three mono materials: cardboard (box), polystyrene foam (buffer) and
polyethylene (bags, protective foam sheet).
– Your set consists of materials which can be recycled if disassembled by a specialized company.
Please observe the local regulations regarding the disposal of packing materials, exhausted batteries
and old equipment.
Care and safety information
● Avoid high temperatures, moisture, water and dust
– Do not expose the player, batteries or discs to humidity, rain, sand or excessive heat (caused by
heating equipment or direct sunlight.)
● Avoid condensation problem
– The lens may cloud over when the player is suddenly moved from cold to warm surroundings,
taking it impossible to play a disc. Leave the player in the warm environment until the moisture
evaporates.
● Do not block the vents
– Do not operate the DVD Player in an enclosed cabinet, allow about 10 cm (4 inches) of free
space all around the player for adequate ventilation.
● Care of the cabinet
– Use a soft cloth slightly moistened with a mild detergent solution. Do not use a solution
containing alcohol, spirits, ammonia or abrasives.
● Finding a suitable location
– Place the player on a flat, hard, and stable surface.
Disc handling
– To take a disc out of its box easily, press the centre spindle while lifting it. After use, always
take the disc out of the set and store it in the disc case.
– Never attach a sticker to a disc. If you want to provide a disc with an inscription use a soft felt-
tipped pen and write only on the printed side.
– To clean a disc, wipe it in a straight line from the centre towards the edge using a soft, lint-free
cloth.
– Any cleaning agents may damage the disc!
Setup
– Place the set on a flat, hard and stable surface.
– Do not position the set on top of other equipment that might heat it up (e.g. receiver or amplifier).
– Place the apparatus in a location with adequate ventilation to prevent internal heat build up.
– Allow at least 10 cm (4 inches) clearance from the rear and the top of the unit and 5 cm (2 inches)
from each side. The apparatus shall not be exposed to dripping or splashing.
– Do not place any sources of danger on the apparatus (e.g. liquid filled objects, lighted candles).
– Do not block any ventilation openings.
45
Technical data
Subject to modification without notice.
General WAC700 WAS700
AC Power __________________ 230V / 50–60Hz_______________ 230V / 50–60Hz
Power consumption
Active ______________________ 44 W_________________________ 44 W
Standby ___________________ < 10 W _________________________ < 10 W
Eco Power Standby ___________ < 1 W__________________________< 1 W
Dimensions,
(w) (h) (d) ________
_________606 x 305 x 180mm __________ 360x 278 x130 mm
Weight __________________ 7.8 kg ____________________________ 4.2 kg
Amplifier
Output power _____________2 x 40W RMS_______________________2 x 10W RMS
2 x 75 W RMS (6 Ω, 1kHz, 10% THD)
Frequency response _ 50–20000 Hz, - 3dB
S/N ratio _____________ ≥75 dBA (IEC)
Input sensitivity
AUX/CDR IN __________ 500 mV/1V
Output
Impedance speakers _________ ≥6 Ω
Impedance headphones 32 Ω – 1000 Ω
Wireless
Wireless standard ____________ 802.11g
Frequency range ____ 50–20000 Hz, - 3dB
S/N ratio _____________ ≥75 dBA (IEC)
Total harmonic distortion _____ 0.3% (1 kHz)
Tuner
Wave range
FM ________________ 87.5–108 MHz
Number of presets _______________ X
FM Antenna/cable _____________________ 75 Ω
System Sound panels
Impedance _____________________ 6 Ω_____________________ 6 Ω
Woofer ____________________ 1 x 6.5"
Tweeter _____________________ 1 x 2"
CD player (WAC700 only)

46
Number of programmable tracks ____ xx
Frequency range ____ 50–20000 Hz, - 3dB
S/N ratio _____________ ≥ 75 dBA (IEC)
Channel separation ____ ≥ 60 dB (1 kHz)
MPEG 1 Layer 3 (MP3-CD) __ MPEG AUDIO
MP3-CD bit rate _________ 32-256 kbps, 128 kbps advised
Sampling frequencies ___ 32, 44.1, 48 kHz
Storage capacity (WAC700 only)_____________40GB*
* Actual formatted capacity will be less
Troubleshooting
For more on-line troubleshooting visit:
www.philips.com/support
Or contact our Contact Center
Please read the supplied instruction manual for detailed information:
You can also download the manual as a pdf file from www.philips.com...
FAQs
What is Wi-Fi Streaming?
Wi-Fi, or IEEE802.11, is the international leading industry standard for wireless broadband networking.
It is a technology for digital data transfer with wider range and bandwidth. Streaming is process
describing data is pulling between places, can be multiple places. The Wi-Fi logo guarantees maximum
interoperability among devices carrying this symbol. The Philips Streamium connects quickly and easily
to any other Wi-Fi certified networking equipment.
How do I add an additional station to my original Wireless Music Center & Station bundle?
To add a new station to your bundle, select the “Add New Client” option from the setup menu of the Center.
Power up the new Station: you will be prompted on the Center to confirm adding this new Station after it has
been detected by your Center.
XX and CHECK CONNECTION indication
– Make sure your PC is switched on.
– Check the wireless connection between your PC and the set (see “Quick installation of the wireless connection
to a PC server”).

47
– Make sure the wireless USB adapter is connected or another network connection works properly.
Can I use other music archiving software than DMM?
Yes. Providing your music software uses an Universal Plug and Play (UPnPTM) server interface.
I want to use my Center in a wireless network which is already installed. What can I do?
…it is possible to use the my Center together with most other WiFi certified wireless adapters as well as in
infrastructure mode networks using Access Point. Use the Custom Installation menu from the CD-ROM setup
and choose Network Setup. In this advanced setup mode you can add to your audio system the network
configuration of your home network.
My Station is unable to play music streamed from the Center. Display message shows: “ No
server found. Server may be too far away or is not looking for clients. Continue/Retry”
-Check distance between the two sets. Check if any interference caused by other metal materials /
electrical appliances, active mobile phones.
- Check connections and installation. Possible WiFi link problem, or the server is not in client installation
mode.
What is the maximum distance between the Center and Station in order to allow effective
wireless streaming?
The Standard Wi-Fi specification is 100m. However, due to the material construction and design of homes,
multiple layers of wall, doors, furnishings, etc. create added barriers. As a result, the maximum distance for
streaming without distortion is approximately 60m.
Can I download music from the internet and store them on the Music Center?
Yes, if your PC is internet-connected, you can basically download MP3 music from selected websites onto
your PC. Transfer these tracks to the Music Center via the supplied Ethernet cable, using Philips Digital
Media Manager (DMM). Alternatively, you can burn a CD-Rom and then record the music onto the Music
Center.
Content Capture
Can the Wireless Music Center playback “MP3/WMA CD” as well as “Copy Protected CD”?
Yes
What kind of information can I backup?
All compressed music files and ID3 tag information for each title) stored in hard disk of the Wireless Music
Center.
Can I use music archiving software other than Philips Media Manager?
You can use another music archiving system other than PMM under condition that it provides an Universal Plug
and Play (UPnP) server interface. However, it is advised that you should stick to the provided PMM software for
all you backup and restore functions.

48
Glossary
CDDB
Gracenote CDDB Music Recognition Service is a music CD database with access to ID3 tag information.
Network Connections
With WACS700 you can choose to make a wired or wireless (WiFi) connection to your Center or a
computer.
Both your Center or a computer act as a server device which can share data with your Station or other
devices.
Instead of using LAN cables for connection, WiFi uses specific radio signals to transmit data.
Ad-Hoc Network
A direct network connection between two devices (two computers, or a PC and WACS700).
Access Point (Infrastructure network)
A network connection between two or more devices (computers, or PCs and WACS700) with a central
network host (router, base station or PC).
DCHP
This service automatically assigns IP (Internet Protocol) addresses to devices active in a LAN (Local Area
Network) from the Center (your server device).
DNS (Domain Name System)
Firewall
A firewall acts as a barrier that helps protect your network from intruders from the Internet. The firewall
specifies what information can be communicated from the computers on your network to the Internet, and
from the Internet to the computers on your network.
IP address
A 12-digit ID used by devices connected to a network
Proxy address
The address of an intermediate computer, provided to you by your Internet Service Provider. Sometimes
needed for accessing the Internet.
SSID
The wireless network name (this is not the same as your computer network name).
Streaming
Playing media content from the Internet while it is downloading is called 'streaming'.
Subnet mask
This is a number ID used to identify a group of devices within a network
TCP/ IP
49
Transmission Control Protocol/ Internet Protocol – a data coding system
WEP
Wired Equivalent Privacy – a password or ‘key’ used for wireless networks, WEP is an encryption key for
security. When prompted, you will need to enter your WEP to enable 2 or devices to share data.

50
Meet Philips at the Internet
http://www.philips.com
Need more help or information on installation? Visit:
www.philips.com/support
WACS700
Printed in China LC wk513
ENGLISH