Philips Electronics Singapore KWR101803 PHILIPS DUAL MOTION Remote Control User Manual Maual KWR101803
Philips Electronics Singapore Pte Ltd PHILIPS DUAL MOTION Remote Control Maual KWR101803
User manual

Philips Home Control
Confidential ©Philips Home Control,
2011 Page 1 of 10
Manual of KWR101803/01B

Philips Home Control
Confidential ©Philips Home Control,
2011 Page 2 of 10
FCC Statement
FCC Part 15.19
This device complies with Part 15 of the FCC Rules. Operation is subject to the
following two conditions:
(1) this device may not cause harmful interference and
(2) this device must accept any interference received, including interference that may
cause undesired operation.
NOTE:
This equipment has been tested and found to comply with the limits for a Class B
digital device, pursuant to Part 15 of the FCC Rules. These limits are designed to
provide reasonable protection against harmful interference in a residential installation.
This equipment generates, uses and can radiate radio frequency energy and, if not
installed and used in accordance with the instructions, may cause harmful interference
to radio communications. However, there is no guarantee that interference will not occur
in a particular installation. If this equipment does cause harmful interference to radio or
television reception, which can be determined by turning the equipment off and on, the
user is encouraged to try to correct the interference by one or more of the following
measures:
-- Reorient or relocate the receiving antenna.
-- Increase the separation between the equipment and receiver.
-- Connect the equipment into an outlet on a circuit different from that to which the
receiver is connected.
-- Consult the dealer or an experienced radio/TV technician for help.
Any changes or modifications not expressly approved by the party responsible for
compliance could void the user’s authority to operate the equipment.
No special accessory is required to enable the equipment to comply with the emission
limits.

KWR101803/01B Manual (Draft Version)
Status :Draft, For Review Page 3 of 10
Philips Proprietary &Confidential
Philips Home Control Company Restricted
Table of Contents
1.PRODUCTDESCRIPTION......................................................................................................................4
1.1PRODUCTSUMMARY.....................................................................................................................................4
1.2PRODUCTPASSPORT......................................................................................................................................5
2.FUNCTIONALREQUIREMENTS.............................................................................................................6
2.1SIMULTANEOUSKEYPRESS(RC)......................................................................................................................6
2.2SIMULTANEOUSKEYPRESS(KB)......................................................................................................................6
2.3CONSECUTIVEKEYPRESS(KB).........................................................................................................................6
2.4INDICATORLED............................................................................................................................................6
2.5POWERMANAGEMENT..................................................................................................................................6
2.5.1StuckKeyTimeout...........................................................................................................................6
2.5.2LowVoltageDetection....................................................................................................................6
3.RFFUNCTIONS....................................................................................................................................7
3.1RFPAIRING..................................................................................................................................................7
3.2RFUN‐PAIRING............................................................................................................................................7
3.3REMOTEIDLING,RFLINKTIME‐OUTWITHCONNECTION.......................................................................................7
3.4RFBROKENLINK...........................................................................................................................................7
3.5RFAUTOCONNECTION..................................................................................................................................7
3.6RFOUTOFRANGE........................................................................................................................................7
4.OPERATIONALFEATURES....................................................................................................................8
4.1MODESWITCH.............................................................................................................................................8
4.1.1RCtoKeyboard...............................................................................................................................8
4.1.2KeyboardtoRC...............................................................................................................................8
4.2REMOTEIRKEYS...........................................................................................................................................8
4.3REMOTERFKEYS..........................................................................................................................................8
4.4MOTIONCONTROLMOUSEMODE...................................................................................................................8
4.5KEYBOARDMODE.........................................................................................................................................8
5.IRFUNCTIONALITY..............................................................................................................................9
5.1IRLEARN.....................................................................................................................................................9
5.2LEARNFUNCTION‐RESET................................................................................................................................9
6.UNIVERSALRCFUNCTION.................................................................................................................10

KWR101803/01B Manual (Draft Version)
Status :Draft, For Review Page 4 of 10
Philips Proprietary &Confidential
Philips Home Control Company Restricted
1. Product Description
1.1 Product Summary
• Dual button entry RC and KWR.
• Number of keys: 38 for Keyboard, 18 for RC. Total 56 keys.
• 3 main functions. Remote control, mouse cursor control and QWERTY KB for text entry.
• 3-D Gyro meter for motion pointing.
• IR Learn using DataFlash. (optional)
• Universal IR database for TV. (optional)
• IR used 32K or 64K Flash chip.
• Low voltage alert through LED blinks.
KWR101803/01B Manual (Draft Version)
Status :Draft, For Review Page 5 of 10
Philips Proprietary &Confidential
Philips Home Control Company Restricted
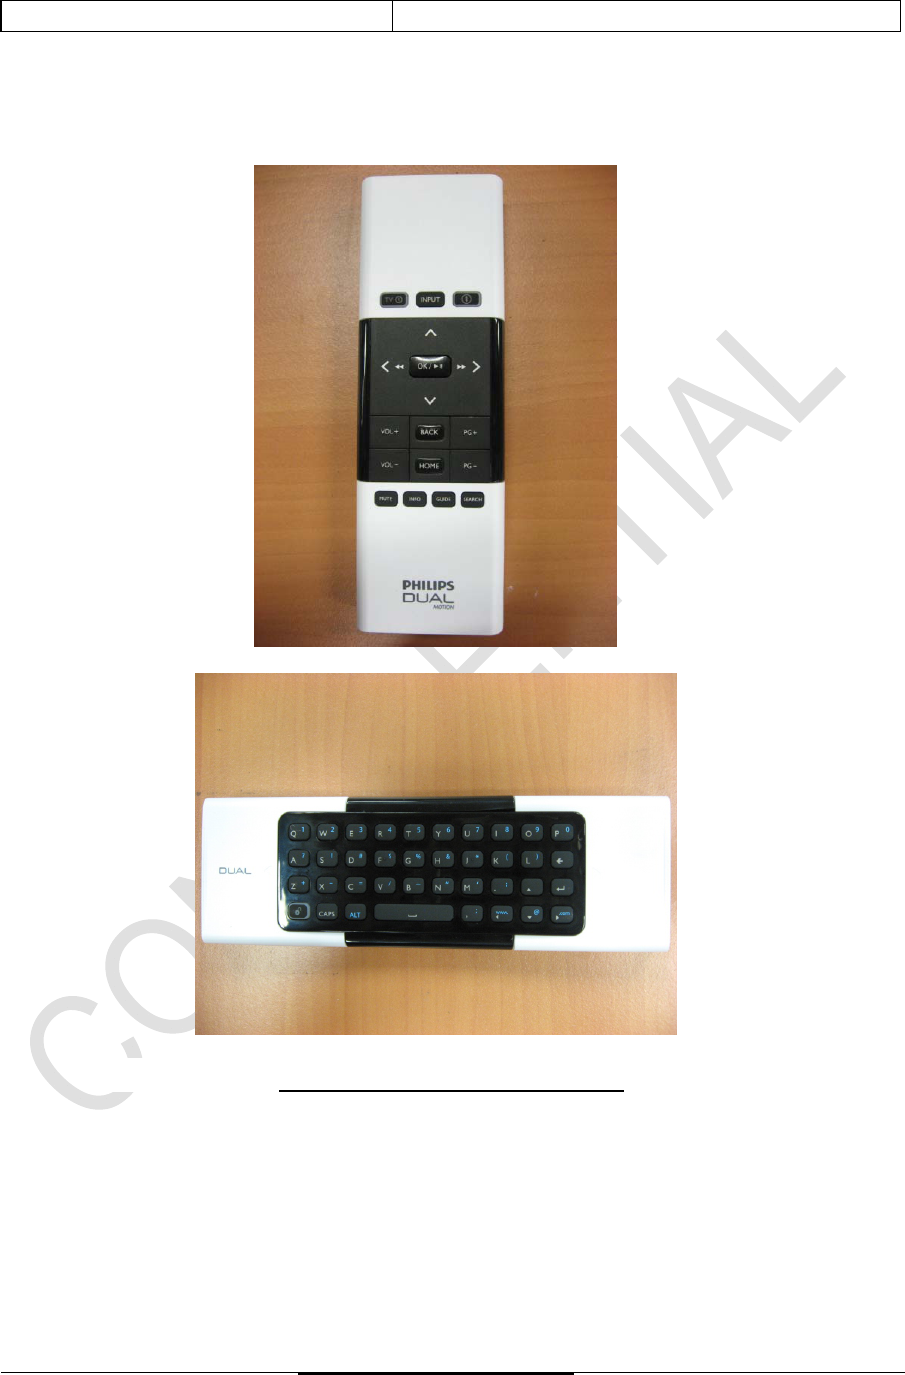
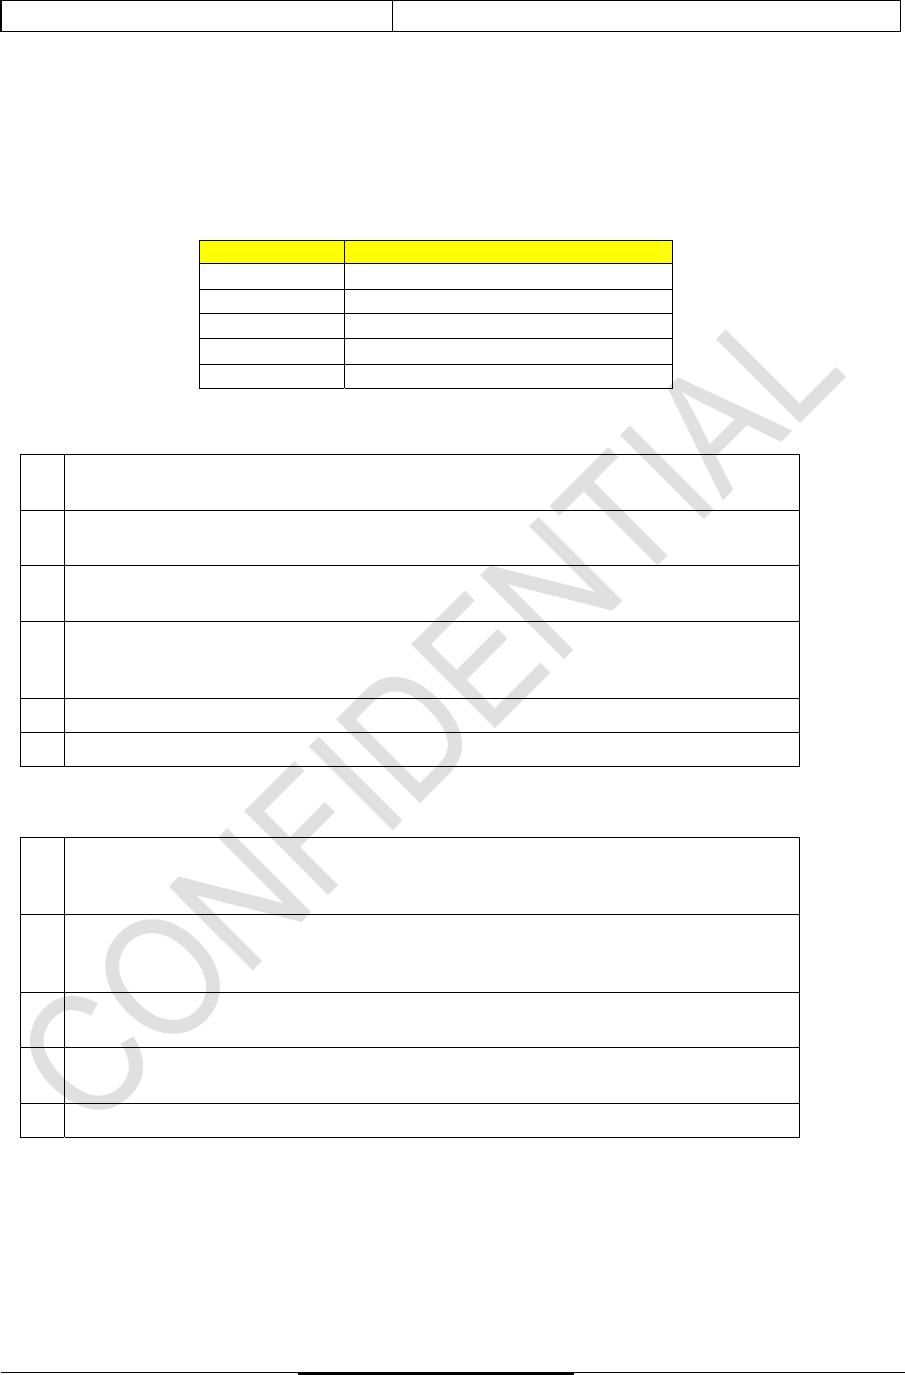
1.2 Product
Picture for illustration onl
y

KWR101803/01B Manual (Draft Version)
Status :Draft, For Review Page 6 of 10
Philips Proprietary &Confidential
Philips Home Control Company Restricted
2. Functional Requirements
2.1 Simultaneous Key Press (RC)
If more than one key press detected, the remote control will stop sending IR/RF code.
2.2 Simultaneous Key Press (KB)
The remote support multiple key press but only limited keys are able to do so. When two or more
remote KB keys, that do not support simultaneous press are pressed simultaneously, the remote will
not send codes. When only one key is still pressed the remote will restart and send the code of this
key as per normal.
Workable 2 keys simultaneous key presses are;
CAPS with any Alphabets: Capital Letters of the Alphabets
ALT with keys with Blue options (numbers and symbols etc)
2.3 Consecutive Key Press (KB)
When ALT key is pressed or still press, the RC will not transmit or do any action. After release and
then press any keys that have alternate function on the same key, eg Q key shares the same as
Numeric ‘1’ key, the RC will transmit Numeric ‘1’ code.
The same is true for CAPS keys. For CAPS, after release of the key, an alphabet key is pressed, the
RC will transmit the capital letter of the particular key.
2.4 Indicator LED
Total 3 Indicator backlit LED.
1) RED colour, on STANDBY key, RC side
2) RED colour, on TV STANDBY key, RC side
3) AMBER colour, on UNLOCK key, Keyboard side
Blinking Definition
Fast Blink: 50ms ON then OFF.
Slow Blink: 0.5s ON then OFF.
Upon pressing of any valid key, a LED fast blink of 50ms will be shown just before IR/RF
transmission.
2.5 Power Management
2.5.1 Stuck Key Timeout
Stuck Mode function is use to conserve battery life. When a key is being press continuously for
~30 seconds (e.g. by placing something heavy on top of the remote) the remote will stop
transmitting code automatically after 30 seconds and will resume operation when all keys are
released. Typical stuck key time is between 27 and 33 seconds with a tolerance of +- 3sec.
2.5.2 Low Voltage Detection
The RC comes with three 1.5V batteries working in series to give total maximum 4.5V.
LED blinking dependant on the side, red LED for RC, amber LED for Keyboard.
Low voltage detection triggers when the battery voltage is at low level. Upon any key press or
upon last key press, the LED will do 10 Quick Blinks to indicate low power.

KWR101803/01B Manual (Draft Version)
Status :Draft, For Review Page 7 of 10
Philips Proprietary &Confidential
Philips Home Control Company Restricted
3. RF Functions
3.1 RF Pairing
However, when there is more than 1 pair of KWR working in a near distance, interference may occur,
thus the KWR has to pair with the Receiver to generate a specific address to overcome the
interference.
RF pairing will take place with proximity pairing method, when both the KWR and Receiver are in RF
Pairing mode and they are within 6cm apart from each other.
User could the following steps:
1) Make sure KWR is within 6cm distance from Receiver and no other KWR are present.
2) Make sure the QWERTY keyboard faces upwards.
3) Press and hold Keyboard W and Keyboard O keys together for more than 5sec.
4) The LOCK LED will start blinking after 5sec, and the KWR is in Pairing Mode.
5) Once the pairing is completed, the LOCK LED will stop blinking.
There will be a 2minute timeout for KWR in Pairing Mode. When timeout happens, the LOCK LED will
be turned off.
The Receiver pairing pipe is always open for pairing. Whenever a KWR in Pairing Mode is within
pairing proximity, both KWR and Receiver will be paired.
3.2 RF Un-Pairing
1) Make sure the QWERTY keyboard faces upwards.
2) Press and hold Keyboard X and Keyboard UP keys together for more than 5sec.
3) The LOCK LED will start blinking slowly after 5sec.
4) Reset the power or battery and the KWR is ready to pair again.
3.3 Remote Idling, RF Link Time-out with connection
When detected no activities, the remote control will enter STANDBY mode. During STANDBY mode,
RF link will be disconnected to preserve power. Pressing any key or any gesture action will resume
the remote control to ACTIVE mode almost immediately. Key pressed that resume remote from
STANDBY mode will be remembered and transmitted.
When remote control wakes up from SLEEP, there may be re-connection latency that depending on
the RF link condition with Receivers.
Once the RF link has been established, the remote control will execute upon ANY key press. Key
presses prior to RF link successful connection will not be transmitted.
3.4 RF Broken Link
When the RF (2.4G) connection is lost when the Receivers sleeps or during system shutdown or due
to out of range.
3.5 RF Auto Connection
When the RF wakes up or resumes from SLEEP/STANDBY or come back within range of a power on
paired Receiver, RF link will be re-connected automatically. No RF re-pairing is needed.
3.6 RF Out of Range
When the RF link broken/ out of range, RC goes to SLEEP immediately to conserve power.

KWR101803/01B Manual (Draft Version)
Status :Draft, For Review Page 8 of 10
Philips Proprietary &Confidential
Philips Home Control Company Restricted
4. Operational Features
4.1 Mode Switch
4.1.1 RC to Keyboard
When in RC mode, keyboard keys will be locked to prevent accidental press. Keyboard keys can
only be unlocked by flipping over to the keyboard side in landscape orientation. Pess the
UNLOCK key to lock the KB. Each key press will do a fast blink on the KB amber LED.
4.1.2 Keyboard to RC
When in keyboard mode, user can change to RC mode by flipping over to the RC face side.
Like-wise, when in KB mode, RC keys will be locked to prevent accidental press.
4.2 Remote IR keys
Power, TV/AV Input keys, Vol +, Vol -, and Mute are IR command keys. With RC face up and in a
portrait orientation, pressing these buttons will fire the respective IR codes from the IR LED of the
remote.
4.3 Remote RF keys
Some of the remote keys will be sent out using RF keys command codes. OK key is used also as the
mouse left click button. Other remaining keys are HID consumer control keys. For example,
Programme Up, Programme Down, Home, Back, etc.
4.4 Motion Control Mouse Mode
Mouse mode allows user to use the gyro meter of the RC as a floating mouse or joystick.
The relative movement of panning and lifting (roll, yaw and pitch) will control the mouse cursor to
move in the same relative direction on the screen.
In the floating mouse mode, user can press and hold the OK key for motion control to be used as
mouse or joystick.
On the other hand, if user just press and release the OK key it will act as the Mouse Left click.
When RC is face up portrait orientation, the RC is used as a floating mouse.
When keyboard is in face up landscape orientation, press and hold the SHIFT key to use the motion
control as the floating mouse.
4.5 Keyboard Mode
The QWERTY keys will be held by both hands and used in landscape orientation.
The KB also support secondary keys by press and hold ALT key followed by press another key
together. This allows the KB to support Numbers and Symbols with the limited number of QWERTY
keys. Example, press ALT + Q will send ‘1’.
KWR101803/01B Manual (Draft Version)
Status :Draft, For Review Page 9 of 10
Philips Proprietary &Confidential
Philips Home Control Company Restricted
5. IR functionality
The remote control has a default IR code table for 5 TV keys (TV Power, TV AV input, TV Vol +, TV
Vol – and TV Mute). All the 5 keys can also support learning and universal database engine.
5.1 IR Learn
The 5 keys specially used for TV Learning and they are listed in the following table.
Key Name Key function
TV AV input Change AV input source to TV
TV Standby Power on/off TV
TV VOL+ TV Volume up
TV VOL - TV Volume down
TV Mute TV Mute
Follow the key sequence below to invoke the Learn feature for a key:
1. Press and hold “TV” and “Mute” Key for 3 seconds. Release the key, LED stays on
and other backlight LEDs fade off. RC enters into leaning mode.
2. Press and release a learnable key. The indictor “TV” LED off when pressed and hold,
on after released.
3. Hold the source remote (in of sight) at an optimum distance (3cm to 6cm) and
continuously transmit the signal.
4. The LED shall blink 2 times, if learning is successful and the new learnt code will
replace the previous one. The LED shall blink 1 time, if the learning fails. Go back to
step 2 to learn again. Previous learnt code will be kept if it fails learning.
5. User can learn other keys follow the above 2 to 4 steps.
6. Press “TV” Key in learning mode and will exit to normal mode.
Please take note of the following points when performing the learning function:
1. The remote will NOT exit the learning mode, except for the following occurrence:
1. If no key selected within 30 seconds.
2. If “TV” Key is pressed.
2. Press and release a learnable key and then wait for the signal to be learnt. If there’s
no signal in 10 seconds, The LED shall blink 1 time to indicate learning fails. You can
select other keys to learn.
3. The LED will always turn ON during learning mode while waiting for key input or signal
to be learnt.
4. The LED shall blink 1 time and the remote will enter into stuck mode and when any
key is pressed and held beyond 30 seconds.
5. No key is active when the LED is blinking.
5.2 Learn function - Reset
The user shall be able to reset all the 5 keys to the default setting (TBC).
This is done by pressing its TV key simultaneously with the GUIDE key for 3s. LED shall do 2 Quick
Blinks. The RC shall return to its original settings; i.e. before any learning was performed.
KWR101803/01B Manual (Draft Version)
Status :Draft, For Review Page 10 of 10
Philips Proprietary &Confidential
Philips Home Control Company Restricted
6. Universal RC Function
The 5 keys that are programmable by URC and they are listed in the following table.
Key Name Key function
TV AV input Change AV input source to TV
TV Standby Power on/off TV
TV VOL+ TV Volume up
TV VOL - TV Volume down
TV Mute TV Mute
Follow the key sequence below to invoke the database feature for a key:
1 Turn on the TV.
2 Press and hold “PG+” together with “PG-” key.
The user can also press and hold a key first then press and hold the next key.
However this will cause the first key to transmit code.
3 Press and hold both keys for 3 seconds or more. Both LED on RC side will turn on.
Release the key. RC enters into Database Search mode.
4 The user can choose the following steps to perform the database search
5) Full Search (key TV Standby)
6) Step Forward (key PG+)
7) Step Backward (key PG-)
8) To store the desire codeset (key BACK)
5 Full Search:
Point the KWR at the TV.
Press and hold the POWER to start full search.
Each time a codeset is been transmitted, the TV Standby LED will blink.
When the TV response by turning off, release the POWER key.
6 Step Forward:
Point the KWR at the TV.
Press and release the PG+ to send the next codeset.
Each time a codeset is been transmitted, the TV Standby LED will blink.
When the TV response by turning off, do not continue with key PG+.
If the current codeset is the last codeset, there will be 10 blinks on the “IR” LED.
Use Step Backward to continue the search.
7 Step Backward:
Point the KWR at the TV.
Press and release the PG- to send the previous codeset.
Each time a codeset is been transmitted, the TV Standby LED will blink.
When the TV response by turning off, do not continue with key PG-.
If the current codeset is the first codeset, there will be 10 blinks on the “IR” LED.
Use Step Forward to continue the search.
8 Storing:
Once the TV is responding with the found codeset, press the BACK key to store the
codeset.
The KWR will exit the database search mode and user can start to use the desire
codeset.
Please take note of the following points when performing the database function:
a The remote will NOT exit the database mode, except for the following occurrence:
• If no key selected within 30 seconds.
• If BACK key is pressed
b User can press and release the TV STANDBY, INPUT, TV VOL+, TV VOL- and TV
MUTE to test the code.
c The STANDBY LED will always turn ON during database mode.
d No key is active when the LED is blinking.