Philips Medical Systems North America M3815A2 Home Blood Pressure Transmitter User Manual manual
Philips Medical Systems North America Co. Home Blood Pressure Transmitter manual
manual

Blood Pressure Unit
User Guide
M3815-90001-UG-Eng-revD.qxd 5/1/01 4:20 PM Page 1

Blood Pressure Unit Quick Start
2
Before You Start
• Make sure you read and understand the Blood Pressure Unit
User Guide.
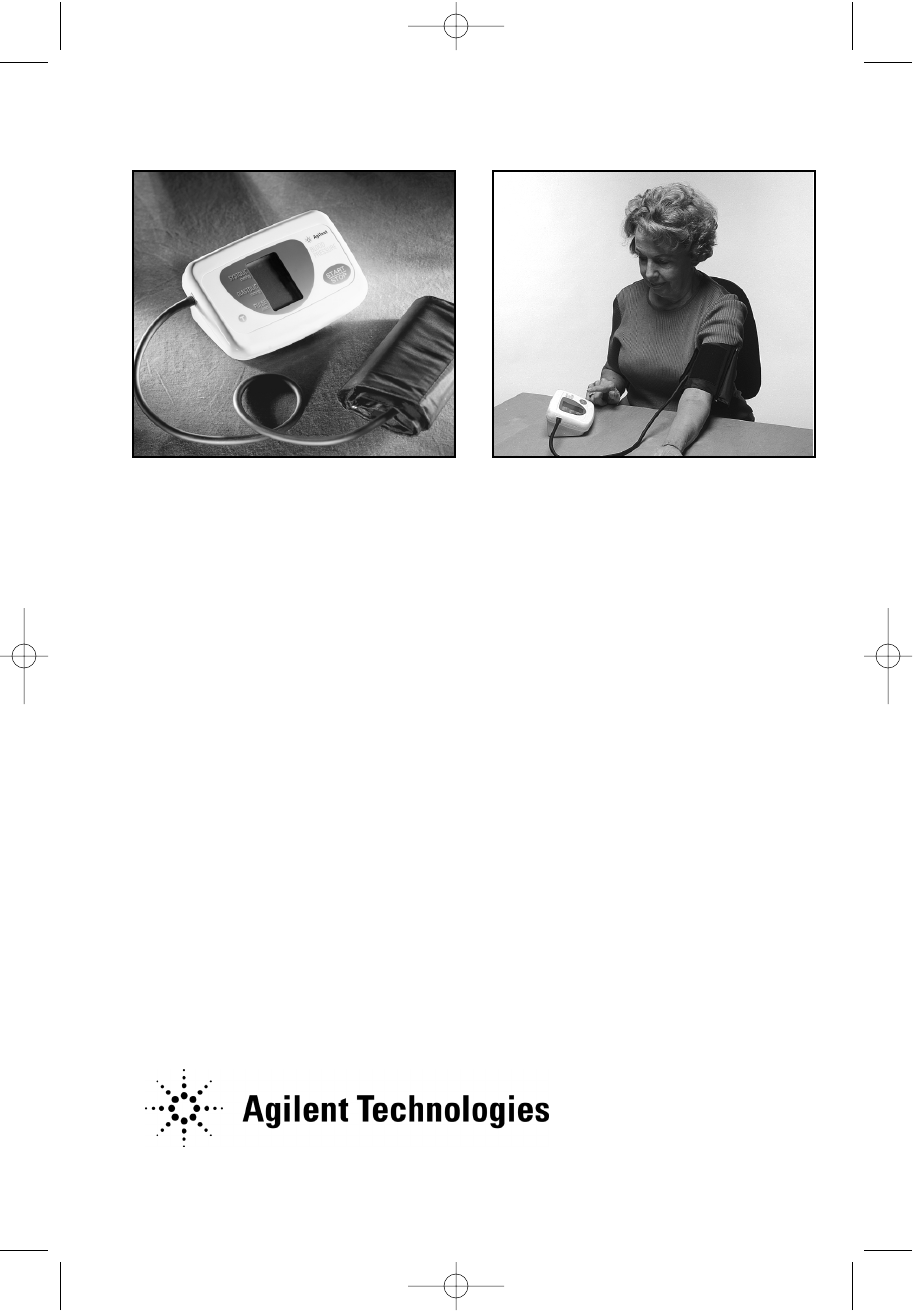
Taking Your Blood Pressure
To begin, sit down, put on the blood pressure cuff, and press the
START/STOP button. Your blood pressure (BP) is measured and
displayed automatically.
1. Sit comfortably with your left forearm resting on a flat surface
so that the center of your upper arm is at about the same height
as your heart.
2. Loosen the blood pressure cuff so that you can slide the cuff
over your arm. Place your hand into the cuff.
3. Slide the cuff up your forearm.
4. As you slide the cuff on, position the cuff so that the bottom of
the cuff is on your upper arm and about one inch above the
elbow crease; make sure that the air hose dangles
on the inside of your arm.
5. Pull on the cuff end to tighten it. The cuff does not have to be
pulled very tight. For comfort, you can leave room for one fin-
ger to fit under the cuff.
6. Fold the cuff end back over the metal D-ring, and fasten the
cuff end to the Velcro®closure.
7. Press the START/STOP button. Sit still and do not move your
arm during the measurement. If you want to stop the measure-
ment at any time, press the START/STOP button. Wait 15 min-
utes before taking your blood pressure again.
M3815-90001-UG-Eng-revD.qxd 5/1/01 4:20 PM Page 2
3
BP User Guide
8. A series of numbers and symbols appear in the display window.
The cuff inflates and may feel tight. A long beep signals the end of
the BP measurement and the cuff deflates. The display window
shows your final BP measurement and pulse rate.
WARNING: As you watch the display, if you notice the pressure
increase above 330 mmHg OR if the pressure decreases and remains
at 15 mmHg for more than 3 minutes, press the START/STOP but-
ton to stop the measurement. The BP Unit is defective. Contact your
Health Care Provider.
9. You can remove the cuff. The BP Unit has taken your blood pres-
sure and pulse rate. The BP Unit turns off automatically.
Note: Do not store the BP Unit with the air hose twisted or wrapped
tightly around the display.
M3815-90001-UG-Eng-revD.qxd 5/1/01 4:20 PM Page 3

Notice
4
The information contained in this document is subject to change
without notice.
Agilent Technologies makes no warranty of any kind with regard to this
material, including, but not limited to, the implied warranties of mer-
chantability and fitness for a particular purpose. Agilent Technologies
shall not be liable for errors contained herein or for incidental or conse-
quential damages in connection with the furnishing, performance, or use
of this material.
Agilent Technologies assumes no responsibility for the use or
reliability of its software on equipment that is not furnished by
Agilent Technologies.
This document contains proprietary information that is protected by
copyright. All rights are reserved. No part of this document may be
photocopied, reproduced, or translated to another language without
the prior written consent of Agilent Technologies.
Copyright ©2001 Agilent Technologies, Inc.
All rights reserved.
Agilent Technologies, Inc.
3000 Minuteman Rd.
Andover, MA 01810
USA
Note: All Agilent devices must be initially installed by an Agilent
installer or responsible party. The installation information provided in
this guide is for reference only.
M3815-90001-UG-Eng-revD.qxd 5/1/01 4:20 PM Page 4

Table of Contents
5
BP User Guide
Blood Pressure Unit Quick Start ........................................2
Notice ....................................................................................4
Introduction ..........................................................................6
Precautions ............................................................................7
BP Unit Symbols ..................................................................9
BP Unit Components..........................................................10
Installation ..........................................................................12
Installation Setup ..........................................................12
Inserting Four Type AA (1.5 Volt) Alkaline
Batteries ........................................................................13
Performing a Radio Test................................................15
Preparing the Cuff Assembly ........................................17
How to Take Your Blood Pressure ....................................18
Taking Your Blood Pressure..........................................19
What Display Symbols Mean ............................................26
Maintenance........................................................................27
Troubleshooting ..................................................................28
Specifications ......................................................................30
Electromagnetic Compatibility ........................................32
Electromagnetic Compatibility Testing ....................32
Avoiding Electromagnetic Interference Problems ..33
FCC Regulations ................................................................34
Conclusion ..........................................................................35
M3815-90001-UG-Eng-revD.qxd 5/1/01 4:20 PM Page 5

6
Welcome to Agilent Technologies’ Interactive Healthcare Services. Your
Health Care Provider has enrolled you in a progressive program to mea-
sure, transmit, and review your vital signs on a daily basis. This pro-
gram’s approach will help you and your provider make better informed
decisions about your care.
Your patient measurement set—which may include a Scale, Blood
Pressure Unit, Rhythm Strip Recorder, and Home Hub—is designed to
let you quickly and easily take your vital signs. The data you collect in
a few minutes each day are automatically transferred via the Agilent
Home Hub, using your existing phone line, to your Health Care
Provider’s computer system. The Home Hub is smart enough to know
when you’re not on the phone, and that’s when it will make the data
transfer. You do not need to do anything. Feel free to use the phone at
any time. The Home Hub also recognizes if the connection was inter-
rupted and will automatically re-transmit stored information later.
If any of the devices in your patient measurement set is not functioning
properly, please advise your Health Care Provider and Agilent will
repair or replace the device.
As a user of Interactive Healthcare Services, you are taking an active
role in providing your Health Care Provider with accurate, relevant, and
timely information—information we expect will go a long way toward
improving your quality of life.
The Blood Pressure Unit User Guide explains how you can measure your
blood pressure and pulse rate from the convenience and comfort of your
own home. This guide provides you easy-to-understand information about
operation and maintenance. Agilent and your Health Care Provider appre-
ciate your efforts to actively participate in your home health care plan.
Introduction
M3815-90001-UG-Eng-revD.qxd 5/1/01 4:20 PM Page 6

Precautions
7
BP User Guide
• It is important that you use this Blood Pressure Unit (BP Unit) as
directed by your Health Care Provider. This BP Unit is provided for
your personal use only. Please do not allow others to use this BP
Unit.
• Your Health Care Provider will tell you when and how often to take
your blood pressure. Please follow your Health Care Provider’s
directions carefully. Report any change in the way you take your
blood pressure (BP) to your Health Care Provider.
• Follow your physician’s instructions regarding symptoms that require
direct contact with your Health Care Provider. Keep in mind that use
of this BP Unit is not a substitute for medical care. Only your Health
Care Provider is qualified to interpret the results. If you have any
questions regarding how to use your BP Unit, please contact your
Health Care Provider.
•Caution: Avoid storing your BP Unit inside a metal container or
drawer, such as a file cabinet.
•Caution: Do not attempt to service or repair the BP Unit yourself.
If a mechanical problem occurs, contact your Health Care Provider
for further instructions.
•WARNING: It is important for you to watch the display when taking
your blood pressure measurement. If the numbers go up to 330
mmHg, press the START/STOP button to stop the measurement.
The BP Unit is defective. Contact your Health Care Provider for fur-
ther instructions.
M3815-90001-UG-Eng-revD.qxd 5/1/01 4:20 PM Page 7

Precautions
8
•WARNING: As you watch the display when taking your blood pres-
sure measurement, if the BP numbers drop down to 15 mmHg and
stay that way for more than 3 minutes, press the START/STOP but-
ton to stop the measurement. The BP Unit is defective. Contact your
Health Care Provider for further instructions.
• If you received an error message, aborted the BP measurement while
in progress, or feel that the reading might be in error, wait 15 min-
utes before taking your blood pressure again.
•Caution: Avoid storing the BP Unit where children or pets have
access to it. There may be a risk of injury if children or pets get
tangled in the air hose or if the cuff inflates.
•WARNING: Do not allow children to use this BP unit. This BP unit
is intended for the patient only.
M3815-90001-UG-Eng-revD.qxd 5/1/01 4:20 PM Page 8
Blood Pressure Unit Symbols
9
BP User Guide
Symbol Definitions
Type B Patient Applied Parts as defined in IEC 60601-1.
Not suitable for direct cardiac application.
Attention: Consult accompanying documents.
Complies with Canadian Standards Association.
Complies with Class B standard.
M3815-90001-UG-Eng-revD.qxd 5/1/01 4:20 PM Page 9
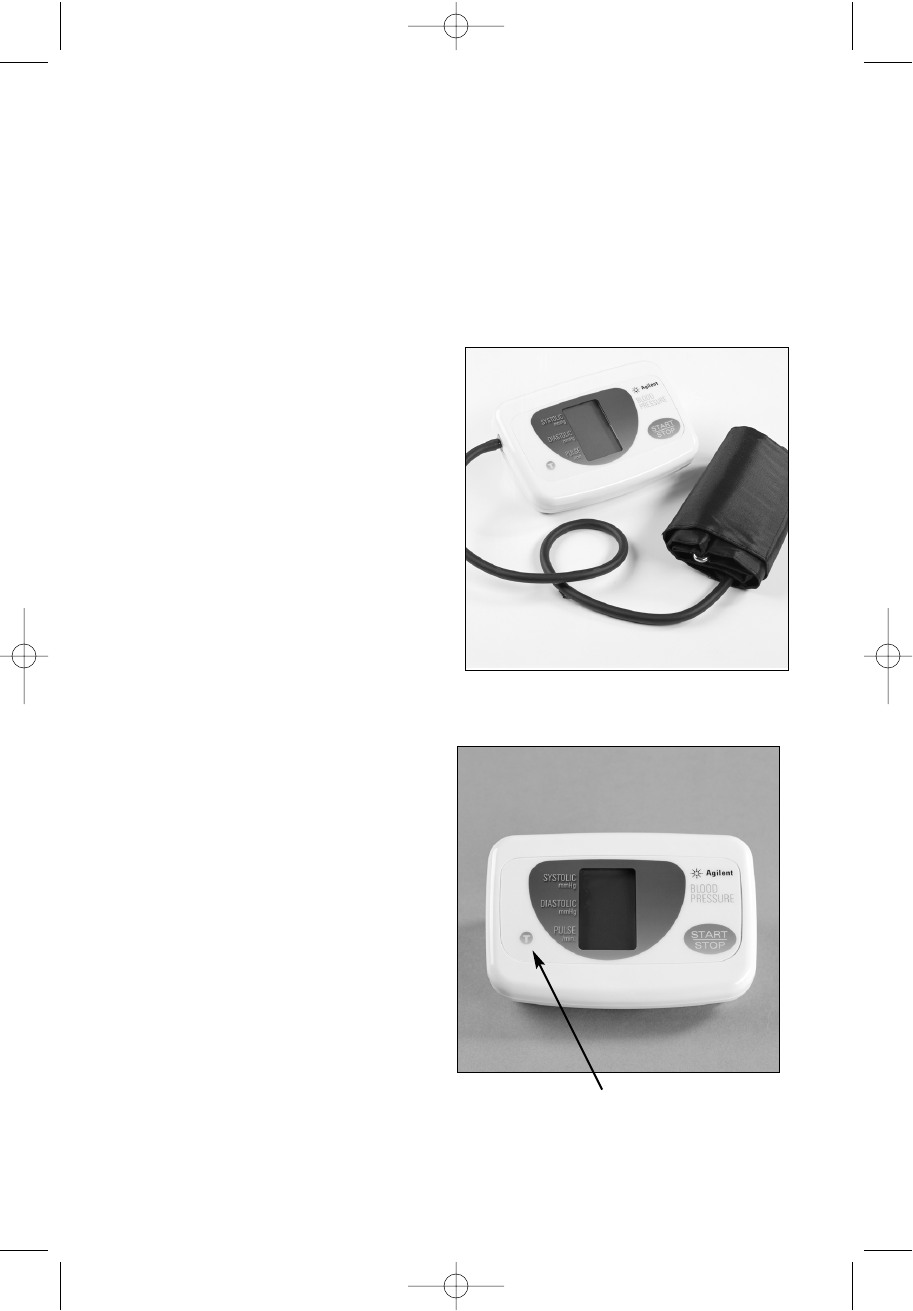
Blood Pressure Unit Components
10
The BP Unit is made up of the BP
Unit and a cuff assembly. An air
socket is on one side of the BP
Unit. The cuff assembly has a cuff
(with metal D-ring) and an air
hose (with air connector).
The BP Unit face has a
START/STOP button, a display
window (for the BP and pulse
measurement), and a Radio Test
button.
Radio Test button
M3815-90001-UG-Eng-revD.qxd 5/1/01 4:20 PM Page 10
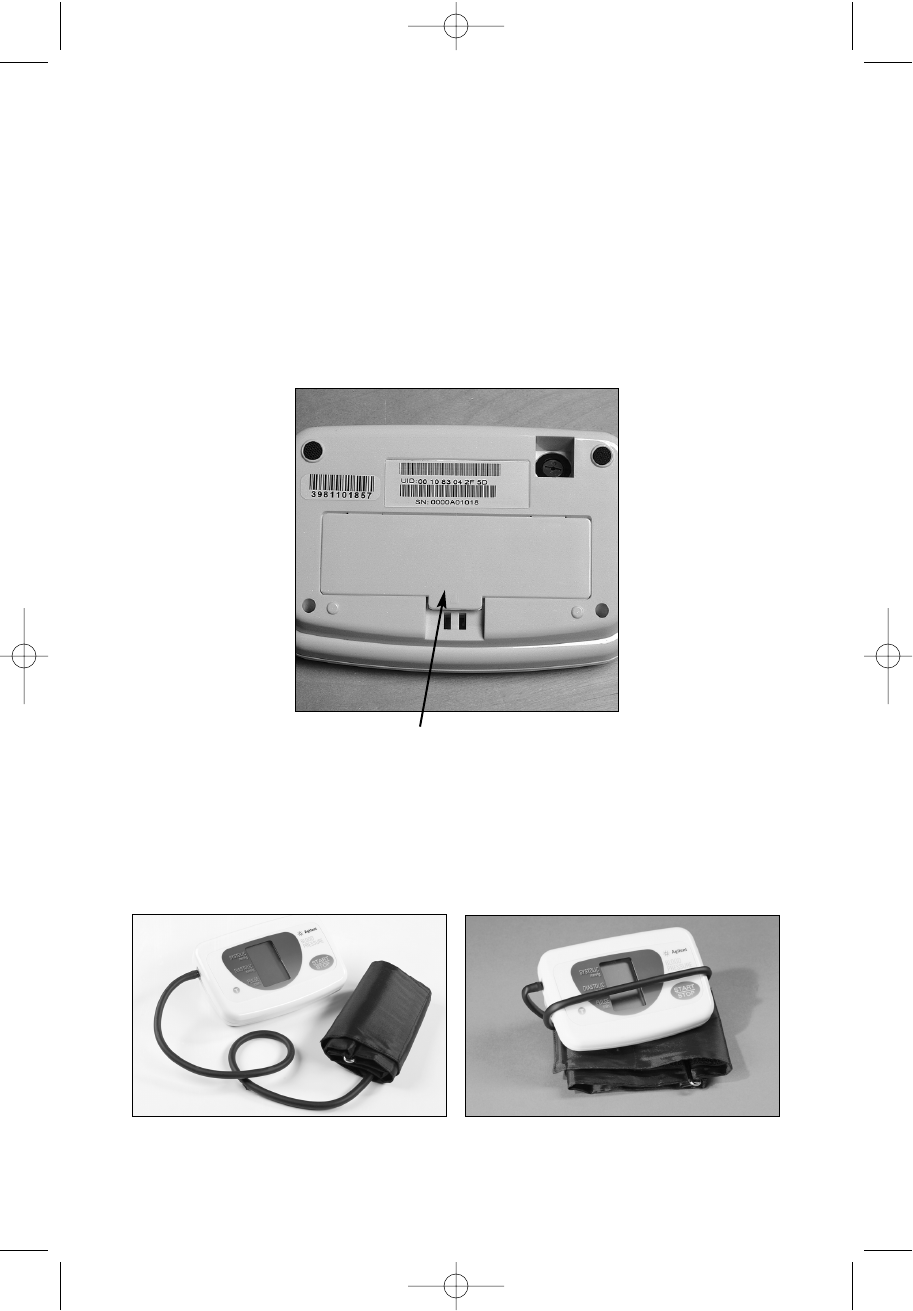
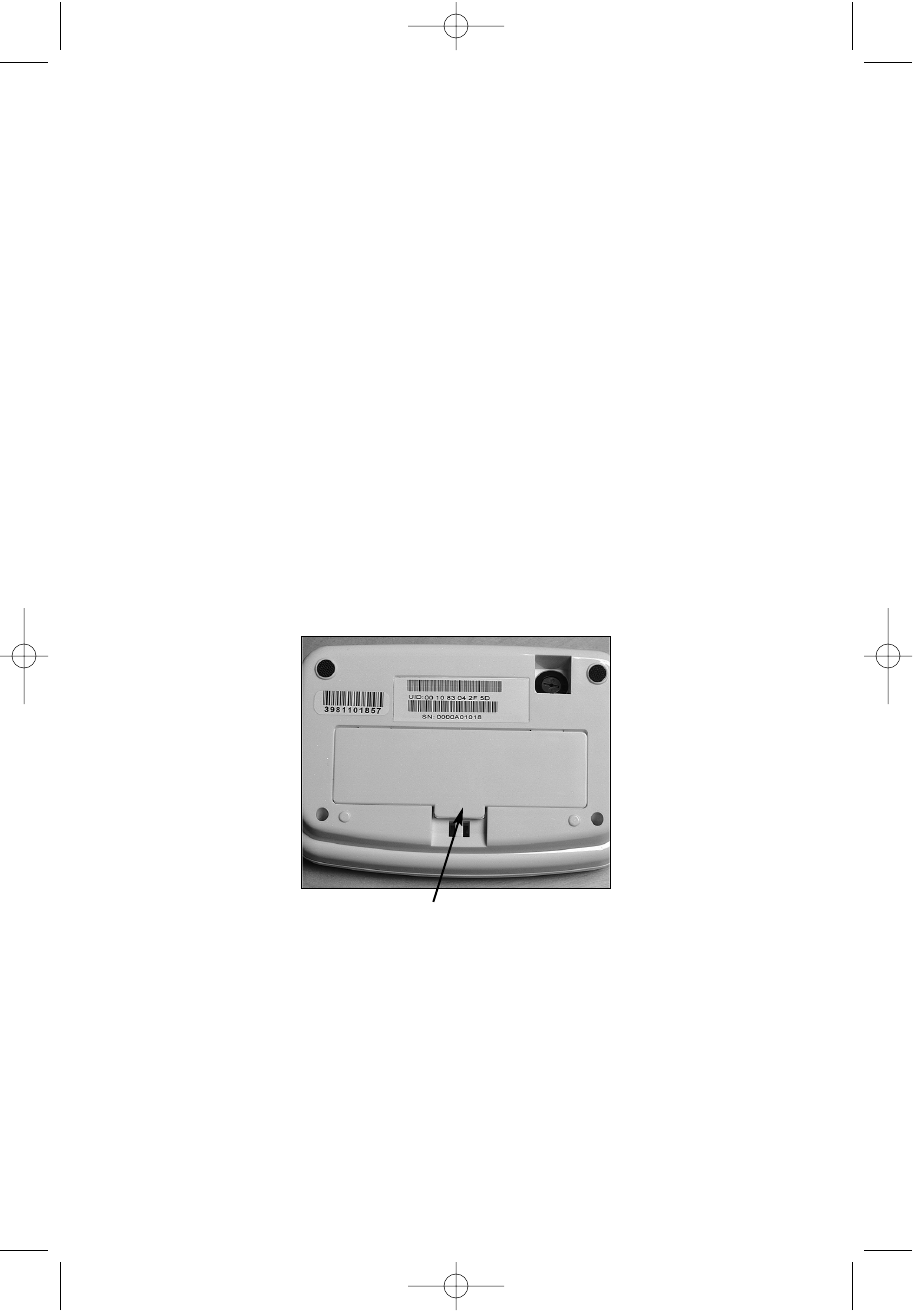
Blood Pressure Unit Components
11
BP User Guide
The BP Unit back has a battery compartment.
Storage Between Uses
Store the BP Unit so that the hose is not bent. Do not wrap the hose
around the BP display unit.
Battery compartment
Right Way Wrong Way
M3815-90001-UG-Eng-revD.qxd 5/1/01 4:20 PM Page 11

Installation
12
• Locate and store your BP Unit within 20 feet of the Home Hub. In
addition to transmitting data when you take your blood pressure,
your BP Unit sends periodic updates to the Home Hub.
• Hazards for children are packing materials that can be swallowed or
plastic bags that can be pulled over the head. Discard and safely dis-
pose of these materials immediately.
•Caution: Avoid storing the BP Unit where children or pets have
access to it. There may be a risk of injury if children or pets get
tangled in the air hose or if the cuff inflates.
•Caution: Avoid storing your BP Unit inside a metal container or
drawer, such as a file cabinet.
Installation Setup
The measurements you take cannot be transmitted to your Health Care
Provider until you install the Home Hub.
You must install the Home Hub before you set up the BP Unit. Refer to
the Home Hub User Guide.
After you have performed the installation for the Home Hub, insert
alkaline batteries into the BP Unit, perform the Radio Test, and prepare
the cuff assembly. Then, you must return to the Home Hub User Guide
and complete the connection steps.
WARNING: Do not allow children to use this BP unit. This BP unit is
intended for the patient only.
It is important to take your blood pressure as instructed by your Health
Care Provider. Your Health Care Provider may contact you if they do
not receive blood pressure measurements as scheduled.
M3815-90001-UG-Eng-revD.qxd 5/1/01 4:20 PM Page 12
Installation
13
BP User Guide
Inserting Four Type AA (1.5 Volt) Alkaline Batteries
Caution: Use alkaline batteries only. Replace all four batteries at the
same time. Do not use rechargeable batteries. Always replace old
batteries with four new batteries.
WARNING: Do not use this equipment with the battery door removed.
1. Remove the battery compartment cover on the back of the BP
Unit by gently lifting up the tab marked with the arrow symbol
and popping the cover off.
Arrow symbol
M3815-90001-UG-Eng-revD.qxd 5/1/01 4:20 PM Page 13

Installation
14
2. Place the batteries in the compartment with the positive (+) and
negative (-) terminals matching those shown in the compart-
ment. To prevent the batteries from popping out, insert the bat-
teries in the bottom row first. Make sure that the battery termi-
nals make contact with the compartment terminals.
3. Replace the cover by inserting its tabs into the slots of the com-
partment and gently pressing the cover into place.
4. Perform a Radio Test as described in the next section.
Bottom row
M3815-90001-UG-Eng-revD.qxd 5/1/01 4:20 PM Page 14
Installation
15
BP User Guide
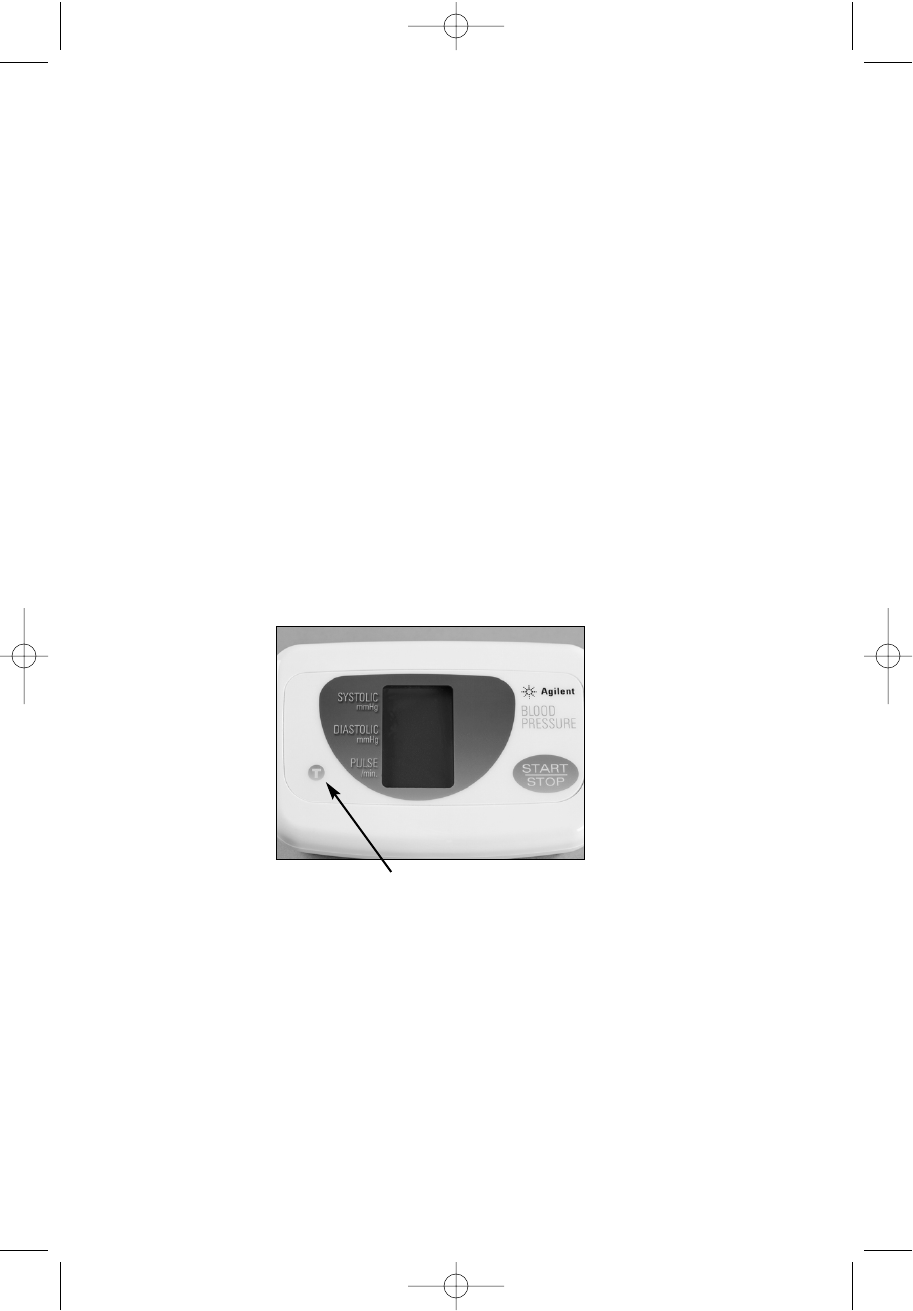
Performing a Radio Test
Perform a Radio Test when you set up the BP Unit, change batteries,
or change the testing location.
1. The Radio Test button appears as a circle with a “T” inside it on
the lower left of the display (for SYSTOLIC, DIASTOLIC,
PULSE) on the front of the BP Unit. Press and hold the Radio
Test button for at least 3 to 5 seconds until the
Home Hub starts beeping (at a rate of one beep per second).
Note: If the Home Hub’s using phone light turns on while performing
the Radio Test, stop and wait until the using phone light turns off
before resuming the Radio Test.
2. If the Home Hub does not beep, determine if there are any
obstacles (such as large metal objects) between the BP Unit and
the Home Hub.
Radio Test button
M3815-90001-UG-Eng-revD.qxd 5/1/01 4:20 PM Page 15
Installation
16
3. If obstacles are present, move the BP Unit so that no obstacles
are between the BP Unit and the Home Hub. If no obstacles
are present, move the BP Unit closer to the Home Hub.
4. Press and hold the Radio Test button until the Home Hub
beeps. If the Home Hub does not beep within 5 seconds, con-
tact your Health Care Provider.
Note: If you accidentally press the Radio Test button, it is OK.
If you are performing the Radio Test for the first time, stop now and return to the
Home Hub User Guide, and then complete the steps to connect the Home Hub.
Otherwise, you can begin using your BP Unit as usual.
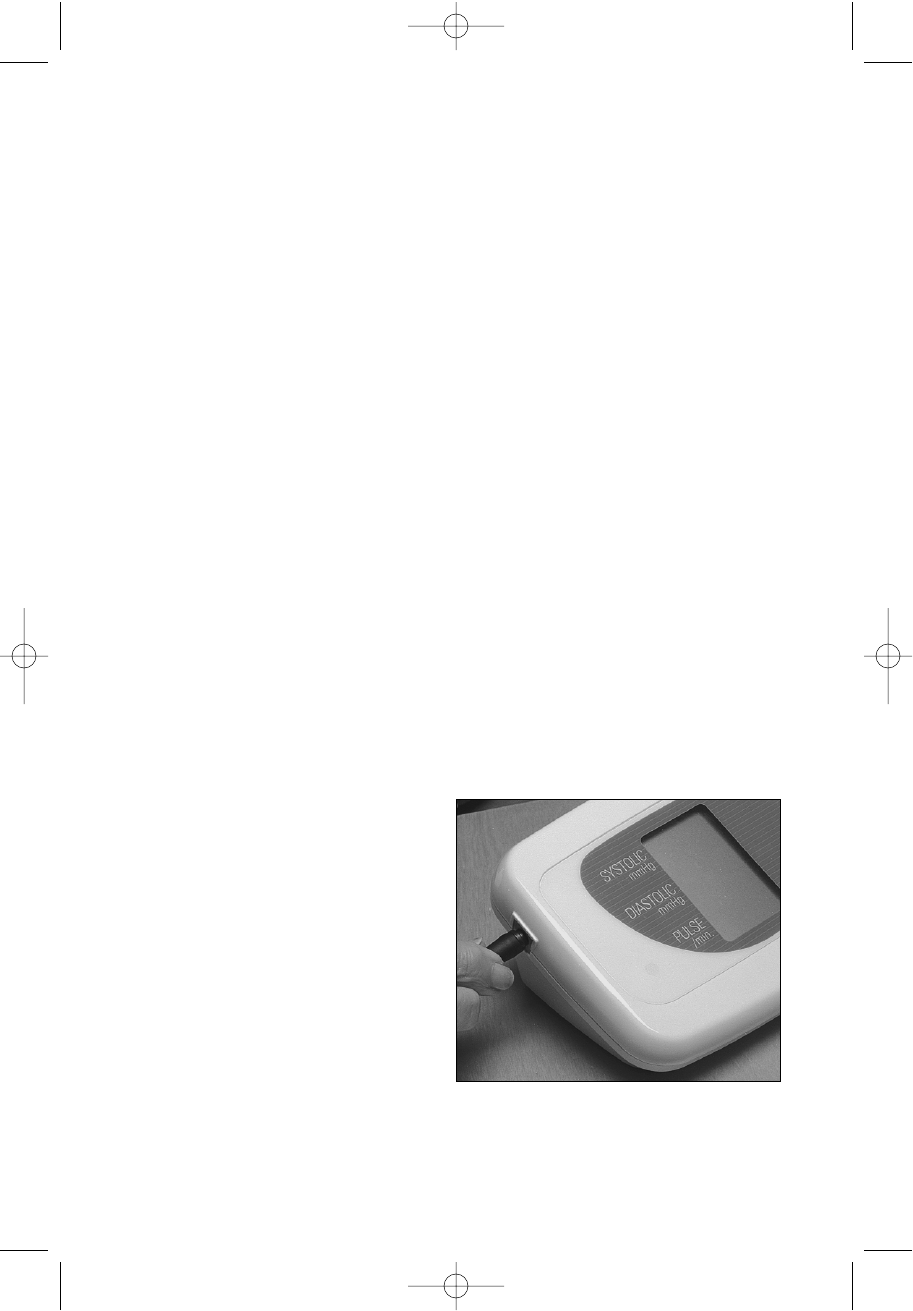
Preparing the Cuff Assembly
1. Insert the air connector at
the end of the air hose into
the socket on the side of the
BP Unit. Gently rotate the
air connector as you insert it
into the socket. You should
feel the air connector snap
into place.
M3815-90001-UG-Eng-revD.qxd 5/1/01 4:20 PM Page 16
Installation
17
BP User Guide
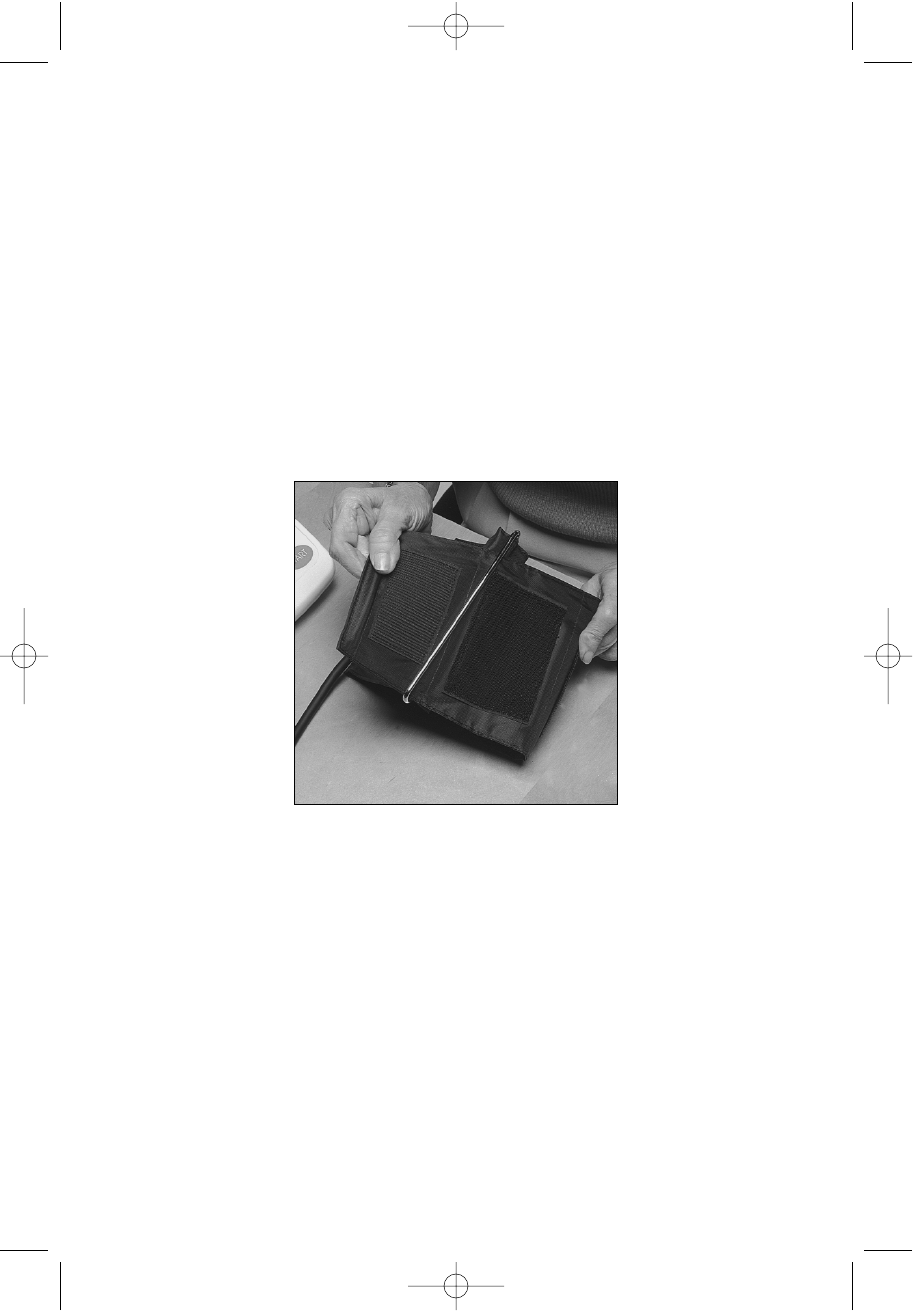
2. If the cuff has not been threaded through the metal D-ring,
thread the cuff end through now. Then, fold the cuff end back
over the D-ring so that the end fastens to the
Velcro®closures.
The BP Unit is now ready for use.
M3815-90001-UG-Eng-revD.qxd 5/1/01 4:20 PM Page 17

18
How to Take Your Blood Pressure
To begin, sit down, put on the BP cuff, and press the START/STOP
button. Your blood pressure is measured and displayed automatically.
Caution: Do not talk or move during the measurement.
Before you take your BP measurement, do the following:
• Sit within 20 feet of the Home Hub.
• Relax for about 15 minutes.
• Remove restrictive clothing or roll up a loose garment sleeve. You
will be placing the cuff on your bare upper arm.
• Use the left arm for the BP measurement unless instructed otherwise
by your Health Care Provider.
M3815-90001-UG-Eng-revD.qxd 5/1/01 4:20 PM Page 18

19
BP User Guide
How to Take Your Blood Pressure
Taking Your Blood Pressure
1. Sit comfortably with your left forearm resting on a flat surface
so that the center of your upper arm is at about the same height
as your heart.
Note: If you desire, you may lie down while someone else takes your
blood pressure.
It is important to be consistent in the way you take your blood
pressure (either sitting or lying down). Report any changes in
how you take your blood pressure to your Health Care Provider
immediately.
M3815-90001-UG-Eng-revD.qxd 5/1/01 4:20 PM Page 19
20
How to Take Your Blood Pressure
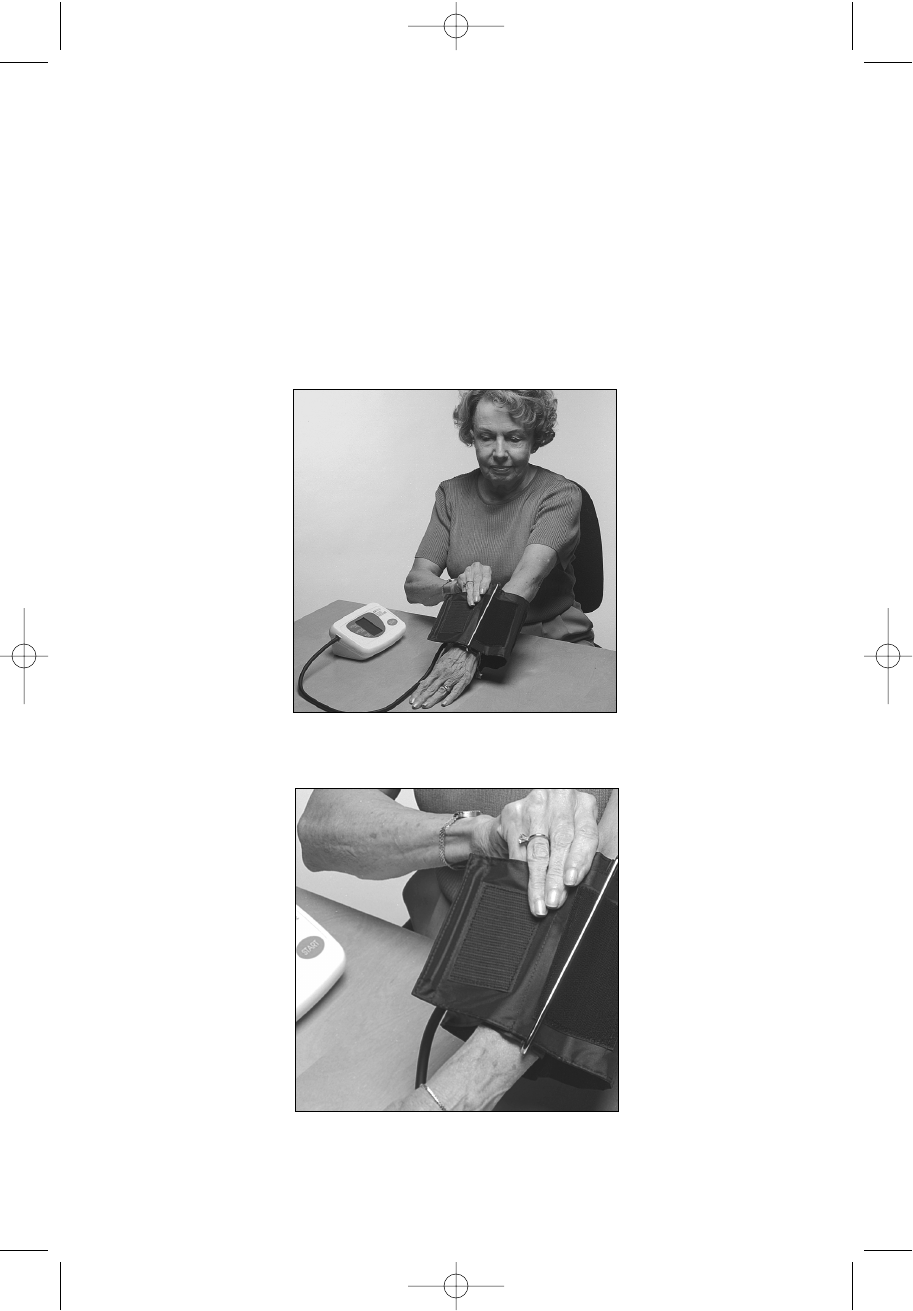
2. Place your hand into the cuff.
3. Slide the cuff up your forearm.
M3815-90001-UG-Eng-revD.qxd 5/1/01 4:20 PM Page 20
21
BP User Guide
How to Take Your Blood Pressure
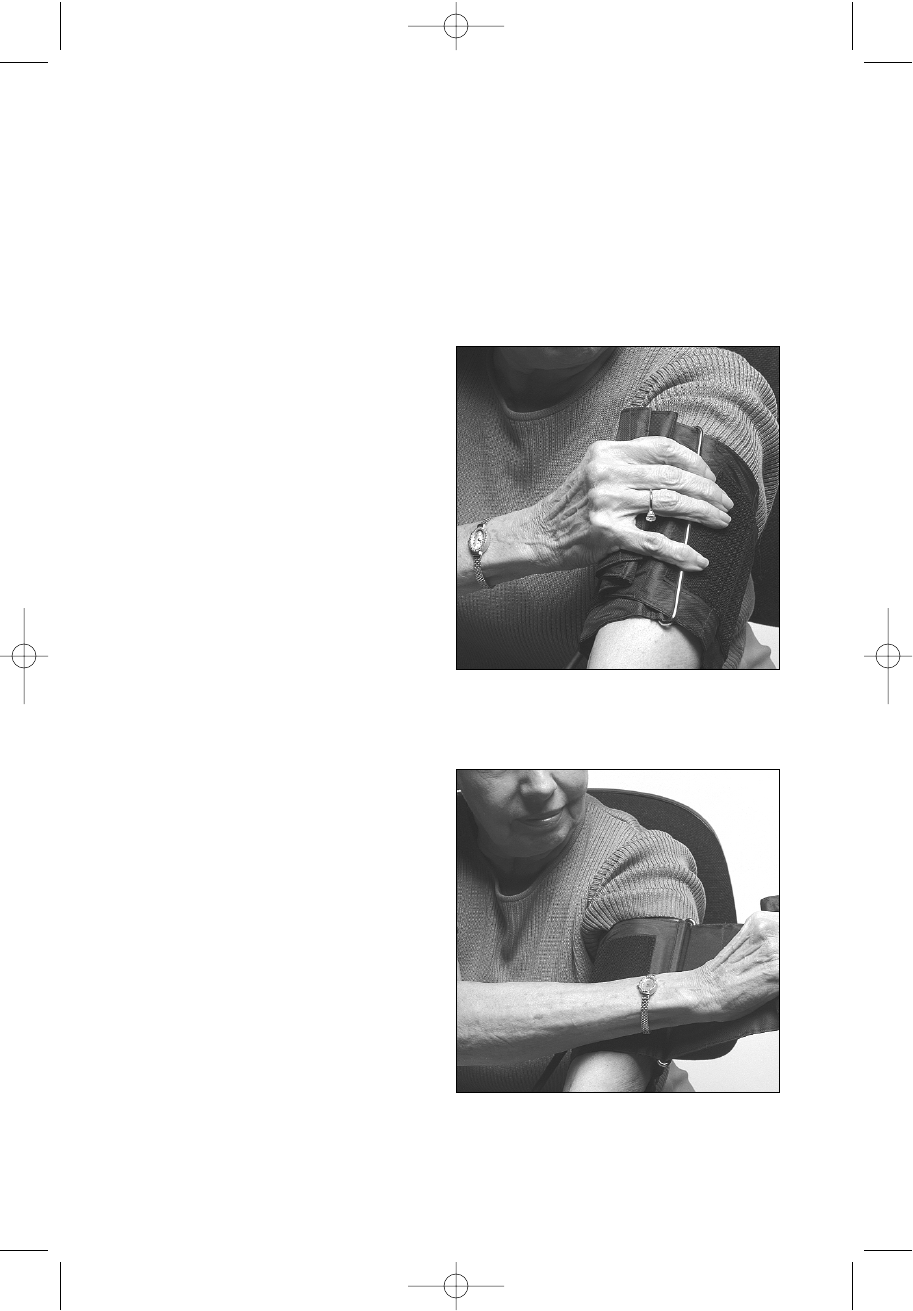
4. As you slide the cuff on,
position the cuff so that it is
on your upper arm and the
bottom of the cuff is about 1
inch above the elbow
crease; make sure that the
air hose dangles on the
inside of your arm.
WARNING: Do not allow the air hose to kink or twist while you are
taking your blood pressure.
5. Pull on the cuff end to tight-
en it, and fold the cuff end
back over the metal D-ring.
M3815-90001-UG-Eng-revD.qxd 5/1/01 4:20 PM Page 21
22
How to Take Your Blood Pressure
Note: The cuff should be snug but not tight. For comfort, you can leave
room for one finger to fit under the cuff.
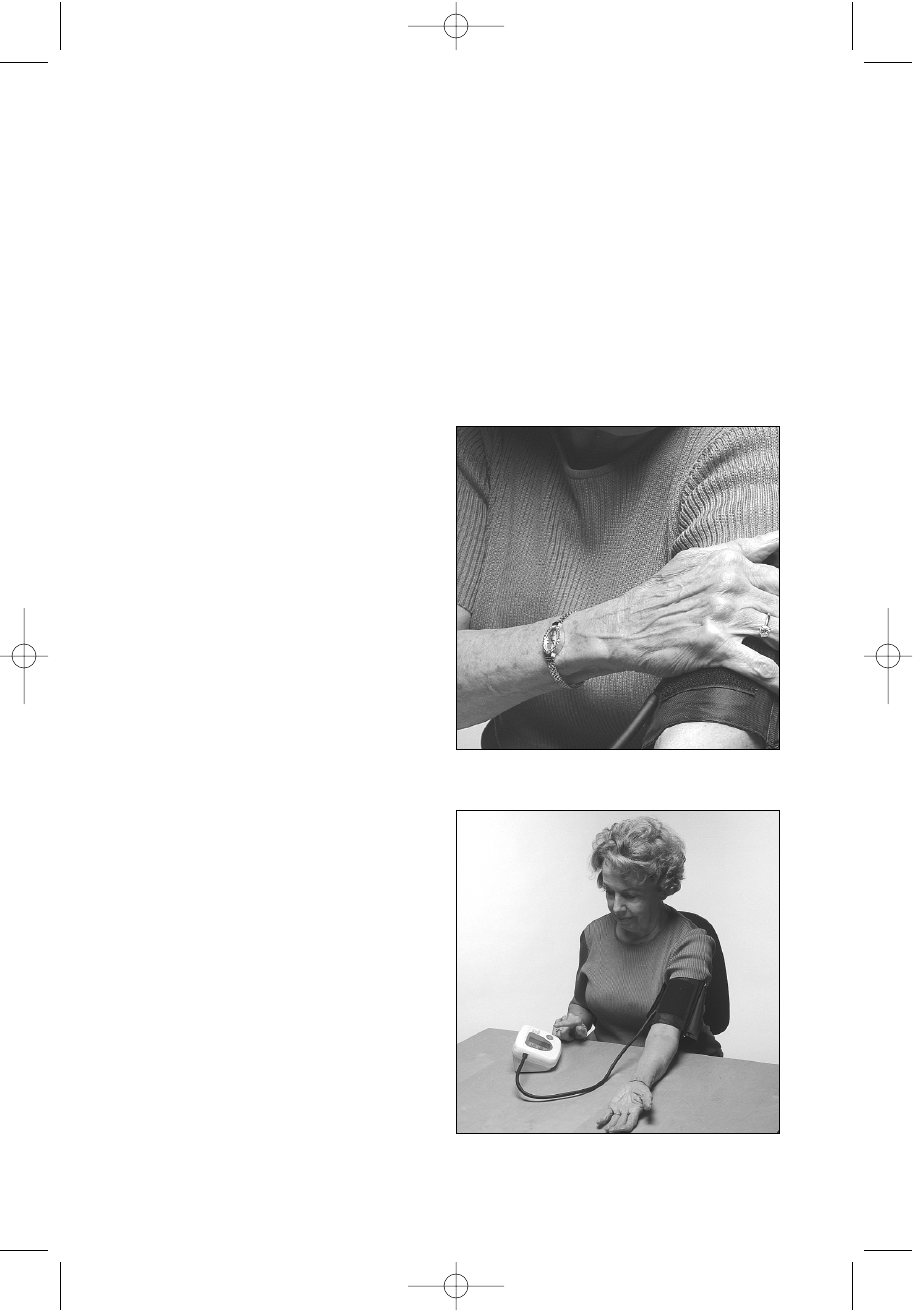
6. Fasten the cuff end to the
Velcro®closure.
7. Make sure that your hand is
open, relaxed, and palm up.
M3815-90001-UG-Eng-revD.qxd 5/1/01 4:20 PM Page 22
23
BP User Guide
How to Take Your Blood Pressure
8. Press the START/STOP button. Sit still and do not move your
arm during the measurement.
Note: If you want to stop the measurement at any time, press the
START/STOP button. Wait 15 minutes before taking your blood
pressure again.
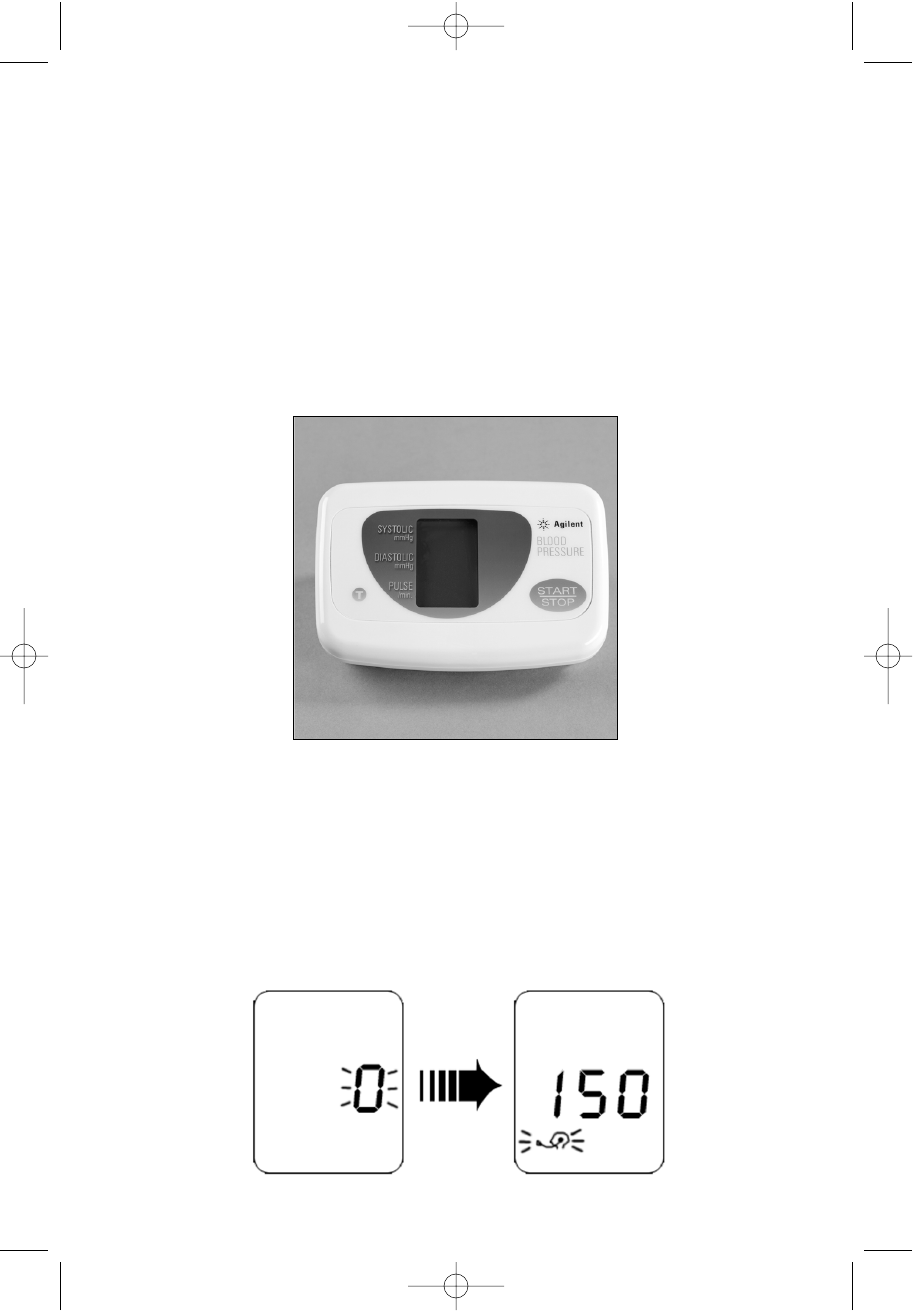
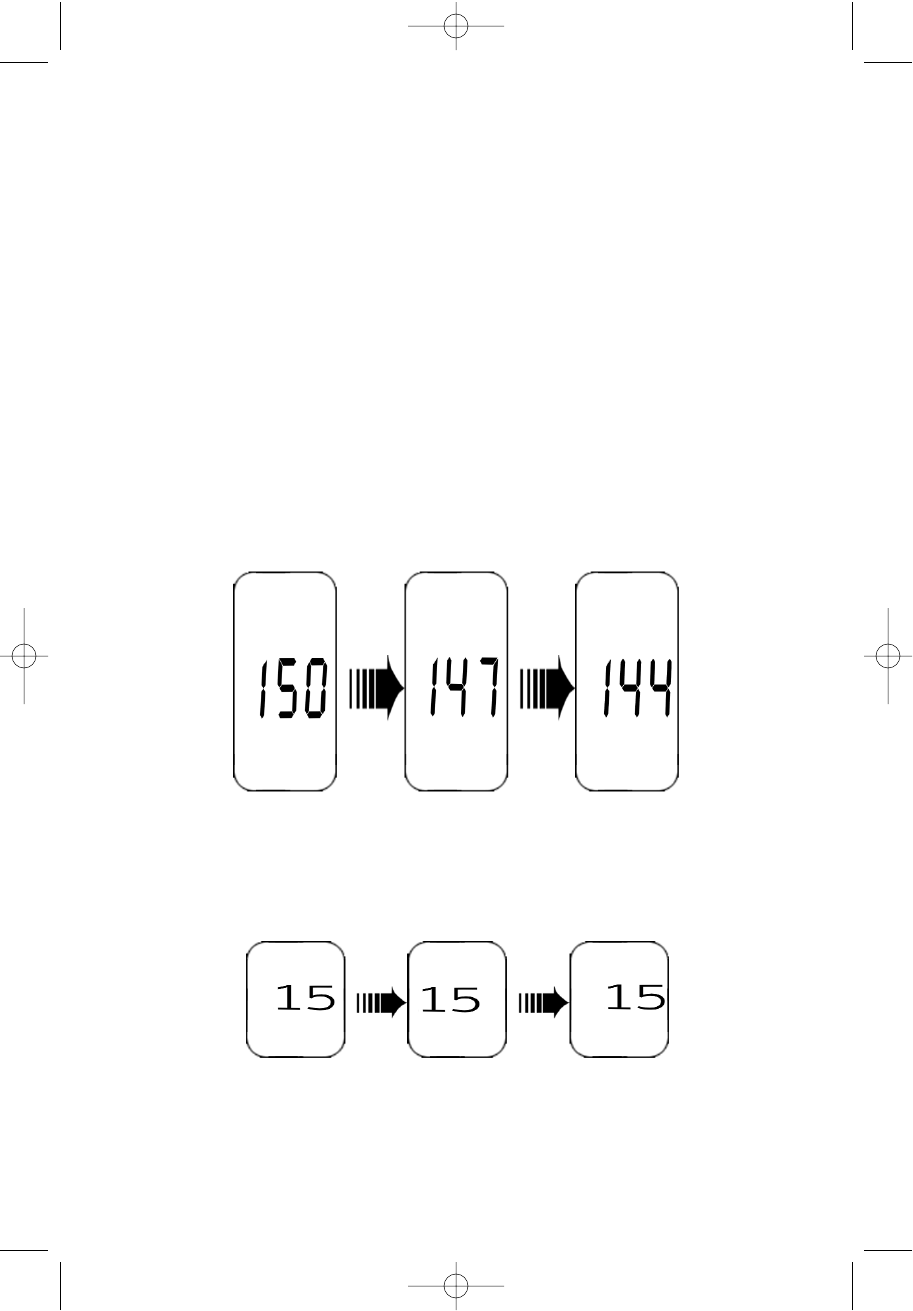
9. Watch the display window. A series of numbers and symbols
will appear in the display window. The cuff inflates and may
feel tight. The BP Unit displays pressure numbers that change
and increase to just beyond 150 mmHg.
M3815-90001-UG-Eng-revD.qxd 5/1/01 4:20 PM Page 23
24
How to Take Your Blood Pressure
WARNING: It is important for you to watch the display. If the numbers
go up to 330 mmHG, press the START/STOP button to stop the mea-
surement. The BP Unit is defective. Contact your Health Care Provider
for further instructions.
10. As the cuff pressure automatically decreases, watch the dis-
play screen. The BP Unit emits a series of beeps while the
pressure decreases.
WARNING: As you watch the display, if the BP numbers drop
down to 15 mmHg and stay that way for more than 3 minutes, press
the START/STOP button to stop the measurement. The BP Unit is
defective. Contact your Health Care Provider for further instruc-
tions.
M3815-90001-UG-Eng-revD.qxd 5/1/01 4:20 PM Page 24

25
BP User Guide
How to Take Your Blood Pressure
11. A long beep signals the end of the BP measurement and the
cuff deflates. The display window shows your final BP mea-
surement and pulse rate.
Note: If you received an error message, stopped the BP measurement
while in progress, or feel that the reading might be in error, wait 15
minutes before taking your blood pressure again.
12. You can remove the cuff. The BP Unit has taken your blood
pressure and pulse rate. The BP Unit turns off automatically.
Note: Do not store the BP Unit with the air hose twisted or wrapped
tightly around the display.
M3815-90001-UG-Eng-revD.qxd 5/1/01 4:20 PM Page 25
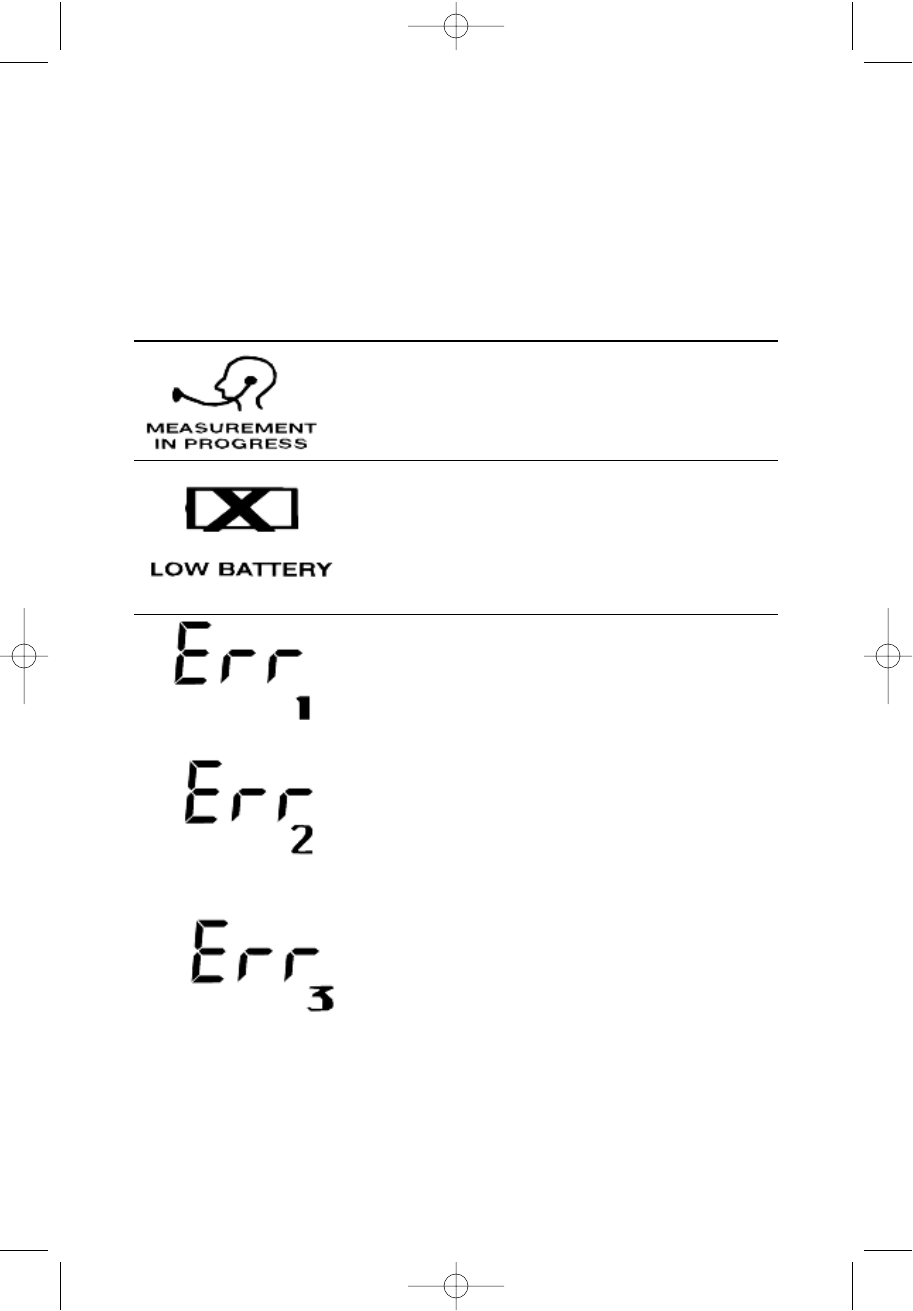
What Display Symbols Mean
26
DISPLAY SYMBOLS EXPLANATION
Appears during the blood pressure measure-
ment; blinks and beeps with each detected
pulse beat
Appears when the batteries need to be replaced;
also appears briefly at the start of your blood
pressure measurement
When an error message appears, check your
equipment, wait 15 minutes and retake your
blood pressure before contacting your Health
Care Provider. You may be able to troubleshoot
these error messages as described later in the
Troubleshooting section.
or
or
M3815-90001-UG-Eng-revD.qxd 5/1/01 4:20 PM Page 26

BP User Guide
27
Maintenance
Replace the batteries when instructed to by your Health Care Provider
or when you see the Low Battery symbol on the BP Unit display.
Caution: Avoid exposing the BP Unit to extremes in temperature,
humidity, direct sunlight, shock, dust, spills, or standing water.
Clean the BP Unit only as required. Clean the BP Unit with a dry, soft
cloth or a soft cloth dampened with tap water and mild detergent, if
desired. Never use alcohol, acetone, benzene, thinner, or other harsh
chemicals to clean the BP Unit, cuff, or air hose.
Caution: Avoid storing the BP Unit so that the cuff assembly is twisted
or folded tightly.
Caution: Avoid tugging at the air hose or carrying the BP Unit by the
air hose.
Caution: Avoid storing the BP Unit where children or pets have access
to it. There may be a risk of injury if children or pets get tangled in the
air hose or if the cuff inflates.
M3815-90001-UG-Eng-revD.qxd 5/1/01 4:20 PM Page 27
Troubleshooting
28
The only user-serviceable parts are the batteries.
Caution: Do not attempt to service or repair the BP Unit yourself. If a
mechanical problem occurs, contact your Health Care Provider for fur-
ther instructions.
When an error message appears, check your equipment and retake your
blood pressure before contacting your Health Care Provider. Remember
to relax for 15 minutes before taking your BP again.
You may be able to perform minor troubleshooting when error messages
appear on the display.
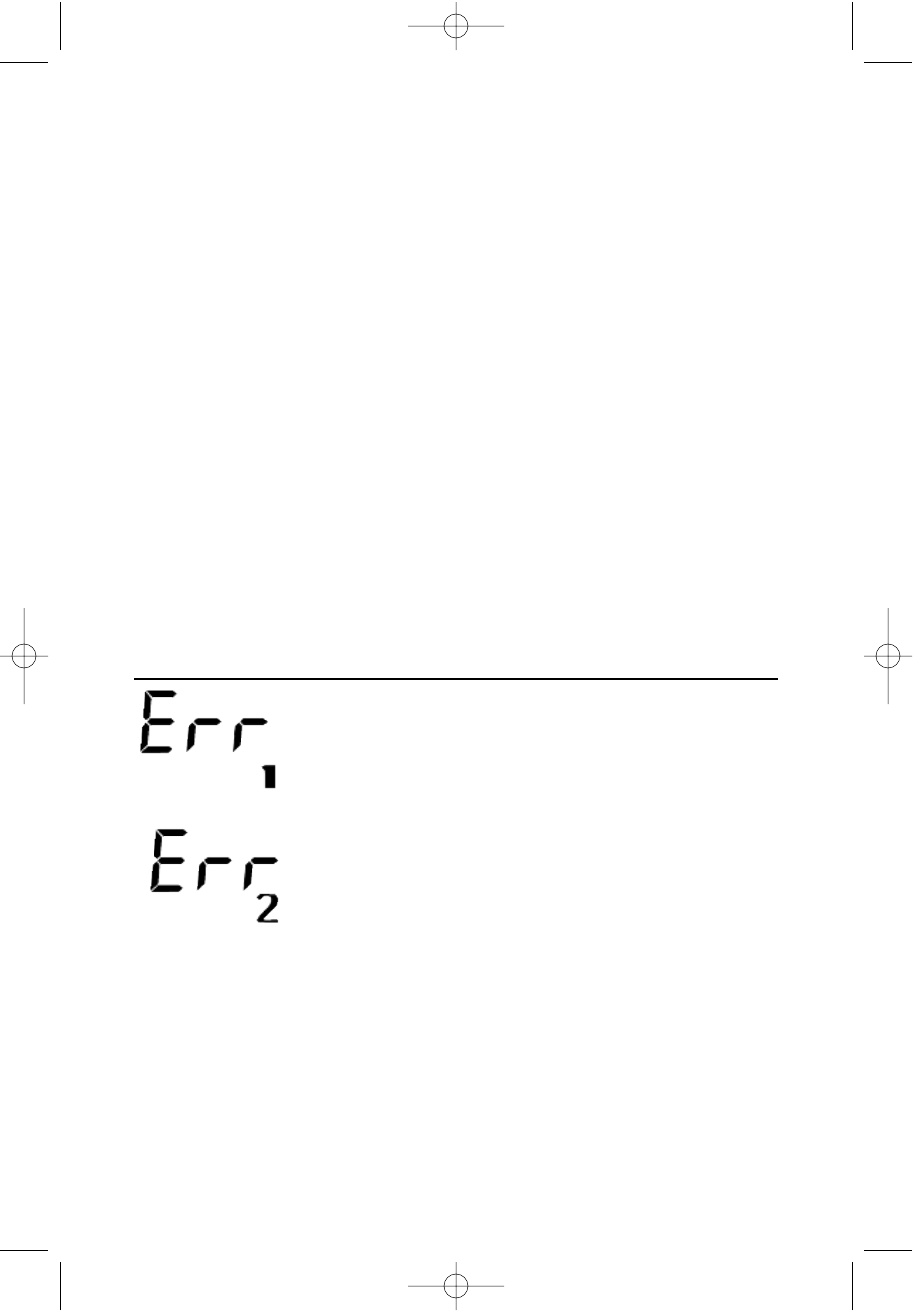
DISPLAY SYMBOL CONDITION/CAUSE CORRECTIVE ACTION
Appears when the
systolic and diastolic mea-
surements are
within 10 mmHg of
each other
Appears if the pressure
value is unstable due to
movement during reading
Check for air leakage;
check that the air hose
is properly connected by
unplugging it and firmly
replugging it in.
Wait 15 minutes, and
then take your blood
pressure again BUT
remain very still.
M3815-90001-UG-Eng-revD.qxd 5/1/01 4:20 PM Page 28
Troubleshooting
29
BP User Guide
If you are unable to troubleshoot these error messages by follow-
ing these corrective actions, contact your Health Care Provider for
further instructions.
If your BP Unit is defective or no longer necessary, please contact
your Health Care Provider.
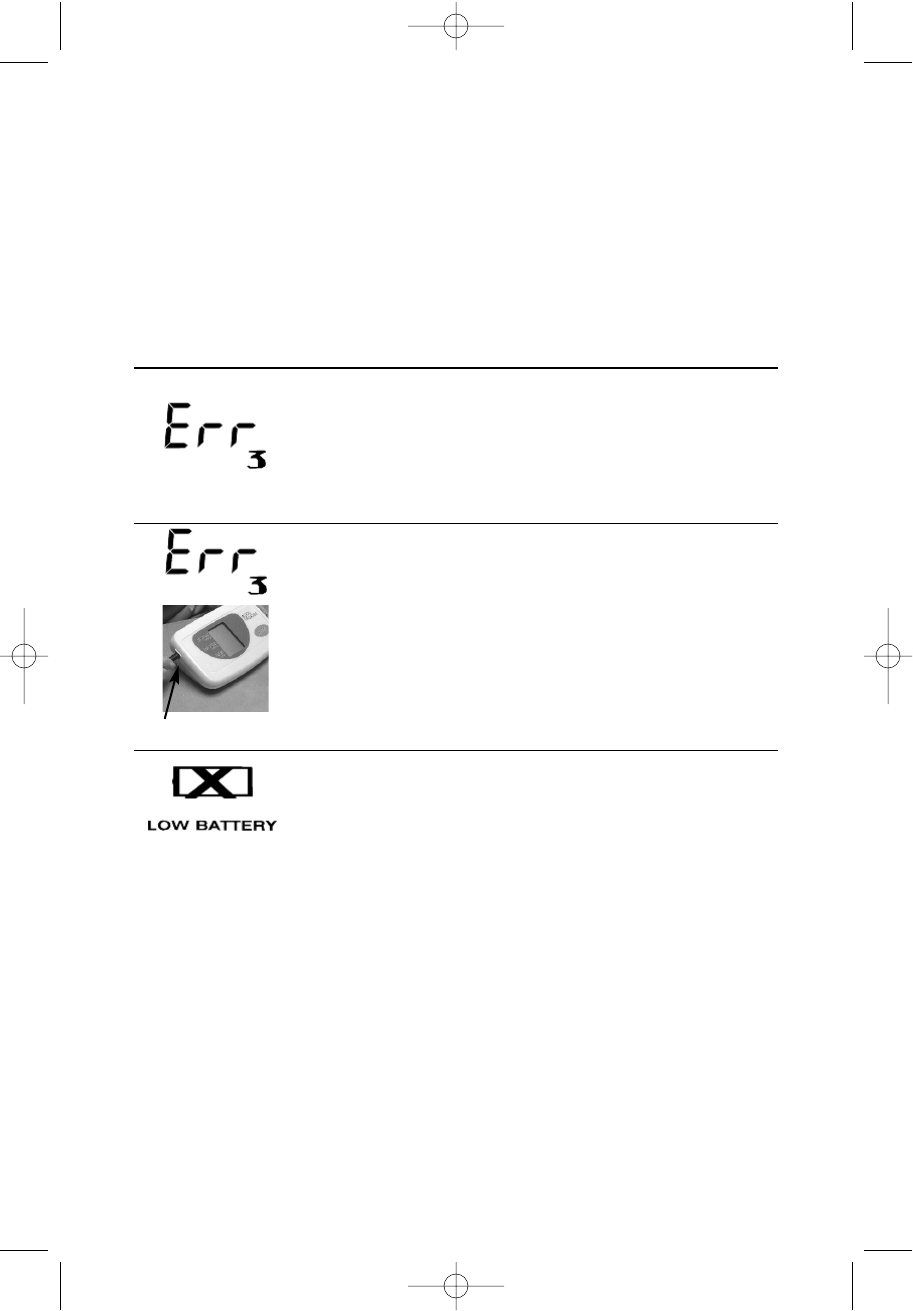
DISPLAY SYMBOL CONDITION/CAUSE CORRECTIVE ACTION
Appears if the pressure
value did not increase
during cuff inflation or if
the cuff is not fastened
Appears if the air connec-
tor of the air hose is not
inserted properly into the
BP Unit socket
Appears when the battery
voltage is too low for the
BP Unit to work properly
Check that the air hose
is properly connected by
unplugging it and firmly
replugging it in. Make
sure the cuff is securely
fastened.
Refer to step 1 of
Preparing the Cuff
Assembly. Check that
the air hose is properly
connected by unplugging
it and firmly replugging it
in.
Replace all four batteries
immediately and perform
a Radio Test.
Socket
M3815-90001-UG-Eng-revD.qxd 5/1/01 4:20 PM Page 29
30
Specifications
Model M3815A
Type • Oscillometric
• Type B Patient Applied Part
• IPXO Ordinary Equipment
• Continuous operation
Display • Digital, 16 mm character height
• Pressure/pulse displayed simultaneously
Measurement range • Pressure: 20 to 280 mmHg
• Pulse: 40 to 200 pulses per minute
Accuracy • Pressure; ±4 mmHg or 2%, whichever is greater
• Pulse ±6%
Pressurization Automatic, using micropump
Depressurization Constant-air release-valve system
Deflation Automatic exhaust
Power source Four type AA (1.5 volt) alkaline batteries connected
in series (6.0 volts), included
Battery Life Approximately 6 months with 1 daily measurement
M3815-90001-UG-Eng-revD.qxd 5/1/01 4:20 PM Page 30

BP User Guide
31
Specifications
Operating environment • 50º to 104º F (10º - 40º C)
• Less than 85% relative humidity
• Atmospheric altitude pressure 5.72 - 1013 hPa
(0 - 15,000 feet or 0 - 4,600 meters of altitude)
• WARNING: This equipment is not suitable for
use in the presence of flammable anaesthetic
mixture with air or with oxygen or nitrous oxide.
Storage environment • 15º to 130º F (-9º - 54º C)
• Less than 85% relative humidity
• Atmospheric pressure 572 - 1013 hPa
(0 - 15,000 feet or 0 - 4,600 meters of altitude)
Dimensions (approx.) • Length: 6.5” (165 mm)
• Width: 4.4” (112 mm)
• Height: 2.7” (69 mm)
Weight (approx.) 1 lb., 4 oz. (570 gms) with batteries
M3815-90001-UG-Eng-revD.qxd 5/1/01 4:20 PM Page 31

32
Electromagnetic Compatibility
The electromagnetic compatibility (EMC) validation of the M3815A
Blood Pressure Unit included testing performed according to the inter-
national standard for EMC with medical devices. See the
Manufacturer’s Declaration for details.
Electromagnetic Compatibility Testing
During the test program, the BP Unit was subjected to many EMC tests,
including both international standard and Agilent proprietary tests.
During most of the testing, no anomalies were observed.
For one of the tests, EN 61000-4-3 Radiated Immunity reduced perfor-
mance was observed. EN 61000-4-3 specifies that the product be sub-
jected to a field of 3 Volts/meter over a frequency range of 26 to 1000
MHz with no degradation of performance or loss of function below the
performance level specified when equipment is operated as intended. At
many of the test frequencies over the specified range, no anomalies
were observed. However, at a number of test frequencies, radio commu-
nications from the BP Unit to the M3812A Home Hub was disrupted.
These reduced levels are as low as 0.48 V/m in the range from 902.278
MHz to 948.302 MHz.
The phenomena discussed above are not unique to this BP Unit, but are
characteristic of radio instrumentation in use today. The Home Hub is a
radio receiver, and its reception of M3815A BP Unit signals can be
degraded by electromagnetic interference.
M3815-90001-UG-Eng-revD.qxd 5/1/01 4:20 PM Page 32

BP User Guide
33
Electromagnetic Compatibility
Avoiding Electromagnetic Interference Problems
Eliminating or moving the source of interference can prevent electro-
magnetic interference. Possible sources of interfering radio frequency
radiation are cellular telephones, cordless telephones, or other products
that contain radio transmitters. The BP Unit has a Radio Test button
that sends a reduced strength test radio signal to the Home Hub, which
sounds an audio tone if the test signal is successfully received. This test
can be used to determine whether sources of interference are present.
These sources can be turned off or moved away to reduce their strength
and reduce interference. In addition, the BP Unit and the Home Hub can
be placed closer to each other so that the radio transmission from the
BP Unit to the Home Hub has less distance to travel and interfering
radio signals have less effect. The radio transmission from the BP Unit
is repeated periodically so that an intermittent source of interference
should only delay, not prevent, reception.
M3815-90001-UG-Eng-revD.qxd 5/1/01 4:20 PM Page 33

34
FCC Regulations
This equipment has been tested and found to comply with the limits for
a Class B digital device, pursuant to Part 15 of the FCC rules. These
limits are designed to provide reasonable protection against harmful
interference in a residential installation. This equipment generates, uses,
and can radiate radio frequency energy. If it is not installed and used in
accordance with the instructions, it might cause harmful interference to
radio communications. However, there is no guarantee that interference
will not occur in a particular installation. If this equipment does cause
harmful interference to radio or television reception, which can be
determined by turning the equipment off and on, the user is encouraged
to try to correct the interference by one or more of the following mea-
sures:
• Re-orient or relocate the Home Hub.
• Increase separation between the measurement devices or the Home
Hub and the device being interfered with; e.g., the television.
• Consult your Health Care Provider.
Note: Any changes or modifications to the equipment that are not
expressly approved by Agilent could void the user’s authority to operate
this equipment.
M3815-90001-UG-Eng-revD.qxd 5/1/01 4:20 PM Page 34

BP User Guide
35
Conclusion
Agilent and your Health Care Provider appreciate your efforts to partici-
pate in your home health care plan. By learning about and using the
Blood Pressure Unit as directed, you actively participate in your Health
Care Provider’s plan to keep track of your important measurements.
If you have any problems or questions, please contact your Health
Care Provider.
If desired, place Health Care Provider information label here.
M3815-90001-UG-Eng-revD.qxd 5/1/01 4:20 PM Page 35

36
M3815-90001-UG-Eng-revD.qxd 5/1/01 4:20 PM Page 36