Philips 10BDL3051T/00 User Manual מדריך למשתמש 10bdl3051t 00 Dfu Eng
User Manual: Philips 10BDL3051T/00 מדריך למשתמש Multi-Touch Display 10BDL3051T/00 | Philips10BDL3051T/00
Open the PDF directly: View PDF ![]() .
.
Page Count: 43
PHILIPS 10BDL3051T
V1.01
User Manual (English)

Safety Instructions
This electronic user guide is intended for anyone who uses the Philips monitor. Take time to read
this user manual before you use your monitor. It contains important information and notes
regarding operating your monitor. The Philips guarantee applies provided the product is handled
properly for its intended use, in accordance with its operating instructions and upon presentation
of the original invoice or cash receipt, indicating the date of purchase, dealers name and model and
production number of the product.
Warnings
Use of controls, adjustments or procedures other than those specified in this documentation may
result in exposure to shock, electrical hazards and/or mechanical hazards. Read and follow these
instructions when connecting and using your computer monitor.
Operation
• Keep the monitor out of direct sunlight and away from stoves or any other heat source.
• Remove any object that could fall into ventilation holes or prevent proper cooling of the
monitor’s electronics.
• Do not block the ventilation holes on the cabinet.
• When positioning the monitor, make sure the power plug and outlet are easily accessible.
• If turning off the monitor by detaching the power cable or DC power cord, wait for 6 seconds
before attaching the power cable or DC power cord for normal operation.
• Please use approved power cord provided by Philips all the time. If your power cord is missing,
please contact with your local service center. (Please refer to Customer Care Consumer Information
Center)
• Do not subject the monitor to severe vibration or high impact conditions during operation.
• Do not knock or drop the monitor during operation or transportation
Maintenance
To protect your monitor from possible damage, do not put excessive pressure on the LCD panel.
When moving your monitor, grasp the frame to lift; do not lift the monitor by placing your hand or
fingers on the LCD panel.
Unplug the monitor if you are not going to use it for an extensive period of time.
Unplug the monitor if you need to clean it with a slightly damp cloth. The screen may be wiped with
a dry cloth when the power is off. However, never use organic solvent, such as, alcohol, or
ammonia-based liquids to clean your monitor.
To avoid the risk of shock or permanent damage to the set, do not expose the monitor to dust, rain,
water, or excessive moisture environment.
If your monitor gets wet, wipe it with dry cloth as soon as possible.
If foreign substance or water gets in your monitor, please turn the power off immediately and
disconnect the power cord. Then, remove the foreign substance or water, and send it to the
maintenance center.
Do not store or use the monitor in locations exposed to heat, direct sunlight or extreme cold.
In order to maintain the best performance of your monitor and use it for a longer lifetime, please
use the monitor in a location that falls within the following temperature and humidity ranges.
Temperature: 0-40°C 32-95°F
Humidity: 10-85% RH
IMPORTANT:
Always activate a moving screen saver program when you leave your monitor unattended.
Always activate a periodic screen refresh application if your monitor will monitor unchanging static
content. Uninterrupted monitor of still or static images over an extended period may cause “burn
in”, also known as“after-imaging” or “ghost imaging”, on your screen. “Burn-in”, “after-imaging”,
or “ghost imaging” is a well-known phenomenon in LCD panel technology. In most cases, the
“burned in” or “after-imaging” or “ghost imaging” will disappear gradually over a period of time
after the power has been switched off.
Warning
Severe “burn-in” or “after-image” or “ghost image” symptoms will not disappear and cannot be
repaired. The damage mentioned above is not covered under your warranty.
Service
* The casing cover should be opened only by qualified service personnel.
* If there is any need for any document for repair or integration, please contact with your local
service center. (Please refer to the chapter of “Consumer Information Center”)
* For transportation information, please refer to “Technical Specifications”.
* Do not leave your monitor in a car/trunk under direct sun light.
Note
Consult a service technician if the monitor does not operate normally, or you are not sure what
procedure to take when the operating instructions given in this manual have been followed.
Europe – EU Declaration of Conformity
This device complies with the essential requirements of the Radio Equipment Directive
(2014/53/EU). The following test methods have been applied in order to prove presumption of
conformity with the essential requirements of the Radio Equipment Directive (2014/53/EU):
- EN60950-1
Safety of information Technology Equipment
- EN62311
Assessment of electronic and electrical equipment related to human exposure restrictions for
electromagnetic fields (0HZ-300GHz)
-EN 300328(For 802.11b/g/n)
Electromagnetic compatibility and Radio spectrum Matters (ERM); Wideband Transmission systems;
Data transmission equipment operating in the 2.4GHz ISM band and using spread spectrum
modulation techniques; Harmonized EN covering essential requirements under article 3.2 of the
R&TTE Directive.
-EN301489-17
Electromagnetic compatibility and Radio spectrum Matters (ERM); Electromagnetic Compatibility
(EMC) standard for radio equipment and services; Part 17: Specific conditions for 2.4GHz wideband
transmission systems and 5GHz high performance RLAN equipment
-EN301489-1

Electromagnetic compatibility and Radio spectrum Matters (ERM); Electromagnetic Compatibility
(EMC) standard for radio equipment and services; Part 1: Common technical requirements
This product has been tested and found to comply with the harmonized standards for information
Technology Equipment, these harmonized standards published under Directives of Official Journal
of the European Union.
Warning:
This equipment is compliant with Class A of EN55032. In a residential environment this equipment
may cause radio interference.
ESD Warnings:
When user close to the monitor may cause the equipment discharge and reboot to monitor of main
menu.
Federal Communications Commission (FCC) Notice (U.S. Only)
NOTE: This equipment has been tested and found to comply with the limits for a Class A
digital device, pursuant to part15 of the FCC Rules. These limits are designed to provide
reasonable protection against harmful interference when the equipment is operated in a
commercial environment. This equipment generates, uses, and can radiate radio frequency
energy and, if not installed and used in accordance with the instruction manual, may cause
harmful interference to radio communications. Operation of this equipment in a residential
area is likely to cause harmful interference in which case the user will be required to correct
the interference at his own expense.
Changes or modifications not expressly approved by the party responsible for compliance
could void the user's authority to operate the equipment.
Use only an RF shielded cable that was supplied with the monitor when connecting this monitor to a computer
device.
To prevent damage which may result in fire or shock hazard, do not expose this appliance to rain or excessive
moisture.
USA:
WARNING: Changes or modifications to this unit not expressly approved by the party responsible for compliance
could void the user's authority to operate the equipment.
NOTE: This equipment has been tested and found to comply with the limits for a Class A digital device, pursuant to
Part 15 of the FCC Rules. These limits are designed to provide reasonable protection against harmful interference
in a residential installation. This equipment generates, uses and can radiate radio frequency energy and, if not
installed and used in accordance with the instructions, may cause harmful interference to radio communications.
However, there is no guarantee that interference will not occur in a particular installation. If this equipment does
cause harmful interference to radio or television reception, which can be determined by turning the equipment
off and on, the user is encouraged to try to correct the interference by one or more of the following measures:
Reorient or relocate the receiving antenna.
Increase the separation between the equipment and receiver.
Connect the equipment into an outlet on a circuit different from that to which the receiver is connected.
Consult the dealer or an experienced radio/panel PC technician for help.
This device complies with Part 15 of the FCC Rules. Operation is subject to the following two conditions:
(1) This device may not cause harmful interference, and (2) This device must accept any interference received,
including interference that may cause undesired operation.
Canada:
This device complies with Industry Canada licence-exempt RSS standard(s).
Operation is subject to the following two conditions:
(1) This device may not cause interference, and (2) this device must accept any interference, including
interference that may cause undesired operation of the device.
Le présent appareil est conforme aux CNR d'Industrie Canada applicables aux appareils radio exempts de licence.
L'exploitation est autorisée aux deux conditions suivantes : (1) l'appareil ne doit pas produire de brouillage, et (2)
l'utilisateur de l'appareil doit accepter tout brouillage radioélectrique subi, même si le brouillage est susceptible
d'en compromettre le fonctionnement.
FCC, IC& CE RF Radiation Exposure Statement Caution: To maintain compliance with the FCC, IC& CE’s RF
exposure guidelines, place the product at least 20cm from nearby persons.
Le présent document IC, FCC brouilleur fixaient un rayonnement incontrôlée. Installation et mise en œuvre de ce
matériel devrait avec échangeur distance minimale entre 20cm & ton corps.
The suitable temperature for the Colour Monitor and accessories is 0℃-45℃.
Adaptor with ferrite must be used with this equipment to ensure compliance with the Class A FCC limits.
Power Adapter information:
Model No.: KSASB0241200150D5
INPUT: 100-240V~50/60Hz 0.6A
OUTPUT: 12V 1.5A
Waste Electrical and Electronic Equipment-WEEE
Attention users in European Union private households
Correct Disposal of this product. This marking indicates that this product should not be disposed
with other household wastes throughout the EU. To prevent possible harm to the environment or
human health from uncontrolled waste disposal, recycle it responsibly to promote the sustainable
reuse of material resources. To return your used device, please use the return and collection
systems or contact the retailer where the product was purchased. They can take this product for
environmental safe recycling.
Attention users in United States:
Please dispose of according to all Local, State and Federal Laws. For the disposal or recycling information, contact
www.mygreenelectronics.com or www. eiae.org.
End of Life Directives-Recycling
Your new Public Information Monitor contains several materials that can be recycled for new users.
Please dispose of according to all Local, State, and Federal laws.
NOTICE
SOFTWARE END USER LICENSE AGREEMENT
THIS SOFTWARE END USER LICENSE AGREEMENT (THIS “AGREEMENT”) IS A LEGAL AND BINDING AGREEMENT
BETWEEN YOU (EITHER AN INDIVIDUAL OR ENTITY) AND MMD MONITORS & DISPLAYS NEDERLAND B.V., A
DUTCH LIMITED LIABILITY COMPANY, WITH ITS PRINCIPAL OFFICE AT PRINS BERNHARDPLEIN 200, 1097 JB
AMSTERDAM, THE NETHERLANDS AND ITS SUBSIDIARY COMPANIES (INDIVIDUALLY AND COLLECTIVELY "MMD").
THIS AGREEMENT GIVES YOU THE RIGHT TO USE CERTAIN SOFTWARE (THE “SOFTWARE”) INCLUDING USER
DOCUMENTATION IN ELECTRONIC FORM WHICH MAY HAVE BEEN PROVIDED SEPARATELY OR TOGETHER WITH A
MMD PRODUCT (THE DEVICE”). BY DOWNLOADING, INSTALLING OR OTHERWISE USING THE SOFTWARE, YOU
ACCEPT AND AGREE TO BE BOUND BY ALL OF THE TERMS AND CONDITIONS OF THIS AGREEMENT. IF YOU DO
NOT AGREE TO THESE TERMS AND CONDITIONS, DO NOT DOWNLOAD, INSTALL OR OTHERWISE USE THE
SOFTWARE. IF YOU ACQUIRED THE SOFTWARE IN TANGIBLE MEDIA E.G. CD WITHOUT THE OPPORTUNITY TO
REVIEW THIS LICENSE AND DO NOT ACCEPT THESE TERMS, YOU MAY RECEIVE A FULL REFUND OF THE AMOUNT,
IF ANY, THAT YOU PAID FOR THE SOFTWARE IF YOU RETURN THE SOFTWARE UNUSED WITH PROOF OF
PAYMENT WITHIN 30 DAYS FROM THE DATE OF PURCHASE.
1. Grant of License. This Agreement grants you a non-exclusive, nontransferable, non-sub licensable license to
install and use, on the Device, one (1) copy of the specified version of the Software in object code format as set
out in the user documentation solely for your personal use. The Software is "in use" when it is loaded into the
temporary or permanent memory (i.e. RAM, hard disk, etc.) of the Device.
2. Ownership. The Software is licensed and not sold to you. This Agreement grants you only the right to use the
Software, but you do not acquire any rights, express or implied, in the Software other than those specified in this
Agreement. MMD and its licensors retain all right, title, and interest in and to the Software, including all patents,
copyrights, trade secrets, and other intellectual property rights incorporated therein. The Software is protected by
copyright laws, international treaty provisions, and other intellectual property laws. Therefore, other than as
expressly set forth herein, you may not copy the Software without prior written authorization of MMD, except
that you may make one (1) copy of the Software for your back-up purposes only. You may not copy any printed
materials accompanying the Software, nor print more than one (1) copy of any user documentation provided in
electronic form, except that you may make one (1) copy of such printed materials for your back-up purposes only.
3. License Restrictions. Except as provided otherwise herein, you shall not rent, lease, sublicense, sell, assign,
loan, or otherwise transfer the Software. You shall not, and you shall not permit any third party, to reverse
engineer, decompile, or disassemble the Software, except to the extent that applicable law expressly prohibits the
foregoing restriction. You may not remove or destroy any product identification, copyright notices, or other
proprietary markings or restrictions from the Software. All titles, trademarks, and copyright and restricted rights
notices shall be reproduced on your back up copy of the Software. You may not modify or adapt the Software,
merge the Software into another program or create derivative works based upon the Software.
4. Disclaimer. THE SOFTWARE IS DESIGNED TO ASSIST YOU IN TRANSFERRING MATERIAL IN WHICH YOU OWN THE
COPYRIGHT OR HAVE OBTAINED PERMISSION TO GRAB AND TRANSFER FROM THE COPYRIGHT OWNER. UNLESS
YOU OWN THE COPYRIGHT OR HAVE PERMISSION TO GRAB AND TRANSFER FROM THE COPYRIGHT OWNER, YOU
MAY BE VIOLATING COPYRIGHT LAW AND BE SUBJECT TO PAYMENT OF DAMAGES AND OTHER REMEDIES. IF YOU
ARE UNCERTAIN ABOUT YOUR RIGHTS, YOU SHOULD CONTACT YOUR LEGAL ADVISOR. YOU ASSUME FULL
RESPONSIBILITY FOR THE LEGAL AND RESPONSIBLE USE OF THE SOFTWARE
5. Open Source Software. (a) This software may contain components that are subject to open-source terms, as
stated in the documentation accompanying the Device. This Agreement does not apply to this software as such. (b)
Your license rights under this Agreement do not include any right or license to use, distribute or create derivative
works of the Software in any manner that would subject the Software to Open Source Terms. "Open Source
Terms" means the terms of any license that directly or indirectly (1) create, or purport to create, obligations for
MMD with respect to the Software and/or derivative works thereof; or (2) grant, or purport to grant, to any third
party any rights or immunities under intellectual property or proprietary rights in the Software or derivative works
thereof.
6. Termination. This Agreement shall be effective upon installation or first use of the Software and shall
terminate (i) at the discretion of MMD, due to your failure to comply with any term of this Agreement; or (ii) upon
destruction of all copies of the Software and related materials provided to you by MMD hereunder. MMD’s rights
and your obligations shall survive the termination of this Agreement.
7. Upgrades. MMD may, at its sole option, make upgrades to the Software available by general posting on a
website or by any other means or methods. Such upgrades may be made available pursuant to the terms of this
Agreement or the release of such upgrades to you may be subject to your acceptance of another agreement.
8. Support Services. MMD is not obligated to provide technical or other support (“Support Services”) for the
Software. If MMD does provide you with Support Services, these will be governed by separate terms to be agreed
between you and MMD.
9. Limited Software Warranty. MMD provides the Software ‘as is’ and without any warranty except that the
Software will perform substantially in accordance with the documentation accompanying the Software for a
period of one year after your first download, installation or use of the Software, whichever occurs first. MMD’s
entire liability and your exclusive remedy for breach of this warranty shall be, at MMD’s option, either (i) return of
the price paid by you for the Software (if any); or (ii) repair or replacement of the Software that does not meet the
warranty set forth herein and that is returned to MMD with a copy of your receipt. This limited warranty shall be
void if failure of the Software has resulted from any accident, abuse, misuse or wrongful application. Any
replacement Software will be warranted for the remainder of the original warranty period or thirty (30) days,
whichever is longer. This limited warranty shall not apply to you if the Software was provided to you free of charge
on an evaluation only basis.
10. NO OTHER WARRANTIES. EXCEPT AS SET FORTH ABOVE, MMD AND ITS LICENSORS DO NOT WARRANT THAT
THE SOFTWARE WILL OPERATE ERROR FREE OR UNINTERRUPTED, OR WILL MEET YOUR REQUIREMENTS. YOU
ASSUME ALL RESPONSIBILITIES FOR SELECTION OF THE SOFTWARE TO ACHIEVE YOUR INTENDED RESULTS, AND
FOR THE INSTALLATION OF, USE OF, AND RESULTS OBTAINED FROM THE SOFTWARE. TO THE MAXIMUM EXTENT
PERMITTED BY APPLICABLE LAW, MMD AND ITS LICENSORS DISCLAIM ALL WARRANTIES AND CONDITIONS,
WHETHER EXPRESS OR IMPLIED, INCLUDING BUT NOT LIMITED TO THE IMPLIED WARRANTIES OF
MERCHANTABILITY, FITNESS FOR A PARTICULAR PURPOSE, AND ACCURACY OR COMPLETENESS OF RESULTS WITH
RESPECT TO THE SOFTWARE AND THE ACCOMPANYING MATERIALS. THERE IS NO WARRANTY AGAINST
INFRINGEMENT. MMD DOES NOT WARRANT THAT YOU WILL BE ABLE TO DOWNLOAD, COPY, STORE, DISPLAY,
TRANSFER, AND/OR PLAY SECURE CONTENT.
11. LIMITATION OF LIABILITY. UNDER NO CIRCUMSTANCES WILL MMD OR ITS LICENSORS BE LIABLE FOR ANY
CONSEQUENTIAL, SPECIAL, INDIRECT, INCIDENTAL OR PUNITIVE DAMAGES WHATSOEVER, INCLUDING, WITHOUT
LIMITATION, DAMAGES FOR LOSS OF PROFITS OR REVENUES, BUSINESS INTERRUPTION, LOSS OF BUSINESS
INFORMATION, LOSS OF DATA, LOSS OF USE OR OTHER PECUNIARY LOSS, EVEN IF MMD OR ITS LICENSORS HAVE
BEEN ADVISED OF THE POSSIBILITY OF SUCH DAMAGES. IN NO EVENT SHALL MMD’S OR ITS LICENSORS’
AGGREGATE LIABILITY FOR DAMAGES ARISING OUT OF THIS AGREEMENT EXCEED THE GREATER OF THE PRICE
ACTUALLY PAID BY YOU FOR THE SOFTWARE OR FIVE POUNDS STERLING (5.00).
12. Trademarks. Certain of the product and MMD names used in this Agreement, the Software, and the printed
user documentation may constitute trademarks of the MMD, its licensors or other third parties. You are not
authorized to use any such trademarks.
13. Export Administration. You agree that you will not directly or indirectly, export or re-export the Software to
any country for which the United States Export Administration Act, or any similar United States law or regulation
requires an export license or other U.S. Government approval, unless the appropriate export license or approval
has first been obtained. By downloading or installing the Software you agree to abide by this Export provision.
14. Governing law. This Agreement is governed by the laws of the Netherlands, without reference to its conflict
of laws principles. This Agreement shall not be governed by the United Nations Convention on Contracts for the
International Sale of Goods, the application of which is expressly excluded. Any dispute between you and MMD
regarding this Agreement shall be subject to the non-exclusive jurisdiction of the courts of the Netherlands. If for
any reason a court of competent jurisdiction finds any provision, or portion thereof, to be unenforceable, the
remainder of this Agreement shall continue in full force and effect.
15. General. This Agreement contains the entire agreement between you and MMD and supersedes any prior
representation, undertaking or other communication or advertising with respect to the Software and user
documentation. If any part of this Agreement is held invalid, the remainder of this Agreement will continue in
full force and effect. This Agreement shall not prejudice the statutory rights of any party dealing as a consumer.
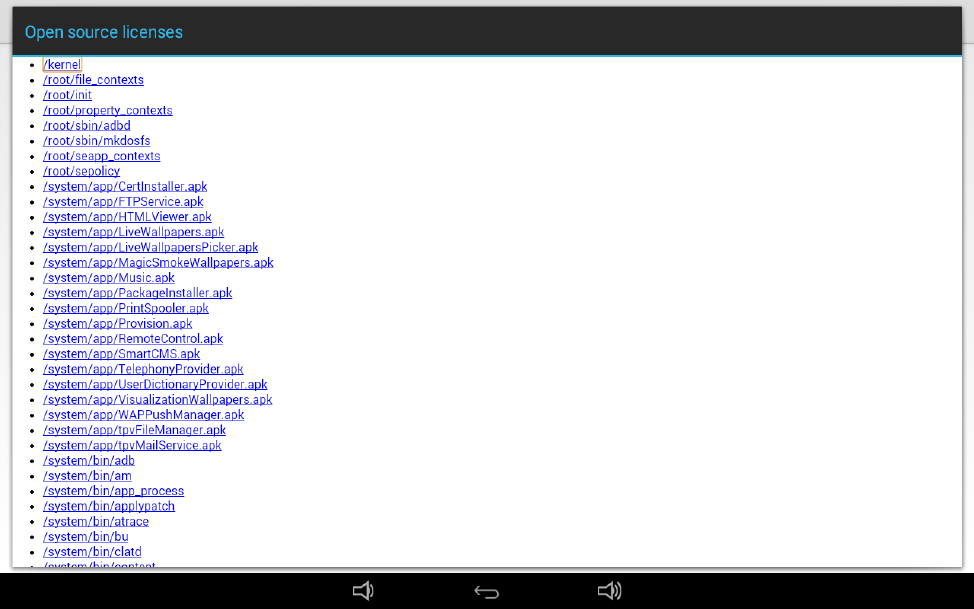
Open source licenses statement
Disclaimer regarding services and/or software offered by third parties
Services and/or software offered by third parties may be changed, suspended, or terminated without prior notice.
MMD does not bear any responsibility in these sorts of situations.
Third Party (Open) Source Software
This product may make use of third party (open) source software and the use of this third party (open) source
software may be subject to terms and conditions of such third party. In case open source software is used, MMD
provides source attribution, where applicable. When required by the terms of the open source license, MMD
published the relevant parts of the source code for the product on http://licenses.cmnd.io. MMD hereby offers to
deliver, upon request, a copy of the complete corresponding source code for the copyrighted open source
packages used in this product for which such offer is requested by the respective license. This offer is valid up to
three years after product purchase to anyone in receipt of this information. To obtain the source code, please
write in English to open.source@tpv-tech.com
You can find the detailed information in Android OSD.
Step 1:
Step:2:
Step 3:
Contents
1.Unpacking and Introduction .................................................................................................................................... 1
1.1. Unpacking .................................................................................................................................................. 1
1.2. Package contents ...................................................................................................................................... 1
1.3. Installation ................................................................................................................................................ 1
2 Physical view and features ...................................................................................................................................... 3
2.1 Front View .................................................................................................................................................. 3
2.2 Top View ...................................................................................................................................................... 3
2.3 Rear View .................................................................................................................................................... 4
2.4 IO Port ......................................................................................................................................................... 5
3. Cleaning and Troubleshooting ................................................................................................................................ 6
3.1. Cleaning ..................................................................................................................................................... 6
3.2 Troubleshooting ........................................................................................................................................ 6
4. Technical Data ......................................................................................................................................................... 6
4.1 Specifications ............................................................................................................................................. 6
4.2. Disclaimer.................................................................................................................................................. 8
5. Operation ................................................................................................................................................................ 8
5.1 Setup wizard .............................................................................................................................................. 8
5.1.1 Setup wizard flow: ......................................................................................................................... 8
5.1.2 Welcome .......................................................................................................................................... 9
5.1.3 Network Setting .............................................................................................................................. 9
5.1.4 Signage Display Settings ............................................................................................................. 10
5.1.5 Clone Media Files into internal ................................................................................................. 11
5.1.6 Setup Complete............................................................................................................................. 11
5.2 Android Launcher ................................................................................................................................... 11
5.2.1. Platform launcher ....................................................................................................................... 11
5.2.2. Admin mode: ................................................................................................................................ 11
5.3 Setting menu ............................................................................................................................................ 12
5.3.1 Setting ............................................................................................................................................ 12
5.3.2 Wi-Fi ............................................................................................................................................... 13
5.3.3 Ethernet ......................................................................................................................................... 13
5.3.4 Bluetooth ....................................................................................................................................... 14
5.3.5 More................................................................................................................................................ 14
5.3.6 Signage Display............................................................................................................................. 14
5.3.7 System Tools.................................................................................................................................. 26
5.3.8 Sound .............................................................................................................................................. 28
5.3.9 Display ........................................................................................................................................... 28
5.3.10 HDMI ............................................................................................................................................ 29
5.3.11 Storage ......................................................................................................................................... 29
5.3.12 Apps .............................................................................................................................................. 29
5.3.13 Language ..................................................................................................................................... 30
5.3.14 Date & Time ................................................................................................................................ 30
5.3.15 Developer options ..................................................................................................................... 30
5.3.16 About ............................................................................................................................................ 30
5.3.17 Appendix ..................................................................................................................................... 31
1
1. Unpacking and Introduction
1.1. Unpacking
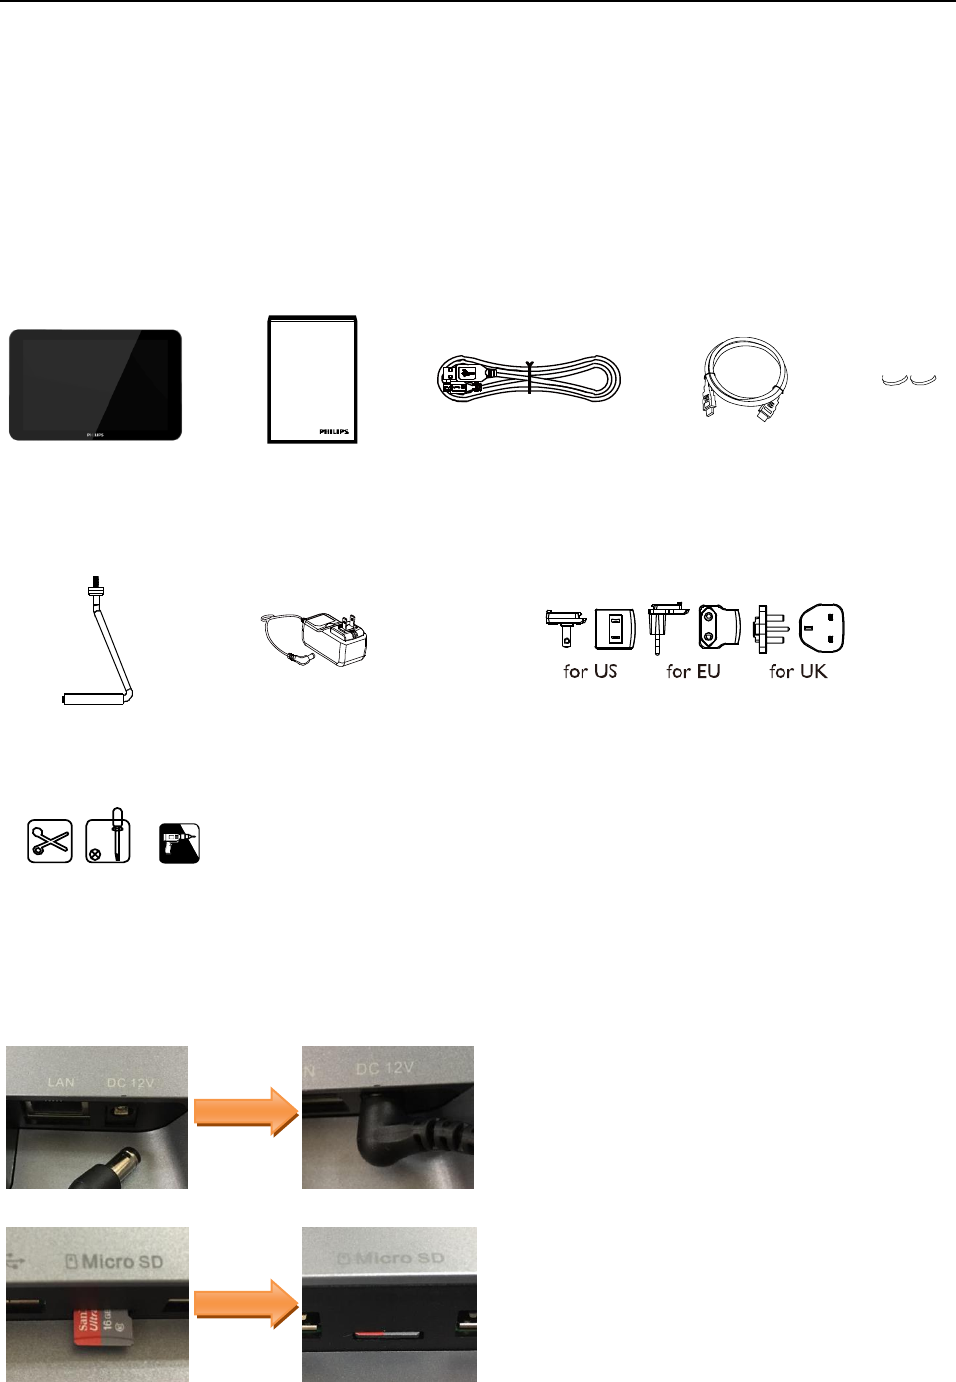
* This product is packed in a carton, together with the standard accessories.
* Any other optional accessories will be packed separately.
* After opening the carton, ensure that the contents are complete and in good condition.
1.2. Package contents
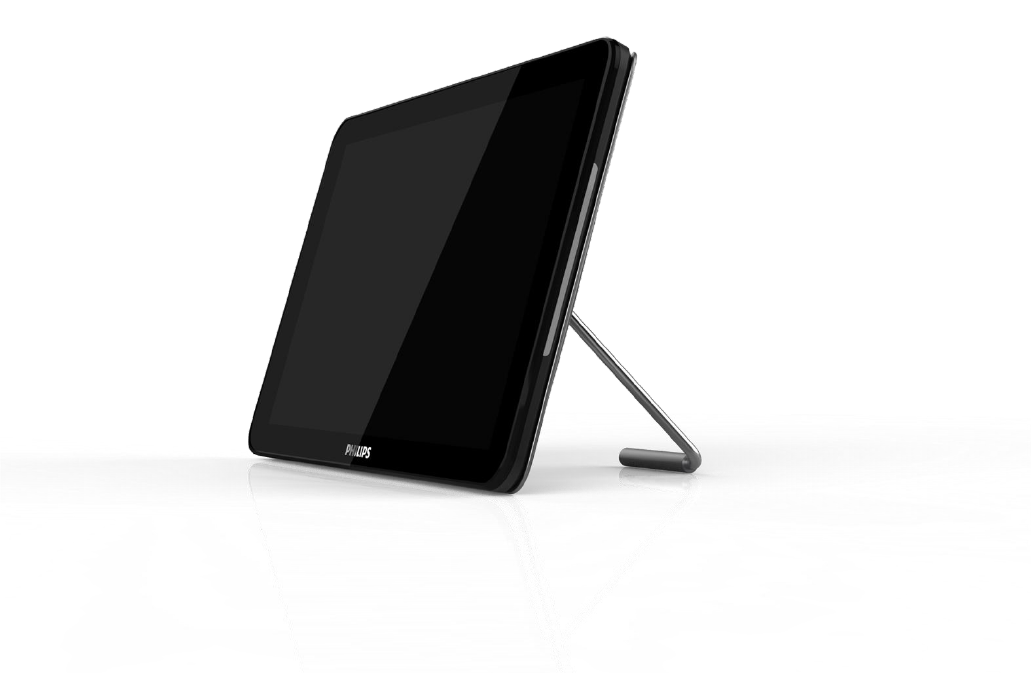
Colour Monitor
Quick Start Guide
USB Cable
HDMI Cable
Silicon
Foot
Stand Bar
DC Power adapter
Power Plug
(Provide by regions)
* Differences according to regions.
* Monitar design and accessories may differ from those illustrated above.
1.3. Installation
Securing the power and network cable
1 Insert power plug
2 Securing Micro SD card: Insert SD card bracket
Installing the table stand
2
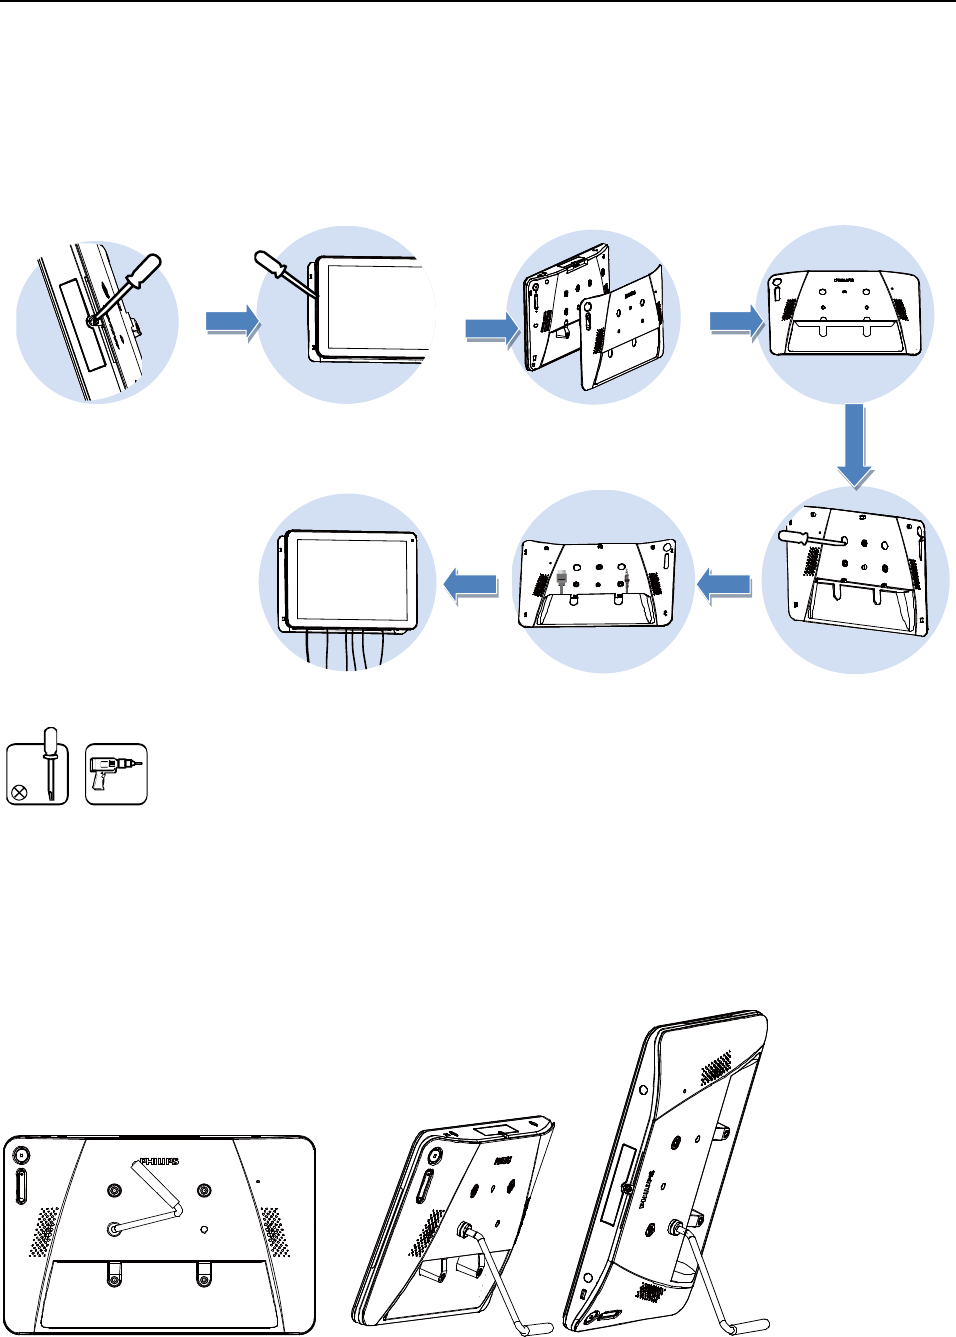
Step1 Release the back cover screw to release back cover.
Step2 Open the back cover with disassemble tool.
Step3 Separate the back cover from main device.
Step4 Stick the silicon gaskets on back cover.
Step5 Install back cover thread head height not exceed 3mm.
Step6 Route power and network cable from bottom, insert signboard before mount signboard on back cover.
Mounting and installation
Mounting Option 1: [VESA mount] f
Supporting VESA standard: VESA MIS-D75 (75*75mm)
Supporting screw: M4*4mm (exclude the mounting plate thickness)
Mounting Option 2: [Using back cover]
Supporting screw: Self-tapping screw*3pcs(exclude the mounting plate thickness)
Simply screw the supplied table stand onto the stand screw hole.
Landscape Portrait
3
2 Physical view and features
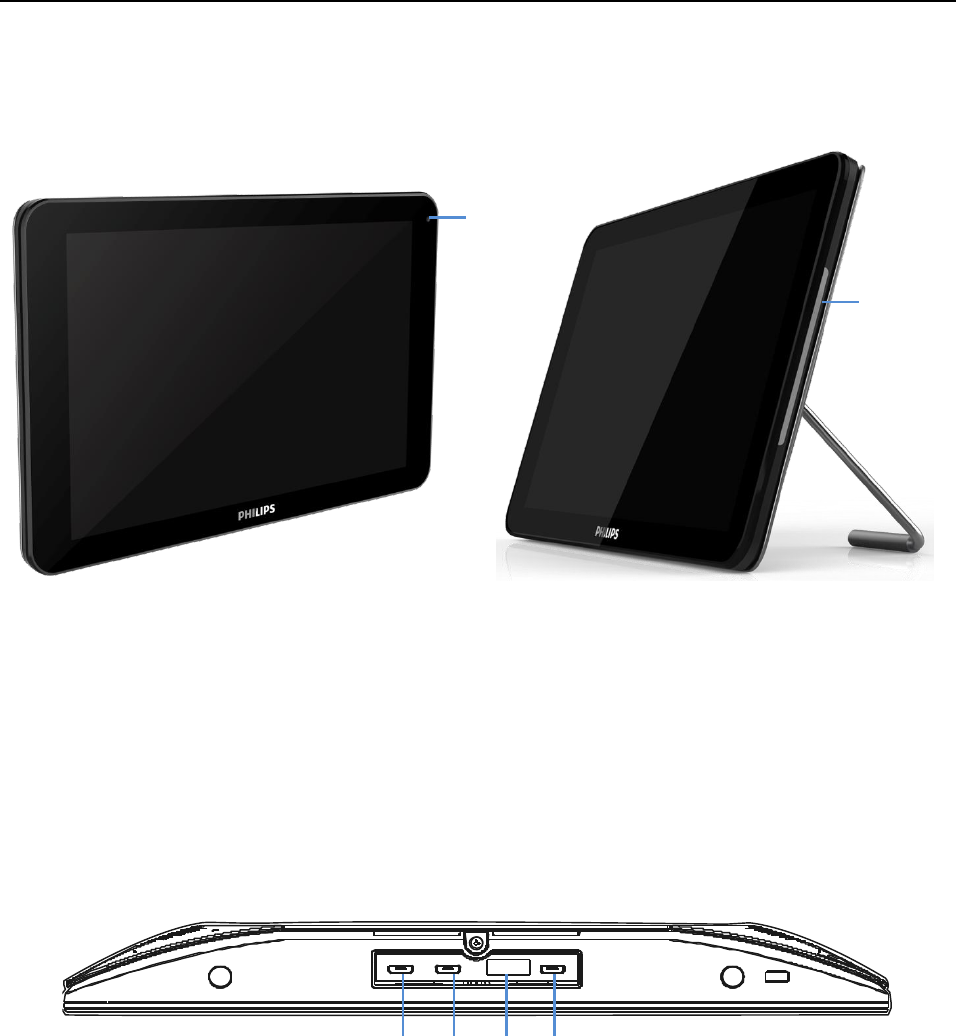
2.1 Front View
① Front Camera
2M
② RGB LED (Left & Right)
Default: OFF
Use SICP to turn On and set RGB
2.2 Top View
① ② ③ ④
① - ② [Host USB]
Micro USB, Support USB external device.
③ Expansion Port(Reserved)
④ Micro USB
Support ADB data transmission, don't support OTG.
①
②
4
2.3 Rear View
① [Menu] Button
② [Volume +/-]
Volume up and down
Key
Function
Menu + Volume-
Launch Admin mode app
Menu + Volume+
Launch Quick Information app
Menu + Menu + Volume+ + Volume- + Volume- +
Volume+
Enable touch function
Menu + Menu + Volume- + Volume-
Turn on the screen
③ [Stand screw hole]
④ [Reset] Button
Factory Reset
⑤ [Speaker Hole]
⑥ [WESA mount]
Screw spec: M4
⑦ [Wall Mount Screw Hole]
⑦
⑥
③
④
⑤
②
①
5
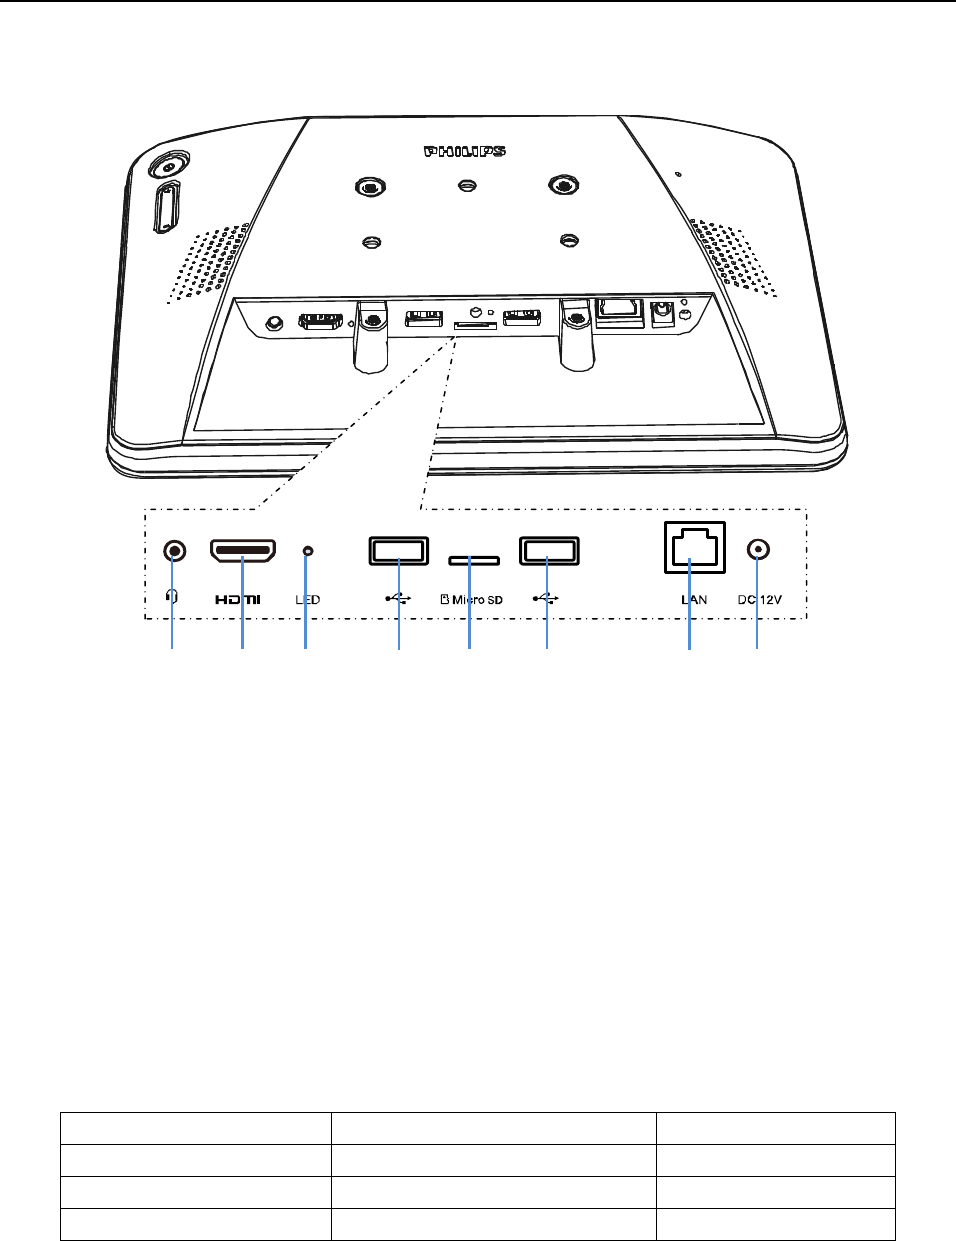
2.4 IO Port
① ② ③ ④ ⑤ ⑥ ⑦ ⑧
① [Ear jack]
3.5mm Ear Jack (CTIA standard) with mic in
② [HDMI OUT]
HDMI video/audio output
③ [LED]
Power on --> LED change to yellow after 5s --> LED change to Green when PHILIPS LOGO appear.
④+⑥ [Micro USB]
Support USB external device.
⑤ [Micro SD]
Connect your Micro SD card.
⑦ [LAN]
* LAN control function for the use of remote control signal from control center.
* PoE+ (power over Ethernet): 24W
Status
Green
Yellow
NC
OFF
OFF
10Mbps
ON (Flicker)
OFF
100Mbps
ON (Flicker)
ON
⑧ [DC 12V]
Switch the AC adapter on/off

6
3. Cleaning and Troubleshooting
3.1. Cleaning
Caution When Using the Monitor
* Be sure to disconnect all cables before moving the monitor. Moving the monitor with its cables attached may
damage the cables and thus cause fire or electric shock.
* Disconnect the power plug from the wall outlet as a safety precaution before carrying out any type of cleaning or
maintenance procedure.
Front Panel Cleaning Instructions
* The front of the display has been specially treated. Wipe the surface gently using only a cleaning cloth or a soft,
lint-free cloth.
* If the surface becomes dirty, soak a soft, lint-free cloth in a mild detergent solution. Wring the cloth to remove
excess liquid. Wipe the surface of the display to remove dirt. Then use a dry cloth of the same type to dry.
* Do not scratch or hit the surface of the panel with fingers or hard objects of any kind.
* Do not use volatile substances such as insert sprays. solvents and thinners.
3.2 Troubleshooting
Symptom
Possible Cause
Remeby
No picture is displayed
1. The adapter is disconnected.
2. The monitor is standby mode
1. Make sure the power LED is green.
Or plug in the adapter.
2. Menu + Menu + Volume- +
Volume-, turn on the screen.
HDMI output is abnormal
1. HDMI cable is not connected
properly.
2. The External device is abnormal.
1. Make sure the HDMI cables
attached firmly.
2. Check the external device is ok
Micro USB HOST & Type A USB HOST
& LAN interface is abnormal.
1. USB cable or output device is
abnormal.
2. The cable is not connected
properly.
1. Make sure USB Cable or output
device is ok.
2. make sure the cable is connected
properly and the RJ45 interface LED
is green.
Can't read USB device and SD card.
The USB device and SD card is
disabled.
Press "MENU" button, choose
"setting" to enable the function.
The screen display normal but can't
use touch function.
Touch function is disabled.
Menu + Menu + Volume+ + Volume-
+ Volume- + Volume+, enable touch
function.
4. Technical Data
4.1 Specifications
Monitor
10.1” HD panel
10 points multi-touch
Programming LED strip x 2
300 cd/m2 maximum Luminance
1280x800 panel resolution

7
Viewing angle (H/V): 175/175
Built-in speaker 2W x 2
Video format support
MPEG1/2(DAT, MPG, VOB, TS)
MPEG4(AVI, MKV, MP4, MOV, 3GP)
H.263(3GP, MOV, MP4)
H.264(AVI, MKV, MP4, MOV, 3GP, TS, FLV)
GOOGLE VP8(WEBM)
Motion JPEG(AVI, MOV)
Image format support
JPEG,BMP,GIF,PNG
Audio codec support
MPEG1/2/2.5 Audio Layer1/2/3(MP2, MP3)
WMA Version 4,4.1, 7, 8, 9, wmapro (WMA)
MAIN, ADIF ,ATDS Header AAC-LC and
AAC-HE(AAC,M4A)
Dynamic content
W3C HTML5 (HTML, CSS, JavaScript)
W3C SMIL 3.0 instructions (sub-set)
Physical I/O connectors
3.5mm analog stereo audio out port
HDMI output port
RJ45 Ethernet port
Micro SD card slot(up to 32GB micro SDHC)
DC -in Jack for charging(12V 1.5A)
Micro USB for ADB *1
Micro USB for host*2
Type A host ports*2
reserved expansion port
Local storage
8 GB eMMC with Micro SD card expansion slot
Accessories
DC Power adapter
HDMI Cable
USB Cable
Stand Bar
Silicon Foot
Power plug(US/EU/UK)
Quick start guide
Power requirement
12V 1.5A DC
802.3af compliance PoE, power over Ethernet
Power consumption*
10.96 watts max
Environmental
Operating temperature: 0 – 40° C / 32 – 104° F
Storage Humidity: 10 – 85% @ 40° C / 104° F
non-condensing
Dimensions
261 x 167.2 x 29 mm
Weight
0.740kg
Safety
UL/CB certified AC adapters
Certifications
CE/FCC/IC/BQB/HDMI
Warranty
One-year limited parts & labor
8
4.2. Disclaimer
Image Retention Disclaimer
When an image is monitored on-screen for prolonged
periods of time, you may see a faint image after it is
replaced. This is expected normal behavior for
monitors.
Image retention may be reduced by:
* Avoiding still images shown on-screen for more than
a few minutes
* Using non-contrasting colors and brightness
* Using background colors other than gray
5. Operation
5.1 Setup wizard
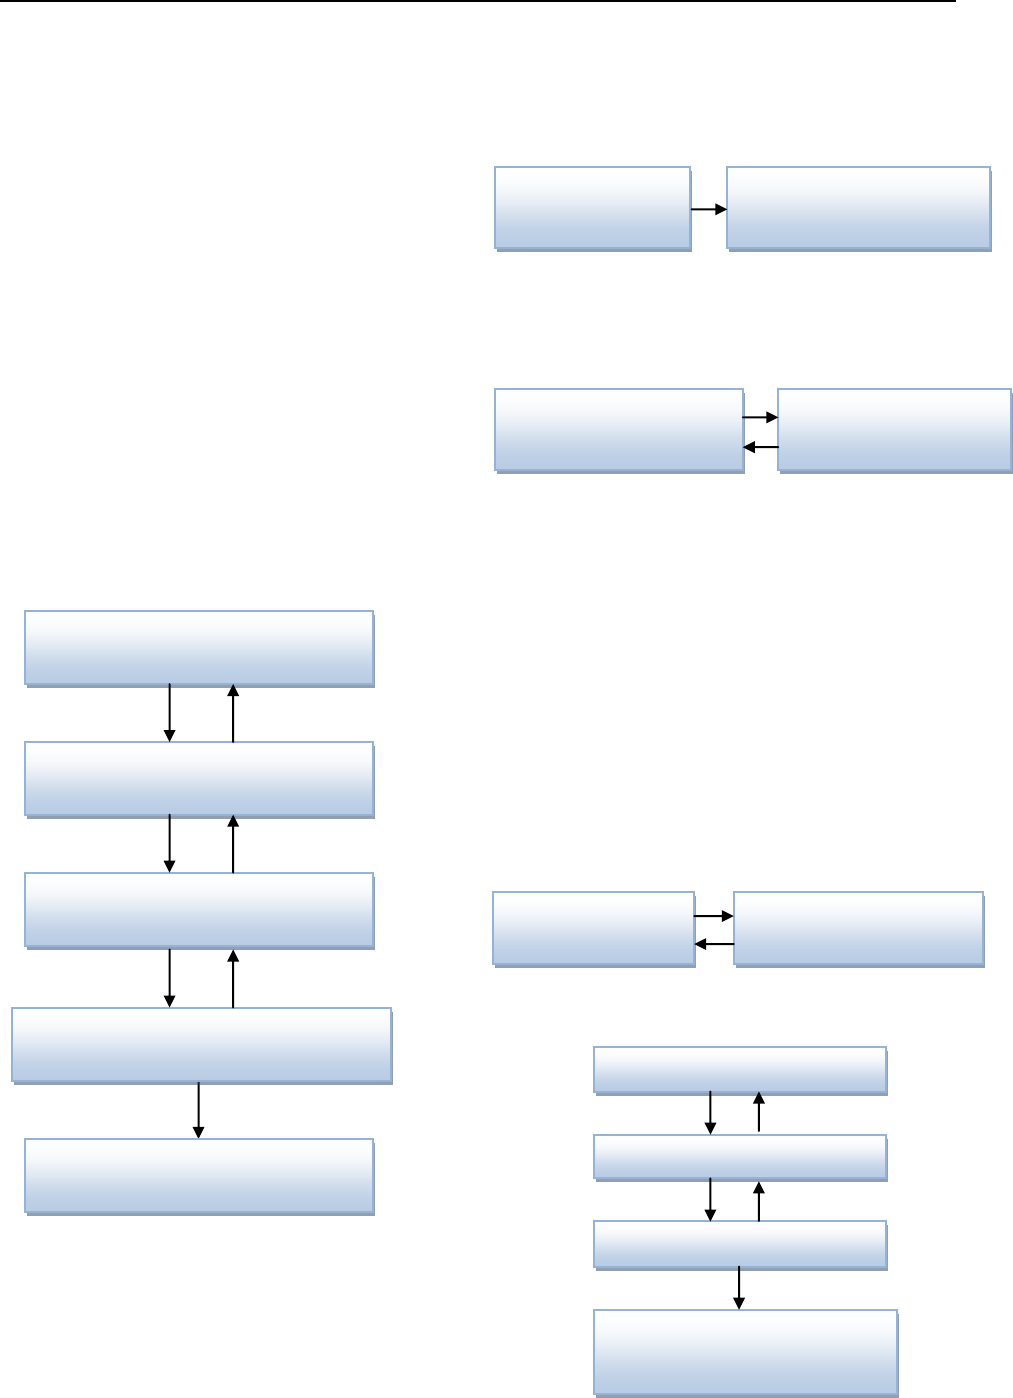
5.1.1 Setup wizard flow:
Android Setup Wizard
PS:
(1)The default of Navigation bar is “enable”. You can
see it through all setup wizard flow.
(2)Only the 1st time you enter Android mode will go to
setup wizard.
(3)Do Factory reset in Android mode, it will run setup
wizard again.
Switch forward/backward among pages
(1) Welcome
Start: Network Settings
(2) Network Settings
Back Page: Welcome
Next Page: Wireless / Ethernet
Skip Page: Signage Display Settings
(2-1) Sub Page
Wi-Fi
Back Page: Network Settings
Next Page: Signage Display Settings
Ethernet
Back Page: Network Settings
Next Page: Signage Display Settings
(3) Signage Display Settings
Back Page: Network Settings
Next Page: Import from SD / Import from USB / Manual
Setup
Skip Page: Clone Media Files into internal
(3-1) Manual Setup
Back Page: Signage Display Settings
Welcome
(Select Language)
Network Setting
(Select Wireless or Ethernet)
Signage Display Settings
(Select Import Type)
Setup Complete
Clone Media Files into internal
(Select Clone Type)
General Information
SmartCMS
Clone Media Files into internal
(Select Clone Type)
Signage Display Settings
(Select Import Type)
Clone Media Files into internal
(Select Clone Type)
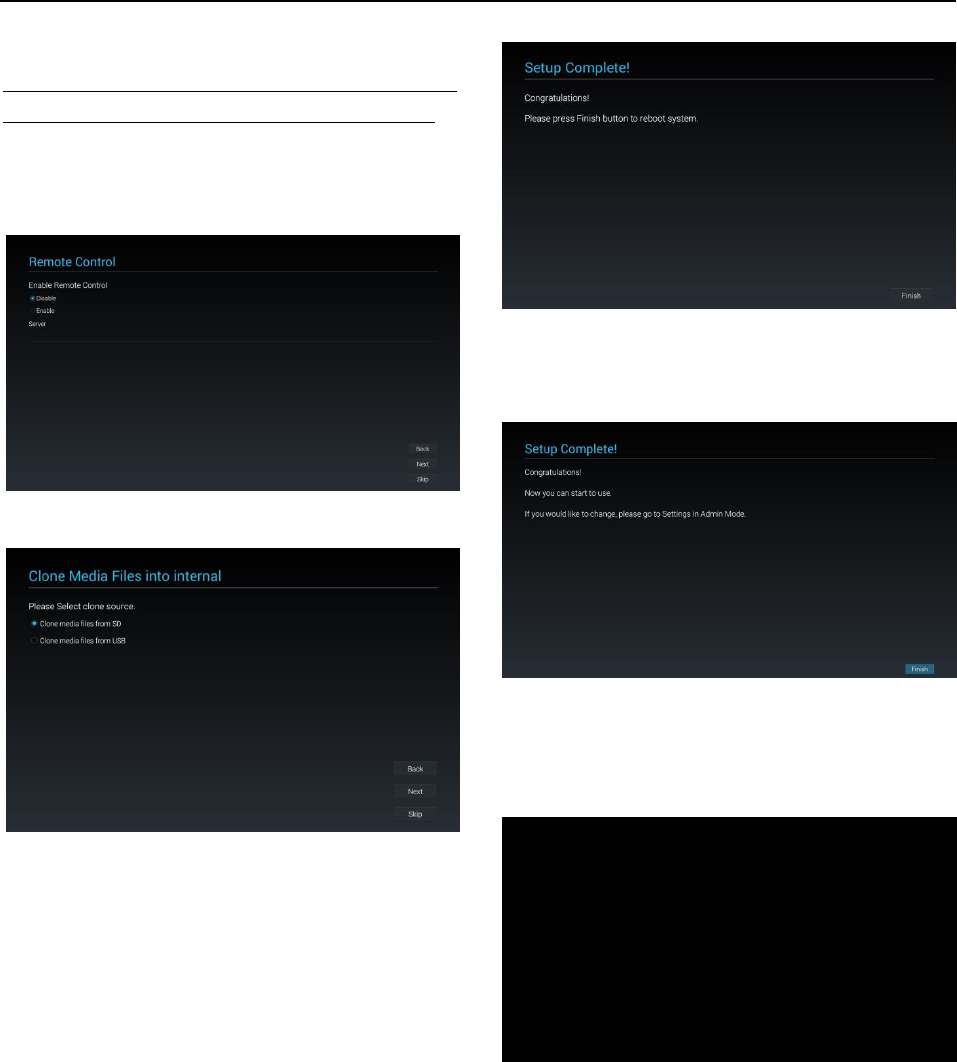
Remote Control
Welcome
(Select Language)
Network Setting
(Select Wireless or Ethernet)
Signage Display Settings
(Select Import Type)
Network Settings
(Select Wireless or Ethernet)

9
(4) Clone Media Files into internal
Back Page: Signage Display Settings
Next Page: Setup Complete
Skip Page: Setup Complete
(5) Setup Complete
Finish: go to boot on source.
5.1.2 Welcome
Select the language and click “Start” to start settings.
The default of the Navigation bar is “enable”. So you
can see it in the bottom.
(1) Support Language
We support 18OSD languages.
No
Support Language
1
ENGLISH
2
GERMAN
3
SIMPLIFIED CHINESE
4
FRENCH
5
ITALIAN
6
SPANISH
7
RUSSIAN
8
POLSKI
9
TURKISH
10
TRADITIONAL CHINESE
11
JAPANESE
12
PORTUGUESE
13
ARABIC
14
DANISH
15
SWEDISH
16
FINNISH
17
NORWEGIAN
18
DUTCH
5.1.3 Network Setting
You can choose the network source: Wi-Fi or Ethernet.
Then click “Next” to finish the network setting. Or, you
can click “Skip” to skip network setting.
PS: If you did not connect Ethernet cable, it will show
“Network cable is not plugged.” If you choose and click
“Next”.
(1)Wireless
When connecting to Wi-Fi, it will lead you to next page
automatically: Signage Display Settings
(2) Ethernet
When you enter “Ethernet” mode, it will show:
Connection Type: 2 options: DHCP and Static IP
IP Address (Only in Static IP mode)
Netmask (Only in Static IP mode)
DNS Address (Only in Static IP mode)
Gateway (Only in Static IP mode)
Finish the setting and click “Next”, it will lead you to
next page: Signage Display Settings
(1) DHCP
In DHCP mode, it will show related information about
current connection.
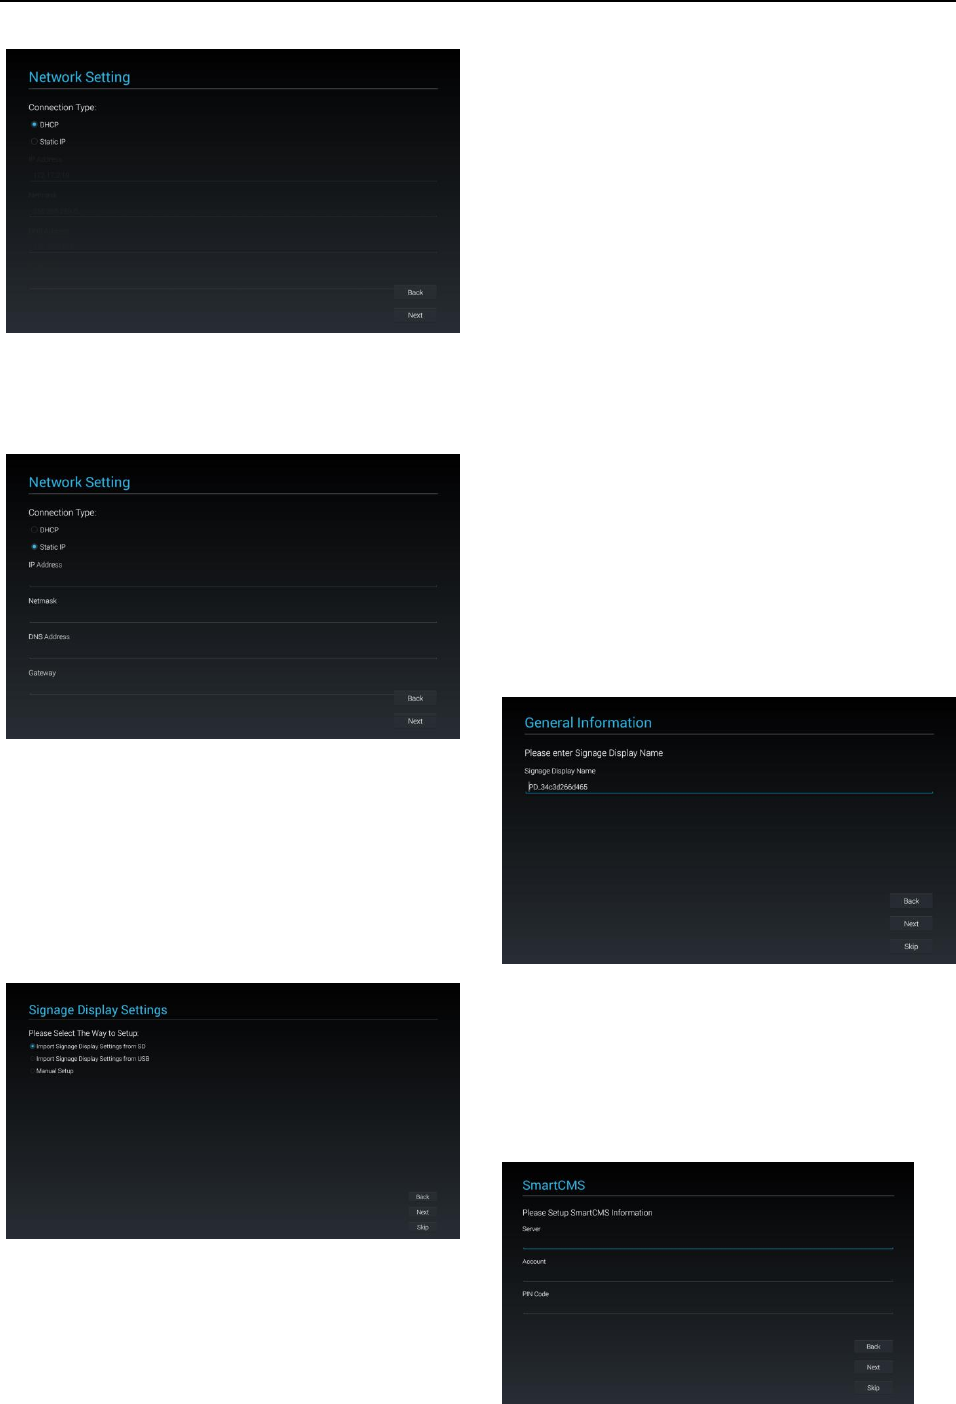
10
(2) Static IP
In Static IP mode, the user can set IP Address, Netmask,
DNS Address, and Gateway manually.
5.1.4 Signage Display Settings
The user can choose to import Database or setup
manually.
You can click “Skip” if you do not want to run this page.
PS: (1) Database needs to put in the “Philips” folder in
SD or USB drive.
(2) Data base file name should be “settings.db”
(1) Import Signage Display Settings from SD
Import Database from SD card, it will jump to the page:
5 Clone Media Files into internal .
PS: If the Database is imported successfully, you need
to re-boot the display.
(2) Import Signage Display Settings from USB
Import Database from USB drive, it will jump to the
page: 5 Clone Media Files into internal .
PS: If the Database is imported successfully, you need
to re-boot the display.
(3) Manual Setup
If you choose manual setup, you need to setup some
items:
* General Information
* SmartCMS
* Remote Control
When you finish setup, it will jump to the page: 5 Clone
Media Files into internal .
PS: Ne need to re-boot after setup.
General Information
It will show the default Signage Display name, but the
user can change to other name.
You can click “Skip” if you do not want to change the
name.
PS: If the name is blank, you can not click “Next” to go
to next page.
SmartCMS
The user can setup the SmartCMS Server, Account, and
PIN Code.
You can also click “Skip” to skip this setting.
PS: If no data entered, you can not click “Next” to go to
next page.
11
Remote Control
You can choose to enable or disable the Remote
Control function. And you can set the Server address.
You can click “Skip” to skip this setting.
PS: If no data entered, you can't click “Next” to go to
next page.
5.1.5 Clone Media Files into internal
(1) Clone media files from SD
After cloning, it will jump to 6.1 Import Clone Data .
(2) Clone media files from USB
After cloning, it will jump to 6.1 Import Clone Data .
5.1.6 Setup Complete
When you click “Finish”, it will start “Import” or “Clone
Data”.
If it runs “Import”, it will show 6.1 Import Clone Data .
Otherwise it will show 6.2 Manual Setup Complete .
PS: Do not power off during “Import” and “Clone”
processes, otherwise it will cause data loss.
(1) Import Clone Data
Click “Finish”, run “Import data”, it will re-boot
automatically.
(2) Manual Setup Complete
After finishing manual setup, you can enter Admin
Mode to change settings in the future if necessary.
5.2 Android Launcher
5.2.1. Platform launcher
Platform launcher is black page as below:
By pressing back key you can exit the app, the screen
will go to platform launcher.
5.2.2. Admin mode:
You can press “Menu + V-” to enter Admin mode.
Admin mode will show 4 icons: “Settings”, “Apps”,
“Network” and “Help”.
When you exit from Admin mode, the system will go
back to boot on source.

12
(1)First, you must enter password. The default
password is “1234”. If you want to change password,
you must go to Settings. “Signage Display” -> “Change
the Administrator Password”.
(2)Home page of Admin mode.
This page has 4 items: “Settings”, “Apps”, “Network”
and “Help”.
Settings: go to settings app.
Applications: show all existing apps.
Network: set wifi or ethernet.
Help: display QRcode.
(3) Applications page:
(4) Network page:
(5) Wi-Fi page:
(6) Ethernet page:
(7) Help page:
Display QR code page.
5.3 Setting menu
5.3.1 Setting
Main items in the Setting menu:
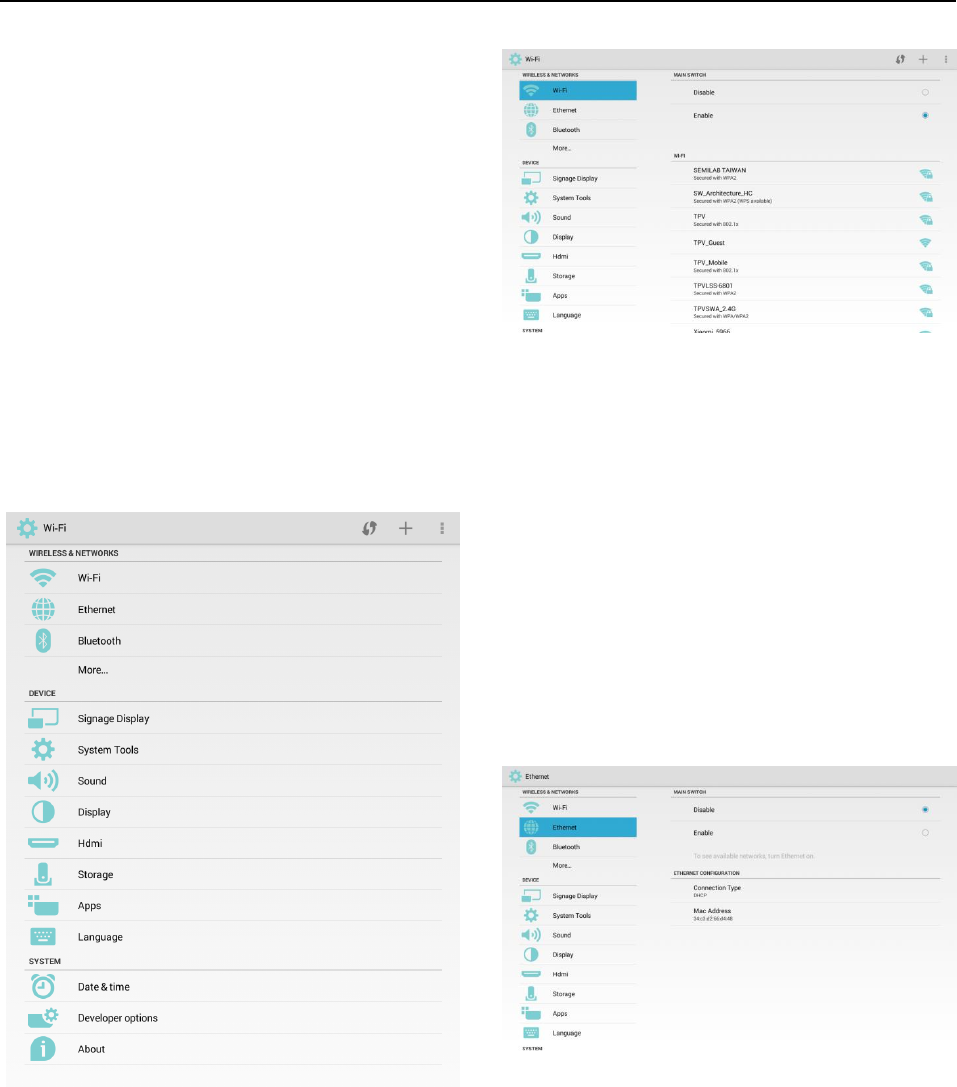
13
(1) Wi-Fi
(2) Ethernet
(3) Bluetooth
(4) More
(5) Signage Display
(6) System Tools
(7) Sound
(8) Display
(9) HDMI
(10) Storage
(11) Apps
(12) Language
(13) Date & time
(14) Developer options
(15) About
5.3.2 Wi-Fi
You can Enable or Disable Wi-Fi.
After enabling, it will show all available Wi-Fi routers.
PS: When Wi-Fi is enabled and connected, Ethernet will
be disabled automatically.
5.3.3 Ethernet
You can Enable or Disable Ethernet.
After enabling Ethernet, it will show:
(1) Connection Type (2 options: DHCP / Static IP)
* DHCP
* Static IP
* IP Address
* Netmask
* DNS Address
* Gateway
(2) Mac Address
PS: When enabling Ethernet and connecting to the
network, Wi-Fi will be disabled automatically.
DHCP
In DHCP mode:
(1) Can't setup IP Address, Netmask, DNS Address, and
Gateway。
(2)If connected, it will show current network
configuration.
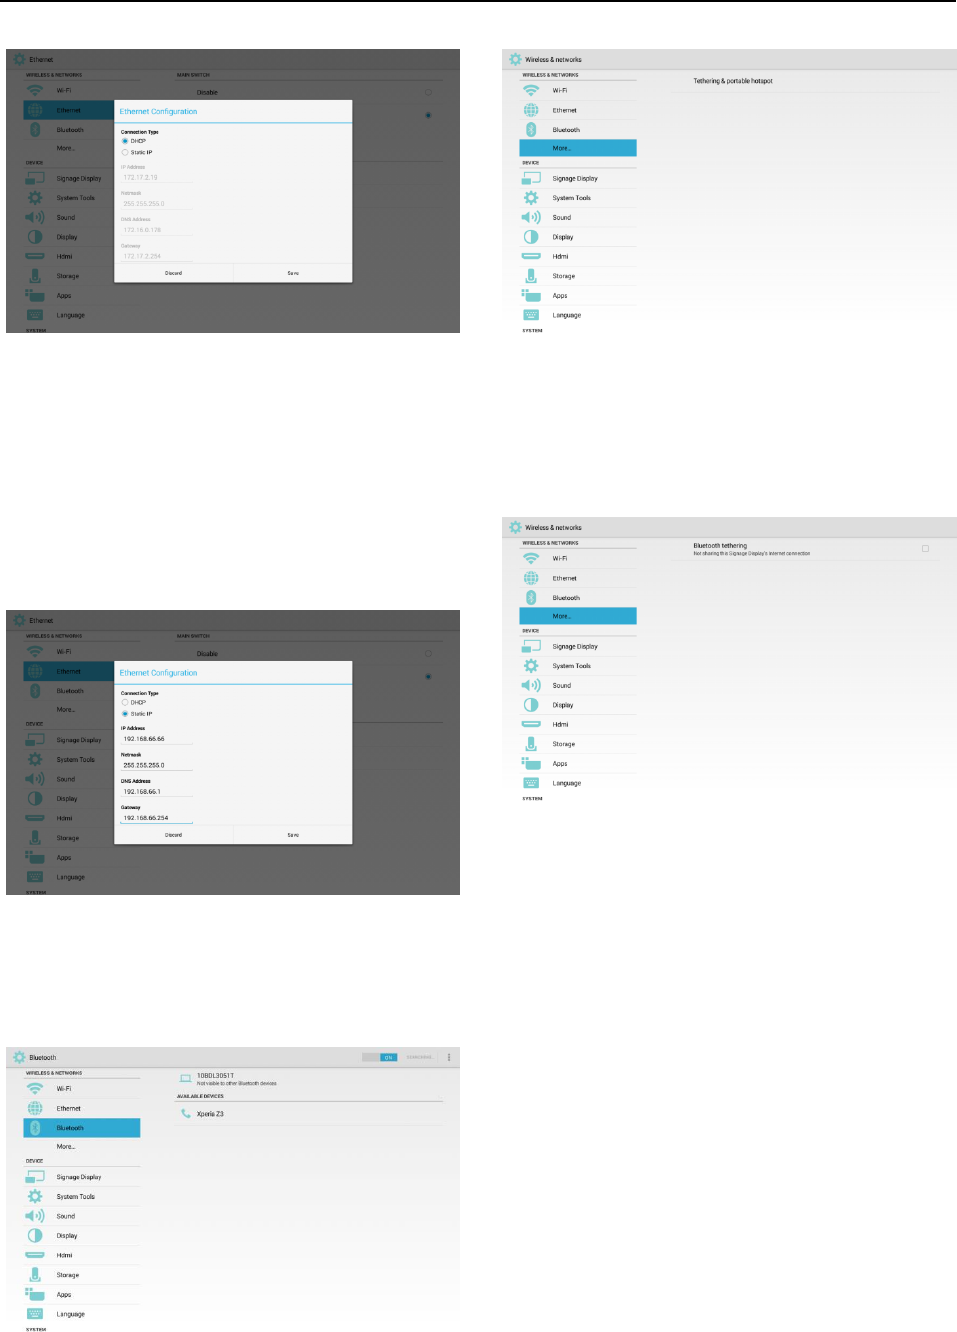
14
Static IP
In Static IP mode, the user can enter IP Address,
Netmask, DNS Address, and Gateway manually.
PS: Format of IP Address, Netmask, DNS Address, and
Gateway Address:
* Numbers: 0-9
* Decimal point “.”
5.3.4 Bluetooth
You can switch OFF or ON Bluetooth.
After switching ON, it will show the device name and all
available devices.
5.3.5 More
Setup Tethering & portable hotspot
Setup Bluetooth tethering
* Enable : Sharing this Signage Display’s Internet
connection.
* Disable : Not sharing this Signage Display’s Internet
connection.
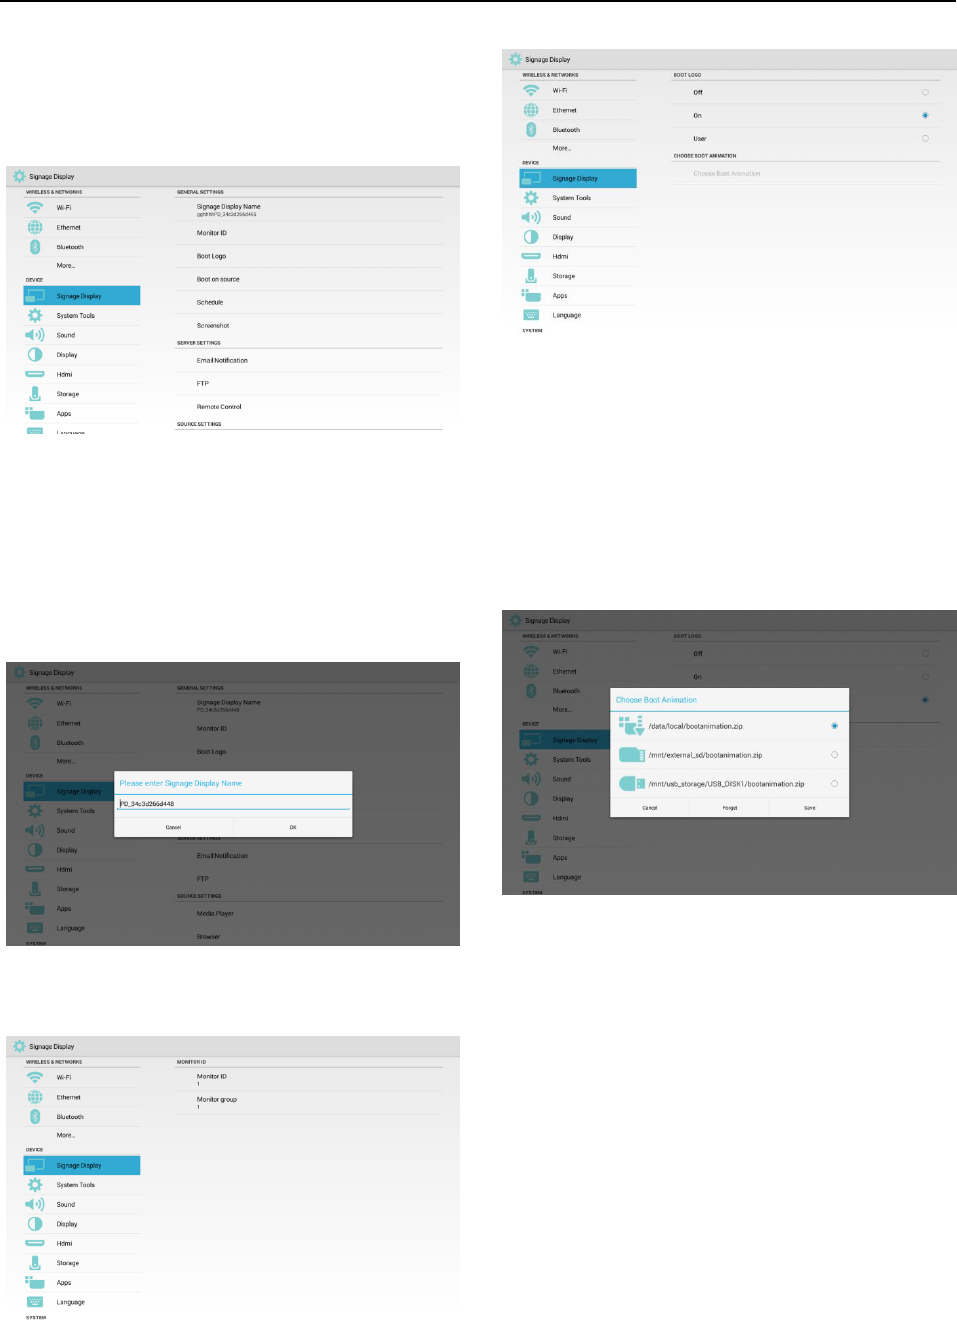
5.3.6 Signage Display
There are 4 different groups: General Settings / Server
Settings / Source Settings / Security
(1) General Settings
* Signage Display Name
* Monitor ID
* Boot Logo
* Boot on source
* Schedule
* Screenshot
(2) Server Settings
* Email Notification
* FTP
* Remote Control
(3) Source Settings
* Media Player
* Browser
* SmartCMS
* PDF Player
15
* Custom app
(4)Security
* Change the Administrator Password
* External Storage
5.3.6.1 General Settings
(1) Signage Display Name
Setup the PD’s name. The default name is “PD_” +
Ethernet Mac Address.
* length: 36 characters maximum
* no limitation in format
(2) Monitor ID
Monitor id/group : 1 – 255.
(3) Boot Logo
* 3 options: Off/On/User
*In User mode, you can select your own power-on
movie (i.e. boot animation).
i. The file name of the power-on movie should be:
bootanimation.zip
ii. When you select the power-on movie, it will check
SD card and USB drive to see if there is
“bootanimation.zip” file automatically, and pop up a
window for you to choose.
Function introduction:
* File location options:
/data/local:
Choose the customized Power-on movie copied from
SD card or USB drive..
/mnt/external_sd:
Choose the Power-on movie found in SD card.
/mnt/usb_storage:
Choose the Power-on movie found in USB drive.
* Save
If you pick “/mnt/external_sd” or “/mnt/usb_storage”,
and click “Save”, it will copy the file “bootanimation.zip”
to the path “/data/local/”.
* Forget
When you click “Forget”, it will clear the customized
power-on movie and not to use any movie.
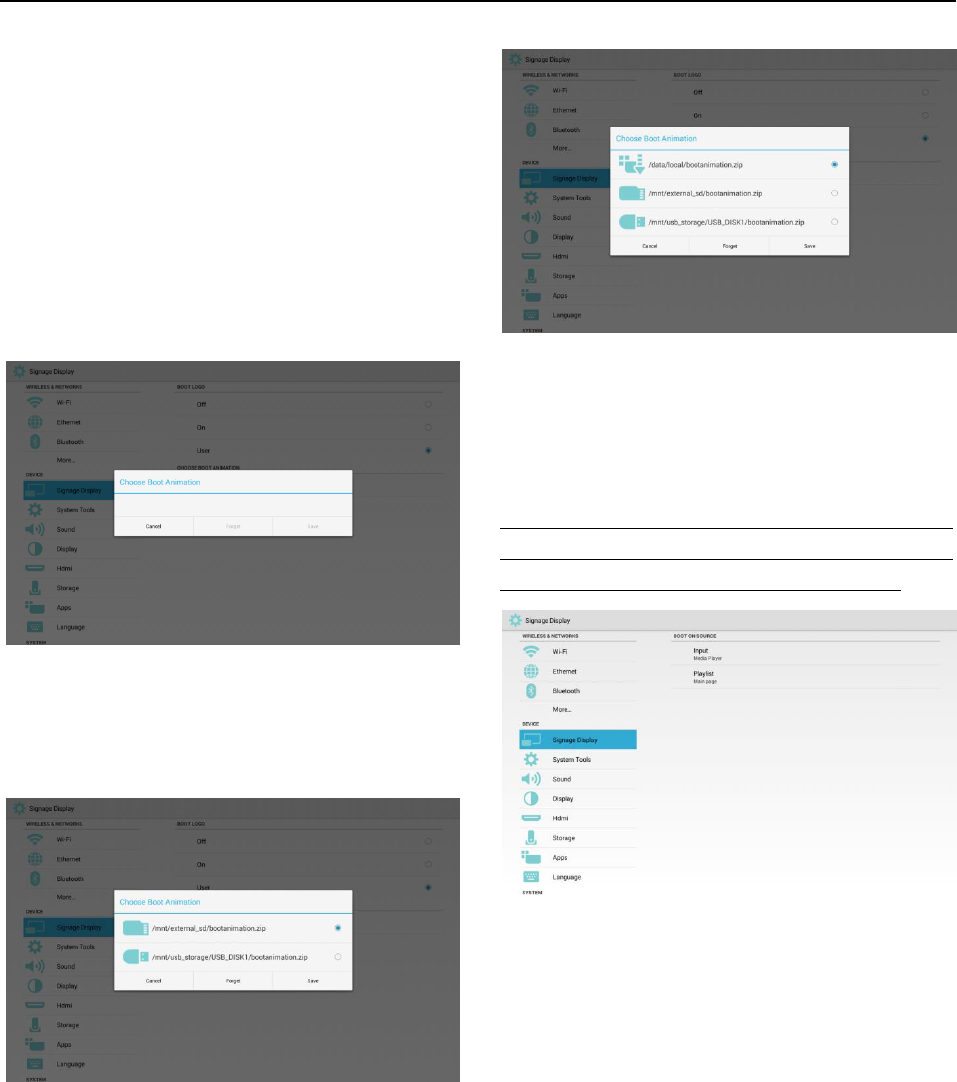
16
* Cancel
Not to do any change, close the window directly.
User scenario:
Case1.
If you do not setup any customized power-on movie,
and no bootanimation.zip file in SD card and USB drive,
then there’s no option on the screen. In the
meantime, it will grey-out “Save” and “Forget” to be no
function.
Case2.
If you do not setup any customized power-on movie,
but it finds “bootanimation.zip” file in SD card or USB
drive, then it will show the file locations.
Case3.
If you setup a customized power-on movie, it will show
it at “/data/local/bootanimation.zip”.
(4) Boot on source
Input: platform will go to the “input” selected by
automatically after re-boot.
Playlist: In Media Play/Browser/PDF Player, you can
setup the Playlist.
If you want to use “Custom app”, you can not choose
the app here. You need to go to Signage Display ->
Source settings -> Custom app to choose the app.
(5) Schedule
Set up the auto-playback schedule.
* The priority of “Schedule” is higher than “Sleep”.
That means, if the Sleep time is during the Schedule”
period, Sleep time will be ignored till end of the
Schedule.
* After the end of a Schedule, the display can only be
awaken by next Schedule, pressing Power button or
SICP wake-up command.
* After the display is awaken again, it’s normal to see a
whole black launcher screen. If the navigation bar is
not disabled, you can slide out the navigation bar from
the bottom, or use the Power button to enter Admin
mode.
* In Sleep mode, the combination keys still work. If you
wake up admin mode or quick info dialog, you‘ll see the

17
screen.
Schedule list : You can set 7 schedules.
Enable : Enable or disable schedule function.
Start time : Set start time.
End time : Set end time.
Input: you can choose Media Player, Browser,
SmartCMS, PDF Player, or Custom app.
Play list: 1 - 7: go to the “input” you selected and
playback 1 - 7 playlists automatically.
Days of the week: You can set Sunday, Monday, Tuesday,
Wednesday, Thursday, Friday, Saturday.
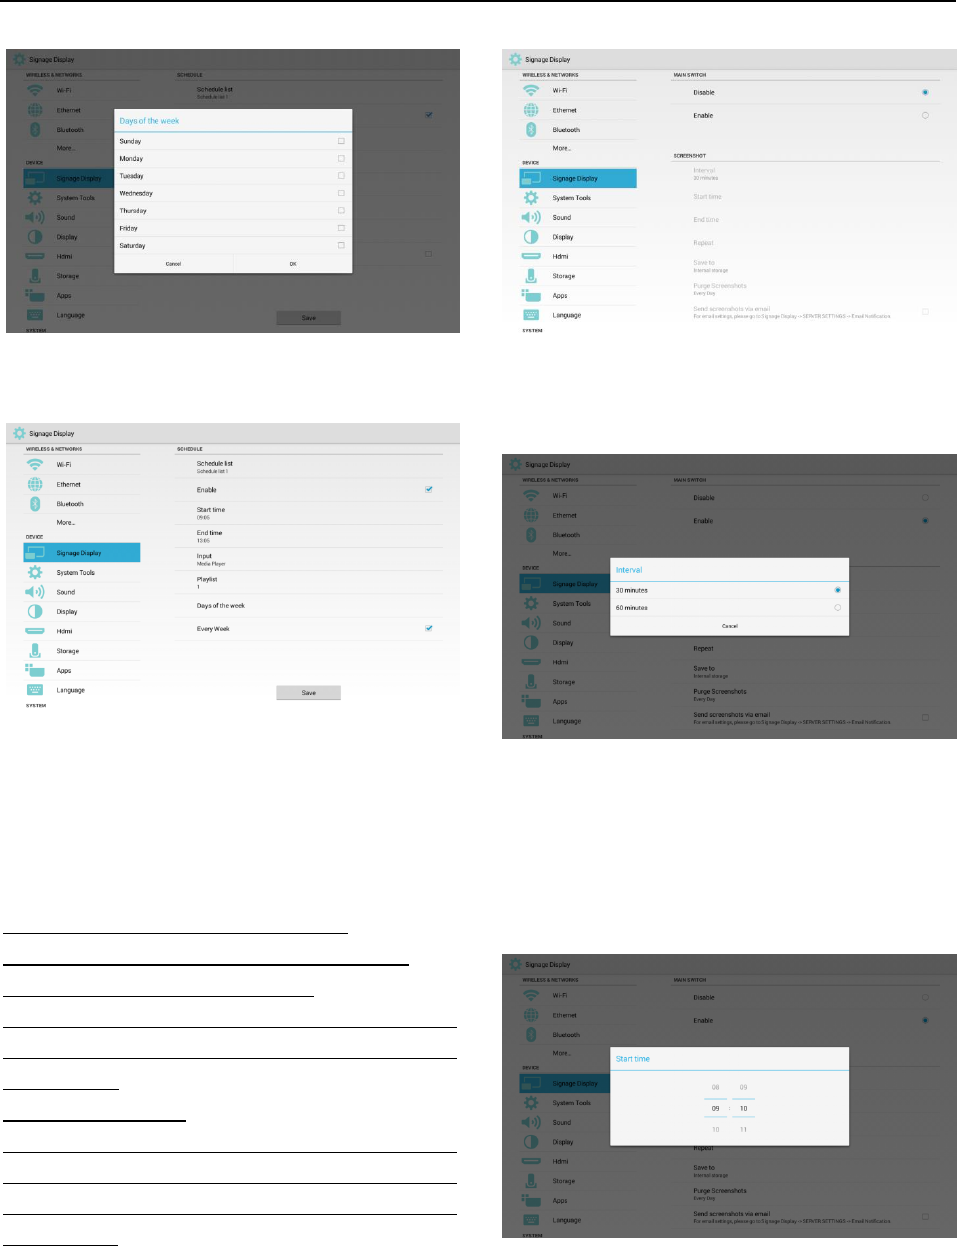
18
Every week: Set lifecycle.
Save: Save the schedule settings.
(6) Screenshot
You can Enable or Disable Screenshot.
Enable to setup the following parameters.
After enabling this function, you can setup to have the
screenshot automatically and store the photos at the
assigned path.
PS: Trigger to delete photos or screenshot:
* It will delete the photos right away at start time.
* After 40 seconds, do the screenshot.
* In case of choosing delete photos every week, the
start day will be changed to the day when you change
the start time.
Screenshot and Sleep:
If the screenshot is scheduled when in Sleep mode,
then the screenshot and mail functions will be disabled.
These 2 functions will resume after the display is
awaken again.
Interval
Set the interval between 2 screenshots. You can
choose 30 or 60 minutes.
Start Time
Set screenshot start time.
* After setup, please exit by clicking return icon. It will
save the set result automatically.
* If the Start Time is later than the End Time, it will
show a warning.
End Time
Set screenshot end time.
* After setup, please exit by clicking return icon. It will
save the set result automatically.
* If the Start Time is later than the End Time, it will
19
show a warning.
Repeat
Select days of the week to have repeated screenshot.
(multiple options)
Save to
Set the path to store the photos. Now you have 3
choices.
* Under the root of Internal storage / USB storage / SD
card, it will create a folder “philips/Screenshot/”
automatically.
* It will store the photos under the path
“philips/Screenshot/”.
Purge Screenshots
Set the frequency to delete the photos. Now you
have 2 choices: per day or per week.
Send screenshots via email
First, please go to Signage Display ->Email Notification
to set sender’s mail server and mail receiver, after that,
please enable “Send screenshots via email”. Then
every screenshot photo will be sent out.
5.3.6.2 Server Settings
(1) Email Notification
You can Enable or Disable Email notification function.
You can set up the following parameters only enabling
this function.
After enabling, it will send the mails according to the
user’s settings.
SMTP
Set the Mail account of the mail sender
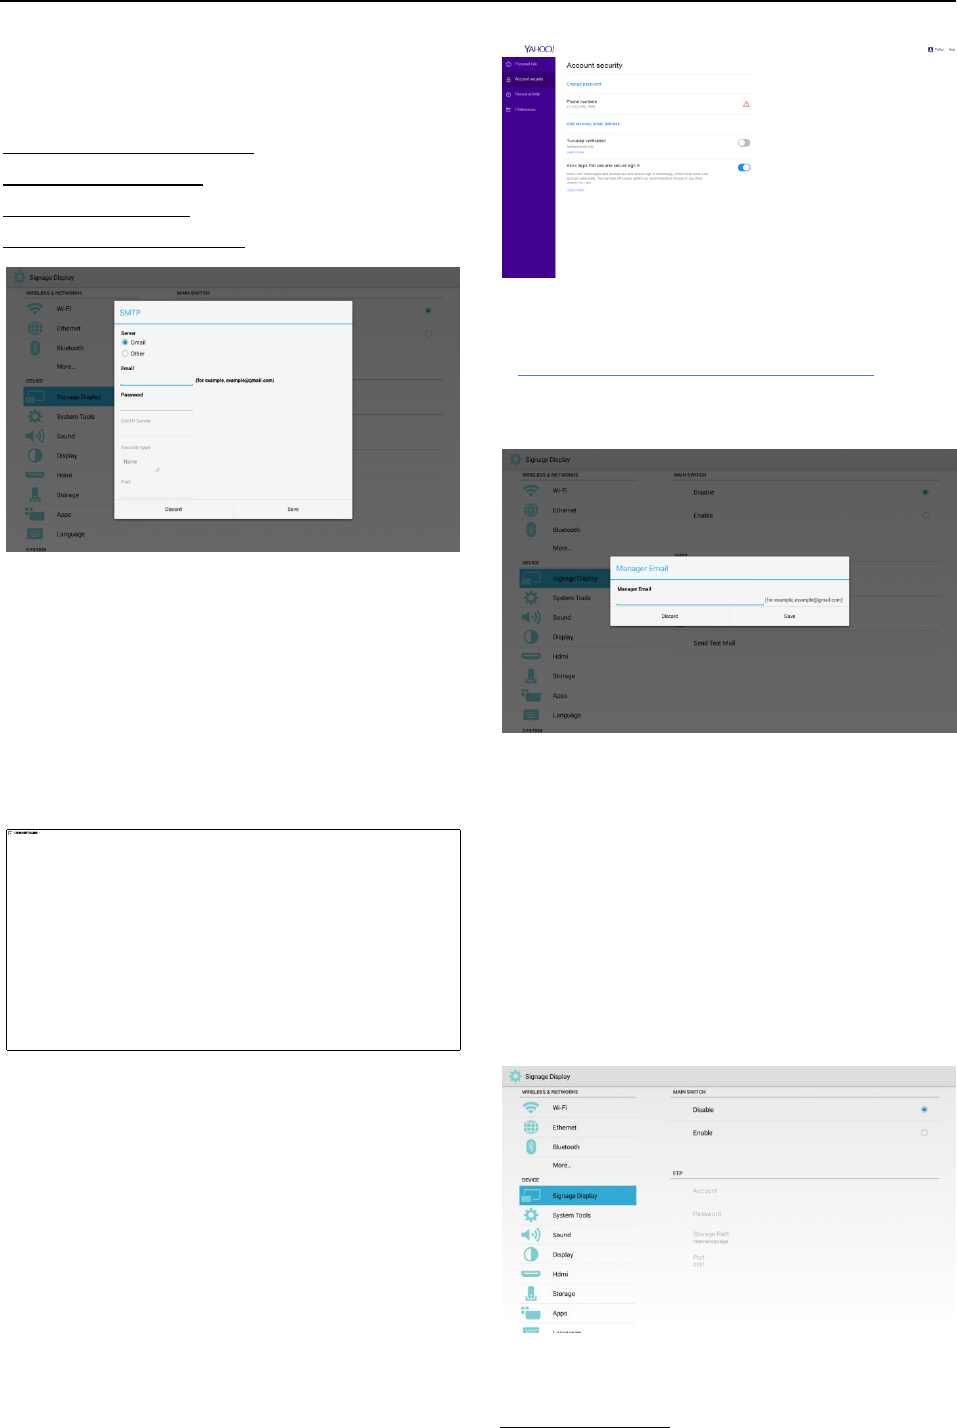
20
Now we have 2 mail sever options: Gmail and Other.
You can choose “Other” and set SMTP Server, Security
type, and Port.
PS: Limitation of the Password:
* Length: 6-20characters
* Format: no limitation
* You can't use the port: 5000
Gmail security setting:
If you can not send the mails after Gmail settings,
please log-in your Gmail account via PC and click the
URL below:
https://www.google.com/settings/security/lesssecurea
pps
Confirm the “Access for less secure apps” , and set as
Turn on.
Yahoo security setting:
In Yahoo Account Security Item, users should enable
“Allow apps that use less secure sign in” item.
After enabling it, it works.
Manager Email
Email
Set receiver’s Mail address.
Test
Send Test Mail
To test if the Gmail mail box’s send/receive functions
work well.
(2) FTP
You can Enable or Disable the FTP function.
You can set the following parameters only to enable
this function.
After setup, you can connect to the FTP path of the
display.
Account
Set FTP account.
PS: Format limitation
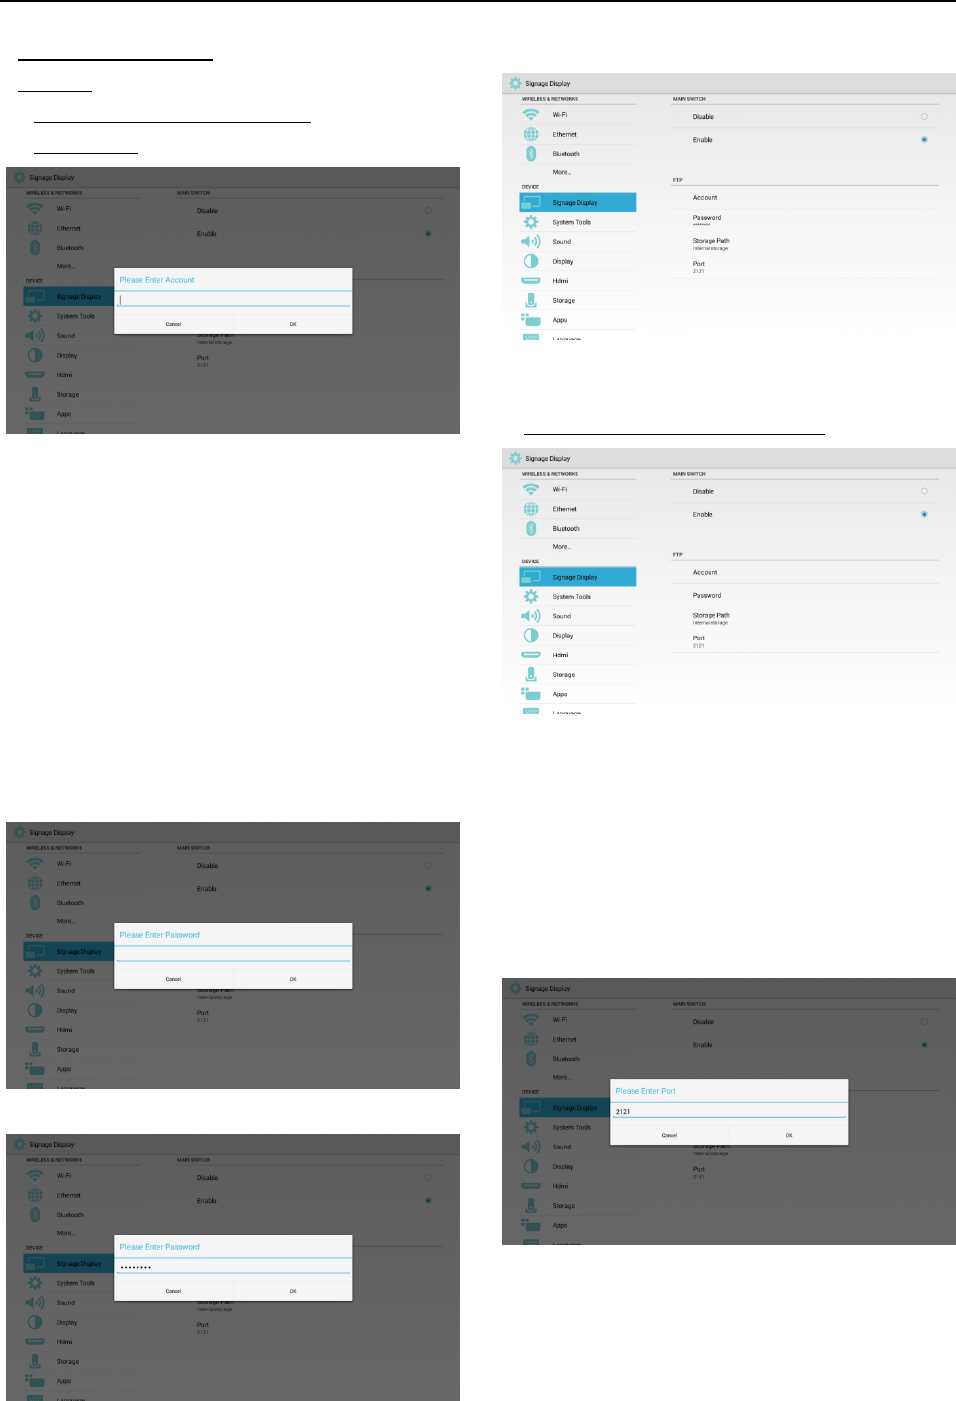
21
* Length : 4-20 characters
* Format:
Lower case a-z and upper case A-Z
Numbers 0-9
Password
Set FTP password.
PS: Format:
* Length: 6-20 characters
* Format:
Lower case a-z and upper case A-Z
numbers 0-9
The ways to show FTP password:
* If you use “remote control” to set the password via
PC, you’ll see it uses (*) to show the password.
* After the password is entered, it will also show (*) .
The screen that does not have the password yet.
After the password entered.
The screen that the password is set.
Storage Path
FTP access path.
PS: You can only access Internal storage.
Port
Set FTP port.
Default: 2121
PS: Format”
* Length: 5 characters maximum
* Range: 1-65535
* Format: numbers 0-9
* Yu can't use port: 5000
(3) Remote Control
You can Enable or Disable the Web Control function.
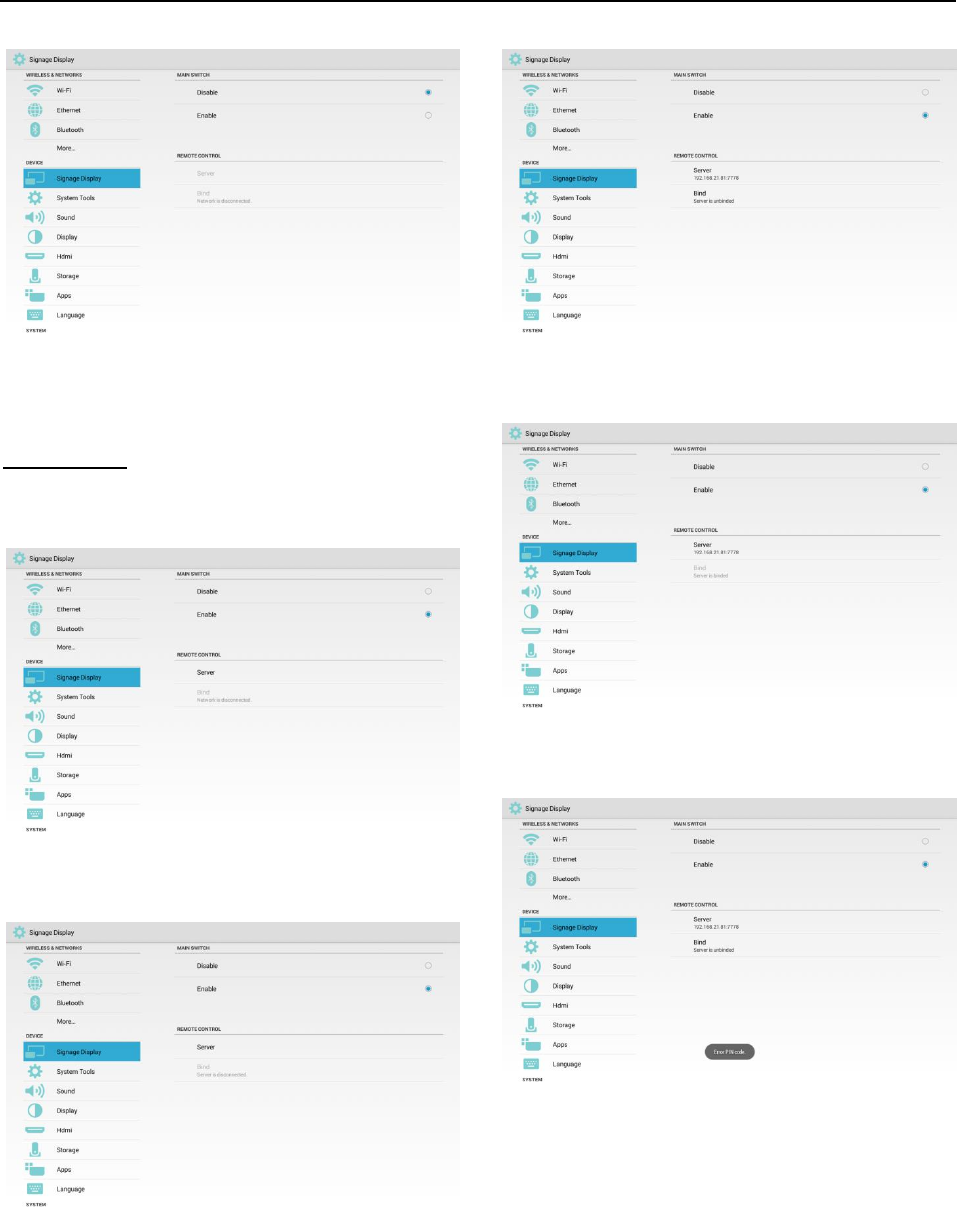
22
You can set the Server address. If the server is not
registered, it will need you to enter PIN Code.
Bind status::
* If not connect to network, it will show: Network is
disconnected.
* Connect to network but not Remote Control Server, it
will show: Server is disconnected.
* If the Remote Control Server is not bound, it will
show: Server is unbound.
* If it is bound successfully, it will show: Server is
bound.
* If you enter wrong PIN code, it will show Error PIN
code.
5.3.6.3 Source Settings
(1) Media Player
You can enter the Playlist setup page and Edit Effect
Settings page of the Media Player.
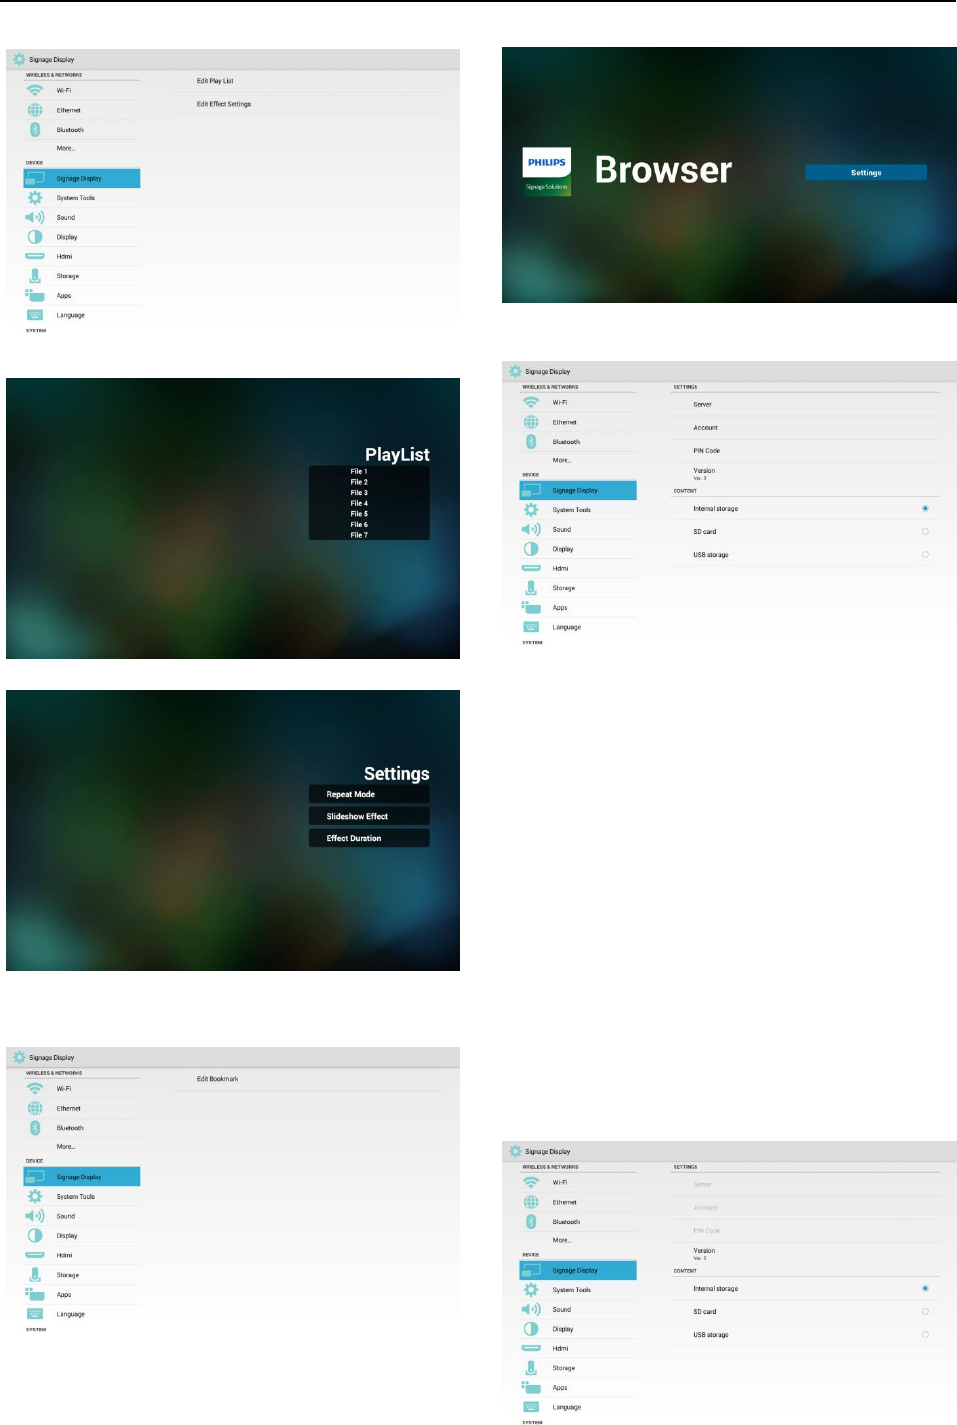
23
Enter Player List setup page of the Media Player.
Enter the Edit Effect Settings page of the Media Player.
(2) Browser
You can edit Browser bookmark.
Enter Browser Bookmark setting page.
(3) SmartCMS
Server
Set Smart CMS Server address.
Account
Set Smart CMS account.
Format: ASCII only (please refer to 17.3 ASCII Table)
PIN Code
Set SmartCMS PIN Code.
Server Version
Now we have Ver. 2 and Ver. 3.
Ver. 2
There are ver. 2.0 and ver.2.2.
Ver. 3
There are ver. 3.0 and ver.3.1.
For Ver. 2 case, Server / Account / PIN Code are useless.
They will be grey-out.
24
Content
You have 3 options: Internal storage, SD card, and
USB storage to choose.
(4) PDF Player
You can enter the Playlist setup page and Edit Effect
Settings page of the PDF Player
Enter the Player List setup page of the PDF Player.
Enter the Edit Effect Settings page of the PDF Player.
(5) Custom app
You can choose the app to launch when you switch the
video source to Custom Source.
PS:
* It only shows the app installed by the user.
*All pre-installed apps will not be shown on the
screen.
If you did set the Custom APK, it will launch the app
when you switch the video source to Custom app.
If you did NOT set the Custom APK, it will show black
screen when you switch the video source to Custom
app.
Function introduction:
* Save
After choosing the App, click “Save” will save the
setting.
* Forget
After clicking “Forget”, it will clean the app you
choose.
* Cancel
Close the window without change.
If the user did not install any APK, the dialogue box
will show blank.
There’s no item to choose. It will grey out “Save” and
“Forget”.
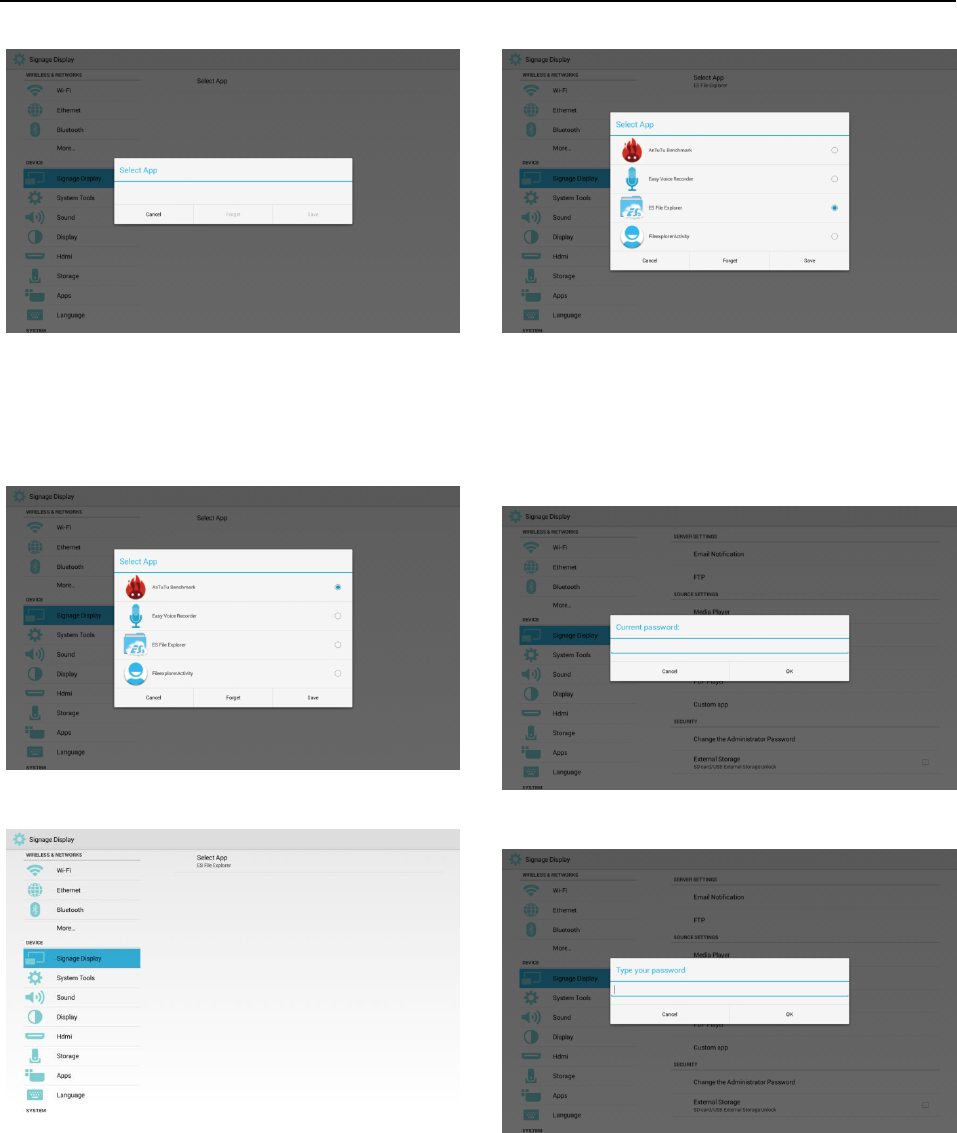
25
If the user has installed the APK, the user can choose
it.
Case 1. Without setting Custom App:
It will show all apps found.
After setting, it will show the selected one.
Case 2. If you has set the Custom App, the app will be
selected.
5.3.6.4 Security
(1) Change the Administrator Password
Change Password.
* Enter current password.
* Enter new password.
(2) External Storage
Lock/Unlock external storage.
* Unlock: summary is SD card/USB External Storage
Unlock.
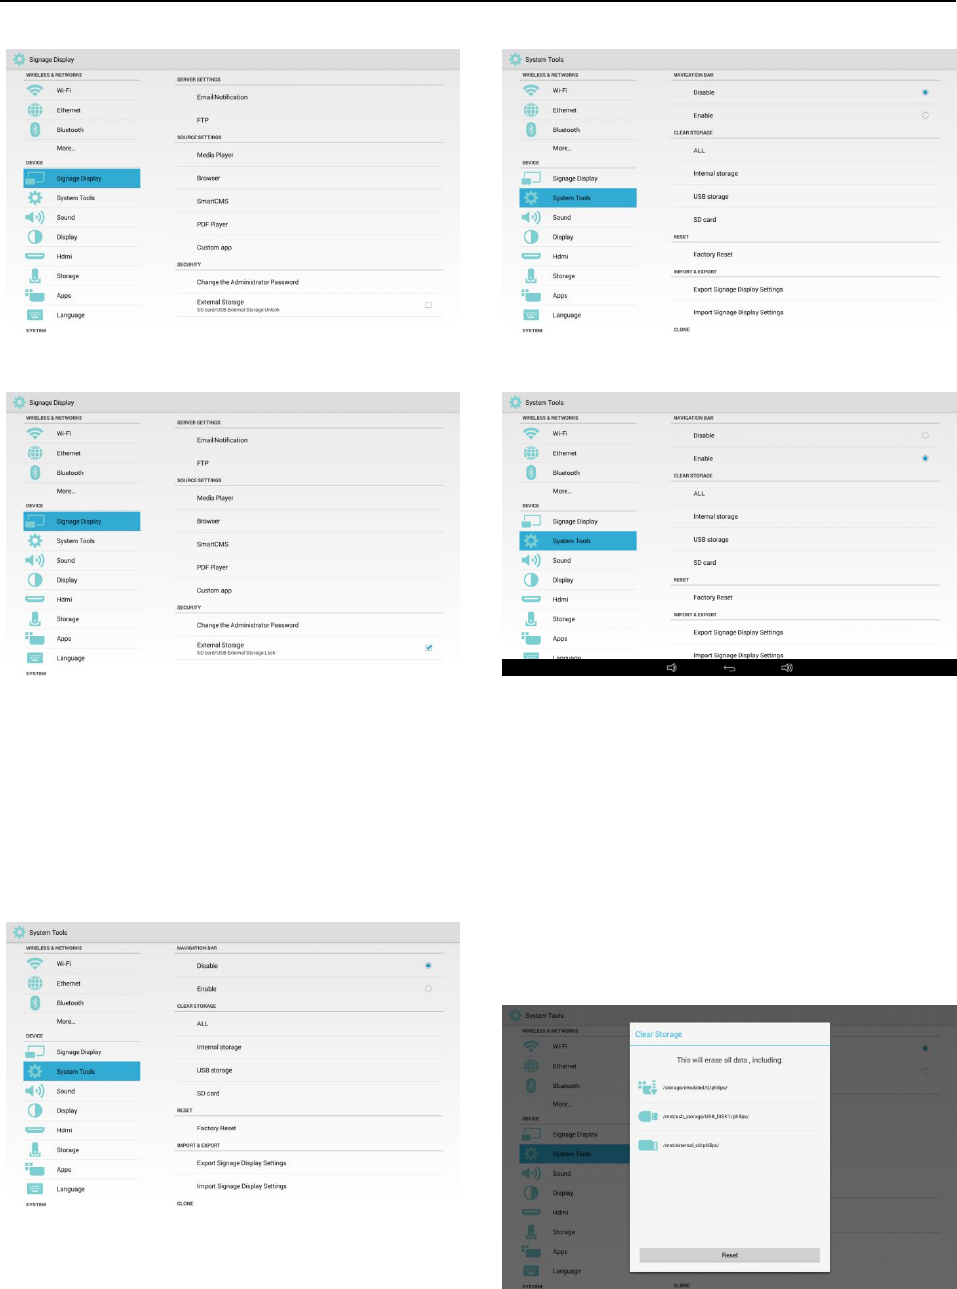
26
* Lock: summary is SD card/USB External Storage Lock.
5.3.7 System Tools
There are 5 functions:
* Navigation Bar
* Clear Storage
* Factory Reset
* Import & Export
* Clone
5.3.7.1 Navigation Bar
To show or hide the Navigation Bar.
Disable : Hide Navigation Bar.
Enable: Show Navigation Bar.
5.3.7.2 Clear Storage
Clean all data in philips folder in Storages.
4 modes:
* Clean the philips folder in all storages.
* Only clean the philips folder in Internal storage.
* Only clean the philips folder in USB storage.
* Only clean the philips folder in SD card.
The dialogue box will show the folders which can be
cleaned.
5.3.7.3 Factory Reset
You can use Factory Reset to resume the open-box
status.
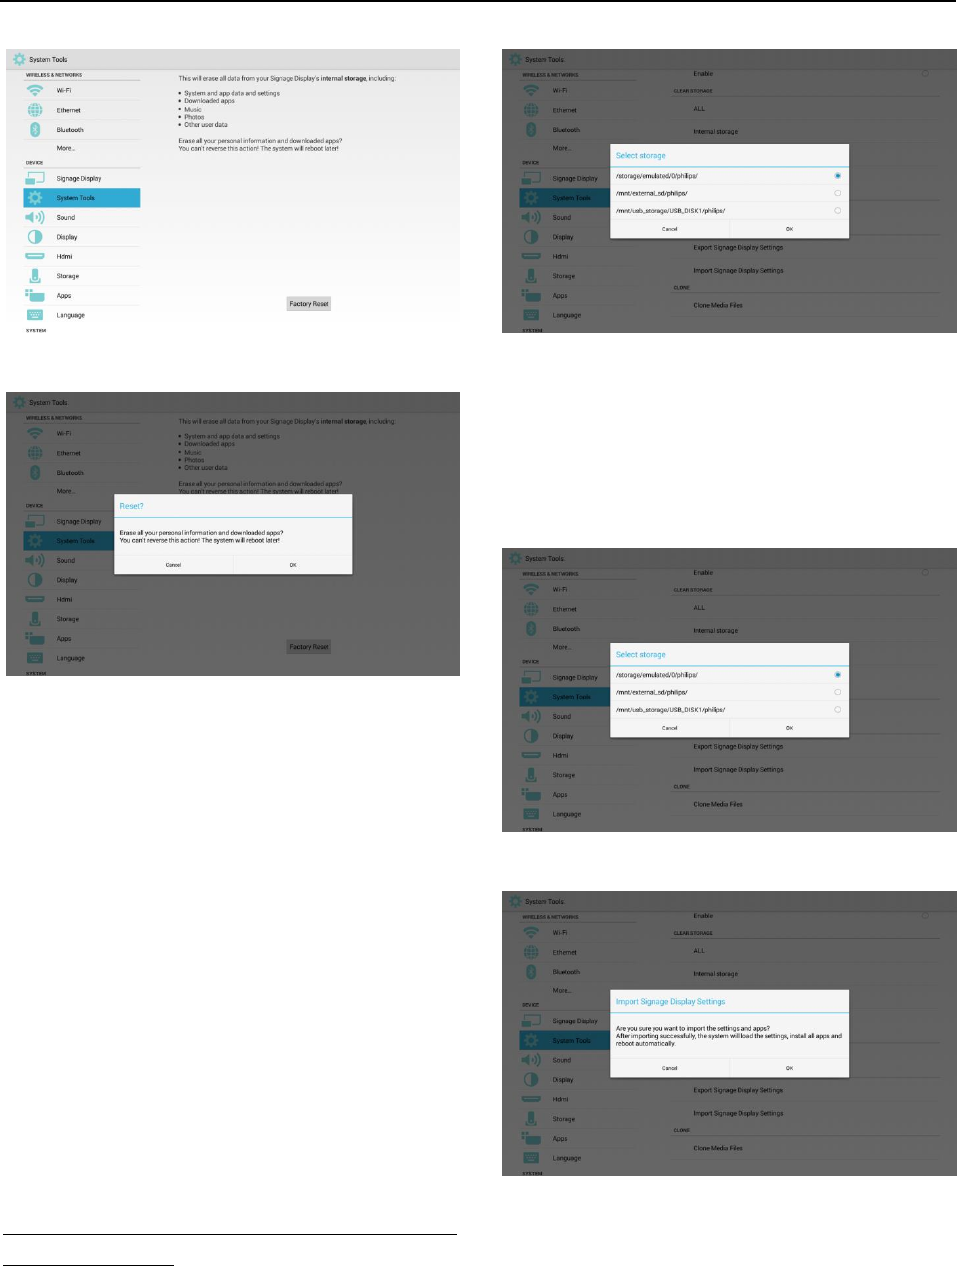
27
After clicking OK, it will execute Reset.
5.3.7.4 Export & Import
You can Export or Import Signage Display Settings and
custom APK.
PS:
* The file name is “settings.db”.
* The storage location is the “Philips” folder in the
storage device.
* Only Signage Display, System Tools, Display->Sleep
can be imported or exported.
* Signage Display Name and Boot Logo under Signage
Display will not be copied.
(1) Export signage Display Settings
Export to the philips folder in Internal, SD card, or USB
drive.
(1) Export the file “settings.db”.
(2) Export custom apk to philips/app/.
PS: It will create “/philips” folder if it can not find it in
SD card or USB drive.
List all available storage devices. (Internal/SD/USB)
(2) Import signage Display Settings
Import data from “philips” folder from Internal, SD card,
or USB drive.
*Import settings.db
* Import custom APK from philips/app/ .
List all storage devices (Internal/SD/USB)
Before importing Database, it will show a dialog box.
5.3.7.5 Clone
Clone media files :
Set to clone "photo", "music", "video", "cms", "pdf",
"browser" folders under “philips” folder.
For the “clone .cms” file, the location is:
=> internal : put in the “philips” folder, ex.
philips/xxx.cms
28
=> sdcard, usb : put in the root directory, ex.
(root)/xxx.cms
Clone source copy to Target location.
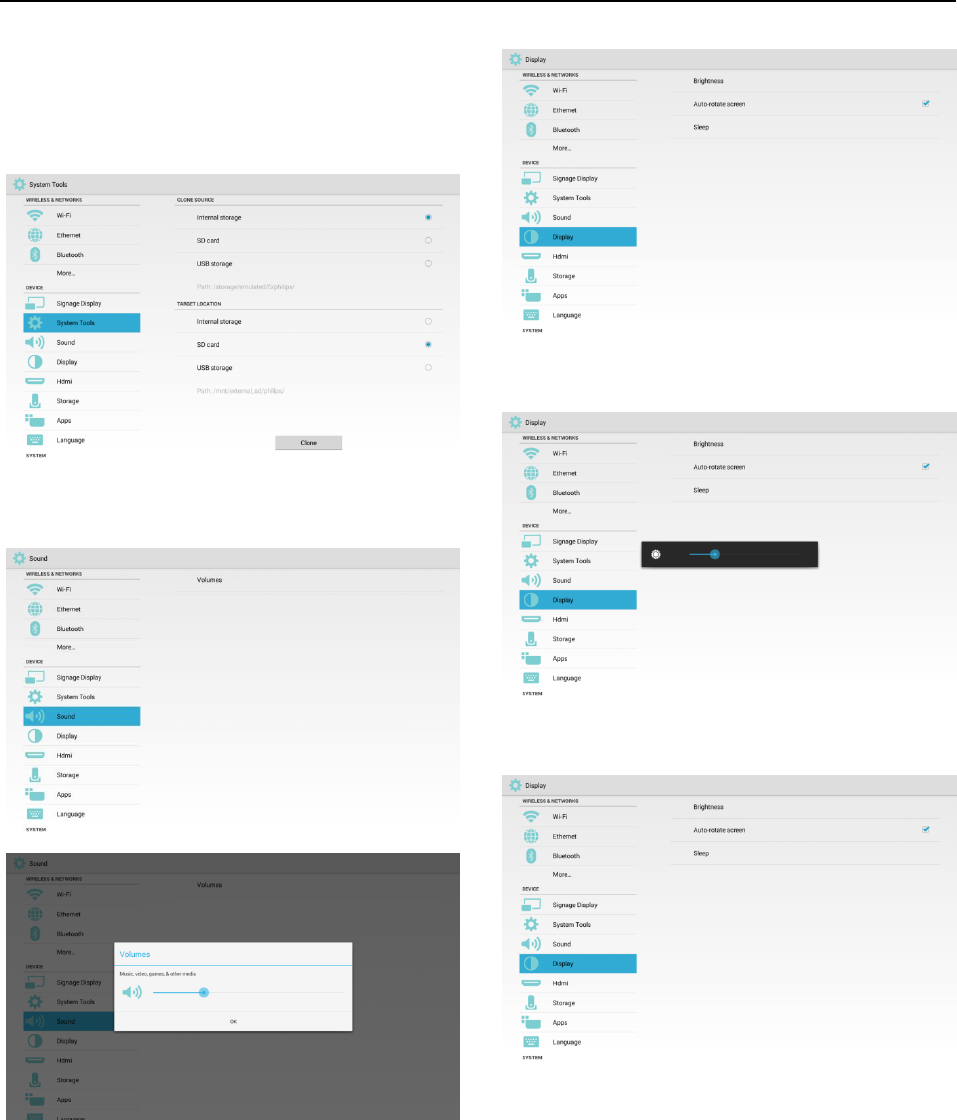
5.3.8 Sound
Set volume
5.3.9 Display
3 functions:
* Brightness
* Auto-rotate screen
* Sleep
5.3.9.1 Brightness
5.3.9.2 Auto-rotate screen
5.3.9.3 Sleep
Set Sleep time.
* Off (not to sleep), 1 Hour – 24 Hours.
* In Sleep mode, you can use the key combination
“Power + Power + Volume Down + Volume Down” to
wake up the display.
* The priority of “Schedule” is higher than “Sleep”.
That means, if the Sleep time is during the Schedule”
period, Sleep time will be ignored till end of the
Schedule.
29
Different from “Schedule” function, it will stay at last
status if it is awaken from Sleep mode.
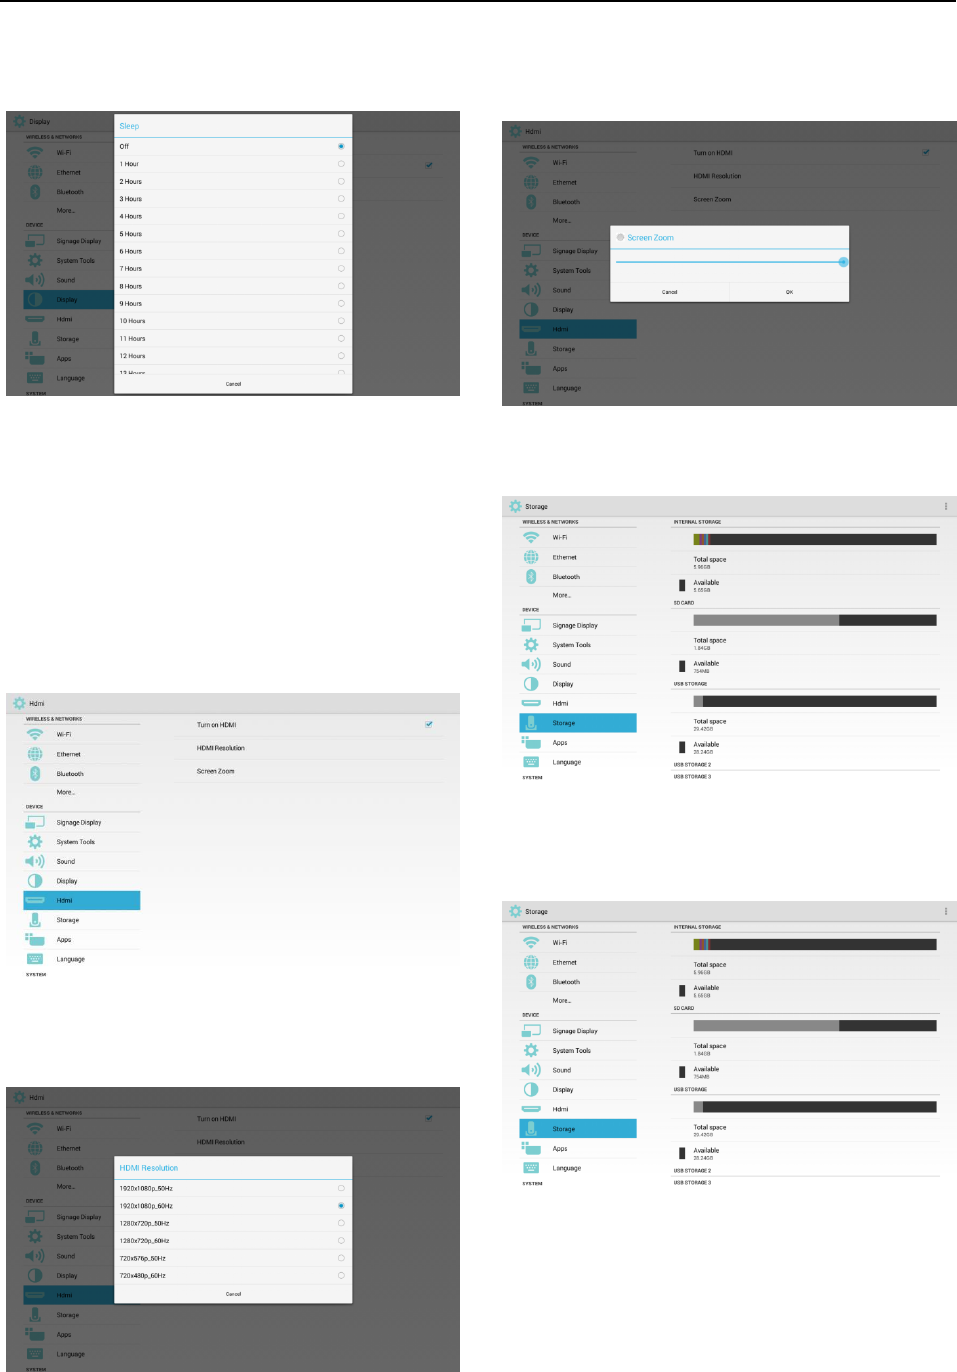
5.3.10 HDMI
3 functions:
* Turn on HDMI
* HDMI Resolution
* Screen Zoom
5.3.10.1 Turn on HDMI
Select: Enable HDMI
Unselect: Disable HDMI
5.3.10.2 HDMI Resolution
Set the resolution.
5.3.10.3 Screen Zoom
Zoom in/out the HDMI screen
5.3.11 Storage
Show the space information in all storage devices.
SD CARD and USB STORAGE:
It will show “Total Space” and “ Available space” only
the SD card and USB drive are plugged.
5.3.12 Apps
Show some information about apps.

30
5.3.13 Language
To select OSD languages.
5.3.14 Date & Time
PS: Add NTP Server to show Server IP.
5.3.15 Developer options
To show Android developer information.
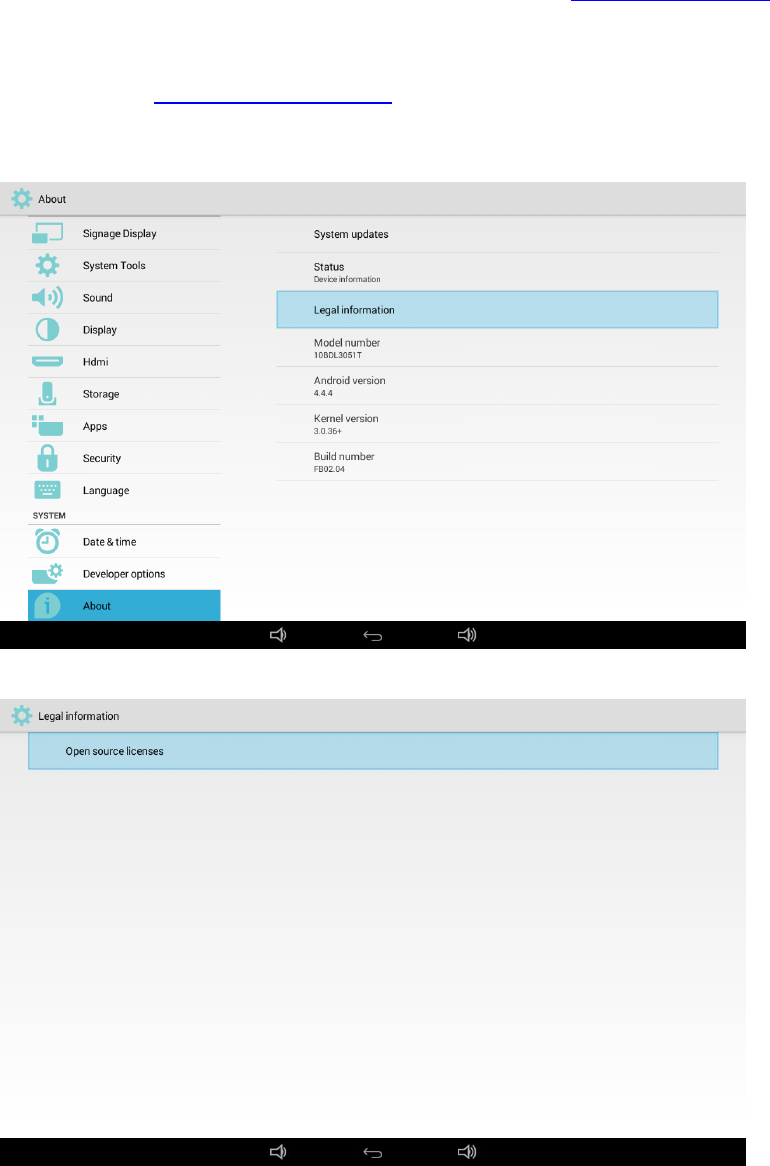
5.3.16 About
Items to show:
* System updates
* Status
* Model number
* Android version
* Kernel version
* Build number
(1) System updates
Local update
* Look for “update.zip” file in SD card and USB drive.
If it finds the file, the user can decide to update or not.
* After choosing the file source, it will re-boot and
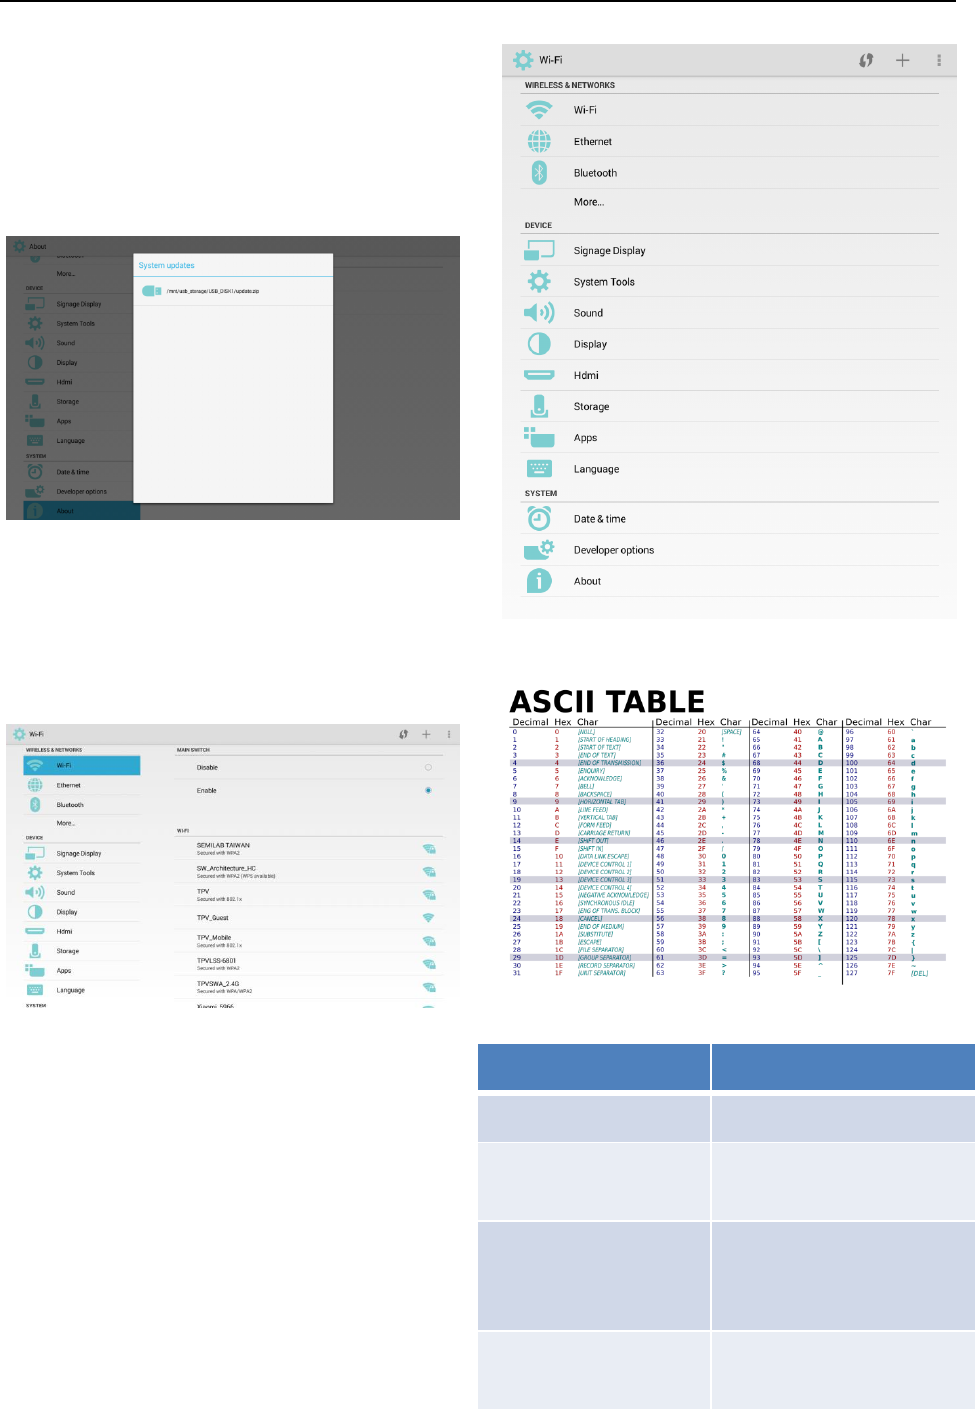
31
update automatically.
PS:
* Only supports Android Full Image
* The file name is update.zip
* The location of the file is under the root directory
of storage devices.
5.3.17 Appendix
5.3.17.1 Landscape
In Landscape Mode, the screen is divided to 2 columns.
When you click the item at left side, right side will show
its content.
5.3.17.2 Portrait
In Portrait Mode, you can only see 1 column. When
you click the item, it will go to the next page.
5.3.17.3 ASCII Table
5.3.17.4 Table of keyboard shortcuts
Press these keys
To do this
Power + Volume↓
Launch Admin mode app
Power + Volume↑
Launch Quick Information
app
Power + Poweru +
Volume↑ + Volume↓ +
Volume↓ + Volume↑
Enable touch function
Power + Power +
Volume↓ + Volume↓
Turn on the screen

32
Note:-
* Disabling touch function is only valid through SICP
command.
* Turning off the screen is only valid by
● SICP command or
● Settings Display Sleep or
● Settings > Signage Display > Schedule
End Time
* Turning on the screen is only valid by
● Hotkey
● SICP command or
● Settings Signage Display Schedule
Start Time if the screen is off.
* Mouse, touch and physical keyboard cannot wake up
the screen.
5.3.17.5 Advanced features
(1) Install custom APK
You can use file-manager apk to install it. Please
use key combination “Power+ V_Down” to enter
“launch admin mode” page. click all app launch
file manager app choose the apk to install
PS: For the file manager app, please refer to Appendix
17.6.
(2)Use the LED strips
Only SICP commands can control the LED strips
ON/OFF and colors.
* SICP commands for controlling Side LED strips
* Led colors
LED Behavior
Power LED
Please wait for 3 seconds after the power is
connected.
Power-on at Android mode:
1. Power LED is amber when power is connected.
2. Power LED is green when running power-on
logo.
3. The power LED is green in Android mode.
4. The power LED is green in Sleep mode.
In Recovery Mode (F/W upgrade or Factory reset)
1. After 3 seconds, Power LED will become amber.
2. After the recovery screen show, power LED will
be green.
R/L
LED strips
1. Default is OFF.
2. Only SICP commands can turn ON/OFF and set
colors on side LED strips.
(3) Use the camera
Use the key combination “Menu+ V_Down” to enter
“launch admin mode”. click “all app” launch
camera app.
5.3.17.6 File manager app
Home page of File Manager app, this page will list
folder and files.
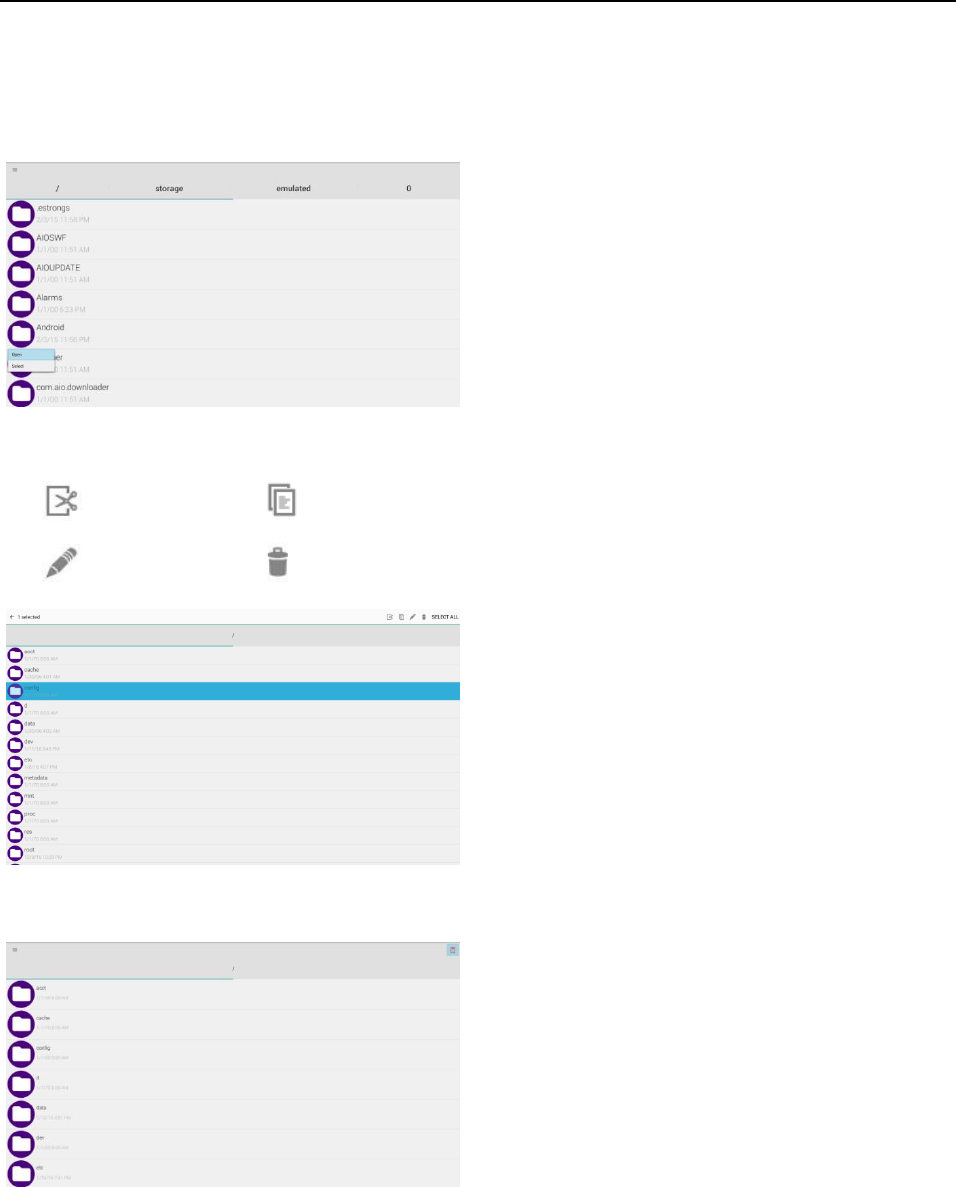
33
Press ok key at folder or file, it will popup option dialog.
* Open: open folder or file.
* Select: select folder or file to edit.
Press select item at option dialog, the top of page will
popup action bar.
: cut : copy
: edit : delete
When you press cut or copy, the page will show paste
icon
You can press back key back to the parent directory
Storage path as below:
* Internal: /mnt/sdcard
* Sdcard path: /mnt/external_sd
* Usb path: /mnt/usb_storage
