Philips HD3037/79 User Manual Gebruiksaanwijzing Hd3037 79 Dfu Nld
User Manual: Philips HD3037/79 Gebruiksaanwijzing Viva Collection Philips-multicooker HD3037/79 | PhilipsHD3037/79
Open the PDF directly: View PDF ![]() .
.
Page Count: 2
English
1 Your multicooker
Congratulations on your purchase, and welcome to Philips!
To fully benet from the support that Philips offers, register your
product at www.Philips.com/welcome.
2 What’s in the box (fig.1)
Multicooker main unit Steam basket
Rice scoop Soup ladle
Measuring cup Power cord
User manual Safety leaet
Warranty card Recipe booklet
Silica gloves
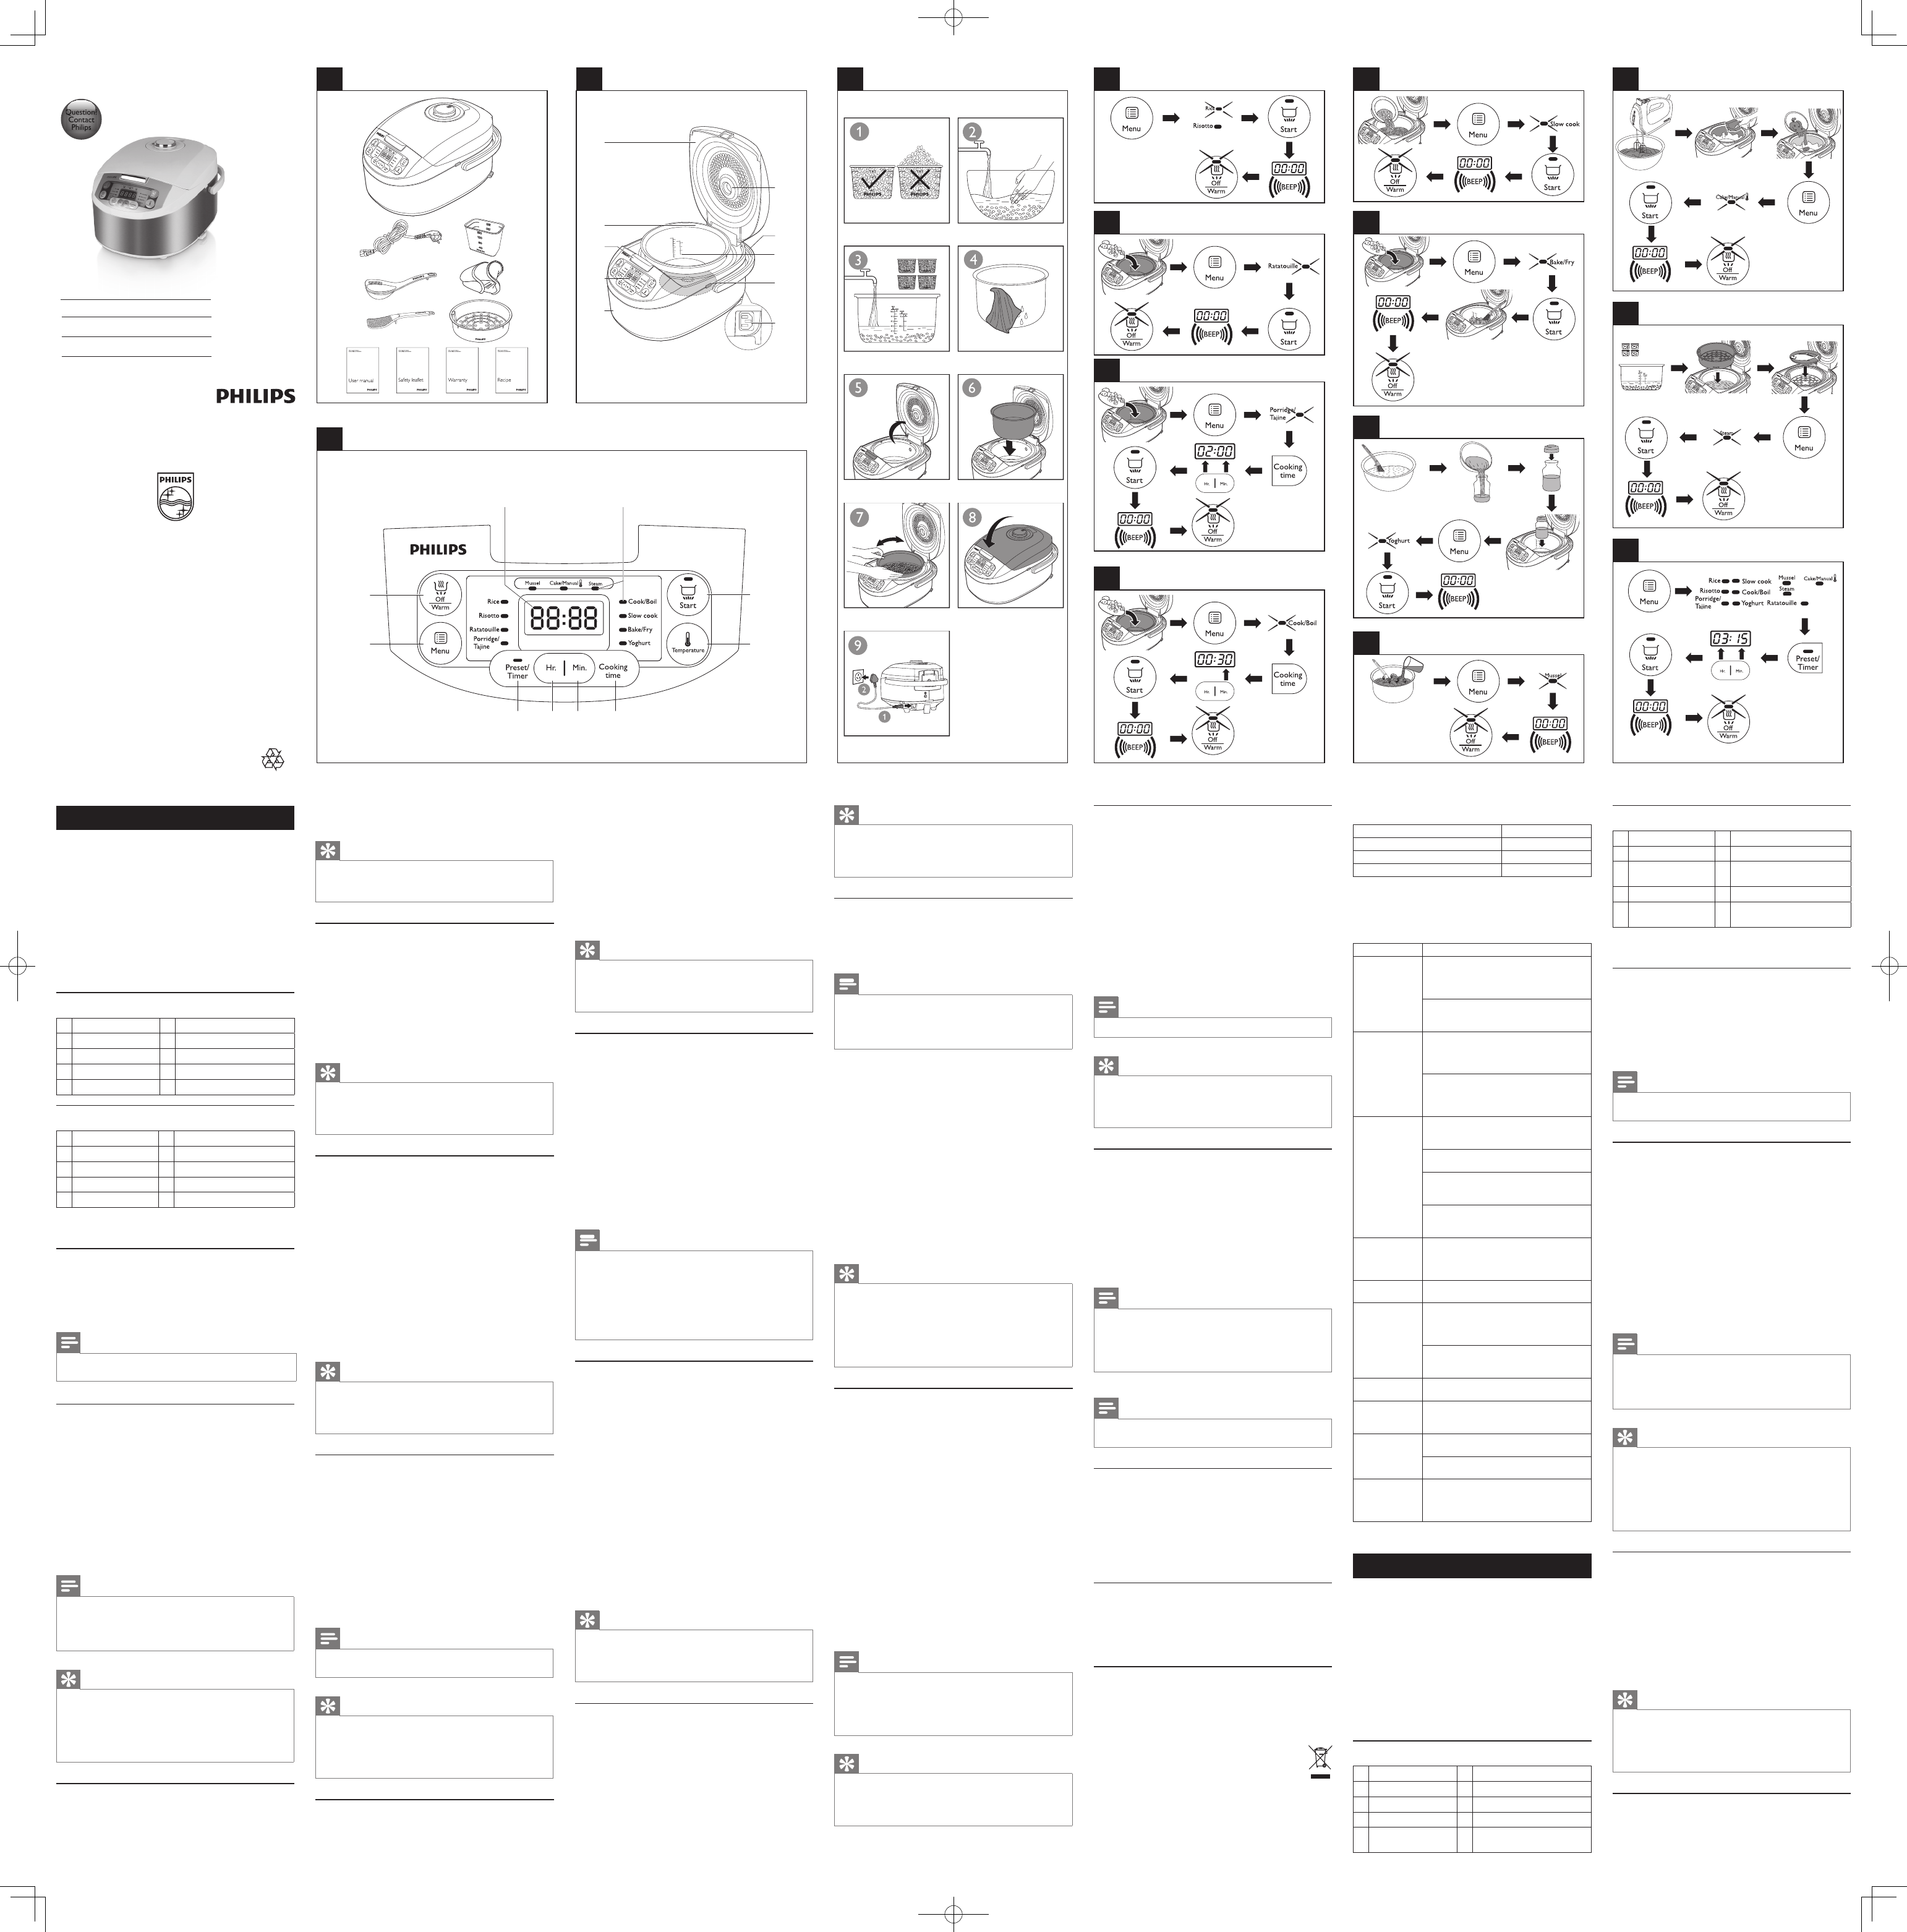
Overview (g.2)
aLid fPower socket
bInner pot gHeating element
cLid release button hWater level indications
dControl panel iCooker handle
eMain body jDetachable steam vent cap
Controls overview (g.3)
kCooking functions pHour button
lDisplay qMinute button
mOff/Keep Warm button rCooking time button
nMenu button sTemperature button
oPreset button tStart button
3 Using the multicooker
Before rst use
1 Take out all the accessories from the inner pot. Remove the sheet
between the inner pot and the heating element.
2 Clean the parts of the multicooker thoroughly before using the
multicooker for the rst time (see chapter ‘Cleaning’).
Note
•Make sure all parts are completely dry before you start using the
multicooker.
Preparations before cooking (fig.4)
Before using the multicooker, you need to follow below preparations:
1 Measure the rice using the measuring cup provided.
2 Wash the rice thoroughly.
3 Put the pre-washed rice in the inner pot.
4 Add water to the level indicated on the scale inside the inner pot
that corresponds to the number of cups of rice used. Then smooth
the rice surface.
5 Press the lid release button to open the lid.
6 Wipe the outside of the inner pot dry, then put it in the
multicooker. Check if the inner pot is in proper contact with the
heating element.
7 Close the lid of the multicooker, and put the plug in the power socket.
Note
•Make sure that the outside of the inner pot is dry and clean, and that
there is no foreign residue on the heating element or the magnetic switch.
•Do not exceed the volume indicated nor exceed the maximum water
level indicated in the inner pot, as this may cause the multicooker to
overow.
Tip
•The level marked inside the inner pot is just an indication. You
can always adjust the water level for different types of rice and
your own preference. Do not exceed the maximum quantities
indicated on the inside of the inner pot.
•Besides following the water level indications, you may also add
rice and water at 1:1-1.2 ratio for rice cooking.
Cooking rice or risotto (g.5)
1 Follow the steps in “Preparations before cooking”.
2 Press the menu button (Menu) until the rice cooking function
(Rice) or the risotto cooking function (Risotto) is selected.
3 Press the start button (Start) to start cooking.
4 When the cooking is nished, you will hear a few beeps and the
selected cooking function light will be off.
5 The multicooker will be in keep-warm mode automatically.
» The keep-warm indicator lights up.
Tip
•You can press the cancel button (Off/Keep Warm) or unplug the
multicooker to turn off the keep-warm function or when not in use.
•The default cooking time is 40 minutes, and is not adjustable.
Cooking ratatouille (g.6)
1 Put food and ingredients in the inner pot.
2 Follow steps 6 and 7 in “Preparations before cooking”.
3 Press the menu button (Menu) until the ratatouille cooking
function (Ratatouille) is selected.
4 Press the start button (Start) to start cooking.
5 When the cooking is nished, you will hear a few beeps and the
selected cooking function light will be off.
6 The multicooker will be in keep-warm mode automatically.
» The keep-warm indicator lights up.
Tip
•You can press the cancel button (Off/Keep Warm) or unplug
the multicooker to turn off the keep-warm function or when
not in use.
•The default cooking time is 40 minutes, and is not adjustable.
Cooking porridge/tajine (g.7)
1 Put food and ingredients in the inner pot.
1 Follow steps 6 and 7 in “Preparations before cooking”.
2 Press the menu button (Menu) until the porridge/tajine cooking
function (Porridge/Tajine) is selected.
3 Press the cooking time button (Cooking time), and the hour unit
starts ashing on the display.
4 Press the hour button (Hr.) to set a desired hour unit.
5 After the hour unit is set, press the cooking time button (Cooking
time) again, and the minute unit starts ashing on the display.
6 Press the minute button (Min.) to set a desired minute unit.
7 Press the start button (Start) to start cooking.
8 When the cooking is nished, you will hear a few beeps and the
selected cooking function light will be off.
9 The multicooker will be in keep-warm mode automatically.
» The keep-warm indicator lights up.
Tip
•You can press the cancel button (Off/Keep Warm) or unplug the
multicooker to turn off the keep-warm function or when not in use.
•The default cooking time is 2 hours. You can select the cooking
time from 1 to 4 hours.
Cooking/Boiling (g.8)
1 Put food and ingredients into the inner pot.
2 Follow steps 6 and 7 in “Preparations before cooking”.
3 Press the menu button (Menu) unitl the cooking/boiling function
(Cook/Boil) is selected.
4 Press the cooking time button (Cooking time), and the minute
unit starts ashing on the display.
5 Press the minute button (Min.) to set a desired minute unit.
6 Press the start button (Start) to start cooking.
7 When the cooking is nished, you will hear a few beeps and the
selected cooking function light will be off.
8 The multicooker will be in keep-warm mode automatically.
» The keep-warm indicator lights up.
Note
•The cooking time begins once the water is boiling, and the time is
displayed as a countdown.
Tip
•You can press the cancel button (Off/Keep Warm) or unplug
the multicooker to turn off the keep-warm function or when
not in use.
•The default cooking time is 30 minutes. You can select the
cooking time between 5 to 30 minutes.
Slow cooking (g.9)
1 Put the food and ingredients in the inner pot.
2 Follow steps 6 and 7 in “Preparations before cooking”.
3 Press the menu button (Menu) until the slow cooking function
(Slow cook) is selected.
4 Press the cooking time button (Cooking time), and the hour unit
starts ashing on the display.
5 Press the hour button (Hr.) to set a desired hour unit.
6 After the hour unit is set, press the cooking time button (Cooking
time) again, and the minute unit starts ashing on the display.
7 Press the minute button (Min.) to set a desired minute unit.
8 Press the start button (Start) to start cooking.
9 When the cooking is nished, you will hear a few beeps and the
selected cooking function light will be off.
10 The multicooker will be in keep-warm mode automatically.
» The keep-warm indicator lights up.
Tip
•You can press the cancel button (Off/Keep Warm) or unplug the
multicooker to turn off the keep-warm function or when not in use.
•The default cooking time is 1 hour. You can select the cooking
time between 20 minutes to 10 hours.
Baking/Frying (g.10)
1 Put food and ingredients into the inner pot.
2 Follow step 6 in “Preparations before cooking”.
3 Put the plug in the power socket.
4 Press the menu button (Menu) until the baking/frying function
(Bake/Fry) is selected.
5 Press the cooking time button (Cooking time), and the minute
unit starts ashing on the display.
6 Press the minute button (Min.) to set a desired minute unit.
7 Press the start button (Start) to start cooking.
8 During cooking, stir the food constantly using a spatula.
9 When the cooking is nished, you will hear a few beeps and the
selected cooking function light will be off.
10 The multicooker will be in keep-warm mode automatically.
» The keep-warm indicator lights up.
Note
•For frying function, this function must be operated with the lid opened.
•This function may be not used for deep fry, and the amount of oil may not
exceed marking “2“.
•The default cooking time is 42 minutes. You can select the cooking time
between 5 to 59 minutes.
•When baking food rather than using oil, this function can be operated with
the lid closed; but must be operated with the lid opened when baking
food for more than 50 minutes.
•When frying food, the oil cannot exceed 2 cap level.
Making yoghurt (g.11)
1 Whisk the ingredients for the yoghurt well and put them in a glass
container.
2 Put the glass container in the inner pot. Make sure that the
container is sealed.
3 Pour some water in the inner pot. Make sure that half of the
container is immersed in water.
4 Follow steps 6 and 7 in “Preparations before cooking”.
5 Press the menu button (Menu) until the yoghurt making function
(Yoghourt) is selected.
6 Press the cooking time button (Cooking time), and the hour unit
starts ashing on the display.
7 Press the hour button (Hr.) to set a desired hour unit.
8 After the hour unit is set, press the cooking time button (Cooking
time) again, and the minute unit starts ashing on the display.
9 Press the minute button (Min.) to set a desired minute unit.
10 Press the start button (Start) to start cooking.
11 When the cooking is nished, you will hear a few beeps and the
selected cooking function light will be off.
12 The multicooker will be in standby mode automatically.
Tip
•You can unplug the multicooker immediately after the cooking
is nished.
•The default cooking time is 8 hours. You can select the cooking
time between 6 to 12 hours.
Cooking mussel (g.12)
1 Put mussels and ingredients into the inner pot.
2 Follow steps 6 and 7 in “Preparations before cooking”.
3 Put the plug in the power socket.
4 Press the menu button (Menu) until the mussel cooking function
(Mussel) is selected.
5 Press the cooking time button (Cooking time), and the minute
unit starts ashing on the display.
6 Press the minute button (Min.) to set a desired minute unit.
7 Press the start button (Start) to start cooking.
8 When the cooking is nished, you will hear a few beeps and the
selected cooking function light will be off.
9 The multicooker will be in keep-warm mode automatically.
» The keep-warm indicator lights up.
Preset time for delayed cooking (g.15)
You can preset the delayed cooking time in different cooking modes.
The preset timer is available from 10 minutes to 24 hours.
1 Follow steps 6 and 7 in “Preparations before cooking”.
2 Press the menu button (Menu) until your desired cooking function
is selected.
3 Press the preset time button (Preset/Timer).
» The preset timer starts ashing on the display.
4 Press the hour button (Hr.) and minute button (Min.) to set the
preset time.
5 Press the start button (Start) to conrm the preset time.
6 The cooking will be nished when the preset time has elapsed. You will
hear a few beeps and the selected cooking function light will be off.
7 The multicooker will be in keep-warm mode automatically.
» The keep-warm indicator lights up.
Note
•The preset timer is not available in bake/fry mode.
Tip
•After the preset time is set, you can press the cancel button
(Off/Keep Warm) to deactivate the preset function.
•You can press the cancel button (Off/Keep Warm) or unplug the
multicooker to turn off the keep-warm function or when not in use.
Keep-warm mode
The multicooker provides you with easy control over the keep-warm
mode.
• After you have selected the cooking function using the menu
button (Menu), if you press the start button (Start) directly, the
keep-warm indicator will light up. After the cooking is nished, the
multicooker will switch to keep-warm mode directly.
• After you have selected the cooking function using the menu
button (Menu), if you press the keep-warm button rst, and then
the start button (Start), the keep-warm indicator will be off. After
the cooking is nished, the multicooker will be in standby mode.
Note
•Except for the yoghurt-making function, all cooking functions will allow the
product to go into the keep-warm mode (Off/Keep Warm).
•In standby mode, you can press the keep-warm button (Off/Keep Warm)
to enter the keep-warm mode.
•In keep-warm mode, you can press the keep-warm button (Off/Keep
Warm)to enter the standby mode.
4 Cleaning and Maintenance
Note
•Unplug the multicooker before starting to clean it.
•Wait until the multicooker has cooled down sufciently before cleaning it.
Interior
Inside of the outer lid and the main body:
• Wipe with wrung out and damp cloth.
• Make sure to remove all the food residues stuck to the
multicooker.
Heating element:
• Wipe with wrung out and damp cloth.
• Remove food residues with wrung out and damp cloth or
toothpicks.
Exterior
Surface of the outer lid and outside of the main body:
• Wipe with a cloth damped with soap water.
• Only use soft and dry cloth to wipe the control panel.
• Make sure to remove all the food residues around the control
buttons.
Accessories
Rice scoop, soup ladle, inner pot, steam basket, and steam vent cap:
• Soak in hot water and clean with sponge.
5 Environment
Do not throw away the appliance with normal household
waste at the end of its life, but hand it in at an ofcial
collection point for recycling. By doing this, you can help to
preserve the environment.
6 Guarantee and service
If you need service or information, or if you have a problem, visit the
Philips website at www.philips.com <http://www.philips.com/> or
contact the Philips Customer Care Center in your country. You can
nd its phone number in the worldwide guarantee leaet. If there is
no Customer Care Center in your country, go to your local Philips
dealer.
Tip
•You can press the cancel button (Off/Keep Warm) or unplug the
multicooker to turn off the keep-warm function or when not in use.
•The default cooking time is 25 minutes. You can select the
cooking time between 8 to 25 minutes.
Baking cake/Manual (g.13)
1 Put the food and ingredients in the inner pot.
2 Follow steps 6 and 7 in “Preparations before cooking”.
3 Put the plug in the power socket.
Note
•When baking cake, keep the lid closed during cooking. Baking cake at
130°C and by 45 minutes usually delivers best cooking result.
•When baking food other than cake, the lid must be opened during cooking.
•Keep the lid open when baking cake at a temperature higher than 130°C
or for more than 50 minutes.
4 Press the menu button (Menu) until the baking function (Cake/
Manual)is selected.
5 Press the cooking time button (Cooking time), and the hour unit
starts ashing on the display.
6 Press the hour button (Hr.) to set a desired hour unit.
7 After the hour unit is set, press the cooking time button (Cooking
time) again, and the minute unit starts ashing on the display.
8 Press the minute button (Min.) to set a desired minute unit.
9 Press the temperature button (Temperature), and the default
cooking temperature starts ashing on the display.
10 Press the temperature button (Temperature) to set a desired
baking temperature.
11 Press the start button (Start) to start cooking.
12 When the baking is nished, you will hear a few beeps and the
selected function light will be off.
13 The multicooker will be in keep-warm mode automatically.
» The keep-warm indicator lights up.
Tip
•When removing the inner pot from the multicooker, use a
kitchen glove or a cloth, as the inner pot will be very hot.
•The default cooking time is 45 minutes. You can select the
cooking time between 20 minutes to 2 hours.
•The default cooking temperature is 40°C. The available
temperature options are 40°C, 60°C, 80°C, 100°C, 120°C,
150°C, and 180°C.
Steaming (g.14)
1 Measure a few cups of water with the measuring cup.
2 Pour the water into the inner pot.
3 Put the steam basket into the inner pot.
4 Put the food into the steam basket.
5 Close the lid of the multicooker, and put the plug in the power socket.
6 Press the menu button (Menu) until the steaming function (Steam)
is selected.
7 Press the cooking time button (Cooking time), and the hour unit
starts ashing on the display.
8 Press the hour button (Hr.) to set a desired hour unit.
9 After the hour unit is set, press the cooking time button (Cooking
time) again, and the minute unit starts ashing on the display.
10 Press the minute button (Min.) to set a desired minute unit.
11 Press the start button (Start) to start cooking.
12 When the steaming is nished, you will hear a few beeps and the
selected cooking function light will be off.
13 The multicooker will be in keep-warm mode automatically.
» The keep-warm indicator lights up.
14 Open the lid and carefully take out the steamed food from the
plate or the steam basket.
Note
•The cooking time begins once the water is boiling, and the time is
displayed as a countdown.
•When removing the steamed food from the steam basket, use a kitchen
glove or a cloth, as the plate and steam basket will be very hot.
•When you cook rice and steam food at the same time, make sure you
measure out an amount of rice that leaves enough room for the steam tray.
Tip
•You can press the cancel button (Off/Keep Warm) or unplug the
multicooker to turn off the keep-warm function or when not in use.
•The default steaming time is 30 minutes. You can select the
cooking time between 5 minutes to 2 hours.
7 Specifications
Model Number HD3037
Rated power output 980W
Rated capacity 5.0L
Rice volume 1.8L
8 Troubleshooting
If you encounter problems when using this multicooker, check the
following points before requesting service. If you cannot solve the
problem, contact the Philips Consumer Care Center in your country.
Problem Solution
The light on the
button does not
go on.
There is a connection problem. Check if
the power cord is connected to the cooker
properly and if the plug is inserted rmly into
the power outlet.
The light is defective. Take the appliance to your
Philips dealer or a service center authorized
by Philips.
The display does
not function.
The multicooker is not connected to the power
supply. If there is no power supply, the power
failure backup function does not work and the
display does not function.
The battery for the display runs out of power.
Take the appliance to your Philips dealer or a
service center authorized by Philips to have the
battery replaced.
The rice is not
cooked.
There is not enough water. Add water
according to the scale on the inside of the
inner pot.
You did not press the start button (Start) to
start cooking.
Make sure that there is no foreign residue on
the heating element and the outside of the
inner pot before switching the multicooker on.
The heating element is damaged, or the inner
pot is deformed. Take the cooker to your Philips
dealer or a service center authorized by Philips.
The cooker does
not switch to
keep-warm mode
automatically.
The temperature control is defective. Take the
appliance to your Philips dealer or a service
center authorized by Philips.
The rice is
scorched.
You have not rinse the rice properly. Rinse the
rice until the water runs clear.
Water spills out of
the multicooker
during cooking.
Make sure that you add water to the level
indicated on the scale inside the inner pot that
corresponds to the number of cups of rice
used.
Make sure the water does not exceed the
next level on the scale, as this may cause the
appliance to overow during cooking.
The cake result is
too hard.
Please use cake mix and follow the instructions
provided in the user manual.
I cannot get to the
desired cooking
function.
Press the menu button (Menu) repeatedly to
select the desired function as shown by the
LED indicator.
Rice smells bad
after cooking
Clean the inner pot with some washing
detergent and warm water.
After cooking, make sure the steam vent cap,
inner lid and inner pot are cleaned thoroughly.
Error message
(E1, E2, E3, or E4)
appears on the
display.
There is malfunction in your multicooker. Take
the appliance to your Philips dealer or a service
center authorized by Philips.
Nederlands
1 Uw multicooker
Gefeliciteerd met uw aankoop en welkom bij Philips!
Registreer uw product op www.philips.com/welcome om optimaal
gebruik te kunnen maken van de door Philips geboden ondersteuning.
2 Wat zit er in de doos? (fig. 1)
Multicooker Stoommand
Rijstlepel Soeplepel
Maatbeker Netsnoer
Gebruikershandleiding Boekje met veiligheidsinformatie
Garantiekaart Receptenboekje
Ovenwanten van silicone
Overzicht (g. 2)
aDeksel fStopcontact
bBinnenpan gVerwarmingselement
cDekselontgrendelknop hWaterniveau-indicatoren
dConguratiescherm iHandgreep van de cooker
eApparaat jVerwijderbare dop van
stoomuitlaat
Overzicht bedieningspaneel (g. 3)
kKookfuncties pKnop Hr. (Uren)
lDisplay qKnop Min. (Minuten)
mKnop Off/Keep warm
(Uit/Warm houden)
rKnop Cooking time (Kooktijd)
nKnop Menu (Menu) sKnop Temperature (Temperatuur)
oKnop Preset/Timer
(Ingestelde tijd/timer)
tknop Start (Start)
3 De multicooker gebruiken
Voor het eerste gebruik
1 Verwijder alle accessoires uit de binnenpan. Verwijder
het beschermingsmateriaal tussen de binnenpan en het
verwarmingselement.
2 Was de onderdelen van de multicooker grondig af voordat u de
multicooker voor de eerste keer gebruikt (zie hoofdstuk ‘Reiniging
en onderhoud’).
Opmerking
•Zorg ervoor dat alle onderdelen volledig droog zijn voor u de multicooker
gaat gebruiken.
Voorbereidingen voor het gebruik (g. 4)
Voer de volgende voorbereidende handelingen uit voordat u de
multicooker gebruikt:
1 Meet de rijst af met de bijgeleverde maatbeker.
2 Was de rijst grondig schoon.
3 Doe de gewassen rijst in de binnenpan.
4 Voeg water toe tot het niveau dat is aangegeven op de
maatverdeling in de binnenpan overeenkomt met het gebruikte
aantal kopjes rijst. Verdeel de rijst gelijkmatig in de pan.
5 Druk op de dekselontgrendelknop om het deksel te openen.
6 Veeg de buitenkant van de binnenpan droog en plaats deze dan
in de multicooker. Controleer of de binnenpan goed contact heeft
met het verwarmingselement.
7 Sluit het deksel van de multicooker en steek de stekker in het
stopcontact.
Opmerking
•Zorg ervoor dat de buitenzijde van de binnenpan droog en schoon is en
dat het verwarmingselement en de magnetische schakelaar vrij zijn van
etensresten of ander vuil.
•Overschrijd het aangeduide volumeniveau en het maximale waterniveau
in de binnenpan niet. De multicooker kan overstromen.
Tip
•Het gemarkeerde niveau in de binnenpan is slechts een
aanduiding. U kunt het waterniveau natuurlijk altijd aanpassen
voor verschillende soorten rijst en naar eigen voorkeur.
Overschrijd de aangegeven maximale hoeveelheden aan de
binnenkant van de binnenpan niet.
•Naast het volgen van het aangegeven waterniveau kunt u ook
rijst en water toevoegen in de verhouding 1:1-1,2.
Rijst of risotto bereiden (g. 5)
1 Volg de stappen in ‘Voorbereidingen voor het gebruik’.
2 Druk op de knop Menu (Menu) tot de rijstkookfunctie (Rice) of
de risottokookfunctie (Risotto) is geselecteerd.
3 Druk op de knop Start (Start) om het kookproces te starten.
4 Wanneer het kookproces is voltooid, hoort u een paar piepjes en
dooft het lampje van de geselecteerde kookfunctie.
5 De multicooker schakelt automatisch over op de
warmhoudmodus.
» Het lampje van de warmhoudmodus gaat branden.
Tip
•U kunt op de knop Off/Keep Warm (Uit/Warm houden)
drukken of de stekker van de multicooker uit het stopcontact
halen om de warmhoudmodus uit te schakelen of als u de
multicooker niet gebruikt.
•De standaardbereidingstijd is 40 minuten en niet instelbaar.
Ratatouille bereiden (g. 6)
1 Plaats voedsel en ingrediënten in de binnenpan.
2 Voer de stappen 6 en 7 uit van “Voorbereidingen voor het
gebruik”.
3 Druk op de knop Menu (Menu) tot de functie Ratatouille
(ratatouille) is geselecteerd.
Specifications are subject to change without notice
© 2013 Koninklijke Philips N.V.
All rights reserved.
HD3037_UM_Dutch_V1.0
HD3037
Register your product and get support at
www.philips.com/welcome
Always there to help you
Question?
Contact
Philips
EN User manual
NL Gebruiksaanwijzing
FR Mode d’emploi
4
1
3
2 5
6
7
8
9
12
11
10
13
a
b
d
ef
g
h
j
ci
kl
m
n
o p q r
s
t
14
15

4 Druk op de knop Start (Start) om het kookproces te starten.
5 Wanneer het kookproces is voltooid, hoort u een paar piepjes en
dooft het lampje van de geselecteerde kookfunctie.
6 De multicooker schakelt automatisch over op de
warmhoudmodus.
» Het lampje van de warmhoudmodus gaat branden.
Tip
•U kunt op de knop Off/Keep Warm (Uit/Warm houden)
drukken of de stekker van de multicooker uit het stopcontact
halen om de warmhoudmodus uit te schakelen of als u de
multicooker niet gebruikt.
•De standaardbereidingstijd is 40 minuten en niet instelbaar.
Pap/tajine bereiden (g. 7)
1 Plaats voedsel en ingrediënten in de binnenpan.
2 Voer de stappen 6 en 7 uit van “Voorbereidingen voor het
gebruik”.
3 Druk op de knop Menu (Menu) tot de functie Porridge/Tajine
(pap/tajine) is geselecteerd.
4 Druk op de knop Cooking time (Kooktijd). De urenaanduiding
begint op het display te knipperen.
5 Druk op de knop Hr. (Uren) om het aantal uren in te stellen.
6 Druk opnieuw op de knop Cooking time (Kooktijd) als u de uren
hebt ingesteld. De minutenaanduiding begint op het display te
knipperen.
7 Druk op de knop Min. (Minuten) om het aantal minuten in te
stellen.
8 Druk op de knop Start (Start) om het kookproces te starten.
9 Wanneer het kookproces is voltooid, hoort u een paar piepjes en
dooft het lampje van de geselecteerde kookfunctie.
10 De multicooker schakelt automatisch over op de
warmhoudmodus.
» Het lampje van de warmhoudmodus gaat branden.
Tip
•U kunt op de knop Off/Keep Warm (Uit/Warm houden)
drukken of de stekker van de multicooker uit het stopcontact
halen om de warmhoudmodus uit te schakelen of als u de
multicooker niet gebruikt.
•De standaardbereidingstijd is 2 uur. U kunt een bereidingstijd
instellen van 1 tot 4 uur.
Koken/vloeistof koken (g. 8)
1 Plaats voedsel en ingrediënten in de binnenpan.
2 Voer de stappen 6 en 7 uit van “Voorbereidingen voor het
gebruik”.
3 Druk op de knop Menu (Menu) tot de functie Cook/Boil (Koken/
vloeistof koken) is geselecteerd.
4 Druk op de knop Cooking time (Kooktijd). De minutenaanduiding
begint op het display te knipperen.
5 Druk op de knop Min. (Minuten) om het aantal minuten in te
stellen.
6 Druk op de knop Start (Start) om het kookproces te starten.
7 Wanneer het kookproces is voltooid, hoort u een paar piepjes en
dooft het lampje van de geselecteerde kookfunctie.
8 De multicooker schakelt automatisch over op de
warmhoudmodus.
» Het lampje van de warmhoudmodus gaat branden.
Opmerking
•De kooktijd start als het water kookt. De tijd wordt weergegeven op het
display.
Tip
•U kunt op de knop Off/Keep Warm (Uit/Warm houden)
drukken of de stekker van de multicooker uit het stopcontact
halen om de warmhoudmodus uit te schakelen of als u de
multicooker niet gebruikt.
•De standaardbereidingstijd is 30 minuten. U kunt een
bereidingstijd instellen van 5 tot 30 minuten.
Langzaam koken (g. 9)
1 Plaats voedsel en ingrediënten in de binnenpan.
2 Voer de stappen 6 en 7 uit van “Voorbereidingen voor het
gebruik”.
3 Druk op de knop Menu (Menu) tot de functie Slow cook
(Langzaam koken) is geselecteerd.
4 Druk op de knop Cooking time (Kooktijd). De urenaanduiding
begint op het display te knipperen.
5 Druk op de knop Hr. (Uren) om het aantal uren in te stellen.
6 Druk opnieuw op de knop Cooking time (Kooktijd) als u de uren
hebt ingesteld. De minutenaanduiding begint op het display te
knipperen.
7 Druk op de knop Min. (Minuten) om het aantal minuten in te
stellen.
8 Druk op de knop Start (Start) om het kookproces te starten.
9 Wanneer het kookproces is voltooid, hoort u een paar piepjes en
dooft het lampje van de geselecteerde kookfunctie.
10 De multicooker schakelt automatisch over op de
warmhoudmodus.
» Het lampje van de warmhoudmodus gaat branden.
Tip
•U kunt op de knop Off/Keep Warm (Uit/Warm houden)
drukken of de stekker van de multicooker uit het stopcontact
halen om de warmhoudmodus uit te schakelen of als u de
multicooker niet gebruikt.
•De standaardbereidingstijd is 1 uur. U kunt een bereidingstijd
instellen van 20 minuten tot 10 uur.
Bakken/bakken in olie (g. 10)
1 Plaats voedsel en ingrediënten in de binnenpan.
2 Voer stap 6 uit van ‘Voorbereidingen voor het gebruik’.
3 Steek de stekker in het stopcontact.
4 Druk op de knop Menu (Menu) tot de functie Bake/Fry (Bakken/
bakken in olie) is geselecteerd.
5 Druk op de knop Cooking time (Kooktijd). De minutenaanduiding
begint op het display te knipperen.
6 Druk op de knop Min. (Minuten) om het aantal minuten in te
stellen.
7 Druk op de knop Start (Start) om het kookproces te starten.
8 Roer het voedsel tijdens het koken voortdurend met een spatel.
9 Wanneer het kookproces is voltooid, hoort u een paar piepjes en
dooft het lampje van de geselecteerde kookfunctie.
10 De multicooker schakelt automatisch over op de
warmhoudmodus.
» Het lampje van de warmhoudmodus gaat branden.
Opmerking
•Bij het bakken in olie met deze functie moet het deksel geopend zijn.
•Deze functie mag niet worden gebruikt om te frituren, en de hoeveelheid
olie mag niet boven de markering '2' komen.
•De standaardbereidingstijd is 42 minuten. U kunt een bereidingstijd
instellen van 5 tot 59 minuten.
•Als u bakt zonder olie te gebruiken, mag het deksel tijdens de bereiding
gesloten zijn; het deksel moet echter geopend blijven als u voedsel langer
dan 50 minuten bakt.
•Bij het bakken van voedsel in olie, mag de olie niet boven het niveau 2
komen.
Yoghurt maken (g. 11)
1 Meng de ingrediënten voor de yoghurt goed en doe ze in een
glazen pot.
2 Plaats de glazen pot in de binnenpan. Zorg ervoor dat de pot is
afgesloten.
3 Giet wat water in de binnenpan. Zorg ervoor dat de pot half
onder water staat.
4 Voer de stappen 6 en 7 uit van “Voorbereidingen voor het
gebruik”.
5 Druk op de knop Menu (Menu) tot de functie Yoghourt (Yoghurt)
is geselecteerd.
6 Druk op de knop Cooking time (Kooktijd). De urenaanduiding
begint op het display te knipperen.
7 Druk op de knop Hr. (Uren) om het aantal uren in te stellen.
8 Druk opnieuw op de knop Cooking time (Kooktijd) als u de uren
hebt ingesteld. De minutenaanduiding begint op het display te
knipperen.
9 Druk op de knop Min. (Minuten) om het aantal minuten in te
stellen.
10 Druk op de knop Start (Start) om het kookproces te starten.
11 Wanneer het kookproces is voltooid, hoort u een paar piepjes en
dooft het lampje van de geselecteerde kookfunctie.
12 De multicooker schakelt automatisch over op de stand-bymodus.
Tip
•U kunt de stekker van de multicooker meteen uit het
stopcontact halen als het bereidingsproces is voltooid.
•De standaardbereidingstijd is 8 uur. U kunt een bereidingstijd
instellen van 6 tot 12 uur.
Mosselen bereiden (g. 12)
1 Plaats mosselen en ingrediënten in de binnenpan.
2 Voer de stappen 6 en 7 uit van “Voorbereidingen voor het
gebruik”.
3 Steek de stekker in het stopcontact.
4 Druk op de knop Menu (Menu) tot de functie Mussel (Mosselen)
is geselecteerd.
5 Druk op de knop Cooking time (Kooktijd). De minutenaanduiding
begint op het display te knipperen.
6 Druk op de knop Min. (Minuten) om het aantal minuten in te
stellen.
7 Druk op de knop Start (Start) om het kookproces te starten.
8 Wanneer het kookproces is voltooid, hoort u een paar piepjes en
dooft het lampje van de geselecteerde kookfunctie.
9 De multicooker schakelt automatisch over op de
warmhoudmodus.
» Het lampje van de warmhoudmodus gaat branden.
Tip
•U kunt op de knop Off/Keep Warm (Uit/Warm houden)
drukken of de stekker van de multicooker uit het stopcontact
halen om de warmhoudmodus uit te schakelen of als u de
multicooker niet gebruikt.
•De standaardbereidingstijd is 25 minuten. U kunt een
bereidingstijd instellen van 8 tot 25 minuten.
Cake bakken/handmatig (g. 13)
1 Plaats voedsel en ingrediënten in de binnenpan.
2 Voer de stappen 6 en 7 uit van “Voorbereidingen voor het
gebruik”.
3 Steek de stekker in het stopcontact.
Opmerking
•Houd het deksel bij het bakken van cake tijdens het bakproces gesloten.
Cake bakken gaat het beste bij 130 °C met een baktijd van 45 minuten.
•Als u andere deegwaren bakt, moet het deksel tijdens het bakken open zijn.
•Houd het deksel geopend als u cake bakt op een hogere temperatuur dan
130 °C of langer dan 50 minutes.
1 Druk op de knop Menu (Menu) tot de functie Cake/Manual (Cake
bakken/handmatig) is geselecteerd.
2 Druk op de knop Cooking time (Kooktijd). De urenaanduiding
begint op het display te knipperen.
3 Druk op de knop Hr. (Uren) om het aantal uren in te stellen.
4 Druk opnieuw op de knop Cooking time (Kooktijd) als u de uren
hebt ingesteld. De minutenaanduiding begint op het display te
knipperen.
5 Druk op de knop Min. (Minuten) om het aantal minuten in te
stellen.
6 Druk op de knop Temperature (Temperatuur). De standaard
bereidingstemperatuur knippert op het display.
7 Druk op de knop Temperature (Temperatuur) om de gewenste
bereidingstemperatuur in te stellen.
8 Druk op de knop Start (Start) om het bakproces te starten.
9 Wanneer het bakproces is voltooid, hoort u een paar piepjes en
dooft het lampje van de geselecteerde functie.
10 De multicooker schakelt automatisch over op de
warmhoudmodus.
» Het lampje van de warmhoudmodus gaat branden.
Tip
•Gebruik een ovenwant of een doek als u de binnenpan uit de
multicooker haalt, omdat de binnenpan erg heet wordt.
•De standaardbereidingstijd is 45 minuten. U kunt een
bereidingstijd instellen van 20 minuten tot 2 uur.
•De standaardbereidingstemperatuur is 40 °C. U kunt de
temperatuur instellen op 40 °C, 60 °C, 80 °C, 100 °C, 120 °C,
150 °C en 180 °C.
Stomen (g. 14)
1 Meet enkele koppen water af met de maatbeker.
2 Giet het water in de binnenpan.
3 Plaats de stoommand in de binnenpan.
4 Plaats het voedsel in de stoommand.
5 Sluit het deksel van de multicooker en steek de stekker in het
stopcontact.
6 Druk op de knop Menu (Menu) tot de functie Steam (Stomen) is
geselecteerd.
7 Druk op de knop Cooking time (Kooktijd). De urenaanduiding
begint op het display te knipperen.
8 Druk op de knop Hr. (Uren) om het aantal uren in te stellen.
9 Druk opnieuw op de knop Cooking time (Kooktijd) als u de uren
hebt ingesteld. De minutenaanduiding begint op het display te
knipperen.
10 Druk op de knop Min. (Minuten) om het aantal minuten in te
stellen.
11 Druk op de knop Start (Start) om het stoomproces te starten.
12 Wanneer het stoomproces is voltooid, hoort u een paar piepjes
en dooft het lampje van de geselecteerde kookfunctie.
13 De multicooker schakelt automatisch over op de
warmhoudmodus.
» Het lampje van de warmhoudmodus gaat branden.
14 Open het deksel en neem het gestoomde voedsel voorzichtig uit
de stoommand.
Opmerking
•De kooktijd start als het water kookt. De tijd wordt weergegeven op het
display.
•Gebruik een ovenwant of een doek als u het gestoomde voedsel uit de
stoommand haalt, want de stoommand wordt erg heet.
•Wanneer u rijst en stoomvoedsel tegelijkertijd bereidt, zorg er dan voor
dat u een hoeveelheid rijst toevoegt die genoeg ruimte laat voor de
stoommand.
Tip
•U kunt op de knop Off/Keep Warm (Uit/Warm houden)
drukken of de stekker van de multicooker uit het stopcontact
halen om de warmhoudmodus uit te schakelen of als u de
multicooker niet gebruikt.
•De standaardstoomtijd is 30 minuten. U kunt een stoomtijd
instellen van 5 minuten tot 2 uur.
Ingestelde tijd voor vertraagd koken (g. 15)
U kunt het tijdstip instellen waarop bij de verschillende kookfuncties
de bereiding moet beginnen. U kunt met de timer een tijd instellen
van 10 minuten tot 24 uur.
1 Voer de stappen 6 en 7 uit van “Voorbereidingen voor het
gebruik”.
2 Druk op de knop Menu (Menu) tot de gewenste kookfunctie is
geselecteerd.
3 Druk op de knop Preset/Timer (Ingestelde tijd/timer).
» De timer begint op het display te knipperen.
4 Druk op de knoppen Hr. (Uren) en Min. (Minuten) om de tijd in
te stellen.
5 Druk op de knop Start (Start) om de ingestelde tijd te bevestigen.
6 Het bereidingsproces is voltooid als de ingestelde tijd voor
vertraging is verstreken. U hoort een paar piepjes en het lampje
van de geselecteerde kookfunctie dooft.
7 De multicooker schakelt automatisch over op de
warmhoudmodus.
» Het lampje van de warmhoudmodus gaat branden.
Opmerking
•De timer is niet beschikbaar bij de functie Bake/Fry (Bakken/bakken in olie).
Tip
•Als u een ingestelde tijd hebt bevestigd, kunt u op de knop Off/
Keep Warm (Uit/Warm houden) drukken om de timerfunctie
te annuleren.
•U kunt op de knop Off/Keep Warm (Uit/Warm houden)
drukken of de stekker van de multicooker uit het stopcontact
halen om de warmhoudmodus uit te schakelen of als u de
multicooker niet gebruikt.
Warmhoudmodus
De warmhoudmodus van de multicooker is gemakkelijk te regelen.
•Als u op de knop Start (Start) drukt, nadat u met de knop
Menu (Menu) een kookfunctie hebt geselecteerd, zal het lampje
van de warmhoudmodus gaan branden. Als het kookproces
is voltooid, schakelt de multicooker automatisch over naar de
warmhoudmodus.
•Als u eerst op de knop Off/Keep Warm (Uit/Warm houden)
drukt en dan op de knop Start (Start), nadat u met de knop Menu
(Menu) een kookfunctie hebt geselecteerd, gaat het lampje van
de warmhoudmodus niet branden. Als het kookproces is voltooid,
schakelt de multicooker automatisch over naar de stand-bymodus.
Opmerking
•Bij alle kookfuncties, met uitzondering van de functie om yoghurt te
maken, kan de warmhoudmodus Off/Keep Warm (Uit/Warm houden)
worden ingeschakeld.
•In de stand-bymodus kunt u op de knop Off/Keep Warm (Uit/Warm
houden) drukken om de warmhoudmodus Off/Keep Warm (Uit/Warm
houden) in te schakelen.
•In de modus Off/Keep Warm (Uit/Warm houden) kunt u op de knop
Off/Keep Warm (Uit/Warm houden) drukken om de stand-bymodus in
te schakelen.
4 Reiniging en onderhoud
Opmerking
•Haal de stekker uit het stopcontact voordat u de multicooker
schoonmaakt.
•Wacht totdat de multicooker voldoende is afgekoeld voordat u deze
schoonmaakt.
Interieur
Binnenkant van het deksel en de behuizing:
• Afvegen met uitgewrongen vochtige doek.
• Zorg ervoor dat u alle aangekoekte etensresten uit de multicooker
verwijdert.
Verwarmingselement:
• Afvegen met uitgewrongen vochtige doek.
• Verwijder etensresten met een uitgewrongen vochtige doek of
met tandenstokers.
Buitenaanzicht
Oppervlak van het deksel en buitenkant van de behuizing:
• Afvegen met een doek die vochtig is gemaakt in een sopje.
• Gebruik alleen een zachte, droge doek voor het afvegen van het
bedieningspaneel.
• Zorg ervoor dat u alle etensresten rond de bedieningsknoppen
verwijdert.
Accessoires
Rijstlepel, soeplepel, binnenpan, stoommand en dop van de
stoomuitlaat:
• Laten weken in heet water en reinigen met een spons.
5 Milieu
Gooi het apparaat aan het einde van zijn levensduur niet weg
met het normale huisvuil, maar lever het in op een door de
overheid aangewezen inzamelpunt om het te laten recyclen.
Op die manier levert u een bijdrage aan een schonere
leefomgeving.
6 Garantie en service
Ga met een serviceverzoek of verzoek om informatie naar de
Philips-website op www.philips.com <http://www.philips.com/> of
neem contact op met het Philips Consumer Care Center in uw land.
U kunt het telefoonnummer vinden in de folder met info over de
wereldwijde garantie. Als er geen Consumer Care Centre in uw land
is, ga dan naar uw Philips-dealer.
7 Specificaties
Modelnummer HD3037
Nominaal uitgangsvermogen 980 W
Geschatte capaciteit 5,0 l
Volume voor rijst 1,8 l
8 Problemen oplossen
Controleer bij problemen met de multicooker eerst de volgende
punten voordat u om service vraagt. Als u het probleem niet kunt
oplossen, neem dan contact op met het Philips Consumer Care
Center in uw land.
Probleem Oplossing
Het lampje van
de knop gaat niet
branden.
Er is een aansluitprobleem. Controleer of
het netsnoer stevig is aangesloten op de
multicooker en of de stekker stevig in het
stopcontact is gestoken.
Het lampje is defect. Breng het apparaat
naar uw Philips-dealer of een door Philips
geautoriseerd servicecentrum.
Het display werkt
niet.
De multicooker is niet op het lichtnet
aangesloten. Als er geen netvoeding is, werken
de back-upfunctie voor stroomstoring en het
display niet.
De batterij voor het display is bijna leeg. Breng
het apparaat naar uw Philips-dealer of een door
Philips geautoriseerd servicecentrum om de
batterij te laten vervangen.
De rijst is niet
gekookt.
Er is niet genoeg water. Voeg water toe
zoals aangegeven op de maatverdeling in de
binnenpan.
U hebt niet op de knop Start (Start) gedrukt
om het kookproces te starten.
Zorg ervoor dat er geen etensresten of
ander vuil op het verwarmingselement en de
buitenkant van de binnenpan zitten voordat u
de multicooker inschakelt.
Het verwarmingselement is beschadigd of de
binnenpan is misvormd. Breng de koker naar uw
Philips-dealer of een door Philips geautoriseerd
servicecentrum.
De multicooker
schakelt niet
automatisch
over op de
warmhoudmodus.
De temperatuurregelaar is defect. Breng het
apparaat naar uw Philips-dealer of een door
Philips geautoriseerd servicecentrum.
De rijst is
aangebrand.
U hebt de rijst niet goed gespoeld. Spoel de
rijst af tot het water helder wordt.
Er komt water uit
de multicooker
tijdens het koken.
Voeg water toe tot het niveau dat is
aangegeven op de maatverdeling in de
binnenpan overeenkomt met het gebruikte
aantal kopjes rijst.
Zorg ervoor dat het water niet boven de
volgende markering op de schaal komt, omdat
de multicooker dan tijdens het kookproces kan
overstromen.
De cake is te hard. Gebruik cakemix en volg de instructies in de
gebruikershandleiding.
Ik kan de
gewenste
kookfunctie niet
activeren.
Druk herhaaldelijk op de knop Menu (Menu)
om de gewenste kookfunctie te selecteren, die
wordt aangegeven met de LED-indicator.
Rijst ruikt niet
lekker na het
koken
Maak de binnenpan schoon met een beetje
afwasmiddel en warm water.
Maak na het koken de dop van de stoomuitlaat,
het binnenste deksel en de binnenpan grondig
schoon.
Foutmelding (E1,
E2, E3 of E4)
verschijnt op het
display.
Er is een storing opgetreden in de multicooker.
Breng het apparaat naar uw Philips-dealer of
een door Philips geautoriseerd servicecentrum.
Français
1 Votre cuiseur multifonction
Félicitations pour votre achat et bienvenue dans le monde de Philips !
Pour proter pleinement de l’assistance offerte par Philips, enregistrez
votre produit à l’adresse suivante : www.Philips.com/welcome.
2 Contenu de l’emballage (fig.1)
Unité principale du cuiseur multifonction Panier vapeur
Cuiller à riz Louche
Mesure graduée Cordon d’alimentation
Mode d’emploi Livret de sécurité
Carte de garantie Livre de recettes
Gants en silice
Aperçu (g.2)
aCouvercle fPrise secteur
bCuve gRésistance chauffante
cBouton de déverrouillage
du couvercle
hIndications du niveau d'eau
dBloc de commande iPoignée du cuiseur
eCorps de l'appareil jCapuchon amovible des
évents à vapeur
Aperçu des commandes (g.3)
kFonctions de préparation pBouton d'heure
lAfcheur qBouton de minute
mBouton d'arrêt/de maintien
au chaud
rBouton de temps de cuisson
nBouton Menu sThermostat
oBouton de présélection tBouton de marche
3 Utilisation du cuiseur
multifonction
Avant la première utilisation
1 Sortez tous les accessoires de la cuve. Retirez la plaque entre la
cuve et l’élément chauffant.
2 Nettoyez soigneusement les éléments du cuiseur multifonction
avant la première utilisation (voir le chapitre « Nettoyage »).
Remarque
•Séchez bien tous les éléments avant d'utiliser le cuiseur multifonction.
Préparations avant cuisson (g.4)
Avant d’utiliser le cuiseur multifonction, vous devez suivre les
préparations ci-dessous :
1 Mesurez le riz à l’aide de la mesure graduée fournie.
2 Lavez le riz à grande eau.
3 Placez le riz lavé dans la cuve.
4 Ajoutez de l’eau jusqu’au niveau correspondant au nombre de
tasses de riz utilisées. Étalez ensuite uniformément le riz.
5 Appuyez sur le bouton de déverrouillage pour ouvrir le couvercle.
6 Essuyez l’extérieur de la cuve et placez celle-ci dans le cuiseur
multifonction. Vériez si la cuve est directement en contact avec
l’élément chauffant.
7 Fermez le couvercle du cuiseur multifonction et insérez la che
dans la prise secteur.
Remarque
•Assurez-vous que l'extérieur de la cuve est bien sec et propre, et qu'il n'y
a aucun résidu sur l'élément chauffant ou sur l'interrupteur magnétique.
•Ne dépassez pas le volume indiqué ni l'indication de niveau d'eau maximal
dans la cuve an d'éviter que le cuiseur multifonction déborde.
Conseil
•Le niveau indiqué à l'intérieur de la cuve est une simple
indication. Vous pouvez toujours adapter le niveau d'eau selon
les différentes variétés de riz et selon vos préférences. Ne
dépassez pas les quantités indiquées à l'intérieur de la cuve.
•Outre le fait de suivre les indications de niveau d'eau,
vous pouvez également ajouter du riz et de l'eau dans les
proportions 1:1-1.2 pour cuire du riz.
Cuisson de riz ou risotto (g.5)
1 Suivez les étapes de la section « Préparations avant cuisson ».
2 Appuyez sur le bouton de menu (Menu) jusqu’à ce que la fonction
de cuisson du riz (Rice) ou du risotto (Risotto) soit sélectionnée.
3 Appuyez sur le bouton de marche (Start) pour lancer la cuisson.
4 Une fois la cuisson terminée, vous entendez quelques signaux
sonores et le voyant de la fonction de cuisson sélectionnée est
éteint.
5 Le cuiseur multifonction passe en mode de maintien au chaud
automatiquement.
» Le voyant de maintien au chaud s’allume.
Conseil
•Vous pouvez appuyer sur le bouton d'annulation (Off/Keep
Warm) ou débrancher le cuiseur multifonction pour désactiver
la fonction de maintien au chaud ou en cas de non-utilisation.
•Le temps de cuisson par défaut est de 40 minutes et n'est pas
modiable.
Cuisson de ratatouille (g.6)
1 Mettez les ingrédients dans la cuve.
2 Suivez les étapes 6 et 7 de la section « Préparations avant
cuisson ».
3 Appuyez sur le bouton de menu (Menu) jusqu’à ce que la fonction
de cuisson de ratatouille (Ratatouille) soit sélectionnée.
4 Appuyez sur le bouton de marche (Start) pour lancer la cuisson.
5 Une fois la cuisson terminée, vous entendez quelques signaux
sonores et le voyant de la fonction de cuisson sélectionnée est
éteint.
6 Le cuiseur multifonction passe en mode de maintien au chaud
automatiquement.
» Le voyant de maintien au chaud s’allume.
Conseil
•Vous pouvez appuyer sur le bouton d'annulation (Off/Keep
Warm) ou débrancher le cuiseur multifonction pour désactiver
la fonction de maintien au chaud ou en cas de non-utilisation.
•Le temps de cuisson par défaut est de 40 minutes et n'est pas
modiable.
Cuisson de ragoût/tajine (g.7)
1 Mettez les ingrédients dans la cuve.
2 Suivez les étapes 6 et 7 de la section « Préparations avant
cuisson ».
3 Appuyez sur le bouton de menu (Menu) jusqu’à ce que la fonction
de cuisson de ragoût/tajine (Porridge/Tajine) soit sélectionnée.
4 Appuyez sur le bouton de temps de cuisson (Cooking time).
L’unité d’heure commence à clignoter sur l’afcheur.
5 Appuyez sur le bouton d’heure (Hr.) pour dénir l’unité d’heure
souhaitée.
6 Une fois que l’unité d’heure est dénie, appuyez à nouveau sur le
bouton de temps de cuisson (Cooking time). L’unité de minute
commence alors à clignoter sur l’afcheur.
7 Appuyez sur le bouton de minute (Min.) pour dénir l’unité de
minute souhaitée.
8 Appuyez sur le bouton de marche (Start) pour lancer la cuisson.
9 Une fois la cuisson terminée, vous entendez quelques signaux
sonores et le voyant de la fonction de cuisson sélectionnée est
éteint.
10 Le cuiseur multifonction passe en mode de maintien au chaud
automatiquement.
» Le voyant de maintien au chaud s’allume.
Conseil
•Vous pouvez appuyer sur le bouton d'annulation (Off/Keep
Warm) ou débrancher le cuiseur multifonction pour désactiver
la fonction de maintien au chaud ou en cas de non-utilisation.
•Le temps de cuisson par défaut est de 2 heures. Vous pouvez
sélectionner un temps de cuisson compris entre 1 et 4 heures.
Cuisson/Ébullition (g.8)
1 Mettez les ingrédients dans la cuve.
2 Suivez les étapes 6 et 7 de la section « Préparations avant
cuisson ».
3 Appuyez sur le bouton de menu (Menu) jusqu’à ce que la fonction
de cuisson/ébullition (Cook/Boil) soit sélectionnée.
4 Appuyez sur le bouton de temps de cuisson (Cooking time).
L’unité de minute commence à clignoter sur l’afcheur.
5 Appuyez sur le bouton de minute (Min.) pour dénir l’unité de
minute souhaitée.
6 Appuyez sur le bouton de marche (Start) pour lancer la cuisson.
7 Une fois la cuisson terminée, vous entendez quelques signaux sonores
et le voyant de la fonction de cuisson sélectionnée est éteint.
8 Le cuiseur multifonction passe en mode de maintien au chaud
automatiquement.
» Le voyant de maintien au chaud s’allume.
Remarque
•Le temps de cuisson commence lorsque l'eau bout et la durée s'afche
comme un compte à rebours.
Conseil
•Vous pouvez appuyer sur le bouton d'annulation (Off/Keep
Warm) ou débrancher le cuiseur multifonction pour désactiver
la fonction de maintien au chaud ou en cas de non-utilisation.
•Le temps de cuisson par défaut est de 30 minutes. Vous
pouvez sélectionner un temps de cuisson compris entre 5 et
30 minutes.
Cuisson lente (g.9)
1 Mettez les ingrédients dans la cuve.
2 Suivez les étapes 6 et 7 de la section « Préparations avant
cuisson ».
3 Appuyez sur le bouton de menu (Menu) jusqu’à ce que la fonction
de cuisson lente (Slow cook) soit sélectionnée.
4 Appuyez sur le bouton de temps de cuisson (Cooking time).
L’unité d’heure commence à clignoter sur l’afcheur.
5 Appuyez sur le bouton d’heure (Hr.) pour dénir l’unité d’heure
souhaitée.
6 Une fois que l’unité d’heure est dénie, appuyez à nouveau sur le
bouton de temps de cuisson (Cooking time). L’unité de minute
commence alors à clignoter sur l’afcheur.
7 Appuyez sur le bouton de minute (Min.) pour dénir l’unité de
minute souhaitée.
8 Appuyez sur le bouton de marche (Start) pour lancer la cuisson.
9 Une fois la cuisson terminée, vous entendez quelques signaux
sonores et le voyant de la fonction de cuisson sélectionnée est
éteint.
10 Le cuiseur multifonction passe en mode de maintien au chaud
automatiquement.
» Le voyant de maintien au chaud s’allume.
Conseil
•Vous pouvez appuyer sur le bouton d'annulation (Off/Keep
Warm) ou débrancher le cuiseur multifonction pour désactiver
la fonction de maintien au chaud ou en cas de non-utilisation.
•Le temps de cuisson par défaut est de 1 heure. Vous pouvez
sélectionner un temps de cuisson compris entre 20 minutes et
10 heures.
Cuisson au four/friture (g.10)
1 Mettez les ingrédients dans la cuve.
2 Suivez l’étape 6 de la section « Préparations avant cuisson ».
3 Branchez le cordon d’alimentation sur la prise secteur.
4 Appuyez sur le bouton de menu (Menu) jusqu’à ce que la fonction
de cuisson au four/friture (Bake/Fry) soit sélectionnée.
5 Appuyez sur le bouton de temps de cuisson (Cooking time).
L’unité de minute commence à clignoter sur l’afcheur.
6 Appuyez sur le bouton de minute (Min.) pour dénir l’unité de
minute souhaitée.
7 Appuyez sur le bouton de marche (Start) pour lancer la cuisson.
8 Au cours de la cuisson, mélangez en permanence les aliments à
l’aide d’une spatule.
9 Une fois la cuisson terminée, vous entendez quelques signaux sonores
et le voyant de la fonction de cuisson sélectionnée est éteint.
10 Le cuiseur multifonction passe en mode de maintien au chaud
automatiquement.
» Le voyant de maintien au chaud s’allume.
Remarque
•Pour la fonction de friture, cette fonction doit être utilisée avec le
couvercle ouvert.
•Cette fonction ne peut pas être utilisée pour une cuisson en grande friture
et la quantité d'huile ne doit pas dépasser le repère « 2 ».
•Le temps de cuisson par défaut est de 42 minutes. Vous pouvez
sélectionner un temps de cuisson compris entre 5 et 59 minutes.
•Lorsque vous utilisez la fonction de cuisson au four plutôt que la fonction
de friture, cette fonction peut être utilisée avec le couvercle fermé. Par
contre, si vous utilisez la fonction de cuisson au four pendant plus de
50 minutes, cette fonction doit être utilisée avec le couvercle ouvert.
•Lorsque vous utilisez la fonction de friture, le niveau d'huile ne doit pas
dépasser 2 mesures.
Préparation de yaourt (g.11)
1 Mélangez bien les ingrédients pour le yaourt à l’aide d’un fouet et
versez-les dans un récipient en verre.
2 Placez le récipient en verre dans la cuve. Assurez-vous que le
récipient est bien fermé.
3 Versez un peu d’eau dans la cuve. Assurez-vous que la moitié du
récipient est immergé dans l’eau.
4 Suivez les étapes 6 et 7 de la section « Préparations avant
cuisson ».
5 Appuyez sur le bouton de menu (Menu) jusqu’à ce que la fonction
de préparation de yaourt (Yaourt) soit sélectionnée.
6 Appuyez sur le bouton de temps de cuisson (Cooking time).
L’unité d’heure commence à clignoter sur l’afcheur.
7 Appuyez sur le bouton d’heure (Hr.) pour dénir l’unité d’heure
souhaitée.
8 Une fois que l’unité d’heure est dénie, appuyez à nouveau sur le
bouton de temps de cuisson (Cooking time). L’unité de minute
commence alors à clignoter sur l’afcheur.
9 Appuyez sur le bouton de minute (Min.) pour dénir l’unité de
minute souhaitée.
10 Appuyez sur le bouton de marche (Start) pour lancer la cuisson.
11 Une fois la cuisson terminée, vous entendez quelques signaux
sonores et le voyant de la fonction de cuisson sélectionnée est
éteint.
12 Le cuiseur multifonction passe en mode veille automatiquement.
Conseil
•Vous pouvez débrancher le cuiseur multifonction
immédiatement après la n de la cuisson.
•Le temps de cuisson par défaut est de 8 heures. Vous pouvez
sélectionner un temps de cuisson compris entre 6 et 12 heures.
Cuisson de moules (g.12)
1 Mettez les moules et les ingrédients dans la cuve.
2 Suivez les étapes 6 et 7 de la section « Préparations avant
cuisson ».
3 Branchez le cordon d’alimentation sur la prise secteur.
4 Appuyez sur le bouton de menu (Menu) jusqu’à ce que la fonction
de cuisson de moules (Mussel) soit sélectionnée.
5 Appuyez sur le bouton de temps de cuisson (Cooking time).
L’unité de minute commence à clignoter sur l’afcheur.
6 Appuyez sur le bouton de minute (Min.) pour dénir l’unité de
minute souhaitée.
7 Appuyez sur le bouton de marche (Start) pour lancer la cuisson.
8 Une fois la cuisson terminée, vous entendez quelques signaux
sonores et le voyant de la fonction de cuisson sélectionnée est
éteint.
9 Le cuiseur multifonction passe en mode de maintien au chaud
automatiquement.
» Le voyant de maintien au chaud s’allume.
Conseil
•Vous pouvez appuyer sur le bouton d'annulation (Off/Keep
Warm) ou débrancher le cuiseur multifonction pour désactiver
la fonction de maintien au chaud ou en cas de non-utilisation.
•Le temps de cuisson par défaut est de 25 minutes. Vous
pouvez sélectionner un temps de cuisson compris entre 8 et
25 minutes.
Cuisson de gâteau/Manuel (g.13)
1 Mettez les ingrédients dans la cuve.
1 Suivez les étapes 6 et 7 de la section « Préparations avant
cuisson ».
1 Branchez le cordon d’alimentation sur la prise secteur.
Remarque
•Pour la cuisson d'un gâteau, gardez le couvercle fermé lors de la cuisson.
Si vous cuisez le gâteau à 130 °C et pendant 45 minutes, vous obtiendrez
généralement les meilleurs résultats.
•Pour la cuisson d'une autre préparation, le couvercle doit rester ouvert
lors de la cuisson.
•Gardez le couvercle ouvert pour la cuisson de gâteau à une température
supérieure à 130 °C ou pendant plus de 50 minutes.
1 Appuyez sur le bouton de menu (Menu) jusqu’à ce que la fonction
de cuisson au four (Cake/Manual) soit sélectionnée.
1 Appuyez sur le bouton de temps de cuisson (Cooking time).
L’unité d’heure commence à clignoter sur l’afcheur.
1 Appuyez sur le bouton d’heure (Hr.) pour dénir l’unité d’heure
souhaitée.
1 Une fois que l’unité d’heure est dénie, appuyez à nouveau sur le
bouton de temps de cuisson (Cooking time). L’unité de minute
commence alors à clignoter sur l’afcheur.
1 Appuyez sur le bouton de minute (Min.) pour dénir l’unité de
minute souhaitée.
1 Appuyez sur le bouton de température (Temperature). La
température de cuisson par défaut commence à clignoter sur
l’afcheur.
1 Appuyez sur le bouton de température (Temperature) pour
dénir la température de cuisson souhaitée.
1 Appuyez sur le bouton de marche (Start) pour lancer la cuisson.
1 Une fois la cuisson terminée, vous entendez quelques signaux
sonores et le voyant de la fonction sélectionnée est éteint.
1 Le cuiseur multifonction passe en mode de maintien au chaud
automatiquement.
» Le voyant de maintien au chaud s’allume.
Conseil
•Lorsque vous retirez la cuve du cuiseur multifonction, utilisez un
gant de cuisine ou un torchon car la cuve est très chaude.
•Le temps de cuisson par défaut est de 45 minutes. Vous pouvez
sélectionner un temps de cuisson compris entre 20 minutes et
2 heures.
•La température de cuisson par défaut est de 40 °C. Les options
de température disponibles sont : 40 °C, 60 °C, 80 °C, 100 °C,
120 °C, 150 °C et 180 °C.
Cuisson à la vapeur (g.14)
1 Mesurez quelques tasses d’eau avec la mesure graduée.
2 Versez l’eau dans la cuve.
3 Placez le panier vapeur dans la cuve.
4 Mettez les aliments dans le panier vapeur.
5 Fermez le couvercle du cuiseur multifonction et insérez la che
dans la prise secteur.
6 Appuyez sur le bouton de menu (Menu) jusqu’à ce que la fonction
de cuisson à la vapeur (Steam) soit sélectionnée.
7 Appuyez sur le bouton de temps de cuisson (Cooking time).
L’unité d’heure commence à clignoter sur l’afcheur.
8 Appuyez sur le bouton d’heure (Hr.) pour dénir l’unité d’heure
souhaitée.
9 Une fois que l’unité d’heure est dénie, appuyez à nouveau sur le
bouton de temps de cuisson (Cooking time). L’unité de minute
commence alors à clignoter sur l’afcheur.
10 Appuyez sur le bouton de minute (Min.) pour dénir l’unité de
minute souhaitée.
11 Appuyez sur le bouton de marche (Start) pour lancer la cuisson.
12 Une fois la cuisson à la vapeur terminée, vous entendez quelques
signaux sonores et le voyant de la fonction de cuisson sélectionnée
est éteint.
13 Le cuiseur multifonction passe en mode de maintien au chaud
automatiquement.
» Le voyant de maintien au chaud s’allume.
14 Ouvrez le couvercle et retirez prudemment les aliments cuits à la
vapeur de la plaque ou du panier vapeur.
Remarque
•Le temps de cuisson commence lorsque l'eau bout et la durée s'afche
comme un compte à rebours.
•Lorsque vous retirez les aliments cuits à la vapeur du panier vapeur, utilisez
un gant de cuisine ou un torchon car la plaque et le panier vapeur sont
très chauds.
•Lorsque vous faites cuire du riz et des aliments à la vapeur en même
temps, veillez à ne pas mettre trop de riz an de laisser assez de place
pour le plateau vapeur.
Conseil
•Vous pouvez appuyer sur le bouton d'annulation (Off/Keep
Warm) ou débrancher le cuiseur multifonction pour désactiver
la fonction de maintien au chaud ou en cas de non-utilisation.
•Le temps de cuisson à la vapeur par défaut est de 30 minutes.
Vous pouvez sélectionner un temps de cuisson compris entre
5 minutes et 2 heures.
Programmation pour une cuisson ultérieure
(g.15)
Vous pouvez programmer un temps de cuisson ultérieur dans
différents modes de cuisson. La durée du minuteur de programmation
est comprise entre 10 minutes et 24 heures.
1 Suivez les étapes 6 et 7 de la section « Préparations avant
cuisson ».
2 Appuyez sur le bouton de menu (Menu) jusqu’à ce que la fonction
de cuisson souhaitée soit sélectionnée.
3 Appuyez sur le bouton de départ différé (Preset/Timer).
» Le minuteur de programmation commence à clignoter sur
l’afcheur.
4 Appuyez sur le bouton d’heure (Hr.) et le bouton de minute
(Min.) pour dénir le temps de programmation.
5 Appuyez sur le bouton de marche (Start) pour conrmer le temps
de programmation.
6 La cuisson est terminée lorsque le temps de programmation est
écoulé. Vous entendez quelques signaux sonores et le voyant de la
fonction de cuisson sélectionnée est éteint.
7 Le cuiseur multifonction passe en mode de maintien au chaud
automatiquement.
» Le voyant de maintien au chaud s’allume.
Remarque
•Le minuteur de programmation n'est pas disponible en mode de cuisson
au four/friture.
Conseil
•Après avoir déni le temps de programmation, vous pouvez
appuyer sur le bouton d'annulation (Off/Keep Warm) pour
désactiver la fonction de programmation.
•Vous pouvez appuyer sur le bouton d'annulation (Off/Keep
Warm) ou débrancher le cuiseur multifonction pour désactiver
la fonction de maintien au chaud ou en cas de non-utilisation.
Mode de maintien au chaud
Le cuiseur multifonction vous permet un contrôle aisé du maintien
au chaud.
• Après avoir sélectionné la fonction de cuisson au moyen du
bouton de menu (Menu), si vous appuyez directement sur le
bouton de marche (Start), le voyant de maintien au chaud s’allume.
Une fois que la cuisson est terminée, le cuiseur multifonction
bascule directement en mode de maintien au chaud.
• Après avoir sélectionné la fonction de cuisson au moyen du
bouton de menu (Menu), si vous appuyez tout d’abord sur le
bouton de maintien au chaud, puis sur le bouton de marche
(Start), le voyant de maintien au chaud est éteint. Une fois que la
cuisson est terminée, le cuiseur multifonction passe en mode veille.
Remarque
•À l'exception de la fonction de préparation de yaourt, toutes les fonctions
de cuisson permettent au produit de passer en mode de maintien au
chaud (Off/Keep Warm).
•En mode veille, vous pouvez appuyer sur le bouton de maintien au chaud
(Off/Keep Warm) pour accéder au mode de maintien au chaud.
•En mode de maintien au chaud, vous pouvez appuyer sur le bouton de
maintien au chaud (Off/Keep Warm) pour accéder au mode veille.
4 Nettoyage et entretien
Remarque
•Débranchez le cuiseur multifonction avant de le nettoyer.
•Attendez que le cuiseur multifonction ait sufsamment refroidi avant de
le nettoyer.
Intérieur
Intérieur du couvercle extérieur et du corps de l’appareil :
• Essuyez à l’aide d’un chiffon humide bien essoré.
• Veillez à enlever tous les résidus d’aliments collés au cuiseur
multifonction.
Résistance chauffante :
• Essuyez à l’aide d’un chiffon humide bien essoré.
• Enlevez les résidus d’aliments à l’aide d’un chiffon humide bien
essoré ou de cure-dents.
Extérieur
Surface du couvercle extérieur et extérieur du corps de l’appareil :
• Essuyez à l’aide d’un chiffon humidié avec de l’eau savonneuse.
• Utilisez uniquement un chiffon doux et sec pour essuyer le
panneau de commande.
• Veillez à enlever tous les résidus d’aliments autour des boutons de
commande.
Accessoires
Cuiller à riz, louche, cuve, panier vapeur et capuchon des évents à
vapeur :
• Trempez dans de l’eau chaude et nettoyez à l’aide d’une éponge.
5 Environnement
Lorsqu’il ne fonctionnera plus, ne jetez pas l’appareil avec
les ordures ménagères mais déposez-le dans un centre de
collecte agréé an qu’il puisse être recyclé. Vous contribuerez
ainsi à la protection de l’environnement.
6 Garantie et service
Si vous rencontrez un problème ou si vous souhaitez obtenir des
informations ou faire réparer votre appareil, rendez-vous sur le
site Web de Philips à l’adresse www.philips.com ou contactez le
Service Consommateurs Philips de votre pays. Vous trouverez son
numéro de téléphone dans le dépliant de garantie internationale.
S’il n’existe pas de Service Consommateurs Philips dans votre pays,
renseignez-vous auprès de votre revendeur Philips.
7 Caractéristiques techniques
Référence du modèle HD3037
Puissance de sortie nominale 980 W
Capacité nominale 5,0 l
Volume de riz 1,8 l
8 Dépannage
En cas de problème lors de l’utilisation de ce cuiseur multifonction,
vériez les points suivants avant de faire appel au service d’assistance.
Si vous ne parvenez pas à résoudre le problème, contactez le Service
Consommateurs Philips de votre pays.
Problème Solution
Le voyant sur
le bouton ne
s'allume pas.
Il s'agit d'un problème de branchement. Vériez
si le cordon d'alimentation est bien raccordé
au cuiseur et si la che d'alimentation est
fermement insérée dans la prise murale.
Le voyant est défectueux. Conez
l'appareil à votre revendeur Philips ou à un
Centre Service Agréé Philips.
L'écran ne
fonctionne pas.
Le cuiseur multifonction n'est pas branché. S'il
n'y a pas de courant, la fonction de sauvegarde
en cas de coupure de courant et l'afcheur ne
fonctionnent pas.
La batterie de l'afcheur est déchargée. Conez
l'appareil à votre revendeur Philips ou à un
Centre Service Agréé Philips pour remplacer
la batterie.
Le riz n'est pas
cuit.
Il n'y a pas assez d'eau. Ajoutez de l'eau
jusqu'au niveau correspondant à l'intérieur de
la cuve.
Vous n'avez pas appuyé sur le bouton de
marche (Start) pour lancer la cuisson.
Assurez-vous qu'aucun résidu ne se trouve sur
l'élément chauffant et l'extérieur de la cuve
avant d'allumer le cuiseur multifonction.
L'élément chauffant est endommagé ou
la cuve est déformée. Conez l'appareil
à votre revendeur Philips ou à un
Centre Service Agréé Philips.
Le cuiseur
ne passe pas
automatiquement
en mode de
maintien au chaud.
Le thermostat est défectueux. Conez
l'appareil à votre revendeur Philips ou à un
Centre Service Agréé Philips.
Le riz est sec. Vous n'avez pas rincé le riz correctement.
Rincez le riz jusqu'à ce que l'eau devienne
claire.
De l'eau déborde
du cuiseur
multifonction
pendant la cuisson.
Veillez à ajouter de l'eau jusqu'au niveau
correspondant au nombre de tasses de riz
utilisées.
Pour éviter que de l'eau déborde lors de la
cuisson, vériez si le niveau d'eau ne dépasse
pas le niveau supérieur.
Le gâteau obtenu
est trop dur.
Utilisez de la pâte à gâteau et suivez les
instructions fournies dans le mode d'emploi.
Je ne parviens
pas à sélectionner
la fonction de
cuisson souhaitée.
Appuyez sur le bouton de menu (Menu) à
plusieurs reprises pour sélectionner la fonction
souhaitée comme indiqué par le voyant.
Le riz ne sent
pas bon après la
cuisson.
Nettoyez la cuve à l'eau chaude savonneuse.
Après la cuisson, veillez à nettoyer
soigneusement le capuchon des évents à
vapeur, le couvercle intérieur et la cuve.
Un message
d'erreur (E1, E2,
E3 ou E4) apparaît
sur l'afcheur.
Le cuiseur multifonction présente un
dysfonctionnement. Conez l'appareil
à votre revendeur Philips ou à un
Centre Service Agréé Philips.
