Philips HD7762/00 使用手册 Käyttöopas Hd7762 00 Dfu Zhs
使用手册: Philips HD7762/00 Käyttöopas Grind & Brew Kahvinkeitin HD7762/00 | PhilipsHD7762/00
Open the PDF directly: View PDF ![]() .
.
Page Count: 32
1
1
5
43
2
8
7
6
A C E F
BG
H
D
9
10
16
I
11
13
12
14
15

5
3 Important
Read this user manual carefully before you use the
appliance and save it for future reference.
3.1 Danger
•Never immerse the appliance in water or any
other liquid, nor rinse it under the tap.
3.2 Warning
•Check if the voltage indicated on the bottom
of the appliance corresponds to the local
mains voltage before you connect the
appliance.
•If the mains cord is damaged, you must have it
replaced by Philips, a service centre authorised
by Philips or similarly qualied persons in
order to avoid a hazard.
•This appliance is not intended for use by
persons (including children) with reduced
physical, sensory or mental capabilities, or lack
of experience and knowledge, unless they
have been given supervision or instruction
concerning use of the appliance by a person
responsible for their safety.
•Children should be supervised to ensure that
they do not play with the appliance.
•Keep the appliance and its cord out of the
reach of children.
•Do not let the mains cord hang over the
edge of the table or worktop on which the
appliance stands.
•Do not touch the grinding burrs of the
appliance, especially when the appliance is
connected to the mains.
•Keep the packaging materials (plastic bags,
cardboard buffers, etc.) out of the reach of
children, as they are not a toy.
•Do not touch the hot surfaces of the
appliance when it operates.
•This appliance is designed to grind beans and
make coffee. Use it correctly and with care to
avoid scalding by hot water and steam.
1 Introduction
Congratulations on your purchase and welcome
to Philips! To fully benet from the support
that Philips offers, register your product at
www.philips.com/welcome.
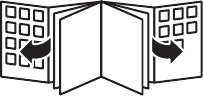
2 General
description (Fig. 1)
1 Filter basket
2 Filter basket holder
3 Water level indicator
4 Water reservoir lid
5 Bean container lid
6 Container selector
7 Coarseness knob
8 Duo coffee bean container
9 Grinder funnel lid
10 Lock of grinder funnel lid
11 Water lling hole
12 Display
A Pre-ground coffee icon
B Number of cups
C Coffee cup icon
D Strength select coffee bean icon
E Strength select button
F Timer button
G Hour indication
H Minute indication
I Timer icon
13 On/off button
14 Glass jug lid
15 Glass jug
16 Cleaning brush
ENGLISH

6
4 Beforerstuse
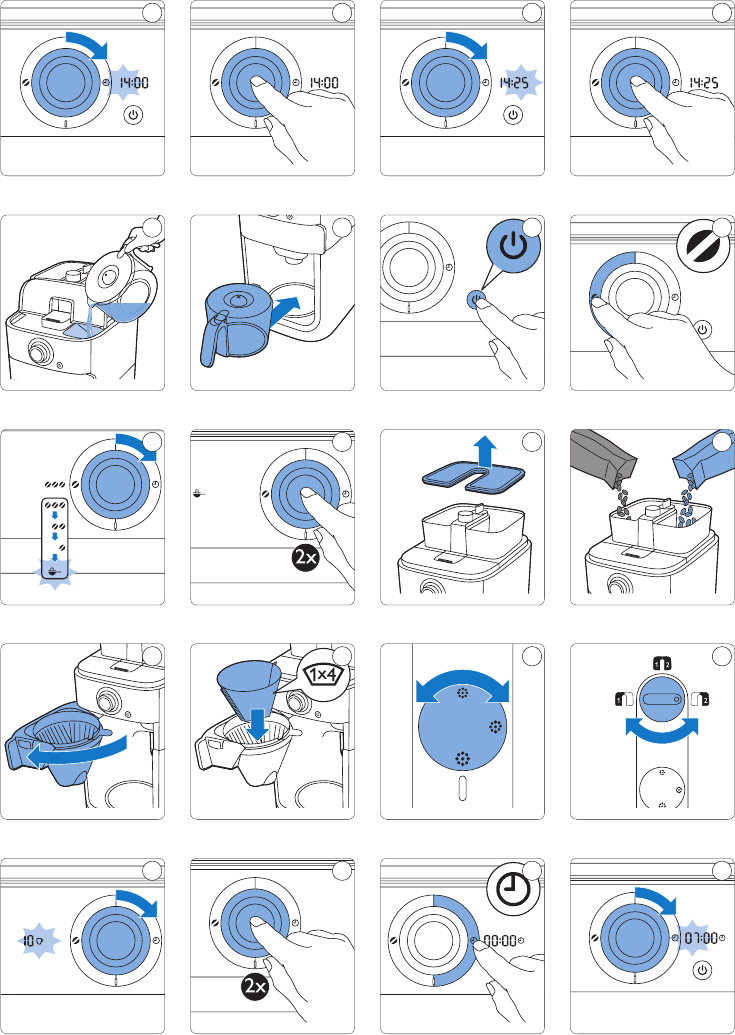
4.1 Setting the clock
1 Put the mains plug in the wall socket.
• 00:00 ashes on the display to indicate
that you have to set the clock time.
2 Turn the knob to set the hour (Fig. 2).
3 Press in the centre of the knob to conrm
the hour (Fig. 3).
•The minutes start to ash to indicate
that you have to set the minutes.
4 Turn the knob to set the minutes (Fig. 4).
5 Press in the centre of the knob to conrm
the minutes (Fig. 5).
6 The display shows the set clock time.
The coffeemaker is ready for use.
4.2 Setting the automatic
switch off time
You can adjust the time after which the appliance
automatically switches off. The default time is
set to 30 minutes. You can adjust this time to a
maximum of 120 minutes. If you want to adjust
the automatic switch off time, follow the steps
below.
1 Make sure the appliance is switched off
(but the mains plug is in the wall socket).
2 Press and hold in the centre of the knob until
the display starts to ash.
3 Turn the knob to increase or decrease the
time. 1 is 10 minutes, 2 is 20 minutes, 3 is
30 minutes and so on until 12 is 120 minutes.
4 Press in the centre of the knob to conrm
the minutes.
D Note:
The appliance always saves the last setting.
•Do not empty the water reservoir by tilting
the appliance, it can damage the appliance.
Only empty the water reservoir by following
the ush instruction.
•Do not use the appliance if the plug, the mains
cord or the appliance itself is damaged.
•If a problem occurs that you cannot solve
by means of this user manual, contact the
Consumer Care Centre in your country. If the
problem cannot be solved, take the appliance
to a service centre authorised by Philips for
examination or repair. Do not attempt to
repair the appliance yourself, otherwise your
guarantee becomes invalid.
3.3 Caution
•Do not place the appliance on a hot surface
and prevent the mains cord from coming into
contact with hot surfaces.
•Unplug the appliance if problems occur during
grinding or brewing and before you clean it.
•Do not move the appliance while it is
operating.
•The appliance becomes hot during use. Let
the appliance cool down before you store it.
•During brewing, the lower part of the
appliance and the bottom of the jug become
hot.
•After you have unpacked the appliance, make
sure it is complete and undamaged. If in doubt,
do not use the appliance but contact the
Consumer Care Centre in your country.
•This appliance is intended for normal
household use only. It is not intended for
use in environments such as staff kitchens
of shops, ofces, farms or other work
environments. Nor is it intended to be used
by clients in hotels, motels, bed and breakfasts
and other residential environments.
3.4Electromagneticelds
(EMF)
This Philips appliance complies with all applicable
standards and regulations regarding exposure to
electromagnetic elds.

7
5.2 Using coffee beans
B Warning:
Always keep the water reservoir lid closed when
you ll the coffee bean container with coffee
beans. Otherwise coffee beans can fall into the
water reservoir and block up the water inlet.
1 Remove the coffee bean container lid. (Fig. 12)
2 Fill the duo coffee bean container with
coffee beans. You can ll the duo coffee bean
container with two different types of coffee
beans. Make sure there are enough coffee
beans in the container for the amount of
coffee you want to brew (Fig. 13).
D Note:
Always make sure the coffee bean container is
at least half full.
B Warning:
To prevent the grinder from jamming,
do not use unroasted or caramelised beans.
We advise to use coffee beans instead of
espresso beans as this may cause damage.
3 To open the lter basket holder, pull at its tab
on the right side of the coffeemaker (Fig. 14).
4 Take a paper lter (type 1x4 or no. 4) and
fold the sealed edges to prevent tearing and
folding. Place the paper lter in the lter
basket. (Fig. 15)
5 Close the lter basket holder.
6 Put the jug in the appliance. (Fig. 7)
7 Turn the coarseness knob to select the
desired type of grind (from ne
to coarse). (Fig. 16)
E Tip:
The coarseness knob allows you to
choose between nine different settings.
We preselected 3 optimal settings but you
can also choose any setting in between the
icons. We advise you to experiment with
the different grind settings to nd out which
setting you prefer.
4.3 Flushing the appliance
You need to ush the coffeemaker once before
rst use.
1 Open the water reservoir lid. Fill the water
reservoir with fresh cold water up to the
8-cup indication. (Fig. 6)
D Note:
Do not put coffee beans or ground coffee
in the appliance.
2 Close the water reservoir lid.
3 Put the jug in the appliance (Fig. 7).
4 Press the on/off button (Fig. 8).
•The display lights up.
5 Press the strength select button (Fig. 9).
6 Turn the knob to choose the pre-ground
coffee setting (Fig. 10).
•The pre-ground coffee icon lights up.
7 Press in the centre of the knob to conrm.
Then press in the centre of the knob again to
start the ushing process (Fig. 11).
8 Let the appliance operate until the ushing
process has been completed.
9 Empty the jug.
5 Using the appliance
5.1 Filling the water reservoir
1 Open the water reservoir lid and ll the water
reservoir with the required amount of cold
water. (Fig. 6)
When you open the water reservoir lid, there
are indications for 2 to 10 cups on the inside
of the appliance. You can use these indications
to determine how much water to put in the
water reservoir. The reection changes from
light to dark per lled cup of water. You can
also use the water level indicator on the jug.
D Note:
Do not ll the water reservoir beyond the
10-cup indication.
ENGLISH

8
E Tip:
We advise you to experiment with
the amount of water to nd out which
strength you prefer. If you select a number
of cups that is higher than the amount of
water, the coffee becomes stronger. If you
select a number of cups that is smaller
than the amount of water, the coffee
becomes weaker.
14 Press in the centre of the knob to conrm,
Then press in the centre of the knob again to
start the brewing process (Fig. 19).
•The grinder grinds the required amount of
coffee beans.
15 Wait until the coffeemaker has stopped
brewing before you remove the jug.
D Note:
After brewing, coffee drips from the lter
basket for several seconds.
5.3 Using pre-ground coffee
If you want to use pre-ground coffee instead of
coffee beans, follow the steps below.
1 Open the water reservoir lid and ll the water
reservoir with the required amount of cold
water. (Fig. 6)
2 To open the lter basket holder, pull at its tab
on the right side of the coffeemaker (Fig. 14).
3 Take a paper lter (type 1x4 or no. 4) and
fold the sealed edges to prevent tearing and
folding. Place the paper lter in the lter
basket (Fig. 15).
4 Put pre-ground coffee in the paper lter.
D Note:
You can adjust the strength of the coffee to
your own personal taste. For a medium-strong
cup of coffee, use one measuring spoon
(approximately 6g) of ground coffee for each
cup (120ml). For stronger coffee, use 1.5
measuring spoons of ground coffee for each
cup of coffee.
5 Close the lter basket holder.
6 Put the jug in the appliance (Fig. 7).
7 Press the on/off button (Fig. 8).
•The display lights up.
8 Turn the container selector to choose
between the two types of coffee
beans (Fig. 17).
B Warning:
Whenever you switch between coffee bean
containers or coffee beans, there will always
be traces of coffee left of the previously
ground type of coffee beans. Clean the
grinder funnel after you switch to a new
type of coffee bean to prevent this.
D Note:
Depending on your taste, you can either
select one of the two types of coffee beans or
a mix of both types.
9 Press the on/off button on the front of the
appliance (Fig. 8).
•The number of cups starts to ash.
10 To select the number of cups, turn the knob
until the desired number of cups appears on
the display (Fig. 18).
D Note:
Make sure that the number of cups you select
with the 2-10 cups button is consistent with
the amount of water in the water reservoir.
Please keep in mind that the coffeemaker
uses all the water in the water reservoir. If you
select a number of cups that is smaller than
the amount of water, the coffee becomes
weaker than you intended.
11 Press in the centre of the knob to conrm the
number of cups.
12 Press the strength select button. (Fig. 9)
•The coffee bean icons start to ash.
13 Turn the knob to select the desired coffee
strength (mild: 1 bean, medium: 2 beans or
strong: 3 beans) (Fig. 10).
•The display shows the selected coffee
strength.

9
6 Cleaning and
maintenance
6.1 Cleaning after every use
B Warning:
Never immerse the appliance in water or any
other liquid, nor rinse it under the tap.
1 Press the on/off button on the front of the
appliance to switch off the appliance. (Fig. 25)
2 Remove the mains plug from the wall socket.
3 Wipe the outside of the coffeemaker with a
damp cloth (Fig. 26).
4 Clean the lter basket and the jug in the
dishwasher or with hot water and some
washing-up liquid.
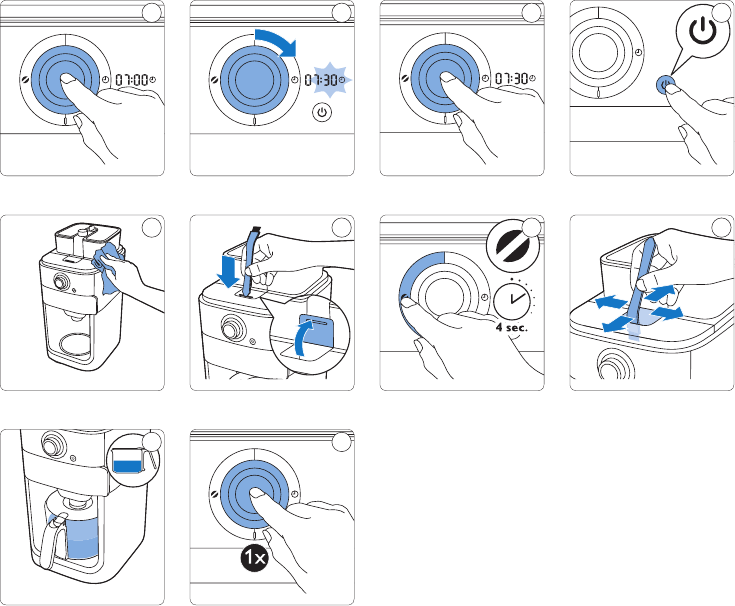
6.2 Cleaning the grinder funnel
Whenever you switch between coffee bean
containers or coffee beans, there will always be
traces left of the previously ground type of coffee
beans that can affect the taste of your coffee.
Clean the grinder funnel every 1 to 2 weeks
or whenever you switch between coffee bean
containers to prevent freshly ground coffee and
traces in the grinder funnel from mixing together.
After you switch to a new type of coffee beans,
follow the steps below to ensure optimal taste.
1 Press the on/off button on the front of the
appliance to switch off the appliance (Fig. 25).
2 To open the lter basket holder, pull at its tab
on the right side of the coffeemaker (Fig. 14).
3 Take a paper lter (type 1x4 or no. 4) and
fold the sealed edges to prevent tearing and
folding. Place the paper lter in the lter
basket. (Fig. 15)
4 Close the lter basket holder.
5 To open the grinder funnel lid, insert the at
end of the cleaning brush handle into the lock
and press it down (Fig. 27).
8 Press the strength select button (Fig. 9).
9 Turn the knob to choose the pre-ground
coffee setting (Fig. 10).
•The pre-ground coffee icon lights up.
10 Press in the centre of the knob to conrm.
Then press in the centre of the knob again to
start the brewing process (Fig. 11).
11 Wait until the coffeemaker has stopped
brewing before you remove the jug.
D Note:
After brewing, coffee drips from the lter
basket for several seconds.
5.4 Setting the timer
The timer enables you to program the time at
which you want the brewing process to start.
Make sure all steps of brewing coffee are taken
with either preground coffee or coffee beans
before setting the timer.
1 Press the timer button. (Fig. 20)
•On the display 00:00 ashes to indicate
that you have to set the timer.
2 Turn the knob to set the hour (Fig. 21).
3 Press in the centre of the knob to conrm
the hour (Fig. 22).
•The minutes starts to ash to indicate that
you have to set the minutes.
4 Turn the knob to set the minutes (Fig. 23).
5 Press in the centre of the knob to conrm
the minutes (Fig. 24).
•The timer is set and the brewing process will
start at the preset time.
5.5 Drip stop function
The drip stop function enables you to remove
the jug from the coffeemaker before the brewing
process is nished. When you remove the jug, the
drip stop stops the ow of coffee into the jug.
D Note:
The brewing process does not stop when you
remove the jug. If you do not put the jug back
into the appliance within 20 seconds, the lter
basket overows.
ENGLISH

10
6 Press the on/off button on the front of the
appliance to switch on the appliance (Fig. 8).
•The display lights up.
7 Press the strength select button and turn
the knob to choose the pre-ground coffee
setting (Fig. 10).
8 Press in the centre of the knob to conrm.
Then press in the centre of the knob again to
start the brewing process (Fig. 11).
9 Wait until half of the vinegar-water solution
has owed into the jug. Then press the on/off
button to stop the brewing process and let
the solution act for at least 15 minutes
(Fig. 30).
10 Press the on/off button to switch the
coffeemaker back on (Fig. 8).
11 Press in the centre of the knob twice to
let the appliance complete the brewing
process (Fig. 31).
12 Empty the jug and throw away the paper lter.
13 Fill the water reservoir with cold water
and press in the centre of the knob twice
to start another brewing process. Let the
coffeemaker complete the entire brewing
process and empty the jug.
14 Repeat step 13 until the water no longer
tastes or smells like vinegar.
15 Clean the lter basket and the jug in the
dishwasher or with hot water and some
washing-up liquid.
16 Press the on/off button on the front of the
appliance to switch off the appliance.
7 Ordering accessories
To buy accessories or spare parts,
visit www.shop.philips.com/service or go to
your Philips dealer. You can also contact the Philips
Consumer Care Centre in your country (see the
worldwide guarantee leaet for contact details).
D Note:
If you want to clean the grinder funnel quickly
by brush only, please continue with step 7.
If you want to prevent ground coffee traces
from affecting the taste of your new coffee
beans, please continue with step 6.
6 Press and hold the strength select button for
4 seconds (Fig. 28).
•The grinder starts cleaning itself.
7 When the grinder has stopped cleaning,
use the cleaning brush to brush ground
coffee residues into the lower part of the
funnel (Fig. 29).
•The ground coffee residues fall into the
lter basket.
B Warning:
Do not drop the brush in the grinder
funnel.
8 Close the lid of the grinder funnel.
9 Remove the paper lter with the ground
coffee residues and throw it away.
6.3 Descaling the coffeemaker
Descale the coffeemaker when you notice
excessive steaming or when the brewing time
increases. It is advisable to descale it every two
months. Only use white vinegar to descale,
as other products may cause damage to the
coffeemaker.
B Warning:
Never use vinegar with an acetic acid content of
8% or more, natural vinegar, powder descalers
or tablet descalers to descale the appliance, as
this may cause damage.
1 Open the water reservoir lid.
2 Fill the water reservoir with 8 cups of white
vinegar (4% acetic acid) and 2 cups of
water (Fig. 6).
3 Place a paper lter (no. 4) in the lter basket
and close the lter basket holder (Fig. 15).
4 Put the empty jug in the appliance (Fig. 7).
5 Put the mains plug in the wall socket.

11
When I use the grinder, the coffee is too weak.
•Make sure the number of cups you select with
the 2-10 cups button is consistent with the
amount of water in the water reservoir. Please
keep in mind that the coffeemaker uses all the
water in the water reservoir.
•Use the strength select button to set the
coffee strength to ‘strong’.
•When you use coffee beans, make sure you do
not press the pre-ground coffee button,
as this switches off the grinder.
•Use coffee beans of a stronger blend or avour.
•Make sure the selected number of cups is
consistent with the amount of water in the
water reservoir.
When I use pre-ground coffee, the coffee is too weak.
•Make sure the amount of pre-ground coffee in
the lter is consistent with the amount of water
in the water reservoir. Please keep in mind that
the appliance uses all the water in the water
reservoir.
•Use ground coffee of a stronger blend or avour.
•To increase the coffee strength, increase the
amount of pre-ground coffee or decrease the
amount of water.
The lter overows when I remove the jug from
the appliance while it is brewing coffee.
•If you remove the jug for more than
20 seconds during the brewing process, the
drip stop causes the lter basket to overow.
Also note that the coffee does not reach its full
taste before the end of the brewing process.
Therefore we advise you not to remove the jug
and pour out the coffee before the end of the
brewing process.
8 Recycling
Do not throw away the product with the normal
household waste at the end of its life, but hand it
in at an ofcial collection point for recycling.
By doing this, you help to preserve the
environment.
9 Guarantee and
support
If you need information or support, please
visit www.philips.com/support or read the
separate worldwide guarantee leaet.
10 Troubleshooting
This chapter summarises the most common
problems you could encounter with the appliance.
If you are unable to solve the problem with the
information below, visit www.philips.com/
support for a list of frequently asked questions
or contact the Consumer Care Centre in your
country.
The appliance does not work.
•Put the mains plug in the wall socket and press
the on/off button on the front of the appliance
to switch on the appliance.
•Make sure that the voltage indicated on the
appliance corresponds to the local mains voltage.
•Fill the water reservoir with water.
•Close the lid of the grinder funnel.
ENGLISH
12
The appliance works but makes a beeping sound.
•Please check if the lid of the grinder funnel is
closed properly.
The coffee beans seem to be used up quickly.
•It may look as if the coffee beans are used up
quickly. To ensure a perfect cup of coffee, a
certain amount of ground coffee is required.
The amount of coffee beans the appliance uses
to get the perfect amount of ground coffee is
normal.
The appliance continues to drip long after the
brewing process has ended.
•The dripping is caused by condensation
of steam. It is completely normal that the
appliance drips for some time.
•If the dripping does not stop, the drip stop may
be clogged. To clean the drip stop, pull at the
tab of the lter basket holder on the right side
of the coffeemaker to open the holder. Take out
the lter basket. Then rinse the lter basket and
the drip stop under the tap.
•If you remove the jug for more than 20 seconds
during the brewing process, the drip stop
causes the lter basket to overow.
The coffee is not hot enough.
•Preheat the jug with hot water before you start
brewing coffee.
•The coffee in the jug cools down faster if you
brew only a few cups. The coffee stays hot
longer if you brew 10 cups, which is a full jug.
•Use thin-walled cups, because they absorb less
heat from the coffee than thick-walled cups.
•Do not use milk that comes directly out of the
fridge.
•Descale the appliance. See section ‘Descaling
the coffeemaker’ in chapter ‘Cleaning and
maintenance’.
The coffeemaker does not start cleaning the
grinder funnel.
•Make sure that the coffeemaker is connected to
the mains.
•Make sure that you open the lid of the grinder
funnel before you press and hold the grinder
button.
•Press and hold the grinder button for 4 seconds
until the grinder starts cleaning itself.

13
3 重要事項
在使用本產品前,請先仔細閱讀本使用手
冊,並保留使用手冊以供日後參考。
3.1危險
•請勿讓產品浸入水或其他液體中,也不要
在水龍頭下沖洗。
3.2警示
•在連接本產品的電源之前,請確認本產品
機體底部所標示的電壓與當地的室內電壓
是否相同。
•如果電線損壞,則必須交由飛利浦、飛利
浦授權之服務中心,或是具備相同資格的
技師更換,以免發生危險。
•本產品不適合供下列人士 (包括孩童) 使
用:身體官能或心智能力退化者,或是經
驗與使用知識缺乏者。他們需要有負責其
安全的人員在旁監督,或指示產品的使用
方法,方可使用。
•請勿讓孩童使用本產品或將本產品當成
玩具。
•請勿讓孩童接觸產品與電線。
•請勿讓電源線懸掛在產品放置的餐桌或流
理台邊緣。
•請勿碰觸產品的研磨刀片,尤其是產品接
上電源時。
•包裝材料 (塑膠袋、紙板緩衝墊等) 並非玩
具,因此請放在兒童拿不到的地方。
•產品運作時,請勿碰觸產品的高溫表面。
•本產品專用於磨碎咖啡豆和沖煮咖啡。請
正確謹慎地使用產品,以避免遭受熱水或
蒸氣燙傷。
•請勿傾斜本產品以清空水箱,否則可能
會損害本產品。請僅依照沖洗指示淨空
水箱。
•當插頭、電線或產品本身受損時,請勿使
用產品。
•若發生問題,且無法利用本使用手冊解
決,請聯絡您所在國家/地區的客戶服務
中心。如果問題無法解決,請將產品送回
飛利浦授權之服務中心進行檢查或維修。
請勿嘗試自行動手維修;否則您的產品保
固將失效。
1 簡介
恭喜您購買本產品並歡迎加入飛利浦!請於
www.philips.com/welcome註冊您的產品,
以善用飛利浦提供的支援。
2 一般說明(圖1)
1 網籃
2 網籃架
3 水位顯示
4 水箱蓋
5 咖啡豆槽上蓋
6 咖啡豆槽選擇鈕
7 研磨度旋鈕
8 雙咖啡豆槽
9 研磨斗蓋
10 研磨斗蓋鎖
11 注水口
12 顯示幕
A 預磨咖啡粉圖示
B 杯數
C 咖啡杯圖示
D 濃度選擇咖啡豆圖示
E 濃度選擇按鈕
F 定時器按鈕
G 小時指示燈
H 分鐘指示燈
I 定時器圖示
13 開關按鈕
14 玻璃壺蓋
15 玻璃壺
16 清潔刷
繁體中文

14
4.2設定自動關機時間
本產品可定時自動關機,預設時間為30分
鐘,最高可調至120分鐘。如果您想要調整
自動關機時間,請依照下列步驟操作。
1 確認本產品已關機(但電源插頭仍應插入
牆上插座中)。
2 按住旋鈕中央,直到顯示幕開始閃爍。
3 旋轉旋鈕以增減時間。1是10分鐘、
2是20分鐘、3是30分鐘,並依此類
推,12是120分鐘。
4 往旋鈕中央按下即可確認分鐘。
D注意:
本產品一律儲存最後的設定。
4.3沖洗產品
第一次使用前,務必先以清水沖洗咖啡機。
1 打開水箱蓋,將乾淨的冷水注入水箱。
請注意水位顯示,勿使水量超過8杯。
(圖 6)
D注意:
此時勿將咖啡豆或咖啡粉放入本產品。
2 關上水箱蓋。
3 放入咖啡壺。(圖7)
4 按下開關按鈕。(圖8)
•顯示幕會亮起。
5 按下濃度選擇按鈕。(圖9)
6 旋轉旋鈕,選擇預磨咖啡粉設定。
(圖10)
•預磨咖啡粉圖示會亮起。
7 按壓旋鈕中央確認操作,然後再按旋鈕中
央一次,開始沖洗程序。(圖11)
8 讓產品自行運作,直到完成沖洗程序。
9 將咖啡壺裡的水倒掉。
3.3警告
•請勿將產品置放在高溫表面,並避免電源
線與高溫表面接觸。
•若清洗前、研磨期間或沖煮咖啡時發生問
題,請先拔下插頭。
•產品運作中請勿移動。
•本產品在使用時溫度很高。請先讓本產品
冷卻後再進行收納。
•煮咖啡時,本產品底部以及咖啡壺底部會
發燙。
•拆開產品包裝後,請務必確認產品完整且
無損壞。如有疑問,請勿使用產品,並與
您所在國家/地區的客戶服務中心聯絡。
•本產品僅供家用。並非用於商店的員工廚
房、辦公室、農舍等等或其他工作場所。
亦非適用於供住宿用餐的飯店、汽車旅館
與其他居住場所。
3.4電磁波(EMF)
本飛利浦產品符合所有電磁波暴露的相關適
用標準和法規。
4 第一次使用前
4.1設定時鐘
1 將電源插頭插入牆上插座。
• 顯示幕上會閃爍 00:00,等待您設定
時鐘時間。
2 旋轉旋鈕以設定小時。(圖2)
3 往旋鈕中央按下即可確認小時。(圖3)
•分鐘數字會開始閃爍,等待您設定分
鐘。
4 旋轉旋鈕以設定分鐘。(圖4)
5 往旋鈕中央按下即可確認分鐘。(圖5)
6 顯示幕會顯示設定的時鐘時間,接下來即
可開始使用咖啡機。

15
以將旋鈕轉到沒有圖示的位置以選擇其他
設定。您可以嘗試不同的研磨度設定,
找出您喜愛的口味。
8 轉動咖啡豆槽選擇鈕,在兩種咖啡豆當中
選擇您要使用的咖啡豆。(圖17)
B警示:
當您切換豆槽或改換咖啡豆種類時,原本
使用的咖啡豆必然會留下些許殘渣。只要
在更換咖啡豆以後清潔研磨斗,就能避免
這點。
D注意:
您可以依照個人品味,在兩種咖啡豆之間
選擇以單品或是混豆方式來沖泡咖啡。
9 按下產品前方的開關按鈕。(圖8)
•杯數會開始閃爍。
10 請轉動旋鈕來選擇杯數,直到想要的杯數
出現在顯示幕上為止。(圖18)
D注意:
請確定您以 2 到 10 杯按鈕所選擇的杯數
與水箱中的水量一致。請記住,咖啡機會
使用水箱中所有的水。如果您選擇的杯數
少於加入的水量,會使咖啡變淡。
11 往旋鈕中央按下即可確認杯數。
12 按下濃度選擇按鈕。(圖9)
•咖啡豆圖示會開始閃爍。
13 轉動旋鈕,選擇想要的咖啡濃度
(較淡:1顆咖啡豆、適中:2顆咖啡豆、
濃郁:3顆咖啡豆)。(圖10)
•顯示幕會顯示所選的咖啡濃度。
E提示:
您可以嘗試調整水量來找出自己喜愛
的濃度。如果您選擇的杯數高於水
量,將會增加咖啡濃度,反之則會使
咖啡變淡。
14 按壓旋鈕中央確認操作,然後再按旋鈕中
央一次,開始沖煮程序。(圖19)
•研磨器會研磨所需的咖啡豆。
15
請等到咖啡機停止沖煮後,再取出咖啡壺。
D注意:
咖啡沖煮完畢幾秒內,網籃可能仍會滴下
咖啡。
5 使用本產品
5.1水箱加水
1 打開水箱蓋,往水箱注入所需的冷水
量。(圖6)
打開水箱蓋以後,您會看到供您參考加水
量的水位顯示,刻度由2到10杯不等。您
可以藉此判斷水箱注水量。每到達一杯的水
量,對應的杯數顯示格便會由亮轉暗。您也
可以利用咖啡壺上的水位顯示來決定水量。
D注意:
水箱加水不得超過 10 杯的水量。
5.2使用咖啡豆
B警示:
往咖啡豆槽倒入咖啡豆時,務必關上水箱蓋,
否則咖啡豆可能掉入水箱,阻塞入水口。
1 取下咖啡豆槽上蓋。(圖12)
2 在雙咖啡豆槽中倒入咖啡豆。雙咖啡豆槽
可以盛裝兩種不同類型的咖啡豆。請確認
您要沖泡的咖啡豆槽中是否有足夠的咖啡
豆。(圖13)
D注意:
咖啡豆槽至少必須半滿。
B警示:
為避免研磨器阻塞,請勿使用未烘焙或焦
糖化的咖啡豆。義式濃縮咖啡豆可能造成
機器損壞,因此建議您改為使用咖啡豆。
3 拉動咖啡機右側的網籃架拉片,打開網籃
架。(圖14)
4 取一張濾紙(1x4或4號)並折疊濾紙的密
封邊緣以避免綻開及翻折。將濾紙放入網
籃。(圖15)
5 蓋上網籃架。
6 放入咖啡壺。(圖7)
7 轉動研磨度旋鈕,選擇您想要的研磨度
(研磨粗細)。(圖16)
E提示:
研磨度旋鈕有九種不同設定可供選擇。咖
啡機本身已預設 3 種最佳設定,但您也可
繁體中文

16
5 往旋鈕中央按下即可確認分鐘。(圖24)
•定時器至此已設定完成,並會在設定
的時間開始沖煮程序。
5.5防漏功能
防漏功能可讓您在沖煮程序結束之前,從咖啡
機取出咖啡壺而不讓咖啡漏出。當您取出咖啡
壺時,防漏裝置會防止咖啡流入咖啡壺中。
D注意:
在您取出咖啡壺時,沖煮程序並未停止。
若您未在 20 秒內放回咖啡壺,咖啡會從網
籃溢出。
5.3使用預磨咖啡粉
若您想要使用預磨咖啡粉而非咖啡豆,
請依照下列步驟操作。
1 打開水箱蓋,往水箱注入所需的冷水
量。(圖6)
2 拉動咖啡機右側的網籃架拉片,打開網籃
架。(圖14)
3 取一張濾紙(1x4或4號)並折疊濾紙的密
封邊緣以避免綻開及翻折。將濾紙放入網
籃。(圖15)
4 將預磨咖啡粉放入濾紙。
D注意:
您可以依照個人口味調整咖啡濃度。如為
中等濃度的咖啡,每杯 (120 毫升) 約需
一量匙 (6 克左右) 的咖啡粉。若要沖煮
較濃的咖啡,每杯咖啡請使用 1.5 量匙的
咖啡粉。
5 蓋上網籃架。
6 放入咖啡壺。(圖7)
7 按下開關按鈕。(圖8)
•顯示幕會亮起。
8 按下濃度選擇按鈕。(圖9)
9 旋轉旋鈕,選擇預磨咖啡粉設定。(圖10)
•預磨咖啡粉圖示會亮起。
10 按壓旋鈕中央確認操作,然後再按旋鈕中
央一次,開始沖煮程序。(圖11)
11
請等到咖啡機停止沖煮後,再取出咖啡壺。
D注意:
咖啡沖煮完畢幾秒內,網籃可能仍會滴下
咖啡。
5.4設定定時器
定時器可讓您設定沖煮程序的開始時間。
在設定定時器前,務請先完成以咖啡粉或咖
啡豆沖煮咖啡需要的所有步驟。
1 按下定時器按鈕。(圖20)
•顯示幕上會閃爍 00:00,等待您設定
定時器時間。
2 旋轉旋鈕以設定小時。(圖21)
3 往旋鈕中央按下即可確認小時。(圖22)
•分鐘數字會開始閃爍,等待您設定分
鐘。
4 旋轉旋鈕以設定分鐘。(圖23)
17
B警示:
切勿將清潔刷掉入研磨斗中。
8 蓋上研磨斗的蓋子。
9 取下裝有殘餘咖啡粉的濾紙並丟棄。
6.3咖啡機除垢
如發現蒸氣過多或沖煮時間增長,請為咖啡
機除垢。建議每兩個月除垢一次。請僅使用
白醋除垢,因為其他產品可能會對咖啡機造
成損害。
B警示:
請勿使用醋酸高於 8% 的醋類、天然醋、粉
狀除垢劑或除垢錠為產品除垢,如此可能會
損害產品。
1 打開水箱蓋。
2 在水箱中注入8杯白醋(4%醋酸)和2杯
水。(圖6)
3 將濾紙(4號)放入網籃,然後關上網籃
架。(圖15)
4 放入空咖啡壺。(圖7)
5 將電源插頭插入牆上插座。
6 按下產品前方的開關按鈕以開啟電源。
(圖8)
•顯示幕會亮起。
7 按下濃度選擇按鈕並轉動旋鈕,選擇預磨
咖啡粉設定。(圖10)
8 按壓旋鈕中央確認操作,然後再按旋鈕中
央一次,開始沖煮程序。(圖11)
9 等到醋水混合液過半流入咖啡壺中之後,
按下開關按鈕停止沖煮程序,靜待至少
15分鐘的時間,讓醋水產生作用。
(圖30)
10 按下開關按鈕,再次開啟咖啡機。(圖8)
11
按壓旋鈕中央兩次,完成沖煮程序。(圖31)
12 將咖啡壺裡的水倒掉並丟棄濾紙。
13 在水箱中注入冷水並按壓旋鈕中央兩次,
開始另一次沖煮程序。讓咖啡機完成整個
沖煮程序,然後將咖啡壺裡的水倒掉。
14 重複步驟13,直到煮好的水嘗起來或聞
起來沒有酸味。
15 網籃和咖啡壺可以放入洗碗機中,或以熱
水和少許清潔劑清洗。
16 按下產品前方的開關按鈕以關閉電源。
6 清潔與維護
6.1每次使用後均需清潔
B警示:
請勿讓產品浸入水或其他液體中,也不要在
水龍頭下沖洗。
1 按下產品前方的開關按鈕以關閉電源。
(圖25)
2 從插座拔下電源插頭。
3 用濕布擦拭咖啡機外部。(圖26)
4 網籃和咖啡壺可以放入洗碗機中,
或以熱水和少許清潔劑清洗。
6.2清潔研磨斗
當您切換豆槽或改換咖啡豆種類時,原本使
用的咖啡豆必然會留下些許殘渣,進而影響
咖啡風味。只要每隔1到2週清潔一次研磨
斗,或在每次切換咖啡豆槽時清潔研磨斗,
即可避免現磨咖啡和研磨斗中的殘渣混合。
如改用新的咖啡豆,請依照下列步驟操作,
可使咖啡保有純正風味。
1 按下產品前方的開關按鈕以關閉電源。
(圖25)
2 拉動咖啡機右側的網籃架拉片,打開網籃
架。(圖14)
3 取一張濾紙(1x4或4號)並折疊濾紙的密
封邊緣以避免綻開及翻折。將濾紙放入網
籃。(圖15)
4 蓋上網籃架。
5 若要打開研磨斗蓋,將清潔刷握把的平頭
端插入研磨斗蓋鎖內,並往下按壓。
(圖27)
D注意:
如果您只是要以清潔刷快速清理研磨斗,
請直接跳到步驟 7。如果您不想讓先前殘
留的咖啡粉影響新咖啡豆的味道,請繼續
操作步驟 6。
6 按住濃度選擇按鈕4秒鐘。(圖28)
•研磨器隨即自行清潔。
7 研磨器停止清潔時,請用清潔刷將殘留的
咖啡粉掃往研磨斗下方。(圖29)
•咖啡粉殘渣會掉入網籃中。
繁體中文

18
10疑難排解
本單元概述您使用本產品時最常遇到的問
題。如果您無法利用以下資訊解決您遇到的
問題,請造訪www.philips.com/support查看
常見問題清單,或聯絡您所在國家/地區的飛
利浦客戶服務中心。
本產品無法運作。
•將電源插頭接上電源插座,然後按下產品
前方的開關按鈕,開啟產品。
•請確認本產品的電壓與當地電壓相符。
•將水箱注滿水。
•蓋上研磨斗的蓋子。
使用研磨器製作的咖啡味道太淡。
•請確定您以2到10杯按鈕所選擇的杯數與
水箱中的水量一致。請記住,咖啡機會使
用水箱中所有的水。
•使用濃度選擇按鈕,將咖啡濃度設定為
「濃」。
•當您使用咖啡豆時,請確定您沒有按下預
先研磨咖啡粉按鈕,否則將關閉研磨器。
•使用濃度或風味更濃烈的咖啡豆。
•請確認所選杯數與水箱中的水量相符。
使用預先研磨咖啡粉製作的咖啡味道太淡。
•請確定濾網中的預先研磨咖啡粉與水箱中
的水量一致。請記住,本產品會使用水箱
中所有的水。
•使用濃度或風味更濃烈的咖啡粉。
•若要提升咖啡濃度,請增加咖啡粉量或降
低水量。
我在沖煮過程中移開咖啡壺時,咖啡自濾網
中滿溢出來。
•如果您在沖煮期間移開咖啡壺超過20秒,
防漏裝置會導致網籃中的咖啡溢出。另請
注意,在沖煮程序結束前,咖啡尚未達到
最完整的風味。因此,我們建議您不要將
咖啡壺取出並倒咖啡。
7 訂購配件
若要購買配件或備用零件,請造訪
www.shop.philips.com/service,或洽詢您的
飛利浦經銷商。您也可以聯絡您所在國家/地
區的飛利浦客戶服務中心(聯絡詳細資料請參
閱全球保證書)。
8 回收
本產品使用壽命結束時,請勿隨一般家庭廢
棄物一併丟棄。請將本產品送至政府指定的
回收站,此舉能為環保盡一份心力。
9 保固與支援
如果您需要資訊或支援,請造訪:
www.philips.com/support,或另行參閱全球
保證書。

19
在沖煮程序結束之後一段時間,產品仍繼續
滴水。
•滴水是因為蒸氣凝結而造成。產品持續滴
水一陣子是完全正常的現象。
•如果滴水現象沒有停止,可能是防漏裝置
堵塞。若要清洗防漏裝置,請拉動咖啡機
右側網籃架的拉片以打開網籃架。取出網
籃,以自來水沖洗網籃與防漏裝置。
•如果您在沖煮期間移開咖啡壺超過20秒,
防漏裝置會導致網籃中的咖啡溢出。
咖啡不夠燙。
•開始煮咖啡前,請以熱水預熱咖啡壺。
•如果您僅沖煮數杯咖啡,咖啡壺內的咖啡
將較快冷卻。但如果您沖煮10杯咖啡
(滿壺),咖啡則可保溫較久。
•請使用杯壁較薄的杯子,因為這種杯子不
像杯壁較厚的杯子那麼會吸熱。
•請勿使用從冰箱直接取出的冰牛奶。
•為產品除垢。請參閱「清潔與維護」單元
中的「咖啡機除垢」一節。
咖啡機沒有開始清潔研磨斗。
•請確認咖啡機接上電源。
•請先打開研磨斗的蓋子,再按住研磨器按
鈕。
•按住研磨器按鈕4秒,直到研磨器開始自
行清潔。
產品運作時發出嗶聲。
•請檢查研磨斗的蓋子是否蓋好。
咖啡豆似乎消耗過快。
•為確保咖啡的完美風味,咖啡機必須使用
一定數量的咖啡粉。咖啡豆可能看起來用
得很快,但本產品為研磨出理想的咖啡粉
量而消耗的咖啡豆量,實屬正常範圍。
繁體中文

20
3 注意事项
使用本产品之前,请仔细阅读本使用
说明书,并妥善保管以备日后参考。
3.1危险
•不要将本产品浸入水或其它液
体中,也不要在水龙头下冲
洗。
3.2警告
•在将产品接通电源以前,首先
确认产品底部所标示的电压是
否与当地的电压相符。
•如果电源线损坏,为了避免危
险,必须由飞利浦、飞利浦特
约维修中心或有同等维修资格
的专业人员来进行更换。
•产品不建议由有肢体、感官或
精神能力缺陷或缺少使用经验
和知识的人(包括儿童)使
用,除非有负责他们安全的人
对他们进行与产品使用有关的
监督或指导。
•请照看好儿童,本产品不能用
于玩耍。
•
将产品及其线缆放在儿童接触不
到的地方。
•不要将电源线悬挂在放置产品
的桌子或工作台的边缘上。
•请勿触摸本产品的研磨盘,特
别是在本产品连接到电源时。
•将包装材料(塑料袋、纸板
等)置于儿童无法触及的地
方,因其不是玩具。
•请勿在本产品工作时触摸其高
温表面。
•
本产品专为研磨咖啡豆和冲煮
咖啡而设计。请正确、小心地使
用,以免被热水和蒸汽烫伤。
1 简介
感谢您的惠顾,欢迎光临飞利浦!
为了您能充分享受飞利浦提供的支
持,请在www.philips.com/welcome
上注册您的产品。
2 基本说明(图1)
1 滤框
2 滤框支架
3 水位计
4 水箱盖
5 咖啡豆容器盖
6 容器选择器
7 粗度旋钮
8 双咖啡豆容器
9 研磨机漏斗盖
10研磨机漏斗盖锁
11注水孔
12显示屏
A 预研磨咖啡图标
B 杯数
C 咖啡杯图标
D 咖啡豆浓度选择图标
E 浓度选择按钮
F 预约按钮
G 小时显示
H 分钟显示
I 定时器图标
13开/关按钮
14玻璃壶盖
15玻璃壶
16清洁刷

21
简体中文
•倒空水箱时请勿倾斜产品,这
可能会损坏产品。只能按照以
下冲洗说明倒空水箱。
•如果插头、电源线或产品本身
受损,请勿使用本产品。
•如果出现无法根据本用户手册
解决的问题,请与您所在国家/
地区的客户服务中心联系。如
果问题不能得到解决,请将本
产品送往飞利浦授权的服务中
心进行检修。切勿尝试自行修
理本产品,否则您的保修将失
效。
3.3警告
•切勿将本产品放在热的表面
上,并防止电源线与热的表面
接触。
•如果在研磨或冲煮咖啡期间出
现问题,
以及在清洁之前,请拔下产品的
电源插头。
•请勿在使用期间移动本产品。
•产品在使用过程中会发热。待
产品冷却后再存放。
•冲煮过程中,产品下部和水壶
底部会变得很烫。
•在拆开包装之后,请确保产品
完好无损。如有疑问,请勿使
用本产品,而应与所在国家/地
区的客户服务中心联系。
•本产品仅限于正常家用。它不
得用于商店、办公场所、农场
或其他工作环境的员工食堂。
也不得由酒店、汽车旅馆、提
供住宿和早餐的场所及其他住
宿环境中的客人使用。
3.4 电磁场(EMF)
本飞利浦产品符合所有有关暴露于电
磁场的适用标准和法规。
4 首次使用之前
4.1设置时钟
1 将电源插头插入插座。
• 00:00 在显示屏上闪烁,
表示您必须设置时钟时间。
2
转动旋钮以设置小时。(图2)
3
按旋钮的中央以确认小时。(图3)
•分钟开始闪烁,表示您必须设
置分钟。
4
转动旋钮以设置分钟。(图4)
5
按旋钮的中央以确认分钟。(图5)
6
显示屏显示设定的时钟时间。
咖啡机可以使用了。
4.2设置自动关机时间
您可以调整产品自动关机前运行的
时间。
默认时间设置为30分钟。该时间最
长可调整为120分钟。如果您想调
整自动关机时间,
请按照以下步骤操作。
1 确保产品已关闭(但电源插头仍
插入电源插座)。
2 按住旋钮中央,直至显示屏开始
闪烁。
3
转动旋钮可增加或减少时间。
1表示
10分钟,2表示20分钟,
3表示30分钟,以此类推,
12表示120分钟。
4 按旋钮的中央以确认分钟。
D注意:
本产品始终会保存上次设置。

22
5 使用本产品
5.1给盛水箱注水
1 打开水箱盖,在水箱中注入所需
数量的冷水。(图6)
打开水箱盖后,会看到产品内侧
有2至10杯量指示。您可以使用
这些指示来确定水箱中要注入的
水量。每满杯水会呈现由浅至深
的反射变化。您也可以使用水壶
上的水位指示。
D注意:
请勿向水箱中注入超过 10 杯量指
示的水。
5.2使用咖啡豆
B警告:
在将咖啡豆装入咖啡豆容器时,请始
终确保关闭水箱盖。否则,咖啡豆会
落入水箱,阻塞注水口。
1 取下咖啡豆容器盖。(图12)
2 向双咖啡豆容器中加入咖啡豆。
您可以向双咖啡豆容器中加入两
种不同的咖啡豆。确保咖啡豆容
器中所加入的咖啡豆足以冲煮您
想要的咖啡量。(图13)
D注意:
始终确保咖啡豆容器至少半满。
B警告:
为了防止研磨机堵塞,请不要使
用未烘焙或焦糖咖啡豆。我们建
议使用咖啡豆而非浓缩咖啡豆,
因其会造成损坏。
3 要打开滤框支架,请拉咖啡机右
侧的卡舌。(图14)
4 取一张过滤纸(1x4型或4号),
将密封边折起,以防撕破或折叠。
将过滤纸放置在滤框上。(图15)
5 关闭滤框支架。
4.3冲洗产品
首次使用之前,需要冲洗一次咖啡
机。
1 打开水箱盖。向水箱注入清
水,直至8杯量指示处。(图6)
D注意:
切勿将咖啡豆或研磨咖啡放入产
品中。
2 关闭水箱盖。
3 将咖啡壶放到产品中。(图7)
4 按开/关按钮。(图8)
•显示屏将亮起。
5 按浓度选择按钮。(图9)
6 转动旋钮以选择预研磨咖啡设
置。(图10)
•预研磨咖啡图标亮起。
7 按旋钮中央进行确认。然后再次
按旋钮中央开始冲洗过程。
(图11)
8 保持产品运转直至冲洗过程完
成。
9 倒空咖啡壶。

23
E提示:
我们建议您试验水量,以找出您最
爱的浓度。如果您选择的杯数高于
水量,咖啡将较浓。如果您选择的
杯数小于水量,咖啡将较淡。
14 按旋钮中央进行确认,然后再次按
旋钮中央开始冲煮过程。(图19)
•研磨机将研磨所需数量的咖啡
豆。
15 等到咖啡机停止冲煮后再取下咖
啡壶。
D注意:
冲煮完成后,咖啡会从滤框中滴出
几秒钟。
5.3使用预磨咖啡
如果要使用预磨咖啡而非咖啡豆冲煮
咖啡,请按照以下步骤进行操作。
1 打开水箱盖,在水箱中注入所需
数量的冷水。(图6)
2 要打开滤框支架,请拉咖啡机右
侧的卡舌。(图14)
3 取一张过滤纸(1x4型或4号),
将密封边折起,以防撕破或折叠。
将过滤纸放置在滤框上。(图15)
4 将预研磨的咖啡放入过滤纸中。
D注意:
您可以根据自己的口味调节咖啡
浓度。对于中等浓度的咖啡,每
杯(120 毫升)使用一量匙(大约
6 克)研磨咖啡。对于浓郁咖啡,
每杯使用 1.5 量匙研磨咖啡。
5 关闭滤框支架。
6 将咖啡壶放到产品中。(图7)
7 按开/关按钮。(图8)
•显示屏将亮起。
8 按浓度选择按钮。(图9)
9 转动旋钮以选择预研磨咖啡设
置。(图10)
•预研磨咖啡图标亮起。
6 将咖啡壶放到产品中。(图7)
7 旋转粗度旋钮以选择所需的研磨
类型(从细到粗)。(图16)
E提示:
粗度旋钮为您提供 9 种不同设置。
我们预先选择了 3 种最佳设置,但
您也可以选择图标中的任意设置。
我们建议您试验从细到粗的不同研
磨设置,以找出您喜欢的设置。
8 旋转容器选择器,在两种不同咖
啡豆之间进行选择。(图17)
B警告:
每当您在咖啡豆容器或咖啡豆之
间切换时,总会存在先前研磨某类
咖啡豆时遗留的微量粉末。换用
新咖啡豆后清洁研磨机漏斗可有效
避免。
D注意:
根据您的口味,您可以选择两种
咖啡豆的一种,也可以选择混合
两者。
9 按位于产品正面的开/关按钮。
(图8)
•杯数开始闪烁。
10 选择杯数,转动旋钮直到所需的
杯数出现在屏幕上。(图18)
D注意:
确保您通过 2-10 杯旋钮所选择
的杯数与水箱中的水量一致。请
记住,咖啡机会用完水箱中所有
的水。如果您选择的杯数少于水
量,咖啡会比您想要的浓度淡。
11 按旋钮中央以确认杯数。
12 按浓度选择按钮。(图9)
•咖啡豆图标开始闪烁。
13
转动旋钮以选择所需的咖啡浓度
(轻度:1颗咖啡豆、中度:2颗
咖啡豆或重度:3颗咖啡豆)。
(图10)
•显示屏将显示选定的咖啡浓度。
简体中文

24
6 清洁和保养
6.1每次使用后进行清洁
B警告:
不要将本产品浸入水或其它液体中,
也不要在水龙头下冲洗。
1 按下产品正面的开/关按钮关闭产
品。(图25)
2 将插头从电源插座中拔下:
3 用湿布擦拭咖啡机的外侧。(图26)
4 在洗碗机中或用热水和少许清洗液
清洁滤框和咖啡壶。
6.2清洁研磨机漏斗
每当换用咖啡豆容器或咖啡豆时,总
会存在先前研磨某类咖啡豆时遗留的
微量粉末,这可能会影响咖啡的口
感。每1至2周清洁一次研磨机漏
斗,或当您在咖啡容器间切换时进行
清洁,以免鲜磨咖啡和研磨机漏斗中
的微量粉末混合在一起。换用新品种
咖啡豆后,请按照以下步骤操作,确
保至佳口感。
1 按下产品正面的开/关按钮关闭产
品。(图25)
2 要打开滤框支架,请拉咖啡机右
侧的卡舌。(图14)
3 取一张过滤纸(1x4型或4号)
,将密封边折起,以防撕破或折
叠。将过滤纸放置在滤框上。
(图15)
4 关闭滤框支架。
5 如要打开研磨机漏斗盖,请将清
洁刷手柄的平面端插入研磨机漏
斗盖锁,然后向下按压。(图27)
D注意:
如果您想要仅通过刷子快速清洁
研磨机漏斗,请继续步骤 7。如果
您想要避免遗留的鲜磨咖啡影响
新咖啡豆的口味,请继续步骤 6。
10 按旋钮中央进行确认。然后再次
按旋钮中央开始冲煮过程。
(图11)
11 等到咖啡机停止冲煮后再取下咖
啡壶。
D注意:
冲煮完成后,咖啡会从滤框中滴
出几秒钟。
5.4设置计时器
通过计时器可设定要开始冲煮过程的
时间。设置计时器之前,确保冲煮咖
啡的所有步骤均采用预研磨咖啡或咖
啡豆。
1 按计时器按钮。(图20)
•00:00 会在显示屏上闪烁,表
示您必须设置计时器。
2 转动旋钮以设置小时。(图21)
3 按旋钮的中央以确认小时。
(图22)
•分钟开始闪烁,表示您必须设
置分钟。
4 转动旋钮以设置分钟。(图23)
5 按旋钮的中央以确认分钟。
(图24)
•计时器已设定,冲煮过程将在
预设的时间开始。
5.5防滴漏功能
防滴漏功能让您可以在冲煮过程完成
前从咖啡机中取出咖啡壶。取走咖
啡壶时,滴漏盘会阻止咖啡滴入咖啡
壶。
D注意:
取走咖啡壶时,冲煮过程不会停止。
如在 20 秒钟内未将咖啡壶放回产
品,滤框会溢出。

25
10 按开/关按钮开启咖啡机电源。
(图8)
11 按两下旋钮的中央,让产品完成
冲煮过程。(图31)
12 倒空咖啡壶并丢弃滤纸。
13 向水箱中注入冷水,然后按两下
旋钮的中央,以开启另一个冲煮
过程。让咖啡机完成整个冲煮过
程,然后倒空咖啡壶。
14 重复步骤13,直至水里不再有醋
味。
15 在洗碗机中或用热水和少许清洗
液清洁滤框和咖啡壶。
16 按下产品正面的开/关按钮关闭产
品。
7 订购附件
要购买附件和备件,请访问
www.shop.philips.com/service或请
联系飞利浦经销商。您也可以联系您
所在国家/地区的飞利浦客户服务中
心(联系详情,请参阅全球保修卡)
。
8 回收
弃置产品时,请不要将其与一般生活
垃圾扔在一起,应将其交给指定的回
收中心,这样做有利于环保。
6 按住浓度选择按钮4秒钟。
(图28)
•研磨机将自动开始清洁。
7 当研磨机停止清洁时,请使用清
洁刷将研磨咖啡残渣扫到漏斗的
下半部分。(图29)
•研磨咖啡残渣会落入滤框。
B警告:
请不要让刷子跌落到研磨机漏
斗内。
8 盖上研磨机漏斗盖。
9 取下并丢弃带有研磨咖啡残渣的
滤纸。
6.3为咖啡机除垢
当您发现蒸汽过多或冲煮时间增加
时,请为咖啡机除垢。建议每两个月
除垢一次。仅使用白醋除垢,因为其
他产品可能会对咖啡机造成损坏。
B警告:
不要使用醋酸度为 8% 或以上的白
醋、天然醋、粉状除垢剂或片状除垢
剂给本产品除垢,否则可能会造成损
坏。
1 打开水箱盖。
2 在水箱中注入8杯白醋(4%醋
酸)和2杯水。(图6)
3 将滤纸(4号)放入滤框并关闭滤
框支架。(图15)
4 将空咖啡壶放入产品中。(图7)
5 将电源插头插入插座。
6 按下产品正面的开/关按钮开启产
品。(图8)
•显示屏将亮起。
7 按浓度选择按钮,然后转动旋钮
以选择预研磨咖啡设置。(图10)
8 按旋钮中央进行确认。然后再次
按旋钮中央开始冲煮过程。
(图11)
9 一直等到一半醋水溶液流入壶内,
然后按开/关按钮停止冲煮过程,
使溶液浸泡至少15分钟。(图30)
简体中文

26
冲煮咖啡的过程中取出玻璃壶时过滤
网溢出。
•如果您在冲煮过程中将玻璃壶移
开20秒以上,则滴漏盘会导致滤
框溢出。另请注意,在冲煮过程结
束之前,咖啡将无法释放其最浓
的香味。因此建议您在冲煮过程结
束之前,请不要取出玻璃壶并倒出
咖啡。
冲煮过程结束后很长时间,产品仍然
滴漏。
•滴漏由蒸汽冷凝造成。产品滴漏几
次是完全正常的。
•如果滴漏不止,则滴漏盘可能已堵
塞。要清洁滴漏盘,请抽出咖啡机
右侧滤框支架的卡舌打开支架。取
出滤框。然后在水龙头下冲洗滤框
和滴漏盘。
•如果您在冲煮过程中将咖啡壶移
开20秒以上,滴漏盘会导致滤框
溢出。
咖啡不够热。
•开始冲煮咖啡前先用热水预热咖啡
壶。
•如果只冲煮几杯,壶中的咖啡会很
快冷却。如果冲煮10杯,咖啡保
温时间会更长,因为壶已装满。
•使用壁薄的杯子,因为与壁厚的杯
子相比,它们从咖啡吸收的热量更
少。
•请勿使用直接从冰箱拿出来的牛
奶。
•为产品除垢。请参阅“清洁和保
养”一章中的“为咖啡机除垢”
部分。
咖啡机未开始清洁研磨机漏斗。
•确保咖啡机已连接到电源。
•确保在按住研磨机按钮之前打开研
磨器漏斗盖。
•按住研磨机按钮4秒钟,直到研磨
机开始自动清洁。
9 保修和支持
如果您需要信息或支持,请访问
www.philips.com/support或阅读单
独的全球保修卡。
10故障种类和处理方法
本章归纳了使用本产品时最常见的一
些问题。如果您无法根据以下信息解
决问题,请访问www.philips.com/
support查阅常见问题列表,或联系
您所在国家/地区的客户服务中心。
产品不能工作。
•将电源插头插入插座,按下产品正
面的开/关按钮打开产品。
•确保产品上标示的电压与当地的电
源电压相符。
•将水注入盛水箱。
•盖上研磨机漏斗盖。
使用研磨机时,咖啡太淡。
•确保使用2-10杯按钮所选的杯数
与水箱中的水量一致。请记住,
咖啡机会用完水箱中所有的水。
•使用浓度选择按钮将咖啡浓度设置
为“重度”。
•使用咖啡豆时,确保不要按预研
磨咖啡按钮,因为这样会关闭研
磨机。
•使用更浓的混合或口味的咖啡豆。
•请确保所选择的杯数与水箱中的水
量一致。
使用预磨咖啡时,咖啡太淡。
•确保滤网中预磨咖啡的量与水箱中
的水量一致。请记住,产品会用完
水箱中所有的水。
•使用更浓的混合或口味的预磨咖
啡。
•要增加咖啡浓度,请增加预磨咖啡
的量或减少水量。
27
产品运行,但发出哔声。
•请检查研磨机漏斗盖是否已盖好。
咖啡豆似乎很快用完了。
•咖啡豆可能是看起来好像很快用完
了。要确保冲煮香醇美味的咖啡,
需要使用一定数量的研磨咖啡。产
品为冲煮最优研磨咖啡量所用的咖
啡豆量是正常的。
22/05/2015
简体中文
2345
6789
10 11 12 13
14 15 16 17
18 19 20 21
22 23 24 25
26 27 28 29
1/2
30 31

© 2015 Koninklijke Philips Electronics N.V.
版权所有 / All rights reserved.
文件号 / Document order number: 4222.200.0060.5
