Philips V200 Users Manual Esprit Ventilator Operator’s
V200 to the manual 7870606e-e8cc-4025-8a1a-00eacf0d58c8
2015-02-05
: Philips Philips-V200-Users-Manual-386812 philips-v200-users-manual-386812 philips pdf
Open the PDF directly: View PDF ![]() .
.
Page Count: 328 [warning: Documents this large are best viewed by clicking the View PDF Link!]
- Chapter 1. Introduction and Intended Use
- Chapter 2. Warnings, Cautions, and Notes
- Chapter 3. Symbols
- Chapter 4. Getting Started
- Chapter 5. Setup
- Chapter 6. Connecting Additional Equipment
- Chapter 7. Operating Theory
- Chapter 8. Operating Instructions
- Overview
- The Front Panel
- Ventilator Screens
- Settings Screens
- Selecting a New Ventilation Breath Type (VCV, PCV, or NPPV)
- Selecting the Mode (A/C-SIMV-CPAP or Spont-Spont/T)
- Apnea Ventilation
- Patient Data Screen
- Monitor Screen
- Special Procedures
- Preoperational Procedure
- Alarm Testing Procedure
- Where To Go For Help
- Chapter 9. Alarms
- Chapter 10. Care and Maintenance
- Chapter 11. Diagnostics
- Chapter 12. Technical Specifications
- Breath Types
- Modes
- Volume Ventilation Settings, Ranges and Resolution
- Pressure Control Ventilation Settings, Ranges and Resolution
- Non-Invasive Positive Pressure Ventilation Settings, Ranges and Resolution
- Apnea Ventilation
- Value Entry Message
- Patient Data Screen
- Front Panel Keys
- Level Controls
- Calculated Values from Expiratory Hold Maneuver
- Interface Ports
- Environmental Specifications
- Environmental Protection
- Alarms
- Connectors
- Filters
- Measuring and Display Devices
- AC Power and Battery Indicators
- Leakage Current
- Compliance and Approvals
- Power Requirements
- Dimensions and Weights
- Electromagnetic Compatibility Declaration
- Pneumatic System
- Labels
- Chapter 13. Options and Accessories
- Introduction
- Assemble O2 Sensor
- Attaching the Sensor to the Ventilator
- Warranty
- O2 Sensor Tee
- Installation
- Power Consumption Sequence
- External Battery/ Backup Battery Operation
- Battery Capacity
- Battery Charging
- Testing
- Battery Specifications
- Warranty
- Kit Contents
- Assembly Instructions
- Replacement Parts:
- Using the Manifold
- Starting Graphics
- Using Graphics
- Replotting and Scrolling
- Rescaling the Display
- Freeze Feature
- Save and Overlay Features
- Inspiratory Area
- Alarms During Graphics
- Print Screen
- VueLink Compatibility
- Configuring the VueLink Module
- Analog Output (Chart Recorder)
- RS-232 Configuration
- Commands Transmitted to the Ventilator
- Transmission of Data from the Ventilator
- SNDA<CR>, Send Variable Length Ventilator Settings Report
- Accessing Respiratory Mechanics Data
- Vital Capacity Maneuver
- MIP/P0.1 Maneuver
- Static C and R Maneuver
- Alarms and Error Messages
- Compliance (C) and Resistance (R) Computations
- Accessing Trending Data
- Selecting Parameters for Display
- Using the Manual Rescale Function
- Changing the Cursor Position
- Selecting the Time Scale
- Using the +2 Hrs/-2 Hrs buttons
- Using the Zoom Function
- Using the Rescale Button
- Using the View 1/ View 2 buttons
- Using the Clear button
- Alarms during Trending
- PCMCIA Card
- Trending Not Available
- Specifications
- On the Screen
- Breath Delivery
- Inspiratory Hold
- Respiratory Mechanics
- Alarms
- System Requirements
- Hardware Setup
- RS-232 Communications
- Trended NICO Data
- Troubleshooting
- System Requirements
- Changing Patient Types
- Percent Leak
- Patient Leak Values
- Warnings, Cautions, and Notes
- Patient Preparation
- Settings
- Starting Speaking Mode
- Alarms
- Displayed Data
- Trended Data
- Discontinue Speaking Mode
- Introduction
- Compatible Patient Interfaces
- How to Select Auto- Trak
- Turning Auto-Trak Off
- Triggering and Cycling with Auto- Trak
- Leak Detection and Compensation
- Appendix A. RS-232 Communications Protocol
- RS-232 Configuration
- Commands Transmitted to the Ventilator
- Transmission of Data from the Ventilator
- Ventilator Report Command and Response (VRPT)
- Volume Control Ventilation Settings Report (VCVS)
- Pressure Control Ventilation Settings Report (PCVS)
- Non-Invasive Positive Pressure Ventilation Settings Report (NPVS)
- Patient Data Report (PTDT)
- Alarm Status Report (ALRM)
- Unrecognized Commands
- Appendix B. Customer Service & Warranty
- Appendix C. Alarm Testing Procedure
- Index

1057983 50
Respironics V200 Ventilator
Operator’s Manual

For Technical Support and Customer Service, contact:
USA and Canada: 1-800-345-6443 or 724-387-4000
Respironics Europe, Africa, Middle East: +33-1-47-52-30-00
Respironics Asia Pacific: +852-3194-2280
Facsimile: 724-387-5012
USA
Respironics California, Inc.
2271 Cosmos Court
Carlsbad, CA 92011
Email and web addresses
service@philips.com
clinical@philips.com
www.philips.com\healthcare
Authorized European address
Respironics Deutschland GmbH
Gewerbestrasse 17
D-82211 Herrsching
Germany
+49-8-15-29-30-60
© 2009 Respironics and its affiliates.
All rights reserved.
This work is protected under Title 17 of the United States copyright code and is the sole property of Respironics.
No part of this document may be copied or otherwise reproduced, or stored in any electronic information
retrieval system, except as specifically permitted under United States copyright law, without the prior written
consent of Respironics.
EC REP

REF 1057983 A Respironics V200 Ventilator Operator’s Manual iii
Table of Contents
1. Introduction and Intended Use. . . . . . . . . . . . . . . . . . . . . . . . . . . . . . . . . . 1-1
2. Warnings, Cautions, and Notes . . . . . . . . . . . . . . . . . . . . . . . . . . . . . . . . . 2-1
Summary of Warnings, Cautions, and Notes . . . . . . . . . . . . . . . . . . . . . . . . . . . 2-1
3. Symbols . . . . . . . . . . . . . . . . . . . . . . . . . . . . . . . . . . . . . . . . . . . . . . . . . . . 3-1
4. Getting Started . . . . . . . . . . . . . . . . . . . . . . . . . . . . . . . . . . . . . . . . . . . . . . 4-1
Unpacking . . . . . . . . . . . . . . . . . . . . . . . . . . . . . . . . . . . . . . . . . . . . . . . . . . 4-1
Inspection. . . . . . . . . . . . . . . . . . . . . . . . . . . . . . . . . . . . . . . . . . . . . . . . . . . 4-2
List of Parts and Accessories . . . . . . . . . . . . . . . . . . . . . . . . . . . . . . . . . . . . . 4-2
Repacking. . . . . . . . . . . . . . . . . . . . . . . . . . . . . . . . . . . . . . . . . . . . . . . . . . . 4-3
Ventilator Positioning. . . . . . . . . . . . . . . . . . . . . . . . . . . . . . . . . . . . . . . . . . . 4-4
Backup Battery . . . . . . . . . . . . . . . . . . . . . . . . . . . . . . . . . . . . . . . . . . . . . . . 4-4
Inspiratory Bacteria Filter Installation . . . . . . . . . . . . . . . . . . . . . . . . . . . . . . 4-16
Heated Expiratory Bacteria Filter Installation . . . . . . . . . . . . . . . . . . . . . . . . . 4-18
Oxygen Source Connection . . . . . . . . . . . . . . . . . . . . . . . . . . . . . . . . . . . . . . 4-20
Patient Circuit Flex Arm Installation . . . . . . . . . . . . . . . . . . . . . . . . . . . . . . . 4-22
5. Setup . . . . . . . . . . . . . . . . . . . . . . . . . . . . . . . . . . . . . . . . . . . . . . . . . . . . . 5-1
Back Panel Connections and Controls . . . . . . . . . . . . . . . . . . . . . . . . . . . . . . . 5-1
Connecting AC Power Cord . . . . . . . . . . . . . . . . . . . . . . . . . . . . . . . . . . . . . . . 5-3
Power On/Off. . . . . . . . . . . . . . . . . . . . . . . . . . . . . . . . . . . . . . . . . . . . . . . . . 5-4
Entering Diagnostic Mode. . . . . . . . . . . . . . . . . . . . . . . . . . . . . . . . . . . . . . . . 5-5
User Configuration Screen . . . . . . . . . . . . . . . . . . . . . . . . . . . . . . . . . . . . . . . 5-7
Backup Battery . . . . . . . . . . . . . . . . . . . . . . . . . . . . . . . . . . . . . . . . . . . . . . 5-11
Extended Self Test (EST) . . . . . . . . . . . . . . . . . . . . . . . . . . . . . . . . . . . . . . . 5-12
6. Connecting Additional Equipment . . . . . . . . . . . . . . . . . . . . . . . . . . . . . . . 6-1
Communication Interface . . . . . . . . . . . . . . . . . . . . . . . . . . . . . . . . . . . . . . . . 6-1
Connecting Serial Communications Devices . . . . . . . . . . . . . . . . . . . . . . . . . . . 6-2
Connecting Remote Alarm Port . . . . . . . . . . . . . . . . . . . . . . . . . . . . . . . . . . . . 6-2
Connecting Humidifier. . . . . . . . . . . . . . . . . . . . . . . . . . . . . . . . . . . . . . . . . . 6-3
Connecting the Patient Circuit . . . . . . . . . . . . . . . . . . . . . . . . . . . . . . . . . . . . 6-5
Connecting the Analog Port . . . . . . . . . . . . . . . . . . . . . . . . . . . . . . . . . . . . . . 6-7
7. Operating Theory . . . . . . . . . . . . . . . . . . . . . . . . . . . . . . . . . . . . . . . . . . . . 7-1
Introduction . . . . . . . . . . . . . . . . . . . . . . . . . . . . . . . . . . . . . . . . . . . . . . . . . 7-1
System Overview . . . . . . . . . . . . . . . . . . . . . . . . . . . . . . . . . . . . . . . . . . . . . . 7-1
Ventilator Breath Types . . . . . . . . . . . . . . . . . . . . . . . . . . . . . . . . . . . . . . . . . 7-1
Ventilation Modes Common to VCV and PCV. . . . . . . . . . . . . . . . . . . . . . . . . . . 7-3
Ventilation Modes Common to NPPV . . . . . . . . . . . . . . . . . . . . . . . . . . . . . . . . 7-6
Emergency Modes of Ventilation . . . . . . . . . . . . . . . . . . . . . . . . . . . . . . . . . . . 7-7

iv Respironics V200 Ventilator Operator’s Manual REF 1057983 A
Contents
8. Operating Instructions . . . . . . . . . . . . . . . . . . . . . . . . . . . . . . . . . . . . . . . . . 8-1
Overview. . . . . . . . . . . . . . . . . . . . . . . . . . . . . . . . . . . . . . . . . . . . . . . . . . . . . 8-1
The Front Panel. . . . . . . . . . . . . . . . . . . . . . . . . . . . . . . . . . . . . . . . . . . . . . . . 8-3
Ventilator Screens . . . . . . . . . . . . . . . . . . . . . . . . . . . . . . . . . . . . . . . . . . . . . 8-11
Settings Screens . . . . . . . . . . . . . . . . . . . . . . . . . . . . . . . . . . . . . . . . . . . . . . 8-14
Selecting a New Ventilation Breath Type (VCV, PCV, or NPPV). . . . . . . . . . . . . . 8-23
Selecting the Mode (A/C-SIMV-CPAP or Spont-Spont/T) . . . . . . . . . . . . . . . . . . 8-26
Apnea Ventilation . . . . . . . . . . . . . . . . . . . . . . . . . . . . . . . . . . . . . . . . . . . . . 8-27
Patient Data Screen. . . . . . . . . . . . . . . . . . . . . . . . . . . . . . . . . . . . . . . . . . . . 8-28
Monitor Screen . . . . . . . . . . . . . . . . . . . . . . . . . . . . . . . . . . . . . . . . . . . . . . . 8-29
Special Procedures . . . . . . . . . . . . . . . . . . . . . . . . . . . . . . . . . . . . . . . . . . . . 8-31
Preoperational Procedure . . . . . . . . . . . . . . . . . . . . . . . . . . . . . . . . . . . . . . . . 8-32
Alarm Testing Procedure . . . . . . . . . . . . . . . . . . . . . . . . . . . . . . . . . . . . . . . . 8-34
Where To Go For Help . . . . . . . . . . . . . . . . . . . . . . . . . . . . . . . . . . . . . . . . . . 8-34
9. Alarms . . . . . . . . . . . . . . . . . . . . . . . . . . . . . . . . . . . . . . . . . . . . . . . . . . . . . 9-1
Introduction . . . . . . . . . . . . . . . . . . . . . . . . . . . . . . . . . . . . . . . . . . . . . . . . . . 9-1
Visual Alarms . . . . . . . . . . . . . . . . . . . . . . . . . . . . . . . . . . . . . . . . . . . . . . . . . 9-1
Audible Alarms . . . . . . . . . . . . . . . . . . . . . . . . . . . . . . . . . . . . . . . . . . . . . . . . 9-2
Alarm Reset . . . . . . . . . . . . . . . . . . . . . . . . . . . . . . . . . . . . . . . . . . . . . . . . . . 9-3
Alert Messages . . . . . . . . . . . . . . . . . . . . . . . . . . . . . . . . . . . . . . . . . . . . . . . . 9-4
Alarm Indicators . . . . . . . . . . . . . . . . . . . . . . . . . . . . . . . . . . . . . . . . . . . . . . . 9-9
10. Care and Maintenance. . . . . . . . . . . . . . . . . . . . . . . . . . . . . . . . . . . . . . . . 10-1
General Information. . . . . . . . . . . . . . . . . . . . . . . . . . . . . . . . . . . . . . . . . . . . 10-1
Cleaning. . . . . . . . . . . . . . . . . . . . . . . . . . . . . . . . . . . . . . . . . . . . . . . . . . . . 10-1
Sterilization . . . . . . . . . . . . . . . . . . . . . . . . . . . . . . . . . . . . . . . . . . . . . . . . . 10-2
Bacteria Filters . . . . . . . . . . . . . . . . . . . . . . . . . . . . . . . . . . . . . . . . . . . . . . . 10-4
Periodic Maintenance . . . . . . . . . . . . . . . . . . . . . . . . . . . . . . . . . . . . . . . . . . 10-7
Storage. . . . . . . . . . . . . . . . . . . . . . . . . . . . . . . . . . . . . . . . . . . . . . . . . . . . 10-10
Repairs. . . . . . . . . . . . . . . . . . . . . . . . . . . . . . . . . . . . . . . . . . . . . . . . . . . . 10-10
11. Diagnostics. . . . . . . . . . . . . . . . . . . . . . . . . . . . . . . . . . . . . . . . . . . . . . . . . 11-1
Entering Diagnostic Mode. . . . . . . . . . . . . . . . . . . . . . . . . . . . . . . . . . . . . . . . 11-2
Diagnostic Functions . . . . . . . . . . . . . . . . . . . . . . . . . . . . . . . . . . . . . . . . . . . 11-3
Extended Self Test (EST) . . . . . . . . . . . . . . . . . . . . . . . . . . . . . . . . . . . . . . . . 11-4
Self Test. . . . . . . . . . . . . . . . . . . . . . . . . . . . . . . . . . . . . . . . . . . . . . . . . . . 11-10
12. Technical Specifications. . . . . . . . . . . . . . . . . . . . . . . . . . . . . . . . . . . . . . 12-1
Breath Types. . . . . . . . . . . . . . . . . . . . . . . . . . . . . . . . . . . . . . . . . . . . . . . . . 12-1
Modes . . . . . . . . . . . . . . . . . . . . . . . . . . . . . . . . . . . . . . . . . . . . . . . . . . . . . 12-1
Volume Ventilation Settings, Ranges and Resolution. . . . . . . . . . . . . . . . . . . . . 12-1
Pressure Control Ventilation Settings, Ranges and Resolution . . . . . . . . . . . . . . 12-2
Non-Invasive Positive Pressure Ventilation Settings, Ranges and Resolution . . . . 12-3
Apnea Ventilation . . . . . . . . . . . . . . . . . . . . . . . . . . . . . . . . . . . . . . . . . . . . . 12-3
Value Entry Message . . . . . . . . . . . . . . . . . . . . . . . . . . . . . . . . . . . . . . . . . . . 12-4

REF 1057983 A Respironics V200 Ventilator Operator’s Manual v
Contents
Patient Data Screen. . . . . . . . . . . . . . . . . . . . . . . . . . . . . . . . . . . . . . . . . . . 12-5
Front Panel Keys . . . . . . . . . . . . . . . . . . . . . . . . . . . . . . . . . . . . . . . . . . . . . 12-6
Level Controls . . . . . . . . . . . . . . . . . . . . . . . . . . . . . . . . . . . . . . . . . . . . . . . 12-7
Calculated Values from Expiratory Hold Maneuver. . . . . . . . . . . . . . . . . . . . . . 12-7
Interface Ports . . . . . . . . . . . . . . . . . . . . . . . . . . . . . . . . . . . . . . . . . . . . . . 12-7
Environmental Specifications . . . . . . . . . . . . . . . . . . . . . . . . . . . . . . . . . . . . 12-8
Environmental Protection . . . . . . . . . . . . . . . . . . . . . . . . . . . . . . . . . . . . . . . 12-8
Alarms . . . . . . . . . . . . . . . . . . . . . . . . . . . . . . . . . . . . . . . . . . . . . . . . . . . . 12-8
Connectors . . . . . . . . . . . . . . . . . . . . . . . . . . . . . . . . . . . . . . . . . . . . . . . . . 12-9
Filters. . . . . . . . . . . . . . . . . . . . . . . . . . . . . . . . . . . . . . . . . . . . . . . . . . . . 12-10
Measuring and Display Devices. . . . . . . . . . . . . . . . . . . . . . . . . . . . . . . . . . 12-10
AC Power and Battery Indicators. . . . . . . . . . . . . . . . . . . . . . . . . . . . . . . . . 12-10
Leakage Current . . . . . . . . . . . . . . . . . . . . . . . . . . . . . . . . . . . . . . . . . . . . 12-11
Compliance and Approvals . . . . . . . . . . . . . . . . . . . . . . . . . . . . . . . . . . . . . 12-11
Power Requirements . . . . . . . . . . . . . . . . . . . . . . . . . . . . . . . . . . . . . . . . . 12-11
Dimensions and Weights . . . . . . . . . . . . . . . . . . . . . . . . . . . . . . . . . . . . . . 12-12
Electromagnetic Compatibility Declaration. . . . . . . . . . . . . . . . . . . . . . . . . . 12-12
Pneumatic System. . . . . . . . . . . . . . . . . . . . . . . . . . . . . . . . . . . . . . . . . . . 12-17
Labels . . . . . . . . . . . . . . . . . . . . . . . . . . . . . . . . . . . . . . . . . . . . . . . . . . . 12-18
13. Options and Accessories . . . . . . . . . . . . . . . . . . . . . . . . . . . . . . . . . . . . . 13-1
Introduction . . . . . . . . . . . . . . . . . . . . . . . . . . . . . . . . . . . . . . . . . . . . . . . . 13-1
Oxygen Sensor Option . . . . . . . . . . . . . . . . . . . . . . . . . . . . . . . . . . . . . . . . . . 13-3
Assemble O2 Sensor . . . . . . . . . . . . . . . . . . . . . . . . . . . . . . . . . . . . . . . . . . 13-3
Attaching the Sensor to the Ventilator . . . . . . . . . . . . . . . . . . . . . . . . . . . . . . 13-4
Warranty. . . . . . . . . . . . . . . . . . . . . . . . . . . . . . . . . . . . . . . . . . . . . . . . . . . 13-5
O2 Sensor Tee. . . . . . . . . . . . . . . . . . . . . . . . . . . . . . . . . . . . . . . . . . . . . . . 13-5
External Battery Option . . . . . . . . . . . . . . . . . . . . . . . . . . . . . . . . . . . . . . . . . 13-7
Installation . . . . . . . . . . . . . . . . . . . . . . . . . . . . . . . . . . . . . . . . . . . . . . . . . 13-8
Power Consumption Sequence . . . . . . . . . . . . . . . . . . . . . . . . . . . . . . . . . . . 13-8
External Battery/Backup Battery Operation. . . . . . . . . . . . . . . . . . . . . . . . . . . 13-8
Battery Capacity . . . . . . . . . . . . . . . . . . . . . . . . . . . . . . . . . . . . . . . . . . . . 13-10
Battery Charging . . . . . . . . . . . . . . . . . . . . . . . . . . . . . . . . . . . . . . . . . . . . 13-10
Testing. . . . . . . . . . . . . . . . . . . . . . . . . . . . . . . . . . . . . . . . . . . . . . . . . . . 13-11
Battery Specifications . . . . . . . . . . . . . . . . . . . . . . . . . . . . . . . . . . . . . . . . 13-11
Warranty. . . . . . . . . . . . . . . . . . . . . . . . . . . . . . . . . . . . . . . . . . . . . . . . . . 13-12
Oxygen Manifold Option . . . . . . . . . . . . . . . . . . . . . . . . . . . . . . . . . . . . . . . . 13-13
Kit Contents . . . . . . . . . . . . . . . . . . . . . . . . . . . . . . . . . . . . . . . . . . . . . . . 13-13
Assembly Instructions . . . . . . . . . . . . . . . . . . . . . . . . . . . . . . . . . . . . . . . . 13-14
Replacement Parts: . . . . . . . . . . . . . . . . . . . . . . . . . . . . . . . . . . . . . . . . . . 13-17
Using the Manifold . . . . . . . . . . . . . . . . . . . . . . . . . . . . . . . . . . . . . . . . . . 13-17

vi Respironics V200 Ventilator Operator’s Manual REF 1057983 A
Contents
Graphics. . . . . . . . . . . . . . . . . . . . . . . . . . . . . . . . . . . . . . . . . . . . . . . . . . . 13-19
Starting Graphics . . . . . . . . . . . . . . . . . . . . . . . . . . . . . . . . . . . . . . . . . . . . 13-19
Using Graphics . . . . . . . . . . . . . . . . . . . . . . . . . . . . . . . . . . . . . . . . . . . . . . 13-19
Replotting and Scrolling. . . . . . . . . . . . . . . . . . . . . . . . . . . . . . . . . . . . . . . . 13-20
Rescaling the Display. . . . . . . . . . . . . . . . . . . . . . . . . . . . . . . . . . . . . . . . . . 13-20
Freeze Feature . . . . . . . . . . . . . . . . . . . . . . . . . . . . . . . . . . . . . . . . . . . . . . 13-22
Save and Overlay Features . . . . . . . . . . . . . . . . . . . . . . . . . . . . . . . . . . . . . . 13-23
Inspiratory Area. . . . . . . . . . . . . . . . . . . . . . . . . . . . . . . . . . . . . . . . . . . . . . 13-24
Alarms During Graphics . . . . . . . . . . . . . . . . . . . . . . . . . . . . . . . . . . . . . . . . 13-25
Communications Option (Com1) . . . . . . . . . . . . . . . . . . . . . . . . . . . . . . . . . . 13-27
Print Screen . . . . . . . . . . . . . . . . . . . . . . . . . . . . . . . . . . . . . . . . . . . . . . . . 13-27
VueLink Compatibility . . . . . . . . . . . . . . . . . . . . . . . . . . . . . . . . . . . . . . . . . 13-29
Configuring the VueLink Module . . . . . . . . . . . . . . . . . . . . . . . . . . . . . . . . . . 13-30
Analog Output (Chart Recorder) . . . . . . . . . . . . . . . . . . . . . . . . . . . . . . . . . . 13-36
RS-232 Communications Option 2 (Com2) . . . . . . . . . . . . . . . . . . . . . . . . . . 13-39
RS-232 Configuration . . . . . . . . . . . . . . . . . . . . . . . . . . . . . . . . . . . . . . . . . 13-39
Commands Transmitted to the Ventilator . . . . . . . . . . . . . . . . . . . . . . . . . . . . 13-40
Transmission of Data from the Ventilator . . . . . . . . . . . . . . . . . . . . . . . . . . . . 13-40
SNDA<CR>, Send Variable Length Ventilator Settings Report . . . . . . . . . . . . . 13-40
Respiratory Mechanics Option. . . . . . . . . . . . . . . . . . . . . . . . . . . . . . . . . . . . 13-51
Accessing Respiratory Mechanics Data . . . . . . . . . . . . . . . . . . . . . . . . . . . . . 13-51
Vital Capacity Maneuver. . . . . . . . . . . . . . . . . . . . . . . . . . . . . . . . . . . . . . . . 13-52
MIP/P0.1 Maneuver. . . . . . . . . . . . . . . . . . . . . . . . . . . . . . . . . . . . . . . . . . . 13-54
Static C and R Maneuver . . . . . . . . . . . . . . . . . . . . . . . . . . . . . . . . . . . . . . . 13-56
Alarms and Error Messages. . . . . . . . . . . . . . . . . . . . . . . . . . . . . . . . . . . . . . 13-58
Compliance (C) and Resistance (R) Computations. . . . . . . . . . . . . . . . . . . . . . 13-65
Trending Option . . . . . . . . . . . . . . . . . . . . . . . . . . . . . . . . . . . . . . . . . . . . . 13-69
Accessing Trending Data . . . . . . . . . . . . . . . . . . . . . . . . . . . . . . . . . . . . . . . 13-69
Selecting Parameters for Display. . . . . . . . . . . . . . . . . . . . . . . . . . . . . . . . . . 13-72
Using the Manual Rescale Function . . . . . . . . . . . . . . . . . . . . . . . . . . . . . . . 13-74
Changing the Cursor Position . . . . . . . . . . . . . . . . . . . . . . . . . . . . . . . . . . . . 13-74
Selecting the Time Scale . . . . . . . . . . . . . . . . . . . . . . . . . . . . . . . . . . . . . . . 13-75
Using the +2 Hrs/-2 Hrs buttons. . . . . . . . . . . . . . . . . . . . . . . . . . . . . . . . . . 13-76
Using the Zoom Function. . . . . . . . . . . . . . . . . . . . . . . . . . . . . . . . . . . . . . . 13-76
Using the Rescale Button. . . . . . . . . . . . . . . . . . . . . . . . . . . . . . . . . . . . . . . 13-76
Using the View 1/View 2 buttons. . . . . . . . . . . . . . . . . . . . . . . . . . . . . . . . . . 13-77
Using the Clear button. . . . . . . . . . . . . . . . . . . . . . . . . . . . . . . . . . . . . . . . . 13-77
Alarms during Trending . . . . . . . . . . . . . . . . . . . . . . . . . . . . . . . . . . . . . . . . 13-77
PCMCIA Card . . . . . . . . . . . . . . . . . . . . . . . . . . . . . . . . . . . . . . . . . . . . . . . 13-77
Trending Not Available. . . . . . . . . . . . . . . . . . . . . . . . . . . . . . . . . . . . . . . . . 13-78
Specifications. . . . . . . . . . . . . . . . . . . . . . . . . . . . . . . . . . . . . . . . . . . . . . . 13-78

REF 1057983 A Respironics V200 Ventilator Operator’s Manual vii
Contents
Flow-Trak® Option. . . . . . . . . . . . . . . . . . . . . . . . . . . . . . . . . . . . . . . . . . . . 13-83
On the Screen. . . . . . . . . . . . . . . . . . . . . . . . . . . . . . . . . . . . . . . . . . . . . . 13-84
Breath Delivery . . . . . . . . . . . . . . . . . . . . . . . . . . . . . . . . . . . . . . . . . . . . . 13-85
Inspiratory Hold. . . . . . . . . . . . . . . . . . . . . . . . . . . . . . . . . . . . . . . . . . . . . 13-85
Respiratory Mechanics. . . . . . . . . . . . . . . . . . . . . . . . . . . . . . . . . . . . . . . . 13-85
Alarms . . . . . . . . . . . . . . . . . . . . . . . . . . . . . . . . . . . . . . . . . . . . . . . . . . . 13-86
Respiratory Profile Monitor Interface (NICO-Esprit) Option. . . . . . . . . . . . . . . . 13-87
System Requirements . . . . . . . . . . . . . . . . . . . . . . . . . . . . . . . . . . . . . . . . 13-87
Hardware Setup. . . . . . . . . . . . . . . . . . . . . . . . . . . . . . . . . . . . . . . . . . . . . 13-88
RS-232 Communications . . . . . . . . . . . . . . . . . . . . . . . . . . . . . . . . . . . . . . 13-91
Trended NICO Data . . . . . . . . . . . . . . . . . . . . . . . . . . . . . . . . . . . . . . . . . . 13-92
Troubleshooting. . . . . . . . . . . . . . . . . . . . . . . . . . . . . . . . . . . . . . . . . . . . . 13-96
Neonatal Option . . . . . . . . . . . . . . . . . . . . . . . . . . . . . . . . . . . . . . . . . . . . . 13-97
System Requirements . . . . . . . . . . . . . . . . . . . . . . . . . . . . . . . . . . . . . . . . 13-97
Changing Patient Types . . . . . . . . . . . . . . . . . . . . . . . . . . . . . . . . . . . . . . . 13-98
Percent Leak. . . . . . . . . . . . . . . . . . . . . . . . . . . . . . . . . . . . . . . . . . . . . . 13-101
Patient Leak Values . . . . . . . . . . . . . . . . . . . . . . . . . . . . . . . . . . . . . . . . . 13-102
Speaking Mode Option. . . . . . . . . . . . . . . . . . . . . . . . . . . . . . . . . . . . . . . . 13-103
Warnings, Cautions, and Notes . . . . . . . . . . . . . . . . . . . . . . . . . . . . . . . . . 13-103
Patient Preparation . . . . . . . . . . . . . . . . . . . . . . . . . . . . . . . . . . . . . . . . . 13-104
Settings . . . . . . . . . . . . . . . . . . . . . . . . . . . . . . . . . . . . . . . . . . . . . . . . . 13-106
Starting Speaking Mode . . . . . . . . . . . . . . . . . . . . . . . . . . . . . . . . . . . . . . 13-106
Alarms . . . . . . . . . . . . . . . . . . . . . . . . . . . . . . . . . . . . . . . . . . . . . . . . . . 13-109
Displayed Data . . . . . . . . . . . . . . . . . . . . . . . . . . . . . . . . . . . . . . . . . . . . 13-111
Trended Data . . . . . . . . . . . . . . . . . . . . . . . . . . . . . . . . . . . . . . . . . . . . . 13-112
Discontinue Speaking Mode . . . . . . . . . . . . . . . . . . . . . . . . . . . . . . . . . . . 13-115
Auto-Trak Sensitivity™. . . . . . . . . . . . . . . . . . . . . . . . . . . . . . . . . . . . . . . . 13-117
Introduction . . . . . . . . . . . . . . . . . . . . . . . . . . . . . . . . . . . . . . . . . . . . . . 13-117
Compatible Patient Interfaces. . . . . . . . . . . . . . . . . . . . . . . . . . . . . . . . . . 13-117
How to Select Auto-Trak. . . . . . . . . . . . . . . . . . . . . . . . . . . . . . . . . . . . . . 13-118
Turning Auto-Trak Off . . . . . . . . . . . . . . . . . . . . . . . . . . . . . . . . . . . . . . . 13-121
Triggering and Cycling with Auto-Trak . . . . . . . . . . . . . . . . . . . . . . . . . . . . 13-121
Leak Detection and Compensation. . . . . . . . . . . . . . . . . . . . . . . . . . . . . . . 13-121

viii Respironics V200 Ventilator Operator’s Manual REF 1057983 A
Contents
A. RS-232 Communications Protocol. . . . . . . . . . . . . . . . . . . . . . . . . . . . . . . . A-1
RS-232 Configuration . . . . . . . . . . . . . . . . . . . . . . . . . . . . . . . . . . . . . . . . . . . A-1
Commands Transmitted to the Ventilator . . . . . . . . . . . . . . . . . . . . . . . . . . . . . . A-1
Transmission of Data from the Ventilator . . . . . . . . . . . . . . . . . . . . . . . . . . . . . . A-1
Ventilator Report Command and Response (VRPT) . . . . . . . . . . . . . . . . . . . . . . . A-1
Volume Control Ventilation Settings Report (VCVS) . . . . . . . . . . . . . . . . . . . . . . A-11
Pressure Control Ventilation Settings Report (PCVS) . . . . . . . . . . . . . . . . . . . . . A-14
Non-Invasive Positive Pressure Ventilation Settings Report (NPVS). . . . . . . . . . . A-16
Patient Data Report (PTDT) . . . . . . . . . . . . . . . . . . . . . . . . . . . . . . . . . . . . . . A-18
Alarm Status Report (ALRM) . . . . . . . . . . . . . . . . . . . . . . . . . . . . . . . . . . . . . A-21
Unrecognized Commands. . . . . . . . . . . . . . . . . . . . . . . . . . . . . . . . . . . . . . . . A-24
B. Customer Service & Warranty . . . . . . . . . . . . . . . . . . . . . . . . . . . . . . . . . . B-1
Customer Service. . . . . . . . . . . . . . . . . . . . . . . . . . . . . . . . . . . . . . . . . . . . . . B-1
Warranty. . . . . . . . . . . . . . . . . . . . . . . . . . . . . . . . . . . . . . . . . . . . . . . . . . . . B-1
Options and Accessories. . . . . . . . . . . . . . . . . . . . . . . . . . . . . . . . . . . . . . . . . B-2
C. Alarm Testing Procedure . . . . . . . . . . . . . . . . . . . . . . . . . . . . . . . . . . . . . . . C-1
Glossary . . . . . . . . . . . . . . . . . . . . . . . . . . . . . . . . . . . . . . . . . . Glossary-1
Index . . . . . . . . . . . . . . . . . . . . . . . . . . . . . . . . . . . . . . . . . . . . . . Index-1

REF 1057983 A Respironics V200 Ventilator Operator’s Manual 1-1
Chapter 1. Introduction and Intended Use
The Respironics V200 Ventilator is a microprocessor-controlled, electrically
powered mechanical ventilator. It is intended for use by qualified medical
personnel to provide continuous or intermittent ventilatory support for adult,
pediatric, and neonatal patients as prescribed by a physician. The ventilator is
intended for use in either invasive or non-invasive applications in institutional
environments.
The Respironics V200 Ventilator meets applicable safety requirements,
consensus guidelines, U.S.A. regulatory statutes, and international regulatory
standards for life support/mechanical ventilation devices.
Please read this manual thoroughly and become familiar with the ventilator's
operation before using it on a patient. For additional information about
accessories or related equipment, such as humidifiers and remote alarm
systems, refer to the appropriate instruction manual prior to operating the
accessory with the ventilator.
Advanced troubleshooting, calibration, and maintenance instructions are
included in the Esprit /V200 Ventilator Service Manual, P/N 580-1000-02. All
maintenance and repair work should be performed by qualified biomedical
technicians who have received appropriate training and authorization to
provide maintenance, repair, and service for the ventilator.
WARNING: Patients on life-support equipment should be visually monitored by
competent medical personnel, since life-threatening circumstances may
arise that may not activate alarms. Heed all appropriate alarms and follow
the instructions and warnings in this operator’s manual. Always check life-
support equipment for proper operation before use.
WARNING: Do not use in the presence of flammable anesthetics. Possible explosion
hazard.
CAUTION: Federal law (USA) restricts this device to sale by or on the order of a
physician.
NOTE: Follow the setup instructions in this manual before placing the
Respironics V200 Ventilator into service. If you have questions, contact
Respironics Customer Service at 1-800-345-644

Chapter 1
1-2 Respironics V200 Ventilator Operator’s Manual REF 1057983 A
Introduction and Intended Use
(This page is intentionally blank.)

REF 1057983 A Respironics V200 Ventilator Operator’s Manual 2-1
Chapter 2. Warnings, Cautions, and Notes
Throughout this manual the following definitions apply:
Additional Warnings, Cautions, and Notes pertaining to options and
accessories are included in the documentation for each option or accessory.
Refer to Chapter 13, “Options and Accessories”.
Summary of
Warnings, Cautions,
and Notes
Warnings
• Patients on life-support equipment should be visually monitored
by competent medical personnel, since life-threatening
circumstances may arise that may not activate alarms. Heed all
appropriate alarms and follow the instructions and warnings in
this operator’s manual. Always check life-support equipment for
proper operation before use.
• Do not use in the presence of flammable anesthetics. Possible
explosion hazard.
• One person alone should not attempt to lift the ventilator or
remove it from the shipping carton or the cart. At least two people
are required to avoid possible personal injury or damage to the
equipment.
• To reduce the chance of contamination or infection, always use an
inspiratory and expiratory filter when the ventilator is in operation.
Refer to manufacturer’s instructions and follow institutional
infection control guidelines when replacing the inspiratory and
expiratory filter.
• Do not use anti-static or conductive hoses or conductive patient
tubing.
• The expiratory filter housing may be hot if removed from the
ventilator immediately after use. Wait 15 minutes after turning off
WARNING: A condition that could cause injury to a patient or operator if the operating
instructions in this manual are not followed correctly.
CAUTION: A condition that could cause damage to, or shorten the service life of,
the Respironics V200 Ventilator.
NOTE: Important information concerning the construction or operation of the
Respironics V200 Ventilator.

Chapter 2
2-2 Respironics V200 Ventilator Operator’s Manual REF 1057983 A
Warnings, Cautions, and Notes
ventilator power before removing the heated expiratory bacteria
filter. Exercise caution when handling the filter housing.
• All oxygen connections should be carefully inspected to ensure
that leaks are not present. Excessive leaks can result in higher
than normal ambient oxygen concentrations and create a
potentially hazardous oxygen-enriched environment.
• Worn/frayed oxygen hoses or oxygen hoses contaminated by
hydrocarbon greases or oils should not be used since an oxygen
leak or intense fire could result.
• Care in the routing of the oxygen inlet hose should be exercised to
ensure it is not exposed to mechanisms that could cause damage
by cutting or heating/melting.
• The cover plate for the PCMCIA slot at the back of the ventilator
must be replaced after the adapter and card are installed. This is
to protect the ventilator.
• AC power is applied to the humidifier from the ventilator
humidifier outlet (only available on 100-120 VAC ventilators).
Under no circumstances does the Respironics V200 Ventilator
provide control for the humidifier. To ensure patient safety, it is
important that any humidifier used with the ventilator include an
acceptable temperature control and monitoring mechanism, as
well as a temperature display and appropriate alarm capabilities
(refer to ISO 8185).
• To avoid electrical shock hazard, connect the ventilator to a
properly grounded AC power outlet.
• The ventilator front panel LEDs will indicate the power source that
is being used. If the ventilator is plugged in and the MAINS LED
is not lit, either the circuit breaker is off or the wall power outlet is
not functioning.
• The two circuit breakers (MAINS/Humidifier) located on the back
of the ventilator are covered to prevent unintentional ventilator
power-off. Do not use the circuit breaker to power the ventilator
on/off. The power switch is located on the front of the ventilator
below the front panel.
• Always turn the ventilator power OFF before connecting additional
equipment.
• Use only Respironics approved cables when connecting to the
remote alarm port. Be sure to fully insert the cable into the remote
alarm port and into the remote alarm.

Chapter 2
Warnings, Cautions, and Notes
REF 1057983 A Respironics V200 Ventilator Operator’s Manual 2-3
• When using the Remote Alarm Port be sure to fully test the
Remote Alarm Port and cable by:
• Verifying that annunciated alarms on the ventilator are also
annunciated on the remote alarm.
• Verifying that disconnecting the cable from the Remote. Alarm
port results in an alarm notification at the Remote Alarm.
• Verifying that disconnecting the cable from the remote alarm
results in an alarm notification at the Remote Alarm.
• Ensure that an alternative means of ventilation (that is, a
resuscitator or similar device) is available while the ventilator is in
use on a patient.
• The ventilator complies with the requirements of IEC 601-1-2
(EMC collateral standard), including the E-field susceptibility
requirements at a level of 10 volts per meter. However, even at
this level of immunity, certain transmitting devices (cellular
phones, walkie-talkies, etc.) emit radio frequencies that could
disrupt ventilator operation if operated in a range too close to the
ventilator.
• DO NOT operate the ventilator in a Magnetic Resonance Imaging
(MRI) environment.
• Vent Inop is a serious condition, which is indicated by both visual
and audible alarms. If the ventilator is attached to a patient when
Vent Inop occurs, the patient must be supported with another
means of life support ventilation.
• When the battery low indicator is flashing red, operation of the
ventilator from battery power should be discontinued.
• For patient safety the HIP Limit Setting should be set as close to
the peak inspiratory pressure as patient conditions allow.
• DO NOT perform the preoperational procedure when the ventilator
is on a patient.
• You will be warned if the compliance is 9.0 ml/cmH2O (hPa) or
larger. Patients should not be put on a patient circuit that does
not meet this requirement.
• A high priority, visual and audible alarm indicates a potentially
life-threatening condition and immediate response is required.
• When the safety valve open indicator is lit, the ventilator does not
provide any ventilatory support to the patient. Immediately use a
backup means of ventilatory support.
• Visually monitor the patient and ventilator during the Alarm
Silence period to ensure that alarms do not go undetected.
Allowing alarm conditions to continue without intervention may
result in harm to the patient and/or ventilator.
• Do not expose expiratory and inspiratory bacteria filters or
reusable patient tubing to ETO gas.

Chapter 2
2-4 Respironics V200 Ventilator Operator’s Manual REF 1057983 A
Warnings, Cautions, and Notes
• Disposable or single-patient filters must be discarded between
patients. Do not chemically disinfect or expose single patient use
bacteria filters to ETO gas.
• The patient must be disconnected from the ventilator before
entering the Diagnostic Mode since normal ventilation is
suspended.
• Do not use a ventilator that has failed SST without verifying
operational readiness by other means. Doing so may place a
patient at risk.
• Never initiate SST while the patient is connected to the ventilator.
The high airway pressures generated during SST can injure a
patient.
• Never initiate EST while the patient is connected to the ventilator.
The high airway pressures and gas flows generated during EST can
injure a patient.
• Do not use a ventilator that has failed EST without verifying
operational readiness by other means. Doing so may place a
patient at risk.
• Remove the ventilator from service and contact trained service
personnel if any diagnostic codes appear with the exception of:
1, 3, 2000, 3000, 5000, 5002, 8003, or 8004.
• Use of a ventilator that has not passed SST or EST is against the
strongest recommendation of Respironics.
• Please contact Respironics Customer Service at 1-800-345-6443
or consult your service manual if any diagnostic codes are
encountered.
• When connecting a humidifier to the humidifier outlet (available
only on 100-120 VAC ventilators) allowable leakage current values
may be exceeded.
• The use of accessories, cables, and transducers other than those
specified may result in increased EM emissions or decreased
immunity of the system.
• We recommend that you use an oxygen monitor that complies with
ISO-7767; Oxygen Monitors or Monitoring Patient Breathing
Mixtures - Safety Requirements. This requirement ensures that
the desired fraction of inspired oxygen (FiO2) is delivered to the
patient.
• The batteries (backup battery) in the battery compartment are
non-spillable sealed lead acid. Recycle or dispose of batteries
properly.
• Do not connect the DC power cord from the backup battery while
the Respironics V200 is functioning as a ventilator. Always turn
the Power On/Off switch to off ( ).

Chapter 2
Warnings, Cautions, and Notes
REF 1057983 A Respironics V200 Ventilator Operator’s Manual 2-5
• Backup battery operating life may be affected by battery age and
the number of times it has been discharged and recharged. Over
time the battery will degenerate and will not provide the same
amount of operating time per charge that is available from a fully
charged new battery. Use only the Respironics backup battery
P/ N 1059956.
• Titrate the EPAP level such that the masks air entrainment valve
(if present) remains closed to room air. Always evaluate and
monitor patient condition when adjusting EPAP or other settings.
• The backlight lamps in the monitor display contain mercury,
which must be recycled or disposed of in accordance with local,
state, or federal laws. (Within this system, the backlight lamps in
the monitor display contain mercury.)
Cautions
• Federal law (USA) restricts this device to sale by or on the order of
a physician.
• Be sure to check all exterior parts of the ventilator. Problems
found during inspection should be corrected and/or reported to
Respironics before using the ventilator.
• Always ship the ventilator using the original packing material. If
the original material is not available, contact your Respironics
representative to order replacements.
• Do not operate the ventilator without a properly functioning
expiratory filter and heater. Doing so may cause damage to
delicate ventilator components, such as the expiratory flow sensor,
which may lead to inaccurate spirometry or a Vent Inop condition.
• The ventilator oxygen filter should be replaced annually as a part
of preventive maintenance.
• The PCMCIA card should only be removed by trained service
personnel once power to the ventilator is off.
• To avoid the possibility of damage to the ventilator, do not connect
a humidifier whose maximum rating exceeds 3 amps. Ensure that
the humidifier power cord is free from defects and any obvious
wear, and is properly grounded. A humidifier connection is only
available on 100-120VAC ventilators.
• Before connecting the ventilator to the AC power source, ensure
that the total electrical load does not exceed the ampere rating of
the AC branch circuit, especially when using the ventilator with
other electrical equipment. An AC branch circuit includes all
outlets serviced by a single circuit breaker. If the maximum
current drain through a branch circuit exceeds the circuit
breaker’s rating, the branch circuit will open, causing the

Chapter 2
2-6 Respironics V200 Ventilator Operator’s Manual REF 1057983 A
Warnings, Cautions, and Notes
ventilator to lose power. For further information, consult a service
technician or a trained biomedical technician.
• The ventilator is shipped with a power cord that complies with
electrical safety standards. Do not use substitute power cords
unless specifically instructed to do so by an authorized distributor
or qualified personnel. Do not modify the power cord or connect it
with electrical extension cords or outlet adapters.
• To prevent the risk of excessive leakage due to external equipment
being connected to the ventilator via the communication ports, a
means for external separation of the conductive earth paths must
be provided.
• All equipment used and connected to the ventilator
communications ports (analog, parallel, and serial) must comply
with the medical electrical equipment (IEC601-1) or other
applicable standards.
• The remote alarm port is intended to connect only to SELV (safety
extra low voltage and ungrounded system with basic insulation to
ground), in accordance with IEC60601-1. To prevent damage to
the remote alarm, the signal input should not exceed the
maximum rating of 24 VAC or 36 VDC at 500 mA with a minimum
current of 1 mA.
• Failure to protect the expiratory filter from damage by using
inappropriate patient circuit configurations may cause damage to
delicate ventilator components, such as the expiratory flow sensor,
which may lead to inaccurate spirometry or a Vent Inop condition.
• If clinical conditions do not require setting the HIP Limit above
60 cmH2O, we recommend the setting normally be adjusted to 60
cmH2O or less in order to prolong the operating life of the blower
and to maximize backup battery run time.
• The ventilator alarm indicators and the Alerts insert should be
monitored closely during the Alarm Silence period to ensure that
unexpected alarms are noticed.
• If an alarm persists for no apparent reason, contact Respironics
Customer Service at 1-800-345-6443.
• Care should be taken when cleaning the touch display. (Refer to
Figure 8-2 on page page 8-3). A soft moist cloth should be used
that does not drip water and/or soap solution when in contact with
the display. After cleaning and rinsing with a damp cloth, remove
all moisture with a dry, soft cloth. Never allow solutions of any
kind to collect on the bottom bezel of the display. Never use a
brush or device that can cause abrasion to clean the touch display
or its bezel; they will cause irreparable damage.
• Do not remove any screws from the cooling filter area. Removing
screws from this area will result in damage to internal
components.

Chapter 2
Warnings, Cautions, and Notes
REF 1057983 A Respironics V200 Ventilator Operator’s Manual 2-7
• Follow the detergent manufacturer’s instructions. Exposure to
detergent solution stronger than necessary can shorten the useful
life of the product. Rinse parts thoroughly to remove all detergent
residues. Wipe parts dry. Detergent residue can cause blemishes
or fine cracks, especially on parts exposed to elevated
temperatures during sterilization.
• Autoclavable parts will withstand repeated steam autoclaving at
temperatures not to exceed 135° C (275ºF).
• DO NOT autoclave the ventilator.
• Formaldehyde, phenol-based, and quaternary ammonium
compound (QUATS) disinfectants are not recommended because
these agents can cause cracking and crazing of plastic parts.
Exposure of components to disinfectant concentrations stronger
than required or for excessive time may shorten product life. Parts
should be thoroughly rinsed and dried to prevent spotting and
blemishes when exposed to elevated temperatures.
• DO NOT allow liquid to penetrate the ventilator rear or front panel.
DO NOT attempt to sterilize the ventilator by exposing to ETO gas.
DO NOT steam-autoclave.
• Troubleshooting and repair should be performed only by a
qualified service technician.
• If the optional external O2 sensor is in-line, it must be calibrated
during EST.
• Diagnostic codes should only be cleared by qualified personnel.
• To prevent contamination of the O2 sensor, always locate it
between the ventilator gas output port and the inspiratory bacteria
filter.
•PVC O
2 (P/N 8-100498-00) and Ultem® (P/N 1020380) Sensor
Tees cannot be autoclaved or chemically disinfected.
• When inserting the battery tray into the cart’s center column,
make sure not to crimp cable connections between the battery tray
and cart.
• The backup battery is designed to be charged only by the
Respironics V200 Ventilator. Under no circumstances should an
attempt be made to charge it in any other way.
• If the ventilator will not be used for 30 days or more, the backup
battery should be preserved. Either disconnect the backup battery
from the ventilator or keep the ventilator plugged into an active
electrical outlet.

Chapter 2
2-8 Respironics V200 Ventilator Operator’s Manual REF 1057983 A
Warnings, Cautions, and Notes
Notes
• Follow the setup instructions in this manual before placing the
Respironics V200 Ventilator into service. If you have questions,
contact Respironics Customer Service at 1-800-345-644
• Save the shipping container in case the backup battery has to be
returned to Respironics.
• We recommend that before using the ventilator for the first time,
wipe the exterior clean and disinfect or sterilize its components
according to the instructions in Chapter 10, “Care and
Maintenance” or the component manufacturer’s instructions.
• Follow institutional infection control guidelines when replacing
the inspiratory or expiratory bacteria filter.
• When adding attachments or other components or subassemblies
to the breathing system, for example, an HME or humidifier,
ensure that the inspiratory and expiratory resistances (measured at
the patient connection port) do not exceed 6 cmH2O (hPa) at a
flow of 60 L/min for adults, 30L/min for pediatrics.
• High humidity and aerosol medications may reduce expiratory
filter life, increase expiratory resistance, and/or cause filter
damage. Review ventilator patient graphics frequently for changes
in expiratory resistance. Consult filter manufacturer
recommendations regarding duration of use, maintenance, and
removal and disposal of expiratory filter.
• The ventilator should only be connected to an appropriate medical
grade 100% O2 gas source capable of delivering a regulated 40 to
90 PSIG (276-620 kPa).
• The ventilator is shipped with the appropriate gas fittings and
hoses for the intended environment, i.e. DISS (U.S.A. and
Canada), Ohmeda (Germany), NIST (UK), Air Liquide (France),
SIS (Australia).
• All volumes entered into the ventilator are assumed to be BTPS
(Body Temperature atmospheric Pressure Saturated (with H2O))
volumes unless otherwise noted. All volumes reported by the
ventilator are reported as BTPS volumes. All pressures are
assumed to be relative to atmospheric pressure unless otherwise
noted.
• The Air Inlet Filter houses a reusable foam filter that should be
periodically cleaned. Refer to Chapter 10, “Care and
Maintenance”, for more information on filter changes.
• Unless the Mains Circuit Breaker is turned OFF, electrical power is
applied to the ventilator even though the front panel switch is in
the OFF position. With the Mains Circuit Breaker ON, if the
backup battery is connected, the ventilator will charge the battery
if it requires a charge.

Chapter 2
Warnings, Cautions, and Notes
REF 1057983 A Respironics V200 Ventilator Operator’s Manual 2-9
• To disconnect the ventilator from MAINS power, remove the AC
plug from the wall power receptacle. The MAIN switch/circuit
breaker is covered to prevent unintentional ventilator turn off.
• If the operator sets the %O2 setting to 100%, the 100% O2
indicator does not light. The 100% O2 indicator only lights when
the 100% O2 front panel key has been pressed.
• The ventilator selects its power source based on the following
prioritization: AC power (if present), external battery, then backup
battery.
• The ventilator may automatically reset certain types of alarm
conditions once the causes of the alarms are corrected. After an
automatic reset, the ventilator will clear the audible alarm and will
display a Low Urgency Alarm alert in the Alert Message Insert to
inform the operator that an alarm condition existed. When this
situation occurs, use ALARM RESET to clear the visual alarm
indicator.
• For optimal performance and battery life of a newly purchased
backup battery, establish full backup battery charge by plugging
the ventilator into AC power for eight (8) hours maximum, or until
the charging indicator light turns off, and then unplug the unit.
• To monitor backup battery performance and life, run the ventilator
on battery power for at least 20 minutes at typical settings once a
month. Recharge the battery when the test is complete.
• If the 100% O2 key is pressed and a 100% O2 gas source is not
available, the Low O2 alarm will be active for the two-minute
100% O2 delivery period.
• Manual breaths are not permitted during the inspiratory phase of a
breath (whether manual or spontaneous). Pressing the MANUAL
BREATH key during these times will not result in the delivery of a
manual breath.
• Some settings buttons appear active despite the fact they are not
being used in the ACTIVE MODE. This is because the setting is
used in Apnea Ventilation or when manual inspiration is pressed.
The operator should always choose a value for an active button
that is appropriate for the patient being ventilated.
• When the active mode is set to NPPV, the HIP Limit Setting will
automatically be adjusted to 10 cmH2O above the current IPAP
setting.
• Pt. Leak only appears on Patient Data block on Settings screen.
• The V200 Ventilator keeps a distinct set of alarm limits for each
ventilation breath type (VCV, PCV and NPPV).
• Any of the changes made in the screen shown in Figure 8-18, do
not take effect until the operator switches to the new ventilation
breath type (in this case Pressure Control).

Chapter 2
2-10 Respironics V200 Ventilator Operator’s Manual REF 1057983 A
Warnings, Cautions, and Notes
• If the EXP HOLD key is held continuously, and the expiratory hold
maneuver exceeds 5 seconds, the ventilator automatically
terminates the expiratory hold maneuver and begins a new
inspiratory period.
• If Auto PEEP as calculated in Equation 1: Auto-PEEP = Expiratory
Pause Pressure – End Expiratory Pressure, is negative, Auto-PEEP
will be displayed as “—.”
• All components of the patient circuit must not have leaks in order
to pass SST.
• If time is found to be incorrect more than once in the
preoperational procedure, an internal battery may have to be
replaced. Contact qualified service personnel or call Respironics
Customer Service at 1-800-345-6443.
• Because conditions and practices in health care institutions vary,
this manual can only describe general guidelines. It is the user’s
responsibility to ensure the validity and effectiveness of the
methods used.
• Because some environments cause a quicker collection of lint and
dust than others, inspect and clean the fan filters more often than
every 250 hours if necessary.
• The “Hardware” function and EST in the Diagnostics Mode should
only be run by qualified personnel.
• A “restart” is an infrequent event.
• The gas return port on the ventilator is a cylindrical port which
requires mating to a specified expiratory filter to seal the
expiratory limb.
• The humidifier power connection is available only on 100-120VAC
ventilators.
• Record O2 sensor manufacturing or warranty numbers and
installation date for future reference. Save manufacturers
instruction about end of life replacement.
• To ensure accurate O2 monitoring, check O2 sensors periodically
and replace as per manufacturer specification.
• Sensor performance and expected operating life information is
outlined in the sensor manufacturer’s instructions for use.
Thoroughly review all O2 sensor instructions prior to installation
and use with the Respironics V200 Ventilator.
•O
2 sensor calibration is performed during EST. If recalibration of
the O2 sensor is required, follow the instructions in “Extended
Self Test (EST)” on page 11-4 for running EST.

Chapter 2
Warnings, Cautions, and Notes
REF 1057983 A Respironics V200 Ventilator Operator’s Manual 2-11
• Medical electrical equipment needs special precautions regarding
EMC and needs to be installed and put into service according to
the EMC information provided in Chapter 12, “Technical
Specifications”.
• Speaking Mode is available ONLY in invasive ventilation mode.

Chapter 2
2-12 Respironics V200 Ventilator Operator’s Manual REF 1057983 A
Warnings, Cautions, and Notes
(This page is intentionally blank.)
REF 1057983 A Respironics V200 Ventilator Operator’s Manual 3-1
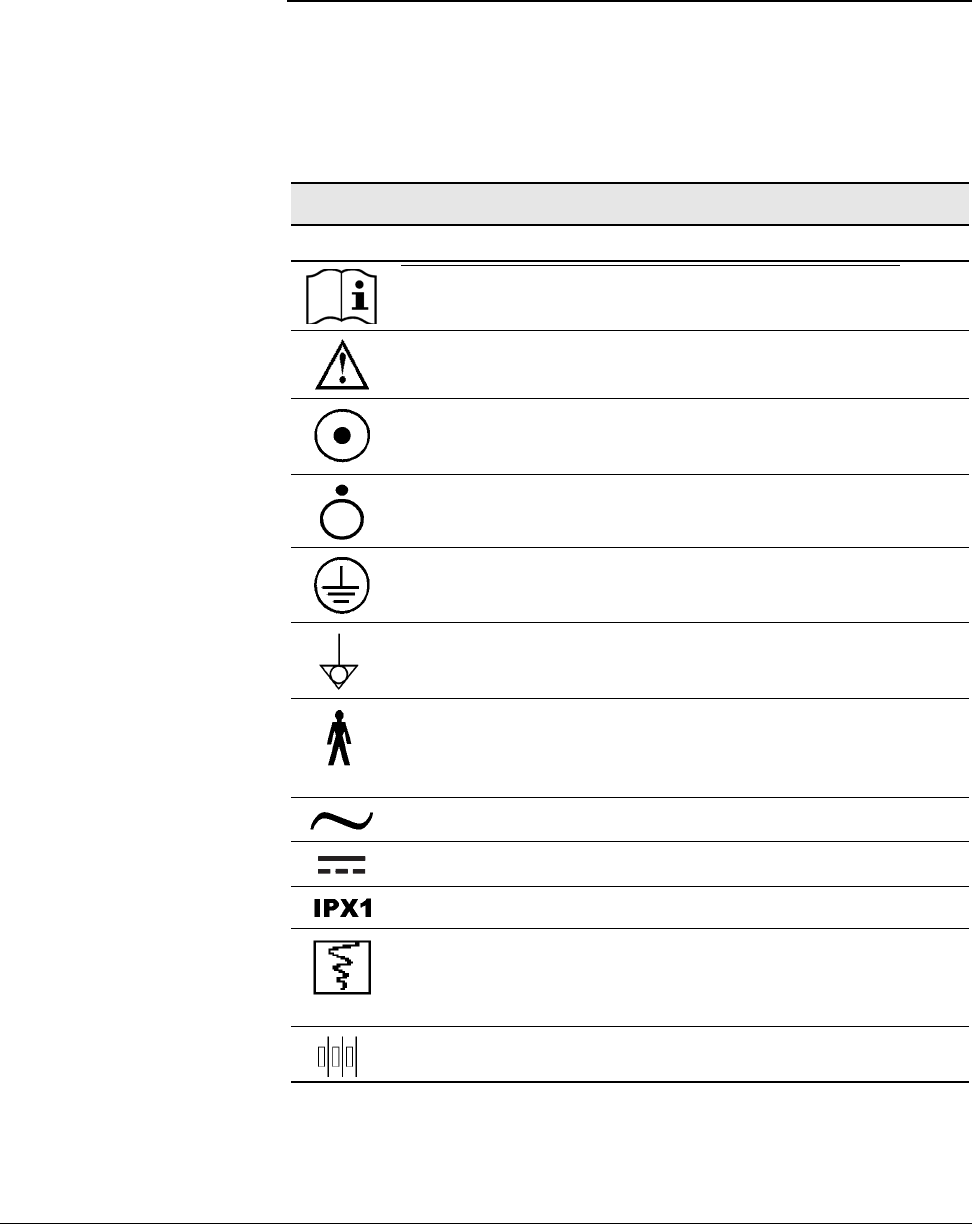
Chapter 3. Symbols
The following symbols appear on the Respironics V200 Ventilator, accessories,
documentation, and packaging. Additional symbols pertaining to options and
accessories are included in the documentation for each option or accessory.
Refer to Chapter 13, “Options and Accessories”.
Symbols
Symbol Description
READ THE USER MANUAL OR ACCOMPANYING DOCUMENTS
ATTENTION
ON condition for part of the equipment. When pressed, the ventilator
will operate from the MAINS voltage if connected or from the backup
battery if the battery charge is within operating specifications.
OFF condition for part of the equipment
PROTECTIVE EARTH (ground)
POTENTIAL EQUALIZATION CONNECTOR used to connect the
equipment to an electrical installation earth busbar
TYPE B applied part, which indicates equipment that provides a
particular degree of protection against electric shock, particularly with
regards to allowable leakage current and of the protective earth
connection
SUITABLE FOR ALTERNATING CURRENT
DIRECT CURRENT
DRIP PROOF
Chart recorder ANALOG OUTPUT. Pin 12 signals an unsilenced high or
medium urgency alarm: 0 VDC= active alarm, 1.5 VDC = no alarm or
silenced alarm. (Voltage signal for flow and pressure reserved for future
use.)
DC BATTERY CONNECTION
Table 3-1: Symbols (Sheet 1 of 5)
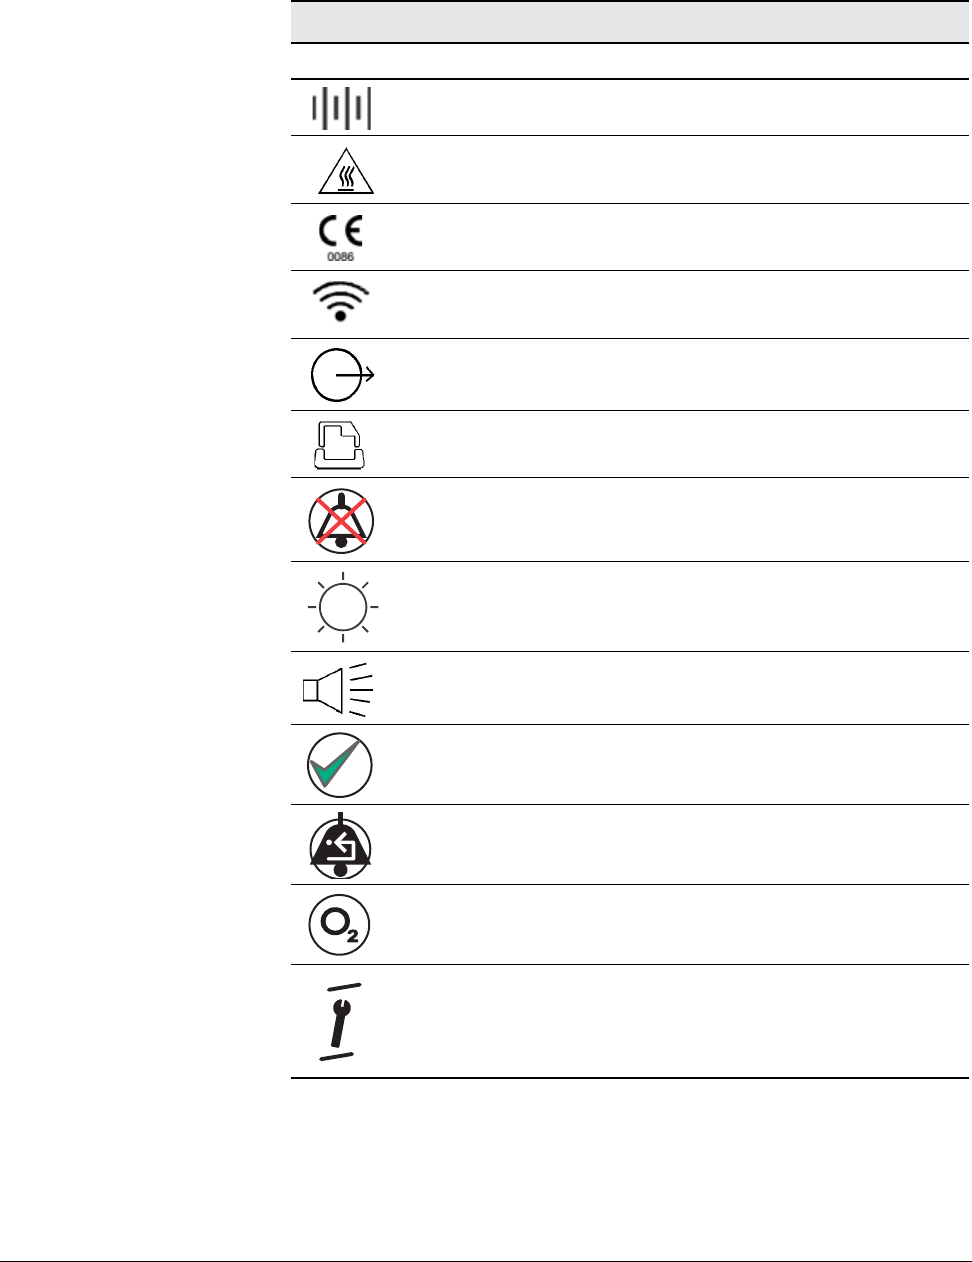
Chapter 3
3-2 Respironics V200 Ventilator Operator’s Manual REF 1057983 A
Symbols
DC BATTERY CONNECTION
HOT SURFACE warning
EUROPEAN CONFORMITY
REMOTE ALARM connection
RS-232 serial output
PARALLEL PORT printer connection
ALARM SILENCE (Silences alarm for two minutes)
BRIGHTNESS ADJUST
AUDIO ALARM VOLUME CONTROL
ACCEPT
ALARM RESET
100% OXYGEN
Located between the ALARM RESET and 100% O2 buttons, this
symbol indicates that the two keys (ALARM RESET AND 100% O2)
must be pressed simultaneously for approximately five seconds to enter
Diagnostic Mode
Symbols (Continued)
Symbol Description
Table 3-1: Symbols (Sheet 2 of 5)
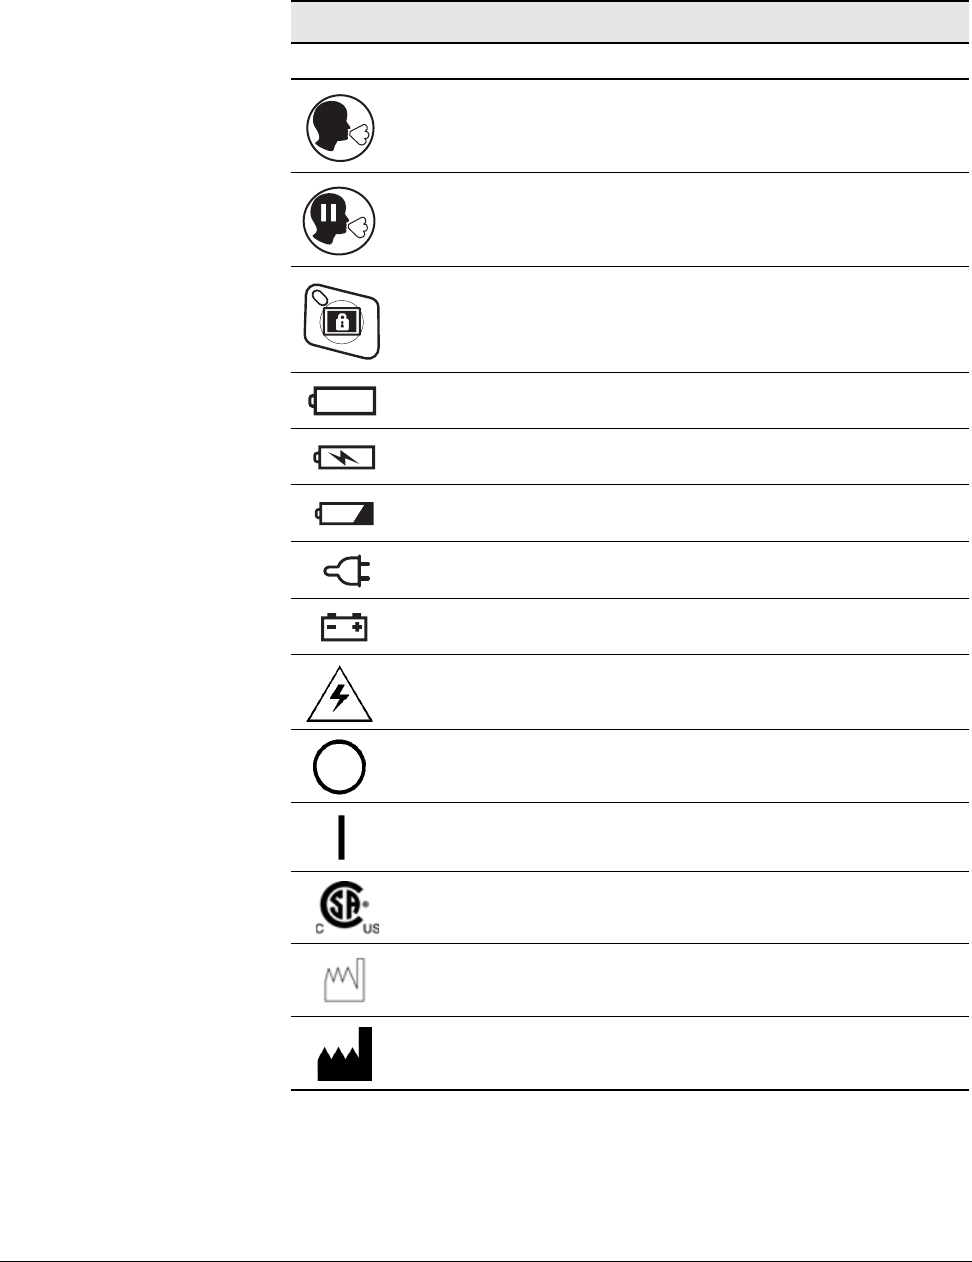
Chapter 3
Symbols
REF 1057983 A Respironics V200 Ventilator Operator’s Manual 3-3
MANUAL BREATH
EXPIRATORY HOLD
SCREEN LOCK
(Symbol version of the front panel only) Illuminates yellow to indicate
backup battery IN USE (backup)
(Symbol version of the front panel only) llluminates yellow to indicate
backup battery CHARGING
(Symbol version of the front panel only) Flashes red to indicate that the
backup battery is LOW
(Symbol version of the front panel only) MAINS battery indicator
(Symbol version of the front panel only) EXTERNAL BATTERY is in use
DANGEROUS VOLTAGE—electrical shock hazard
The portion of the circuit breaker that must be pushed in to turn the
CIRCUIT BREAKER OFF
The portion of the circuit breaker that must be pushed in to turn the
CIRCUIT BREAKER ON
CANADIAN STANDARDS ASSOCIATION approval.
DATE OF MANUFACTURE
MANUFACTURER
Symbols (Continued)
Symbol Description
Table 3-1: Symbols (Sheet 3 of 5)
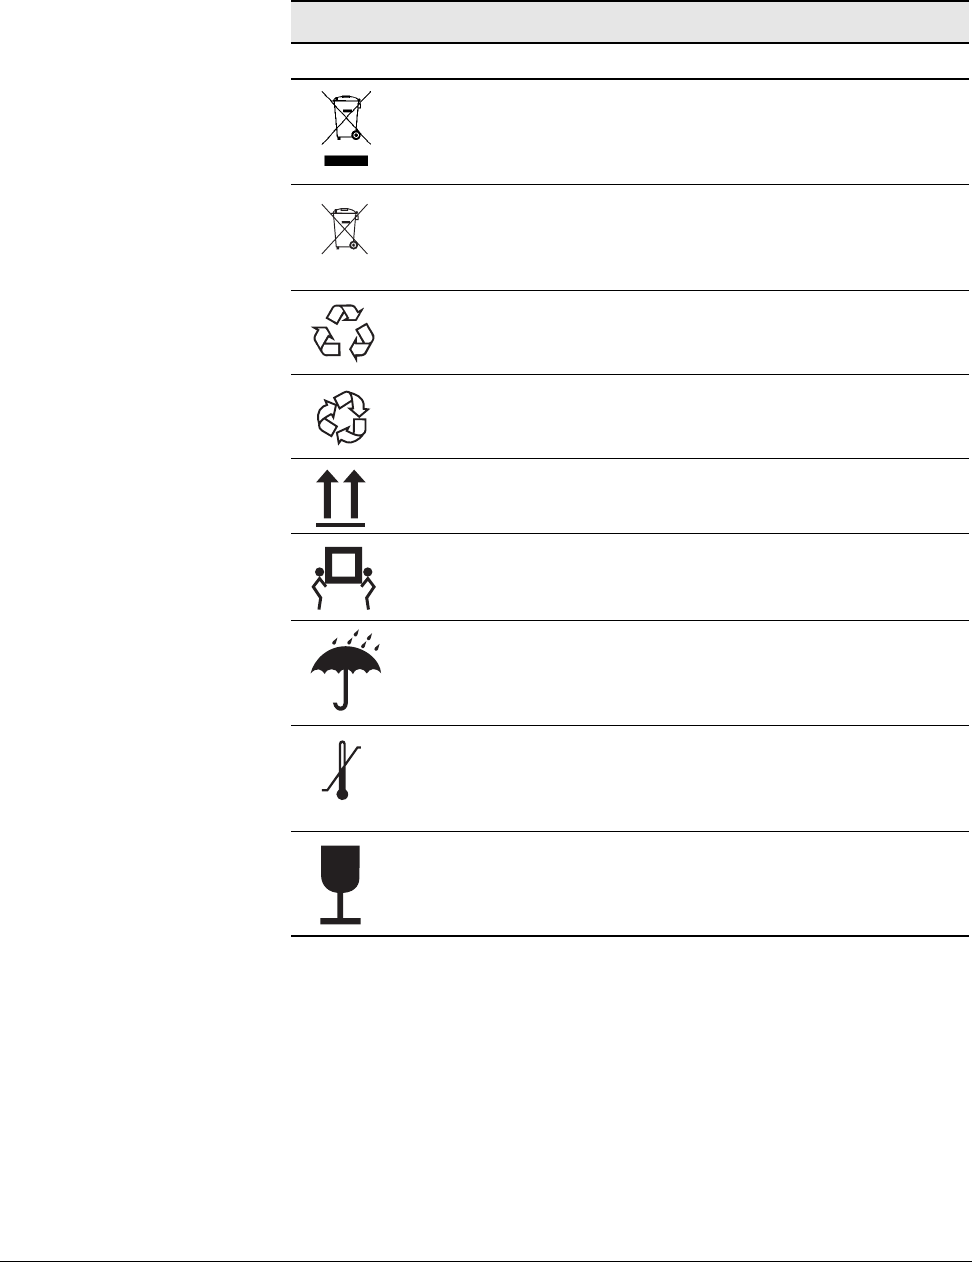
Chapter 3
3-4 Respironics V200 Ventilator Operator’s Manual REF 1057983 A
Symbols
The product must be disposed of in accordance with the WEEE
directive.
SEALED, NON-SPILLABLE LEAD ACID BATTERY. MUST BE
RECYCLED
SEALED, NON-SPILLABLE LEAD-ACID BATTERY. MUST BE
RECYCLED
RECYCLE
THIS SIDE UP
AT LEAST TWO PEOPLE ARE REQUIRED TO LIFT THE VENTILATOR
TO AVOID POSSIBLE PERSONAL INJURY OR DAMAGE TO THE
EQUIPMENT.
KEEP DRY
LIMIT TEMPERATURE TO BETWEEN-20 AND 60 ºC (-4 AND 140 ºF)
FRAGILE
Symbols (Continued)
Symbol Description
Table 3-1: Symbols (Sheet 4 of 5)
Pb
Pb
+60C
-20C
500-1060 hPa

Chapter 3
Symbols
REF 1057983 A Respironics V200 Ventilator Operator’s Manual 3-5
STORE AT 10%-95% RELATIVE HUMIDITY
Do not stack > 2 high
Symbols (Continued)
Symbol Description
Table 3-1: Symbols (Sheet 5 of 5)
%
10-95
2

Chapter 3
3-6 Respironics V200 Ventilator Operator’s Manual REF 1057983 A
Symbols
(This page is intentionally blank.)
REF 1057983 A Respironics V200 Ventilator Operator’s Manual 4-1
Chapter 4. Getting Started
Unpacking The Respironics V200 Ventilator has been carefully packaged to assure safe
shipping. In addition, the packing container has been designed for easy
unpacking. Do not discard packing materials.
Before unpacking the ventilator, examine the shipping carton(s) for visible
damage. If the shipping carton(s) arrives damaged or if you suspect the
contents are damaged, contact the carrier for an inspection report. If any
damage is evident, we recommend that you photograph the carton(s) before
the shipment is unpacked. Report any damage to the shipping container or
ventilator to your local authorized Respironics distributor and to the carrier.
Save all packing material after removing the ventilator. In the event that the
ventilator or backup battery needs to be repacked and reshipped, use the
original packing material or order replacement material from a Respironics
representative.
NOTE: The contents of the shipping carton may vary.
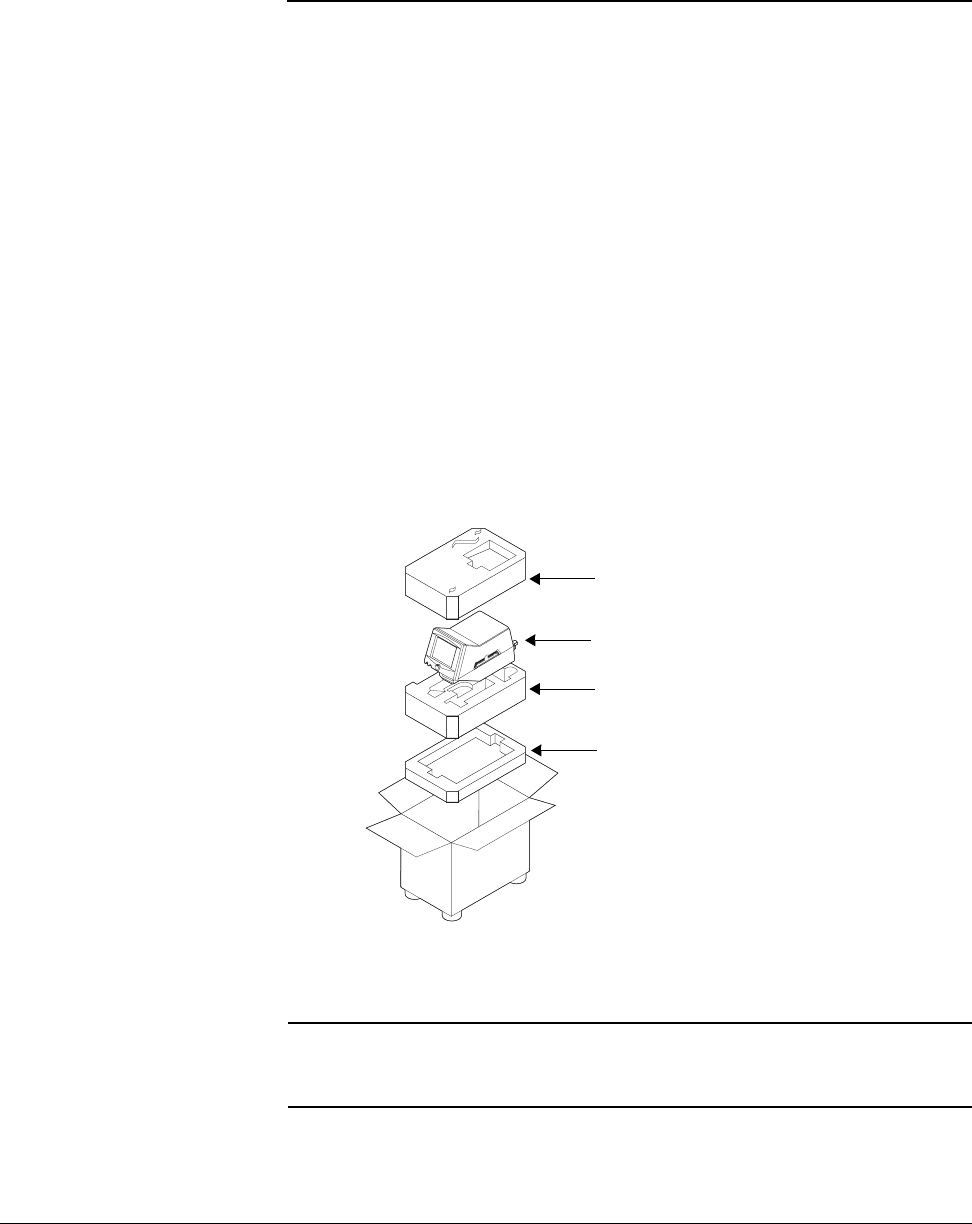
Figure 4-1: Unpacking/Repacking the Ventilator
WARNING: One person alone should not attempt to lift the ventilator or remove it from
the shipping carton or the cart. At least two people are required to avoid
possible personal injury or damage to the equipment.
Top Foam Insert
Respironics V200 Ventilator
Center Foam Insert
Bottom Foam Insert

Chapter 4
4-2 Respironics V200 Ventilator Operator’s Manual REF 1057983 A
Getting Started
Unpacking Instructions
Refer to Figure 4-1.
•Tools Required: Box knife
1. Using a box knife, cut a slit in packaging tape on top of shipping
carton.
2. Remove accessories box and optional flex arm box (not shown).
3. Remove top foam insert from inside carton.
4. Roll the plastic shipping bag (not shown) off the ventilator.
5. Gently lift ventilator from the bag and carton.
6. Remove patient circuit package (not shown).
7. Store carton, foam insert, and plastic bag in safe place for possible
future use.
Inspection After unpacking the ventilator, inspect its cabinet exterior for damage,
including cracks and scratches or blemishes. Inspect the front panel for
scratches, chips, abrasions or other deformities.
List of Parts and
Accessories Using the packing list that accompanies the ventilator, take an inventory of the
entire shipment before assembling the ventilator. In case of discrepancies,
immediately contact Respironics Customer Service at 1-800-345-6443.
The Esprit/V200 Ventilator Service Manual, P/N 580-1000-02, is available for
qualified personnel. It includes block diagrams, components parts lists,
descriptions, calibration instructions, and other information that will assist
appropriately qualified personnel to repair those parts of the equipment that
are designated by the manufacturer as repairable. For more information
contact Respironics Customer Service at 1-800-345-6443.
NOTE: Medical electrical equipment needs special precautions regarding EMC
and needs to be installed and put into service according to the EMC
information provided in Chapter 12, “Technical Specifications”.
CAUTION: Be sure to check all exterior parts of the ventilator. Problems found
during inspection should be corrected and/or reported to Respironics
before using the ventilator.

Chapter 4
Getting Started
REF 1057983 A Respironics V200 Ventilator Operator’s Manual 4-3
Repacking Should the ventilator need to be returned to Respironics for servicing, or
shipped elsewhere for any reason, instructions for repacking are listed below.
The following instructions should be followed closely to avoid damage to the
ventilator.
Repacking Instructions
Refer to Figure 4-1.
•Tools Required: Heavy duty packaging tape
1. Open carton so that bottom foam insert is facing up.
2. Place backup battery in the bottom foam insert if it is being shipped.
3. Place center foam insert into box on top of the bottom foam insert.
4. If you are also shipping the flex arm, place it in its box (not shown)
and place the box in the bottom of the center foam insert.
5. Remove all power cords and accessory items from the ventilator.
6. Set the open ventilator shipping bag (not shown) in the box on the
middle foam insert.
7. Gently place the ventilator into the open bag. Check to ensure that the
ventilator is firmly positioned into bottom foam insert. Close plastic
bag over the ventilator.
8. Replace accessories box (not shown) in the center foam insert beside
the ventilator (if also being shipped).
9. Place top foam insert onto ventilator. Ensure snug fit.
10. Close top flaps of carton and seal with heavy-duty packaging tape.
NOTE: We recommend that before using the ventilator for the first time, wipe
the exterior clean and disinfect or sterilize its components according to
the instructions in Chapter 10, “Care and Maintenance” or the
component manufacturer’s instructions.
WARNING: One person alone should not attempt to lift the ventilator or remove it from
the shipping carton or the cart. At least two people are required to avoid
possible personal injury or damage to the equipment.
CAUTION: Always ship the ventilator using the original packing material. If the
original material is not available, contact your Respironics
representative to order replacements.

Chapter 4
4-4 Respironics V200 Ventilator Operator’s Manual REF 1057983 A
Getting Started
Ventilator Positioning For information about mounting the ventilator on a table top, see the Esprit
Operator’s Manual (580-1000-01).
If the ventilator is on a cart, lock the cart wheels as needed as shown in Figure
4-2.
Figure 4-2: Locking Ventilator Wheel
Backup Battery The ventilator will automatically switch to operating on backup battery power when
the AC power fails or the system is disconnected from AC mains power. A fully
charged backup battery will operate the ventilator for approximately 30 minutes,
dependent upon the specific ventilator setting.
WARNING: The batteries (backup battery) in the battery compartment are non-spillable
sealed lead acid. Recycle or dispose of batteries properly.
WARNING: Do not connect the DC power cord from the backup battery while the
Respironics V200 is functioning as a ventilator. Always turn the Power On/
Off switch to off ( ).
WARNING: Backup battery operating life may be affected by battery age and the number
of times it has been discharged and recharged. Over time the battery will
degenerate and will not provide the same amount of operating time per
charge that is available from a fully charged new battery. Use only the
Respironics backup battery P/ N 1059956.

Chapter 4
Getting Started
REF 1057983 A Respironics V200 Ventilator Operator’s Manual 4-5
Backup Battery Removal and Installation
Required Tool: Philips screwdriver
Remove the backup battery from the internal packaging material and shipping
bag. Do not discard packing materials until the backup battery has been
installed on the ventilator and its operation has been confirmed.
NOTE: Save the shipping container in case the backup battery has to be returned
to Respironics.
Figure 4-3 illustrates the backup battery assembly.
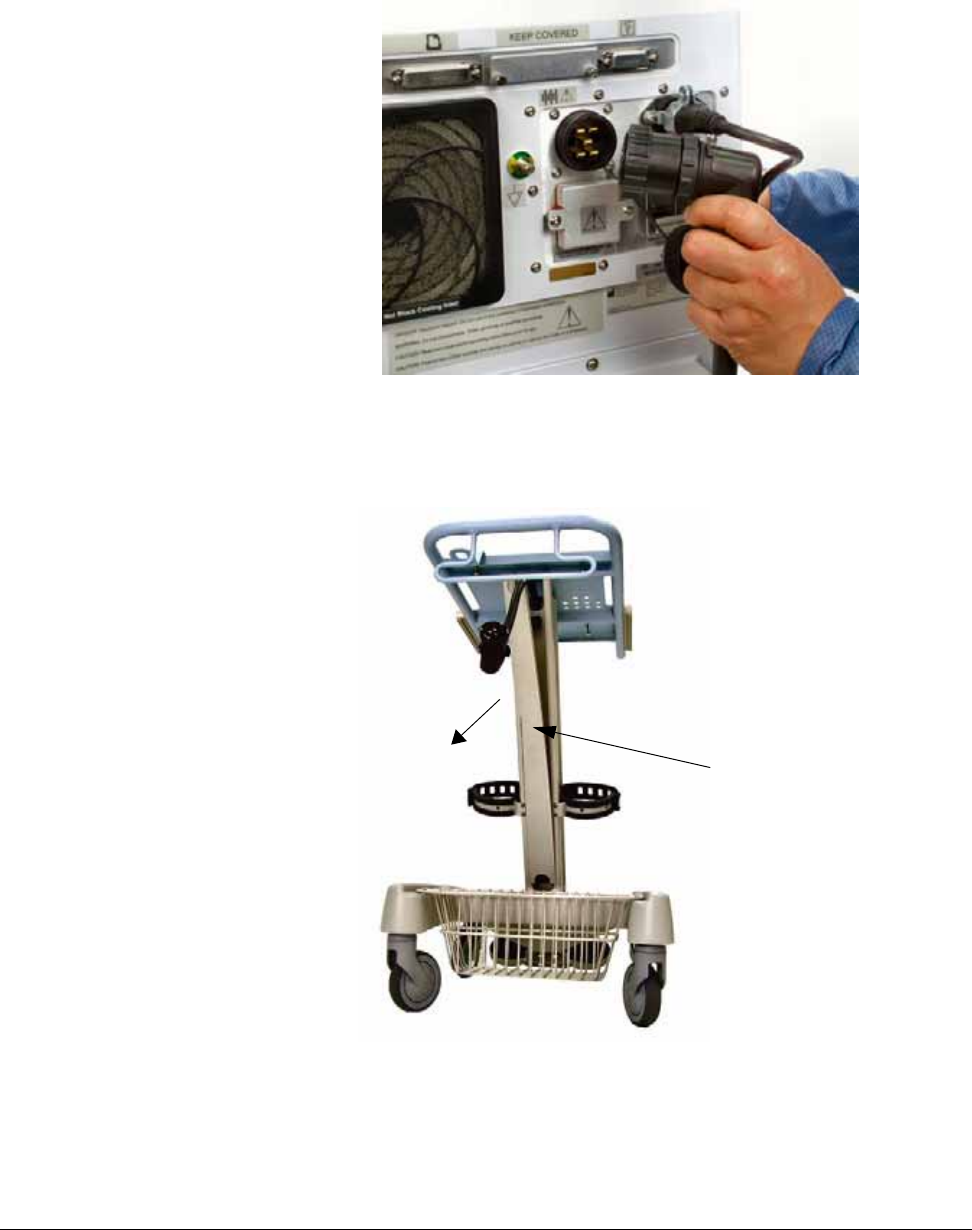
Figure 4-3: Backup Battery
1. Before the backup battery is installed, disconnect AC power and any
attached equipment. Disconnect the backup battery cable connector
from the rear panel of the ventilator by rotating the connector's collar
nut counterclockwise while pulling back on the connector.
Chapter 4
4-6 Respironics V200 Ventilator Operator’s Manual REF 1057983 A
Getting Started
Figure 4-4: Disconnecting the Battery Cable
2. Remove the rear cable channel cover from the cart by gently prying it
back from the top of the center column, freeing it from the column.
Figure 4-5: Removing the Rear Cable Channel Cover
Rear cable channel cover
Chapter 4
Getting Started
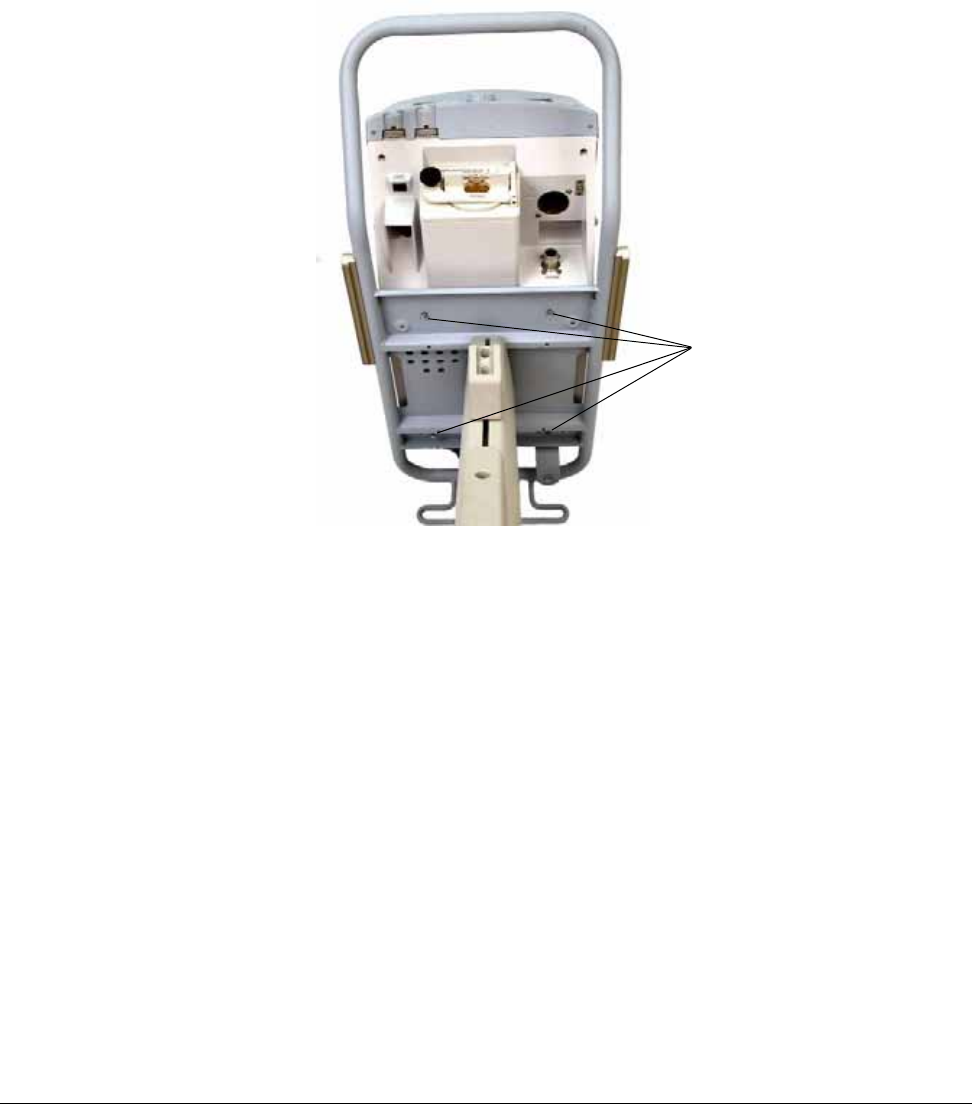
REF 1057983 A Respironics V200 Ventilator Operator’s Manual 4-7
3. Loosen the ventilator mounting screws (4) from the underside of the
cart, and remove the ventilator from the cart.
WARNING: One person alone should not attempt to lift the ventilator or remove it from the
shipping carton or the cart. At least two people are required to avoid possible
personal injury or damage to the equipment.
Figure 4-6: Removing the Ventilator from the Cart
Mounting screws
Chapter 4
4-8 Respironics V200 Ventilator Operator’s Manual REF 1057983 A
Getting Started
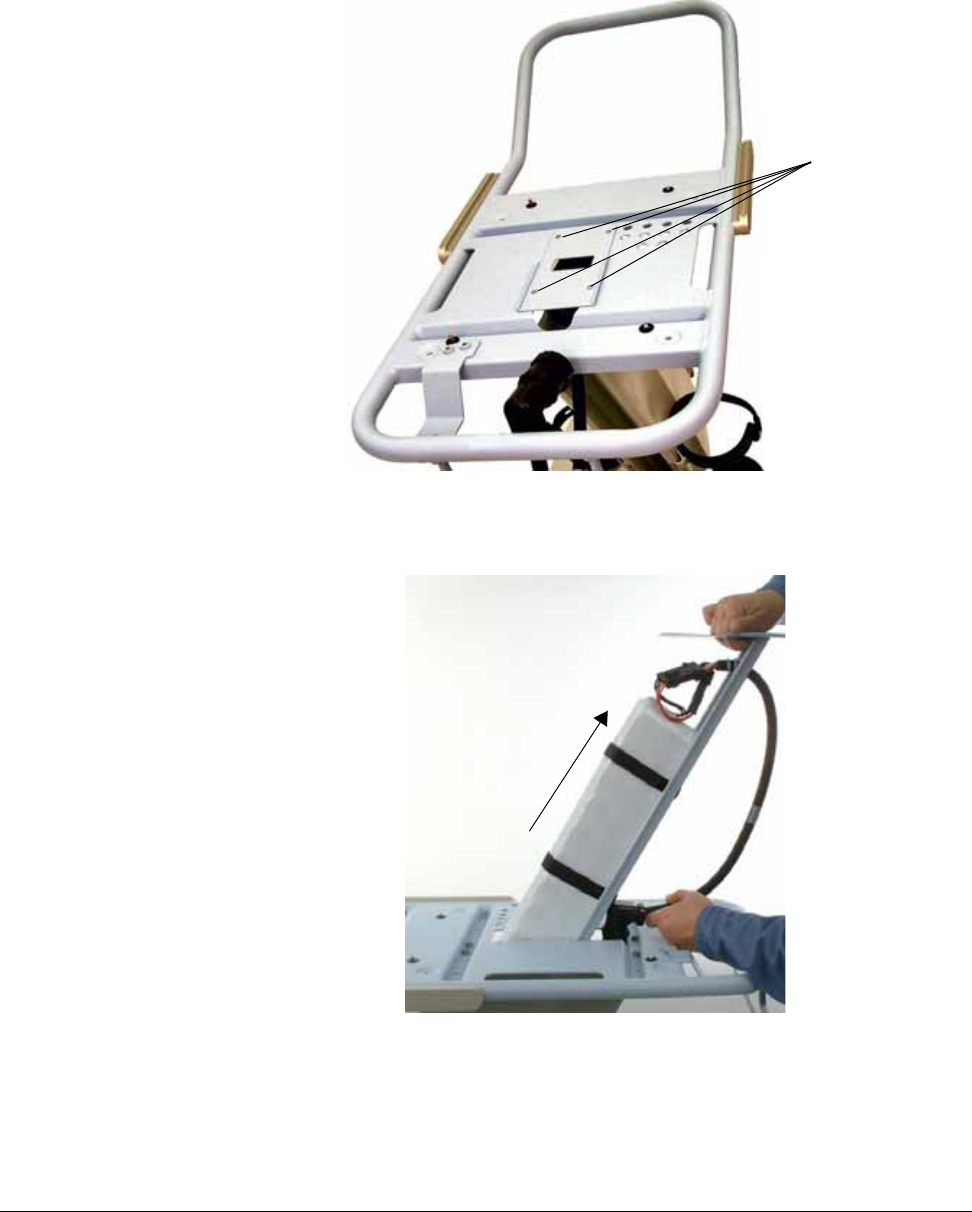
4. Remove the screws (4) holding the battery tray to the cart.
Figure 4-7: Removing the Battery Tray
5. Gently pull up the battery tray and remove it from the cart.
Figure 4-8: Removing the Battery Tray
Battery tray
mounting screws
Chapter 4
Getting Started
REF 1057983 A Respironics V200 Ventilator Operator’s Manual 4-9
6. If a battery is present in the battery tray, disconnect the old battery
from the battery tray’s cable.
Figure 4-9: Disconnecting the Old Battery from the Battery Tray’s Cable
7. Undo the straps, remove the old battery if present, and place the new
battery in the battery tray.
Figure 4-10: Inserting Battery Into Tray
Chapter 4
4-10 Respironics V200 Ventilator Operator’s Manual REF 1057983 A
Getting Started
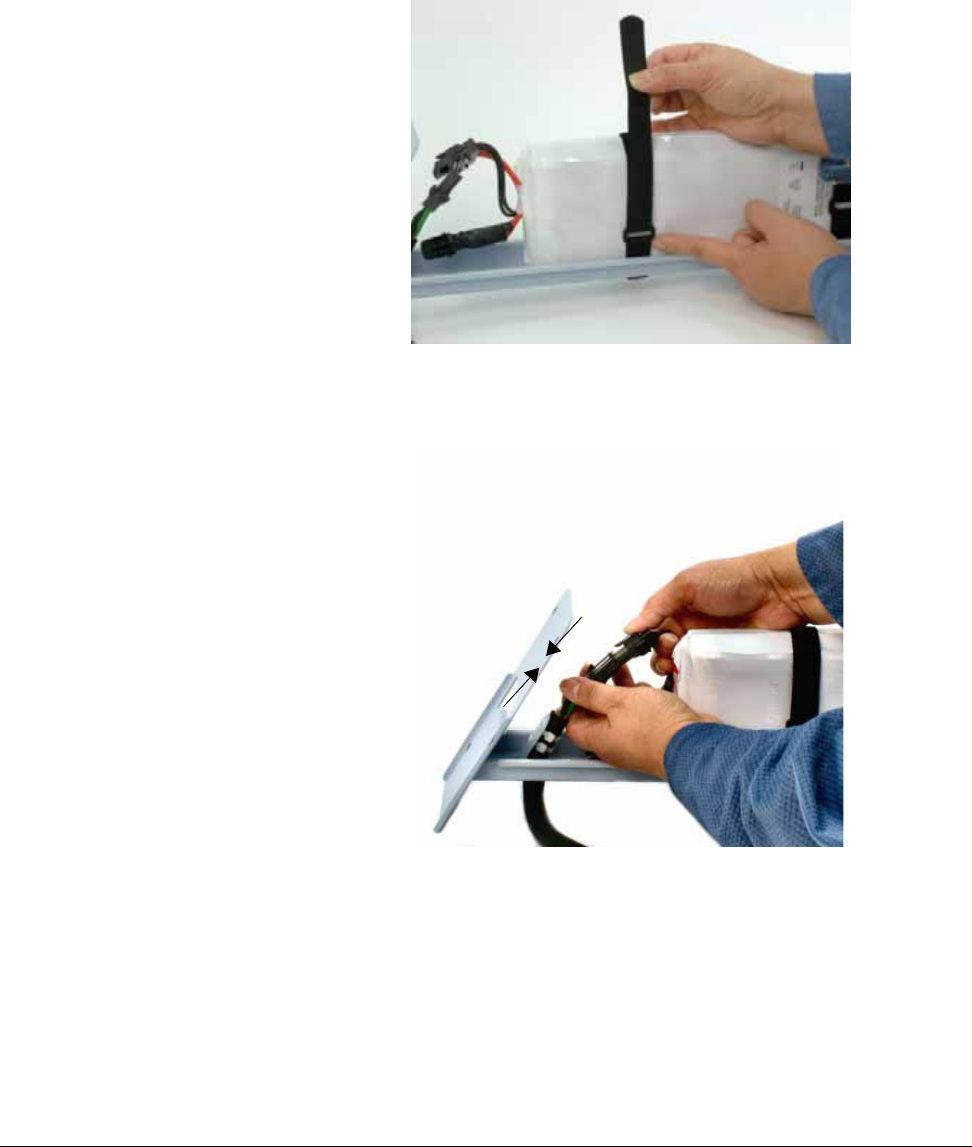
8. Position the D ring on the straps as shown below.
NOTE: If the D rings are not positioned properly, the excess strap will interfere
with the tray’s channel guide.
Figure 4-11: Positioning the D Rings on the Battery Straps
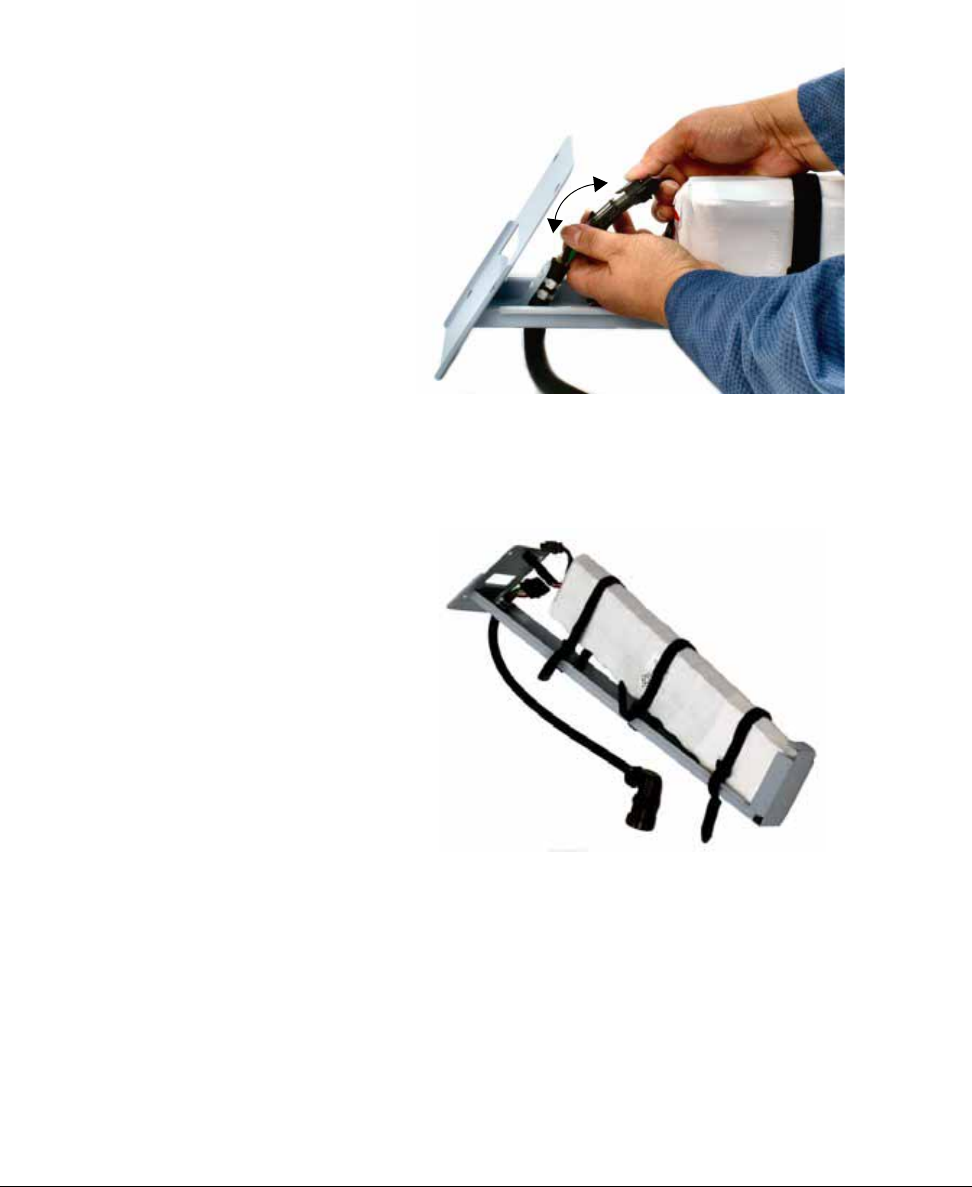
9. Connect the battery to the battery tray’s cable.
Figure 4-12: Connecting the Battery to the Battery Tray’s Cable
10. Insert the battery tray into the cart’s center column by mating the
battery tray’s channel guide to the tray’s channel guide of the center
column.
CAUTION: When inserting the battery tray into the cart’s center column, make sure
not to crimp cable connections between the battery tray and cart.
Chapter 4
Getting Started
REF 1057983 A Respironics V200 Ventilator Operator’s Manual 4-11
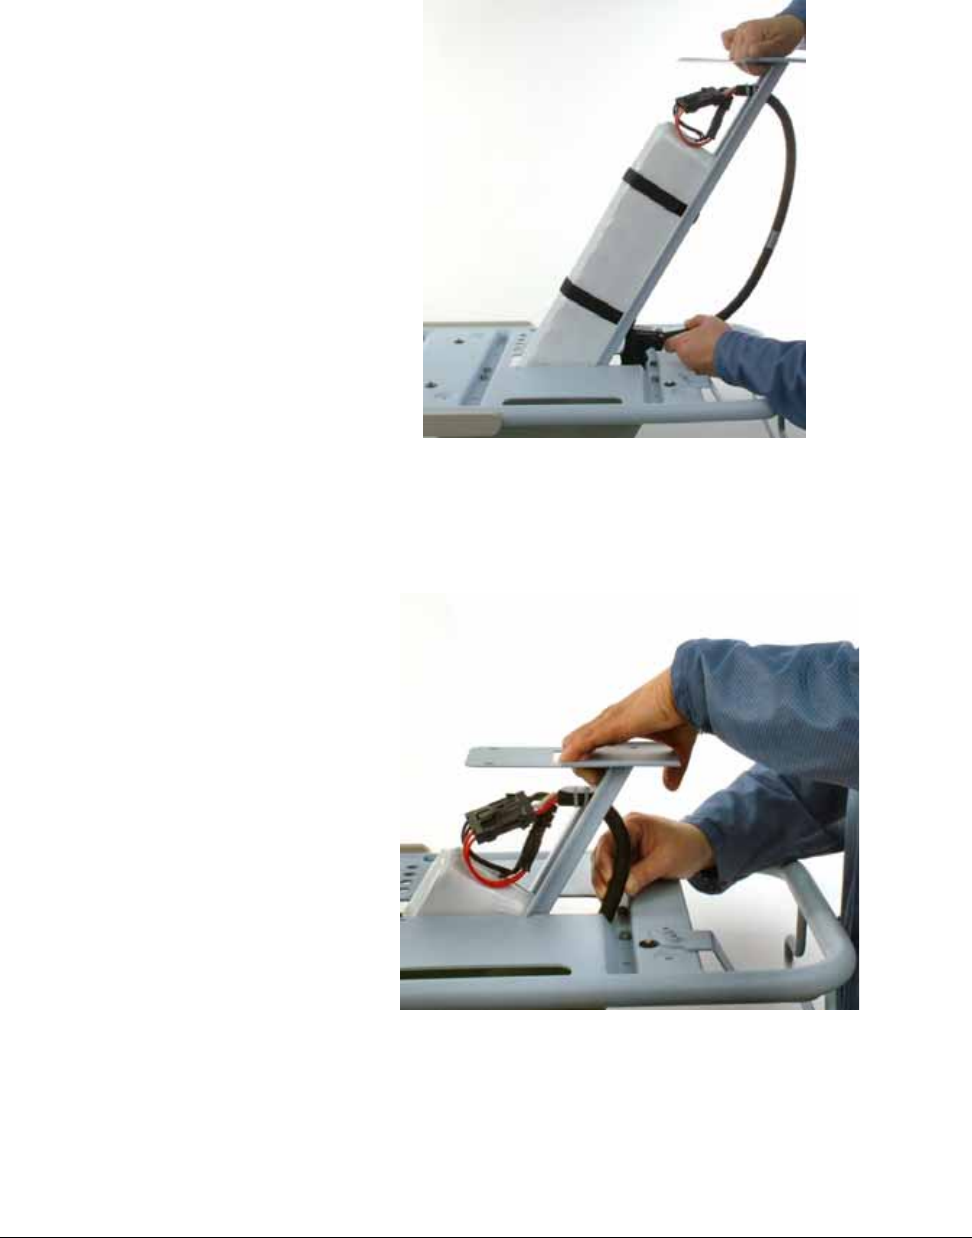
Figure 4-13: Installing the Battery Tray
11. Slide the battery halfway down the center column, and insert the
circular right angle battery connector into the cutout. Pull the cable
downward as the tray is fully inserted into the cart's center column.
Figure 4-14: Inserting the Circular Right Angle Battery Connector Into the Cutout
Chapter 4
4-12 Respironics V200 Ventilator Operator’s Manual REF 1057983 A
Getting Started
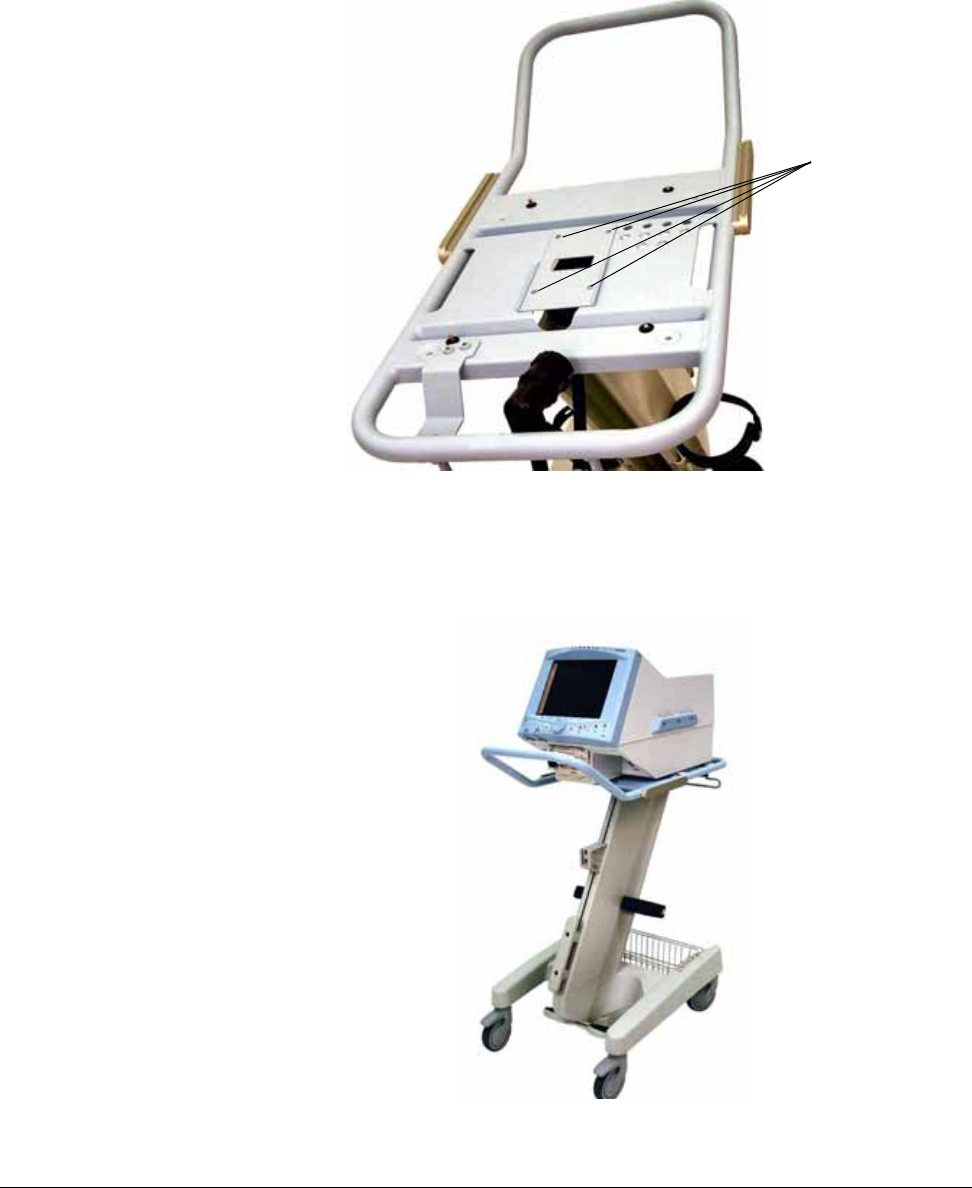
12. Fasten the battery tray to the cart using the 4 screws used when the
tray was removed.
Figure 4-15: Battery Tray Mounting Screws
13. Set the ventilator back on the cart, ensuring that the four ventilator
feet meet the four circular recesses on the top of the cart. Tighten the
four mounting screws that were loosened in step 3.
Battery tray
mounting screws
Chapter 4
Getting Started
REF 1057983 A Respironics V200 Ventilator Operator’s Manual 4-13
14. Routing the backup battery cable from the tray between the rear of the
ventilator and the rear handle of the cart, connect the cable to the
circular battery connector on the back of the ventilator. Snap the rear
channel cover back into place.
Figure 4-16: Backup Battery Connector
15. Plug the ventilator into an AC outlet.
16. Allow the backup battery to charge as required (see “Battery
Charging” on page 4-15).
17. When charging is complete, attach a patient circuit and turn the
ventilator on in the diagnostics mode. Select the User Config touch
key and enable the Backup Battery confirmation feature (refer to
Chapter 5, “Backup Battery”).
18. Run SST (refer to Chapter 11, “Diagnostics”).
19. After SST has been successfully completed, exit the diagnostics mode
and power up the ventilator in the normal ventilation mode.
20. While the ventilator is cycling, unplug the AC power from the wall.
21. The ventilator should continue ventilation without interruption of any
kind.
22. The ventilator should have the “In Use” indicator (text version of front
panel) or the battery symbol (symbol version of the front panel)
on and a non-silenceable, non-resettable audible alarm should sound
every 60 seconds. "Backup Battery On" is displayed while the
ventilator consumes power from the backup battery.
23. Plug the AC wall power back in and the ventilator should continue
ventilation without interruption of any kind.
Battery backup
connector
Chapter 4
4-14 Respironics V200 Ventilator Operator’s Manual REF 1057983 A
Getting Started
Backup Battery Operation
When the backup battery is attached and the Respironics V200 Ventilator is op-
erating in normal ventilation mode anytime there is a loss of AC power, the ven-
tilator will automatically switch to battery power and continue ventilation
without interruption. Whenever the ventilator is powered by the backup battery,
it will generate a non-silenceable, non-resettable alarm that creates an alarm
sound every 60 seconds. During this state, the front panel indicator labeled “In
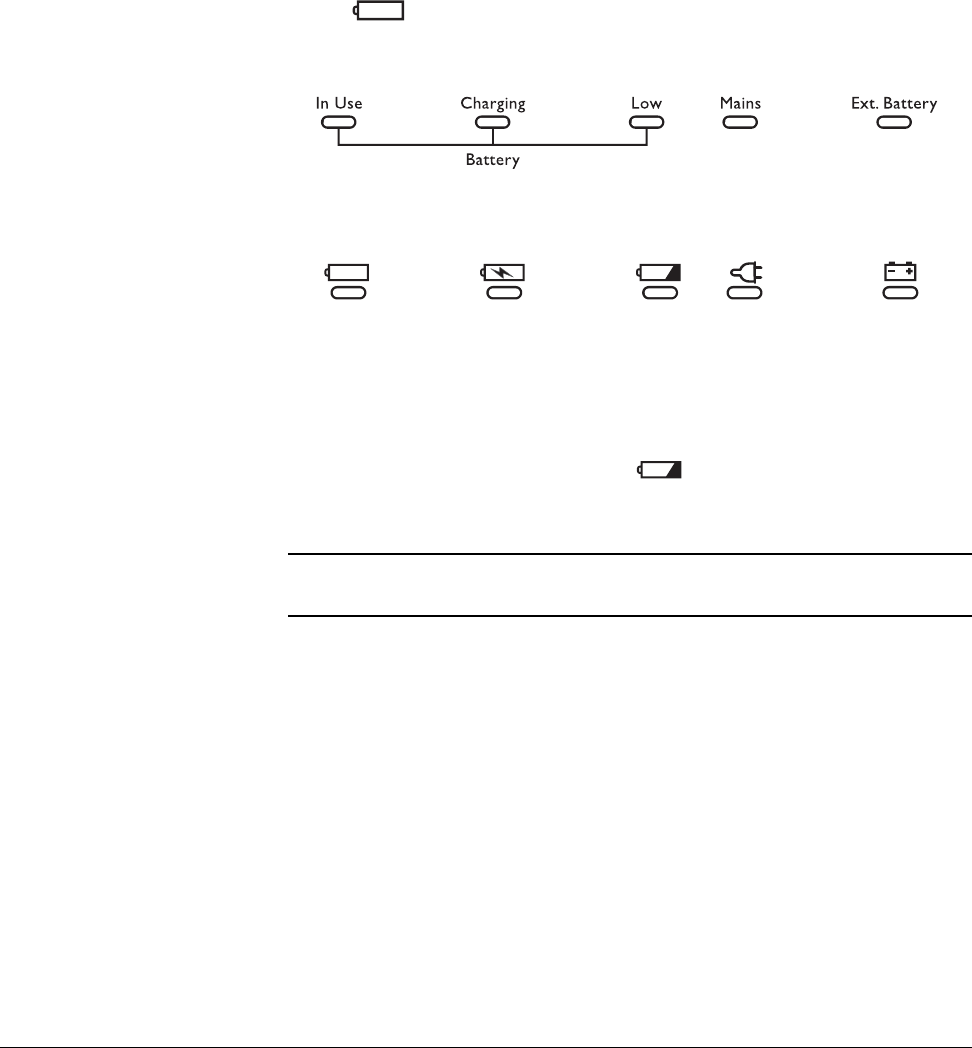
Use” (text version of the front panel as shown in Figure 4-17), or the battery
symbol (symbol version of the front panel as shown in Figure 4-18) will
illuminate yellow continuously. In addition, "Backup Battery On" is displayed.
Figure 4-17: Backup Battery Front Panel Indicators — Text Version
Figure 4-18: Backup Battery Front Panel Indicators — Symbol Version
Operation will continue in this state until the battery capacity is nearly expend-
ed. When the battery has only about 5 minutes of operation left, an audible,
nonresetable, HIGH priority alarm will sound. When this happens, the red,
front panel indicator labeled “Low” (text version of the front panel as shown in
Figure 4-17), or the low battery symbol (symbol version of the front pan-
el as shown in Figure 4-18) and the high priority alarm LED will flash continu-
ously. In addition, "Low Backup Battery" is displayed.
When power is finally depleted, the ventilator will open the Safety Valve and
terminate ventilation in an orderly fashion. In this state, the front panel dis-
plays "Backup Battery Depleted-Connect AC & Cycle Power." The backup alarm
emits a continuous tone, the high priority alarm LED flashes, and the Safety
Valve, Vent Inop, and Battery Low front panel indicators remain lit until power
from the Backup Battery is completely gone.
Battery Capacity
There is a great deal of variability in the power consumption of the ventilator
depending on altitude, ventilator settings, and the age and amount of charge
on the backup battery. These parameters will determine the exact amount of
time the ventilator can operate from the backup battery.
WARNING: When the battery low indicator is flashing red, operation of the ventilator
from the battery power should be discontinued.

Chapter 4
Getting Started
REF 1057983 A Respironics V200 Ventilator Operator’s Manual 4-15
Battery Charging
When the ventilator is plugged into a viable AC supply, it will charge the
backup battery if the Mains Circuit Breaker is on and the machine is operating
as a ventilator, or in diagnostic mode or the Power ON/OFF switch is OFF ( ).
Charging time will depend on the amount of charge the batteries require. A
fully discharged backup battery will be fully recharged within 10 hours. If the
backup battery does not reach a full charge within 10 hours, contact
Respironics Customer Service. While the ventilator is charging, the front panel
indicator labeled “Charging” (text version of the front panel as shown in Figure
4-17) or the charging battery symbol (symbol version of the front panel
as shown in Figure 4-18) will be on continuously. When the backup battery is
fully charged, the indicator will turn off.
NOTE: For optimal performance and battery life of a newly purchased backup
battery, establish full backup battery charge by plugging the ventilator
into AC power for eight (8) hours maximum, or until the charging
indicator light turns off, and then unplug the unit.
NOTE: To monitor backup battery performance and life, run the ventilator on
battery power for at least 20 minutes at typical settings once a month.
Recharge the battery when the test is complete.
Warranty
Respironics warrants the backup battery to be free from defects in material
and workmanship for a period of one year from the date of purchase, provided
that the unit is operated under conditions of normal use as described in this
operator’s manual.
At its discretion, Respironics will make replacements, repairs or issue credits
for equipment or parts that are found to be defective.
CAUTION: The backup battery is designed to be charged only by the Respironics
V200 Ventilator. Under no circumstances should an attempt be made to
charge it in any other way.
CAUTION: If the ventilator will not be used for 30 days or more, the backup battery
should be preserved. Either disconnect the backup battery from the
ventilator or keep the ventilator plugged into an active electrical outlet.
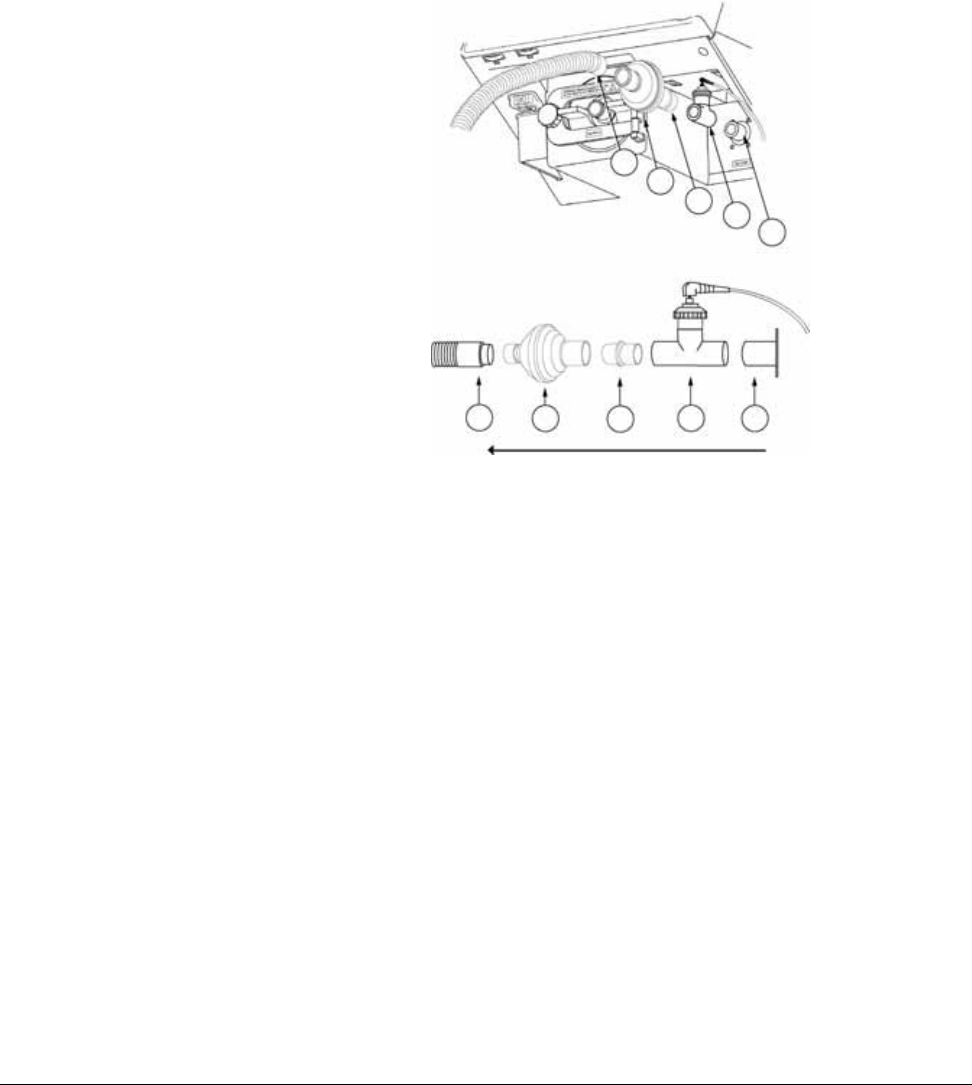
Chapter 4
4-16 Respironics V200 Ventilator Operator’s Manual REF 1057983 A
Getting Started
Inspiratory Bacteria
Filter Installation The inspiratory bacteria filter (4) in Figure 4-19, mounts on the gas outlet port
(1) located in the lower right corner on the front of the ventilator. If the
optional O2 sensor (2) will be used, it will be connected to the gas outlet port
(1) before the inspiratory bacteria filter is connected. For more information
regarding the optional O2 sensor, refer to Chapter 13, “Options and
Accessories”.
Figure 4-19: Inserting Disposable Inspiratory Bacteria Filter
Flow
1
2
3
4
4321
5
5

Chapter 4
Getting Started
REF 1057983 A Respironics V200 Ventilator Operator’s Manual 4-17
Inspiratory Bacteria Filter Installation Instructions
Refer to Figure 4-19.
1. Locate the gas outlet port (1) on the front panel.
2. If the optional O2 sensor (2) will be used, connect it to the gas outlet
port (1).
3. Remove the inspiratory bacteria filter from the filter package and
inspect for cracks or potential leaks. Discard the filter if it is cracked,
has moisture inside, or is otherwise unserviceable.
4. Some bacteria filters provide an arrow or other mark to indicate the
direction of flow. The flow indicator should be pointed away from the
ventilator, toward the patient circuit connection
Insert inspiratory filter inlet (4) into either
• the optional O2 sensor (2) using the 22mm connector (3)
or
• the gas outlet port (1) if the optional O2 sensor (2) is not used.
5. Connect inspiratory limb of patient circuit (5) to bacteria filter (4).
WARNING: To reduce the chance of contamination or infection, always use an
inspiratory and expiratory filter when the ventilator is in operation. Refer to
manufacturer’s instructions and follow institutional infection control
guidelines when replacing the inspiratory and expiratory filter.
WARNING: Do not use anti-static or conductive hoses or conductive patient tubing.
NOTE: Follow institutional infection control guidelines when replacing the
inspiratory or expiratory bacteria filter.
NOTE: When adding attachments or other components or subassemblies to the
breathing system, for example, an HME or humidifier, ensure that the
inspiratory and expiratory resistances (measured at the patient
connection port) do not exceed 6 cmH2O (hPa) at a flow of 60 L/min for
adults, 30L/min for pediatrics.
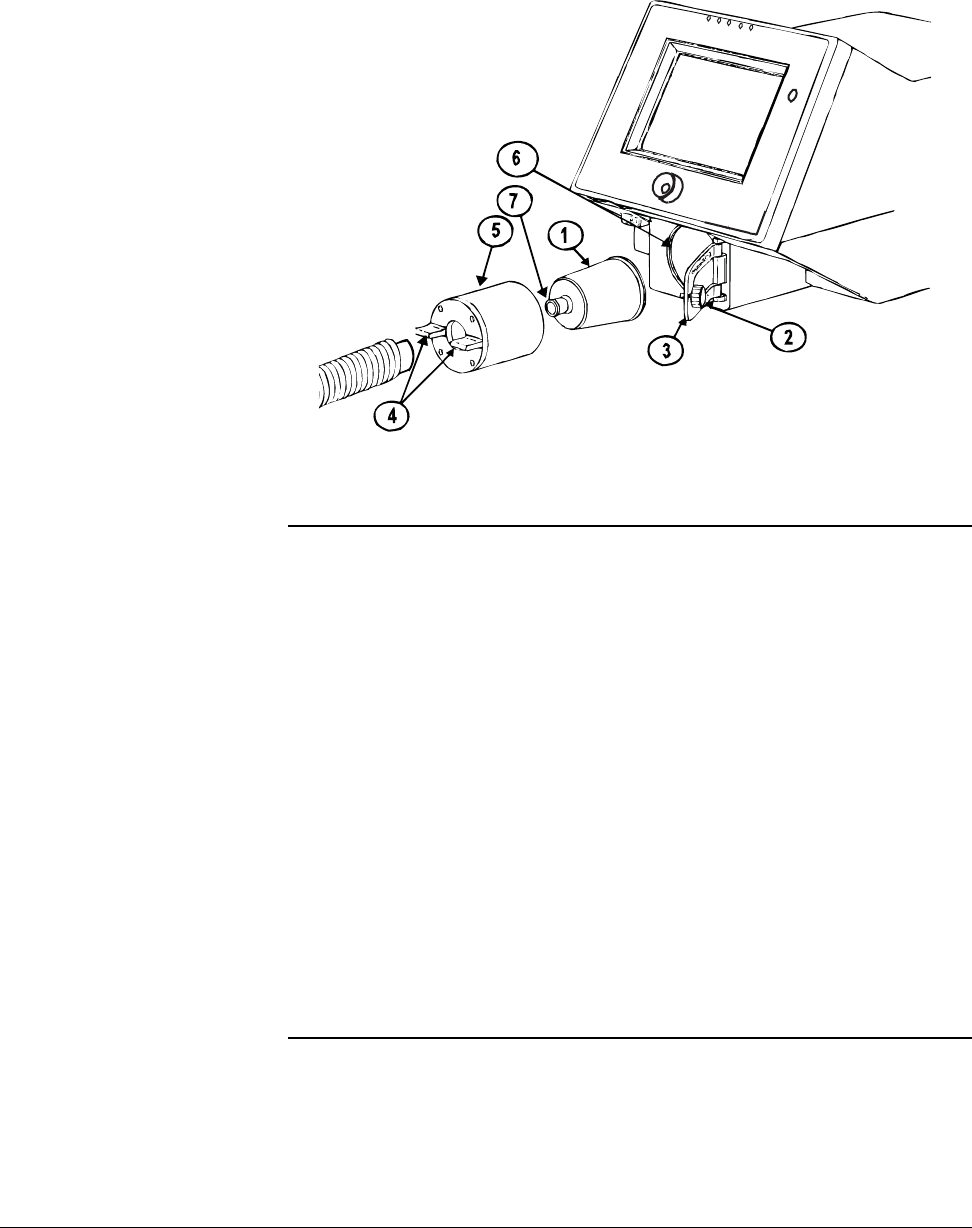
Chapter 4
4-18 Respironics V200 Ventilator Operator’s Manual REF 1057983 A
Getting Started
Heated Expiratory
Bacteria Filter
Installation
Figure 4-20: Installing Expiratory Bacteria Filter
Heated Expiratory Bacteria Filter Installation Instructions
Refer to Figure 4-20.
WARNING: The expiratory filter housing may be hot if removed from the ventilator
immediately after use. Wait 15 minutes after turning off ventilator power
before removing the heated expiratory bacteria filter. Exercise caution when
handling the filter housing.
CAUTION: Do not operate the ventilator without a properly functioning expiratory
filter and heater. Doing so may cause damage to delicate ventilator
components, such as the expiratory flow sensor, which may lead to
inaccurate spirometry or a Vent Inop condition.
WARNING: Vent Inop is a serious condition, which is indicated by both visual and
audible alarms. If the ventilator is attached to a patient when Vent Inop
occurs, the patient must be supported with another means of life support
ventilation.
NOTE: Follow institutional infection control guidelines when replacing the
inspiratory or expiratory bacteria filter.
NOTE: When adding attachments or other components or subassemblies to the
breathing system, for example, an HME or humidifier, ensure that the
inspiratory and expiratory resistances (measured at the patient
connection port) do not exceed 6 cmH2O (hPa) at a flow of 60 L/min for
adults, 30L/min for pediatrics.

Chapter 4
Getting Started
REF 1057983 A Respironics V200 Ventilator Operator’s Manual 4-19
1. Locate the heated expiratory bacteria filter (1) and receiving
compartment (6) in the lower center of front panel.
2. Turn knob (2) counterclockwise to unlatch retaining bracket (3).
3. Open retaining bracket (3) by pulling it out and away from the
ventilator.
4. Use tabs (4) to gently pull the heater housing (5) away from the
ventilator.
5. Ensure that ventilator has been turned off for 15 minutes. If not, allow
the heater housing (5) to cool before touching it with fingers.
6. Gently remove the heater housing (5). Tap filter input port (7) if the
filter does not come out easily.
7. Insert the new expiratory bacteria filter (1) into the heater housing (5).
8. Reinstall housing (5) and filter (1) into receiving compartment (6),
then close retaining bracket (3).
9. Ensure that the retaining bracket (3) is securely closed and turn knob
(2) clockwise to secure latch.
10. Connect the exhalation limb and water collection system of the patient
circuit (not shown) to the inlet port of the exhalation filter (7).
NOTE: High humidity and aerosol medications may reduce expiratory filter life,
increase expiratory resistance, and/or cause filter damage. Review
ventilator patient graphics frequently for changes in expiratory resistance.
Consult filter manufacturer recommendations regarding duration of use,
maintenance, and removal and disposal of expiratory filter.
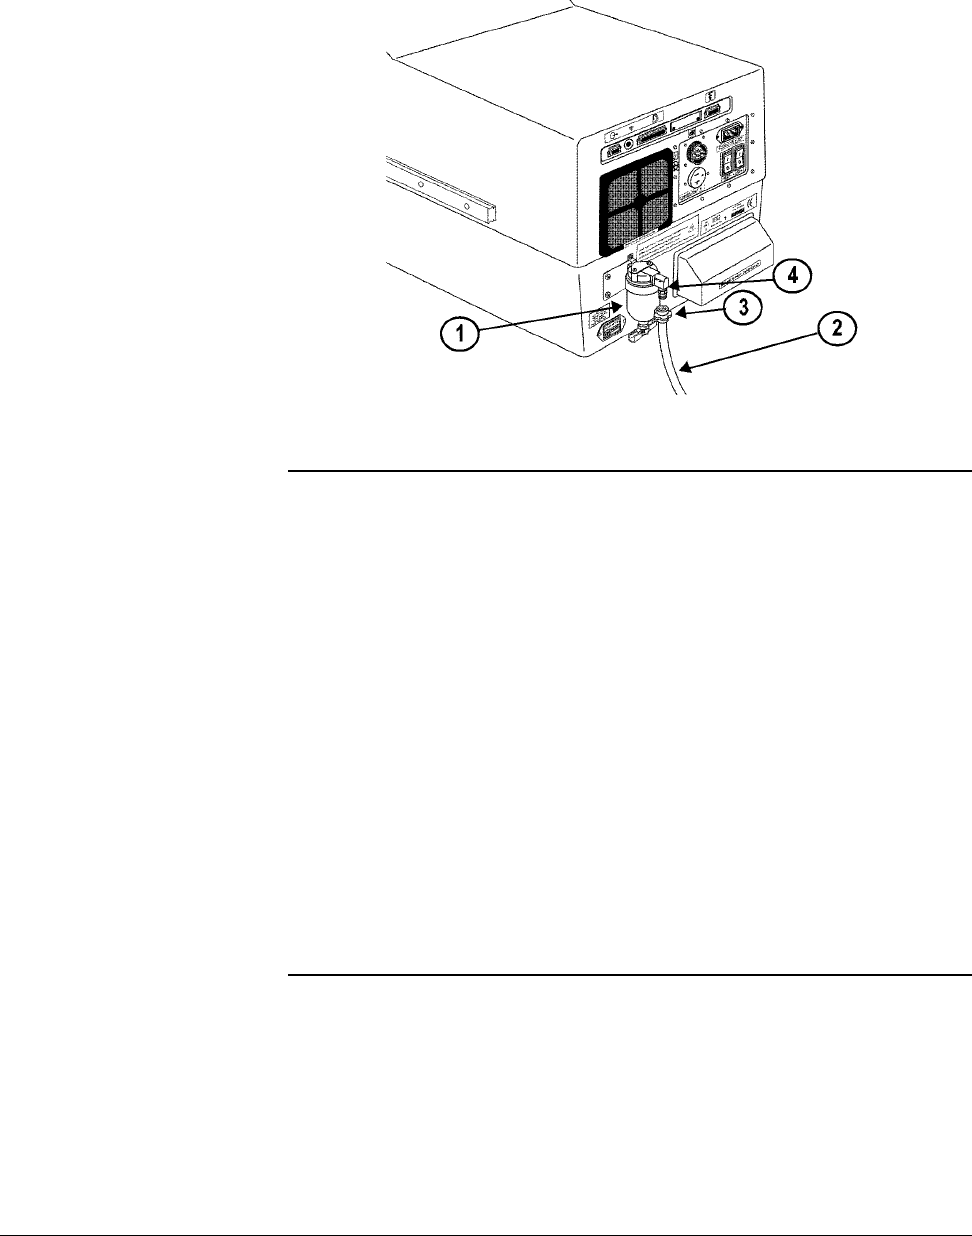
Chapter 4
4-20 Respironics V200 Ventilator Operator’s Manual REF 1057983 A
Getting Started
Oxygen Source
Connection
Figure 4-21: O2 Gas Connections and Filter
WARNING: All oxygen connections should be carefully inspected to ensure that leaks
are not present. Excessive leaks can result in higher than normal ambient
oxygen concentrations and create a potentially hazardous oxygen-enriched
environment.
WARNING: Worn/frayed oxygen hoses or oxygen hoses contaminated by hydrocarbon
greases or oils should not be used since an oxygen leak or intense fire
could result.
WARNING: Care in the routing of the oxygen inlet hose should be exercised to ensure it
is not exposed to mechanisms that could cause damage by cutting or
heating/melting.
CAUTION: The ventilator oxygen filter should be replaced annually as a part of
preventive maintenance.
NOTE: The ventilator should only be connected to an appropriate medical
grade 100% O2 gas source capable of delivering a regulated 40 to 90
PSIG (276-620 kPa).
NOTE: The ventilator is shipped with the appropriate gas fittings and hoses for
the intended environment, i.e. DISS (U.S.A. and Canada), Ohmeda
(Germany), NIST (UK), Air Liquide (France), SIS (Australia).

Chapter 4
Getting Started
REF 1057983 A Respironics V200 Ventilator Operator’s Manual 4-21
Oxygen Source Connection Instructions
Refer to Figure 4-21.
1. Locate the O2 filter with water trap (1) located in the lower left corner
of the rear panel.
2. Ensure that the O2 filter and water trap (1) are properly attached to
the ventilator. Inspect the bowl (1) for cracks or potential leaks.
Ensure all connections are tight.
3. Inspect the O2 hose (2), hose connector (3) and the hose connector
mate (4).
4. Check the oxygen gas supply. Clean, adjust pressure, and drain
condensate from any water traps, filters, or regulators in the O2 supply
lines.
5. Connect O2 gas connector (3) to the ventilator O2 filter with DISS hose
connector (4).
6. If gas source is not already turned on, turn it on and verify that no O2
gas is leaking.
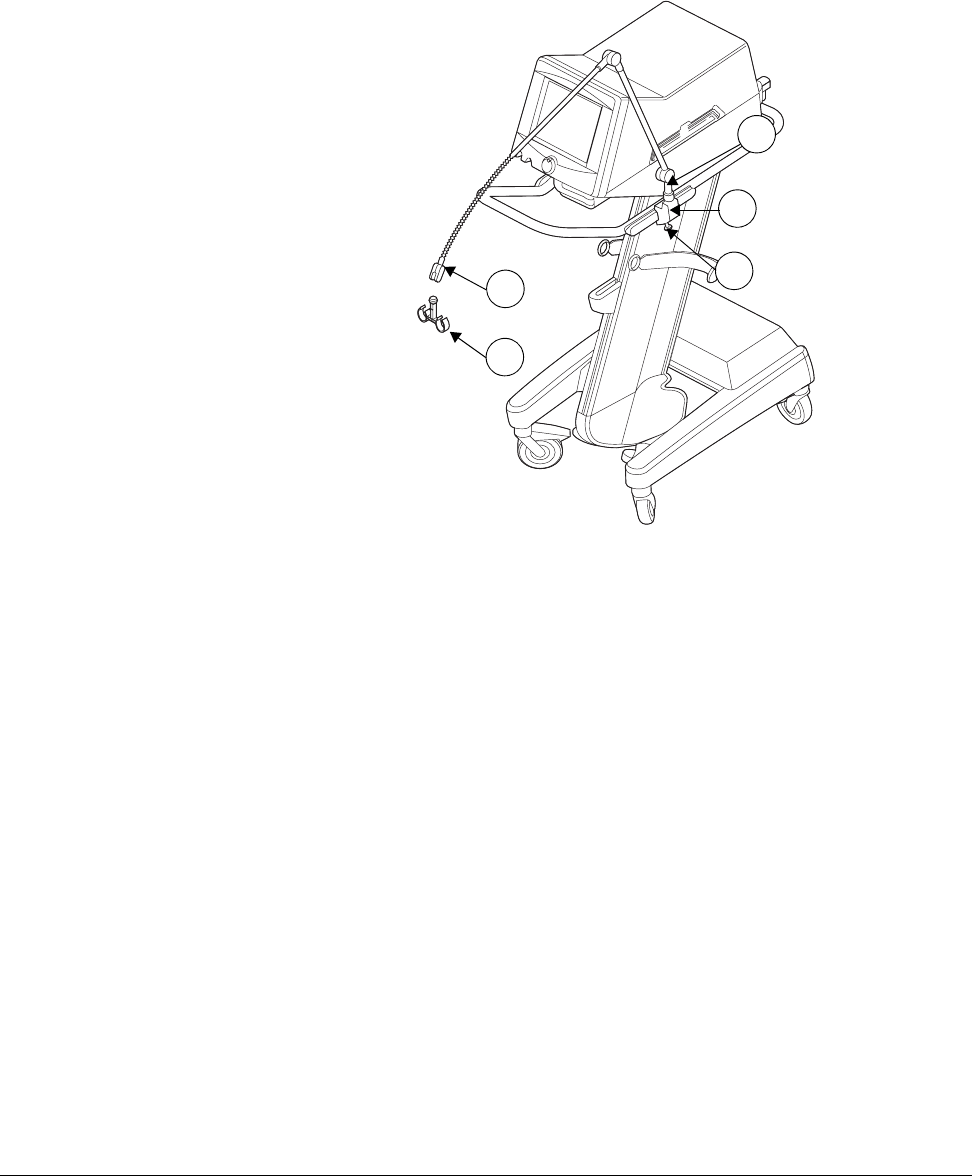
Chapter 4
4-22 Respironics V200 Ventilator Operator’s Manual REF 1057983 A
Getting Started
Patient Circuit Flex
Arm Installation A patient circuit flex arm is provided for use on the ventilator. The patient
circuit flex arm may be installed on either the left or right side rail on the cart.
Figure 4-22: Patient Circuit Flex Arm Installation
Patient Circuit Flex Arm Installation Instructions
Refer to Figure 4-22.
1. Slide flex arm bracket (1) on to the side rail of the cart (one per side).
2. Tighten black screw knob (2) on flex arm bracket.
3. Insert base of flex arm (3) into flex arm bracket and tighten.
4. Place patient circuit hose clamp (4) into the flex arm clamp (5) and
tighten.
2
3
4
5
1
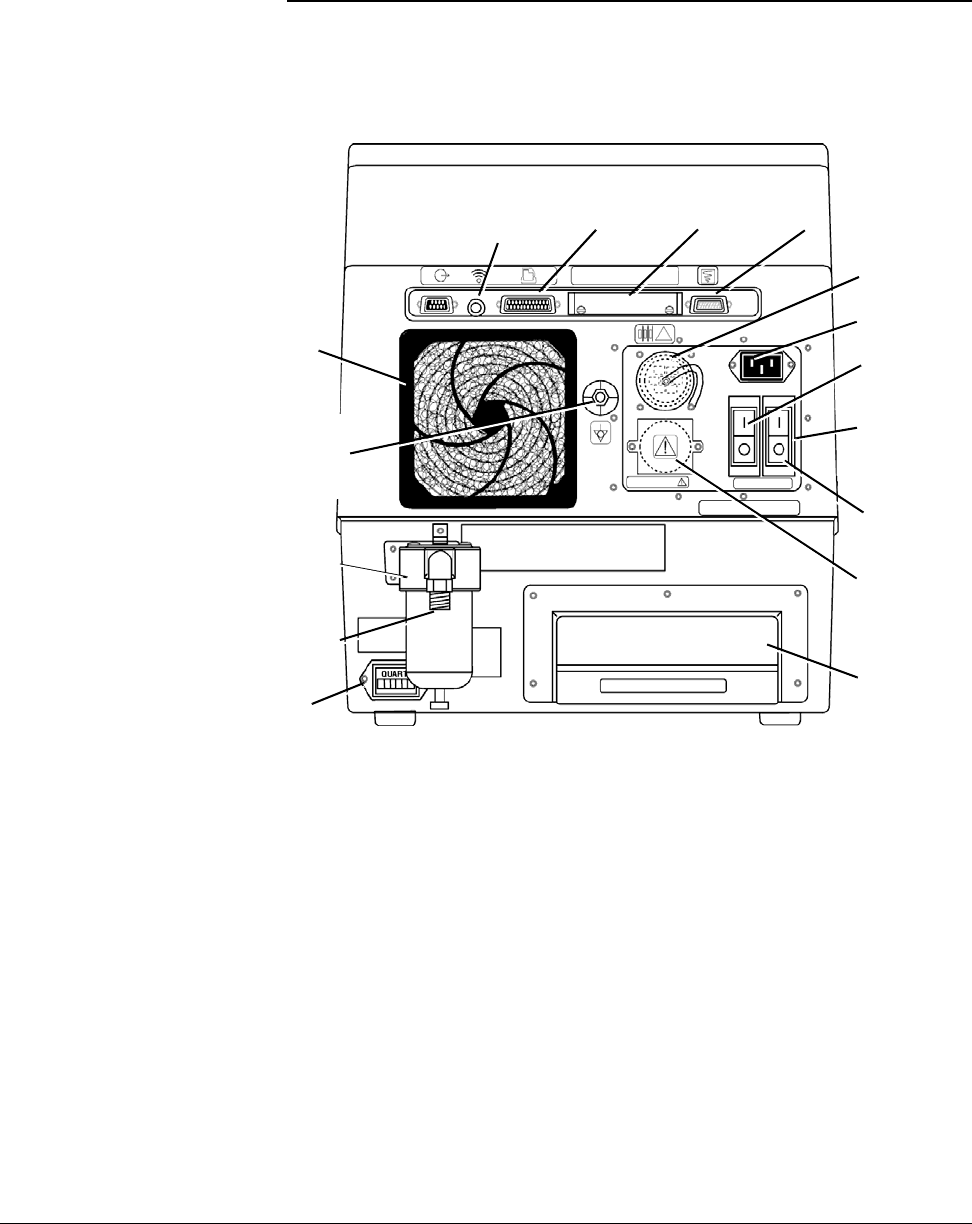
REF 1057983 A Respironics V200 Ventilator Operator’s Manual 5-1
Chapter 5. Setup
Back Panel
Connections and
Controls
Figure 5-1: Back Panel
1. 232 Serial Port: Connection source for devices capable of serial
communication. Refer to Chapter 6, “Connecting Additional
Equipment”.
2. Remote Alarm Nurse Call: Connection source for remote alarm devices.
3. Parallel Printer Port: For use with the Communications Option. Refer to
Chapter 13, “Options and Accessories”.
4. PCMCIA Card Slot: (PC Card) For use with the Trending Option. Refer to
Chapter 13, “Options and Accessories”.
11. Humidifier
AC Outlet
12. Air Inlet
Duct and Filter
14. O2 Inlet
Connector
15. O2 Inlet
Filter and
Water Trap
2. Remote
Alarm Nurse
Call
3. Parallel
Printer Port 4. PCMCIA
Card Slot
8 Humidifier A
C
Circuit Breaker
10. Mains
Circuit
Breaker
1.RS-232
Serial Port
6. DC Battery
Connector
7. AC Inlet
17. Cooling
Fan
Inlet
5. Analog Port
13. Elapsed
Time Meter
16. Potential
Equalization
Connection
9. Circuit
Breaker
Cover
(not shown)

Chapter 5
5-2 Respironics V200 Ventilator Operator’s Manual REF 1057983 A
Setup
5. Analog Port: Pin 12 signals an unsilenced high or medium urgency
alarm. Other pins are used by the Communications Option. Refer to
Chapter 13, “Options and Accessories”.
6. DC Battery Connector: Connection source for battery power cord.
7. AC Inlet: Connection for AC power cord.
8. Humidifier AC Circuit Breaker: Circuit breaker for AC power applied to a
humidifier.
9. Circuit Breaker Cover: Circuit breaker cover (not shown) protects the
Humidifier AC Circuit Breaker and Mains Circuit Breaker switches.
10. Mains Circuit Breaker: Circuit breaker for main AC circuit.
11. Humidifier AC Outlet: Connection for Humidifier AC power cord.
12. Air Inlet Duct and Filter: Filters room air drawn into the ventilator
internal air source.
13. Elapsed Time Meter: Records time when the Power On/Off Switch is on
().
14. O2 Inlet Connector: Connection for oxygen hoses.
15. O2 Inlet Filter and Water Trap: Filters oxygen entering the ventilator.
16. Potential Equalization Connection: Common grounding point.
17. Cooling Fan Inlet: Allows cooling air to enter the ventilator.
WARNING: The cover plate for the PCMCIA slot at the back of the ventilator must be
replaced after the adapter and card are installed. This is to protect the
ventilator.
CAUTION: The PCMCIA card should only be removed by trained service personnel
once power to the ventilator is off.
WARNING: AC power is applied to the humidifier from the ventilator humidifier outlet
(only available on 100-120 VAC ventilators). Under no circumstances does
the Respironics V200 Ventilator provide control for the humidifier. To ensure
patient safety, it is important that any humidifier used with the ventilator
include an acceptable temperature control and monitoring mechanism, as
well as a temperature display and appropriate alarm capabilities (refer to
ISO 8185).
CAUTION: To avoid the possibility of damage to the ventilator, do not connect a
humidifier whose maximum rating exceeds 3 amps. Ensure that the
humidifier power cord is free from defects and any obvious wear, and is
properly grounded. A humidifier connection is only available on 100-
120VAC ventilators.

Chapter 5
Setup
REF 1057983 A Respironics V200 Ventilator Operator’s Manual 5-3
Connecting AC Power
Cord
Figure 5-2: AC Power Cord Retaining Bracket
NOTE: All volumes entered into the ventilator are assumed to be BTPS (Body
Temperature atmospheric Pressure Saturated (with H2O)) volumes
unless otherwise noted. All volumes reported by the ventilator are
reported as BTPS volumes. All pressures are assumed to be relative to
atmospheric pressure unless otherwise noted.
NOTE: The Air Inlet Filter houses a reusable foam filter that should be
periodically cleaned. Refer to Chapter 10, “Care and
Maintenance”, for more information on filter changes.
WARNING: To avoid electrical shock hazard, connect the ventilator to a properly
grounded AC power outlet.
CAUTION: Before connecting the ventilator to the AC power source, ensure that the
total electrical load does not exceed the ampere rating of the AC branch
circuit, especially when using the ventilator with other electrical
equipment. An AC branch circuit includes all outlets serviced by a
single circuit breaker. If the maximum current drain through a branch
circuit exceeds the circuit breaker’s rating, the branch circuit will open,
causing the ventilator to lose power. For further information, consult a
service technician or a trained biomedical technician.
CAUTION: The ventilator is shipped with a power cord that complies with electrical
safety standards. Do not use substitute power cords unless specifically
instructed to do so by an authorized distributor or qualified personnel.
Do not modify the power cord or connect it with electrical extension
cords or outlet adapters.
2
1
3
Circuit Breaker
Cover not shown.
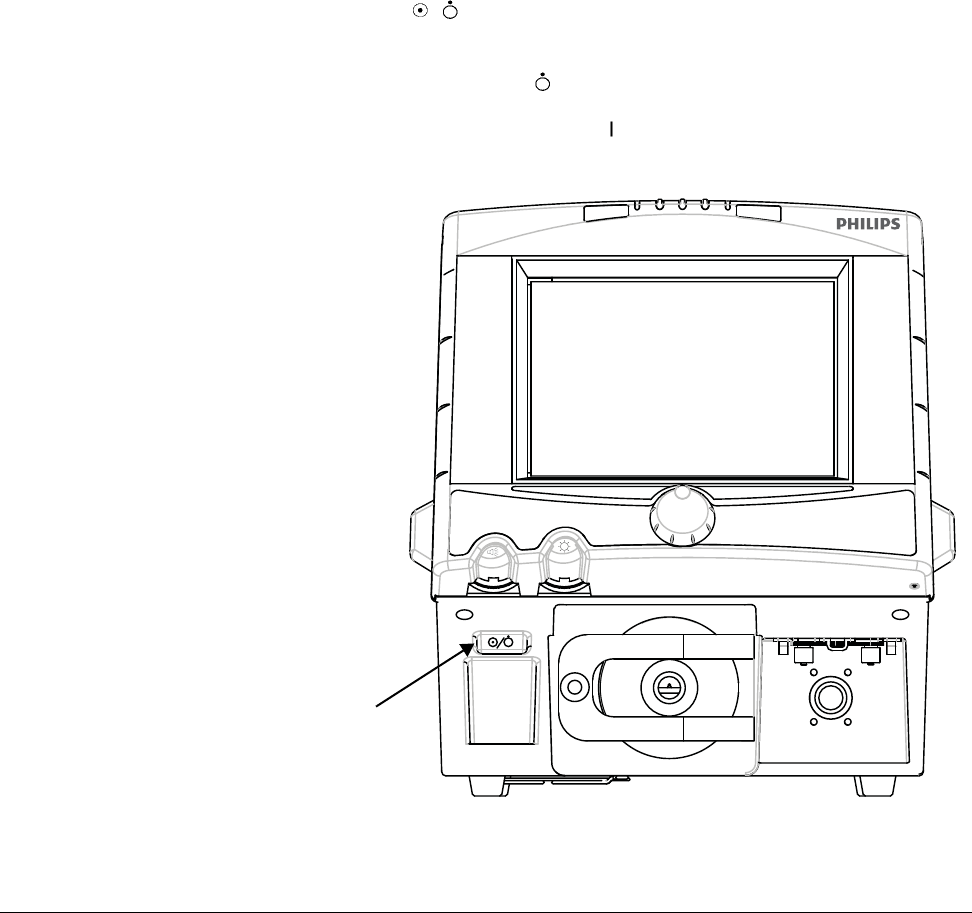
Chapter 5
5-4 Respironics V200 Ventilator Operator’s Manual REF 1057983 A
Setup
Connecting AC Power Cord Instructions
Refer to Figure 5-2.
•Tools Required: Small Phillips screwdriver
1. Ensure that the ventilator is properly positioned on a secure table top,
wall mount, or pedestal.
2. Connect the AC Power Cord (1) to the AC inlet (3) located on the rear
panel. (Refer to Figure 5-1.)
3. After cord is fully inserted, tighten the retaining bracket screw (2) so
that the power cord cannot be inadvertently disconnected from the
ventilator.
Power On/Off The ON/OFF ( / ) switch is located in the lower portion of the front panel,
and is recessed to avoid inadvertent access.
When the switch is in OFF ( ) position, the ventilator does not provide
mechanical ventilation. If the AC plug is connected and the Mains circuit
breaker (refer to Figure 5-1) is ON ( ), AC power is active and the green
Mains circuit indicator on the front panel, is illuminated.
Figure 5-3: On/Off Switch
Inop
Vent Safety
Valve
Power On/
Off Switch

Chapter 5
Setup
REF 1057983 A Respironics V200 Ventilator Operator’s Manual 5-5
Turning the Ventilator On
1. Ensure that the Mains Circuit Breaker (refer to Figure 5-1), located on
the ventilator back panel, is in the ON ( ) position.
2. For 120V applications, if a humidifier is attached to the ventilator,
ensure that the Humidifier AC Circuit Breaker (refer to Figure 5-1),
located on the ventilator back panel, is in the ON ( ) position. A
humidifier connection is only available on 100-120VAC ventilators.
3. Press the Power ON/OFF switch to the ON ( ) position (left side up).
Turning the Ventilator Off
1. Press the Power ON/OFF Switch to the OFF ( ) position (right side
up).
Entering Diagnostic
Mode The Diagnostic Mode is used for:
1. Running tests of the operation of the ventilator that can only be run
when a patient is not attached to the machine.
2. Setting altitude, time and date, and circuit compliance.
3. Other more detailed service/maintenance functions.
4. Calibration of inline Oxygen Sensor, during EST only.
Some of these functions are discussed in detail in Chapter 12, “Technical
Specifications”. The functions of the Diagnostic Mode that are used to make
the machine ready for use as a ventilator when it is first put into service are
explained here.
WARNING: The ventilator front panel LEDs will indicate the power source that is being
used. If the ventilator is plugged in and the MAINS LED is not lit, either the
circuit breaker is off or the wall power outlet is not functioning.
WARNING: The two circuit breakers (MAINS/Humidifier) located on the back of the
ventilator are covered to prevent unintentional ventilator power-off. Do not
use the circuit breaker to power the ventilator on/off. The power switch is
located on the front of the ventilator below the front panel.
NOTE: Unless the Mains Circuit Breaker is turned OFF, electrical power is
applied to the ventilator even though the front panel switch is in the
OFF position. With the Mains Circuit Breaker ON, if the backup battery
is connected, the ventilator will charge the battery if it requires a
charge.
NOTE: To disconnect the ventilator from MAINS power, remove the AC plug
from the wall power receptacle. The MAIN switch/circuit breaker is
covered to prevent unintentional ventilator turn off.
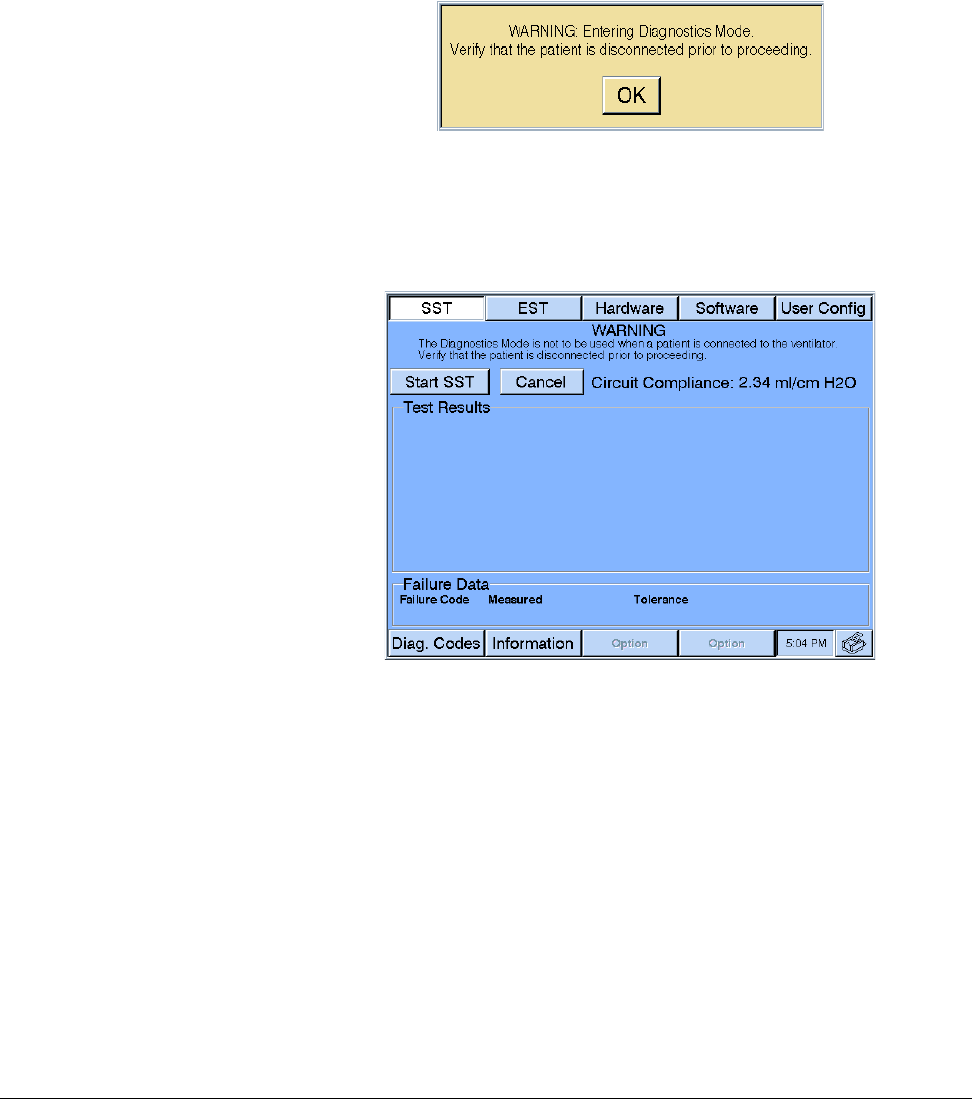
Chapter 5
5-6 Respironics V200 Ventilator Operator’s Manual REF 1057983 A
Setup
Entering Diagnostic Mode
1. To access the Diagnostic Mode, simultaneously press the ALARM
RESET and 100% O2 keys on the front panel for approximately five
seconds while turning the ventilator power on. The following message
will appear on the screen:
Figure 5-4: Warning in Diagnostic Mode
2. Press the OK button to enter the Diagnostic Mode. The following
screen appears:
Figure 5-5: Main Screen in Diagnostic Mode

Chapter 5
Setup
REF 1057983 A Respironics V200 Ventilator Operator’s Manual 5-7
User Configuration
Screen The buttons across the top and bottom bars are used to select the Diagnostic
Mode functions. To set up the machine for the first time for operation as a
ventilator, USER CONFIG should be selected. When this button is pressed, the
following screen appears.
Figure 5-6: User Configuration Screen
The User Configuration screen allows the operator to:
• Set the date and time
• Activate or deactivate the automatic patient circuit compliance
compensation feature
• Set the proper altitude
• Set 24 Hrs/AM PM time display
• Activate or deactivate backup battery check at startup
Date and Time
The real-time clock and calendar will last for approximately 2.5 years. When
the ventilator is received, the clock’s time will have to be changed to that of
the existing time zone. The date should be checked and changed if necessary.
Setting Date and Time Format
To set time (Figure 5-8) or date (Figure 5-7):
1. Press the desired date or time button (month, day, year, hour, minute,
second).
2. When the window insert appears, press the INCREASE or DECREASE
button, or rotate the control knob to change the value of the selected
parameter.
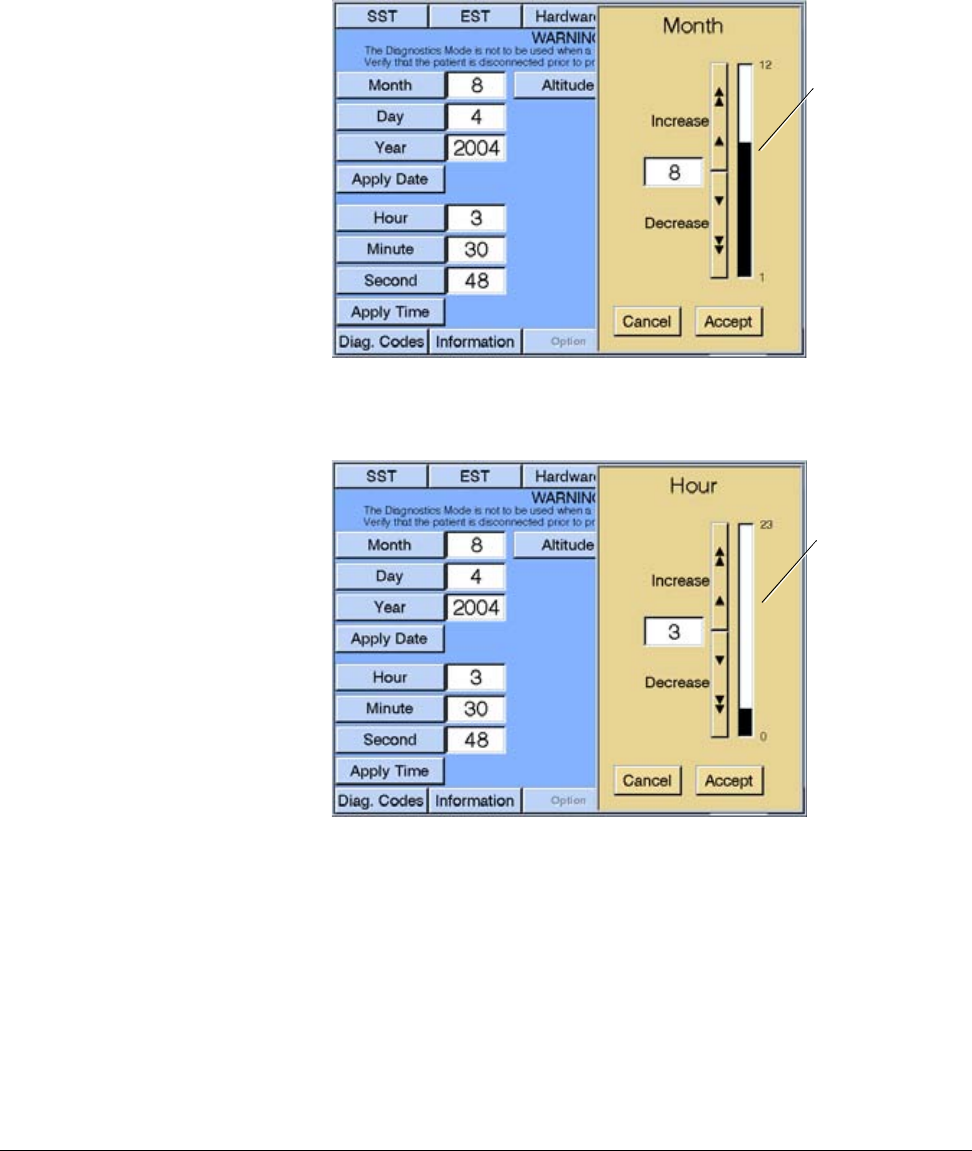
Chapter 5
5-8 Respironics V200 Ventilator Operator’s Manual REF 1057983 A
Setup
3. Press the ACCEPT button to confirm the change and return to the User
Config screen. Press the CANCEL button to leave the value
unchanged.
Figure 5-7: Setting the Date
Figure 5-8: Setting the Time
4. After the date and time values have been set, the changes will be
shown on the screen.
5. Press the APPLY DATE and APPLY TIME buttons to activate the
change.
Window insert
to change the
value of Month
Window insert
to change the
value of Hour
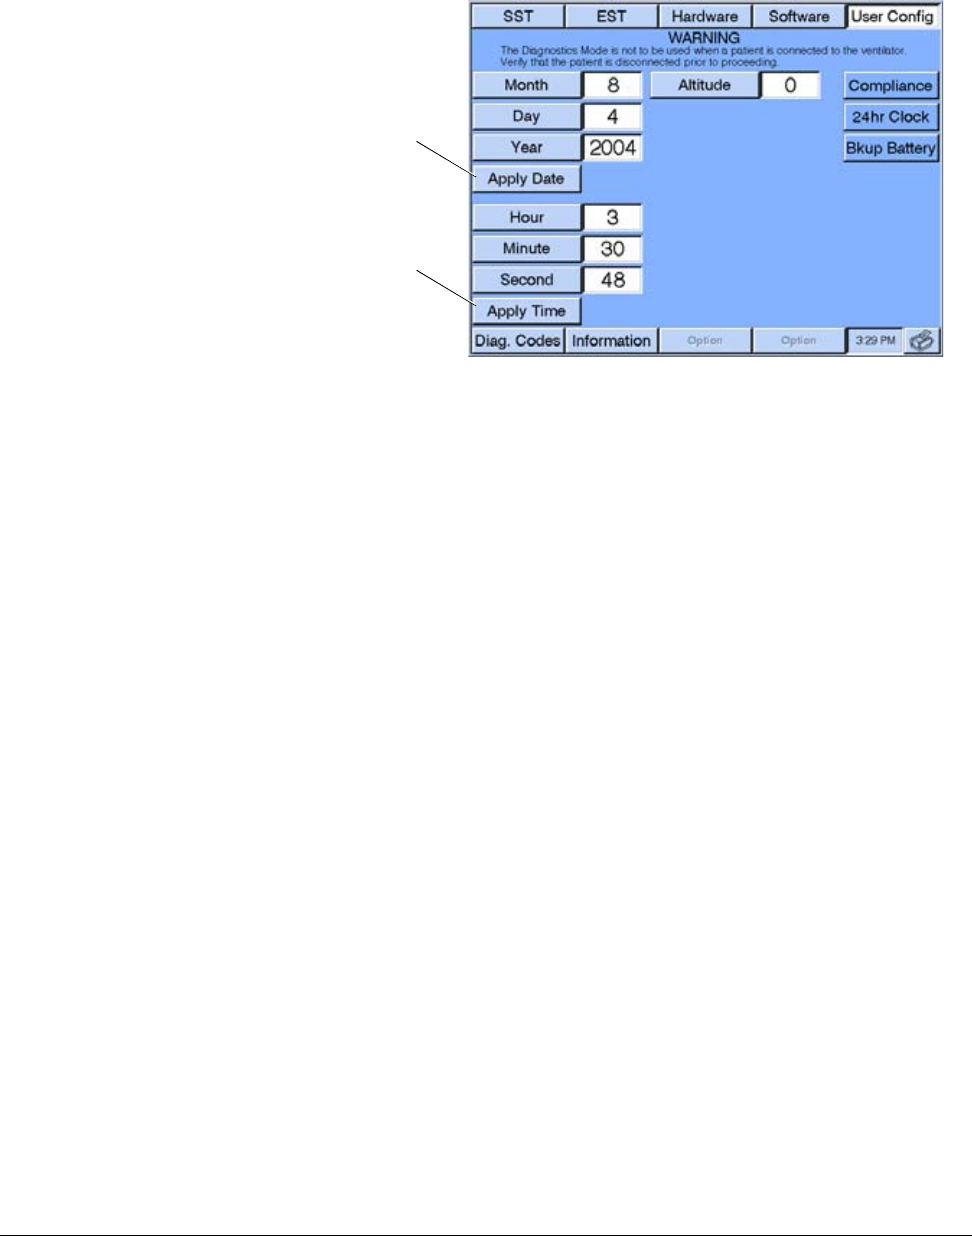
Chapter 5
Setup
REF 1057983 A Respironics V200 Ventilator Operator’s Manual 5-9
Figure 5-9: User Configuration Screen After Date and Time are Set
6. The 24 HR CLOCK button allows the operator or technician to set the
displayed time in an AM/PM (e.g., 1:15 PM) or 24 Hr. (e.g., 13:15)
format. When the 24 HR CLOCK button has a white background, time
is displayed in the 24 Hr. format; when it has a gray background, time
is displayed in the AM/PM format.
7. Press the 24 HR CLOCK button to toggle between AM/PM and 24 Hr.
formats. Observe the time display in the lower right hand corner of the
diagnostic screen to confirm the format.
Altitude
The User Configuration screen in the Diagnostic Mode is used to input the
altitude of the location of the ventilator. To enter Diagnostic Mode, follow the
instructions “Entering Diagnostic Mode” on page 5-6. At Figure 5-5 select
USER CONFIG and the screen in Figure 5-10 appears. Pressing the ALTITUDE
button enables you to set the altitude to that of the present geographical
location of the ventilator. This factor ensures a more accurate tidal volume
delivery.
Setting Altitude
To adjust the altitude:
1. Verify the altitude using an altimeter, if available, or estimate the
altitude in feet (or meters) above sea level.
2. Press the ALTITUDE button.
3. When the window insert appears, select either feet or meters. Press
the INCREASE or DECREASE button, or rotate the control knob, to
change the value. The longer the increase and decrease are touched,
the faster the value will change.
Apply Time
button
Apply Date
button
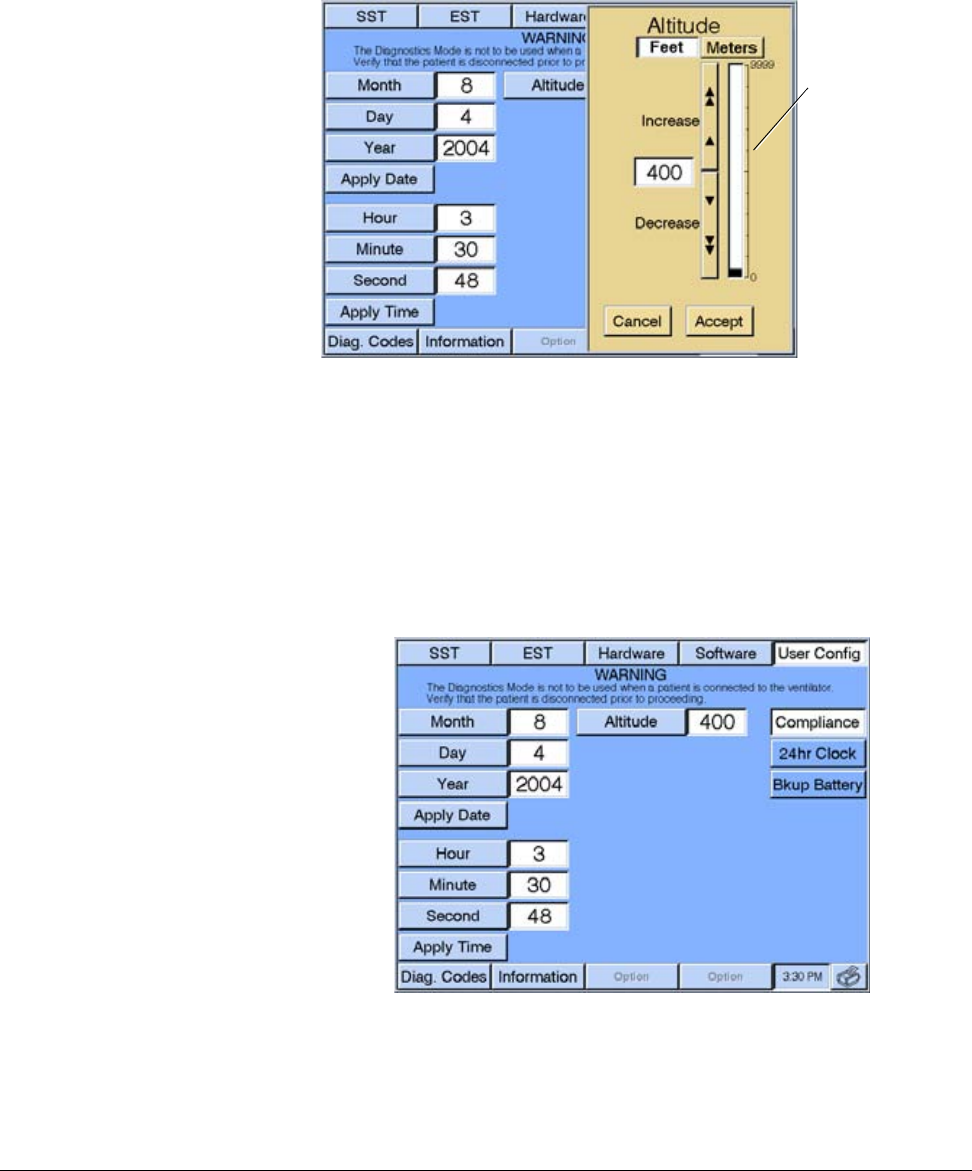
Chapter 5
5-10 Respironics V200 Ventilator Operator’s Manual REF 1057983 A
Setup
4. Press ACCEPT to accept the changed value. Press the CANCEL button
to leave the value unchanged.
Figure 5-10: Setting Altitude
Enabling/Disabling Tubing Compliance
The operator can activate or deactivate “tubing compliance compensation” in
the User Configuration screen. To enter Diagnostic Mode, follow the
instructions for “Entering Diagnostic Mode” on page 5-6. At Figure 5-5, select
USER CONFIG and the screen in Figure 5-11 appears.
Figure 5-11: Compliance Activated
Window insert
to change the
value of Altitude
Chapter 5
Setup
REF 1057983 A Respironics V200 Ventilator Operator’s Manual 5-11
You can have the ventilator compensate the volumes delivered in volume
controlled, mandatory breaths with the tubing compliance volume by
activating the COMPLIANCE button (Figure 5-11). Circuit compliance is
activated when this button has a white background. When the function is
activated the exhaled volumes reported by the ventilator will also be tubing
compliance compensated.
Backup Battery You can have the ventilator confirm the backup battery is connected each time
that the machine powers on. Pressing the BKUP BATTERY button (Figure 5-
12) allows this confirmation feature, which is identified by an active button
with a white background.
Figure 5-12: Backup Battery Activated
From then on when the machine powers on, it searches for a backup battery. If
the backup battery is connected to the ventilator, the startup is normal. If the
backup battery is not connected, the ventilator displays a message at startup
and a 5002 Diagnostic Code will be logged.
Figure 5-13: No Backup Battery Connected message
Backup Battery
(confirm at
startup)
button active

Chapter 5
5-12 Respironics V200 Ventilator Operator’s Manual REF 1057983 A
Setup
Press the OK button to clear the message from the screen. You may continue
to use the ventilator without the backup battery or power off the ventilator and
reconnect the backup battery.
To turn this feature off, enter Diagnostic Mode and deactivate the messaging
feature by pressing the BKUP BATTERY button.
1. Power off the ventilator.
2. Power on the ventilator while holding down the ALARM RESET and
100% O2 keys simultaneously for approximately 5 seconds.
3. A message appears on the ventilator screen asking the user to ‘Verify
that the patient is disconnected prior to proceeding.’ Press OK to enter
Diagnostic Mode.
4. Once you’ve entered Diagnostic Mode, select USER CONFIG button,
which takes you to the User Config screen.
5. Press the BKUP BATTERY button. The background color should return
to blue signifying that this feature has been deactivated.
Extended Self Test
(EST) We recommend that you run an Extended Self Test (EST) upon receipt of the
ventilator to ensure that there has been no shipping damage to the system. We
also recommend that you run EST between patients to verify the overall
functional integrity of the ventilator. Refer to chapter 11 for instructions on
running EST.
If EST was run successfully and all configuration information has been
entered, the ventilator is ready to be used. Follow the recommended
“Preoperational Procedure” on page 8-32 once a patient has been selected.
To exit the Diagnostics Mode you must turn the Power On/Off switch OFF ( )
and then turn it ON ( ).
WARNING: Always turn the ventilator power OFF before connecting additional
equipment.
REF 1057983 A Respironics V200 Ventilator Operator’s Manual 6-1
Chapter 6. Connecting Additional Equipment
Communication
Interface
The ventilator provides three communications interfaces: one serial RS-232
port, an analog output port, and a parallel port. (The parallel port is reserved
for use by the Communications Option.)
Figure 6-1: Ports and Outlets on the Rear Panel
WARNING: Always turn the ventilator power OFF before connecting additional
equipment.
CAUTION: To prevent the risk of excessive leakage due to external equipment being
connected to the ventilator via the communication ports, a means for
external separation of the conductive earth paths must be provided.
CAUTION: All equipment used and connected to the ventilator communications
ports (analog, parallel, and serial) must comply with the medical
electrical equipment (IEC601-1) or other applicable standards.
Circuit Breaker
(cover not shown)
Humidifier AC
Outlet
AC Power Cord
AnalogParallel
Remote Alarm
Serial
Chapter 6
6-2 Respironics V200 Ventilator Operator’s Manual REF 1057983 A
Connecting Additional Equipment
Connecting Serial
Communications
Devices
The serial port is designed to transmit data on a one device to one device serial
communications channel. In the connection between the two devices, the
ventilator assumes the “slave” role and responds to commands transmitted to
it via the serial port by the external “master.” The serial communications port
uses a standard RS-232, null modem, pin configuration. The ventilator
assumes the serial communications is set up for:
• 19,200 bits/second baud rate
• 8 data bits
• no parity bit
• 1 stop bit
The ventilator is sent commands that are 4 ASCII characters from the external
device and responds with a fixed format message. The commands and the
responses are specified in Appendix A, “RS-232 Communications Protocol”.
Connecting Remote
Alarm Port The ventilator is equipped with a remote alarm port enabling ventilator alarm
conditions to be sounded at remote locations away from the ventilator.
Pressing ALARM SILENCE deactivates the remote alarm. The ventilator signals
an alarm using a normally open or normally closed relay contact. The de-
energized state of the relay represents an alarm state (any Medium or High
Priority alarm) and the energized state represents no alarms.
The remote alarm port is a standard ¼ inch, female, phono jack (ring, tip,
sleeve) connector.
Figure 6-2: Remote Alarm Port
The port is configured to work with the Normally Open (NO), Normally Closed
(NC), and Respironics (LifeCare) systems. Each requires specific cabling
identified in Table 6-1:.
SleeveCommon TipNC
RingNO
Remote alarm
connector & cable

Chapter 6
Connecting Additional Equipment
REF 1057983 A Respironics V200 Ventilator Operator’s Manual 6-3
Table 6-1: Remote Alarm Cable Kits
Connecting
Humidifier We recommend only those humidifiers that comply with ISO 8185 for use on
the ventilator.
You should consult with the manufacturer(s) of the active humidification
system (humidifier and patient circuit components) for their most recent
recommendations regarding circuit configurations. Additionally, unless
specifically contraindicated by these manufacturers’ recommendations, we
recommend the use of a drop-down tube and water collection vial (water trap)
placed between the expiratory filter and the expiratory limb of the patient
circuit. This is necessary to prevent damage to the expiratory filter. Reference
P/N 1006241 Water Collection System, or equivalent.
CAUTION: Failure to protect the expiratory filter from damage by using inappropriate
patient circuit configurations may cause damage to delicate ventilator
components, such as the expiratory flow sensor, which may lead to
inaccurate spirometry or a Vent Inop condition.
Remote Alarm Cable Kits
System Part Number
Remote Alarm Cable Kit (Normally Open Protocol) 1003741
Remote Alarm Cable Kit (Normally Closed Protocol) 1003742
Remote Alarm Cable Kit — Respironics (LifeCare) 1003743
WARNING: Use only Respironics approved cables when connecting to the remote alarm
port. Be sure to fully insert the cable into the remote alarm port and into the
remote alarm.
WARNING: When using the Remote Alarm Port, be sure to fully test the Remote Alarm
Port and cable by:
• Verifying that annunciated alarms on the ventilator are also
annunciated on the remote alarm.
• Verifying that disconnecting the cable from the Remote Alarm port
results in an alarm notification at the Remote Alarm.
• Verifying that disconnecting the cable from the remote alarm
results in an alarm notification at the Remote Alarm.
CAUTION: The remote alarm port is intended to connect only to SELV (safety extra
low voltage and ungrounded system with basic insulation to ground), in
accordance with IEC60601-1. To prevent damage to the remote alarm,
the signal input should not exceed the maximum rating of 24 VAC or 36
VDC at 500 mA with a minimum current of 1 mA.

Chapter 6
6-4 Respironics V200 Ventilator Operator’s Manual REF 1057983 A
Connecting Additional Equipment
WARNING: Vent Inop is a serious condition, which is indicated by both visual and audible
alarms. If the ventilator is attached to a patient when Vent Inop occurs, the
patient must be supported with another means of life support ventilation.
When connecting a humidifier to the patient circuit, follow the setup
procedure supplied by the humidifier manufacturer. The following steps should
be followed to electrically connect the humidifier to the ventilator (for 100-
120 VAC ventilators). For ventilators using voltage other than 100-120 VAC,
the humidifier must be connected to another AC outlet.
1. Remove the cover of the humidifier AC power outlet on the back of the
ventilator (Figure 6-3).
Figure 6-3: Humidifier AC Outlet Cover
2. Connect the humidifier AC plug to the humidifier AC power outlet.
Figure 6-4: Humidifier AC Plug
(Circuit Breaker Cover
not shown)
Humidifier AC Outlet
Cover
(Circuit Breaker Cover
not shown)
Humidifier AC Plug
Chapter 6
Connecting Additional Equipment
REF 1057983 A Respironics V200 Ventilator Operator’s Manual 6-5
3. Run any test procedures recommended by the humidifier
manufacturer before the ventilator and humidifier are used on a
patient.
Connecting the
Patient Circuit 1. The humidifier should be connected between the inspiratory bacteria
filter (Figure 6-5) and the inspiratory limb of the patient circuit that
leads to the patient wye (Figure 6-6).
2. Follow steps illustrated by Figure 6-5, Figure 6-6, and Figure 6-7.
Figure 6-5: Ventilator Gas Outlet Port to Humidifier Patient Circuit Connection
WARNING: AC power is applied to the humidifier from the ventilator humidifier outlet
(only available on 100-120 VAC ventilators). Under no circumstances does
the Respironics V200 Ventilator provide control for the humidifier. To ensure
patient safety, it is important that any humidifier used with the ventilator
include an acceptable temperature control and monitoring mechanism, as
well as a temperature display and appropriate alarm capabilities (refer to
ISO 8185).
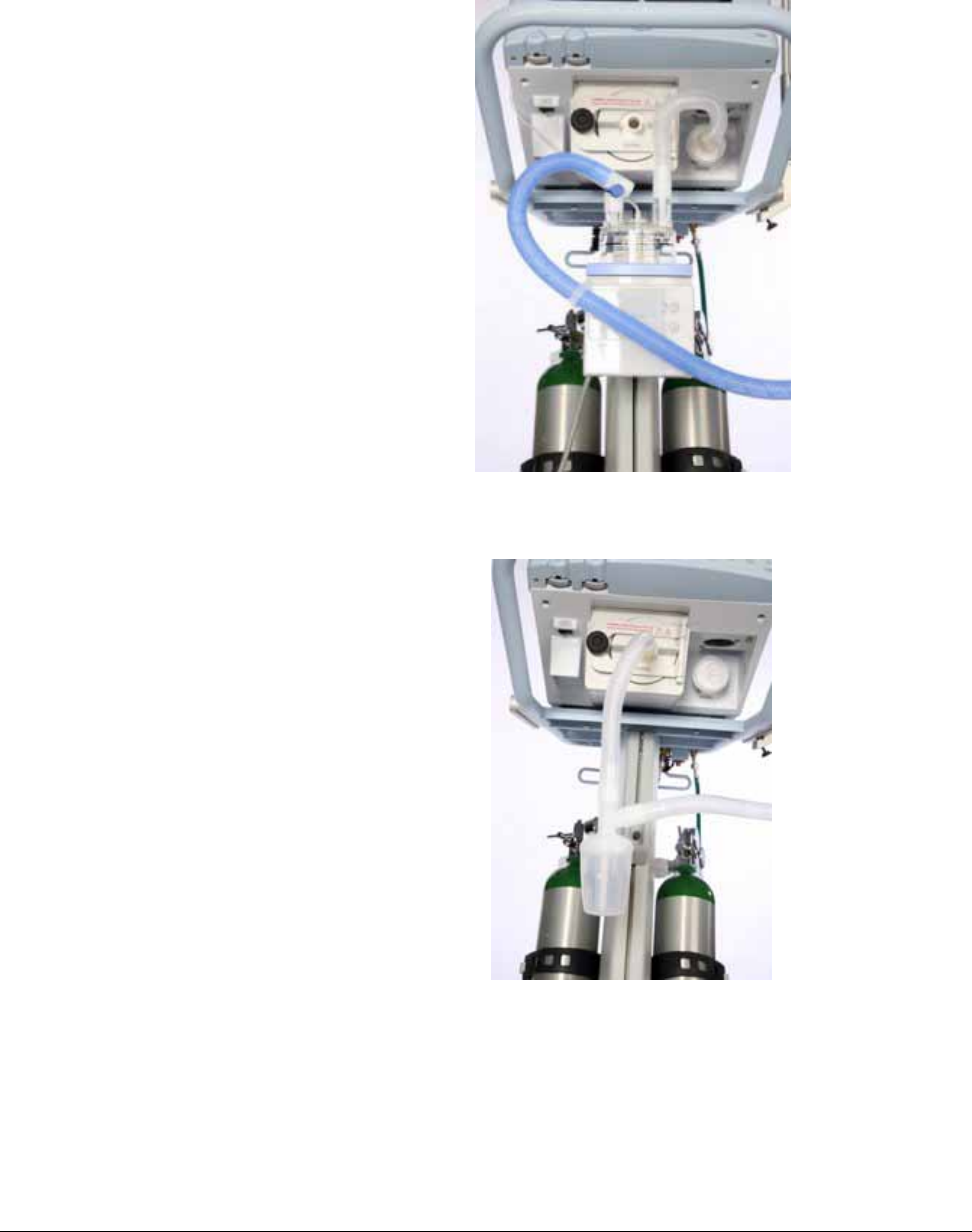
Chapter 6
6-6 Respironics V200 Ventilator Operator’s Manual REF 1057983 A
Connecting Additional Equipment
Figure 6-6: Humidifier Outlet to Patient Wye Connection
Figure 6-7: Expiratory Limb of Patient Circuit to Water Trap Connection (Shows Down
Tube between Ventilator and Water Trap)
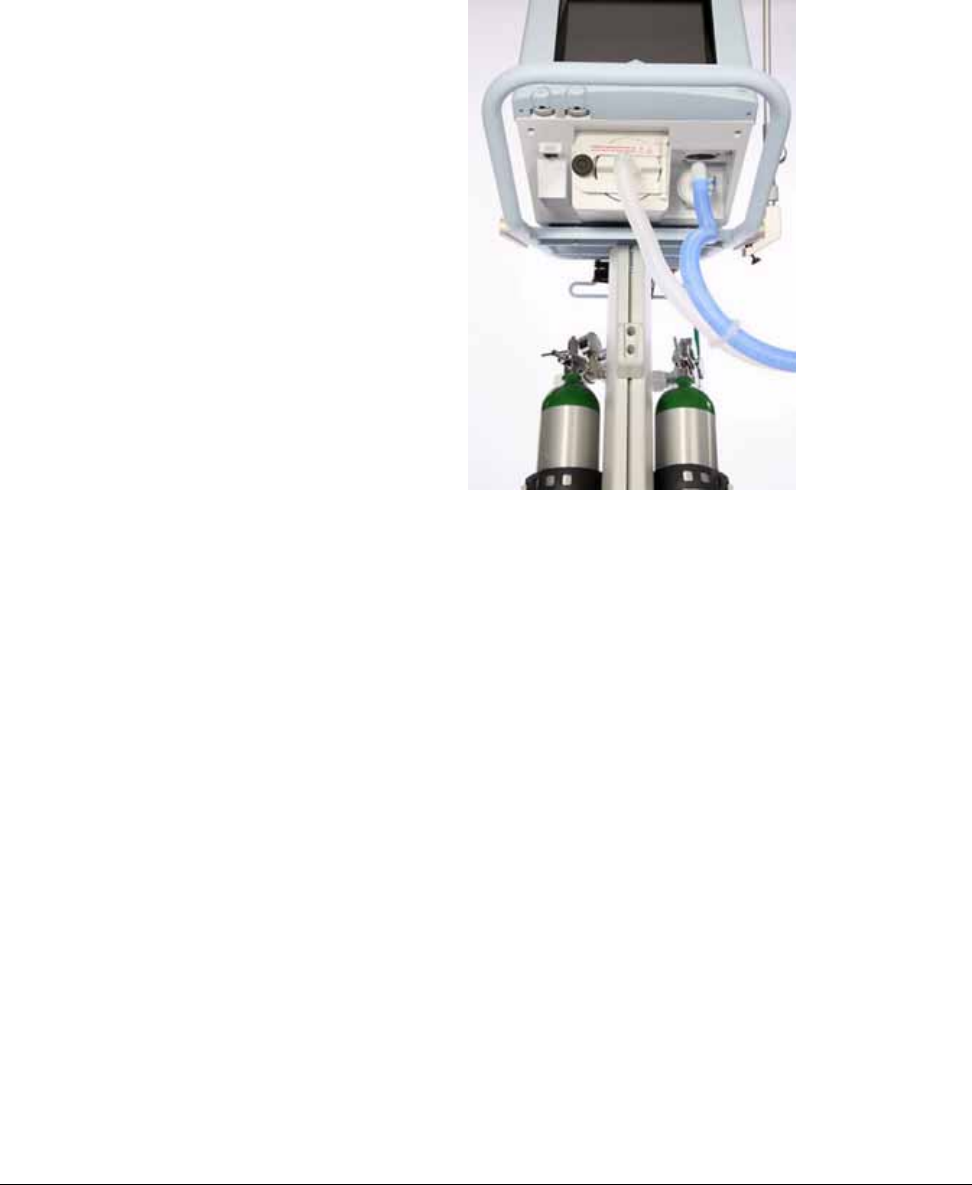
Chapter 6
Connecting Additional Equipment
REF 1057983 A Respironics V200 Ventilator Operator’s Manual 6-7
When connecting a patient circuit without a humidifier (for example, when
using a heat and moisture exchanger), refer to Figure 6-8.
Figure 6-8: Patient Circuit Connections Without Humidifier
Connecting the
Analog Port The analog output port adds a second remote alarm output. Pin 12 (fourth pin
from the top left is pin 12) signals an unsilenced high or medium urgency
alarm:
• 0 VDC = active alarm
• 1.5 VDC = no alarm or silenced alarm
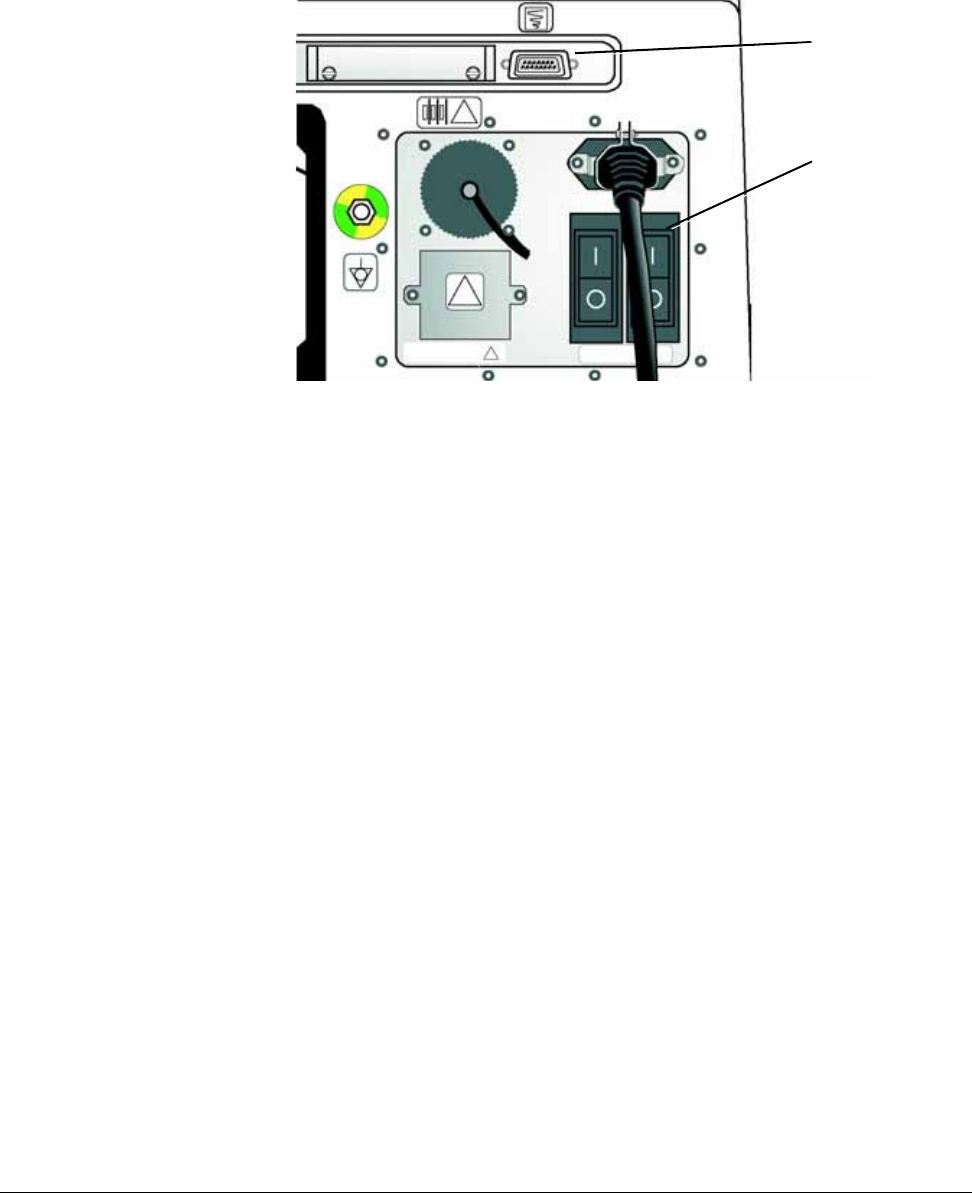

REF 1057983 A Respironics V200 Ventilator Operator’s Manual 7-1
Chapter 7. Operating Theory
Introduction This chapter describes the ventilator’s breath delivery capabilities. It includes
a system overview and descriptions of the ventilation modes and available
breath types. For descriptions of button settings and general operating
instructions, refer to Chapter 8, “Operating Instructions”.
System Overview The ventilator is a microprocessor-controlled ventilator capable of delivering a
mixture of air and oxygen to a patient’s lungs in a predetermined manner to
augment or replace the work normally performed by the patient’s respiratory
system. The ventilator performs breath delivery via two different patient
interfaces:
• endotracheal tube or tracheostomy tube (invasive ventilation)
• face mask, nasal mask, nasal pillows, or mouthpiece with a seal (non-
invasive ventilation)
Ventilator Breath
Types The ventilator provides the following ventilation breath types:
• Volume Control Ventilation (VCV) – invasive ventilation
• Pressure Control Ventilation (PCV) – invasive ventilation
• Non-Invasive Positive Pressure Ventilation (NPPV) – non-invasive
ventilation
During mechanical ventilation, the operator selects one of the ventilation
modes. The selected ventilation breath type, along with the selected mode, the
patient breathing effort, and the ventilator settings determine the type of
breath delivered. Each ventilation breath type has its own settings, alarms, and
monitor screens. (Refer to Chapter 8, “Operating Instructions”.)
Volume Control Ventilation (VCV)
In Volume Control Ventilation, breaths may be controlled by the ventilator
(mandatory) or triggered by the patient (spontaneous). When controlled by the
ventilator, breaths will be flow controlled and time cycled, thus delivering an
operator (TIDAL VOLUME) set volume. In Volume Control Ventilation, the flow
pattern can be selected between square and descending ramp waveforms.
Refer to Figure 7-1.
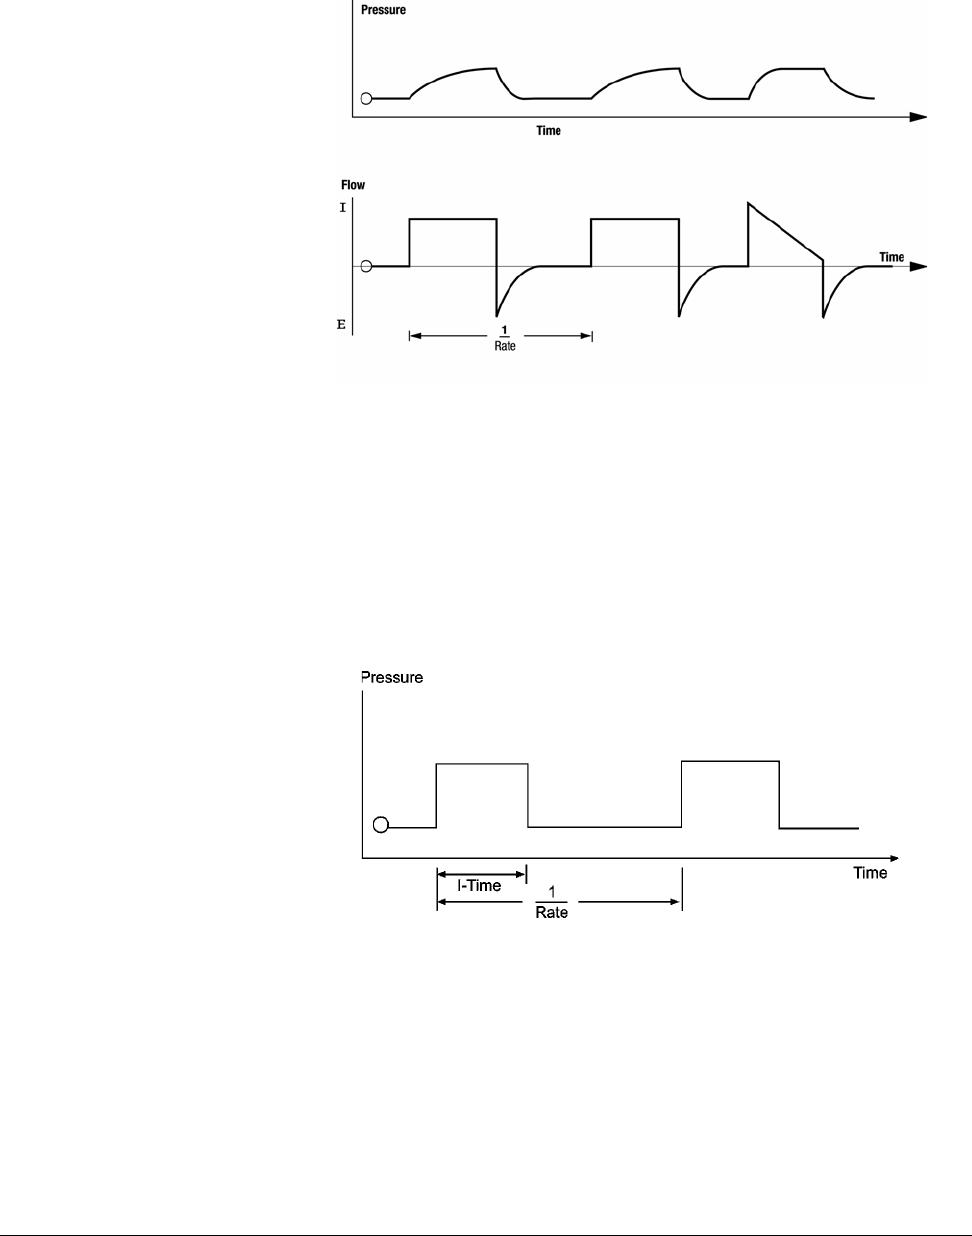
Chapter 7
7-2 Respironics V200 Ventilator Operator’s Manual REF 1057983 A
Operating Theory
Figure 7-1: Volume Control Ventilation (VCV) Waveform
Pressure Control Ventilation (PCV)
In Pressure Control Ventilation, breaths may be controlled by the ventilator
(mandatory) or by the patient (spontaneous). When controlled by the ventilator,
breaths are pressure limited and time cycled, resulting in an operator set
(PRESSURE) pressure being delivered for an operator set (I-TIME) period of
time. Refer to Figure 7-2.
Figure 7-2: Pressure Control Ventilation (PCV) Waveform

Chapter 7
Operating Theory
REF 1057983 A Respironics V200 Ventilator Operator’s Manual 7-3
Ventilation Modes
Common to VCV and
PCV
In Volume Control Ventilation and Pressure Control Ventilation, the operator
can select between ventilation modes of Assist/Control, SIMV, and CPAP.
Assist Control Ventilation (A/C)
With the Assist/Control mode (refer to Figure 7-1 or Figure 7-2), a minimal rate
and tidal volume (or inspiratory pressure) are set by the operator. The patient
can trigger the ventilator at a more rapid rate, but the operator set tidal volume
(or inspiratory pressure) is delivered during each breath. The ventilator delivers
only mandatory breaths. Assisted breaths may be either pressure or flow
triggered. If the trigger setting is adjusted so that the patient cannot trigger the
ventilator, all breaths will be delivered by the ventilator at the operator set rate
and tidal volume (or pressure).
Synchronized Intermittent Mandatory Ventilation (SIMV)
SIMV is a ventilation mode where the patient is allowed to breathe
spontaneously and the machine attempts to deliver volume (VCV) or pressure
(PCV) mandatory breaths in synchrony with the patient’s effort at the operator
set rate and volume (or pressure). This is accomplished by a combination of
spontaneous and mandatory windows that open and close. The type of breath
delivered depends upon whether the event during the window is patient
initiated, operator initiated or time initiated. This logic is illustrated in Table 7-
1: “SIMV Logic”.
SIMV Logic
Current
SIMV State Inputs Ventilator Response Next
SIMV State
Mand
Window Time Trigger
(breath period
timer expires)
Deliver mandatory breath using operator
settings for mandatory breath type; Restart
breath period
Mand
Window
Mand
Window Patient Trigger;
Operator Trigger Deliver mandatory breath using operator
settings for mandatory breath type Spont
Window
Spont
Window Patient Trigger Deliver a spontaneous breath using
operator settings for spontaneous breath
type
Spont
Window
Spont
Window Operator Trigger Deliver a mandatory breath using operator
settings for mandatory breath type Spont
Window
Spont
Window Time Trigger
(breath period
elapses)
Restart breath period timer Mand
Window
Table 7-1: SIMV Logic
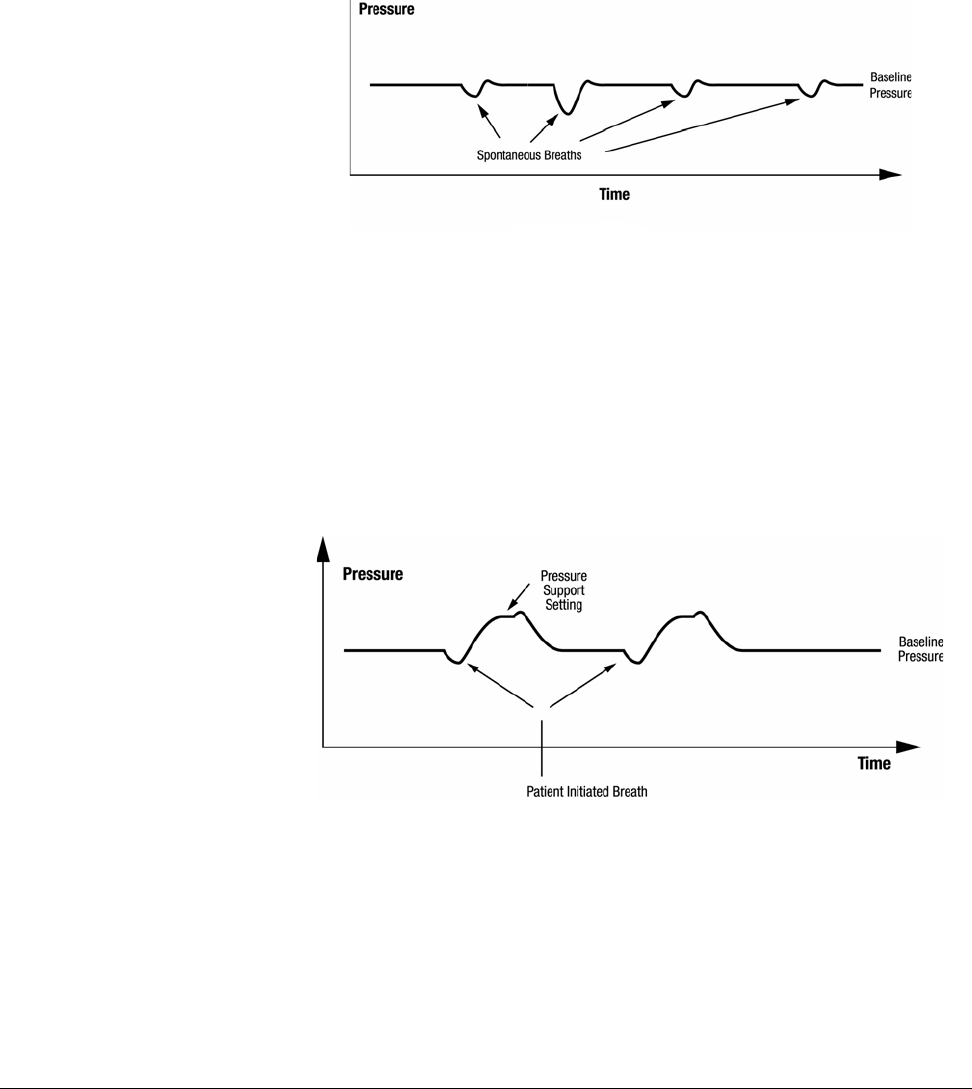
Chapter 7
7-4 Respironics V200 Ventilator Operator’s Manual REF 1057983 A
Operating Theory
Continuous Positive Airway Pressure (CPAP)
CPAP is a spontaneous mode of ventilation. No mandatory breaths are
delivered. Throughout the breath cycle, an operator set pressure is provided.
The level of pressure delivered during CPAP is the baseline pressure, or PEEP
(Positive end Expiratory Pressure). Refer to Figure 7-3.
Figure 7-3: Continuous Positive Airway Pressure (CPAP)
Pressure Support Ventilation (PSV)
In Pressure Support Ventilation, the patient’s spontaneous efforts are assisted
by the ventilator at an operator set level of inspiratory pressure. Inspiration is
initiated by the patient and terminated when the inspiratory flow falls below an
operator set percentage of the peak flow during this breath. During Pressure
Support, the patient determines the respiratory rate, and the patient and
ventilator determine the inspiratory time and tidal volume. Refer to Figure 7-4.
Figure 7-4: Pressure Support Ventilation (PSV)

Chapter 7
Operating Theory
REF 1057983 A Respironics V200 Ventilator Operator’s Manual 7-5
Positive End Expiratory Pressure (PEEP)
The PEEP pressure is the operator set baseline pressure maintained during
exhalation. All breaths are referenced to this baseline pressure and the
resulting pressure is in addition to the baseline pressure. Refer to Figure 7-5.
Figure 7-5: Positive End Expiratory Pressure (PEEP)
Rise Time Setting
Rise Time applies to all pressure targeted breaths — PSV, PCV, and IPAP in
NPPV. The operator can adjust the velocity of pressurization to better match
the patient’s demand for flow. Refer to Figure 7-6.
Figure 7-6: Rise Time
Patient Initiated Breath Triggering
Patient initiated breaths can be flow or pressure triggered in A/C, SIMV, CPAP
for Pressure or Volume breath types, or flow triggered in NPPV. The pressure
trigger level determines the amount of pressure below the baseline pressure
that the patient must create in order for the ventilator to deliver a breath. The
Flow Trigger level is the amount of flow that the patient must inspire from the
base flow in order for the ventilator to deliver a breath.

Chapter 7
7-6 Respironics V200 Ventilator Operator’s Manual REF 1057983 A
Operating Theory
Patient Leak Display
Estimated patient leak (Pt Leak) is displayed in LPM and updated at each
breath. Pt Leak is the average leak rate during a breath (delivered volume
minus exhaled volume divided by the breath time).
Pt Leak is estimated breath by breath. If the physical characteristics of the
leak change, there will be a corresponding change in the actual leak flow,
which will be detected and leak estimation will be updated in subsequent
breaths. Physical characteristics of leaks are determined by a number of
factors, for example, the size and shape of the leak (such as a gap in the seal
between the mask and face). Leaks that may occur during invasive ventilation
are usually undesirable and are not compensated to allow easier leak
detection.
Ventilation Modes
Common to NPPV Non-Invasive Positive Pressure Ventilation (NPPV)
In Non-Invasive Ventilation, gas is delivered to the patient via a nasal mask,
full face mask, nasal pillows, or mouthpiece with a lip seal. The operator
determines whether the mode is totally spontaneous (Spont Ventilation Mode)
or spontaneous with a backup rate (Spont/T Ventilation Mode).
Spontaneous Ventilation Mode (Spont)
In Spontaneous Ventilation Mode, the operator sets the pressure during
exhalation (EPAP) and the target pressure during inspiration (IPAP). The
patient triggers the breath based on the Flow Trigger setting. Exhalation is
determined by the setting E-Trigger, which is a percentage of peak flow during
the breath. Refer to Figure 7-7.
Spontaneous/Timed Ventilation Mode (Spont/T)
In the Spontaneous/Timed Ventilation Mode, the patient can breathe
spontaneously, or receive machined controlled breaths. The machine
controlled breaths are delivered for a set inspiratory time at a set breath rate.
In Spont/T mode, every patient initiated breath is spontaneous and restarts the
breath period timer. If the patient triggers a breath before the breath period
elapses, the ventilator delivers a spontaneous supported breath (based upon
the settings). If the breath period elapses without a patient trigger, the
ventilator delivers a ventilator initiated mandatory breath at the set IPAP level.
Patient initiated, time cycled breaths are not delivered in Spont/T mode. Refer
to Figure 7-7.
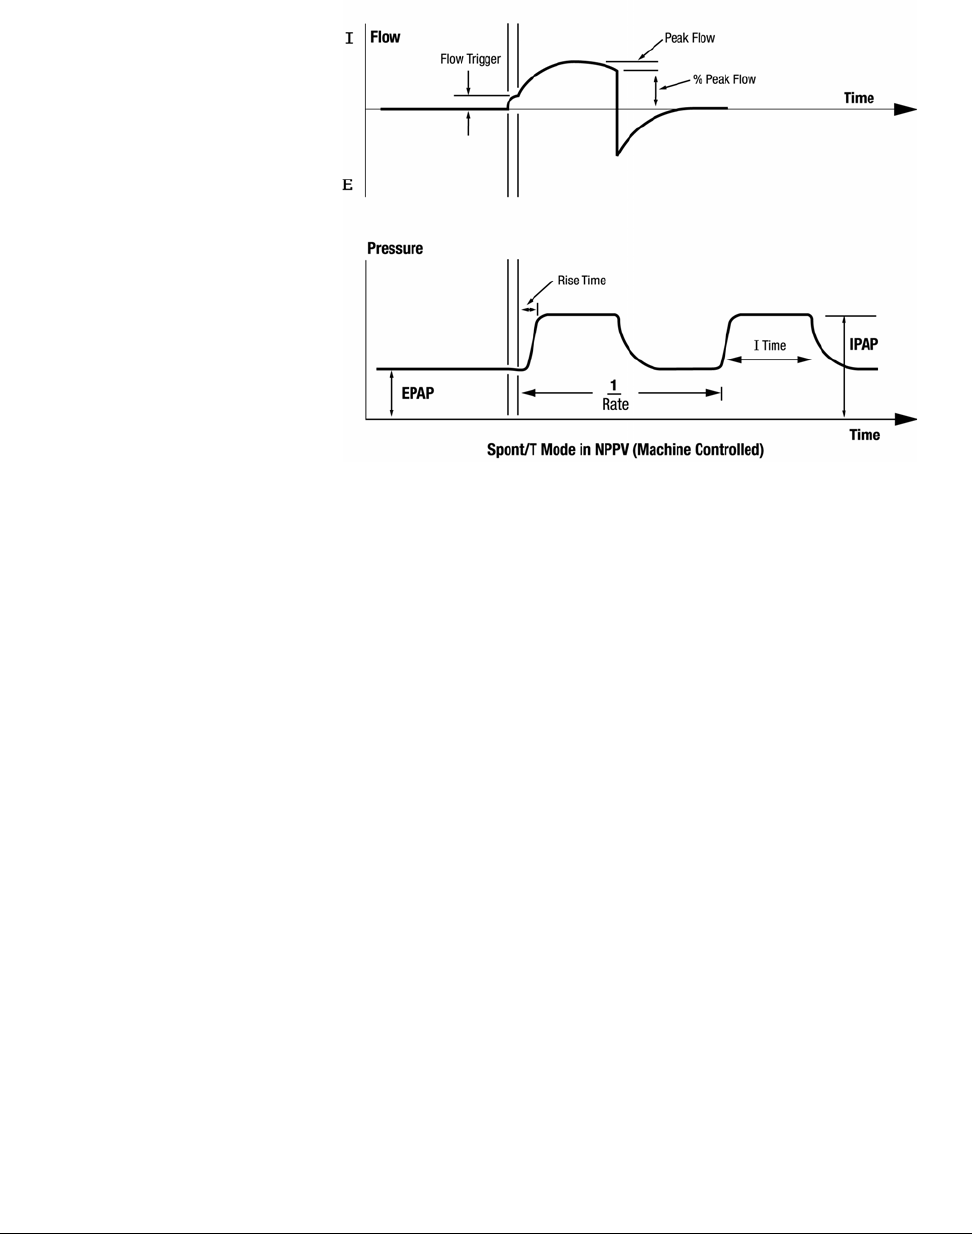
Chapter 7
Operating Theory
REF 1057983 A Respironics V200 Ventilator Operator’s Manual 7-7
Figure 7-7: Spont/T Mode
Emergency Modes of
Ventilation The ventilator has the following two emergency modes of ventilation that are
entered in response to certain alarm conditions:
• Apnea Ventilation
• Safety Valve Open
Apnea Ventilation
Apnea ventilation provides an emergency mode of ventilation if the ventilator
does not deliver a breath for an operator set interval of time. The apnea time
can be set between 10 and 60 seconds. Upon entering this mode of
ventilation, the ventilator will alarm and immediately start using the Apnea
Rate setting specified by the operator. In PCV and VCV, the ventilator will begin
delivering breaths in Assist/Control (A/C), but with the operator set Apnea
Rate. In NPPV, the ventilator will deliver only machine controlled breaths
either at the operator set Apnea Rate or in response to patient effort. In Apnea
ventilation, the alarms used are the ones used for machine controlled breaths
for the ventilation breath type (VCV, PCV and NPPV) the ventilator was using
when Apnea occurred.

Chapter 7
7-8 Respironics V200 Ventilator Operator’s Manual REF 1057983 A
Operating Theory
The ventilator will reset out of Apnea Ventilation if the operator presses the
Alarm Reset button, or if the patient triggers two successive breaths.
Safety Valve Open (SVO)
Safety valve open is an emergency mode of ventilation that allows the patient
to breathe through the system whenever any of the following occur:
1. An occlusion is detected.
(The ventilator resumes normal breathe delivery if the occlusion is
removed.)
2. Loss of both the air supply and the oxygen supply occurs.
(The ventilator resumes normal breath delivery if the gas supply is made
available.)
3. The Ventilator Inoperative state (Vent InOp) is entered due to a hardware
malfunction that prevents breath delivery.
(The ventilator will not resume normal breath delivery in this case. Call for
service.)
During SVO:
1. The safety valve is opened,
2. The exhalation valve is opened,
3. The air and oxygen valves remain closed,
4. A high priority alarm is activated,
5. The Safety Valve Open indicator is illuminated,
6. The Normal indicator is turned off.
Parameters Used in Apnea Ventilation, Settings, and Alarm Limits
VCV PCV NPPV
Settings Tidal Volume
Peak Flow
PEEP
I-Trigger (pressure/flow)
Flow pattern
O2 %
Insp Hold
Apnea Rate
Inhalation Pressure
Inhalation Time
PEEP
I-Trigger (pressure/flow)
Rise Time
O2 %
Apnea Rate
IPAP
EPAP
Inhalation Time
Rise Time
I-Trigger (flow)
E-Cycle
O2%
Apnea Rate
Alarm
Limits High Pressure
Low Insp Pressure
Low PEEP
Low Mandatory Tidal Volume
High Rate
High Exhaled Minute Volume
Low Exhaled Minute Volume
High Pressure
Low Insp Pressure
Low PEEP
Low Mandatory Tidal Volume
High Rate
High Exhaled Minute Volume
Low Exhaled Minute Volume
Low Pressure
Low EPAP
Low Tidal Volume
High Rate
Low Exhaled Minute Volume
High Leak
Table 7-2: Parameters Used in Apnea Ventilation, Settings, and Alarm Limits

REF 1057983 A Respironics V200 Ventilator Operator’s Manual 8-1
Chapter 8. Operating Instructions
Overview
There are three ventilation breath types:
• Volume Control Ventilation (VCV)
• Pressure Control Ventilation (PCV)
• Non-Invasive Ventilation (NPPV)
Each has mandatory or machine controlled breaths and each has patient
controlled or spontaneous breaths.
Each ventilation breath type has its own settings that are mutually exclusive
from the other ventilation modes.1
• In VCV, you can select either A/C, SIMV, or CPAP mode.
• In PCV, you can select either A/C, SIMV, or CPAP mode.
• In NPPV, you can select Spont/T or Spont mode.
Alarms are specific to the ventilation breath type. Alarm limits in one
ventilation breath type are mutually exclusive from the alarm limits of the
other ventilation breath types.
The ventilator is easy to use because all mode settings and alarm limits are
selected using the same three-step process:
1. Select the parameter to be changed by pressing the associated button.
The screen shown in Figure 8-1 appears.
WARNING: Ensure that an alternative means of ventilation (that is, a resuscitator or
similar device) is available while the ventilator is in use on a patient.
WARNING: The ventilator complies with the requirements of IEC 601-1-2 (EMC
collateral standard), including the E-field susceptibility requirements at a
level of 10 volts per meter. However, even at this level of immunity, certain
transmitting devices (cellular phones, walkie-talkies, etc.) emit radio
frequencies that could disrupt ventilator operation if operated in a range too
close to the ventilator.
WARNING: DO NOT operate the ventilator in a Magnetic Resonance Imaging (MRI)
environment.
1. Set O2 and patient type are exceptions that can be changed only in the active mode and
applies to all modes.
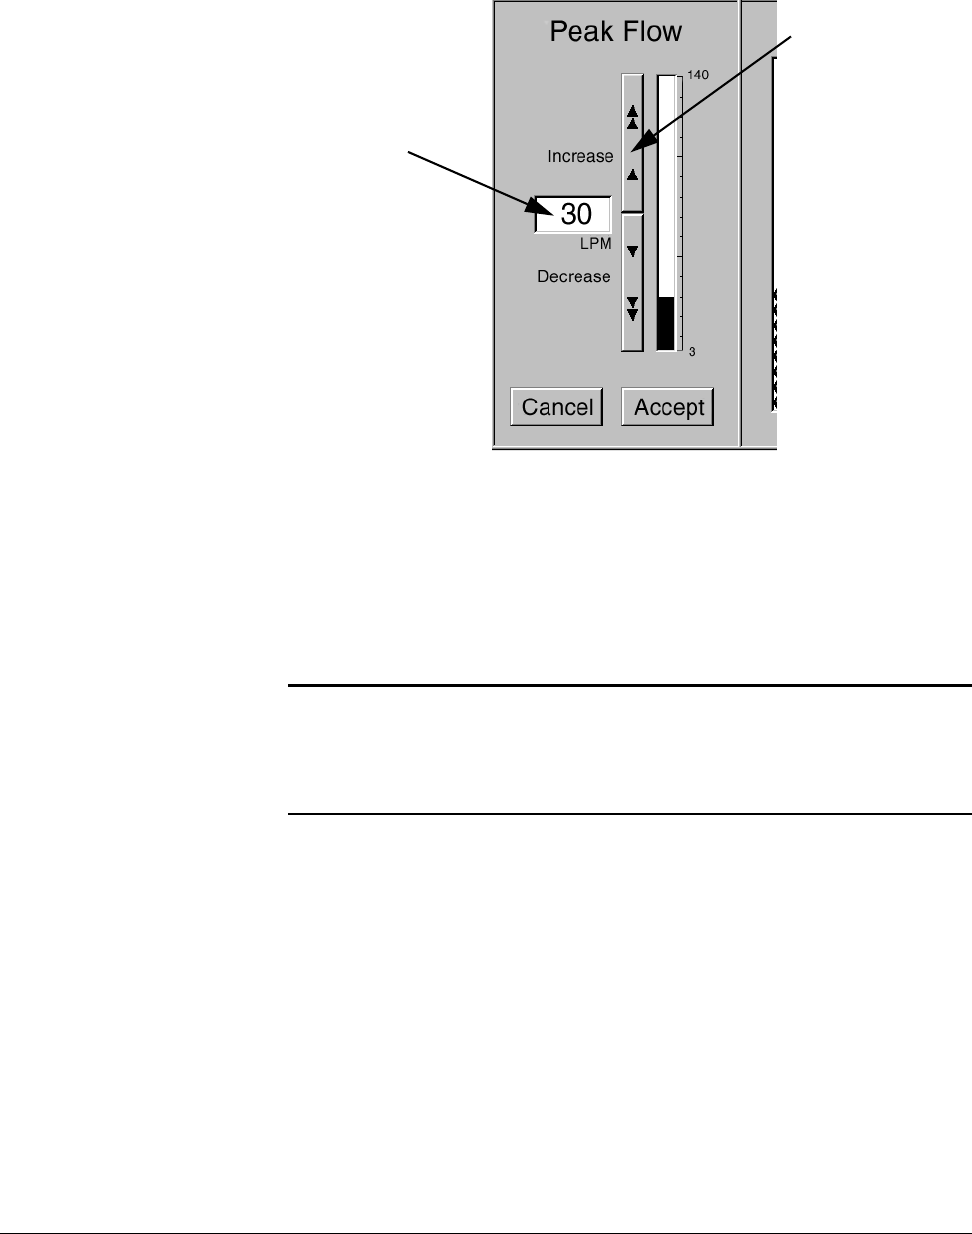
Chapter 8
8-2 Respironics V200 Ventilator Operator’s Manual REF 1057983 A
Operating Instructions
Figure 8-1: Entering Settings and Alarm Parameters
2. Press the INCREASE bar or DECREASE bar until the desired value
appears in the digital window, or use the front panel control knob to
increase or decrease the displayed value.
3. Press the ACCEPT button (or FRONT PANEL ACCEPT key) to enter the
value and return to the previous display. Press the CANCEL button to
leave the value unchanged.
NOTE: All volumes entered into the ventilator are assumed to be BTPS (Body
Temperature atmospheric Pressure Saturated (with H2O)) volumes
unless otherwise noted. All volumes reported by the ventilator are
reported as BTPS volumes. All pressures are assumed to be relative to
atmospheric pressure unless otherwise noted.
Digital value of
setting to be
changed
Increase bar, the
farther from the middle
the bar is pushed the
faster the value
changes. Similarly for
the decrease bar.
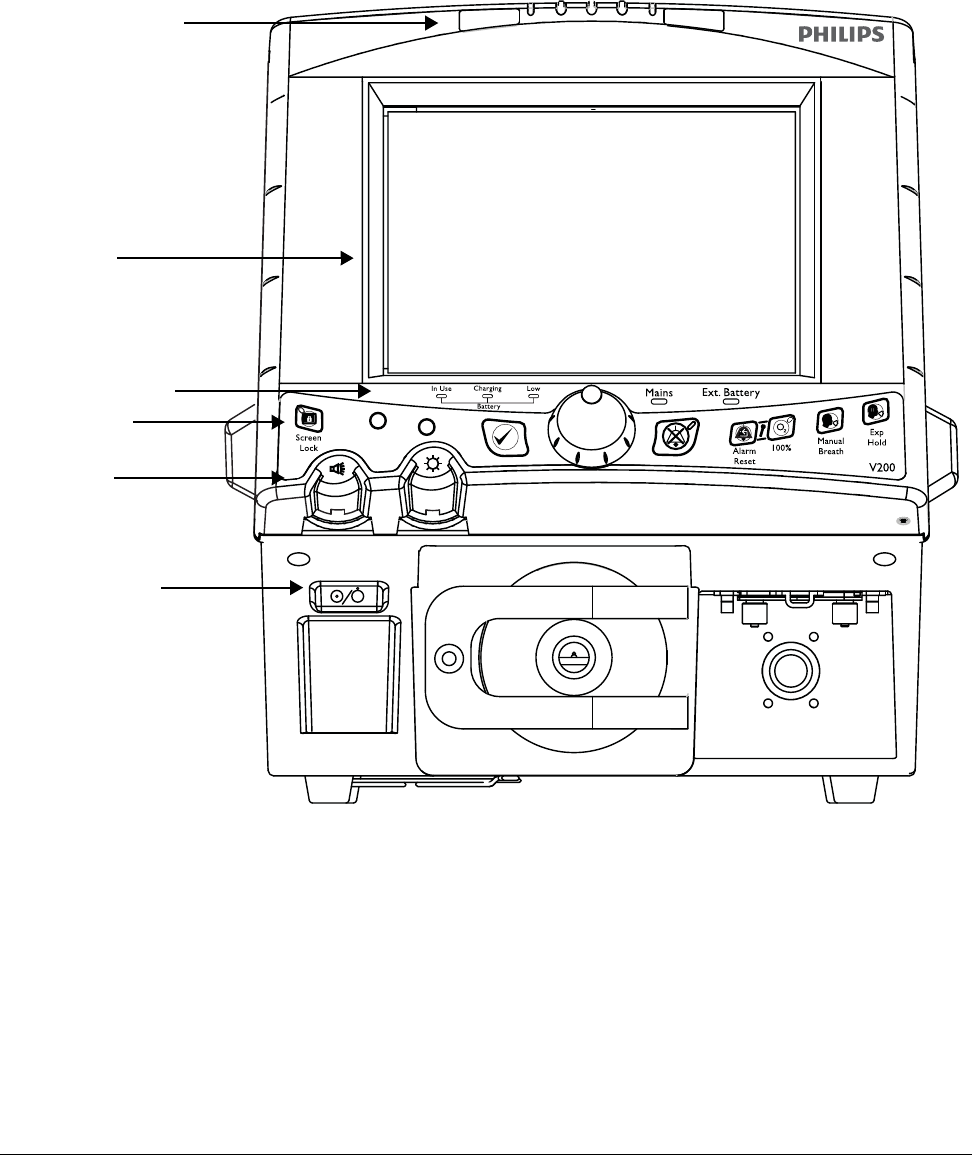
Chapter 8
Operating Instructions
REF 1057983 A Respironics V200 Ventilator Operator’s Manual 8-3
The Front Panel The text version of the ventilator’s front panel includes the indicators and
controls shown in Figure 8-2. The symbol version of the front panel is shown in
Figure 8-3.
Figure 8-2: Front Panel — Text Version
Inop
Ven t Safety
Valve
Alarm Status Indicators
Touch Display
Power Status Indicators
Front Panel Keys
Power On/Off Switch
Level Controls
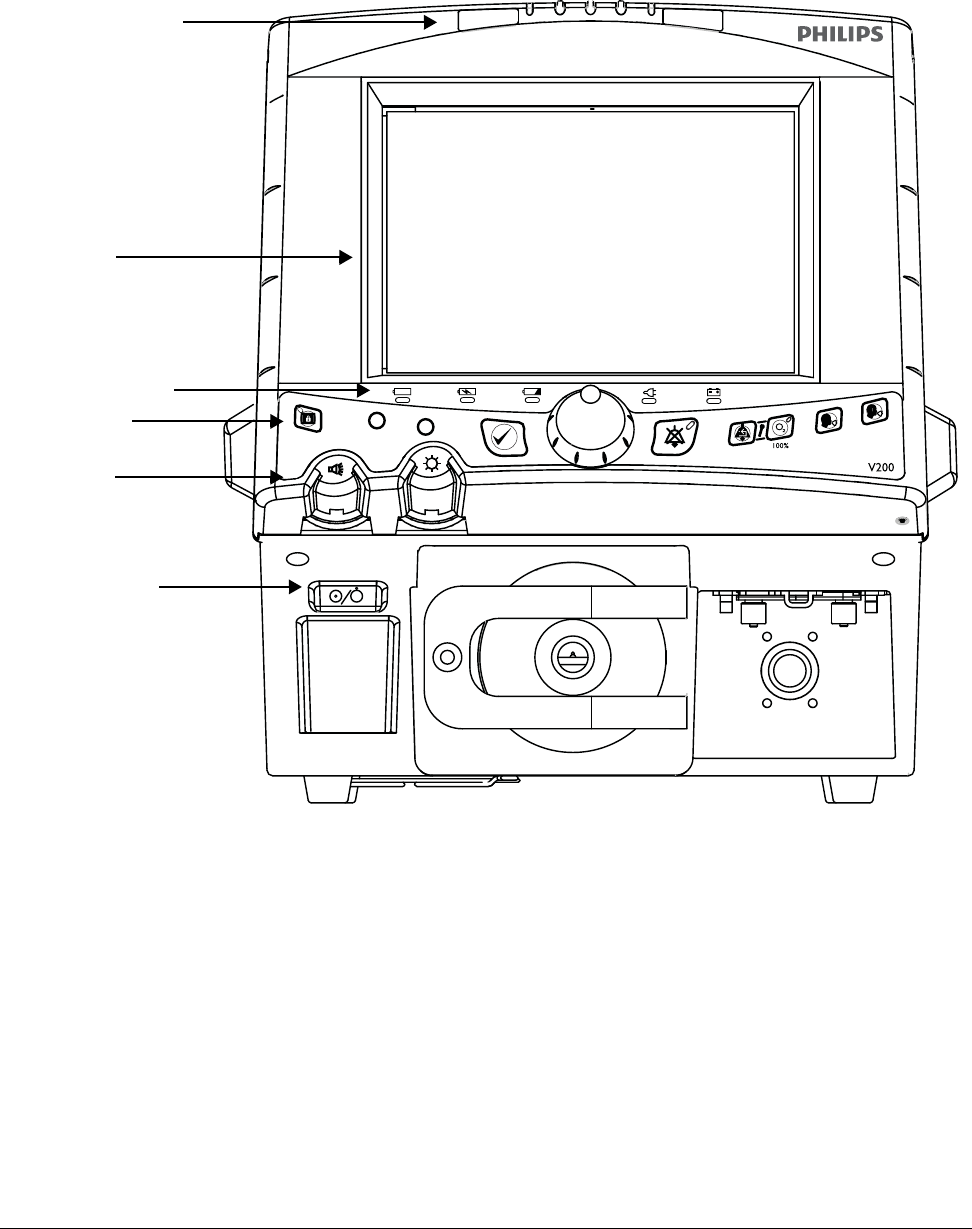
Chapter 8
8-4 Respironics V200 Ventilator Operator’s Manual REF 1057983 A
Operating Instructions
Figure 8-3: Front Panel — Symbol Version
Inop
Ven t Safety
Valve
Alarm Status Indicators
Touch Display
Power Status Indicators
Front Panel Keys
Power On/Off Switch
Level Controls

Chapter 8
Operating Instructions
REF 1057983 A Respironics V200 Ventilator Operator’s Manual 8-5
Alarm Status Indicators
The alarm status indicators located at the top of the ventilator alert you to the
ventilator’s alarm conditions. (Refer to Chapter 9, “Alarms” for more detailed
descriptions.)
Figure 8-4: Alarm Status Indicators
Alarm Status Indicators
Alarm Indicator Status Description
Normal Green No active or auto reset alarm condition exists.
High Flashing red A high priority alarm condition exists.
Med/Low Flashing
yellow
Continuous
yellow
A medium priority alarm condition exists.
A low priority alarm condition exists. In addition,
indicates auto reset conditions
Vent Inop Red (active) The ventilator is not capable of supporting
mechanical ventilation and requires service.
During Vent Inop, the ventilator opens the safety
valve to enable the patient to breathe room air
spontaneously. The ventilator also discontinues
detection of new alarm conditions during Vent
Inop.
WARNING: Vent Inop is a serious condition, which is
indicated by both visual and audible
alarms. If the ventilator is attached to a
patient when Vent Inop occurs, the
patient must be supported with another
means of life support ventilation.
Safety Valve Red (active) The safety valve is open and the ventilator is not in
operation. This is a high priority alarm condition.
When the Safety Valve indicator is illuminated, the
ventilator is not providing ventilatory support to
the patient. The safety valve opens to allow the
patient to breathe spontaneously through the
ventilator circuit. The patient must be capable of
creating a spontaneous breath in order to breathe
through the safety valve.
Table 8-1: Alarm Status Indicators
Normal Alarm Med/LowAlarm High
VENT
INOP SAFETY
VALVE
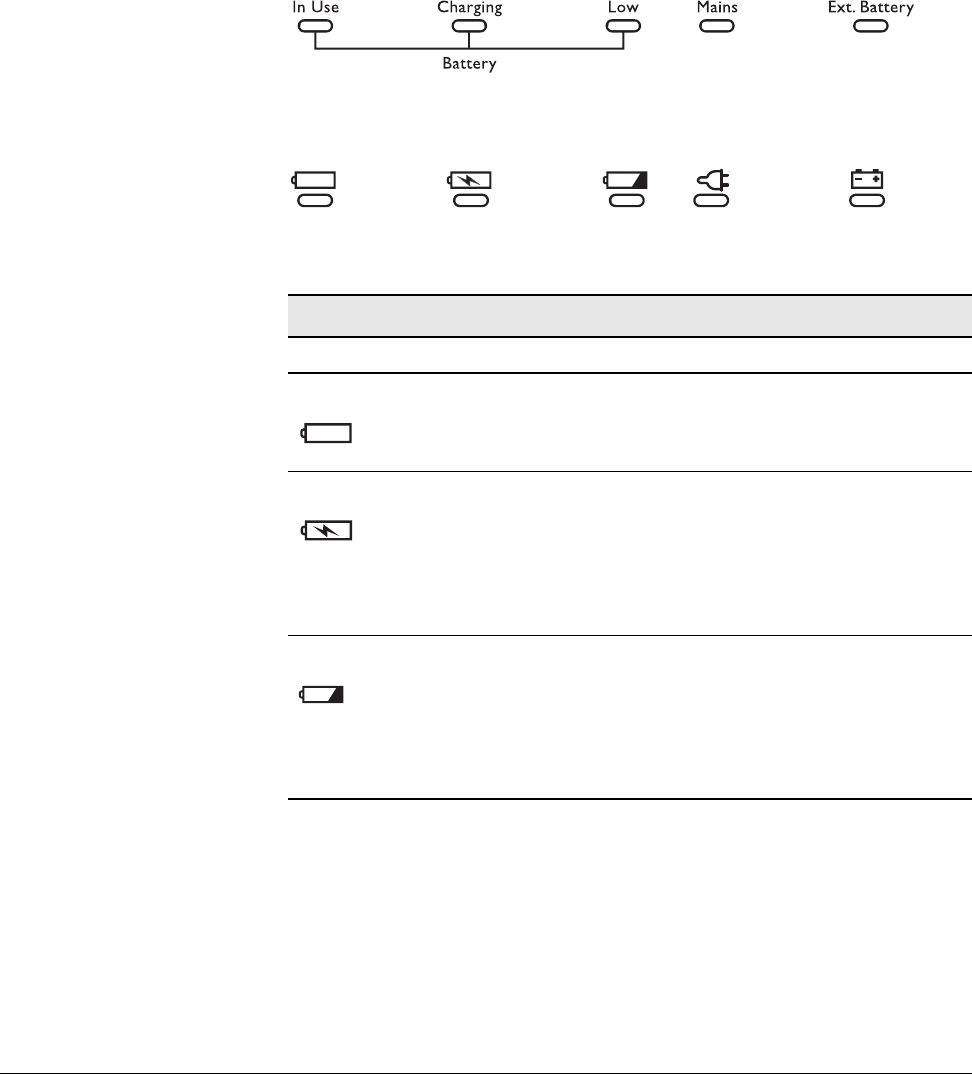
Chapter 8
8-6 Respironics V200 Ventilator Operator’s Manual REF 1057983 A
Operating Instructions
Power Status Indicators
Power status indicators alert you to the status of the backup battery. The text
version of the power status indicators is shown in Figure 8-5. The symbol
version of the power status indicators is shown in Figure 8-6.
NOTE: The ventilator selects its power source based on the following
prioritization: AC power (if present), external battery, then backup battery.
Figure 8-5: Power Status Indicators — Text Version
Figure 8-6: Power Status Indicators — Symbol Version
Power Status Indicators
Battery Indicator Status Description
In Use Yellow (active) The ventilator is running on backup battery
power. The backup battery is used when there
is no AC power and no other battery is
available.
Charging Yellow (active) The backup battery is charging. The battery
should not be considered a fully charged power
source when this indicator is illuminated. The
Charging indicator will stay on for the duration
of the charging cycle, which can last up to ten
hours. Once the battery has fully charged, the
Charging indicator will turn off.
Low Flashing red The backup battery has approximately 5
minutes of power remaining.
WARNING: When the battery low indicator is
flashing red, operation of the
ventilator from battery power should
be discontinued.
Table 8-2: Power Status Indicators (Sheet 1 of 2)

Chapter 8
Operating Instructions
REF 1057983 A Respironics V200 Ventilator Operator’s Manual 8-7
Mains Green The ventilator is connected to an AC power
source and the rear panel Mains circuit breaker
is on ( I ).
Ext. Battery Yellow Continuously illuminated when the external
battery is in use.
NOTE: The external battery is an optional
accessory. See “Options and
Accessories” on page 13-1 for more
information.
Power Status Indicators (Continued)
Battery Indicator Status Description
Table 8-2: Power Status Indicators (Sheet 2 of 2)
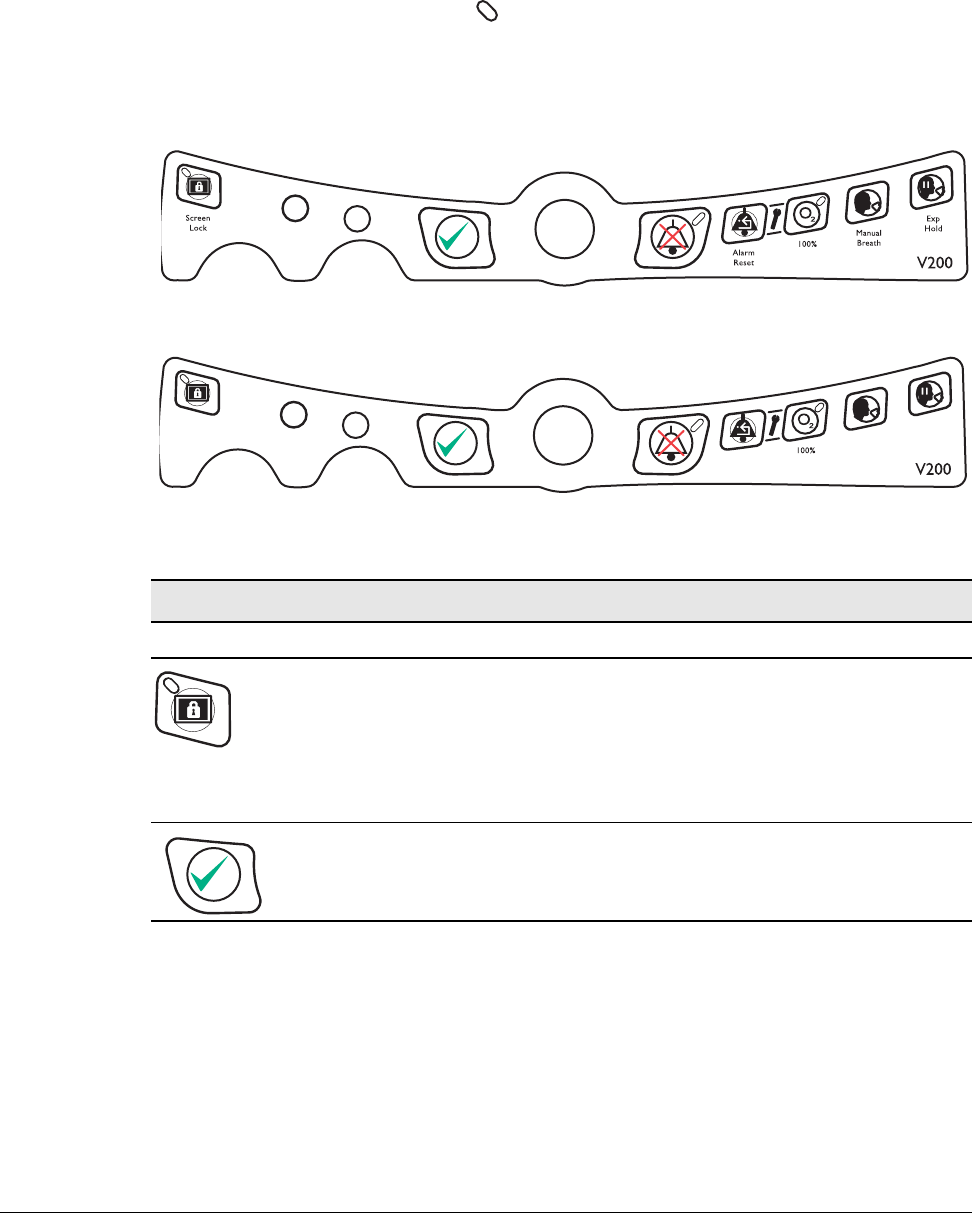
Chapter 8
8-8 Respironics V200 Ventilator Operator’s Manual REF 1057983 A
Operating Instructions
Front Panel Keys
The front panel keys enable you to initiate ventilator functions. The keys that
include an indicator ( ) also provide operational status of the function that it
performs. The text version of the front panel keys is shown in Figure 8-7. The
symbol version of the front panel keys is shown in Figure 8-8. (Refer to
Chapter 9, “Alarms” for more detailed information on the alarm keys and
buttons).
Figure 8-7: Front Panel Keys — Text Version
Figure 8-8: Front Panel Keys — Symbol Version
Front Panel Keys
Key Symbol Definition Description
Screen
Lock Function: Locks and unlocks the graphic display (touch screen). When the
screen lock is activated, all on-screen buttons are disabled until the touch
screen is unlocked. This prevents inadvertent setting and display changes
via the touch screen. MANUAL BREATH, 100% O2, EXP. HOLD, ALARM
RESET, and ALARM SILENCE keys are still active keys.
Indicator: Illuminates green when active.
Accept Function: Enables you to accept selected settings on the front panel
graphical display.
Table 8-3: Front Panel Keys (Sheet 1 of 3)
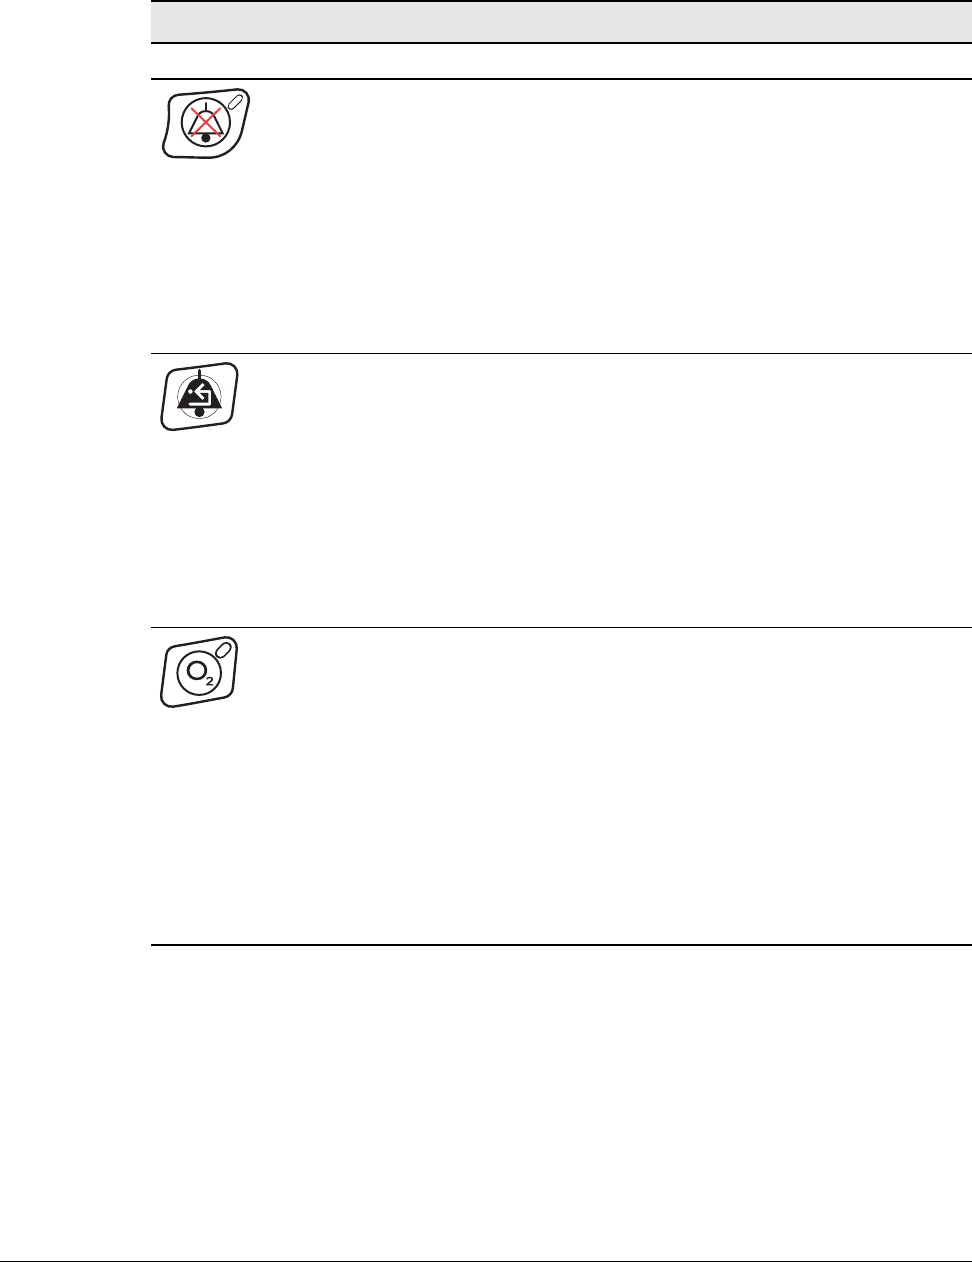
Chapter 8
Operating Instructions
REF 1057983 A Respironics V200 Ventilator Operator’s Manual 8-9
Alarm
Silence Function: Disables the audio alarm for two minutes. When Alarm Silence is
pressed before the end of a two-minute period, the two-minute timer is
reset. Alarms that cannot be silenced are listed in Table 9-1: “Alarm Alert
Messages” on page 9-5.
Indicator: Illuminated yellow when the audible alarm has been disabled; is
active and stays on for two minutes when the ALARM SILENCE button is
pressed. If ALARM SILENCE is active, and a new alarm condition occurs,
which involves exceeding an active alarm limit, the visual alarm functions
will be active. (Refer to “Alarm Silence” on page 9-2.) ALARM RESET
clears ALARM SILENCE. If a medium or high priority alarm exists after
ALARM RESET clears ALARM SILENCE, the audible alarm will begin.
Alarm
Reset Function: Clears the visual indicator for auto reset alarms, certain active
alarms (see “Alarm Reset” on page 9-3), and reset of apnea ventilation
back to the active mode of ventilation (see “Apnea Ventilation” on page 8-
27). Alarm Reset also terminates ALARM SILENCE.
NOTE: The ventilator may automatically reset certain types of alarm
conditions once the causes of the alarms are corrected. After an
automatic reset, the ventilator will clear the audible alarm and will
display a Low Urgency Alarm alert in the Alert Message Insert to
inform the operator that an alarm condition existed. When this
situation occurs, use ALARM RESET to clear the visual alarm
indicator.
100% O2Function: Press once to deliver 100% O2 to the patient for two minutes.
Subsequent button presses will reset the timer to two minutes.
NOTE: If the 100% O2 key is pressed and a 100% O2 gas source is not
available, the Low O2 alarm will be active for the two-minute 100%
O2 delivery period.
Indicator: Illuminated green; is active only when the 100% O2 front panel
button has been pressed and the ventilator is delivering 100% O2 to the
patient; remains on for the duration of 100% O2 delivery (two minutes).
NOTE: If the operator sets the %O2 setting to 100%, the 100% O2
indicator does not light. The 100% O2 indicator only lights when
the 100% O2 front panel key has been pressed..
Front Panel Keys (Continued)
Key Symbol Definition Description
Table 8-3: Front Panel Keys (Sheet 2 of 3)
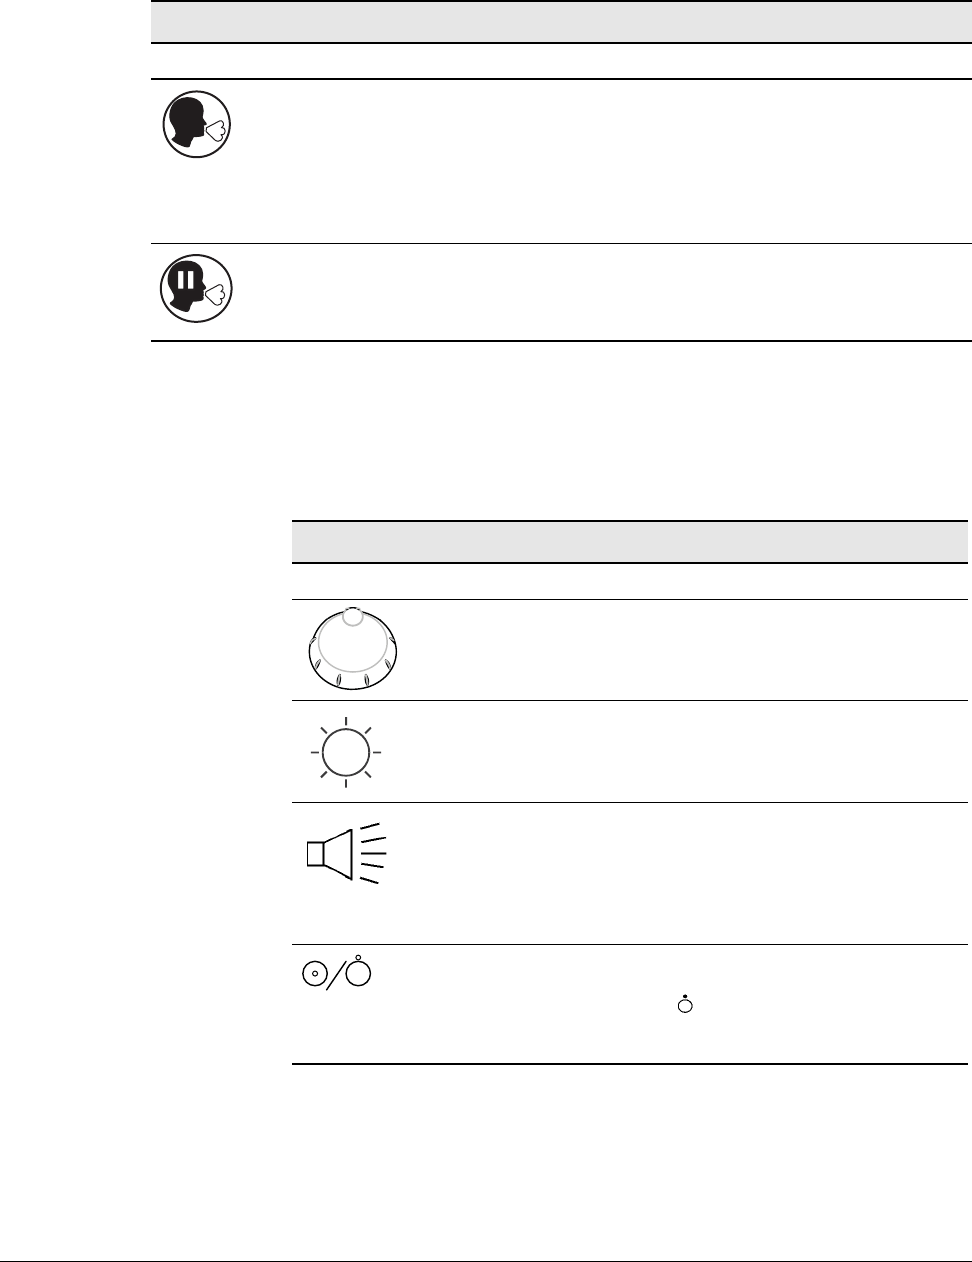
Chapter 8
8-10 Respironics V200 Ventilator Operator’s Manual REF 1057983 A
Operating Instructions
Front Panel Level Controls
The front panel level controls enable you to adjust ventilator settings,
brightness, and volume.
Manual
Breath Function: Delivers an operator-initiated, mandatory (OIM) breath. Delivery
of the breath is based on the current ventilation breath type settings.
NOTE: Manual breaths are not permitted during the inspiratory phase of a
breath (whether manual or spontaneous). Pressing the MANUAL
BREATH key during these times will not result in the delivery of a
manual breath.
Expiratory
Hold Enables calculations of Auto-PEEP from an expiratory hold maneuver. (See
“Special Procedures” on page 8-31.)
Front Panel Keys (Continued)
Key Symbol Definition Description
Table 8-3: Front Panel Keys (Sheet 3 of 3)
Front Panel Controls
Control Definition Description
Adjust
Control Used in conjunction with the front panel graphical
display and touch screen to enter operator-selected
values for ventilator settings and alarms.
Display
Brightness Increases or decreases the brightness of the touch screen
display
Audible
Alarm
Volume
Increases or decreases the audible alarm volume. The
minimum audible alarm volume is dictated by
international standards. The audible alarm volume
control will not turn the audible alarm volume lower than
the minimum decibel level dictated by these standards.
It is not possible to turn the audible alarm volume off.
On/Off
Switch Located near the front panel, the On/Off switch is
recessed to avoid inadvertent or accidental access. When
the switch is in off ( ) position, the ventilator does not
provide mechanical ventilation, although AC power is
active and the green Mains indicator is illuminated.
Table 8-4: Front Panel Controls
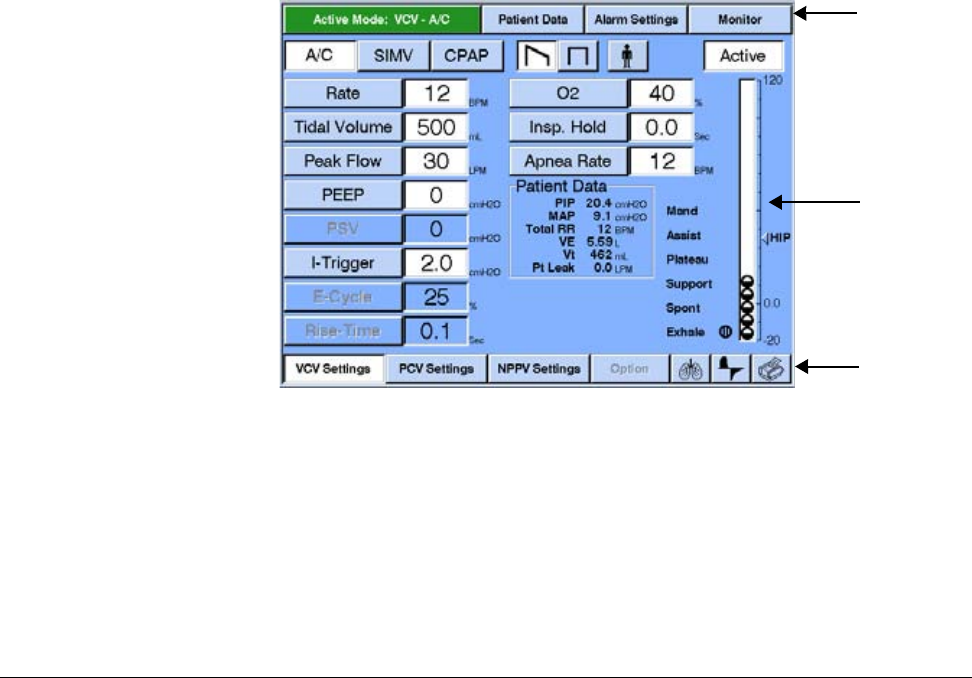
Chapter 8
Operating Instructions
REF 1057983 A Respironics V200 Ventilator Operator’s Manual 8-11
Ventilator Screens Front Panel Touch Display
The front panel display allows you to select ventilation modes, breath types,
settings, alarms, and access patient data. The front panel display is a touch
screen that lets you select settings and data so you can monitor the status of
the patient, ventilator, and control ventilator operation.
There are two different categories of screens:
• Ventilator Screens that appear when the machine is functioning as a
ventilator
• Diagnostic Screens that appear when the machine is not functioning
as a ventilator and is running internal tests
(Refer to Chapter 11, “Diagnostics”, for more information about displaying
ventilator diagnostic information.).
Common Ventilator Screen Components
Except for the patient data screen, screen configurations are determined by
the selected ventilation breath type. Figure 8-9 shows the elements that are
common to all ventilator (non-diagnostic) screens: the top bar, bottom bar, and
manometer.
Figure 8-9: Elements Common to All Operational Screens (VCV settings shown)
Top Bar
Manometer
Bottom Bar
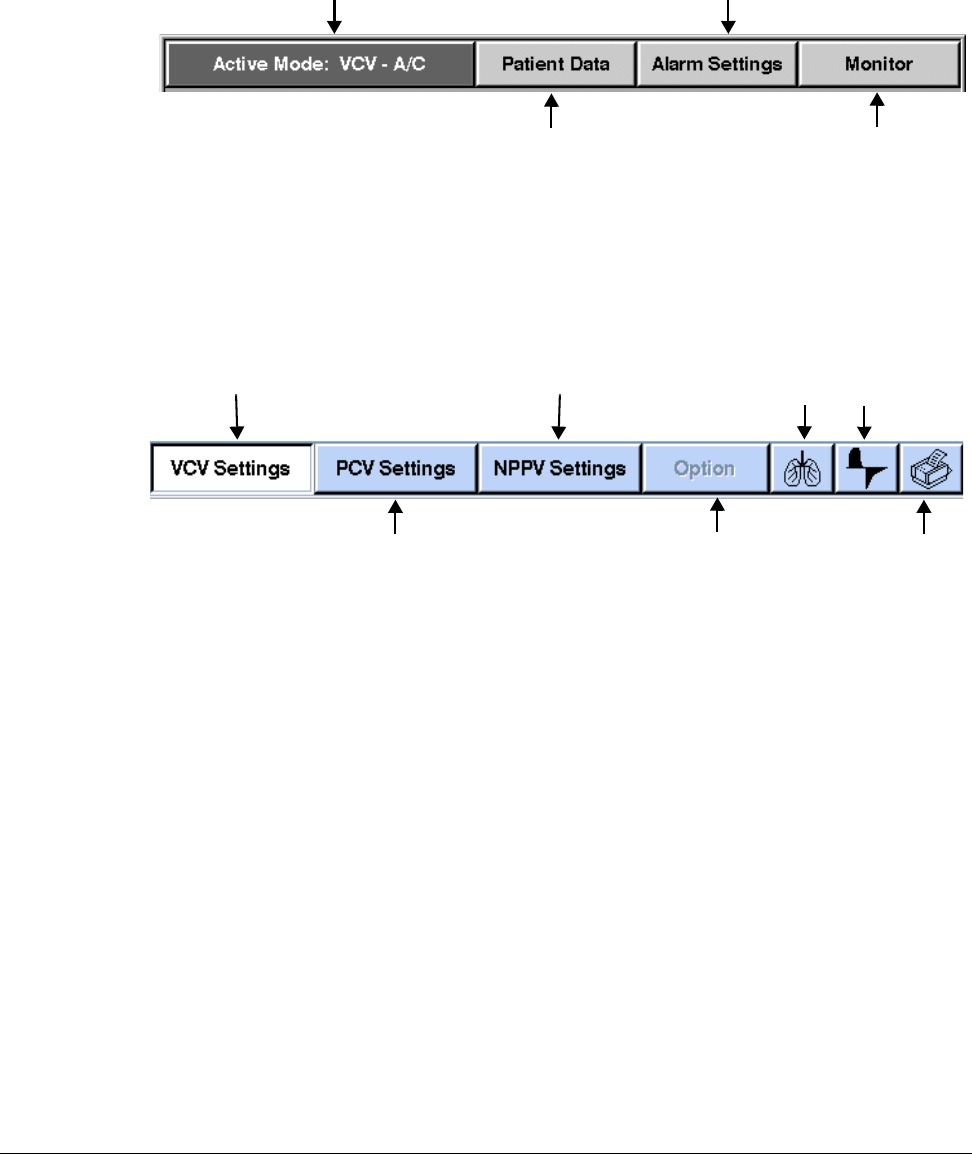
Chapter 8
8-12 Respironics V200 Ventilator Operator’s Manual REF 1057983 A
Operating Instructions
Figure 8-10 shows the top bar and describes its buttons.
Figure 8-10: Top Bar (common to all operational screens)
Figure 8-11 shows the bottom bar and describes its buttons.
Figure 8-11: Bottom Bar (common to all operational screens)
Buttons in the bottom bar have two states, “selected” and “not selected”. In
the “selected” state, the button has a white background and black letters (see
VCV SETTINGS in Figure 8-11). In the “not-selected” state the button has a
gray background and black letters (see PCV SETTINGS, and NPPV SETTINGS
in Figure 8-11). In the upper bar the buttons PATIENT DATA, ALARM
SETTINGS, and MONITOR are also the “selected/not-selected” type.
When one of these “selected/not-selected” buttons is selected, it indicates
that the screen is being used to display the information described by the name
of the button on the screen. Making a setting screen “selected” (for a breath
type that is not active), is the first step to activate that ventilation breath type
(Refer to “Selecting a New Ventilation Breath Type (VCV, PCV, or NPPV)” on
page 8-23.)
Active Mode: push to display the
settings for the active ventilation mode
and breath type.
Active Alarms: push to show current alarm
settings for the active ventilation mode and
breath type.
Patient Data: push to show
the Patient Data screen. Monitor: push to display the monitor
screen (ventilator settings and
patient data).
PCV Settings: push to display PCV settings
screen, which allows you to view and
change settings for pressure controlled
ventilation.
Graphics
button: selects
option if
installed.
VCV Settings: push to display VCV
settings screen, which allows you to
view and change settings for volume
controlled ventilation.
Option: for use in the
future.
NPPV Settings: push to display NPPV
settings screen, which allows you to
view and change settings for
noninvasive positive pressure
ventilation.
Printer: Available if
Communications
option is installed.
Respiratory
Mechanics
button: selects
option if
installed.
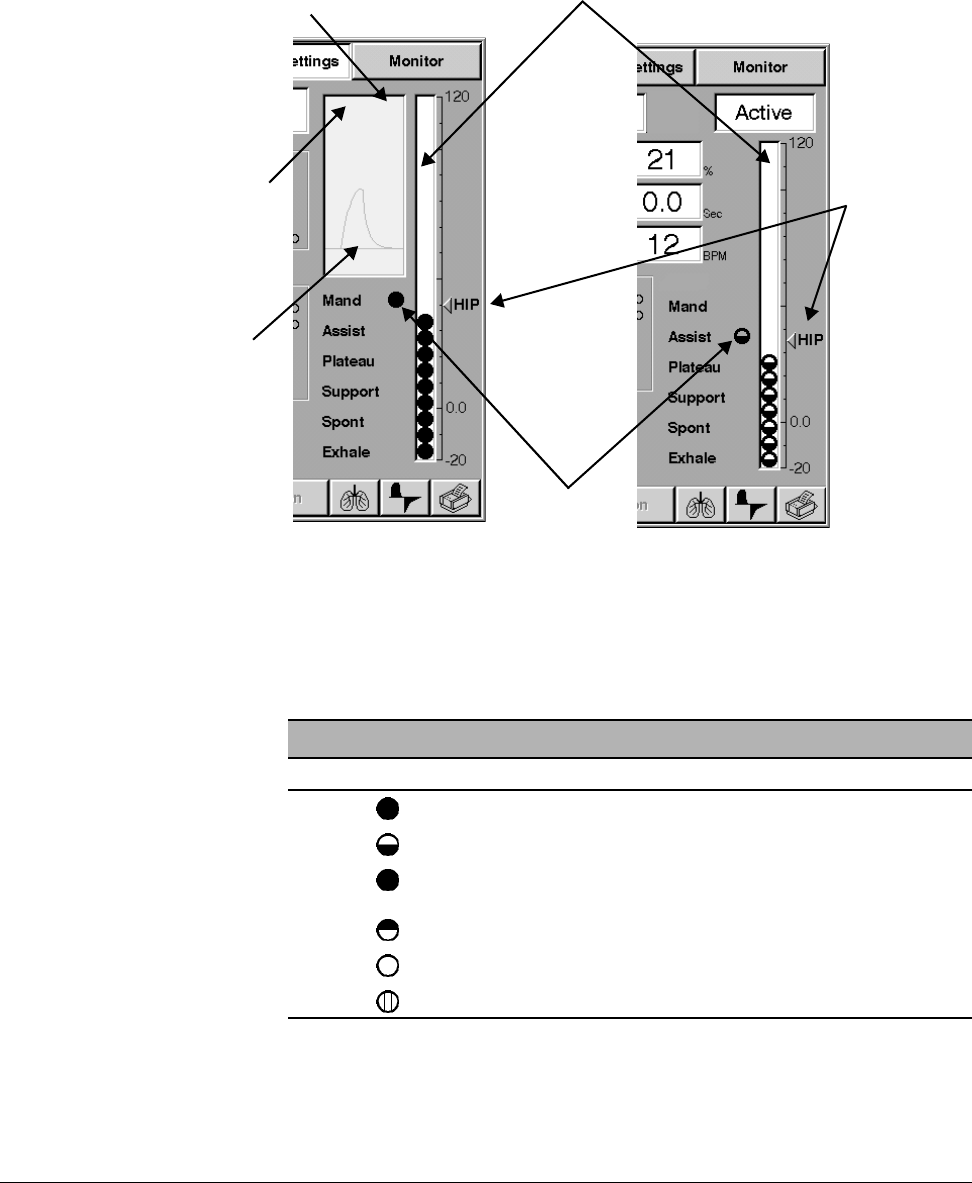
Chapter 8
Operating Instructions
REF 1057983 A Respironics V200 Ventilator Operator’s Manual 8-13
Figure 8-12 shows the real time manometer displays.
Figure 8-12: Manometer (common to operational screens)
Table 8-5: “Breath Indicator” describes the breath indicator.
Zero pressure
line
Upper limit of
real time display
determined by
High Pressure
alarm setting
Waveform: airway pressure
versus time Indicator
High pressure
alarm setting -
press this button
to modify HIP.
Breath
Indicator
Manometer with Waveform Manometer only
(for mode setting screens)
Breath Indicator
Breath Symbol Description
Mand Operator or ventilator triggered mandatory breath.
Assist Patient triggered mandatory breath.
Plateau Inspiratory hold, can be set at the end of the inspiratory phase of
a VCV breath type.
Support Patient triggered spontaneous breath with PSV>0 or IPAP>EPAP.
Spont Patient triggered spontaneous breath, PSV=0 or IPAP = EPAP.
Exhale Indicates exhalation phase of any breath.
Table 8-5: Breath Indicator

Chapter 8
8-14 Respironics V200 Ventilator Operator’s Manual REF 1057983 A
Operating Instructions
Pressing the HIP indicator on the screen (Figure 8-12) will
immediately allow the operator to modify the high pressure limit for
VCV or PCV. In NPPV, the high pressure limit is automatically set to
10 cmH2O (hPa) above IPAP. The HIP indicator does not appear near the
manometer in NPPV.
Settings Screens The buttons in the middle of the settings and alarm limit screens all have two
states: active and inactive. Active settings have a gray background with black
letters (Figure 8-13). An active setting is currently being used to control
ventilation or as an alarm limit. Inactive setting buttons have a gray
background with gray letters. Inactive settings are not currently being used to
control ventilation or as an alarm limit. In both states the button can be
pressed and an insert window will appear that will allow the operator to change
the value of the setting (Figure 8-1).
Pressing the ACTIVE MODE button displays the settings screen for the
currently selected ventilation breath type and mode (Chapter 7, “Operating
Theory”, for more information on ventilation modes, breath types, and
controls).
For example, in Figure 8-13 the current breath type is VCV and the mode is A/
C. Because A/C does not allow the ventilator to deliver any spontaneous
breaths, any settings that apply to spontaneous breaths are not active and are
grayed out. In Figure 8-13, PSV is grayed out, indicating that it isn’t active,
but you can still push this button and change the PSV value. The PSV value
will become active only if the SIMV or CPAP mode is selected.
HIP
NOTE: Some settings buttons appear active despite the fact they are
not being used in the ACTIVE MODE. This is because the setting
is used in Apnea Ventilation or when manual inspiration is
pressed. The operator should always choose a value for an active
button that is appropriate for the patient being ventilated..
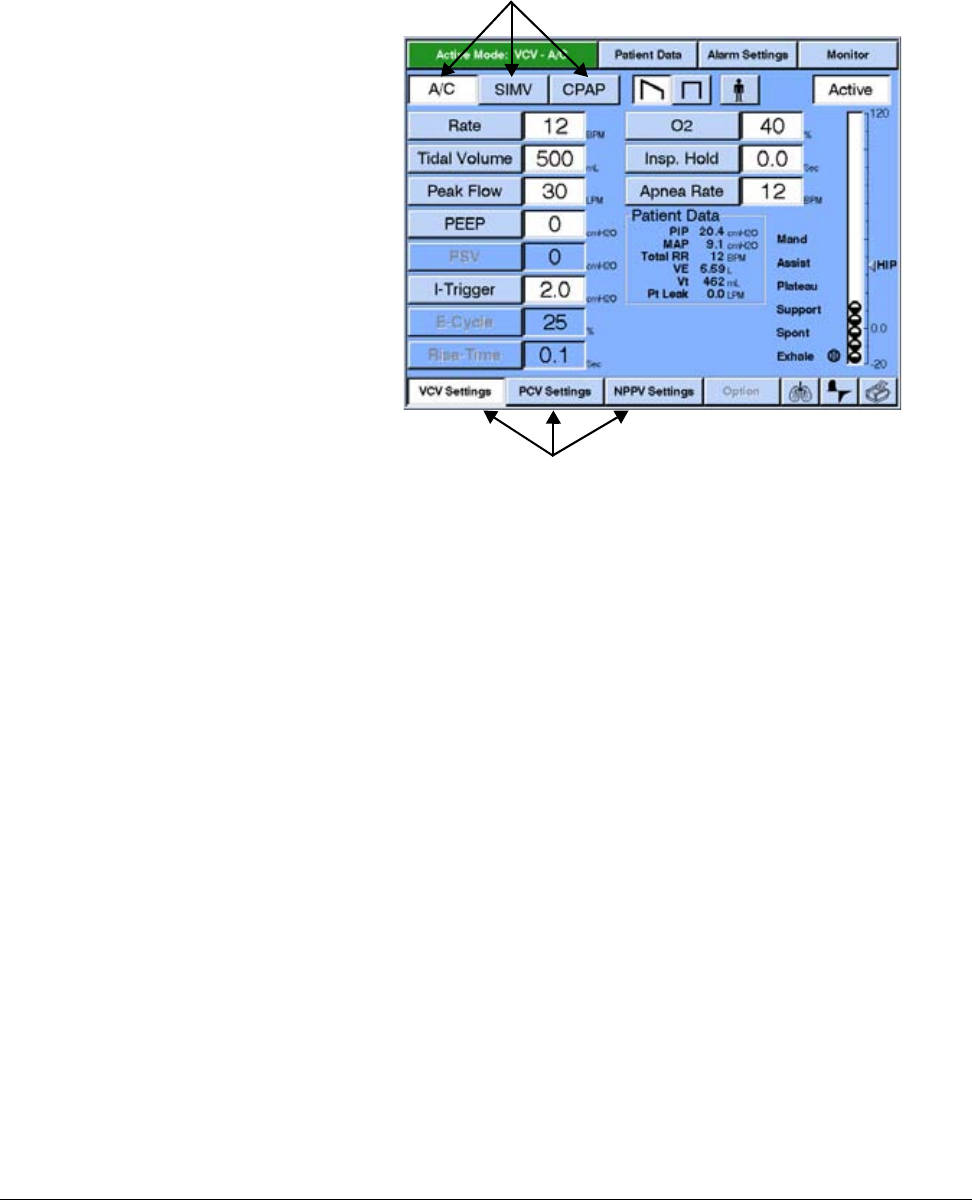
Chapter 8
Operating Instructions
REF 1057983 A Respironics V200 Ventilator Operator’s Manual 8-15
Figure 8-13: VCV Settings Screen (VCV active)
Selecting Settings
Follow these steps to adjust ventilator control settings:
1. Push VCV SETTINGS, PCV SETTINGS, or NPPV SETTINGS.
2. Push the button for the control settings you want to select. The
ventilator displays the current value for that parameter in an insert
that allows the operator to adjust the settings value. (Figure 8-14).
3. Press the bar to increase or decrease the setting to the value you want
or use the front panel knob to adjust the value of the setting.
4. Press the screen ACCEPT button or the front panel ACCEPT button to
activate the new setting or CANCEL to leave the setting unchanged.
Ventilation control settings: VCV, PCV, or NPPV
Ventilation mode: A/C, SIMV, or CPAP. Spont
or Spont/T are available during NPPV
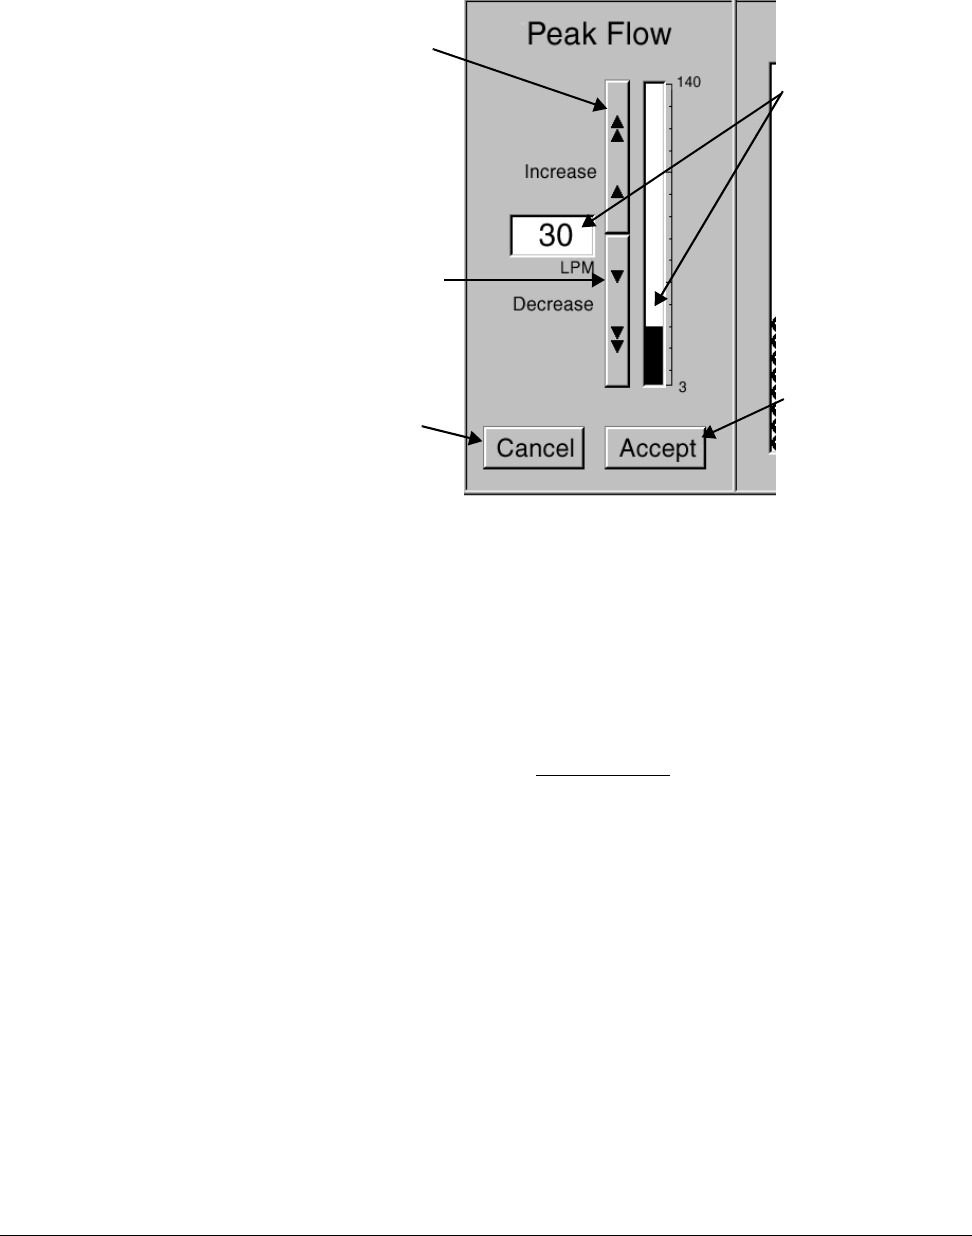
Chapter 8
8-16 Respironics V200 Ventilator Operator’s Manual REF 1057983 A
Operating Instructions
Figure 8-14: Changing a Setting
When a value is entered, as shown in Figure 8-14, the ventilator checks to
assure that the value has been accepted by the operator, is within limits, and
will not cause other settings to be out of limits. If the new value causes these
limits to be exceeded, a diagnostic message will be displayed. (Refer to “Value
Entry Message” on page 12-4 for more details about the diagnostic messages).
Selecting Alarm Limits
Follow these steps to adjust currently active alarm limits:
1. Push ALARM SETTINGS. The ventilator displays the alarm limits for
the currently active ventilation mode (Figure 8-15).
2. Push the button for the alarm limit you want to adjust. The ventilator
displays the current value for that alarm limit in a display insert,
similar to Figure 8-14.
3. Press the bar or use the front panel knob to adjust the value.
4. Press ACCEPT to activate the new alarm limit or CANCEL to leave it
unchanged.
Current or new value
displayed digitally and
graphically
Press ACCEPT to
activate the new
setting
Press CANCEL to
leave the setting
unchanged
Push this bar to
decrease the value
Push this bar to
increase the value
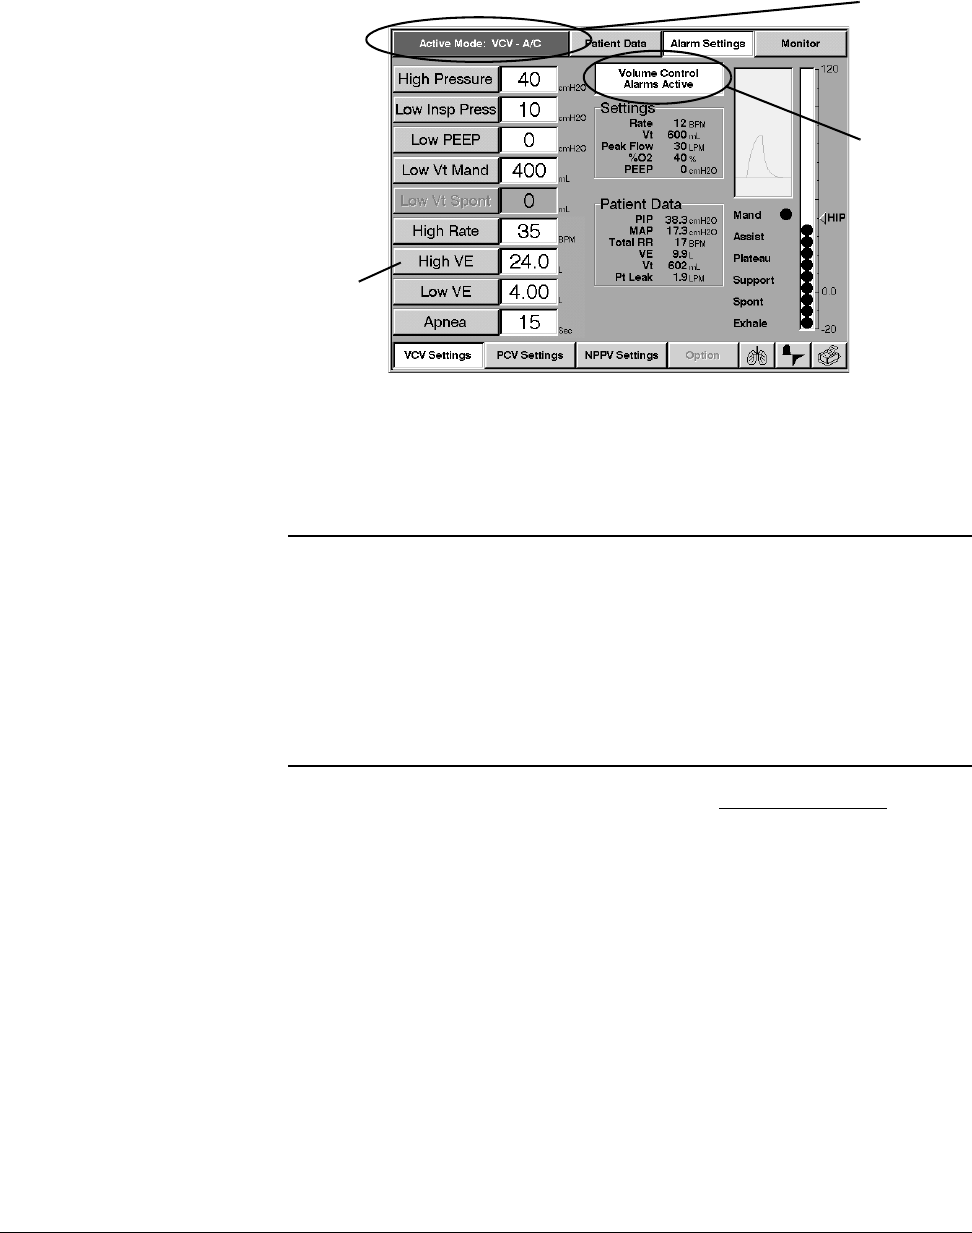
Chapter 8
Operating Instructions
REF 1057983 A Respironics V200 Ventilator Operator’s Manual 8-17
Figure 8-15: Setting Alarm Limits That Are Currently Active
The High Pressure Alarm Setting may be accessed through the Alarms Settings
Screen or through the HIP Indicator adjacent to the manometer in the PCV and
VCV Settings, Alarm Settings, Patient Data, and Monitor Screens.
Follow these steps to adjust alarm limits that are not currently active:
1. Depending on the alarm limits you wish to review, push the VCV
SETTINGS, PCV SETTINGS, or NPPV SETTINGS button that has a
gray background and black letters (not active).
WARNING: For patient safety the HIP Limit Setting should be set as close to the peak
inspiratory pressure as patient conditions allow.
CAUTION: If clinical conditions do not require setting the HIP Limit above 60
cmH2O, we recommend the setting normally be adjusted to 60 cmH2O
or less in order to prolong the operating life of the blower and to
maximize backup battery run time.
NOTE: When the active mode is set to NPPV, the HIP Limit Setting will
automatically be adjusted to 10 cmH2O above the current IPAP setting.
Active
ventilation
mode and
breath type
button
displayed
Indicates this
screen is for
VCV alarms
Push
button of
alarm you
want to
adjust
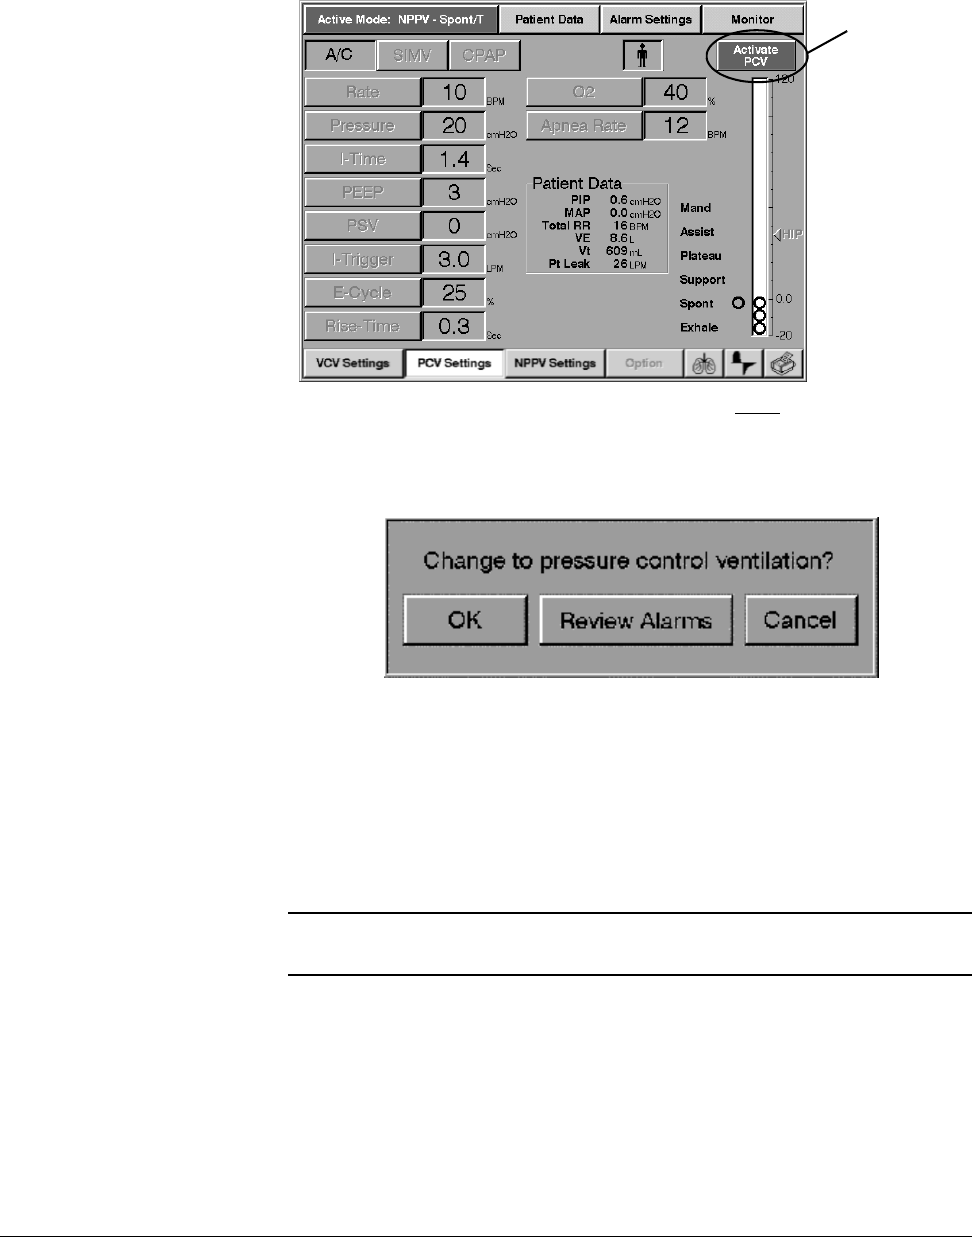
Chapter 8
8-18 Respironics V200 Ventilator Operator’s Manual REF 1057983 A
Operating Instructions
Figure 8-16: PCV Setting while NPPV is the active breath type
2. From the control settings screen, push the ACTIVATE button. Refer to
Figure 8-16. The ventilator displays a prompt insert (Figure 8-17).
Figure 8-17: Change Breath Type Insert Window for PCV
3. Select the REVIEW ALARMS button to display the alarm settings for
PCV (Figure 8-18).
4. Notice that all the alarm buttons (Figure 8-18) are grayed out,
indicating that the alarm limits are not currently active. The ventilator
displays the current value for that set of alarm limits. Push the button
for the alarm limit you want to adjust.
5. Press the bar or use the front panel knob to adjust the value (as shown
in Figure 8-14).
6. Press ACCEPT to activate the new alarm limit or CANCEL to leave it
unchanged.
NOTE: The ventilator keeps a distinct set of alarm limits for each
ventilation breath type (VCV, PCV and NPPV).
ACTIVATE
button

Chapter 8
Operating Instructions
REF 1057983 A Respironics V200 Ventilator Operator’s Manual 8-19
Figure 8-18: Setting Alarm Limits That Are Not Currently Active
Selecting Waveforms (VCV only)
Two inspiratory flow waveforms for mandatory VCV breaths are available:
descending ramp and square wave (Figure 8-19). The selected waveform is
highlighted and defines the inspiratory flow for all mandatory VCV breaths,
whether they are initiated by the patient, the ventilator, or the operator. The
waveform selection is not applicable to PCV or NPPV.
NOTE: Any of the changes made in the screen shown in Figure 8-18, do
not take effect until the operator switches to the new ventilation
breath type (in this case Pressure Control).
Grayed out buttons indicate that the alarm limits are not active
Push button of
alarm setting to
adjust
Press this ACTIVATE
button to switch to the
ventilation breath type
indicated. The
ventilation breath type
on this button
indicates which alarm
set is shown on this
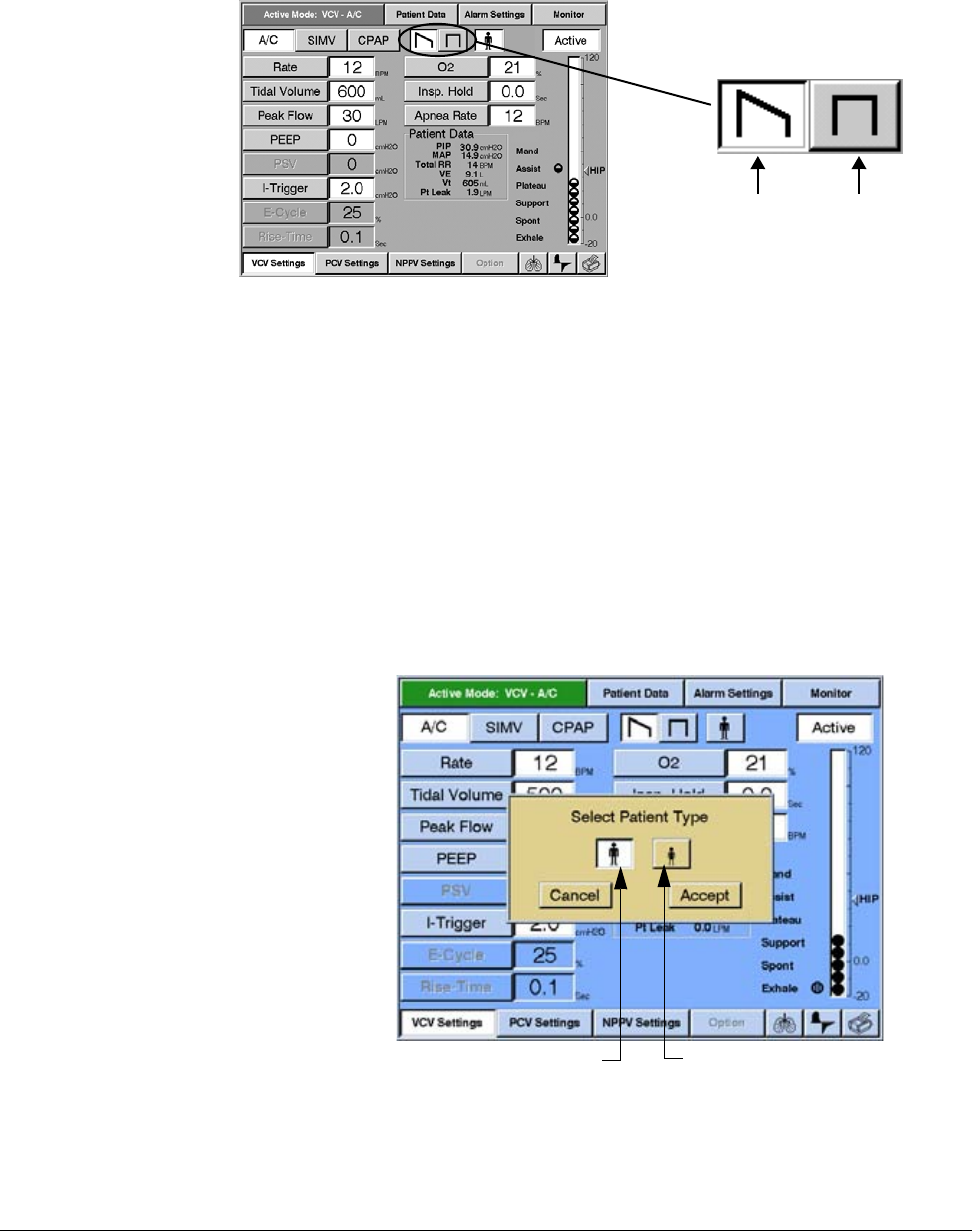
Chapter 8
8-20 Respironics V200 Ventilator Operator’s Manual REF 1057983 A
Operating Instructions
Figure 8-19: Selecting Waveforms (descending ramp selected)
Selecting Adult/Pediatric Buttons
You can configure ventilation for adult or pediatric patients (Figure 8-20) from
the active ventilation type screen. Selecting adult or pediatric tailors the
ventilator’s breath delivery algorithms to the selected adult/pediatric patient
type. Selecting adult or pediatric does not change how the screens work, and
does not change ventilator or alarm settings. The patient type selection
determines flow output at various rise time settings for PCV, PSV, and IPAP. In
addition, the “I-Time too long” alarms and time out for spontaneous breaths
are set to 3.5 seconds for the adult setting and 2.5 seconds for the pediatric
setting. Peak flow is limited to 100 LPM in all pressure-based breaths when
using the pediatric setting.
Figure 8-20: Selecting Adult/Pediatric Controls (adult selected)
Descending ramp and square wave act as
mutually exclusive select/non-select buttons.
Push this button
to select
descending ramp
waveform
Push this button to
select square
waveform
Push this button to
select pediatric controls
Push this button to
select controls
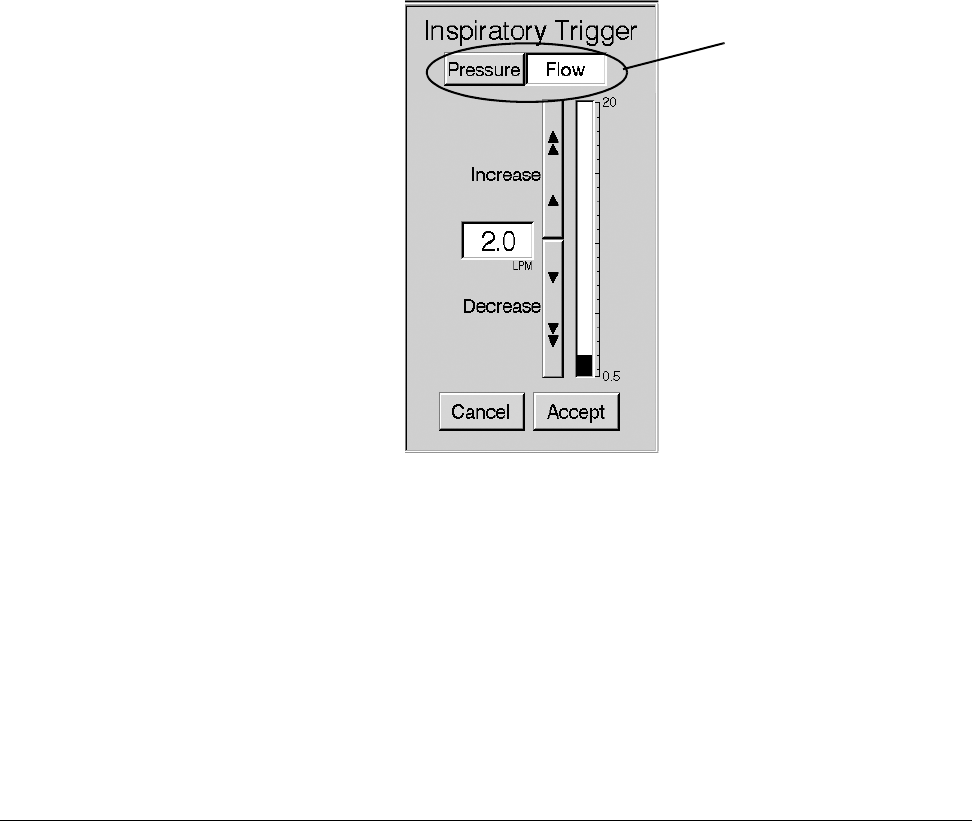
Chapter 8
Operating Instructions
REF 1057983 A Respironics V200 Ventilator Operator’s Manual 8-21
Selecting the Inspiratory Trigger (I-Trigger)
The I-Trigger setting determines how inspiratory effort is detected (by
measuring a drop in airway pressure or an increase in patient inspiratory flow)
and when inspiration begins.
• In VCV and PCV, you can select a pressure or flow I-Trigger.
• In NPPV, the I-Trigger is always Flow.
Follow these steps to set the I-Trigger:
1. Push the VCV SETTINGS, PCV SETTINGS, or NPPV SETTINGS button.
2. Push the I-TRIGGER button. The inspiratory trigger window insert
(Figure 8-21) appears.
3. In VCV and PCV: select Pressure or Flow. (Because only the flow trigger
is available in NPPV, the Pressure and Flow buttons do not appear in
this insert in NPPV.)
4. Adjust and change the value as described above.
Figure 8-21: Inspiratory Trigger Window
Settings with Calculated Values
Certain window inserts that are used to modify values of settings can also have
calculated results in them (Figure 8-22).
When the settings window insert being displayed is VCV Rate, the calculated
minute volume that results from the rate and tidal volume settings is displayed
along with the rate value. This is also the case when the tidal volume setting
window insert is displayed. When the setting window insert for PCV Rate is
You can select Pressure or
Flow in VCV or PCV. In
NPPV, only Flow I- Trigger
is available (these buttons
do not appear).
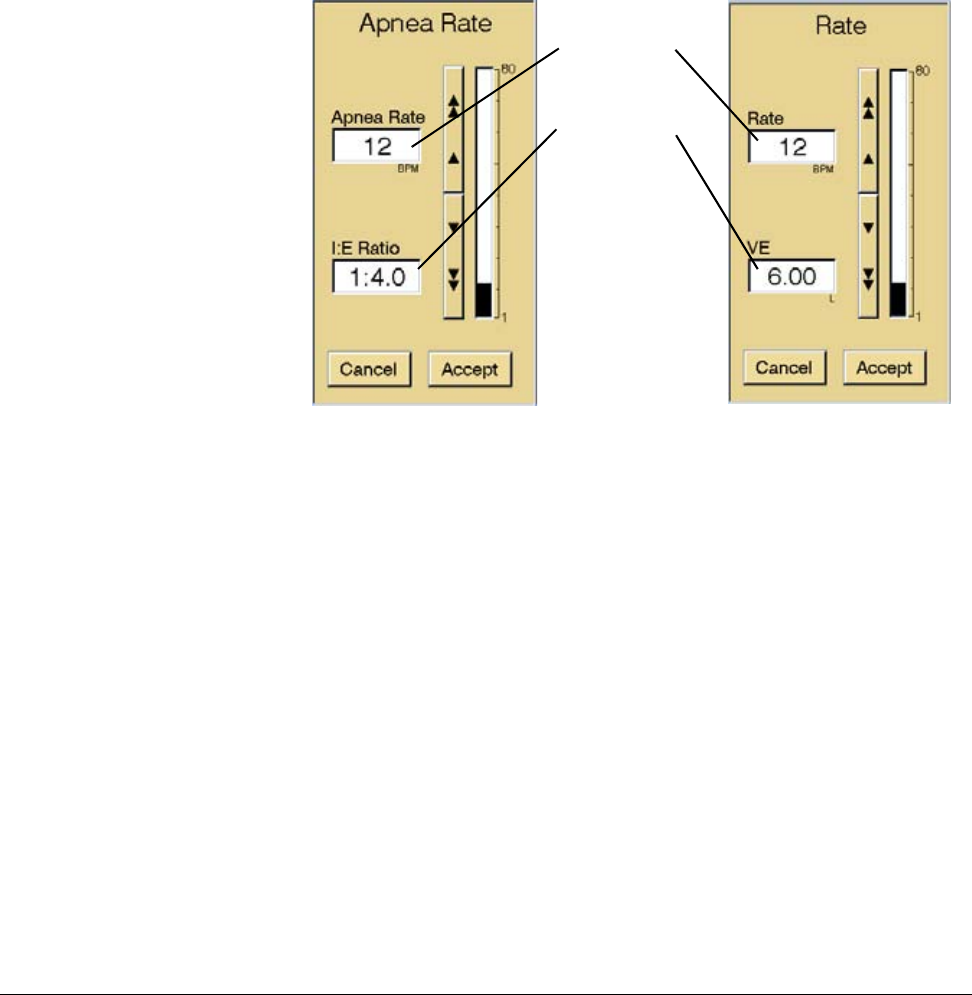
Chapter 8
8-22 Respironics V200 Ventilator Operator’s Manual REF 1057983 A
Operating Instructions
displayed, the calculated value for the I:E ratio that will result from the PCV
rate value is also displayed.
When the setting window insert for VCV Apnea Rate is displayed, the
calculated minute ventilation that will exist if the ventilator goes into Apnea
Ventilation in VCV is shown. When the setting window insert for PCV Apnea
Rate is displayed, the I:E Ratio shown is the I:E Ratio that will exist if the
ventilator goes into Apnea Ventilation in PCV.
Figure 8-22: Settings Window Inserts With Calculated Results
Rate and Apnea Rate Settings Relationship
For all breath types, VCV, PCV, and NPPV, the ventilator ensures the Apnea
Rate setting is equal to or greater than the set Rate up to 20 BPM. When set
rate is equal to the Apnea Rate and less than 20 BPM increasing the Set Rate
increases the Apnea Rate equally up to 20 BPM. Above 20 BPM the Apnea
Rate can be greater than or less than the Set Rate, down to 20 BPM.
PCV Settings Window Insert VCV Settings Window Insert
Setting to be
changed on the
top.
Setting that is
calculated as
the setting
above changes,
below.
I:E Ratio is the parameter that is
calculated and displayed in certain
PCV setting window inserts. These
are PCV Rate, PCV I-Time, and PCV
VE is the parameter that is
calculated and displayed in certain
VCV setting window inserts. These
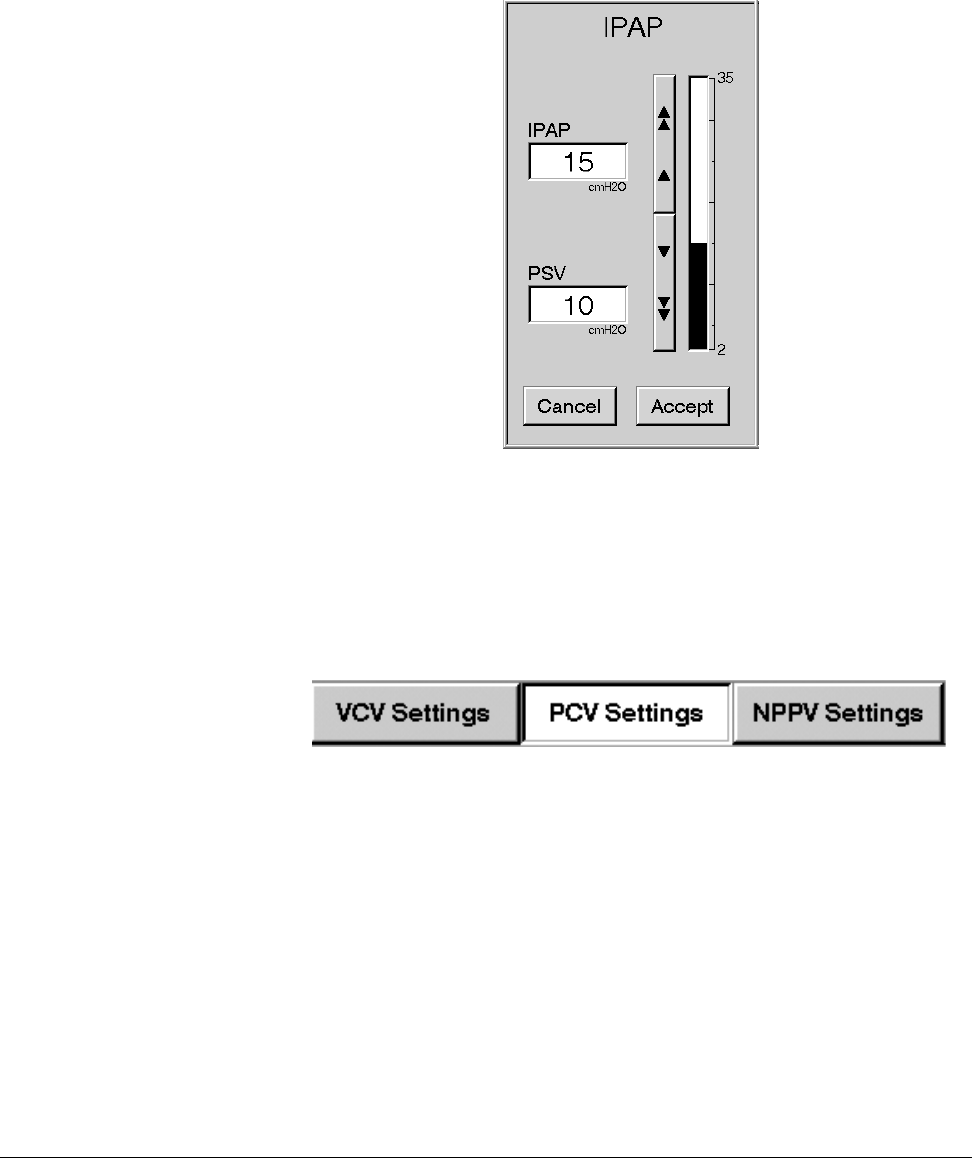
Chapter 8
Operating Instructions
REF 1057983 A Respironics V200 Ventilator Operator’s Manual 8-23
Changing IPAP or EPAP in NPPV
When changing the IPAP or EPAP settings in NPPV, the difference between
IPAP and EPAP is displayed in the window insert as PSV.
Figure 8-23: Changing IPAP or EPAP in NPPV
Selecting a New
Ventilation Breath
Type (VCV, PCV, or
NPPV)
Follow these steps to select the ventilation breath type:
1. Press the button for the new breath type you want to select from the
bottom bar (Figure 8-24) [PCV in this example].
Figure 8-24: Ventilation Control Buttons (PCV settings selected)
2. The setting screen for the selected breath type appears. All of the
settings are grayed out, indicating that they are not currently active.
However, you can use the grayed out buttons to change the settings as
necessary, (with the exception of Set O2 and patient type, which can
be changed only in the active mode).
For example, if you press PCV SETTINGS when the current breath type
is NPPV, all the PCV settings are grayed out (Figure 8-25) because
NPPV is currently active.

Chapter 8
8-24 Respironics V200 Ventilator Operator’s Manual REF 1057983 A
Operating Instructions
Figure 8-25: Settings Screen (PCV settings, PCV not currently active)
3. Press the ACTIVATE button. The prompt in Figure 8-26 is displayed on
the screen.
Figure 8-26: Prompt when Activate is pressed and PCV settings selected
4. At this prompt the operator can:
• Move directly into PCV by pressing the OK button, or
• Review the PCV alarm settings, or
• Change nothing and return to the PCV settings screen by pressing
the CANCEL button.
If the OK button is pressed, the ventilator immediately begins
operations in PCV, the PCV settings become active and screen in
Figure 8-27(a) appears.
ACTIVATE
button
Press the OK button and go
to this screen.
(a)
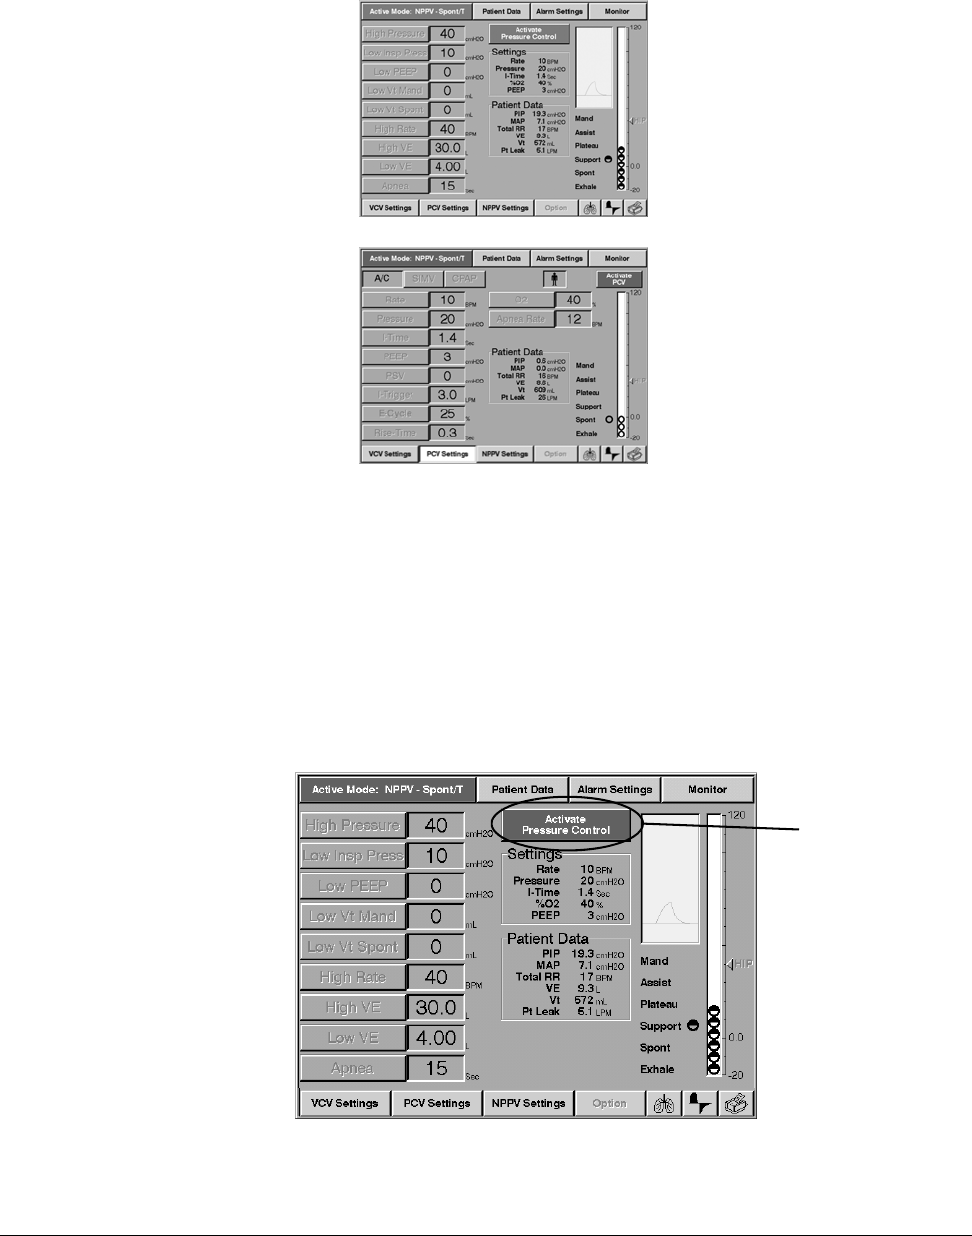
Chapter 8
Operating Instructions
REF 1057983 A Respironics V200 Ventilator Operator’s Manual 8-25
Figure 8-27: Destination Screens after Activate Prompt
If the REVIEW ALARMS button is pressed the ventilator immediately
displays the screen shown in Figure 8-27(b) appears. If the CANCEL
button is pressed, the ventilator returns to the settings screen for the
selected breath type as shown in Figure 8-27(c).
5. If the operator elects to review alarm settings, the alarm settings
screen for the destination mode is shown (Figure 8-28). All the alarm
limits are grayed out in this screen, because the selected breath type
(PCV), is not yet active. However the grayed out buttons can be used
to adjust values as seems appropriate for the patient.
Figure 8-28: Alarm Limits Screen (PCV active)
Press the Review Alarms button
to go to this screen.
(b)
Press the Cancel button and
return to this screen.
(c)
Press to activate
new breath type.
Chapter 8
8-26 Respironics V200 Ventilator Operator’s Manual REF 1057983 A
Operating Instructions
6. If the operator reviews alarm settings and then activates the new
breath type, the ventilator uses the new breath type and displays the
alarm settings of the new breath type (Figure 8-29).
Figure 8-29: Alarm Limits Screen (PCV inactive)
Selecting the Mode
(A/C-SIMV-CPAP or
Spont-Spont/T)
Alarm limits no
longer grayed out,
indicating that the
selected breath type
is active
ALARM
SETTINGS
button is
selected
indicating the
alarm settings
shown are for
the active breath
type
Active mode and
breath type
Indicates the active
breath type alarms
Summary—Ventilation Modes and Availability
Ventilation
Mode Available
during… Description
A/C VCV or PCV Assist/control: all breaths are mandatory, and are
triggered by operator, patient, or ventilator.
SIMV VCV or PCV Synchronous intermittent mandatory ventilation:
breaths can be mandatory or spontaneous. Mandatory
breaths are triggered by operator, patient, or ventilator.
PSV is available.
CPAP VCV or PCV Continuous positive airway pressure: all patient
triggered breaths are spontaneous, and can be pressure
supported. PSV is available. The MANUAL BREATH key
can be used to initiate a mandatory breath.
Spont NPPV Spontaneous ventilation: all breaths are spontaneous
and patient triggered. The MANUAL BREATH key can
be used to initiate a mandatory breath.
Spont/T NPPV Spontaneous Timed ventilation: breaths can be
spontaneous or mandatory. The MANUAL BREATH key
can be used to initiate a mandatory breath.
Table 8-6: Summary—Ventilation Modes and Availability
Chapter 8
Operating Instructions
REF 1057983 A Respironics V200 Ventilator Operator’s Manual 8-27
The ventilation mode buttons are the selected/not-selected type.
Follow these steps to select the mode:
1. Press the button for the mode you want to select (the active mode is
highlighted) from the top bar:
• If VCV or PCV breath types are active, you can select A/C, SIMV, or
CPAP mode (Figure 8-30).
• If NPPV is active, you can select Spont/T or Spont.
Figure 8-30: Ventilation Mode buttons (A/C and Spont/T active as shown)
2. The ventilator asks you to confirm the mode change (Figure 8-31).
Press YES to confirm, or press NO to leave the mode as is.
Figure 8-31: Mode Change Confirmation Message
3. Once you confirm a mode change, the ventilator changes the mode
selected to active (Figure 8-32).
Figure 8-32: Ventilation Mode buttons (SIMV and Spont shown as active)
Apnea Ventilation Apnea ventilation provides an emergency mode of ventilation if the ventilator
does not deliver a breath for an operator set interval of time. The apnea time
can be set between 10 and 60 seconds. Upon entering this mode of
ventilation, the ventilator will immediately start using the Apnea Rate setting
specified. In PCV and VCV, the ventilator will begin delivering breaths in Assist/
Control (A/C), but with the operator set Apnea Rate. In NPPV, the ventilator will
deliver only machine controlled breaths either at the set Apnea Rate or in
response to patient effort. In Apnea ventilation, the alarms used are the ones
used for machine controlled breaths in the active breath type (VCV, PCV and
NPPV) that the ventilator was in, when Apnea occurred.
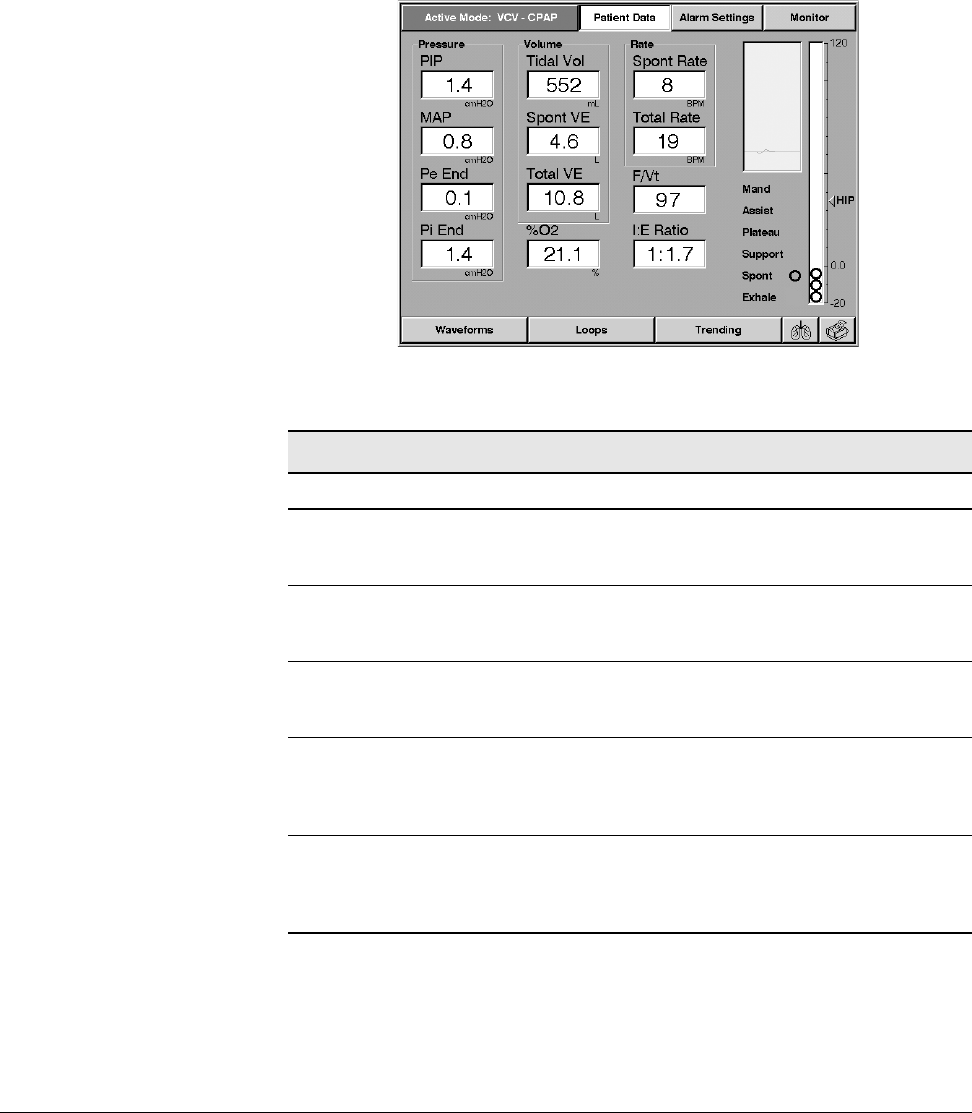
Chapter 8
8-28 Respironics V200 Ventilator Operator’s Manual REF 1057983 A
Operating Instructions
Patient Data Screen You can view the patient data screen (Figure 8-33) by pressing the PATIENT
DATA button in the top bar. The format of this screen is the same in VCV, PCV,
and NPPV. Table 8-7: “Patient Data Definitions: Range, Units & Resolution”
summarizes the definitions, display ranges, and resolution for patient data
parameters.
Figure 8-33: Patient Data Screen
Patient Data Definitions: Range, Units & Resolution
Parameter Description Display Range Resolution
PIP Peak Inspiratory Pressure
The maximum airway pressure
during inspiration.
-20.0 to 130
cmH2O (hPa) 0.1 for -20.0 to
99.9
1 for 100 to 130
MAP Mean Airway Pressure
The average of airway pressure
during one full breath cycle.
-20.0 to 120
cmH2O (hPa) 0.1 for -20.0 to
99.9
1 for 100 to 130
Pe End Pressure at End Expiration
The pressure measured at the
end of expiration.
-20.0 to 99.9
cmH2O (hPa) 0.1
Pi End Pressure at End Inspiration
The pressure measured at the
end of inspiration (or at the end
of Insp Hold if it is >0).
-20.0 to 130
cmH2O (hPa) 0.1 for -20.0 to
99.9
1 for 100 to 130
Tidal Vol. Exhaled Tidal Volume
The volume exhaled at each
breath. Compliance
compensated (if enabled).
0 to 9999 ml
(BTPS) 1
Table 8-7: Patient Data Definitions: Range, Units & Resolution (Sheet 1 of 2)

Chapter 8
Operating Instructions
REF 1057983 A Respironics V200 Ventilator Operator’s Manual 8-29
Monitor Screen The monitor screen (Figure 8-34) is the default screen, and is automatically
displayed if the screen has not been touched for 15 minutes. The screen can
also be viewed by pressing the MONITOR button. The screen is shown in
Figure 8-34. The patient data and settings displayed on this screen depend on
the active breath type (Refer to Table 8-8: “Monitor Screen Settings
Displayed” and Figure 8-34.)
Spont VE Spontaneous Minute Volume
The spontaneous ventilation
normalized to one minute.
Compliance compensated (if
enabled).
0.00 to 99.9 L
(BTPS) 0.01 for 0.00 to
9.99
0.1 for 10.0 to 99.9
Total VE Exhaled Minute Volume
The total volume exhaled by the
patient in one minute.
Compliance compensated (if
enabled.)
0.00 to 99.9 L
(BTPS) 0.01 for 0.00 to
9.99
0.1 for 10.0 to 99.9
% O2 Delivered O2
One second average of O2
sensor reading (if O2 sensor is
installed).
0.0 to 110% 0.01 for 0.00 to
9.99
1 for 100 to 110
Spont Rate Spontaneous Respiratory Rate
The respiratory rate of
spontaneous breaths.
0.0 to 150
Bpm 0.1 for 0.0 to 9.9
1 for 10 to 150
Total Rate Total Respiratory Rate
The respiratory rate for all
breaths.
0.0 to 150
Bpm 0.1 for 0.0 to 9.9
1 for 10 to 150
F/VtRapid Shallow Breathing Index
The ratio of the respiratory rate
to exhaled tidal volume for
spontaneous breaths.
0 to 150 Bpm/
L1
I:E Ratio I:E Ratio
The ratio of inspiratory time to
expiratory time.
9.9:1 to 1:99 0.1 for 9.9:1 to
1:9.9
one (1) for 1:10 to
1:99
NOTE: Pt. Leak only appears on Patient Data block on Settings screen.
Patient Data Definitions: Range, Units & Resolution (Continued)
Parameter Description Display Range Resolution
Table 8-7: Patient Data Definitions: Range, Units & Resolution (Sheet 2 of 2)
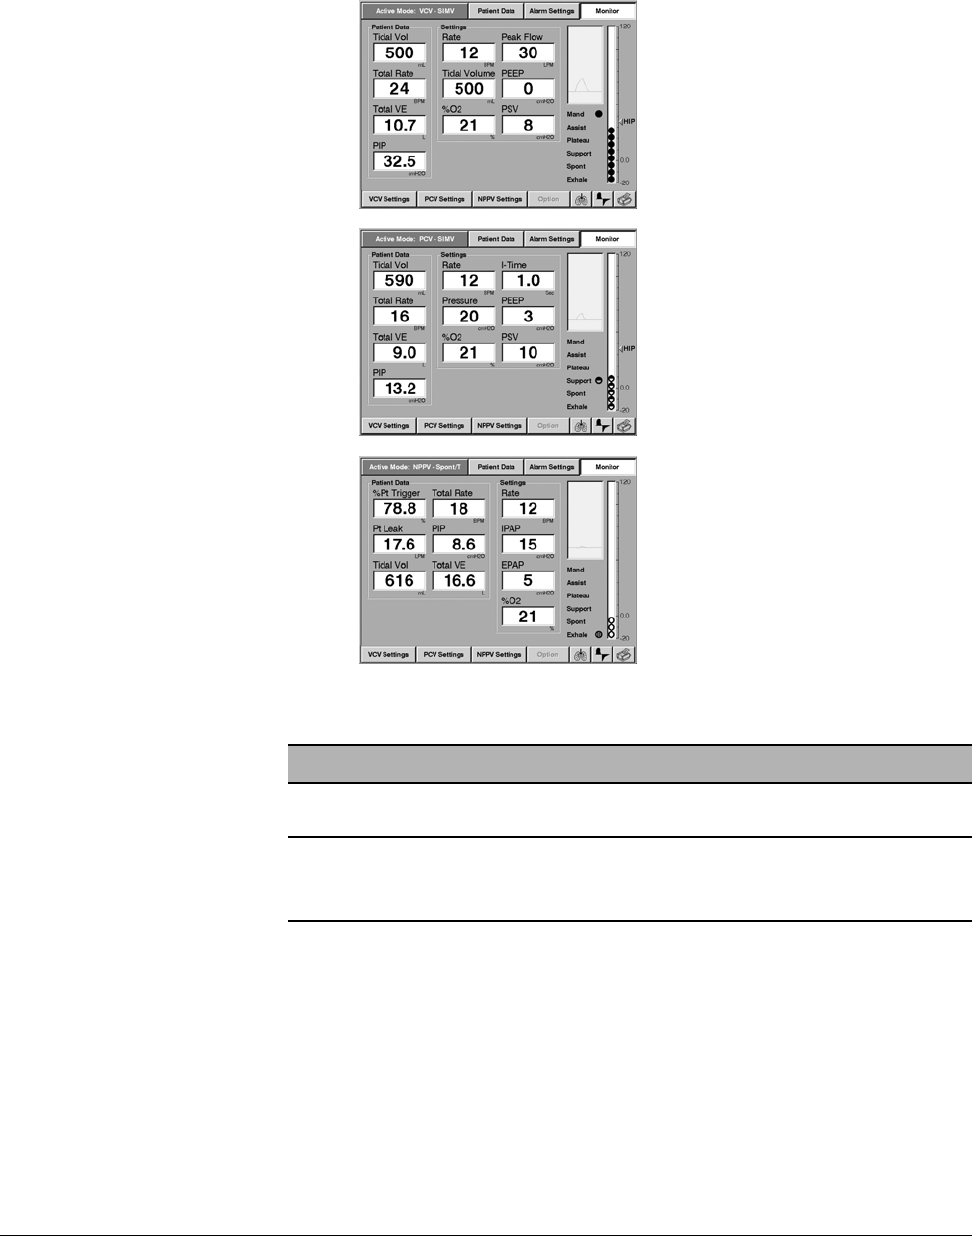
Chapter 8
8-30 Respironics V200 Ventilator Operator’s Manual REF 1057983 A
Operating Instructions
Figure 8-34: Monitor Screen
Monitor Screen Settings Displayed
Ventilation
Breath Type Monitor Screen Settings Displayed
VCV Rate, Peak Flow, Tidal Volume, PEEP, %O2, Pressure Support
PCV Rate, Inspiration Time, Pressure, PEEP, %O2, Pressure Support
NPPV Rate, IPAP, EPAP, %O2
Table 8-8: Monitor Screen Settings Displayed
This screen is displayed
in VCV.
This screen is displayed
in NPPV.
This screen is displayed
in PCV.
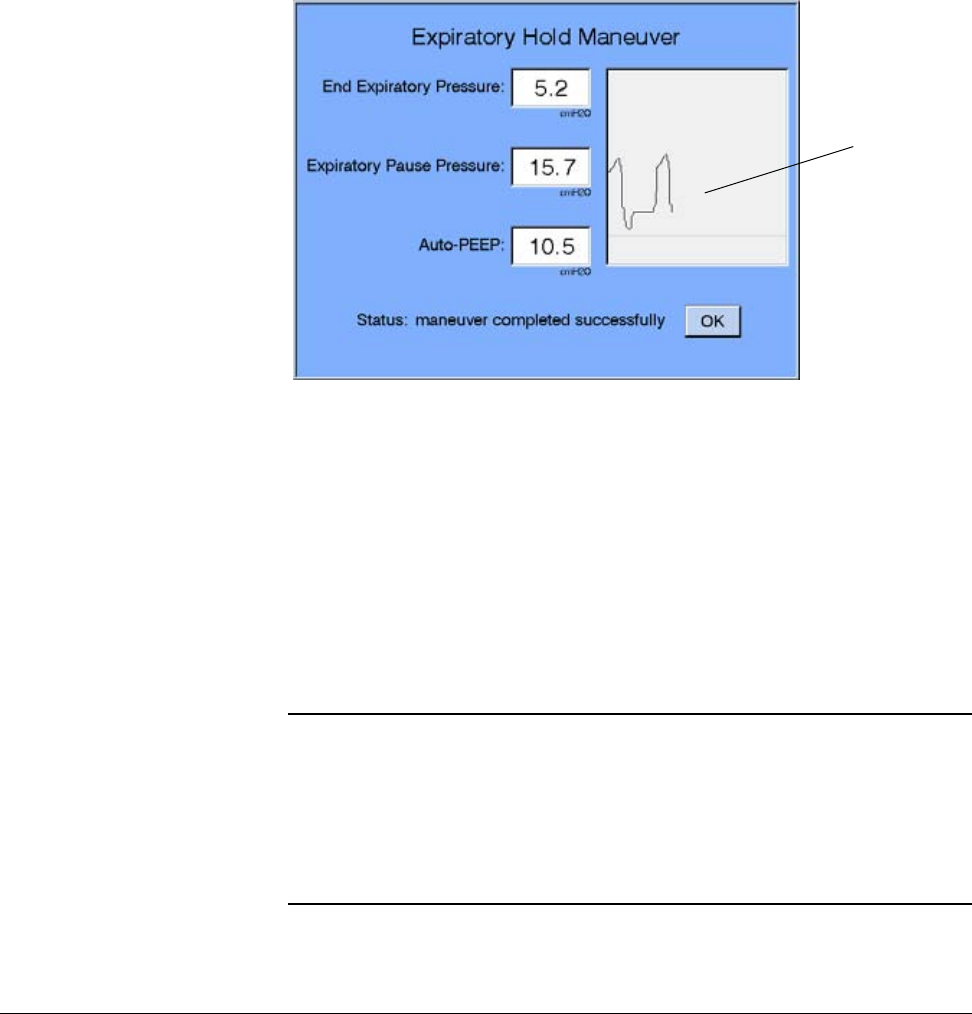
Chapter 8
Operating Instructions
REF 1057983 A Respironics V200 Ventilator Operator’s Manual 8-31
Special Procedures Auto-PEEP Calculation
The ventilator allows the operator to calculate Auto-PEEP from an expiratory
hold procedure. This function is active only at the end of a mandatory breath
and is not available in the emergency ventilation mode. Expiratory hold is
initiated by pressing the EXP HOLD key on the front panel. When exhalation
ends in the breath during which the EXP HOLD key is being pressed, an
expiratory hold maneuver will begin and will continue only as long as the key is
pressed. During the expiratory hold maneuver, the screen shown in Figure 8-35
below will appear.
Figure 8-35: Expiratory Hold Maneuver
While the EXP HOLD key is held, the exhalation valve and the air and O2 valves
will be closed. During this period there is no flow of gas into or out of the
patient circuit from the ventilator. You can monitor the airway pressure by
watching the EXPIRATORY PAUSE PRESSURE digital display, and by watching
the pressure versus time waveform. When you determine the airway pressure
has stabilized, the EXP HOLD key should be released. If the key is held for 5
seconds, the ventilator will automatically terminate the maneuver and perform
the calculation if stability was achieved. The ventilator then calculates Auto-
PEEP as shown in the equation below:
• Auto-PEEP = Expiratory Pause Pressure - End Expiratory Pressure
NOTE: If the EXP HOLD key is held continuously, and the expiratory
hold maneuver exceeds 5 seconds, the ventilator automatically
terminates the expiratory hold maneuver and begins a new
inspiratory period.
NOTE: If Auto PEEP as calculated in Equation 1: Auto-PEEP = Expiratory
Pause Pressure – End Expiratory Pressure, is negative, Auto-PEEP will
be displayed as “—.”
Pressure
versus time
waveform.
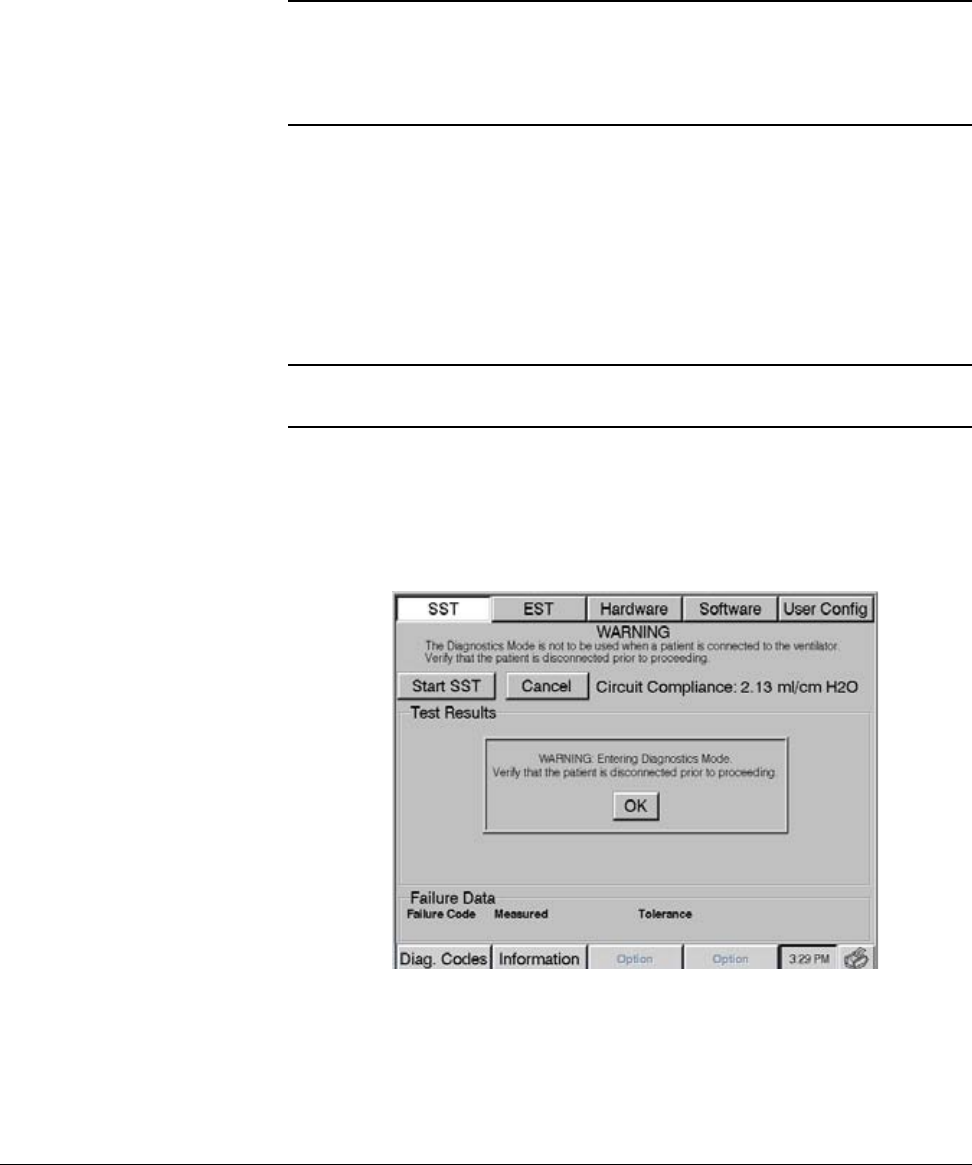
Chapter 8
8-32 Respironics V200 Ventilator Operator’s Manual REF 1057983 A
Operating Instructions
Preoperational
Procedure The preoperational procedure verifies that the ventilator is ready for use on a
patient.
Follow these steps:
1. Follow the setup procedures in Chapter 5, “Setup”, to prepare the
ventilator for use.
2. Connect the patient circuit to be used on the next patient.
3. Install any components that are to be used in line with the patient
circuit (for example, humidifier, O2 monitor, or airway temperature
monitors).
4. Ensure that the ventilator is not on a patient!
5. Hold down the ALARM RESET and 100% O2 keys while the ventilator
is powered up. The operator must confirm that the machine should be
in Diagnostic Mode (Figure 8-36).
Figure 8-36: Entering Diagnostic Mode
6. Press OK to clear the Warning message and enter Diagnostic Mode.
WARNING: Ensure that an alternative means of ventilation (that is, a resuscitator or
similar device) is available while the ventilator is in use on a patient.
WARNING: DO NOT perform the preoperational procedure when the ventilator is on a
patient.
NOTE: All components of the patient circuit must not have leaks in order to
pass SST.
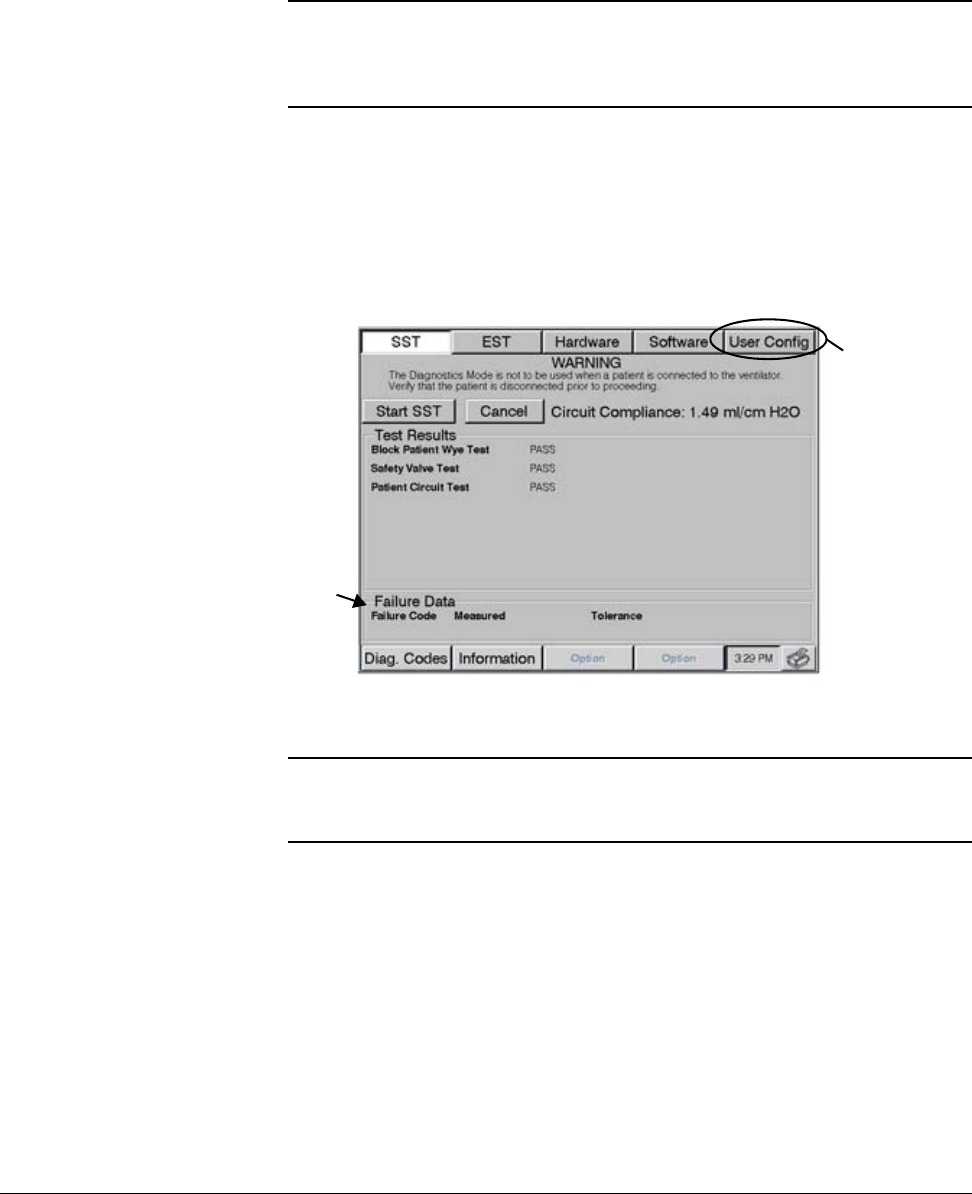
Chapter 8
Operating Instructions
REF 1057983 A Respironics V200 Ventilator Operator’s Manual 8-33
7. Push USER CONFIG to check time, time format, date and altitude and
set compliance compensation as required (Figure 8-37).
8. Press START SST to begin Short Self Test, and follow the screen
prompts. Use a cap to plug the patient port of the patient circuit wye
at the prompt.
9. During SST, as each test is performed, the ventilator displays test
results (Figure 8-37). Do not proceed until the ventilator completes
SST without failures.
Figure 8-37: SST Results
NOTE: If time is found to be incorrect more than once in the preoperational
procedure, an internal battery may have to be replaced. Contact
qualified service personnel or call Respironics Customer Service at
1-800-345-6443.
Any failures
detected during
SST are listed
here.
Push USER
CONFIG to set
time, date,
altitude,
compliance
compensation
enable, and time
format.
WARNING: You will be warned if the compliance is 9.0 ml/cmH2O (hPa) or larger.
Patients should not be put on a patient circuit that does not meet this
requirement.
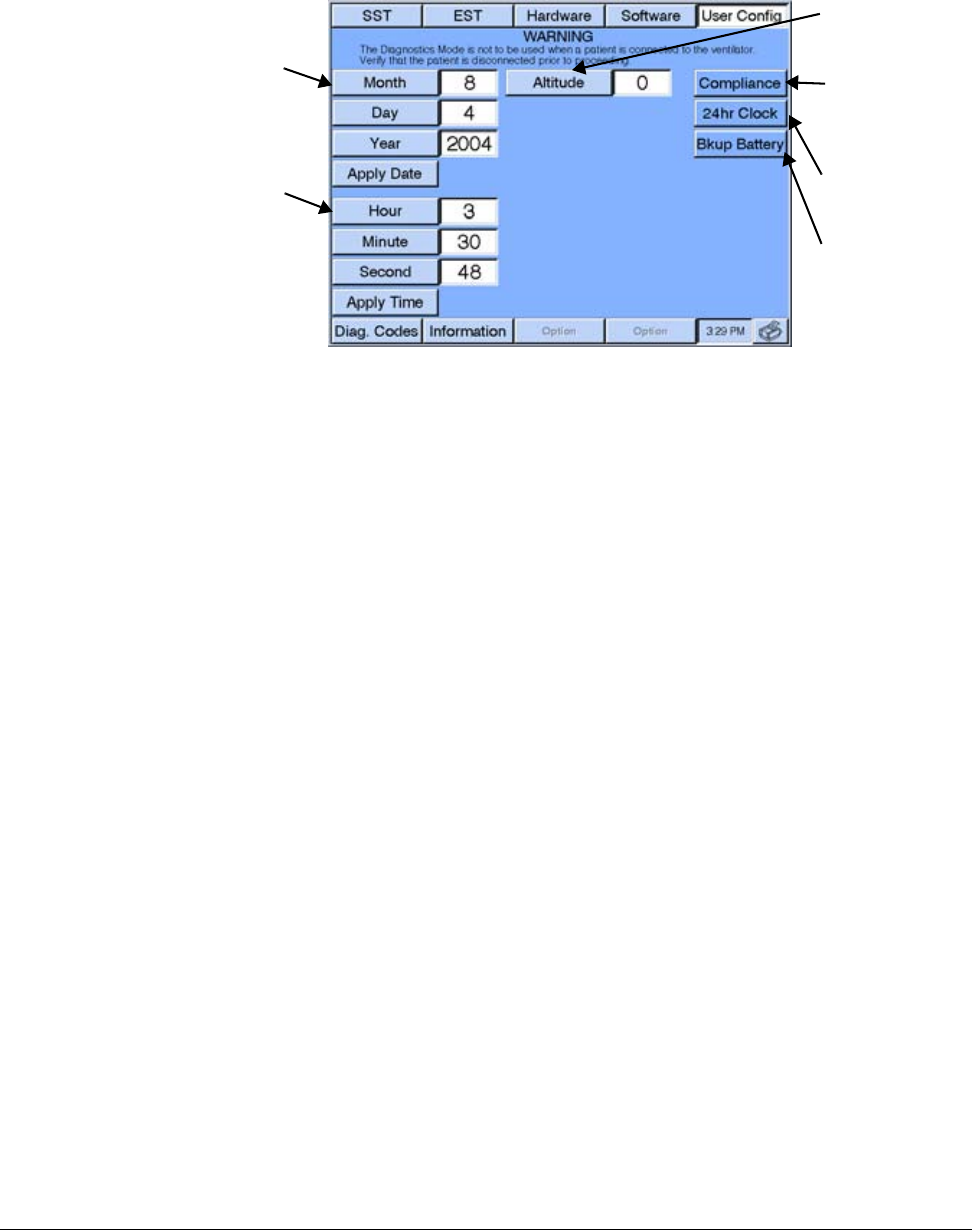
Chapter 8
8-34 Respironics V200 Ventilator Operator’s Manual REF 1057983 A
Operating Instructions
Figure 8-38: User Config Screen
10. Once you have reviewed all the parameters on the User Config screen,
the ventilator is ready for patient use. Turn the ventilator off, then on,
without holding down any front panel keys.
11. Ventilator settings from the previous use are in effect at power up.
Select appropriate settings for the next patient as described in this
chapter.
Alarm Testing
Procedure A procedure is available if the operator wants to test the operation of alarms.
We recommend following the preoperational procedure. (Refer to C, “Alarm
Testing Procedure”.)
Where To Go For Help For clinical or technical support, contact Respironics Customer Service at
1-800-345-6443.
Date set
Altitude set
Compliance
compensation
enable/disable
Time format (12 or
24_hour) set
Backup Battery
(confirm at startup)
enable/disable
Time set
REF 1057983 A Respironics V200 Ventilator Operator’s Manual 9-1
Chapter 9. Alarms
Introduction The Respironics V200 Ventilator provides an easy-to-use hierarchical alarm
system that includes both visual and audible alarms. When the ventilator
detects an operating condition that requires attention, it generates an alarm.
The alarm system communicates three levels of urgency and priority:
•High Urgency: Alerts the operator that immediate response is
required. (red flashing indicator)
•Medium Urgency: Alerts the operator that prompt response is
required. (yellow flashing indicator)
•Low Urgency: Alerts the operator to a change in the ventilator status.
(yellow continuous indicator)
In most cases, the alarm will have the following audible and visual
components:
• an indicator is illuminated
• a sequence of tones sounds
• a screen alert window appears with a message in it
Visual Alarms The ventilator includes alarm and status indicators located on the front panel
to provide a visual summary of active alarm conditions. Each of these
indicators is illuminated by either a red, green, or yellow light, which will flash
or remain illuminated, depending on the alarm condition.
Figure 9-1: Alarm Status Indicators
Pressing the ALARM RESET key on the front panel clears the visual indicators
for active or auto-reset alarms. If the alarm condition reoccurs, the visual
indicator illuminates again.
Alarm messages also appear in an Alert insert that appears in any screen
whenever there is a low, medium, or high urgency alarm active (Figure 9-2).
Normal Alarm Med/LowAlarm High
VENT
INOP SAFETY
VALVE
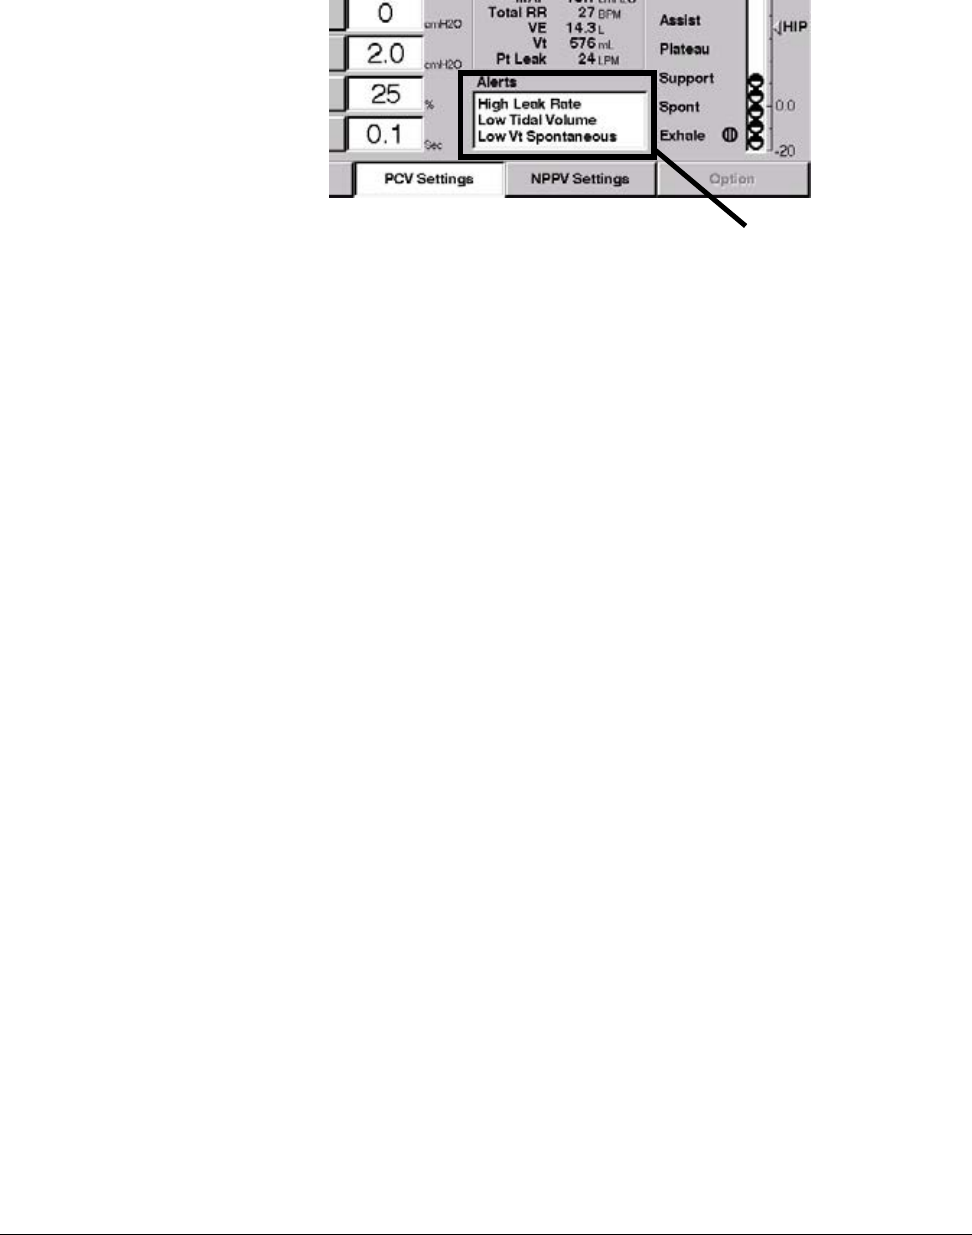
Chapter 9
9-2 Respironics V200 Ventilator Operator’s Manual REF 1057983 A
Alarms
Figure 9-2: Alarm Alerts
Audible Alarms When an alarm condition exists, the ventilator will generate a sequence of
audible tones to alert the operator. The sequence varies according to the
urgency and priority level of the alarm:
•High Urgency: The ventilator emits a repeating sequence of five tones.
•Medium Urgency: The ventilator emits a repeating sequence of three
tones.
•Low Urgency: No audible tone emitted. (Med/Low indicator
illuminates and alarm messages appear in the front panel Alerts
window)
When more than one alarm is active, only the highest urgency level alarm is
audibly annunciated. Procedures for silencing audible alarms are described
below.
Alarm Silence
To silence alarms, perform the following:
• Press the ALARM SILENCE key on the front panel. The audible tone
will cease and the alarm silence indicator will illuminate and remain
lit for two minutes. Specific alarms that cannot be silenced are listed
in Table 9-1: “Alarm Alert Messages”.
When ALARM SILENCE is pressed before the end of the two-minute period,
the two-minute timer is reset, and alarm silence begins anew. Pressing ALARM
SILENCE multiple times does not give multiple two-minute silence periods.
If new alarms occur during alarm silence, all visual alarm annunciation
continues. If the Alerts insert is not present, it will appear. The message for
any alarms that occur during the alarm silence period will appear in the Alerts
insert if there are fewer than three messages currently displayed or the new
Alarm Insert

Chapter 9
Alarms
REF 1057983 A Respironics V200 Ventilator Operator’s Manual 9-3
message is higher priority than one of the currently displayed messages. The
highest three priority messages will be displayed.
ALARM SILENCE is immediately terminated if ALARM RESET is pressed. Any
medium or high priority alarm that is active will immediately begin audible
annunciation.
Alarm Reset Automatic Alarm Reset (Auto-Reset)
When the alarm conditions that have caused a medium or high level alarm
clear, the audible alarm will terminate automatically (auto-reset). However,
after an alarm condition has been corrected, you must press the ALARM
RESET key to clear all visual alarm indicators.
Operator-Initiated Alarm Reset
You can clear active and auto-reset alarms by pressing the ALARM RESET key.
This clears the alarm messages in the Alerts insert for active and auto-reset
alarms. If the alarm condition reoccurs, the alarm restarts at its initial level of
urgency and elevates as described in Table 9-1: “Alarm Alert Messages” on
page 9-5.
For you to clear an apnea alarm, the ALARM RESET key may be pressed. Once
it has been pressed, the ALARM RESET will cancel an existing apnea alarm
and return ventilation to the active mode. If the condition that triggered the
apnea alarm persists after the ALARM RESET key has been pressed, the apnea
alarm will re-trigger. If the patient triggers two successive breaths in apnea
ventilation, the ventilator will automatically reset out of apnea ventilation.
Alarm Reset Terminates Alarm Silence
If ALARM SILENCE is active when ALARM RESET is pressed, the ALARM
SILENCE period will terminate and any active medium or high priority alarms
will become audible.
CAUTION: The ventilator alarm indicators and the Alerts insert should be
monitored closely during the Alarm Silence period to ensure that
unexpected alarms are noticed.
CAUTION: If an alarm persists for no apparent reason, contact Respironics
Customer Service at 1-800-345-6443.
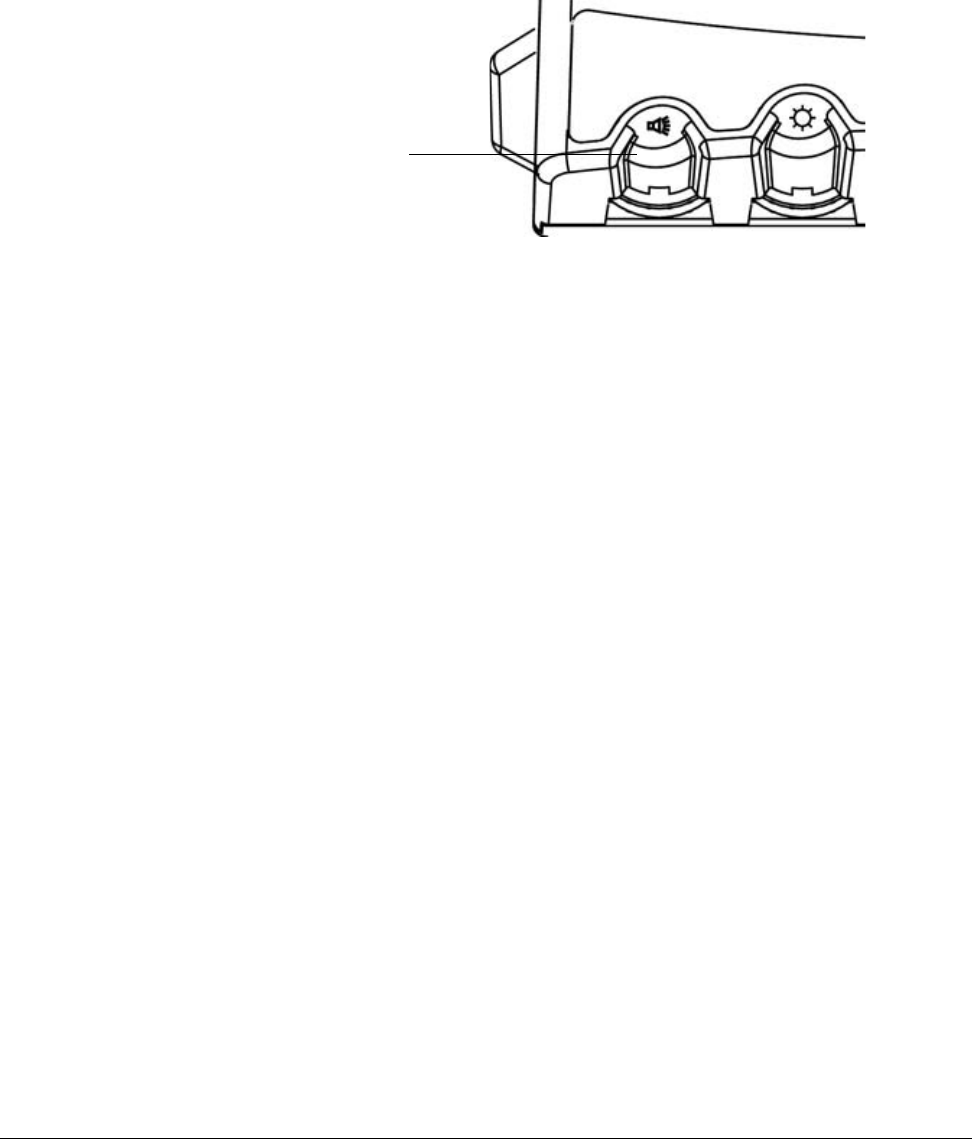
Chapter 9
9-4 Respironics V200 Ventilator Operator’s Manual REF 1057983 A
Alarms
Alarm Volume Control
Under the left hand bottom edge of the front panel is a partially exposed round
control that enables you to control the volume of audible alarms (Figure 9-3).
Figure 9-3: Alarm Volume Control
The volume control can be adjusted between a minimum and maximum setting
to suit the particular clinical situation.
Alert Messages When the ventilator detects an alarm condition, it presents an Alert insert
below the Patient Data box in the middle of the screen.
While the alarm is active (i.e. visual and audible alarms are still present), the
message in the Alert insert appears in bold-faced type. Once the alarm
condition has been corrected, the message automatically switches to regular
face type. Pressing ALARM RESET clears alarm messages.
When the operator presses the ALARM RESET button (described above), the
alarm messages disappear from the alert window.
When the ventilator detects more than three alarm conditions, the three
highest priority alert messages will be displayed.
Alert messages, along with the corresponding alarm descriptions, are listed in
Table 9-1: “Alarm Alert Messages”.
Alarm Volume
Control Knob

Chapter 9
Alarms
REF 1057983 A Respironics V200 Ventilator Operator’s Manual 9-5
Alarm Alert Messages
Alert Message Description
Air Source Fault A high urgency alarm indicates the internal air source is not
functioning properly, patient ventilation continues using the
100% O2 gas source if available. Call for service. Cannot be
silenced or manually reset.
Apnea The ventilator triggers a medium urgency alarm condition
and enters Apnea Ventilation mode if no inspiration is
started within the operator set apnea interval while in a non-
emergency breathing mode. It is elevated to high urgency
after one minute of Apnea Ventilation.
Audible Alarm Failed Primary audible alarm is defective. Alarm cannot be
manually reset.
Bad ADC Wrap Sensor Alarm cannot be silenced or manually reset. Call for service.
Bad Bat Volt Sensor Alarm cannot be silenced or manually reset. Call for service.
Bad Int O2 Sensor Alarm cannot be silenced or manually reset. Call for service.
Bad Int Temp Sensor Alarm cannot be silenced or manually reset. Call for service.
Battery Backup On Indicates the backup battery is the power source for
ventilator operation. Alarm cannot be silenced.
Exp Valve Stuck Open Alarm cannot be silenced or manually reset. Call for service.
Gas Supplies Lost -
SVO A high urgency alarm indicates the oxygen and air source
are no longer operable. Safety valve opens. Check O2 source
and internal air source. Call for service. Cannot be silenced
or manually reset.
High Inspiratory
Pressure Indicates that circuit pressure exceeds the high pressure
limit. When High Inspiratory Pressure condition occurs, the
ventilator immediately cycles into the exhalation phase and
illuminates the low priority indicator. Then on the second
consecutive breath with a pressure violation, sounds the
audible alarm, lights the Alarm High indicator, and displays
High Inspiratory Pressure message.
High Internal O2Oxygen concentration internal to the enclosure is beyond
allowable levels. Indicative of an internal O2 leak. Alarm
cannot be silenced or manually reset.
High Leak Rate The average estimated leak from the previous breath has
exceeded the set High Leak alarm limit (alarm applies to
NPPV mode only). Medium urgency, escalates to high
urgency after 60 seconds. The alarm cancels when the
estimated leak from the previous breath equals or falls
below the alarm setting, if the ventilation type changes from
NPPV to another ventilation mode or if the alarm is reset by
the clinician.
Table 9-1: Alarm Alert Messages (Sheet 1 of 4)

Chapter 9
9-6 Respironics V200 Ventilator Operator’s Manual REF 1057983 A
Alarms
High Minute Volume Indicates total minute ventilation (VE) measured in
exhalation is higher than the set limit. This alarm is
available in Volume Control and Pressure Control modes. It
is elevated to high urgency after one minute.
High O2A high urgency alarm indicates that the monitored O2
concentration is at least 6% above the set value (%O2) for
30 seconds. Verify operation of the O2 sensor. Alarm cannot
be manually reset.
High Respiratory Rate The ventilator triggers a medium urgency alarm if the total
respiratory rate is greater than the operator-set High
Respiratory Rate limit. The ventilator evaluates this alarm
condition at the start of inspiration, after calculating the
total respiratory rate including the just completed breath. It
is elevated to high urgency after one minute.
High Temperature Internal temperature monitor detects higher than allowed
temperatures inside the enclosure. Alarm cannot be
silenced or manually reset.
I-Time Too Long The ventilator triggers a medium urgency alarm to indicate
that a spontaneous breath has exceeded the maximum
allowed inspiratory time of 3.5 seconds (2.5 seconds in
Pediatric mode). The alarm is elevated to high urgency after
two consecutive breaths that meet the alarm criteria.
Low Backup Battery If the backup battery is low, a high priority alarm will be
triggered. Immediately connect an AC power source to avoid
a loss of power. Provide AC power and/or replace the backup
battery. Alarm cannot be silenced or manually reset. 5
minutes or less of battery run time remains.
Low EPAP If the Exhalation Positive Airway Pressure is less than the
operator set Low EPAP Pressure limit for one second, the
ventilator signals a medium urgency condition. If the Low
EPAP alarm remains active for one minute, the ventilator
elevates the alarm to high urgency.
Note: A Low EPAP setting of zero (0) will disable this alarm.
Note: If an inspiration is triggered immediately after the
mandatory minimum exhalation time of 200 msec, this
alarm will not be activated unless this condition occurs for
three consecutive breaths.
Alarm Alert Messages (Continued)
Alert Message Description
Table 9-1: Alarm Alert Messages (Sheet 2 of 4)

Chapter 9
Alarms
REF 1057983 A Respironics V200 Ventilator Operator’s Manual 9-7
Low Insp Pressure If the peak airway pressure during any mandatory inhalation
is less than the Low Insp Pressure limit, the ventilator will
immediately signal a high priority alarm.
Note: If an inspiration is triggered immediately after the
mandatory minimum exhalation time of 200 msec, this
alarm will not be activated unless this condition occurs for
three consecutive breaths.
Low Minute Volume Indicates the measured patient minute ventilation (VE) is
below the set limit. It is elevated to high urgency after one
minute.
Note: A Low Minute Volume setting of zero (0) will disable
this alarm.
Low O2A high urgency alarm indicates that the monitored O2
concentration is 18% or at least 6% below set value for 30
seconds. Verify operation of the O2 sensor. Alarm cannot be
manually reset.
Low O2 Supply A high urgency alarm indicates that O2 gas supply is below
acceptable levels and the %O2 setting is above 21%. Check
O2 gas connections and inlet filter. Alarm cannot be
manually reset.
Low PEEP If PEEP is less than the operator set Low PEEP limit for one
second during exhalation, triggers a medium priority alarm.
If the Low PEEP alarm remains active for one minute, the
alarm moves to high priority.
Note: A Low PEEP setting of zero (0) will disable this alarm.
Note: If an inspiration is triggered immediately after the
mandatory minimum exhalation time of 200 msec, this
alarm will not be activated unless this condition occurs for
three consecutive breaths.
Low Tidal Volume The ventilator triggers a medium urgency alarm to indicate
that the NPPV (mandatory or spontaneous breath) tidal
volume is less than the set limit. It is elevated to a high
urgency alarm after one minute.
Note: A Low Tidal Volume setting of zero (0) will disable this
alarm.
Alarm Alert Messages (Continued)
Alert Message Description
Table 9-1: Alarm Alert Messages (Sheet 3 of 4)

Chapter 9
9-8 Respironics V200 Ventilator Operator’s Manual REF 1057983 A
Alarms
Low Vt Mandatory The ventilator triggers a medium urgency alarm to indicate
that the VCV or PCV mandatory tidal volume is less than the
set limit. It is elevated to high urgency after one minute.
Note: A Low Vt setting of zero (0) will disable this alarm.
Note: If an inspiration is triggered immediately after the
mandatory minimum exhalation time of 200 msec, this
alarm will not be activated unless this condition occurs for
three consecutive breaths.
Low Vt Spontaneous The ventilator triggers a medium urgency alarm to indicate
that the VCV or PCV spontaneous tidal volume is below the
set alarm limit. It is elevated to high urgency after one
minute.
Note: A Low Vt setting of zero (0) will disable this alarm.
O2 Valve Stuck Closed Alarm cannot be silenced or manually reset. Call for service.
Occlusion - SVO Safety Valve opens. The ventilator triggers a high urgency
alarm to indicate that an occlusion has been detected in the
patient circuit. Check circuit tubing for crimped hoses or
blockage. Check filters and humidification devices to ensure
they are functioning properly. Alarm cannot be manually
reset.
Restart The ventilator has restarted. If the ventilator repeatedly
restarts on its own, call for service.
Using Default Altitude Ventilator is using default altitude.
Using Default
Compliance Ventilator is using default compliance.
Using Default Settings Ventilator is using default settings.
Alarm Alert Messages (Continued)
Alert Message Description
Table 9-1: Alarm Alert Messages (Sheet 4 of 4)

Chapter 9
Alarms
REF 1057983 A Respironics V200 Ventilator Operator’s Manual 9-9
Alarm Indicators
Figure 9-4: Alarm and Status Indicators
Normal
The Normal indicator remains lit with a steady green light as long as there are
no active or auto reset alarm conditions present.
Alarm High
The Alarm High indicator visually indicates a high priority alarm. When a high
priority alarm condition exists, this indicator flashes red and an audible five
tone sequence sounds until the condition is corrected or reset.
Alarm Med/Low
The Alarm Med/Low indicator visually indicates a medium or low priority alarm.
When a medium priority alarm condition exists, this indicator will flash yellow
and an audible three tone sequence will be heard until the condition is
corrected. When a low priority alarm condition exists, this indicator remains lit
with a steady yellow light, until the alarm is reset.
Vent Inop
The Vent Inop indicator signals the operator that the ventilator is not capable
of supporting ventilation and requires service. During a ventilator inoperative
condition, the ventilator enters a safe state, where the safety valve is opened
and new alarm condition detection is discontinued. If the ventilator is attached
to a patient when this condition is detected, the ventilator must be replaced
immediately.
WARNING: A high priority, visual and audible alarm indicates a potentially life-
threatening condition and immediate response is required.
WARNING: Vent Inop is a serious condition, which is indicated by both visual and
audible alarms. If the ventilator is attached to a patient when Vent Inop
occurs, the patient must be supported with another means of life support
ventilation.
Normal Alarm Med/LowAlarm High
Vent
Inop Safety
Valve
Chapter 9
9-10 Respironics V200 Ventilator Operator’s Manual REF 1057983 A
Alarms
When a ventilator inoperative condition is detected, the Vent Inop indicator
will display a steady red light, and the ventilator will sound a five-tone audible
alarm sequence.
The Vent Inop alarm cannot be reset by an operator. It cannot be auto-reset or
silenced. The ventilator must be serviced by a qualified service representative,
in order for the Vent Inop audible and visual alarms to be cleared.
Safety Valve
This indicator signals that the Safety Valve is open and the ventilator is not
providing breath support to the patient. It is accompanied by a five-tone
audible alarm sequence and a Safety Valve Open message in the touch screen
display.
The Safety Valve opens automatically whenever the ventilator is not able to
provide breath support to the patient. It allows the patient to spontaneously
breathe room air through the ventilator system.
The Safety Valve Open condition is normal during start-up and restart, and it
automatically turns off when the start-up sequence is complete. If this
condition occurs at any other time, it cannot be reset. Immediately use an
alternative ventilation source and call for service.
Alarm Silence
The indicator ( ) on the Alarm Silence key will illuminate with a steady yellow
light whenever the operator presses the alarm silence control. The indicator
remains lit for two minutes after the Alarm Silence key is pressed. If Alarm
Silence is active and an alarm takes place that involves an operator alarm limit
being exceeded, the alarm will be anunciated visually, but Alarm Silence will
continue to be active and the Alarm Silence timer will continue to time out.
Alarms that can not be silenced are listed in Table 9-1: “Alarm Alert
Messages” on page 9-5. If Alarm Reset is pressed at any time during the Alarm
Silence period, the Alarm Silence period is terminated. If any high or medium
priority alarm condition exists after pressing Alarm Reset, an audible alarm
sounds.
WARNING: When the safety valve open indicator is lit, the ventilator does not provide
any ventilatory support to the patient. Immediately use a backup means of
ventilatory support.
WARNING: Visually monitor the patient and ventilator during the Alarm Silence period
to ensure that alarms do not go undetected. Allowing alarm conditions to
continue without intervention may result in harm to the patient and/or
ventilator.

REF 1057983 A Respironics V200 Ventilator Operator’s Manual 10-1
Chapter 10. Care and Maintenance
General Information Procedures for ventilator cleaning, sterilizing, and periodic maintenance must
be performed to ensure consistent ventilator operation. Institutional policies
may also provide guidelines, procedures, and schedules for cleaning and
sterilizing equipment before, during and after patient use.
In addition, recommended methods and time frames for performing all
necessary care and maintenance procedures for the ventilator are presented in
this section.
Respironics recognizes that cleaning, sterilization, sanitation and disinfecting
practices vary widely among health care institutions. It is not possible for
Respironics to specify or require specific practices that will meet all needs, or
to be responsible for the effectiveness of cleaning, sterilization, and other
practices carried out in the patient care setting.
General procedures for cleaning and sterilizing the ventilator are described in
the following sections. Some ventilator parts must be disassembled before
cleaning and sterilizing. (Refer to “Removing and Replacing Internal Air
Source Inlet Filter” on page 10-10.)
Cleaning When cleaning parts, avoid the use of hard brushes or other instruments likely
to cause surface damage.
CAUTION: Care should be taken when cleaning the touch display. (Refer to Figure
8-2 on page page 8-3). A soft moist cloth should be used that does not
drip water and/or soap solution when in contact with the display. After
cleaning and rinsing with a damp cloth, remove all moisture with a dry,
soft cloth. Never allow solutions of any kind to collect on the bottom
bezel of the display. Never use a brush or device that can cause
abrasion to clean the touch display or its bezel; they will cause
irreparable damage.
CAUTION: Follow the detergent manufacturer’s instructions. Exposure to detergent
solution stronger than necessary can shorten the useful life of the
product. Rinse parts thoroughly to remove all detergent residues. Wipe
parts dry. Detergent residue can cause blemishes or fine cracks,
especially on parts exposed to elevated temperatures during
sterilization.

Chapter 10
10-2 Respironics V200 Ventilator Operator’s Manual REF 1057983 A
Care and Maintenance
Sterilization
Do not clean, disinfect, sterilize or reuse disposable products.
Steam Autoclaving
The O2 sensor tee (P/N 1001736) and the O2 sensor coupling
(P/N 1002505) may be steam autoclaved. The PVC O2 sensor tee,
P/N 8-100498-00 (gray in color), cannot be autoclaved.
1. Ensure that the part has been disassembled, cleaned, and partially
reassembled, as applicable.
2. Separately wrap the part in muslin or equivalent paper wrapper.
3. Steam autoclave according to the autoclave manufacturers
instructions. In many institutions it may be routine to place a
biological indicator in the autoclave load as a subsequent test for
sterility.
4. Aseptically store parts until used.
Chemical Disinfecting
The O2 sensor tee (P/N 1001736) and the O2 sensor coupling
(P/N 1002505) may be chemically disinfected.The PVC O2 sensor tee,
P/N 8-100498-00 (gray in color), cannot be chemically disinfected.
For chemically disinfected parts, reassemble after disinfecting.
WARNING: Do not expose expiratory and inspiratory bacteria filters or reusable patient
tubing to ETO gas.
NOTE: Because conditions and practices in health care institutions vary, this
manual can only describe general guidelines. It is the user’s
responsibility to ensure the validity and effectiveness of the methods
used.
CAUTION: Autoclavable parts will withstand repeated steam autoclaving at
temperatures not to exceed 135° C (275ºF).
CAUTION: DO NOT autoclave the ventilator.

Chapter 10
Care and Maintenance
REF 1057983 A Respironics V200 Ventilator Operator’s Manual 10-3
1. Separately immerse each part in the chemical disinfectant, i.e.
ammonia (15% solution), bleach (10% solution) or commercial,
hospital grade disinfectant, etc. Follow the disinfectant manufacturers
directions for the solution concentration, immersion times, and other
conditions for disinfecting. The use of a laminar air flow hood during
the chemical disinfecting process is recommended.
2. Thoroughly rinse and dry each part.
3. Aseptically reassemble (as required) and store the part until use.
Ventilator Exterior
Wipe the ventilator exterior clean with a damp cloth and mild detergent. Do not
use liquid or aerosol bactericide. Do not allow moisture to come in contact with
the touch panel screen or to collect between the keypad and front bezel
assembly.
Patient Circuit Support Arm
Wipe the patient circuit support arm clean with alcohol or bactericide.
O2 Gas Supply Filter/Water Trap
Wipe the exterior of the O2 gas supply filter/water trap with a mild solution of
soap and water. Rinse and dry parts. Do not steam-autoclave, chemically
disinfect, or expose to ETO gas. Do not allow liquid to migrate into the inlet
port.
CAUTION: Formaldehyde, phenol-based, and quaternary ammonium compound
(QUATS) disinfectants are not recommended because these agents can
cause cracking and crazing of plastic parts. Exposure of components to
disinfectant concentrations stronger than required or for excessive time
may shorten product life. Parts should be thoroughly rinsed and dried to
prevent spotting and blemishes when exposed to elevated temperatures.
CAUTION: DO NOT allow liquid to penetrate the ventilator rear or front panel. DO
NOT attempt to sterilize the ventilator by exposing to ETO gas. DO NOT
steam-autoclave.
CAUTION: Care should be taken when cleaning the touch display. (Refer to Figure
8-2 on page page 8-3). A soft moist cloth should be used that does not
drip water and/or soap solution when in contact with the display. After
cleaning and rinsing with a damp cloth, remove all moisture with a dry,
soft cloth. Never allow solutions of any kind to collect on the bottom
bezel of the display. Never use a brush or device that can cause
abrasion to clean the touch display or its bezel; they will cause
irreparable damage.
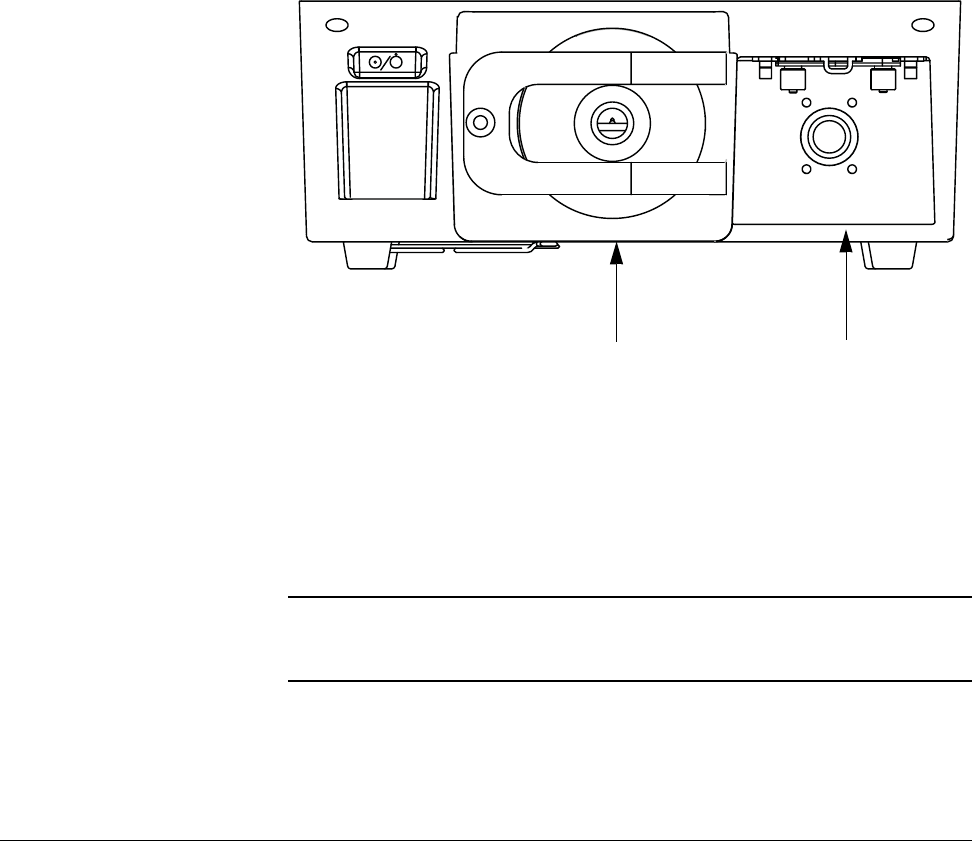
Chapter 10
10-4 Respironics V200 Ventilator Operator’s Manual REF 1057983 A
Care and Maintenance
Reusable Patient Circuit Tubing, Couplings, and Connectors
Disassemble and clean manually followed by steam-autoclave. Follow all
institutional guidelines for autoclaving.
Visually inspect tubing for nicks, cuts and holes prior to use with the ventilator.
Reusable In-line Water Traps
Disassemble and clean water traps as per the manufacturers instructions.
Inspect for cracks or leaks prior to use with the ventilator. Replace if cracked
or leaking.
Bacteria Filters Bacteria filters are typically used on the inspiratory and expiratory port
connections on the front of the ventilator. Filter locations are illustrated below.
Figure 10-1: Inspiratory and Expiratory Bacteria Filter Locations
The inspiratory filter port is a 22mm standard connector. Use the filter
supplied with the ventilator.
The expiratory port includes a heated exhalation compartment. Use the filter
supplied with the ventilator.
WARNING: Disposable or single-patient filters must be discarded between patients. Do
not chemically disinfect or expose single patient use bacteria filters to ETO
gas.
Inspiratory FilterExpiratory Filter
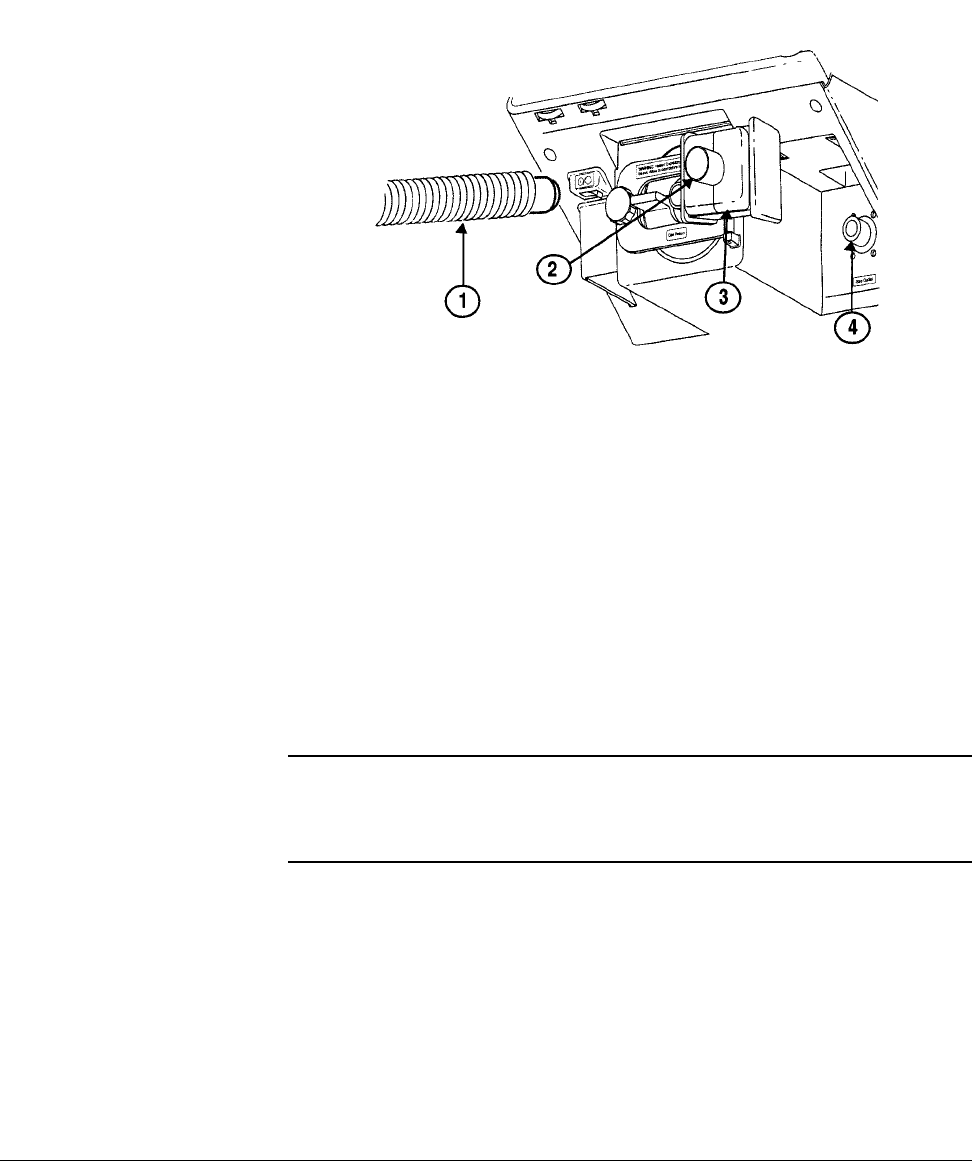
Chapter 10
Care and Maintenance
REF 1057983 A Respironics V200 Ventilator Operator’s Manual 10-5
Removing and Replacing Inspiratory Bacteria Filter
Follow the steps outlined below to remove and replace the inspiratory bacteria
filter.
Figure 10-2: Removing and Replacing Inspiratory Bacteria Filter
1. Disconnect circuit tubing (1) from inspiratory bacteria filter outlet (2).
2. Disconnect filter (3) from the gas outlet (4). If optional O2 sensor is
installed, ensure it is not dislodged. When used, O2 sensor is located
between gas outlet (4) and filter (3).
3. Insert new filter onto the gas outlet (4) with flow direction indicator
(on the filter) pointing away from the ventilator.
4. Reconnect circuit tubing (1) to new filter outlet (2).
Removing and Replacing Expiratory Bacteria Filter
Refer to the illustration below and follow the steps outlined below to remove
and replace the expiratory bacteria filter.
WARNING: The expiratory filter housing may be hot if removed from the ventilator
immediately after use. Wait 15 minutes after turning off ventilator power
before removing the heated expiratory bacteria filter. Exercise caution when
handling the filter housing.
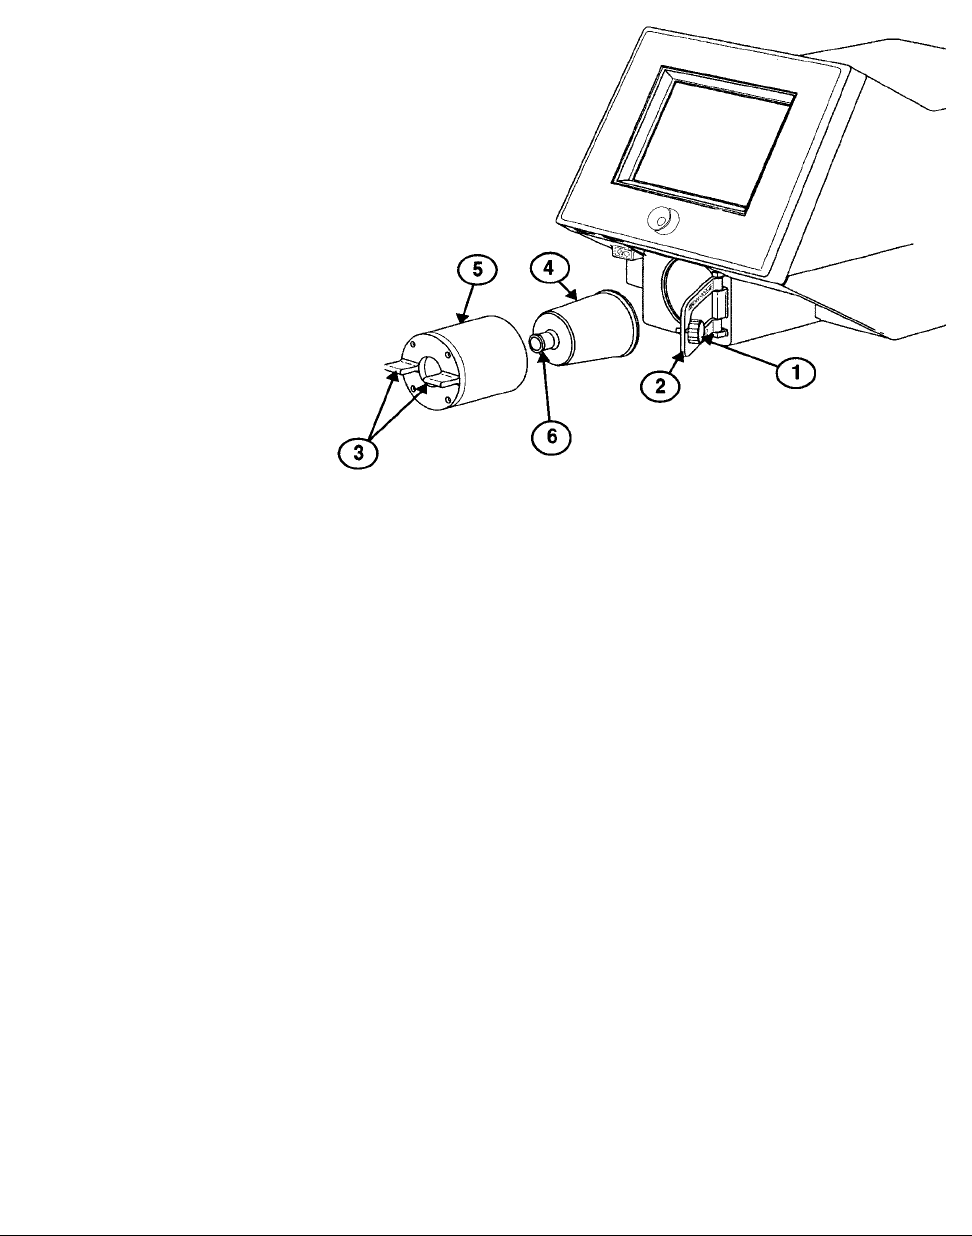
Chapter 10
10-6 Respironics V200 Ventilator Operator’s Manual REF 1057983 A
Care and Maintenance
Figure 10-3: Removing and Replacing Expiratory Bacteria Filter
1. Disconnect circuit tubing from filter inlet (not shown).
2. Unscrew knob (1) to unlatch retaining bracket (2).
3. Open retaining bracket (2).
4. Use tabs (3) to gently remove heater housing (5) and filter (4) from
the ventilator.
5. Do not touch heater housing. If ventilator has not been turned off and
heater housing has not been allowed to cool, it may be hot to the
touch.
6. Carefully remove filter (4) from heater housing (5).
7. Tap filter input port (6) if filter (4) cannot be easily removed from
housing (5).
8. Insert new filter into housing (5).
9. Reinstall housing (5) and new filter and close retaining bracket (2).
10. Connect circuit.

Chapter 10
Care and Maintenance
REF 1057983 A Respironics V200 Ventilator Operator’s Manual 10-7
Periodic
Maintenance This section includes detailed operator maintenance.
Schedule for Periodic Maintenance
Frequency Component Maintenance
During ventilator
setup •Inspiratory bacteria filter
• Ventilator and patient circuit
components
• Inspiratory and expiratory filters
•Check filter for occlusions, cracks and
tears.
•Perform SST (Short Self-Test)
whenever circuit components are
changed
•Perform EST (Extended Self-Test)
between patient uses
•Ensure that the ventilator functions
normally with both filters in place
At least daily, and as
recommended by
filter manufacturers
•Inspiratory and expiratory filters •Monitor performance of filters and
replace as needed. Review ventilator
patient graphics frequently for changes
in expiratory resistance which may
indicate degradation of expiratory filter.
•Follow filter manufacturer
recommendations regarding duration
of use, maintenance (for reusable
filters), removal and disposal. Note
that high humidity and aerosol
medications may reduce expiratory
filter life, increase expiratory
resistance, and/or cause filter damage.
CAUTION: Do not operate the ventilator without a properly functioning
expiratory filter and heater. Doing so may cause damage to delicate ventilator
components, such as the expiratory flow sensor, which may lead to inaccurate
spirometry or a Vent Inop condition.
WARNING: Vent Inop is a serious condition which is indicated by both visual and
audible alarms. If the ventilator is attached to a patient when Vent Inop occurs, the
patient must be supported with another means of life support ventilation.
At least daily • Oxygen supply water trap and
filter •Check and empty as required every
shift
At least every 250
hours •Air Inlet & Fan Filters •Inspect and clean. Some
environments cause a quicker
collection of lint and dust than others,
requiring maintenance more frequently
than every 250 hours.
Annually • Annual preventive
maintenance kit (P/N
1034840). Kit contents are
subject to change.
•Install annual preventive maintenance
kit.
•Clean ventilator interior and exterior
•Complete performance verification
procedure
CAUTION: The annual preventive maintenance procedure is to be performed only
by a qualified service technician
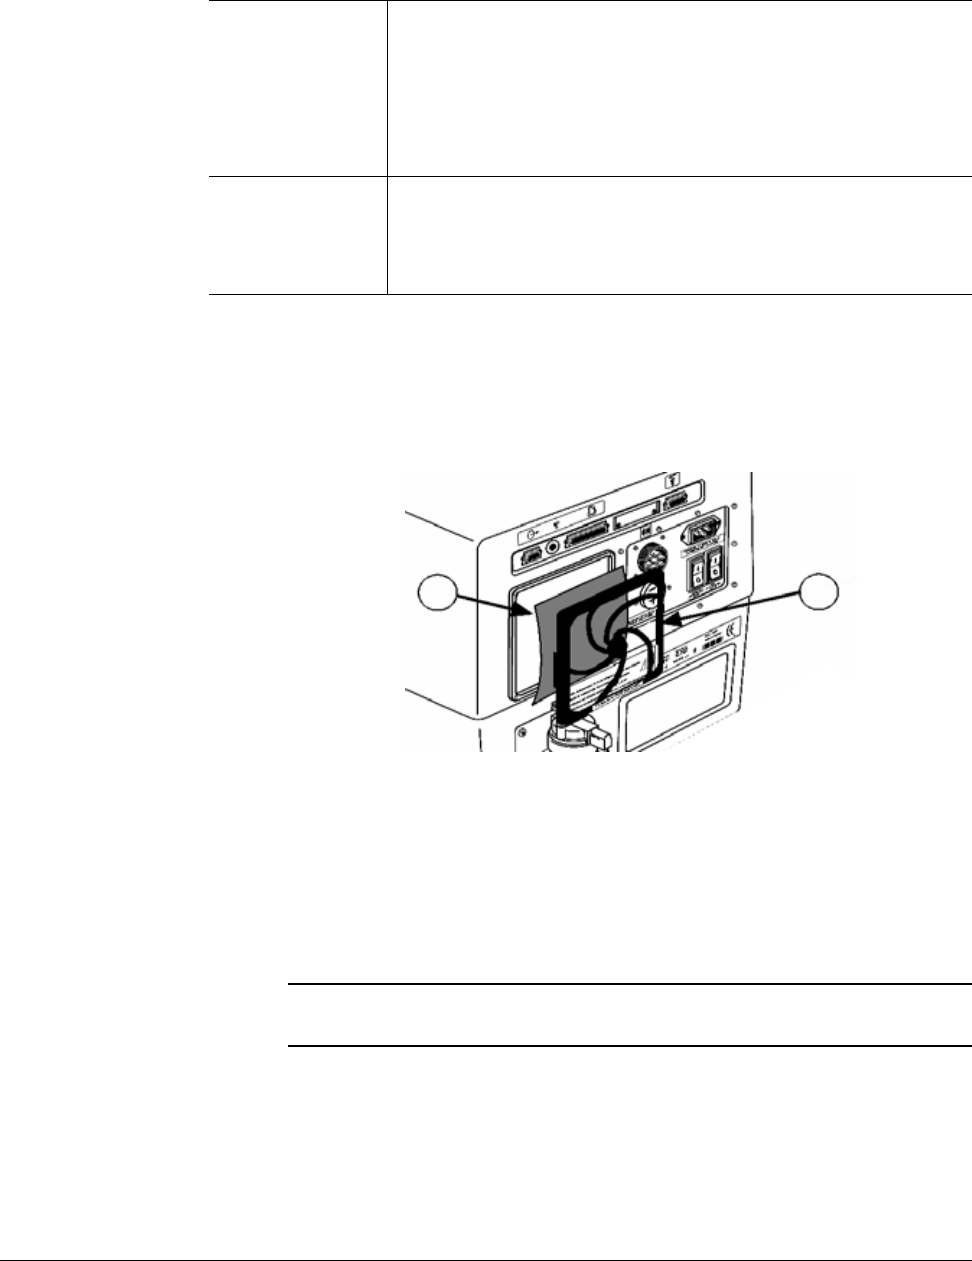
Chapter 10
10-8 Respironics V200 Ventilator Operator’s Manual REF 1057983 A
Care and Maintenance
Table 10-1: Schedule for Periodic Maintenance
Removing Cooling Filter
Figure 10-4: Removing Cooling Filter
Refer to Figure 10-4.
1. Remove black filter retaining bracket (1). (Pry off if necessary.)
2. Wash filter (2) in soapy water.
3. Dry thoroughly before reinstalling.
12,500 hours • 12,500 hour preventive
maintenance kit (P/N
1001733). Kit contents are
subject to change.
•Install 12,500 hour preventive
maintenance kit
•Clean ventilator interior and exterior
•Complete performance verification
procedure
CAUTION: The 12,500 hour preventive maintenance procedure is to be
performed only by a qualified service technician.
As required • External oxygen sensor
• Backup Battery
• Replace and recalibrate new sensor by
running Extended Self-Test
• For charging and maintenance
instructions, see “Backup Battery” on
page 4-4.
CAUTION: Do not remove any screws from the cooling filter area. Removing screws
from this area will result in damage to internal components.
1
2
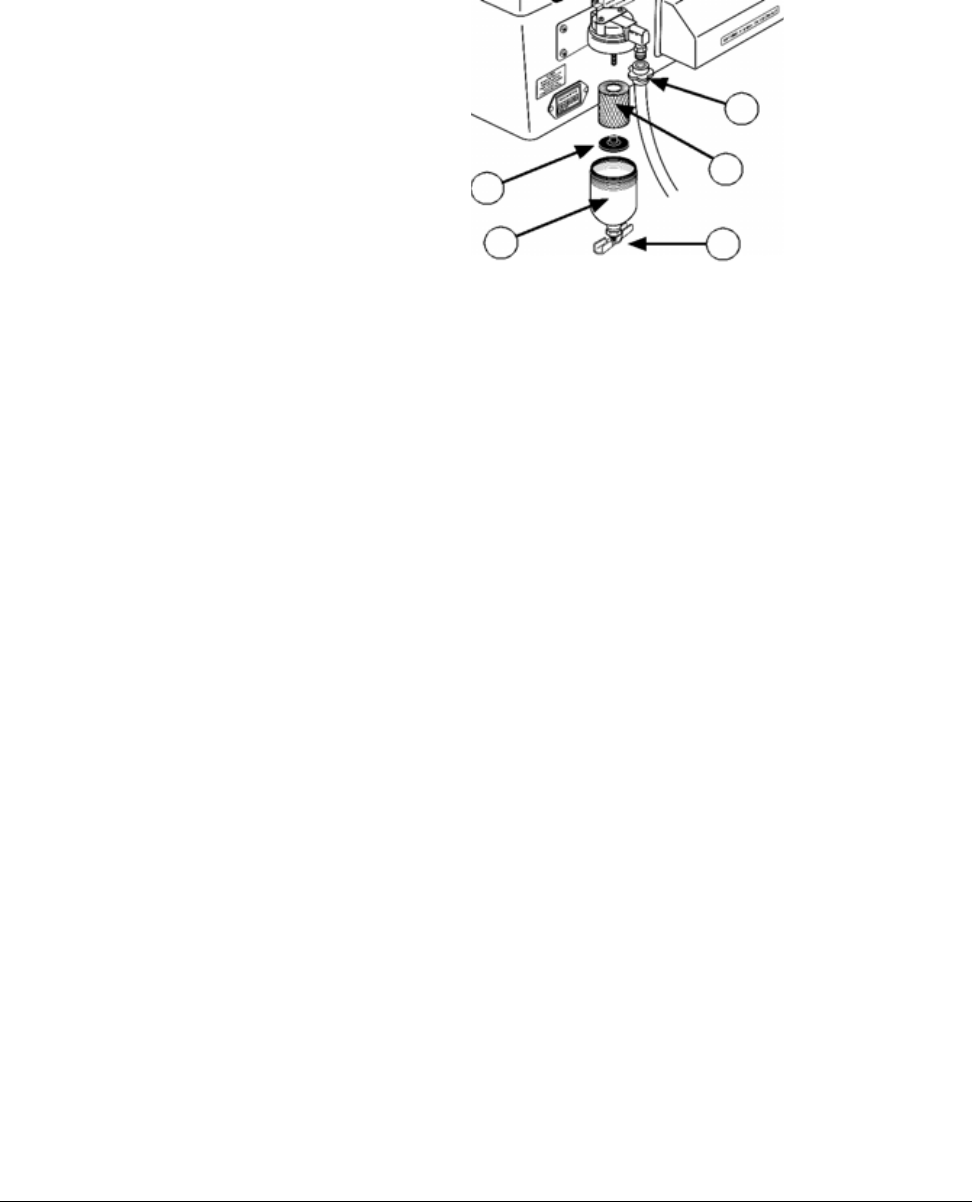
Chapter 10
Care and Maintenance
REF 1057983 A Respironics V200 Ventilator Operator’s Manual 10-9
Removing and Replacing O2 Input Filter Element
Figure 10-5: Removing and Replacing O2 Input Filter Element
Refer to Figure 10-5.
1. Disconnect O2 Hose (1).
2. Unscrew filter housing (3).
3. Unscrew filter element retaining screw (4).
4. Remove and replace filter element (5).
5. Reconnect filter element retaining screw (4).
6. Reinstall filter housing (3).
7. Reconnect O2 hose (1).
8. Check system for leaks prior to patient use.
1
5
2
3
4
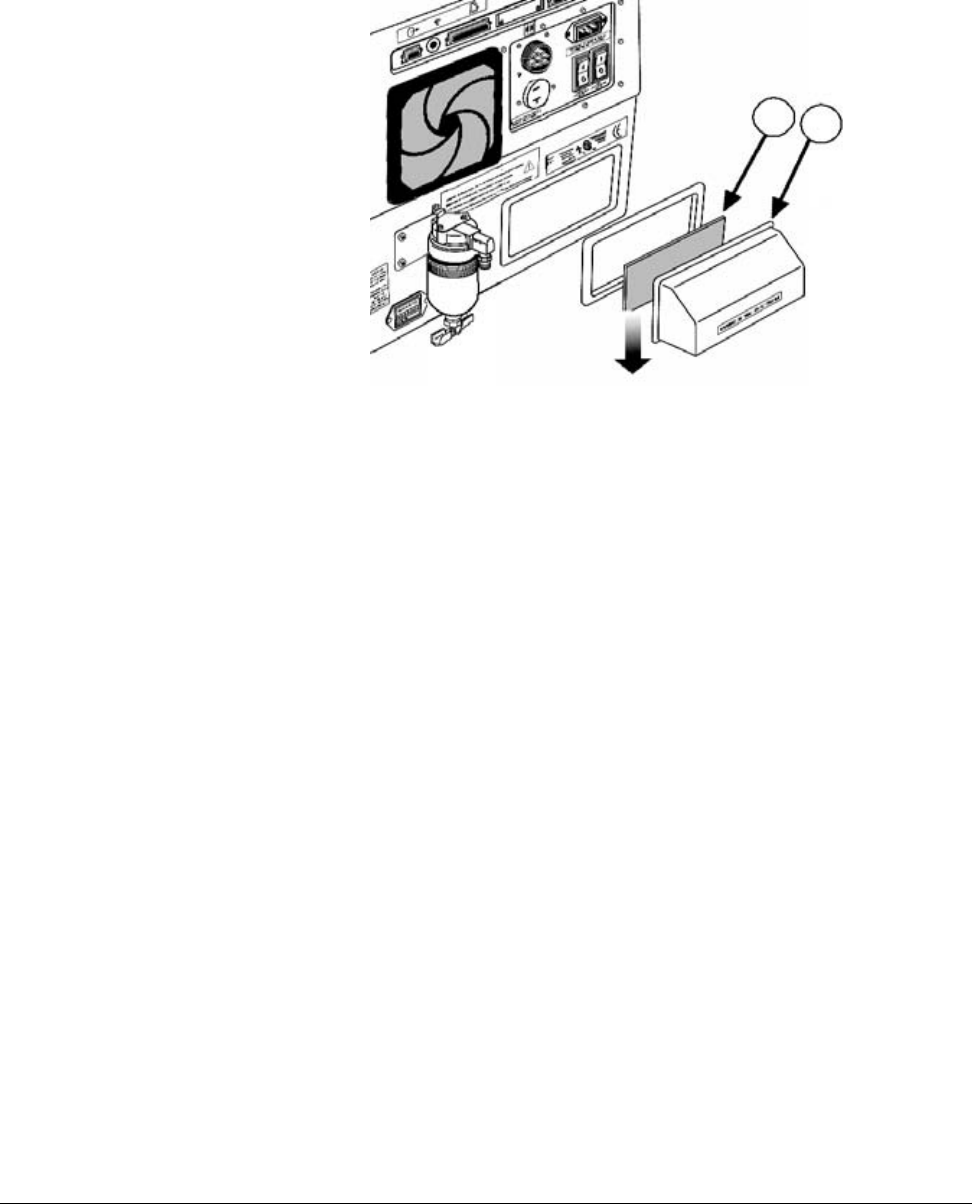
Chapter 10
10-10 Respironics V200 Ventilator Operator’s Manual REF 1057983 A
Care and Maintenance
Removing and Replacing Internal Air Source Inlet Filter
Figure 10-6: Removing and Replacing Internal Air Source Inlet Filter
Refer to Figure 10-6. Figure 10-6 shows exploded view of the duct (2) and
filter (1), but it does not have to be disassembled.
1. Move the ventilator so that there is easy access to the underside of the
internal air source duct (2).
2. The internal air source filter (1) can be removed manually. The filter
can be reached from under the internal air source duct (2) as
indicated by the arrow.
3. Wash internal air source filter (1) with mild soap and water.
4. Rinse thoroughly then pat dry.
5. Reinstall internal air source filter (1) from underneath the duct (2) in
the same fashion it was removed.
Storage If you need to store the ventilator for fifteen days or more, ensure that the
altitude, temperature and humidity of the storage site fall within the following
ranges: • Environmental Temperature: -20 to 60°C (-4 to 140° F)
• Relative Humidity: 10 to 100% noncondensing
• Maximum Altitude: 6,560 m (20,000 ft.)
Repairs For technical service or repairs not included in this chapter, refer to the Esprit/
V200 Ventilator Service Manual, P/N 580-1000-02 or contact Respironics
Customer Service at 1-800-345-6443.
Pull filter out from
underside of duct.
12

REF 1057983 A Respironics V200 Ventilator Operator’s Manual 11-1
Chapter 11. Diagnostics
The Diagnostic Mode allows you to:
• Run short self test (SST)
• Run extended self test (EST)
• Run hardware diagnostics to help you troubleshoot SST or EST failures
• Check the software revision of the ventilator
• Set user configuration, including:
• time and date
• compliance compensation enable/disable
• local altitude and time format
• backup battery (confirm at startup) enable/disable
• Check diagnostic codes.
WARNING: The patient must be disconnected from the ventilator before entering the
Diagnostic Mode since normal ventilation is suspended.
CAUTION: Troubleshooting and repair should be performed only by a qualified
service technician.
NOTE: The “Hardware” function and EST in the Diagnostics Mode should only
be run by qualified personnel.
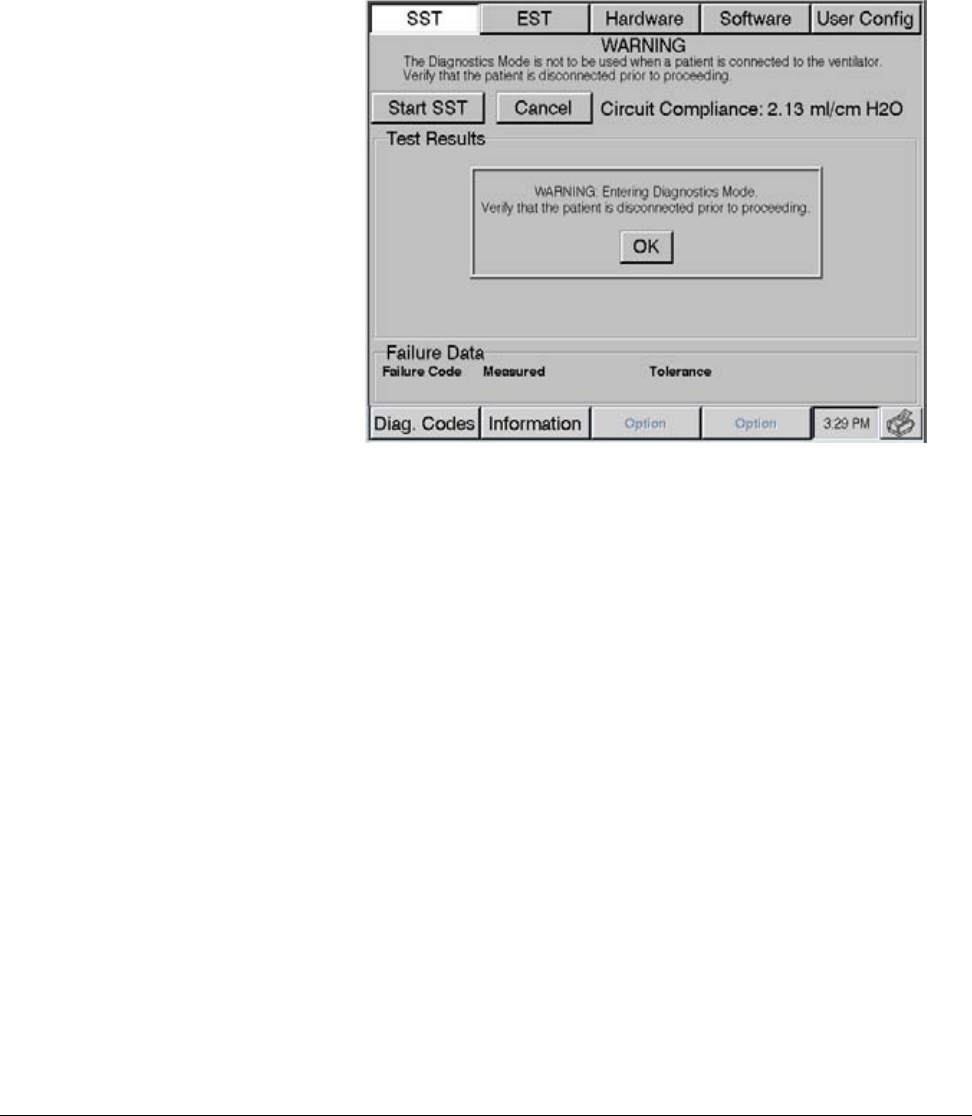
Chapter 11
11-2 Respironics V200 Ventilator Operator’s Manual REF 1057983 A
Diagnostics
Entering Diagnostic
Mode To enter Diagnostic Mode, hold down the ALARM RESET and 100% O2 keys
for approximately 5 seconds while you turn on the ventilator. A message
appears on the ventilator prompting you to confirm that the patient is
disconnected before entering Diagnostic Mode (Figure 11-1). Press OK to
enter Diagnostic Mode.
Figure 11-1: Entering Diagnostic Mode
Once you’ve entered Diagnostic Mode, you can select any of diagnostic
functions by pressing its button. Change values in Diagnostic Mode the same
way you change ventilator settings.

Chapter 11
Diagnostics
REF 1057983 A Respironics V200 Ventilator Operator’s Manual 11-3
Diagnostic Functions Short Self Test (SST)
SST verifies the integrity of the patient circuit tubing by measuring its leak
rate and compliance. SST also tests critical hardware components, including
the safety valve, flow sensors, and autozero solenoids. Perform SST before
every patient circuit change. If SST passes, the ventilator and all attached
components are ready for use.
Equipment required to run SST:
• Patient circuit to be used on the next patient including any devices
installed in line with the circuit (such as a humidifier, O2 sensors,
and/or temperature sensor).
• Plug or cap for the patient wye
Follow these steps to run SST:
1. Connect the circuit to be used on the next patient to the ventilator.
2. Press the SST button (Figure 11-1) on the diagnostic screen.
3. Press the Start SST button to begin the test.
4. When prompted, unplug the patient wye and press the OK button.
5. When prompted, plug the patient wye and press the OK button.
6. When SST completes successfully, press the OK button.
When SST is completed, the calculated circuit compliance is displayed on the
screen.
WARNING: Do not use a ventilator that has failed SST without verifying operational
readiness by other means. Doing so may place a patient at risk.
WARNING: Never initiate SST while the patient is connected to the ventilator. The high
airway pressures generated during SST can injure a patient.

Chapter 11
11-4 Respironics V200 Ventilator Operator’s Manual REF 1057983 A
Diagnostics
Extended Self Test
(EST) EST verifies the overall functional integrity of the ventilator by testing all
critical hardware subsystems and components. Perform EST between patients
as part of preventive maintenance, a performance verification, or if the
operational integrity of the ventilator is in question. EST is typically run by
qualified trained personnel.
Equipment required to run EST:
• Patient circuit
• Plug for the patient wye
• High pressure O2 source
Follow these steps to run EST:
1. Enter Diagnostic Mode as described “Entering Diagnostic Mode” on
page 11-2.
2. Connect a patient circuit to the ventilator.
3. Press the EST button on the diagnostic screen (Figure 11-1).
4. Press START EST to begin EST.
5. Follow the prompts.
6. When EST completes successfully, press the OK button.
Hardware
The hardware function allows a trained service technician to operate critical
components separately to help identify a faulty component in the event that
the ventilator fails SST, EST, or performance verification testing. For more
information on the Hardware function, see the Esprit/V200 Ventilator Service
Manual, P/N 580-1000-02.
Software
The software function displays the ventilators serial number, software part
numbers, and version numbers and the part numbers of other critical
components.
WARNING: Never initiate EST while the patient is connected to the ventilator. The high
airway pressures and gas flows generated during EST can injure a patient.
WARNING: Do not use a ventilator that has failed EST without verifying operational
readiness by other means. Doing so may place a patient at risk.
CAUTION: If the optional external O2 sensor is in-line, it must be calibrated during
EST.

Chapter 11
Diagnostics
REF 1057983 A Respironics V200 Ventilator Operator’s Manual 11-5
User Config
The User Config function allows you to:
• Set the date and time when first setting up the ventilator.
• Set the altitude for the location of the ventilator. This setting allows for
more accurate tidal volume delivery.
• Enable or disable the automatic patient circuit compliance
compensation feature. Compliance compensation corrects the
delivered volumes of VCV mandatory breaths for patient circuit
compliance. It also corrects all exhaled volume for patient circuit
compliance volume. The COMPLIANCE button is grey when
compliance compensation is disabled and white when compliance
compensation is enabled.
• Set the time format (AM/PM or 24 hour).
• Enable or disable the confirmation that the backup battery is
connected each time that the machine powers on.
Diagnostic Codes
The Diagnostic Codes function allows you to review the diagnostic log in
ventilator memory.
To view the diagnostic codes, press the DIAGNOSTIC CODE button on the
diagnostic screen. The ventilator displays the following information:
• Number: Diagnostic codes are numbered in reverse order of
occurrence (most recent first).
• Code: The number assigned to a specific diagnostic code; used in
determining the cause of a possible failure.
• Repeat: If the same code occurs consecutively, this parameter will be
incremented rather than creating a new entry in the log. For example,
if the diagnostic code 1002 occurs three consecutive times, it is
logged as diagnostic code 1002 and the repeat column is 2. The
repeat column increments until a different diagnostic code occurs.
• Time: Diagnostic codes are time stamped in hour:minute:second
format (for example: 09:15:23). When the same diagnostic code
repeats, the time stamp represents the most recent occurrence of the
diagnostic code.
• Date: Diagnostic codes are date stamped in month/day/year format (for
example: 03/12/98). When the same diagnostic code repeats, the date
stamp represents the most recent occurrence of the diagnostic code.
• Corrupted: The microprocessor cross checks the data in memory prior
to display. If it determines that the memory contents have been
corrupted, it logs a YES indicating that the memory contents validity is
suspect.

Chapter 11
11-6 Respironics V200 Ventilator Operator’s Manual REF 1057983 A
Diagnostics
Diagnostic codes associated with EST and SST are only recorded the first time
the failure is encountered.
The log holds the last 20 diagnostic codes. The screen can only display 10
codes at a time. Press NEXT PAGE button to see the next group of codes or
PREV PAGE to view the previous group.
The CLEAR CODES button allows a qualified service technician to delete
codes from the log. Because diagnostic codes provide the primary means of
fault diagnosis, they should only be cleared by or under the advice of qualified
personnel.
Table 11-1: “Diagnostic Codes and Descriptions”, summarizes some
diagnostic codes and their descriptions. The codes and descriptions for SST
and EST are identical except that SST codes are preceded by a 2 and EST
codes are preceded by a 3. For example, if code 106 occurred during an SST,
it would be logged as 2106. If it occurred during an EST, it would be logged as
3106.
CAUTION: Diagnostic codes should only be cleared by qualified personnel.
WARNING: Remove the ventilator from service and contact trained service personnel if
any diagnostic codes appear with the exception of: 1, 3, 2000, 3000, 5000,
5002, 8003, or 8004.
WARNING: Use of a ventilator that has not passed SST or EST is against the strongest
recommendation of Respironics.
Diagnostic Codes and Descriptions
Code Description
1 Normal mode startup
3 Diagnostic Startup
2XXX Short Self Test
2000 SST Passed
2106 Patient Circuit Leak
2107 Inh Pressure Too Low
2110 Check Valve 3 Leak
2125 Inhalation Pressure/Exhalation Pressure Disagreement
2128 Circuit Compliance Out of Range
2129 Pressure Leak Out of Range
2130 Safety Valve Cannot Open
2131 Patient Wye Not Blocked
Table 11-1: Diagnostic Codes and Descriptions (Sheet 1 of 4)

Chapter 11
Diagnostics
REF 1057983 A Respironics V200 Ventilator Operator’s Manual 11-7
2134 Cannot Calibrate Air Flow Sensor
2135 Cannot Calibrate O2 Flow Sensor
2136 Cannot Calibrate Exh Flow Sensor
2137 Verify Failure—Air Flow Sensor Cal
2138 Verify Failure—O2 Flow Sensor Cal
2139 Verify Failure—Exh Flow Sensor Cal
2140 Cannot Erase Flow Sensor Tables
2141 Cannot Open Inh Autozero Solenoid
2142 Cannot Open Exh Autozero Solenoid
2152 Patient Wye Not Unblocked
3XXX Extended Self Test
3000 EST Passed
3100 Canceled By User
3101 Air Stepper Motor Outside Range
3102 O2 Stepper Motor Outside Range
3103 Air Flow Outside Range
3104 O2 Flow Outside Range
3105 Exh Flow Outside Range
3106 Patient Circuit Leak
3107 Inh Pressure Too Low
3108 Exh Pressure Outside Range
3109 Check Valve 2 Leak
3110 Check Valve 3 Leak
3111 O2 Not Connected
3112 O2 Not Disconnected
3113 FiO2 Sensor Sample Out of Range
3114 FiO2 Sensor Average Out of Range
3115 Primary Audio Not Sounding
3116 Backup Audio Not Sounding
3117 Crossover Circuit Fault
3118 Blower Off Switch Failure
3119 Blower DAC Failure
3120 Pressure Relief Valve Cracking Pressure Too High
3121 Pressure Relief Valve Cracking Flow Not Stable
3122 Pressure Relief Valve Cracking Pressure Too Low
Diagnostic Codes and Descriptions (Continued)
Code Description
Table 11-1: Diagnostic Codes and Descriptions (Sheet 2 of 4)

Chapter 11
11-8 Respironics V200 Ventilator Operator’s Manual REF 1057983 A
Diagnostics
3123 O2 Valve Cracking Flow Outside Range
3124 O2 Valve Full Flow Outside Range
3125 Air Flow Sensor/Exh Flow Sensor Disagreement or Inhalation Pressure/Exhalation
Pressure Disagreement
3126 O2 Flow Sensor/Exh Flow Sensor Disagreement
3127 Heated Filter Backpressure Out of Range
3128 Circuit Compliance Out of Range
3129 Pressure Leak Out of Range
3130 Safety Valve Cannot Open
3131 Patient Wye Not Blocked
3132 keyboard Failure
3133 Rotary Knob Failure
3134 Cannot Calibrate Air Flow Sensor
3135 Cannot Calibrate O2 Flow Sensor
3136 Cannot Calibrate Exh Flow Sensor
3137 Verify Failure—Air Flow Sensor Cal
3138 Verify Failure—O2 Flow Sensor Cal
3139 Verify Failure—Exh Flow Sensor Cal
3140 Cannot Erase Flow Sensor Tables
3141 Cannot Open Inh Autozero Solenoid
3142 Cannot Open Exh Autozero Solenoid
3143 Air Step Position for Open—Outside Range
3144 Air Step Position for Midpoint—Outside Range
3145 Air Step Position for Close—Outside Range
3146 O2 Step Position for Open—Outside Range
3147 O2 Step Position for Midpoint—Outside Range
3148 O2 Step Position for Close—Outside Range
3149 Exh Step Position for Open—Outside Range
3150 Exh Step Position for Midpoint—Outside Range
3151 Exh Step Position for Close—Outside Range
3152 Patient Wye Not Unblocked
3153 Touchscreen Failure
3154 LED Indicator Failure
3155 Remote Alarm Not Sounding
3156 Inh. Transducer Autozero Failure
3157 Exh. Transducer Autozero Failure
Diagnostic Codes and Descriptions (Continued)
Code Description
Table 11-1: Diagnostic Codes and Descriptions (Sheet 3 of 4)

Chapter 11
Diagnostics
REF 1057983 A Respironics V200 Ventilator Operator’s Manual 11-9
Information
The Information function is reserved for future expansion.
Option
The Option function is reserved for future expansion.
3158 Exhalation Valve initial pressure —Outside Range
3159 Exhalation Valve final pressure —Outside Range
3160 Exhalation Valve flow —Outside Range
5XXX Safety Valve Open or Backup Battery Not connected
5000 Occlusion - Safety Valve Open Alarm
5001 Gas Supplies Lost - Safety Valve Open Alarm
5002 Backup Battery Not Connected
8XXX Software Diagnostic information
8003 Software Option Button Failure
8004 Insufficient Blower Current
WARNING: Please contact Respironics Customer Service at 1-800-345-6443 or
consult your service manual if any diagnostic codes are encountered.
Diagnostic Codes and Descriptions (Continued)
Code Description
Table 11-1: Diagnostic Codes and Descriptions (Sheet 4 of 4)

Chapter 11
11-10 Respironics V200 Ventilator Operator’s Manual REF 1057983 A
Diagnostics
Self Test Introduction
The Respironics V200 ventilator has an extensive system of checks designed
into the system to ensure that it operates safely and detects fault conditions
that can compromise the performance of the system as a ventilator. These
checks include hardware that checks the integrity of the software and software
that checks the hardware to ensure that it is operating within normal ranges.
These checks are described below.
Self-Test Hardware
The self-test hardware involves hardware components that check the integrity
of the software. The hardware components that perform these checks are the
watchdog timer and the bus activity monitor.
• Watchdog Timer: The watchdog timer is a timer that the software must
reset. If the timer times out, it causes a reset that restarts the
ventilator as if the power switch had been turned on. Normally the
software resets the watchdog timer and it never times out.
• Bus Activity Monitor: The bus activity monitor is a timer similar to the
watchdog timer. The bus activity monitor timer is a timer that only
times out if there has been no activity on the microprocessor bus. If
there is no activity on the bus, it would indicate there is a malfunction
of some kind and the microprocessor is restarted in the same way that
the watchdog timer does.
Power On Self Test (POST)
POST is the test that the ventilator does when the machine power is turned on
or if there has been a potential fault detected by the watchdog timer or the bus
activity monitor. POST has the constraint that it must be able to run safely
when the ventilator has a patient attached. POST checks the integrity of
critical system electronics such as the self test hardware and microprocessor
electronics. POST also tests other critical ventilator components that can be
tested.
A primary objective of POST is to ensure that the watchdog timer and the bus
activity monitor hardware are working and will catch software malfunctions.
These are critical components of the safety system and therefore POST tests
these components every time it runs.
POST also checks all critical digital hardware, including the processor,
program memory, data memory, and functions of various measurement
systems.
POST also checks pneumatic components that can be safely tested with the
safety valve open.
If all of these tests pass, the Respironics V200 ventilator will operate as a
ventilator.

Chapter 11
Diagnostics
REF 1057983 A Respironics V200 Ventilator Operator’s Manual 11-11
Built-In Test
When the Respironics V200 ventilator is operating as a ventilator, it is
constantly making reasonableness checks on the operation of the hardware to
ensure that failures have not occurred and that the hardware appears to be
operating normally. Also, while the microprocessor is operating, there is
execution time available that is not required for ventilator operation. When
execution time is available, the microprocessor runs many of the hardware
tests that are run during POST. These include Program memory, RAM memory,
and other measurements that can be tested without interfering with the
operations of the ventilator.
The ventilator’s safety system of hardware checking software and software
checking hardware means that the ventilator only operates as a ventilator if the
extensive constraints of the safety system are met.
Restart
During normal operation, the ventilator performs background checks to ensure
the integrity of the system. If a problem is detected, the ventilator enters the
“restart” sequence, in which it opens the safety valve while it performs
additional integrity checks. Restart is 10 to 20 seconds, depending upon the
reason for the restart. The ventilator sounds an alarm and displays a visual
message indicating the unit is in a restart sequence. In some cases, a
countdown timer will display the number of seconds remaining until the
ventilator completes the restart cycle. If, during the restart sequence, an
actual problem is confirmed, the ventilator enters the “Vent Inop” state, in
which it activates audible and visual alarms while the safety valve remains
open. Alternatively, if at the end of the restart sequence the ventilator
determines it is safe to continue operation, the unit will return to normal
ventilation.
NOTE: A “restart” is an infrequent event.

Chapter 11
11-12 Respironics V200 Ventilator Operator’s Manual REF 1057983 A
Diagnostics
(This page is intentionally blank.)

REF 1057983 A Respironics V200 Ventilator Operator’s Manual 12-1
Chapter 12. Technical Specifications
Breath Types
Modes
Volume Ventilation
Settings, Ranges and
Resolution
Resolution is one unit unless otherwise noted (cmH2O is considered
numerically equivalent to hPa).
Breath Types
Volume Controlled Ventilation VCV
Pressure Controlled Ventilation PCV
Non-Invasive Positive Pressure Ventilation NPPV
Apnea Ventilation
Table 12-1: Breath Types
Modes
Assist/Control (A/C) VCV, PCV
SIMV VCV,PCV
CPAP VCV, PCV
Spont/T NPPV
Spont NPPV
Table 12-2: Modes
Volume Ventilation Settings, Ranges & Resolution
Setting Range
Respiratory Rate 1 to 80 Bpm
Tidal Volume 50 to 2500 mL
Peak Inspiratory Flow 3 to 140 Lpm (Compliance compensated, actual to 200 Lpm)
PEEP 0 to 35 cmH2O (hPa)
PSV Pressure 0 to 100 cmH2O (hPa)
Table 12-3: Volume Ventilation Settings, Ranges and Resolution (Sheet 1 of 2)

Chapter 12
12-2 Respironics V200 Ventilator Operator’s Manual REF 1057983 A
Technical Specifications
Pressure Control
Ventilation Settings,
Ranges and
Resolution
Resolution is one unit unless otherwise noted (cmH2O is considered
numerically equivalent to hPa).
Inspiratory Trigger
(I-trigger)
Pressure Sensitivity
Flow Sensitivity
-20 to -0.1 cmH2O (hPa) (Resolution is 0.1 cmH2O (hPa))
0.5 to 20 LPM (Resolution is 0.1 LPM)
Expiratory Trigger
(E-Cycle)
% Peak Flow 10 to 80% of inspiratory peak flow
Rise Time 0.1 to 0.9 seconds (Resolution is 0.1 second)
%O2 21% to 100%
Insp. Hold 0 to 2.0 seconds (Resolution is 0.1 second)
Flow Waveform Descending ramp, square
Patient Type Adult/Pediatric
Volume Ventilation Settings, Ranges & Resolution (Continued)
Setting Range
Table 12-3: Volume Ventilation Settings, Ranges and Resolution (Sheet 2 of 2)
Pressure Control Ventilation Settings, Ranges & Resolution
Setting Range
Apnea Rate 1-80 Bpm
Respiratory Rate 1 to 80 Bpm
PCV Pressure 5 to 100 cmH2O (hPa) (Relative to PEEP)
Inspiratory Time 0.1 to 9.9 seconds (Resolution is 1 second)
PEEP 0 to 35 cmH2O (hPa)
PSV Pressure 0 to 100 cmH2O (hPa) (Relative to PEEP)
Inspiratory Trigger
(I-trigger)
Pressure Sensitivity
Flow Sensitivity
-20 to -0.1 cmH2O (hPa) (Resolution is 0.1 cmH2O (hPa))
0.5 to 20 LPM from base flow of 3 LPM above sensitivity (Resolution is
0.1 LPM)
Expiratory Trigger
(E-Cycle)
% Peak Flow 10 to 80% of inspiratory peak flow
Table 12-4: Pressure Control Ventilation Settings, Ranges & Resolution (Sheet 1 of 2)

Chapter 12
Technical Specifications
REF 1057983 A Respironics V200 Ventilator Operator’s Manual 12-3
Non-Invasive Positive
Pressure Ventilation
Settings, Ranges and
Resolution
Resolution is one unit unless otherwise noted (cmH2O is considered
numerically equivalent to hPa).
Maximum delivered flow during pressure controlled breaths in NPPV is limited
to 100 LPM for the pediatric patient type.
Apnea Ventilation Apnea ventilation is considered equivalent to Assist Control with Apnea Rate in
VCV and PCV. In NPPV, only mandatory breaths are delivered, triggered either
at the Apnea Rate or by the patient.
Rise Time 0.1 to 0.9 seconds
%O2 21% to 100%
Patient Type Adult/Pediatric
Pressure Control Ventilation Settings, Ranges & Resolution (Continued)
Setting Range
Table 12-4: Pressure Control Ventilation Settings, Ranges & Resolution (Sheet 2 of 2)
Non-Invasive Positive Pressure Ventilation Settings, Ranges & Resolution
Setting Range
Respiratory Rate 1 to 80 Bpm
EPAP 2 to 25 cmH2O (hPa)
IPAP 2 to 35 cmH2O (hPa)
Inspiratory Time 0.1 to 9.9 seconds (Resolution is 0.1 second)
Rise Time 0.1 to 0.9 seconds
Inspiratory Trigger
(I-trigger)
Flow Sensitivity 0.5 to 20 LPM from base flow of 3 LPM above sensitivity (Resolution is
0.1 LPM)
Expiratory Trigger
(E-Cycle)
% Peak Flow 10 to 80% of inspiratory peak flow
%O2 21% to 100%
Apnea Rate 1-80 Bpm
Patient Type Adult/Pediatric
Table 12-5: Non-Invasive Positive Pressure Ventilation Settings, Ranges and
Resolution

Chapter 12
12-4 Respironics V200 Ventilator Operator’s Manual REF 1057983 A
Technical Specifications
Value Entry Message If you enter a value that is outside the operational limits of the ventilator, you
will be shown a message window on the screen. Once you acknowledge the
message, the ventilator returns to the value modification display without
changing the value.
Assist/Control Ventilation
Value Entry Reasonability Checks
Item Limit Exceeded Message
Apnea Rate I:E Ratio>3:1 I:E Ratio must be less than or equal to 3:1.
Check Vt, Peak Flow, or Insp. Hold
Peak Flow I:E Ratio>3:1 I:E Ratio must be less than or equal to 3:1.
Check Vt, Apnea Rate, or Insp. Hold.
Tidal Volume I:E Ratio>3:1 I:E Ratio must be less than or equal to 3:1.
Check Flow, Apnea Rate, or Insp. Hold.
Insp. Hold I:E Ratio>3:1 I:E Ratio must be less than or equal to 3:1.
Check Vt, Apnea Rate or Peak Flow.
Waveform I:E Ratio>3:1 I:E Ratio must be less than or equal to 3:1.
Check Vt, Peak Flow or Apnea Rate.
I-Time I-Time>9 sec. I-Time must be less than or equal to 9 sec.
Check Vt, Peak Flow, Insp. Hold or Waveform.
Table 12-6: Assist/Control Ventilation Value Entry Reasonability Checks
Pressure Control Ventilation
Value Entry Reasonability Checks
Item Limit Exceeded Message Changed
Apnea Rate I:E Ratio>4:1 I:E Ratio must be less than
or equal to 4:1.Check I-
Time.
Readjust the Apnea Rate or
adjust I-Time or Rate.
I-Time I:E Ratio>4:1 I:E Ratio must be less than
or equal to 4:1.Check
Apnea Rate.
Readjust the I-Time or
adjust Apnea Rate or Rate.
I-Time I-Time<Rise Time I-Time must greater than or
equal to Rise Time. Increase the Rise Time or
increase the I-Time.
Rise Time Rise Time>I Time Rise Time must be less
than I-Time. Decrease the Rise Time or
increase the I-Time.
Table 12-7: Pressure Control Ventilation Value Entry Reasonability Checks

Chapter 12
Technical Specifications
REF 1057983 A Respironics V200 Ventilator Operator’s Manual 12-5
Patient Data Screen Monitored patient data is displayed when Patient Data is pressed. Patient data
ranges, resolution, units, and accuracy specifications are provided in the table
below. Minute volume data is based on an eight breath average.
Non-Invasive Ventilation
Value Entry Reasonability Checks
Item Limit Exceeded Message Changed
Apnea Rate I:E Ratio>4:1 I:E Ratio must be less than
or equal to 4:1. Check I-
Time.
Readjust the Apnea Rate or
adjust I-Time or Rate.
I-Time I:E Ratio>4:1 I:E Ratio must be less than
or equal to 4:1. Check
Apnea Rate.
Readjust the I-Time or
adjust Apnea Rate or Rate.
IPAP IPAP<EPAP IPAP must be greater than
or equal to EPAP. Readjust IPAP higher or
adjust EPAP lower.
EPAP EPAP>IPAP EPAP must be less than or
equal to IPAP. Readjust EPAP lower or
adjust IPAP higher.
Rise Time Rise Time>I Time Rise Time must be less
than I-Time. Decrease the Rise Time or
increase the I-Time.
Table 12-8: Non-Invasive Ventilation Value Entry Reasonability Checks
General Value Entry Reasonability Checks
Item Limit Exceeded Message Changed
Apnea Apnea Rate<Set Rate Apnea Rate must be
greater than or equal to the
Set Rate.
Increase the Apnea Rate or
decrease the Rate.
Table 12-9: General Value Entry Reasonability Checks
Patient Data Range, Resolution, Units & Accuracy
Patient Data Display Range Units Resolution Accuracy
Exhaled Minute
Volume 0.00 to 99.9 L 0.01 for 0.00-9.99;
0.1 for 10.0-99.9 ±10%
Exhaled Tidal Volume 0 to 9999 mL 1 ±10%
Spontaneous Minute
Volume 0.00 to 99.9 L 0.01 for 0.00-9.99;
0.1 for 10.0-99.9 ±10%
Rapid Shallow Breathing
Index 0 to 500 Bpm/L 1 ±10%
Table 12-10: Patient Data Range, Resolution, Units & Accuracy (Sheet 1 of 2)
Chapter 12
12-6 Respironics V200 Ventilator Operator’s Manual REF 1057983 A
Technical Specifications
Front Panel Keys
I:E 9.9:1 to 1:99 none 0.1 for 9.9:1-1:9.9;
1 for 1:10-1:99 ±10%
Peak Inspiration
Pressure -20.0 to 130 cmH2O
(hPa) 1 for 100-130;
0.1 for -20.0 to 99.9 ±10%
End Inspiration
Pressure (Pi End) -20.0 to 130 cmH2O
(hPa) 1 for 100-130;
0.1 for -20.0 to 99.9 ±10%
Mean Airway
Pressure -20.0 to 120 cmH2O
(hPa) 1 for 100-120;
0.1 for -20.0 to 99.9 ±10%
Delivered O2% 0.0 to 110 -- 1 for 100-110;
0.1 for -20.0 to 99.9 ±3 vol%
Total Respiratory Rate 0.0 to 150 Bpm 1 for 10-150;
0.1 for 0.0 to 9.9 ±10%
Spontaneous
Respiratory Rate 0.0 to 150 Bpm 1 for 10-150;
0.1 for 0.0 to 9.9 ±10%
End Exhalation
Pressure (Pe End) -20.0 to 99.9 cmH2O
(hPa) 0.1 ±10%
Patient Leak (Pt Leak) 0.0 to 140 LPM 0.1 for 0.0-99.9
1 for 100-140 Not
specifieda
Percent Patient Trigger
(%Pt Trigger) 0.0 to 99.9 % 0.1 for 0.0-99.9
1 for 100 ±10%
a. Due to the variable nature of patient leaks, this parameter is an estimate only.
Patient Data Range, Resolution, Units & Accuracy (Continued)
Patient Data Display Range Units Resolution Accuracy
Table 12-10: Patient Data Range, Resolution, Units & Accuracy (Sheet 2 of 2)
Front Panel Keys
Alarm Silence Screen Lock
Alarm Reset Expiratory Hold
100% O2Accept
Manual Breath
Table 12-11: Front Panel Keys
Chapter 12
Technical Specifications
REF 1057983 A Respironics V200 Ventilator Operator’s Manual 12-7
Level Controls
Calculated Values
from Expiratory Hold
Maneuver
Interface Ports
Level Controls
Control Adjustment
Display Brightness
(underneath front panel
keys)
Continuous (min to max)
Alarm Volume
(underneath front panel
key
Continuous (54 to 77 db)
Adjust Control Continuous—to change values on
screen
Table 12-12: Level Controls
Calculated Values from Expiratory Hold Maneuver
Value Range
End Expiratory Pressure -20 to 120 cmH2O (hPa)
Expiratory Pause Pressure -20 to 120 cmH2O (hPa)
Auto PEEP (calculated range) 0 to 120 cmH2O (hPa)
Table 12-13: Calculated Values from Expiratory Hold Maneuver
Interface Ports
Parallel Printer Port future
RS-232 output and input
Analog Output 0 to 5 VDC full-scale feature
Remote Alarm Nurse Call and Remote Alarm Annunciation
Table 12-14: Interface Ports
Chapter 12
12-8 Respironics V200 Ventilator Operator’s Manual REF 1057983 A
Technical Specifications
Environmental
Specifications
Environmental
Protection
Alarms
Environmental Specifications
Temperature/Humidity Operating 10º to 40ºC (50º to 104ºF)
10 to 95% R.H. (non-condensing)
Storage -20º to 60ºC (-4º to 140ºF)
10 to 100% R.H. (non-condensing)
Atmospheric Pressure Operating 700 to 1060 cmH2O (hPa)
Storage 500 to 1060 cmH2O (hPa)
Altitude Operating 0 to 3280m (0 to 10,000 ft.)
Storage up to 6560m (20,000 ft.)
Oxygen Inlet Supply Pressure 276 to 620 kPa (40-90 psig)
Flow 200 L/min. minimum
Table 12-15: Environmental Specifications
Environmental Protection
Batteries Do not dispose of in fire, possible explosion hazard. Do not dispose of in
garbage, recycle lead batteries.
Ventilator Enclosure The system plastic enclosure should not be disposed of in fire, possible
toxic fumes may be generated.
General The system and accessories (bacteria filters, patient tubing, etc.) may be
subject to medical hazardous waste regulations. Consult with local
authorities for proper disposition of the system and accessories at the end
of their useful life.
Table 12-16: Environmental Protection
Alarms
Alarm
Controls Audible Alarm
Volume adjustable, 45 dB(A) to 85 dB(A)
Alarm Silence 120 seconds
Alarm Reset
Table 12-17: Alarms (Sheet 1 of 2)

Chapter 12
Technical Specifications
REF 1057983 A Respironics V200 Ventilator Operator’s Manual 12-9
Connectors
Alarm
Settings High Inspiratory
Pressure 10 to 105 cmH2O (hPa)
Low Inspiratory
Pressure 3 to 105 cmH2O (hPa)
Low PEEP
Pressure 0 to 35 cmH2O (hPa)
High Respiratory
Rate 0 to 150 Bpm
Low Exhaled
Mandatory Tidal
Volume
0 mL to 2500 mL
Low Exhaled
Spontaneous Tidal
Volume
0 mL to 2500 mL
Low Exhaled
Minute Volume 0 to 60 Lpm
High Exhaled
Minute Volume 0 to 60 Lpm
High Leak (NPPV
mode only) 0 to 60 Lpm
Alarm
Status
Indicators
Normal Indicator
High Urgency Alarm (flashing red)
Medium/Low Urgency Alarm (flashing yellow/steady yellow)
Alarm Silence
Safety Valve Open
Ventilator Inoperative (steady red)
Screen Locked
Alarms (Continued)
Table 12-17: Alarms (Sheet 2 of 2)
Connectors
Inspiratory Limb Connector Gas outlet port: 22 mm conical male
Expiratory Limb Connector Gas return port (on expiratory filter):
Proprietary barb fitting
NOTE: The gas return port on the ventilator is a
cylindrical port which requires mating to a
specified expiratory filter to seal the expiratory
limb.
Oxygen Inlet DISS male, DISS female, NIST, Air Liquide, or SIS Fitting
(depending on country and configuration).
Table 12-18: Connectors
Chapter 12
12-10 Respironics V200 Ventilator Operator’s Manual REF 1057983 A
Technical Specifications
Filters
Measuring and
Display Devices
AC Power and Battery
Indicators
Filters
Inspiratory See filter instruction sheets for complete specification.
Bacterial Filter Efficiency: 99.999+%
Viral Filtration Efficiency: 99.99+%
Expiratory See filter instruction sheets for complete specification.
Typical efficiency: 99.97% for nominal particle size of 0.3 micro meter (micron)
at 100L/min flow.
Table 12-19: Filters
Measuring and Display Devices
Pressure Measurements Type Solid State
Sensing Position Inhalation output port
Exhalation input port
Measurements Patient airway pressure
Volume Measurements Type Hot Film Anemometer flow integrated
Sensing Position O2, air and exhalation
Measurements O2 flow, air flow and exhalation flow
Oxygen Measurements Type Zirconia solid electrolyte
Sensing Position Internal enclosure
Measurements Oxygen concentration (range 0 to 95%)
Type Galvanic cell
Sensing Position Inspiratory limb of VBS
Measurements Delivered O2% (range 0 to 110%)
Settings, Alarms and
Data Display Type TFT liquid crystal touch screen
Table 12-20: Measuring and Display Devices
AC Power & Battery Indicators
Loss of Power (audible only) Backup Battery Low
External Battery In Use Backup Battery In Use
Backup Battery Charging Mains
Table 12-21: AC Power & Battery Indicators
Chapter 12
Technical Specifications
REF 1057983 A Respironics V200 Ventilator Operator’s Manual 12-11
Leakage Current
Compliance and
Approvals
Power Requirements
Leakage Current
Ventilator Earth Leakage Current 100 to 240VAC; 300µA maximum
Enclosure/Patient Leakage Current 100 to 240VAC; 100µA maximum
Table 12-22: Leakage Current
WARNING: When connecting a humidifier to the humidifier outlet (available only on
100-120 VAC ventilators) allowable leakage current values may be
exceeded.
Compliance and Approvals
The Respironics V200 ventilator system complies with the
requirements of the European Directive 93/42/EEC
concerning medical devices and the requirements of Directive
89/336/EEC relating to electromagnetic compatibility.
IEC 601-1 Classification Protection class 1, type B applied part, drip proof, continuous
operation.
The ventilator system complies
with these international and
European Standards.
IEC 601-1/EN60601-1
IEC 601-1-2/EN60601-1-2
EN 794-1
The ventilator system has been
certified by the following. CSA/NRTL: CSA C22.2 No. 601-1, CSA C22.2 No. 601-2-
12, UL2601-1
Table 12-23: Compliance and Approvals
Power Requirements
Configuration Voltages & Frequencies
Ventilator Only 100 to 240VAC, 50/60Hz, 6 amp max. or
100 to 120VAC, 50/60Hz, 6 amp max. depending on
configuration
Ventilator Only 24VDC, 8AH, Backup Battery pack (operating time
approximately 30 minutes)
Ventilator with Humidifier 100 to 120VAC, 50/60Hz, 9 amp max.
Table 12-24: Power Requirements

Chapter 12
12-12 Respironics V200 Ventilator Operator’s Manual REF 1057983 A
Technical Specifications
Dimensions and
Weights
Electromagnetic
Compatibility
Declaration
NOTE: The humidifier power connection is available only on 100-120VAC
ventilators.
Dimensions and Weights
Ventilator Cart
Height 17inches (42 cm) 42 inches (107 cm)
Width 15 inches (38 cm) 23 inches (58 cm)
Depth 25 inches (65 cm)
29 inches with water trap
filter (74 cm)
37 inches (95 cm)
Weight 66 pounds (30 kg) 80 pounds (36.2 kg)
With backup battery - 93 pounds (42 kg)
Table 12-25: Dimensions and Weights
Guidance and Manufacturer's Declaration - Electromagnetic Emissions
The ventilator is intended for use in the electromagnetic environment specified below. The user
of the ventilator should assure that it is used in such an environment.
Emissions Test Compliance Electromagnetic Enforcement - Guidance
RF Emissions CISPR 11 Group 1
The ventilator uses RF energy only for its internal
function. Therefore, its RF emissions are very low
and are not likely to cause interference in nearby
electronic equipment.
RF Emissions CISPR 11 Class A The ventilator is suitable for use in all
establishments, including domestic
establishments and those directly connected to
the public low voltage power supply network that
supplies buildings used for domestic purposes.
Harmonic emissions
IEC 61000-3-2 Class A
Voltage fluctuations/flicker
emissions IEC 61000-3-3 Complies
Table 12-26: EMC Declaration - Emissions

Chapter 12
Technical Specifications
REF 1057983 A Respironics V200 Ventilator Operator’s Manual 12-13
Guidance and Manufacturer's Declaration - Electromagnetic Immunity
The ventilator is intended for use in the electromagnetic environment specified below. The user
of the ventilator should assure that it is used in such an environment.
Immunity Test IEC 60601 Test
Level Compliance
Level Electromagnetic Environment -
Guidance
Electrostatic
Discharge (ESD)
IEC 61000-4-2
±6kV contact
±8kV air
±6kV contact
t±8kV air
Floors should be wood, concrete
or ceramic tile. If floors are
covered with synthetic material,
the relative humidity should be
at least 30%.
Electrical Fast
Transient/burst
IEC 61000-4-4
±2kV for power
supply lines.
±1kV for input/
output lines
±2kV for power
supply lines.
±1kV for input/
output lines
Mains power quality should be
that of a typical hospital
environment
Surge
IEC 61000-4-5
±1kV differential
mode
±2kV common
mode
±1kV differential
mode
±2kV common
mode
Mains power quality should be
that of a typical hospital
environment
Voltage dips, short
interruptions and
voltage variations on
power supply input
lines
IEC 61000-4-11
<5% UT
(>95% dip in UT)
for 0.5 cycle
40% UT
(60% dip in UT)
for 5 cycles
70% UT
(30% dip in UT)
for 25 cycles
5% UT
(>95% dip in UT)
for 5 sec
<5% UT
(>95% dip in UT)
for 0.5 cycle
40% UT
(60% dip in UT)
for 5 cycles
70% UT
(30% dip in UT)
for 25 cycles
5% UT
(>95% dip in UT)
for 5 sec
Mains power quality should be
that of a typical hospital
environment. If the user of the
ventilator requires continued
operation during power mains
interruptions, it is recommended
that the ventilator be powered
from an external battery.
Power Frequency
(50/60Hz) magnetic
field
IEC 61000-4-8
3 A/m 3 A/m
Power frequency magnetic fields
should be at levels characteristic
of a typical location in a typical
hospital environment.
NOTE: UT is the a.c. mains voltage prior to application of the test level.
Table 12-27: EMC Declaration - Immunity
Chapter 12
12-14 Respironics V200 Ventilator Operator’s Manual REF 1057983 A
Technical Specifications
Guidance and Manufacturer's Declaration - Electromagnetic Immunity
The ventilator is intended for use in the electromagnetic environment specified below. The user of
the ventilator should assure that it is used in such an electromagnetic environment.
Immunity
Test IEC 60601
Test Level Compliance
Level Electromagnetic Environment - Guidance
Conducted
RF
IEC
61000-4-6
Portable and mobile RF communications
equipment should be used no closer to any part of
the ventilator, including cables, than the
recommended separation distance calculated from
the equation applicable to the frequency of the
transmitter.Recommended separation distance
Table 12-29: “EMC Declaration - Recommended
Distances”.
3 Vrms150
kHz to 80
MHz outside
ISM bandsa
3Vrms
Radiated
RF
IEC
61000-4-3
10 Vrms
150kHz to
80 MHz in
10 Vrms
10 V/m
80Mhz to
2.5GHz
10 V/m
80Mhz to 800Mhz
800Mhz to 2.5GHz
where P is the maximum output power rating of the
transmitter in watts (W) according to the
transmitter manufacturer and d is the
recommended separation distance in meters (m).b
Field strengths from fixed RF transmitters, as
determined by an electromagnetic site survey,c
should be less than the compliance level in each
frequency range.d
Interference may occur in the vicinity of equipment
marked with the
following symbol:
Table 12-28: EMC Declaration - Immunity
d
3.5
V1
------- P=
d12
V2
------P=
d12
E1
------P=
d23
E1
------P=

Chapter 12
Technical Specifications
REF 1057983 A Respironics V200 Ventilator Operator’s Manual 12-15
NOTE 1 At 80 MHz and 800 MHz, the higher frequency range applies.
NOTE 2 These guidelines may not apply in all situations. Electromagnetic propagation is affected
by absorption and reflection from structures, objects and people.
a The ISM (industrial, scientific and medical) bands between 150 kHz and 80 MHz are
6.765 MHz to 6.795 MHz; 13.553 MHz to 13.567 MHz; 26.957 MHz to 27.283 MHz; and
40.66 MHz to 40.70 MHz.
b The compliance levels in the ISM frequency bands between 150 kHz and 80 MHz and in
the frequency range 80 MHz to 2.5 GHz are intended to decrease the likelihood that mobile/
portable communications equipment could cause interference if it is inadvertently brought into
patient areas. For this reason, an additional factor of 10/3 is used in calculating the
recommended separation distance for transmitters in these frequency ranges.
c Field strengths from fixed transmitters, such as base stations for radio (cellular/cordless)
telephones and land mobile radios, amateur radio, AM and FM radio broadcast and TV broadcast
cannot be predicted theoretically with accuracy. To assess the electromagnetic environment due to
fixed RF transmitters, an electromagnetic site survey should be considered. If the measured field
strength in the location in which the ventilator is used exceeds the applicable RF compliance level
above, the ventilator should be observed to verify normal operation. If abnormal performance is
observed, additional measures may be necessary, such as re-orienting or relocating the ventilator.
d Over the frequency range 150 kHz to 80 MHz, field strengths should be less than 1 V/m.
Guidance and Manufacturer's Declaration - Electromagnetic Immunity
Table 12-28: EMC Declaration - Immunity
Chapter 12
12-16 Respironics V200 Ventilator Operator’s Manual REF 1057983 A
Technical Specifications
Table 12-29: EMC Declaration - Recommended Distances
Recommended Separation Distances Between
Portable and Mobile RF Communications Equipment and the Respironics V200 Ventilator
The ventilator is intended for use in an electromagnetic environment in which radiated RF disturbances
are controlled. The user of the ventilator can help prevent electromagnetic interference by maintaining a
minimum distance between portable and mobile RF communications equipment (transmitters) and the
ventilator as recommended below, according to the maximum output power of the communications
equipment
Separation Distance According to Frequency of Transmitter
(Meters)
Rated
Maximum
Output
Power of
Transmitter
(Watts)
150 kHz to 80
MHz Outside ISM
Bands
150 kHz to 80 MHz
in ISM Bands 80 MHz to 800 MHz 800 MHz to 2.5 GHz
0.01 0.12 0.12 0.12 0.23
0.1 0.38 0.38 0.38 0.74
1 1.20 1.20 1.20 2.30
10 3.80 3.80 3.79 7.40
100 12.00 12.00 12.00 23.00
For transmitters rated at a maximum output power not listed above, the recommended separation
distance d in meters (m) can be determined using the equation applicable to the frequency of the
transmitter, where P is the maximum output power rating of the transmitter in watts (W) according to the
transmitter manufacturer.
NOTE 1 At 80 MHz and 800 MHz, the separation distance for the higher frequency range applies.
NOTE 2 The ISM (industrial, scientific and medical) bands between 150 kHz and 80 MHz are 6.765
MHz to 6.795 MHz;13.553 MHz to 13.567 MHz; 26.957 MHz to 27.283 MHz; and 40.66
MHz to 40.70 MHz.
NOTE 3 An additional factor of 10/3 is used in calculating the recommended separation distance for
transmitters in the ISM frequency bands between 150 kHz and 80 MHz and in the frequency
range 80 MHz to 2.5 GHz to decrease the likelihood that mobile/portable communications
equipment could cause interference if it is inadvertently brought into patient areas.
NOTE 4 These guidelines may not apply in all situations. Electromagnetic propagation is affected by
absorption and reflection from structures, objects and people.
d12
V2
------P=d12
E1
------P=d23
E1
------P=
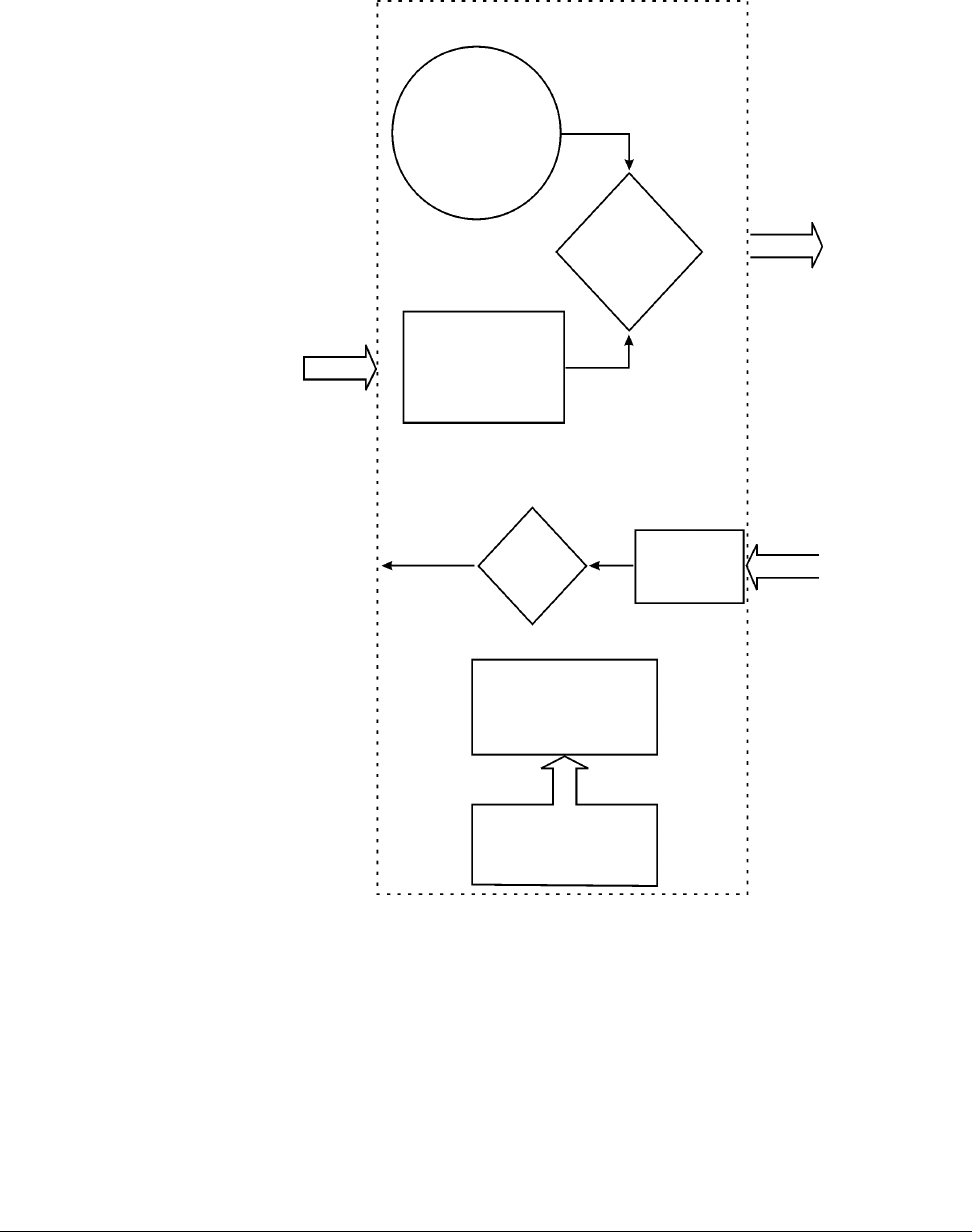
Chapter 12
Technical Specifications
REF 1057983 A Respironics V200 Ventilator Operator’s Manual 12-17
Pneumatic System
Figure 12-1: Pneumatic System
To Patient
From Patient
Internal Blower
Heated
Exhalation
Filter Assy
User Interface
Inspiratory
Module
w/SV and PRV
Expiratory Gas
to Atmosphere
Exhalation
Valve
Assembly
Oxygen Assembly
System
Electromechanical
Controls
O2 Inlet
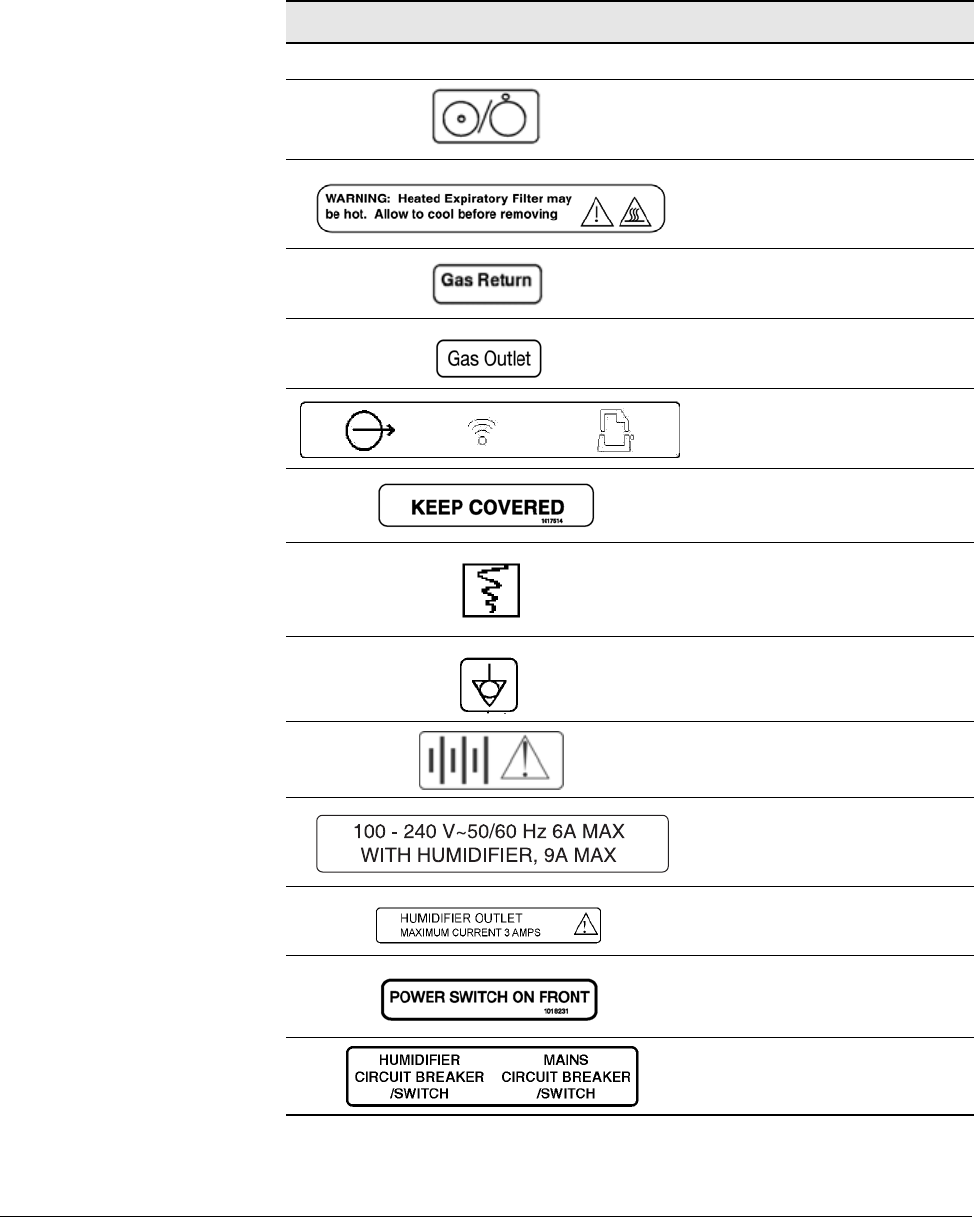
Chapter 12
12-18 Respironics V200 Ventilator Operator’s Manual REF 1057983 A
Technical Specifications
Labels
Ventilator Labels
Label Description
On/Off Switch Label
Heated Expiratory Filter Label
Gas Return Label
Gas Outlet Label
Serial Port, Remote Alarm Nurse
Call, parallel printer port Label
Keep Covered Label
Analog port
Potential Equalization Connector
DC Battery Connection Label
AC Power Label
Humidifier Outlet Label
Power Switch on Front Label
Circuit Breakers Label
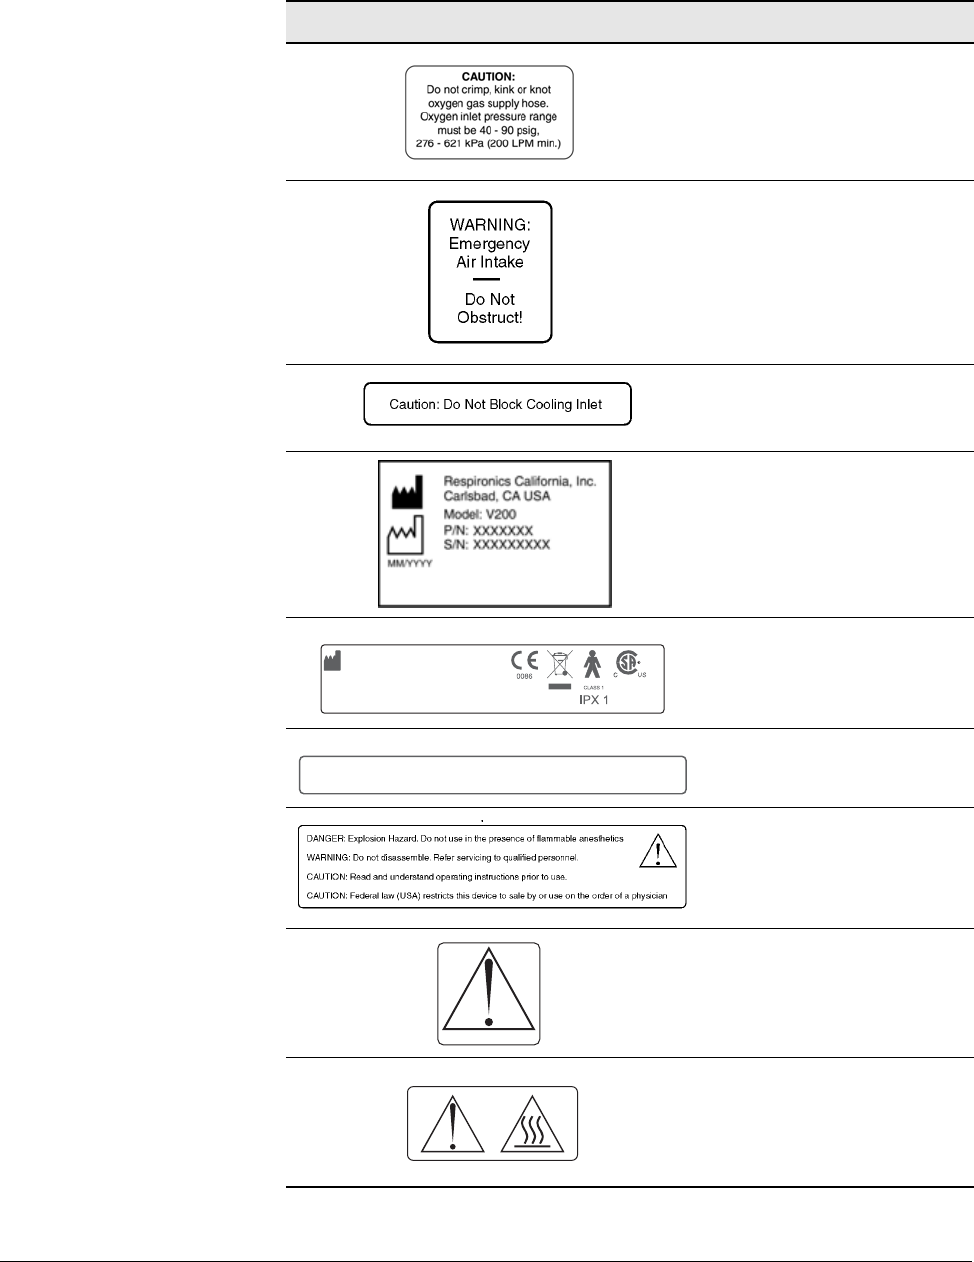
Chapter 12
Technical Specifications
REF 1057983 A Respironics V200 Ventilator Operator’s Manual 12-19
Oxygen Inlet Label
Emergency Air Intake Label
Cooling Inlet Label
Date of Manufacture/Manufacturer
Label
Manufacturer Label
Mercury disposal warning label
Warning Label
Attention Label
Hot and Attention Label
Ventilator Labels (Continued)
1059179 REV A
Respironics California, Inc.
2271 Cosmos Court
Carlsbad, CA 92011
MADE IN THE U.S.A.
Authorized Representative:
Respironics Deutschland GmbH
Gewerbestrasse 17
D-82211 Herrsching
Germany
Covered by one or more of the following patents: 6,543,449. Other patents pending.
WARNING: Lamps in display contain mercury - Dispose of properly.

Chapter 12
12-20 Respironics V200 Ventilator Operator’s Manual REF 1057983 A
Technical Specifications
Air Intake Label
Protective Earth (Ground) Label
Ventilator Labels (Continued)
WARNING: Air Intake - Do Not Obstruct!

REF 1057983 A Respironics V200 Ventilator Operator’s Manual 13-1
Chapter 13. Options and Accessories
Introduction This chapter lists and describes the Respironics V200 ventilator options and
accessories.
Options and Accessories
Software Options Page
Reference Part Number
Communications 13-27 1010525
Flow-Trak 13-83 1019026
Graphics 13-19 1003772a
Neonatal 13-97 1016851
Respiratory profile monitor interface (NICO-Esprit Interface) 13-87 1022488
Respiratory Mechanics 13-51 1006600
RS-232 Communications 2 13-39 1015725
Trending 13-69 1013446
Speaking Mode 13-103 1046805
Auto-Trak 13-117 1061450
Hardware Accessories
AC Power Cord 1001832a
Backup Battery 1059956
External Battery 13-6 1059955
Vuelink Cable 1006912
V200 Cart 1060495
Flex Arm Assembly 1003781
Flex Arm Bracket 1002497
Humidifier Bracket Kit, Hudson CONCHATHERM IV 1061390
Humidifier Mounting Adapter, Hudson CONCHATHERM
Series III/IV 1002231
O2 Cylinder Holder Kit 1060815
O2 High Pressure Hose 1001664a
O2 Manifold 13-13 1060785
O2 Sensor Kit 13-3 1002541
O2 Sensor Kit, PVC 13-3 1032037
Respiratory Profile Monitor Mounting Kit 1060784
RS-232 serial communications 3’ cable (NICO-Esprit) 1018292
Table 13-1: Options and Accessories (Sheet 1 of 2)

Chapter 13
13-2 Respironics V200 Ventilator Operator’s Manual REF 1057983 A
Options and Accessories
Remote Alarm Cable Kit (Normally Open Protocol) 1003741
Remote Alarm Cable Kit (Normally Closed Protocol) 1003742
Remote Alarm Cable Kit — Respironics (LifeCare) 1003743
Test Lung 1001737
Reusable Items
Reusable Exhalation Bacteria Filter Omni (Single) 1002970
Reusable Inspiratory Bacteria Filter (Single) 1003847
Reusable Patient Circuit Kit, Adult
Kit includes:
1 - Reusable Inspiratory Bacteria Filter
1 - Reusable Exhalation Bacteria Filter
2 - Water Traps
2 - Coupling, Straight Silicone
1003058
1003847
1002970
1003648
500-1000-43
Reusable Patient Circuit Kit, Pediatric
Kit includes:
1 - Reusable Inspiratory Bacteria Filter
1 - Reusable Exhalation Bacteria Filter
2 - Water Traps
2 - Coupling, Straight Silicone
1003059
1003847
1002970
1003648
500-1000-43
Reusable Vial System, Water Collection 1021884
Disposable Items
Disposable Exhalation Bacteria Filter (pkg of 12) 1002240
Disposable Inspiratory Bacteria Filter (Single) 1014047
Disposable Inspiratory Bacteria Filter (pkg of 10) 0342077
Disposable Patient Circuit, Adult
Kit includes:
1 - Disposable Inspiratory Bacteria Filter
1 - Disposable Exhalation Bacteria Filter
2 - Coupling, Straight Silicone
1003698a
1014047
1002240
500-1000-43
Disposable Vial System, Water Collection 1006241
Documentation
Respironics V200 Operator’s Manual CD
Respironics V200 Operator’s Manual (included on CD) 1062476
1057983b
Respironics V200 Service Manual CD
Respironics V200 Operator’s Manual (included on CD) 1062500
580-1000-02
a.The part number varies with the country to which the ventilator is delivered.
b.The part number varies by language.
WARNING: The use of accessories, cables, and transducers other than those specified
may result in increased EM emissions or decreased immunity of the system.
Options and Accessories (Continued)
Table 13-1: Options and Accessories (Sheet 2 of 2)
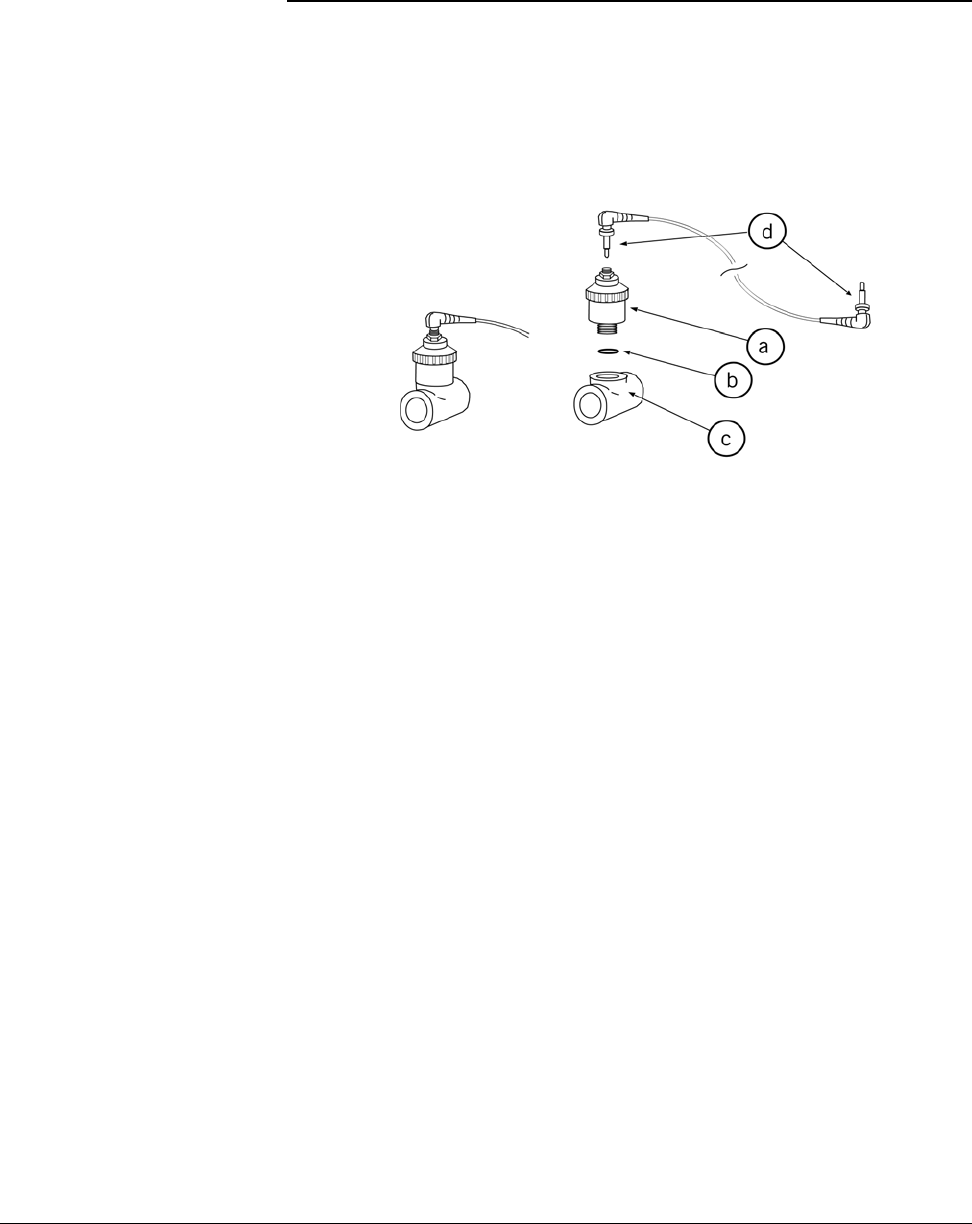
Options and Accessories
REF 1057983 A Respironics V200 Ventilator Operator’s Manual 13-3
Chapter 13
Oxygen Sensor Option
The optional Oxygen sensor (O2 sensor) may be installed to allow monitoring of
delivered O2 to the inspiratory limb of the patient circuit. The ventilator will
accept the MSA MiniOX® O2 and Analytical Industries Inc. sensors, P/N
1001454.
Figure 13-1: O2 Sensor exploded view
Assemble O2 Sensor Refer to Figure 13-1 for the following instructions.
MSA MiniOX O2
1. Remove the O2 sensor (a) from the package. Discard the o-ring and
adapter (not shown) provided with the sensor.
2. Place flat gasket (b) into the threaded hole of the O2 Sensor Tee (c).
3. Screw the O2 sensor (b) into the O2 sensor tee (c).
4. Insert one end of the O2 sensor cord (d) into ventilator. Insert other
end of O2 sensor cord (d) into the sensor. Fasten each end with
knurled collars.
Analytical Industries Inc.
1. Remove the O2 sensor (a) from the package.
2. Screw the O2 sensor (b) into the O2 sensor tee (c).
3. Insert one end of the O2 sensor cord (d) into ventilator. Insert other
end of O2 sensor cord (d) into the sensor. Fasten each end with
knurled collars.
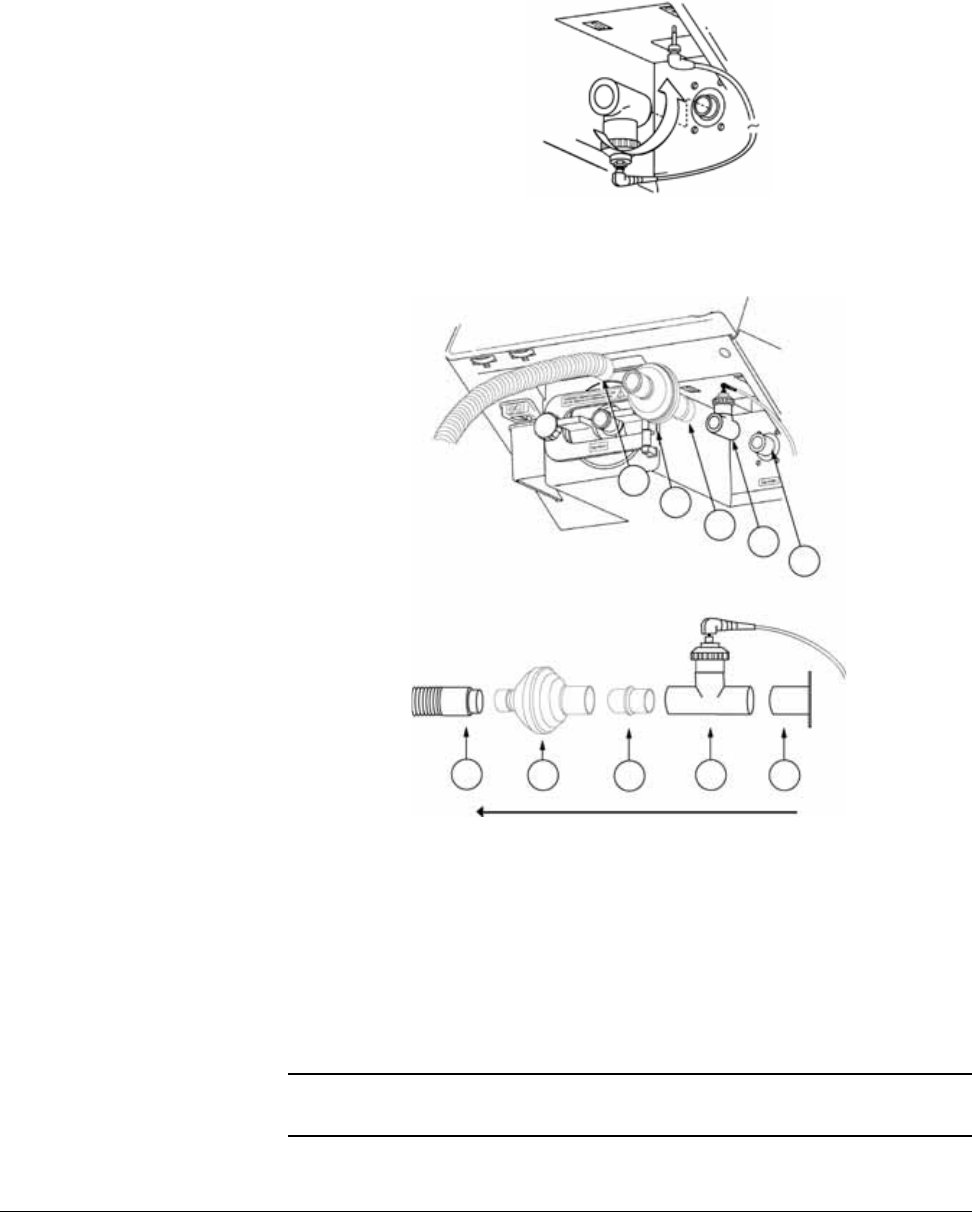
Chapter 13
13-4 Respironics V200 Ventilator Operator’s Manual REF 1057983 A
Options and Accessories
Attaching the Sensor
to the Ventilator The O2 sensor attaches to the gas outlet port located below the front panel on
the ventilator’s lower right corner.
Figure 13-2: O2 Sensor Orientation
1. Rotate the sensor assembly so that the sensor is pointing up.
Figure 13-3: Connecting O2 Sensor and Patient Circuit
2. Connect the T-fitting (2) to the gas outlet port (1).
3. Insert the inspiratory bacteria filter (4) into the T-fitting (2) using the
22mm connector (3) if necessary. Some bacteria filters provide an
arrow or other mark to indicate the direction of flow. The flow indicator
should be pointed away from the ventilator, toward the patient circuit
connection.
CAUTION: To prevent contamination of the O2 sensor, always locate it between the
ventilator gas output port and the inspiratory bacteria filter.
Flow
1
2
3
4
4321
5
5

Options and Accessories
REF 1057983 A Respironics V200 Ventilator Operator’s Manual 13-5
Chapter 13
4. Connect inspiratory limb of patient circuit (5) to bacteria filter (4).
5. Ensure that all connections are tight.
Warranty Respironics warrants the O2 sensor to be free from defects in material and
workmanship for a period of one year from the date of purchase, provided that
the unit is operated under conditions of normal use as described in this
operator’s manual.
At its discretion, Respironics will make replacements, repairs, or issue credits
for equipment or parts that are found to be defective.
O2 Sensor Tee The External Oxygen Sensor Adapters (P/Ns 8-100498 and 1020380) are also
referred to as O2 Sensor Tees. The PVC adapter is gray, the Ultem® is clear
with an amber tint, and both are compatible with the MSA and Analytical
Industries External Oxygen Sensors. Both tees are compatible with all
ventilators.
Both tees have 22mm female/male connections; therefore the 22mm male-
male adapter (P/N 1002505) is not needed when using this adapter.
Figure 13-4: Sensor Tee
NOTE: Record O2 sensor manufacturing or warranty numbers and installation
date for future reference.
NOTE: To ensure accurate O2 monitoring, check O2 sensors periodically and
replace as per manufacturer specification.
NOTE: Sensor performance and expected operating life information is outlined
in the sensor manufacturer’s instructions for use. Thoroughly review all
O2 sensor instructions prior to installation and use with the ventilator.
NOTE: O2 sensor calibration is performed during EST. If recalibration of the O2
sensor is required, follow the instructions for “Extended Self Test
(EST)” in Chapter 11.
CAUTION: PVC O2 (P/N 8-100498-00) and Ultem® (P/N 1020380) Sensor Tees
cannot be autoclaved or chemically disinfected.
8-100498-00 1020380
Ultem®
PVC
(Gray) (Clear)

Chapter 13
13-6 Respironics V200 Ventilator Operator’s Manual REF 1057983 A
Options and Accessories
(This page is intentionally blank.)
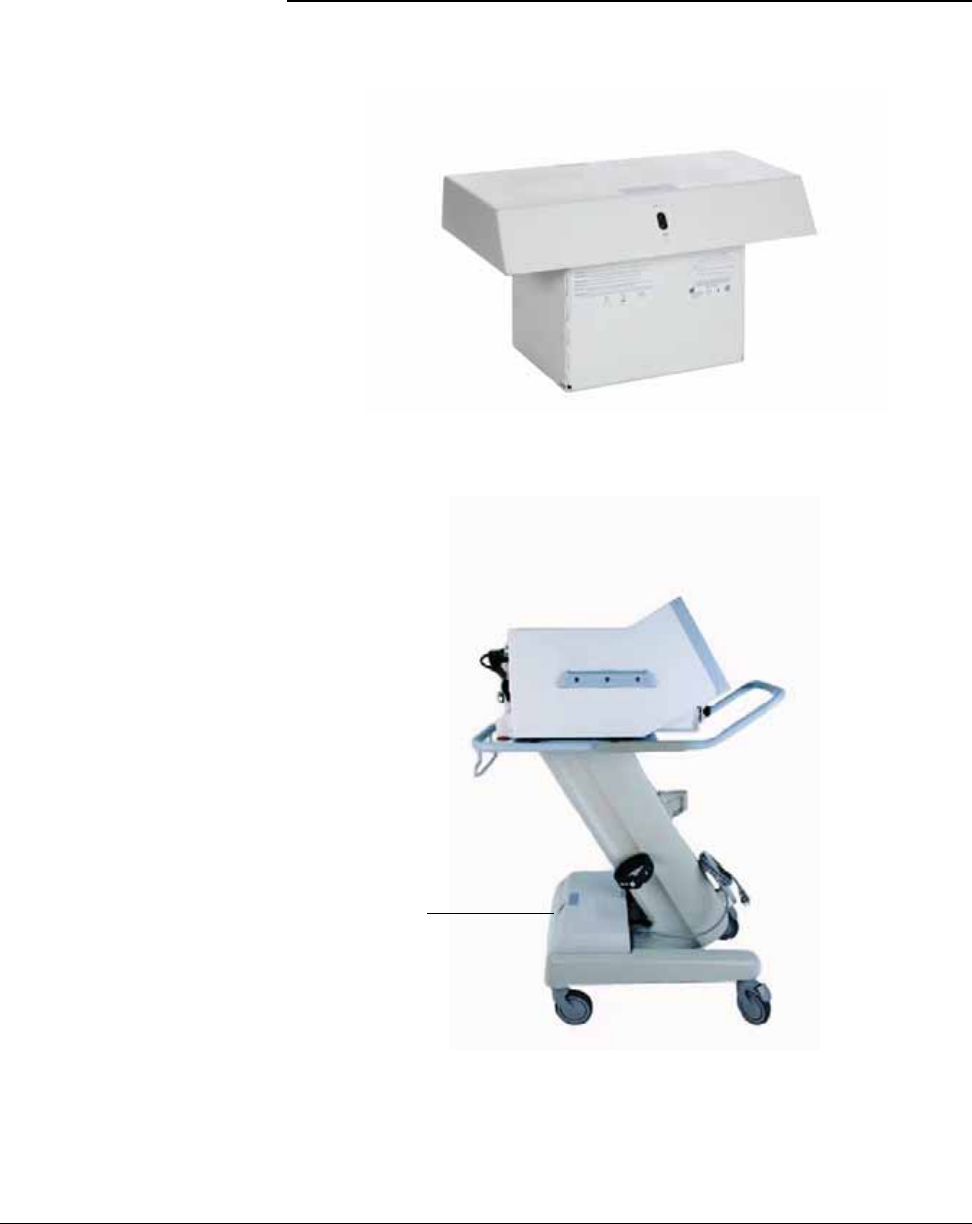
REF 1057983 A Respironics V200 Ventilator Operator’s Manual 13-7
External Battery Option
The V200 External Battery is designed for use with a Respironics V200 Ventilator
equipped with a backup battery.
Figure 13-5: Ventilator with External Battery Installed
External
battery

Chapter 13
13-8 Respironics V200 Ventilator Operator’s Manual REF 1057983 A
Options and Accessories
Installation Contact Respironics Customer Service at 1-800-345-6443 to arrange
installation or refer to the installation section of the Ventilator External Battery
Service Instructions (1013569).
Power Consumption
Sequence When AC power becomes unavailable, the ventilator consumes power from the
battery systems as follows:
•With the external battery installed and turned ON and backup battery
installed: External battery power is consumed first until depleted.
Backup battery power is then used until depleted. An audible alarm
sounds when the backup battery is in use. The ventilator will not
operate when both batteries are depleted.
•With backup battery installed only: Backup battery power is used until
depleted. An audible alarm sounds when the backup battery is in use.
The ventilator will not operate when the battery is depleted.
AC power can be restored to the ventilator at any time during battery use.
When AC power is restored the ventilator consumes AC power only, and both
batteries begin recharging. (See “Battery Charging” on page 13-10).
External Battery/
Backup Battery
Operation
The external battery must be turned ON in order for the external battery to be
used. Make sure the ON/OFF switch located on the external battery (Figure 13-
6) is in the ON (I) position. When AC power becomes unavailable, the
ventilator automatically switches to external battery operation without
interruption in ventilation. When the external battery is depleted, the ventilator
automatically switches to backup battery power.
WARNING: Do not lift the external battery. If the battery needs to be removed from the
cart, contact Respironics Customer Service at 1-800-345-6443.
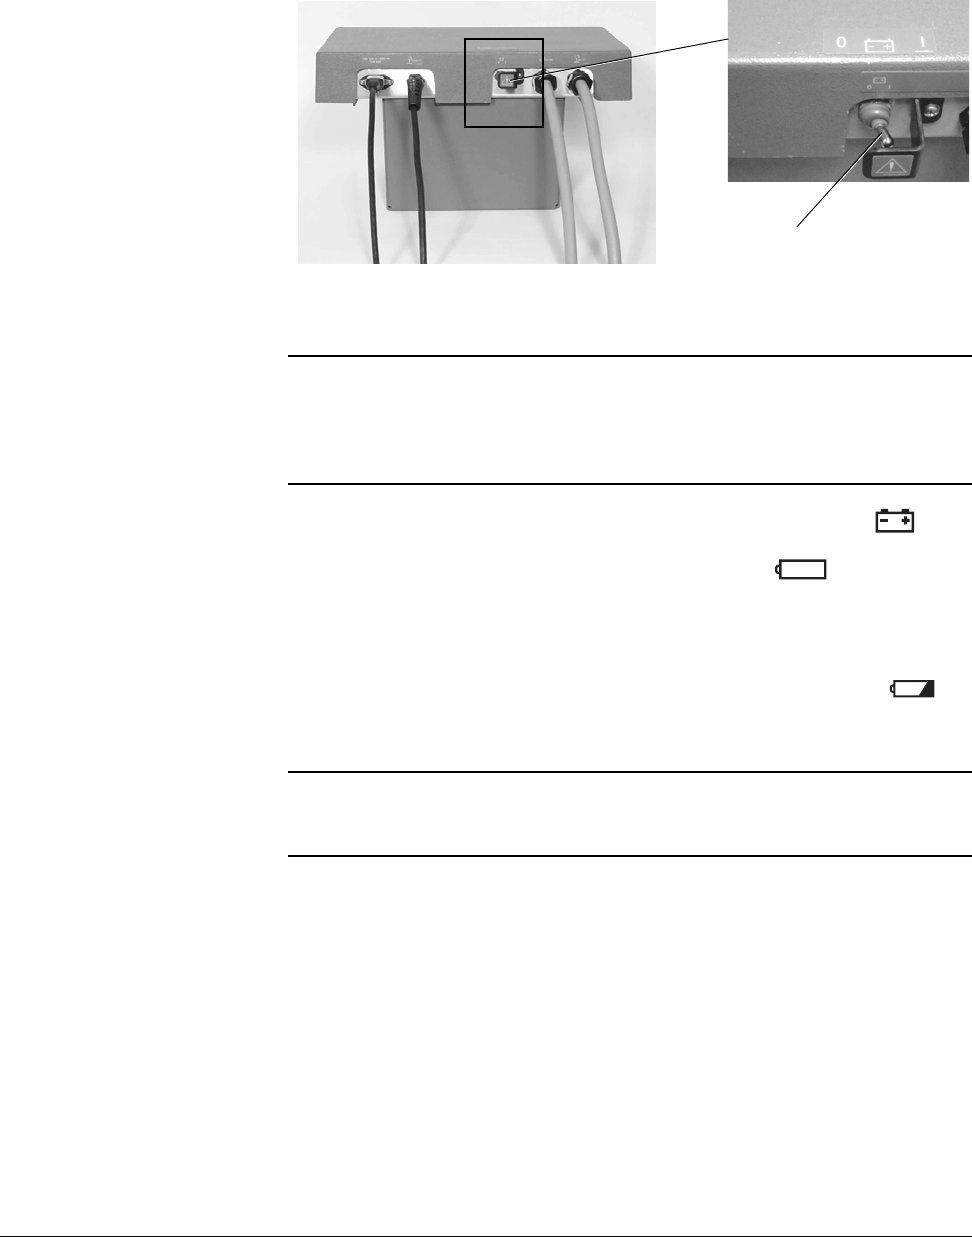
Options and Accessories
REF 1057983 A Respironics V200 Ventilator Operator’s Manual 13-9
Chapter 13
Figure 13-6: External Battery On/Off Switch
When the external battery is in use, the External Battery indicator ( ) is
continuously illuminated. If the ventilator switches to backup battery
operation, the In Use (text version of the front panel) or (symbol version
of the front panel) indicator illuminates, and the ventilator sounds an audible
alarm every 60 seconds (the alarm cannot be reset or silenced). When
approximately five minutes of backup battery power remains, the ventilator
sounds a high urgency audible alarm (a repeating sequence of five tones) that
cannot be reset, and the red Low (text version of the front panel) or ()
(symbol version of the front panel) and Alarm High indicators flash.
WARNING: The external battery ON/OFF switch must be in the ON (I) position to ensure
operation during a power failure. When this switch is in the OFF (O) position,
the external battery is disabled. Switch off ONLY when connecting or
disconnecting cables or when the ventilator or external battery is in storage
for more than 2 weeks and is not connected to AC power.
WARNING: When the ventilator Battery Low indicator flashes red, less than five minutes
of battery power remains. Immediately connect AC power or provide an
alternate source of ventilation.
On/Off switch

Chapter 13
13-10 Respironics V200 Ventilator Operator’s Manual REF 1057983 A
Options and Accessories
Battery Capacity The external battery is used with the backup battery. Under optimal running
conditions, both batteries together can operate the ventilator for up to four
hours. However, ventilator power consumption varies according to
environmental conditions and ventilator settings. Battery capacity varies with
the age and charge level of the battery. The external battery should be kept
fully charged to ensure maximum capacity when needed.
Battery Charging The external battery is designed to be recharged only as described here. Do not
use any other method to recharge the battery.
In order for the external battery to charge, the system must be connected to a
viable AC power source. The ventilator can be operating or in standby mode. A
new external battery fully charges within 15 hours. The time required to
recharge depends on the original charge level of the battery.
When the external battery is connected to a functioning AC power source, the
MAINS indicator located on the front of the ventilator is lit and the green AC
indicator on the external battery is lit (Figure 13-7).
The yellow “Battery Charging” indicator on the external battery has the
following indication modes:
• Continuous ON - Battery is in deep charge mode
• Flashing - Battery is approaching full charge
• Off-Battery is fully charged
Figure 13-7: External Battery Indicator Lights
If the external battery does not reach full charge within 15 hours, contact
Respironics Customer Service at 1-800-345-6443.
CAUTION: Battery operating life depends on battery age and number of discharges
and recharges. Over time the battery degenerates and provides less
operating time per charge than a fully-charged new battery. Use a
Respironics External Battery P/N 1059955 only.
AC indicator
Battery charging
indicator

Options and Accessories
REF 1057983 A Respironics V200 Ventilator Operator’s Manual 13-11
Chapter 13
Testing The external battery should be tested during the regular preventative
maintenance cycle of the ventilator or as required by your institutional
procedures. Perform the External Battery Verification Procedure included in
the External Battery Service Instructions (1013569).
Battery
Specifications
*Batteries are considered hazardous waste and must be disposed of according
to local regulations. It is unlawful to dispose of these batteries except through
a regionally approved recycling center.
For additional information, contact Respironics Customer Service at
1-800-345-6443.
CAUTION: The External Battery is designed to recharge only as described here. Do
not use any other method to recharge the External Battery.
CAUTION: If the ventilator is expected to be stored for more than 2 weeks, the
external battery ON/OFF switch should be set to the OFF (O) position to
avoid discharging the external battery. This switch must be placed in
the ON (I) position when the ventilator is removed from storage and
returned to use.
Part Number: 1059955
Model: V200 External Battery
Type: Lead Acid*
Output: 24 V, 33AH
Class: 1
Recharge Time: ~ 15 hours
Charge Hold: ~ 14 days at 20 C
Storage Conditions: -20 C to 60 C at 10%-95% relative humidity

Chapter 13
13-12 Respironics V200 Ventilator Operator’s Manual REF 1057983 A
Options and Accessories
Warranty Respironics warrants the Respironics V200 external battery to be free from
defects in material and workmanship for a period of twelve months from the
date of installation, provided that the unit is operated under conditions of
normal use as described in this operator’s manual.
At its discretion, Respironics will make replacements, repairs, or issue credits
for equipment or parts that are found to be defective.
This warranty does not apply to any unit or individual parts which have been
repaired or altered in any way that, in Respironics judgment, affect its ability
or reliability, or which has been subjected to misuse, negligence, abuse, or
accident.
Unauthorized service and/or failure to perform periodic maintenance may void
this warranty.
This warranty does not cover damage that may occur in shipment.
This warranty takes precedence over all other warranties, expressed or implied.
This warranty also takes precedence over all other obligations or liabilities on
the part of Respironics including, but not limited to, contingent or
consequential damages, such as costs of repairing or replacing other property
which may be damaged as a direct result of Respironics V200 Ventilator
operation.
This warranty, and the rights and obligations described herein, is construed
under and governed by the laws of the State of California, U.S.A.
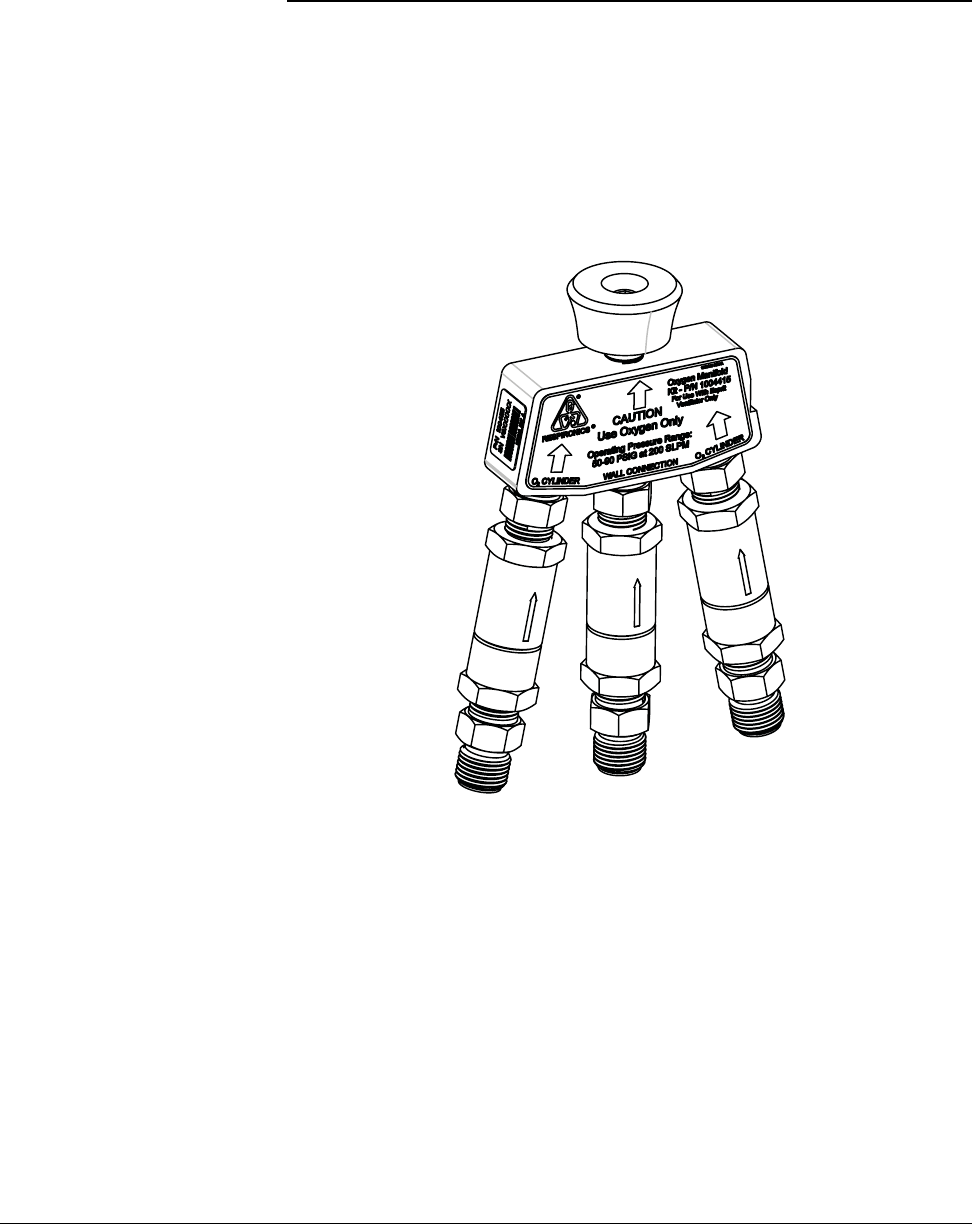
REF 1057983 A Respironics V200 Ventilator Operator’s Manual 13-13
Oxygen Manifold Option
The oxygen manifold allows two O2 cylinders and one wall oxygen supply line
to be used as inputs to the ventilator. Each of the three inlets has a check-
valve that prevents pressure loss when disconnecting from the wall or
cylinders. This allows quick, easy transfer between oxygen supplies without
interruption of flow. Easy transfer of oxygen supply facilitates patient transport
within the facility and allows replacement of one cylinder while operating from
the other.
Figure 13-8: Oxygen Manifold Assembly
Kit Contents • (1) Oxygen Manifold Assembly
• (1) Oxygen Manifold Bracket with Grommet
• (2) 24-inch Medical Hose Assemblies - Oxygen
• (1) 4.0mm Allen wrench
• (2) M6 x 10mm BUTTON HEAD SCREWS, SOC CAP
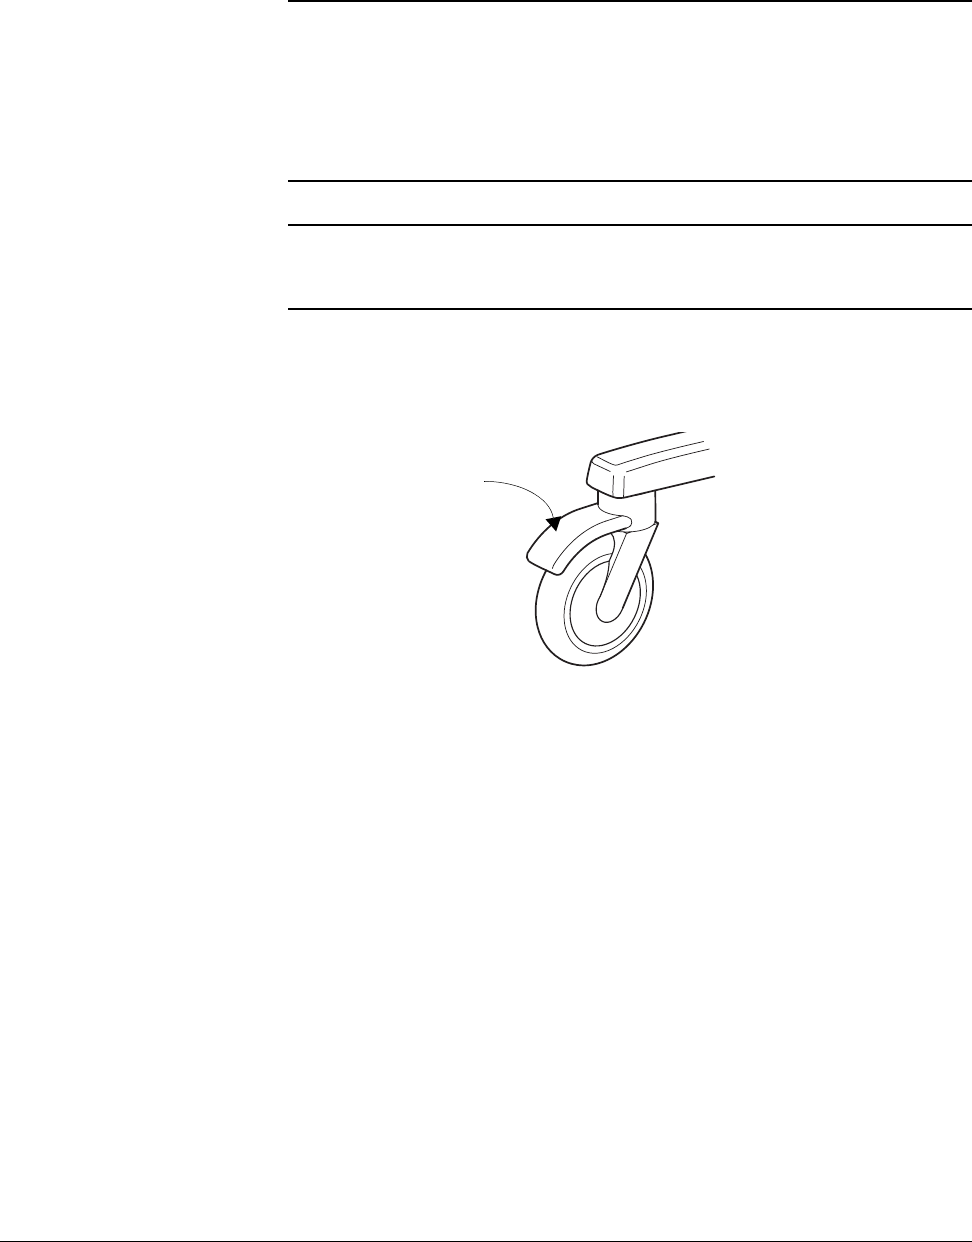
Chapter 13
13-14 Respironics V200 Ventilator Operator’s Manual REF 1057983 A
Options and Accessories
Assembly Instructions 1. Lock the front wheels of the ventilator.
Figure 13-9: Locking Ventilator Wheel
WARNING: The Oxygen Manifold is for oxygen use only.
WARNING: Maximum inlet pressure: 90 PSIG
Minimum inlet pressure: 50 PSIG at 200 SLPM
WARNING: Keep all hoses within the limits of the ventilator footprint to prevent
a tripping or snag hazard.
CAUTION: Use this kit with the Respironics V200 Ventilator only.
CAUTION: Do not use the oxygen manifold or oxygen hoses to move the ventilator.
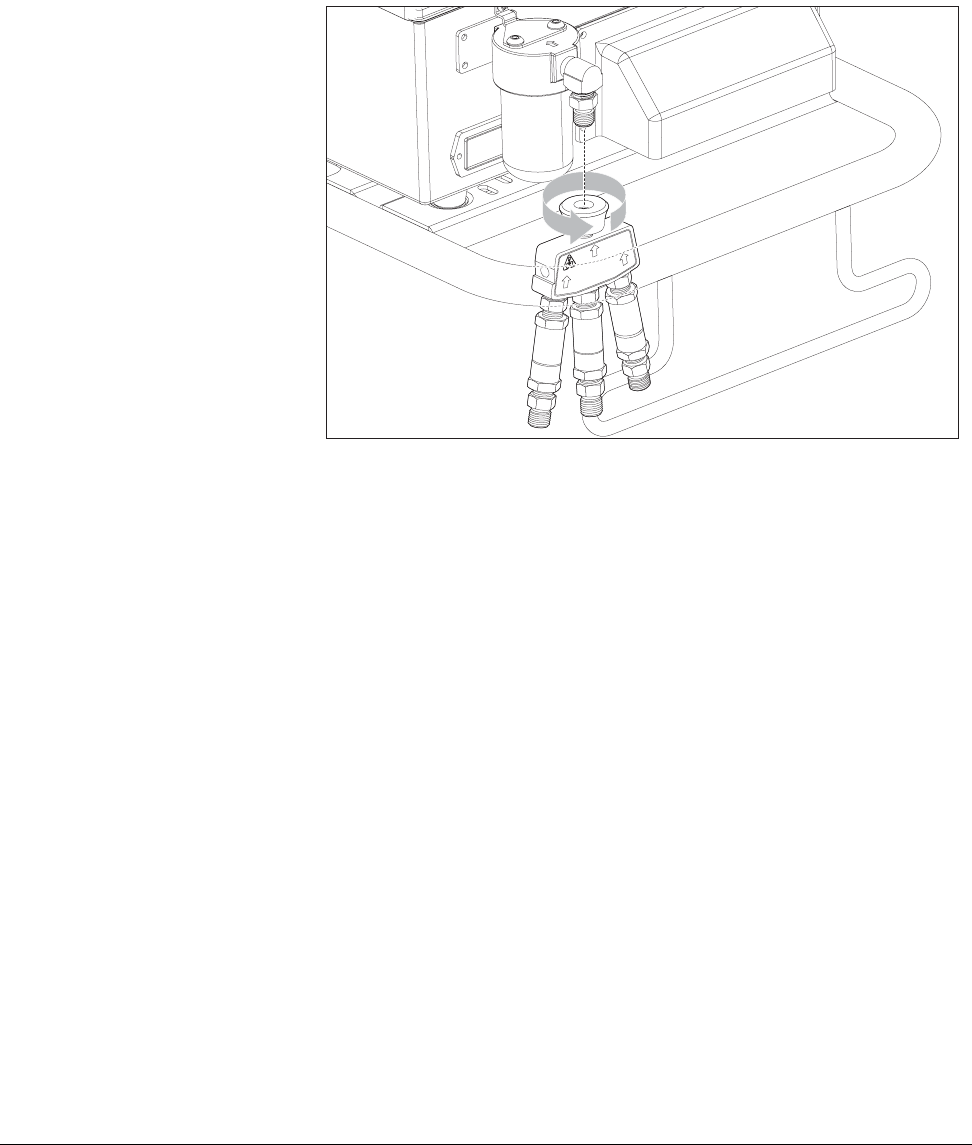
Options and Accessories
REF 1057983 A Respironics V200 Ventilator Operator’s Manual 13-15
Chapter 13
2. Attach the oxygen manifold assembly to the ventilator by threading the
adapter fitting onto the oxygen inlet elbow fitting. Using the manifold
for leverage, rotate the oxygen inlet elbow fitting until the manifold
assembly is vertical, as shown in Figure 13-10.
Figure 13-10: Ventilator With Oxygen Manifold
Oxygen Manifold
Kit - P/N 1004415
For Use With Exprit
Ventilator Only
CAUTION
Use Oxygen Only
Operating Pressure Range:
50-90 PSIC at 200 SLPM
WALL CONNECTION
O
2
CYLINDER
O
2
CYLINDER
RESPIRONICS
®
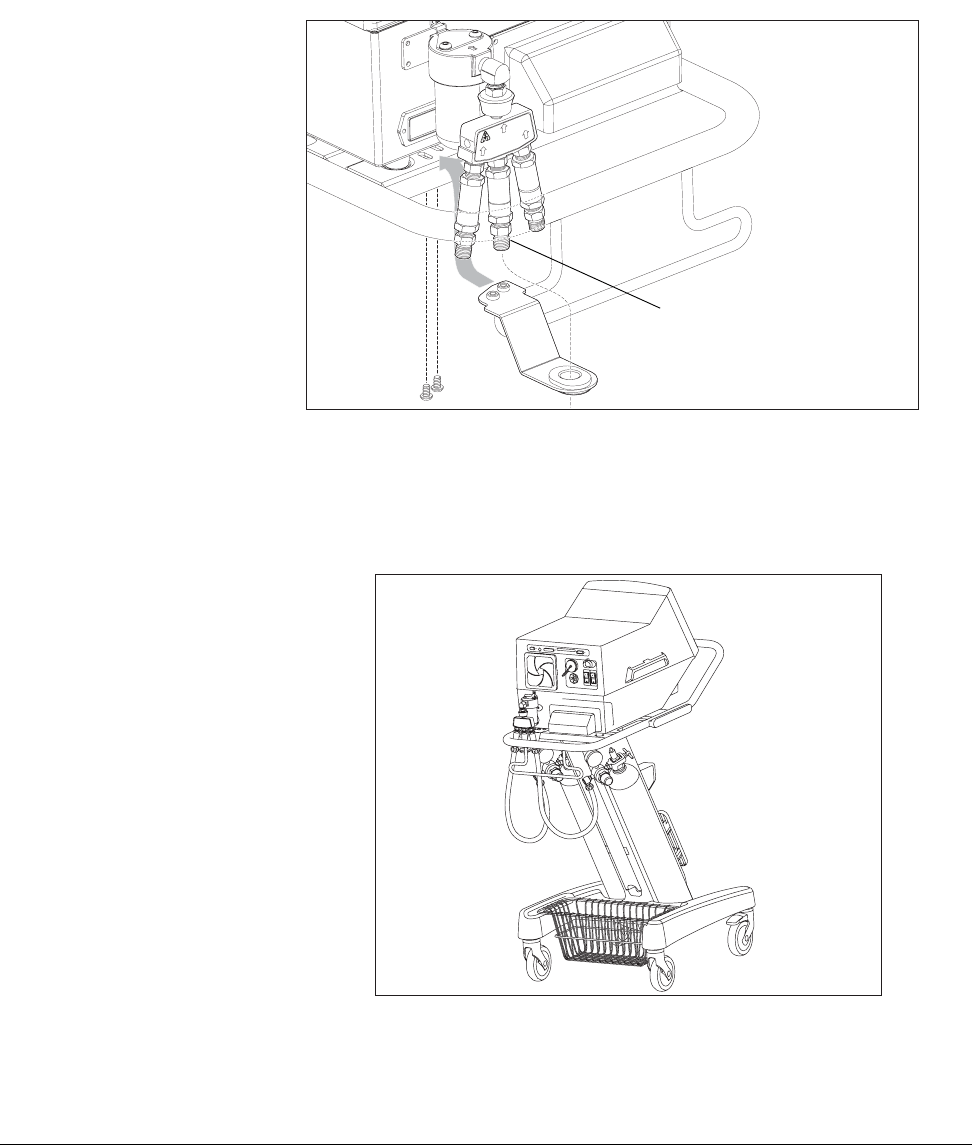
Chapter 13
13-16 Respironics V200 Ventilator Operator’s Manual REF 1057983 A
Options and Accessories
3. Position the manifold support bracket so that the Wall O2 connection
of the manifold fits snugly into the manifold support bracket grommet.
Using the Allen wrench, attach the bracket to the cart using the two
M6 x 10mm screws.
Figure 13-11: Attaching Manifold Support Bracket
4. If you will be using O2 cylinders, connect either or both of the oxygen
hoses from the O2 cylinders to the left and right inlets of the oxygen
manifold assembly. These inlets are marked "O2 Cylinder".
Figure 13-12: Completed Manifold Assembly
Oxygen Manifold
Kit - P/N 1004415
For Use With Exprit
Ventilator Only
CAUTION
Use Oxygen Only
Operating Pressure Range:
50-90 PSIC at 200 SLPM
WALL CONNECTION
O
2
CYLINDER
O
2
CYLINDER
RESPIRONICS
®
Wall O2 connection

Options and Accessories
REF 1057983 A Respironics V200 Ventilator Operator’s Manual 13-17
Chapter 13
5. When using oxygen from a wall supply, attach a wall oxygen hose (not
included) to the center inlet of the oxygen manifold assembly.
Replacement Parts: The following replacement parts can be ordered from Respironics:
• Check Valve Assembly (PN 1007190)
• 24-inch Medical Hose Assemblies - Oxygen (PN 1006655)
• Bracket and Hardware Kit (PN 1062294)
Using the Manifold To Use Wall Supply Oxygen
Connect the wall oxygen supply to the manifold. Close the O2 cylinder valves.
Oxygen is delivered to the ventilator from all sources that are active. Therefore,
if the O2 cylinder valves are open while oxygen is being delivered from the wall
supply, the cylinders can be depleted of oxygen. To avoid depleting the O2
cylinders, shut off the cylinder valves when using the wall oxygen supply.
To Use O2 Cylinders
Open the O2 cylinder valves and disconnect the wall oxygen supply.
Transport Use
When preparing for intra-facility transport use, first open the O2 cylinder valves
and then disconnect the wall oxygen supply. When transport is complete,
reconnect the wall oxygen supply and then close the O2 cylinder valves.
WARNING: If using wall oxygen supply, close the O2 cylinder valves to avoid
depleting the cylinders.

Chapter 13
13-18 Respironics V200 Ventilator Operator’s Manual REF 1057983 A
Options and Accessories
(This page is intentionally blank.)
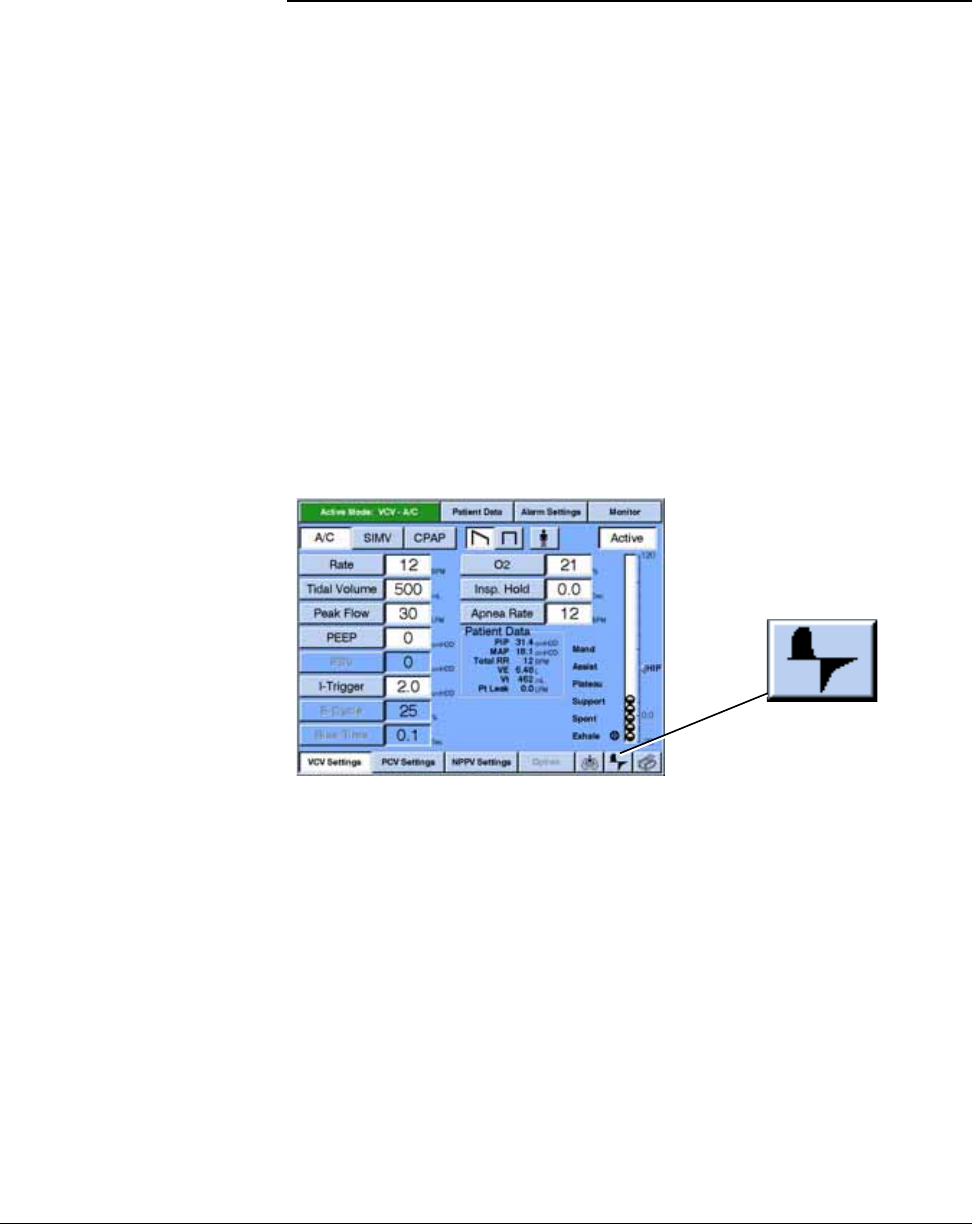
Options and Accessories
REF 1057983 A Respironics V200 Ventilator Operator’s Manual 13-19
Chapter 13
Graphics
The Graphics software enhances the display screens with graphical data of the
patient’s flow, pressure, and volume. The Graphics software offers a choice of
screens:
• The Waveform screen displays two windows displaying pressure, flow, or
volume within a specified time scale.
• The Loops screen displays three windows: a waveform window (pressure,
flow, or volume), a flow/volume loop window, and a pressure/volume loop
window.
Graphics is available in all ventilation types.
Starting Graphics To enter the graphics screens, press the Graphics icon button in the lower right
corner of the screen (Figure 13-13).
Figure 13-13: VCV Settings Screen and the Graphics Icon Button
Using Graphics Press the WAVEFORMS button to view two waveforms, or press the LOOPS button
to view one waveform and two loops (Figure 13-14 shows a Waveforms screen).
1. For each waveform, press the FLOW, PRESSURE, or VOLUME button.
2. Press the 7 sec, 14 sec, or 21 sec button to select the waveforms time
scale.
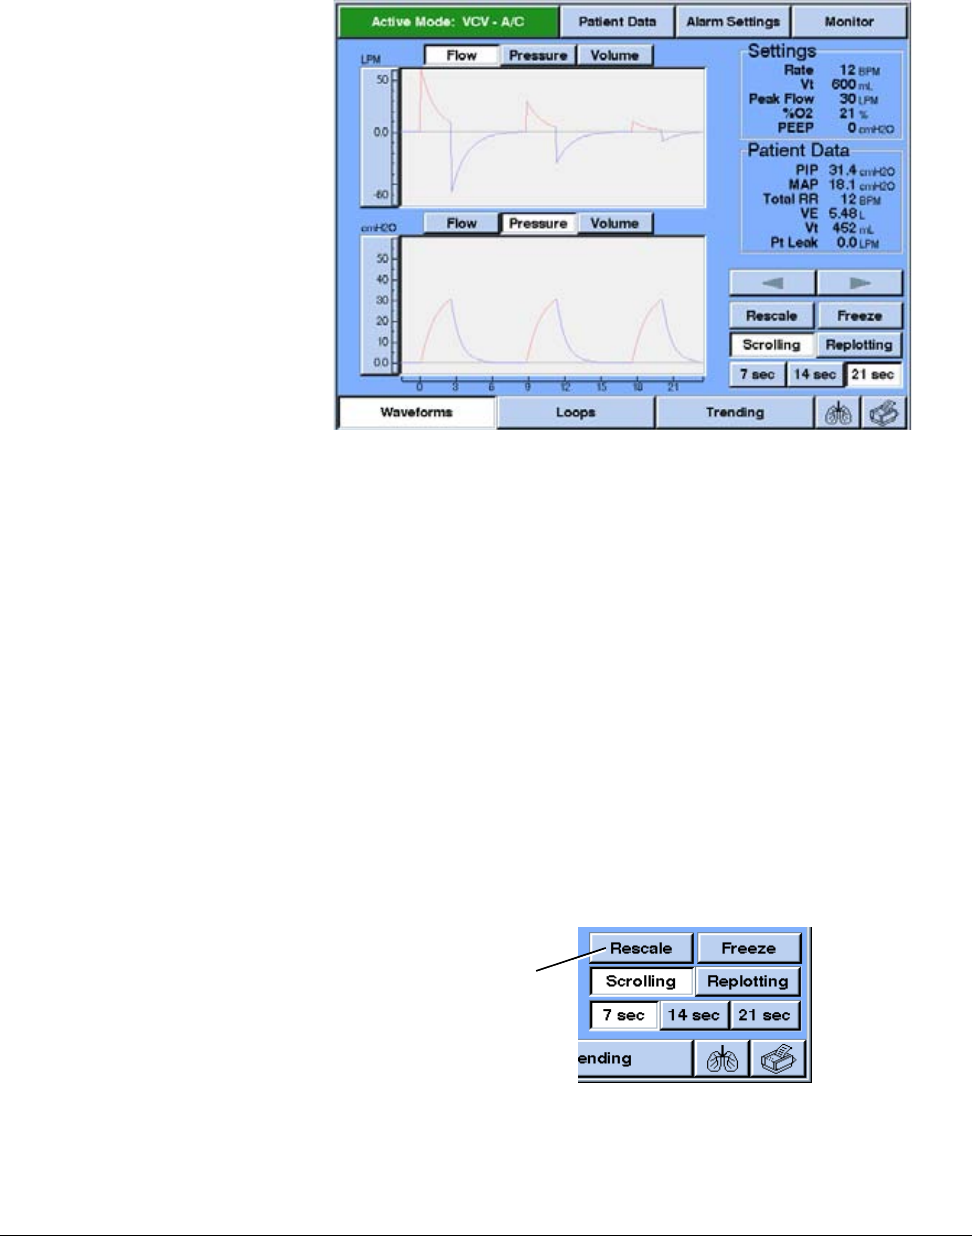
Chapter 13
13-20 Respironics V200 Ventilator Operator’s Manual REF 1057983 A
Options and Accessories
Figure 13-14: Waveform Screens
Replotting and
Scrolling You can select one of two plotting methods for waveforms:
•Replotting selects a waveform that is drawn from left to right, then clears
and restarts from the left edge (similar to an oscilloscope).
•Scrolling selects a waveform that is drawn from left to right, then
continuously shifts to the left to display the most recent data at the right
edge of the screen (similar to a stripchart).
Rescaling the Display Press RESCALE (Figure 13-15) to allow software to adjust the vertical scales for
waveforms and vertical and horizontal scales for loops. Rescaling is available for
waveforms and loops, in normal and during Freeze operation. For optimum viewing,
press RESCALE at the end of exhalation.
Figure 13-15: Rescale Button
Rescale button
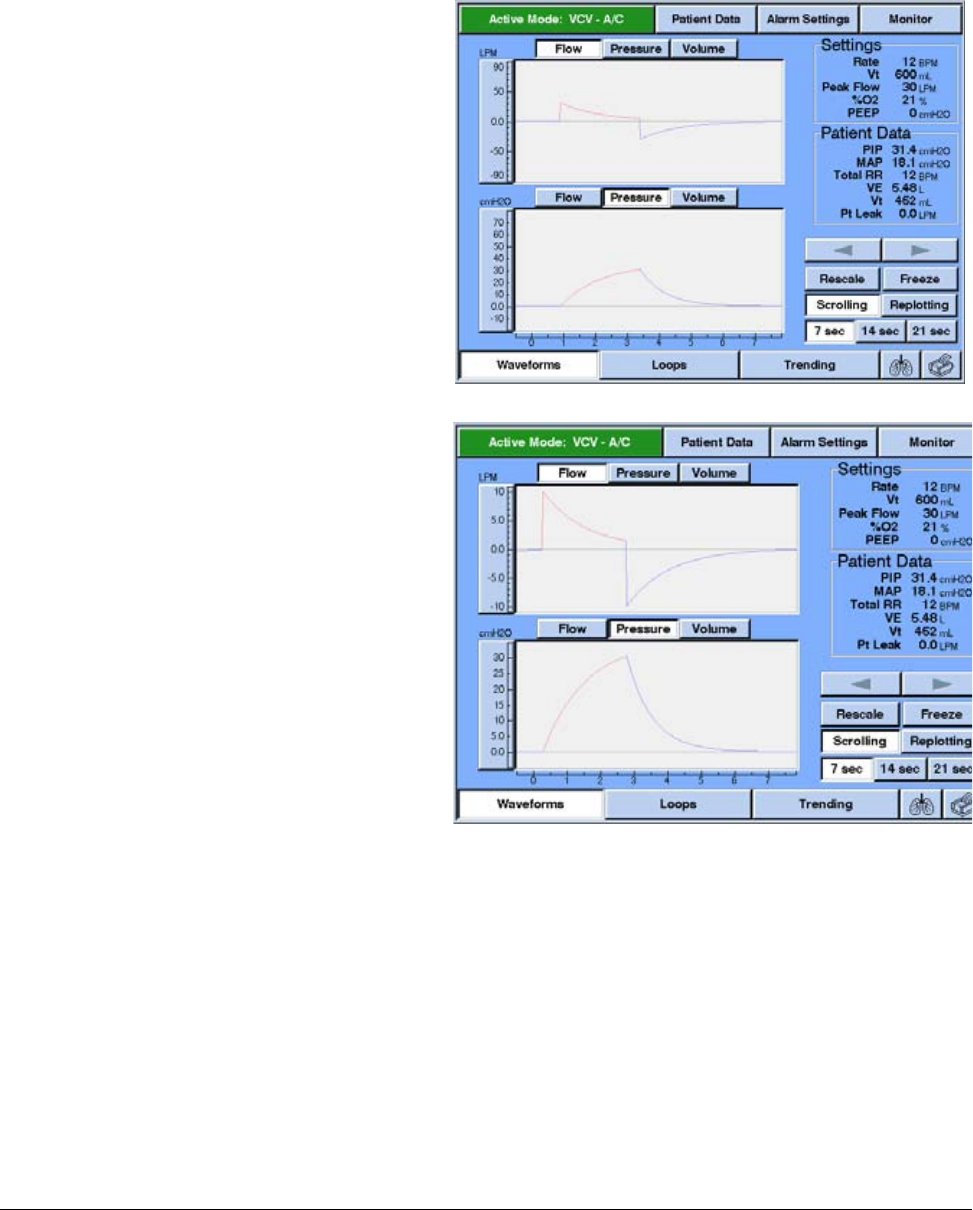
Options and Accessories
REF 1057983 A Respironics V200 Ventilator Operator’s Manual 13-21
Chapter 13
Figure 13-16 shows waveforms before and after rescaling.
Figure 13-16: Waveforms Screen (a) Before and (b) After Rescale
Follow these steps to change scales manually:
1. Touch the upper or lower portion of the scale you want to change.
2. Press the INCREASE or DECREASE bar or turn the knob to adjust the
scale range.
3. Press ACCEPT (onscreen button or offscreen key).
Figure 13-17 shows an example of how to adjust an upper scale limit.
(a) BEFORE Rescale
(b) AFTER Rescale
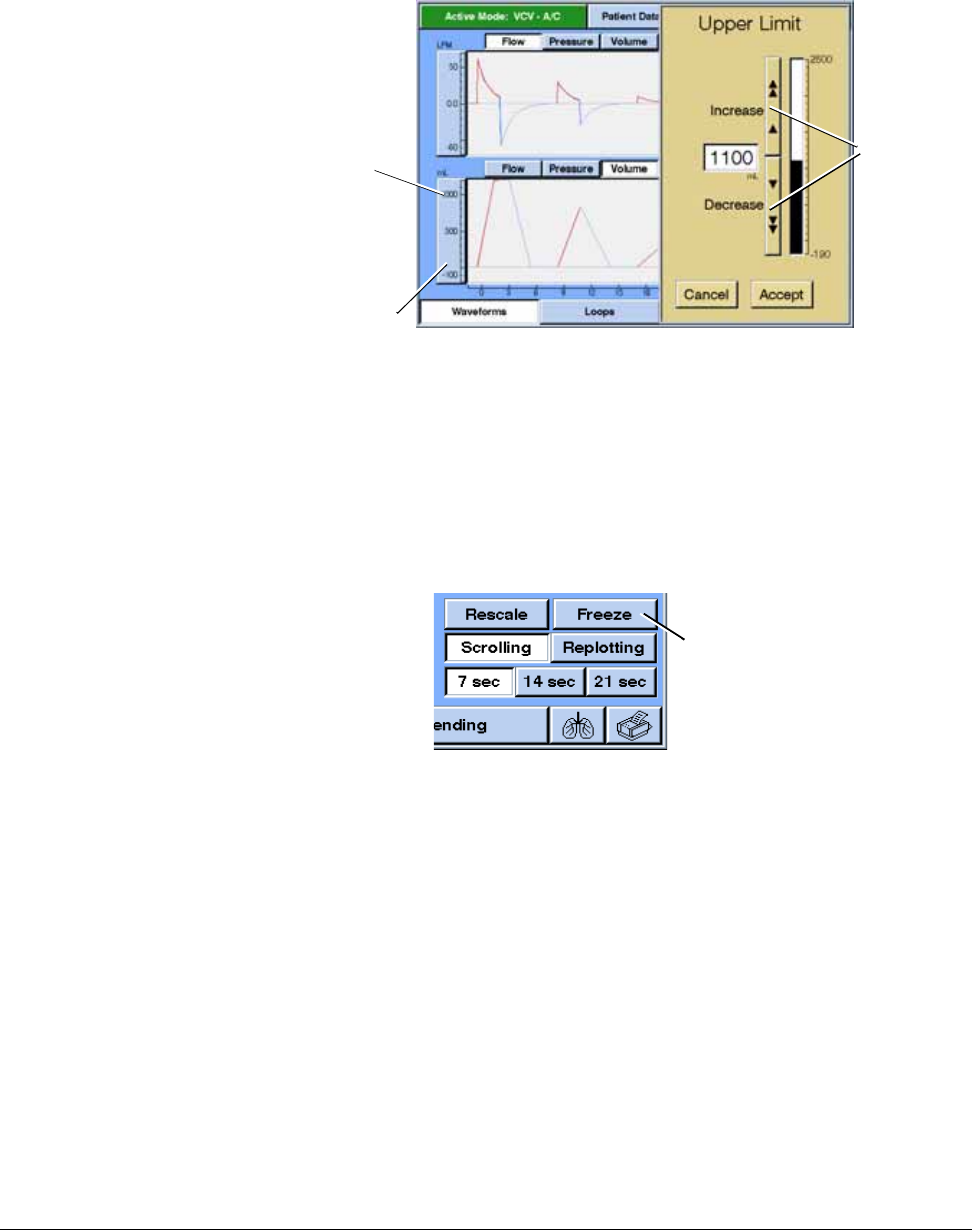
Chapter 13
13-22 Respironics V200 Ventilator Operator’s Manual REF 1057983 A
Options and Accessories
Figure 13-17: Manually Adjusting a Scale
Freeze Feature The FREEZE button (Figure 13-18) pauses the Waveforms or Loops windows for
extended viewing when the waveform window is full.
Figure 13-18: Freeze Button
Once the Freeze feature is in effect, each graphics window shows numeric data for
the cursor position on the waveform display. To adjust the cursor position (and select
which breath appears on the loops windows) and view the exact flow/pressure and
volume at different points of each breath, press the arrow button or turn the knob.
Press the CONTINUE button to unfreeze graphics. Figure 13-19 shows a frozen
Loops display.
Press the
INCREASE or
DECREASE
bar or turn
knob to adjust
scale range
Upper portion
of Scale
Lower portion
of Scale
Freeze button
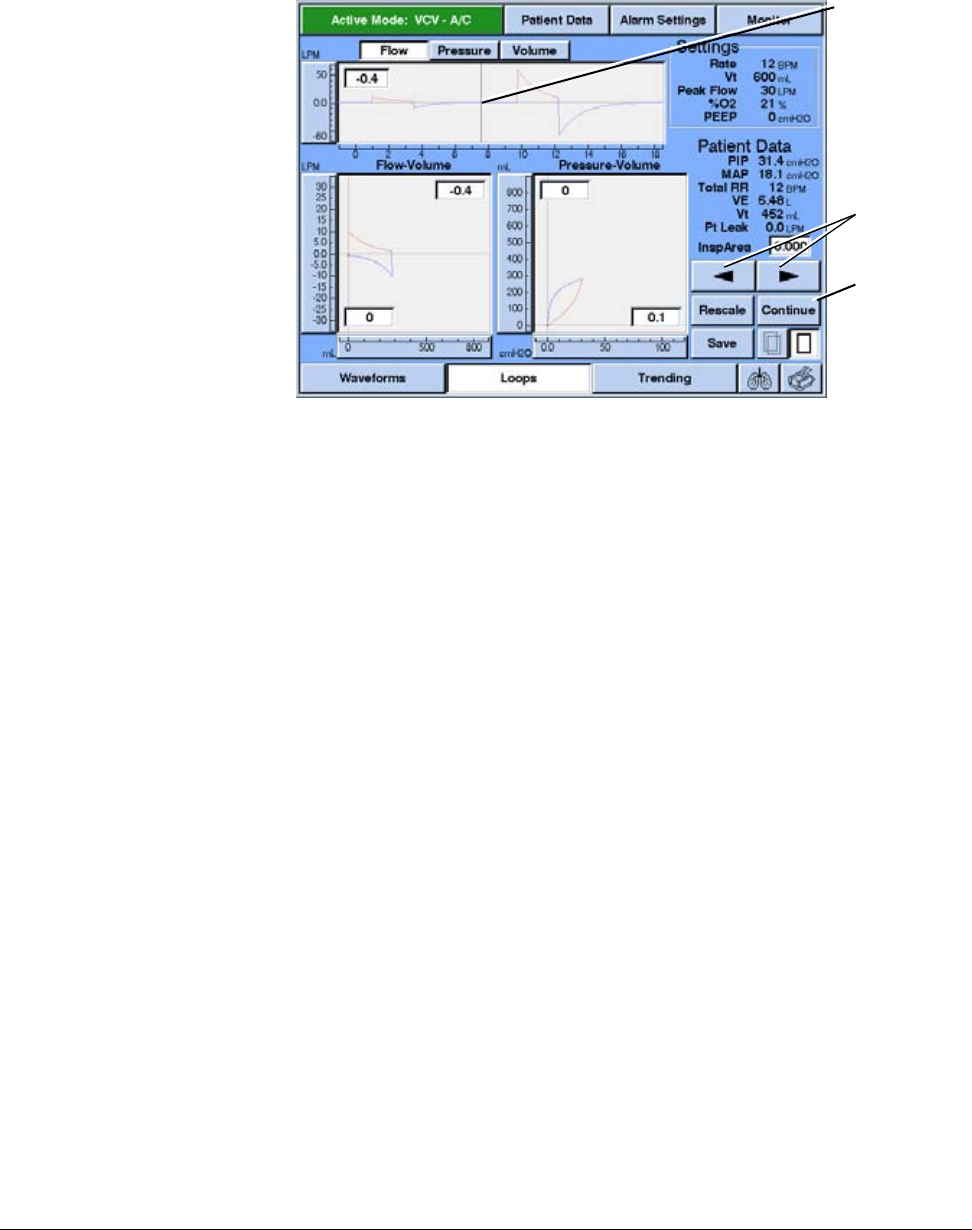
Options and Accessories
REF 1057983 A Respironics V200 Ventilator Operator’s Manual 13-23
Chapter 13
Figure 13-19: Frozen Loops Display with Numeric Data Windows
Save and Overlay
Features Follow these steps to save a frozen loop for later reference against future data
(for example, before and after bronchodilator therapy):
1. Press the FREEZE button to save the Loops screen.
2. Use the arrow buttons or knob to select a breath.
3. Press the SAVE button.
4. Press CONTINUE to unfreeze the screen.
5. Press the OVERLAY button to superimpose a gray image of the saved loop
on the current display (the Overlay feature works on frozen or unfrozen
displays).
6. Press the SINGLE VIEW button to view current graphics without the saved
loops.
Figure 13-20 illustrates the Overlay feature
Cursor position
selects
waveform and
position (and
corresponding
points on loops)
Use arrow
buttons or knob
to set cursor
position.
Continue
button unfreeze
graphics
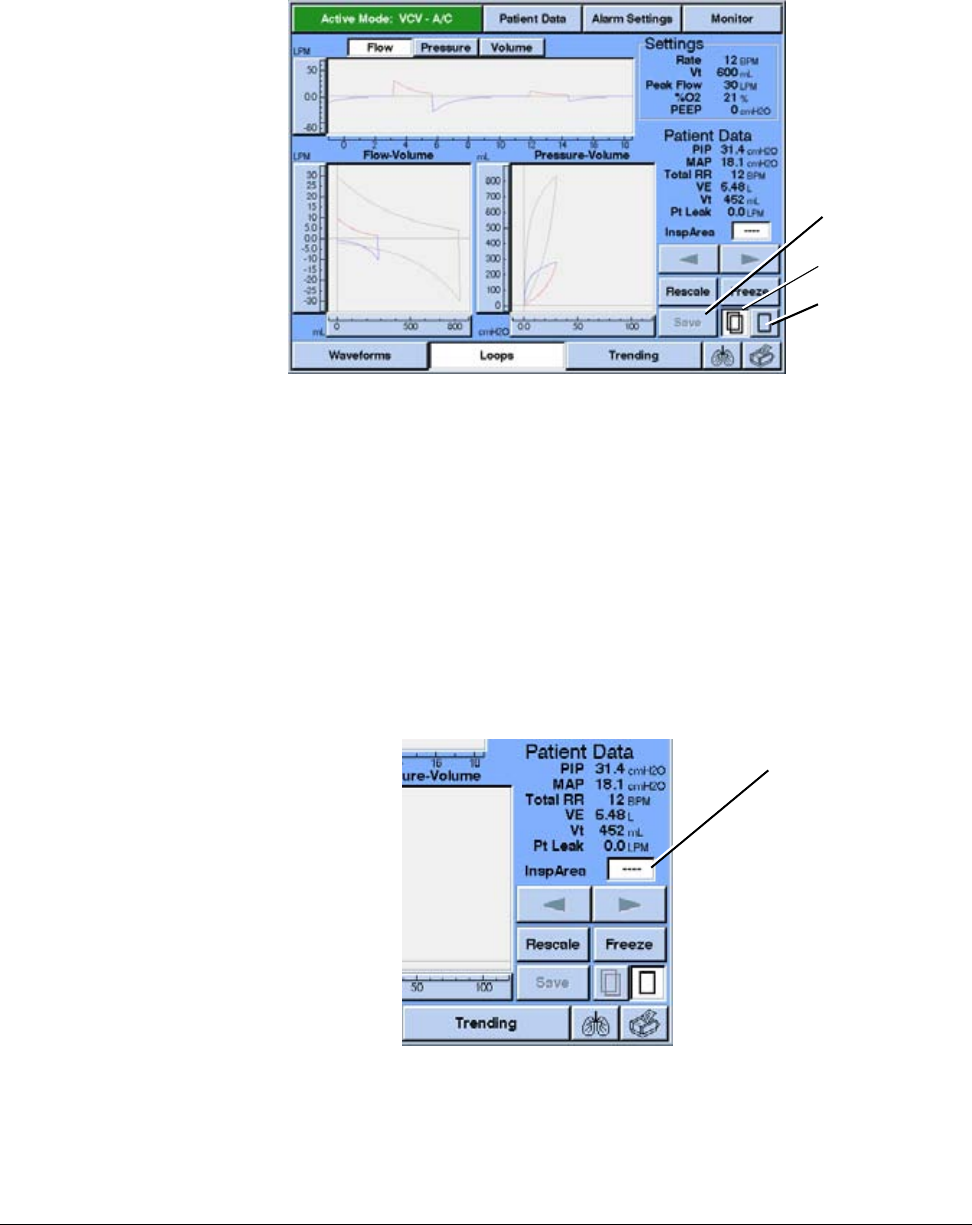
Chapter 13
13-24 Respironics V200 Ventilator Operator’s Manual REF 1057983 A
Options and Accessories
Figure 13-20: Loops Display with Overlay Feature Active
Inspiratory Area The Loops screen includes a window for the inspiratory area (Figure 13-21F).
This window displays a numeric value that represents the ventilator imposed
work of breathing, and is only calculated and displayed for a frozen loop. If the
ventilator is supporting the entire breath, the Insp Area window displays
“0.000”. If the Insp Area window shows dashes (“– – – –”), the ventilator is
not calculating inspiratory area because the loops are not frozen.
Figure 13-21: Loops Screen with Inspiratory Area Window
SAVE button
OVERLAY icon
button
SINGLE VIEW
icon button
Dashes indicate
Inspiratory are
not calculated
(loop not frozen)
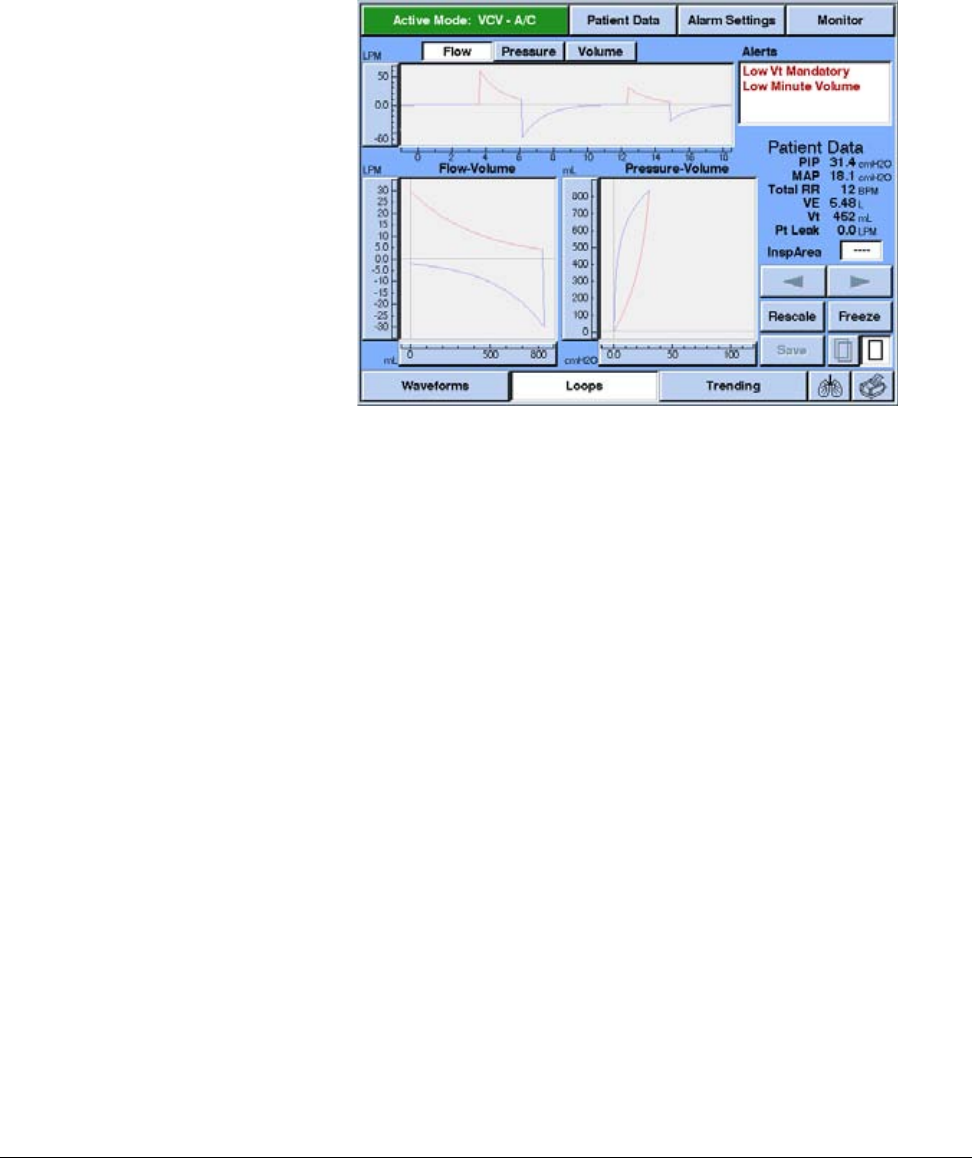
Options and Accessories
REF 1057983 A Respironics V200 Ventilator Operator’s Manual 13-25
Chapter 13
Alarms During
Graphics If an alarm occurs during Graphics, an Alerts window (Figure 13-22) lists the
active alarms.
Figure 13-22: Graphics Screen with Alerts window

Chapter 13
13-26 Respironics V200 Ventilator Operator’s Manual REF 1057983 A
Options and Accessories
(This page is intentionally blank.)
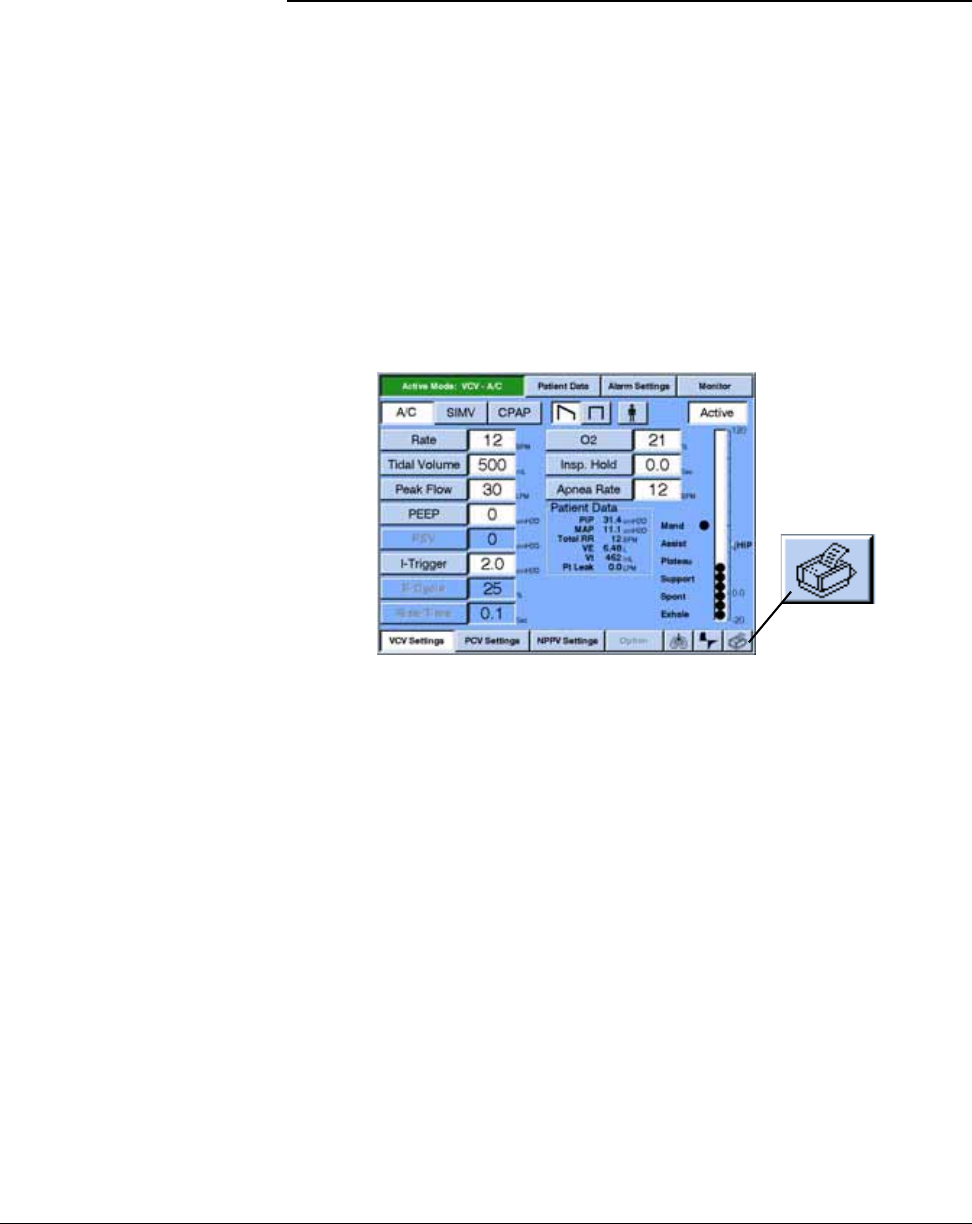
Options and Accessories
REF 1057983 A Respironics V200 Ventilator Operator’s Manual 13-27
Chapter 13
Communications Option (Com1)
The Communications option allows the Respironics V200 Ventilator to:
• Print out the ventilator's screen contents.
• Communicate with a Philips/Agilent/HP VueLink module.
• Connect another device, such as a chart recorder, via the analog
output port.
Using the Communications option does not affect ventilation or monitoring.
The Communications option button (a printer icon) is displayed in the lower
right corner of the screen (Figure 13-23). The printer icon is gray if the
Communications option is not installed, not available, or a print is in progress.
Figure 13-23: Communications-Print Option Button (Printer Icon)
Print Screen The Communications-Print option allows the ventilator to print out the screen
contents to an attached printer. The printer must be connected to the
ventilator’s parallel port and use PCL3 or PCL5 printer language.
Connecting to a Printer
Figure 13-24 shows how to connect a ventilator to a printer. Use a standard
25-pin parallel printer cable to connect the ventilator to the printer.
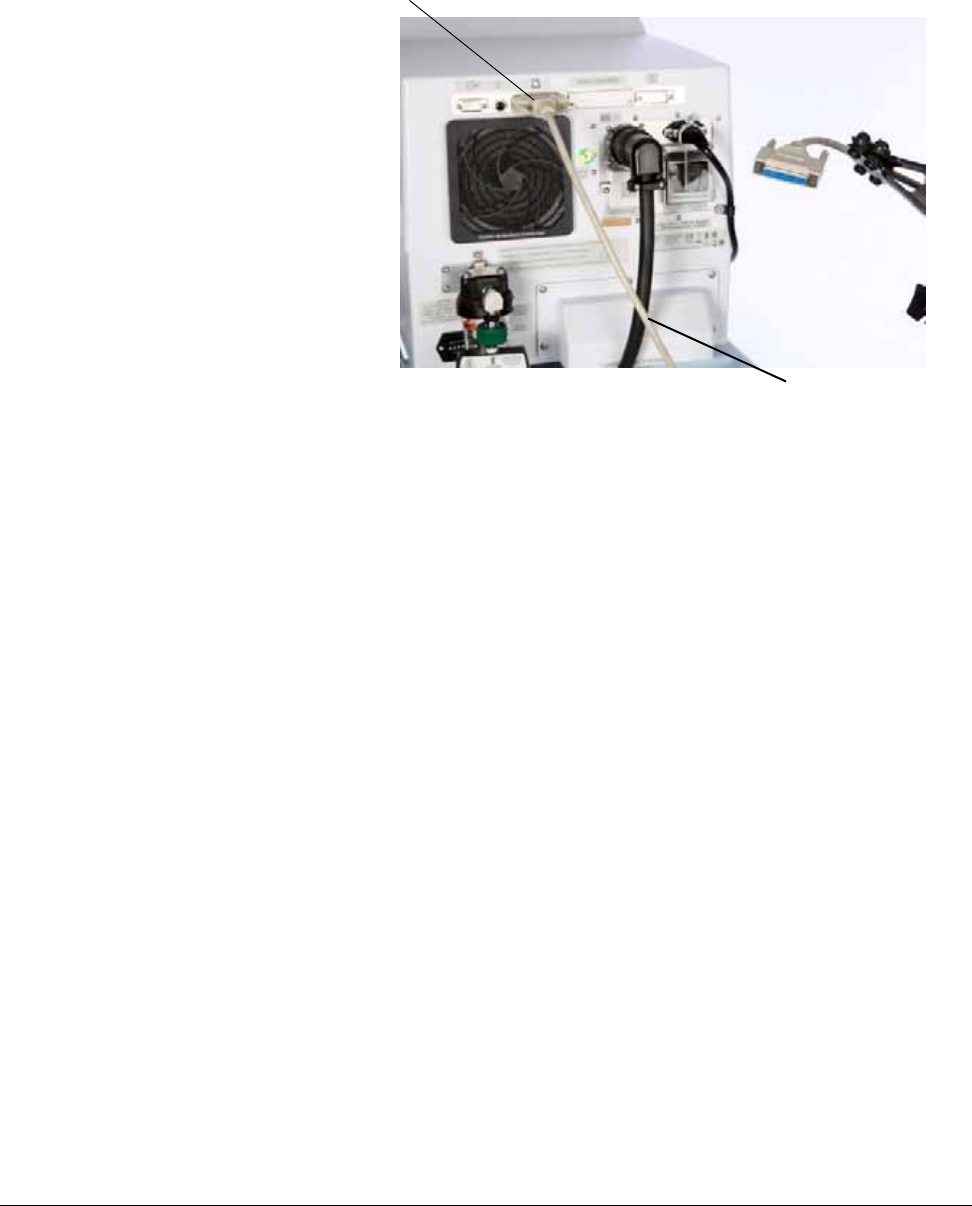
Chapter 13
13-28 Respironics V200 Ventilator Operator’s Manual REF 1057983 A
Options and Accessories
Figure 13-24: Connecting the Ventilator to a Printer
Printing a Screen
To print a screen, touch the printer icon in the lower right corner of the screen.
While the ventilator processes the print screen request, the screen freezes
(typical freeze time of 30-60 seconds, depending on ventilator settings) and
the printer icon turns gray. Ventilation and monitoring continue uninterrupted
although the screen does not update during this time.
Certain screens and popup menus cover the printer icon and are not available
for printing. The print screen function is also not available any other time the
printer icon is gray.
Canceling a Print Screen Request
To cancel a print screen request (e.g. during an alarm), touch the frozen screen
at any location. Any contact with the touch screen (including the gray printer
icon) while the printer icon is gray cancels the print in progress.
Print Screen Messages
Table 13-2 summarizes print screen messages that can occur. The actual
message displayed depends on the connected printer. For example, if a printer
turns itself offline when it is out of paper, the error message may indicate that
the printer is offline rather than out of paper.
Parallel Printer Port
Ventilator (Back Panel) Parallel Printer Cable

Options and Accessories
REF 1057983 A Respironics V200 Ventilator Operator’s Manual 13-29
Chapter 13
VueLink Compatibility The Communications option allows the ventilator to communicate with a
Philips/Agilent/HP Component Monitoring System (CMS) via the VueLink
module M1032A #A02. Once the ventilator and VueLink module are
connected, the VueLink module automatically updates the monitor's screen to
display ventilator parameters, provided the CMS is configured for an Open
Interface device. For more information on configuring, see "Configuring the
VueLink Module". Displayed parameters are determined by the ventilation
mode selected on the ventilator. Any time the mode of ventilation is changed,
the CMS will revert to the Standard Parameter Interface (SPI) screen. Pressing
the button on the VueLink Module will then activate the CMS screen with more
ventilator information.
If any alarms are active, alarm messages are also displayed. The CMS can only
display one patient alarm and one ventilator alarm (called an inop on the CMS)
at a time. Alarms are listed in order of priority as defined by the ventilator.
Data displayed on the VueLink system is for reference purposes only. Decisions
for patient care should not be based solely on the data displayed on the
VueLink system.
Connecting to the VueLink Module
The Communications option enables the ventilator to connect to a VueLink
module, using:
• a VueLink cable (Respironics part number 1006912).
• a VueLink module M1032A #A02 (for connection to devices using the
open device driver; contact Philips sales representative for ordering
information).
Figure 13-25 shows how to connect a ventilator to a VueLink module.
Message Corrective action
Print aborted: Printer paper empty Load paper and retry print screen.
Print aborted: Printer offline Check printer, cycle power to printer, retry print
screen.
Print aborted: Printer error Check printer, retry print screen if printer is busy,
cycle power to printer.
Print canceled: Touching the screen while
a print is in progress will cancel the Print.
Avoid touching the screen while the printer icon is
dimmed unless intending to cancel the print in
progress.
Print unavailable: Print in progress None required: retry print screen when current
print is complete.
Table 13-2: Print Screen Messages and Corrective Actions
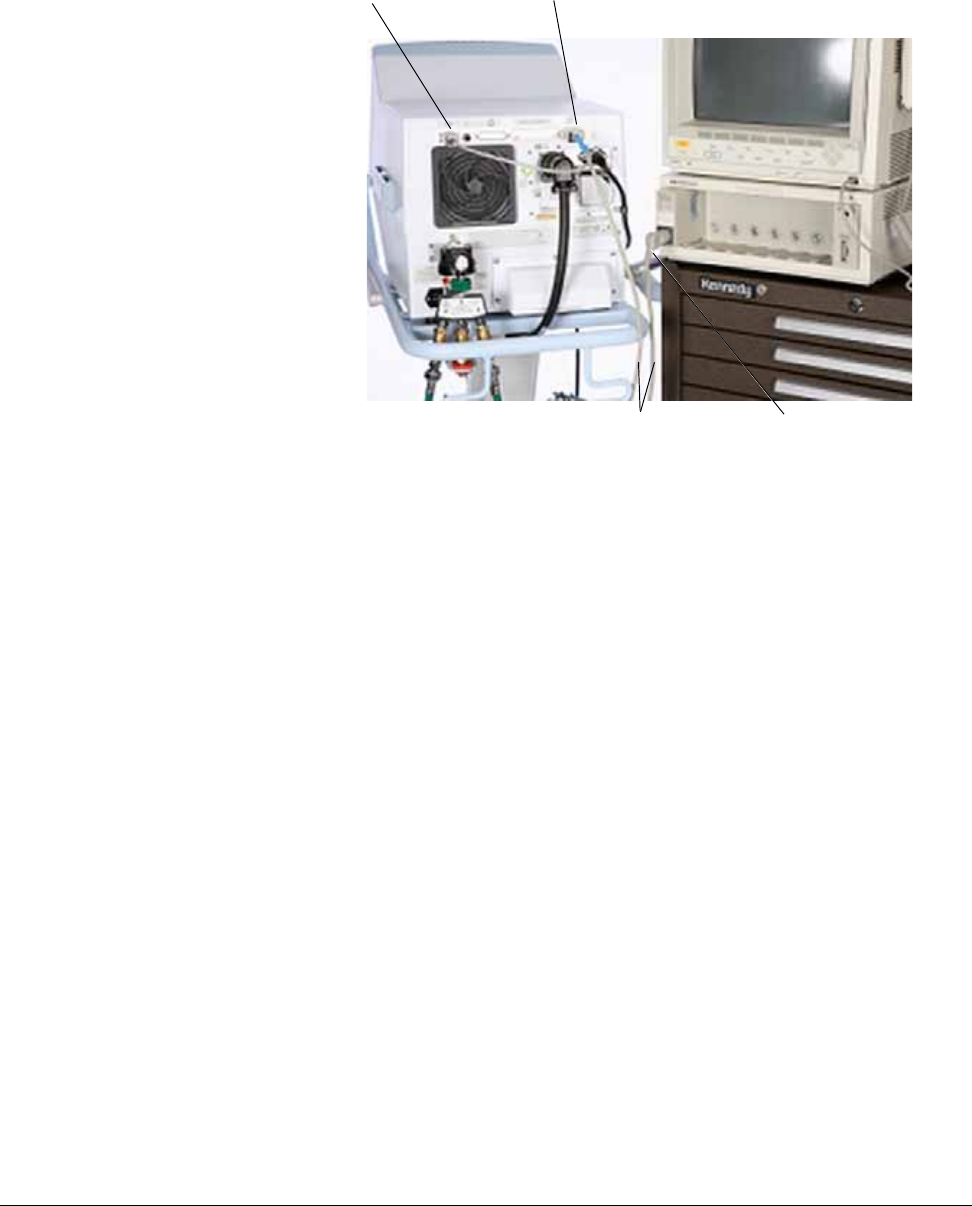
Chapter 13
13-30 Respironics V200 Ventilator Operator’s Manual REF 1057983 A
Options and Accessories
Figure 13-25: Connecting a Ventilator to a VueLink Module
Configuring the
VueLink Module A VueLink Ventilator Module M1032A #A02, is required for communication
with the ventilator. The VueLink Module can communicate to three different
protocols for external devices: VueLink Interface, Analog Interface, or VueLink
Open Interface. The ventilator uses the VueLink Open Interface. Refer to the
VueLink Handbook provided with the VueLink module for configuration
directions for an Open Interface device. For reference purposes only, below are
configuration directions from the "Agilent M1032A VueLink Module
Handbook", Fourth Edition, 08/2000.
Configuration Overview
The VueLink Module must be configured during installation. Additional
configuration will be required whenever a new device driver is preselected for
availability in Monitoring Mode. The VueLink Module can be configured for up
to three preselected device drivers.
Changing modes
The CMS must be in Configuration Mode to preselect devices. To do this,
follow the steps below.
1. Turn on the ventilator in ventilation mode and connect it to a VueLink
Module as shown in Figure 13-23.
Analog PortRS-232 Serial Port
VueLink cable VueLink module
CMS
Ventilator (Back Panel)

Options and Accessories
REF 1057983 A Respironics V200 Ventilator Operator’s Manual 13-31
Chapter 13
2. Press "Monitor Setup" on a Standard Control Panel, or "Instrument
Config." on a Classic Control Panel of the Component Monitoring
System (CMS).
3. Highlight "Operating Modes" on the displayed window and press
"Confirm". The current operating mode will appear in the task window
(for example, "Operating Mode - Monitoring") along with a prompt for
the password.
4. Enter the password, 1245. If the password is entered correctly, the
"Change OpMode" key will be highlighted.
5. Press "Change OpMode" and select "Config" or "Monitor".
6. Press "Confirm".
a. If "Config" was selected in step 5, the display will become blank
and the message "Config mode active - NO MONITORING!" will
appear at the top of the screen. Continue with the "Preselecting
Devices" section below.
b. If "Monitor" was selected in step 5, the VueLink system will begin
to display data. Make sure that the LED next to "Open Device" is
lit while in Monitoring mode to display ventilator data. If it is not
lit, press the button on the VueLink Module, select "Open
Interface" and press confirm. Pressing the button on the VueLink
Module will then display the Standard Parameter Interface (SPI)
screen. Pressing the VueLink Module button a second time will
activate the ventilator screen with more information.
Preselecting Devices
Once in Configuration Mode, the Open device must be selected as one of the
three preselected devices for the VueLink Ventilator Module. To do this, follow
the steps below.
1. Press "Module Setup" or "Module Config" on the CMS.
2. Highlight "VENTILTR", "OPEN INTRFACE", OR "ESPRIT VENT" and
press "Confirm".
3. Note: Only one of the above choices will be available at a time. The
choice depends on how the module is already configured.
4. Verify "Prefer'd Module" is set to "Ventiltr" and choose whether device
alarms should be Accepted or Ignored.
Press "Module Config".
5. Highlight "Open Interface M1032-TU1AA" by using the arrow keys or
pressing "Next Device".
6. Press "On/Off Preselect" if "On" is not already displayed beside this
item.

Chapter 13
13-32 Respironics V200 Ventilator Operator’s Manual REF 1057983 A
Options and Accessories
NOTE: If "On/Off Preselect" is pressed a second time, the preselection is
switched off.
NOTE: If there are already three devices preselected, one of the preselected
devices must be turned "off" before adding a new one.
7. Press "Store Preselect", then "Confirm".
8. Attach the adhesive label containing "Open Device" to the VueLink
module. The adhesive labels MUST be placed on the module in the
same order as they appear in the Preselection Task Window.
9. When the above steps have been completed, change the CMS to
Monitoring mode (see "Changing Modes").
For more information about the VueLink module, refer to the VueLink Module
Handbook.
Information Sent to the VueLink System
Once the CMS detects that the ventilator is connected to the module, the CMS
automatically displays ventilator parameters. The active type of ventilation
determines what data the CMS displays. Table Figure 13-24 defines CMS
displays and equivalent Respironics V200 Ventilator information.
Available
on
CareNet
CMS
message V200
equivalent Comments
Volume control ventilation (VCV) parameters
Mode and type of ventilation will always be displayed.
X AWF Flow Delivered flow.
X AWP Pressure Delivered pressure.
AWV Volume Delivered volume.
sPSV set PSV Set pressure support ventilation.
sPEEP set PEEP Set positive end expiratory pressure.
X PIP PIP Measured peak inspiratory pressure.
MnAwP MAP Measured mean airway pressure.
Pplat Pi End Measured end inspiratory (plateau) pressure.
PEEP Pe End Measured positive end expiratory pressure.
SpMV Spont VE Measured spontaneous minute volume.
sTV set TV Set tidal volume.
MV VE Measured minute volume.
PtLeak Pt Leak Estimated patient leak.
X TV Vt Measured tidal volume.
sFIO_2 set %O2 Set oxygen percentage (fractional inspired oxygen).

Options and Accessories
REF 1057983 A Respironics V200 Ventilator Operator’s Manual 13-33
Chapter 13
X FIO_2 %O2 Measured oxygen percentage (fractional inspired
oxygen).
sPkFl set Peak Flow Set peak flow.
RiseTi Rise Time Set rise time.
sAWRR set Rate Set (airway) respiratory rate.
SpAWRR Spont Rate Measured spontaneous respiratory rate.
X AWRR Rate Measured (airway) respiratory rate.
F/TV F/Vt Ratio of frequency to tidal volume (rapid shallow
breathing index).
Pressure control ventilation (PCV) parameters
Mode and type of ventilation will always be displayed.
X AWF Flow Delivered flow.
X AWP Pressure Delivered pressure.
AWV Volume Delivered volume.
sPSV set PSV Set pressure support ventilation.
sPEEP set PEEP Set positive end expiratory pressure.
X PIP PIP Measured peak inspiratory pressure.
MnAwP MAP Measured mean airway pressure.
Pplat Pi End Measured end inspiratory (plateau) pressure.
PEEP Pe End Measured positive end expiratory pressure.
sPVcP set pressure Set PCV pressure.
SpMV Spont VE Measured spontaneous minute volume.
MV VE Measured minute volume.
PtLeak Pt Leak Estimated patient leak.
X TV Vt Measured tidal volume.
sFIO_2 set %O2 Set oxygen percentage (fractional inspired oxygen).
X FIO_2 %O2 Measured oxygen percentage (fractional inspired
oxygen).
sInsTi set I-Time Set inspiratory time.
RiseTi Rise Time Set rise time.
sAWRR set Rate Set (airway) respiratory rate.
SpAWRR Spont Rate Measured spontaneous respiratory rate.
X AWRR Rate Measured (airway) respiratory rate.
F/TV F/Vt Ratio of frequency to tidal volume (rapid shallow
breathing index).
Noninvasive positive pressure ventilation (NPPV) parameters
Mode and type of ventilation will always be displayed.
Available
on
CareNet
CMS
message V200
equivalent Comments

Chapter 13
13-34 Respironics V200 Ventilator Operator’s Manual REF 1057983 A
Options and Accessories
X AWF Flow Delivered flow.
X AWP Pressure Delivered pressure.
AWV Volume Delivered volume.
sIPAP set IPAP Set inspiratory positive airway pressure.
sEPAP set EPAP Set expiratory positive airway pressure.
X PIP PIP Measured peak inspiratory pressure.
MnAwP MAP Measured mean airway pressure.
Pplat Pi End Measured end inspiratory (plateau) pressure.
SpMV Spont VE Measured spontaneous minute volume.
MV VE Measured minute volume.
PtLeak Pt Leak Estimated patient leak.
X TV Vt Measured tidal volume.
sFIO_2 set %O2 Set oxygen percentage (fractional inspired oxygen).
X FIO_2 %O2 Measured oxygen percentage (fractional inspired
oxygen).
sInsTi set I-Time Set inspiratory time.
RiseTi Rise Time Set rise time.
sAWRR set Rate Set (airway) respiratory rate.
SpAWRR Spont Rate Measured spontaneous respiratory rate.
X AWRR Rate Measured (airway) respiratory rate.
F/TV F/Vt Ratio of frequency to tidal volume (rapid shallow
breathing index).
Alarms
XOCCL/
Disconnec
t
Occlusion - SV
Open/SM
Occlusion/
Disconnect
Occlusion, safety valve open. SM occlusion,
disconnect. Red Alarm.
X APNEA Apnea Apnea detected. Red Alarm.
XLOW INSP
PRESS Low Insp.
Pressure Low inspiratory pressure limit violation. Red Alarm.
X LOW O2
SUPPLY Low O2
Supply Oxygen supply below acceptable level. Red Alarm.
XHIGH
INSP
PRESS
High Pressure High pressure limit violation. Yellow Alarm.
X LOW O2% Low O2 Low measured oxygen concentration. Yellow Alarm.
XLOW EXH
MV Low Minute
Volume Low exhaled minute volume. Yellow Alarm.
Available
on
CareNet
CMS
message V200
equivalent Comments

Options and Accessories
REF 1057983 A Respironics V200 Ventilator Operator’s Manual 13-35
Chapter 13
XHIGH
LEAK
RATE
High Leak
Rate High leak alarm limit violation. Yellow Alarm.
XLOW EXH
MAND TV Low Vt
Mandatory Low mandatory tidal volume limit violation. Yellow
Alarm.
X HIGH EXH
MV High Minute
Volume High exhaled minute volume limit violation. Yellow
Alarm.
XLOW EXH
TV Low Tidal
Volume Low exhaled tidal volume limit violation. Yellow Alarm.
XLOW EXH
TV-SPNT Low Vt
Spontaneous Low spontaneous tidal volume limit violation. Yellow
Alarm.
XINS TI
TOO
LONG
I-Time Too
Long Maximum inspiratory time exceeded. Yellow Alarm.
XHIGH
RESP
RATE
High
Respiratory
Rate
High respiratory rate limit violation. Yellow Alarm.
XHIGH
O2% High O2 High measured oxygen concentration. Yellow Alarm.
XLOW
PEEP/
EPAP
Low PEEP Low PEEP limit violation. Yellow Alarm.
XLOW
PEEP/
EPAP
Low EPAP Low EPAP limit violation. Yellow Alarm.
X BACKUP
BATT ON Battery In Use
indicator on
ventilator
front panel
Ventilator has switched from AC power to Backup
Battery operation. Yellow Alarm.
Inops
X LOSS OF
GAS-SVO Gas Supplies
Lost-SVO Oxygen and air sources lost, safety valve open.
XLOW
BACKUP
BATT
Low Backup
Battery Low Backup Battery voltage.
XALARM
FAILURE Audible Alarm
Failed Audible alarm failure.
XAIR
FAULT Air Source
Fault Internal air source failure.
XO2 VALVE
STUCK O2 Valve
Stuck Closed Defective oxygen valve.
XEXH
VALVE
STUCK
Exp Valve
Stuck Open Defective exhalation valve.
Available
on
CareNet
CMS
message V200
equivalent Comments

Chapter 13
13-36 Respironics V200 Ventilator Operator’s Manual REF 1057983 A
Options and Accessories
Analog Output (Chart
Recorder) The Communications-Print option enables the ventilator to send ventilator data
to a chart recorder or similar device using the analog output port.
Data displayed via the chart recorder is for reference purposes only. Decisions
for patient care should not be based solely on the data displayed via the chart
recorder.
Table 13-3 summarizes the Analog Output pinout.
X HIGH INT
TEMP High
Temperature Temperature within ventilator enclosure exceeds
maximum limit.
X HIGH INT
O2% High Internal
O2 Oxygen concentration within ventilator enclosure
exceeds maximum limit.
NOTE: The following alarm messages are not displayed on the CMS:
Bad
ADCWrap
Sensor
ERROR
Bad Bat
Volt
Sensor
Service Due
Bad Int
O2 Sensor Using Default Altitude
Bad Int
Temp
Sensor
Using Default Compl
Battery
Charging Using Default Settings
Available
on
CareNet
CMS
message V200
equivalent Comments
Respironics V200 Ventilator Analog Output Port Pinout
Pin Number Signal
1 Flow signal return
2 Volume signal return
3 Pressure signal return
4 Alarm signal return
5 Nebulizer signal return
9 Flow (0 V = -200 LPM, 5 V = 200 LPM)
10 Volume (0 V = 0 ml, 5 V = 2500 ml)
11 Pressure (0 V = -20 cmH2O, 5 V = 120 cmH2O)
12 Alarm (0 V = active alarm, 1.5 V = no alarm or silenced alarm)

Options and Accessories
REF 1057983 A Respironics V200 Ventilator Operator’s Manual 13-37
Chapter 13
Table 13-3: Ventilator Analog Output Port Pinout
13 Nebulizer (0 V = exhalation phase, 5 V = inhalation or plateau phase)
14 No data
15 No data
NOTE: All analog outputs = 0 V at power up. Voltages have a linear
relationship to the corresponding values. For example, 2.5 V on pin
9 = 0 LPM, 2.5 V on pin 11 = 70 cmH2O.
NOTE: The resolution of the analog output is 0 to 5 V in 256 increments.
Respironics V200 Ventilator Analog Output Port Pinout

Chapter 13
13-38 Respironics V200 Ventilator Operator’s Manual REF 1057983 A
Options and Accessories
(This page is intentionally blank.)
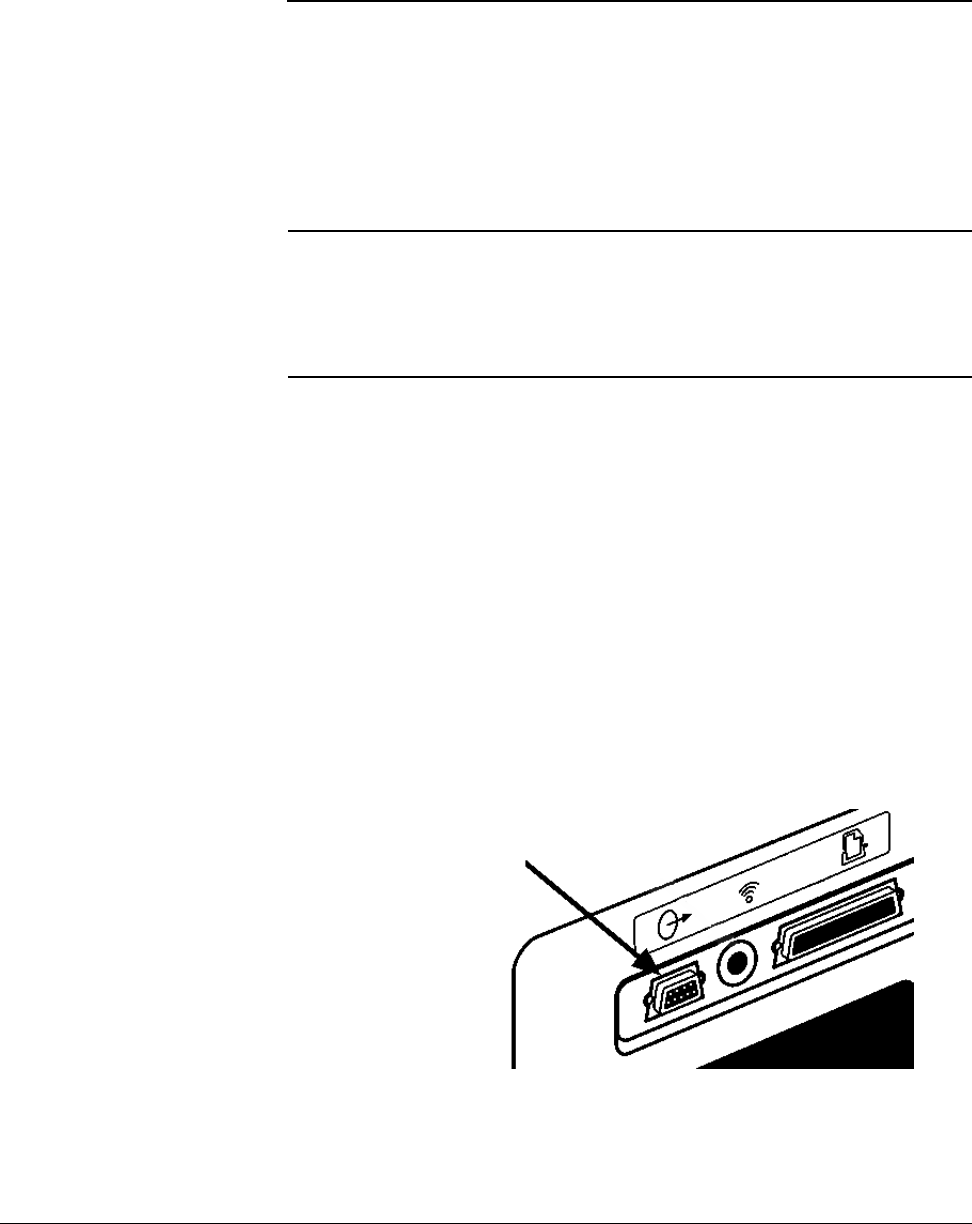
Options and Accessories
REF 1057983 A Respironics V200 Ventilator Operator’s Manual 13-39
Chapter 13
RS-232 Communications Option 2 (Com2)
The Respironics V200 Ventilator allows the transmission of data from the
ventilator to the RS-232 communications interface. The Com2 option allows
the ventilator to communicate with data systems The ventilator has two
communications options, Com1 and Com2, which work exclusively of one
another.
RS-232 Configuration When the Com2 option is installed, the RS-232 communications port is
configured for all communications functions in the following manner:
• Baud Rate 9,600
• Data Bits 8
•Parity None
•Stop Bits 1
NOTE: In diagnostics mode, with Com2 installed, the baud rate is 19,200.
To properly use the Com2 option, connect the communications cable to the
9-pin serial connection on the back of the ventilator.
Figure 13-26: 9-pin serial port connection
WARNING: It is the responsibility of the end user to validate the compatibility and use
of information transmitted from the ventilator with the device to be
connected to the ventilator.
WARNING: The data provided via the Com2 option is for reference only. Decisions for
patient care should be based on the clinician’s observations of the patient.
Serial Port Connection

Chapter 13
13-40 Respironics V200 Ventilator Operator’s Manual REF 1057983 A
Options and Accessories
Commands
Transmitted to the
Ventilator
Commands are transmitted as a series of four ASCII characters followed by a
carriage return. Valid commands will be stored and response transmissions will
be sent in the order the corresponding commands were received.
Transmission of Data
from the Ventilator Unless stated otherwise, all fields will be left justified and six (6) characters in
length. A comma will separate each field, except for the field following the
start code. Each data transmission shall be terminated with a carriage return.
In the following subparagraphs, a space is designated as “◆”. When data is
unavailable, the output field shall contain “◆◆◆◆◆◆”
SNDA<CR>, Send
Variable Length
Ventilator Settings
Report
When the ventilator receives SNDA followed by a carriage return, it will
respond by transmitting the information shown in Table 13-4: “Ventilation
Report”. The ventilator responds to the SNDA command by returning a string
with a variable length. The second and third fields define the length of the
message. The second field indicates the number of characters between the
start and stop codes. The third field indicates the number of fields between
the start and stop codes. The fourth field is the start code, 02H. The last field
in the string is the stop code, 03H, indicating the end of the message.
NOTE: The SNDA command is only available in Normal mode.
Ventilation Report
Description Example Resolution Range Units Comments
Command Name MISCA N/A N/A N/A 5 character field
Number of characters
between the start and
stop codes
706 N/A N/A N/A 3 character field
Number of fields
between the start and
stop codes
97 N/A N/A N/A 2 character field
Start Code 0x02 N/A N/A N/A ASCII Start
Transmission
Character (STX)
Time of request 13:45N/A N/A N/A 24 hour clock,
hh:mm
Not used
N/A N/A N/A 18 character field.
Outputs example
value.
Table 13-4: Ventilation Report (Sheet 1 of 10)

Options and Accessories
REF 1057983 A Respironics V200 Ventilator Operator’s Manual 13-41
Chapter 13
Not used N/A N/A N/A Outputs example
value.
Date FEB231997N/A N/A N/A 12 character field,
MMMDDYYYY
Mode setting CMV N/A CMV
SIMV
CPAP
N/A Assist/Control =
CMV, Spont/Timed
= SIMV, Spont =
CPAP
Active Respiratory
Rate setting 12.0 0.1 or 1 1.0 – 9.0
10 – 80 BPM Outputs
when mode is
CPAP or Spont.
VCV Tidal Volume
setting 0.50 0.01 0.05 – 2.50 L
VCV Peak Flow
setting 5 1 3 – 140 LPM
Oxygen Concentration
setting 100 121 – 100%
Pressure Trigger
setting 0.5 0.1 0.1 – 20.0 cm
H2OOutputs value from
active type (VCV or
PCV). When active
type is NPPV then
outputs the VCV
value.
PEEP or EPAP setting 0.0 0.1 0.0 – 35.0 cm
H2OUses PEEP setting
from active
ventilation type
(VCV or PCV).
When active type
is NPPV uses
EPAP setting.
VCV Insp. Hold
Setting 0.0 0.1 0.0 – 2.0 Sec
Not used N/A N/A N/A Outputs example
value.
Not used N/A N/A N/A Outputs example
value.
Not used N/A N/A N/A Outputs example
value.
Not used N/A N/A N/A Outputs example
value.
VCV Apnea Interval
setting 10 110 – 60sec
VCV Apnea Tidal
Volume setting (same
as Tidal Volume
setting)
0.50 0.01 0.05 – 2.50 L Outputs VCV Tidal
Volume setting
Ventilation Report
Description Example Resolution Range Units Comments
Table 13-4: Ventilation Report (Sheet 2 of 10)

Chapter 13
13-42 Respironics V200 Ventilator Operator’s Manual REF 1057983 A
Options and Accessories
VCV Apnea
Respiratory Rate
setting
12.0 0.1 or 1 1.0 – 9.0
10 – 80 BPM
Apnea Peak Flow
setting (same as Peak
Flow setting)
5 1 3 – 140 LPM Outputs VCV Peak
Flow setting
VCV Apnea Oxygen
Concentration setting
(same as Oxygen
Concentration
setting)
21 1 21 – 100 % Outputs Oxygen
Concentration
setting
Pressure Support
setting 0 10 – 100cm
H2OOutputs value from
active ventilation
type (VCV or PCV).
When active type
is NPPV then IPAP
– EPAP is used.
VCV Flow Pattern
setting SQUARE N/A SQUARE,
RAMP
N/A
Not used N/A N/A N/A Outputs example
value.
Not used N/A N/A N/A Outputs example
value.
100% Oxygen setting ON N/A ON
OFF
N/A
Not used N/A N/A N/A Outputs example
value.
Not used N/A N/A N/A Outputs example
value.
Not used N/A N/A N/A Outputs example
value.
Measured total
respiratory rate 0.0 0.1 or 1 0.0 – 9.9
10 - 150 BPM For values greater
than 150 output
set to 150.
Measured tidal
volume 1.15 0.01 0.00 – 9.99 L Outputs
for values out of
range.
Measured total
minute volume 0.00 0.01 or 1 0.00 – 9.99
10.0 – 99.9 L For values out of
range output set to
99.9.
Measured
spontaneous minute
volume
0.00 0.01 or 0.1 0.00 - 9.99
10.0 – 99.9 L Outputs
when ventilation
mode is A/C. For
values out of range
output set to 99.9.
Ventilation Report
Description Example Resolution Range Units Comments
Table 13-4: Ventilation Report (Sheet 3 of 10)

Options and Accessories
REF 1057983 A Respironics V200 Ventilator Operator’s Manual 13-43
Chapter 13
Measured peak
inhalation pressure 0.0 0.1 or 1 0.0 – 99.9
100 – 130 cm
H2OOutputs
when ventilation
mode is CPAP or
Spont and No
Apnea alarm is
present.
Measured mean
airway pressure 0.9 0.1 or 1 0.0 – 99.9
100 - 130 cm
H2O
Measured end
inhalation pressure 7.7 0.1 or 1 0.0 – 99.9
100 – 130 cm
H2OOutputs
when
Ventilation type is
PCV or NPPV, or
Ventilation mode is
CPAP or Spont, or
VCV Insp. Hold
setting = 0.
Measured I:E ratio 0.2 0.1 0.1 – 9.9
10 - 99 N/A Fractional
representation of
1:X.X with one (1)
decimal place,
e.g., 4:1 = 0.3
High Inhalation
Pressure Alarm
setting
20 110 – 105cm
H2OOutputs high
inhalation pressure
setting for active
ventilation type
(PCV or VCV) or
IPAP + 10 if NPPV
is active.
Low Inhalation
Pressure Alarm
setting
3 13 – 105cm
H2OOutputs Low
Inhalation
Pressure setting
for active
ventilation type.
Low PEEP or Low
EPAP Alarm setting 0 1 0 – 35 cm
H2OOutputs Low PEEP
from active type
(VCV or PCV).
When active type
is NPPV uses Low
EPAP.
Ventilation Report
Description Example Resolution Range Units Comments
Table 13-4: Ventilation Report (Sheet 4 of 10)

Chapter 13
13-44 Respironics V200 Ventilator Operator’s Manual REF 1057983 A
Options and Accessories
Low Exhaled
Mandatory Tidal
Volume Alarm setting
0.00 0.01 0.00 – 2.50 L For VCV and PCV
types of
ventilation, set to
Low Exhaled
Mandatory Tidal
Volume alarm limit
(for A/C and
Apnea) and Low
Exhaled
Spontaneous Tidal
Volume Alarm limit
(for SIMV and
CPAP). When
active type of
ventilation is
NPPV uses Low
Exhaled Tidal
Volume alarm
limit.
Low Exhaled Minute
Volume Alarm setting 0.0 0.1 0.0 – 60.0 L Low Exhaled
Minute Volume
alarm limit from
active type (VCV,
PCV, or NPPV).
High Respiratory Rate
Alarm setting 0 1 0 – 150 BPM High Respiratory
Rate from active
type (VCV, PCV, or
NPPV).
High Inhalation
Pressure Alarm status NORMAL N/A NORMAL,
RESET
ALARM
N/A
Low Inhalation
Pressure Alarm status
or Disconnect Alarm
status
RESET N/A NORMAL,
RESET
ALARM
N/A
Low PEEP or Low
EPAP Alarm status ALARMN/A NORMAL,
RESET
ALARM
N/A Outputs Low PEEP
in VCV and PCV,
Low EPAP in NPPV
Ventilation Report
Description Example Resolution Range Units Comments
Table 13-4: Ventilation Report (Sheet 5 of 10)

Options and Accessories
REF 1057983 A Respironics V200 Ventilator Operator’s Manual 13-45
Chapter 13
Low Exhaled
Mandatory/
Spontaneous Tidal
Volume Alarm status
NORMAL N/A NORMAL,
RESET
ALARM
N/A Outputs ALARM
when any of the
following alarms
are active:
Low Mandatory
Tidal Volume
Alarm, or
Low Spontaneous
Tidal Volume
Alarm, or
Low Tidal Volume
Alarm
Outputs RESET
when any of the
above alarms are
reset and none are
active.
Outputs NORMAL
when none of the
above alarms are
reset or active.
Low Exhaled Minute
Volume Alarm status NORMAL N/A NORMAL,
RESET
ALARM
N/A
High Respiratory Rate
Alarm status NORMAL N/A NORMAL,
RESET
ALARM
N/A
Low Oxygen Supply
Pressure Alarm status NORMAL N/A NORMAL,
RESET
ALARM
N/A
Air Source
Inoperative Alarm
status
NORMAL N/A NORMAL,
RESET
ALARM
N/A
Low Battery Alarm
status NORMAL N/A NORMAL,
RESET
ALARM
N/A Status of Low
Backup Battery
Alarm
Apnea Alarm status NORMAL N/A NORMAL,
RESET
ALARM
N/A
Not used N/A N/A Outputs example
value.
Not used N/A N/A Outputs example
value.
Time 12:45N/A N/A N/A 24 hour clock,
hh:mm same as
field 5
Not used N/A N/A Outputs example
value.
Ventilation Report
Description Example Resolution Range Units Comments
Table 13-4: Ventilation Report (Sheet 6 of 10)

Chapter 13
13-46 Respironics V200 Ventilator Operator’s Manual REF 1057983 A
Options and Accessories
Date FEB231997N/A N/A N/A 12 character field,
MMMDDYYYY
Static Compliance 0 1 0 - 350 ml/
cm
H2O
Outputs
when Mechanics
option is not
installed or no
maneuver was
performed.
Static Resistance 0.0 0.1 or 1 0.1 – 99.9
100 – 400 cm
H2O/
L/s
Outputs
when Mechanics
option is not
installed or no
maneuver was
performed.
Dynamic Compliance 0 1 0 – 350 ml/
cm
H2O
Outputs
when Mechanics
option is not
installed.
Dynamic Resistance 0.0 0.1 or 1 0.1 –99.9
100 – 400 cm
H2O/
L/s
Outputs
when Mechanics
option is not
installed.
Maximum Inhalation
Pressure 0 10 – 100cm
H2OOutputs
when Mechanics
option is not
installed or no
maneuver was
performed.
Vital Capacity 0.0 0.1 0.1 – 9.9 L Outputs
when Mechanics
option is not
installed or no
maneuver was
performed. when
the value is out of
range output
is.
Peak Lung Flow 0 1 0 - 200 LPM Outputs
when Mechanics
option is not
installed.
Bias Flow 20 1 0 – 23 LPM Outputs 0 when
pressure trigger is
active, otherwise
outputs Flow
trigger plus three
(3).
Ventilation Report
Description Example Resolution Range Units Comments
Table 13-4: Ventilation Report (Sheet 7 of 10)

Options and Accessories
REF 1057983 A Respironics V200 Ventilator Operator’s Manual 13-47
Chapter 13
Flow trigger setting 2 1 1 – 20 LPM Outputs Flow
trigger setting of
active ventilation
type.
Not used N/A N/A N/A Outputs example
value.
Not used N/A N/A N/A Outputs example
value.
Not used N/A N/A N/A Outputs example
value.
Not used N/A N/A N/A Outputs example
value.
Not used N/A N/A N/A Outputs example
value.
Not used N/A N/A N/A Outputs example
value.
Not used N/A N/A N/A Outputs example
value.
Not used N/A N/A N/A Outputs example
value.
Not used N/A N/A N/A Outputs example
value.
Not used N/A N/A N/A Outputs example
value.
Not used N/A N/A N/A Outputs example
value.
Not used N/A N/A N/A Outputs example
value.
Measured end
inhalation pressure 20.0 0.1 or 1 0.0 – 99.9
100 – 130 cm
H2OOutputs
when Ventilation
type is PCV or
NPPV, or
Ventilation mode is
CPAP or Spont, or
VCV Insp. Hold
setting = 0.
PCV Pressure Setting 100 15 – 100cm
H2OOutput 0 when
VCV is active, PCV
Pressure when
PCV is active,
when
NPPV is active
Ventilation Report
Description Example Resolution Range Units Comments
Table 13-4: Ventilation Report (Sheet 8 of 10)

Chapter 13
13-48 Respironics V200 Ventilator Operator’s Manual REF 1057983 A
Options and Accessories
PCV Inhalation Time
Setting 0.10 0.01 0.10 – 9.90 sec Outputs PCV
Inhalation Time
when PCV or VCV
is active, NPPV
Inhalation Time
when NPPV is
active
PCV or NPPV Apnea
Interval Setting 10 1 10 – 60 sec Outputs PCV
Apnea Interval
when PCV or VCV
is active, NPPV
Apnea Interval
when NPPV is
active
PCV Apnea Inhalation
Pressure Setting or
NPPV Apnea IPAP
setting
100 15 – 100cm
H2OOutputs PCV
Pressure setting
when VCV or PCV
active, IPAP –
EPAP when NPPV
active
PCV Apnea
Respiratory Rate
Setting or NPPV
Apnea Respiratory
Rate Setting
12 0.1 or 1 1.0 - 9.9
10 – 80 BPM Outputs PCV
Apnea Rate setting
when VCV or PCV
active, NPPV
Apnea rate when
NPPV active
PCV Apnea Inhalation
Time Setting or NPPV
Apnea Inhalation
Time Setting
2.00 0.01 0.10 – 9.90 sec Outputs PCV
Inhalation Time
setting when VCV
or PCV active,
NPPV Inhalation
Time when NPPV
active
PCV Apnea Oxygen
Concentration Setting
or NPPV Apnea
Oxygen Concentration
100 121 – 100%
PCV Apnea High
Inhalation Pressure
Setting or NPPV
Apnea High
Inhalation Pressure
Setting
20 110 – 105cm
H2OOutputs PCV High
Inhalation
Pressure setting
when VCV or PCV
active, IPAP + 10
when NPPV active
Alarm Silence Status ON N/A ON
OFF
N/A
Apnea Alarm Status NORMAL N/A NORMAL,
RESET
ALARM
N/A
Ventilation Report
Description Example Resolution Range Units Comments
Table 13-4: Ventilation Report (Sheet 9 of 10)

Options and Accessories
REF 1057983 A Respironics V200 Ventilator Operator’s Manual 13-49
Chapter 13
Occlusion Alarm
Status or SM
Occlusion Alarm
Status or I-Time Too
Long Alarm Status
NORMAL N/A NORMAL,
RESET
ALARM
N/A
Not used N/A N/A Outputs example
value.
Not used N/A N/A Outputs example
value.
Not used N/A N/A Outputs example
value.
Not used N/A N/A Outputs example
value.
Not used I-TIME N/A I-TIME N/A Outputs example
value.
I:E Ratio 1:99 N/A 9.9:1 - 1:99 N/A measured I:E ratio,
expressed as
1:X.X, 1:XX, X.X:1,
or XX:1.
Stop Code 0x03 N/A N/A N/A ASCII End
Transmission
Character (ETX)
Ventilation Report
Description Example Resolution Range Units Comments
Table 13-4: Ventilation Report (Sheet 10 of 10)

Chapter 13
13-50 Respironics V200 Ventilator Operator’s Manual REF 1057983 A
Options and Accessories
(This page is intentionally blank.)
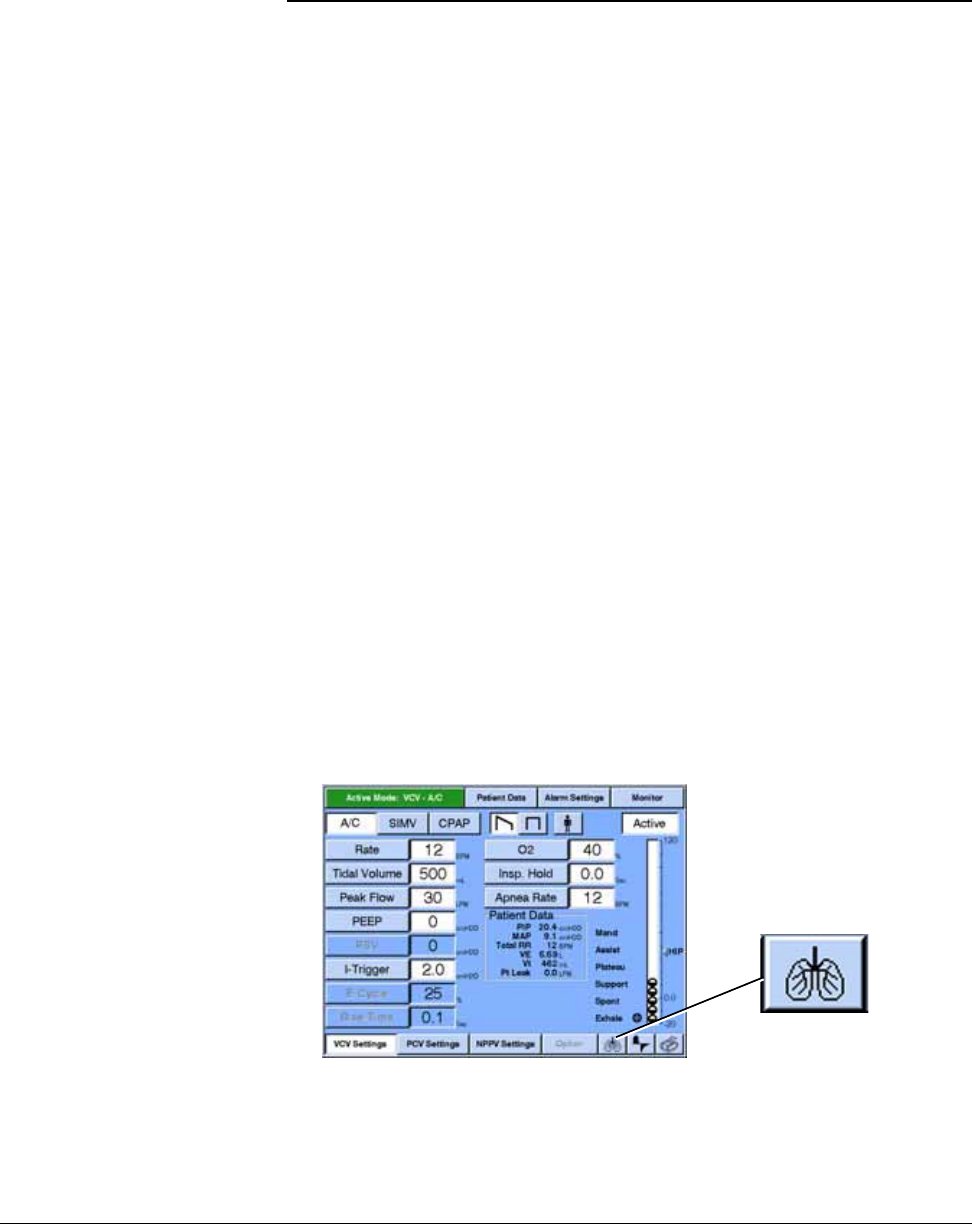
Options and Accessories
REF 1057983 A Respironics V200 Ventilator Operator’s Manual 13-51
Chapter 13
Respiratory Mechanics Option
The Respiratory Mechanics option allows the Respironics V200 Ventilator to
perform respiratory mechanics maneuvers, including:
• Vital Capacity (VC): The VC maneuver measures the patient’s lung
capacity. It is available only in Volume Control Ventilation (VCV) and
Pressure Control ventilation (PCV).
• Maximum Inspiratory Pressure (MIP): The MIP maneuver measures
the maximum negative pressure resulting from the patient’s inspiratory
effort. It is available only in VCV and PCV. MIP is also known as
negative inspiratory force (NIF).
• Occlusion Pressure at 100 ms (P0.1): The P0.1 maneuver measures
the pressure change after the first 100 milliseconds (ms) of an
inspiratory phase. It is available only in VCV and PCV. This maneuver
is also known as P100.
• Static Compliance and Resistance (Static C and R): The static C and R
maneuver estimates the compliance and resistance of the patient’s
lungs. It is available only in VCV.
• Plateau Pressure (Pplat) is a measured value collected during the last
saved Static C and R maneuver.
• The results of maneuvers are displayed graphically and numerically.
The Respiratory Mechanics option also displays dynamic compliance
and resistance, inspiratory time divided by total breath time (TI/TTOT),
and peak lung flow (Peak L-Flow).
Accessing
Respiratory
Mechanics Data
Touch the Mechanics icon button at the bottom of the screen (Figure 13-27).
Figure 13-27: VCV Settings Screen and Mechanics Icon Button
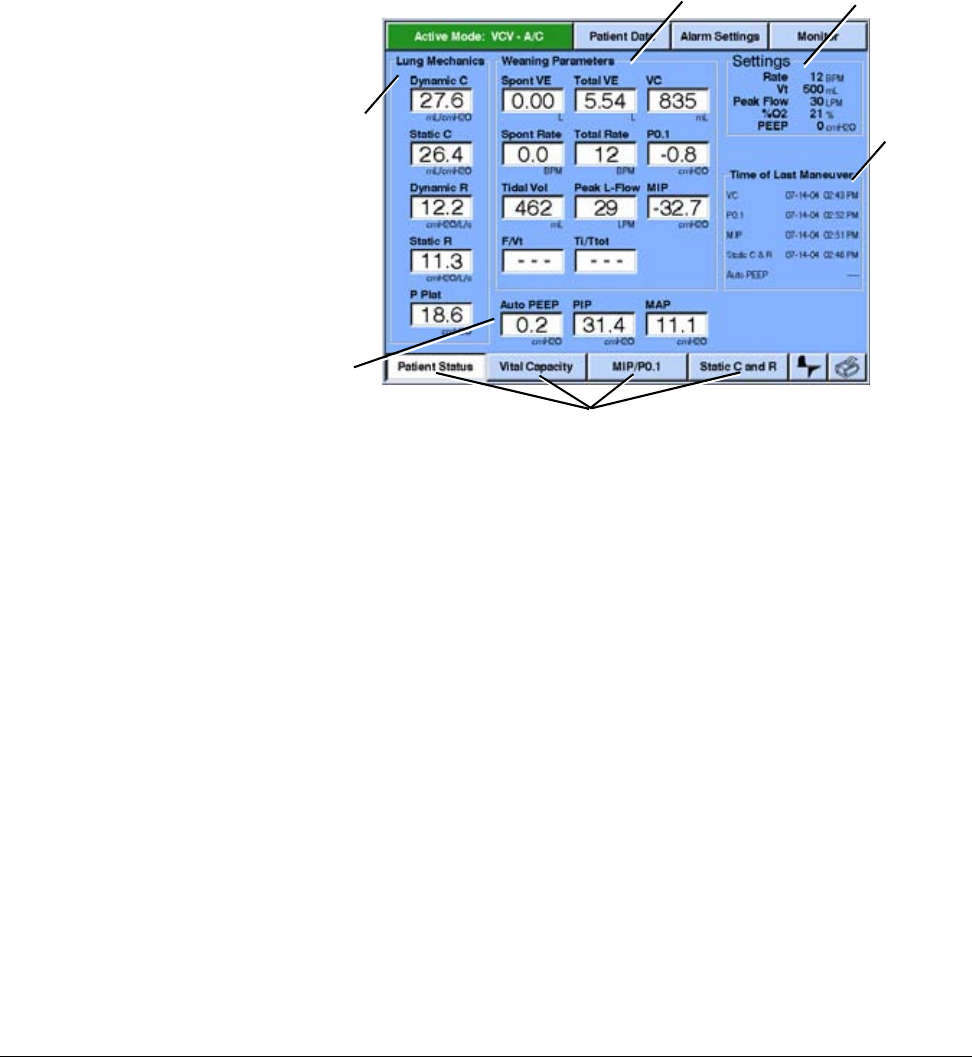
Chapter 13
13-52 Respironics V200 Ventilator Operator’s Manual REF 1057983 A
Options and Accessories
When you touch the Mechanics icon button, the Patient Status screen appears,
see Figure 13-28. This screen displays patient data and includes derived lung
mechanics results, weaning parameters, ventilator settings, maneuver date
and time stamps, and other patient data. It also provides access to the
respiratory mechanics maneuvers via the maneuver buttons on the bottom of
the screen.
Figure 13-28: Patient Status Screen
Vital Capacity
Maneuver The Vital Capacity screen (Figure 13-29) allows you to perform a Vital Capacity
maneuver and displays the maneuver results graphically and numerically. The
Vital Capacity maneuver is available only in VCV and PCV. It is not available in
NPPV.
How to perform the Vital Capacity Maneuver
1. Enter the Vital Capacity screen: Touch the Mechanics icon button,
then the Vital Capacity button.
2. Touch the Start button. Instruct the patient to inhale to maximum
capacity at the next inspiration, then exhale completely, followed by a
normal inspiration.
Once touched, the Start button changes to Stop. The Stop button
allows you to cancel the maneuver at any time. A high-priority alarm
automatically cancels the maneuver.
Lung
Mechanics
Other
patient
data
Weaning
Parameters Ventilator
Settings
Maneuver
Time
Stamps
Maneuver
Buttons
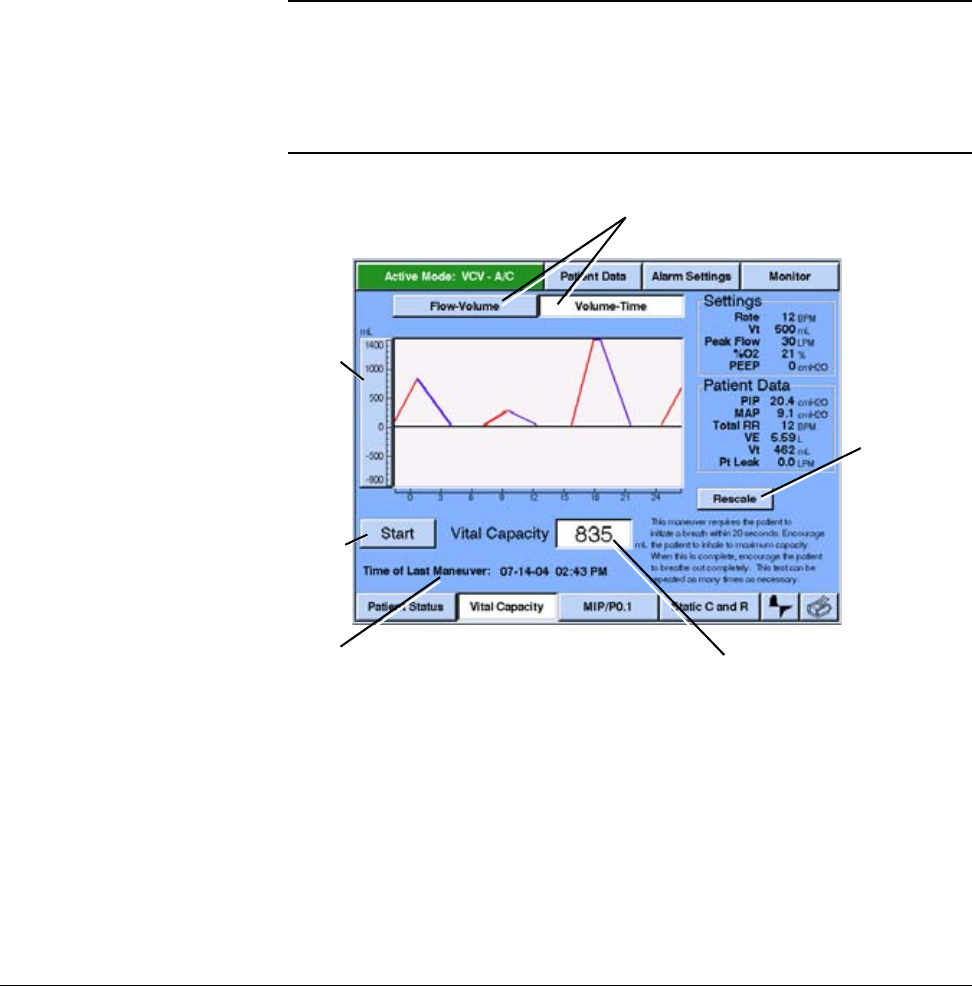
Options and Accessories
REF 1057983 A Respironics V200 Ventilator Operator’s Manual 13-53
Chapter 13
3. At the end of a successful maneuver, a pop-up screen displays the
result of the maneuver and asks you to accept or reject the results by
touching the Accept or Reject button.
4. At the end of the maneuver (whether successful or cancelled), the
Stop button changes to Continue. While the Continue button is
displayed, the graph is frozen and can be rescaled. Touch Continue or
exit the screen to unfreeze the display.
5. Touch Continue: the button changes to Start and you can repeat the
maneuver.
Figure 13-29: Vital Capacity Screen
WARNING: Perform the Vital Capacity maneuver according to instructions. Because
machine-assisted breath delivery, apnea detection, and detection of certain
patient alarms are temporarily disabled during a Vital Capacity maneuver,
close clinical supervision is recommended.
WARNING: Because PEEP is temporarily set to 0 cmH2O during a Vital Capacity
maneuver, close clinical supervision is recommended.
Flow-Volume and Volume-Time buttons
Time
Stamp
Rescale
button
Vital
Capacity
window
Start
button
Start
button
Vital
Capacity
window
Flow-Volume and Volume-Time buttons
Scale
button

Chapter 13
13-54 Respironics V200 Ventilator Operator’s Manual REF 1057983 A
Options and Accessories
MIP/P0.1 Maneuver The MIP/P0.1 screen (Figure 13.J4) allows you to perform a Maximum
Inspiratory Pressure (MIP) or occlusion pressure at 100 ms (P0.1) maneuver.
It displays the maneuver results graphically and numerically. The MIP
maneuver is available only in VCV and PCV. It is not available in NPPV.
How to perform an MIP or P0.1 maneuver
1. Enter the MIP/P0.1 screen: touch the Mechanics icon button, then
MIP/P0.1.
2. MIP maneuver: hold down the Start MIP Press & Hold button, and
instruct the patient to inhale several times as forcefully as possible.
The maneuver automatically ends after 30 seconds or when you
release the Start MIP Press & Hold button. (The Start MIP Press &
Hold button can be pressed and held at any time during a breath. If
pressed during the inhalation phase of a breath, the MIP maneuver
will be executed during the exhalation phase of that breath. If pressed
during an exhalation, the maneuver will be executed during the same
exhalation.)
P0.1 maneuver: touch the Start P0.1 button. A message above the
graphic display shows the results for the just-completed breath. The
maneuver automatically ends after four preselected patient-initiated
breaths have occurred or one minute has elapsed, whichever comes
first.
3. Once touched, either one of the Start buttons changes to Stop. The
Stop button allows you to cancel the maneuver at any time. A high-
priority alarm also cancels the maneuver.
4. At the end of a successful maneuver, a pop-up screen displays the
result of the maneuver and asks you to accept or reject the results by
touching the Accept or Reject button.
Information type Description
Flow-Volume or Volume-
Time button Flow-Volume: Displays a real-time flow-volume loop.
Volume-Time: Displays a real-time volume-time waveform.
Start button Starts the maneuver. Changes to Stop when the maneuver is started.
Changes to Continue when the maneuver is complete or when the Stop
button is touched. Changes to Start when Continue is touched.
Vital Capacity window Displays the most recently accepted VC maneuver results. The date
and time of the maneuver appear below the window.
Scale (button at left of
graphic display) Allows you to adjust graphic scales manually. The default scales for the
Vital Capacity screen are –1000 to +1500 mL for volume, -100 to
+100 LPM for flow. Default scales are in effect every time you enter
the Vital Capacity screen.
Rescale button Allows software to adjust the vertical scales for waveforms and vertical
and horizontal scales for loops.
Table 13-5: Summary of Vital Capacity Screen Information
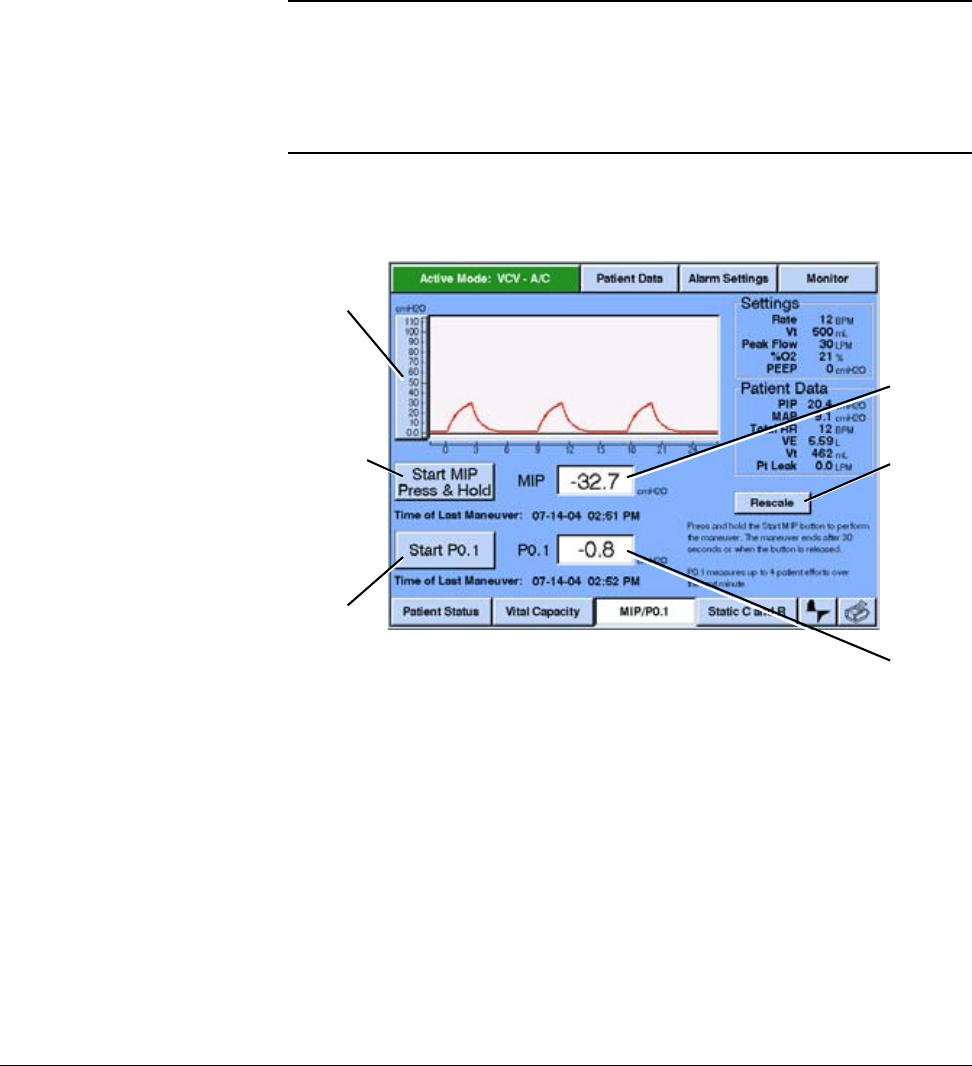
Options and Accessories
REF 1057983 A Respironics V200 Ventilator Operator’s Manual 13-55
Chapter 13
5. At the end of the maneuver (whether successful or cancelled), the
Stop button changes to Continue. While the Continue button is
displayed, the graph is frozen and can be rescaled. Touch Continue or
exit the screen to unfreeze the display.
6. Touch Continue: the button changes to Start and you can repeat the
maneuver.
Figure 13-30: MIP/P0.1 Screen
WARNING: Perform the MIP maneuver according to instructions. Because machine
assisted breath delivery, apnea detection, and detection of certain patient
alarms are temporarily disabled during a MIP maneuver, close clinical
supervision is recommended.
WARNING: Because PEEP is temporarily set to 0 cmH2O during a MIP maneuver, close
clinical supervision is recommended.
MIP
window
P0.1
window
Rescale
button
Start MIP
Press &
Hold
button
Scale
button
Start
P0.1
button

Chapter 13
13-56 Respironics V200 Ventilator Operator’s Manual REF 1057983 A
Options and Accessories
Static C and R
Maneuver The Static C and R screen (Figure 13-31) allows you to perform a static
compliance and resistance maneuver and displays the maneuver results. The
maneuvers are carried out on machine or operator initiated breaths. If the
patient triggers a breath when a maneuver is scheduled, the ventilator does not
perform the maneuver. Although the maneuver does not require patient effort,
patient interference can affect the accuracy of maneuver results. The Static C
and R maneuver is available in VCV only. It is not available in PCV and NPPV.
NOTE: Depending on the High Pressure limit setting, if the pre-maneuver flow
pattern is ramp, delivering a square waveform during the Static C and R
maneuver can trigger a High Inspiratory Pressure alarm and cancel the
maneuver. Should this happen, adjust alarm settings as needed.
How to perform Static C and R maneuver
1. Enter the Static C and R screen: touch the Mechanics icon button,
then Static C and R.
2. Touch the Start button. If you do nothing, the maneuver automatically
ends at the next mandatory inspiration.
Once touched, the Start button changes to Stop. The Stop button
allows you to cancel the maneuver at any time. A high-priority alarm
automatically cancels the maneuver.
Information type Description
Start MIP Press & Hold
button Starts the MIP maneuver. Changes to Continue when the maneuver is
complete or when finger is lifted from the button. Changes to Start
when Continue is touched.
Start P0.1 button Starts the P0.1 maneuver. Changes to Stop when the maneuver is
started. Changes to Continue when the maneuver is complete or when
the Stop button is touched. Changes to Start when Continue is
touched.
MIP window Displays the most recently accepted maneuver results. The date and
time of the maneuver appears below each window.
P0.1 window Displays the most recently accepted maneuver results. The date and
time of the maneuver appears below each window.
Scale (button at left of
graphic display) Allows you to adjust graphic scales manually. The default scale for the
MIP/P0.1 screen is –100 cmH2O to the High Pressure limit. Default
scales are in effect every time you enter the MIP/P0.1 screen, and the
graph reverts to default scales when the maneuver is complete.
Rescale button Allows software to adjust the vertical scales for waveforms and vertical
and horizontal scales for loops. The graph cannot be rescaled during
the MIP maneuver.
Table 13-6: Summary of MIP/P0.1 Screen Information
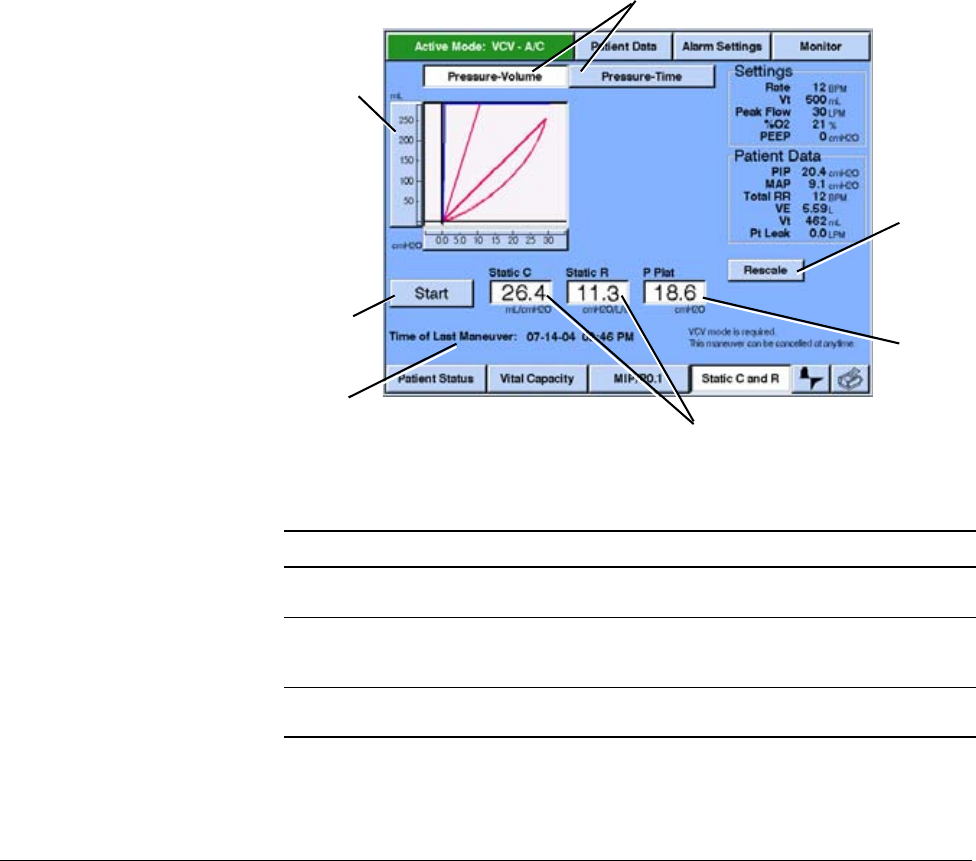
Options and Accessories
REF 1057983 A Respironics V200 Ventilator Operator’s Manual 13-57
Chapter 13
3. At the end of a successful maneuver, a pop-up screen displays the
result of the maneuver and asks you to accept or reject the results by
touching the Accept or Reject button.
4. At the end of the maneuver (whether successful or cancelled), the
Stop button changes to Continue. While the Continue button is
displayed, the graph is frozen and can be rescaled. Touch Continue or
exit the screen to unfreeze the display.
5. Touch Continue: the button changes to Start and you can repeat the
maneuver.
6. Return the active ventilation mode from VCV to the previous mode if
necessary.
Figure 13-31: Static C and R Screen
Information type Description
Pressure--Volume or
Pressure--Time button Pressure--Volume: Displays a real-time pressure-volume loop.
Pressure--Time: Displays a real-time pressure-time waveform.
Start button Starts the maneuver. Changes to Stop when the maneuver is started.
Changes to Continue when the maneuver is complete or when the Stop
button is touched. Changes to Start when Continue is touched.
Static C and Static R
windows Displays the most recently accepted maneuver results. The date and
time of the maneuver appear below each window.
Table 13-7: Summary of Static C and R Screen Information
Time
Stamp
Rescale
button
Start
button
Static C and R Windows
Pressure-Volume and Pressure-Time buttons
P Plat
window
Scale
button

Chapter 13
13-58 Respironics V200 Ventilator Operator’s Manual REF 1057983 A
Options and Accessories
Alarms and Error
Messages If an alarm occurs during Respiratory Mechanics, an Alerts window lists the
active alarms. Any active maneuvers are cancelled if a high-priority alarm
occurs. If there is a preexisting alarm of any priority when you attempt to start
a maneuver, the maneuver cannot be performed and an error message is
displayed. Table 13-8: “Respiratory Mechanics Error Messages and Alarms”
summarizes error messages and changes that can occur during Respiratory
Mechanics.
Pplat window Displays the most recently accepted maneuver results. The date and
time of the maneuver appear below each window.
Scale (button at left of
graphic display) Allows you to adjust graphic scales manually. The default scales for the
Static C & R screen are 0 cmH2O to the High Pressure limit for
pressure, 0 to Vt + 100 mL for volume. Default scales are in effect
every time you enter the Static C and R screen.
Rescale button Allows software to adjust the vertical scales for waveforms and vertical
and horizontal scales for loops.
Information type Description
Table 13-7: Summary of Static C and R Screen Information

Options and Accessories
REF 1057983 A Respironics V200 Ventilator Operator’s Manual 13-59
Chapter 13
Maneuver Error Messages Temporarily Disabled Alarms
VC Measurement out of range
Measured volume exceeds 9999 mL.
Vital Capacity unavailable due to alarm
condition
Alarm condition exists when maneuver
requested.
Maneuver cancelled
Operator presses Stop button.
Maneuver timed out
No inspiration within 20 seconds of starting
maneuver.
Maneuver cancelled by alarm condition
Alarm condition occurs after maneuver
begins.
•Low Exhaled Minute Volume
•Low Exhaled Mandatory Tidal
Volume
•High Exhaled Minute Volume
•Low Exhaled Spontaneous Tidal
Volume
•Low PEEP
MIP Measurement out of range
Measured pressures exceed –100 to +200
cmH2O.
MIP unavailable due to alarm condition
Alarm condition exists when maneuver
requested.
Maneuver timed out
MIP button held down for 30 seconds since
starting maneuver.
All patient alarms and the Low O2
alarm are disabled during the MIP
maneuver.
Table 13-8: Respiratory Mechanics Error Messages and Alarms

Chapter 13
13-60 Respironics V200 Ventilator Operator’s Manual REF 1057983 A
Options and Accessories
P0.1 Measurement out of range
Measured pressures exceed –100 to +200
cmH2O.
P0.1 unavailable due to alarm condition
Alarm condition exists when maneuver
requested.
Maneuver cancelled
Operator presses Stop button and no P0.1
maneuver breaths performed.
Maneuver cancelled by alarm condition
Alarm condition occurs after maneuver
begins.
Maneuver timed out
One minute elapses with no P0.1 maneuver
breaths performed.
None: all alarms are active during
the P0.1 maneuver.
Maneuver Error Messages Temporarily Disabled Alarms
Table 13-8: Respiratory Mechanics Error Messages and Alarms

Options and Accessories
REF 1057983 A Respironics V200 Ventilator Operator’s Manual 13-61
Chapter 13
Static C and R Measurement out of range. Check tubing
system for leaks
Static compliance exceeds 0 to 350 mL/
cmH2O or static resistance exceeds 0 to
400 cmH2O/L/s:
Static C & R unavailable due to alarm
condition
Alarm condition exists when maneuver
requested.
Static C & R only available in VCV
Ventilator not in VCV mode.
Static C & R unavailable; I-Time less than
200ms
Inspiration time must be between 200 ms
and 5 seconds.
Static C & R unavailable; I-Time greater
than 5 seconds
Inspiration time must be between 200 ms
and 5 seconds.
Plateau pressure stability not achieved;
Static C & R unavailable
Stable plateau pressure cannot be
achieved.
Maneuver cancelled
Operator presses Stop button.
Maneuver timed out
No machine or operator initiated inspiration
within 20 seconds of starting maneuver.
Maneuver cancelled by alarm condition
Alarm condition occurs after maneuver
begins.
None: all alarms are active during
the Static C and R maneuver.
Maneuver Error Messages Temporarily Disabled Alarms
Table 13-8: Respiratory Mechanics Error Messages and Alarms

Chapter 13
13-62 Respironics V200 Ventilator Operator’s Manual REF 1057983 A
Options and Accessories
Parameter Description
Vital Capacity
(VC) maneuver Procedure: The clinician instructs the patient to inhale to maximum
capacity at the next inspiration, then exhale completely, followed by a
normal inspiration. The maneuver automatically ends at the next inspiration
(following the maneuver breath) or if 20 seconds elapse without another
inspiration. Available in VCV and PCV. Not available in NPPV.
During the maneuver: Once the maneuver starts, settings for maneuver
breath are mode = CPAP, PEEP = 0 cmH2O (during the start of the next
inhalation or exhalation following pressing the start button), and PSV = 0
cmH2O. For the breath following the maneuver breath, PSV = 0 cmH2O and
PEEP is restored to its original setting. Pre-maneuver settings are restored
during exhalation of the breath following the maneuver breath. Any
scheduled breaths that were postponed by the VC maneuver are delivered
after the maneuver is complete.
Results display: Measured volumes from 0 to 9999 mL are displayed for the
VC maneuver: if measured volume exceeds these limits, only a message (no
data) is displayed. VC is displayed in mL, and is time-stamped based on
ventilator time and date.
Range: 0 to 9999 mL
Resolution: 1 mL
Accuracy: ± 10% of true value
Maximum
Inspiratory
Pressure (MIP)
maneuver
Procedure: To perform a MIP maneuver, the clinician asks the patient to
inhale as forcefully as possible against a closed circuit that allows the
patient to exhale through a one-way valve. Available in VCV and PCV. Not
available in NPPV.
During the maneuver: Once the maneuver starts, settings for maneuver
breath are mode = CPAP, PEEP = 0 cmH2O (during the start of the next
inhalation or exhalation following pressing the start button), and PSV = 0
cmH2O. For the breath following the maneuver breath, PSV = 0 cmH2O and
PEEP is restored to its original setting. Any gas exhaled during an MIP
maneuver is not applied to the tidal volume or minute volume calculations.
Results display: MIP is displayed in cmH2O, and is time-stamped based on
ventilator time and date. Measured pressures from –100 to +200 cmH2O
are displayed for the MIP maneuver: If measured pressure exceeds these
limits, only a message (no data) is displayed.
Range: -100 to +200 cmH2O
Resolution: 1 cmH2O
Accuracy: ± 10% of true value
Table 13-9: Respiratory Mechanics Maneuver Summary and Data Specifications

Options and Accessories
REF 1057983 A Respironics V200 Ventilator Operator’s Manual 13-63
Chapter 13
Occlusion
pressure at 100
ms (P0.1)
maneuver
Procedure: No instructions to the patient are required. Available in VCV and
PCV. Not available in NPPV.
During the maneuver: Settings do not change during the P0.1 maneuver.
The ventilator briefly occludes the patient circuit and measures occlusion
pressure in the first 100 ms of four preselected patient initiated breaths. If
you press Stop during a P0.1 maneuver, results are displayed for the
maneuver breaths that did occur.
Results display: P0.1 is displayed in cmH2O, and is time-stamped based on
ventilator time and date. Measured pressures from –100 to +200 cmH2O
are displayed for the P0.1 maneuver: If measured pressure exceeds these
limits, only a message (no data) is displayed.
Range: -100 to +200 cmH2O
Resolution: 1 cmH2O
Accuracy: ± (0.5 cmH2O) ± (10%) of true value
Parameter Description
Table 13-9: Respiratory Mechanics Maneuver Summary and Data Specifications

Chapter 13
13-64 Respironics V200 Ventilator Operator’s Manual REF 1057983 A
Options and Accessories
Static compliance
and resistance
(static C and R)
maneuver
Procedure: Patient participation is not required, and patient interference
can affect the accuracy of the maneuver. If the patient initiates a breath
when a maneuver breath is scheduled, the ventilator does not perform the
maneuver. Available in VCV only. Not available in PCV and NPPV.
During the maneuver: The ventilator delivers a square waveform, regardless
of the current setting. No other settings change during the static C and R
maneuver. The maneuver is not performed unless a machine or operator
triggered breath is delivered within 20 seconds. The inspiration time must
be between 200 ms and 5 seconds for the maneuver to occur, and the
maximum plateau duration is 2.5 seconds.
Results display: Static compliance is displayed in mL/cmH2O. Static
resistance is displayed in cmH2O/L/s. All compliance and resistance values
are measured on time or operator triggered mandatory breaths only. During
the last saved Static C and R maneuver, Plateau Pressure (Pplat) is
measured and displayed as a static value. Static C and R are time-stamped
based on ventilator time and date. Static compliance values from 0 to 350
mL/cmH2O and static resistance values from 0 to 400 cmH2O/L/s are
displayed: If either value exceeds its limits or a stable plateau pressure
cannot be achieved, only a message (no data) is displayed.
Range:
Static compliance: 0 to 350 mL/cmH2O
Static resistance: 0 to 400 cmH2O/L/s
Plateau Pressure: -20 to 130 cmH2O
Resolution:
Static compliance: 1 mL/cmH2O
Static resistance: 1 cmH2O/L/s
Plateau Pressure: 1 cmH2O
Accuracy:
Static compliance: ± 1 mL/cmH2O ± 20% of true value
Static resistance: ± 3 cmH2O/L/s ± 20% of true value
Plateau Pressure: ± (0.5 cmH2O) ± (10%) of true value
Inspiratory time
divided by total
breath time (TI/
TTOT).
Calculated inspiratory time divided by total breath time, or percent
inspiratory time. An eight-breath running average. Available in VCV, PCV,
and NPPV.
Applicable to spontaneous and pressure-supported breaths only. If there
were no spontaneous or pressure-supported breaths within the last one
minute, - - - - is displayed.
Parameter Description
Table 13-9: Respiratory Mechanics Maneuver Summary and Data Specifications

Options and Accessories
REF 1057983 A Respironics V200 Ventilator Operator’s Manual 13-65
Chapter 13
Compliance (C) and
Resistance (R)
Computations
Dynamic C and R are estimated during ventilator and operator initiated
breaths. Static C and R are estimated during a Static C and R maneuver.
Dynamic Compliance
Dynamic compliance is calculated using these equations:
Peak lung flow
(Peak L-Flow) The maximum measured inspiratory flow at the patient wye. Available in
VCV and PCV.
Peak L-Flow is displayed in LPM.
Dynamic
compliance and
resistance
An estimation of the compliance and resistance of the patient’s lungs, using
the Least Square Estimation algorithm on the equation of motion (P = R • Q
+ V /C, where Q = lung flow and V = lung volume), performed during each
machine or operator initiated inspiration.
Dynamic compliance is displayed in mL/cmH2O. Dynamic resistance is
displayed in cmH2O/L/s. All compliance and resistance values are estimated
on time or operator triggered mandatory breaths only. If there were no
machine or operator initiated breaths within the last one minute, - - - - is
displayed.
These alarms interrupt dynamic compliance and resistance updates: Corrupt
Compliance, Corrupt Altitude, High Pressure, Low Insp pressure, Air Source
Fault, O2 Valve stuck closed, Exh Valve stuck open, Low Tidal volume, Low
PEEP.
Dynamic compliance values from 0 to 350 mL/cmH2O and dynamic
resistance values from 0 to 400 cmH2O/L/s are displayed: (If either value is
above its limit, only + + + is displayed. If either value is below its limit, only
- - - is displayed.)
Parameter Description
Table 13-9: Respiratory Mechanics Maneuver Summary and Data Specifications
CL
QiVi
i0=
n
∑
2
Qi
2∗
i0=
n
∑Vi
2
i0=
n
∑
–
QiVi∗PiQiPiVi∗Vi
i0=
n
∑
i0=
n
∑
–
i0=
n
∑
i0=
n
∑
------------------------------------------------------------------------------------------------=

Chapter 13
13-66 Respironics V200 Ventilator Operator’s Manual REF 1057983 A
Options and Accessories
Dynamic Resistance
Dynamic resistance is calculated using this equation.
Where:
n = Number of samples taken during for the calculation
i = Sample number
Qi = Patient flow
Vi = Lung volume for the /th sample number
Pi = Pressure sensor measurement for the /th sample number
Static C and R
Static C and R are calculated using these equations:
Where:
RL
QiVi∗PiViPiQi∗Vi
i0=
n
∑
i0=
n
∑
–
i0=
n
∑
i0=
n
∑
QiVi
i0=
n
∑
2
Qi
2∗
i0=
n
∑Vi
2
i0=
n
∑
–
------------------------------------------------------------------------------------------------=
Qi∗td
∫
=
CLV
Peplat P0
–()
--------------------------------=
CRL
Pei Peplat PVplat CL
⁄–()–()
QLend
------------------------------------------------------------------------=

Options and Accessories
REF 1057983 A Respironics V200 Ventilator Operator’s Manual 13-67
Chapter 13
CL = The value of the combined compliance of the lungs and chest wall
RL = The value of the combined resistance elements between the patient
wye and the alveoli of the lungs
V = Lung volume
Peplat = End of plateau pressure
Vplat = Lung volume added during the plateau phase
QLend = Patient flow at the end of the delivery phase (beginning of plateau
phase)
P0 = Pressure at the start of inspiration
Pei = Pressure at the end of inspiration

Chapter 13
13-68 Respironics V200 Ventilator Operator’s Manual REF 1057983 A
Options and Accessories
(This page is intentionally blank.)

Options and Accessories
REF 1057983 A Respironics V200 Ventilator Operator’s Manual 13-69
Chapter 13
Trending Option
The Trending option allows the ventilator to store and display ventilator
information for intervals from 2 to 72 hours. Trended data includes:
• Patient data.
• Ventilator settings.
• Lung mechanics data (most of the data in this category is available
only if the Respiratory Mechanics option is installed).
• Respiratory profile monitor data (data in this category is available only
if the respiratory profile monitor interface (NICO-Esprit) option is
installed).
All data is date and time-stamped, and 32 parameters are stored for use by the
Trending option.
You can view three trended parameters at a time, and you can change the
displayed parameters and time scale at any time.
Accessing Trending
Data Touch either the Patient Data button at the top of any settings screen (VCV,
PCV, or NPPV) or the Graphics icon button at the bottom of the screen (Figure
13-32). If the Graphics option is not installed, the Graphics button is grayed
and Trending is only accessible from the Patient Data screen.
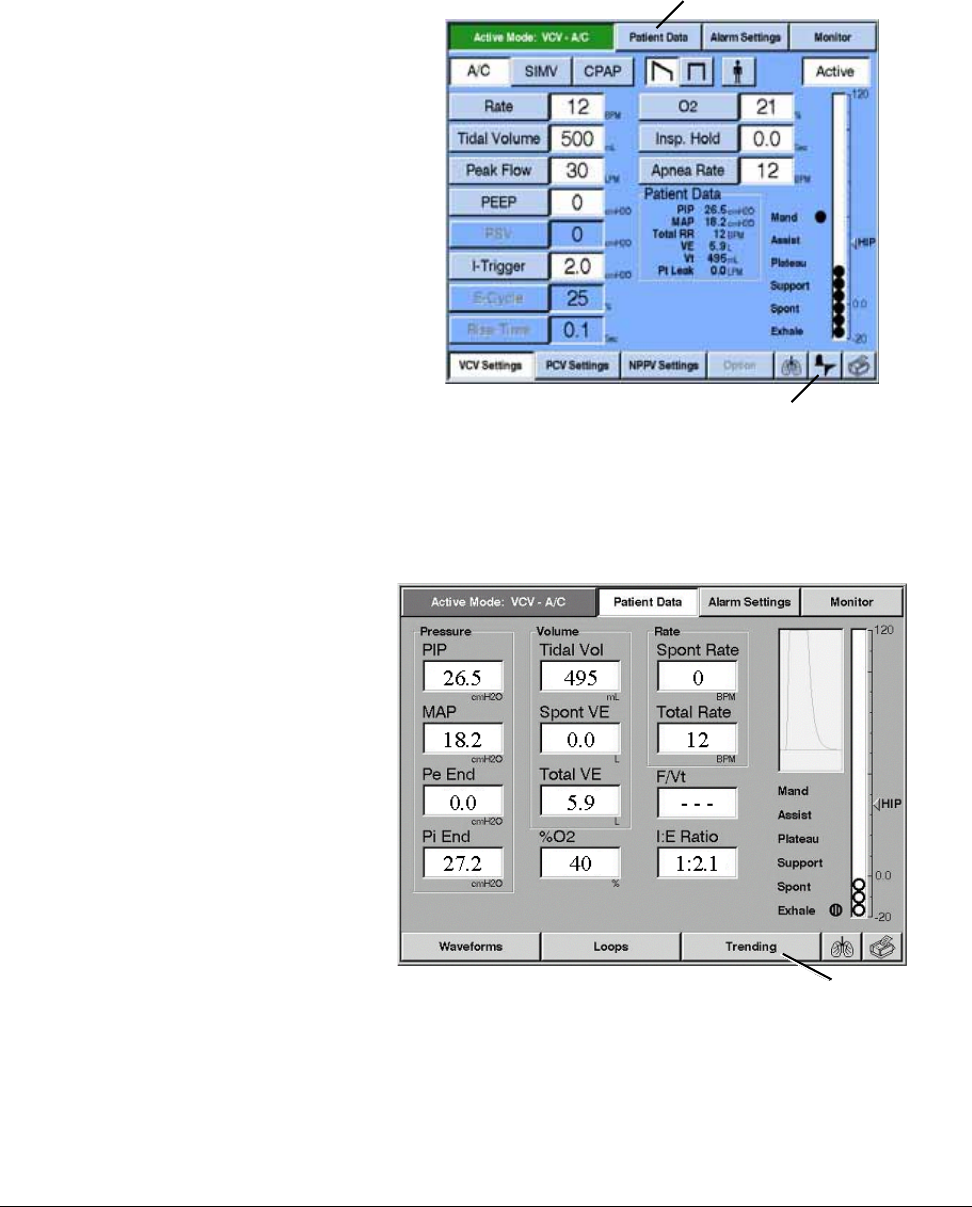
Chapter 13
13-70 Respironics V200 Ventilator Operator’s Manual REF 1057983 A
Options and Accessories
Figure 13-32: VCV Settings Screen
In the Patient Data screen (Figure 13-33) or Graphics screen (not shown),
touch the Trending button to display the Trending screen (Figure 13-34).
Figure 13-33: Patient Data Screen
Patient Data button
Graphics button
Trending button
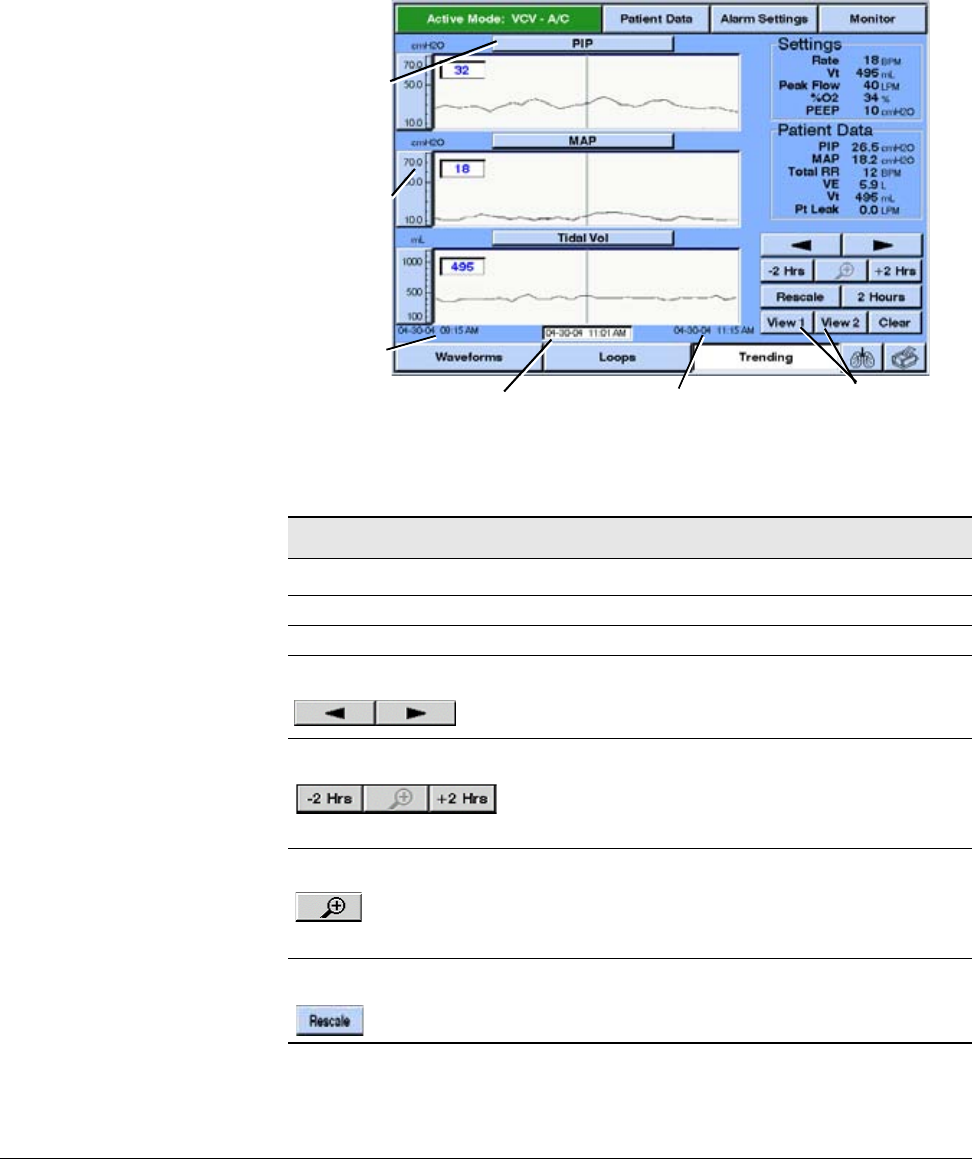
Options and Accessories
REF 1057983 A Respironics V200 Ventilator Operator’s Manual 13-71
Chapter 13
The Trending screen (Figure 13-34) displays three trending waveforms as well
as a summary of ventilator settings and patient data. You can change the
waveforms and time scale at any time.
Figure 13-34: Trending Screen
Summary of Trending Screen Information
Information type Description
Parameter select buttons Selects which parameter to display in the trending waveform.
Manual rescale buttons Selects the upper and lower limits for the displayed parameter.
Cursor arrow buttons Changes the position of the cursor. (You can also use the front
panel control knob to adjust cursor position.)
-2 Hrs and +2 Hrs buttons Shifts the waveform forward or backward by 2 hours without
changing the time scale. If you press and hold the buttons, the
time scale shifts every ½ second. If less than 2 hours of data
exists, the waveform shifts by the time available. The button is
grayed if the waveform cannot shift any further.
Zoom in/out button Zoom in sets the time scale to 2 hours, with time centered at the
cursor position. The button is grayed if the current time scale is 2
hours.
Zoom out button returns the time scale to its previous setting.
Rescale button Automatically adjusts the vertical axis for all three waveforms for
optimal viewing based on the maximum and minimum values for
the currently displayed data.
Table 13-10: Summary of Trending Screen Information
Parameter
select
button
Manual
rescale
button
Begin
trending
time
Cursor time and date End Trending Time View 1, View 2 buttons
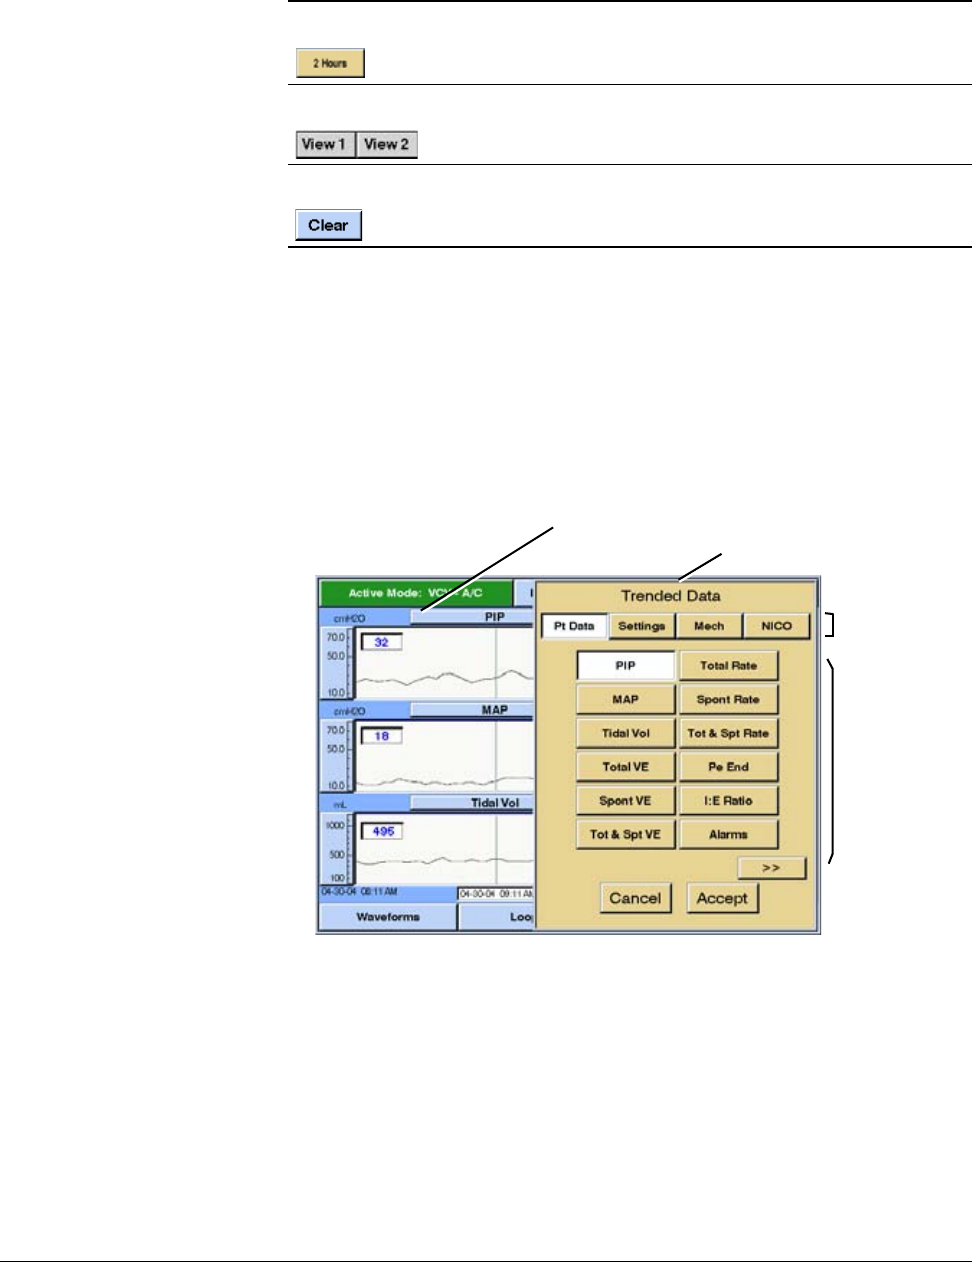
Chapter 13
13-72 Respironics V200 Ventilator Operator’s Manual REF 1057983 A
Options and Accessories
Selecting Parameters
for Display On the Trending screen (Figure 13-35), a Parameter select button above each
waveform shows the name of the currently displayed parameter. To choose a
different parameter for display, press the button above the waveform: a
Trended Data pop-up window allows you to select another parameter.
Figure 13-35: Selecting Parameters for Display on the Trending Screen
Four category select buttons (PT Data, Settings, Mech, NICO) appear at the
top of the Trended Data pop-up window. Each button, when pressed, displays a
different set of Parameter select buttons. There are a total of 78 parameters
that are displayed by the four category select buttons. Below is a summary of
each category select button.
Time scale button Displays the time scale menu to select from 2 to 72 hours. The
button shows the currently selected time scale.
View 1 and View 2 buttons Displays either of two user-defined views. Each view consists of
three trending waveforms and a time scale. The button shows the
active view.
Clear button Clears all stored trended data.
Table 13-10: Summary of Trending Screen Information
Category
select
buttons
Parameter
select
buttons
Trended Data pop-up window
Parameter select button
Options and Accessories
REF 1057983 A Respironics V200 Ventilator Operator’s Manual 13-73
Chapter 13
•The Pt Data category includes measured and calculated patient data
parameters.
•The Settings category includes ventilator settings.
•The Mech category includes lung mechanics data (most of the Mech
parameters are available only if the Respiratory Mechanics option is
installed).
•The NICO category includes data collected from the Respiratory
Profile Monitor. This category is available only if the respiratory profile
monitor interface (NICO-Esprit) option is installed.
NOTE: If any button is grayed out, that particular feature may not be enabled.
Contact Respironics Technical Service at 1-800-345-6443.
Summary of Trended Data Information
Information type Description
Pt Data, Settings, or Mech button Selects the category of data to choose from (the current
selection is highlighted). Changing the category causes a
different set of parameter select buttons to appear.
Parameter select button Selects which parameter to display as trended data (the
current selection is highlighted in the data category list).
For a complete list of parameters, see Table 13.K3.
>> button Appears if more than one page of trended data is available
for the selected category (the next page displays a <<
button to return to the previous page).
Cancel button Exits the Trended Data pop-up window without making
changes.
Accept button Confirms the selected parameter and exits the Trended
Data pop-up window.
Table 13-11: Summary of Trended Data Information
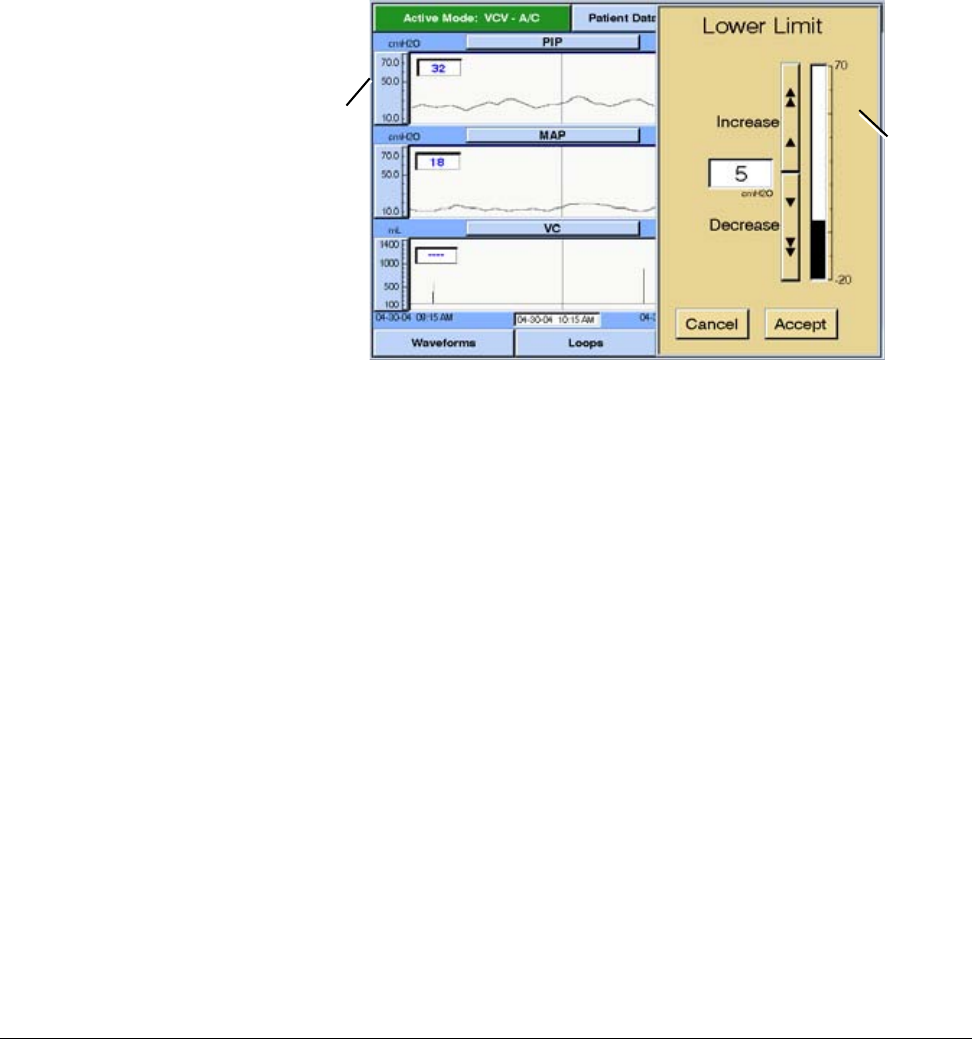
Chapter 13
13-74 Respironics V200 Ventilator Operator’s Manual REF 1057983 A
Options and Accessories
Using the Manual
Rescale Function The Manual rescale buttons (Figure 13-36) allow you to adjust the vertical
scale for most waveforms. Press the top half of the scale to change the upper
limit, and the bottom half of the scale to change the lower limit. A pop-up
window allows you to adjust the scale. Press the Cancel button to exit the pop-
up window without making changes, or press Accept to select the new value
and exit the pop-up window.
Figure 13-36: Manually Rescaling a Vertical Axis on the Trending Screen
Changing the Cursor
Position The Cursor arrow buttons (Figure 13-36) allow you to adjust the position of the
cursor for all three waveforms. You can also turn the knob to adjust the cursor
position.
The data display window for each waveform shows the value of the data at the
time indicated by the cursor position. A window at the bottom of the screen
shows the time reflective of the cursor position.
Alarms are represented as active or inactive. To see which alarm was active at
a given time, move the cursor to that time. Up to three alarms that were active
appear in the data display window. They appear in order of priority.
Maneuvers display the value obtained when the maneuver was performed. No
data is displayed for times when the maneuver was not performed.
Manual
rescale
button Pop-up
window for
adjusting
scale
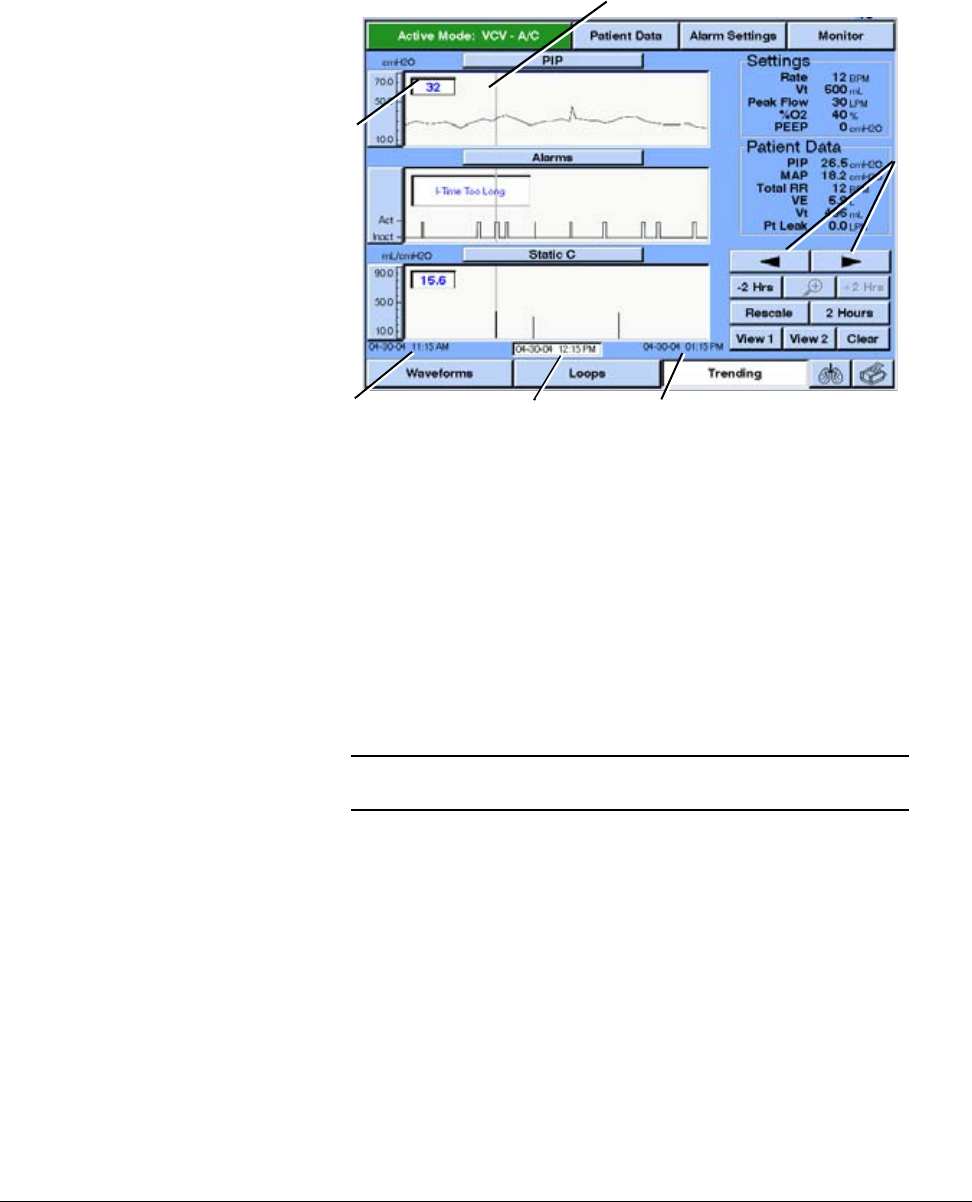
Options and Accessories
REF 1057983 A Respironics V200 Ventilator Operator’s Manual 13-75
Chapter 13
Figure 13-37: Changing Cursor Position on the Trending Screen
Selecting the Time
Scale The selected time scale (Figure 13-38) applies to all three waveforms on the
Trending screen. To choose a different scale, press the Time scale button: a
Time Scale pop-up window allows you to select another scale.
Press the Cancel button to exit the pop-up window without making changes, or
press Accept to select the new value and exit the pop-up window. The new
value will appear on the time scale button.
Cursor
arrow
buttons
Cursor
Data
display
window
End Trending TimeBegin Trending Time Cursor Time
NOTE: If there is not enough recorded data to display a time
scale, then its respective button is grayed out.
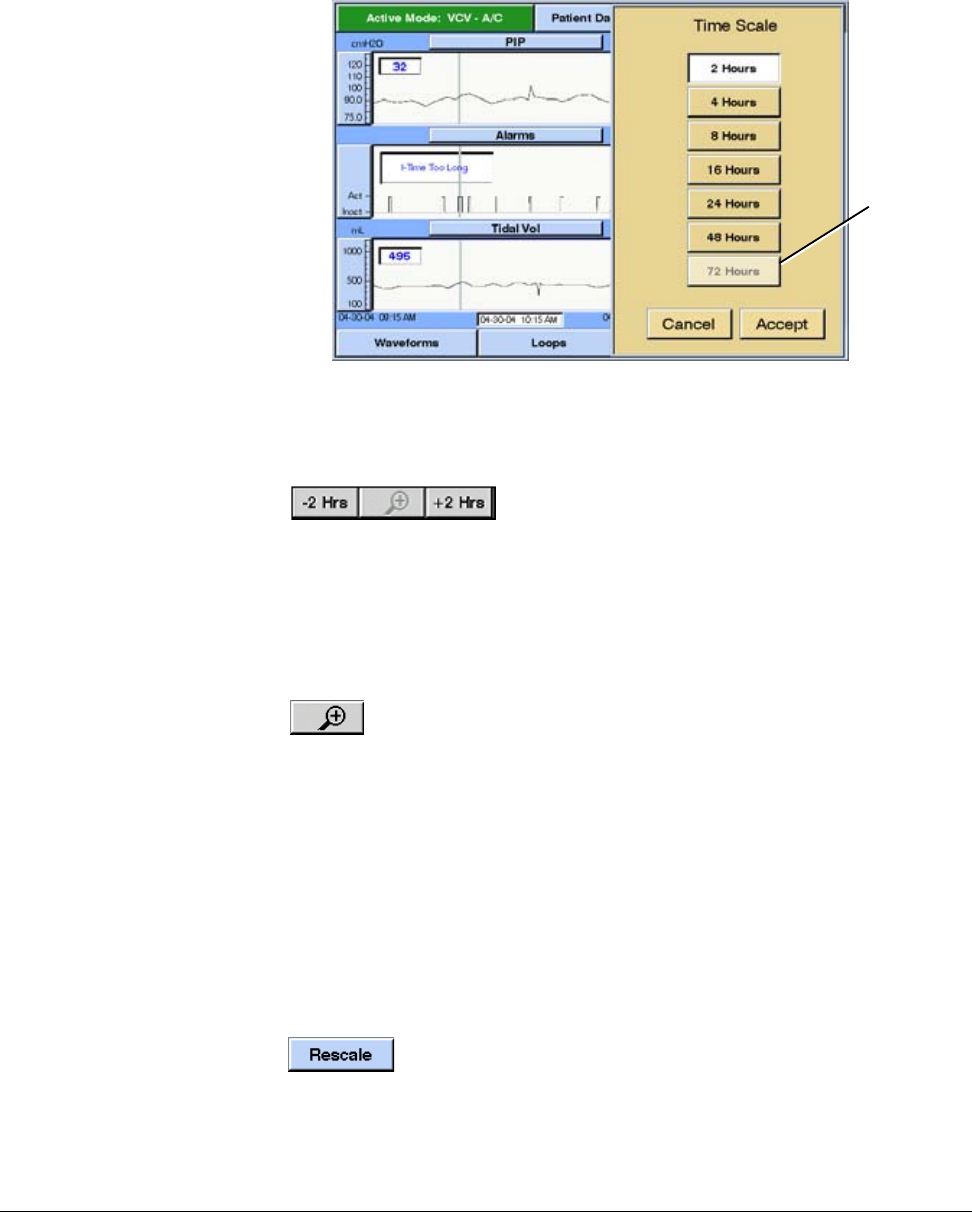
Chapter 13
13-76 Respironics V200 Ventilator Operator’s Manual REF 1057983 A
Options and Accessories
Figure 13-38: Selecting the Time Scale for the Trending Screen
Using the +2 Hrs/-2
Hrs buttons The +2 Hrs and –2 Hrs buttons shift all three
waveforms forward or backward by two hours without
changing the time scale. If you press and hold the
buttons, the time scale shifts every ½ second. If less than 2 hours of data
exist, the waveform shifts by the amount of available data. The buttons are
grayed if the waveform cannot shift any further.
Using the Zoom
Function The Zoom button allows you to zoom in on trended data by
switching the time scale to two hours, centered around the cursor
position. If the current time scale is two hours, the zoom button is
grayed.
When the Zoom button shows a magnifying glass with a plus (+) sign, the
“zoom in” function is available. Once zoomed in, the button changes to a
magnifying glass with a minus (-) sign to indicate that the “zoom out” function
is available, and the Time and View buttons are disabled. Zooming out returns
the waveforms to their previous time scale and all buttons to their previous
states.
Using the Rescale
Button The Rescale button automatically adjusts the vertical axis for
all three waveforms. The software determines a scale based on
the minimum and maximum values of the data to display an
optimal view.
Grayed-out
button
indicates that
the time scale
is not
available
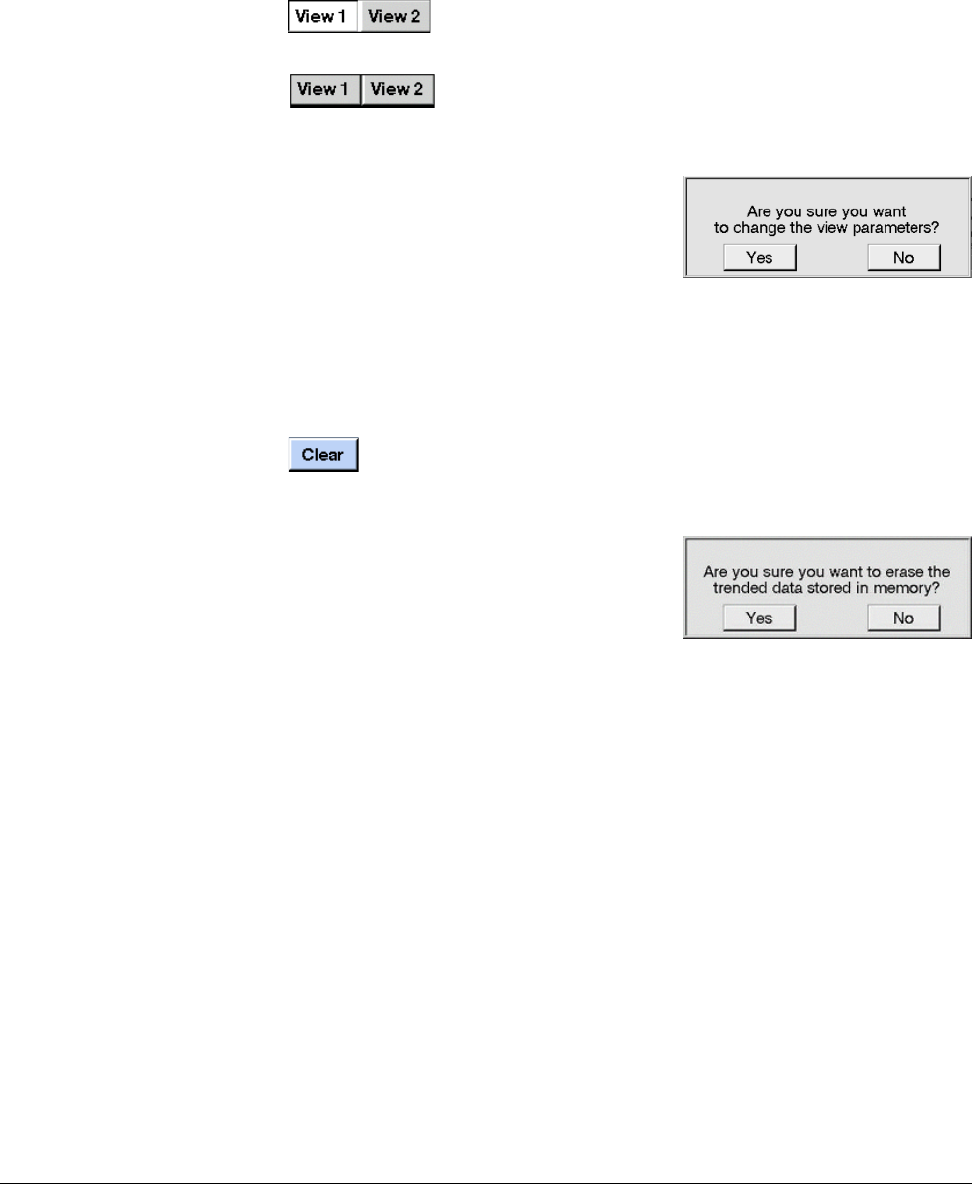
Options and Accessories
REF 1057983 A Respironics V200 Ventilator Operator’s Manual 13-77
Chapter 13
Using the View 1/
View 2 buttons The View 1 and View 2 buttons make it possible for the user to store three
trending waveforms and a time scale and recall them with a press of a button.
A highlighted View button indicates that a preselected view
is being displayed.
If neither button is highlighted, the view (waveform(s) and/
or time scale) has been changed from the preselected view.
Touch the View button to revert to the preselected view
To store settings to one of the View buttons,
select the desired waveforms and timescale
then press and hold the View 1 or View 2
button for three (3) seconds. A pop-up
window asks you to confirm that you want
to change the preselected view. Press Yes to
reconfigure the preselected view, or No to exit the pop-up window without
making changes. Repeat the process to store settings to the other View button.
Using the Clear
button The Clear button allows you to clear all stored data for trending.
Press Clear between patients or to erase all of a patient’s previously
stored data.
When you press Clear, a pop-up window
asks you to confirm that you want to erase
all stored data. Press Yes to clear the data,
or No to exit the pop-up window without
clearing data.
Alarms during
Trending If an alarm occurs while viewing the Trending screen, an Alerts window
replaces the Settings window, and lists up to four currently active alarms. If
the alarm conditions no longer exist, press Alarm Reset to close the Alerts
window and restore the Settings window.
PCMCIA Card The Trending option with the ventilator requires the use of a Respironics
approved 16 MB flash memory card. The card must be used in conjunction
with an adaptor for the PCMCIA slot at the back of the ventilator. The order
number for the card and adaptor is P/N 1014293.
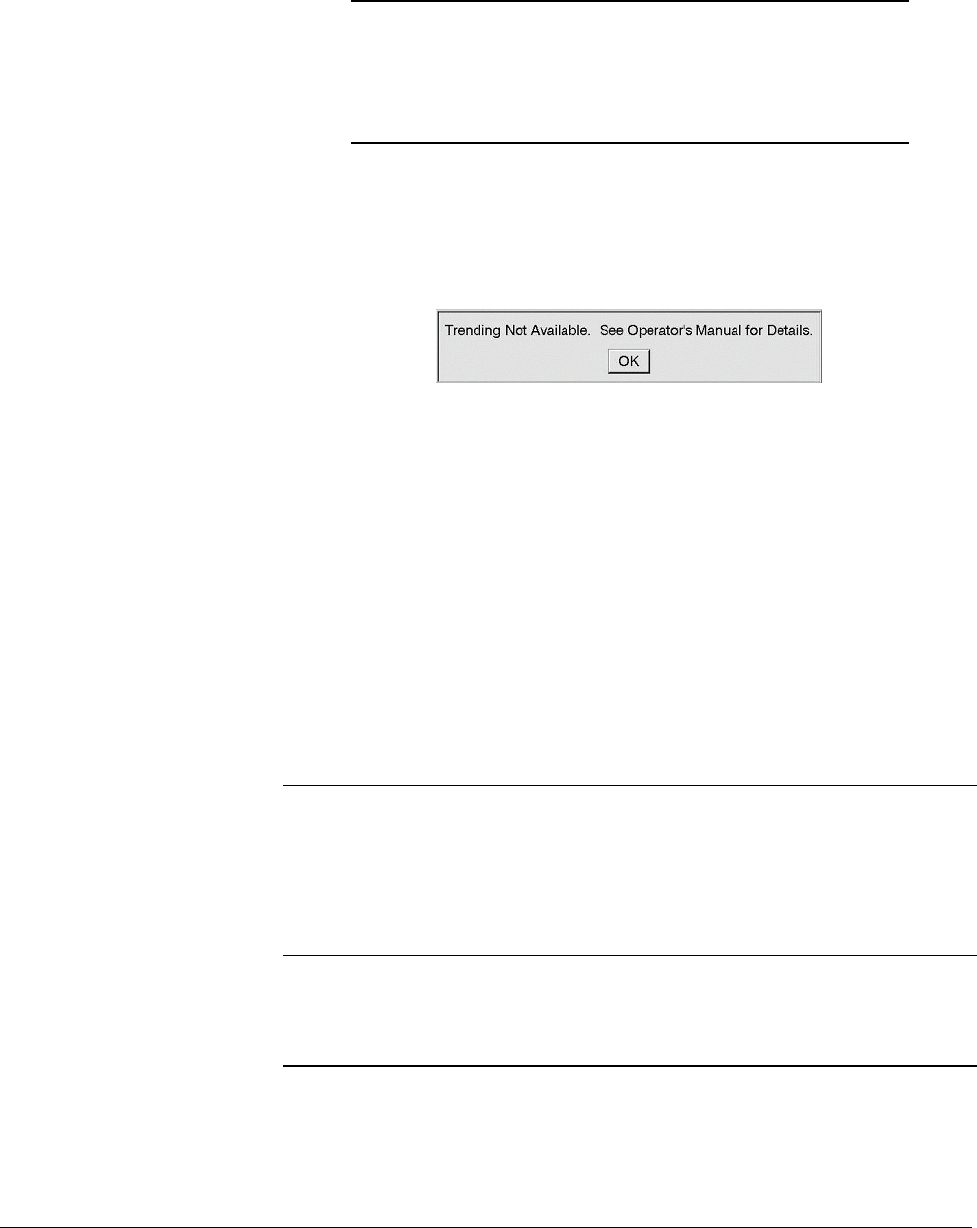
Chapter 13
13-78 Respironics V200 Ventilator Operator’s Manual REF 1057983 A
Options and Accessories
Trending Not
Available This Trending Not Available message indicates a problem with Trending option
data storage.
This message may appear if:
• the PCMCIA card installed for the Trending option is removed,
• the PCMCIA card includes unrecognizable or corrupted files, or
• the PCMCIA card does not contain enough memory.
• the internal clock setting was moved back by more than 1.25 hours
and trending data was not erased.
Contact Respironics Technical Support for more information.
Specifications
WARNING: The cover plate for the PCMCIA slot at the back of the
ventilator must be replaced after the adaptor and card are
installed. This is to protect the ventilator.
CAUTION: The PCMCIA card should only be removed by trained
service personnel once power to the ventilator is off.
Data collection and
display The system collects numeric data every 20 seconds. Alarms are considered
active if they occurred at any time during the previous 20-second interval.
If the selected time scale is 2 hours, each data point on a waveform
represents 20 seconds. As the scale is increased, each data point represents
a longer interval.
Data is periodically refreshed if there is no user interaction.
Display time-outs The Trending screen automatically reverts to the Monitor screen if 15
minutes elapse without user interaction.
Pop-up windows are cleared from the display if 2 minutes elapse without
user interaction, and any pending changes are cancelled.
Table 13-12: Trending Data Specifications (Sheet 1 of 4)

Options and Accessories
REF 1057983 A Respironics V200 Ventilator Operator’s Manual 13-79
Chapter 13
Trended data The Trending option simultaneously trends 32 parameters from four
categories: patient data, settings, lung mechanics (Mech) and (NICO).
Parameters that are not currently displayed are stored in memory for
viewing.
Trended data:
Pt Data PIP
(peak inspiratory pressure)
MAP
(mean airway pressure)
Tidal Vol
(exhaled tidal volume)
Total VE
(total minute volume)
Spont VE
(spontaneous minute volume)
Tot & Spt VE
(both spontaneous and total minute volume displayed on the same
waveform)
Total Rate
(measured total respiratory rate)
Spont Rate
(measured spontaneous respiratory rate)
Tot & Spt Rate
(measured spontaneous and total rate displayed on the same waveform)
Pe End
(measured end expiratory pressure)
I:E Ratio
(inspiratory to expiratory ratio)
Table 13-12: Trending Data Specifications (Sheet 2 of 4)

Chapter 13
13-80 Respironics V200 Ventilator Operator’s Manual REF 1057983 A
Options and Accessories
Trended data:
Pt Data (continued) Alarm
(alarm occurrence)
%O2
(percentage of oxygen delivered)
F / Vt
(rapid shallow breathing index)
Ti/Ttot
(the ratio of inspiratory time to total respiratory cycle time for spontaneous
breaths)
Peak L-Flow
(peak flow of gas during the inspiratory phase)
% Pt Trigger
(percentage of patient triggered breaths)
Pt Leak
(patient leak)
Trended data:
Settings Set Tidal Vol
(set tidal volume, only available in VCV mode)
Set Pressure
(set pressure, only available in PCV mode)
Set PEEP
(set PEEP level, only available in VCV or PCV mode)
Set % O2
(set delivered O2%)
Set PSV
(set pressure support, only available in VCV mode)
Set IPAP
(set inspiratory positive airway pressure level, only available in NPPV mode)
Set EPAP
(set expiratory positive airway pressure level, only available in NPPV mode)
Set I-Time
(set inhalation time, only available in PCV or NPPV mode)
Table 13-12: Trending Data Specifications (Sheet 3 of 4)

Options and Accessories
REF 1057983 A Respironics V200 Ventilator Operator’s Manual 13-81
Chapter 13
Trended data:
Mech Static C
(static compliance maneuver, only available if Mechanics option is installed)
Static R
(static resistance maneuver, only available if Mechanics option is installed)
VC
(vital capacity maneuver, only available if Mechanics option is installed)
MIP
(maximum inspiratory pressure maneuver, only available if Mechanics option
is installed)
P0.1
(P0.1 maneuver, only available if Mechanics option is installed)
Dynamic C
(dynamic compliance, only available if Mechanics option is installed)
Dynamic R
(dynamic resistance, only available if Mechanics option is installed)
Auto PEEP
(expiratory hold)
Trended data:
NICO CO-a
(Cardiac Output Average, only available if the respiratory profile monitor
interface (NICO-Esprit) option is installed)
SpO2
(O2 Saturation, only available if the respiratory profile monitor interface
(NICO-Esprit) option is installed)
ETCO2
(End Tidal CO2, only available if the respiratory profile monitor interface
(NICO-Esprit) option is installed)
VCO2
(CO2 Elimination, only available if the respiratory profile monitor interface
(NICO-Esprit) option is installed)
Vtalv
(Alveolar Tidal Volume, only available if the respiratory profile monitor
interface (NICO-Esprit) option is installed)
Mvalv
(Alveolar Minute Volume, only available if the respiratory profile monitor
interface (NICO-Esprit) option is installed)
Time scales Selected time scales apply to all displayed waveforms:
2, 4, 8, 16, 24, 48, or 72 hours.
Table 13-12: Trending Data Specifications (Sheet 4 of 4)

Chapter 13
13-82 Respironics V200 Ventilator Operator’s Manual REF 1057983 A
Options and Accessories
(This page is intentionally blank.)
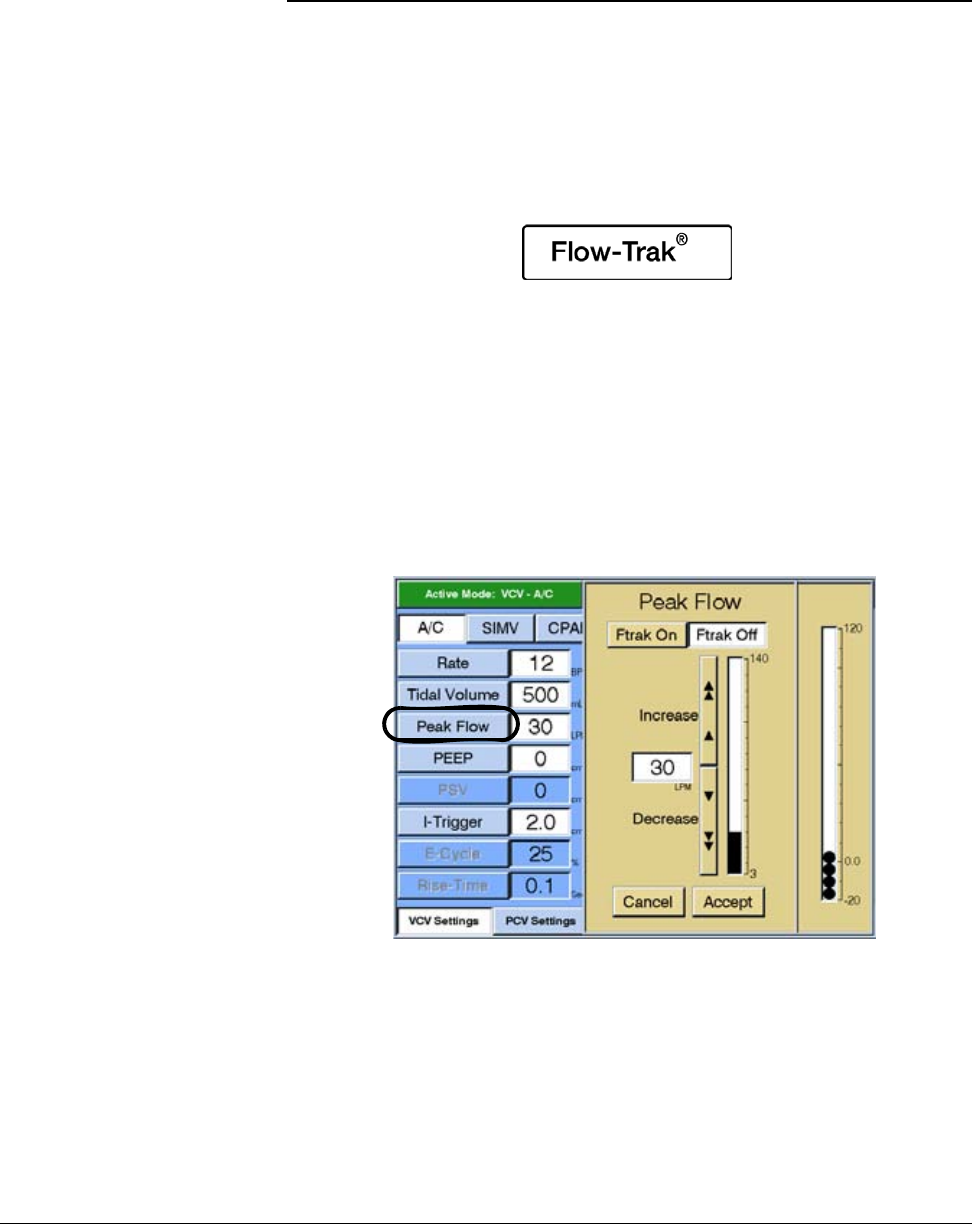
Options and Accessories
REF 1057983 A Respironics V200 Ventilator Operator’s Manual 13-83
Chapter 13
Flow-Trak® Option
Flow-Trak provides additional flow to Volume Control Ventilation (VCV) breaths.
It allows the patient to draw additional flow or volume as desired.
Ventilators with Flow-Trak installed are identified by the option label as seen in
Figure 13-39.
Figure 13-39: Flow-Trak option label
Once the Flow-Trak option has been loaded on the ventilator it is active. Follow
these steps to turn Flow-Trak Off and On:
1. While in VCV, press the Peak Flow settings button.
2. Press the Ftrak OFF button.
3. Press the Accept button.
Use these same steps pressing Ftrak On to turn Flow-Trak on.
Figure 13-40: Turning off the Flow-Trak Option
Flow-Trak will stay resident on the ventilator when shut down and restarted.
That is, if Flow-Trak is OFF when the ventilator is shut down then it will be OFF
the next time the ventilator is started.
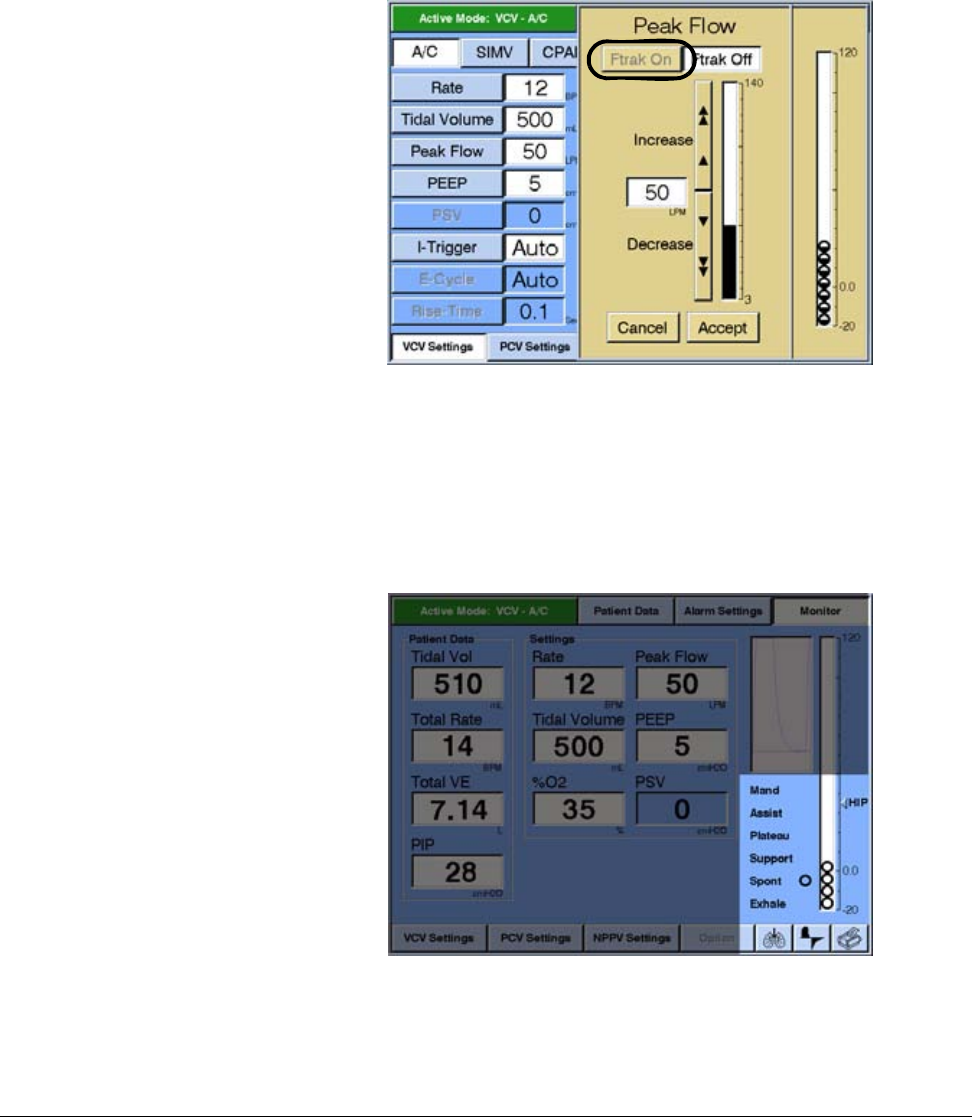
Chapter 13
13-84 Respironics V200 Ventilator Operator’s Manual REF 1057983 A
Options and Accessories
NOTE: If the Ftrak On button is grayed out in the settings window (Figure
13-41) then the Flow-Trak Option has not been installed. Contact
Respironics Customer Service
Within the U.S.A. 1-800-345-6443
Outside the U.S.A. 724-387-4000
Figure 13-41: FTrak On Button Grayed Out, Flow-Trak is Not Loaded
On the Screen When a patient initiates a Flow-Trak breath the ventilator screen shows the
Breath Indicator bubble change from mandatory (Mand) or Assist to
spontaneous (Spont).
Figure 13-42: Breath Indicator During Flow-Trak Breath

Options and Accessories
REF 1057983 A Respironics V200 Ventilator Operator’s Manual 13-85
Chapter 13
Breath Delivery The Flow-Trak option allows the ventilator to give additional flow to patients
who are not receiving the flows or volumes they desire by monitoring the
pressure during a mandatory or assist breath. If the patient draws more flow or
volume than what has been set, the inhalation pressure drops and Flow-Trak is
initiated. The target pressure during Flow-Trak is 2 cmH2O above PEEP. If the
patient’s effort to draw flow or volume drops below the set flows or volumes the
ventilator returns to VCV.
The ventilator cycles to exhalation only if the set tidal volume plus compliance
and BTPS compensation has been delivered (unless HIP has been met). If the
patient effort ceases and set volume has not been met, the breath will
continue to deliver flow until volume has been met.
Table 13-13: Breath Transitions
If the actual I-Time is greater than the calculated I-Time, the next scheduled
mandatory inspiration is postponed to ensure exhalation time.
NOTE: In VCV, the calculated I-Time is based on the set tidal volume, peak flow,
and waveform shape.
Inspiratory Hold Inspiratory hold is only allowed if the actual I-Time is less than or equal to the
calculated I-Time.
Respiratory
Mechanics The Flow-Trak option affects the following Respiratory Mechanics features.
Flow-Trak Cycling
Condition (following the delivery of set Vt) Response
The delivered flow meets the exhalation flow
threshold. The exhalation threshold is either the flow
trajectory that would have been followed had there not
been a Flow-Trak breath or 25% of measured peak
flow (whichever is larger).
The ventilator transitions to exhalation.
Exhalation effort detected (pressure exceeds 4.5
cmH20 above PEEP). The ventilator transitions to exhalation.
HIP condition has been met. The alarm sounds and ventilator
transitions to exhalation. See “Alarms”
on page 13-86.
I-Time too long condition has been met. The alarm sounds and ventilator
transitions to exhalation. See “Alarms”
on page 13-86.

Chapter 13
13-86 Respironics V200 Ventilator Operator’s Manual REF 1057983 A
Options and Accessories
Table 13-14: Respiratory Mechanics Maneuvers with Flow-Trak
Alarms The Flow-Trak option does not change the ventilator alarms with the exception
of those alarms found below in Table 13-15:. For a complete listing of
ventilator alarms and descriptions see Chapter 9, “Alarms”, Table 9-1: “Alarm
Alert Messages”.
Table 13-15: Flow-Trak Affected Alarms
NOTE: The I-Time too long alarm and/or the Low Inspiratory Pressure alarm will
sound if a circuit disconnect were to occur.
Respiratory Mechanics Maneuvers with Flow-Trak
Maneuver Affect of Flow-Trak
Static C & R The maneuver is cancelled if the patient initiates a Flow-Trak breath. A
message appears when the maneuver is cancelled due to the change in breath
type.
Dynamic C & R Dynamic C & R are not calculated for Flow-Trak breaths.
Ti/Ttot Ti/Ttot is not calculated for Flow-Trak breaths.
Peak Lung Flow Peak Lung Flow is calculated for Flow-Trak breaths.
Flow-Trak Affected Alarms
Alert Message Description
I-Time too long The breath transitions from inhalation to exhalation when 3.5
seconds has passed for adults or 2.5 seconds for pediatrics from
the start of the mandatory breath. If the operator’s settings result
in a calculated I-Time > 3.5 seconds for adults or 2.5 seconds for
pediatrics, then the calculated I-Time is the cycling criteria.
Low Inspiratory Pressure Not available for the Flow-Trak triggered breath only.
Options and Accessories
REF 1057983 A Respironics V200 Ventilator Operator’s Manual 13-87
Chapter 13
Respiratory Profile Monitor Interface (NICO-
Esprit) Option
The respiratory profile monitor interface (NICO-Esprit) software allows the
ventilator and the respiratory profile monitor to exchange information via a
bidirectional RS-232 serial link. Through this link, the ventilator supplies the
monitor with breath type and FIO2 information and in turn, the monitor
provides the ventilator with data for trending parameters related to measuring
CO2 elimination (VCO2).
System Requirements The following hardware and software is required for the proper use of the
respiratory profile monitor interface:
Table 13-16: respiratory profile monitor Interface Option Requirements
Respiratory Profile Monitor Interface (NICO-Esprit) Requirements
Monitor
NICO Monitor, Model 7300 Part number varies by
language
NICO2 Monitor, Model 7600
Respironics V200 Ventilator
Trending option loaded and enabled
Respironics V200 ventilator with the respiratory profile monitor interface
option enabled.
NOTE: Ventilators with the respiratory profile monitor software
installed are identified by an option label located near
the power switch.
Accessories
RS-232 serial communications 3’ cable
WARNING: Use only Respironics approved cables when
connecting to the communications port.
1018292
Mounting kit, respiratory profile monitor 10060784
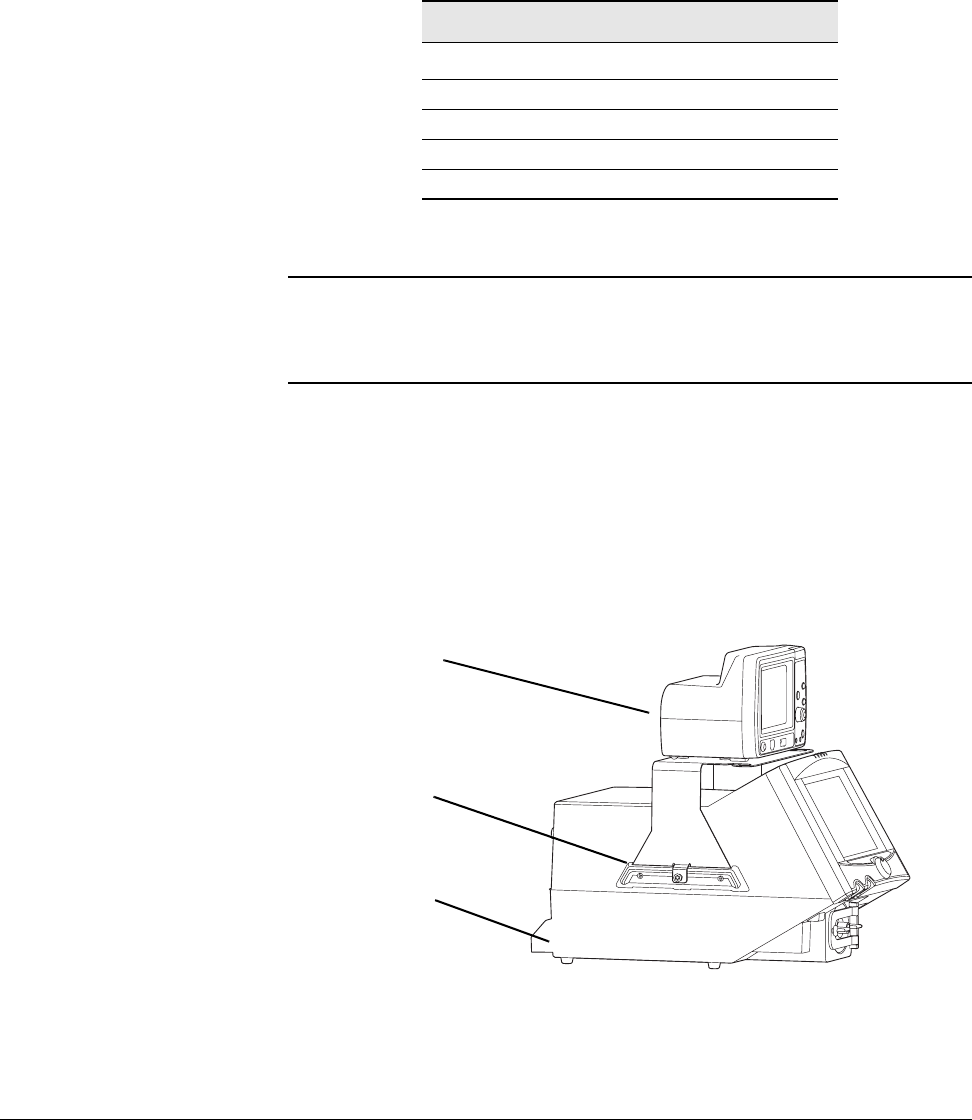
Chapter 13
13-88 Respironics V200 Ventilator Operator’s Manual REF 1057983 A
Options and Accessories
Communications
When the respiratory profile monitor interface (NICO-Esprit) option is installed,
the RS-232 communications port is configured for all communications
functions in the following manner:
Hardware Setup Once the software is loaded on the ventilator, the necessary hardware can be
attached.
1. Attach the respiratory profile monitor to the mounting bracket, and
then attach the assembly to the ventilator. Assembly instructions are
included with the bracket.
Figure 13-43: Assembled Monitor, Bracket, and Ventilator
Ventilator RS-232 Communications Port Settings
Specification Setting
Baud Rate 19200
Data Bits 8
Parity None
Stop Bits 1
Table 13-17: Ventilator RS-232 Communications Port Settings
NOTE: The respiratory profile monitor interface (NICO-Esprit) option uses the
communications port on the ventilator exclusively. The respiratory
profile monitor interface (NICO-Esprit) option and the RS-232
Communications Option 2 cannot be installed on the same ventilator.
Respiratory profile
monitor
Mounting bracket
Ventilator
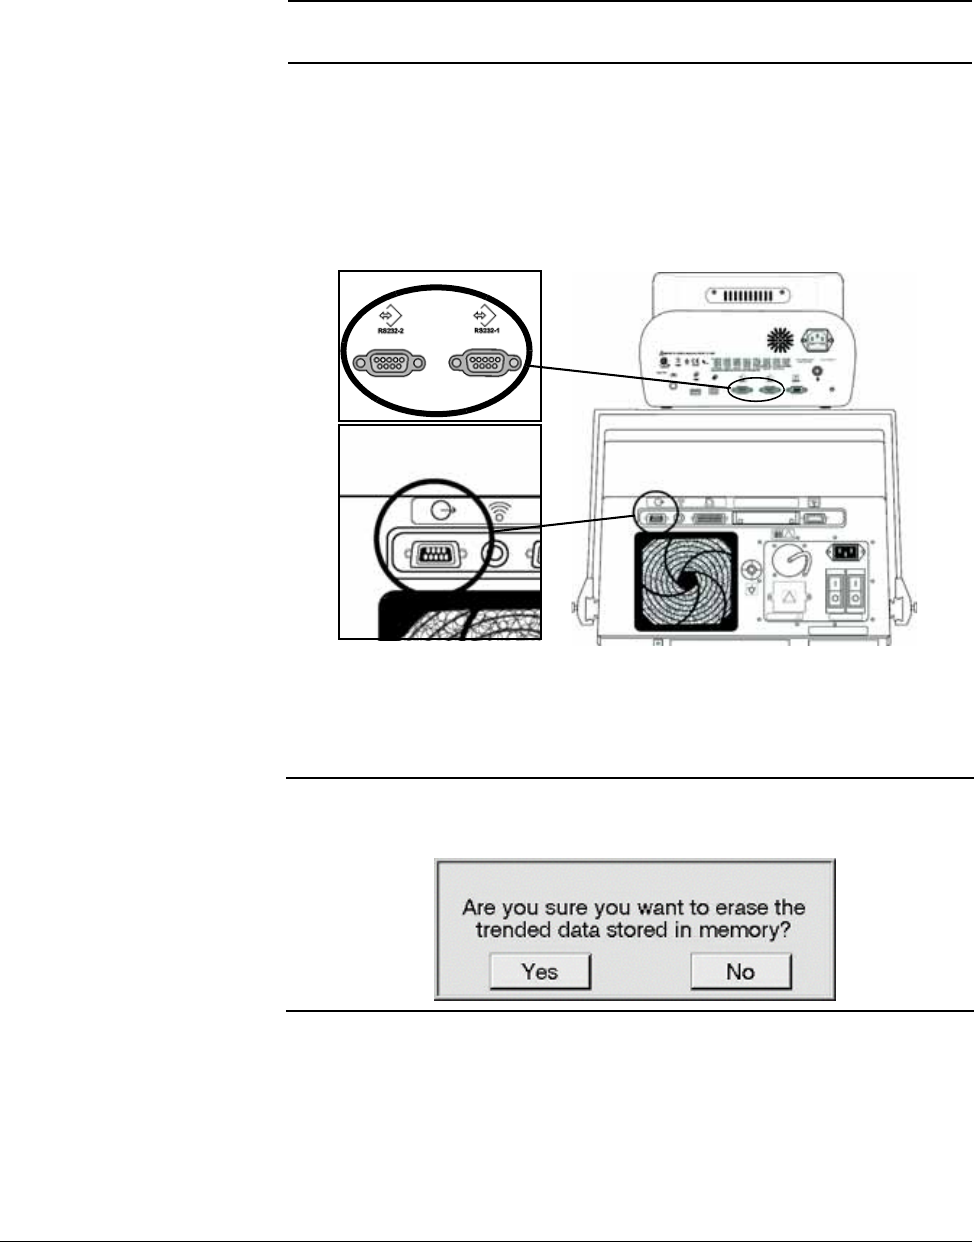
Options and Accessories
REF 1057983 A Respironics V200 Ventilator Operator’s Manual 13-89
Chapter 13
2. Attach one end of the RS-232 serial communications cable to the RS-
232 port 1 or 2 on the back of the respiratory profile monitor.
See Figure 13-44.
3. Attach the other end of the RS-232 serial communications cable to
the serial communications port on the back of the ventilator. See
Figure 13-44.
Figure 13-44: RS-232 Communication Ports for the Monitor and the Ventilator
4. Connect the patient circuit to the ventilator.
5. Power up the ventilator if not already operating.
6. Power up and connect the monitor according to the user’s manual for
your Respironics respiratory profile monitor.
• Inspect the monitor before powering up.
• Press the Operate/Standby key to turn the monitor on.
WARNING: Always turn the ventilator power OFF before connecting additional
equipment.
NOTE: When powering on the ventilator for the first time after installing the
respiratory profile monitor software, the Trending Memory Card must be
reformatted. Press YES when asked the question:
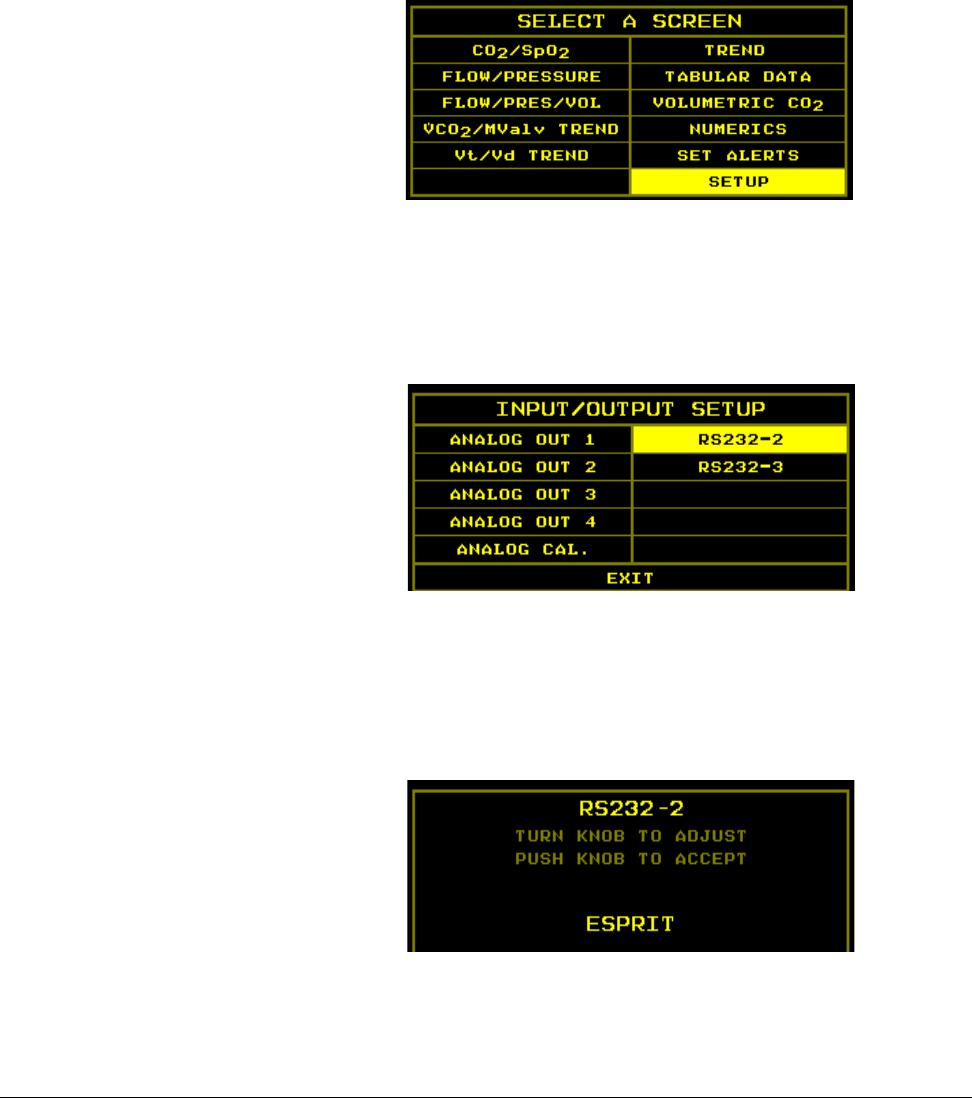
Chapter 13
13-90 Respironics V200 Ventilator Operator’s Manual REF 1057983 A
Options and Accessories
• Connect the sensors to the monitor, ventilator circuit, and patient
according to the Respiratory Monitoring section of the user’s
manual for your Respironics respiratory profile monitor.
7. Select the NICO-Esprit interface on the respiratory profile monitor.
• Press the MENU key to activate the SELECT A SCREEN menu.
Figure 13-45: Select A Screen Menu screen
• Turn the knob to highlight SETUP and then press the knob. The
SETUP screen appears.
• Turn the knob to highlight INPUT/OUTPUT and then press the
knob. The INPUT/OUTPUT screen appears.
Figure 13-46: Input/Output Setup Screen
• Turn the knob to highlight RS232-2 and then press the knob. The
RS232-2 screen appears
• Turn the knob to highlight ESPRIT and then press the knob. The
INPUT/OUTPUT screen appears.
Figure 13-47: ESPRIT Choice for RS232-2 Port Screen

Options and Accessories
REF 1057983 A Respironics V200 Ventilator Operator’s Manual 13-91
Chapter 13
• Turn the knob to highlight EXIT and then press the knob. Turn the
knob to highlight EXIT again and then press the knob.The monitor
returns to the SETUP screen.
The ventilator and the respiratory profile monitor will begin communication
within 60 seconds.
RS-232
Communications The bidirectional communication between the respiratory profile monitor and
ventilator is initiated by the monitor. The ventilator recognizes the connect
request message from the monitor and responds.
Information Transferred from the Respiratory Profile Monitor to the
Ventilator
The respiratory profile monitor provides the ventilator with the data listed in
the following table. The monitor sends the average value for each parameter for
the previous 60 seconds.
Table 13-18: Information Transferred from the Monitor to the Ventilator
Information Transferred from the Respiratory Profile Monitor to the Ventilator
Data Description
CO-a Cardiac Output Average
NOTE: Available only when the Cardiac Output option is
installed.
SpO2O2 Saturation
ETCO2End Tidal CO2
VCO2Volume CO2
Vtalv Alveolar Tidal Volume
MValv Alveolar Minute Volume

Chapter 13
13-92 Respironics V200 Ventilator Operator’s Manual REF 1057983 A
Options and Accessories
Information Transferred from the Ventilator to the Respiratory Profile Monitor
The ventilator provides the respiratory profile monitor with the following
information.
Table 13-19: Information Transferred from the Ventilator to the Monitor
Trended NICO Data The ventilator captures the data sent from the respiratory profile monitor and
stores it on the PCMCIA card (PC Card). The Trending screen makes it possible
to display ventilator and monitor information for intervals from 2 to 72 hours.
To access the respiratory profile monitor trended data:
1. Touch the Patient Data button at the top of any settings screen (VCV,
PCV, or NPPV).
Information Transferred from the Ventilator to the Respiratory Profile Monitor
Data Description
Breath Type Mandatory, Assisted, Spontaneous, or Supported
FIO2The percentage of oxygen in the gas delivered to the patient.
NOTE: If the optional oxygen sensor for the
ventilator is used, this number will be the
FIO2 measured by the sensor. If the
optional oxygen sensor is not used, this will
be the set FIO2.
NOTE: If the Graphics option is not installed, the Graphics button is grayed out
and Trending is only accessible from the Patient Data screen.
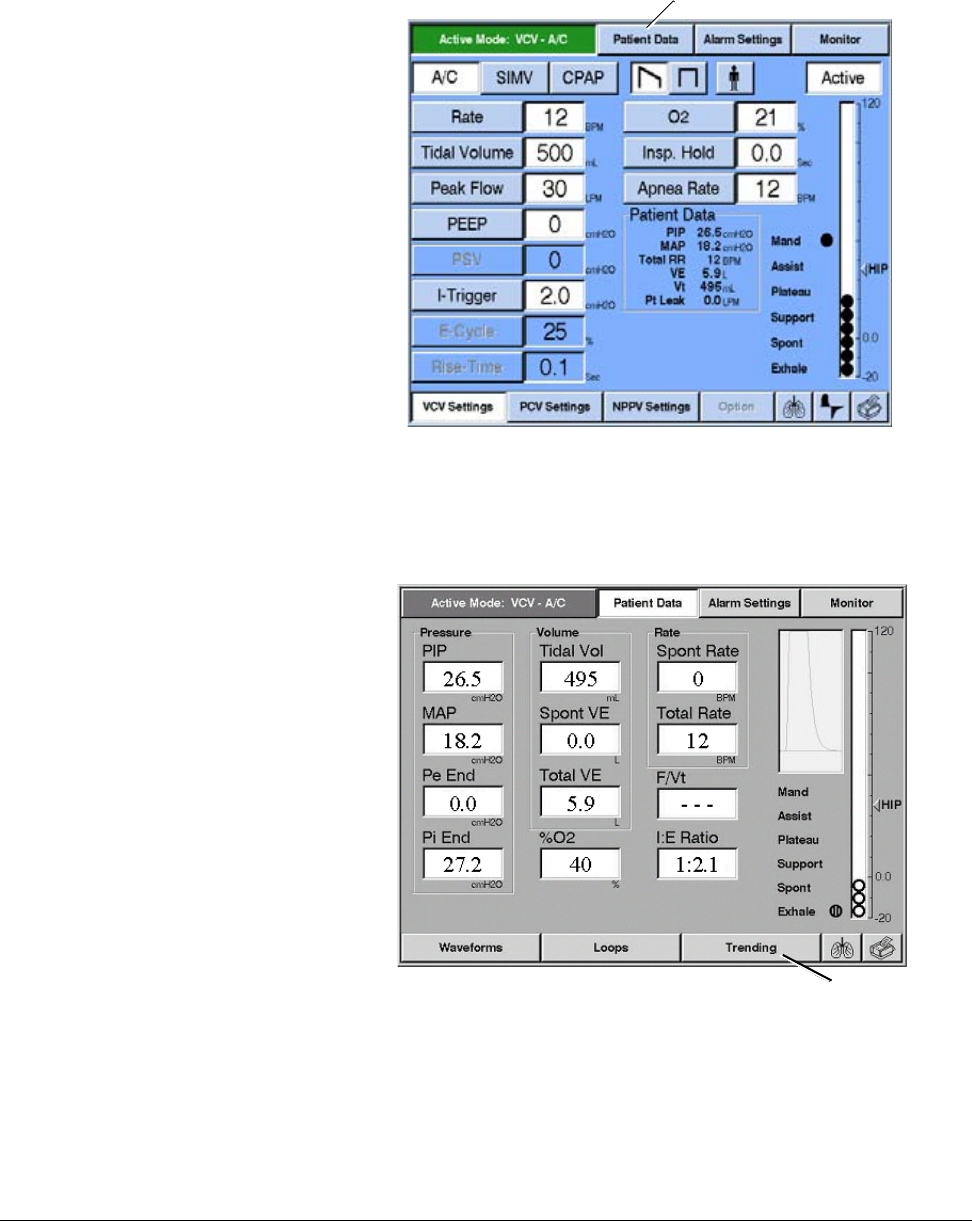
Options and Accessories
REF 1057983 A Respironics V200 Ventilator Operator’s Manual 13-93
Chapter 13
Figure 13-48: VCV Settings Screen
2. Touch the Trending button to display the Trending screen (Figure 13-
33).
Figure 13-49: Patient Data Screen
The Trending screen (Figure 13-34) displays three trending waveforms as well
as a summary of ventilator settings and patient data. You can change the
waveforms and time scale at any time.
Patient Data button
Trending button
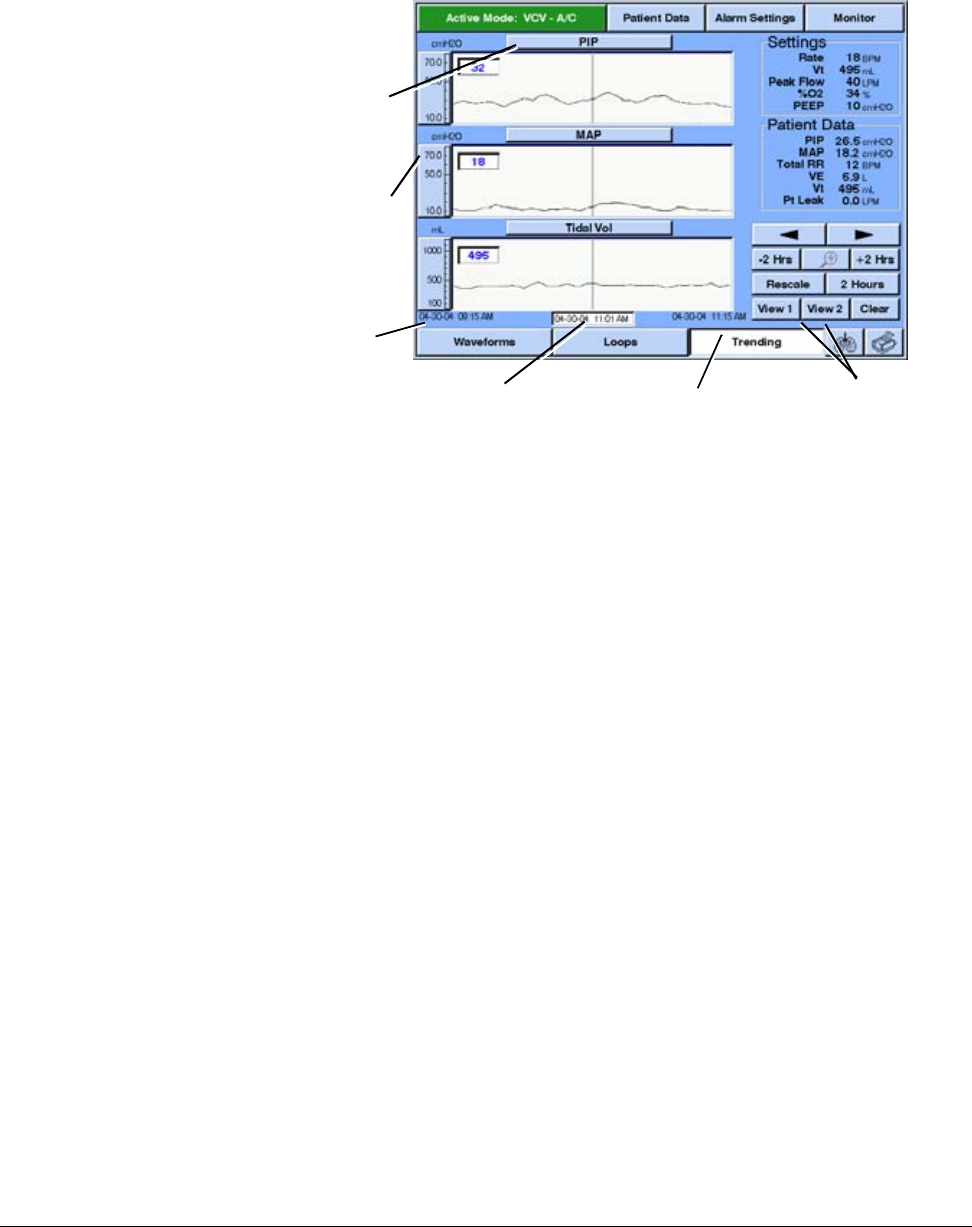
Chapter 13
13-94 Respironics V200 Ventilator Operator’s Manual REF 1057983 A
Options and Accessories
Figure 13-50: Trending Screen
The parameter select button above each waveform shows the name of the
currently displayed parameter. To choose a different parameter for display,
press the button above the waveform. The Trended Data pop-up window
appears showing the available data choices.
3. Press the NICO button on the Trended Data pop-up window to view the
available parameters. See
Figure 13-51.
4. Select a parameter button then press Accept or Cancel to return to the
Trending Data screen.
Parameter
select
button
Manual
rescale
button
Begin
trending
time
Cursor time and date View 1, View 2 buttonsEnd trending time
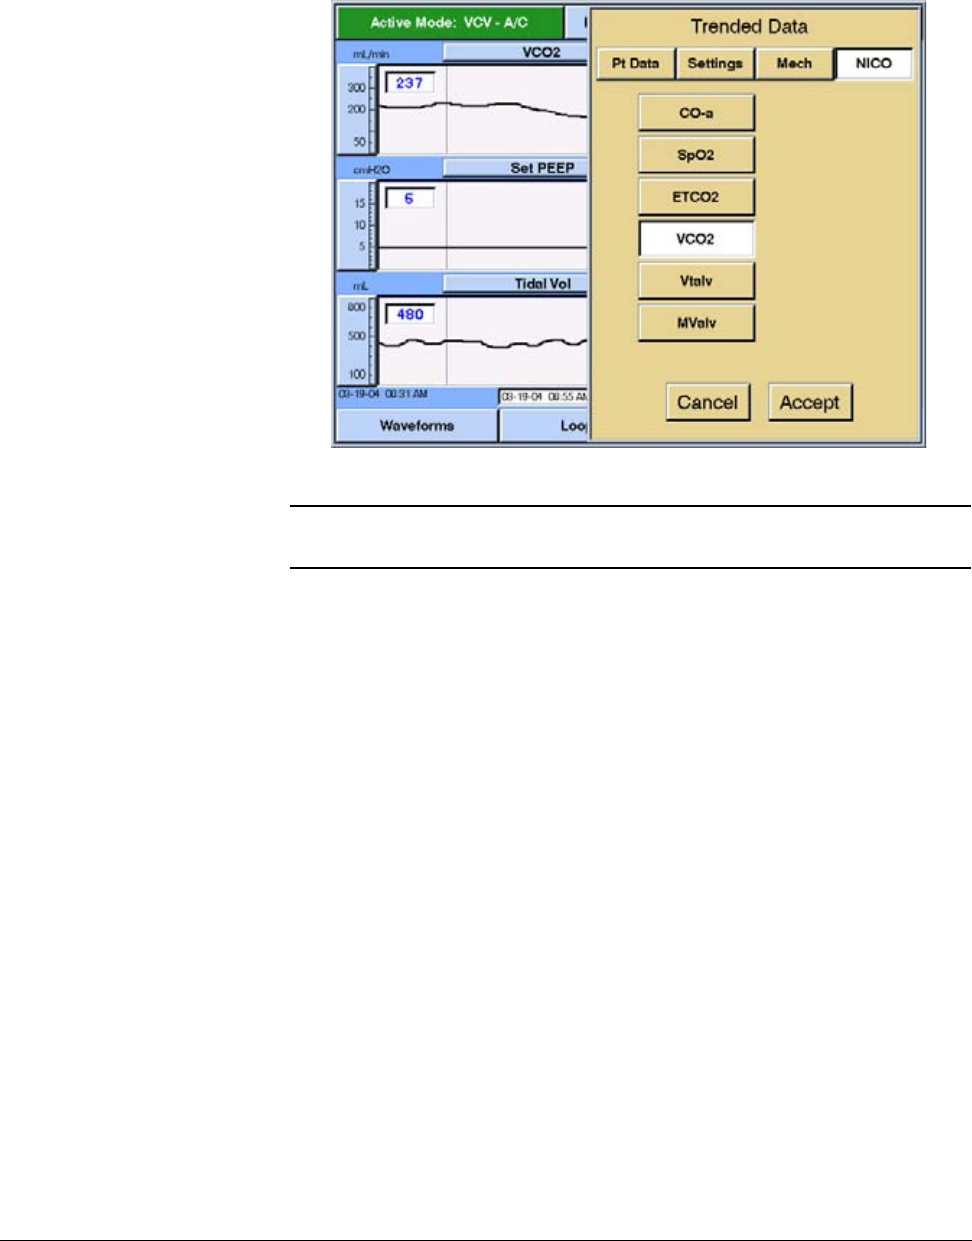

Chapter 13
13-96 Respironics V200 Ventilator Operator’s Manual REF 1057983 A
Options and Accessories
Troubleshooting
Troubleshooting
NICO button does not
appear on the Trended Data
screen
Probable Cause:
What to Do:
The ventilator may not have respiratory profile
monitor interface software.
Contact Respironics Technical Service:
1-800-345-6443.
NICO button on the
Trended Data screen is
grayed out
Probable Cause:
What to Do:
The respiratory profile monitor interface option
is loaded but not enabled on the ventilator.
Contact Respironics Technical Service:
1-800-345-6443.
Ventilator is not capturing
data sent from the
respiratory profile monitor
Probable Cause:
What to Do:
The bidirectional communication link is not
functioning properly.
Check that the RS-232 serial communications
cable (P/N 1018292) is being used.
Check cable connections.
Preform the steps listed on page 13-90 and
page 13-91 for setting up the monitor with the
RS-232 input/output for the ventilator.
Cycle the power on the monitor.
If there is no improvement, Contact
Respironics Technical Service:
1-800-345-6443.
The monitor displays the
CHECK COMMUNICATION
message
Probable Cause:
What to Do:
The bidirectional communication link is not
functioning properly.
Check that the RS-232 serial communications
cable (P/N 1018292) is being used.
Check cable connections.
If there is no improvement, Contact
Respironics Technical Service:
1-800-345-6443.
Probable Cause:
What to Do:
The ventilator may not have respiratory profile
monitor software.
If the NICO button on Trended Data screen is
grayed out, the respiratory profile monitor
interface option is loaded but not enabled on
the ventilator. Contact Respironics Technical
Service: 1-800-345-6443.
Any other condition What to Do: Contact Respironics Technical Service:
1-800-345-6443.
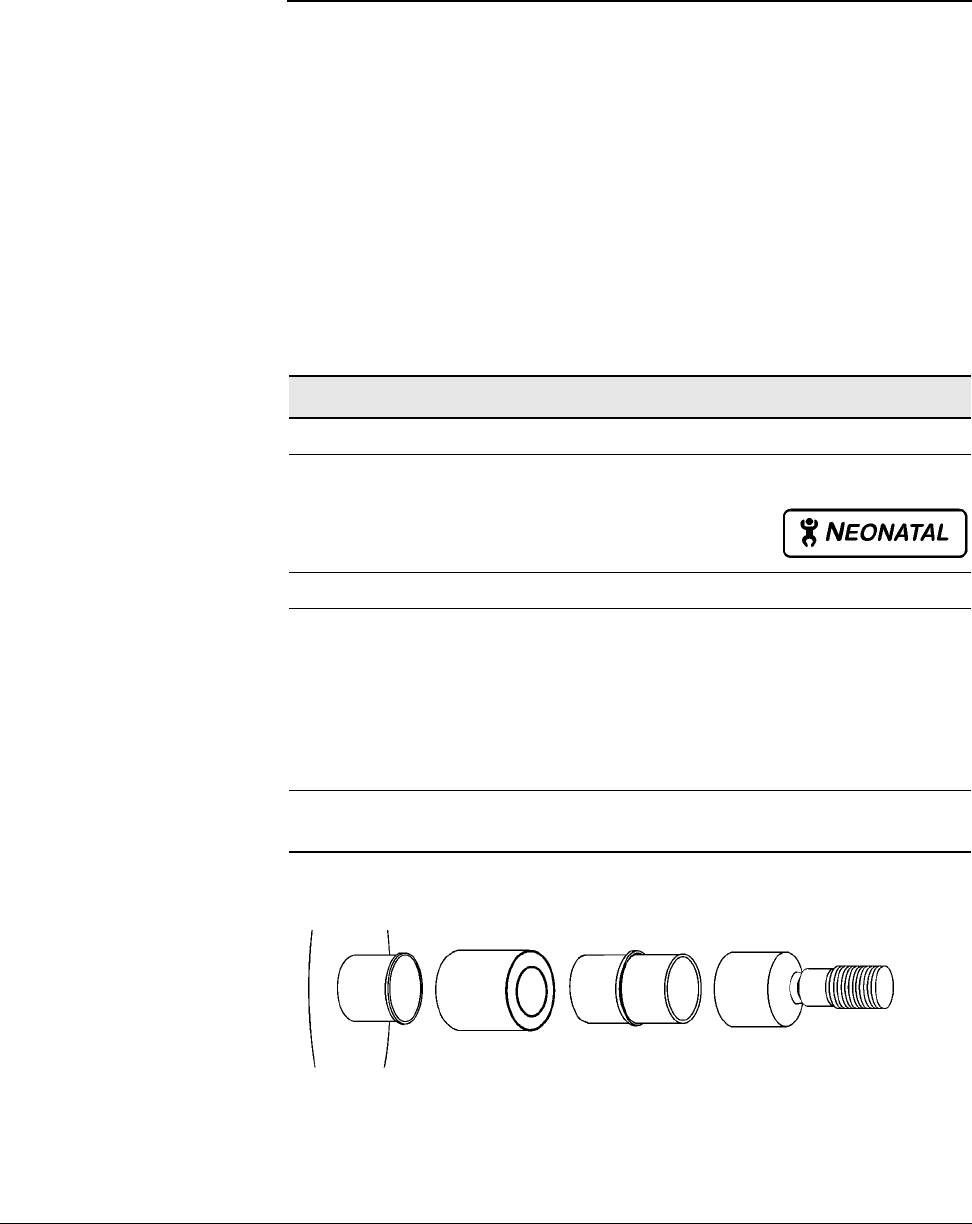
Options and Accessories
REF 1057983 A Respironics V200 Ventilator Operator’s Manual 13-97
Chapter 13
Neonatal Option
The Neonatal option allows the Respironics V200 Ventilator to ventilate
intubated neonatal patients with an ideal body weight range of 0.5 - 6.5 kg
(1.10 - 14.33 lb.) and an endotracheal tube I.D. range from 2.5 - 4.0 mm.
The option provides pressure control in A/C, SIMV, and Apnea ventilation and
also provides pressure support in SIMV and CPAP. The Neonatal Option is not
available in VCV or NPPV modes.
System Requirements The Neonatal option requires the following software and accessories for proper
use:
Figure 13-52: Circuit to Filter Connection
Neonatal option Requirements
Respironics V200 Ventilator
Neonatal option loaded and enabled.
NOTE: Ventilators with the Neonatal option software
installed are identified by the option label
located near the power switch.
Recommended Accessories Part Number
Neonatal patient circuits (10 mm I.D.)
Fisher & Paykel reusable circuit
Hudson RCI disposable circuit
Fisher & Paykel disposable circuit
22mm, Male x Male Connector (Refer to Figure 13-52.)
coupling, Straight Silicone
900MR780
780-07
RT131
(RT125 is EU equivalent)
1002505
500-1000-43
NOTE: We recommend using approved circuits or equivalent when connecting
to the ventilator.
Table 13-20: Neonatal Option Requirements
Filter Connector CircuitSilicone coupler
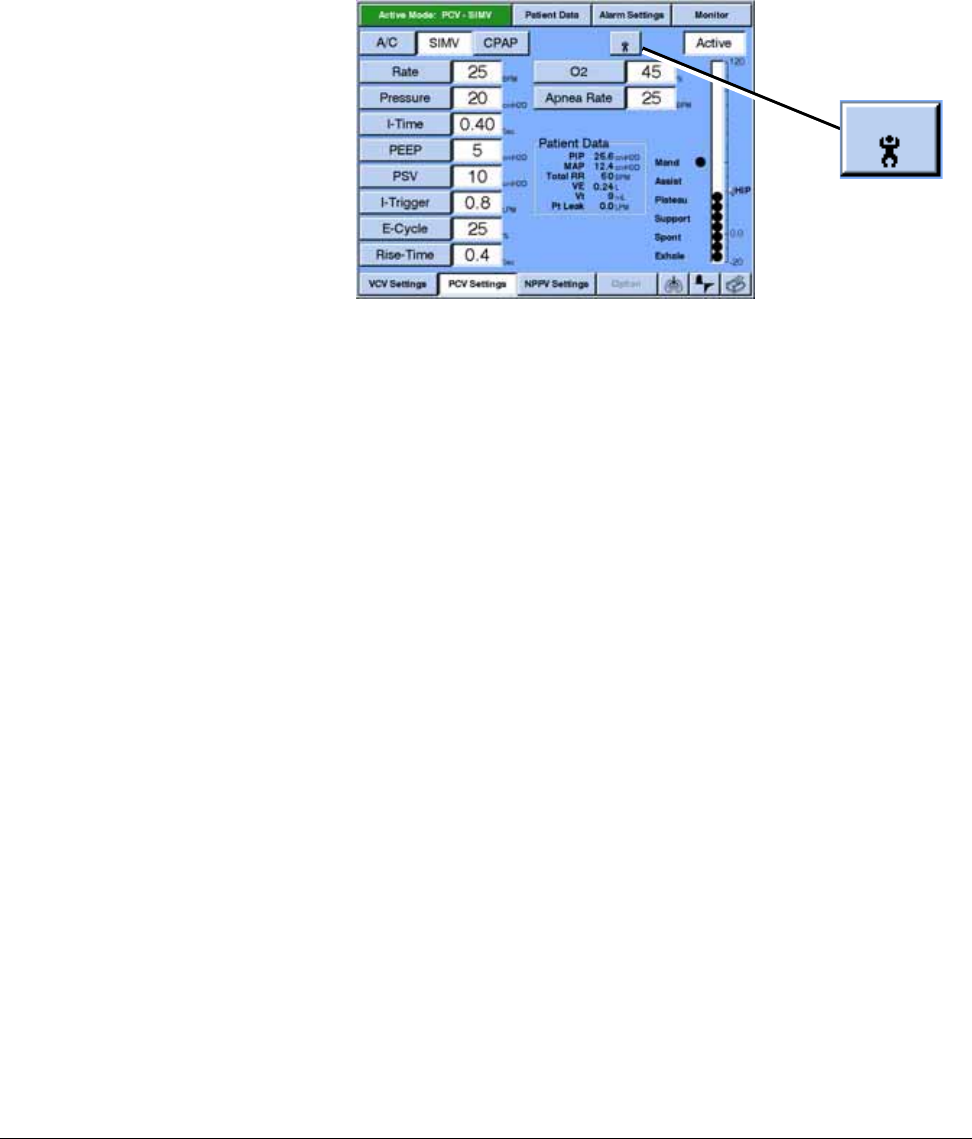
Chapter 13
13-98 Respironics V200 Ventilator Operator’s Manual REF 1057983 A
Options and Accessories
Changing Patient
Types The Neonatal option is available once the software option is installed. The
current patient is identified by the icon found on any active ventilation type
screen. In Figure 13-53 the neonatal patient type has been selected, which is
identified by the neonatal patient type icon.
Figure 13-53: Identifying the Neonatal Patient Type
Changing to or from the neonatal patient type requires that the Short Self-Test
(SST) or Extended Self-Test (EST) must first be run. Attempts to change
patient types to or from the neonatal patient type while in the active ventilation
type screen causes a message box to appear explaining that you must run SST
or EST in order to change patient type.
Selecting Neonatal Patient Type
To select the neonatal patient type, you must enter Diagnostic Mode.
1. Power off the ventilator.
2. Power on the ventilator while holding down the ALARM RESET and
100% O2 keys for approximately 5 seconds.
A message appears on the ventilator screen that prompts the user to
‘Verify that the patient is disconnected prior to proceeding.’ Press OK
to enter Diagnostic Mode.
3. Once you’ve entered Diagnostic Mode, select either SST or EST.
4. Press Start SST (or if in EST, Start EST).
5. Select Neonatal patient type and then follow the remaining on-screen
instructions.
The next time the ventilator is powered on, it will be set for neonatal patients.
For optimum performance use a Neonatal patient circuit (10 mm I.D.) with
compliance compensation enabled.
These same steps apply when changing to Adult or Pediatric patient type from
Neonatal.
Neonatal
patient type
icon
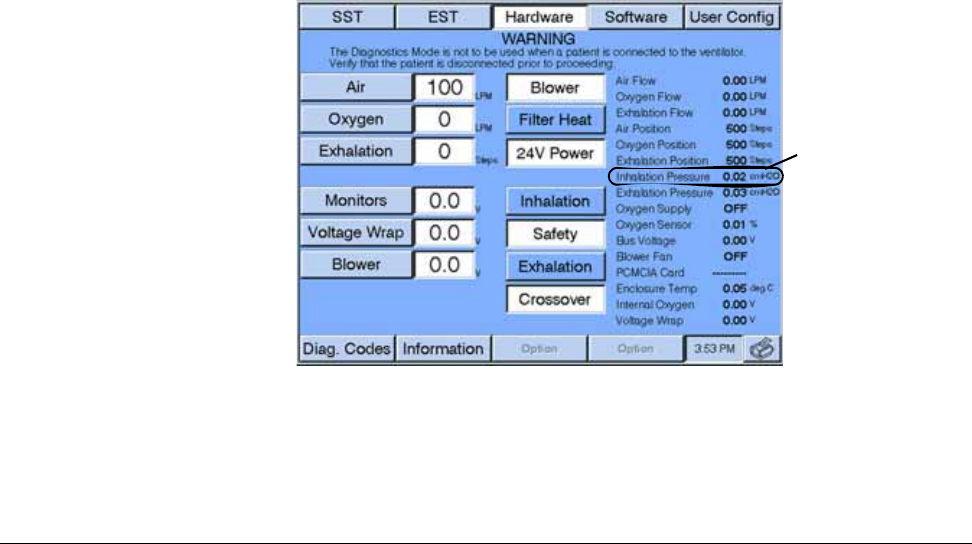
Options and Accessories
REF 1057983 A Respironics V200 Ventilator Operator’s Manual 13-99
Chapter 13
Heated Filter Test
The heated filter test in EST for adult and pediatric patient types automatically
tests for pressure drop of the exhalation filter. This portion of EST is not
possible with neonatal circuits. We recommend running this test according to
the filter manufacturers recommendations. The following steps can be run in
diagnostics mode:
1. Power off the ventilator.
2. Power on the ventilator while holding down the ALARM RESET and
100% O2 keys for approximately 5 seconds.
A message appears on the ventilator screen prompting the user to
‘Verify that the patient is disconnected prior to proceeding.’ Press OK
to enter Diagnostic Mode.
3. Once you’ve entered Diagnostic Mode, select the HARDWARE screen.
4. Press the SAFETY button so that it has a white background.
5. Attach a length of 22 mm I.D. tubing to the gas outlet port of the
ventilator.
6. Set the air flow to 100 LPM. Record what the inhalation pressure
sensor is reading. See Figure 13-54.
7. Attach the filter to the end of the length of 22 mm I.D. tubing and
again record the inhalation pressure sensor reading. See Figure 13-
54.
The difference between the first pressure reading and second pressure reading
should not be greater than 4 cmH2O (or manufacturer’s recommendations).
Figure 13-54: Hardware Screen in Diagnostics Mode, Inhalation Pressure reading
Inhalation
Pressure

Chapter 13
13-100 Respironics V200 Ventilator Operator’s Manual REF 1057983 A
Options and Accessories
Initial Neonatal Settings
When the ventilator is first powered on and the neonatal patient type is
selected, the initial startup settings found in Table 13-21: are applied. Each
subsequent startup will display the settings from the last use of the ventilator
of that patient type with the exception of O2. The last O2 setting used on the
ventilator will remain regardless of patient type.
Initial Patient Settings, Ranges
Ventilation Settings Value Ranges
Ventilation Mode PCV - SIMV AC, SIMV, CPAP
Rate 20 BPM 1 - 150 BPM
Pressure 10 cmH2O 5 - 100 cmH2O
I-Time 0.3 Sec 0.1 - 2.0 Sec
PEEP 3 cmH2O0 - 35 cmH
2O
PSV 0 cmH2O 0 - 100 cmH2O
I-Trigger 2.0 L/Min 0.3 - 10.0 L/Min
E-Cycle 25% 10 - 80%
Rise-TIme 0.2 Sec 0.1 - 0.5 Sec
O2 % same as last O2 setting 21 - 100%
Apnea Rate 20 BPM 1 - 80 BPM
Alarm Settings Value Ranges
High Press 30 cmH2O 10 - 105 cmH2O
Low Insp Press 5 cmH2O 3 - 105 cmH2O
Low Peep 0 cmH2O 0 - 35 cmH2O
Low Vt Mand 10 mL 0 - 300 mL
Low Vt Spont 3 mL 0 - 300 mL
High Rate 150 BPM 0 - 150 BPM
High VE 1.2 L 0.00 - 5.0 L
Low VE 0.3 L 0.00 - 5.0 L
Apnea 20 Sec 10 - 60 Sec
I-Time Too Long sounds after 1.5 Sec of spont
breath
Table 13-21: Initial Neonatal Patient Settings
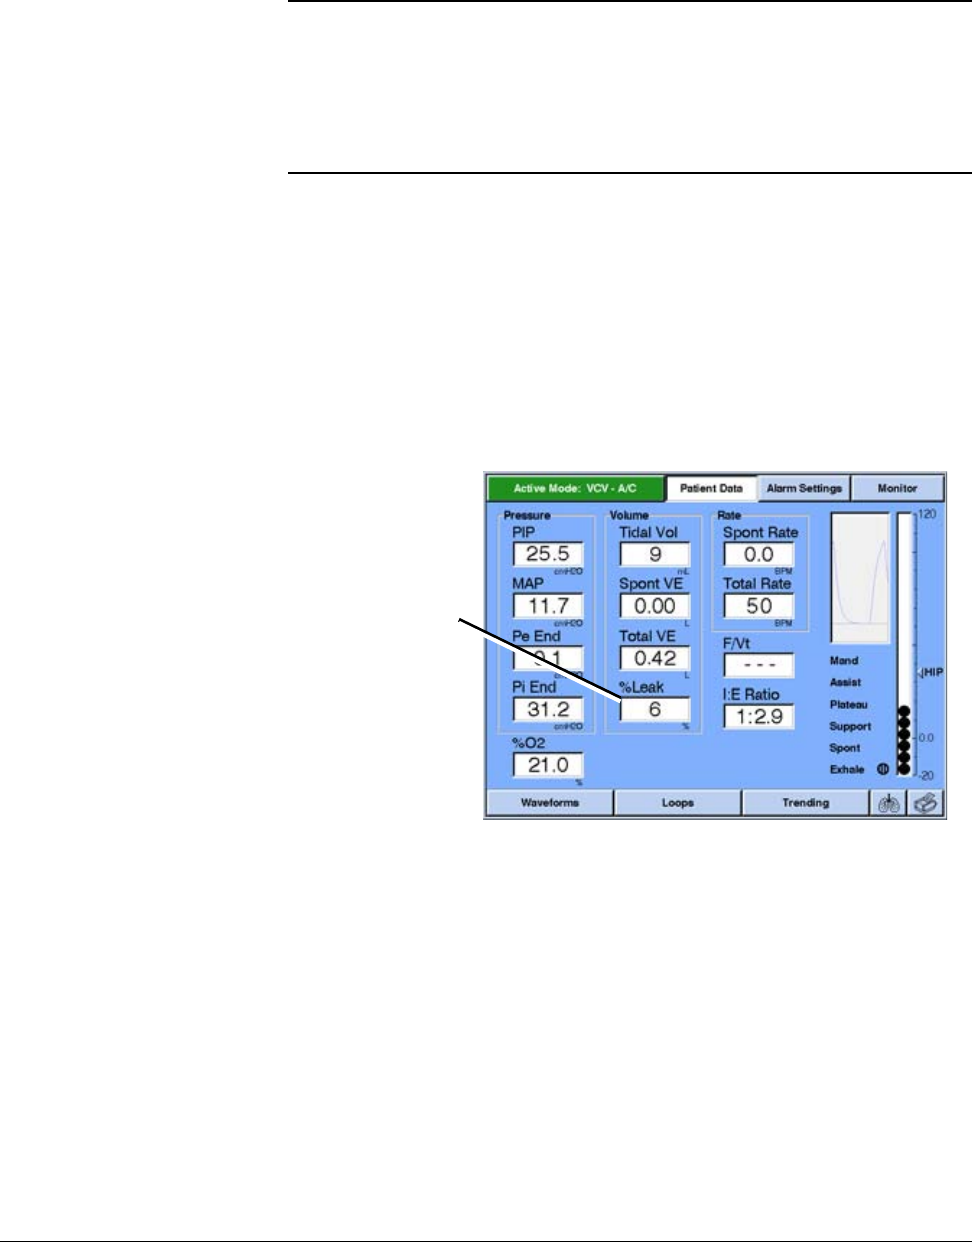
Options and Accessories
REF 1057983 A Respironics V200 Ventilator Operator’s Manual 13-101
Chapter 13
Percent Leak When the neonatal software option is loaded on the ventilator, a % Leak
window appears on the Patient Data screen. The window displays the
estimated leak of the delivered volume as a percentage. The % Leak value is
updated at the beginning of each inhalation. The % Leak is available for all
patient types when the neonatal software option is loaded. While the estimate
for percent leak is not a precise measurement it can be used to trend relative
changes in leak delivered volume.
Figure 13-55: Patient Data Screen With % Leak
NOTE: Patient data ranges and accuracies can be found in Chapter 12,
“Technical Specifications” with the exception of the Exhaled Tidal
Volume. The accuracy for exhaled Tidal Volume is ±(4ml ±10%)
NOTE: Neither Respiratory Mechanics nor Expiratory Hold are active when the
neonatal patient type is selected. Flow trigger is the only trigger type
available. All other features apply.
Percent Leak
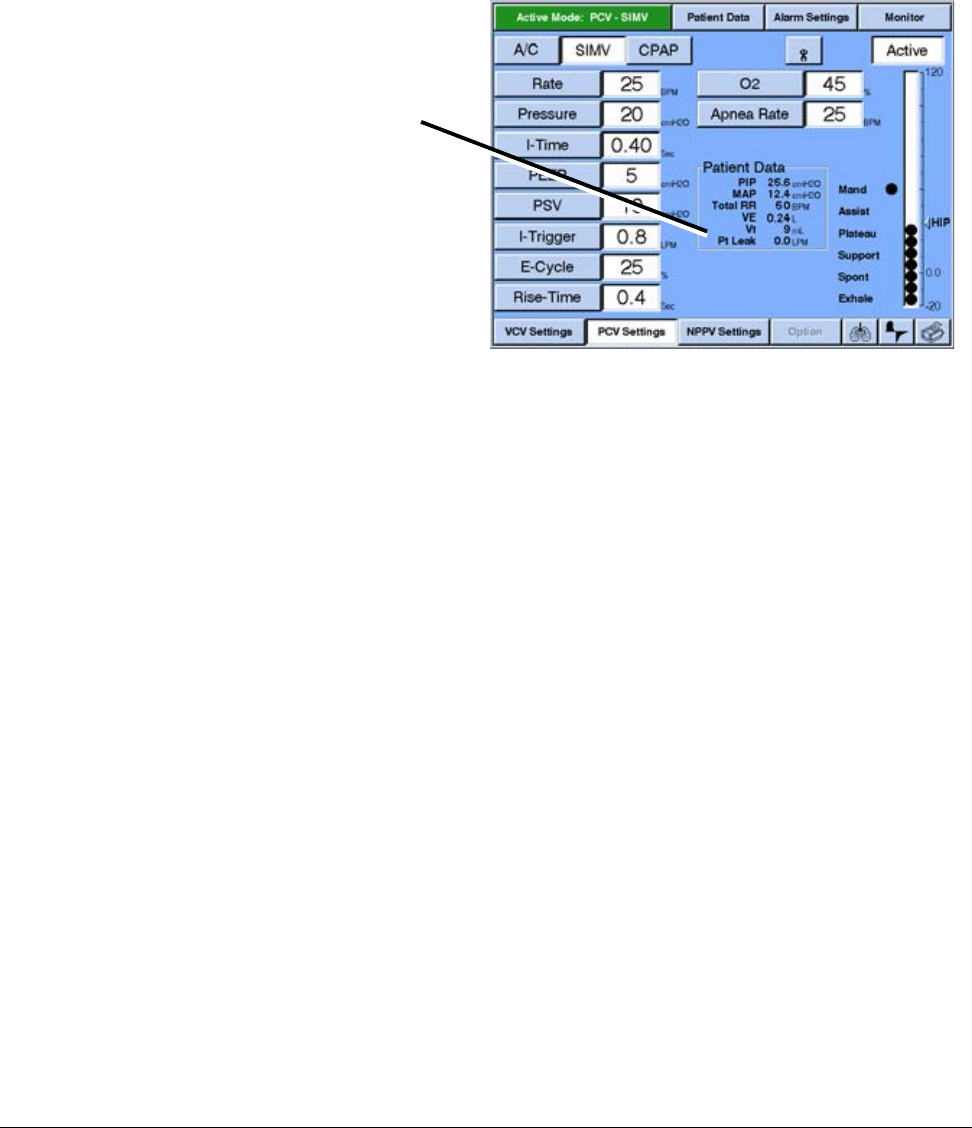
Chapter 13
13-102 Respironics V200 Ventilator Operator’s Manual REF 1057983 A
Options and Accessories
Patient Leak Values Patient Leak values (as seen in the Patient Data window, Figure 13-56)
between 0 and 1 LPM are rounded values. Refer to Chapter 7, “Operating
Theory”, for more information about Patient Leak Display.
Figure 13-56: Patient Data Window
Patient Leak

Options and Accessories
REF 1057983 A Respironics V200 Ventilator Operator’s Manual 13-103
Chapter 13
Speaking Mode Option
The Speaking Mode software option for the Respironics V200 Ventilator allows
tracheostomized adult and pediatric patients who meet certain criteria to
vocalize without the need of a speaking valve. The Speaking Mode software,
when activated, closes the ventilator’s exhalation valve, keeping it closed
during the expiratory phase. This action redirects airflow around the deflated
balloon cuff on the tracheostomy tube, through the larynx and pharynx, and
out through the mouth. As the air flow passes through the vocal cords, speech
is returned.
Speaking Mode provides pressure control and volume control in A/C, SIMV,
CPAP, Pressure Support, and in the Flow-Trak ventilator option (if enabled).
Speaking Mode is not available in NPPV mode, Respiratory Mechanics, and
Neonatal options.
Ventilators installed with Speaking Mode option software have the following
identifying label located near the power switch:
Figure 13-57: Speaking Mode Option Label
Warnings, Cautions,
and Notes Warnings
A warning indicates a condition that could cause injury to a patient or operator
if instructions are not followed.
• Read and understand these Speaking Mode Option instructions before
using Speaking Mode on a patient.
• Wait at least 72 hours after a tracheostomy before initiating Speaking
Mode.
• Monitor patients with trained medical personnel when using Speaking
Mode.
• COMPLETELY DEFLATE the tracheostomy tube cuff before activating
Speaking Mode.
• Do not use while patient is sleeping, unresponsive, or comatose.
• Do not use with patients with upper airway obstruction.
• Do not use with foam cuff tracheostomy tubes.

Chapter 13
13-104 Respironics V200 Ventilator Operator’s Manual REF 1057983 A
Options and Accessories
• Do not use with neonatal tracheostomy tubes.
• Do not use on neonates.
• Do not inflate the tracheostomy tube cuff until Speaking Mode has
been turned off.
• Do not use on patients who are dependent on PEEP therapy.
• Do not use with HME filters.
• Discontinue using Speaking Mode promptly and institute appropriate
ventilation if the patient experiences difficulty or their status
deteriorates from baseline parameters.
• Perform an airway patency test immediately after activating Speaking
Mode.
NOTE: Speaking Mode is available ONLY in invasive ventilation mode.
Patient Preparation Using Speaking Mode on a patient requires preparation before activating the
mode. Refer to the Sequence for Use diagram in Figure 13-58 and follow the
necessary steps before starting Speaking Mode and discontinuing Speaking
Mode. The Speaking Mode Clinical Guide describes patient care steps in
detail.
WARNING: Read and understand these Speaking Mode Option instructions before using
Speaking Mode on a patient.
WARNING: Wait at least 72 hours after a tracheostomy before initiating Speaking
Mode.
Options and Accessories
REF 1057983 A Respironics V200 Ventilator Operator’s Manual 13-105
Chapter 13
Figure 13-58: Speaking Mode Sequence for Use
Tracheostomized patient ventilated in
(PSV, PCV, VCV, SIMV, CPAP) mode
PASS
Baseline clinical
parameters
Patient
assessment
Observe patient
settings
Monitor with pulse
oximeter
Instruct patient
Suction oral airway
and tracheostomy
tube
Activate Speaking Mode
on the ventilator
Confirm airway
patency
Position patient
Deflate cuff
Encourage speech
Discontinue Speaking Mode
Inflate cuff Check ventilator
settings and alarms Procedure
complete
Procedure
halted
PASS
FAIL
FAIL
Monitor
patient FAIL
PASS
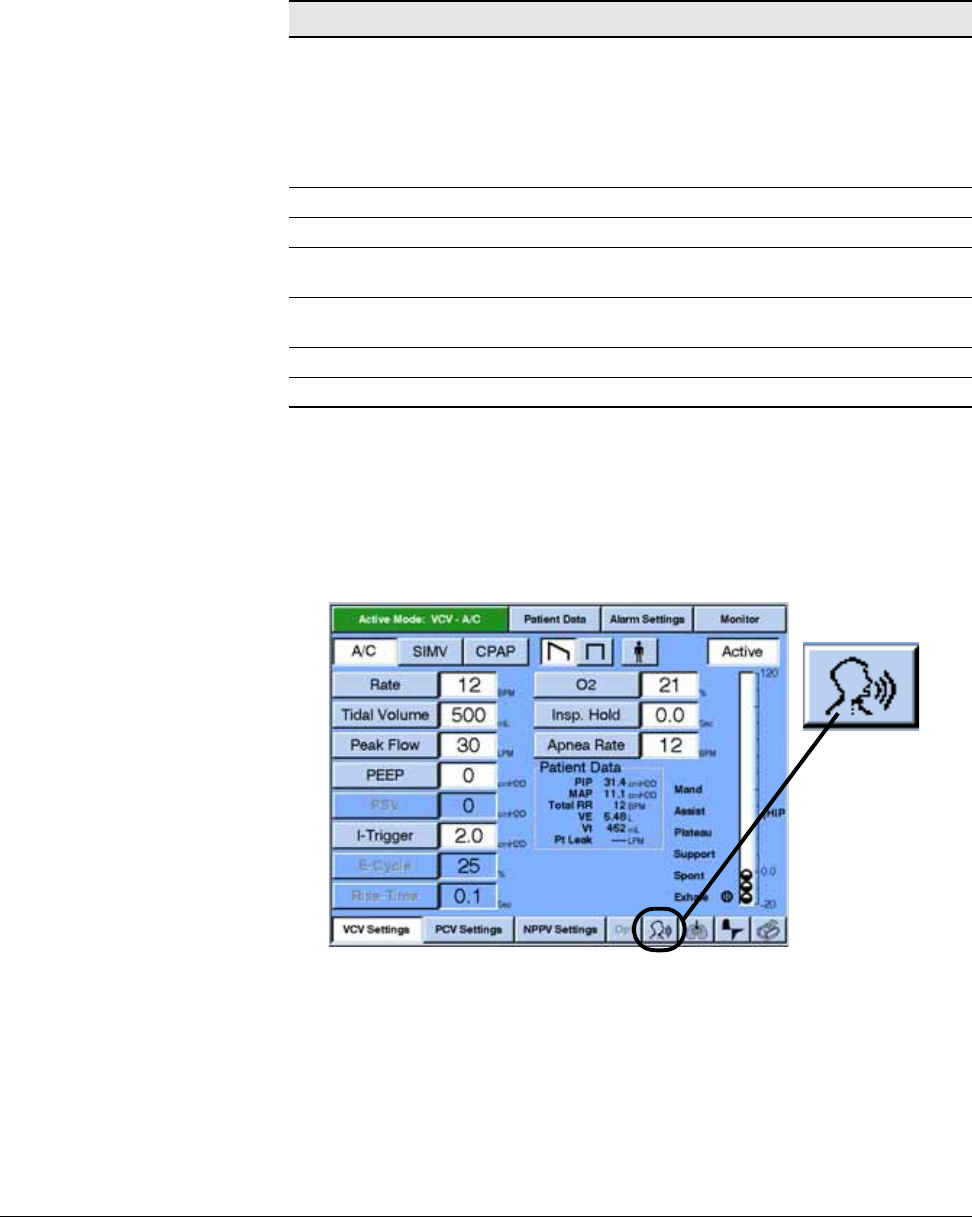
Chapter 13
13-106 Respironics V200 Ventilator Operator’s Manual REF 1057983 A
Options and Accessories
Settings
Starting Speaking
Mode Prepare the patient and deflate the tracheostomy cuff.
1. Press the Speaking Mode button.
Figure 13-59: Speaking Mode Button
The first message box appears, Turn Speaking Mode On?
This message box explains the changes that will occur while the ventilator is
operating in Speaking Mode.
Speaking Mode Ventilator Settings
Available in Modes Pressure Control Ventilation (AC, SIMV, and CPAP)
Volume Control Ventilation (AC, SIMV, and CPAP)
Pressure Support Ventilation (SIMV and CPAP)
Apnea Ventilation
Patient Type: Adults & Pediatrics
PEEP Automatically reset to zero and low PEEP alarm is reset to zero
Trigger-type Automatically will switch from flow triggering, if previously selected, to
a pressure triggering of 1 cm H2O
Alarm Changes Exhaled volume alarms automatically change to delivered volume
alarms
Patient Data Trended and displayed values based on delivered volumes
Mechanics Respiratory mechanics feature not available
Speaking Mode
Button
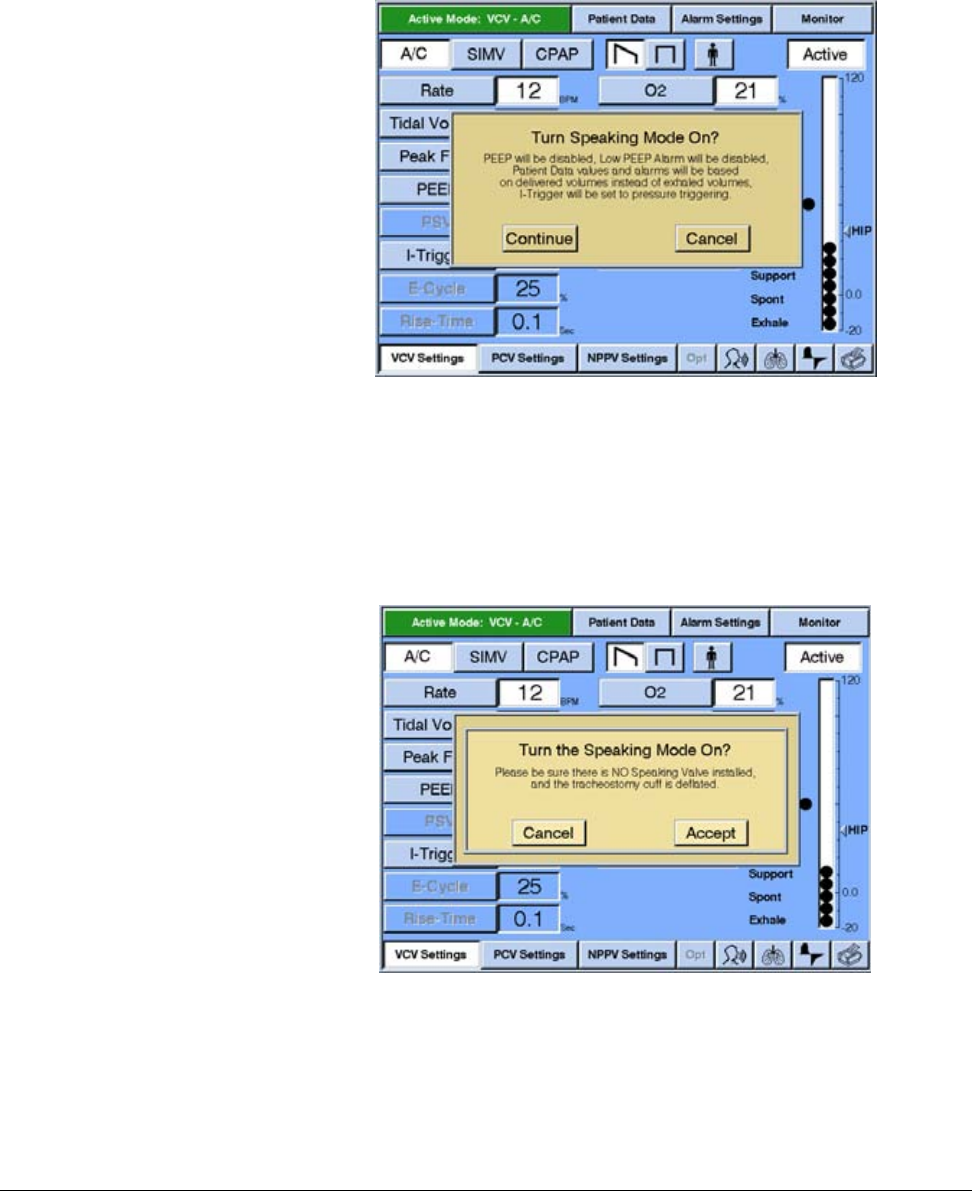
Options and Accessories
REF 1057983 A Respironics V200 Ventilator Operator’s Manual 13-107
Chapter 13
2. Press Continue to continue or Cancel to exit Speaking Mode.
Figure 13-60: Turn Speaking Mode On? First Message Box
The second message box then appears with the same command, Turn
Speaking Mode On?, reminding the user to:
Please be sure there is NO Speaking Valve installed
and the tracheostomy cuff is deflated.
3. Press Accept to continue or Cancel to exit Speaking Mode.
Figure 13-61: Turn the Speaking Mode On? Reminder Second Message Box
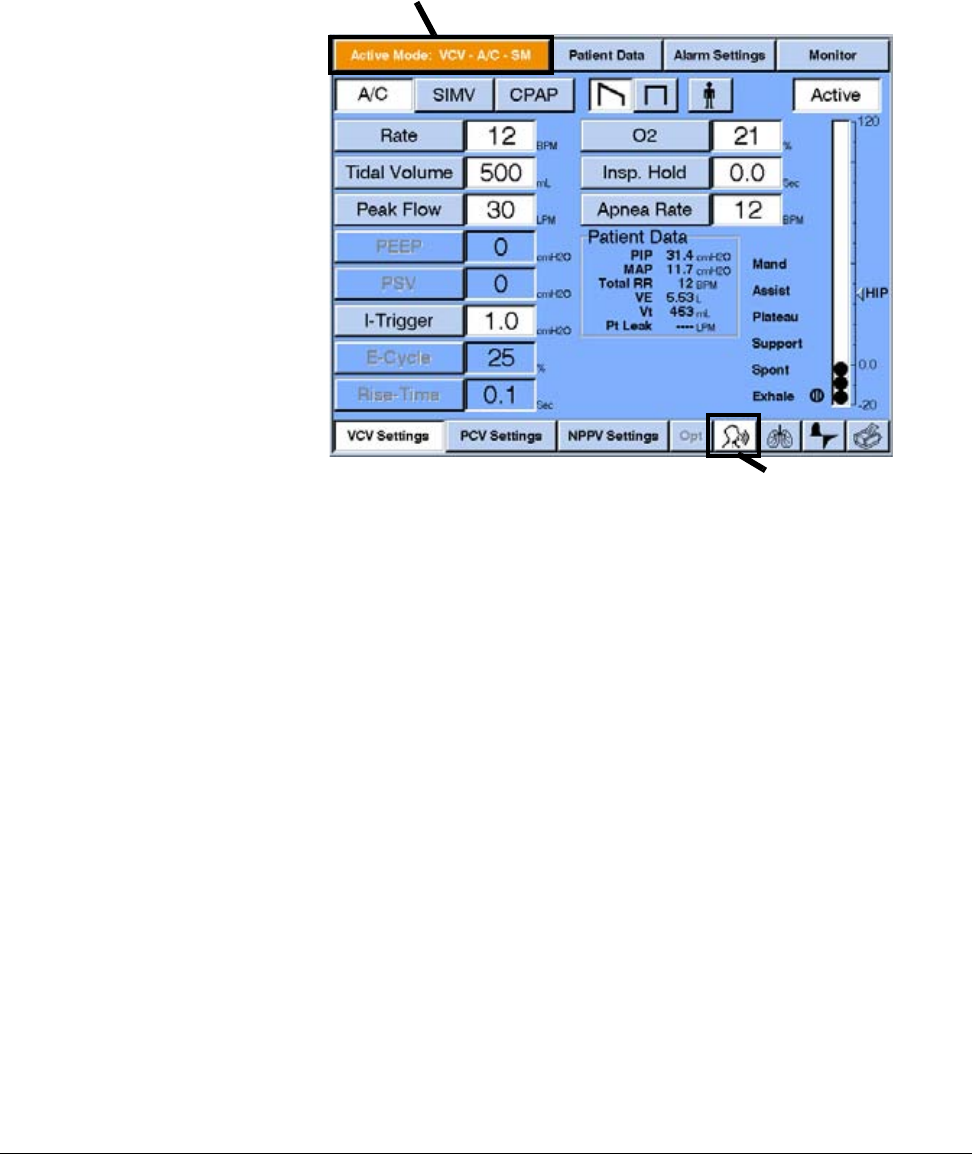
Chapter 13
13-108 Respironics V200 Ventilator Operator’s Manual REF 1057983 A
Options and Accessories
Speaking Mode is ON when the Active Mode button in the upper left-hand
corner of the screen is orange and the Speaking Mode button at the bottom of
the screen has a white background.
Figure 13-62: How the Ventilator Screen Appears When Speaking Mode Is ON
4. We recommend reviewing alarm and ventilator settings at this time.
Continue to monitor patient's respiratory effort and clinical status. If
patient's respiratory efforts deteriorate, discontinue Speaking Mode.
See “Discontinue Speaking Mode” on page 115.
Active Mode button is orange
Speaking Mode button
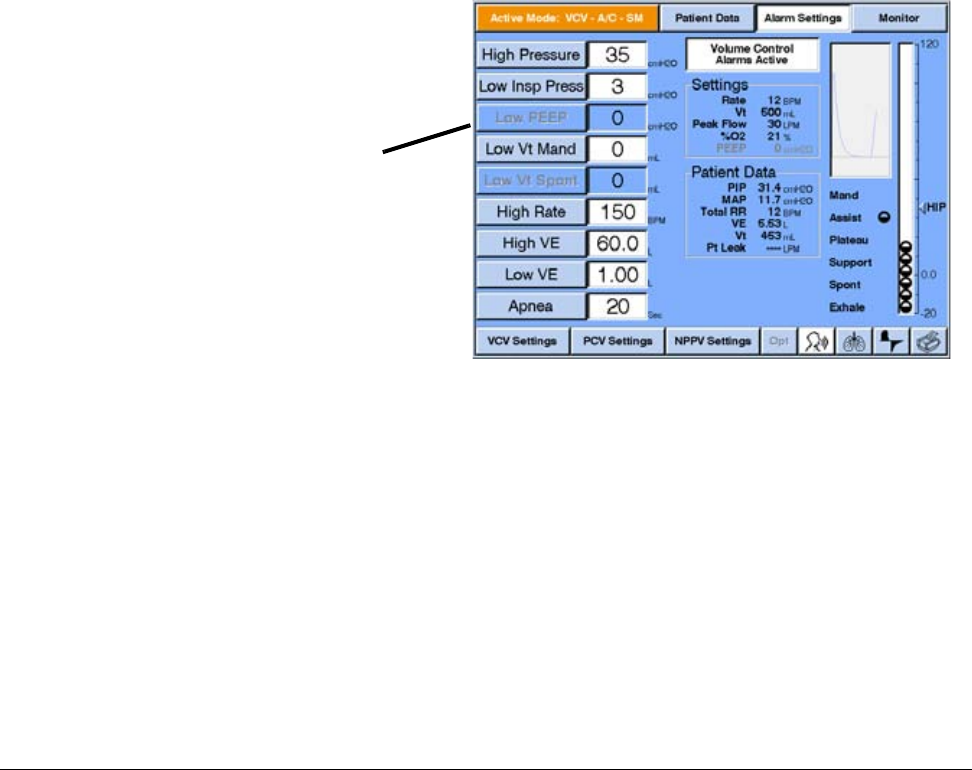
Options and Accessories
REF 1057983 A Respironics V200 Ventilator Operator’s Manual 13-109
Chapter 13
Alarms While in Speaking Mode, the ventilator switches all volumetric alarms from
exhaled to delivered alarms. This means that all alarms that were triggered
based on exhaled volumes will now be based on delivered volumes. These
alarms include:
• Low Exhaled Minute Volume
• High Exhaled Minute Volume
• Low Exhaled Mandatory Tidal Volume
• Low Exhaled Spontaneous Tidal Volume
Disabled Alarms
The Low PEEP alarm is disabled while in Speaking Mode.
This alarm will be appear “grayed out.” When the ventilator returns to PSV,
PCV, VCV, SIMV, or CPAP operation, the current alarm settings will remain after
Speaking Mode is discontinued.
Figure 13-63: Alarm Settings Screen
Changes can be made to these disabled alarms while in Speaking Mode, but
they will not take affect until Speaking Mode is discontinued.
Disabled
alarms are
grayed out
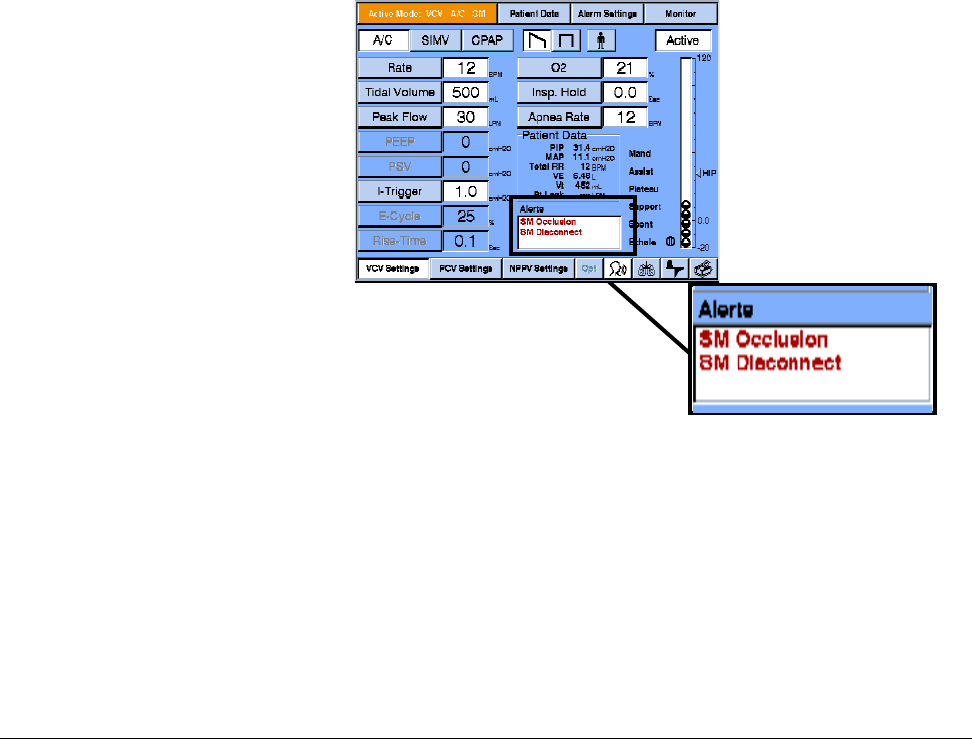
Chapter 13
13-110 Respironics V200 Ventilator Operator’s Manual REF 1057983 A
Options and Accessories
Mode-Specific Alarms
Disconnect Alarm
If the tracheostomy tube becomes disconnected from the patient
circuit, a high urgency Disconnect Alarm will sound. When the
disconnect alarm is active, the ventilator continues ventilation. If the
tracheostomy tube becomes re-connected, the alarm auto-resets.
Airway Occlusion Alarm
If the area surrounding the tracheostomy tube becomes obstructed
during ventilation in Speaking Mode (e.g., the tracheostomy cuff is
inflated) so the flow rate through the patient's airway during exhalation
is less than 5 L/min for the entire exhalation, a high urgency airway
occlusion alarm will sound. The ventilator continues to ventilate and
the exhalation valve closes during inhalation only.
The airway occlusion alarm will auto-reset when an exhalation occurs
that does not meet the alarm condition. The airway occlusion alarm
cannot be silenced by the alarm silence key.
Figure 13-64: Speaking Mode Alerts: Disconnect and Airway Occlusion Alarms
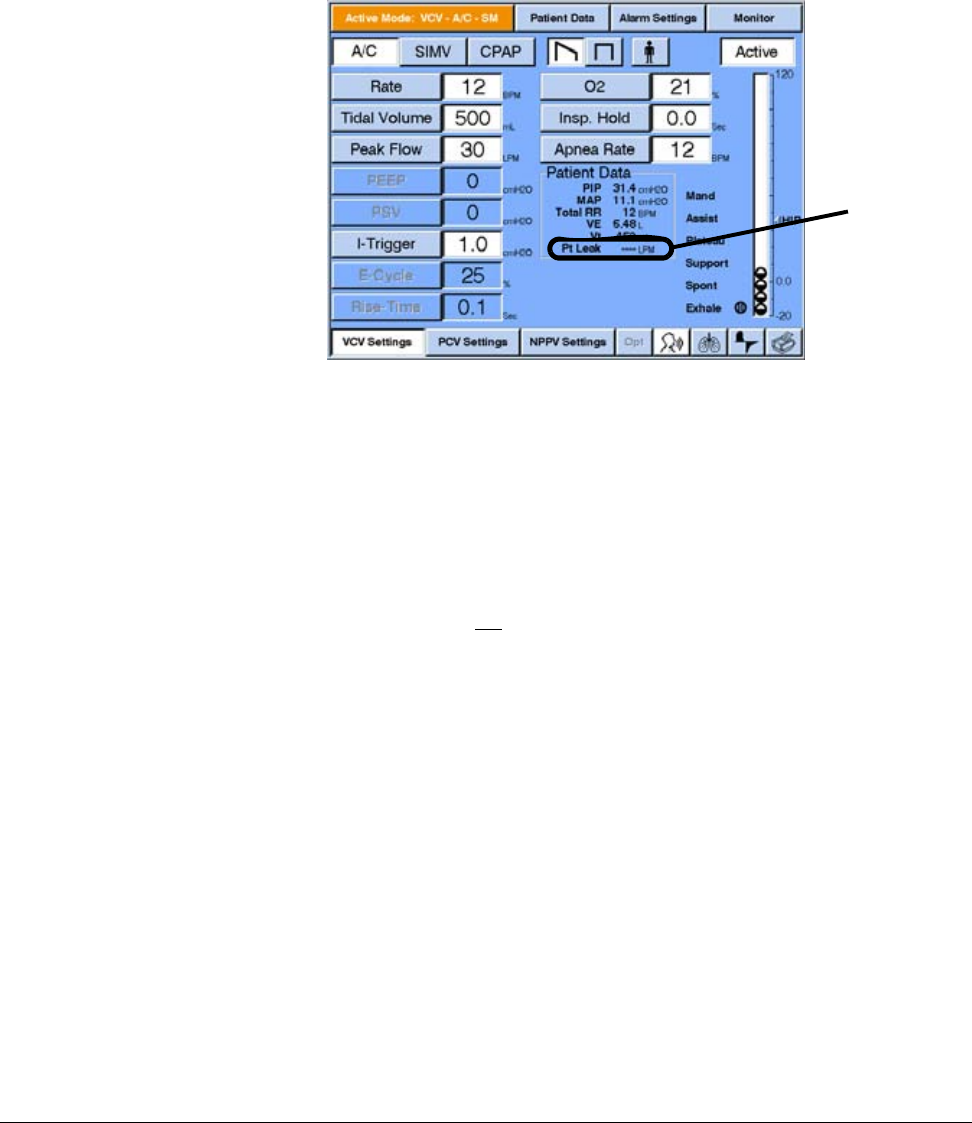
Options and Accessories
REF 1057983 A Respironics V200 Ventilator Operator’s Manual 13-111
Chapter 13
Displayed Data While in Speaking Mode, the ventilator switches all volumetric readings from
exhaled to delivered readings. This means that all data displayed based on
exhaled volumes will now be based on delivered volumes. Some data is not
available in Speaking Mode, including data on Patient Leak (circled below in
Figure 9).
Figure 13-65: Active Mode: Displayed Data in the VCV Settings Screen
The following data in the Patient Data screen displays in delivered volumes
(not exhaled volumes):
• Tidal Volume
• Spontaneous Minute Volume
• Total Minute Volume
The following data is not available in Speaking Mode. Dashed lines appear in
the data box instead of a numeric value:
• Patient Leak
• F/Vt (Ratio of respiratory rate to tidal volume)
Patient Leak data
is not available in
Speaking Mode
Chapter 13
13-112 Respironics V200 Ventilator Operator’s Manual REF 1057983 A
Options and Accessories
Figure 13-66: Active Mode: Patient Data Screen
Trended Data NOTE: NICO data is not available when the Speaking Mode is active
NOTE: The time spent in Speaking Mode can be recorded as trended data. This
requires the Trending Option be loaded and active on the ventilator.
To access the Trending screen:
1. Press the Patient Data button at the top of the settings screen (see
Figure 13-66).
2. Press the Trending button at the bottom of the settings screen (see
Figure 13-67).
3. Choose a Parameter select button (light blue button above each
displayed data option) that shows the name of the currently displayed
data option (see Figure 13-67).
4. Once the Trended Data pop-up window has displayed, click on one of
the Category Select buttons at the top of the menu to view and select
parameters for each option.
Speaking Mode Trended Data
To display trended data in Speaking Mode, press the Speaking Mode
Parameter select button over the displayed data option (if displayed). Or press
any Parameter select button to activate the Trended Data pop-up window.
(Figure 13-67).
Data not
available in
Speaking Mode
Options and Accessories
REF 1057983 A Respironics V200 Ventilator Operator’s Manual 13-113
Chapter 13
1. Press the Settings button.
2. Press the Speaking Mode button to show trended data options
available in Speaking Mode (Figure 13-68).
Figure 13-67: Selecting Speaking Mode on the Trended Data Screen
Category
select
buttons
Parameter
select
buttons
Trended Data pop-up window
Parameter select button
Chapter 13
13-114 Respironics V200 Ventilator Operator’s Manual REF 1057983 A
Options and Accessories
The trended data will appear as blocks of time shown as either ON or OFF.
Figure 13-68: Speaking Mode Trended Data Screen
For more information regarding Trending, see the Trending Option instructions
or contact Respironics. Inc. Customer Service at the following numbers:
• USA and Canada: 1-800-345-6443 or 724-387-4000
• Europe, Africa, and the Middle East: +33-1-47-52-30-00
• Asia Pacific: +852-3194-2280
In North America:
Respironics California, Inc.
2271 Cosmos Court
Carlsbad, California 92011
Made in USA
Speaking
Mode
trended
data
Options and Accessories
REF 1057983 A Respironics V200 Ventilator Operator’s Manual 13-115
Chapter 13
Discontinue Speaking
Mode Removing a patient from Speaking Mode is very similar to starting a patient on
Speaking Mode.
1. Press the Speaking Mode button.
2. The message box appears, Turn Speaking Mode Off?, reminding the
user to:
Please be sure to inflate tracheostomy cuff
AFTER switching SM OFF,
Patent Data values and alarms will be based on exhaled volumes.
WARNING: Do not inflate the tracheostomy tube cuff until Speaking Mode has
been turned off.
• Press Yes to turn Speaking Mode off.
3. Inflate the tracheostomy tube cuff (if Yes was pressed).
• Press No to remain in Speaking Mode.
Figure 13-69: Turn Speaking Mode Off? Message Box
When discontinuing Speaking Mode, we recommend reviewing alarm and
ventilator settings again. Continue to monitor patient's respiratory effort and
clinical status.

Chapter 13
13-116 Respironics V200 Ventilator Operator’s Manual REF 1057983 A
Options and Accessories
(This page is intentionally blank.)

Options and Accessories
REF 1057983 A Respironics V200 Ventilator Operator’s Manual 13-117
Chapter 13
Auto-Trak Sensitivity™
Introduction Auto-Trak Sensitivity is a feature designed to enhance patient comfort and
ventilation effectiveness and reduce patient work of breathing. Auto-Trak
automatically triggers and cycles breathing without the need for user-
adjustment of I-Trigger (sensitivity) and E-Trigger (cycling) thresholds.
Auto-Trak is available in Volume Control Ventilation (VCV), Pressure Control
Ventilation (PCV), and Noninvasive Positive Pressure Ventilation (NPPV).
Compatible Patient
Interfaces Respironics recommends the following patient interfaces for compatibility with
the V200 Ventilator in NPPV. Refer to the usage instructions provided with
each mask for detailed instructions.
• Respironics Image3™ Full Face Mask
• Respironics Spectrum™ Disposable Full Face Mask
• Respironics Total™ Face Mask
• Respironics Disposable Contour™ Deluxe Nasal Mask
• Respironics Disposable Small Child Nasal Mask
• Respironics Disposable Nasal Mask
The V200 Ventilator’s built-in exhalation valve satisfies any Respironics mask
requirement for an exhalation port in the patient circuit. Do not use an
additional exhalation device (for example, Whisper Swivel®, Plateau™
Exhalation Valve, or equivalent).
If the mask you are using has an air entrainment valve, be sure to titrate the
EPAP level such that the entrainment valve remains closed to room air. This
will ensure that the oxygen mix and breath triggering remain unaffected.
WARNING: Titrate the EPAP level such that the masks air entrainment valve (if present)
remains closed to room air. Always evaluate and monitor patient condition
when adjusting EPAP or other settings.
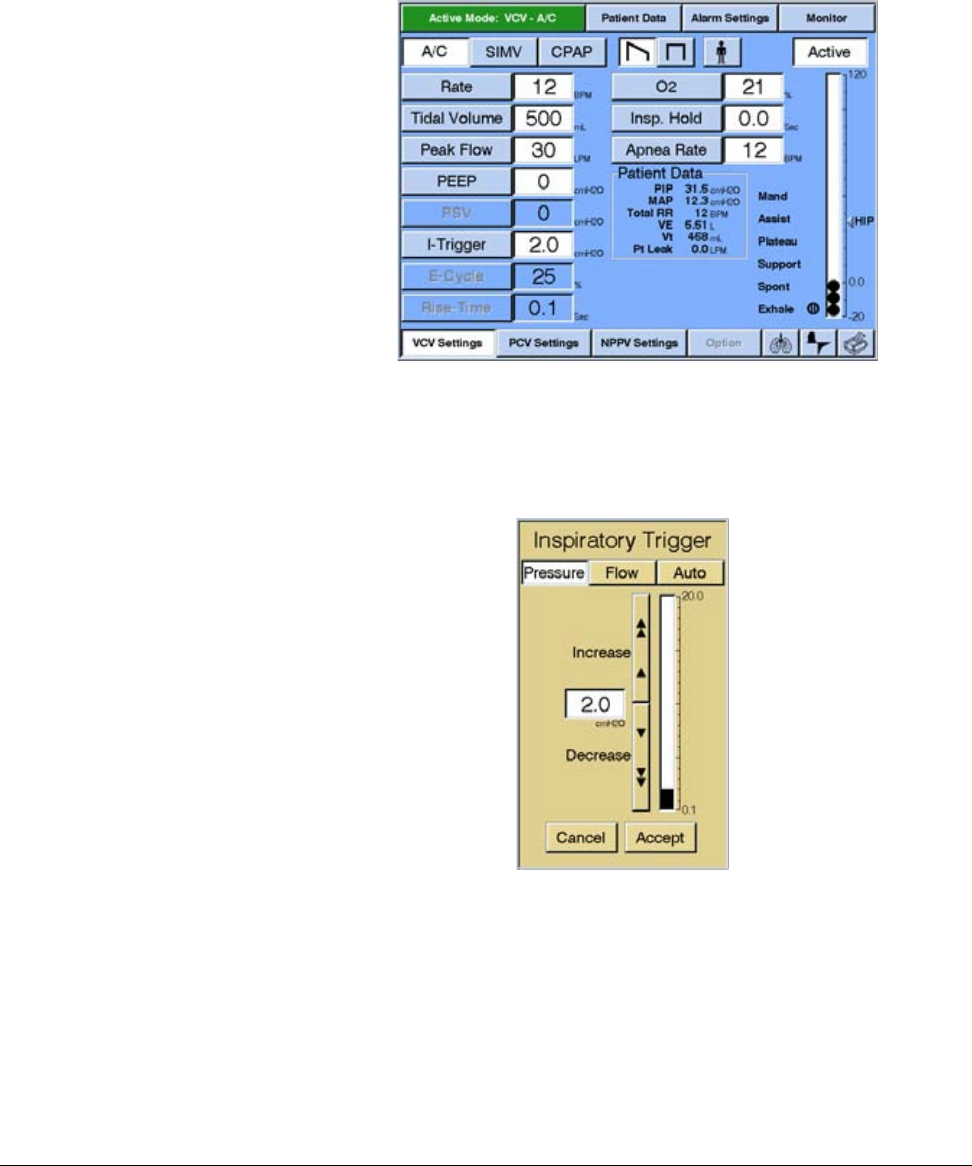
Chapter 13
13-118 Respironics V200 Ventilator Operator’s Manual REF 1057983 A
Options and Accessories
How to Select Auto-
Trak 1. Touch either the I-Trigger or E-Trigger button in the Settings screen
(Figure 13-70).
Figure 13-70: Settings Screen
2. When the I-Trigger or E-Trigger window appears, touch the Auto button
(Figure 13-71 and Figure 13-72).
Figure 13-71: Sample Inspiratory Trigger Windowwith Auto-Trak Option Available
(Pressure is not an available option for NPPV)
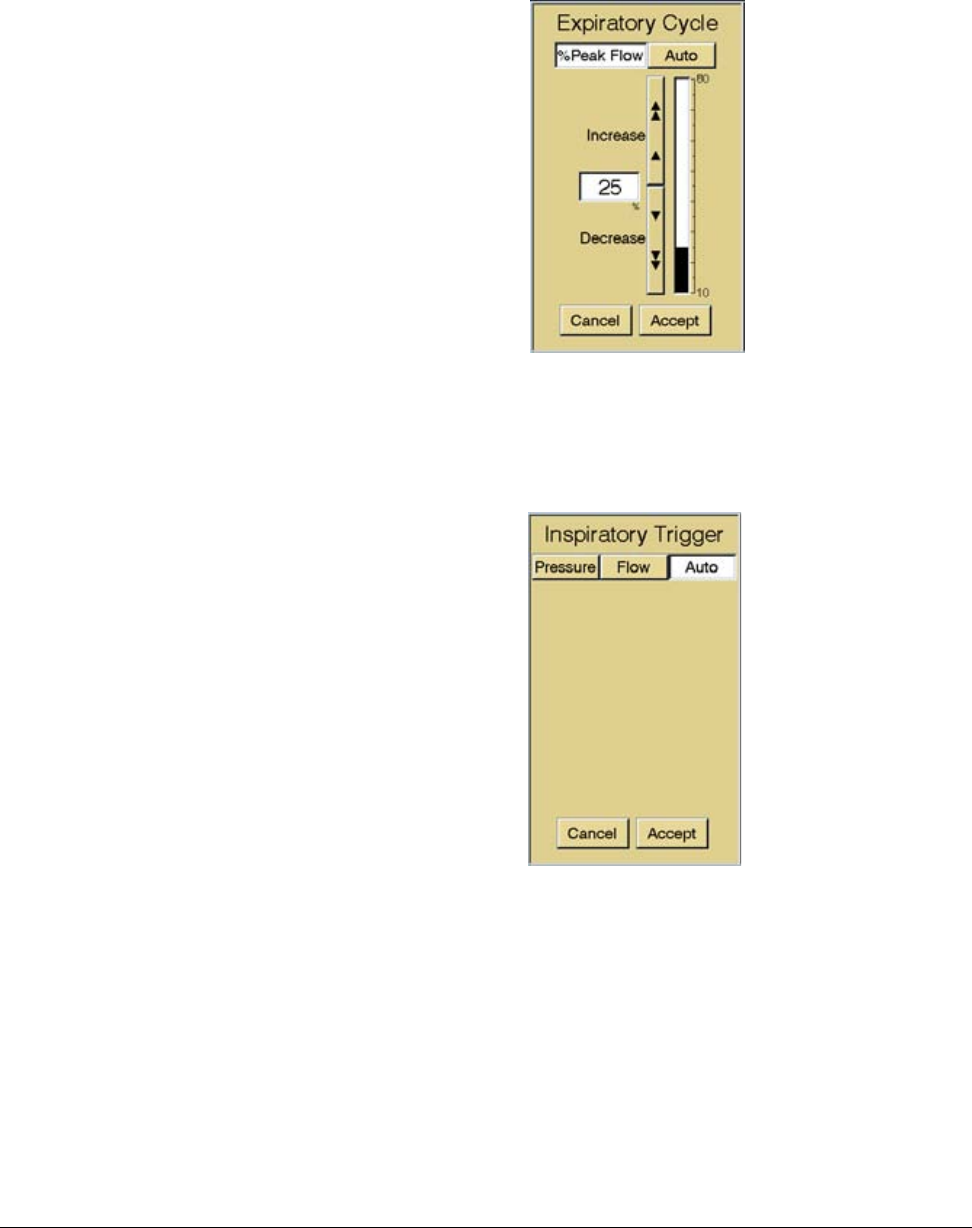
Options and Accessories
REF 1057983 A Respironics V200 Ventilator Operator’s Manual 13-119
Chapter 13
Figure 13-72: Sample Expiratory Trigger Window with Auto-Trak Option Available.
The Pressure or Flow values that previously appeared in the I-Trigger
and E-Trigger windows are removed (Figure 13-73 and Figure 13-74).
Figure 13-73: Sample Inspiratory Trigger Window with Auto-Trak Option Selected
(Pressure is not an available option for NPPV)
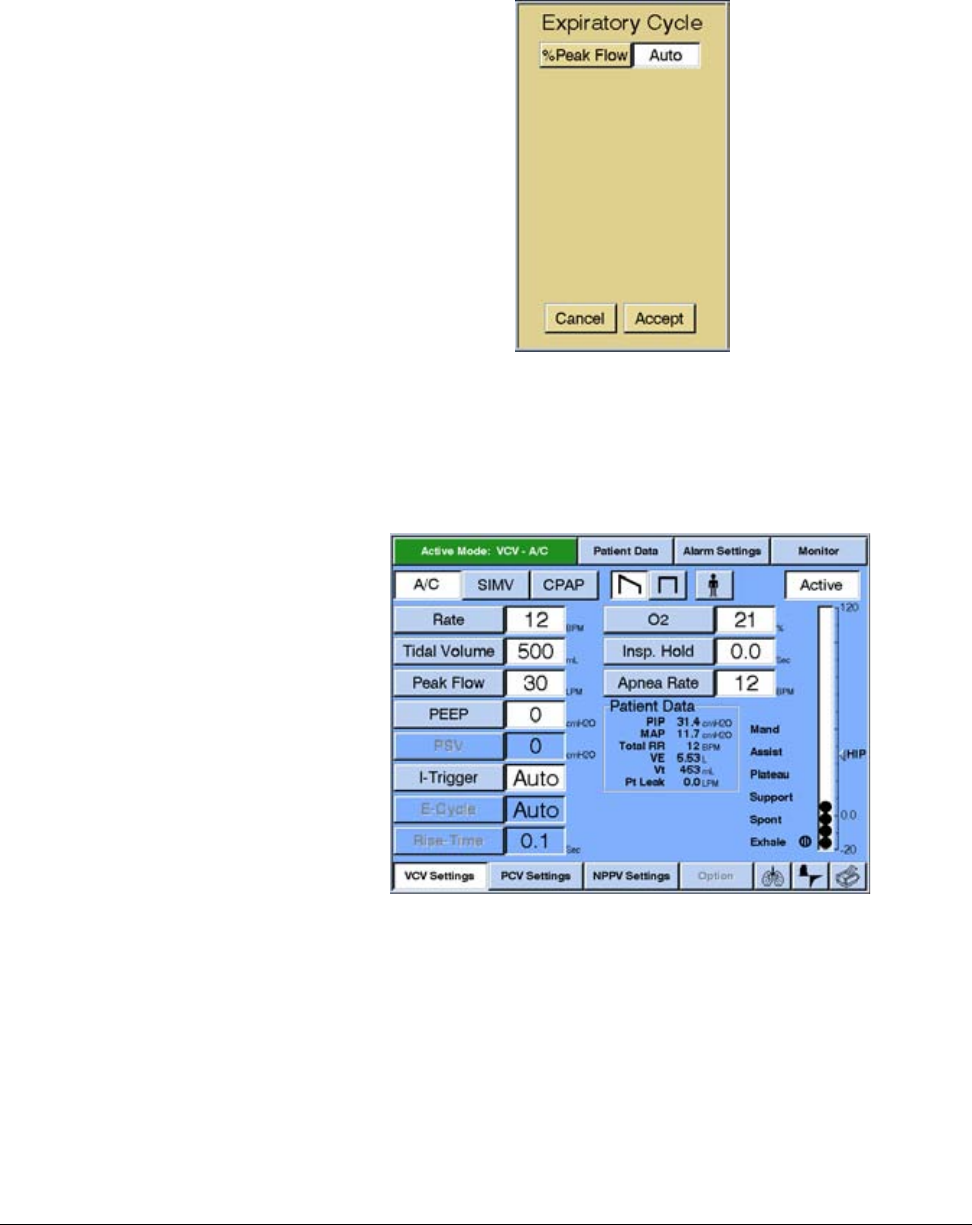
Chapter 13
13-120 Respironics V200 Ventilator Operator’s Manual REF 1057983 A
Options and Accessories
Figure 13-74: Sample Expiratory Trigger Window with Auto-Trak Option Selected
3. Touch the Accept button. The ventilator does not begin using Auto-
Trak until you touch the Accept button. The Settings screen now
displays Auto as the I-Trigger and E- Trigger settings (Figure 13-75).
Figure 13-75: Settings Window with Auto-Trak Selected

Options and Accessories
REF 1057983 A Respironics V200 Ventilator Operator’s Manual 13-121
Chapter 13
Turning Auto-Trak Off 1. Touch either the I-Trigger or E-Trigger button in the Settings screen
(Figure 13-70). The I- Trigger or E-Trigger window will appear as
shown in Figure 13-73 or Figure 13-74.
2. Change the I-Trigger setting to Pressure or Flow, or change the E-
Trigger setting to %Peak Flow. (When you change the I-Trigger setting
to Pressure or Flow, the E- Trigger reverts to the most recently selected
%Peak Flow value. Similarly, when you change the E-Trigger setting to
%Peak Flow, the I-Trigger reverts to the most recently selected
Pressure or Flow value.)
3. Touch the Accept button in the I-Trigger or E-Trigger window. The
Settings screen will display the current I-Trigger and E-Trigger values
as shown in Figure 13-70.
Triggering and
Cycling with Auto-
Trak
In order to determine triggering and cycling sensitivity thresholds for each
breath, Auto-Trak applies multiple algorithms derived from flow, volume and
pressure measurements throughout the breathing cycle.
Triggering
Auto-Trak monitors changes in pressure and flow patterns throughout
exhalation, applies compensation for circuit leaks, and triggers an inspiration
when the criterion for one of the triggering algorithms has been met. As a
backup, Auto-Trak uses pressure triggering at a fixed level of 3 cm H2O.
Cycling
Auto-Trak automatically cycles breathing based on the pressure and flow
patterns at the end of inspiration and beginning of expiration. The threshold
used to cycle each breath changes with the patients breathing pattern and
lung dynamics.
Leak Detection and
Compensation Patient leaks at the mask interface are a critical factor and are significant in
determining triggering and cycling thresholds. With noninvasive ventilation,
failure to compensate for these leaks can impact the patients work of
breathing.
Patient leak is the average leak rate during a breath and is estimated as the
delivered volume minus exhaled volume divided by the total breath time. This
average estimated leak value is displayed in LPM as Pt Leak in the Patient
Data section of the Settings screen. Pt Leak is updated with each breath.
Bias flow through the patient circuit is adjusted according to the estimated
leak and is quantified as follows:

Chapter 13
13-122 Respironics V200 Ventilator Operator’s Manual REF 1057983 A
Options and Accessories
• For adult patients: Bias flow = Pt Leak + 5 LPM.
• For pediatric patients: Bias flow= Pt Leak + 3 LPM.
Patient flow is estimated as the delivered flow (Bias flow during exhalation)
minus the estimated Leak Flow, minus the measured expiratory flow (flow
through the exhalation valve):
• Patient flow = Delivered flow - Leak flow measured expiratory flow
The estimated Leak Flow value in the above equation differs from the Patient
Leak value defined earlier. Leak Flow is the estimated leak at a given moment
in time and is dependent upon pressure (the higher the pressure, the higher
the leak flow) and the physical characteristics of the leak itself. The Patient
Leak value is the average Leak Flow over an entire breath.
When Auto-Trak is selected in NPPV mode, the estimated exhaled tidal volume
includes compensation for the estimated leak volume lost during exhalation.
Therefore, all other parameters that depend on exhaled tidal volume also
include this compensation (for example, minute ventilation and rapid-shallow
breathing index, F/Vt).
If the Graphics Option is enabled, waveforms and loops displayed in NPPV
mode will show estimated flows and volumes that include compensation for
the estimated leak.
Exhaled tidal volume is leak-compensated only in NPPV. Leaks that may occur
during invasive ventilation are intentionally not compensated for, allowing
them to be more easily detected.

REF 1057983 A Respironics V200 Ventilator Operator’s Manual Appendix A-1
Appendix A. RS-232 Communications Protocol
The ventilator will allow for the transmission of data from the ventilator via the
RS-232 communications interface. The ventilator receives commands from
the remote device and responds with fixed format records.
RS-232 Configuration The RS-232 communications port will be configured in the following manner
for all communications functions:
• Baud Rate 19,200
• Data Bits 8
•Parity None
•Stop Bits 1
Commands
Transmitted to the
Ventilator
Commands are transmitted as a series of four ASCII characters followed by a
carriage return. Valid commands will be stored and response transmissions will
be sent in the order the corresponding commands were received. Invalid
commands will be returned in an error message (Table A-7: “Unrecognized
Commands” on page A-24), in sequence with all other commands.
Transmission of Data
from the Ventilator Unless stated otherwise, all fields will be left justified and six (6) characters in
length. A comma will separate each field. Each data transmission shall be
terminated with a carriage return.
In the following subparagraphs, a space is designated as “◆”. When data is
unavailable, the output field shall contain “----◆◆” (i.e. four dash characters
followed by two spaces).
Ventilator Report
Command and
Response (VRPT)
When the ventilator receives VRPT followed by a carriage return, it will respond
by transmitting the information shown in Table A-1: “Ventilation Report”. The
ventilator responds to the VRPT command by returning a string with a variable
length. Fields 2 through 4 define the length of the message. The last character
transmitted is a stop code indicating the end of the message. The second field
indicates the number of characters between the start and stop codes. The third
field indicates the number of fields between the start and stop codes. The
fourth field is the start code, 0x02. The last field in the string is the stop code,
0x03.

Appendix A
Appendix A-2 Respironics V200 Ventilator Operator’s Manual REF 1057983 A
RS-232 Communications Protocol
Ventilation Report
Description Example Resolution Range Units Comments
Command Name VRPT N/A N/A N/A
Number of characters
between the start and
stop codes
990 N/A N/A N/A 3 character field
Number of fields
between the start and
stop codes
134 N/A N/A N/A 3 character field
Start Code 0x02 N/A N/A N/A ASCII Start
Transmission
Character (STX)
Time of request 13:45◆N/A N/A N/A 24 hour clock,
hh:mm◆
Date FEB◆23◆1997◆N/A N/A N/A 12 character field,
MMM◆DD◆YYYY◆
Current Ventilation
Type VCV◆◆◆ N/A VCV◆◆◆
PCV◆◆◆
NPPV◆◆
N/A The ventilation
type currently
being used by the
ventilator.
VCV Mode Setting A/C◆◆◆ N/A A/C◆◆◆
SIMV◆◆
CPAP◆◆
N/A
VCV Waveform Setting RAMP◆◆ N/A RAMP◆◆
SQUARE N/A
VCV Patient Type ADULT◆N/A ADULT◆
PED◆◆◆
NEO◆◆◆
VCV Respiratory Rate
Setting 12◆◆◆◆ 11 - 80BPM
VCV Tidal Volume
Setting 500◆◆◆ 1 50 - 2500 mL
VCV Peak Flow Setting 30◆◆◆◆ 13 - 140LPM
VCV PEEP Setting 0◆◆◆◆◆ 10 - 35cmH
2O
(hPa)
VCV Pressure Support
Setting 0◆◆◆◆◆ 10 - 100cmH
2O
(hPa)
VCV I-Trigger Type PRESS◆N/A PRESS◆
FLOW◆◆
AUTO◆◆
N/A
VCV Pressure I-Trigger
Setting 2.0◆◆◆ 0.1 0.1 - 20.0 cmH2O
(hPa)
VCV Flow I-Trigger
Setting 3.0◆◆◆ 0.1 0.5 - 20.0 LPM
Table A-1: Ventilation Report (Sheet 1 of 10)

Appendix A
RS-232 Communications Protocol
REF 1057983 A Respironics V200 Ventilator Operator’s Manual Appendix A-3
VCV E-Cycle Type %Flow◆N/A %FLOW◆
AUTO◆◆
N/A
VCV %Flow Expiratory
Cycle Setting 25◆◆◆◆ 110 - 80%
VCV Rise Time 0.1◆◆◆ 0.1 0.1 - 0.9 Sec
VCV Oxygen
Concentration Setting 21◆◆◆◆ 1 21 - 100 %
VCV Plateau Setting 0.0◆◆◆ 0.1 0.0 - 2.0 Sec
VCV Apnea Rate
Setting 12◆◆◆◆ 11 - 80BPM
VCV High Inspiratory
Pressure Alarm Limit
Setting
35◆◆◆◆ 1 10 - 105 cmH2O
(hPa)
VCV Low Inspiratory
Pressure Alarm Limit
Setting
3◆◆◆◆◆ 13 - 105cmH
2O
(hPa)
VCV Low PEEP Alarm
Limit Setting 0◆◆◆◆◆ 10 - 35cmH
2O
(hPa)
VCV Low Mandatory
Tidal Volume Alarm
Limit Setting
0◆◆◆◆◆ 1 0 - 2500 mL
VCV Low Spontaneous
Tidal Volume Alarm
Limit Setting
0◆◆◆◆◆ 1 0 - 2500 mL
VCV High Respiratory
Rate Alarm Limit
Setting
150◆◆◆ 10 - 150BPM
VCV Low Minute
Volume Alarm Limit
Setting
1.00◆◆ 0.01 for
0.00 to 9.99
0.1 for 10.0
to 60.0
0.00 - 60.0 L
VCV Apnea Interval
Alarm Limit Setting 20◆◆◆◆ 110 - 60sec
PCV Mode Setting A/C◆◆◆ N/A A/C◆◆◆
SIMV◆◆
CPAP◆◆
N/A
PCV Patient Type ADULT◆N/A ADULT◆
PED◆◆◆
NEO◆◆◆
PCV Respiratory Rate
Setting 12◆◆◆◆ 11 - 150BPM
PCV Pressure Setting 20◆◆◆◆ 15 - 100cmH
2O
(hPa)
Ventilation Report (Continued)
Description Example Resolution Range Units Comments
Table A-1: Ventilation Report (Sheet 2 of 10)

Appendix A
Appendix A-4 Respironics V200 Ventilator Operator’s Manual REF 1057983 A
RS-232 Communications Protocol
PCV Inspiratory Time
Setting 1.00◆◆ 0.01 0.1 - 9.9 sec
PCV PEEP Setting 0◆◆◆◆◆ 10 - 35cmH
2O
(hPa)
PCV Pressure Support
Setting 0◆◆◆◆◆ 10 - 100cmH
2O
(hPa)
PCV I-Trigger Type PRESS◆N/A PRESS◆
FLOW◆◆
AUTO◆◆
N/A
PCV Pressure I-Trigger
Setting 2.0◆◆◆ 0.1 0.1 - 20.0 cmH2O
(hPa)
PCV Flow I-Trigger
Setting 3.0◆◆◆ 0.1 0.3 - 20.0 LPM
PCV E-Cycle Type %FLOW◆N/A %FLOW◆
AUTO◆◆
N/A
PCV %Flow Expiratory
Cycle Setting 25◆◆◆◆ 110 - 80%
PCV Rise Time 0.1◆◆◆ 0.1 0.1 - 0.9 sec
PCV Oxygen
Concentration Setting 21◆◆◆◆ 1 21 - 100 %
PCV Apnea Rate
Setting 12◆◆◆◆ 11 - 80BPM
PCV Apnea Interval
Alarm Limit Setting 20◆◆◆◆ 110 - 60sec
PCV High Inspiratory
Pressure Alarm Limit
Setting
35◆◆◆◆ 1 10 - 105 cmH2O
(hPa)
PCV Low Inspiratory
Pressure Alarm Limit
Setting
3◆◆◆◆◆ 13 - 105cmH
2O
(hPa)
PCV Low PEEP Alarm
Limit Setting 0◆◆◆◆◆ 10 - 35cmH
2O
(hPa)
PCV Low Mandatory
Tidal Volume Alarm
Limit Setting
0◆◆◆◆◆ 1 0 - 2500 mL
PCV Low Spontaneous
Tidal Volume Alarm
Limit Setting
0◆◆◆◆◆ 1 0 - 2500 mL
PCV High Respiratory
Rate Alarm Limit
Setting
150◆◆◆ 10 - 150BPM
Ventilation Report (Continued)
Description Example Resolution Range Units Comments
Table A-1: Ventilation Report (Sheet 3 of 10)

Appendix A
RS-232 Communications Protocol
REF 1057983 A Respironics V200 Ventilator Operator’s Manual Appendix A-5
PCV Low Minute
Volume Alarm Limit
Setting
1.00◆◆ 0.01 for
0.00 to 9.99
0.1 for 10.0
to 60.0
0.00 - 60.0 L
PCV High Minute
Volume Alarm Limit
Setting
60.0◆◆ 0.01 for
0.00 to 9.99
0.1 for 10.0
to 60.0
0.00 - 60.0 L
NPPV Mode Setting SPONT/T N/A SPONT/T
SPONT◆◆
NPPV Patient Type ADULT◆N/A ADULT◆
PED◆◆◆
NEO◆◆◆
NPPV Respiratory
Rate Setting 12◆◆◆◆ 11 - 80BPM
NPPV EPAP Setting 5◆◆◆◆◆ 12 - 25cmH
2O
(hPa)
NPPV IPAP Setting 5◆◆◆◆◆ 12 - 35cmH
2O
(hPa)
NPPV Inspiratory Time
Setting 1.0◆◆◆ 0.1 0.1 - 9.9 sec
NPPV Rise Time 0.1◆◆◆ 0.1 0.1 - 0.9 sec
NPPV I-Trigger Type AUTO◆N/A FLOW◆◆
AUTO◆◆
N/A
NPPV Flow I-Trigger
Setting 3.0◆◆◆ 0.1 0.5 - 20.0 LPM
NPPV E-Cycle Type AUTO◆◆ N/A FLOW◆◆
AUTO◆◆
N/A
NPPV %Flow
Expiratory Cycle
Setting
25◆◆◆◆ 110 - 80%
NPPV Oxygen
Concentration Setting 21◆◆◆◆ 1 21 - 100 %
NPPV Apnea Rate
Setting 12◆◆◆◆ 11 - 80BPM
NPPV Low Inspiratory
Pressure Alarm Limit
Setting
3◆◆◆◆◆ 13 - 105cmH
2O
(hPa)
NPPV Low EPAP
Alarm Limit Setting 0◆◆◆◆◆ 10 - 25cmH
2O
(hPa)
NPPV Low Tidal
Volume Alarm Limit
Setting
0◆◆◆◆◆ 10 - 2500 mL
Ventilation Report (Continued)
Description Example Resolution Range Units Comments
Table A-1: Ventilation Report (Sheet 4 of 10)

Appendix A
Appendix A-6 Respironics V200 Ventilator Operator’s Manual REF 1057983 A
RS-232 Communications Protocol
NPPV High
Respiratory Rate
Alarm Limit Setting
150◆◆◆ 10 - 150 BPM
NPPV Low Minute
Volume Alarm Limit
Setting
1.00◆◆ 0.01 for
0.00 to 9.99
0.1 for 10.0
to 60.0
0.00 - 60.0 L
NPPV Apnea Interval
Alarm Limit Setting 20◆◆◆◆ 110 - 60 sec
NPPV High Leak
Alarm Limit Setting 60◆◆◆◆ 110 - 60 sec
Measured Peak
Inspiratory Pressure 24.1◆◆ 0.1 for -20.0
to 99.9
1 for 100 to
130
-20.0 - 130 cmH2O
(hPa) The PIP value from
the Patient Data
screen.
Measured Mean
Airway Pressure 5.6◆◆◆ 0.1 for -20.0
to 99.9
1 for 100 to
120
-20.0 -120 cmH2O
(hPa) The MAP value
from the Patient
Data screen.
Measured End
Expiratory Pressure 2.0◆◆◆ 0.1 -20.0-99.9 cmH2O
(hPa) The End Exp. value
from the Patient
Data screen.
Measured End
Inhalation Pressure 24.0◆◆ 0.1 for -20.0
to 99.9
1 for 100 to
130
-20.0 - 130 cmH2O
(hPa) The Plateau value
from the Patient
Data screen.
Measured Tidal
Volume 468◆◆◆ 10 - 2500 mL The Tidal Volume
value from the
Patient Data
screen.
Measured
Spontaneous Minute
Volume
0.00◆◆ 0.01 for
0.00 to 9.99
0.1 for 10.0
to 60.0
0.00 - 60.0 L The Spont VE value
from the Patient
Data screen.
Measured Minute
Volume 5.83◆◆ 0.01 for
0.00 to 9.99
0.1 for 10.0
to 60.0
0.00 - 60.0 L The Total VE value
from the Patient
Data screen.
Measured
Spontaneous Breath
Rate
0.0◆◆◆ 0.1 for 0.0
to 9.9
1 for 10 to
150
0.0 - 150 BPM The Spont Rate
value from the
Patient Data
screen.
Measured Total Breath
Rate 12.0◆◆ 0.1 for 0.0
to 9.9
1 for 10 to
150
0 - 150 BPM The Total Rate
value from the
Patient Data
screen.
Measured Rapid
Shallow Breathing
Index
5◆◆◆◆◆ 10 - 500 BPM/L The F/Vt value from
the Patient Data
screen.
Ventilation Report (Continued)
Description Example Resolution Range Units Comments
Table A-1: Ventilation Report (Sheet 5 of 10)

Appendix A
RS-232 Communications Protocol
REF 1057983 A Respironics V200 Ventilator Operator’s Manual Appendix A-7
Measured I:E Ratio 1:4.1◆0.1 for 9.9:1
to 1:9.9
1 for 1:10 to
1:99
4.1:1-1:99 N/A The I:E Ratio
display from the
Patient Data
screen.
Measured Patient
Leak 0.0◆◆◆ 0.1 for 0.0
to 99.9
1 for 100 to
140
0.0 - 140 LPM The Pt Leak
display.
Measured Percent of
Breaths Triggered by
the Patient (NPPV
Spont/T mode only;
otherwise ◆◆◆◆◆◆)
56.2 0.1 for 0.0
to 99.9
1 for 100
0.0 - 100 % The Pt Trigger
display on the
NPPV Monitor
screen.
Monitored Oxygen
Concentration 55.1◆◆ 0,1 for 0.0
to 99.9
1 for 100
0.0 - 100 % The % O2 display
from the Patient
Data Screen.
Ti/Ttot 0.23◆◆ 0.01 0.00 - 1.00 N/A The Ti/Ttot display
from the
Mechanics Patient
Status Screen
Dynamic Resistance 5.43◆◆ 0.01 for
0.00 to
9.99
0.1 for
10.0 to
99.9
1 for 100
to 400
0.00 - 400 cmH20
/L/Sec The Dynamic
Resistance display
from the
Mechanics Patient
Status Screen
Dynamic Compliance 19.2◆◆ 0.01 for
0.00 to
9.99
0.1 for
10.0 to
99.9
1 for 100
to 350
0.00 - 350 mL/
cmH20The Dynamic
Compliance display
from the
Mechanics Patient
Status Screen
Peak Lung Flow 35.1◆◆ 0.1 for -
99.9 to
99.9
1 for -100
to -300
1 for 100
to 300
-300 - 300 LPM The Peak L-Flow
display from the
Mechanics Patient
Status Screen
Vital Capacity 450◆◆ 1 0 - 9999 mL Vital Capacity
display from Vital
Capacity Screen
Ventilation Report (Continued)
Description Example Resolution Range Units Comments
Table A-1: Ventilation Report (Sheet 6 of 10)

Appendix A
Appendix A-8 Respironics V200 Ventilator Operator’s Manual REF 1057983 A
RS-232 Communications Protocol
Vital Capacity Time of
Last Maneuver 11-14-
01◆◆13:11 1 minute 01-01-70
0:00 to
01-19-38
3:14
N/A Time of Last
Maneuver display
from the Vital
Capacity
Screen.15
character field, 24
hour clock: MM-
DD-YYuuHH:MM
MIP -54.1◆0.1 for -99.9
to 99.9
1 for -100
and 100 to
200
-100 - 200 cmH20 MIP display from
MIP/P0.1 display
Screen
MIP Time of Last
Maneuver 11-14-01◆◆13:11 1 minute 01-01-7
0 0:00 to
01-19-38
3:14
N/A MIP Time of Last
Maneuver display
from MIP/P0.1
Screen15
character field, 24
hour clock: MM-
DD-YYuuHH:MM
P0.1 -2.3◆◆ 0.1for -99.9
to 99.9
1 for -100
and 100 to
200
-100 - 200 cmH20 P0.1 display from
MIP/P0.1 display
screen
P0.1 Time of Last
Maneuver 11-14-01◆◆13:11 1 minute 01-01-70
0:00 to
01-1-/38
3:14
N/A P0.1 Time of Last
Maneuver display
from MIP/P0.1
Screen.15
character field, 24
hour clock: MM-
DD-YYwwHH:MM
Static Resistance 5.43◆◆ 0,01 for
0.00 to 9.99
0.1 for 10.0
to 99.9
1 for 100 to
400
0.00 - 400 cmH20
/L/Sec Static Resistance
display from the
Static C & R screen
Static Compliance 19.2◆◆ 0.01 for
0.00 to 9.99
0.1 for 10.0
to 99.9
1 for 100 to
350
0.00 - 350 mL/
cmH2OStatic Compliance
display from the
Static C & R
Screen
Static C & R Time of
Last Maneuver 11-14-01◆◆13:11 1 minute 01-01-70
0:00 to
01-19-38
3:14
N/A Static C & R Time
of Last Maneuver
display from Static
C & R Screen.15
character field, 24
hour clock: MM-
DD-YYwwHH:MM
Ventilation Report (Continued)
Description Example Resolution Range Units Comments
Table A-1: Ventilation Report (Sheet 7 of 10)

Appendix A
RS-232 Communications Protocol
REF 1057983 A Respironics V200 Ventilator Operator’s Manual Appendix A-9
AutoPeep 1.2◆◆ 0.1 for -9.9
to 9.9
1 for -10 to -
20
1 for 10 to
120
-20 - 120 cmH2O AutoPeep display
from the
Mechanics Patient
Status Screen
AutoPeep Time of Last
Maneuver 11-14-01◆◆13:11 1 minute 01-01-70
0:00 to
01-19-38
3:14
N/A AutoPeep Time of
Last Maneuver
display from
Mechanics Patient
Status Screen.15
character field, 24
hour clock: MM-
DD-YYwwHH:MM
Occlusion Alarm
Status or SM
Occlusion Alarm
Status
NORMAL N/A NORMAL
ALARM◆
RESET◆
N/A
Safety Valve Status NORMAL N/A NORMAL
ALARM◆
RESET◆
N/A
Low Internal Battery
Alarm Status NORMAL N/A NORMAL
ALARM◆
RESET◆
N/A
Nonvolatile Memory
Failure—Using
Default Settings
NORMAL N/A NORMAL
ALARM◆
RESET◆
N/A
Primary Alarm Failure NORMAL N/A NORMAL
ALARM◆
RESET◆
N/A
High Inspiratory
Pressure Alarm Status NORMAL N/A NORMAL
ALARM◆
RESET◆
N/A
Apnea Alarm Status NORMAL N/A NORMAL
ALARM◆
RESET◆
N/A
Low Inspiratory
Pressure Alarm Status
or Disconnect Alarm
Status
NORMAL N/A NORMAL
ALARM◆
RESET◆
N/A
Air Source Fault
Alarm Status NORMAL N/A NORMAL
ALARM◆
RESET◆
N/A
O2 Valve Stuck Closed
Alarm Status NORMAL N/A NORMAL
ALARM◆
RESET◆
N/A
Ventilation Report (Continued)
Description Example Resolution Range Units Comments
Table A-1: Ventilation Report (Sheet 8 of 10)

Appendix A
Appendix A-10 Respironics V200 Ventilator Operator’s Manual REF 1057983 A
RS-232 Communications Protocol
Exhalation Valve
Stuck Open Alarm
Status
NORMAL N/A NORMAL
ALARM◆
RESET◆
N/A
Low O2 Supply Alarm
Status NORMAL N/A NORMAL
ALARM◆
RESET◆
N/A Low supply
pressure
Low O2 Alarm Status NORMAL N/A NORMAL
ALARM◆
RESET◆
N/A Low O2
concentration
Low Minute Volume
Alarm Status NORMAL N/A NORMAL
ALARM◆
RESET◆
N/A
Low Mandatory Tidal
Volume Alarm Status NORMAL N/A NORMAL
ALARM◆
RESET◆
N/A
High Minute Volume
Alarm Status NORMAL N/A NORMAL
ALARM◆
RESET◆
N/A
Low Tidal Volume
Alarm Status NORMAL N/A NORMAL
ALARM◆
RESET◆
N/A
Low Spontaneous
Tidal Volume Alarm
Status
NORMAL N/A NORMAL
ALARM◆
RESET◆
N/A
I-Time Too Long Alarm
Status NORMAL N/A NORMAL
ALARM◆
RESET◆
N/A
High Respiratory Rate
Alarm Status NORMAL N/A NORMAL
ALARM◆
RESET◆
N/A
High O2 Alarm Status NORMAL N/A NORMAL
ALARM◆
RESET◆
N/A
High Enclosure
Temperature Alarm
Status
NORMAL N/A NORMAL
ALARM◆
RESET◆
N/A
High Internal Oxygen
Concentration Alarm
Status
NORMAL N/A NORMAL
ALARM◆
RESET◆
N/A
Low PEEP Alarm
Status NORMAL N/A NORMAL
ALARM◆
RESET◆
N/A
Ventilation Report (Continued)
Description Example Resolution Range Units Comments
Table A-1: Ventilation Report (Sheet 9 of 10)

Appendix A
RS-232 Communications Protocol
REF 1057983 A Respironics V200 Ventilator Operator’s Manual Appendix A-11
Volume Control
Ventilation Settings
Report (VCVS)
When the ventilator receives VCVS followed by a carriage return, it will respond
by transmitting the information shown in Table A-2: “Volume Control
Ventilation Settings Report”. The ventilator responds to the VCVS command by
returning a string with a variable length. Fields 2 through 4 define the length
of the message. The last character transmitted is a stop code indicating the
end of the message. The second field indicates the number of characters
between the start and stop codes. The third field indicates the number of
Low EPAP Alarm
Status NORMAL N/A NORMAL
ALARM◆
RESET◆
N/A
High Leak Alarm
Status NORMAL N/A NORMAL
ALARM◆
RESET◆
N/A
100% O2 Function
Status OFF◆◆◆ N/A ON◆◆◆◆
OFF◆◆◆
N/A Status of the
100% O2 LED on
the front panel
Alarm Silence Status OFF◆◆◆ N/A ON◆◆◆◆
OFF◆◆◆
N/A Status of the Alarm
Silence LED on the
front panel
Screen Lock Status OFF◆◆◆ N/A ON◆◆◆◆
OFF◆◆◆
N/A Status of the
Screen Lock LED
on the front panel
Tube Type ET◆◆◆◆ N/A ET◆◆◆◆
TT◆◆◆◆
NONE◆◆
N/A Tube type as
selected in
Respiratory
Mechanics Screens
(Not used)
Tube Size 7.0◆◆◆ 0.1 for 3.5
to 9.9
1 for 10
3.5 - 10 mm Tube size as
selected in
Respiratory
Mechanics Screens
(Not used)
VCV High Minute
Volume Alarm Limit
Setting
60.0◆◆ 0.01 for
0.00 to 9.99
0.1 for 10.0
to 60.0
0.00 - 60.0 L
Static C & R Plateau
End Pressure 8.2◆◆◆ 0.1 for -20
to 99.9
1 for 100 to
130
-20.0 - 130 cmH2OP
plat display from
Static C & R
Screen
Stop Code 0x03 N/A N/A N/A ASCII End
Transmission
Character (ETX)
Ventilation Report (Continued)
Description Example Resolution Range Units Comments
Table A-1: Ventilation Report (Sheet 10 of 10)

Appendix A
Appendix A-12 Respironics V200 Ventilator Operator’s Manual REF 1057983 A
RS-232 Communications Protocol
fields between the start and stop codes. The fourth field is the start code,
0x02. The last field in the string is the stop code, 0x03.
Volume Control Ventilation Settings Report
Description Example Resolution Range Units Comments
Command Name VCVS N/A N/A N/A
Number of characters
between the start and
stop codes
209 N/A N/A N/A 3 character field
Number of fields
between the start and
stop codes
29 N/A N/A N/A 2 character field
Start Code 0x02 N/A N/A N/A ASCII Start
Transmission
Character (STX)
Time of request 13:45◆N/A N/A N/A 24 hour clock,
hh:mm◆
Date FEB◆23◆1997◆N/A N/A N/A 12 character field,
MMM◆DD◆YYYY◆
Current Ventilation
Type VCV◆◆◆ N/A VCV◆◆◆
PCV◆◆◆
NPPV◆◆
N/A The ventilation
type currently
being used by the
ventilation.
VCV Mode Setting A/C◆◆◆ N/A A/C◆◆◆
SIMV◆◆
CPAP◆◆
N/A
VCV Waveform
Setting RAMP◆◆ N/A RAMP◆◆
SQUARE N/A
VCV Patient Type ADULT◆N/A ADULT◆
PED◆◆◆
NEO◆◆◆
VCV Respiratory Rate
Setting 12◆◆◆◆ 11 - 80BPM
VCV Tidal Volume
Setting 500◆◆◆ 1 50 - 2500 mL
VCV Peak Flow
Setting 30◆◆◆◆ 13 - 140LPM
VCV PEEP Setting 0◆◆◆◆◆ 10 - 35cmH
2O
(hPa)
VCV Pressure Support
Setting 0◆◆◆◆◆ 10 - 100cmH
2O
(hPa)
VCV I-Trigger Type PRESS◆N/A PRESS◆
FLOW◆◆
AUTO◆◆
N/A
VCV Pressure I-
Trigger Setting 2.0◆◆◆ 0.1 0.1 - 20.0 cmH2O
(hPa)
Table A-2: Volume Control Ventilation Settings Report (Sheet 1 of 2)

Appendix A
RS-232 Communications Protocol
REF 1057983 A Respironics V200 Ventilator Operator’s Manual Appendix A-13
VCV Flow I-Trigger
Setting 3.0◆◆◆ 0.1 0.5 - 20.0 LPM
VCV E-Cycle Type %Flow◆N/A %FLOW◆
AUTO◆◆
N/A
VCV %Flow
Expiratory Cycle
Setting
25◆◆◆◆ 1 10 - 80 %
VCV Rise Time 0.1◆◆◆ 0.1 0.1 - 0.9 Sec
VCV Oxygen
Concentration Setting 21◆◆◆◆ 1 21 - 100 %
VCV Plateau Setting 0.0◆◆◆ 0.1 0.0 - 2.0 Sec
VCV Apnea Rate
Setting 12◆◆◆◆ 11 - 80BPM
VCV High Inspiratory
Pressure Alarm Limit
Setting
35◆◆◆◆ 1 10 - 105 cmH2O
(hPa)
VCV Low Inspiratory
Pressure Alarm Limit
Setting
3◆◆◆◆◆ 13 - 105cmH
2O
(hPa)
VCV Low PEEP Alarm
Limit Setting 0◆◆◆◆◆ 10 - 35cmH
2O
(hPa)
VCV Low Mandatory
Tidal Volume Alarm
Limit Setting
0◆◆◆◆◆ 1 0 - 2500 mL
VCV Low
Spontaneous Tidal
Volume Alarm Limit
Setting
0◆◆◆◆◆ 1 0 - 2500 mL
VCV High Respiratory
Rate Alarm Limit
Setting
150◆◆◆ 1 0 - 150 BPM
VCV Low Minute
Volume Alarm Limit
Setting
1.00◆◆◆ 0.01 for
0.00 to 9.99
0.1 for 10.0
to 60.0
0.00 - 60.0 L
VCV Apnea Interval
Alarm Limit Setting 20◆◆◆◆ 110 - 60 sec
VCV High Minute
Volume Alarm Limit
Setting
60.0◆◆ 0.01 for
0.00 to 9.99
0.1 for 10.0
to 60.0
0.00 - 60.0 L
Stop Code 0x03 N/A N/A N/A ASCII End
Transmission
Character (ETX)
Volume Control Ventilation Settings Report (Continued)
Description Example Resolution Range Units Comments
Table A-2: Volume Control Ventilation Settings Report (Sheet 2 of 2)

Appendix A
Appendix A-14 Respironics V200 Ventilator Operator’s Manual REF 1057983 A
RS-232 Communications Protocol
Pressure Control
Ventilation Settings
Report (PCVS)
When the ventilator receives PCVS followed by a carriage return, it will respond
by transmitting the information shown in Table A-3: “Pressure Control
Ventilation Settings Report”. The ventilator responds to the PCVS command by
returning a string with a variable length. Fields 2 through 4 define the length
of the message. The last character transmitted is a stop code indicating the
end of the message. The second field indicates the number of characters
between the start and stop codes. The third field indicates the number of
fields between the start and stop codes. The fourth field is the start code,
0x02. The last field in the string is the stop code, 0x03.
Pressure Control Ventilation Settings Report
Description Example Resolution Range Units Comments
Command Name PCVS N/A N/A N/A
Number of characters
between the start and
stop codes
195 N/A N/A N/A 3 character field
Number of fields
between the start and
stop codes
27 N/A N/A N/A 2 character field
Start Code 0x02 N/A N/A N/A ASCII Start
Transmission
Character (STX)
Time of request 13:45◆N/A N/A N/A 24 hour clock,
hh:mm◆
Date FEB◆23◆1997◆N/A N/A N/A 12 character field,
MMM◆DD◆YYYY◆
Current Ventilation
Type VCV◆◆◆ N/A VCV◆◆◆
PCV◆◆◆
NPPV◆◆
N/A The ventilation
type currently
being used by the
ventilator.
PCV Mode Setting A/C◆◆◆ N/A A/C◆◆◆
SIMV◆◆
CPAP◆◆
N/A
PCV Patient Type ADULT◆N/A ADULT◆
PED◆◆◆
NEO◆◆◆
PCV Respiratory Rate
Setting 12◆◆◆◆ 1 1 - 150 BPM
PCV Pressure Setting 20◆◆◆◆ 15 - 100cmH
2O
(hPa)
PCV Inspiratory Time
Setting 1.00◆◆ 0.01 0.1 - 9.9 sec
PCV PEEP Setting 0◆◆◆◆◆ 10 - 35cmH
2O
(hPa)
PCV Pressure Support
Setting 0◆◆◆◆◆ 10 - 100cmH
2O
(hPa)
Table A-3: Pressure Control Ventilation Settings Report (Sheet 1 of 3)

Appendix A
RS-232 Communications Protocol
REF 1057983 A Respironics V200 Ventilator Operator’s Manual Appendix A-15
PCV I-Trigger Type PRESS◆N/A PRESS◆
FLOW◆◆
AUTO◆◆
N/A
PCV Pressure I-Trigger
Setting 2.0◆◆◆ 0.1 0.1 - 20.0 cmH2O
(hPa)
PCV Flow I-Trigger
Setting 3.0◆◆◆ 0.1 0.3 - 20.0 LPM
PCV E-Cycle Type %FLOW◆N/A %FLOW◆
AUTO◆◆
N/A
PCV %Flow Expiratory
Cycle Setting 25◆◆◆◆ 1 10 - 80 %
PCV Rise Time 0.1◆◆◆ 0.1 0.1 - 0.9 sec
PCV Oxygen
Concentration Setting 21◆◆◆◆ 1 21 - 100 %
PCV Apnea Rate
Setting 12◆◆◆◆ 11 - 80BPM
PCV Apnea Interval
Alarm Limit Setting 20◆◆◆◆ 1 10 - 60 sec
PCV High Inspiratory
Pressure Alarm Limit
Setting
35◆◆◆◆ 1 10 - 105 cmH2O
(hPa)
PCV Low Inspiratory
Pressure Alarm Limit
Setting
3◆◆◆◆◆ 13 - 105cmH
2O
(hPa)
PCV Low PEEP Alarm
Limit Setting 0◆◆◆◆◆ 10 - 35cmH
2O
(hPa)
PCV Low Mandatory
Tidal Volume Alarm
Limit Setting
0◆◆◆◆◆ 1 0 - 2500 mL
PCV Low Spontaneous
Tidal Volume Alarm
Limit Setting
0◆◆◆◆◆ 1 0 - 2500 mL
PCV High Respiratory
Rate Alarm Limit
Setting
150◆◆◆ 1 0 - 150 BPM
PCV Low Minute
Volume Alarm Limit
Setting
1.00◆◆ 0.01 for
0.00 to
9.99
0.1 for
10.0 to
60.0
0.00 - 60.0 L
Pressure Control Ventilation Settings Report (Continued)
Description Example Resolution Range Units Comments
Table A-3: Pressure Control Ventilation Settings Report (Sheet 2 of 3)

Appendix A
Appendix A-16 Respironics V200 Ventilator Operator’s Manual REF 1057983 A
RS-232 Communications Protocol
Non-Invasive Positive
Pressure Ventilation
Settings Report
(NPVS)
When the ventilator receives NPVS followed by a carriage return, it will respond
by transmitting the information shown in Table A-4: “Non-Invasive Positive
Pressure Ventilation Settings Report”. The ventilator responds to the NPVS
command by returning a string with a variable length. Fields 2 through 4
define the length of the message. The last character transmitted is a stop code
indicating the end of the message. The second field indicates the number of
characters between the start and stop codes. The third field indicates the
number of fields between the start and stop codes. The fourth field is the start
code, 0x02. The last field in the string is the stop code, 0x03.
PCV High Minute
Volume Alarm Limit
Setting
60.0◆◆ 0.01 for
0.00 to
9.99
0.1 for
10.0 to
60.0
0.00 - 60.0 L
Stop Code 0x03 N/A N/A N/A ASCII End
Transmission
Character (ETX)
Pressure Control Ventilation Settings Report (Continued)
Description Example Resolution Range Units Comments
Table A-3: Pressure Control Ventilation Settings Report (Sheet 3 of 3)
Non-Invasive Positive Pressure Ventilation Settings Report
Description Example Resolution Range Units Comments
Command Name NPVS N/A N/A N/A
Number of characters
between the start and
stop codes
168 N/A N/A N/A 3 character field
Number of fields
between the start and
stop codes
23 N/A N/A N/A 2 character field
Start Code 0x02 N/A N/A N/A ASCII Start
Transmission
Character (STX)
Time of request 13:45◆N/A N/A N/A 24 hour clock,
hh:mm◆
Date FEB◆23◆1997◆N/A N/A N/A 12 character field,
MMM◆DD◆YYYY◆
Current Ventilation
Type VCV◆◆◆ N/A VCV◆◆◆
PCV◆◆◆
NPPV◆◆
N/A The ventilation
type currently
being used by the
ventilator.
Table A-4: Non-Invasive Positive Pressure Ventilation Settings Report (Sheet 1 of 3)

Appendix A
RS-232 Communications Protocol
REF 1057983 A Respironics V200 Ventilator Operator’s Manual Appendix A-17
NPPV Mode Setting SPONT/T N/A SPONT/T
SPONT◆◆
NPPV Patient Type ADULT◆N/A ADULT◆
PED◆◆◆
NEO◆◆◆
NPPV Respiratory
Rate Setting 12◆◆◆◆ 11 - 80BPM
NPPV EPAP Setting 5◆◆◆◆◆ 12 - 25cmH
2O
(hPa)
NPPV IPAP Setting 5◆◆◆◆◆ 12 - 35cmH
2O
(hPa)
NPPV Inspiratory Time
Setting 1.0◆◆◆ 0.1 0.1 - 9.9 sec
NPPV Rise Time 0.1◆◆◆ 0.1 0.1 - 0.9 sec
NPPV I-Trigger Type FLOW◆◆ N/A FLOW◆◆
AUTO◆◆
N/A
NPPV Flow I-Trigger
Setting 3.0◆◆◆ 0.1 0.5 - 20.0 LPM
NPPV E-Cycle Type %FLOW◆N/A %FLOW◆
AUTO◆◆
N/A
NPPV %Flow
Expiratory Cycle
Setting
25◆◆◆◆ 1 10 - 80 %
NPPV Oxygen
Concentration Setting 21◆◆◆◆ 1 21 - 100 %
NPPV Apnea Rate
Setting 12◆◆◆◆ 11 - 80BPM
NPPV Low Inspiratory
Pressure Alarm Limit
Setting
3◆◆◆◆◆ 13 - 105cmH
2O
(hPa)
NPPV Low EPAP
Alarm Limit Setting 0◆◆◆◆◆ 10 - 25cmH
2O
(hPa)
NPPV Low Tidal
Volume Alarm Limit
Setting
0◆◆◆◆◆ 1 0 - 2500 mL
NPPV High
Respiratory Rate
Alarm Limit Setting
150◆◆◆ 1 0 - 150 BPM
NPPV Low Minute
Volume Alarm Limit
Setting
1.00◆◆ 0.01 for
0.00 to 9.99
0.1 for 10.0
to 60.0
0.00 - 60.0 L
NPPV Apnea Interval
Alarm Limit Setting 20◆◆◆◆ 1 10 - 60 sec
Non-Invasive Positive Pressure Ventilation Settings Report (Continued)
Description Example Resolution Range Units Comments
Table A-4: Non-Invasive Positive Pressure Ventilation Settings Report (Sheet 2 of 3)

Appendix A
Appendix A-18 Respironics V200 Ventilator Operator’s Manual REF 1057983 A
RS-232 Communications Protocol
Patient Data Report
(PTDT) When the ventilator receives PTDT followed by a carriage return, it will respond
by transmitting the information shown in Table A-5: “Patient Data Report”.
The ventilator responds to the PTDT command by returning a string with a
variable length. Fields 2 through 4 define the length of the message. The last
character transmitted is a stop code indicating the end of the message. The
second field indicates the number of characters between the start and stop
codes. The third field indicates the number of fields between the start and
stop codes. The fourth field is the start code, 0x02. The last field in the string
is the stop code, 0x03.
NPPV High Leak
Alarm Limit 60◆◆◆◆ 11 - 60LPM
Stop Code 0x03 N/A N/A N/A ASCII End
Transmission
Character (ETX)
Non-Invasive Positive Pressure Ventilation Settings Report (Continued)
Description Example Resolution Range Units Comments
Table A-4: Non-Invasive Positive Pressure Ventilation Settings Report (Sheet 3 of 3)
Patient Data Report
Description Example Resolution Range Units Comments
Command Name PTDT N/A N/A N/A
Number of
characters between
the start and stop
codes
275 N/A N/A N/A 3 character field
Number of fields
between the start
and stop codes
32 N/A N/A N/A 2 character field
Start Code 0x02 N/A N/A N/A ASCII Start
Transmission
Character (STX)
Time of request 13:45◆N/A N/A N/A 24 hour clock,
hh:mm◆
Date FEB◆23◆1997◆N/A N/A N/A 12 character field,
MMM◆DD◆YYYY◆
Measured Peak
Inspiratory
Pressure
24.1◆◆ 0.1 for -20.0 to 99.9
1 for 100 to 130 -20.0 - 130 cmH2O
(hPa) The PIP value from
the Patient Data
screen.
Measured Mean
Airway Pressure 5.6◆◆◆ 0.1 for -20.0 to 99.9
1 for 100 to 120 -20.0 -120 cmH2O
(hPa) The MAP value
from the Patient
Data screen.
Table A-5: Patient Data Report (Sheet 1 of 4)

Appendix A
RS-232 Communications Protocol
REF 1057983 A Respironics V200 Ventilator Operator’s Manual Appendix A-19
Measured End
Expiratory Pressure
Data
2.0◆◆◆ 0.1 -20.0-99.9 cmH2O
(hPa) The End Exp. value
from the Patient
Data screen.
Measured End
Inhalation Pressure 24.0◆◆ 0.1 for -20.0 to 99.9
1 for 100 to 130 -20.0 - 130 cmH2O
(hPa) The Plateau value
from the Patient
Data screen.
Measured Tidal
Volume 468◆◆◆ 1 0 - 2500 mL The Tidal Volume
value from the
Patient Data
screen.
Measured
Spontaneous
Minute Volume
0.00◆◆ 0.01 for 0.00 to
9.99
0.1 for 10.0 to 60.0
0.00 - 60.0 L The Spont VE value
from the Patient
Data screen.
Measured Minute
Volume 5.83◆◆ 0.01 for 0.00 to
9.99
0.1 for 10.0 to 60.0
0.00 - 60.0 L The Total VE value
from the Patient
Data screen.
Measured
Spontaneous
Breath Rate
0.0◆◆◆ 0.1 for 0.0 to 9.9
1 for 10 to 150 0.0 - 150 BPM The Spont Rate
value from the
Patient Data
screen.
Measured Total
Breath Rate 12.0◆◆ 0.1 for 0.0 to 9.9
1 for 10 to 150 0 - 150 BPM The Total Rate
value from the
Patient Data
screen.
Measured Rapid
Shallow Breathing
Index
5◆◆◆◆◆ 1 0 - 500 BPM/L The F/Vt value from
the Patient Data
screen.
Measured I:E Ratio 1:4.1◆0.1 for 9.9:1 to 1:9.9
1 for 1:10 to 1:99 4.1:1-1:99 N/A The I:E Ratio
display from the
Patient Data
screen.
Measured Patient
Leak 0.0◆◆◆ 0.1 for 0.0 to 99.9
1 for 100 to 140 0.0 - 140 LPM The Pt Leak
display.
Measured Percent
of Breaths
Triggered by the
Patient (NPPV
Spont/T mode only;
otherwise
◆◆◆◆◆◆)
56.2◆◆ 0.1 for 0.0 to 99.9
1 for 100 0.0 - 100 % The Pt Trigger
display on the
NPPV Monitor
screen.
Monitored Oxygen
Concentration 55.1◆◆ 0,1 for 0.0 to 99.91 for
100 0.0 - 100 % The % O2 display
from the Patient
Data Screen.
Ti/Ttot 0.23◆◆ 0.01 0.00 - 1.00 N/A The Ti/Ttot display
from the
Mechanics Patient
Status Screen
Patient Data Report (Continued)
Description Example Resolution Range Units Comments
Table A-5: Patient Data Report (Sheet 2 of 4)

Appendix A
Appendix A-20 Respironics V200 Ventilator Operator’s Manual REF 1057983 A
RS-232 Communications Protocol
Dynamic
Resistance 5.43◆◆ 0.01 for 0.00 to
9.990.1 for 10.0 to
99.91 for 100 to 400
0.00 - 400 cmH2
0/L/
Sec
The Dynamic
Resistance display
from the
Mechanics Patient
Status Screen
Dynamic
Compliance 19.2◆◆ 0.01 for 0.00 to
9.990.1 for 10.0 to
99.91 for 100 to 350
0.00 - 350 mL/cm
H20 The Dynamic
Compliance display
from the
Mechanics Patient
Status Screen
Peak Lung Flow 35.1◆◆ 0.1 for -99.9 to 99.91
for -100 to -3001 for
100 to 300
-300 - 300 LPM The Peak L-Flow
display from the
Mechanics Patient
Status Screen
Vital Capacity 468◆◆ 1 0 - 9999 mL Vital Capacity
display from Vital
Capacity Screen
Vital Capacity Time
of Last Maneuver 11-14-01◆◆13:11 1 minute 01-01-70
0:00 to
01-19-38
3:14
N/A Time of Last
Maneuver display
from the Vital
Capacity
Screen.15
character field, 24
hour clock: MM-
DD-YYuuHH:MM
MIP -54.1◆0.1 for -99.9 to
99.91 for -100 and
100 to 200
-100 - 200 cm
H20 MIP display from
MIP/P0.1 display
Screen
MIP Time of Last
Maneuver 11-14-01◆◆13:11 1 minute 01-01-7
0 0:00 to
01-19-38
3:14
N/A MIP Time of Last
Maneuver display
from MIP/P0.1
Screen15
character field, 24
hour clock: MM-
DD-YYuuHH:MM
P0.1 -2.3◆◆ 0.1for -99.9 to
99.91 for -100 and
100 to 200
-100 - 200 cm
H20 P0.1 display from
MIP/P0.1 display
screen
P0.1 Time of Last
Maneuver 11-14-01◆◆13:11 1 minute 01-01-70
0:00 to
01-1-/38
3:14
N/A P0.1 Time of Last
Maneuver display
from MIP/P0.1
Screen.15
character field, 24
hour clock: MM-
DD-YYwwHH:MM
Static Resistance 5.43◆◆ 0,01 for 0.00 to
9.990.1 for 10.0 to
99.91 for 100 to
400
0.00 - 400 cmH2
0/L/
Sec
Static Resistance
display from the
Static C & R screen
Patient Data Report (Continued)
Description Example Resolution Range Units Comments
Table A-5: Patient Data Report (Sheet 3 of 4)

Appendix A
RS-232 Communications Protocol
REF 1057983 A Respironics V200 Ventilator Operator’s Manual Appendix A-21
Alarm Status Report
(ALRM) When the ventilator receives ALRM followed by a carriage return, it will
respond by transmitting the information shown in Table A-6: “Alarm Status
Report”. The ventilator responds to the ALRM command by returning a string
with a variable length. Fields 2 through 4 define the length of the message.
The last character transmitted is a stop code indicating the end of the
message. The second field indicates the number of characters between the
start and stop codes. The third field indicates the number of fields between
the start and stop codes. The fourth field is the start code, 0x02. The last field
in the string is the stop code, 0x03.
Static Compliance 19.2◆◆ 0.01 for 0.00 to
9.990.1 for 10.0 to
99.91 for 100 to
350
0.00 - 350 mL/
cmH2
O
Static Compliance
display from the
Static C & R
Screen
Static C & R Time
of Last Maneuver 11-14-01◆◆13:11 1 minute 01-01-70
0:00 to
01-19-38
3:14
N/A Static C & R Time
of Last Maneuver
display from Static
C & R Screen.15
character field, 24
hour clock: MM-
DD-YYwwHH:MM
AutoPeep 1.2◆◆ 0.1 for -9.9 to 9.91
for -10 to -201 for
10 to 120
-20 - 120 cmH2
OAutoPeep display
from the
Mechanics Patient
Status Screen
AutoPeep Time of
Last Maneuver 11-14-01◆◆13:11 1 minute 01-01-70
0:00 to
01-19-38
3:14
N/A AutoPeep Time of
Last Maneuver
display from
Mechanics Patient
Status Screen.15
character field, 24
hour clock: MM-
DD-YYwwHH:MM
Static C & R
Plateau End
Pressure
8.2◆◆◆ 0.2 for -20 to 99.9
1 for 100 to 130 -20.0 - 130 cmH2OP
plat display from
Static C & R
Screen
Stop Code 0x03 N/A N/A N/A ASCII End
Transmission
Character (ETX)
Patient Data Report (Continued)
Description Example Resolution Range Units Comments
Table A-5: Patient Data Report (Sheet 4 of 4)

Appendix A
Appendix A-22 Respironics V200 Ventilator Operator’s Manual REF 1057983 A
RS-232 Communications Protocol
Alarm Status Report
Description Example Range Comments
Command Name ALRM N/A
Number of characters between the start
and stop codes 202 N/A 3 character field
Number of fields between the start and
stop codes 28 N/A 2 character field
Start Code 0x02 N/A ASCII Start
Transmission
Character (STX)
Time of request 13:45◆N/A 24 hour clock,
hh:mm◆
Date FEB◆23◆1997◆N/A 12 character field,
MMM◆DD◆YYYY◆
Occlusion Alarm Status or SM Occlusion
Status NORMAL NORMAL
ALARM◆
RESET◆
Safety Valve Status NORMAL NORMAL
ALARM◆
RESET◆
Low Internal Battery Alarm Status NORMAL NORMAL
ALARM◆
RESET◆
Nonvolatile Memory Failure—Using
Default Settings NORMAL NORMAL
ALARM◆
RESET◆
Primary Alarm Failure NORMAL NORMAL
ALARM◆
RESET◆
High Inspiratory Pressure Alarm Status NORMAL NORMAL
ALARM◆
RESET◆
Apnea Alarm Status NORMAL NORMAL
ALARM◆
RESET◆
Low Inspiratory Pressure Alarm Status or
Disconnect Alarm Status NORMAL NORMAL
ALARM◆
RESET◆
Air Source Fault Alarm Status NORMAL NORMAL
ALARM◆
RESET◆
O2 Valve Stuck Closed Alarm Status NORMAL NORMAL
ALARM◆
RESET◆
Table A-6: Alarm Status Report (Sheet 1 of 3)

Appendix A
RS-232 Communications Protocol
REF 1057983 A Respironics V200 Ventilator Operator’s Manual Appendix A-23
Exhalation Valve Stuck Open Alarm
Status NORMAL NORMAL
ALARM◆
RESET◆
Low O2 Supply Alarm Status NORMAL NORMAL
ALARM◆
RESET◆
Low supply pressure
Low O2 Alarm Status NORMAL NORMAL
ALARM◆
RESET◆
Low O2
concentration
Low Minute Volume Alarm Status NORMAL NORMAL
ALARM◆
RESET◆
Low Mandatory Tidal Volume Alarm
Status NORMAL NORMAL
ALARM◆
RESET◆
High Minute Volume Alarm Status NORMAL NORMAL
ALARM◆
RESET◆
Low Tidal Volume Alarm Status NORMAL NORMAL
ALARM◆
RESET◆
Low Spontaneous Tidal Volume Alarm
Status NORMAL NORMAL
ALARM◆
RESET◆
I-Time Too Long Alarm Status NORMAL NORMAL
ALARM◆
RESET◆
High Respiratory Rate Alarm Status NORMAL NORMAL
ALARM◆
RESET◆
High O2 Alarm Status NORMAL NORMAL
ALARM◆
RESET◆
High Enclosure Temperature Alarm
Status NORMAL NORMAL
ALARM◆
RESET◆
High Internal Oxygen Concentration
Alarm Status NORMAL NORMAL
ALARM◆
RESET◆
Low PEEP Alarm Status NORMAL NORMAL
ALARM◆
RESET◆
Alarm Status Report (Continued)
Description Example Range Comments
Table A-6: Alarm Status Report (Sheet 2 of 3)

Appendix A
Appendix A-24 Respironics V200 Ventilator Operator’s Manual REF 1057983 A
RS-232 Communications Protocol
Unrecognized
Commands If an unrecognized command is received, the ventilator will respond by
transmitting the information shown in Table A-7: “Unrecognized Commands”.
Low EPAP Alarm Status NORMAL NORMAL
ALARM◆
RESET◆
High Leak Alarm Status NORMAL NORMAL
ALARM◆
RESET◆
Stop Code 0x03 N/A ASCII End
Transmission
Character (ETX)
Alarm Status Report (Continued)
Description Example Range Comments
Table A-6: Alarm Status Report (Sheet 3 of 3)
Unrecognized Commands
Description Example Comments
The unrecognized command
response: ?ERROR ?ERROR
Time of request 13:45◆24 hour clock, hh:mm◆
Up to the first five characters
received set off in brackets [VRPY] Example for VRPT being sent as VRPY. Non-
printable characters are returned as ^.
Table A-7: Unrecognized Commands

REF 1057983 A Respironics V200 Ventilator Operator’s Manual Appendix B-1
Appendix B. Customer Service & Warranty
Customer Service For further information or assistance in operating the Respironics V200,
contact Respironics Customer Service:
Within the United States: 800-345-6443
Outside the United States: 724-387-4000
Fax: 724-387-5012
email: service@respironics.com
Warranty Two Year Warranty
Respironics warrants the Respironics V200 to be free from defects in material
and workmanship for a period of two years from the date of purchase, provided
that the unit is operated under conditions of normal use as described in this
Operator’s Manual.
At its discretion, Respironics will make replacements, repairs, or issue credits
for equipment or parts that are found to be defective.
Exclusions
This warranty does not apply to any unit or individual parts which have been
repaired or altered in any way that, in Respironics’ judgement, affect its ability
or reliability, or which has been subjected to misuse, negligence, abuse, or
accident.
Unauthorized service and/or failure to perform periodic maintenance may void
this warranty.
This warranty does not cover damage that may occur in shipment.
Warranty Limits
This warranty takes precedence over all other warranties, expressed or implied.
This warranty also takes precedence over all other obligations or liabilities on
the part of Respironics including, but not limited to, contingent or
consequential damages, such as costs of repairing or replacing other property
which may be damaged as a direct result of Respironics V200 operation.
This warranty, and the rights and obligations described herein, is construed
under and governed by the laws of the State of California, U.S.A.

Appendix B
Appendix B-2 Respironics V200 Ventilator Operator’s Manual REF 1057983 A
Customer Service & Warranty
Options and
Accessories Warranties are available for various options and accessories. See the specific
option or accessory in Chapter 13 for complete warranty information.

REF 1057983 A Respironics V200 Ventilator Operator’s Manual Appendix C-1
Appendix C. Alarm Testing Procedure
The following procedure is available if the operator wants to test the operation
of the following alarms. We recommend following “Preoperational Procedure”
on page 8-32 before performing the Alarm Testing procedure. It is assumed
that the preoperational procedure has been run before the Alarm Testing
Procedure is followed.
Setup
1. Connect O2 supply to the Respironics V200 Ventilator.
2. Connect optional O2 sensor.
3. Run EST.
4. Attach the test lung to the patient wye. (Use the test lung provided
with your system.)
5. Use the following settings:
• Mode VCV-A/C
• Tidal Vol: 400ml
• High Pressure (HIP): 50cmH20 (hPa)
(or higher if required by the test lung)
• Rate: 10 Bpm
• Low Insp Press: 3 cmH20 (hPa)
• Peak Flow 40 Lpm
• PEEP: 4 cmH20 (hPa)
• Low PEEP: 2 cmH20 (hPa)
• Low Vt Mand: 0 mL
• PSV: 0 cmH20 (hPa)
• Low Vt Spont: 0 Lpm
• I-Trigger: 2 cmH20 (hPa)
• High Rate: 150 Bpm
•O
2: 21%
• Low VE: 1 L
• Insp. Hold: 0 sec.
• Apnea: 15 sec.
• Apnea Rate: 20 Bpm

Appendix C
Appendix C-2 Respironics V200 Ventilator Operator’s Manual REF 1057983 A
Alarm Testing Procedure
High Inspiratory Pressure Alarm Test
1. During inhalation squeeze the test lung for at least two breaths until
the High Pressure alarm sounds.
2. Wait for one normal breath, the alarm auto resets.
3. RESET the alarm.
Low Volume Alarm Test
1. Set the Low Vt Mand alarm limit to 500 ml.
2. Wait for one breath and alarm should sound.
3. Set the Low Vt Mand to 0 ml.
4. Wait for one breath and RESET the alarm.
Low O2 Alarm Test
(If optional O2 sensor is installed.)
1. Turn the ventilator OFF.
2. Disconnect the O2 sensor and its Tee from the inhalation limb of the
patient circuit. (Leave the electrical connection.)
3. Connect the inspiratory bacteria filter directly to the gas outlet port
and connect the inhalation limb to the filter.
4. Turn the ventilator ON.
5. Set the O2 setting to 40%.
6. Wait at least 3-5 breaths, the alarm should sound.
7. Set the O2 setting to 21%.
8. Wait for 3 - 5 breaths, the alarm should reset.
9. Press the RESET key to clear the alarm.
10. Turn the ventilator OFF and re-insert the O2 sensor and Tee.
11. Turn the ventilator ON.
Power Fail Alarm Test
1. While the system is ventilating normally, pull the AC plug from the
wall.
2. If the backup battery is attached, the ventilator should continue
ventilating, and an alarm should sound every 60 seconds. If no
backup battery is attached, the ventilator will stop operating and
sound a continuous audible alarm.
3. Plug the power cord back in.

Appendix C
Alarm Testing Procedure
REF 1057983 A Respironics V200 Ventilator Operator’s Manual Appendix C-3
4. Alarm should reset. (If the backup battery is attached, the ventilator
should return to AC power. If no battery is attached, the ventilator will
resume operating.)
Apnea Alarm Test
1. Set the rate to 1 breath per minute.
2. Wait for 20 seconds.
3. The Respironics V200 should begin ventilating at a rate of 20 BPM
while activating the Apnea alarm.
4. Reset the rate to 10 BPM.
5. RESET the alarm.
6. The Respironics V200 should begin ventilating normally.

Appendix C
Appendix C-4 Respironics V200 Ventilator Operator’s Manual REF 1057983 A
Alarm Testing Procedure
(This page is intentionally blank.)

REF 1057983 A Respironics V200 Ventilator Operator’s Manual Glossary-1
Glossary
Abbreviations
24 Hrs used to describe format for time-of-day when AM or PM does not appear
AC alternating current (power)
A/C assist/control ventilation
AM/PM used to describe format for time-of-day when AM or PM occurs
ASCII commonly accepted 8-bit binary code for characters
Assist assist/control ventilation
ATPS ambient temperature, ambient pressure, saturated (with water vapor)
Auto-PEEP end-expiratory alveolar pressure above set PEEP level
Aux auxiliary
BTPS Body temperature (98°F, ambient pressure) 100% saturated (with water vapor)
C compliance, ratio of change in volume divided by change in pressure
CL lung compliance
cmH2O unit of pressure measurement centimeters of water
CMV controlled mechanical ventilation (same as A/C)
CPAP continuous positive airway pressure
Crs compliance of respiratory system
Cw chest wall compliance
DISS Diameter Index Safety System
E-Cycle Expiratory Cycle
End Exp end expiratory pressure
EPAP expiratory positive airway pressure
ETO ethylene oxide. Gas used for sterilization.

Glossary-2 Respironics V200 Ventilator Operator’s Manual REF 1057983 A
Glossary
f respiratory frequency
FIO2 fractional inspired oxygen
FRC functional residual capacity
f/VT rate versus tidal volume ratio; rapid shallow breathing index
HIP high inspiratory pressure
HME heat and moisture exchanger
hPa unit of pressure measurement hecto Pascals
I:E ratio inspiration:exhalation ratio
ICU intensive care unit
ISO International Standards Organization
IMV intermittent mandatory ventilation
Inop inoperational
IPAP inspiratory positive airway pressure
I-Time inspiratory time
L Liter
MAP mean airway pressure
mL milliliter, or 1/1000 L
mm millimeters
msec millisecond
M a notation for screw threads: metric
NPPV noninvasive positive pressure ventilation
NO nitric oxide
O2 molecular oxygen
OIM operator initiated mandatory
Paw airway pressure
PCV pressure-controlled ventilation
Pe End airway pressure at end exhalation

Glossary
REF 1057983 A Respironics V200 Ventilator Operator’s Manual Glossary-3
PEEP positive end-expiratory pressure
Pi End airway pressure at the end of inhalation
PIP peak inspiratory pressure
Plateau inspiratory plateau pressure, pressure at end exhalation and no flow from or out of
the ventilator
Pplat end-inspiratory plateau pressure
psi pounds per square inch; Unit of pressure measurement
psig pounds per square inch gauge (above atmospheric pressure)
PSV pressure-support ventilation
SIMV synchronous intermittent mandatory ventilation
Spont Rate spontaneous respiratory rate
Spont T spontaneous timed
Spont VE spontaneous volume exhaled
STPD standard temperature, standard pressure dry
SVO safety valve open
Tidal Vol tidal volume
Total RR total respiratory rate
Total VE total volume exhaled/minute
V volume
flow
VAC volts of alternating current (power)
E expired minute ventilation
Vent ventilator
VT tidal volume
V
•
V
•

Glossary-4 Respironics V200 Ventilator Operator’s Manual REF 1057983 A
Glossary
Definitions
Airway Pressure the pressure in the patient circuit, measured at the distal end
of the exhalation filter.
Baseline as in baseline pressure. The pressure at end exhalation.
Baud serial transmission speed usually bits/second.
Bias flow a continuous flow of gas used during expiratory phase when flow
triggering is active.
Bit binary digit.
Compliance a measure of stiffness for containers that hold gas (i.e. lungs,
patient tubing). The volume required to increase the pressure in the container
by a unit of pressure (i.e., L/cmH2O (hPa)).
Continuous positive airway pressure (CPAP) a mode of ventilator operation that
allows the patient to breath spontaneously from a continuous-flow or demand
valve at an elevated airway pressure. (same as CAP)
E-Cycle The E-Cycle setting on the ventilator determines when the ventilator
will transition from inspiration to expiration in PSV and NPPV modes. E-Cycle
defines the percent of peak inspiratory flow that end inspiratory flow needs to
drop to in order for inspiration to end.
End Expiratory Pressure (End Exp) the airway pressure measured at the end of
exhalation. The display is updated at the end of each exhalation.
Expiratory phase (exhalation) the part of the ventilatory cycle from the
beginning of expiratory flow to the beginning of inspiratory flow.
Flow Trigger initiation of inspiration when the patients inspiratory effort
exceeds the flow sensitivity setting (threshold).
Indicator a light, usually light emitting diode (LED).
Inspiration:Exhalation Ratio (I:E ratio) a standard I:E ratio. It is displayed as
XX:1 when exhalation period is larger than the inhalation period. It is displayed
as 1:XX when inhalation period is larger than the exhalation period.
Inspiratory phase (inspiration) the part of the ventilatory cycle from the
beginning of inspiratory flow to the beginning of expiratory flow. Any inspiratory
pause (plateau) is included in the inspiratory phase.
Inspiratory time inspiratory time (expressed in seconds) is the duration of
inspiration during mechanical ventilation. As inspiratory time increases, mean
airway pressure increases and the I:E ratio becomes lower.

Glossary
REF 1057983 A Respironics V200 Ventilator Operator’s Manual Glossary-5
Inspiratory pause inspiratory pause is a brief pause (0.1 to 2 seconds) at end-
inspiration during which pressure is held constant and flow is zero. The
purpose of the pause is to improve gas distribution throughout the lungs. Same
as Plateau pressure.
Intermittent Mandatory Ventilation (IMV) a mode of ventilatory support that
allows spontaneous breathing in between mandatory breaths from the
ventilator.
Mandatory Breath a breath whose inspiratory flow and or pressure is under the
control of the ventilator.
Manual Breath a breath initiated by the operator.
Mean Airway Pressure (MAP) the average over one inspiration/exhalation cycle.
The value displayed is the average of this calculation over one minute. The
display is updated at the end of each exhalation.
Medical gas a gas that has been refined and purified according to
specifications in the United States Pharmacopoeia (USP) intended for human
use in the diagnosis or treatment of disease.
Millisecond (msec) one thousandth of a second.
Minute Ventilation ( E) the total amount of gas moving out of the lungs during
1 minute.
Noninvasive pertaining to a diagnostic or therapeutic technique that does not
require the skin to be broken or a cavity or organ of the body to be entered.
Mechanical ventilation via mask, nasal prongs, or mouthpiece.
Peak Inhalation Pressure (PIP) the greatest airway pressure during an inspiratory
cycle no matter what the breath type. The pressure is measured at the
exhalation valve and the new data is displayed at the beginning of exhalation.
Plateau Pressure (Plateau) the pressure measured at the end of exhalation on
every breath. The display is updated at the beginning of each exhalation.
PCMCIA Card (PC Card) Acronym for Personal Computer Memory Card
International Association, more commonly referred to as a PC Card. This is a
data storage device with an approximate physical size of a credit card, used in
conjunction with the Trending Option.
Positive End-Expiratory Pressure (PEEP) the application and maintenance of
pressure above atmospheric at the airway throughout the expiratory phase of
positive-pressure mechanical ventilation.
Pressure Support Ventilation (PSV) pressure-limited assisted ventilation
designed to augment a spontaneously generated breath; the patient has
primary control over the frequency of breathing, the inspiratory time, and the
inspiratory flow.
V
•

Glossary-6 Respironics V200 Ventilator Operator’s Manual REF 1057983 A
Glossary
Pressure Sensitivity a measure of the amount of negative pressure that must be
generated by a patient to trigger a mechanical ventilator into the inspiratory
phase; alternatively, the mechanism used to set or control this level.
Pressure Trigger initiation of inspiration when the patients inspiratory effort
exceeds the sensitivity threshold.
PVC O2 Sensor Tee An external oxygen sensor adapter made of polyvinyl
chloride (PVC). This O2 Sensor Tee is gray in color and cannot be autoclaved or
chemically disinfected.
Rapid Shallow Breathing Index (F/VT) used to evaluate the adequacy of the
patients spontaneous ventilation. It is calculated by as shown below
•f/V
t = (Spont Rate)/(Spont VE)
Resistance The pressure drop across a pneumatic device (i.e. bacteria filter,
patient circuit tubing) for a unit of flow when the volume of the device remains
constant, i.e., (cmH2O (hPa))/mL/sec.
Risetime the time required for a pressure support or pressure controlled breath
to reach its target pressure.
RS-232 ANSI standard for communication.
Spontaneous Respiratory Rate (Spont Rate) the average rate of the spontaneous
breaths in the last eight breaths delivered by the ventilator.
Spontaneous Volume Exhaled (Spont E) the exhaled volume that would come
from spontaneous breaths, projected over one minute. The calculation is done
by averaging the spontaneous exhaled tidal volume from the last eight breaths
and projecting what that volume would be if it continued for one minute.
Tidal Volume (Tidal Vol) the volume of patient gas as measured at the
exhalation flow transducer. The display shows an average unless the current
breath differs substantially from the average. When there is a substantial
change, the current breath is displayed. The average for tidal volume is
restarted when the operator changes the tidal volume setting and the machine
is delivering mandatory breaths.
Time Trigger initiation of inspiration by the ventilator according to the
respiratory frequency (Rate) setting.
Total Respiratory Rate (Total RR) the total breaths taken, spontaneous breath
rate + mandatory breath rate, from the last eight breaths and projecting what
that rate would be if it continued for one minute.
Total Volume Exhaled (Total E) the total exhaled volume that would come from
all the patient’s breaths, projected over one minute. The calculation is done by
averaging the total exhaled tidal volume from the last eight breaths and
projecting what that volume would be if it continued for one minute. This value
is updated at the end of each exhalation.
V
•
V
•

Glossary
REF 1057983 A Respironics V200 Ventilator Operator’s Manual Glossary-7
Trigger normally a patient effort to begin inhalation.
Volume space occupied by matter measured in milliliters or liters.
Window either a period of time or a portion of a screen depending on the
context.

Glossary-8 Respironics V200 Ventilator Operator’s Manual REF 1057983 A
Glossary
(This page is intentionally blank.)

REF 1057983 A Respironics V200 Ventilator Operator’s Manual Index-1
Index
Symbols
100% O2 Key,8-9
A
A/C, Assist Control,7-3
AC Inlet,5-2
ACCEPT key,5-8, 8-2
Accept Key,8-8
Accessories,4-2, 13-1
Adjust Control Knob,8-11, 12-7
Adult
Disposable Patient Circuit,13-2
Patient Circuit Kit,13-2
Adult/Pediatric Keys,8-20
Air Inlet Filter,5-1
Air Source Fault Alarm,9-5
Airway Pressure,7-4
Alarm Reset Key,8-9
Alarm Silence,12-9
Alarm Silence Key,8-9
Alarm Status
Indicators,8-5
Alarms,9-1
Audible,9-2
Auto-Reset of,9-3
Descriptions,9-5, 9-8
High Urgency,9-1, 9-2
Low Urgency,9-1, 9-2
Medium Urgency,9-1, 9-2
Operator-Initiated Reset of,9-3
Remote,6-2
Reset,9-3
Silence,9-2
Visual,9-1
Alert Messages,9-4
Altitude, Setting,5-5, 5-9
Analog Port,5-2, 6-7
Apnea Alarm,9-5
Apnea Ventilation,7-7, 8-27
Operation During,7-7
Respiratory Rate,8-22
Apply Date,5-8
Apply Time,5-8
Assist Control Ventilation,7-3
Assist Control Ventilation (A/C),7-3
Audible Alarm Failed Alarm,9-5
Auto-PEEP,8-31
Calculation,8-31
B
Backup Battery,4-4
Power Status Indicators,8-6
Bad ADC Wrap Sensor Alarm,9-5
Bad Bat Volt Sensor Alarm,9-5
Bad Int O2 Sensor Alarm,9-5
Bad Int Temp Sensor Alarm,9-5
Battery Backup On Alarm,9-5
Baud Rate, RS-232,6-2, A-1
Breath Indicator,8-13
Breath Type,12-1
Selecting,8-23
BTPS,G-1
Built-In Test,11-11
Bus Activity Monitor,11-10
C
Cautions,2-5
Circuit Breaker
Humidifier AC,5-2
Mains,5-2
Cleaning, Ventilator Parts,10-1
Clock,5-7

Index
Index-2 Respironics V200 Ventilator Operator’s Manual REF 1057983 A
Compliance,G-1, G-4
Circuit,5-5, 11-5
Compensation,8-33, 11-1
Tubing,5-10
Compliance and Approvals,12-11
Continuous Positive Airway Pressure,7-4
CPAP,7-4
D
Date of Manufacture,3-3
Date Setting,5-7
Delivered O2, %O2,8-29
Diagnostic
Codes,11-5
Descriptions,11-6, 11-8
Mode,5-5, 11-2
Diagnostics,11-1
Display
Front Touch Panel,8-11
Patient Leak,7-6
E
End Exhalation Pressure,8-31
EPAP,7-6, 8-23, 12-3, G-1
EST,11-4
Exhalation Bacteria Filter,13-2
Exp Valve Stuck Open Alarm,9-5
Expiratory Bacteria Filter,4-18
Expiratory Hold
Calculated Values,12-7
Expiratory Hold Key,8-10
Expiratory Positive Airway Pressure,G-1
Extended Self Test (EST),5-12, 11-4
F
F/Vt,8-29
Filters
Removal/Installation
Bacteria,10-4
Cooling,10-8
Heated Bacteria,4-18
Inspiratory Bacteria,4-16
Internal Air Source Inlet,10-10
O2 Input Filter,10-9
Flex Arm,4-22
Front Panel,8-3
Controls,8-10
Keys,8-8
Text Version,8-3
Touch Display,8-11
G
Gas Supplies Lost - SVO Alarm,9-5
Glossary,G-1
H
High Indicator,8-5
High Inspiratory Pressure,9-5, 12-9
Alarm Test,C-2
High Inspiratory Pressure Alarm,9-5
High Internal O2 Alarm,9-5
High Leak Rate Alarm,9-5
High Minute Volume Alarm,9-6
High O2 Alarm,9-6
High Respiratory Rate,9-6, 12-9
High Respiratory Rate Alarm,9-6
High Temperature Alarm,9-6
High Urgency Alarm,12-9
high urgency alarm,9-1, 9-5
Humidifier
AC Circuit Breaker,5-2
AC Outlet,6-1
Connecting,6-3

Index
REF 1057983 A Respironics V200 Ventilator Operator’s Manual Index-3
I
I:E Ratio,8-29
Inspiratory Bacteria Filter,4-17, 13-2, 13-4
Installation,4-16
Removing and Replacing,10-5
Inspiratory Trigger (I-Trigger),8-21
IPAP,7-6, 8-23, 12-3
I-TIME,7-2
I-Time Too Long Alarm,9-6
L
Labels,12-18
Lock
Screen,8-8
Low Backup Battery Alarm,9-6
Low EPAP Alarm,9-6
Low Insp Pressure Alarm,9-7
Low Minute Volume Alarm,9-7
Low O2 Alarm,9-7
Low O2 Supply Alarm,9-7
Low PEEP Alarm,9-7
Low Tidal Volume Alarm,9-7
Low Vt Mandatory Alarm,9-8
Low Vt Spontaneous Alarm,9-8
M
Mandatory Breaths,7-3, 8-26
Manometer,8-13
Manual Breath Key,8-10
Med/Low Indicator,8-5
Medium/Low Urgency Alarm,12-9
Modes,8-1, 12-1
Common to NPPV,7-6
Common to VCV & PCV,7-3
Emergency,7-7
Mount
Wall,5-4
N
Non-Invasive Positive Pressure Ventilation
(NPPV),7-6
Non-Invasive Ventilation,7-1, 7-6, 8-1
Normal Indicator,8-5, 12-9
Notes,2-8
NPPV,7-6, 8-23
Symbols
Nurse Call
Label,12-18
Remote Alarm,5-1
O
O2Cylinder Bracket,13-1
High Pressure Hose,13-1
Manifold,13-1
Sensor,4-16, 13-3
Sensor Kit,13-1
O2 Sensor Tee
Autoclaving,10-2
Chemical Disenfecting,10-2
See also PVC O2 Sensor Tee
O2 Valve Stuck Closed Alarm,9-8
Occlusion - SVO Alarm,9-8
On/Off
Power,5-4
On/Off Switch,5-2
Open,7-7
Safety Valve,7-7, 7-8, 9-9, 9-10
Operating
Conditions,9-1
Instructions,8-1
Theory,7-1
Options
Communications,13-1
Flow-Trak,13-1
Graphics,13-1
Neonatal,13-1

Index
Index-4 Respironics V200 Ventilator Operator’s Manual REF 1057983 A
Respiratory Mechanics,13-1
RS-232 Communications 2,13-1
Trending,13-1
Output
Analog label,3-1
Analog port,6-7
Field,A-1
Port,6-1
Serial label,3-2
Oxygen
Source Connection,4-21
Oxygen Sensor,13-3
P
Panel, Back
Connections and Controls,5-1
Panel, Front
Dispay,8-11
Patient Initiated Breath Triggering,7-5
Patient Leak Display,7-6
Pediatric
Patient Circuit Kit,13-2
Positive End Expiratory Pressure (PEEP),7-5
POST,11-10
Power Cord,5-3
Power On Self Test (POST),11-10
Power Status Indicators,8-6
Pressure Support Ventilation (PSV),7-4
PVC O2 Sensor Tee
Cannot be autoclaved,10-2
Cannot be chemically disinfected,10-2
R
Restart,11-11
Alarm,9-8
Rise Time Setting,7-5
S
Safety Valve Open,12-9
Safety Valve Ventilator Inoperative,8-5
Schedule for Periodic Maintenance,10-7
Screen Lock Key,8-8
Screen Locked,12-9
Self-Test Hardware,11-10
Serial Port,5-1
SIMV,7-3
Software Options,13-1
Spont Rate,8-29
Spontaneous Respiratory Rate (Spont Rate),G-6
Spontaneous Volume Exhaled (Spont VE),G-6
SST,11-3
Symbols,3-1
Synchronized Intermittent Mandatory Ventilation
(SIMV),7-3
T
Table Top Mounting,4-4
Tidal Volume,G-6
Time Format,5-7
Time Setting,5-7
Total Rate,8-29
Total VE,8-29
Touch Display,8-11
U
Using Default Altitude Alarm,9-8
Using Default Compliance Alarm,9-8
Using Default Settings Alarm,9-8
V
Ventilator Inoperative,12-9
Ventilator Inoperative Indicator,8-5
W
Warnings,2-1
Warranty,13-5, B-1
