Pioneer CT W208R User Manual STEREO CASSETTE DECK Manuals And Guides L0090022
PIONEER Tape Deck Manual L0090022 PIONEER Tape Deck Owner's Manual, PIONEER Tape Deck installation guides
User Manual: Pioneer CT-W208R CT-W208R PIONEER STEREO CASSETTE DECK - Manuals and Guides View the owners manual for your PIONEER STEREO CASSETTE DECK #CTW208R. Home:Electronics Parts:Pioneer Parts:Pioneer STEREO CASSETTE DECK Manual
Open the PDF directly: View PDF ![]() .
.
Page Count: 20

STEREO ETTE DECK
8R
0tstructions

Thank you for buying this Pioneer product.
Please read through ttmse operating instructions so you
will know how to operate your unit properly, After you
have finished reading the instructions, keep them in a
safe place for future reference.
In some countries or regions, the shape of the power
plug and power outlet may sometimes differ from that
shown in the explanatory drawings. However, the
method of connecting and operating the unit Is the
same.
WARNING:To PREVENT FIRE OR SHOCK HAZ-
ARD, DO NOT EXPOSE THIS APPLIANCE TO RAIN OR
MOISTURE.
IMPORTANT NOTICE
[For U.S. model]
The serial number for this equipment is located on
the rear panel, Please write this serial number on
your enclosed warranty card and keep it In a secure
area. This is for your security.
This product compiles with the Low Voltage
Directive (73/23/EEC). EMC Directives (89/336/EEC,
92/37/EEC) and CE Marking Directive (93/68/EEC).
IMPORTANT
The ligiltnlrtg fissh w)ttl an'owheed symbOl,
within an equUater_ _isngl_ Is Intenbed to iset
ti_e user to the presence of unlnsuisted "ben.
genus voltage" w_ln the product's encto_Jre
tha_ may be of _Jfficlent magnRude to conStl-
tuto a risk of ole¢l;tc shock _.o pa_o_.
CAUTION
CAUTION:
TO PREVENT THE RISK OF ELECTRIC
SHOCK. DO NOT REMOVE COVER (OR
BACK). NO USER-SERVICEABLE PARTS IN-
SLOE. REFER SERVICING TO QUALIFIED
SERVICE PERSONNEL
The exdamatJon point wRflln an equilateral
triangle Is Intended to alert the user to the
presence of important operltlng and
maintenance Isep_lClng) InStrL_tlonS in tt_e
IR_aeJre acrJ_lpanyir_ the 8ppiance,
IMPORTANT
FOR USE IN THE UNITED
KWGDOM
Timwire IneCsmelm k_l m ¢mlmmNII.
amm'den_ withthe Mtloed_ _:
IVAle: Nm/tBll
Ilmmm :Ll_t
Irtheplug provided isUnSLI_Clefor_ _x:ke_
out(et_tt_eplugmustbecutoffmn¢la suitable
p;ugt_.
Tile cut_off plug should 0e ¢llsposed of and must
r_X t)e It-melted Into any ! 3 imlp sockel as thl_ can
resul(Inolec_lc s;qocl_ T_e plug or adaptor or the
distribution panel should be provided with 5 amp
fuse, As the colours of the v.tres Inthe mdns isad
of this applame m_ n_ correspond wRh coloured
mmldngs Uent_j the tun_nais _your pug. pn>
teed 8s folk_ws :
The wire WhiCh IS coloured blue must be con-
nected to tbe terminal wfl_t_ is marked with the
istter N or colour ed biscL
Tt_e wire WhiCh Is coisured I:xown must be con-
ne_ed
to the terminal which Is n'ala_ wRh _e is_ar Lor
coloured red.
Do notconnectolther wire to the e_t hterminal
of a mree p4nplug.
NOTE
Aeer mp_c_ orcremglnga fu_. em fuseccver
Inthe plugmust be repiscedWith a fuse cover
w_iChcorre_ _othe colow o( me I_er_ In
the base o@theplug orthe word that s era-
bossed on the base of t_e plug. andI1_eapoll- I
ante mus_ no( be use_ wW_outi _usecover It
lost replacetnen_ fuse coverscan be Ob_lned
from:_our deoler
Only 5A fusesappmved byBSI orAS.TAto
S.S. 1362 shouldbe used,
This equipment has been tested and found to comply with the limits for • Class B digital device, pursuant to
Part 15 of the FCC Rules. These limits are designed to provide reasonable protection against harmful
interference in a residential installation. This equipment generates, uses, and can radiate radio frequency
energy and, if not installed and used in accordance with the instructions, may cause harmful interference to
radio communications. However, there is no guarantee that interference will not occur in is particular
installation. If this equipment does cause harmful Interference to radio or television reception, which can be
determined by turning the equipment off and on, the user Is encouraged to try to correct the interference by
one or more of the following measures:
- Reorient or relocate the receiving antenna.
- Increase the separation between the equipment and receiver,
- Connect the equipment into an outlet on a circuit different from that to which the receiver is connected.
- Consult the dealer or an experienced radio/TV technician for help,
Information to User
Alteration or modifications carried out without appropriate authorization may invalidate the user'sright to
operate the equipment.
2
--IMPORTANT SAFETY INSTRUCTIONS--
READ INSTRUCTIONS -- All the safety and
operatlrl(j InS_rd_ns should IX: road bof_o
the product is opora_d.
RETAIN INSTRUCTIONS -- Tho safoty and
opor_lng instructions shoutd borct alnOd for
futuro r(:for onto.
HEED W,qltMNG$ -- AJlwarnings on the product
and in tho oporat_ng tnSlXL_-'_ldnsshould bo
adhorod t_
FOLLOW INSlWJETIONS mAJIog_at _J and uso
ins_uctJons s;_ulct bo followod.
CLENVlNG _Unplug this product from ff_ v_ll
oust bOld(e ck_ning+ ThO product shou_ bo
cleaned onlyw;_ apdishlng cl(Xh or asoredry
dofft. NC*_r c_a_ wtth _l_um _ bon_no,
InsocZiddes or o[her '_attlo llquk:_ sinco thoy
may con'odofflo cabin_.
ATTACHMENTS -- Do not uso a[Iachments no(
bytho pioducz rnanufacmmr as
they may _uso hazards.
WAll_ _ND MOI_qJH reDO no[ usotl'Jsproduct
noar wilt_ -- for cxaml_C, rmar a bathtub,
Washbow_ kJtch_ _nk, or laund(ytul= inav,_
basemor_; or noar aswtmm+ng pOOl;and t_o
lik_
ACCESSORIES -- DOno_ place this i_oclu¢z on an
unstab_ocart, st,and, utpo_. 0rackm, or UII_+
Tho prixlu_ may t_l. causing SO't_S inJuryto
achild or adult, anO s_'lou s damago to ttto
i_oduct, Uso o_ly W_ a cart. stand, tripod.
brackOt, Or tablo rocommondod by tho
manufacturor, _sold with tho prociUCtrAny
mounting o( the prod_t should folLoW tim
manufacoJ[or'slr=_txu_r,_ns,and stm¢_l _ a
mo_ntlng aoccssory roc(xTvnondo0 by tho
manufacturo_.
CART -- A preduct and cart r_mblna_lon should I_
rnov_ _t_h _r e. Qu;ck s_os. _c_a_o for_.
and unovon sulfacos may r.au¢_ th(_ pr(xlu_t
and _coml_r_ldn to ove_um,
VI_N11LAIlON -- Sld(san_ oponings_n_ ca_nc_
m_hoa_g, and _hcso openings must no( bo
lYock_d or covo+od "theoponlm(jssl+_uldnc_
bo blockod by placing the {yoduct o_ aI:_-'_L
s_a, rLe, _othor sJmll_"surfac_ This proOJ_
should not bo pla<:od In a I_lil_ln InStallll_Oll
such a_ 8 boo_caso oT r_<:k unless i_opot
VOmllatlo_ is _or tho rnanufllctUlOl_S
InsmJCllOns havo I_ocn adPmsmit _
POWER SOIJ_CES -- This product should bo
oporatod only flora the _po of powo" sourco
I_dica_o_ on tho ma_king lafx)L If _oJ ato rm(
smo _(tho typo of pow_ sup_ytoy_r homo.
comsult your ptodu_ dcalor c+ local DO+Ks
compen'_
LO_J),llON - Tho applian_ s;_o_l bo Installo_ Ina
stald_ libation.
NONUSE pERJOOS -ThO _cord ol tho
appl+ar_ s_ml_ 13ounplu_godflora _oust
wt_m _c_ ur_usod for along porldd ot tJmo
GROUNOING OR UZATION
• If this p_o_Juc{is oqulppod with a polarlzod
_ado 'Mdor the1 the o_hor), K _MIIi_ IntO tho
O_XI_ o_ly c_o way. TNS Is asafct-j fca_uro, ff
you a'o uPa_o to inscrt U_Oplug fully Into tho
sQI fall to fit+€ontact your (_k:oxldafl to roplaco
you_obso_m ou_lc_ Do r_ d_foa_ th_ safo_
purpose o_tho po_iz_ I_Ug
• If this ptoduc_ is oqulppod w_h a thmC-Wlm
grounding typo plug. a plug havtng athlr_
(g_ounding)I_n, _v_ll only II( Imo a grounding
t-_o po_ oo_c_ TNs _a safc_ foa_m. If you
a_o UnablOto tnsor_ the plug _n_o tho outlor_
co_a_ you_ckx_rlcJa_m rol_e_ _ur obsc_o
oudo_,Do r_( 0cfo_ the safcoj purpaso of tho
_cundng typo p_ug,
POWER-CORD PROTECTION mPowor +SUpl_y
COrdSShould bo rou_od SOthat t_lOy a_o not
Ilkoly m bo _l_d on or plnch_d by Items
Up_ or against _pey_n9pa_cular
a_T(_nt_o_lto ¢_'ds at plugs, convoni_nc_
mcomadc_ and U_Opo_n_w_m thcy c_ ho_
tho I_OOJC_
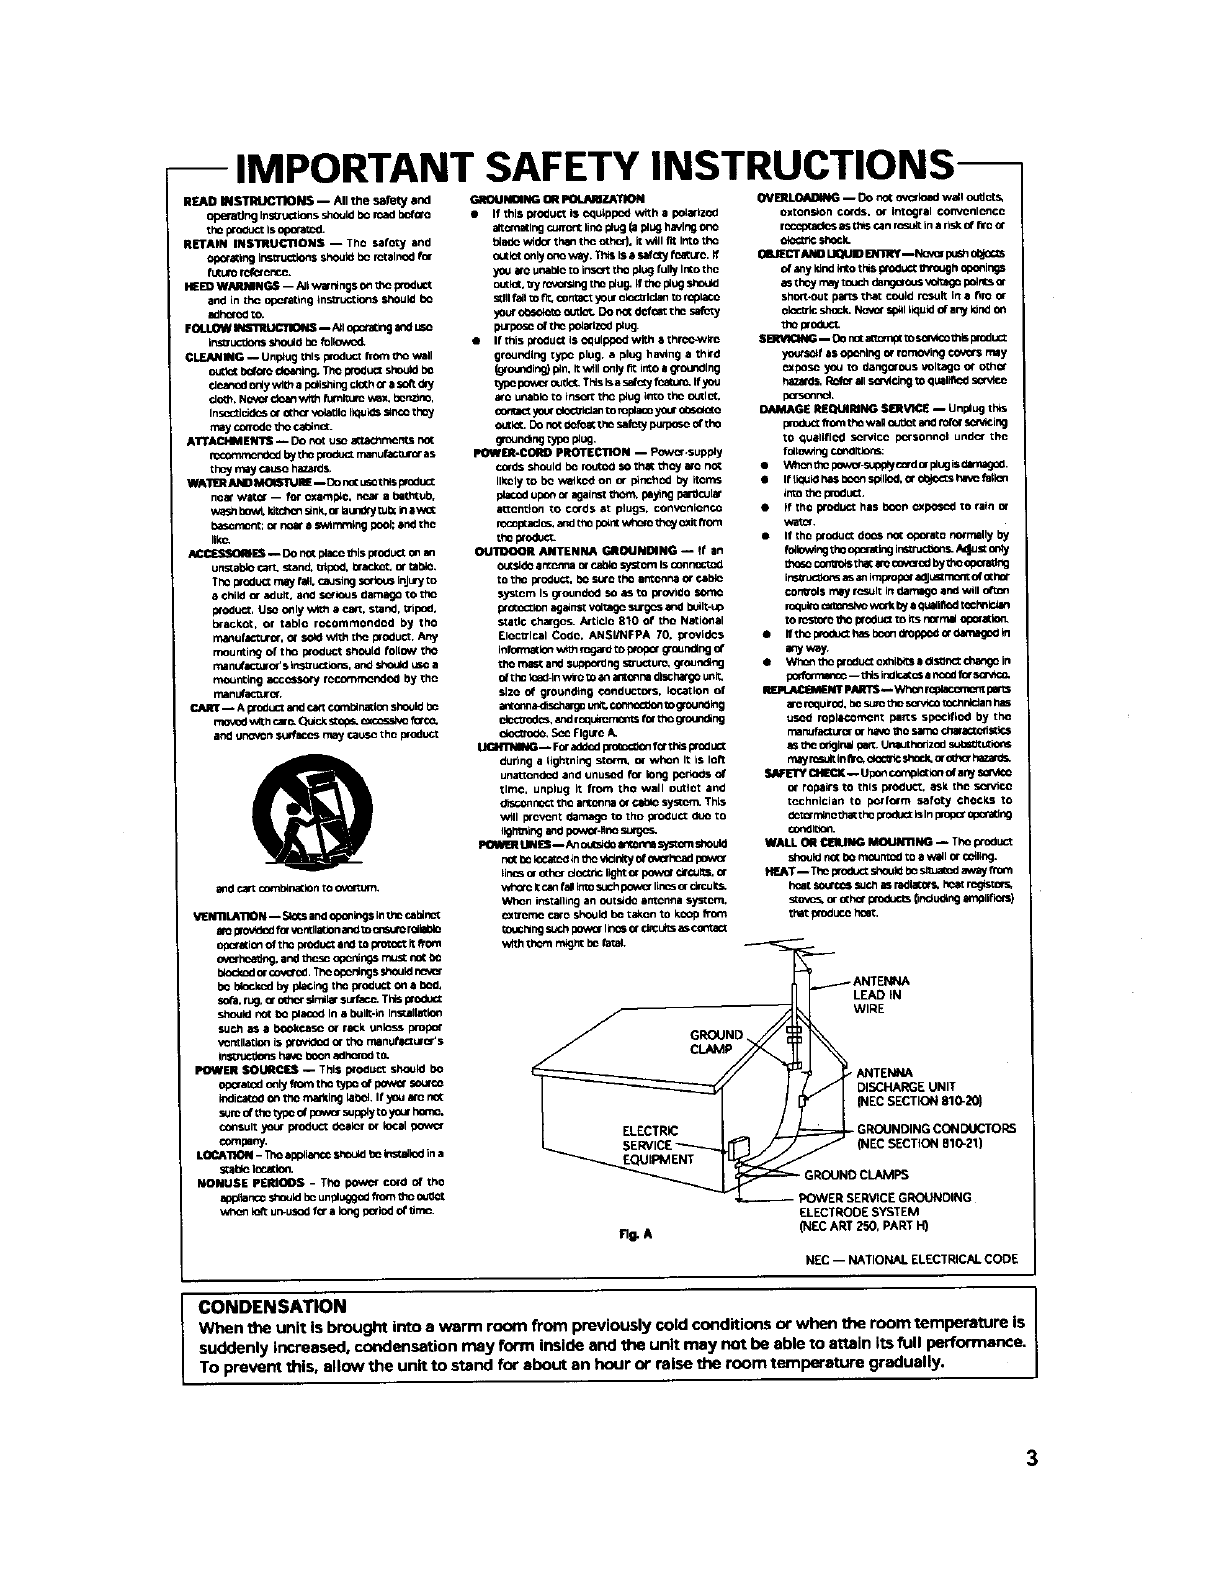
OUTDOOR ANTENNA GROUNDING _tf am
ou_-._doar[c_lfla or cab_osys_.,m Is conmoc1:od
to tho pro_ucT, b_ sur_ tho an_c/ln8 06"c_l_o
sys_om Is groundod so as to _ovido sor_c
prooc_lon against vol_ag_s_xgcs and bU_ll_Up
static chargos. ArLiclo 810 of _he NatiOnal
Eloctrlcal Codo, ANSUNFPA 70. provides
infomm(io_ w_h mga_ _o pmp_ _oundir_ c(
tho ma_ and supporting so'u_uro+ _ound_j
ofthe ideal-inwWo_o_ al_c_na dl_hat go unit,
slzo of grounding conductors. IOC_lon of
an(o_na_schar_o uf_. _ _o_oundlng
(:_C_OdCS,androquimrnon_ f_" tlx__oun_ng
m-- FO_addod _forthis produO:
during a flgh(ning storm, m whom It is loft
una_ondc_J and unus_J for long pPJ_odsof
tlmo, unplug it from tho wall outlot and
dtsco_ nc_ th_ ammrl_aOrc_blo syslom, ThLs
W_ll i_ovont damago to tho pro_uc_ _¢JOto
IIQhming and powor-I_rmsurgc_
I_R LIN£S -- An oumldomsys_omshould
r,_( bo Ioca_-d _ntt_ v_r_y of ov_hoad powcr
_inos or o(hor dOCUtCllgh_or powo{ droJISs, or
WhO-CI_ca_ fal Imosuch poYa_ linCsor drcull_
When instailing an outs_do amcnna nystom.
c_tromo caro should bo takon to kcop fTorn
(Ouchlngsuch pow_ lln_ or CimL_Sas cor_a_
w_h thorn r_gr_ be fa_+
CLAMP
ELECTRIC
SERVICE
Fig. A
OVER_ -- Do mot o+o"load wall o_d ors,
oxtons+orl cords, or _ntngral coiwOlllenc(_
r{:copt_dos as t_s _._mr(_ult ima llSk 0f rlo or
ok_ shock_
0_J_CTANO I.IqUIO ENTmY--No_ pusho_cts
o__y kind kXo this product mmxjh oponin_
asthby _ery toJch da_ous _a_ polls _r
sho_-out parts thatcOUld r_,uK in a f_roor
ok_r_'lcshock+NOVOrsp'_lliquid o_any Idrld on
tho produ_
S_-,qQNG -- Do ra atmmp( to soV_ _hlsprodu_
youts_f as Opc_irr_gor romoving _may
_poso you to dangorous voltago or o_hor
_zar_ Rc_r allso_dng to q_lifl<xI
p<xsomnc4.
DAMAGE aEQUmlNG SEItVICE -- Unplug th_s
productfrom tho wa_ _Jt_t an4 roll scrv+cirsg
to _uallfll_ sor_lco pQ'sonnol umd_" tl,+o
folmw_ngcomOltio_:
•*t,_mn_hopo_.s,._o_j c_,d orplugis _amago_.
• if ti¢_uldI'.ts boon sotllOd,or o0jocts halo fallon
mm the prod_t.
•If th0 p_oduct has bo_, _xposod to rain or
'a,'atoL
•if tho p{oduc( do¢_ not oporato normally by
theso controlsthat ao co_(xl by_ho opoa_g
irs_u<:_,o_ a_ +mimplopor +ldJUSt_ of othot
COrT_O_S rrtsy (_It it+darl_ arl¢iWill
roquim _m_o work I_ equNllod t_chnP.+tm
m rcst_o the plo<iuct m+ts to'roll oporltld_
•fftho pm<s_ has boon m0ppod _dama_d In
any way.
•Wlm_ mo pr mluct oxh,:_s a _ls_t cha_go i.
podotmet_c_ -- ors Indicates_nc_xlfor sor_c_
REPLACI+_NT PARTS-- Wh_ _ pel_s
amroqmlro_,I:_ sum tho sorvl¢0t_'J_rdclan has
used ropIICO_nt pa_:s spoclfIo¢l by the
n',armfa_uror or h4vo I_ samo chara_t_st k_s
asthe original _Ur_Jth_zod mJt_it utio_s
m_lyll_u4t In i'lrc, (YOcI_i(;s;lock,or o_o" ha_l+ds+
S_FETY CHk'CK -- UpO_complctt_ ol a_ SOMCO
OT r0psirs tO this _l._"t + ask tft_ S¢{VICO
tochnician to porform safoty (;hocks to
_'mlno _hattho productksln proporOpot_ng
WALL O_ Ci_IUNG MOUNTING -- The pro(iu_t
should not bo me_Jnto¢lto a v_dl or _l+ng.
h<:_ so_rcos _JCh as r_la(ors, I'_ r_tstors,
sto_5, or o(hor _ 0r_u_ng amplilk_s)
that pm_uco ho_.
_-ANT_ LEAD IN
WIRE
-- POWER SERVICE GROUNDING
ELECTRODE SYSTEM
(NEC ART 250, PART H)
NEC -- NATIONAL ELECTRICAL CODE
CONDENSATION
When the unit is brought into e warm room from previously cold conditions or when the room temperature is
suddenly increased, condensation may form inside and the unit may not be able to attain its full performance.
To prevent this, allow the unit to stand for about an hour or raise the room temperature gradually.
Selecting fm¢ aucSoequipozm suchas theumityoe've jtut
indmd is only the strutof your muical ¢joymmt, Now it's time
to comid_ how 3_u ca_ maxin_ze th=timand¢xcitm.aent
Sotmd c_ t_ dec_ving. O_ timeyourh:m_g _k-ve.r"
adaptsto hisher volmnes of soe_ So whatsounds '_'_al" c:m
actuallybe loudamdharn_ U>_er _ Gumdagdn_ thisby
s_tfingyourequipme_ at a safelevd BEFOREyourhem_ adapts.
To eMalMidtms_re k.vd:
oStartyourvohune o_tml ata low smt_.
•Slowly h_creas_the sold untilyou caa hea_it
comfortably and dearly, andwid_out€fi_tonio_
Cmce yoahaveestaYd_J_edmem_lm4ablesmmd leveh
e S_tthedialandkaveittl_
1_i_ a mimte_odo _now wet hdp to pr_-_ hem_ damaee
or loss m the fima_. Al_eral_we wal you listmbg fora fifethr_
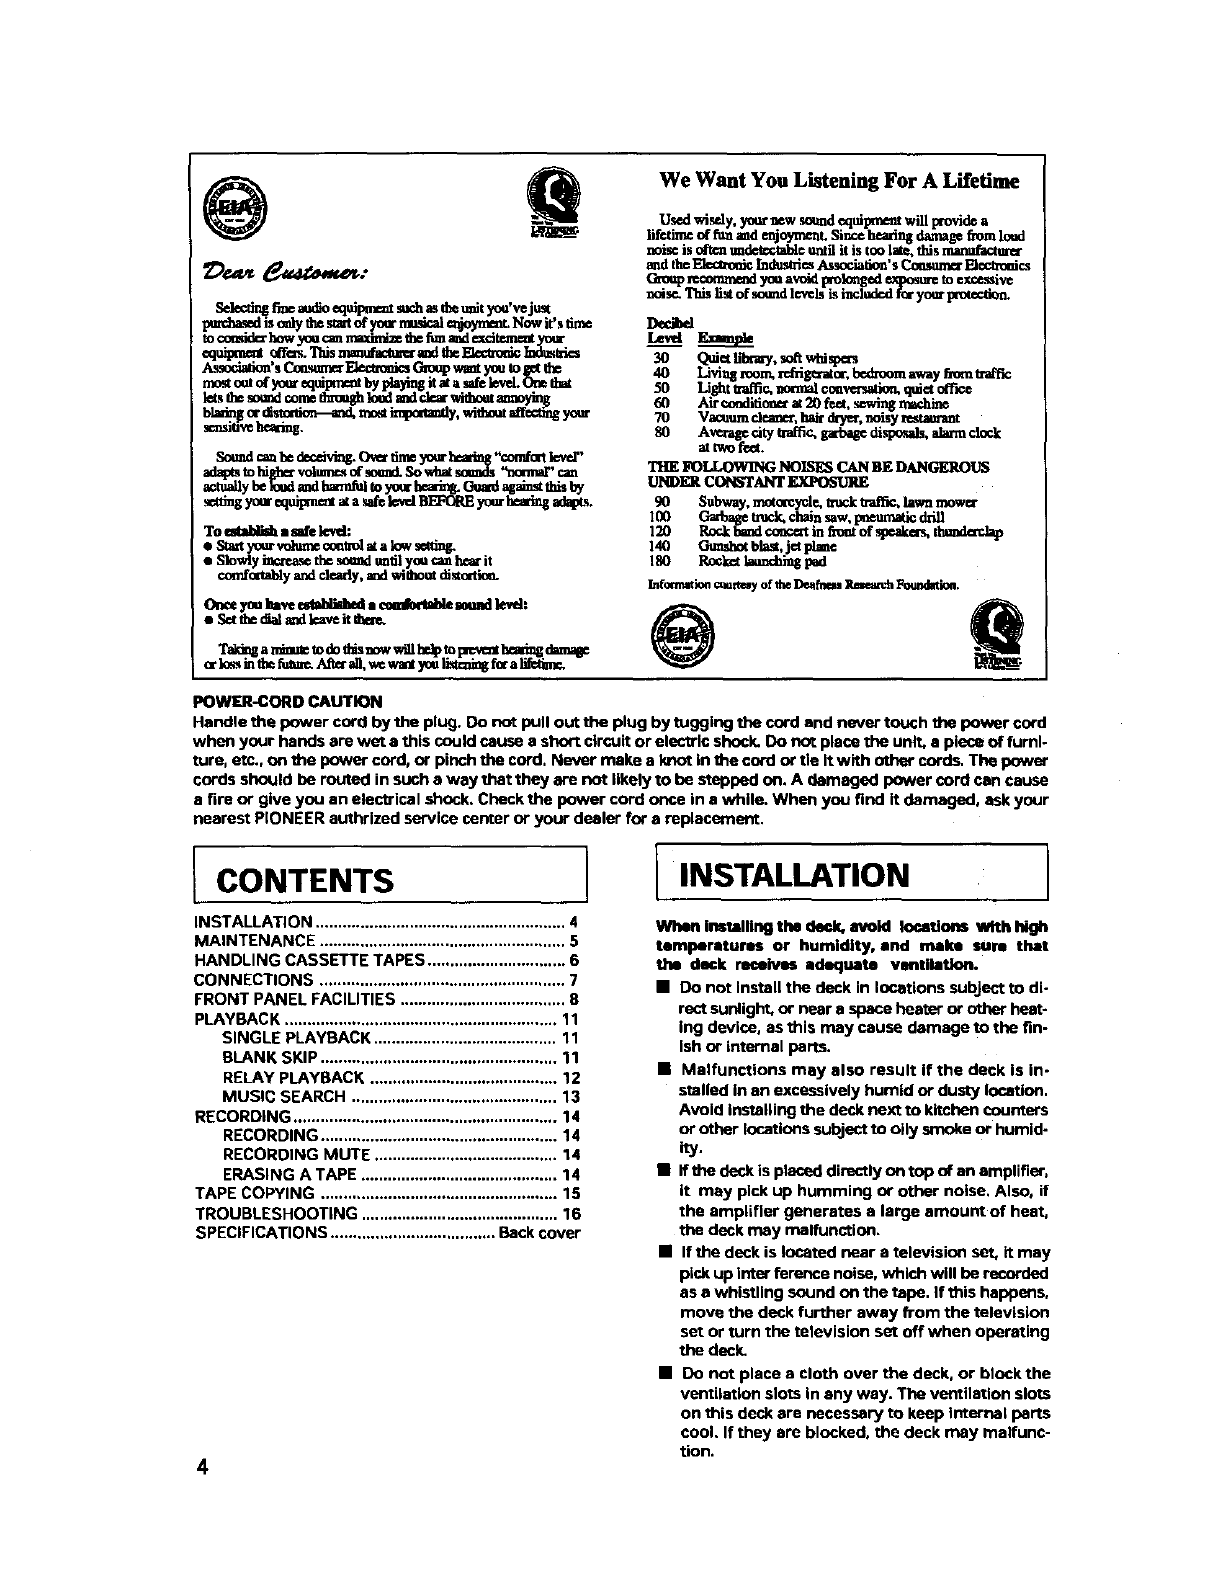
We Want You Listening For A Lifetime
Used wisely, yournew sou_ equiprae_ will provide a
lif_tinp dtimamdenj_ Since heroin8 damag_ from loud
norsess o_tc_undetccta_= until it is too late, thisnutmffacttm_
and tl_ ]_:€_'onk Indus_ Ass_iafion's Consume"Pt_cs
G_oupn_on_neod you avold i_mlo_ged expostw=to excessive
noise. Thb listof scud l_wls is includ=df_r yv_ _
Decibel
L_t S_
30 Quiet h'l_my,s_t whis_s
40 Livlng room. rddgexat or,bedxoom away from traffic
50 Li_t u-a_€, normal co.re.ration,quiet
60 Air eenditloncr at 20 feet, sewing rmchine
70 Vacuum cle:me_,hak d_Te_,noisy lestmuant
80 Averagecitytraffic_garbagedispomds,alamnclock
attwofeet.
THE FOLLOWING NOISES CAN BE DANGEROUS
UND£_ CONSTANT
90 Subway, moto_pl.e, m_ u-af_ lawn mow_
100 _tmck. €lan saw, pneumatic ddll
120 Rock [_m_dcol_¢erthi f3_mtof sl_.ake_ t_
140 Gumshotblast,jet Flame
180 Roc_ launchlng l_d
Infonnatiee_rtay of theDe_fa_s Rmmm:hFoendatioa.
POWER-CORD CAUTION
Hendle the power cord by the plug. Do not pull out the plug by tugging tim cord and never touch the power cord
when your hands are wet a this could cause a short circuit or electric shock. Do not place the unit, s piece of furni-
ture, etc., on _e power cord, or pinch the cord, Never make a knot in b_e cord or tie it with other cords. The power
cords should be routed in such a way that they are not likely to be stepped on, A damaged power cord can cause
a fire or give you an electrical shock. Check the power cord once in a while. When you find it damaged, ask your
nearest PIONEER authrized service center or your dealer for a replacement.
CONTENTS
INSTALLATION ........................................................ 4
MAINTENANCE ....................................................... 5
HANDLING CASSETTE TAPES ............................... 6
CONNECTIONS ....................................................... 7
FRONT PANEL FACILITIES ..................................... 8
PLAYBACK ............................................................. 11
SINGLE PLAYBACK ......................................... 11
BLANK SKIP ..................................................... 11
RELAY PLAYBACK .......................................... 12
MUSIC SEARCH .............................................. 13
RECORDING ........................................................... 14
RECORDING ..................................................... 14
RECOROING MUTE ......................................... 14
ERASING A TAPE ............................................ 14
TAPE COPYING ..................................................... 15
TROUBLESHOOTING ............................................ 16
SPECIFICATIONS ..................................... Back cover
4
INSTALLATION
When installing the daek. avoid locations With high
temperatures or humidity, and maim sum that
the deck receives adequate ventihttlon.
•Do not install the deck in locations subject to di-
rect sunlight, or near a space heater or other heat-
ing device, as this may cause damage to the fin-
Ish or internsl parts.
•Malfunctions may also result if the deck is in-
stalled in an excessively humid or dusty location.
Avoid installing the deck next to kitchen counters
or other locations subJect to oily smoke or humid-
_y.
•If the deck is placed directly on top of an amplifier,
it may pick up humming or other noise, Also, if
the amplifier generates a large amount of heat,
the deck may malfunction.
•If the deck is located near a televisiou set, it may
pick up inter ference noise, which will be recorded
as a whistling sound on the tape. If this happens,
move the deck further away from the television
set or turn the television set off when operating
the deck,
• Do not place e cloth over the deck, or block the
ventilation slots in eny way. The ventilation slots
on this deck are necessary to keep Internal parts
cool. If they are blocked, the deck may malfunc-
tion.

IMAINTENANCE
Pinch roller
RecJplay heed Capstan
Pinch roller
CLEANING THE HEADS, PINCH I
ROLLERS AND CAPSTANS I
The heeds, pinch milers and ©apstans are likely to
get dirty quite easily. If these parts, particularly the
heads, get dirty, the high frequency components of
a recording will not he reproduced and the stare,:
balance will he impaired, resulting in a deterioration
oil the playt:mck sound. Ris thereforerecon_needed
that the head section be cheaned regularly.
1. Set the POWER switch to OFF.
2. Press the eject button to open the cassette door.
3. Dip a cleaning swab in cleaning fluid and use it to
wipe the heads, capstans and pinch rollers.
NOT_
After cleaning the head s_tion, do not load a rape unUI
the cleaning fluid has dried completely (about two or
three minutes),
DEMAGNETIZING THE HEADS
After using the cassette deck for a period of time, the
heeds will become magnetized. The same effect will
occur if a magnetized screwdriver, magnet or other
magnetized object is brought too close to the
heads. When the heads become magnetized, high-
frequency sounds will be lost during recording or
playback, and Interference noise may also occur. The
heads should be regularly demegnetlzed with a head
demagnetizer, which can be purchased at most
audio stores.
When demagnetizing the heads, make sure that the
POWER switch of the cassette deck is set to ON.
However, be sure to turn down the amplifier's
volume control to Its lower position, and disconnect
any headphones from their headphones Jack. For
detailed Instructions, refer to the operating
instructions of the head demagnetizer.
LCLEANING THE FRONT PANEL
Clean the deck regularly with • soft cloth. If the front
panel becomes soiled, moisten a soft cloth with a
weak solution of neutral detergent (diluted in five to
six parts water), wring the cloth well, and wipe the
panel clean. Never use volatile cleaners like thinners,
benzine or alcohol because they will damage the
panel finish.
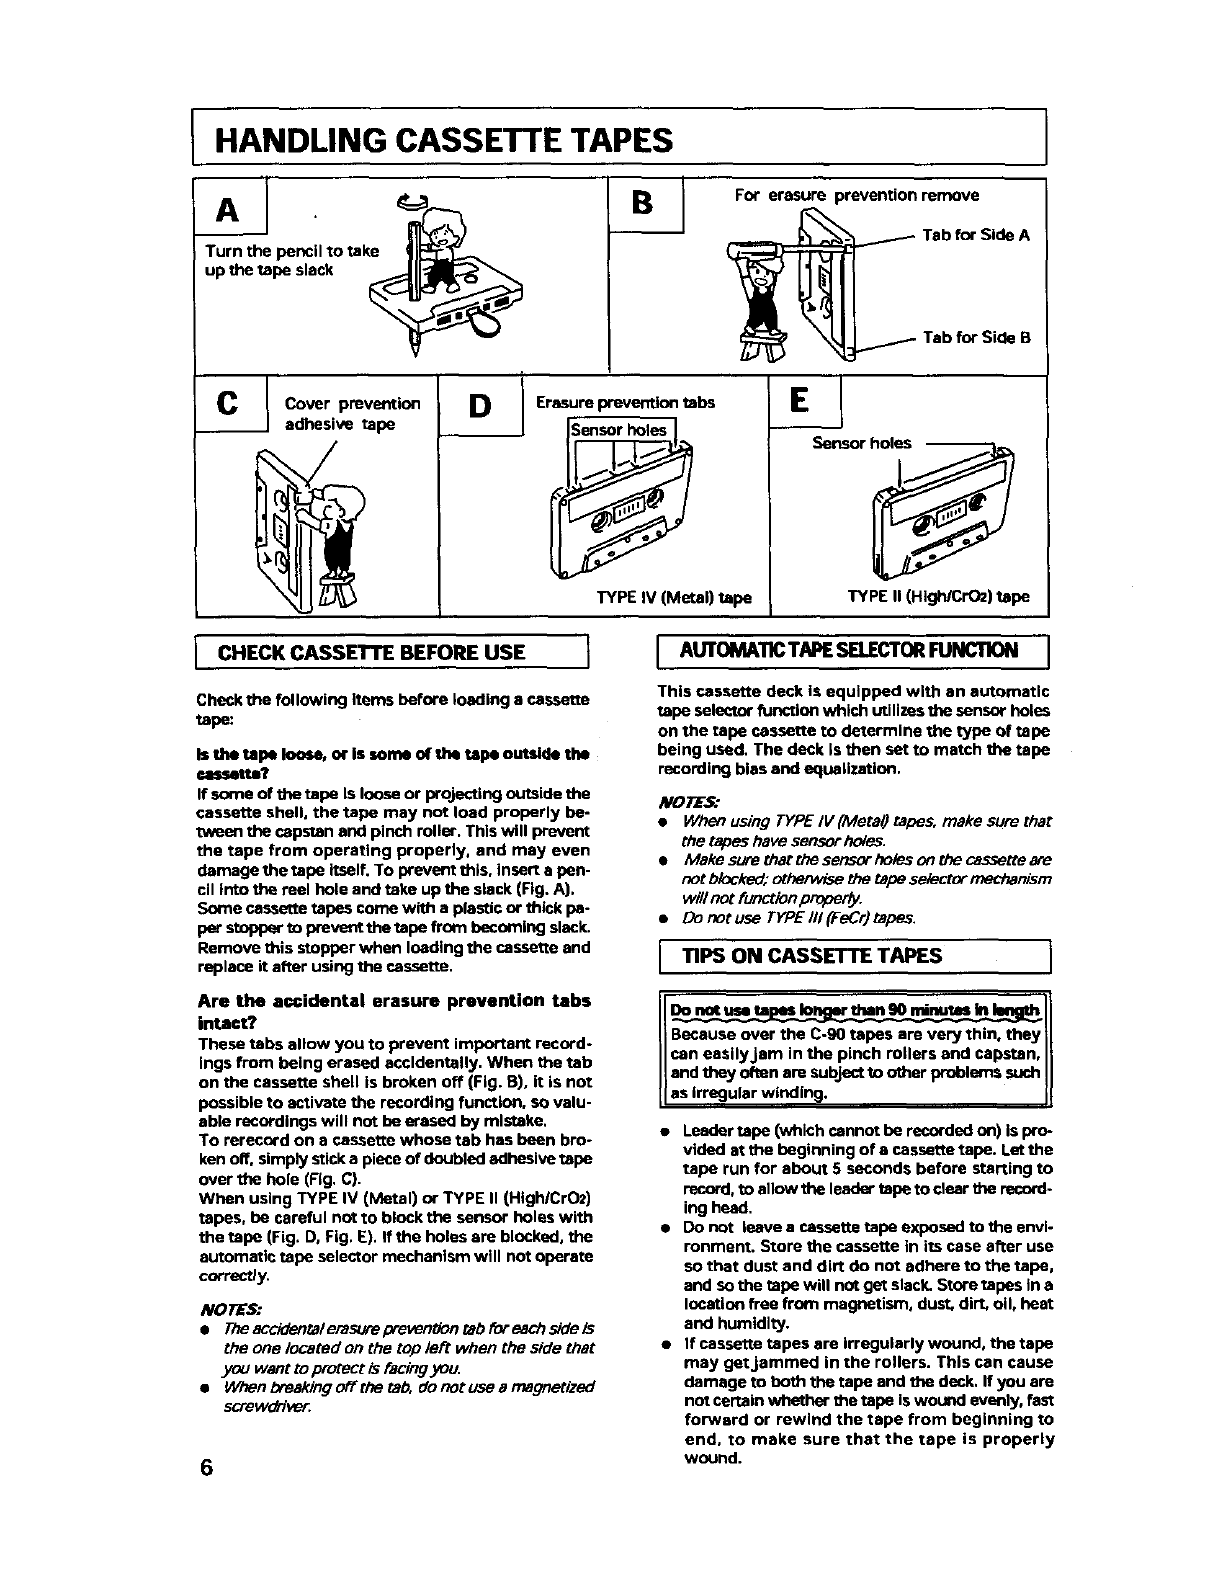
HANDLING CASSETTE TAPES
CIB''°er suilr!ven'°n'--e
_._ Tab for Side A
._- Tab for Side B
Cover prevention
adhesive tape DErasure prevention tabs
Sensor hol_._]. I
TYPE IV (Metal) tape
Ej
Sensor holes
'S
TYPE II (High/CrO2) tape
J CHECK CASSETTE BEFORE USE I
Check the following items before loading a cassette
tape:
Is the tepe loose, or Is some of the tepe outaide thl
cassette?
If some of the tape Is loose or projecting outside the
cassette shell, the tape may not load properly be.
tween the capstan and pinch miler. This will prevent
the tape from operating properly, and may even
damage the tape itself. To prevent this, insert a pen-
cil into the reel hole and take up the slack (Fig. A).
Some cassette tapes come with a plastic or thick pa-
Wstt)pper _o prevent the tape from becoming slack.
Remove this stopper when loading the cassette and
replace it after using the cassette.
Are the ac,¢idental erasure prevention tabs
intact?
These tabs allow you to prevent important record-
ings from being erased accidentally. When the tab
on the cassette shell is broken off (Fig. 13),it is not
possible to activate the recording function, so valu-
able recordings will not be erased by mistake.
To rerecord on a cassette whose tab has been bro-
ken off, simply stick a piece of doubled adhesive tape
over the hole (Fig. C).
When using TYPE IV (Metal) or TYPE II (Hlgh/CrO2)
tapes, be careful not to block the sensor holes with
the tape (Fig. D, Fig. E). If the holes are blocked, the
automatic tape selector mechanism will not operate
correctly.
NOTES:
•Theacddentalemsurep-even_ontabif_reachsideis
the one located on the top left when the side that
you want to protect is facing you.
•When breaking o_the tab. do not use a magnetized
screwd[ive_
6
J AUTOMA11CTAPESELECTORFUNCTION J
This cassette deck is equipped with an automatic
tape selector function which utilizes the sensor holes
on the tape cassette to determine the type of tape
being used. The deck Is then set to match the tape
recording bias and equalization,
NOTES."
•When using TYPE IV (MetaQ tapes, make sure that
the tapes have sanso[ holes.
•Makesurethatthesensorholesonthecassetteare
not Mocked; othe/wise the tape se/ecter mechan_m
will not function/_.
•Donotuse TYPEIIl(FeCr)tapes.
TIPS ON CASSETTE TAPES I
Do not use te Io than 90 minotes In
Because over the C.90 tapes are very thin, they
can easily.Jam in the pinch rollers and capstan,
and they often are subject to other problems such
as rregular w nd ng.
•Leader tape (which cannot he recorded on) is pro-
vided atthe beginning of a cassette tape. Let the
tape run for about 5 seconds before starting to
record, to allow the leader tape to dear _e record.
ing head.
• Do not leave a cassette tape exposed to the envi-
ronment. Store the cassette in its case affer use
so that dust and dirt do not adhere to the tape,
and so the tape will not get slack. Store tapes in a
location free from magnetism, dust. dirt, oil, beat
and humidity.
•If cassette tapes are irregularly wound, the tape
may get jammed in the rollers. This can cause
damage to both the tape end ttm deck, If you are
not certain whether the tape is wound evenly, fast
forward or rewind the tape from beginning to
end, to make sure that the tape is properly
wound.
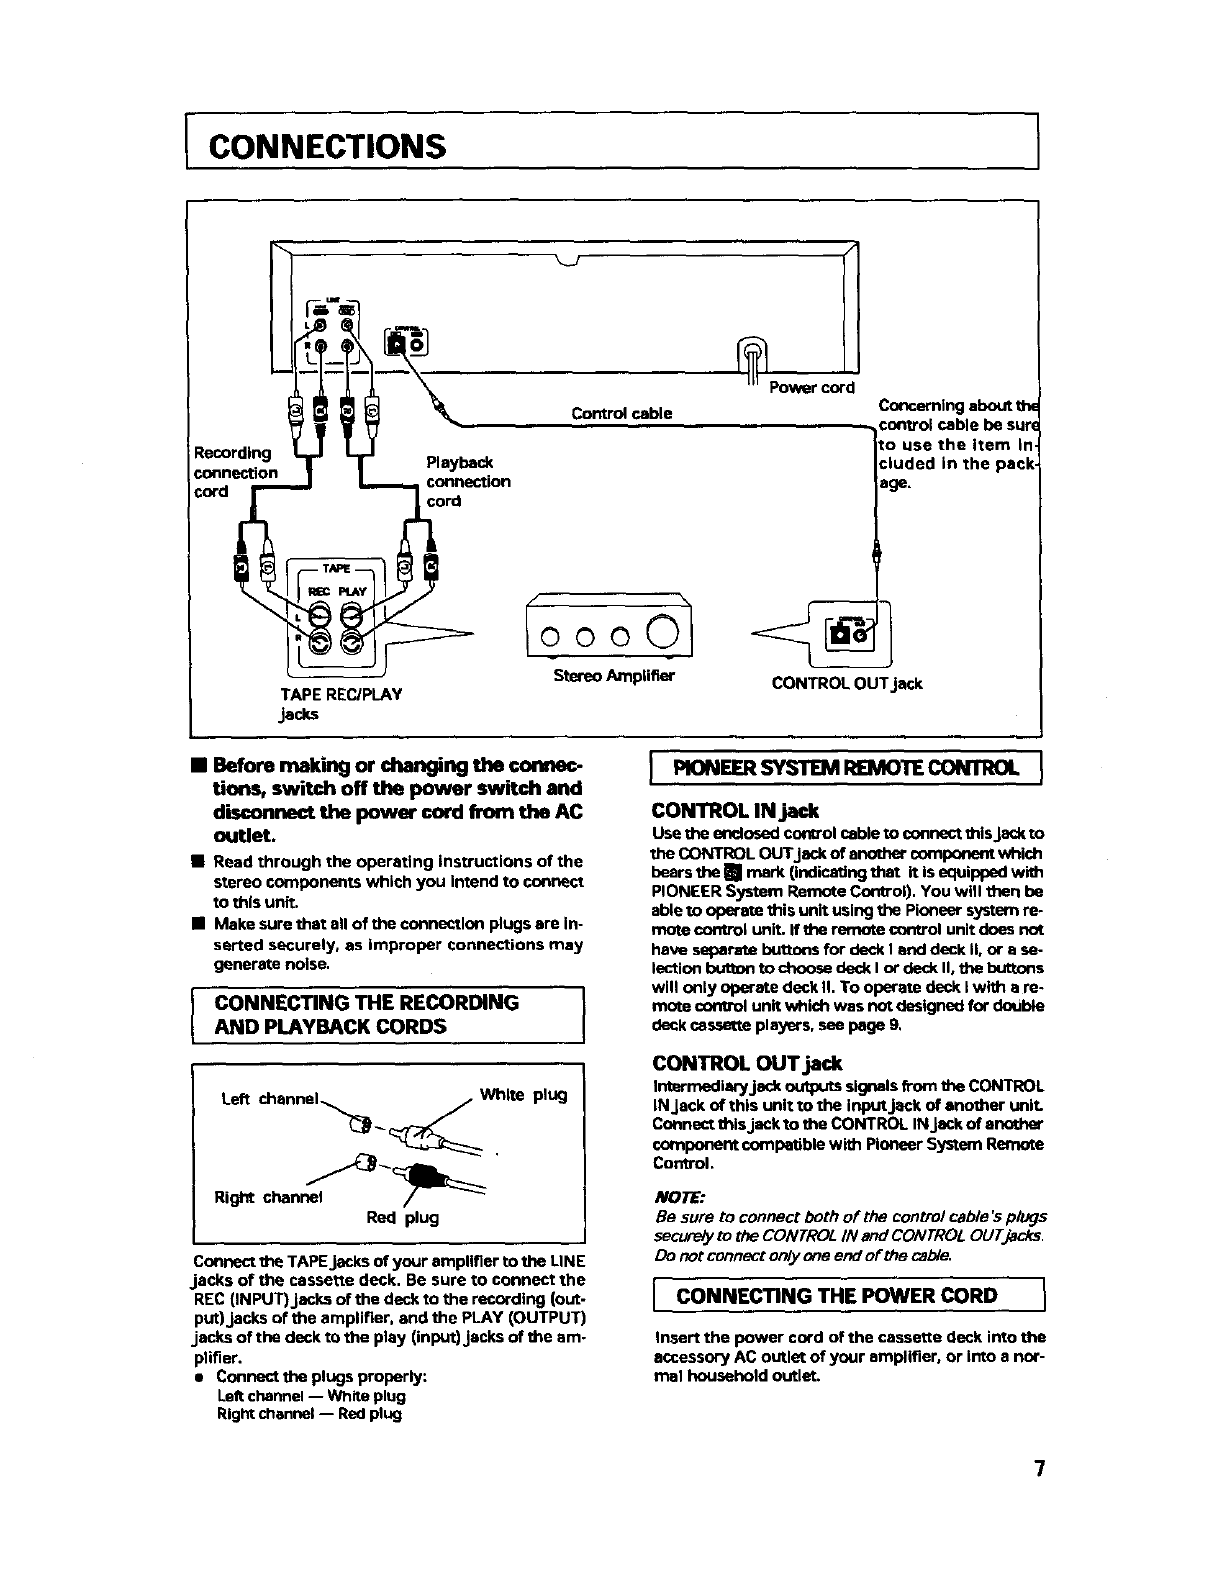
CONNECTIONS
Recording
connection
=ord
TAPE REC/PLAY
jacks
Playback
connection
cord
Power cord
Control cable
Io o o 0"
Stereo Amplifier CONTROL OUTjack
Cor_emlng about the
:ontrol cable be sur(
Io use the item in.
=luded in the pack.
age.
•Before making or changing the connec-
tion_ switch off the power switch and
disconnect the power cord from the AC
outlet.
•Read through the operating instructions of the
stereo components which you Intend to connect
to this unit.
•Make sure that all of the connection plugs are In-
serted securely, as improper connections may
generate noise.
CONNECTING THE RECORDING
AND PLAYBACK CORDS
PIONEER SYSTEM REIVIOTECONTROL
CONTROL IN jack
Use the enclosed control cable to connect this Jack to
theCONTROLOUTJackofanothercomponentwhich
bears the [] mark (indicating that it is equipped with
PIONEER System Remote Control). You will then be
able to operate this unit using the Pioneer system re*
mote control unit. If the r_-note control unit does not
have separate buttons for deck I end deck II, or a se-
lectiun button to choose deck I or deck II, the buttons
will only operate deck II. To operate deck I with s re-
mote control unit which was not designed for double
deck cassette players, see page 9.
Left channel..___::_ white plug
Rig_ channe_"_ I_:_
Red plug
Connect the TAPE jacks of your amplifier to the LINE
.jacks of the cassette deck. Be sure to connect the
REC (INPUT)jacks of the deck to the recording (out-
put)jacks of the amplifier, and the PLAY (OUTPUT)
jacks of the deck to the play (input) jacks of the am-
plifier.
• Connect the plugs properly:
LeRchannel -- White plug
Right channel -- Red plug
CONTROL OUT jack
Intermediary jack outputs signals from the CONTROL
IN Jeck of this unit to the inputjeck of another unit.
Connect this jack to the CONTROL IN Jackof another
component compatible with Pioneer System Remote
Control.
/t/ORE:
Be sure to connect both of the control cable's plugs
secureiy to the CONTROL IN and CONTROL OLITJacks.
Do net contract only one end of the cable.
CONNECTING THE POWER CORD }
Insert the power cord of the cassette deck into the
accessory AC outlet of your amplifier, or into a nor-
mal household outlet.
7
FRONT PANEL FACILITIES )
!!o__
t;
)
I
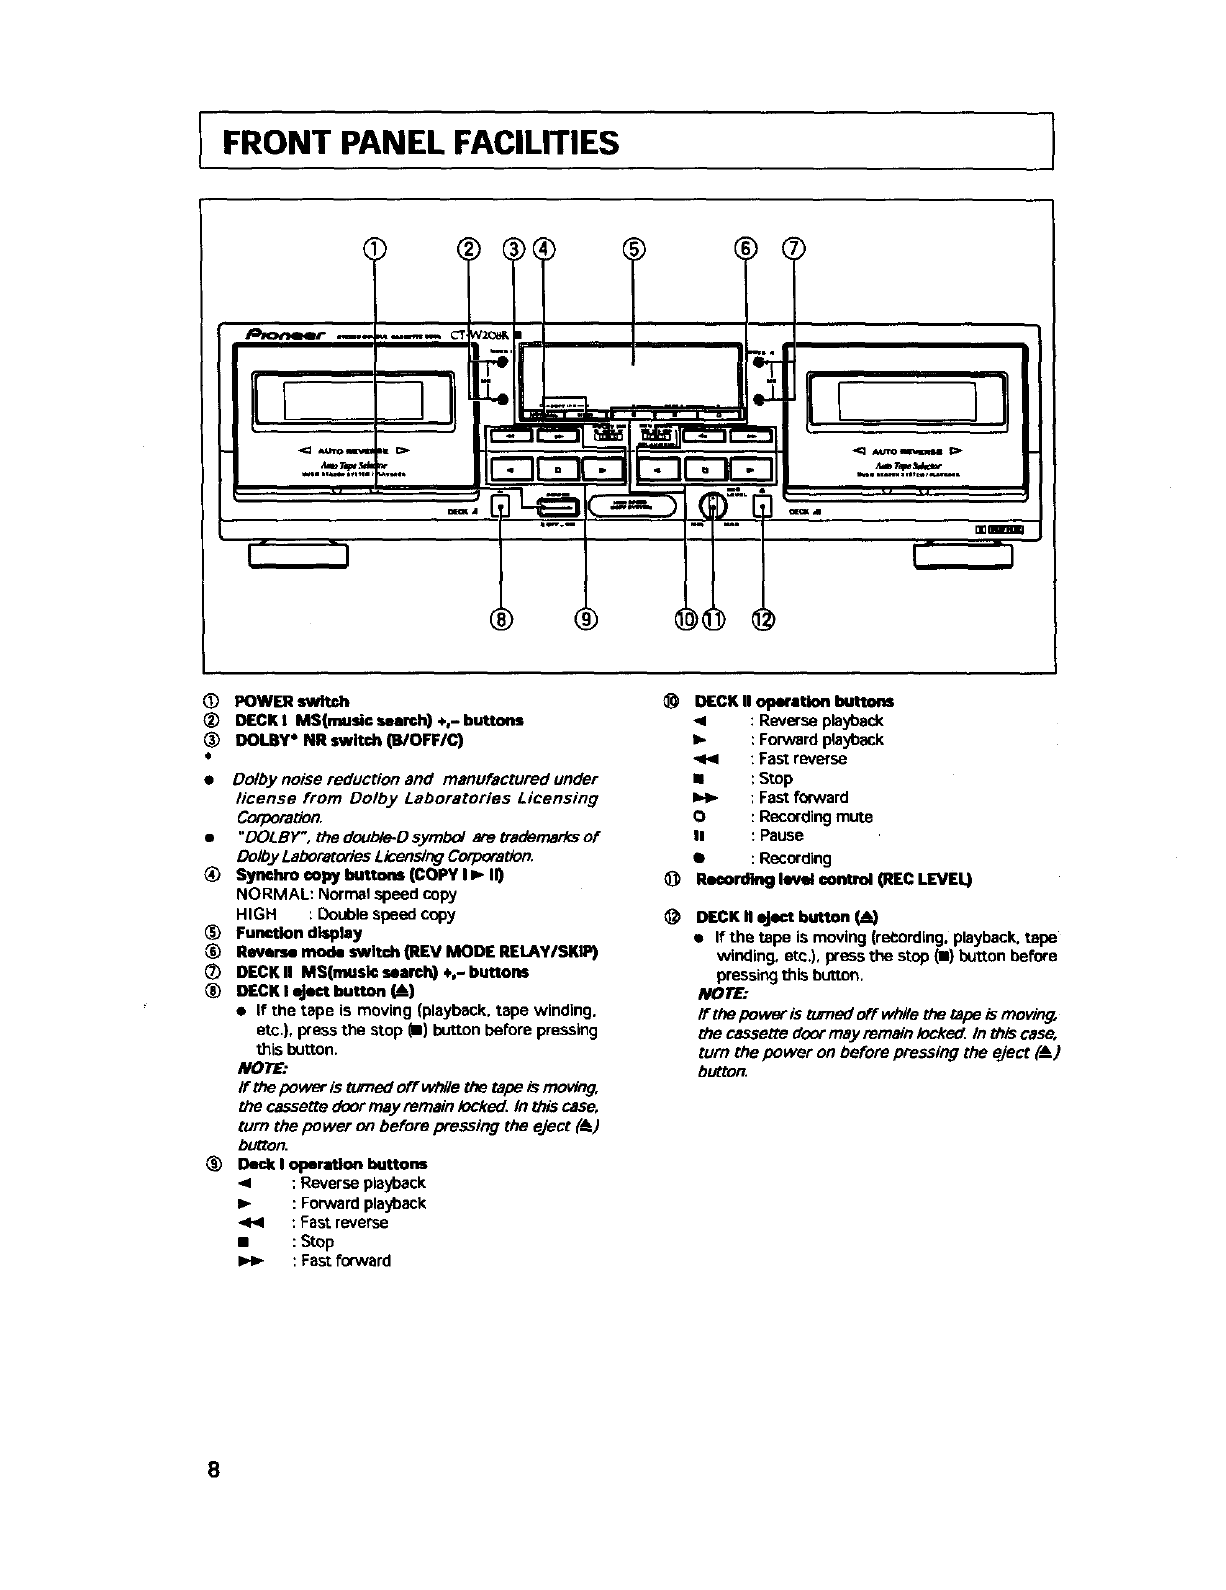
(D POWER switch
®DECKI MS(mude=umrd0 +,-buttons
_) DOt.By* NR switch (B/OFF/C)
•Dolby noise reduction and manufactured under
license from Dolby Laboratories Licensing
Corporation.
•"DOLBY', rhedoubte-Ds.ymbo/eretrademerksof
Doioy Laboratories Licensing Corporation.
_) Syeehro copy buttons (COPY I _II)
NORMAL: Normal speed copy
HIGH : Double speed copy
(_) FuneUon display
Reverse mode switch (REV MODE REI.AYISKIP)
DECK II MS(musk: search) ÷,- buttons
_) DECK I eject button (!)
•If the tape is moving (playback. tape winding.
etc). press the stop m) button before pressing
this button.
NOTE:
If the power is tumed off whlle the tape is moving,
the cassette door may remain iocke_ In this case,
turn the power on before pressing the eject (_)
button.
_) Deck I operation buttons
<:Reverse playback
Ip : Forward playback
_< : Fast reverse
• : Stop
I_ : Fast forward
@
@
DECK II operation buttons
41 : Reverse playback
_,, : Forward playback
: Fast reverse
•:Stop
I=_ : Fast forward
O : Recording mute
II : Pause
•: Recording
_ m_ co_ O_cLEVEL)
DECK II eject button
• If'the tape is moving (reCording. playback, tape
winding, etc.), press the stop {i) button before
pressing this button,
NOT_
If the power is turned off while the tape is moving,
the cassette door may remsin iocke_ In this case,
turn the power on before pressing the eject (A )
button.
8
IFRONT PANEL FACILITIES
[ REVERSE MODE SWITCH (REV MOOE) J
There are three settings:
One way mode _" position
When the switch Is set to this position, playback or
recording is performed on one side of the tape only.
When the tape reaches the end of the side, it stops
automatically (auto stop function).
Two way mode = position
When the switch is set to this position, playback or
recording can be performed on both sides of the
tape. When the tape reaches the end of the first (for.
ward) side, Its direction is automatically reversed,
and playback or recording continues on the other (re-
verse) side. When it reaches the end of the reverse
side, the tape stops automatically (auto stop func-
tion). If playback or recording is started from the re-
verse side, the tape will stop when it reaches the end
of that side.
Repeat mode C'.._ position
When the switch is set to this position for playback,
both sides of the tape are played back repeatedly
until the stop (I) button is pressed, or until the tape
has been replayed 15 times (32 sides playback). If the
pause button is pressed to pause the tape, and then
playback is restarted, the repeat mode starts over
from the beginning, and will play the tape 15 times
(32 sides playback).
When the switch is set to this position for recording,
both sides are recorded and then the tape stops, as
described above for the two way mode.
RELAY PLAY/BLANK SKIp
If Deck I and II are loaded with tapes, each tape will
be played using relay palyback.
IPERATIONOF DECKI WITH A REMOTE
CONTROLUNIT NOT DESIGNEDFOR
DOUBLEDECKS(Systemremote control)
Sele_lrlg DECK I
In erder to opereta DECK Iwith the remnte control unit,
edjust ttm unit es follow_ With the power off, press and
hold the stop (11)_of DECK I, and turn the power
on. Continue to hold the stop (11)button for spproxi-
mataly five seconds. DECK Icen now he oparated using
the remora cormol unit, but DECK i1cannot.
Switching to DECK II
To restore remote contTol operation to DECK II, [Dress
the stop (m) button of DECK II while DECK II is in stop
mode. DECK il can now be operated using the re.
mote control unit. Remote control operation can be
switched beck and forth between decks by pressing
the stop button of the desired DECK while it Is in
stopmode.
NOTE:
If apower failure or a sudden change in the power
supp_ (_ by lighlning, et_) _curs. the unit ls lP_et
to its original state. Only DECK/I can be operated by
remote control. To restore operation to either deck,
repeat the above procedure from the beginning
DOLBY NR
•Dolby NR System
Dolby NR systems are designed to reduce the
amount of tape hiss, mainly in the treble compo-
nents. During recording, the highpltched pianissimo
sounds which are most characteristic of audible
noise are boosted, and during playback, only these
boosted sections are attenuated, so that tape sound
Is returned to normal. As a result, the noise is atZenu-
ated by an amount equal to the boosting in the treble
range. The Dolby B-type NR system reduces noise in
the treble range, cutting tape hiss and expanding the
dynamic range. The Dolby C-type NR system is even
more effective in reducing noise, as it reduces noise
from the mid-range on.
NOTE:
When a tape has been recorded using the Dolby B.O,pe
or C-type NR system, make sure that the DOLBY /dR
switch is set to the same position during/da2back,
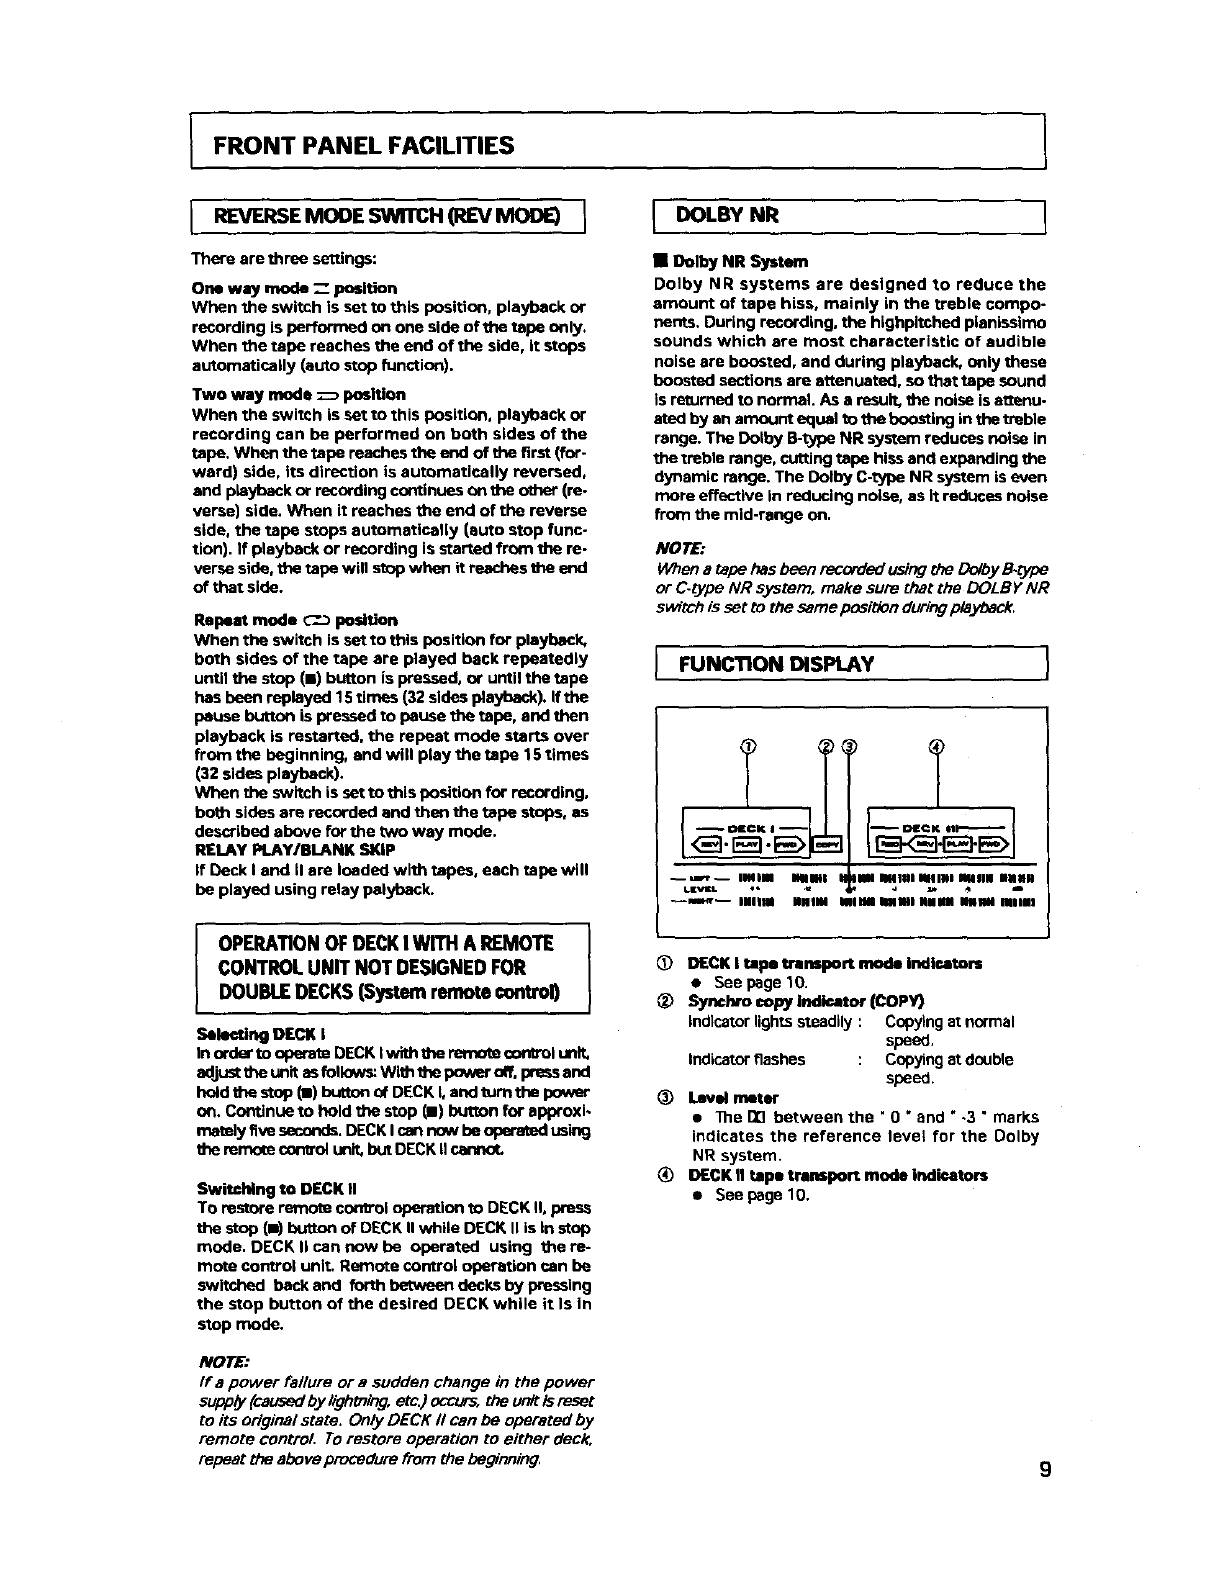
IFUNCTION DISPLAY
ilal Slllal alllNI lalllN NHNII
...... ,; .; -
illUla NNIIII Iilail IIIi all Iiii iSnlll
C_) DECK Itape transport mode Indlce_
•See page 10.
@_ sopyh_di_ (COPY)
Indicator lights steadily : Copying at normal
speed,
Indic_or flashes : Copyir,:J st d_Jble
speed.
_) Level meter
• ]he DE]between the " 0 "and ",3 " marks
indicates the reference level for the Dolby
NR system.
DECK II tape transport mode indicators
• See page 10.
9
FRONT PANEL FACILITIES
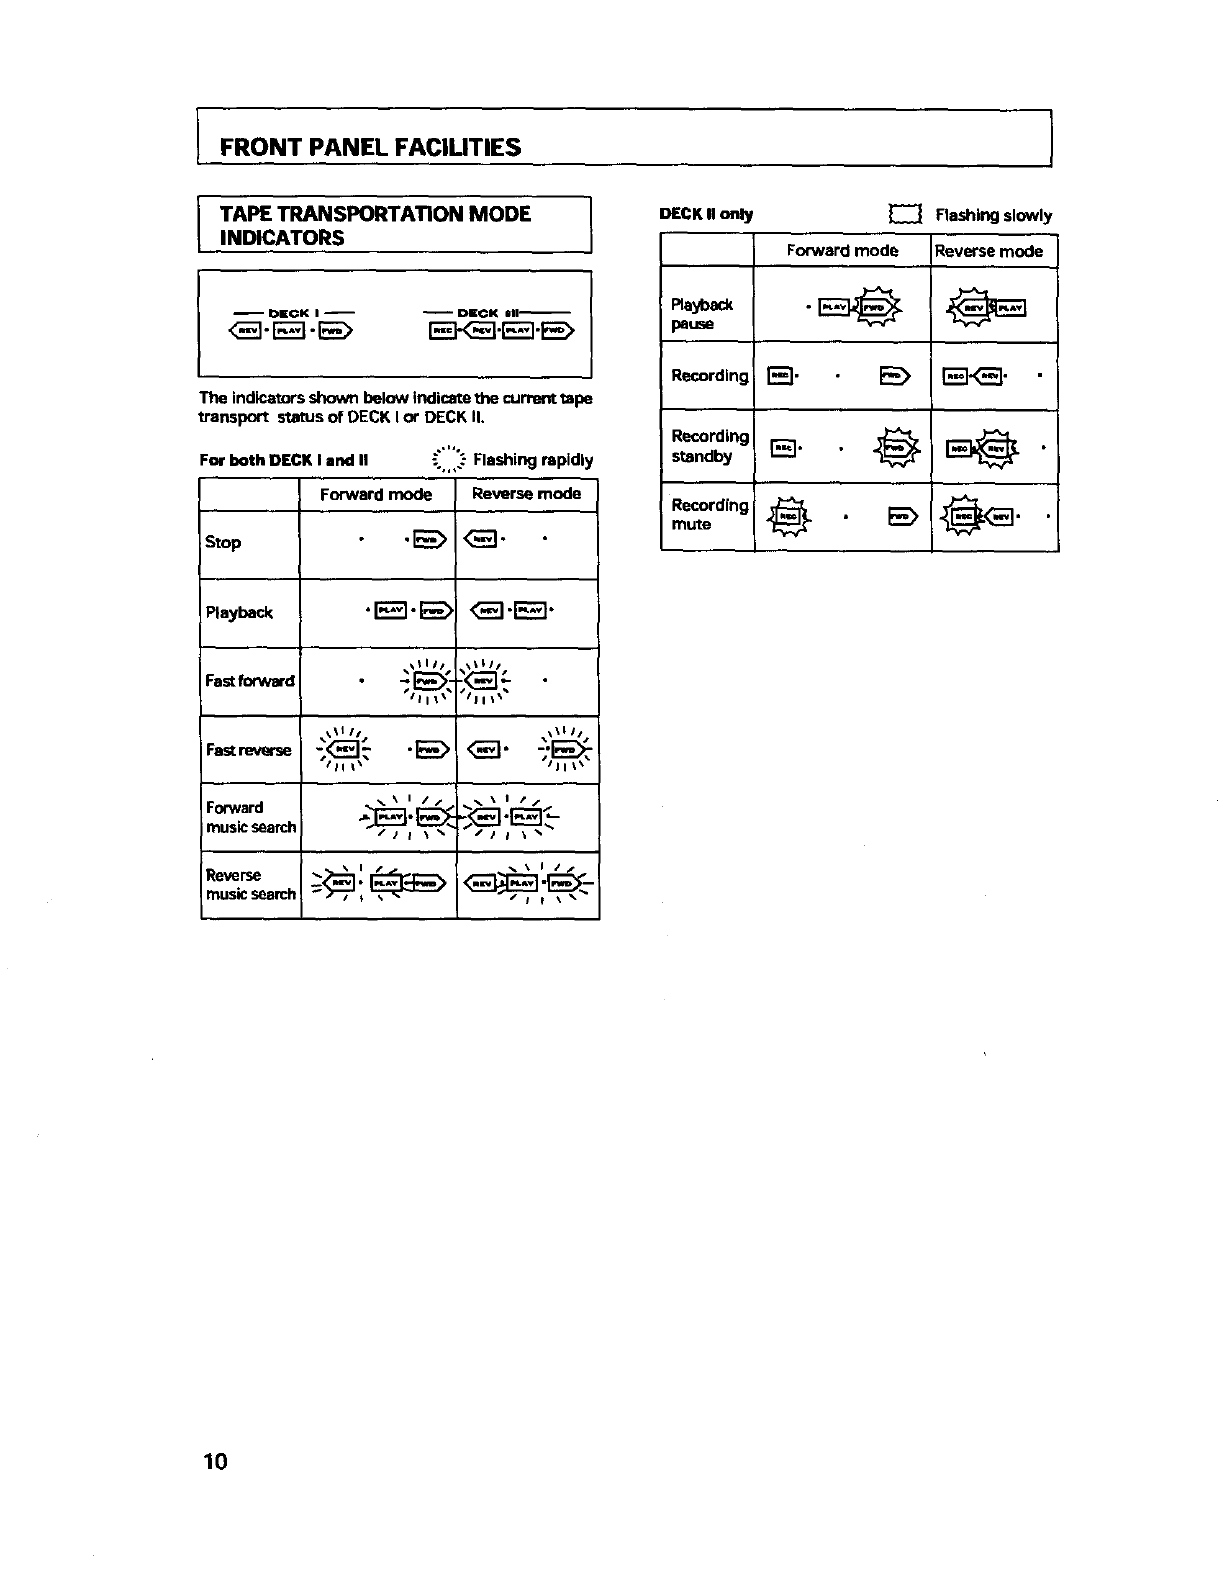
TAPE TRANSPORTATION MODE I
INDICATORS I
-- OECK I -- _ DICK Ull_
<_-_-E_> _.r_._
The indicators shown below indicate the current tape
transport status of DECK I o¢ DECK il.
,..,
For both DECK I and II _.'-Flashing rapidly
Forward mode Reverse mode
stop .E_ _"
Pl,yb_k "EE]'E_> <3_]'E_"
_,%_I11s1,%_III J
_.\ I //_. \ I t/
FO_N,rd ,_[_-_._-'_ -,j_....j t_..f, _] _],"
musk:search /i i \ _ /ia _ _
music search
DECK II o.ly _ Flashing slowl
Forward mode Reverse mode
Recording r_'l •E_ _].
Recording
standby r_]" "_ _
I0
IPLAYBACK
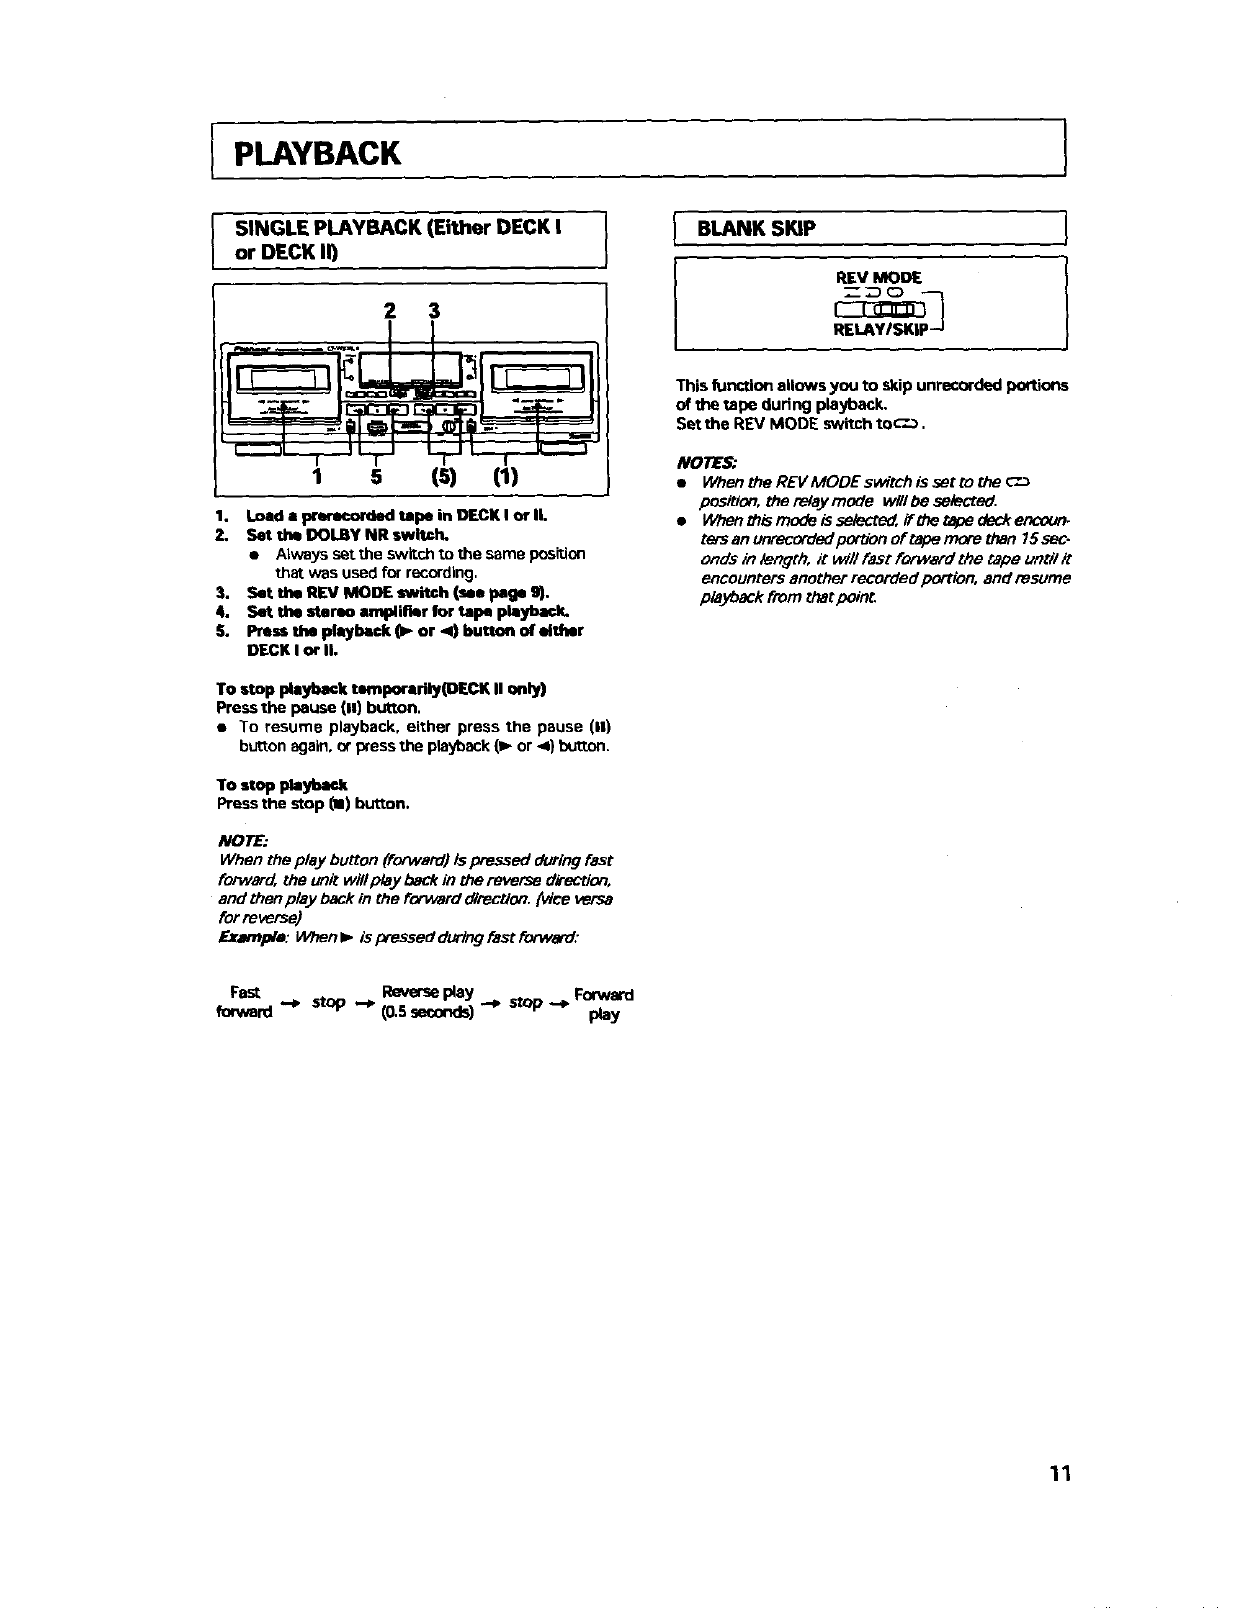
SINGLE PLAYBACK (Either DECK I I
or DECK ll) )
2 3
,I-TL L.pl-,k
1s (s) (1)
1. Load • prerecorded tape in DECK I or II.
2. Set the DOLBYNR switch.
• Always set the switchto the same position
that was usedfor recording,
3. Set the RIEVMODE switch (su peg• 9).
4. Set thin stereo arev_li_r for tape pl=yback.
S. Pressthe playback (1_or ,4) button of either
DECK I or li.
IBLANK SKIP
IREV MODE
RELAYISKIP -J
I
I
This function allows you to skip unrecorded portions
of the tape during playback.
Set the REV MODE switch to_-'.-_,
NOTES:
•When the REVMODE switch is set to the c"-_
position, the relay mGde wlll be selected,
•Whenthismodelasele_,ifthetapedeckencoum
ters an unrecorded portion of tape more than 15sec-
onds in length, it will fast forward the tape until it
encounters another recorded portion, and resume
playback from that point.
To stop playback tamporari_(DECK U only)
Press the pause (11)button.
•To resume playback, either press the pause (11)
button again, or press the playback {_ or .4) button,
To stop playback
Press the stop (II) button.
NOTE:
When the play button (forward) Is pressed during fast
forward, the unit wlll play back in the reverse dk_ction,
and then play back in the forward d_rectlen. (vice versa
for reverse}
Example: When l_ is pressed during fast forward:
Fast stop Reverseplay Forward
forward "-_ (0.5 seconds)""*
-_ stop ,-* Play
11
IPLAYBACK
IRELAY PLAYBACK I
When relay playback mode is selected, continuous
playback can be performed. When the tape in the
first deck reaches its end and stops, the other deck
will automatically begin playback.
1. Load prerecorded tapes In DECK I and DECK II.
2. Set the DOLBY NR switch,
• Always set the switch to the same positions
that was used for recording.
3. Set the REV MODE switch to C".D (See table en-
titled "PLAYBACK SEQUENCE WITH REV MODE
SWITCH SETTING" on this page).
4. SOt the sterso amplirmr for tape pleybeck.
5. Press the piaybeck (P- or _) button of tbe deck
that will start to play first,
•When the tape in one deck ends, the other
deck automatically begins playback.
•To cancel relay playback, press the stop (m)
button.
NOTES:
•Relay playback can begin from either DECK I or
DECK I1.
•7he_apeintheKIledeckcanberepl_addudngrelay
playback mode, allowing many tapes to be played
back continuously. This is a convenient feature for
parties, background music, etc.
•When this mode is selected, of the deck encounters
an unrecorded portion of tape more than 15 seconds
in length, it will fast forward the tape unix7it encour_
ters another recorded portion, and resume playback
from thet _nt.
To stop playbtmk temporarily(D.ok II only)
Press the pause (11)button.
• To resume playback, either press the pause {11)
button again, or press the playback (1_or <) button.
TOstop playback
Press the stop (11)button of the operating deck.
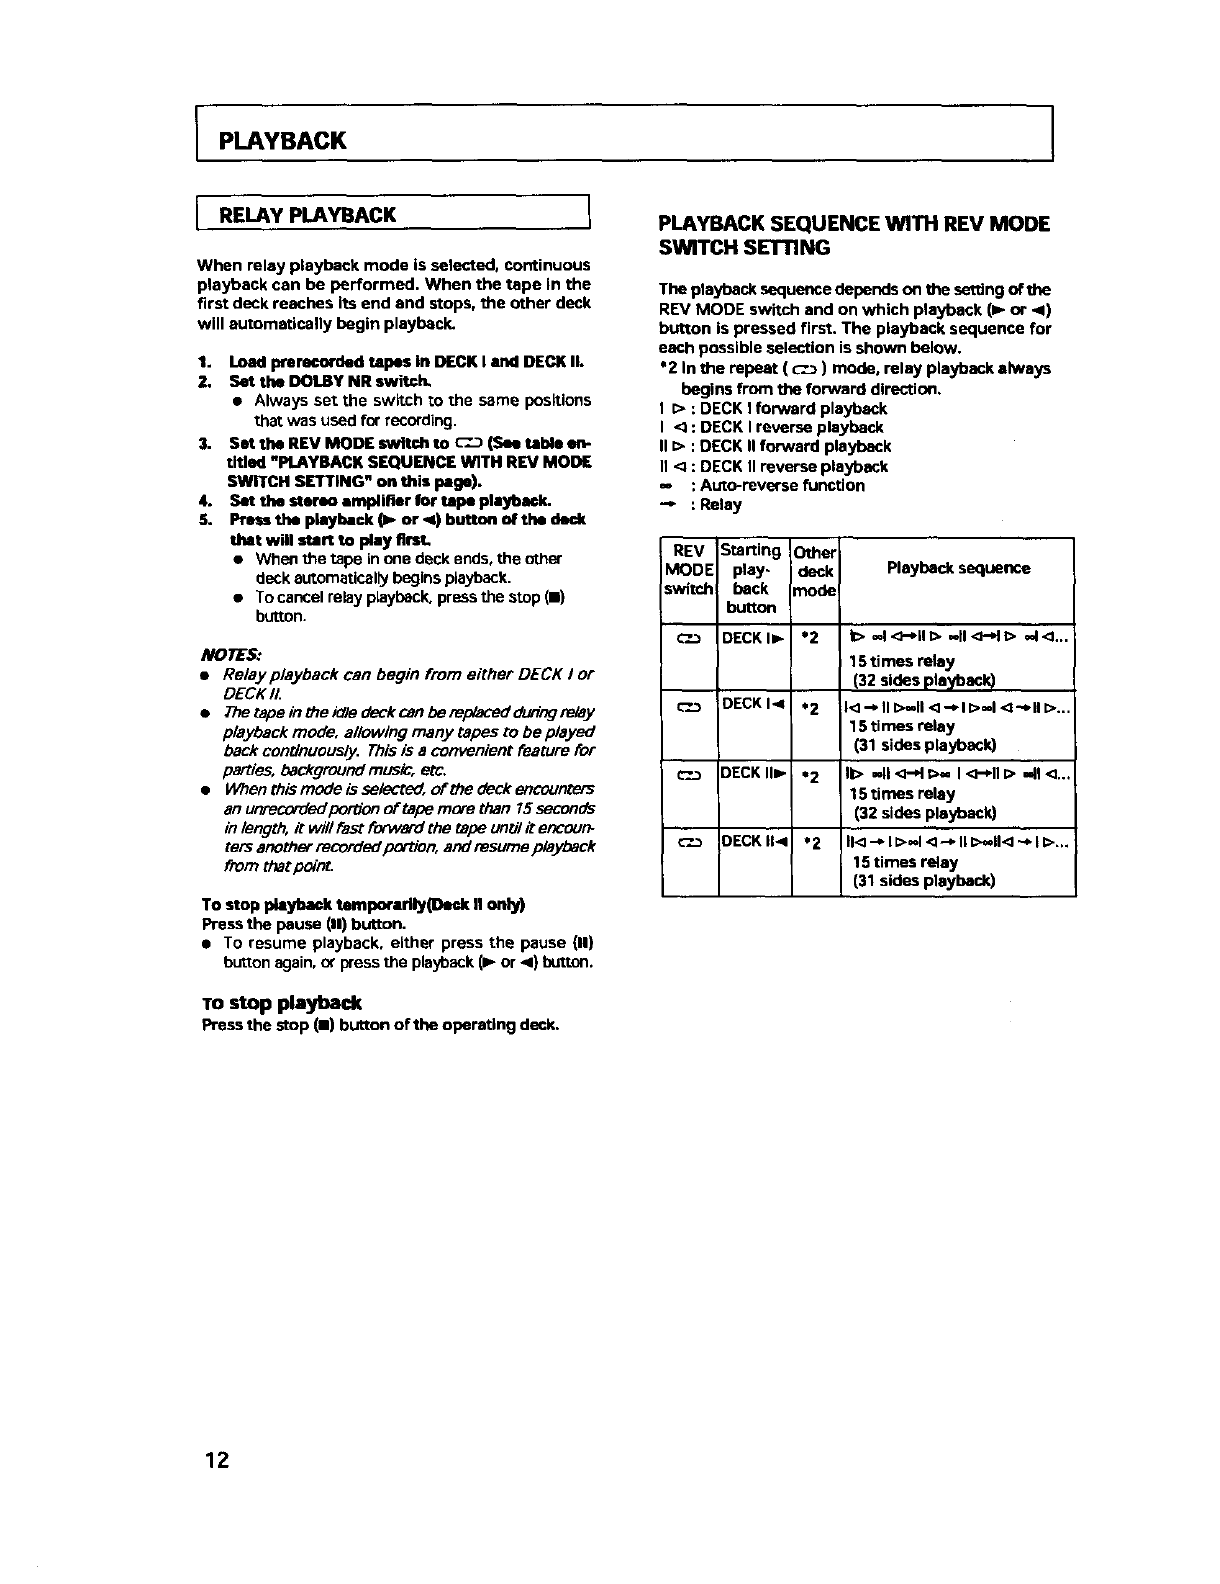
PLAYBACK SEQUENCE WITH REV MODE
SWITCH SETTING
The playback sequence depends on the setting oftbe
REV MODE switch and on which playback (1_ or _1)
button is pressed first. The playback sequence for
each possible selection is shown below.
*2 In the repeat ( c'._ ) mode, relay playback always
begins from the forward direction,
I D : DECK I forward playback
I <_ : DECK I reverse playback
II I> : DECK II forward playback
n< : DECK II reverse playback
=, : Auto-reverse function
"-- : Relay
REV Starting Other
MODE play- deck Playback sequence
switch beck n_ode
button
_'..3 DECKI=- *2 k> -I<;-*il[> -II<;-dl> -I<L,.
15 times relay
(32 sides playback)
c-.__ DECKI< *2 [<]--_ll[>-II<]-_l[>=,l<_-_ll[>...
15 times relay
(31 sides playback)
c-.__ DECK,=- *2 II> ,,ll,_-H_>- I<_-*11=>-41<...
15 times relay
(32 sides playback)
_--.-_ OECKII< *2 II<-_l[>=d<l--,lll>--ll<-,l[>..
15 times relay
(31 sides playback)
12

PLAYBACK
MUSIC SEARCH
(Skipping forward or backward to playback a
desired selection)
The music search function detects blanks (longer
than 4 seconds) between selections, advances the
tape in the forward or reverse direction to find the
beginning of the desired selection and auto matlorlly
starts playback.
It can find a selection located up to 15 selections be.
fore or after the present position.
During forward playback
When you wish to locate a future song, press the
MS+ button as many times as the number of songs
to be skipped. When you wish to listen to the song
currently being played from the beginning, press the
MS- button once. To return to a previously played
song, press the MS- button as many times as the
number of songs to be skipped, plus one.
During reverse playback
When you wish to locate a future song, press the
MS+ button as many times as the number of songs
to he skipped. When you wish to listen to the song
currently being played from the beginning, press the
MS- button once. To return to a previously played
song, press the MS- button as many times as the
number of songs to be skipped plus one.
From the stop mode
Press the MS+ or - button to perform music search
as mentioned above.
Display the number of songs skipped.
The level mater will blink to display the number of
songs skipped.
Selecting songs during skip operations
To change songs to be skipped, pressthe MS + and
MS - buttons during skipoperations.
Example:When selecting the 5th song by pressing
the MS +button in the forward direction:
When MS + is pressed :The 6th song is
selected,
When MS - is pressed : The 4th song is
selected.
• If the butten is pressed mare tirnes than the r_Jmber
of select'tons recorded on the tape, fonNard search
will continue on the opposite side, 10utreverse search
will stop at the tape end.
NOrE_
In the following circumstances, the music search fur/c.
Uon may he unabio to property detect blanks between
selections; this is not, however, a sign era malfunction
with the unit.
•When using a tape with blanks between selections
lass than 4seconds long.
•When lismning to tapes with long lol_levelinterva_
like classical music, or with sound breaks several
seconds long Within selections.
•When/istening to recorded conferences or talk
shews, where sound is intermittenL
•When using tapes with noise in _e blanks between
selection.
How Selections are counted
When starting the music search operation from the
middle of a selection and specifying "1st previous
selection," playback wHi rettJm to the beginning of
the present selection. To return to selections further
beck, count one extra selection.
-,-- .., .,.,
Exampl_ s 7ao _o
Skipped 1 song llllll_mOOm OO_OgOOBOOOmDO0_ODOOaBIB
.lime ogna_0mornoror on(m M00(l_mlml
SklppedZsongs Ha mm_or oror oror mama
maim ormoonmln oonnnnmEoonnnnoomg_mama
Skipped 10 songs
Skipped 15 songs
mlml BBDOQO0O_O_9OO00OQOOOBBD000BO O_0O_ll Mama
DelH4 U_O0m _WU0 Om60O0m_0_OD',_Zltl0igll
IIMIDN 0OO0Om0OB0m0 000gin0 m00BO0',_llliNII
IIIIIM ggoogg0ogog00agggggg000Dooggogo.,_t_mlml
Search (-)
3rd selection 1st
(2selections selection
before) (present
selection
2nd selection (next
I (last selec- Iselection)
_tion) _
Playback (I,,,.)..-_.-.._.IL. _
Present position
-_ Search (÷)
2nd selection
I st selection 3rd selectlo_
' J' IJ'
13
RECORDING
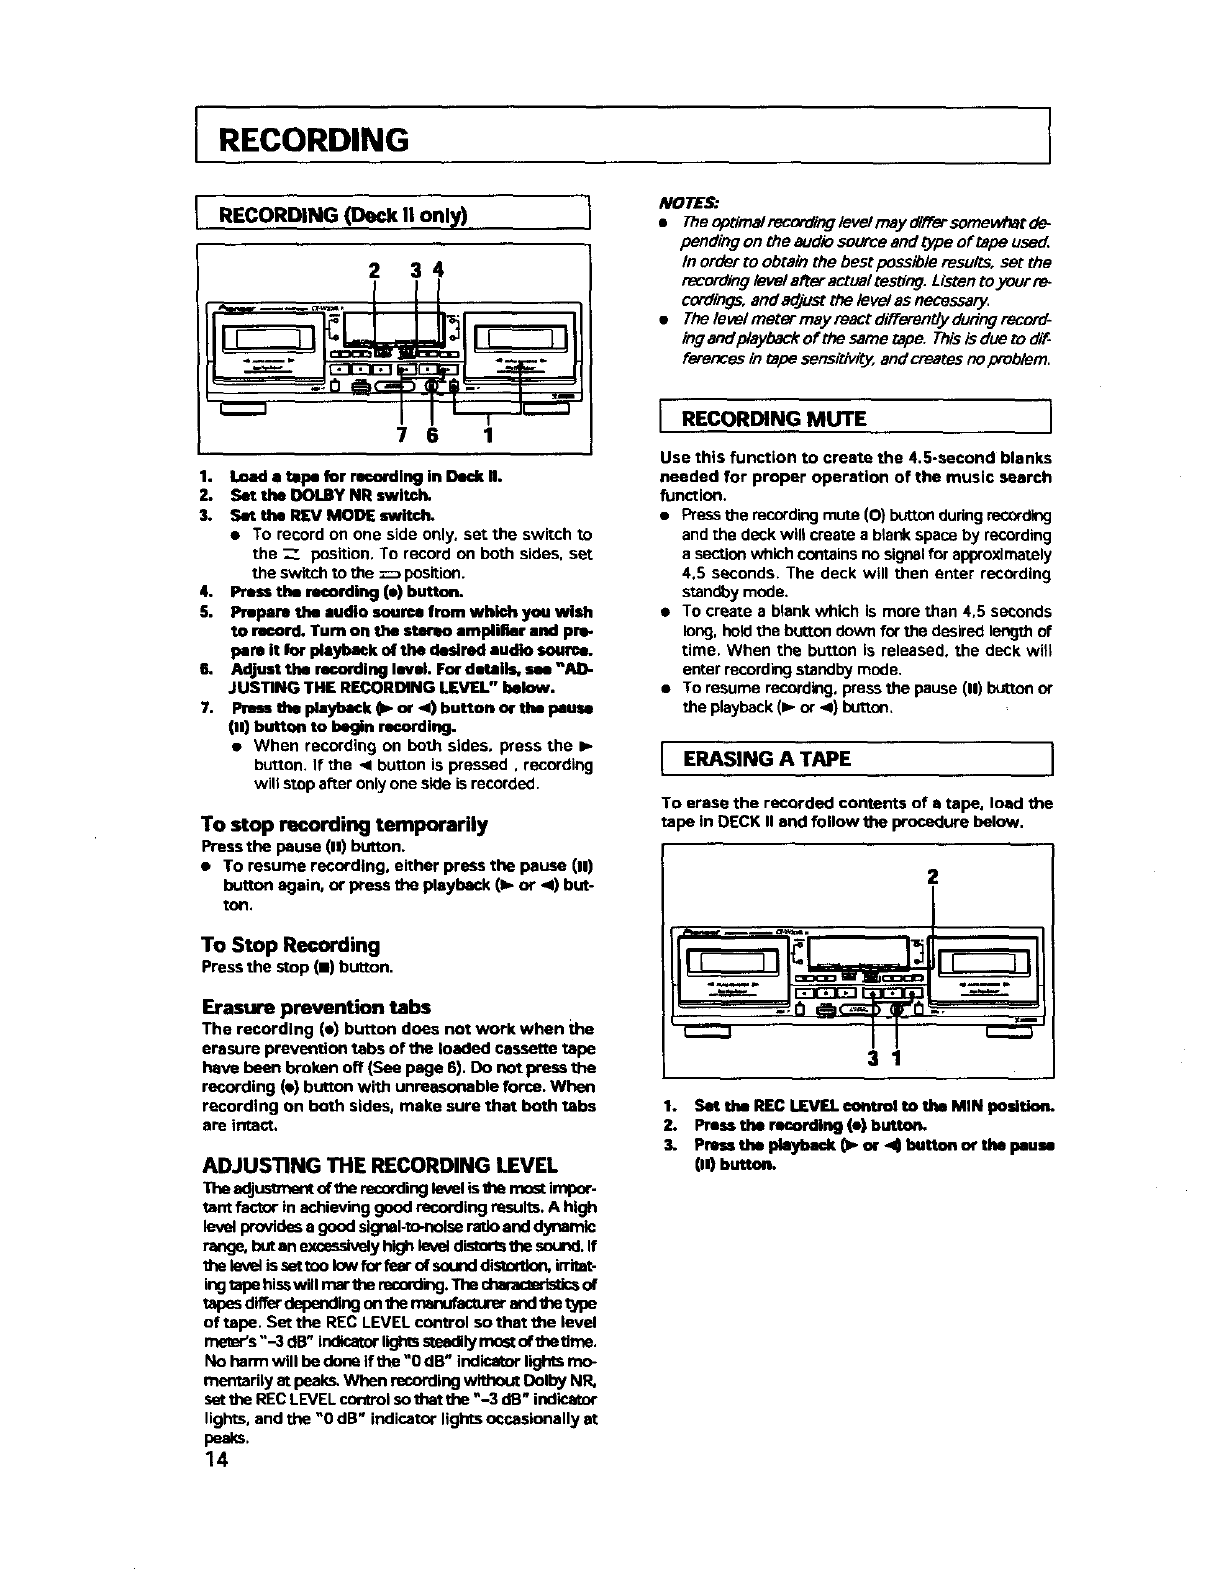
RECORDING (Deck II only)
2 34
7 6 1
1. Load a tape for rseordlng in Dedx H.
2. Set the OOLBY NR switch,
3. Set the REV MODE switch.
• To record off one side only, set the switch to
the Z position. To record on both sides, set
the sw;toh to the _pesition.
4. Press the recording (e) button.
5. Prepare the audio source from which you wish
to record. Turn on the stermo amplifier and pre-
pare it for playback of the desired audio source.
6, AdJust the recording level. For details, see "AD-
JUSTING THE RECORDING LEVEL" below.
7. Press the playback (1_or 4) bucten or the Pause
(.) button to begin recording.
• When recording on beth sides, press the •
button. If the < button is pressed, recording
will stop after only one side is recorded.
To stop recordin 9 temporarily
Press the pause (11)button.
• To resume recording, either press the pause (11)
butlon again, or press the playback (lb. or ,,11)but-
tOll.
To Stop Recording
Pressthe stop (11)button,
Erasure prevention tabs
The recording (e) button does not work when the
erasure prevention tabs of the loaded cassette tope
have been broken off (See page 6). Do not press the
recording (e) button with unreasonable force. When
recording on both sides, make sure that both tabs
are intact.
ADJUSTING THE RECORDING LEVEL
The adjustment of the recording level is the rr_ impor.
tent factor in achieving good recording results. A high
level Provides a good signal-te-nolse ratio and dynamic
_butan exceesively higi_ level distorB the sound. If
the level is set ted low for feor of sound dis_ inttet-
ing tape hisswill mar the reesrding. The charec_ristics of
tspes differ depending on the _ and the t_e
of tope. Set the REC LEVEL control so that the level
_s "-3 dB" indicator lights steadily most of the time.
No harTn will be done If the "0 dB" indicator lights mo-
mentsrily at peak_ When recording without Dolby NR,
sst the REC LEVEL _1 su that the "-3 dB" indicator
lights, and the "0 dB" indicator lights occasionally at
peaks.
14
NOTE_
•TheopUmalrenordingiovelrnay#lTersornowhatd_
pending on the audio so_ce and type of tape use_,
In order to obtain the best peseible resu_s, set the
recording/eve/after actual testiorJ. Listen to your [e_
cordings, and adjust the/eve/as necessary
•The levelmmer may react d#Terently during record-
ing and playback of the same tape. This is due to dif-
f_ in tape ser_tivily, and _eates no problem.
J RECORDING MUTE ]
Use this function to create the 4.5-second blanks
needed for proper operation of the music search
function.
• Press the mcerding mute (O) button during mCOrdklg
and the deck wilt create a blank space by recording
a section which contains no signal for aPlYoxlmately
4.5 seconds. The deck will then enter recording
standby mode.
•To create a blank which is more than 4,5 seconds
long. hold the bu_on down for the desired ler'xjth of
time. When the button is released, the deck will
enter recording standby mode.
• To resume recording, press the pause (11)button or
the playback (• or -4) button,
J ERASING A TAPE J
To erase the recorded contents of atape, load the
ta )e in DECK II end follow the procedure below,
2
I
31
1. Set the REC LEVEL €ontrol to the MIN posltlo_
2. Press the recording (e) button.
3. Press the playback O_ or ,4 button or the pause
1,_button.
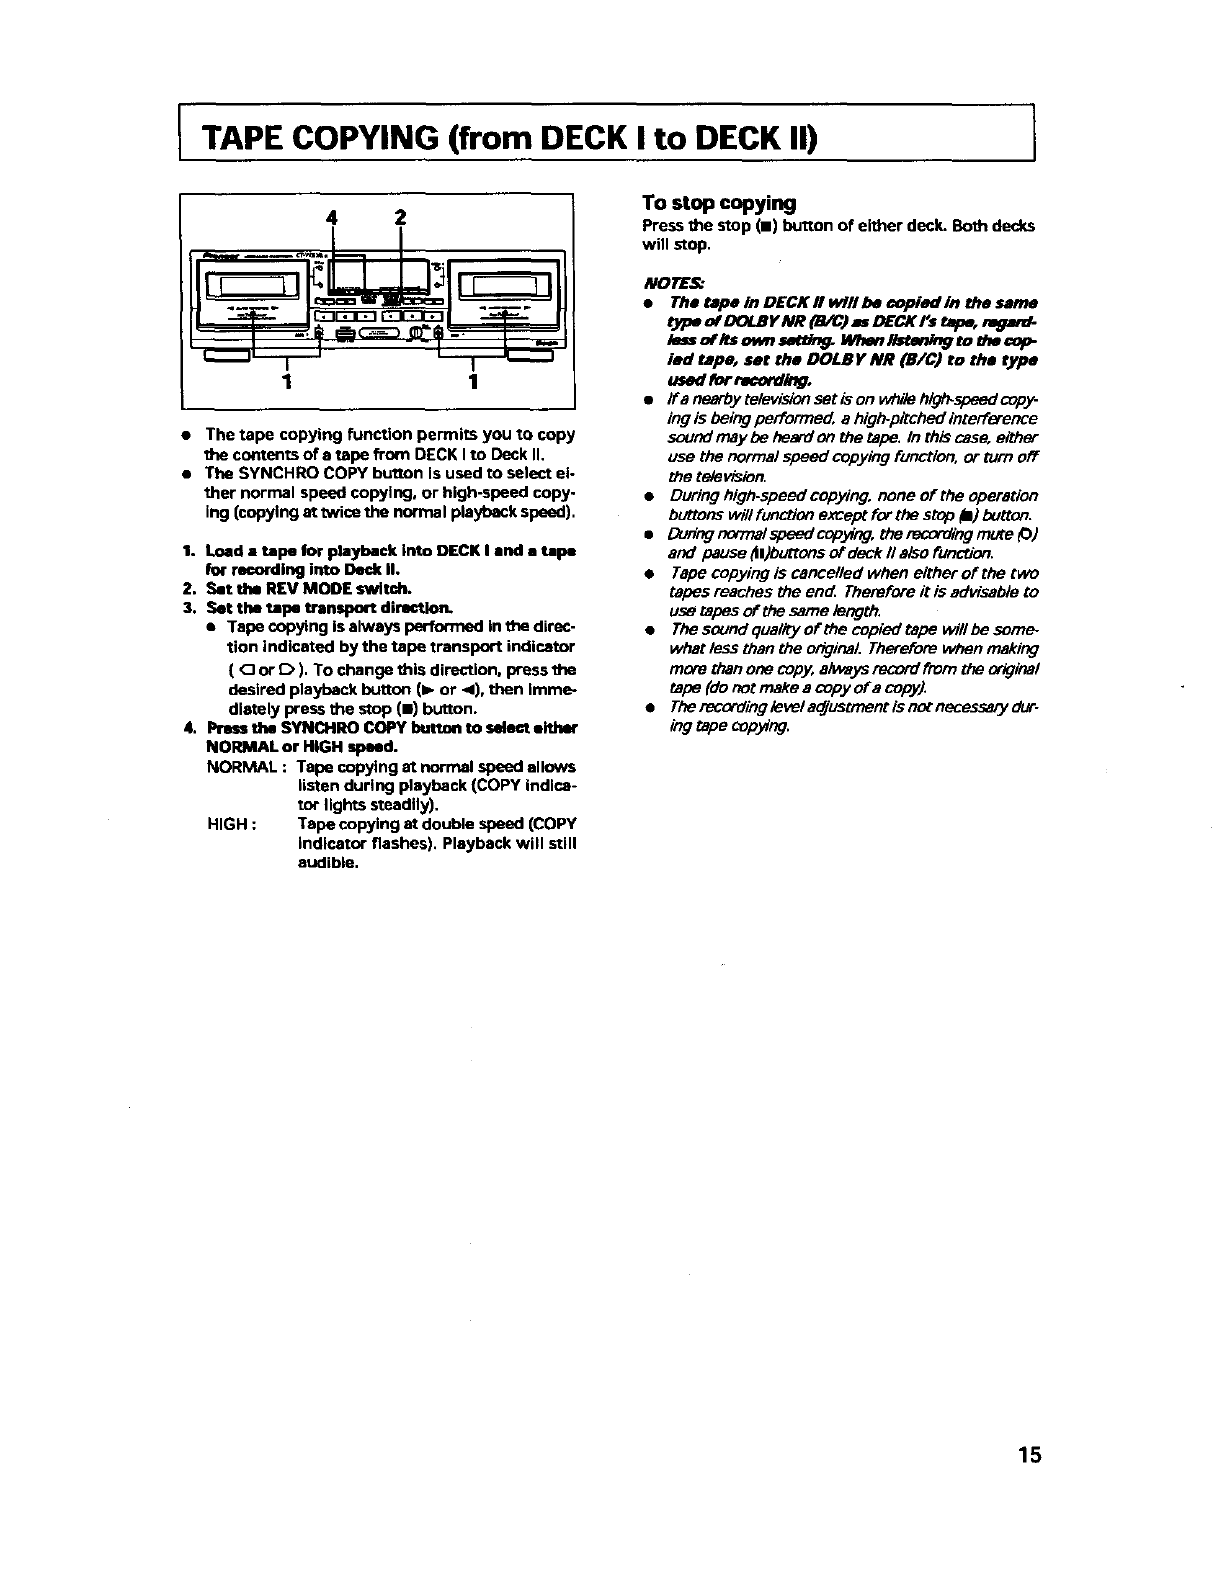
ITAPE COPYING (from DECK I to DECK II)
4 2
1 1
•The tape copying function permits you to copy
contents of e tape from DECK I to Deck II.
• The SYNCHRO COPY button is used to select el-
",her normal speed copying, or high-speed copy-
ing (copying at twice the normal playback speed),
1. Load a tape for playback into DECK I and a tape
for re_rdlng into Deck II.
2. Set the REV MODE switch.
3. Set the tape transport directlo_
•Tape copying is always performed in _direc-
tion indicated by the tape transport indicator
(Oor D). To change this direction, press the
desired playback button (l_ or 4), then imme-
diately press the stop(m)button.
4. Preas the SYNCHRO COPY buttan to ealaat either
NORMAL or HiGH speed.
NORMAL : Tape copying at normal speed allows
listen during playback (COPY indlce-
tor lights steadily),
HIGH : Tape copying at double speed (COPY
indicator flashes). Playback will still
audible,
To stop copying
Press the stop (11)button of either deck. Both decks
will stop,
NOTES_
•The tepe In DECK II willbe copied In the same
type of DOLBY NR (B/C) as DECK l's tmpe, r_ar_
lessoflts ownsatUr_ Wben_tetdng to mecop
led tape, set the DOLBy NR (B/C) to the type
us_ forrecorda_.
•Ira nearbytelevisionsetison while hlgl_spsedcopy-
ing is being performed, e high-pitched interference
sound may be heard on the tape. In th_s case, either
use the normal speed copying function, or turn off
the television.
•During high.speed copying, none of the operation
buttons will function except for the stop _1)button.
•Dur_gcormalspeedcop_ng, therecomingmute_)
and pause ttl)buttons of deck II also function.
•Tape copying is cancelled when either of the two
tapes reaches the en_ Therefore it is advisable to
use tapes of the same length.
•The sound qualEy of the copied tape willbe som_
what less than the original. Therefore When making
more than one copy, aiways record from the orkJinal
tape (do not make a copy of a copy).
•The recordingleveladjustment is not necessary dur-
legtapecopying.
15
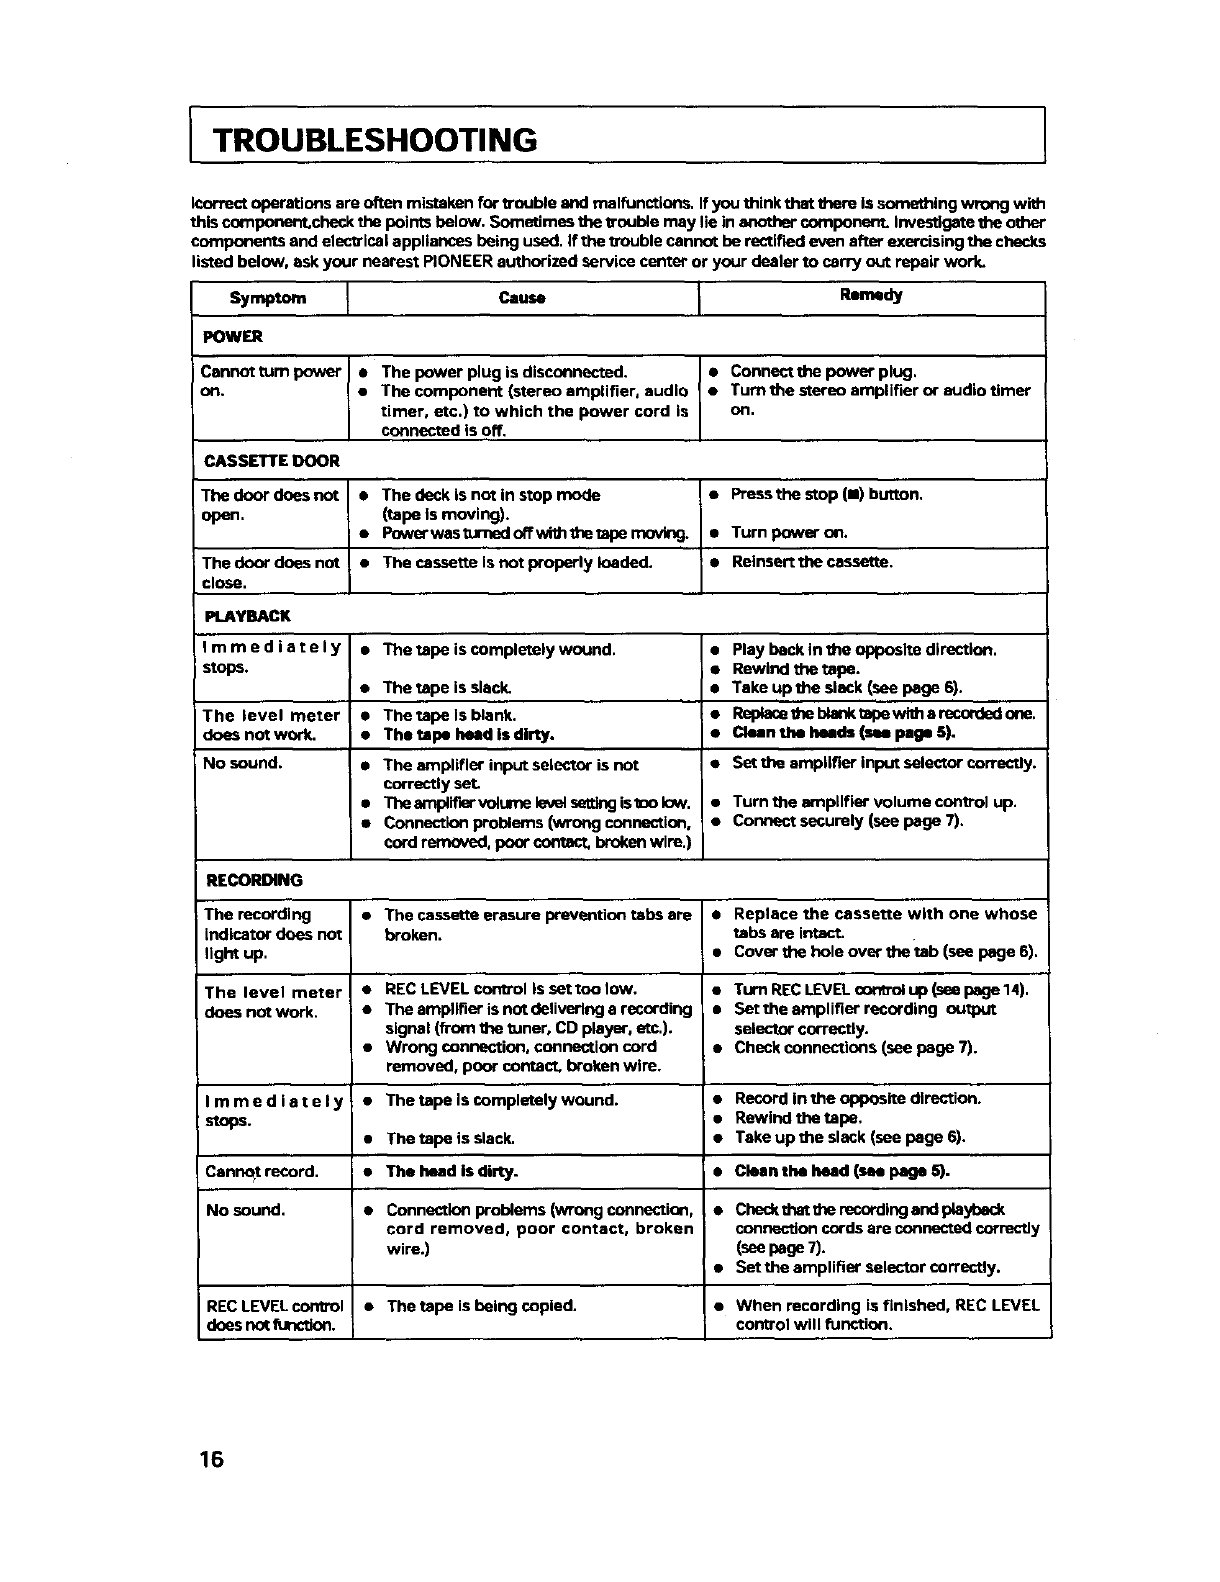
ITROUBLESHOOTING
Icorrect operations are often mistaken for trouble and malfunctions. If you think that them is something wrong wi_
this coe_ponent,check the points below. Sometimes the trouble may lie in a_tother component. Investigate the other
components and electrical appliances being used. If the lzouble cannot be rectified even after exercising the checks
listed below, ask your nearest PIONEER authorized service center or your dealer to carry out repair work.
Symptom Cause Remedy
POWER
Cannot turn power
oR.
CASSET]rE DOOR
Tbe door does not
open.
The door does not
close.
PLAYBACK
Immediately
stops.
The level meter
does not work.
No sound.
RECORDING
The recording
indicator does not
light up.
The level meter
does not work.
Immediately
stops.
Cennqt record.
No sound.
RECLEVELcontrol
doesnot function.
• The power plug is disconnected.
•The component (stereo amplifier, audio
timer, etc.) to which the power cord is
connected is off.
• Conneet the power plug.
•Turn the stereo amplifier or audio timer
oR,
•The deck is not in stop mode
(tape is moving).
•Power wes turned off with the tape mnvir_
• The cassette Is not properly loaded.
•Pressthe stop (111)button,
• Turn power on,
•Reinsertthe cassette.
• The tape is completely wound.
e
e
a
The tape is slack.
The tape Is blank.
The tape head is dirty.
The amplifier input selector is not
correctly set
The amplir_r vblume levi setting is mo low.
Connection problems (wrong connection,
cord removed, poor contact, brokon wire.)
•Play beck in the opposite dWection.
i•Rewind the tape.
• Take up the slack (see page 6).
:•Replece the blenk tape with a recorded one.
l e Clean the heads (see page 51,
•Set the amplifier inpot selector correctly.
•Turn the amplifier Volumecontrol up.
•Connect securely (see page 7).
•The cassette erasure prevontion tabs are
broken.
•REC LEVEL control Issettoolow.
•The amplifier is not delivering a recording
signal (from the tuner, CD player, etc.).
•Wrong connection, connection cord
removed, poor contact, broken wire.
•The tape Is completely wound.
•The tape is slack.
• The head is dirty.
•Connection problems (wrong connection,
cord removed, poor contact, broken
wire.)
•The tape is beJng copied.
• Replace the cassette with one whose
tabs are imac'L
• Cover the hole over the tab (see page 6).
•Turn REC LEVEL control up (see page 14).
•Settheempliflerrecording output
selector correctly.
•Check connections (see page 7).
•Record in the opposite direction.
• Rewind the tape.
•Take up the slack (see page 6).
• Clean the head (m page b').
•Check thst the recording end pla_l_eck
connection cords are connected correctly
(see page 7).
• Set the amplifier selector correctly.
•When recording is finished, REC LEVEL
control will function.
16
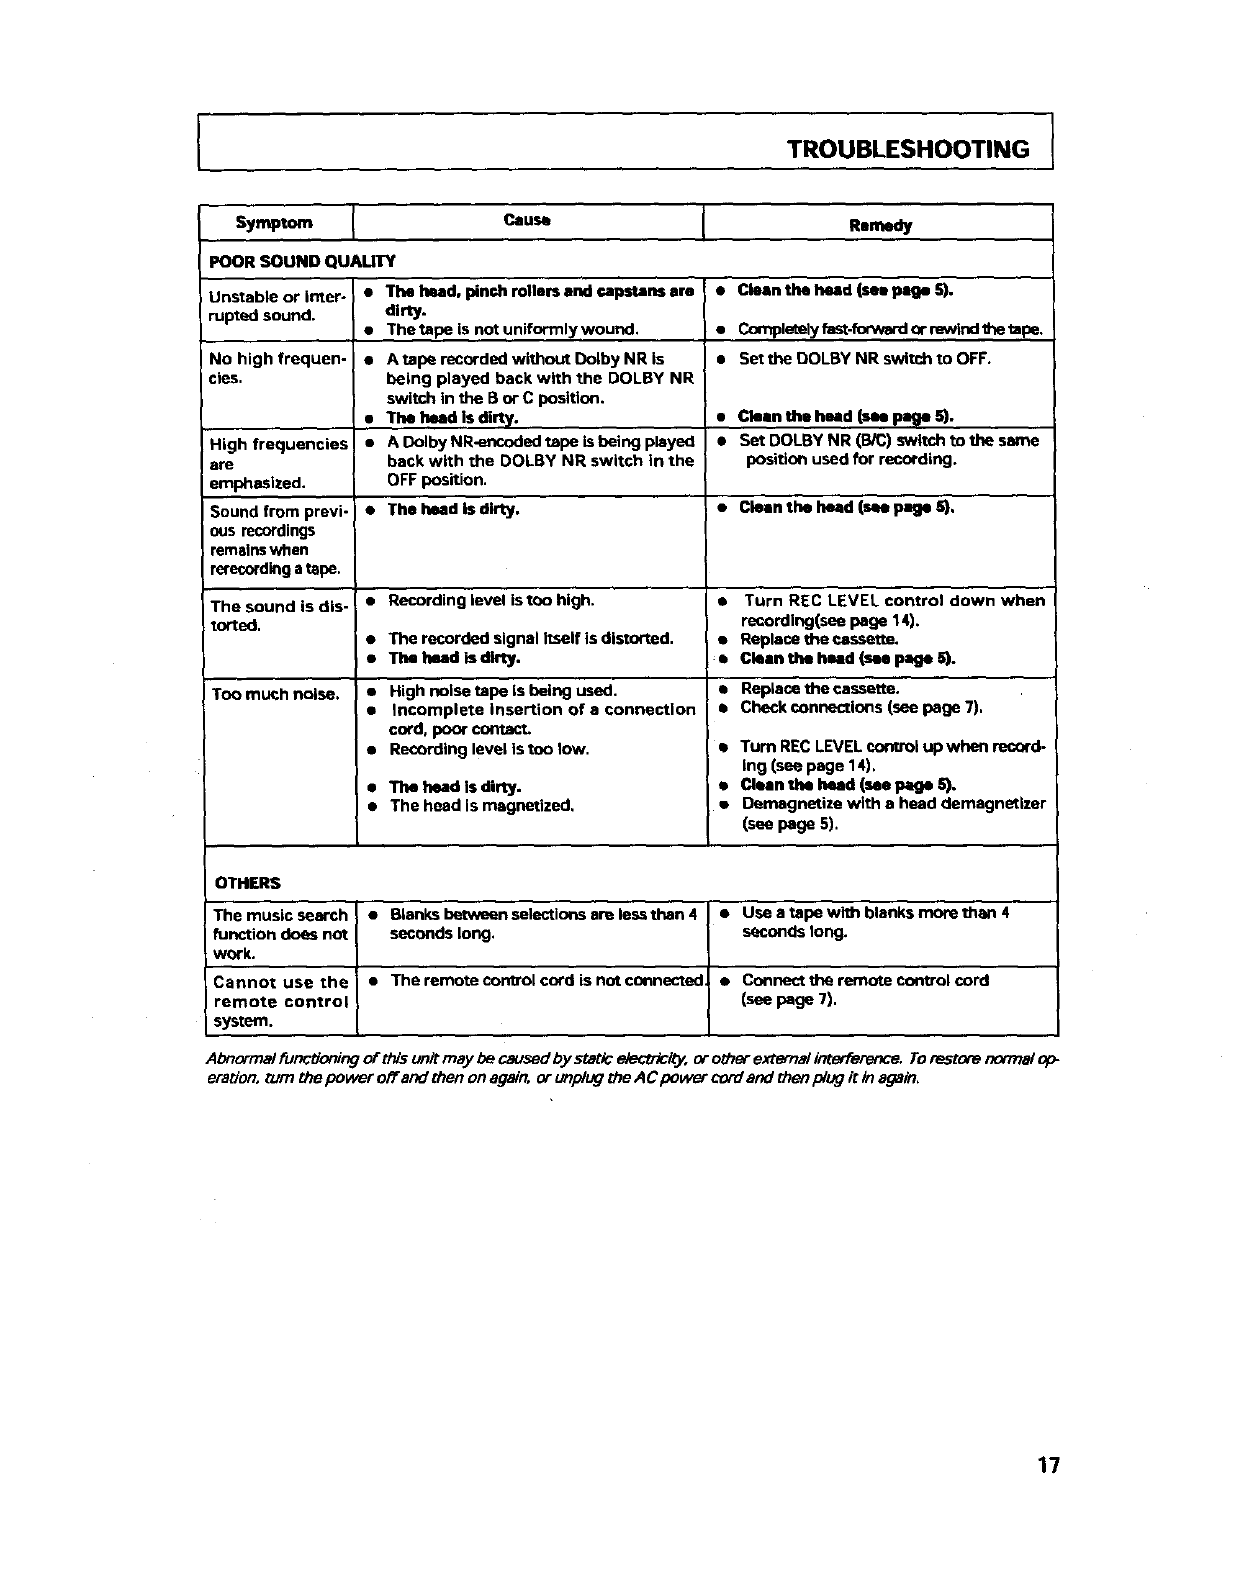
TROUBLESHOOTING
Symptom Cause Rmmedy
POOR SOUND QUAUTY
Jnstable or inter- • The Iwad, pinch milers end capstans ere
mpted sound.
No high frequen-
cies.
High frequencies
•re
emphasized.
dirty.
•Thetape is notuniformlywound.
• A tape recorded wlthout Dolby NR is
being played back with the DOLBY NR
switch in the B or C position.
• The head is dirty.
• A Dolby NR<_ncoded tape is being played
back with the DOLBY NR switch in the
OFF position.
•Cleanthe head (see page S).
•Completelyfast-forwardor rewindtbetapa.
• Set the DOLBY NR switch to OFF.
• Clean the head (see page 5).
• Set DOLBY NR (B/C) switch to the same
position used for recording,
Sound from previ- •The head is dirty. •Clean the head (m page 5).
ous recordings
remsins when
rerecording a tape.
The sound is dis- • Recording level iston high. • Turn REC LEVEL control down when
torted, recording(see page 14).
•The recorded sign•l itself is distortad, •Repiacetheoassette.
•Thelwadisdlrty. •Cloen the heed (see page S).
Too much noise. •• Replace the cassette.
•• Check connections (see page 7),
High noise mpo is being used.
Incomplete insertion of • connection
cord, poor contact.
Recording level is ton low.
•The head Is dirty.
• The head is magnetized,
•Turn RECLEVELcor_rolup when record-
ing (see page 14).
•Cleenthe heed (see F.=geS).
•Demagnetize with e heed demagnetizer
(see page 5).
OTHERS
The music search • Blanks between selections am less than 4 •Use a tape with blanks more than 4
function does not seconds long. seconds long.
work.
Cannot use the • The remote con_rol cord is not connected •Connect the ramofJ.=control cord
remote control (see page 7).
system,
Abnormai functioning of this unit may be caused by static etectTicity, or other external tn_rference. Torestore no/Trialoh"
eration, nJm the power o_ and then on again, or unplug the A Cpower cord and then/dug it in again,
17

18

19
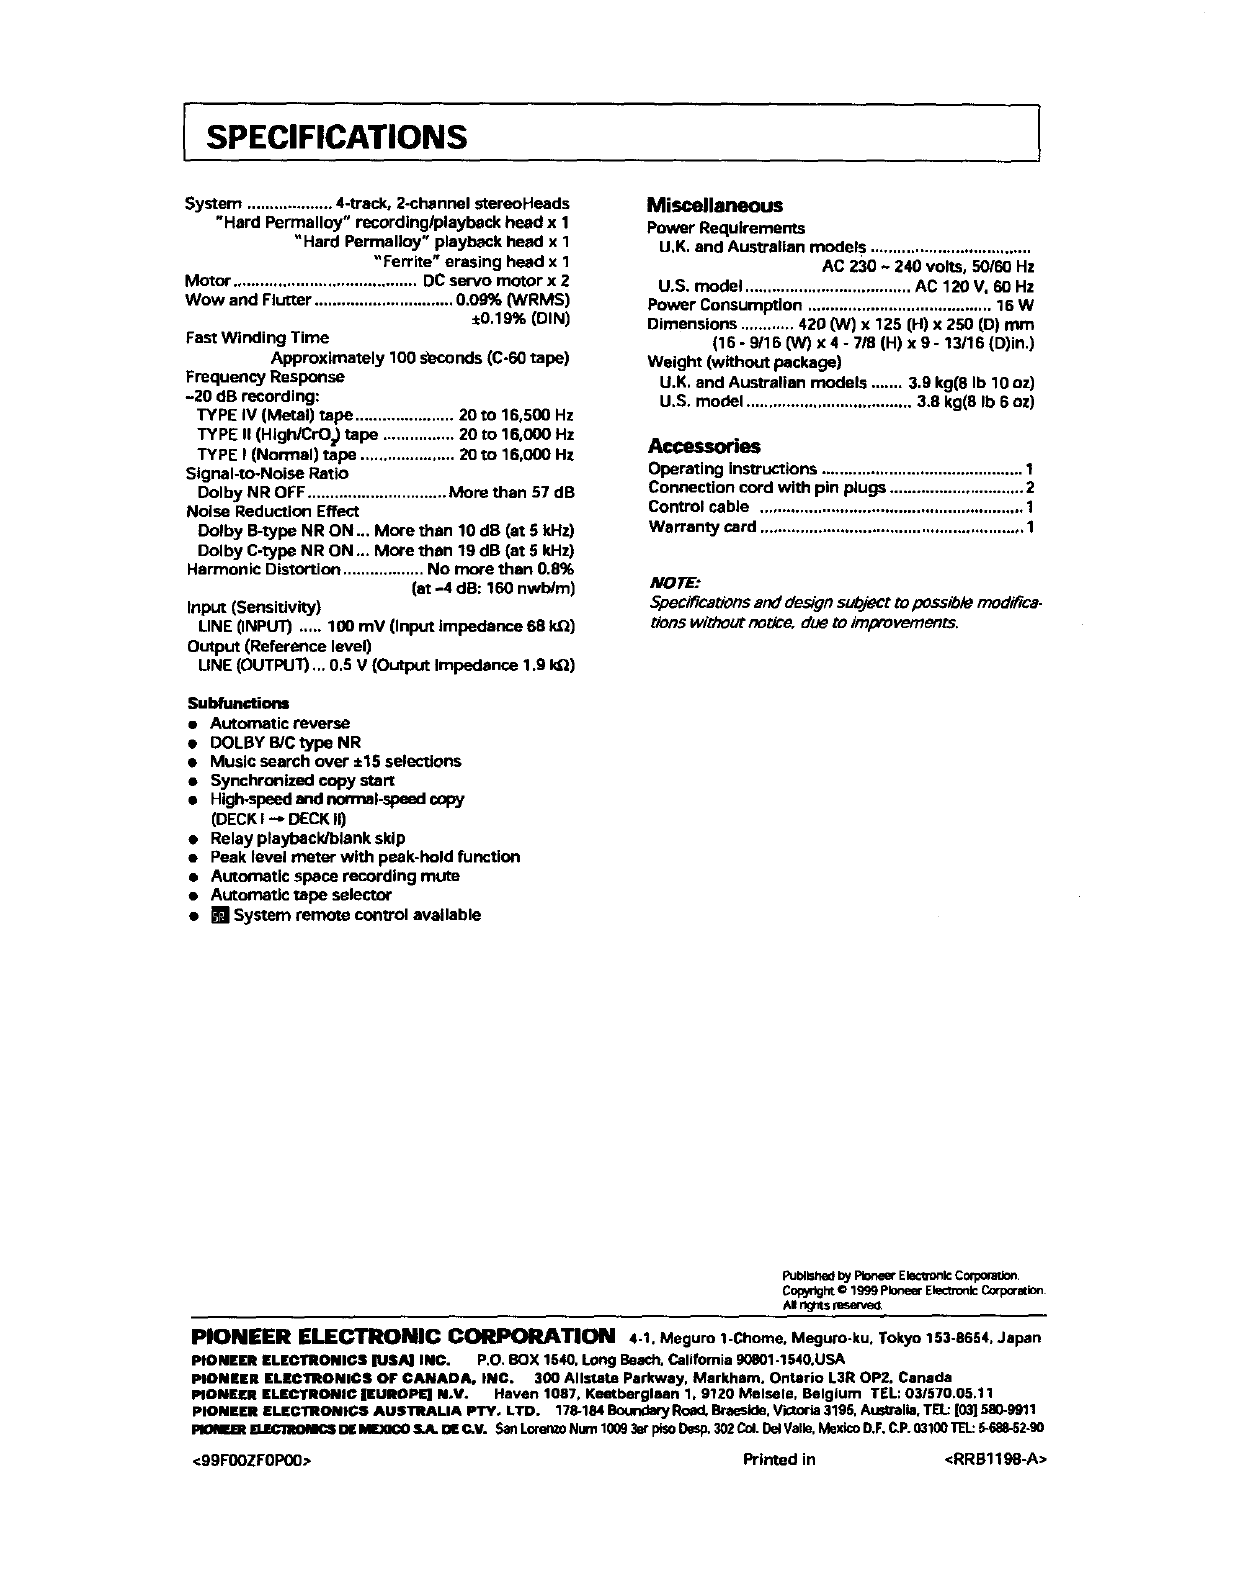
SPECIFICATIONS
System ................... 4-track, 2-channal stereoHeads
"Hard Permalloy" recordinglplayback head x 1
"Hard Perrnalloy" playback head x 1
"Ferrite" erasing head x 1
Motor ......................................... DC servo motor x 2
Wow and Flutter ............................... 0.09% (WRMS)
,0.1 9% (DIN)
Fast Winding Time
Approximately 100 s_econds (C-60 tape)
Frequency Response
-20 dB recording:
TYPE IV (Metal) tape ...................... 20 to 18,500 Hz
TYPE II (HIgWCrO=) tape ................ 20 to 16,000 Hz
TYPE I (Normal) tape ..................... 20 to 16,000 Hz
Signal-to-Noise Ratio
Dolby NR OFF ............................... More than 57 dB
Noise Reduction Effect
Dolby B-type NR ON ... More then 10 dB (at 5kHz)
Dolby C-type NR ON _. More than 19 dB (at 5 Id-lz)
Harmonic Distortion .................. No more then 0.8%
(at -4 dB: 160 nwb/m)
Input (Sensitivity)
LINE 0NPUT) ..... 100 mV (Input impedance 68 kQ)
Output (Reference level)
UNE (OUTPUT)... 0.5 V (Output Impedance 1.9 kQ)
Subfunctions
• Automatic reverse
• DOLBY B/C type NR
•Music search over ±15 selections
•Synchronized copy start
•High.speed end norrnal-spead copy
(DECK I --_ DECK II)
•Relay playback/blank skip
•Peak level meter with peak-hold function
•Automatic space recording mute
•Automatic rope selector
• [] System remote control available
Miscellaneous
Power Requirements
U.K. end Australian models ....................................
AC 230 ~ 240 volts, 50/60 Hz
U.S. model ..................................... AC 120 V. 60 Hz
Power Consumption ......................................... 16 W
Dimensions ............ 420 (W) x 125 (H) x 250 (D) mm
(16 -9116 ON) x 4 -7/0 (H) x 9 -13/16 (D)in.)
Weight (without package)
U.K. and Australian models ....... 3.9 kg(8 Ib 10 oz)
U.S. modal ..................................... 3.8 kg(8 Ib 6 oz)
Accessories
Operating instructions ............................................. 1
Connection cord with pin plugs .............................. 2
Control cable ........................................................... 1
Warranty card ........................................................... 1
NOTE:
Specifications and design s_t to possible modifica-
tion5 without noUce, due to improvements.
Pu=_hedbyPt_e_ E_c_n_ ComOra_
CowdghtO1999pI0neerElectro_Corpmation
AI r_J_tsn_a-n_
PIONEER ELECTRONIC CORPORATION 4-1. Meguro 1-Chome, Meguro-ku. Tokyo 153-8654, Japan
PIONEER ELECTIIONIC$ IUSA] INC. P.O, BOX 1540, Long Beach. California g0801-1540.USA
PIONEER ELBClRtONIC$ OF CANADA. INC. 300 Allstate Parkway, Markham. Ontario L3R OP2. Canada
PIONEER ELEC'I'RONI¢ IEUROPI_ N.V. Haven 1087, Keeteerglaan 1, 9120 Melsele, Belgium TEL: O3/570.05,11
PIONEER ELECERONIC$ AUSTRALIA PTYo LTD. 178-184 BOUrlda_ Road. B_eside, Vk_o'ia 3195, Aus_alia. TELL:|03] 580-9911
PIONF.BI EUEC1NOM(_ DE IMJOCO S.A. OE C.V. San Lorento Num 1009 3at plso Desp.302 Col.Del Valle, Mexico D.F.C.P. 03100 R'L: 5-688-52-g0
<99F00ZFOP00> Printed in <RRB1198-A>
