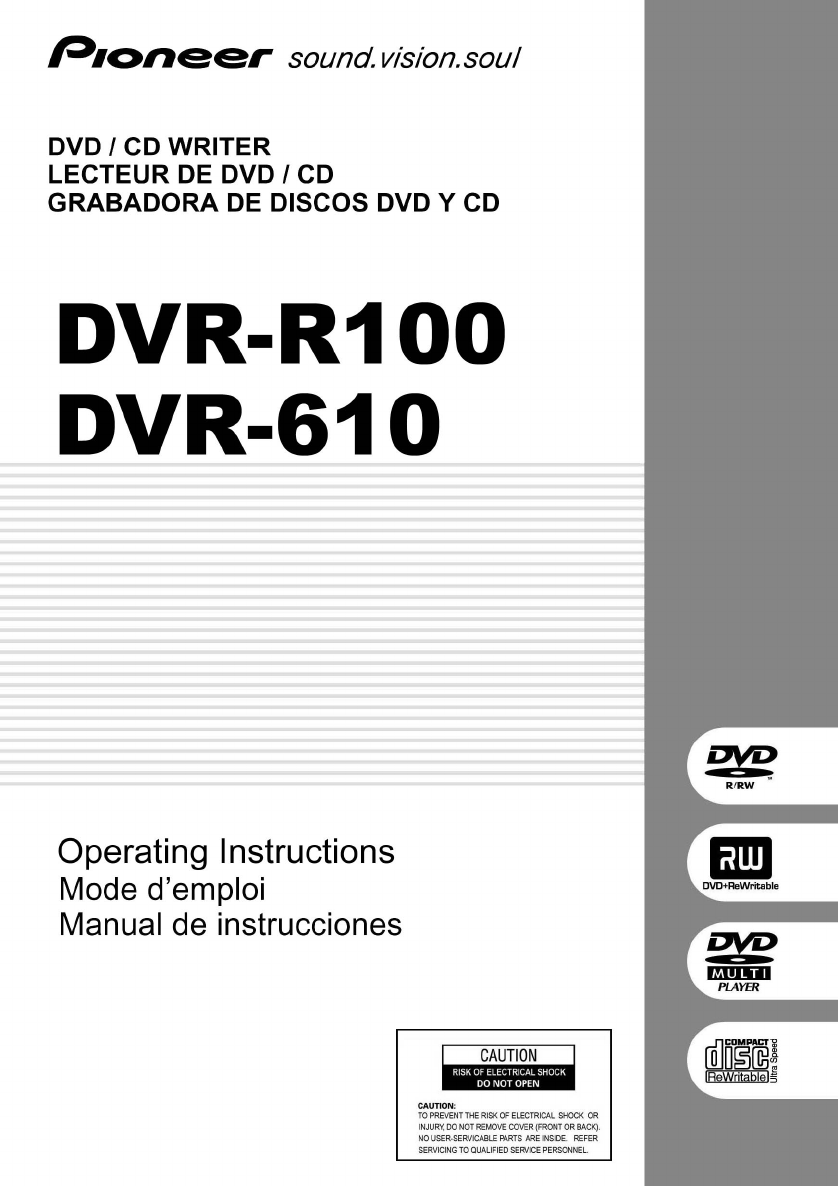
Pioneer DVR R100 DRC1227 A User Manual To The 45ae4f12 C9da 4ff1 A2f1 9e5858faab9e
User Manual: Pioneer DVR-R100 to the manual
Open the PDF directly: View PDF ![]() .
.
Page Count: 30
4
En
Thank you for buying this Pioneer product.
Please read through these operating instructions so you will know how to operate your model
properly. After you have finished reading the instructions, put them away in a safe place for
future reference. K015 En
The Generation of Acoustical Noise Is Less Than 70dB.
(ISO7779/DIN45635)
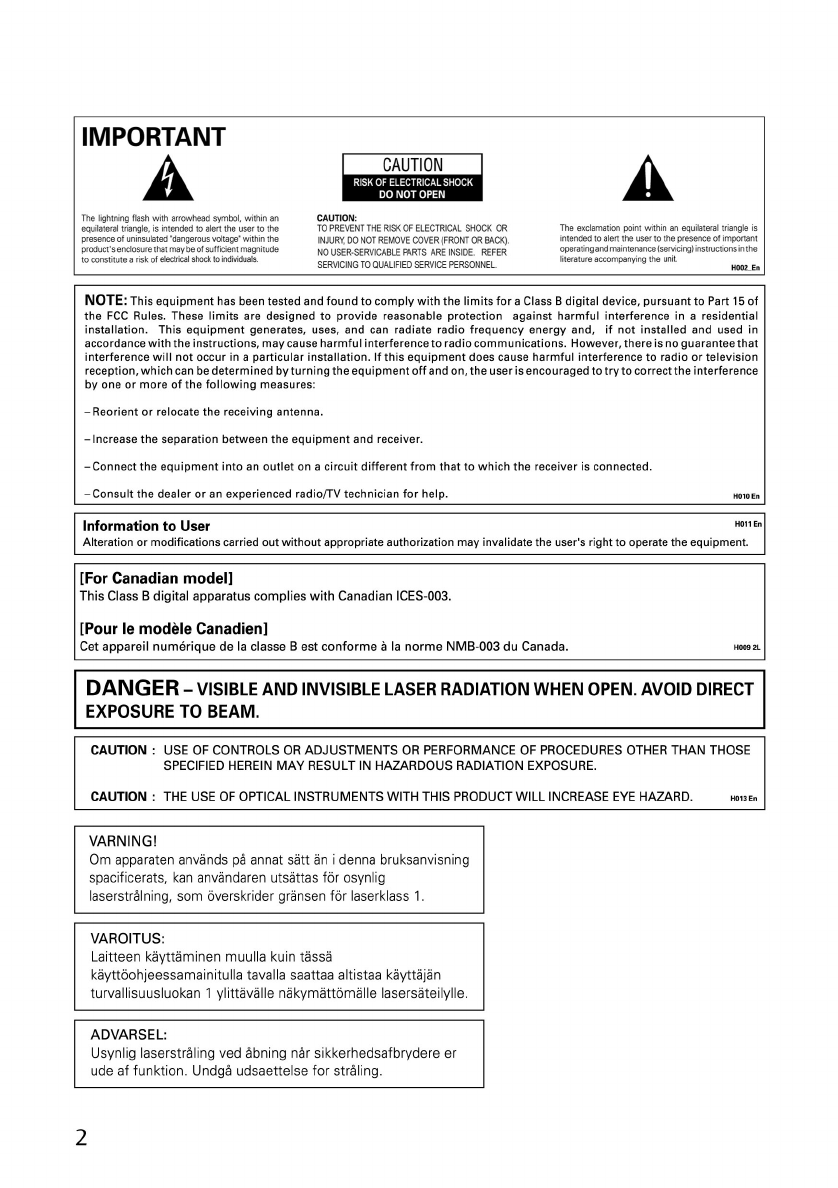
WARNING
This equipment is not waterproof. To prevent a fire
or shock hazard, do not place any container filed
with liquid near this equipment (such as a vase or
flower pot) or expose it to dripping, splashing, rain
or moisture.
D3-4-2-1-3_A_En
CAUTION
This product is a class 1 laser product, but this
product contains a laser diode higher than Class 1.
To ensure continued safety, do not remove any covers
or attempt to gain access to the inside of the product.
Refer all servicing to qualified personnel.
The following caution label appears on your unit.
Location: on top of the cover D3-4-2-1-8_A_En
CLASS 1 LASER PRODUCT
LASER KLASSE 1
IMPORTANT NOTICE – RECORD THE MODEL NUMBER AND SERIAL NUMBERS OF THIS EQUIPMENT BELOW.
THE NUMBERS ARE ON THE REAR.
MODEL NO.
SERIAL NO.
KEEP THESE NUMBERS FOR FUTURE USE. D1-4-2-6-2_En
DVR-R100, DVR-610
WARNING: Handling the cord on this product or
cords associated with accessories sold with the
product will expose you to lead, a chemical known to
the State of California and other governmental
entities to cause cancer and birth defects or other
reproductive harm.
D36-P4_En
Wash hands after handling
is a trademark of DVD Format/Logo Licensing Corporation.

FEATURES
• Write Speed (*CAV, **ZCLV)
DVD-R 1X, 2X, 6X, 8X*, 12X*, 16X*
DVD-R (DL) 2X, 4X, 6X, 8X
DVD-RW 1X, 2X, 4X, 6X
DVD+R 2.4X, 4X, 6X, 8X*, 12X*, 16X*
DVD+R (DL) 2.4X, 4X, 6X, 8X
DVD+RW 2.4X, 4X, 6X, 8X
CD-R 4X, 10X, 16X, 24X*, 32X*, 40X*
CD-RW 4X, 10X, 16X, 20X**, 24X**, 32X**
• Maximum Read Speed
DVD-ROM (single) 16X DVD-ROM (DL) 12X
DVD-R 16X DVD+R 16X
DVD-R (DL) 8X DVD+R (DL) 8X
DVD-RW 6X DVD+RW 8X
DVD-RAM 2X
CD-ROM, CD-R 40X
CD-RW 32X
• Buffer Memory Size 2 MBytes (Write/Read)
• IDE Data Transfer Mode PIO Mode 4 / Multi Word DMA
Mode 2 / Ultra DMA Mode 4
• 5.25” Half-Height built-in type
• Stereo Audio Output
• LCD Tilt Servo Mechanism
• Horizontal/Vertical orientation available
• Low vibration mechanism by DRA system
Disc Format (Read/Write)
• DVD single layer/dual layer / 120mm / 80mm disc
• DVD-R (when writing, use only 650nm for General use media)
• DVD-R
• Dual Layer DVD-R
• DVD-RW
• DVD+R
• Double Layer DVD+R
• DVD+RW
• DVD-RAM (non-cartridge, Version 2.0, Version 2.1) (Read only)
• CD-ROM Mode 1
• CD-ROM XA Mode 2 (form 1, form 2)
• Photo CD (single and multiple session)
• CD-DA
• CD-Extra (CD PLUS)
• Video CD
• CD Text
• CD-R
• CD-RW / High Speed CD-RW / Ultra Speed CD-RW
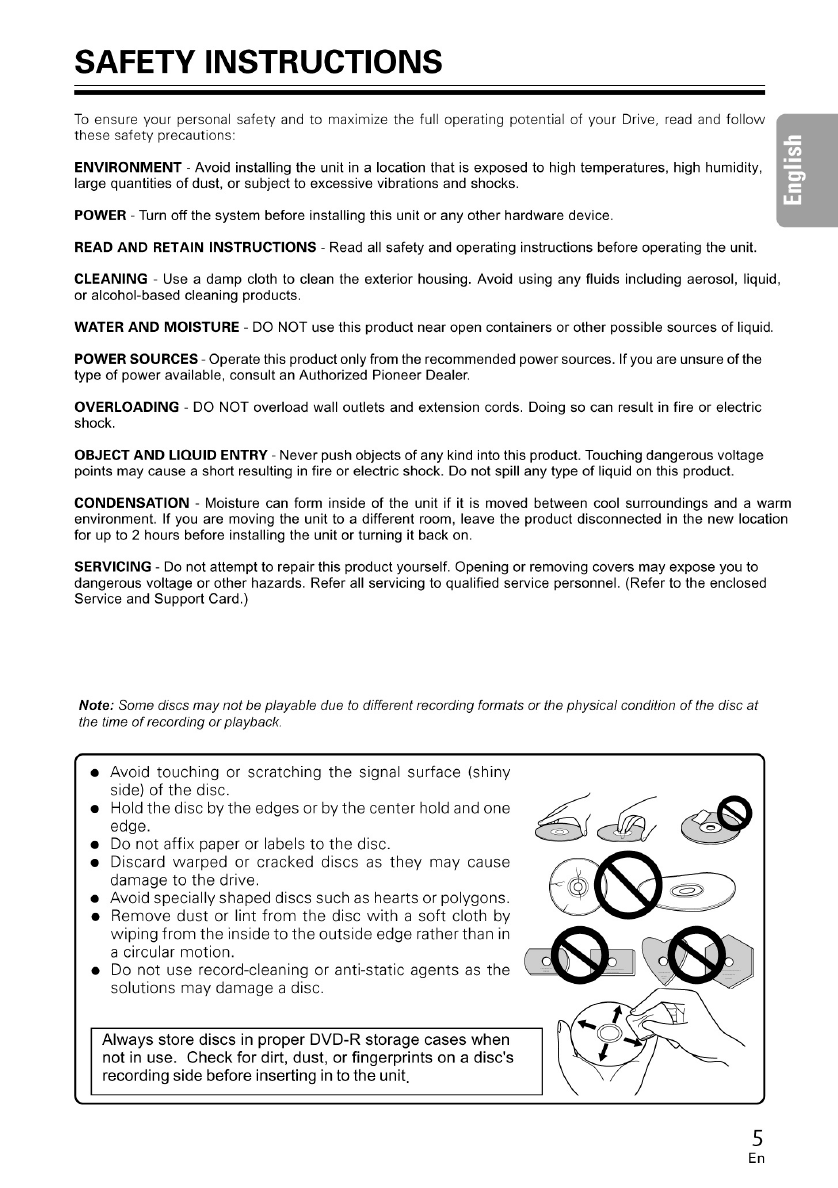
Note:
• A specific application program is needed to write the formats listed above.
• Supported media required for specific DVD and CD writing speeds.
• When writing to DVD at 12X or 16X, use Pioneer-tested media. For media brand information, refer to
Pioneer website: www.pioneerelectronics.com
6
En

8
En
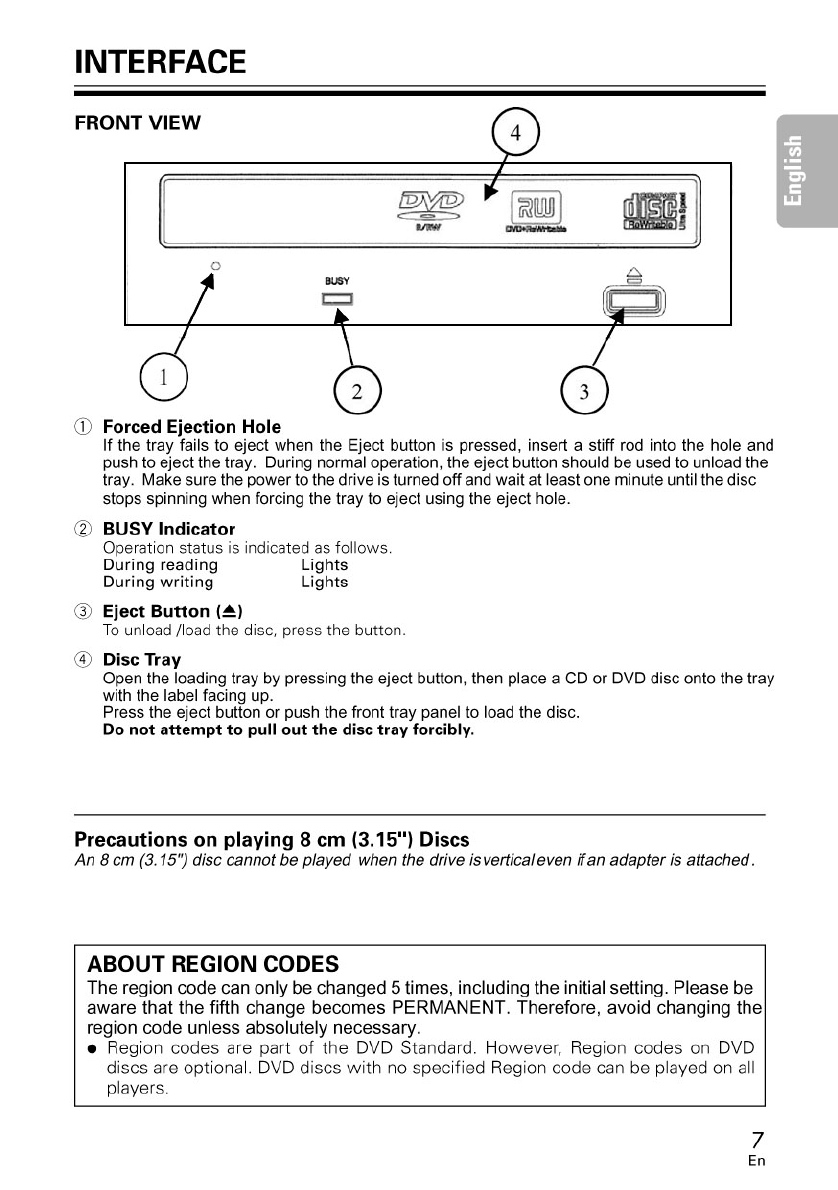
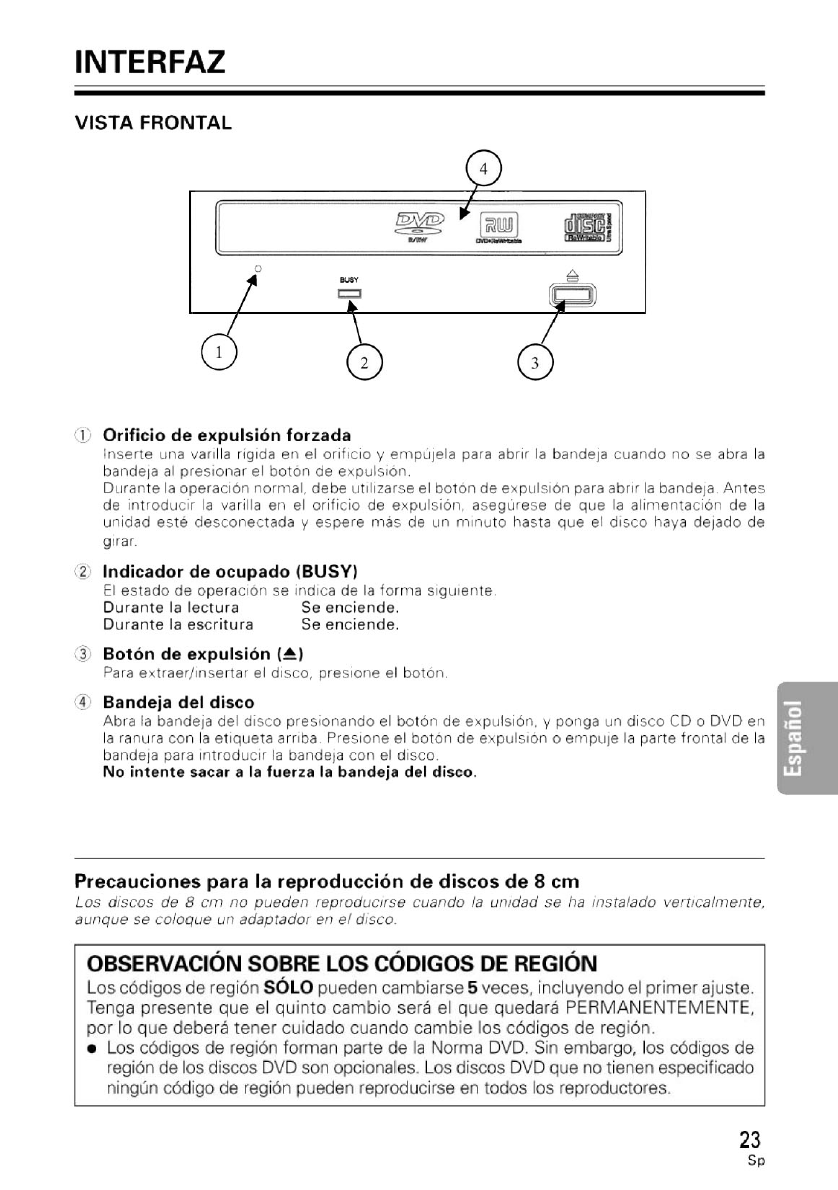
INTERFACE
REAR VIEW
Pin Name Function
1 L Left channel audio output.
2 G Ground.
3 G Ground.
4 R Right channel audio output.
Pin Name Function
1 MA on The drive is used in master mode.
2 SL on The drive is used in slave mode.
3 CS on Using Cable Select function.
4 Reserved.
5 Reserved.
5Audio Output
This connector outputs analog audio.
This connector is compatible with `Molex 70553`, choose a suitable connection cable.
Pin Name Function
1 +12 Power supply input for DC +12 V.
2 G Ground.
3 G Ground.
4 +5 Power supply input for DC +5 V.
6Device Configuration Jumper
Switch becomes ON when a jumper is added.
Make sure the power of the drive is OFF before changing the jumper setting.
Pin # 1 is ON when shipped from the factory.
7Host IDE Interface
This is a 40 pin I/O connector according to the ATA specifications.
8DC Input
5 6 7
ANLOG AUDIO
CABLE SELECT
SLAVE
MASTER
5V G G 12V
ALS
M
40
39
2
1
SC IDE INTERFACE
DC INPUT
8

9
English
En
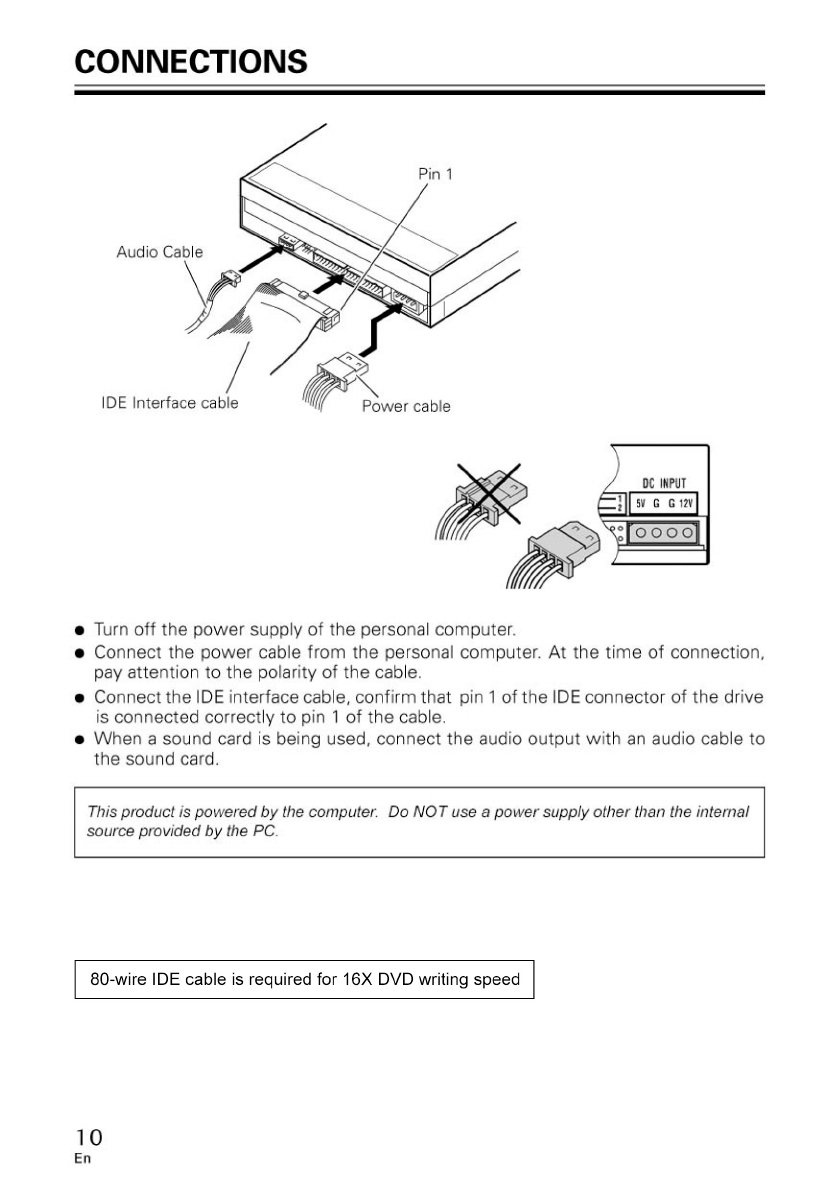
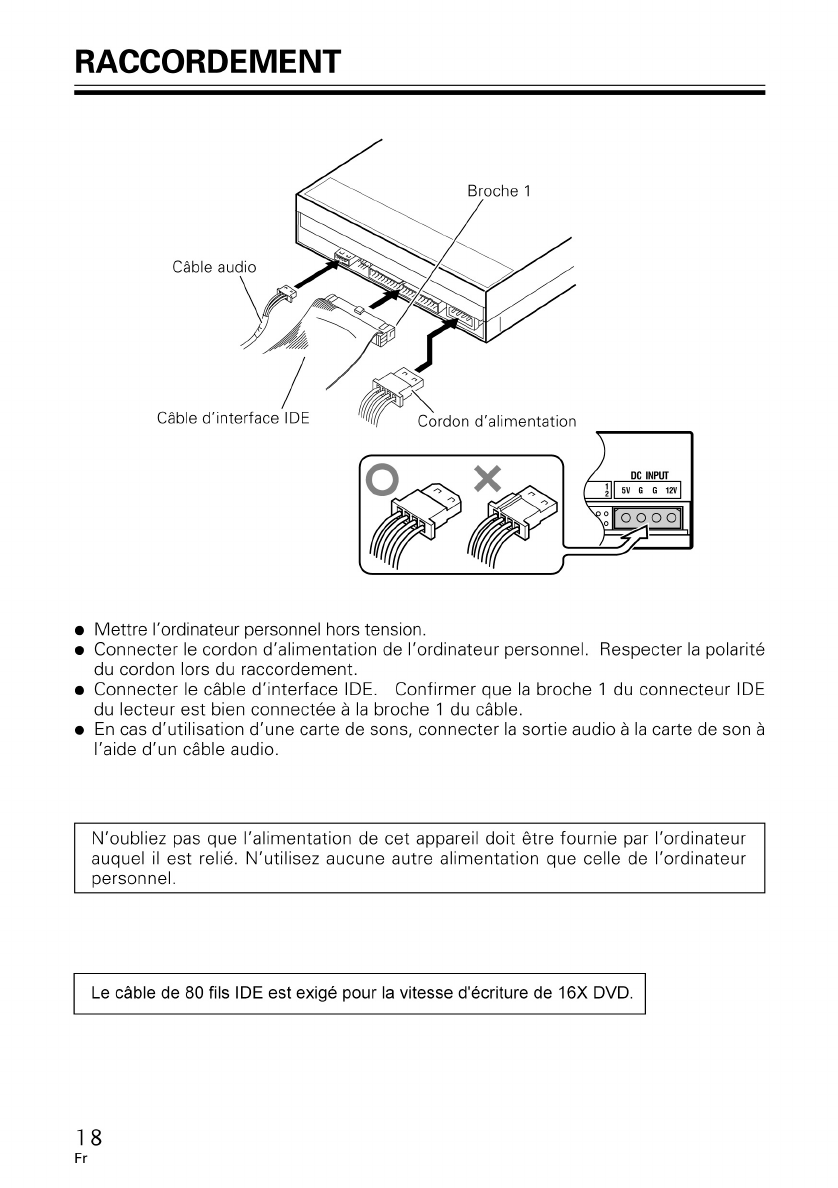
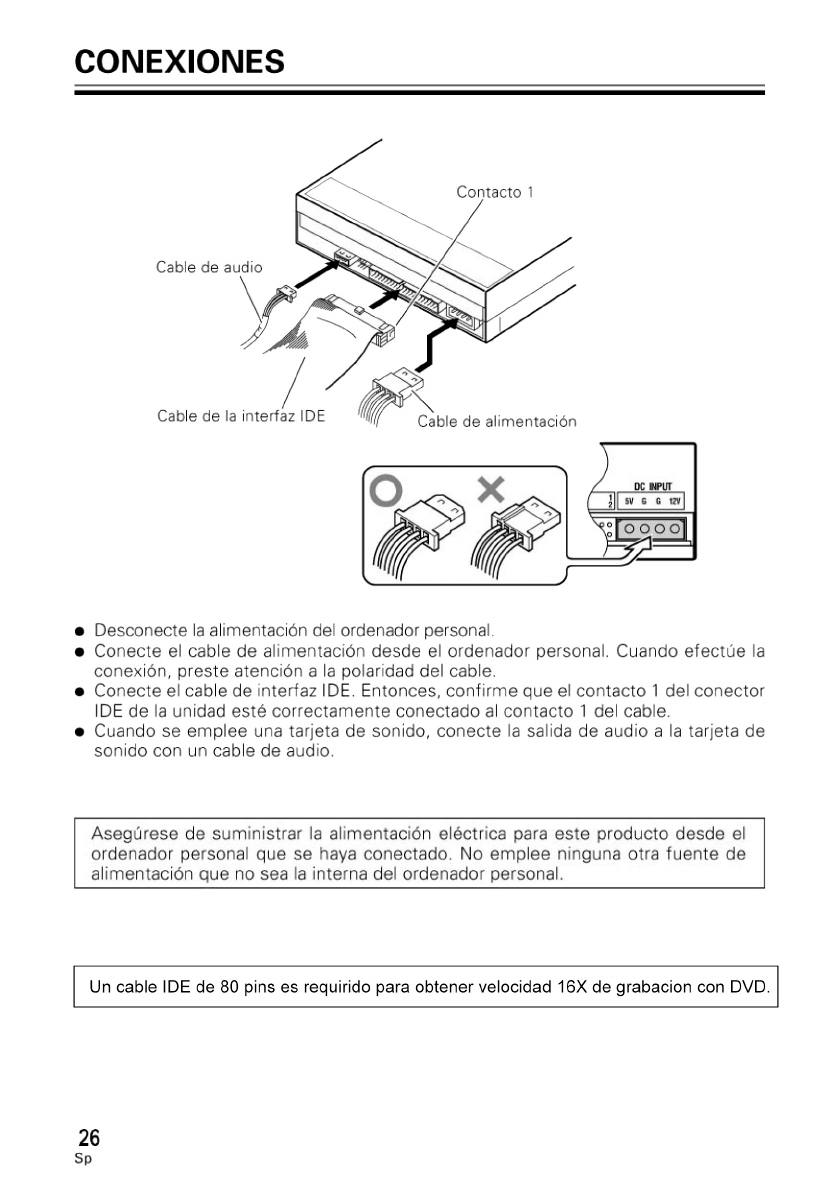
1Turn OFF the computer's power and remove the power cord from the wall outlet
before removing the front panel cover.
2Remove the blank panel from the front of the 5.25" bay slot.
3Install the fixing slide rails on the drive. (When slide rails are required, please contact
the store where the drive was purchased.)
4Insert the drive into the slot.
5When anchoring is required, please refer to the computer's instruction manual.
÷Please use screws measuring 5mm (3/16 in.) or less for mounting. Using
longer screws may damage the drive.
÷When the mounting screws are loose, the vibrations from a spinning disc may
generate ripping noise. To prevent this noise, tighten the screws.
INSTALLATION

SPECIFICATIONS
[Setting]
This drive can be installed Horizontally or Vertically.
[Disc Size]
12cm (4.72”) / 8cm (3.15”)
* Drive does not support non-standard disc shapes such as business cards, etc.
* 8cm discs cannot be used vertically. Adapters do not allow change this limitation.
[Disc Transfer Rate]
Data Read (Sustained)
DVD Max 21.6 MBytes/sec. (6.6X – 16X CAV Mode over 16 block transfer)
CD Max. 6.00 MBytes/sec. (17.2X-40X CAV Mode over 16 block transfer)
Data Write (Sustained)
DVD Max 21.6 MBytes/sec. (Max. 16X DVD-R)
CD Max. 6.00 MBytes/sec. (Max. 40X CD-R)
Host Interface Specification
PIO Mode 4, Multi word DMA Mode 2 16.6 MBytes/sec.
Ultra DMA Mode 4 (U-ATA66 cable, 80 conductor) 66.6 MBytes/sec.
Ultra DMA Mode 2 33.3 MBytes/sec.
* 80-wire IDE cable is required for 16X DVD writing speed.
* Media that is dirty or damaged can affect the transfer rate.
[Access Time / Seek Time] (Random Averages)
Access Time DVD-ROM 130 ms CD-ROM 120 ms
Seek Time DVD-ROM 120 ms CD-ROM 110 ms
[Audio Characteristics]
Line Out 0.70 ± 0.15 Vms (at 10kΩ load)
[Physical Information]
Power Supply DC +12 V, 1.3 A
DC + 5 V, 1.4 A
Dimensions
(including front panel)
5 27/32” x 1 11/16” x 7 3/32”
148mm (W) x 42.3mm (H) x 180mm (D)
Weight 2.2 pounds (1.0 kg)
Operation Temperature 41° F to 113° F (+5° C to +45° C)
Operation Humidity 5% to 85% (no condensation)
Storage Temperature - 40° F to 140° F (-40° C to +60° C)
Storage Humidity 5% to 90% (no condensation)
[Accessories]
Short-Circuit Socket [Jumper] (2)
Mounting Screw (4)
Operating Instructions (1)
Note: Specifications and design subject to possible modifications without notice, due to improvements.
Published by Pioneer Corporation 11
Copyright ® 2005 Pioneer Corporation – All rights reserved En
12
Fr
Nous vous remercions pour cet achat d’un produit Pioneer.
Nous vous demandons de lire soigneusement ce mode d’emploi ; vous serez ainsi à même de
faire fonctionner l’appareil correctement. Après avoir bien lu le mode d’emploi, le ranger dans un
endroit sûr pour pouvoir s’y référer ultérieurement. K015 Fr
La production de bruits acoustiques est inférieure à 70 dB.
(ISO7779/DIN45635)
AVERTISSEMENT
Cet appareil n’est pas étanche. Pour éviter les
risques d’incendie et de décharge électrique, ne
placez près de lui un récipient rempli d’eau, tel
qu’un vase ou un pot de fleurs, et ne l’exposez pas
à des gouttes d’eau, des éclaboussures, de la pluie
ou de l’humidité.
D3-4-2-1-3_A_Fr
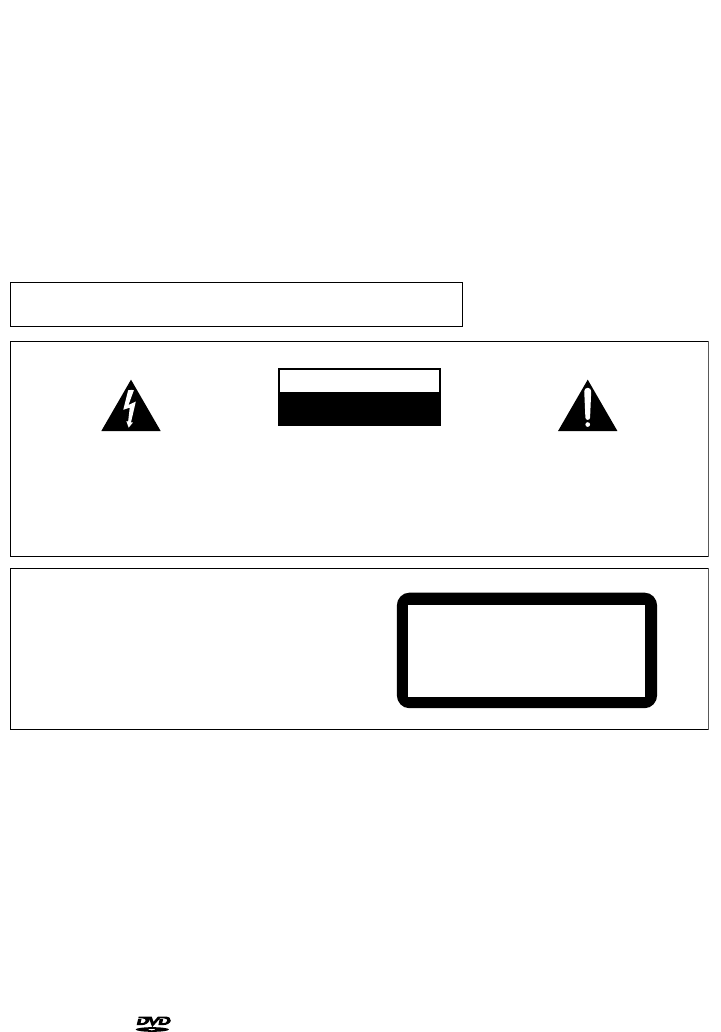
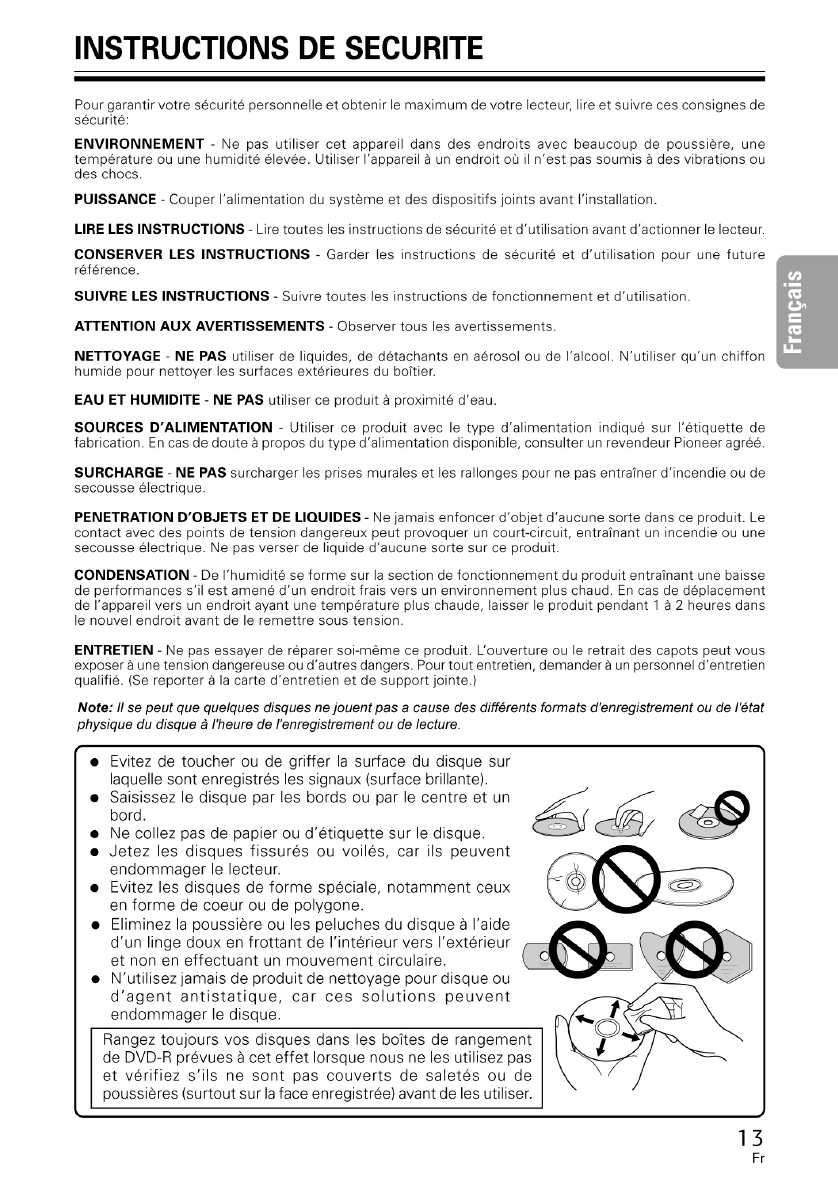
Ce point d’exclamation, placé dans un
triangle équilatéral, a pour but d’attirer
l’attention de l’utilisateur sur la présence,
dans les documents qui accompagnent
l’appareil, d’explications importantes du
point de vue de l’exploitation ou de
l’entretien.
Ce symbole de l’éclair, placé dans un
triangle équilatéral, a pour but d’attirer
l’attention de l’utilisateur sur la présence, à
l’intérieur du coffret de l’appareil, de
“tensions dangereuses” non isolées d’une
grandeur suffisante pour représenter un
risque d’électrocution pour les êtres
humains.
IMPORTANT
ATTENTION:
POUR ÉVITER TOUT RISQUE
D’ÉLECTROCUTION, NE PAS ENLEVER LE
COUVERCLE (NI LE PANNEAU ARRIÈRE).
AUCUNE PIÈCE RÉPARABLE PAR
L’UTILISATEUR NE SE TROUVE À
L’INTÉRIEUR. CONFIER TOUT ENTRETIEN À
UN PERSONNEL QUALIFIÉ UNIQUEMENT.
ATTENTION
DANGER D´ELECTROCUTION
NE PAS OUVRIR
D3-4-2-1-1_Fr
ATTENTION
Cet appareil est un produit laser de Classe 1, mais la
diode laser qu’il renferme est supérieure à la Classe 1.
Pour garantir une sécurité constante, ne retirez
aucun des couvercles et n’essayez pas d’avoir accès à
l’intérieur de l’appareil.
Confiez toute réparation à un personnel qualifié.
L’étiquette suivante se trouve sur votre appareil.
Emplacement : sur le dessus du couvercle
D3-4-2-1-8_A_Fr
CLASS 1 LASER PRODUCT
LASER KLASSE 1
est une marque de fabrique de DVD Format/Logo Licensing Corporation.

CARACTERISTIQUES
• Vitesse écriture (*CAV, **ZCLV)
DVD-R 1X, 2X, 6X, 8X*, 12X*, 16X*
DVD-R (DL) 2X, 4X, 6X
DVD-RW 1X, 2X, 4X, 6X
DVD+R 2.4X, 4X, 6X, 8X*, 12X*, 16X*
DVD+R (DL) 2.4X, 4X, 6X
DVD+RW 2.4X, 4X, 6X, 8X
CD-R 4X, 10X, 16X, 24X*, 32X*, 40X*
CD-RW 4X, 10X, 16X, 20X**, 24X**
• Vitesse de lecture maximale
DVD-ROM (sinple) 16X DVD-ROM (DL) 12X
DVD-R, DVD+R 12X DVD-R (DL) 8X
DVD-RW, DVD+RW 8X DVD+R (DL) 8X
DVD-RAM 2X
CD-ROM, CD-R 40X
CD-RW 32X
• Mode de transfert de données IDE PIO Mode 4 / DMA multi-mot mode
Mode 2 / Ultra DMA Mode 4
• Taille de la mémoire tampon 2 Mo (écriture, lecture)
• Type integer 5,25 pouces demi-hauteur
• Sortie audio stéréo
• Sevomecanisme de bascule d’écran a cristaux liquides
• Horizontale / Verticale au choix
• Mécanisme a faible vibration par système DRA
Format du Disque (Lecture / Écriture)
• DVD sinple couche / double couche / disque de 120 mm / disque de 80 mm
• DVD-R (En cas écriture, disque 650 nm pour usage général seul)
• DVD-R (4X, 8X, 16X vitesse écriture)
• Couche Duelle DVD-R
• DVD-RW (1X, 2X, 4X, 6X vitesse écriture)
• DVD+R (2.4X, 4X, 8X, 16X vitesse écriture)
• Double Couche DVD+R
• DVD+RW (2.4X, 4X, 8X vitesse écriture)
• DVD-RAM (non-arrondi, Version 2.0, Version 2.1) (lecture seul)
• CD-ROM Mode 1
• CD-ROM XA Mode 2 (forme 1, forme 2)
• Photo CD (sinple et plusieurs sessions)
• CD-DA
• CD-Extra (CD PLUS)
• Vidéo CD
• CD Text
• CD-R
• CD-RW / Haute Vitesse CD-RW / Ultra Rapide CD-RW
Note:
• Un programme d’application prenant en charge le format ci-dessus est nécessaire pour écriture
• Médias supportes requis pour les vitesse écriture DVD et Cdspecifiques.
• Pour effectuer une écriture sur DVDaux vitesse 12X or 16X, utilisez des disques désignes par Pioneer.
Pour plus de détails, consultez les informations disponibles sur le site web de Pioneer: www.pioneerelectronics.com
14
Fr
16
Fr
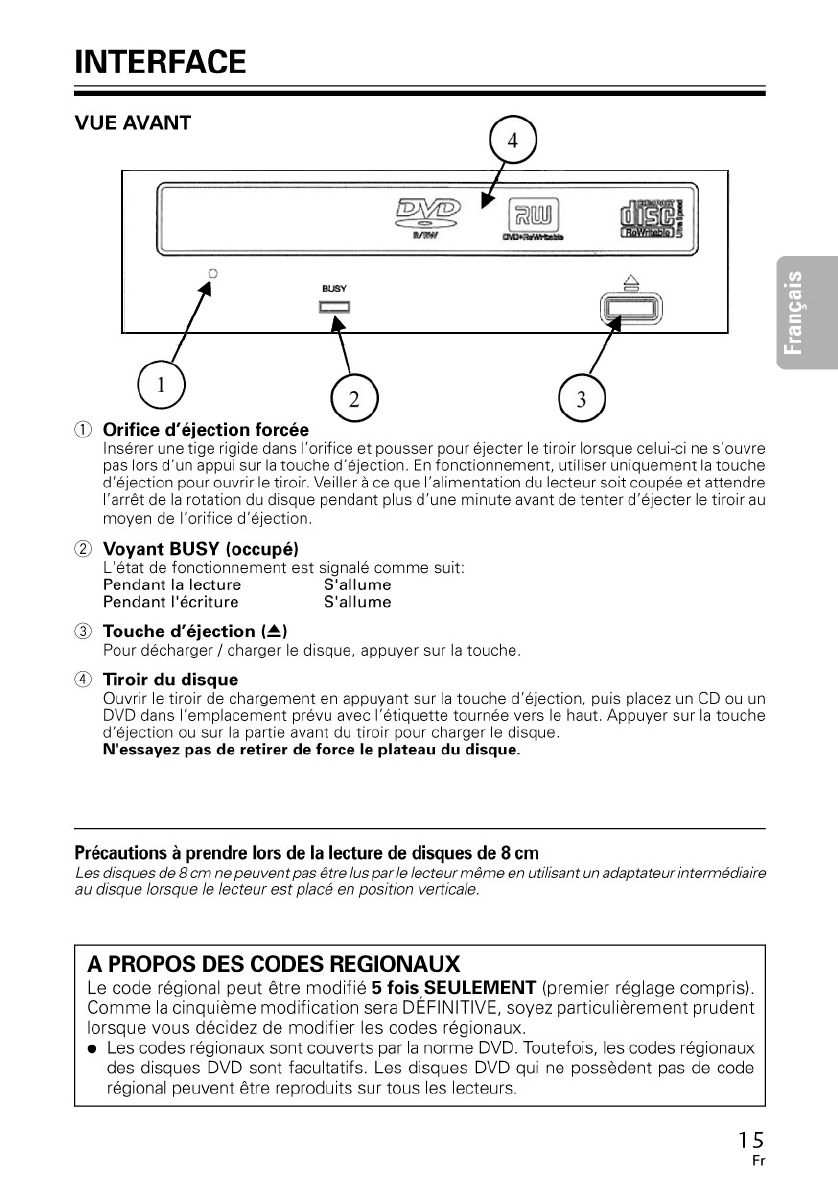
INTERFACE
VUE DE LA FACE ARRIERE
Broche
Nom Fonction
1MAon
Le lecteur est utilisé en mode maître (Master).
2SLon
Le lecteur est utilisé en mode esclave (Slave).
3 CS on Utilisation de la fonction de sélection par
câble (Cable Select).
4Réservé.
5Réservé.
Broche
Nom Fonction
1
L
Sortie audio voie de droite (Left)
2GTerre
3GTerre
4 R Sortie audio voie de gauche (Right)
5Sortie audio
Connecteur pour sortie analogique audio.
Ce connecteur est compatible avec la norme « Molex 70553 ».
Choisir un câble de connexion
approprié.
Broche
Nom Fonction
1 +12 Entrée cc +12 V
2GTerre
3GTerre
4 +5 Entrée cc +5 V
6Cavalier de configuration
ON signifie que le cavalier réunit les deux broches de cette position.
Veiller à ce que l’alimentation du lecteur soit coupée avant de changer la configuration du cavalier.
La broche n° 1 est configurée sur ON en usine.
7Interface IDE avec l’hôte
Connecteur d’E/S 40 broches conforme aux spécifications ATA.
8Entrée cc (DC)
5 6 7
ANLOG AUDIO
CABLE SELECT
SLAVE
MASTER
5V G G 12V
ALS
M
40
39
2
1
SC
IDE INTERFACE
DC INPUT
8

17
Fr
Français
1Couper l’alimentation de l’ordinateur personnel, débrancher le cordon d’alimentation et
déposer le capot ou le panneau avant.
2Retirer la plaque masquant de la fente de 5,25 pouces.
3Poser les glissières de fixation sur le lecteur. (S'adresser au magasin ou au fabricant de
l’ordinateur lorsque des glissières sont nécessaires.)
4Introduire le lecteur dans la fente.
5Lorsqu’il est nécessaire de fixer le lecteur, se reporter au manuel d’instruction de
l’ordinateur.
÷Utiliser des vis ayant une longueur inférieure ou égale à 5 mm. L’utilisation de vis plus
longues pourrait endommager le lecteur.
÷Lorsque les vis de fixation ne sont pas suffisamment serrées, etc., les vibrations
provoquées par la rotation du disque peuvent générer un bruit de déchirure et il faut
donc serrer les vis solidement pour éliminer ce bruit.
INSTALLATION

CARACTERISTICAS
• Velocidad de Escritura (*CAV, **ZCLV)
DVD-R 1X, 2X, 6X, 8X*, 12X*, 16X*
DVD-R (DL) 2X, 4X, 6X
DVD-RW 1X, 2X, 4X, 6X
DVD+R 2.4X, 4X, 6X, 8X*, 12X*, 16X*
DVD+R (DL) 2.4X, 4X, 6X
DVD+RW 2.4X, 4X, 6X, 8X
CD-R 4X, 10X, 16X, 24X*, 32X*, 40X*
CD-RW 4X, 10X, 16X, 20X**, 24X**
• Velocidad Máxima de Lectura
DVD-ROM (single) 16X DVD-ROM (DL) 12X
DVD-R, DVD+R 12X DVD-R (DL) 8X
DVD-RW, DVD+RW 8X DVD+R (DL) 8X
DVD-RAM 2X
CD-ROM, CD-R 40X
CD-RW 32X
• Modo de transferencia de datos IDE PIO modo 4 / DMA multipalabras modo 2 /
Ultra DMA modo 4
• Tamaño de la memoria intermedia 2 MBytes (Escritura/Lectura)
• Tipo incorporado de altura media de 5,25 pulgadas
• Salida de audio estereo
• Servomecanismo de inclinación de la pantalla LCD
• Orientación Horizontal/Vertical ajustable
• Mecanismo de bajas vibraciones mediante el sistema DRA
Formato de discos (Lectura / Escritura)
• DVD de un estrato / estrato doble / disco de 120 mm / disco de 80 mm
• DVD-R (en caso de escritura, solo disco de 650 nm para General)
• DVD-R (4X, 8X, 16X Velocidad de Escritura)
• Capa Dual DVD-R
• DVD-RW (1X, 2X, 4X, 6X Velocidad de Escritura)
• DVD+R (2.4X, 4X, 8X, 16X Velocidad de Escritura)
• Capa Doble DVD+R
• DVD+RW (2.4X, 4X, 8X Velocidad de Escritura)
• DVD-RAM (non-cartridge, Versión 2.0, Versión 2.1) (Lectura solamente)
• CD-ROM modo 1
• CD-ROM XA modo 2 (forma 1, forma 2)
• CD con fotos (sesión sencilla y múltiple)
• CD-DA
• CD-Extra (CD PLUS)
• Video CD
• CD Text
• CD-R
• CD-RW / CD-RW de alta velocidad / Ultra Velocidad CD-RW
Note:
• Para la escritura, se requiere un programa de aplicación especifcoque soporta el formato de arriba.
• Medios Compatibles necesarios para ciertas velocidades de escrituran discos DVD y CD.
• Para poder efectuar la escritura en un DVD a las velocidades de 12X o de 1X, será necesario utilizar un disco designado par
Pioneer. Para encontrar mas detailes al respecto, consulte le información disponible en el sitio de Pioneer en la Web:
www.pioneerelectronics.com
22
Sp

<NSO-02002[R10]>
Printed in U.S.A.
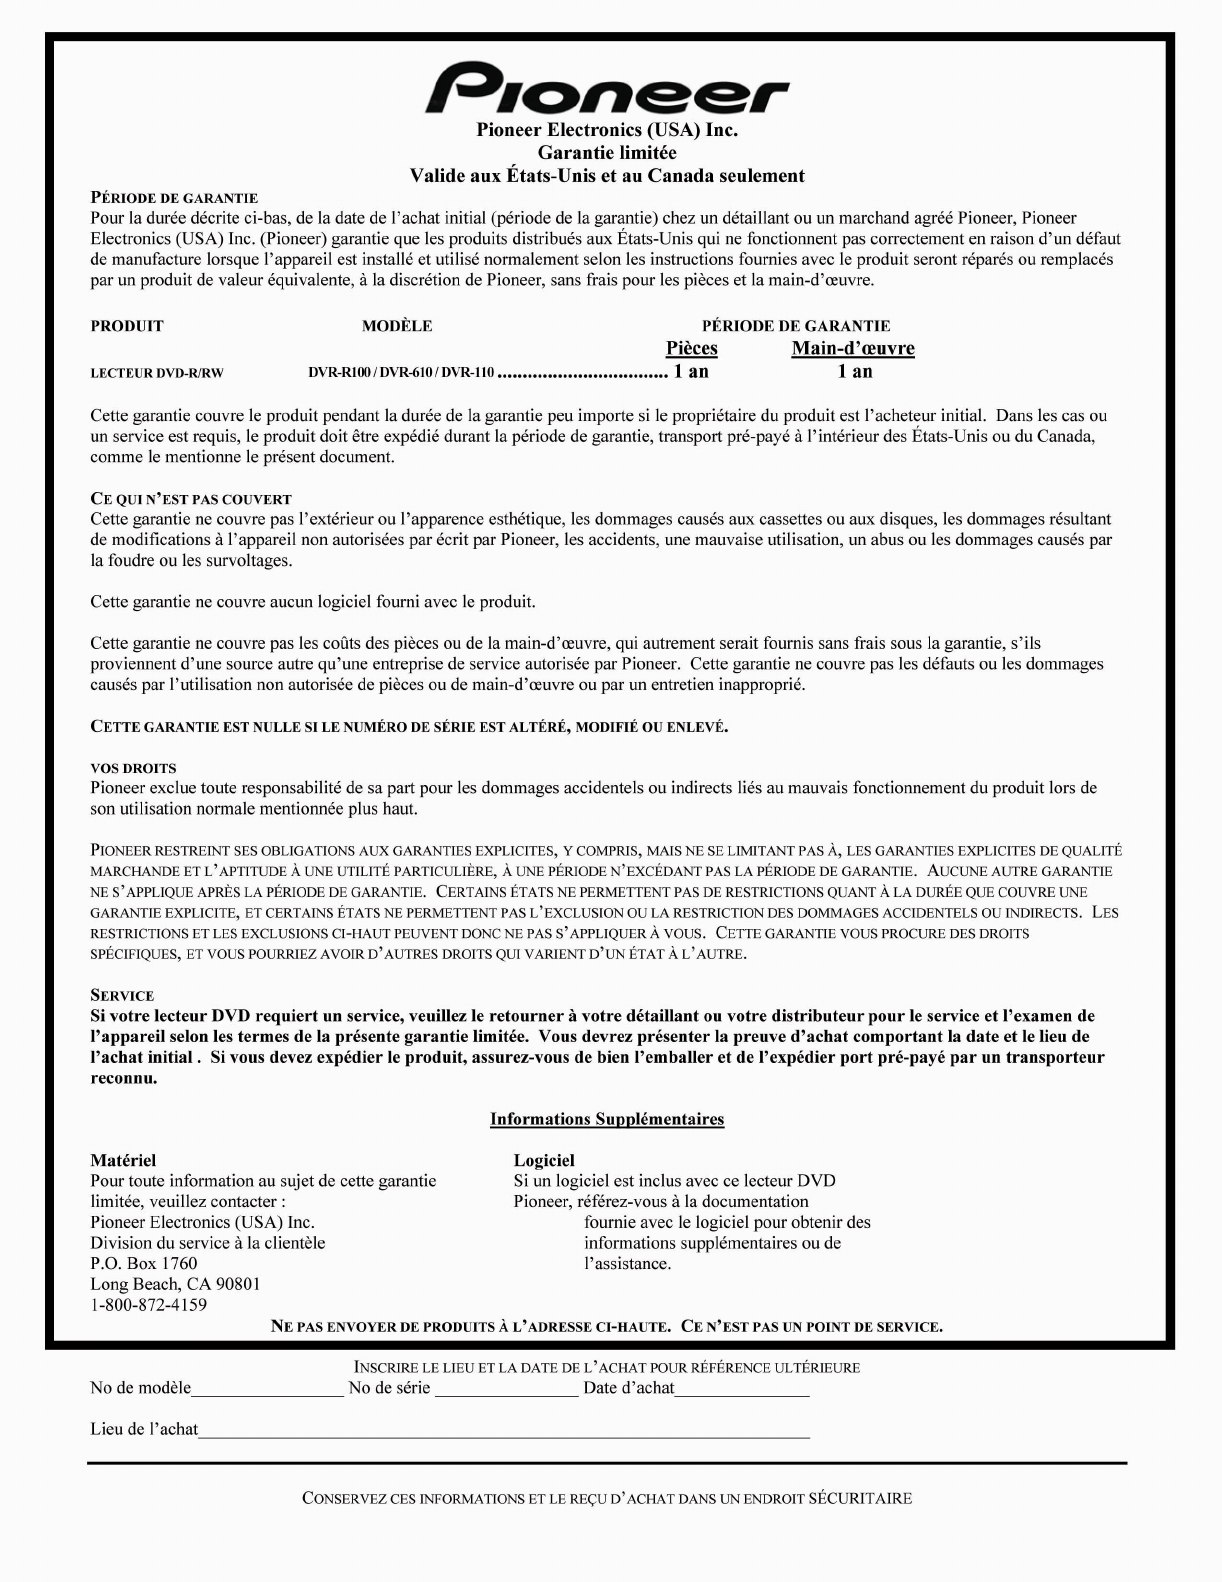
Pioneer Electronics (USA) Inc.
Limited Warranty
Applicable Only in the United States and Canada
WARRANTY PERIOD
For the period specified below from date of original purchase (the warranty period) from an authorized Pioneer dealer or distributor, Pioneer
Electronics (USA) Inc. (Pioneer) warrants that products distributed by Pioneer in the U.S.A. that fail to function properly under normal use due to
a manufacturing defect when installed and operated according to the operating instructions enclosed with the unit will be repaired or replaced
with a unit of comparable value, at the option of Pioneer, without charge to you for parts or actual repair work. Parts supplied under this warranty
may be new or rebuilt at the option of Pioneer.
PRODUCT MODELS
WARRANTY PERIOD
Parts Labor
DVD Writer Drive DVR-R100 / DVR-610 / DVR-110 1 Year 1 Year
This warrant covers the product during the warranty period whether in the possession of the original owner or any subsequent owner. In the
event service is required, the product must be delivered within the warranty period, transportation prepaid, from within the United States or
Canada as explained in this document.
WHAT IS NOT COVERED
This warranty does not cover the cabinet or any appearance item, any damage to recordings or discs, any damage to the product resulting from
alterations, modifications, not authorized in writing by Pioneer, accident, misuse or abuse or damage due to lightening or to power surges.
This warranty does not cover any software included with the product.
This warranty does not cover the cost of parts or labor, which would be otherwise provided without charge under this warranty obtained from any
source other than a Pioneer Authorized Service Company or other designated location. This warranty does not cover defects or damage caused
by the use of unauthorized parts or labor, or from improper maintenance.
ALTERED, DEFACED OR REMOVED SERIAL NUMBERS VOID THIS WARRANTY.
YOUR RIGHTS
Pioneer excludes any obligation on its part for incidental or consequential damages related to the future of products to function properly under
the conditions set forth above.
PIONEER LIMITS ITS OBLIGATIONS UNDER ANY IMPLIED WARRANTIES INCLUDING, BUT NOT LIMITED TO, THE IMPLIED
WARRANTIES OF MERCHANTABILITY AND FITNESS FOR A PARTICULAR PURPOSE, TO A PERIOD NOT TO EXCEED THE WARRANTY
PERIOD. NO WARRANTIES SHALL APPLY AFTER THE WARRANTY PERIOD. SOME STATES DO NOT ALLOW LIMITATIONS ON HOW
LONG AN IMPLIED WARRANTY LASTS, AND SOME STATES DO NOT ALLOW THE EXCLUSION OR LIMITATION OF INCIDENTAL OR
CONSEQUENTIAL DAMAGES, SO THE ABOVE LIMITATIONS OR EXCLUSIONS MAY NOT APPLY TO YOU. THIS WARRANTY GIVES YOU
SPECIFIC LEGAL RIGHTS, AND YOU MAY HAVE OTHER RIGHTS, WHICH MAY VARY FROM STATE TO STATE.
TO OBTAIN SERVICE
Should your Drive require service, return it to your retail dealer or your distributor for service and testing under the terms of this
Limited Warranty. You will need to present your sales receipt showing place and date or original owner’s retail purchase. Should it be
necessary to ship the unit you will need to package the product carefully and sent it, transportation prepaid, by a traceable, pre-
insured method.
Additional Information
Hardware Software
For additional information about this
Limited Warranty, please contact:
Pioneer Electronics (USA) Inc.
Customer Support Division
P.O. Box 1760
Long Beach, CA 90801
1-800-872-4159
If software is included with the Pioneer drive
please refer to documentation provided with
that software to obtain additional information
or assistance on its use.
DO NOT RETURN ANY PRODUCT TO THE ABOVE ADDRESS. IT IS NOT A SERVICE LOCATION.
RECORD THE PLACE AND DATE OF PURCHASE FOR FUTURE REFERENCE RECORD THE PLACE AND DATE OF PURCHASE FOR FUTURE REFERENCE
Model No. Model No. Serial No. Serial No. Purchase Date Purchase Date
Purchased From