Pioneer K056 Bluetooth CD RDS RECEIVER User Manual Short Term Confidential DEH X8500BH BS

Pioneer Corporation Bluetooth CD RDS RECEIVER Short Term Confidential DEH X8500BH BS

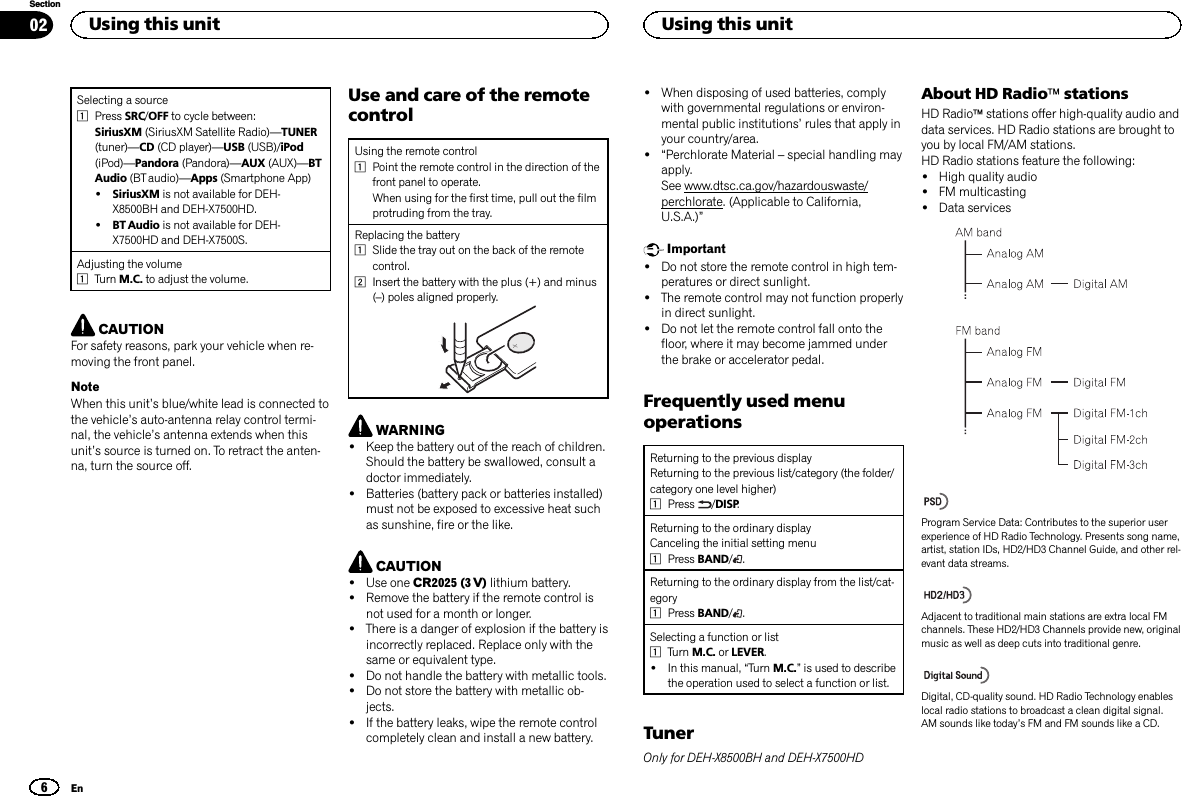
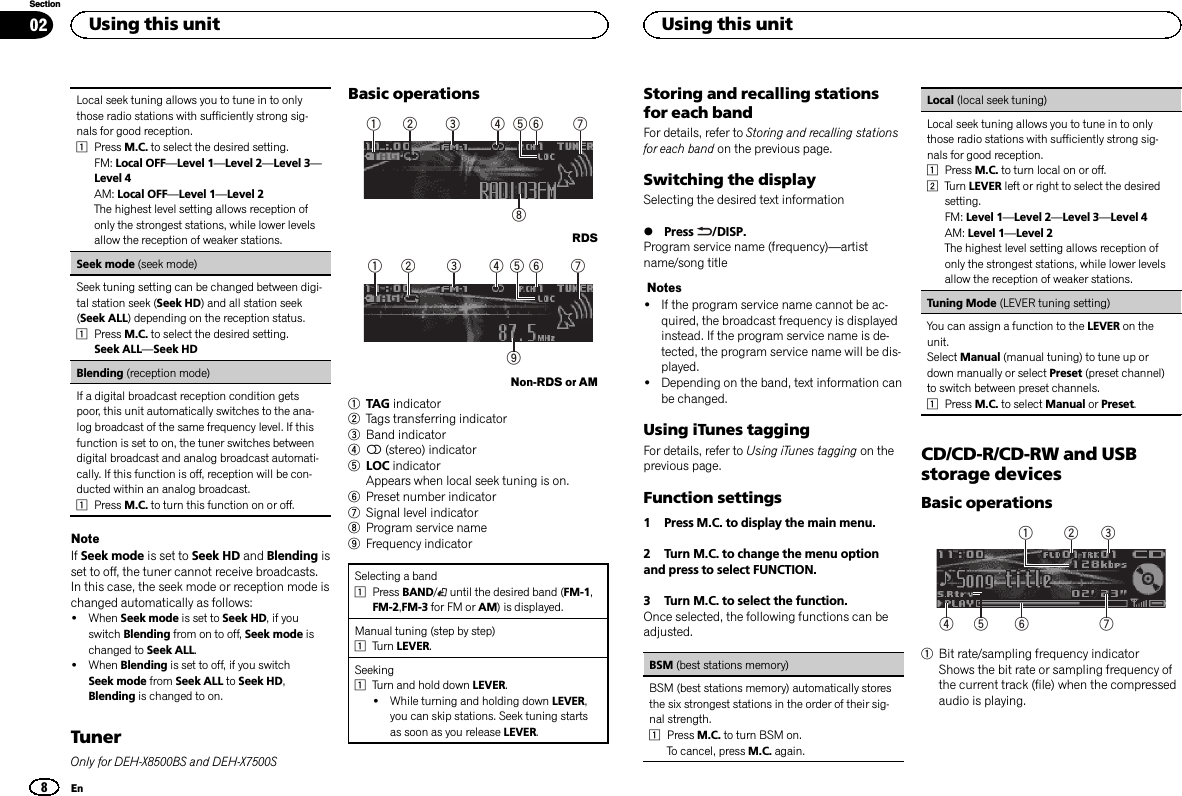
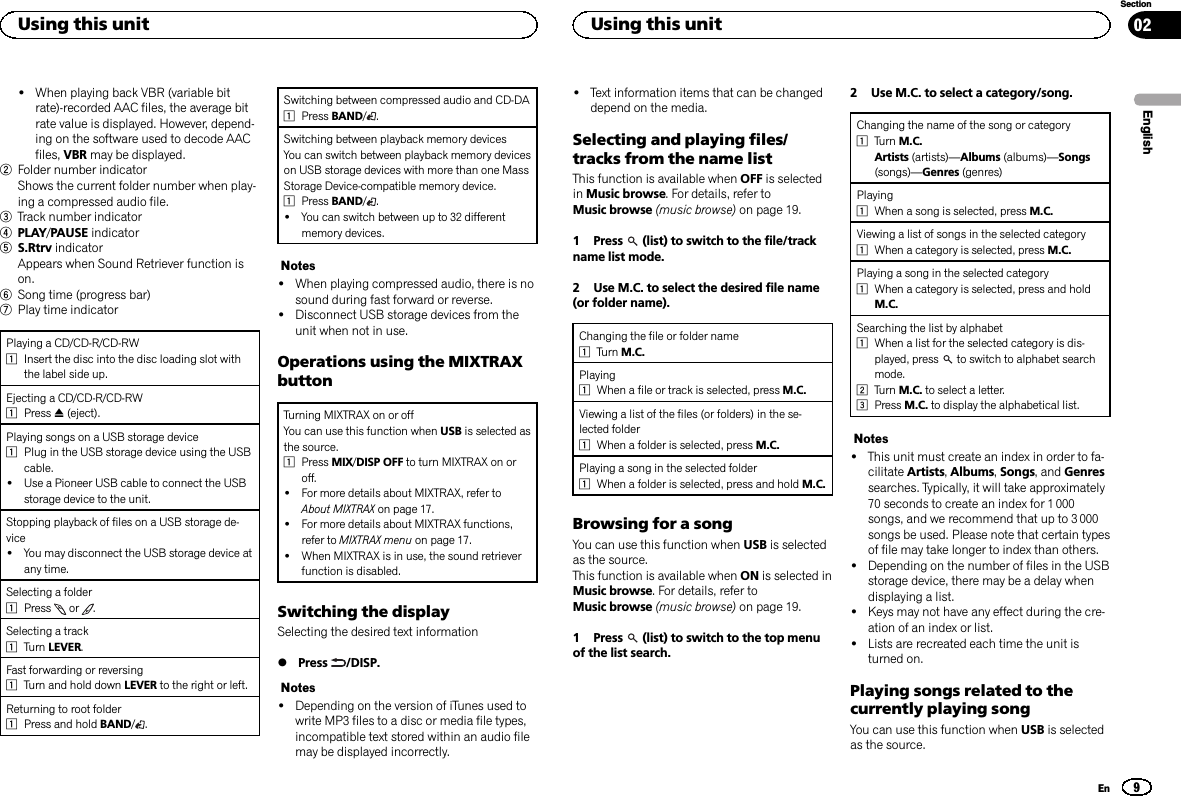
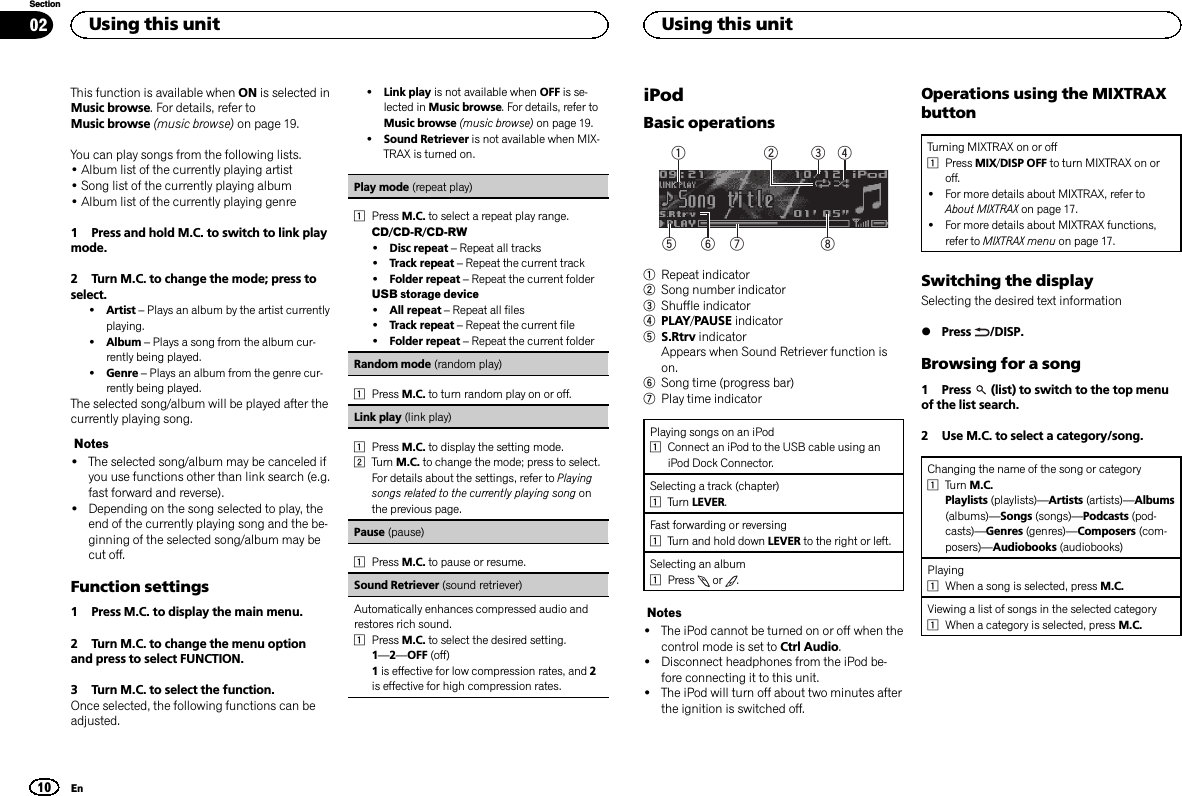
[Short Term Confidential]User Manual(DEH-X8500BH_BS)

Owner’s ManualCD RDS RECEIVERDEH-X8500BHDEH-X7500HDDEH-X8500BSDEH-X7500SEnglish
Before you startInformation to User 2The Safety of Your Ears is in YourHands 3About this unit 3After-sales service for Pioneerproducts 3If you experience problems 3Visit our website 3About this manual 4Using this unitHead unit 4Remote control 4Set up menu 5Basic operations 5Use and care of the remote control 6Frequently used menu operations 6Tuner 6Tuner 8CD/CD-R/CD-RW and USB storagedevices 8iPod 10Using Bluetooth wireless technology 11Using smartphone applications 14Audio adjustments 16Using different entertainmentdisplays 16Selecting the illumination color 17Customizing the illumination color 17About MIXTRAX 17MIXTRAX menu 17System menu 18Initial menu 19System menu 20Using an AUX source 20Turning the display off or on 20If an unwanted display appears 20Available accessoriesSiriusXM Satellite Radio 20InstallationConnections 22Installation 23Installing the microphone 25Additional informationTroubleshooting 26Error messages 26Handling guidelines 28Compressed audio compatibility (disc,USB) 29iPod compatibility 29Sequence of audio files 30Bluetooth profiles 30Copyright and trademark 30Specifications 31Thank you for purchasing this PIONEERproductTo ensure proper use, please read through thismanual before using this product. It is especiallyimportant that you read and observe WARN-INGs and CAUTIONs in this manual. Pleasekeep the manual in a safe and accessible place forfuture reference.FCC ID: AJDK056MODEL NO.: DEH-X8500BH/DEH-X8500BSIC: 775E-K056This device complies with Part 15 of FCCRules and Industry Canada licence-exemptRSS standard(s). Operation is subject to thefollowing two conditions: (1) this device maynot cause interference, and (2) this devicemust accept any interference, including inter-ference that may cause undesired operationof this device.This transmitter must not be co-located or op-erated in conjunction with any other antennaor transmitter.The antenna for Bluetooth cannot be removed(or replaced) by user.This equipment complies with FCC/IC radia-tion exposure limits set forth for an uncon-trolled environment and meets the FCC radiofrequency (RF) Exposure Guidelines in Sup-plement C to OET65 and RSS-102 of the ICradio frequency (RF) Exposure rules. Thisequipment has very low levels of RF energythat it deemed to comply without maximumpermissive exposure evaluation (MPE). But itis desirable that it should be installed and op-erated keeping the radiator at least 20 cm ormore away from person’s body (excluding ex-tremities: hands, wrists, feet and ankles).MODEL NO.: DEH-X7500HD/DEH-X7500SThis device complies with Part 15 of the FCCRules. Operation is subject to the followingtwo conditions:(1) this device may not cause harmful interfer-ence, and (2) this device must accept any in-terference received, including interferencethat may cause undesired operation.Information to UserAlteration or modifications carried out with-out appropriate authorization may invalidatethe user’s right to operate the equipment.Contents2SectionBefore you startEn01
NoteThis equipment has been tested and foundto comply with the limits for a Class B digitaldevice, pursuant to Part 15 of the FCC Rules.These limits are designed to provide reason-able protection against harmful interferencein a residential installation. This equipmentgenerates, uses and can radiate radio fre-quency energy and, if not installed and usedin accordance with the instructions, maycause harmful interference to radio commu-nications. However, there is no guaranteethat interference will not occur in a particu-lar installation. If this equipment does causeharmful interference to radio or television re-ception, which can be determined by turningthe equipment off and on, the user is encour-aged to try to correct the interference by oneor more of the following measures:- Reorient or relocate the receiving antenna.- Increase the separation between the equip-ment and receiver.- Connect the equipment into an outlet on acircuit different from that to which the re-ceiver is connected.- Consult the dealer or an experienced radio/TV technician for help.The Safety of Your Ears is inYour HandsGet the most out of your equipment by playing itat a safe level—a level that lets the sound comethrough clearly without annoying blaring or dis-tortion and, most importantly, without affectingyour sensitive hearing. Sound can be deceiving.Over time, your hearing “comfort level”adapts tohigher volumes of sound, so what sounds “nor-mal”can actually be loud and harmful to yourhearing. Guard against this by setting yourequipment at a safe level BEFORE your hearingadapts.ESTABLISH A SAFE LEVEL:!Set your volume control at a low setting.!Slowly increase the sound until you can hearit comfortably and clearly, without distortion.!Once you have established a comfortablesound level, set the dial and leave it there.BE SURE TO OBSERVE THEFOLLOWING GUIDELINES:!Do not turn up the volume so high that youcan’t hear what’s around you.!Use caution or temporarily discontinue usein potentially hazardous situations.!Do not use headphones while operating amotorized vehicle; the use of headphonesmay create a traffic hazard and is illegal inmany areas.About this unitThe tuner frequencies on this unit are allocatedfor use in North America. Use in other areasmay result in poor reception.WARNINGHandling the cord on this product or cords asso-ciated with accessories sold with the productmay expose you to chemicals listed on proposi-tion 65 known to the State of California andother governmental entities to cause cancer andbirth defect or other reproductive harm. Washhands after handling.CAUTION:USE OF CONTROL OR ADJUSTMENT ORPERFORMANCE OF PROCEDURESOTHER THAN THOSE SPECIFIED HEREINMAY RESULT IN HAZARDOUS RADIATIONEXPOSURE.CAUTION:THE USE OF OPTICAL INSTRUMENTSWITH THIS PRODUCT WILL INCREASEEYE HAZARD.CAUTION!Do not allow this unit to come into contactwith liquids. Electrical shock could result.Also, damage to this unit, smoke, and over-heating could result from contact withliquids.!Always keep the volume low enough to hearoutside sounds.!Avoid exposure to moisture.!If the battery is disconnected or discharged,any preset memory will be erased.Important (Serial number)The serial number is located on the bottom ofthis unit. For your own security and conven-ience, be sure to record this number on the en-closed warranty card.NoteFunction setting operations are completed evenif the menu is canceled before the operationsare confirmed.After-sales service forPioneer productsPlease contact the dealer or distributor fromwhere you purchased this unit for after-salesservice (including warranty conditions) or anyother information. In case the necessary infor-mation is not available, please contact the com-panies listed below:Please do not ship your unit to the companies atthe addresses listed below for repair without ad-vance contact.U.S.A.Pioneer Electronics (USA) Inc.CUSTOMER SUPPORT DIVISIONP.O. Box 1760Long Beach, CA 90801-1760800-421-1404CANADAPioneer Electronics of Canada, Inc.CUSTOMER SATISFACTION DEPARTMENT340 Ferrier StreetUnit 2Markham, Ontario L3R 2Z5, Canada1-877-283-5901905-479-4411For warranty information please see the LimitedWarranty sheet included with this unit.If you experience problemsShould this unit fail to work properly, please con-tact your dealer or nearest authorized PIONEERService Station.Visit our websitehttp://www.pioneerelectronics.comin CanadaEnglishBefore you start3SectionBefore you startEn01
http://www.pioneerelectronics.ca!Learn about product updates (such as firm-ware updates) for your product.!Register your product to receive noticesabout product updates and to safeguard pur-chase details in our files in the event of lossor theft.!Access owner’s manuals, spare parts infor-mation, service information, and muchmore.About this manual!In the following instructions, USB memorysticks and USB audio players are collectivelyreferred to as “USB storage device”.!In this manual, iPod and iPhone will be re-ferred to as “iPod”.Head unitDEH-X8500BH and DEH-X8500BS34 561 2a78 d9 b cDEH-X7500HD and DEH-X7500S34 561 2a78 d9 b cPart Part1SRC/OFF 8MULTI-CONTROL(M.C.)2LEVER 9/DISP3(list) aMIX/DISP OFF4Disc loading slot b/5h(eject) cAUX input jack(3.5 mm stereojack)Part Part6DEH-X8500BHand DEH-X8500BS(phone/onhook) dDetach buttonDEH-X7500HDand DEH-X7500SCLOCK7BAND/(iPod)CAUTION!Use an optional Pioneer USB cable (CD-U50E) to connect the USB storage device asany device connected directly to the unit willprotrude out from the unit, which could bedangerous.!Do not use unauthorized products.Remote controlRemote controller buttons marked with thesame numbers as on the unit work in the sameway as the corresponding unit button, regard-less of button name.eki17f9hjgBefore you start4SectionUsing this unitEn0102
Part OperationeVOLUME Press to increase or decreasevolume.fMUTE Press to mute. Press again tounmute.ga/b/c/dPress to perform manual seektuning, fast forward, reverseand track search controls.Also used for controlling func-tions.hDEH-X8500BH and DEH-X8500BSPress to end a call, reject an in-coming call, or reject a callwaiting while on another call.AUDIODEH-X7500HD and DEH-X7500SPress to select an audio func-tion.iePress to pause or resume play-back.jDEH-X8500BH and DEH-X8500BSPress to start talking to thecaller while using the phone.FUNC-TIONDEH-X7500HD and DEH-X7500SPress to select functions.kLIST/ENTERPress to display the list de-pending on the source.While in the operating menu,press to control functions.Set up menuWhen you turn the ignition switch to ON after in-stallation, set up menu appears on the display.You can set up the menu options below.1 After installation of this unit, turn theignition switch to ON.SET UP appears.2 Turn M.C. to switch to YES.#If you do not use the unit for 30 seconds, the setup menu will not be displayed.#If you prefer not to set up at this time, turn M.C.to switch to NO.If you select NO, you cannot set up in the set upmenu.3 Press M.C. to select.4 Follow these steps to set the menu.To proceed to the next menu option, you need toconfirm your selection.Language select (multi-language)1Turn M.C. to select the desired language.English—Français—Español2Press M.C. to confirm the selection.Calendar (setting the date)1Turn M.C. to change the year.2Press M.C. to select day.3Turn M.C. to change the day.4Press M.C. to select month.5Turn M.C. to change the month.6Press M.C. to confirm the selection.Clock (setting the clock)1Turn M.C. to adjust hour.2Press M.C. to select minute.3Turn M.C. to adjust minute.4Press M.C. to confirm the selection.Contrast (display contrast setting)1Turn M.C. to adjust the contrast level.0to 15 is displayed as the level is increased ordecreased.2Press M.C. to confirm the selection.Quit appears.5 To finish your settings, turn M.C. to selectYES.#If you prefer to change your setting again, turnM.C. to switch to NO.6 Press M.C. to select.Notes!You can set up the menu options from thesystem menu. For details about the settings,refer to System menu on page 18.!You can cancel set up menu by pressingSRC/OFF.Basic operationsImportant!Handle the front panel with care when re-moving or attaching it.!Avoid subjecting the front panel to excessiveshock.!Keep the front panel out of direct sunlightand high temperatures.!To avoid damaging the device or vehicle inte-rior, remove any cables and devices attachedto the front panel before detaching it.Removing the front panel to protect your unit fromtheft1Press the detach button to release the frontpanel.2Push the front panel upward (M) and then pullit toward (N) you.3Always store the detached front panel in a pro-tective case or bag.Re-attaching the front panel1Slide the front panel to the left.Make sure to insert the tabs on the left side ofthe head unit into the slots on the front panel.2Press the right side of the front panel until it isfirmly seated.If you cannot attach the front panel to thehead unit successfully, make sure that you areplacing the front panel onto the head unit cor-rectly. Forcing the front panel into place mayresult in damage to the front panel or headunit.Turning the unit on1Press SRC/OFF to turn the unit on.Turning the unit off1Press and hold SRC/OFF until the unit turnsoff.EnglishUsing this unit5SectionUsing this unitEn02
Selecting a source1Press SRC/OFF to cycle between:SiriusXM (SiriusXM Satellite Radio)—TUNER(tuner)—CD (CD player)—USB (USB)/iPod(iPod)—Pandora (Pandora)—AUX (AUX)—BTAudio (BT audio)—Apps (Smartphone App)!SiriusXM is not available for DEH-X8500BH and DEH-X7500HD.!BT Audio is not available for DEH-X7500HD and DEH-X7500S.Adjusting the volume1Turn M.C. to adjust the volume.CAUTIONFor safety reasons, park your vehicle when re-moving the front panel.NoteWhen this unit’s blue/white lead is connected tothe vehicle’s auto-antenna relay control termi-nal, the vehicle’s antenna extends when thisunit’s source is turned on. To retract the anten-na, turn the source off.Use and care of the remotecontrolUsing the remote control1Point the remote control in the direction of thefront panel to operate.When using for the first time, pull out the filmprotruding from the tray.Replacing the battery1Slide the tray out on the back of the remotecontrol.2Insert the battery with the plus (+) and minus(–) poles aligned properly.WARNING!Keep the battery out of the reach of children.Should the battery be swallowed, consult adoctor immediately.!Batteries (battery pack or batteries installed)must not be exposed to excessive heat suchas sunshine, fire or the like.CAUTION!Use one CR2025 (3 V) lithium battery.!Remove the battery if the remote control isnot used for a month or longer.!There is a danger of explosion if the battery isincorrectly replaced. Replace only with thesame or equivalent type.!Do not handle the battery with metallic tools.!Do not store the battery with metallic ob-jects.!If the battery leaks, wipe the remote controlcompletely clean and install a new battery.!When disposing of used batteries, complywith governmental regulations or environ-mental public institutions’rules that apply inyour country/area.!“Perchlorate Material –special handling mayapply.See www.dtsc.ca.gov/hazardouswaste/perchlorate. (Applicable to California,U.S.A.)”Important!Do not store the remote control in high tem-peratures or direct sunlight.!The remote control may not function properlyin direct sunlight.!Do not let the remote control fall onto thefloor, where it may become jammed underthe brake or accelerator pedal.Frequently used menuoperationsReturning to the previous displayReturning to the previous list/category (the folder/category one level higher)1Press /DISP.Returning to the ordinary displayCanceling the initial setting menu1Press BAND/.Returning to the ordinary display from the list/cat-egory1Press BAND/.Selecting a function or list1Turn M.C. or LEVER.!In this manual, “Turn M.C.”is used to describethe operation used to select a function or list.TunerOnly for DEH-X8500BH and DEH-X7500HDAbout HD RadioästationsHD Radioästations offer high-quality audio anddata services. HD Radio stations are brought toyou by local FM/AM stations.HD Radio stations feature the following:!High quality audio!FM multicasting!Data servicesProgram Service Data: Contributes to the superior userexperience of HD Radio Technology. Presents song name,artist, station IDs, HD2/HD3 Channel Guide, and other rel-evant data streams.Adjacent to traditional main stations are extra local FMchannels. These HD2/HD3 Channels provide new, originalmusic as well as deep cuts into traditional genre.Digital, CD-quality sound. HD Radio Technology enableslocal radio stations to broadcast a clean digital signal.AM sounds like today’s FM and FM sounds like a CD.Using this unit6SectionUsing this unitEn02
iTunesâTagging provides you the opportunity to discovera wide range of content and the means to “tag”that con-tent for later review and purchase from the iTunesâStore.HD RadioäTechnologyHD Radio Technology manufactured under li-cense from iBiquity Digital Corporation. U.S.and Foreign Patents. HD Radioäand the HD,HD Radio, and “Arc”logos are proprietary trade-marks of iBiquity Digital Corp.Basic operations91 5 7432 861TAG indicator2Tags transferring indicator3Signal reception status indicatorWhen digital signal is received, is dis-played. Otherwise, is displayed.4Band indicator55(stereo) indicator6LOC indicatorAppears when local seek tuning is on.7Preset number indicator8Signal level indicator9Frequency indicatorSelecting a band1Press BAND/until the desired band (FM-1,FM-2,FM-3 for FM or AM) is displayed.Manual tuning (step by step)1Turn LEVER.!When an analog station is received, tuningdown operation is conducted within theanalog broadcasting. (6d2)!If a digital broadcast is not yet received,tuning-up operation tunes in the next ana-log station. (2d6)Seeking1Turn and hold down LEVER.!While turning and holding down LEVER,you can skip stations. Seek tuning startsas soon as you release LEVER.Storing and recalling stationsfor each band1 Press (list).The preset screen is displayed.2 Use M.C. to store the selected frequencyin the memory.Turn to change the preset number. Press andhold to store.3 Use M.C. to select the desired station.Turn to change the station. Press to select.#You can also change the station by pressingor .Switching the displaySelecting the desired text information%Press /DISP.Channel and program service name (frequency)—song title/channel and program service name(frequency)—song title/artist name—song title/genre—album title/genreNotes!If the channel and program service namecannot be acquired, the broadcast frequencyis displayed instead. If the channel and pro-gram service name are detected, the channeland program service name will be displayed.!Depending on the band, text information canbe changed.Using iTunes taggingThis function can be performed with the followingiPod models.—iPod touch 4th generation—iPod touch 3rd generation—iPod touch 2nd generation—iPod touch 1st generation—iPod classic 160GB—iPod classic 120GB—iPod classic—iPod nano 6th generation—iPod nano 5th generation—iPod nano 4th generation—iPod nano 3rd generation—iPhone 4—iPhone 3GS—iPhone 3G—iPhoneHowever, tag information can be stored in thisunit even while other iPod models are used.The song information (tag) can be saved fromthe broadcasting station to your iPod. The songswill show up in a playlist called “Tagged playlist”in iTunes the next time you sync your iPod. Thenyou can directly buy the songs you want fromthe iTunes Store.!The tagged songs and the song that you canbuy from the iTunes Store may be different.Make sure to confirm the song before youmake the purchase.Storing the tag information to this unit1Tune in to the broadcast station.2Press and hold M.C. if TAG is indicated in thedisplay while desired song is broadcasting.!While storing the tag data on this unit,TAG flashes.Storing the tagged information to your iPod1Switch the source to iPod.The tag transfer screen is displayed.2Turn M.C. to switch to YES.3Press M.C. to select.Tagged information is transferred to your iPod.Function settings1 Press M.C. to display the main menu.2 Turn M.C. to change the menu optionand press to select FUNCTION.3 Turn M.C. to select the function.Once selected, the following functions can beadjusted.BSM (best stations memory)BSM (best stations memory) automatically storesthe six strongest stations in the order of their sig-nal strength.1Press M.C. to turn BSM on.To cancel, press M.C. again.Local (local seek tuning)EnglishUsing this unit7SectionUsing this unitEn02
Local seek tuning allows you to tune in to onlythose radio stations with sufficiently strong sig-nals for good reception.1Press M.C. to select the desired setting.FM: Local OFF—Level 1—Level 2—Level 3—Level 4AM: Local OFF—Level 1—Level 2The highest level setting allows reception ofonly the strongest stations, while lower levelsallow the reception of weaker stations.Seek mode (seek mode)Seek tuning setting can be changed between digi-tal station seek (Seek HD) and all station seek(Seek ALL) depending on the reception status.1Press M.C. to select the desired setting.Seek ALL—Seek HDBlending (reception mode)If a digital broadcast reception condition getspoor, this unit automatically switches to the ana-log broadcast of the same frequency level. If thisfunction is set to on, the tuner switches betweendigital broadcast and analog broadcast automati-cally. If this function is off, reception will be con-ducted within an analog broadcast.1Press M.C. to turn this function on or off.NoteIf Seek mode is set to Seek HD and Blending isset to off, the tuner cannot receive broadcasts.In this case, the seek mode or reception mode ischanged automatically as follows:!When Seek mode is set to Seek HD, if youswitch Blending from on to off, Seek mode ischanged to Seek ALL.!When Blending is set to off, if you switchSeek mode from Seek ALL to Seek HD,Blending is changed to on.TunerOnly for DEH-X8500BS and DEH-X7500SBasic operations83 4 61 2 75RDS91 4 632 75Non-RDS or AM1TAG indicator2Tags transferring indicator3Band indicator45(stereo) indicator5LOC indicatorAppears when local seek tuning is on.6Preset number indicator7Signal level indicator8Program service name9Frequency indicatorSelecting a band1Press BAND/until the desired band (FM-1,FM-2,FM-3 for FM or AM) is displayed.Manual tuning (step by step)1Turn LEVER.Seeking1Turn and hold down LEVER.!While turning and holding down LEVER,you can skip stations. Seek tuning startsas soon as you release LEVER.Storing and recalling stationsfor each bandFor details, refer to Storing and recalling stationsfor each band on the previous page.Switching the displaySelecting the desired text information%Press /DISP.Program service name (frequency)—artistname/song titleNotes!If the program service name cannot be ac-quired, the broadcast frequency is displayedinstead. If the program service name is de-tected, the program service name will be dis-played.!Depending on the band, text information canbe changed.Using iTunes taggingFor details, refer to Using iTunes tagging on theprevious page.Function settings1 Press M.C. to display the main menu.2 Turn M.C. to change the menu optionand press to select FUNCTION.3 Turn M.C. to select the function.Once selected, the following functions can beadjusted.BSM (best stations memory)BSM (best stations memory) automatically storesthe six strongest stations in the order of their sig-nal strength.1Press M.C. to turn BSM on.To cancel, press M.C. again.Local (local seek tuning)Local seek tuning allows you to tune in to onlythose radio stations with sufficiently strong sig-nals for good reception.1Press M.C. to turn local on or off.2Turn LEVER left or right to select the desiredsetting.FM: Level 1—Level 2—Level 3—Level 4AM: Level 1—Level 2The highest level setting allows reception ofonly the strongest stations, while lower levelsallow the reception of weaker stations.Tuning Mode (LEVER tuning setting)You can assign a function to the LEVER on theunit.Select Manual (manual tuning) to tune up ordown manually or select Preset (preset channel)to switch between preset channels.1Press M.C. to select Manual or Preset.CD/CD-R/CD-RW and USBstorage devicesBasic operations75 643211Bit rate/sampling frequency indicatorShows the bit rate or sampling frequency ofthe current track (file) when the compressedaudio is playing.Using this unit8SectionUsing this unitEn02
!When playing back VBR (variable bitrate)-recorded AAC files, the average bitrate value is displayed. However, depend-ing on the software used to decode AACfiles, VBR may be displayed.2Folder number indicatorShows the current folder number when play-ing a compressed audio file.3Track number indicator4PLAY/PAUSE indicator5S.Rtrv indicatorAppears when Sound Retriever function ison.6Song time (progress bar)7Play time indicatorPlaying a CD/CD-R/CD-RW1Insert the disc into the disc loading slot withthe label side up.Ejecting a CD/CD-R/CD-RW1Press h(eject).Playing songs on a USB storage device1Plug in the USB storage device using the USBcable.!Use a Pioneer USB cable to connect the USBstorage device to the unit.Stopping playback of files on a USB storage de-vice!You may disconnect the USB storage device atany time.Selecting a folder1Press or .Selecting a track1Turn LEVER.Fast forwarding or reversing1Turn and hold down LEVER to the right or left.Returning to root folder1Press and hold BAND/.Switching between compressed audio and CD-DA1Press BAND/.Switching between playback memory devicesYou can switch between playback memory deviceson USB storage devices with more than one MassStorage Device-compatible memory device.1Press BAND/.!You can switch between up to 32 differentmemory devices.Notes!When playing compressed audio, there is nosound during fast forward or reverse.!Disconnect USB storage devices from theunit when not in use.Operations using the MIXTRAXbuttonTurning MIXTRAX on or offYou can use this function when USB is selected asthe source.1Press MIX/DISP OFF to turn MIXTRAX on oroff.!For more details about MIXTRAX, refer toAbout MIXTRAX on page 17.!For more details about MIXTRAX functions,refer to MIXTRAX menu on page 17.!When MIXTRAX is in use, the sound retrieverfunction is disabled.Switching the displaySelecting the desired text information%Press /DISP.Notes!Depending on the version of iTunes used towrite MP3 files to a disc or media file types,incompatible text stored within an audio filemay be displayed incorrectly.!Text information items that can be changeddepend on the media.Selecting and playing files/tracks from the name listThis function is available when OFF is selectedin Music browse. For details, refer toMusic browse (music browse) on page 19.1 Press (list) to switch to the file/trackname list mode.2 Use M.C. to select the desired file name(or folder name).Changing the file or folder name1Turn M.C.Playing1When a file or track is selected, press M.C.Viewing a list of the files (or folders) in the se-lected folder1When a folder is selected, press M.C.Playing a song in the selected folder1When a folder is selected, press and hold M.C.Browsing for a songYou can use this function when USB is selectedas the source.This function is available when ON is selected inMusic browse. For details, refer toMusic browse (music browse) on page 19.1 Press (list) to switch to the top menuof the list search.2 Use M.C. to select a category/song.Changing the name of the song or category1Turn M.C.Artists (artists)—Albums (albums)—Songs(songs)—Genres (genres)Playing1When a song is selected, press M.C.Viewing a list of songs in the selected category1When a category is selected, press M.C.Playing a song in the selected category1When a category is selected, press and holdM.C.Searching the list by alphabet1When a list for the selected category is dis-played, press to switch to alphabet searchmode.2Turn M.C. to select a letter.3Press M.C. to display the alphabetical list.Notes!This unit must create an index in order to fa-cilitate Artists,Albums,Songs, and Genressearches. Typically, it will take approximately70 seconds to create an index for 1 000songs, and we recommend that up to 3 000songs be used. Please note that certain typesof file may take longer to index than others.!Depending on the number of files in the USBstorage device, there may be a delay whendisplaying a list.!Keys may not have any effect during the cre-ation of an index or list.!Lists are recreated each time the unit isturned on.Playing songs related to thecurrently playing songYou can use this function when USB is selectedas the source.EnglishUsing this unit9SectionUsing this unitEn02
This function is available when ON is selected inMusic browse. For details, refer toMusic browse (music browse) on page 19.You can play songs from the following lists.•Album list of the currently playing artist•Song list of the currently playing album•Album list of the currently playing genre1 Press and hold M.C. to switch to link playmode.2 Turn M.C. to change the mode; press toselect.!Artist –Plays an album by the artist currentlyplaying.!Album –Plays a song from the album cur-rently being played.!Genre –Plays an album from the genre cur-rently being played.The selected song/album will be played after thecurrently playing song.Notes!The selected song/album may be canceled ifyou use functions other than link search (e.g.fast forward and reverse).!Depending on the song selected to play, theend of the currently playing song and the be-ginning of the selected song/album may becut off.Function settings1 Press M.C. to display the main menu.2 Turn M.C. to change the menu optionand press to select FUNCTION.3 Turn M.C. to select the function.Once selected, the following functions can beadjusted.!Link play is not available when OFF is se-lected in Music browse. For details, refer toMusic browse (music browse) on page 19.!Sound Retriever is not available when MIX-TRAX is turned on.Play mode (repeat play)1Press M.C. to select a repeat play range.CD/CD-R/CD-RW!Disc repeat –Repeat all tracks!Track repeat –Repeat the current track!Folder repeat –Repeat the current folderUSB storage device!All repeat –Repeat all files!Track repeat –Repeat the current file!Folder repeat –Repeat the current folderRandom mode (random play)1Press M.C. to turn random play on or off.Link play (link play)1Press M.C. to display the setting mode.2Turn M.C. to change the mode; press to select.For details about the settings, refer to Playingsongs related to the currently playing song onthe previous page.Pause (pause)1Press M.C. to pause or resume.Sound Retriever (sound retriever)Automatically enhances compressed audio andrestores rich sound.1Press M.C. to select the desired setting.1—2—OFF (off)1is effective for low compression rates, and 2is effective for high compression rates.iPodBasic operations86 7532411Repeat indicator2Song number indicator3Shuffle indicator4PLAY/PAUSE indicator5S.Rtrv indicatorAppears when Sound Retriever function ison.6Song time (progress bar)7Play time indicatorPlaying songs on an iPod1Connect an iPod to the USB cable using aniPod Dock Connector.Selecting a track (chapter)1Turn LEVER.Fast forwarding or reversing1Turn and hold down LEVER to the right or left.Selecting an album1Press or .Notes!The iPod cannot be turned on or off when thecontrol mode is set to Ctrl Audio.!Disconnect headphones from the iPod be-fore connecting it to this unit.!The iPod will turn off about two minutes afterthe ignition is switched off.Operations using the MIXTRAXbuttonTurning MIXTRAX on or off1Press MIX/DISP OFF to turn MIXTRAX on oroff.!For more details about MIXTRAX, refer toAbout MIXTRAX on page 17.!For more details about MIXTRAX functions,refer to MIXTRAX menu on page 17.Switching the displaySelecting the desired text information%Press /DISP.Browsing for a song1 Press (list) to switch to the top menuof the list search.2 Use M.C. to select a category/song.Changing the name of the song or category1Turn M.C.Playlists (playlists)—Artists (artists)—Albums(albums)—Songs (songs)—Podcasts (pod-casts)—Genres (genres)—Composers (com-posers)—Audiobooks (audiobooks)Playing1When a song is selected, press M.C.Viewing a list of songs in the selected category1When a category is selected, press M.C.Using this unit10SectionUsing this unitEn02
Playing a song in the selected category1When a category is selected, press and holdM.C.Searching the list by alphabet1When a list for the selected category is dis-played, press to switch to alphabet searchmode.2Turn M.C. to select a letter.3Press M.C. to display the alphabetical list.Notes!You can play playlists created with the Music-Sphere application. The application will beavailable on our website.!Playlists that you created with the Music-Sphere application are displayed in abbrevi-ated form.Playing songs related to thecurrently playing songYou can play songs from the following lists.•Album list of the currently playing artist•Song list of the currently playing album•Album list of the currently playing genre1 Press and hold to switch to link playmode.2 Turn M.C. to change the mode; press toselect.!Artist –Plays an album by the artist currentlyplaying.!Album –Plays a song from the album cur-rently being played.!Genre –Plays an album from the genre cur-rently being played.The selected song/album will be played after thecurrently playing song.Notes!The selected song/album may be canceled ifyou use functions other than link search (e.g.fast forward and reverse).!Depending on the song selected to play, theend of the currently playing song and the be-ginning of the selected song/album may becut off.Using this unit's iPod functionfrom your iPodThis unit’s iPod function can be controlled byusing the connected iPod.Ctrl iPod is not compatible with the followingiPod models.!iPod nano 1st generation!iPod with video%Press BAND/ to switch the controlmode.!Ctrl iPod –This unit’s iPod function can beoperated from the connected iPod.!Ctrl Audio –This unit’s iPod function can becontrolled by using this unit.Notes!Switching the control mode to Ctrl iPodpauses song playback. Use the iPod to re-sume playback.!The following operations are still accessiblefrom the unit even if the control mode is setto Ctrl iPod.—Pausing—Fast forward/reverse—Selecting a song (chapter)!The volume can only be adjusted from thisunit.Function settings1 Press M.C. to display the main menu.2 Turn M.C. to change the menu optionand press to select FUNCTION.3 Turn M.C. to select the function.Once selected, the following functions can beadjusted.!Pause and Sound Retriever are only avail-able when Ctrl iPod is selected in the controlmode. For details, refer to Using this unit'siPod function from your iPod on this page.Play mode (repeat play)1Press M.C. to select a repeat play range.!Repeat One –Repeat the current song!Repeat All –Repeat all songs in the se-lected list!When the control mode is set to Ctrl iPod, therepeat play range will be same as what is setfor the connected iPod.Shuffle mode (shuffle)1Press M.C. to select the desired setting.!Shuffle Songs –Play back songs in the se-lected list in random order.!Shuffle Albums –Play back songs from arandomly selected album in order.!Shuffle OFF –Cancel random play.Shuffle all (shuffle all)1Press M.C. to turn shuffle all on.To turn off Shuffle all, select Shuffle OFF inShuffle mode. For details, refer toShuffle mode (shuffle) on this page.Link play (link play)1Press M.C. to display the setting mode.2Turn M.C. to change the mode; press to select.For details about the settings, refer to Playingsongs related to the currently playing song onthis page.Pause (pause)1Press M.C. to pause or resume.Audiobooks (audiobook speed)1Press M.C. to select the desired setting.!Faster –Playback at a speed faster thannormal!Normal –Playback at normal speed!Slower –Playback at a speed slower thannormalSound Retriever (sound retriever)1Press M.C. to select the desired setting.1—2—OFF (off)1is effective for low compression rates, and 2is effective for high compression rates.Using Bluetooth wirelesstechnology!Only for DEH-X8500BH and DEH-X8500BSUsing the Bluetooth telephoneImportant!Leaving the unit on standby to connect toyour phone via Bluetooth while the engine isnot running can drain the battery.!Operations may vary depending on the kindof cellular phone.!Advanced operations that require attentionsuch as dialing numbers on the monitor,using the phone book, etc., are prohibitedwhile driving. Park your vehicle in a safeplace when using these advanced opera-tions.!Be sure to park your vehicle in a safe placeand apply the parking brake when perform-ing this operation.EnglishUsing this unit11SectionUsing this unitEn02
Setting up for hands-free phoningBefore you can use the hands-free phoningfunction you must set up the unit for use withyour cellular phone.1ConnectionUse the Bluetooth telephone connectionmenu. Refer to Connection menu operation onthis page.2Function settingsUse the Bluetooth telephone function menu.Refer to Phone menu operation on the nextpage.Basic operationsMaking a phone call!Refer to Phone menu operation on the nextpage.Answering an incoming call1When a call is received, press .Ending a call1Press .Rejecting an incoming call1When a call is received, press and hold .Answering a call waiting1When a call is received, press .Switching between callers on hold1Press M.C.Canceling call waiting1Press and hold .Adjusting the other party’s listening volume1Turn LEVER while talking on the phone.!When private mode is on, this function is notavailable.Turning private mode on or off1Press BAND/while talking on the phone.Switching the information display1Press /DISP while talking on the phone.Notes!If private mode is selected on the cellularphone, hands-free phoning may not be avail-able.!The estimated call time appears in the dis-play (this may differ slightly from the actualcall time).Using voice recognitionThis feature can be used on an iPod equippedwith voice recognition that is connected byBluetooth with the source set to iPod orBT Audio.%Press and hold M.C. to switch to voicerecognition mode.The commands available with this unit are listedbelow.!Song playback!Making a phone callNoteFor details on voice recognition features, checkthe manual for the iPod you are using.Connection menu operationImportant!Be sure to park your vehicle in a safe placeand apply the parking brake when perform-ing this operation.!Connected devices may not work properly ifmore than one Bluetooth device is con-nected at a time (e.g. a phone and a separateaudio player are connected simultaneously).1 Press and hold to display the connec-tion menu.#You cannot perform this step during a call.2 Turn M.C. to select the function.Once selected, the following functions can beadjusted.Device list (connecting or disconnecting a devicefrom the device list)!When no device is selected in the device list,this function is not available.1Press M.C. to display the setting mode.2Turn M.C. to select the name of a device youwant to connect/disconnect.!Press and hold M.C. to swap between theBluetooth device address and the devicename.3Press M.C. to connect/disconnect the selecteddevice.Once the connection is established, Con-nected is displayed.Delete device (deleting a device from the devicelist)!When no device is selected in the device list,this function is not available.1Press M.C. to display the setting mode.2Turn M.C. to select the name of a device youwant to delete.!Press and hold M.C. to swap between theBluetooth device address and the devicename.3Press M.C. to display Delete YES.4Press M.C. to delete the device informationfrom the device list.!While this function is in use, do not turn offthe engine.Add device (connecting a new device)1Press M.C. to start searching.!To cancel, press M.C. while searching.!If this unit fails to find any available cellularphones, Not found is displayed.2Turn M.C. to select a device from the devicelist.!Press and hold M.C. to swap between theBluetooth device address and the devicename.3Press M.C. to connect the selected device.!To complete the connection, check the de-vice name (Pioneer BT Unit). Enter thePIN code on your device if necessary.!PIN code is set to 0000 as the default. Youcan change this code.!6-digit number appears on the display ofthis unit. Once the connection is estab-lished, this number disappears.!If you are unable to complete the connec-tion using this unit, use the device to con-nect to the unit.!If three devices are already paired, DeviceFull is displayed and it is not possible toperform this operation. In this case, deletea paired device first.Auto connect (connecting to a Bluetooth deviceautomatically)1Press M.C. to turn automatic connection on oroff.Visibility (setting the visibility of this unit)Bluetooth visibility can be turned on so that otherdevices can discover the unit.1Press M.C. to turn the visibility of this unit onor off.Pin code input (PIN code input)Using this unit12SectionUsing this unitEn02
You must enter a PIN code on your device to con-firm the Bluetooth connection. The default code is0000, but you can change it with this function.1Press M.C. to display the setting mode.2Turn M.C. to select a number.3Press M.C. to move the cursor to the next posi-tion.4After inputting PIN code, press and hold M.C.!After inputting, pressing M.C. returns youto the PIN code input display, and you canchange the PIN code.Device INFO (Bluetooth device address display)1Press M.C. to display the setting mode.2Press M.C. to select the desired setting.Device name—Bluetooth device addressPhone menu operationImportantBe sure to park your vehicle in a safe place andapply the parking brake when performing thisoperation.1 Press to display the phone menu.2 Turn M.C. to select the function.Once selected, the following functions can beadjusted.Missed calls (missed call history)Dialed calls (dialed call history)Received calls (received call history)1Press M.C. to display the phone number list.2Turn M.C. to select a name or phone number.3Press M.C. to make a call.!To display details about the contact you se-lected, press and hold M.C.PhoneBook (phone book)!The contacts on your phone will normally betransferred automatically when the phone isconnected. If it is not, use your phone menu totransfer the contacts. The visibility of this unitshould be on when you use the phone menu.Refer to Visibility (setting the visibility of thisunit) on the previous page.1Press M.C. to display SEARCH (alphabeticallist).2Turn M.C. to select the first letter of the nameyou are looking for.3Press M.C. to display a registered name list.4Turn M.C. to select the name you are lookingfor.5Press M.C. to display the phone number list.6Turn M.C. to select a phone number you wantto call.7Press M.C. to make a call.Phone Function (phone function)You can set Auto answer,Ring tone and PH.B.Name view from this menu. For details, refer toFunction and operation on this page.Function and operation1 Display Phone Function.Refer to Phone Function (phone function) onthis page.2 Press M.C. to display the function menu.3 Turn M.C. to select the function.Once selected, the following functions can beadjusted.Auto answer (automatic answering)1Press M.C. to turn automatic answering on oroff.Ring tone (ring tone select)1Press M.C. to turn the ring tone on or off.PH.B.Name view (phone book name view)1Press M.C. to invert the order of names in thephone book.Bluetooth AudioImportant!Depending on the Bluetooth audio playerconnected to this unit, the available opera-tions will be limited to the following two lev-els:—A2DP profile (Advanced Audio DistributionProfile): You can only playback songs on youraudio player.You cannot use the A2DP connection wheniPod or Pandora is selected as a source.—AVRCP profile (Audio/Video Remote ControlProfile): You can perform playback, pauseplayback, select songs, etc.!Functions will vary depending on theBluetooth audio player you are using. Whenusing your player with this unit, refer to theinstruction manual that came with yourBluetooth audio player as well as this man-ual.!As the signal from your cellular phone maycause noise, avoid using it when you are lis-tening to songs on your Bluetooth audioplayer.!The sound of the Bluetooth audio player willbe muted when the phone is in use.!When the Bluetooth audio player is in use,you cannot connect to a Bluetooth telephoneautomatically.!Playback continues even if you switch fromyour Bluetooth audio player to anothersource while listening to a song.!Depending on the type of Bluetooth audioplayer you have connected to this unit, oper-ation and information display may not beavailable for some functions.Setting up for Bluetooth audioBefore you can use the Bluetooth audio functionyou must set up the unit for use with yourBluetooth audio player. You will need to pair thisunit with your Bluetooth audio player.1ConnectionUse the Bluetooth telephone connectionmenu. Refer to Connection menu operation onthe previous page.Basic operations11Device nameShows the device name of the connectedBluetooth audio player.Fast forwarding or reversing1Turn and hold down LEVER to the right or left.Selecting a track1Turn LEVER.Starting playback1Press BAND/.Switching the displaySelecting the desired text informationEnglishUsing this unit13SectionUsing this unitEn02
%Press /DISP.NoteDepending on the device, text information canbe changed.Function settings1 Press M.C. to display the main menu.2 Turn M.C. to change the menu optionand press to select FUNCTION.3 Turn M.C. to select the function.Once selected, the following functions can beadjusted.Play (play)1Press M.C. to start playback.Stop (stop)1Press M.C. to stop the playback.Pause (pause)1Press M.C. to pause or resume.Using smartphone applicationsInformation for the smartphonecompatibilityThe following devices can use this function.!iPhone and iPod touchIn this chapter, iPod and iPhone will be re-ferred to as “iPhone”.!AndroidädeviceFor iPhone users!Use an optional Pioneer USB cable (CD-U50E) to connect an iPhone.!!!CAUTION: There is no text.For Android device users!The device has Android OS 2.2 or later.!The device supports Bluetooth SPP (SerialPort Profile) and A2DP (Advanced Audio Dis-tribution Profile).The device is connected to this unit viaBluetooth.Compatibility with all Android devices is notguaranteed.For details about Android device compatibilitywith this unit, refer to the information on ourwebsite.Using PandoraâIMPORTANT:Requirements to access Pandora using thePioneer car audio/video products:!iPhone compatibilityApple iPhone (first generation), iPhone 3G,iPhone 3GS, iPhone 4, iPhone 4S, iPod touch 1G,iPod touch 2G, iPod touch 3G or iPod touch 4G(firmware version 3.0 or later)Certain firmware versions for the iPhone may notbe compatible with the Pandora application. Ifthis appears to be the case, please update thefirmware to a version that is compatible withPandora.!Latest version of the Pandora application, down-loaded to your device (Search Apple iTunes AppStore for “Pandora”).!Current Pandora account (Free account and paidaccounts available from Pandora; create a freeaccount online athttp://www.pandora.com/register or through thePandora application for the iPhone).!Data PlanNote: If the Data Plan for your iPhone does notprovide for unlimited data usage, additionalcharges from your carrier may apply for accessingthe Pandora service via 3G and/or EDGE net-works.!Connection to the Internet via 3G, EDGE or Wi-Finetwork.!Optional Pioneer adapter cable connecting youriPhone to the Pioneer car audio/video products.Limitations:!Access to the Pandora service will depend on theavailability of a cellular and/or Wi-Fi network forpurposes of allowing your device to connect tothe Internet.!Ability of the Pioneer car audio/video products toaccess the Pandora service is subject to changewithout notice and could be affected by any ofthe following: compatibility issues with futurefirmware versions of iPhone; compatibility issueswith future firmware versions of the Pandora ap-plication for the iPhone; changes to the Pandoramusic service by Pandora; discontinuation of thePandora music service by Pandora.!Certain functions of the Pandora service are notavailable when accessing the service through thePioneer car audio/video products, including, butnot limited to, creating new stations, deleting sta-tions, emailing current stations, buying tracksfrom iTunes, viewing additional text information,logging in to Pandora, and adjusting Cell Net-work Audio Quality.Pandora internet radio is a music service not af-filiated with Pioneer. More information is avail-able at http://www.pandora.com.You can play Pandora by connecting youriPhone with the Pandora application installed.Starting procedure (for iPhone users)1 Connect an iPhone to the USB cable usingan iPhone Dock Connector.2 Select Wired in APP CONNECT MODE. Fordetails, refer to APP CONNECT MODE (APPconnect mode setting) on page 19.If using DEH-X7500HD and DEH-X7500S, pro-ceed to the next step.3 Start up the application on the smart-phone.4 Switch the source to Pandora.Starting procedure (for Androiddevice users)Only for DEH-X8500BH and DEH-X8500BS1 Connect your Android device to this unitusing Bluetooth wireless technology. For de-tails, refer to Connection menu operation onpage 12.2 Select Bluetooth in APP CONNECT MODE.For details, refer to APP CONNECT MODE(APP connect mode setting) on page 19.3 Start up the application on the smart-phone.4 Switch the source to Pandora.Basic operations64 531 21Thumbs Up/Thumbs Down indicator2QuickMix indicator3PLAY/PAUSE indicator4S.Rtrv indicatorAppears when Sound Retriever function ison.5Song time (progress bar)6Play time indicatorUsing this unit14SectionUsing this unitEn02
Giving a Thumbs Up1Press to give a “Thumbs Up”for the trackcurrently playing.Giving a Thumbs Down1Press to give a “Thumbs Down”for thetrack currently playing and to skip to the nexttrack.Skipping tracks1Turn LEVER to the right.Switching the displaySelecting the desired text information%Press /DISP.NoteDepending on the station, text information canbe changed.Selecting and playing the QuickMix/station listThe device name that appears on the screenmay not be the same as the device name of theconnected device.1 Press (list) to switch to the QuickMix/station list mode.2 Use M.C. to select the QuickMix or de-sired station.Changing the sort order1Press (list).!ABC –You can sort the items in the list alpha-betically!DATE –You can sort the items in the list inorder of the dates on which the items werecreatedChanging QuickMix or stations1Turn M.C.Playing1When QuickMix or the station is selected,press M.C.Function settings1 Press M.C. to display the main menu.2 Turn M.C. to change the menu optionand press to select FUNCTION.3 Turn M.C. to select the function.Once selected, the following functions can beadjusted.Bookmark (bookmark)1Press M.C. to store track information.Pause (pause)1Press M.C. to pause or resume.Sound Retriever (sound retriever)1Press M.C. to select the desired setting.1—2—OFF (off)1is effective for low compression rates, and 2is effective for high compression rates.Using other applicationsYou can use this unit to control smartphone ap-plications and start playback of tracks.Starting procedure (for iPhone users)1 Connect an iPhone to the USB cable usingan iPhone Dock Connector.2 Select Wired in APP CONNECT MODE. Fordetails, refer to APP CONNECT MODE (APPconnect mode setting) on page 19.If using DEH-X7500HD and DEH-X7500S, pro-ceed to the next step.3 Start up the application on the smart-phone.4 Switch the source to Apps.Starting procedure (for Androiddevice users)Only for DEH-X8500BH and DEH-X8500BS1 Connect your Android device to this unitusing Bluetooth wireless technology. For de-tails, refer to Connection menu operation onpage 12.2 Select Bluetooth in APP CONNECT MODE.For details, refer to APP CONNECT MODE(APP connect mode setting) on page 19.3 Start up the application on the smart-phone.4 Switch the source to Apps.Basic operations'800<Selecting a track1Turn LEVER.Fast forwarding or reversing1Turn and hold down LEVER to the right or left.Switching the displaySelecting the desired text information%Press /DISP.Function settings1 Press M.C. to display the main menu.2 Turn M.C. to change the menu optionand press to select FUNCTION.3 Turn M.C. to select the function.Once selected, the following functions can beadjusted.Pause (pause)1Press M.C. to pause or resume.Sound Retriever (sound retriever)1Press M.C. to select the desired setting.1—2—OFF (off)1is effective for low compression rates, and 2is effective for high compression rates.EnglishUsing this unit15SectionUsing this unitEn02
Audio adjustments11Audio displayShows the audio adjustment status.1 Press M.C. to display the main menu.2 Turn M.C. to change the menu optionand press to select AUDIO.3 Turn M.C. to select the audio function.Once selected, the following audio functionscan be adjusted.!The cut-off frequency and output level can beadjusted when the subwoofer output is on.!SLA is not available when FM is selected asthe source.Fader/Balance (fader/balance adjustment)1Press M.C. to display the setting mode.2Press M.C. to cycle between fader (front/rear)and balance (left/right).3Turn M.C. to adjust the front/rear speaker bal-ance.Turn M.C. to adjust the left/right speaker bal-ance.Preset EQ (equalizer recall)1Press M.C. to display the setting mode.2Turn M.C. to select an equalizer curve.Powerful—Natural—Vocal—Custom1—Cus-tom2—Flat—Super bassG.EQ (equalizer adjustment)You can adjust the currently selected equalizercurve setting as desired. Adjusted equalizer curvesettings are stored in Custom1 or Custom2.!Custom1 can be set separately for eachsource. However, USB,iPod,PANDORA andApps are all set to the same setting automati-cally.!Custom2 is a shared setting used in commonfor all sources.1Press M.C. to display the setting mode.2Press M.C. to cycle between the following:Equalizer band—Equalizer level3Turn M.C. to select the desired setting.Equalizer band: 100Hz—315Hz—1.25kHz—3.15kHz—8kHzEqualizer level: +6 to –6Loudness (loudness)Loudness compensates for deficiencies in the low-frequency and high-frequency ranges at low vol-ume.1Press M.C. to display the setting mode.2Press M.C. to turn loudness on or off.3Turn M.C. to select the desired setting.Low (low)—Mid (mid)—High (high)Subwoofer1 (subwoofer on/off setting)This unit is equipped with a subwoofer outputwhich can be turned on or off.1Press M.C. to display the setting mode.2Press M.C. to turn subwoofer output on or off.3Turn M.C. to select the phase for the sub-woofer output.Turn M.C. to the left to select reverse phase,and Reverse appears in the display. Turn M.C.to the right to select normal phase, and Nor-mal appears in the display.Subwoofer2 (subwoofer adjustment)Only frequencies lower than those in the selectedrange are outputted from the subwoofer.1Press M.C. to display the setting mode.2Press M.C. to cycle between the cut-off fre-quency and the output level for the subwoofer.3Turn M.C. to select the cut-off frequency.50Hz—63Hz—80Hz—100Hz—125Hz4Turn M.C. to adjust the output level for the sub-woofer.+6 to –24 is displayed as the level is increasedor decreased.Bass Booster (bass boost)1Press M.C. to display the setting mode.2Turn M.C. to select a desired level.0to +6 is displayed as the level is increased ordecreased.HPF (high pass filter adjustment)When you do not want low sounds from the sub-woofer output frequency range to play from thefront or rear speakers, turn on the HPF (high passfilter). Only frequencies higher than those in theselected range are output from the front or rearspeakers.1Press M.C. to display the setting mode.2Press M.C. to turn high pass filter on or off.3Turn M.C. to select the cut-off frequency.50Hz—63Hz—80Hz—100Hz—125HzSLA (source level adjustment)SLA (Source level adjustment) lets you adjust thevolume level of each source to prevent suddenchanges in volume when switching between sour-ces.!Settings are based on the FM volume level,which remains unchanged.!The AM volume level can also be adjusted withthis function.!USB,iPod,PANDORA and Apps are all set tothe same setting automatically.1Press M.C. to display the setting mode.2Turn M.C. to adjust the source volume.Adjustment range: +4 to –4Using differententertainment displaysYou can enjoy entertainment displays while lis-tening to each sound source.1 Press M.C. to display the main menu.2 Turn M.C. to change the menu optionand press to select ENTERTAINMENT.3 Turn M.C. to select the entertainmentfunction.Once selected, the following entertainmentfunctions can be adjusted.Using this unit16SectionUsing this unitEn02
Background (background setting)1Press M.C. to display the setting mode.2Press M.C. to select the desired setting.Background visual—genre—background pic-ture 1—background picture 2—backgroundpicture 3—background picture 4—simple dis-play—movie screen —calendar!Genre display changes depending on thegenre of music.!Genre display may not work correctly de-pending on the application used to encodeaudio files.Clock (clock display setting)1Press M.C. to display the setting mode.2Press M.C. to select the desired setting.ON (clock display)—Elapsed time (elapsedtime display)—OFF (clock off)!Only for DEH-X7500HD and DEH-X7500SYou can switch the function by pressingCLOCK.Selecting the illumination color1 Press M.C. to display the main menu.2 Turn M.C. to change the menu optionand press to select ILLUMI.3 Turn M.C. to select the illumination func-tion.Once selected, the following illumination func-tions can be adjusted.!Phone color is not available for DEH-X7500HD and DEH-X7500S.Key color (key color setting)You can select desired colors for the keys of thisunit.1Press M.C. to display the setting mode.2Press M.C. to select the desired setting.You can select any one of the options in the fol-lowing list:!Preset colors (ranging from WHITE toROSE)!SCAN (cycle through all colors)!Sets of colors (WARM,AMBIENT,CALM)!CUSTOM (customized illumination color)Display color (display color setting)You can select the desired colors for the display ofthis unit.1Press M.C. to display the setting mode.2Press M.C. to select the desired setting.You can select any one of the options in the fol-lowing list:!Preset colors (ranging from WHITE toROSE)!SCAN (cycle through all colors)!Sets of colors (WARM,AMBIENT,CALM)!CUSTOM (customized illumination color)Key & Display (key and display color setting)You can select the desired colors for the keys anddisplay of this unit.1Press M.C. to display the setting mode.2Press M.C. to select the desired setting.You can select any one of the options in the fol-lowing list:!Preset colors (ranging from WHITE toROSE)!SCAN (cycle through all colors)Phone color (phone color setting)You can select the desired key colors to displaywhen an incoming call is received.1Press M.C. to display the setting mode.2Press M.C. to select the desired setting.You can select any one of the options in the fol-lowing list:!Flashing –The color selected from Keycolor flashes.!Flash FX 1 to Flash FX 6 –The system auto-matically cycles through all available keycolors for this unit. Select the desiredmode.!OFF –No change in key color made whenincoming calls are received.Notes!When SCAN is selected, the system auto-matically cycles through the preset colors.!When WARM is selected, the system auto-matically cycles through the warm colors.!When AMBIENT is selected, the system au-tomatically cycles through the ambient col-ors.!When CALM is selected, the system auto-matically cycles through the calm colors.!When CUSTOM is selected, the customizedcolor saved is selected.Customizing theillumination colorYou can create custom illumination colors forboth Key color and Display color.1 Press M.C. to display the main menu.2 Turn M.C. to display ILLUMI and press toselect.3 Turn M.C. to display Key color orDisplay color. Press to select.4 Press M.C. and hold until the customizingillumination color setting appears in the dis-play.5 Press M.C. to select the primary color.R(red)—G(green)—B(blue)6 Turn M.C. to adjust the brightness level.Adjustment range: 0to 60#You cannot select a level below 20 for all three ofR(red), G(green), and B(blue) at the same time.#You can also perform the same operation onother colors.NoteYou cannot create a custom illumination colorwhile SCAN,WARM,AMBIENT or CALM is se-lected.About MIXTRAXMIXTRAX technology is used to insert a varietyof sound effects in between songs, allowing youto experience your music as a nonstop mix com-plete with visual and lighting effects.Notes!Depending on the file/song, sound effectsmay not be added.!MIXTRAX includes a MIXTRAX flashing colormode that when switched on turns the flash-ing colors on and off in time with the audiotrack. If you find the feature distracting whiledriving, please turn MIXTRAX off. Refer to Op-erations using the MIXTRAX button on page 9.MIXTRAX menu1 Press M.C. to display the main menu.2 Turn M.C. to change the menu optionand press to select MIXTRAX.EnglishUsing this unit17SectionUsing this unitEn02
3 Turn M.C. to select the MIXTRAX func-tion.Once selected, the following MIXTRAX functionscan be adjusted. The function is enabled whenMIXTRAX is on.SHORT PLAYBACK (short playback mode)You can select the length of the playback time.1Press M.C. to display the setting mode.2Turn M.C. to select the desired setting.1.0 MIN (1.0 minute)—1.5 MIN (1.5 minutes)—2.0 MIN (2.0 minutes)—2.5 MIN (2.5 minutes)—3.0 MIN (3.0 minutes)—Random (random)—OFF (off)!Turn this option OFF if you want to play a selec-tion all the way through from start to finish.FLASH AREA (flash area)You can select areas for flashing colors.1Press M.C. to display the setting mode.2Turn M.C. to select the desired setting.KEY & DISPLAY (key and display)—KEY (key)—OFF (off)!When OFF is selected, the color set under IL-LUMI is used as the display color.Flashing Color (flash pattern)You can select flashing color patterns.1Press M.C. to display the setting mode.2Turn M.C. to select the desired setting.You can select any one of the options in the fol-lowing list:!Sound Level Mode Color 1 to Color 6 –Flashing colors will flash on and off in syn-chronization with the sound level in asong. Select the desired mode.!Low Pass Mode Color 1 to Color 6 –Flashing colors will flash on and off in syn-chronization with the bass level in a song.Select the desired mode.!Flashing Color Random –The pattern forthe flashing colors is randomly selectedfrom the sound level mode and low passmode.!Sound Level Mode Random –The patternfor the flashing colors is randomly selectedfrom the sound level mode.!Low Pass Mode Random –The pattern forthe flashing colors is randomly selectedfrom the low pass mode.DISP EFFECT (display effect)The MIXTRAX special effects display can be turnedon or off.1Press M.C. to select the desired setting.ON (MIXTRAX special effects display)—OFF(normal display)CUT IN EFFECT (manual cut-in effect)You can turn on or off the MIXTRAX sound effectswhile manually changing tracks.1Press M.C. to select the desired setting.ON (on)—OFF (off)MIX Settings (MIXTRAX settings)For details, refer to MIXTRAX settings on this page.MIXTRAX settingsYou can change the settings for fixed soundsand sound effects.!The fixed sound settings can be changedfrom MIX Fixed.!The sound effect settings can be changedfrom any of the following menus:LOOP EFFECT,Flanger EFFECT,Echo EFFECT, and Crossfade EFFECT.1 Display MIX Settings.2 Press M.C. to display the function menu.3 Turn M.C. to select the function.Once selected, the following functions can beadjusted.MIX Fixed (MIXTRAX sound effects)The fixed sounds can be removed from MIXTRAXsound effects.1Press M.C. to select the desired setting.ON (fixed sounds and sound effects)—OFF(sound effects)LOOP EFFECT (loop effect)The loop effect, which is inserted at the end ofeach song automatically, can be removed fromthe sound effect.1Press M.C. to select the desired setting.ON (on)—OFF (off)Flanger EFFECT (flanger effect)The flanger effect can be removed from the soundeffect.1Press M.C. to select the desired setting.ON (on)—OFF (off)Echo EFFECT (echoe effect)The echo effect can be removed from the sound ef-fect.1Press M.C. to select the desired setting.ON (on)—OFF (off)Crossfade EFFECT (crossfade effect)The crossfade effect can be removed from thesound effect.1Press M.C. to select the desired setting.ON (on)—OFF (off)System menu11Function display!Shows the function status.1 Press M.C. to display the main menu.2 Turn M.C. to change the menu optionand press to select SYSTEM.3 Turn M.C. to select the system menufunction.Once selected, the following system menu func-tions can be adjusted.!BT AUDIO,Clear memory,BT Version info.and APP CONNECT MODE are not availablefor DEH-X7500HD and DEH-X7500S.!APP CONNECT MODE is not available whenPandora or Apps is selected as the source.Language select (multi-language)For your convenience, this unit offers a choice ofseveral languages. You can select the languageyou prefer to use.1Press M.C. to select the language.English—Français—EspañolCalendar (setting the date)Using this unit18SectionUsing this unitEn02
1Press M.C. to select the segment of the calen-dar display you wish to set.Year—Day—Month2Turn M.C. to set the date.Clock (setting the clock)1Press M.C. to select the segment of the clockdisplay you wish to set.Hour—Minute2Turn M.C. to adjust the clock.EngineTime alert (elapsed time display setting)This setting displays how much time has elapsedsince the machine was turned on.You can set a timer and an alarm.1Press M.C. to select the desired setting.OFF—15Minutes—30MinutesMusic browse (music browse)When operating a USB storage device, you can se-lect a file from the list.1Press M.C. to select the desired setting.You can select any one of the options in the fol-lowing list:!ON –Category/song list can be used.!OFF –File/folder list can be used.Warning tone (warning tone setting)If the front panel is not detached from the headunit within four seconds of turning off the ignition,a warning tone sounds. You can turn off the warn-ing tone.1Press M.C. to turn the warning tone on or off.AUX (auxiliary input)Activate this setting when using an auxiliary de-vice connected to this unit.1Press M.C. to turn AUX on or off.Dimmer (dimmer setting)To prevent the display from being too bright atnight, the display is automatically dimmed whenthe car’s headlights are turned on. You can turnthe dimmer on or off.1Press M.C. to turn dimmer on or off.Contrast (display contrast setting)1Press M.C. to display the setting mode.2Turn M.C. to adjust the contrast level.0to 15 is displayed as the level is increased ordecreased.Ever-scroll (scroll mode setting)When ever scroll is set to ON, recorded text infor-mation scrolls continuously in the display. Set toOFF if you prefer the information to scroll justonce.1Press M.C. to turn the ever scroll on or off.BT AUDIO (Bluetooth audio activation)You need to activate the BT Audio source in orderto use a Bluetooth audio player.1Press M.C. to turn the BT Audio source on oroff.Clear memory (clearing the Bluetooth devicedata stored on this unit)Bluetooth device data stored on this unit can becleared. To protect your personal information,clear the device memory before you pass the uniton to someone else. The following information willbe deleted.!Device list!PIN code!Call history!Phone book1Press M.C. to show the confirmation display.YES is displayed. Clearing memory is now onstandby.If you do not want to clear the Bluetooth devicedata stored on this unit, turn M.C. to displayCANCEL and press it again to select.2Press M.C. to clear the memory.Cleared is displayed and the Bluetooth devicedata is cleared.!While this function is in use, do not turnoff the engine.BT Version info. (Bluetooth version display)You can display the system versions of this unitand of Bluetooth module.1Press M.C. to display the information.APP CONNECT MODE (APP connect mode set-ting)Select an appropriate option for your smartphone.1Press M.C. to select the desired setting.Wired (for iPhone)—Bluetooth (for Androiddevice)Initial menu1 Press and hold SRC/OFF until the unitturns off.2 Press and hold M.C. until the main menuappears in the display.3 Turn M.C. to change the menu optionand press to select INITIAL.4 Turn M.C. to select the initial menu func-tion.Once selected, the following initial menu func-tions can be adjusted.!S/W UPDATE is not available for DEH-X7500HD and DEH-X7500S.S/W control (rear output and subwoofer setting)This unit’s rear output (rear speaker leads outputand RCA rear output) can be used for full-rangespeaker (Rear SP :F.Range) or subwoofer (RearSP :S/W) connection. If you switch the rear outputsetting to Rear SP :S/W, you can connect a rearspeaker lead directly to a subwoofer without usingan auxiliary amp.1Press M.C. to switch the rear output setting.!When no subwoofer is connected to therear output, select Rear SP :F.Range (full-range speaker).!When a subwoofer is connected to the rearoutput, select Rear SP :S/W (subwoofer).!Even if you change this setting, there will beno output unless you turn the subwoofer out-put on (refer to Subwoofer1 (subwoofer on/offsetting) on page 16).!If you change this setting, subwoofer output inthe audio menu will return to the factory set-tings.!Both rear speaker lead outputs and RCA rearoutput are switched simultaneously in this set-ting.EnglishUsing this unit19SectionUsing this unitEn02
S/W UPDATE (updating the software)This function is used to update this unit with thelatest Bluetooth software. For about Bluetoothsoftware and updating, refer to our website.!Never turn the unit off while the Bluetooth soft-ware is being updated.1Press M.C. to display the data transfer mode.Follow the on-screen instructions to finish up-dating the Bluetooth software.System menu1 Press and hold SRC/OFF until the unitturns off.2 Press and hold M.C. until the main menuappears in the display.3 Turn M.C. to change the menu optionand press to select SYSTEM.4 Turn M.C. to select the system menufunction.For details, refer to System menu on page 18.Using an AUX source1 Insert the stereo mini plug into the AUXinput jack.2 Press SRC/OFF to select AUX as thesource.NoteAUX cannot be selected unless the auxiliary set-ting is turned on. For more details, refer to AUX(auxiliary input) on the previous page.Turning the display off or on%Press and hold MIX/DISP OFF until thedisplay turns on or off.If an unwanted display appearsTurn off the unwanted display using the proce-dures listed below.1 Press M.C. to display the main menu.2 Turn M.C. to change the menu optionand press to select SYSTEM.3 Turn M.C. to display DEMO OFF and pressto select.4 Turn M.C. to switch to YES.5 Press M.C. to select.SiriusXM Satellite RadioOnly for DEH-X8500BS and DEH-X7500SYou can use this unit to control the SiriusXMConnect Vehicle Tuner (SXV200), which is soldseparately.For more information on how to install the Sir-iusXM Connect Vehicle Tuner, consult the instal-lation guide included with the tuner.Everything worth listening to is on SiriusXM, get-ting over 130 channels, including the most com-mercial‐free music, plus the best sports, news,talk and entertainment. A SiriusXM VehicleTuner and Subscription are required. For moreinformation, visit www.siriusxm.com.To subscribe to the SiriusXMSatellite Radio service1 Switch the source to SiriusXM.You should be able to tune in to Channel 1. Ifyou cannot get Channel 1, make sure that yourSiriusXM Connect Vehicle Tuner is installed cor-rectly as described in the tuner installationguide.2 Switch to Channel 0 and check the RadioID.You will need this number to activate your sub-scription. For details, refer to Displaying theRadio ID on the next page.3 Activate the service either online or byphone.!Go to www.siriusxm.com, and click on ACTI-VATE RADIO to start the activation process.!Call SiriusXM Listener Care at 1-800-XM-RADIO (1-800-967-2346) to activate.#As part of the activation process, the SiriusXMsatellites will send an activation message to your Sir-iusXM Connect Vehicle Tuner. Once the tuner has re-ceived the message, this unit will display“Subscription Updated”. Once the update is com-pleted, you can start tuning in to the channels inyour subscription.The activation process usually takes 10 to 15 minutesbut may take up to an hour in some cases. Do notturn off the unit while the activation message is dis-played.Basic operations3 41 2657 8 91SiriusXM band indicator2Scan play indicator3SiriusXM channel number indicator4SiriusXM preset number indicator5Replay indicator6Title icon indicator7PLAY/PAUSE indicator8Progress bar9Buffer timeSelecting a band1Press BAND/.!Band can be selected from SXM-1,SXM-2or SXM-3.Returning to the current live broadcast1Press and hold BAND/.Using this unit20SectionAvailable accessoriesEn0203
Select a channel.This function is available when Channel is se-lected in Operate Mode. For details, refer toOperate Mode (operation mode setting) on thispage.1Turn LEVER.!By turning and holding down LEVER, youcan increase or decrease the channelnumber continuously.Selecting a trackThis function is available when Replay is selectedin Operate Mode. For details, refer toOperate Mode (operation mode setting) on thispage.1Turn LEVER.Fast forwarding or reversingThis function is available when Replay is selectedin Operate Mode. For details, refer toOperate Mode (operation mode setting) on thispage.1Turn and hold down LEVER to the right or left.Switching the displaySelecting the desired text information%Press /DISP.NoteDepending on the channel, text information canbe changed.Displaying the Radio IDThe SiriusXM Radio ID can be found by tuningto Channel 0. In addition, the Radio ID is locatedon the bottom of the SiriusXM Connect VehicleTuner.Please note that the SiriusXM Radio ID does notinclude the letters I, O, S or F.Scan playContent scanThis unit will scan the channels to allow you tolisten to the beginning of the songs from eachtrack.You can listen to recent broadcast tracks fromthe preset channels.For details, refer to Content Scan (scanning thecontent) on this page.Category scanYou can listen to the live broadcast from eachchannel in the current category.For details, refer to Channel list categories onthis page.Switching to the channel currently playing in scanplay1Press M.C.Switching to the next song during the scan play1Turn LEVER to the right.1Press and hold BAND/.Quitting scan playThis unit will receive the selected channel beforethe scan play.1Press BAND/.List menuYou can select a channel from the list.Selecting a channel from the channel listYou can select a channel from any of the avail-able channels.1 Press (list).2 Turn M.C. to display All Channels andpress to select.3 Turn M.C. to select a channel.!Press to change the display.Channel name—artist name—song title—content information4 Press M.C. to receive the channel.Setting preset channelsYou can store your favorite channels as presetsand recall them later on.1 Press (list).2 Turn M.C. to display Presets and press toselect.3 Turn M.C. to select a preset channel.4 Press and hold M.C. to store the currentchannel as a preset.5 Press M.C. to recall the preset channel.#You can tune the channel up or down manuallyby pressing or .Channel list categoriesYou can select a channel from the current cate-gory.The available categories will depend on the avail-able channels.1 Press (list).2 Turn M.C. to display Category and pressto select.3 Turn M.C. to select a channel.4 Press M.C. to receive the channel.Press and hold M.C. to switch to scan play. Fordetails, refer to Scan play on this page.Function and operation1 Press M.C. to display the main menu.2 Turn M.C. to change the menu optionand press to select FUNCTION.3 Turn M.C. to select the function.Once selected, the following functions can beadjusted.Pause (pause)Press M.C. to pause or resume.Operate Mode (operation mode setting)1Press M.C. to select the desired setting.Channel (channel)—Replay (Replay)!You can also toggle between operation modesby pressing .Content Scan (scanning the content)1Press M.C. to switch to scan play. For details,refer to Scan play on this page.Tune Start (tune start)You can select where to start the broadcast whenswitching to a preset channel.1Press M.C. to select the desired setting.You can select any one of the options in the fol-lowing list:!ON –The broadcast will start from the be-ginning of a saved song/program.!OFF –The broadcast will start from the cur-rent live program.Parental Control (Parental Control)For details, refer to Setting Parental Control on thenext page.EnglishAvailable accessories21SectionAvailable accessoriesEn03
Setting Parental ControlThe SiriusXM Parental Control feature allowsyou to control access to channels that you con-sider inappropriate for younger listener.When enabled, the Parental Control feature re-quires you to enter a passcode to tune to thelocked channels.1 Display Parental Control.2 Press M.C. to display the passcode inputscreen.The default passcode is 0000.3 Turn M.C. to select a number.4 Press M.C. to move the cursor to the nextposition.5 After inputting passcode, press M.C.You will be able to proceed to the next step if youenter the correct passcode.6 Turn M.C. to select the function.Once selected, the following functions can beadjusted.Locked Channels (locking the channels)Access to the current broadcast channel can belocked. You will need to enter your passcode inorder to access a locked channel.1Press M.C. to select the desired setting.2Press M.C. to turn the lock on or off.Clear all (clearing all channel locks)You can clear the locks from all locked channelsat the same time.1Press M.C. to select the desired setting.2Turn M.C. to switch to YES.3Press M.C.Edit Code (changing the passcode)You can change your passcode.1Press M.C. to display the setting mode.Enter your current passcode.!The default passcode is 0000.2Turn M.C. to select a number.3Press M.C. to move the cursor to the next posi-tion.4After inputting passcode, press M.C.Enter a new passcode.5Turn M.C. to select a number.6Press M.C. to move the cursor to the next posi-tion.7After inputting passcode, press M.C.The new passcode is saved.ConnectionsWARNING!Use speakers over 50 W (output value) andbetween 4 Wto 8 W(impedance value). Donot use 1 Wto 3 Wspeakers for this unit.!The black cable is ground. When installingthis unit or power amp (sold separately),make sure to connect the ground wire first.Ensure that the ground wire is properly con-nected to metal parts of the car’s body. Theground wire of the power amp and the one ofthis unit or any other device must be con-nected to the car separately with differentscrews. If the screw for the ground wire loos-ens or falls out, it could result in fire, genera-tion of smoke or malfunction.Ground wireMetal parts of car’s bodyPOWER AMPOther devices(Another electronic device in the car)Important!When installing this unit in a vehicle withoutan ACC (accessory) position on the ignitionswitch, failure to connect the red cable to theterminal that detects operation of the ignitionkey may result in battery drain.ONSTARTOFFACC position No ACC position!Use this unit with a 12-volt battery and nega-tive grounding only. Failure to do so may re-sult in a fire or malfunction.!To prevent a short-circuit, overheating or mal-function, be sure to follow the directionsbelow.—Disconnect the negative terminal of the bat-tery before installation.—Secure the wiring with cable clamps or adhe-sive tape. Wrap adhesive tape around wiringthat comes into contact with metal parts toprotect the wiring.—Place all cables away from moving parts,such as the shift lever and seat rails.—Place all cables away from hot places, suchas near the heater outlet.—Do not connect the yellow cable to the batteryby passing it through the hole to the enginecompartment.—Cover any disconnected cable connectorswith insulating tape.—Do not shorten any cables.—Never cut the insulation of the power cable ofthis unit in order to share the power withother devices. The current capacity of thecable is limited.—Use a fuse of the rating prescribed.—Never wire the negative speaker cable directlyto ground.—Never band together negative cables of multi-ple speakers.!When this unit is on, control signals are sentthrough the blue/white cable. Connect thiscable to the system remote control of an ex-ternal power amp or the vehicle’s auto-anten-na relay control terminal (max. 300 mA12 V DC). If the vehicle is equipped with aglass antenna, connect it to the antennabooster power supply terminal.!Never connect the blue/white cable to thepower terminal of an external power amp.Also, never connect it to the power terminalof the auto antenna. Doing so may result inbattery drain or a malfunction.Available accessories22SectionInstallationEn0304
This unit234596 abedc7181USB port2Antenna input15 cm (5-7/8 in.)3Sirius XM BUS input (DEH-X8500BS andDEH-X7500S only)4Fuse (10 A)5Power cord input6Wired remote input (DEH-X7500HD andDEH-X7500S only)Hard-wired remote control adapter can beconnected (sold separately).7Microphone input (DEH-X8500BH and DEH-X8500BS only)8Microphone (DEH-X8500BH and DEH-X8500BS only)4 m (13 ft. 1 in.)9Rear outputaFront outputbSubwoofer outputcUSB cable1.5 m (4 ft. 11 in.)dSiriusXM BUS cable (sold separately)eSiriusXM Connect Vehicle Tuner (sold sepa-rately)Power cordPerform these connections when not connect-ing a rear speaker lead to a subwoofer.189cd632457abefhigLRFRPerform these connections when using a sub-woofer without the optional amplifier.189cd63247ababefighLRFSWjkdclm1To power cord input2Left3Right4Front speaker5Rear speaker6White7White/black8Gray9Gray/blackaGreenbGreen/blackcVioletdViolet/blackeBlack (chassis ground)Connect to a clean, paint-free metal location.fYellowConnect to the constant 12 V supply termi-nal.gRedConnect to terminal controlled by ignitionswitch (12 V DC).hBlue/whiteConnect to system control terminal of thepower amp or auto-antenna relay control ter-minal (max. 300 mA 12 V DC).iOrange/whiteConnect to lighting switch terminal.jSubwoofer (4 W)kWhen using a subwoofer of 70 W (2 W), besure to connect the subwoofer to the violetand violet/black leads of this unit. Do notconnect anything to the green and green/black leads.lNot used.mSubwoofer (4 W)×2Notes!With a 2 speaker system, do not connect any-thing to the speaker leads that are not con-nected to speakers.!Change the initial setting of this unit. Referto S/W control (rear output and subwoofersetting) on page 19.The subwoofer output of this unit is monau-ral.Power amp (sold separately)Perform these connections when using the op-tional amplifier.1132455326771328991System remote controlConnect to Blue/white cable.2Power amp (sold separately)3Connect with RCA cables (sold separately)4To Rear output5Rear speaker6To Front output7Front speaker8To subwoofer output9SubwooferInstallationImportant!Check all connections and systems beforefinal installation.!Do not use unauthorized parts as this maycause malfunctions.!Consult your dealer if installation requiresdrilling of holes or other modifications to thevehicle.!Do not install this unit where:—it may interfere with operation of the vehicle.—it may cause injury to a passenger as a resultof a sudden stop.EnglishInstallation23SectionInstallationEn04
!The semiconductor laser will be damaged ifit overheats. Install this unit away from hotplaces such as near the heater outlet.!Optimum performance is obtained when theunit is installed at an angle of less than 60°.60°!When installing, to ensure proper heat dis-persal when using this unit, make sure youleave ample space behind the rear panel andwrap any loose cables so they are not block-ing the vents.5cmcmLeave ample space 5 cm5 cmDIN front/rear mountThis unit can be properly installed using eitherfront-mount or rear-mount installation.Use commercially available parts when instal-ling.DIN Front-mount1 Insert the mounting sleeve into the dash-board.For installation in shallow spaces, use the sup-plied mounting sleeve. If there is enough space,use the mounting sleeve that came with the ve-hicle.2 Secure the mounting sleeve by using ascrewdriver to bend the metal tabs (90°) intoplace.121Dashboard2Mounting sleeve#Make sure that the unit is installed securely inplace. An unstable installation may cause skippingor other malfunctions.DIN Rear-mount1 Determine the appropriate positionwhere the holes on the bracket and the sideof the unit match.2 Tighten two screws on each side.1231Screw2Mounting bracket3Dashboard or console!Use either truss (5 mm × 8 mm) or flush sur-face (5 mm × 9 mm) screws, depending onthe bracket screw holes.Removing the unit1 Remove the trim ring.1Trim ring2Notched tab!Releasing the front panel allows easier ac-cess to the trim ring.!When reattaching the trim ring, point theside with the notched tab down.2 Insert the supplied extraction keys intoboth sides of the unit until they click intoplace.3 Pull the unit out of the dashboard.Removing and re-attaching thefront panelYou can remove the front panel to protect yourunit from theft.Press the detach button and push the frontpanel upward and pull it toward you.For details, refer to Removing the front panel toprotect your unit from theft and Re-attaching thefront panel on page 5.Securing the front panelThe front panel can be secured with the sup-plied screw.11ScrewInstallation24SectionInstallationEn04
Installing the microphone!Only for DEH-X8500BH and DEH-X8500BSCAUTIONIt is extremely dangerous to allow the micro-phone lead to become wound around the steer-ing column or shift lever. Be sure to install theunit in such a way that it will not obstruct driv-ing.NoteInstall the microphone in a position and orienta-tion that will enable it to pick up the voice of theperson operating the system.When installing the microphoneon the sun visor1 Install the microphone on the micro-phone clip.121Microphone2Microphone clip2 Install the microphone clip on the sunvisor.With the sun visor up, install the microphoneclip. (Lowering the sun visor reduces the voicerecognition rate.)121Microphone clip2ClampUse separately sold clamps to secure thelead where necessary inside the vehicle.When installing the microphoneon the steering column1 Install the microphone on the micro-phone clip.24311Microphone2Microphone base3Microphone clip4Fit the microphone lead into the groove.#Microphone can be installed without using mi-crophone clip. In this case, detach the microphonebase from the microphone clip. To detach the micro-phone base from the microphone clip, slide the mi-crophone base.2 Install the microphone clip on the steer-ing column.2131Double-sided tape2Install the microphone clip on the rear side ofthe steering column.3ClampUse separately sold clamps to secure thelead where necessary inside the vehicle.Adjusting the microphone angleThe microphone angle can be adjusted.EnglishInstallation25SectionInstallationEn04
TroubleshootingSymptom Cause ActionThe displayautomaticallyreturns to theordinary dis-play.You did not per-form any opera-tion withinabout 30 sec-onds.Perform operationagain.The repeatplay rangechanges un-expectedly.Depending onthe repeat playrange, the se-lected rangemay changewhen anotherfolder or track isbeing selectedor during fastforwarding/re-versing.Select the repeatplay range again.A subfolder isnot playedback.Subfolders can-not be playedwhen Folder re-peat (folder re-peat) isselected.Select another re-peat play range.NO XXXX ap-pears when adisplay ischanged (NOTITLE, for ex-ample).There is no em-bedded text in-formation.Switch the displayor play anothertrack/file.No text informa-tion can be ob-tained!Switch thebroadcast station.!Operate thisunit in areas withget good recep-tion condition.The unit ismalfunction-ing.There is inter-ference.You are using adevice, such asa cellularphone, that maycause audibleinterference.Move electricaldevices that maybe causing the in-terference awayfrom the unit.Symptom Cause ActionThe soundfrom theBluetoothaudio sourceis not playedback.There is a call inprogress on aBluetooth con-nected cellularphone.The sound will beplayed back whenthe call is termi-nated.A Bluetoothconnected cel-lular phone iscurrently beingoperated.Do not use thecellular phone atthis time.A call wasmade with aBluetooth con-nected cellularphone and thenimmediately ter-minated. As aresult, commu-nication be-tween this unitand the cellularphone was notterminatedproperly.Reconnect theBluetooth con-nection betweenthis unit and thecellular phone.Error messagesWhen you contact your dealer or your nearestPioneer Service Center, be sure to note the errormessage.CommonMessage Cause ActionAMP ERROR Unit fails to op-erate or speakerconnection isincorrect; pro-tective circuit isactivated.Check the speak-er connection. Ifthe message failsto disappear evenafter the engine isswitched off/on,contact your deal-er or an author-ized PioneerService Stationfor assistance.CD playerMessage Cause ActionERROR-07,11, 12, 17, 30The disc is dirty. Clean the disc.The disc isscratched.Replace the disc.ERROR-10,11, 12, 15,17, 30, A0There is an elec-trical or me-chanical error.Turn the ignitionswitch OFF andback ON, orswitch to a differ-ent source, thenback to the CDplayer.ERROR-15 The inserteddisc is blank.Replace the disc.ERROR-23 UnsupportedCD format.Replace the disc.FORMATREADSometimesthere is a delaybetween thestart of playbackand when youstart to hear anysound.Wait until themessage disap-pears and youhear sound.Message Cause ActionNO AUDIO The inserteddisc does notcontain anyplayable files.Replace the disc.SKIPPED The inserteddisc containsDRM protectedfiles.Replace the disc.PROTECT All the files onthe inserteddisc are em-bedded withDRM.Replace the disc.USB storage device/iPodMessage Cause ActionFORMATREADSometimesthere is a delaybetween thestart of playbackand when youstart to hear anysound.Wait until themessage disap-pears and youhear sound.NO AUDIO There are nosongs.Transfer the audiofiles to the USBstorage deviceand connect.The connectedUSB storage de-vice has secur-ity enabled.Follow the USBstorage device in-structions to dis-able the security.SKIPPED The connectedUSB storage de-vice containsfiles embeddedwith WindowsMediaäDRM 9/10.Play an audio filenot embeddedwith WindowsMedia DRM 9/10.Additional information26AppendixAdditional informationEn
Message Cause ActionPROTECT All the files inthe USB storagedevice are em-bedded withWindows MediaDRM 9/10.Transfer audiofiles not em-bedded withWindows MediaDRM 9/10 to theUSB storage de-vice and connect.NOT COM-PATIBLEThe USB deviceconnected to isnot supportedby this unit.!Connect a USBMass StorageClass compliantdevice.!Disconnectyour device andreplace it with acompatible USBstorage device.Non-compatibleiPodDisconnect yourdevice and re-place it with acompatible iPod.CHECK USB The USB con-nector or USBcable has short-circuited.Check that theUSB connector orUSB cable is notcaught in some-thing or dam-aged.CHECK USB The connectedUSB storage de-vice consumesmore than maxi-mum allowablecurrent.Disconnect theUSB storage de-vice and do notuse it. Turn theignition switch toOFF, then to ACCor ON and thenconnect onlycompliant USBstorage devices.Message Cause ActionCHECK USB The iPod oper-ates correctlybut does notcharge.Make sure theconnection cablefor the iPod hasnot shorted out(e.g., not caughtin metal objects).After checking,turn the ignitionswitch OFF andback ON, or dis-connect the iPodand reconnect.ERROR-19 Communicationfailed.Perform one ofthe following op-erations.–Turn the ignitionswitch OFF andback ON.–Disconnect theUSB storage de-vice.–Change to a dif-ferent source.Then, return tothe USB source.iPod failure. Disconnect thecable from theiPod. Once theiPod’s mainmenu is dis-played, reconnectthe iPod and resetit.ERROR-23 USB storage de-vice was not for-matted withFAT12, FAT16 orFAT32.USB storage de-vice should be for-matted withFAT12, FAT16 orFAT32.Message Cause ActionERROR-16 The iPod firm-ware version isold.Update the iPodversion.iPod failure. Disconnect thecable from theiPod. Once theiPod’s mainmenu is dis-played, reconnectthe iPod and resetit.STOP There are nosongs in thecurrent list.Select a list thatcontains songs.Not found No relatedsongs.Transfer songs tothe iPod.Bluetooth deviceMessage Cause ActionERROR-10 The power failedfor theBluetooth mod-ule of this unit.Turn the ignitionswitch OFF andthen to ACC orON.If the error mes-sage is still dis-played afterperforming theabove action,please contactyour dealer or anauthorizedPioneer ServiceStation.PandoraMessage Cause ActionERROR-19 Communicationfailed.Disconnect thecable from theiPod. Once theiPod’s mainmenu is dis-played, reconnectthe iPod and resetit.Start up thePandora Ap-plicationThe Pandora ap-plication hasnot started run-ning yet.Start up thePandora applica-tion from youriPhone.Can’t oper-ateThe operationwas disabled.Run the samecommand for an-other track.Try againlaterCommunica-tions failed.Try again later.MAINTE-NANCEPandora systemis undergoingmaintenance.Try again later.Skip limitreachedSkip limitreached.Do not exceed theskip limit.Check Appli-cationThis version ofthe Pandora ap-plication is notsupported.Connect aniPhone that has acompatible ver-sion of thePandora applica-tion installed.Check Device Device errormessage dis-played inPandora Appli-cation.Unable to playmusic fromPandora.Please check youriPhone.EnglishAdditional information27AppendixAdditional informationEn
Message Cause ActionNo AvailableStationNo stationfound.Create a stationin the Pandoraapplication onyour iPhone.No ActiveStationsNo station se-lected.Select a station.SiriusXM Satellite RadioMessage Cause ActionCheck An-tennaThe antennaconnection isincorrect.Check the anten-na connection. Ifthe message failsto disappear evenafter the engine isswitched off/on,contact your deal-er or an author-ized PioneerService Stationfor assistance.Check Tun-nerThe SiriusXMConnect VehicleTuner connec-tion is incorrect.Check the tunnerconnection. If themessage fails todisappear evenafter the engine isswitched off/on,contact your deal-er or an author-ized PioneerService Stationfor assistance.Message Cause ActionNo Signal The SiriusXMConnect VehicleTuner is havingdifficulty receiv-ing the Sir-iusXM satellitesignal.!Verify that yourvehicle is out-doors with a clearview of the south-ern sky.!Verify that theSiriusXM mag-netic mount an-tenna is mountedon a metal sur-face on the out-side the vehicle.!Move the Sir-iusXM antennaaway from any ob-structions.SubscriptionUpdatedThis unit has de-tected a changein your Sir-iusXM subscrip-tion status.Press any keys toclear the mes-sage.Not Avail-ableThe channelthat you haverequested is nota valid SiriusXMchannel.Check the Sir-iusXM channellineup.Not Sub-scribedThe channelthat you haverequested is notincluded in yourSiriusXM sub-scription pack-age.Check the con-tent of your Sir-iusXM subscrip-tion package.ChannelLockedLocked by theradio ParentalControl feature.Release the chan-nel lock.Handling guidelinesDiscs and playerUse only discs that feature either of the followingtwo logos.Use 12-cm discs. Do not use 8-cm discs or anadapter for 8-cm discs.Use only conventional, fully circular discs. Do notuse shaped discs.Do not insert anything other than a CD into theCD loading slot.Do not use cracked, chipped, warped, or other-wise damaged discs as they may damage the play-er.Unfinalized CD-R/RW discs cannot be playedback.Do not touch the recorded surface of the discs.Store discs in their cases when not in use.Do not attach labels, write on or apply chemicalsto the surface of the discs.To clean a CD, wipe the disc with a soft cloth out-ward from the center.Condensation may temporarily impair the player’sperformance. Let it rest for about one hour to ad-just to a warmer temperature. Also, wipe anydamp discs off with a soft cloth.Playback of discs may not be possible because ofdisc characteristics, disc format, recorded applica-tion, playback environment, storage conditions,and so on.Road shocks may interrupt disc playback.Read the precautions for discs before using them.When using discs that can be printed on label sur-faces, check the instructions and the warnings ofthe discs. Depending on the discs, inserting andejecting may not be possible. Using such discsmay result in damage to this equipment.Do not attach commercially available labels orother materials to the discs.!The discs may warp making the disc unplay-able.!The labels may come off during playback andprevent ejection of the discs, which may resultin damage to the equipment.USB storage deviceAddress any questions you have about your USBstorage device to the manufacturer of the device.Connections via USB hub are not supported.Do not connect anything other than a USB stor-age device.Firmly secure the USB storage device when driv-ing. Do not let the USB storage device fall onto thefloor, where it may become jammed under thebrake or accelerator pedal.Depending on the USB storage device, the follow-ing problems may occur.!Operations may vary.!The storage device may not be recognized.!Files may not be played back properly.!The device may cause audible interferencewhen you are listening to the radio.Additional information28AppendixAdditional informationEn
iPodTo ensure proper operation, connect the dock con-nector cable from the iPod directly to this unit.Firmly secure the iPod when driving. Do not let theiPod fall onto the floor, where it may becomejammed under the brake or accelerator pedal.About iPod settings!When an iPod is connected, this unit changesthe EQ (equalizer) setting of the iPod to off inorder to optimize the acoustics. When you dis-connect the iPod, the EQ returns to the originalsetting.!You cannot set Repeat to off on the iPod whenusing this unit. Repeat is automaticallychanged to All when the iPod is connected tothis unit.Incompatible text saved on the iPod will not be dis-played by the unit.DualDiscsDualDiscs are two-sided discs that have a record-able CD for audio on one side and a recordableDVD for video on the other.Since the CD side of DualDiscs is not physicallycompatible with the general CD standard, it maynot be possible to play the CD side with this unit.Frequent loading and ejecting of a DualDisc mayresult in scratches on the disc. Serious scratchescan lead to playback problems on this unit. Insome cases, a DualDisc may become stuck in thedisc loading slot and will not eject. To prevent this,we recommend you refrain from using DualDiscwith this unit.Please refer to the information from the disc man-ufacturer for more detailed information aboutDualDiscs.CAUTIONDo not leave discs, a USB storage device, or aniPod in any place that is subject to high temper-atures.Compressed audiocompatibility (disc, USB)WMAFile extension: .wmaBit rate: 48 kbps to 320 kbps (CBR), 48 kbps to384 kbps (VBR)Sampling frequency: 32 kHz, 44.1 kHz, 48 kHzWindows MediaäAudio Professional, Lossless,Voice/DRM Stream/Stream with video: Not com-patibleMP3File extension: .mp3Bit rate: 8 kbps to 320 kbps (CBR), VBRSampling frequency: 8 kHz to 48 kHz (32 kHz,44.1 kHz, 48 kHz for emphasis)Compatible ID3 tag version: 1.0, 1.1, 2.2, 2.3, 2.4(ID3 tag Version 2.x is given priority over Version1.x.)M3u playlist: Not compatibleMP3i (MP3 interactive), mp3 PRO: Not compatibleWAVFile extension: .wavQuantization bits: 8 and 16 (LPCM), 4 (MSADPCM)Sampling frequency: 16 kHz to 48 kHz (LPCM),22.05 kHz and 44.1 kHz (MS ADPCM)AACCompatible format: AAC encoded by iTunesFile extension: .m4aSampling frequency: 11.025 kHz to 48 kHzTransmission rate: 16 kbps to 320 kbps, VBRApple Lossless: Not compatibleAAC file bought from the iTunes Store (.m4p fileextension): Not compatibleSupplemental informationOnly the first 32 characters can be displayed as afile name (including the file extension) or a foldername.This unit may not work properly depending on theapplication used to encode WMA files.There may be a slight delay at the start of playbackof audio files embedded with image data or audiofiles stored on a USB storage device that has nu-merous folder hierarchies.DiscPlayable folder hierarchy: up to eight tiers (A prac-tical hierarchy is less than two tiers.)Playable folders: up to 99Playable files: up to 999File system: ISO 9660 Level 1 and 2, Romeo, JolietMulti-session playback: CompatiblePacket write data transfer: Not compatibleRegardless of the length of blank sections be-tween the songs from the original recording, com-pressed audio discs play with a short pausebetween songs.USB storage devicePlayable folder hierarchy: up to eight tiers (A prac-tical hierarchy is less than two tiers.)Playable folders: up to 1 500Playable files: up to 15 000Playback of copyright-protected files: Not compati-blePartitioned USB storage device: Only the first par-tition can be played.There may be a slight delay when starting play-back of audio files on a USB storage device withnumerous folder hierarchies.CAUTION!Pioneer accepts no responsibility for datalost on the USB storage device even if thatdata is lost while using this unit.!Pioneer cannot guarantee compatibility withall USB mass storage devices and assumesno responsibility for any loss of data onmedia players, smart phones, or other devi-ces while using this product.iPod compatibilityThis unit supports only the following iPod mod-els. Supported iPod software versions are shownbelow. Older versions may not be supported.EnglishAdditional information29AppendixAdditional informationEn
Made for!iPod touch 4th generation (software version5.1.1)!iPod touch 3rd generation (software version5.1.1)!iPod touch 2nd generation (software version4.2.1)!iPod touch 1st generation (software version3.1.3)!iPod classic 160GB (software version 2.0.4)!iPod classic 120GB (software version 2.0.1)!iPod classic (software version 1.1.2)!iPod with video (software version 1.3.0)!iPod nano 6th generation (software version1.2)!iPod nano 5th generation (software version1.0.2)!iPod nano 4th generation (software version1.0.4)!iPod nano 3rd generation (software version1.1.3)!iPod nano 2nd generation (software version1.1.3)!iPod nano 1st generation (software version1.3.1)!iPhone 4S (software version 5.1.1)!iPhone 4 (software version 5.1.1)!iPhone 3GS (software version 5.1.1)!iPhone 3G (software version 4.2.1)!iPhone (software version 3.1.2)Depending on the generation or version of theiPod, some functions may not be available.Operations may vary depending on the softwareversion of iPod.When using an iPod, an iPod Dock Connector toUSB Cable is required.A Pioneer CD-IU51 interface cable is also avail-able. For details, consult your dealer.About the file/format compatibility, refer to theiPod manuals.Audiobook, Podcast: CompatibleCAUTIONPioneer accepts no responsibility for data loston the iPod, even if that data is lost while thisunit is used.Sequence of audio filesThe user cannot assign folder numbers andspecify playback sequences with this unit.Example of a hierarchyLevel 1  Level 2  Level 3  Level 4 0102030405: Folder: Compressedaudio file01 to 05: Foldernumber1to 6: PlaybacksequenceDiscFolder selection sequence or other operationmay differ depending on the encoding or writingsoftware.USB storage devicePlayback sequence is the same as recorded se-quence in the USB storage device.To specify the playback sequence, the followingmethod is recommended.1Create a file name that includes numbersthat specify the playback sequence (e.g.,001xxx.mp3 and 099yyy.mp3).2Put those files into a folder.3Save the folder containing files on the USBstorage device.However, depending on the system environment,you may not be able to specify the playback se-quence.For USB portable audio players, the sequence isdifferent and depends on the player.Bluetooth profilesIn order to use Bluetooth wireless technology,devices must be able to interpret certain pro-files. This unit is compatible with the followingprofiles.!GAP (Generic Access Profile)!OPP (Object Push Profile)!HFP (Hands Free Profile) 1.5!HSP (Head Set Profile)!PBAP (Phone Book Access Profile)!A2DP (Advanced Audio Distribution Profile)!AVRCP (Audio/Video Remote Control Profile)1.0Copyright and trademarkBluetoothThe Bluetoothâword mark and logos are regis-tered trademarks owned by Bluetooth SIG, Inc.and any use of such marks by PIONEERCORPORATION is under license. Other trade-marks and trade names are those of their re-spective owners.iTunesApple and iTunes are trademarks of Apple Inc.,registered in the U.S. and other countries.MP3Supply of this product only conveys a license forprivate, non-commercial use and does not con-vey a license nor imply any right to use this prod-uct in any commercial (i.e. revenue-generating)real time broadcasting (terrestrial, satellite,cable and/or any other media), broadcasting/streaming via internet, intranets and/or othernetworks or in other electronic content distribu-tion systems, such as pay-audio or audio-on-de-mand applications. An independent license forsuch use is required. For details, please visithttp://www.mp3licensing.com.WMAWindows Media is either a registered trademarkor trademark of Microsoft Corporation in theUnited States and/or other countries.This product includes technology owned byMicrosoft Corporation and cannot be used ordistributed without a license from MicrosoftLicensing, Inc.iPod & iPhoneiPhone, iPod, iPod classic, iPod nano, and iPodtouch are trademarks of Apple Inc., registered inthe U.S. and other countries.“Made for iPod”and “Made for iPhone”meanthat an electronic accessory has been designedto connect specifically to iPod or iPhone, respec-tively, and has been certified by the developer tomeet Apple performance standards. Apple isnot responsible for the operation of this deviceor its compliance with safety and regulatorystandards. Please note that the use of this ac-cessory with iPod or iPhone may affect wirelessperformance.AndroidäAndroid is a trademark of Google Inc.Additional information30AppendixAdditional informationEn
SiriusXM Satellite RadioSiriusXM and all related marks and logos aretrademarks of Sirius XM Radio, Inc. All rights re-served.PandoraPandora is a registered trademark of PandoraMedia, Inc.MIXTRAXMIXTRAX is a trademark of the PIONEERCORPORATION.SpecificationsGeneralPower source ................... 14.4 V DC (10.8 V to 15.1 V al-lowable)Grounding system ............ Negative typeMaximum current consumption................................... 10.0 ADimensions (W × H × D):DINChassis .............. 178mm × 50mm ×165 mm(7 in. × 2 in. × 6-1/2 in.)Nose .................. 188 mm × 58mm ×18 mm(7-3/8 in.× 2-1/4 in.× 3/4 in.)DChassis .............. 178mm × 50mm ×165 mm(7 in.× 2 in.× 6-1/2 in.)Nose .................. 170 mm × 46mm ×18 mm(6-3/4 in.× 1-3/4 in.× 3/4 in.)Weight ............................. 1.2 kg (2.6 lbs)AudioMaximum power output ... 50 W × 450 W × 2/4 W+70W×1/2W(for subwoofer)Continuous power output................................... 22 W × 4 (50 Hz to 15000 Hz,5 % THD, 4 Wload, both chan-nels driven)Load impedance .............. 4 Wto 8 W×44Wto 8 W×2+2W×1Preout maximum output level................................... 4.0 VEqualizer (5-Band Graphic Equalizer):Frequency ................. 100 Hz/315 Hz/1.25 kHz/3.15 kHz/8 kHzGain ......................... ±12 dBHPF:Frequency ................. 50 Hz/63 Hz/80 Hz/100 Hz/125 HzSlope ........................ –12 dB/octSubwoofer (mono):Frequency ................. 50 Hz/63 Hz/80 Hz/100 Hz/125 HzSlope ........................ –18 dB/octGain ......................... +6 dB to –24 dBPhase ....................... Normal/ReverseBass boost:Gain ......................... +12 dB to 0 dBCD playerSystem ............................ Compact disc audio systemUsable discs .................... Compact discSignal-to-noise ratio ......... 94 dB (1 kHz) (IHF-A network)Number of channels ........ 2 (stereo)MP3 decoding format ...... MPEG-1 & 2 Audio Layer 3WMA decoding format ..... Ver. 7, 7.1, 8, 9, 10, 11, 12 (2 chaudio)(Windows Media Player)AAC decoding format ....... MPEG-4 AAC (iTunes encodedonly) (.m4a)(Ver. 9.2 and earlier)WAV signal format ........... Linear PCM & MS ADPCM(Non-compressed)USBUSB standard specification................................... USB 2.0 full speedMaximum current supply................................... 1 AUSB Class ....................... MSC (Mass Storage Class)File system ....................... FAT12, FAT16, FAT32MP3 decoding format ...... MPEG-1 & 2 Audio Layer 3WMA decoding format ..... Ver. 7, 7.1, 8, 9, 10, 11, 12 (2 chaudio)(Windows Media Player)AAC decoding format ....... MPEG-4 AAC (iTunes encodedonly) (.m4a)(Ver. 9.2 and earlier)WAV signal format ........... Linear PCM & MS ADPCM(Non-compressed)FM tunerFrequency range .............. 87.9 MHz to 107.9 MHzUsable sensitivity ............. 9 dBf (0.8 µV/75 W, mono, S/N:30 dB)Signal-to-noise ratio ......... 80 dB (digital broadcasting)(IHF-A network)Signal-to-noise ratio ......... 72 dB (analog broadcasting)(IHF-A network)EnglishAdditional information31AppendixAdditional informationEn
AM tunerFrequency range .............. 530 kHz to 1 710 kHzUsable sensitivity ............. 25 µV (S/N: 20 dB)Signal-to-noise ratio ......... 80 dB (digital broadcasting)(IHF-A network)Signal-to-noise ratio ......... 62 dB (analog broadcasting)(IHF-A network)BluetoothVersion ............................ Bluetooth 3.0 certifiedOutput power ................... +4 dBm Maximum(Power class 2)CEA2006 SpecificationsPower output ................... 14 W RMS × 4 Channels (4 Wand ≦1 % THD+N)S/N ratio .......................... 91 dBA (reference: 1 W into4W)NoteSpecifications and the design are subject tomodifications without notice.Additional information32AppendixEn
English33En
34 En
English35En
PIONEER CORPORATION1-1, Shin-ogura, Saiwai-ku, Kawasaki-shi,Kanagawa 212-0031, JAPANPIONEER ELECTRONICS (USA) INC.P.O. Box 1540, Long Beach, California 90801-1540, U.S.A.TEL: (800) 421-1404PIONEER EUROPE NVHaven 1087, Keetberglaan 1, B-9120 Melsele, Belgium/BelgiqueTEL: (0) 3/570.05.11PIONEER ELECTRONICS ASIACENTRE PTE. LTD.253 Alexandra Road, #04-01, Singapore 159936TEL: 65-6472-7555PIONEER ELECTRONICS AUSTRALIA PTY. LTD.5 Arco Lane, Heatherton, Victoria, 3202 AustraliaTEL: (03) 9586-6300PIONEER ELECTRONICS OF CANADA, INC.340 Ferrier Street, Unit 2, Markham, Ontario L3R 2Z5, CanadaTEL: 1-877-283-5901TEL: 905-479-4411PIONEER ELECTRONICS DE MEXICO, S.A. de C.V.Blvd.Manuel Avila Camacho 138 10 pisoCol.Lomas de Chapultepec, Mexico, D.F. 11000TEL: 55-9178-4270先鋒股份有限公司台北市內湖區瑞光路407號8樓電話:886-(0)2-2657-3588先鋒電子(香港)有限公司香港九龍長沙灣道909號5樓電話:852-2848-6488ã2011 PIONEER CORPORATION.All rights reserved.Printed in Thailand<QRD3150-A/N> UC<KOKZX> <12F00000>

Navigation menu