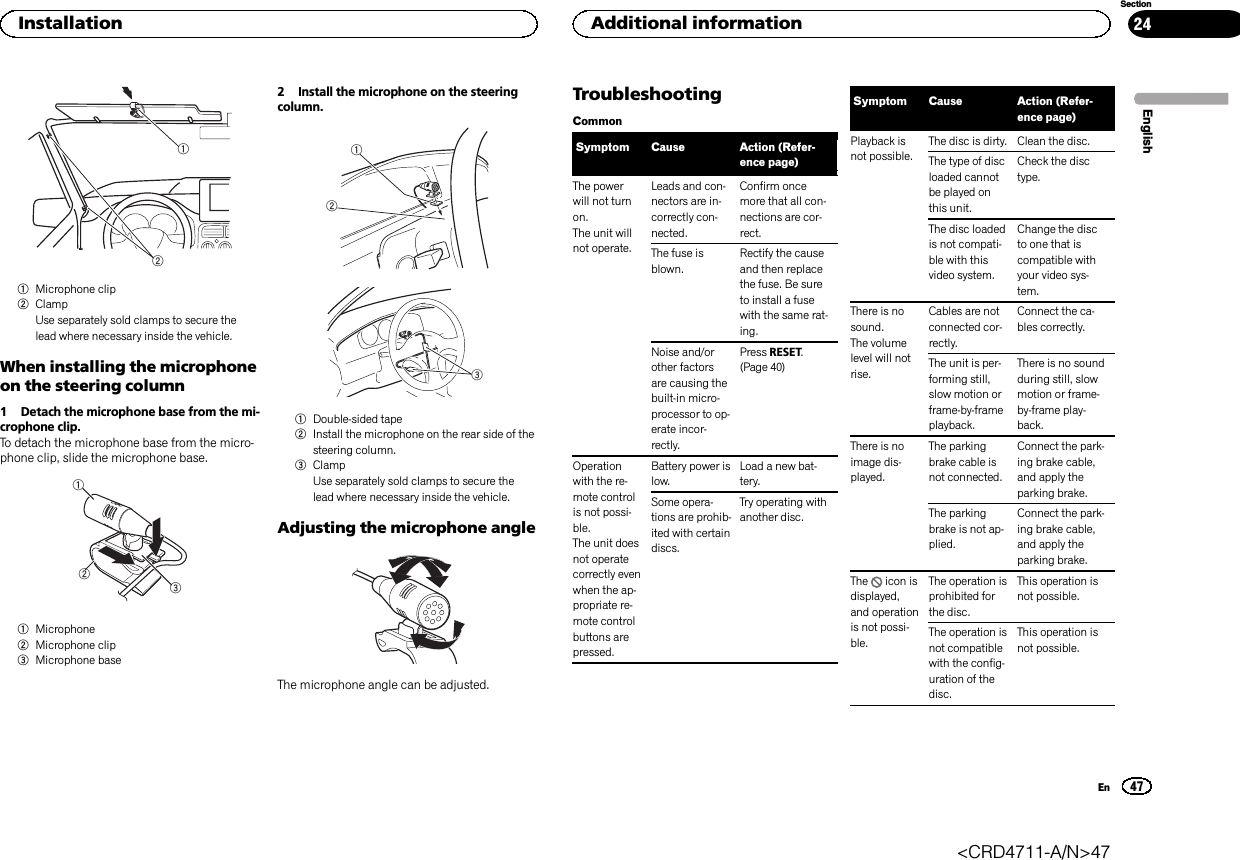
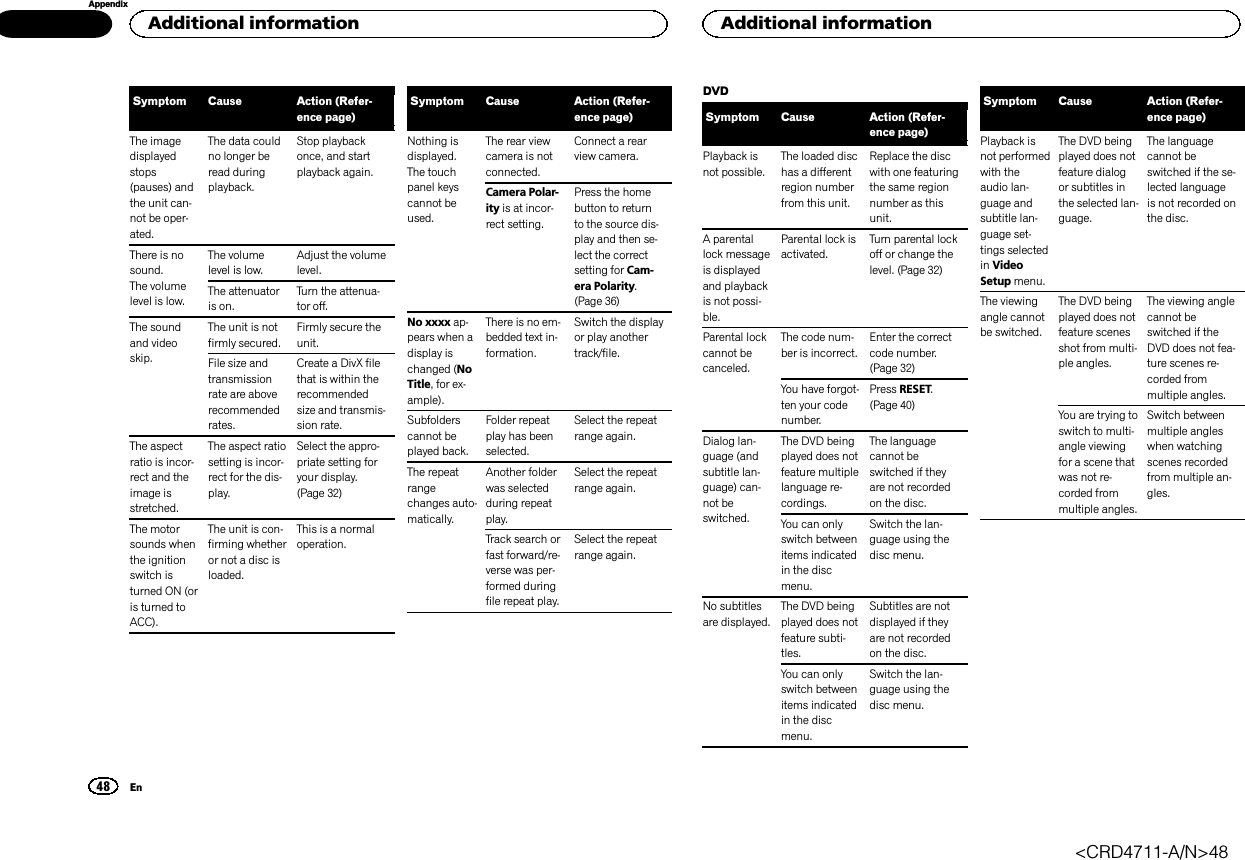
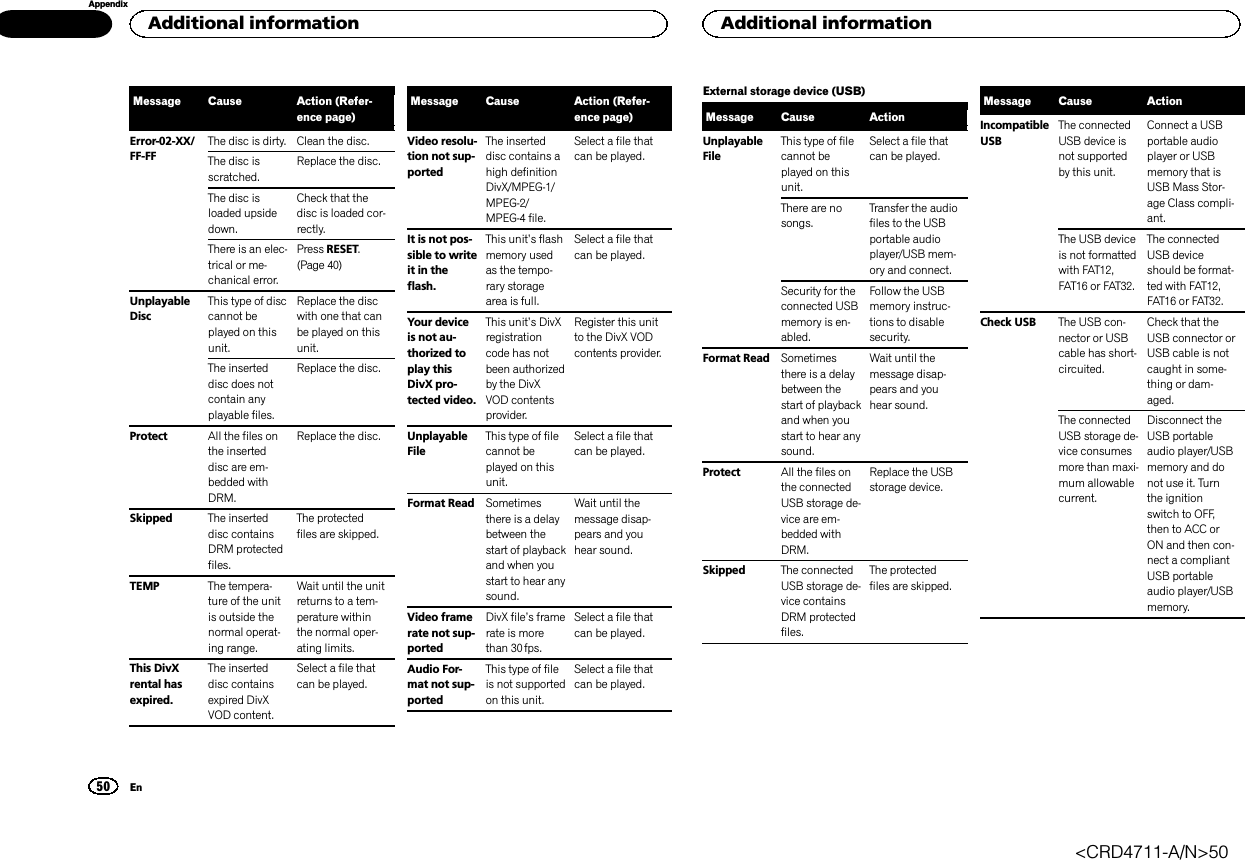
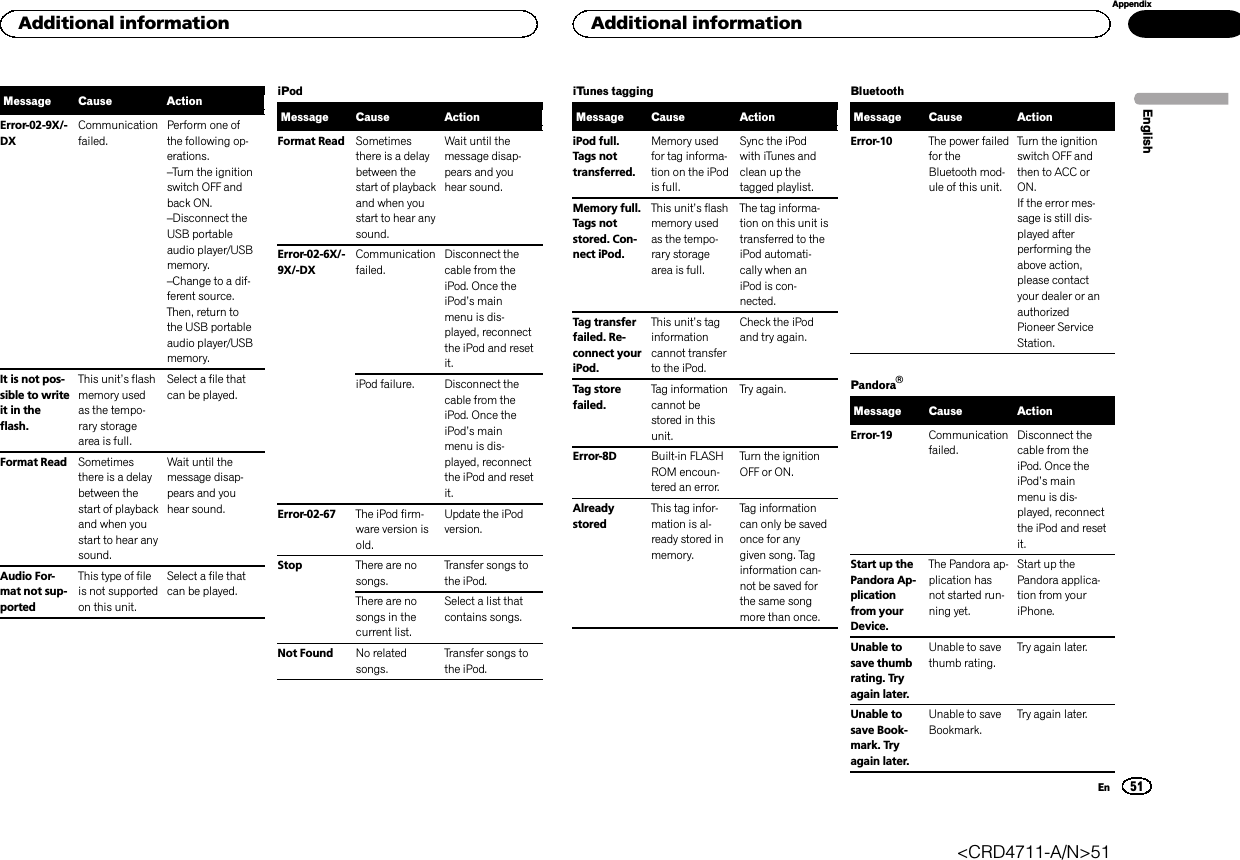
Pioneer K062 DVD RDS AV RECEIVER User Manual 05 Short Term Confidential 1

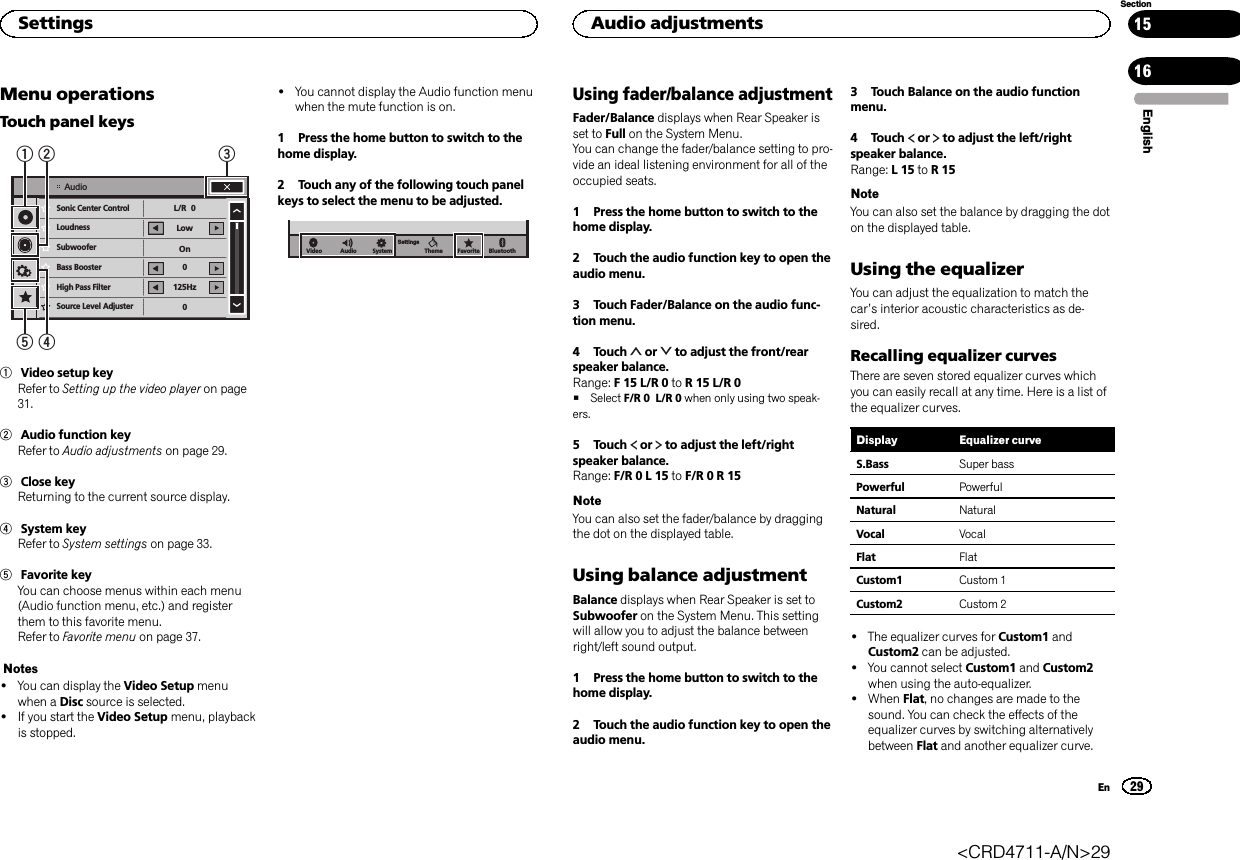
Pioneer Corporation DVD RDS AV RECEIVER 05 Short Term Confidential 1

Contents

05_[Short Term Confidential]User Manual1
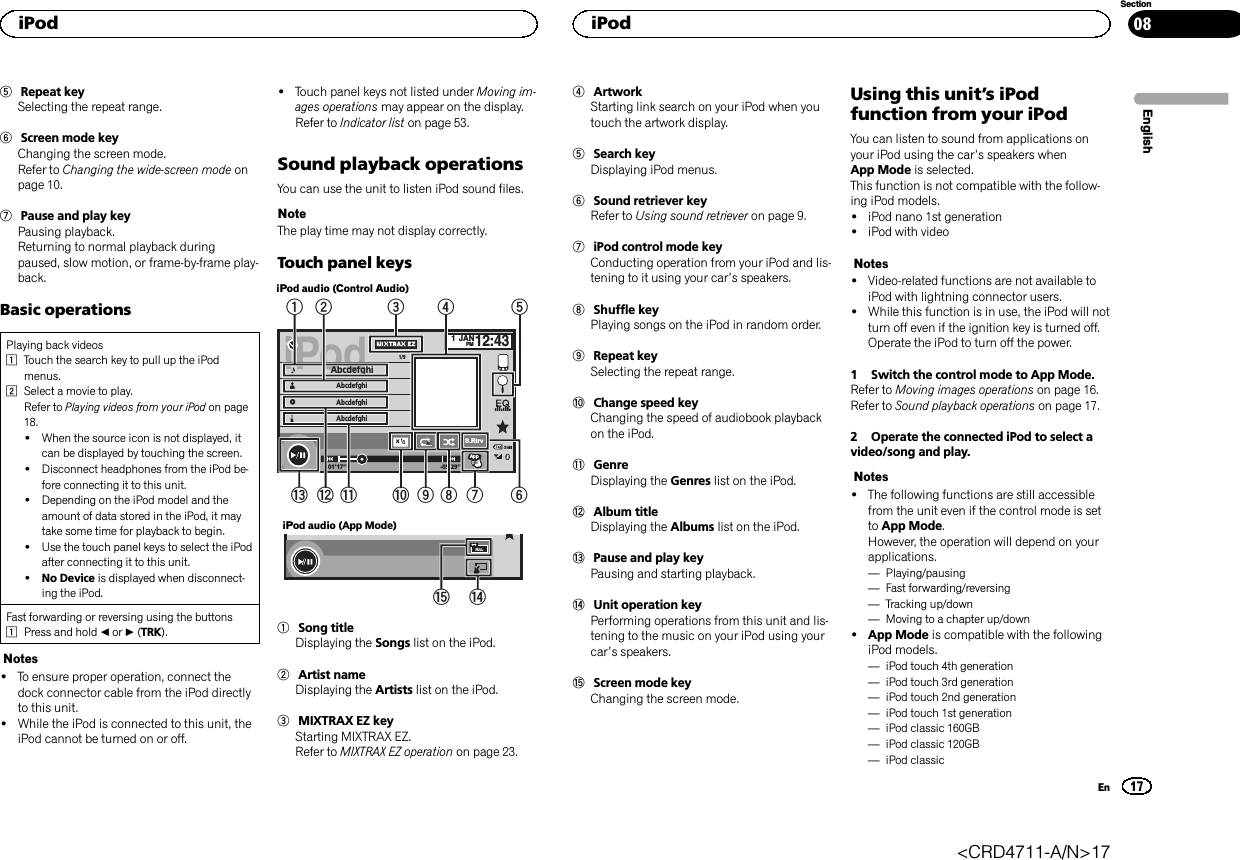
Owner’s ManualMode d’emploiManual de instruccionesDVD RDS AV RECEIVERAUTORADIO AV RDS LECTEUR DE DVDRADIO AV RDS CON DVDAVH-X7500BTAVH-X6500DVD<CRD4711-A/N>1English EspañolFrançais
PrecautionsIMPORTANT SAFEGUARDS 3To ensure safe driving 3To avoid battery exhaustion 4Before you startInformation to User 4The Safety of Your Ears is in YourHands 5About this unit 5DVD video disc region numbers 5About this manual 5After-sales service for Pioneerproducts 5Visit our website 5Protecting your unit from theft 6Use and care of the remote control 6Demo mode 6What’s whatHead unit 7Home display 7Turning the source ON/OFF 7Selecting a source 8Adjusting the volume 8Remote control 8Common operationsCommon operations for menu settings/lists 9Operating the scroll icon and the scrubberbar 9Activating the touch panel keys 9Using the rear view 9Using the rear monitor 9Using sound retriever 9Changing the wide-screen mode 10Basic operationsOpening and closing the LCD panel 10Adjusting the LCD panel slideposition 11Adjusting the LCD panel angle 11Ejecting a disc 11Setting the clock 11TunerTuner operations 12Storing and recalling stations 12Storing the strongest stations 12Tuning in to strong signals 12Using iTunes tagging 12Disc (CD/DVD)Introducing movie operations 13Sound playback operations 14Switching the media file type 14Operating the DVD menu 14Random play (shuffle) 15Repeating playback 15Searching for the part you want toplay 15Selecting audio output 15PBC playback 15Selecting tracks from the track titlelist 15Selecting files from the file name list 15Playing DivXâVOD content 16iPodiPod control 16Moving images operations 16Sound playback operations 17Using this unit’s iPod function from youriPod 17Shuffle play 18Repeating playback 18Playing videos from your iPod 18Browsing for a video/music on theiPod 18Changing audiobook speed 18Displaying lists related to the song currentlyplaying (link search) 19AppRadio ModeAppRadio Mode operation 19Starting procedure 20Setting the Keyboard 20Setting the App sound mixing 20USBSound playback operations 21Music browse mode 21Switching the media file type 21Random play (shuffle) 21Repeating playback 21Selecting files from the file name list 21Displaying lists related to the song currentlyplaying (link search) 21Bluetooth AudioSound playback operations 22Setting up for Bluetooth audio 22Random play (shuffle) 22Repeating playback 22Using MIXTRAXMIXTRAX operation 23MIXTRAX EZ operation 23Starting MIXTRAX EZ operation 23Setting MIXTRAX mode 23Setting the effect 23Streaming PandoraâPandora operations 24Selecting and playing Pandoraâstations/shuffle 25Bluetooth telephoneBluetooth telephone operations 26Calling a number in the phone book 27Selecting a number by alphabet searchmode 27Inverting names in phone book 27Using the missed, received and dialed calllists 27Setting automatic answering 27Adjusting the other party’s listeningvolume 27Switching the ring tone 28Using the preset dial lists 28Making a call by entering phonenumber 28Setting the private mode 28Voice control 28SettingsMenu operations 29Audio adjustmentsUsing fader/balance adjustment 29Using balance adjustment 29Using the equalizer 29Using the auto-equalizer 30Using sonic center control 30Adjusting loudness 30Using subwoofer output 30Boosting the bass 30Using the high pass filter 30Adjusting source levels 31Setting up the video playerSetting the subtitle language 31Setting the audio language 31Setting the menu language 31Setting the multi-angle DVD display 32Setting the aspect ratio 32Setting parental lock 32Setting the DivX subtitle file 33Displaying the DivXâVOD registrationcode 33Automatic playback of DVDs 33System settingsSwitching the auxiliary setting 33Setting AV input 33Setting the RGB Input 33Setting the Pandora connect mode 33Setting the App sound mixing 33Setting MIXTRAX mode 33Changing the picture adjustment 33Selecting the system language 34Setting Demo Mode 34Switching sound muting/attenuation 34Contents2ContentsEn<CRD4711-A/N>2
Setting the rear output and subwoofercontroller 34Using the keyboard 35Setting the ever scroll 35Setting the Bluetooth audio 35Clearing Bluetooth memory 35Updating Bluetooth connectionsoftware 35Displaying the Bluetooth systemversion 35Setting the automatic open function 35Setting the rear view camera (back upcamera) 35Auto EQ (auto-equalizing) 36Setting the video signal 37Favorite menuUsing the Favorite menu 37Bluetooth connection menuBluetooth connection menuoperations 38Theme menuSelecting the illumination color 39Selecting the OSD (on-screen display)color 39Selecting the background display 39Other functionsAdjusting the response positions of thetouch panels (Touch PanelCalibration) 39Using an AUX source 39Resetting the microprocessor 40ConnectionConnecting the power cord 42When connecting to separately sold poweramp 43When connecting the external videocomponent and the display 43When connecting with a rear viewcamera 44iPod with lightning connector 44iPod with 30-pin connector 45InstallationDIN front/rear-mount 45Installing the microphone 46Additional informationTroubleshooting 47Error messages 49Understanding auto EQ errormessages 52Understanding messages 52Indicator list 53Handling guidelines 54Audio compatibility (USB) 55Compressed audio compatibility (disc,USB) 55iPod compatibility 56Sequence of audio files 57Using the display correctly 57Bluetooth profiles 57License, Warranty Disclaimer & Limitation ofLiability 58Language code chart for DVD 60Specifications 61Thank you for purchasing this PIONEERproduct.To ensure proper use, please read through thismanual before using this product. It is especiallyimportant that you read and observe WARN-INGs and CAUTIONs in this manual. Pleasekeep the manual in a safe and accessible place forfuture reference.IMPORTANT SAFEGUARDSPlease read all of these instructions regardingyour display and retain them for future refer-ence.1Do not install the display where it may(i) obstruct the driver’s vision, (ii) impairthe performance of any of the vehicle’soperating systems or safety features, in-cluding air bags, hazard lamp buttons or(iii) impair the driver’s ability to safelyoperate the vehicle.2Do not operate this display if doing so inany way will divert your attention fromthe safe operation of your vehicle. Al-ways observe safe driving rules and fol-low all existing traffic regulations. If youexperience difficulty in operating thesystem or reading the display, park yourvehicle in a safe location and make nec-essary adjustments.3Please remember to wear your seat beltat all times while operating your vehicle.If you are ever in an accident, your inju-ries can be considerably more severe ifyour seat belt is not properly buckled.4Never use headphones while driving.5To promote safety, certain functions aredisabled unless the parking brake is on,and the vehicle is not in motion.6Never set the volume of your display sohigh that you cannot hear outside trafficand emergency vehicles.WARNINGDo not attempt to install or service thisproduct by yourself. Installation or servicingof this product by persons without trainingand experience in electronic equipment andautomotive accessories may be dangerousand could expose you to the risk of electricshock, injury or other hazards.To ensure safe drivingWARNING!LIGHT GREEN LEAD AT POWER CONNEC-TOR IS DESIGNED TO DETECT PARKEDSTATUS AND MUST BE CONNECTED TOTHE POWER SUPPLY SIDE OF THE PARK-ING BRAKE SWITCH. IMPROPER CON-NECTION OR USE OF THIS LEAD MAYVIOLATE APPLICABLE LAW AND MAY RE-SULT IN SERIOUS INJURY OR DAMAGE.!To avoid the risk of damage and injury and thepotential violation of applicable laws, this unit isnot for use with a video screen that is visible tothe driver.!To avoid the risk of accident and the potential vio-lation of applicable laws, no viewing of front seatvideo should ever occur while the vehicle isbeing driven.!In some countries or states the viewing of imageson a display inside a vehicle even by personsother than the driver may be illegal. Where suchregulations apply, they must be obeyed and thisunit’s video features should not be used.When you attempt to watch a video image whiledriving, the warning “Viewing of front seatvideo source while driving is strictly prohib-ited.”will appear on the front display.To watch a video image on the front display, parkyour vehicle in a safe place and apply the park-ing brake.EnglishContents3SectionPrecautionsEn01<CRD4711-A/N>3
Parking brake interlockCertain functions (Video viewing and certaintouch panel keys) offered by this unit could bedangerous and/or unlawful if used while driving.To prevent such functions from being used whilethe vehicle is in motion, there is an interlock sys-tem that senses when the parking brake is set. Ifyou attempt to use the functions describedabove while driving, they will become disableduntil you stop the vehicle in a safe place, and (1)apply the parking brake, (2) release the parkingbrake, and then (3) apply the parking brakeagain. Please keep the brake pedal pusheddown before releasing the parking brake.When using a display connectedto rear monitor outputThe rear monitor output on this unit (V OUT)isused to connect a rear display that allows pas-sengers in the rear seats to watch videos.WARNINGNEVER install the rear display in a locationwhere the driver can watch videos while driving.When using the rear view cameraWith an optional rear view camera, this unit canbe used as an aid to keep an eye on trailers, orwhen backing into a tight parking spot.WARNING!SCREEN IMAGE MAY APPEAR RE-VERSED.!USE INPUT ONLY FOR REVERSE ORMIRROR IMAGE REAR VIEW CAMERA.OTHER USE MAY RESULT IN INJURYOR DAMAGE.CAUTION!The rear view camera function is to be usedas an aid to keep an eye on trailers, or whilebacking up. Do not use for entertainmentpurposes.!Please note that the edges of the rear viewcamera images may differ slightly accordingto whether full screen images are displayedwhen backing up, and whether the imagesare used for checking the rear when the ve-hicle is moving forward.To avoid battery exhaustionKeep the vehicle engine running when usingthis unit to avoid draining the battery power.!When no power is supplied to this unit, suchas when the vehicle battery is being re-placed, the microcomputer of this unit re-turns to its initial condition. We recommendthat you transcribe the audio adjustmentdata.WARNINGDo not use with vehicles that do not feature anACC position.Information to UserFCC ID: AJDK062MODEL NO.: AVH-X7500BTIC: 775E-K062This device complies with Part 15 of FCCRules and Industry Canada licence-exemptRSS standard(s). Operation is subject to thefollowing two conditions: (1) this device maynot cause interference, and (2) this devicemust accept any interference, including inter-ference that may cause undesired operationof this device.This transmitter must not be co-located or op-erated in conjunction with any other antennaor transmitter.The Bluetooth antenna cannot be removed (orreplaced) by user.This equipment complies with FCC/IC radia-tion exposure limits set forth for an uncon-trolled environment and meets the FCC radiofrequency (RF) Exposure Guidelines in Sup-plement C to OET65 and RSS-102 of the ICradio frequency (RF) Exposure rules. Thisequipment has very low levels of RF energythat it deemed to comply without maximumpermissive exposure evaluation (MPE). But itis desirable that it should be installed and op-erated keeping the radiator at least 20 cm ormore away from person’s body (excluding ex-tremities: hands, wrists, feet and ankles).MODEL NO.: AVH-X6500DVDThis device complies with Part 15 of the FCCRules. Operation is subject to the followingtwo conditions:(1) this device may not cause harmful interfer-ence, and (2) this device must accept any in-terference received, including interferencethat may cause undesired operation.Alteration or modifications carried out with-out appropriate authorization may invalidatethe user’s right to operate the equipment.NoteThis equipment has been tested and foundto comply with the limits for a Class B digitaldevice, pursuant to Part 15 of the FCC Rules.These limits are designed to provide reason-able protection against harmful interferencein a residential installation. This equipmentgenerates, uses and can radiate radio fre-quency energy and, if not installed and usedin accordance with the instructions, maycause harmful interference to radio commu-nications. However, there is no guaranteethat interference will not occur in a particu-lar installation. If this equipment does causeharmful interference to radio or television re-ception, which can be determined by turningthe equipment off and on, the user is encour-aged to try to correct the interference by oneor more of the following measures:- Reorient or relocate the receiving antenna.- Increase the separation between the equip-ment and receiver.- Connect the equipment into an outlet on acircuit different from that to which the re-ceiver is connected.- Consult the dealer or an experienced radio/TV technician for help.Precautions4SectionBefore you startEn0102<CRD4711-A/N>4
The Safety of Your Ears is inYour HandsGet the most out of your equipment by playing itat a safe level—a level that lets the sound comethrough clearly without annoying blaring or dis-tortion and, most importantly, without affectingyour sensitive hearing. Sound can be deceiving.Over time, your hearing “comfort level”adapts tohigher volumes of sound, so what sounds “nor-mal”can actually be loud and harmful to yourhearing. Guard against this by setting yourequipment at a safe level BEFORE your hearingadapts.ESTABLISH A SAFE LEVEL:!Set your volume control at a low setting.!Slowly increase the sound until you can hearit comfortably and clearly, without distortion.!Once you have established a comfortablesound level, set the dial and leave it there.BE SURE TO OBSERVE THEFOLLOWING GUIDELINES:!Do not turn up the volume so high that youcan’t hear what’s around you.!Use caution or temporarily discontinue usein potentially hazardous situations.!Do not use headphones while operating amotorized vehicle; the use of headphonesmay create a traffic hazard and is illegal inmany areas.About this unitThe tuner frequencies on this unit are allocatedfor use in North America. Use in other areasmay result in poor reception.WARNINGHandling the cord on this product or cords asso-ciated with accessories sold with the productmay expose you to chemicals listed on proposi-tion 65 known to the State of California andother governmental entities to cause cancer andbirth defect or other reproductive harm. Washhands after handling.CAUTION:USE OF CONTROL OR ADJUSTMENT ORPERFORMANCE OF PROCEDURESOTHER THAN THOSE SPECIFIED HEREINMAY RESULT IN HAZARDOUS RADIATIONEXPOSURE.CAUTION:THE USE OF OPTICAL INSTRUMENTSWITH THIS PRODUCT WILL INCREASEEYE HAZARD.CAUTIONThis product is a class 1 laser product classi-fied under the Safety of laser products, IEC60825-1:2007, and contains a class 1M lasermodule. To ensure continued safety, do not re-move any covers or attempt to gain access tothe inside of the product. Refer all servicing toqualified personnel.CAUTION—CLASS 1M VISIBLE AND INVISIBLE LASER RADIATION WHEN OPEN, DO NOT VIEW DIRECTLY WITH OPTICAL INSTRUMENTS.CAUTION!Do not allow this unit to come into contactwith liquids. Electrical shock could result.Also, damage to this unit, smoke, and over-heating could result from contact withliquids.!Keep this manual handy for future reference.!Always keep the volume low enough to hearoutside sounds.!Avoid exposure to moisture.!If the battery is disconnected or discharged,any preset memory will be erased.Important (Serial number)The serial number is located on the bottom ofthis unit. For your own security and conven-ience, be sure to record this number on the en-closed warranty card.DVD video disc region numbersOnly DVD video discs with compatible regionnumbers can be played on this player. You canfind the region number of the player on the bot-tom of this unit and in this manual (refer toSpecifications on page 61).About this manual!This unit features a number of sophisticatedfunctions to ensure superior reception andoperation. All the functions have been de-signed for the easiest possible use, but manyare not self-explanatory. This operation man-ual will help you benefit fully from this unit’spotential and to maximize your listening en-joyment.!This manual uses diagrams of actual screensto describe operations. However, the screenson some units may not match those shownin this manual depending on the modelused.!In the following instructions, USB memorysticks and USB audio players are collectivelyreferred to as “USB storage device”.!In this manual, iPod and iPhone will be re-ferred to as “iPod”.After-sales service forPioneer productsPlease contact the dealer or distributor fromwhere you purchased this unit for after-salesservice (including warranty conditions) or anyother information. In case the necessary infor-mation is not available, please contact the com-panies listed below:Please do not ship your unit to the companies atthe addresses listed below for repair without ad-vance contact.U.S.A.Pioneer Electronics (USA) Inc.CUSTOMER SUPPORT DIVISIONP.O. Box 1760Long Beach, CA 90801-1760800-421-1404CANADAPioneer Electronics of Canada, Inc.CUSTOMER SATISFACTION DEPARTMENT340 Ferrier StreetUnit 2Markham, Ontario L3R 2Z5, Canada1-877-283-5901905-479-4411For warranty information please see the LimitedWarranty sheet included with this unit.Visit our websiteVisit us at the following site:EnglishBefore you start5SectionBefore you startEn02<CRD4711-A/N>5
http://www.pioneerelectronics.comin Canadahttp://www.pioneerelectronics.ca1 Register your product. We will keep the de-tails of your purchase on file to help you referto this information in the event of an insur-ance claim such as loss or theft.2 Receive updates on the latest products andtechnologies.3 Download owner’s manuals, order productcatalogues, research new products, andmuch more.4 Your feedback is important in our continualeffort to design and build the most advanced,consumer-focused product in the industry.Protecting your unit from theftThe front panel can be detached to deter theft.Important!Handle the front panel with care when re-moving or attaching it.!Avoid subjecting the front panel to excessiveshock.!Keep the front panel out of direct sunlightand high temperatures.!If removed, replace the front panel on theunit before starting up your vehicle.!To avoid damaging the device or vehicle inte-rior, remove any cables and devices attachedto the front panel before detaching it.Removing the front panel%Pinch the top and bottom of its right sideand pull the front panel out.Take care not pinch it too tightly or to drop it,and also avoid contact with water or other fluidsto prevent permanent damage.Re-attaching the front panel1 Slide the front panel to the left.The front panel and the head unit are connectedon the left side. Make sure that the front panelhas been properly connected to the head unit.2 Press the right side of the front paneluntil it is firmly seated.#If you can’t attach the front panel to the headunit successfully, try again. Forcing the front panelinto place may result in damage.Use and care of the remotecontrolInstalling the batterySlide the tray on the back of the remote controlout and insert the battery with the plus (+) andminus (–) poles aligned properly.!When using for the first time, pull out thefilm protruding from the tray.WARNING!Keep the battery out of the reach of children.Should the battery be swallowed, consult adoctor immediately.!Batteries (battery pack or batteries installed)must not be exposed to excessive heat suchas sunshine, fire or the like.CAUTION!Use one CR2025 (3 V) lithium battery.!Remove the battery if the remote control isnot used for a month or longer.!There is a danger of explosion if the battery isincorrectly replaced. Replace only with thesame or equivalent type.!Do not handle the battery with metallic tools.!Do not store the battery with metallic ob-jects.!If the battery leaks, wipe the remote controlcompletely clean and install a new battery.!When disposing of used batteries, complywith governmental regulations or environ-mental public institutions’rules that apply inyour country/area.!“Perchlorate Material –special handling mayapply.See www.dtsc.ca.gov/hazardouswaste/perchlorate. (Applicable to California,U.S.A.)”Using the remote controlPoint the remote control in the direction of thefront panel to operate.!The remote control may not function properlyin direct sunlight.Important!Do not store the remote control in high tem-peratures or direct sunlight.!Do not let the remote control fall onto thefloor, where it may become jammed underthe brake or accelerator pedal.Demo modeThe feature demo automatically starts when youselect Off for the source and continues whilethe ignition switch is set to ACC or ON. To can-cel the feature demo, press and hold MUTE.Press and hold MUTE again to restart. Operat-ing the feature demo while the car engine isturned off it may drain the battery power.ImportantThe red lead (ACC) of this unit should be con-nected to the ignition on/off function. Failure todo so may result in battery drain.Before you start6SectionBefore you startEn02<CRD4711-A/N>6
Head unit1VOLUME/MUTETurn VOLUME to adjust the volume.Press to mute. Press again to unmute.2Home buttonDisplaying the home display.The display returns to the Launcher screenwhile a 3rd-party application is being used inAppRadio Mode.Double-clicking the icon on the Launcherscreen returns the display to the home dis-play.3SRC/OFF4MODETurning the information display off.5c/d(TRK)6Disc loading slot7OPEN/CLOSE8h(eject)9RESETFor details refer to Resetting the microproces-sor on page 40.CAUTIONDo not use unauthorized products.Notes!When an iPhone is connected, press andhold the home button to activate the voicecontrol.!When the navigation system is connected,press MODE to switch to the navigation dis-play. Press and hold MODE to turn the dis-play off.Press MODE again to turn the display on.!For details on how to operate a navigationsystem from this unit, refer to its operationmanual.!When an iPhone that is running an applica-tion that supports AppRadio Mode is con-nected, press MODE to switch to theapplication display. You can use the applica-tion by touching the display.!For details on how to connect an iPod orUSB storage device to this unit, refer toWhen connecting with optional CD-IU201Vcable on page 45.Home displayHome displayRadio Disc USB/iPod Pandora Bluetooth AudioAV RearViewONAppsOFFAUXBluetoothFavoriteThemeSystemSettingsAudioVideo1324567Source off displayOFF1 JANAM12:1289Source on displayJANAMDB12:22AUXRadioPandoraDiscBluetooth AudioUSB/iPodS.RtrvApprpprAppppApp11Source iconSelecting a favorite source.When the source icon is not displayed, it canbe displayed by pressing the home key ortouching .2Apps keySwitching to AppRadio Mode.3Rear view keyDisplaying the rear view image.For details refer to Using the rear view onpage 9.4Source off keyTurning the source off.5Bluetooth keyDisplaying the Bluetooth connection menu.6Theme keyDisplaying the Theme menu.7Menu iconDisplaying the menu.8Source keyDisplaying the source menu.9Clock keySwitching to clock adjustment display.Turning the source ON/OFFTurning the source on using the buttons1Press SRC/OFF to turn the source on.Turning the source off using the buttons1Press and hold SRC/OFF until the source turnsoff.EnglishWhat’s what7SectionWhat’s whatEn03<CRD4711-A/N>7
Selecting a sourceAvailable source modes!Radio –Radio tuner!Disc –Built-in DVD and CD player!USB/iPod –USB/iPod!Pandora –Pandoraâinternet radio!Bluetooth Audio –Built-in Bluetooth audio(Function of AVH-X7500BT)!AUX –AUX!AV –AV inputSelecting a source!Using SRC/OFF1Press SRC/OFF.!Using the touch panel keys on the home dis-play1Touch the source icon and then touch thedesired source name.!When the source icon is not displayed, itcan be displayed by touching the screen.!While operating the menu, you cannot se-lect a source by touching the source icon.NoteThe USB/iPod icon will change as follows:!USB is displayed when a USB storage device isconnected to USB input.!iPod is displayed when an iPod is connected toUSB input.!USB/iPod is displayed when no device is con-nected.!iPod is not displayed when RGB Input is set toiPhone (VGA adapter).Refer to Setting the RGB Input on page 33.Adjusting the volume%Turn VOLUME to adjust the volume.Remote control1+/–(VOLUME)2MODETurning the information display off.3SRC/OFFRefer to Source off key on page 7.4Thumb padUse to select a menu on the DVD menu.5RETURNPress to display the PBC (playback control)menu during PBC playback.6fPress to pause or resume playback.mPress to perform fast reverse.Press to change the fast reverse speed.nPress to perform fast forward.Press to change the fast forward speed.oPress to return to the previous track (chap-ter).pPress to go to the next track (chapter).gPress to stop playback.If you resume playback, playback will startfrom the point where you stopped. Touch thekey again to stop playback completely.7FOLDER/P.CHPress to select the next or previous disc orfolder.Press to recall radio station frequencies as-signed to preset channel keys.8MUTEPress to mute. Press again to unmute.9MENUPress to display the DVD menu during DVDplayback.TOP MENUPress to return to the top menu during DVDplayback.aAUDIOPress to change the audio language duringDVD playback.Press to switch audio output for DivX/MPEG-4.SUBTITLEPress to change the subtitle language duringDVD/DivX/MPEG-4 playback.ANGLEPress to change the viewing angle duringDVD playback.bBAND/ESCPress to select the tuner band when tuner isselected as a source. Also used to cancel thecontrol mode of functions.Press to switch between modes when play-ing the following types of data:!DiscCompressed audio and audio data (CD-DA) such as with CD-EXTRA and MIXED-MODE CDs!USB storage deviceAudio dataWhat’s what8SectionWhat’s whatEn03<CRD4711-A/N>8
Common operations formenu settings/lists(Function of AVH-X7500BT)Starting the Bluetooth telephonemenu.For details refer to Bluetooth tele-phone on page 26.Displaying the list menu.Starting the search function.Displaying the EQ (Audio func-tion menu).Displaying the Favorite menu.Operating the scroll iconand the scrubber barSonic Center Control   LoudnessSubwooferBass BoosterHigh Pass FilterSource Level AdjusterL/R  0Low0125Hz0OnAudio112DVD-V00'20'' -119'51''48kHz 16bitDolby DMENU MENUTOP1/2Dolby DMulti chFULL111JANPM12:4301 0121Scroll iconAppears when selectable items are hidden.2Scrubber barAppears when items cannot be displayed ona single page only.Viewing the hidden items1Touch the scroll icon or drag the scrubber barto view any hidden items.!Also, you can drag the list to view any hiddenitems.Specifying the playback point1Drag the scrubber bar on the screen.(Not available when the scrubber bar is grayedout.)Activating the touch panel keysTouch panel keysDVD-V00'20'' -119'51''48kHz 16bitDolby DMENU MENUTOP1/2Dolby DMulti chFULL111JANPM12:4301 0107'24'' -112'47''2/2L+RReturn1111Tab keySwitching the touch panel keys on the dis-play.Using the rear viewA rear view camera sold separately is requiredfor using the rear view mode. The below func-tions are available.!Rear view cameraThis unit can be setup to display the rearview image automatically when you movethe shift lever to the REVERSE (R) position.!Camera for rear view modeThe rear view can be turned on to display atall times.The rear view camera needs to be set to a set-ting other than Off to turn on rear viewmode.For details about the settings, refer to Setting therear view camera (back up camera) on page 35.Using the rear view key todisplay the rear viewDisplaying the rear view image byturning the rear view image on.When the rear view image is dis-played, you can switch to thesource display by touching the dis-play. You can operate from thesource display temporarily at thistime. If you do not perform any op-erations within a few seconds, thedisplay will return to the rear viewimage.To turn off the rear view image,press the home button to return tothe home display and then pressthis key again.Using the rear monitorConnecting a rear monitor, sold separately, tothis unit allows images and videos to be viewedfrom the rear seats.Notes!You cannot use touch panel keys and opera-tion screens from the rear monitor.!Images and video will continue to be dis-played whether the vehicle is in motion orstopped.Using sound retrieverAutomatically enhances com-pressed audio and restores richsound.Off — —!is more effective than .EnglishCommon operations9SectionCommon operationsEn04<CRD4711-A/N>9
Notes!This function is enabled for playback on thesources listed below.—CD-DA—MP3/WMA/AAC/WAV files on USB storagedevices—MP3/WMA/AAC files on CD media—iPod—PandoraThis function is not available on an iPod withlightning connector or Android devices.!The sound retriever setting is turned offwhen the MIXTRAX function is used in USBsource mode.Changing the wide-screenmodeSelecting the appropriate screenratio for the playback video.1 Display the screen mode.2 Touch the desired wide mode setting.Full (full screen)The 4:3 picture is enlarged in the horizontal di-rection only, granting viewers a 4:3 TV picture(normal picture) without any omissions.Zoom (zoom)The 4:3 picture is enlarged in the same propor-tion both vertically and horizontally; ideal for acinema sized picture (wide screen picture).Normal (normal)The 4:3 picture is displayed as is, granting view-ers no sense of disparity as the proportions arethe same as that of the normal picture.Notes!You cannot operate this function while driv-ing.!Different settings can be stored for eachvideo source.!When a video is viewed in a wide screenmode that does not match its original aspectratio, it may appear different.!Remember that using the wide mode featureof this system for commercial or public view-ing purposes may constitute an infringementon the author’s rights protected by the Copy-right Law.!The video image will appear coarser whenviewed in Zoom mode.!This function is enabled for playback on thesources listed below.—Disc: DVD-V, Video-CD, DivX, MPEG-1,MPEG-2, MPEG-4—iPod: Video—AV: A/V data—AUX: A/V dataOpening and closing the LCDpanelThe LCD panel will open or close automaticallywhen the ignition switch is turned on or off. Youcan turn off the automatic close/open function.!Do not close the LCD panel by force withyour hands. That will cause a malfunction.!The automatic close/open function will oper-ate the display as follows.—When the ignition switch is turned OFFwhile the LCD panel is opened, the LCDpanel will close after six seconds.—When the ignition switch is turned ONagain (or turned to ACC), the LCD panelwill open automatically.—Removing or attaching the front panelwill automatically close or open the LCDpanel. (Refer to Protecting your unit fromtheft on page 6.)!When the ignition switch is turned OFF afterthe LCD panel has been closed, turning theignition switch ON again (or turning it toACC) will not open the LCD panel. In thiscase, press OPEN/CLOSE to open the LCDpanel.!When closing the LCD panel, check to makesure that it has closed completely. If the LCDpanel has stopped halfway, leaving it like thiscould result in damage.CAUTIONKeep hands and fingers clear of the unit whenopening, closing, or adjusting the LCD panel. Beespecially cautious of children’s hands and fin-gers.%Press OPEN/CLOSE to open the LCDpanel.#To close the LCD panel, press OPEN/CLOSEagain.Setting the automatic openfunctionTo prevent the display from hitting the shift leverof an automatic vehicle when it is in the P(park)position, or when you do not wish the display toopen/close automatically, you can set the auto-matic open function to manual mode.1 Press the home button to switch to thehome display.2 Touch the system key to open the systemmenu.3 Touch Auto Flap to select whether toopen/close the display automatically or man-ually.Each time you touch Auto Flap the settingswitches between:!On –The LCD panel will open or close auto-matically when the ignition switch is turnedon or off.!Off –You have to press OPEN/CLOSE toopen/close the LCD panel.Turning the LCD panel horizontallyWhen the LCD panel is upright and hinders theoperation of the air conditioner, the panel canbe turned horizontally temporarily.1 Press and hold OPEN/CLOSE to displaythe flap menu.2 Touch the flip down temporarily key toflip the LCD panel down to the horizontalposition.Flips the LCD panel down tothe horizontal position tem-porarily.Common operations10SectionBasic operationsEn0405<CRD4711-A/N>10
#To return to the original position, press and holdOPEN/CLOSE.#The LCD panel returns to the original position au-tomatically, indicated with a beeping sound 10 sec-onds after operation.Adjusting the LCD panelslide positionYou can adjust the LCD panel slide position sothat the panel is set back or forward.1 Press and hold OPEN/CLOSE to displaythe flap menu.2 Touch the slide back key or slide frontkey to move the LCD panel back and forth.The LCD panel slides to theback.The LCD panel slides to thefront.Adjusting the LCD panel angleImportant!If you can hear the LCD panel knockingagainst your vehicle’s console or dashboard,touch the flip down temporarily key from theflap menu to temporarily level the LCD panel.!When adjusting the LCD panel angle, besure to adjust from the flap menu. Forciblyadjusting the LCD panel by hand may dam-age it.1 Press and hold OPEN/CLOSE to displaythe flap menu.2 Touch the tilt down key or tilt up key toadjust the LCD panel to an easily viewableangle.Laying the panel down.Returning the panel to theupright position.#As the set angle is saved, the LCD panel will au-tomatically be adjusted to the same position the nexttime the LCD panel is opened.Ejecting a disc%Press hto eject a disc.Setting the clock1 Touch the Clock key.The Clock Adjustment screen appears.For details refer to Home display on page 7.2 Select the item to set.3 Touch aor bto set the correct date andtime.EnglishBasic operations11SectionBasic operationsEn05<CRD4711-A/N>11
Tuner operationsTouch panel keysRadio8 AUGPM12:05123456FM AM1LocalMHzTextTag87.50134562WWWWWWWWWWWWWWWWWWWWWWWW1Band keySelecting a band (FM1,FM2 or FM3)bytouching the left icon. Switching to the AMband by touching the right icon.The icon for the selected band is highlighted.2Tag keySaving song information (tag) from thebroadcasting station to your iPod.3Local keySetting the local seek level.4Tuning keyTuning up or down manually.Touch and hold down for more than two sec-onds to skip stations. Seek tuning starts assoon as you release. Touch again to cancelseek tuning.5List keyDisplaying the preset channel list.6Preset channel keySelecting a preset channel.Basic operationsSwitching preset channels using the buttons1Press cor d(TRK).Seek tuning using the buttons1Press and hold cor d(TRK).Notes!Listening AM radio while an iPod is chargedfrom this unit may generate noise. In thiscase, disconnect the iPod from this unit.!Touch panel keys not listed under Tuner oper-ations may appear on the display.Refer to Indicator list on page 53.Storing and recalling stationsYou can easily store up to six stations for eachband as presets.1 Display the preset screen.Refer to Tuner operations on page 12.The preset screen appears in the display.2 Touch and hold down one of the presetchannel keys to store the selected frequencyto the memory.The selected radio station frequency has beenstored in the memory.3 Touch the appropriate preset channel keyto select the desired station.Storing the strongest stationsBSM (best stations memory) automaticallystores the six strongest stations in the order oftheir signal strength.Storing broadcast frequencies with BSM may re-place broadcast frequencies you have savedusing the preset channel keys.1 Display the preset screen.Refer to Tuner operations on page 12.The preset screen appears in the display.2 Touch BSM to turn BSM on.The six strongest broadcast frequencies will bestored under preset channel keys in order oftheir signal strength.#To cancel the storage process, touch Cancel.Tuning in to strong signalsLocal seek tuning allows you to tune in to onlythose radio stations with sufficiently strong sig-nals for good reception.FM: Off —— — —AM: Off — —The more there are on the screen, the fewerthe stations that can be selected. Only stationswith the strongest signals in your local area canbe selected.If there are fewer , this unit will be able to re-ceive broadcasts from weaker stations.Using iTunes taggingNoteFor more details about iTunes tagging, refer toAbout iTunes tagging on page 56.Storing the tag information tothis unit1 Tune in to the broadcast station.2 Store the tag information to this unit.Refer to Tuner operations on page 12.You can store the information if the Tag indica-tor is displayed while the desired song is beingbroadcast.#While storing the tag data on this unit, Tagflashes.#The tag information for up to 50 songs can bestored on this unit.#Depending on the timing of when the tag infor-mation is stored, the tag information for the songplayed before or after the currently playing song mayalso be stored.3 When completed, indicator turnsoff and indicator is displayed.Storing the tagged informationto your iPod1 Connect your iPod.When your iPod is connected to this unit, youriPod starts storing the tagged information auto-matically.2 When completed, indicator turns offand the tagged information is stored onyour iPod.Tuner12SectionTunerEn06<CRD4711-A/N>12
Introducing movie operationsYou can use this unit to view DVD/DVD-R/DVD-RW/CD/CD-R/CD-RW movie files.Touch panel keysDVD videoDVD-V00'20'' -119'51''48kHz 16bitDolby DMENU MENUTOP1/2Dolby DMulti chFULL111JANPM12:4301 0107'24'' -112'47''2/2L+RReturn1a 98765421fedcgb3Video CD00'20'' -119'51''L+RFULLReturn98h7 eg bWhen playing a disc containing a mixture of vari-ous media file types00'15'' -00'59''yyFULL1OFFMedia987 i3e41Fast forward key/Reverse keyFast forwarding or reversingTouch to change the fast forward and reversespeed.2Search keyStarting the search function.3Switch subtitle language keyWith DVDs/DivX files featuring multi-subtitlerecordings, you can switch between subtitlelanguages during playback.4Switch audio language keyWith DVDs/DivX files that provides audioplayback in different languages and differentaudio systems (DolbyâDigital, DTS, etc.),you can switch between languages/audiosystems during playback.Depending on the setting, the video may notbe played back with the audio system usedto record the DVD.5TOP MENU keyReturning to the top menu during DVD play-back.6MENU keyDisplaying the DVD menu during DVD play-back.7Slow-motion playback keyMoving the selection ahead one frame at atime during playback.Touch and hold down the key for more thantwo seconds to slow down playback speed.Touching the key increases the playbackspeed over four incremental settings duringslow motion playback from DVD video/VideoCD.8Stop keyStopping playback.If you resume playback, playback will startfrom the point where you stopped. Touch thekey again to stop playback completely.9Screen mode keyChanging the screen mode.Refer to Changing the wide-screen mode onpage 10.aPause and play keyPausing playback.Returning to normal playback duringpaused, slow motion, or frame-by-frame play-back.bReturn keyReturning to the specified scene to whichthe DVD currently being played has been pre-programmed to return.This function cannot be used if a specifiedscene has not been preprogrammed on theDVD disc.cBookmark keyDuring playback, touch the point at whichyou want to resume playback the next timethe disc is loaded.!You can set one bookmark per DVD video.You can set up to five bookmarks total.!To clear the bookmark on a disc, touchand hold the key during playback.!The oldest bookmark is replaced by thenew one.dArrow keyDisplaying arrow keys to operate the DVDmenu.eRepeat keySelecting the repeat range.fViewing angle keyWith DVDs featuring multi-angle (scenesshot from multiple angles) recordings, youcan switch among viewing angles duringplayback.gAudio output keySwitching the audio output, when playingvideo discs recorded with LPCM audio.hSlow keySpeeding down the playback speed in foursteps, during slow motion playback on DVDvideo/Video CD.!There is no sound during slow motionplayback.!Images during slow motion playback maybe unclear for some discs.!Reverse slow motion playback is not avail-able.iMedia keySwitching between media file types to playon DVD/CD.Basic operationsPlaying back videos1Insert the disc into the disc loading slot withthe label side up.Playback will automatically start.!If you are playing a DVD or Video CD, a menumay appear. Refer to Operating the DVD menuon page 14 and PBC playback on page 15.!When the automatic playback function is on,the unit will skip the DVD menu and automati-cally start playback from the first chapter ofthe first title. Refer to Automatic playback ofDVDs on page 33.!When the source icon is not displayed, it canbe displayed by touching the screen.!If a message is displayed after loading a disccontaining DivX VOD content, touch PLAY.Refer to Playing DivXâVOD content on page16.Ejecting a disc!Refer to Ejecting a disc on page 11.EnglishDisc (CD/DVD)13SectionDisc (CD/DVD)En07<CRD4711-A/N>13
Selecting a chapter using the buttons1Press cor d(TRK).Fast forwarding or reversing using the buttons1Press and hold cor d(TRK).!Fast forward/fast reverse may not always bepossible on some discs. In such cases, normalplayback will automatically resume.!The fast forward/fast reverse speed dependson the length of time you press and hold downcor d(TRK). This function is not available forVideo CD.Notes!This DVD player can play back a DivX file re-corded on CD-R/RW, DVD-R/RW, or MPEG-1/MPEG-2/MPEG-4. (Please see the followingsection for files that can be played back.Refer to DivX video files on page 55.)!Do not insert anything other than a DVD-R/RW or CD-R/RW into the disc loading slot.!Some operations may not be available whilewatching a media due to the programmingof the disc. In such cases, the icon ap-pears on the screen.!There may be touch panel keys not listedunder Introducing movie operations on page13 that appear on the screen.Refer to Indicator list on page 53.!With some DVDs, switching between lan-guages/audio systems may only be possibleusing a menu display.!You can also switch between languages/audio systems using Video Setup menu. Fordetails, refer to Setting the audio language onpage 31.!This unit will return to normal playback if youchange the audio language during fast for-ward/fast reverse, pause or slow motion play-back.!With some DVDs, switching between subtitlelanguages may only be possible using amenu display.!You can also switch between subtitle lan-guages using Video Setup menu. For de-tails, refer to Setting the subtitle language onpage 31.!This unit will return to normal playback if youchange the subtitle language during fast for-ward/fast reverse, pause or slow motion play-back.!During playback of a scene shot from multi-ple angles, the angle icon is displayed. Usethe Video Setup menu to turn the angleicon display on or off. For details, refer to Set-ting the multi-angle DVD display on page 32.!You will return to normal playback if youchange the viewing angle during fast for-ward/fast reverse, pause or slow motion play-back.Sound playback operationsYou can use this unit to listen to DVD-R/DVD-RW/CD/CD-R/CD-RW sound files.Touch panel keysROMS.Rtrv11AbcdefghiAbcdefghiAbcdefghiAbcdefghi1JANPM12:4300'37'' -08'43''1245678 3Media1Information keySwitching the text information to display onthis unit when playing MP3/WMA/AAC files.2Search keyDisplaying a list of track titles/file names toselect songs on a CD.Displaying the file name list to select thefiles.3Media keySwitching between media file types on aDVD or CD.4Sound retriever keyRefer to Using sound retriever on page 9.5Random keyPlaying songs in random order.6Repeat keySelecting the repeat range.7Previous folder key/Next folder keySelecting a folder.8Pause and play keyPausing and starting playback.Switching the media file typeWhen playing a digital media containing a mix-ture of various media file types, such as DivX,MPEG-1, MPEG-2, MPEG-4 and MP3, you canswitch between media file types to play.%Touch Media to switch media file types.CD (audio data (CD-DA))—Music/ROM (com-pressed audio)—Video (DivX, MPEG-1, MPEG-2,MPEG-4 video files)NoteAudio data (CD-DA) files on DVD-R/RW/ROMcannot be played back on this unit.Operating the DVD menu(Function for DVD video)Some DVDs allow you to make a selection fromthe disc contents using a menu.Using the arrow keys1 Display arrow keys to operate the DVDmenu.2 Select the desired menu item.Returning to the normal DVDvideo display.Displaying arrow keys.Selecting the desired menu item.Starting playback from the se-lected menu item.Operating the DVD menu by di-rectly touching the menu item.Back to previous display.#When operating the DVD menu by directly touch-ing the menu item, touch the icon to operate.Disc (CD/DVD)14SectionDisc (CD/DVD)En07<CRD4711-A/N>14
#Ways to display the menu will differ dependingon the disc.#Depending on the contents of the DVD disc, thisfunction may not work properly. In such cases, usethe touch panel keys to operate the DVD menu.Random play (shuffle)%Touch the random key.!On –Play back files in random order withinthe repeat range, Folder and Disc.!Off –Cancel random play.Repeating playback%Touch the repeat key.!Disc –Play through the current disc!Chapter –Repeat the current chapter!Title –Repeat the current title!Track –Repeat the current track!File –Repeat the current file!Folder –Repeat the current folder!One –Repeat just the current video/songNotes!This function cannot be operated duringVideo CD playback featuring PBC (playbackcontrol).!If you perform chapter search, fast forward/reverse, frame-by-frame playback or slow mo-tion playback, the repeat play will stop.!When playing discs with compressed audioand audio data (CD-DA), playback is re-peated within the type of data currently play-ing even if Disc is selected.!If you select another folder during repeatplay, the repeat play range changes to Disc.!If you perform track search or fast forward/reverse during File, the repeat play rangechanges to Folder.!If you perform title/chapter search or fast for-ward/reverse during Chapter, the repeat playis set to off automatically.!If you perform track search or fast forward/reverse during Track, the repeat play rangechanges to Disc.!When Folder is selected, it is not possible toplay back a subfolder of that folder.Searching for the part youwant to playYou can use the search function to find the partyou want to play.For DVD videos, you can select Title (title),Chapter (chapter) or 10key (numeric keypad).For video CDs, you can select Track (track) or10key (numeric keypad).!Chapter search is not available when discplayback is stopped.!This function cannot be operated duringVideo CD playback featuring PBC (playbackcontrol).1 Start the search function.Refer to Introducing movie operations on page13.2 Touch the desired search option (e.g.,Chapter).3 Touch 0 to 9 to input the desired number.#To cancel the entered numbers, touch C.4 Start playback from the selected part.Registering the numbers andstarting playback.NoteWith discs featuring a menu, you can also usethe DVD menu to make your selection.Refer to Introducing movie operations on page13.Selecting audio outputWhen playing DVD video discs recorded withLPCM audio, you can switch the audio output.When playing video CDs, you can switch be-tween stereo and monaural audio output.!This function is not available when disc play-back is stopped.%Touch the audio output key to switchaudio output types.!L+R –Left and right!Left –Left!Right –Right!Mix –Mixing left and rightNoteYou may not be able to select or use this func-tion depending on the disc and the playback lo-cation.PBC playback(Function for Video CDs)During playback of Video CDs featuring PBC(playback control), PBC On is displayed.1 Start the search function.Refer to Introducing movie operations on page13.2 Touch 10key to display the numeric key-pad.3 Touch 0 to 9 corresponding to a menunumber.4 Start playback from the selected part.Registering the numbers andstarting playback.Notes!You can display the menu by touchingReturn during PBC playback. For details,refer to the instructions provided with thedisc.!PBC playback of a Video CD cannot be can-celed.!During playback of Video CDs featuring PBC(playback control), you cannot select the re-peat play range or use the search function.Selecting tracks from thetrack title listYou can select tracks to playback using the tracktitle list which is a list of the tracks recorded ona disc.1 Display the track title list.Refer to Sound playback operations on page 14.2 Touch your favorite track title.Playback begins.Selecting files from the filename list(Function for compressed audio/DivX/MPEG-1/MPEG-2/MPEG-4)File name list is a list of file names (or foldernames) from which you can select a file (or fold-er) to play back.1 Touch the search key to display the file(or folder) name list.2 Touch your favorite file (or folder) name.#When you have selected a folder, a list of thenames of the files (or the folders) in it can be viewed.Repeat this operation to select the desired file name.#If folder 1(ROOT) contains no files, playbackstarts from folder 2.EnglishDisc (CD/DVD)15SectionDisc (CD/DVD)En07<CRD4711-A/N>15
NoteIf part of the recorded information does not dis-play, a scroll key appears on the right side of list.Touch the scroll key to scroll.Playing DivXâVOD contentSome DivX video on demand (VOD) content mayonly be playable a fixed number of times. Whenyou load a disc containing this type of content,the number of times it has been played will beshown on-screen. You can then decide whetheror not to play the disc.!For DivX VOD content without this restriction,you can load the disc into your player andplay the content as often as you like, with nomessage displayed.!You can confirm the number of times thatthe content can be played by checking themessage, This DivX rental has usedout of views..Important!In order to play DivX VOD contents on thisunit, you first need to register the unit withyour DivX VOD contents provider. For detailson your registration code, refer to Displayingthe DivXâVOD registration code on page 33.!DivX VOD content is protected by a DRM(Digital Rights Management) system. This re-stricts playback of content to specific, regis-tered devices.%If a message is displayed after loading adisc containing DivX VOD content, touchPLAY.Playback of the DivX VOD content will start.#To skip to the next file, touch NEXT.#If you do not want to play the DivX VOD content,touch STOP.iPod controlThis manual applies to the following iPod mod-els.iPod with 30-pin connector—iPod touch 4th generation—iPod touch 3rd generation—iPod touch 2nd generation—iPod touch 1st generation—iPod classic 160GB—iPod classic 120GB—iPod classic—iPod with video—iPod nano 6th generation—iPod nano 5th generation—iPod nano 4th generation—iPod nano 3rd generation—iPod nano 2nd generation—iPod nano 1st generation—iPhone 4S—iPhone 4—iPhone 3GS—iPhone 3G—iPhoneiPod with lightning connector—iPod touch 5th generation—iPod nano 7th generation—iPhone 5For iPod with lightningconnector users—Use the Lightning to USB Cable (Suppliedwith iPod/iPhone) when you use this func-tion.—Refer to When connecting with Lightning toUSB Cable on page 44.—Functions related to iPod movie files are notavailable.—If AppRadio Mode is used, the functions inthis section cannot be used.Refer to AppRadio Mode operation on page19.Moving images operationsFor iPod with 30-pin connector usersYou can use the unit to view iPod movie files.!Depending on your iPod, there may not beany output unless you use CD-IU201S/CD-IU201V (sold separately). Be sure to use CD-IU201S/CD-IU201V to connect your iPod.For iPod with lightning connector users!This function is not available.Touch panel keysiPod02'35'' -21'54''1JANPM12:43FULL 1ApprpprAppppApp2/321654 3721Fast forward key/Reverse keyFast forwarding or reversingTouch to change the fast forward and reversespeed.2Search keyDisplaying iPod menus.3iPod control mode keyConducting operation from your iPod and lis-tening to it using your car’s speakers.4Shuffle keyPlaying the video on your iPod in a randomorder.Disc (CD/DVD)16SectioniPodEn0708<CRD4711-A/N>16
5Repeat keySelecting the repeat range.6Screen mode keyChanging the screen mode.Refer to Changing the wide-screen mode onpage 10.7Pause and play keyPausing playback.Returning to normal playback duringpaused, slow motion, or frame-by-frame play-back.Basic operationsPlaying back videos1Touch the search key to pull up the iPodmenus.2Select a movie to play.Refer to Playing videos from your iPod on page18.!When the source icon is not displayed, itcan be displayed by touching the screen.!Disconnect headphones from the iPod be-fore connecting it to this unit.!Depending on the iPod model and theamount of data stored in the iPod, it maytake some time for playback to begin.!Use the touch panel keys to select the iPodafter connecting it to this unit.!No Device is displayed when disconnect-ing the iPod.Fast forwarding or reversing using the buttons1Press and hold cor d(TRK).Notes!To ensure proper operation, connect thedock connector cable from the iPod directlyto this unit.!While the iPod is connected to this unit, theiPod cannot be turned on or off.!Touch panel keys not listed under Moving im-ages operations may appear on the display.Refer to Indicator list on page 53.Sound playback operationsYou can use the unit to listen iPod sound files.NoteThe play time may not display correctly.Touch panel keysiPod audio (Control Audio)iPodApprpprAppppApp1JANPM12:43Abcdefghi 1/9AbcdefghiAbcdefghiAbcdefghi01'17'' -05'29''S.RtrvAllAllAllx1254321dcb a987 6iPod audio (App Mode)FULLef1Song titleDisplaying the Songs list on the iPod.2Artist nameDisplaying the Artists list on the iPod.3MIXTRAX EZ keyStarting MIXTRAX EZ.Refer to MIXTRAX EZ operation on page 23.4ArtworkStarting link search on your iPod when youtouch the artwork display.5Search keyDisplaying iPod menus.6Sound retriever keyRefer to Using sound retriever on page 9.7iPod control mode keyConducting operation from your iPod and lis-tening to it using your car’s speakers.8Shuffle keyPlaying songs on the iPod in random order.9Repeat keySelecting the repeat range.aChange speed keyChanging the speed of audiobook playbackon the iPod.bGenreDisplaying the Genres list on the iPod.cAlbum titleDisplaying the Albums list on the iPod.dPause and play keyPausing and starting playback.eUnit operation keyPerforming operations from this unit and lis-tening to the music on your iPod using yourcar’s speakers.fScreen mode keyChanging the screen mode.Using this unit’s iPodfunction from your iPodYou can listen to sound from applications onyour iPod using the car’s speakers whenApp Mode is selected.This function is not compatible with the follow-ing iPod models.!iPod nano 1st generation!iPod with videoNotes!Video-related functions are not available toiPod with lightning connector users.!While this function is in use, the iPod will notturn off even if the ignition key is turned off.Operate the iPod to turn off the power.1 Switch the control mode to App Mode.Refer to Moving images operations on page 16.Refer to Sound playback operations on page 17.2 Operate the connected iPod to select avideo/song and play.Notes!The following functions are still accessiblefrom the unit even if the control mode is setto App Mode.However, the operation will depend on yourapplications.—Playing/pausing—Fast forwarding/reversing—Tracking up/down—Moving to a chapter up/down!App Mode is compatible with the followingiPod models.—iPod touch 4th generation—iPod touch 3rd generation—iPod touch 2nd generation—iPod touch 1st generation—iPod classic 160GB—iPod classic 120GB—iPod classicEnglishiPod17SectioniPodEn08<CRD4711-A/N>17
—iPod nano 6th generation—iPod nano 5th generation—iPod nano 4th generation—iPod nano 3rd generation—iPod nano 2nd generation—iPhone 4S—iPhone 4—iPhone 3GS—iPhone 3G—iPhoneShuffle play%Touch the shuffle key.!Songs –Play back videos/songs in the se-lected list in random order.!Albums –Play back videos/songs from a ran-domly selected album in order.!Off –Turn off shuffle play.Repeating playback%Touch the repeat key.!One –Repeat just the current video/song!All –Repeat all videos/songs in the selectedlist on the iPodPlaying videos from your iPodVideos can be played on this unit if an iPod withvideo capabilities is connected.!This unit can play back “Movies”,“Music vid-eos”,“Video Podcast”and “TV show”whichare downloaded from the iTunes store.NoteThis function is not available to iPod with light-ning connector users.1 Touch Search to display iPod menus.Refer to Moving images operations on page 16.2 Switch to iPod video mode.PlaylistsArtistsAlbumsSongsPodcastsGenresROOT#If you want to switch to iPod video mode, touchthe icon.Switching to iPod video mode.3 Play the video from the iPod.Video PlaylistsMoviesMusic VideosVideo PodcastsTV ShowsRentalsROOT#If you want to switch to iPod music mode, touchthe icon.Switching to iPod music mode.Browsing for a video/musicon the iPodTo make operating and searching easy, opera-tions to control an iPod with this unit are de-signed to be as similar to the iPod as possible.NoteVideo-related functions are not available to iPodwith lightning connector users.Searching for a video/music bycategory1 Touch the search key to pull up the iPodmenus.Refer to Sound playback operations on page 17.2 Touch one of the categories in which youwant to search for a video/music.!Video Playlists (video playlists)!Movies (movies)!Music Videos (music videos)!Video Podcasts (video podcasts)!TV Shows (TV shows)!Playlists (playlists)!Artists (artists)!Albums (albums)!Songs (songs)!Podcasts (podcasts)!Genres (genres)!Composers (composers)!Audiobooks (audiobooks)3 Touch the title of the list that you wantto play.Repeat this operation until you find the desiredvideo/music.Notes!Depending on the generation or version ofthe iPod, some functions may not be avail-able.!You can play playlists created with theMusicSphere application. The applicationwill be available on our website.!Playlists that you created with theMusicSphere application are displayed in ab-breviated form.Searching the list by alphabet1 Select a category.Refer to Searching for a video/music by categoryon page 18.2 Switch to alphabet search mode.Switching to alphabet searchmode.Alphabet search mode is displayed.3 Touch the first letter of the title of thevideo/song you are looking for.While searching, touch panel key operation isnot available.#To refine the search with a different letter, touchCancel.4 Touch the title of the list that you wantto play.Repeat this operation until you find the desiredsong/video.Changing audiobook speed%Touch the change speed key to changethe speed.2Playback at a speed faster thannormal1Playback at normal speed1/2 Playback at a speed slower thannormaliPod18SectioniPodEn08<CRD4711-A/N>18
Displaying lists related tothe song currently playing(link search)Touch the artwork to open a list of the names ofsongs on the album currently playing. Touch thename of the song you want to play to start play-ing that song.NoteIf part of the recorded information does not dis-play, a scroll key appears on the right side of list.Touch the scroll key to scroll.AppRadio Mode operationThis system can switch to the AppRadio Mode,which you can display and operate the applica-tion for iPhone on the screen.In AppRadio Mode, you can operate applica-tions with finger gestures such as tapping, drag-ging, scrolling or flicking on the screen of thesystem.Install the AppRadio app on your iPhone.WARNINGCertain uses of a smartphone may not belegal while driving in your jurisdiction, soyou must be aware of and obey any such re-strictions.If in doubt as to a particular function, onlyperform it while the car is parked.No feature should be used unless it is safeto do so under the driving conditions youare experiencing.CAUTIONWhile driving, you cannot enter text on youriPod.!Pioneer is not liable for any issues thatmay arise from incorrect or flawed app-based content.!The content and functionality of the sup-ported applications are the responsibilityof the App providers.!In AppRadio Mode, functionality throughthe product is limited while driving, withavailable functions determined by the Appproviders.!Availability of AppRadio Mode functional-ity is determined by the App provider, andnot determined by Pioneer.!AppRadio Mode allows access to applica-tions other than those listed (subject tolimitations while driving), but the extent towhich content can be used is determinedby the App providers.Important!The only port that supports AppRadio Mode isUSB input.!When listening to music and sounds from appli-cation simultaneously, see the following section.Refer to Setting the App sound mixing on page20.Notes!Applications operable by switching this sys-tem to AppRadio Mode are only those avail-able for AppRadio Mode.!Please check applications supportedAppRadio Mode athttp://www.pioneerelectronics.com/AppRadioModein Canadahttp://www.pioneerelectronics.ca/AppRadioModeiPhone compatibilityAppRadio Mode is compatible with the follow-ing iPod models.EnglishiPod19SectionAppRadio ModeEn0809<CRD4711-A/N>19
!iPod touch 5th generation!iPod touch 4th generation!iPhone 5!iPhone 4S!iPhone 4Starting procedure1 Install the AppRadio app on your iPhone.2 After configuring RGB Input, connect theiPhone to this unit.#For iPod with lightning connector users(Function of AVH-X7500BT)—Set RGB Input to iPhone (VGA adapter).—Use the CD-IV202AV (sold separately) andLightning to VGA adapter (Apple Inc. prod-ucts) (sold separately) when you use thisfunction.—Refer to When connecting with optional CD-IV202AV cable on page 44.—A Bluetooth connection is required for iPodwith lightning connector. Refer to Bluetoothconnection menu on page 38.#For iPod with 30-pin connector users—Set RGB Input to iPhone (CD-IU201S).—Use the CD-IU201S (sold separately) whenyou use this function.—Refer to When connecting with optional CD-IU201S cable on page 45.3 Start an application available forAppRadio Mode from the iPhone.An image of the application is displayed on thescreen of this system.!You can start an application available forAppRadio Mode also from a launcher appli-cation.4 Press MODE.#Press the home button to switch to the home dis-play and then touch the Apps key to start the launch-er application.5 Operate the application.Setting the KeyboardCAUTIONFor your safety, the keyboard functionality is onlyavailable when the vehicle is stopped and theparking brake is engaged.Depending on the application, you can inputtext on the display. In order to input text correctlyusing keyboard which appears on this unit, youneed to set the language setting in this function.When the AppRadio Mode is used, the lan-guage setting for the keyboard set for the func-tion and the language setting for the iPhonekeyboard need to be the same.!Keyboard is available only in AppRadioMode.When you tap a text input area of an applicationfor iPhone, a keyboard will be displayed on-screen. You can input the desired text directlyfrom this system.!The language preference for the keyboard ofthis system should be same as the setting onyour iPhone.If the settings for this product and theiPhone are different, you may not be able toenter characters properly.1 Press the home button twice to switchfrom the AppRadio Mode display to thehome display.2 Touch the system key to open the systemmenu.3 Touch Keyboard on the System menu toselect desired language.4 Touch or to select a desired language.French (French)—German (German)—Greek(Greek)—Russian (Russian)—English (US Eng-lish)—English (UK) (UK English)—Dutch(Dutch)—Italian (Italian)—Norwegian (Norwe-gian)—Swedish (Swedish)—Finnish (Finnish)—Spanish (Spanish)—Portuguese (Portu-guese)5 Tap the text input area on the applicationscreen of the iPhone.Touch to hide the keyboard.Setting the App sound mixingYou cannot turn on or off Mixing when this unitis playing a song of iPod.The sound of application during AppRadioMode can be adjusted.Enable this setting when you want to mix theApp sound with the sound from a built-in source(such as the radio). The volume of the Appsound can be selected from three levels.This function is not available when RGB Input isset to iPhone (VGA adapter).Refer to Setting the RGB Input on page 33.1 Press the home button twice to switchfrom the AppRadio Mode display to thehome display.2 Touch the system key to open the systemmenu.3 Touch App sound mixing on the Systemmenu to select desired setting.OFF (off)—Low (low)—Mid (mid)—High (high)AppRadio Mode20SectionAppRadio ModeEn09<CRD4711-A/N>20
Sound playback operationsYou can use this unit to listen to USB audio files.Notes!The play time may not display correctly.!When playing back files recorded as VBR(variable bit rate) files, the play time will notbe correctly displayed if fast forward or re-verse operations are used.!To ensure proper operation, connect thedock connector cable from the iPod directlyto this unit.!While the iPod is connected to this unit, theiPod cannot be turned on or off.!If the characters recorded on the disc are notcompatible with this unit, those characterswill not be displayed.!Text information may not be correctly dis-played depending on the recorded environ-ment.!Disconnect the USB portable audio player/USB memory when you are done using it.!When you select Speana on Selecting thebackground display on page 39, the artwork isnot displayed.Touch panel keys00'01'' -00'03''JANPM12:43USBAbcdefghiAbcdefghiAbcdefghiAbcdefghiS.Rtrv61AllAllAllMedia21a98765431MIXTRAX EZ keyStarting MIXTRAX EZ.2Information keySwitching the text information to display onthis unit when playing MP3/WMA/AAC/WAVfiles.3Search keyDisplaying the file name list to select thefiles.4Media keySwitching between media file types to playon USB.5Sound retriever keyRefer to Using sound retriever on page 9.6Random keyPlaying songs in random order.7Repeat keySelecting the repeat range.8DB keyCreating a database that enables searchesby artist name, genre, and other options.Refer to Music browse mode on page 21.9Previous folder key/Next folder keySelecting a folder.aPause and play keyPausing and starting playback.Basic operationsPlaying back tracks1Connect the USB device.Playback will automatically start.When the source icon is not displayed, it canbe displayed by touching the screen.Fast forwarding or reversing using the buttons1Press and hold cor d(TRK).Music browse mode(Function for USB)This unit creates an index in order to facilitatebrowsing for a song. You can search by the cate-gories such as albums and artists.CAUTION!This function is not available when the USBstorage device is locked.!This function is not available when the freespace of USB storage device is less than5 MB.!While this unit creates an index, do not turnthe unit off. It may cause loss of data on yourUSB storage device.1 Touch DB to create a database in Musicbrowse mode.Refer to Sound playback operations on page 21.2 When “Save the Database to memory?”is displayed, touch “Yes”.Saving of the database is completed. If you donot save it, touch “No”.When the saving is completed, “Completedsaving Database to memory.”appears.Music browse mode will start.3 Display a list and touch the tag key.4 Select a file.Switching the media file type%Touch Media to switch between mediafile types.Random play (shuffle)%Touch the random key.!On –Play back files in random order withinthe repeat range, Folder and Media.!Off –Cancel random play.Repeating playback%Touch the repeat key.!File –Repeat the current file!Folder –Repeat the current folder!All –Repeat all files!When Folder is selected, it is not possible toplay back a subfolder of that folder.!If you select USB source, the repeat playrange changes to All.Selecting files from the filename list(Function for compressed audio)Operation is the same as that for Disc.Refer to Selecting files from the file name list onpage 15.Displaying lists related tothe song currently playing(link search)Touch the artwork to open a list of the names ofsongs on the album currently playing. Touch thename of the song you want to play to start play-ing that song.Notes!If part of the recorded information does notdisplay, a scroll key appears on the right sideof list. Touch the scroll key to scroll.!This function is available for USB devices inMusic browse mode.EnglishUSB21SectionUSBEn10<CRD4711-A/N>21
Sound playback operations(Function of AVH-X7500BT)You can use this unit to listen to Bluetooth audiofiles.Notes!Depending on the Bluetooth audio playerconnected to this unit, the available opera-tions will be limited to the following two lev-els:—A2DP profile (Advanced Audio DistributionProfile): You can only playback songs on youraudio player.—AVRCP profile (Audio/Video Remote ControlProfile): You can perform playback, pauseplayback, select songs, etc.!As there is a wide variety of Bluetooth audioplayers available on the market, operationsavailable with specific models may vary ex-tensively. When attempting to run aBluetooth audio player using this unit, referto the instruction manual that came with theplayer as well as to this manual for assis-tance.!As the signal from your cellular phone maycause noise, avoid using it when you are lis-tening to songs on your Bluetooth audioplayer.!The sound from a Bluetooth audio playerconnected to this unit will be muted while acall is in progress on a cellular phone con-nected to this unit via Bluetooth wirelesstechnology.!The play time may not display correctly.!Depending on the type of Bluetooth audioplayer you have connected to this unit, oper-ation and information display may not beavailable for some functions.Touch panel keysBluetooth88'88'' -88'88''Abcdefghi AbcdefghAbcdefghAbcdefgh888822 JANAM12:22DB43211Search keyDisplaying the file name list to select thefiles.2Random keyPlaying songs in random order.3Repeat keySelecting the repeat range.4Pause and play keyPausing and starting playback.Setting up for Bluetooth audioBefore you can use the Bluetooth audio functionyou must establish a Bluetooth wireless connec-tion between the unit and your Bluetooth audioplayer.1ConnectionFirst, you need to connect a Bluetooth audio tothis unit.For detailed instructions on connecting yourBluetooth audio to this unit via Bluetooth wire-less technology, refer to Bluetooth connectionmenu on page 38.Notes!When playing back files recorded as VBR(variable bit rate) files, the play time will notbe correctly displayed if fast forward or re-verse operations are used.!To ensure proper operation, connect thedock connector cable from the iPod directlyto this unit.!While the iPod is connected to this unit, theiPod cannot be turned on or off.!If the characters recorded on the disc are notcompatible with this unit, those characterswill not be displayed.!Text information may not be correctly dis-played depending on the recorded environ-ment.Random play (shuffle)%Touch the random key.!On –Play back files in random order.!Off –Cancel random play.Repeating playback%Touch the repeat key.!One –Repeat the current song only!All –Repeat all songsBluetooth Audio22SectionBluetooth AudioEn11<CRD4711-A/N>22
MIXTRAX operationMIXTRAX is original technology for creatingnon-stop mixes of selections from your audio li-brary, complete with DJ effects that make themsound as if a DJ is right there with you playingthe music.MIXTRAX EZ operationYou can use this unit to play iPod/USB audiofiles.MIXTRAX EZ is used to add a variety of sound ef-fects between songs for arranging the pausesbetween songs. It allows you to enjoy listeningto music non-stop.!This function is only available when a file ona USB storage device or a song on an iPod isbeing played.!This function is not available when the con-trol mode is set to App Mode.!Depending on the file/song, sound effectsmay not be available.!Depending on the file/song, non-stop play-back may not be available.Starting MIXTRAX EZ operation%Touch MIXTRAX EZ.Setting MIXTRAX modeTurn on this function to play back audio filesusing MIXTRAX.1 Press the home button to switch to thehome display.2 Touch the system key to open the systemmenu.3 Touch MIXTRAX Setup on the systemmenu.MIXTRAX setting items are displayed.!Short Playback Mode –When turned on, se-lect an audio track playback length. Whenthis mode is turned off, the audio track willplay all the way to the end.60s (60 sec.)—90s (90 sec.)—120s (120 sec.)—150s (150 sec.)—180s (180 sec.)—Random(random)—Off (off)When Random is selected, the playback timevaries between 60 s, 90 s, 120s, 150 s, and180 s selected at random when the playbacksong changes.!Display Effect –When Display Effect is setto Disp&Key, the artwork display and keyscan be moved according to the music type.Disp&Key (display and key)—Key (key)—OFF (off)!Cut-In Effect –When Cut-In Effect is set toon, sound effects will play between tracks.!Effect Setting –Use Effect Setting to set upthe sound effect you want to insert betweentracks.!Flash Pattern –Use Flash Pattern to selectthe flash color pattern that can flash whenthe MIXTRAX is turned on.Random 1—Sound 1—Sound 2—Sound 3—Sound 4—Sound 5—Sound 6—Random 2—L-Pass 1—L-Pass 2—L-Pass 3—L-Pass 4—L-Pass 5—L-Pass 6—Random 3Setting the effectYou can change the settings for fixed soundsand sound effects.There are six different fixed sounds availablethat can be inserted for playback betweentracks.The sound effects are used as effects to signalthe end of a song being played and the begin-ning of the next song in series.The fixed sounds and sound effects are set ascombinations as MIXTRAX sounds.Fixed sounds!Phaser –A fixed sound that sounds like surg-ing waves.!Roll –A fixed sound that repeats playback ofa certain sound.!Turntable1 –A fixed sound that mimics DJscratching.!Flanger1 –A rushing sound that mimicsthat rising and falling sounds of a jet engine.!Reverb –A fixed sound effect that creates areverberation effect.!Echo –A fixed sound effect that creates anechoing effect.Sound effects!Cross Fade –A sound effect that creates afade in and fade out effect between songs.!Flanger –A rushing sound that mimics thatrising and falling sounds of a jet engine.!Echo –A sound effect that creates an echo-ing effect.!Loop –A sound effect that repeats playbackof one section of a song track.Setting sounds and sound effectsas presets using the preset keyThe Standard and Simple sound effects are setalready as default presets.%Touch Standard or Simple to check thesettings.The registered preset sound effect for the keythat was touched is set as a preset.Registering sounds and soundeffects as presetsRegisters a desired combination of sounds andsound effects to Custom.Touch Custom to easily set the desired sound orsound effect.1 Touch Custom.2 Add a check mark to the desired soundeffect by touching the option.The marked sound effect is registered as a pre-set in Custom.Notes!If a sound effect is touched in the selectionscreen for Standard or Simple, the Customscreen is automatically displayed and thesound effect is registered to Custom.!You can listen to fixed sounds to hear exam-ples by touching the speaker icon.EnglishUsing MIXTRAX23SectionUsing MIXTRAXEn12<CRD4711-A/N>23
Pandora operationsTo play Pandora on the Pioneer car audio/videoproducts, connect an iPod, iPhone or Androidädevice with the most recent Pandora applicationinstalled, and start the Pandora application.!iPod with lightning connector or Android de-vice can be connected to the AVH-X7500BT.!Only iPod with 30-pin connector can be con-nected to the AVH-X6500DVD.For iPod with lightning connector users(Function of AVH-X7500BT)—Set RGB Input to iPhone (VGA adapter).—Use the CD-IV202AV (sold separately) andLightning to VGA adapter (Apple Inc. prod-ucts) (sold separately) when you use thisfunction.—Refer to When connecting with optional CD-IV202AV cable on page 44.—A Bluetooth connection is required for iPodwith lightning connector. Refer to Bluetoothconnection menu on page 38.For iPod with 30-pin connector users—Set RGB Input to iPhone (CD-IU201S).—Set Pandora Connection to iPhone.(Function of AVH-X7500BT)—Use the CD-IU201S (sold separately) whenyou use this function.—Refer to When connecting with optional CD-IU201S cable on page 45.For Android device users(Function of AVH-X7500BT)—Set Pandora Connection to Android.—A Bluetooth connection is required forAndroid devices. Refer to Bluetooth connec-tion menu on page 38.ImportantRequirements to access Pandora using thePioneer car audio/video products:—Connect an iPod with 30-pin connector to USBinput.—Connect an iPod with lightning connector toRGB input and enable Bluetooth.—Connect an Android device to this unit usingBluetooth.!iPod and iPhone compatibilityApple iPhone (first generation), iPhone 3G,iPhone 3GS, iPhone 4, iPhone 4S, iPhone 5, iPodtouch 1G, iPod touch 2G, iPod touch 3G, iPodtouch 4G or iPod touch 5G (firmware version 3.0or later)Certain firmware versions for the iPhone may notbe compatible with the Pandora application. Ifthis appears to be the case, please update thefirmware to a version that is compatible withPandora.!Android compatibilityAndroid OS Version 2.2 or later!Latest version of the Pandora application, down-loaded to your device (Search Apple iTunes AppStore or Google Play for “Pandora”).!Current Pandora account (if you do not have aPandora account, create one for free athttp://www.pandora.com or with the mobile ap-plication.!Data PlanNote: If the Data Plan for your iPhone orAndroid device does not provide for unlimiteddata usage, additional charges from your carriermay apply for accessing the Pandora service via3G and/or EDGE networks.!Connection to the Internet via 3G, EDGE or Wi-Finetwork.!Optional Pioneer adapter cable connecting youriPhone to the Pioneer car audio/video products.Limitations:!Access to the Pandora service will depend on theavailability of a cellular and/or Wi-Fi network forpurposes of allowing your device to connect tothe Internet.!Ability of the Pioneer car audio/video products toaccess the Pandora service is subject to changewithout notice and could be affected by any ofthe following: compatibility issues with futurefirmware versions of iPhones or Android devices;compatibility issues with future firmware ver-sions of the Pandora application for them;changes to the Pandora music service byPandora; discontinuation of the Pandora musicservice by Pandora.!Certain functions of the Pandora service are notavailable when accessing the service through thePioneer car audio/video products, including, butnot limited to, creating new stations, deleting sta-tions, emailing current stations, buying tracksfrom iTunes, viewing additional text information,logging in to Pandora, and adjusting Cell Net-work Audio Quality.Pandora internet radio is a music service not af-filiated with Pioneer. More information is avail-able at http://www.pandora.com.Setting the Pandora connect mode(Function of AVH-X7500BT)Set the Pandora connection mode appropriatelyto notify the system whether you are streamingPandora over an iPod via USB or over anAndroid device via Bluetooth.NoteThis function is not available when RGB Input isset to iPhone (VGA adapter).Refer to Setting the RGB Input on page 33.1 Press the home button to switch to thehome display.2 Touch the system key to open the systemmenu.3 Touch Pandora Connection repeatedlyuntil the desired setting appears on thescreen.iPhone: An iPod is connected using an actualcable.Android: An Android device is connected usingBluetooth.4 Touch the connect key.(Only when Pandora Connection is set toAndroid)Streaming Pandoraâ24SectionStreaming PandoraâEn13<CRD4711-A/N>24
Touch panel keysPandora (Control Audio)Pandora88'88'' -88'88''AbcdefghiAbcdefghiAbcdefghiAbcdefghi22 JANAM12:22DBS.Rtrv123456Pandora (Connect Mode)Connect71Search keyDisplays the shuffle/station list. Select thedesired station or shuffle mode.2Sound retriever key(Only available on iPod)Refer to Using sound retriever on page 9.3Bookmark keyStores track information (Bookmark).Bookmarks are viewable in your profile.4Thumbs-down keyGiving a “thumbs-down”tells Pandora you donot like the current track. Pandora will skip tothe next track, and will not play that track onthe station again.5Thumbs-up keyGiving a “thumbs-up”tells Pandora that youlike the current track. Pandora will continueto play that track and tracks like it on the sta-tion.6Pause and play keyPausing and starting playback.7Connect key(Function of AVH-X7500BT)Starting the connection to Pandora.Basic operationsPlaying tracks1For an iPod with lightning connector or anAndroid device, a Bluetooth connection is re-quired as well.Refer to Pandora operations on page 24.2Switch the source to Pandora.Skipping tracks1Press d(TRK).Notes!Touch panel keys not listed under Pandora op-erations may appear on the display.Refer to Indicator list on page 53.!Pandora limits the number of skips allowedon their service. If you attempt to skip tracksbeyond the limit, “Skip limit reached.”is dis-played. If you have reached the skip limit andyou give a “thumbs-down”, the current trackwill continue to play, but your feedback willbe registered.Selecting and playingPandoraâstations/shuffleTouch the list for your Pandora stations to selectone of them to play.1 Display the shuffle/station list.Refer to Pandora operations on page 24.2 Change the sort order.You can sort the items in the listalphabetically.You can sort the items in the listin order of the dates on which theitems were created.You can scroll the titles in the listwhile you touch and hold downthe scroll icon.3 Select shuffle or the desired station.Shuffle mode will play tracksfrom your selected stations. Youcan edit shuffle preferences onyour mobile device.NoteStations indicated by are shared stations.EnglishStreaming Pandoraâ25SectionStreaming PandoraâEn13<CRD4711-A/N>25
Bluetooth telephoneoperations(Function of AVH-X7500BT)You can use Bluetooth telephone.Important!Leaving the unit on standby to connect toyour phone via Bluetooth while the engine isnot running can drain the battery.!Advanced operations that require attentionsuch as dialing numbers on the monitor,etc., are prohibited while driving. Park yourvehicle in a safe place when using these ad-vanced operations.!Bluetooth connection menu cannot be se-lected while driving.!Operations available may be limited depend-ing on the cellular phone connected to thisunit.!Be sure to park your vehicle in a safe placeand apply the parking brake when perform-ing this operation.!If you are unable to complete the connectionusing this unit, use the device to connect tothe unit.!If you connect more than one device at atime, connected device may not operateproperly. Connecting one device at a time isrecommended.Touch panel keysTelephone standby display13 ARPPM12:251Abcdefghi1234567890123456AutoONToneOFFe12345678dWhen switching to the entering phone numbermode13 APRPM12:251123456789*0#C+AbcdefghiXXXXXXXXXXXXXXXXPrivateONVol9abc1Close keyDisplay is closed.2Preset dial keyDisplaying the preset dial screen.3Phone book keySwitching to the phone book mode.4Setting keyDisplaying the Bluetooth connection menu.5Tone keyTurning the ring tone for incoming calls onor off.6Auto-answer keyTurning automatic answering on or off.7History keySwitching to the missed, received and dialedcall lists.8Key pad keySwitching the mode to enter the phone num-ber directly.9On-hook keyEnding a call.Rejecting an incoming call.Canceling call waiting.aVolume keyAdjusting the other party’s listening volume.bPrivate mode keyTurning private mode on or off.cOff-hook keyAccepting an incoming call.Making a phone call, when selecting aphone number.Switching between callers on hold.dVoice control keyNotes!Private mode can only be operated while youare talking on the phone.!To end the call, both you and the other callermust hang up your phones.!Touch panel keys not listed under Bluetoothtelephone operations may appear on the dis-play.Refer to Indicator list on page 53.Text informationeIncoming call noticeIndicates that an incoming call has been re-ceived and has not been checked yet.!Not displayed for calls made when yourcellular phone is disconnected from thisunit.Setting up for hands-free phoningBefore you can use the hands-free phoningfunction you must set up the unit for use withyour cellular phone. This entails establishing aBluetooth wireless connection between this unitand your phone, registering your phone withthis unit, and adjusting the volume level.1ConnectionFirst, you need to connect a Bluetooth tele-phone to this unit.For detailed instructions on connecting yourphone to this unit via Bluetooth wireless tech-nology, refer to Pairing from this unit on page38.2Volume adjustmentAdjust the earpiece volume of your cellularphone to your preference. The unit will recordthe adjusted volume level as the default set-ting.Notes!The volume of the caller’s voice and ringtone may vary depending on the type of cellu-lar phone.!If there is a large volume difference betweenthe ring tone and caller’s voice, the overallvolume level may become unstable.Bluetooth telephone26SectionBluetooth telephoneEn14<CRD4711-A/N>26
!Make sure to adjust the volume to a properlevel before disconnecting the cellular phonefrom the unit. If the volume is muted (zerolevel) on your cellular phone, the volumelevel of your cellular phone remains mutedeven after the cellular phone is discon-nected.Calling a number in thephone bookThe contacts on your phone will normally betransferred automatically when the phone isconnected. If it is not, use your phone menu totransfer the contacts. The visibility of this unitshould be on when you use the phone menu.Refer to Switching visible unit on page 38.After finding the number you want to call in thephone book, you can select the entry and makethe call.1 Touch the phone book key to switch tothe phone book mode.2 Select the phone number list.The detailed phone number list of the selectedentry is displayed.3 Select the phone number.#If you want to store the phone number, touch andhold the list.4 Touch the off-hook key to make the call.5 Touch the on-hook key to end the call.Selecting a number byalphabet search modeIf a lot of numbers are registered in the phonebook, you can search for the phone number byalphabet search mode.1 Touch the phone book key to switch tothe phone book mode.2 Touch ABC to switch to alphabet searchmode.3 Touch the first letter of the entry you arelooking for.The Phone Book entries starting with that letter(e.g. “Ben”,“Brian”and “Burt”when “B”is se-lected) will be displayed.#If you want to change the character to Russian,touch the icon. To return to English, touch the iconagain.Changing the character to Rus-sian.#The order of the first name and last name may bedifferent from that of the cellular phone.4 Touch the list to display the phone num-ber list of the selected entry.#If several phone numbers are included in anentry, select one by touching the list.#If you want to switch to the call history list, touchthe icon.Switching to the call history list.5 Touch the off-hook key to make the call.6 Touch the on-hook key to end the call.Inverting names in phone bookWhen your cellular phone is connected to thisunit, the first and last names of your contactsmay be registered to the phone book in reverseorder. You can use this function to change theorder back.(Inverting the names in the phone book)1 Touch the phone book key to switch tothe phone book mode.2 Invert names in phone books.Inverting names in phone books.3“Would you like to invert all names?”ap-pears. Touch Yes to continue.While the names are inverted, is displayed.#If the inversion fails, “Invert Name Error”ap-pears. In such cases, try again from the beginning.NoteInverting the names of your contacts from thisunit does not affect the data on your Bluetoothdevice.Using the missed, receivedand dialed call listsThe 80 most recent calls dialed, received, andmissed are stored in the memory. You canbrowse them and call numbers from these lists.1 Touch the history key to display the callhistory list.2 Select Missed Calls, Dialed Calls orReceived Calls.Displaying the received call list.Displaying the dialed call list.Displaying the missed call list.3 Touch the list number to select a phonenumber.Name and phone number are displayed in thedetailed list.#If you want to store the phone number, touch andhold the list.4 Touch the off-hook key to make the call.5 Touch the on-hook key to end the call.Setting automatic answeringIf this function is on, this unit automatically an-swers all incoming calls.%Touch the auto-answer key to turn auto-matic answering on or off.Adjusting the other party’slistening volumeTo maintain the good sound quality, this unitcan adjust the other party’s listening volume. Ifthe volume is not loud enough for the otherparty, use this function.EnglishBluetooth telephone27SectionBluetooth telephoneEn14<CRD4711-A/N>27
%Touch the volume key to selectFar-End VOL.1—2—3#This function can be performed even while talk-ing on the phone.#Settings can be stored for each device.Switching the ring toneYou can select whether or not to use this unit’sring tone. If this function is set to on, the ringtone for this unit will sound.1 Connect your cellular phone to this unit.2 Touch the tone key to turn the ring toneon or off.Using the preset dial listsYou can easily store up to six phone numbers aspresets.1 Touch the preset dial key to display thepreset screen.2 Touch one of the phone numbers to se-lect.#If you want to delete a preset phone number,touch and hold the phone number you wish to de-lete.3 Touch the off-hook key to make the call.4 Touch the on-hook key to end the call.Making a call by enteringphone number13 APRPM12:251123456789*0#C+AbcdefghiXXXXXXXXXXXXXXXXPrivateONVolImportantBe sure to park your vehicle in a safe place andapply the parking brake when performing thisoperation.1 Touch the key pad key to start enteringthe phone number.2 Touch the number icons to input thenumbers.#Up to 24 digits can be entered.3 Touch the off-hook key to make the call.4 Touch the on-hook key to end the call.NoteEntering phone number mode cannot be oper-ated unless a Bluetooth telephone is connectedto this unit.Setting the private modeDuring a conversation, you can switch to privatemode (talk directly on your cellular phone).%Touch the private mode key to turn pri-vate mode on or off.Voice controlIf your cellular phone is equipped with the voicecontrol feature, you can use voice commands tomake calls, for example.!Operation varies depending on the type ofcellular phone. Refer to the instruction man-ual that came with your cellular phone for de-tailed instructions.!For details on cellular phone models that arecompatible with this feature, refer to the in-formation on our website.1 Touch the voice control key.The display switches to the voice control screen.You can also switch to the voice control screenby pressing and holding down the home buttonwhile the source is on.13 ARPPM12:251Voice Control2 Start voice control.Indicates that continuous callscan be made uninterrupted.Indicates that the display isclosed.Notes!In order for your voice commands to be rec-ognized and interpreted correctly, ensurethat conditions are suitable for recognition.!Please note that wind blowing through thevehicle windows and noise coming from out-side the vehicle can interfere with voice com-mand operation.!For optimum pick-up, the microphone shouldbe placed directly in front of the driver at asuitable distance.!Speaking too soon after the start of the com-mand may cause voice recognition to fail.!Speak slowly, deliberately, and clearly.Bluetooth telephone28SectionBluetooth telephoneEn14<CRD4711-A/N>28
Menu operationsTouch panel keysSonic Center Control   LoudnessSubwooferBass BoosterHigh Pass FilterSource Level AdjusterL/R  0Low0125Hz0OnAudio154231Video setup keyRefer to Setting up the video player on page31.2Audio function keyRefer to Audio adjustments on page 29.3Close keyReturning to the current source display.4System keyRefer to System settings on page 33.5Favorite keyYou can choose menus within each menu(Audio function menu, etc.) and registerthem to this favorite menu.Refer to Favorite menu on page 37.Notes!You can display the Video Setup menuwhen a Disc source is selected.!If you start the Video Setup menu, playbackis stopped.!You cannot display the Audio function menuwhen the mute function is on.1 Press the home button to switch to thehome display.2 Touch any of the following touch panelkeys to select the menu to be adjusted.BluetoothFavoriteThemeSystemSettingsAudioVideoUsing fader/balance adjustmentFader/Balance displays when Rear Speaker isset to Full on the System Menu.You can change the fader/balance setting to pro-vide an ideal listening environment for all of theoccupied seats.1 Press the home button to switch to thehome display.2 Touch the audio function key to open theaudio menu.3 Touch Fader/Balance on the audio func-tion menu.4 Touch or to adjust the front/rearspeaker balance.Range: F 15 L/R 0 to R 15 L/R 0#Select F/R 0 L/R 0 when only using two speak-ers.5 Touch or to adjust the left/rightspeaker balance.Range: F/R 0 L 15 to F/R 0 R 15NoteYou can also set the fader/balance by draggingthe dot on the displayed table.Using balance adjustmentBalance displays when Rear Speaker is set toSubwoofer on the System Menu. This settingwill allow you to adjust the balance betweenright/left sound output.1 Press the home button to switch to thehome display.2 Touch the audio function key to open theaudio menu.3 Touch Balance on the audio functionmenu.4 Touch or to adjust the left/rightspeaker balance.Range: L15to R15NoteYou can also set the balance by dragging the doton the displayed table.Using the equalizerYou can adjust the equalization to match thecar’s interior acoustic characteristics as de-sired.Recalling equalizer curvesThere are seven stored equalizer curves whichyou can easily recall at any time. Here is a list ofthe equalizer curves.Display Equalizer curveS.Bass Super bassPowerful PowerfulNatural NaturalVocal VocalFlat FlatCustom1 Custom 1Custom2 Custom 2!The equalizer curves for Custom1 andCustom2 can be adjusted.!You cannot select Custom1 and Custom2when using the auto-equalizer.!When Flat, no changes are made to thesound. You can check the effects of theequalizer curves by switching alternativelybetween Flat and another equalizer curve.EnglishSettings29SectionAudio adjustmentsEn1516<CRD4711-A/N>29
1 Press the home button to switch to thehome display.2 Touch the audio function key to open theaudio menu.3 Touch Graphic EQ on the audio functionmenu.#You cannot select or adjust the equalizer curvesof Custom1 and Custom2 when using the auto-equalizer.4 Touch the desired setting.S.Bass—Powerful—Natural—Vocal—Flat—Custom1—Custom2Adjusting the 8-band graphicequalizerYou can adjust the level of each band for theequalizer curves.!A separate Custom1 curve can be createdfor each source. If you make adjustmentswhen a curve other than Custom2 is se-lected, the equalizer curve settings will bestored in Custom1.!ACustom2 curve that is common for allsources can be created. If you make adjust-ments when the Custom2 curve is selected,the Custom2 curve will be updated.1 Press the home button to switch to thehome display.2 Touch the audio function key to open theaudio menu.3 Touch Graphic EQ on the audio functionmenu.4 Touch the desired setting.S.Bass—Powerful—Natural—Vocal—Flat—Custom1—Custom25 Touch the table to adjust the level of theequalizer band.Range: +12dB to –12dBUsing the auto-equalizerThe auto-equalizer is an equalizer curve createdby auto EQ (refer to Auto EQ (auto-equalizing) onpage 36).You can turn the auto-equalizer on or off.If you connect an optional microphone to thisunit, you can use this function.1 Press the home button to switch to thehome display.2 Touch the audio function key to open theaudio menu.3 Touch Auto EQ to turn the auto-equalizeron or off.#You cannot use this function if auto EQ has notbeen carried out.Using sonic center controlSound that is suited for the listening positioncan easily be created with this function.1 Press the home button to switch to thehome display.2 Touch the audio function key to open theaudio menu.3 Touch Sonic Center Control on the audiofunction menu.4 Touch or to select a listening position.Range: Left 7 to Right 7Adjusting loudnessLoudness compensates for deficiencies in thelow-frequency and high-frequency ranges at lowvolume.1 Press the home button to switch to thehome display.2 Touch the audio function key to open theaudio menu.3 Touch cor dto select a desired level forloudness.Off (off)—Low (low)—Mid (mid)—High (high)Using subwoofer outputThis unit is equipped with a subwoofer outputwhich can be turned on or off.!The cut-off frequency and output level can beadjusted when the subwoofer output is on.1 Press the home button to switch to thehome display.2 Touch the audio function key to open theaudio menu.3 Touch Subwoofer on the audio functionmenu.4 Touch On or Off next to Subwoofer toturn the subwoofer output on or off.5 Touch Normal or Reverse next to Phaseto select the phase of subwoofer output.6 Touch cor dnext to Level to adjust theoutput level of the subwoofer.Range: +6 to –247 Touch cor dnext to Frequency to selectthe cut-off frequency.50Hz—63Hz—80Hz—100Hz—125HzOnly frequencies lower than those in the se-lected range are outputted from the subwoofer.Boosting the bassYou can boost the bass level.1 Press the home button to switch to thehome display.2 Touch the audio function key to open theaudio menu.3 Touch cor dto select a desired level.Range: 0to +6Using the high pass filterWhen you do not want low sounds from the sub-woofer output frequency range to play from thefront or rear speakers, turn on the HPF (highpass filter). Only frequencies higher than thosein the selected range are output from the frontor rear speakers.1 Press the home button to switch to thehome display.2 Touch the audio function key to open theaudio menu.3 Touch cor dnext to the frequency to se-lect cut-off frequency.Off (off)—50Hz—63Hz—80Hz—100Hz—125HzOnly frequencies higher than those in the se-lected range are output from the front or rearspeakers.Audio adjustments30SectionAudio adjustmentsEn16<CRD4711-A/N>30
Adjusting source levelsWith SLA (source level adjustment), the volumelevels of each source can be adjusted to preventsignificant differences between sources.!Settings are based on the FM volume level,which remains unchanged.1 Press the home button to switch to thehome display.2 Touch the audio function key to open theaudio menu.3 Compare the FM volume level with thelevel of the source you wish to adjust.4 Touch Source Level Adjuster on the audiofunction menu.5 Touch or to adjust the source vol-ume.Range: +4 to –4Notes!Source Level Adjuster is not available whenFM is selected as the source.!The AM volume level can also be adjustedwith this function.!Video CD, CD, compressed audio, DivX,MPEG-1, MPEG-2 and MPEG-4 are automati-cally set to the same source level adjustmentvolume.Setting the subtitle languageYou can set a desired subtitle language. Whenavailable, the subtitles will be displayed in theselected language.1 Press the home button to switch to thehome display.2 Touch the video setup key to open thevideo setup menu.3 Touch Subtitle Language on theVideo Setup menu.A subtitle language menu is displayed.4 Touch the desired language.The subtitle language is set.#If you have selected Others, refer to When you se-lect Others on page 31.Notes!If the selected language is not available, thelanguage specified on the disc is displayed.!You can also switch the subtitle language bytouching the switch subtitle languages keyduring playback.!The setting made here will not be affectedeven if the subtitle language is switched dur-ing playback using the switch subtitle lan-guages key.When you select OthersA language code input display is shown whenOthers is selected. Refer to Language code chartfor DVD on page 60.%Touch 0 to 9 to input the language code.#To cancel the entered numbers, touch C.#To register the code, touch the following touchpanel key.Registering the code.Setting the audio languageYou can set the preferred audio language.1 Press the home button to switch to thehome display.2 Touch the video setup key to open thevideo setup menu.3 Touch Audio Language on the VideoSetup menu.An audio language menu is displayed.4 Touch the desired language.The audio language is set.#If you have selected Others, refer to When you se-lect Others on page 31.Notes!If the selected language is not available, thelanguage specified on the disc is used.!You can also switch the audio language bytouching the switch audio languages keyduring playback.!The setting made here will not be affectedeven if the audio language is switched dur-ing playback using the switch audio lan-guages key.Setting the menu languageYou can set the preferred language in which themenus recorded on a disc are displayed.1 Press the home button to switch to thehome display.EnglishAudio adjustments31SectionSetting up the video playerEn1617<CRD4711-A/N>31
2 Touch the video setup key to open thevideo setup menu.3 Touch Menu Language on theVideo Setup menu.A menu language menu is displayed.4 Touch the desired language.The menu language is set.#If you have selected Others, refer to When you se-lect Others on page 31.NoteIf the selected language is not available, the lan-guage specified on the disc is displayed.Setting the multi-angle DVDdisplayThe angle icon can be set so it appears onscenes where the angle can be switched.1 Press the home button to switch to thehome display.2 Touch the video setup key to open thevideo setup menu.3 Touch Multi Angle on the Video Setupmenu to turn angle icon display on or off.Setting the aspect ratioThere are two kinds of display: a wide screen dis-play that has a width-to-height ratio (TV aspectratio) of 16:9, and regular display that has a TVaspect of 4:3. Be sure to select the correct TV as-pect for the display connected to V OUT.!When using regular display, select eitherLetter Box or Pan Scan. Selecting 16:9 mayresult in an unnatural picture.!If you select the TV aspect ratio, the unit’sdisplay will change to the same setting.1 Press the home button to switch to thehome display.2 Touch the video setup key to open thevideo setup menu.3 Touch TV Aspect on the Video Setupmenu to select the TV aspect ratio.Touch TV Aspect repeatedly until the desired as-pect ratio appears.!16:9 –Wide screen picture (16:9) is displayedas is (initial setting)!Letter Box –The picture is the shape of a let-terbox with black bands on the top and bot-tom of the screen!Pan Scan –The picture is cut short on theright and left sides of the screenNotes!When playing discs that do not specifyPan Scan, the disc is played back inLetter Box display even if you select thePan Scan setting. Confirm whether the discpackage bears the 16 : 9 LB mark.!The TV aspect ratio cannot be changed forsome discs. For details, refer to the disc’s in-structions.Setting parental lockSome DVD video discs let you use parental lockto restrict children from viewing violent andadult-oriented scenes. You can set parental lockto the desired level.!When you have a parental lock level set andplay a disc featuring parental lock, codenumber input indications may be displayed.In such cases, playback will begin when thecorrect code number is entered.Setting the code number and levelA code number must be registered in order toplay back discs with parental lock.1 Press the home button to switch to thehome display.2 Touch the video setup key to open thevideo setup menu.3 Touch Parental on the Video Setup menu.4 Touch 0 to 9 to input a four digit codenumber.#To cancel the entered numbers, touch C.#To register the code, touch the following touchpanel key.Registering the code.The code number is set, and the level can now beset.5 Touch 1 to 8 to select the desired level.6 Touch Enter.The parental lock level is set.!8–Playback of the entire disc is possible (ini-tial setting)!7to 2–Playback of discs for children andnon-adult-oriented discs is possible!1–Playback of discs for children only is pos-sibleNotes!We recommend to keep a record of yourcode number in case you forget it.!The parental lock level is stored on the disc.Look for the level indication written on thedisc package, included literature or on thedisc itself. Parental lock of this unit is notpossible if a parental lock level is not storedon the disc.!With some discs, the parental lock may beactive only for certain levels of scenes. Theplayback of those scenes will be skipped. Fordetails, refer to the instruction manual thatcame with the disc.Changing the levelYou can change the set parental lock level.1 Press the home button to switch to thehome display.2 Touch the video setup key to open thevideo setup menu.3 Touch Parental on the Video Setup menu.4 Touch 0 to 9 to input the registered codenumber.5 Registering the code.Registering the code.This sets the code number, and the level cannow be changed.#If you enter an incorrect code number, theicon is displayed. Touch Cand enter the correct codenumber.#If you forget your code number, refer to If you for-get your code number on page 32.6 Touch 1 to 8 to select the desired level.7 Touch Enter.The new parental lock level is set.If you forget your code number%Press RESET.Setting up the video player32SectionSetting up the video playerEn17<CRD4711-A/N>32
Setting the DivX subtitle fileYou can select whether or not to display DivX ex-ternal subtitles.!The DivX subtitles will be displayed evenwhen Custom is selected if no DivX externalsubtitle files exist.1 Press the home button to switch to thehome display.2 Touch the video setup key to open thevideo setup menu.3 Touch DivX® Subtitle on the Video Setupmenu to select the desired subtitle setting.!Original –Display the DivX subtitles!Custom –Display the DivX external subtitlesNotes!Up to 42 characters can be displayed on oneline. If more than 42 characters are set, theline breaks and the characters are displayedon the next line.!Up to 126 characters can be displayed onone screen. If more than 126 characters areset, the excess characters will not be dis-played.Displaying the DivXâVODregistration codeIn order to play DivX VOD (video on demand)contents on this unit, the unit must first be reg-istered with a DivX VOD contents provider. Forregistration, generate a DivX VOD registrationcode and submit it to your provider.!Keep a record of the code as you will need itwhen you register your unit to the DivX VODprovider.1 Press the home button to switch to thehome display.2 Touch the video setup key to open thevideo setup menu.3 Touch DivX® VOD on the Video Setupmenu.Registration Code and Deregistration Codeappear.4 Touch Registration Code.Your registration code is displayed.Displaying the deregistration codeIf your device is already registered, deregister itby entering the deregistration code.1 Press the home button to switch to thehome display.2 Touch the video setup key to open thevideo setup menu.3 Touch DivX® VOD on the Video Setupmenu.4 Touch Deregistration Code.#To cancel deregistration, touch Cancel.5 Touch OK.The deregistration is complete.Automatic playback of DVDsWhen a DVD disc with a DVD menu is inserted,this unit will cancel the menu automatically andstart playback from the first chapter of the firsttitle.!Some DVDs may not operate properly. If thisfunction is not fully operable, turn this func-tion off and start playback.1 Press the home button to switch to thehome display.2 Touch the video setup key to open thevideo setup menu.3 Touch DVD Auto Play to turn automaticplayback on.#To turn automatic playback off, touchDVD Auto Play again.Switching the auxiliary settingActivate this setting when using an auxiliary de-vice connected to this unit.1 Press the home button to switch to thehome display.2 Touch the system key to open the systemmenu.3 Touch AUX Input on the system menu toturn AUX Input on or off.Setting AV inputActivate this setting when using an externalvideo component connected to this unit.1 Press the home button to switch to thehome display.2 Touch the system key to open the systemmenu.3 Touch AV Input on the system menu toturn AV Input on or off.Setting the RGB InputSettings are required according to the con-nected device.RGB Input can be set when all of the followingconditions are met.—The iPhone is not connected to RGB input.—No Bluetooth connection.—The source is turned off.1 Turn the source off.Refer to Turning the source ON/OFF on page 7.2 Press the home button to switch to thehome display.3 Touch the system key to open the systemmenu.4 Touch RGB Input on the system menu toselect the RGB input.5 Touch the desired setting.!iPhone (CD-IU201S) –iPod with 30-pin con-nector!iPhone (VGA adapter) –iPod with lightningconnector!NAVI –Navigation systemSetting the Pandora connectmodeRefer to Setting the Pandora connect mode onpage 24.Setting the App sound mixingRefer to Setting the App sound mixing on page20.Setting MIXTRAX modeRefer to Setting MIXTRAX mode on page 23.Changing the pictureadjustmentYou can adjust the Brightness (brightness),Contrast (contrast), Color (color) , Hue (hue),Dimmer (dimmer), and Temperature (tempera-ture) for each source and rear view camera.!You cannot adjust Color or Hue for the audiosource.1 Press the home button to switch to thehome display.EnglishSetting up the video player33SectionSystem settingsEn1718<CRD4711-A/N>33
2 Touch the system key to open the systemmenu.3 If you are adjusting thePicture Adjustment, select the unit.NAVIAppsCompleting Picture Adjust-ment for the Navigation systemwhen the RGB input setting isset to NAVI.Completing Picture Adjust-ment for the AppRadio Modewhen the RGB input setting isset to iPhone (CD-IU201S) oriPhone (VGA adapter).Adjusting the Picture Adjust-ment for the rear view camera.Source Adjusting the Picture Adjust-ment for the source.4 Touch any of the following touch panelkeys to select the function to be adjusted.Picture Adjustment items are displayed.!Brightness –Adjusts the black intensity!Contrast –Adjusts the contrast!Color –Adjusts the color saturation!Hue –Adjusts the tone of color (red or greenis emphasized)!Dimmer –Adjusts the brightness of the dis-play!Temperature –Adjusts the color tempera-ture, resulting in a better white balance#You can adjust Hue only when the color systemis set to NTSC.#With some rear view cameras, picture adjust-ment may not be possible.5 Touch cor dto adjust the selected item.Each time you touch cor d, the level of the se-lected item increases or decreases.#Dimmer can be adjusted from +1 to +48.#Temperature can be adjusted from +3 to –3.Notes!You cannot operate this function while driv-ing.!Different Brightness/Contrast/Dimmer set-tings can be set for when the illuminationswitch is on and when it is off.Selecting the system languageThe system language can be selected.If text information such as the title name, artistname or a comment is embedded in a Europeanlanguage, they can also be displayed on thisunit.!The language can be changed for the follow-ing:—Audio menu—System menu—Video Setup menu—Bluetooth menu—Language for cautionsSome operations on this unit are prohib-ited from use while driving or requirecareful attention when operated. In suchcases, a caution will appear on the dis-play. You can change the language forcaution messages with this setting.!If the embedded language and the selectedlanguage setting are not the same, text infor-mation may not display properly.!Some characters may not be displayed prop-erly.1 Press the home button to switch to thehome display.2 Touch the system key to open the systemmenu.3 Touch System Language on the systemmenu to select the desired language.4 Touch the desired language.English (English)—Français (French)—Español(Spanish)—Portuguese (Portuguese)—中文(Simplified Chinese)Setting Demo ModeOnce Demo Mode is turned on, the Demoscreen appears.Refer to Demo mode on page 6.1 Press the home button to switch to thehome display.2 Touch the system key to open the systemmenu.3 Touch Demo mode on the system menuto turn Demo mode on or off.!On –The Demo screen appears.!Off –The Demo screen does not appear.Switching sound muting/attenuationSound from this system is automatically mutedor attenuated when a signal from equipmentwith a mute function is received.!Sound from this system returns to normalwhen the muting or attenuation is canceled.1 Press the home button to switch to thehome display.2 Touch the system key to open the systemmenu.3 Touch Mute/ATT until the desired settingappears.Touch Mute/ATT until the desired setting ap-pears in the display.!Mute –Muting!ATT –20dB –Attenuation (ATT –20dB has astronger effect than ATT –10dB)!ATT –10dB –Attenuation!Off –Turns the sound muting/attenuation offNotes!When Mute is displayed, the sound is turnedoff and no audio adjustments can be made.!When ATT is displayed, the sound is attenu-ated and only the volume can be adjusted.(No other audio adjustments can be made.)!Operation returns to normal when the phoneconnection is ended.Setting the rear output andsubwoofer controllerThis unit’s rear output (rear speaker leads out-put and RCA rear output) can be used for full-range speaker (Full) or subwoofer (Subwoofer)connection. If you switch the rear output settingto Subwoofer, you can connect a rear speakerlead directly to a subwoofer without using anauxiliary amp.Initially, the unit is set for a rear full-range speak-er connection (Full).1 Turn the source off.Refer to Turning the source ON/OFF on page 7.2 Press the home button to switch to thehome display.3 Touch the system key to open the systemmenu.4 Touch Rear Speaker on the system menuto switch the subwoofer output or full-rangespeaker.#When no subwoofer is connected to the rear out-put, select Full (full-range speaker).#When a subwoofer is connected to the rear out-put, select Subwoofer (subwoofer).System settings34SectionSystem settingsEn18<CRD4711-A/N>34
Notes!Even if you change this setting, there will beno output unless you turn the subwoofer out-put on (refer to Using subwoofer output onpage 30).!Both rear speaker lead outputs and RCA rearoutput are switched simultaneously in thissetting.Using the keyboardKeyboard is available only in AppRadio Mode.Refer to Setting the Keyboard on page 20.Setting the ever scrollWhen ever scroll is set to On, recorded text infor-mation scrolls continuously in the display. Set toOff if you prefer the information to scroll justonce.1 Press the home button to switch to thehome display.2 Touch the system key to open the systemmenu.3 Touch Ever Scroll on the system menu toturn ever scroll on or off.Setting the Bluetooth audio(Function of AVH-X7500BT)You need to activate the Bluetooth Audiosource in order to use a Bluetooth audio player.1 Press the home button to switch to thehome display.2 Touch the system key to open the systemmenu.3 Touch Bluetooth Audio on the systemmenu to turn Bluetooth audio on or off.Clearing Bluetooth memoryImportantNever turn the unit off while the Bluetooth mem-ory is being cleared.1 Turn the source off.Refer to Turning the source ON/OFF on page 7.2 Press the home button to switch to thehome display.3 Touch the system key to open the systemmenu.4 Touch Bluetooth Memory Clear on thesystem menu.5 Touch Clear.After selecting a desired item, a confirmationdisplay appears. Touch OK to delete the memo-ry.#If you do not want to clear the memory, touchCancel.Updating Bluetoothconnection softwareThis function is used to update this unit with thelatest Bluetooth software. For about Bluetoothsoftware and updating, refer to our website.ImportantNever turn the unit off and never disconnect thephone while the software is being updated.1 Turn the source off.Refer to Turning the source ON/OFF on page 7.2 Press the home button to switch to thehome display.3 Touch the system key to open the systemmenu.4 Touch BT Software Update.5 Touch Start to display the data transfermode.#Follow the on-screen instructions to finish updat-ing the Bluetooth software.Displaying the Bluetoothsystem versionIf this unit fails to operate properly, you mayneed to consult your dealer for repair. In suchcases, you may be asked to specify the systemversion. Perform the following procedure tocheck the version on this unit.1 Turn the source off.Refer to Turning the source ON/OFF on page 7.2 Press the home button to switch to thehome display.3 Touch the system key to open the systemmenu.4 Touch Bluetooth Version Information todisplay to the version of the Bluetooth mod-ule of this unit.Setting the automatic openfunctionRefer to Setting the automatic open function onpage 10.Setting the rear viewcamera (back up camera)CAUTIONPioneer recommends the use of a camerawhich outputs mirror-reversed images. Oth-erwise, the screen image will appear re-versed.This unit features a function that automaticallyswitches to the rear view camera video (REARVIEW CAMERA IN) when a rear view camera isinstalled on your car and the shift lever is movedto the REVERSE (R) position. (For more de-tails, consult your dealer.)You can also switch the rear view image bypressing the touch panel key.For details refer to Using the rear view on page 9.!After you set up the rear view camera setting,move the shift lever to REVERSE (R) andconfirm that the rear view camera video isshown on the display.!Change this setting if the display switches tothe rear view camera video by error while youare driving forward.!To stop watching the rear view camera videoand return to the source display, press andhold MUTE.!Touch the RearView icon to display the rearview camera image while driving. Touch thesource icon again to turn the rear view cam-era off. For details, refer to Selecting a sourceon page 8.1 Press the home button to switch to thehome display.2 Touch the system key to open the systemmenu.EnglishSystem settings35SectionSystem settingsEn18<CRD4711-A/N>35
3 Touch Camera Polarity on the systemmenu to select the appropriate setting.!Battery –When the polarity of the connectedlead is positive while the shift lever is in RE-VERSE (R) position!Ground –When the polarity of the connectedlead is negative while the shift lever is in RE-VERSE (R) position!Off –When a rear view camera is not con-nected to this unit!The rear view key setting also turns off on thehome display screen.Auto EQ (auto-equalizing)The auto-equalizer automatically measures thecar’s interior acoustic characteristics, and thencreates an auto-equalizer curve based on that in-formation.!To perform this function, dedicated micro-phone (e.g. CD-MC20) is required.WARNINGAs a loud tone (noise) may be emitted from thespeakers when measuring the car’s interioracoustic characteristics, never perform auto EQwhile driving.CAUTION!Thoroughly check the conditions before per-forming auto EQ as the speakers may bedamaged if these functions are performedwhen:—The speakers are incorrectly connected. (Forexample, when a rear speaker is connectedas a subwoofer output.)—A speaker is connected to a power amp deliv-ering output higher than the speaker’s maxi-mum input power capability.!If the microphone is placed in an unsuitableposition the measurement tone may becomeloud and measurement may take a longtime, resulting in battery drainage. Be sureto place the microphone in the specified lo-cation.Before operating the auto EQfunction!Carry out auto EQ in as quiet a place as pos-sible, with the car engine and air condition-ing switched off. Also cut power to carphones or portable telephones in the car, orremove them from the car before carryingout auto EQ. Sounds other than the measure-ment tone (surrounding sounds, enginesound, telephones ringing etc.) may preventcorrect measurement of the car interioracoustic characteristics.!Be sure to carry out auto EQ using the op-tional microphone. Using another micro-phone may prevent measurement, or resultin incorrect measurement of the car interioracoustic characteristics.!In order to perform auto EQ, the front speak-er must be connected.!When this unit is connected to a power ampwith input level control, auto EQ may not bepossible if the power amp’s input level is setbelow the standard level.!When this unit is connected to a power ampwith an LPF, turn this LPF off before perform-ing auto EQ. Also set the cut-off frequencyfor the built-in LPF of an active subwoofer tothe highest frequency.!The distance has been calculated by com-puter to be the optimum delay to give accu-rate results for the circumstances, so pleasecontinue to use this value.—The reflected sound within the car isstrong and delays occur.—The LPF on active subwoofers or externalamps delay the lower sounds.!Auto EQ changes the audio settings as fol-lows:—The fader/balance settings return to thecenter position. (Refer to Using fader/bal-ance adjustment on page 29.)—The equalizer curve switches to Flat.(Refer to Recalling equalizer curves onpage 29.)—The front, center and rear speakers willautomatically be adjusted to a high passfilter setting.!Previous settings for auto EQ will be overwrit-ten.!Connect a microphone extension cable (soldseparately) to the AUX input in advance.Performing auto EQ1 Stop the car in a place that is quiet, closeall the doors, windows and sun roof, andthen turn the engine off.If the engine is left running, engine noise mayprevent correct auto EQ.2 Fix the optional microphone in the centerof the headrest of the driver’s seat, facingforward.The auto EQ may differ depending on where youplace the microphone. If desired, place the mi-crophone on the front passenger seat to carryout auto EQ.3 Turn the ignition switch to ON or ACC.If the car’s air conditioner or heater is turned on,turn it off. Noise from the fan in the air condi-tioner or heater may prevent correct auto EQ.4 Press the home button to switch to thehome display.5 Touch the system key to open the systemmenu.6 Touch Auto EQ Measurement to enterauto EQ measurement mode.7 Plug the microphone into the AUX inputjack on this unit.AUX input(AUX IN)Extension Cable(Sold separately)Microphone8 Touch Start to start auto EQ.9 When the 10-second countdown starts,get out of the car and close the door within10 seconds.A measurement tone (noise) is emitted from thespeakers, and auto EQ measurement begins.When auto EQ is completed, The measurementhas finished. Please disconnect the micro-phone and then push HOME key. is displayed.System settings36SectionSystem settingsEn18<CRD4711-A/N>36
When the car’s interior acoustic characteristicscannot be measured correctly, an error messagewill be displayed. (Refer to Understanding autoEQ error messages on page 52.)#It takes about nine minutes for auto EQ measure-ment to be completed when all the speakers are con-nected.#To stop auto EQ, touch Stop.10 Store the microphone carefully in theglove compartment or another safe place.If the microphone is subjected to direct sunlightfor an extended period, high temperatures maycause distortion, color change or malfunction.Setting the video signalWhen you connect this unit to an AV equipmentto this unit, select the suitable video signal set-ting.!As this function is initially set to Auto, theunit will automatically adjust the video signalsetting.!You can operate this function only for thevideo signal input into the AV input.1 Press the home button to switch to thehome display.2 Touch the system key to open the systemmenu.3 Touch Video Signal Setting on the func-tion menu.Video Signal Setting items are displayed.!AV –Adjusts the AV video signal!AUX –Adjusts the AUX video signal!Camera –Adjusts the rear view camera videosignal4 Touch cor dto select the desired videosignal appears.Auto—PAL—NTSC—PAL-M—PAL-N—SECAMUsing the Favorite menu1 Display menu columns to register.Refer to Menu operations on page 29.#You can customize menus except Video Setupmenu.2 Touch the star icon in the menu columnfor the desired menu to register the menu.The star icon for the selected menu is filled in.#To cancel the registration, touch the star icon inthe menu column again.3 Display the favorite menu and choose aregistered menu.Refer to Menu operations on page 29.NoteYou can register up to 12 columns.EnglishSystem settings37SectionFavorite menuEn1819<CRD4711-A/N>37
Bluetooth connection menuoperations(Function of AVH-X7500BT)If you are using a cellular phone that can beconnected via Bluetooth wireless technology, werecommend that you use your phone to searchfor this unit and establish a connection betweenit and your phone. The PIN code is set to 0000as default. The product name for this unit willdisplay on your phone as the device name. Fordetails, refer to Entering PIN code for Bluetoothwireless connection on page 38. For further de-tails concerning the procedures for establishingBluetooth wireless connections, refer to the in-struction manual for the phone.Pairing from this unit1 Press the home button to switch to thehome display.2 Touch the Bluetooth key to open theBluetooth connection menu.3 Touch Connection to select a device.4 Start to search.Starting to search.While searching, is displayed and when avail-able devices are found, the device names orBluetooth device addresses (if names cannot beobtained) are displayed.#If you want to switch between the device namesand Bluetooth device addresses, touch the icon.Switching between the devicenames and Bluetooth device ad-dresses.#To cancel searching, touch Stop.#If three devices are already paired, Memory Fullis displayed and pairing cannot be performed. Insuch cases, delete a paired device first. Refer topage 38.#If no device can be found, Not Found is dis-played. In such cases, check the status of theBluetooth device and search again.5 Touch a device name to select the deviceyou want to connect to.While connecting, Pairing is displayed. If theconnection is established, Paired is displayed.#If your device support SSP (Secure Simple Pair-ing), six-digit number appears on the display of thisunit. Once the connection is established, this num-ber disappears.#If the connection fails, Error is displayed. In suchcases, try again from the beginning.#The PIN code is set to 0000 as the default, butcan be changed. Refer to Entering PIN code forBluetooth wireless connection on page 38.#Once the connection is established, the devicename is displayed.Touch the device name to disconnect.#If you want to delete a paired Bluetooth tele-phone, display Delete OK?. Touch Yes to delete thedevice.Deleting a paired device.#Never turn the unit off while the paired Bluetoothtelephone is being deleted.Connecting to a Bluetoothdevice automaticallyIf this function is set to on, a connection be-tween your Bluetooth device and this unit willtake place automatically as soon as the two devi-ces are less than a few meters apart.Initially, this function is set to on.1 Press the home button to switch to thehome display.2 Touch the Bluetooth key to open theBluetooth connection menu.3 Touch Auto Connect to turn automaticconnection on.If your Bluetooth device is ready for a Bluetoothwireless connection, a connection to this unitwill automatically be established.#To turn automatic connection off, touchAuto Connect again.If connection fails, “Auto connection failed.Retry?”appears. Touch Yes to reconnect.4 Once you turn your vehicle’s ACC switchon again, a connection is established auto-matically.Switching visible unitThis function sets whether or not to make thisunit visible to the other device.Initially, this function is set to on.1 Press the home button to switch to thehome display.2 Touch the Bluetooth key to open theBluetooth connection menu.3 Touch Visibility to select visibility off.#To turn visibility on, touch Visibility again.Entering PIN code for Bluetoothwireless connectionTo connect your Bluetooth device to this unit viaBluetooth wireless technology, you need to entera PIN code on your Bluetooth device to verify theconnection. The default code is 0000, but youcan change it with this function.1 Press the home button to switch to thehome display.2 Touch the Bluetooth key to open theBluetooth connection menu.3 Touch PIN Code Input to selectPIN Code Input.4 Touch 0 to 9 to input pin code.5 After inputting PIN code (up to 8 digits),store in this unit.Storing the PIN code in this unit.Displaying Bluetooth DeviceaddressThis unit displays its Bluetooth device address.1 Press the home button to switch to thehome display.2 Touch the Bluetooth key to open theBluetooth connection menu.3 Touch Device Information to display de-vice information.The Bluetooth device address is displayed.Bluetooth connection menu38SectionBluetooth connection menuEn20<CRD4711-A/N>38
Selecting the illumination colorThis unit is equipped with multiple-color illumi-nation.Direct selection from presetillumination colorsYou can select an illumination color from thecolor list.1 Press the home button to switch to thehome display.2 Touch the theme key to open the themesettings.3 Touch Illumination and then touch a coloron the list.Customizing the illumination color1 Press the home button to switch to thehome display.2 Touch the theme key to open the themesettings.3 Touch Illumination and then touchCustom.4 Display the customizing menu.Displaying the customizingmenu.5 Touch the color bar to customize thecolor.6 Touch cor dto fine-tune the color.7 Touch and hold the icon to store the cus-tomized color in the memory.MemoStoring the customized color inthe memory.The customized color has been stored in thememory.The set color will be recalled from the memorythe next time you touch the same icon.Selecting the OSD (on-screendisplay) colorThe OSD color can be changed.1 Press the home button to switch to thehome display.2 Touch the theme key to open the themesettings.3 Touch Screen.4 Touch one of the colors on the list.Selecting the backgrounddisplayYou can switch the background that is displayedwhen listening to a source.1 Press the home button to switch to thehome display.2 Touch the theme key to open the themesettings.3 Touch Background.4 Touch the desired setting.#You can view the hidden settings by flicking thedisplay.Adjusting the responsepositions of the touch panels(Touch Panel Calibration)If you feel that the touch panel keys on thescreen deviate from the actual positions that re-spond to your touch, adjust the response posi-tions of the touch panel. There are twoadjustment methods: four-point adjustment, inwhich you touch four corners of the screen; and16-point adjustment, in which you make fine-ad-justments on the entire screen.!Park your car in a safe place and use thisfunction. Do not operate it while driving.!Touch the screen gently for adjustment.Forcefully pressing the touch panel maydamage the touch panel. Do not use a sharppointed tool such as a ballpoint pen or me-chanical pen. Doing so may damage thescreen.!If the touch panel cannot be adjusted prop-erly, consult your local Pioneer dealer.1 Turn the source off.Refer to Turning the source ON/OFF on page 7.2 Press and hold the home button to startTouch Panel Calibration.The four-point touch panel adjustment screenappears. When two-point appears at once,touch both.3 Touch each of the arrows on the four cor-ners of the screen.#To cancel the adjustment, press and hold thehome button.4 Press the home button to complete four-point adjustment.Data for the adjusted position is saved.#Do not turn off the engine while the data is beingsaved.5 Press the home button to proceed to 16-point adjustment.The 16-point touch panel adjustment screen ap-pears.#To cancel the adjustment, press and hold thehome button.6 Gently touch the center of the + mark dis-played on the screen.After you touch all the marks, the data for theadjusted position is saved.#Do not turn off the engine while the data is beingsaved.7 Press and hold the home button to com-plete the adjustment.Using an AUX sourceAn auxiliary device or portable device sold sepa-rately can be connected to this unit.About AUX connection methodsYou can connect auxiliary devices to this unit.Mini pin plug cable (AUX)When connecting an auxiliary device using a miniplug cableiPods and portable audio/video players can beconnected to this unit via mini plug cable.!If an iPod with video capabilities is con-nected to this unit via 3.5 mm plug (fourpole) cable (such as the CD-V150M), you canenjoy the video contents of the connectediPod.!A portable audio/video player can be con-nected by using a 3.5 mm plug (four pole)with an RCA cable (sold separately). How-ever, depending on the cable, a reverse con-nection between the red (right side audio)cable and yellow (video) cable may be re-quired in order for the sound and videoimage to be reproduced correctly.EnglishTheme menu39SectionOther functionsEn2122<CRD4711-A/N>39
%Insert the stereo mini plug into the AUXinput jack on this unit.Refer to Connection on page 42.Resetting the microprocessorBy pressing RESET, you can reset the microproc-essor to its initial settings without changing thebookmark information.The microprocessor must be reset in the follow-ing situations:!Before using this unit for the first time afterinstallation!If the unit fails to operate properly!When strange or incorrect messages appearon the display1 Turn the ignition switch OFF.2 Press RESET with a pen tip or otherpointed instrument.Refer to What’s what on page 7.NoteSwitch your engine ON or set the ignition switchto ACC ON before pressing RESET in the follow-ing situations:!After completing connections!When erasing all stored settings!When resetting the unit to its initial (factory) set-tingsWARNING!In some countries or states the viewing of imageson a display inside a vehicle even by personsother than the driver may be illegal. Where suchregulations apply, they must be obeyed and thisunit’s DVD features should not be used.CAUTION!Do not drill a hole into the engine compart-ment to connect the yellow cable of the dis-play unit to the vehicle battery. Enginevibration may eventually cause the insulationto fail at the point where the wire passesfrom the passenger compartment into theengine compartment. Take extra care in se-curing the wire at this point.!Make sure that cables will not interfere withmoving parts of the vehicle, such as the shiftlever, parking brake or seat sliding mecha-nism.WARNING!Use speakers over 50 W (output value) andbetween 4 Wto 8 W(impedance value). Donot use 1 Wto 3 Wspeakers for this unit.!The black cable is ground. When installingthis unit or power amp (sold separately),make sure to connect the ground wire first.Make sure that the ground cable is properlyconnected to metal parts of the car bodyusing a spade terminal sold commercially.The ground wire of the power amp and theone of this unit or any other device must beconnected to the car separately with differentscrews. If the screw for the ground wire loos-ens or falls out, it could result in fire, genera-tion of smoke or malfunction.Ground wireMetal parts of car’s bodyPOWER AMPOther devices(Another electronic device in the car)Important!This unit cannot be installed in a vehiclewithout ACC (accessory) position on the igni-tion switch.ONSTARTOFFACC position No ACC position!Use this unit with a 12-volt battery and nega-tive grounding only. Failure to do so may re-sult in a fire or malfunction.!To prevent a short-circuit, overheating or mal-function, be sure to follow the directionsbelow.—Disconnect the negative terminal of the bat-tery before installation.Other functions40SectionConnectionEn2223<CRD4711-A/N>40
—Secure the wiring with cable clamps or adhe-sive tape. Wrap adhesive tape around wiringthat comes into contact with metal parts toprotect the wiring.—Place all cables away from moving parts,such as the shift lever and seat rails.—Place all cables away from hot places, suchas near the heater outlet.—Do not connect the yellow cable to the batteryby passing it through the hole to the enginecompartment.—Cover any disconnected cable connectorswith insulating tape.—Do not shorten any cables.—Never cut the insulation of the power cable ofthis unit in order to share the power withother devices. The current capacity of thecable is limited.—Use a fuse of the rating prescribed.—Never wire the negative speaker cable directlyto ground.—Never band together negative cables of multi-ple speakers.!When this unit is on, control signals are sentthrough the blue/white cable. Connect thiscable to the system remote control of an ex-ternal power amp or the vehicle’s auto-anten-na relay control terminal (max. 300 mA12 V DC). If the vehicle is equipped with aglass antenna, connect it to the antennabooster power supply terminal.!Never connect the blue/white cable to thepower terminal of an external power amp.Also, never connect it to the power terminalof the auto antenna. Doing so may result inbattery drain or a malfunction.EnglishConnection41SectionConnectionEn23<CRD4711-A/N>41
Connecting the power cordFuse (10 A)Connection method1.  Clamp the lead. 2.  Clamp firmly with needle-nosed pliers.Note: ·  The position of the parking brake switch depends on the vehicle model. For details, consult the vehicle Owner’s Manual or dealer.Yellow/blackIf you use an equipment with Mute function, wire this lead to the Audio Mute lead on that equipment. If not, keep the Audio Mute lead free of any connections.Light greenUsed to detect the ON/OFF status of the parking brake. This lead must be connected to the power supply side of the parking brake switch.Blue/whiteConnect to system control terminal of the power amp or auto-antenna relay control terminal (max. 300 mA 12 V DC).Ground sidePower supply sideParking brake switchYellow Connect to the constant 12 V supply terminal.Red Connect to terminal controlled by ignition switch (12 V DC).Black (chassis ground) Connect to a clean, paint-free metal location.Left RightFront speaker Front speakerRear speaker or Subwoofer (4 Ω)White GrayGray/blackWhite/blackGreen VioletGreen/black Violet/blackWith a 2 speaker system, do not connect anything to the speaker leads that are not connected to speakers.Note:·  Change the initial setting of this unit. The subwoofer output of this unit is monaural.VioletViolet/blackNot used.GreenGreen/blackWhen using a subwoofer of 70 W (2 Ω), be sure to connect with Violet and Violet/black leads of this unit. Do not connect anything to Green and Green/black leads. Subwoofer (4 Ω) × 2 Rear speaker or Subwoofer (4 Ω)Violet/whiteOf the two lead wires connected to the back lamp, connect the one in which the voltage changes when the gear shift is in the REVERSE (R) position. This connection enables the unit tosense whether the car is moving forwards or backwards.Orange/white Connect to lighting switch terminal.Microphone(Function of AVH-X7500BT)4 m (13 ft. 1 in.)Microphone input(Function of AVH-X7500BT)This productAntenna inputAUX jack (3.5 ø)(AUX IN)Use a mini plug cable to connect with auxiliary device.RGB inputNavigation system (AVIC-U250(sold separately))Please contact your dealer to inquire about the connectable navigation unit.Insert the 26 pin cable in the direction indicated in the figure.26 pin cable (Supplied with navigation unit)Wired remote inputHard-wired remote control adapter can be connected (sold separately).Fuse resistorFuse resistorFuse resistor17 cm (6-3/4 in.)Connection42SectionConnectionEn23<CRD4711-A/N>42
When connecting to separately sold power ampBlue/whiteConnect to system control terminal of the power amp(max. 300 mA 12 V DC).Connect with RCA cables (sold separately)Rear speakerPerform these connections when using the optional amplifier.System remote controlFront speaker Front speakerLeft RightRear speakerPower amp (sold separately)Power amp (sold separately)Power amp (sold separately)Subwoofer SubwooferTo front outputTo rear outputTo subwoofer outputThis productRear output(REAR OUTPUT)Front output(FRONT OUTPUT)Subwoofer output(SUBWOOFER OUTPUT)13 cm (5-1/8 in.)17 cm (6-3/4 in.)13 cm (5-1/8 in.)When connecting the external video component and the displayThis productExternal video component (sold separately)RCA cable (sold separately)Audio inputs (AUDIO INPUT)Video input (VIDEO INPUT)Display with RCA input jacks (sold separately)Rear monitor output (REAR MONITOR OUTPUT)To video inputTo video outputTo audio outputs13 cm (5-1/8 in.)RCA cables (sold separately)17 cm (6-3/4 in.)!It is necessary to change AV Input in thesystem menu when connecting the externalvideo component.Refer to Setting AV input on page 33.This product’s rear video output is for connec-tion of a display to enable passengers in the rearseats to watch the DVD, etc.WARNING!Never install a rear display in a location that isvisible to the driver while the vehicle is in motion.EnglishConnection43SectionConnectionEn23<CRD4711-A/N>43
When connecting with a rearview cameraIf you switch the shift lever to REVERSE (R), thedisplay on this unit will automatically switch tothe rear view image. You need to set theCamera Polarity properly in the system unit touse. For details on settings, refer to Setting therear view camera (back up camera) on page 35.You can also switch to the rear view image bypressing the touch panel key. For details, refer toUsing the rear view on page 9.WARNINGUSE INPUT ONLY FOR REVERSE OR MIR-ROR IMAGE REAR VIEW CAMERA. OTHERUSE MAY RESULT IN INJURY OR DAM-AGE.CAUTION!You must use a camera which outputsmirror reversed images.!The screen image may appear reversed.!The rear view camera function is to be usedas an aid to keep an eye on trailers, or whilebacking up. Do not use for entertainmentpurposes.!Objects in the rear view may appear closer ormore distant than they actually are.To video outputRear view camera (sold separately)Violet/whiteOf the two lead wires connected to the back lamp, connect the one in which the voltage changes when the gear shift is in the REVERSE (R) position. This connection enables the unit tosense whether the car is moving forwards or backwards.Fuse resistor RCA cable (sold separately)Rear view camera input (REAR VIEW CAMERA IN)This product13 cm (5-1/8 in.)iPod with lightning connectorWhen connecting withLightning to USB CableiPod with lightning connector(sold separately)USB cable(Supplied with this unit)Connect to separately soldUSB device.Lightning to USB Cable (Supplied with iPod/iPhone)This product USB/iPod inputWhen connecting with optionalCD-IV202AV cableLightning to USB Cable(Supplied with iPod/iPhone)     (*1)     For details of how to connect the separately sold VGA/USB interface cable (CD-IV202AV), refer to the VGA/USB interface cable manual.RGB inputiPod with lightning connector(sold separately)Lightning to VGA Adapter (Apple Inc. products)(sold separately)VGA/USB interface cable(*1)(sold separately)USB/iPod inputThis productConnection44SectionConnectionEn23<CRD4711-A/N>44
iPod with 30-pin connectorWhen connecting with optionalCD-IU201V cableThis productInterface cable (CD-IU201V) (sold separately)AUX input (AUX IN)1.5 m (4 ft. 11 in.)Dock connectorUSB cable(Supplied with this unit)Connect to separately sold USB device.USB/iPod input iPod with video capabilities(sold separately)17 cm (6-3/4 in.)When connecting with optionalCD-IU201S cableThis product1.5 m (4 ft. 11 in.)Dock connectorUSB cable(Supplied with this unit)Connect to separately sold USB device.USB/iPod input iPod with video capabilities(sold separately)RGB inputInterface cable (CD-IU201S) (sold separately)Notes!Check all connections and systems beforefinal installation.!Do not use unauthorized parts as this maycause malfunctions.!Consult your dealer if installation requiresdrilling of holes or other modifications to thevehicle.!Do not install this unit where:—it may interfere with operation of the vehicle.—it may cause injury to a passenger as a resultof a sudden stop.!The semiconductor laser will be damaged ifit overheats. Install this unit away from hotplaces such as near the heater outlet.!Optimum performance is obtained when theunit is installed at an angle of less than 30°.!When installing, to ensure proper heat dis-persal when using this unit, make sure youleave ample space behind the rear panel andwrap any loose cables so they are not block-ing the vents.5cmcmLeave ample space 5 cm5 cm!The cords must not cover up the area shownin the figure below. This is necessary to allowthe amplifiers to radiate freely.11Do not cover this area.!Make sure you leave enough gap betweenthe dashboard and the LCD panel of this unitso the LCD panel can be opened and closedwithout contacting with the dashboard.1231Dashboard2Leave gap3LCD panelDIN front/rear-mountThis unit can be properly installed using eitherfront-mount or rear-mount installation.Use commercially available parts when instal-ling.DIN Front-mount1 Decide the position of the side brackets.When installing in a shallow space, change theposition of side brackets (small).EnglishConnection45SectionInstallationEn2324<CRD4711-A/N>45
211Side bracket (small)2Flush surface screw (5 mm × 6 mm)2 Install the unit into the dashboard.Insert the mounting sleeve into the dashboard.And then secure the mounting sleeve by using ascrewdriver to bend the metal tabs (90°) intoplace.1825313421Dashboard2Mounting sleeve3Side bracket4Screw (2 mm × 3 mm)DIN Rear-mount1 Determine the appropriate positionwhere the holes on the bracket and the sideof the unit match.When installing in a shallow space, use the fol-lowing screw holes.111Use binding screws (4 mm × 3 mm) only.2 Tighten two screws on each side.Use any of binding screws (4 mm × 3 mm),binding screws (5 mm × 6 mm) or flush surfacescrews (5 mm × 6 mm), depending on theshape of screw holes in the bracket.1231Screw2Dashboard or console3Factory radio mounting bracketNoteIn some types of vehicles, discrepancy mayoccur between the unit and the dashboard. Ifthis happens, use the supplied frame to fill thegap.Removing the unitExtend top and bottom of the trim ring outwardsto remove the trim ring. And then loosen thescrews (2 mm × 3 mm) to remove the mountingsleeve.!When reattaching the trim ring, push thetrim ring onto the unit until it clicks. (If thetrim ring is attached upside down, the trimring will not fit properly.)1321Mounting sleeve2Screw (2 mm × 3 mm)3Trim ringFastening the front panelIf you do not plan to detach the front panel, thefront panel can be fastened with supplied screw.11ScrewInstalling the microphone(Function of AVH-X7500BT)CAUTIONIt is extremely dangerous to allow the micro-phone lead to become wound around the steer-ing column or shift lever. Be sure to install theunit in such a way that it will not obstruct driv-ing.NoteInstall the microphone in a position and orienta-tion that will enable it to pick up the voice of theperson operating the system.When installing the microphoneon the sun visor1 Fit the microphone lead into the groove.121Microphone lead2Groove2 Install the microphone clip on the sunvisor.With the sun visor up, install the microphoneclip. (Lowering the sun visor reduces the voicerecognition rate.)Installation46SectionInstallationEn24<CRD4711-A/N>46
121Microphone clip2ClampUse separately sold clamps to secure thelead where necessary inside the vehicle.When installing the microphoneon the steering column1 Detach the microphone base from the mi-crophone clip.To detach the microphone base from the micro-phone clip, slide the microphone base.1231Microphone2Microphone clip3Microphone base2 Install the microphone on the steeringcolumn.1231Double-sided tape2Install the microphone on the rear side of thesteering column.3ClampUse separately sold clamps to secure thelead where necessary inside the vehicle.Adjusting the microphone angleThe microphone angle can be adjusted.TroubleshootingCommonSymptom Cause Action (Refer-ence page)The powerwill not turnon.The unit willnot operate.Leads and con-nectors are in-correctly con-nected.Confirm oncemore that all con-nections are cor-rect.The fuse isblown.Rectify the causeand then replacethe fuse. Be sureto install a fusewith the same rat-ing.Noise and/orother factorsare causing thebuilt-in micro-processor to op-erate incor-rectly.Press RESET.(Page 40)Operationwith the re-mote controlis not possi-ble.The unit doesnot operatecorrectly evenwhen the ap-propriate re-mote controlbuttons arepressed.Battery power islow.Load a new bat-tery.Some opera-tions are prohib-ited with certaindiscs.Try operating withanother disc.Symptom Cause Action (Refer-ence page)Playback isnot possible.The disc is dirty. Clean the disc.The type of discloaded cannotbe played onthis unit.Check the disctype.The disc loadedis not compati-ble with thisvideo system.Change the discto one that iscompatible withyour video sys-tem.There is nosound.The volumelevel will notrise.Cables are notconnected cor-rectly.Connect the ca-bles correctly.The unit is per-forming still,slow motion orframe-by-frameplayback.There is no soundduring still, slowmotion or frame-by-frame play-back.There is noimage dis-played.The parkingbrake cable isnot connected.Connect the park-ing brake cable,and apply theparking brake.The parkingbrake is not ap-plied.Connect the park-ing brake cable,and apply theparking brake.The icon isdisplayed,and operationis not possi-ble.The operation isprohibited forthe disc.This operation isnot possible.The operation isnot compatiblewith the config-uration of thedisc.This operation isnot possible.EnglishInstallation47SectionAdditional informationEn24<CRD4711-A/N>47
Symptom Cause Action (Refer-ence page)The imagedisplayedstops(pauses) andthe unit can-not be oper-ated.The data couldno longer beread duringplayback.Stop playbackonce, and startplayback again.There is nosound.The volumelevel is low.The volumelevel is low.Adjust the volumelevel.The attenuatoris on.Turn the attenua-tor off.The soundand videoskip.The unit is notfirmly secured.Firmly secure theunit.File size andtransmissionrate are aboverecommendedrates.Create a DivX filethat is within therecommendedsize and transmis-sion rate.The aspectratio is incor-rect and theimage isstretched.The aspect ratiosetting is incor-rect for the dis-play.Select the appro-priate setting foryour display.(Page 32)The motorsounds whenthe ignitionswitch isturned ON (oris turned toACC).The unit is con-firming whetheror not a disc isloaded.This is a normaloperation.Symptom Cause Action (Refer-ence page)Nothing isdisplayed.The touchpanel keyscannot beused.The rear viewcamera is notconnected.Connect a rearview camera.Camera Polar-ity is at incor-rect setting.Press the homebutton to returnto the source dis-play and then se-lect the correctsetting for Cam-era Polarity.(Page 36)No xxxx ap-pears when adisplay ischanged (NoTitle, for ex-ample).There is no em-bedded text in-formation.Switch the displayor play anothertrack/file.Subfolderscannot beplayed back.Folder repeatplay has beenselected.Select the repeatrange again.The repeatrangechanges auto-matically.Another folderwas selectedduring repeatplay.Select the repeatrange again.Track search orfast forward/re-verse was per-formed duringfile repeat play.Select the repeatrange again.DVDSymptom Cause Action (Refer-ence page)Playback isnot possible.The loaded dischas a differentregion numberfrom this unit.Replace the discwith one featuringthe same regionnumber as thisunit.A parentallock messageis displayedand playbackis not possi-ble.Parental lock isactivated.Turn parental lockoff or change thelevel. (Page 32)Parental lockcannot becanceled.The code num-ber is incorrect.Enter the correctcode number.(Page 32)You have forgot-ten your codenumber.Press RESET.(Page 40)Dialog lan-guage (andsubtitle lan-guage) can-not beswitched.The DVD beingplayed does notfeature multiplelanguage re-cordings.The languagecannot beswitched if theyare not recordedon the disc.You can onlyswitch betweenitems indicatedin the discmenu.Switch the lan-guage using thedisc menu.No subtitlesare displayed.The DVD beingplayed does notfeature subti-tles.Subtitles are notdisplayed if theyare not recordedon the disc.You can onlyswitch betweenitems indicatedin the discmenu.Switch the lan-guage using thedisc menu.Symptom Cause Action (Refer-ence page)Playback isnot performedwith theaudio lan-guage andsubtitle lan-guage set-tings selectedin VideoSetup menu.The DVD beingplayed does notfeature dialogor subtitles inthe selected lan-guage.The languagecannot beswitched if the se-lected languageis not recorded onthe disc.The viewingangle cannotbe switched.The DVD beingplayed does notfeature scenesshot from multi-ple angles.The viewing anglecannot beswitched if theDVD does not fea-ture scenes re-corded frommultiple angles.You are trying toswitch to multi-angle viewingfor a scene thatwas not re-corded frommultiple angles.Switch betweenmultiple angleswhen watchingscenes recordedfrom multiple an-gles.Additional information48AppendixAdditional informationEn<CRD4711-A/N>48
Symptom Cause Action (Refer-ence page)The image isextremely un-clear/dis-torted anddark duringplayback.Some discs fea-ture a signal toprohibit copy-ing.Since this unit iscompatible withthe analog copygeneration man-agement system,when playing adisc that has asignal prohibitingcopying, horizon-tal stripes orother imperfec-tions may appearwhen viewed onsome displays.This is not a mal-function.Video CDSymptom Cause ActionThe PBC(playbackcontrol) menucannot becalled up.The Video CDbeing playeddoes not featurePBC.This operation isnot available forVideo CDs that donot feature PBC.Repeat playand track/time searchare not possi-ble.The Video CDbeing playedfeatures PBC.This operation isnot available forVideo CDs thatfeature PBC.iPodSymptom Cause ActionThe iPod doesnot operatecorrectly.The cables areincorrectly con-nected.Disconnect thecable from theiPod. Once theiPod’s mainmenu is dis-played, reconnectthe iPod and resetit.The iPod versionis old.Update the iPodversion.Sound fromthe iPod can-not be heard.The audio out-put directionmay switch au-tomaticallywhen theBluetooth andUSB connec-tions are usedat the sametime.Use the iPod tochange the audiooutput direction.Bluetooth audio/telephoneSymptom Cause ActionThe soundfrom theBluetoothaudio sourceis not playedback.There is a call inprogress on aBluetooth con-nected cellularphone.The sound will beplayed back whenthe call is termi-nated.A Bluetoothconnected cel-lular phone iscurrently beingoperated.Do not use thecellular phone atthis time.A call wasmade with aBluetooth con-nected cellularphone and thenimmediately ter-minated. As aresult, commu-nication be-tween this unitand the cellularphone was notterminatedproperly.Reconnect theBluetooth con-nection betweenthis unit and thecellular phone.Error messagesWhen you contact your dealer or your nearestPioneer Service Center, be sure to note the errormessage.CommonMessage Cause ActionAMP Error This unit fails tooperate or thespeaker connec-tion is incorrect;the protectivecircuit is acti-vated.Check the speak-er connection. Ifthe message failsto disappear evenafter the engine isswitched off/on,contact your deal-er or an author-ized PioneerService Stationfor assistance.TunerMessage Cause ActionNo Data Pro-videdThis unit cannotreceive artistname/song titleinformation.Move to the desir-able location withgood reception.No Data This unit cannotreceive programservice name in-formation.Move to the desir-able location withgood reception.DVDMessage Cause Action (Refer-ence page)Different Re-gion DiscThe disc doesnot have thesame regionnumber as thisunit.Replace the DVDwith one bearingthe correct regionnumber.EnglishAdditional information49AppendixAdditional informationEn<CRD4711-A/N>49
Message Cause Action (Refer-ence page)Error-02-XX/FF-FFThe disc is dirty. Clean the disc.The disc isscratched.Replace the disc.The disc isloaded upsidedown.Check that thedisc is loaded cor-rectly.There is an elec-trical or me-chanical error.Press RESET.(Page 40)UnplayableDiscThis type of disccannot beplayed on thisunit.Replace the discwith one that canbe played on thisunit.The inserteddisc does notcontain anyplayable files.Replace the disc.Protect All the files onthe inserteddisc are em-bedded withDRM.Replace the disc.Skipped The inserteddisc containsDRM protectedfiles.The protectedfiles are skipped.TEMP The tempera-ture of the unitis outside thenormal operat-ing range.Wait until the unitreturns to a tem-perature withinthe normal oper-ating limits.This DivXrental hasexpired.The inserteddisc containsexpired DivXVOD content.Select a file thatcan be played.Message Cause Action (Refer-ence page)Video resolu-tion not sup-portedThe inserteddisc contains ahigh definitionDivX/MPEG-1/MPEG-2/MPEG-4 file.Select a file thatcan be played.It is not pos-sible to writeit in theflash.This unit’s flashmemory usedas the tempo-rary storagearea is full.Select a file thatcan be played.Your deviceis not au-thorized toplay thisDivX pro-tected video.This unit’s DivXregistrationcode has notbeen authorizedby the DivXVOD contentsprovider.Register this unitto the DivX VODcontents provider.UnplayableFileThis type of filecannot beplayed on thisunit.Select a file thatcan be played.Format Read Sometimesthere is a delaybetween thestart of playbackand when youstart to hear anysound.Wait until themessage disap-pears and youhear sound.Video framerate not sup-portedDivX file’s framerate is morethan 30 fps.Select a file thatcan be played.Audio For-mat not sup-portedThis type of fileis not supportedon this unit.Select a file thatcan be played.External storage device (USB)Message Cause ActionUnplayableFileThis type of filecannot beplayed on thisunit.Select a file thatcan be played.There are nosongs.Transfer the audiofiles to the USBportable audioplayer/USB mem-ory and connect.Security for theconnected USBmemory is en-abled.Follow the USBmemory instruc-tions to disablesecurity.Format Read Sometimesthere is a delaybetween thestart of playbackand when youstart to hear anysound.Wait until themessage disap-pears and youhear sound.Protect All the files onthe connectedUSB storage de-vice are em-bedded withDRM.Replace the USBstorage device.Skipped The connectedUSB storage de-vice containsDRM protectedfiles.The protectedfiles are skipped.Message Cause ActionIncompatibleUSBThe connectedUSB device isnot supportedby this unit.Connect a USBportable audioplayer or USBmemory that isUSB Mass Stor-age Class compli-ant.The USB deviceis not formattedwith FAT12,FAT16 or FAT32.The connectedUSB deviceshould be format-ted with FAT12,FAT16 or FAT32.Check USB The USB con-nector or USBcable has short-circuited.Check that theUSB connector orUSB cable is notcaught in some-thing or dam-aged.The connectedUSB storage de-vice consumesmore than maxi-mum allowablecurrent.Disconnect theUSB portableaudio player/USBmemory and donot use it. Turnthe ignitionswitch to OFF,then to ACC orON and then con-nect a compliantUSB portableaudio player/USBmemory.Additional information50AppendixAdditional informationEn<CRD4711-A/N>50
Message Cause ActionError-02-9X/-DXCommunicationfailed.Perform one ofthe following op-erations.–Turn the ignitionswitch OFF andback ON.–Disconnect theUSB portableaudio player/USBmemory.–Change to a dif-ferent source.Then, return tothe USB portableaudio player/USBmemory.It is not pos-sible to writeit in theflash.This unit’s flashmemory usedas the tempo-rary storagearea is full.Select a file thatcan be played.Format Read Sometimesthere is a delaybetween thestart of playbackand when youstart to hear anysound.Wait until themessage disap-pears and youhear sound.Audio For-mat not sup-portedThis type of fileis not supportedon this unit.Select a file thatcan be played.iPodMessage Cause ActionFormat Read Sometimesthere is a delaybetween thestart of playbackand when youstart to hear anysound.Wait until themessage disap-pears and youhear sound.Error-02-6X/-9X/-DXCommunicationfailed.Disconnect thecable from theiPod. Once theiPod’s mainmenu is dis-played, reconnectthe iPod and resetit.iPod failure. Disconnect thecable from theiPod. Once theiPod’s mainmenu is dis-played, reconnectthe iPod and resetit.Error-02-67 The iPod firm-ware version isold.Update the iPodversion.Stop There are nosongs.Transfer songs tothe iPod.There are nosongs in thecurrent list.Select a list thatcontains songs.Not Found No relatedsongs.Transfer songs tothe iPod.iTunes taggingMessage Cause ActioniPod full.Tags nottransferred.Memory usedfor tag informa-tion on the iPodis full.Sync the iPodwith iTunes andclean up thetagged playlist.Memory full.Tags notstored. Con-nect iPod.This unit’s flashmemory usedas the tempo-rary storagearea is full.The tag informa-tion on this unit istransferred to theiPod automati-cally when aniPod is con-nected.Tag transferfailed. Re-connect youriPod.This unit’s taginformationcannot transferto the iPod.Check the iPodand try again.Tag storefailed.Tag informationcannot bestored in thisunit.Try again.Error-8D Built-in FLASHROM encoun-tered an error.Turn the ignitionOFF or ON.AlreadystoredThis tag infor-mation is al-ready stored inmemory.Tag informationcan only be savedonce for anygiven song. Taginformation can-not be saved forthe same songmore than once.BluetoothMessage Cause ActionError-10 The power failedfor theBluetooth mod-ule of this unit.Turn the ignitionswitch OFF andthen to ACC orON.If the error mes-sage is still dis-played afterperforming theabove action,please contactyour dealer or anauthorizedPioneer ServiceStation.PandoraâMessage Cause ActionError-19 Communicationfailed.Disconnect thecable from theiPod. Once theiPod’s mainmenu is dis-played, reconnectthe iPod and resetit.Start up thePandora Ap-plicationfrom yourDevice.The Pandora ap-plication hasnot started run-ning yet.Start up thePandora applica-tion from youriPhone.Unable tosave thumbrating. Tryagain later.Unable to savethumb rating.Try again later.Unable tosave Book-mark. Tryagain later.Unable to saveBookmark.Try again later.EnglishAdditional information51AppendixAdditional informationEn<CRD4711-A/N>51
Message Cause ActionPandora sys-tem mainte-nance. Tryagain later.Pandora systemis undergoingmaintenance.Try again later.Skip limitreached.Skip limitreached.Do not exceed theskip limit.This versionof thePandora Ap-plication isnot sup-ported.This version ofthe Pandora ap-plication is notsupported.Connect aniPhone that has acompatible ver-sion of thePandora applica-tion installed.Check Device Device errormessage dis-played in thePandora appli-cation.Please check youriPhone.Pandora isunable toplay music.Please seeyour Device.Unable to playmusic fromPandora.Please check youriPhone.Create sta-tion withinthe PandoraApplicationon Device.No stationfound.Create a stationin the Pandoraapplication onyour iPhone.No ActiveStationNo station se-lected.Select a station.Message Cause ActionCommunica-tion error oc-cured. Pleasereconnectyour device.If there is noACK after 10 at-tempted retriesat 750 ms, theaccessoryshould assumethat communi-cation is inter-rupted anddisconnectfromPandoraLink.Please reconnectyour iPhone andtry again.Device hasnot beenregistered.Go toBluetoothConnectionMenu toregister.No Bluetoothdevice found.Follow the in-structions that ap-pear on thescreen.BT error.Press BANDkey to retry.Bluetooth con-nection failed.Follow the in-structions that ap-pear on thescreen.Start upPandora.Press BANDkey to retry.Connection tothe Pandora ap-plication failed.Follow the in-structions that ap-pear on thescreen.CheckPandora.Press BANDkey to retry.Connection tothe Pandora ap-plication failed.Follow the in-structions that ap-pear on thescreen.Disconnect-ed.PressBAND key toretry.Bluetooth con-nection lost.Follow the in-structions that ap-pear on thescreen.Understanding auto EQ errormessagesWhen correct measurement of the car’s interioracoustic characteristics is not possible usingauto EQ, an error message may appear on thedisplay. In such cases, refer to the table below tosee what the problem is and how it may be cor-rected. After checking, try again.Message Cause ActionPlease con-nect the mi-crophone formeasure-ment. Whenfinished,please pushHOME key.The microphoneis not con-nected.Plug the optionalmicrophone se-curely into thejack.Error. Pleasecheck xxxxspeaker.The microphonecannot pick upthe measuringtone of a speak-er.!Confirm thatthe speakers areconnected cor-rectly.!Correct theinput level settingof the power ampconnected to thespeakers.!Plug the micro-phone securelyinto the jack.Error. Pleasecheck noise.The surround-ing noise levelis too high.!Stop your car ina place that isquiet, and switchoff the engine, airconditioner andheater.!Set the micro-phone correctly.Message Cause ActionError. Pleasecheck bat-tery.Power is notbeing suppliedfrom the batteryto this unit.!Connect thebattery correctly.!Check the bat-tery voltage.Understanding messagesMessages TranslationScreen image mayappear reversed.Pioneer recommendsthe use of a camerawhich outputs mirror-reversed images. Oth-erwise, the screenimage will appear re-versed.Additional information52AppendixAdditional informationEn<CRD4711-A/N>52
Indicator listArea 1 Area 2Area 3Area 1Indicates that the volume is ad-justed.Indicates that the mute functionis on.Indicates that the sound is atte-nuated.Area 2Shows when downloadable songinformation (tag) from a radio sta-tion is received.Indicates that the digital format isDolby Digital.Indicates that the digital format isMPEG Audio.Indicates that the digital format isLinear PCM.Indicates the sampling fre-quency.Indicates that the digital format isDTS.Indicates the audio channel.Indicates that a disc with PBC Onis being played.!Indicates that a cellularphone is connected.!Indicates that an incomingcall has been received andhas not been checked yet.Indicates the battery strength ofthe cellular phone.!The level shown on the indica-tor may differ from the actualbattery strength.!If the battery strength is notavailable, nothing is displayedin the battery strength indica-tor area.Indicates that the connectedBluetooth device only supportsBluetooth telephone.Indicates that the connectedBluetooth device only supportsBluetooth audio.Show the album title when receiv-ing the tag information.Shows the album title of the songcurrently being played for MP3/WMA/AAC/WAV files.Shows the song title when receiv-ing the tag information.Shows the song title of the songcurrently being played for MP3/WMA/AAC/WAV files.Shows the comment currentlybeing played.Shows the station name currentlytuned in to.Shows the artist name when re-ceiving the tag information.Shows the artist name of the ar-tist currently being played forMP3/WMA/AAC/WAV files.Shows cellular phone informa-tion.Shows general phone informa-tion.Shows home phone information.Shows office phone information.Shows other phone information.Shows the composer name.Shows the folder name of thefolder containing the MP3/WMA/AAC/WAV file currently beingplayed.Shows the file name of the MP3/WMA/AAC/WAV file currentlybeing played.Shows the preset number of thestation currently being tuned into.Shows the channel currentlybeing tuned in to.Shows the title number currentlybeing played.Shows the chapter number cur-rently being played.Shows the replay time currentlybeing played.Shows the genre of the track/song currently being played.Area 3Shows when radio signal is re-ceived.Touch to turn BSM on.Indicates that Auto EQ is on.EnglishAdditional information53AppendixAdditional informationEn<CRD4711-A/N>53
Shows when this unit has thesong information (tag).Indicates that the unit is currentlyprocessing an operation such assearch.DB Shows when creating the data-base in Music browse mode.DB Shows when saving the databasein Music browse mode.Indicates the signal strength ofthe cellular phone.Indicates that a Bluetooth tele-phone is connected.Handling guidelinesDiscs and playerUse discs featuring any of the following logos.Use 12-cm discs. Do not use 8-cm discs or anadapter for 8-cm discs.Use only conventional, fully circular discs. Do notuse shaped discs.Do not insert anything other than a DVD-R/RW orCD-R/RW into the disc loading slot.Do not use cracked, chipped, warped, or other-wise damaged discs as they may damage the play-er.Unfinalized CD-R/RW discs cannot be playedback.Do not touch the recorded surface of the discs.Store discs in their cases when not in use.Do not attach labels, write on or apply chemicalsto the surface of the discs.To clean a disc, wipe the disc with a soft cloth out-ward from the center.Condensation may temporarily impair the player’sperformance. Let it rest for about one hour to ad-just to a warmer temperature. Also, wipe anydamp discs off with a soft cloth.Playback of discs may not be possible because ofdisc characteristics, disc format, recorded applica-tion, playback environment, storage conditions,and so on.Road shocks may interrupt disc playback.Certain functions may not be available for someDVD video discs.It may not be possible to play back some DVDvideo discs.It is not possible to play back DVD-RAM discs.This unit is not compatible with discs recorded inAVCHD (Advanced Video Codec High Definition)format. Do not insert AVCHD discs as you may notbe able to eject the disc.When using discs that can be printed on label sur-faces, check the instructions and the warnings ofthe discs. Depending on the discs, inserting andejecting may not be possible. Using such discsmay result in damage to this equipment.Do not attach commercially available labels orother materials to the discs.!The discs may warp making the disc unplay-able.!The labels may come off during playback andprevent ejection of the discs, which may resultin damage to the equipment.External storage device (USB)Depending on the external storage device (USB),the following problems may occur.!Operations may vary.!The storage device may not be recognized.!Files may not be played back properly.USB storage deviceConnections via USB hub are not supported.Do not connect anything other than a USB stor-age device.Firmly secure the USB storage device when driv-ing. Do not let the USB storage device fall onto thefloor, where it may become jammed under thebrake or accelerator pedal.Depending on the USB storage device, the devicemay cause noise to occur in the radio.Copyright protected files that are stored in theUSB devices cannot be played back.You cannot connect a USB portable audio player/USB memory to this unit via USB hub.Partitioned USB memory is not compatible withthis unit.Depending on the kind of USB portable audioplayer/USB memory you use, the device may notbe recognized or audio files may not be playedback properly.Do not leave the USB portable audio player/USBmemory in direct sunlight for extended amountsof time. Doing so may cause the device to mal-function from the extreme rise in temperature.iPodTo ensure proper operation, connect the dock con-nector cable from the iPod directly to this unit.Firmly secure the iPod when driving. Do not let theiPod fall onto the floor, where it may becomejammed under the brake or accelerator pedal.Additional information54AppendixAdditional informationEn<CRD4711-A/N>54
About iPod settings!When an iPod is connected, this unit changesthe EQ (equalizer) setting of the iPod to off inorder to optimize the acoustics. When you dis-connect the iPod, the EQ returns to the originalsetting.!You cannot set Repeat to off on the iPod whenusing this unit. Repeat is automaticallychanged to All when the iPod is connected tothis unit.Incompatible text saved on the iPod will not be dis-played by the unit.DVD-R/RW discsUnfinalized DVD-R/RW discs which have been re-corded in the Video format (video mode) cannotbe played back.Playback of DVD-R/RW discs may not be possible,due to disc characteristics, scratches or dirt onthe disc, or dirt, condensation, etc. on the lens ofthis unit.Depending on the application settings and the en-vironment, playback of discs recorded on a com-puter may not be possible. (For details, contact themanufacturer of the application.)CD-R/RW discsWhen CD-R/RW discs are used, playback is possi-ble only for discs which have been finalized.Playback of CD-R/RW discs recorded on a musicCD recorder or a computer may not be possibledue to disc characteristics, scratches or dirt onthe disc, or dirt, condensation, etc., on the lens ofthis unit.Depending on the application settings and the en-vironment, playback of discs recorded on a com-puter may not be possible. (For details, contact themanufacturer of the application.)Playback of CD-R/RW discs may become impossi-ble in case of direct exposure to sunlight, hightemperatures, or the storage conditions in the ve-hicle.Titles and other text information recorded on aCD-R/RW disc may not be displayed by this unit(in the case of audio data (CD-DA)).DualDiscsDualDiscs are two-sided discs that have a record-able CD for audio on one side and a recordableDVD for video on the other.Playback of the DVD side is possible with this unit.However, since the CD side of DualDiscs is notphysically compatible with the general CD stand-ard, it may not be possible to play the CD side withthis unit.Frequent loading and ejecting of a DualDisc mayresult in scratches on the disc. Serious scratchescan lead to playback problems on this unit. Insome cases, a DualDisc may become stuck in thedisc loading slot and will not eject. To prevent this,we recommend you refrain from using DualDiscwith this unit.Please refer to the information from the disc man-ufacturer for more detailed information aboutDualDiscs.DivX video filesDepending on the composition of the file informa-tion, such as the number of audio streams or filesize, there may be a slight delay when playingback discs.Some special operations may be prohibited due tothe composition of the DivX files.Only DivX files downloaded from a DivX partnersite are guarantee for proper operation. Unauthor-ized DivX files may not operate properly.DRM rental files cannot be operated until play-back is started.Recommended file size: 2 GB or less with a trans-mission rate of 2 Mbps or less.The ID code of this unit must be registered to aDivX VOD provider in order to playback DivX VODfiles. For information on ID codes, refer to Display-ing the DivXâVOD registration code on page 33.For more details about DivX, visit the followingsite:http://www.divx.com/MPEG-1/MPEG-2/MPEG-4 video filesElapsed playback time may not be displayed cor-rectly.Audio compatibility (USB)WAVFile extension: .wavQuantization bits: 8 and 16 (LPCM), 4 (MSADPCM)Sampling frequency: 16 kHz to 48 kHz (LPCM),22.05 kHz and 44.1 kHz (MS ADPCM)Compressed audiocompatibility (disc, USB)WMAFile extension: .wmaBit rate: 48 kbps to 320 kbps (CBR), VBRSampling frequency: 32 kHz to 48 kHzWindows MediaäAudio Professional, Lossless,Voice/DRM Stream/Stream with video: Not com-patibleMP3File extension: .mp3Bit rate: 8 kbps to 320 kbps (CBR), VBRSampling frequency: 8kHz to 48 kHz (32 kHz,44.1 kHz, 48 kHz for emphasis)Compatible ID3 tag version: 1.0, 1.1, 2.2, 2.3, 2.4(ID3 tag Version 2.x is given priority over Version1.x.)M3u playlist: Not compatibleMP3i (MP3 interactive), mp3 PRO: Not compatibleAACCompatible format: AAC encoded by iTunesFile extension: .m4aSampling frequency: 11.025 kHz to 48 kHzBit rate: 16 kbps to 320 kbpsApple Lossless: Not compatibleAAC file bought from the iTunes Store (.m4p fileextension): Not compatibleDivX compatibility (disc)Compatible format: DivX video format imple-mented in relation to DivX standardsFile extensions: .avi or .divxDivX Ultra format: Not compatibleDivX HD format: Not compatibleEnglishAdditional information55AppendixAdditional informationEn<CRD4711-A/N>55
DivX files without video data: Not compatibleDivX plus: Not compatibleCompatible audio codec: MP2, MP3, Dolby DigitalLPCM: CompatibleBit rate: 8 kbps to 320 kbps (CBR), VBRSampling frequency: 8 kHz to 48 kHzCompatible external subtitle file extension: .srtMPEG-1/MPEG-2/MPEG-4 video(disc)File extensions: .mpg or .mpeg (MPEG-1/MPEG-2),.avi (MPEG-4)Compatible audio codec: MP2 (MPEG-1/MPEG-2),MP2, MP3, Dolby Digital (MPEG-4)H.264 (MPEG-4AVC): CompatibleLPCM: Not compatibleBit rate: 8 kbps to 320 kbps (CBR), VBRSampling frequency: 8 kHz to 48 kHzSupplemental informationSome characters in a file name (including the fileextension) or a folder name may not be displayed.This unit may not work properly depending on theapplication used to encode WMA files.There may be a slight delay at the start of playbackof audio files embedded with image data or audiofiles stored on a USB storage device that has nu-merous folder hierarchies.Disc (CD/DVD)Playable folders: up to 99 for CD-R/RWPlayable folders: up to 700 for DVD-R/RWPlayable files: up to 999 for CD-R/RWPlayable files: up to 3 500 for DVD-R/RWFile system: ISO 9660 Level 1 and 2, Romeo, Joliet,UDF 1.02 (DVD-R/RW)Multi-session playback: CompatiblePacket write data transfer: Not compatibleRegardless of the length of blank sections be-tween the songs from the original recording, com-pressed audio discs play with a short pausebetween songs.External storage device (USB)Playable folders: up to 1 500Playable files: up to 15 000Playback of copyright-protected files: Not compati-blePartitioned external storage device (USB): Only thefirst playable partition can be played.There is no compatibility for Multi Media Cards(MMC).CAUTION!Pioneer accepts no responsibility for datalost on the USB memory/USB portable audioplayer even if that data is lost while usingthis unit.!Pioneer cannot guarantee compatibility withall USB mass storage devices and assumesno responsibility for any loss of data onmedia players, smart phones, or other devi-ces while using this product.!Do not leave the discs/external storage de-vice (USB) or iPod in places with high tem-peratures.iPod compatibilityThis unit supports only the following iPod mod-els. Supported iPod software versions are shownbelow. Older versions may not be supported.Made for!iPod touch 5th generation (software version6.0.1)!iPod touch 4th generation (software version5.1.1)!iPod touch 3rd generation (software version5.1.1)!iPod touch 2nd generation (software version4.2.1)!iPod touch 1st generation (software version3.1.3)!iPod classic 160GB (software version 2.0.4)!iPod classic 120GB (software version 2.0.1)!iPod classic (software version 1.1.2)!iPod with video (software version 1.3)!iPod nano 7th generation (software version1.0.1)!iPod nano 6th generation (software version1.2)!iPod nano 5th generation (software version1.0.2)!iPod nano 4th generation (software version1.0.4)!iPod nano 3rd generation (software version1.1.3)!iPod nano 2nd generation (software version1.1.3)!iPod nano 1st generation (software version1.3.1)!iPhone 5 (software version 6.0.1)!iPhone 4S (software version 5.1.1)!iPhone 4 (software version 5.1.1)!iPhone 3GS (software version 5.1.1)!iPhone 3G (software version 4.2.1)!iPhone (software version 3.1.3)Depending on the generation or version of theiPod, some functions may not be available.Operations may vary depending on the softwareversion of iPod.About the file/format compatibility, refer to theiPod manuals.Audiobook, Podcast: CompatibleCAUTIONPioneer accepts no responsibility for data loston the iPod, even if that data is lost while thisunit is used.About iTunes taggingThis function can be performed with the followingiPod models.—iPod touch 4th generation—iPod touch 3rd generation—iPod touch 2nd generation—iPod touch 1st generation—iPod classic 160GB—iPod classic 120GB—iPod classic—iPod with video—iPod nano 6th generation—iPod nano 5th generation—iPod nano 4th generation—iPod nano 3rd generation—iPhone 4S—iPhone 4—iPhone 3GS—iPhone 3G—iPhoneAdditional information56AppendixAdditional informationEn<CRD4711-A/N>56
The song information (tag) can be saved fromthe broadcasting station to your iPod. The songswill show up in a playlist called “Tagged playlist”in iTunes the next time you sync your iPod. Thenyou can directly buy the songs you want fromthe iTunes Store.The tagged songs and the song that you can buyfrom the iTunes Store may be different. Makesure to confirm the song before you make thepurchase.If you cannot use this function normally, updateyour iPod firmware.Sequence of audio filesThe user cannot assign folder numbers andspecify playback sequences with this unit.Example of a hierarchyLevel 1  Level 2  Level 3  Level 4 0102030405: Folder: Compressedaudio file01 to 05: Foldernumber1to 6: PlaybacksequenceDiscFolder selection sequence or other operationmay differ depending on the encoding or writingsoftware.External storage device (USB)The playback sequence is the same as the re-corded sequence in the external storage device(USB).To specify the playback sequence, the followingmethod is recommended.1Create a file name that includes numbersthat specify the playback sequence (e.g.,001xxx.mp3 and 099yyy.mp3).2Put those files into a folder.3Save the folder that contains the files to theexternal storage device (USB).However, depending on the system environment,you may not be able to specify the playback se-quence.For USB portable audio players, the sequence isdifferent and depends on the player.Using the display correctlyCAUTION!If liquid or foreign matter should get insidethis unit, turn off the power immediately andconsult your dealer or the nearest authorizedPIONEER Service Station. Do not use theunit in this condition because doing so mayresult in fire, electric shock, or other failure.!If you notice smoke, a strange noise or smell,or any other abnormal signs from the display,turn off the power immediately and consultyour dealer or the nearest authorizedPIONEER Service Station. Using this unit inthis condition may result in permanent dam-age to the system.!Do not disassemble or modify this unit, asthere are high-voltage components insidewhich may cause electric shock. Be sure toconsult your dealer or the nearest authorizedPIONEER Service Station for internal inspec-tion, adjustments, or repairs.Handling the display!Never touch the screen with anything be-sides your finger when operating the touchpanel function. The screen can scratcheasily.!When the display is subjected to direct sun-light for a long period of time, it will becomevery hot resulting in possible damage to theLCD screen. You should avoid exposing thedisplay unit to direct sunlight as much aspossible.!The display should be used within the tem-perature range of 14 °F to 140 °F.At temperatures higher or lower than this op-erating temperature range, the display maynot operate normally.!The LCD screen is exposed in order to in-crease its visibility within the vehicle. Do notpress it strongly on it as this may damage it.!Do not push the LCD screen forcefully asthis may scratch it.Liquid crystal display (LCD) screen!Heat from the heater may damage the LCDscreen, and cool air from the cooler maycause moisture to form inside the display re-sulting in possible damage.!Small black dots or white dots (bright dots)may appear on the LCD screen. These aredue to the characteristics of the LCD screenand do not indicate a malfunction.!When using a cellular phone, keep the an-tenna away from the display to prevent dis-ruption of the video image by theappearance of spots, colored stripes, etc.LED (light-emitting diode) backlight!At low temperatures, using the LED backlightmay increase image lag and degrade theimage quality due to the characteristics ofthe LCD screen. Image quality will improvewith an increase in temperature.!To protect the LED backlight, the display willdarken in the following environments:—In the direct sunlight—Near the heater vent!The product lifetime of the LED backlight ismore than 10 000 hours. However, it may de-crease if used in high temperatures.!If the LED backlight reaches the end of itsproduct lifetime, the screen will become darkand the image will no longer be projected. Insuch cases, please consult your dealer or thenearest authorized PIONEER Service Station.Keeping the display in goodcondition!When removing dust from the screen orcleaning the display, first turn the systempower off, then wipe with a soft dry cloth.!When wiping the screen, take care not toscratch the surface. Do not use harsh orabrasive chemical cleaners.Bluetooth profilesIn order to use Bluetooth wireless technology,devices must be able to interpret certain pro-files. This unit is compatible with the followingprofiles.!GAP (Generic Access Profile)!SDP (Service Discovery Protocol)!OPP (Object Push Profile)!HFP (Hands Free Profile)!HSP (Head Set Profile)!PBAP (Phone Book Access Profile)!A2DP (Advanced Audio Distribution Profile)!AVRCP (Audio/Video Remote Control Profile)1.3!SPP (Serial Port Profile) 1.1EnglishAdditional information57AppendixAdditional informationEn<CRD4711-A/N>57
License, Warranty Disclaimer& Limitation of LiabilityThis item incorporates copy protection technol-ogy that is protected by U.S. patents and otherintellectual property rights of Rovi Corporation.Reverse engineering and disassembly are pro-hibited.DisclaimerTHE WARRANTIES SET FORTH IN PIONEER’SLIMITED WARRANTY ARE THE ONLY WARRAN-TIES MADE BY PIONEER OR ANY OF ITS LICEN-SORS, AS APPLICABLE. PIONEER AND ITSLICENSORS EXPRESSLY DISCLAIM ALL OTHERWARRANTIES, EXPRESS OR IMPLIED, INCLUD-ING, WITHOUT LIMITATION, WARRANTIES OFMERCHANTABILITY AND FITNESS FOR A PAR-TICULAR PURPOSE.Limitation of LiabilityTO THE MAXIMUM EXTENT PERMISSIBLEUNDER APPLICABLE LAW, NEITHER PIONEERNOR ITS LICENSORS WILL BE LIABLE TO YOUOR TO ANY OTHER PARTY FOR ANY INDIRECT,CONSEQUENTIAL, INCIDENTAL, PUNITIVE, ORSPECIAL DAMAGES, REGARDLESS OF THEFORM OF ACTION, WHETHER IN CONTRACTOR IN TORT, INCLUDING NEGLIGENCE, EVEN IFSUCH PARTIES HAVE BEEN ADVISED OF THEPOSSIBILITY OF SUCH DAMAGES.TO THE MAXIMUM EXTENT PERMISSIBLEUNDER APPLICABLE LAW, PIONEER’S, OR ITSLICENSORS’, TOTAL LIABILITY OF ANY KINDARISING OUT OF OR RELATED TO YOUR USEOF THE PRODUCTS, INCLUDING, BUT NOT LIM-ITED TO, ANY WARRANTY CLAIMS, OR ANYCLAIMS FOR PROPERTY DAMAGE, DEATH ORDISABILITY, REGARDLESS OF THE FORUMAND REGARDLESS OF WHETHER ANY ACTIONOR CLAIM IS BASED ON CONTRACT, TORT, (IN-CLUDING NEGLIGENCE), STRICT PRODUCT LI-ABILITY, OR ANY OTHER LEGAL THEORY, WILLNOT EXCEED ONE THOUSAND DOLLARS (USD$1 000).SOME JURISDICTIONS DO NOT ALLOW THEEXCLUSION OF DAMAGES OR LIMITATION OFLIABILITY, SO THE ABOVE EXCLUSIONS ORLIMITATIONS, TO THE EXTENT PROHIBITED BYAPPLICABLE LAW, MAY NOT APPLY TO YOU.YOUR SPECIFIC RIGHTS MAY VARY FROM JU-RISDICTION TO JURISDICTION.BluetoothThe Bluetoothâword mark and logos are regis-tered trademarks owned by Bluetooth SIG, Inc.and any use of such marks by PIONEERCORPORATION is under license. Other trade-marks and trade names are those of their re-spective owners.DVD videois a trademark of DVD Format/LogoLicensing Corporation.iTunesApple and iTunes are trademarks of Apple Inc.,registered in the U.S. and other countries.MP3Supply of this product only conveys a license forprivate, non-commercial use and does not con-vey a license nor imply any right to use this prod-uct in any commercial (i.e. revenue-generating)real time broadcasting (terrestrial, satellite,cable and/or any other media), broadcasting/streaming via internet, intranets and/or othernetworks or in other electronic content distribu-tion systems, such as pay-audio or audio-on-de-mand applications. An independent license forsuch use is required. For details, please visithttp://www.mp3licensing.com.WMAWindows Media is either a registered trademarkor trademark of Microsoft Corporation in theUnited States and/or other countries.This product includes technology owned byMicrosoft Corporation and cannot be used ordistributed without a license from MicrosoftLicensing, Inc.iPod & iPhoneiPhone, iPod, iPod classic, iPod nano, and iPodtouch are trademarks of Apple Inc., registered inthe U.S. and other countries.Lightning is a trademark of Apple Inc.“Made for iPod”and “Made for iPhone”meanthat an electronic accessory has been designedto connect specifically to iPod or iPhone, respec-tively, and has been certified by the developer tomeet Apple performance standards. Apple isnot responsible for the operation of this deviceor its compliance with safety and regulatorystandards. Please note that the use of this ac-cessory with iPod or iPhone may affect wirelessperformance.Androidä& Google PlayAndroid and Google Play are trademarks ofGoogle Inc.Dolby DigitalManufactured under license from DolbyLaboratories. Dolby and the double-D symbolare trademarks of Dolby Laboratories.DivXDivXâ, DivX Certifiedâand associated logos aretrademarks of Rovi Corporation or its subsidia-ries and are used under license.ABOUT DIVX VIDEO: DivXâis a digital videoformat created by DivX, LLC, a subsidiary of RoviCorporation. This is an official DivX Certifiedâdevice that plays DivX video. Visit divx.com formore information and software tools to convertyour files into DivX videos.ABOUT DIVX VIDEO-ON-DEMAND: ThisDivX Certifiedâdevice must be registered inorder to play purchased DivX Video-on-Demand(VOD) movies. To obtain your registration code,locate the DivX VOD section in Displaying theDivXâVOD registration code. Go to vod.divx.comfor more information on how to complete yourregistration.Pandora®internet radioPANDORA, the PANDORA logo, and thePandora trade dress are trademarks or regis-tered trademarks of Pandora Media, Inc. Usedwith permission.MIXTRAXMIXTRAX is a trademark of the PIONEERCORPORATION.libpngPlease be aware in advance that Pioneer will notrespond to questions concerning the contentsof the source code.This licence was originally written in Englishand translated here only to help the readerunderstand its content. Therefore, please notethat translated licence is NOT legally identifiedwith the original English text.This copy of the libpng notices is provided foryour convenience. In case of any discrepancybetween this copy and the notices in the filepng.h that is included in the libpng distribution,the latter shall prevail.COPYRIGHT NOTICE, DISCLAIMER, and LI-CENSE:If you modify libpng you may insert additionalnotices immediately following this sentence.Additional information58AppendixAdditional informationEn<CRD4711-A/N>58
This code is released under the libpng license.libpng versions 1.2.6, August 15, 2004, through1.5.0, January 6, 2011, are Copyright (c) 2004,2006-2010 Glenn Randers-Pehrson, and are dis-tributed according to the same disclaimer and li-cense as libpng-1.2.5 with the followingindividual added to the list of Contributing Au-thorsCosmin Trutalibpng versions 1.0.7, July 1, 2000, through 1.2.5- October 3, 2002, are Copyright (c) 2000-2002Glenn Randers-Pehrson, and are distributed ac-cording to the same disclaimer and license aslibpng-1.0.6 with the following individuals addedto the list of Contributing AuthorsSimon-Pierre CadieuxEric S. RaymondGilles Vollantand with the following additions to the disclaim-er:There is no warranty against interference withyour enjoyment of the library or against infringe-ment. There is no warranty that our efforts orthe library will fulfill any of your particular pur-poses or needs. This library is provided with allfaults, and the entire risk of satisfactory quality,performance, accuracy, and effort is with theuser.libpng versions 0.97, January 1998, through1.0.6, March 20, 2000, are Copyright (c) 1998,1999 Glenn Randers-Pehrson, and are distrib-uted according to the same disclaimer and li-cense as libpng-0.96, with the followingindividuals added to the list of Contributing Au-thors:Tom LaneGlenn Randers-PehrsonWillem van Schaiklibpng versions 0.89, June 1996, through 0.96,May 1997, are Copyright (c) 1996, 1997 AndreasDilger Distributed according to the same dis-claimer and license as libpng-0.88, with the fol-lowing individuals added to the list ofContributing Authors:John BowlerKevin BraceySam BushellMagnus HolmgrenGreg RoelofsTom Tannerlibpng versions 0.5, May 1995, through 0.88, Jan-uary 1996, are Copyright (c) 1995, 1996 Guy EricSchalnat, Group 42, Inc.For the purposes of this copyright and license,"Contributing Authors" is defined as the follow-ing set of individuals:Andreas DilgerDave MartindaleGuy Eric SchalnatPaul SchmidtTim WegnerThe PNG Reference Library is supplied "AS IS".The Contributing Authors and Group 42, Inc. dis-claim all warranties, expressed or implied, in-cluding, without limitation, the warranties ofmerchantability and of fitness for any purpose.The Contributing Authors and Group 42, Inc. as-sume no liability for direct, indirect, incidental,special, exemplary, or consequential damages,which may result from the use of the PNG Refer-ence Library, even if advised of the possibility ofsuch damage.Permission is hereby granted to use, copy, modi-fy, and distribute this source code, or portionshereof, for any purpose, without fee, subject tothe following restrictions:1. The origin of this source code must not bemisrepresented.2. Altered versions must be plainly marked assuch and must not be misrepresented as beingthe original source.3. This Copyright notice may not be removed oraltered from any source or altered source distri-bution.The Contributing Authors and Group 42, Inc.specifically permit, without fee, and encouragethe use of this source code as a component tosupporting the PNG file format in commercialproducts. If you use this source code in a prod-uct, acknowledgment is not required but wouldbe appreciated.A "png_get_copyright" function is available, forconvenient use in "about" boxes and the like:printf("%s",png_get_copyright(NULL));Also, the PNG logo (in PNG format, of course) issupplied in the files "pngbar.png" and"pngbar.jpg (88x31) and "pngnow.png" (98x31).Libpng is OSI Certified Open Source Software.OSI Certified Open Source is a certificationmark of the Open Source Initiative.Glenn Randers-Pehrsonglennrp at users.sourceforge.netJanuary 6, 2011EnglishAdditional information59AppendixAdditional informationEn<CRD4711-A/N>59
Language code chart for DVDLanguage (code), input codeJapanese (ja), 1001 Dzongkha (dz), 0426 Kurdish (ku), 1121 Kinyarwanda (rw), 1823English (en), 0514 Ewe (ee), 0505 Komi (kv), 1122 Sanskrit (sa), 1901French (fr), 0618 Esperanto (eo), 0515 Cornish (kw), 1123 Sardinian (sc), 1903Spanish (es), 0519 Estonian (et), 0520 Kirghiz, Kyrgyz (ky),1125 Sindhi (sd), 1904German (de), 0405 Basque (eu), 0521 Latin (la), 1201 Northern Sami (se),1905Italian (it), 0920 Persian (fa), 0601 Luxembourgish (lb),1202 Sangho (sg), 1907Chinese (zh), 2608 Fulah (ff), 0606 Ganda (lg), 1207 Sinhala (si), 1909Dutch, Flemish (nl),1412 Finnish (fi), 0609 Limburgan (li), 1209 Slovak (sk), 1911Portuguese (pt), 1620 Fijian (fj), 0610 Lingala (ln), 1214 Slovenian (sl), 1912Swedish (sv), 1922 Faroese (fo), 0615 Lao (lo), 1215 Samoan (sm), 1913Russian (ru), 1821 Western Frisian (fy),0625 Lithuanian (lt), 1220 Shona (sn), 1914Korean (ko), 1115 Irish (ga), 0701 Luba-Katanga (lu), 1221 Somali (so), 1915Greek (el), 0512 Gaelic (gd), 0704 Latvian (lv), 1222 Albanian (sq), 1917Afar (aa), 0101 Galician (gl), 0712 Malagasy (mg), 1307 Serbian (sr), 1918Abkhazian (ab), 0102 Guarani (gn), 0714 Marshallese (mh), 1308 Swati (ss), 1919Avestan (ae), 0105 Gujarati (gu), 0721 Maori (mi), 1309 Sotho, Southern (st),1920Afrikaans (af), 0106 Manx (gv), 0722 Macedonian (mk), 1311 Sundanese (su), 1921Akan (ak), 0111 Hausa (ha), 0801 Malayalam (ml), 1312 Swahili (sw), 1923Amharic (am), 0113 Hebrew (he), 0805 Mongolian (mn), 1314 Tamil (ta), 2001Aragonese (an), 0114 Hindi (hi), 0809 Marathi (mr), 1318 Telugu (te), 2005Arabic (ar), 0118 Hiri Motu (ho), 0815 Malay (ms), 1319 Tajik (tg), 2007Assamese (as), 0119 Croatian (hr), 0818 Maltese (mt), 1320 Thai (th), 2008Avaric (av), 0122 Haitian (ht), 0820 Burmese (my), 1325 Tigrinya (ti), 2009Aymara (ay), 0125 Hungarian (hu), 0821 Nauru (na), 1401 Turkmen (tk), 2011Azerbaijani (az), 0126 Armenian (hy), 0825 Bokmal (nb), 1402 Tagalog (tl), 2012Bashkir (ba), 0201 Herero (hz), 0826 Ndebele, North (nd),1404 Tswana (tn), 2014Belarusian (be), 0205 Interlingua (ia), 0901 Nepali (ne), 1405 Tonga (to), 2015Bulgarian (bg), 0207 Indonesian (id), 0904 Ndonga (ng), 1407 Turkish (tr), 2018Bihari (bh), 0208 Interlingue (ie), 0905 Nynorsk (nn), 1414 Tsonga (ts), 2019Bislama (bi), 0209 Igbo (ig), 0907 Norwegian (no), 1415 Tatar (tt), 2020Bambara (bm), 0213 Sichuan Yi (ii), 0909 Ndebele, South (nr),1418 Twi (tw), 2023Language (code), input codeBengali (bn), 0214 Inupiaq (ik), 0911 Navajo, Navaho (nv),1422 Tahitian (ty), 2025Tibetan (bo), 0215 Ido (io), 0915 Chichewa (ny), 1425 Uighur, Uyghur (ug),2107Breton (br), 0218 Icelandic (is), 0919 Occitan (oc), 1503 Ukrainian (uk), 2111Bosnian (bs), 0219 Inuktitut (iu), 0921 Ojibwa (oj), 1510 Urdu (ur), 2118Catalan (ca), 0301 Javanese (jv), 1022 Oromo (om), 1513 Uzbek (uz), 2126Chechen (ce), 0305 Georgian (ka), 1101 Oriya (or), 1518 Venda (ve), 2205Chamorro (ch), 0308 Kongo (kg), 1107 Ossetian (os), 1519 Vietnamese (vi), 2209Corsican (co), 0315 Kikuyu, Gikuyu (ki), 1109 Panjabi, Punjabi (pa),1601 Volapük (vo), 2215Cree (cr), 0318 Kuanyama (kj), 1110 Pali (pi), 1609 Walloon (wa), 2301Czech (cs), 0319 Kazakh (kk), 1111 Polish (pl), 1612 Wolof (wo), 2315Church Slavic (cu), 0321 Kalaallisut (kl), 1112 Pashto, Pushto (ps),1619 Xhosa (xh), 2408Chuvash (cv), 0322 Central Khmer (km),1113 Quechua (qu), 1721 Yiddish (yi), 2509Welsh (cy), 0325 Kannada (kn), 1114 Romansh (rm), 1813 Yoruba (yo), 2515Danish (da), 0401 Kanuri (kr), 1118 Rundi (rn), 1814 Zhuang, Chuang (za),2601Divehi (dv), 0422 Kashmiri (ks), 1119 Romanian (ro), 1815 Zulu (zu), 2621Additional information60AppendixAdditional informationEn<CRD4711-A/N>60
SpecificationsGeneralPower source ................... 14.4 V DC (10.8 V to 15.1 V al-lowable)Grounding system ............ Negative typeMaximum current consumption................................... 10.0 ADimensions (W × H × D):DChassis .............. 178 mm × 50mm ×165 mm(7 in. × 2 in. × 6-1/2 in.)Nose .................. 170mm × 46mm ×27 mm(6-3/4 in. × 1-3/4 in. × 1 in.)Weight ............................. 2.0kg (4.4 lbs)DisplayScreen size/aspect ratio ... 7.00 inch wide/16:9(effective display area:154.1 mm × 85.9 mm)Pixels ............................... 1 152000 (2400 × 480)Display method ................ TFTactive matrix, driving typeColor system .................... NTSC/PAL/PAL-M/PAL-N/SECAM compatibleDurable temperature range (power off)................................... –4 °F to +176 °FAudioMaximum power output ... 50 W × 470 W × 1/2 W(for subwoofer)Continuous power output................................... 22W × 4 (50Hz to 15000Hz,5 % THD, 4 Wload, both chan-nels driven)Load impedance .............. 4 W(4 Wto 8 W(2 Wfor 1 ch)allowable)Preout maximum output level................................... 4.0 VEqualizer (8-Band Graphic Equalizer):Frequency ................. 40 Hz/80 Hz/200 Hz/400 Hz/1 kHz/2.5 kHz/8 kHz/10 kHzGain ......................... ±12 dBHPF:Frequency ................. 50 Hz/63 Hz/80 Hz/100 Hz/125 HzSlope ........................ –12 dB/octSubwoofer (mono):Frequency ................. 50 Hz/63 Hz/80 Hz/100 Hz/125 HzSlope ........................ –18 dB/octGain ......................... +6dB to –24 dBPhase ....................... Normal/ReverseBass boost:Gain ......................... +12 dB to 0 dBDVD PlayerSystem ............................ DVD video, Video CD, CD,WMA, MP3, AAC, DivX, JPEG,MPEG playerUsable discs .................... DVD video, Video CD, CD, CD-R/RW, DVD-R/RW/R DLRegion number ................ 1Frequency response ......... 5 Hz to 44 000 Hz (with DVD,at sampling frequency 96 kHz)Signal-to-noise ratio ......... 96dB (1kHz) (IHF-A network)(RCA level)(AVH-X7500BT/AVH-X6500DVD)Signal-to-noise ratio ......... 91 dB (1 kHz) (IHF-A network)(RCA level)Output level:Video ........................ 1.0 Vp-p/75 W(±0.2 V)Number of channels ........ 2 (stereo)MP3 decoding format ...... MPEG-1 & 2 Audio Layer 3WMA decoding format ..... Ver. 7, 7.1, 8, 9, 10, 11, 12 (2 chaudio)(Windows Media Player)AAC decoding format ....... MPEG-4 AAC (iTunes encodedonly) (.m4a)(Ver. 10.6 and earlier)DivX decoding format ....... Home Theater Ver. 3, 4, 5.2, 6(Except ultra and HD) (.avi,.divx)MPEG video decoding format................................... MPEG1, MPEG2, MPEG4USBUSB standard specification................................... USB 1.1, USB 2.0 full speedUSB 2.0 high speed (Foraudio files)Maximum current supply................................... 1.0 AUSB Class ....................... MSC (Mass Storage Class)File system ....................... FAT16, FAT32MP3 decoding format ...... MPEG-1 & 2 Audio Layer 3WMA decoding format ..... Ver. 7, 7.1, 8, 9, 10, 11, 12 (2 chaudio)(Windows Media Player)AAC decoding format ....... MPEG-4 AAC (iTunes encodedonly)(Ver. 10.6 and earlier)WAV:WAV signal format .... Linear PCM, MS ADPCM(.wav)Sampling Frequency............................ Linear PCM:16 kHz,22.05 kHz, 24 kHz, 32 kHz,44.1 kHz, 48 kHzMS ADPCM:22.05 kHz,44.1 kHzFM tunerFrequency range .............. 87.9 MHz to 107.9 MHzUsable sensitivity ............. 9dBf (0.8 µV/75 W, mono, S/N:30 dB)Signal-to-noise ratio ......... 80 dB (digital broadcasting)(IHF-A network)Signal-to-noise ratio ......... 72 dB (analog broadcasting)(IHF-A network)AM tunerFrequency range .............. 530 kHz to 1 710kHz (10 kHz)Usable sensitivity ............. 25µV (S/N: 20 dB)Signal-to-noise ratio ......... 80 dB (digital broadcasting)(IHF-A network)Signal-to-noise ratio ......... 62 dB (analog broadcasting)(IHF-A network)Bluetooth(AVH-X7500BT)Version ............................ Bluetooth 3.0 certifiedOutput power ................... +4dBm Maximum(Power class 2)CEA2006 SpecificationsPower output ................... 14 W RMS × 4 Channels (4 Wand ≦1 % THD+N)S/N ratio .......................... 91dBA (reference: 1 W into4W)NoteSpecifications and the design are subject tomodifications without notice.EnglishAdditional information61AppendixAdditional informationEn<CRD4711-A/N>61
PIONEER CORPORATION1-1, Shin-ogura, Saiwai-ku, Kawasaki-shi,Kanagawa 212-0031, JAPANPIONEER ELECTRONICS (USA) INC.P.O. Box 1540, Long Beach, California 90801-1540, U.S.A.TEL: (800) 421-1404PIONEER EUROPE NVHaven 1087, Keetberglaan 1, B-9120 Melsele, Belgium/BelgiqueTEL: (0) 3/570.05.11PIONEER ELECTRONICS ASIACENTRE PTE. LTD.253 Alexandra Road, #04-01, Singapore 159936TEL: 65-6472-7555PIONEER ELECTRONICS AUSTRALIA PTY. LTD.5 Arco Lane, Heatherton, Victoria, 3202 AustraliaTEL: (03) 9586-6300PIONEER ELECTRONICS OF CANADA, INC.340 Ferrier Street, Unit 2, Markham, Ontario L3R 2Z5, CanadaTEL: 1-877-283-5901TEL: 905-479-4411PIONEER ELECTRONICS DE MEXICO, S.A. de C.V.Blvd.Manuel Avila Camacho 138 10 pisoCol.Lomas de Chapultepec, Mexico, D.F. 11000TEL: 55-9178-4270先鋒股份有限公司台北市內湖區瑞光路407號8樓電話:886-(0)2-2657-3588先鋒電子(香港)有限公司香港九龍長沙灣道909號5樓電話:852-2848-6488ã2013 PIONEER CORPORATION. All rights reserved.ã2013 PIONEER CORPORATION. Tous droits de reproduction et de traduction réservés. Printed in ThailandImprimé en Thaïlande<CRD4711-A/N> UC<KOKZX> <13A00000><CRD4711-A/N>196

Navigation menu