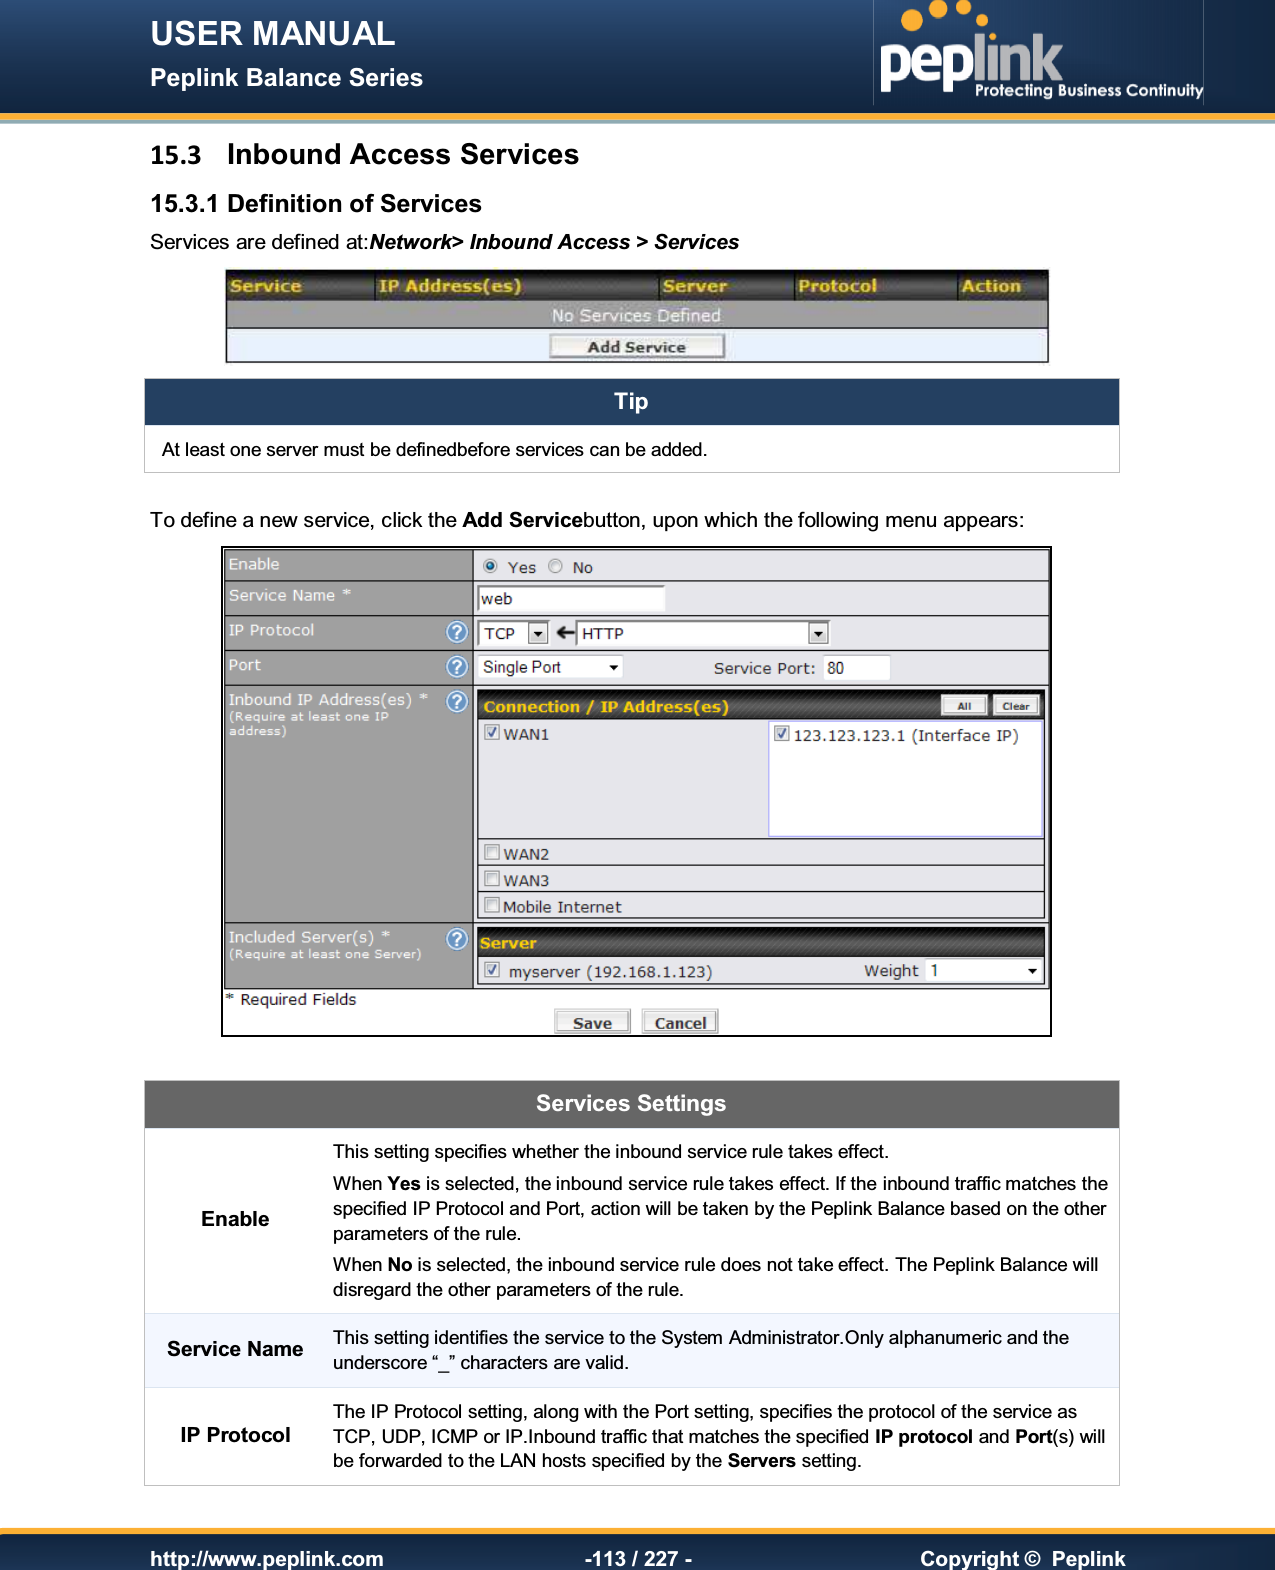
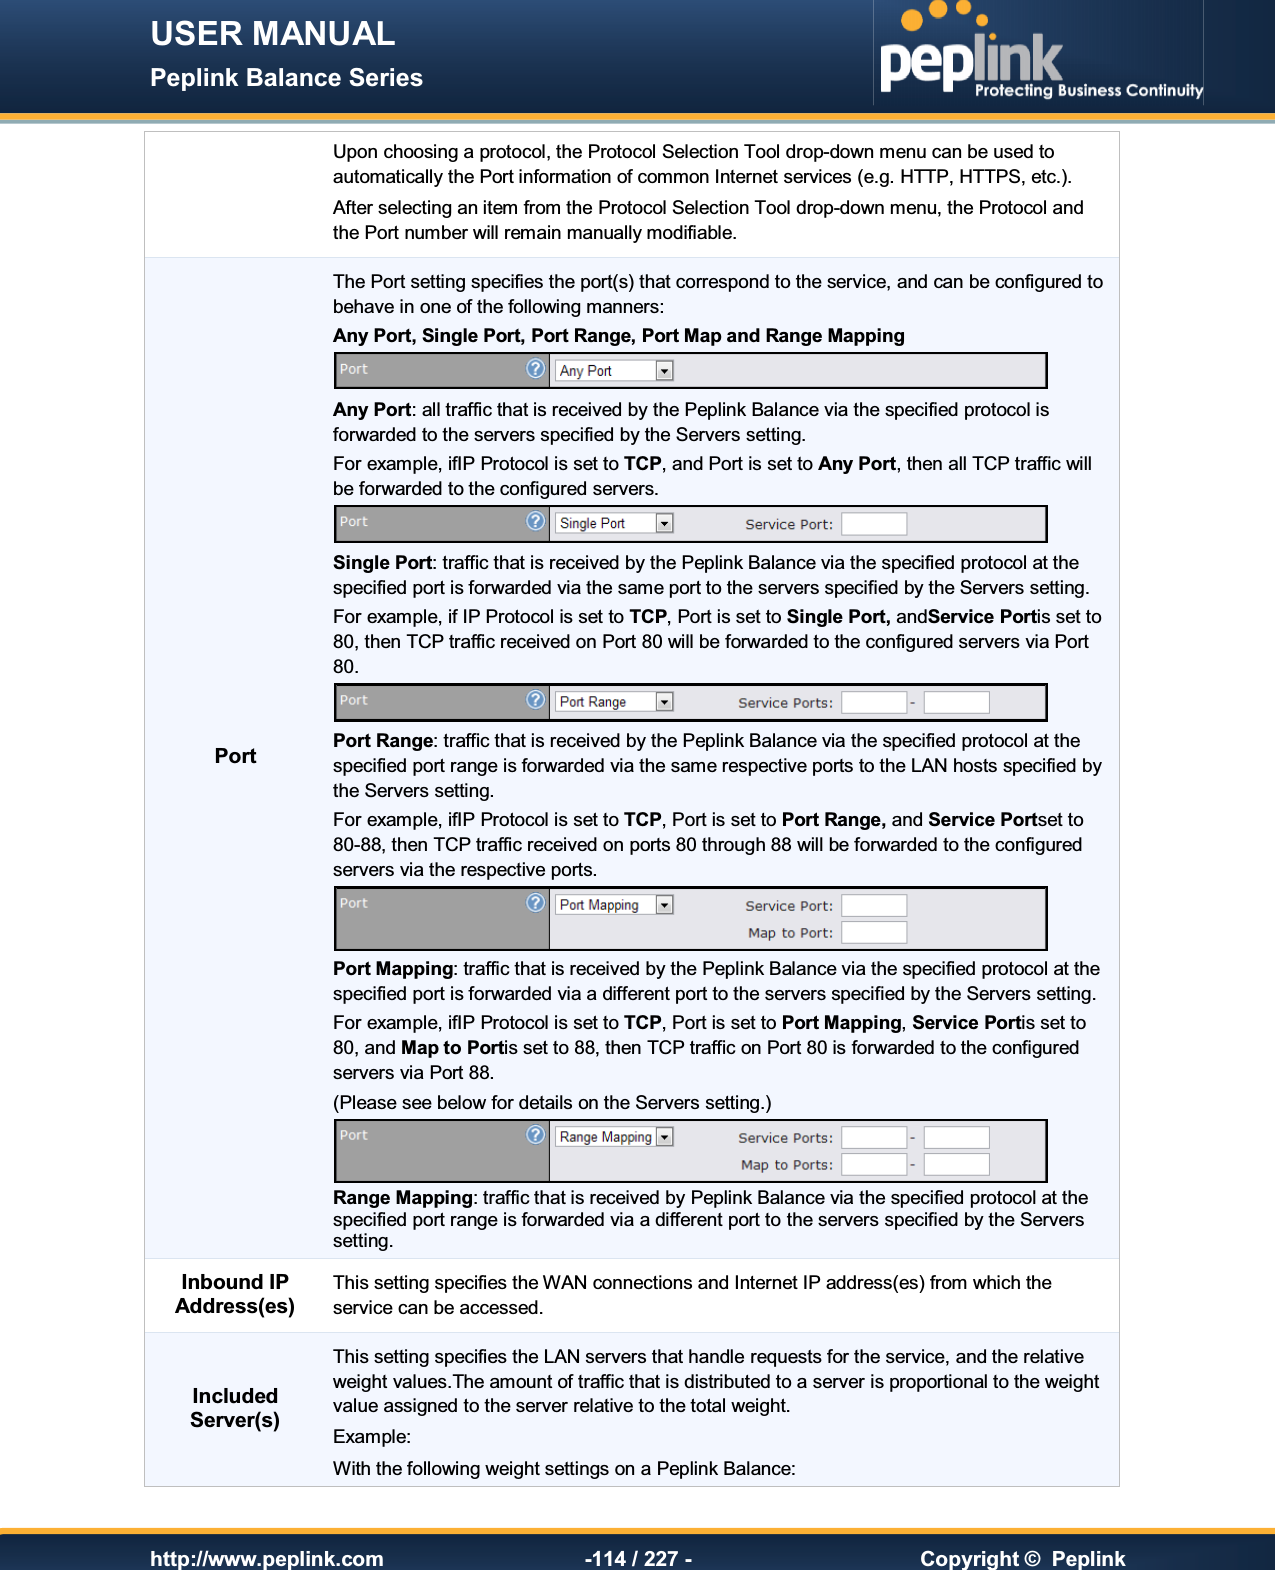
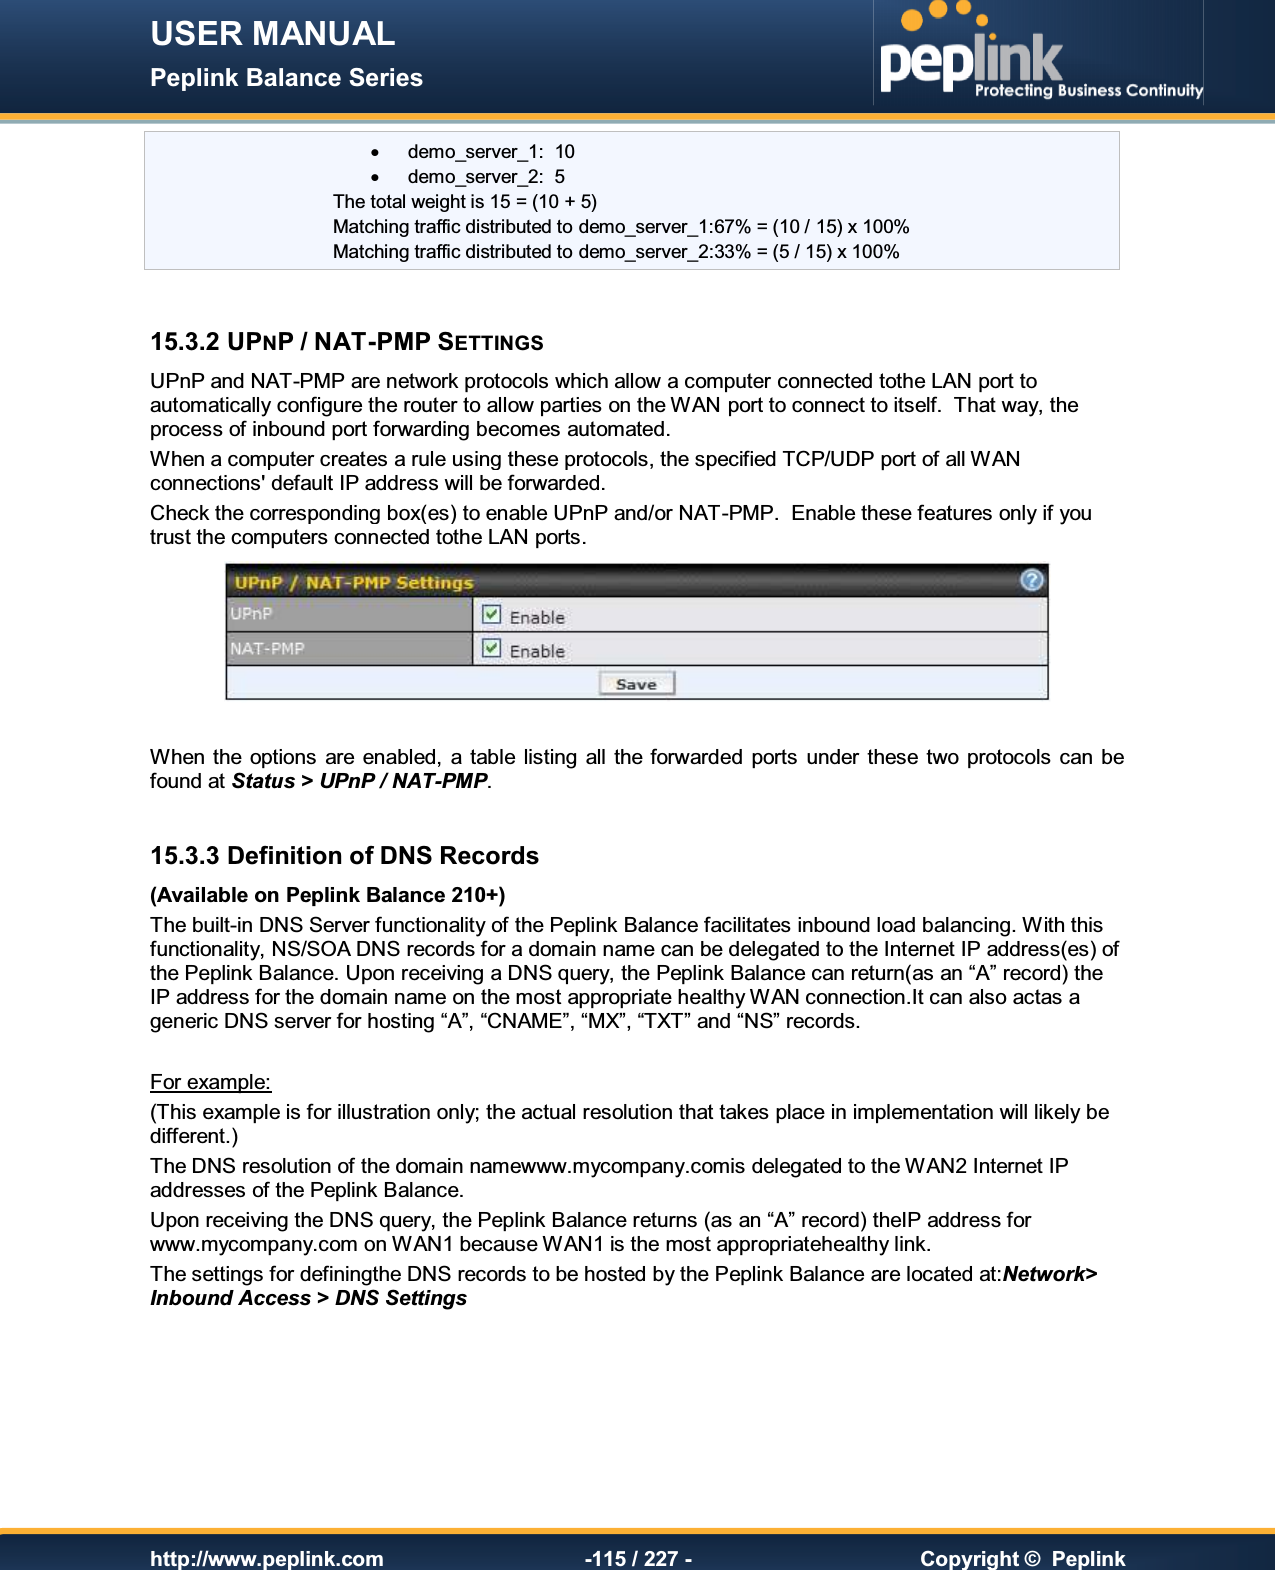
Pismolabs Technology P1805 Pepwave / Peplink / Pismo Wireless Product User Manual U8G P1805

Pismo Labs Technology Limited Pepwave / Peplink / Pismo Wireless Product U8G P1805

User Manual (3 of 4).pdf
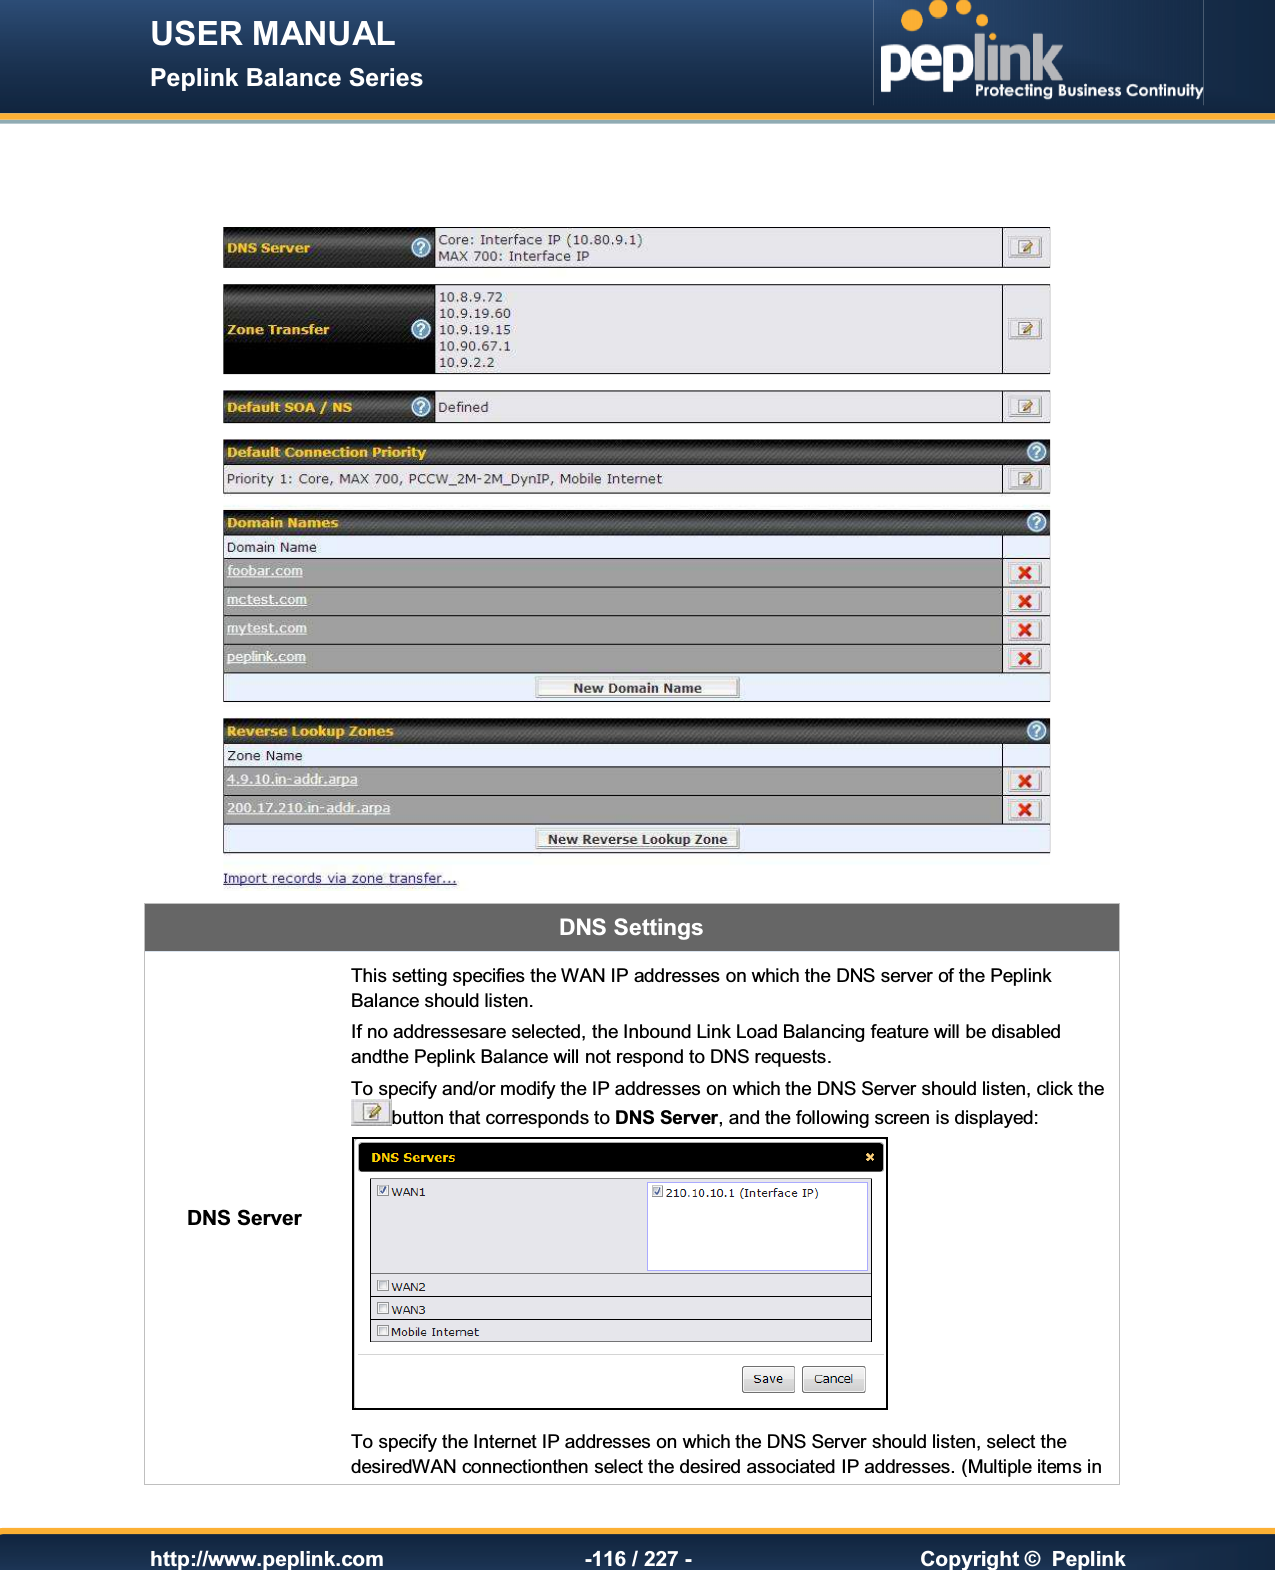
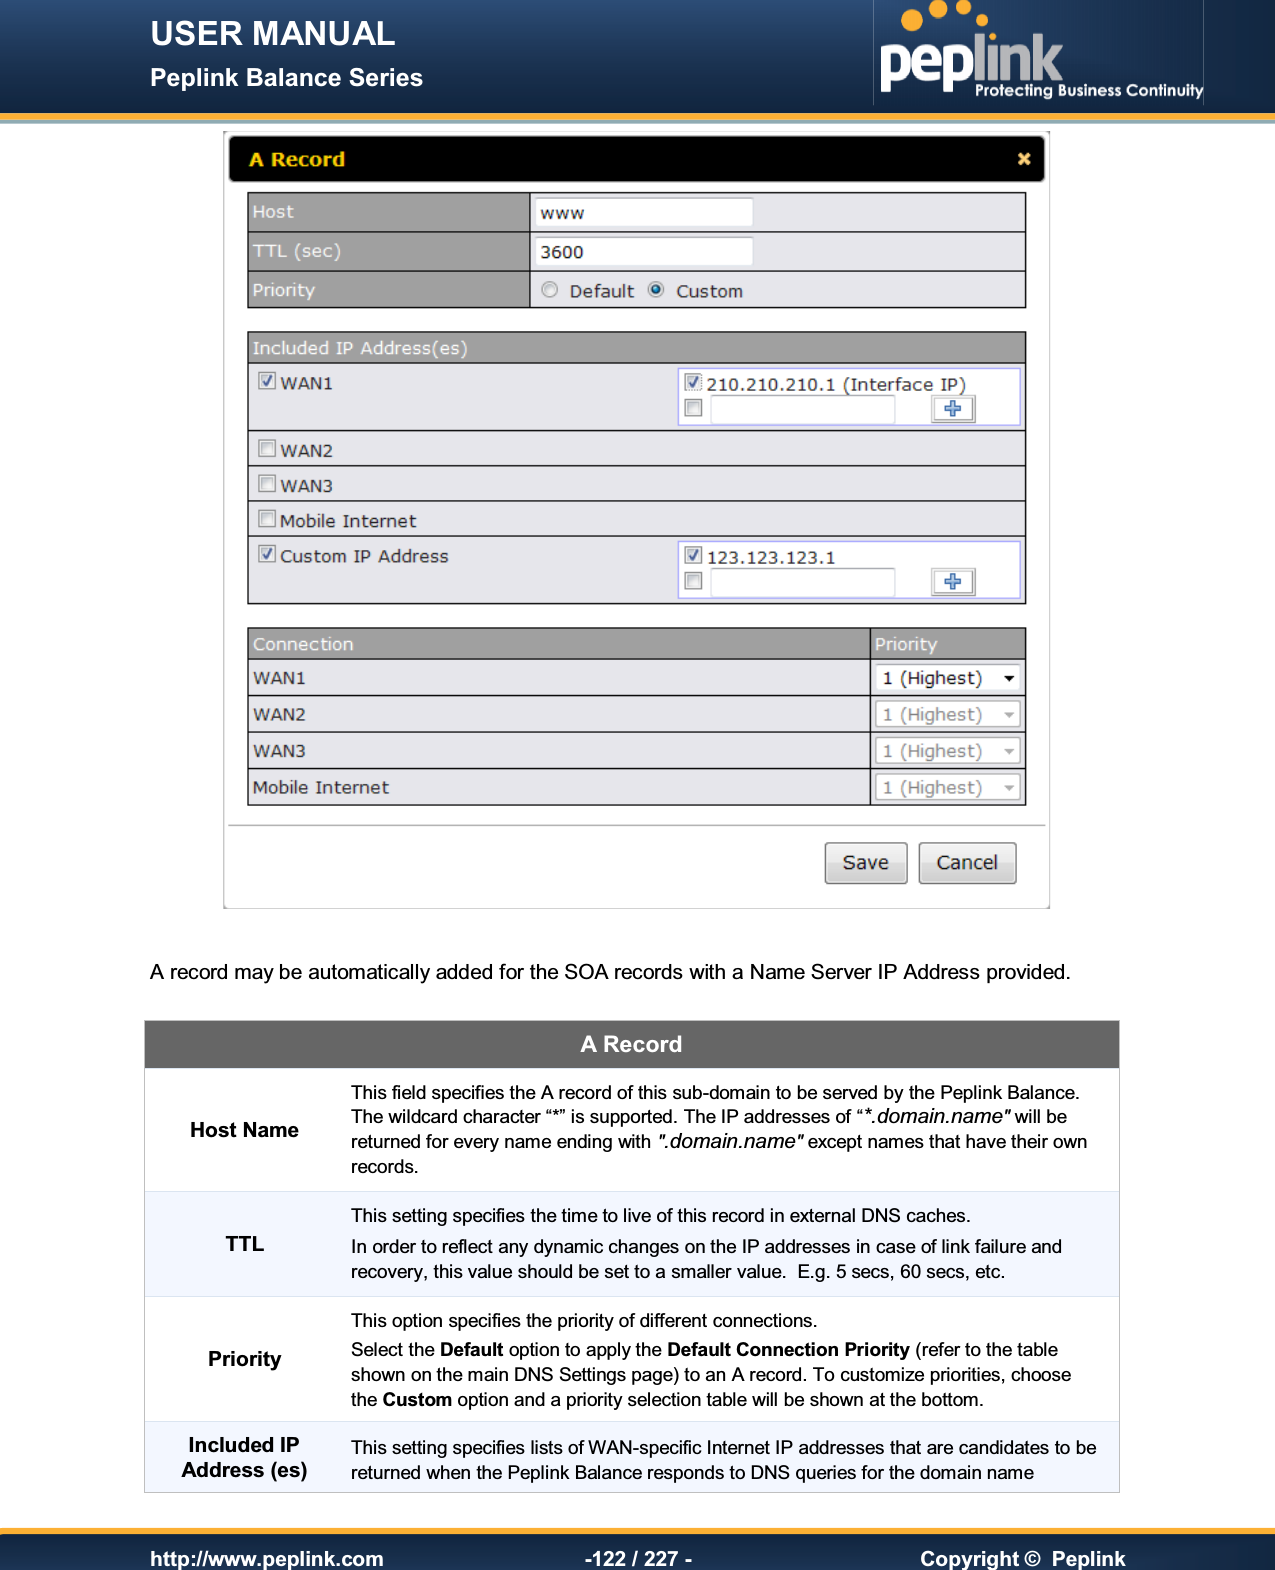
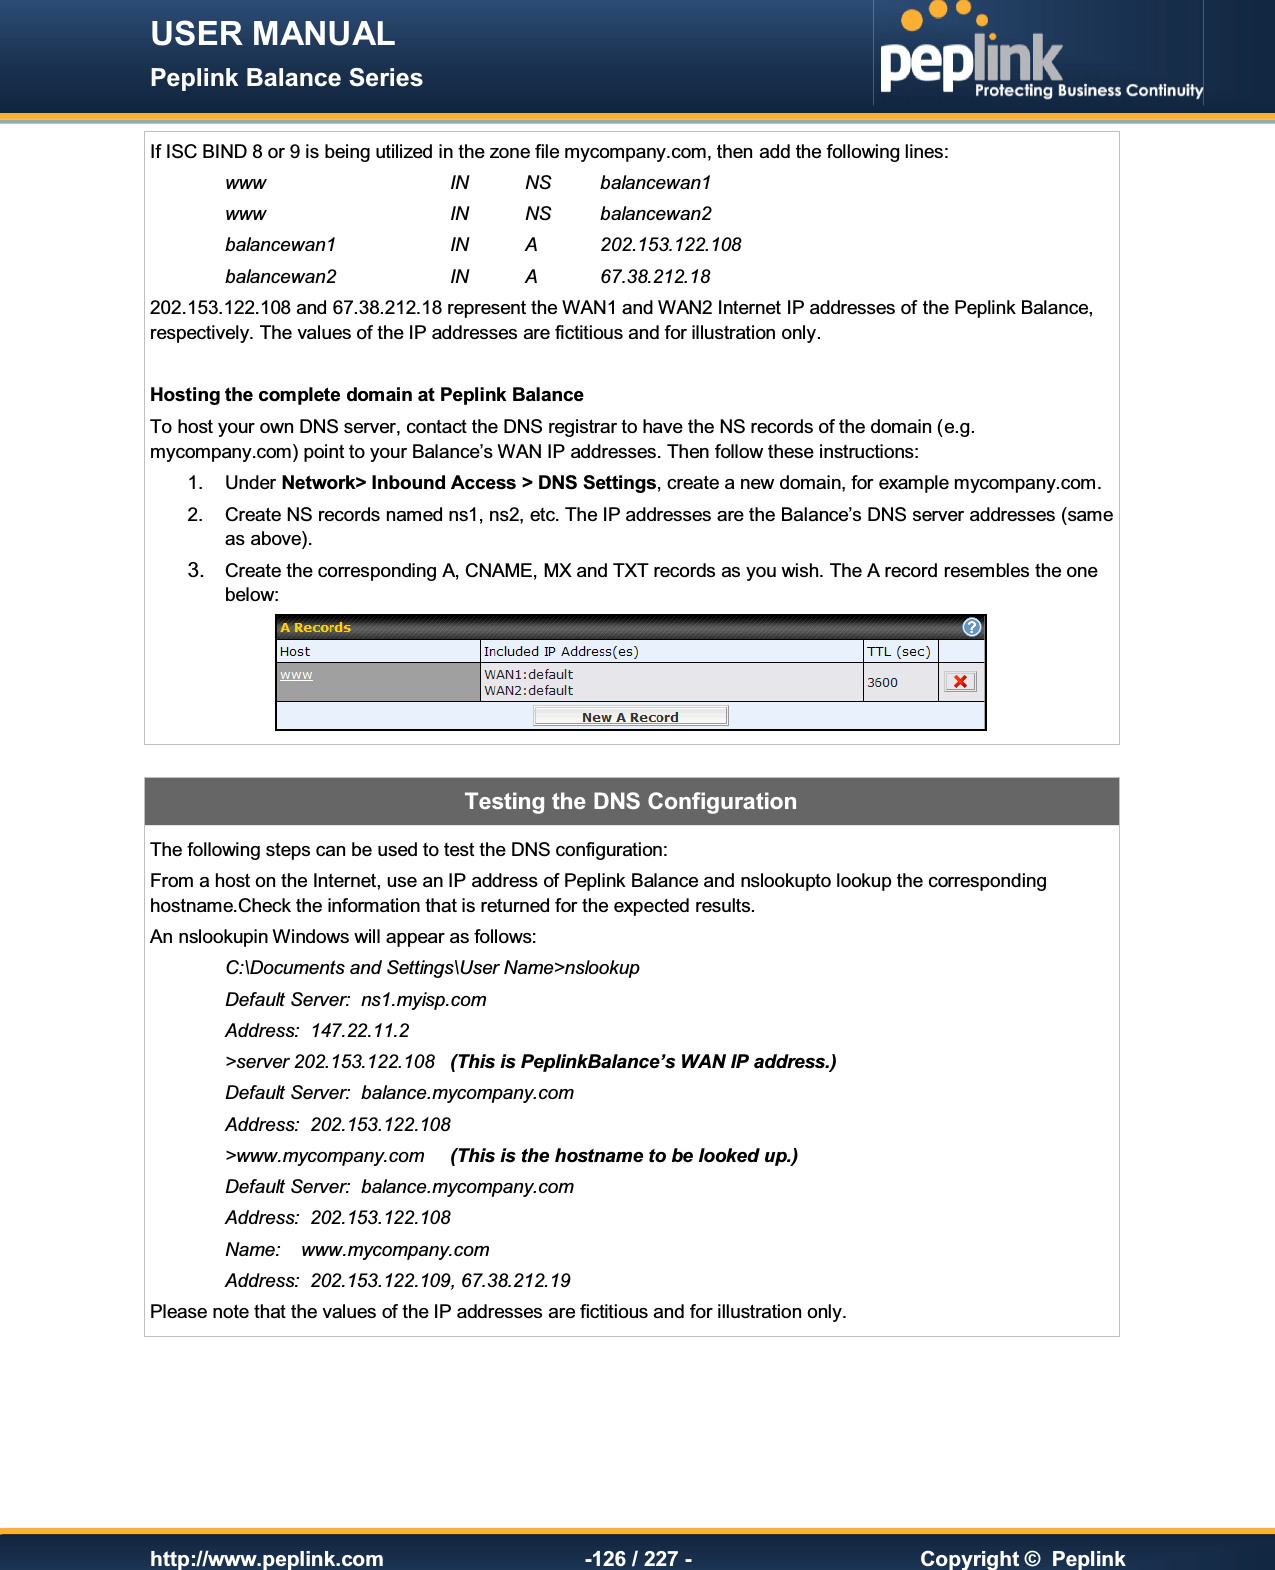
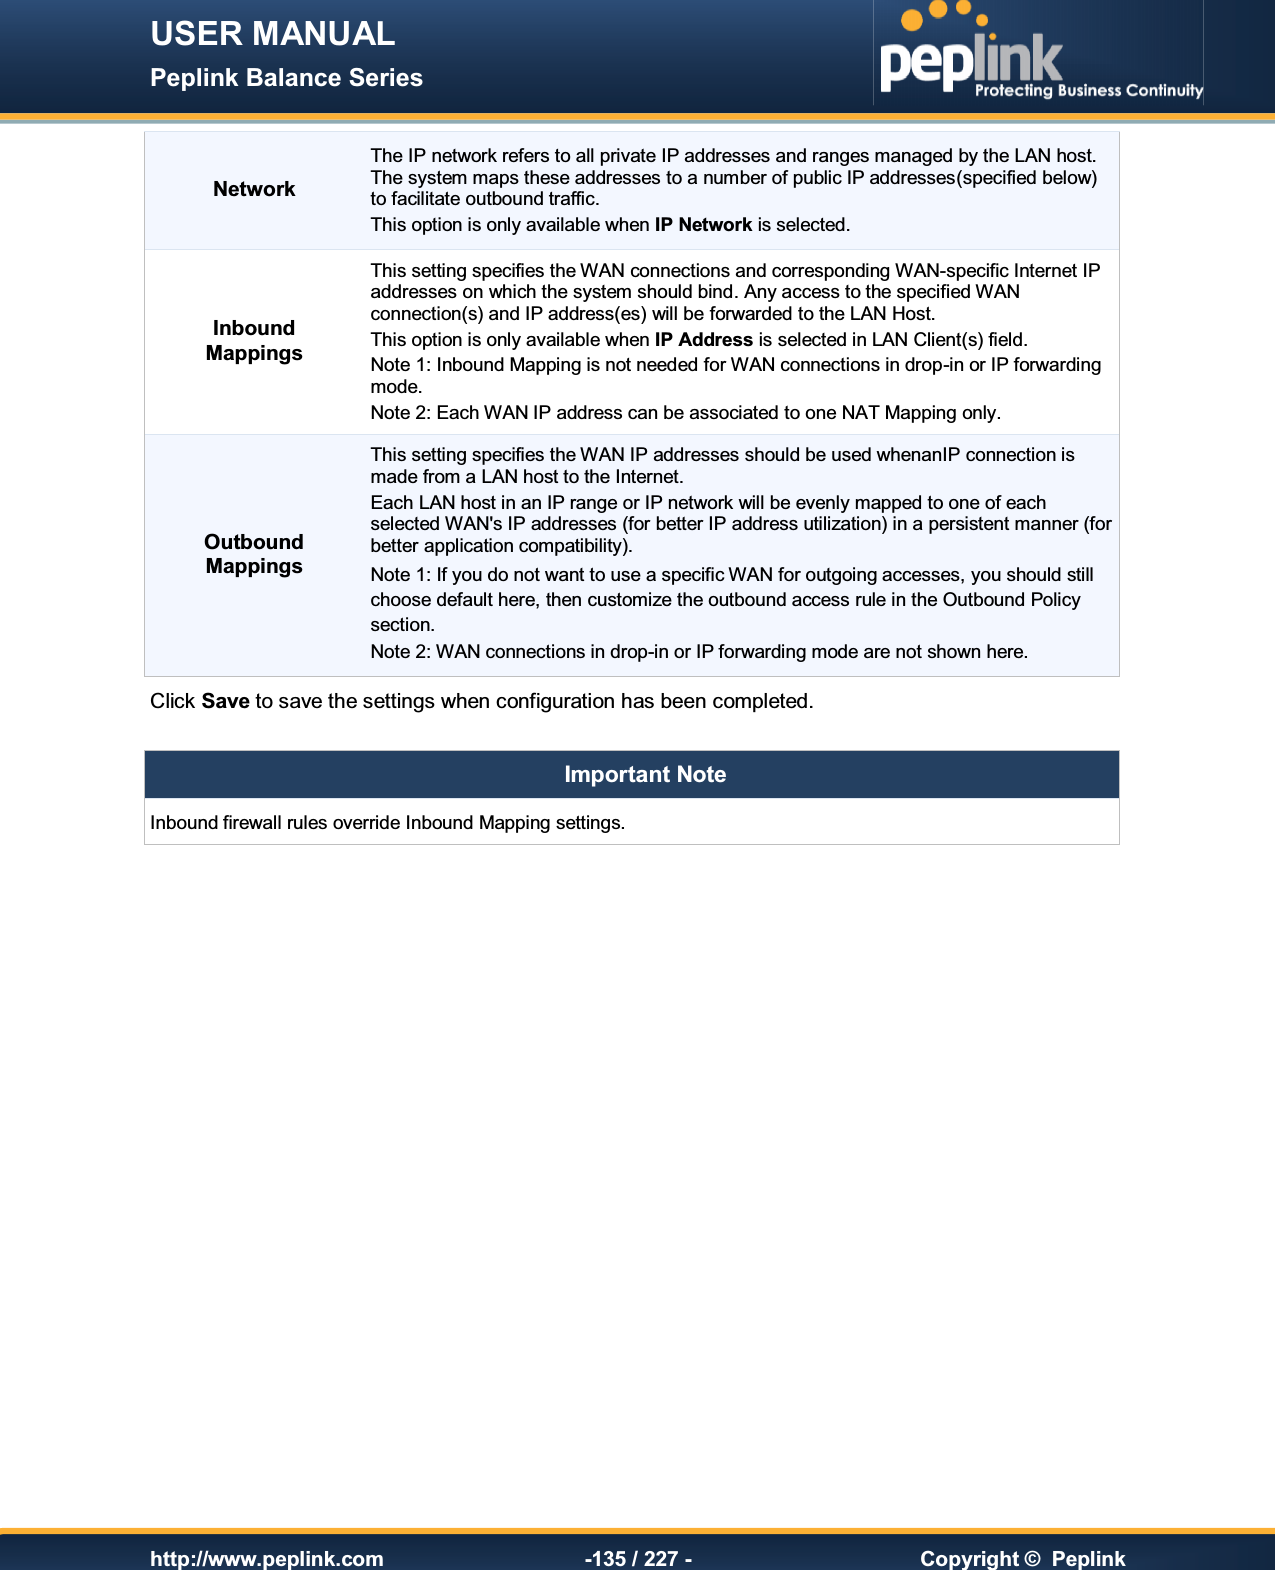
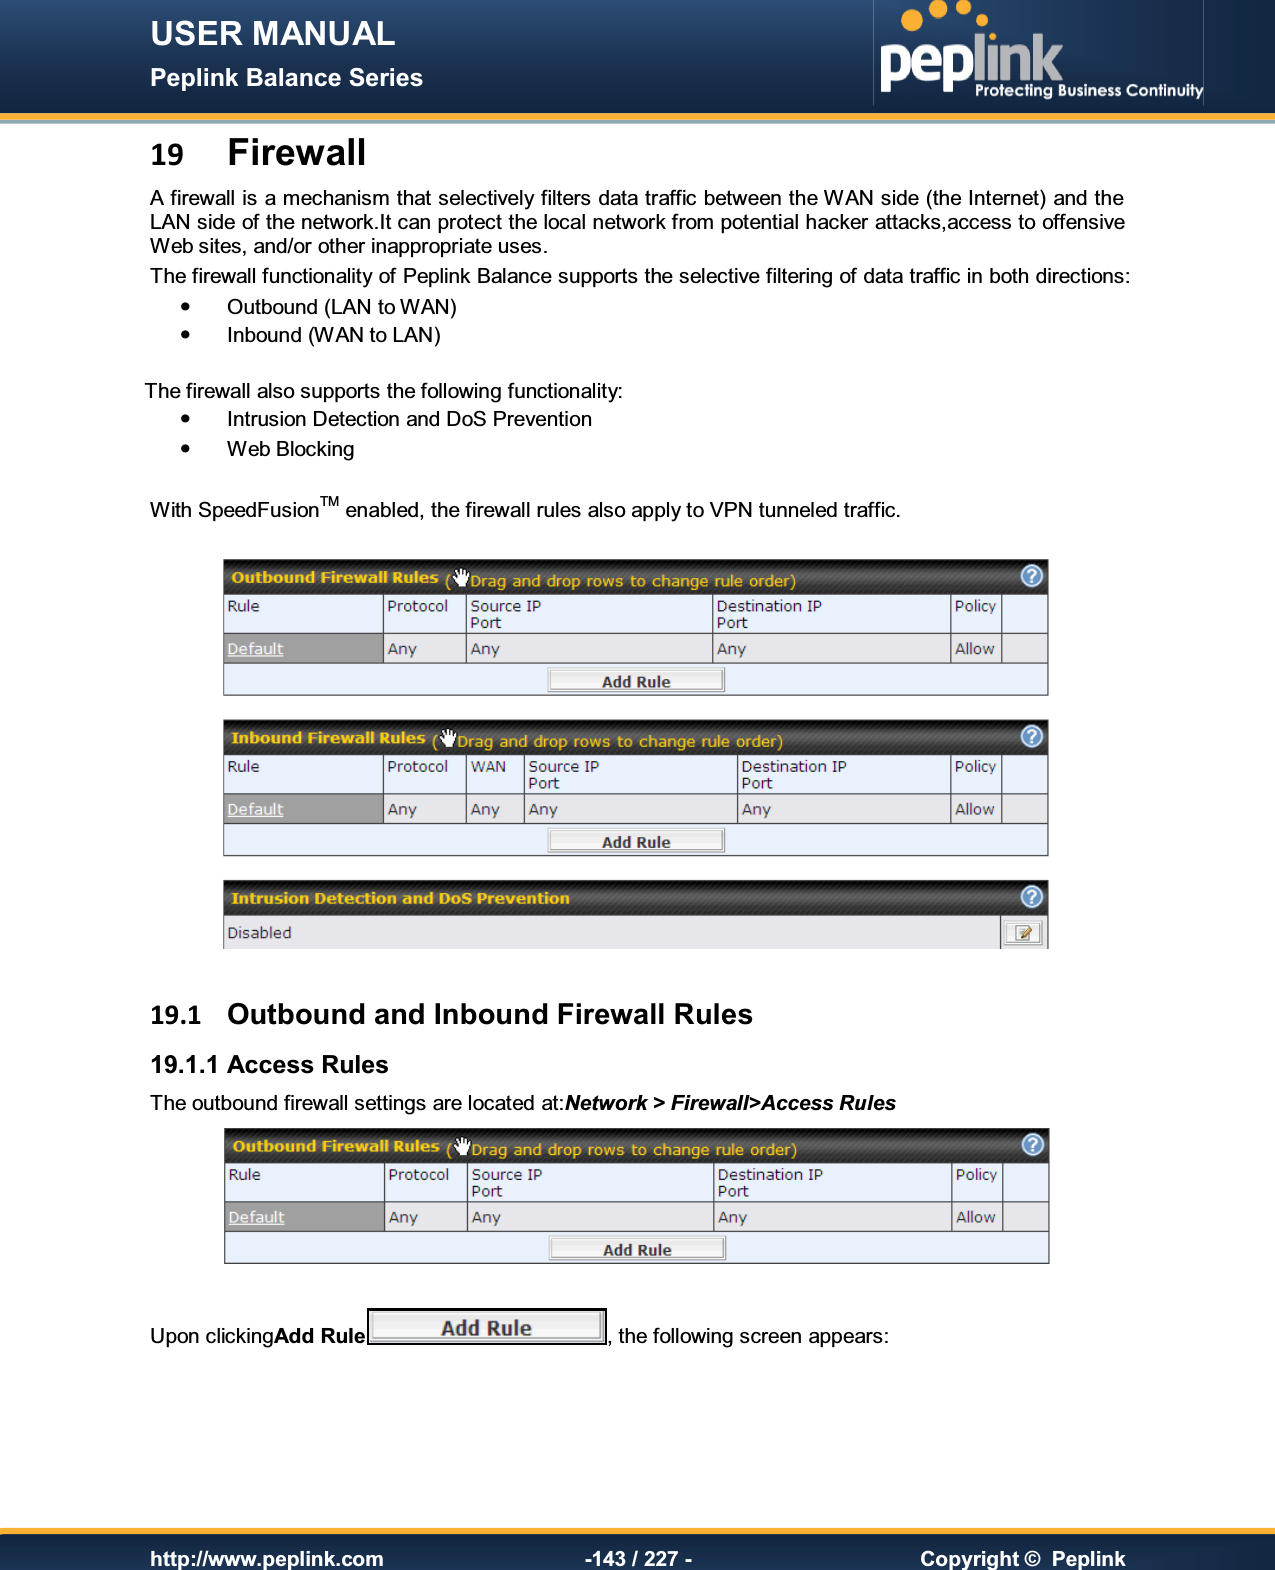
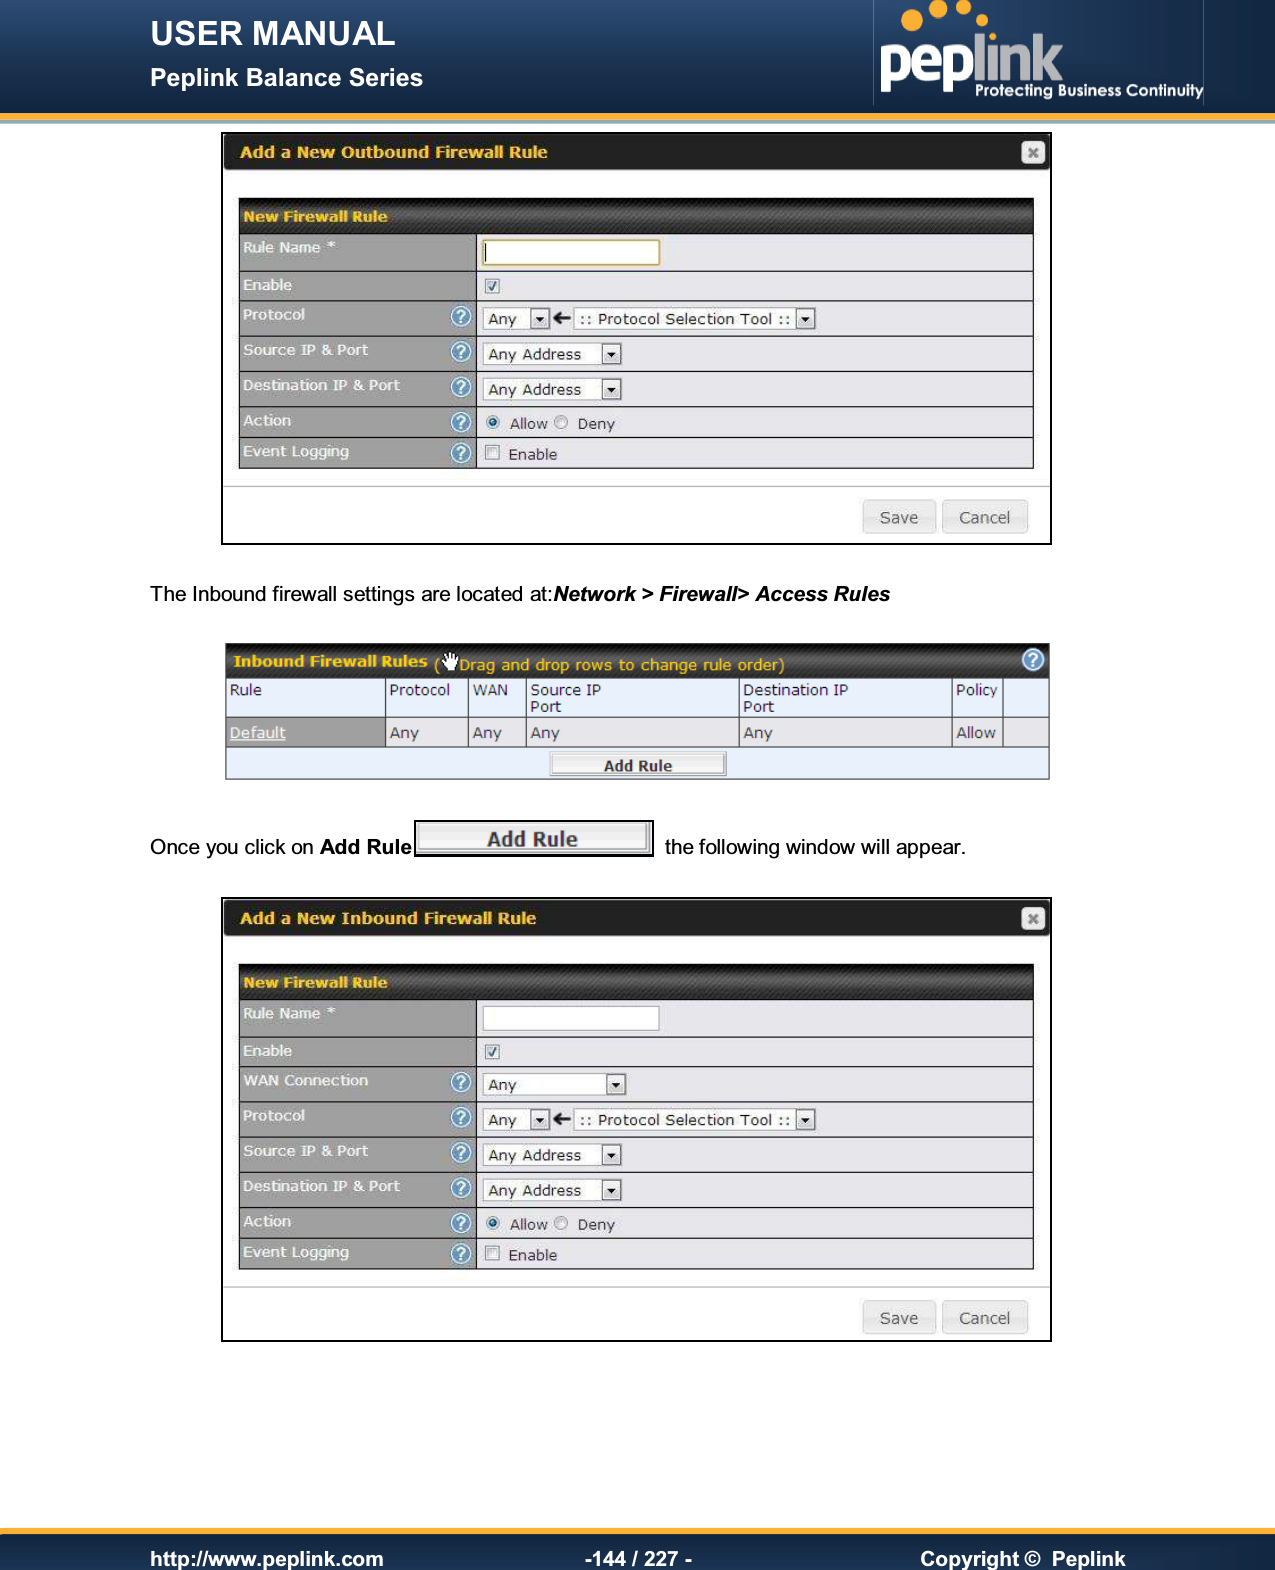
USER MANUAL Peplink Balance Series   http://www.peplink.com -101 / 227 -  Copyright ©  Peplink  Send All Traffic To This featureenables you to prioritize the WAN connections used by this VPN profile.   13.2  IPsec Status IPsec Status shows the current connection status ofeach connection profile and is displayed atStatus > IPsec VPN.
USER MANUAL Peplink Balance Series   http://www.peplink.com -102 / 227 -  Copyright ©  Peplink 14  Outbound Policy Management The Peplink Balance canflexibly manage and load balance outbound traffic among WAN connections. Important Note Outbound policy is applied only when more than one WAN connection is active. The settings for managing and load balancing outbound traffic are located at Network> Outbound Policy.    Outbound policies for managing and load balancing outbound traffic are located at Network > Outbound Policy>click on
USER MANUAL Peplink Balance Series   http://www.peplink.com -103 / 227 -  Copyright ©  Peplink 14.1  Outbound Policy There are three main selections for the outbound traffic policy:   High Application Compatibility   Normal Application Compatibility   Custom   Outbound Policy Settings High Application Compatibility Outbound traffic from a source LAN device is routed through the same WAN connection regardless of the destination Internet IP address and protocol. This option provides the highest application compatibility. Normal Application Compatibility Outbound traffic from a source LAN device to the same destination Internet IP address will be routed through the same WAN connection persistently,regardless of protocol. This option provides high compatibility to most applications, and users still benefit from WAN link load balancing when multiple Internet servers are accessed. Custom Outbound traffic behavior can be managed by defining rules in a custom rule table. A default rule can be defined for connections that cannot be matched with any of the rules. The default policy is Normal Application Compatibility.  Tip Want to know more about creating outbound rules? Visit our YouTube Channel for a video tutorial!  http://youtu.be/rKH4AS_bQnE
USER MANUAL Peplink Balance Series   http://www.peplink.com -104 / 227 -  Copyright ©  Peplink 14.2 Custom Rules for Outbound Policy Click   in the Outbound Policy form.Choose Custom and press the Savebutton.The followingscreen will then be displayed:   The  bottom-most  rule  is  Default.  Edit  this  rule  to  change  the  device’s  default  manner  ofcontrolling outbound traffic for all connections that  donot match any of  the  rules above it.  Under  the Service  he––ading,Defaultto change  thesesettings. To  rearrange the  priority  of  outbound  rules,  drag  and  drop  them into the desired sequence.    By default, Auto is selected for as theDefault Rule.You can select Custom to change the algorithm to be used.  Please refer to the upcoming sections for the details onthe available algorithms.  To create a custom rule, click Add Rule at the bottom of the table.The following window will be displayed:
USER MANUAL Peplink Balance Series   http://www.peplink.com -105 / 227 -  Copyright ©  Peplink   New Custom Rule Settings Service Name This setting specifies the name of the outbound traffic rule. Enable This setting specifies whether the outbound traffic rule takes effect.When Enable is checked, the rule takes effect: traffic is matched and actions are takenby the Peplink Balance based on the other parameters of the rule.When Enable is unchecked, the rule does not take effect: the PeplinkBalance disregards the other parameters of the rule. Source This setting specifies the source IP address, IP network, or MAC address for traffic that matches the rule. Destination This setting specifies the destination IP address, IP network, or domain name for traffic that matches the rule.  If Domain Name is chosen and a domain name, such as foobar.com, is entered, any outgoing accesses to foobar.com and *.foobar.com will match this criterion. You may enter a wildcard (.*) at the end of a domain name to match any host with a name having the domain name in the middle. If you enter foobar.*, for example, www.foobar.com, www.foobar.co.jp, or foobar.co.uk will also match. Placing wildcards in any other position is not supported.  NOTE: if a server has one Internet IP address and multiple server names, and if one of the names is defined here, accesses to any one of the server names will also match this rule. Protocol and Port This setting specifies the IP protocol and port of traffic that matches this rule. You may select common protocols from the Protocol Selection Tool drop-down menu.
USER MANUAL Peplink Balance Series   http://www.peplink.com -106 / 227 -  Copyright ©  Peplink Algorithm This setting specifies the behavior of the Peplink Balance for the custom rule. One of the following values can be selected:    Weighted Balance   Persistence   Enforced   Priority   Overflow   Least Used (not applicable to Balance 20/30/30 LTE)   Lowest Latency (not applicable to Balance 20/30/30 LTE) The upcoming sections detail the listed algorithms. Terminate Sessions on Link Recovery This setting specifies whether to terminate existing IP sessions on a less preferred WAN connection in the event that a more preferred WAN connection is recovered. This setting is applicable to theWeighted,Persistence, and Priority algorithms. By default, this setting is disabled. In this case, existing IP sessions will not be terminated or affected when any other WAN connection is recovered.When this setting is enabled, existing IP sessions may be terminated when another WAN connection is recovered, such that only the preferred healthy WAN connection(s) isused at any point in time. 14.2.1 Algorithm: Weighted Balance This  setting  specifies  the  ratio  of  WAN  connection  usage  to  be  applied  on  the  specified  IP  protocol andport. This setting is applicable only when Algorithm is set to Weighted Balance.  The  amount  of  matching  traffic that  is  distributed  to  a WAN connection  is  proportional  to the weight  of theWAN connection relative to the total weight.Use the sliders to change each WAN’s weight. For example, with the following weight settings on a Peplink Balance 310: ·  WAN1:  10 ·  WAN2:  10 ·  WAN3:  5 Total weight is 25 = (10 + 10 + 5) Matching traffic distributed to WAN1 is 40% = (10 / 25) x 100% Matching traffic distributed to WAN2 is 40% = (10 / 25) x 100% Matching traffic distributed to WAN3 is 20% = (5 / 25) x 100%  14.2.2 Algorithm: Persistence The configuration of persistent services is the solution to the few situations where link load distribution for Internet  services  is  undesirable.  For  example,  for  security  reasons,  many  e-banking  and  other  secure websitesterminate the session when the client computer’s Internet IP address changes mid-session.   In general, different Internet IP addresses represent different computers. The security concern is that an IP address change during a session may be the result of an unauthorized intrusion attempt. Therefore, to prevent  damages  from  the  potential  intrusion,  the  session  is  terminated  upon  the  detection  of  an  IP
USER MANUAL Peplink Balance Series   http://www.peplink.com -107 / 227 -  Copyright ©  Peplink address change. The Peplink Balance can be configured to distribute data traffic across multiple WAN connections. Also, the  Internet  IP depends  on the WAN connections  over which communication  actually takes place. As a result,  a  LAN client  computer  behind  the  Peplink  Balance  may  communicate  using  multiple  Internet  IP addresses.  For  example,  a  LAN  client  computer  behind  a  Peplink  Balance  310  with  three  WAN connections may communicate on the Internet using three different IP addresses. With  the  Persistency  feature  of  PeplinkBalance,  rules  can  be  configured  to  enable  client  computers  to persistently  utilize the  same WAN  connections for  e-banking  and  other  secure websites.  As  a result,  a client computer will communicate using one IP address, eliminating the issues mentioned above.  There are two persistent modes:By SourceandBy Destination.    By Source: The  same WAN  connection will  be used for traffic matching  the rule and  originating  from the same machine, regardless of its destination. This option will provide the highest level of application compatibility. By Destination: The  same WAN  connection will  be used for traffic matching  the rule,  originating from the same machine, and going to the same  destination. This option can better distribute loads to WAN connections when there are only a few client machines. The default mode is By Source.  When there are multiple client requests, they can be distributed (persistently) to WAN connections with a weight. If you choose Autoin Load Distribution, the weights will be automatically adjusted according to each  WAN’s  DownloadBandwidth,  which  is  specified  in  the  WAN  Settings  page  (see sectionConfiguring the WAN Interface(s)). If you chooseCustom, you can customize the weight of each WAN manually using the provided sliders.  14.2.3 Algorithm: Enforced This setting specifies the WAN connection usage to be applied on the specified IP protocol andport. This setting is applicable only whenAlgorithm is set toEnforced.  Matching  traffic  will  be  routed  through  the  specified  WAN  connection,  regardless  of  the  health  check status of the WAN connection. Starting fromFirmware 5.2, outbound traffic can be enforced to go through a specifiedSpeedFusionTM connection. (Available onthe Peplink Balance 210+) 14.2.4 Algorithm: Priority This setting specifies the priority of the WAN connections used to route the specified network service. The
USER MANUAL Peplink Balance Series   http://www.peplink.com -108 / 227 -  Copyright ©  Peplink highest priority WAN connection  available  will  always  be  used for  routing the specified type of traffic. A lower  priority  WAN  connection  will  be  used  only  when  all  higher  priority  connections  have  become unavailable.  Starting from Firmware 5.2, outbound traffic can be prioritized to go through SpeedFusionTMconnection(s). By default, VPN connections are not included in the priority list. (Available on the Peplink Balance 210+)    Tip Configure multiple distribution rules to accommodate different kinds of services. 14.2.5 Algorithm: Overflow The traffic matching this rule will be routed through the healthy WAN connection that has the highest priority and is not in full load. When this connection gets saturated, new sessions will be routed to the next healthy WAN connection that is not in full load.  Drag and drop to specify the order of WAN connections to be used for routing traffic. Only the highest priority healthy connection that is not in full load will be used.  14.2.6 Algorithm: Least Used (Available onthe Peplink Balance 210+)  The traffic matching this rule will be routed through the healthy WAN connection that is selected in Connectionand has the most available download bandwidth. The available download bandwidth of a WAN connection is calculated from the total download bandwidth specified on the WAN Settings page and the current download usage. The available bandwidth and WAN selection is determined every time an IP session is made.  14.2.7 Algorithm: Lowest Latency (Available onthe Peplink Balance 210+)
USER MANUAL Peplink Balance Series   http://www.peplink.com -109 / 227 -  Copyright ©  Peplink  The traffic matching this rule will be routed through the healthy WAN connection that is selected in Connection and has the lowest latency. Latency checking packets are issued periodically to a nearby router of each WAN connection to determine its latency value. The latency of a WAN is the packet round trip time of the WAN connection. Additional network usage may be incurred as a result.  Tip The round trip time of a 6M down /640k uplinkcan be higher than that of a 2M down /2M up linkbecause the overall round trip time is lengthened by its slowerupload bandwidth, despite its higher downlink speed.Therefore, this algorithm isgood for two scenarios: ·  All WAN connections are symmetric; or ·  A latency sensitive application must be routed through the lowestlatency WAN,regardless the WAN’s available bandwidth. 14.2.8 Expert Mode Expert  Mode  is  available  for  advanced  users.To  enable  the  feature, click on the help icon and click turn on Expert Modeį InExpert Mode, a new special rule,SpeedFusionTM Routes, is displayed inthe Custom Rules table.This rule represents all SpeedFusionTM routes learned from remote VPN peers. By default, this bar is on the top of all custom rules. This position means that traffic for remote VPN subnets will be routed to thecorresponding VPN peer. You can create custom Priority or Enforced rules and move them above the bar to override the SpeedFusionTMroutes.  Upon disabling Expert Mode, all rules above the bar will be removed.
USER MANUAL Peplink Balance Series   http://www.peplink.com -110 / 227 -  Copyright ©  Peplink 15  Inbound Access Inbound access is also known as inbound port address translation. On NAT WAN connection, all inbound traffic to the server behind the Peplink unit requires inbound access rules. By the custom definition of servers and services for inbound access,Internet users can access the servers behind PeplinkBalance. Advanced configurations allow inbound access to be distributed  among multiple servers on the LAN.  Important Note Inbound access applies only to WAN connections that operate inNAT mode. For WAN connections that operate inDrop-in mode or IP forwarding, inbound traffic is forwarded to the LAN by default.   15.1  Definition of Port Forwarding (Available onthe Peplink Balance 20/30/30 LTE) Inbound port forwarding rules are defined atNetwork > Inbound Access >Port Forwarding.  To define a new service, click the Add Service button .The followingscreen is displayed:  Port Forwarding Settings Enable This setting specifies whether the inbound service takes effect.When Enable is checked, the inbound service takes effect: traffic is matched and actions are taken by the Peplink Balance based on the other parameters of the rule.When this setting is disabled, the inbound service does not take effect: the Peplink Balance disregards the other parameters of the rule. Service Name This setting identifies the service to the system administrator.Valid values for this setting consist of only alphanumeric and underscore “_” characters.
USER MANUAL Peplink Balance Series   http://www.peplink.com -111 / 227 -  Copyright ©  Peplink IP Protocol The IP Protocol setting, along with the Port setting, specifies the protocol of the service as TCP, UDP, ICMP, or IP.Traffic that is received by the Peplink Balance via the specified protocol at the specified port(s) is forwarded to the LAN hosts specified by the Servers setting.   Please seebelow for details on the Port and Servers settings. Alternatively, the Protocol Selection Tool drop-down menu can be used to automatically fill in the protocol and a single port number of common Internet services (e.g. HTTP, HTTPS, etc.)  After selecting an item from the Protocol Selection Tool drop-down menu, the protocol and port number remain manually modifiable. Port The Port setting specifies the port(s) that correspond to the service, and can be configured to behave in one of the following manners: Any Port, Single Port, Port Range, Port Map, and Range Mapping  Any Port: all traffic that is received by the Peplink Balance via the specified protocol is forwarded to the servers specified by the Servers setting. For example, with IP Protocol set to TCP, and Port set to Any Port, all TCP traffic is forwarded to the configured servers.  Single Port: traffic that is received by the Peplink Balance via the specified protocol at the specified port is forwarded via the same port to the servers specified by the Servers setting.  For example, with IP Protocol set to TCP, and Port set to Single Port and Service Port 80, TCP traffic received on port 80 is forwarded to the configured servers via port 80. Port Range: traffic that is received by the Peplink Balance via the specified protocol at the specified port range is forwarded via the same respective ports to the LAN hosts specified by the Servers setting. For example, with IP Protocol set to TCP, and Port set to Port Range and Service Ports 80-88, TCP traffic received on ports 80 through 88 is forwarded to the configured servers via the respective ports.  Port Mapping: traffic that is received by Peplink Balance via the specified protocol at the specified port is forwarded via a different port to the servers specified by the Servers setting.   For example, with IP Protocol set to TCP, and Port set to Port Mapping, Service Port 80, and Map to Port 88, TCP traffic on Port 80 is forwarded to the configured servers via Port 88. (Please see below for details on the Servers setting.)  Range Mapping: traffic that is received by the Peplink Balance via the specified protocol at the specified port range is forwarded via a different port to the servers specified by the Servers setting. Inbound IP Address(es) This setting specifies the WAN connections and Internet IP address(es) from which the service can be accessed. Server IP Address This setting specifies the LAN IP address of the server that handles the requests for the service. 15.2  Definition of Servers on LAN (Available onthe Peplink Balance 210+)
USER MANUAL Peplink Balance Series   http://www.peplink.com -112 / 227 -  Copyright ©  Peplink The settings to configure servers on the LAN are located at Network> Inbound Access > Servers. Inbound connections from the Internet will be forwarded to the specified Inbound IP address(es) based on  the protocol and port number.When more than one server is defined, requests will be distributed to the servers in the weight ratio specified for each server.   To define a new server, click Add Server, which displays the following screen:   Enter  a  valid  server  name  and  its  corresponding  LAN  IP  address.Upon  clickingSaveafter  entering required information, the following screen appears.    To define additional servers, click Add Serverand repeat the above steps.
USER MANUAL Peplink Balance Series   http://www.peplink.com -113 / 227 -  Copyright ©  Peplink 15.3  Inbound Access Services 15.3.1 Definition of Services Services are defined at:Network> Inbound Access > Services  Tip At least one server must be definedbefore services can be added.  To define a new service, click the Add Servicebutton, upon which the following menu appears:   Services Settings Enable This setting specifies whether the inbound service rule takes effect. When Yes is selected, the inbound service rule takes effect. If the inbound traffic matches the specified IP Protocol and Port, action will be taken by the Peplink Balance based on the other parameters of the rule. When No is selected, the inbound service rule does not take effect. The Peplink Balance will disregard the other parameters of the rule. Service Name This setting identifies the service to the System Administrator.Only alphanumeric and the underscore “_” characters are valid. IP Protocol The IP Protocol setting, along with the Port setting, specifies the protocol of the service as TCP, UDP, ICMP or IP.Inbound traffic that matches the specified IP protocol and Port(s) will be forwarded to the LAN hosts specified by the Servers setting.
USER MANUAL Peplink Balance Series   http://www.peplink.com -114 / 227 -  Copyright ©  Peplink Upon choosing a protocol, the Protocol Selection Tool drop-down menu can be used to automatically the Port information of common Internet services (e.g. HTTP, HTTPS, etc.).  After selecting an item from the Protocol Selection Tool drop-down menu, the Protocol and the Port number will remain manually modifiable. Port The Port setting specifies the port(s) that correspond to the service, and can be configured to behave in one of the following manners: Any Port, Single Port, Port Range, Port Map and Range Mapping  Any Port: all traffic that is received by the Peplink Balance via the specified protocol is forwarded to the servers specified by the Servers setting.   For example, ifIP Protocol is set to TCP, and Port is set to Any Port, then all TCP traffic will be forwarded to the configured servers.  Single Port: traffic that is received by the Peplink Balance via the specified protocol at the specified port is forwarded via the same port to the servers specified by the Servers setting.   For example, if IP Protocol is set to TCP, Port is set to Single Port, andService Portis set to 80, then TCP traffic received on Port 80 will be forwarded to the configured servers via Port 80.  Port Range: traffic that is received by the Peplink Balance via the specified protocol at the specified port range is forwarded via the same respective ports to the LAN hosts specified by the Servers setting.   For example, ifIP Protocol is set to TCP, Port is set to Port Range, and Service Portset to 80-88, then TCP traffic received on ports 80 through 88 will be forwarded to the configured servers via the respective ports.  Port Mapping: traffic that is received by the Peplink Balance via the specified protocol at the specified port is forwarded via a different port to the servers specified by the Servers setting.   For example, ifIP Protocol is set to TCP, Port is set to Port Mapping, Service Portis set to 80, and Map to Portis set to 88, then TCP traffic on Port 80 is forwarded to the configured servers via Port 88. (Please see below for details on the Servers setting.)  Range Mapping: traffic that is received by Peplink Balance via the specified protocol at the specified port range is forwarded via a different port to the servers specified by the Servers setting. Inbound IP Address(es) This setting specifies the WAN connections and Internet IP address(es) from which the service can be accessed. Included Server(s) This setting specifies the LAN servers that handle requests for the service, and the relative weight values.The amount of traffic that is distributed to a server is proportional to the weight value assigned to the server relative to the total weight. Example: With the following weight settings on a Peplink Balance:
USER MANUAL Peplink Balance Series   http://www.peplink.com -115 / 227 -  Copyright ©  Peplink ·  demo_server_1:  10 ·  demo_server_2:  5 The total weight is 15 = (10 + 5) Matching traffic distributed to demo_server_1:67% = (10 / 15) x 100% Matching traffic distributed to demo_server_2:33% = (5 / 15) x 100%  15.3.2 UPNP / NAT-PMP SETTINGS UPnP and NAT-PMP are network protocols which allow a computer connected tothe LAN port to automatically configure the router to allow parties on the WAN port to connect to itself.  That way, the process of inbound port forwarding becomes automated.  When a computer creates a rule using these protocols, the specified TCP/UDP port of all WAN connections' default IP address will be forwarded. Check the corresponding box(es) to enable UPnP and/or NAT-PMP.  Enable these features only if you trust the computers connected tothe LAN ports.   When the  options  are  enabled,  a  table  listing  all  the forwarded ports  under  these  two protocols can be found at Status > UPnP / NAT-PMP.  15.3.3 Definition of DNS Records (Available on Peplink Balance 210+) The built-in DNS Server functionality of the Peplink Balance facilitates inbound load balancing. With this functionality, NS/SOA DNS records for a domain name can be delegated to the Internet IP address(es) of the Peplink Balance. Upon receiving a DNS query, the Peplink Balance can return(as an “A” record) the IP address for the domain name on the most appropriate healthy WAN connection.It can also actas a generic DNS server for hosting “A”, “CNAME”, “MX”, “TXT” and “NS” records.  For example: (This example is for illustration only; the actual resolution that takes place in implementation will likely be different.) The DNS resolution of the domain namewww.mycompany.comis delegated to the WAN2 Internet IP addresses of the Peplink Balance. Upon receiving the DNS query, the Peplink Balance returns (as an “A” record) theIP address for www.mycompany.com on WAN1 because WAN1 is the most appropriatehealthy link. The settings for definingthe DNS records to be hosted by the Peplink Balance are located at:Network> Inbound Access > DNS Settings
USER MANUAL Peplink Balance Series   http://www.peplink.com -116 / 227 -  Copyright ©  Peplink     DNS Settings DNS Server This setting specifies the WAN IP addresses on which the DNS server of the Peplink Balance should listen. If no addressesare selected, the Inbound Link Load Balancing feature will be disabled andthe Peplink Balance will not respond to DNS requests. To specify and/or modify the IP addresses on which the DNS Server should listen, click the button that corresponds to DNS Server, and the following screen is displayed:  To specify the Internet IP addresses on which the DNS Server should listen, select the desiredWAN connectionthen select the desired associated IP addresses. (Multiple items in
USER MANUAL Peplink Balance Series   http://www.peplink.com -117 / 227 -  Copyright ©  Peplink the list can be selected by holding CTRL and clicking on the items.) Click Save to save the settings when configuration is complete. Zone Transfer This setting specifies the IP address(es) of the secondary DNS server(s)authorized to retrieve zone records from the DNS server of the Peplink Balance. The zone transfer server of the Peplink Balance listens on TCP Port 53.    The Peplink Balance serves both the clients that are accessing from the specified IP addresses, and the clients that are accessing itsLAN Interface. Default SOA / NSClick the   button to define a default SOA / NS record for all Domain Names.For Configuration details please refer to section. Whendefining a default SOA record, the field Name Server IP Address is optional. If left blank, the Address (A) record for the same server should be defined manually in each domain. For defining default NS records, the host [domain] indicates that this record is for the domain name itself without a sub-domain prefix. To add a secondary NS server, just create a second NS record with the Host field left empty. When the entered Name Server is a fully qualified domain name (FQDN), the IP Address field will be disabled. Default Connection Priority Default Connection Priority defines the default priority group of each WAN connection in resolving A records. It applies to Address (A) records which have the Connection Priority set to Default. Please refer to Section for details. The WAN connection(s) with the highest priority (smallest number) will be chosen. Those with lower priorities will not be chosen in resolving A records unless the higher priority ones become unavailable. To specify the Primary and Backup connections, click the  button that corresponds to Default Connection Priority.The following screen will appear:  Each WAN connection is associated with a priority number. Click Save to save the settings when configuration is complete. Domain name This section shows a list of domain names to be hosted by the Peplink Balance. Each domain can have its “NS”, “MX” and “TXT” records, andits sub-domains’ “A” and
USER MANUAL Peplink Balance Series   http://www.peplink.com -118 / 227 -  Copyright ©  Peplink “CNAME”records.Add a new record by clicking the New Domain Name button. Click on a domain name to edit. Press   to remove a domain name.   15.3.4 Creating DNS Records To create new DNS records for a domain, perform the following steps: From Network> Inbound Access > DNS Settings, click New Domain Namein the Domain Name field.  Then click on the newly created domain name and the following screen will be displayed:  This page is for defining the domain’s SOA, NS, MX, CNAME, A, TXT and SRV records. Seven tables are presented in this page for defining the five types of records.
USER MANUAL Peplink Balance Series   http://www.peplink.com -119 / 227 -  Copyright ©  Peplink 15.3.5 SOARecords   Click on the  icon to choose whether to use the pre-defined Default SOA Record and NS Records. If the option Use Default SOA and NS Records is selected, any changes made in the Default SOA/NS Records will be applied to this domain automatically. Otherwise, select the option Customize SOA Record for this domain to customize this domain's SOA and NS records.  This table displays the current SOA record. When the option Customize SOA Record for this domain is selected, you can click the link Click here to define SOA record to create or click on the Name Server field to edit the SOA record. In the SOA record, you have to fill out the fields Name Server, Name Server IP Address (optional), Email, Refresh, Retry, Expire, Min Time, and TTL. Default values are set for SOA and NS records,  Name Server IP Address (optional):This is the IP address of the authoritative name server. If the Balance is the authoritative name server of the domain, this field's value should be the WAN connection's name server IP address that is registered in the DNS registrar. If this field is entered, a corresponding A record for the name server will be created automatically.  If it is left blank, the A record for the name server must be created manually.  E-mail: Defines the E-mail address of the person responsible for this zone.  Note: Format should be mailbox-name.domain.com, e.g. hostmaster.example.com.  Refresh: Indicates the length of time (in seconds) when the slave will try to refresh the zone from the master.
USER MANUAL Peplink Balance Series   http://www.peplink.com -120 / 227 -  Copyright ©  Peplink  Retry: Defines the duration (in seconds)between retries if the slave (secondary) fails to contact the master and the Refresh (above) has expired.    Expire: Indicates the time (in seconds) when the zone data is no longer authoritative. This option applies to Slave DNS servers only.  Min Time: Is the negative caching time which defines the time (in seconds) after an error record is cached.  TTL (Time-to-Live): Defines the duration (in seconds) that the record may be cached.  15.3.6 NS Records The NS Record table shows the NS servers and TTL that correspond to the domain. The NS record of the name server defined in the SOA record is automatically added here. To  add  a new NS record, click  the  New  NS  Recordsbutton in the  NS  Records box.Then the  table will expand to look like the following:  When creating an NS record for the domain itself (not a sub-domain), the Host field should be left blank. Enter a name server host name and its IP address into the corresponding boxes. The host name can be a non-FQDN (fully qualified domain name) (please be sure that a corresponding A record is created). Click the  button on the right to finish and to add other Name Servers. Click the Save button to save your changes.  15.3.7 MX Records The  MX  Record  table  shows  the  domain’s  MX  records.To  add  a  newMX  record,  click  theNew  MX Recordsbutton in the MX Records box.  Then the table will expand to look like the following:  When creating an MX record for the domain itself (not a sub-domain), the Host field should be left blank.
USER MANUAL Peplink Balance Series   http://www.peplink.com -121 / 227 -  Copyright ©  Peplink For each record, PriorityandMail Server name must be entered.Priority typically ranges from 10 to 100.  Smaller numbers have a higher a priority.   After finishing adding MX records, click the Save button. 15.3.8 CNAME Records The CNAME Record table shows the domain’s CNAME records. To add a newCNAME record, click theNew CNAME Recordsbutton in the CNAME Record box. Then the table will expand to look like the following:  When creating a CNAME record for the domain itself (not a sub-domain), the Hostfield should be left blank. The wildcard character “*”is supported in the Host field. The Reference of ".domain.name" will be returned for every name ending with ".domain.name" except names that have their own records. The TTL field tells the time to live of the record in external DNS caches.  15.3.9 A Records This table shows the A records of the domain name.  To add an A record, click the NewA Record button. The following screen will appear:
USER MANUAL Peplink Balance Series   http://www.peplink.com -122 / 227 -  Copyright ©  Peplink   A record may be automatically added for the SOA records with a Name Server IP Address provided.  A Record Host Name This field specifies the A record of this sub-domain to be served by the Peplink Balance.  The wildcard character “*” is supported. The IP addresses of “*.domain.name" will be returned for every name ending with ".domain.name" except names that have their own records. TTL This setting specifies the time to live of this record in external DNS caches. In order to reflect any dynamic changes on the IP addresses in case of link failure and recovery, this value should be set to a smaller value.  E.g. 5 secs, 60 secs, etc. Priority This option specifies the priority of different connections. Select the Default option to apply the Default Connection Priority (refer to the table shown on the main DNS Settings page) to an A record. To customize priorities, choose the Custom option and a priority selection table will be shown at the bottom.  Included IP Address (es) This setting specifies lists of WAN-specific Internet IP addresses that are candidates to be returned when the Peplink Balance responds to DNS queries for the domain name
USER MANUAL Peplink Balance Series   http://www.peplink.com -123 / 227 -  Copyright ©  Peplink specified by Host Name. The IP addresses listed in each box asdefault are the Internet IP addresses associated with each of the WAN connections. Static IP addresses that are not associated with any WAN can be entered into the Custom IP list.  A PTR record is also created for each Custom IP. For WAN connections that operate under Drop-in mode, there may be other routable IP addresses in addition to the default IP address.Therefore, the Peplink Balance allows custom Internet IP addresses to be added manually via filling the text box on the right-hand side and clicking the   button. Only the checked IP addresses in the listsare candidates to be returned when responding to a DNS query. If a WAN connection is down, the corresponding set of IP addresses will not be returned. However, the IP addresses in the Custom IP field will always be returned. If the Connection Priority field is set to Custom, you can also specify the usage priority of each WAN connection. Only selected IP address(es) of available connection(s) with the highest priority, and Custom IP addresses will be returned. By default, the Connection Priority is set to Default.   15.3.10  PTR Records PTR records are created along with A records pointing to Custom IPs. Please refer to Section  for details. For example, if you created an A record www.mydomain.com pointing to 11.22.33.44, then a PTR record 44.33.22.11.in-addr.arpa pointing to www.mydomain.com will also be created. When there are multiple host names pointing to the same IP address, only one PTR record for the IP address will be created. In order for PTR records to function, youalso need to create NS records. For example, if the IP address range  11.22.33.0  to 11.22.33.255is  delegated  to  the  DNS server  on  the  Peplink  Balance,  you  will  also have  to  create  a  domain  33.22.11.in-addr.arpa  and  have  its  NS  records  pointing  to  your  DNS  server’s (the Peplink Balance) public IP addresses.  With the above records created, the PTR record creation is complete.
USER MANUAL Peplink Balance Series   http://www.peplink.com -124 / 227 -  Copyright ©  Peplink 15.3.11  TXT Records This table shows the TXT record of the domain name.  To add a newTXT record, click theNew TXT Recordbutton in the TXT Records box.Click the Editbutton to  edit  the  record.  The  time-to-live  value  and  the  TXT  record’s  value  can  be  entered.  Click  the  Save button to finish. When creating a TXT record for the domain itself (not a sub-domain), the Host field should be left blank. The maximum size of the TXT Value is 255 bytes. After  completed  editing  the  five  types  of  record,  you  can  simply  leave  the  page  by  going  to  another section of the Web Admin Interface.  15.3.12  SRV Records To add a newSRV record, click theNew SRV Recordbutton in the SRV Records box.   · Service: The symbolic name of the desired service.  · Priority: Indicates the priority of the Target; the smaller the value, the higher the priority. · Weight: A relative weight for records with the same priority. · Target: The canonical hostname of the machine providing the service. · Port: Enter the TCP or UDP port number on which the service is to be found.
USER MANUAL Peplink Balance Series   http://www.peplink.com -125 / 227 -  Copyright ©  Peplink Domain Delegation These are the steps to follow when you host your domain at anISP or domain registrar, and want to delegate a sub-domain to be resolved and managed by the Peplink Balance.   ·  Click New Domain Name button to add a domain name.e.g.www.mycompany.com. Click the corresponding domain name to view and edit record details.   ·  Create SOA/NS records named ns1, ns2, etc. The IP addresses are the Balance’s DNS server addresses.   ·  Then create an A record with an empty host name
USER MANUAL Peplink Balance Series   http://www.peplink.com -126 / 227 -  Copyright ©  Peplink If ISC BIND 8 or 9 is being utilized in the zone file mycompany.com, then add the following lines: www      IN  NS  balancewan1 www      IN  NS  balancewan2 balancewan1    IN  A  202.153.122.108 balancewan2    IN  A  67.38.212.18 202.153.122.108 and 67.38.212.18 represent the WAN1 and WAN2 Internet IP addresses of the Peplink Balance, respectively. The values of the IP addresses are fictitious and for illustration only.  Hosting the complete domain at Peplink Balance To host your own DNS server, contact the DNS registrar to have the NS records of the domain (e.g. mycompany.com) point to your Balance’s WAN IP addresses. Then follow these instructions: 1.  Under Network> Inbound Access > DNS Settings, create a new domain, for example mycompany.com. 2.  Create NS records named ns1, ns2, etc. The IP addresses are the Balance’s DNS server addresses (same as above). 3.  Create the corresponding A, CNAME, MX and TXT records as you wish. The A record resembles the one below:   Testing the DNS Configuration The following steps can be used to test the DNS configuration: From a host on the Internet, use an IP address of Peplink Balance and nslookupto lookup the corresponding hostname.Check the information that is returned for the expected results. An nslookupin Windows will appear as follows: C:\Documents and Settings\User Name>nslookup Default Server:  ns1.myisp.com Address:  147.22.11.2 >server 202.153.122.108  (This is PeplinkBalance’s WAN IP address.) Default Server:  balance.mycompany.com Address:  202.153.122.108 >www.mycompany.com  (This is the hostname to be looked up.) Default Server:  balance.mycompany.com Address:  202.153.122.108 Name:    www.mycompany.com Address:  202.153.122.109, 67.38.212.19 Please note that the values of the IP addresses are fictitious and for illustration only.
USER MANUAL Peplink Balance Series   http://www.peplink.com -127 / 227 -  Copyright ©  Peplink 15.4  Reverse Lookup Zones Reverse lookup Zones can be configured in Network > Inbound Access > DNS Settings.   Reverse lookup refers to performing a DNS query to find one or more DNS names associated with a given IP address. The DNS stores IP addresses in the form of specially formatted names as pointer (PTR) records using special domains/zones. The zone is in-addr.arpa. To enable DNS clients to perform a reverse lookup for a host, perform two steps: ·  Create a Reverse Lookup Zone that corresponds to the subnet network address of the host.  In the Reverse Lookup Zone, add a pointer (PTR) resource record that maps the host IP address to the host name. ·  Click the New Reverse Lookup Zone button and enter a Reverse Lookup Zone Name. If you are delegated the subnet 11.22.33.0/24, the Zone Name should be 33.22.11.in-arpa.addr.PTR records for 11.22.33.1, 11.22.33.2, ... 11.22.33.254 should be defined in this zone where the Host IP Numbers are 1, 2, ... 254 respectively.
USER MANUAL Peplink Balance Series   http://www.peplink.com -128 / 227 -  Copyright ©  Peplink  15.4.1 SOA Record You can click the link Click here to define SOA record to create or click on the Name Server field to edit the SOA record.  To define a SOA record, fill out the fields:Name Server, Name Server IP Address (optional), Email, Refresh, Retry, Expire, Min Time, and TTL.  Name Server: Enter the NS record's FQDN server name here.  For example: "ns1.mydomain.com" (equivalent to "www.1stdomain.com.") "ns2.mydomain.com."  Email, Refresh, Retry, Expire, Min Time, and TTLareentered in the same way as in the forward zone. Please refer to section  for details. 15.4.2 NS Records  The NS record of the name server defined in the SOA record is automatically added here.To create a new NS record, click the New NS Records button.   When creating an NS record for the Reverse Lookup Zone itself (not a sub-domain or dedicated zone), the Host field should be left blank. Name Server field must be an FQDN.
USER MANUAL Peplink Balance Series   http://www.peplink.com -129 / 227 -  Copyright ©  Peplink 15.4.3 CNAME Records    To create a new CNAME record, click the New CNAME Record button. CNAME records are typically used for defining classless reverse lookup zones. Subnetted reverse lookup zones are further described in RFC 2317, "Classless IN-ADDR.ARPA delegation."  15.4.4 PTR Records    To create a new PTR record, click the New PTR Record button.  For Host IP Number field, enter the last integer in the IP address of a PTR record. E.g. for the IP address 11.22.33.44, where the Reverse Lookup Zone is 33.22.11.in-arpa.addr, the Host IP Number should be 44.  The Points To field defines the host name which the PTR record should be pointed to. It must be an FQDN.
USER MANUAL Peplink Balance Series   http://www.peplink.com -130 / 227 -  Copyright ©  Peplink 15.5  DNS Record Import Wizard At the bottom of the DNS Settings page, the link Import records via zone transfer…is used to import DNS record using an Import Wizard.     ·  Select Next>> to continue.    ·  In the Target DNS Server IP Addressfield, enter the IP address of the DNS server. ·  In the Transfer via…field, choose the connection which you would like to transfer through. ·  Select Next>>to continue.
USER MANUAL Peplink Balance Series   http://www.peplink.com -131 / 227 -  Copyright ©  Peplink   ·  In  the  blank  space,  enter  the  Domain  Names  (Zones)  which  you  would  like  to  assign  the  IP address entered in the previous step. Enter one domain name per line. ·  Select Next>>to continue.  Important Note If you have entered domain(s) which already exist in your settings, a warning message will appear. Select Next>>to overwrite the existing record, or <<Backto go back to the previous step.
USER MANUAL Peplink Balance Series   http://www.peplink.com -132 / 227 -  Copyright ©  Peplink    After the zone records process have been fetched, the fetch results would be shown as above. You can view import details by clicking the corresponding hyperlink on the right hand side.
USER MANUAL Peplink Balance Series   http://www.peplink.com -133 / 227 -  Copyright ©  Peplink
USER MANUAL Peplink Balance Series   http://www.peplink.com -134 / 227 -  Copyright ©  Peplink 16  NAT Mappings The Peplink Balance allows the IP address mapping of all inbound and outbound NAT’edtraffic to and from an internal client IP address. NAT Mappings can be configured at:Network>NAT Mappings   To add a rule for NAT Mappings, clickAdd NAT Ruleand the following screen will be displayed:  NAT Mapping Settings LAN Client(s) NAT Mapping rules can be defined for a single LAN IP Address, an IP Range, or an IP Network. Address This refers to the LAN host’s private IP address.The system maps this address to a number of public IP addresses (specified below) in order to facilitate inbound and outbound traffic. This option is only available when IP Address is selected. Range The IP range is a contiguous group of private IP addresses used by the LAN host. The system maps these addresses to a number of public IP addresses(specified below) to facilitate outbound traffic. This option is only available when IP Range is selected.
USER MANUAL Peplink Balance Series   http://www.peplink.com -135 / 227 -  Copyright ©  Peplink Network The IP network refers to all private IP addresses and ranges managed by the LAN host. The system maps these addresses to a number of public IP addresses(specified below) to facilitate outbound traffic. This option is only available when IP Network is selected. Inbound Mappings This setting specifies the WAN connections and corresponding WAN-specific Internet IP addresses on which the system should bind. Any access to the specified WAN connection(s) and IP address(es) will be forwarded to the LAN Host. This option is only available when IP Address is selected in LAN Client(s) field. Note 1: Inbound Mapping is not needed for WAN connections in drop-in or IP forwarding mode. Note 2: Each WAN IP address can be associated to one NAT Mapping only. Outbound Mappings This setting specifies the WAN IP addresses should be used whenanIP connection is made from a LAN host to the Internet. Each LAN host in an IP range or IP network will be evenly mapped to one of each selected WAN's IP addresses (for better IP address utilization) in a persistent manner (for better application compatibility).  Note 1: If you do not want to use a specific WAN for outgoing accesses, you should still choose default here, then customize the outbound access rule in the Outbound Policy section. Note 2: WAN connections in drop-in or IP forwarding mode are not shown here. Click Save to save the settings when configuration has been completed.  Important Note Inbound firewall rules override Inbound Mapping settings.
USER MANUAL Peplink Balance Series   http://www.peplink.com -136 / 227 -  Copyright ©  Peplink 17 Captive Portal The Captive Portal serves as gateway that clients have to pass if they wish to access the internet using your router. To configure, navigate to Network >Captive Portal to see the following screen:       Captive Portal Settings Apply On Clicking the edit button trigger a dialogue where you can choose which LAN / VLAN to apply your captive portal.   Click all LAN / VLAN that you wish to apply the captive portal to. Access Mode Click Open Access to allow clients to freely access your router. Click User Authentication to force your clients to authenticate before accessing your router. Radius Server This authenticates your clients through a Radius Server. Upon selecting this option, you will see the following fields:    Fill in the necessary information to complete your connection to the server and enable authentication.
USER MANUAL Peplink Balance Series   http://www.peplink.com -137 / 227 -  Copyright ©  Peplink LDAP Server This authenticates your clients through a LDAP Server. Upon selecting this option, you will see the following fields:    Fill in the necessary information to complete your connection to the server and enable authentication. Access Quota Set a time and data cap to each user’s Internet usage. Quota Reset Time This menu determines how your usage quota resets. Setting it to daily will reset it at a specified time every day. Setting a number of minutes after quota reached establish a timer for each user that begins after the quota has been reached. Splash Page Here, you can choose between using the Balance’s built-in captive portal and redirecting clients to a URL you define.  The Portal Customization menu has two options:   and  . Clicking will result in a pop-up previewing the captive portal that your clients will see. Clicking   will result in the appearance of following menu:
USER MANUAL Peplink Balance Series   http://www.peplink.com -138 / 227 -  Copyright ©  Peplink   Portal Customization Logo Image Click the Choose File button to select an logo to use for the built-in portal Message If you have any additional messages for your users, place it on this field. Terms & Conditions If you would like to use your own set of terms and conditions, please place it here. If left empty, the built-in portal will display the default terms and conditions. Custom Landing Page Fill in this field to redirect clients to an external URL.
USER MANUAL Peplink Balance Series   http://www.peplink.com -139 / 227 -  Copyright ©  Peplink  QoS 18.1.1 User Groups (Available on Peplink Balance 305 and 380+) LAN and PPTP clients can be categorized into three user groups - Manager, Staff, and Guest.This menu allows you to define rules and assign client IP addresses or subnets to a user group. You can apply different bandwidth and traffic prioritization policies on each user group in the BandwidthControl and Application sections. The table is automatically sorted, and the table order signifies the rules' precedence. The smaller and more specific subnets are put towards the top of the table and have higher precedence; larger and less specific subnets are placed towards the bottom. Click the Add button to define clients and their user group. Click the   button to remove the defined rule.  Two default rules are pre-defined and put at the bottommost.They are All DHCP reservation clients and Everyone, and they cannot be removed. The All DHCP reservation client representsthe LAN clients defined in the DHCP Reservation table in the LAN settings page.  Everyone represents all clients that are not defined in any rule above. Click on a rule to change its group.     Add / Edit User Group Subnet / IP Address From the drop-down menu, choose whether you are going to define the client(s) by an IP Address or a Subnet.  If IP Address is selected, enter a name defined in DHCP Reservation table or a LAN client's IP address. If Subnet is selected, enter a subnet address and specify its subnet mask. Group This field is to define which User Group the specified Subnet / IP Address belongs to.  Once users have been assigned to a user group, their internet traffic will be restricted by rules defined for that particular group. Please refer to the following two sections for details.
USER MANUAL Peplink Balance Series   http://www.peplink.com -140 / 227 -  Copyright ©  Peplink 18.1.2 Bandwidth Control (Group Bandwidth Reservation Available on Peplink Balance 305 and 380+) This section is to define how much minimum bandwidth will be reserved to each user group when a WAN connection is in full load.When this feature is enabled, a slider with two indicators will be shown. You can move the indicators to adjust each group's weighting. The lower part of the table shows the corresponding reserved download and uploads bandwidth value of each connection. By default, 50% of bandwidth has been reserved for Manager, 30% for Staff, and 20% for Guest.    (Individual Bandwidth Limit Available on Peplink Balance One, 305 and 380+) You can define a maximum download speed (over all WAN connections) and upload speed (for each WAN connection) that each individual Staff and Guest member can consume. No limit can be imposed on individual Managers. By default, Download and Upload Bandwidth Limits are set to unlimited (set as 0).
USER MANUAL Peplink Balance Series   http://www.peplink.com -141 / 227 -  Copyright ©  Peplink 18.1.3 Application 18.1.3.1  Application Prioritization You  can  choose  whether  to  apply  the  same  Prioritization  settings  to  all  user  groups  or  customize  the settings for each group.   Three priority levels can be set for application prioritization: ɥHigh,ʈ Normal, andɧLow. The Peplink Balance can detectvarious application traffics by inspecting the packets' content. Select an application by choosing a supported application, or by defining a custom application manually. The priority preference of supported applications is placed at the top of the table. Custom applications are at the bottom.    18.1.3.2  Prioritization for Custom Application Click  the Add button  to  define  a  custom  application. Click  the  button   in  the  Action  column  to delete the custom application in the corresponding row. When Supported Applications is selected, the Peplink Balance will inspect network traffic and prioritize the selected applications. Alternatively, you can select Custom Applicationsand define the application by providing the protocol, scope, port number, and DSCP value.
USER MANUAL Peplink Balance Series   http://www.peplink.com -142 / 227 -  Copyright ©  Peplink   Categoryand Applicationavailability will be different across different models of Peplink Balance.  18.1.3.3  DSL/Cable Optimization DSL/cable-based WAN connectionshave lower upload bandwidth and higher download bandwidth.  When a DSL/cable circuit's uplink is congested, the download bandwidth will be affected. Users will not be able to download data at full speed until the uplink becomes less congested.DSL/Cable Optimization can relieve such an issue. When it is enabled, the download speed will become less affected by the upload traffic. By default, this feature is enabled.
USER MANUAL Peplink Balance Series   http://www.peplink.com -143 / 227 -  Copyright ©  Peplink 19 Firewall A firewall is a mechanism that selectively filters data traffic between the WAN side (the Internet) and the LAN side of the network.It can protect the local network from potential hacker attacks,access to offensive Web sites, and/or other inappropriate uses. The firewall functionality of Peplink Balance supports the selective filtering of data traffic in both directions:   Outbound (LAN to WAN)   Inbound (WAN to LAN)  The firewall also supports the following functionality:   Intrusion Detection and DoS Prevention   Web Blocking  With SpeedFusionTM enabled, the firewall rules also apply to VPN tunneled traffic.    19.1  Outbound and Inbound Firewall Rules 19.1.1 Access Rules The outbound firewall settings are located at:Network > Firewall>Access Rules   Upon clickingAdd Rule , the following screen appears:
USER MANUAL Peplink Balance Series   http://www.peplink.com -144 / 227 -  Copyright ©  Peplink   The Inbound firewall settings are located at:Network > Firewall> Access Rules    Once you click on Add Rule   the following window will appear.
USER MANUAL Peplink Balance Series   http://www.peplink.com -145 / 227 -  Copyright ©  Peplink Inbound / Outbound Firewall Settings Rule Name This setting specifies a name for the firewall rule. Enable This setting specifies whether the firewall rule should take effect. If the box is checked, the firewall rule takes effect. If the traffic matches the specified Protocol/IP/Port, actions will be taken by Peplink Balance based on the other parameters of the rule. If the box is not checked, the firewall rule does not take effect. Peplink Balance will disregard the other parameters of the rule. Protocol This setting specifies the protocol to be matched. Via a drop-down menu, the following protocols can be specified: · TCP · UDP · ICMP · IP  Alternatively, the Protocol Selection Tool drop-down menu can be used to automatically fill in the Protocol and Port number of common Internet services (e.g. HTTP, HTTPS, etc.)   After selecting an item from the Protocol Selection Tool drop-down menu, the Protocol and Port number remains manually modifiable. Source IP & Port This specifies the source IP address(es) and port number(s) to be matched for the firewall rule. A single address, or a network, can be specified as the Source IP & Port setting, as indicated with the following screenshots:  In addition, a single port, or a range of ports, can be specified for the Source IP & Portsettings. Destination IP & Port This specifies the destination IP address(es) and port number(s) to be matched for the firewall rule. A single address, or a network, can be specified as the Source IP & Port setting, as indicated with the following screenshots:  In addition, a single port, or a range of ports, can be specified for the Source IP & Portsettings. Action This setting specifies the action to be taken by the router upon encountering traffic that matches the both of the following:
USER MANUAL Peplink Balance Series   http://www.peplink.com -146 / 227 -  Copyright ©  Peplink ·  Source IP & Port ·  Destination IP & Port With the value of Allow for the Action setting, the matching traffic passes through the router (to be routed to the destination). If the value of the Action setting is set to Deny, the matching traffic does not pass through the router (and is discarded). Event Logging This setting specifies whether or not to log matched firewall events.   The logged messages are shown on the page Status > Event Log. A sample message is as follows: Aug 13 23:47:44 Denied CONN=Ethernet WAN SRC=20.3.2.1  DST=192.168.1.20 LEN=48 PROTO=TCP SPT=2260 DPT=80 · CONN:  The connection where the log entry refers to · SRC:  Source IP address · DST:  Destination IP address · LEN:  Packet length · PROTO:  Protocol · SPT:  Source port DPT:  Destination port  Upon clicking Saveafter entering required information, the following screen appears.   To create an additional firewall rule, click Add Rule and repeat the above steps.
USER MANUAL Peplink Balance Series   http://www.peplink.com -147 / 227 -  Copyright ©  Peplink To changea rule’s priority, simply drag and drop the rule: ·  Holdthe left mouse button on the rule. ·  Move it to the desired position. ·  Drop it by releasing the mouse button.    To remove a rule, click the  button.  Rules  are  matched  from  top  to  the  bottom.If  a  connection  matches  any  one  of  the  upper  rules,  the matching process will stop.  If none of the rules match the connection, the Default rule will be applied.  The Default rule is Allow for both outbound and inbound access.  Tip If the default inbound rule is set toAllow for NAT enabled WANs, no inbound Allow firewall rules will be required for inbound Port Forwarding and inbound NAT Mapping rules. However, if the default inbound rule is set as Deny, a corresponding Allow firewall rule will be required.
USER MANUAL Peplink Balance Series   http://www.peplink.com -148 / 227 -  Copyright ©  Peplink 19.1.1.1  Intrusion Detection and DoS Prevention   The Balance can detect and prevent intrusions and Denial-of-Service (DoS) attacks from the Internet. To turn on this feature, click , check the Enablecheck box for the Intrusion Detection and DoS Preventionand press the Savebutton.  When this feature  is  enabled,  the Balance  will  detect  and  prevent  the following  kinds  of  intrusions  and denial-of-service attacks.  ·  Port Scan: ·  NMAP FIN/URG/PSH ·  Xmas Tree ·  Another Xmas Tree ·  Null Scan ·  SYN/RST ·  SYN/FIN ·  SYN Flood Prevention ·  Ping Flood Attack Prevention
USER MANUAL Peplink Balance Series   http://www.peplink.com -149 / 227 -  Copyright ©  Peplink 19.1.2 Web Blocking (Available on Peplink Balance 305 and 380+)  19.1.2.1  Web Blocking Enter an appropriate website address and Peplink Balance will block and disallow LAN/PPTP/SpeedFusionTM peer clients to access these websites. Exception can be added in the following sections -  and .  You may enter the wild card ".*" at the end of a domain name to block any web site with a host name having the domain name in the middle. For example, If you enter "foobar.*," then "www.foobar.com," "www.foobar.co.jp," or "foobar.co.uk" will be blocked. Placing the wild card in any other position is not supported. The Peplink Balance will inspect and look for blocked domain names on all HTTP traffic. Secure web (HTTPS) traffic is not supported.  19.1.2.2  Exempted User Groups Check and select pre-defined user group(s) who can be  exempted from the access blocking rules. User groups can be defined at QoS> User Groups section. Please refer to section  for details.  19.1.2.3  Exempted Subnets With the subnet defined in the field, clients on the particular subnet(s) can be exempted from the access blocking rules.
USER MANUAL Peplink Balance Series   http://www.peplink.com -150 / 227 -  Copyright ©  Peplink 20 OSPF & RIPv2 The  Balance Router  supports OSPF  and  RIPv2  dynamic  routing  protocols.  Click the  Network tab  from the top bar, and click the OSPF & RIPv2 item on the side bar to reach the following menu:  OSPF Router ID This field determines the ID of the router. By default, this is specified as the LAN IP address. If you want to specify your own ID, enter it on the Custom field. Area This is an overview of the OSPF areas you have defined. Click on the area name to configure it. To set a new area, click the button   . To delete an existing area, click the   button    OSPF / RIPv2 Settings

Navigation menu