Pismolabs Technology P1AC6 Peplink/ Pepwave/ Pismo Labs wireless product User Manual 2 revised
Pismo Labs Technology Limited Peplink/ Pepwave/ Pismo Labs wireless product 2 revised
Contents
- 1. User manual-1-revised
- 2. User manual-2-revised
User manual-2-revised
http://www.pepwave.com
36
Copyright ©
5/23/16
Pepwave
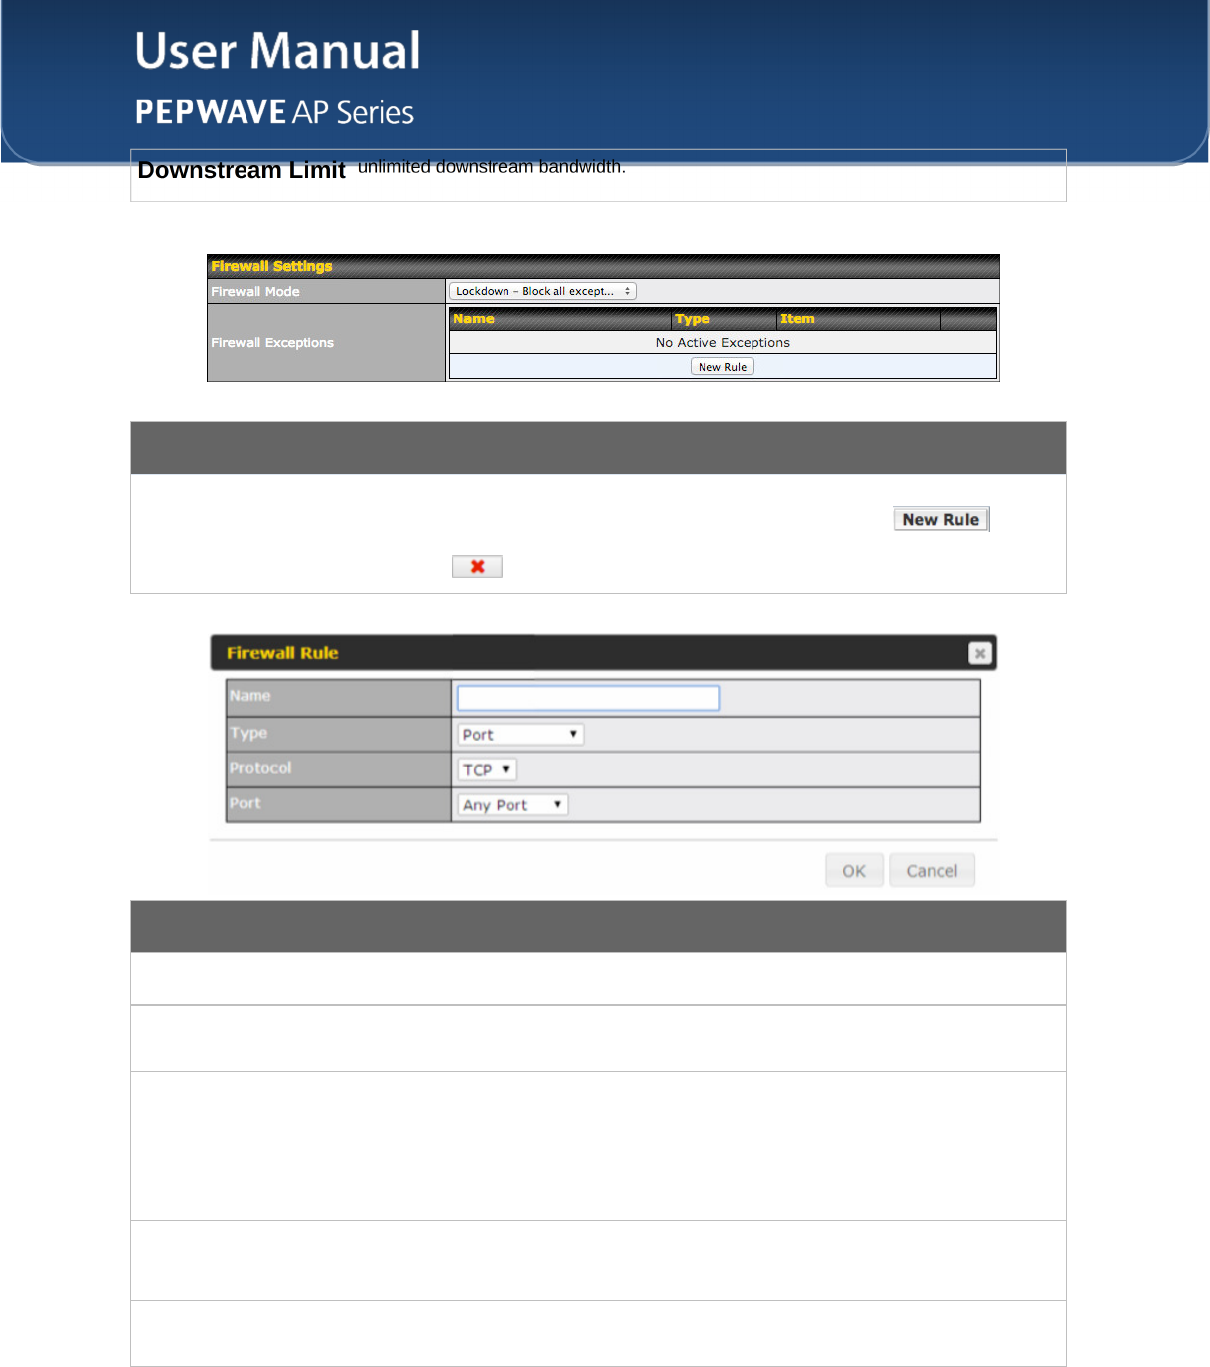
Firewall Settings
Firewall Mode
Choose Flexible – Allow all except… or Lockdown – Block all except… to turn on
the firewall, then create rules for the firewall exceptions by clicking . See
the discussion below for details on creating a firewall rule. To delete a rule, click the
associated button. To turn off the firewall, select Disable.
Firewall Rule
Name
Enter a descriptive name for the firewall rule in this field.
Type
Choose Port, Domain, IP Address, or MAC Address to allow or deny traffic from any
of those identifiers. Depending on the option chosen, the following fields will vary.
Protocol / Port
Choose TCP or UDP from the Protocol drop-down menu to allow or deny traffic using
either of those protocols. From the Port drop-down menu, choose Any Port to allow or
deny TCP or UDP traffic on any port. Choose Single Port and then enter a port number
in the provided field to allow or block TCP or UDP traffic from that port only. You can
also choose Port Range and enter a range of ports in the provided fields to allow or
deny TCP or UDP traffic from the specified port range.
IP Address /
Subnet Mask
If you have chosen IP Address as your firewall rule type, enter the IP address and
subnet mask identifying the subnet to allow or deny.
MAC Address
If you have chosen MAC Address as your firewall rule type, enter the MAC address
identifying the machine to allow or deny.
http://www.pepwave.com
37
Copyright ©
5/23/16
Pepwave
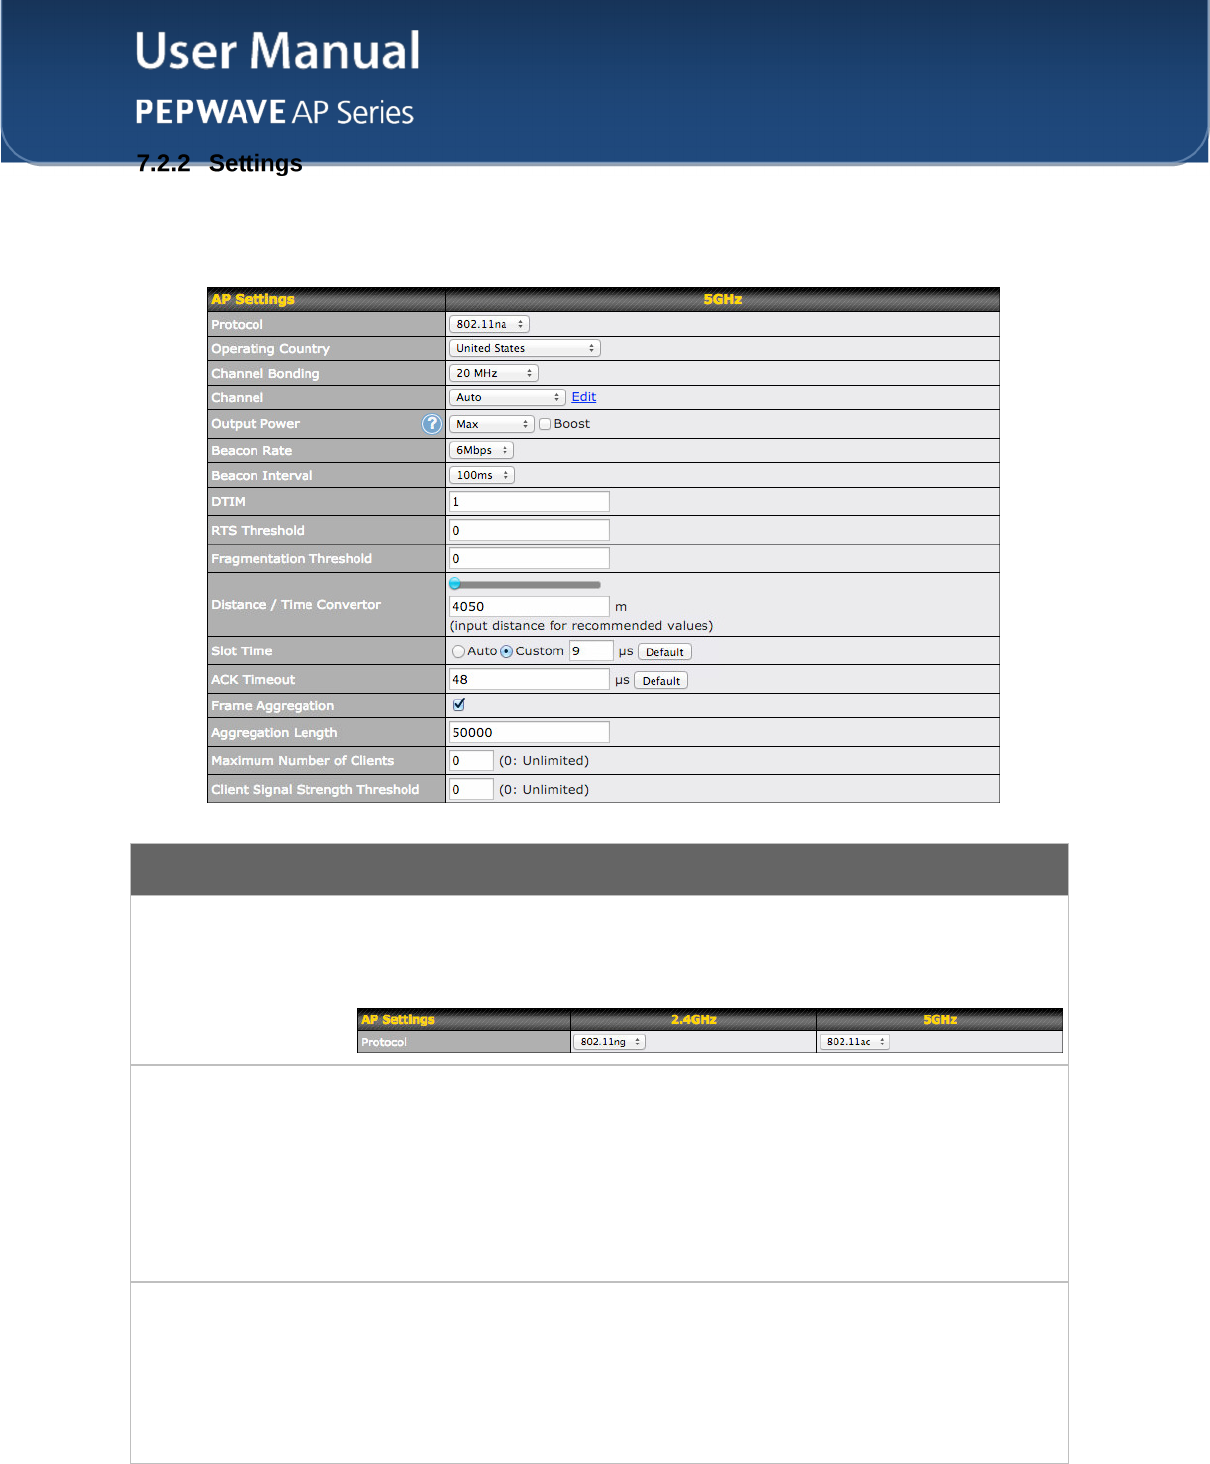
Basic access point operation settings, such as the protocol and channels used, as well
as scanning interval and other advanced settings, can be defined and managed in this
section.
AP Settings
Protocol
Choose 802.11ng or 802.11na as your access point’s Wi-Fi protocol.
The AP One AC mini provides the 802.11ng protocol for the 2.4 GHz band and the
802.11ac protocol for the 5GHz band, as shown below.
Operating
Country
This drop-down menu specifies the national / regional regulations the AP should follow.
• If a North American region is selected, RF channels 1 to 11 will be available and the
maximum transmission power will be 26 dBm (400 mW).
• If European region is selected, RF channels 1 to 13 will be available. The maximum
transmission power will be 20 dBm (100 mW).
NOTE: Users are required to choose an option suitable to local laws and regulations.
Per FCC regulation, the country selection is not available on all models marketed in the
US. All US models are fixed to US channels only.
Channel Bonding
There are three options: 20 MHz, 40 MHz, and 20/40 MHz. With this feature enabled,
the Wi-Fi system can use two channels at once. Using two channels improves the
performance of the Wi-Fi connection.
The AP One AC mini offers channel bonding options for the 2.4GHz and 5GHz bands,
as shown below. In addition to 20 MHz, 40 MHz, and 20/40 MHz, the 5Ghz band offers
80Mhz, which is the default setting.

http://www.pepwave.com
38
Copyright ©
5/23/16
Pepwave
http://www.pepwave.com
39
Copyright ©
5/23/16
Pepwave
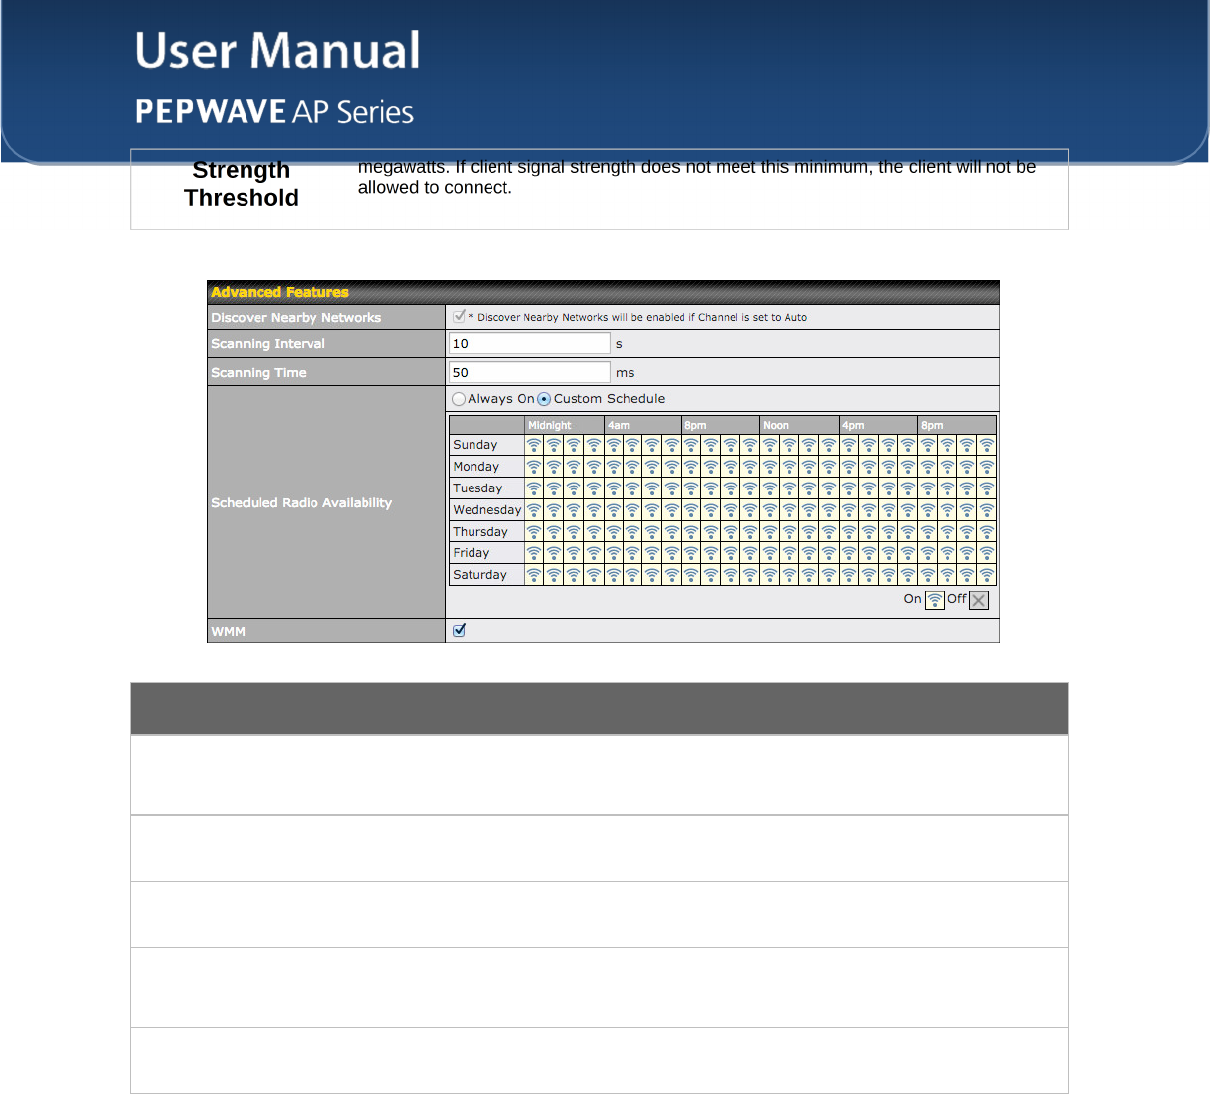
Advanced Features
Discover Nearby
Networks
Check this box to enable network discovery. Note that setting Channel to Auto will
activate this feature automatically.
Scanning Interval
This setting controls the interval, in seconds, that your access point scans for nearby
networks.
Scanning Time
This setting specifies the time, in milliseconds, that your access point scans any
particular channel while searching for nearby networks.
Scheduled Radio
Availability
Click Custom Schedule to specify radio availability schedule options or select Always
On to make the radio continuously available.
WMM
This checkbox enables Wi-Fi Multimedia (WMM), also known as Wireless Multimedia
Extensions (WME), on your access point. The default is enabled.
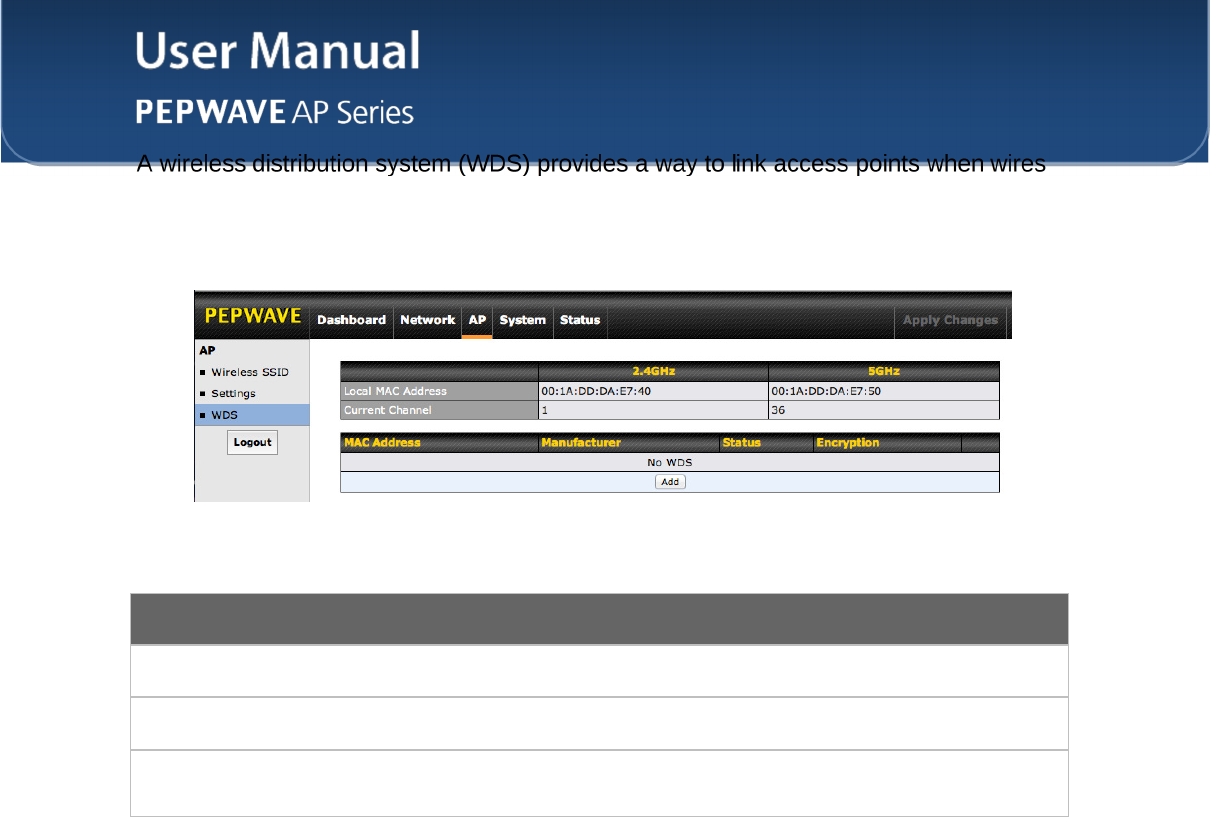
7.2.3 WDS
http://www.pepwave.com
40
Copyright ©
5/23/16
Pepwave
are not feasible or desirable. A WDS can also extend wireless network coverage for
wireless clients. Note that your access point’s channel setting should not be set to Auto
when using WDS.
To create a new WDS, click Add.
WDS
Enable
Check this box to enable WDS.
MAC Address
Enter the MAC address of the access point with which to form a WDS link.
Encryption
Select AES to enable encryption for WDS peer connections. Selecting None disables
encryption.
http://www.pepwave.com
41
Copyright ©
5/23/16
Pepwave
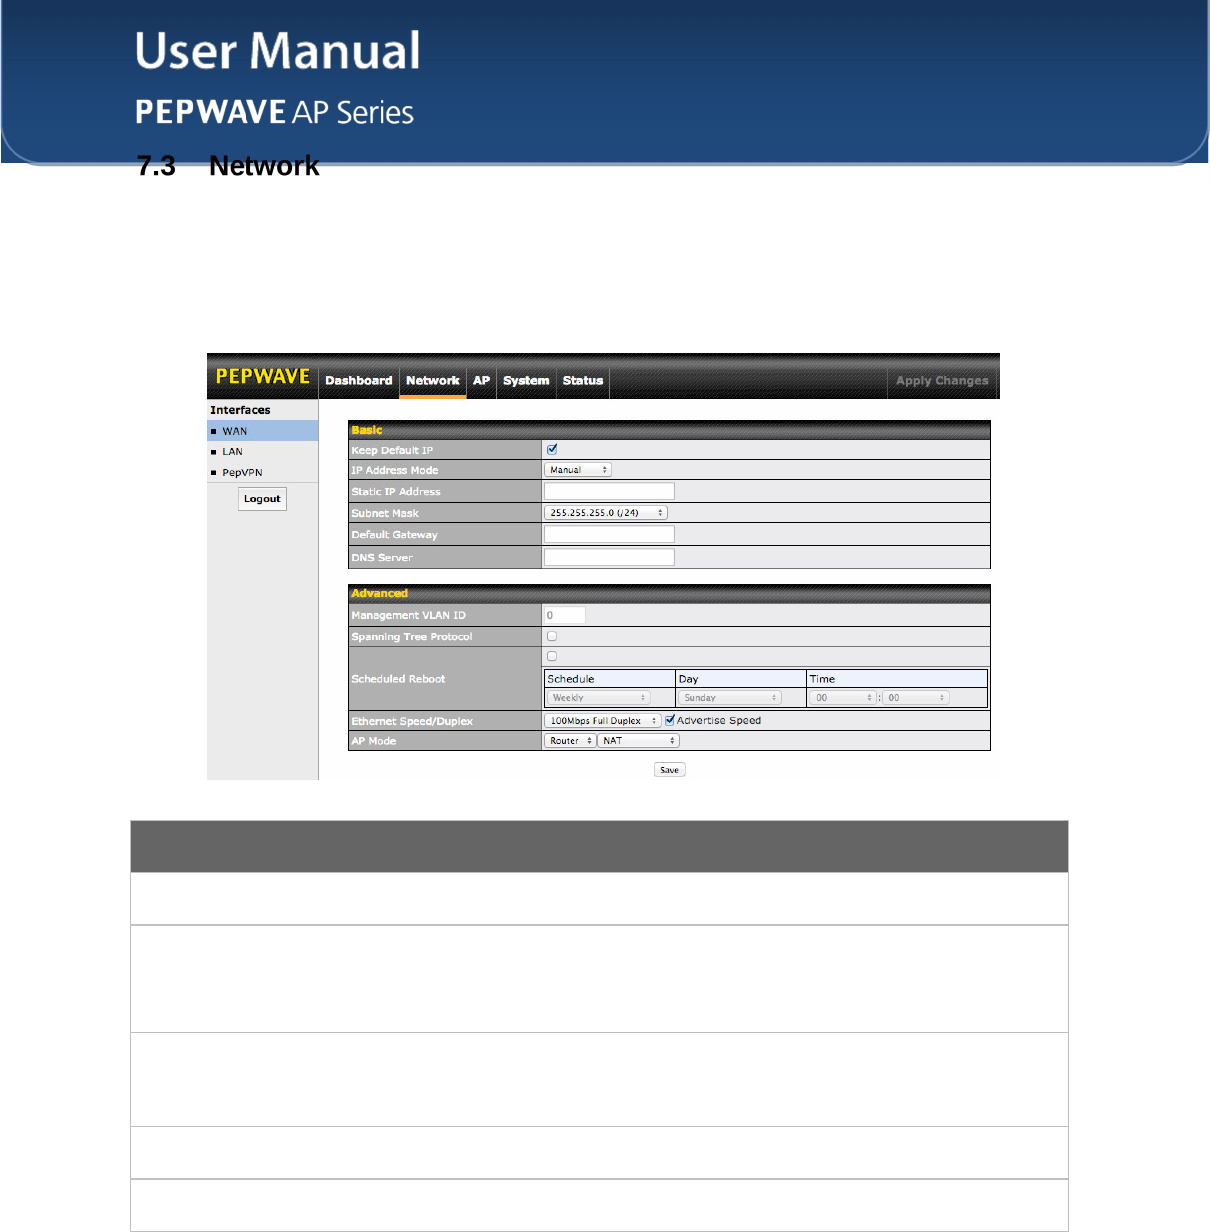
The settings on the AP tab control WAN and LAN settings, as well as allow you to set
up PepVPN profiles.
7.3.1 WAN
This section provides basic and advanced WAN settings.
Basic
Keep Default IP
When enabled, this option maintains 192.168.0.3 as your access point’s IP address.
IP Address Mode
IP Address Mode options are Automatic and Manual. In Automatic mode, the IP
address of your access point is acquired from a DHCP server on the Ethernet segment.
In Manual mode, a user-specified IP address is used for your access point, as described
below.
Static IP Address
/ Subnet Mask
You can use these fields to specify a unique IP address that your access point will use to
communicate on the Ethernet segment. This IP address is distinct from the admin IP
address (192.168.0.3) on the Ethernet segment
.
Default Gateway
Enter the IP address of the default gateway to the internet.
DNS Server
Enter the DNS server address that your access point will use to resolve host names.
http://www.pepwave.com
42
Copyright ©
5/23/16
Pepwave
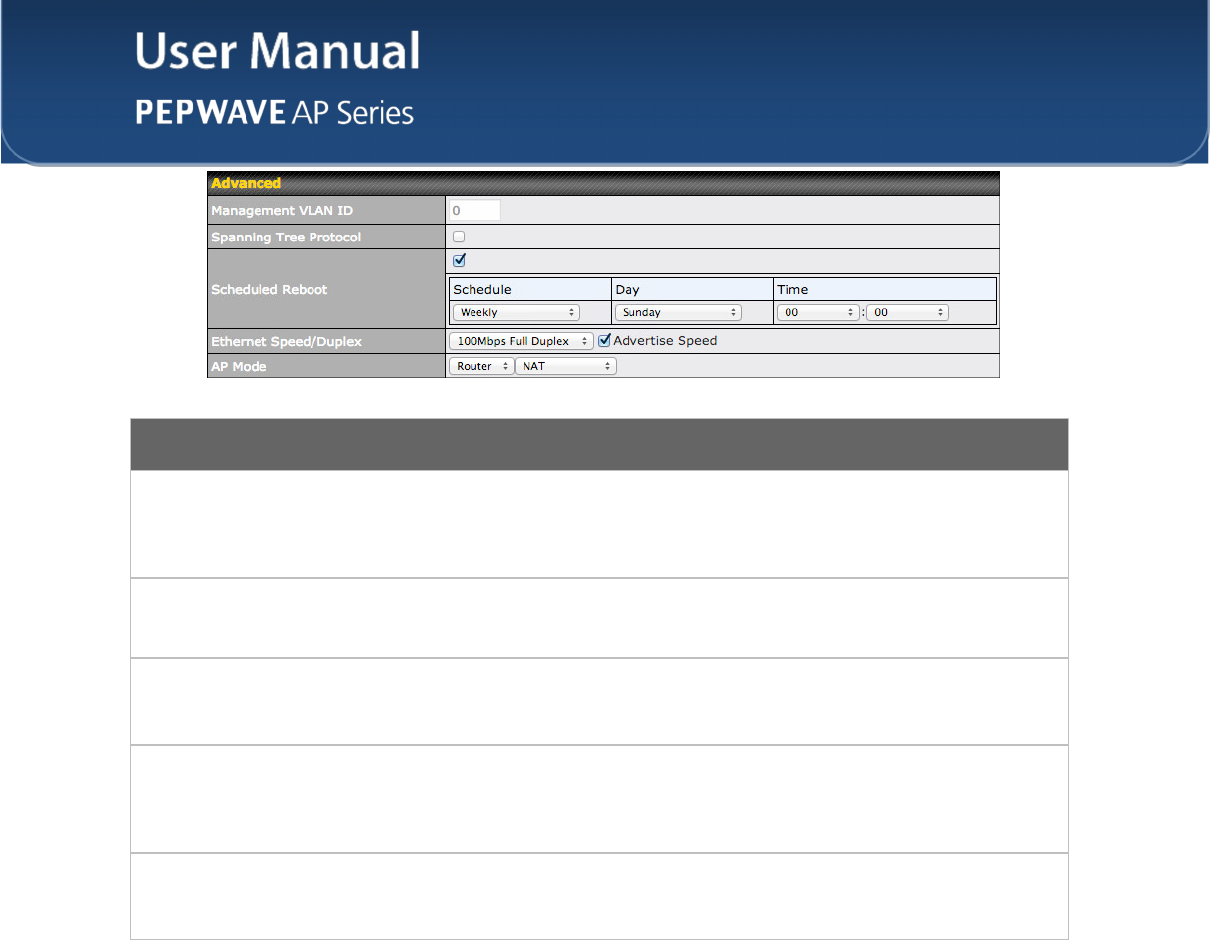
Advanced
Management
VLAN ID
This field specifies the VLAN ID to tag to management traffic, such as AP-to-AP
controller communication traffic. The value is 0 by default, meaning that no VLAN tagging
will be applied. NOTE: change this value with caution as alterations may result in loss of
connection to the AP controller.
Spanning Tree
Protocol
Checking this box enables spanning tree protocol, used to prevent loops in bridged
Ethernet LANs
Scheduled
Reboot
When this box is checked, your access point can be scheduled to reboot automatically
on a recurring basis, as indicated by the values under the Schedule, Day, and Time
headings.
Ethernet
Speed/Duplex
Select a speed and duplex setting for sending and receiving. When selecting a speed
manually, you can also control whether the access point’s speed will be advertised on
the network by checking or unchecking the Advertise Speed box. When Auto is
selected, your access point will automatically negotiate speeds.
AP Mode
Your access point can act as a bridge or as a router, depending on your selection here.
When Router is selected, you can additionally select whether the access point will
function in NAT or IP Forwarding mode.
http://www.pepwave.com
43
Copyright ©
5/23/16
Pepwave
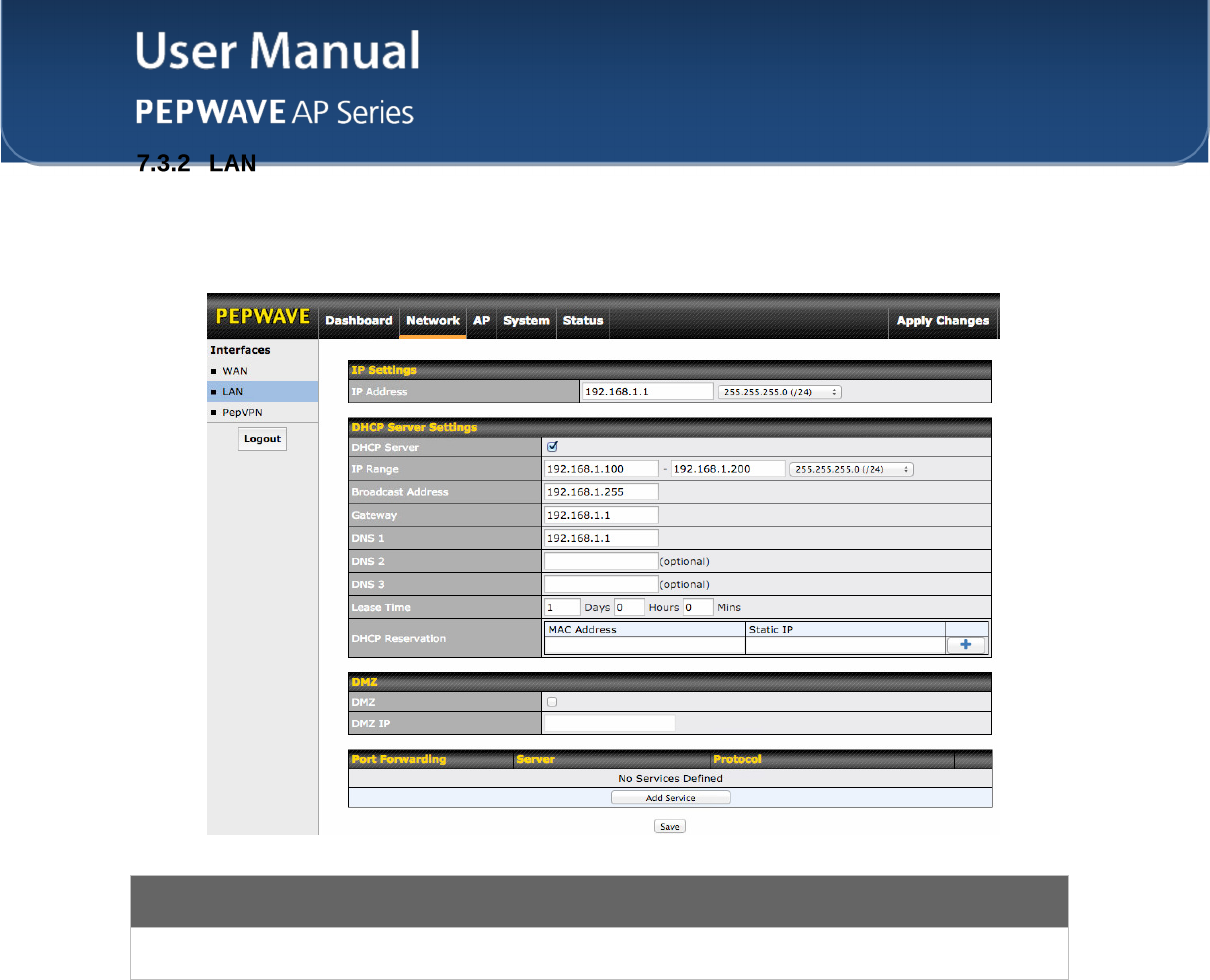
This section offers a variety of settings that affect your access point’s operation on the
LAN, such as settings for DHCP, DMZ, and port forwarding. Note that the following
settings will be available only when your access point is operating in router mode.
IP Settings
IP Address
Enter the LAN IP address and subnet mask to assign to your access point on the LAN.
http://www.pepwave.com
44
Copyright ©
5/23/16
Pepwave
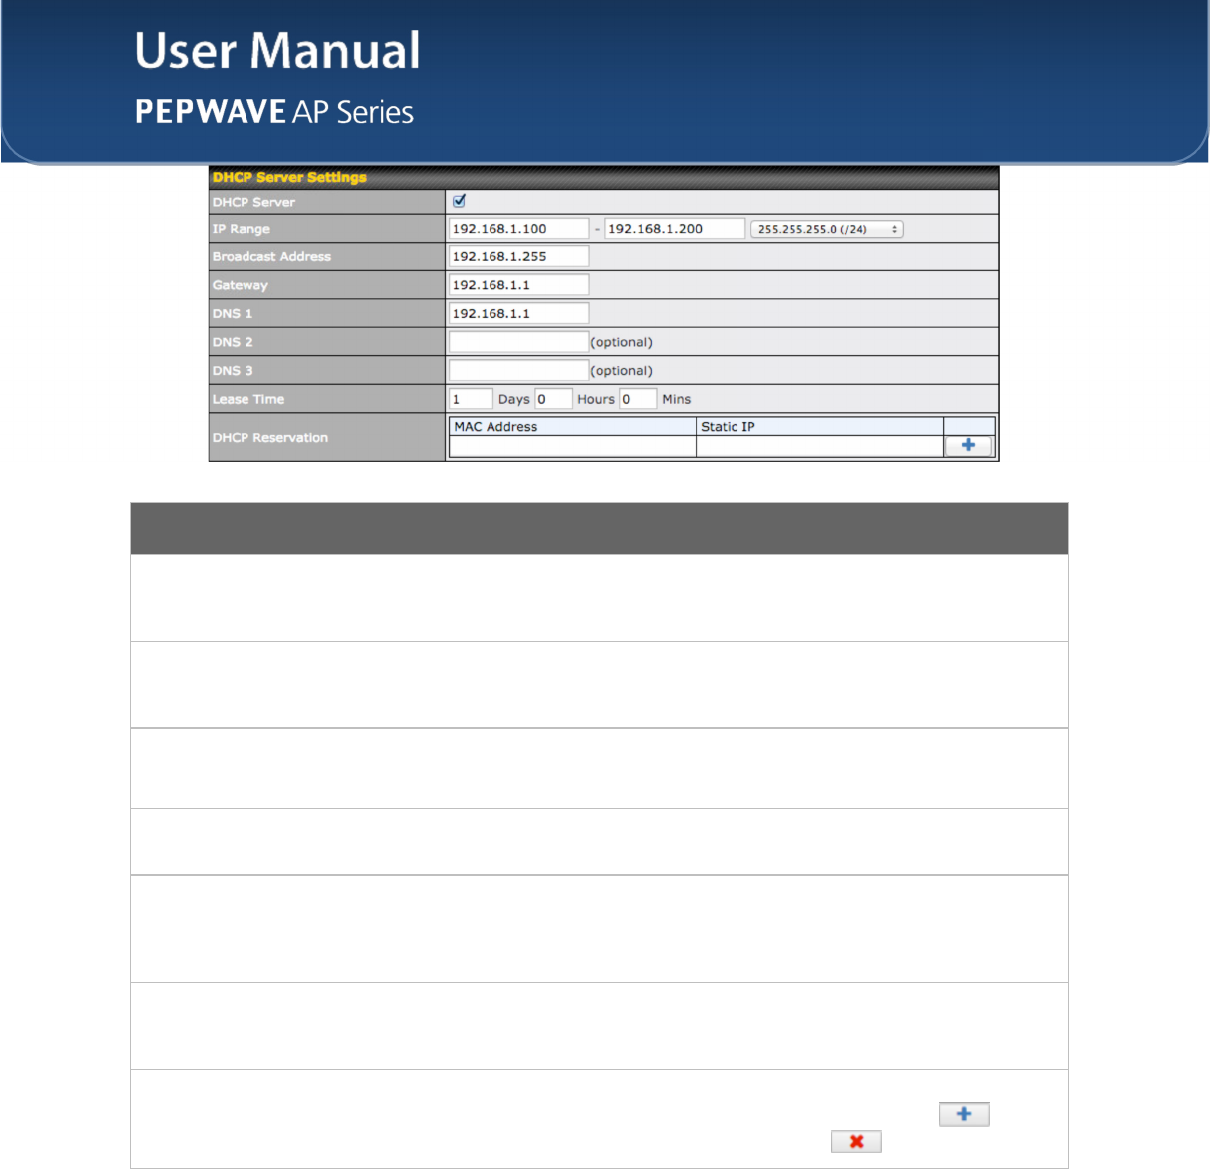
DHCP Server Settings
DHCP Server
Check to enable the DHCP server feature of your access point. Enabling DHCP is the
best option for most users. The following options will be enabled once you have checked
and enabled the DHCP server.
IP Range
Enter the first and last IP addresses of the range of addresses that your access point will
make available to DHCP clients. The default range is from 192.168.1.100 to
192.168.1.200, with 24-bit subnet mask.
Broadcast
Address
Enter the broadcast address that DHCP clients will use when communicating with the
entire LAN segment. The default value is 192.168.1.255.
Gateway
Enter the default gateway address that DHCP clients will use to access the internet. By
default, this address will be the same as your access point’s IP address on the LAN.
DNS 1/2/3
In DNS 1, enter the IP address of the primary DNS server offered to DNS clients or
accept the default of 192.168.1.1, which is your access point’s address on the LAN. You
can also specify up to two additional DNS servers to use when the primary server is busy
or down.
Lease Time
Specify the length of time that an IP address of a DHCP client remains valid. When an
address lease time has expired, the assigned IP address is no longer valid, and renewal
of the IP address assignment is required. By default, this value is set to one day.
DHCP
Reservation
To reserve certain addresses for specific clients, such as network printers, enter the
device’s MAC Address and a static IP to be assigned to the device. Click to add
the DHCP reservation. To delete a DHCP reservation, click .
http://www.pepwave.com
45
Copyright ©
5/23/16
Pepwave
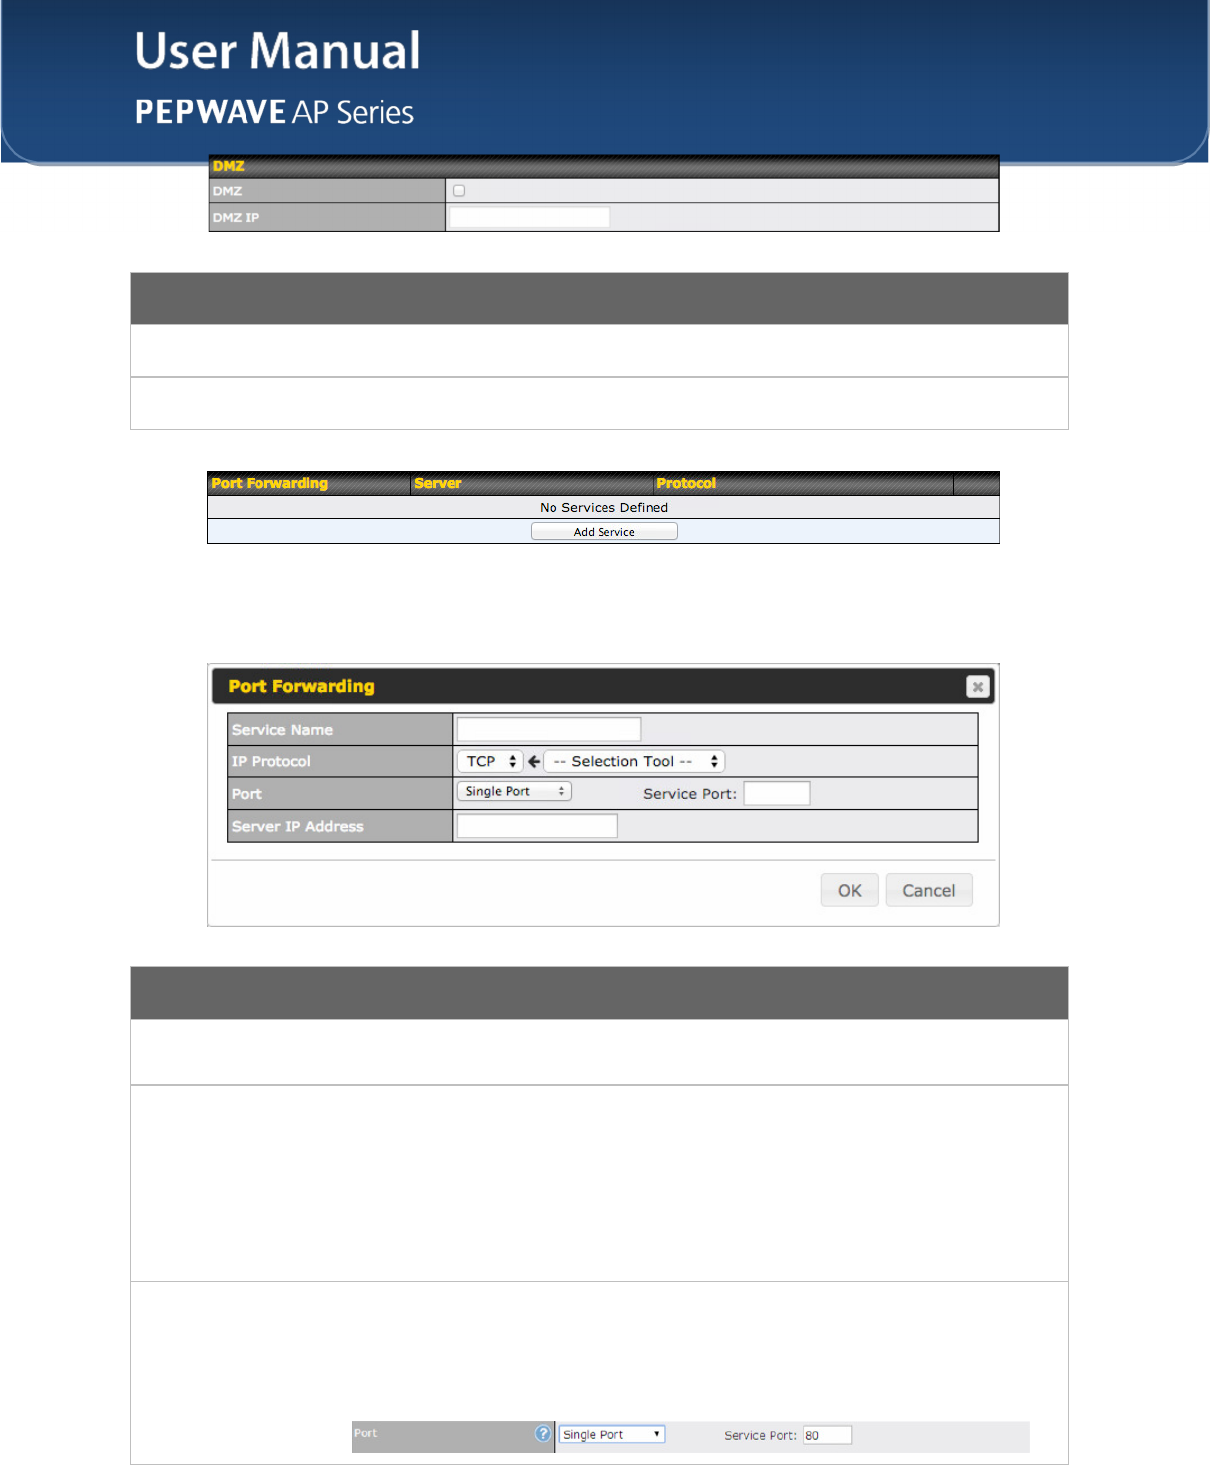
DMZ
DMZ
Check this box to forward traffic sent to the WAN IP address to the DMZ IP address.
DMZ IP
Enter an IP address clients will use to connect to the DMZ.
To create a port forwarding rule, first click the Add Service button, located in the Port
Forwarding section.
Port Forwarding
Service Name
Enter a name for the new port forwarding rule. Valid values for this setting consist of
alphanumeric and underscore “_” characters only.
IP Protocol
The IP Protocol setting, along with the Port setting, specifies the protocol of the service
as TCP, UDP, ICMP, or IP. Traffic that is received by your access point via the specified
protocol at the specified port(s) is forwarded to the LAN hosts specified by the Servers
setting. Please see below for details on the Port and Servers settings.
Alternatively, the Protocol Selection Tool drop-down menu can be used to
automatically fill in the protocol and a single port number of common Internet services
(e.g., HTTP, HTTPS, etc.). After selecting an item from the Protocol Selection Tool
drop-down menu, the protocol and port number remain manually modifiable.
Port
The Port setting specifies the port(s) that correspond to the service, and can be
configured to behave in one of the following manners:
Single Port, Port Range, Port Mapping
http://www.pepwave.com
46
Copyright ©
5/23/16
Pepwave
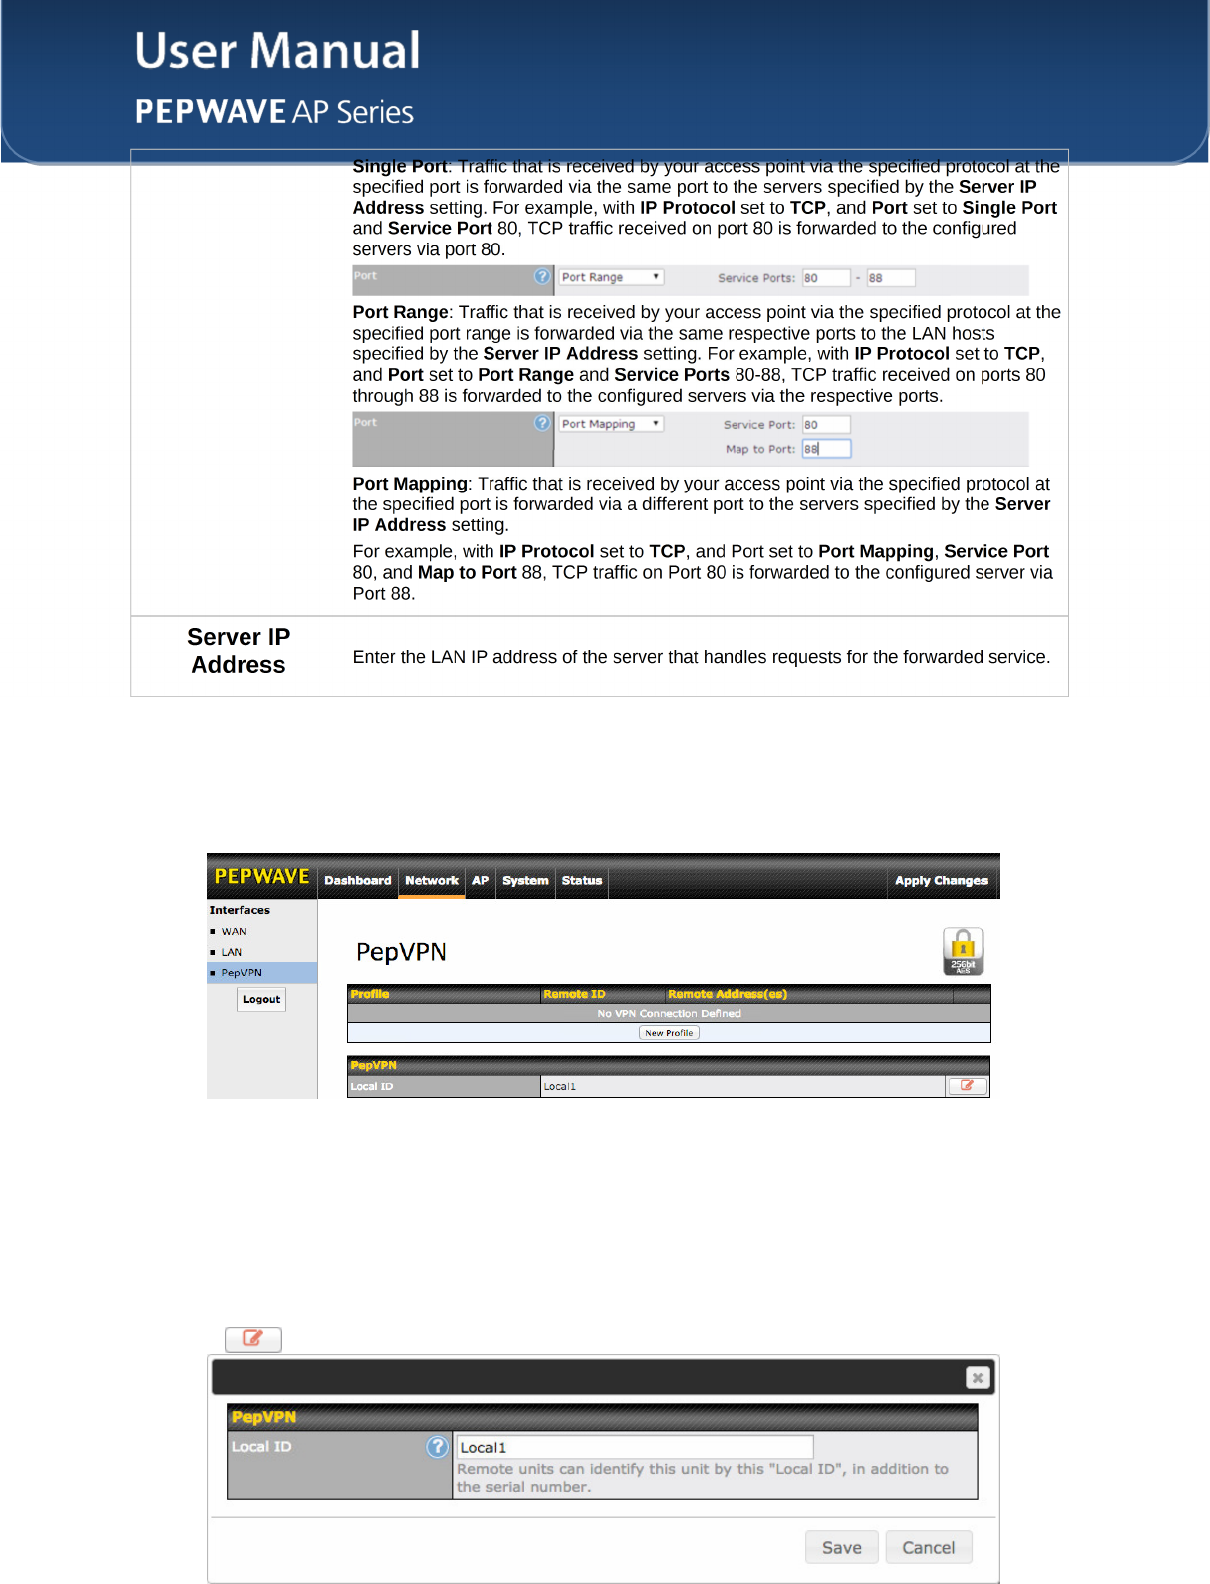
7.3.3 PepVPN
PepVPN securely connects one or more remote sites to the site running your access
point.
To set up PepVPN, first give your site a local PepVPN ID. To modify an existing local ID,
http://www.pepwave.com
47
Copyright ©
5/23/16
Pepwave
Once you’ve specified a local ID, click the New Profile button to configure PepVPN.
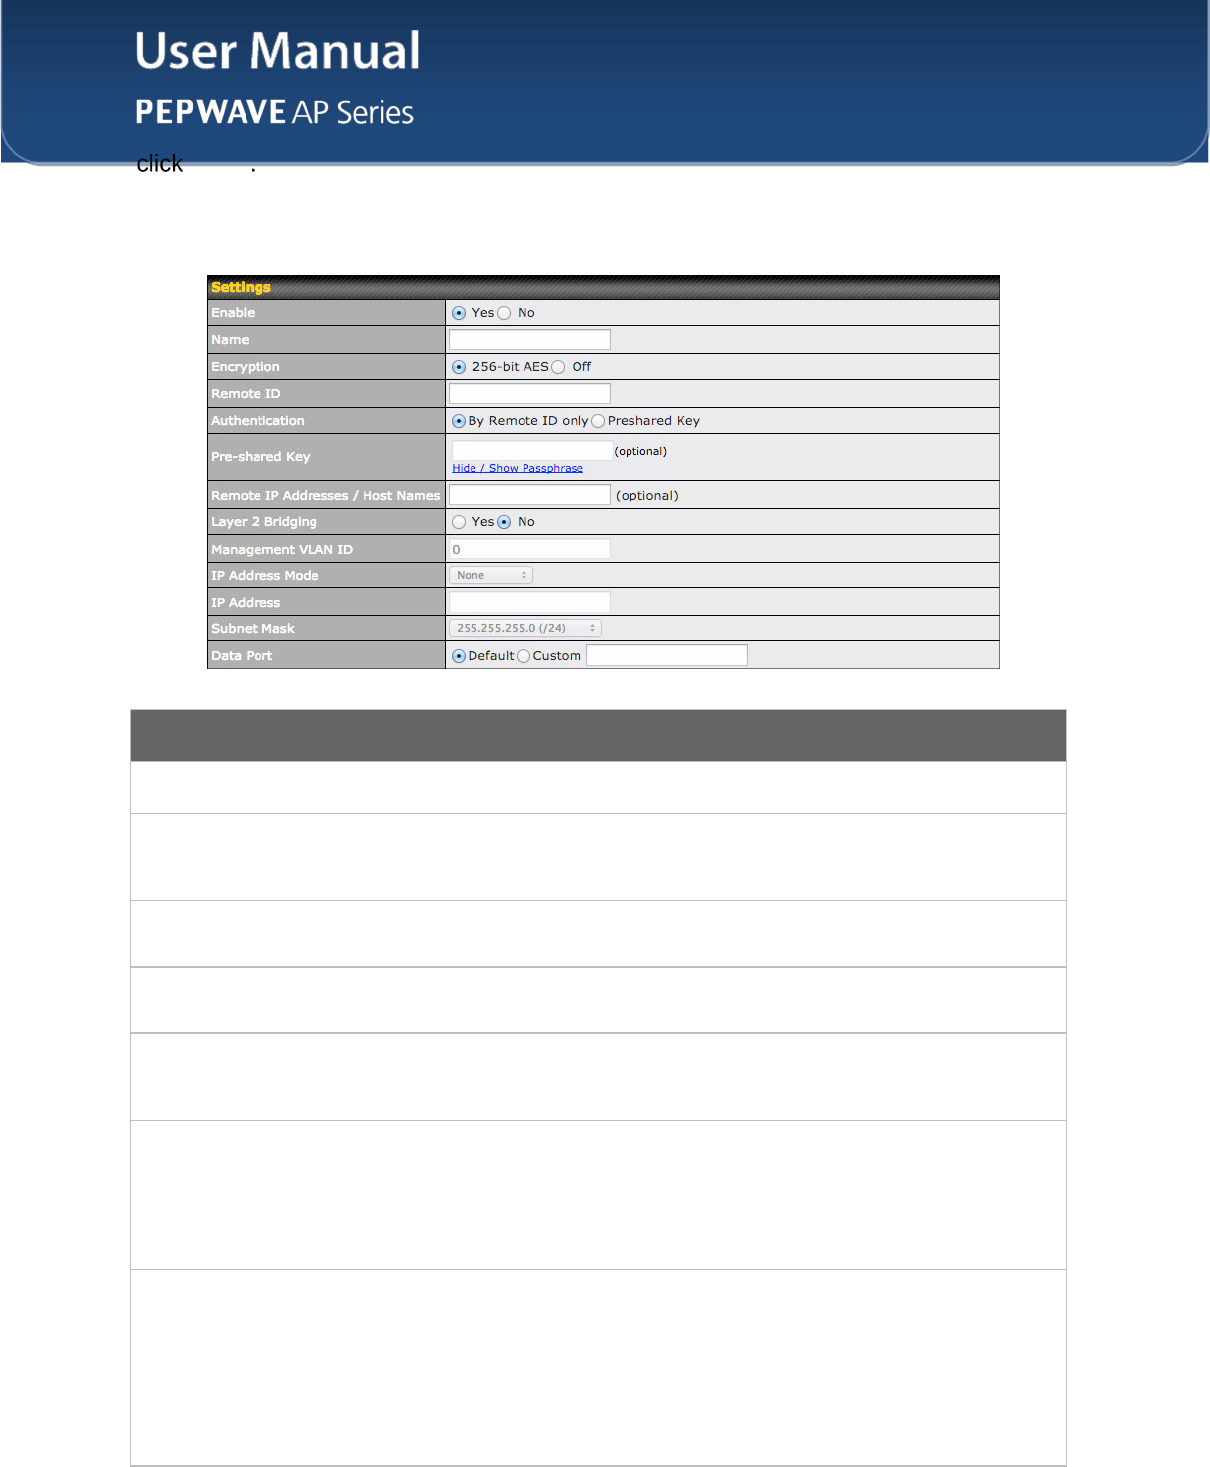
PepVPN Profile Settings
Enable
Check this box to enable PepVPN.
Name
Enter a name to represent this profile. The name can be any combination of
alphanumeric characters (0-9, A-Z, a-z), underscores (_), dashes (-), and/or non-
leading/trailing spaces ( ).
Encryption
By default, VPN traffic is encrypted with 256-bit AES. If Off is selected on both sides of
a VPN connection, no encryption will be applied.
Remote ID
To allow your access point to establish a VPN connection with a specific remote peer
using a unique identifying number, enter the peer’s ID or serial number here.
Authentication
Select By Remote ID Only or Preshared Key to specify the method your access point
will use to authenticate peers. When selecting By Remote ID Only, be sure to enter a
unique peer ID number in the Remote ID field.
Pre-shared Key
This optional field becomes available when Pre-shared Key is selected as the VPN
Authentication method, as explained above. Pre-shared Key defines the pre-shared
key used for this particular VPN connection. The VPN connection's session key will be
further protected by the pre-shared key. The connection will be up only if the pre-shared
keys on each side match. Click Hide / Show Passphrase to toggle passphrase
visibility.
Remote IP
Address / Host
Names (Optional)
Optionally, you can enter a remote peer’s WAN IP address or hostname(s) here. If the
remote client uses more than one address, enter only one of them here. Multiple
hostnames are allowed and can be separated by a space character or carriage return.
Dynamic-DNS host names are also accepted.
With this field filled, your access point will initiate connection to each of the remote IP
addresses until it succeeds in making a connection. If the field is empty, your access
point will wait for connection from the remote peer. Therefore, at least one of the two
VPN peers must specify this value. Otherwise, VPN connections cannot be established.
http://www.pepwave.com
48
Copyright ©
5/23/16
Pepwave
8 Tools
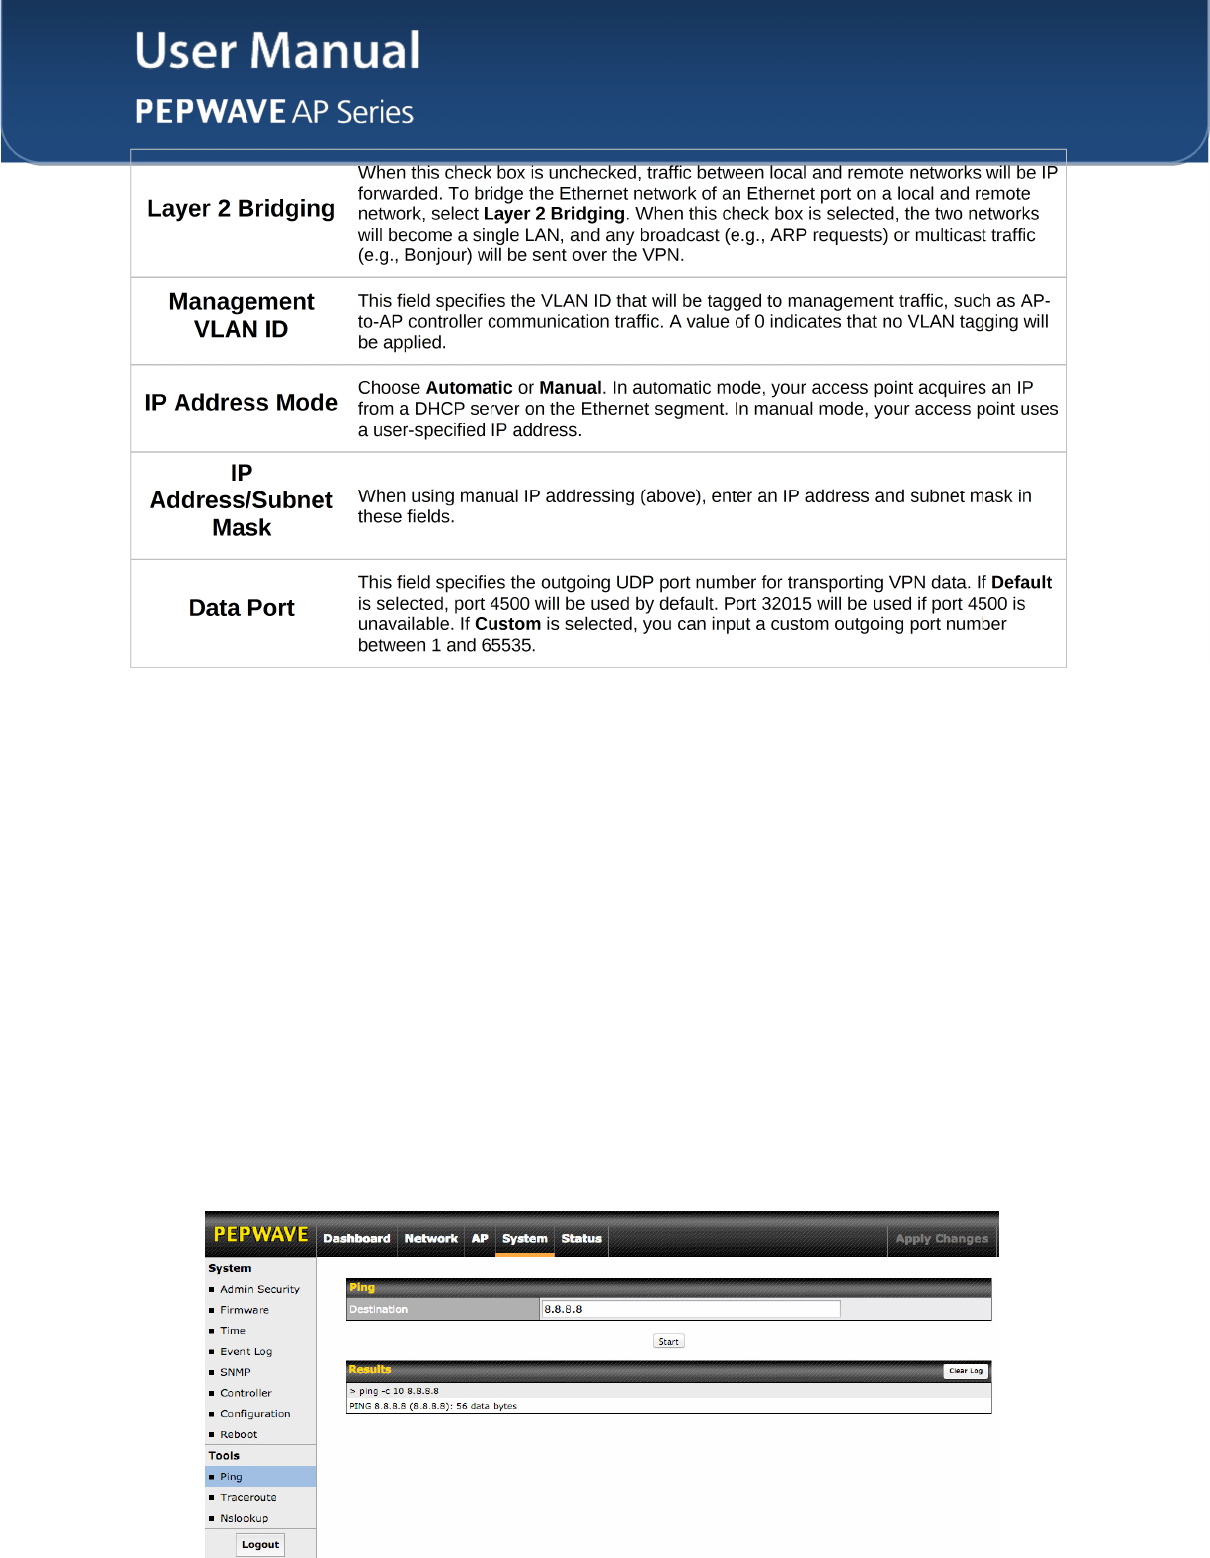
8.1 Ping
The ping test tool tests connectivity pinging the specified destination IP address. The
ping utility is located at System>Tools>Ping.
http://www.pepwave.com
49
Copyright ©
5/23/16
Pepwave
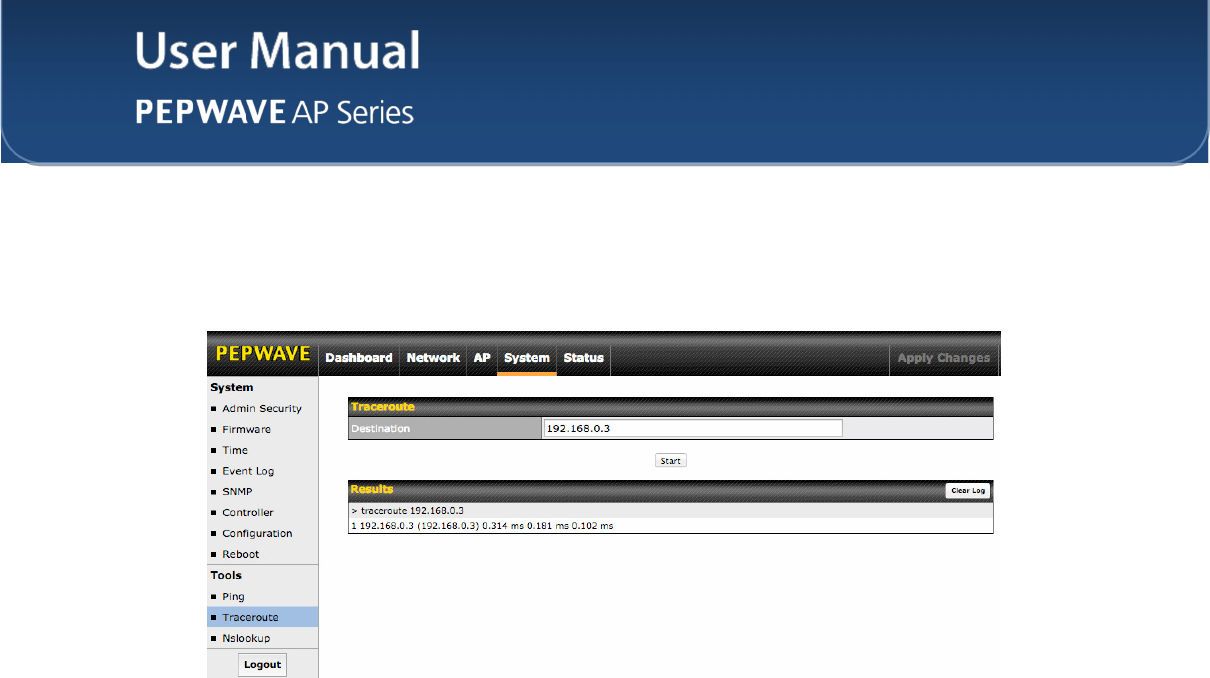
8.2 Traceroute
The traceroute test tool traces the routing path to the specified IP address. The
traceroute test utility is located at System>Tools>Traceroute.
http://www.pepwave.com
50
Copyright ©
5/23/16
Pepwave
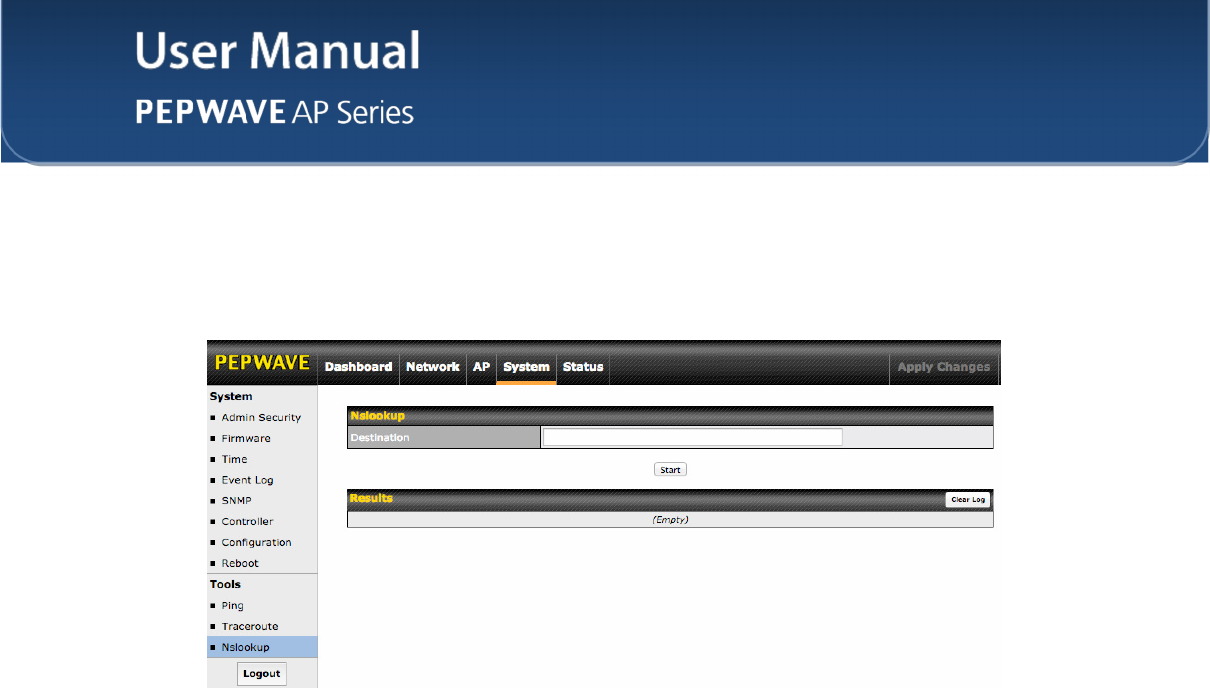
8.3 Nslookup
The nslookup tool is used to test DNS name servers. The nslookup utility can be found
at System>Tools>Nslookup.
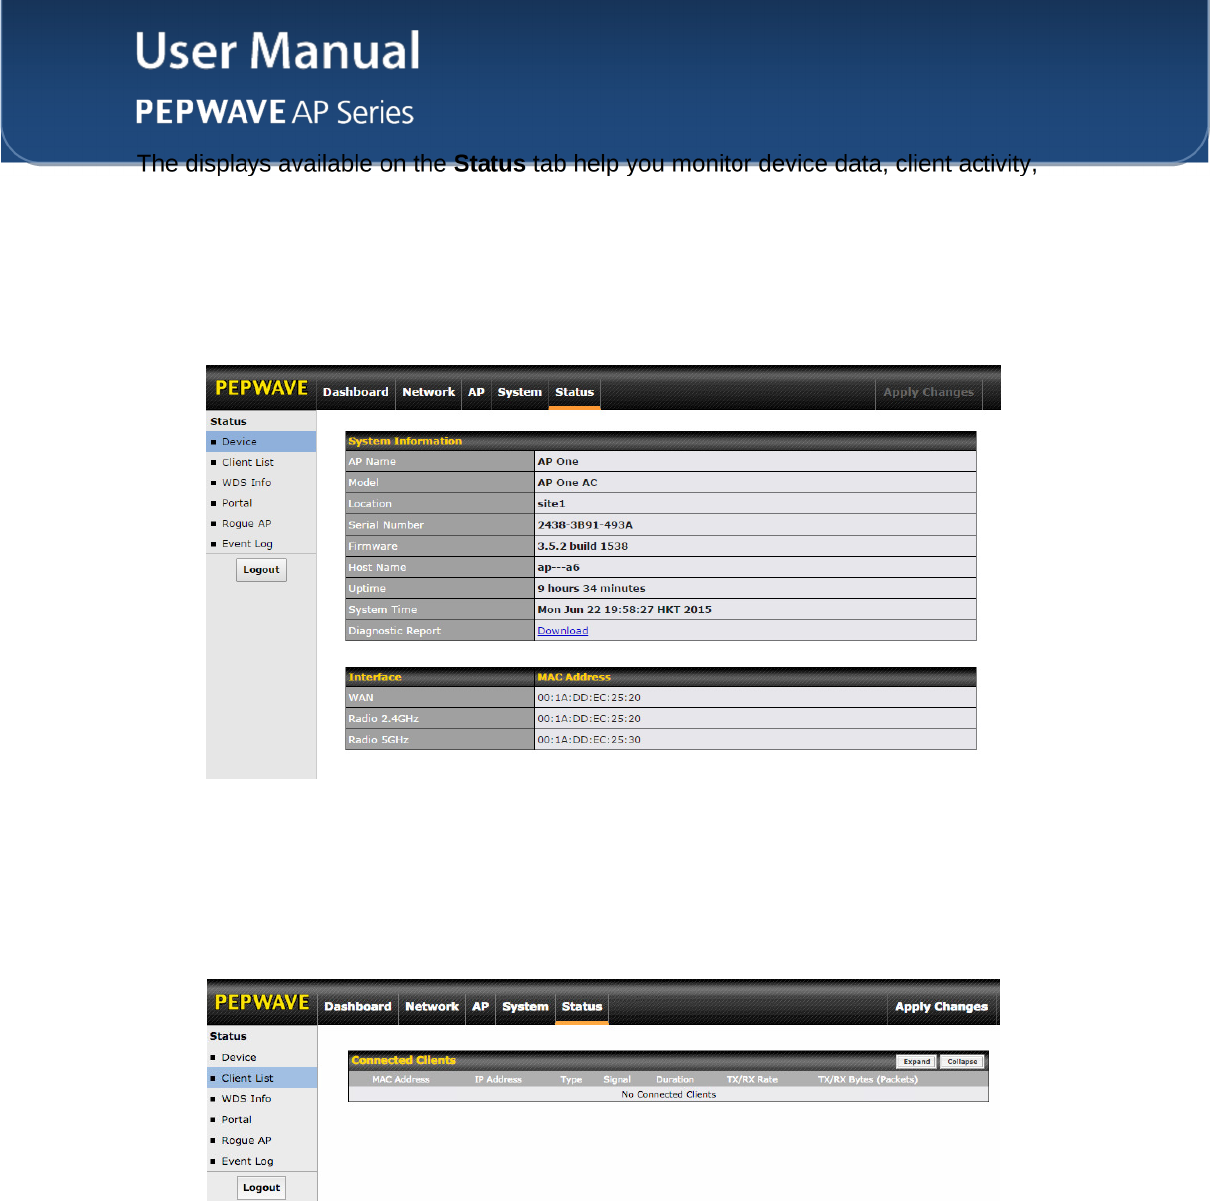
9 Monitoring Device Status
http://www.pepwave.com
51
Copyright ©
5/23/16
Pepwave
rogue device access, and more.
9.1 Device
Here you can access a variety of data about your access point, download a diagnostic
report, and check MAC addresses. To download a diagnostic report, click the
Download link.
9.2 Client List
The Client List displays all currently connected clients. Use the Expand and Collapse
buttons to control the amount of data displayed.
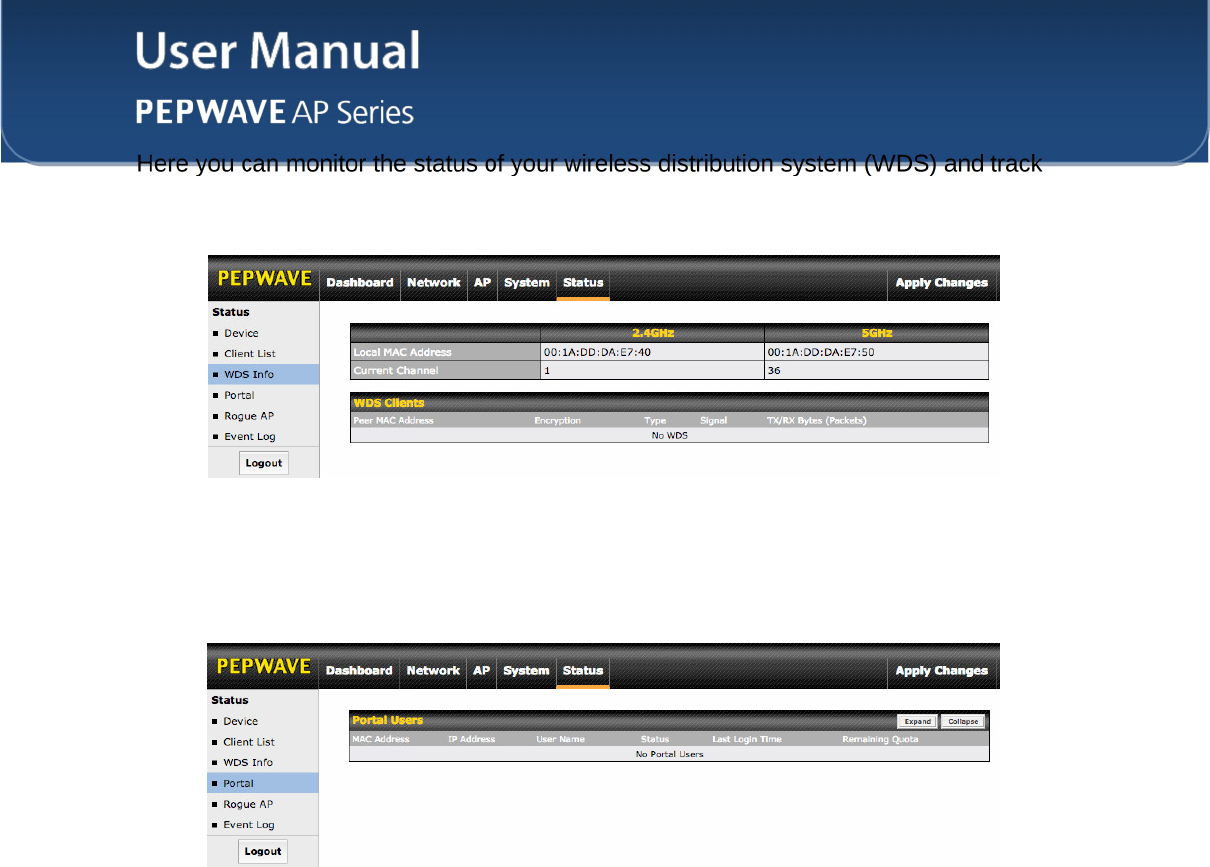
9.3 WDS Info
http://www.pepwave.com
52
Copyright ©
5/23/16
Pepwave
activity by MAC address. If you’re using the AP One AC mini, this section will display
information for both the 2.4GHz and 5GHz radios.
9.4 Portal
If you’ve turned on your access point’s captive portal, client connection data will appear
here. Use the Expand and Collapse buttons to control the amount of data displayed.
9.5 Rogue AP

http://www.pepwave.com
53
Copyright ©
5/23/16
Pepwave
9.6 Event Log
The Event Log displays a list of all events associated with your access point. Check
Auto Refresh to refresh log entries automatically. Click the Clear Log button to clear
the log.
10 Restoring Factory Defaults

http://www.pepwave.com
54
Copyright ©
5/23/16
Pepwave
• Power on the unit and wait for one minute.
• Press and hold the reset button for at least five seconds, then release.
• The unit will automatically reboot.
• Wait for one minute or until the status LED turns green, upon which the settings
of the device will have been restored to the factory defaults.
By default, the unit will acquire an IP address from a DHCP server.

http://www.pepwave.com
55
Copyright ©
5/23/16
Pepwave
Federal Communication Commission Interference Statement
This equipment has been tested and found to comply with the limits for a Class A digital
device, pursuant to part 15 of the FCC Rules. These limits are designed to provide
reasonable protection against harmful interference when the equipment is operated in a
commercial environment. This equipment generates, uses, and can radiate radio
frequency energy and, if not installed and used in accordance with the instruction
manual, may cause harmful interference to radio communications. Operation of this
equipment in a residential area is likely to cause harmful interference in which case the
user will be required to correct the interference at his own expense.
FCC Caution: Any changes or modifications not expressly approved by the party
responsible for compliance could void the user's authority to operate this equipment.
IEEE 802.11b or 802.11g operation of this product in the U.S.A. is firmware-limited to
channels 1 through 11.
5.15 ~ 5.25GHZ is for indoor user only.
IMPORTANT NOTE
FCC Radiation Exposure Statement
This equipment complies with FCC radiation exposure limits set forth for an uncontrolled
environment. This equipment should be installed and operated with minimum distance
20cm between the radiator & your body.
This transmitter must not be co-located or operating in conjunction with any other
antenna or transmitter.
The availability of some specific channels and/or operational frequency bands are
country dependent and are firmware programmed at the factory to match the
intended destination.
12 Datasheets

Contact Us:
Sales
http://www.pepwave.com/contact/sales/
Support
http://www.pepwave.com/contact/
Business Development and
Partnerships
http://www.pepwave.com/partners/channel-
partner-program/
www.pepwave.com