Pitney Bowes Dm100I Users Manual
DM200L to the manual 2b32d9c0-7862-4bdb-8a82-6d47b48ac553
2015-02-06
: Pitney-Bowes Pitney-Bowes-Dm100I-Users-Manual-518843 pitney-bowes-dm100i-users-manual-518843 pitney-bowes pdf
Open the PDF directly: View PDF ![]() .
.
Page Count: 6
Quick Reference Guide
DM100i / DM200L Digital Mailing Systems
DM100i / DM200L
AW21784 Rev. A ©2008 Pitney Bowes Inc. All Rights Reserved Printed in U.S.A.
1 Elmcroft Road
Stamford, Connecticut 06926-0700
www.pitneybowes.com
Customer Support: 1.800.522.0020
DM100i / DM200L
Funds
Print
Menu Options
8
Print Menu
The Print Menu key provides quick access to what will, or will not, be printed on your mail.
Selecting the Print Menu key provides
these additional printing options.
Seal Only allows you to use your system moistener and
transport mechanism to wet and seal envelopes. In this mode
nothing will be printed on the envelope as it moves through the
system.
Date & Time Only allows you to print a “received” stamp, usually
placed on incoming mail. Nothing except this stamp is printed in this
mode.
Ad Only allows you to print only the currently selected ad slogan on
the envelope. This can be most useful if you have a personalized
ad slogan that you want to print in the area the meter stamp usually
appears.
Selecting Omit day/date/other allows you to print a normal meter
stamp without the day...or without the date altogether.
Free Auto Repair Estimates
Jake’s Garage
99 Main Street
Somecity, US 12345
VOID VOID
Date omitted
Day omitted
Seal Only
Date & Time Only
Ad Only
PRINT MENU
Omit day/date/other
PRINT MENU
Page
Up
Page
Down
Normal
Preset Home
/
Yes/Enter
No
Custom
Preset
Page
Up
Page
Down
Print Menu
Reports
Add
Postage
PQRS
Weigh/Rate
Options
®®
Funds
6
9
3
.
5
4
2
1
8
0
7
ABC DEF
GHI
Clear Space Shift
JKL MNO
TUV WXYZ
"TF
Getting to know the DM100i / DM200L
These cards provide quick step-by-
step instructions to perform basic
operations with your DM Series meter.
For more detailed information
refer to the Operator Guide that is
included on the CD, or visit
www.pitneyworks.com/DM100 or
www.pitneyworks.com/DM200
for the most current version.
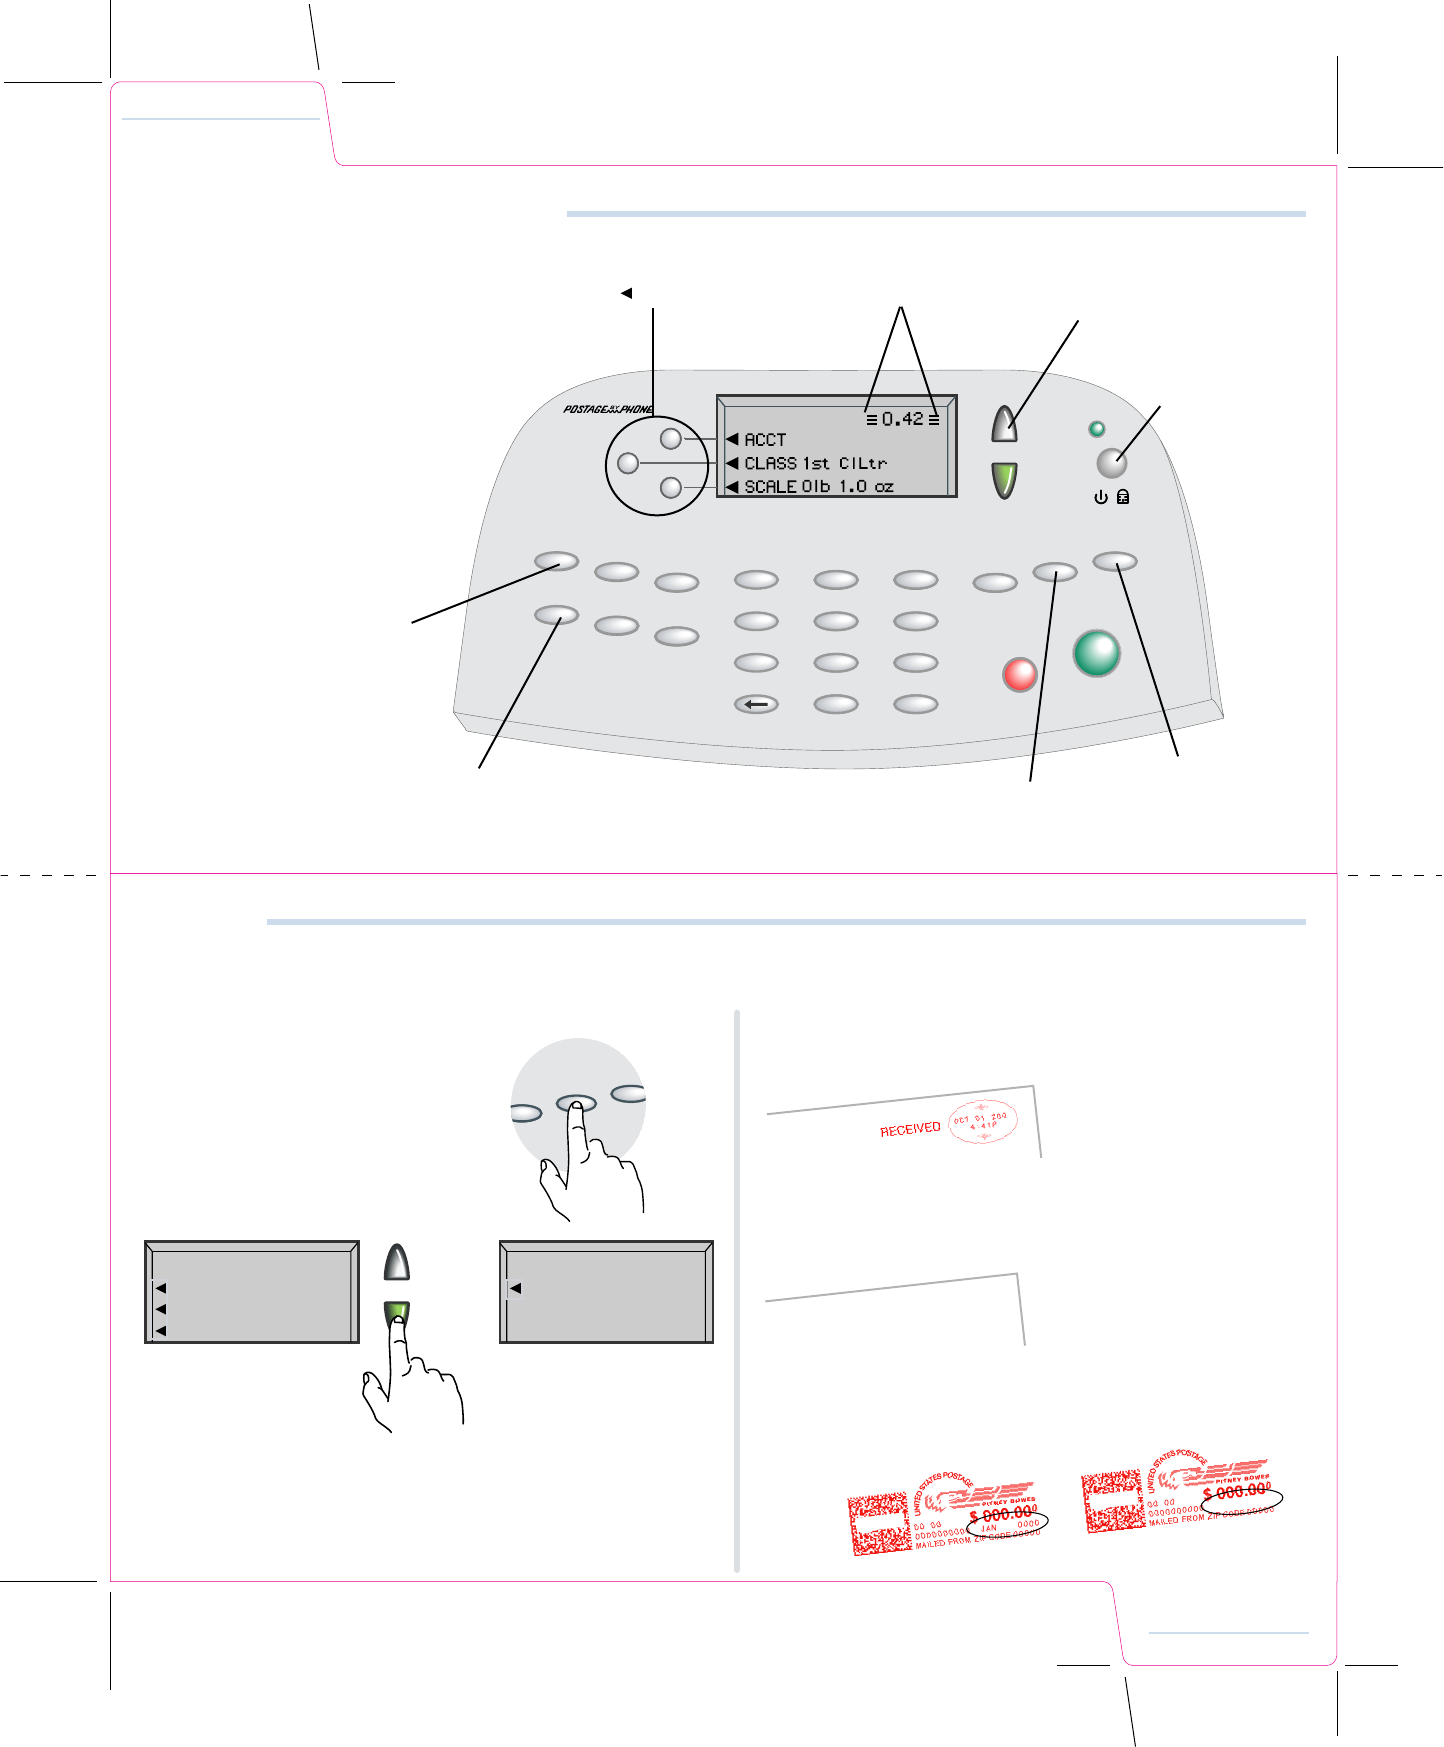
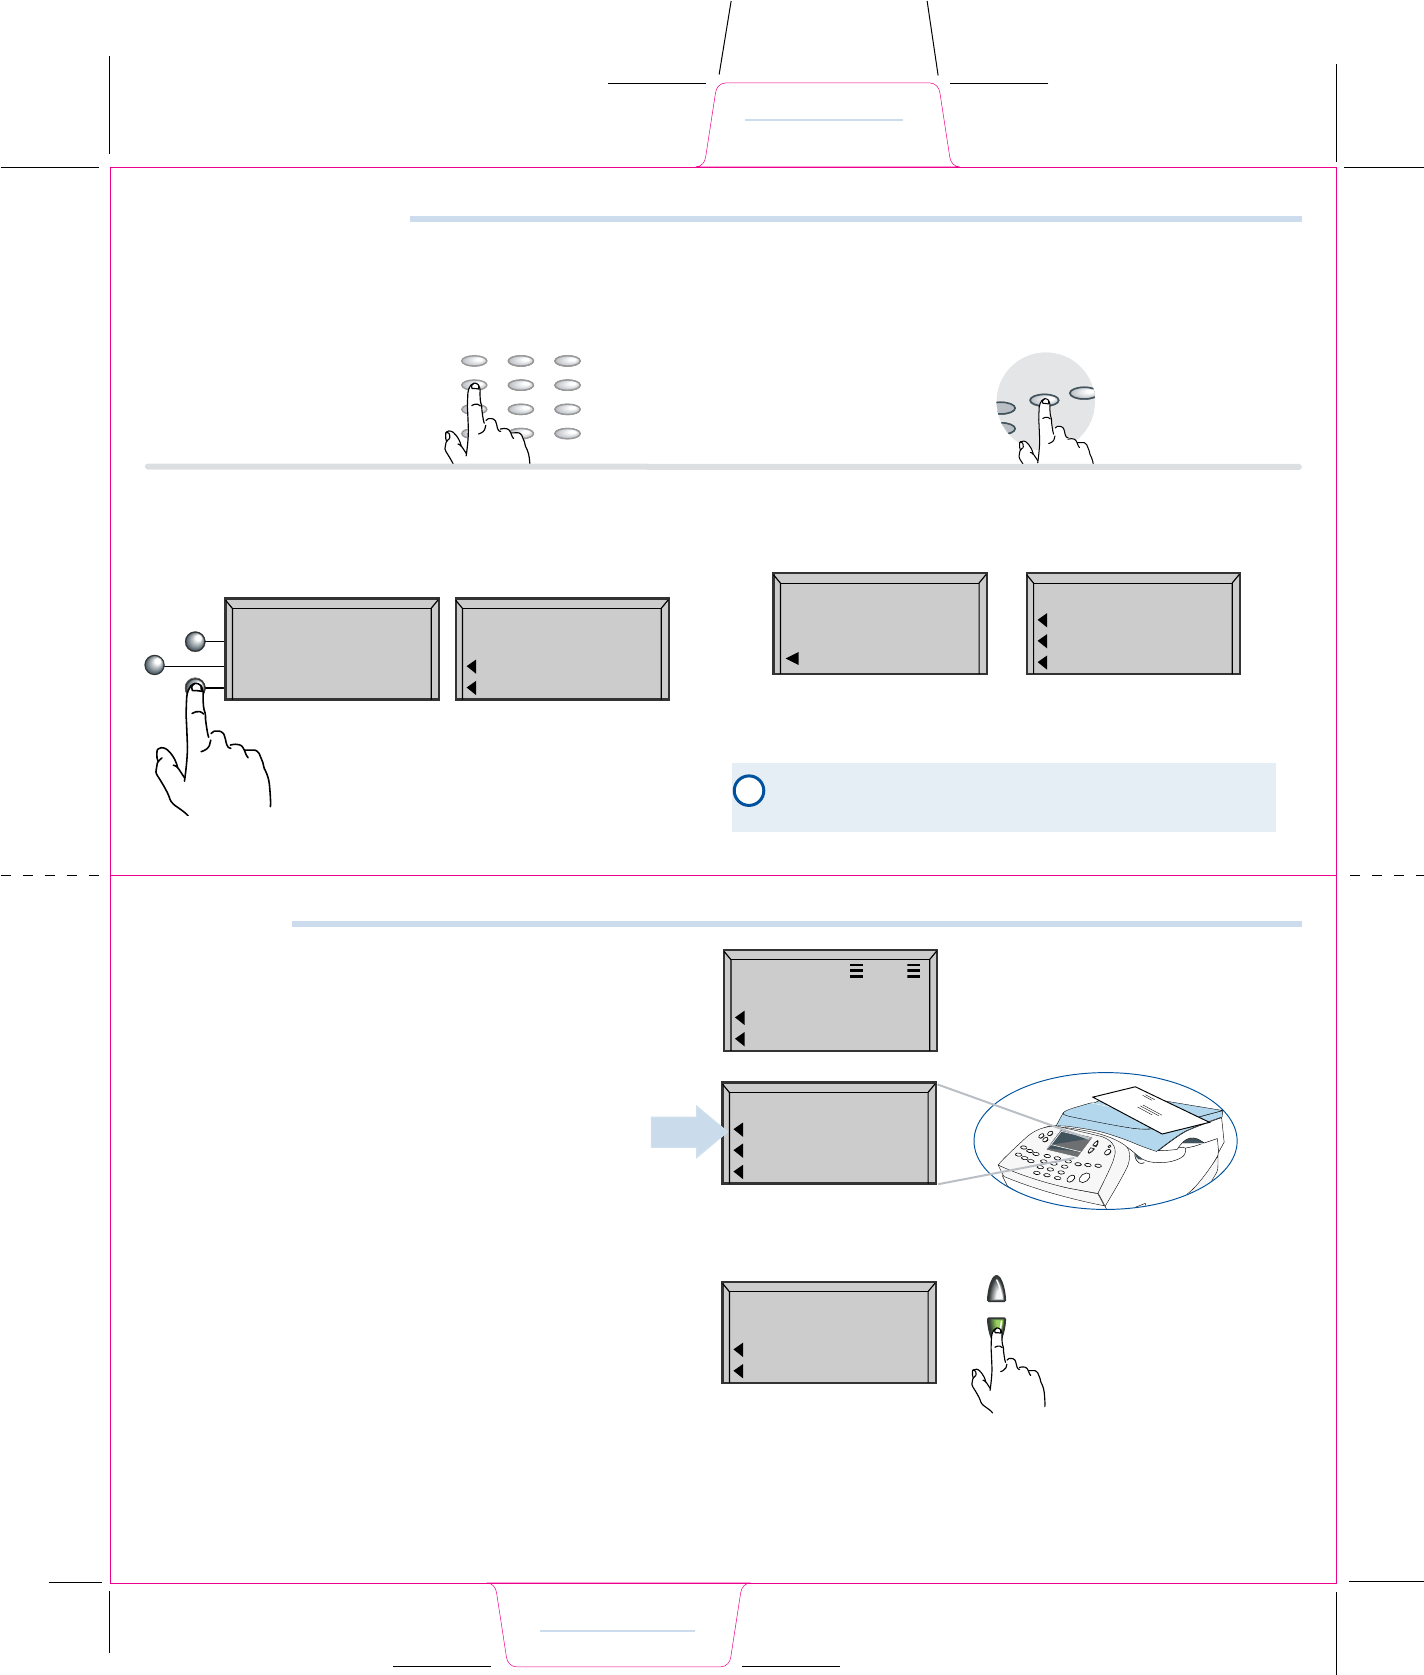
Selection Keys are active when
display arrow ( ) is present.
Home Screen
When 3 bars are visible the
system is ready to print postage.
When scroll keys are lit,
more information is available
by pressing keys.
Power and Lock
Return to the
Home Screen
at any time from
any place.
Return to your most
frequently used setting.
Determine instantly how much
postage you have used, and
how much is left.
Add postage to your
system with as few as 2
button presses.
Changing Ink Cartridge
Print Menu
Overview
Key in Postage / Meter Stamp
CLICK
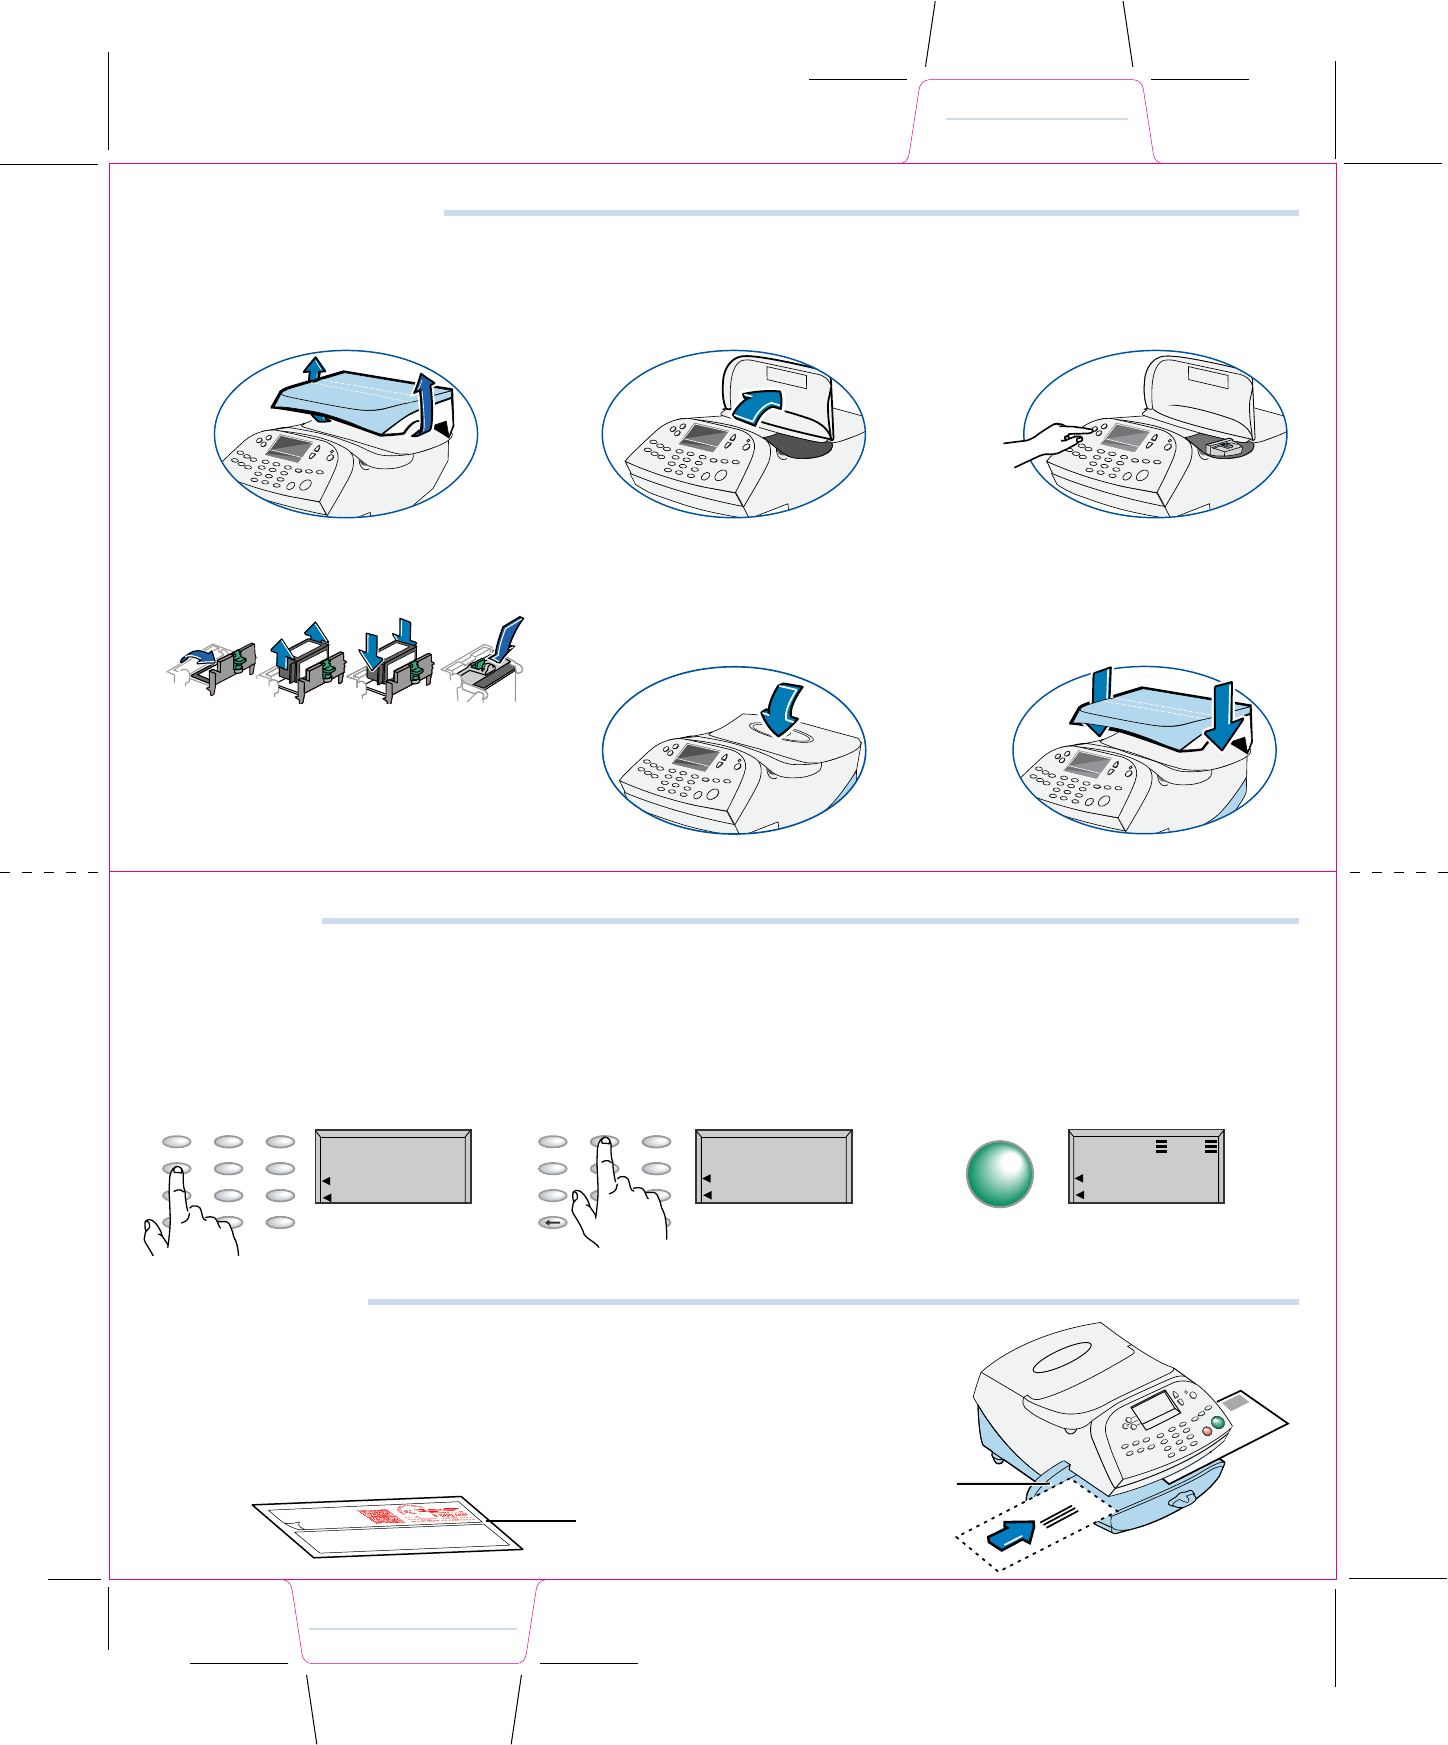
Changing the Ink Cartridge
Remove the scale by placing your hands in
the left and right scoops and lifting straight
up. (DM200L only. The scale does not
have to be removed for DM100i.)
Open the top cover. The Top Cover Open
message will appear on the display.
Select Replace Ink Tank to continue.
Flip open the ink cartridge cover.
Lift and remove the old ink cartridge.
Close the cover. The system will auto-
matically recognize the new cartridge,
perform a brief maintenance operation,
and return you to the home screen.
Replace the scale. (DM200L only)
Lower the new ink cartridge into position.
The printing on the top of the cartridge
should face the front of your system.
Return the guard to the closed position
and click to secure.
1 2 3
4 5 6
a b c d
Changing Ink Cartridge
Print Menu
CLASS: None
SCALE: 0lb 0.0 oz
Aug 24 08
Key in Postage
If you know the value of the postage you want to print... simply key it in!
Select Enter.
Your system is ready to print
postage.
3
Select 2.
2
PQRS
6
9
3
.
5
4
2
1
8
0
7
ABC DEF
GHI
Clear Space Shift
JKL MNO
TUV WXYZ
CLASS: None
SCALE: 0lb 0.0 oz
Aug 24 08 42
PQRS
6
9
3
.
5
4
2
1
8
0
7
ABC DEF
GHI
Clear Space Shift
JKL MNO
TUV WXYZ
For example: At the home screen
Select 4.
1
CLASS: None
SCALE: 0lb 0.0 oz
Aug 24 08 4
Yes/Enter
Registration wall
Tape sheet
Place the long edge of the envelope ush against the registration wall. Slide the mail into the
meter. The system will detect the envelope and automatically guide it through the printing
mechanism.
If you’re mailing a package, or your letter is too thick to pass through the meter, you may print a
postage tape. Tape sheets may be fed and printed the same as envelopes.
Print a Meter Stamp
Overview
Key in Postage / Meter Stamp
0.42
Using the Moistener
You may moisten, seal, and print postage in one smooth operation.
Install moistener as shown. Fill reservoir with E-Z Seal™
Sealing Solution.
Guide envelope ap around gray edge
of moistener deck as shown.
1 2 3
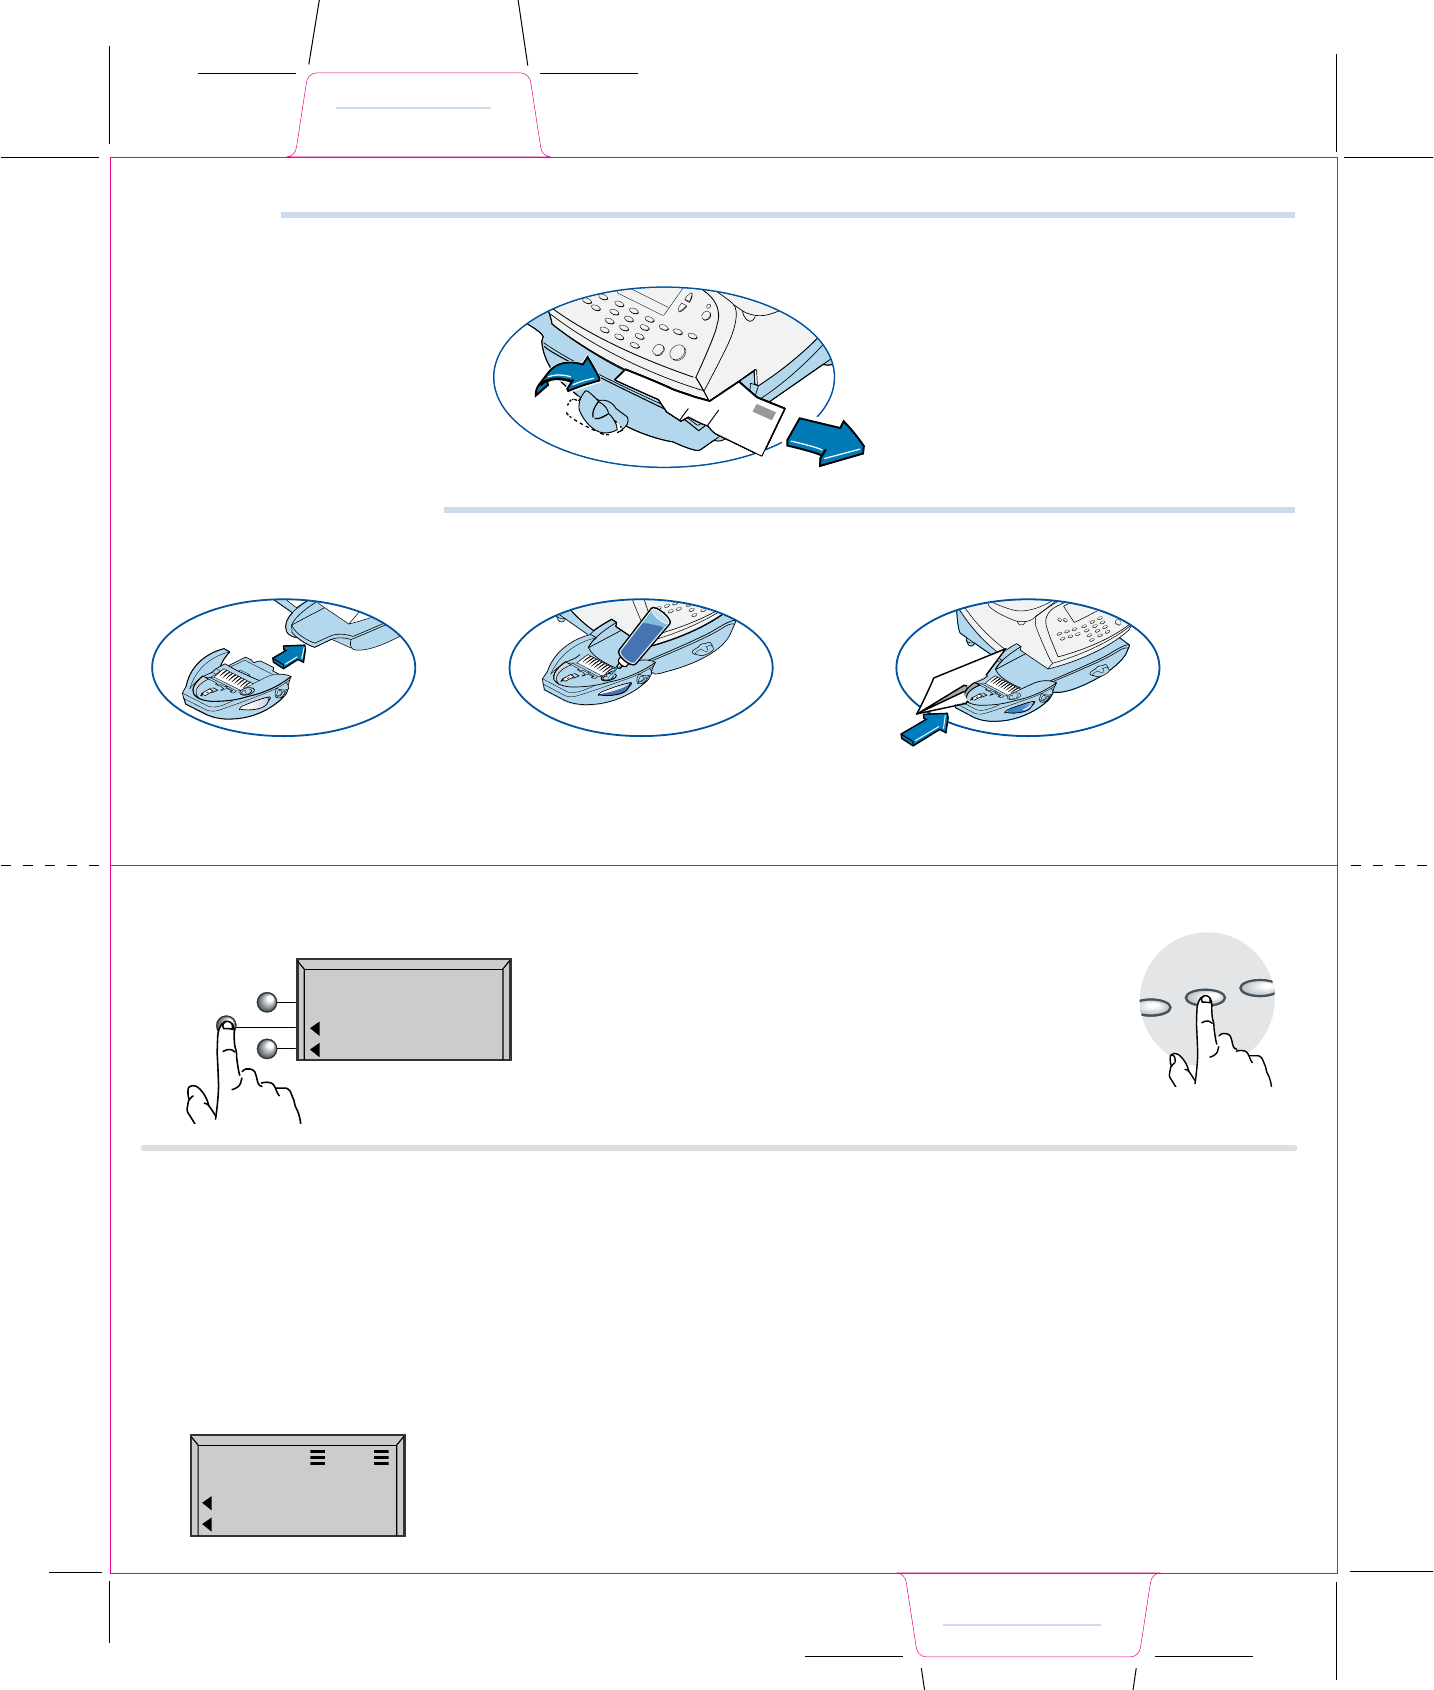
Clear a Jam
Turn the jam clearance lever to the
right (clockwise).
1
To clear a jam, do the following:
2
3
Remove the mail piece.
Rotate lever back to its home
position.
Set up a preset.
Press the Custom Presets key.
Select Dene Normal Preset.
Select YES: store preset.
2
CLASS 1st ClLtr
SCALE 0lb 0.0 oz
Aug 24 08 0.42
Custom
Preset
Normal
Preset Home
Return to the Home Screen by
selecting Home or Clear.
From this point on whenever you
select the Normal Preset key the values
you just chose will be set on your meter.
6
If these values are acceptable, select
YES: store preset.
5
YES: store preset
NO:review values
Are all the curernt
values correct?
Select Class.
Set up a class of mail (for example, select 1st Class followed
by Letter, followed by Done).
Conrm that the screen now shows the correct class (in this
example, it should read “Class: 1st ClLtr” and “0.42”).
1
If you dene a preset based on a Postal Class (e.g. First Class Letter) instead of only a value (e.g. $0.42) your preset will update automati-
cally whenever the postal rates change. This is highly recommended.
Setting the Normal Preset to a Class
Complete the process.
When the system returns to the “Custom Presets” screen,
press the Home key.
3
Clear Jam / Moistener
Rate Preview
Normal Preset - Value
Normal Preset - Class
PQRS
6
9
3
.
5
4
2
1
8
0
7
ABC DEF
GHI
Clear Space Shift
JKL MNO
TUV WXYZ
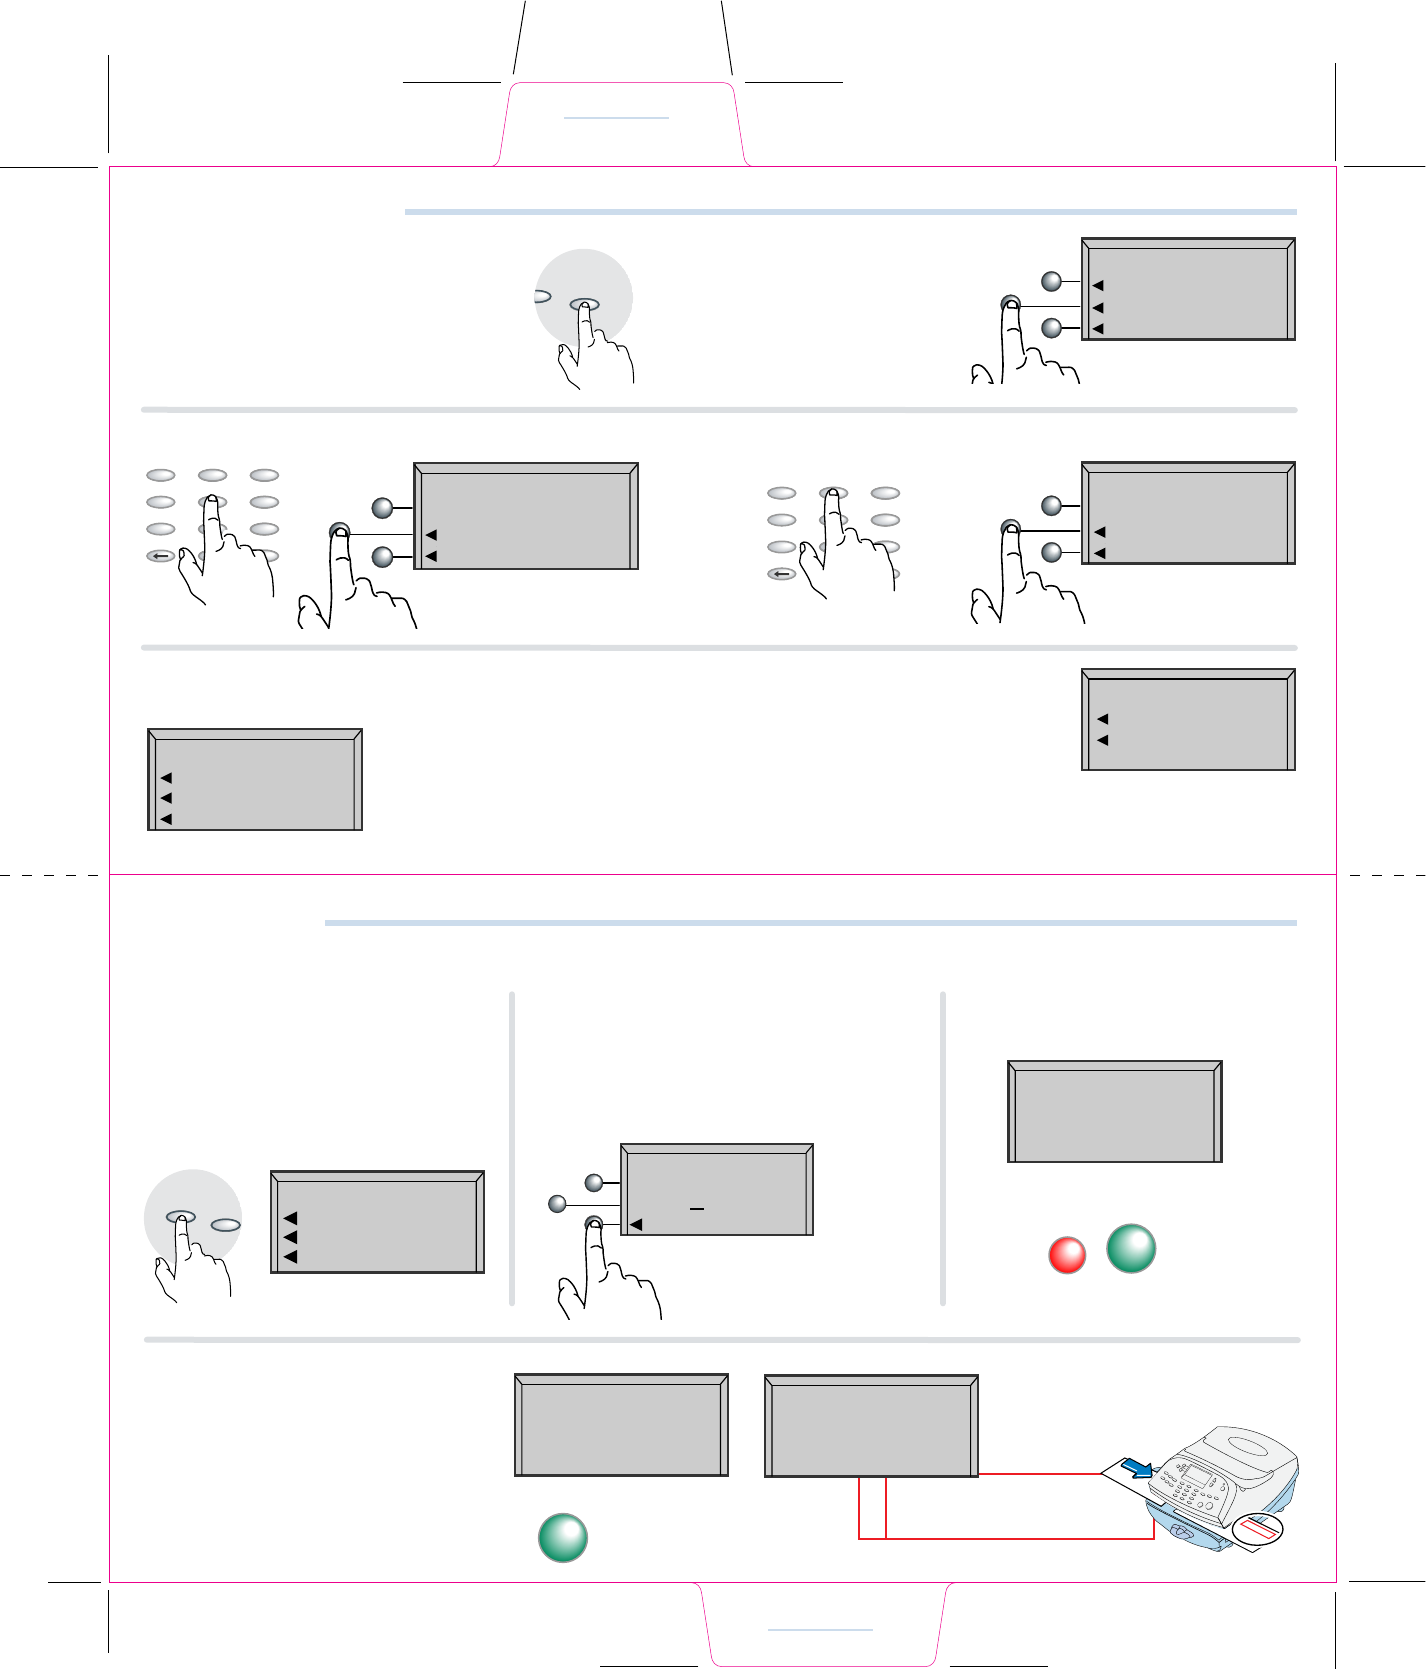
Rate Preview
Make sure the Class is set to “None”. You can set the
Class to “None” by keying in 0 on the keypad, and pressing
the Yes/Enter button.
Put the mail piece on the scale. The weight of the mail
piece will appear in the upper right of the display, and pos-
sible classes and rates for this weight will be displayed on
the screen. If there is no value next to a class name your
system needs more information to calculate an accurate
rate.
Selecting a key with no associated rate will either prompt
you for the additional information needed or present
alternative rates. For example, selecting 1st Class on the
screen above would present a screen such as:
(Don’t forget the lighted scroll keys to view additional
classes and rates.)
If you are unsure if a particular class is valid for your mail
piece, visit www.`usps.com
CLASS: None
SCALE: 0lb 0.0 oz
Aug 24 08 0.00
0lb 10 oz
1st Class
Priority
Pkg. Service
1
2
3Page
Up
Page
Down
Lighted scroll keys
i
Custom
Preset
Normal
Preset
DEF
Setting a Normal Preset
The normal preset is a shortcut; a single button selection to call up your most frequently used settings. Many customers choose to set the
Normal preset to the cost of a 1 oz First Class letter, since that is the most frequently used setting. Whenever your meter is powered on, or
wakes from the sleep mode, it will display the Normal preset values.
Key in the value you wish to
make the Normal Preset.
Select Custom Preset key.
12
Setting the Normal Preset to a Value
Select Dene Normal Preset. You can view all the values
associated with this Normal Preset by selecting NO: review
values. This will show you which ads and inscriptions, if any,
are associated with your Normal Preset.
3
CUSTOM PRESETS
Select Preset
Define New Preset
Define Normal Preset
YES: store preset
NO:review values
Are all the current
values correct?
If your meter recognizes the value you keyed in as a common-
ly used value (such as the cost of a 1 oz First Class letter),
you will be prompted to include a class in your Normal Preset.
4
It is recommended
a class be included
in this preset
Continue
Select Continue.
Include a Class?
Yes
No
Tell me why
Follow the screen prompts to
either include the class, or not.
Note: It is strongly recommended that you INCLUDE the class in
your preset. See additional information in the section, “Setting
the Normal Preset to a Class.”
Normal Preset - Value
Normal Preset - Class
Clear Jam / Moistener
Rate Preview
0lb 10 oz
Flat $2.36
Parcel $2.70
Enter Weight
Adding Postage
Enter Weight
Adding Postage
Reports Weigh/Rate
PQRS
6
9
3
.
5
4
2
1
8
0
7
ABC DEF
GHI
Clear Space Shift
JKL MNO
TUV WXYZ
PQRS
6
9
3
.
5
4
2
1
8
0
7
ABC DEF
GHI
Clear Space Shift
JKL MNO
TUV WXYZ
Enter a Known Weight
If you have not purchased the optional
scale, or you know the weight of your
mail piece, or if your package is too
heavy for the scale...
Select Weight/Rate key.
Select Enter Manual
Weight.
Key in pounds. Select Set pounds.Key in ounces. Select Set oz. and Continue.
You will see the screen as shown on the Rate Preview card.
In this example, all of the classes
available for a 5lb, 2 oz. package will
require additional information, such
as Destination ZIP Code.
1
3
2
4
5
Set pounds
Clear pounds
Enter weight
5 lb oz
5lb 2 oz
Aug 24 08
Priority
Pkg. Service
Express
Set oz and Continue
Clear ounces
Enter weight
5 lb 2 oz
0lb 0 oz
Enter Manual Weight
Rate mail on scale
$X.XX
Aug 24 08
ACCT: Xyz
CLASS: Pkg
MAN WT 5lb 2.0 oz
After you have completed the
rating process, including any fee
services desired (e.g. insurance)
you return to the Home screen
by selecting Done.
The bottom line on the home
screen will remind you that a
manually entered weight was
used ot compute the postal rate.
6
Diff.weighing
ADD POSTAGE TO METER
Add $ 50.00
Add another amount
Check PBP balance
Continue
Enter amount of
postage to add.
$100.00
Adding Postage
It is very simple and convenient to add postage to your system.
Press the Add Postage key.
You can pick the default amount
shown, key in a different amount to
add, or call the Data Center to check
your balance.
Suppose you wish to add $100.00,
select Add another amount.
Key in the amount of postage you wish
to add. You can only enter whole dollar
amounts. Select
Continue.
You will be asked to conrm the
amount requested.
1 2 3
Refill
Receipt
Refill: AUG 24 08 11:38 A Account No: 120000
Refill Amount: $100.00 Meter No.: 1111146
Funds Available in Meter: $115.00 AUG 24 08
Prepaid: $935.000 11:38 A
Additional Funds Available: 000000000000
Add
Postage Reports
* PBP is Postage by Phone
Postage Added
Amt Added $100.00
Available $115.00
Receipt (Yes or No)
Yes/Enter
Please insert
envelope or tape
sheet to print
receipt.
The system contacts the Postage
By Phone™ Data Center automati-
cally. The funds transfer should take
less than 60 seconds.
To print your receipt select Yes.
4
CONFIRM ADD POSTAGE
Adding $100.00
(Yes or No)?
Yes/Enter
No
