Pittasoft SC500 BLACKVUE SPORT User Manual
Pittasoft Co., Ltd. BLACKVUE SPORT
User Manual
Name Ι Blackvue Sport
Manufacturer Ι Pittasoft Co.,Ltd. / South Korea
Address Ι BYC HIGH CITY A-7th floor, 371-17 Gasan-Dong, Geumcheon-Gu,
Seoul, 153-718 Republic of Korea
Facebook Ι http://facebook.com/blackvuesport
Twitter Ι http://twitter.com/blackvuesport
Youtube Ι http://www.youtube.com/user/blackvuesport
E-mail Ι sales@pittasoft.com
Service Center Ι +82.2.6947.4670(ext.3)

BLACKVUE SPORT
SC500
KOREAN

> 카메라 활용하기
다양한 액세서리를 이용하여 역동적인 순간을 놓치지 않고 카메라에 담을 수 있습니다.
별매품 액세서리를 이용하여 하늘을
날으는 짜릿한 순간을 손쉽게 촬영할
수 있습니다.
활용 예시
별매품 거치대를 장착하여 자전거,
오토바이, 자동차 주행 중 안전하게
주변 풍경을 촬영할 수 있습니다.
BLACKVUE SPORT I SC500 4
KOREAN
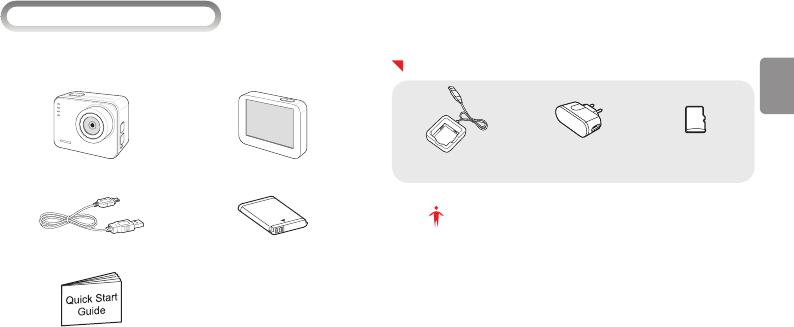
> 구성품 확인하기
카메라 구입 후 포장 상자를 열고 아래의 구성품 항목을 확인하십시오.
카메라 LCD
USB 케이블 배터리
•프레임마운트
•3M테이프
•마운트연결고리 사각
•마운트연결고리 원형
QSG
별매품
전원 어댑터배터리 충전기 메모리 카드
알아두기
y구성품 또는 별매품의 그림은 실물과 다를 수 있습니다.
y이 제품의 구성품은 제품 성능 향상을 위해 사전 예고 없이 변경될 수
있습니다
y구성품은 블랙뷰 홈페이지(www.blackvue.com)에서 추가로 구매
할 수 있습니다.
y제조업자로부터 보증받지 못한 제품을 사용하여 발생한 문제에 대해서
는 제조회사에서 책임지지 않습니다.
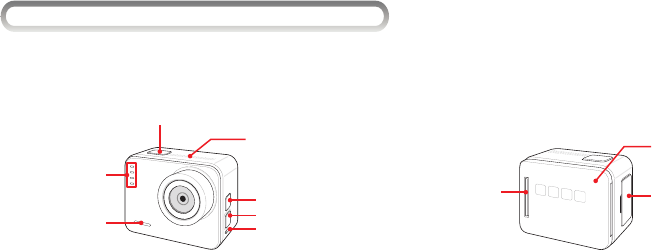
> 카메라 각 부분의 명칭 및 기능 알기
카메라를 사용하기 전에 먼저 각 부분의 명칭과 기능을 확인하십시오.
셔터/선택 버튼
스피커
Wi-Fi/재생 버튼
상태 표시 LED
•VIDEO
•PHOTO
•HIGH SPEED
•WiFi
상태 표시 LED
• 깜빡임: 사진 저장 중,
PC 또는 포토 프린터
와 통신 중, 초점이 맞
지 않을 때
• 켜짐: PC 연결 중, 초
점이 맞을 때
전원/모드 버튼
마이크
USB, HDMI 출력
단자 및 메모리 카드
삽입구 덮개
LCD 연결 단자
배터리 삽입구 덮개
BLACKVUE SPORT I SC500 6
KOREAN
항목 설명
촬영 모드: 촬영 시작/종료
재생 모드
*
•썸네일 뷰: 파일 선택
•재생 또는 일시정지
*
설정 모드
*
: 메뉴 또는 설정 항목 선택
Wi-Fi On/Off: 길게 누름
전원 On/Off : 길게 누름
모드 변경 : 짧게 누름
•
*
동영상/일반사진/고속촬영/재생/설정
•
*
설정 항목간 이동(설정 변경 시)
항목 설명
VIDEO 파란색: 동영상/타임랩스 모드
PHOTO 파란색: 사진 촬영 모드
HIGH SPEED 파란색: 고속 촬영/재생/설정 모드
Wi-Fi 파란색: Wi-Fi 켜짐
꺼짐: Wi-Fi 꺼짐
* 항목은 LCD 장착 시에만 지원되는 기능입니다.

> 촬영 준비하기 I 배터리 넣기/빼기
배터리 넣기
배터리 덮개를 열어 주십시오.
배터리를 삽입합니다.
배터리 덮개를 닫습니다.
배터리 빼기
금속 단자 반대쪽 비닐 손잡이를 잡고
들어올려 배터리를 꺼냅니다.
BLACKVUE SPORT I SC500 8
KOREAN
I 메모리 카드 넣기/빼기
메모리 카드 넣기
메모리 카드 삽입구 덮개를 열어
주십시오.
금속 단자가 왼편에 위치하도록 하여
삽입합니다.
메모리 카드 샆입구 덮개를 닫습니다.
메모리 카드 빼기
메모리 카드를 살짝 눌러 일부가
빠져나오면 완전히 꺼냅니다.
I 배터리 충전하기
카메라를 구입한 후 처음 사용할 때는 배터리를 완전히 충전하십시오.
PC와 연결하여 충전
별매품 전원 어댑터와 연결하여 충전
상태 표시 LED
•충전 중 : 빨강
•완료 : 꺼짐
I LCD 조립하기
구성품 LCD를 카메라에 장착하면 촬영 장면 확인, 저장 파일 재생, 카메라
및 촬영 환경을 설정할 수 있습니다.
LCD 각 부분의 명칭
LCD 전원 버튼
카메라 연결 단자
조립 홈
BLACKVUE SPORT I SC500 10
KOREAN
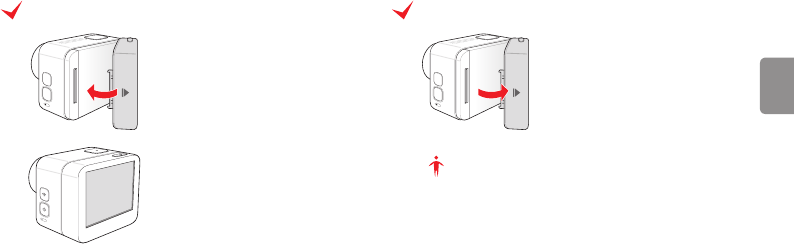
LCD 조립하기
LCD의 조립 홈과 카메라 오른쪽 끝을
맞춘뒤 카메라와 LCD의 연결 단자를
잘 맞추어 끼워 넣습니다.
LCD 분리하기
화살표 표시가 되어있는 부분을 힘을
주어 들어 올려 분리합니다.
알아두기
조립이 끝나면 카메라 전원을 켜 LCD 가 제대로 작동하는지 확인해 주십
시오. LCD 화면이 켜지지 않으면 카메라 전원을 끈 후 위의 방법으로 다시
조립하십시오.
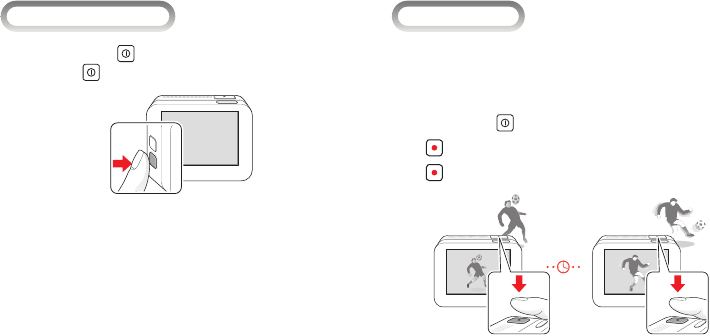
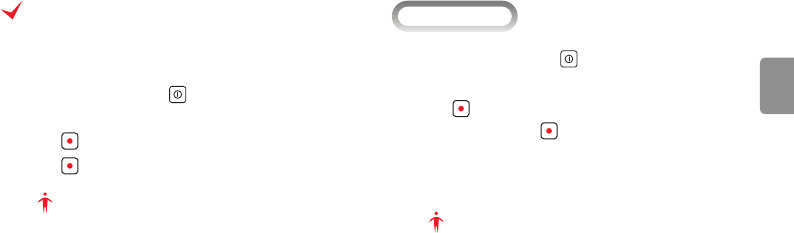
> 촬영 하기 I 전원켜기
배터리 충전이 완료되면 를 길게 눌러 카메라 전원을 켜십시오.
• 전원을 끄려면 를 다시 길게 누르십시오.
I 동영상 촬영하기
동영상 모드에서는 최대 Full HD급 해상도(1920 X 1080)로 동영상을 촬
영할 수 있습니다. Full HD급 해상도(1920 X 1080) 동영상은 초당 60컷
또는 초당 30컷의 속도로 최대 2시간 촬영할 수 있으며, 촬영한 동영상은
MP4(H.264) 형식으로 저장됩니다.
1 촬영 모드에서 를 눌러 동영상을 선택하십시오.
2 를 누르면 촬영이 시작됩니다.
3 를 한 번 더 누르면 촬영이 종료됩니다.

BLACKVUE SPORT I SC500 12
KOREAN
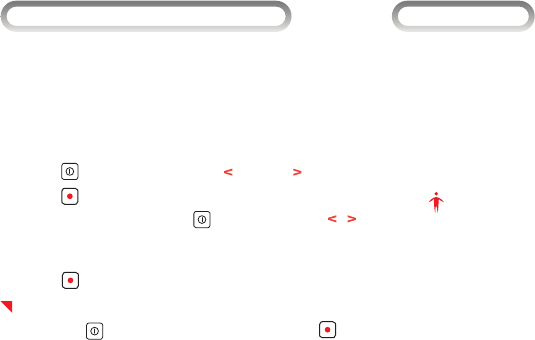
고속촬영 모드 사용하기
고속촬영 모드를 설정하면 초당 24프레임보다 빠른 속도로 동영상을 촬영할
수 있습니다. 짧은 시간에 일어나는 액션을 촬영할 때 적합합니다.
1 촬영 모드에서 를 눌러 고속촬영을 선택하십시오.
• 해상도/프레임 수를 설정할 수 있습니다.
2 를 누르면 촬영이 시작됩니다.
3 를 한 번 더 누르면 촬영이 종료됩니다.
알아두기
y촬영된 동영상 파일은 외장 메모리에 자동 저장됩니다.
y저장 속도가 느린 메모리 카드를 사용할 경우 촬영하는 동영상의 저
장 속도를 처리하지 못하여 촬영이 중간에 중단될 수도 있습니다.
y저장 속도가 느린 메모리 카드를 사용할 경우 고해상도와 초고속 동
영상을 지원하지 않을 수 있습니다. 고해상도나 초고속 동영상을 촬
영하려면 속도가 빠른 메모리 카드로 교체하십시오.
I 사진 촬영하기
1 촬영 모드에서 를 눌러 사진을 선택하십시오.
2 촬영 구도를 잡으십시오.
3 촬영하려면 를 누르십시오.
• 를 길게 누르고 있으면 연속 촬영이 시작되며, 버튼에서 손을 떼
면 촬영이 종료됩니다.
• 장면 모드를 사용하면 더욱 효과적인 촬영을 할 수 있습니다. 장면
모드 설정 방법은 사용 설명서를 참고하세요.
알아두기
y촬영 가능한 사진 매수는 선택한 해상도와 메모리 용량에 따라 달라
집니다.
y연속 촬영 중 저장 공간이 부족하면 촬영이 중단됩니다.
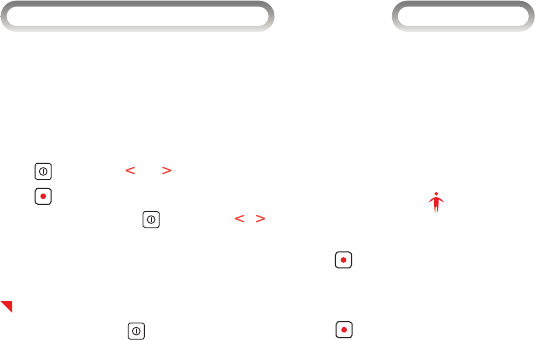
> 재생/편집 하기 I LCD에서 재생하기
저장된 사진, 동영상을 바로 확인할 수 있습니다.
1 카메라의 전원이 꺼진 상태에서 LCD와 카메라를 연결하십시오.
(10 페이지)
2 카메라의 전원을 켜십시오.
3 재생 모드로 설정 하십시오.
4 를 눌러 커서를 또는 로 이동하십시오.
5 를 눌러 원하는 파일을 선택한 후 V 를 눌러 파일을 재생하십시오.
• 동영상 파일의 경우 를 눌러 커서를 / / 재생 / 일시정지로
이동하여 재생하십시오.
6 썸네일 보기로 되돌아 가려면 썸네일로 커서를 이동하여 를
누르십시오.
파일 삭제하려면
원하는 파일을 선택한 후 를 눌러 휴지통으로 커서를 이동한 후 를
누르십시오.
I TV에서 재생하기
카메라를 HDMI 케이블로 HDTV와 연결하면 TV 화면을 통해 사진 및 동영
상을 볼 수 있습니다.
1 카메라 전원을 켜십시오.
2 HDMI 케이블을 사용하여 TV와 연결하십시오.
3 TV를 켠 후 TV의 외부입력을 HDMI 입력으로 설정하십시오.
4 원하는 동영상 또는 사진을 재생하십시오.
알아두기
촬영 시 설정된 화면 비율(16:9, 4:3)에 따라 TV 출력 화면의 크기가 다를
수 있습니다.

BLACKVUE SPORT I SC500 14
KOREAN
I PC로 파일 전송하기
카메라를 PC에 연결하면 카메라가 이동식 디스크로 인식되어 카메라에 있는
파일을 PC로 전송할 수 있습니다.
권장 시스템 규격
항목 WINDOWS MAC
CPU Windows XP (서비스팩 2 이상)
또는 Vista Mac OS® X 10.4.11 이상
RAM 3.2GHz Pentium 4 이상 2.0GHz Intel Core Duo 이상
운영 체제 DirectX 9.0c 이상
Memory 최소 1GB 시스템 RAM 최소 1GB 시스템 RAM
비디오 카드 최소 256MB RAM의 비디오 카드 최소 128MB RAM의 비디오 카드
1 카메라가 꺼진 상태에서 USB 케이블로 PC와 연결하십시오.
2 카메라 전원을 켜십시오.
3 PC에서 내 컴퓨터 > 이동식 디스크 > DCIM > 100BVSCM을 차례로
선택 하십시오.
4 원하는 사진 파일 또는 동영상 파일을 선택해 PC로 전송하십시오.

I BLACKVUE SPORT 앱 사용하기
BLACKVUE SPORT App이 설치되어 있는 무선기기(스마트폰 또는 태블릿
PC)에서 카메라를 작동 및 관리할 수 있습니다.
1 무선기기에서 BLACKVUE SPORT App을 설치하고 실행하십시오.
알아두기
yBLACKVUE SPORT App은 구글 Play 스토어와 애플 App Store에서
다운로드 받을 수 있습니다.
yBLACKVUE SPORT App은 Android 2.3 이상, iOS 5.0 이상에서
사용할 수 있습니다.
y무선기기의 종류에 따라 일부 기능이 지원되지 않을 수 있습니다.
2 무선 기기의 Wi-Fi 다이렉트 기능을 켜십시오.
3 카메라의 전원을 켠 후 를 길게 눌러 Wi-Fi 다이렉트 기능을 켜십
시오.
4 BLACKVUE SPORT App의 Wi-Fi 버튼을 터치하십시오.
(예시: SC500-A682DE) 연결하려는 장치 목록을 선택한 후, 패스워
드를 입력하십시오. 확인 버튼을 터치하면 선택한 장치와 연결됩니다.
Wi-Fi SSID는 앱 환경설정에서 변경 가능합니다.
알아두기
yWi-Fi 연결 시 연결 정보를 저장해두면 스마트폰의 Wi-Fi 기능을 켜
지 않아도 BLACKVUE SPORT App의 Wi-Fi 버튼을 터치하여 자동
으로 연결할 수 있습니다.
y초기 패스워드는 blackvue로 설정되어 있으며, 사용자가 변경할 수
있습니다.
yWi-Fi 기능은 라이브뷰 기능을 기준으로 10m 이내에서 사용할 수 있
으며, 사용 환경에 따라 차이가 발생할 수 있습니다.
yWi-Fi 기능을 통해 녹화 영상 재생 시 데이터 전송속도에 따라 수신이
원활하지 않을 수 있습니다.
yWi-Fi 설정에 대한 자세한 내용은 ‘사용자 설명서’의 환경 설정하기
를 참고하십시오.

BLACKVUE SPORT I SC500 16
KOREAN
> 제품 규격
제품 규격은 제품의 성능 개선에 따라 사전 공지없이 변경될 수 있습니다.
모델명 SC500
카메라
픽셀 SONY Exmor 12M Pixel
화각 152˚
렌즈 Full HD CMOS Lens
노출 자동
화이트발란스 자동
인터페이스
저장 Micro SD 32GB 지원
USB 2.0 충전/파일 전송
출력 HDMI
버튼 Power/Mode, Wi-Fi, Shooting/
Choice
LCD 2.0 inch
5 녹화 영상 목록에서 재생하려는 녹화 영상을 선택하십시오.
알아두기
y라이브뷰 버튼을 눌러 영상을 실시간으로 확인할 수 있습니다.

오디오
마이크로폰 내장
포맷 128kHz, AAC
소프트웨어 앱 안드로이드, iOS 지원
옵션 배터리 충전 외부 배터리 충전 옵션
방수케이스
방수등급 IP68
하우징
깊이 60m / 160ft
전방
후방 1
후방 2(멀티팩) 옵션
동작 온도 0 ~ 40℃
배터리
타입 리튬 폴리머 배터리
용량 3.7V, 1050mAh
동작시간 1080p30 : 2 hours @ 15Mbps
충전방식 USB / 어댑터
비디오
포맷 H.264, MP4
해상도
1080p, 60/30fps
720p 120/60/30fps
WVGA 240/60/30fps
타입랩스 1, 5, 30, 60, 300, 600 초
마다 전송
사진
포맷 JPEG
크기 0.3M, 7.2M, 8.5M, 12M
Wi-Fi
13채널 802.11b/g/n(20)
9채널 802.11n(40)
변조 방식 DSSS(CCK), OFDM(QAM)

MEMO

BLACKVUE SPORT
SC500
ENGLISH

BLACKVUE SPORT I SC500 20
ENGLISH
Utilizing the Camera 21
Checking the Components 22
Understanding the Name and
Function of Each Part 23
Preparation Inserting/Removing the Battery 25
Inserting/Removing
the Memory Card 26
Charging the Battery 27
Assembling the LCD 27
Shooting Turning on the Power 29
Shooting Movies 29
Taking Pictures 30
>
Contents
Playback/Editing Playback on the LCD 31
Playback on a TV 31
Sending Files to PC 32
Using the BLACKVUE SPORT
APP 33
Product Specications 34

>
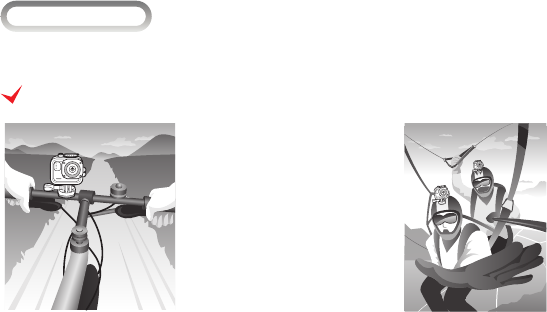
Utilizing the Camera
You can capture dynamic moments with the camera using various accessories.
You can easily capture exciting mo-
ments when flying in the sky using
the optional accessories.
Usage Examples
You can capture the surrounding
scenery safely while driving a bicy-
cle, motor cycle or car by mounting
the optional holder.
BLACKVUE SPORT I SC500 22
ENGLISH
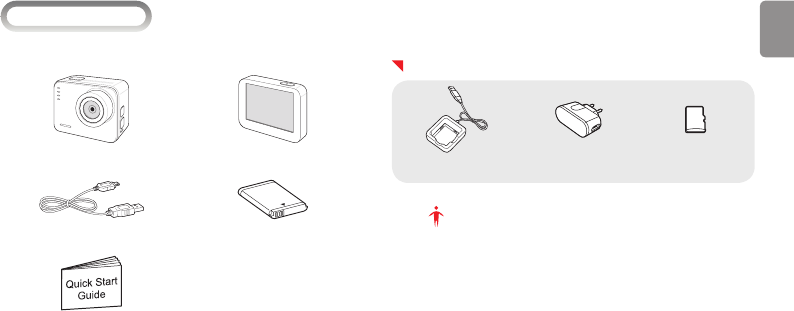
>
Checking the Components
After purchasing the camera, open the package box and check the following
components.
Camera LCD
USB cable Battery
• Frame mount
• 3M tape
• Square mount connecting link
• Round mount connecting link
QSG
Accessories
Power adaptorBattery charger Memory card
Note
yThe picture of each component or accessory may differ from the
actual component or accessory.
yTo enhance the performance of the product, the components of this
product may be changed without prior notice.
yThe components can be purchased separately from the BlackVue
homepage (www.blackvue.com).
yThe manufacturer holds no responsibility for any problem occurred
due to the use of a product which is not certied by the manufacturer.
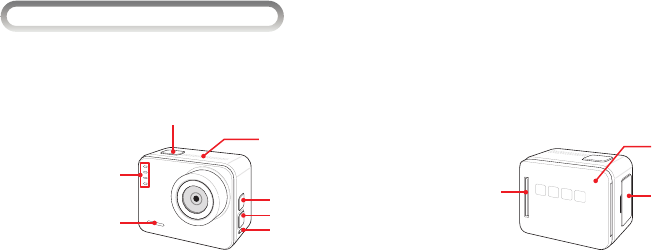
>
Understanding the Name and Function of Each Part
Check the name and function of each part rst before using the camera.
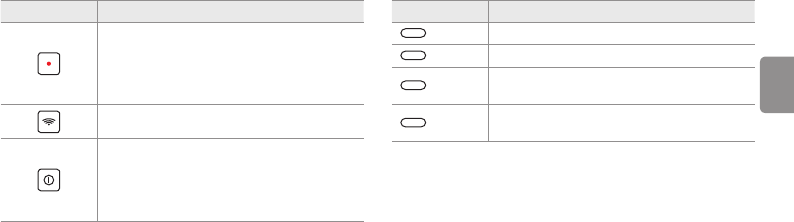
Shutter/Select button
Speaker
Wi-Fi/Playback button
LED indicators
•VIDEO
•PHOTO
•HIGH SPEED
•WiFi
LED Indicators
• Blinking: Saving a
photo, communicating
with PC or photo printer,
or being out of focus
• Lighting: Connecting
to PC, or being in focus
Power/Mode button
Microphone
USB, HDMI output
terminal and
memory card slot
cover
LCD connection
terminal
Battery slot cover
BLACKVUE SPORT I SC500 24
ENGLISH
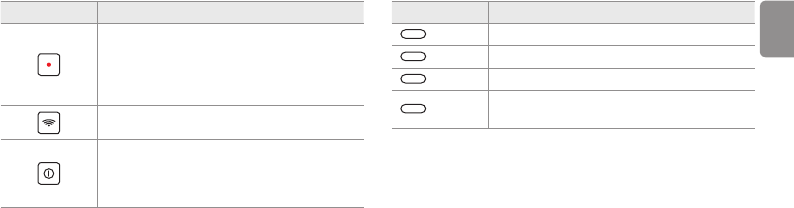
Item Description
Shooting mode: Start/End shooting
Playback mode
*
• Thumbnail view: Select a le
• Playback or Pause
*
Setting mode
*
: Select a menu or setting item
Wi-Fi On/O: Long press
Power On/O: Long press
Mode change: Press
•
*
Movie/Normal Photo/High-speed Shooting/Playback/
Setting
•
*
Switching between menus or setting items
Item Description
VIDEO Blue: Movie/Time Lapse mode
PHOTO Blue: Photo shooting mode
HIGH SPEED Blue: High speed shooting mode/
Playback mode, Setting Mode
Wi-Fi Blue: Wi-Fi power on
O: Wi-Fi power o
* The items marked with are the functions supported only when LCD is mounted.
>
Preparation
I
Inserting/Removing the Battery
Inserting the Battery
Open the battery cover.
Insert the battery.
Close the battery cover.
Removing the Battery
Remove the battery by holding and
lifting the plastic handle on the
opposite side of the metallic terminal.
BLACKVUE SPORT I SC500 26
ENGLISH
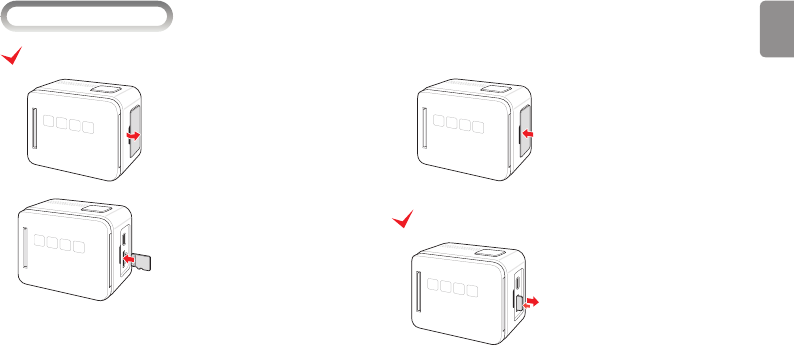
I
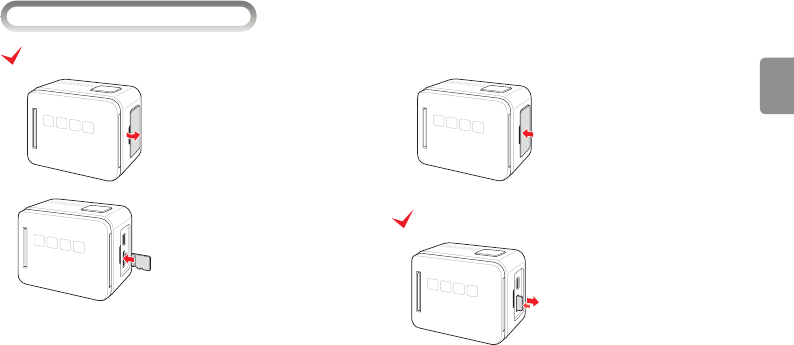
Inserting/Removing the Memory Card
Inserting the Memory Card
Open the cover of the memory card
slot.
Insert the memory card with the
metallic terminal on the left side.
Close the cover of the memory card
slot.
Removing the Memory Card
Press the memory card slightly, and
when a part of the memory card
comes out, remove the memory card
completely.
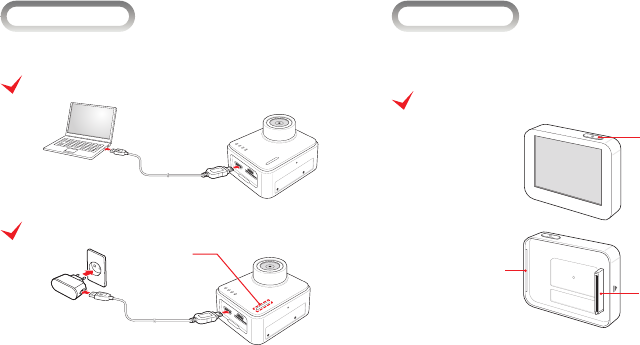
I
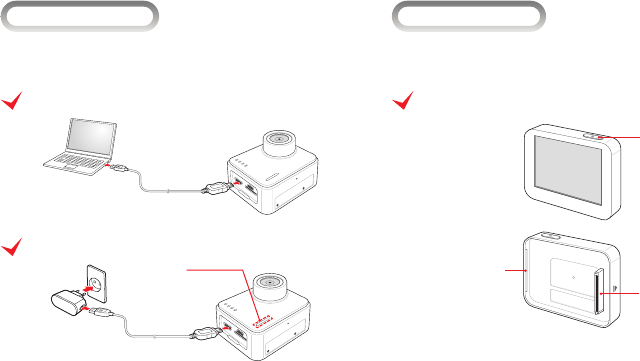
Charging the Battery
Charge the battery completely when using the camera for the rst time after
purchasing it.
Charging by Connecting to PC
Charging by Connecting to the Optional Power Adaptor
LED Indicators
• Charging in progress : Red
• Charging complete : O
I
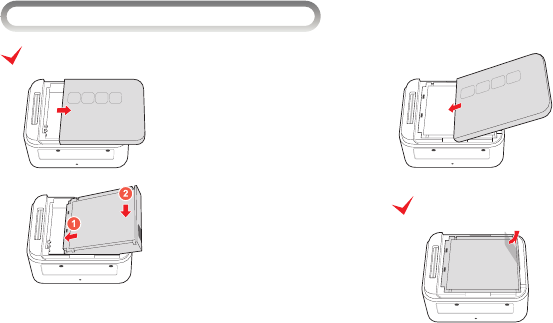
Assembling the LCD
You can check the shooting scene, play back a file or set the camera and
shooting environments by mounting the LCD component to the camera.
Name of Each Part in LCD
LCD Power button
Camera connecting
terminal
Assembly groove
BLACKVUE SPORT I SC500 28
ENGLISH
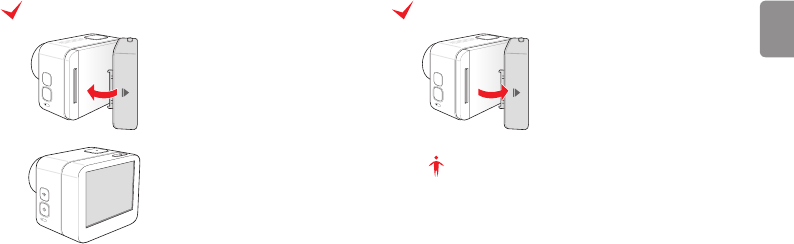
Assembling the LCD
Align the assembly groove on the LCD
with the right end of the camera, and
insert the connecting terminal of the
LCD into the connecting terminal of
the camera properly.
Removing LCD
Remove the LCD by lifting the part
marked with an arrow with force.
Note
After assembling the LCD, turn on the camera and check the LCD operates
normally. If the LCD screen does not turn on, turn o the camera and as-
semble the LCD again using the method above.

>
Shooting
I
Turning on the Power
After charging the battery, press and hold down until the camera turns
on.
• Press and hold down again to turn o the camera.
I
Shooting Movies
In the movie mode, you can take a movie at a resolution up to Full HD (1920
X 1080). A movie at Full HD resolution (1920 X 1080) can be taken at a speed
of 60 or 30 cuts per second for up to 2 hours, and the movie is saved in MP4
(H.264) format.
1 In the shooting mode, press to select Movie.
2 Press to begin shooting.
3 Press once again to end shooting.
BLACKVUE SPORT I SC500 30
ENGLISH
Using the High Speed Shooting Mode
Setting the high speed shooting mode allows you to take a movie at a speed
faster than 24 frames per second. This mode is suitable for capturing an ac-
tion taken within a short time.
1 In the shooting mode, press to select High Speed Shooting.
• You can set the resolution/number of frames.
2 Press to begin shooting.
3 Press once again to end shooting.
Note
yThe captured movie le is saved automatically in the external memory.
yIf a memory card with a slow recording speed is used, it may not
process the recording speed of the movie being taken, so shooting
may be interrupted.
yIf a memory card with a slow recording speed is used, high-resolution
and high-speed movie may not be supported. In order to take a high-
resolution or high-speed movie, replace it with a memory card with a
fast recording speed.
I
Taking Pictures
1 In the shooting mode, press to select Photo.
2 Compose the photo.
3 Press to take a picture.
• Press and hold down to start continuous shooting and release
the button to end the shooting.
• Using the scene mode allows you to take a photo more eectively.
Refer to the instruction manual for setting the scene mode.
Note
yThe number of photos that can be taken varies according to the se-
lected resolution and the memory capacity.
yIf there is not enough storage space during continuous shooting, the
shooting will stop.
>
Playback/Editing
I
Playback on the LCD
You can see the saved photo or movie immediately.
1 While the camera is turned o, connect the LCD to the camera.
(page 28 )
2 Turn the camera on.
3 Enter the Playback mode.
4 Press to move the curser backward ( ) or forward ( ).
5 Press to select a desired le. And, press V to playback a le.
• In case of a movie file, press to move the curser to / /
Playback / Pause to play the le.
6 To return to the thumbnail view, move the curser to Thumbnail and
press .
To Delete a File
Select a le, press to move the curser to Recycle Bin, and press .
I
Playback on a TV
You can watch photos and movies through the TV screen by connecting the
camera to the HDTV using the HDMI cable.
1 Turn the camera on.
2 Connect the camera to a TV using the HDMI cable.
3 Turn on the TV, and set the external input of TV to HDMI input.
4 Playback a desired movie or photo.
Note
The size of TV output screen may vary according to the congured screen
ratio (16:9, 4:3).

BLACKVUE SPORT I SC500 32
ENGLISH
I
Sending Files to PC
When you connect the camera to a PC,the PC recognizes the camera as an
external hard disk, allowing you to send les saved in the camera to the PC.
System Reqirements
Item WINDOWS MAC
CPU Windows XP (Service pack 2 or
later) or Vista Mac OS® X 10.4.11 or later
RAM 3.2 GHz Pentium 4 or faster 2.0 GHz Intel Core Duo or faster
Operating
System DirectX 9.0 c or later
Memory Minimum 1 GB of system RAM Minimum 1 GB of system RAM
Video card Video card with minimum 256 MB
of RAM
Video card with minimum 128 MB
of RAM
1 While the camera is turned o, connect the camera to PC using the
USB cable.
2 Turn the camera on.
3 Select My Computer > External Disk > DCIM > 100BVSCM in order
from PC.
4 Select a photo or movie le and send it to PC.

I
Using the BLACKVUE SPORT APP
You can control or manage the camera from a wireless device (smartphone
or tablet PC) where BLACKVUE SPORT App is installed.
1 Install and execute BLACKVUE SPORT App on a wireless device.
Note
yThe BLACKVUE SPORT App can be downloaded from the Google Play
store and Apple App Store.
yThe BLACKVUE SPORT App can be used with Android 2.3 or later and
iOS 5.0 or later.
ySome functions may not be supported depending on the wireless
device.
2 Turn on the Wi-Fi Direct function of the wireless device.
3 Turn the camera on and press and hold down to turn on the Wi-Fi
Direct function.
4 Touch the Wi-Fi button of BLACKVUE SPORT App.
(e.g. SC500-A682DE) Select the device you want to connect and, enter
the password. Tap the OK button to connect it to the selected device.
Wi-Fi SSID can be changed from the App Settings.
Note
yIf you save the connection information when connecting using Wi-Fi,
you can tap the Wi-Fi button in the BLACKVUE SPORT App to connect
it without turning on the Wi-Fi function of the smartphone.
yThe initial password is blackvue, but the user can change it.
yFor the Live View function, Wi-Fi can be used within a 10 m range,
although the range may vary in some circumstances.
yFor playback of recorded videos using Wi-Fi, reception may vary
according to the data transfer rate.
yRefer to the Conguration section on 'User's manual' for the details
of Wi-Fi setting.

BLACKVUE SPORT I SC500 34
ENGLISH
>
Product Specications
To enhance the performance of the product, the product specications may
be changed without prior notice.
Model SC500
Camera
Pixel SONY Exmor 12M Pixel
Angle of View 152˚
Lens Type Full HD CMOS Lens
Exposure Auto
White Balance Auto
Interface
Storage micro SD Up to 32 GB
USB 2.0 Recharging/File Transfer
Video out HDMI
Button Power/Mode, Wi-Fi, Shooting/
Choice
LCD 2.0 inch
5 Select the recorded video in the video list you want to play back.
Note
yTap the Live View button to play the video in real time.

Audio
Microphone Built-in, Mono
Format 128 kHz, AAC
Software App Android, iOS to support
Option Battery Charge External Battery Charger Option
Waterproof
Degree of
Protection IP68
Housing
Depth Rate 60 m / 160 ft
Front
Rear 1
Rear 2 (for Multi Pac)) Option
Operation Temperature 0 ~ 40 °C
Battery
Type Li-Polymer Pac Battery
Capacity 3.7 V, 1050 mAh
Average Record
Time 1080p30 : 2 hours @ 15 Mbps
Charging USB to computer or optional
power adapter
Video
Format H.264, MP4
Resolution
1080 p, 60/30 fps
720 p 120/60/30 fps
WVGA 240/60/30 fps
Time-laps
Recording
1, 5, 30, 60, 300, 600 second
intervals
Photo
Format JPEG
Image Size 0.3M, 7.2M, 8.5M, 12M
Wi-Fi
13 Channel 802.11b/g/n(20)
9 Channel 802.11n(40)
PCM DSSS(CCK), OFDM(QAM)

FCC Compliance Information (FCC ID: YCK-SC500)
THIS DEVICE COMPLIES WITH PART 15 OF THE FCC RULES.
Operation is subject to the following two conditions;
(1) This device may not cause harmful interference, and
(2) This device must accept any interference received, including interference that may cause undesired operation.
CAUTION : Changes or modications not expressly approved by the party responsible for compliance could void the user’s authority to operate the
equipment.
Note: This equipment has been tested and found to comply with the limits for a Class B digital device, pursuant to part 15 of the FCC Rules. These
limits are designed to provide reasonable protection against harmful interference in a residential installation. This equipment generates, uses and
can radiate radio frequency energy and, if not installed and used in accordance with the instructions, may cause harmful interference to radio
communications. However, there is no guarantee that interference will not occur in a particular installation. If this equipment does cause harmful
interference to radio or television reception, which can be determined by turning the equipment o and on, the user is encouraged to try to correct
the interference by one or more of the following measures:
yReorient or relocate the receiving antenna.
yIncrease the separation between the equipment and receiver.
yConnect the equipment into an outlet on a circuit dierent from that to which the receiver is connected.
yConsult the dealer or an experienced radio/TV technician for help.
Modications not expressly approved by the manufacturer could void the user's authority to operated the equipment under FCC rules.

MEMO

MEMO