Planex Communications 20100921-0 Gigabit wireless LAN router User Manual MZK WG300NX QIG
Planex Communications inc. Gigabit wireless LAN router MZK WG300NX QIG
User Manual
MZK-WG300FF14
http://www.planex.net
Quick Installation Guide
Gigabit wireless LAN router
MZK-WG300FF14
Thank you for purchasing MZK-WG300FF14. Before using, please check if all accessories are in the
package. If not, please contact your dealer directly.
Package Contents:
1. MZK-WG300FF14 Router x1
2. Quick Installation Guide x1
3. Safety and Warranty Sheet x1
4. AC Power Adapter x1
5. LAN Cable x1
6. USB Cable x1
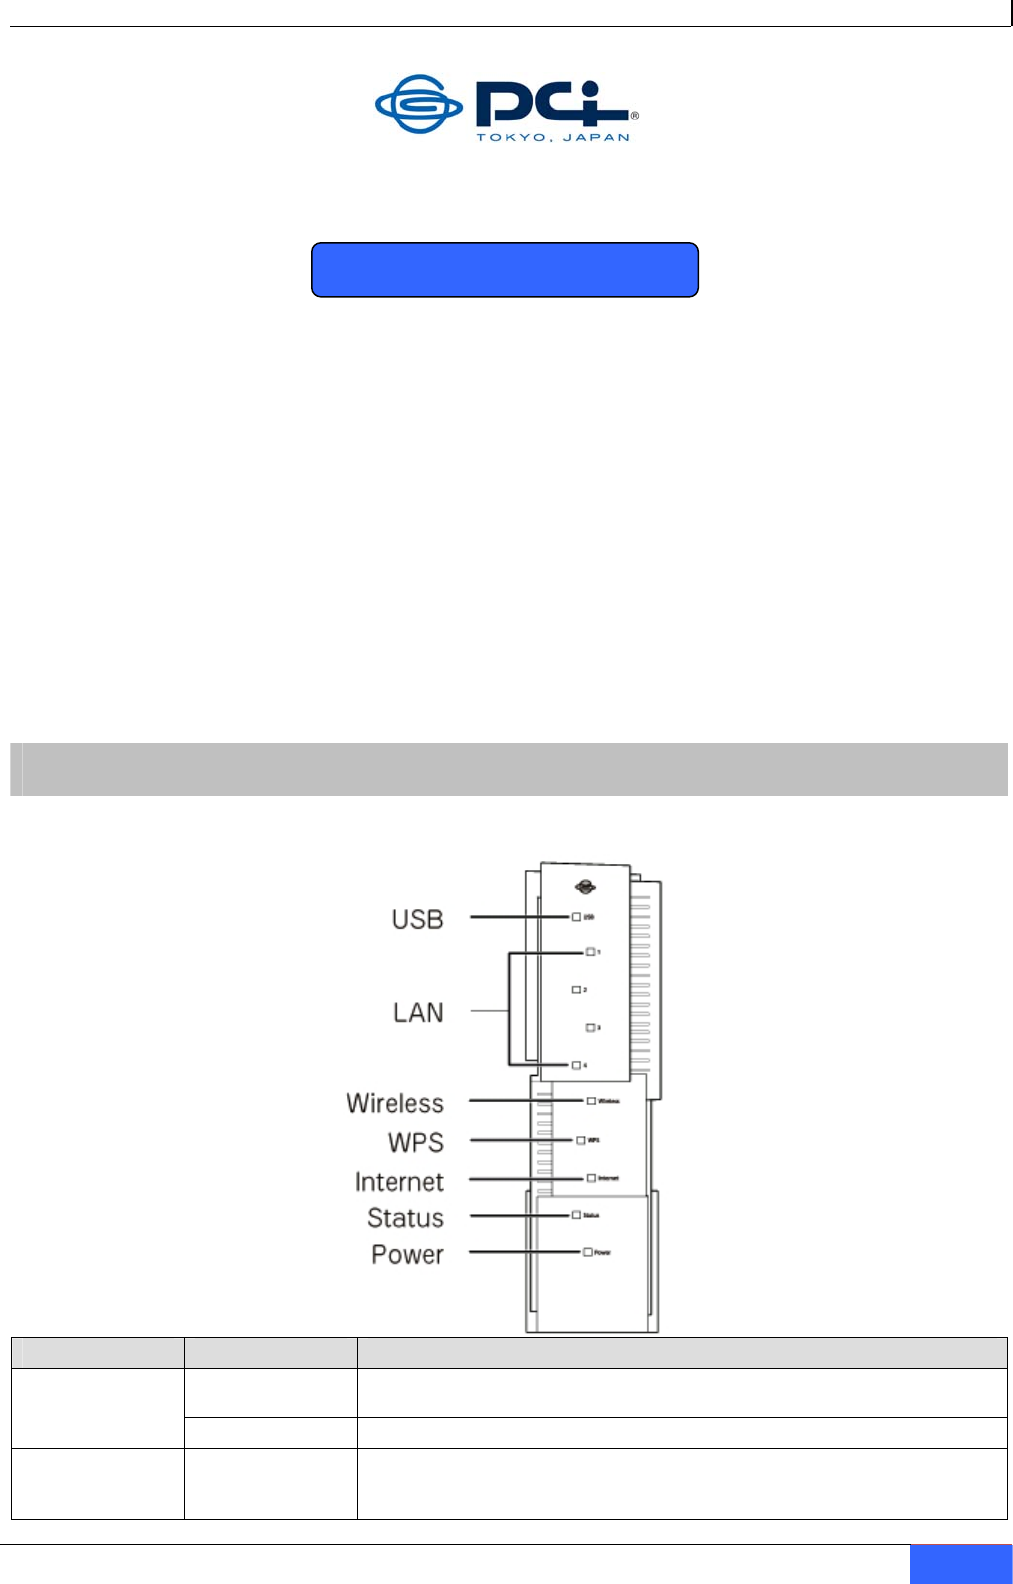
1 Parts
1.1 Front Panel LEDs
LEDs Status Meaning
Solid Green When MZK-WG300FF14 is powered on, the Power LED will be solid
green.
Power Off The Power LED is off when AC power adapter is not connected.
Status Amber When MZK-WG300FF14 is powered on, a self-test will be started and
the Status LED will be amber for a few minutes, and then will turn
off. If there is any error on the router, it will stay amber.
Quick Installation Guide 1
MZK-WG300FF14
Green After self-test and start-up is complete, and the router is working
fine, the Status LED will be green.
On/Blinking
When network connection between MZK-WG300FF14 and a modem
is established, the Internet LED will be on. The Internet LED will be
blinking when data is being transmitted or received via the Internet
(WAN) Port.
Internet
Off The LED is off when there is no connection between the MZK-
WG300FF14 and a modem.
On When a host has established wireless connection to MZK-
WG300FF14, the LED is on.
WPS Off LED is off when there is no wireless connection to MZK-WG300FF14.
Wireless Blinking
The LED will be blinking when wireless reception works fine.
On When network connection between MZK-WG300FF14 and a host is
established, the LED will be on.
LAN 1-4 Blinking The LED will be blinking when data is being transmitted or received
between MZK-WG300FF14 and a host via the LAN Port.
USB On
LED is on when a USB device is connected to USB port.
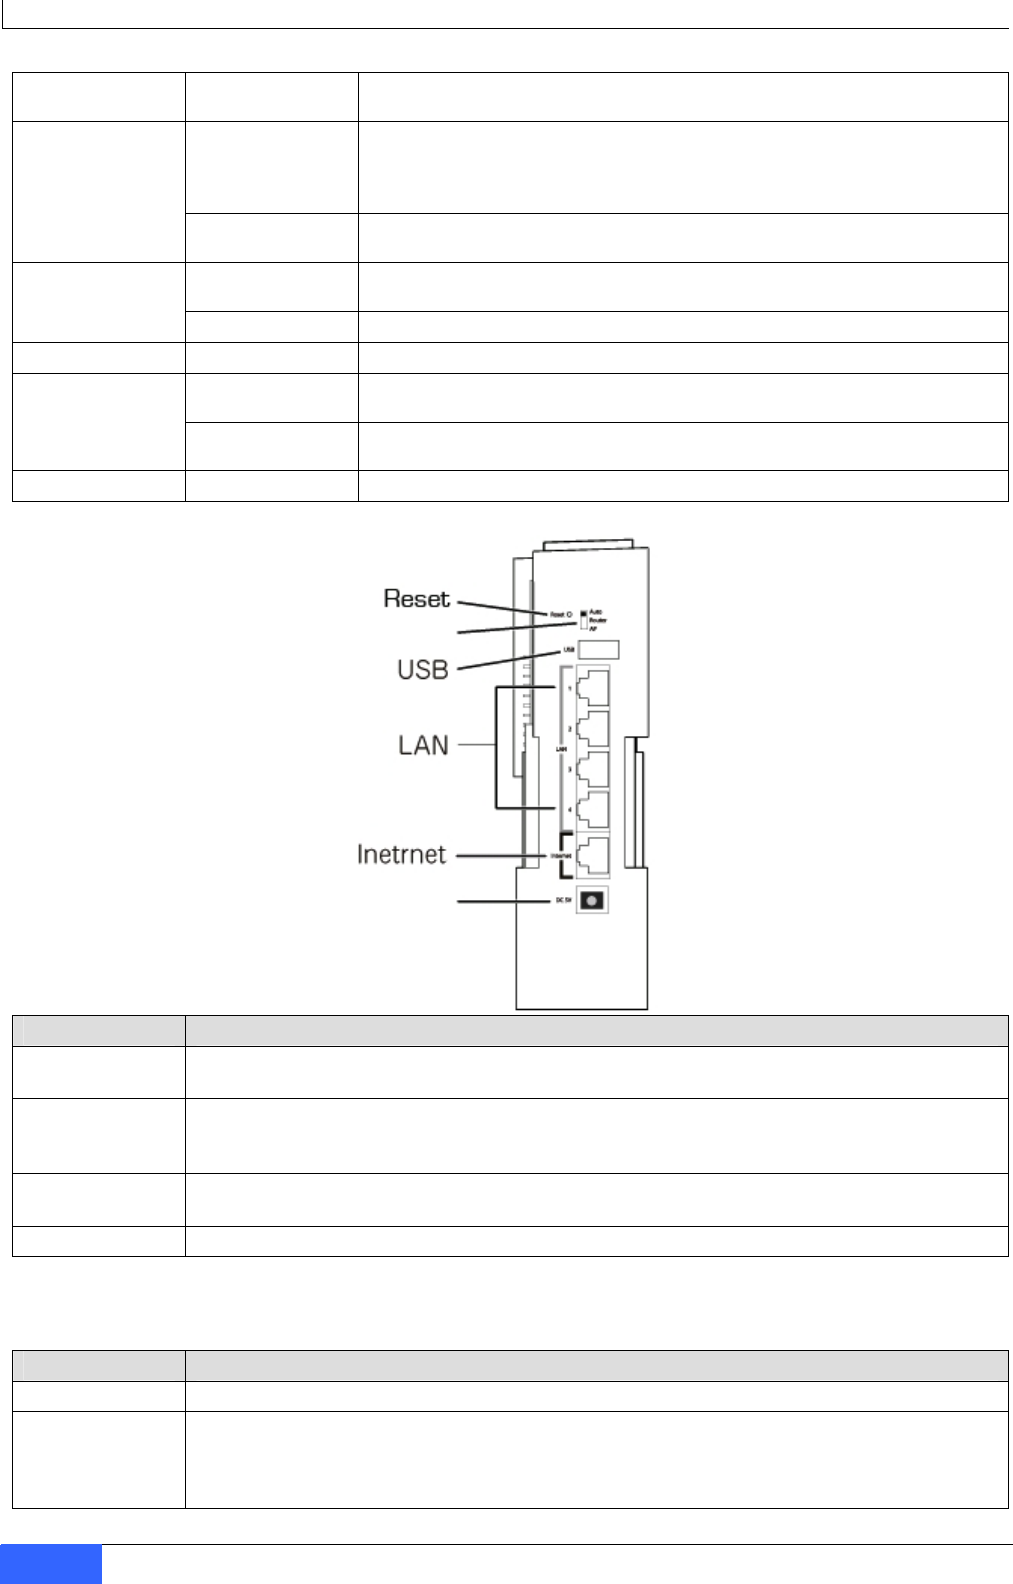
1.2 Back Panel Ports and Buttons
Auto/Router/AP Switch
Power
Ports Function
Power Socket To power up the MZK-WG300FF14, insert the adapter plug into this socket, and insert
the other end of AC adapter into the power source.
Internet Connect a DSL or Cable Modem into this Internet port in order to link to the Internet
(WAN). If your modem came with a cable, use the supplied cable. Otherwise, use a
standard LAN cable.
LAN 1-4 Use standard LAN cables (RJ45) connectors to connect your PCs (hosts) to these ports.
Any LAN port can be connected with a network switch/hub, if needed.
USB Use this port to connect a USB device.
Caution: Use the AC adapter that comes with the MZK-WG300FF14. If a different AC adapter is
used and caused damage to this device, warranty will not be applicable in this case.
Buttons Function
Auto/Router/AP Use this switch to shift between Auto, Router, or AP mode.
Reset
Use this switch to reset to default settings. Press the button for 3 to 5 seconds, and
then unplug the power cord, but do not release the Reset button. Wait for 3 seconds
before plugging the power cord back. Release the Reset button and MZK-WG300FF14
will automatically restart and back to default settings.
2 Quick Installation Guide
MZK-WG300FF14
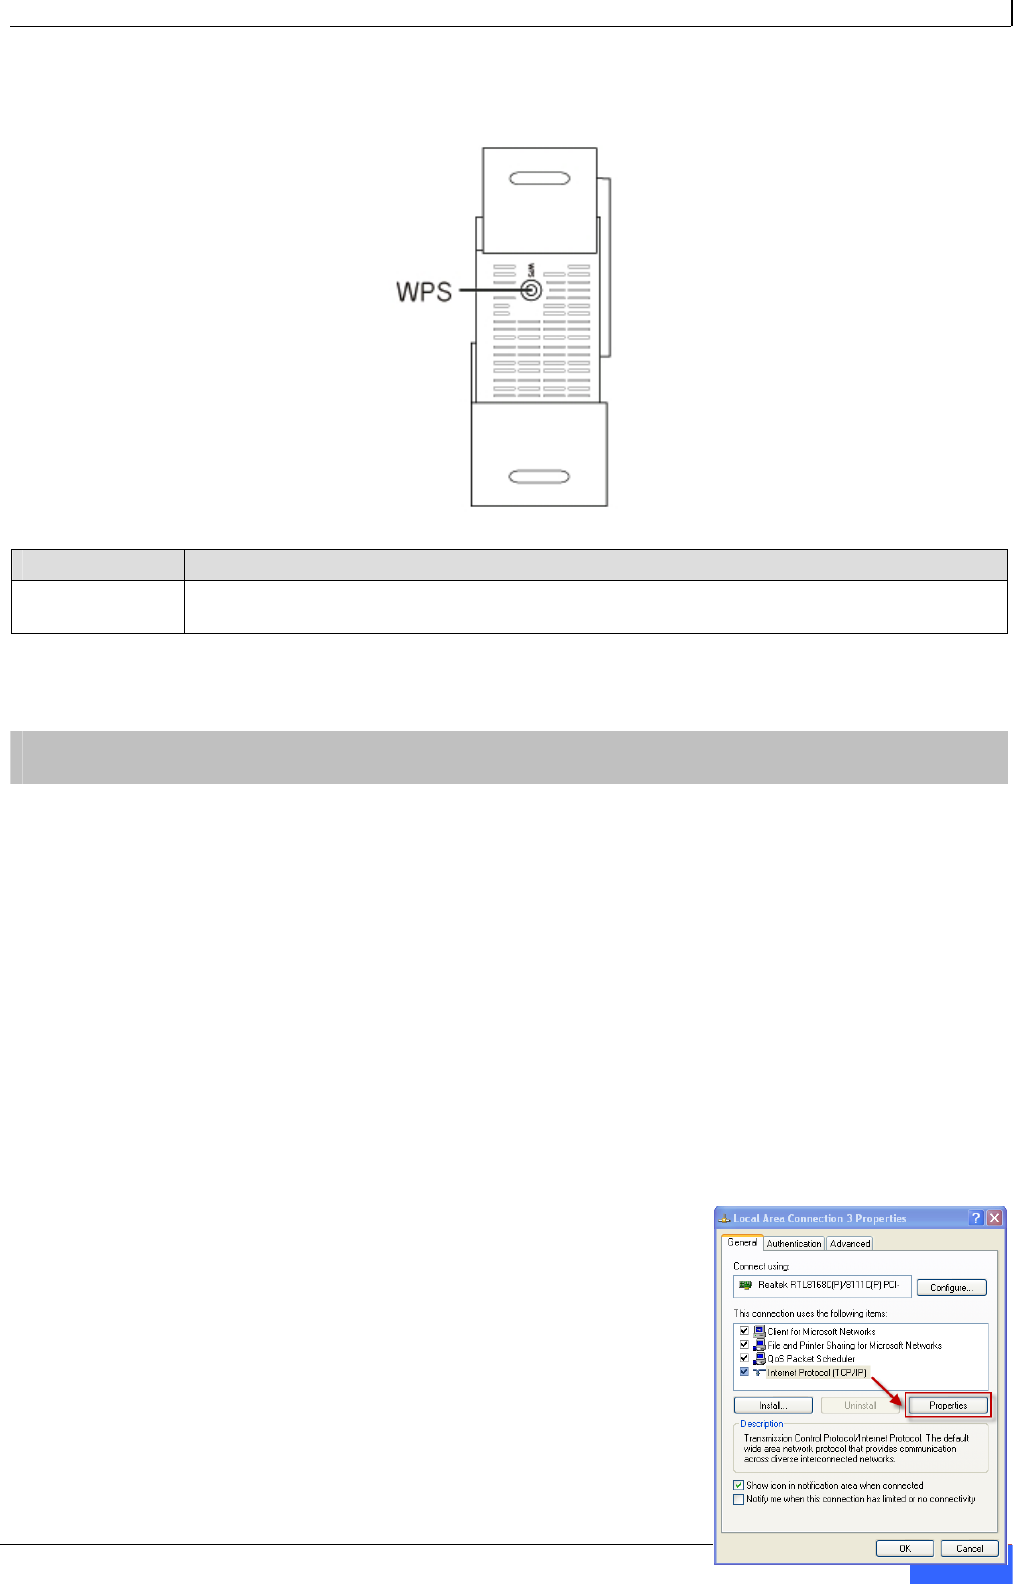
1.3 Bottom Button
Button Function
WPS Press this button to establish a wireless connection between MZK-WG300FF14 and a
station (remote device/host).
*Operation temperature is 0~40℃.
2 Installation and Setup
2.1 Installing the Device
Steps:
1. Open the MZK-WG300FF14 package. Check if all items are complete.
2. Choose a preferred installation site, where this router will be installed.
3. To connect PCs using wired connection, connect the LAN cables from PCs to the LAN ports.
4. Connect the DSL or Cable Modem network cable to the Internet port of MZK-WG300FF14.
5. Power on the DSL or Cable Modem. Then power on MZK-WG300FF14, that is, connect the
AC power adapter (one end) to power source and then insert the adapter plug (other end)
into the power socket of MZK-WG300FF14.
2.2 Network Setup
Please use a web browser to configure MZK-WG300FF14 (wireless router). A computer with
wired Ethernet connection to this wireless router is required for
first time configuration.
Steps:
1. Set your computer to obtain an IP address from MZK-
WG300FF14 router.
a. Open Control Panel in Windows OS (i.e., click “Start”
-> “Settings” -> “Control Panel”).
b. Double-click “Network Connections” icon.
c. Double-click “Local Area Connection”.
d. The “Local Area Connection” window will appear.
Click “Properties” button.
Quick Installation Guide 3
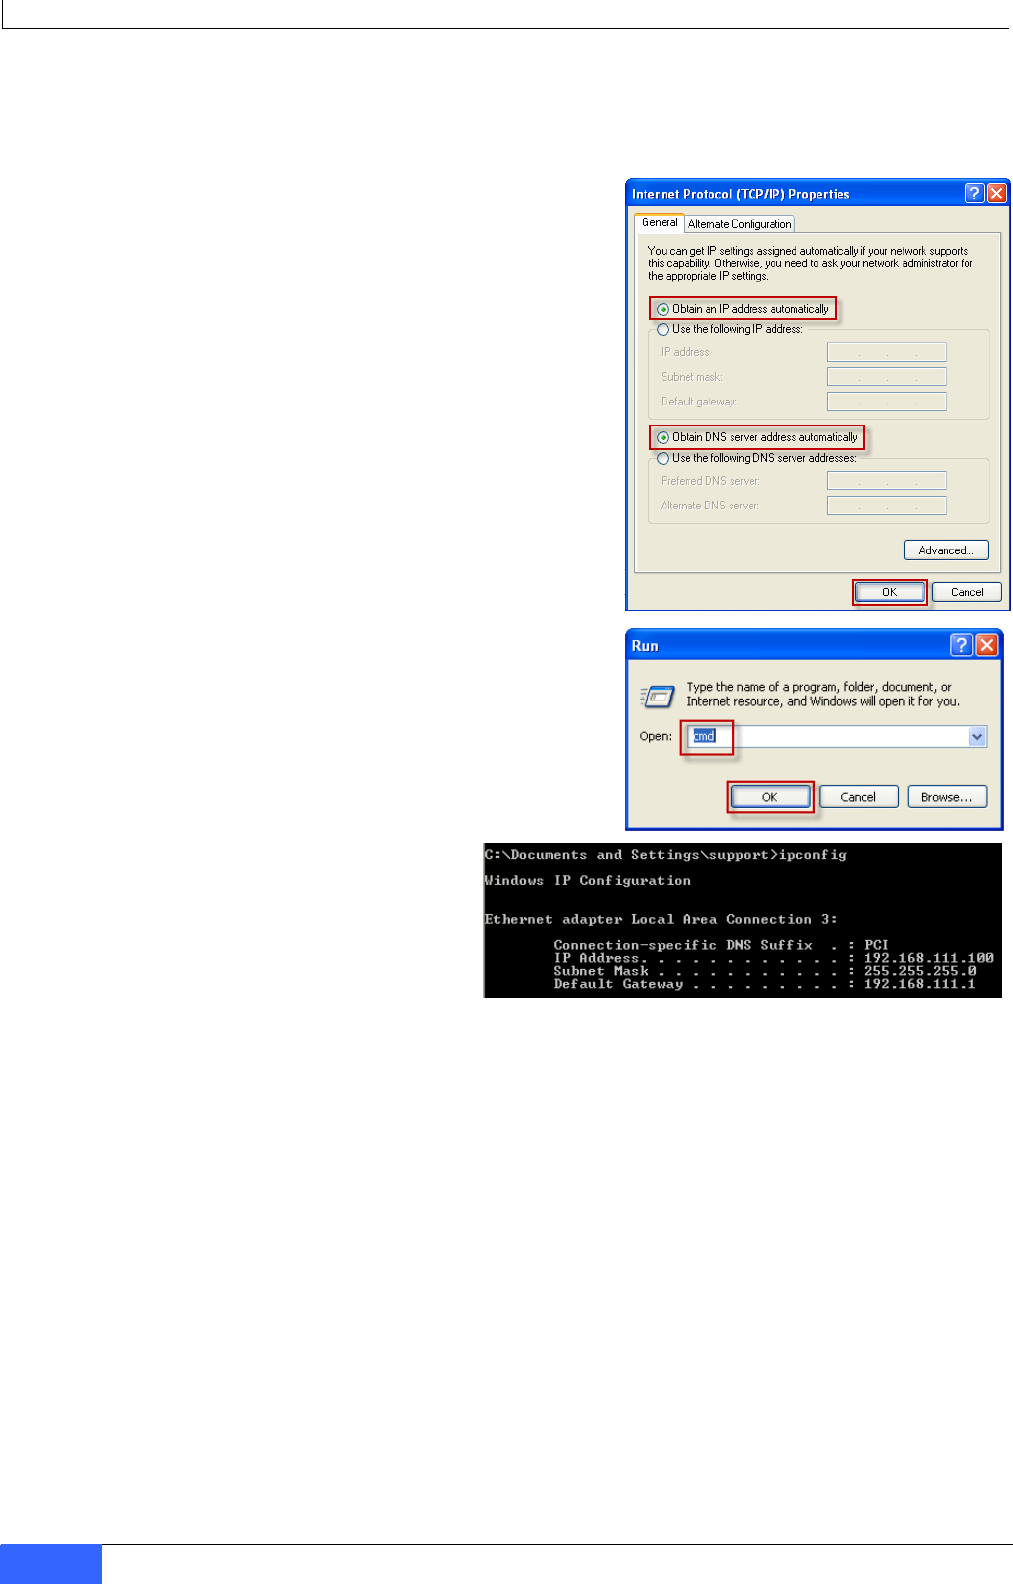
MZK-WG300FF14
e. The “Local Area Connection Properties” window will appear. Select “Internet
Protocol (TCP/IP), and then click “Properties” button.
2. Select “Obtain an IP address automatically” and
“Obtain DNS server address automatically”. Click
“OK”. Close the “Local Area Connection Properties”
window, and then close the “Network Connections”
screen.
3. After the IP address setup is complete, open
command prompt (i.e., click “Start” -> “Run…”),
and then type ‘cmd’ and click “OK”.
4. Input “ipconfig” command and press
Enter key. The value of IP Address is
the IP address assigned to this PC.
The Default Gateway value is the IP
address of MZK-WG300FF14 router. In
this example, it is 192.168.111.1.
NOTE: The Default Gateway value may be different.
5. Open web browser and enter “mf.setup” in the address bar. A login window will appear. Enter
user name and password, and then click “OK”. The web management interface of MZK-WG300FF14
router will be displayed.
Default user name: admin
Default password: password
2.3 Web Management Interface
The MZK-WG300FF14 router has a built-in HTTP server. This enables you to connect to the
router and configure it using a web browser.
4 Quick Installation Guide
MZK-WG300FF14
1. To login to the web management interface, open a web browser.
2. Enter “mf.setup” in the address bar.
3. A login window will appear.
4. Enter the user name (default is admin) and password (default is password). The
homepage will be displayed.
NOTE: The password can be changed in Administration -> Password.
2.4 Configuration Using Setup Wizard
The Setup Wizard will guide you to configure the router for the first time.
1. Click “Setup Wizard” on the left pane. In “Detect WAN Connection” page, click “Start Auto
Detect” button. The router will start to detect your WAN access type.
2. The WAN Access Type will be shown in Detect Result. Click “Next>>”.
NOTE: If the Setup Wizard does not detect a WAN connection type, you must select one
WAN Access Type, either Static IP, DHCP Client, or PPPoE, in the WAN Interface
Setup page (the next step).
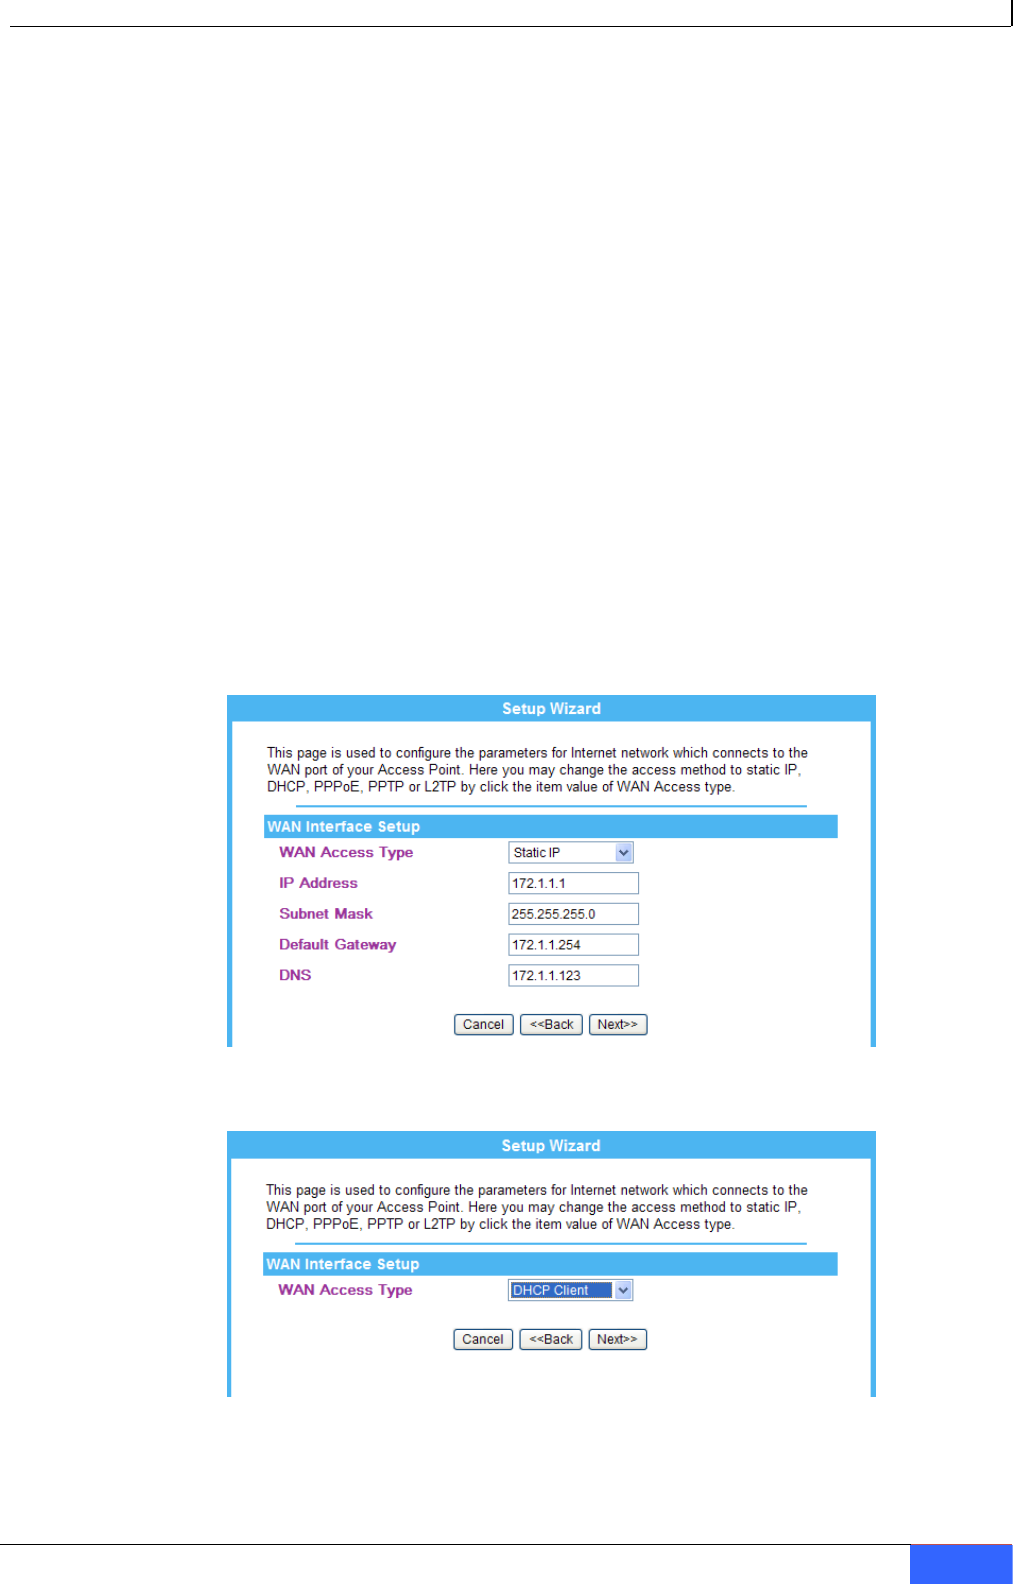
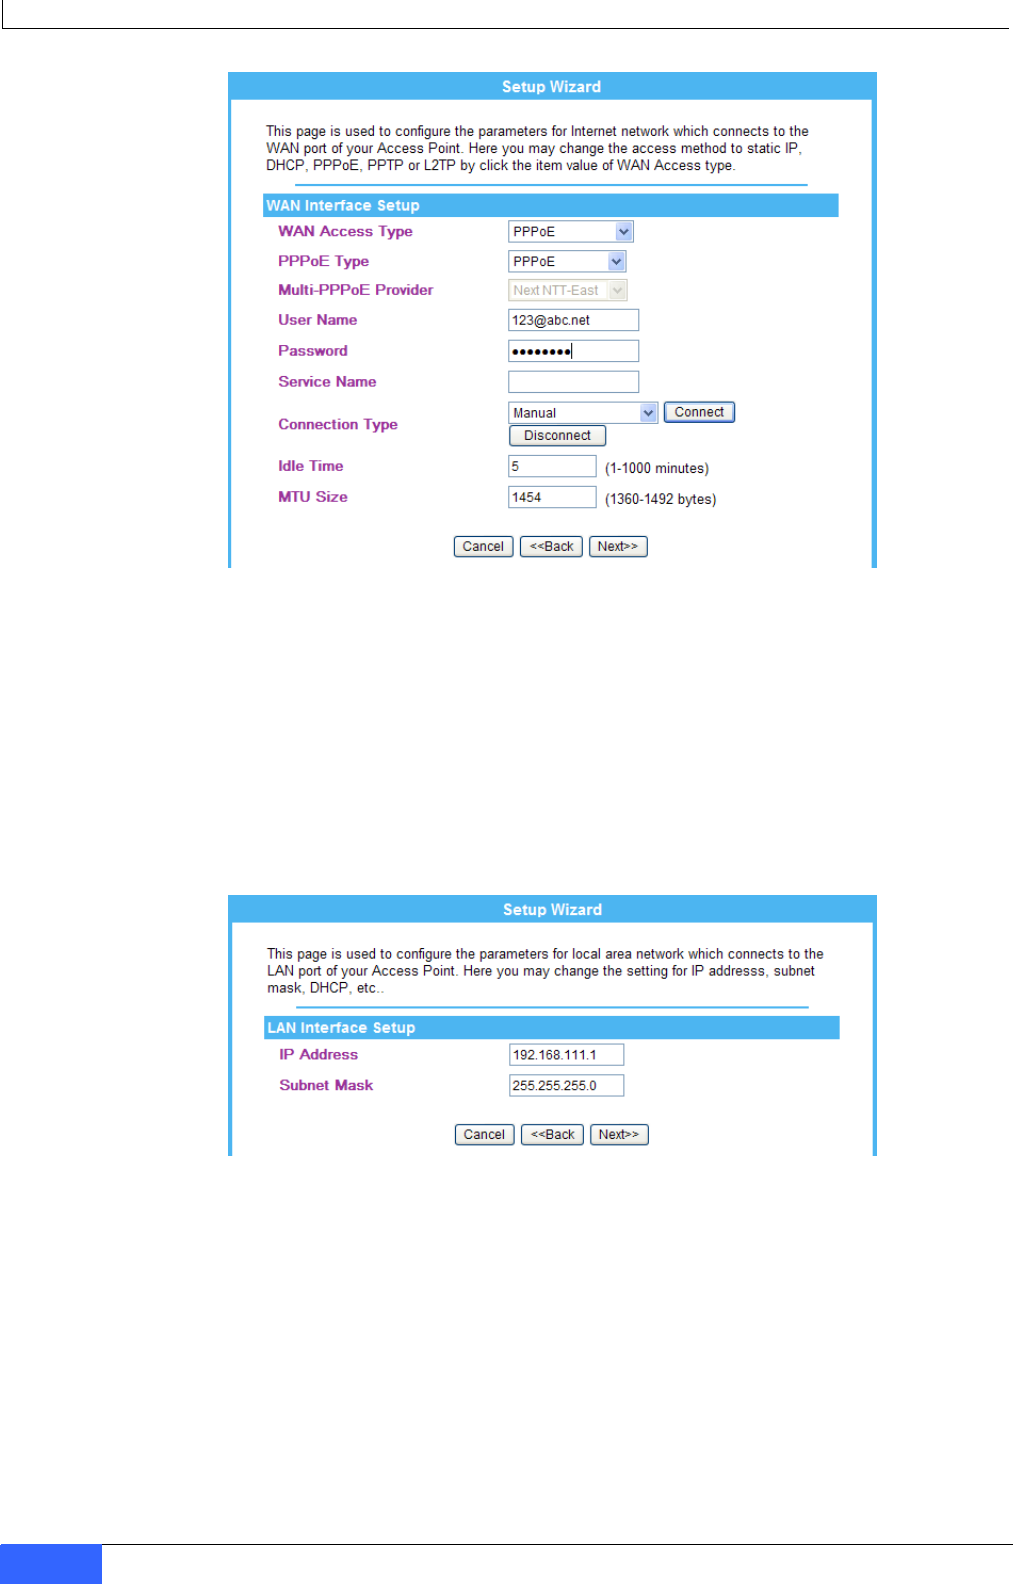
3. The WAN Interface Setup page will be displayed. Configure the necessary settings of WAN
Access Type. Click “Next>>” when done.
NOTE: The WAN Interface Setup can also be configured with customized settings in
Network -> Internet Service Setup.
Static IP
Enter a WAN IP address, Subnet Mask, Default Gateway, and
DNS Server IP address provided by your ISP.
DHCP Client
In DHCP Client, the router will automatically get a dynamic IP
from your ISP.
Quick Installation Guide 5
MZK-WG300FF14
PPPoE
Select the PPPoE Type and change the Multi-PPPoE Provider, if
necessary.
Type the User Name (Login Name or Login Account), Password,
and Service Name (optional) provided by your ISP.
Click “Connect” to enable connection.
4. The LAN Interface Setup page will be displayed. If needed, setup the LAN port IP Address
and Subnet Mask of the router. Click “Next>>” when done.
NOTE: The LAN Interface Setup can also be configured with customized settings in
Network -> LAN Interface Setup.
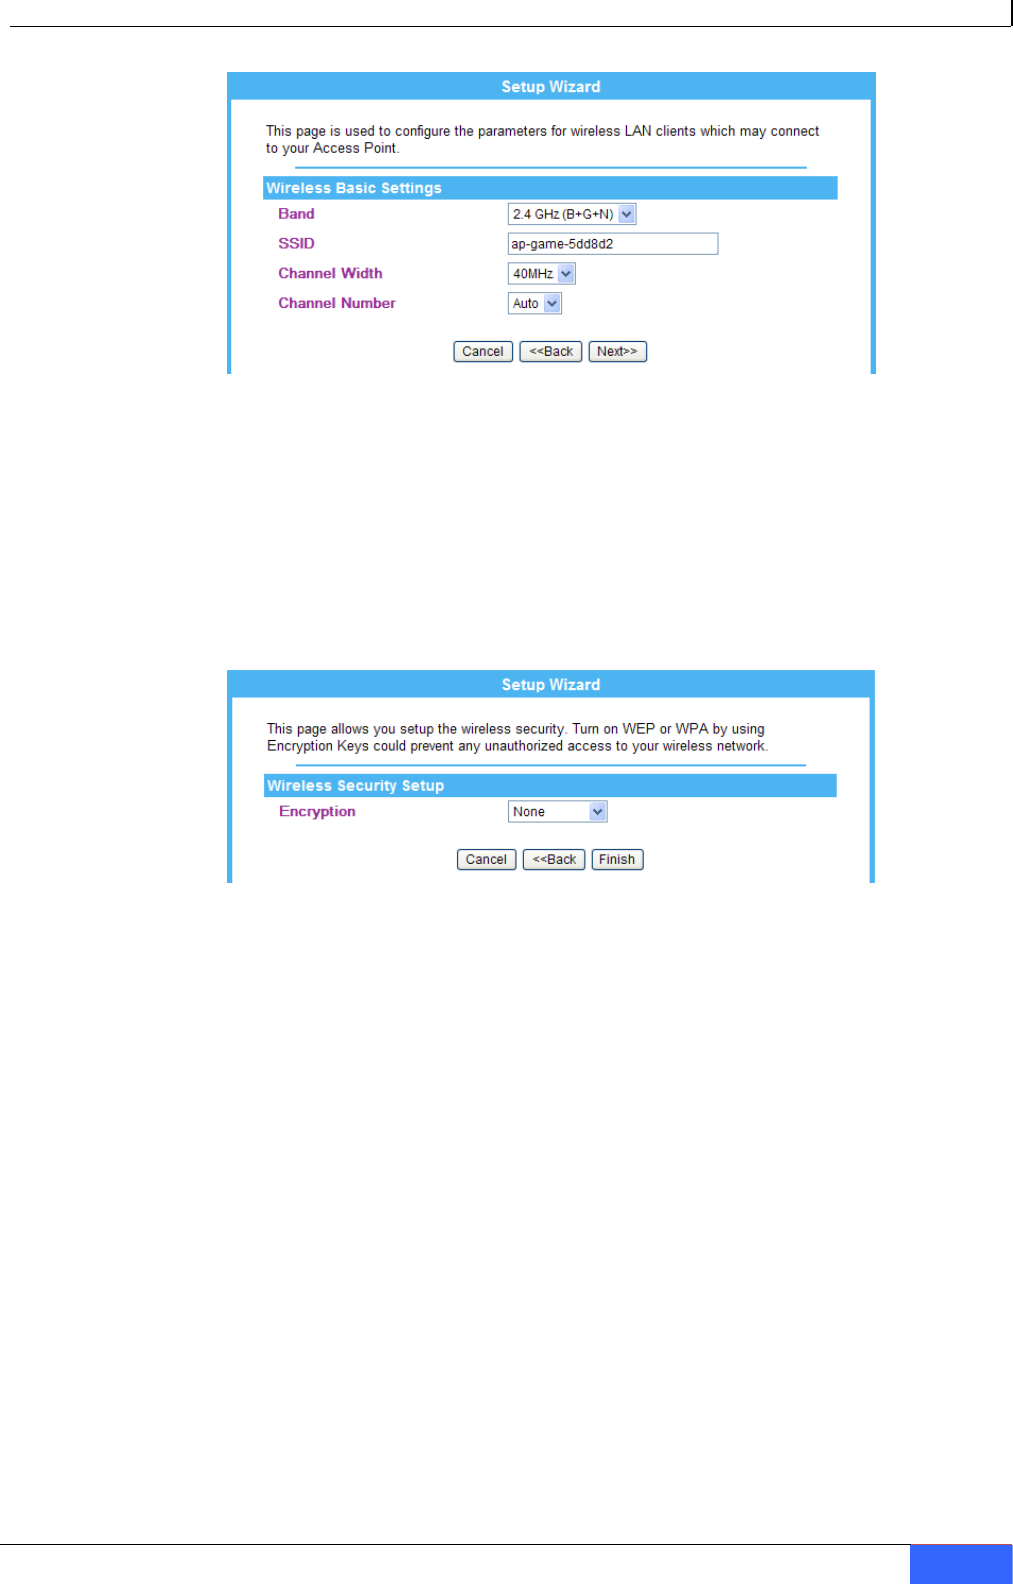
5. The Wireless Basic Settings page will be displayed. Configure the parameters as necessary.
Click “Next>>” when done.
NOTE: The Wireless Basic Settings can also be configured with customized settings in
Wireless -> Basic.
6 Quick Installation Guide
MZK-WG300FF14
Band – allows you to select the 802.11 standards that will be allowed to
connect to the wireless router
SSID – (service set identifier) allows you to enter a unique name for the
wireless LAN. It is recommended to change the default SSID for
better security.
6. The Wireless Security Setup page will be displayed. Select the encryption type to prevent
any unauthorized access to your wireless network. Click “Finish”.
NOTE: The Wireless Security Settings can also be configured with customized settings in
Wireless -> Security.
Encryption – choose your preferred encryption type
7. The Internet access setup is complete. Your router may reboot at this point.
NOTE: If your PC/host system is still cannot get internet access, please reboot your
DSL/cable modem. Contact also your ISP for trouble shooting.
If wireless stations will connect to the router, the wireless stations must use the
same settings, such as SSID, encryption type, etc.
Quick Installation Guide 7

MZK-WG300FF14
Federal Communication Commission Interference Statement
This equipment has been tested and found to comply with the limits for a Class B digital
device, pursuant to Part 15 of the FCC Rules. These limits are designed to provide
reasonable protection against harmful interference in a residential installation. This
equipment generates, uses and can radiate radio frequency energy and, if not installed and
used in accordance with the instructions, may cause harmful interference to radio
communications. However, there is no guarantee that interference will not occur in a
particular installation. If this equipment does cause harmful interference to radio or television
reception, which can be determined by turning the equipment off and on, the user is
encouraged to try to correct the interference by one of the following measures:
- Reorient or relocate the receiving antenna.
- Increase the separation between the equipment and receiver.
- Connect the equipment into an outlet on a circuit different from that
to which the receiver is connected.
- Consult the dealer or an experienced radio/TV technician for help.
This device complies with Part 15 of the FCC Rules. Operation is subject to the following two
conditions: (1) This device may not cause harmful interference, and (2) this device must
accept any interference received, including interference that may cause undesired operation.
FCC Caution: Any changes or modifications not expressly approved by the party responsible
for compliance could void the user's authority to operate this equipment.
IEEE 802.11b or 802.11g operation of this product in the U.S.A. is firmware-limited to
channels 1 through 11.
IMPORTANT NOTE:
FCC Radiation Exposure Statement:
This equipment complies with FCC radiation exposure limits set forth for an uncontrolled
environment. This equipment should be installed and operated with minimum distance
20cm between the radiator & your body.
This transmitter must not be co-located or operating in conjunction with any other
antenna or transmitter.
8 Quick Installation Guide