Plantronics CA12CDYYYY Wireless Headset Adapter - Remote Unit User Manual
Plantronics Inc Wireless Headset Adapter - Remote Unit
Contents
- 1. Users Manual 1
- 2. Users Manual 2
Users Manual 1
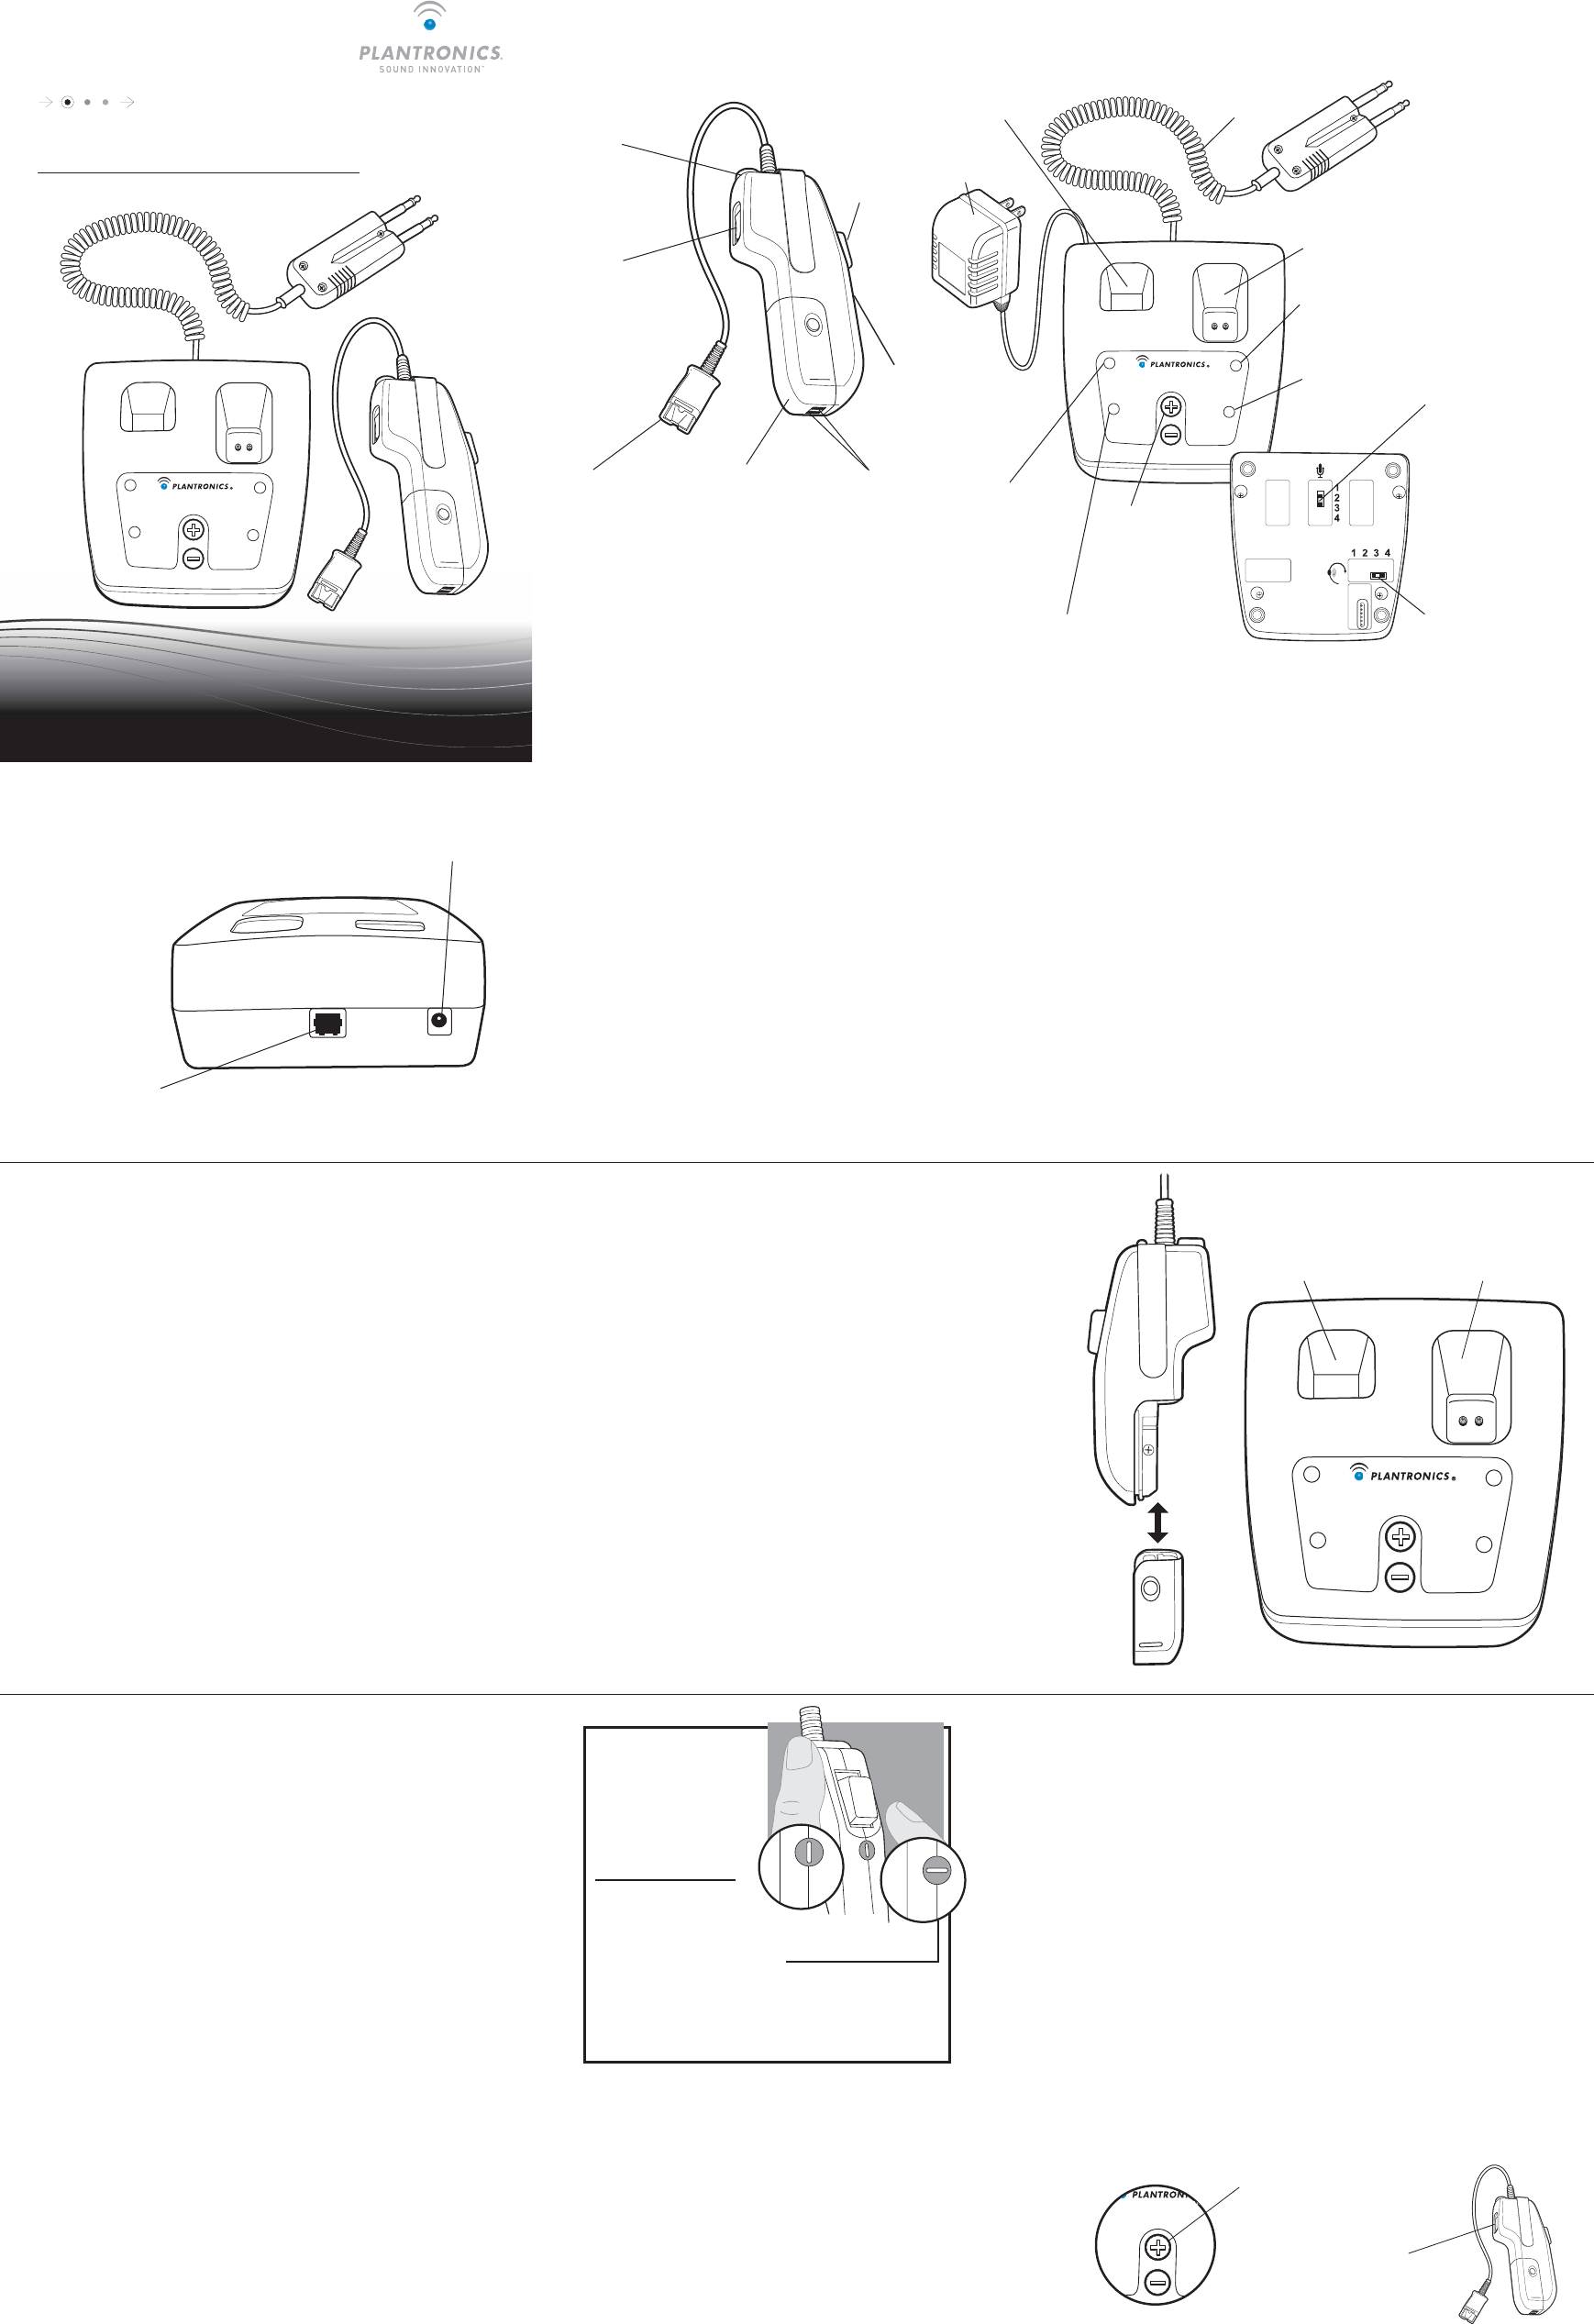
REMOTE
CHARGE
SPARE
CHARGE
BASE
POWER
TALK
TAL K
VOLUME
BASE UNITREMOTE UNIT
Quick Disconnect™
for Headset
Headset
Volume Control
(Fine Adjust)
Remote
On-Off Button
and
Indicator LED
Push-to-
Talk
Button
Selector for
Momentary/
Locking PTT
Function
Battery
Pack
Battery Charging
Contacts
Talk (Transmit)
Level Volume
Control
(Fine Adjust)
PTT Indicator
(Green)
Remote Unit
Battery Charging
Indicator (Orange)
Spare
Battery Pack
Charging
Indicator
(Orange)
Base Unit
Power Indicator
(Green)
Charging Well for
Remote Unit
Charging Well for
Spare Battery Pack
Console
Interface Cable
AC Adapter
BOTTOM VIEW
OF BASE UNIT
1.4, 2.1,
2.3, 2.4
Talk (Transmit)
Level Volume
Control
(Course Adjust)
*The factory
settings provide
a carbon micro-
phone output level.
No adjustment is
typically required.
Headset (Listen)
Level Volume
Control
(Course Adjust)
1Set-up
2Battery Charging
& Management
3Operation
Charging Well for
Remote Unit
Charging Well for
Spare Battery Pack
REMOTE
CHARGE
SPARE
CHARGE
BASE
POWER
TALK
TALK
VOLUME
Talk (Transmit)
Volume Control
(Fine Adjust)
E
ER
TAL K
VOLUME
Headset (Listen)
Volume Control
(Fine Adjust)
Push-to-Talk Headset Amplifier
Note: When the Battery Pack is
installed or changed, the indicator
light will begin to flash as soon as
the unit is ready for use. This may
require up to 45 seconds as the
Remote Unit determines and selects
the most reliable radio channel.
1.1 Set up the CA12CD Amplifier as shown.
1.2 Plug the modular connector on the Console Interface Cable
into the modular jack on the back of the Base. Plug the other
end into your console.
1.3 Plug the AC Adapter into the wall outlet, and plug the round
power connector into the back of the Base. The Base Power
indicator will illuminate.
1.4 Slide the Battery Pack on to the Remote Unit. When the
Battery Pack is installed or changed, the indicator light will
begin to flash as soon as the unit is ready for use. This may
require up to 45 seconds as the Remote Unit determines and
selects the most reliable radio channel.
1.5 Attach a Headset to the Remote Unit.
Note: Except for adjusting the Headset Volume on the Remote
Unit to the users preference, no other adjustments are typically
required. Please refer to Section 3 for adjustment instructions.
2.1 To attach the Battery Pack to the Remote Unit, simply slide
the Battery Pack onto the Remote Unit and snap it into place.
Do not force them together.
2.2 The Base Unit is equipped with 2 battery charging wells. The
larger well allows charging of the battery while it is attached
to the Remote Unit. The smaller well allows charging of a
spare Battery Pack all by itself.
2.3 Insert the Remote Unit and the spare Battery Packs into their
respective charging wells. The Charge Indicators will flash
when the Battery Packs are charging.
2.4 When the Battery Pack is charged, the charge LED will stop
blinking and glow steadily.
2.5 The indicator light on the Remote Unit will begin to flash as
soon as the unit is ready for use. This may require up to 45
seconds as the Remote Unit determines and selects the
most reliable radio channel.
2.6 A fully charged Battery Pack will usually last for an 8-hour
shift. To maximize the life of the Battery Pack, turn the
Remote off and place it into the charging well when not in use.
Prior to being used, Battery Packs must be charged for 3
hours.
Note: Swap battery packs at the end of each shift.
Note: Always release/disengage PTT button before swapping
Battery Packs.
The CA12CD operates within the 1.92–1.93 MHz frequency range.
Operation of other devices within this frequency range will reduce
the user density of the CA12CD.
3.1 To maximize user density, always turn Remote Unit off when
not in use.
3.2 Press the On-Off button located on top of the Remote Unit.
The green On-Off indicator will begin to flash. If the battery
has just been installed, the Remote Unit will automatically
turn on and the On-Off indicator will begin to flash within 45
seconds. (Reference section 1.4)
3.3 Depressing the Push-To-Talk (PTT) button on the Remote
Unit will generate the “key” signal to your console or radio.
While the PTT button is depressed, the green Talk indicator on
the Base Unit will illuminate.
3.4 The operation of the PTT button can be adjusted with a
screwdriver to be either lockable or non-lockable as shown.
REMOTE
CHARGE
SPARE
CHARGE
BASE
POWER
TAL K
TAL K
VOLUME
QUICK START USER GUIDE
CA12CD
. . . . . . . . . . . . . . . . . . . . . . . . . . . . . . . . . . . . . . . . . . . . . . . . . . . . . . . . . . . .
COMPONENTS OF THE CA12CD
Plug in Console
Interface Cable
here
Plug in
AC Adapter
here
BACK VIEW OF BASE UNIT
1.1, 1.2, 1.3
Nonlockable Position
Lockable Position
3.4
Turn the selector
horizontally. The push-
to-talk button can be
depressed momentarily
when you wish to speak.
Note that the selector
slot is aligned vertically.
The push-to-talk button
can be depressed
momentarily or locked
in the ON position by
first depressing then
sliding the button until
it locks.
How to select
the lockable
or nonlockable
switch position
3.5 You should not need to adjust your Talk (transmit) level: The
factory setting (coarse switch set to 4 and fine-adjust set to
nominal) is perfect for most applications. If you need to
change this level, first try adjusting the fine-adjust controls
on the top of the Base. If you cannot get a sufficient change
in output by adjusting the fine-adjust controls, change the
course-adjust switch on the bottom of the Base to the next
position. You may have to repeat these steps a couple of
times before you get the correct Talk level.
3.6 The Listen (receive) level is set at the factory to coarse-switch
position 2, and the fine-adjust rocker switch on the Remote is
set to nominal. If you need to change this level, you can do so
by following the steps for changing the Talk level in the
previous section.
3.7 The Base and the Remote are paired with each other at the
factory in a process called subscription. If you replace your
Remote, or if your Remote looses its subscription (indicated
by a rapidly-flashing On-Off LED), you can perform the
subscription process as follows:
• Hold both of the Talk Volume Fine-Adjust controls on the
top of the Base down.
• The Base Power LED will begin blinking.
• Hold the Remote’s Fine-Adjust Volume Control in either
the up or down position while holding the PTT button down.
• The Remote’s On-Off LED will turn on steady (no flashing).
• The Remote will subscribe (or re-subscribe) to the Base,
after which the Base Power LED will return to the steady-
on state and the Remote’s On-Off LED will go out.
• Unplug AC adaptor from the Base and then plug it back in.
• Press the Remote’s On-Off switch to enable the RF link
and use the CA12CD.