Plantronics E230 Bluetooth Headset User Manual
Plantronics Inc Bluetooth Headset
User manual

Plantronics Explorer® 230
User Guide

ii
iii
Welcome
Congratulations on purchasing a Plantronics headset. This
User Guide contains instructions for setting up and using your
Plantronics Explorer® 230 headset. Please refer to the separate
Safety Instructions booklet for important product safety information
prior to installation or use of the product.
Getting Assistance
The Plantronics Technical Assistance Center is ready to assist you.
You can find answers to frequently asked questions, ask a question
using e-mail, receive service over the Internet, or speak directly with
a representative. Visit www.plantronics.com/support
Registering Your Product
Visit www.plantronics.com/product registration to register your
product online so we can provide you with the best service and
technical support.
Contents
Welcome ...............................................................................................ii
What is Bluetooth®? ............................................................................iv
Package Contents, Features and Accessories ..................................... 1
Charging Your Headset ........................................................................ 2
How to Charge Your Headset Using the AC Charger .................. 2
Pairing Your Headset ........................................................................... 4
Plantronics QuickPair™ Technology ........................................... 4
How to Pair Your Phone With Your Headset for the First Time ..... 5
How to Pair Your Headset if it Has Been Previously Paired With
Another Device ........................................................................... 6
Adjusting the Fit ................................................................................... 7
Headset Controls ................................................................................. 8
Range .................................................................................................. 9
Indicator Lights .................................................................................. 10
Hands-Free Features ......................................................................... 11
Troubleshooting ................................................................................. 12
Product Specifications ....................................................................... 13
Limited Warranty ................................................................................ 14
Regulatory Notices ............................................................................ 15
1
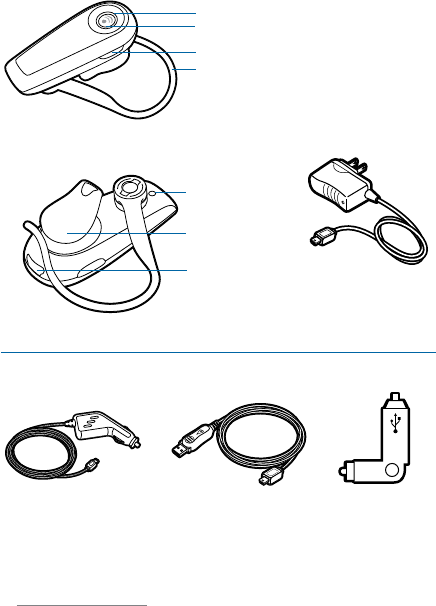
Package Contents and Features
Plantronics Explorer® 230 Accessories*
Headset Front
AC Charger
100 – 240V
Indicator Light
* Not included. To order, please contact your Plantronics supplier or go
to www.plantronics.com
What is Bluetooth®?
Bluetooth wireless technology provides a way for devices to
communicate with each other using short-range radio frequency instead
of wires. Any two Bluetooth devices can communicate as long as they
both have Bluetooth turned on, they are within range and they have
been paired — a quick “handshake” process that connects the two
devices. Bluetooth range is up to 33 feet (10 meters). Obstructions such
as walls or other electronics devices can cause interference or shorten
the effective range.
NOTE For optimal performance, place your headset and phone on the
same side of your body. Headset Back
Microphone
Eartip
Charging Jack
Volume Control
Swivel Earloop
Call Control Button (on/off)
Vehicle Charging Adapter
#76777-01
USB Headset Charger
#76016-01
Vehicle Power Charger
#78583-01
2
3
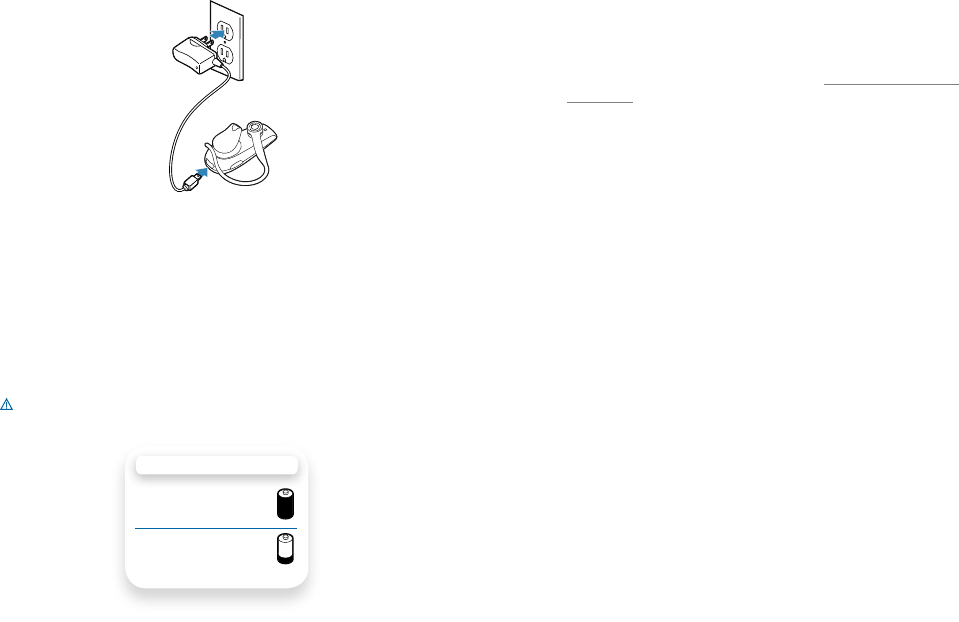
How to Charge Your Headset Using Only the AC Charger
Before using your headset for the first time, charge it for at least
20 minutes. A full charge takes approximately two hours.
1 Connect the AC charger to a power outlet.
2 Plug the AC jack into the charging jack on the headset.
While your headset is charging, the indicator glows red. When your
headset is fully charged, the indicator turns off.
WARNING Do not use your headset while it is connected to
the charger.
Charging Your Headset
CHARGING TIME
2 hours ...................
Full charge
20 minutes ..............
Minimum charge
before first use
1
2
Pairing Your Headset
Pairing is the process of introducing your headset to your phone.
Before using your headset for the first time, you must pair it with
your Bluetooth phone. Normally, you need to pair your headset with
your phone only once.
To see a demo of the pairing process, visit www.plantronics.com/
EasyToPair
Plantronics QuickPair™ Technology
Your new headset includes Plantronics QuickPair technology to simplify
the Bluetooth setup process. The first time you turn your headset on,
your headset automatically enters pairing mode for 10 minutes. Once
paired successfully, your headset stays on for instant use.
If not sucessfully paired after 10 minutes, your headset automatically
powers off. When you turn the headset on again, it automatically goes
into pairing mode until successfully paired with a Bluetooth phone.
4
5
1
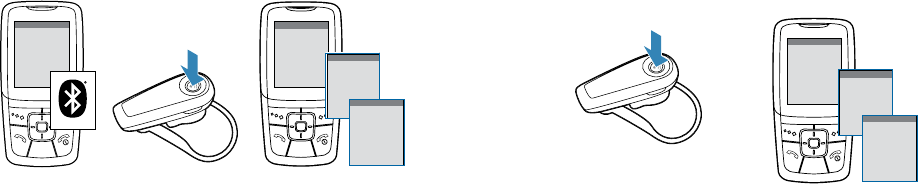
How to Pair Your Phone With Your Headset for the First Time
1 Turn on the Bluetooth feature on your phone.
For most phones, select Settings/Tools > Connections >
Bluetooth > On. See your phone’s user guide for more information.
2 Turn the headset on.
Press and hold the call control button until the indicator flashes
red/blue. The headset is now in pairing mode.
If you don’t see the red/blue flash, press and hold the call control
button to turn your headset off, and then press and hold the call
control button again until you see the red/blue flash.
3 Use the commands on your phone to locate your headset.
For most phones, select Settings/Tools > Connections > Bluetooth
> Search > 2XXPlantronics. See your phone’s user guide for more
information.
When prompted for the passkey, enter 0000.
Pairing is successful when the indicator on your headset flashes
blue. Your headset is now connected and ready to use.
Pairing Your Headset
3
SETTINGS
SETTINGS
Tim e and Dat e
Phone Settings
Bluetooth
Sound Settings
Net work S ervices
Security
Reset Settings
BLUETOOTH
BLUETOOTH
Discover/
Search
BLUETOOTH
BLUETOOTH
2xxPlantronics
PAS SKE Y
0000
2
Pairing Your Headset
How to Pair Your Headset if it Has Been Previously Paired
With Another Device
1 Turn the headset off.
Press and hold the call control button until the indicator turns red
and then turns off.
2 Turn the headset on.
Press and hold the call control button until the indicator flashes
red/blue. The headset is now in pairing mode.
3 Use the commands on your phone to locate your headset.
For most phones, select Settings/Tools > Connections > Bluetooth
> Search > 2XXPlantronics. See your phone’s user guide for more
information.
4 When prompted for the passkey, enter 0000.
Pairing is successful when the indicator on your headset flashes
blue. Your headset is now connected and ready to use.
2
1
4
3
BLUETOOTH
BLUETOOTH
Discover/
Search
BLUETOOTH
BLUETOOTH
2xxPlantronics
PAS SKE Y
0000
6
7
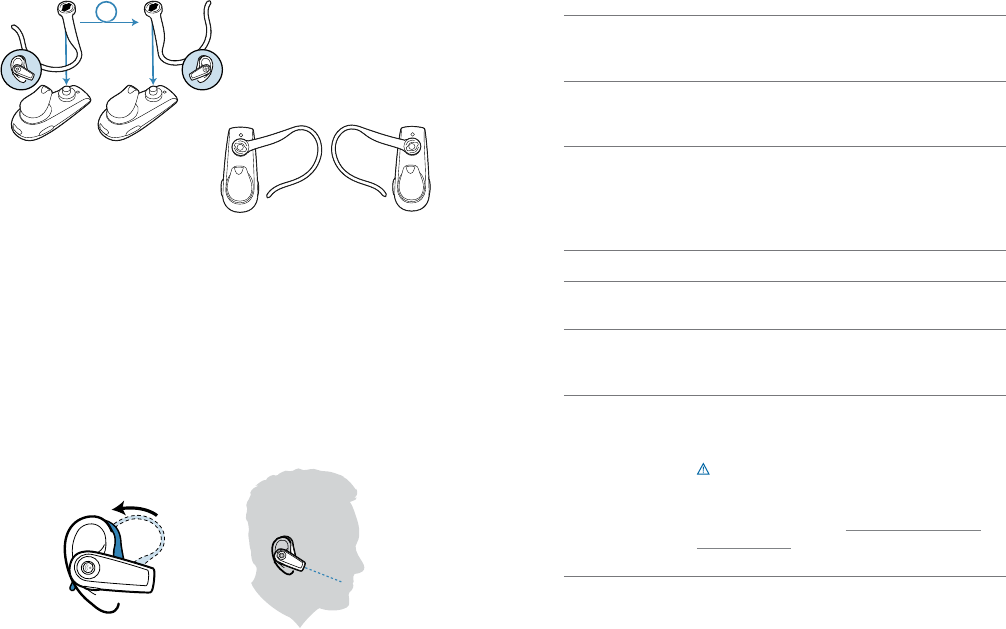
1 To remove the earloop gently push up on earloop near the
plantronics logo until you hear a snap. Gently snap back in to
replace.
2 Position earloop opening on left to wear on left ear, position
opening to the right to wear on .
3 Place the ear loop behind your ear.
4 Rotate the headset so that the speaker rests comfortably in
your ear.
5 Align the microphone with the corner of your mouth.
Callers can hear you best when you point the microphone towards
the corner of your mouth.
Adjusting the Fit
Right Left
2
1
3
4
5
Headset Controls
Turn on the headset Press and hold the call control button until the
indicator glows blue. You will hear ascending
tones.
Turn off the headset Press and hold the call control button until the
indicator glows red. You will hear descending
tones. When power is off, indicator stays off.
Answer a call Briefly press the call control button.
When you receive a call, your phone may ring
before your headset rings. Wait until you hear
the ring in your headset before you press the call
control button to answer the call.
Reject a call Press the call control button for 2 seconds.
End a call or cancel
an outgoing call
Briefly press the call control button.
Make a call Enter number on your phone, press send, and
the call is automatically transferred to headset; no
need to press call control button.
Adjust the volume Briefly push up or down on the volume button for
incremental volume steps. You will hear two tones
(high tone followed by low tone) at the volume limit.
WARNING: Do not use headphones/headsets
at high volumes for an extended period of time.
Doing so can cause hearing loss. Always listen
at moderate levels. See www.plantronics.com/
healthandsafety for more information on headsets
and hearing.

8
9
Range
To maintain a connection, keep your headset within 33 feet (10 meters)
of the Bluetooth device. If there are obstacles between your headset and
the device, you may experience interference. For optimal performance,
place your headset and phone on the same side of your body.
Audio quality degrades as you move out of range. When you are far
enough away to lose the connection, you hear a high tone in the headset.
The headset attempts to reconnect after 30 seconds. If you move back
in range, you can manually reconnect by pressing the call control button.
NOTE Audio quality is also dependent upon the device with which the
headset is paired.
Headset Controls
Transfer a call from
headset to phone
Press and hold the call control button until you
hear a short, low tone.
Transfer a call from
phone to headset
Press and hold the call control button until you
hear a short, low tone.
Indicator Lights
Headset Status Headset Indicator Light
Powering on Steady Blue.
Powering off Red appears and goes off.
Standby Blue flashes.
Charging battery Red solid light.
Low battery Triple red flashes,
Pairing mode Blue/red flashes.
Missed call Purple flashes. Single press the call control
button to cancel.
In coming call Triple blue flashes. Briefly press call control
button to answer the call. Press call control
button for 2 seconds to reject the call.

10
11
Hands-Free Features
If your phone and your wireless service provider both support hands-free
operation, you can use the following features:
Redial the last number To activate last number redial, double press
the call control button. You will hear a low
tone after each double-key press.
Using Voice Dialing With the headset on, press the call control
button for 2 seconds to activate the voice
dialing.
NOTE To use voice-activated dialing, the
voice-dialing feature must be enabled on
your phone. See your Bluetooth phone
manual for instructions.
Reject a call When receiving an incoming call, press the
call control button for 2 seconds to reject
the call.
Troubleshooting
My headset
does not work
with my phone.
Headset was not in pairing mode when mobile
phone menu selections were made. See page 5
“Pairing Your Headset.”
Incorrect menu selections were made on
your mobile phone. See page 5 “Pairing Your
Headset.”
I did not enter
my passkey.
Your phone did not locate the headset.
Repeat the pairing process on page 5.
Incorrect menu selections were made on your
mobile phone. Repeat the pairing process on
page 5.
Callers cannot hear
me, or I cannot
hear caller/dialing
tone.
The headset is not turned on. Press the call
control button for 2 seconds until you hear a
beep or see the indicator light glow blue to turn
headset on.
Your headset is out of range. Move the headset
closer to the phone or Bluetooth device.
Your headset battery is drained. Charge your
battery using the AC power adapter supplied.
The listening volume is too low. Press the volume
key up (toward the ear loop) to increase the
sound heard in the headset.

12
13
Product Specifications
Talk Time* Up to 7 hours
Standby Time* Approximately 8 days or 200 hours
Charge Time 2 hours
Range Up to Bluetooth standard 33 feet (10 meters)
Power Requirements 5V DC – 350 mA
Battery Type Lithium ion polymer
Storage/Usage
Temperature
32F – 120F (0C – 48C)
Version Bluetooth 2.0
Supports Bluetooth hands-free and headset profiles.
* Battery enabled. Performance may vary by device.
LIMITED WARRANTY
This warranty covers defects in materials and workmanship of products manufactured,
sold or certified by Plantronics which were purchased and used in the United States.
The warranty lasts for one year from the date of purchase of the products.
This warranty extends to you only if you are the end user with the original purchase
receipt.
We will at our option, repair or replace the products that do not conform to the
warranty. We may use functionally equivalent reconditioned/refurbished/remanufac-
tured/pre-owned or new products or parts.
To obtain service in the U.S., contact Plantronics at (866) 363-BLUE (2583).
THIS IS PLANTRONICS’ COMPLETE WARRANTY FOR THE PRODUCTS.
This warranty gives you specific legal rights, and you may also have other rights that
vary from state to state. Please contact your dealer or our service center for the full
details of our limited warranty, including items not covered by this limited warranty.

14
15
REGULATORY NOTICES
EXPOSURE TO RF RADIATION
The internal wireless radio operates within the guidelines found in radio frequency
safety standards and recommendations, which reflect the consensus of the scien-
tific community. Independent studies have shown that the internal wireless radio is
safe for use by consumers. Visit www.plantronics.com for more information.
NOTE: Modifications not expressly approved by Plantronics, Inc. could void the user’s
authority to operate the equipment.
US FCC REQUIREMENTS PART 15
This device complies with Part 15 of the FCC Rules. Operation is subject to the
following two conditions:
1. This device may not cause harmful interference, and
2. This device must accept any interference received, including interference that may
cause undesired operation.
This equipment has been tested and found to comply with the limits for a Class B digital
device, pursuant to Part 15 of the FCC Rules. These limits are designed to provide
reasonable protection against harmful interference in a residential installation. This
equipment generates, uses, and can radiate radio frequency energy and, if not installed
and used in accordance with the instructions, may cause harmful interference to radio
communications.
However, there is no guarantee that interference will not occur in a particular installation.
If this equipment does cause harmful interference to radio or television reception which
can be determined by turning the radio or television off and on, the user is encouraged
to try to correct interference by one or more of the following measures:
1. Reorient or relocate the receiving antenna.
2. Increase the separation between the equipment and receiver.
3. Connect the equipment into an outlet on another circuit.
4. Consult the dealer or an experienced radio/TV technician for help.
RSS 210
Industry Canada Radio Equipment
The term “IC:” before the radio certification number only signifies that Industry Canada
technical specifications were met. Operation is subject to the following two conditions:
(1) this device may not cause interference, and (2) this device must accept any
interference, including interference that may cause undesired operation of the device.
“Privacy of communications may not be ensured when using this telephone.” This
product meets the applicable Industry Canada technical specifications of the RSS210.
EXPOSURE TO RADIO FREQUENCY RADIATION
This device and its antenna must not be co-located or operated in conjunction
with any other antenna or transmitter. To comply with FCC RF exposure require-
ments, only use supplied antenna. Any unauthorized modification to the antenna
or device could void the user’s authority to operate this device.
Plantronics, Inc.
345 Encinal
Santa Cruz, CA 95060
United States
Tel: 800-544-4660
www.plantronics.com
© 2008 Plantronics, Inc. All rights reserved. Plantronics, the logo design, Plantronics
Explorer, QuickPair and Sound Innovation are trademarks or registered trademarks of
Plantronics, Inc. The Bluetooth word mark and logo are owned by Bluetooth SIG, Inc. and
any use of such marks by Plantronics, Inc. is under license. All other trademarks are the
property of their respective owners.
U.S. Patents Pending
TBD (01/08)