Plantronics M1000 Bluetooth Class 2 Device User Manual 1930PLA M1500 manual 072902 Page 1
Plantronics Inc Bluetooth Class 2 Device 1930PLA M1500 manual 072902 Page 1
Manual
CORDLESS HEADSET SOLUTION WITH BLUETOOTH™
M1500
QUICK START AND INFORMATION GUIDE
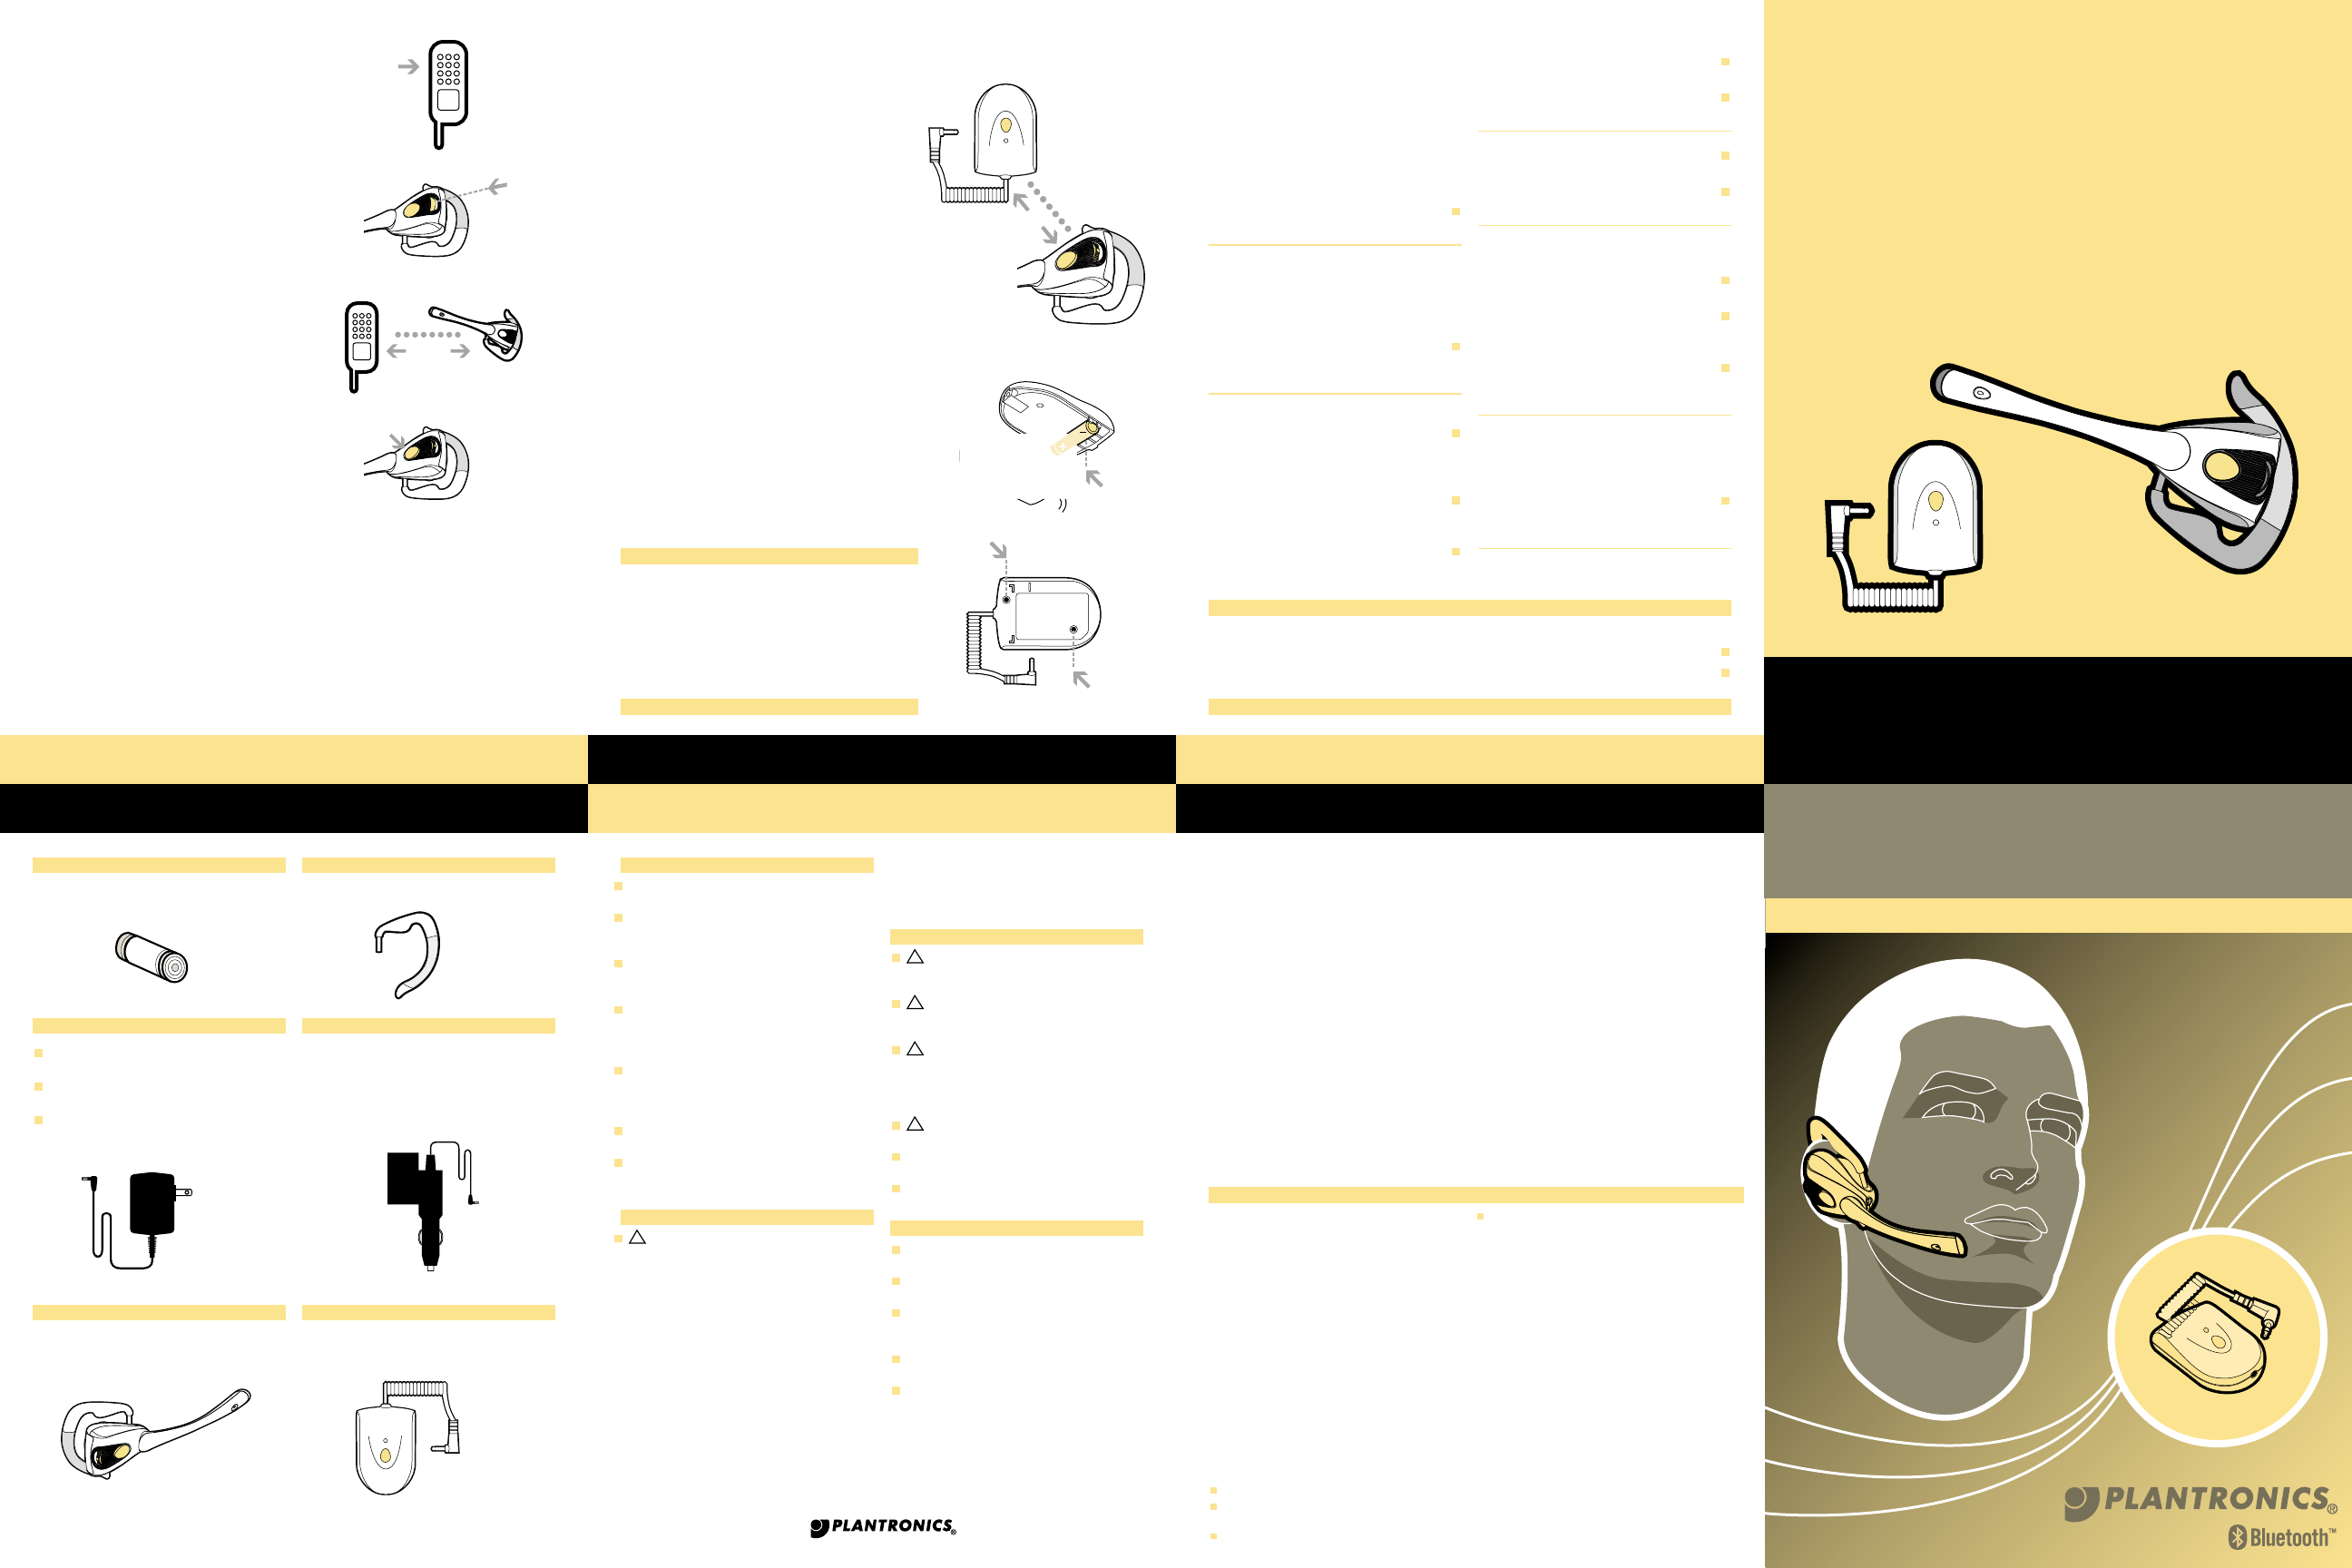
PARTS AND ACCESSORIES IMPORTANT SAFETY INSTRUCTIONS
OTHER IMPORTANT INSTRUCTIONS
ABOUT
PLANTRONICS
CORDLESS HEADSET SOLUTION WITH BLUETOOTH™
Your Plantronics M1500 cordless headset solution utilizes
2.4GHz Bluetooth technology to provide lightweight, hands-free
and wire-free communication for your headset-ready mobile
phone. Designed for maximum comfort and ease of use, this
cordless headset solution is tailored to suit your mobile lifestyle.
This guide will help you set up and use your cordless headset.
Your headset is compliant with version 1.1 of the Bluetooth
Specification and supports the Headset Profile. The adapter unit
also supports the Audio Gateway Profile.
For accessibility information call the Plantronics Technical
Assistance Center (TAC) at (800) 544-4660 or visit
www.plantronics.com.
M1500 BATTERY
Replacement battery for headset or adapter,
2.4V Nickel Metal Hydride (NiMH).
M1500 FLEXIBLE EARLOOP
Replacement headset earloop.
AC ADAPTER
110-Volt AC Adapter. Replacement AC
adapter/charger for North America.
220-Volt AC Adapter. Replacement AC
adapter/charger for Europe.
220-Volt UK AC adapter. Replacement AC
adapter/charger for United Kingdom.
CAR LIGHTER ADAPTER
Optional car lighter Y-adapter allows you
to charge your M1500 headset, adapter
and one other device from any 12-Volt car
lighter socket.
M1500 HEADSET
Replacement headset for your M1500
system. Battery included.
A500 ADAPTER
Replacement adapter for your M1500
system. Battery included.
PAIRING TO ANOTHER DEVICE
FIG. 7.1A
FIG. 7.1B
FIG. 7.2
FIG. 7.3
WARRANTY AND SERVICES
IN THE UNITED STATES IN CANADA
Plantronics Service Center Plantronics Service Center
345 Encinal Street 1455 Pitfield Boulevard
Santa Cruz, Saint-Laurent,
CA 95060 Quebec H4S lG3
Tel: 800.544.4660 Tel: 800.540.8363
(toll free) (toll free)
514.956.8363
(toll call)
Fax: 800.279.0162 Fax: 514.956.1825
(toll free) (toll call)
Please use the original container, or pack the unit(s) in a car ton
with sufficient packing material to prevent damage. Include the
following information:
1. Proof of purchase indicating model number and date of
purchase.
2. Bill-to address.
3. Ship-to address.
4. Number and description of units shipped.
5. Name and telephone number of person to call, should con-
tact be necessary.
6. Reason for return and description of the problem.
The following one-year warranty and service information
applies only to product purchased and used in the U.S. and
Canada. Contact your local retail dealer for warranty informa-
tion in your country. During this warranty time, if the product is
defective in workmanship or materials, Plantronics, at our
option, will replace or exchange it for a model of equal value.
Damage caused by improper care, accidents, unauthorized
repair or modifications are not covered under this warranty.
NEITHER PLANTRONICS NOR YOUR RETAIL DEALER OR
SELLING DISTRIBUTOR HAS ANY RESPONSIBILITY FOR
ANY INCIDENTAL OR CONSEQUENTIAL DAMAGES,
INCLUDING WITHOUT LIMITATION, DAMAGE TO PROP-
ERTY, COMMERCIAL LOSS OF PROFIT, OR FOR ANY
EXPENSES, LOSS OF TIME, OR INCONVENIENCE.
SOME STATES DO NOT ALLOW EXCLUSION OR LIMITA-
TION OF INCIDENTAL OR CONSEQUENTIAL DAMAGE,
SO THE ABOVE LIMITATION OR EXCLUSION MAY NOT
APPLY TO YOU.
To obtain warranty service, please prepay shipment and return
the unit to the appropriate facility listed at right:
Consult the dealer or an experienced radio/TV technician
for help.
NOTE: Modifications not expressly approved by
Plantronics, Inc. could void the user's authority to operate
the equipment.
EXPOSURE TO RADIO FREQUENCY RADIATION
The radiated output power of this internal wireless radio is
far below the FCC radio frequency exposure limits. Never-
theless, the wireless radio shall be used as described in
the manual.
The internal wireless radio operates within guidelines
found in radio frequency safety standards and recom-
mendations, which reflect the consensus of the scientific
community.
Plantronics therefore believes the internal wireless radio
is safe for use by consumers. The level of energy emitted is
far less than the electromagnetic energy emitted by wire-
less devices such as mobile phones. However, the use of
wireless radios may be restricted in some situations or envi-
ronments, such as aboard airplanes. If you are unsure
of restrictions, you are encouraged to ask for authorization
before turning on the wireless radio.
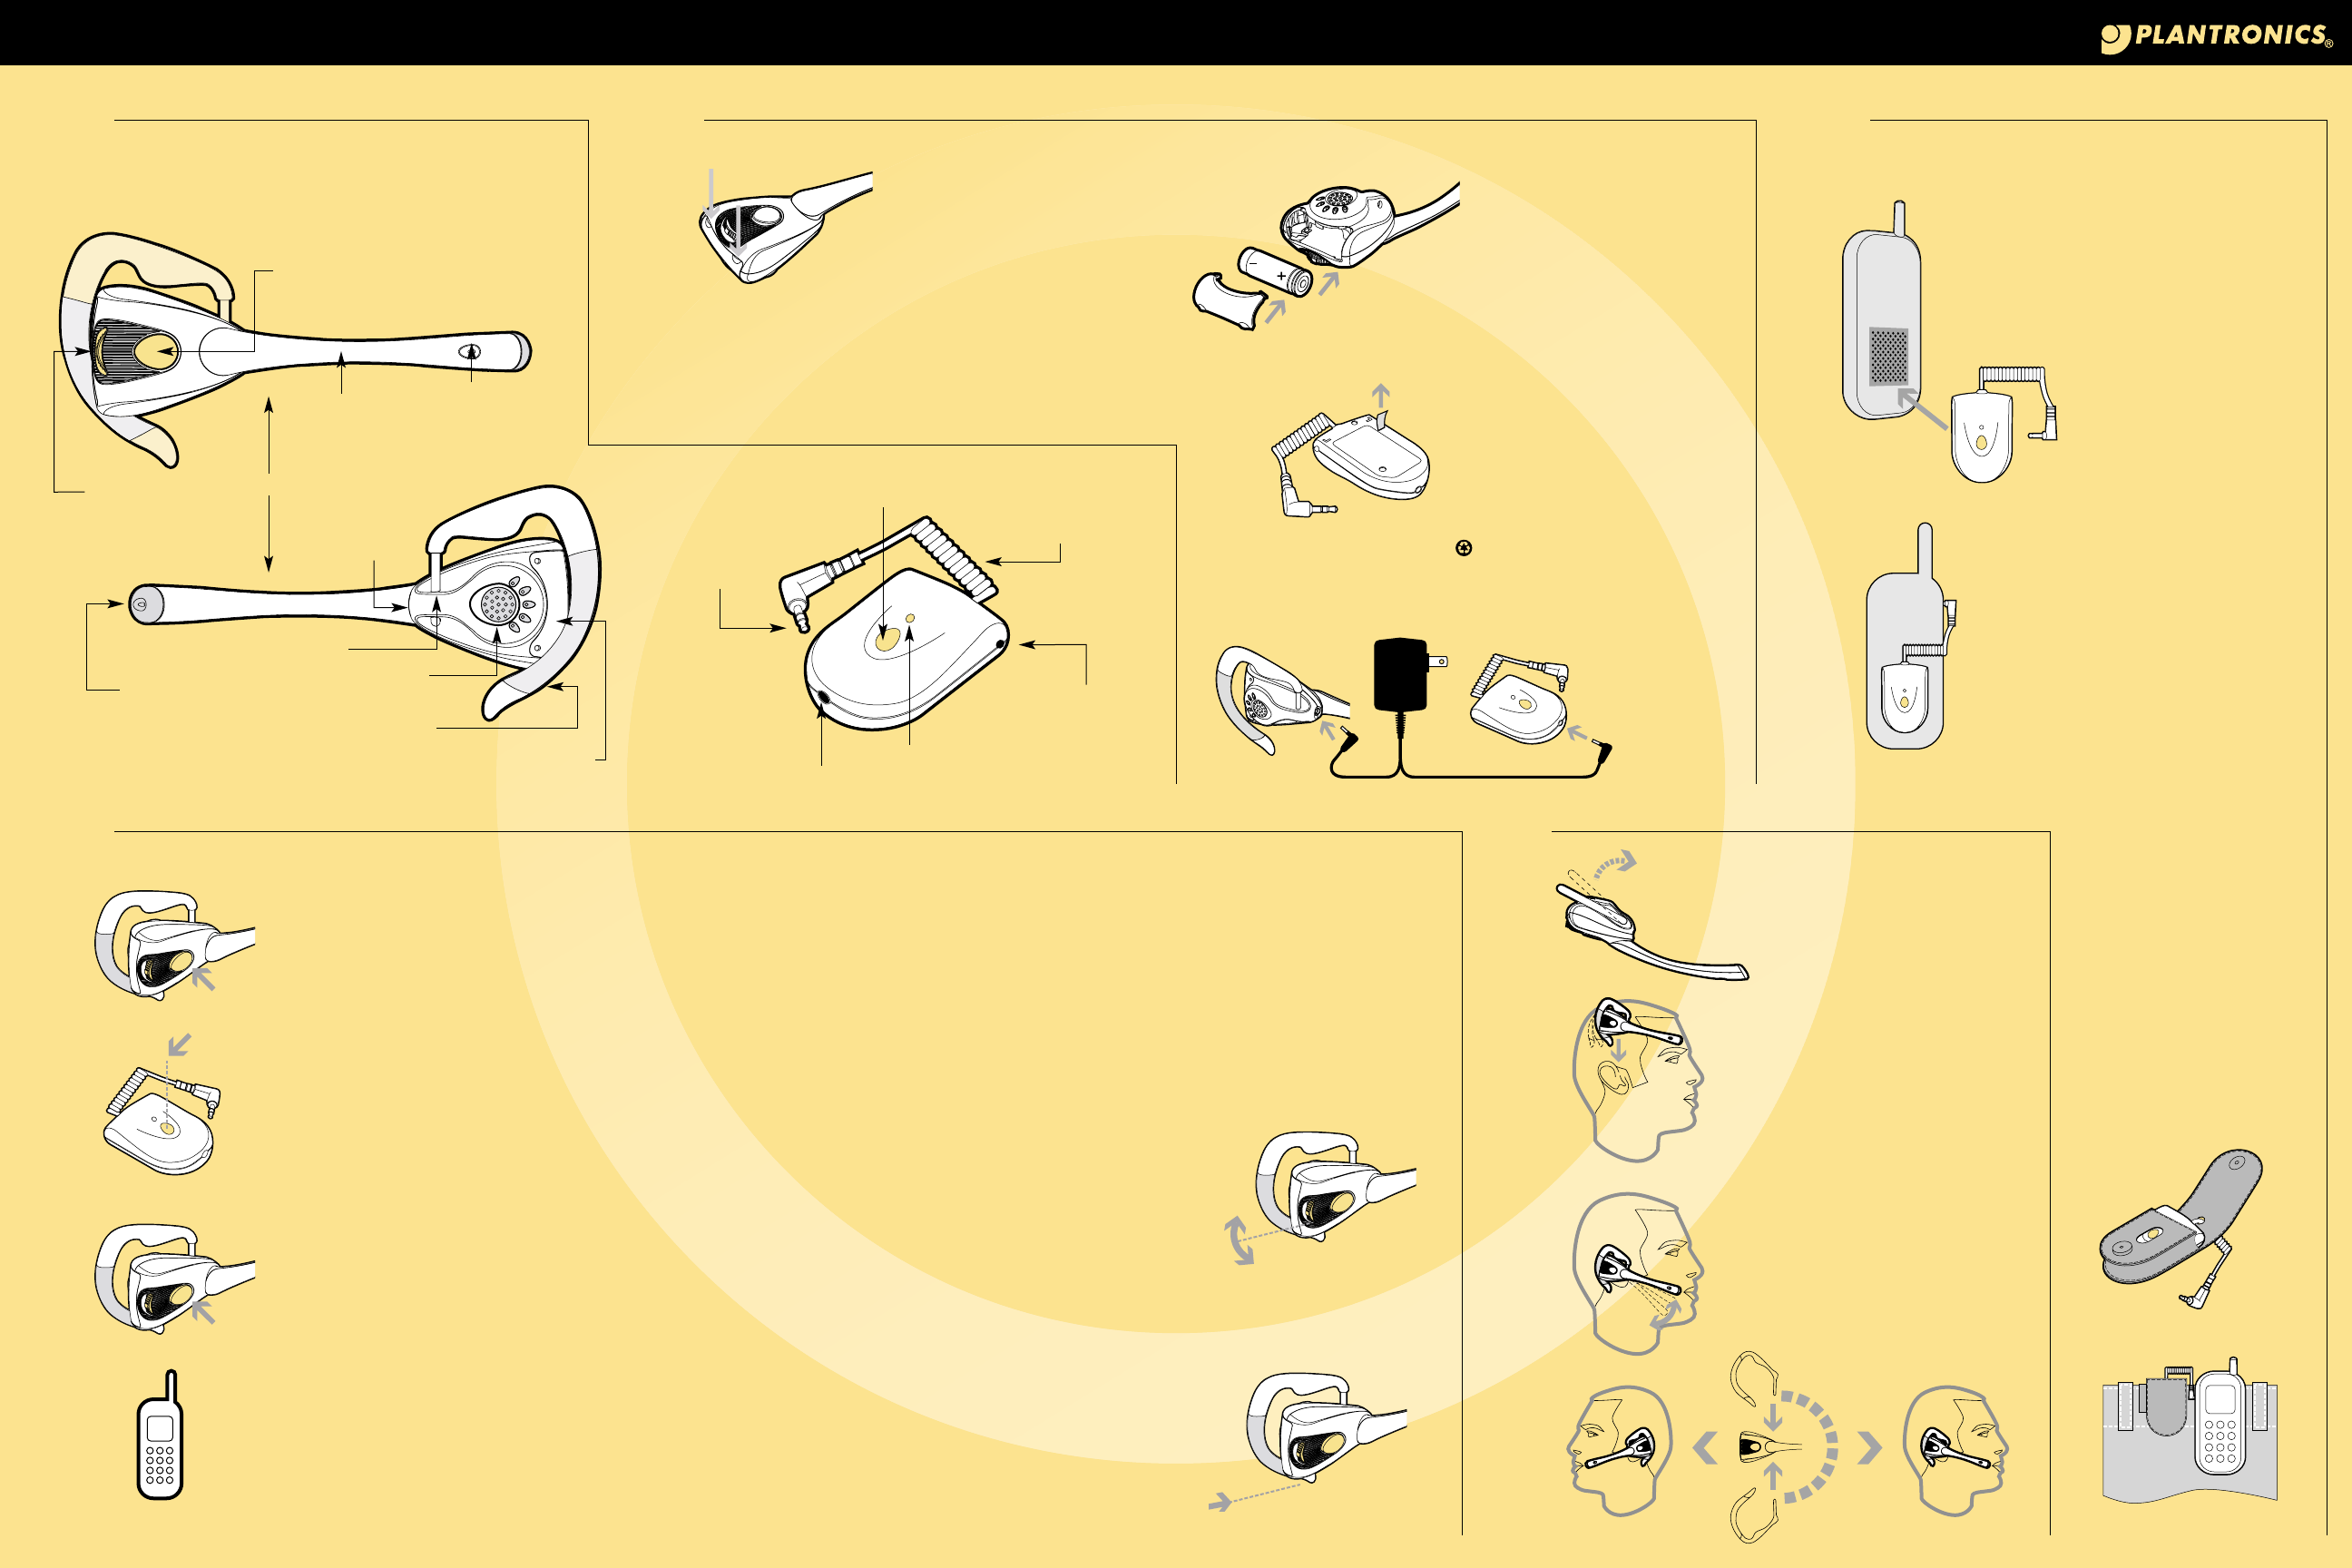
REPLACING THE ADAPTER BATTERY
FIG. 6.1 – Loosen and remove the two screws on the
bottom of the adapter using a small Philips screwdriver.
FIG. 6.2 – Lift the cover and remove the battery. Insert
a new battery so the (+) and (-) symbols correspond
correctly to the labels inside the battery compartment.
Replace the bottom cover and insert and tighten the
two screws. Be careful not to over tighten the screws.
BLUETOOTH PAIRING
Use these instructions only if you replace either the
headset or adapter in your system. Your M1500
headset and adapter are already paired when you
receive them.
See Section 7 for instructions on pairing just the head-
set to a Bluetooth enabled mobile phone.
FIG. 6.3 – PAIRING THE HEADSET AND ADAPTER
Make sure both devices are turned on. See Section 5
for more details.
Press and HOLD the POWER button on the adapter
unit for about 10 seconds, or until the INDICATOR light
begins to flash red.
Now, PUSH IN and HOLD the headset MUTE/VOL-
UME dial until the INDICATOR light begins to flash.
The pairing process should take about 15–30 seconds.
If pairing is successful, the headset will sound a tone
and both the headset and adapter INDICATOR lights
will turn off.
If pairing fails, the headset INDICATOR will stop blink-
ing after 60 seconds and return to standby mode. It
will not sound a tone. Also, the adapter INDICATOR
will light red for 2 seconds and then turn off. Repeat
the pairing process.
You may also use the headset alone with a
compatible Bluetooth mobile device.
The following instructions show how to pair
your headset to a Bluetooth mobile phone.
Before PAIRING, you will need: (1) your fully
charged headset, (2) your mobile phone user
guide; and (3) your four-digit headset passkey
(located on the passkey card included in your
M1500 package).
FIG. 7.1 – TURN ON BOTH DEVICES
To turn on your headset, press and HOLD the
TALK/ON-OFF button until the button lights.
See Section 5 for more details.
Once both devices are turned on, place the
headset and phone within an arm’s length of
each other.
FIG. 7.2 – SELECT PAIRING MODE
Following instructions in your mobile phone
user guide, select discover, or pairing, mode
from the Bluetooth options of your phone.
On your headset, PUSH IN and HOLD the
MUTE/VOLUME key until the INDICATOR
light begins to blink. Your headset is now
discoverable.
Check your mobile phone display and follow
any instructions.
FIG. 7.3 – ENTER YOUR PASSKEY
If prompted by your phone, enter your four-
digit passkey.
Some mobile phones and portable devices
will not require a passkey.
CONFIRM PAIRING
If pairing is successful, the headset will sound
a tone and the INDICATOR light will turn off.
Check your mobile phone display to see if
pairing succeeded and follow any instructions.
NOTE – If pairing fails, the INDICATOR light
will stop flashing after 60 seconds and your
headset will return to standby without sounding
a tone.
Refer to your mobile phone user guide and
repeat the pairing process.
CHECK THE CONNECTION
Test the headset to phone pairing by making a
call. Refer to Section 5, FIG. 5.2 and your
mobile phone user guide for more details.
Customize your headset so it fits comfortably.
FIG. 6.1
FIG. 6.2
FIG. 6.3
MAINTENANCE/TROUBLESHOOTING
MAINTENANCE HINTS FOR OPTIMAL PERFORMANCE
Replace both the headset and adapter batteries every 12 months.
Clean the outside of the headset with a moist cloth once a month. Dirt can decrease the
efficiency of the headset.
TROUBLESHOOTING
What do I do if...
THE ADAPTER UNIT DOESN’T PLUG INTO
MY PHONE?
Different models of phones require different
plug styles. Check the compatibility sticker
on your M1500 box and make sure the unit
you purchased is compatible with your
model phone.
I CAN’T ANSWER CALLS FROM MY
HEADSET?
Check your mobile phone user guide to see
if your phone supports answer/end control
from a headset, then review Section 5.
Make sure both your headset and adapter
are turned on and the batteries are charged.
Make sure the adapter unit is connected
securely and is compatible with your model
phone.
CALLERS DO NOT HEAR ME.
Make sure that the headset’s microphone is
facing your mouth and positioned properly.
Verify that the unit is not in mute mode.
I DON’T HEAR CALLERS.
Turn up the volume using the volume control
on your headset and on your mobile phone.
Make sure the headset’s speaker is posi-
tioned snugly over your ear.
THE HEADSET IS UNCOMFORTABLE.
Check to make sure that the adjustable earloop
is properly positioned and resting gently on
your ear.
Adjust the height and direction of the ear-
loop, both up and down, front and back, so
pressure is not being exerted on any part of
your ear, causing you discomfort.
Gently bend the angle of the flexible ear-
loop to conform to the shape of your ear.
HOW DO I USE THE HEADSET ON MY LEFT
EAR?
The headset, as packaged, is ready to
be used on your right ear. However, with
one very simple adjustment, the headset is
easily aligned for your left ear . Please
see the footnote in Section 4 for detailed
instructions.
I NEED MORE HELP.
Visit www.plantronics.com or call
1.800.544.4660 for assistance.
3 SECONDS
PUSH IN
345 Encinal Street, Santa Cruz, CA 95060 (800) 544-4660 www.plantronics.com
!
!
!
!
!
SAFETY
Check local laws regarding use of a mobile
phone and headset while driving.
If you use the product while driving ensure your
attention and focus remains on your responsibility
of driving safely.
CHILDREN. Never allow children to play with
the headset — small parts may be a choking
hazard.
Batteries can be swallowed by children and
are dangerous if swallowed. Always store
and dispose of batteries where children can’t
reach them.
Observe all signs that require an electrical device
or RF radio product to be switched off in desig-
nated areas. These could include hospitals, blast-
ing areas, and potentially explosive atmospheres.
Turn off your headset prior to boarding an air-
craft. Do not use your headset in an aircraft.
Never mount or store your headset over any air
bag deployment area as serious injury may result
when an air bag deploys.
BATTERY
CAUTION: To reduce the risk of fire or injury
to persons, read and follow these instructions.
1. Use only the battery supplied with this product;
Plantronics Part Number 35923-01.
2. Do not dispose of battery in a fire. The cells may
explode. Check with local codes for possible dis-
posal instructions.
3. Do not open or mutilate battery. Released elec-
trolyte is corrosive and may cause damage
to eyes or skin and may be toxic if swallowed.
4. Exercise care in handling the battery in order
not to “short” the battery contacts with conducting
materials such as rings, bracelets, or keys.
The battery or conductor may overheat and
cause burns.
5. Charge the battery in accordance with instruc-
tions supplied with this unit.
6. Observe proper orientation between battery and
charger contacts.
CHARGING
CAUTION: Use only the supplied Class 2
AC adapter to charge the headset from an AC
voltage or wall outlet.
CAUTION: If the headset becomes hot dur-
ing charging, disconnect the AC adapter from
the wall and contact qualified service personnel.
CAUTION: Do not disassemble the AC
adapter of this product as it may expose you to
dangerous voltages or other risks. Incorrect
reassembly can cause electric shock when the
product is subsequently used.
CAUTION: Do not use the charger outdoors
or in damp areas.
Only charge the headset battery in accordance
with the instructions of this manual.
Charger Output: 5.5V/500mA maximum, center
contact positive.
CARE
Never submerge your headset in water or other
liquids.
Protect your headset from spills, excessive rain,
and wet locations.
Do not use liquid cleaners or aerosol cleaners as
they may damage the headset or finish of the
headset.
Use a damp cloth to clean the external portions
of the headset.
Do not stick anything inside the product as this
may damage internal components.
FCC NOTICE
This device complies with Part 15 of the FCC Rules.
Operation is subject to the following two conditions:
1. This device may not cause harmful interference; and
2. This device must accept any interference received, includ-
ing interference that may cause undesired operation.
This equipment has been tested and found to comply with
the limits for a Class B digital device, pursuant to Part 15
of the FCC Rules. These limits are designed to provide rea-
sonable protection against harmful interference in a resi-
dential installation. This equipment generates, uses and
can radiate radio frequency energy and, if not installed
and used in accordance with the instructions, may cause
harmful interference to radio communications. However,
there is no guarantee that interference will not occur in a
particular installation.
If this equipment does cause harmful interference to radio
or television reception, which can be determined by turn-
ing the equipment off and on, the user is encouraged to try
to correct the interference by one or more of the following
measures:
Reorient or relocate the receiving antenna.
Increase the separation between the equipment and
receiver.
Connect the equipment into an outlet on a circuit different
from that to which the receiver is connected.
M1500 CORDLESS HEADSET SOLUTION WITH BLUETOOTH™
12
54
WELCOME
USING YOUR HEADSET
GETTING STARTED
GETTING THE PERFECT FIT
TALK/POWER BUTTON/INDICATOR LIGHT
INDICATOR LIGHT
TRANSFER/POWER BUTTON
POWER JACK
CORD
HANDSET
CONNECTION
FIG. 2.3 – Locate the white vinyl strip
protruding from the rear of the adapter
unit. Remove the strip by pulling it directly
out of the slot to activate the battery.
FIG. 2.4 – Connect the included wall
charger to AC power and then to both
the headset and adapter power jacks. In
a few seconds, the INDICATOR lights will
begin to blink. The INDICATOR lights will
stop blinking and turn off when the head-
set and adapter are fully charged.
The first charge takes 2 hours; subse-
quent charges take just 1 hour. A fully
charged headset and adapter will pro-
vide approximately 3 hours of talk time
and 3 days of standby. Recharging your
batteries each night will ensure your
headset is ready for use the next day.
The batteries used in this product must be
recycled or disposed of properly. Contact
your local recycling center for proper dis-
posal instructions.
Install, activate and charge the batteries.
FIG. 2.1 – Open the battery compart-
ment by pulling on the two battery door
latches. Remove the door.
FIG. 2.2 – Insert battery into compart-
ment so the (+) and (-) symbols corre-
spond correctly. Replace battery com-
partment door by inserting the small tabs
nearest the speaker and then snapping
the door into place.
MUTE/VOLUME
CONTROL
BOOM NOISE-CANCELLING
DEVICE
Welcome to the cutting edge of hands-free and
wire-free technology for mobile phones. Here
are the components to your Plantronics M1500
headset and adapter solution.
Customize your headset so that it fits
comfortably.
FIG. 4.1 – Rotate the earloop outward.
FIG 4.2 – Position the headset over
your right ear so that the earloop slides
behind your ear. Bend the flexible ear-
loop to achieve a snug, comfortable fit.
FIG 4.3 – Adjust the microphone BOOM
so it is aligns with your mouth.
FIG 4.4 – For left ear usage, simply
remove the earloop from the headset, flip
the headset over and reinsert the earloop
on the opposite side. After completing
this step, follow the fit instructions above
— except using your left ear.
NOTE – If the speaker sounds soft or feels
uncomfortable, slide the headset up or
down along the earloop post so that it is
centered on your ear when fitted.
FIG. 5.1 – TURNING THE HEADSET
ON AND OFF
• To turn your headset on, press
and HOLD the blue TALK button until
the button lights.
The INDICATOR will light contin-
uously for a few seconds and then
turn off.
• To turn your headset off, press
and HOLD the TALK button for about
3 seconds or until you hear a tone.
The INDICATOR will flash twice and
the headset will turn off.
• To check if your headset is turned on
or off, hold the unit to your ear and
ROTATE the MUTE/VOLUME dial.
If you hear a tone, your headset is
turned on.
FIG. 5.2 – TURNING THE ADAPTER
ON AND OFF
• To turn your adapter on, press and
HOLD the blue POWER button until
the INDICATOR lights.
The INDICATOR will flash green
while the unit is on.
• To turn your adapter off, press
and HOLD the POWER button for
about 3 seconds, or until the
indicator turns red.
The INDICATOR will flash twice and
the adapter will turn off.
FIG. 5.3 – HANDLING CALLS
• Make sure both your headset and
adapter are turned on and the
adapter is connected to your phone.
MAKING A CALL
• Press the TALK button on your head-
set to establish a connection between
the headset and adapter. You will
hear a tone and the INDICATOR
lights on both the adapter and head-
set will begin to flash red.
• Dial using your mobile phone keypad
and press the SEND key to place a
call. You will hear the call progress in
your headset.
• When your call is complete, press the
TALK button on your headset to dis-
connect the adapter. The INDICATOR
light on the adapter will return to
flashing green.
NOTE—To prevent shortened battery
life, make sure the adapter INDICA-
TOR light is flashing green between
calls. If the adapter INDICATOR
light is flashing red and you are not
using your headset, press the TALK
button on the headset to disconnect
the adapter.
ACCEPTING A CALL
• As soon as your handset rings, press
the TALK button on your headset
to establish a connection between the
headset and adapter. You will hear
a tone and the INDICATOR lights on
both the adapter and headset will
begin to flash red.
• Answer the call using your handset
SEND key.
• When your call is complete, press
the TALK button on your headset
to disconnect the adapter. The
INDICATOR light on the adapter will
return to flashing green.
FIG. 5.4 – ADJUSTING THE VOLUME
• To increase volume, ROTATE the
MUTE/VOLUME dial up and release
(for headset usage on right ear).
• To lower volume, ROTATE the MUTE/
VOLUME dial down and release (for
headset usage on right ear).
• Also adjust the volume on your
handset.
NOTE—If using the headset on your
left ear, reverse the instructions, rotat-
ing down to raise volume, and up
to lower it.
FIG. 5.5 – MUTE FUNCTION
• To mute the microphone while on a
call, PUSH IN on the MUTE/VOLUME
dial. A tone, followed 2 seconds
later by a reminder tone, indicates
mute function.
• To disable the mute, PUSH IN on the
MUTE/VOLUME dial again. A beep
indicates Mute function is off.
FIG. 2.1 FIG. 2.2
3 SECONDS
3 SECONDS
ROTATE
PUSH IN
FIG. 2.3
FIG. 2.4
FIG. 4.1
FIG. 4.2
FIG. 4.3
FIG. 4.4
FIG. 5.1
FIG. 5.2
FIG. 5.3A
FIG. 5.3B
FIG. 5.4
FIG. 5.5
3CONNECTING TO YOUR HANDSET
You may attach the adapter unit directly
to your handset or carry it separately
in the supplied belt pouch. Before attach-
ing the unit to your handset, place a
few calls (see Section 5) and determine
a position that provides the best audio
performance.
FIG. 3.1 – ATTACHING DIRECTLY TO
HANDSET
• Select a location on your handset to
attach the adapter unit. Make sure
the attachment point is flat and large
enough to fit the supplied tape/Velcro
patches.
• Check that the adapter unit cord will
connect to the headset-jack on your
handset without interfering with nor-
mal usage.
•NOTE – Make sure that when the
adapter unit is fixed to your handset,
other accessories you use (belt clips,
car kits or charging stations) can con-
nect and work properly.
• Peel the backing off one side of
the tape/Velcro patch and attach
it squarely to the back of the
adapter unit.
• Peel off the other (exposed) side of
the tape/Velcro patch and secure it to
your handset.
• Now attach the adapter unit to your
handset and connect the cord to the
headset-jack. See your mobile phone
user guide for instructions for con-
necting a headset.
FIG. 3.2 – USING THE BELT POUCH
• Open the pouch and slide in the
adapter unit with the power jack
facing down.
• With the pouch open, slip the adapter
cord through the rectangular slot
in the top flap and close the pouch.
• Slide the pouch onto your belt
and attach the adapter cord to your
handset.
• When using the belt pouch, remember
to unplug the adapter before you
answer or make a call using your
handset.
FIG. 3.1A
EARLOOP
(FLEXIBLE FOR FIT) BATTERY DOOR
POWER
JACK
EARLOOP POST/
HEIGHT ADJUSTMENT
SPEAKER
MICROPHONE
FIG. 3.1B
FIG. 3.2
HEADSET
ADAPTER
UNIT