Plantronics WH100 Wireless Communications System Headset User Manual
Plantronics Inc Wireless Communications System Headset Users Manual
Users Manual

Versa VS21M Professional Wireless Headset System
Quick Start Guide

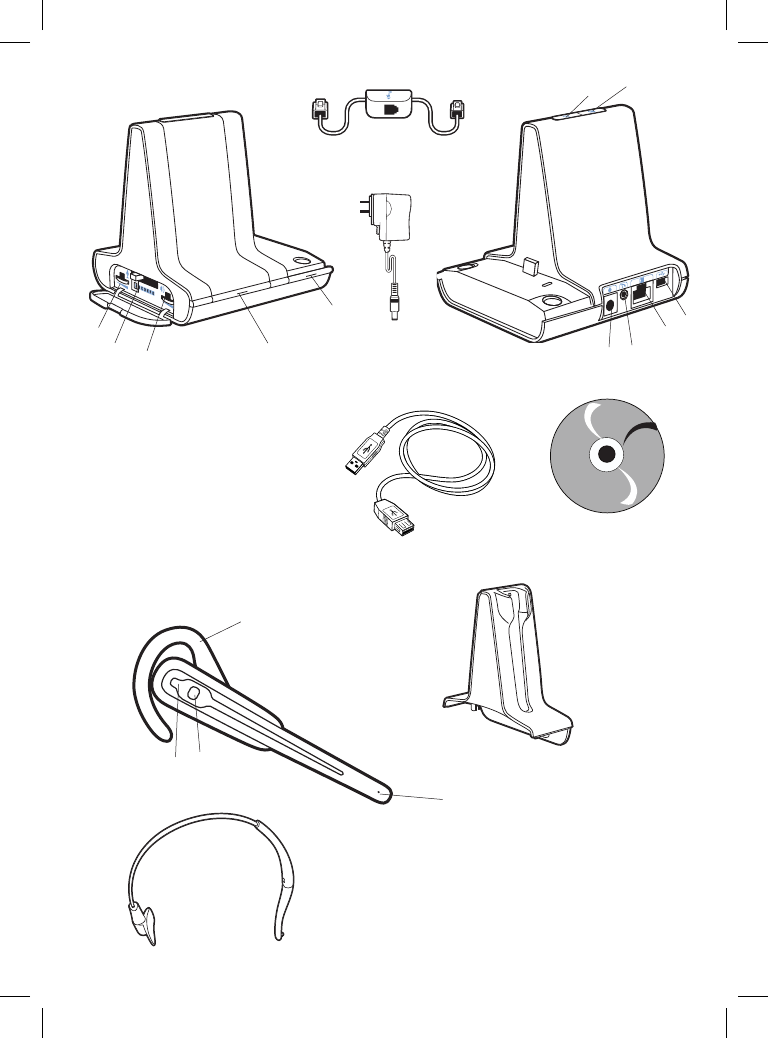
Versa VH21 Headset
Versa Base
1. Master Speaking Volume
2. Configuration Switch
3. Master Listening Volume
4. Subscription Button and Indicator Light
5. Power/Charging Indicator Light
6. Power Jack
7. Handset Lifter Jack
8. Telephone Interface Cable Jack
9. USB Port
10. Desk phone Talk Button and Indicator Light
11. PC Talk Button and Indicator Light
5
1. Earloop
2. Indicator Light
3. Call Control Button (also controls
volume, mute and flash functions)
4. Microphone
5. Headband
6. Charge Cradle
6
Telephone
Interface Cable
2
1
3
4
10
67
8
11
9
4
23
1
5
Base Power
Supply
AudioCentral Software/
Interactive User Guide CD
USB Cable

2-1
2-2
2-3
1

3-1
3-2
4
6-6
6-4 6-5
5-5
7-1
7-2

Welcome
Congratulations on purchasing your new Plantronics product. This Quick Start Guide contains
instructions for setting up the Versa VS21M Professional Wireless Headset System. Please refer to
the printable user guide located on the AudioCentral Software/Interactive User Guide CD for further
details on how to use your system.
Safety Instructions
Do not use headphones / headsets at high volumes for an extended period of time.
Doing so can cause hearing loss. Always listen at moderate levels. See www.plantronics.com/
healthandsafety for more information on headsets and hearing.

Setting Up the Versa VS21M
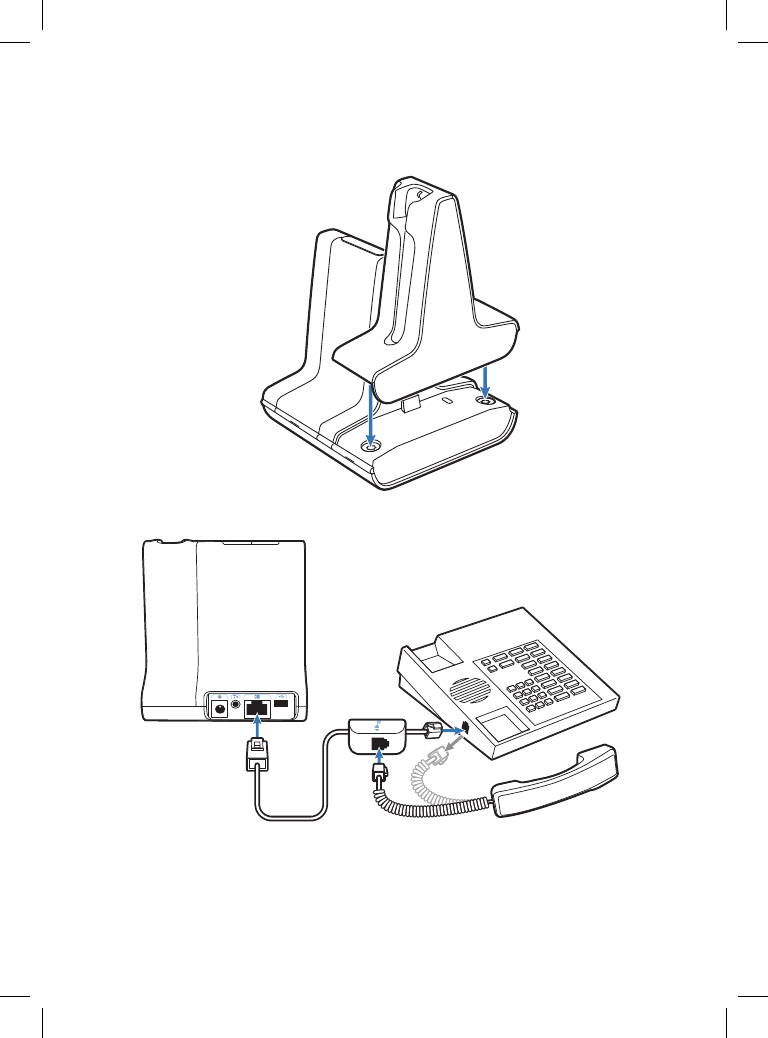
1. Attaching Charge Cradle to Base
Connect the headset charge cradle to the base. Push firmly on the cradle until the cradle snaps
into place.
2. Connecting Base to Desk Phone
2-1. Connect the telephone interface cable to the telephone interface cable jack on the base.
2-2. After disconnecting the handset coil cord from the desk phone, connect the telephone
interface cable to the now open handset port on the desk phone.
2-3. Connect the handset coil cord to the telephone interface cable junction box.
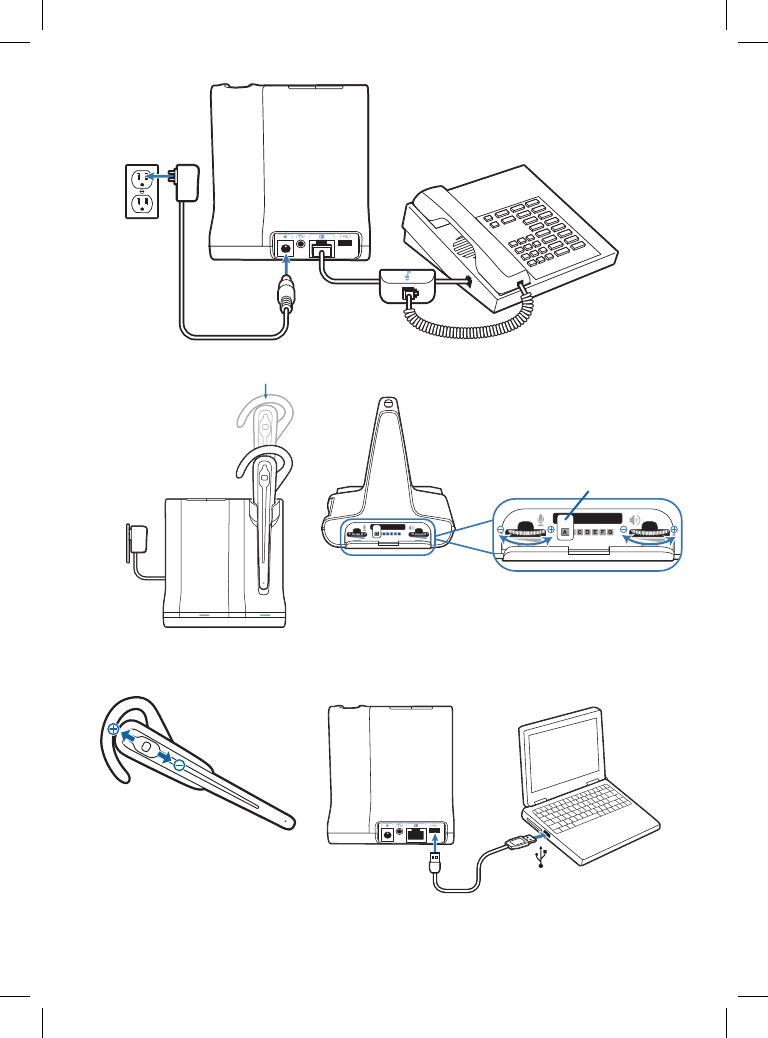
3. Connecting Power Supply to Base
3-1. Connect the base power supply into the power jack on the base.
3-2. Connect the power supply to outlet.
4. Docking and Charging Headset
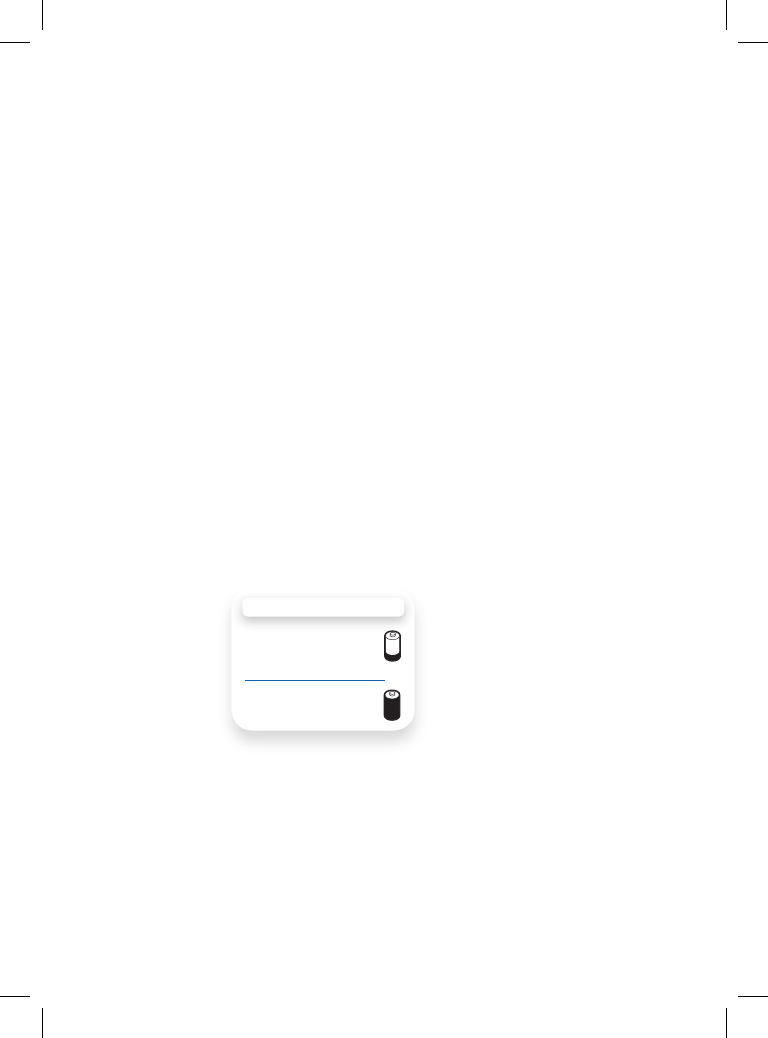
Gently push the headset into the charge cradle. Charge for at least 20 minutes prior to the first use.
A full charge takes 3 hours.
5. Checking Configuration
5-1. Set volume on desk phone to mid-range.
5-2. Remove handset from desk phone cradle.
5-3. With your headset on, press the call control button on the headset.
5-4. Listen for a normal dial tone. If you hear a dial tone and the dial tone sounds normal continue
with Step 6 “Making a Test Call with Desk Phone”.
CHARGING TIME
20 min .....................
Minimum charge
before first use
3 hours ...................
Full charge

5-5. If you do not hear a dial tone or the dial tone is distorted adjust the configuration switch until
the dial tone sounds normal.
NOTE Multiple settings might work with your phone; however, only one is the optimal position.
6. Making a Test Call with Desk Phone
6-1. Remove handset from desk phone cradle.
6-2. With your headset on, press the call control button on the headset.
6-3. Dial the number using your desk phone.
6-4. Adjust the master speaking volume on base to the best setting for your listener. A setting of
3 or 4 is ideal.
6-5. Adjust the master listening volume on base. A setting of 2 or 3 is ideal.
6-6. You can fine tune the listening volume on the headset.
6-7. To end the test call, press the call control button on the headset and replace the handset
into the desk phone cradle.
7. Connecting to the PC
7-1. Connect the USB cable to the USB port on the back of the base.
7-2. Connect the other end of the USB cable to the USB port on the PC.
7-3. Insert the AudioCentral Software/Interactive User Guide CD and download the AudioCentral
software from the Wizard. Follow the installation instructions shown on your PC.
8. Making a Test Call with PC
8-1 Ensure the AudioCentral software is running on your PC.
8-2 With your headset on, press the PC talk button on the base.
8-3 Dial the number using your softphone application.
8-4 Adjust listening and speaking volume using your softphone application and/or “sound and
audio devices” in your PC control panel.
8-5 You can fine tune the listening volume on the headset.
8-6 To end the test call, press the call control button on the headset.
Please refer to the printable user guide located on the AudioCentral Software/Interactive User Guide
CD for further details on how to use your Versa VS21M Professional Wireless Headset System.

МЛ05
Plantronics, Inc.
345 Encinal Street
Santa Cruz, CA 95060
United States
Tel: 800-544-4660
Tel: 831-426-5858
www.plantronics.com
©2008 Plantronics, Inc. All rights reserved. Plantronics, the logo design, CS50, CS55. IntelliStand, and Sound Innovation
are trademarks or registered trademarks of Plantronics, Inc. All other trademarks are the property of their respective owners.
US patents 5,210,791; 6,735,453; 6,903,693; D492,667; Australia 303306; EM 293964; 69109; Patents Pending.
XXXXX-XX (08.08)
This device complies with Part 15 of the FCC Rules. Operation is subject to the following two conditions:
1. This device may not cause harmful interference, and
2. This device must accept any interference received, including interference that may cause undesired operation.
This equipment has been tested and found to comply with the limits for a Class B digital device, pursuant to Part 15 of the FCC Rules.
These limits are designed to provide reasonable protection against harmful interference in a residential installation. This equipment gener-
ates, uses, and can radiate radio frequency energy and, if not installed and used in accordance with the instructions, may cause harmful
interference to radio communications. However, there is no guarantee that interference will not occur in a particular installation. If this equip-
ment does cause harmful interference to radio or television reception which can be determined by turning the radio or television off and on,
the user is encouraged to try to correct interference by one or more of the following measures:
1. Reorient or relocate the receiving antenna.
2. Increase the separation between the equipment and receiver.
3. Connect the equipment into an outlet on another circuit.
4. Consult the dealer or an experienced radio/TV technician for help.
FCC REGISTRATION INFORMATION — Part 68
This equipment complies with Part 68 of the FCC rules and the requirements adopted by ACTA. On the exterior of this equipment is a
label that contains a product identifier in the format US:AAAEQ##TXXXX. If requested, this information must be provided to your telephone
company.
A plug and jack used to connect this equipment to the premises wiring and telephone network must comply with the applicable FCC Part
68 rules and requirements adopted by ACTA. A compliant telephone cord and modular plug is provided with this product. It is designed to
be connected to a compatible jack that is also compliant. See installation instructions for details.
The REN is useful to determine the quantity of devices you may connect to your telephone line. Excessive RENs on a telephone line may
result in the devices not ringing in response to an incoming call. In most, but not all areas, the sum of the RENs should not exceed five (5.0).
To be certain of the number of devices you may connect to your line, as determined by the REN, contact your local telephone company. For
product approved after July 23, 2001, the REN for this product is part of the product identifier that has the format US:AAAEQ##TXXXX. The
digits represented by ### are the REN without the decimal point. (For example, 03 represents a REN of 0.3.) For earlier producers, the REN
is separately shown on the label.
If this telephone equipment causes harm to the telephone network, the telephone company will notify you in advance that temporary
discontinuance of service may be required. But if advance notice isn’t practical, the telephone company will notify the customer as soon as
possible. Also, you will be advised of your right to file a complaint with the FCC if you believe it is necessary.
The telephone company may make changes in its facilities, equipment, operations, or procedures that could affect the proper functioning
of your equipment. If they do, you will be notified in advance in order for you to make necessary modifications to maintain uninterrupted
service.
If trouble is experienced with this unit, for repair or warranty information, please contact customer service at (800) 544-4660. If the equip-
ment is causing harm to the network, the telephone company may request that you disconnect the equipment until the problem is resolved.
DO NOT DISASSEMBLE THIS EQUIPMENT: it does not contain any user serviceable components.
We recommend the installation of an AC surge arrester in the AC outlet to which this equipment is connected. Telephone companies report
that electrical surges, typically lighting transients, are very destructive to customer terminal equipment connected to AC power sources.
Exposure to RF Radiation
The internal wireless radio operates within the guidelines found in radio frequency safety standards and recommendations, which reflect the
consensus of the scientific community. Independent studies have shown that the internal wireless radio is safe for use by consumers. Visit
www.plantronics.com for more information.
NOTE: Modifications not expressly approved by Plantronics, Inc. could void the user’s authority to operate the equipment.