Plantronics WH110 Wireless Communications System Headset User Manual
Plantronics Inc Wireless Communications System Headset Users Manual
Users Manual
Savi™ Office WO100 Professional Wireless Headset System
(WO1™ Base + WH100™ / WH110™ Headset)
Quick Start Guide
Guide de démarrage rapide
Guía de inicio rápido
Guia de Início Rápido
2-1
2-2
2-3
1
Quick Start
Welcome
Congratulations on purchasing your new Plantronics product. This Quick Start Guide contains
instructions for setting up the Savi Office WO100 Professional Wireless Headset System. Please
refer to the separate safety instructions for important product safety information prior to installation
or use of the product.
System Requirements
The minimum system requirements for Savi Office are as follows:
• SupportedOperatingSystems:WindowsXP,WindowsVista
• Processor:400MHzPentiumprocessororequivalent(Minimum);1GHzPentiumprocessoror
equivalent(Recommended)
• RAM:96MB(Minimum);256MB(Recommended)
• HardDisk:280MB(Minimum);500MB(Recommended)
• Display:800x600,256colours(Minimum);1024x768highcolour,32-bit(Recommended)
• InternetExplorerV6orbettermustbeontheuser’ssystem(Required)
Safety Instructions
Donotuseheadphones/headsetsathighvolumesforanextendedperiodoftime.
Doingsocancausehearingloss.Alwayslistenatmoderatelevels.Seewww.plantronics.com/
healthandsafety for more information on headsets and hearing.
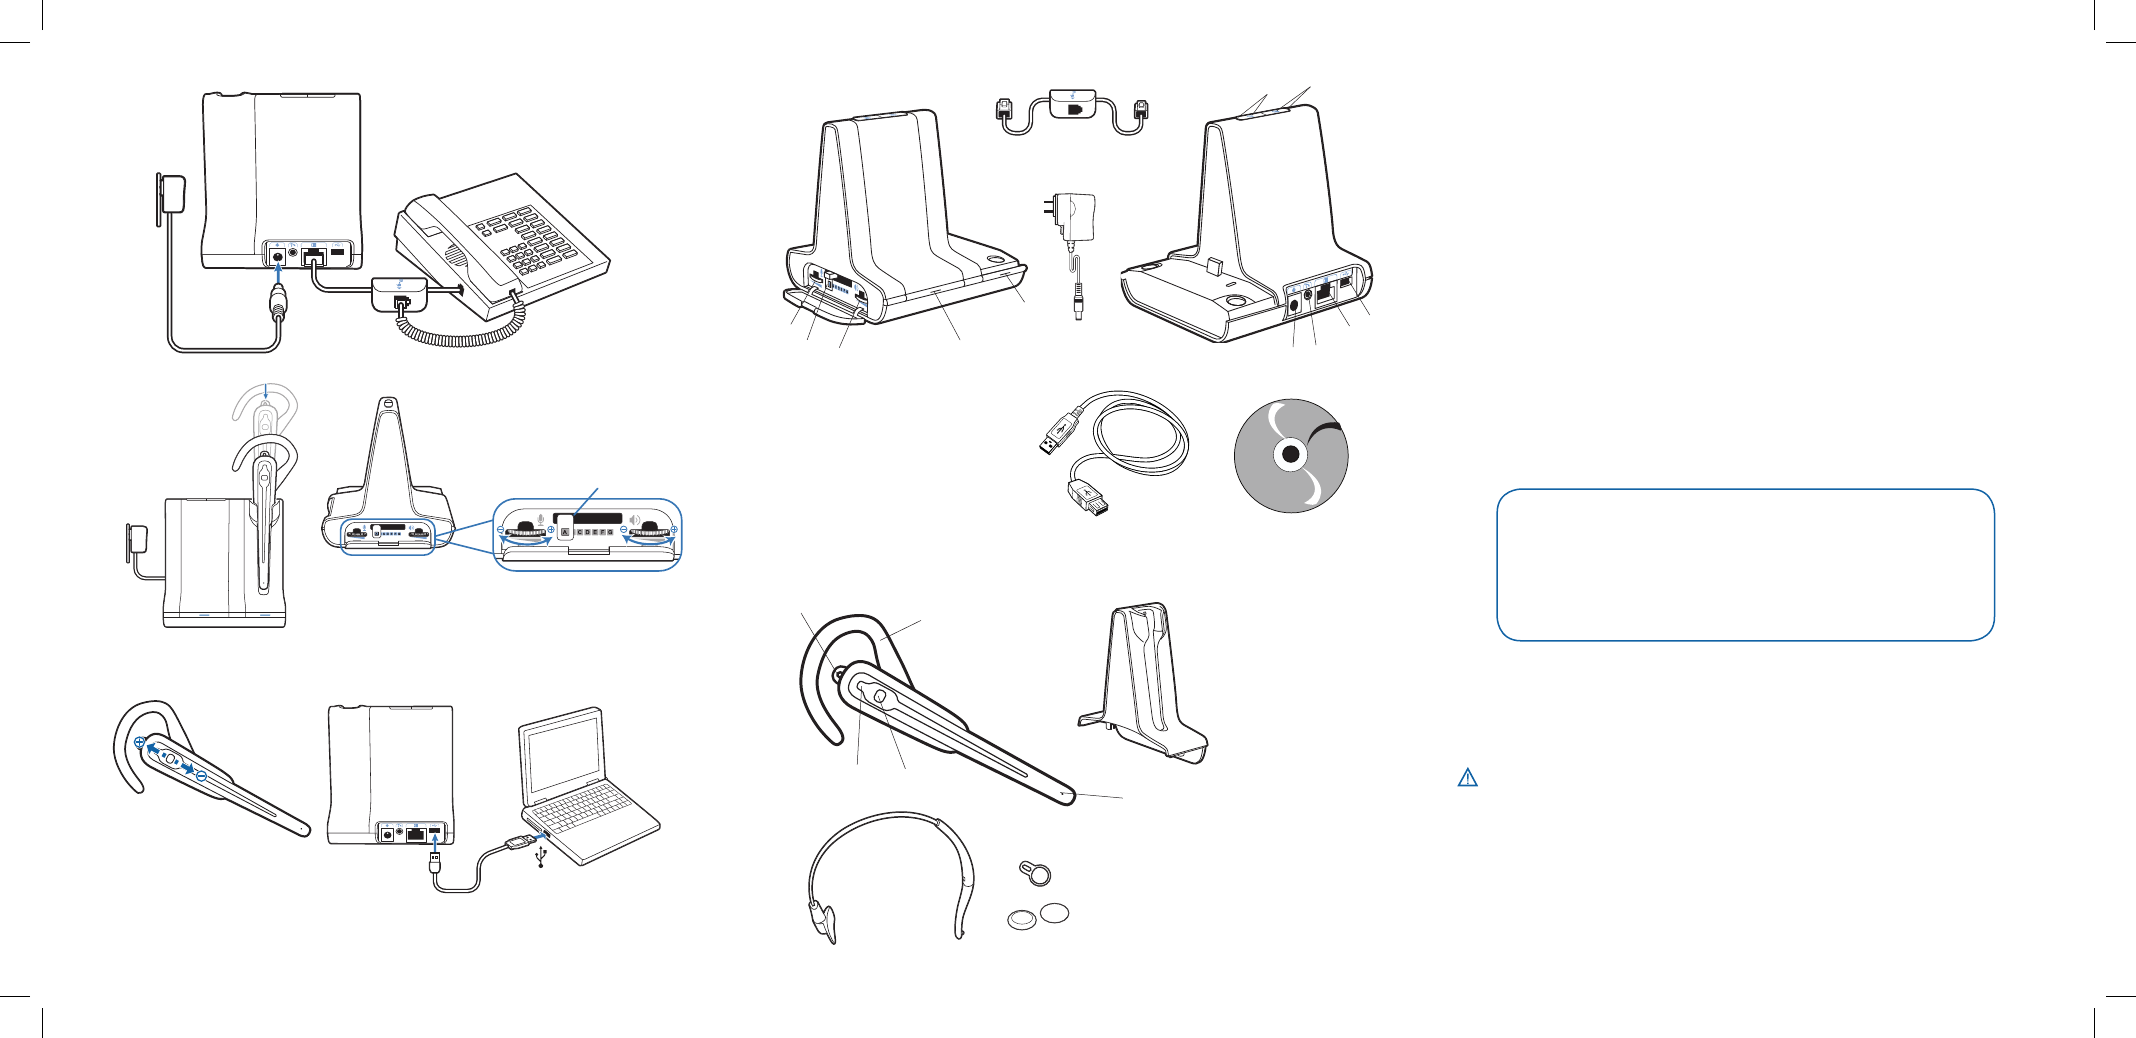
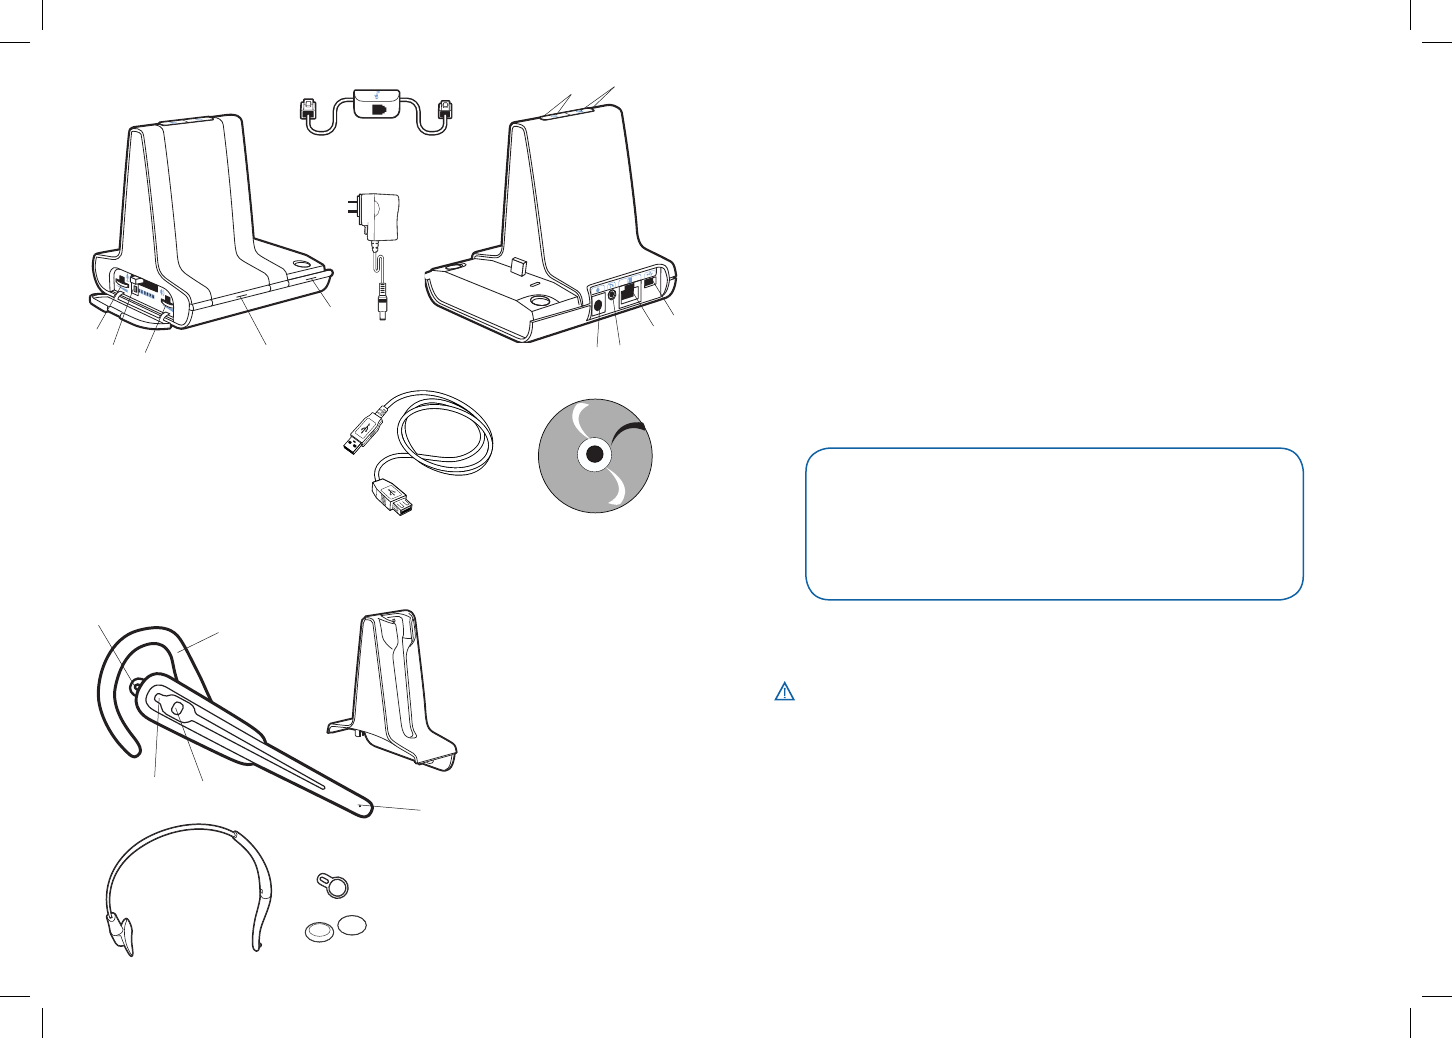
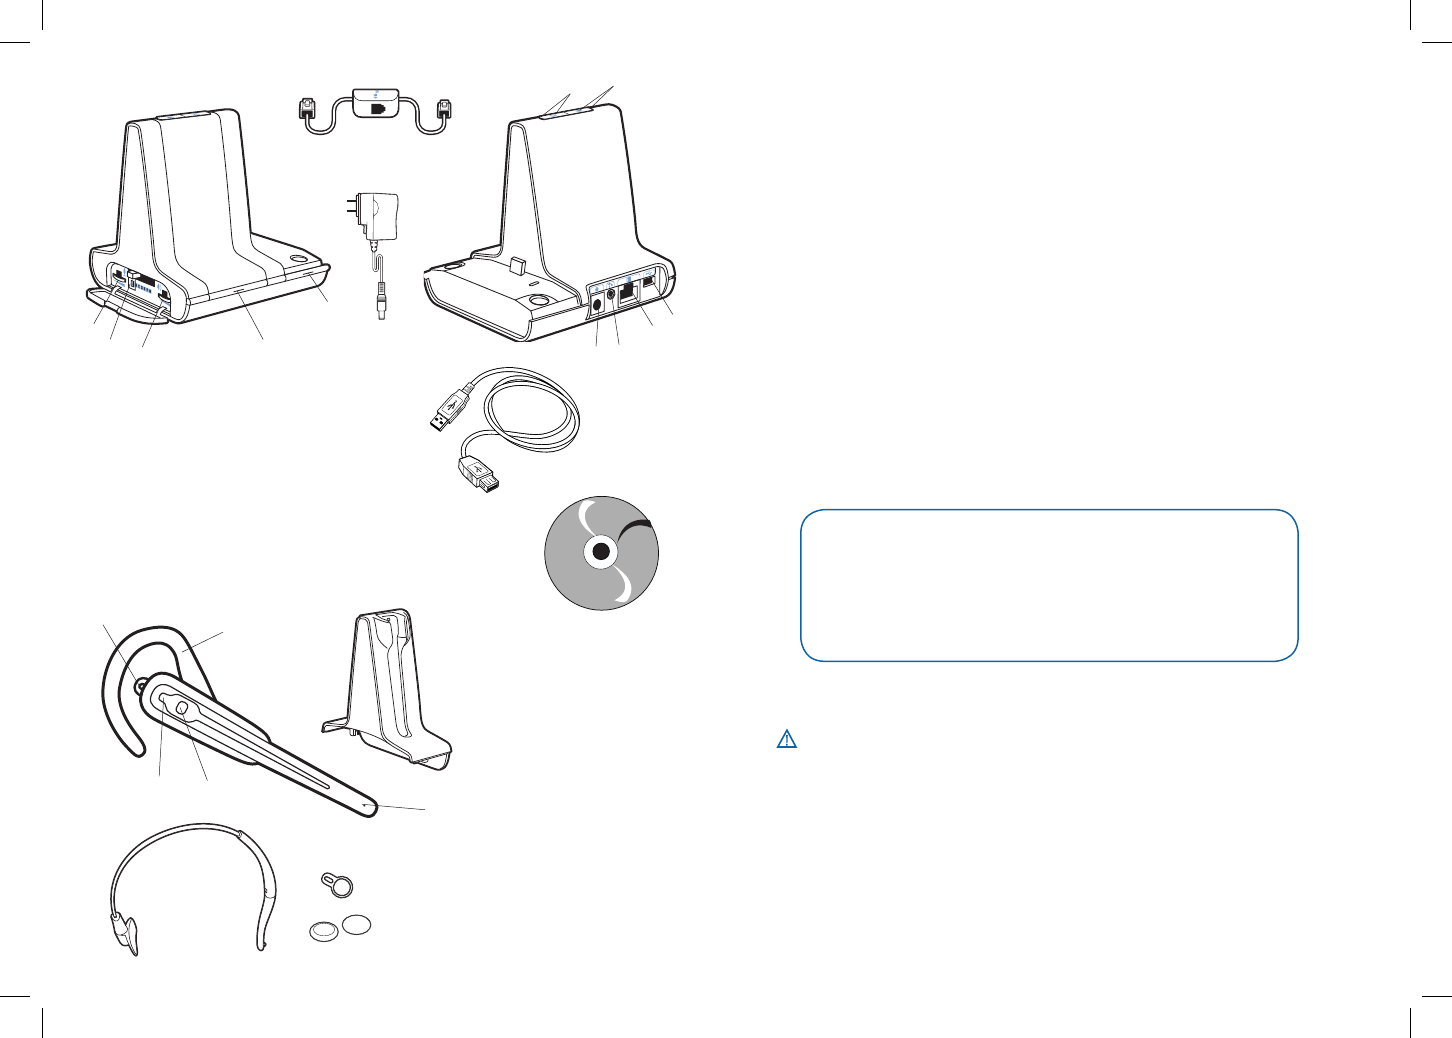
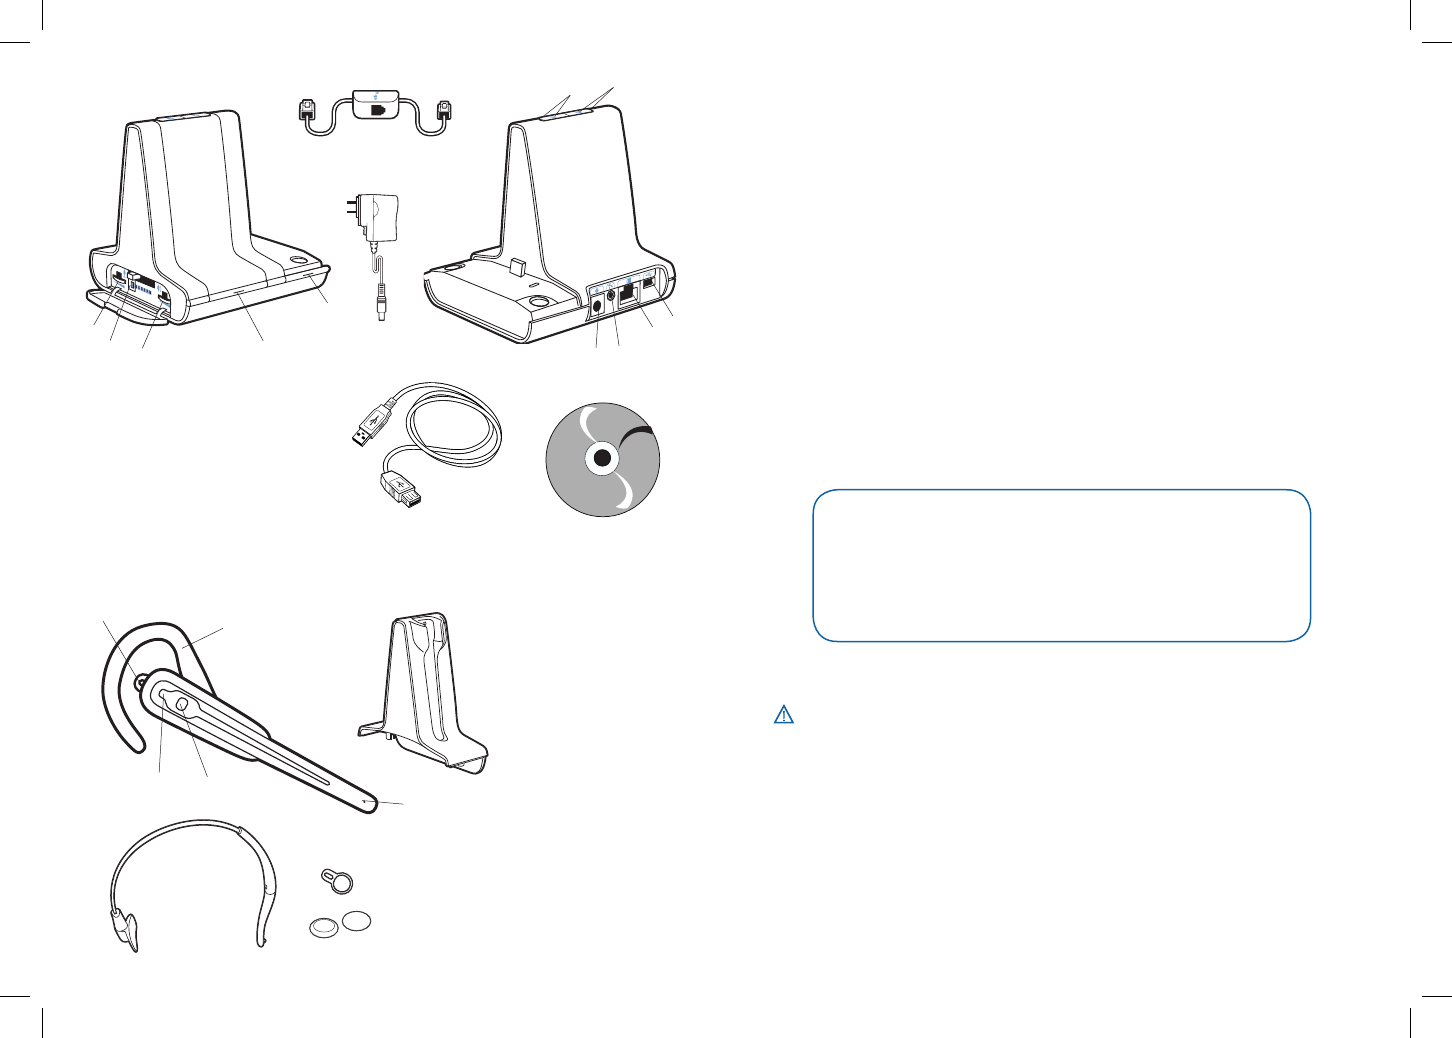
Savi WH100 / WH110 Headset
Savi WO1 Base
1.DeskPhoneSpeakingVolume
2.CongurationSwitch
3.DeskPhoneListeningVolume
4.SubscriptionButtonandIndicatorLight
5.Power/ChargingIndicatorLight
6.PowerJack
7.HandsetLifterJack
8.TelephoneInterfaceCableJack
9.USBPort
10.DeskphoneTalkButtonandIndicatorLight
11.PCTalkButtonandIndicatorLight
Telephone
InterfaceCable
BasePower
Supply
CDincludes:
•PerSono® Suite Software
•AnimatedSetupGuide
•CompleteUserGuide
USBCable
10
67
8
11
9
3-1
3-2
4
5-7
7-1
7-2
We highly recommend that you refer to the CD
for Animated Set Up instructions and the complete
User Guide.
5-2
6-6
5-2
6-5
5-2
6-4
5-6
1.Earloop
2.EarTab
3.IndicatorLight
4.CallControlButton(alsocontrols
volume,muteandswitching
functions)
5.Microphone
6.Headband
7.ChargeCradle
8.ExtraEarTab
9.FoamEarCushions
6
7
21
3
5
4
9
8
4
23
1
5

Setting Up the Savi Office WO100 System
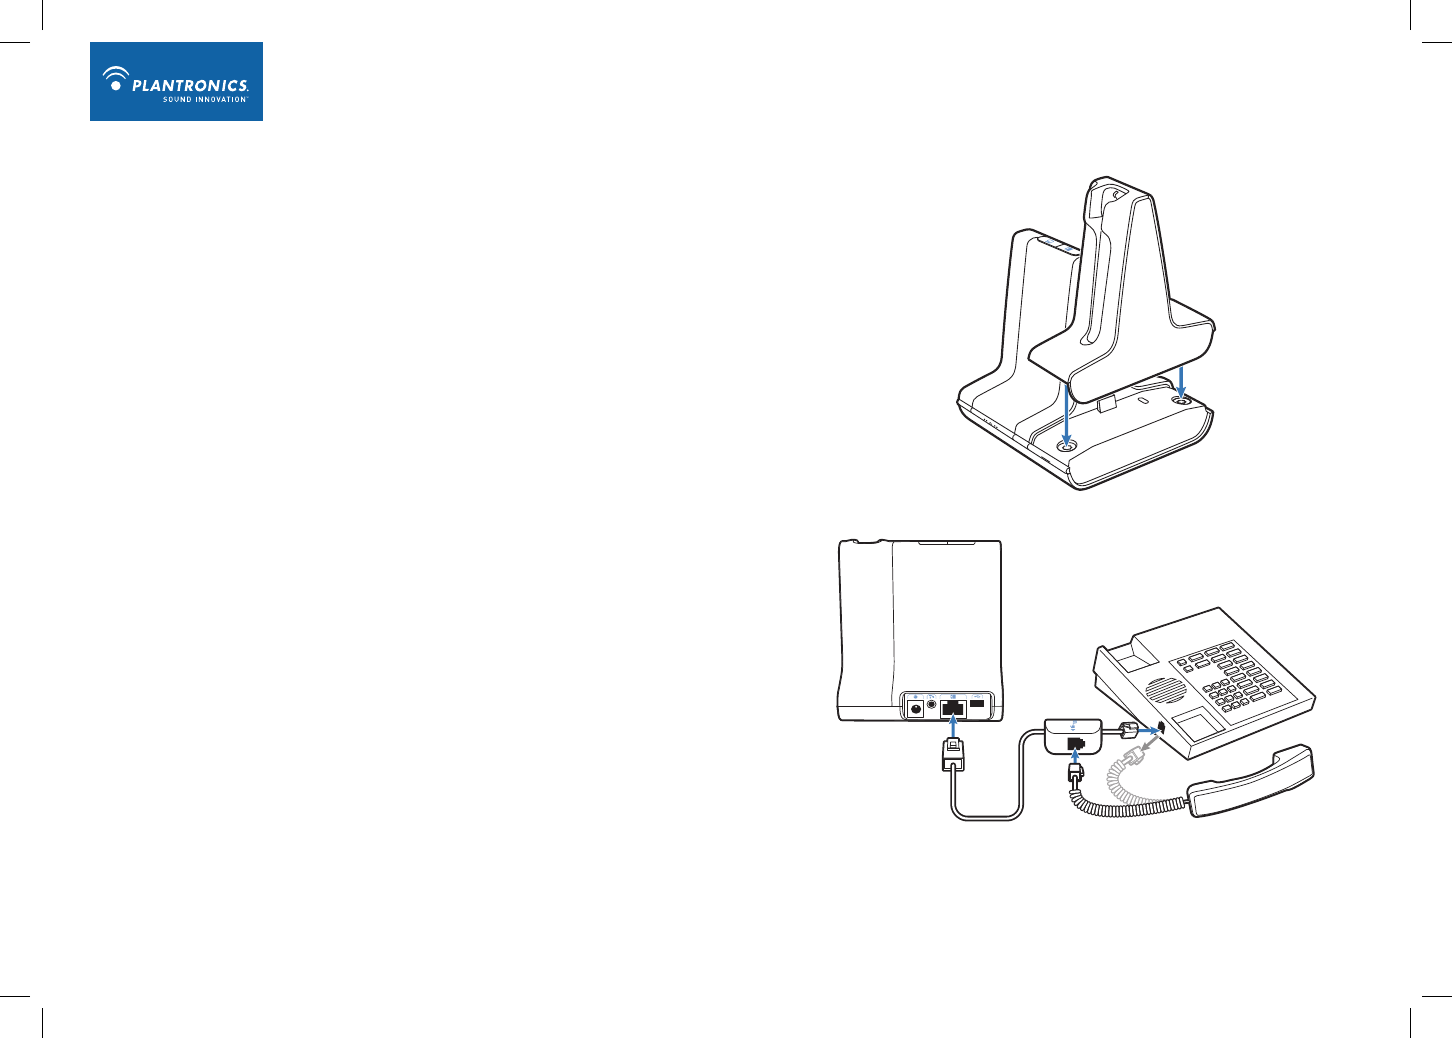
1. Attaching Charge Cradle to Base
Connecttheheadsetchargecradletothebase.Pushrmlyonthecradleuntilthecradlesnaps
into place.
2. Connecting Base to Desk Phone
2-1. Connectthetelephoneinterfacecabletothetelephoneinterfacecablejackonthebase.
2-2. Afterdisconnectingthehandsetcoilcordfromthedeskphone,connectthetelephone
interfacecabletothenowopenhandsetportonthedeskphone.
2-3. Connectthehandsetcoilcordtothetelephoneinterfacecablejunctionbox.
3. Connecting Power Supply to Base
3-1. Connectthebasepowersupplyintothepowerjackonthebase.
3-2. Connect the power supply to outlet.
4. Docking and Charging Headset
Gentlypushtheheadsetintothechargecradle.Chargeforatleast20minutespriortotherstuse.
Afullchargetakes3hours.
5. Checking Configuration
5-1. Setvolumeondeskphonetomid-range.
5-2. Onthebase,ensurethecongurationswitchissetto“A”andthedeskphonespeaking
volumeanddeskphonelisteningvolumearebothsetto3.
NOTEFormostphones,thesefactorydefaultsettingswillsoundthebest.
5-3. Withyourheadseton,pressthecallcontrolbuttononheadset.
5-4. Removethehandsetfromdeskphonecradle.
5-5. Listenforadialtone.Ifthedialtonesoundsclear,pressthecallcontrolbuttononheadset
and continue with Step 6. Making a Test Call with Desk Phone.
5-6. Ifthedialtoneistooloudortoosoft,adjusttheheadsetvolumelevel.
5-7. Ifthedialtonestilldoesnotsoundclear,adjustthecongurationswitchuntilthedialtone
soundsthebest.
NOTEMultiplesettingsmightworkwithyourphone;however,onlyoneistheoptimalposition.
5-8. Pressthecallcontrolbuttonontheheadsetandreturnthehandsettothecradletocomplete
configuration.
6. Making a Test Call with Desk Phone
6-1. Withyourheadseton,pressthecallcontrolbuttononheadset.
6-2. Removethehandsetfromdeskphonecradle.
6-3. Dialthenumberusingyourdeskphone.
6-4. Ifneeded,adjustthelisteningvolumeontheheadset.
6-5. Ifthelisteningvolumeisstilltooloudortoosoft,adjustthedeskphonelisteningvolume
onthebase.
6-6. Ifthespeakingvolumeistooloudortoosoftforyourlistener,adjustthedeskphone
speakingvolumeonthebase.
6-7. Pressthecallcontrolbuttonontheheadsetandreturnthehandsettothecradleto
complete the test call.
7. Connecting to the PC
7-1. ConnecttheUSBcabletotheUSBportonthebackofthebase.
7-2. ConnecttheotherendoftheUSBcabletotheUSBportonthePC.
7-3. InserttheCDandinstallthePerSonoSuitesoftware.Followtheinstallationinstructions
shown on your PC.
8. Making a Test Call with PC
8-1. EnsurethePerSonoSuitesoftwareisrunningonyourPC.
8-2. Withyourheadseton,pressthePCtalkbuttononthebase.
8-3. Dialthenumberusingyoursoftphoneapplication.
8-4. Adjustlisteningandspeakingvolumeusingyoursoftphoneapplicationand/or“soundand
audiodevices”inyourPCcontrolpanel.
8-5. You can fine tune the listening volume on the headset.
8-6. Toendthetestcall,pressthecallcontrolbuttonontheheadset.
PleaserefertothecompleteUserGuidelocatedontheCDforfurtherdetailsonhowtouseyour
Savi Office WO100 Professional Wireless Headset System.
CHARGING TIME
20 min .....................
Minimum charge
before first use
3 hours ...................
Full charge
Micro-casque Savi WH100 / WH110
Base Savi WO1
1.Volumed’émissiondutéléphone
2.Commutateurdeconguration
3.Volumederéceptiondutéléphone
4.Boutond’associationetvoyant
5.Voyantd’alimentation/charge
6.Prised’alimentation
7.Prisedudécrocheurdecombiné
8.Prisedecâbled’interfacetéléphonique
9.PortUSB
10.Boutondeconversationpartéléphoneetvoyant
11.Boutondeconversationparordinateuretvoyant
1.Contourd’oreille
2.Embout
3.Voyant
4.Boutondecontrôledesappels
(contrôleaussilevolumeetles
fonctions de sourdine et de
commutation)
5.Microphone
6.Serre-tête
7.Chargeur
8.Emboutpouroreillesupplémentaire
9.Coussinetsenmousse
Câble
d’interfacetéléphonique
Blocd’alimentation
delabase
ContenuduCD:
•LogicielPerSono®
•Guidedecongurationanimé
•Guidedel’utilisateurcomplet
CâbleUSB
10
67
8
11
9
Bienvenue
FélicitationspourvotrenouveauproduitPlantronics.Ceguideexpliquecommentinstallerle
systèmedemicro-casquesanslprofessionnelSaviOfceWO100.Veuillezlirelesconsignes
de sécuritéfourniesséparémentavantd’installeroud’utiliserleproduit.Ellescontiennentdes
renseignementsimportantsrelatifsàlasécurité.
Configuration système requise
LacongurationsystèmerequisepourSaviOfceestlasuivante:
•Systèmesd’exploitationcompatibles:WindowsXPetWindowsVista
•Processeur:400MHz(minimum);1GHz(recommandé)
•Mémoire:96Mo(minimum);256Mo(recommandé)
•Disquedur:280Mo(minimum);500Mo(recommandé)
•Afchage:800x600,256couleurs(minimum);1024x768,couleurs32bits(recommandé)
•InternetExplorerversion6
Renseignements sur la sécurité
Attention:N’utilisezpaslescasquesetmicro-casquesàvolumeélevésurdelongues
périodes.Celapourraitprovoquerdesproblèmesd’audition.Conserveztoujoursunniveau
d’écoutemodéré.Consultezlesitewww.plantronics.com/healthandsafetypourobtenirdeplus
amplesrenseignementssurlesmicro-casquesetl’audition.
Nous vous recommandons fortement de vous
reporter aux instructions du guide de configuration
animé et du guide de l’utilisateur complet sur le CD.
6
7
21
3
5
4
9
8
4
23
1
5

Installation du Savi Office WO100
1. Connexion du chargeur à la base
Connectezlechargeuràlabase.Appuyezfermementsurlechargeurjusqu’àcequ’ilsoitbienen
place.
2. Connexion de la base au téléphone
2-1. Branchezlecâbled’interfacedanslaprised’interfacedelabase.
2-2. Débranchezlecâbleenroulédecombinésurletéléphone,puisbranchezlecâbled’interface
danscettemêmeprisesurletéléphone.
2-3. Branchezlecâbleenroulédecombinédanslaboîtedejonctionducâbled’interface.
3. Branchement du bloc d’alimentation
3-1. Branchezlamini-chedublocdanslaprised’alimentationdelabase.
3-2. Branchezlachedansunepriseélectrique.
4. Recharge du micro-casque
Poussezdoucementlemicro-casquedanslechargeur.Chargezlemicro-casquependantaumoins
20minutesavantdel’utiliserpourlapremièrefois.Unechargecomplètedure3heures.
5. Vérification de la configuration
5-1. Surletéléphone,réglezlevolumeàlamoitié.
5-2. Assurez-vousquelesélecteurdecongurationdelabaseestpositionnésur«A»etqueles
volumesd’émissionetderéceptiondutéléphonesontrégléssur3.
REMARQUE : surlaplupartdestéléphones,cesréglagespardéfautpermettentd’obtenirla
meilleurequalitésonore.
5-3. Mettezlemicro-casque,puisappuyezsurleboutondecontrôledesappels.
5-4. Soulevezlecombinédutéléphone.
5-5. Vousdevriezentendrelatonalité. Silatonalitéestclaire,appuyezsurleboutondecontrôle
desappelsdumicro-casque,puispassezàl’étape6.Appel de test avec le téléphone.
5-6. Silatonalitéesttropforteoutropfaible,réglezlevolumedumicro-casque.
5-7. Si,malgrévosréglages,latonalitén’esttoujourspasclairementaudible,changezlaposition
dusélecteurdecongurationjusqu’àcequ’ellevousconvienne.
REMARQUE : mêmesiplusieursréglagespeuventfonctionneravecletéléphone,unseulest
optimal.
5-8. Pourterminerlaconguration,appuyezsurleboutondecontrôledesappelsdumicro-
casqueetreposezlecombinésurletéléphone.
6. Appel de test avec le téléphone
6-1. Mettezlemicro-casque,puisappuyezsurleboutondecontrôledesappels.
6-2. Soulevezlecombinédutéléphone.
6-3. Composezlenumérosurletéléphone.
6-4. Aubesoin,réglezlevolumederéceptionsurlemicro-casque.
6-5. S’ilestencoretropfortoutropfaible,ajustez-lesurlabasedutéléphone.
6-6. Silevolumed’émissionneconvientpasàvotreinterlocuteur,réglez-lesurlabasedu
téléphone.
6-7. Pourterminerl’appeldetest,appuyezsurleboutondecontrôledesappelsdumicro-
casqueetreposezlecombinésurletéléphone.
7. Connexion à l’ordinateur
7-1. BranchezuneextrémitéducâbleUSBdansleportUSBàl’arrièredelabase.
7-2. Branchezl’autreextrémitédansunportUSBdel’ordinateur.
7-3. InsérezleCDdanslelecteuroptiquedel’ordinateuretinstallezlelogicielPerSono.Suivez
lesinstructionsafchées.
8. Appel de test avec l’ordinateur
8-1. DémarrezPerSonoSuitesurl’ordinateur.
8-2. Mettezlemicro-casque,puisappuyezsurleboutondeconversationparPCsurlabase.
8-3. Composezlenumérodetéléphoneavecvotreapplicationdetéléphonie.
8-4. Vouspouvezréglerlevolumed’émissionetd’écouteavecl’applicationdetéléphonieou
avecl’optionSonsetpériphériquesaudioduPanneaudecongurationdeWindows.
8-5. Vouspouvezajusterlevolumed’écoutesurlemicro-casque.
8-6. Pourraccrocher,appuyezsurleboutondecontrôledesappelsdumicro-casque.
Pourplusdedétailssurl’utilisationdevotresystèmedemicro-casquesanslprofessionnelSavi
OfceWO100,consultezleguidedel’utilisateursurleCD.
TEMPS DE CHARGE
20 min .....................
Charge minimale avant
la première utilisation
3 heures ..................
Charge complète
Audífono Savi WH100 / WH110
Base Savi WO1
1.Volumendeconversacióndelteléfonodeescritorio
2.Controldeconguración
3.Volumendeescuchadelteléfonodeescritorio
4.Volumendeescuchadelteléfonodeescritorio
5.Luzindicadoradeenergía/carga
6.Entradadealimentación
7.Entradadeldispositivoparadescolgarelteléfono
8.Entradadelcabledeinterfazdelteléfono
9.PuertoUSB
10.Botóndeconversaciónporelteléfonodeescritorio
11.BotóndeconversaciónporlaPCyluzindicadora
Cabledeinterfazdel
teléfono
Fuentedealimentación
delabase
ElCDincluye:
•PaquetedesoftwarePerSono®
•Guíaanimadadeconguración
•Manualdelusuariocompleto
CableUSB
10
67
8
11
9
1. Gancho
2.Lengüeta
3.Luzindicadora
4.Botóndecontroldellamadas
(tambiéncontrolalasfunciones
devolumen,silencioy
conmuación)
5.Micrófono
6.Diadema
7.Basedecarga
8.Lengüetaadicional
9.Orejerasacolchadas
6
7
21
3
5
4
9
8
4
23
1
5
Bienvenido
FelicidadesporsucompradeunnuevoproductoPlantronics.Estaguíadeiniciorápidocontiene
instruccionesparacongurarelsistemadeaudífonosinalámbricosprofesionalesSaviOfce
WO100.Antesdeinstalaroutilizarelproducto,consultelasinstrucciones de seguridad(aparte)
paraobtenerinformaciónimportanteacercadelaseguridaddelproducto.
Requisitos del sistema
LosrequisitosmínimosdelsistemaparaSaviOfceson:
• Sistemasoperativoscompatibles:WindowsXP,WindowsVista
• Procesador:procesadorPentiuma400MHzoequivalente(mínimo);procesadorPentiuma
1GHzoequivalente(recomendado)
• RAM:96MB(mínimo);256MB(recomendado)
• Discoduro:280MB(mínimo);500MB(recomendado)
• Pantalla:800x600,256colores(mínimo);1024x768colordealtacalidad,32bits
(recomendado)
• DebetenerinstaladoInternetExplorerV6oposteriorenelsistema(necesario)
Instrucciones de seguridad
Advertencia:nouselosauricularesoaudífonosaunvolumenaltoduranteperiodos
prolongados.Estopuedecausarpérdidadeaudición.Usesiempreunvolumenmoderado.Visite
www.plantronics.com/healthandsafetydondeencontrarámásinformaciónacercadelosaudífonos
ylaaudición.
Le recomendamos que consulte las instrucciones
animadas de configuración y el manual del usuario
completo incluidos en el CD.

Instalación del sistema Savi Office WO100
1. Conexión de la base de carga a la base
Conectelabasedecargadelaudífonoalabase.Presionermementelabasedecargacontrala
basehastaqueencajeensusitio.
2. Conexión de la base al teléfono de escritorio
2-1. Conecteelcabledeinterfazdelteléfonoalaentradacorrespondienteenlabase.
2-2. Despuésdedesconectarelcableespiraldelauriculardelteléfonodeescritorio,conecte
elcabledeinterfazdelteléfonoalaentradadeauricular(ahoradesocupada)delteléfonode
escritorio.
2-3. Conecteelcableespiraldelauricularalacajadeconexionesdelcabledeinterfazdel
teléfono.
3. Conexión de la fuente de alimentación a la base
3-1. Conectelafuentedealimentacióndelabasealaentradadealimentacióndelabase.
3-2. Conectelafuentedealimentaciónaunatomadecorriente.
4. Acoplamiento y carga del audífono
Presionesuavementeelaudífonoenlabasedecarga.Cárguelodurantealmenos20minutos
antesdeusarloporprimeravez.Lacargacompletatarda3horas.
5. Comprobación de la configuración
5-1. Ajusteelvolumendelteléfonodeescritorioenunnivelintermedio.
5-2. Enlabase,compruebequeelcontroldeconguraciónestéajustadoen“A”,yqueel
volumendeconversaciónyelvolumendeescuchadelteléfonodeescritorioesténajustados
enelnivel3.
NOTAEnlamayoríadelosteléfonos,estosajustespreconguradosdefábricaproducenunsonido
óptimo.
5-3. Conelaudífonopuesto,presioneelbotóndecontroldellamadasdelaudífono.
5-4. Retireelauriculardelabasedelteléfonodeescritorio.
5-5. Espereaescuchareltonodemarcar.Siescuchaclaramenteeltonodemarcar,presioneel
botóndecontroldellamadasdelaudífonoycontinúeconelpaso6.
5-6. Sieltonodemarcarseescuchademasiadoaltoodemasiadobajo,ajusteelvolumendel
audífono.
5-7. Sieltonodemarcaraúnnosuenaclaro,ajusteelcontroldeconguraciónhastaobtenerun
sonidoóptimo.
NOTAPuedehabervariasconguracionesquefuncionenconsuteléfono;sinembargo,solouna
eslaposiciónóptima.
5-8. Presioneelbotóndecontroldellamadasdelaudífonoydevuelvaelauricularalabasepara
nalizarlaconguración.
6. Realización de una llamada de prueba con el
teléfono de escritorio
6-1. Conelaudífonopuesto,presioneelbotóndecontroldellamadasdelaudífono.
6-2. Retireelauriculardelabasedelteléfonodeescritorio.
6-3. Marqueelnúmeroenelteléfonodeescritorio.
6-4. Siesnecesario,ajusteelvolumendeescuchaenelaudífono.
6-5. Sielvolumendeescuchasiguesiendodemasiadoaltoodemasiadobajo,ajusteelvolumen
deescuchadelteléfonodeescritorioenlabase.
6-6. Sielvolumendeconversaciónesdemasiadoaltoodemasiadobajoparasuinterlocutor,
ajusteelvolumendeconversacióndelteléfonodeescritorioenlabase.
6-7. Presioneelbotóndecontroldellamadasdelaudífonoydevuelvaelauricularalabasepara
nalizarlallamadadeprueba.
7. Conexión a la PC
7-1. ConecteelcableUSBalpuertoUSBdelaparteposteriordelabase.
7-2. ConecteelotroextremodelcableUSBalpuertoUSBdelaPC.
7-3. InserteelCDeinstaleelpaquetedesoftwarePerSono.Sigalasinstruccionesdeinstalación
que aparecen en la PC.
8. Realización de una llamada de prueba con la PC
8-1. CompruebequeelpaquetedesoftwarePerSonoseestáejecutandoensuPC.
8-2. Conelaudífonopuesto,presioneelbotóndeconversaciónporlaPCdelabase.
8-3. Marqueelnúmeroconlaaplicacióndeteléfono.
8-4. AjusteelvolumendeescuchayconversaciónconlaaplicacióndeteléfonooenDispositivos
desonidoyaudio,enelPaneldecontroldelaPC.
8-5. Puederealizarunajustenodelvolumendeescuchaenelaudífono.
8-6. Paraterminarlallamadadeprueba,presioneelbotóndecontroldellamadasdelaudífono.
ConsulteelmanualdelusuariocompletoincluidoenelCDparaobtenermásinformaciónacercade
cómousarelsistemadeaudífonosinalámbricosprofesionalesSaviOfceWO100.
TIEMPO DE CARGA
20 min .....................
Carga mínima
antes del primer uso
3 horas ....................
Carga completa
Bem-vindo
ParabénsporadquiriroseunovoprodutodaPlantronics.EsteGuiadeInícioRápidocontém
instruções para configurar o sistema de headset wireless profissional do Savi Office WO100.
Consulte o folheto InstruçõessobreSegurançaparaobterinformaçõesimportantesdesegurança
do produto antes da instalação ou do uso do produto.
Requisitos de sistema
OsrequisitosmínimosdesistemaparaoSaviOfcesãoosseguintes:
• Sistemasoperacionaissuportados:WindowsXP,WindowsVista
• Processador:processadorPentiumde400MHzouequivalente(mínimo);processadorPentium
de1GHzouequivalente(recomendado)
• RAM:96MB(mínimo);256MB(recomendado)
• Discorígido:280MB(mínimo);500MB(recomendado)
• Visor:800x600,256cores(mínimo);coresdealtaresoluçãode1024x768,32bits
(recomendado)
• InternetExplorer6.0ousuperior(necessário)
Instruções de Segurança
Nãousefonesdeouvido/headsetsemvolumemuitoaltoporperíodosprolongadosdetempo.
Issopodecausaraperdadeaudição.Ouçasempreemníveismoderados.Visite
www.plantronics.com/healthandsafetyparamaisinformaçõessobreheadsetseassuntosde
audição.
Headset Savi WH100 / WH110
Base do Savi WO1
1.Volumedefaladotelefonedemesa
2.Chavedeconguração
3.Volumedeaudiçãodotelefonedemesa
4.Botãodevinculaçãoeluzindicadora
5.Luzindicadoradeenergia/carga
6.Entradadeenergia
7.Tomadadosuportedemonofone
8.Entradadocabodeinterfacedotelefone
9.PortaUSB
10.Botãodeconversaçãoeluzindicadorado
telefone de mesa
11.BotãodeconversaçãoeluzindicadoradoPC
Cabodeinterfacedo
telefone
Fontedealimentação
dabase
OCDinclui:
•ConjuntodosoftwarePerSono
•Guiadeinstalaçãoanimado
•Guiacompletodousuário
CaboUSB
10
67
8
11
9
Recomendamos que você consulte o CD com
instruções interativas de configuração e o Guia do
Usuário.
1.Earloop
2.Alçadeouvido
3.Luzindicadora
4.Botãodecontroledechamadas
(tambémcontrolaasfunçõesde
volume,mudoealternância)
5.Microfone
6.Alça
7.Basedecarga
8.Alçadeouvidoextra
9.Almofadasdeespumaparaoouvido
6
7
21
3
5
4
9
8
4
23
1
5

Configurando o sistema Savi Office WO100
1. Conectando a base de carga à base
Conecteabasedecargadoheadsetàbase.Empurrermementeabaseatéqueelaseencaixe
e fique no lugar.
2. Conectando a base ao telefone de mesa
2-1. Conecteocabodeinterfacedotelefoneàentradadocabodeinterfacenabase.
2-2. Apósdesconectarocaboespiraldomonofonedotelefonedemesa,conecteocabode
interfacedotelefonenaporta,agoraaberta,domonofone,notelefonedemesa.
2-3. Conecteocaboespiraldomonofoneàcaixadejunçãodocabodeinterfacedotelefone.
3. Conectando a fonte de alimentação à base
3-1. Conecteafontedealimentaçãodabasenaentradadeenergiadabase.
3-2. Conecte a fonte de alimentação à tomada.
4. Encaixando e recarregando o headset
Empurrelevementeoheadsetparaabasedecarga.Carreguepor,nomínimo,20minutosantes
deusarpelaprimeiravez.Umacargacompletaleva3horas.
TEMPO DE
CARREGAMENTO
20 min .....................
Carga mínima antes do
primeiro uso
3 horas ....................
Recarga completa
5. Verificando a configuração
5-1. Ajusteovolumedotelefonedemesaparaumnívelmédio.
5-2. Nabase,certique-sedequeachavedeconguraçãoestejadenidapara“A”equeos
volumesdefalaedeaudiçãodotelefoneestejamdenidospara3.
OBSERVAÇÃOparaamaioriadostelefones,asconguraçõespadrõesdefábricasãoas
melhores.
5-3. Comoseuheadsetligado,pressioneobotãodecontroledechamadasdoheadset.
5-4. Removaomonofonedabasedotelefonedemesa.
5-5. Ouçaumtomdediscagem.Seotomdediscagemforclaro,pressioneobotãodecontrole
de chamadas do headset e continue noPasso6.Fazendoumachamadatestecomo
telefone de mesa.
5-6. Seotomdechamadasoarmuitoaltooumuitosuave,ajusteovolumedoheadset.
5-7. Seotomdediscagemnãosoarclaro,ajusteachavedeconguraçãoatéqueeleatinjao
som ideal.
OBSERVAÇÃODiversasconguraçõespodemfuncionarcomoseutelefone;noentanto,apenas
umaseráaposiçãoideal.
5-8. Pressioneobotãodecontroledechamadasdoheadseteretorneomonofoneàbasepara
concluir a configuração.
6. Fazendo uma chamada teste com o telefone de
mesa
6-1. Comoseuheadsetligado,pressioneobotãodecontroledechamadasdoheadset.
6-2. Removaomonofonedabasedotelefonedemesa.
6-3. Disqueonúmerousandooseutelefonedemesa.
6-4. Senecessário,ajusteovolumedeaudiçãodoheadset.
6-5. Seovolumedeaudiçãodotelefonedemesaaindaestivermuitoaltooumuitosuave,
ajuste-onabase.
6-6. Seovolumedefalaestivermuitoaltooumuitosuaveparaoreceptor,ajusteovolumede
faladotelefonenabase.
6-7. Pressioneobotãodecontroledechamadasdoheadseteretorneomonofoneàbasepara
concluir a chamada teste.
7. Conectando ao PC
7-1. ConecteocaboUSBnaportaUSBdapartetraseiradabase.
7-2. ConecteaoutraextremidadedocaboUSBnaportaUSBdoPC.
7-3. InsiraoCDeinstaleosoftwarePerSonoSuite.Sigaasinstruçõesdeinstalação
exibidasemseucomputador.
8. Fazendo uma chamada teste com o computador
8-1. VeriqueseosoftwarePerSonoSuiteestáemexecuçãonoseucomputador.
8-2. Comoheadsetligado,pressioneobotãodeconversaçãodocomputadornabase.
8-3. Disqueumnúmerousandooaplicativodoseusoftphone
8-4. Ajusteosvolumesdefalaeaudiçãousandooaplicativodoseusoftphonee/ounaopção
“SonseDispositivosdeÁudio”noPaineldeControledoseucomputador.
8-5. Vocêpodeajustardamelhorformaovolumedeaudiçãonoheadset.
8-6. Paranalizarachamadateste,pressioneobotãodecontroledechamadasnoheadset.
ConsulteoGuiadeUsuário,queestánoCD,paraobtermaisdetalhesdecomousaroseusistema
de headset wireless profissional do Savi Office WO100.

Homologação Anatel
Este produto está homologado pela ANATEL, de acordo com os procedimentos
regulamentados pela resolução 242/2000, e atende aos requisitos técnicos aplicados.
Para maiores informações consulte o site da ANATEL.
http://www.anatel.gov.br
Distribuído por Plantronics Telecomunicações Ltda
CNPJ 05.758.913/0001-95
“ ESTE EQUIPAMENTO OPERA EM CARÁTER SECUNDÁRIO. ISTO É, NÃO TEM DIREITO A
PROTEÇÃO CONTRA INTERFERÊNCIA PREJUDICIAL, MESMO DE ESTAÇÕES DO MESMO TIPO E
NÃO PODE CAUSAR INTERFERÊNCIA A SISTEMAS OPERANDO EM CARÁTER PRIMÁRIO. ”
( 01) 07898401710672
14 9 6 - - 0 9 - 1 89 3
Modelo: BUA-200
( 01) 07898401710665
06 4 7 - - 0 9 - 1 89 3
Modelo: WH100/B

Plantronics,Inc.
345EncinalStreet
SantaCruz,CA95060
UnitedStates
Tel:800-544-4660
Tel:831-426-5858
www.plantronics.com
ThisdevicecomplieswithPart15oftheFCCRules.Operationissubjecttothefollowingtwoconditions:
1.Thisdevicemaynotcauseharmfulinterference,and
2.Thisdevicemustacceptanyinterferencereceived,includinginterferencethatmaycauseundesiredoperation.
ThisequipmenthasbeentestedandfoundtocomplywiththelimitsforaClassBdigitaldevice,pursuanttoPart15oftheFCCRules.
Theselimitsaredesignedtoprovidereasonableprotectionagainstharmfulinterferenceinaresidentialinstallation.Thisequipment
generates,uses,andcanradiateradiofrequencyenergyand,ifnotinstalledandusedinaccordancewiththeinstructions,maycause
harmfulinterferencetoradiocommunications.However,thereisnoguaranteethatinterferencewillnotoccurinaparticularinstallation.If
thisequipmentdoescauseharmfulinterferencetoradioortelevisionreceptionwhichcanbedeterminedbyturningtheradioortelevision
offandon,theuserisencouragedtotrytocorrectinterferencebyoneormoreofthefollowingmeasures:
1.Reorientorrelocatethereceivingantenna.
2.Increasetheseparationbetweentheequipmentandreceiver.
3.Connecttheequipmentintoanoutletonanothercircuit.
4.Consultthedealeroranexperiencedradio/TVtechnicianforhelp.
FCCREGISTRATIONINFORMATION—Part68
ThisequipmentcomplieswithPart68oftheFCCrulesandtherequirementsadoptedbyACTA.Ontheexteriorofthisequipmentisalabel
thatcontainsaproductidentierintheformatUS:AAAEQ##TXXXX.Ifrequested,thisinformationmustbeprovidedtoyourtelephone
company.
AplugandjackusedtoconnectthisequipmenttothepremiseswiringandtelephonenetworkmustcomplywiththeapplicableFCCPart
68rulesandrequirementsadoptedbyACTA.Acomplianttelephonecordandmodularplugisprovidedwiththisproduct.Itisdesignedto
beconnectedtoacompatiblejackthatisalsocompliant.Seeinstallationinstructionsfordetails.
TheRENisusefultodeterminethequantityofdevicesyoumayconnecttoyourtelephoneline.ExcessiveRENsonatelephonelinemay
resultinthedevicesnotringinginresponsetoanincomingcall.Inmost,butnotallareas,thesumoftheRENsshouldnotexceedve(5.0).
Tobecertainofthenumberofdevicesyoumayconnecttoyourline,asdeterminedbytheREN,contactyourlocaltelephonecompany.For
productsapprovedafterAugust8,2001,theRENforthisproductispartoftheproductidentierthathastheformatUS:AAAEQ##TXXXX.
Thedigitsrepresentedby##aretheRENwithoutthedecimalpoint.(Forexample,03representsaRENof0.3.)Forearlierproducers,the
RENisseparatelyshownonthelabel.
Ifthistelephoneequipmentcausesharmtothetelephonenetwork,thetelephonecompanywillnotifyyouinadvancethattemporary
discontinuanceofservicemayberequired.Butifadvancenoticeisn’tpractical,thetelephonecompanywillnotifythecustomerassoonas
possible.Also,youwillbeadvisedofyourrighttoleacomplaintwiththeFCCifyoubelieveitisnecessary.
Thetelephonecompanymaymakechangesinitsfacilities,equipment,operations,orproceduresthatcouldaffecttheproperfunctioning
ofyourequipment.Iftheydo,youwillbenotiedinadvanceinorderforyoutomakenecessarymodicationstomaintainuninterrupted
service.
Iftroubleisexperiencedwiththisunit,forrepairorwarrantyinformation,pleasecontactcustomerserviceat(800)544-4660.Ifthe
equipmentiscausingharmtothenetwork,thetelephonecompanymayrequestthatyoudisconnecttheequipmentuntiltheproblemis
resolved.
DONOTDISASSEMBLETHISEQUIPMENT:itdoesnotcontainanyuser-serviceablecomponents.
WerecommendtheinstallationofanACsurgearresterintheACoutlettowhichthisequipmentisconnected.Telephonecompaniesreport
thatelectricalsurges,typicallylightingtransients,areverydestructivetocustomerterminalequipmentconnectedtoACpowersources.
ExposuretoRFRadiation
Theinternalwirelessradiooperateswithintheguidelinesfoundinradiofrequencysafetystandardsandrecommendations,whichreectthe
consensusofthescienticcommunity. Independentstudieshaveshownthattheinternalwirelessradioissafeforusebyconsumers.Visit
www.plantronics.com for more information.
InordertocomplywithFCCRFExposurerequirements,thebasemustbeinstalledandoperatedsuchthataminimumseparationdistance
of20cmismaintainedbetweenthebaseandallpersonsduringnormaloperation.
NOTE: ModicationsnotexpresslyapprovedbyPlantronics,Inc.couldvoidtheuser’sauthoritytooperatetheequipment.
INDUSTRY CANADA REGULATORY INFORMATION
ThisproductmeetstheapplicableIndustryCanadatechnicalspecications/Leprésentmaterielestconformeauxspecicationstechniques
applicabled’InduristrieCanada.
ThisClassBdigitalapparatuscomplieswithCanadianICES-003.
CetappareilnumériquedelaclasseBestconformeàlanormeNMB-003duCanada.
©2009Plantronics,Inc.Allrightsreserved.Plantronics,thelogodesign,PerSono,Savi,andSoundInnovationaretrademarksorregistered
trademarksofPlantronics,Inc.Allothertrademarksarethepropertyoftheirrespectiveowners.
PatentsUS5,210,791;D469,756;Australia147229;France651,857-651,865;Germany40108524.4;GBRegd.Des.No.2104923;
Patents Pending..
82328-03(7.09)

en Safety Instructions
ar إرشادات حول السلامة
bg Инструкции за безопасност
cs Bezpečnostní pokyny
da Sikkerhedsvejledning
de Sicherheitshinweise
el Οδηγίες για την ασφάλεια
es Instrucciones de seguridad
fa دستورالعمل های ایمنی
fr Instructions de sécurité
he הוראות בטיחות
hr Sigurnosne upute
hu Biztonsági előírások
it Informazioni sulla sicurezza
mk Безбедносни упатства
nl Veiligheidsinstructies
no Sikkerhetsinstruksjoner
pl Instrukcje bezpieczeństwa
pt Instruções de Segurança
ro Instrucţiuni de siguranţă
ru Инструкции по безопасности
sl Varnostna navodila
sv Säkerhetsanvisningar
tr Instrucţiuni de siguranţă

AR
EN
إرشادات حول السلامة
يرجى قراءة إرشادات السلامة والتشغيل التالية قبل استخدام منتج Plantronics. يرجى الاحتفاظ
بهذه الإرشادات للرجوع إليها. عند استخدام هذا المنتج، يجب اتباع تدابير وتحذيرات السلامة
الأساسية هذه للتخفيف من خطر الحريق والصدمات الكهربائية والإصابات الجسدية وخطر
الأضرار المادية.
تحذيرات
استخدم فقط منتجات Plantronics المصممة للاستخدام مع نظام Plantronics هذا.
الأطفال. لا تسمح للأطفال باللعب بالمنتج على الإطلاق إذ قد تتسبب القطع الصغيرة
بالاختناق.
وصّل محوّل التيار المتناوب بالمأخذ الأقرب إلى الجهاز والذي يسهل الوصول إليه.
للتخفيف من خطر حدوث صدمة كهربائية، أو انفجار أو حريق، استخدم فقط الشاحن الموفر أو محوّل
التيار المتناوب Class 2 لشحن سماعة الرأس. تأكد من أن درجة الفولتية (مثلاً 120 فولت، 60
هرتز) تطابق مصدر الطاقة الذي تنوي استخدامه.
Safety Instructions
Please read the following safety and operational instructions before using your Plantronics product.
Please keep these instructions for your reference. When using this product, these basic safety
precautions and warnings should be followed to reduce the risk of fire, electric shock, injury to persons
and damage to property.
General
Operating, charging and storage temperature is 0ºC to 40ºC (32ºF to 104ºF).
Warnings
• Only use those Plantronics products designed for use with this Plantronics system.
• CHILDREN. Never allow children to play with the product—small parts may be a choking hazard.
• Plug the AC adapter into the outlet nearest the equipment that is easily accessible.
• To reduce the risk of electric shock, explosion or fire, use only the supplied charger or Class 2 AC
adapter to charge the headset. Ensure that the voltage rating (e.g. 120v, 60 Hz) corresponds to the
power supply you intend to use.
• Do not disassemble the product or AC adapter as this may expose you to dangerous voltages or other
risks. Incorrect reassembly can cause electric shock or fire when the product is subsequently used.
• Do not insert anything into the product because this may cause damage to the internal components or
cause injury to you.
• If this system includes a mobile phone headset, check local laws regarding use of a mobile phone and
headset while driving. If you use the headset while driving, ensure your attention and focus remain on
driving safely.
• Use of a headset that covers both ears will impair your ability to hear other sounds. Use of such a
headset while operating a motor vehicle or riding a bicycle may create a serious hazard to you and/or
others, and is illegal in most states and regions.
• If this system includes a Bluetooth headset, observe all signs or instructions that require an electrical
device or RF radio product to be switched off in designated areas, such as hospitals, blasting areas,
potentially explosive atmospheres, and aircraft.
• Avoid contact with liquids. Do not locate this product near water, for example, near a bathtub, or sink,
in a wet basement, or near a swimming pool.
• Discontinue use of product and contact Plantronics if the product overheats, has a damaged cord or
plug, if the product has been dropped or damaged, or if the product has come into contact with liquids.
• This product should never be placed over or near a heat register and should not be placed in locations
without which do not have proper ventilation.
• If you experience a skin irritation after using this product, discontinue use and contact Plantronics.
• Exposure to high volume sound levels or excessive sound pressure may cause temporary or
permanent damage to your hearing. Although there is no single volume setting that is appropriate for
everyone, you should always use your headset/headphones with the volume set at moderate levels
and avoid prolonged exposure to high volume sound levels. The louder the volume, the less time is
required before your hearing could be affected. You may experience different sound levels when using
your headset /headphones with different devices. The device you use and its settings affect the level of
sound you hear. If you experience hearing discomfort, you should stop listening to the device through
your headset/headphones and have your hearing checked by your doctor. To protect your hearing,
some hearing experts suggest that you:
1. Set the volume control in a low position before putting your headset or headphones
on your ears and use as low a volume as possible.
2. Avoid turning up the volume to block out noisy surroundings. Whenever possible,
use your headset or headphones in a quiet environment with low background noise.
3. Limit the amount of time you use headsets or headphones at high volume levels.
4. Turn the volume down if the sound from the headset/headphones prevent you from hearing people
speaking near you.
See www.plantronics.com/healthandsafety for more information on headsets/headphones and hearing.
To avoid the risk of electric shock, explosion, fire or leakage of corrosive or toxic chemicals,
please observe the following charging and battery warnings:
Charging Warnings
• Use only the charger supplied by Plantronics to charge the product. Do not use the charger for any
other purpose. Ensure that the voltage rating corresponds to the power supply you intend to use.
• Charge the headset/headphones according to the instructions supplied with the unit.
• Plug the AC adapter or charger into an outlet that is near the equipment and will be
easily accessible.
• Never charge the battery where the temperature may fall below 0ºC (32ºF) or rise above 40ºC (104ºF) -
for example in an unattended motor vehicle.
• Avoid charging the battery while it is unattended.
Headset Battery Warnings
The headset is equipped with a non-replaceable battery. To reduce the risk of fire or injury to persons,
read and follow these instructions.
Do not attempt to open the headset or remove the battery.
Do not dispose of the headset or battery in a fire. The battery may explode. Check local laws for disposal
instructions.
Do not open or mutilate the battery. There may be corrosive materials which can cause damage to eyes
or skin and may be toxic if swallowed.
Charge the headset according to the instructions supplied with the headset.
RECYCLING: The battery used in your headset must be recycled or disposed of properly. Contact your
local recycling center for proper disposal of your headset.