Plantronics XLC34 1.9GHz CORDLESS PHONE User Manual 1
Plantronics Inc 1.9GHz CORDLESS PHONE Users Manual 1
Contents
- 1. Users Manual 1
- 2. Users Manual 2
Users Manual 1
E
S
P
A
~
N
O
L
E
N
G
L
I
S
H
F
R
A
N
Ç
A
I
S
User Guide
IN USE/
CHARGE POWER
VOLUME
FIND
SILENT
MENU
TALK FLASH EXIT
MUTE
BACK
RD/P
!
BOOST
PRINTED IN CHINA
Clarity, a Division of Plantronics, Inc.
4289 Bonny Oaks Drive, Chattanooga, TN 37406
Tel: 800-426-3738 Fax: 800-325-8871
E-mail: claritycs@plantronics.com Website: www.clarityproducts.com
©2010 Clarity, a Division of Plantronics, Inc. All rights reserved.
Clarity, Clarity Professional, XLC3.4, Digital Clarity Power and
the amplified figure are trademarks or registered trademarks of
Plantronics, Inc.
Rev. A (09-10)
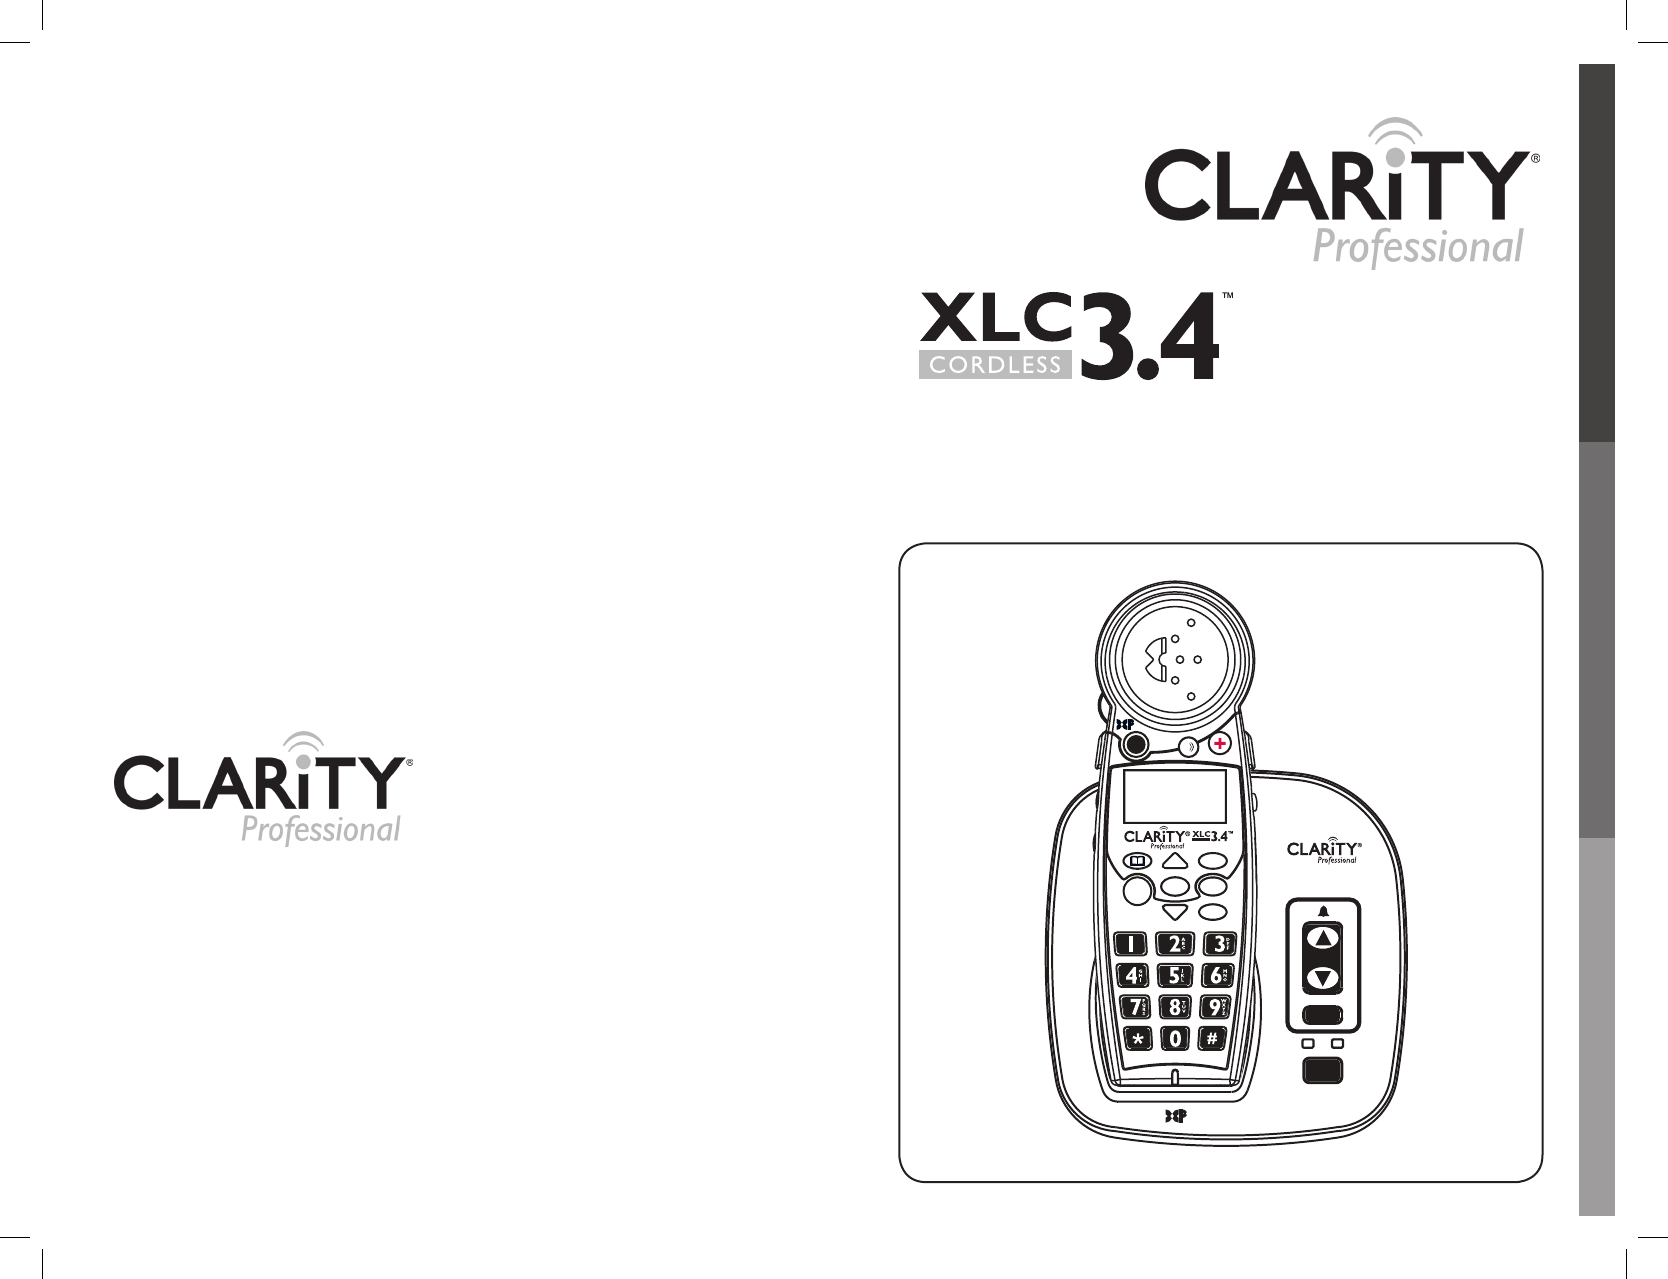
Extra Loud Cordless
Speakerphone with
Caller ID

E
N
G
L
I
S
H
TABLE OF CONTENTS
XLC3.4
IMPORTANT SAFETY INSTRUCTIONS 2
CONTENTS & PARTS CHECKLIST 5
INSTALLATION 6
WALL MOUNTING YOUR XLC3.4 8
BASE - Quick Reference Guide 10
HANDSET - Quick Reference Guide 11
BATTERY INFORMATION 14
PLACING & ANSWERING CALLS 15
VOLUME & TONE ADJUSTMENTS 16
CALLER ID FUNCTION 16
PHONEBOOK 17
SCREEN DETAILS 17
TELEPHONE MENU 19
HANDSET REGISTRATION 28
TROUBLESHOOTING 29
TECHNICAL SPECIFICATIONS 32
REGULATORY COMPLIANCE 33
WARRANTY INFORMATION 36

2 3
E
N
G
L
I
S
H
SAVE THESE INSTRUCTIONS
SAVE THESE INSTRUCTIONS
When using your telephone
equipment, basic safety precautions
should always be followed to
reduce the risk of fire, electric
shock and injury to persons,
including the following:
1. Read and understand all
instructions.
2. Follow all warnings and
instructions marked on the
telephone.
3. Avoid contact with liquids. Do
not locate base unit or handset
near water, for example, near a
bathtub, wash basin, sink or laundry
tub, in a wet basement or near a
swimming pool.
4. Avoid using a telephone (other
than a cordless type) during a
storm. There may be a remote risk
of electrical shock from lightning.
5. Do not use the telephone to
report a gas leak in the vicinity of
the leak.
6. Unplug this telephone from the
wall outlets before cleaning. Do
not use liquid cleaners or aerosol
cleaners on the telephone. Use a
damp cloth for cleaning.
7. Place this telephone on a stable
surface. Serious damage and/or
injury may result if the telephone
falls.
8. Do not cover the slots and
openings on this telephone. This
telephone should never be placed
near or over a radiator or heat
register. This telephone should not
be placed in a built-in installation
unless proper ventilation is
provided.
9. Operate this telephone using the
electrical voltage as stated on the
base unit or the owner’s manual. If
you are not sure of the voltage in
your home, consult your dealer or
local power company.
10. Do not allow anything to rest
on the power cord or locate this
product in an area where the
power cord is likely to be damaged
by furniture or foot traffic.
11. Do not overload wall outlets or
extension cords as this can increase
the risk of fire or electrical shock.
12. Never push any objects through
the slots in the telephone. They can
touch dangerous voltage points or
short out parts that could result
in a risk of fire or electrical shock.
Never spill liquid of any kind on the
telephone.
13. To reduce the risk of electrical
shock, do not take this phone apart.
Opening or removing covers may
expose you to dangerous voltages
or other risks. Incorrect reassembly
can cause electric shock when the
appliance is subsequently used.
14. Unplug this product from the
wall outlet and refer servicing
to the manufacturer under the
following conditions: when the
power supply cord or plug is
frayed or damaged; if liquid has
been spilled into the product; if the
telephone has been exposed to
rain or water; if the telephone has
been dropped or the case has been
damaged; if the telephone exhibits
a distinct change in performance;
if the telephone does not operate
normally by following the operating
instructions. Adjust only those
controls that are covered by the
operating instructions. Improper
adjustment may require extensive
work by a qualified technician to
restore the telephone to normal
operation if the telephone does not
operate normally by following the
operating instructions.
15. Never install telephone wiring
during a lightning storm.
16. Never install telephone jacks
in wet locations unless the jack
is specifically designed for wet
locations.
17. Never touch uninsulated
telephone wires or terminals
unless the telephone line has been
disconnected at the network
interface.
18. Use caution when installing or
modifying telephone lines.
19. This product should be
operated only from the type of
power source indicated on the
marking label. If you are not sure of
the type of power supply to your
home, consult your local power
company.
20. Do not attempt to open the
AC adapter. There are potentially
dangerous voltages inside, and there
are no serviceable parts.
21. Discontinue use of product
and contact Clarity if the product
overheats, has a damaged cord
or plug, if the product has been
dropped or damaged or if the
product has come into contact with
liquids.
22. Use only the AC adapter
provided with this product or a
replacement AC adapter provided
by Clarity.
23. This phone amplifies sound to
loud volumes. To prevent hearing
damage, all users of the phone
should be informed of the high
volume capability of the phone and
children should only use the phone
when supervised by an adult.
24. Exposure to high volume
sound levels or excessive sound
pressure may cause temporary
or permanent damage to your
hearing. Although there is no single
volume setting that is appropriate
for everyone, you should always
use your telephone with the
volume set at moderate levels and
avoid prolonged exposure to high
volume sound levels. The louder the
volume, the less time is required
before your hearing could be
IMPORTANT SAFETY
INSTRUCTIONS
XLC3.4
IMPORTANT SAFETY
INSTRUCTIONS
XLC3.4
4 5
E
N
G
L
I
S
H
TONE
INTERCOM
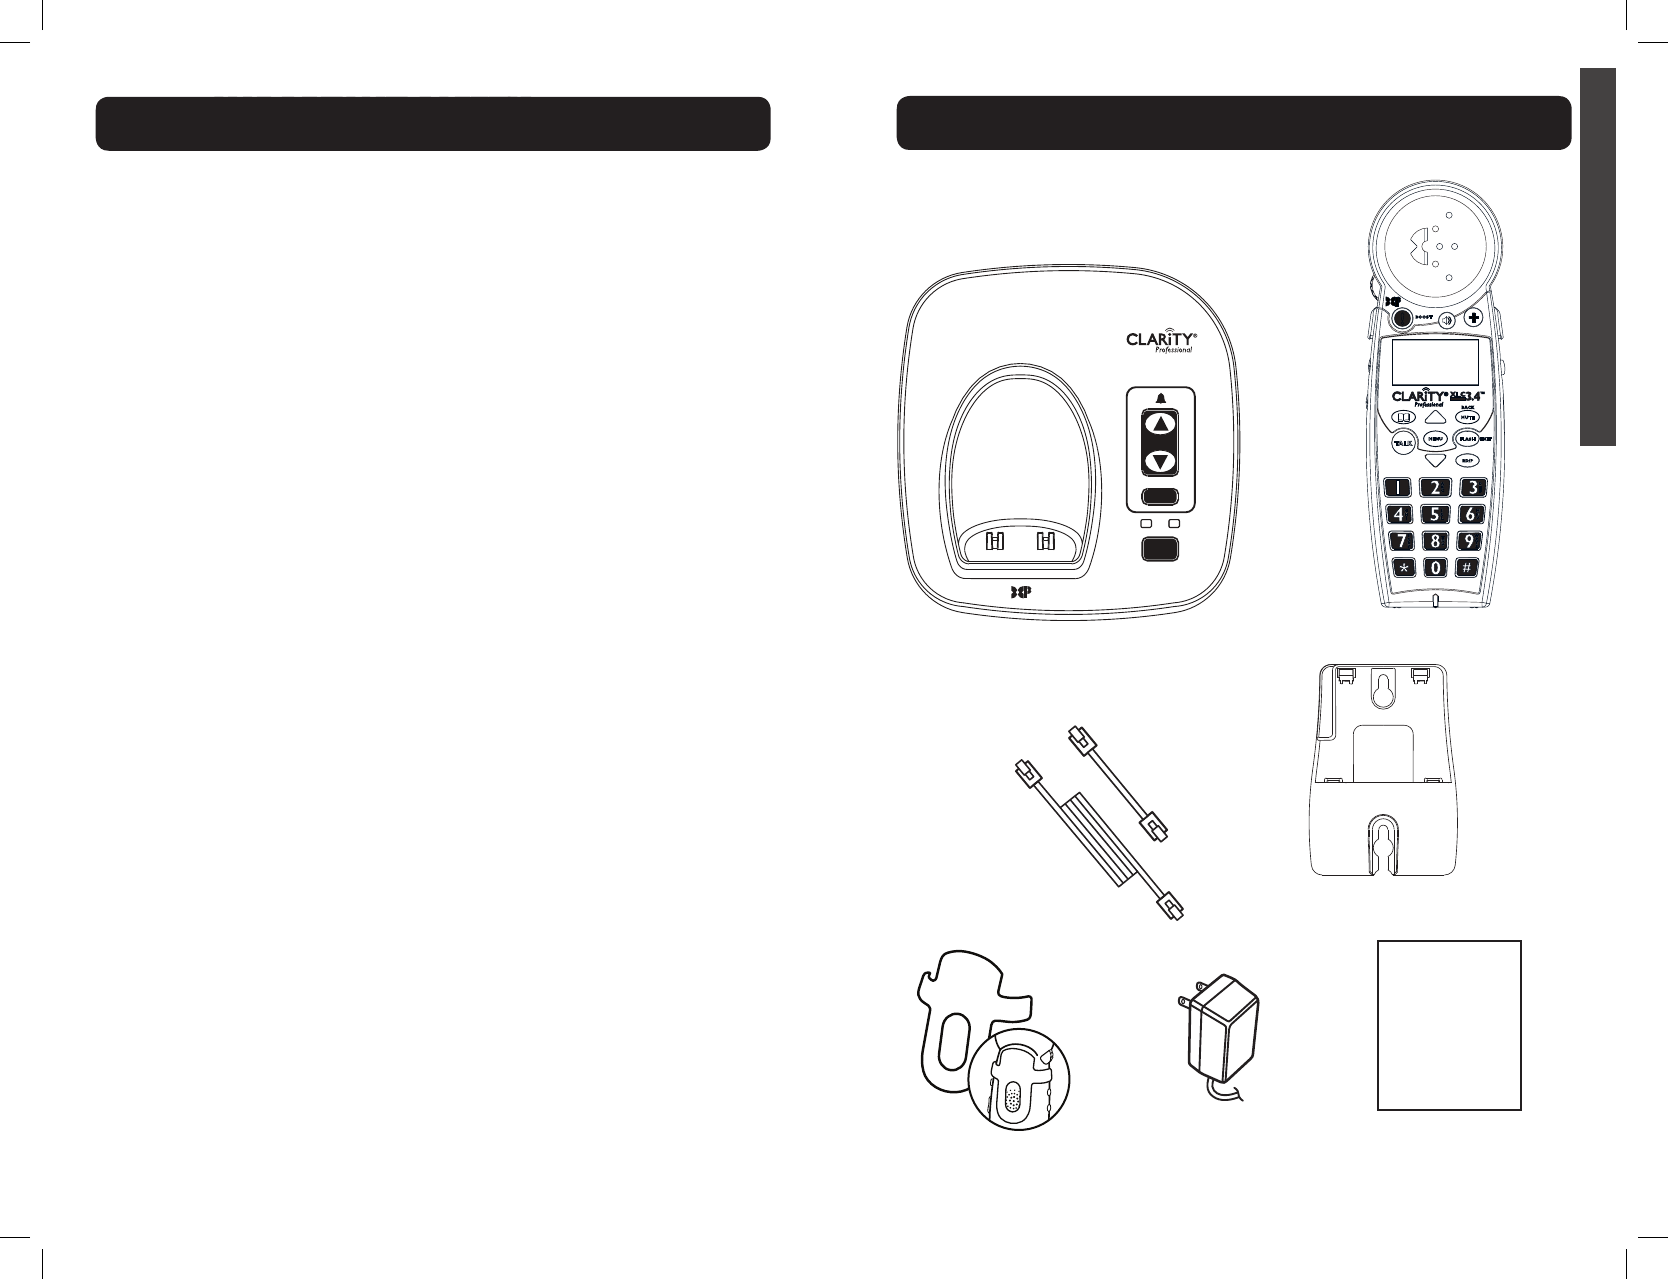
Base Handset
Belt clip AC power adapter
Long
Phone cord
User
guide
Short
Phone cord
SAVE THESE INSTRUCTIONS
affected. If you experience hearing
discomfort, you should have your
hearing checked by a doctor. To
protect your hearing, you should:
A) Set the volume control in a low
position and gradually increase the
volume as needed. Before pressing
the BOOST button, reduce the
volume to the lowest level. Use the
phone on the lowest volume setting
as possible.
B) Limit the amount of time you
use the telephone at high volume
levels.
25. If you experience a skin
irritation after using this product,
discontinue use and contact Clarity.
XLC3.4
User Guide
IN USE/
CHARGE POWER
VOLUME
FIND
SILENT
MENU
TALK FLASH EXIT
MUTE
BACK
RD/P
!
BOOST
BATTERY SAFETY
INSTRUCTIONS
Dispose of used batteries
according to the instructions.
1. Do not dispose of the battery
in a fire as it may explode. Check
with local codes for possible special
disposal instructions.
2. Do not open or mutilate the
battery. Released electrolyte is
corrosive and may cause damage to
the eyes and skin. It may
be toxic if swallowed.
3. Exercise care in handling batteries
in order not to short the battery
with conducting materials such
as rings, bracelets and keys. The
battery or conduction material may
overheat and cause burns.
4. Remove batteries when they are
discharged and when the equipment
will not be used for an extended
period of time. Dispose of batteries
according to local environmental
laws.
5. Do not disassemble, heat, crush,
deform or puncture batteries.
6. Do not attempt to charge non-
rechargeable batteries.
7. Keep batteries out of the reach
of children.
WARNING: Risk of explosion if
battery is replaced by an incorrect
type.
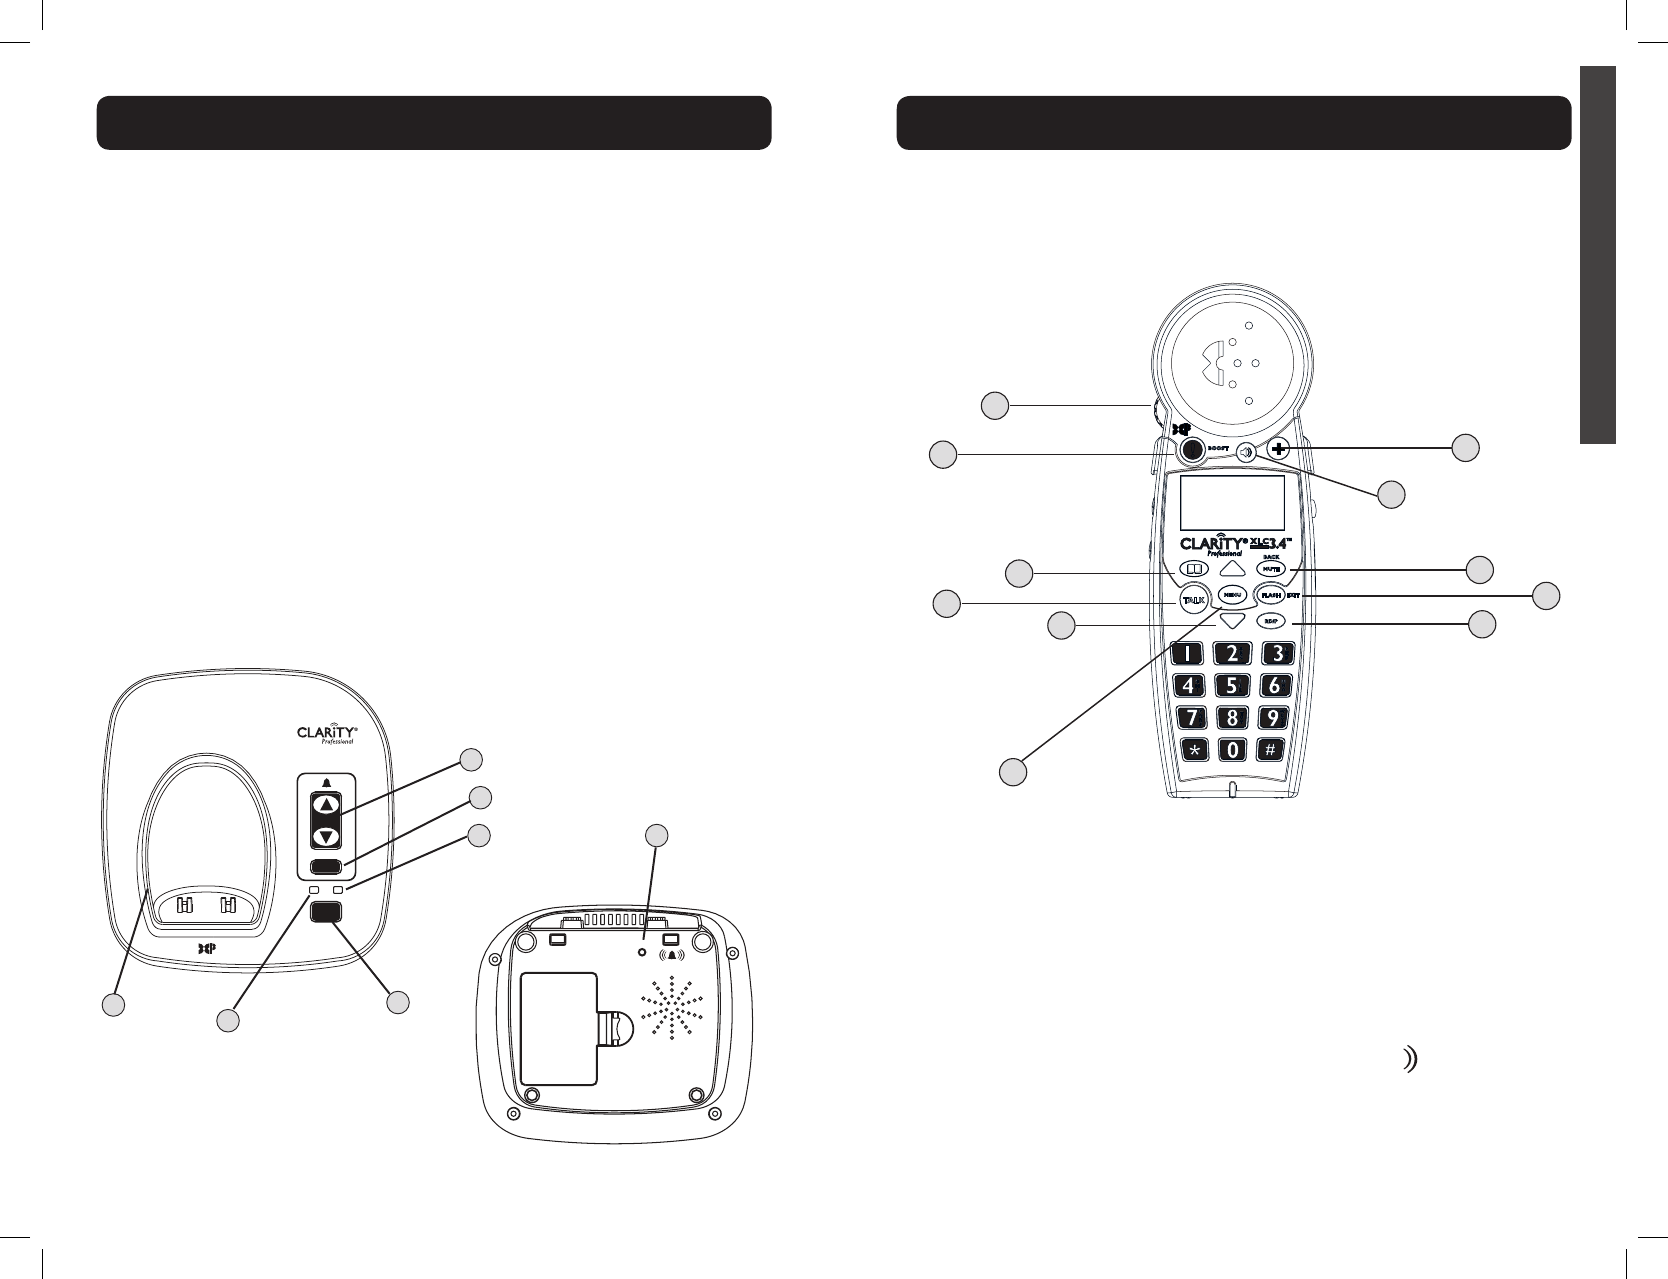
CONTENTS & PARTS CHECKLIST
XLC3.4
Wall mount bracket
IMPORTANT SAFETY
INSTRUCTIONS
XLC3.4
6 7
E
N
G
L
I
S
H
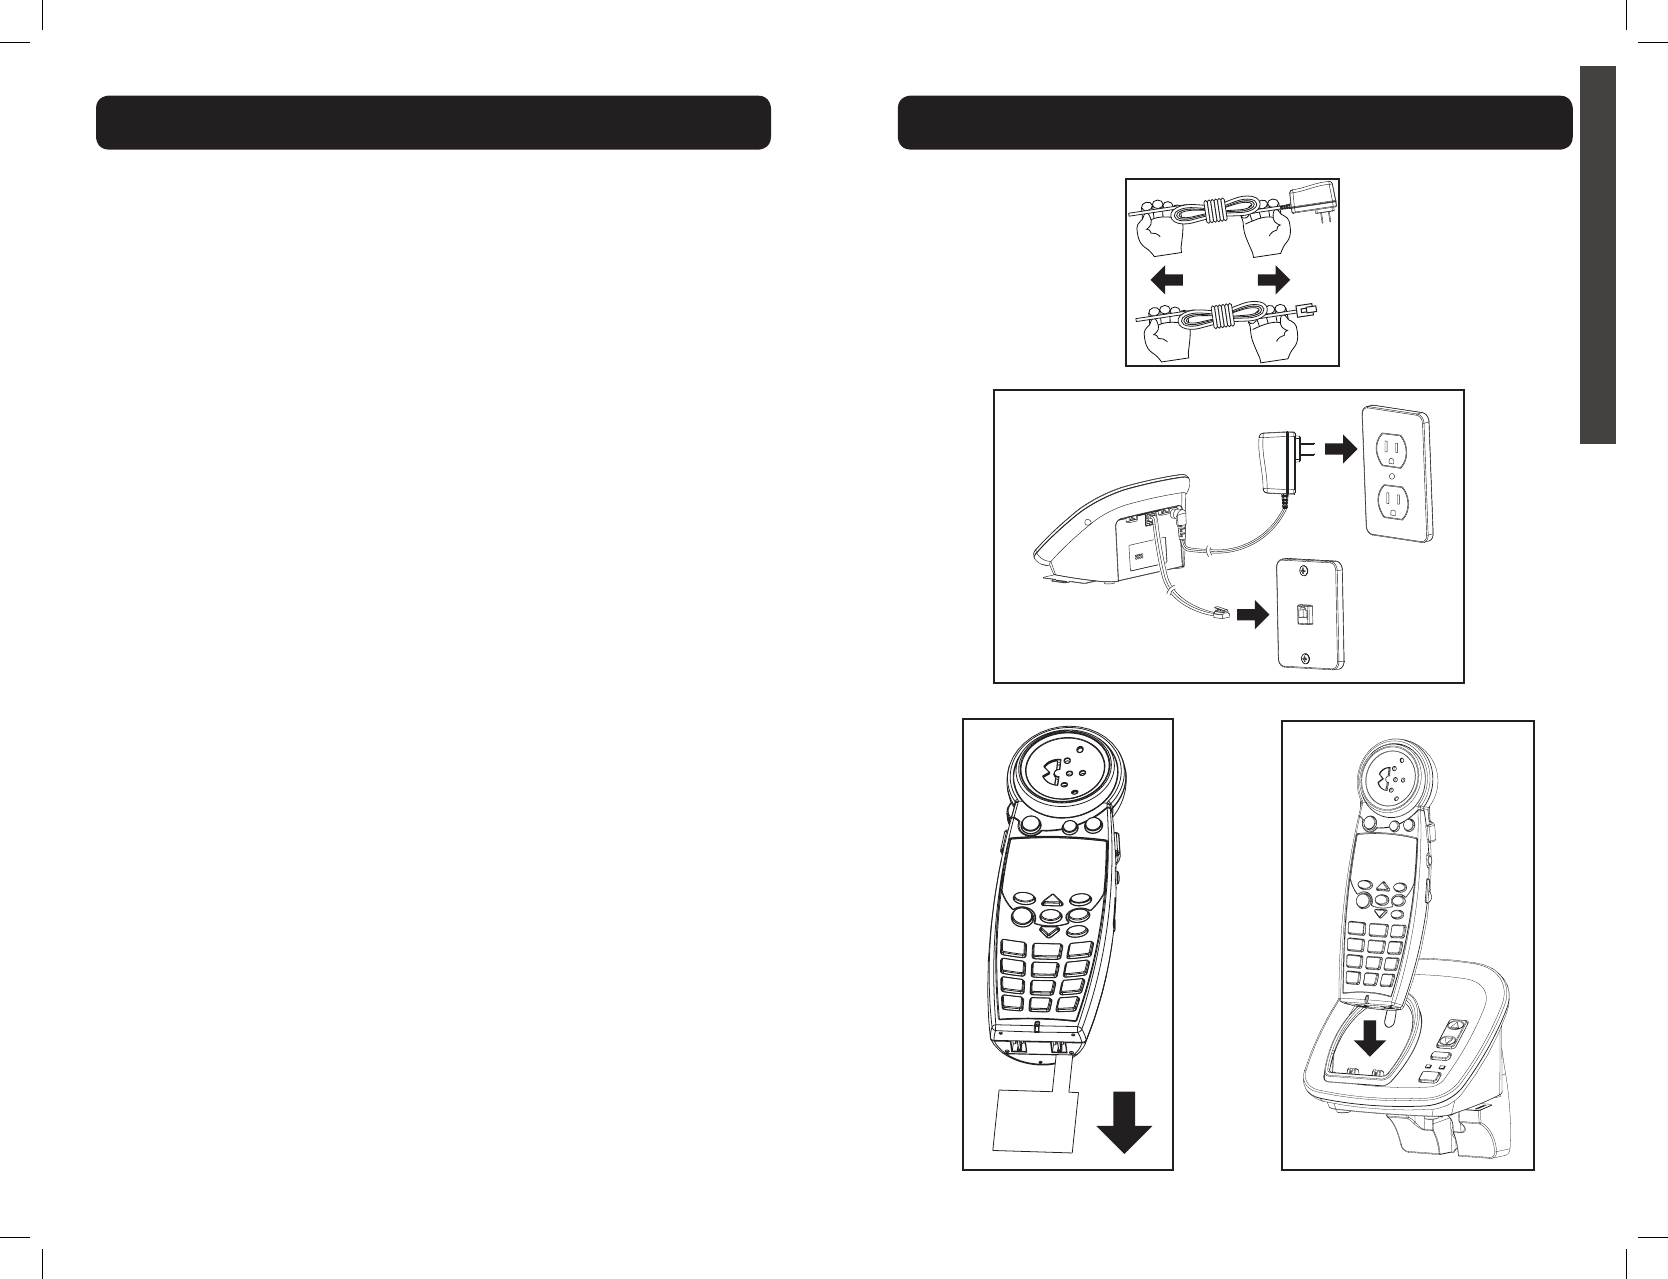
Connect your telephone as shown on the enclosed Quick Start guide.
Your telephone should arrive pre-assembled. To install it:
1. Remove base from package.
2. Hold one end of your XLC3.4’s long phone line cord tightly. The
correct end to hold should already be plugged into your phone’s jack.
Simultaneously pull the other end of the phone cord away from the phone,
unraveling it and allowing you to plug that end of the cord into a wall
telephone outlet.
3. Plug the loose end of the phone cord into the wall telephone outlet.
4. Hold one end of your phone’s white power adapter cord tightly. The
correct end to hold should already be plugged into the back of your
telephone base unit. Simultaneously pull the other end of the adapter cord
away from the phone, unraveling it and allowing you to plug that end of the
cord into a wall electrical outlet.
3. Plug white power adapter cord on left rear of the base into a wall
electrical outlet.
6. Remove handset from package.
7. Pull the handset’s battery tab located on the bottom of the device in the
direction of the arrow.
8. Place the handset in the base charger. The batteries in the handset must
be fully charged for 10 hours before using the telephone for the first time.
9. Lift handset and press TALK to test. If you hear a dial tone, your
telephone is ready for use. If not, check all connections again.
INSTALLATION
XLC3.4
INSTALLATION
XLC3.4
apide Guía de Inicio Rápido
8 9
E
N
G
L
I
S
H
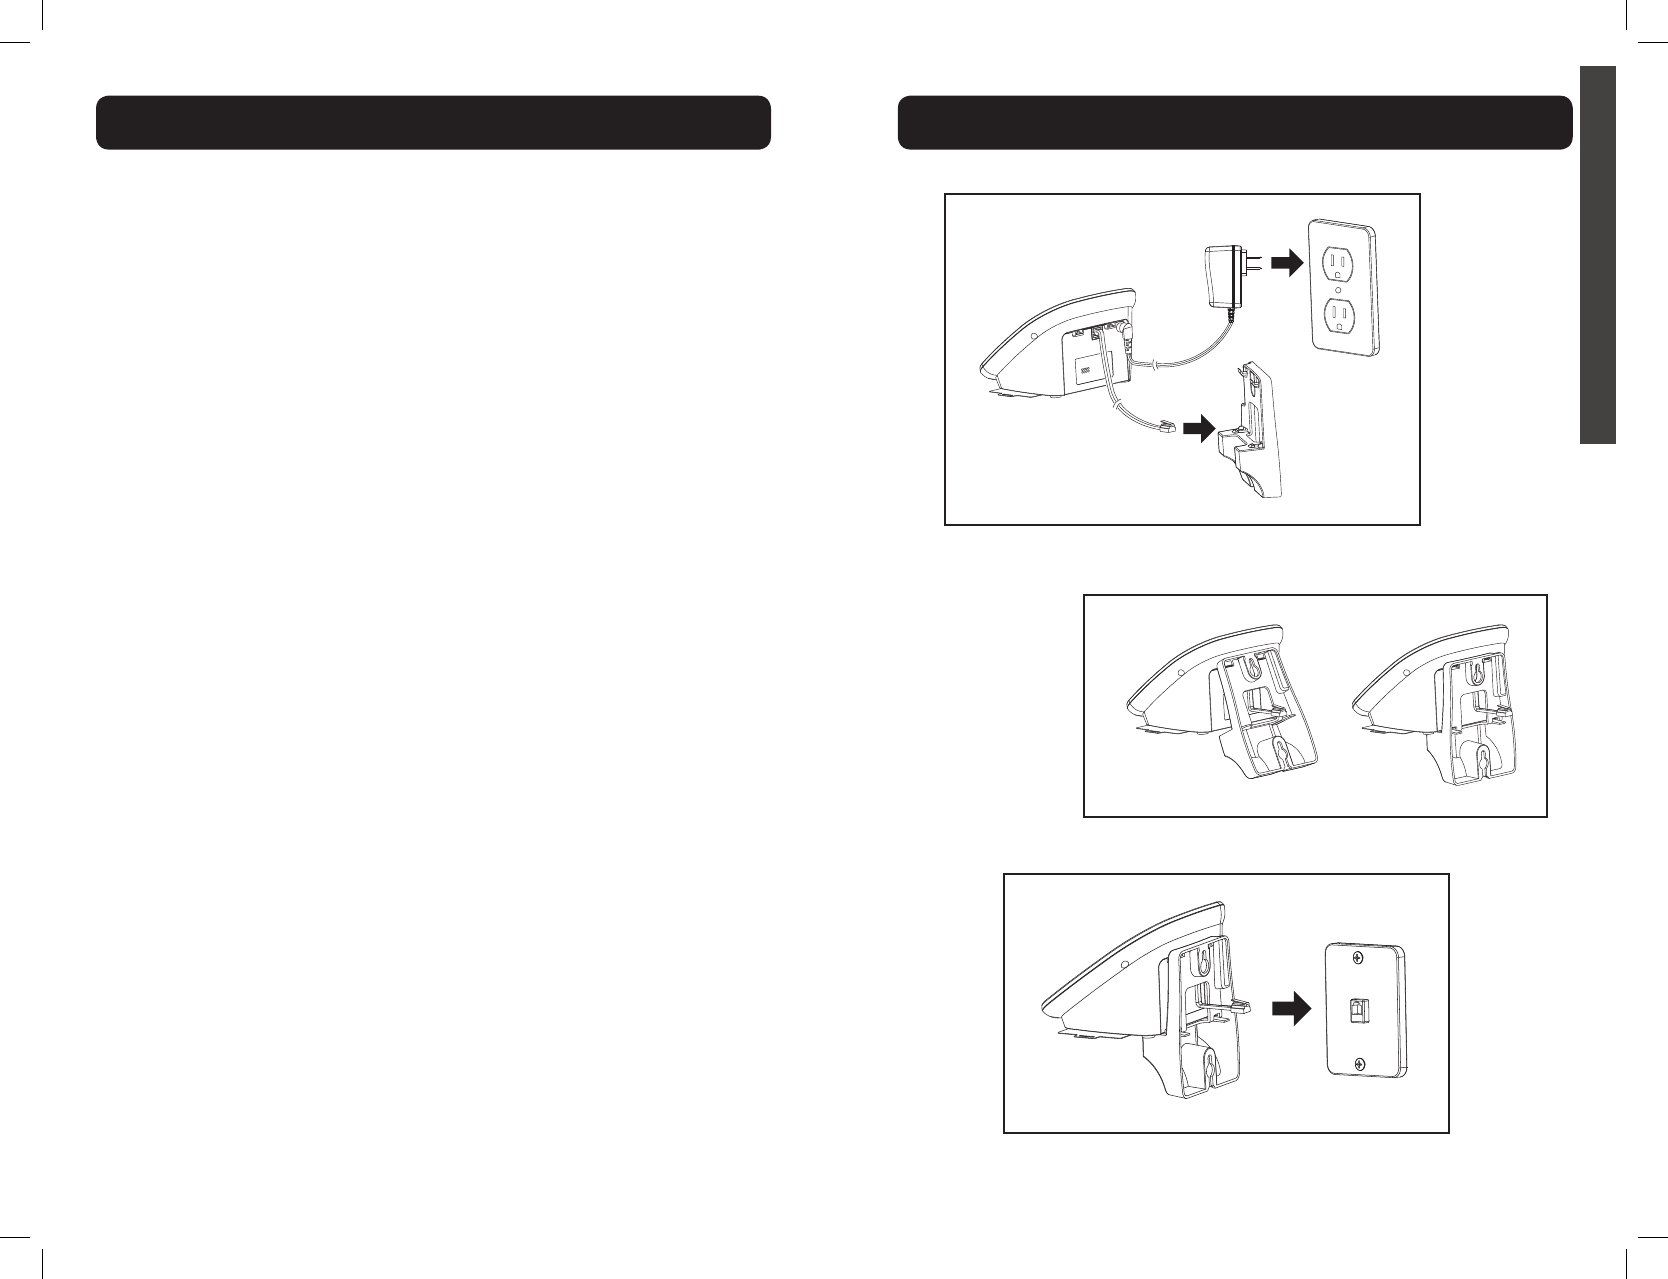
Wall mount your telephone as shown on the enclosed Quick Start guide.
(This is optional.)
1. Follow the instructions in the Installation section on page 6 to remove
the base and handset from the base – steps 1, 4, 6.
2. Unplug the long phone line cord from the phone jack located on the
back of your XLC3.4. Plug one end of the short phone line cord into the
same jack identified by LINE on the back of your base.
3. Install the XLC3.4 base onto the wall mount bracket as shown on page
9. Guide the short phone cord through the wall mount bracket as shown
in the diagram.
4. Using a screwdriver, loosen the screws on your phone wall outlet (1-2
turns).
5. Plug the loose end of the short phone cord into the wall phone outlet.
6. Attach the wall mount bracket (with the XLC3.4 base) onto the wall
phone outlet.
7. Plug the power adapter into a wall electrical outlet.
8. Pull the handset’s battery tab located on the bottom of the device in the
direction of the arrow.
9. Place the handset in the base and allow 10 hours for full charge.
WALL MOUNTING YOUR XLC3.4
XLC3.4
WALL MOUNTING YOUR XLC3.4
XLC3.4
10 11
E
N
G
L
I
S
H
1 Visual Ringer
Lights up when phone rings;
turns on when phone is in
use.
2 IN USE / CHARGE Light
The light turns red when the
phone is charging, and it turns
green when the phone is in
use.
3 POWER Light
Light is lit green when the
power adapter is plugged in.
During a power outage, the
POWER light will blink green
once per second.
4 FIND
Press this key to locate
handset.
5 SILENT
Press if you want to turn off
the base ringer. The button
lights up red when the ringer
is turned off.
6 VOLUME (UP / DOWN)
Use these keys to increase or
decrease the ringer volume.
7 RINGER STYLE
Use this key to choose the
most comfortable base ring
tone for your environment.
There are six ring tones
available.
IN USE/
CHARGE POWER
VOLUME
FIND
SILENT
1
2
7
4
3
5
6
BASE - Quick Reference Guide
XLC3.4
RINGER
STYLE
HIGH OUTPUT
RINGER
HANDSET - Quick Reference Guide
XLC3.4
MENU
TALK FLASH EXIT
MUTE
BACK
RD/P
!
BOOST
1
2
4
5
3
8
9
10
611
7
NOTE (Base): You can only
set the ringer volume or style
when the phone is not in use.
1 VOLUME Control Wheel
Use the rotary control to
increase or decrease the
volume of the incoming call.
The volume level is displayed
on the screen, lower right
corner.
2 BOOST
Press this button to engage
the extra amplification. The
BOOST button turns red
when Boost function is active.
Press and hold this button
for three seconds to engage
the Outgoing Speech
Amplification (OSA - see page
17). When OSA is active, the
screen displays “OSA On”.
For more details on the
Boost function, see page 16.
3 Speaker
During a call, press to activate
handset speakerphone. Press
again to switch back to
earpiece.
12 13
E
N
G
L
I
S
H
When in speakerphone mode,
the speakerphone icon is
displayed on the screen (to
the left of the battery icon),
and the speakerphone button
lights up red.
4 Phonebook
This button allows you to
access your XLC3.4’s list of
saved names and numbers.
See page 21.
5 TALK
This button allows you to
make or answer phone calls.
It lights up green during a call.
6 Arrow Buttons (UP /
DOWN)
Press UP or DOWN arrows
to navigate through the
menus.
In standby mode, press UP
or DOWN to access your
Caller List.
7 MENU Button
Press this button to engage
your phone’s available
options. See page 17 for
details.
8 Help Button
Press to dial pre-programmed
number.
9 MUTE / BACK (EDIT)
Button
Mute: Allows you to conduct
HANDSET - Quick Reference Guide
XLC3.4
VOLUME
TONE
INTERCOM
ON OFF
NECK
LOOP
12
13
14
15
16
17
18
19
HANDSET - Quick Reference Guide
XLC3.4
private conversations you
don’t want heard (during a
call).
Back: In MENU mode, allows
you to return to the previous
screen.
(Edit): When a phone number
is displayed, allows you to
toggle between 7/10/11 digit
formats for the number you
are viewing.
10 FLASH / EXIT
FLASH: While on a call,
press FLASH / EXIT to
receive another incoming
call. (Call Waiting service is
required.)
EXIT: In MENU mode, allows
you to return to standby
mode.
11 RD / P (Redial / Pause)
Press to redial last number
dialed or insert pause (two
seconds) when programming
memories or pre-dialing.
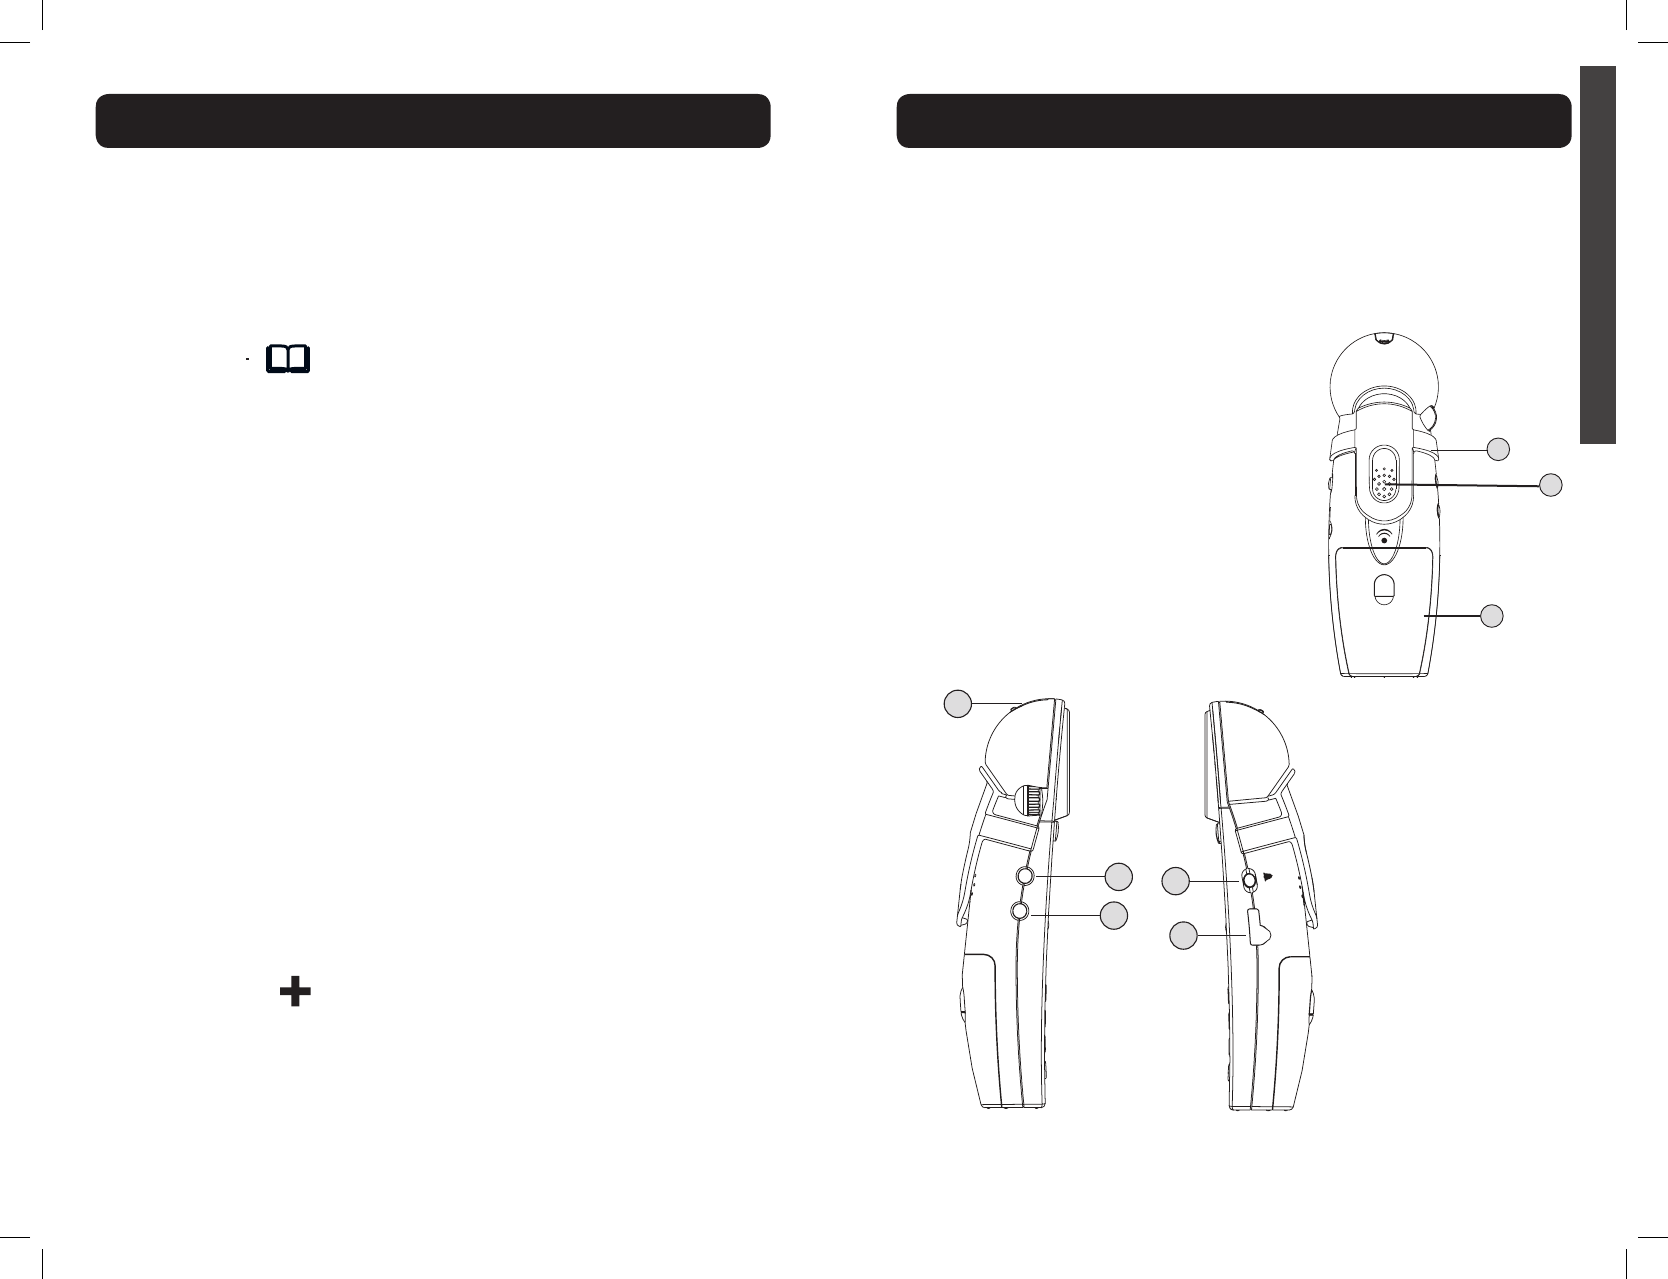
12 Headset
A 2.5 mm headset can be
used in the Headset Port. (We
recommend the Plantronics
M175C headset.)
13 TONE
Press to select the audio tone
for the handset. See page 16.
14 Intercom
Press to call other handset on
system.
15 RINGER ON / OFF
Switch to turn handset ringer
on or off.
16 NECKLOOP
A 3.5 mm neckloop can be
used in the Neckloop Port.
(We recommend the Clarity
CE30 Neckloop.)
17 Belt Clip
The belt clip comes pre-
attached.
18 Speaker Grill
19 Battery Compartment

14 15
E
N
G
L
I
S
H
HANDSET
The batteries in the handset must be fully charged for 10 hours before using the
telephone for the first time.
Battery life: Talk time is 6.5 hours, while standby is 130 hours without usage.
Actual times will vary depending on the amplifier settings used. Replace batteries
every two years.
Battery spec (as supplied with your phone): 3xAAA NiMH rechargeable
batteries,(1.2V 600mAh NiMH, 60AAAHC, GPI International Ltd.).
To replace batteries, remove the handset battery cover and install new batteries,
then close battery cover.
BASE (OPTIONAL)
The base batteries are optional (backup). If you choose to install backup batteries
for the base, use rechargeable batteries ONLY. The backup batteries should be
AAA, NiMH, rechargeable only, rated 600mAh. They must be fully charged for 10
hours before using the telephone for the first time.
The base backup batteries ensure the functionality of your cordless phone (3-4
hours), in case of a power outage.
When the base unit operates in battery mode (no AC power). the base POWER
light will blink once every two seconds.
To install batteries in the base:
1. Turn base over and remove memory card.
2. Open battery compartment door.
3. Install batteries according to the polarity shown inside the battery compartment.
NOTE: To replace handset batteries or to install base backup batteries,
use ONLY standard rechargeable AAA NiMH batteries - 600mAh.
LOW BATTERY INFORMATION
Handset
1. The battery icon on the screen shows no bars; the screen displays “Low
Battery”.
2. The handset beeps every two seconds in OFF HOOK mode.
3. The TALK button blinks green twice every 15 seconds in Standby mode. It will
not flash an alert in OFF HOOK mode.
Base (if optional batteries are installed)
1. The POWER light will blink green once every five seconds.
WARNING: Use rechargeable batteries only.
Do NOT use alkaline batteries!
BATTERY INFORMATION
XLC3.4
Open battery
compartment door
here.
PLACING & ANSWERING CALLS
XLC3.4
TO PLACE A CALL:
1. Press TALK, then dial the number
using the numeric keypad. See
lighting pattern for the TALK button
on the bottom of the page.
2. Adjust the volume to the most
comfortable level - using the Volume
Control and BOOST button (if
necessary).
3. Press the TONE button on the side
of the handset to adjust the tonality
of the incoming voice to the most
comfortable level.
WARNING: VOLUME MAY BE
LOUD!
NOTE:
1. If the Voice Assist function is
enabled, you will hear the digits of
the incoming phone number.
2. Step 1 above can be replaced with
one of the following options:
• Dial from CID records: Choose a
record from your Caller List (see
page 17), then press TALK.
• Dial from PHONEBOOK: Choose a
record from your Phonebook (see
page 18), then press TALK.
• Pre-dial: before pressing TALK,
dial the number you wish to call;
digits will display on the screen;
press TALK when the number is
complete.
Follow with steps 2-3 above to
enjoy a clear and comfortable phone
conversation.
TO ANSWER A CALL:
1. When phone is ringing, press TALK
to answer the call.
2. Adjust the volume and tone of the
incoming voice according to your
preferences.
3. When finished, press TALK to
hang up.
NOTE:
1. For an explanation of the TALK
button light, see the bottom of the
page.
2. If you have CID service, note the
incoming phone number displayed
on your screen.
3. If the Voice Assist function is
enabled, you will hear the digits of
the incoming phone number.
4. At any point during the
conversation, press the
speakerphone button to switch
to handsfree mode. Use the volume
control for adjusting the level of
the incoming audio. Switch back
to earpiece mode by pressing the
speakerphone button again.
Talk Button Lighting Pattern
Green: Phone is in use.
Flashing Green every 15 seconds in
standby mode: Low batteries.
AUTO
BOOST
OFF/ON
TONE/
PULSE
T P RINGER
STYLE
VOICE
ASSIST
OFF/ON
HIGH OUTPUT
RINGER

16 17
E
N
G
L
I
S
H
VOLUME & TONE ADJUSTMENTS
XLC3.4
Digital Clarity PowerTM Technology
With Digital Clarity Power, high frequency sounds
are amplified more than low frequency sounds so
words are not just louder, but clearer and easier to
understand. It also provides intelligent amplification
to make soft sounds audible, while keeping loud
sounds bearable.
BOOST On / Off
The BOOST button controls the loudness of the
receiver. Once the BOOST button is pressed, an extra
level of amplification is added over the entire range of
volume control.
VOLUME Control Wheel
During a call, the dial on the side controls the level of
volume for handset and speakerphone. The volume dial
provides up to 16dB of volume before the BOOST
button is activated. Once the BOOST button is
pressed, the XLC3.4 will provide up to 50dB of
amplification.
Auto Boost
(For turning Auto Boost On or Off, see page 24.)
ON – When the Auto Boost is set to ON, the Boost
function will be ON every time a call starts. If the
phone hangs up, the Boost function will remain ON.
OFF – When the Auto Boost is set to OFF, the Boost
function will be OFF at the beginning of all calls. Every
time a call starts, the user will need to press the
BOOST button in order to gain the extra level of
amplification.
TONE
Press the TONE button to change the style of
amplification. Switching audio tones will change how
the telephone conversation sounds to you.
BOOST
!
BOOST
!
INTERCOM
TONE
In order to achieve the best audio experience, we
recommend the following:
1. Adjust the Volume Control and enable the Boost
function (if needed). (Lower the volume level to minimum
(VOL 0) before activating the Boost feature.)
2. Press the TONE button to toggle between the available
tone settings.
Outgoing Speech Amplification (OSA)
If the level of your voice is too low, while on a call press
and hold the BOOST button -- the screen displays “OSA
On” on the middle line, alternating with the tone setting.
To disable OSA, press and hold the BOOST button until
the display shows the tone setting only.
WARNING: Voice volume level may be loud. We
recommend that you turn on this OSA function
only if your voice is considered too quiet.
Speakerphone
To switch to speakerphone mode, press the SPK button
.
The display shows the speakerphone mode (see page 18).
VOLUME & TONE ADJUSTMENTS
XLC3.4
CALLER ID FUNCTION
XLC3.4
Your XLC3.4 is CID / CWCID compatible (optional service, purchased from your
local telephone service provider).
When your phone is ringing, the screen shows the name and number of the person
calling you. This information will be stored in the Caller List on your phone.
To access this list, and for further details regarding this function, press UP or
DOWN in standby mode, and/or follow the instructions under CALLER LIST
(page 20).
NOTE: If you have CID service, the date and time will automatically be set after
the first incoming call.
BOOST
!
The BOOST button
engages the amplifier,
controlling the phone’s
loudness. When the
VOLUME dial is adjusted
and the BOOST button
is pressed, the phone can
reach up to 50dB of gain.
WARNING: VOLUME
MAY BE LOUD.
PROCEED WITH
CARE.
18 19
E
N
G
L
I
S
H
SCREEN DETAILS
XLC3.4
IMPORTANT:
In standby mode, the screen displays the date and time, handset number (for the first
10 seconds of inactivity), and date and time (after the first 10 seconds of inactivity).
04-2512:38
HANDSET1
SCREEN ICONS AND SYMBOLS
• Battery charge level
When the icon displays just one
bar, return the handset to the
charger.
• New calls indicator
There are new calls in your Caller
List.
• The phone is in a call, in
speakerphone mode.
• The phone is in a call, in earpiece
mode.
• New voicemail (separate
service).
• Handset is connected to base,
and in range.
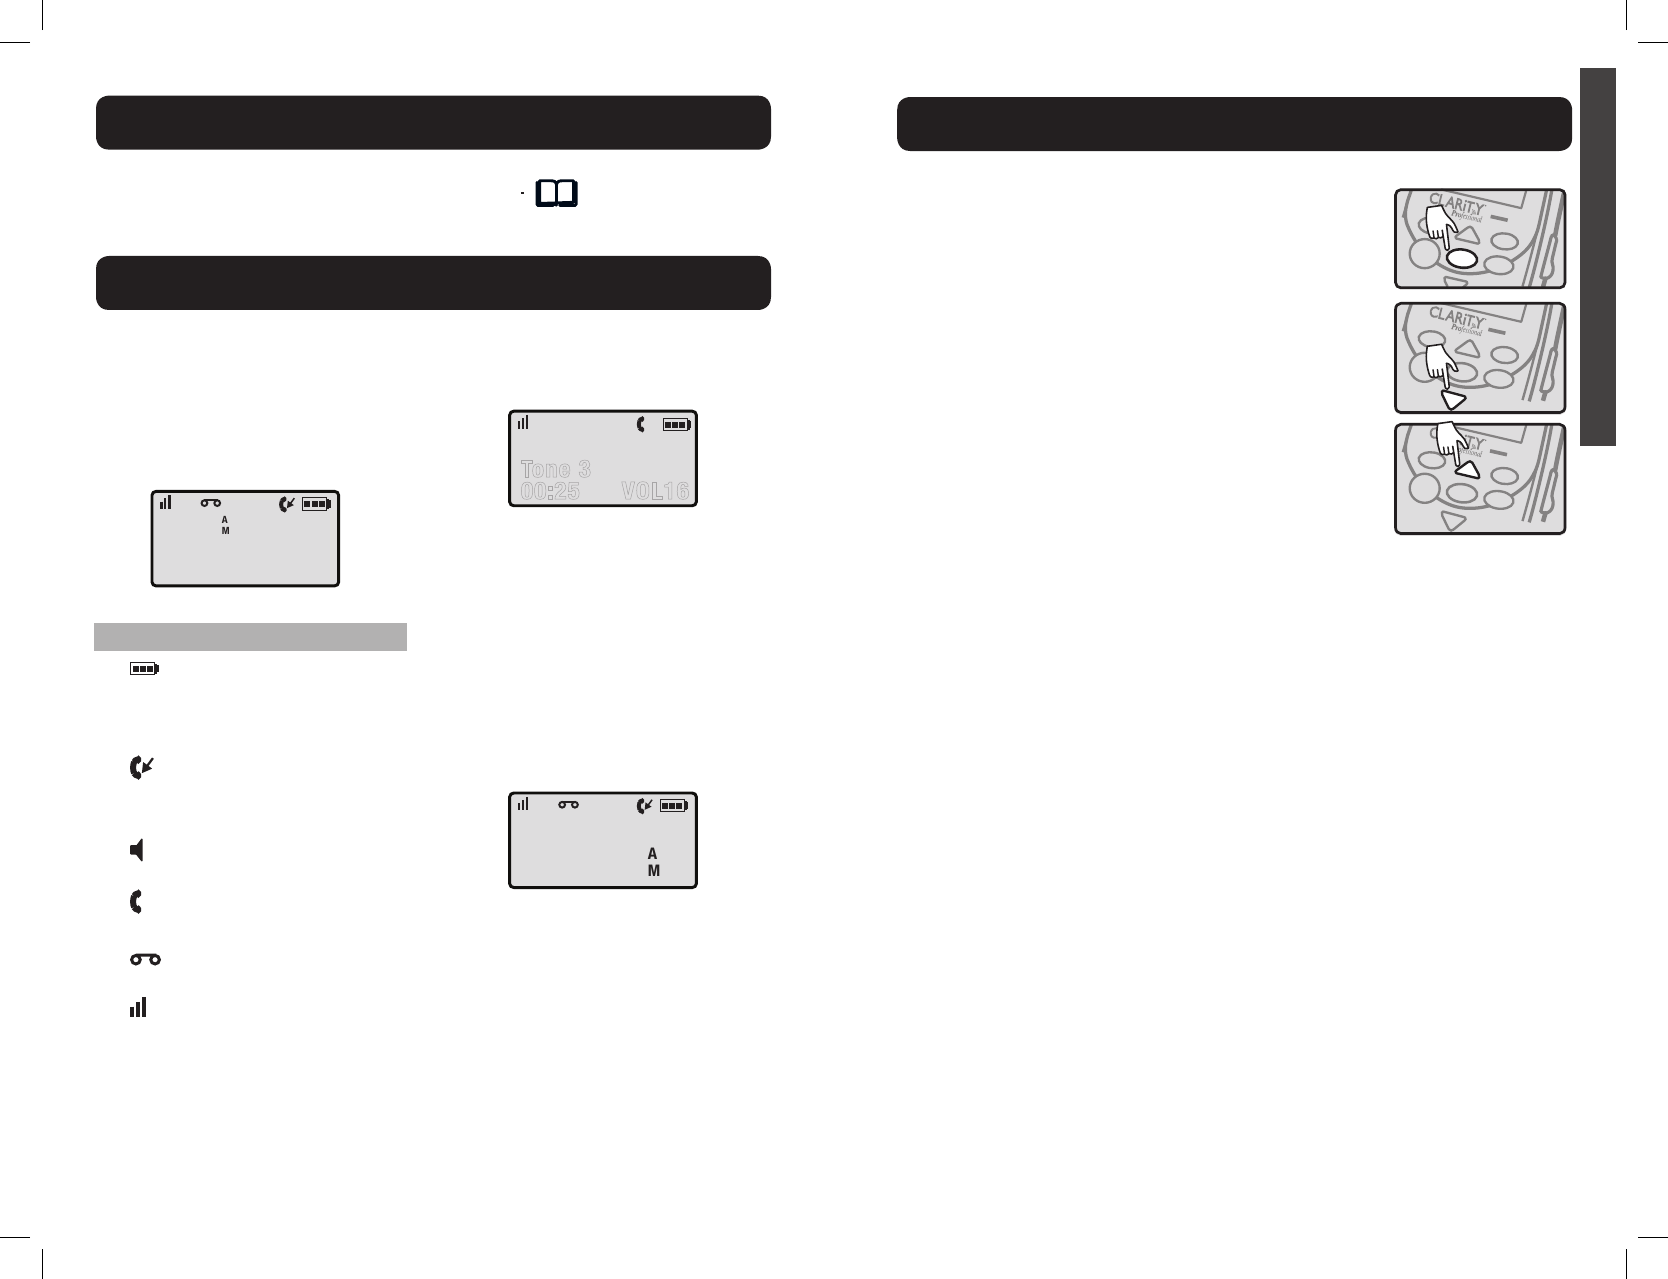
Tone3
18004263738
00:25 VOL16
EXAMPLE 2 (above):
• Phone is in standby; more than 10
seconds since the phone was active.
• Date: April 25.
• Time: 12:38AM.
• There are new calls in the Caller
List.
• There is new voicemail (service
from the local phone service
provider).
To start the setup process, press MENU. You will see
the list of features to be set up on your new XLC3.4
At any point during the navigation of the MENU
options, you can press MUTE / BACK to go back to
the previous screen, or you can press FLASH / EXIT
to return to standby mode (exit setup).
To navigate through the menu options, press UP or
DOWN arrows.
While in MENU mode, note the cursor on the top
row, to the left of the text. It indicates that the feature
displayed on the upper row is active. Press MENU to
select that feature or option.
The SETUP menu allows you to choose your
preferences for the following features of your new
XLC3.4:
TELEPHONE MENU
XLC3.4
TALK
MENU
FLASH
EXIT
MUTE
BACK
XLC
3.4
TALK
MENU
FLASH
EXIT
MUTE
BACK
XLC
3.4
TALK
MENU
FLASH
EXIT
MUTE
BACK
XLC
3.4
• Caller List - to view and manage the information for your incoming calls -
CID / CWCID service (required from your local telephone company);
• Phonebook - to view and manage your saved records (names and numbers
for your frequently dialed locations);
• Ringer Setup - to choose ringer tones, set ringer volume, turn keypad tones
on or off (default: On);
• Visual ring - to turn your handset visual ringer on or off (default: On);
• Auto Boost - to enable Boost function to be active at the beginning of all
calls (default: Off);
• Phone Setup - to re-establish registration to the base, to enable Auto Talk
function (default: Off), to enable Voice Assist feature (default: On), to enable
Any Key Answer (default: Off), to enable Low Noise feature (default: On),
to choose the language you wish to use (default: English), to choose the dial
mode needed for your specific setup (default: Tone), to adjust the contrast of
your handset screen (default: medium);
• Date & time - to allow you to manually set the date and time; the date
(month and day only) and time will be set during the first incoming call, if you
subscribe to CID service from your local telephone service provider.
04-25
12:38
EXAMPLE 1 (above):
• Phone is in a call, earpiece mode.
• Number that was dialed:
18004263738.
• Tone setting is 3.
• Volume level is 16.
• Call timer: 25 seconds since the
beginning of the call.
PHONEBOOK
XLC3.4
To access your phone’s stored records (Phonebook), and for further details
regarding this feature, press the Phonebook button on the handset, and /
or follow the instructions under PHONEBOOK (page 21).
20 21
E
N
G
L
I
S
H
MENU - CALLER LIST
XLC3.4
If you have new calls, you will notice the New Calls
icon to the left of the battery level indicator (upper
right corner).
In standby mode, press MENU twice.
Your screen displays the number of new calls (which
have not been reviewed yet).
Press UP or DOWN to review the records in your
call history (up to 40 records).
For each record, the screen alternates between
showing the date / time of call and phone number,
and the name associated with the phone number that
called you.
Press MUTE / BACK to review the available formats
for the record: 7 digits (no area code), 10 digits (area
code + number), 11 digits (1+area code+number). The
screen displays the new numbers.
When the format number is correct, press TALK if
you wish to dial back the number.
If you wish to save or delete the record from your
memory, press MENU (after formatting the number).
You will see the options available for that record. From
here, choose one of the paths described below:
• To delete the record, press MENU once. The
screen displays “Delete?” Press MENU to delete
(screen displays OK and you hear five beeps), or
MUTE / BACK to return to previous screen.
• To save the number, press DOWN once, then
press MENU. You can edit the number and
then the name associated with the record. Press
MUTE / BACK to delete the previous character;
press UP or DOWN to move cursor within
name. Use keypad to add characters to the name.
Press MENU to save the number to your
phonebook.
• To delete all records, press DOWN twice, then
press MENU. The screen displays “Delete All?”
Press MENU to delete all records (screen
displays OK and you hear five beeps), or press
MUTE / BACK to return to previous screen.
NewCalls2
11:3004-25
800-426-3738
CLARITY
SaveNumber
DeleteAll
DelNumber
SaveNumber
DeleteAll
-----------
DelNumber
DeleteAll
-----------
Delete?
MENU - PHONEBOOK
XLC3.4
To access your phonebook from standby, press
MENU once to enter the menu, press DOWN once,
press MENU again to select.
Use UP or DOWN to browse through your saved
records.
To dial one of your saved numbers, press TALK when
it is shown on the screen.
To add a number, edit a number, delete a number
or delete all numbers, press MENU while viewing
a saved record. From here, choose one of the paths
described below:
• Press MENU to select “Add Number” option.
You will be prompted to enter the number as you
will dial it. To edit the number before saving it, use
MUTE / BACK to delete the last digit (one at
a time); use UP or DOWN to move within the
number without deleting all digits.
When finished, press MENU to save the number.
You will be prompted to enter the name for the
number you saved. Use the numeric keypad to
enter the name to be saved.
When finished, press MENU to save the number.
Screen will display “OK” and you will hear five
beeps.
• To edit the saved record while viewing it: press
DOWN to advance the row that reads “Edit
Number” to the top of the screen. Press MENU
to select this option.
You will be prompted to edit the number - use UP
or DOWN to move the cursor, or use MUTE /
BACK to delete the last digit. Press MENU when
the editing is complete.
You will be prompted to edit the name. Use the
same controls as above.
Press MENU to save your edited record. Screen
will display “OK” and you will hear five beeps.
VisualRing
Phonebook
RingSetup
DelNumber
AddNumber
EditNumber
OK
DelNumber
DeleteAll
EditNumber
OK