User manual

The user manual
I
Welcome, welcome you choose to use this phone, you can read this
manual, a comprehensive understanding of the use of the phone,
appreciate the perfect function and the introduction of the operation method.
Declaration: this manual are only as a guide for product use, does not
represent a software and hardware configuration of product, product and
accessories may vary from area to area. This phone is double card double
stay mobile, applicable to GSM/GPRS/EDGE network environment, some
functions need the support of network operator or service provider, details
please see the user manual. To ensure your safety use, please read the
"safety instructions"。
Directory
1. KNOW YOUR MOBILE PHONE KEY DESCRIPTION ························ 1
1. KEY DESCRIPTION····················································································· 2
• START USING THE EQUIPMENT ···· ·················· ················· ·················· ··········· 4
• INSTALLUSIM/SIM CARD AND BATTERY ···················································· 4
• CHARGE BATTERY ·········· ·························· ·························· ·························· ······· 8
START UP AND SHUTDOWN ··························································································· 9
• PASSWORD ········································································································· 9
PIN ···························· ········· ········· ········· ········ ········· ········· ········ ··· 9
PIN2 ············· ········· ········· ········ ········· ········· ········· ········ ········· ····· ·· 9
PUK and PUK2 ·········· ····· ···· ····· ···· ···· ····· ···· ···· ····· ···· ····· ···· ···· ···· ··· 10
2. QUICK START GUDE ·························································································· 11
II
• TURNED ON AND OFF THE SCREEN ···························································· 11
• LOCK AND UNLOCK ····························································································· 11
• COLUMN NOTICE ································································································ 12
• APPLICATION MENU ··························································································· 12
Open and switching applications ··································· 12
Run···················· ······························ ······························· ··········· 13
3. DIAL ··················································································································· 13
• MAKE AND RECEIVE CALLS ················································································· 13
making a call ········································································ 13
answer calls ·········································································· 13
• CONTACT ·········································································································· 14
• CALL LOG ························ ·························· ·························· ··························· ·· 14
All calls ··············································································· 14
Received calls ····································································· 14
Dialed numbers ····································································· 14
Missed calls ········································································· 14
4. BACKUP AND RESTORE ······················································································ 15
5. E-MAIL ··············································································································· 15
• SET UP EMAIL ACCOUNT ····················· ······························· ······························· ·· 15
• CHECK AND READ EMAIL ····················· ······························· ······························· ·· 15
6. G-MAIL ··············································································································· 错
误!未定义书签。
• SET UP GMAIL ACCOUNT ···················································································· 错
误!未定义书签。
• CHECK AND READ GMAIL ···················································································· 错
误!未定义书签。
7. BROWSER ············································································································· 15
• VIEW THE WEB PAGE ·················· ······························ ······························· ··········· 15
• OPEN WEBSITE ·································································································· 15
III
8. GOOGLE ··············································································································· 16
9. SEARCH ··············································································································· 16
10. MUSIC ················································································································· 16
• TO SEARCH FOR MUSIC ······················································································ 16
• ADD/REMOVE MUSIC ··························································································· 16
11. SOUND RECORDER ······························································································ 16
12. MESSAGING········································································································· 17
• SEND AND RECEIVE MESSAGES ············································································ 17
Send SMS · ···· ····· ···· ···· ····· ···· ···· ····· ···· ····· ···· ···· ····· ···· ····· ···· ···· ····· ·· 17
Cmppdeliver ················· ········ ········· ········· ········· ········ ········· ······· 17
13. CALENDAR ··· ······ ····· ····· ····· ····· ····· ······ ····· ····· ····· ····· ····· ······ ····· ····· ····· ····· ····· ······ ····· 1 7
• VIEW CALENDAR ································································································ 18
• ADD AN EVENT ···· ······························· ······························ ······························ ··· 18
14. GALLERY ····· ············ ············ ············ ············· ············ ············ ············ ············ ······· 1 8
• LOOK AT PHOTOS AND VIDEO ·············································································· 19
• DELETE THE PHOTOS AND VIDEO ········································································· 19
• SLIDE SHOW ····································································································· 19
• SHARE PHOTOS AND VIDEO ················································································· 19
• SET AS WALLPAPER ··························································································· 20
15. CAMERA ··············································································································· 20
• TAKE PHOTOS AND VIDEOS ······················· ·························· ······················ ··········· 20
take photos ················· ········ ········· ········· ········· ········ ········· ······· 20
videos ····· ···· ····· ···· ···· ····· ···· ····· ···· ···· ····· ···· ···· ····· ···· ···· ····· ···· ···· ··· 20
• LOOK AT PHOTOS AND VIDEOS ······························· ·························· ···················· 21
16. VIDEO PLAYER ·································································································· 21
• VIDEO VIEW ·································· ······························· ······························ ······· 21
17. TODO ··················································································································· 21
Add, delete, and edit memo··································· ··········· 21
Add a new item ···································································· 21
IV
Delete items ··········································································· 21
Edit item ··· ········· ········· ········· ········ ········· ········· ········ ····· ········ ··· 22
18. FILE MANAGER ·································································································· 22
19. DOWNLOADS········································································································· 22
20. CLOCK ················································································································· 22
• COUNT DOWN ·································· ······························· ······························ ······· 22
• CLOCK ·············································································································· 23
Add the alarm clock · ···· ····· ···· ···· ····· ···· ···· ····· ···· ···· ····· ···· ···· ··· 23
Delete the alarm clock ······················································· 23
• SECONDS COUNTER ····························································································· 23
21. CALCULATOR ······································································································ 23
22. STTINGS ············································································································· 24
• WIRELESS NETWORKS ·················· ······························ ······························· ··········· 24
SIM MANAGEMENT ······································································································ 24
WI-FI ··········· ········· ········· ········· ········ ········· ········· ········· ···· ········· ·· 24
BLUETOOTH ··············································································································· 24
TRAFFIC USAGE ··················· ············· ············· ············· ············· ·············· ············ ··· 25
MORE 25
AUDIO PROFILES ······································································································· 25
DISPLAY ······························ ······························ ······························· ························ 26
STORAGE ······························ ······························ ······························· ························ 26
BATTERY ······························ ······························ ······························· ························ 26
APPS 27
• PERSONAL ········· ······························ ······························· ·························· ······· 27
LOCATION INFORMATION ACCESS ······································································· 27
POSITIONING SYSTEM ·························································································· 27
SECURITY ················································································································· 27
LANGUAGE AND INPUT METHOD ·········································································· 28
BACKUP $ RESET ············· ·························· ······························· ······························ ··· 28
V
ACCOUNTS ······································· ······························ ······························· ··········· 28
• SYSTEM ·········································································································· 28
DATE & TIME ····················· ············· ············· ············· ············· ············· ············· ······· 28
POWER-ON BY ALARM ··························································································· 28
MISCELLANEOUS FUNCTION ·························································································· 29
DEVELOPER OPTIONS ·································································································· 29
ABOUT PHONE ············································································································ 29
23. PEOPLE ··············································································································· 29
• CREATE A CONTACT ····················································································· 29
• SEARCH CONTACTS ····················································································· 30
24. FM ······················································································································· 30
25. PLAY STORE ······································································································ 30
DOWNLOADING AN APP ························································································· 30
DELETE APP ············································································································· 31
26. TALK ··················································································································· 31
27. BATTERY MAINTENANCE AND EQUIPMENT MAINTENANCE ···· 31
• BATTERY MAINTENANCE ······················································································ 31
• EQUIPMENT MAINTENANCE ········································································· 32
28. SIMPLE TROUBLESHOOTING ································································ 34
VI
The use of safety instructions, please read the following simple
rules. Violation of these rules may lead to dangerous or violate
the law. Read the complete user manual for further
information。
Make or receive cell phone while driving while
driving: if, please use headphones or parked
before using a cell phone。
Medical equipment: near the mark do not use
wireless devices medical equipment or medical
place, please turn off equipment。
The plane: wireless devices can cause
interference to aircraft flight, please comply with all
restrictions。
During fuel: do not use near the gas station, fuels,
chemicals in this equipment。
Avoid interference blasting: closing device should
be at the scene of the blast, and comply with the
provisions of any relevant。
Interference: all wireless devices may receive
interference, impact performance。
Original accessories: in order to ensure the best
VII
performance, please use the original accessories
and battery, please don't connect incompatible
products。
Waterproof: this mobile phone does not have
waterproof function, please pay attention to
waterproof, keep the device dry。
Recycling: do not burn equipment battery or the
battery as ordinary garbage disposal. Please
comply with local environmental policy。
Connection: need to connect to other devices,
please read carefully the equipment specifications
to ensure the safety。
Child safety: please put mobile phone, batteries,
small parts, such as place where the children's
reach, lest produce risk。
Data backup: please backup important information
stored in the equipment, in case of loss。

VIII
SOS:Ensure equipment switched on and in the service
area, call the emergency number, and inform you that your
position。
Know your mobile phone
1
1. Know your mobile phone
Know your mobile phone
2
Key Description
Key functional description
Home Key
Any interface click the Home button to
switch to the main interface by default;
Click on the time, long in the near future.
power
Long press for 3 seconds to start up and
shut down; On the short press to close the
screen backlight。
Volume key
+
To speak when adjusting call volume;
Standby adjust phone volume; In the menu
long press to return to the main menu
interface。
Volume key
-
To speak when adjusting call volume;
Standby adjust phone volume; In the menu
long press to return to the main menu
interface。
Start using the equipment
4
Start using the equipment
installUSIM/SIM Card and battery
In before install or remove the SIM/USIM card and
battery, please make sure the power supply, cell phone has
shut down. USIM/SIM card provided by the service provider, it
can store some basic data, such as contact name and phone
number, etc. Pay attention to some UIM/may SIM CARDS and
mobile phones don't match, please consult the service provider
to replace. This original lithium batteries are included in the
mobile phone, do not attempt to open or repair the battery, can
only use the product specified by the battery. Battery is
influenced by many factors, including network configuration,
signal strength, operating equipment when the environment
temperature, the use of voice or data communications and
other program usage.
In order to avoid to ignition and combustion: - do not
open or repair the battery itself. - don't break down, squeezing
and Pierce the battery, not short meet battery outside of the
joint, more do not put it into the fire or into the water. - don't
exposed to more than 60 C (140 F) temperature environment. -
can only use the product specified batteries for replacement. -
please correct battery, do not arbitrarily discarded.
Start using the equipment
5
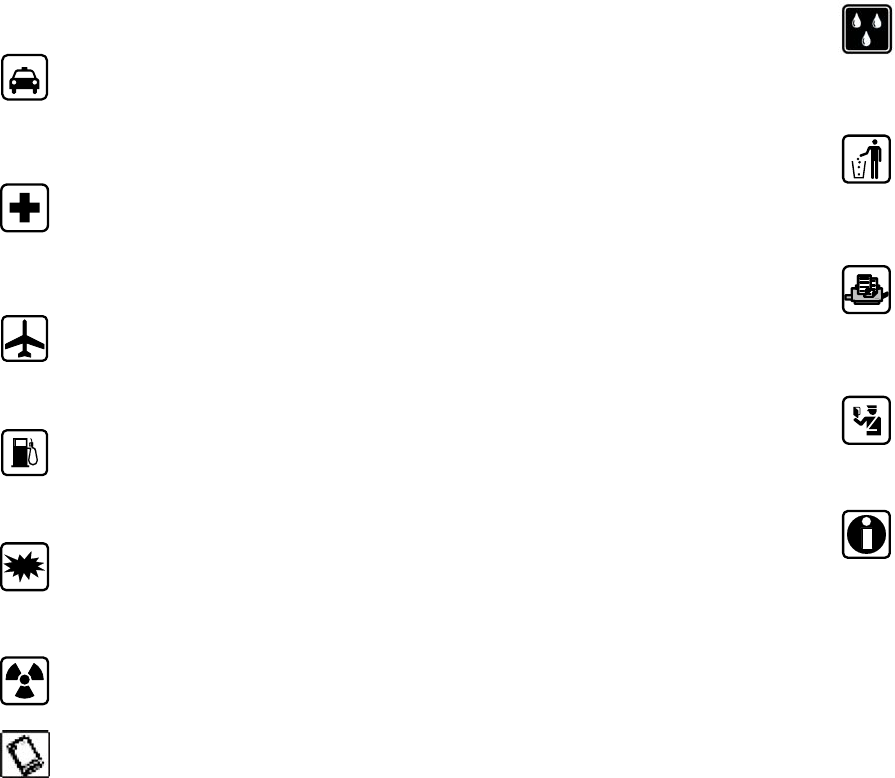
open the back:
(1) Confirm phone closed, if the phone open, please hold
the power key about 3 seconds, 】 to turn off the phone。
(2) Equipment to the back, with his hands push up can
open the back cover。
Take out the battery:
(3) From here is outstanding, lift up and remove the
battery。
Start using the equipment
6
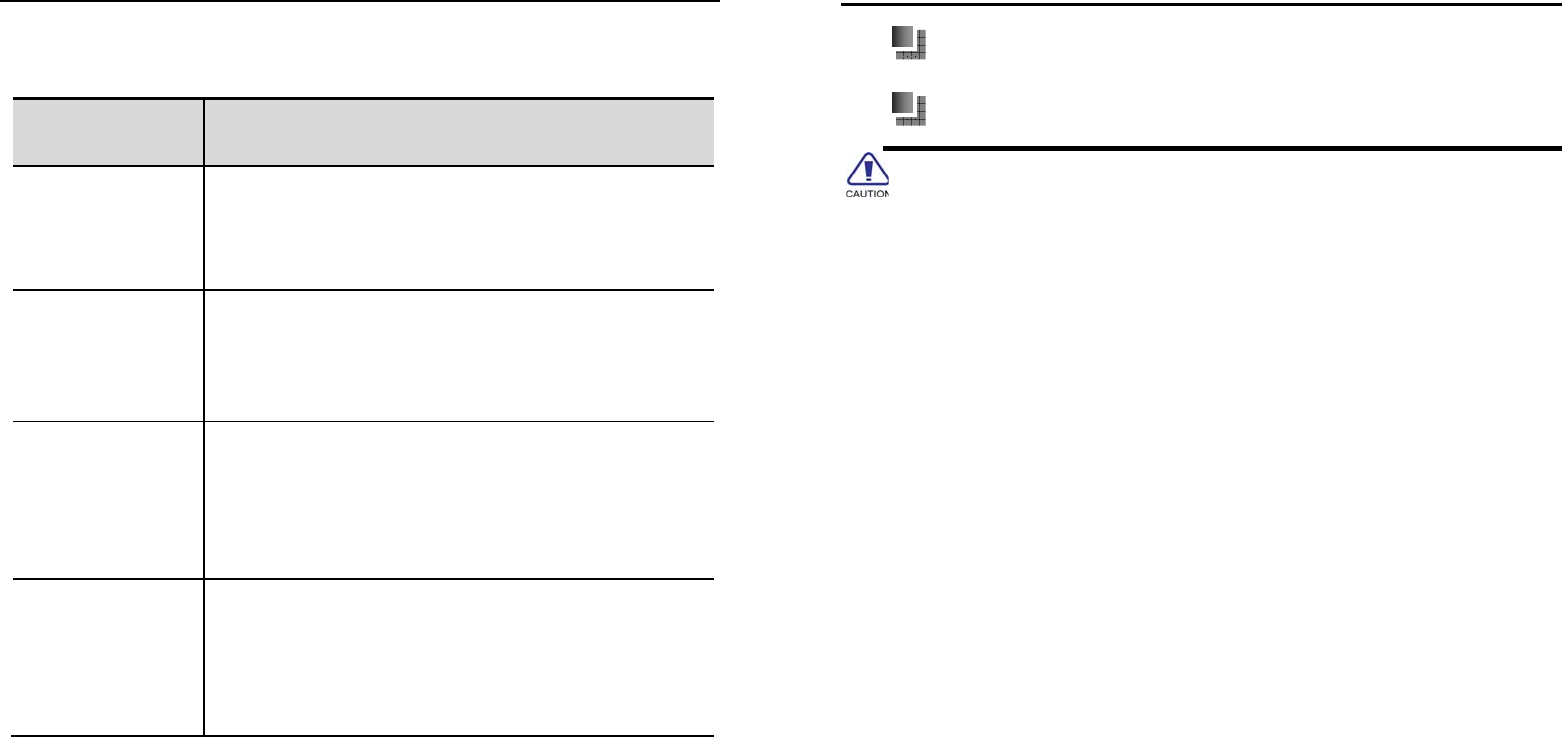
install SIM block:
(4) According to the direction of graphic insert USIM/SIM
card slot。
This cell phone support GSM dual SIM card, only need to
insert the SIM/USIM card corresponding card slot can be
normal use.
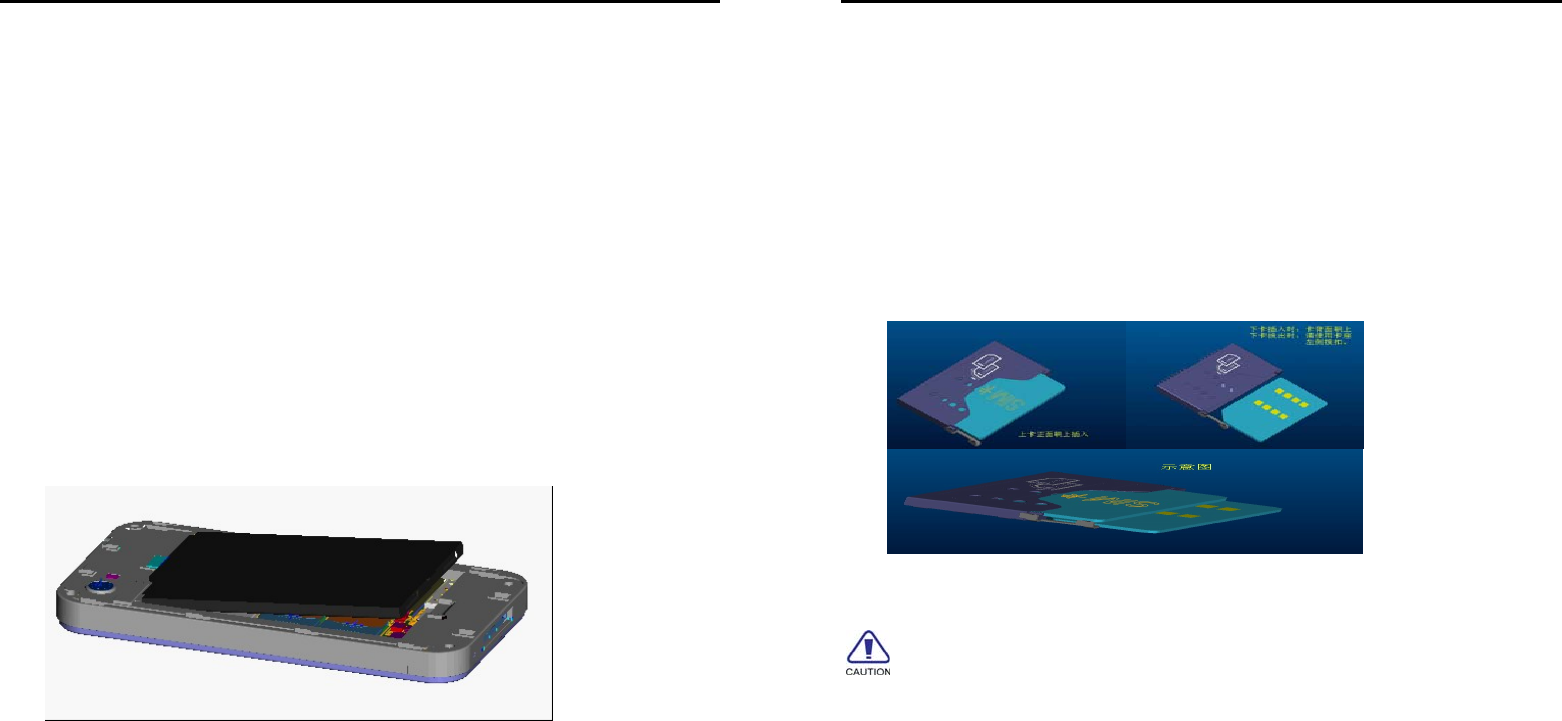
Install battery:
Start using the equipment
7
(5) The battery metal contact with the battery connector PIN
feet alignment. As shown in the first battery connector on one
side, and then gently will click on the other side。
(6) The final reinstall the battery cover。
Before install the battery, be sure to check whether the
battery reverse, pay attention to the alignment battery
connector PIN the feet.
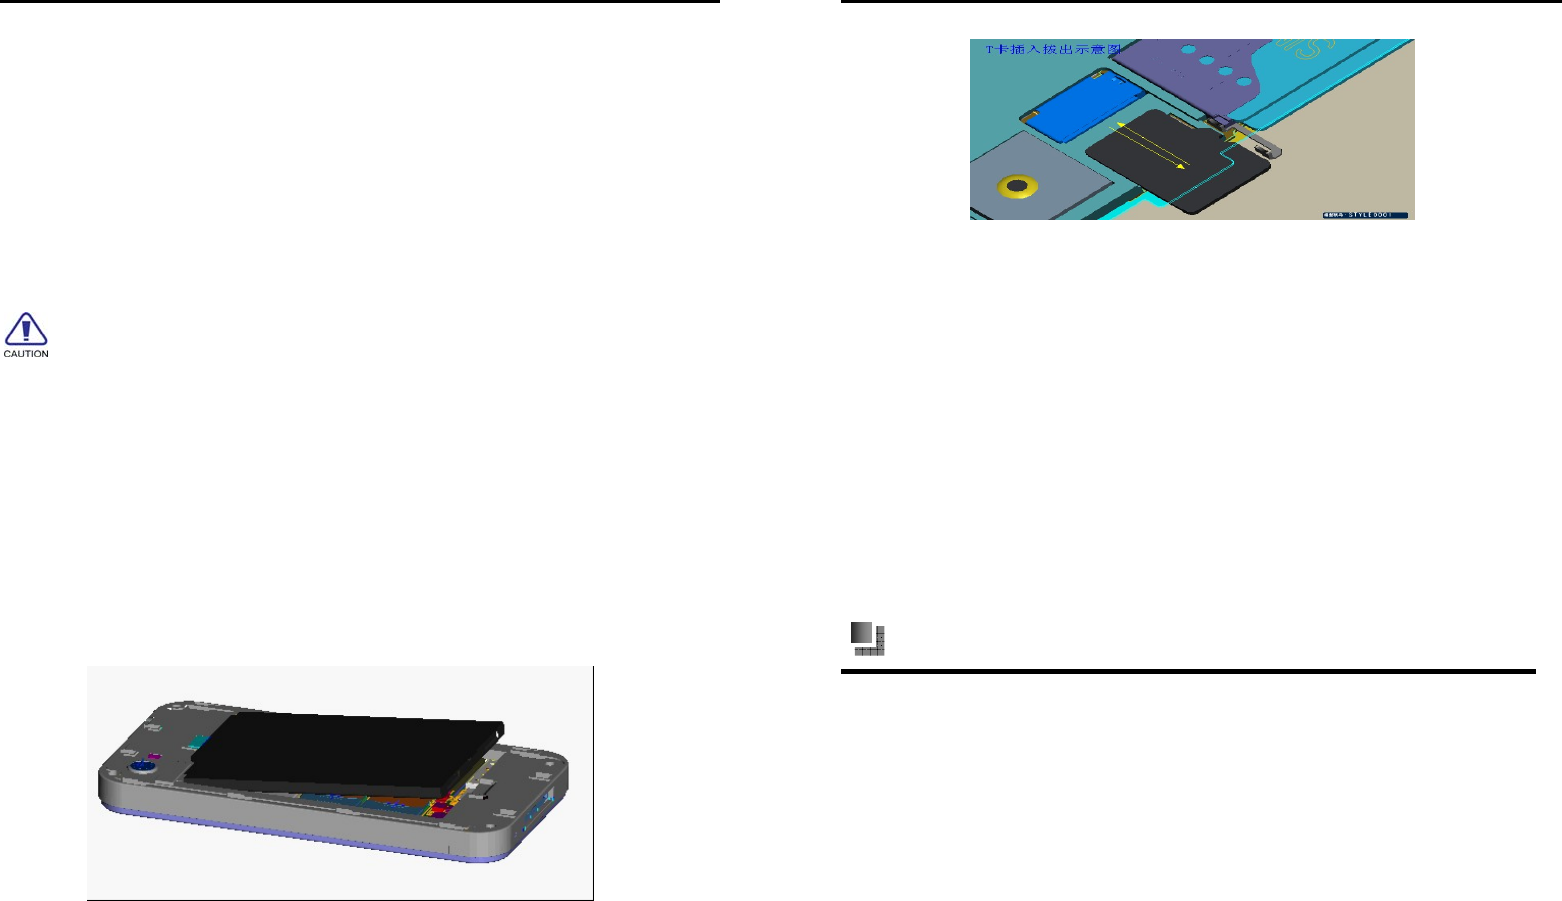
Install the memory card
Install memory card to expand other storage space (the
machine use MicroSD memory card) 。
(1) Install memory card: open the back cover, the MicroSD card with
gold contact side, according to the graphic direction, can be inserted into
the card slot。
Start using the equipment
8
(2) Remove the memory card, open the back cover and push down
MicroSD card and remove the MicroSD card。
It is recommended to use original factory standard MicroSD
card or SanDisk MicroSD card, Kingston and other mainstream
brands, use of certain purchased MicroSD card may exist with the
incompatible problem. Please confirm compatibility before you buy.
MicroSD card belongs to the tiny objects, please don't let the child
contact MicroSD card, in order to avoid the children will be
swallowed its entrance!
Charge battery
Use the travel charger battery: confirmation of mobile phone
batteries. Connect the USB cable and travel charger. Data interface
line mini USB port to connect to the mobile phone, and will travel
charger received standard power outlet. Normal charging, battery
status icon will scroll. The end of the charging display complete
state. After full, please cut off the charger and ac power connection,
and then disconnect the connection with the device.

Start using the equipment
9
Initial several times to use new battery, please after full charge
and full discharge for several times, and for 10 hours, in order to achieve
the best performance. Will damage the batteries run out, please charge
in time, excessive discharge. Mobile phones have slight fever is normal
phenomenon during charging.
Start up and shutdown
Confirmation of mobile phone batteries and battery has
enough power, hold the power key about 3 seconds, 】 can be
switched on and off.
password
PIN
PIN PIN (personal identification number) to prevent your SIM card from
being illegally used. Generally the initial PIN number is 1234. PIN
usually provided with SIM card. If three consecutive mistyped PIN code,
you should enter the PUK code to unlock. For details, please contact the
wireless service providers.。
PIN2
PIN2 code into some features require input, if input wrong PIN2 code in
a row, you should input PUK2 code to unlock. For details, please contact
the wireless service providers。
Start using the equipment
10
PUK and PUK2
PUK and PUK2 code may be provided with a SIM card, if three
consecutive input the wrong PIN/PIN2 code, mobile phone will
require you to provide PUK/PUK2 code. If you don't have the
code, please contact the wireless service providers。
If input the wrong PIN number three times in a row, SIM card will
be locked, please contact with network operators to seek help
immediately decoding. Trying to decode may result in the SIM card to a
permanent failure。

Equipment maintenance
11
2. Quick start Gude
Quick start guide will help you to familiar with your mobile
phone as soon as possible, and do some basic operations。
Turned on and off the screen
1. screen off
You can press "power key" to close the screen to save power, prevent the
pressing。
2. Open the screen
To open screen, press the Home button can light up the screen, in the
condition of lock screen press the Home key/power key light screen。
Lock and unlock
To prevent accidental operation of equipment and screen you can lock。
1. LockoutDevice
Short press "power key" lock screen, please note that if you set the system
default or lock screen time of equipment without any operation, the device
will automatically be locked。
2. Unlock the device
Under the condition of lock screen, short press power
key/Home button 】 【 light screen, unlock icon slipping to
unlock, to the left as the phone records, the right to information,
Equipment maintenance
12
upwards into the camera. Access to the Internet as long as you
open the data connection, the use of the email, browser, maps,
installation, application, market mall。
Column notice
Has not a call with the new information, will be at the top event
notification message indicating bar display screens, a finger from the
event notification indicating column slide down gently, displays all the
message, click the message, to view the new information or call.
Drop-down a note, click in the top right corner of the icon to go in there is
the mobile phone can be quick setup shortcut icon。
Application menu
Open and switching applications
1. If you want to open the application on your phone, please light click its
icon on the main screen;
2. Return to the main screen: click the Home button;
3. Switch to the other main screen: rapid slide your finger to the left or
right. (to the first main screen, can gently press the Home button);
4. You can quickly switch between applications are using; Multitasking

Equipment maintenance
13
also allows some applications running in the background;
5. To view recently used application can long click the Home button for 3
seconds, the screen is displayed recently used applications。
Run
1. Drag to move up or down to scroll the screen;
2. Drag to move finger to scroll will not select or activate any content on
the screen。
3. dial
Make and receive calls
making a call
“Dial "button allows you to quickly access the upper screen: call lo
g, contacts, and digit dialing the keyboard (for manual dialing) to dial"
keyboard ", enter the number, then click "card 1/2" light can make a
phone call
answer calls
When there is a phone call, gently press "answer". If the machine has been
locked, please move the slider. You can also press the center button on the
headset to answer the call. Make calls mute: press "on/off" and
"sleep/wake" button or any volume button。
Equipment maintenance
14
Contact
In "contacts" screen, quick to can make a phone call, to create a new
E-mail message, find the position of the other, and perform more
operations
Call log
All calls
Gently press "call" recently, "all calls are recorded all did not call, call, dial
the phone. You can choose to call, send information, create a new contact
and existing contacts。
Received calls
"Call" is all records have a call. When you have already answered the
phone, "phone" will show already call number。
Dialed numbers
Has dialed calls" is to record all have dial call. When you have had the
phone, "phone" displays have dial the telephone number。
Missed calls
Call" is to record all the missed call. When you have not call, "phone" not
call number will be shown。
Equipment maintenance
15
4. backup and restore
Need to insert the T card to backups of data and application。
5. E-Mail
Set up email account
In this machine can choose corresponding E-mail Settings。
Check and read email
In the Mail, "mailbox" screen allows you to quickly access all of your email
inbox and other. When you open the mail, E-mail will retrieve and display
the latest, and at the top of the screen shows the number of unread mail。
6. Browser
View the web page
You can use the landscape pattern or rank to view web pages. Web page
will turn with the rotation of the machine, and can automatically adjust to fit
the page。
Open website
according to the address bar, then type the url and gently press
the "search". If the address bar is not visible, please slide the
page to the top of the screen
Equipment maintenance
16
7. Google
Type any character to find information/use,
8. Search
Type any character to find information/use,
9. music
With "music" application to enjoy music collection. According to the artist,
album, song, playlist browsing the content of this machine。
To search for music
You can in the search box to enter the name of a song you want to find
Add/remove music
Add repertoire: can copy the music from the computer to the SD card, can
be in the "music" list add tracks. Delete repertoire: can direct access to
delete the music file management, also can connect to your computer,
delete the music from the computer, or long click the songs name will
popup menu ", added to the playlist, delete, search "may choose to delete
to delete the menu。
10. Sound recorder
Select this feature, press the center button for the recording. Select
options to enter:

Equipment maintenance
17
¾ Quality: set to high or standard
¾ The recording mode: set to normal or meeting or distance of the
recording
Recording: to record a new voice。
¾ Check the file: view the current recording file。
。
You can use this function to record audio files. Note: the recording time
is decided by the residual capacity of mobile phone memory。
11. Messaging
Send and receive messages
Send SMS
According to the lower left corner "information" icon, and then input the
name or telephone number, or light according to the recipients of the "+"
icon on the right, then choose your contacts from the address book list.
Light according to the text above the keyboard, typing information or click
on the icon on the left side of the text to add video/image, then gently press
"send
Cmppdeliver
When you have unread messages, "messages" icon will be displayed on
the main screen you haven't read number of text messages. When you
enter the "text", after reading light according to enter the text messages。
12. Calendar
The "calendar" allows you to access your calendar, and events. You can
view the calendar respectively, also can see several calendar at the
Equipment maintenance
18
same time. You can daily, monthly, or according to the list view events。
View calendar
Light switch display mode: press the "day", "week", "month", "schedule"。
By date show that slide up or down to see the one day of weekly events in
view:
View: gently by one day to see the weekly event
View: to one day to see the events of the month。
Schedule shows: all the dates and events will appear in the scrolling list。
Add an Event
You can directly in the machine to create and update the calendar events.
Click on add a new activity, enter any of the following: title/position/start
time (if it is a full-day event, please open the "day")/repeat time (no, or
every day, every week, every two weeks, a month or a year)/be inviter (if
your calendar server support)/remind time (from five minutes to two days
before the event)。
13. Gallery
Allows you to take photos and video, so that you can share with family,
friends and colleagues. From PC sync photos and video, you can check
Equipment maintenance
19
with the machine photos and video and photos will be used for the
wallpaper, and specify the photos to identify the telephone contacts. You
can also send photos and video information by E-mail, use MMS send
photos and video, with bluetooth send your photo and video。
Look at photos and video
Use the machine photos and video, photos and video from the PC
synchronization, or from email or MMS storage of photos and video can
see in the "gallery"。
Look at photos and video: in the "gallery", you can choose you want to see
the pictures or video light, can see the pictures or video. Local: enlarge
photos even according to the location of the two do you want to enlarge.
Even twice to shrink again. You can also open or closed two fingers to
zoom in and out。
Delete the photos and video
Gently press to select you want to delete the photo and video.
"Delete" button will indicate the number of your choice。
Slide show
You can put the album as a slide show to see the album as a slide show to
watch, light light according to the photo album, and then press "slideshow"。
Share photos and video
You can put your photos and video, bluetooth, Mail sent to the information。
Equipment maintenance
20
Set as wallpaper
You can enter the gallery, choose you need to set up image, click on the
"menu" will be a photo set as wallpaper。
14. camera
This machine is divided into front and back camera. Mainly on the back
of the camera. You can use the screen to control the camera and view
your photos or video。
take photos and videos
take photos
Use this machine on target, gently press photo. When you take photos or
video begins to emit the shutter sound. If the ring/silent switch is set to mute,
it couldn't hear the sound. Interface at the top of the "camera" icon in the
order: flash light switches, options, camera before and after the switch
1. Flash: if you are in the weak light, can open the flash。
2. Option: you can set the flash, white balance, storage location, photo
mode, exposure, and so on。
videos
Click on the video button to start video. "Camera" is in the video, the video
button in red. Lightly press video button again to stop recording。

Equipment maintenance
21
look at photos and videos
In the "camera", the screen lightly in the lower right hand corner of the
thumbnail. In the "gallery", according to the "camera" album. Light
according to the left or right button, or slide your finger to the left or right
quickly, to leaf through photographs and video。
15. video player
Can quickly into the view you need to find a video。
video view
Choose "video player" in the main interface, can manage their files into the
video folder, enter the "video" you can choose the video file to watch the
video you will see。
16. TODO
You can create a memo in the unit, you can search text in the memo list。
Add, delete, and edit memo
Add a new item
Gently press the "+" icon, and then type do you want to input the content of
the light and press "done"
Delete items
According to the memo, then gently remove icon。
Equipment maintenance
22
Edit item
Light according to the particulars of any location to bring up the keyboard
for editing。
17. File Manager
Can view the phone and SD card storage file, insert the USB line, mobile
phone can be stored and stored in the SD card files"
18. Downloads
In the application of the website such as mobile Internet or MP3
and pictures will be shown in the download
19. clock
You can view the world clock, alarm clock, stopwatch, timer
count down
Mobile phone built-in countdown function. Set a time, you can click on the
bottom of the screen icon in the start the countdown, time arrives, the
phone automatically。
Equipment maintenance
23
clock
Add the alarm clock
Main screen click on the "clock", select "alarm interface" add
ICONS and type you want to set up the content
Delete the alarm clock
Gently press "alarm clock" and click "edit". Next to the clock and then lightly
in "-", then press "delete" gently。
seconds counter
Use a stopwatch to event timing: lightly press "stopwatch" select "start" to
enable a stopwatch。
To record the time back and forth, back and forth in each light after press
"would"。
If you want to suspend a stopwatch, please press "stop" light. Gently press
"start" to continue。
If a stopwatch is to be reset, please light when a stopwatch to suspend the
press the "reset"。
20. Calculator
Light according to the number and function in the "calculator", just like you
use the standard calculator. To add, subtract, multiply or divide button, the
button will twist, to let you know to perform operations. . Recorded voice
memos, gently press "play" button, then press "play" to suspend play。
Equipment maintenance
24
21. Sttings
To access the Settings menu: in the menu mode, choice: network
Wireless networks
SIM management
Can be set up single or double card master card and set the machine
operation。
WI-FI
WiFi:Open or close the WiFi function。
Network inform: setting equipment available in the open network for
notification。
Add the wi-fi network: manually add WiFi access point
。
Bluetooth
You can via bluetooth electronic equipment within 10
meters and set up a wireless connection. Bluetooth can be used
to send pictures, video, digital data, etc. Under the bluetooth
interface, can make the following options:
◆ Open/close:sets the Bluetooth status:open or closed。
◆ Paired device: the show has been paired device list record of
success。
◆ Search for equipment:can search for the new device

Equipment maintenance
25
◆ Setting: can be visible to the machine name, name of
equipment, etc。
Traffic usage
Traffic usage: set the SIM card flow cycle, the use of display using SIM card
data connection into the application of flow。
more
Wireless and Internet: flight mode: disable devices all wireless functions.
Can only use a VPN network service: to set the lock screen PIN or
credential storage password to use. Network sharing and portable hot: can
open WIFI hotspot / / bluetooth USB sharing network sharing network
mobile networks: can set card 1/2 mobile network Settings. USB Internet:
Shared Windows PC via a USB line network。
Audio profiles
You can select the desired scene mode according to need. Scene mode
option: standard, silent, meeting, outdoor model, this factory has done
several patterns and Settings, you can customize the Settings. In the scene
mode interface, short press of the selected mode to pop up after the
individual Settings to enter personal Settings, change model of the scenario
specific Settings are as follows:
1. Vibration: set later will not ring the bell
2. Volume: can be adjusted by rolling up and down the ball path to r
ing the bell and the volume of the sound。
3. Ringtone: to set the phone ring。
4. Notification ringtone: can be set to notify the bell
5. Choose sound: operation Settings screen to choose whether to play
Equipment maintenance
26
sounds
6. Prompt: screen lock lock and unlock the screen broadcast voice switch
7. Touch:If there is a touch switch can touch screen
Display
Lock screen notification: open/close on the lock screen display/no unread
message/phone call
Wallpaper: you can set the standby interface wallpaper for
dynamic wallpaper/desktop wallpaper/video/image in the atlas of
the wallpaper。
Automatic rotary screen: open the horizontal/vertical placement will follow
swings to the phone's screen, shut down does not follow the rotating
screen。
Luminance: the screen brightness will affect battery life. Reduce the screen
brightness in order to prolong the using time of the battery, or use the
"automatic brightness adjustment"
Font size: you can set the phone font size
Dormancy: the mobile phone is not operating in a set of time automatically
cut off screen
Storage
Show a mobile phone internal storage capacity and storage capacity of the
SD card, can be executed on mobile phones and SD format
Battery
Show a mobile phone battery has been used time and specific power
consumption
Equipment maintenance
27
Apps
To manage your applications, to delete the machine application, mobile
storage location。
PERSONAl
Location information access
Can set access my location information
positioning system
A virtual private network Settings, you can set up wireless network or using
a GPS satellite. At the same time open A - GPS can quickly locate your
current position。
Security
Can screen lock: lock screen set to slide/voice
unlocked/design/PIN/combination lock
Main information: edit the information, in the locked state displays edit
content
Encryption mobile: set the encryption mobile phone every boot need input
digital PIN or password to decrypt the mobile phone
SIM card lock: set the SIM password every boot to input a SIM card
password to boot
Show the password: open in the input password lock screen or password
will show the password
The device manager: view or stop using the device manager
Unknown sources: open allows installing applications from unknown
Equipment maintenance
28
sources, otherwise not
Certificate of the credential storage: can be installed from the SD card
Language and input method
Can set the phone language and input method
Backup $ reset
Reset the DRm: delete all the DRm license
Restore the factory Settings: remove all the data on the phone
ACCOUNTS
Background data: when binding Google account or company account, the
application can be automatically synchronized calendar calendar, contacts,
email in the Google account。
Automatic synchronization: when binding account application will
synchronize data
E-mail: show email account
Add account: to add a new account
SYSTEM
date & time
To automatically update the time and date set a time format
power-on by alarm
On:Set a specific time, when the time arrives, the phone automatically
Equipment maintenance
29
switched on
Off:Set a specific time, when the time arrives, the phone will be pro
mpted whether to turn it off, after 30 seconds, if no choice, the phon
e automatically shut down
miscellaneous function
Can be set to mobile phone perform auxiliary functions
Developer options
Can to the operation of the phone system, open the USB debugging plug
USB connection peas / 91 assistant download APK application, etc。
About phone
Show a mobile phone version of the system and hardware information
22. People
In the main menu, click the address book, enter the contact menu, and can
give the address book contacts to make calls, send messages, etc。
Create a contact
1. In the main screen, click the address book, enter the contact menu。
2. Press the "+" input contact information click on the corresponding items
3. Click finish after input to complete the related information, save the
contact。
Equipment maintenance
30
Search contacts
You can search in the unit name, last name and company name in the
contact。
Search contacts: in the "address book", gently press any contacts list at the
top of the search bar, and then input search content。
23. FM
Choose FM radio, will enter the radio broadcast interface (need to insert the
headset to listen to)。
Channel list: storage channel, can be to manually edit channel
Settings: set the background, cell phone speakers on or off; Can also set
the recording format, sound quality, storage location and channel effects。
Collection list: into the list view collection channels。
24. Play store
You can download it from play store is directly applied to your phone。
downloading an app
When you find the application in the play store, you can choose to
download. Once downloaded an application, it will be installed on a mobile
phone。
View your application download status: started to download the application,
its icon will appear in the status bar drop-down menu, you can choose to
view the download progress。

Equipment maintenance
31
Delete App
You can delete from the android market installed applications. If you delete
the application, it is related to the application of the data is no longer
suitable for the machine。
Delete App :
1. Touch any application icon on the main screen and hold down, the
screen will pop up a delete icon above, dragging the application ICONS to
the application you can delete the delete icon。
。
25. Talk
Can online video chatf
26. Battery maintenance and equipment maintenance
Battery maintenance
1. This phone is a rechargeable battery as a power source.
When power weak, please send the battery. To maintain
battery life, the best will run out the battery before charging;
2. When the battery charger is not used, please with the power supply source separation. Do not
connect the charger with battery more than a week, over charge will shorten the battery life;
3.
Temperature influence the limits of the battery to charge. So, before charging the battery may need to
be cool or warm. If the battery more than 40 degrees Celsius temperature, the battery can't charge:
Equipment maintenance
32
4. Temperature influence the limits of the battery to charge. So, before charging the battery may need
to be cool or warm. If the battery more than 40 degrees Celsius temperature, the battery can't charge;
5. Do not use the damaged cells;
6.
Put the battery in the extremely cold or hot place can lead to shorten the battery life, battery exposed
to cold or hot place may lead to can't normal mobile phone function, even rushed out battery;
7. Please don't put battery in the fire! Please according to the local regulation to deal with waste
batteries。
equipment maintenance
Column Suggestions will help you to take care of your mobile phone:
1. All mobile phones and accessories from where children can touch;
2. Please keep the body dry, liquid can cause metal corrosion circuit;
3. Please send the body away from high temperature, high temperature
will shorten the service life of electronic devices, melted the plastic and
damage to the battery;
4. Please do not attempt to open the cabinet or cell phone,
non-professional disassembly may cause damage of the body;
5. Do not use strong acid or alkaline detergent to clean the body;

Equipment maintenance
33
6. Only use a mobile phone original accessories. Violation of these will
lead to warranty even use fault。
34
27. Simple troubleshooting
fault phenomenon probable cause
Cannot turn on the computer Is there a battery; Battery is correct。
(U)SIMCard error (U) SIM card smudgy, clean (U) SIM card; Reinstall
(U) SIM card; (U) SIM card is damaged, replace the
(U) SIM card。
Poor reception
Check on the display signal strength indicator, the
number of the signal is 4 said signal is strong, weak
signal under 2 case。
In poor areas the use of mobile phones, such as
high-rise buildings near or basement, radio waves,
unable to communicate effectively。
Period in the intensive use of mobile phones, such as
working hours, the line congestion cause can't talk to
each other。
Associated with the launch of the base station
network built near and far. Regions can require
Internet service providers to provide services。
Echo or noise Due to poor network trunk, is a regional problem, or
some bad conversation in line。

35
Can hang up replay again, trunk may replace the
good line。
Phone can't breathe out
You may set up to hide the unit number, but your
network operator does not provide the service; May
the environment has a strong jamming signal; Could
you activate the call barring function; Could you
activate the line 2, but your network operator does
not provide the service。
The battery is not charging
Might have excessive battery discharge, the need to
connect the charger after a period of time to charge;
Battery performance has deteriorated。
Unable to access the network
The signal is too weak, or surrounded by wireless
interference; (U) SIM card installed correctly, whether
poor contact or broken (U) SIM card? If (U) SIM card
is damaged, please consult network service
providers。
Standby time shorter
Standby time is related to the system Settings of the
network. In accepting bad area, please temporarily
shut down the cellular phone。
Need to replace the battery
Don't get the signal, the unit will continue to launch
36
for base station, consume a large amount of battery
power, hit a shorter time. Please move to the strong
signal used or temporarily shut down the phone.
PIN error Input incorrect PIN number three times in a row.
Contact your network provider。
Could not add phone book record Phone book storage space is full. Delete some
telephone directory records.
Unable to set certain functions
Network providers do not support this function, or you
do not apply for this function. Contact your network
provider。

37
FCC Statement:
1. This device complies with Part 15 of the FCC Rules. Operation is
subject to the following two conditions:
(1) This device may not cause harmful interference.
(2) This device must accept any interference received, including
interference that may cause undesired operation.
2. Changes or modifications not expressly approved by the party
responsible for compliance could void the user's authority to operate
the equipment.
NOTE:
This equipment has been tested and found to comply with the limits
for a Class B digital device, pursuant to Part 15 of the FCC Rules. These
limits are designed to provide reasonable protection against harmful
interference in a residential installation.
This equipment generates uses and can radiate radio frequency
energy and, if not installed and used in accordance with the
instructions, may cause harmful interference to radio communications.
However, there is no guarantee that interference will not occur in a
particular installation. If this equipment does cause harmful
interference to radio or television reception, which can be determined
by turning the equipment off and on, the user is encouraged to try to
38
correct the interference by one or more of the following measures:
Reorient or relocate the receiving antenna.
Increase the separation between the equipment and receiver.
Connect the equipment into an outlet on a circuit different from that
to which the receiver is connected.
Consult the dealer or an experienced radio/TV technician for help.
SAR Information Statement
Your wireless phone is a radio transmitter and receiver. It is designed
and manufactured not to exceed the emission limits for exposure to
radiofrequency (RF) energy set by the Federal Communications
Commission of the U.S. Government. These limits are part of
comprehensive guidelines and establish permitted levels of RF energy
for the general population. The guidelines are based on standards
that were developed by independent scientific organizations through
periodic and thorough evaluation of scientific studies. The standards
include a substantial safety margin designed to assure the safety of all
persons, regardless of age and health. The exposure standard for
wireless mobile phones employs a unit of measurement known as the
Specific Absorption Rate, or SAR. The SAR limit set by the FCC is 1.6
W/kg. * Tests for SAR are conducted with the phone transmitting at its

39
highest certified power level in all tested frequency bands. Although
the SAR is determined at the highest certified power level, the actual
SAR level of the phone while operating can be well below the
maximum value. This is because the phone is designed to operate at
multiple power levels so as to use only the power required to reach
the network. In general, the closer you are to a wireless base station
antenna, the lower the power output. Before a phone model is
available for sale to the public, it must be tested and certified to the
FCC that it does not exceed the limit established by the government
adopted requirement for safe exposure. The tests are performed in
positions and locations (e.g., at the ear and worn on the body) as
required by the FCC for each model. The highest SAR value for this
model phone when tested for use at the ear is 0.691W/Kg and when
worn on the body, as described in this user guide, is
0.504W/Kg(Body-worn measurements differ among phone models,
depending upon available accessories and FCC requirements). The
maximum scaled SAR in hotspot mode is 0.623 W/Kg. While there
may be differences between the SAR levels of various phones and at
various positions, they all meet the government requirement for safe
exposure. The FCC has granted an Equipment Authorization for this
model phone with all reported SAR levels evaluated as in compliance
with the FCC RF exposure guidelines. SAR information on this model
phone is on file with the FCC and can be found under the Display
Grant section of http://www.fcc.gov/ oet/fccid after searching on
40
FCC ID: 2AG5L-FTU161G Additional information on Specific
Absorption Rates (SAR) can be found on the Cellular
Telecommunications Industry Asso-ciation (CTIA) web-site at
http://www.wow-com.com. * In the United States and Canada, the
SAR limit for mobile phones used by the public is 1.6watts/kg (W/kg)
averaged over one gram of tissue. The standard incorporates a
sub-stantial margin of safety to give additional protection for the
public and to account for any variations in measurements.
Body-worn Operation
This device was tested for typical body-worn operations. To comply
with RF exposure requirements, a minimum separation distance of
10mm must be maintained between the user’s body and the handset,
including the antenna. Third-party belt-clips, holsters, and similar
accessories used by this device should not contain any metallic
components. Body-worn accessories that do not meet these
requirements may not comply with RF exposure requirements and
should be avoided. Use only the supplied or an approved antenna.