Pogo Products En 50361 Ogo Users Manual OGO_UserManual_Rev0.4bx
OGO to the manual 0bfb81f1-d823-442d-8b1f-12ee66d6015d
2015-02-06
: Pogo-Products Pogo-Products-En-50361-Ogo-Users-Manual-519633 pogo-products-en-50361-ogo-users-manual-519633 pogo-products pdf
Open the PDF directly: View PDF ![]() .
.
Page Count: 100

OGO
User Manual
OGOUserManual
ii
Table of Contents
Introducing the Ogo ......................................................................... 1
Features ................................................................................................. 2
Accessories ............................................................................................. 3
Getting Started ................................................................................. 4
Inserting the SIM Card and Battery ............................................................ 4
Charging the Battery ................................................................................ 6
Checking the Battery Power ....................................................................... 6
Identifying the Low Battery Warnings .................................................... 7
Working with the Ogo ...................................................................... 8
Interacting with Your Ogo – Terminology & Tips ........................................... 8
Powering On Your Ogo for the First Time ..................................................... 9
Using the External Keys .......................................................................... 10
Keyboard Functionality ........................................................................... 11
Navigation Keys ............................................................................... 11
Shortcut Keys .................................................................................. 12
Inserting Text ........................................................................................ 13
Using Text Insertion Keys .................................................................. 13
Using the Extended Character Palette .................................................. 14
Changing the Writing Language .......................................................... 15
Working with QuickText ..................................................................... 15
External LCD ......................................................................................... 16
Overview of the Ogo Screen .................................................................... 17
Status Bar ....................................................................................... 17
Application Area ............................................................................... 19
Home Screen and Application Menu .......................................................... 20
Home Screen ................................................................................... 20
Application Menu .............................................................................. 21
Checking for Unread Messages and Open Chats .......................................... 22
Instant Messaging .......................................................................... 23
Using the Instant Messaging Wizard to Set Up Your Account ......................... 23
Setting Up Your Windows Live Messenger Account ................................. 24
Setting Up Your ICQ Account .............................................................. 25
Working with Instant Messaging ............................................................... 27
Signing In ............................................................................................. 28
Signing Out ........................................................................................... 28

TableofContents
iii
IM Status Icons ..................................................................................... 29
Changing Your Status ............................................................................. 30
Sending an Instant Message .................................................................... 31
Adding Emoticons to Your Instant Messages ......................................... 31
Receiving an Instant Message .................................................................. 31
Closing an IM Chat Session ...................................................................... 32
Managing Your IM Contacts ..................................................................... 32
Adding an IM Contact ........................................................................ 32
Viewing Contact Details ..................................................................... 33
Assigning an Alerticon to an IM Contact ............................................... 33
Blocking/Unblocking an IM Contact...................................................... 34
Deleting an IM Contact ...................................................................... 35
Messages (E-Mail and SMS) ............................................................ 36
Setting Up Your E-Mail Accounts ............................................................... 36
Using the E-Mail Wizard to Set Up Your Account .................................... 36
Setting Up Your Windows Live Mail Account .......................................... 37
Setting Up Your Gmail or Custom Email Account ................................... 38
Accessing the Messages Application .......................................................... 39
Viewing Your Message Lists ..................................................................... 39
Composing a Message ............................................................................ 41
Working with Messages ........................................................................... 43
Viewing a Message ............................................................................ 43
Viewing an Attachment ...................................................................... 44
Forwarding a Message ....................................................................... 44
Replying to a Message ....................................................................... 45
Deleting a Message ........................................................................... 45
Finding a Message ............................................................................ 46
Checking for New Messages ............................................................... 47
Viewing Your Outgoing Messages ........................................................ 48
Using Your Ogo as a Phone ............................................................ 49
Making a Call ......................................................................................... 49
Dialing a Phone Number .................................................................... 50
Calling a Contact .............................................................................. 51
Dialing a Number from the Call Log ..................................................... 51
Redialing a Number .......................................................................... 52
Handling Incoming Calls .......................................................................... 52
OGOUserManual
iv
Handling an Incoming Call – Ogo is On, Cover is Closed ......................... 52
Handling an Incoming Call – Cover is Open .......................................... 52
Handling a Waiting Call ...................................................................... 53
Handling Multiple Calls ............................................................................ 53
Swapping Calls ................................................................................. 53
Joining Calls (Conferencing) ............................................................... 53
Making another Call While Talking on the Phone .................................... 54
Ending a Call ......................................................................................... 54
Muting/Unmuting a Call .......................................................................... 54
Viewing Your Call Lists ............................................................................ 55
Call Timers ............................................................................................ 55
Managing Your Ogo Contacts List ................................................... 57
Adding Contacts ..................................................................................... 58
Deleting Contacts ................................................................................... 58
Viewing/Editing Contact Profiles ............................................................... 59
Assigning an Alerticon to a Contact ..................................................... 59
Working with Contact Groups ................................................................... 60
Creating a Group .............................................................................. 60
Adding Contacts to Groups ................................................................. 60
Removing Contacts from Groups ......................................................... 60
Sending a Message to a Group ........................................................... 61
Removing a Contact Group ................................................................ 61
Exporting Contacts ................................................................................. 62
Importing Contacts ................................................................................ 62
Working with the Address Clipboard .......................................................... 63
Creating a Contact from the Clipboard ................................................. 63
Working with the Calendar ............................................................. 65
Adding an Appointment ........................................................................... 66
Opening/Editing an Appointment .............................................................. 67
Deleting an Appointment ......................................................................... 67
Deleting Old Appointments ...................................................................... 67
Deleting All Appointments ....................................................................... 68
Appointment Reminders .......................................................................... 68
Viewing the News .......................................................................... 69
Accessing News Feeds ............................................................................ 69
Adding a News Feed ............................................................................... 70

TableofContents
v
Browsing the Web .......................................................................... 72
Requesting a Specific URL ....................................................................... 73
Working with Bookmarks ......................................................................... 73
Adding a Bookmark ........................................................................... 73
Removing a Bookmark ...................................................................... 74
Adding a Folder ................................................................................ 74
Opening a Bookmark ......................................................................... 74
Viewing Your Browsing History ................................................................. 75
Ogo Extras ..................................................................................... 76
Playing Ogo Blocks ................................................................................. 76
Viewing Technical Support Information ...................................................... 77
Device and Application Settings ..................................................... 78
Configuring the Phone Settings ................................................................ 79
Configuring the IM Settings ..................................................................... 82
Configuring Your E-Mail Settings .............................................................. 83
Configuring Your Web Browser Settings ..................................................... 85
Configuring the Device Settings ............................................................... 86
Configuring the Calendar Settings ............................................................ 88
Configuring the Sound Settings ................................................................ 90
Configuring the Time and Date Settings .................................................... 91
Configuring the Network Settings ............................................................. 92
Viewing Your System Settings .................................................................. 94
Important Safety Information ........................................................ 95
Certification Information (SAR) ................................................................ 94
IntroducingtheOgo
Features1
IntroducingtheOgo
Ogoisaneasy‐to‐usehandhelddevicethatoffersavarietyofmobile
communicationmethodsincludinge‐mail,instantmessaging,SMS,RSS,voice,and
Webbrowsing.Ogo'sinterfaceandfunctionalityweredesignedtoenhanceWeb2.0
usabilityfeaturingahighresolutionscreen,andbuilt‐instereospeakersforan
optimalaudio‐visualexperience.Thefullkeyboardandsleekdesignencourageuser
interactionforconstantconnectivitytolivecommunitiesanduser‐content
generatedsites.
OgoalsofeaturestherevolutionaryOgoClip™concept–avarietyofoptional,
replaceablecomponents,suchasa2.0megapixelcamera,amusicstreamer,a
Bluetoothhandset,andevenabottleopener.OgoClipsallowuserstopersonalize
andaccessorizetheirOgo,keepingupwiththenewestmobileadd‐onsastheyare
madeavailable.
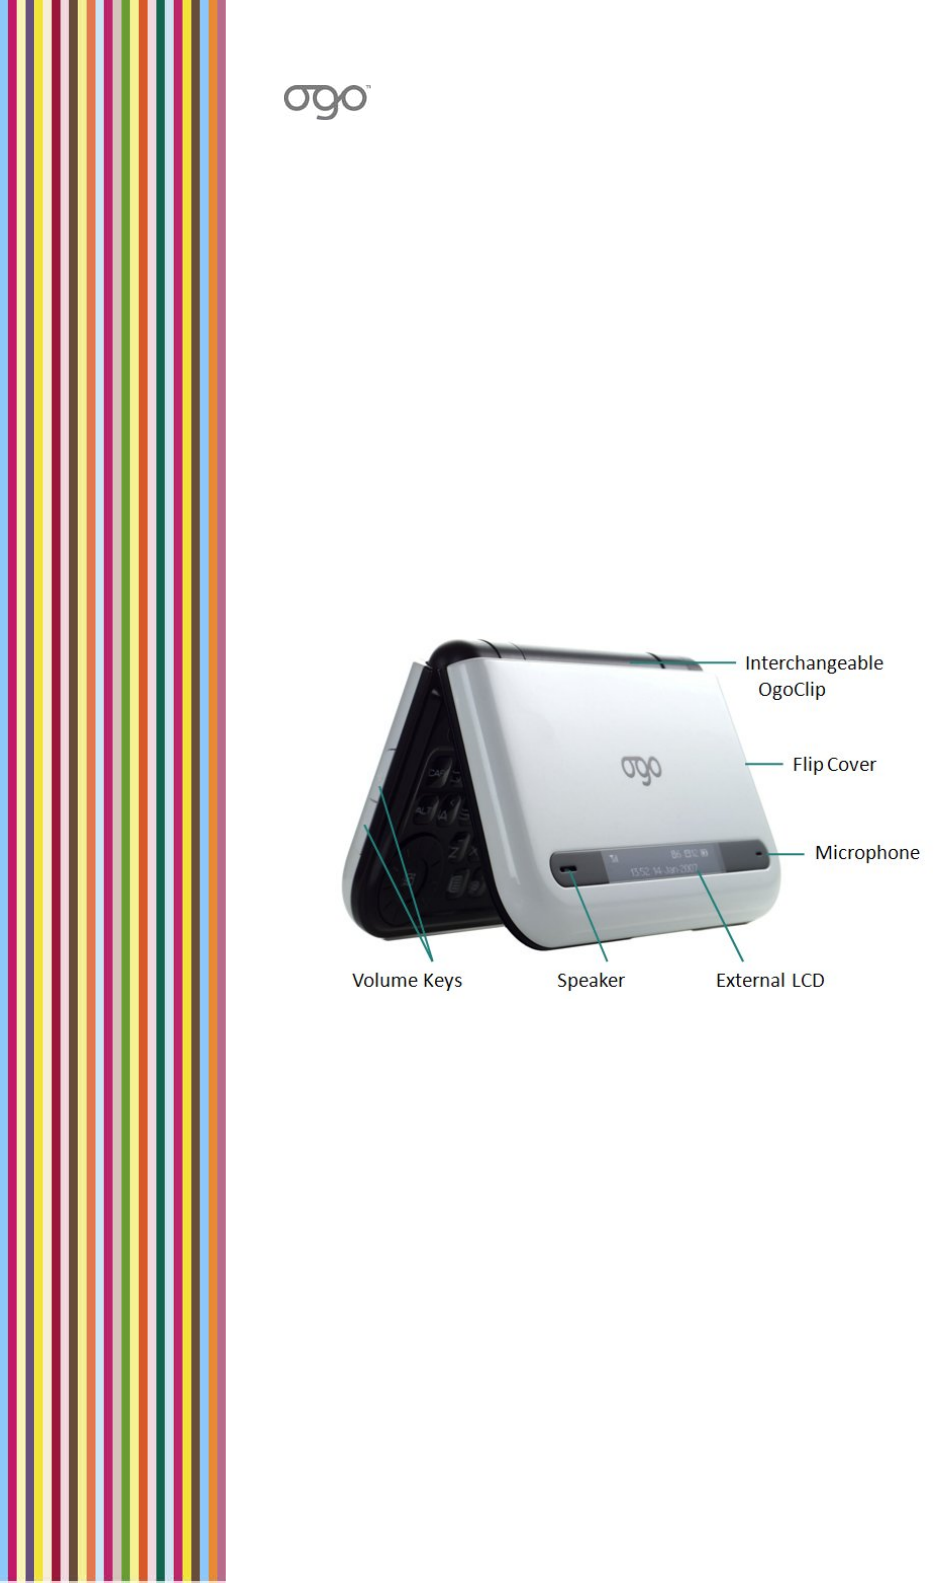
Figure1:OgoDevice(CoverClosed)
OGOUserManual
2Features
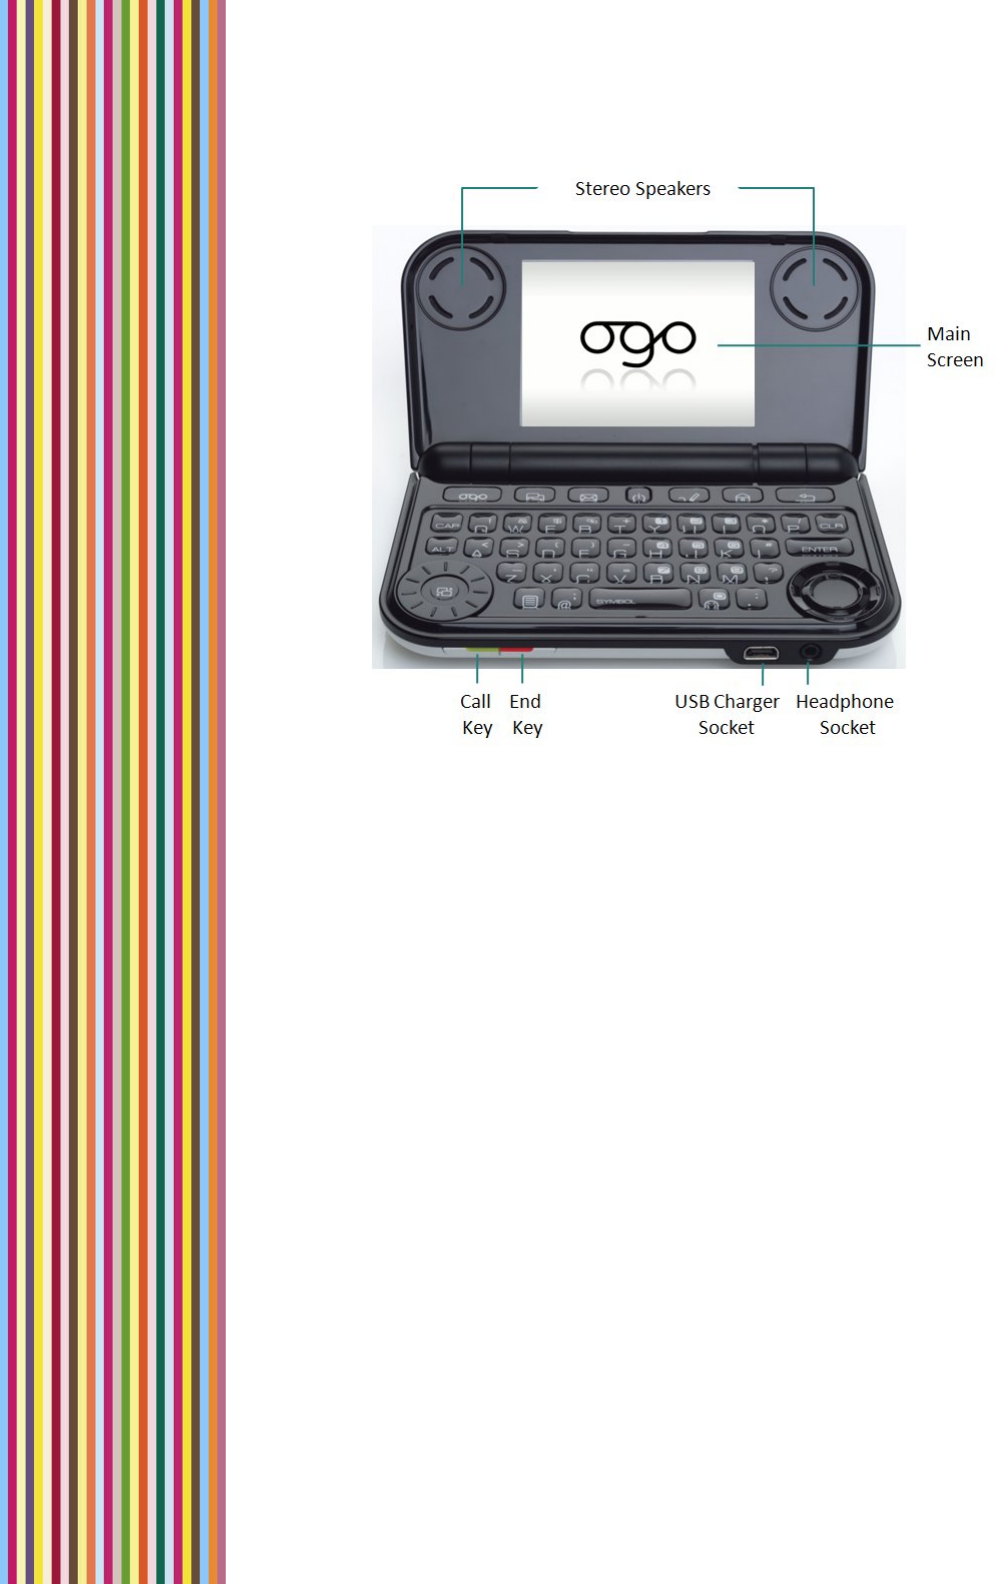
Figure2:OgoDevice(CoverOpen)
Features
ThekeyfeaturesofyourOgoinclude:
TextandInstantMessaging:Sendaquicktextmessage(SMS)orchatwith
contactsonyourICQorWindowsLiveMessengerlists.Ogo'sfingerfriendly
full‐featuredkeyboardmakesitfast,efficientandeasy.
E‐mailAnywhere:Readandreplytoemailfrommultipleaccounts.Ogoletsyou
managemessagesfrommultipleaccountseasilyandefficiently,whetheryou're
sittinginarestaurant,ridingthebus,orrelaxingonthebeach.WithOgoyou
canhandleattachmentswithease.Youcanviewphotos,textversionsofWord
documents,PDFfilesandmore.AndOgo'sPUSHemailfeaturemeansyouget
emailassoonasithitsyourinbox,sothere'snoneedtowait.
RSSNewsFeeds:Stayintouchwithyourworld.SetupRSSnewsfeedsforupto
themomentnews,informationandalertsaboutthesubjectsyoucareabout
most.
VoiceCalls:Ogo’sfull‐featuredandeasytousemobilephonefunctionality
makesitmucheasiertostayconnected.

IntroducingtheOgo
Accessories3
SurftheWeb:Browsethewebfrompracticallyanywhere.Blog,browse,check
outyourfavoritewebsitesorthelatestnewsandgossip—withOgoyou'rein
touch.
ContactsListandCalendar:Ogo'sPersonalInformationManagerletsyoucarry
yourcalendarandcontacts’informationwithyou.
Note: Theavailabilityofsomeoftheservicesdescribedinthismanualdepends
onthespecificversionoftheproductpurchased.
Accessories
YourOgoisprovidedwiththefollowingaccessories:
3.7VLi‐ionbattery920mAh(120hoursstandby,2.5hoursusage)
Chargerwithmini‐USBconnection

OGOUserManual
4InsertingtheSIMCardandBattery
GettingStarted
BeforeyoucanbegintoenjoyyourOgo,youneedtoinsertthefollowing
componentsintothedevice:
SIMcard
Battery
InsertingtheSIMCardandBattery
BeforeyouuseyourOgo,youneedtoinserttheSIMcardandbatteryintothe
device.
► ToinserttheSIMcardandbattery:
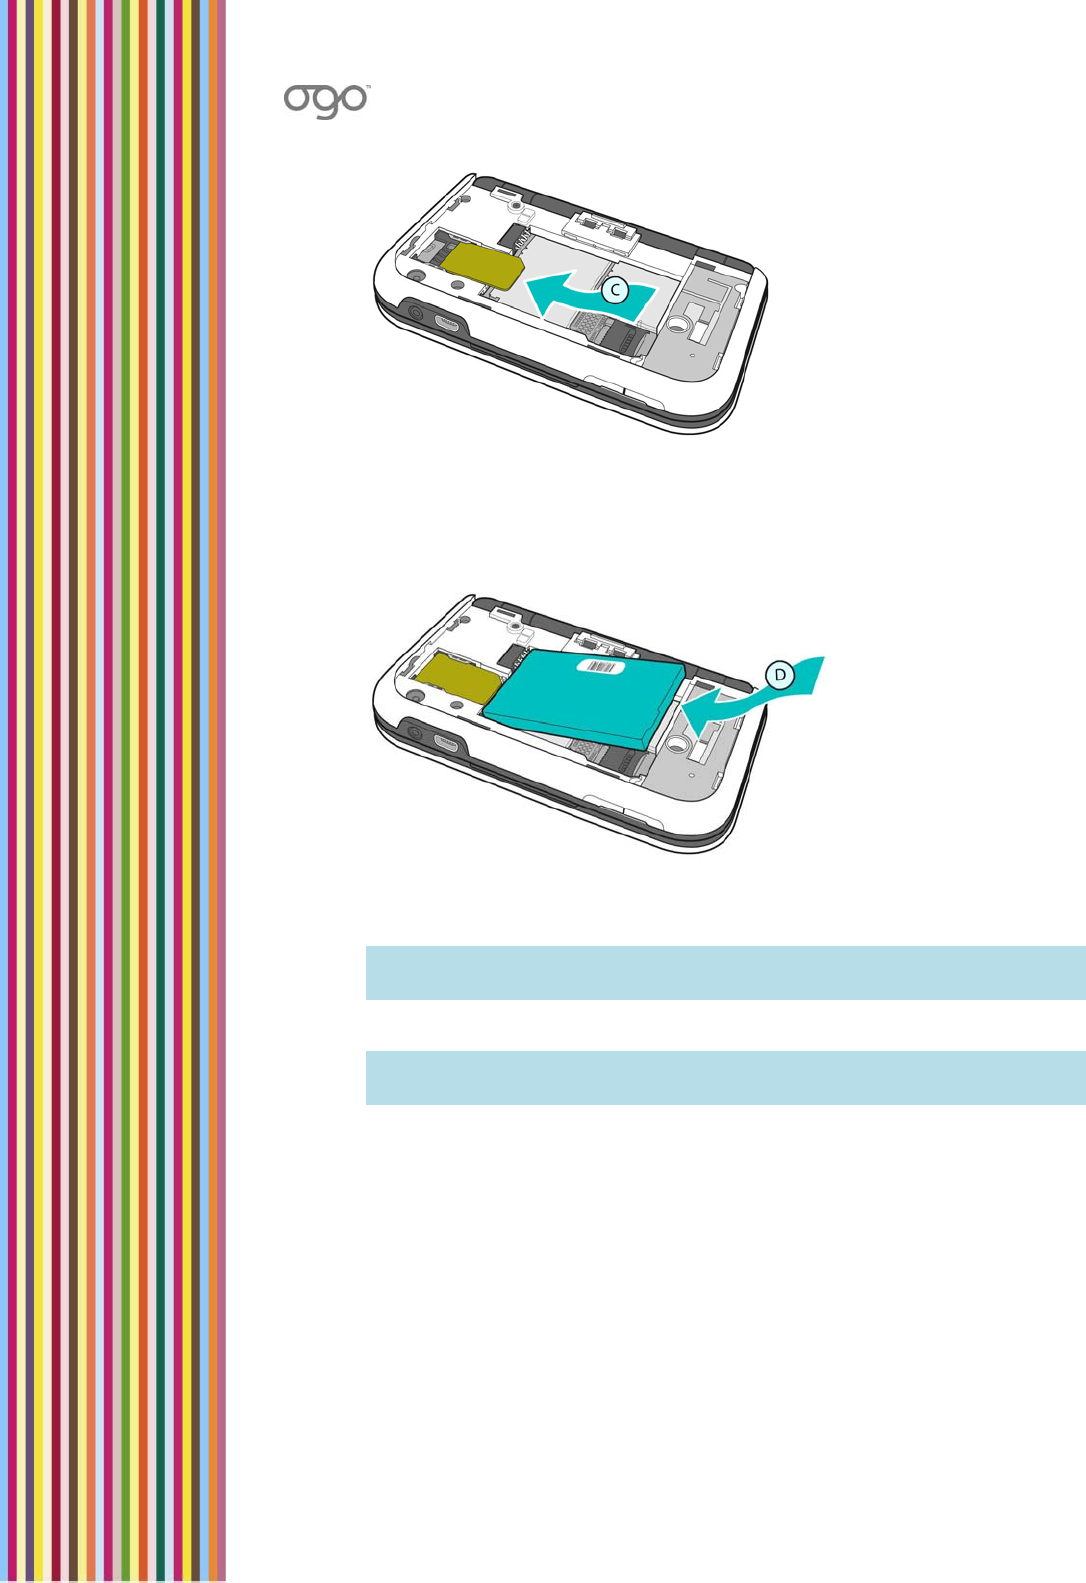
1 TurnyourOgooverandremovethebackcover(Figure3).
Figure3:RemovingtheBackCover
2 Withitslabelfacingup,gentlyslidetheSIMcardintotheSIMcardslot.Make
suretheSIMcard’sangledcornermatchestheangledcorneroftheSIMcard
slot.
Note: BecarefulnottoscratchtheSIMcard'smetalcontactasitcaneasilybe
damaged.
GettingStarted
InsertingtheSIMCardandBattery5
Figure4:InsertingtheSIMCard
3 Now,withthebatterylabelfacingup,matchthebatterycontactswiththe
contactsinthebatteryslot.Pushthebatteryin,contacts‐sidedownfirst
(Figure5).
Figure5:InsertingtheBattery
4 Pushtheothersidedowntoslidethebatteryinuntilitclicksintoplace.
Note: Toremovethebattery,gentlyliftitupfromthesideoppositethe
contacts.
5 Replacethebackcover(Figure6).
Note: Makesurethatthebatteryhasbeenproperlyinsertedbeforecharging
orpoweringonyourOgo.

OGOUserManual
6ChargingtheBattery
Figure6:ClosingtheBackCover
ChargingtheBattery
Thefirsttimeyouchargethebattery,itisrecommendedthatyouchargeitfor8
hours.
► Tochargethebattery:
1 Withthebatteryproperlyinserted,connectthecharger’smini‐USBpowerplug
tothemini‐USBconnectoronthefrontofyourOgo.
2 Plugthechargerintoanelectricaloutlet.
Whilethebatteryischarging,ananimatedbatteryiconisdisplayed.Whenthe
batteryisfullycharged,theicondisplaysfoursolidbars.
CheckingtheBatteryPower
Ogo’spowerconsumptiondependsonyourcurrentusage.Forexample,whenyou
aresendingalotofe‐mailsorparticipatinginnumerousInstantMessagingchat
sessions,thebatterypowerweakensfasterthanwhenyourdeviceisinactive,but
poweredon.
Thepowerlevelisindicatedbythenumberofbarsonthebatterylevelicon,which
appearonboththestatusbarandtheexternalLCD.
Note:TheremainingpercentageofbatterypowerislistedintheSystemtabin
Settings.

GettingStarted
CheckingtheBatteryPower7
IdentifyingtheLowBatteryWarnings
Whenbatterypowerbecomeslow,aBatteryLowpop‐upmessageappears.When
thishappens,chargeyourOgoassoonaspossible.
Ifthebatterylevelbecomescriticallylow,anadditionalBatteryLow!pop‐up
messageappears,indicatingthatyoumustshutdownthedeviceandrechargeits
battery.Formoreinformation,seeChargingtheBatteryonpage6.

OGOUserManual
8InteractingwithYourOgo–Terminology&Tips
WorkingwiththeOgo
TomakeiteasyforyoutoenjoyOgo,we
recommendthatyoutakeafewminutestoget
acquaintedwiththescreen,thekeyboard,andafew
ofthegeneralfeatures.
InteractingwithYourOgo–
Terminology&Tips
Inthismanual,thefollowingtermshavebeenused
intheinstructionstodescribethewaysinwhichyou
interactwithyourOgo:
Selectreferstomovingthefocusonthescreentoatab,field,buttonoroption.
Theselectedoptionishighlightedonthescreen.Itemsareselectedusingeither
the8‐wayNavigationKeyortheScrollWheel.Formoreinformation,see
NavigationKeysonpage11.
Scrollreferstomovingupordownwithintheitemsinalistormenu.
Pressalwaysreferstothepressingofphysicalkeysonthekeyboard.
Insertreferstotheenteringoftextusingthekeyboardwhencompletingforms
orcomposingmessages.Formoreinformation,seeInsertingTextonpage13.
IninteractingwithyourOgo,notethefollowing:
PressingEnterconfirmsaselection.ThisisaccomplishedbypressingtheEnter
keyorbypressingthebuttonatthecenteroftheScrollWheel.
PressingEnterwhenacheckboxoptionishighlightedtogglesthesetting
betweenselected(checked)andcleared(unchecked).
PressingtheOptionskeydisplaystheOptionsmenu.Theavailableoptionsvary
accordingtoyourcurrentlocationintheapplication.Toselectanoption,
simplypressthecorrespondingnumberonthekeyboard.Alternatively,youcan
scrolltotheoptioninthemenuandpressEnter.
Whenscrollingthroughalistofitems,youcantypethefirstletter(s)ofan
item’snametojumptothefirstitemthatstartswiththedesignatedletter(s).

WorkingwiththeOgo
PoweringOnYourOgofortheFirstTime9
PoweringOnYourOgofortheFirstTime
OnceyourOgoisfullycharged,holddownthePowerkey untilthescreenturns
on.
ThefirsttimeyouturnonyourOgo,asetupwizardappears,readytoguideyou
throughtheinitialstagesofsettingupyourdevicesettings.
ThefirstscreenoftheMessagingWizardpromptsyoutoselectalanguage.
Onceyouhavesetthelanguage,youarereadytobegintouseyourOgo.
► Tosetthelanguage:
1 Whenprompted,scrolltothelanguagethatyouwanttouseonthedeviceand
pressEnter.
2 SelectNextandpressEntertocontinue.Awelcomemessageisdisplayedinthe
selectedlanguage,andtheInstantMessagingWizardisautomatically
launched.
Youcansetupyourinstantmessagingande‐mailaccountsnow,oryoucan
closethewizard(byselectingCancelandpressingEnter)andcompletethe
processlaterfromtheSettingsscreen.
ForadescriptionoftheInstantMessagingWizard,seeUsingtheInstant
MessagingWizardtoSetUpYourAccountonpage23.
ForadescriptionoftheE‐mailWizard,seeUsingtheE‐MailWizardtoSetUp
YourAccountonpage36.
OGOUserManual
10UsingtheExternalKeys
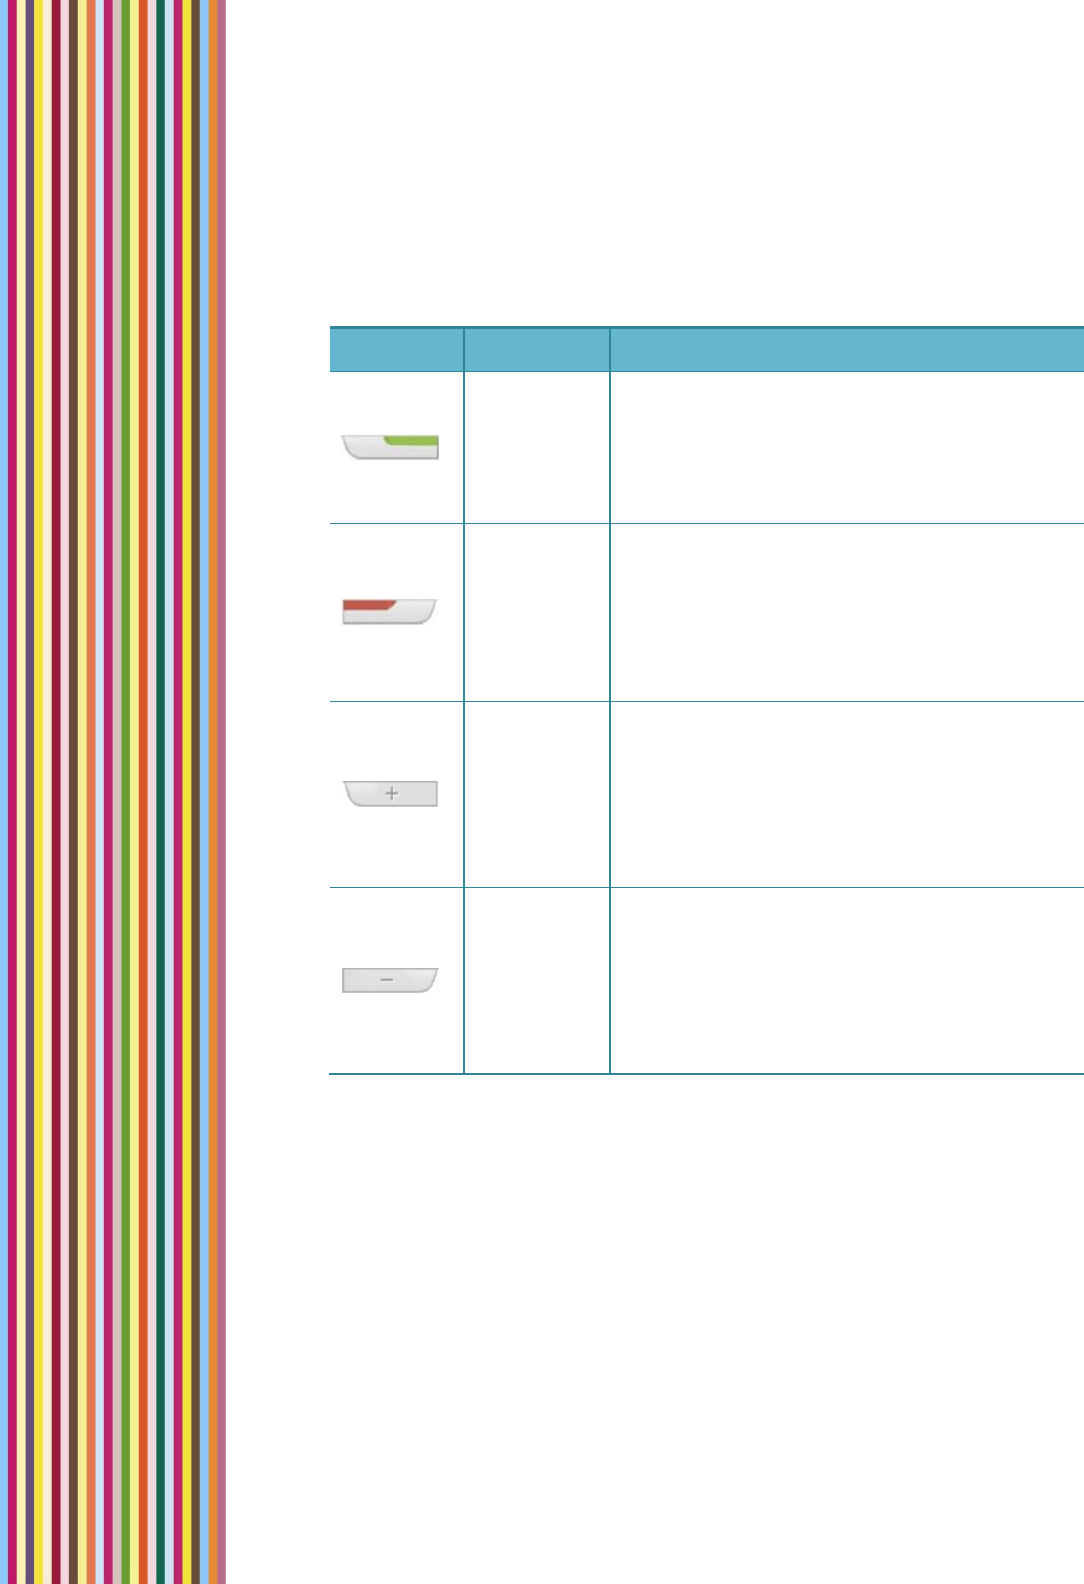
UsingtheExternalKeys
UsethefollowingexternalkeysforeasyoperationofthephonewhiletheOgo
coverisclosed.
Table1:ExternalKeys
KeyNameFunction
Call
Pressingthiskeyacceptsanincomingcall,or
switchesbetweenanactivecallandacallon
hold.Pressingthiskeywhennocallisactive
navigatestotheDialedcallslist.Pressingit
againre‐dialsthelastcall.
End
Pressingthiskeyhangs‐upanactivecall,or
rejectsanincomingcall.Pressingthiskeywhen
nocallisactivenavigatestotheHomescreen
(whenthecoverisopen),anddisplaysstatus
indicationsontheExternalLCDforafew
seconds(whenthecoverisclosed).
Volume+
Usethiskeytoincreasevolumeduringacall,or
toadjusttheringervolumewhennocallis
active.
Whenthedeviceissilenced,alongpressonthis
keyre‐enablessounds.Whenprompted,press
againtoconfirm.
Volume–
Usethiskeytodecreasethevolumeduringa
call,ortoadjusttheringervolumewhennocall
isactive.
Youcansilencethedevicewithasinglelong
pressonthiskey.Whenprompted,pressagain
toconfirm.
WorkingwiththeOgo
KeyboardFunctionality11
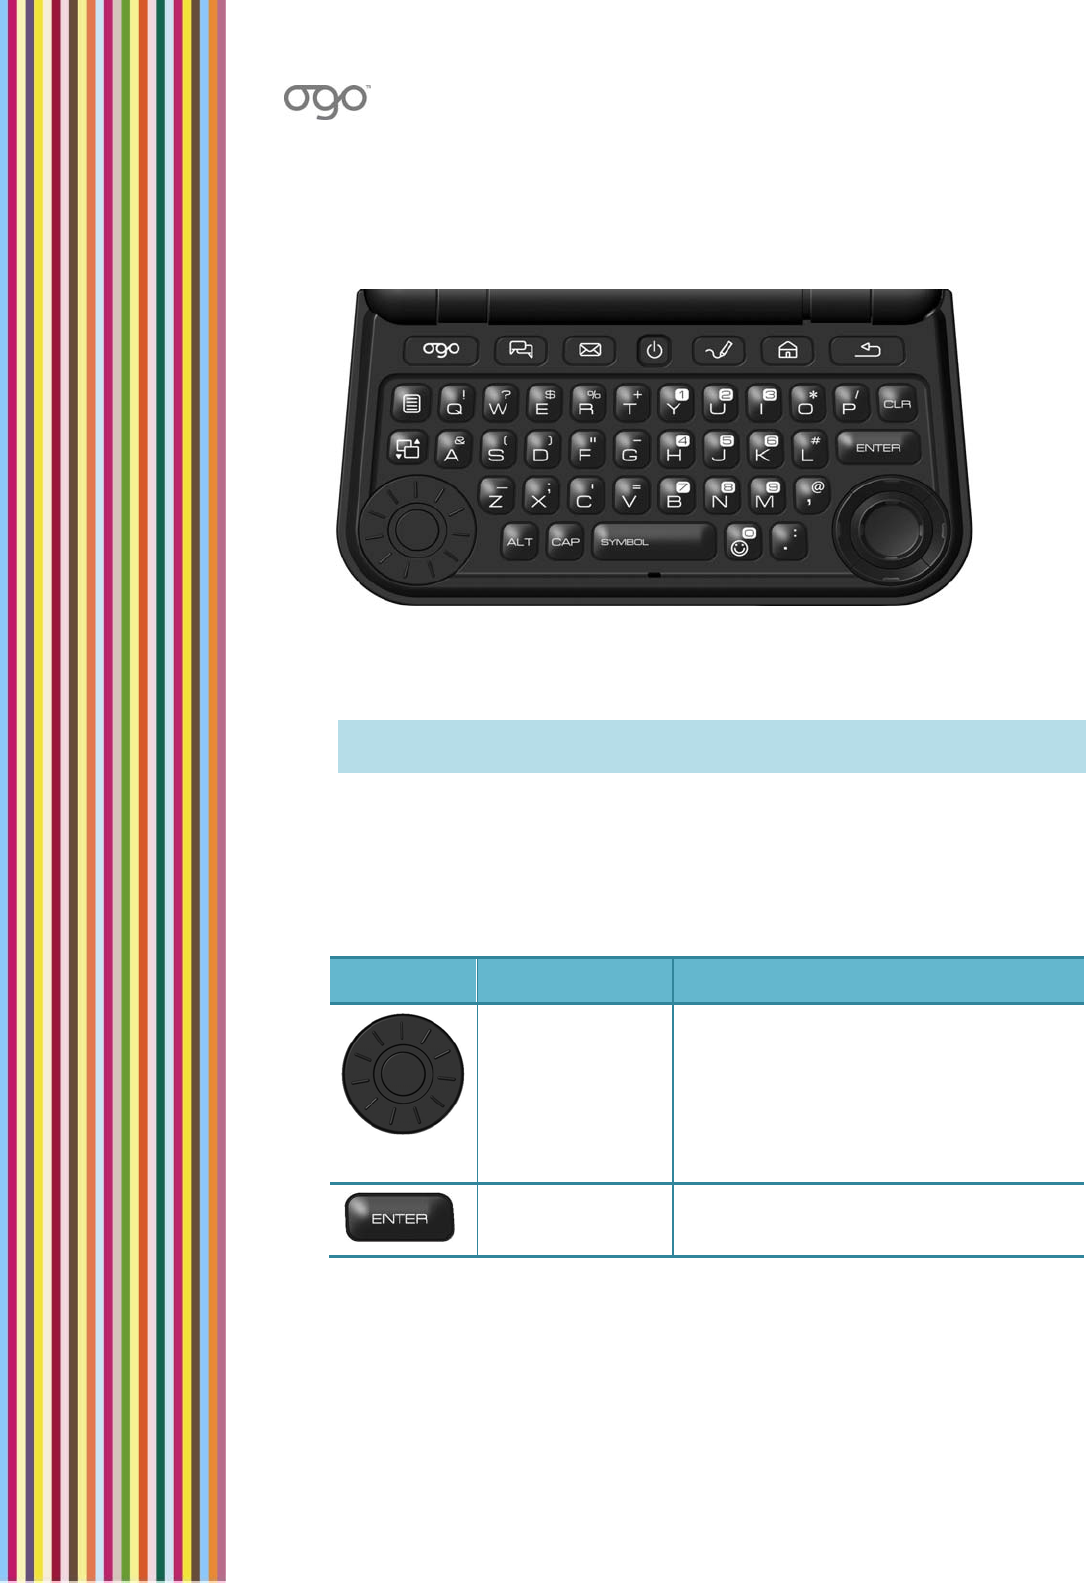
KeyboardFunctionality
TheconvenientlayoutoftheOgokeyboardenablesyoutoeasilyaccessthevarious
functionsofyourOgodevice.
Figure7:OgoKeyboard
Thekeyboardincludesnavigationandselectionkeys,shortcutkeys,and
text/characterinsertionkeys.
Note: Dependingonthemodel,yourOgomayhaveeitheraQWERTYora
QWERTZkeyboard.
NavigationKeys
ThefollowingkeysenableyoutonavigatewithintheOgo’sscreens,andtoselect
andactivatetheavailableitems.
Table2:NavigationandSelectionKeys
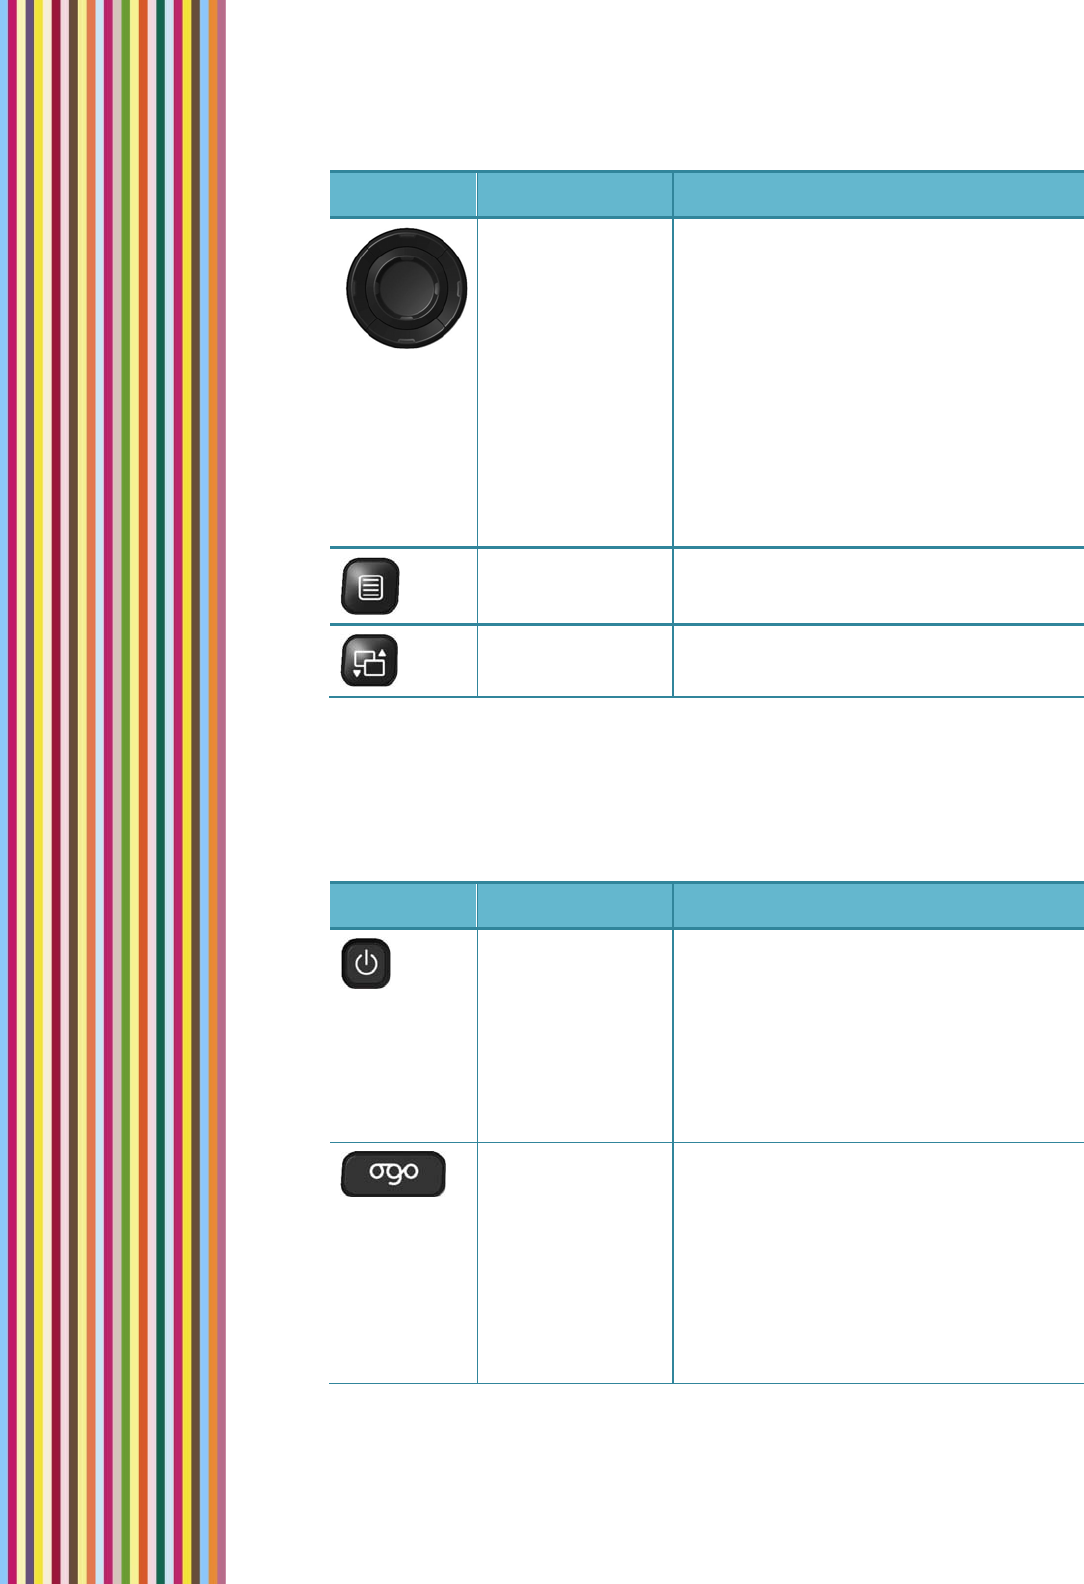
KeyNameFunction
ScrollWheelTheScrollWheelenablesyoutomove
theselectionbetweenitemsonthe
screen.Toactivatetheselecteditem,
pressthebuttoninthecenterofthe
scrollwheelorpressEnteronthe
keyboard.
EnterActivatestheselecteditemonthe
screen.
OGOUserManual
12KeyboardFunctionality
KeyNameFunction
8‐way
NavigationKey
Theouterleftandrightarrowkeys
enableyoutomovebetweentabsorto
movetothebeginningorendofalineof
text.
Theouterupanddownarrowkeysscroll
onepageatatime(pageup/down),or
movetothebeginningandendofthe
message.
Theinnerarrowkeysenableyouto
moveleftandrightorupanddown
withinascreenorwithinlinesoftext.
OptionsDisplaystheOptionsmenuforthe
currentscreen,ifavailable.
Application
Menu
DisplaystheApplicationmenu.
ShortcutKeys
Thefollowingshortcutkeysmakeiteasytonavigatebetweenthemostcommonly
usedfeaturesonyourOgodevice.
Table3:ShortcutKeys
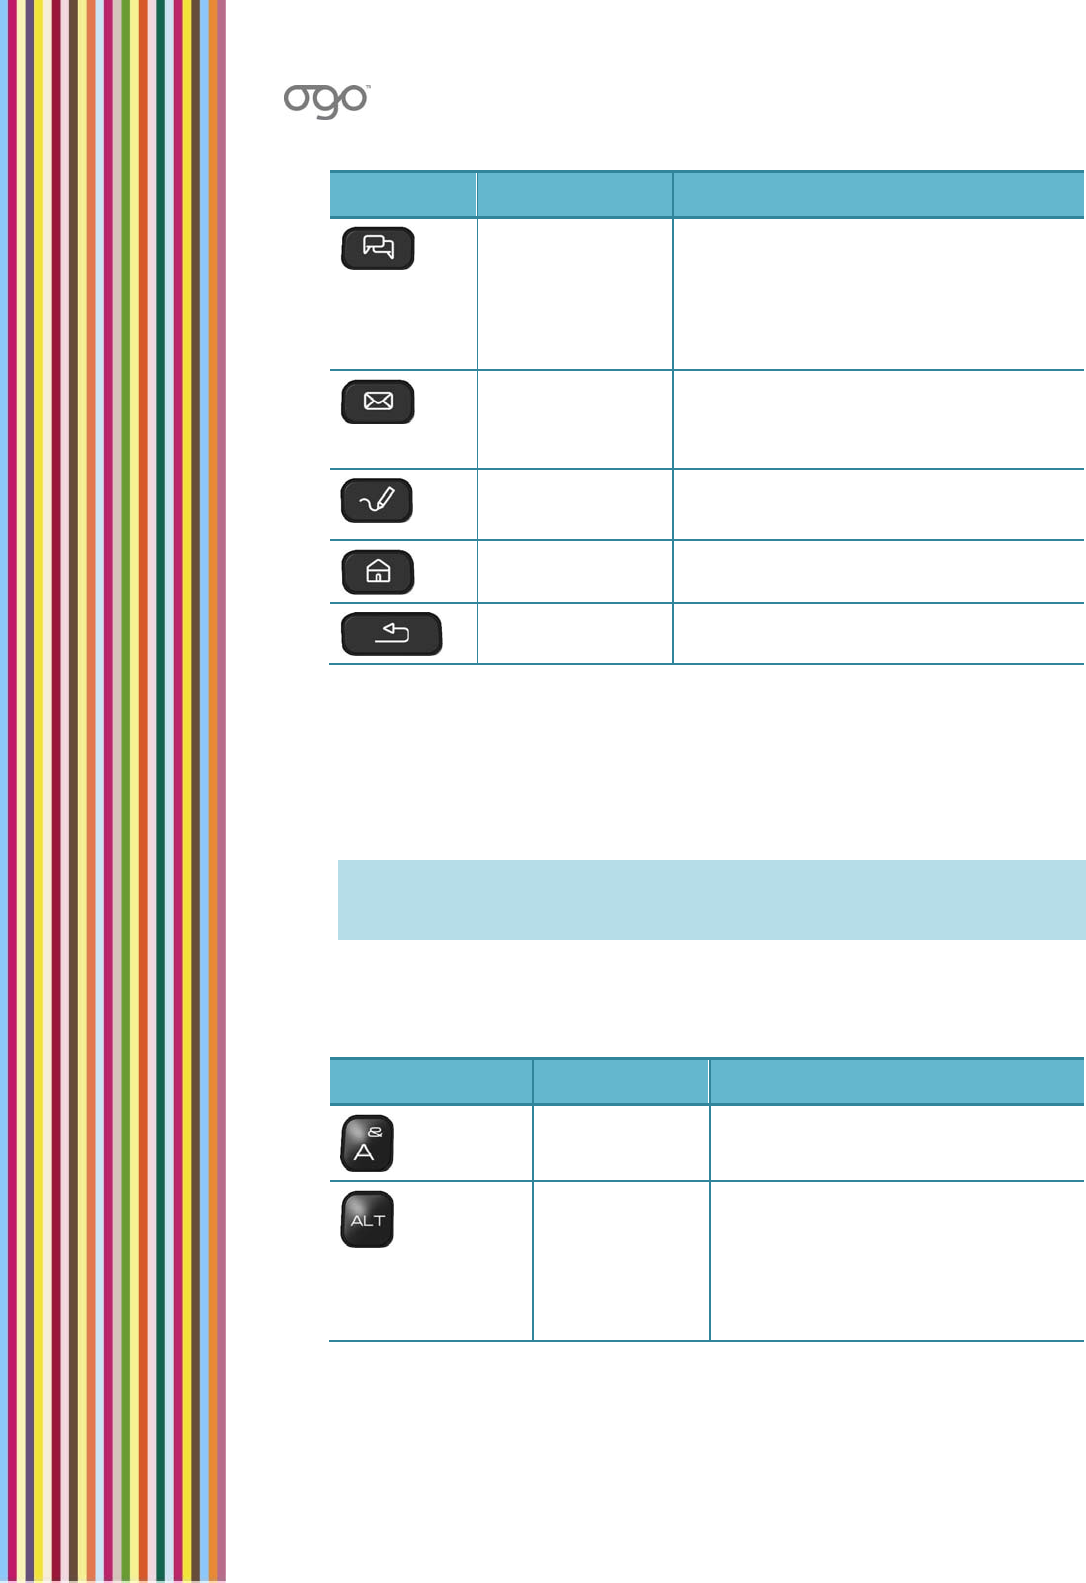
KeyNameFunction
Power AlongpressonthePowerkeyturns
yourOgoonandoff.
WhentheOgoispoweredon,ashort
pressonthePowerkeydisplaysthe
DeviceOptionsmenu,providingaquick
waytoturnthedevicesoundand
vibrationonoroff.
OgoListsallrecentunreade‐mailandSMS
messages,openIMchatsessions,and
draftsofmessagesnotyetsent.Also
indicatesmissedcallsandcurrentcall
(whenapplicable).
HoldingdowntheALTkeyandpressing
theOgokeydisplaysthePhone
application.
WorkingwiththeOgo
InsertingText13
KeyNameFunction
Instant
Messaging
NavigatestotheInstantMessaging
application,enablingyoutomanage
yourICQand/orWindowsLive
Messengercontacts,sendandreceive
messages,andmore.
MessagesNavigatestotheMessagesapplication,
enablingyoutoview,sort,andsende‐
mailandSMSmessages.
ComposeOpensascreenwhereyoucanwritea
newe‐mailorSMS.
HomeNavigatestotheHomescreen.
BackDisplaysthepreviouslyviewedscreen.
InsertingText
UsingyourOgokeyboard,youcaninserttext,symbols,andemoticons.Youcan
alsotakeadvantageofOgo’sQuickTextfeaturetoinsertpredefinedorcustomized
text.Fordetails,seeWorkingwithQuickTextonpage15.
Note: Dependingonyourregionandwirelesscarrier,youmayalsoabletoinsert
non‐Englishcharacters.Fordetails,seeUsingtheExtendedCharacter
Paletteonpage14.
UsingTextInsertionKeys
Table4:TextInsertionKeys
KeyNameFunction
LetterkeysInsertsletters,numbersandother
symbols.
AlternateInsertsthesymbollocatedabove
theletteronthekey.Forexample,
holddowntheALTkeyandpress
theBkeytoinsertthenumber7.
OGOUserManual
14InsertingText
KeyNameFunction
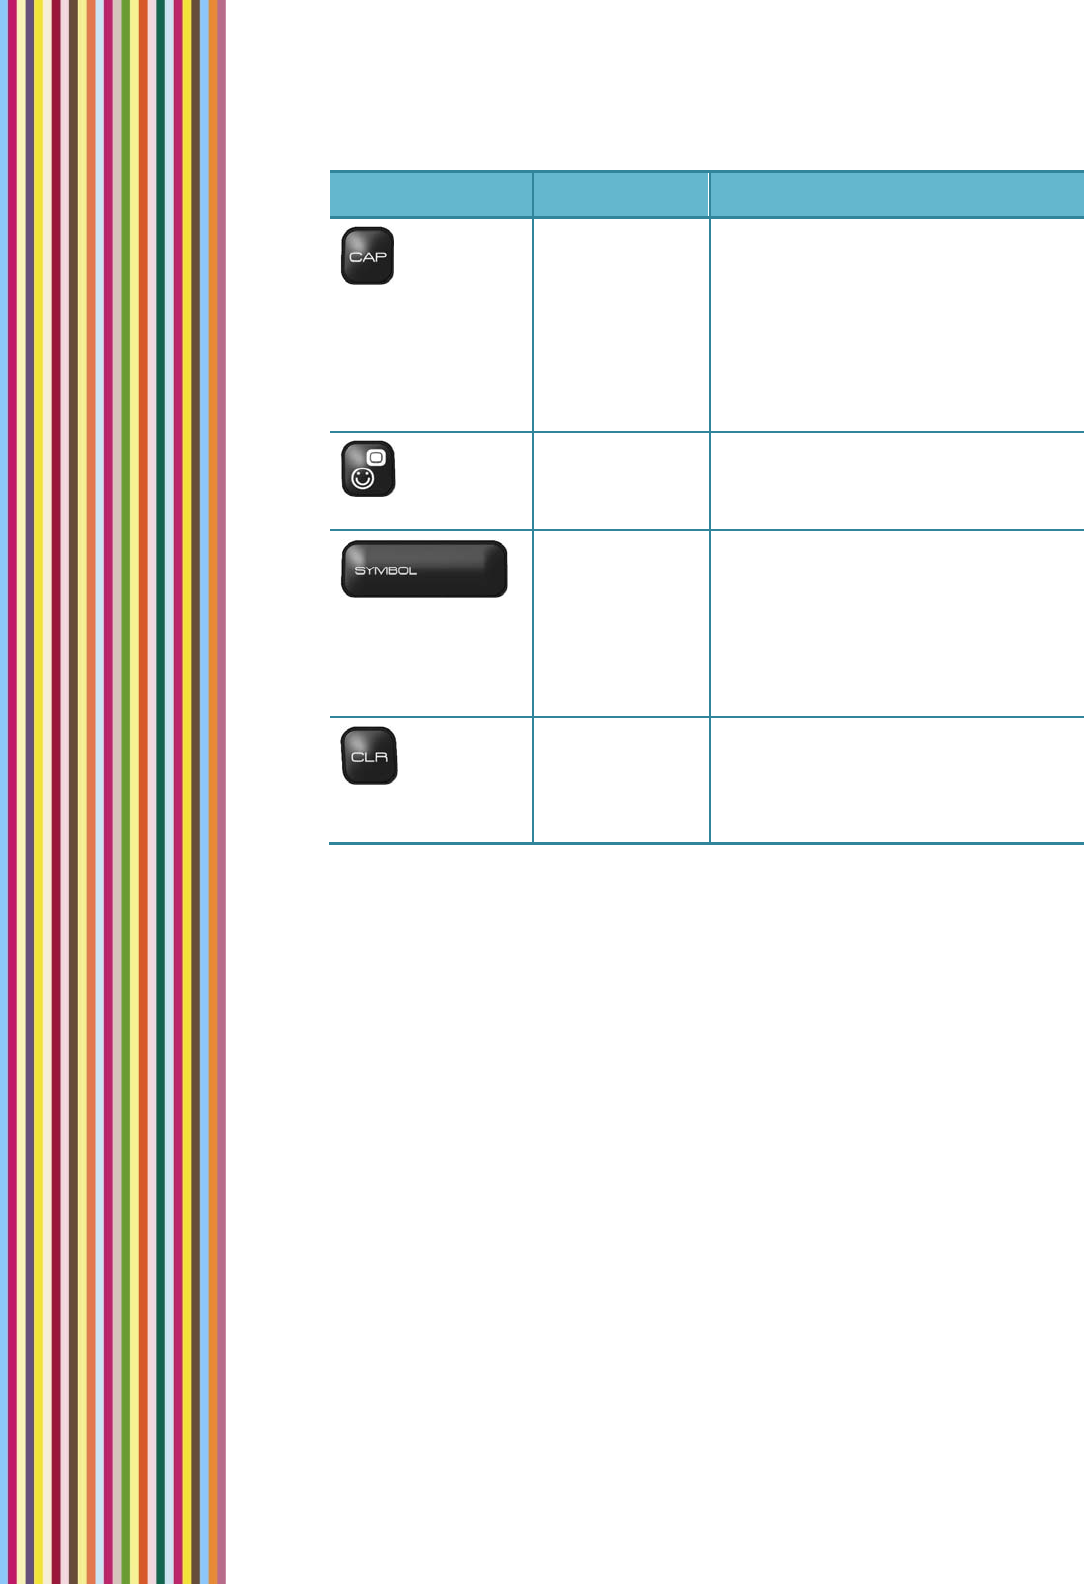
CapitalizeInsertsacapitalletter.Forexample,
holddowntheCAPkeyandpressD
toinsertthecapitalletterD.
HoldingdowntheCAPkeyformore
than3secondslockstheCAPkey.
ToreleasetheCAPkey,pressit
again.
EmoticonDisplaystheemoticonpalette,
enablingyoutoincludeemoticonsin
yourinstantmessages.
Space
bar/Symbol
Whenpressedalone,insertsaspace
intext.
Whenpressedinconjunctionwith
ALT,displaystheSymbolpalette,
enablingyoutoinsertspecial
characters.
ClearDeletesthelastcharacterinsertedin
atextfield(pressonceforeach
character),oraselecteditemina
list.
UsingtheExtendedCharacterPalette
Dependingonyourregionandyourwirelesscarrier,youmaybeabletoinsert
non‐Englishcharacters,suchasaccentedlettersandsymbols,intoyourmessages
usingtheExtendedCharacterpalette.
► Toenteranextendedcharacterinafield:
1 AccesstheExtendedCharacterpalettebylong‐pressingoneofthekeys
associatedwiththeletteryouwanttotype;theExtendedCharacterpaletteis
displayed.
2 Keeppressingthekeytoscrollthroughtheaccentedcharacters.PressEnteror
simplyreleasethekeytoclosethepaletteandinserttheselectedcharacter
intoyourmessage.

WorkingwiththeOgo
InsertingText15
ChangingtheWritingLanguage
Dependingonthespecificversionofyourdevice,thekeyboardmayincludeanon‐
Latinalphabet(suchasRussian),inadditiontotheLatincharacterset.
Toinsertcharactersusingtheadditionalalphabet,presstheand keys
together.Thelanguageindicatorinthestatusbarchangesaccordingly.
Pressingtheand keysagainreturnstheoriginalwritinglanguage.
WorkingwithQuickText
Canyoutype“Talktoyousoon”withjustthreekeystrokes?Well,nowyoucan.
QuickTextprovidesafunandfastwaytocommunicateatthetouchofakey.Use
yourOgo’spredefinedorcustomizedone‐linerswithyourfavoritephrases.
ThereareeightpredefinedQuickTextitemsavailableforquickinsertionintoany
IM,e‐mail,orSMSmessagefield.
► ToinsertQuickText:
1 Whilecomposingyourmessage,press andselectInsertQuickTextfrom
theOptionsmenu.TheInsertQuickTextscreenisdisplayed,listingtheavailable
QuickTextitems.
2 SelecttheQuickTextitemyouwanttoinsertandpressEnter(orpressthe
numberofQuickTextitem).TheInsertQuickTextscreenclosesandthe
QuickTextisinsertedintothemessagefield.
► ToeditQuickText:
1 Whilecomposingamessage,press andselectEditQuickTextfromthe
Optionsmenu.TheChooseQuickTexttoEditscreenisdisplayed,listingthe
availableQuickTextitems.
2 SelecttheQuickTextitemyouwanttoeditandpressEnter(orpressthe
numberofQuickTextitem).TheEditQuickTextscreenisdisplayed.
3 Editthetext.
4 SelectSaveandpressEnter.ThemodifiedQuickTextissavedandreadyfor
insertionintoyourmessage(s).
OGOUserManual
16ExternalLCD
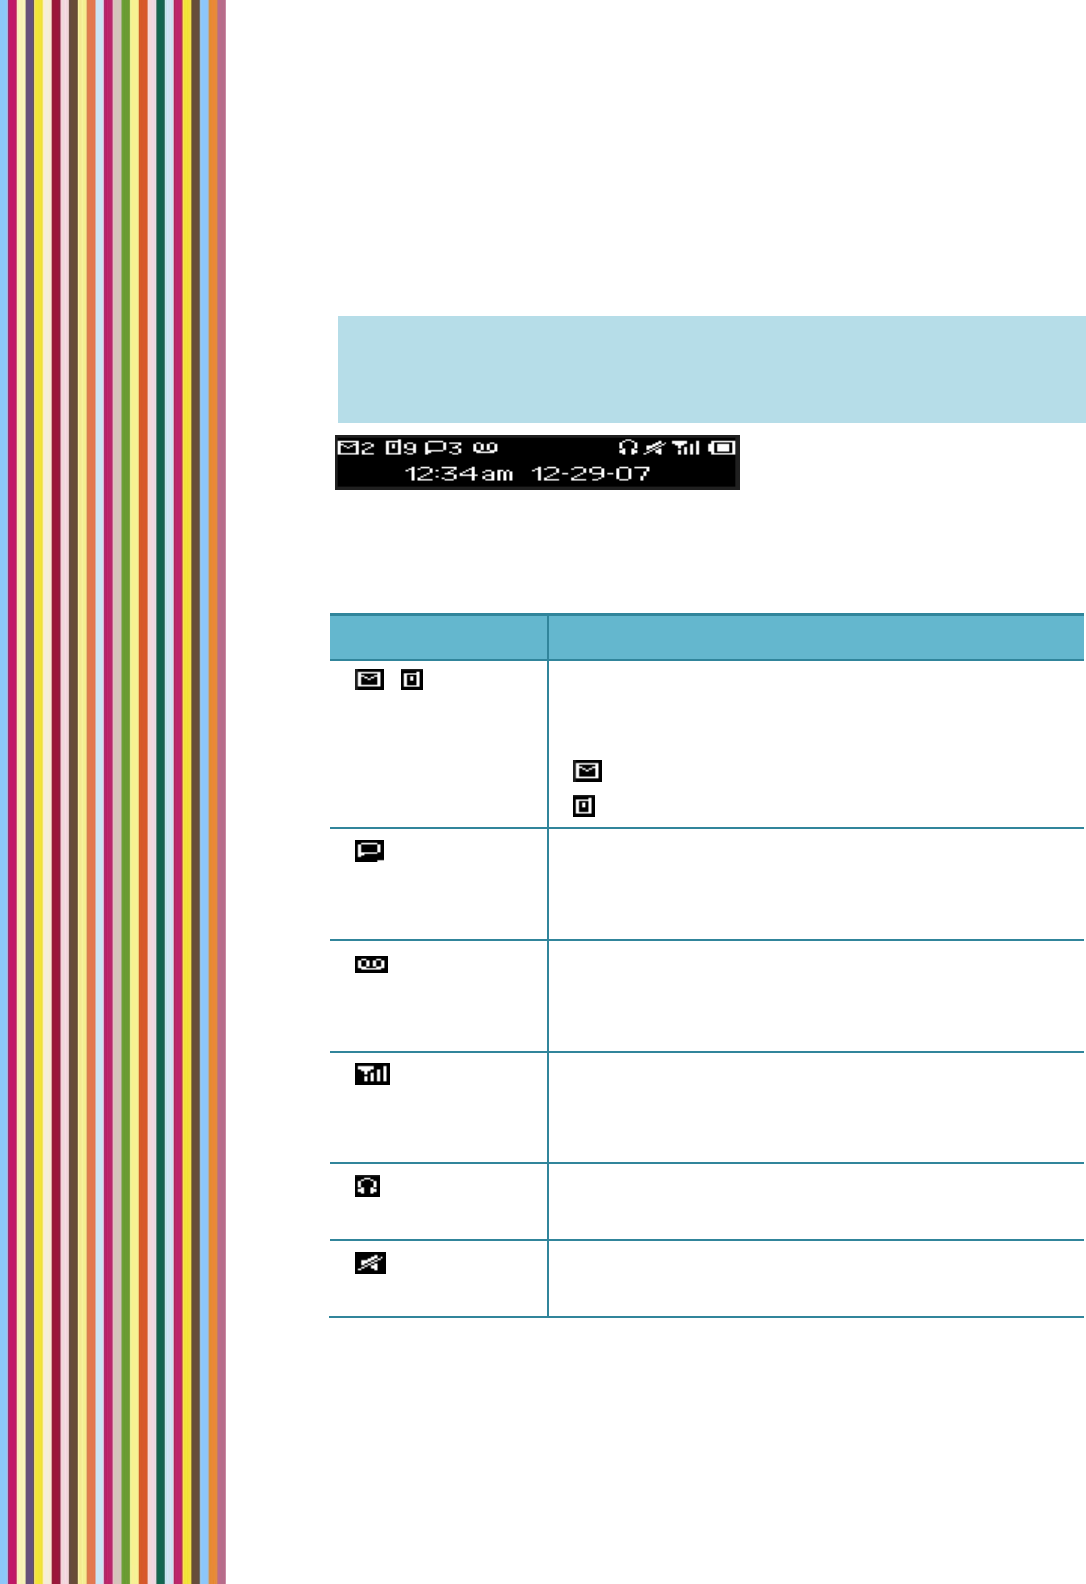
ExternalLCD
WhenthecoverofyourOgoisclosed,anexternalLCDpanedisplaysinformation
aboutthesystemstatus,newmessages,InstantMessagingstatus,batterylevel,
andmore.
Note: AnotificationisdisplayedontheexternalLCDforeacheventforwhich
youassignedaBannerMessage,suchaswhennewmessagesarereceived
oranInstantMessagingcontactbecomesonline.Fordetails,see
ConfiguringtheDeviceSettingsonpage86.
Figure8:ExternalLCD(whenbacklightisON)
TheitemsdescribedinTable5appearontheLCDdisplay,fromlefttoright.
Table5:ExternalLCDItems
ItemDescription
/
UnreadMessages
(Iconandnumber)
TheUnreadMessagesiconsappearswhenthereare
unreadmessages;theadjacentnumberindicatesthe
numberofunreadmessagespertype
:IndicatesunreadEmails.
:IndicatesunreadSMSmessages.
ActiveChats
TheActiveChatsiconappearswhenthereareopen
chats.Thisiconbecomesanimatedifthechatsinclude
new,previouslyunviewedmessages.
Voicemail
TheVoicemailiconappearswhenyouhavea
voicemail.(Thisfeatureisnotprovidedbyall
networks.)
Signalstrength
Thenumberofverticalbarsindicatesthestrengthof
Ogo’snetworkconnection.An'x'signappearsnextto
thesignalstrengthindicationifthereisnoreception.
Headphones
TheHeadphonesiconappearswhenaheadsetis
connectedtotheOgodevice.
Silentmode
TheSilentmodeiconappearswhenthedeviceisin
Silentmode,wherenosoundsareplayed.
WorkingwiththeOgo
OverviewoftheOgoScreen17
ItemDescription
Batterycharge
level
Thenumberofverticalbarsindicatesthebattery
chargelevel.Theiconisanimatedwhenchargingisin
progress.
Time&DateThecurrenttimeanddateappearwheneveryourOgo
backlightisON.
Note: TheexternalLCDdisplaysthedetailedstatusaslongasthebacklightison.
Thebacklightturnsoffafterafewsecondstosavepower,andonlythe
timeisdisplayed.Toseethedetailedstatus,pressEnd(theredbutton).
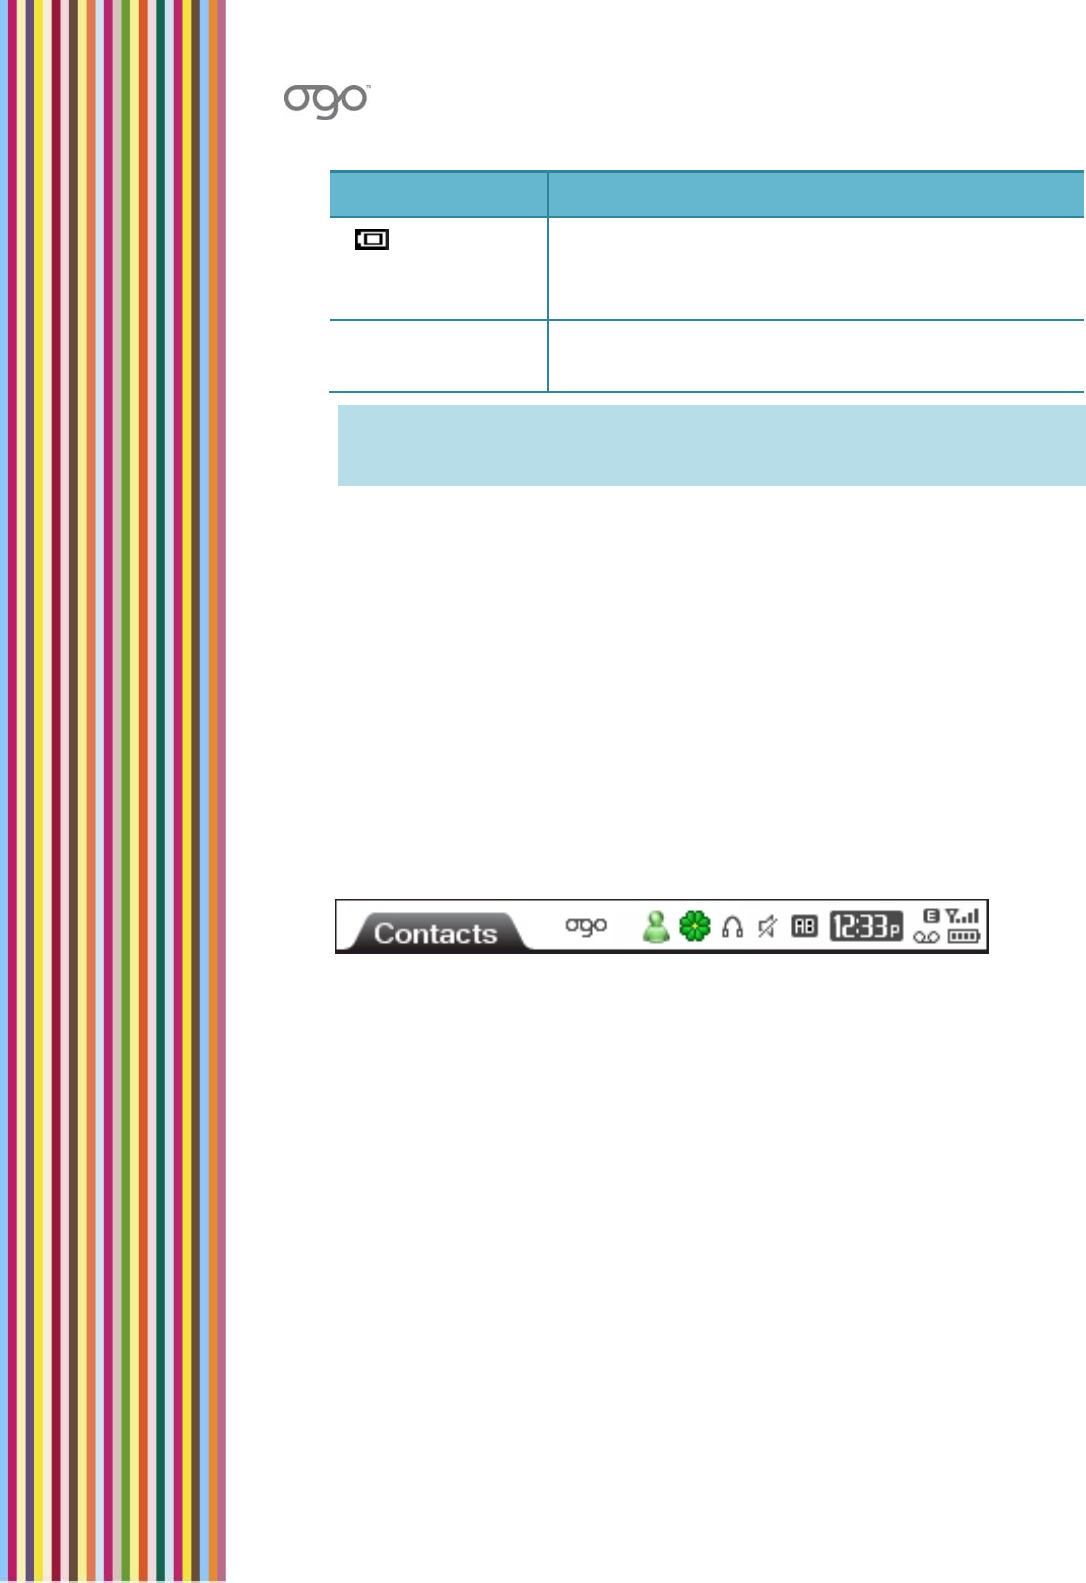
OverviewoftheOgoScreen
TheOgoscreenisdividedintotwomainareas:
StatusBar
ApplicationArea
StatusBar
TheOgostatusbarappearsatthetopofyourOgoscreen,anddisplaysthenameof
theactivescreen,togetherwithinformationaboutthesystemstatus,new
messages,headsetconnection,InstantMessagingstatus,batterylevel,current
time,andmore.
Figure9:SampleStatusBar
TheitemsdescribedinTable6appearonthestatusbar,fromlefttoright.
OGOUserManual
18OverviewoftheOgoScreen
Table6:StatusBarItems
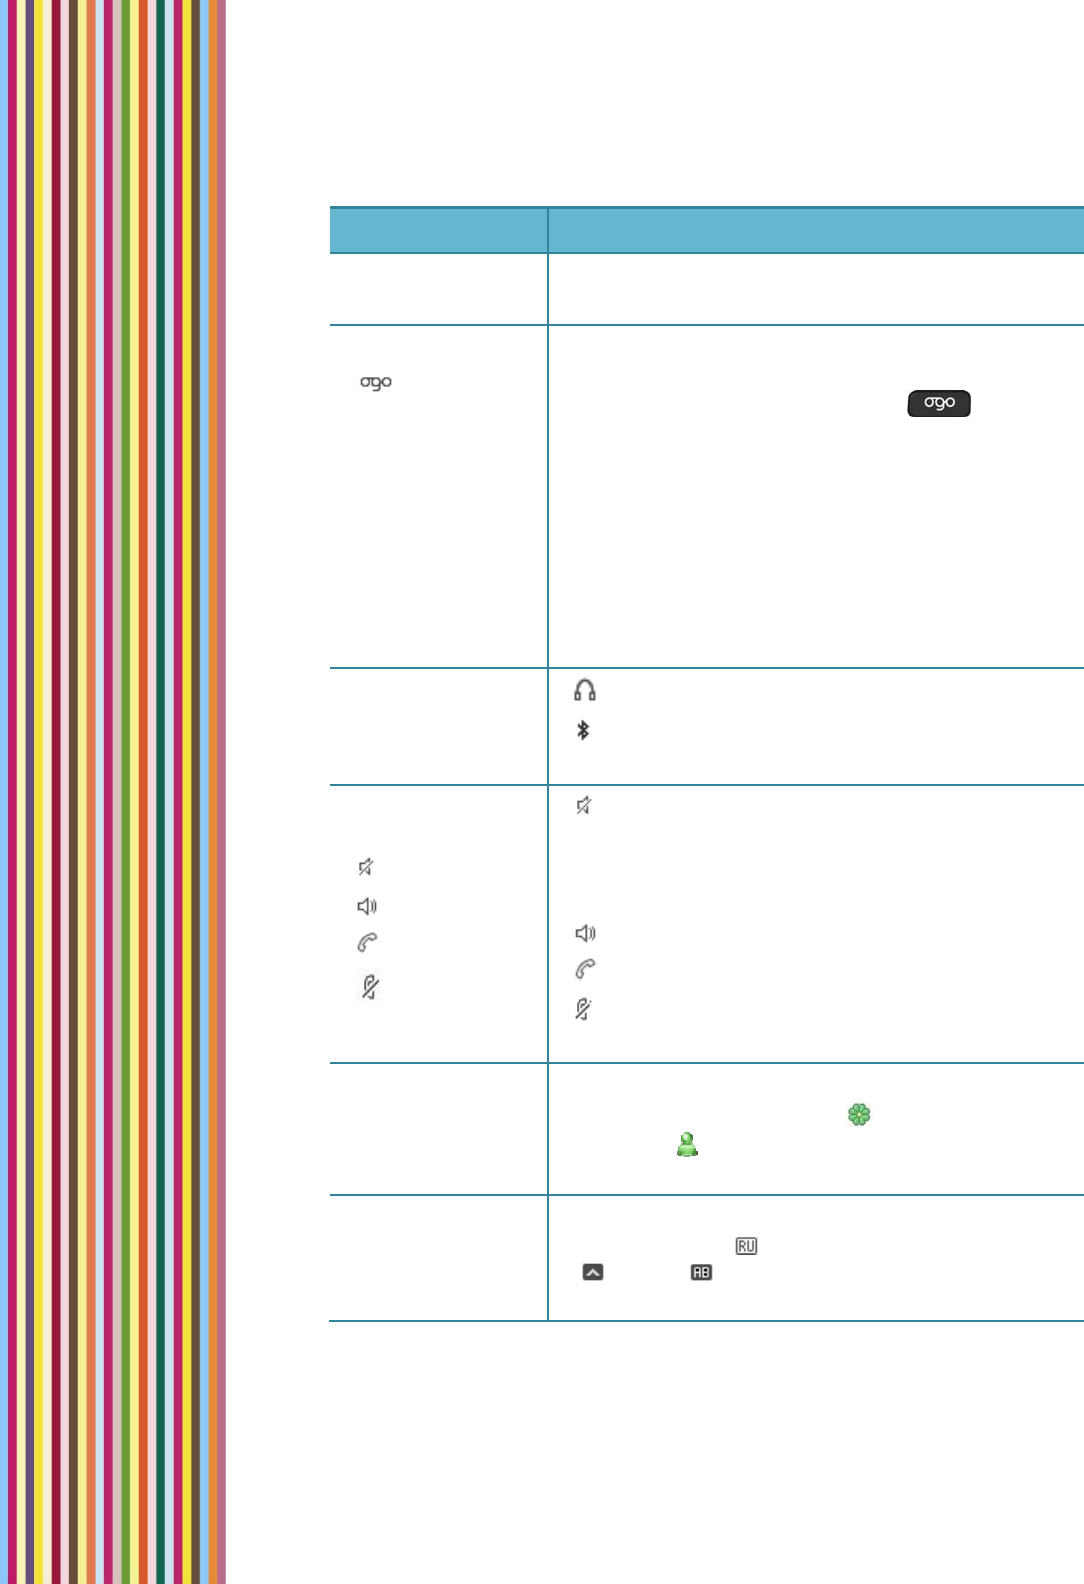
StatusBarItemDescription
ScreenTitleThenameofcurrentscreen(forexample,Homeor
Compose).
Ogoindicator
Thisanimatediconspinsandflipsoverwhenyouhave
newunreadmessages(e‐mail,SMS,Instant
Messaging)ormissedcalls.Pressthekeyto
viewthelistofallnewitems.
Ifyouhaveopenedthelistofunreadmessagesbut
havenotyetviewedallofthem,theOgoindicator
gentlyfloatsupanddown.
Whenthisindicatorisstill,youhavenounread
messagesonyourdevice.
Formoreinformation,seeCheckingforUnread
MessagesandOpenChatsonpage22.
Headset
connectionicons
:AheadsetisconnectedtotheOgodevice.
:ABluetoothheadsetisconnectedtotheOgo
device.
Audio&Voice
statusicons
Silent
Speaker
Call
Mute
:ThedeviceisinSilentmode,wherenosoundsare
played.
Duringacall,thefollowingiconsindicatetheaudio
andvoicestatus:
:ThedeviceisinSpeakerphonemode.
:Aheadset(wiredorBluetooth)isactive.
:Themicrophoneismuted.Fordetails,see
Muting/UnmutingaCallonpage54.
InstantMessaging
status
Indicatesthestatusoftheconfiguredinstant
messagingcommunities–ICQand/orWindowsLive
Messenger.ForIMstatusiconsanddescriptions,
seeIMStatusIconsonpage29.
Language,ALT,
CAP
Thisiconindicatesthewritinglanguagecurrentlyin
use(forexample,forRussian).WhenusingtheALT
()orCAP( )keys,thisisindicatedontopofthe
languageicon.
WorkingwiththeOgo
OverviewoftheOgoScreen19
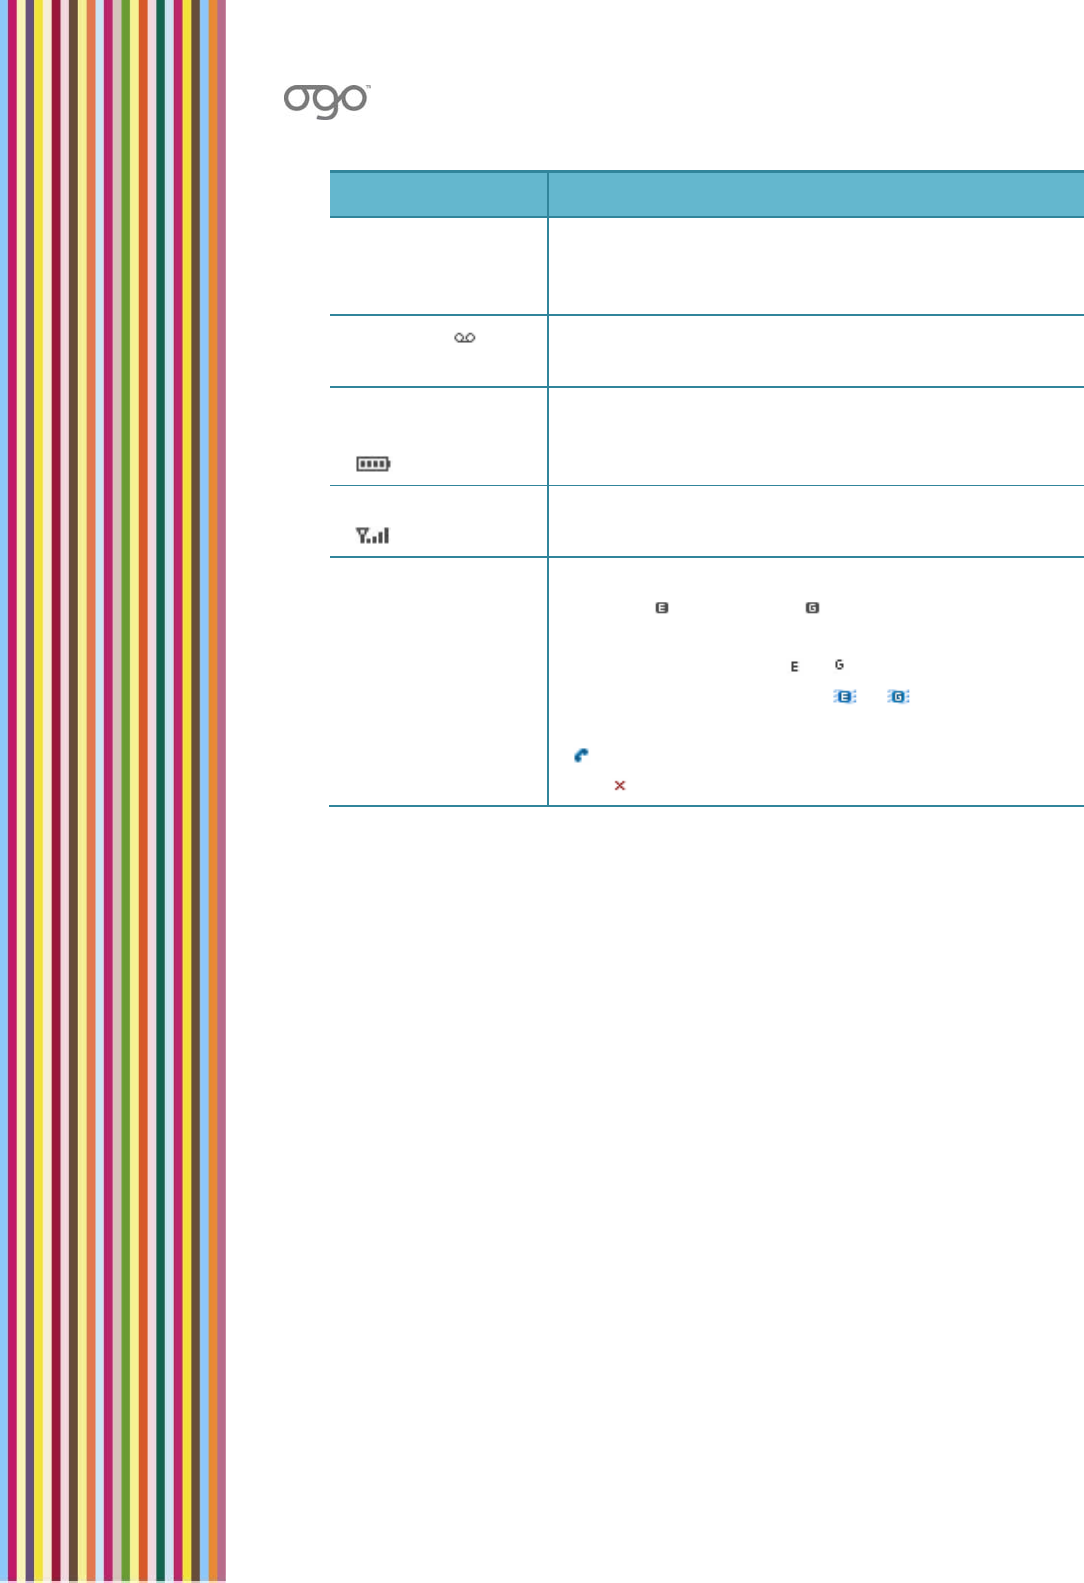
StatusBarItemDescription
TimeDisplaysthecurrenttime.Tochangethetimeformat
(24hoursorAM/PM),seeConfiguringtheTimeand
DateSettingsonpage91.
Voicemail Thisiconappearswhenyouhaveavoicemail.(This
featureisnotprovidedbyallnetworks.)
Batterycharge
level
Thenumberofverticalbarsindicatesthebattery
chargelevel.Formoreinformation,seeCheckingthe
BatteryPoweronpage6.
Signalstrength
Thenumberofverticalbarsindicatesthestrengthof
Ogo’snetworkconnection.
DataConnection
Status
Thisiconindicatesthecurrentdataconnectionstatus,
showingforEDGE,and forGPRS.
Whenthedataconnectionisavailable(readyfor
connection),theiconisor,respectively.Theicon
ishighlightedandanimated(or)whiledata
transfertakesplace.
appearsduringacall(whendatatransferispaused),
andappearswhennosignalisreceived.
ApplicationArea
TheApplicationareaappearsbelowtheOgostatusbar(whichdisplaysthenameof
theactivescreen).
ThecontentandlayoutoftheApplicationareavaryaccordingtothecurrentscreen
andactivefunctionality.
ManyofyourOgoscreensaremadeupofmultiplepagesor"tabs".Thenamesof
theavailabletabsappearimmediatelybelowtheOgostatusbar.
Forexample,Figure10showsasampleofaSettingsscreen,whichincludes
multipletabs.
Youcanmovebetweenthetabsbypressingtheouterrightandleftarrowkeyson
the8‐waynavigationkey.The>ontherightendofthetabbarindicatesthatyou
canscrolltotherightorlefttoviewadditionaltabs.
OGOUserManual
20HomeScreenandApplicationMenu
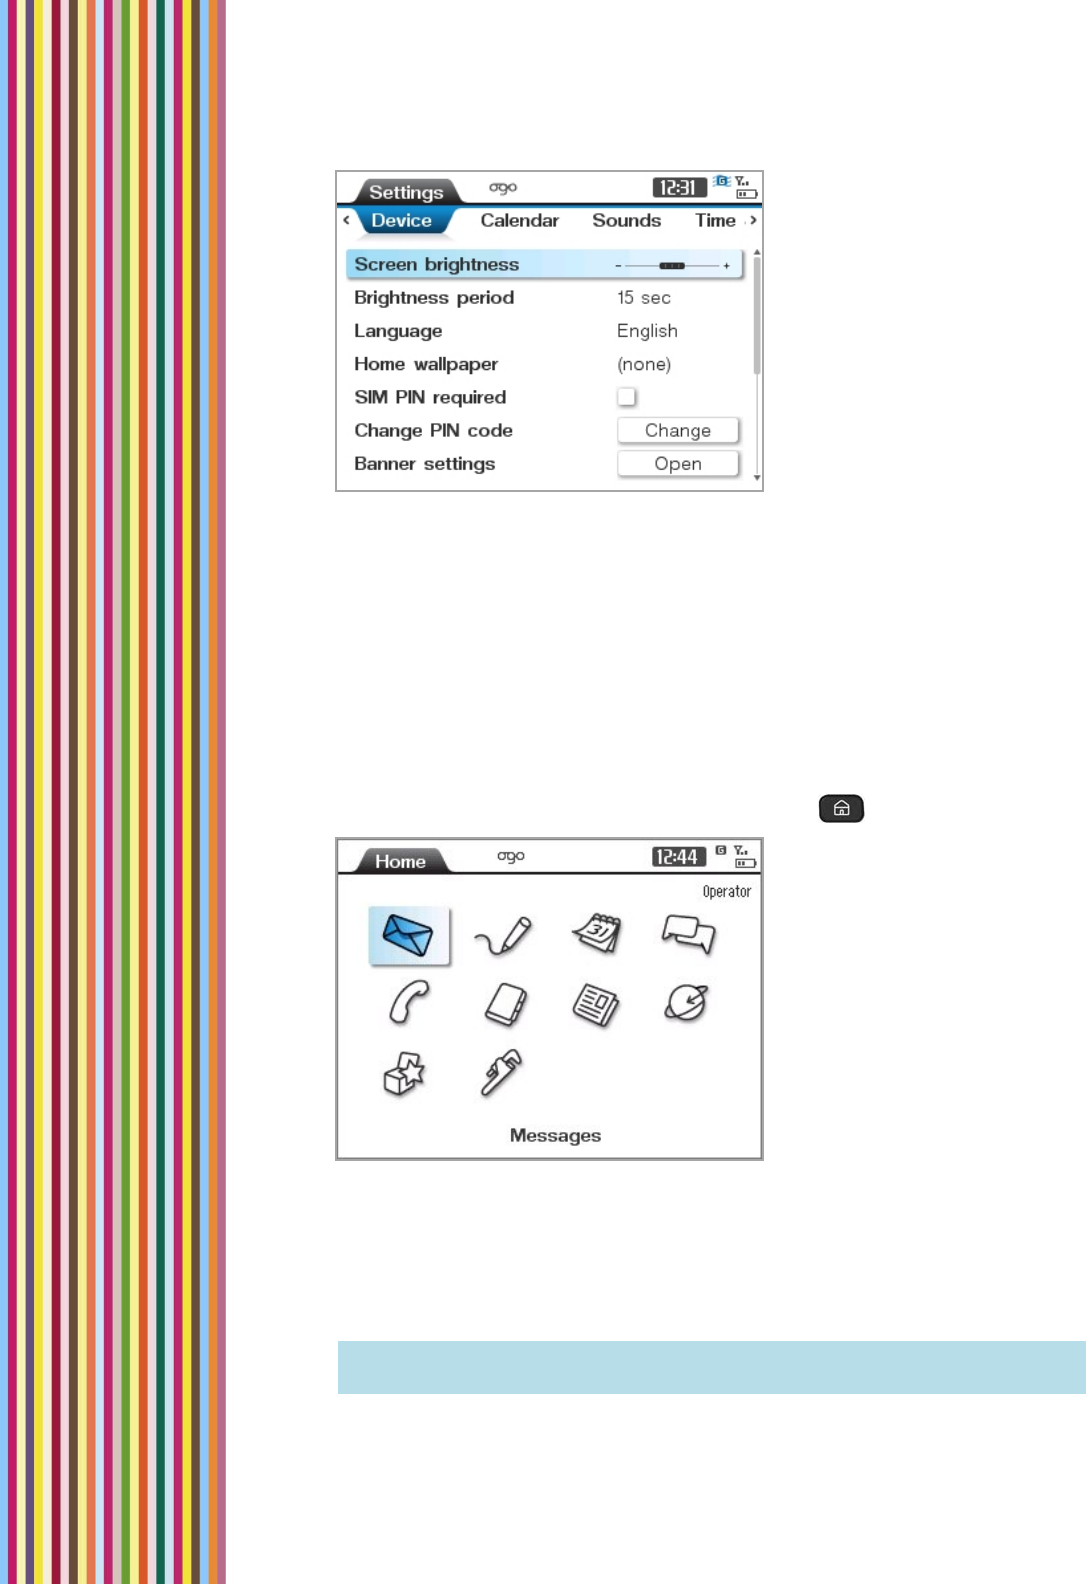
Figure10:SampleSettingsScreen
HomeScreenandApplicationMenu
Ogo’sapplicationscanbeeasilyaccessedbyselectingtherequireditemfromthe
HomescreenorfromtheApplicationmenu.(Fordetails,seeTable7.)
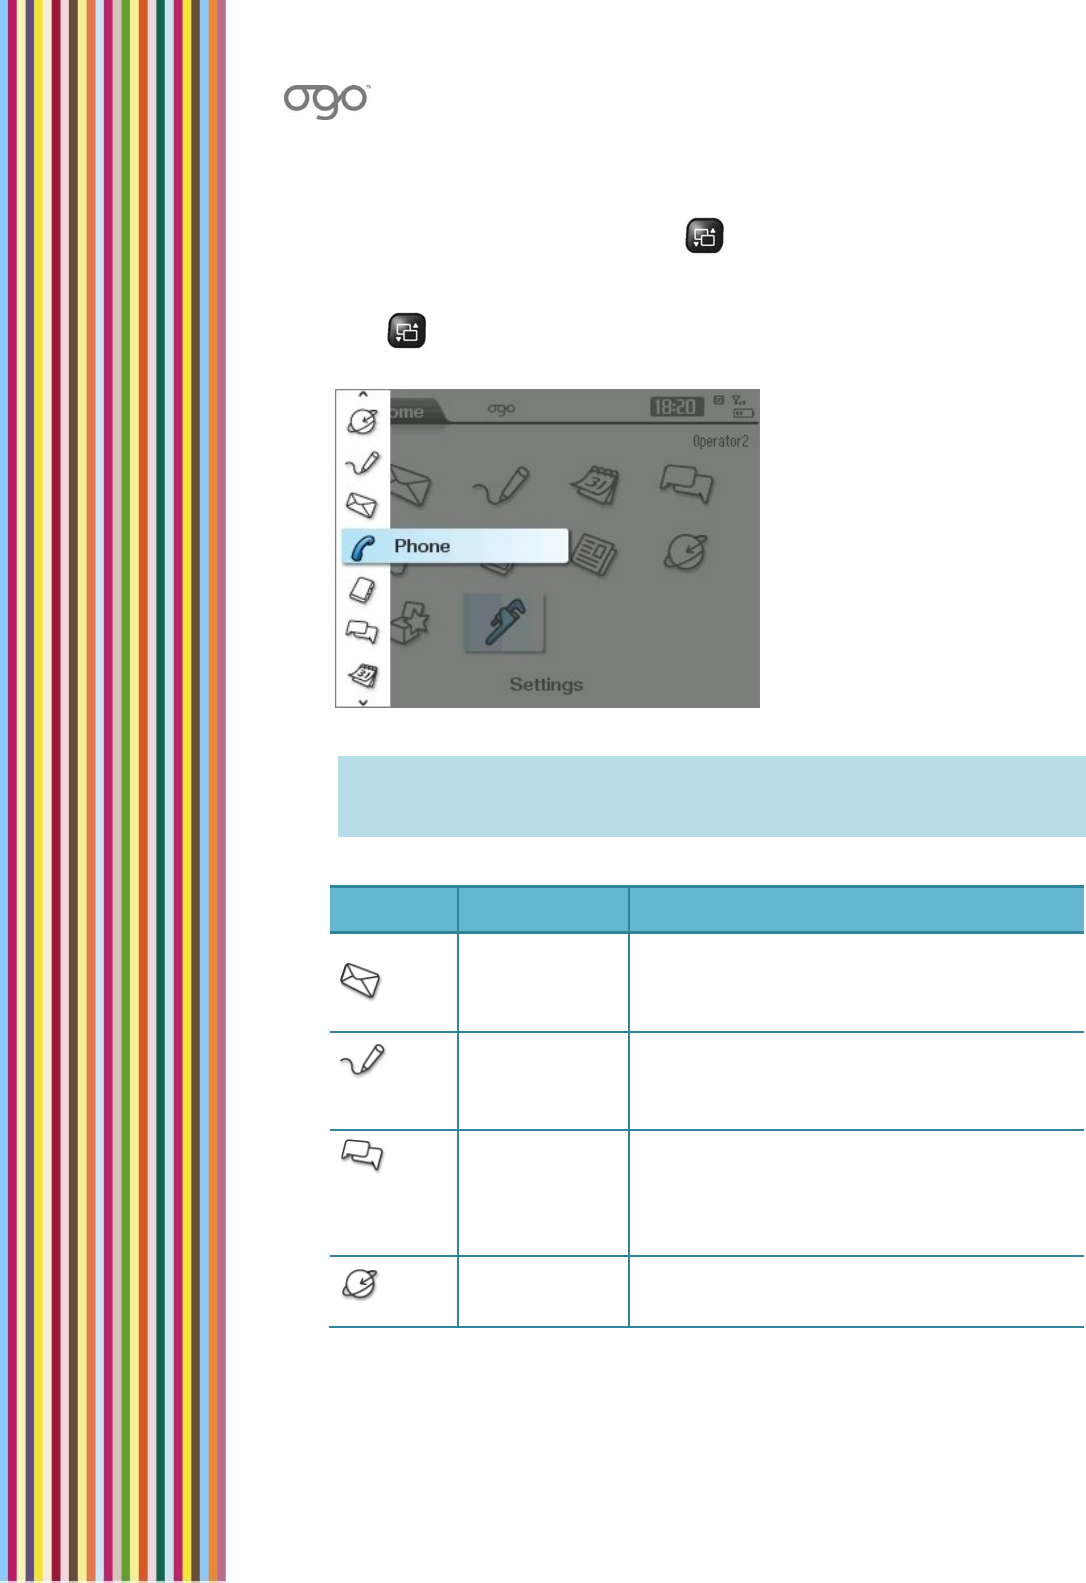
HomeScreen
TheHomescreenisdisplayedafterthedeviceispoweredon,andcompletesthe
start‐upprocess.ToreturntotheHomescreen,press.
Figure11:HomeScreen
ThenameoftheselectedapplicationisdisplayedatthebottomoftheHome
screen.
TheOperator'snameappearsinthetop‐rightcorneroftheHomescreen(when
available).
Note: YoucanchangetheimagedisplayedasthebackgroundoftheHome
screen.Fordetails,seeConfiguringtheDeviceSettingsonpage86.
WorkingwiththeOgo
HomeScreenandApplicationMenu21
ApplicationMenu
TodisplaytheApplicationmenu,press.Theoptionsaredisplayedinacolumn
ontheleftsideofthescreen.ScrollupordownusingtheScrollWheelorarrow
keys,andpressEntertonavigatetotheselectedapplication.Alternatively,youcan
pressagain,orpresstherightarrow,toopenmorenavigationoptionsforthe
selectedapplication.
Figure12:ApplicationMenu
Note: AllnavigationoptionsprovidedintheHomescreenarealsoavailablein
theApplicationmenu.Inaddition,theApplicationmenuprovidesdirect
navigationtotabswithintheapplications.
Table7:HomeScreenandApplicationMenuItems
ItemNameFunction
Messages
Enablesyoutoview,sort,andsende‐mail
andSMSmessages.Fordetails,seeViewing
YourMessageListsonpage39.
ComposeEnablesyoutocomposeandsendanSMS
messageoranEmailMessage.Fordetails,see
ComposingaMessageonpage41.
Instant
Messaging
(IM)
EnablesyoutomanageyourICQand/or
WindowsLiveMessengercontacts,sendand
receivemessages,andmore.Fordetails,see
InstantMessagingonpage23.
Web
Browser
EnablesyoutosurftheInternet.Fordetails,
seeBrowsingtheWebonpage72.

OGOUserManual
22CheckingforUnreadMessagesandOpenChats
ItemNameFunction
NewsEnablesyoutoviewRSSfeedsandstayon
topofcurrentevents.Fordetails,seeViewing
theNewsonpage69.
CalendarEnablesyoutomanageyourschedule.For
details,seeWorkingwiththeCalendaron
page65.
ContactsEnablesyoutostorecontactprofile
informationforpeopletowhomyoucall,or
sende‐mailorSMSmessages(regardlessof
whethertheyuseIM).Fordetails,see
ManagingYourOgoContactsListonpage57.
PhoneEnablesyoutomakeandreceivephonecalls.
Fordetails,seeUsingYourOgoasaPhoneon
page49.
ExtrasEnablesyoutoselectfromvariousexternal
applications,andprovidestechnicalsupport
contactdetails.Fordetails,seeOgoExtrason
page76.
SettingsEnablesyoutoconfigureyourphone,IM,
E‐mail,webbrowser,andotherdevice
settings.Fordetails,seeDeviceand
ApplicationSettingsonpage78.
CheckingforUnreadMessagesandOpenChats
WithOgo,youcancheckfornewmessagesofalltypesandopenchatsinoneeasy
step–simplypressonthekeyboardtodisplaytheOgoquick‐accesslist.
YourOgoquick‐accesslistshowsallrecentunreade‐mailandSMSmessages,open
InstantMessagingchatsessions,anddraftsofmessagesnotyetsent.Italsolists
missedcallsthathaveyetbeennotviewed,andshowsthecurrentcall.
Tosynchronizeyouremail,selectSend/ReceiveatthebottomoftheOgoquick‐
accesslist,andpressEnter.

InstantMessaging
UsingtheInstantMessagingWizardtoSetUpYourAccount23
InstantMessaging
YoucanuseyourOgotochatwithfriendsand
colleaguesusingtheWindowsLiveMessenger
and/orICQinstantmessagingcommunities.
Note: TheavailabilityofInstantMessaging
communitiesonyourOgodevice
dependsonthepackageofferedby
yourwirelesscarrier/operator.
InstantMessagingisalsoreferredtoas
IM,forshort.
UsingtheInstantMessagingWizardtoSetUpYour
Account
IMaccountsaresetupusingtheInstantMessagingWizard.
YouneedtohaveyourIMaccountdetails(usernameandpassword)readyinorder
tosetupanIMaccountonthedevice.
Note: IfyouareusingyourOgoforthefirsttime,theInstantMessagingWizardis
displayedimmediatelyafteryouselectthelanguage.
► ToaccesstheInstantMessagingWizard:
1 IntheHomescreenorApplicationmenu,selectSettingsandpressEnter.
TheSettingsscreenisdisplayed.
2 SelecttheIMtab.
3 ScrolldowntoselectAddIMaccountandpressEnter.TheInstantMessaging
Wizardisdisplayed.
4 SelectNextandpressEnter.YouarepromptedtoselecttheIMprovider.
Note: YoucanuseonlyoneWindowsLiveMessengeraccountandoneICQ
accountatanygiventime.IfyouhavealreadysetupaWindowsLive
Messengeraccount,thenyouaregiventheoptionofsettingupanICQ
accountonly.IfyouhavealreadysetupanICQaccount,thenyouare
giventheoptionofsettingupaWindowsLiveMessengeraccountonly.
5 SelecttheIMProvider(WindowsLiveMessengerorICQ)andpressEnter.

OGOUserManual
24UsingtheInstantMessagingWizardtoSetUpYourAccount
6 SelectNextandpressEnter.
7 Followtheon‐screeninstructionsfortheselectedIMProvider,asdescribedin
SettingUpYourWindowsLiveMessengerAccountandSettingUpYourICQ
Account,respectively.
Note: Youcanexitthewizardwithoutcompletingtheprocessbyselecting
CancelandpressingEnter.However,anyinformationenteredislost
whenthewizardiscancelled.
SettingUpYourWindowsLiveMessengerAccount
YouneedtohavetheusernameandpasswordofyourexistingWindowsLive
MessengeraccountinordertosetupthisaccountonyourOgodevice.
► TosetupaWindowsLiveMessengeraccount:
1 IfyouselectWindowsLiveMessengerastheIMProviderintheInstant
MessagingWizard,theWindowsLiveTermsofUsearedisplayed.
2 Beforeyouconfiguretheaccount,youmustdeclarethatyouaccepttheterms
ofuse.Readthetermsofuse.ThenselectAccepttoindicateyouragreement
andpressEnter.Ifyoudonotagreetotheterms,selectDeclineandpress
Enter.
3 SelectNextandpressEnter.TheWindowsLiveMessengerSetupscreenis
displayed.
4 IntheE‐mailAddressfield,inserttheusernameassociatedwiththee‐mail
addresstobesetuponWindowsLiveMessenger.Ifyouareusingahotmailor
MSNe‐mailaddress,donotincludethedomainname.Ifyouareusinganother
e‐mailaddress,suchasaYahooe‐mailaccount,thenyoumustincludethe
domainnameinthee‐mailaddress.
5 Selecttherequireddomain(@hotmail.com;@msn.com;orOther)andpress
Enter.
6 InthePasswordfield,insertyourpassword.
Note: Thelettersaredisplayedoneatatimeasyouinsertthem;upon
insertingthenextletterthepreviouslyenteredoneturnsintoan
asterisk.
Whenyouattempttomovetothenextfield,youarepromptedtoconfirmthat
youwanttostoreyourpasswordonthedevice.
7 SelectYestosavethepasswordonthedeviceorselectNoifyoupreferto
enterthepasswordeachtimeyousignin.Then,pressEnter.
Note: IfyouselectYes,asecuritywarningisdisplayedadvisingyoutogoto
the.NETpasswordwebsiteandchangeyourpasswordintheeventthat
yourdeviceislostorstolen.PressEntertocontinue.

InstantMessaging
UsingtheInstantMessagingWizardtoSetUpYourAccount25
8 ToautomaticallysigninwheneveryourOgoisturnedon,selectSigninwhen
poweredonandpressEnter.
Note: ThisoptionispartoftheIMSettings,andcanalsobemodifiedlater
9 SelectNextandpressEnter.TheIMaccountsetupprocessiscomplete.
10 TosetupanIMaccountwiththealternatecommunity,selectSetupanother
accountandpressEnter.
11 Toclosethewizard,selectFinishIMWizard.
SettingUpYourICQAccount
YouneedtohavetheICQ#andpasswordofyourexistingICQaccountinorderto
setupthisaccountonyourOgodevice.
► TosetupyourICQaccount:
1 SelectICQastheIMProviderintheInstantMessagingWizard,theICQSetup
screenisdisplayed.
2 IntheICQ#field,insertyourICQ#.
3 InthePasswordfield,insertyourpassword.
Note: Thelettersaredisplayedoneatatimeasyouinsertthem;upon
insertingthenextletterthepreviouslyenteredoneturnsintoan
asterisk.
Whenyouattempttomovetothenextfield,youarepromptedtoconfirmthat
youwanttostoreyourpasswordonthedevice.
4 SelectYestosavethepasswordonthedeviceorselectNoifyoupreferto
enterthepasswordeachtimeyousignin.Then,pressEnter.
Note: IfyouselectYes,asecuritywarningisdisplayedadvisingyoutochange
yourpasswordintheeventthatyourdeviceislostorstolen.Press
Entertocontinue.
5 ToautomaticallysigninwheneveryourOgoisturnedon,selectConnectwhen
poweredonandpressEnter.
6 SelectNextandpressEnter.TheIMaccountsetupprocessiscomplete.
7 Ifyouhavenotsetupanaccountwiththealternatecommunity,youare
promptedtodoso.
Note: Ifyouhavealreadysetupbothcommunities,theAccountSummary
screenisdisplayed.

OGOUserManual
26UsingtheInstantMessagingWizardtoSetUpYourAccount
8 TosetupanIMaccountwiththealternatecommunity(ifnotalreadydone),
selectSetupanotheraccountandpressEnter,
OR
Toclosethewizard,selectFinishIMWizard.
TheAccountSummaryscreenisdisplayed,listingtheIMcommunitiesthatcan
beaccessedfromyourdevice.
Note: Toremoveacommunity,selectitandpressEntertoclearthe
checkbox.
9 PressNexttocontinue.
Ifyoucompletethewizardthefirsttimeyouusethedevice,youareprompted
tosetupyoure‐mailaccount(s).Fordetails,seeUsingtheE‐MailWizardtoSet
UpYourAccountonpage36.
IfyouaccessthewizardfromtheSettingsscreen,thewizardcompletesandthe
IMtabofSettingsisdisplayed.
InstantMessaging
WorkingwithInstantMessaging27
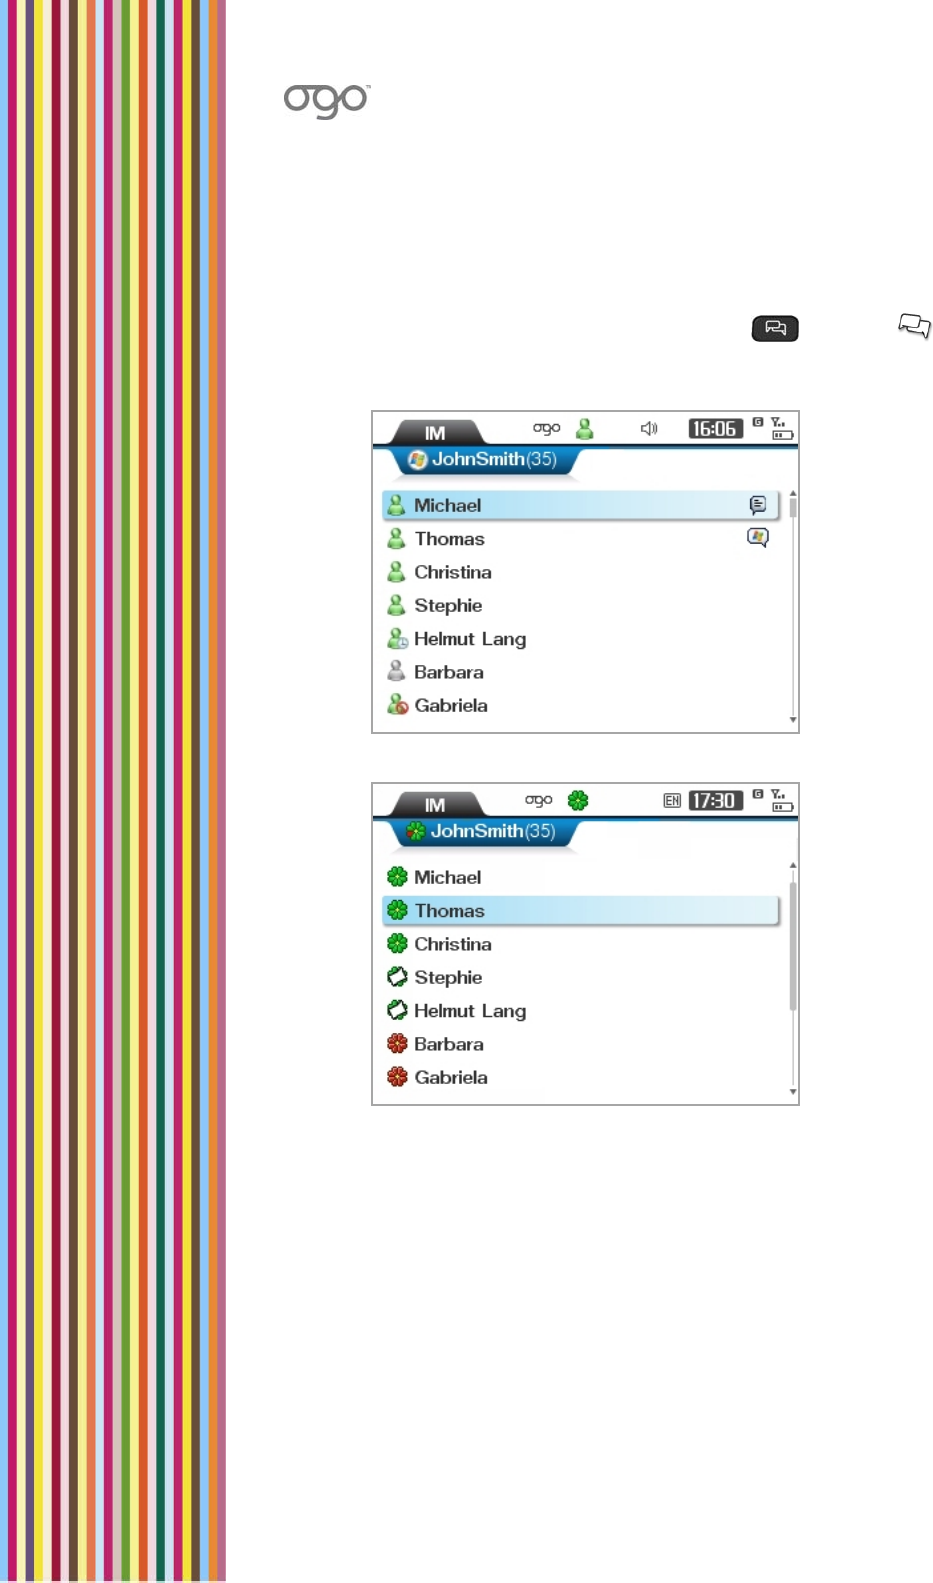
WorkingwithInstantMessaging
► ToaccessInstantMessaging:
1 PresstheInstantMessagingshortcutkey(),orselect intheHome
screenorApplicationmenuandpressEnter.TheIMapplication'scontactlist
screenisdisplayed.
Figure13:IMContactList(WindowsLiveMessenger)
Figure14:IMContactList(ICQ)
AtabisdisplayedforeachoftheconfiguredIMcommunities(ICQand/or
WindowsLiveMessengerappearinseparatetabs).
YourIMstatusfortheconfiguredIMcommunitiesisdisplayedinthestatusbar.

OGOUserManual
28SigningIn
2 SelectthetabfortheIMcommunitythatyouwanttoworkwith.Whenatabis
selected,thedisplaynameappearsonthetab,andthecontactlistdisplays
yourexistingcontacts.
Note: Ifnocontactshavebeendefined,amessageisdisplayedindicatingthat
theIMcontactlistisempty.Toaddauser,pressEnter.Fordetails,see
AddinganIMContactonpage32.
Statusiconsareusedtoindicatethemessagingstatusofyourcontacts.The
iconsvaryaccordingtotheselectedcommunity.
SigningIn
IfyouhavenotconfiguredyourOgotoautomaticallysignyouinwheneveritis
turnedon,youcanmanuallysigninwhenitsuitsyou.Oryoucansigninagain,if
youhavesignedoutforanyreason.
► TosignintotheIM:
1 NavigatetotheInstantMessagingapplicationandselectthetabfortheIM
community(ICQorWindowsLiveMessenger).Youarepromptedtosignin.
2 PressEnter.TheSignInscreenisdisplayed,listingyourdefaultsignindetails.
3 Tosigninusingthespecifieddetails,selectOKandpressEnter.
Note: Tosigninasadifferentuser,inserttherequireddetailsbeforeselecting
OKandpressingEnter.
YouaresignedintotheIMcommunity.
SigningOut
► Tosignout:
IntheIMcontactlistscreen,press,selectSignOut/Disconnectfromthe
Optionsmenu,andpressEnter.YouaredisconnectedfromtheIMcommunity.
Note: Alternatively,youcanselectSignOut/DisconnectfromtheOptions
menuinaChatscreen.
InstantMessaging
IMStatusIcons29
IMStatusIcons
StatusiconsindicatethestatusofotherIMusers.Thespecificiconsvaryaccording
totheIMcommunityinuse(WindowsLiveMessengerorICQ).
Table8:WindowsLiveMessengerStatusIcons
IconStatus
Online
Busy/OnthePhone
Away/OuttoLunch/Be
RightBack
OnlineBlocked
Offline
OfflineBlocked
Table9:ICQStatusIcons
IconStatus
Online
Away/Occupied/DND/Not
Available
Invisible
Offline
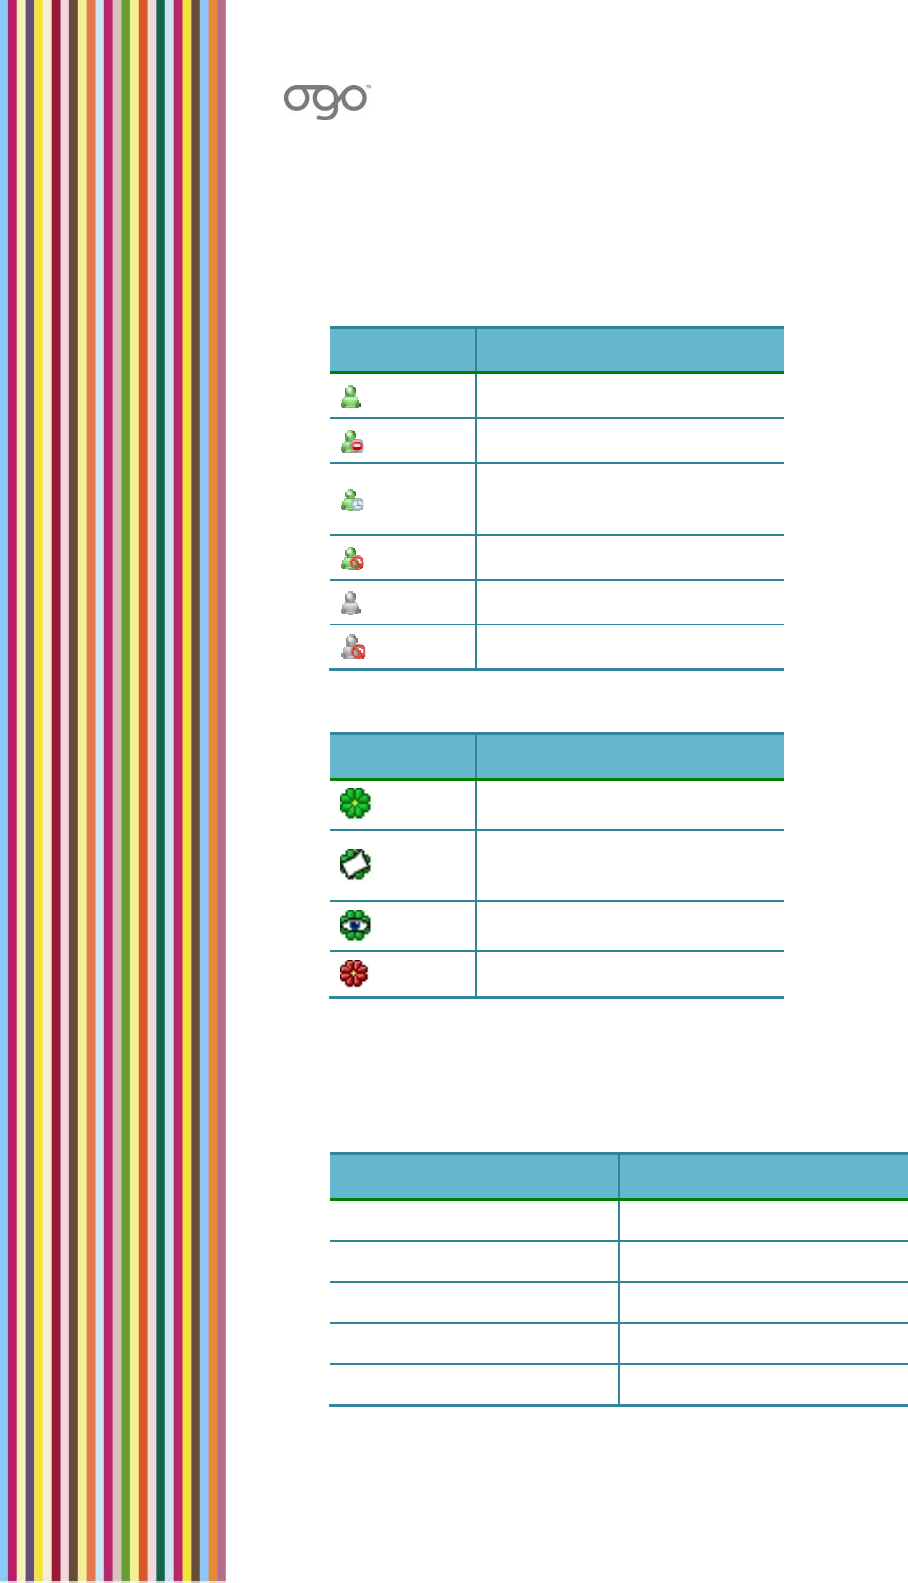
WhileviewingtheIMcontactlistscreen,thefollowingoptionsareavailablefrom
theOptionsmenu:
Table10:IMOptions
WindowsLiveMessengerICQ
ChangeStatusChangeStatus
SendIM/E‐mailSendIM/E‐mail
AddaContactAddaUser
DeleteContactDeleteUser
BlockContactBlockUser

OGOUserManual
30ChangingYourStatus
WindowsLiveMessengerICQ
ContactInfoUser’sDetails
AssignAlerticonAssignAlerticon
SignOutDisconnect
MyProfile
ChangingYourStatus
Youcandefinethewayinwhichyourstatusisdisplayedtoothersintheircontact
lists.
► Tochangeyourstatus:
1 AccesstheIMapplicationandselectthetabfortheIMcommunity(ICQor
WindowsLiveMessenger).
2 Press andselectChangeStatusfromtheOptionsmenu.Alistofavailable
statusesisdisplayed.
Note: Alternatively,youcanselectChangeStatusfromtheOptionsmenuina
Chatscreen.
3 SelectthestatusthatyouwanttobedisplayedandpressEnter.Yourstatusis
updatedaccordingly,andisreflectedonthecorrespondingiconinthestatus
bar.
► TochangethedefaultIMstatusdisplayedwhenyourOgosigns‐in:
1 IntheHomescreenorApplicationmenu,selectSettingsandpressEnter.
TheSettingsscreenisdisplayed.
2 SelecttheIMtab.
3 Scrolldowntoselectyourcommunity(WindowsLiveMessengerorICQ)and
pressEnter.TheIMcommunitysettingsscreenisdisplayed.
4 SelectDefaultpresenceandpressEnter.Selectthestatustobedisplayedto
yourcontactsafteryousign‐infromthelist.
5 SelectSaveorSignInandpressEnter.Thechangeissaved.
► TochangetheIMstatusthatisdisplayedwhenyourOgoisclosed:
1 IntheHomescreenorApplicationmenu,selectSettingsandpressEnter.
TheSettingsscreenisdisplayed.
2 SelecttheIMtab.

InstantMessaging
SendinganInstantMessage31
3 ScrolldowntoselectWhenclosedandpressEnter.Adropdownmenuis
displayed.
4 SelecttherequiredoptionandpressEnter.Thestatusdisplayedtoyour
contactswhentheOgocoverisclosedissetaccordingly.
SendinganInstantMessage
AssoonasyouhavesetupyourIMaccountontheOgo,youcanexchange
messageswithyourcontacts.
► Tosendaninstantmessage:
1 AccesstheIMapplicationandselectthetabfortheIMcommunity(ICQor
WindowsLiveMessenger).
2 Selectthecontacttowhomyouwanttosendamessage,andpressEnter.The
Chatscreenisdisplayed.
3 InsertyourmessagetextandpressEnter.Yourmessageissenttotheselected
contact,andisdisplayedinthetophalfofthescreen.
Note: YoucanuseQuickTexttoquicklyinsertpredefinedorcustomizedtexts.
Fordetails,seeWorkingwithQuickTextonpage15.
AddingEmoticonstoYourInstantMessages
Youcanuseavarietyofemoticonstopersonalizeyourchatmessages.
► Toaddanemoticontoaninstantmessage:
PresstheEmoticonkey onthekeyboard.Anemoticonpaletteisdisplayed.
ScrollthroughthepalettetoselectthedesiredemoticonandpressEnter.The
ASCIIcodeoftheemoticonisaddedtoyourmessagetext,thegraphic
emoticonappearsinthetophalfofthescreenafteryoupressEnter.
Notes:Whenanemoticonisselectedforafewseconds,aTooltipappearswith
theASCIIequivalentoftheicon(e.g. is“:‐)”).YoucaninserttheASCII
stringtoincludetheemoticoninyourmessage.
TheavailableemoticonsvaryaccordingtotheIMprovider.
ReceivinganInstantMessage
WhenaninstantmessagearrivesonyourOgoandtheChatscreenisnotopen,a
bannermessageappearsbrieflyatthetopofthescreen.Ifanalerticonhasbeen
assignedtothecontact,thealerticonanimationisplayed.
Duringanongoingchat,anincomingmessagefromthesamecontactis
automaticallyaddedtothedialoginthetophalfofthescreen.

OGOUserManual
32ClosinganIMChatSession
► Toviewaninstantmessage:
1 Inanyscreen,press todisplaytheogoquick‐accesslist.Chatswithnew
messagesappearatthetopofthelist,withanimatedindicationsnexttothem.
2 SelectthecontactnameandpressEntertodisplaytheChatscreen.
Note: Ifyoureceiveamessagefromcontactsthatarenotinyourcontactlist,use
theogoquick‐accesstoviewthemessage.
► ToviewaninstantmessagefromtheIMcontactlistscreen:
1 WhenyouopentheIMcontactlistscreen,ananimationappearsnexttoany
contactfromwhomyouhaveunreadmessages.
2 SelectthecontactandpressEnter.TheChatscreenisdisplayed,withthe
sender’smessageinthetophalfofthescreen.
ClosinganIMChatSession
YoucancloseanopenIMchatsessionineitherofthefollowingways:
IntheChatscreenfortheopensession,press andselectCloseChat
OptionsfromtheOptionsmenu.
IntheOgoquick‐accesslist,selecttheIMchatsessionandpressCLRonthe
keyboard.
ManagingYourIMContacts
Youcanadd,deleteandblockspecificcontactsinyourcontactlistfromyourOgo.
Inaddition,youcanassignAlerticonstospecificcontactssothatananimatedalert
popsupwhenevertheysendyoumessages.
Note: ChangesmadefromtheOgodeviceaffecttheIMcontactlistasifthey
weremadefromaPC,exceptforAlerticons,whichareusedonlyonyour
Ogodevice.
AddinganIMContact
It’seasytoaddnewcontactstoyourIMcontactlist(s)fromyourOgo.
► ToaddanIMcontact(WindowsLiveMessenger):
1 IntheIMcontactlistscreen,press andselectAddaContactfromthe
Optionsmenu.TheAddaContactscreenisdisplayed.
2 Inserttheuser’se‐mailaddress.
3 SelectAddaContactandpressEnter.Thecontactisaddedtoyourcontactlist.

InstantMessaging
ManagingYourIMContacts33
► ToaddanIMUser(ICQ):
1 IntheIMcontactlistscreen,press andselectAddaUserfromtheOptions
menu.TheAddaUserscreenisdisplayed.
2 Inserttheuser’sICQ#.
3 SelectAddaUserandpressEnter.Theuserisaddedtoyourcontactlist.
Note: IfyoureceiveamessagefromacontactthatisnotonyourIMcontactlist
yet,usetheogoquickaccesslisttoviewit,andthenyoucanselectthe
AddtoContactListoptionfromtheChatscreentoaddthenewcontactto
yourcontactlist.
ViewingContactDetails
YoucanviewthecontactdetailsofyourIMcontacts.
Note: DifferentIMcommunitiesuseslightlydifferentterms("Contact"in
WindowsLiveMessenger,vs."User"inICQ).Allrelevanttermsare
specified,asapplicable.
► Toviewcontactinformation:
1 IntheIMcontactlistscreen,selectthecontact.
2 PressandselectContactInfo/User'sDetailsandpressEnter.TheContact
Info/User'sDetailsscreenisdisplayed.Thespecificdetailsdisplayeddependon
theselectedIMcommunity.
AssigninganAlerticontoanIMContact
Ogo’sanimatedAlerticonsmakeiteasyforyoutoidentifywhensomeone
importanttoyouhassentyouamessage.SimplyassignanAlerticontoacontact
andanattractiveanimationwillappearinthebannermessagewheneverthat
contactsendsyouamessageorbecomesonline.
Note: Fordetailsonhowtoenablebannermessages,seeConfiguringtheDevice
Settingsonpage86.
► Toassignanalerticon:
1 AccesstheIMapplicationandselectthetabfortheIMcommunity(ICQor
WindowsLiveMessenger).
2 Selectthecontact.
3 Press andselectAssignAlerticonfromtheOptionsmenu.TheAssign
Alerticonscreenisdisplayed.

OGOUserManual
34ManagingYourIMContacts
4 ScrollandselectthedesiredAlerticon.
Note: WhenanAlerticonisselected,theanimationisplayed.Youcanscroll
throughandviewthevariousanimationsbeforemakingyourselection.
5 PressEnter.
6 SelectDoneandpressEnter.TheselectedAlerticonisassignedtothecontact,
andappearnexttothecontactinthecontactlist.TheAlerticon'sanimationwill
appeareachtimeabannerindicatesthatamessageisreceivedfromthe
contact,orthatthecontact’sstatushaschangedtoonline.
Blocking/UnblockinganIMContact
► ToblockanIMcontact(WindowsLiveMessenger)
1 IntheIMcontactlistscreen,selectthecontacttobeblocked.
2 Press andselectBlockContactfromtheOptionsmenu.
Note: Alternatively,youcanselectBlockContactfromtheOptionsmenuin
theChatscreen.
TheBlockUserscreenisdisplayed,promptingyoutoconfirmthatyouwantto
blockthecontact.
3 SelectYesandpressEnter.Thecontact’sstatusisupdatedintheIMcontact
list;thecontactisblockedandisunabletosendyouinstantmessages.
► TounblockanIMcontact(WindowsLiveMessenger)
1 IntheIMcontactlistscreen,selecttheblockedcontact.
2 Press andselectUnblockContactfromtheOptionsmenu.TheUnblock
Userscreenisdisplayed,promptingyoutoconfirmthatyouwanttounblock
thecontact.
3 SelectYesandpressEnter.Thecontact’sstatusisupdatedintheIMContact
list;thecontactisunblocked.
► ToblockanIMUser(ICQ):
1 IntheIMcontactlistscreen,selectthecontacttobeblocked.
2 Press andselectBlockUserfromtheOptionsmenu.
Note: Alternatively,youcanselectBlockUserfromtheOptionsmenuinthe
Chatscreen.
TheBlockUserscreenisdisplayed,promptingyoutoconfirmthatyouwantto
blockthecontact.

InstantMessaging
ManagingYourIMContacts35
3 SelectYesandpressEnter.TheuserisremovedfromtheIMcontactlist;the
userisblockedandisunabletosendyouinstantmessages.
Note: AnICQusercannotbeunblockedwhenusingamobiledevice.Youcan,
however,unblocktheuserfromyourPC'sICQclient.
DeletinganIMContact
YoucanremovecontactsfromyourIMcontactlist.
► TodeleteanIMcontact:
1 IntheIMcontactlistscreen,selectthecontacttobedeleted.
2 Press andselectDeleteContact/UserfromtheOptionsmenu.TheDelete
Userscreenisdisplayed,promptingyoutoconfirmthatyouwanttodeletethe
contact.
3 SelectDeleteandpressEnter.ThecontactisdeletedfromyourIMcontactlist.
Note: Deletingacontactdoesnotblockit.Youcanstillreceivemessagesfrom
thiscontact,unlessyouchoosetoblockthecontactaswell.

OGOUserManual
36SettingUpYourE‐MailAccounts
Messages(EMailandSMS)
Ogoletsyoumanagemessagesfromvariouse‐mail
accountseasilyandefficiently,whetheryou'resittingina
restaurant,ridingthebus,orrelaxingonthebeach.
Ogo'sPUSHe‐mailfeaturemeansyougete‐mailassoon
asithitsyourinbox,sothere'snoneedtowait.
SettingUpYourEMailAccounts
YourOgodevicesupportstheabilitytosend/receive
e‐mailfromuptofiveexistinge‐mailaccount(s).
Note: Theabilitytomanagemultiplee‐mailaccountsontheOgodependson
yourserviceprovider.
UsingtheEMailWizardtoSetUpYourAccount
E‐mailaccountsaresetupusingtheE‐mailWizard.Dependingonyourwireless
carrier/operator,youmaybeabletosetupmultiplee‐mailaccountsfordifferent
e‐mailproviders(forexample,HotmailorGmail).
Youneedtohaveyoure‐mailaccountdetails(e‐mailaddressandpassword)ready
inordertosetupane‐mailaccountonthedevice.Forcustomemailaccounts,you
needtoprovideserverdetailsaswell.
► ToaccesstheE‐mailWizard:
1 IntheHomescreenorApplicationmenu,selectSettingsandpressEnter.
TheSettingsscreenisdisplayed.
2 SelecttheE‐mailtab.
3 ScrolldowntoselectAddandpressEnter.TheE‐mailWizardisdisplayed.
4 SelectNextandpressEnter.Youarepromptedtoselectthee‐mailprovider.
Note: IfyouhavealreadysetupanaccountonOgoforane‐mailprovider,
thatprovidermaynolongerbeavailableforselection.
5 Selectthee‐mailprovider(WindowsLiveMail,GmailorCustome‐mail
provider)andpressEnter.TheE‐mailSetupscreenisdisplayed.
6 Followtheon‐screeninstructionsfortheselectedE‐mailProvider,asdescribed
inSettingUpYourWindowsLiveMessengerAccountandSettingUpYour
GmailorCustomEmailAccount,respectively.

Messages(E‐MailandSMS)
SettingUpYourE‐MailAccounts37
Note: Youcanexitthewizardwithoutcompletingtheprocessbyselecting
CancelandpressingEnter.However,anyinformationenteredislost
whenthewizardiscancelled.
SettingUpYourWindowsLiveMailAccount
IfyouhaveaWindowsLiveMailaccount,youcanconfigureyourOgotosendand
receivee‐mailforthoseaccounts(subjecttotheconditionsimposedbyyour
wirelessoperator).
► TosetupyourWindowsLiveMailaccount:
1 SelectWindowsLiveMailasthee‐mailproviderintheE‐mailWizard.The
WindowsLiveMailSetupscreenisdisplayed.
2 IntheE‐mailAddressfield,insertthee‐mailaddressofyourexistingWindows
LiveMailaccount.IfyouareusingahotmailorMSNe‐mailaddress,youmay
leaveoutthedomainname,andselectitfromtheoptionsbelowthisfield.
Note: IfyouhavealreadyconfiguredWindowsLiveMessenger,your
configureduserdetailsaredisplayedbydefault.
3 Selecttherequireddomain(@hotmail.com;@msn.com)andpressEnter.
4 InthePasswordfield,insertyourpassword.
Note: Thelettersaredisplayedoneatatimeasyouinsertthem;upon
insertingthenextletterthepreviouslyenteredoneturnsintoan
asterisk.
5 SelectNextandpressEnter.Youarepromptedtoenteryouraccount
information.
6 Inserttherequestedinformationinthedesignatedfields.Sethowoftenyou
wanttheOgotocheckfornewmailasfollows:
• SelectCheckintervalandpressEnter.Adrop‐downmenuisdisplayed.
• Scrollandselectthedesiredtimeinterval(OFF,10m,30m,1h,2h)and
pressEnter.
7 PressEnter.Youarepromptedtosetupanotheraccount(optional)ortofinish
thewizard.
8 SelectFinishE‐mailWizardandpressEnter.
9 SelectNextandpressEnter.TheAccountSummaryscreenliststhee‐mail
service(s)configuredonyourOgo.
Note: Toremoveane‐mailservice,clearitscheckbox.
10 SelectNextandpressEnter.Youre‐mailaccountdataisupdated.

OGOUserManual
38SettingUpYourE‐MailAccounts
SettingUpYourGmailorCustomEmailAccount
IfyouhaveaGmailorothere‐mailaccount(s),youcanconfigureyourOgotosend
andreceiveemailforthoseaccounts(subjecttotheconditionsimposedbyyour
wirelessoperator).
IfyouaresettingupaGmailaccount,youwillneedtoenableyouraccount’sPOP
Downloadoption(inGmail'swebsite)inordertoaccessGmailfromthedevice.To
doso,selectEnabledPOPforallmailinyourGmailAccountSettings(inthe
ForwardingandPOPsection).
Ifyouaresettingupacustomaccount,youwillneedtohavethecompleteaccount
informationready,includingtheusername,E‐mailprotocol,incomingserver,
outgoingserver,andsoon.
► TosetupyourGmailorcustome‐mailaccount:
1 SelectGmailorCustome‐mailproviderasthee‐mailproviderintheE‐mail
Wizard.Youarepromptedtoenteryourlogininformation.
2 IntheE‐mailAddressfield,insertyoure‐mailaddress.(Ifyouaresettingupa
custome‐mailaccount,includethedomainname.)
3 InthePasswordfield,insertyourpassword.
Note: Thelettersaredisplayedoneatatimeasyouinsertthem;upon
insertingthenextletterthepreviouslyenteredoneturnsintoan
asterisk.
4 SelectNextandpressEnter.Youarepromptedtoenteryouraccount
information.
5 Inserttherequestedinformationinthedesignatedfields.
6 SethowoftenyouwanttheOgotocheckfornewmailasfollows:
• SelectCheckintervalandpressEnter.Adrop‐downmenuisdisplayed.
• Scrollandselectthedesiredtimeinterval(OFF,10m,30m,1h,2h)and
pressEnter.
7 PressEnter.Youarepromptedtosetupanotheraccount(optional)ortofinish
thewizard.
8 SelectFinishE‐mailWizardandpressEnter.
9 SelectNextandpressEnter.TheAccountSummaryscreenliststhee‐mail
service(s)configuredonyourOgo.
Note: Toremoveane‐mailservice,clearitscheckbox.
10 SelectNextandpressEnter.Youre‐mailaccountdataisupdated.

Messages(E‐MailandSMS)
AccessingtheMessagesApplication39
AccessingtheMessagesApplication
TheMessagesapplicationiswhereyoucanmanageandviewyoure‐mailandSMS
messages.
► ToaccesstheMessagesapplication:
PresstheMessagesshortcutkey(),orselect intheHomescreenor
ApplicationmenuandpressEnter.TheMessagesapplicationisdisplayed.
Figure15:MessagesApplication
TheMessagesapplicationprovidesmessagelistsinthefollowingtabs:
• Inbox
• SMS
• E‐mailaccount(s)(ifsetuponthedevice)
• Find
• Outgoing
ViewingYourMessageLists
TheInboxtabshowsacombinedlistofallyoure‐mailandSMSmessages.The
mostrecentlyreceivedmessagesappearatthetopofthelist.
Alternatively,youcanviewonlymessagesofaspecifictypeorforaspecifice‐mail
addressinthecorrespondingtab.Forexample,toviewonlySMSmessages,select
theSMStab.
Thefollowingdetailsappearforeachmessage:
Anicon,indicatingthetypeandstatusofthemessage(seeTable11)
Anicon,indicatingwhetherthereareattachmentsforthisemail
Thenameofthesender
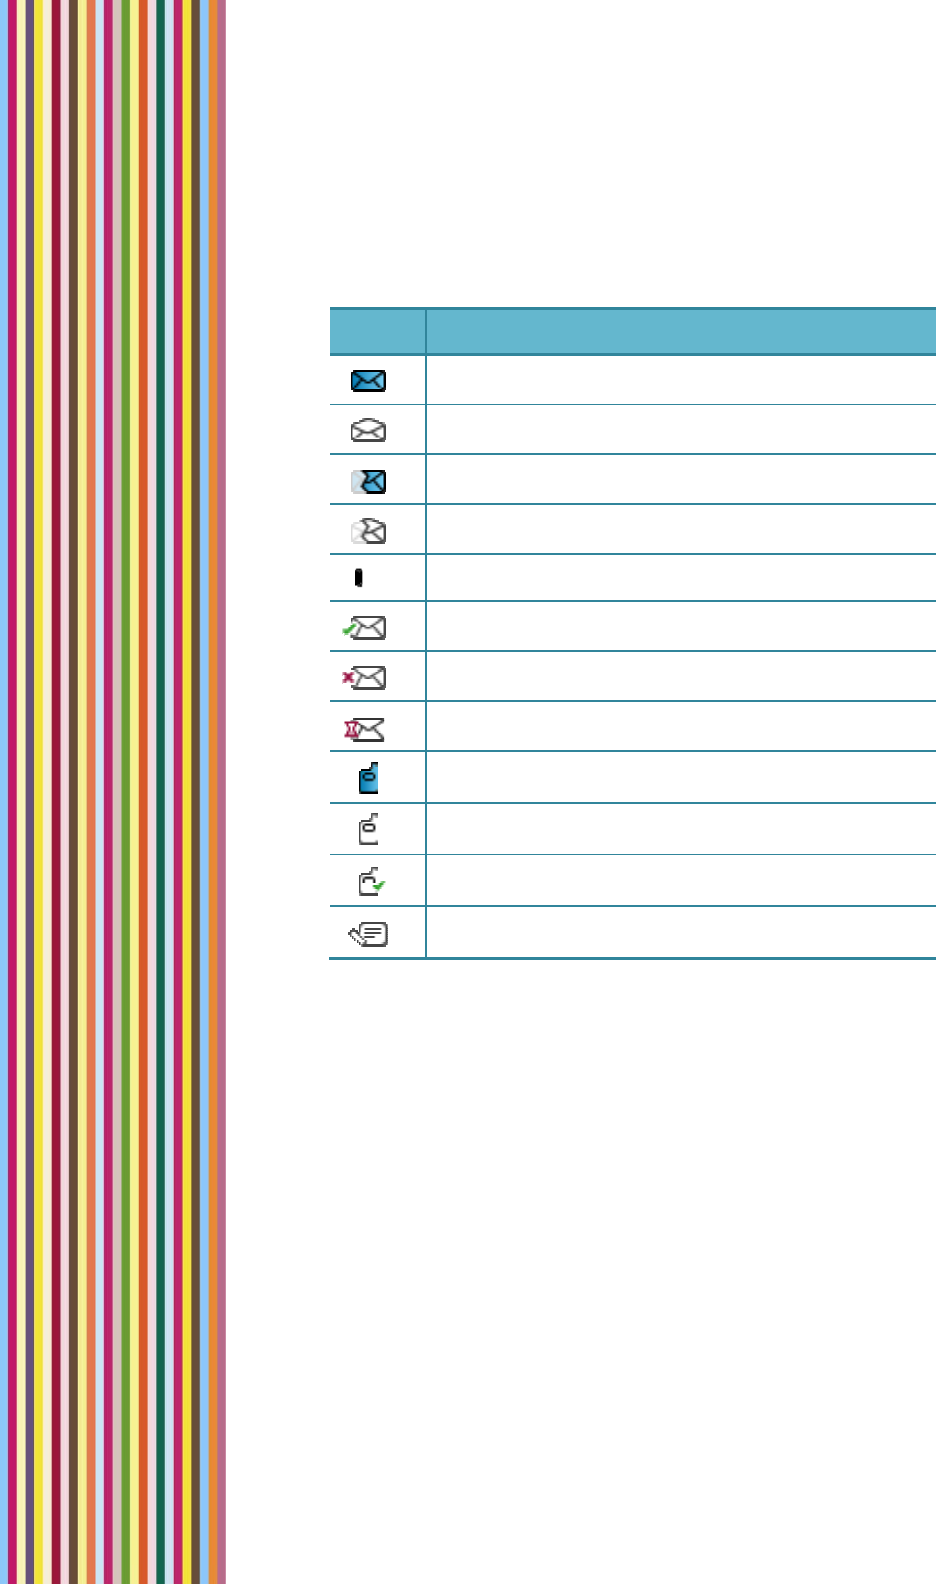
OGOUserManual
40ViewingYourMessageLists
Thesubjectofthemessage(fore‐mailmessages)orthebeginningofthe
message(forSMSmessages).Intheselectedmessage,thispartalternateswith
thedisplayofsendingtime&date.
Table11:MessagesIcons
IconMessageType/Status
E‐mail–Unread
E‐mail–Read
E‐mail–Unread,partiallyretrieved
E‐mail–Read,partiallyretrieved
Attachmentsincluded
E‐mail–Sent
E‐mail–Sent(failure)
E‐mail‐Pending
SMS/text–Unread
SMS/text–Read
SMS/text–Sent
Draftmessage
WhileviewingamessageintheInboxtab(orinane‐mailaccounttab),the
followingoptionsareavailablefromtheOptionsmenu:
MarkasRead/Unread
Reply
ReplytoAll
Forward
Delete…
SortbySender/Date&Time
DeleteAll…
Send/Receive
Messages(E‐MailandSMS)
ComposingaMessage41
ComposingaMessage
YoucancomposeandsendSMSand/ore‐mailmessagesintheComposescreen.
► ToaccesstheComposescreen:
PresstheComposeshortcutkey(),orselectComposeintheHomescreen
orApplicationmenuandpressEnter.TheComposescreenisdisplayed.
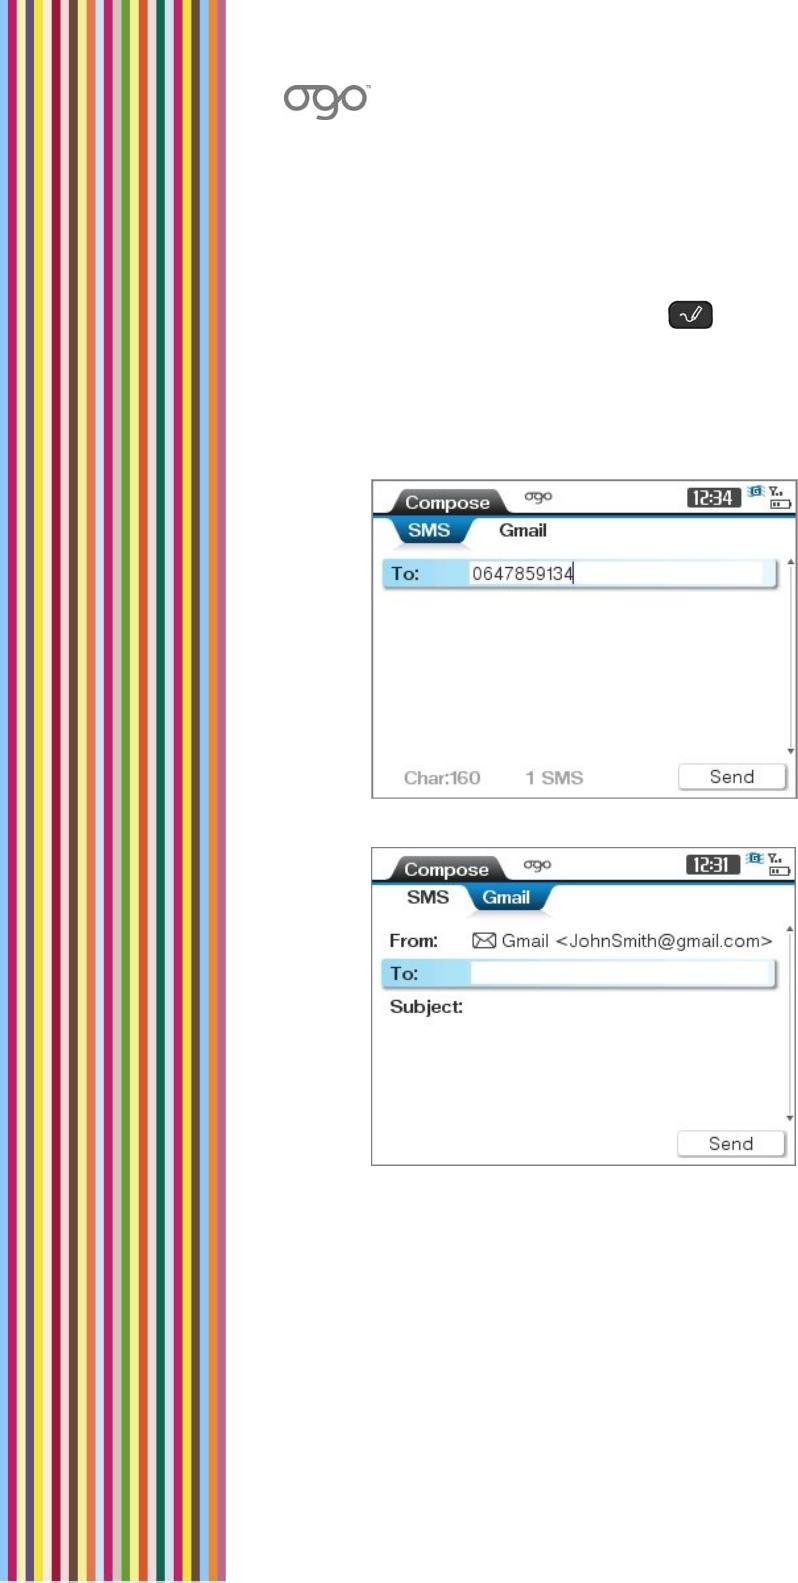
Typically,theComposescreenincludesthefollowingtabs:
• SMS
• E‐mailaccount(s)(ifsetuponthedevice)
Figure16:ComposeScreen–SMSTab
Figure17:ComposeScreen–E‐mailTab

OGOUserManual
42ComposingaMessage
► TocomposeanSMSmessage:
1 PresstheComposeshortcutkey(),orselectComposeintheHomescreen
orApplicationmenuandpressEnter.SelecttheSMStab.
OR
IntheSMStaboftheMessagesapplication,press andselectNewmessage
fromtheOptionsmenu.TheComposescreenisdisplayed,withtheSMStab
selected.
2 Inserttherecipient’smobilenumberintheTofield.
3 Scrolldownandinsertthemessagetext.
Note: Acounteratthebottomofthescreenindicatestheremainingnumber
ofcharactersthatcanbeinsertedintothemessage.AsingleSMS
messagecanincludeupto160characters.Ogoallowsyoutocreatea
longermessage,andbreaksitintouptofourseparatepartswhen
sending.
4 SelectSendandpressEnter.
► Tocomposeane‐mailmessage:
1 PresstheComposeshortcutkey(),orselectComposeintheHomescreen
orApplicationmenuandpressEnter.SelecttherequiredE‐mailtab.
OR
IntheE‐mailtaboftheMessagesapplication,press andselectNew
messagefromtheOptionsmenu.TheComposescreenisdisplayed,withtheE‐
mailtabselectedandtheFromdetailsautomaticallyinserted.
2 Inserttherecipient’se‐mailaddress,themessagesubject,andmessagetextin
thedesignatedfields.
3 SelectSendandpressEnter.
Note: IfyouattempttoleavetheComposescreenwithoutsendingthe
message,youarepromptedtosaveitasadraft.SelectYestosavethe
draft,Notodiscardthemessage,orCanceltoremaininthescreen.

Messages(E‐MailandSMS)
WorkingwithMessages43
WorkingwithMessages
YoucanviewfromthevarioustabsoftheMessagesapplication.Unreadmessages
canalsobeviewedfromtheogoquick‐accesslist
Whileviewingamessage,thefollowingoptionsareavailablefromtheOptions
menu:
1 AddSendertoContacts:Enablesyoutoaddthesenderofthemessagetoyour
contactslist.
2 Reply:Enablesyoutosendareplytothesenderofthemessage.Fordetails,
seeReplyingtoaMessageonpage45.
3 ReplytoAll:Enablesyoutosendareplytoallrecipientsofthemessage,
includingthesender.Fordetails,seeReplyingtoaMessageonpage45.
4 Forward:Enablesyoutoforwardthemessage.Fordetails,seeForwardinga
Messageonpage45.
5 Delete:EnablesyoutodeletethemessagefrombothyourOgoandthe
mailboxmaintainedbythee‐mailserviceprovider.Fordetails,seeDeletinga
Messageonpage45.
6 DeleteLocally:EnablesyoutodeletethemessagefromyourOgoonly(without
deletingitfromthemailboxmaintainedbythee‐mailserviceprovider).For
details,seeDeletingaMessageonpage45.
7 AddressClipboard:Enablesyoutouseinformationfromthecontentofa
messageforaddingnewcontactstoyourOgoContactsList,ortosenda
messageorplaceacalldirectly,withoutaddinganewcontact.Fordetails,see
WorkingwiththeAddressClipboardonpage63.
ViewingaMessage
► Toviewamessage:
1 SelecttherequiredtabintheMessagesapplication.
2 SelectthemessageinthemessagelistandpressEnter.
Themessageisdisplayed,includingdetailsregardingthemessagesender,
destinatione‐mailaddressormobilenumber,dateandtimethemessagewas
sent,subjectandtext,asapplicable.
Whenapplicable,attachmentsarelistedbelowthemessage'ssubject.
Note: Pressing displaystheogoquick‐accesslist,whereunreadmessages
arelisted(sendernameisdisplayed).SelectthemessageandpressEnter
toviewthemessage.

OGOUserManual
44WorkingwithMessages
ViewinganAttachment
Youcanreceiveandviewe‐mailattachmentsonyourOgo,includingimagefiles
(.jpg,.bmp,.gif),anddocuments(Word,Excel,PDFfilesandmore)whichare
displayedasplaintext.
Notes:Theavailabilityofviewingattachmentsdependsontheserviceprovided
byyourcellularoperator,andtheattributesofyouremailaccount.
AttachmentsarenotsupportedforWindowsLiveMail.
► Toviewanattachment:
1 SelecttheattachmentintheAttachmentslistandpressEnter.Apop‐upmenu
isdisplayed.
2 Toviewasummaryoftheattachmentproperties(filename,type,sizeand
status),selectDetails.
OR
Toviewtheattachmentcontent,selectViewtext(foradocument),orView
Image.Thetext"Downloading…"isdisplayedatthebottomofthescreenwhile
theattachmentisdownloaded.
Note: Iftheattachmentisofanon‐supportedfiletype,theoptionsViewTextor
ViewImagearenotavailable.
ForwardingaMessage
Youcanforwardamessagetofriendsandcolleagues.
► Toforwardamessage:
1 Inthemessagescreen(orinoneoftheMessagesapplicationtabs,withthe
messageselected),pressandselectForwardfromtheOptionsmenu.The
Composescreenisdisplayed,withtheoriginalmessagelistedinthemessage
area.
2 InsertthedetailsoftheintendedrecipientintheTofield.
3 (Optional)Addtooreditthemessagetextifdesired.
4 SelectSendandpressEnter.The“SendMessage?”screenisdisplayed.
5 SelectYesandpressEnter.
Note: Ifoneormorerecipient/senderisnotinyourOgoContactsList,youare
promptedtosavetheirdetailsatthistime.Todoso,selectSaveandpress
EntertodisplaytheAddressClipboardscreen.Fordetailsonsaving
contactsfromtheAddressClipboard,seeWorkingwiththeAddress
Clipboardonpage63.

Messages(E‐MailandSMS)
WorkingwithMessages45
Iftheoriginalmessageincludesattachments,theoriginalattachmentsare
includedintheforwardedmessage.Youcanviewtheattachments,and
removesomeorallofthembeforesending.
ReplyingtoaMessage
Youcanreplytoyourincomingmessages.
► Toreplytoamessage:
1 Intheviewedmessagescreen,selectReplyandpressEnter.
OR
Inthemessagescreen(orinoneoftheMessagesapplicationtabs,withthe
messageselected),pressandselectoneofthefollowingoptionsfromthe
Optionsmenu:
• Toreplytothesenderonly,ReplyandpressEnter.
• Toreplytothesenderandallotherrecipients,selectReplytoAllandpress
Enter.
TheComposescreenisdisplayed,includingtheoriginalmessage,andwith
sender’saddressintheTofield.
2 Youcaneditthemessagetextifdesired.
3 SelectSendandpressEnter.The“SendMessage?”confirmationmessagemay
bedisplayed.Ifyouwishtosendmessageswithoutaconfirmationmessage,
selectDon'tshowmeagainandpressEnter.
4 SelectYesandpressEnter.Abriefanimationisdisplayed,indicatingthatthe
messageisabouttobesent.
DeletingaMessage
Bydefault,messagesdeletedonyourOgoarealsodeletedfromthemailbox
maintainedbythee‐mailserviceprovider.However,youcanchooseto"Delete
Locally",whichremovesthemessagefromtheOgo,butkeepsthemessage
unharmedonthemailboxmaintainedbyyoure‐mailprovider.
► Todeletethecurrentlydisplayedmessage:
Inthemessagescreen,press andselectoneofthefollowingoptionsfrom
theOptionsmenu:
• TodeletethemessagefromyourOgodevicewithoutremovingitfromthe
mailboxmaintainedbythee‐mailserviceprovider,selectDeleteLocally
andpressEnter.
• Todeletethemessageentirely,selectDeleteandpressEnter.
Themessageisdeletedaccordingtoyourselection.

OGOUserManual
46WorkingwithMessages
Note: Alternatively,youcanpressthe keywhenthemessageisviewedto
deletethedisplayedmessage(thisperformsregulardelete,notlocal
delete).
► TodeleteamessagefromthelistintheMessagesapplication:
1 IntheMessagesscreen,selectthemessage.
2 Press andselectDeletefromtheOptionsmenu.Themessageisdeleted.
Note: Alternatively,youcanpressthe keywhenthemessageisviewedto
deletethedisplayedmessage(thisperformsregulardelete,notlocal
delete).
► TodeletemultiplemessagesfromtheselectedtaboftheMessagesapplication:
Note: Tomarkmultiplemessagesfordeletion,selectamessageandpressthe
Spacekey.ThenfollowtheinstructionsbelowandselectDeleteAll
Selected.
1 IntheMessagesscreen,press andselectDeleteAll…fromtheOptions
menu.Asub‐menuisdisplayed:
2 Selectoneofthefollowingoptionsfromthesub‐menu:
• Todeleteallofthemessagesfromthecurrenttab,selectDeleteAll
Messages.
• Todeleteallreadmessagesfromthecurrenttab,selectDeleteAllRead.
• Todeleteallselectedmessagesfromthecurrenttab,selectDeleteAll
Selected.(Thisoptionisenabledonlyifoneormoremessagesare
selected.)
• Toselectallofthemessagesinthecurrenttab,selectSelectAllMessages.
• Tounselectallofthemessagesinthecurrenttab,selectUnselectAll
Messages.(Thisoptionisenabledonlyifoneormoremessagesare
selected.)
Allmessagesofthetypeyouhavechosenareselectedordeletedaccordingto
yourselection.
FindingaMessage
TheFindtabletsyousearchforaparticularmessagebasedonatextstring
containedanywherewithinthemessage,includingtheaddress,subjectormessage
contentfields.

Messages(E‐MailandSMS)
WorkingwithMessages47
► Tofindamessage:
1 IntheMessagesapplication,selecttheFindtab.
2 Insertthesearchcriteriaintheemptyfield.(Thesearchcriteriacanbeapartial
word,wholeword,phrases,numbers,andsoon.)Youcansearchforupto32
characters(includingsymbols).
3 PressEnter.Thesearchresultsarelistedinthescreen.
Note: Toviewthecontentofamessagethatappearsintheresults,selectthe
messageandpressEnter.
4 Tosortthesearchresults,press andselectSortbyRecipient/Senderfrom
theOptionsmenu.
5 Toclearthesearchresults,press andselectClearResultsfromtheOptions
menu.
CheckingforNewMessages
Newe‐mailmessagesare"pushed"toyourdeviceastheyarrivetoyourmailbox
(dependingontheserviceprovidedbyyourcellularoperator,andtheattributesof
thee‐mailaccount).
Inaddition,yourOgochecksfornewe‐mailatsettimeintervals,whichcanbe
configuredwhenyousetupyoure‐mailaccounts,andviatheE‐mailsettings.
Atanytime,youcanpromptyourOgotocheckfornewe‐mailandsendany
messagespendingonthedevice,usingthesend/receiveoption.
Note: SomeoftheSend/Receiveoptionsdescribedhereinmaynotbeavailable
inyourspecificversion.
► Tosend/receivee‐mailforallyouremailaccounts:
Intheogoquick‐accesslist,selectSend\ReceiveandpressEnter.
OR
IntheInboxtaboftheMessagesapplication,pressandselect
Send/ReceivefromtheOptionsmenu.
Thedevicestartstoretrievenewmessagesforallyouremailaccounts,andthe
messagelistsareupdatedaccordingly.

OGOUserManual
48WorkingwithMessages
► Tosend/receiveemailforaselectedemailaccount:
1 Inthetaboftheselectede‐mailaccount,press andselectSend/Receive
fromtheOptionsmenu.TheSend/Receivescreenisdisplayed,showingthe
time&dateofthelastSend/Receiveoperation.
2 SelectStartandpressEnter.
Thedevicestartstoretrieveanynewmessagesfortheselectede‐mailaccount,
andthemessagelistinthistabisupdatedaccordingly.Tocanceltheemail
retrieval,selectStopandpressEnter.
Note: Whene‐mailretrievaliscomplete,abannermessageappearsbriefly
indicatingthenumberofnewe‐mailmessages.
ViewingYourOutgoingMessages
Thelateste‐mailandSMSmessagesyouhavesentfromyourOgoarelistedinthe
OutgoingtaboftheMessagesapplication.
Youcanreviewyoursentmessages,forwardthemtoadditionalrecipients,or
deletethemiftheyarenolongerrequired.
ThenumberofsentemailmessageskeptinthislistcanbemodifiedintheEmail
tabintheSettingsscreen.Fordetails,seeConfiguringYourE‐MailSettingsonpage
83.
UsingYourOgoasaPhone
MakingaCall49
UsingYourOgoasaPhone
AsbrilliantasOgoisattextbasedmessaging,sometimes
youjustneedtotalktosomeone.
ThePhoneapplicationenablesyoutomakeandanswer
phonecalls,aswellasviewphonenumberspreviously
dialed,andthecallsreceivedandcallsmissedlists.
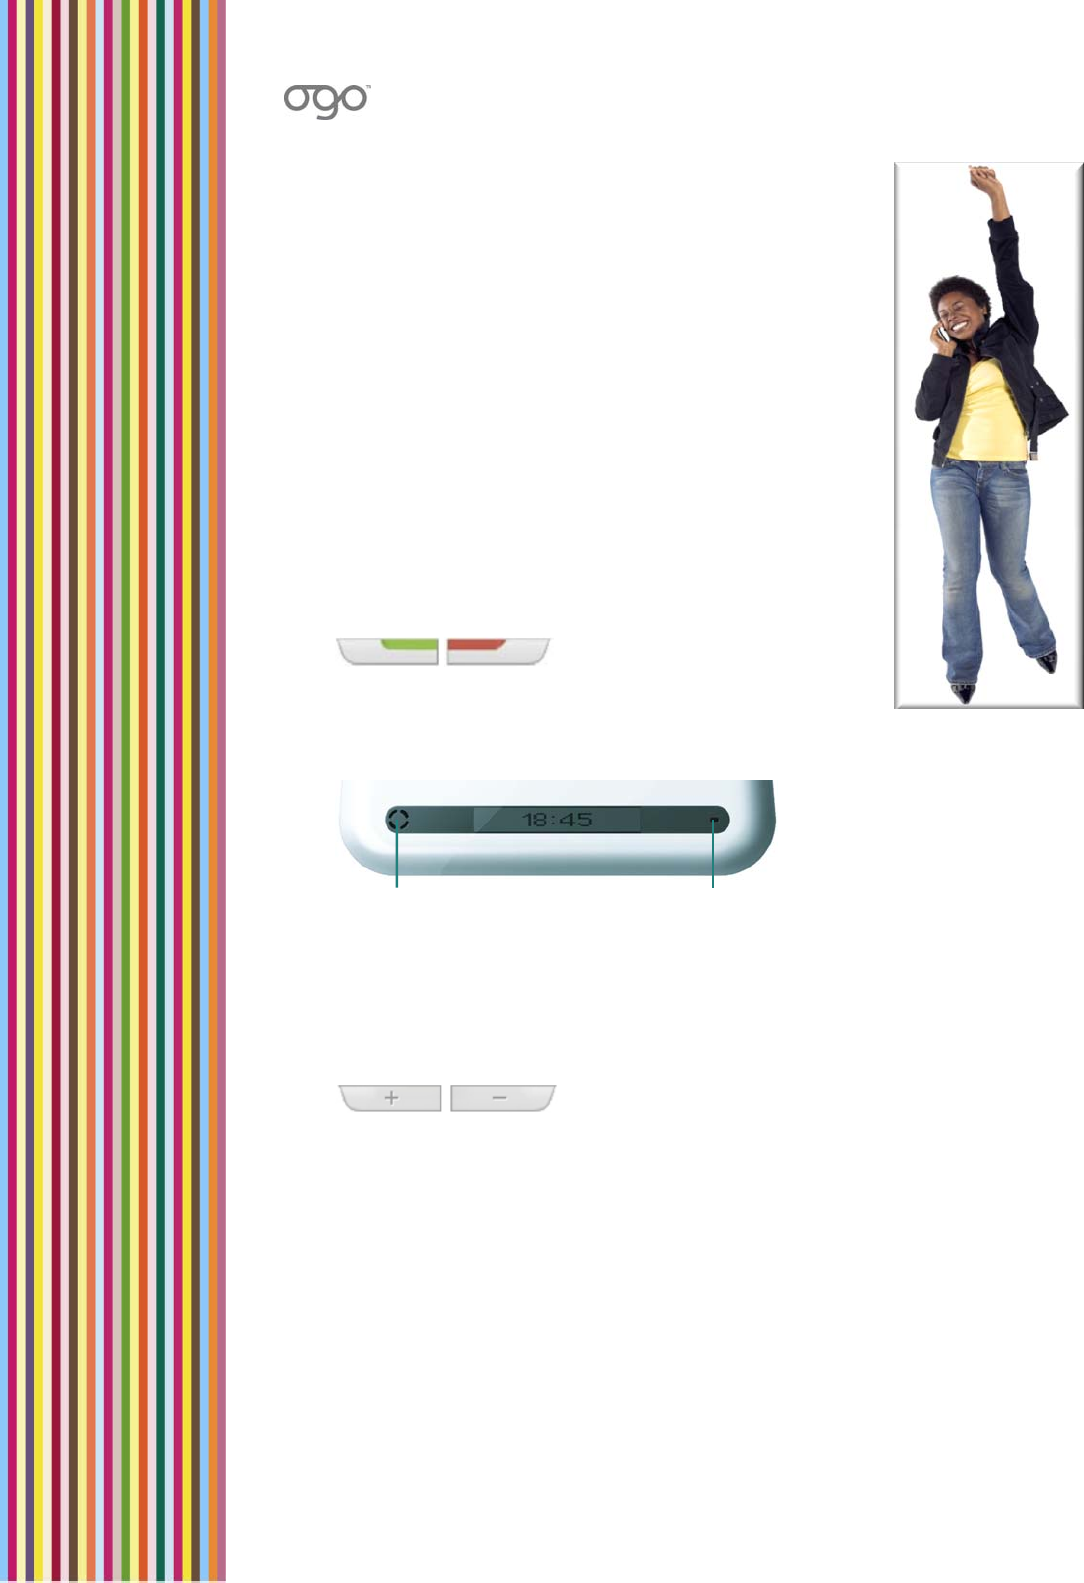
CallandEndButtons
Foraddedconvenience,yourOgofeaturesCall(green)and
End(red)buttons,whicharelocatedalongtheedgeofthe
device,soyoucananswerorrejectacallwhilethecoveris
closed.
Figure18:CallandEndButtons
Forbestvoicequality,holdyourOgodevicewiththeLogosidefacingyouwiththe
Call/Endbuttonsnearthetop.
AdjustingtheVolume
YoucanadjustthevolumeonyourOgobysimplypressingthevolume+and–
buttonsontheedgeofthedevice.Or,tosilencethedevice,holddownthevolume
–buttonforafewsecondstoturnoffthesoundentirely.
Figure19:VolumeButtons
MakingaCall
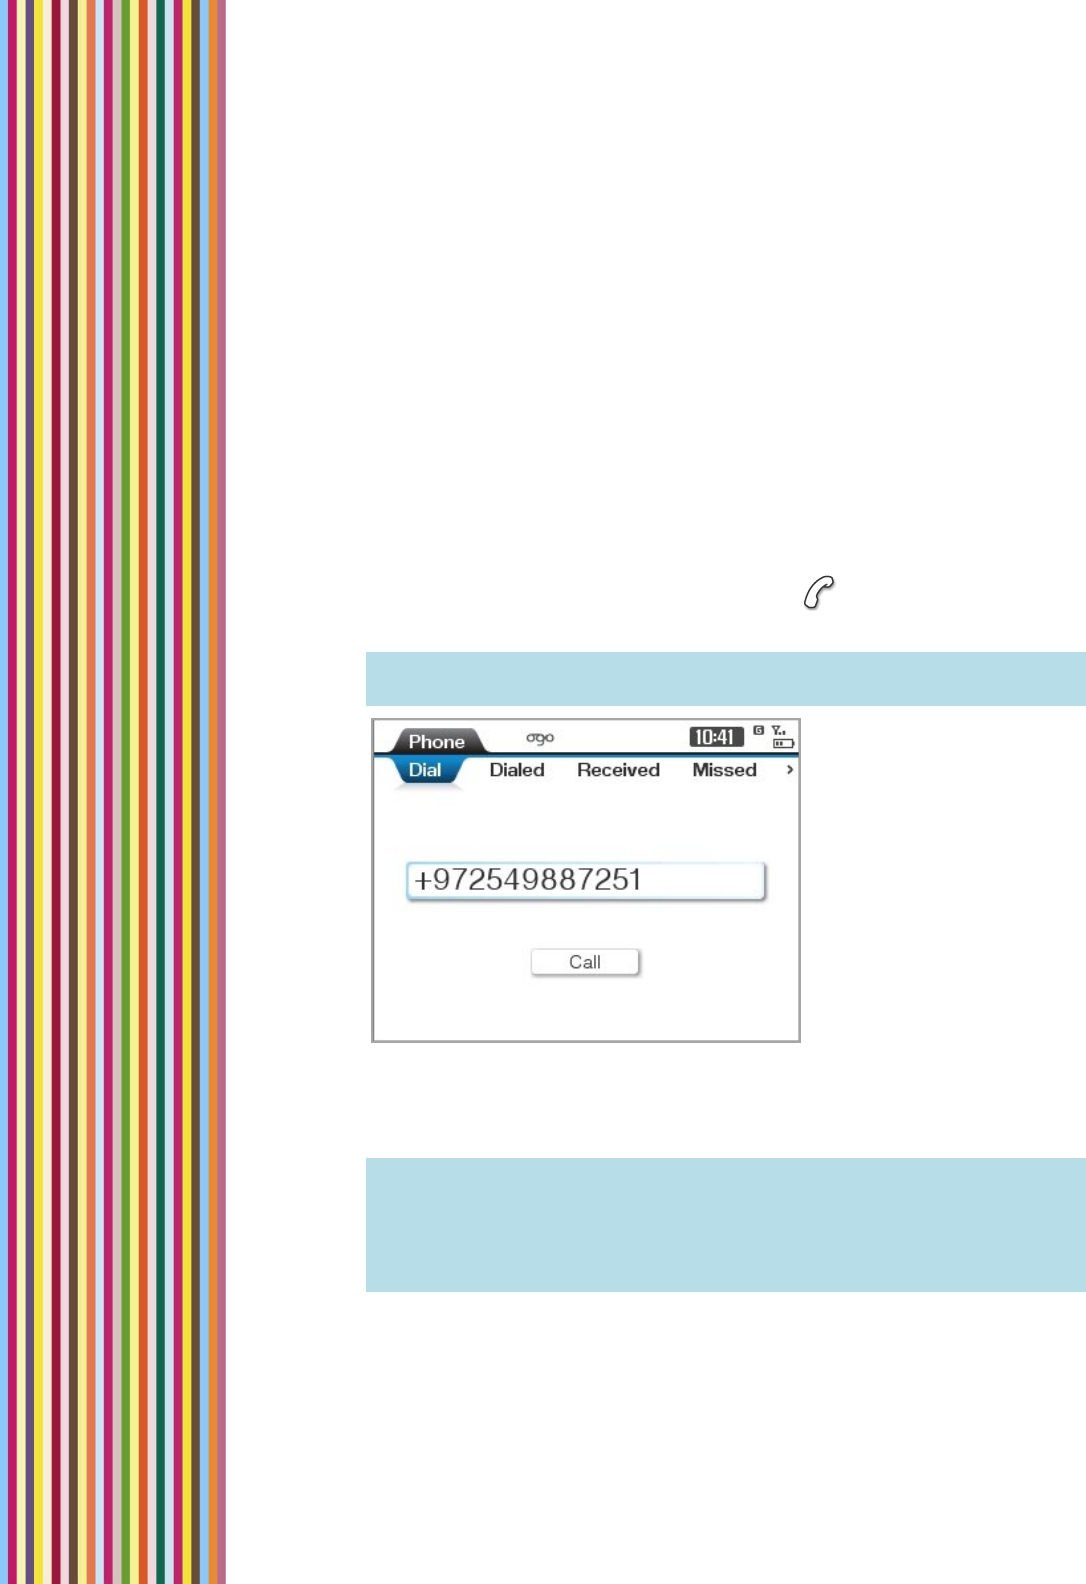
It’seasytomakecallsonyourOgo—andinsomanyways:
SimplystartdialingintheHomescreenbypressingthenumberkeys.
CallacontactfromPhone'sDialtabbypressingEnterandselectingthecontact
fromapop‐uplist.
SpeakerMicrophone
OGOUserManual
50MakingaCall
SelectacontactinContactsListandselectDialfromtheOptionsmenu.
SelectoneofthecallsinthePhone'scalllog(Dialed/Missed/Receivedcalls)and
pressEntertodialthatnumber.
PresstheCallkeytwice(whentheflipcoverisopen)toredialthelastdialed
call.
Pressandholddownoneofthenumberkeys,afterassigningacontacttothat
speeddialnumber.
DialingaPhoneNumber
Youcanplaceacallbymanuallyinsertingthephonenumber.
► Todialaphonenumber:
1 IntheHomescreenorApplicationmenu,selectPhoneandpressEnter.
TheDialtabisdisplayed.
Note: PressingthenumberkeyswhiletheHomescreenisdisplayedalso
openstheDialtab.
Figure20:PhoneScreen
2 Insertthephonenumbertobedialed.(YoudonotneedtopressALTwhen
dialingaphonenumber.)
Note: Ifyouhaveassignedaspeeddialnumberfortherequiredphone
number,longpressthecorrespondingspeeddialnumbertoplacethe
call.Ifnocontactnumberhasbeenassignedtothisspeeddialnumber,
longpressdisplaystheAssignSpeedDialscreen.Fordetailsondefining
speeddialnumbers,seeConfiguringthePhoneSettingsonpage79.
3 PressEnter,orpresstheCallbutton(thegreenbuttonontheedgeofyour
Ogo).Yourcallisplaced.TheCallscreenisdisplayed.

UsingYourOgoasaPhone
MakingaCall51
4 Whenthecallrecipientpicksup,atimerisdisplayedthattracksthedurationof
theongoingcall.
Onceyouhavebegunthecall,feelfreetoclosethecoveratanytime.Yourcall
willnotbedisconnected.
Note: Toendthecall,presstheEndbutton(theredbuttonontheedgeof
yourOgo),orscrolltoHangUpandpressEnter.
CallingaContact
YoucanselectandcallacontactfromtheContactsscreenorthePhonescreen.
► TocallacontactfromtheDialtab:
1 IntheHomescreenorApplicationmenu,selectPhoneandpressEnter.
TheDialtabisdisplayed.
2 PressEnteragain.Apop‐uplistofyourcontactsisdisplayed.
Note: Typethefirstlettersofthecontact’snametojumptothefirstcontact
thatstartswiththeseletters.
3 SelectthecontacttobecalledandpressEnter.YourcallisplacedandtheCall
screenisdisplayed.
Note: Iftheselectedcontacthasmorethanonephonenumberstored,a
symbolisincludedwiththecontactname.WhenyoupressEnter,alist
oftheavailablephonenumbersforthecontactisdisplayed;Selectthe
requirednumberandpressEnteragain.
► TocallacontactfromtheContactsList:
1 IntheContactsList,selectthecontactthatyouwanttocall.
2 Press andselectDialfromtheOptionsmenu.Yourcallisplacedandthe
Callscreenisdisplayed.
DialingaNumberfromtheCallLog
Youcandialanumberdirectlyfromoneofthecallloglists.
► TocallanumberfromtheCalllog:
IntheDialed/Received/Missedtab,selectthenumberthatyouwanttodial,
andpressEnter.
OR
PressandselectCallThisNumberfromtheOptionsmenu.
ThecallisplacedandtheCallscreenisdisplayed.

OGOUserManual
52HandlingIncomingCalls
RedialingaNumber
YoucanredialthelastnumberthatyoudialedonyourOgo.
► Toredialthelastnumber:
PresstheCallkeytwice(whentheflipcoverisopen).Acallisplacedtothelast
numberthatyoucalled.
HandlingIncomingCalls
WheneveryourOgoispoweredon,youcanreceivecallsonit–whetherornotthe
coverisopenorclosed.
HandlinganIncomingCall–OgoisOn,CoverisClosed
► Toanswerorrejectthecall(Ogoison,coverclosed):
WhenyouhearyourOgoringtone,pressCall(thegreenbuttonontheedgeof
yourOgo),toanswerorpressEnd(theredbutton)torejectthecall.
Pressthe volumekeytosilencetheincomingcall.Theringtonestops,
withoutdisconnectingthecall.
HandlinganIncomingCall–CoverisOpen
IfyouareusingyourOgoandacallarrives,theIncomingCallscreenpromptsyou
todecidewhetheryouwanttoaccept,reject,orsilencethecall.Ifthecallisfroma
numberthatislistedinyourOgoContactsList,thenthecaller’snameisdisplayed.
Ifnot,thecaller’sphonenumberisdisplayed.Ifthecallerhasoptedtoblock
his/hercallerID,“PrivateNumber”isdisplayed.
Toacceptthecall,pressthegreenbuttonontheedgeofyourOgo,orselect
AcceptandpressEnter.Starttalking!
Torejectthecall,selectRejectandpressEnter.Thecallisdisconnected,andis
listedintheReceivedtab.
Tosilencethecall,selectSilenceandpressEnter.Theplayingofyourringtone
stops,withoutdisconnectingthecall.

UsingYourOgoasaPhone
HandlingMultipleCalls53
HandlingaWaitingCall
Ifanotherpartycallsyouwhileyouaretalkingonthephone,anIncomingCall
screenisdisplayed.
Youcanchooseoneofthefollowingoptions:
Toacceptthenewcallandplacetheexistingcallonhold,selectAnswerand
pressEnter.ORpressCallkey(greenbutton)
Toendtheexistingcallandacceptthenewcallinitsplace,selectReplaceand
pressEnter.
Torejectthenewcallandcontinuetheexistingcall,selectRejectandpress
EnterORpresstheEndkey(redbutton).
HandlingMultipleCalls
YoucanjugglemultiplecallsonyourOgo,freelyswitchingbetweenongoingcalls,
orjoiningthemintoaconferencecall.
SwappingCalls
Ifyouareengagedintwocallssimultaneously,talkingtoonepersonwhilethe
otherisonhold,Ogoallowsyouto"swap"betweenthecalls–placingtheactive
callonholdsothatyoucantalktotheotherperson.
► Toswapcalls:
1 SimplypressCall(greenbutton)orpressEnter.Thecallmenuisdisplayed.
2 SelectSwapandpressEnter.Thecallsareswapped.
JoiningCalls(Conferencing)
Ifyouareengagedinanumberofsimultaneouscalls(twoormore),Ogoallowsyou
tojointhecallsintoaconference.
► Tojointhecalls:
1 Press andselectJoinfromtheOptionsmenu.Thecallsarejoined.The
numberofparticipantsintheconferencecallisdisplayedintheCallscreen.
► Tosplitthecalls:
2 Press andselectSplitfromtheOptionsmenu.Thelistofpartiesis
displayed.
3 SelectthepartyyouwanttotalkwithandpressEnter.Thecallsaresplit.Each
callreturnstoitspreviousstate(activeoronhold).

OGOUserManual
54EndingaCall
MakinganotherCallWhileTalkingonthePhone
Youcanmakeanewoutgoingcallwhileanexistingcallisongoing.
► Tomakeanewcallwhiletalkingonthephone:
1 PressEnter.Thecallmenuisdisplayed.
2 SelectNewCallfromthecallmenu.ADialscreenisdisplayed.
3 InsertthephonenumberforthenewcallandpressEnter.Thecallisdialed.
Whenthecallisanswered,youcantalkwhilekeepingthepreviouscallonhold.
Note: Optionally,youcanswapbetweentheactivecallsorcombinethemintoa
conferencecall.
EndingaCall
Itiseasytoendacall,simplypressEnd(theredbuttonontheedgeofyourOgo),
orselectHangUpintheCalltabandpressEnter.Thecallisdisconnected.
Alternatively,youcanpressEnterintheCalltab,andselectHangUpfromthecall
menu.
Muting/UnmutingaCall
Everneedtosaysomethingthatyoudon’twantthepersononthelinetohear,but
youaren’treadytohangupyet?Then,mutingthecallisthesolutionforyou.
MutingacalltemporarilydisablesOgo’smicrophonesothattheotherpartycannot
hearyou.
► Tomuteacall:
IntheCalltab,selectMuteandpressEnter.The iconisdisplayed.
► Tounmuteacall:
Tore‐enablethemicrophone,selectUnmuteandpressEnter.The icon
disappears.

UsingYourOgoasaPhone
ViewingYourCallLists55
ViewingYourCallLists
TheOgostoreslistsofdialed,receivedandmissedcalls.
Eachcalllistentryincludesthefollowing:
Thephonenumbercalledorthenameofthecontactifitappearsinyour
ContactsList."Private"appearsifthecallingnumberisnotdisclosedbythe
network.
Atimestamp,indicatingwhenthecallwasdialed,orreceived,ormissed.
Acallicon,indicatingthetypeofcall.
Note: PressingtheCallkeydisplaystheDialedtab,withthelastcallhighlighted.
► Toviewahistoryofrecentcalls:
Selectthetabforthetypeofcalllist(Dialed,Received,orMissed).The
correspondingcalllistisdisplayed.
Whileviewingacalllist,pressEntertocalltoaselectedcallnumber.Inaddition,
thefollowingoptionsareavailablefromtheOptionsmenuforaselectedentry:
1 ViewDetails:DisplaystheCallDetailsscreen,includingthephonenumberand
anyavailablecallerdetails.
2 CallThisNumber:DisplaystheCallscreen,andplacesacalltotheselected
number.
3 UseNumber:DisplaystheCallscreen,withthenumberinsertedbydefault.
Thecallisnotplaced;youcaneditthenumberandpressEntertodial.
4 ComposeSMS:DisplaystheComposeSMSscreen,withthenumberinsertedin
theTofieldbydefault.Fordetails,seeComposingaMessageonpage41.
5 AddtoContact:Enablesyoutoaddtheselectednumbertoanexistingcontact.
6 CreateContact:Enablesyoutocreateanewcontactwiththeselectednumber.
7 DeleteItem:Removesaselectedentryfromthecalllist.
8 ClearList:Removesallentriesfromthecurrentlydisplayedcalllist.
CallTimers
TheTimerstabdisplaysthefollowingtimers:
Lastcallduration:Thedurationofthelastcall,eitherdialedoutorreceived.
Receivedcallsduration:Theaccumulateddurationofallincomingcallslistedin
theReceivedcallshistory.

OGOUserManual
56CallTimers
Dialedcallsduration:Theaccumulateddurationofalloutgoingcallslistedin
theDialedcallshistory.
Allcallsduration:Theaccumulateddurationofallcalls,bothincomingand
outgoing,listedintheDialedcallsandReceivedcallshistories.(Thistimer
cannotbecleared).
► Toresetthetimers:
1 IntheTimerstab,selectClearandpressEnter.TheResetTimersscreenis
displayed.
2 SelectYesandpressEntertoconfirmthatyouwanttoresetthecalltimers.
TheLastcallduration,ReceivedcallsdurationandDialedcallsdurationtimers
arereset.
Note: TheAllcallsdurationtimerisnotreset.
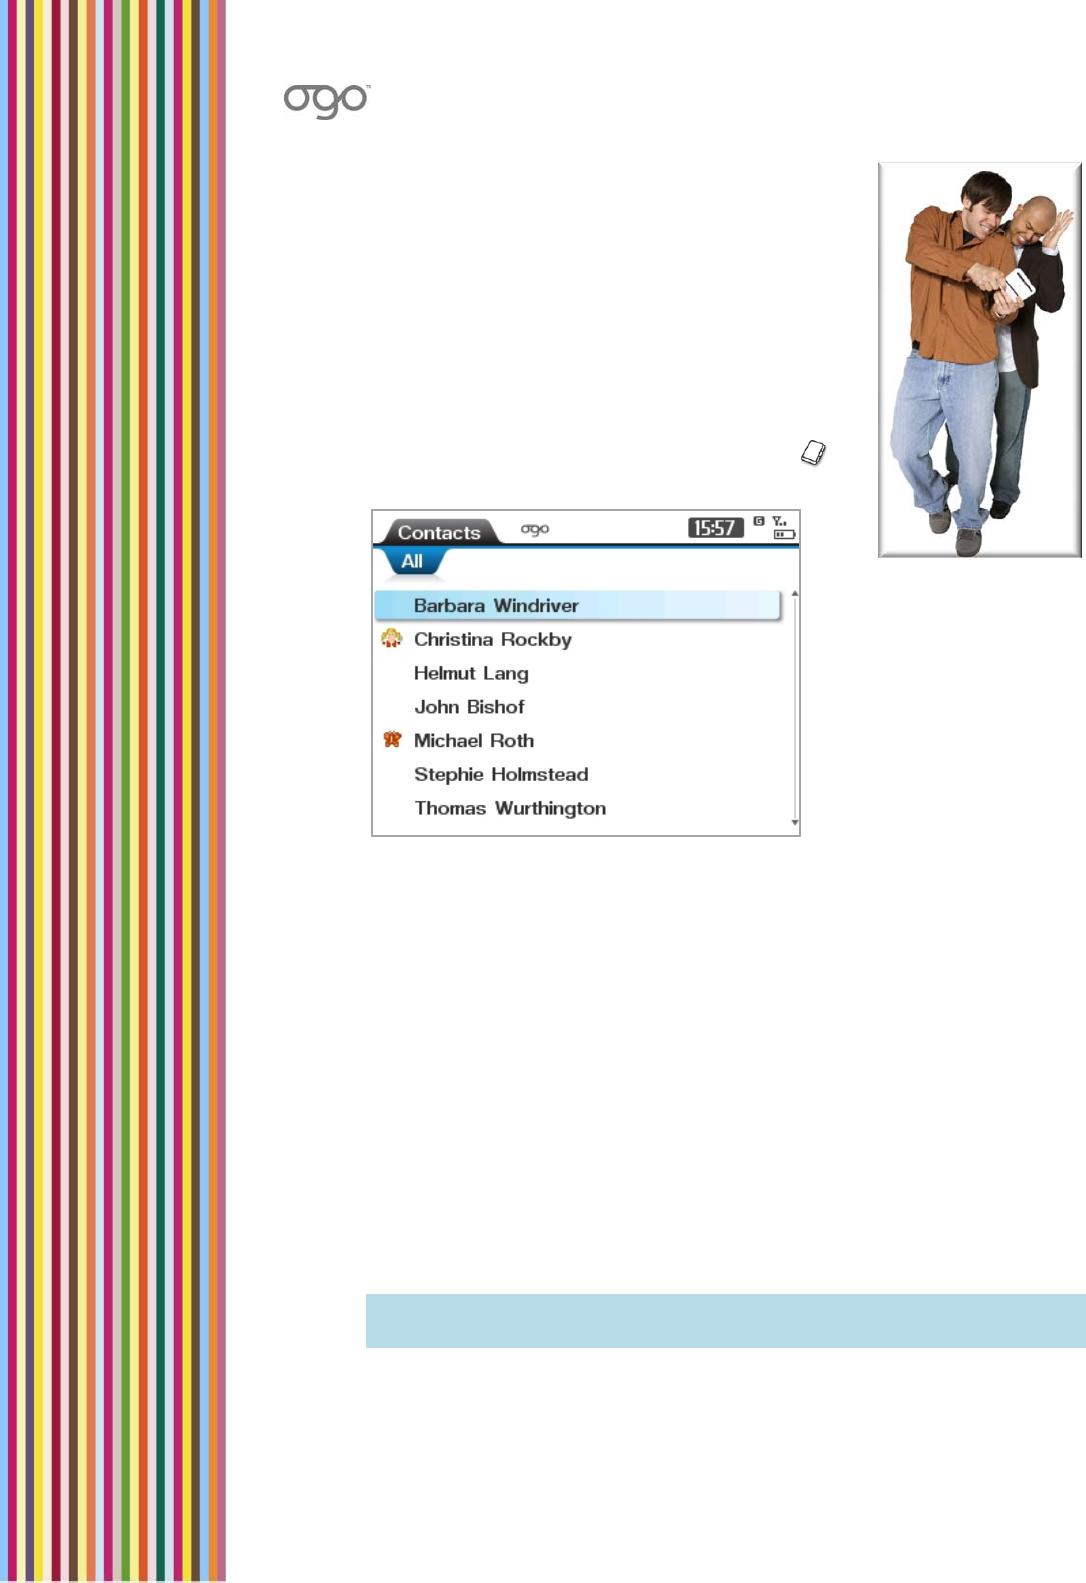
ManagingYourOgoContactsList
CallTimers57
ManagingYourOgoContactsList
YourOgoContactsListsletsyousetup,findandmanage
contactinformationforpeoplewithwhomyouexchange
e‐mail,SMSmessages,andphonecalls.
► ToaccesstheContactsList:
IntheHomescreenorApplicationmenu,select
andpressEnter.TheContactsListisdisplayed.
Figure21:ContactsList
TheAlltablistsallofyourcontacts.Anadditionaltabisdisplayedforeach
ContactsGroup(ifdefined).
WhileviewingtheContactsList,thefollowingoptionsareavailablefromthe
Optionsmenuforaselectedentry:
1 Dial:DisplaystheCallscreen,andplacesacalltotheselectednumber.Ifthe
Contacthasmultiplenumbers,youarepromptedtoselecttherequired
numberfromalist.
2 EditContactProfile:DisplaystheContactProfilescreen,enablingyoutoaddto
oredittheexistingcontactdetails.Fordetails,seeViewing/EditingContact
Profilesonpage59.
3 ComposeMessage:DisplaystheComposescreen,withthecontact’s
number/emailaddressinsertedintheTofield.Fordetails,seeComposinga
Messageonpage41.
Note: Ifthecontacthasmorethanasingleaddress(SMSnumberore‐mail),
youarepromptedtoselecttherequiredaddressfromalist.
4 NewContact:EnablesyoutocreateanewcontactintheContactProfile
screen.Fordetails,seeAddingContactsonpage58.

OGOUserManual
58AddingContacts
5 DeleteContact:RemovestheselectedcontactfromtheContactsList.For
details,seeDeletingContactsonpage58.
6 DeleteAllContacts:RemovesallcontactsfromtheContactsList.Fordetails,
seeDeletingContactsonpage58.
7 NewGroup:EnablesyoutocreateagroupwithinyourContactsList.For
details,seeWorkingwithContactGroupsonpage60.
8 ExporttoSIM:EnablesyoutoexportyourContactsListfromtheOgodevice
memorytotheSIMcardmemory.Fordetails,seeExportingContactsonpage
61.
9 ImportfromSIM:EnablesyoutoimportyourContactsListfromtheSIMcard
memoryintotheOgodevicememory.Fordetails,seeImportingContactson
page62.
AddingContacts
YoucanaddcontactstoyourOgoContactsListatanytime.
► Toaddacontact:
1 IntheContactsList,press andselectNewContactfromtheOptionsmenu.
TheContactProfilescreenisdisplayed.
2 Insertthedisplayedcontactdetails(FirstName,LastName,MobilePhone,
andE‐mailAddress)asrequired.
Note: Youmustprovideeitherthefirstorlastname.
3 ToassignanAlerticontothiscontact,selectAlerticonandpressEntertoselect
analerticonforthecontact.Fordetails,seeAssigninganAlerticontoaContact
onpage59.
4 Toincludeadditionalfieldsforthiscontact,suchasPostalAddress,Web
Addressoradditionalphonenumbers,oremailaddresses:
• SelectAddFieldandpressEnter.Amenuofoptionalfieldsisdisplayed.
SelectthedesiredfieldnameandpressEntertoaddittotheform.
• Inserttherelevantinformationinthenewfield.
• Repeatforadditionaldatafieldsifrequired.
5 SelectSave&CloseandpressEnter.Thenewcontactissaved.
DeletingContacts
YoucanremovecontactsfromyourOgoContactsList.

ManagingYourOgoContactsList
Viewing/EditingContactProfiles59
► Todeleteacontact:
1 IntheContactsList,selectthecontactyouwanttodelete.
2 Pressthe key,orpress andselectDeleteContactfromtheOptions
menu.
Aconfirmationmessageisdisplayed.
3 SelectYestoconfirmthedeletionandpressEnter.Thecontactisdeletedfrom
yourOgoContactsList.
► Todeleteallyourcontacts:
1 IntheContactsList,press andselectDeleteAllContactsfromtheOptions
menu.Aconfirmationmessageisdisplayed.
2 SelectYestoconfirmthedeletionandpressEnter.Thecontactisdeletedfrom
yourOgoContactsList.
Viewing/EditingContactProfiles
Youcanviewexistingcontactprofilesandedittheinformationtheycontain.
► Toviewacontactprofile:
IntheContactsList,selectthecontactandpressEnter.TheContactProfile
screenisdisplayed.
Note: Fordetailsondefiningacontactprofile,seeAddingContactsonpage58.
AssigninganAlerticontoaContact
Ogo’sanimatedAlerticonsmakeiteasyforyoutoidentifywhensomeone
importanttoyouhassentyouamessage.SimplyassignanAlerticontoacontact
andanattractiveanimationpopsuponyourogoquick‐accesslistwheneverthat
contactsendsyouamessage.
► Toassignanalerticon:
1 IntheContactProfilescreen,selecttheAlerticonfieldandpressEnter.The
AssignAlerticonscreenisdisplayed.
2 ScrollandselectthedesiredAlerticon.
Note: WhenanAlerticonisselected,theanimationisplayed.Youcanscroll
throughandviewthevariousanimationsbeforemakingyourselection.
3 PressEnter.
4 SelectDoneandpressEnter.TheselectedAlerticonisassignedtothecontact,
andisdisplayedonthedeviceeachtimeamessageisreceivedfromthe
contact.

OGOUserManual
60WorkingwithContactGroups
WorkingwithContactGroups
OrganizingyourcontactsintoContactGroupsmakesiteasyforyoutolocatethat
specialperson’sdetailswhenyouneedthem.Similartoamailinglist,anOgo
ContactGroupisalistofaddressesthatalsoenablesyoutosende‐mailandSMS
messagestotheentiregroupatonce.
CreatingaGroup
YoucancreateContactGroupsandthenaddmultiplecontactstothegroups.
Note: Thesamecontactcanbeaddedtomorethanonegroup.
► Tocreateagroup:
1 IntheOgoContactsList,press andselectNewGroupfromtheOptions
menu.TheNewGroupscreenisdisplayed.
2 Insertanameforthegroup,forexample,family.
3 SelectOKandpressEnter.Atabisaddedforthenewgroup.
AddingContactstoGroups
YoucanassignacontacttooneormoreContactGroups.Thecontactwillcontinue
toappearintheAlltabaswellasinthetab(s)forthegroup(s)towhichithasbeen
added.
► Toaddacontacttoagroup:
1 Inthegroup’stab,press andselectAddContacttoGroupfromthe
Optionsmenu.Yourexistingcontactsarelistedinapop‐uplist.
2 Selectthecontacttobeaddedtothegroup,andpressEnter.Thecontactis
listedinthegroup’stab.
Note: Ifthecontacthasmorethanoneaddress(SMSorE‐mail),youare
promptedtoselecttherequiredaddressfromalist.
RemovingContactsfromGroups
YoucanremoveacontactfromaContactGroup.(Thecontactwillcontinueto
appearintheAlltab.)
► Toremoveacontactfromacontactgroup:
1 Inthegroup’stab,selectthecontact.

ManagingYourOgoContactsList
WorkingwithContactGroups61
2 Press andselectRemovefromGroupfromtheOptionsmenu.Thecontact
isremovedfromthegroup.
SendingaMessagetoaGroup
Youcansendamessagetoanentiregroupofcontactsatthesametime,without
havingtoinserttheindividualaddressoneatatime.
► Tosendamessagetoagroup:
1 Inthegroup’stab,press andselectComposeMessagetoGroupfromthe
Optionsmenu.TheComposescreenisdisplayedwithyourdetailsintheFrom
fieldandthegroupnameintheTofield.
OR
IntheTofieldinComposescreen,pressEnterandselectaContactGroupfrom
theContactsList.
2 Insertthesubjectandmessagetext.
3 SelectSendandpressEnter.Themessageissenttoallcontactsinthegroup.
RemovingaContactGroup
YoucanremoveaContactGroup.
Note: RemovingaContactGroupdoesnotremovethecontactsfromthe
ContactsList.ExistingcontactscontinuetoappearintheAlltab.
► Toremoveacontactfromagroup:
1 Inthegroup’stab,press andselectRemoveGroupfromtheOptions
menu.Aconfirmationmessageisdisplayed.
2 SelectYesandpressEnter.Thegroup’stabisremoved.

OGOUserManual
62ExportingContacts
ExportingContacts
YoucanexportspecificcontactsoryourentireOgoContactsListfromthedevice
memorytoyourSIMcard,forexample,tomakethecontactinformationavailable
onanotherdevice.
► Toexportcontacts:
1 IntheContactsList,press andselectExporttoSIMfromtheOptions
menu.Asub‐menuisdisplayed.
2 ToexporttheentireContactsList,selectAllRecordsandpressEnter.
OR
Toexportonlytheselectedcontact,selectThisRecordandpressEnter.
TheExportRecord(s)screenisdisplayed.
3 Selectthecheckboxesforthetypesofphonenumberstobeexported.
Note: Theremaybealimittothenumberofcharacters/fieldsthatmaybe
exported.
4 SelectExportandpressEntertoexportthecontactdata.Apop‐upmessage
indicatestheprogressoftheexportprocess.
ImportingContacts
YoucanimportcontactsfromyourSIMcardtoyourOgoContactsList.
► Toimportcontacts:
1 IntheContactsList,press andselectImportfromSIMfromtheOptions
menu.TheImportRecord(s)screenisdisplayed,advisingyouthatboththe
devicecardandtheSIMcardmaycontaindifferentnumbersforthesame
contactfields.
2 Tooverridethelocalentries,selectYesandpressEnter.
OR
Tomanuallyresolveanypotentialconflicts,selectNoandpressEnter.
TheCopyingscreenisdisplayedwhiletherecordsarecopied.
Note: Ifyouopttomanuallyresolveconflictsandconflictsaredetected,youare
promptedtooverridethelocalentry.(SelectYesorNo,asrequired,and
pressEnter.)

ManagingYourOgoContactsList
WorkingwiththeAddressClipboard63
WorkingwiththeAddressClipboard
TheAddressClipboardmakesiteasytoaddnewcontactstoyourOgoContactsList
oraddnewinformationtoexistingcontactsbasedonthecontactdataavailable
fromthemessagesinyourmailbox.Youcanalsosendamessageorplaceacall
directlyfromtheclipboard,withoutaddinganewcontact.
Menuoptionsvaryaccordingtotypeofentryselectedinclipboardandmayinclude
acombinationofthefollowing:
AddtoContact:Enablesyoutoaddanumberore‐mailaddresstoanexisting
contact.
CreateNewContact:Enablesyoutocreateanewcontact.Fordetails,see
CreatingaContactfromtheClipboardonpage63.
Compose:EnablesyoutosendanSMSore‐mailmessageusingaddressonthe
clipboard,withoutaddinganewcontact.Fordetails,seeComposingaMessage
onpage41.
Call(SMSonly):Enablesyoutoplaceanoutgoingcalltothespecifiednumber.
Open(URLonly):EnablesyoutobrowsetothespecifiedURL.
CreatingaContactfromtheClipboard
YoucancreateacontactdirectlyfromwithinamessageusingtheAddress
Clipboard.
► Tocreateanewcontactfromtheclipboard:
1 WhenviewinganEmailorSMSmessage,orintheIMChatscreen,press
andselectAddressClipboardfromtheOptionsmenu.TheAddressClipboardis
displayed.
2 SelecttheentryinthedisplayedlistandpressEnter.Apop‐upmenuis
displayed.
3 SelectCreateNewContactandpressEnter.TheContactProfilescreenis
displayed.
Note:Ifyouselectane‐mailaddressitisinsertedautomatically.Ifyouselect
aphonenumber,youarepromptedtoselectthetypeofnumber
(MobilePhone,MainPhone,HomePhone,WorkPhone,Fax,orPager).
4 Addtooreditthedisplayedcontactdetails(FirstName,LastName,Mobile
Phone,andE‐mailAddress)asrequired.
5 (Optional)SelectAlerticonandpressEntertoselectanalerticonforthe
contact.(Fordetails,seeAssigninganAlerticontoaContactonpage59.)

OGOUserManual
64WorkingwiththeAddressClipboard
6 (Optional)Toaddanadditionaldatafield:
• SelectAddFieldandpressEnter.Amenuofoptionalfieldsisdisplayed.
SelectthedesiredfieldnameandpressEntertoaddittotheform.
• Inserttherelevantinformationinthenewfield.
7 SelectSave&CloseandpressEnter.Thenewcontactissaved.
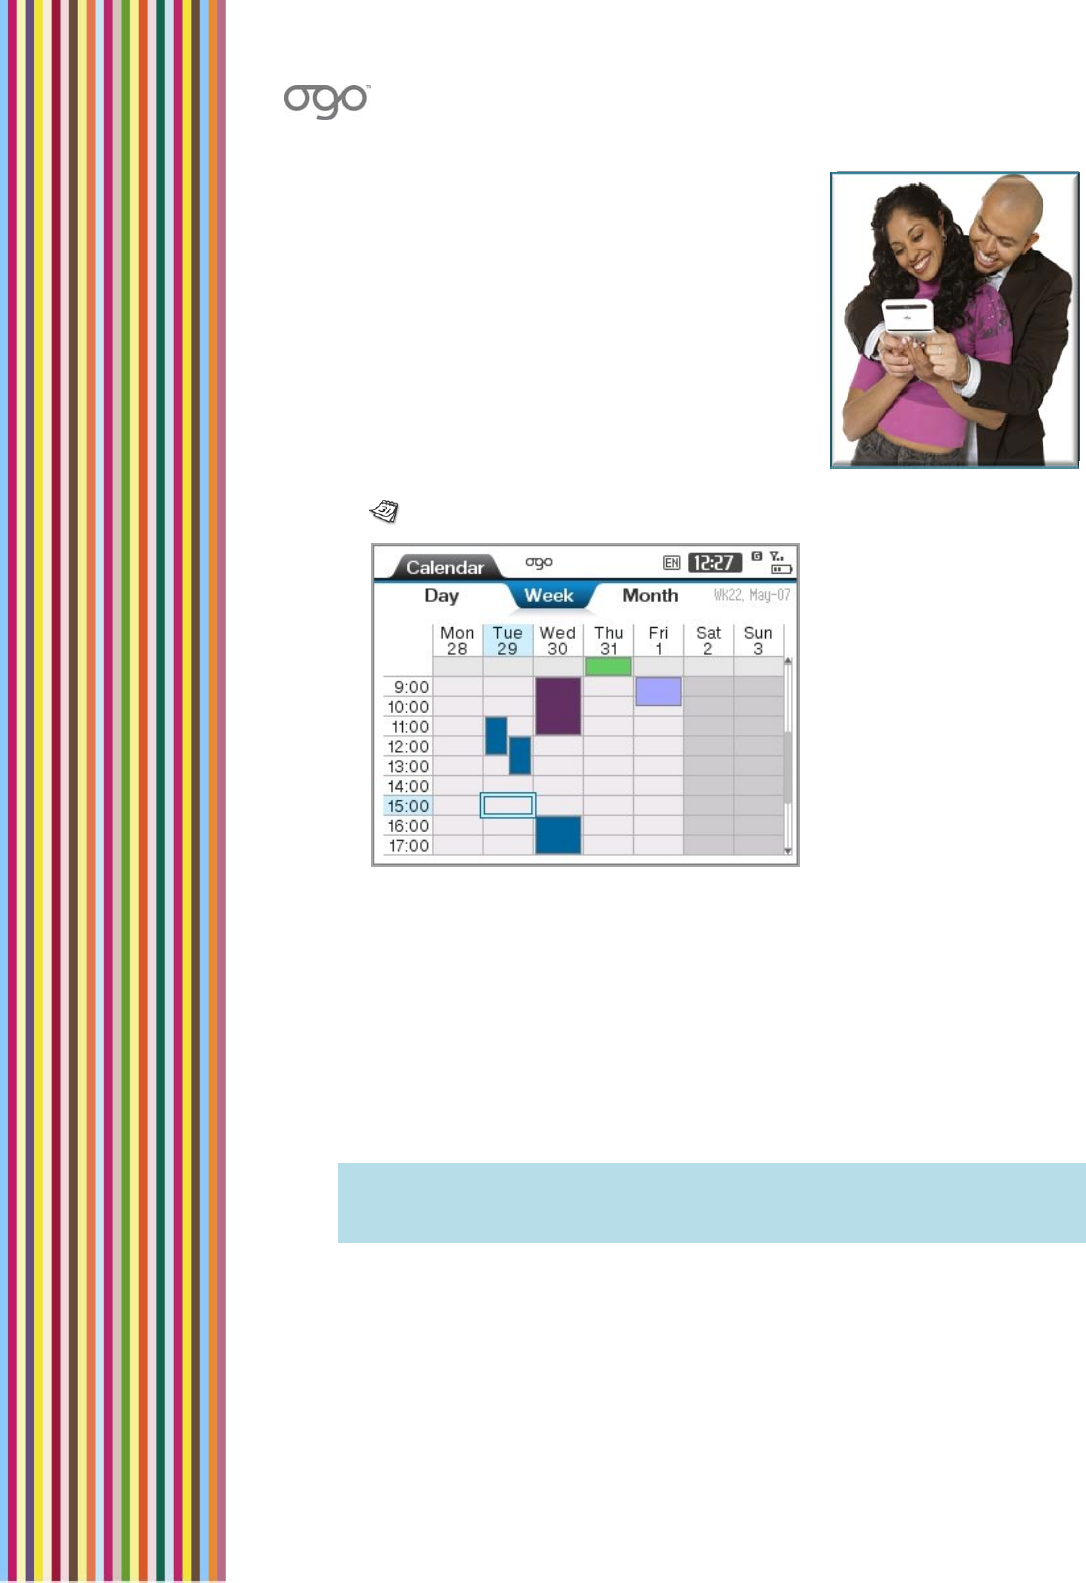
WorkingwiththeCalendar
WorkingwiththeAddressClipboard65
WorkingwiththeCalendar
Ogo’sCalendarenablesyoutomanageyour
scheduleonthego.Viewyourappointmentsfor
today,thisweekorthismonth,andgetremindersin
advance.
► ToaccesstheCalendar:
IntheHomescreenorApplicationmenu,select
CalendarandpressEnter.TheCalendarisdisplayed.
Figure22:Calendar
TheCalendarincludesthreetabs:
Day/Summary:Displaysyourscheduleforasingleday,orasummaryviewof
theappointmentsscheduledfor3days
Week:Displaysyourscheduleforaweek,withacolumnforeachdayofthe
week.
Month:Displaysyourscheduleforamonth,witharowforeachweekinthe
month.
Note: Onallthreetabs,timeblocksforwhichappointmentsexistaremarkedin
differentcolors,accordingtotheir“Showas”value–bluefor“busy”,
purplefor“outofoffice”,lilacfor“tentative”andgreenfor“free”.
ThefollowingoptionsareavailablefromtheOptionsmenuintheCalendar:
NewAppointment:Enablesyoutoaddanewappointment.Fordetails,see
AddinganAppointmentonpage66.

OGOUserManual
66AddinganAppointment
OpenAppointment:OpenstheAppointmentscreen,enablingyoutoviewand
edittheappointmentdetails.Fordetails,seeOpening/EditinganAppointment
onpage67.
DeleteAppointment:Removestheappointmentfromyourschedule.For
details,seeDeletinganAppointmentonpage67.
SummaryMode:Displaysalistoftheappointmentsinyourcalendar.
DayView:ChangestheviewfromSummaryModetoDayView.
Today:Highlightsthecurrentday’sscheduleonthescreen.
Clean‐Up:Enablesyoutodeleteoldappointmentsfromyourcalendar.For
details,seeDeletingOldAppointmentsonpage67.
AddinganAppointment
AddingappointmentstoyourOgocalendarmakesiteasierforyoutokeeptrackof
yourschedule.
► Toaddanappointment:
1 IntheCalendar,press andselectNewAppointmentfromtheOptions
menu.TheAppointmentscreenisdisplayed.
2 InsertthesubjectintheSubjectfield.(InsertingtheLocationfieldisoptional.)
3 Ifyouareschedulinganall‐dayappointment,selectAll‐dayeventandpress
Enter.
4 Ifyouaresettinganappointmentforpartofaday,insertthetimesanddates
intheStartandEndfields.
5 SelectShowasandpressEnter.Adrop‐downlistofavailablestatusesis
displayed.SelectthestatustobeshownonyourcalendarandpressEnter.
6 Bydefault,areminderwillbedisplayed15minutesbeforethisappointment.If
youwanttochangethistimeorcancelthereminder,selectReminderand
pressEnter.Adrop‐downlistisdisplayed.Selecthowfarinadvanceyouwant
toberemindedfromthelistofavailablevalues,orselectnoneifyoudonot
wanttoberemindedaboutthisappointment.
7 (Optional)Tosetthepriorityoftheappointment,selectImportanceandpress
Enter.Selectthedesiredpriority(Low,NormalorHigh)fromthesub‐menu.
ThedefaultpriorityisNormal.
8 (Optional)InsertanoteintheNotefield.
9 SelectSaveandpressEntertoaddtheappointmenttoyourcalendar.

WorkingwiththeCalendar
Opening/EditinganAppointment67
Opening/EditinganAppointment
Youcanviewandupdatetheappointmentdetails,forexample,ifthelocationor
timehasbeenchanged.
► Toopen/editanappointment:
1 IntheDaytaboftheCalendar,selecttheappointmentandpressEnter.
Notes:Alternatively,youcanpress andselectOpenAppointmentfrom
theOptionsmenu.
Ifmorethanoneappointmentisscheduledfortheselectedhour,you
arepromptedtoselecttheappointmentyouwanttoopen.
TheAppointmentscreenisdisplayed.
2 Changetheappointmentdetails,asrequired.Fordetails,seeAddingan
Appointmentonpage66.
3 SelectSaveandpressEnter.Theappointmentdetailsareupdatedaccordingly.
DeletinganAppointment
Themeetingwascancelled.Noproblem.Youcandeletetheappointmentfrom
yourcalendar.
► Todeleteanappointment:
1 IntheDaytaboftheCalendar,selecttheappointmentyouwanttodelete.
2 Pressthe key,orpress andselectDeleteAppointmentfromthe
Optionsmenu.
TheDeleteAppointmentscreenisdisplayed.
3 SelectYestoconfirmthedeletionandpressEnter.Theappointmentisdeleted
fromyourschedule.
Note: Ifmorethanoneappointmentisscheduledfortheselectedhour,youare
promptedtoselecttheappointmentyouwishtodelete.
DeletingOldAppointments
Youcandeleteoutdatedappointmentsfromyourcalendar.
► Todeleteoldappointments:
1 IntheCalendar,press andselectCleanupfromtheOptionsmenu.Asub‐
menuisdisplayed.

OGOUserManual
68DeletingAllAppointments
2 SelectDeleteOldAppointmentstodeleteappointmentsaccordingto
scheduleddates.TheDeleteOldAppointmentsscreenisdisplayed.
3 PressEnterandselectthetimeframetoserveasthebasisfordeletingold
appointments(olderthan1week,2weeks,andsoon).
4 SelectOKandpressEnter.Appointmentsthatpredatedthesettimeframeare
deletedfromthecalendar.
DeletingAllAppointments
Youcandeleteallofyourappointmentsfromyourcalendar.
► Todeleteallappointments:
1 IntheCalendar,press andselectCleanupfromtheOptionsmenu.Asub‐
menuisdisplayed.
2 SelectDeleteAllAppointmentstodeleteappointmentsaccordingtotheir
scheduleddates.TheDeleteAppointmentsscreenisdisplayed.
3 SelectYestoconfirmthedeletionandpressEnter.Allappointmentsare
deletedfromyourschedule.
AppointmentReminders
Appointmentremindersaredisplayedbeforethetimeinwhichtheappointment
takesplace,accordingtothevalueselectedintheReminderfieldwhenthe
appointmentwascreated.
TheReminderscreendisplaystheappointment’ssubject,location,andthetime
remainingbeforetheappointmenttakesplace.Youarepromptedtotakeoneof
thefollowingactions:
Remindmein:EnablesyoutosetatimeintervalafterwhichtheReminderwill
pop‐upagain.
Snooze:TheReminderscreenwillpop‐upagainafterthetimeintervaldefined
intheRemindmeinfield.
Dismiss:TheReminderscreenisdismissedanddoesnotre‐appear.
Open:OpenstheAppointmentscreen.
SelectthedesiredoptionandpressEntertocontinue.
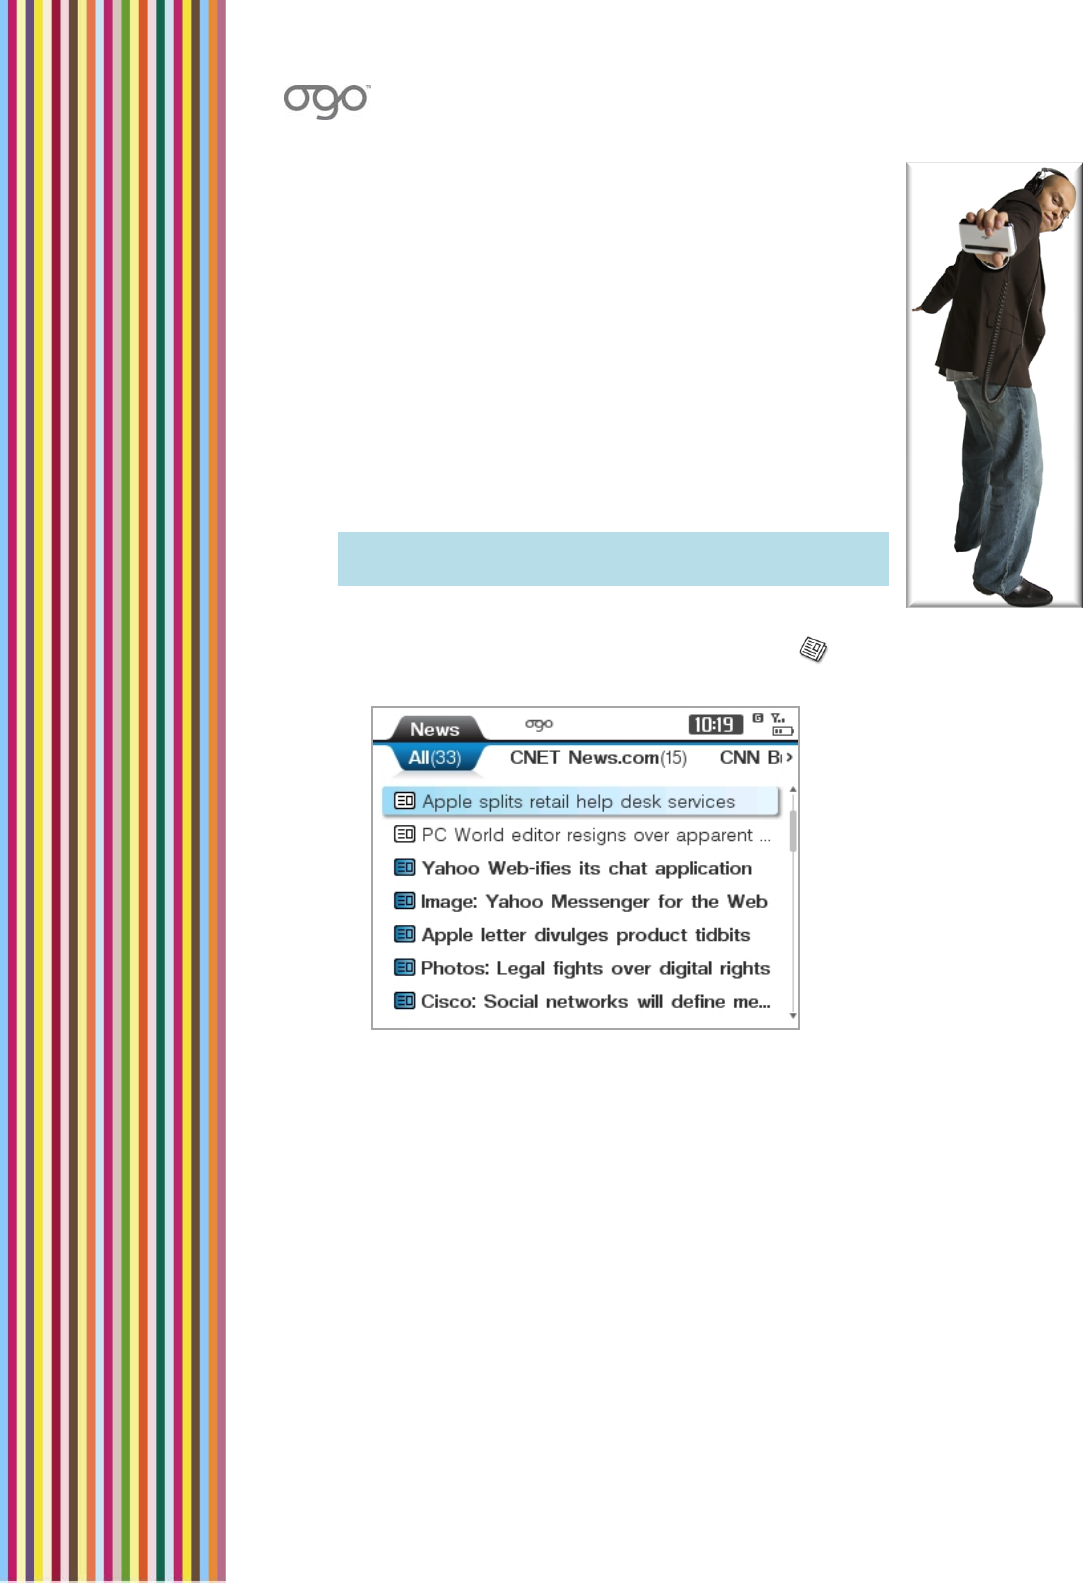
ViewingtheNews
AccessingNewsFeeds69
ViewingtheNews
Tostayintouchwithyourworld,OgoenablesyoutogetRSS
newsfeedsforuptothemomentnews,informationand
alertsaboutthesubjectsyoucareaboutmost.
TheOgoNewsapplicationprovidesasimpleandintuitive
interfaceforreceivingupdatesfromwebsitesfeaturing
standardRSSfeed.Youcanmonitorseveralfeeds
concurrently.
Note: TheNewsapplicationmaynotbeavailableonyour
specificversionofthedevice.
► ToaccessNews:
IntheHomescreenorApplicationmenu,selectNewsandpressEnter.The
Newsapplicationisdisplayed.
Figure23:News
AccessingNewsFeeds
TheNewsapplicationcontainsseveraltabs.
TheAlltablistsalloftheavailablenewitems.Eachoftheadditionaltabsdisplaysa
singlesourceofnews(anRSSFeed).Thenumberofunreadnewsitemsoneachtab
appearsinparenthesisafterthetabname.
Ineachnewsitemslist,thecoloroftheiconindicatesthestatusoftheitem:a
color‐fillediconindicatesanunreadnewsitem.Awhiteiconindicatesthattheitem
hasbeenread.

OGOUserManual
70AddingaNewsFeed
► TorefreshalltheNewsFeeds:
IntheAlltaboftheNewsapplication,press andselectRefreshAllFeeds
fromtheOptionsmenu.Afterafewseconds,allnewsitemslistsbegin
updating.
► TorefreshoneoftheFeeds:
1 NavigatetothetabholdingtheFeedofinterest.
2 Press andselectRefreshfromtheOptionsmenu.Afterafewseconds,the
currentnewsitemslistbeginsupdating.
► Toviewanewsitem:
1 SelectthenewsitemandpressEnter.Theitemisdisplayed,includingthetime,
dateandsupplyingfeed.
2 PressBacktoreturntothelist,andselectanotheritemofinterest,
OR
SelectNextorPreviousbuttonatthebottomofthescreenandpressEnter,to
viewthenext/previousnewsitem.
► ToviewthefullnewsitemintheWebBrowser:
1 SelectthenewsitemintheNewslist.
2 Press andselectOpeninBrowserfromtheOptionsmenu,andpressEnter.
ThefullnewsitemisopenedintheWebBrowser
► Tomarkanitemasread/unread:
Selectthenewsitem,thenpress andselectMarkasUnread/MarkasRead
fromtheOptionsmenu.Thestatusofthenewsitemchangesaccordingly.
AddingaNewsFeed
Yourdeviceispreconfiguredwithasetofavailablefeeds.Youcanaddfeedsupto
atotalof10feeds.
► Toaddacustomnewsfeed:
1 IntheAlltaboftheNewsapplication,press andselectAddNewFeedfrom
theOptionsmenu.TheFeedSelectionscreenisdisplayed,withtheoption
"[Custom]"highlighted.
2 SelectDoneandpressEnter.TheFeedSettingsscreenisdisplayed.
3 IntheFeedTitlefield,insertthenameyouwishtouseforthisfeed.
4 IntheFeedURLfield,insertthefeedsURLaddress.

ViewingtheNews
AddingaNewsFeed71
5 InthePollingPeriodfield,settheintervalbetweencheckingfornewsupdates.
(ItcanalsobesettoOff,inwhichcasenewswillberetrievedonlywhenyou
selectRefreshfromtheOptionsmenu.)
6 Ifyouwanttogetanalertbannereachtimenewsitemsarereceived,select
BreakingNewsandpressEnter.
7 SelectDoneandpressEnter.Atabisaddedforthenewfeedandrelevant
newsitemsareretrievedautomatically.
► Toaddapredefinednewsfeed:
1 IntheAlltaboftheNewsapplication,press andselectAddNewFeedfrom
theOptionsmenu.TheFeedSelectionscreenisdisplayed,withtheoption
"[Custom]"highlighted.
2 PressEnter.Alistofavailablefeedsisdisplayed.
3 SelectthedesiredfeedandpressEnter.
4 SelectDoneandpressEnter.Atabisaddedforthenewfeedandrelevant
newsitemsareretrievedautomatically.
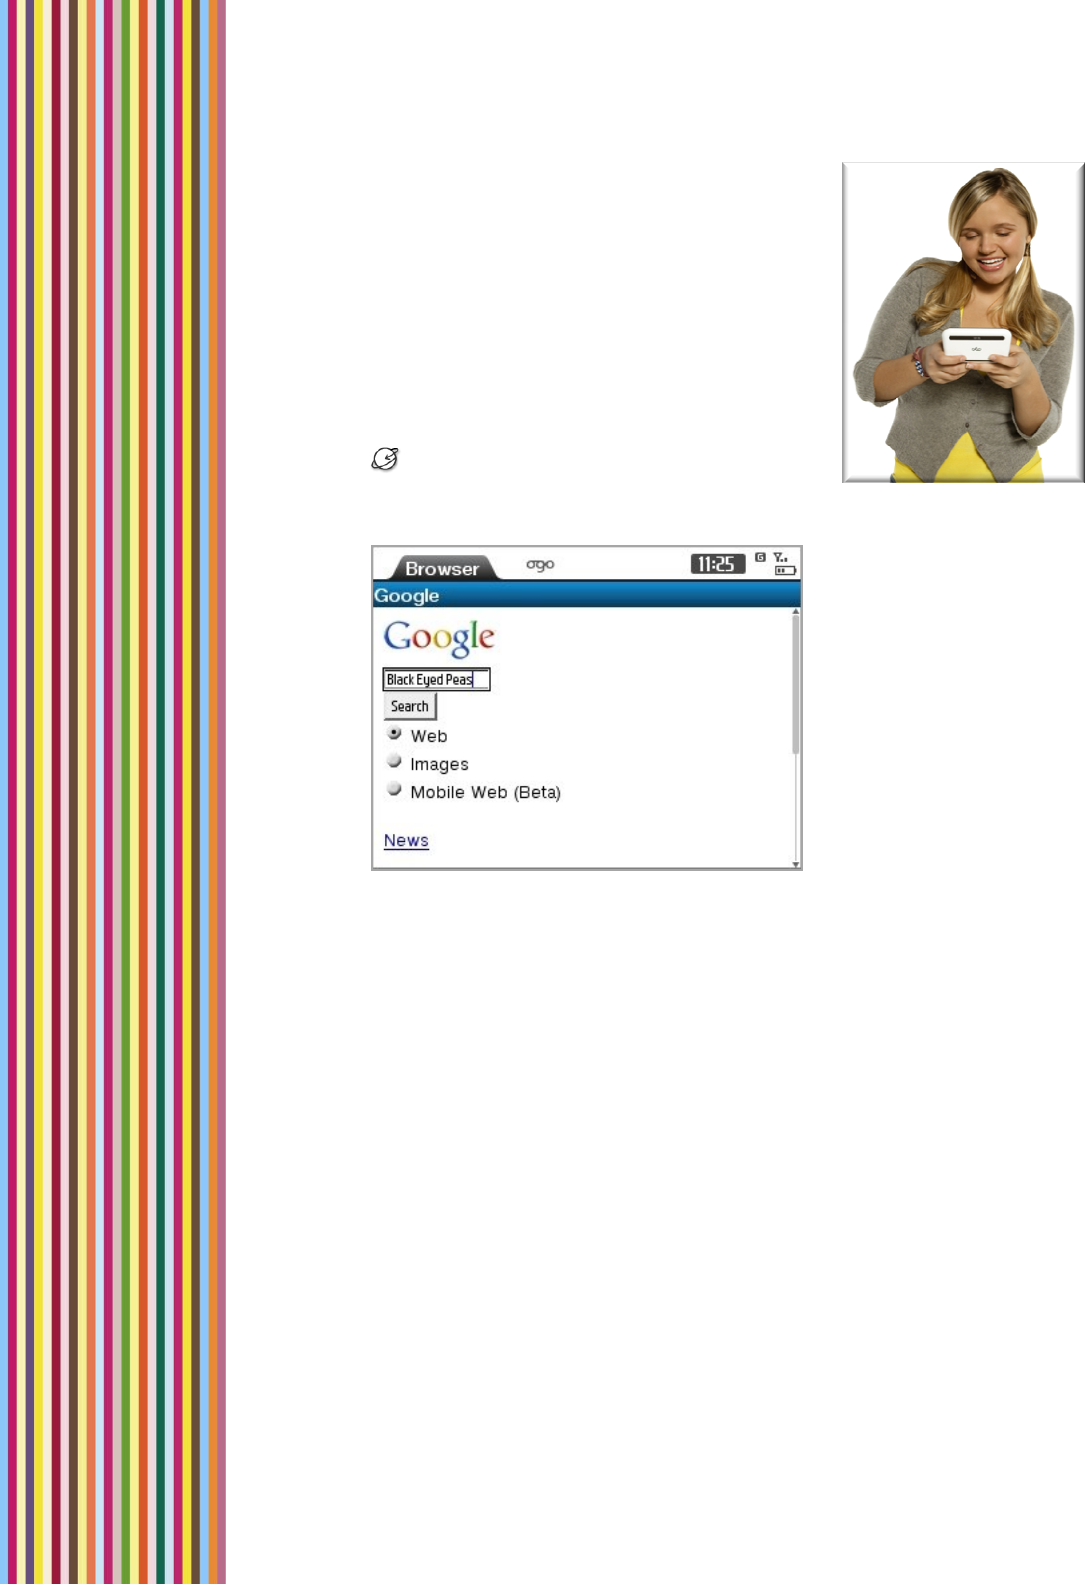
OGOUserManual
72AddingaNewsFeed
BrowsingtheWeb
WithOgo,youcanbrowsethewebfrompractically
anywhere.
► ToopentheWebBrowser:
IntheHomescreenorApplicationmenu,select
WebBrowserandpressEnter.TheWeb
Browserisdisplayed.Whentheconnectionis
established,yourhomepageappears.
Figure24:WebBrowser
WhilebrowsingtheInternet,thefollowingoptionsareavailablefromtheOptions
menu:
1. GotoURL:Enablesyoutoopenaspecificwebpage.Fordetails,see
RequestingaSpecificURLonpage73.
2. Navigate:Displaysasubmenuofstandardnavigationoptions,including
Refresh,Forward,Backward,Stop,andHomepage.
3. View:Displaysasubmenuofstandardviewingoptions,includingZoomin,
Zoomout,Resetzoom,andThumbnailOn/Off.
4. AddtoBookmarks:Enablesyoutocreatebookmarkstoselectedweb
pages.Fordetails,seeAddingaBookmarkonpage73.
5. Open:Enablesyoutoviewyourbookmarksandbrowsinghistory.For
details,seeOpeningaBookmarkonpage74.

BrowsingtheWeb
RequestingaSpecificURL73
6. Security:Displaysactivesessionandsessioncertificateinformation,when
applicable.
7. Properties:Displaysthepropertiesofthecurrentwebpage,includingpage
title,address,andpagesize.
RequestingaSpecificURL
IfyouknowtheURLofthewebpageyouwouldliketoview,youcaninserttheURL
andviewitonyourOgo.
► TogotoaspecificURL:
1 IntheWebBrowser,press andselectGotoURLfromtheOptionsmenu.
TheOpennewpagescreenisdisplayed,includingahistoryofpreviouslytyped
URLs.
2 Inthehttp://field,inserttheURLofthepagethatyouwanttoopenandpress
Enter.
OR
IfyouhaverecentlytypedtheURL,selectitinthehistorylistandpressEnter.
YourOgoWebBrowserconnectstoanddisplaystherequestedURL.
WorkingwithBookmarks
Creatingbookmarksmakesiteasiertoreturntothewebpagesthatyouneedthe
most.Andyoucanmakeiteasiertofindyourbookmarksbyorganizingtheminto
personalfolders.
AddingaBookmark
Youcancreateabookmarktoanywebpagethatyouexpecttovisitfrequently.
► Toaddabookmark:
1 WhileviewingapageintheWebBrowser,press andselectAddto
BookmarksfromtheOptionsmenu.TheAddtoBookmarksscreenisdisplayed.
ThescreennameandURLofthecurrentlydisplayedpageareinserted
automatically.
2 (Optional)Insert/editthebookmarktitle.

OGOUserManual
74WorkingwithBookmarks
3 SelectOKandpressEnter.TheBookmarksscreenisdisplayed,withtheitem
Addherehighlighted.
Tosavethebookmarkinmaindirectory,pressEnter,
OR
Tosavethebookmarkinanexistingfolder,selectthefolderandpressEnter.
AddHereishighlighted.PressEntertoaddthebookmark.
RemovingaBookmark
Youcanremovebookmarkstowebpagesthatarenolongerofinteresttoyou.
► Toremoveabookmark:
1 IntheBookmarksscreen,selectthebookmark.
2 Press andselectDeletefromtheOptionsmenu.Thebookmarkisdeleted
fromyourBookmarkslist.
AddingaFolder
Foreasiernavigation,youcancreatefoldersforyourbookmarks.
► Toaddafolder:
1 IntheBookmarksscreen,press andselectCreatenewfolderfromthe
Optionsmenu.TheEnterfoldernamescreenisdisplayed.
2 Insertthefoldername.
3 SelectOKandpressEnter.ThefolderisaddedintheBookmarksscreen.
OpeningaBookmark
Selectingabookmarkisafastandeasywayofopeningawebpage.
► Toopenapageusingabookmark:
1 IntheWebBrowserscreen,press andselectOpenfromtheOptionsmenu.
Asub‐menuisdisplayed.
2 SelectBookmarksandpressEnter.TheBookmarksscreenisdisplayed.
3 SelectabookmarkandpressEntertodisplaythecorrespondingwebpage.

BrowsingtheWeb
ViewingYourBrowsingHistory75
ViewingYourBrowsingHistory
YoucanviewalistoftheURLsrecentlyopenedonyourOgo.
► Toviewthehistory:
1 IntheWebBrowser,press andselectOpenfromtheOptionsmenu.Asub‐
menuisdisplayed.
2 SelectHistoryandpressEnter.TheHistoryscreenisdisplayed.
Thesitesaccessedaresortedaccordingtoday,fromthecurrentdaybackward.
YoucantakethefollowingactionsfromwithintheHistoryscreen:
• Toviewthesitesaccessedaspecificday,selectthedayandpressEnter.
• Tosortthesites(bydate,bysite,bylastvisited,orbymostvisited),press
andselectSortfromtheOptionsmenu.
• Toviewalistofpagesaccessedonaspecificsite,selecttheURLandpress
Enter.
• Todisplayaspecificpage,selectthepageinthelistandpressEnter.
• Todeleteaselectedsite/page,press andselectDeletefromthe
Optionsmenu.
• Tocleartheentirehistory,press andselectDeleteallfromtheOptions
menu.
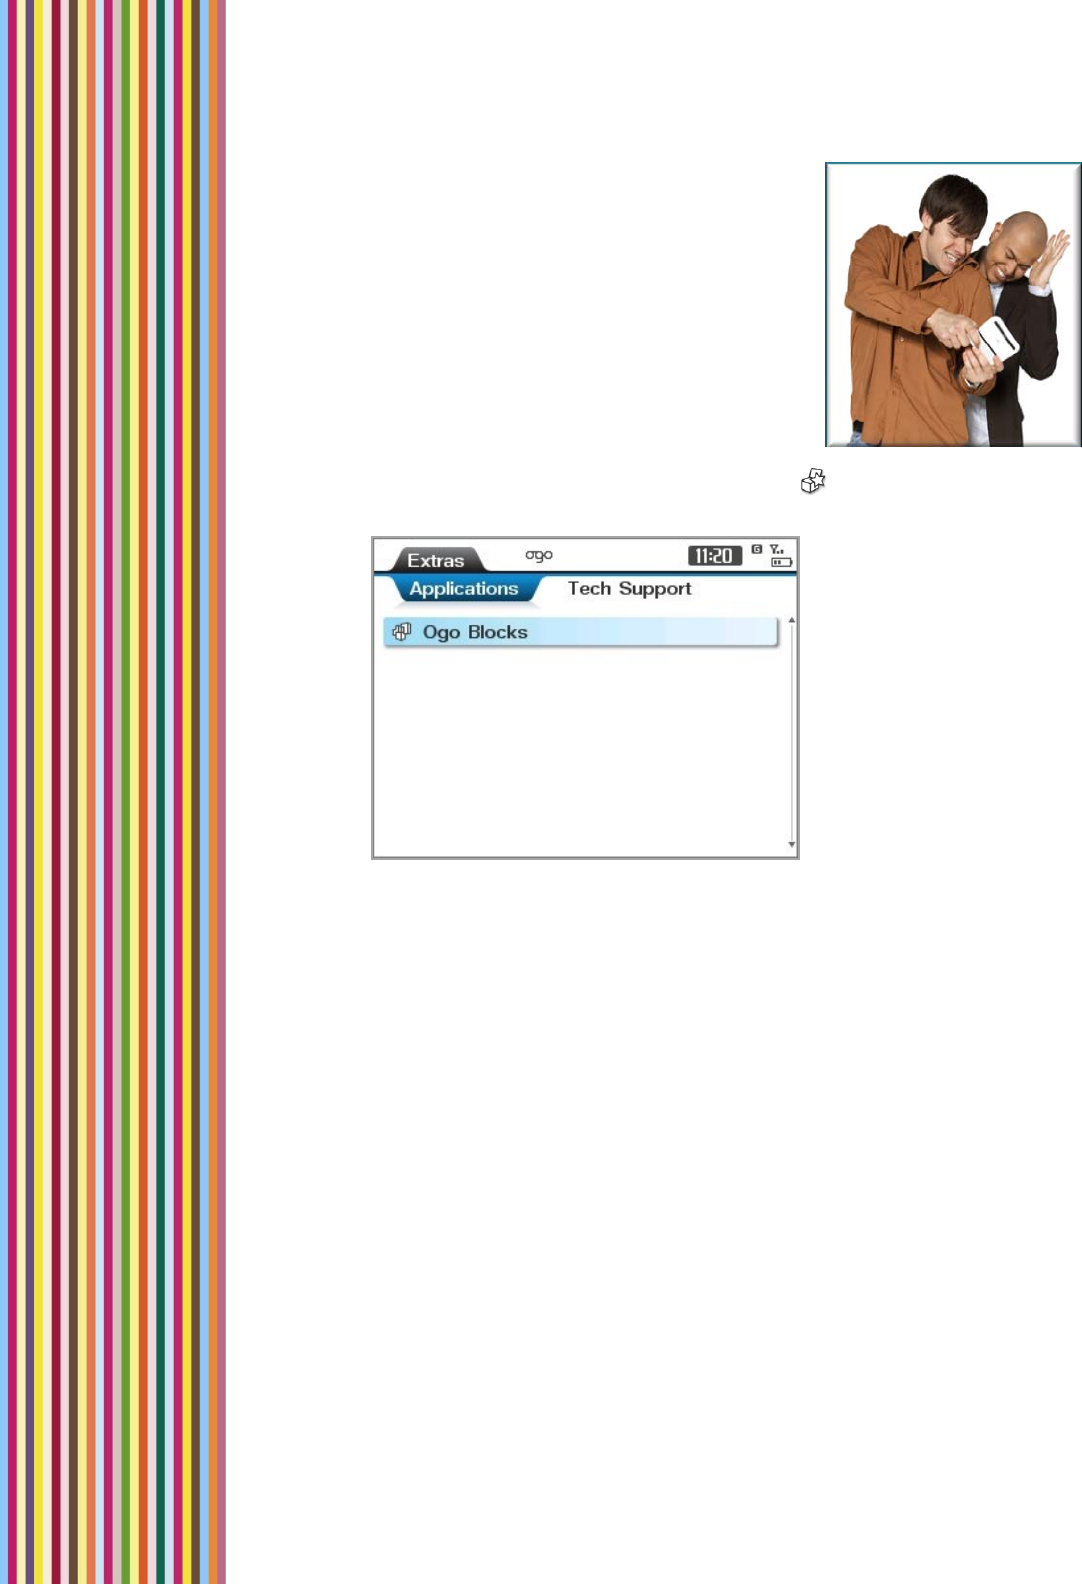
OGOUserManual
76PlayingOgoBlocks
OgoExtras
TheOgoExtrasprovideaccesstoanyadditional
applicationsavailableonthedevice,suchasOgo
Blocks,aswellastothecontactdetailsfortechnical
supportpurposes.
► ToaccessExtras:
IntheHomescreenorApplicationmenu,select ExtrasandpressEnter.The
Extrasscreenisdisplayed.
Figure25:OgoExtras
TheExtrasscreenincludestwotabs:
Applications:Listsanypre‐installedapplicationsavailableonthedevice.
TechSupportInfo:Liststhecontactdetailsfortechnicalsupportpurposes.
PlayingOgoBlocks
TheBlocksgamecomespre‐installedonyourOgo.Inthisgame,yourotateshapes
astheyfallsothattheyfittogethertoformafullhorizontalrow.
► ToplayOgoBlocks:
1 IntheApplicationtaboftheExtrasscreen,selectOgoBlocksandpressEnter.
2 Usethegamecontrolkeystocontrolthemovementofthefallingblocks.

OgoExtras
ViewingTechnicalSupportInformation77
Table12:BlocksGameControls
ControlKeyFunctionality
A,Z(inaQWERTYkeyboard)
orY(inaQWERTZkeyboard),
innerleftarrowkey
Movesapiecetotheleft
L","innerrightarrowMovesapiecetotheright
S,X,K,M,innerUparrow
key,outeruparrowkey
Rotatesapiece
Space,innerdownarrowkey,
outerdownarrowkey
Dropsthepiece,orresumesapausedgame
P,Space Pausesorresumesanactivegame
ViewingTechnicalSupportInformation
Thephonenumberande‐mailaddressofthetechnicalsupportarelistedinthe
TechSupportInfotab.

OGOUserManual
78ViewingTechnicalSupportInformation
DeviceandApplicationSettings
YoucanconfigurevarioussettingsforyourOgo,includingthedefaultmethodsfor
handlingcalls,IM,ande‐mailmessagesonthedevice.
EachofthetabsintheSettingsscreenincludesthesettingforoneofthe
applicationsoraspecificissueofthedevicebehavior,asfollows:
Phone:EnablesyoutoconfiguresettingsrelatedtoyourOgophone
functionality.Fordetails,seeConfiguringthePhoneSettingsonpage79.
IM:EnablesyoutoconfigureyourIMaccountssettings.Fordetails,see
ConfiguringtheIMSettingsonpage82.
E‐mail:Enablesyoutoconfiguree‐mailrelatedsettings.Fordetails,see
ConfiguringYourE‐MailSettingsonpage83.
WebBrowser:EnablesyoutoconfigurethedisplayofInternetcontentonyour
Ogo.Fordetails,seeConfiguringYourWebBrowserSettingsonpage85.
Device:EnablesyoutocustomizethelookofyourOgoHomescreen,and
configuregeneraldeviceoptionssuchasbacklight,bannersandmore.For
details,seeConfiguringtheDeviceSettingsonpage86.
Calendar:EnablesyoutoconfigurethedisplayandhandlingyourCalendar.For
details,seeConfiguringtheCalendarSettingsonpage88.
Sounds:EnablesyoutoconfigurethesoundsmadebyyourOgoinvarious
situations.Fordetails,seeConfiguringtheSoundSettingonpage90
Time&Date:EnablesyoutoconfigurethetimeanddatesettingsonyourOgo.
Fordetails,seeConfiguringtheTimeandDateSettingsonpage91.
Network:Enablesyoutoviewandconfigureyournetworksettings.Fordetails,
seeConfiguringtheNetworkSettingsonpage92.
System:EnablesyoutoviewyourOgo’ssystemcapacitiesandidentifying
characteristics.Fordetails,seeViewingYourSystemonpage94.

DeviceandApplicationSettings
ConfiguringthePhoneSettings79
► ToaccessSettings:
IntheHomescreenorApplicationmenu,select SettingsandpressEnter.
TheSettingsscreenisdisplayed.
Figure26:SettingsScreen
ConfiguringthePhoneSettings
ThesettingsconfiguredinthePhonetabdeterminehowyourOgorespondsto
variouscallingconditions.
► ToconfigurethePhonesettings:
1 InSettings,selectthePhonetab.
2 SelectandeditoneormoreofthePhonesettings,asrequired.ThePhone
settingsaredescribedinTable13.

OGOUserManual
80ConfiguringthePhoneSettings
Table13:PhoneSettings
ItemDescription
CallforwardingThefollowingcallforwardingoptionsmaybeconfigured
toEnableorDisable:
• Forwardallcalls:Ogore‐routesallincomingcallsto
anotherpre‐determinednumber.
• Forwardifbusy:Ogore‐routesincomingcallsto
anotherpre‐determinednumberifyouareengagedin
anactivephonecall.
• Forwardifnotanswered:Ogore‐routesanincoming
calltoanotherpre‐determinednumberifyoudonot
answerthecall.
• Forwardifnotreachable:Ogore‐routesanincoming
calltoanotherpre‐determinednumberifthenetwork
cannotlocateyourOgotodeliverthecall.
• Cancelall:Activatethisoptiontodisableallofthe
Forwardoptionsthathavebeenenabled.
Toaccessthesettings,selectConfigureandpressEnter
todisplaytheCallForwardingscreen.SelectConfigure
foreachoftheCallforwardingoptionsandsetthe
optionstoEnableorDisable.(PressQueryifyouwantto
viewthecurrentsetting).SelectDoneandpressEnter.
Voicemailbox
number
Thephonenumberusedtoretrieveyourvoicemail.(This
numberisassignedbyyourcellularoperator.)
SelectEditandpressEntertodisplaytheVoicemail
numberscreen.Insertthenumber,selectDoneandpress
Enter.
Ownnumber
setting
Thissettingdefineswhetherthepersonyouarecalling
canviewyourphonenumberoncallerID‐equipped
telephones:
• On:Yournumberisdisplayed.
• Off:Yournumberisnotdisplayed.
• SetbyNetwork:Theoptionissetatthediscretionof
yourcellularservicecarrier(usuallyOn).
PressEnterandselectyourpreferencefromthelist.

DeviceandApplicationSettings
ConfiguringthePhoneSettings81
ItemDescription
CallwaitingWhenenabled,Ogonotifiesyouofanincomingcallwhile
acallisinprogress,ratherthandeliveringabusysignalto
thenewcaller.
Toaccessthesettings,selectConfigureandpressEnter
todisplaytheCallwaitingscreen.SelectEnableor
Disable,andpressEnter.PressQuerytoviewthecurrent
setting.
Incomingcall
alert
Thewaysinwhichyouarealertedtoanincomingcall,
includingthetypeofringtone,itsvolume,and/or
vibration.
Toaccessthesettings,selectConfigureandpressEnter
todisplaytheIncomingCallAlertscreen.
Tosettheringtone,selectRingingtoneandpressenter.
Thenselectthedesiredringtonefromthelist.Each
ringtoneinthelistwillplaywhenhighlightedforafew
seconds.
Tosetthevolume,selectRingingvolumeandadjustthe
volumebymovingtheindicatoronthesliderusingthe
innerleftandrightarrowkeys.
Toenablethevibratingalert,selectVibratingalertand
pressEnter.PressingEnterwhentheoptionisalready
selectedclearsthecheckbox,anddisablesthevibrating
alert.
SelectDoneandpressEnter.
SpeeddialYoucancreateshortcutsfordialingyourmostcommonly
needednumbers.
Toaccessthesesettings,selectConfigureandpressEnter
todisplaytheSpeeddialscreen.
Selectanumberforwhichyouwanttoassignthespeed
dialoption,andpressEnter.TheContactsListappears,
enablingyoutoselectthetelephonenumbertobe
assignedtothenumberyouhavechosen.(Repeatto
assignadditionalspeeddialnumbers.)
SelectCloseandpressEnter.

OGOUserManual
82ConfiguringtheIMSettings
ConfiguringtheIMSettings
YourIMaccountsettingscanbeconfiguredintheIMtab.
► ToconfigureyourIMsettings:
1 InSettings,selecttheIMtab.
2 SelectandeditoneormoreoftheIMsettings,asrequired.TheIMsettingsare
describedinTable14.
Table14:IMSettings
ItemDescription
ICQSelectOpenandpressEntertoview/editthefollowing
ICQsettings:ICQnumber,Password,Defaultpresence,
andthe"Connectwhenpoweredon"option.
Note:ThisitemappearsonlyafterICQisconfigured.
WindowsLive
Messenger
SelectOpenandpressEntertoview/editthefollowing
WindowsLiveMessengersettings:e‐mailaddress,
password,defaultpresence,and"Signinwhenpowered
on"option.
Note:ThisitemappearsonlyafterWindowsLive
Messengerisconfigured.
WhenclosedThestatusofyourIMpresencewhenthecoverisclosed.
SelectWhencloseandpressEnter.Selectthedesired
status(NochangeorAway)fromthelistandpressEnter.
AddIMaccountEnablesyoutoaddanIMaccount.Ifyouhavealreadyset
upyourIMaccount(s),thisoptionisdisabled.
SelectAddandpressEnter.TheInstantMessaging
Wizardisdisplayed.Fordetails,seeUsingtheInstant
MessagingWizardtoSetUpYourAccountonpage23.
RemoveIM
account
RemovesanexistingIMaccount.
SelectRemoveandpressEnter.TheAccountSummary
screenisdisplayed.Clearthecheckboxforthe
communitytoberemovedandpressNext.

DeviceandApplicationSettings
ConfiguringYourE‐MailSettings83
ConfiguringYourEMailSettings
Youre‐mailaccountsettingscanbeconfiguredfromtheE‐mailtab.
► Toconfigureyoure‐mailsettings:
1 InSettings,selecttheE‐mailtab.
2 SelectandeditoneormoreoftheE‐mailsettings,asrequired.TheE‐mail
settingsaredescribedinTable15.
Table15:E‐mailSettings
ItemDescription
MailboxnameTheoptionsforthedisplayedmailbox(foreach
configurede‐mailaddress).
SelectOpenandpressEntertodisplaytheMailbox
Settingsscreen(foreachconfigurede‐mailaddress).For
details,seeTable16.
Adde‐mail
account
Enablesyoutoaddane‐mailaccount.
SelectAddandpressEnter.TheE‐mailWizardis
displayed.Fordetails,seeUsingtheE‐MailWizardtoSet
UpYourAccountonpage36.
Removee‐mail
account
Removesanexistinge‐mailaccount.
SelectRemoveandpressEnter.TheAccountSummary
screenisdisplayed.Clearthecheckboxforthee‐mail
accounttoberemovedandpressNext.
Personal
signature
Youcaninsertapersonalsignatureattheendofyour
e‐mailmessages.
SelectOpenandpressEntertodisplaythePersonal
Signaturescreen.
SelectEditandpressEntertoinsert/edityourpersonal
signature.SelectSaveandpressEnter.
SelecttheNewmessagesand/orRepliedandforwarded
checkboxestodeterminetowhichmessagesyour
signatureisattached.
Replywith
original
Includestheoriginalmessagewhenyoureplytoa
message.
Brandauto
signature
Insertsabrandingmessageattheendofyoure‐mail
message.

OGOUserManual
84ConfiguringYourE‐MailSettings
ItemDescription
Sentitemsto
keep
ThenumberofsentitemstobekeptintheOutgoingtab.
SelectSentitemstokeepandpressEnter.Selectthe
desirednumberfromthelistandpressEnter.
Table16:MailboxSettings
ItemDescription
MailboxnameThenameusedtoidentifytheemailaccount,which
appearsasthetab'stitleintheMessagesapplication.
Canbeeditedformostemailaccounts(exceptfor
WindowsLiveMessenger,whereitisfixed).
E‐mailaddressYoure‐mailaddressfortheselectedMailbox.
UsernameYourusernameforthee‐mailaccount.
PasswordYourpasswordforthee‐mailaccount.
DisplaynameThenamethatappearsintheFromfieldofane‐mail
accountthatyousendfromthisaccount.
ServernameIfyouhaveacustome‐mailaccountsetup,thisisthe
servernameforthataccount.(Thisfieldcannotbe
edited).
ConfigureserverEnablesyoutoconfiguretheserverforacustome‐mail
account.
SelectOpenandpressEntertoconfiguretheserver
settings.
CheckintervalThefrequencyatwhichOgochecksfornewe‐mail
messages.
PressEnterandselectthetimeintervalfromthelist.

DeviceandApplicationSettings
ConfiguringYourWebBrowserSettings85
ConfiguringYourWebBrowserSettings
ThesettingsconfiguredintheWebBrowsertabdeterminehowInternetcontentis
displayedonyourOgo.
► ToconfigureyourWebBrowsersettings:
1 InSettings,selecttheWebBrowsertab.
2 EditoneormoreoftheWebBrowsersettings,asrequired.TheWebBrowser
settingsaredescribedinTable17.
Table17:WebBrowserSettings
ItemDescription
FullscreenDisplaystheWebbrowserinfullscreenmode.
RenderingmodeDisplaysthemodeforpresentingcontentontheOgo
screen.
PressEnterandselecttherenderingmodefromthelist:
• Standard:Displaysthewebpageinitsoriginalform.
Horizontalscrollingisavailableifneeded.
• Textwrap:Wrapsthetextcontentofthewebpageso
thatitisnotbroken.Horizontalscrollingisavailableif
needed.
• Screenoptimized:Wrapsthewebpageintoasingle
screenwidth,sothattheentirecontentcanbeviewed
byverticalscrolling.
• Textonly:Hidesanyimages.
Requestmobile
content
Whenthisoptionischecked,theOgoidentifiesasa
mobiledevicewhenbrowsing,inordertoobtaincontent
optimizedforamobiledevice,fromwebsitesthat
supportthis.
EnablescriptsEnablestheuseofjavascriptswhenbrowsing.
ShowimagesEnablesthedisplayofimageswhenbrowsing.
EnablecookiesEnablestheuseofcookieswhenbrowsing.
EncodingDeterminesthetypeofencodingused.
PressEnterandselecttheencodingtype(Auto‐Select,
Latin‐1;UTF‐16,UCS‐2,UTF‐8,orLatin‐2)fromthelist.

OGOUserManual
86ConfiguringtheDeviceSettings
ItemDescription
PrivatedataEnablesyoutocleartheprivatedatastoredonthedevice
(cache,cookies,andhistory).
SelectConfigureandpressEntertodisplaythePrivate
datascreen.Foreachoftheitems(Cache,Cookiesand
History),youcanselectClearandpressEntertoclearthe
saveddata.
Security
warning
Whenthisoptionischecked,asecuritywarningis
displayedbeforenavigatingtoawebsitewhichisnot
secure.
ConfiguringtheDeviceSettings
ThesettingsconfiguredintheDevicetabenableyoutocustomizethelookofyour
OgoHomescreen,andsetthegeneraldeviceoptions,suchasbacklight,banners
andmore.
► Toconfigureyourdevicesettings:
1 InSettings,selecttheDevicetab.
2 Editoneormoreofthedevicesettings,asrequired.TheDevicesettingsare
describedinTable18.
Table18:DeviceSettings
ItemDescription
Screen
brightness
ThelevelofbrightnessoftheOgoscreendisplay.
Adjustthebrightnessbymovingtheindicatorontheslider
usingtheinnerright/leftarrowkeysonthe8‐wayselection
key.Thescreenbrightnesschangesimmediatelyasyou
movefromoneleveltothenext.
Brightness
period
Thetimeintervalforwhichthescreenbrightnessis
maintainedwhennokeysarepressed.Thelongerthe
brightnessperiod,themorebatterypowerconsumed.
PressEnterandselectthedesiredperiodfromthelist.
LanguageThelanguageoftheOgouserinterface.
PressEnterandselectthepreferredlanguagefromthelist.
Home
wallpaper
ThebackgroundimageisdisplayedonyourOgoHome
screen.
PressEnterandselectawallpaperfromthelist.

DeviceandApplicationSettings
ConfiguringtheDeviceSettings87
ItemDescription
SIMPIN
required
Forsecuritypurposes,enablingthisoptionpromptsyouto
enteraPINwhenthedeviceispoweredon.
WARNING!IfyouforgetyourSIMPIN,youhaveonlythree
opportunitiestocorrectlyenterit.Afterthreefailed
attempts,youareaskedtoenteryourPUKcodeinorder
toreactivateyourSIM.Youmustcontactyourcarrierif
youdonothavethePUKcode.Youhaveonlyten
opportunitiestocorrectlyenteryourPUKcode.Afterten
failedattempts,yourSIMcardisirretrievablyunusable.
ChangePIN
code
ChangesyourPINcode.Besuretokeeparecordofyour
newcodeinasafeplace.
SelectChangeandpressEntertodisplaytheChangePIN
codescreen.EntertheoldPINcode,setyournewPIN
code,andselectDone.
Banner
settings
Enablesyoutocontrolwhetherornotbannersappear
whennewmessagesarereceivedand/orwhenIM
contactscomeonline.
SelectOpenandpressEntertodisplaytheBannerSettings
screen.Selecttheeventsforwhichyouwanttoreceive
bannernotification(newIMorSMS,newe‐mail,and/or
IMcontactcomesonline),andselectDone.
ResetdeviceResetsyourOgodevicetoitsoriginalfactorysettings,
permanentlyremovingallpersonalandaccount
information.
SelectResetandpressEnter.Aconfirmationmessageis
displayed.SelectOKandpressEntertoresetthedevice.
Thedevicerestartsafterresetting.
Confirmmsg.
delete
Whenthisoptionischecked,Ogopromptsyoufor
confirmationeachtimeyouchoosetodeleteamessage.
Prompttoadd
contacts
Promptsyoutoaddacontactwhenyousendane‐mailor
SMSmessagetoanaddress/numberthatisnotalreadyin
yourOgoContactsList.
Restore
canceled
pop‐ups
Restoresallcanceledpop‐upmessages.

OGOUserManual
88ConfiguringtheCalendarSettings
ItemDescription
Checkfor
software
updates
Whenthisoptionisselected,theOgochecksforsoftware
updateseachtimeitispoweredon.
Bluetooth
settings
EnablesyoutoconfiguretheuseofBluetoothaccessories
withyourOgo.
Note:TheavailabilityofthisoptiondependsonyourOgo
modelandcellularoperator.
SelectOpenandpressEntertodisplaytheBluetooth
settingsscreen.
Configurethefollowingparameters:
• Localdevicename:ThedesignatedBluetoothnameof
theOgodevice.OtherBluetoothdevicessearchingfor
thisOgorecognizeitbythisdesignation.
• Changename:ThesettingusedtochangetheLocal
devicename.
• Mydevices:ThenamesofalloftheBluetoothdevices
thatarepairedwiththeOgodevice.
• Searchfordevices:Anoptionscansforavailable
Bluetoothdevicestoconnectto.SelectScanandpress
Enter;apop‐upmessageappearsindicatingthata
searchisinprogress.
• Temporaryvisibility:Toprotectitselffromundesired
contacts,theOgoisnormally"invisible"torandom
searches.Whenyouwishtobefound,theOgomustbe
made"visible"totheairwaves.SelectEnableandpress
Enter;apop‐upmessageappearsinformingyouthat
yourOgowillbetemporarilyvisiblefor1minute.
ConfiguringtheCalendarSettings
ThesettingsconfiguredintheCalendartabdeterminehowyourcalendaris
displayedandmanagedonyourOgodevice.
► ToconfigureyourCalendarsettings:
1 InSettings,selecttheCalendartab.
2 Editoneormoreofthecalendarsettings,asrequired.Thecalendarsettings
aredescribedinTable19.

DeviceandApplicationSettings
ConfiguringtheCalendarSettings89
Table19:CalendarSettings
ItemDescription
DefaultviewThedefaulttimetabviewforyourcalendar(Day,Week,
orMonth).
PressEnterandselectthedesiredoptionfromthelist.
Defaultday
view
ThedefaultviewfortheDaytabinthecalendar
(Detailed,Summary,orLastviewed).
PressEnterandselectthedesiredoptionfromthelist.
Default
reminder
Thedefaulttime(inminutes)inadvancetobereminded
ofanupcomingappointment.
PressEnterandselectthedesiredoptionfromthelist.
WorkweekThestandardworkweeksettings,includingthestarting
andendingworkinghoursandthefirstdayoftheweek.
SelectOpenandpressEntertodisplaytheWorkweek
screen.
Defaultsnooze
period
Thedefaulttime(inminutes)afterwhicharepeat
reminderisdisplayed.
PressEnterandselectthedesiredtimeintervalfromthe
list.
Deleteitems
olderthan
ThetimeintervalusedwhenselectingDeleteOld
AppointmentsfromtheCalendar.
PressEnterandselectthedesiredoptionfromthelist.
Delete
confirmation
Whenthisoptionischecked,aconfirmationmessageis
displayedbeforedeletinganappointmentfromthe
calendar.
Tooltipsinweek
view
Whenthisoptionischecked,atooltipwiththe
appointmentsubjectisdisplayedwhenanappointment
isselectedinweekview.

OGOUserManual
90ConfiguringtheSoundSettings
ConfiguringtheSoundSettings
ThesettingsconfiguredintheSoundstabenableyoutodeterminethesounds
madebyyourOgoinvarioussituations.
► Toconfigureyoursoundssettings:
1 InSettings,selecttheSoundstab.
2 Editoneormoreofthesoundsettings,asrequired.TheSoundssettingsare
describedinTable20.
Table20:SoundsSettings
ItemDescription
Ringtones Enablesyoutosetthevolumeoftheringtoneplayedto
indicateanincomingcall.
Adjustthevolumebymovingtheindicatorontheslider
usingtheinnerleftandrightarrowkeysonthe8‐way
selectionkey.Theringtoneisplayedaftereachchangeof
thevolumelevel,enablingyoutoheartheactualvolume
levelbeingconfigured.
SystemsoundsEnablesyoutosetthevolumeofthesoundsplayedto
indicatevarioussystemevents.
Adjustthevolumebymovingtheindicatorontheslider
usingtheinnerleftandrightarrowkeysonthe8‐way
selectionkey.Abeepisplayedaftereachchangeofthe
volumelevel,enablingyoutoheartheactualvolume
levelbeingconfigured.
AlertsEnablesyoutosetthevolumeofthesoundsplayedto
indicateanalert(suchasreceivinganewmessage).
Adjustthevolumebymovingtheindicatorontheslider
usinginnerleftandrightarrowkeysonthe8‐way
selectionkey.Abeepsoundisplayedaftereachchange
ofthevolumelevel,enablingyoutoheartheactual
volumelevelbeingconfigured.
SilentSilencesallofthedevicesounds(ringtones,system
soundsandalert).
VibrationWhenthisoptionisselected,thevibrationalertis
enabled.Thevibrationalertcanbeactivatedforan
incomingcall(dependingontheoptioninIncomingCall
Alertscreen),and(iftheSilentoptionisselected)forany
eventthatdisplaysabanner,whenacontactcomes
online,orwhenanewmessageisreceived.

DeviceandApplicationSettings
ConfiguringtheTimeandDateSettings91
ItemDescription
KeytonesTurnson/offthesoundmadewhenOgokeysare
pressed.
Alerticon
sounds
Turnson/offthesoundsassociatedwithalerticons.
MessageeventsTurnson/offthesoundsmadewhenmessagesare
received.
PresenceeventsTurnson/offthesoundsmadewhenIMcontactsbecome
online.
SystemsoundsTurnson/offthesoundsmadewhenyoupoweron/off,
oropen/closethecover.
ConfiguringtheTimeandDateSettings
WhenyourOgoispoweredon,itautomaticallysynchronizeswiththecurrenttime
fromyourcarrier’snetwork.Ifforsomereasonthenetworkisnotavailable,you
cansetthetimeanddatemanuallyusingthesettingsontheTime&Datetab.
► Toviewandconfigureyourtimeanddatesettings:
1 InSettings,selecttheTimeandDatetab.
2 Editoneormoreofthetimeanddatesettings,asrequired.Thetimeanddate
settingsaredescribedinTable21.
Table21:TimeandDateSettings
ItemDescription
DevicetimeDisplaysthecurrenttimeanddateascurrentlyseton
yourOgo(cannotbeedited).
NetworktimeDisplaysthecurrenttimeanddateonthenetwork
(cannotbeedited).
UsenetworktimeWhenthisoptionisselected,thenetworktimeisused
asthedefaulttimeonyourOgo.

OGOUserManual
92ConfiguringtheNetworkSettings
ItemDescription
SetTime&DateEnablesyoutomanuallysetthetimeanddate.
SelectOpenandpressEntertodisplaytheSetTime&
Datescreen.Selectyourtimezone,selecttheDaylight
savingoption,insertthedateandtime,andthenselect
Done.
Note:Manuallysettingthetimeanddatestops
automaticupdates.
TimeformatDeterminestheformatfordisplayingtimeonyourOgo
(24HorAM/PM).
PressEnterandselectthedesiredtimeformatfromthe
list.
DateformatDeterminestheformatfordisplayingdatesonyourOgo
(DD/MM/YYorMM/DD/YY).
PressEnterandselectthedesireddateformatfromthe
list.
ConfiguringtheNetworkSettings
ThesettingsconfiguredintheNetworktabaretypicallyusedbyyourcellular
operatorfortroubleshooting.
► Toviewandconfigureyournetworksettings:
1 InSettings,selecttheNetworktab.
2 Editoneormoreofthenetworksettings,asrequired.Thenetworksettingsare
describedinTable22.

DeviceandApplicationSettings
ConfiguringtheNetworkSettings93
Table22:NetworkSettings
ItemDescription
ActivenetworkDisplaysthenameoftheactivenetwork(cannotbe
edited).
Network
selection
Themodeforselectingtheactivenetwork(Autoor
Manual).
Tochangethissetting,pressEnter,andselectthe
requiredoptionfromthelist.
IfyouselectAuto,yourOgodeviceautomaticallyselects
thenetworkforyou.
IfyouselectManual,yourOgodevicescansfor
networksandpromptsyoutoselectanavailable
network.SelectthepreferrednetworkandpressEnter.
Yourdeviceisregisteredonthatnetwork.
Scanfor
networks
Scansforavailablenetworks.Thisoptionisenabledonly
whenselectingmanualnetworkselection.
Messaging
center
Displaysthephonenumberofthemessagingcenterto
becalledtoretrieveyourSMSMessages.Youcanmodify
thisnumber;seeEditSMSCnumber.
EditSMSC
number
ThenumberofthemessagingcenterforSMSservices.
SelectEditandpressEntertodisplaytheEditSMSC
numberscreen.Insert/editthenumberandselectDone.
GPRS
configuration
TheGPRSsettings,includingAPN,authentication,user
andpassword.
SelectEditandpressEntertodisplaytheGPRS
configurationscreen.Configurethesettingsandselect
Done.
GPRSstatusThestatusofyourGPRSconnection(Connected,Not
connected,Connectiondenied,Paused,orNotavailable).
DatacountersEnablesyoutoviewthecumulativevolumeofincoming
andoutgoingdata.Youcanmanuallyresetthese
counters.
SelectOpenandpressEntertodisplaytheDatacounters
screen.Toresetthecounters,selectResetandpress
Enter.

OGOUserManual
94ViewingYourSystemSettings
ViewingYourSystemSettings
TheSystemtabdisplaysthecurrentcapacitiesandidentifyingcharacteristicsof
yourOgo.
► Toviewyoursystemsettings:
InSettings,selecttheSystemtab.ThesystemsettingsaredescribedinTable
23.
Table23:SystemSettings
ItemDescription
ContactsThenumberofexistingcontactrecords;thenumberof
contactrecordsavailableforfutureuse.
SoftwareTheversionnumberofthesoftwareonyourOgo(for
example,v3.0_PRO(20121).
IMSITheuniqueidentifieroftheSIMcard.
IMEITheuniqueidentifierofthedevice.
BatteryThebatterylevel,asapercentageoftotalbattery
capacity.
Checkfor
updates
Enablesyoutomanuallycheckforavailablesoftware
updatesforyourOgo.
SelectCheckandpressEnter.

ImportantSafetyInformation
ViewingYourSystemSettings95
ImportantSafetyInformation
CertificationInformation(SAR)
ThismobiledeviceisincompliancewithSARforgeneralpublicexposurelimits
specifiedinEN50360andCouncilRecommendation199/519/ECandhasbeen
testedinaccordancewiththemeasurementmethodsandproceduresspecifiedin
EN50361.
