Polycom 8500 VOIP Conference phone with Bluetooth functionality User Manual Polycom RealPresence Trio Solution User Guide

Polycom Inc. VOIP Conference phone with Bluetooth functionality Polycom RealPresence Trio Solution User Guide
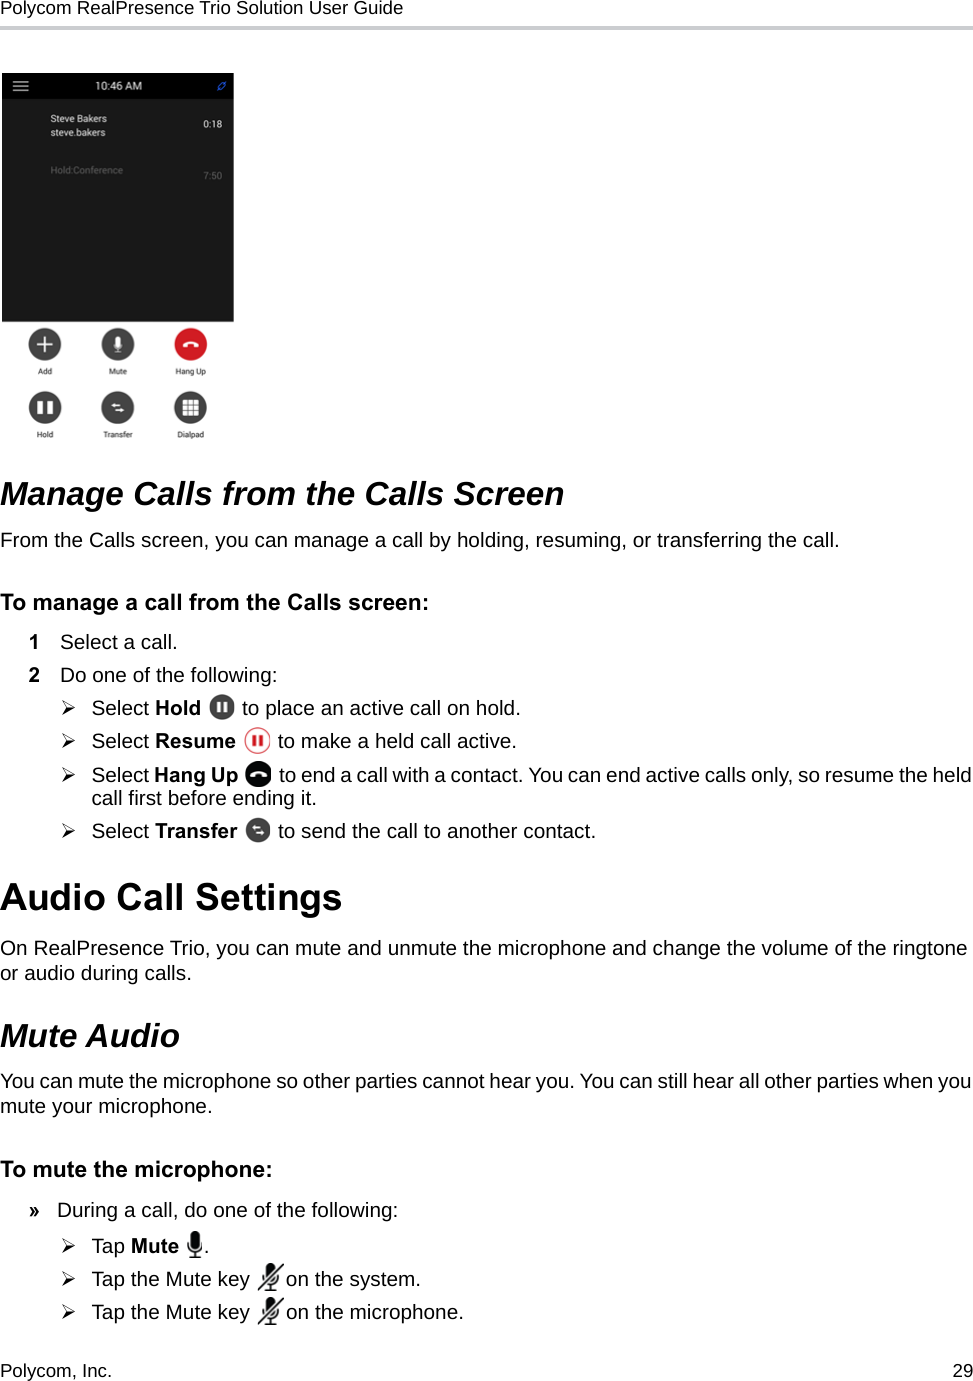
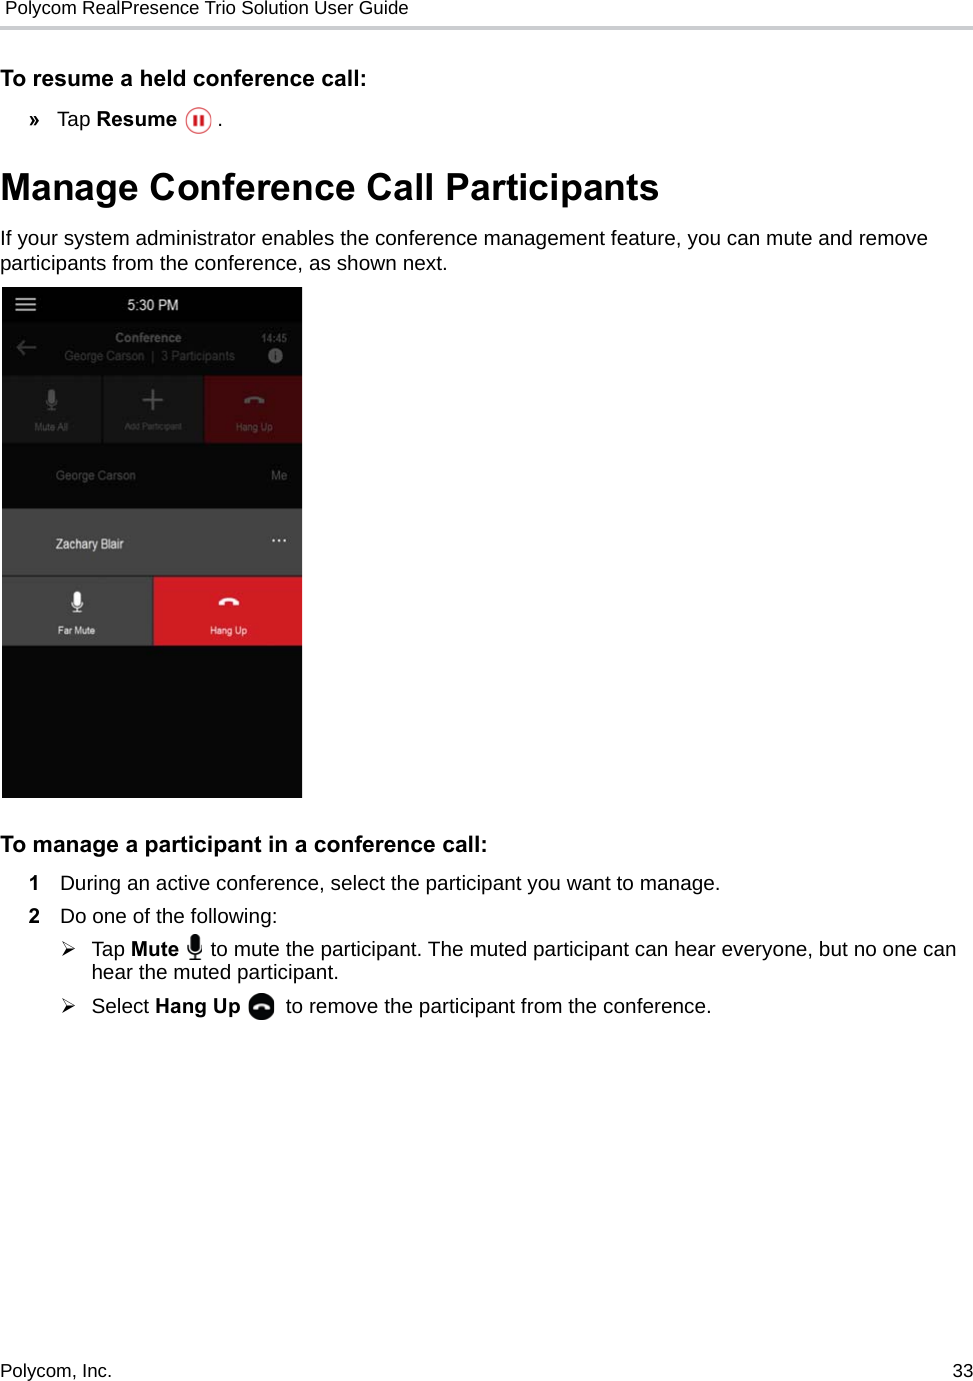
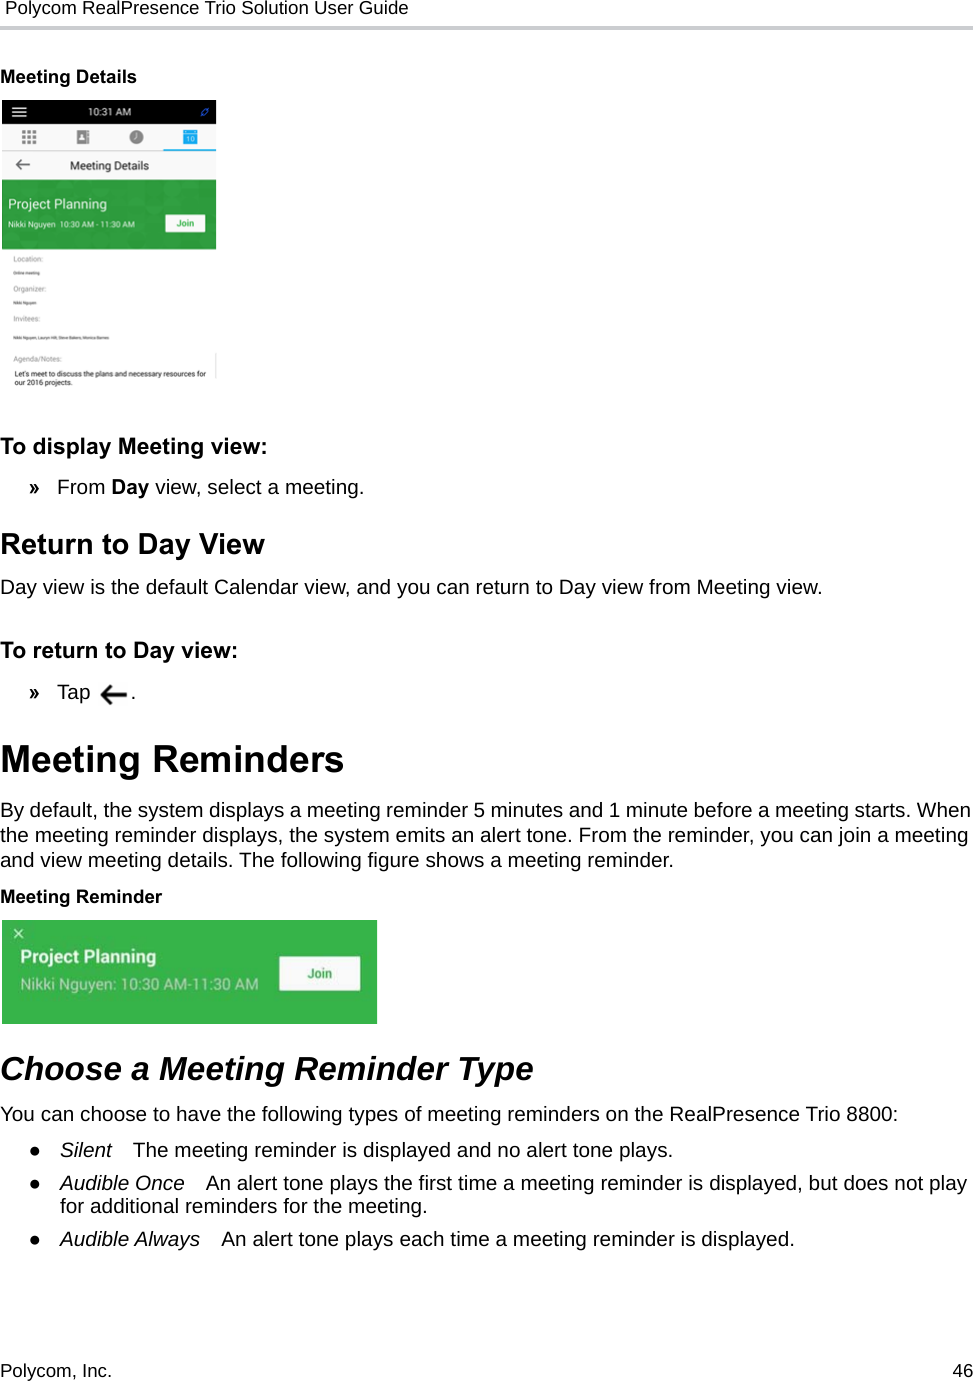
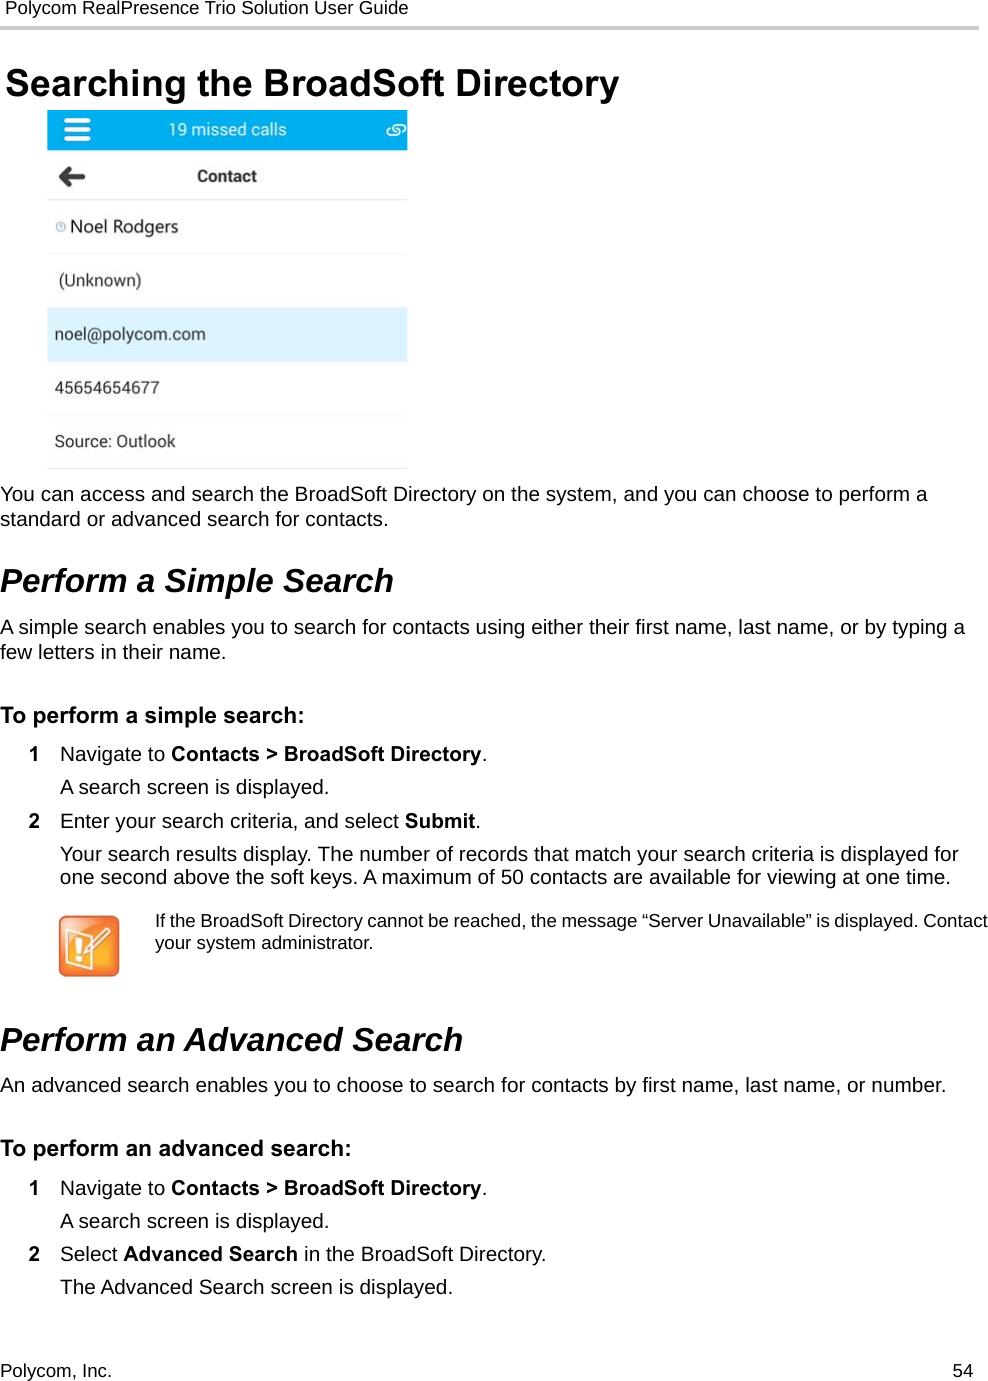
Users manual_Users guide

UC Software 5.4.5 |March 2017 |3725-20598-005AUSER GUIDEPolycom® RealPresence Trio™ SolutionApplies to Polycom® RealPresence Trio™ 8800 and Polycom® RealPresence Trio™ Visual+
2 Copyright© 2017, Polycom, Inc. All rights reserved. No part of this document may be reproduced, translated into another language or format, or transmitted in any form or by any means, electronic or mechanical, for any purpose, without the express written permission of Polycom, Inc.6001 America Center DriveSan Jose, CA 95002USATrademarks  Polycom®, the Polycom logo and the names and marks associated with Polycom products are trademarks and/or service marks of Polycom, Inc. and are registered and/or common law marks in the United States and various other countries. All other trademarks are property of their respective owners. No portion hereof may be reproduced or transmitted in any form or by any means, for any purpose other than the recipient's personal use, without the express written permission of Polycom.Disclaimer   While Polycom uses reasonable efforts to include accurate and up-to-date information in this document, Polycom makes no warranties or representations as to its accuracy. Polycom assumes no liability or responsibility for any typographical or other errors or omissions in the content of this document.Limitation of Liability  Polycom and/or its respective suppliers make no representations about the suitability of the information contained in this document for any purpose. Information is provided "as is" without warranty of any kind and is subject to change without notice. The entire risk arising out of its use remains with the recipient. In no event shall Polycom and/or its respective suppliers be liable for any direct, consequential, incidental, special, punitive or other damages whatsoever (including without limitation, damages for loss of business profits, business interruption, or loss of business information), even if Polycom has been advised of the possibility of such damages.End User License Agreement  BY USING THIS PRODUCT, YOU ARE AGREEING TO THE TERMS OF THE END USER LICENSE AGREEMENT (EULA) AT: http://documents.polycom.com/indexes/licenses. IF YOU DO NOT AGREE TO THE TERMS OF THE EULA, DO NOT USE THE PRODUCT, AND YOU MAY RETURN IT IN THE ORIGINAL PACKAGING TO THE SELLER FROM WHOM YOU PURCHASED THE PRODUCT.Patent Information  The accompanying product may be protected by one or more U.S. and foreign patents and/or pending patent applications held by Polycom, Inc.Open Source Software Used in this Product  This product may contain open source software. You may receive the open source software from Polycom up to three (3) years after the distribution date of the applicable product or software at a charge not greater than the cost to Polycom of shipping or distributing the software to you.  To receive software information, as well as the open source software code used in this product, contact Polycom by email at OpenSourceVoice@polycom.com.Customer Feedback  We are striving to improve our documentation quality and we appreciate your feedback. Email your opinions and comments to DocumentationFeedback@polycom.com.Polycom Support   Visit the Polycom Support Center for End User License Agreements, software downloads, product documents, product licenses, troubleshooting tips, service requests, and more.
Polycom, Inc.  3 ContentsBefore You Begin  . . . . . . . . . . . . . . . . . . . . . . . . . . . . . . . . . . . . . . . . . . . . . . . . . . .  9Audience, Purpose, and Required Skills  . . . . . . . . . . . . . . . . . . . . . . . . . . . . . . . . . . . . . . . . . .  9Related Documentation  . . . . . . . . . . . . . . . . . . . . . . . . . . . . . . . . . . . . . . . . . . . . . . . . . . . . . . .  9Getting Started with Polycom RealPresence Trio 8800   . . . . . . . . . . . . . . . . . . .  10Overview of RealPresence Trio 8800  . . . . . . . . . . . . . . . . . . . . . . . . . . . . . . . . . . . . . . . . . . .  10RealPresence Trio 8800 Hardware  . . . . . . . . . . . . . . . . . . . . . . . . . . . . . . . . . . . . . . . . . . . . .  10Navigating the System . . . . . . . . . . . . . . . . . . . . . . . . . . . . . . . . . . . . . . . . . . . . . . . . . . . . . . .  11Accessing User Screens . . . . . . . . . . . . . . . . . . . . . . . . . . . . . . . . . . . . . . . . . . . . . . . . . .  11Access the Home Screen  . . . . . . . . . . . . . . . . . . . . . . . . . . . . . . . . . . . . . . . . . . . . . .  11Accessing the Place a Call Screen . . . . . . . . . . . . . . . . . . . . . . . . . . . . . . . . . . . . . . .  12Accessing the Calls Screen  . . . . . . . . . . . . . . . . . . . . . . . . . . . . . . . . . . . . . . . . . . . .  13Icons and Status Indicators . . . . . . . . . . . . . . . . . . . . . . . . . . . . . . . . . . . . . . . . . . . . . . . .  14Enter Information Using the Onscreen Keyboard  . . . . . . . . . . . . . . . . . . . . . . . . . . . . . . . . . .  14Close the Onscreen Keyboard   . . . . . . . . . . . . . . . . . . . . . . . . . . . . . . . . . . . . . . . . . . . . .  15Logging Into and Locking the System  . . . . . . . . . . . . . . . . . . . . . . . . . . . . . . . . .  16Logging into the System   . . . . . . . . . . . . . . . . . . . . . . . . . . . . . . . . . . . . . . . . . . . . . . . . . . . . .  16Log Into the System   . . . . . . . . . . . . . . . . . . . . . . . . . . . . . . . . . . . . . . . . . . . . . . . . . . . . .  16Log Out of the System   . . . . . . . . . . . . . . . . . . . . . . . . . . . . . . . . . . . . . . . . . . . . . . . . . . .  16Change Your User Login Password  . . . . . . . . . . . . . . . . . . . . . . . . . . . . . . . . . . . . . . . . .  17Locking the System  . . . . . . . . . . . . . . . . . . . . . . . . . . . . . . . . . . . . . . . . . . . . . . . . . . . . . . . . .  17Lock the System  . . . . . . . . . . . . . . . . . . . . . . . . . . . . . . . . . . . . . . . . . . . . . . . . . . . . . . . .  17Unlock the System   . . . . . . . . . . . . . . . . . . . . . . . . . . . . . . . . . . . . . . . . . . . . . . . . . . . . . .  18Change Your User Password  . . . . . . . . . . . . . . . . . . . . . . . . . . . . . . . . . . . . . . . . . . . . . .  18 Audio Calls  . . . . . . . . . . . . . . . . . . . . . . . . . . . . . . . . . . . . . . . . . . . . . . . . . . . . . . .  19Placing Audio Calls  . . . . . . . . . . . . . . . . . . . . . . . . . . . . . . . . . . . . . . . . . . . . . . . . . . . . . . . . .  19Place a Call . . . . . . . . . . . . . . . . . . . . . . . . . . . . . . . . . . . . . . . . . . . . . . . . . . . . . . . . . . . .  19Place an International Call   . . . . . . . . . . . . . . . . . . . . . . . . . . . . . . . . . . . . . . . . . . . . . . . .  19Place a Call from Recent Calls  . . . . . . . . . . . . . . . . . . . . . . . . . . . . . . . . . . . . . . . . . . . . .  19Place a Call to a Favorite  . . . . . . . . . . . . . . . . . . . . . . . . . . . . . . . . . . . . . . . . . . . . . . . . .  20Place Calls from Directories  . . . . . . . . . . . . . . . . . . . . . . . . . . . . . . . . . . . . . . . . . . . . . . .  20
 Polycom, Inc.  4   Place a Call from the Directory Search Screen   . . . . . . . . . . . . . . . . . . . . . . . . . . . . .  20Place Calls from a Locked or Logged Out System  . . . . . . . . . . . . . . . . . . . . . . . . . . . . . .  20Place an Intercom Call   . . . . . . . . . . . . . . . . . . . . . . . . . . . . . . . . . . . . . . . . . . . . . . . . . . .  21Place an Intercom Call during a Call   . . . . . . . . . . . . . . . . . . . . . . . . . . . . . . . . . . . . .  21Place a Call over Bluetooth . . . . . . . . . . . . . . . . . . . . . . . . . . . . . . . . . . . . . . . . . . . . . . . .  22Redial a Number  . . . . . . . . . . . . . . . . . . . . . . . . . . . . . . . . . . . . . . . . . . . . . . . . . . . . . . . . . . .  22Answering Audio Calls . . . . . . . . . . . . . . . . . . . . . . . . . . . . . . . . . . . . . . . . . . . . . . . . . . . . . . .  22Answer Calls in the Incoming Call Window . . . . . . . . . . . . . . . . . . . . . . . . . . . . . . . . . . . .  22Answer a Call When in a Call  . . . . . . . . . . . . . . . . . . . . . . . . . . . . . . . . . . . . . . . . . . . . . .  23Answer Calls Automatically . . . . . . . . . . . . . . . . . . . . . . . . . . . . . . . . . . . . . . . . . . . . . . . .  23Answer Calls on a Locked System  . . . . . . . . . . . . . . . . . . . . . . . . . . . . . . . . . . . . . . . . . .  24Answer an Intercom Call . . . . . . . . . . . . . . . . . . . . . . . . . . . . . . . . . . . . . . . . . . . . . . . . . .  24Handling Incoming Calls  . . . . . . . . . . . . . . . . . . . . . . . . . . . . . . . . . . . . . . . . . . . . . . . . . . . . .  24Decline an Incoming Call   . . . . . . . . . . . . . . . . . . . . . . . . . . . . . . . . . . . . . . . . . . . . . . . . .  24Rejecting Calls with Enable Do Not Disturb  . . . . . . . . . . . . . . . . . . . . . . . . . . . . . . . . . . .  25Enable Do Not Disturb  . . . . . . . . . . . . . . . . . . . . . . . . . . . . . . . . . . . . . . . . . . . . . . . .  25Enable Do Not Disturb on Multiple Lines  . . . . . . . . . . . . . . . . . . . . . . . . . . . . . . . . . .  25Enable Do Not Disturb for One Line  . . . . . . . . . . . . . . . . . . . . . . . . . . . . . . . . . . . . . .  25Disable Do Not Disturb  . . . . . . . . . . . . . . . . . . . . . . . . . . . . . . . . . . . . . . . . . . . . . . . .  26Forwarding Incoming Calls  . . . . . . . . . . . . . . . . . . . . . . . . . . . . . . . . . . . . . . . . . . . . . . . .  26Forward an Incoming Call to a Contact   . . . . . . . . . . . . . . . . . . . . . . . . . . . . . . . . . . .  26Forward All Incoming Calls to a Contact . . . . . . . . . . . . . . . . . . . . . . . . . . . . . . . . . . .  26Disable Call Forwarding  . . . . . . . . . . . . . . . . . . . . . . . . . . . . . . . . . . . . . . . . . . . . . . .  26End an Audio Call  . . . . . . . . . . . . . . . . . . . . . . . . . . . . . . . . . . . . . . . . . . . . . . . . . . . . . . . . . .  27Holding and Resuming Calls  . . . . . . . . . . . . . . . . . . . . . . . . . . . . . . . . . . . . . . . . . . . . . . . . . .  27Hold a Call . . . . . . . . . . . . . . . . . . . . . . . . . . . . . . . . . . . . . . . . . . . . . . . . . . . . . . . . . . . . .  27Resume a Call . . . . . . . . . . . . . . . . . . . . . . . . . . . . . . . . . . . . . . . . . . . . . . . . . . . . . . . . . .  27Transferring Calls   . . . . . . . . . . . . . . . . . . . . . . . . . . . . . . . . . . . . . . . . . . . . . . . . . . . . . . . . . .  28Choose a Default Transfer Type . . . . . . . . . . . . . . . . . . . . . . . . . . . . . . . . . . . . . . . . . . . .  28Transfer a Call . . . . . . . . . . . . . . . . . . . . . . . . . . . . . . . . . . . . . . . . . . . . . . . . . . . . . . . . . .  28Cancel a Transfer  . . . . . . . . . . . . . . . . . . . . . . . . . . . . . . . . . . . . . . . . . . . . . . . . . . . . . . .  28Managing Multiple Calls   . . . . . . . . . . . . . . . . . . . . . . . . . . . . . . . . . . . . . . . . . . . . . . . . . . . . .  28Manage Calls from the Calls Screen . . . . . . . . . . . . . . . . . . . . . . . . . . . . . . . . . . . . . . . . .  29Audio Call Settings   . . . . . . . . . . . . . . . . . . . . . . . . . . . . . . . . . . . . . . . . . . . . . . . . . . . . . . . . .  29Mute Audio  . . . . . . . . . . . . . . . . . . . . . . . . . . . . . . . . . . . . . . . . . . . . . . . . . . . . . . . . . . . .  29Unmute Audio  . . . . . . . . . . . . . . . . . . . . . . . . . . . . . . . . . . . . . . . . . . . . . . . . . . . . . . . . . .  30Change the Volume   . . . . . . . . . . . . . . . . . . . . . . . . . . . . . . . . . . . . . . . . . . . . . . . . . . . . .  30Conference Calls . . . . . . . . . . . . . . . . . . . . . . . . . . . . . . . . . . . . . . . . . . . . . . . . . . .  31Tips for Conference Calls   . . . . . . . . . . . . . . . . . . . . . . . . . . . . . . . . . . . . . . . . . . . . . . . . . . . .  31
 Polycom, Inc.  5   Initiating Conference Calls . . . . . . . . . . . . . . . . . . . . . . . . . . . . . . . . . . . . . . . . . . . . . . . . . . . .  31Initiate a Conference Call  . . . . . . . . . . . . . . . . . . . . . . . . . . . . . . . . . . . . . . . . . . . . . . . . .  31Add Additional Participants to a Conference Call  . . . . . . . . . . . . . . . . . . . . . . . . . . . . . . .  32Merge Two Calls into a Conference Call . . . . . . . . . . . . . . . . . . . . . . . . . . . . . . . . . . . . . .  32End a Conference Call   . . . . . . . . . . . . . . . . . . . . . . . . . . . . . . . . . . . . . . . . . . . . . . . . . . . . . .  32Hold a Conference Call  . . . . . . . . . . . . . . . . . . . . . . . . . . . . . . . . . . . . . . . . . . . . . . . . . . . . . .  32Resume a Conference Call  . . . . . . . . . . . . . . . . . . . . . . . . . . . . . . . . . . . . . . . . . . . . . . . . . . .  32Manage Conference Call Participants  . . . . . . . . . . . . . . . . . . . . . . . . . . . . . . . . . . . . . . . . . . .  33Video Calls . . . . . . . . . . . . . . . . . . . . . . . . . . . . . . . . . . . . . . . . . . . . . . . . . . . . . . . .  34Tips for Video Calls  . . . . . . . . . . . . . . . . . . . . . . . . . . . . . . . . . . . . . . . . . . . . . . . . . . . . . . . . .  34Video Call Settings   . . . . . . . . . . . . . . . . . . . . . . . . . . . . . . . . . . . . . . . . . . . . . . . . . . . . . . . . .  34Set the Call Rate for Video Calls . . . . . . . . . . . . . . . . . . . . . . . . . . . . . . . . . . . . . . . . . . . .  34Change Video Clarity   . . . . . . . . . . . . . . . . . . . . . . . . . . . . . . . . . . . . . . . . . . . . . . . . . . . .  35Set the Video Layout for the Meeting  . . . . . . . . . . . . . . . . . . . . . . . . . . . . . . . . . . . . . . . .  35Change How Far-End Video Displays . . . . . . . . . . . . . . . . . . . . . . . . . . . . . . . . . . . . . . . .  35Place a Video Call  . . . . . . . . . . . . . . . . . . . . . . . . . . . . . . . . . . . . . . . . . . . . . . . . . . . . . . . . . .  36Stop Sending Video during a Call  . . . . . . . . . . . . . . . . . . . . . . . . . . . . . . . . . . . . . . . . . . . . . .  36Start Video During an Audio Call . . . . . . . . . . . . . . . . . . . . . . . . . . . . . . . . . . . . . . . . . . . . . . .  36Handling Conference Calls with Video   . . . . . . . . . . . . . . . . . . . . . . . . . . . . . . . . . . . . . . . . . .  37Handling Video Calls without a Camera   . . . . . . . . . . . . . . . . . . . . . . . . . . . . . . . . . . . . . . . . .  37Audio and Video Calls . . . . . . . . . . . . . . . . . . . . . . . . . . . . . . . . . . . . . . . . . . . . . . . . . . . .  37Handling a Mixture of Video and Audio-Only Calls  . . . . . . . . . . . . . . . . . . . . . . . . . . . . . .  37Record Audio Calls . . . . . . . . . . . . . . . . . . . . . . . . . . . . . . . . . . . . . . . . . . . . . . . . .  38Guidelines when Recording Calls  . . . . . . . . . . . . . . . . . . . . . . . . . . . . . . . . . . . . . . . . . . . . . .  38Record a Call . . . . . . . . . . . . . . . . . . . . . . . . . . . . . . . . . . . . . . . . . . . . . . . . . . . . . . . . . . . . . .  38Pause a Recording   . . . . . . . . . . . . . . . . . . . . . . . . . . . . . . . . . . . . . . . . . . . . . . . . . . . . . . . . .  38Resume a Recoding  . . . . . . . . . . . . . . . . . . . . . . . . . . . . . . . . . . . . . . . . . . . . . . . . . . . . .  39Stop Recording  . . . . . . . . . . . . . . . . . . . . . . . . . . . . . . . . . . . . . . . . . . . . . . . . . . . . . . . . . . . .  39Browse Recorded Calls  . . . . . . . . . . . . . . . . . . . . . . . . . . . . . . . . . . . . . . . . . . . . . . . . . . . . . .  39Play Recorded Calls   . . . . . . . . . . . . . . . . . . . . . . . . . . . . . . . . . . . . . . . . . . . . . . . . . . . . . . . .  39Pause and Resume Played Recordings  . . . . . . . . . . . . . . . . . . . . . . . . . . . . . . . . . . . . . .  40Stop Playing a Recording  . . . . . . . . . . . . . . . . . . . . . . . . . . . . . . . . . . . . . . . . . . . . . . . . .  40Rename a Recording . . . . . . . . . . . . . . . . . . . . . . . . . . . . . . . . . . . . . . . . . . . . . . . . . . . . . . . .  40Delete Recordings  . . . . . . . . . . . . . . . . . . . . . . . . . . . . . . . . . . . . . . . . . . . . . . . . . . . . . . . . . .  40Sharing Content  . . . . . . . . . . . . . . . . . . . . . . . . . . . . . . . . . . . . . . . . . . . . . . . . . . .  42Sharing Content with RealPresence Desktop or Mobile  . . . . . . . . . . . . . . . . . . . . . . . . . . . . .  42Sharing Content with People+Content IP  . . . . . . . . . . . . . . . . . . . . . . . . . . . . . . . . . . . . . . . .  42
 Polycom, Inc.  6   Download and Install People+Content IP  . . . . . . . . . . . . . . . . . . . . . . . . . . . . . . . . . . . . .  43Share Content with People+Content IP   . . . . . . . . . . . . . . . . . . . . . . . . . . . . . . . . . . . . . .  43Stop Sharing Content with People+Content IP  . . . . . . . . . . . . . . . . . . . . . . . . . . . . . . . . .  43Share Content with People+Content over USB . . . . . . . . . . . . . . . . . . . . . . . . . . . . . . . . . . . .  43Using the Calendar  . . . . . . . . . . . . . . . . . . . . . . . . . . . . . . . . . . . . . . . . . . . . . . . . .  45Open the Calendar   . . . . . . . . . . . . . . . . . . . . . . . . . . . . . . . . . . . . . . . . . . . . . . . . . . . . . . . . .  45Display Meeting Details . . . . . . . . . . . . . . . . . . . . . . . . . . . . . . . . . . . . . . . . . . . . . . . . . . .  45Return to Day View . . . . . . . . . . . . . . . . . . . . . . . . . . . . . . . . . . . . . . . . . . . . . . . . . . .  46Meeting Reminders  . . . . . . . . . . . . . . . . . . . . . . . . . . . . . . . . . . . . . . . . . . . . . . . . . . . . . . . . .  46Choose a Meeting Reminder Type  . . . . . . . . . . . . . . . . . . . . . . . . . . . . . . . . . . . . . . . . . .  46Choose an Alert Tone  . . . . . . . . . . . . . . . . . . . . . . . . . . . . . . . . . . . . . . . . . . . . . . . . . . . .  47Disable Meeting Reminders  . . . . . . . . . . . . . . . . . . . . . . . . . . . . . . . . . . . . . . . . . . . . . . .  47Joining a Meeting   . . . . . . . . . . . . . . . . . . . . . . . . . . . . . . . . . . . . . . . . . . . . . . . . . . . . . . . . . .  47Join Meetings from the Calendar   . . . . . . . . . . . . . . . . . . . . . . . . . . . . . . . . . . . . . . . . . . .  47Join a Meeting from a Meeting Reminder  . . . . . . . . . . . . . . . . . . . . . . . . . . . . . . . . . . . . .  48Join a Meeting with an Alternate Number  . . . . . . . . . . . . . . . . . . . . . . . . . . . . . . . . . . . . .  48Call Lists and Directories . . . . . . . . . . . . . . . . . . . . . . . . . . . . . . . . . . . . . . . . . . . .  49Recent Calls   . . . . . . . . . . . . . . . . . . . . . . . . . . . . . . . . . . . . . . . . . . . . . . . . . . . . . . . . . . . . . .  49View Recent Calls . . . . . . . . . . . . . . . . . . . . . . . . . . . . . . . . . . . . . . . . . . . . . . . . . . . . . . .  49View Call Details  . . . . . . . . . . . . . . . . . . . . . . . . . . . . . . . . . . . . . . . . . . . . . . . . . . . . . . . .  49Save a Recent Contact  . . . . . . . . . . . . . . . . . . . . . . . . . . . . . . . . . . . . . . . . . . . . . . . . . . .  49Delete a Recent Call Entry  . . . . . . . . . . . . . . . . . . . . . . . . . . . . . . . . . . . . . . . . . . . . . . . .  50Edit Recent Contact Entries  . . . . . . . . . . . . . . . . . . . . . . . . . . . . . . . . . . . . . . . . . . . . . . .  50Managing the Local Directory  . . . . . . . . . . . . . . . . . . . . . . . . . . . . . . . . . . . . . . . . . . . . . . . . .  50Search for Contacts   . . . . . . . . . . . . . . . . . . . . . . . . . . . . . . . . . . . . . . . . . . . . . . . . . . . . .  50Add a Contact to the Local Directory   . . . . . . . . . . . . . . . . . . . . . . . . . . . . . . . . . . . . . . . .  51View Contact Details . . . . . . . . . . . . . . . . . . . . . . . . . . . . . . . . . . . . . . . . . . . . . . . . . . . . .  51Update a Contact’s Information . . . . . . . . . . . . . . . . . . . . . . . . . . . . . . . . . . . . . . . . . . . . .  51Delete a Contact  . . . . . . . . . . . . . . . . . . . . . . . . . . . . . . . . . . . . . . . . . . . . . . . . . . . . . . . .  51Favorites  . . . . . . . . . . . . . . . . . . . . . . . . . . . . . . . . . . . . . . . . . . . . . . . . . . . . . . . . . . . . . . . . .  52Add Favorites  . . . . . . . . . . . . . . . . . . . . . . . . . . . . . . . . . . . . . . . . . . . . . . . . . . . . . . . . . .  52Remove Favorites . . . . . . . . . . . . . . . . . . . . . . . . . . . . . . . . . . . . . . . . . . . . . . . . . . . . . . .  52Using the Corporate Directory  . . . . . . . . . . . . . . . . . . . . . . . . . . . . . . . . . . . . . . . . . . . . . . . . .  52Searching the Corporate Directory  . . . . . . . . . . . . . . . . . . . . . . . . . . . . . . . . . . . . . . . . . .  52Perform a Quick Search  . . . . . . . . . . . . . . . . . . . . . . . . . . . . . . . . . . . . . . . . . . . . . . .  53Perform an Advanced Search   . . . . . . . . . . . . . . . . . . . . . . . . . . . . . . . . . . . . . . . . . .  53Add Corporate Directory Contacts to the Local Directory  . . . . . . . . . . . . . . . . . . . . . . . . .  53 Searching the BroadSoft Directory  . . . . . . . . . . . . . . . . . . . . . . . . . . . . . . . . . . . . . . . . . . . . .  54
 Polycom, Inc.  7   Perform a Simple Search  . . . . . . . . . . . . . . . . . . . . . . . . . . . . . . . . . . . . . . . . . . . . . . . . .  54Perform an Advanced Search . . . . . . . . . . . . . . . . . . . . . . . . . . . . . . . . . . . . . . . . . . . . . .  54Add BroadSoft Contacts to the Local Directory . . . . . . . . . . . . . . . . . . . . . . . . . . . . . . . . .  55Voicemail and Pages   . . . . . . . . . . . . . . . . . . . . . . . . . . . . . . . . . . . . . . . . . . . . . . .  56Access Voicemail Messages  . . . . . . . . . . . . . . . . . . . . . . . . . . . . . . . . . . . . . . . . . . . . . . . . . .  56Receiving Messages with Group Paging . . . . . . . . . . . . . . . . . . . . . . . . . . . . . . . . . . . . . . . . .  56Receiving Pages  . . . . . . . . . . . . . . . . . . . . . . . . . . . . . . . . . . . . . . . . . . . . . . . . . . . . . . . .  57Receiving Pages When You’re Not in an Active Call  . . . . . . . . . . . . . . . . . . . . . . . . .  57Listen to Pages during Active Calls   . . . . . . . . . . . . . . . . . . . . . . . . . . . . . . . . . . . . . .  57Connecting Bluetooth Devices and Laptops  . . . . . . . . . . . . . . . . . . . . . . . . . . . .  59Connecting Devices using Bluetooth . . . . . . . . . . . . . . . . . . . . . . . . . . . . . . . . . . . . . . . . . . . .  59Make the System Visible to Nearby Bluetooth Devices   . . . . . . . . . . . . . . . . . . . . . . . . . .  59Connect a Bluetooth Device  . . . . . . . . . . . . . . . . . . . . . . . . . . . . . . . . . . . . . . . . . . . . . . .  59Connect a Bluetooth Device Using Near Field Communication  . . . . . . . . . . . . . . . . . . . .  60Play Audio from a Bluetooth Device  . . . . . . . . . . . . . . . . . . . . . . . . . . . . . . . . . . . . . . . . .  60Connecting a Device using a USB Cable   . . . . . . . . . . . . . . . . . . . . . . . . . . . . . . . . . . . . . . . .  60Connecting a Laptop to the System  . . . . . . . . . . . . . . . . . . . . . . . . . . . . . . . . . . . . . . . . .  60Connect a Device or Laptop  . . . . . . . . . . . . . . . . . . . . . . . . . . . . . . . . . . . . . . . . . . . . . . .  61Setting RealPresence Trio 8800 as Your Audio Device  . . . . . . . . . . . . . . . . . . . . . . . . . .  61Setting the System as Your Audio Device for Communication Clients . . . . . . . . . . . .  61Set the System as Your Audio Device in RealPresence Desktop   . . . . . . . . . . . . . . .  61Set the System as Your Audio Device for Your Laptop  . . . . . . . . . . . . . . . . . . . . . . .  62System Settings   . . . . . . . . . . . . . . . . . . . . . . . . . . . . . . . . . . . . . . . . . . . . . . . . . . .  63Password Required to Customize RealPresence Trio 8800  . . . . . . . . . . . . . . . . . . . . . . . . . .  63Set the Language   . . . . . . . . . . . . . . . . . . . . . . . . . . . . . . . . . . . . . . . . . . . . . . . . . . . . . . . . . .  63Time and Date Display   . . . . . . . . . . . . . . . . . . . . . . . . . . . . . . . . . . . . . . . . . . . . . . . . . . . . . .  63Set the Time and Date Display  . . . . . . . . . . . . . . . . . . . . . . . . . . . . . . . . . . . . . . . . . . . . .  63Disable the Time and Date Display . . . . . . . . . . . . . . . . . . . . . . . . . . . . . . . . . . . . . . . . . .  64Backlight Intensity and Timeout . . . . . . . . . . . . . . . . . . . . . . . . . . . . . . . . . . . . . . . . . . . . . . . .  64Change the Backlight Intensity  . . . . . . . . . . . . . . . . . . . . . . . . . . . . . . . . . . . . . . . . . . . . .  64Change the Backlight Timeout  . . . . . . . . . . . . . . . . . . . . . . . . . . . . . . . . . . . . . . . . . . . . .  65Formatting Numbers  . . . . . . . . . . . . . . . . . . . . . . . . . . . . . . . . . . . . . . . . . . . . . . . . . . . . . . . .  65Power-Saving Mode   . . . . . . . . . . . . . . . . . . . . . . . . . . . . . . . . . . . . . . . . . . . . . . . . . . . . . . . .  65Change Your Office Hours  . . . . . . . . . . . . . . . . . . . . . . . . . . . . . . . . . . . . . . . . . . . . . . . .  65Change Timeouts  . . . . . . . . . . . . . . . . . . . . . . . . . . . . . . . . . . . . . . . . . . . . . . . . . . . . . . .  66Set a Ringtone for Incoming Calls  . . . . . . . . . . . . . . . . . . . . . . . . . . . . . . . . . . . . . . . . . . . . . .  66Control Where Audio Plays  . . . . . . . . . . . . . . . . . . . . . . . . . . . . . . . . . . . . . . . . . . . . . . . . . . .  67
 Polycom, Inc.  8   Accessibility Features   . . . . . . . . . . . . . . . . . . . . . . . . . . . . . . . . . . . . . . . . . . . . . .  68Features for Hearing-Impaired Users   . . . . . . . . . . . . . . . . . . . . . . . . . . . . . . . . . . . . . . . . . . .  68Features for Vision-Impaired and Blind Users   . . . . . . . . . . . . . . . . . . . . . . . . . . . . . . . . . . . .  68Features for Mobility-Impaired Users   . . . . . . . . . . . . . . . . . . . . . . . . . . . . . . . . . . . . . . . . . . .  69Maintaining the System  . . . . . . . . . . . . . . . . . . . . . . . . . . . . . . . . . . . . . . . . . . . . .  70Investigate Warnings  . . . . . . . . . . . . . . . . . . . . . . . . . . . . . . . . . . . . . . . . . . . . . . . . . . . . . . . .  70Restart the System   . . . . . . . . . . . . . . . . . . . . . . . . . . . . . . . . . . . . . . . . . . . . . . . . . . . . . . . . .  70Update the System Configuration  . . . . . . . . . . . . . . . . . . . . . . . . . . . . . . . . . . . . . . . . . . . . . .  70Test System Hardware   . . . . . . . . . . . . . . . . . . . . . . . . . . . . . . . . . . . . . . . . . . . . . . . . . . . . . .  71Clean the Touchscreen  . . . . . . . . . . . . . . . . . . . . . . . . . . . . . . . . . . . . . . . . . . . . . . . . . . . . . .  71Troubleshooting  . . . . . . . . . . . . . . . . . . . . . . . . . . . . . . . . . . . . . . . . . . . . . . . . . . .  72Check the Status of RealPresence Trio Visual+  . . . . . . . . . . . . . . . . . . . . . . . . . . . . . . . . . . .  72Check the Status of the Calendar  . . . . . . . . . . . . . . . . . . . . . . . . . . . . . . . . . . . . . . . . . . . . . .  72Tips for Resolving Content Sharing Issues  . . . . . . . . . . . . . . . . . . . . . . . . . . . . . . . . . . . . . . .  72Tips for Resolving Camera Issues . . . . . . . . . . . . . . . . . . . . . . . . . . . . . . . . . . . . . . . . . . . . . .  72
Polycom, Inc.  9 Before You BeginThis Polycom RealPresence Trio Solution User Guide contains overview information for the Polycom® RealPresence Trio™ 8800 audio conferencing system and the Polycom® RealPresence Trio™ Visual+ content and video accessory. Audience, Purpose, and Required SkillsThis guide is intended for beginning users, as well as intermediate and advanced users who want to learn more about the solution’s features.Related DocumentationFor additional information about the solution, view the following documents on the RealPresence Trio 8800 support page:●User Documents:Quick Tips—A quick reference on how to perform basic functions. ●Setup and Maintenance Documents:Setup Sheet—This guide describes the contents of your package, how to assemble the system or accessory, and how to connect the system to the network. The quick start guide is included in the solution package.Administrator Guide—This guide provides detailed information about setting up your network and configuring features.Regulatory Notice—This guide provides information for all regulatory and safety guidance. You can also view Feature Descriptions and Technical Notifications on the Polycom Voice Support page. These documents describe workarounds to existing issues and provide expanded descriptions and examples for settings and features. You can find these documents on the Polycom Profiled UC Software Features and Polycom Engineering Advisories and Technical Notifications support pages.
Polycom, Inc.  10 Getting Started with Polycom RealPresence Trio 8800Before you use the RealPresence Trio 8800, take a few moments to familiarize yourself with the system and its features. This section details the system’s components, the screen layout, and how to navigate the system. Overview of RealPresence Trio 8800RealPresence Trio 8800 supports audio-only conference calls with Open-SIP voice platforms along with point-to-point, bridge, and  video calls. When paired with the RealPresence Trio Visual+ content and video accessory, you can stream video and share content for all calls on the RealPresence Trio 8800.RealPresence Trio 8800 HardwareThe following figure displays the hardware features on the RealPresence Trio 8800. The table lists each numbered feature shown in this figure.RealPresence Trio 8800 hardware featuresAs you read this guide, keep in mind that certain features are configurable by your system administrator or determined by your network environment, and some features may not be enabled or may operate differently on the system. Additionally, the examples in this guide may not directly reflect what is displayed or is available.
 Polycom RealPresence Trio Solution User GuidePolycom, Inc.  11   Navigating the SystemThe RealPresence Trio 8800 has icons, status indicators, and screens to help you navigate the user interface and understand important information on the state of the solution. Accessing User ScreensThe following screens display on the RealPresence Trio 8800:●Home Screen—Displays your messages, settings, and information. ●Place a Call Screen—Enables quick access to the dial pad, Recent Calls, Contacts, and Calendar.●Calls Screen—Displays all active and held calls on your line.Access the Home ScreenThe Home screen displays the icons you can select to access features, settings, and other information; additional registered lines; and favorites you can save to quickly call contacts. RealPresence Trio 8800 Hardware Feature DescriptionsReference Number Feature  Feature Description1 Touchscreen Enables you to select items and navigate menus on the touch-sensitive screen. 2 NFC Enables you to connect a Bluetooth-capable mobile phone or tablet using Near Field Communication (NFC).3 USB Port Enables you to connect a USB flash drive or connect a computer using a USB cable.4 Device Port Enables you to connect a mobile or tablet device to the system using a USB device cord.5 Speaker and MicrophonesProvides audio for the ringer and speakerphone and sends your audio to the far-end.6 Mute key Mutes the microphones during calls and conferences. The key glows red when activated.7 Volume keys Adjust the volume of the audio from the speakerphone and ringer.
 Polycom RealPresence Trio Solution User GuidePolycom, Inc.  12   Home screen and Page Indicator To access the Home screen:»Tap   and tap   Home.Expand or Contract the Home ScreenA Page Indicator shows underneath the Menu options of the Home screen and indicates the page you are currently viewing. You can press and hold the Page Indicator to control how many icons display on the Home screen. To expand or contract the Home screen: 1On the Home screen, press and hold the Page Indicator, as shown next. Accessing the Place a Call ScreenThe Place a Call screen is displayed when you tap the Place a Call icon on the Home Screen or when the system is idle and not in use, if set by your system administrator. From the Place a Call screen, you can access the dial pad, Contacts, Recent Calls, and the Calendar, as shown in the following figure.
 Polycom RealPresence Trio Solution User GuidePolycom, Inc.  13   Place a Call screen Accessing the Calls ScreenThe Calls screen is displayed automatically when you place a call and you have an active call in progress. When you have an active call in progress, the name and number of the contact you are talking with and the duration of the call is displayed in the Calls screen, as shown next. Active call on the Calls screenYou can also view active and held calls in progress on the system, as shown next. If the system has multiple lines, active and held calls display under the associated line.
 Polycom RealPresence Trio Solution User GuidePolycom, Inc.  14   Two calls on the Calls screenIcons and Status IndicatorsThe following table display icons and status indicators that display on the RealPresence Trio 8800.Enter Information Using the Onscreen KeyboardThe onscreen keyboard enables you to enter information into text fields using the touchscreen. The keyboard is displayed on screen automatically when a text field is shown. When a data entry field requires only numbers, the onscreen keyboard displays only numbers.You can use the following icons on the onscreen keyboard to enter information in text fields: Icons and Status IndicatorsIcon Description Icon DescriptionRegistered line Do Not Disturb enabledUnregistered line Call forwarding is enabledPlacing a call Wireless statusActive call Paired deviceUSB device attached Bluetooth enabledPlaced audio call Missed audio callReceived audio call
 Polycom RealPresence Trio Solution User GuidePolycom, Inc.  15   ● Shows alphabetical letters● Shifts to uppercase letters.● Shifts to lowercase letters● Displays numbers and punctuation marks● Displays special charactersTo access and use the onscreen keyboard:1Tap a text field. 2Press your finger on each character you want to enter.Close the Onscreen KeyboardWhen you are done entering information into a text field, or you want to exit the current screen and return to the previous screen, close in onscreen keyboard.To close the onscreen keyboard:»Tap Done.
Polycom, Inc.  16 Logging Into and Locking the SystemYou can lock the RealPresence Trio 8800 and log in to the system with login credentials. Logging into the SystemIf your system administrator has enabled users to sign in to their user accounts on the system, you can log into the system to access and view your Local Directory, favorites, and custom settings. Contact your system administrator for your user credentials.When you change settings while logged in to the system, the settings are saved and displayed the next time you log into another system.Log Into the SystemDepending on how your system administrator set up the user login feature, you may need to log in to the system before you can use the system. When you log in, you have full access to your personal settings and your directory. To log into the system:1Do one of the following:If you see the User Login screen, proceed to step 2. If you do not see the User Login screen, navigate to Settings > Features > User Login > Log In. 2From the User Login screen, enter your user ID and password, and tap Log In.Log Out of the SystemAfter you use a RealPresence Trio 8800, make sure you log out to prevent access to your personal settings.To log out of the system:1Tap Log Out, or select Settings > Features > User Login > Log Out. The Logout screen is displayed with a confirmation message.When the system is logged out, you can use the system to place emergency calls and calls to other pre-determined phone numbers. Pre-determined numbers are set up by your administrator. For information on how to place authorized calls, see Place Calls from a Locked or Logged Out System.
 Polycom RealPresence Trio Solution User GuidePolycom, Inc.  17   2Select Yes.Your personal profile is no longer accessible, and the system displays either the User Login screen for the next user, or the default profile.Change Your User Login PasswordYou can change your login password from any RealPresence Trio 8800.To change your user password:1Log in to a system on your network.2Navigate to Settings > Features > User Login > Change User Login Password. 3From the Change User Login Password screen, enter your old and new password information, and select Enter.Your password is changed. The next time you log in to a RealPresence Trio 8800, you need to enter your new password.Locking the SystemYour system administrator provides you with a user password that you can use to unlock the system and use to answer calls when the system is locked. When the system is locked, you can:●Make outgoing calls to authorized numbers.●Enter a password to answer incoming calls.●View messages on the status bar informing you that the system is locked and that only authorized calls are allowed. Any messages that displayed before the system was locked do not display.Lock the SystemWhen you lock the system, you can choose to enable one of the following options:. ●Allow ringing when locked - incoming calls ring on the system, and you can answer calls by entering a user password.●DND when locked - Do Not Disturb applies to all lines and the system does not ring for incoming calls (see the section Rejecting Calls with Enable Do Not Disturb). If you set up the system to allow you to answer incoming calls when locked, you can answer calls by entering your user password. See the section Answer Calls on a Locked System for more information.To lock the system:1Navigate to Settings > Basic > Lock Phone. 2From the Lock Phone screen, select Allow ringing when locked (the default setting) or DND when locked.When you choose this option, you can answer a call by entering your password.3Select Lock.
 Polycom RealPresence Trio Solution User GuidePolycom, Inc.  18   Unlock the SystemYou can unlock the system using your user password.To unlock the system:1Tap Unlock.2Enter your user password and tap Enter. Change Your User PasswordTo change your user password, you need access to the Advanced settings menu, which is password-protected. Contact your administrator for help with accessing Advanced settings and changing your user password. To change your user password:1Navigate to Settings > Advanced. 2Enter the administrator password, and tap Enter. 3From the Advanced screen, tap Change User Password.4From the Change User Password screen, enter your old and new password information.By default, the onscreen keyboard displays numbers. You can tap Mode and select ABC to set your password with alphabets.5Select Enter.
Polycom, Inc.  19  Audio CallsThe system can manage a maximum of 12 active, incoming, and held audio calls at a time on one registered line. However, you can have only one active call in progress with numerous other incoming calls or calls on hold. The system can only have one registered line. Placing Audio CallsYou can place audio calls on the system in numerous ways, including placing international calls, placing calls from Recent Calls, placing calls to contacts or favorites, or calling authorized numbers on a locked system. If enabled, you can also place calls over Bluetooth or an intercom call to a specified contact. Place a CallThe Dialer enables you to enter a number or IP address to place a call using the dial pad or onscreen keyboard.To place a call:1Tap Place a Call.2Enter your contact’s number or tap the onscreen keyboard   and enter an IP address.3Tap .Place an International CallYou can place calls to international numbers from the Dialer. To place an international call: 1In the Place a Call screen, quickly tap the star key * twice. A plus sign + is displayed.2Enter the number and tap  .Place a Call from Recent Calls You can place calls from Recent Calls, which has calls that were recently placed, answered, or missed. See the section View Recent Calls for more information on recent calls.
Polycom RealPresence Trio Solution User Guide Polycom, Inc.  20   To place a call from Recent Calls:1Navigate to Recent Calls. 2From the Recent Calls screen, select a contact. The call is automatically placed after you select a contact.Place a Call to a FavoriteYou can place a call to favorites by selecting a favorite on the Home screen. Contacts you add as favorites display at the bottom of the Home screen with an avatar  . See the section Add Favorites for information on adding Favorites.To place a call to a favorite:»On the Home screen, tap a favorite.A call is placed to the favorite automatically.Place Calls from DirectoriesYou can place a call to a contact directly from one of the directories available on the system or you can select contacts to call in the directory from the Place a Call screen.To call a contact from a directory:1Do one of the following:Navigate to Contacts and select a directory.Navigate to Place a Call, tap  , and select a directory.2Select a contact.3From the Details screen, tap   next to the number you want to call. Place a Call from the Directory Search ScreenYou can also call contacts from the search screen in your directory.To call contacts from the directory search screen:1Select Contacts and select a directory. 2In the Search field, enter your contact’s first or last name. 3Select your contact.4In the Details screen, tap   next to the number you want to call.Place Calls from a Locked or Logged Out SystemWhen the system is locked or you are not logged in to the system, you can place calls only to emergency numbers, such as 911, and up to five authorized numbers that your administrator can set up, as shown next.
Polycom RealPresence Trio Solution User Guide Polycom, Inc.  21   You cannot call any other numbers from a locked or logged out system. For more information, see the section Logging Into and Locking the System.To call an authorized number from a locked or logged out system:1Tap New Call. 2From the Place an Authorized Call screen, select a number and tap Dial.Place an Intercom CallThe intercom on the system enables you to place a call to a contact that is answered automatically on the contact’s phone. The intercom call is automatically answered only if the contact is not in an active call. If the contact is in an active call, the contact can choose to answer the intercom call, or the intercom call is answered automatically after the active call ends. Check with your system administrator to find out if this feature is available on the system.To place an intercom call:1From the Home screen, select Intercom.2Enter a number or select a contact from Contacts, Favorites, or Recent.3Tap .The system plays a tone and the call is answered automatically on the contact’s phone. 4Speak your message and wait for a reply.5If you do not need to wait for a response, tap Hang Up  .Place an Intercom Call during a CallYou can place an intercom call to another contact during an active call.Your system administrator can set up the system to automatically call a specific contact when you press the Intercom soft key. If the system is set up this way, press the Intercom soft key and wait for the call to be answered before speaking your message.
Polycom RealPresence Trio Solution User Guide Polycom, Inc.  22   To use the intercom during a call:1Select Hold, and select the Intercom soft key.The active call is placed on hold and the Dialer screen is displayed.2Enter a number or select a contact.3Tap 4After the call is answered, speak your message and select Hang Up.5Select Resume.Place a Call over BluetoothWhen the RealPresence Trio 8800 is paired and connected with a Bluetooth-enabled mobile phone or tablet, you can place a call on your device and use the system as a speakerphone for the call. See the section Connecting Bluetooth Devices and Laptops for information on connecting and pairing your device with the RealPresence Trio 8800.To place a call over Bluetooth: 1Connect your device with the RealPresence Trio 8800 over Bluetooth. 2On your device, place a call to a contact.3On the call screen, select the RealPresence Trio 8800 as your audio source.Redial a NumberAll recently placed calls are displayed in the Recent Calls list. The first number in the list is the last call you placed.To redial a number:»Do one of the following: Tap Redial on the Home Screen. Select Place a Call, tap  , and select the first number in the list. Answering Audio CallsWhen you receive an incoming call on the system, you can choose to answer the call in various ways. Answer Calls in the Incoming Call WindowWhen you receive an incoming call, the system rings and an Incoming Call screen is displayed, as shown next. In the Incoming Call screen, you can choose to answer or ignore the incoming call.
Polycom RealPresence Trio Solution User Guide Polycom, Inc.  23   Incoming Call screenTo answer an incoming call:»Tap Answer .After you answer the incoming call, the call becomes active.Answer a Call When in a CallWhen you are in an active call and an incoming call arrives on the same or a different line, a call waiting tone beeps, and the Incoming Call window is displayed. To answer an incoming call during a call: »Tap Answer . The active call is placed on hold, and the incoming call becomes active.Answer Calls AutomaticallyYou can set up the system to automatically answer calls using the Auto Answer feature. When this feature is enabled, the system automatically answers all incoming calls using the speakerphone. Your system administrator sets how many times the system rings before the call is automatically answered.When Auto Answer is enabled and you receive an incoming call while in a call, the incoming call is not answered until you end or hold the current call.Your system administrator can enable the screen to flash bright orange when you have an incoming call. The screen continues to flash until the incoming call is displayed in the Home or Calls screen. For more information about this feature, see your system administrator.If the system is locked, you must enter a user password before answering the call. See the section Answer Calls on a Locked System.
Polycom RealPresence Trio Solution User Guide Polycom, Inc.  24   To enable the system to automatically answer calls:1Navigate to Settings > Basic > Preferences > Auto Answer. 2From the Auto Answer screen, select Auto Answer SIP Calls, and select Yes. 3Select Microphone Mute, and choose Yes (the default setting) to mute the microphone for auto-answered calls.4Select Video Mute, and select Yes to mute the video when video calls are auto-answered. The default setting is No. See the section Video Calls for more information on placing video calls.5Select Save.These settings are applied to all incoming calls.Answer Calls on a Locked SystemWhen the system is set up so that you can answer incoming calls when locked (see the section Locking the System), you can answer calls by entering your user password.To answer a call on a locked system:1From the Incoming Call window, tap Answer .2Enter your user password and select Enter.The call connects.Answer an Intercom CallWhen you receive an intercom call on the system, the call is answered automatically using the speakerphone. If the system is set up to answer intercom calls with your microphone muted, you need to unmute your microphone before responding to the call. To answer an intercom call:»After the call is answered, tap Mute  and reply.Handling Incoming CallsWhen you receive an incoming call, you can choose to decline the call instead of answering. You can also enable Do Not Disturb to reject all calls for a brief time period or set up Call Forwarding to automatically forward calls sent to your line.Decline an Incoming CallYou can decline an incoming call and send the call directly to voicemail. Declined calls display in the Missed Calls list in Recent Calls. Rejecting calls is not available for shared lines.
Polycom RealPresence Trio Solution User Guide Polycom, Inc.  25   To decline an incoming call:»From the Incoming Call window, select Decline  . The call goes directly to voicemail.Rejecting Calls with Enable Do Not Disturb When you enable DND, the following occurs:●The DND icon   is displayed in the status bar. ●When the system is idle, the DND icon is displayed next to the line on the Home screen. If you have new messages or forwarding enabled, the messages or forwarding icon is displayed instead.Enabling DND on shared lines disables ringing only. A visual notification of the call still displays, and you have the option to answer or silence the call.Enable Do Not Disturb If there is a single line registered on the system, you can enable Do Not Disturb (DND) to prevent the system from ringing and to send all incoming calls directly to voicemail. All calls received while DND is enabled are logged in the Recent Calls list.To enable or disable Do Not Disturb:»Do one of the following: Tap DND on the Home screen. Navigate to Settings > Features > Do Not Disturb, and tap Enable. Enable Do Not Disturb on Multiple LinesBy default, the Do Not Disturb feature applies to all registered lines on the system. Your system administrator can set up the system so that you can enable the feature on a per-line basis.To automatically enable Do Not Disturb for all lines:1Navigate to Settings > Features > Do Not Disturb. 2Select Set All to enable DND for all lines. Enable Do Not Disturb for One LineIf the system has multiple line registrations, you can choose to enable DND for a particular line and not all lines.To enable Do Not Disturb for a particular line:1Navigate to Settings > Features > Do Not Disturb. 2From the Line Select screen, select a line.3From the Do Not Disturb screen, tap Enable.
Polycom RealPresence Trio Solution User Guide Polycom, Inc.  26   Disable Do Not DisturbYou can disable DND when you are ready to resume receiving calls again. To disable Do Not Disturb: »Navigate to Settings > Features > Do Not Disturb and tap Disable. Forwarding Incoming CallsYou can choose to forward an incoming call to a contact or forward all incoming calls to one of your contacts.Forward an Incoming Call to a ContactYou can forward an incoming call directly to a contact without answering the call. You cannot forward calls in this way on shared lines. To forward an incoming call to a contact:1In the Incoming Call screen, tap   then tap Forward.2From the Call Forwarding screen, enter the forwarding number, and tap Forward.Forward All Incoming Calls to a ContactYou can set up the system to forward all incoming calls to a contact, which you can also do with the Do Not Disturb feature enabled. For shared lines, you can only choose Always as your forwarding option; the other forwarding options are not available for shared lines.To forward all incoming calls to a contact:1Navigate to Settings > Features > Forward. 2If the system has multiple lines, select a line. 3From the Forwarding Type Select screen, select a forwarding type:Always Forwards all incoming calls.No Answer Forwards all unanswered incoming calls.Busy Forwards incoming calls when you’re in a call.4Enter a contact’s number, and select Enable. 5If you selected the No Answer option, you can enter the number of rings before the system forwards the call. The default is set to nine.The forwarding number or name of the contact you chose displays in the status bar, and when you select Always as your forwarding option, the forwarding icon   is displayed on the line.Disable Call ForwardingYou can disable call forwarding when you no longer want to forward calls.
Polycom RealPresence Trio Solution User Guide Polycom, Inc.  27   To disable call forwarding:1Navigate to Settings > Features > Forward.2If the system has multiple lines, select a line.3From the Forwarding Type Select screen, tap Disable Call Forwarding.End an Audio CallYou can end an active call on the system at any time. You cannot end calls on hold. You must resume held calls before ending them.To end active calls:»Do one of the following:Tap Hang Up . In the Calls screen, select the call and tap Hang Up .From the Calls screen, select a held call, tap Resume , then tap Hang Up  .Holding and Resuming CallsWhen you are in a call, you can place an active audio or video call on hold and resume the call. When you place a call on hold, the Mute key indicators on the system and microphones are red. When you are placed on hold, the Mute key indicators on the system and microphones flash green.Hold a CallYou can place any active audio or video call on hold. To hold a call:»During an active call, tap Hold  . If you’re in the Calls screen, be sure to highlight the call first.The Resume   soft key is displayed. Resume a CallYou can view and resume all held calls in the Calls screens.To resume a held call:»Do one of the following:Tap Resume . From the Calls screen, select the call to highlight it, and tap Resume .
Polycom RealPresence Trio Solution User Guide Polycom, Inc.  28   Transferring CallsYou can transfer active or held calls to another person using the following transfer types:●Blind transfer Transfer calls directly to another line without speaking with the other party first.●Consultative transfer Speak with the other party before completing the transfer.Choose a Default Transfer TypeYou can choose a default transfer type to use for all calls or choose a transfer type during a call. When you choose a default transfer type, you can press the Transfer soft key, and the system uses the set transfer type for all calls. Consultative is set as the transfer type by default. To set a default transfer type for all calls: 1Navigate to Settings > Basic > Preferences > Default Transfer Type. 2On the Default Transfer Type screen, choose a transfer type. The selected transfer type is used for all calls. Transfer a CallYou can transfer a call to another contact and choose the transfer type you want to use for the call. To transfer a call: 1During a call, tap Transfer   to use the default transfer type.2Dial a number or choose a contact from Contacts or Recent Calls. If the default transfer type is set to Blind, the call is transferred immediately.3If the transfer type is set to Consultative, press Transfer  after speaking with your contact. Cancel a TransferIf a contact does not answer the transfer or you want to remain speaking with the contact on your line, you can cancel the transfer before it is complete. To cancel a transfer before the call connects:»Select Cancel.The call is not transferred and becomes active.Managing Multiple CallsYou can manage multiple calls that are active, incoming, or held on the system. In the Calls screen, you can view active and held calls, including conference calls. The following figure shows an active call and a held conference call.
Polycom RealPresence Trio Solution User Guide Polycom, Inc.  29   Manage Calls from the Calls ScreenFrom the Calls screen, you can manage a call by holding, resuming, or transferring the call. To manage a call from the Calls screen:1Select a call. 2Do one of the following:Select Hold   to place an active call on hold.Select Resume   to make a held call active.Select Hang Up   to end a call with a contact. You can end active calls only, so resume the held call first before ending it.Select Transfer   to send the call to another contact.Audio Call Settings On RealPresence Trio, you can mute and unmute the microphone and change the volume of the ringtone or audio during calls. Mute AudioYou can mute the microphone so other parties cannot hear you. You can still hear all other parties when you mute your microphone.To mute the microphone:»During a call, do one of the following:Tap Mute .Tap the Mute key  on the system. Tap the Mute key  on the microphone.
Polycom RealPresence Trio Solution User Guide Polycom, Inc.  30   Unmute AudioUnmute your audio when you are ready to speak and let your contacts hear.To unmute the microphone:»During a call, do one of the following:Tap Unmute .Tap the Mute key   on the system. Tap the Mute key   on the microphone. Change the VolumeYou can increase the volume of the system’s ringtone and the audio during a call.To change the volume of the ringtone or audio during calls:»Tap one of the Volume keys to increase or decrease the audio.
Polycom, Inc.  31 Conference CallsYou can initiate and manage up to 12 audio conference calls on the RealPresence Trio 8800. You can also place video conference calls with contacts and view video streams for those participants. See the section Video Calls for more information on video conference calls.Tips for Conference CallsWhen you are in a conference call, follow these tips:●Mute your microphone when you are not speaking, especially in noisy environments.●Avoid tapping the microphone or rustling papers near the microphone.●Speak in your normal voice without shouting.Initiating Conference CallsYou can initiate a conference call with four contacts, and you can also hold, resume, or split a conference call. The RealPresence Trio 8800 can manage a maximum of 12 active or held conference calls at a time. However, you can have only one active conference call in progress with numerous other conference calls on hold.If your system administrator enables the Conference Management feature, you can manage each participant in the call. With the Conference Management feature, you can mute and remove individual participants in a conference call. For more information, see the section Manage Conference Call Participants.Initiate a Conference CallYou can initiate a conference by adding a contact during an active call and merging the contacts into a conference call. To initiate a conference call:1Call a contact.2After the contact answers, tap Add  .The call is held.3Enter another contact’s number or select a contact from Contacts or Recent Calls.The contact is added to the conference call after answering.
 Polycom RealPresence Trio Solution User GuidePolycom, Inc.  32   Add Additional Participants to a Conference CallYou can add up to four contacts to a conference call.To add additional participants to a conference call:1During an active conference call, tap Add Participant. 2Enter another contact’s number or select a contact from Contacts or Recent Calls.The new contact is added to the conference call after answering.Merge Two Calls into a Conference Call You can merge an active call and a held call to initiate a conference call. To merge calls into a conference call: 1In the calls screen, tap the held call. 2Tap Merge.The held call is merged with the active call and a conference call is initiated.End a Conference CallBy default, when you end a conference call, your connection to the call ends, and the other participants in the conference remain in the call. However, your system administrator can set up the system so that all connections terminate when you end a conference call.To end a conference call:»During a conference call, select Hang Up .Hold a Conference CallWhen you place a conference call on hold, you place all conference participants on hold. To place one conference participant on hold, see the section Manage Conference Call Participants.To place a conference call on hold:»Tap Hold  . If you’re in the Calls screen, highlight the conference first. Resume a Conference CallResuming a held conference call enables all participants to hear the audio of everyone on the call.
 Polycom RealPresence Trio Solution User GuidePolycom, Inc.  33   To resume a held conference call:»Tap Resume . Manage Conference Call ParticipantsIf your system administrator enables the conference management feature, you can mute and remove participants from the conference, as shown next.To manage a participant in a conference call:1During an active conference, select the participant you want to manage.2Do one of the following:Tap Mute   to mute the participant. The muted participant can hear everyone, but no one can hear the muted participant.Select Hang Up   to remove the participant from the conference.
Polycom, Inc.  34 Video CallsWhen the RealPresence Trio Visual+ content and video accessory is paired with the RealPresence Trio 8800, you can send video to your contacts with a connected  Logitech Webcam C930e USB camera and view video from contacts on a connected monitor. See Logitech Support for more information on the Logitech Webcam C930e. If you do not have a Logitech Webcam C930e connected to the RealPresence Trio Visual+ when you receive video during calls, you can see your contact’s video, but your contact cannot see video from you.Tips for Video CallsUse the following tips when you’re in a video call:●Check your video image to make sure it’s clear, bright, and sharp. For information on adjusting camera settings, see Change Video Clarity .●Avoid bright lights or windows behind you. If the camera faces a window or bright lights, you may have to adjust the camera settings. To adjust camera settings, see Video Call Settings.●Avoid wearing bright colors, all-light or all-dark clothing, or busy patterns, such as small checks or narrow stripes. Pastels and muted colors look best on the screen.●Use natural gestures and speak in a natural tone without shouting.●Pause between sentences to allow for possible audio delay. ●During a conference call, mute your microphone when not speaking.●Avoid tapping or rustling papers near the microphone.Video Call SettingsWhen you update video settings, you change the way all video calls display for a RealPresence Trio 8800. If you update settings during a call, the new settings apply to the next call and not the current call.Set the Call Rate for Video CallsYou can set the maximum bandwidth to use for a video call. The call rate you select applies to your next video call. Your system administrator can set a maximum call rate for video calls. If your system administrator sets a call rate limit, you cannot select a call rate above this limit.For more tips on proper video conferencing etiquette, see Polycom’s The Etiquette of Video Conferencing and Telepresence.
 Polycom RealPresence Trio Solution User GuidePolycom, Inc.  35   To set the maximum call rate to use for video calls:1Navigate to Settings > Basic > Call Rate.2From the Call Rate screen, select the maximum call rate you want to use for video calls. You can choose a call rate between 128 kbps and 4096 kbps. The default setting is 2048 kbps.Change Video Clarity You can change the Target Frame Rate to improve video clarity. The Target Frame Rate sets how smoothly your video displays. You can set a rate between 5 (least smooth) and 30 (smoothest). The default rate is 30.To change the clarity of your video:1Navigate to Settings > Basic > Video > Camera Settings.2From the Camera Settings screen, tap Target Frame Rate, and tap Up or Down to move the slider to change the frame rate.Set the Video Layout for the MeetingDuring a video call, you can choose how video from meeting participants display on the monitor. You can choose any of the following options:●Auto (default)—The system chooses the best layout for the call.●Gallery View— Shows up to five meeting participants. If content is displayed when the maximum number of participants is active, the content replaces one participant. When there are less than five participants, self-view displays. ●Picture-in-Picture (PIP)—Displays self-view or the active talker. The PIP displays in or on the meeting content●Full Screen— The video of the active speaker or the meeting content displays in full screen.To set the video layout for the meeting:1During a video call, tap Layout.2Select a layout option. Change How Far-End Video DisplaysYou can adjust the appearance of far-end video so that it displays as one of the following:●Normal (default)—The video image displays with correct proportions. Black bars appear on the top, bottom, or sides of the area to maintain the correct aspect ratio if the aspect ratio of the sent video does not match the display area on the system. The portions of the video that are not being received display as black bars.●Full—If the received video image is not the same aspect ratio as the monitor’s display area, the video image is stretched to fill the area. If the aspect ratios match, no stretching occurs.●Crop—The video image is resized to maintain the correct aspect ratio. Any parts of the image that do not fit within the area are cropped.
 Polycom RealPresence Trio Solution User GuidePolycom, Inc.  36   To change the way far-end video displays:1Navigate to Settings > Basic > Video > Video Screen Mode.2Tap Video Screen Mode (Full Screen).3Select Normal, Full, or Crop. 4Tap Save.Place a Video CallDepending on how the system is set up by your administrator, you can place a video call to one contact or add video during an audio call.To place a video call:1Tap Place a Call, enter a number or select a contact from Contacts or Recent Calls. 2Tap  or tap Dial.3In the Call screen, tap Start Video, if needed.Stop Sending Video during a CallYou can stop transmitting video at any time during a call. Stopping video does not create an audio-only call. When you end the video call, the video setting is reset, and video displays automatically for the next video call. To stop sending video during a call:»In the Call screen, tap Stop My Video. The stop video icon   is displayed and the far-side cannot see you.Start Video During an Audio CallWhen you place an audio-only call, you can start sending video at any point during the call if a camera is connected to the system. After you start sending video, you can mute your video, but you cannot stop sending video and return to an audio-only call. To start video during an audio-only call: »In the Call screen, tap Start My Video. You can't start and stop far-side video. If the system is set up to receive far-side video, the far-side video always displays.
 Polycom RealPresence Trio Solution User GuidePolycom, Inc.  37   Handling Conference Calls with VideoWhen you set up a conference, the system displays video for only one conference participant at a time, even if more than one participant can send video. The person whose video you see is the active speaker or the last person with video enabled who joined the conference. Handling Video Calls without a CameraWhen you do not have a  Logitech Webcam C930e attached to the RealPresence Trio Visual+, you can receive video, but you cannot send video. Video always displays when the person you are talking with can send video and the system is enabled to receive video.Audio and Video CallsWhen you are in a call with a person who has a video-enabled phone or video conferencing system, the far side video displays on the monitor. For contacts without video enabled, only your video stream displays on the monitor, and an Audio icon displays on the monitor with the number of contacts on audio. For more information on viewing and changing how the far-side video displays, see the section Change How Far-End Video Displays.Handling a Mixture of Video and Audio-Only CallsWhen you have multiple calls, and two or more calls are video calls, only the active call shows a video stream of the far side. All other video calls show a paused grayscale image of the far side. If you resume a held video call, the held call becomes active and displays an active video stream again.Viewing all video participants requires the use of a Polycom Video Conference Bridge. For more information, contact your Polycom reseller.
Polycom, Inc.  38 Record Audio Calls When a USB flash drive is connected to the system, you can record audio calls onto the drive. Recordings are stored as .wav files on the USB flash drive, and you can record up to four hours in one file. You can replay recordings on the system or on a Apple or Windows computer.Guidelines when Recording Calls The following are a list of guidelines to follow when recording audio calls: ●Inform contacts when you are recording a call. ●Make sure you mute your audio when you are placed on hold while recording the call. When you place a call on hold while recording, the recording pauses. However, when another person places you on hold, the recording continues. ●During an active call, pause your recording before answering incoming calls. All incoming calls you answer after you start recording are also recorded in the same file. For example, on June 22, 2012, at 11:22 a.m., you answer a call from person A. During your call with person A, you answer calls from person B and person C. All three calls are recorded in the same file.Record a Call You can record all audio active calls on the system. You cannot record video calls or record when there are no connected calls, when you place a new call to transfer a call or initiate a conference, or when you have an incoming call.Make sure to inform your contacts on the call before you begin recording.To record a call: »During an active call, select   >   Start Recording.The recording icon   displays at the top of the call screen. Pause a Recording You can pause a recording during a call at any time while the call is active. To pause a recording: »Select   >   Pause Recording.  The paused recording icon   displays at the top of the call screen.
 Polycom RealPresence Trio Solution User GuidePolycom, Inc.  39   Resume a Recoding When you resume a recording after pausing, the recording continues within the same file. To resume the recording: » Select   >  Resume Recording.  Stop Recording You can choose to stop recording a call before the call ends. The recording also stops when the active call ends, no matter who ended the call.  To stop recording: »Do one of the following: Select  >  Stop Recording.  Select End Call.  Browse Recorded Calls You can browse the recorded files stored on the USB drive and view system recordings. To browse recorded files: »Navigate to Settings > Features > Removable Storage Media > Browse Recordings.  A list of recordings is displayed. Play Recorded Calls You can play back calls that you recorded on your USB drive on the system. You can also play recorded files on a Windows or Apple computer using an application capable of playing .wav files.To play a recorded call: 1Navigate to Settings > Features > Removable Storage Media > Browse Recordings.  2Select a file, and select Open. 3Select Play. The length of the recording and a progress bar is displayed as the recording plays. Caution: Removing a USB flash drive during a recordingPolycom recommends that you do not remove the USB flash drive while recording. The file being recorded will be incomplete and cannot be played back later. When you remove the USB flash drive while recording, you can also damage the flash drive.
 Polycom RealPresence Trio Solution User GuidePolycom, Inc.  40   Pause and Resume Played Recordings While you’re playing a recording, you can pause the recording, perform another tasks on your phone, and resume the recording at any time. To pause and resume a recording: 1While the recording plays, select Pause.  2Select Resume to continue playing the recording.  When you receive an incoming call while playing a recording, the recording is paused automatically. If you do not answer or reject the incoming call, the recording remains paused until you resume playing the recording. Stop Playing a Recording When you are finished listening to a recording, you can stop playing it by exiting the recording. To stop playing a recording:  »Select Exit. Rename a Recording By default, recordings are labeled with the date of the recording. You can rename recordings to give them more meaningful names. To rename a recording: 1Navigate to Settings > Features > Removable Storage Media > Browse Recordings.  2From the Browse Recordings screen, select a recording. 3Select Rename, update the filename, and select OK. Delete Recordings When you have played a recording or need additional space on your USB drive, you can delete recordings on your phone. To delete a recording: 1Navigate to Settings > Features > Removable Storage Media > Browse Recordings.  Note: You cannot play recordings during active calls You cannot open and play recordings when you are in an active call or if you're recording a call. If you try to, a message indicating that the action was canceled is displayed. Place the call on hold before playing the recordings. The recording stops playing when you resume the call.
 Polycom RealPresence Trio Solution User GuidePolycom, Inc.  41   2From the Browse Recordings screen, select a recording. 3Select Delete.
Polycom, Inc.  42 Sharing Content When a RealPresence Trio Visual+ is connected to a TV monitor and paired with the RealPresence Trio 8800, you can show content to in-room meeting participants and during audio or video calls. You can use the following applications or devices to show content: ●Polycom® RealPresence® Desktop ●Polycom® RealPresence® Mobile ●Polycom® People + Content™ IPSharing Content with RealPresence Desktop or MobileTo share content during a call, you need to use RealPresence Desktop on your laptop or RealPresence Mobile on your tablet. If you do not have either application, you can download RealPresence Desktop onto your laptop from the RealPresence Desktop Support page or download RealPresence Mobile from your tablet’s application store.Using RealPresence Desktop on your laptop, you can choose to share your monitor or share an open application. Using RealPresence Mobile on your tablet, you can choose to share content from local documents, photos, a website, or Dropbox. You can also choose to share annotations you make on the Whiteboard or Blackboard application within RealPresence Mobile. See the RealPresence Desktop and RealPresence Mobile support pages for information on sharing content with a room system. Sharing Content with People+Content IPThe People+Content IP application enables you to send content from a computer using the system’s IP address. Keep the following points in mind about People+Content IP:●While People+Content IP supports any computer desktop resolution, video streamed to the RealPresence Trio solution will be scaled to either 720p or 1080p.●People+Content IP provides video-only content. No audio is shared.If the RealPresence Trio 8800 system is connected to a low resolution monitor or using a low quality HDMI cable, a message displays and suggests you switch the monitor or HDMI cable.
 Polycom RealPresence Trio Solution User GuidePolycom, Inc.  43   Download and Install People+Content IPDownload and install the People+Content IP application onto your computer to use it to show content.To download and install People+Content IP on a computer:1On your computer, go to the RealPresence Trio Support page.2Download the People+Content IP software for Mac or PC.3Open the zip file and click on the application installation.4Follow the installation wizard. Share Content with People+Content IPAfter you install People+Content IP, you are ready to share content.To show content with People+Content IP: 1On your computer, do one of the following: On a Windows computer, navigate to My Computer and click the People+Content IP folder.On a Mac computer, navigate to Finder then search for and run the People+Content IP application.2Enter the IP address of the RealPresence Trio 8800 and the meeting password, if one is set. 3Click Connect, open the content you want to show, and click  .Stop Sharing Content with People+Content IPWhen you are done showing content, stop the People+Content IP application.To stop showing content:»Click  in People+Content IP application.Share Content with People+Content over USB You can connect your Windows or Mac computer over USB to the RealPresence Trio 8800 system and show content using the People+Content IP application. Video and data sent using the People + Content application is sent over the USB cable and no network connection is required. To show content over USB: 1Connect a USB cable from the micro USB port on the RealPresence Trio 8800 to the USB port on your computer.A folder with the People+Content IP application opens automatically.2If the application folder does not open automatically, on your computer, do one of the following: On a Windows computer, navigate to My Computer and click the People+Content IP folder.
 Polycom RealPresence Trio Solution User GuidePolycom, Inc.  44   On a Mac computer, navigate to Finder then search for and run the People+Content IP application.3Open the content you want to show, and click  .
Polycom, Inc.  45 Using the CalendarWhen your RealPresence Trio 8800 is configured to connect to the Microsoft Exchange Server, you can view and join meetings scheduled in Microsoft® Outlook® from the RealPresence Trio 8800.Open the CalendarYou can access the calendar on the system to view and join scheduled meetings. You can view meetings for the current day and upcoming meetings. You cannot view meetings for previous days.To open the calendar: »From the Home screen, tap Calendar.The calendar displays your meetings for the day, as shown next. Display Meeting DetailsFrom the Meeting Details screen, you can view the meeting’s start and end time, location, organizer, invitees, and meeting description, as shown next. You can also join meetings and view all meeting numbers that you can use to join the meeting.If you select Calendar, and the Calendar does not display, it is possible your login credentials are incorrect or the Calendar is not connected. See the section Check the Status of the Calendar for more information.
 Polycom RealPresence Trio Solution User GuidePolycom, Inc.  46   Meeting DetailsTo display Meeting view:»From Day view, select a meeting.Return to Day ViewDay view is the default Calendar view, and you can return to Day view from Meeting view.To return to Day view:»Tap .Meeting RemindersBy default, the system displays a meeting reminder 5 minutes and 1 minute before a meeting starts. When the meeting reminder displays, the system emits an alert tone. From the reminder, you can join a meeting and view meeting details. The following figure shows a meeting reminder.Meeting ReminderChoose a Meeting Reminder TypeYou can choose to have the following types of meeting reminders on the RealPresence Trio 8800: ●Silent The meeting reminder is displayed and no alert tone plays.●Audible Once An alert tone plays the first time a meeting reminder is displayed, but does not play for additional reminders for the meeting. ●Audible Always An alert tone plays each time a meeting reminder is displayed.
 Polycom RealPresence Trio Solution User GuidePolycom, Inc.  47   To choose the type of meeting reminder: 1Navigate to Setting > Basic > Preferences > Calendar Settings > Reminder Settings. 2From the Reminder Settings screen, select Reminder Type, and choose a type. Choose an Alert ToneYou can choose the alert tone that plays for meeting reminders. To choose an alert tone: 1Navigate to Setting > Basic > Preferences > Calendar Settings. 2From the Calendar Settings screen, select Alert Tone.3Choose an alert tone and tap Play to hear the tone. Disable Meeting RemindersMeeting reminders are enabled on the system by default. When enabled, reminders display for all meetings. When disabled, reminders do not display for any meetings. You can choose to disable meeting reminders so they do not display for any meetings.To disable meeting reminders:1Navigate to Setting > Basic > Preferences > Calendar Settings > Reminder Settings. 2From the Reminder Settings screen, select Reminder > Disable.Joining a Meeting You can join a meeting from the Calendar or from a meeting reminder. Join Meetings from the CalendarYou can join meetings from the Calendar in Day view or from the Meeting Details screen. To join a meeting from the Calendar:»Do one of the following: From Day view, tap Join for your meeting.Tap a meeting and tap Join in the Meeting Details screen.If you have enabled meeting reminders, but the system is not displaying them, make sure that your login credentials are correct.
 Polycom RealPresence Trio Solution User GuidePolycom, Inc.  48   Join a Meeting from a Meeting ReminderYou can join a meeting from the meeting reminder when it displays before a meeting.To join a meeting from a meeting reminder:»Tap Join.Join a Meeting with an Alternate NumberIf the meeting organizer has provided alternate numbers you can use to join the meeting, you can choose to view and use alternate numbers to join the meeting. To join a meeting using an alternate meeting number:»In the Meeting Details screen, choose a number.
Polycom, Inc.  49 Call Lists and DirectoriesRealPresence Trio 8800 supports a Recent Calls list, a Local Directory, and a Corporate Directory. The system can also support a BroadSoft Directory, depending on your server and if enabled by your system administrator. Recent CallsThe RealPresence Trio 8800 system maintains a Recent Calls list that includes missed, received, and placed calls. Each list holds up to 100 entries.You can perform the following tasks from the Recent Calls list:●Remove calls from the list.●Select a call record to view call details.●Select a call record to call a contact.View Recent CallsIn the Recent Calls list, you can view a list of up to 100 missed, received, and placed call entries.To view your Recent Calls list:»On the Home screen, tap Recent Calls. View Call DetailsIn the Recent Calls list, you can view call details, edit call details before calling a contact, save a contact to your directory, and delete call entries.To view call details:»Tap   next to a call record.Save a Recent Contact From the Call Details screen, you can save a contact to the Local Directory.The system may not support all of the features described in this section. Check with your system administrator to find out which features are available.
 Polycom RealPresence Trio Solution User GuidePolycom, Inc.  50   To save a contact to your Local Directory:1From the Call Details screen, tap Save. 2If needed, edit the contact’s information. 3Tap Save.Delete a Recent Call EntryYou can delete a recent call entry from the Recent Calls list. To delete a recent call entry from the Recent Calls list:»Select a call record and tap  .Edit Recent Contact EntriesYou can edit a contact’s number stored in your Recent Calls list before returning the contact’s call.To edit a recent contact’s number before calling the contact:1Tap   next to a call record.2Tap .3Edit the number then tap  .Managing the Local DirectoryYou can add and save contacts in the system’s Local Directory, if you are allowed access by your system administrator. Note that your system administrator may set the Local Directory as read-only or require a password for access to the directory. Contact your system administrator for assistant accessing or updating the Local Directory. You can perform the following tasks in your Local Directory:●Search for Contacts●Add a Contact to the Local Directory●View Contact Details●Update a Contact’s Information●Delete a Contact●Add FavoritesSearch for ContactsIn the Local Directory, you can enter a search criteria to find your desired contact.
 Polycom RealPresence Trio Solution User GuidePolycom, Inc.  51   To search for a contact:1Navigate to Contacts > Local Directory. 2In the Local Directory, enter your search criteria in the Search field.A list of search results is displayed.Add a Contact to the Local DirectoryWhen you add a contact to your Local Directory, you can choose how much information you want to enter for your contact. You are required to only enter a contact number for each new contact. To add a contact to your Local Directory:1In the Local Directory, tap  .2From the Add Contact screen, enter your contact’s information in the available fields.3Select Save.View Contact DetailsFrom your Local Directory, you can view information for any contacts saved to the directory.To view contact details:1Navigate to Contacts > Local Directory. 2In your Local Directory, select a contact. The Details screen is displayed with the contact’s name and number. Additional information, such as a job title or email address, can also display.Update a Contact’s Information After you add a contact to your Local Directory, you can update the contact’s information.To update a contact’s information:1From the Local Directory, select a contact.2From the Details screen, tap  . 3From the Edit Contact screen, update the contact’s information.4Select Save.Delete a ContactYou can delete any contact from the Local Directory.To delete a contact:1From your Local Directory, select a contact.
 Polycom RealPresence Trio Solution User GuidePolycom, Inc.  52   2From the Details screen, tap Delete Contact. A confirmation message is displayed, confirming that you want to delete the contact. 3Tap Yes to delete the contact.FavoritesFavorites are the contacts in your Local Directory that you will call most often. Contacts that you add as favorites display on the Home screen. Only three favorites display onscreen at a time; you can swipe the screen from right to left to display additional favorites. Favorites also display at the top of the list of contacts in the Local Directory.Add FavoritesYou can add any contact in the local directory as a favorite.To add a contact as a Favorite:1Navigate to Contacts > Local Directory and select a contact. 2On the Details screen, tap  .The contact is added to the Home screen.Remove FavoritesYou can remove favorites to make room for new favorites.To remove a favorite:1Navigate to Contacts > Local Directory and select a contact. 2From the Details screen, tap  .The Favorites icon   is changed to white, and the contact is removed from the Home screen.Using the Corporate DirectoryYour system administrator can set up the system so that you can access a Corporate Directory. However, you cannot update your Corporate Directory, and your administrator determines which contacts you can see. Check with your system administrator to find out if this feature is available.You can do the following in the Corporate Directory:●Search for contacts.●Dial contacts.●Add contacts to your Local Directory.Searching the Corporate Directory In the Corporate Directory, you can perform a quick or advanced search of contacts.
 Polycom RealPresence Trio Solution User GuidePolycom, Inc.  53   Perform a Quick Search A quick search enables you to search for contacts using either their first name, last name, or by typing a few letters in their name.To perform a quick search of the Corporate Directory:1Navigate to Contacts > Corporate Directory. 2In the Search field, enter your contact’s first or last name and tap Submit. The screen displays a list of contacts, starting with the most successful matches.3Select a contact and tap View to see your contact’s information.The Contact screen is displayed.Perform an Advanced Search An advanced search enables you to choose to search for contacts by first name, last name, or number.To perform an advanced search:1Navigate to Contacts > Corporate Directory. By default, a blank search screen is displayed.2In the Corporate Directory, select AdvFind. 3From the Advanced Find screen, enter your search criteria, and select Submit.The screen displays a list of contacts, starting with the most successful matches. 4Select a contact and tap View to see your contact’s information.The Contact screen is displayed.Add Corporate Directory Contacts to the Local DirectoryYou can add contacts in the Corporate Directory to your Local Directory. When you choose to save a Corporate Directory contact to the Local Directory, the first name, last name, and number of the contact are automatically saved, and you can choose to add additional information before saving the contact. See the section Managing the Local Directory for information on viewing and editing contacts.To add a contact to your Local Directory:1In the Corporate Directory, search for a contact.2From the search results, select the contact, and select View.3From the Contact screen, select Save. 4Enter any additional contact information and tap Save.
 Polycom RealPresence Trio Solution User GuidePolycom, Inc.  54    Searching the BroadSoft DirectoryYou can access and search the BroadSoft Directory on the system, and you can choose to perform a standard or advanced search for contacts. Perform a Simple SearchA simple search enables you to search for contacts using either their first name, last name, or by typing a few letters in their name. To perform a simple search:1Navigate to Contacts > BroadSoft Directory. A search screen is displayed.2Enter your search criteria, and select Submit.Your search results display. The number of records that match your search criteria is displayed for one second above the soft keys. A maximum of 50 contacts are available for viewing at one time.Perform an Advanced SearchAn advanced search enables you to choose to search for contacts by first name, last name, or number.To perform an advanced search: 1Navigate to Contacts > BroadSoft Directory. A search screen is displayed.2Select Advanced Search in the BroadSoft Directory.The Advanced Search screen is displayed. If the BroadSoft Directory cannot be reached, the message “Server Unavailable” is displayed. Contact your system administrator.
 Polycom RealPresence Trio Solution User GuidePolycom, Inc.  55   3In the Advance Search screen, choose to search for a contact by first name, last name, or a contact number. 4Enter your search criteria, and select Submit.Your search results display.5Choose your contact.The Details screen is displayed.Add BroadSoft Contacts to the Local DirectoryAfter you find your BroadSoft contact, you can add the contact to your Local Directory on the system. The first name, last name, and number of the contact are saved to the Local Directory. You can go to the Local Directory to see if the contact was saved correctly and to add additional contact information. See the section Managing the Local Directory for information on viewing and editing contacts.To add a BroadSoft contact to the Local Directory»In the Details screen, tap Add to local directory.
Polycom, Inc.  56 Voicemail and PagesYou can send, broadcast, and access a variety of audio, verbal, video, and written messages on RealPresence Trio 8800.Access Voicemail MessagesYou are notified of new voicemail messages on the RealPresence Trio 8800 in the following ways:●The number of voicemails displays on the Voicemail option in the menu. ●An audible alert is played.To access voicemail messages:1From the Home screen, navigate to Settings > Features > Voicemail > Message Center. 2If you have multiple lines on the system, select the line that has the new message.3From the Messages screen, tap Connect and follow the prompts to access your messages.Receiving Messages with Group PagingGroup Paging enables you to receive pages—one-way audio announcements—from contacts subscribed to a page group. Your administrator can enable the system to operate in a broadcast mode called Group Paging mode. In this mode, you can receive one-way announcements from a specified group called a Paging Group. Your system administrator can define up to 25 paging groups. Your system administrator can assign a label to each group to identify the system in the group, such as All, HR Dept, Shipping Staff, or Executives. Each group has one of the following priorities:The system may not support all of the features described in this section. Check with your system administrator to find out which features are available.Contact your system administrator or service provider for information on setting or changing the voicemail greeting.Contact your system administrator or service provider for information on remotely accessing your voicemail.
 Polycom RealPresence Trio Solution User GuidePolycom, Inc.  57   ●Normal By default, broadcasts sent to groups 1 to 23 are considered Normal broadcasts. If two users begin a broadcast on the same group at the same time, the system with the lower serial number continues to transmit while the other system enters the receiving state. By default, all systems are configured to receive broadcasts sent to group 1.●Priority By default, broadcasts sent to group 24 are considered Priority broadcasts. A Priority broadcast interrupts Normal broadcasts or active calls. All systems receive Priority broadcasts unless Do Not Disturb is enabled. Priority broadcasts are played at the system current audio level.●Emergency By default, broadcasts sent to group 25 are considered Emergency broadcasts. An Emergency broadcast interrupts Normal broadcasts, Priority broadcasts, and active calls and plays out at near maximum volume even if Do Not Disturb is enabled.Receiving PagesTo receive pages, you need to subscribe to certain paging groups. By default, you are subscribed to paging groups 1, 24, and 25. This means that you can receive pages to paging groups 1, 24, and 25. Contact your system administrator to find out which paging group you are subscribed to. How you receive a page depends on the priority of the page, whether you are in an active call, and whether the system is set to receive a page during an active call. When you receive a page, the page is always played through the system’s speakerphone. You cannot play a page through your handset or headset.You receive pages on the paging groups you are subscribed to as well as Group 24, Priority pages, and Group 25, Emergency pages. When you enable Do Not Disturb, you only receive Emergency pages. Non-emergency pages do not display or play.Receiving Pages When You’re Not in an Active CallWhen you receive a page and you are not in an active call, the page immediately plays, regardless of the paging priority.While a page plays, you can:●Hold the page.●End the page. This ends the page on the system only.●Place a new call.Listen to Pages during Active CallsHow you handle a page when you are in an active call depends on the page priority and whether the system is set up to receive a page when you are in an active call.The following occurs when you receive a page during a call:●When the system is set up to receive Normal pages during active calls, the page immediately plays, and you hear both the original call and the page. ●When the system is not set up to receive Normal pages during active calls, the page is displayed as a Pending page. ●When the page is a Priority or Emergency page, the page immediately plays. You hear the original call and the page.
 Polycom RealPresence Trio Solution User GuidePolycom, Inc.  58   To listen to a page during a call:»Do one of the following,For pages that play automatically during a call, hold the call to hear only the page. For Pending pages, select Accept or hold the call.When you adjust the volume of a non-emergency page, the system uses the adjusted volume for subsequent non-emergency pages. However, only your system administrator can change the volume of an Emergency page.
Polycom, Inc.  59 Connecting Bluetooth Devices and LaptopsYou can connect a laptop or mobile devices to the RealPresence Trio 8800 using a USB cable, Bluetooth, or Near Field Communication (NFC). When you connect a device to the system, you can play audio from audio calls, video calls, music players, or videos on the system. Connecting Devices using Bluetooth The Bluetooth feature on the RealPresence Trio 8800 enables you to place calls on your mobile phone and use the system as a speakerphone for the call (see the section Place a Call over Bluetooth). You can also use the system to play audio from media, such as music or videos, from your mobile phone or tablet (see the section Play Audio from a Bluetooth Device). Make the System Visible to Nearby Bluetooth DevicesBefore you connect a Bluetooth or NFC device to the system, make sure the system is visible to nearby devices.To make the system visible to nearby devices: 1On the Home screen, tap Bluetooth. 2Make sure the statement Visible to all nearby Bluetooth device is displayed below the system’s name, as shown next.3If the statement Only visible to paired devices is displayed, tap the system’s name. The system is now visible to all nearby Bluetooth devices. Connect a Bluetooth DeviceYou can connect a Bluetooth-capable mobile phone or tablet to the RealPresence Trio 8800, if your system administrator has enabled Bluetooth on the system. The RealPresence Trio 8800 can remember up to 10 previously paired devices.
 Polycom RealPresence Trio Solution User GuidePolycom, Inc.  60   You cannot connect to a Bluetooth device when you are in a call on the system.To connect a Bluetooth device: 1On your device, turn on Bluetooth and select the name of the system in available devices. Connect a Bluetooth Device Using Near Field CommunicationYou can connect a Bluetooth-capable mobile phone or tablet with the system using Near Field Communication (NFC). Connecting the mobile phone or tablet to the system with Bluetooth using NFC enables you to play the audio from calls or media, such as music or videos, on the system. To connect a Bluetooth device using NFC: 1Enable NFC on your device. 2Tap and hold your device for two seconds above the NFC symbol on the left side of the system.3Confirm that your device is paired and connected to the system. Play Audio from a Bluetooth DeviceYou can use the system as a Bluetooth speaker for music or videos played on your mobile phone or tablet.To play audio from a Bluetooth device: 1Connect your mobile phone or tablet with the RealPresence Trio 8800.2On your mobile phone or tablet, choose the music or video you want to hear. 3Make sure that the system is set as your audio device.The audio plays through the system’s speakers.Connecting a Device using a USB CableYou connect your laptop, mobile phone, or tablet directly to the system using a USB cable or a micro USB cable. When you connect your device to the system, you can use it as a speaker for audio calls or media played on your device. When you connect a Microsoft® Windows® computer to the system, you can control the volume of audio and video calls from the computer or on the RealPresence Trio 8800 system, and the volume is synchronized on both devices.See the section RealPresence Trio 8800 Hardware for the location of the USB ports on the system. Connecting a Laptop to the SystemBefore you connect your laptop to the RealPresence Trio 8800, make sure your laptop meets the minimum hardware and software requirements shown in the following table.
 Polycom RealPresence Trio Solution User GuidePolycom, Inc.  61   Connect a Device or LaptopWhen connected to a laptop or mobile device, you can use the system to play audio from video calls, and from media including music and videos. See the section RealPresence Trio 8800 Hardware for the location of the micro USB port.To connect your device to the system using USB:»Connect a USB cable from your computer or device to the micro USB port on the system.Setting RealPresence Trio 8800 as Your Audio DeviceIn order to use the RealPresence Trio 8800 system to play audio from calls or media on your connected laptop, you need to set the system as your audio device. The following sections provide information on setting the system as your audio device in RealPresence Desktop, and for your laptop. Setting the System as Your Audio Device for Communication ClientsWhen your laptop is connected to the RealPresence Trio 8800, you can set the system as your microphone and speakers for communication and collaboration clients, like BroadSoft BroadTouch Communicator or Skype for Business, and use the system to control calls placed on your laptop. Depending on the capabilities of the client, you can use the system to accept, hold and resume, and end calls placed and received in the client. Note that the status of the calls may differ between the client and the system depending on the capabilities of the client.Set the System as Your Audio Device in RealPresence DesktopWhen your laptop is connected to the RealPresence Trio 8800, you can set the system as your audio device input and output device in the RealPresence Desktop application to play audio from the meeting using the system speakers and use the system as your microphone. If you do not have the RealPresence Desktop application, download the application from the RealPresence Desktop Support page. Minimum Hardware and Software Requirements for the Connected LaptopCategory RequirementOperating System •Windows 8.1 (32-bit or 64-bit)•Windows 8 (32-bit or 64-bit)•Windows 7 (32-bit or 64-bit)•OS X 10.9.x (Maverick)•OS X 10.10.x (Yosemite)•OS X 10.11.x (El Capitan)Desktop client or application•Polycom RealPresence Desktop
 Polycom RealPresence Trio Solution User GuidePolycom, Inc.  62   To set the system as your audio device in RealPresence Desktops: 1In RealPresence Desktop, click   and click Audio Device. 2For Audio input device (microphone), click RealPresence Trio 8800 from the drop-down list.3For Audio output device (speakers), click RealPresence Trio 8800 from the drop-down list. 4Click OK. Set the System as Your Audio Device for Your LaptopWhen your laptop is connected to the RealPresence Trio 8800, you can set the system as the default audio device for your laptop and play audio from music and videos using the system’s speakers. To set the system as the audio device for your laptop: 1On your laptop, click Start > Control Panel.2In the Control Panel, click Hardware and Sound > Sound. 3Click RealPresence Trio 8800, and click Set Default. 4Click OK. Any audio from music or videos plays on the system.
Polycom, Inc.  63 System SettingsThis section explains how to customize the system’s touchscreen display. Basic customizations include changing the time and date format, setting language, and updating the screen brightness. Password Required to Customize RealPresence Trio 8800Many of the features on the system can be enabled or customized from the Basic settings menu. If your system administrator has set up the system to require a password to access the Basic settings menu, you cannot customize the system without the permission of your system administrator. Contact your system administrator for assistance enabling or customizing the system’s features. Set the Language The system supports several languages that you can choose to display. Check with your system administrator to find out which languages are supported.To change the language:1Navigate to Settings > Basic > Preferences > Language. 2From the Language screen, select a language. The language on the system updates automatically.Time and Date DisplayThe time and date display in the status bar. When the system cannot obtain a time and date, the time and date display flashes. If this happens, or if the time and date are incorrect, contact your system administrator.Set the Time and Date DisplayYou can customize the time and date by choosing between a variety of time and date formats, including options to display the day, month, or year.To update the time and date display:1Navigate to Settings > Basic > Preferences > Time & Date. 2From the Time & Date screen, do one of the following:
 Polycom RealPresence Trio Solution User GuidePolycom, Inc.  64   Select Clock Date to change the date format.Select Clock Time to change the time format.Select Clock Order to change the order of the time and date display.3From the Clock Date, Clock Time, or Clock Order screen, select the format you want.Disable the Time and Date DisplayYou can turn off the time and date display so that they do not display at all.To disable the time and date display:1Navigate to Settings > Basic > Preferences > Time & Date.2From the Time & Date screen, select Disable to turn off the time and date display.Backlight Intensity and TimeoutThe system’s backlight has the following components:●Backlight Intensity The brightness of the screen during system activity and inactivity.●Backlight Timeout The number of seconds the system is inactive before the backlight dims to its Backlight Idle intensity. The backlight timeout period begins after your last key press or the last system event, such as an incoming call.Backlight Intensity includes the following settings you can choose from:●Backlight On The brightness of the screen when there is system activity.●Backlight Idle The brightness of the screen when there is no system activity.●Maximum Intensity The brightness scale that applies to both Backlight On and Backlight Idle intensities.Change the Backlight IntensityYou can change the Backlight On intensity and the Backlight Idle intensity separately, and you can choose a high, medium, or low intensity, or turn off the backlight entirely. When you change the Maximum Intensity, you modify the entire backlight intensity scale. For example, if you decrease the Maximum Intensity, the low, medium, and high levels for both Backlight On and Backlight Idle intensities decrease.To change the backlight intensity:1Navigate to Settings > Basic > Backlight Intensity. 2From the Backlight Intensity screen, select Backlight On Intensity.3From the Backlight On Intensity screen, select the intensity you want, and select Back. The default is High.4From the Backlight Intensity screen, select Backlight Idle Intensity.5From the Backlight Idle Intensity screen, select the intensity you want, and select Back. The default is Low.6From the Backlight Intensity screen, select Maximum Intensity.
 Polycom RealPresence Trio Solution User GuidePolycom, Inc.  65   7From the Maximum Intensity screen, select Up or Down, or drag your finger along the slider, to increase or decrease the maximum intensity the screen displays.Change the Backlight TimeoutThe backlight automatically turns on with any system activity. By setting the Backlight Timeout, you can determine how long the system should be idle before the backlight dims to its Backlight Idle intensity. By default, after the system is idle for 40 seconds, the backlight dims.To change the Backlight Timeout:1Navigate to Settings > Basic > Backlight Timeout.2From the Backlight Timeout screen, select the number of seconds the system is idle before the backlight dims. The default is 40 seconds.Formatting NumbersBy default, the system automatically formats phone numbers based on the amount of numbers entered. For example, 17235439078 is reformatted as +1 (713) 543-9078. To choose the number format: 1Navigate to Settings > Preferences > Number Formatting.2Select Enable or Disable.Power-Saving ModeBy default, the system is set up with a power-saving mode that turns off the screen to conserve energy. The system enters power-saving mode after it has been idle for a certain period of time. You can configure the period of time that the system is idle before the screen turns off. You can configure different idle timeouts for office hours and off hours, such as evenings and weekends.During off hours, the message “Off Hours Mode” scrolls on the status bar. The system exits power-saving mode if a system event occurs—for example, if the system has an incoming call or message, or you press a key or tap the screen. If a screen saver is enabled, power-saving mode still occurs.You can update the following power-saving settings:●Office Hours When you start work and how long you’re in the office each day (see Change Your Office Hours).●Timeouts The period of time the system should be idle before the screen turns off (see Change Timeouts).Change Your Office HoursWhen you update your office hours, you specify when you start, and how long you work each day. The system is idle in during the hours outside of your office hours.
 Polycom RealPresence Trio Solution User GuidePolycom, Inc.  66   To change your office hours:1Navigate to Settings > Basic > Power Saving > Office Hours > Start Hour. 2From the Start Hour screen, select a day of the week. 3Enter a start time using the 24-hour clock. You can enter a start time from 0 to 23.4Select Save.5From the Office Hours screen, select Duration.6From the Duration screen, select a day of the week. 7Enter a duration of 0 to 12 hours per day.8Select Save.Change TimeoutsYou can update the period of time the system is idle before the screen turns off. You can specify different timeouts for office hours (Office Hours Idle Timeout) and non-office hours (Off Hours Idle Timeout). By default, the Office Hours Idle Timeout is much longer than the Off Hours Idle Timeout.You can also specify a separate timeout period that applies after you press a key or select the screen. This is called the User Input Idle Timeout. You can choose to set a higher User Input Idle Timeout than the Office Hours and Off Hours Idle Timeouts so that when you’re actively using the system, power-saving mode doesn’t initiate as often.To change timeouts:1Navigate to Settings > Basic > Power Saving > Timeouts. 2Select Office Hours Idle Timeout, and enter the number of minutes the system should wait, during office hours, before starting power-saving mode. Enter a number between 1 minute and 600 minutes. The default is 10 minutes.3Select Off Hours Idle Timeout, and enter the number of minutes the system should wait, during off-hours, before starting power-saving mode. Enter a number between 1 minute and 10 minutes. The default is 1 minute.4Select User Input Idle Timeout, and enter the number of minutes the system should wait after a key press or screen select before starting power-saving mode. Enter a number between 1 minute and 10 minutes. The default is 10 minutes.5Select Save.Set a Ringtone for Incoming CallsA simple way to customize the system is to change the ringtone. You can pick unique ringtones for the different lines on the system. The default ringtone is Low Trill.To select an incoming call ringtone for the system or a line:1Navigate to Settings > Basic > Ring Type.2When multiple lines are configured on the system, select a line.
 Polycom RealPresence Trio Solution User GuidePolycom, Inc.  67   3From the Ring Type screen, select Normal Ring Type for all incoming calls or Private Ring Type for private calls. 4Select a ringtone and tap Play to hear the ringtone.5Tap   after you select your ringtone. Control Where Audio PlaysYou can choose to have audio play from the system’s speakers or from the monitor or external speakers connected to the RealPresence Trio Visual+. You can also choose to let the system automatically play audio from audio calls on the system and audio from video calls on the connected monitors or external speakers. To control where audio plays: 1On the system, navigate to Settings > Basic > Preferences > Audio Output. 2Choose one of the following: Choose Phone Speakers to play audio on the system only. Choose TV Speakers to play audio from the connected monitor or external speakers.Choose Automatic to let the system choose where to play audio based on the call type.
Polycom, Inc.  68 Accessibility Features This section provides information for accessibility features available on the RealPresence Trio 8800.Features for Hearing-Impaired UsersThe following table lists the accessibility features on the RealPresence Trio 8800 for hearing-impaired users.Features for Vision-Impaired and Blind Users The following table lists the accessibility features on the RealPresence Trio 8800 for visually-impaired and blind users.Accessibility Features on RealPresence Trio 8800 for Hearing-Impaired UsersAccessibility Feature DescriptionVisual message indicators Icons on the user screen indicate when the system has new messages.Adjustable ring tone and volume You can choose from a variety of ring tones for the system (see Set a Ringtone for Incoming Calls).Adjustable call volume If you’re in a call, you can raise or lower the volume of the voice on the far end and of other system sounds you hear (see Change the Volume).Visual notifications Indicators on the screen (such as flashing bars or icons) let you know when calls are incoming, outgoing, active, or held. Indicators can also indicate system status and if certain features are activated (see Icons and Status Indicators).TTY support Supports commercial TTY devices such as Ultratec Superprint. In addition, the system provides acoustic coupled TTY support.
 Polycom RealPresence Trio Solution User GuidePolycom, Inc.  69   Features for Mobility-Impaired Users The following table lists the accessibility features on the RealPresence Trio 8800 for mobility-impaired users.Accessibility Features on RealPresence Trio 8800 for Vision-Impaired and Blind UsersAccessibility Feature DescriptionAdjustable backlight settings You can change the brightness of the screen by adjusting backlight intensity settings (see Backlight Intensity and Timeout).Plastic overlay A plastic overlay is available for placement on the touchscreen for the volume keys to assist visually impaired users with adjusting the volume.Auto-answer feature The system can auto-answer calls, so you don't have to select an option to answer a call (see Answer Calls Automatically).Accessibility Features on RealPresence Trio 8800 for Mobility-Impaired UsersAccessibility Feature DescriptionAuto-answer feature You can set the system to auto-answer calls, so you don't have to select an option to answer a call (see Answer Calls Automatically).Touchscreen The system has a large touchscreen that you can select, swipe, and press to perform system functions and activate features.Built-in speakerphone A built-in speakerphone allows you to use the system without having to use a handset or headset.
Polycom, Inc.  70 Maintaining the SystemWhen the system is unable to operate properly, you need to investigate or troubleshoot issues among other tasks your administrator may ask you to perform. Investigate WarningsWhen the system is unable to perform certain tasks, a notification message is displayed in the status bar and on the Settings icon on the Home screen. The warning notification lets you know that the system has one or more important issues. You can view details about the issues from the Warnings screen. To view a detailed list of system issues:»Navigate to Settings > Status > Diagnostics > Warnings. The Warnings screen is displayed listing any issues.Restart the SystemYour system administrator may ask you to restart the system if the system malfunctions or to assist in troubleshooting.To restart the system:1Navigate to Settings > Basic > Restart Phone. A confirmation message is displayed.2Select Yes.The restart process begins, and the process ends when the Home screen is displayed.Update the System ConfigurationYour system administrator may ask you to update the system configuration, which you can do without restarting the system.Before you restart the system, contact your system administrator. If the system is malfunctioning, you may be able to restore normal operation without restarting. In addition, your administrator may want to troubleshoot the system before you restart it.If you need to update the system's configuration, don't restart it. Instead, see the section Update the System Configuration.
 Polycom RealPresence Trio Solution User GuidePolycom, Inc.  71   To update the system’s configuration:1Navigate to Settings > Basic > Update Configuration.A confirmation message is displayed.2Select Yes.The configuration is updated. The system may restart, depending on the system settings that have changed.Test System HardwareYour system administrator may ask you to access a diagnostics menu on the system to test its hardware. You can test the system’s microphones, speaker, handset, third-party headset (if present), keypad mappings, touchscreen, and LEDs. See your system administrator for instructions on how to perform these tests.To test the system hardware:1Navigate to Settings > Status > Diagnostics > Test Hardware.2From the Test Hardware screen, select one of the following:Audio DiagnosticsDisplay DiagnosticsTouch Screen DiagnosticsClean the TouchscreenThe touchscreen on the systems requires minor maintenance, but you may periodically need to clean the touchscreen. Use a clean, dry, microfiber cloth—the kind you would use to clean glass surfaces—to wipe the touchscreen.Before you clean the screen, disable it so you don’t activate system functions while you wipe the touchscreen.To clean the touchscreen:1Navigate to Settings > Basic > Screen Clean.2Wipe the screen with a clean, dry, microfiber cloth.3Tap the screen to enable the touchscreen again.If the screen is still dirty after cleaning, dampen a soft, lint-free cloth with an isopropyl alcohol and water solution of 50:50, and then wipe the screen with the cloth. Always use the dampened cloth to apply the solution; never apply the solution directly, which could seep inside the screen or stain the system. In addition, do not use chemicals to clean the touchscreen.
Polycom, Inc.  72 TroubleshootingThis section lists potential issues, problems, and common difficulties and possible solutions to guide you towards resolving those issues. Check the Status of RealPresence Trio Visual+ If your or the far-end’s video stream or content is not displaying on the monitor, you need to check the status of the RealPresence Trio Visual+ and make sure the accessory is on and paired with the RealPresence Trio 8800.To check the status of the RealPresence Trio Visual+: 1On the system, navigate to Settings > Status > Networked Devices. 2Make sure that the Paired Device is Connected. If the paired device is not connected, contact your system administrator. Check the Status of the CalendarWhen you do not see the Calendar icon on the Home screen, or you are not receiving meeting reminders, it is possible that the system is not connected to the Microsoft Exchange Server. You can check the status of the calendar to make sure it is connected to the Exchange Server.To check the status of the Calendar feature:1Navigate to Settings > Status > Calendar. 2On the Calendar screen, make sure the Status field includes Connected to server.3If the status of the Calendar states that it is not connected to the server, contact your administrator. Tips for Resolving Content Sharing IssuesIf your content is not showing, try one of the following solutions: ●Make sure your device is on the same network as the room system.●Contact your system administrator for additional help.Tips for Resolving Camera IssuesIf the USB camera is not working during a video call, try one of the following solutions:
 Polycom RealPresence Trio Solution User GuidePolycom, Inc.  73   ●Check that the RealPresence Trio Visual+ is paired and connected with the RealPresence Trio 8800 (see the section Check the Status of RealPresence Trio Visual+).●Disconnect the USB camera from the RealPresence Trio Visual+ then reconnect the camera.●Make sure the USB camera is a supported camera, which is a  Logitech Webcam C930e.●Contact your system administrator for additional help.

Navigation menu