Polycom PANO Visual Collaboration Device User Manual Polycom Pano User Guide
Polycom Inc. Visual Collaboration Device Polycom Pano User Guide
Polycom >
Contents
- 1. SafetyandRegulatoryNotices
- 2. User Guide
User Guide

1.0 |September 2016 |3725-42667-001A
User Guide
Polycom® Pano

2
Copyright© 2016, Polycom, Inc. All rights reserved. No part of this document may be reproduced, translated into another
language or format, or transmitted in any form or by any means, electronic or mechanical, for any purpose, without the
express written permission of Polycom, Inc.
6001 America Center Drive
San Jose, CA 95002
USA
Trademarks Polycom®, the Polycom logo and the names and marks associated with Polycom products are
trademarks and/or service marks of Polycom, Inc. and are registered and/or common law marks in the United States
and various other countries.
All other trademarks are property of their respective owners. No portion hereof may be reproduced or transmitted in any
form or by any means, for any purpose other than the recipient's personal use, without the express written permission
of Polycom.
Disclaimer While Polycom uses reasonable efforts to include accurate and up-to-date information in this document,
Polycom makes no warranties or representations as to its accuracy. Polycom assumes no liability or responsibility for
any typographical or other errors or omissions in the content of this document.
Limitation of Liability Polycom and/or its respective suppliers make no representations about the suitability of the
information contained in this document for any purpose. Information is provided "as is" without warranty of any kind and
is subject to change without notice. The entire risk arising out of its use remains with the recipient. In no event shall
Polycom and/or its respective suppliers be liable for any direct, consequential, incidental, special, punitive or other
damages whatsoever (including without limitation, damages for loss of business profits, business interruption, or loss of
business information), even if Polycom has been advised of the possibility of such damages.
End User License Agreement By installing, copying, or otherwise using this product, you acknowledge that you
have read, understand and agree to be bound by the terms and conditions of the End User License Agreement for this
product. The EULA for this product is available on the Polycom Support page for the product.
Patent Information The accompanying product may be protected by one or more U.S. and foreign patents and/or
pending patent applications held by Polycom, Inc.
Open Source Software Used in this Product This product may contain open source software. You may receive
the open source software from Polycom up to three (3) years after the distribution date of the applicable product or
software at a charge not greater than the cost to Polycom of shipping or distributing the software to you. To receive
software information, as well as the open source software code used in this product, contact Polycom by email at
OpenSourceVideo@polycom.com.
Customer Feedback We are striving to improve our documentation quality and we appreciate your feedback. Email
your opinions and comments to DocumentationFeedback@polycom.com.
Polycom Support Visit the Polycom Support Center for End User License Agreements, software downloads,
product documents, product licenses, troubleshooting tips, service requests, and more.

Polycom, Inc. 1
Contents
Before You Begin . . . . . . . . . . . . . . . . . . . . . . . . . . . . . . . . . . . . . . . . . . . . . . . . . . . 3
Audience, Purpose, and Required Skills . . . . . . . . . . . . . . . . . . . . . . . . . . . . . . . . . . . . . . . . . . 3
Get Help . . . . . . . . . . . . . . . . . . . . . . . . . . . . . . . . . . . . . . . . . . . . . . . . . . . . . . . . . . . . . . . . . . 3
The Polycom Community . . . . . . . . . . . . . . . . . . . . . . . . . . . . . . . . . . . . . . . . . . . . . . . . . . 3
Getting Started with Polycom® Pano Pod . . . . . . . . . . . . . . . . . . . . . . . . . . . . . . . . 4
Polycom Pano Power . . . . . . . . . . . . . . . . . . . . . . . . . . . . . . . . . . . . . . . . . . . . . . . . . . . . . . . . 4
Power On the Polycom Pano System . . . . . . . . . . . . . . . . . . . . . . . . . . . . . . . . . . . . . . . . . 4
Power On Self Test (POST) . . . . . . . . . . . . . . . . . . . . . . . . . . . . . . . . . . . . . . . . . . . . . . . . 4
Power Off a Polycom Pano System . . . . . . . . . . . . . . . . . . . . . . . . . . . . . . . . . . . . . . . . . . . 5
Polycom Pano Home Screen . . . . . . . . . . . . . . . . . . . . . . . . . . . . . . . . . . . . . . . . . . . . . . . . . 5
System Information . . . . . . . . . . . . . . . . . . . . . . . . . . . . . . . . . . . . . . . . . . . . . . . . . . . . . . . 5
Content Viewing Area . . . . . . . . . . . . . . . . . . . . . . . . . . . . . . . . . . . . . . . . . . . . . . . . . . . . . 5
Annotation Toolbar . . . . . . . . . . . . . . . . . . . . . . . . . . . . . . . . . . . . . . . . . . . . . . . . . . . . . . . 6
Content Tray . . . . . . . . . . . . . . . . . . . . . . . . . . . . . . . . . . . . . . . . . . . . . . . . . . . . . . . . . . . . 6
Removing an Item from the Content Tray . . . . . . . . . . . . . . . . . . . . . . . . . . . . . . . . . . . 6
Share Content . . . . . . . . . . . . . . . . . . . . . . . . . . . . . . . . . . . . . . . . . . . . . . . . . . . . . . 7
Share Your Screen . . . . . . . . . . . . . . . . . . . . . . . . . . . . . . . . . . . . . . . . . . . . . . . . . . . . . . . . . . 7
Share Your Screen Using Miracast . . . . . . . . . . . . . . . . . . . . . . . . . . . . . . . . . . . . . . . . . . . 7
Share Your Screen Using AirPlay . . . . . . . . . . . . . . . . . . . . . . . . . . . . . . . . . . . . . . . . . . . . 8
Stop Sharing Your Screen . . . . . . . . . . . . . . . . . . . . . . . . . . . . . . . . . . . . . . . . . . . . . . . . . . . . . 8
Share Content from a Device Connected to Polycom Pano . . . . . . . . . . . . . . . . . . . . . . . . . . 9
Stop Sharing Content from a Connected Device . . . . . . . . . . . . . . . . . . . . . . . . . . . . . . . . . . . . 9
Polycom Pano App . . . . . . . . . . . . . . . . . . . . . . . . . . . . . . . . . . . . . . . , . . . . . . . . . 11
Install Polycom Pano App. . . . . . . . . . . . . . . . . . . . . . . . . . . . . . . . . . . . . . . . . . . . . . . . . . . . 11
Use Polycom Pano App in Standalone Mode . . . . .. . . . . . . . . . . . . . . . . . . . . . . . . . . . . . . . 11
Share Content Using Polycom Pano App . . . . . . . . . . . . . . . . . . . . . . . . . . . . . . . . . . . . . 12
Check Application Information . . . . . . . . . . . . . . . . . . . . . . . . . . . . . . . . . . . . . . . . . . . . . . . . . 12
Connect to a Room System . . . . . . . . . . . . . . . . . . . . . . . . . . . . . . . . . . . . . . . . . . . . . . . . . . . 12
Automatically Detect Rooms . . . . . . . . . . . . . . . . . . . . . . . . . . . . . . . . . . . . . . . . . . . . . . . 12
Connect to an Automatically Detected Room . . . . . . . . . . . . . . . . . . . . . . . . . . . . . . . 12

Polycom, Inc. 2
Recent Devices . . . . . . . . . . . . . . . . . . . . . . . . . . . . . . . . . . . . . . . . . . . . . . . . . . . . . 12
Remove a Device from Recent Devices List . . . . . . . . . . . . . . . . . . . . . . . . . . . . . . . 13
Connect to a Recent Room . . . . . . . . . . . . . . . . . . . . . . . . . . . . . . . . . . . . . . . . . . . . . . . . 13
Connect to a Room Manually . . . . . . . . . . . . . . . . . . . . . . . . . . . . . . . . . . . . . . . . . . . . . . 13
Disconnect from a Room System . . . . . . . . . . . . . . . . . . . . . . . . . . . . . . . . . . . . . . . . . . . . . . 13
Share Local Content . . . . . . . . . . . . . . . . . . . . . . . . . . . . . . . . . . . . . . . . . . . . . . . . . . . . . . . . 13
Stop Sharing Local Content . . . . . . . . . . . . . . . . . . . . . . . . . . . . . . . . . . . . . . . . . . . . . . . . . . . 14
Annotation Toolbar . . . . . . . . . . . . . . . . . . . . . . . . . . . . . . . . . . . . . . . . . . . . . . . . . 15
Annotation Toolbar Elements . . . . . . . . . . . . . . . . . . . . . . . . . . . . . . . . . . . . . . . . . . . . . . . . . 15
Annotate Content . . . . . . . . . . . . . . . . . . . . . . . . . . . . . . . . . . . . . . . . . . . . . . . . . . . . . . . . . . . 17
Erase an Annotation . . . . . . . . . . . . . . . . . . . . . . . . . . . . . . . . . . . . . . . . . . . . . . . . . . . . . . . . 17
Undo an Annotation . . . . . . . . . . . . . . . . . . . . . . . . . . . . . . . . . . . . . . . . . . . . . . . . . . . . . . . . . 17
Use Snapshot to Annotate Content . . . . . . . . . . . . . . . . . . . . . . . . . . . . . . . . . . . . . . . . . . . . . 18
Take a Snapshot . . . . . . . . . . . . . . . . . . . . . . . . . . . . . . . . . . . . . . . . . . . . . . . . . . . . . . . . 18
Switch between Live Content and a Snapshot . . . . . . . . . . . . . . . . . . . . . . . . . . . . . . . . . 18
Stop Sharing Annotated Content . . . . . . . . . . . . . . . . . . . . . . . . . . . . . . . . . . . . . . . . . . . . . . . 18
Highlight Content . . . . . . . . . . . . . . . . . . . . . . . . . . . . . . . . . . . . . . . . . . . . . . . . . . . . . . . . . . . 18
Create a Whiteboard or Blackboard . . . . . . . . . . . . . . . . . . . . . . . . . . . . . . . . . . . . . . . . . . . . 19
Exit the Annotation Toolbar . . . . . . . . . . . . . . . . . . . . . . . . . . . . . . . . . . . . . . . . . . . . . . . . . . . 19
Troubleshooting . . . . . . . . . . . . . . . . . . . . . . . . . . . . . . . . . . . . . . . . . . . . . . . . . . . 20
View System Information . . . . . . . . . . . . . . . . . . . . . . . . . . . . . . . . . . . . . . . . . . . . . . . . . . . . . 20
Locate the System Serial Number . . . . . . . . . . . . . . . . . . . . . . . . . . . . . . . . . . . . . . . . . . 20
Locate the IP Address . . . . . . . . . . . . . . . . . . . . . . . . . . . . . . . . . . . . . . . . . . . . . . . . . . . . 20
View Polycom Pano App Log Files . . . . . . . . . . . . . . . . . . . . . . . . . . . . . . . . . . . . . . . . . . 20
Regulatory Notices . . . . . . . . . . . . . . . . . . . . . . . . . . . . . . . . . . . . . . . . . . . . . . . . . . . . . . . . . 20

Polycom, Inc. 3
Before You Begin
Topics:
●Audience, Purpose, and Required Skills
●Get Help
This guide is for users who want to operate Polycom Panl systems.
Please read the Polycom Pano documentation before you operate the system. The following related
documents are available from Polycom Support:
●Polycom Pano Administrator Guide, which describes how to configure, customize, manage, and
troubleshoot Polycom Pano systems
●Setup sheets for your hardware
●Release notes
●Polycom Pano Safety and Regulatory Notices, which describes safety and legal considerations
for using Polycom Pano systems
Polycom recommends that you record the serial number and option key of your PolycomPano system
here for future reference. The serial number for the system is printed on the unit.
System Serial Number: ____________________________________________
Option Key: ____________________________________________________
Audience, Purpose, and Required Skills
The primary audience for this guide are users who want to perform basic to intermediate tasks using the
Polycom Pano system.
Get Help
For more information about installing, configuring, and administering Polycom products, refer to
Documents and Downloads at Polycom Support.
The Polycom Community
The Polycom Community gives you access to the latest developer and support information. Participate in
discussion forums to share ideas and solve problems with your colleagues. To register with the Polycom
Community, simply create a Polycom online account. When logged in, you can access Polycom support
personnel and participate in developer and support forums to find the latest information on hardware,
software, and partner solutions topics.

Polycom, Inc. 4
Getting Started with Polycom®
Polycom Pano
Topics:
●Polycom Pano Power
●Polycom Pano Home Screen
This guide includes information about Polycom Pano systems. It includes information that helps you
whether you're just starting to learn about video conferencing or if you just need a quick refresher. It also
includes step-by-step instructions for everyday video conferencing tasks.
For detailed information on the most recent feature descriptions, refer to the Polycom Pano Release
Notes available at support.polycom.com.
Polycom Pano Power
Powering your system on and off is a simple procedure. Make sure the system is powered off before you
connect devices to it. After you have connected all of the related equipment that you intend to use, connect
the power on the system.
It is important to note that Polycom Pano systems are designed to stay in a wake state and do not have a
power button.
Power On the Polycom Pano System
After setting up your system, you need to power on the Polycom Pano system.
Procedure
1 Use the HDMI cable to connect the Polycom Pano system to the monitor.
2 Connect the touch monitor USB cable.
3 Connect the power cord to the Polycom Pano system or connect the LAN cable to
power on the system by Power over Ethernet (PoE).
4 If it is not already connected, connect the LAN cable to the system for network connectivity.
The Polycom splash screen displays within several seconds.
Power On Self Test (POST)
After being powered on, Polycom Pano systems automatically perform system health checks before the
systems are initialized. This process is known as a power on self test, or POST. The status of the POST
sequence is displayed with the LED indicator light on the front of the device.
Polycom, Inc. 5
All test results are logged in the system memory. For more information about what the colors of the indicator
lights mean, contact your administrator.
When the POST sequence completes with no severe errors, the Polycom Pano system starts normally.
Power Off a Polycom Pano System
If you need to change out a monitor, you might need to power off the Polycom Pano system.
Procedure
»Disconnect the power cord from the Polycom Pano system or disconnect the LAN cable when the
system is powered by PoE.
Polycom Pano Home Screen
The Polycom Pano Home screen invites meeting participants to start collaborating, to share content, or to
touch the screen and start writing. When you select Start Writing, a new session begins on a blackboard
with a toolbar and content tray. When you exit the session, you return to the Home screen. Before
collaborating, you can connect to the system using Polycom Pano app, Airplay, Miracast, or an HDMI
connection. The following information appears on the home screen:
●System Information
●Content Viewing Area
●Annotation Toolbar
●Content Tray
System Information
The following information about the system is available on the Home screen:
●IP Address - Location identifier for the Polycom Pano system used to connect Polycom Pano app.
The IP address is also used by administrators to access the web interface to configure the system.
●Room System Name - The name assigned to the system and broadcast to nearby devices.
●Date and Time - Current date and time associated with the system’s configured location.
●PIN - Code that is assigned to the system to limit access.
Content Viewing Area
The content sharing sources display in the center of the Home screen. This area shows a single
maximized content source or up to four minimized content sources. For more details about sharing
content on the Polycom Pano, see Share Content.

Polycom, Inc. 6
Annotation Toolbar
The annotation toolbar enables you to create and annotate content in real-time on the Polycom Pano
system. You can use the annotation toolbar to annotate content using your finger or a stylus. For more
information, see Annotation Toolbar.
Content Tray
The Polycom Pano Home screen shows a maximum of four content sources at one time. When the
maximum number of sessions are displayed and another source is added, the incoming source is added to
the top-left of the content view area. The system moves one of the original sources to the content tray,
the storage area for inactive content sources.
Keep the following in mind about the content tray:
●Content items are shown newest to oldest.
●The content tray expands to show up to three lines of sources. If there are more sources available,
scroll vertically to see those items.
Removing an Item from the Content Tray
You can move an item from the content tray to the content viewing area.
Procedure
1Tap to open the content tray.
2Tap the content item you want to move from the content tray to the content viewing area.
Polycom, Inc. 7
Share Content
Topics:
●Share Your Screen
●Stop Sharing Your Screen
●Share Content from a Device Connected to Polycom Pano
●Stop Sharing Content from a Connected Device
You can share content on a Polycom Pano system wirelessly or using an HDMI connection. The
following is supported:
●Casting information from a device that supports AirPlay® or Miracast wireless streaming.
●Sending content from Polycom Pano app, which is installed on a computer and wirelessly
connected to the Polycom Pano system. For more details, see Polycom Content Companion.
●Broadcasting information stored on a computer that is directly connected to a Polycom Pano
system.
The Polycom Pano can show up to four content sources at a time from one participant at a time or multiple
participants at the same time. The name associated with the device that is sharing content displays on
the Polycom Pano system to identify the meeting participant who is sharing content.
Share Your Screen
You can stream video and audio content onto a Polycom Pano system from a device that supports
Miracast or AirPlay screen mirroring.
Keep the following in mind when sharing your screen:
●The device must be on the same Wi-Fi network as the Polycom Pano system.
●You control the audio by using the volume controls on the device.
●The Polycom Pano system uses the orientation and aspect ratio of your device.
Share Your Screen Using Miracast
You can share the screen and audio of a Microsoft Windows® or Android™ device that supports the Miracast
wireless display standard and is no more than 10 meters away from the Polycom Pano system.
Note: The Polycom Pano system does not support high-bandwidth digital content protection
(HDCP). If you share HDCP-encrypted content, it is not shown.

Share Content
Polycom, Inc. 8
Polycom has tested and supports the following devices:
●Microsoft Surface Book
●Microsoft Surface Pro 4
●Lumia 650 and above
●Dell XPS 13 950-80085LV Signature Edition laptop
●HP Spectre x360 13-4195nr Signature Edition 2 in 1 P
●NuVision TM800W560L Signature Edition Tablet
Procedure
1 Make sure the device is connected to the same Wi-Fi network as the Polycom Pano
system.
2 On the device, access the Miracast or compatible screen mirroring feature. Miracast is supported on
a variety of devices that use different methods for accessing the feature. On most devices, the
screen mirroring feature is accessed from the Settings menu. For details, check your device
documentation.
3 On the device, select the name of the Polycom Pano system shown on the home
screen.
4 When prompted, enter the PIN shown on the Polycom Pano home screen.
Share Your Screen Using AirPlay
You can share the screen and audio of an iPhone®, iPad®, or Mac® computer that is AirPlay-enabled.
Procedure
1 Make sure the AirPlay-enabled device is connected to the same Wi-Fi network as the Polycom
Pano system.
2 Access AirPlay on the device. On most iOS devices, the AirPlay feature is located in the Control
Center that you open by swiping up from the bottom of the device. For details, check your device
documentation.
3 Select the name of the Polycom Pano system that is shown on the home screen. 4 When
prompted, enter the PIN shown on the Polycom Pano home screen.
Stop Sharing Your Screen
When you are done presenting content on your Windows, Android, or iOS device, make sure you end the
sharing session.
Procedure
»Do one of the following:
End the AirPlay or Miracast screen share feature on the device.
Tap .on the content window. Confirm that you want to end the session.

Share Content
Polycom, Inc. 9
Share Content from a Device Connected to
Polycom Pano
You can share content from a computer or other device that is directly connected to the Polycom
Pano.
Keep the following in mind when sharing your computer system:
●You control the audio using the volume controls on the monitor.
●The computer video output must be configured to use one of the supported resolutions and refresh
rates.
Procedure
1 Connect one end of an HDMI cable to the HDMI Input port on the monitor. Connect the other end of
the HDMI cable to the HDMI Output port on the Polycom Pano system.
2 If your monitor has only a DVI input port, use a DVI-HDMI adapter to connect it to the HDMI output
port of the Polycom Pano system.
Stop Sharing Content from a Connected Device
You can stop sharing content from a connected device.
Supported HDMI Input Resolutions and Frame Rates
Input Resolution Frame Rate(s)
UHD 3840 x 2160p 24,25,30
OHD 2560 x 1440p 50,60
FHD 2560 x 1440p 50,60
WSXGA+ 1680 x 1050 60
UXGA 1600 x 1200 60
SXGA 1280 x 1024 60,70,75,85
HD 1280 x 1024 50,60
XGA 1280 x 1024 60,70,75,85
Note: The way you set the resolution and refresh rate differs, depending on the type of operating
system you have. Check your computer’s manual or help topics for the appropriate steps.
Note: If you use an HDMI-to-DVI adapter, you must connect an audio cable from the computer to the
Polycom Pano system to receive audio.

Share Content
Polycom, Inc. 10
Procedure
»Do one of the following:
Disconnect the HDMI cable from the Polycom Pano system and computer.
Tap .on the content window. Confirm that you want to end the session.

11
Polycom Pano App
Topics:
●Install Polycom Pano App
●Use Polycom Pano app in Standalone Mode
●Connect to a Room System
●Disconnect from a Room System
●Share Local Content
●Stop Sharing Local Content
Polycom Pano app allows you to share local content, such as your desktop or a running application, from
a computer that is not connected directly to the Polycom Pano system.
Keep the following points in mind about Polycom Pano app:
●The application provides video-only content. No audio is shared.
●Polycom Pano app supports any computer desktop resolution with color set to 32-bit.
●Your computer resolution can be set to anything, but Polycom Pano app scales the image to
1024x768 or 1280x720.
●If Bluetooth detection is turned on, Polycom Pano app can detect nearby room systems that are
enabled with Bluetooth broadcasting to facilitate content sharing. Note, this feature is only available
to Microsoft Windows 10 users with Bluetooth version 4.0 or higher.
●Content sent from the Polycom Pano app to the Polycom Pano is encrypted.
Install Polycom Pano app
You must install the Polycom Pano app application on a computer before you can use it to show content.
Procedure:
1Download the installation package to your local drive.
2Double-click the installation package.
3Follow the on-screen instructions.
Use Polycom Pano app in Standalone Mode
Standalone mode allows you to share local content.
Polycom, Inc.

Polycom Content Companion
Polycom, Inc. 12
Procedure
»Start Polycom Pano app and click or tap Skip on the Sign In screen.
Share Content Using Polycom Pano App
After connecting to a room, you can share your local desktop or a running local application on the
Polycom Pano room system.
Check Application Information
The Polycom Pano app version and copyright information are located on the application title bar.
Procedure:
1Click or tap on the application title bar.
2Click or tap About.
Connect to a Room System
You must connect to a room system before you can share content.
Automatically Detect Rooms
If your Bluetooth detection is turned on, Polycom Pano app can detect nearby Polycom Pano room
systems that have enabled Bluetooth broadcasting to facilitate content sharing. Detected rooms are listed
on the Connect to window.
Connect to an Automatically Detected Room
After you enable Bluetooth on your device, Polycom Content Companion can automatically detect nearby
rooms. You can then connect to a detected room.
Procedure
1Click or tap a room listed under Connect to.
2Enter the room PIN code, if asked.
Recent Devices
Up to five recently connected devices are listed under Recent Devices. You can connect to a recent device,
or remove devices from the Recent Devices list.
Note: The auto discovery feature is available to Microsoft Windows 10 users with Bluetooth version
4.0 or higher.

Polycom Content Companion
Polycom, Inc. 13
Remove a Device from Recent Devices List
If a recently connected device is no longer available, you can remove it from the Recent Devices list.
Procedure
1Click or tap Recent Devices.
2Click or tap the icon located to the right of the desired device.
Connect to a Recent Room
You can connect to a previously connected room.
Procedure
1Click or tap a room in the Recent Used Room list.
2Enter the PIN, if required.
Connect to a Room Manually
You can find a room by specifying its IP address.
Procedure
1Click or tap Find Other Devices.
2Enter the IP address or name of the desired room, and click or tap Connect.
3Enter the PIN, if required.
Disconnect from a Room System
You can connect with one room system at a time. To connect with another room system, you must
disconnect from the current one first.
Procedure
»Click or tap on the upper-right of the screen, then click or tap Yes.
Share Local Content
After connecting to a room, you can present your local desktop or running local applications to
the Polycom Pano room system.
Procedure
»Do one of the following:
To share you desktop, click or tap Monitor.

Polycom Content Companion
Polycom, Inc. 14
To share a running application, click or tap an application name on the Share screen.
You can refresh the running application list by clicking or tapping on the icon located to the right
of the Share screen.
Stop Sharing Local Content
You can stop sharing content without disconnecting from the room system.
Procedure
»On the Content Sharing toolbar, click or tap Stop.

Polycom, Inc. 15
Annotation Toolbar
Topics:
●Annotation Toolbar Elements
●Annotate Content
●Erase an Annotation
●Undo an Annotation
●Use Snapshot to Annotate Content
●Stop Sharing Annotated Content
●Highlight Content
●Create a Whiteboard or Blackboard
●Exit the Annotation Toolbar
You can highlight, draw, and erase annotations on a whiteboard, blackboard or shared content
using elements on the Polycom Pano annotation toolbar.
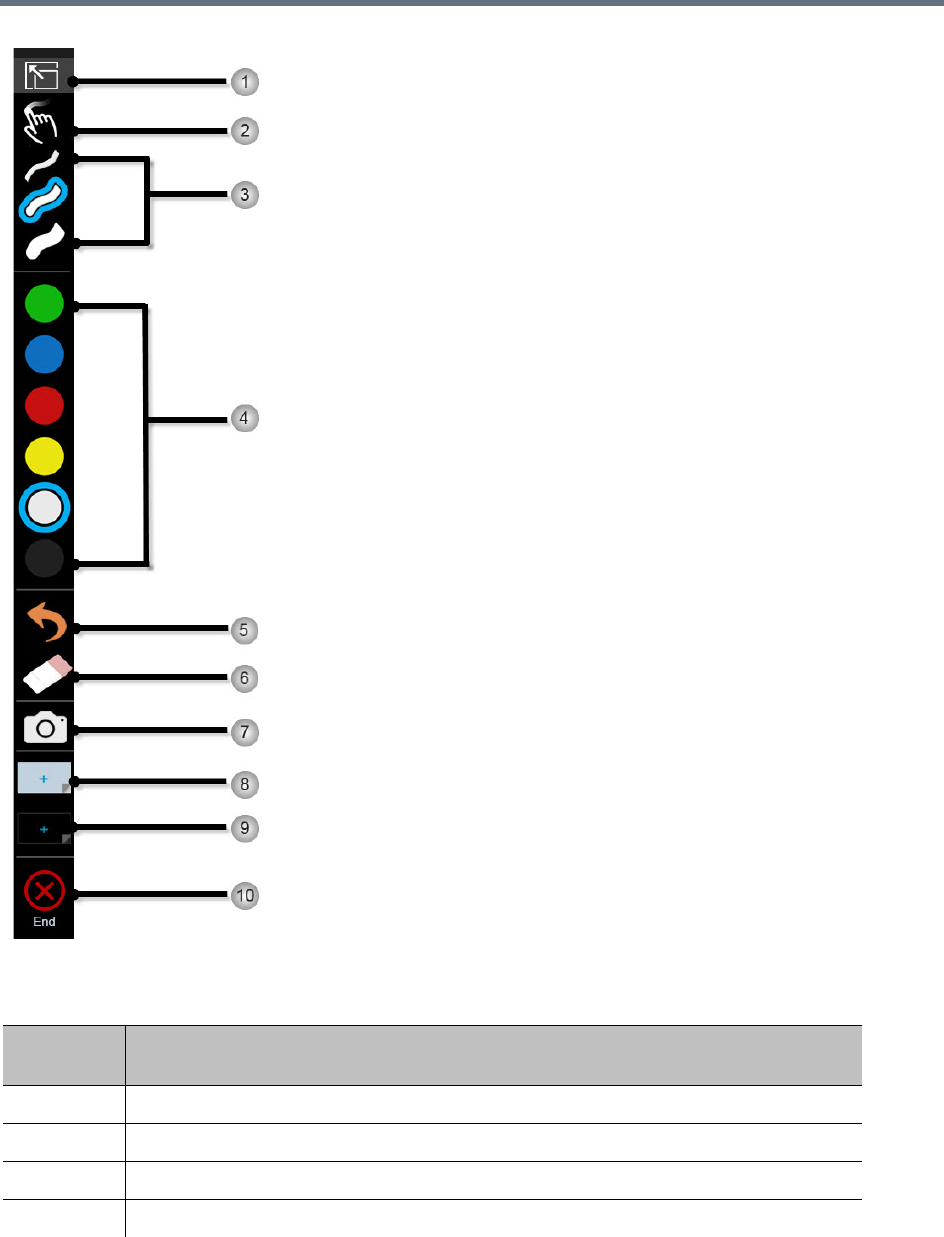
Annotation Toolbar Elements
Refer to the following figure and table for descriptions of the annotation toolbar elements.
Annotation Toolbar
Polycom, Inc. 16
Annotation Toolbar Elements
Reference
Number Description
1 Expands the view of the whiteboard, blackboard, or content to full screen.
2 Highlights briefly on content to note certain areas of interest.
3 Provides drawing line widths.
4 Provides color selections.

Annotation Toolbar
Polycom, Inc. 17
Annotate Content
You can draw or write annotations on shared content.
Procedure
1On the annotation toolbar, select the desired line width.
2Select a color.
3Use one finger or a stylus to draw or write.
Erase an Annotation
You can use three or more fingers to erase annotations on shared content. When you erase an annotation,
an indicator appears under your finger. Erased annotations cannot be undone.
Procedure
»Do one of the following:
On the toolbar, tap . Use your finger to erase an annotation.
On the shared content screen, use three or more fingers to erase an annotation.
Undo an Annotation
You can undo a previous annotation or undo all annotations at one time.
Procedure
»Do one of the following:
Tap to undo the last annotation you made.
Tap and hold to undo all annotations you made.
5 Undoes the last annotation.
6 Erases annotations made on whiteboard, blackboard, or content.
7 Captures a snapshot of live content.
8 Provides a blank whiteboard to create annotations.
9 Provides a blank blackboard to create annotations.
10 Exits the current content sharing interaction screen and returns to the Home screen
Annotation Toolbar Elements
Reference
Number Description
Annotation Toolbar
Polycom, Inc. 18
Use Snapshot to Annotate Content
Snapshot freezes live content by capturing the current screen so you can highlight or annotate it without
changing the live content shared in a session. You can return to the live content at any time or switch
between any content sources in the content tray. A limited number of snapshots are available. A prompt
notifies you when you have reached the snapshot limit.
Take a Snapshot
You can take a snapshot of all the sources of live content and annotate on them across the panels or take
a snapshot of the live content without changing the original content source.
Procedure
1Tap . A snapshot flash and sound indicates success. All existing sources move to the content
tray and are replaced with a full screen snapshot.
2Use the toolbar to annotate or highlight on the snapshot.
3Tap anywhere on the snapshot to minimize, maximize or close the snapshot in the session
Switch between Live Content and a Snapshot
If you take a snapshot of live content, you can view and switch between all the content sources in the content
tray.
Procedure
1Tap to view all the sources in the content tray.
2Tap on the source. The label Snapshot indicates the snapshot source.
3Select minimize, maximize for full screen, or close on the source window.
Stop Sharing Annotated Content
When you are finished sharing annotated content, you can stop the content sharing session.
Procedure
»Tap .to end the sharing session.
Highlight Content
You can highlight content temporarily instead of drawing on it.
Procedure
1Locate the area on the content you want to highlight.
2Tap .

Annotation Toolbar
Polycom, Inc. 19
3Select a color from the toolbar.
4Use one finger to circle around or slide across the content. A transparent highlight appears briefly.
Repeat as often as you desire anywhere on the displayed content.
Create a Whiteboard or Blackboard
The whiteboard and blackboard allow you to draw or write on content on a shared space. Create a new
whiteboard or blackboard at any time.
Procedure
»From the toolbar, tap or .
Exit the Annotation Toolbar
When you are finished using the annotation toolbar, exit the feature.
Procedure:
»Tap .

Polycom, Inc. 20
Troubleshooting
Your administrator is available to assist you when you encounter difficulties.
View System Information
Note that your administrator might ask you for the system serial number, software version, any active alert
messages, and other information.
Locate the System Serial Number
You can view the system serial number on the web interface of the Polycom Pano system, if your
administrator has granted users access.
»To locate the system serial number (14 digits), look on the back of the system.
Locate the IP Address
You can view the system IP Address on the Home screen of the Polycom Pano system.
View Polycom Pano App Log Files
Viewing the log file is helpful in determining the causes and solutions of problems. Before you open log
files, you must exit Polycom Pano app. You can find the log files from the following location:
●Windows 7 and 8: C:\Users\yourAlias\Polycom Pano app\log
●Mac: /Users/UserName/Library/Application Support/Polycom/Content Companion
Procedure
1Click or tap on the application's title bar.
2Click or tap Log Collector.
3Enter the recipient’s email address.
4Click or tap Send.
Regulatory Notices
Regulatory notices describe safety and legal considerations for using the following Polycom Pano
systems:
