Polygroup CW004 Christmas Tree Lighting User Manual TG90P4826D09 Canada
Polygroup Limited(Macao Commercial Offshore) Christmas Tree Lighting TG90P4826D09 Canada
user manual
Page: 4 of 4
2.7 m / 9 ft EZ Connect™ Pre-lit Aspen Tree
ITM. / ART. 1455658
For assistance with assembly, parts and customer service, call: 1-888-919-0070 (English, Spanish, French),
10:00am-7:00pm, Monday-Friday, Eastern Time.
Congratulations on purchasing your new tree from Polygroup®! This tree assembles with EZ Connect™ and Simple
Shape™ technology, allowing you to set up and light up your tree in less than 10 minutes! Carefully follow the instruc-
tions below on how to quickly and easily set up your new tree.
1. Before you start to assemble your tree, choose an appropriate location near a wall outlet.
2. Assemble the tree stand on a level surface. (See Fig. A)
- This device complies with Part 15 of the FCC Rules. Operation is subject to the following two conditions: (1) this
device may not cause harmful interference, and (2) this device must accept any interference received, including
interference that may cause undesired operation.
- “Warning: Changes or modifications to this unit not expressly approved by the party responsible for compliance
could void the user’s authority to operate the equipment.”
- “NOTE: This equipment has been tested and found to comply with the limits for a Class B digital device, pursuant to
Part 15 of the FCC Rules. These limits are designed to provide reasonable protection against harmful interference in
a residential installation. This equipment generates, uses and can radiate radio frequency energy and, if not
installed and used in accordance with the instructions, may cause harmful interference to radio communications.
Model no:. TG90P4826D09
However, there is no guarantee that interference will not occur in a particular installation. If this equipment does
cause harmful interference to radio or television reception, which can be determined by turning the equipment off
and on, the user is encouraged to try to correct the interference by one or more of the following measures:
TREE ASSEMBLY INSTRUCTIONS
FCC Verification User Manual
- The Canadian Government has announced an amendment of the radio act which will require computing equip-
ment to comply with EMI specifications in Canada. The effective date for products imported into Canada is January
31, 1989.
- The intent of the amendment is to establish Canadian Regulations which are harmonized with the existing FCC
Regulations. As such, no retesting is required and devices which have been tested and comply with the FCC Specifi-
cations (Class B) also comply with the Canadian Specification (Class B).
- There is however, an additional equipment label requirement. Units imported into Canada must be accompanied
by a label affixed to the device in both English and French.
“This Class B digital apparatus complies with Canadian ICES-003.”
“Cet appareil numérique de la classe B est conforme à la norme NMB-003 du Canada.”
Canadian Emissions Requirements
“This Class B digital apparatus complies with Canadian ICES-003.”
“Cet appareil numérique de la classe B est conforme à la norme NMB-003 du Canada.”
CUSTOMER SERVICE FOR CHRISTMAS TREES
For any questions, assistance, or missing parts, DO NOT RETURN YOUR TREE TO PLACE OF PURCHASE. please
contact us first, call: 1-888-919-0070 (English, Spanish and French), 10:00am-7:00pm, Monday-Friday, Eastern
Time, or visit our website at www.polygoup.com.
TREE ID# IS LOCATED ON END PANEL OF BOX. TREE ID# IS REQUIRED WHEN REQUESTING REPLACEMENT
PARTS.
Customer Name:
Address:(No P.O. Boxes)
City & State:
Zip Code:
Day Phone:
Date Purchased:
Tree ID#:
Tree UPC#:
Store Purchased:
Specify Problem:
Reorient or relocate the receiving antenna.
Increase the separation between the equipment and receiver.
Connect the equipment into an outlet on a circuit different from that to which the receiver is connected.
Consult the dealer or an experienced radio/TV technician for help.
Page: 1 of 4
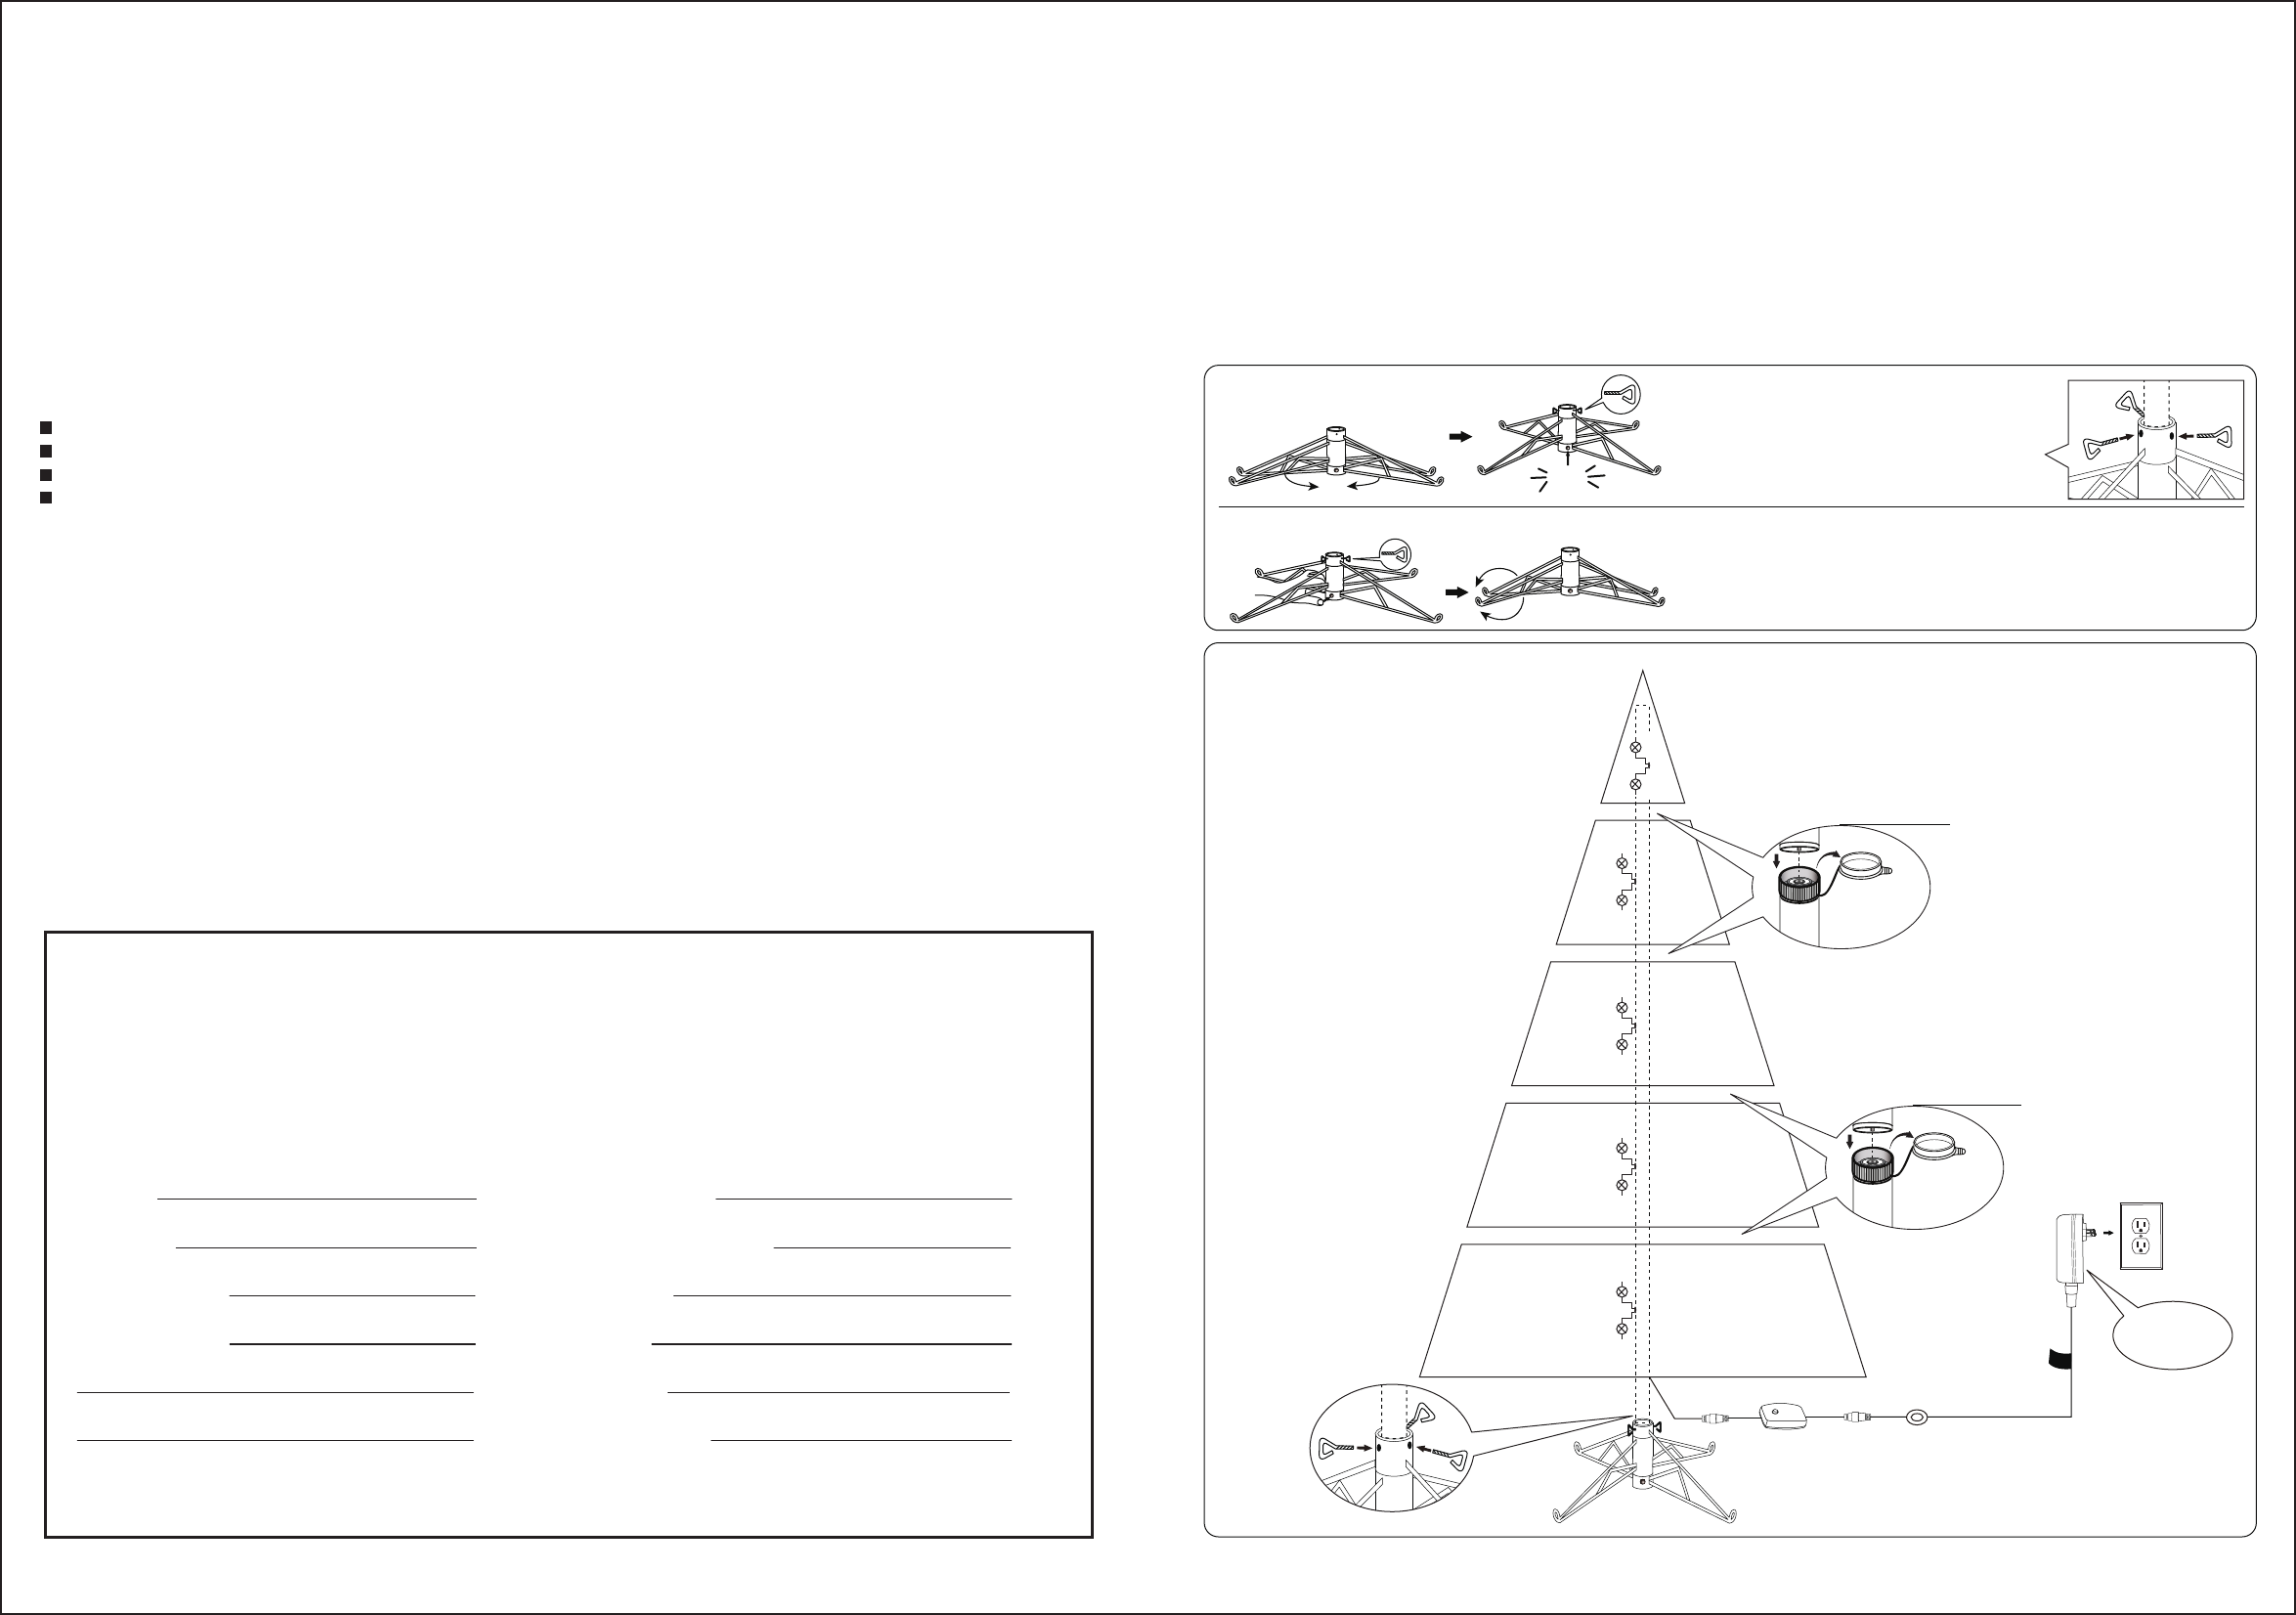
Fig. A Tree Stand Assembly
Tree Stand Disassembly
1. Pull apart the legs of the stand so that
they are snapped into an x-shape, place the
tree stand on a level surface.
2. Then inserting the bottom section of the tree
into the assembled stand, insert and turn the
eyebolts into the stand and tighten until the
tree pole is firmly secured.
3. To close the stand, remove the eyebolts, press the metal button and
fold the legs together.
Click
Eye Bolt
Eye Bolt
*Electrical Rating For The Tree
(For Indoor Use Only)
Input: 120V, 60Hz, 0.38A Max.
Output: 29V 0.9A
Fig. B - Tree and Light Assembly
Section 1
Section 2
Section 3
Section 4
Section 5
Do Not Tamper
Internal Parts
Open the
protective
cap before
assembly
Do Not Tamper
Internal Parts
Open the
protective
cap before
assembly
Insert Green
Label Extension
Cord into Adaptor
Control box
Adaptor
To Be Plugged
Into Wall
Outlet
Foot Pedal
on/off Switch
1. Unplug extension cord from the wall outlet first and then remove all ornaments and decorations.
2. Disassemble the tree from the top to the bottom. Start with the tree top and gently lift straight up to remove from
section below and fold all branches toward the pole.
3. Continue by gently lifting straight up each section(s) from the section below and fold all
branches toward the pole until the bottom section is removed from the tree stand. Cover
the protective cap on the poles to avoid damaging the internal parts. (See Fig. D)
4. Carefully place all tree sections into shipping box and tape it shut.
5. When not in use, please store your tree in a cool, dry place away from sunlight. Exposing
your tree to excessive heat or humidity may damage your tree.
STORAGE INSTRUCTIONS
For Pre-lit Trees, If The Tree Does Not Illuminate
1. Please check to make sure that all connectors are properly connected and the power adapter / extension cord is
plugged into the wall outlet.
2. Turn the poles gently to ensure pole-to-pole connection.
3. Check for loose, broken or missing bulbs and replace as needed.
4. Check for blown fuse of the extension cord, replace if needed, refer to USER SERVICING INSTRUCTIONS.
5. Check on / off foot pedal.
Loose Hinge Pin
1. Extra hinge pins are included for repairing the hinges. Place the branch into the slot of the bracket.
2. Insert a new hinge pin through the hole and secure using the retainer washer. (See Fig. E)
TROUBLE SHOOTING TIPS
Each tree includes hinge pins/washers and spare bulbs. If extra parts are
needed, please contact our customer service center.
SPARE PARTS
1. Use only power adapter supplied with this product, using a different adapter can damage the lights and cause fire
or electrical shock hazards.
2. FOR INDOOR USE ONLY.
3. Each tree section is numbered with a tag. Please identify all sections before assembling.
4. Assemble the tree from the bottom to the top (See Fig. B). Start with the bottom section and remove protective
cap before inserting into the assembled stand. Make sure the pole is firmly inserted and secured into the stand.
5. Open the protective cap from the lower section(s) and continue inserting the upper section(s) until the tree top is
inserted.
6. Allow branches to fall into place or gently pull up and out. When adjusting branches, be sure that all wires are free
of branch hinges.
7. Plug the extension cord into a wall outlet (See Fig. B), your entire tree should now be lit. If some bulbs do not light
or are flickering, search for any loose plugs and/or broken, loose or missing bulbs. Replace the bad bulbs promptly
in order to maintain the performance and life expectancy of your pre-lit tree.
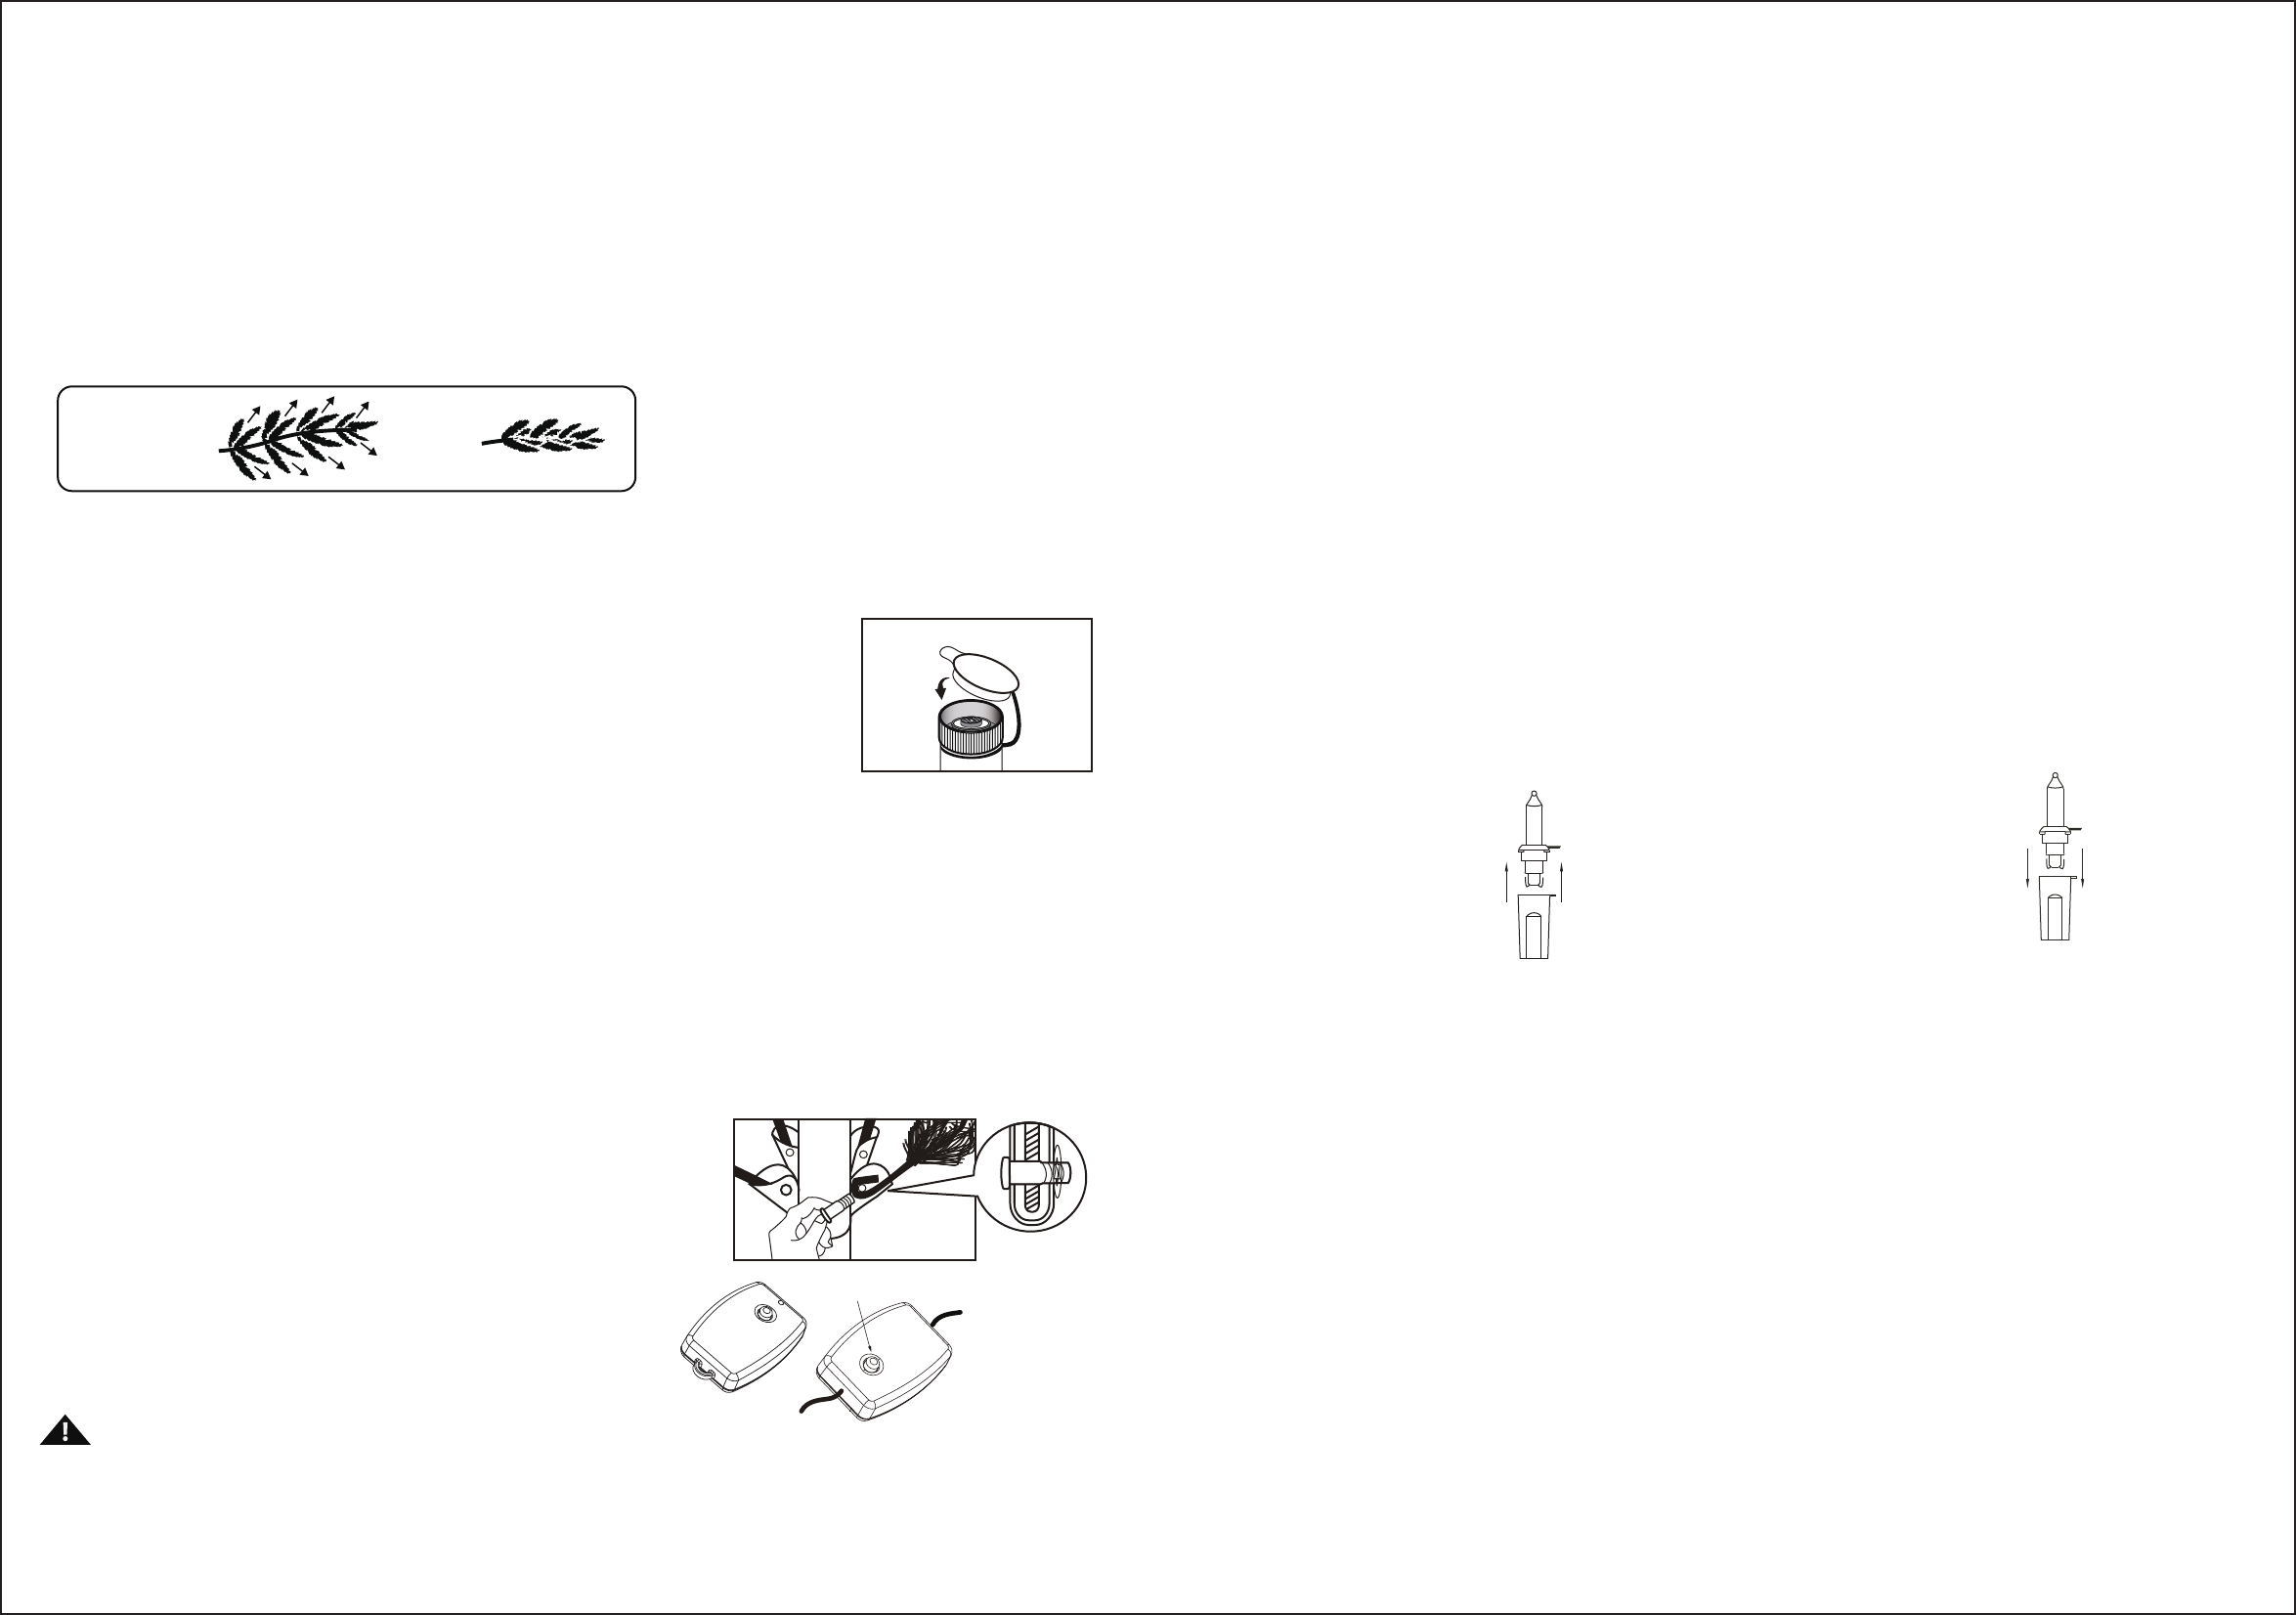
8. This is a Simple Shape™ tree, just slightly upsweep all branch tips for a uniform look, no shaping required. If
needed, shape the branches and tips to make the tree look fuller. Your Christmas tree is now complete and ready to
be decorated. (See Fig. C)
Top view Side view
Fig. C
Fig. D
Fig. E
WARNING
Page: 2 of 4 Page: 3 of 4
IMPORTANT SAFETY INSTRUCTIONS
When using electrical products, basic precautions should always be followed including the following:
a. READ AND FOLLOW ALL SAFETY INSTRUCTIONS.
b. Do not use seasonal products outdoors unless marked suitable for indoor and outdoor use. When products are
used in outdoor applications, connect the product to a Ground Fault Circuit Interrupting (GFCI) outlet. If one is not
provided, contact a qualified electrician for proper installation.
c. This seasonal use product is not intended for permanent installation or use.
d. Do not mount or place near gas or electric heaters, fireplaces, candles or other similar sources of heat.
e. Do not secure the wiring of the product with staples or nails, or place on sharp hooks or nails.
f. Do not let lamps rest on the supply cord or on any wire.
g. Unplug the product when leaving the house, when retiring for the night, or if left unattended.
h. This is not a toy. For decorative use only! To avoid risk of fire, burns, personal injury and electric shock it should not
be played with or placed where small children can reach it.
i. Do not use this product for other than its intended use.
j. Do not hang ornaments or other objects from cord, wire, or light string.
k. Do not close doors or windows on the product or extension cords as this may damage wire insulation.
l. Do not cover the product with cloth, paper or any material not part of the product when in use.
m. This product is equipped with push-in type lamps. Do not twist lamps.
n. Read and follow all instructions that are on the
product or provided with the product.
o. SAVE THESE INSTRUCTIONS
CAUTION:
1. Risk of fire. Use only the power adapter provided with this product. Do not replace lamps with other than the spare
lamps provided with this product.
2. To reduce the risk of fire and electric shock:a) Do not install on trees having needles, leaves or branch covering of metal
or materials which look like metal, and b)Do not mount or support strings in a manner that can cut or damage wire
insulation.
3. To reduce the risk of fire and electric shock, use only the power supply that was provided with this product.
Step 1
Grasp the power adapter or power cord plug, and than unplug from the power outlet. Do not pull the power cord.
LAMP REPLACEMENT
( Reference figure only)
Step 2
Lift up lamp lock tab,
then pull the lamp and
plastic lamp base straight
out of the lamp-holder.
Step 3
Replace with a new
spare lamp provided
with this product.
USER SERVICING INSTRUCTIONS
Press the selector button on the “Dual Color Light Controller” to
select among: 1. CLEAR STEADY 2. CLEAR TWINKLING
3. CLEAR FADING 4. MULTI STEADY 5. MULTI TWINKLING
6. MULTI FADING 7. COMBINATION
HOW TO USE THE DUAL COLOR LIGHT CONTROLLER:
Remote
Controller Light
Controller
Selector Button