Polygroup LUMALIGHT-C Remote Controller User Manual Tinsel tree IM
Polygroup Trading Limited Remote Controller Tinsel tree IM
Contents
- 1. User Manual
- 2. User manual
User manual
ASSEMBLY INSTRUCTIONS MADE IN CHINA
*Electrical Rating For The Tree
(For Indoor Use Only)
0.8A 120V 60Hz
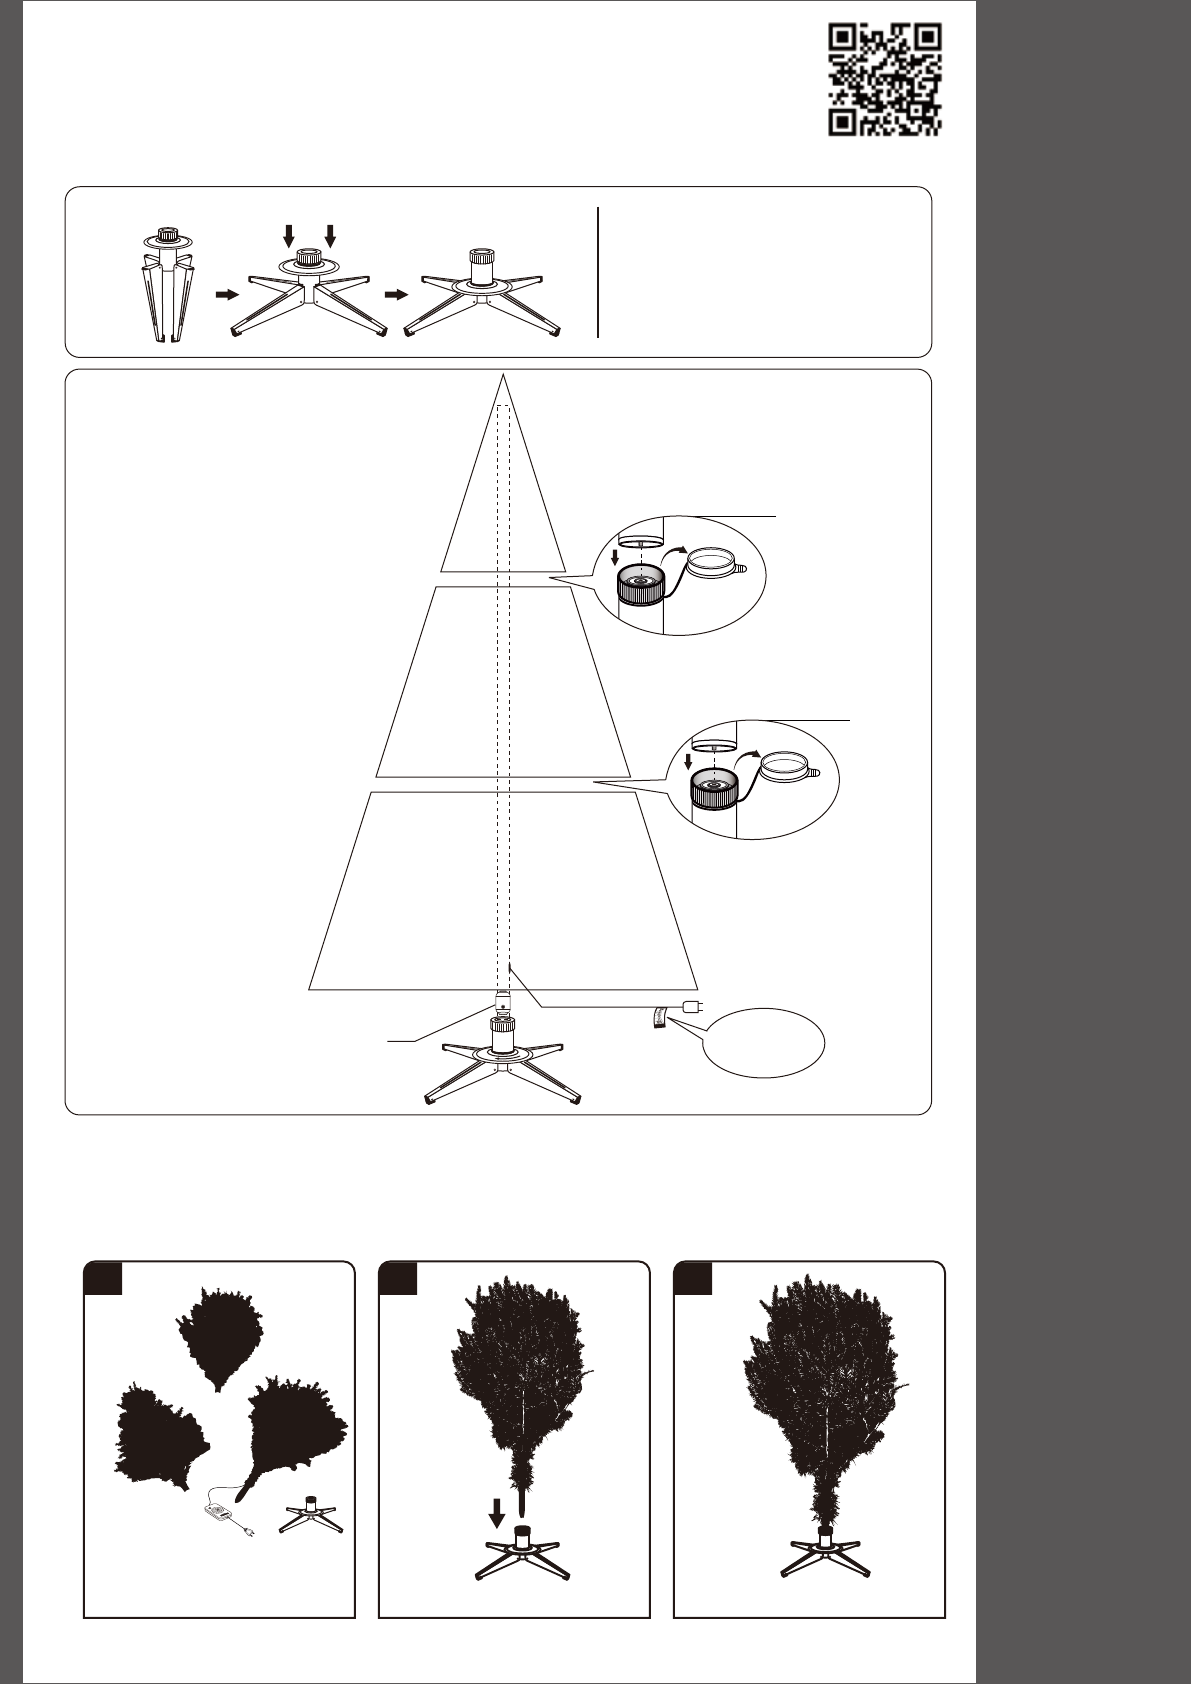
Fig. B - Tree and Light Assembly
1. Before you start to assemble your tree, choose an appropriate location near a wall outlet.
2. Assemble the tree stand and place on a level surface. (See Fig. A)
Congratulations on purchasing your new tree from Polygroup. This tree feature
Quick Set® technology to make set up and storage quick and easy.
Carefully follow the instructions below on how to quickly and easily set up your new tree.
TREE ASSEMBLY INSTRUCTIONS
3. Each tree section is numbered with a tag. Please identify all sections before assembling.
4. Assemble the tree from bottom to tree top. Start with the bottom section and remove the protective
cap before inserting into the assembled stand. Make sure the pole is firmly inserted and secured into the
stand.
Section 3
Section 2
Section 1
Insert
Green Label
Plug Into Wall
Outlet
Do Not Tamper
Internal Parts
Open the
protective
cover
Do Not Tamper
Internal Parts
Open the
protective
cover
Fig. A - Tree Stand Assembly
Unfold the legs and lay the
stand in a flat area. Then slide
the locking disc downward and
snap into place.
Please scan code to
learn how to shape
and set up your tree
1 2
Section 1
Section 3
Section 2
Remove tree stand and tree sections
from box.
Detach Remote Controller from
power cord. Insert Section 1 into the tree stand. Deploy and shape the Section 1 .
SET UP
3
Control Box
ASSEMBLY INSTRUCTIONS MADE IN CHINA
Top view Side view
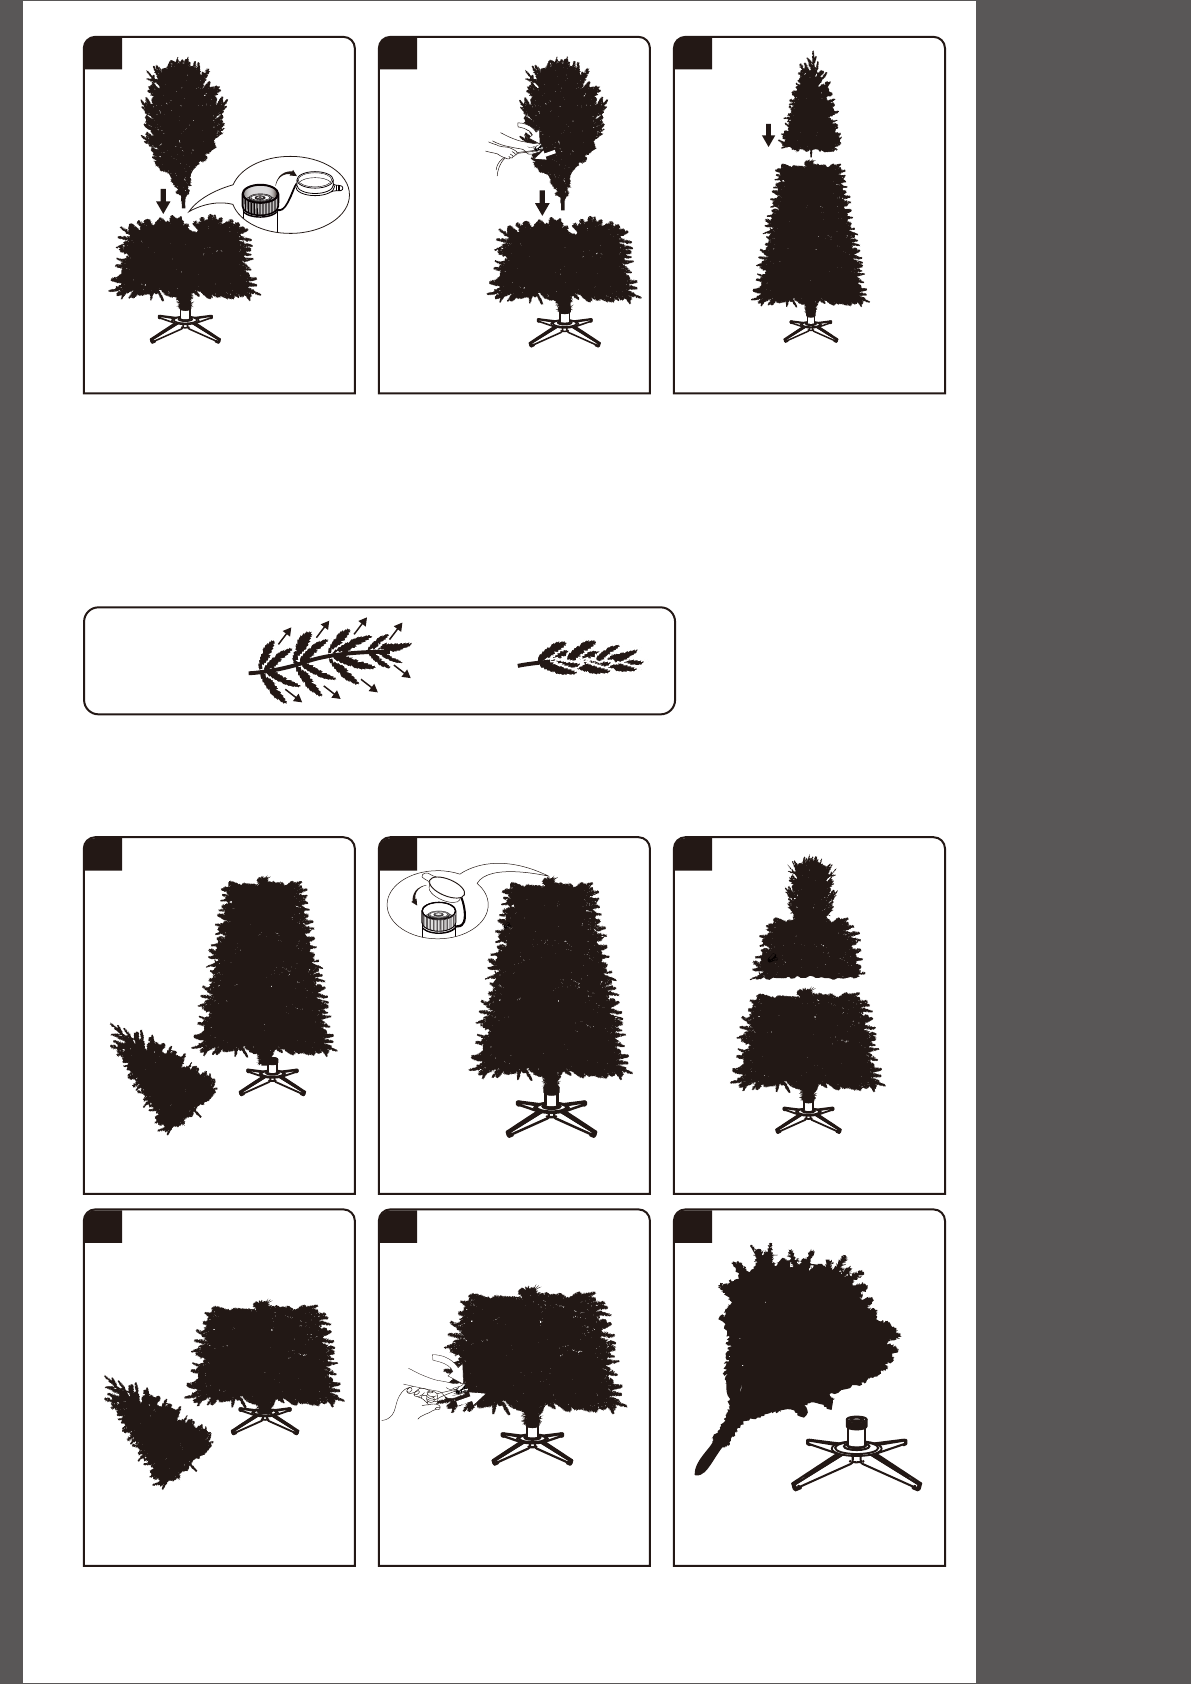
Fig. C
STORAGE INSTRUCTIONS
5. Allow branches to fall into place or gently pull up and out. When adjusting branches, be sure that all
wires are free of branch hinges.
6. Insert green label plug into the wall outlet.(See Fig. B ), Push Power Button on Remote Controller your
entire tree should now be lit. Select Color Selection Buttons or Modes Options can change light show
effects.
7. A button on Control Box can manually operate the light modes and colors selection.
8. Begin to shape the branches and tips working from the bottom to the top. Start with tips farthest from
the pole and fan out one to the right, one to the left and one at the center of the main stem. (See Fig. C)
9. After shaping the entire tree following the previous step, slightly upsweep all branch tips for a uniform
look. Shift branches to fill any gaps. Your Christmas tree is now complete and ready to be decorated.
1. Unplug extension cord from the wall outlet first and then remove all ornaments and decorations.
2. When not in use, please store your tree in a cool, dry place away from sunlight. Exposing your tree to
excessive heat or humidity may damage your tree.
4 5 6
Remove the protective cap of Section
1 and add Section 2. Deploy the Section 2 like Step 3. Remove the protective cap of Section
2 and add Section 3.
1 3
Detach Section 3 and store it into box. Fold the lower layer of Section 2 like
Step 2.
4 5 6
Detach Section 2 and put it into
the box.
Cover the protective cap of Section 1
then fold same as Section 2.
Detach Section 1 from tree stand and
pack them into the box.
Fix the Remote Controller back onto
power cord
2
Cover the protective cap of the
Section 2.
ASSEMBLY INSTRUCTIONS MADE IN CHINA
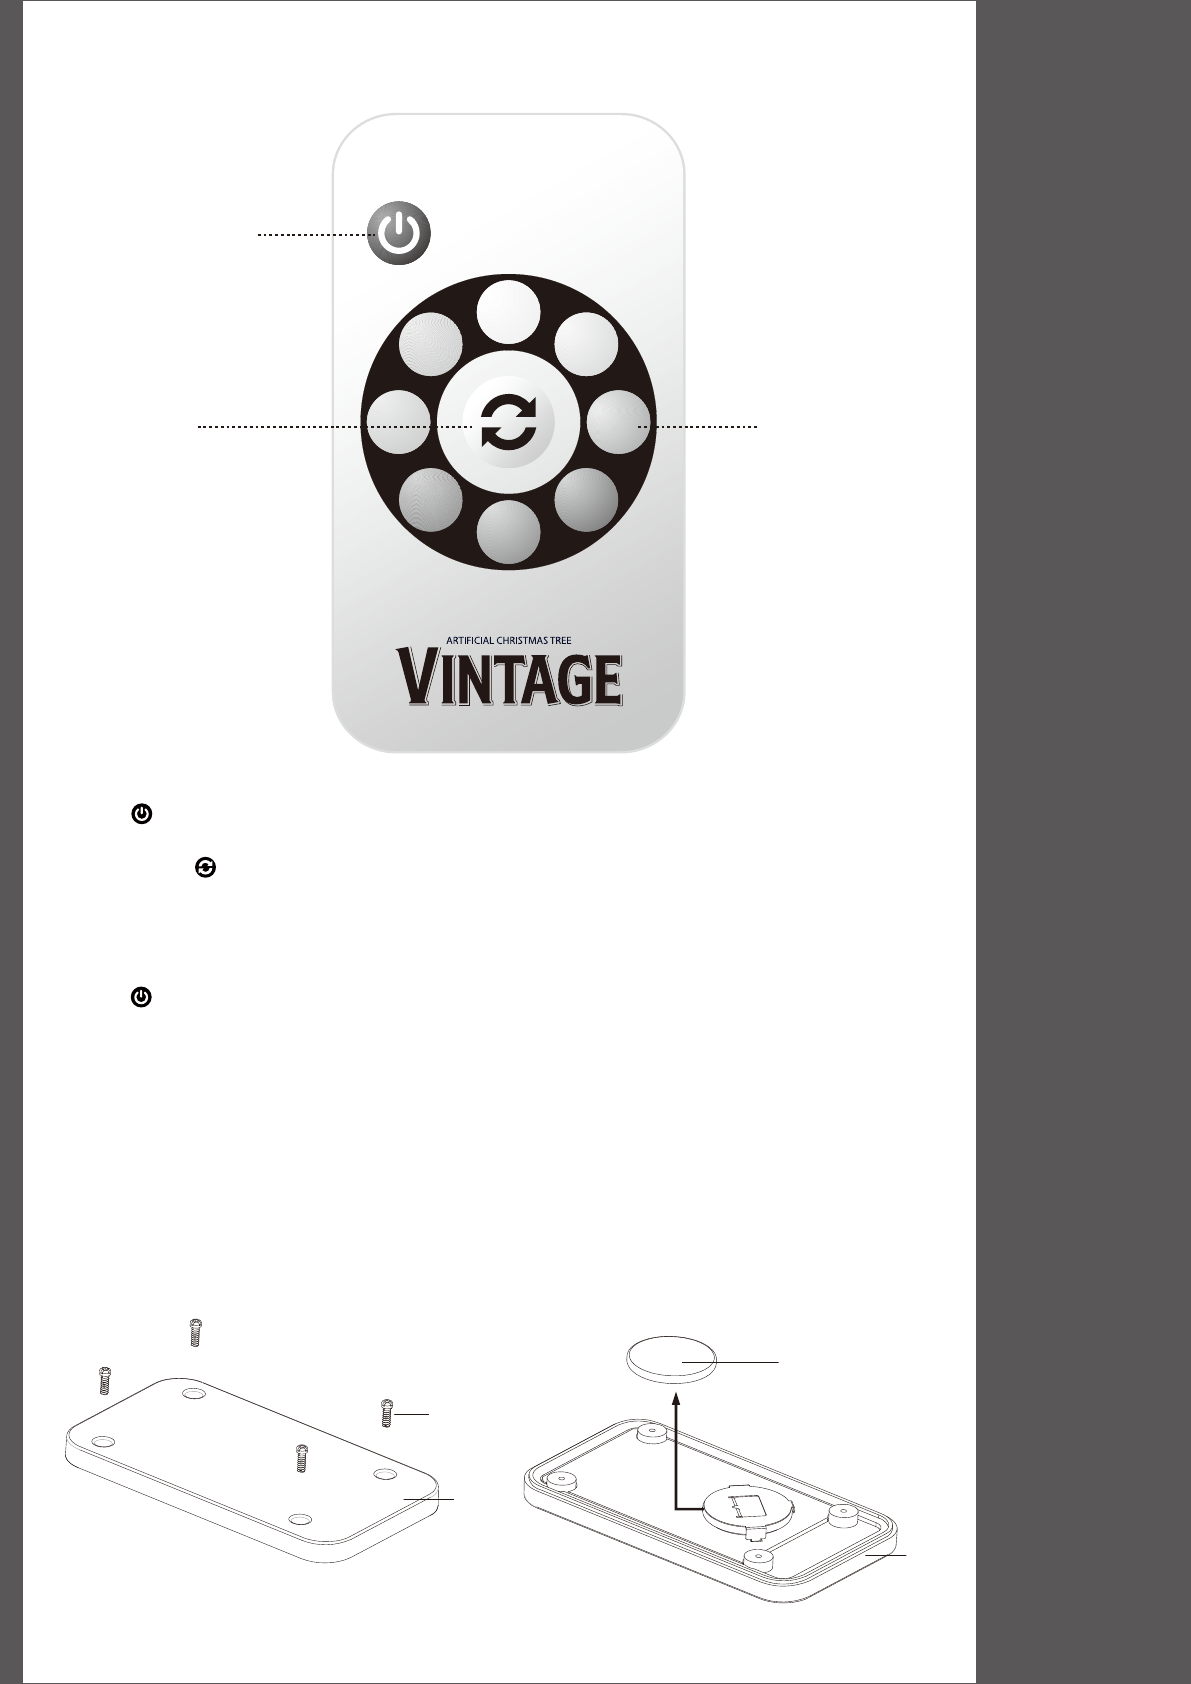
Screw
Battery
CR2025
Front
Cover
Back
Cover
1. Loose the screws and detach the back cover
2. Push the battery and take it out alone with the arrow direction
3. Install another new CR2025 battery
4. Install the back cover and screws to front cover. Make sure the screws are all tightly fastened.
5. Test the function and see if it works.
NOTE: Air-dry remote controller if it gets wet.
BATTERY REPLACEMENT OF REMOTE CONTROLLER
OPERATION INSTRUCTION OF REMOTE CONTROLLER
1. Press button to turn the lights ON.
2. Press color selection button for your preferred color.
3. Cycling Press button to get different light modes:
• flash
• strobe
• fade
• smooth
4. Press button to turn off the light after use.
Color Selection
Buttons
Power (ON/OFF)
Modes
Options
ASSEMBLY INSTRUCTIONS MADE IN CHINA
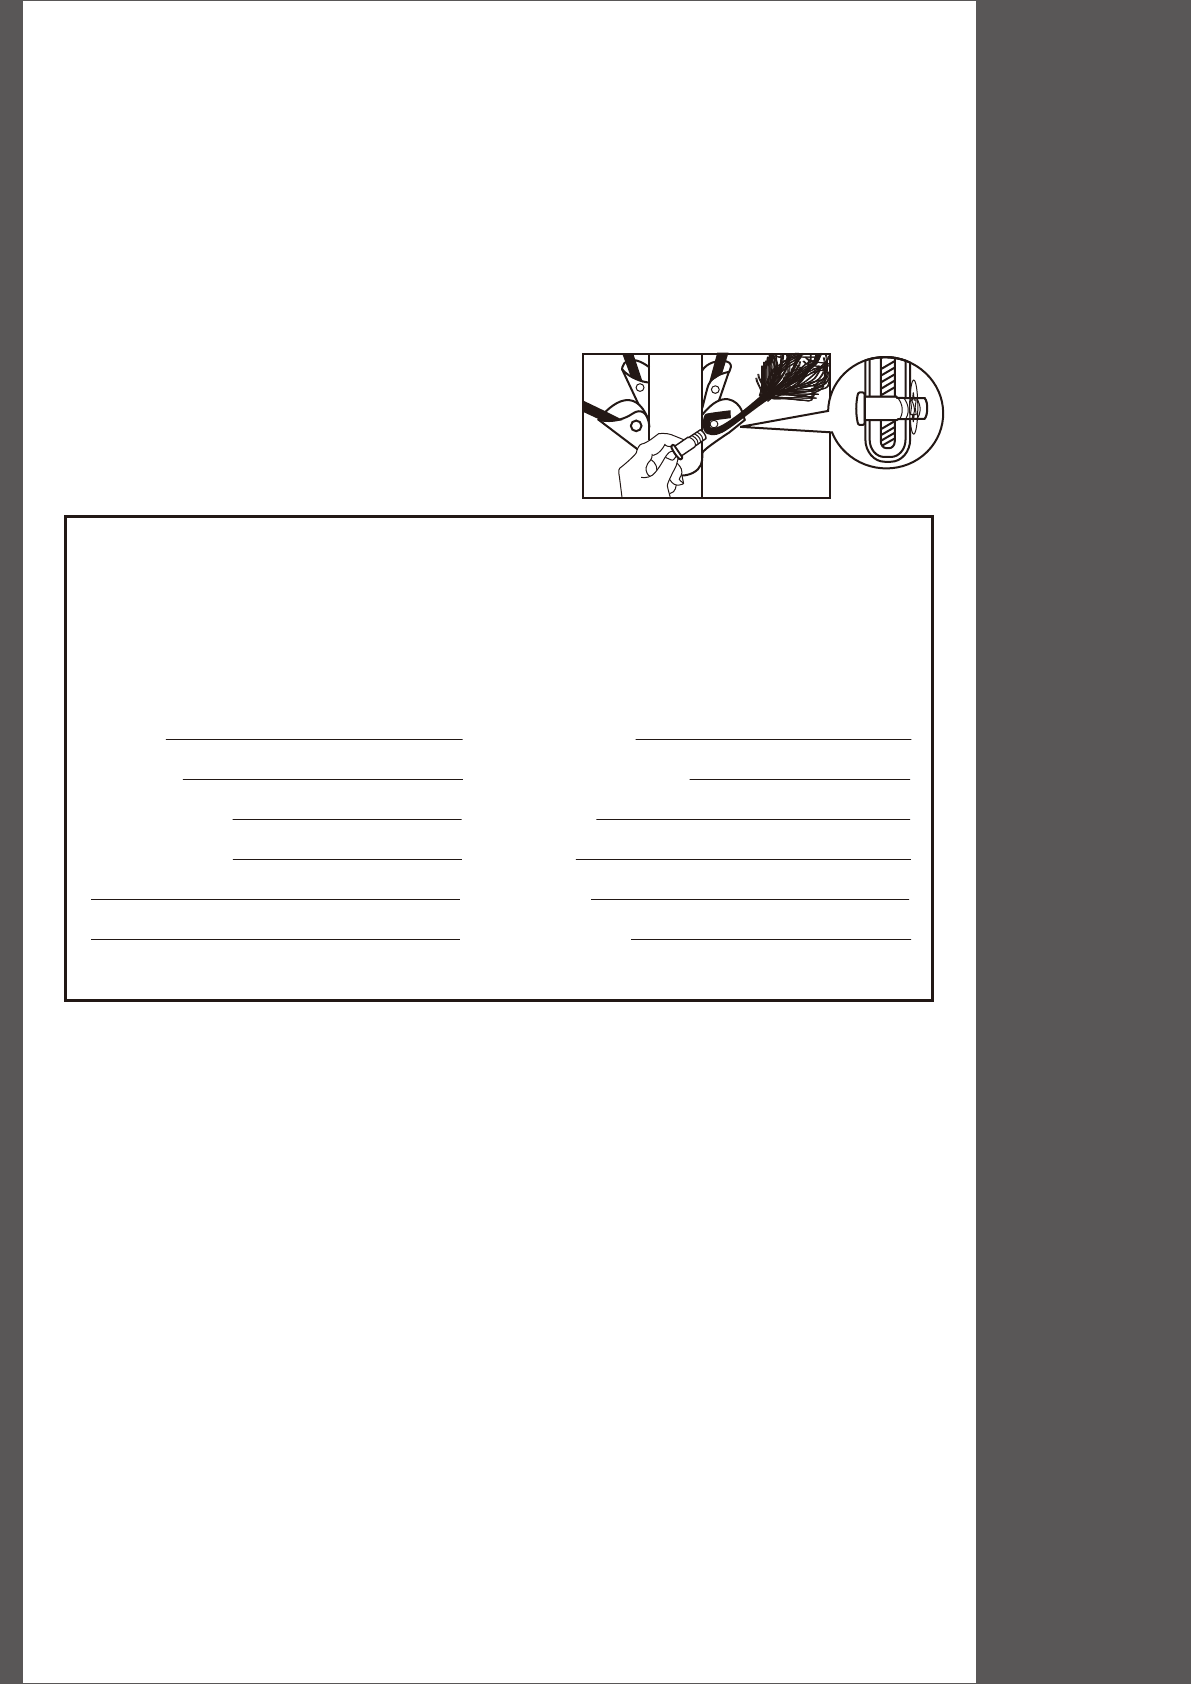
TROUBLE SHOOTING TIPS
SPARE PARTS
For Pre-lit Trees, If The Tree Does Not Illuminate
1. Please check to make sure that all plugs are properly connected and power cord is plugged into the wall
outlet. (If the tree comes with a foot pedal, try stepping on the on/off button).
2. Turning the poles gently to make sure pole to pole are connected into place.
3. Check for loose connection between light string plugs and extension cords.
4. Please check for loose, broken or missing light bulbs and replace as needed.
5. Manually operate the button on Control box to eliminate Remote Controller issues.
1. Extra hinge pins are included for repairing the hinges. Place the branch into the slot of the bracket.
2. Insert a new hinge pin through the hole and secure using the retainer washer.(See Fig. D)
Each tree includes hinge pins/washers, and for pre-lit
trees spare bulbs and fuses are also included. If extra
parts are needed, please contact our customer service
center.
Loose Hinge Pin
Fig.D
CUSTOMER SERVICE FOR CHRISTMAS TREES
For any questions, assistance, or missing parts, Do Not Return To Place Of Purchase. Please contact
us at 1-888-919-0070 or visit our website at www.polygroup.com. One of our customer service
representatives will be happy to assist you.
TREE ID# IS LOCATED ON END PANEL OF BOX. TREE ID# IS REQUIRED WHEN REQUESTING REPLACEMENT PARTS.
Customer Name:
Address:(No P.O. Boxes)
City & State:
Zip Code:
Day Phone:
Date Purchased:
Tree ID#:
Tree UPC#:
Store Purchased:
Specify Problem:
FCC VERIFICATION USER MANUAL
This device complies with Part 15 of the FCC Rules. Operation is subject to the following two
conditions: (1) this device may not cause harmful interference, and (2) this device must accept any
interference received, including interference that may cause undesired operation.
WARNING: Changes or modifications to this unit not expressly approved by the party responsible
for compliance could void the user’s authority to operate the equipment.
NOTE: This equipment has been tested and found to comply with the limits for a Class B digital
device,pursuant to Part 15 of the FCC Rules. These limits are designed to provide reasonable
protection against harmful interference in a residential installation. This equipment generates, uses
and can radiate radio frequency energy and, if not installed and used in accordance with the
instructions, may cause harmful interference to radio communications.
However, there is no guarantee that interference will not occur in a particular installation. If this
equipment does cause harmful interference to radio or television reception, which can be
determined by turning the equipment off and on, the user is encouraged to try to correct the
interference by one or more of the following measures:
• Reorient or relocate the receiving antenna.
• Increase the separation between the equipment and receiver.
• Connect the equipment into an outlet on a circuit different from that to which the receiver is
connected.
• Consult the dealer or an experienced radio/TV technician for help.