Portable Innovation Technology ALP1001CR BI-DIRECTIONAL REMOTE CONTROL FOR iPOD User Manual USERS MANUAL
Portable Innovation Technology Limited BI-DIRECTIONAL REMOTE CONTROL FOR iPOD USERS MANUAL
USERS MANUAL
Quick Start Guide &
Limited Warranty Statement
* Apple iPod sold separately
REMOTE & DOCK
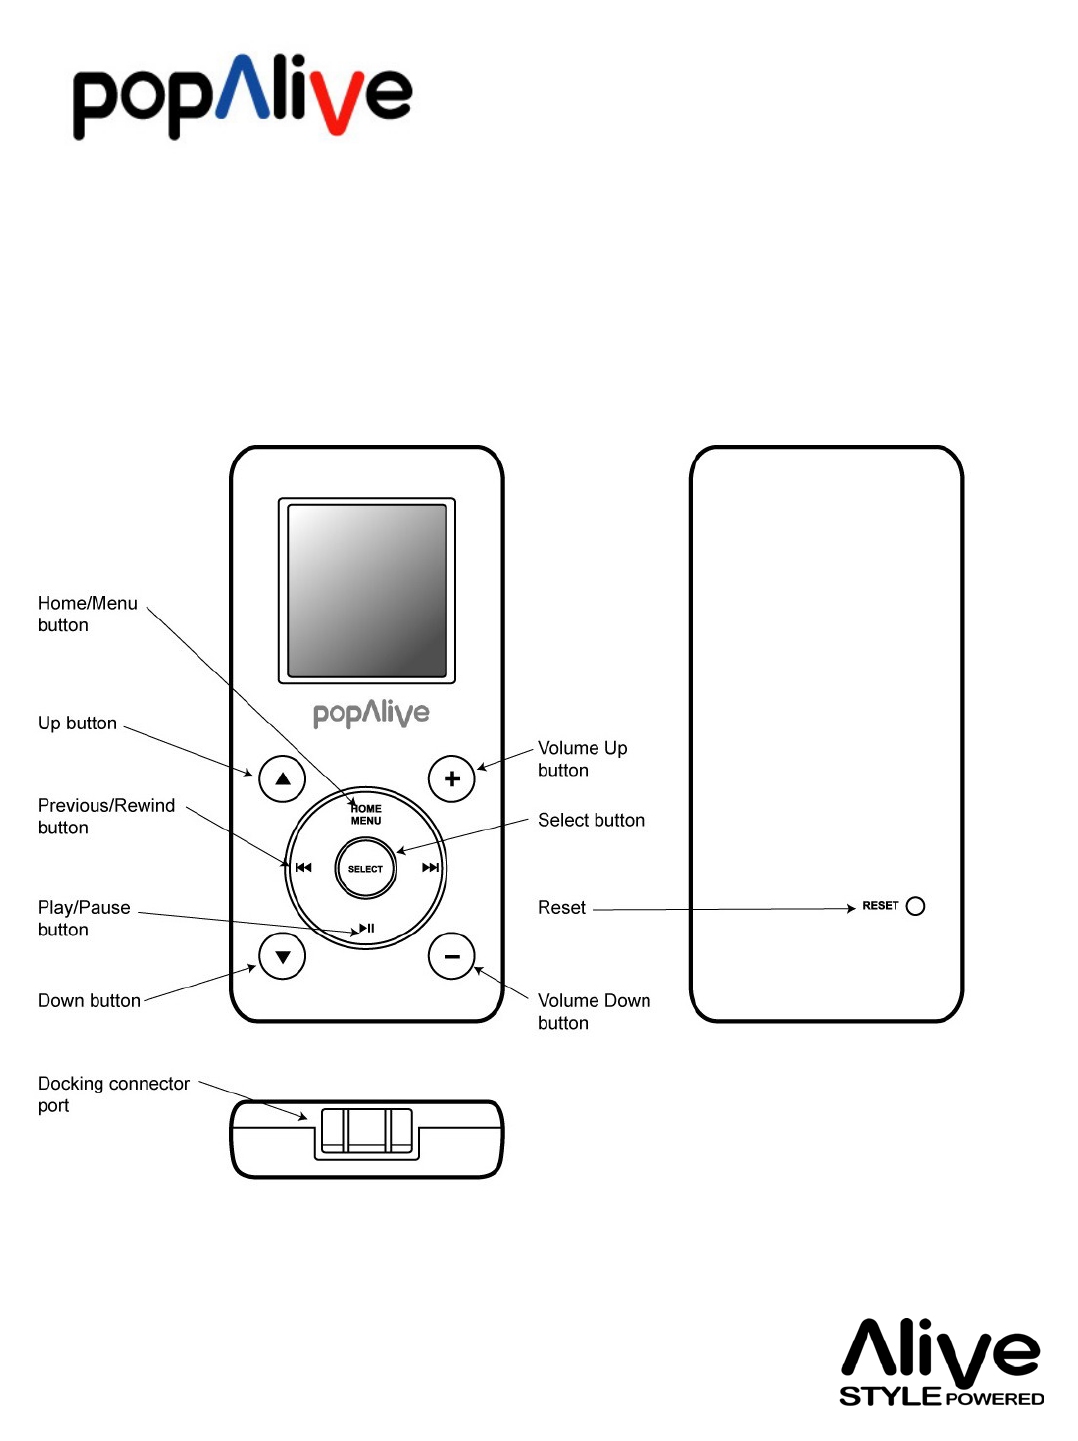
Using the controls (Popalive Remote)
Front view
Bottom view
Rear view
* Images are not to scale
Top view
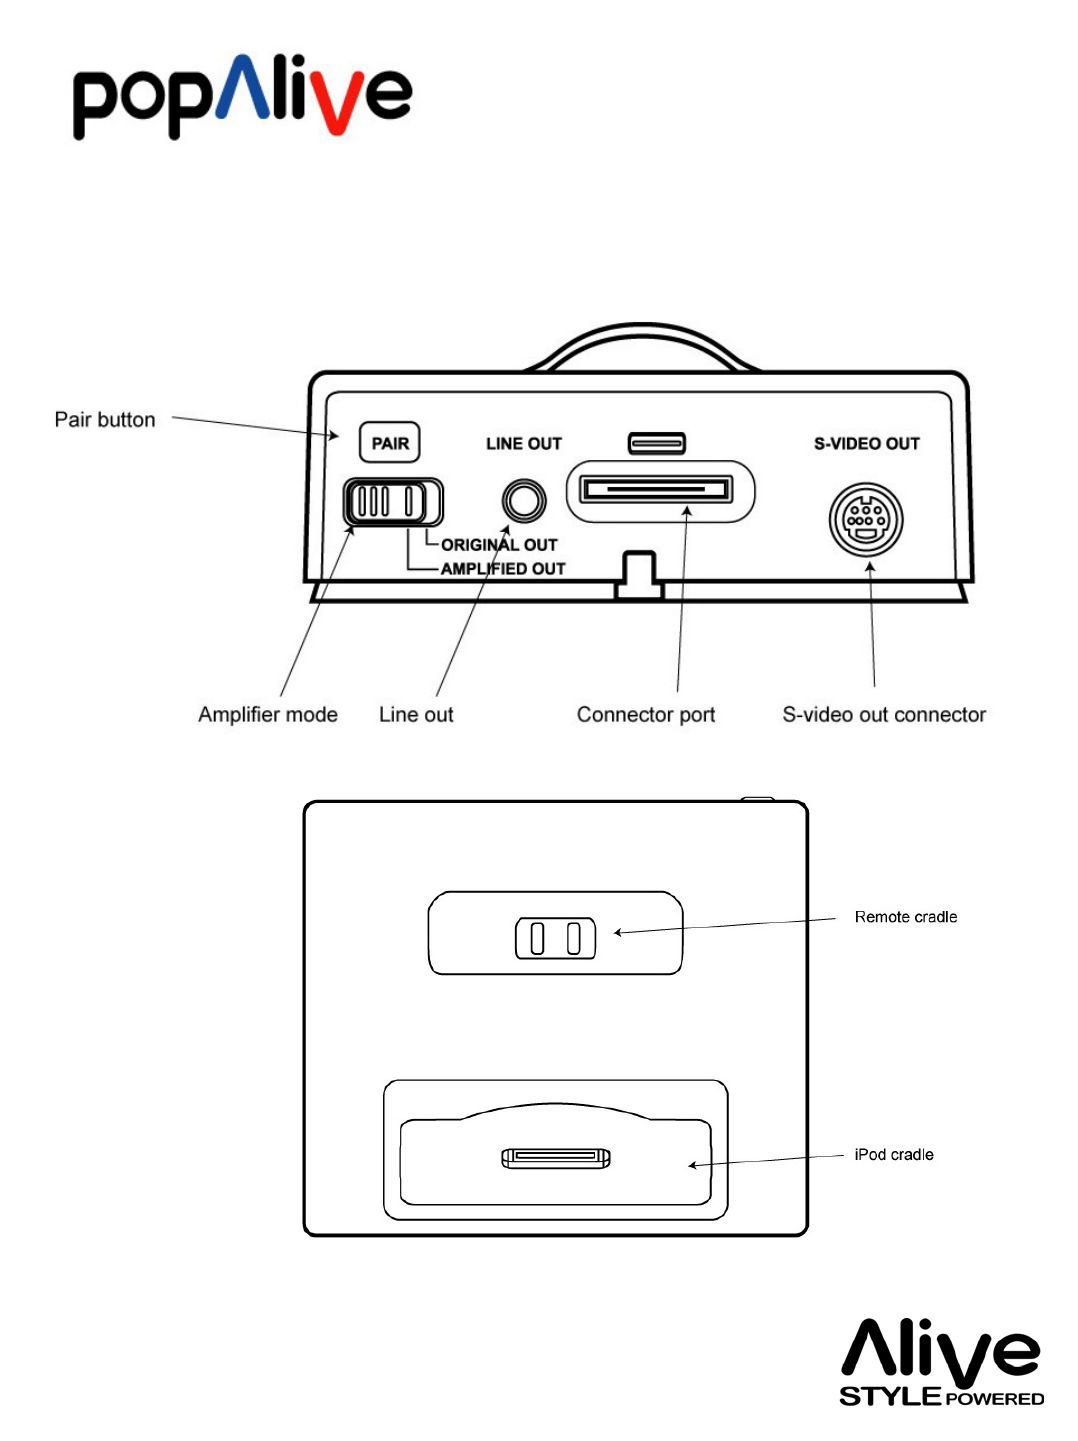
Using the controls (Popalive Dock)
* Images are not to scale
Rear view
Bottom view
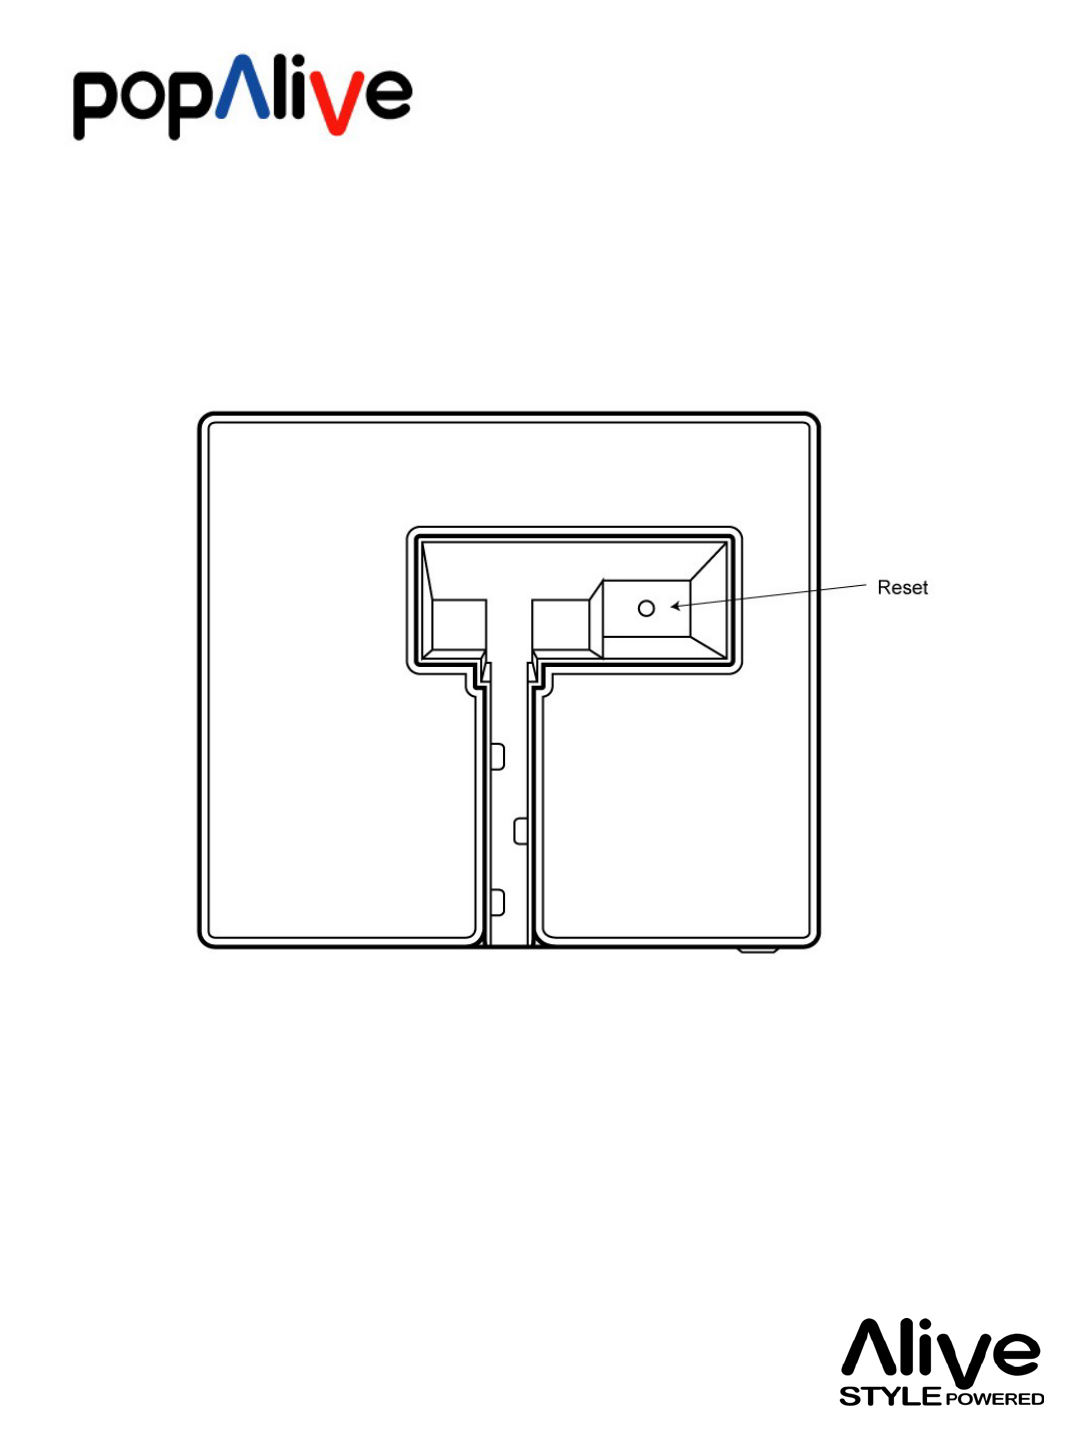
Using the controls (Popalive Dock)
* Images are not to scale
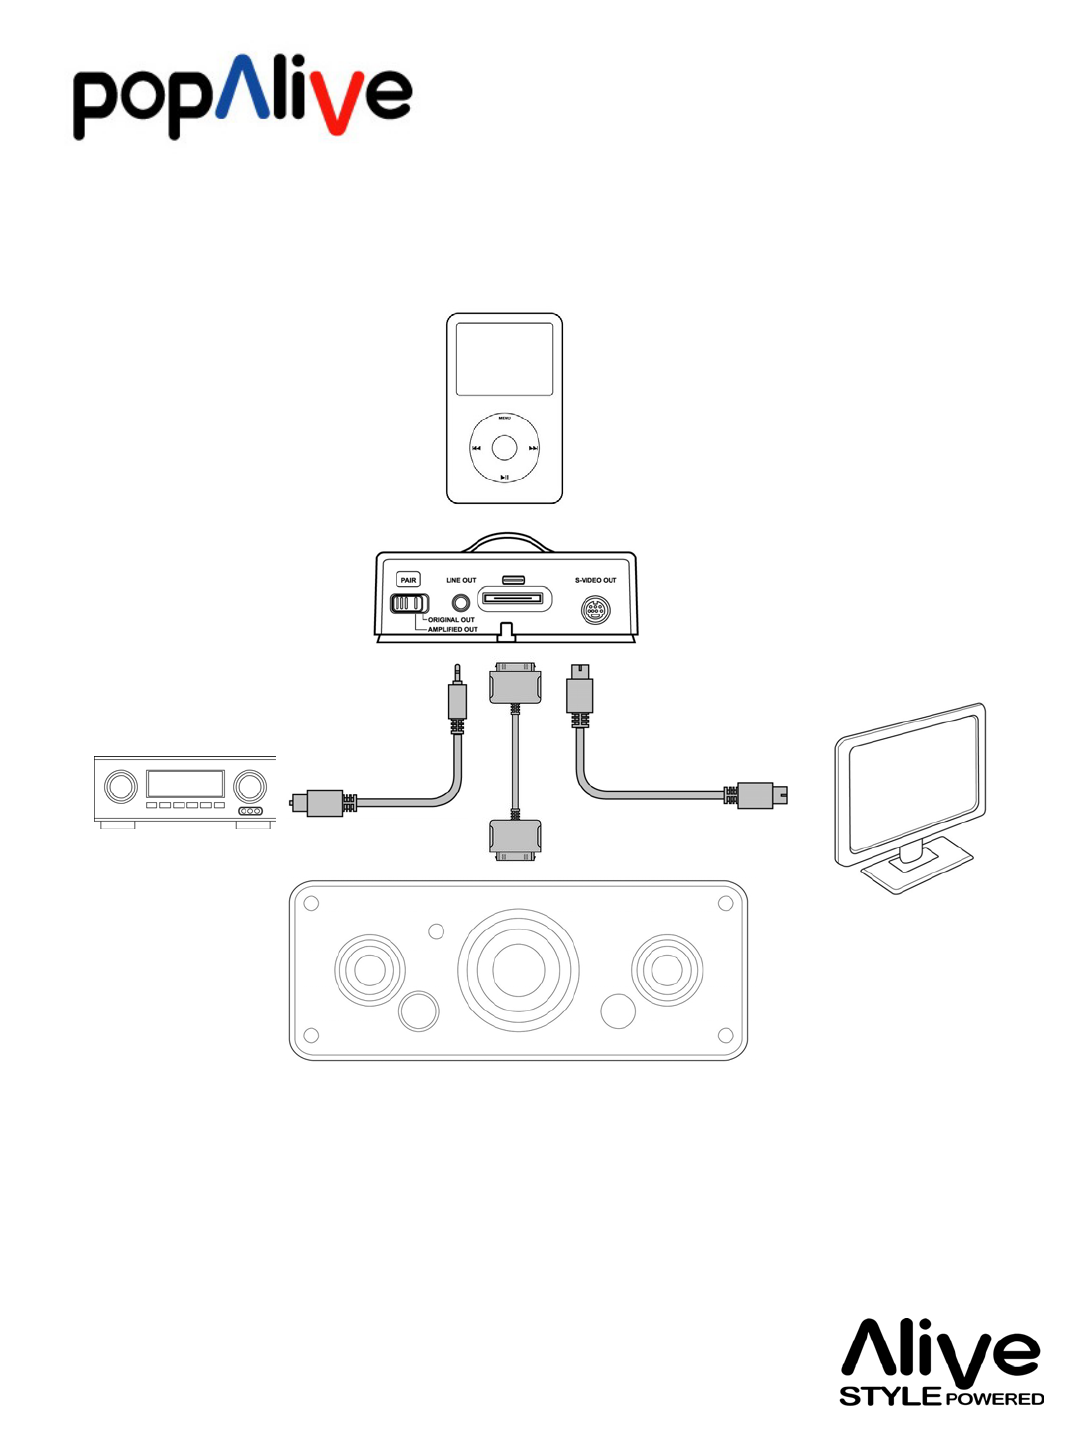
* Apple iPod, speakers, amplifier, video system, S- video cable &
audio cables are sold separately.
iPod
Docking
Station
30-pin iPod connector cable
Speakers or Amplifier with 30-pin iPod connector
Video System
Speakers
or
Amplifier
with
Audio-In
Connectivity
* Images are not to scale
S-Video cable
Stereo
Audio cable
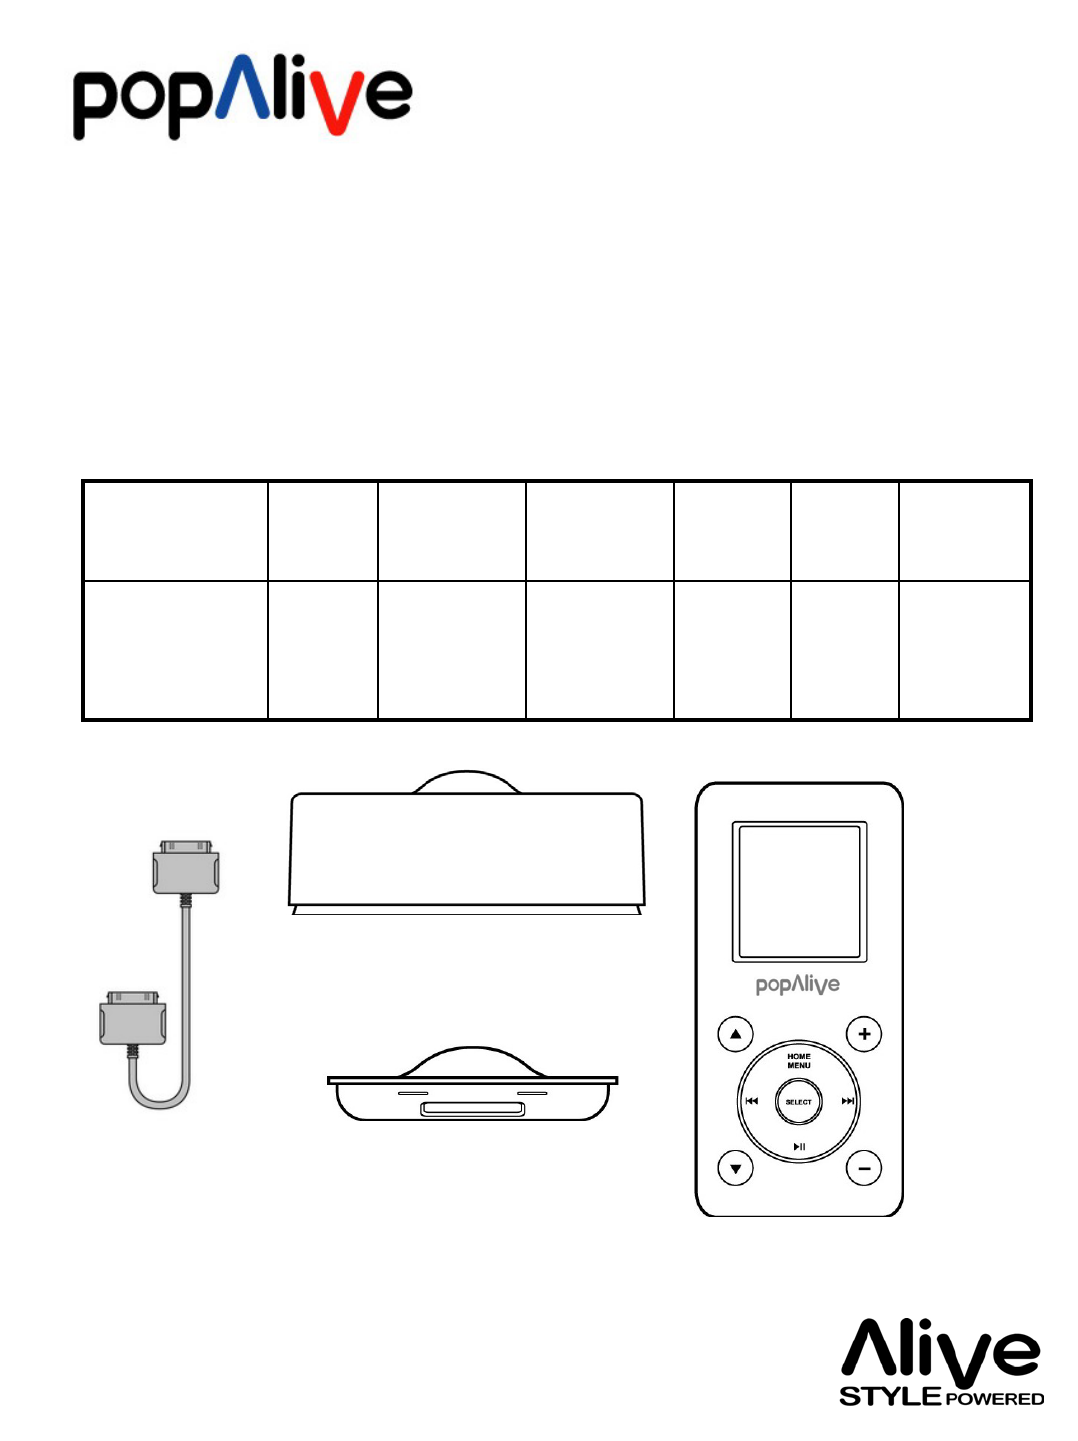
Popalive Remote
Popalive Dock
30-pin iPod connector cable
Quick Start Guide & Limited Warranty Statement
6 dock adapters for different iPods
X 6
Dock adaptor
Popalive Dock
Popalive Remote
Cable
* Apple iPod is sold separately
Packing List
* Images are not to scale
Fifth
Gen.
iPod 60&
80Gb
Fifth
Gen.
iPod
30GB
iPod
nano 1,
2 & 4GB
iPod with
color
display 40
& 60GB
iPod with
color
display 20
& 30GB
iPod
(Click
Wheel)
40GB
iPod Model
Supported
1098765Identification
Number on
Adapter

Getting Started
1. Battery charging for Popalive Remote
i. Connect the Popalive Dock to an electrical
outlet using an iPod Power Adaptor or a
stereo or speakers with 30-pin iPod
connector and place your iPod in the
Popalive Dock to charge the battery;
ii. Place the Popalive Remote in the Popalive
Dock. The recommended first charging time
for Popalive Remote is 12 hours.
Note - The low battery indicator on the
Popalive Remote display will appear when
the battery level is very low.
2. Pairing (IMPORTANT)
i. Press Select button and choose
“Preference” then “Pairing”;
ii. Press “PAIR” button on the Popalive Dock;
iii. If the pairing process is successful, “The
pairing’s succeeded” will be displayed. “The
pairing’s failed” will be displayed in case of
failure. Please retry the process.

Getting Started
3. Insert the suitable dock adapter and
connect your iPod to the Poaplive Dock.
4. Playing music with a stereo or speakers if
it has 30-pin iPod connector
You can connect the Popalive Dock to a
stereo or speakers with 30-pin iPod
connector using the cable that came with
your Popalive Dock to play music from your
iPod and charge the battery.
i. Connect the female side of the cable jets to
the 30-pin iPod connector;
ii. Lay the cable in the ditch to fix its position;
iii. Connect the other jet to the Popalive Dock;
iv. Control playback from a distance using the
Popalive Remote.

Getting Started
5. Playing music with a stereo or speakers if it
has audio line in only
i. Connect the Popalive Dock to an electrical
outlet using an iPod Power Adaptor or an USB
cable with 30-pin iPod connector;
ii. Connect the Popalive Dock to a stereo or
speakers using an iPod AV Cable or a stereo
audio cable to play music from your iPod;
iii. Control playback from a distance using the
Popalive Remote.
6. Select Amplifier Mode (Important)
i. Amplified out: the amplifier of Popalive Dock
will increase the amplitude of your iPod
music. Volume up and down can be controlled
by Popalive Remote;
ii. Original out: the amplifier of Popalive Dock
WILL NOT increase the amplitude of your iPod
music. It will use the audio setting of your
amplifier, stereo or speakers. Volume up and
down CANNOT be controlled by Popalive
Remote.

Getting Started
7. To play music by the Popalive remote
Usually refer to the operation of your iPod
5G device unless;
a. It does not support Podcasts and Audio
books in Music category;
b. It does not support Navigation to Photos,
Videos, Extras, Settings, Shuffle Songs.
i. In song playback screen, no playback
progress, ratings, photos and lyrics
information will be shown.
8. Playing video/photo on a TV or other video
device
i. Connect Popalive Dock to a TV or other video
device using a S-video Cable & a stereo audio
cable (for video only) to play video/photo
from your iPod;
ii. Press Select button and choose “Other”;
iii. Control playback according to the menu on
iPod display using the Popalive Remote or
iPod click wheel;
iv. To get back to Music Navigation, long press
Home/Menu button.

Getting Started
9. Releasing the iPod from connection
(Important)
i. Press Select button and choose “Eject”
before remove your iPod from Popalive Dock;
ii. Press Menu & Center button both at the same
time to reset your iPod when it hangs after
use.
10. Please redo the pairing process for any
hardware change.

• Change user interface
language
• Change backlight timeout
• Change “Sleep Mode”
• Volume Up while playing
music
• Volume Down while playing
music
• Choose a menu item
o Press “Select” button.
Select “Preference”
and “Language”
o Press “Select” button.
Select “Preference”
and “Backlight
timeout”
o Press “Select” button.
Select “Preference”
and “Sleep Mode”
o Press “Volume Up”
button
o Press “Volume Down”
button
o Press “Up” and “Down”
button to scroll to the
item and then press
the “Select” button
Operation Method
General Operation

• Go back to the previous
menu
• Go back to the main
menu
•Play a song
• Play all the songs in a list
• Skip to the next song
• Start a song over
o Press “Menu” button
o Hold “Menu” button
o Select the song & press
the “Select” or “Play”
button
o Select the list title (an
album title or the title
of a play list) and press
Play/Pause
o Press “Forward” button
o Press “Rewind” button
Operation Method
General Operation
* Apple iPod, speakers, amplifier, video system, S- video cable &
audio cables are sold separately.

General Operation
• Sync iPod and charge
the battery
• Play video/photo by
the Popalive Remote
• Reset Popalive Remote
• If Popalive Remote and
iPod batteries are
being charged and
nothing happens
o Connect the Popalive
Dock to your computer
with the cable that
came with your iPod,
then place your iPod in
it
o Choose “Preference”,
then select “Others”
o Press the reset hole with
a pin
o Connect Popalive Dock
to a high-power USB on
your computer or an
iPod power adaptor
(recommended)
Operation Method
* If the battery level of iPod and Popalive Remote are in very
low or empty, please DON’T do iPod playback while charging.

LIMITED WARRANTY:
Alive-Style warrants to the original end user ("Consumer") that the new POPALIVE Remote will be free from defects
in workmanship and materials, under normal use, for twelve (12) months from the original date of purchase, except
the Battery and other accessories warranted under normal use for six (6) months, and the product is not assignable
or transferable to any subsequent purchaser / end user. The limited warranty extends to only to Consumers who
purchase POPALIVE Remote from authorized channels. During the limited warranty period, Alive-Style would repair
or replace, at Alive-Style's discretion, any defective Product or parts with new or factory rebuilt replacement parts,
and return the Product to the Consumer in working condition. No charge will be made to the consumer for either
parts or labor in repairing or replacing the product within the limited warranty period under normal usage
conditions. All replaced parts or equipment shall become the sole property of Alive-Style
The external housing and cosmetic parts shall be free of defects at the time of shipment and therefore shall not be
covered under these limited warranty terms. Repaired products would be warranted for the balance of the original
warranty. Upon request from Alive-Style or its authorized service center, the consumer must provide original
purchase receipt or any other relevant information as proof of the date and place of purchase. All transportation,
delivery and handling charges incurred in the transport of the product to Alive-Style and its authorized service
center shall be borne by the consumer. All transportation, delivery and handling charges incurred in the transport of
the product to the Consumer shall be borne by Alive-Style.
Exclusions:
The consumer shall have no coverage or benefits under this limited warranty if any of the following conditions are
applicable:
(a) Product is subjected to abnormal use, abnormal conditions, improper storage, exposure to moisture or
dampness, exposure to excessive temperatures or other such harsh environmental conditions, unauthorized
modifications, unauthorized connections, unauthorized repair including but not limited to use of authorized spare
parts in repairs, misuse, neglect, abuse, accident, alteration, improper installation, spills of foods, or liquids,
maladjustments of customer controls, acts of God, or other acts which are beyond reasonable control of Alive-Style,
including deficiencies of consumable parts such as fuses and breakage or damages, unless caused directly by defects
in materials or workmanship, and normal wear and tear of the product.
(b) Unstable Radio Performance caused by interference from other radio devices.
(c) The product seal and Serial number has been tampered with, removed, defaced or altered, in any manner.
The Consumer will be billed for any parts or labor charges not covered by this limited warranty. The Consumer shall
be responsible for expenses related to reinstallation of the product. If the product is returned to Alive-Style after
the expiration of the warranty period, Alive-Style shall rightfully apply all services policies, to the Consumer
accordingly.
ANY IMPLIED WARRANTY OF MERCHANTABILITY OR FITNESS FOR PARTICULAR PURPOSE OR USE SHALL BE LIMITED TO
THE DURATION OF THE FOREGOING WRITTEN WARRANTY, OTHERWISE, THE FOREGOING WARRANTY IS THE
PURCHASER'S SOLE AND EXCLUSIVE REMEDY AND IS IN LIEU OF ALL OTHER WARRANTIES, EXPRESS OR IMPLIED. ALIVE-
STYLE SHALL NOT BE LIABLE FOR INCIDENTAL OR CONSEQUENTIAL DAMAGES OR A LOSS OF ANTICIPATED BENEFITS OR
PROFITS, LOSS OR IMPAIRMENT OF PRIVACY OF CONVERSATIONS, WORK STOPPAGE OR LOSS OR IMPAIRMENT OF DATA
ARISING OUT OF THE USE OR INABLILTY TO USE THE PRODUCT.
The benefits conferred by this limited warranty are in addition to all other rights and remedies under any applicable
mandatory legislation as may be in force from country to country.
All warranty information, product features and specifications are subject to change without any prior notification.
Please send the following information to warranty@alive-style.com to start the warranty service of your device:
Your Name Date of Purchase
Reseller Name Model No.
Serial Number
Please send an e-mail to service@alive-style.com for any technical issue.

2006 Alive Style
All right Reserved.
Images are not to scale.
Product may vary from that shown.
Specifications and features subject to change without notice.
iPod & other audio/video systems & accessories sold separately.
Other company and product names mentioned herein may be
trademarks of their respective companies.
This device complies with part 15 of the FCC Rules. Operation is subject to the following two conditions:
(1) This device may not cause harmful interference, and
(2) this device must accept any interference received,including interference that may cause undesired operation.
Warning: Changes or modifications to this unit not expressly approved by the party responsible for compliance
could void the user authority to operate the equipment.
NOTE: This equipment has been tested and found to comply with the limits for a Class B digital device, pursuant
to Part 15 of the FCC Rules. These limits are designed to provide reasonable protection against harmful
interference in a residential installation. This equipment generates, uses and can radiate radio frequency energy
and, if not installed and used in accordance with the instructions, may cause harmful interference to radio
communications.
However, there is no guarantee that interference will not occur in a particular installation. If this equipment
does cause harmful interference to radio or television reception, which can be determined by turning the
equipment off and on, the user is encouraged to try to correct the interference by one or more of the following
measures:
•Reorient or relocate the receiving antenna.
•Increase the separation between the equipment and receiver.
•Connect the equipment into an outlet on a circuit different from that to which the receiver is
connected.
•Consult the dealer or an experienced radio/TV technician for help.