Power Idea Technology 3103 Push To Talk with Bluetooth audio link User Manual
Power Idea Technology Limited. Push To Talk with Bluetooth audio link
User manual
User Manual
PTT Enabled Remote Speaker Microphone (RSM)

Copyright 2013, Kodiak Networks, Inc.
2
Contents
1 General Information ........................................................................................................................ 3
1.1 Model Covered: ........................................................................................................................ 3
1.2 Network Services: ..................................................................................................................... 3
1.3 RugGear RSM Support Information:.......................................................................................... 3
1.4 Safety Guidelines: ..................................................................................................................... 3
1.5 Precautions to Use the Battery: ................................................................................................ 4
1.6 Battery Replacement: ............................................................................................................... 4
1.7 Child Safety: ............................................................................................................................. 4
2 Getting Started ................................................................................................................................ 5
2.1 Setting up your RugGear RSM: ................................................................................................. 5
2.2 Charging the RugGear Bluetooth RSM Battery: ......................................................................... 5
2.3 Device Specifications: ............................................................................................................... 6
3 Basics of your RugGear RSM ............................................................................................................ 7
3.1 RugGear Remote Speaker Microphone Description: .................................................................. 7
3.2 RugGear RSM Front Layout: ..................................................................................................... 7
3.3 RugGear RSM Back Layout: ...................................................................................................... 8
3.4 RugGear RSM Right profile Layout: ........................................................................................... 8
3.5 RugGear RSM Bottom: ............................................................................................................. 8
3.6 RugGear RSM Left profile Layout: ............................................................................................. 9
3.7 RugGear RSM Top: ................................................................................................................... 9
4 Connectivity and Calling ................................................................................................................. 11
4.1 Bluetooth Connectivity: .......................................................................................................... 11
4.2 To Pair with your Phone: ........................................................................................................ 11
4.3 When to perform Bluetooth connection: ................................................................................. 11
4.4 PTT Calling to Individuals and Groups: .................................................................................... 11
4.5 Red Button: ............................................................................................................................ 12
4.6 Reset Button: ......................................................................................................................... 12
4.7 Behavior of PTT button and RED button on RugGear RSM for different Call scenarios: ............ 12

Copyright 2013, Kodiak Networks, Inc.
3
1 General Information
Welcome to the world of RugGear accessories. Bluetooth enabled PTT RSM can be used with any
phones that support Bluetooth wireless technology. This allows you the freedom to make and
receive PTT calls anytime, anywhere hands free. Read this user manual carefully before using the
RSM. Read also the user manual for your phone, which provides instructions for Bluetooth
connectivity.
Bluetooth wireless technology allows you to connect compatible communication devices without
cables. Bluetooth connection does not require that the phone and the RSM be in line of sight, but
both devices should be within 10 meters (30 feet) of each other. There may be restrictions on using
Bluetooth technology in some location.
1.1 Model Covered:
This user manual covers the Bluetooth enabled PTT remote speaker microphone.
1.2 Network Services:
This RugGear accessory is equipped internally with Bluetooth and smart feature for PTT services.
1.3 RugGear RSM Support Information:
For online support information of your RugGear Bluetooth RSM, contact us at :
ruggearbtrsm_support@kodiaknetworks.com.
1.4 Safety Guidelines:
Please read and understand the following safety guidelines before you use the RugGear Bluetooth
RSM. These guidelines provide details to enable you in operating your RSM safely and conform to
any legal requirements regarding the use of RugGear Bluetooth RSM.
Disposal of Stale Electrical and Electronic Equipment
The symbol of the crossed-out wheeled bin indicates that within the country of the United
states of America, this product, and any enhancements marked with this symbol, cannot be
disposed as unsorted waste but must be taken to separate collection at their end-of-life.
Disposal of Battery
Please check local regulations for disposal of batteries. The battery should never be placed in
municipal waste. Use a battery disposal facility if available.
Copyright 2013, Kodiak Networks, Inc.
4
Guideline for Bluetooth Headphone
To prevent possible hearing damage, please do not listen at high volume levels for long
periods.
Warning!
Avoid actions that could cause injury to yourself or others
Caution
Avoid usage of the device in situations that could cause damage to your device or other
equipments
1.5 Precautions to Use the Battery:
A rechargeable battery powers your RugGear Bluetooth accessory. Use the battery only for its
intended purpose. Never use any charger that is damaged. If the battery of the accessory is
completely discharged, it may take a few seconds before the charging indicator to appear on the
display or before any calls can be made using the RSM. The full performance of a battery is achieved
only after three to four complete charge and discharge cycles. Unplug the charger from the
electrical plug and the device when not in use. Ensure that you do not leave the fully charged
battery connected to a charger. If left unused, a fully charged battery will lose its charge over time.
1.6 Battery Replacement:
Never try to dismantle the product yourself. None of the internal components can be replaced or
repaired by users. – Only authorized dealers or service centers may open the product. If any parts
of your product require replacement for any reason, including normal wear and tear or breakage,
contact your dealer.
1.7 Child Safety:
Do not allow children to use your mobile phone or its accessories. Keep it out of their reach. They
could hurt themselves or others, or could accidentally damage the mobile phone or accessories.
Your mobile phone and its accessories may contain small parts, which could be detached and create
a choking hazard for your child.
Copyright 2013, Kodiak Networks, Inc.
5
2 Getting Started
The following topics will give you all the information needed to set up your RugGear Bluetooth RSM
for the first time.
2.1 Setting up your RugGear RSM:
Refer to the following sections to charge your RugGear RSM.
2.2 Charging the RugGear Bluetooth RSM Battery:
Your RugGear Bluetooth accessory comes with an inbuilt battery. The battery provided along with
your RugGear Bluetooth RSM does not come fully charged. We recommend that you charge the
accessory at least for one hour before you use it for the first time.
Note: With a fully charged battery, the RSM can remain in standby mode for longer duration. If the
battery is completely out of charge, the charging LED appears only after some seconds when the
charger is connected.
Complete the following steps to charge the battery of the accessory.
1. Plug the charger into a power outlet.
2. The charger port is located at the bottom
of the RSM. Insert the micro USB
connector into the port and insert the
other end of the USB cable into the
charger.
Alternatively, you can charge the
accessory with your PC. Insert the Micro
USB connector into the charging port of
the accessory and insert the other end of
the cable into a USB port on your
Laptop/Desktop.
3. If the battery is being charged when the
accessory is switched ON/OFF, only the
battery LED is displayed on the RSM.

Copyright 2013, Kodiak Networks, Inc.
6
2.3 Device Specifications:
The following table displays the Device Specification of RugGear RSM:
Frequency
2402 ~ 2480 MHz
Battery
1200 mAh
Enhanced Push to Talk Button
Yes
Connectivity
Bluetooth
Bluetooth
V3.0
Hardware & Software Version
V2.0
Operating Temperature
-20℃ ~ +55℃
Operating Voltage
3.4V ~ 4.2V
Modulation Type
FHSS
Total Channel Number
79
Channel Space
1 MHz
Copyright 2013, Kodiak Networks, Inc.
7
3 Basics of your RugGear RSM
Your RugGear RSM comes with features that simplify your life and expand your ability to stay
connected to the people as well as information that are important to you. Refer to the following
sections to understand the basic functions and features of your RSM.
3.1 RugGear Remote Speaker Microphone Description:
The RugGear RSM comes with inbuilt battery, external PTT button, Bluetooth connectivity and
battery indicator LED for RSM. You can find a large PTT button at the left of RSM as well there is a
scroll up/down buttons, the RSM also has a collar clip for better reception of your voice. The
bottom of the RSM has Micro USB charging port, on top of the RSM you can find the Power ON/OFF
key. The right side of the RSM has a Reset button and a 3.5mm earphone jack. The volume of RSM
speaker can be controlled using the keys in front of the RSM. For more information refer to the
following sections.
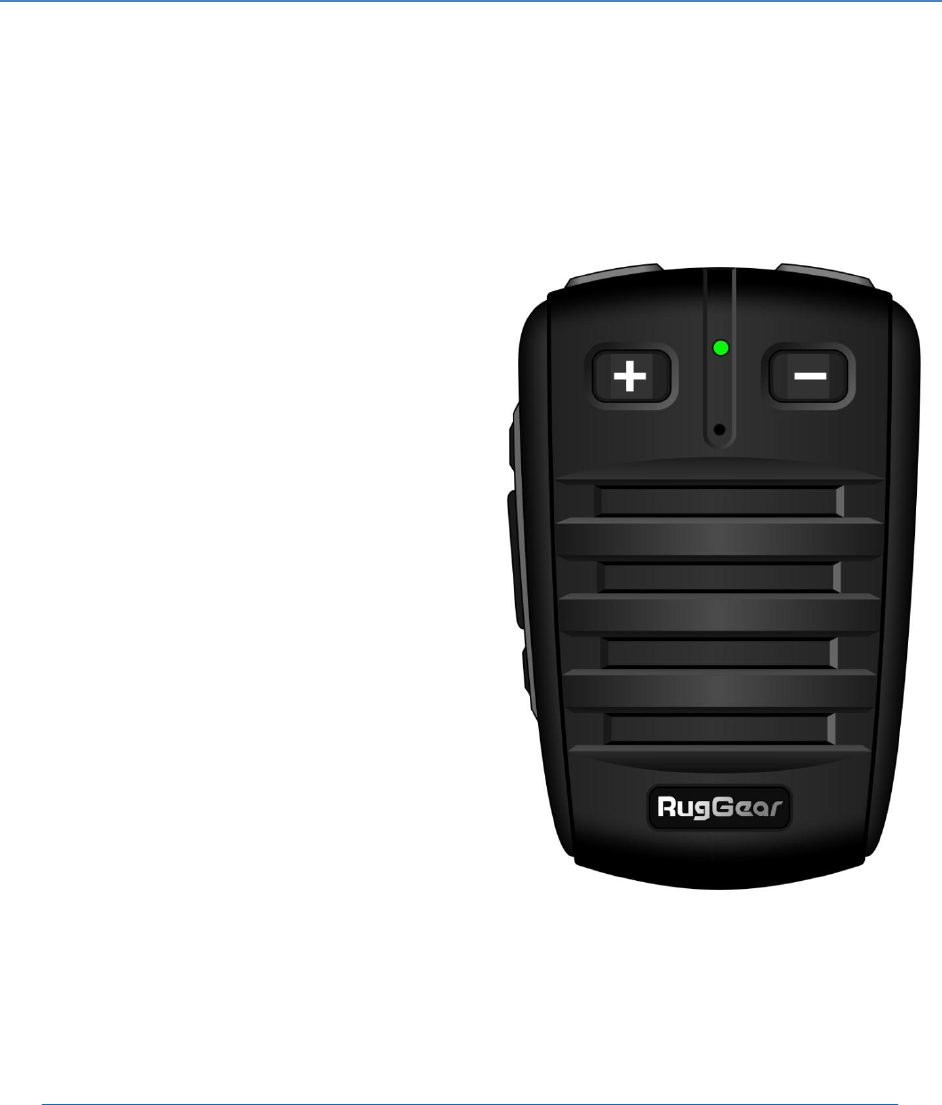
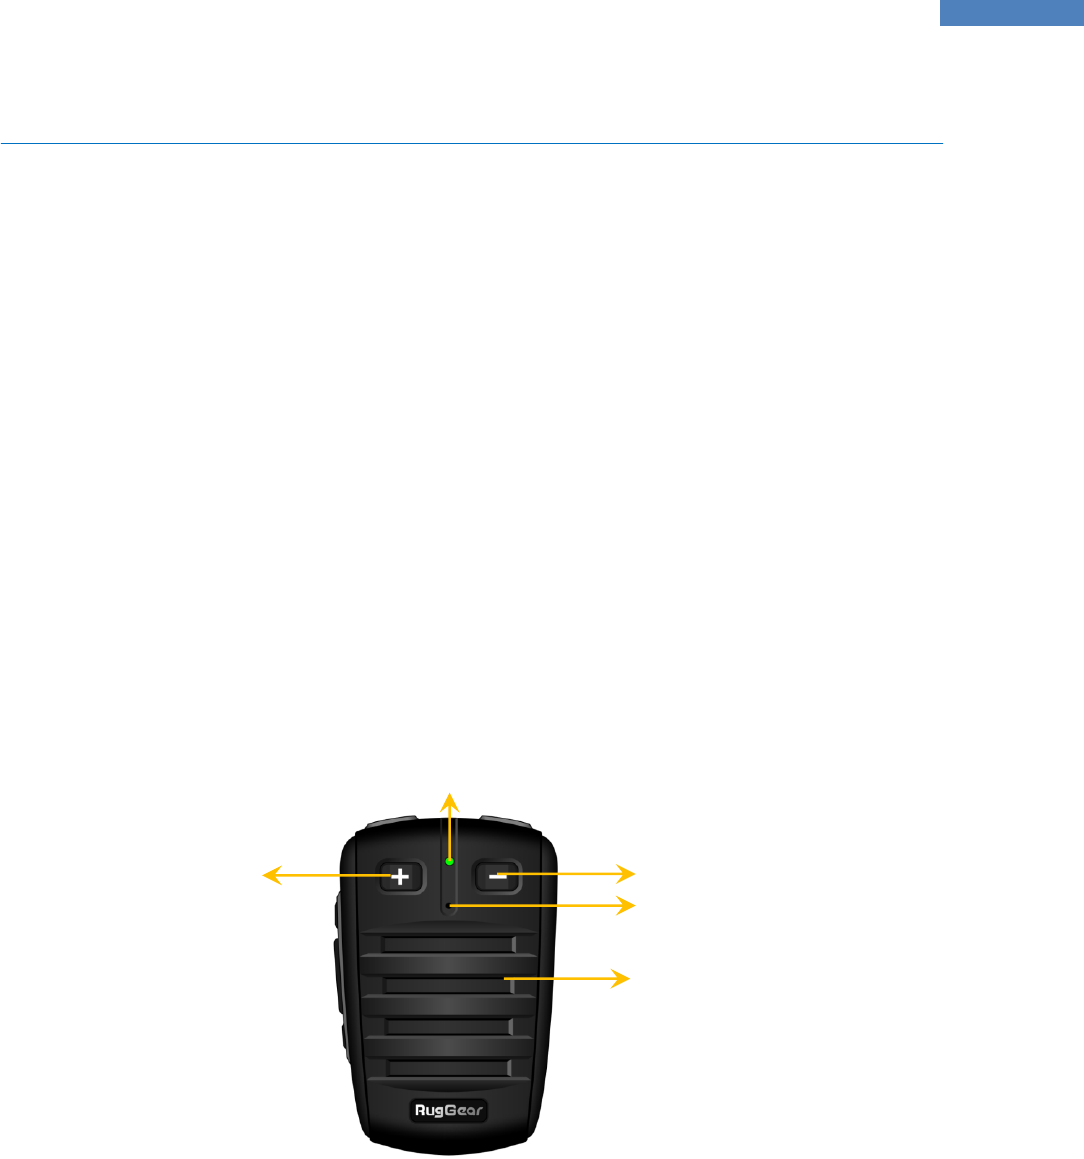
3.2 RugGear RSM Front Layout:
The following image provides the details of the front layout of your RugGear RSM.
Volume Decrease
RSM Speaker
LED indicator for RSM operations
Microphone
Volume Increase
Copyright 2013, Kodiak Networks, Inc.
8
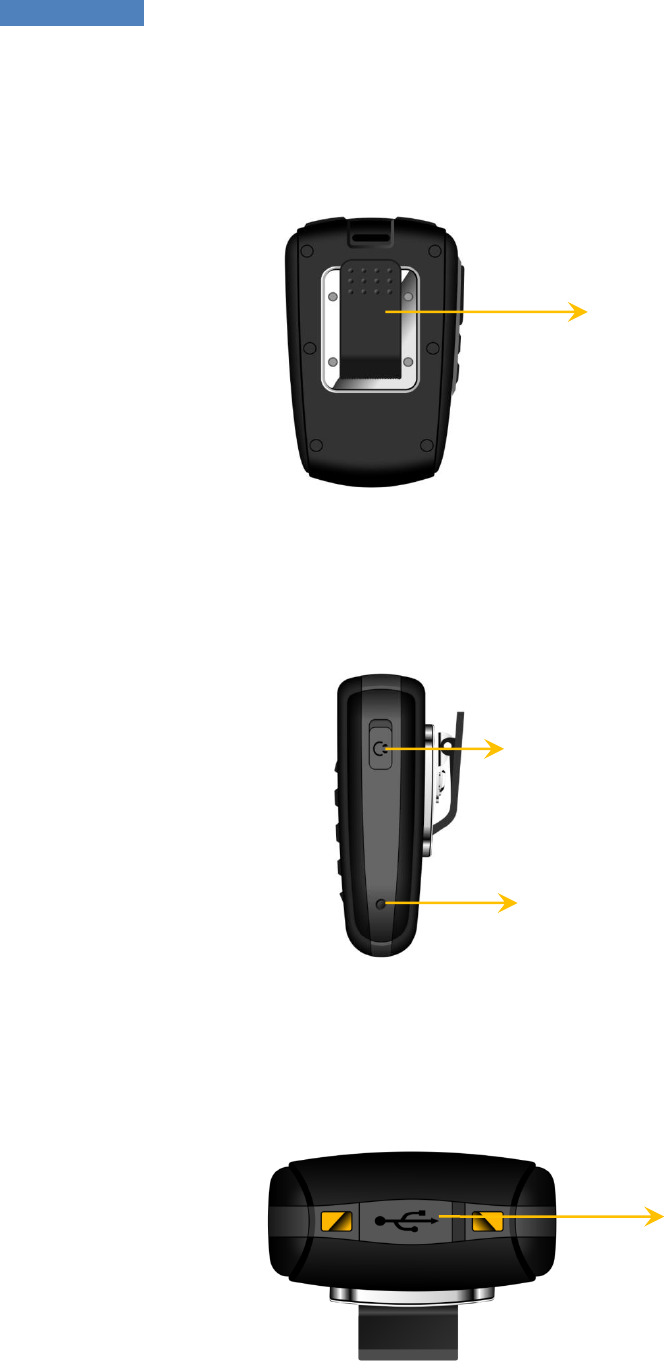
3.3 RugGear RSM Back Layout:
The following image provides the details of the layout at the back of your RugGear RSM.
3.4 RugGear RSM Right profile Layout:
The following image provides the details of the layout at the Right side of your RugGear RSM.
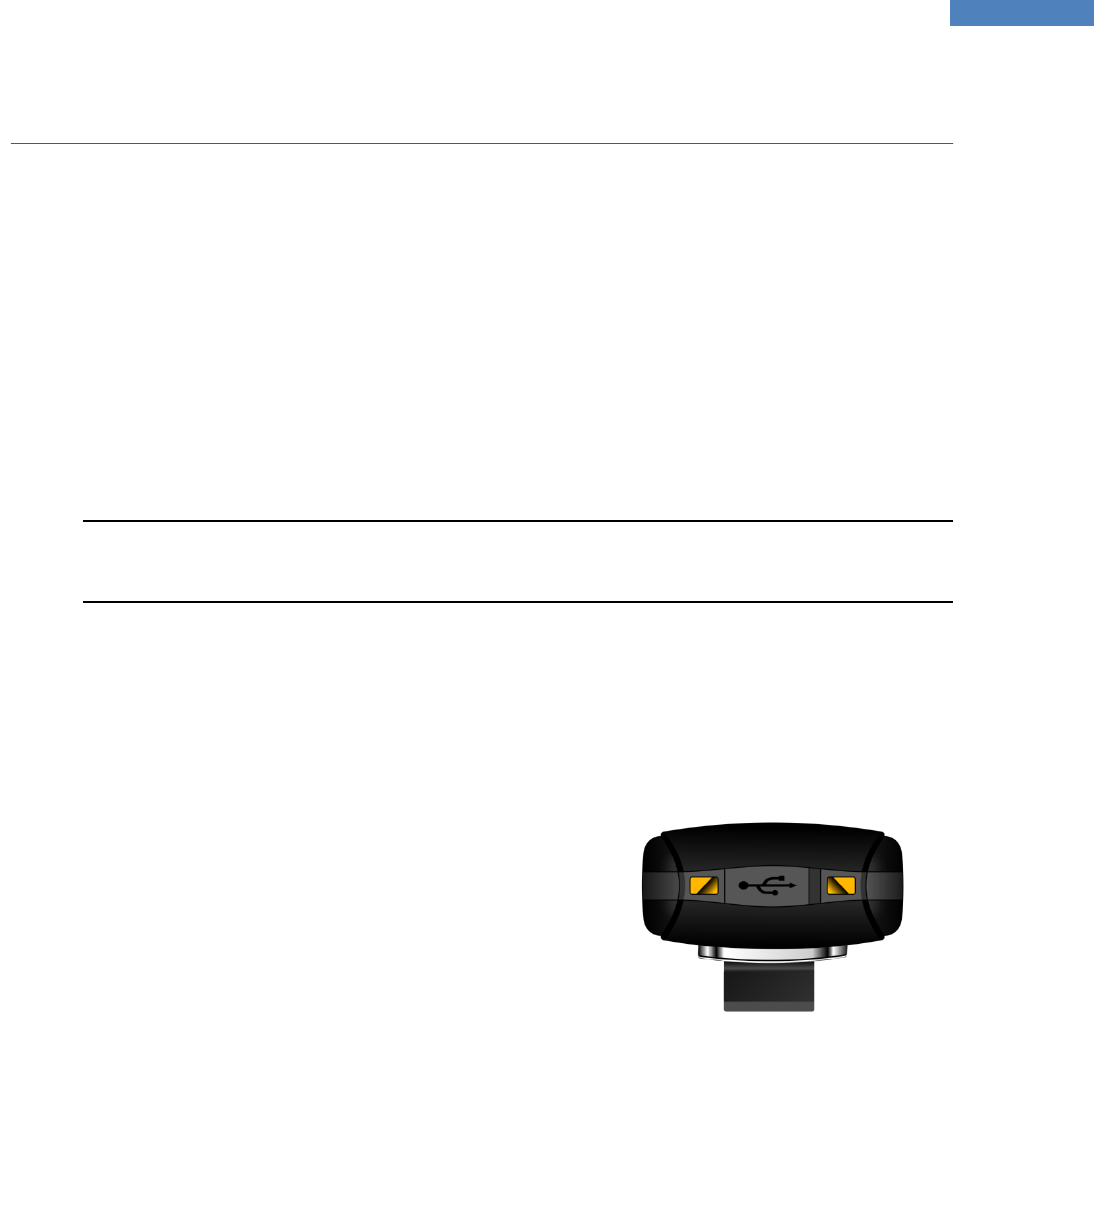
3.5 RugGear RSM Bottom:
The following image provides the details of the Bottom of your RugGear RSM.
Collar Clip
3.5 mm Ear phone Jack
Reset Button
Micro USB charger
Copyright 2013, Kodiak Networks, Inc.
9
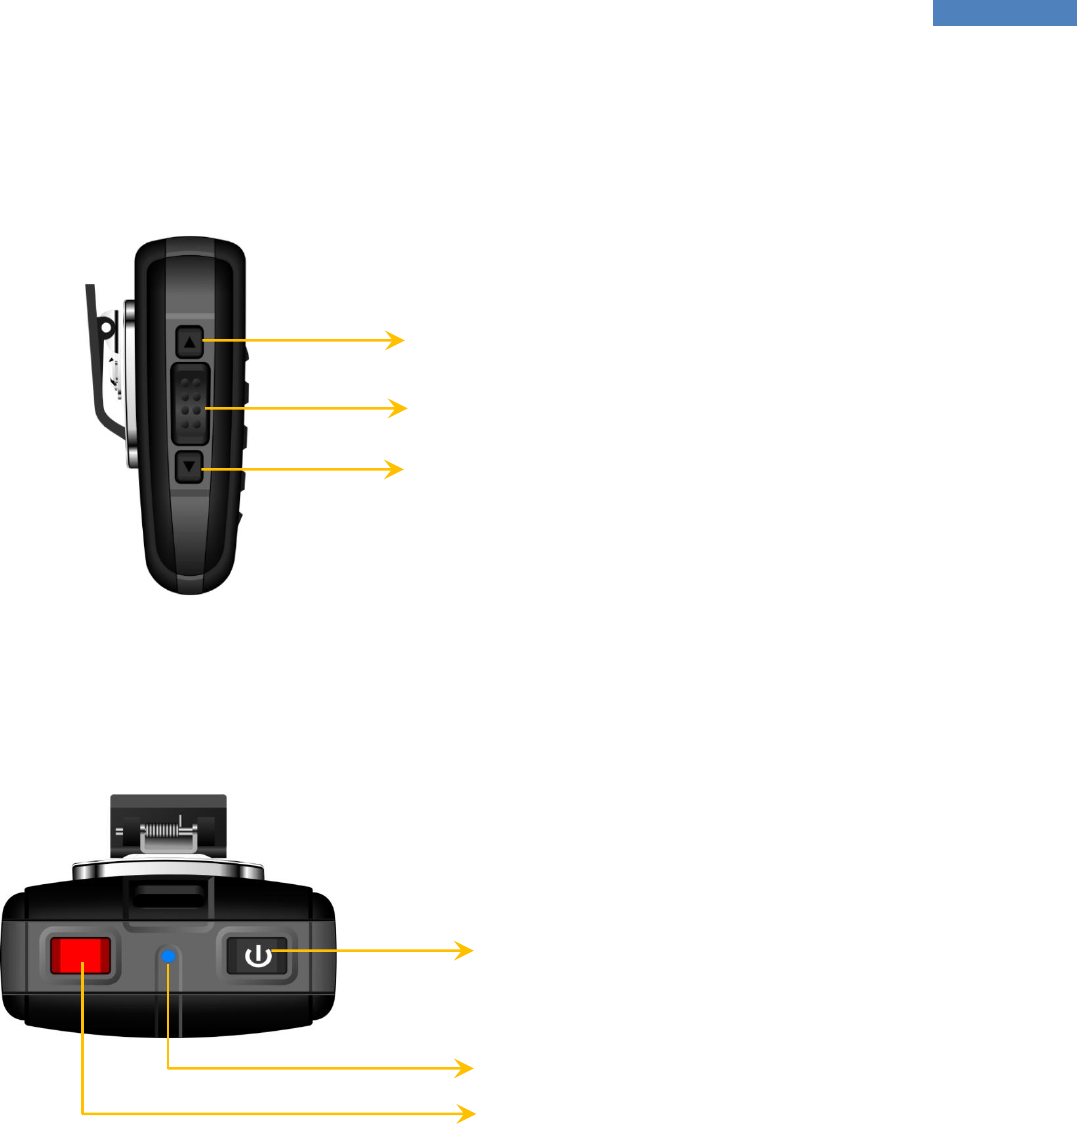
3.6 RugGear RSM Left profile Layout:
The following image provides the details of the layout at the Left side of your RugGear RSM.
3.7 RugGear RSM Top:
The following image provides the details of the layout at the top of your RugGear RSM.
Scroll UP key
PTT button
Scroll Down key
Power button
LED indicator for power indication
Red button
Copyright 2013, Kodiak Networks, Inc.
10
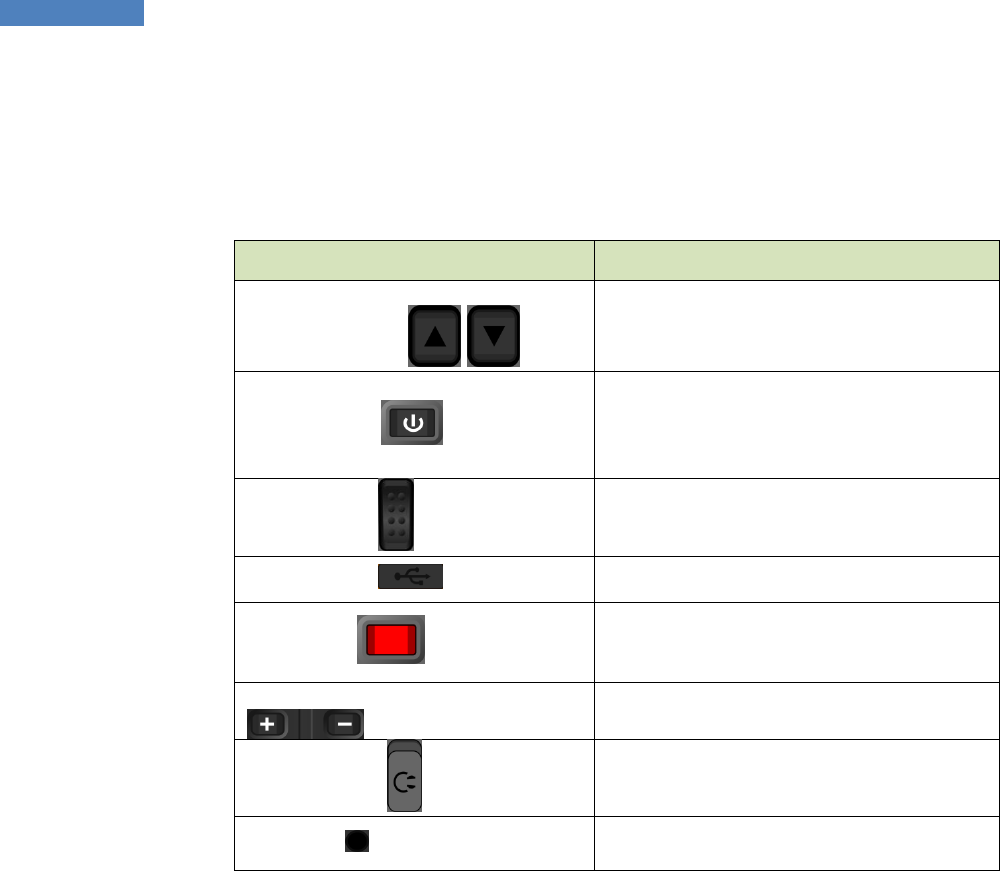
3.8 Key Function:
The following table displays the various keys/buttons and the corresponding function they
perform:
Keys/Buttons
Description
Scroll Up/Down
To scroll up/down the
Contacts/Groups/favorites list.
Power Switch
Single press will power ON/OFF.
Press & hold for 3 sec will change
to pairing mode from power OFF
state.
PTT button
PTT floor control
Answering of Cellular calls
Charger Port
Micro USB charger port
Red button
For Ending the PTT call.
For Ending/rejecting the cellular
call.
Volume Increase/Decrease Key
To increase/decrease the RSM
speaker volume
Earphone Jack
Use the ear phone instead of
RSM speaker.
Note: MIC on the ear phone will not be supported.
Reset Key
Used only if any malfunction of
circuit occurs to reset the RSM

Copyright 2013, Kodiak Networks, Inc.
11
4 Connectivity and Calling
The following sections explain the connectivity (pairing) and the calling procedure for RugGear
Remote Speaker Microphone.
4.1 Bluetooth Connectivity:
The RugGear RSM is wirelessly connected to your handset through Bluetooth, thus the RSM also has
a rechargeable battery inbuilt which can be recharged through the Micro USB port.
4.2 To Pair with your Phone:
Follow the instructions to pair your RugGear Bluetooth accessory with your Phone:
1. Power OFF the RugGear Bluetooth accessory.
2. Press & Hold the RugGear RSM’s power switch for 5 sec. Bluetooth accessory will enter in to
pairing state. This is indicated by Bluetooth accessory indication LED.
3. Now, enable Bluetooth on your Phone & scan for available Bluetooth devices.
4. You can find the new RugGear Bluetooth RSM with name “RTKRSM0”.
5. Select the device and get paired.
4.3 When to perform Bluetooth connection:
You will have to reconnect to RugGear RSM during the following scenarios:
1. Whenever you restart your phone.
2. Whenever you disable & then enable again the Bluetooth on your phone.
3. Whenever you disconnect only the RugGear RSM using the Bluetooth shortcut on your
phone.
4. Whenever you confirm disconnection of the connected RugGear RSM from the Bluetooth
settings screen.
In all the above mentioned cases, user has to manually connect the phone with the RugGear RSM.
Note: If the Bluetooth RSM is powered ON and not connected to any device for more than 5 minutes.
The RSM will enter power save mode & user has to power ON the RSM again and try connecting.
4.4 PTT Calling to Individuals and Groups:
Instead of using the soft PTT icon/Side PTT button on your phone, you can use the PTT button
available on the RugGear RSM for PTT application.
Note: Pressing the PTT button once on the RSM, whenever your PTT application is in
Login/Activate/Start mode for the first time on the your phone, the RSM will establish connection
with the PTT client on your handset, only the second time you press the PTT button on the RSM will
initiate the PTT application.

Copyright 2013, Kodiak Networks, Inc.
12
4.5 Red Button:
Red button on top of the RSM can also be used to terminate the cellular or PTT calls apart from the
on screen End call option in PTT applications.
4.6 Reset Button:
There is a small Reset button onto the right side of the RugGear RSM, this particular button is to be
used only when there occurs any malfunction with the RSM connectivity or functionalities.
4.7 Behavior of PTT button and RED button on RugGear RSM for different Call
scenarios:
Call Scenario
PTT button
RED button
Incoming Cellular
call
Press the PTT button to
answer the cellular call
Press the RED button to reject/terminate the
cellular call
Incoming PTT call
Press the PTT button to
receive the PTT call / take
the floor and speak
Press the RED button to reject/terminate the
PTT call
Outgoing Cellular
call
PTT button not supported
for this action
Press the RED button to cancel the cellular call
Outgoing PTT call
Press the PTT button to
make the PTT call / take
the floor and speak
Press the RED button to reject/terminate the
PTT call
Active PTT call and
also incoming
cellular call
Press the PTT button to
answer the cellular call
Press the RED button to reject the cellular call
Pressing the RED button after answering the
cellular call will terminate only the cellular call
but PTT call can be continued
Active PTT call and
also an outgoing
cellular call
PTT button not supported
for this action
Press the RED button to reject the Cellular call
Table 1: Behavior of PTT and END button for different call scenarios

Copyright 2013, Kodiak Networks, Inc.
13
RugGear Remote Speaker Microphone
FCC Regulations
This device complies with part 15 of the FCC Rules. Operation is subject to the following two conditions:
(1) This device may not cause harmful interference
(2) This device must accept any interference received, including interference that may cause undesired operation.
This device has been tested and found to comply with the limits for a Class B digital device, pursuant to Part 15 of the FCC Rules. These
limits are designed to provide reasonable protection against harmful interference in a residential installation. This equipment
generates uses and can radiate radio frequency energy and, if not installed and used in accordance with the instructions, may cause
harmful interference to radio communications. However, there is no guarantee that interference will not occur in a particular
installation If this equipment does cause harmful interference to radio or television reception, which can be determined by turning the
equipment off and on, the user is encouraged to try to correct the interference by one or more of the following measures:
-Reorient or relocate the receiving antenna.
-Increase the separation between the equipment and receiver.
-Connect the equipment into an outlet on a circuit different from that to which the receiver is connected.
-Consult the dealer or an experienced radio/TV technician for help.
Changes or modifications not expressly approved by the party responsible for compliance could void the user‘s authority to op erate
the equipment.
RF Exposure Information
This device meets the government’s requirements for exposure to radio waves.
This device is designed and manufactured not to exceed the emission limits for exposure to radio frequency (RF) energy set by the
Federal Communications Commission of the U.S. Government.
This device complies with FCC radiation exposure limits set forth for an uncontrolled environment.